

Philips VR420/75, VR220/55 Instructions For Use Manual
1 Press VCR.
2 Press MENU.
3 Press PLAY 5 or STOP ∞ to select
“TUNER SET UP”, then press OK/STATUS.
4 Press PLAY 5 or STOP ∞ to select
“CHANGING TUNER SET UP”, then press OK/
STATUS. The programmed
channel information list
appears.
5 Press PLAY 5 or STOP
∞
until the desired channel
setting flashes.
5.1: TO DELETE UNWANTED CHANNELS:
Press CLEAR. Repeat this step until you delete
all unwanted channels.
For the first time you turn on this VCR, some basic
settings must be done first before going on to further
operations.
❍Select the Language
1 Press POWER.
The language selection screen
appears.
2 Press PLAY5 or STOP
∞
to select either "ENGLISH",
or "
" (Chinese).
3 Press OK/STATUS.
❍Setting the Clock/Date
1 Press PLAY5 or STOP ∞ to
set the time. Each time you
press the button, the set time
changes by one-minute intervals.
Press and hold the button to change time by 30minute intervals.
When the time is correct, press OK/STATUS.
2 Press PLAY5 or STOP ∞ to set the date. Each
time you press the button, the date changes in
one-day increments. Press and hold the button to
change dates in 15-day increments. When the date
is correct, press OK/STATUS.
3 Press PLAY5 or STOP ∞ to set the year. Each
time you press the button, the year changes by
one-year intervals. Press and hold the button to
change years rapidly. When the year is correct,
press OK/STATUS.
RF OUT
ANT.IN
IN
OUT
AUDIO
VIDEO
IN
A
U
D
I
O
V
I
D
E
O
If you want to re-do the auto programming, follow
the procedure below;
1 Press VCR.
2 Press MENU.
3 Press PLAY5 or STOP
∞
to select “TUNER SET UP”
then press OK/STATUS.
4 Press PLAY5 or STOP
∞
to select “AUTO TUNER SET
UP” then press OK/STATUS.
5 Press PLAY5 or STOP
∞
to select the appropriate TV
system [(BG, DK, I)] of your residential area.
6 Press OK/STATUS. Auto programming starts.
When it ends, programmed channels, frequencies
and TV systems are shown on the display.
7 Press MENU to exit.
PLAY 15:00
CH12
AUTO
B-----+-----+-----+-----+-----+-----E
REMAIN 2:30 INDEX - 1
LP 0:00:00
Video Cassette Recorder
Instructions for use
Safety Precaution
VR220/55
VR420/55
LPT0559-001A
C
C
ongratulations on purchasing your new VCR. Spare a few moments to read this instruction
manual to get better results, and to avoid any costly mistakes.
Display Window
Front panel
11
11
1
22
22
2
33
33
3
44
44
4
55
55
5
66
66
6
77
77
7
88
88
8
99
99
9
11
11
1
33
33
3
44
44
4
22
22
2
3
G
Getting CConnected UUp
●
4
B
Basic OOperations
●
5 6
7
8
D
Description of CControls
●
2
00
00
0
●
S
Setting UUp
11
11
1
Operation mode
22
22
2
SmartPicture Setting
33
33
3
Remaining tape length
44
44
4
Tape speed
55
55
5
Current time
66
66
6
Channel Number
77
77
7
Tape position indicator
88
88
8
Time counter
99
99
9
Index Number
11
11
1
33
33
3
44
44
4
22
22
2
55
55
5
66
66
6
77
77
7
88
88
8
99
99
9
11
11
1
POWER button
(✈P.12)
22
22
2
Cassette Compartment
33
33
3
MENU button
44
44
4
REC/OTR ¶ button
(✈P.7)
55
55
51 (Rewind) button
(✈P.5, P.7, P.10)
66
66
6
PLAY 3button (✈P.7, P.8, P.9)
77
77
7¡ (Fast Forward) button (✈P.5, P.7,P.10,
P.12)
88
88
8
VIDEO input jack
(✈P.14)
99
99
9
AUDIO input jack
(✈P.14)
00
00
0
STILL/PAUSE 8 button
(✈P.10)
!!
!!
!
COLOUR MODE button
(✈P.7)
@@
@@
@
Display Window (see below)
##
##
#
IR (infrared) remote sensor
$$
$$
$
OK/STATUS button
(✈P.4, P.5, P.9)
%%
%%
%
CHANNEL
55
55
5
/
∞∞
∞∞
∞
button
(✈P.4, P.5, P.7,
P.8, P.10, P.12, P.14)
^^
^^
^
STOP/EJECT 7/0 button
(✈P.4, P.7, P.9)
11
11
1
(Timer) indicator (✈P.12)
22
22
2
PLAYBACK indicator
33
33
3
RECORDING indicator
44
44
4
Digital clock/Channel/Speed indicator
4 Press MENU.
The message on the right will
appear.
❍Select TV System
1 Press OK/STATUS. The TV
system selecting menu appears
on the TV.
2 Press PLAY5 or STOP
∞
to select the appropriate TV
system of your residential area.
B/G: For West Europe, ASEAN countries,
Australia, New Zealand.
D/K: For China, Russia, East Europe.
I: For Hong Kong, South Africa,
United Kingdom.
❍Start Auto Programming
Press OK/STATUS. Auto programming starts and the message on
the right appears on the TV.
When the auto programming
is completed
The message on the right appears
on the TV, and the lowest channel
will be tuned in.
Press CH 5 or ∞to change
channels on the VCR.
You have now completed the initial
setting.
If you stop the initial setup procedure while it is
proceeding:
The VCR enters the initial setup mode again the next
time you turn on the VCR.
Initial setup will not start in the following cases:
• If there is a tape inserted.
• If any of the initial setup procedures is finished
manually.
You can always change the time and language
setting after you completed the initial set up.
1 Press VCR.
2 Press MENU.
3 Press PLAY5 or STOP
∞
to select “INITIAL SET UP”
then press OK/STATUS.
AUTO CH. SET PROCEEDING
PLEASE WAIT
START FINISH
AUTO CH.SET COMPLETED
4
Before operating the VCR, be familiar with the
menu operations first because most of the features
built into the VCR can be available only on the
menus.
1 Press VCR on the remote control.
• When using the buttons on front panel, skip this step.
2 Press MENU to display the main menu screen.
3 Press PLAY5 or STOP ∞to select a desired
feature on the menu, then press OK/STATUS.
4 When you select a feature, go to the section in
this manual and follow the instructions described
there.
To go back to the previous menu screen, press
REW 2.
To change the setting of a menu item, press FF 3.
Press MENU to exit.
To Reset the Channels
1
2
3
1
2
3
4
5
Recording
Are you familiar with tape playback? If so, you are
ready to enjoy the special effect playback features
described below.
To skip playback for a certain period
Press SKIP SEARCH button 1 to 4 times during
playback to search forward for 30 seconds by the
time counter reading.
Each time you press the button, the search time
increases as follows:
30=60=90=120 sec.
The VCR automatically resumes normal playback
after searching for the specified period.
To view a still picture
Press STILL/SLOW 0 (or STILL/PAUSE on
the front panel) briefly during playback.
Playback is freezed and a still picture appears.
Press the STILL/SLOW 0 button repeatedly to
advance the still picture frame by frame.
To resume playback, press PLAY 3.
To view a slow motion picture
Press STILL/SLOW 0 for more than 2 seconds
during playback.
To decrease the slow motion speed, press
STILL/SLOW –.
To increase the slow motion speed, press
STILL/SLOW +.
To resume playback, press PLAY 3.
Notes:
• No sound comes out during special effect
playbacks.
• If you keep viewing slow motion and still pictures
for more than 5 minutes, the VCR automatically
stops to protect the tape and video heads.
• During special effect playbacks, some noise bars
will appear on the TV screen.
Special Effect Playbacks
To Reset the Time or Language
11
11
1
33
33
3
44
44
4
55
55
5
66
66
6
77
77
7
22
22
2
Rear panel
RF OUT
ANT.IN
IN
OUT
AUDIO
VIDEO
11
11
1
AC power cord
22
22
2
AUDIO IN (input) jack
(✈P.4, P.14)
33
33
3
AUDIO OUT (output) jack
(✈P.4, P.14)
44
44
4
ANT. (antenna) IN (input) terminal
(✈ P.4)
55
55
5
VIDEO IN (input) jacks (✈P.4, P.14)
66
66
6
VIDEO OUT (output) jack
(✈P.4, P.14)
77
77
7
RF OUT (output) terminal (to TV)
(✈ P.4)
!!
!!
!
@@
@@
@
##
##
#
$$
$$
$
%%
%%
%
^^
^^
^
CHANNEL
REC / OTR
MENU
POWER
PLAY
/
OK/
STATUS
COLOUR MODE
VIDEO AUDIO
STILL/PAUSE
S
T
O
P
/
E
J
E
C
T
VCRTV
VCR/TV
QUICK PROGRAMMING
POWER
STILL/SLOW
SMARTPICTURE
CHVOL
MENU
TIMER
EJECT
TURBO
AUDIO /
MUTE
OK/STATUS
-
+
CBL / DBS
123
456
789
START STOP DATE
DBS
DAILY
PLAY
REW FF
STOP
WEEKLY
/OTR
REC
-+-
+
ALT0CLEAR
.............
.............
........
........
TIMER
SKIP
SEARCH
SEARCH
REC END
SPEED
DBS
To insert the batteries:
Install two AA batteries R6 (SUM-3)/AA
- matching the polarity indicated inside
the battery compartment.
11
11
1
22
22
2
33
33
3
44
44
4
55
55
5
66
66
6
77
77
7
88
88
8
99
99
9
00
00
0
!!
!!
!
@@
@@
@
##
##
#
))
))
)
ww
ww
w
ee
ee
e
rr
rr
r
tt
tt
t
^^
^^
^
**
**
*
$$
$$
$
%%
%%
%
((
((
(
qq
qq
q
&&
&&
&
Remote Control
CAUTION
On Battery Replacement
Do not mix old and new batteries.
(Also never mix alkaline batteries with
manganese batteries.)
yy
yy
y
uu
uu
u
11
11
1
CBL/DBS button
22
22
2
POWER button
(✈P.7, P.12)
33
33
3
VCR/TV button
(✈P.7)
44
44
4
ALT/SPEED button
(✈P.7, P.12)
55
55
5
STILL/SLOW – /™ button
(✈P.8)
66
66
6
PLAY 3/ 5 button
(✈P.5, P.7, P.8)
77
77
71 (REWIND)/2button
(✈P.5, P.7)
88
88
8
STOP 7/
∞∞
∞∞
∞
button
(✈P.5, P.7)
99
99
9
VOL (volume) 5/
∞∞
∞∞
∞
button
00
00
0
MENU button
(✈P.5)
!!
!!
!
TURBO TIMER button
(✈P.13)
@@
@@
@0 EJECT button
(✈P.7)
##
##
#
TV button
$$
$$
$
VCR button
%%
%%
%
SMARTPICTURE button
(✈P.9)
^^
^^
^
Number buttons (0, 1, 2, 3, 4, 5, 6, 7, 8 and 9)
(✈P.12)
&&
&&
&
CLEAR button
(✈P.6, P.8, P.12)
**
**
*
STILL/SLOW 0 button
(✈P.7, P.8)
((
((
(
STILL/SLOW + /£ button
(✈P.8)
))
))
)
3(Fast Forward) /3 button
(✈P.7)
qq
qq
q
OK/STATUS button
ww
ww
w
CH (channel) 5 / ∞ button
(✈P.4, P.5, P.10, P.14)
ee
ee
e
TIMER button
(✈P.12)
rr
rr
r
REC (ord) END SEARCH button
(✈P.9)
tt
tt
t
SKIP SEARCH button
(✈P.8)
yy
yy
y
AUDIO/MUTE button
uu
uu
u
REC (record)/ OTR button
(✈P.7, P.10, P.14)
Note:
Button
1
does not function on this VCR.
To Operate your TV.
You can use this remote control to operate some of
PHILIPS TV’s. To operate other manufacturer’s TV, you
have to set the code. Refer to page 15 for setting code instructions.
Followings are the operative buttons.
TV: Makes the remote control ready for operating the TV. Make
sure you press this button before pressing the other operative
buttons.
POWER: Turns the TV on or off.
VCR/TV: Selects TV mode or Auxiliary mode at TV.
ALT (for PHILIPSTV only): Goes back to the previously selected
channel on TV.
VOL
55
55
5
∞∞
∞∞
∞
: Changes the TV volume.
CH
55
55
5
∞∞
∞∞
∞
: Changes the TV channels.
55
55
5
∞∞
∞∞
∞
; :
, MENU (for PHILIPS TV only): Operates the TV menu.
OK/STATUS - For PHILIPS TV : Displays the on- screen
information. For other manufacturer's TV; functions as an
ENTER button after pressing the number buttons while
selecting channels.
AUDIO/MUTE: Turns off the TV sound.
NUMBER buttons: To select channels on TV.
RF OUT
ANT.IN
IN
OUT
AUDIO
VIDEO
VHF
UHF
RF OUT
Cable
ANT. IN
RF coaxial
cable
Back of TV
Back of VCR
Indoor antenna
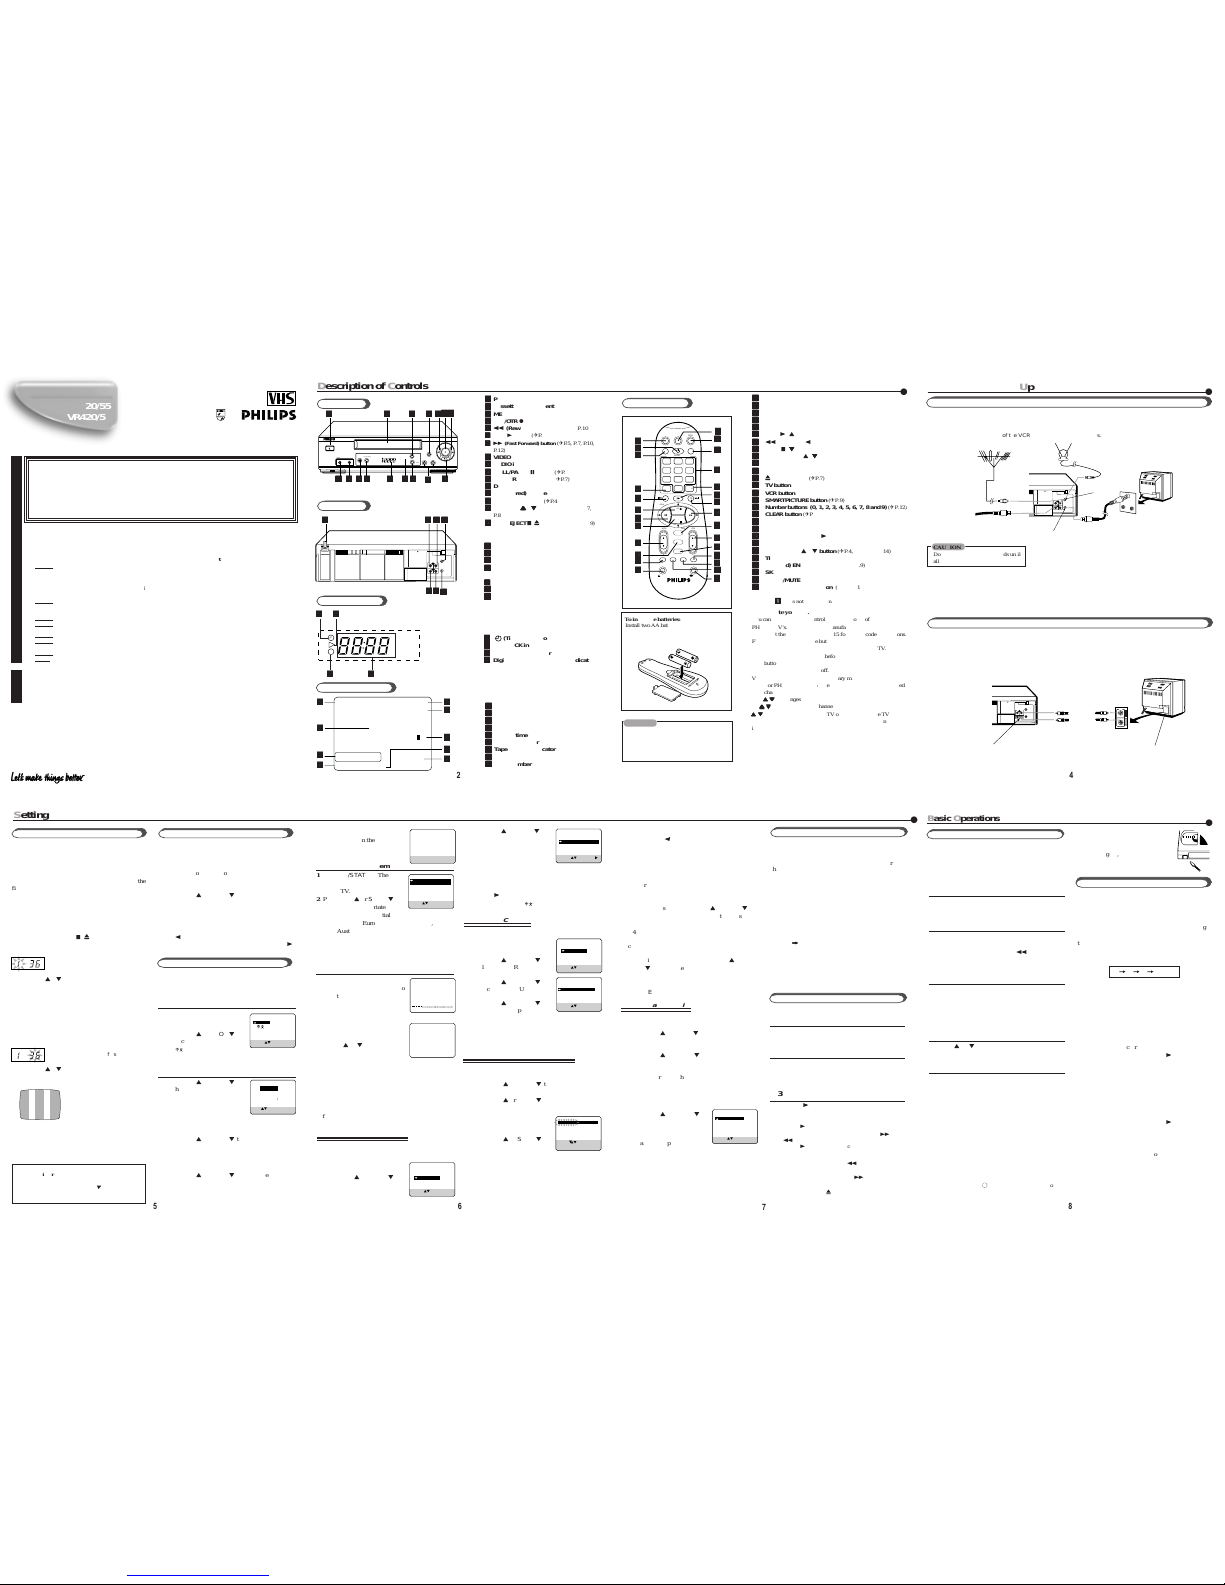
VCR to TV Connection Using RF Cable
1
11 Disconnect the antenna or cable from the TV.
2
22 Connect the antenna or cable to the ANT. IN terminal on the back of the VCR.
3
33 Connect the VCR to the TV using the RF coaxial cable.
4
44 Plug the AC power cords of the VCR and TV into the AC outlets.
CAUTION
Do not plug the AC power cords until
all connections are completed.
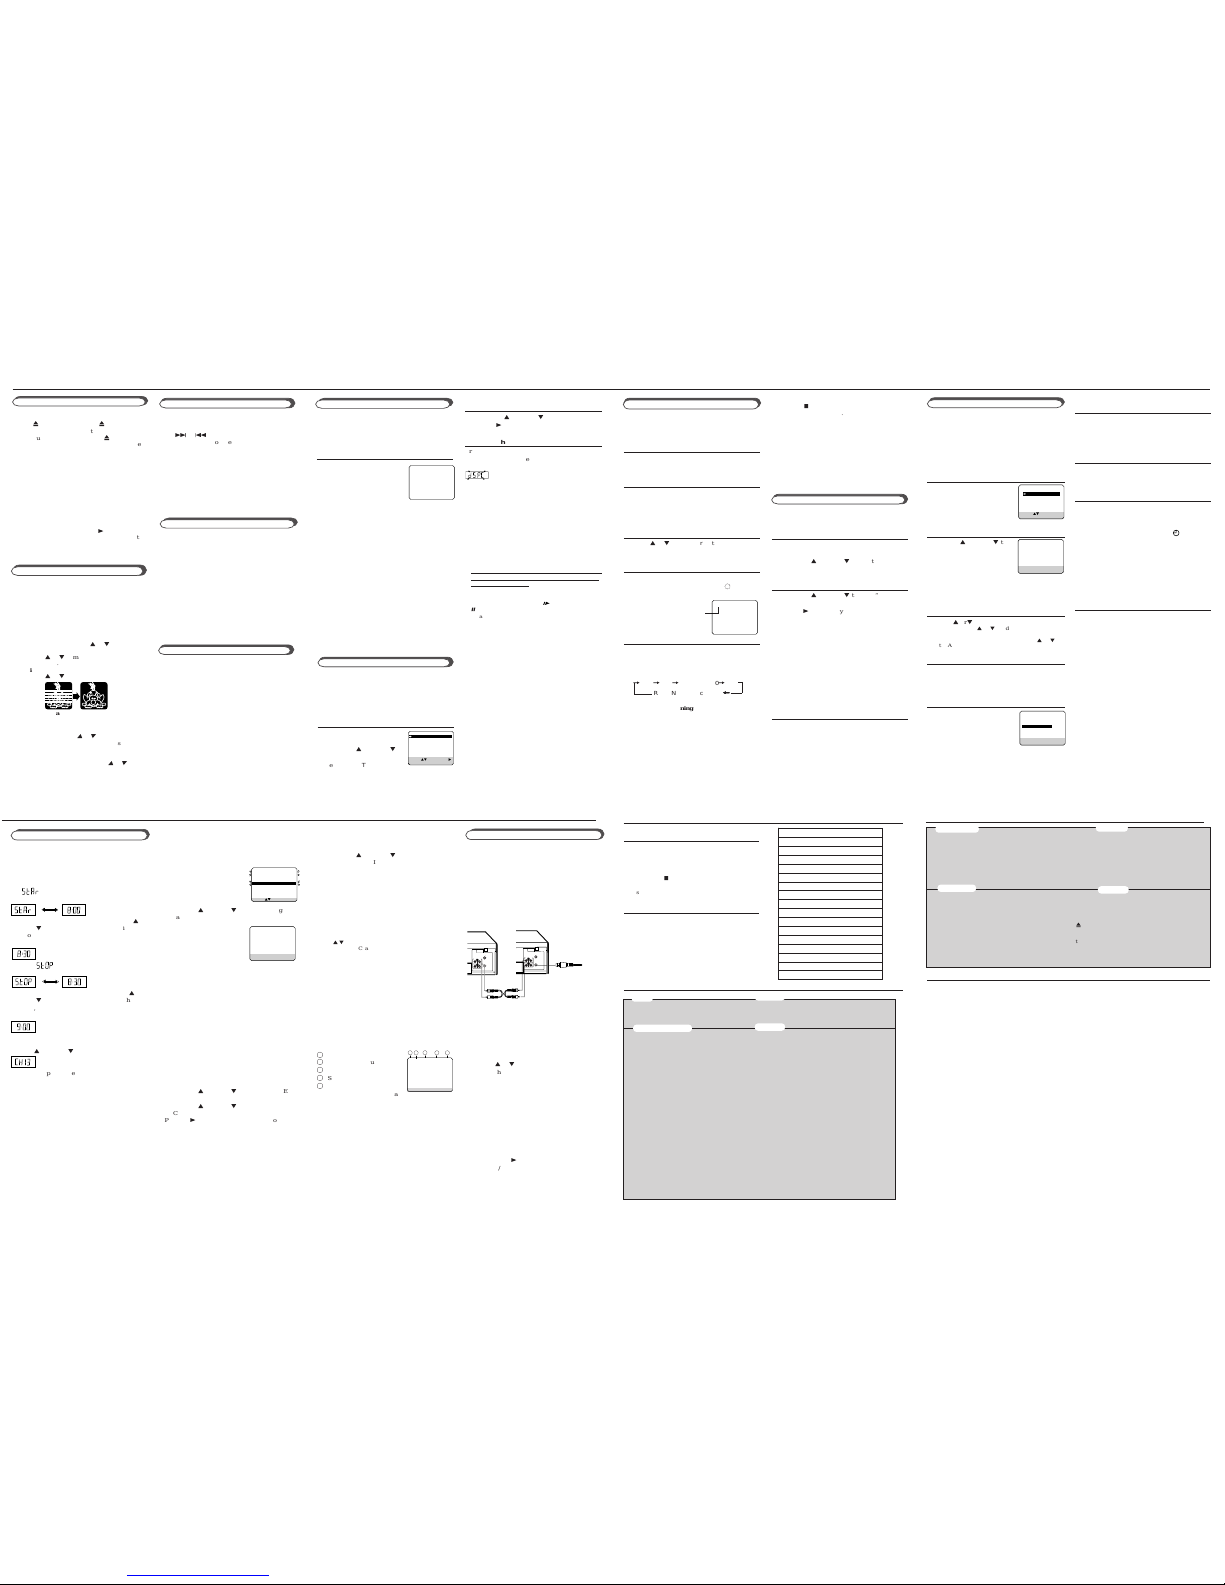
Back of TV
Back of VCR
To VIDEO/AUDIO OUT jacks
To video and audio
input jacks
VCR to TV Connection Using AUDIO/VIDEO Cable
Audio cable
Video cable
If your TV has audio/video connectors, complete the connection below to get better pictures and sounds when playing
back a tape. To watch a picture from this VCR on the TV, select the AV mode on the TV.
Outdoor antenna
Note;
Even if you are using this AV connection, you must also
complete the RF connection
above.
4 Press PLAY5 or STOP
∞
to select “SET CLOCK” or
“LANGUAGE”, depending
on which setting you want
to change.
5 To change clock/date:
Repeat step 2 (Setting the Clock/Date) of
“Initial Set Up” on page 5.
To change language:
Press FF 3 repeatedly to choose your preferred
language English or
.
6 Press MENU to exit.
❍
Selecting Colour Mode
When the equipment is installed in a cabinet or a shelf, make sure that it has sufficient space on all sides to
allow for ventilation (10 cm or more on both sides, on top and at the rear.)
When discarding batteries, environmental problems must be considered and the local rules or laws governing
the disposal of these batteries must be followed strictly.
Failure to heed the following precautions may result in damage to the VCR, remote control or video cassette.
1.
DO NOT place the VCR . . .
... in an environment prone to extreme temperatures or humidity.
... in direct sunlight.
... in a dusty environment.
... in an environment where strong magnetic fields are generated.
... on a surface that is unstable or subject to vibration.
2.
DO NOT block the VCR's ventilation openings or holes.
(If the ventilation openings or holes are blocked by a newspaper or cloth, etc., the heat may not be able
to get out.)
3.
DO NOT place heavy objects on the VCR or remote control.
4.
DO NOT place anything which might spill on top of the VCR or remote control.
(If water or liquid is allowed to enter this equipment, fire or electric shock may be caused.)
5.
DO NOT expose the apparatus to dripping or splashing.
6.
DO NOT use this equipment in a bathroom or places with water. Also DO NOT place any containers filled with
water or liquids (such as cosmetics or medicines, flower vases, potted plants, cups, etc.) on top of this unit.
7.
DO NOT place any naked flame sources, such as lighted candles, on the apparatus.
8.
AVOID violent shocks to the VCR during transport.
WARNING : DANGEROUS VOLTAGE INSIDE
WARNING : TO PREVENT FIRE OR SHOCK HAZARD, DO NOT EXPOSE THIS UNIT TO RAIN
OR MOISTURE.
❒ The POWER button does not completely shut off the mains power from the unit, but
switches operating current on or off only.
❒ The rating plate is on the rear of the unit.
Safety Precaution
❍ SmartPicture ❍ One Touch Recording
❍ Child Lock ❍ On Screen Display
❍ Automatic Operations ❍ Timer Recording
❍ Index Search ❍ Digital Studio Picture Control
Features
3
When using this VCR, an index mark is always
marked at the beginning of every recording. This
index marks make it easier for you to search for the
beginning of the recordings. See “Index Search” at
page 9.
❍On TV
1 Turn on the TV.
2 Select the video channel (or AV mode).
❍On VCR
Insert a cassette with the record tab in place.
The VCR turns on.
To rewind the tape, press REW 1.
To reset the time counter, press CLEAR.
❍Select Tape Speed
After pressing VCR, press ALT/SPEED until the
desired tape speed (SP, LP or SLP) appears on the
screen.
SP, LP: For PAL signal.
SP, SLP: For NTSC signal.
❍Select a Channel
Press CH 5 or ∞ or Number buttons to select the
channel to record.
❍Start Recording
Press REC/OTR ●.
To pause recording
Press STILL/SLOW 0 briefly. To resume
recording, press the same button again.
To stop recording
Press STOP ■.
To watch another TV programme while recording
Select a different channel you want to watch on
the TV.
You can watch the programme of the selected
channel on the TV, without affecting recording on
the VCR.
• When a tape reaches its end during recording, the
recording stops and
blinks on the display window.
On- Screen Display
To Delete or Edit Receivable Channels
Before using the VCR, you need to set the colour
mode both for recording and playback.
Press COLOUR MODE on the front panel for more
than 2 seconds. The current setting will appear on
the screen for about 5 seconds. While the current
setting appears, press COLOUR MODE repeatedly,
the setting changes as follows.
AUTO: Normally select this mode. The colour system
is automatically detected.
If “AUTO” does not work well, choose the
other settings below.
NTSC3.58: To record the NTSC signals or playback an
NTSC3.58 tape on an NTSC TV.
NTSC4.43: To record the NTSC signals or playback an
NTSC4.43 tape on a PAL TV.
NTSC
==
==
=
PAL TV (ONLY FOR PLAYBACK): To
playback an NTSC3.58 tape on a PAL TV.
PAL: To record PAL signals or playback a PAL TV.
MESECAM: To record SECAM signals or playback a
MESECAM tape.
When playing back an NTSC tape with “AUTO” mode
selected, the NTSC signal is converted to PAL signal and is
played back.
To watch a picture from this VCR on the TV, select UHF E36 channel (video
channel of this VCR when shipped from the factory).
If you want to change video channel, see “Setting the Video Channel.” (✈P.5)
This VCR is designed to send picture and sound
signal on UHF channel E36 to the TV, through the
RF coaxial cable.
If you want to change this video channel (E36) to
another channel (between E28 to E60), follow the
procedure below before turning on the VCR for the
first time.
1 Make sure the VCR is turned off and no
cassette is inserted.
2 Turn on the TV, and tune it to any channel (UHF
28 to 60) you want to use as the video channel
on the TV.
• Select a channel not used in your area.
3 Press STOP/EJECT 7 /0 on the front panel for
more than 5 seconds.
The following indication appears on the display.
4 Press CH 5 / ∞ on the front panel to select an
appropriate TV system number for your area.
1: For B/G. (For West Europe, ASEAN coun
tries, New Zealand)
2: For D/K. (For China, Russia, East Europe)
3: For I. (For Hong Kong, South Africa, United
Kingdom)
5 Press OK/STATUS.
The channel number starts flashing on the
display.
6 Press CH 5 / ∞ on the front panel to select the
channel you have tuned on the TV as the video
channel in step 2.
To watch a picture from this VCR on the TV,
select the same channel you have selected as the
video channel (in step 2 above) on the TV.
7 Press OK/STATUS to finish the video channel
setting.
Setting the Video Channel
Channel number starts flashing.
Test signal
(two vertical white bars)
If you use only external video input (AV) mode to
watch the picture from this VCR:
You can turn off the video channel output. To turn off
the video output channel, press CH
∞
until “– –”
appears on the channel number position.
TV system number starts flashing.
Menu Operations
1
2
Initial Set Up
Playback
To prevent accidental erasure:
Break off the record tab with a
screwdriver.
To record again, cover the hole
with adhesive tape.
❍On TV
1 Turn on the TV.
2 Select the video channel (or AV mode).
❍On VCR
Insert a cassette. The VCR turns on.
• If the record tab on a cassette is removed, playback
will start automatically.
• If a cassette is already in the VCR, turn on the VCR.
❍Start Playback
Press PLAY 3.
To pause playback and view still picture, press STILL/
SLOW 0 (or STILL/PAUSE on the front panel).
Press PLAY 3to resume playback.
To rapidly locate a particular scene, press FF¡ or
REW1during playback. s(No sound comes out.)
Press PLAY 3to resume playback.
To stop playback, press STOP ■.
To rewind the tape, press REW 1 when the tape is not
running.
To fast forward the tape, press FF ¡ when the tape is
not running.
To eject the tape, press 0 EJECT.
To turn off the VCR, press POWER.
* If you have accidentally deleted a channel,
press
REW
2.
5.2: TO EXCHANGE CHANNEL POSI TION: Press OK/STATUS once so that the
channel number flashes. Using the number but
on on the remote control, enter the other
channel number that you want to exchange with,
then press OK/STATUS.
5.3: TO FINE-TUNE CHANNELS
Press OK/STATUS twice so that the frequency
indication flashes. Press PLAY5 or STOP
∞
to fine-tune the station until you get the best
possible picture, then press OK/STATUS.
5.4: TO CHANGE THE TV SYSTEM:
This is necessary if no sound comes out on the
channel.
Press OK/STATUS three times so that the TV
system indication flashes. Press PLAY5 or
STOP∞ to select the approriate TV system
(BG, DK, I) so that the sound comes out, then
press OK/ STA TUS.
6 Press MENU to exit.
1 Repeat steps 1-4 of “To delete or edit receivable
channels” on the left column.
2 Press PLAY 5 or STOP ∞ until a vacant channel
in which you want to store a new channel starts
flashing, then press OK/STATUS.
3 Press PLAY 5 or STOP ∞ to select
the search starting band, then press OK/STATUS.
VHF L: Starts searching from the VHF L band.
VHF H: Starts searching from the VHF H band.
UHF: Starts searching from the UHF band.
Searching starts, and when a station is tuned in,
searching stops and the tuned frequency is shown
on the TV.
4 Press PLAY 5 or STOP ∞ to
select “STORE CHANNEL”,
then press OK/STATUS.
The programmed channel in-
formation list appears again
with the settings of the newly tuned channel
flashing.
If you do not want to store the channel, select
“CONTINUE SEARCH”, then press OK/
STATUS so that the search starts again.
5 Press MENU to exit.
Manual Channel Setting
ENGLISH
SELECT: CONFIRM: OK
END: MENU
TIME - - : - -
DATE 01/01/01
SET: NEXT: OK
END: MENU
CONNECT ANTENNA OR CABLE
TO VCR FOR AUTO CH. SET
READY: OK
END: MENU
SYS COUNTRY
B/G W.EUR. ASEAN AUST.
NZ
D/K CHINA RUS. E.EUR.
I HK S.AF. UK
SELECT: CONFIRM: OK
END: MENU
VCR SET UP
TUNER SET UP
INITIAL SET UP
SELECT: CONFIRM: OK
END: MENU
SELECT: CHANGE:
END: MENU
CLOCK
LANGUAGE ENGLISH
VCR SET UP
TUNER SET UP
INITIAL SET UP
SELECT: CONFIRM: OK
END: MENU
CHANGING TUNER SET UP
AUTO TUNER SET UP
SELECT: CONFIRM: OK
END: MENU
CH FRQ SYS CH FRQ SYS
01 150 BG 07 229 BG
02 165 BG 08 237 BG
03 195 BG 09 355 BG
04 205 BG 10 365 BG
05 213 BG 11 374 BG
06 221 BG 12 384 BG
SELECT:∞ DELETE: CLEAR
CHANGE CH: OK
END: MENU
SELECT: CONFIRM: OK
END: MENU
STORE CHANNEL
CONTINUE SEARCH
To record while you’re away, follow step 1 — 9
below. For each programme you set, the VCR will
turn on, start recording, and turn off automatically.
You can store up to 8 programmes.
FOR EACH STEP BELOW, YOU NEED TO FINISH
WITHIN 60 SECONDS; OTHERWISE,
PROGRAMMING WILL HAVE TO BE RESTARTED
FROM STEP 1.
❍Select Timer Mode
1 Press VCR.
2 Press TIMER. The Timer
Recording menu appears.
❍Select Programme mode
Press PLAY 5 or STOP ∞ to
select “QUICK PROGRAMMING”, then press OK/STATUS.
The Quick Programming menu
appears.
• If you have already set 8 programmes, “ALL PROGRAMS IN USE” appears and goes back to the Timer
Recording menu. If this happens, delete unwanted
programmes. (✈P.14)
❍Select Channel
Press CH 5 or ∞ to enter the TV channel.
• Holding down CH 5 or ∞ rapidly scans through the
channels.
• To record from external line input, press CH 5 or
∞
until “A/V REAR” or “A/V FRONT” appears.
❍Select Start Time
Press START + or – (Number button 1 or 4).
• Each time you press the button, the set time changes by
1-minute intervals. If you hold the button, the set time
changes by 30-minute intervals.
❍Select Stop Time
Press STOP + or – (Number
button 2 or 5).
• Each time you press the button,
the set time changes by 1-minute
intervals. If you hold the button,
the set time changes by 30-minute
intervals.
RF OUT
ANT.IN
IN
OUT
AUDIO
VIDEO
RF OUT
ANT.IN
IN
OUT
AUDIO
VIDEO
●
A
Advanced OOperations
●
Timer Recording
Using On-Screen Display
1
2
3
9
10 11 12
13
14
15
16
You can display the VCR operating status on the
TV screen.
❍Select VCR Set Up Mode
1 Press VCR.
2 Press MENU.
3 Press PLAY 5 or STOP ∞ to select“VCR SET
UP” then press OK/STATUS.
❍Select On-Screen Mode
1 Press PLAY 5 or STOP ∞ to select “ON
SCREEN MODE”.
2 Press FF 3. Each time you press the button, the
setting changes.
ON:
When you press a tape running button (Stop,
Play, etc.), the VCR status appears for 5
seconds.
COUNTER:
When you press a tape running button, the VCR
operating status appears for 5 seconds.
After 5 seconds, the VCR status disappears
except the time counter.
OFF:
The VCR operating status does not appear even
if you press a tape running button.
❍Finish Setting
Press MENU.
To display the VCR status on the TV screen
manually, press OK/STATUS. The VCR status
appears for about 5 seconds.
• If “ON SCREEN MODE” is set to “OFF,” no
VCR status appears though you press OK/
STATUS.
You can make the picture softer or sharper or
distinct the picture when playing back the tape.
SmartPicture is set to AUTO when you receive the
VCR.
❍Select SmartPicture Mode
1 Press VCR.
2 Press SMARTPICTURE
button. The current setting will
appear on the screen for about
5 seconds.
3 While the current setting
appears, press the SMART-PICTURE button
repeatedly, the setting changes as follows.
AUTO:
Normally select this mode.
DISTINCT:
Select this mode when you want the distinct
picture. The picture detail is emphasized.
SOFT:
Select this mode when you want the soft
picture. The signal noise of the picture is
softened.
SHARP:
Select this mode when you want the sharp
picture. The picture edge is emphasized.
Notes:
• It is recommended that the SmartPicture is set to
“SOFT” if playback picture is noisy.
• When “DSPC” is set to “OFF”, “AUTO” is switched
to “NATURAL” automatically.
1
With this function, you can prevent the VCR
operations from being misused.
To use Child Lock
When the VCR is turned on, press and hold
POWER on the remote control for more than 10
seconds to turn off the VCR.
The “CL” appears blinking on the display.
While “CL” is on the display, you cannot turn on
the VCR by pressing POWER on the VCR.
To cancel Child Lock
Press and hold POWER on the remote control for
more than 10 seconds to turn on the VCR.
The “CL” disappears on the display and VCR is
turned on.
You can also cancel the child lock function by
unplugging the AC power cord.
Child Lock
SmartPicture
AUTO
One Touch Recording (OTR)
The OTR function lets you quickly specify how
long you want a recording to continue. You do not
have to programme the timer.
❍On TV
1 Turn on the TV.
2 Select the video channel (or video input).
❍On VCR
Insert a cassette with the record tab in place.
The VCR turns on.
• If a cassette is already in the VCR, turn on the
VCR.
❍Select Channel
Press CH 5 or ∞ or Number buttons to select the
channel to record.
❍Start OTR
Press REC/OTR ● twice.
Recording starts immediately, and the
(Record)
indicator lights up and blinks on the display.
This indicates that the VCR
will automatically shut off after
30 minutes of recording.
❍Select Recording Length
Press REC/OTR ● repeatedly until the desired
recording length appears.
Each time you press the button, recording length
increases in 30-minute intervals.
=
0:30=1:00=1:30 5:30=6:00
REC (Normal recording)
++
++
+
To check time remaining during an OTR
Press OK/STATUS.
To change the recording length during an OTR
Press REC/OTR ● repeatedly until the desired
length appears.
1
2
3
4
5
OTR(0:30)
CH12
SP
1
2
3
4
5
❍Select Tape Speed
Press ALT/SPEED.
• Each time you press the button, the tape speed
alternates between SP, LP and SLP.
SP, LP: For PAL signal.
SP, SLP: For NTSC signal.
❍Select Start Date
Press DATE + or – (Number button 3 or 6).
• The year and day of the week are displayed
automatically.
❍Confirm Programme
Press TIMER or OK/STATUS.
“PROGRAM WAS COMPLETED” appears on the
TV screen.
After 5 seconds, the above message disappears, and
the normal TV picture resumes. The
(Timer)
indicator lights up on the display.
• If “PROGRAM NOT COMPLETED” appears,
try again from step 1.
• If “PROGRAM NOT COMPLETED/PROGRAM OVERLAP”
appears on the TV screen, the
timer recording you just programmed overlaps another
timer recording. (✈P.13)
If you want to store other programmes, repeat steps
1 to 8.
❍Finish Settings
Press POWER to turn off the VCR.
The VCR must be turned off for a timer recording to take
place. If you forget to turn off the VCR, PLEASE TURN
OFF VCR FOR TIMER RECORDING flashes on your TV
screen two minutes before a timer recording starts. To
remove the message, press the CLEAR button.
If you want to record the same programme daily, press
DAILY (Number button 8) during step 3 through 7.
(Press the button again to cancel.)
The VCR will record a TV programme every day
(Monday through Friday) at the same time and length.
(Daily Recording)
If you want to record the same programme weekly,
press WEEKLY (Number button 9) during step 3 through
7. (Press the button again to cancel.)
The VCR will record a TV programme once a week at the
same day, time and length. (Weekly Recording)
If you want to cancel the currently set programme,
press CLEAR.
After a timer recording has taken place
Press POWER to turn on the VCR. You can operate your
VCR normally.
To stop a started timer recording
Press POWER.
Recording stops and the VCR turns off.
If it is a Daily or Weekly Recording, future recordings
will be carried out as programmed.
• Tape speed can be selected by pressing the ALT/SPEED
button anytime during steps 1 through 4.
The speed appears on the display for about 5 seconds.
When two programs overlap
The Program Review screen will
appear with a magenta line blinking on the newly set timer
recording while the other
overlapped program blinking.
1 Press PLAY 5 or STOP ∞ to move the magenta
line among the two overlapping programs.
2 Press OK/STATUS to view
the detail information of the
program you want to change.
3 Go to step 4 through 8 to
modify the selected program.
To cancel any timer recording,
press CLEAR.
• If you do not modify the overlapping programs,
the VCR will record the earlier program completely. Only the remaining part of the later
program will be recorded.
• If the START time for the two programs are the
same, the lower program number will be recorded.
Useful function for Timer Recording:
Auto Tape Speed
With this function activated, the VCR can change
the tape speed and record the programme in LP or
SLP mode if not enough tape remains for recording
in SP mode.
1 Press VCR.
2 Press MENU.
3 Press PLAY 5 or STOP ∞ to select “VCR SET
UP” then press OK/STATUS.
4 Press PLAY 5 or STOP ∞ to select “TIMER
REC SPEED.”
5 Press FF 3. Each time you press the button, the
setting changes.
AUTO:
Select this to allow the VCR to change the tape speed
from SP to LP (or SLP) when there is not enough
tape length remaining.
MANUAL:
Select this not to allow the VCR to change the tape
speed.
6 Press MENU to exit from the menu operations.
9
7
8
6
Tape Duplication
To check, edit or erase the programmes
1 Press VCR.
2 Press TIMER.
3 Press PLAY 5 or STOP ∞ to select
“PROGRAM REVIEW”, then press OK/
STATUS.
4 Press OK/STATUS repeatedly to view the more
detailed programme information.
• When you press the button for the first time, the
detailed programme information for Programme 1
appears. By pressing this button repeatedly, you can
review the detailed information of all other
programmes.
5 If you want to change the programme setting
shown on the TV screen, press the following
buttons:
CH 5/∞: Changes the channel.
START +/– : Changes the start time.
STOP +/– :Changes the stop time.
SPEED :Changes the tape speed.
DATE +/– :Changes the date.
If you want to erase the programme setting
shown on the TV screen, press CLEAR. The
detailed information of the next programme
appears.
6 If necessary, press TIMER to exit from the menu
operations.
Note:
• This function does not work for OTR (One Touch
Recording).
How to see the programme list
1
Programme numbers
2
Preset channel numbers
3
Start time
4
Stop time
5
Start date
“D” stands for “DAILY,” and
“W” stands for “WEEKLY .”
• If the programme has worked once for the Daily
recording, “DAILY” will be shown instead of the
start date.
• If the programme has worked once for the
Weekly recording, the day of the week (in this
example, “MON”) will be shown instead of the
start date.
Note:
• Even if a power failure occurs, the VCR keeps your
timer programs. However, the clock time and other
menu settings are lost if it lasts for more than 3
minutes. As a result, when the power is supplied
again to this VCR after the power failure, set the
clock time and turn off the VCR.
Each timer program you have made will start unless
its start time already passes.
1 Insert a source tape in the playing VCR and a
blank tape in the recording VCR.
• If a tape without the record tab is inserted in the play
ing VCR, playback automatically starts. In this case,
press the STOP button.
2 Turn the channel on the TV to your video
channel.
3 Press CH 5 or ∞, pointing the remote
control at this VCR, to select the external line
input.
• For rear jacks, select “L-1” on the display or “A/V IN”
on the TV screen.
• For front jacks, select “L-F” on the display or “F-A/V
IN” on the TV screen.
4 Press ALT/SPEED, pointing the remote control at
this VCR, until the desired tape speed (SP, LP or
SLP) appears on the screen.
SP, LP: For PAL signal.
SP, SLP: For NTSC signal.
5 Press the PLAY 3button on the playing VCR.
6 Press REC/OTR
● at this VCR.
Remember: press the buttons in steps 5 and 6 simultaneously to avoid missing any of the recording.
Dubbing from any VCR (or camcorder) to another is
simple.
Explanations on this page uses this VCR as the
recording VCR.
Refer also the manual supplied with the other VCR
(for playback)
1 Connect the recording VCR (this VCR) and
the playing VCR.
2 Connect the recording VCR (this VCR) to the
TV.
Recording VCR (this VCR)
Playing VCR
To RF OUT
From Audio output to AUDIO IN
From Video output to VIDEO IN
The DSPC (Digital Studio Picture Control) system
checks the condition of the tape in use during
recording and playback, and compensates to
provide the highest possible recording and playback
pictures. Set the DSPC to “ON” or “OFF” on the
VCR Set Up menu.
❍Select VCR Set Up Mode
1 Press VCR.
2 Press MENU.
3 Press PLAY 5 or STOP
∞
to select “VCR SET UP” then
press OK/STATUS.
DSPC
This function allows you to set the timer recording
program without going through the regular set up
with the on screen. The extent of programming is
24 hours from the current time.
1 Insert a tape into the VCR and press the
“TURBO TIMER” button on the remote control.
“ ” (start time prompt) and the current
time appears alternately on the display.
2 To change the START time, press the PLAY 5 or
STOP ∞ button (if you press and hold either
button, the time changes in 30-minutes increments), then press OK/STATUS.
Then,“
” (stop time prompt) and the set
start time appears alternately on the display.
3 To change the STOP time, press the PLAY 5 or
STOP ∞ button (if you press and hold either
button, the time changes in 30-minutes increments), then press OK/STATUS.
Channel number will appear on the display.
4 To change the CHANNEL number, press the
PLAY 5 or STOP ∞, then press OK/STATUS.
5 The data input will be memorized and the Turbo
Timer mode will be finished so that normal
display appears.
6 Turn off the VCR.
Notes:
• To exit Turbo Timer mode at any step, press the TURBO
TIMER button.
• If “Err” appears on the display panel, all eight
programs have been set and Turbo Timer will not
proceed. To remove the err or message, press the
TURBO TIMER button again.
• Settings of Turbo Timer will appear on the display panel
only and not on the screen.
• Programs Overlap Warning does not function with
Turbo Timer.
• DAILY or WEEKLY programming are not available on
Turbo Timer.
Turbo Timer
This function enables you to search forward to the
next unrecorded portion of the tape (or to the point at
which recording was stopped).
1 Press the SKIP SEARCH/REC END button
when the tape is not running. The VCR begins fast
forwarding or rewinding to find the blank portion
or the recording end portion on the tape.
SEARCHING FOR REC END will appear on
the screen during the search.
2 The VCR automatically stop when the blank
portion or the end of the recorded is reached.
REC END SEARCH COMPLETED will appear
on the screen briefly.
The tape remaining tape time also appears on the
display panel.
Rec(ord) End Search
.....
Notes:
• The DSPC system works for SP, LP and SLP modes only
after a tape has been inserted and the Record mode is
first initiated. Also, it works if the colour mode is
changed. It does not work during recording.
• In the case of timer recording, the DSPC system works
before recording is initiated.
• Once the cassette is ejected after recording, the DSPC
data is cancelled. The next time the cassette is used for
recording, DSPC is re-performed.
• When “DSPC’ is displayed, the VCR does not start One
Touch Recording.
•
Since the DSPC system works before recording actually
starts, there is a delay of approximately 7 seconds after
REC/OTR ● is pressed. To make sure you record the
desired scene or programme in its entirety, first perform
the following steps:
1) Press and hold
STILL/SLOW (or PAUSE/STILL
8
on the front panel) and press
REC/OTR
● to
engage the RECORD PAUSE mode.
• The VCR then automatically checks the condition of the
tape and, after approximately 7 seconds, re-enters
RECORD PAUSE.
2) Press
REC/OTR
●
again to start recording.
• If you want to bypass the DSPC system and begin
recording immediately set “DSPC” to “OFF”.
• The VCR adjusts the playback picture quality based on
the quality of the tape in use.
• When watching a tape recorded with “DSPC” set to
“ON”, it is recommended that you leave DSPC to
“ON” during playback as well.
• “DSPC” only appears at the beginning of automatic
tracking. Even though it doesn’t appear after that, the
DSPC function is operative.
Tracking Adjustments
Auto tracking
Each time a tape is inserted, auto tracking starts
working and continuously analyses the signal to adjust
for optimum picture quality during playback. So, there
is no need for you to minimize noises in most tapes
during playback.
Manual tracking
• During normal playback:
If auto tracking cannot eliminate noises well
during playback, press CH 5 or ∞.
• During a slow motion picture:
Press CH 5 or ∞ to minimize noises in the slow
motion picture.
• During a still picture:
Press CH 5 or ∞ to reduce jitter in the still
picture.
To cancel manual tracking, stop the tape, eject the
tape, then re-insert it.
Note:
If you keep pressing
CH
5 or∞ button, you might
get “USE CLEANING CASSETTE” message on the
screen. Please disregard this message and re-adjust
the tracking. However, if the message appears
automatically (without pressing
CH
5 or∞), this
indicates that your video heads are dirty.
You can locate an index marked at the beginning of
each recording on a tape recorded on this VCR (or
an indexed tape).
Press ¢ or 4 repeatedly until the appropriate
number is displayed on the TV screen before
starting play.
Rapid forward or reverse search begins.
When it finds the designated index, playback starts
automatically.
• Locate an index number by pressing the button
repeatedly, indicating how many index marks ahead of
or behind that recording you want is from the tape’s
current position.
• Up to ±9th index mark from the current position on the
tape can be located.
Index Search
1
2
3
Eject cassette
You can eject the tape simply by pressing
EJECT0(or STOP/EJECT ■/0 on the front
panel) even while the VCR is turned off.
When you press STOP/EJECT ■/0 on the front
panel, the VCR automatically turns on, ejects the
tape, then turns off.
Auto playback
When a tape is inserted, the VCR turns on. If the
record tab is removed, playback begins.
Auto rewind
When a tape reaches its end during playback or fast
forwarding, the VCR rewinds the tape and stops.
Memory rewind power off
When you press POWER during rewinding, the
VCR turns off after rewinding is completed.
Repeat Playback
When you press and hold PLAY 3 for more than 5
seconds, you can play back the same tape repeatedly (100 times).
When the tape runs to its end, the VCR automatically rewinds the tape, and starts playback.
To cancel an OTR
Press STOP 7 to stop recording before the preset
recording length is reached.
If you want to cancel the OTR mode but continue
recording, press REC/OTR ● several times until
“OTR” changes to “REC” on the TV screen.
Notes:
• During recording, the displayed time counts down.
When “0:00” is reached, recording stops and the
VCR turns off automatically.
• If an OTR is engaged during pause, the displayed
time counts down normally, but recording does
not begin until you cancel the pause.
❍Select On-Screen Mode
1 Press PLAY 5 or STOP ∞ to select “DSPC”.
2 Press FF 3to set “ON” to “OFF”.
❍Finish Setting
Press MENU.
Once the “DSPC” mode is set to “ON”, the DSPC
system works for both recording & playback;
appears blinking on the display.
Automatic Operations
Power
No power.
Recording & Playback
TV programme cannot be recorded.
Timer recording cannot be performed.
There is no playback picture, or the playback
picture is noisy or contains streaks.
During a still or slow motion picture, the
picture may contain some vertical jitter when
using a TV which has an automatic vertical
hold control.
If the top of your playback picture waves
back and forth excessively.
During playback, “USE CLEANING
CASSETTE” appears on the screen.
Correction
• Check that the AC power cord is correctly connected
to an AC outlet.
• Check that the VCR is turned on.
Correction
• Check the connections between the VCR, the antenna
and the TV.
• Make sure that the record tab on the back of the
cassette is not removed.
• Set the timer on-time and timer off-time correctly.
• Make sure that the VCR is turned off after setting is
made.
• Timer recording may not be performed or stopped if a
power interruption occurs before or during timer
recording.
• Select your video channel correctly.
• Adjust the tracking slowly in either direction.
• Try to change to another tape, you may not have this
problem.
• Because the VCR playback signal is not as stable as
an off-the-air TV signal, the top of your TV screen
may be bent or unstable during playback. You may
have better result if the A/V input is used.
• The video heads are dirty. Use a head cleaner.
B
Before RRequesting SService
●
O
Operating TV
●
❍Set Code
1 Press and hold TV.
2 Press two Number buttons for the manufactur-
er’s code number of your TV, referring to the
table to the right.
• For example, for 02, press 0 then 2.
3 Press STOP 7, then release TV.
• The remote control can now operate the TV of the
selected code.
❍Confirm Setting
Press POWER, pointing the remote control at the
TV.
If the TV turns on or off, your setting is completed.
If not, repeat steps above, using another code.
Notes:
• After replacing the batteries, you need to reset the
manufacturer’s code again.
• The buttons you can use to operate your TV are
explained on page 3.
1
2
TV Manufacturers’ Codes
PHILIPS 01, 02, 03
EMERSON 14
GOLDSTAR 04
GRUNDIG 24, 25
HITACHI 12
JVC 05
MITSUBISHI 13, 26
PANASONIC 07, 17, 19, 20
RCA 10
SAMSUNG 18
SANYO 11
SHARP 16
SONY 09
THOMSON 21, 22, 23
TOSHIBA 08
ZENITH 06, 15
General
GeneralGeneral
Mains voltage AC 110 V – 240 V
Mains frequency 50 Hz/60 Hz
Power consumption Approx. 14W
Ambient temperature +5 °C to +40 °C
Relative humidity 10 % to 80 %
Dimensions (WxHxD) Approx. 360 mm x 94 mm x 249 mm
Mass Approx. 3.0 kg
Position for use Horizontal
Video output channel UHF E36 (adjustable betweeen E28 — E60)
Possible number of TV channel 99
Number of pre-programmable memory blocks 8
Number of days in advance 365 or every day, or every week
Tuner
TunerTuner
Video signal B/G, D/K, I, SECAM K1
VHF 42 MHz — 175 MHz
VHF H 175 MHz — 470 MHz
UHF 470 MHz — 870 MHz
CATV
Video
VideoVideo
Input (VIDEO IN) 0.5 V(p-p) to 2.0 V(p-p), 75 ohms
Output (VIDEO OUT) 1.0 V(p-p) ±0.2 V(p-p), 75 ohms
Resolution Better than 240 lines
Signal/noise ratio Better than 43 dB
Audio
AudioAudio
Input (AUDIO IN) –8 dBs, 50 k ohms (0 dBs=0.775 Vrms)
Output (AUDIO OUT) –8 dBs, 1 k ohms (0 dBs=0.775 Vrms)
Accessories supplied
Accessories suppliedAccessories supplied Remote control unit
RF coaxial cable
Batteries – R6(SUM-3)/AA
(only for checking operations)
B
Before RRequesting SService (continued)
●
S
Specifications
●
Correction
Remote Control
The remote control cannot work.
Miscellaneous
A cassette cannot be inserted.
The cassette does not eject.
The cassette ejects when you press REC/OTR ●.
• Aim the remote control directly at the remote sensor
on the VCR.
• Avoid all obstacles which may interfere with the
signal path.
• Inspect or replace the batteries.
• Make sure batteries are inserted correctly.
Correction
• Insert the cassette with the window side up and the
record tab facing you.
• Check that a cassette tape is not already inserted. Press
0
EJECT.
• Check that the AC power cord is correctly connected
to an AC outlet.
• Check that the record tab on the back of the cassette is
not removed.
Design and specifications are subject to change without notice.
DSPC ON
ON SCREEN MODE ON
TIMER REC SPEED MANUAL
SELECT:
CHANGE:
END: MENU
QUICK PROGRAMMING
PROGRAM REVIEW
SELECT: CONFIRM: OK
END: TIMER
ONE TIME PROGRAM
PROGRAM 1
CHANNEL+/–
START +/– – –:– –
STOP +/– – –:– –
REC SPEED SP
DATE +/– – –/– –/– –
DAILY: 8 WEEKLY: 9
CONFIRM: OK END: TIMER
– –
ONE TIME PROGRAM
PROGRAM 1
CHANNEL+/–
START +/– 20:00
STOP +/– 22:00
REC SPEED SP
DATE +/– – –/– –/– –
DAILY: 8 WEEKLY: 9
CONFIRM: OK END: TIMER
12
PR CH START STOP DATE
1 12 20:00 22:00 20/07
2 20 11:00 11:30 15/10
3 24 15:00 16:00 10/08
4 45 21:00 23:00 FRI
5
6
7
8
SELECT:
CONFIRM: OK
ONE TIME PROGRAM
PROGRAM 1
CHANNEL+/–
START +/– 20 : 00
STOP +/– 22 : 00
REC SPEED SP
DATE +/– 20/07/01
FRIDAY
ERASE: CLEAR
NEXT: OK END: TIMER
12
PR CH START STOP DATE
1 12 20:00 22:00 W10/06
2 25 10:00 10:45 MON
3 03 15:00 15:15 D16/10
4 45 23:30 23:00 DAILY
5
6
7
8
NEXT: OK END: TIMER
1
234 5
 Loading...