

Page 1

CONTENTS
1. HOW TO CONNECT YOUR VIDEO RECORDER 4.........
How to connect your video recorder to the TV set 4.....
Connecting with a scart cable 4......................
Connecting without a scart cable 5...................
Connecting a decoder or other equipment 5............
2. INSTALLING YOUR VIDEO RECORDER 6...............
Initial installation 6..................................
Allocating a decoder 6..............................
Manual TV channel search 6.........................
Channel number or frequency display 7...............
Satellite receiver 7..................................
Special installation functions 7.......................
Automatic TV channel allocation (Follow TV) 7.........
Automatic TV channel search (Autoinstall) 8...........
Monitor function 8..................................
Sorting and clearing TV channels manually 8...........
Setting the time and date 9...........................
3. IMPORTANT NOTES FOR OPERATION 10..............
General information 10..............................
Saving energy 10...................................
Emergency interrupt 10..............................
The symbols on your video recorder display 10.........
Summary of user guide 11...........................
User guide (OSD) 11.................................
6. PROGRAMMED RECORDING (TIMER) 16...............
’VPS’ (Video Programming System) and ’PDC’
(Programme Delivery Control) (UK) 16.................
Programming a recording (with ’VIDEO Plus+’) 16.......
Programming a recording (without ’VIDEO Plus+’) 17....
How to check or change a programmed recording
(TIMER) 18.........................................
How to clear a programmed recording (TIMER) 18......
7. ADDITIONAL FUNCTIONS 19.........................
Child lock 19.......................................
Setting the on-screen display (OSD) 19................
Continuous playback 19.............................
Automatic switch-off (tuner mode) 19.................
Reducing picture disturbance (’optimizing the
modulator’) 20......................................
Switching off the modulator 20.......................
8. Before you call an engineer 21.......................
9. GLOSSARY 22......................................
Technical terms used 22.............................
4. PLAYBACK FUNCTIONS 12..........................
Playing a cassette 12................................
Playing NTSC cassettes 12...........................
Tape position indication 12...........................
Searching for tape position with the picture (picture
search) 12.........................................
Still picture 12......................................
Searching for tape position without the picture (wind
and rewind) 13.....................................
Instant View 13.....................................
Automatic search for a tape position (index search) 13..
Automatic search for a blank space on the tape 13.....
Picture interference 13..............................
Tracking during playback 13.........................
Tracking during still picture 13.......................
Cleaning the video heads 13.........................
5. MANUAL RECORDING 14............................
Recording without automatic switch-off 14............
Recording with automatic switch-off (OTR
one-touch-recording) 14.............................
Protecting your recordings 14........................
Auto-assembling 14.................................
Selecting the recording speed (SP or LP) 15............
Automatic recording from a satellite receiver (SAT
RECORDING) 15....................................
Switching on ’Direct Record’ 15......................
3
Page 2
&
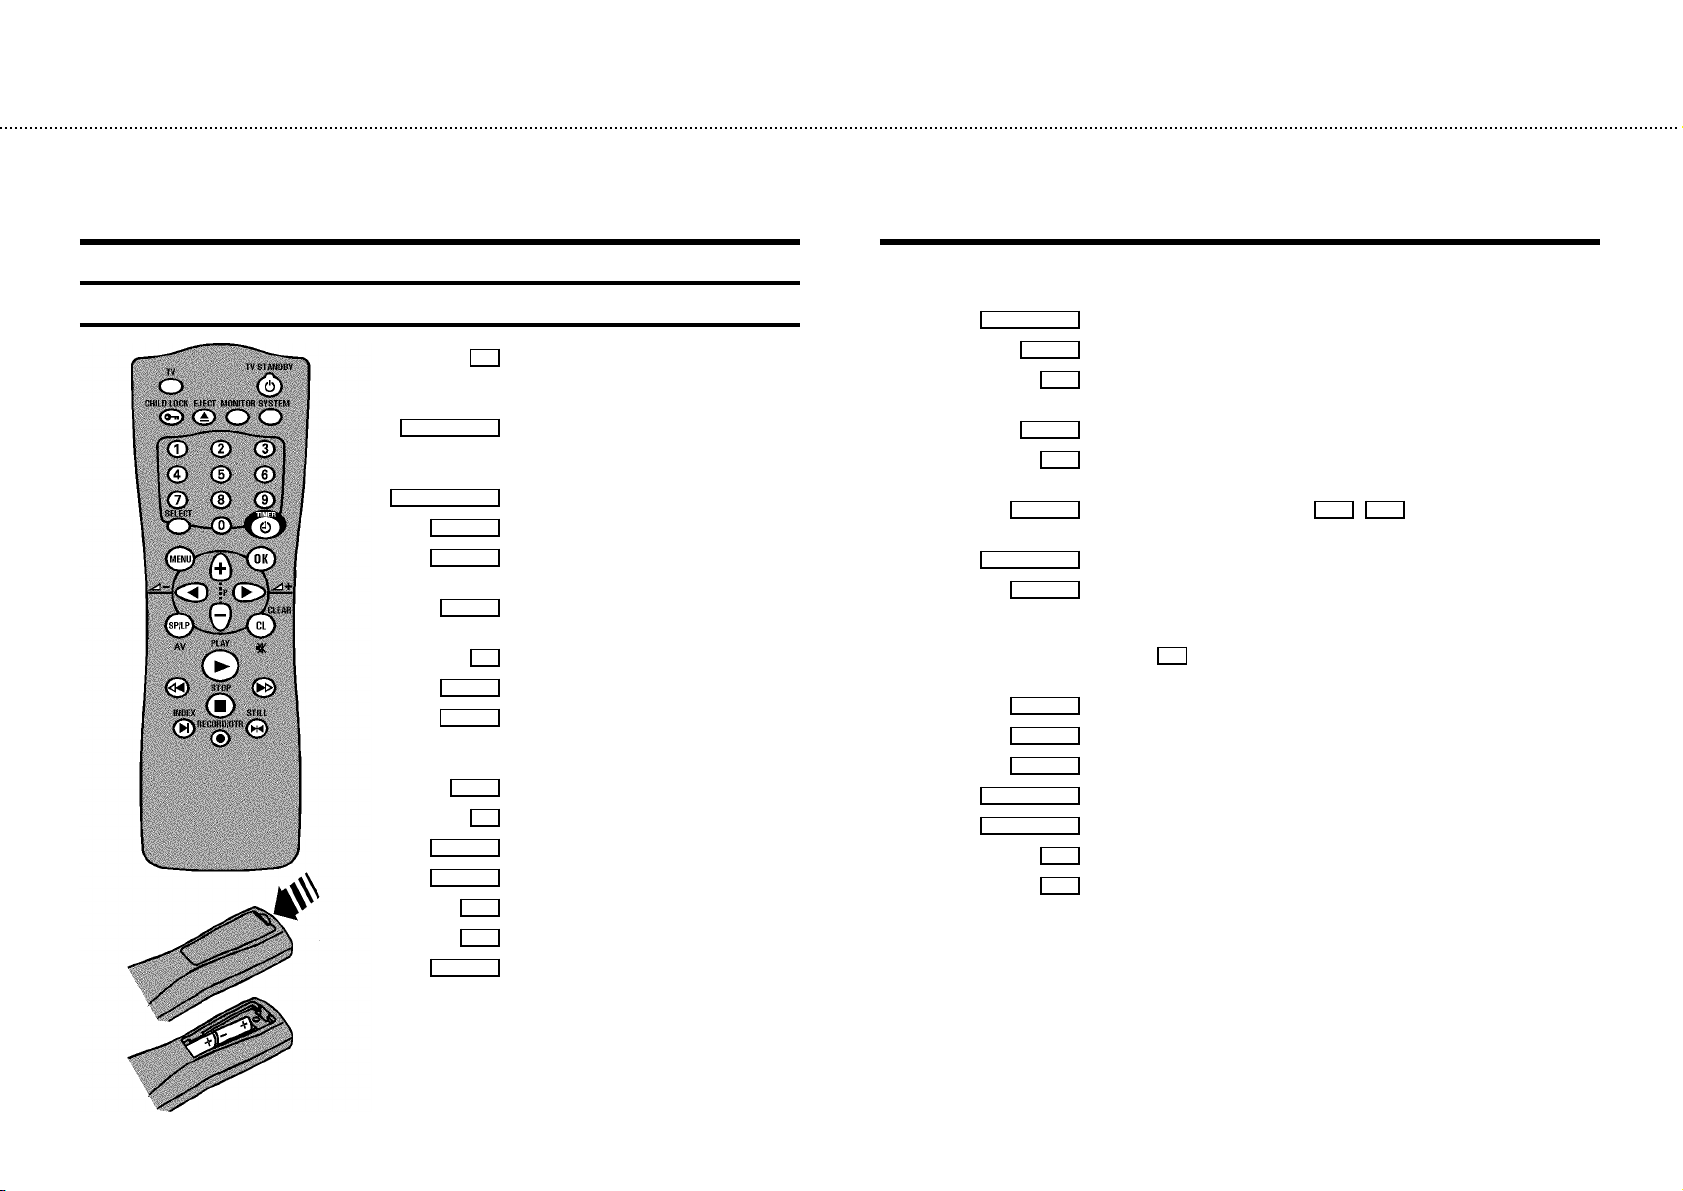
OPERATING INSTRUCTIONS IN BRIEF
The remote control
TV To call up additional TV functions : Additional
TV functions for TV sets with the same remote
control code (RC5)
TV/STANDBY m Switch off : To switch off set, interrupt menu
function, interrupt a programmed recording
(TIMER)
CHILD LOCK u Child lock : To switch child lock on/off
EJECT J Eject: To eject a cassette
MONITOR TV monitor : To switch between TV reception
and VCR playback
SYSTEM Special function: For instance, to switch on
the test picture
0-9 Number buttons:0-9
SELECT Select: To select a function
TIMER k TIMER: To make a manual TIMER
programming with VIDEO Plus+ or to alter or
clear a programmed TIMER
MENU Menu : To call up the main menu
OK Store/Confirm: To store or confirm entry
D/Sr Select: Cursor left
C/Sq Select: Cursor right
P q Select: One line or programme number up
P r Select: One line or programme number down
SP/LP, AV SP/LP : To select the recording speed (Long
Play/Standard Play)
CLEAR (CL), y Delete : To delete last entry/Clear programmed recording (TIMER)
PLAY G Playback : To play a recorded cassette
[ Rewind : During STOP and STANDBY: rewind, during PLAYBACK: reverse
scanning
STOP h Pause/Stop: To stop the tape, except while a TIMER-recording is being made
I Forward wind: During STOP and STANDBY: forward wind, during PLAYBACK:
forward scanning
INDEX E Index search: In combination with [ / I : to search for previous/next
recording on the cassette.
RECORD/OTR n Record: To record the programme selected
STILL R Still picture: To stop the tape and show a still picture
Additional TV functions
Press the TV button and the correct button on the remote control at the same
time
D/Sr TV volume: TV volume down
C/Sq TV volume: TV volume up
SP/LP, AV To switch the TV to Audio-/Video input socket
CLEAR (CL), y TV volume off: To switch off the TV volume
TV/STANDBY m Switch off : To switch off set
P q TV programme number : TV programme number up
P r TV programme number : TV programme number down
Page 3
&
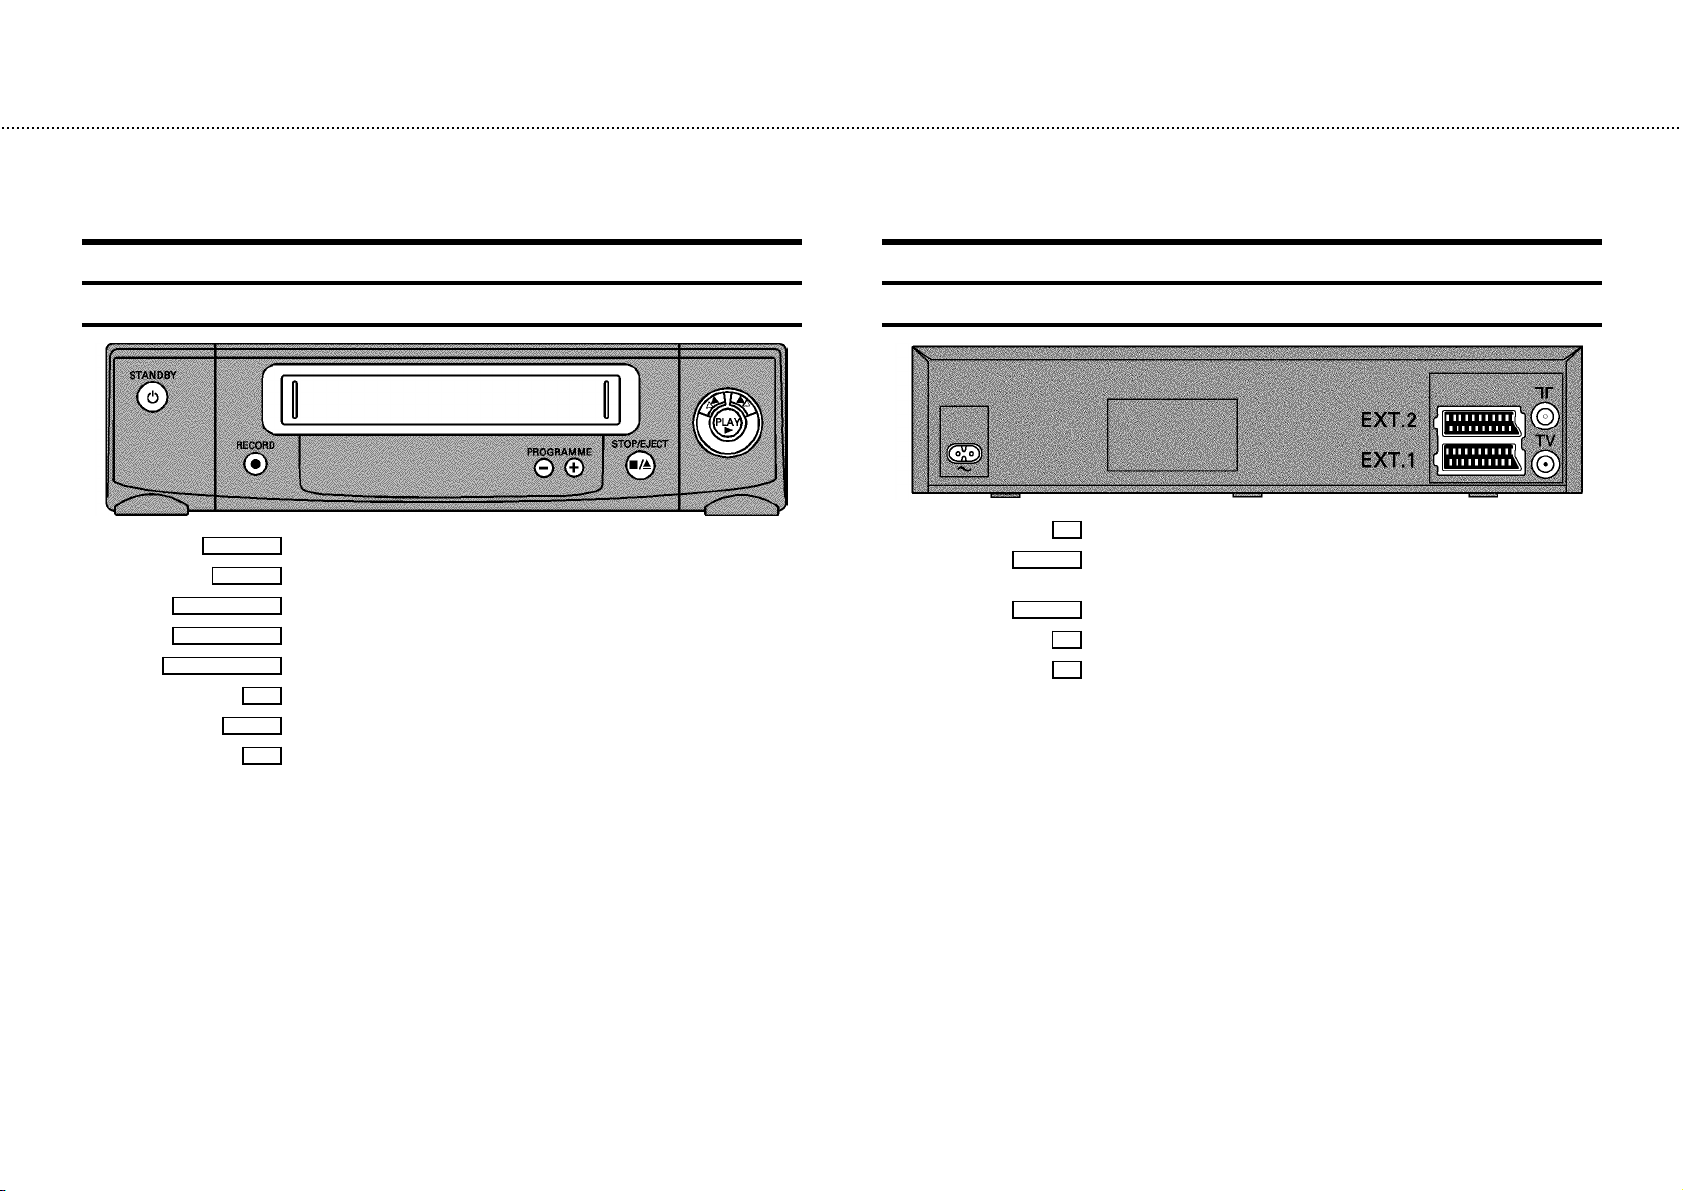
Front of the set
STANDBY m Standby : To switch off, interrupt a function, interrupt a programmed recording (TIMER)
PROGRAMME r
PROGRAMME q
STOP/EJECT ?
RECORD n
H
PLAY G
I
Record: To record the programme selected
Select: One line or programme number down.
Select: One line or programme number up.
Pause/Stop, eject cassette: To stop the tape and eject the cassette
Rewind : During STOP and STANDBY: rewind, during PLAYBACK:reverse scanning
Playback : To play a cassette
Forward wind: During STOP and STANDBY: forward wind, during PLAYBACK: forward
scanning
Back of the set
4 Mains socket: To connect the mains cable
EXT.2 AV 2
EXT.1 AV 1
Scart socket 2: To connect a satellite receiver, decoder, video recorder, etc. (programme
E2’)
number ’
Scart socket 1: To connect the TV set (programme number ’E1’)
Aerial input socket: To connect the aerial cable
2
Aerial output socket: To connect the TV set
3
Page 4
OPERATING INSTRUCTIONS PHILIPS VR205/05
Congratulations! You now own one of the most sophisticated
and simple-to-use video recorders (VCR) on the market. With
this VCR you can record and play VHS-standard cassettes.
Please take the time to read this operating manual before
using your video recorder.
Safety instructions and other notes
ADanger: High voltage!
Do not remove the top cover as there is a risk of an electrical
shock!
AThe video recorder does not contain any components that can
be repaired by the customer. When the appliance is connected
to the power supply there are some components that are
constantly operational. To switch off the video recorder
completely you must disconnect it from the power supply.
BMake sure that air can circulate freely through the ventilation
slots on the video recorder.
So that you can identify your machine in the event of theft,
enter the serial number (PROD.NO) here. The serial number is
printed on the type plate fixed at the rear of the set.
MODEL NO. VR205/05
PROD.NO: ......
This product complies with the requirements of the Directive
73/23/EEC + 89/336/EEC + 93/68/EEC.
Interference
The Department of Trade and Industry operates a Radio
Investigation Service to help TV licence holders improve
reception of BBC and ITC programmes where these are being
spoilt by interference.
If your dealer cannot help, ask at a Main Post Office for the
booklet ’How to Improve Television and Radio Reception’.
BMake sure that no objects or liquids enter the video recorder. If
liquid is spilt into it, disconnect the video recorder immediately
from the power supply and call the After-sales Service for
advice.
BThe video recorder should not be used immediately after
transportation from a cold to a hot area or vice versa, or in
conditions of extreme humidity.
After unpacking the video recorder, it should be allowed to
acclimatize for at least three hours before installation.
C These operating instructions have been printed on nonpolluting
paper.
C Deposit old batteries at the relevant collection points.
C Please make use of the facilities available in your country for
disposing of the packaging of the video recorder in a way that
helps to protect the environment.
C This electronic equipment contains many materials that can be
recycled. Please inquire about the possibilitiesfor recycling
your old set.
DVIDEO Plus+ and PlusCode are registered trademarks of
Gemstar Development Corporation. The VIDEO Plus+
system is manufactured under licence from Gemstar
Development Corporation.
Technical information
Measurements in cm (W / H / D): 38.0 / 9.3 / 26.0
Power consumption (Standby) : less than 6W (Saving energy
mode)
Voltage : 220-240V/50Hz
Number of heads: 2 Video
Winding time: approx. 100 seconds (Cassette E-180)
Recording/Playback time :SP (Standard Play) 4 hours
(Cassette E-240) / LP (Long Play) 8 hours (Cassette E-240)
List of accessories
• Operating instructions
• Remote control and batteries
• Aerial cable
• Mains cable
• Quick install quide
1
Page 5

Special functions on your video recorder
Philips has developed a system which produces the best possible playback
quality. It reduces disturbance on old, worn video cassettes, and emphasises
the detail on very good quality cassettes.
When you connect your video recorder to your television and plug it into the
mains, you will be welcomed with an OSD picture. All you have to do is follow
the instructions in the "intelligent help line" for the next step. Enjoy the Automatic
TV channel search/save function and the automatic time adjustment.
We guarantee that your video recorder will switch to the new millennium with
no problems whatsoever.
Recordings made on your video recorder can be controlled by an external
satellite receiver.
This function automatically transfers all the television channel settings onto
your video recorder.
Your video recorder can ascertain which channel is currently playing on your
television and record from it at the touch of a button.
Simple programming system for video recorders. Makes programming as easy
as making a telephone call. Simply enter the programme code which you will
find in your listings magazine.
The precision tape drive from Philips with short rewind times and automatic
tape length recognition.
2
Page 6
1. HOW TO CONNECT YOUR VIDEO RECORDER
Important for the United Kingdom
This machine is fitted with an approved moulded 13 Amp plug.
To change a fuse in this type of plug, please follow these
instructions.
a Take off the fuse cover and take out the fuse.
b Put in a new fuse which should be a BS1362 3A, A.S.T.A.
or BSI approved type.
c Refit the fuse cover.
If the plug fitted is not suitable for your socket, cut it off and fit
another type.
If the plug you fit contains a fuse, it should be a 3Amp fuse. If
you fit a plug which does not need a fuse, make sure the fuse
on your fuse box is not greater than 5 Amps.
DNote: Please destroy the plug you have cut off so
that it cannot be used in a 13 Amp socket
somewhere else.
How to connect your video recorder to the
TV set
We recommend the use of a scart cable. This will give you the
best picture and sound quality.
When you install your video recorder for the first time, please
read:
E If your TV set has a scart socket and you are using a
scart cable, please read the section ’Connecting with a
scart cable’.
E The section ’Connecting without a scart cable’, if you are
not using a scart cable.
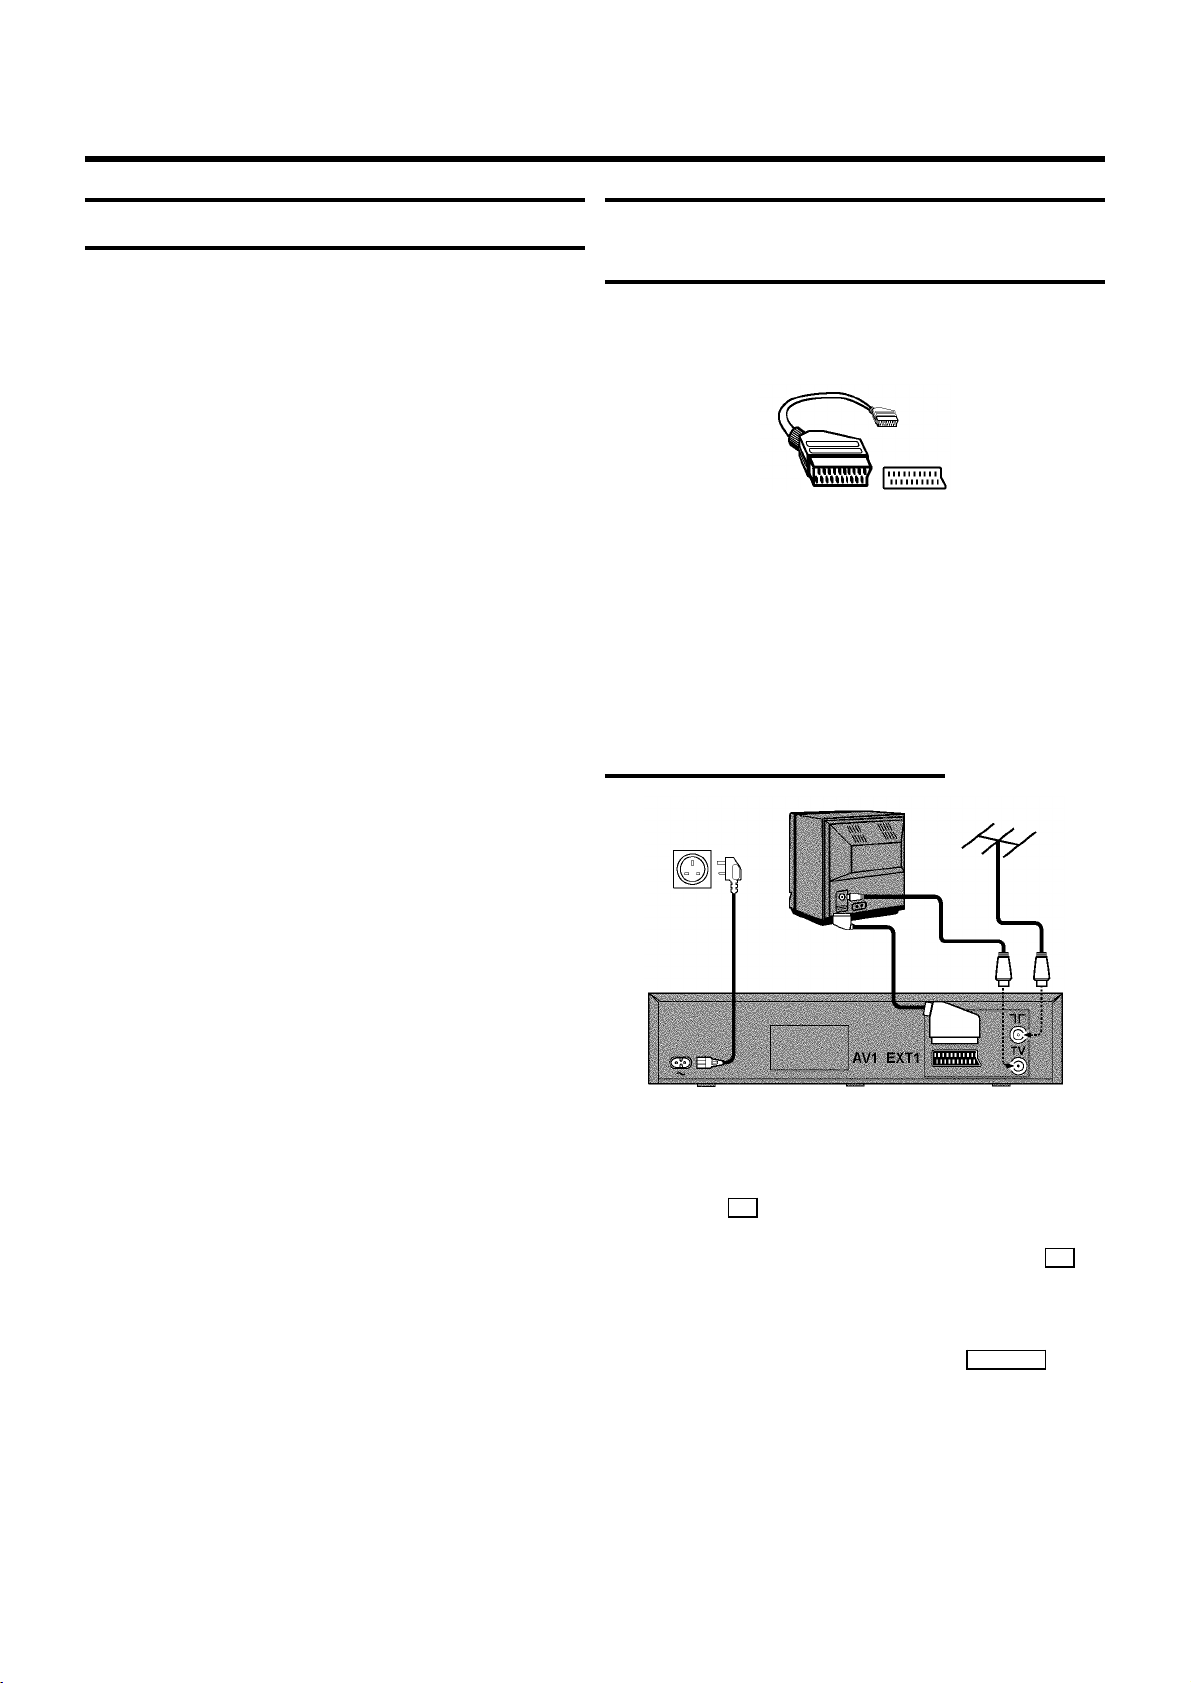
Connecting with a scart cable
How to connect a plug
The wires in the lead from the video recorder are coloured as
follows.
* Blue - ’neutral’ (’N’).
* Brown - ’live’ (’L’).
d Connect the blue wire to the terminal in the plug which is
marked with the letter ’N’ or coloured black.
e Connect the brown wire to the terminal in the plug which
is marked with the letter ’L’ or coloured red.
f Do not connect either of the wires to the terminal in the
plug which is marked with the letter ’E’, the symbol \or
coloured green or green and yellow.
Before you refit the plug cover, make sure that the grip at the
bottom of the plug is clamped over the plastic cover of the
lead, not just over the two wires.
a Switch off the TV set.
b Remove the aerial cable plug from your TV set and insert
it into the 2 socket at the back of the video recorder.
c Plug one end of the aerial cable provided into the 3
socket on the video recorder and the other end into the
aerial input socket on your TV set.
d Plug one end of the scart cable into the EXT.1 AV 1 scart
socket at the back of the video recorder and the other
end into the scart socket on your TV set (see instruction
manual TV set).
e Switch on the TV set.
4
Page 7
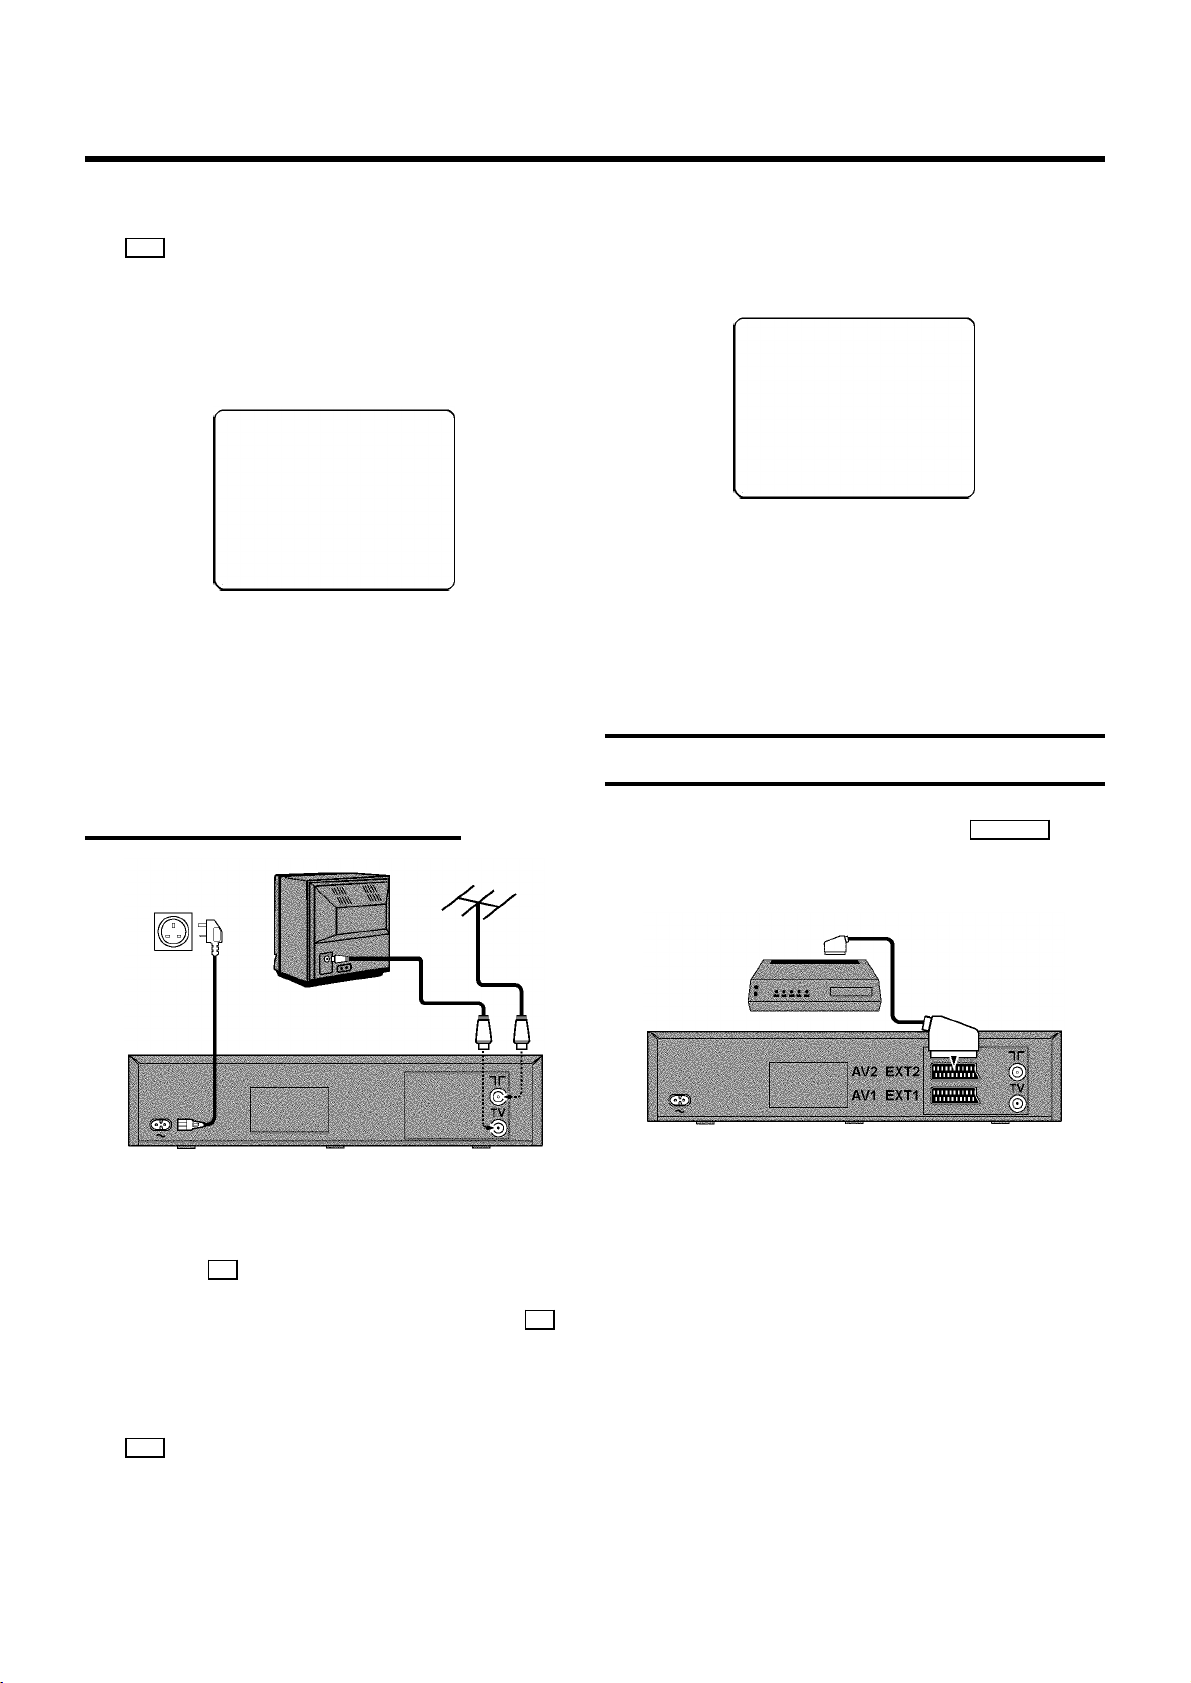
f Insert one end of the mains cable into the mains socket
4 at the back of the video recorder and the other end
into the wall socket.
g If your TV set automatically switches to programme
number e.g.: ’EXT’, ’0’, or ’AV’, this text will appear on the
TV screen:
CONGRATULATIONS ON THE
PURCHASE OF YOUR NEW
PHILIPS VIDEO RECORDER
TO CONTINUE PRESS OK
f Tune in the TV set until this picture appears.
DThe video recorder will now be sending a
welcoming text on channel 35 or 583MHz.
CONGRATULATIONS ON THE
PURCHASE OF YOUR NEW
PHILIPS VIDEO RECORDER
TO CONTINUE PRESS OK
DIf you were using a video recorder before, you will
probably need to retue the ’video channel’ on your
TV to obtain this picture.
DIf your TV set does not switch to programme number
e.g.: ’EXT’, ’0’, or ’AV’ automatically, select the
programme number for the video recorder manually
(see instruction manual TV set).
h Then read ’Initial installation’ in chapter ’INSTALLING
YOUR VIDEO RECORDER’.
Connecting without a scart cable
a Switch off the TV set.
g When the TV has been tuned read the paragraph ’Initial
installation’ in the chapter ’INSTALLING YOUR VIDEO
RECORDER’.
Connecting a decoder or other equipment
You can connect additional equipment to the EXT.2 AV 2
socket. For example: a decoder, a satellite receiver or a
camera recorder.
b Remove the aerial cable plug from your TV set and insert
it into the 2 socket at the back of the video recorder.
c Plug one end of the aerial cable provided into the 3
socket on the video recorder and the other end into the
aerial input socket on your TV set.
d Insert one end of the mains cable into the mains socket
4 at the back of the video recorder and plug the other
end into the wall socket.
e Switch on your TV set and select the programme number
that you have chosen for video playback (see instruction
manual TV set).
5
Page 8
2. INSTALLING YOUR VIDEO RECORDER
Initial installation
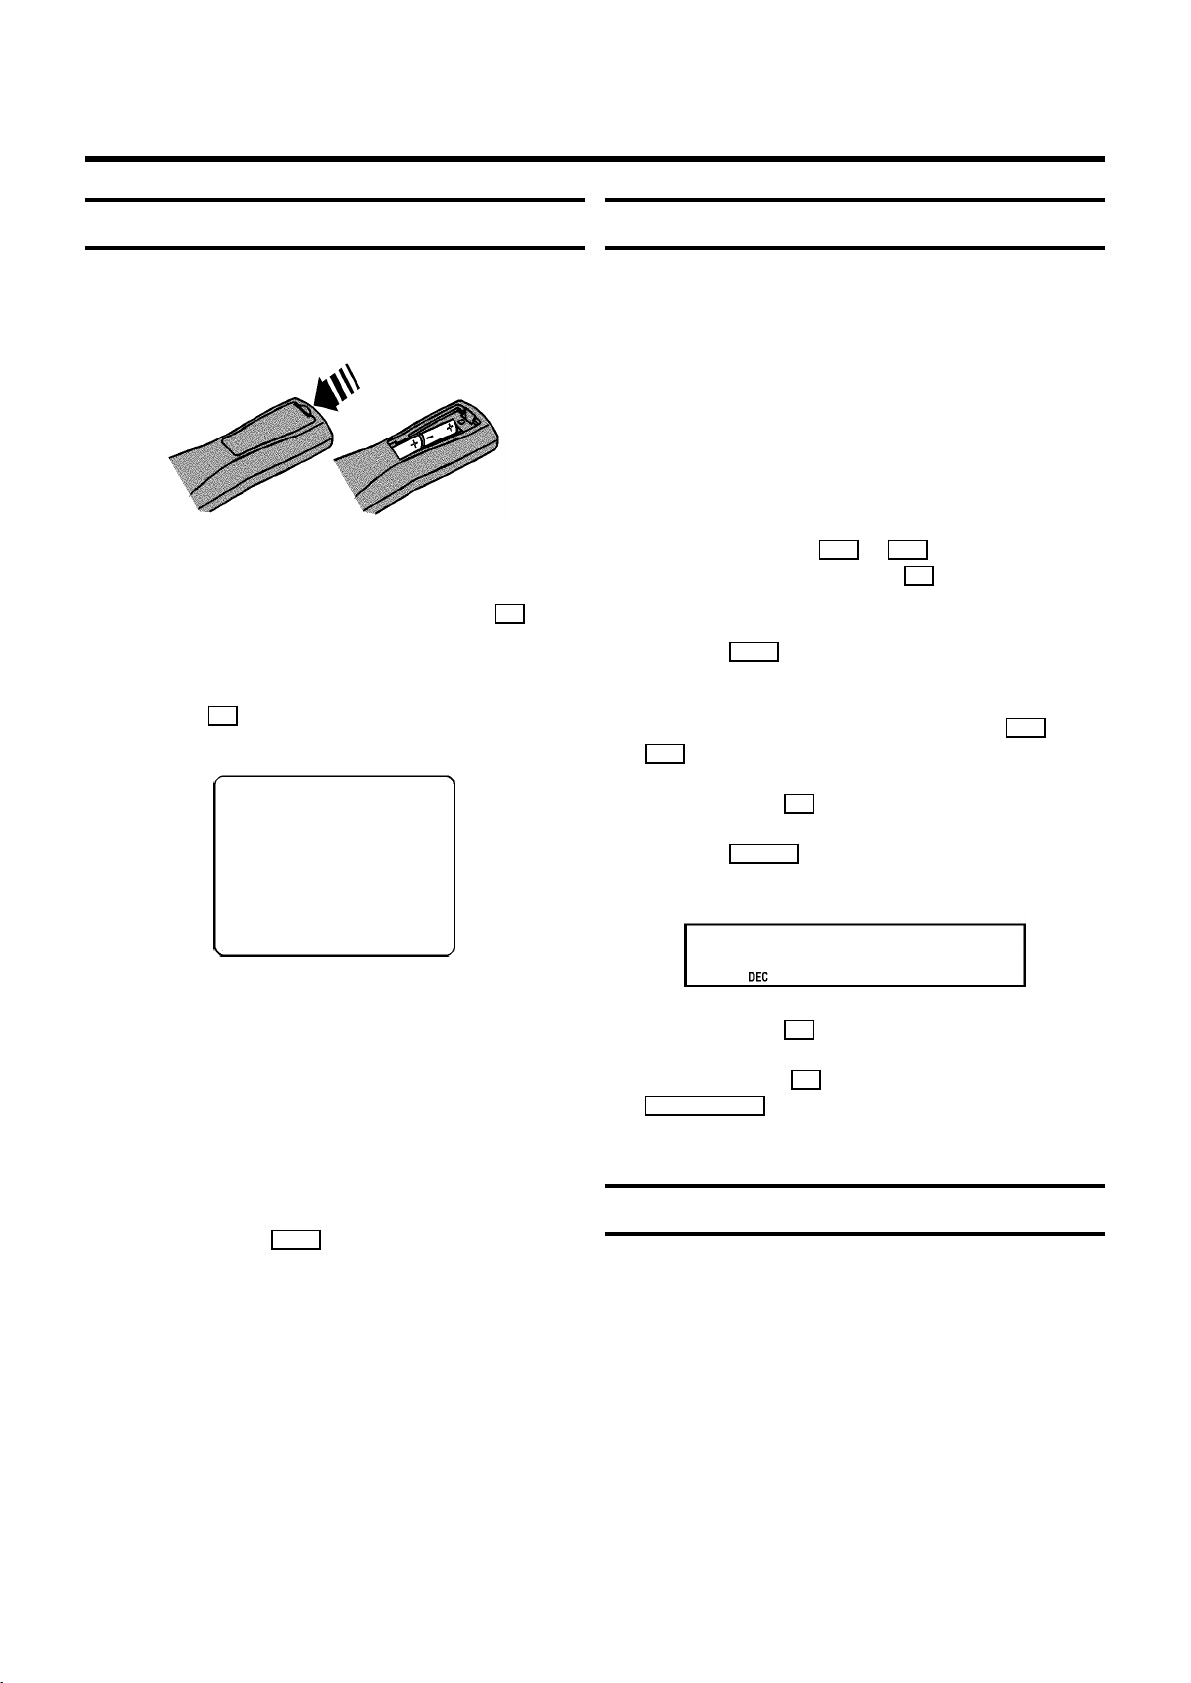
a Open up the battery compartment of your remote control
and place the batteries in it as shown in the picture.
b Close the battery compartment.
c Confirm the picture on the TV screen with the OK button
on the remote control.
d If you have connected the aerial to the video recorder,
press the OK button. ’Autoinstall’ starts. This picture will
appear on the screen:
Allocating a decoder
Some TV stations will send coded TV channels, that you can
only watch when you use a decoder. You can connect such a
decoder (descrambler) to your video recorder. With the
following function, the connected decoder will automatically
be activated for the TV programme you want to watch.
a Switch on the TV set. If required, select the programme
number for the video recorder.
b Choose the television channel on which you wish to use
the decoder with the P q or P r buttons on the video
recorder or the number buttons 0-9 on the remote
control.
c Press the MENU button on the remote control. The main
menu will appear.
d Select the line ’MANUAL SEARCH’ with the P q or
P r button.
e Confirm with the OK button.
AUTOINSTALL 00
Wait until all TV channels have been found. This can take
several minutes.
e When ’AUTOINSTALL’ is complete, ’READY’ will appear
on the TV screen.
DIf the autoinstall procedure is interrupted by the
standby button, press the MENU button to obtain the
welcome screen again.
f To end, press the MENU button.
The initial installation is now complete.
Check the time and date. Please read ’Setting the time
and date’ in this chapter.
DIf you have connected a decoder, you must install it
as described in the next section.
DIf you have connected a satellite receiver, please
read the section ’satellite receiver’.
f Press the INDEX E button. ’DEC’ will appear in the
display.
CH21
g Confirm with the OK button.
h To end, press the OK button again. Then, press the
TV/STANDBY m button.
This channel is now assigned to the decoder.
Manual TV channel search
In certain cases the ’Automatic TV channel search’ may not be
able to find all of the TV channels (e.g. coded TV channels). In
that case, use this manual method to set the channels.
DWhen you search for TV channels manually, you can
choose between the indication for ’channel’ or
’frequency’. Please read the next paragraph
’Channel number or frequency display’.
a Switch on the TV set. If required, select the programme
number for the video recorder.
6
Page 9
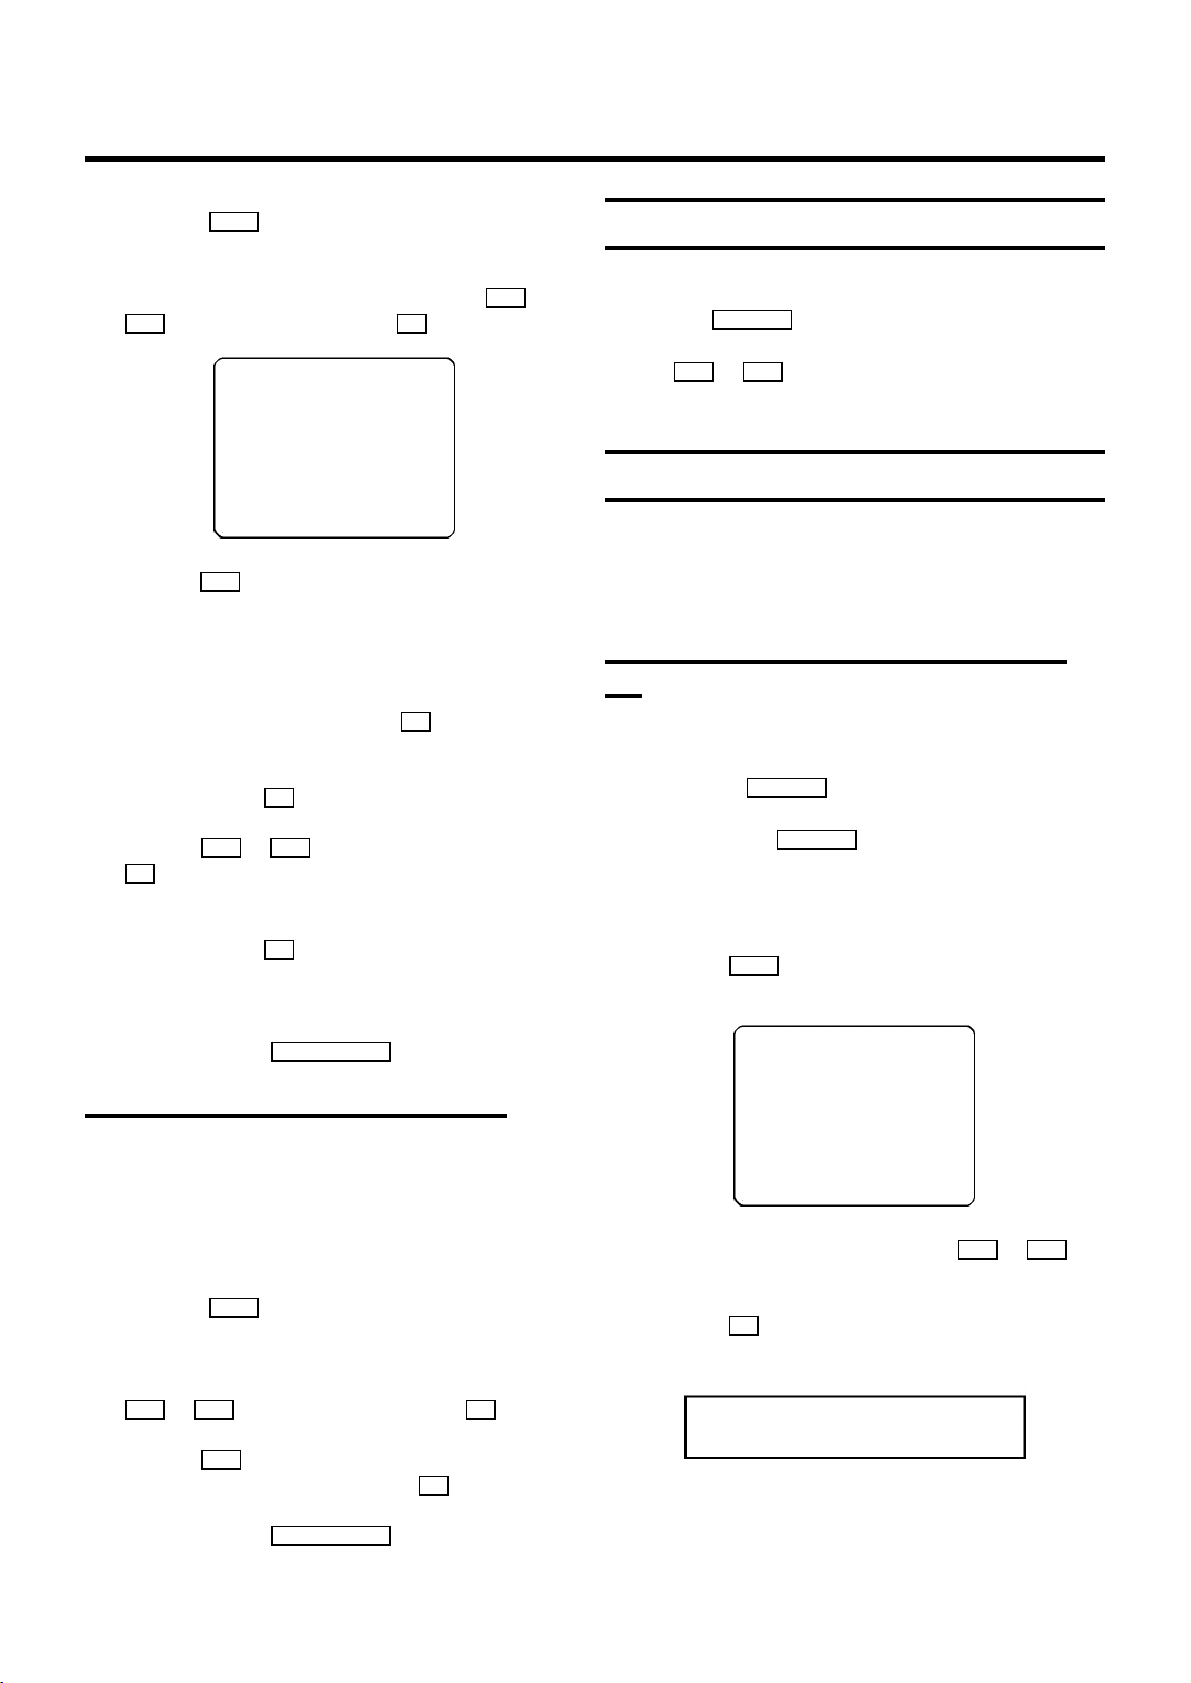
b Press the MENU button on the remote control. The main
menu will appear.
Satellite receiver
c Select the line ’MANUAL SEARCH’ with the P q or
P r button and confirm with the OK button.
CH 26 P01
-----------------------SEARCH g+ 0-9 OK
d Hold the P q button until you have found the right TV
channel. A changing channel number or frequency will
appear on the screen.
DIf you know the frequency or channel number of the
desired TV channel, you can enter the information in
line with the number buttons 0-9 on the remote
control.
e Confirm with the OK button.
f With the P q or P r button or with the number buttons
0-9 , select the programme number you want to give to
this TV channel, for instance, ’P01’.
g Confirm with the OK button.
If you want to allocate more TV channels, repeat steps
d through g .
You can receive channels from the satellite receiver via the
scart socket EXT.2 AV 2 .
To do this, select the channel number ’E2’ by pressing the
buttons P q or P r . You will have to select the channels to
be received by the satellite receiver on the receiver itself.
Special installation functions
You can select one of the following installation functions in
order to adapt the video recorder to your own specific
requirements.
Automatic TV channel allocation (Follow
TV)
With this function, the video recorder stores the channels in
the same order as on the TV set. This only works if the video
recorder (socket EXT.1 AV 1 ) and the TV set are connected
with a scart cable. You must switch off any equipment
connected to socket EXT.2 AV 2 .
a Switch on the TV set. If required, select the programme
number for the video recorder.
b Press the MENU button on the remote control. The main
menu will appear.
h To end, press the TV/STANDBY m button.
Channel number or frequency display
You can switch between the display for ’channel number’ or
’frequency’ for manual channel search.
a Switch on the TV set. If required, select the programme
number for the video recorder.
b Press the MENU button on the remote control. The main
menu will appear.
c Select the line ’CHANNEL/FREQUENCY’ with the
P r or P q button and confirm with the OK button.
d With the P q button, select ’CHANNEL’or
’FREQUENCY’ and confirm with the OK button.
e To end, press the TV/STANDBY m button.
CLOCK
OSD
CHANNEL ALLOCATION
CHANNEL/FREQUENCY
MANUAL SEARCH
AUTOINSTALL
FOLLOW TV
DIRECT RECORD
COUNTER
------------------------
-/+ OK
c Select the line ’FOLLOW TV’ with the P r or P q
button.
d Press the OK button. ’TV01’ will appear on the video
recorder display.
TV01
e Select programme number ’1’ on the TV set.
7
Page 10
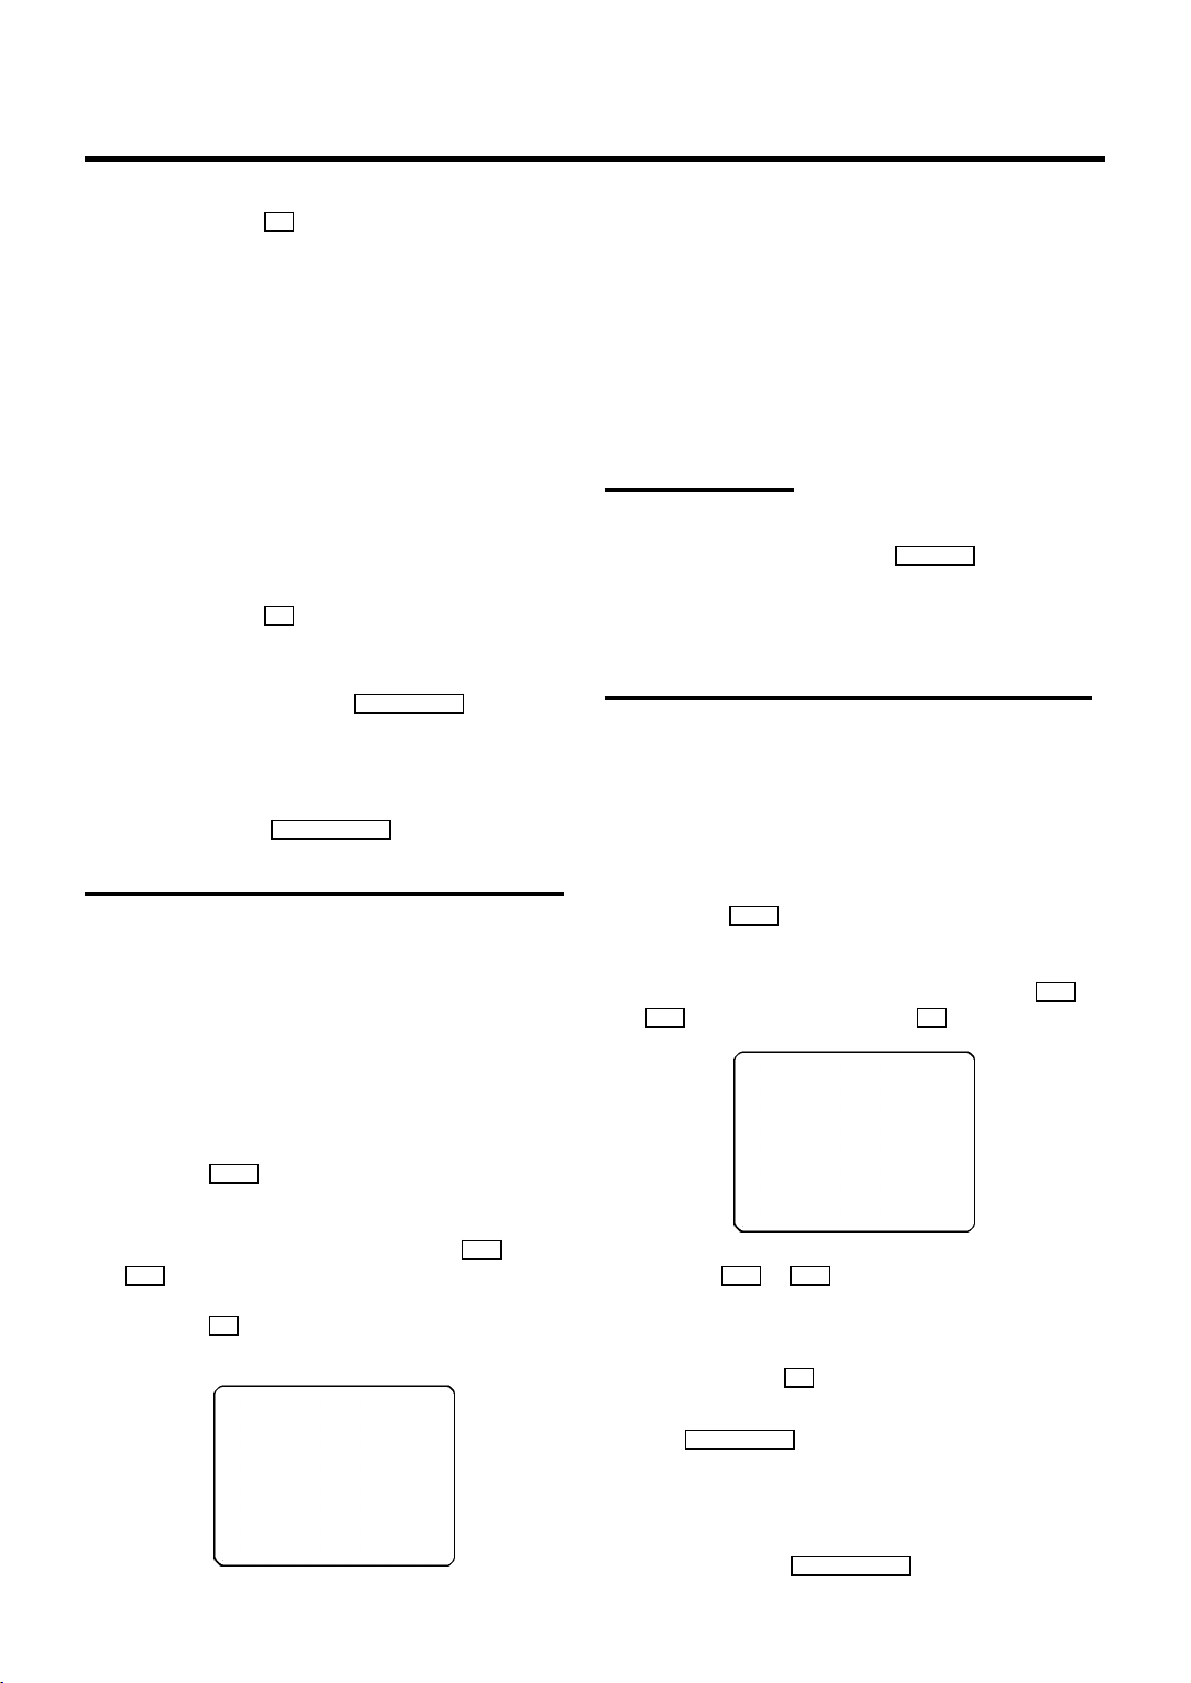
f Confirm with the OK button on the video
recorder-remote control. The video recorder compares
the TV channels on the TV set and the video recorder.
If the video recorder found the same TV channel as the
TV set, then it stores it at ’P01’.
DWhen ’NOTV’ (no signal from TV set) appears in the
display, the TV channels can not be allocated
automatically. In this case, read ’Manual TV channel
allocation’.
Wait until all TV channels have been found. This can take
several minutes.
e When Autoinstall is complete, ’READY’ will appear on the
display.
The time and date information have been set.
How to search for a TV channel manually, you can read in the
section ’Manual TV channel search’.
g Wait until, for example, ’TV02’ appears.
h Select the next programme number, for example, ’2’ on
the TV set.
i Confirm with the OK button on the video
recorder-remote control.
DIf you allocated the wrong TV channeL, you can go
back one step with the CLEAR (CL), y button.
j Repeat steps g to i until all TV channels have been
allocated.
k To end, press the TV/STANDBY m button.
Automatic TV channel search (Autoinstall)
The video recorder will search for all TV channels. It stores TV
channels found in the following sequence: BBC 1, BBC 2, ITV,
CH 4, CH 5, SKY, others.
DIf you want to start the automatic TV channel search
again, then follow the instructions below.
Monitor function
You can switch backwards and forwards between TV picture
and video recorder picture with the MONITOR button. But this
only works when you use a scart cable to connect the video
recorder to your TV set and if your TV set responds to this
switch-over.
Sorting and clearing TV channels manually
You can assign any programme number to a TV channel that
you have stored and you can also delete unwanted TV
channels.
a Switch on the TV set. If required, select the programme
number for the video recorder.
b Press the MENU button on the remote control. The main
menu will appear.
c Select the line ’CHANNEL ALLOCATION’ with P r or
P q button and confirm with the OK button.
a Switch on the TV set. If required, select the programme
number for the video recorder.
b Press the MENU button on the remote control. The main
menu will appear.
c Select the line ’AUTOINSTALL’ with the P r or
P q button.
d Press the OK button. The ’Automatic TV channel search’
starts.
AUTOINSTALL 00
8
P01 CH26
------------------------
-/+ CL OK
d With the P r or P q button, select the TV channel to
which you want to give a programme number (starting
with ’P01’).
e Confirm with the OK button.
DIf you want to delete a TV channel, press the
CLEAR (CL), y button.
f Repeat steps dto euntil you have given a programme
number to all TV channels.
g To end, press the TV/STANDBY m button.
Page 11
Setting the time and date
DIf a TV channel which transmits TXT/PDC is stored
under programme number ’P01’, time and date will
automatically be taken from the TXT/PDC
information.
If the time in the video recorder display is not
correct or if ’--:--’ appears in the display, please
set the clock manually.
a Switch on the TV set. If required, select the programme
number for the video recorder.
b Press the MENU button on the remote control. The main
menu will appear.
c Select the line ’CLOCK’ with the P r or P q button
and confirm with the OK button.
TIME 20:00
YEAR 1999
MONTH 01
DATE 01
------------------------
-/+ 0-9 OK
d Check the time in line ’TIME’. If required, please change
the time with the 0-9 buttons on the remote control.
e Confirm with the OK button.
f Check ’YEAR’, ’MONTH’ and ’DATE’ in the same way.
Confirm each entry with the OK button.
g To end, press the TV/STANDBY m button.
9
Page 12
3. IMPORTANT NOTES FOR OPERATION
General information
DYou can switch on with the STOP h button, the
0-9 buttons or by putting in a cassette.
DIf you do not use the video recorder for a few
minutes, it will switch to standby automatically.
Please read the section ’Automatic switch-off (tuner
mode)’ in chapter ADDITIONAL FUNCTIONS.
DIf you have switched the video recorder off with the
TV/STANDBY m button, the time will show in the
display, for instance , ’18:00’.
If the clock has not been set, ’--:--’ will appear.
DKeep your video recorder connected to the mains at
all times to ensure that programmed recordings can
be made and that the television works normally.
DIf the video recorder is not plugged into the mains, it
will usually store TV channels for a year, and date
and timer information for seven hours.
Saving energy
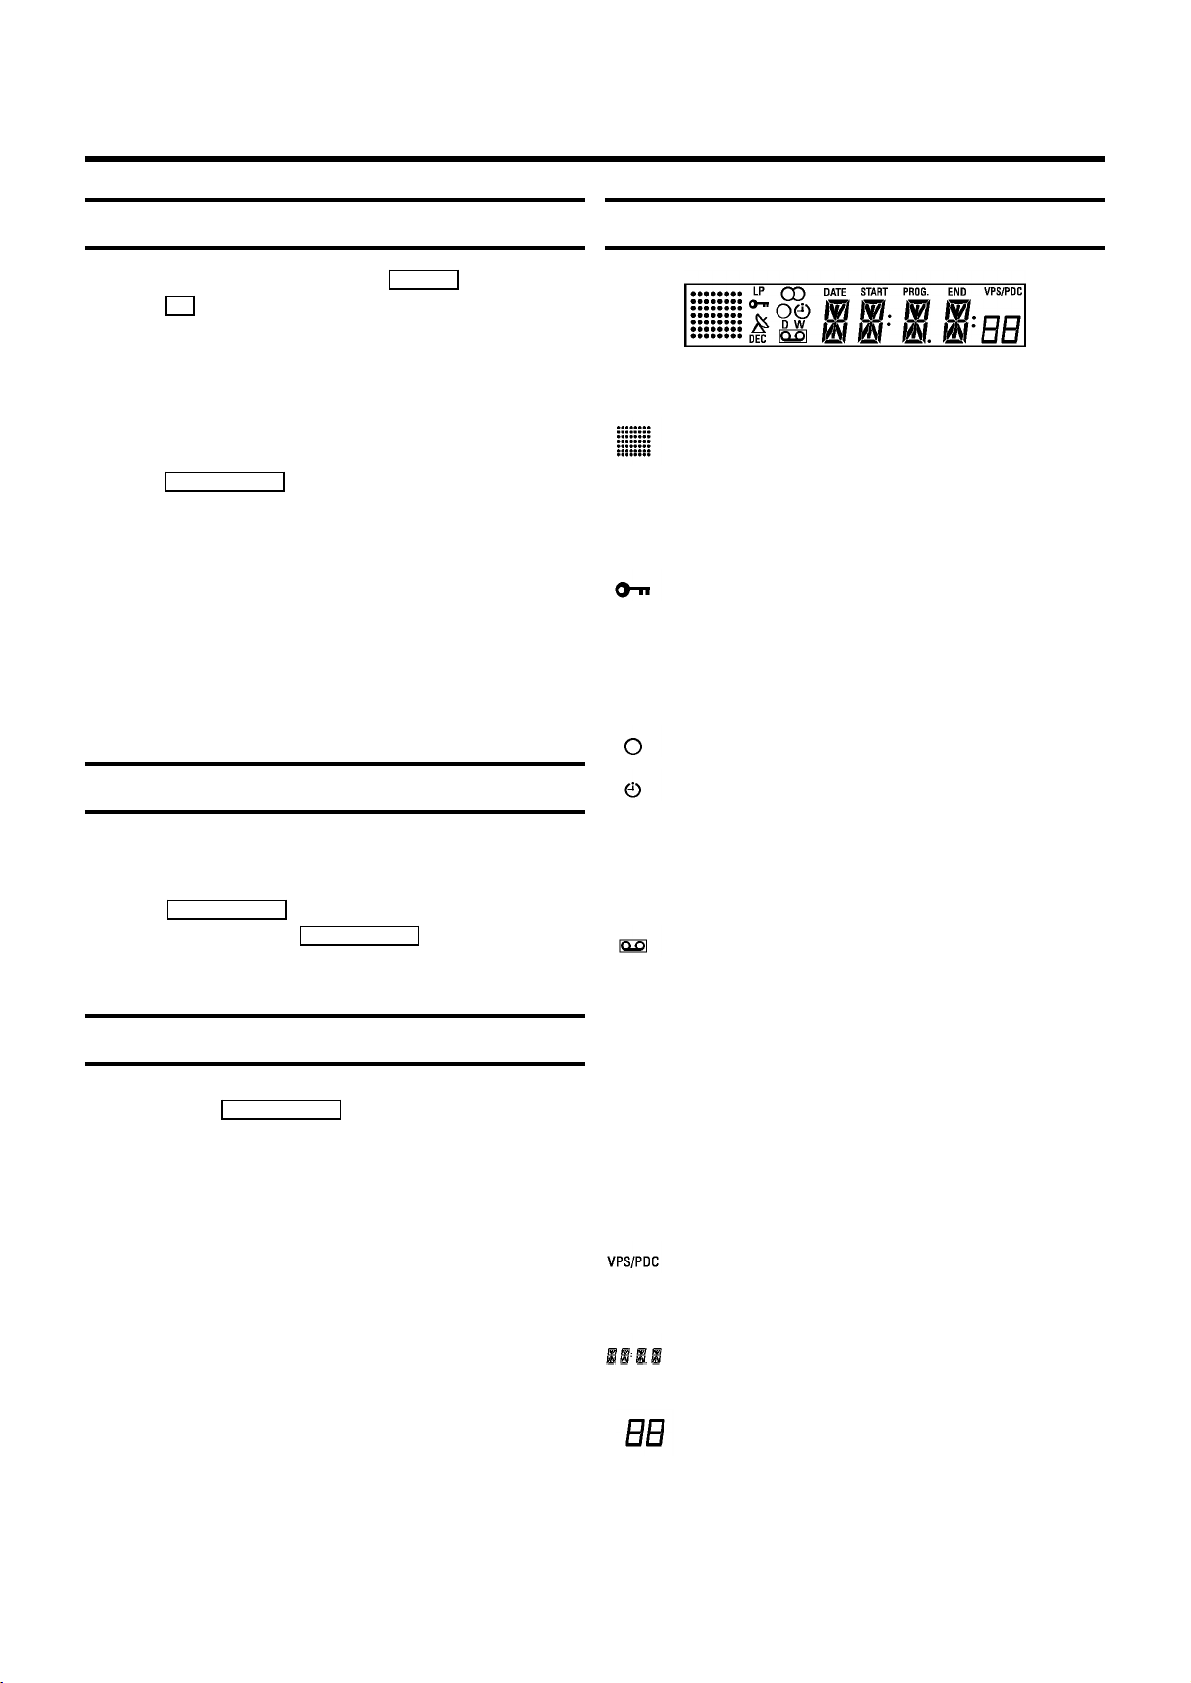
The symbols on your video recorder display
These symbols can light up on your video recorder display:
This is where the current operating mode is shown
as a symbol.
LP When you play a tape that has been recorded in LP
(Long Play).
When you have switched on the child lock.
x When a satellite recording has been programmed.
DEC When a decoder has been allocated to the TV
channel you have currently selected.
When you are recording a progamme.
When you have programmed a recording or when a
programmed recording is being made.
There are two ways to switch to standby.
Switching to standby with clock display: Switch to standby
using the TV/STANDBY m button. The time will be displayed.
To save energy: Press the TV/STANDBY m button twice. The
time will disappear from the display.
Emergency interrupt
You can use the TV/STANDBY m button on the video recorder
or the remote control to interrupt any function.
So if you are having operating problems, you can just interrupt
the function and start again.
And you can practise operating your set without any worries.
No matter which buttons you press, you cannot damage it.
D When you are programming daily recordings.
W When you are programming weekly recordings.
When you have put a cassette in the video recorder.
DATE When the date of the programmed recording is
shown.
START When the start time of the programmed recording is
shown.
PROG. When the programme number of the programmed
recording is shown.
END When the end time of the programmed recording is
shown.
Video programming system / programme delivery
control: when a VPS or PDC code is being
transmitted.
Display of programme number / tape position /
channel name / function.
Tape position in seconds, but only if the display
mode ’LINEAR COUNTER’ has been selected.
10
Page 13
Summary of user guide
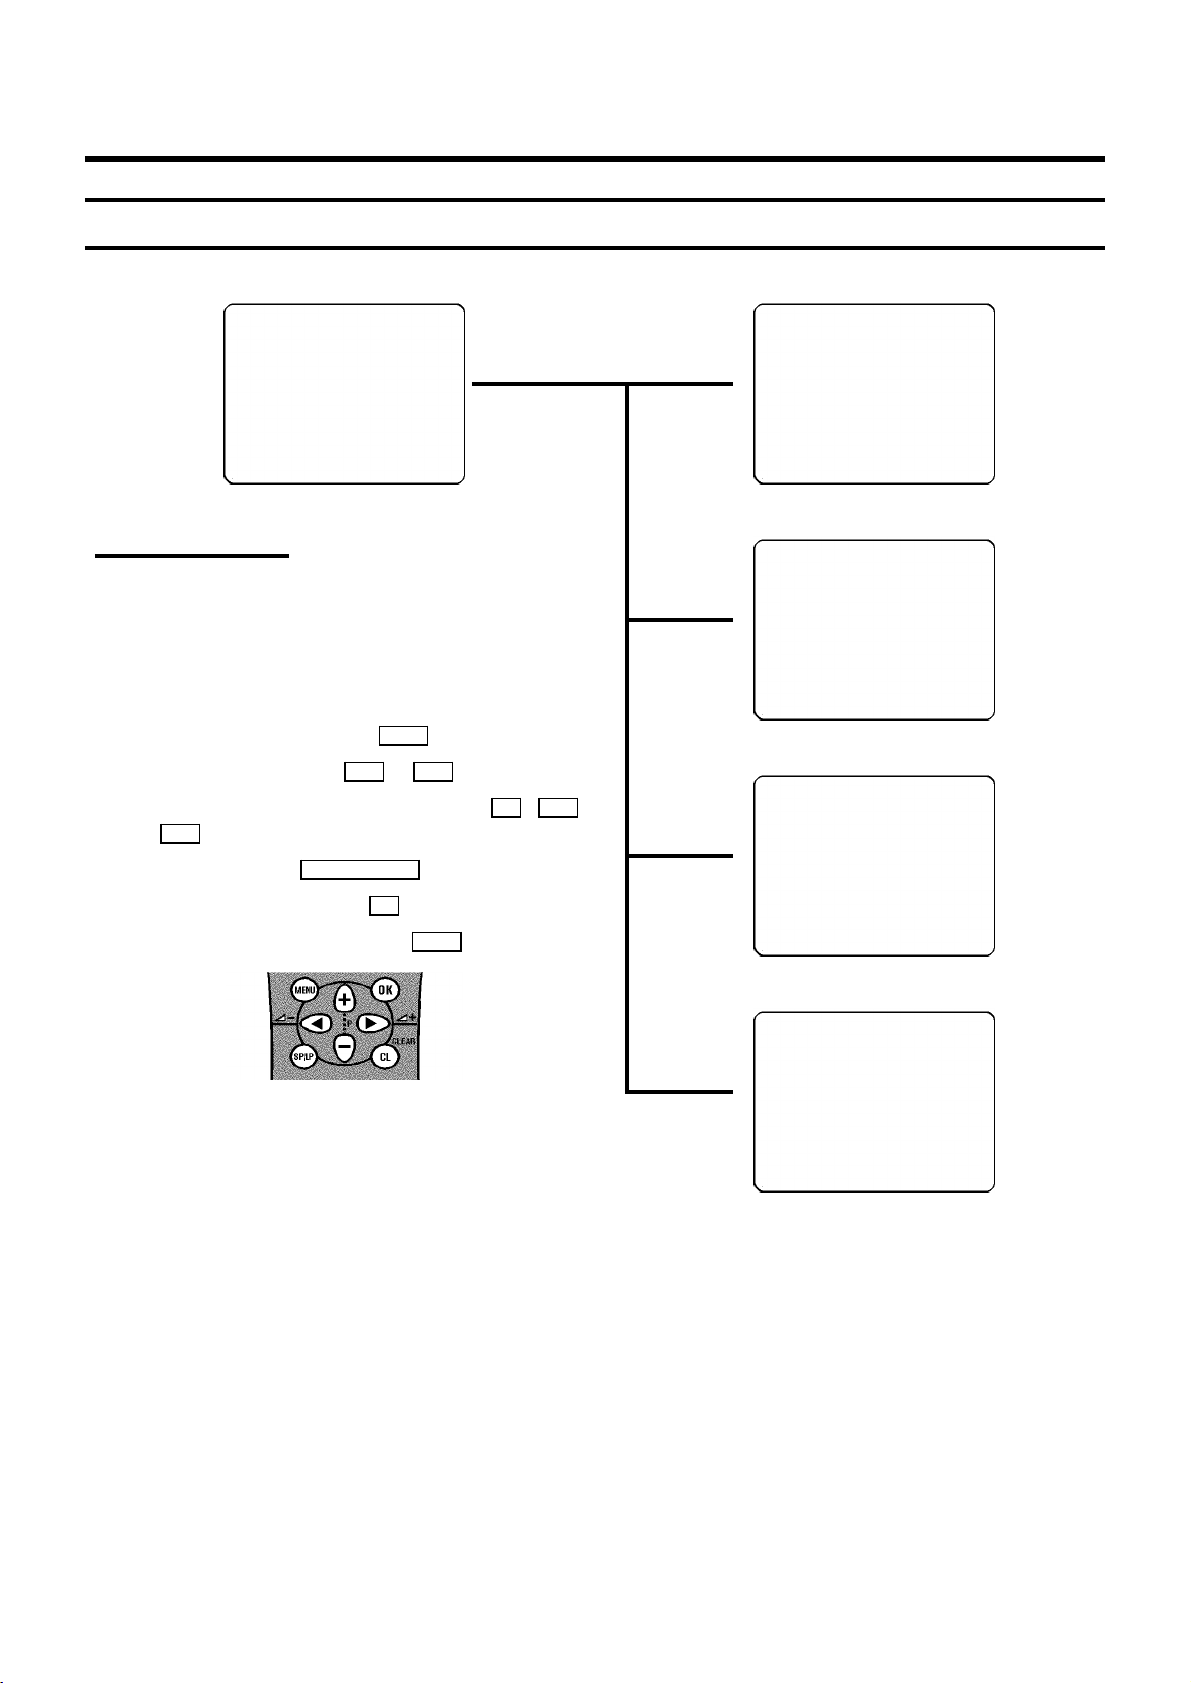
The OSD menu offers the following functions. More details on each can be found in the appropriate chapter.
CLOCK
OSD
CHANNEL ALLOCATION
CHANNEL/FREQUENCY
MANUAL SEARCH
AUTOINSTALL
FOLLOW TV
DIRECT RECORD
COUNTER
------------------------
-/+ OK
TIME 20:00
YEAR 1999
MONTH 01
DATE 01
------------------------
-/+ 0-9 OK
Chapter: INSTALLING YOUR VIDEO RECORDER-
’Setting the date and the time’
User guide (OSD)
The OSD (On-screen display) shows the various functions in
the form of a menu on the television screen. You can then
choose the settings you require. There is a summary of the
menus on this page. The main button functions are displayed
in a help line along the bottom of the screen.
E To call up the menu: With the MENU button.
E To select a line: With the P r or P q button.
OSD
ON
OFF
------------------------
-/+ OK
Chapter: ADDITIONAL FUNCTIONS - ’SwitchingOSD
Information on or off’
E To enter or change your selection: With the 0-9 , P r
or P q button.
E To cancel: With the TV/STANDBY m button.
E To save or confirm: With the OK button.
E To close the main menu: With the MENU button.
P01 CH26
------------------------
-/+ CL OK
Chapter: INSTALLING YOUR VIDEO RECORDER-
’Sorting and clearing TV channels manually’
CHANNEL
FREQUENCY
------------------------
-/+ OK
Chapter: ’INSTALLING YOUR VIDEO RECORDER-
’Channel number or frequency display’
11
Page 14
4. PLAYBACK FUNCTIONS
Playing a cassette
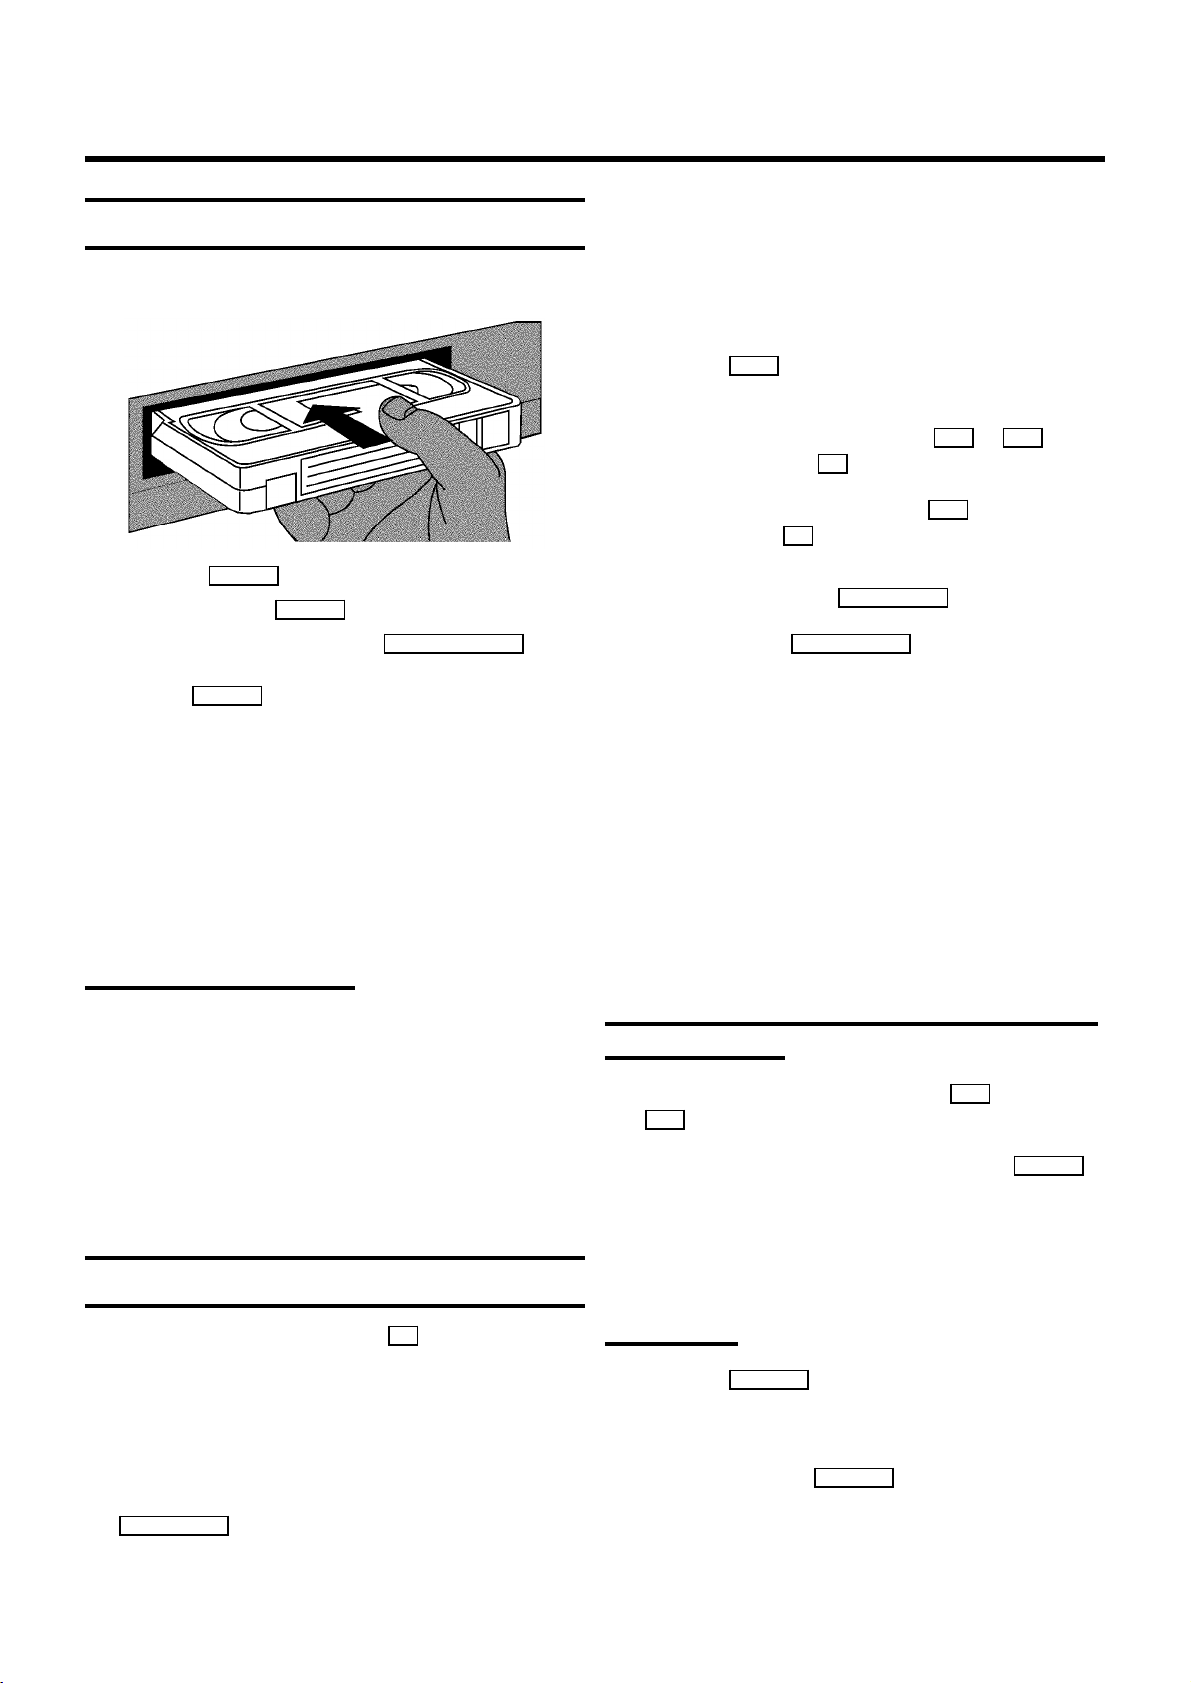
a Put a cassette into the cassette slot. ’v’ will appear on
the display.
b Press the PLAY G button.
c To stop, press the STOP h button.
d To eject the cassette, press the STOP/EJECT ? button
on the video recorder. To eject a cassette, you can also
use the EJECT J button on the remote control
DSome hired cassettes may have a poor picture or
poor sound quality. This is not a fault in your
machine. Please read ’Eliminating picture
interference’.
DSome functions switch off automatically after a
while (for example, pause, still picture, picture
search). This helps to protect the cassette and
avoids wasting power.
Playing NTSC cassettes
With this set you can playback cassettes that have been
recorded on another video recorder in the NTSC standard (for
example, American cassettes). But this only works for
PAL-television sets which are suitable for a picture frequency
of 60 Hz.
DSome special features (for example, still picture) are
not possible while you are playing an NTSC
cassette.
Tape position indication
DWhen you play an NTSC cassette, the video
recorder will only show ’LINEAR COUNTER’.
a Switch on the TV set. If required, select the programme
number for the video recorder.
b Press the MENU button on the remote control. The main
menu will appear.
c Select the line ’COUNTER’ with the P q or P r button
and confirm with the OK button.
d Select the type of counter with the P q button and
confirm with the OK button.
DTo reset the tape position ’LINEAR COUNTER’to
’0:00:00’, press the CLEAR (CL), y button.
e To end, press the TV/STANDBY m button.
DThis video recorder will automatically recognise the
length of the tape.
DWhen you put a cassette in the video recorder and
you want to see ’TIME LEFT’, the video recorder
must first calculate the time played. Therefore, ’-:--’
appears first and only after the tape has been
running for a few seconds the playing time will be
shown.
DIf the video recorder does not find a recording at a
certain tape position with ’LINEAR COUNTER’
switched on, the counter will stop.
Searching for tape position with the picture
(picture search)
a While a cassette is playing, press the [ (reverse) or
I (forward) button once or several times.
b To stop a certain place on the tape, press the PLAY G
button.
DDuring picture search, the picture quality may not be
so good and there will be no sound.
When playing a tape, by pressing the OK button, you can
show the present tape position on the TV screen.
You have a choise of selecting ’LINEAR COUNTER’or
’TIME LEFT’. The LINEAR COUNTER shows the tape position
in hours, minutes and seconds. This LINEAR COUNTER is reset
to 0:00:00 everytime a cassette is inserted even if the tape is
not at the beginning. You can also reset to 0:00:00 by pushing
the CLEAR (CL), y button. ’TIME LEFT’ shows the actual
amount of playing/recording time left on the cassette in hours
and minutes.
12
Still picture
a Press the STILL R button. A still picture will appear on
the screen.
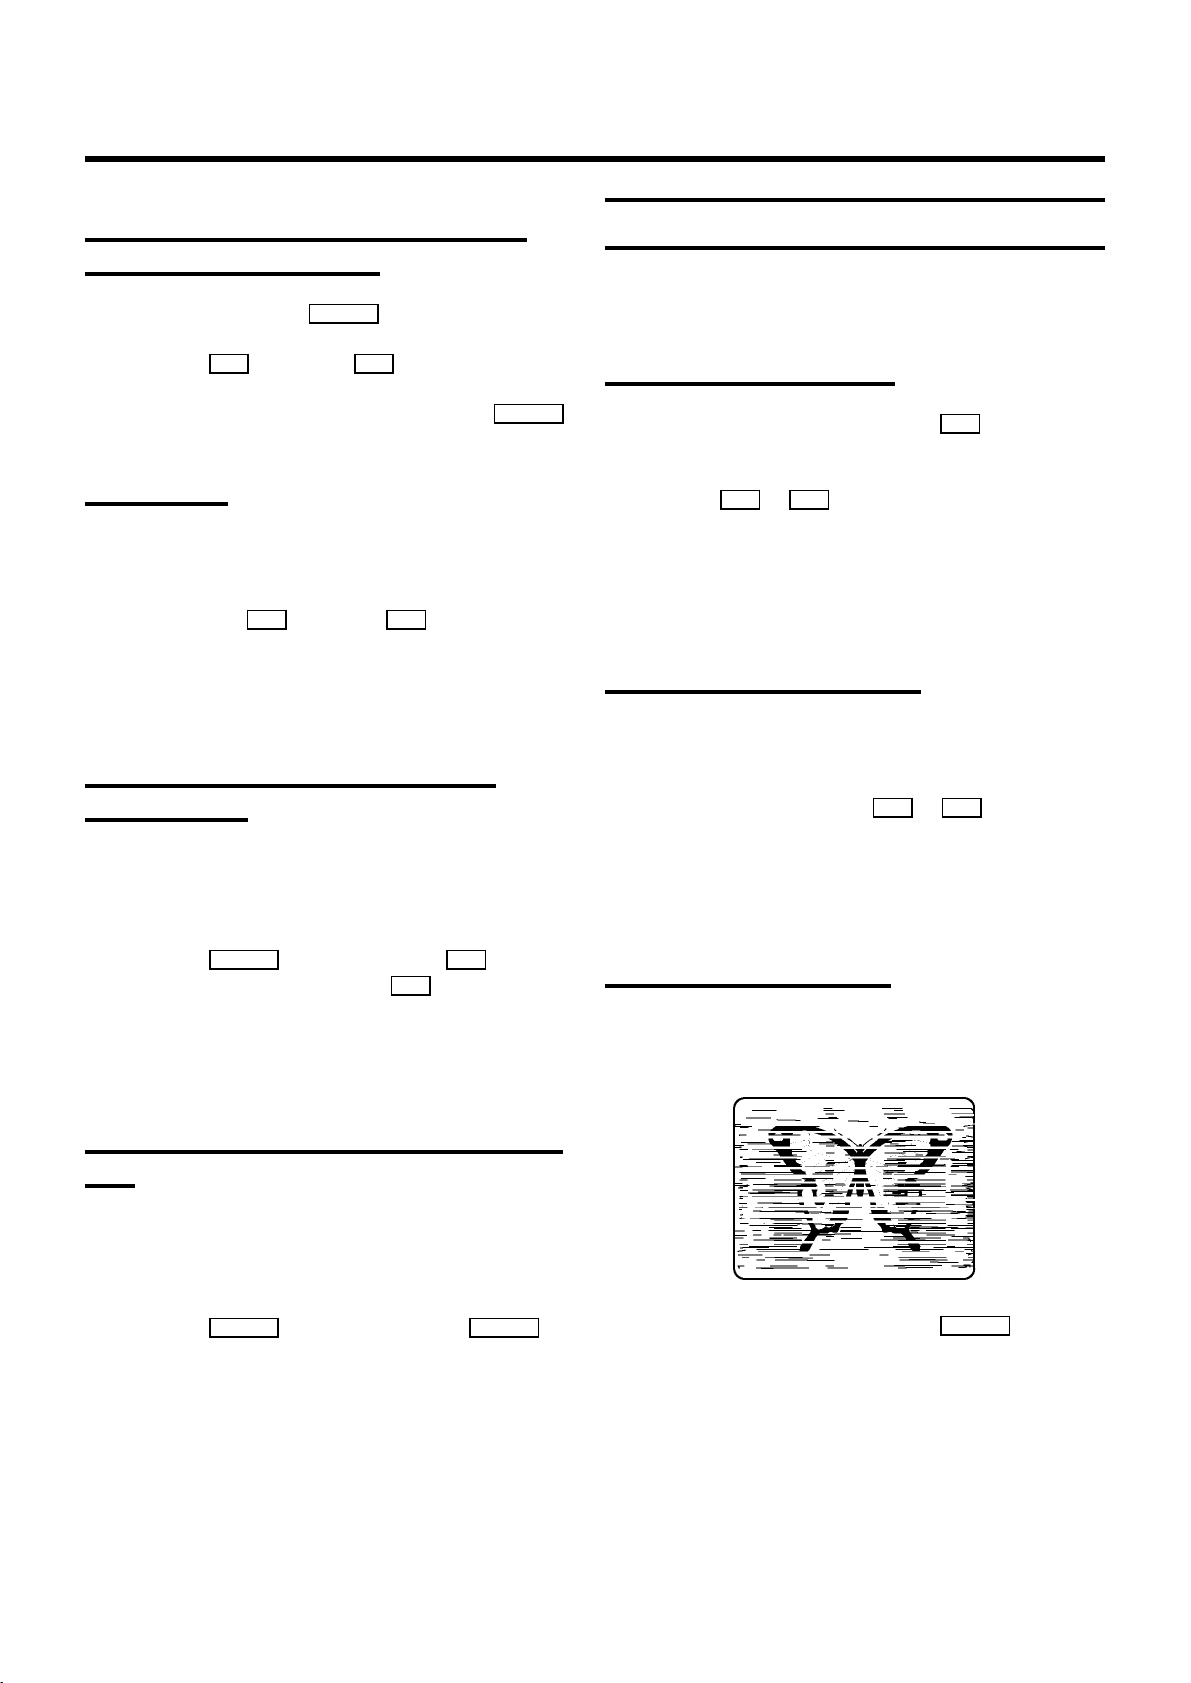
Interference stripes will appear on the screen.
b Each time you press STILL R again, the picture will
move on one step.
Page 15
Searching for tape position without the
picture (wind and rewind)
a Stop the tape with the STOP h button.
Picture interference
If the picture quality is poor when you play a cassette, please
follow these instructions.
b Press the [ (reverse) or I (forward) button.
c To stop a certain place on the tape, press the STOP h
button.
Instant View
With this function you can switch to picture search during
wind and rewind.
a If you hold the [ (rewind) or I (wind) button
during wind or rewind, you will switch to picture search.
b When you release the button, the video recorder will
automatically switch back to rewind or wind.
Automatic search for a tape position
(index search)
At the start of each recording, the video recorder will write an
index code on the tape.
Tracking during playback
a While a cassette is playing, hold the P q button until
’TRAC’ (tracking) appears on the display.
b Hold the P r or P q button until the picture quality is
at its best.
c Wait a few seconds, until ’TRAC’ disappears from the
display. This picture setting will not change until you
eject the cassette.
Tracking during still picture
If the still picture vibrates vertically, you can improve the still
picture as follows:
a During still picture, hold the P q or P r button until
the picture quality is at its best.
The video recorder will store this setting automatically.
DPlease note, however, that interference may still
occur with poor quality cassettes.
a Press the INDEX E button and then the I button to
select the next code mark or the [ button for the
previous code mark.
b When the video recorder finds the code mark, it will
automatically switch to play.
Automatic search for a blank space on the
tape
You can search for a space on the tape (at least 1 minute of
blank tape) for a new recording, for example, after an existing
recording on the tape.
a Press the INDEX E button. Then press the STOP h
button.
b When the video recorder find a blank space, it will
automatically switch to ’pause’.
DIf no empty space has been found when the end of
the tape is reached, the cassette will be ejected.
Cleaning the video heads
If horizontal lines appear on the screen when you play a
cassette, you should clean the video heads.
a While a cassette is playing, hold the PLAY G button until
’HEAD’ appears on the display. The video heads will now
be cleaned. The video recorder will automatically switch
to play again.
13
Page 16
5. MANUAL RECORDING
Use ’Manual Recording’ to make a spontaneous recording (for
example, a programme currently being shown).
E If you want to start and stop a recording manually, read
the section: ’Recording without automatic switch-off’.
E If you want to start a recording manually but have it
stopped automatically, read the section: ’Recording with
automatic switch-off’.
E If you want to record a programme currently being
shown, read the section ’Direct record’.
E If you want a recording to be controlled automatically by
a satellite receiver, read the section entitled ’Automatic
recording from a satellite receiver’.
Recording without automatic switch-off
a Insert a cassette.
b Use the P q or P r button to select the programme
number you want to record, for example, ’P01’. On the
display appears:
BBC1
Recording with automatic switch-off
(OTR one-touch-recording)
a Put a cassette in the machine.
b Use the P q or P r button to select the programme
number you want to record.
c Press the RECORD/OTR n button on the remote control.
d Press the RECORD/OTR n button again and again until the
display on the video recorder shows the desired end time
or length of the recording.
DTo cancel this information, press the
CLEAR (CL), y button.
Protecting your recordings
So that you don’t accidentally delete an important recording,
remove the special tab on the narrow side of the cassette with
a screwdriver or slide the special tab to the left. Later, if you
no longer want to protect your recording, you can seal the gap
again with sticky tape or slide the special tab to the right.
DWhen a TV channel transmits a channel name, it will
show on the video recorder display.
DProgramme numbers ’E1’ and ’E2’ are for recording
from other sources (through scart sockets
EXT.1 AV 1 and EXT.2 AV 2 ).
c To start recording, press the RECORD/OTR n button on the
remote control or RECORD n on the video recorder. On
the display you will see:
0:00
d Stop recording with the STOP h button.
Auto-assembling
You can use the auto-assembling function to join individual
recordings without any major picture disturbance between
them.
a While the cassette is playing, search for the correct
position on the tape.
b Stop the cassette by pressing the STOP h button. ’9’
will appear in the display.
c Now start recording as usual by pressing the
RECORD/OTR n button on the remote control.
14
Page 17

Selecting the recording speed (SP or LP)
Switching on ’Direct Record’
You can reduce the recording speed by half. This makes it
possible to record, for example, eight-hours instead of
four-hours on an ’E240’ (four-hour) cassette.
a Switch on the TV set and, if required, select the
programme number for the video recorder.
b With the video recorder switched on, and before you
start recording, select the recording speed with the
SP/LP, AV button. On the video recorder display you will
see: ’LP’: Long Play = half recording speed (double
recording time).
’SP’: Standard Play = normal recording speed.
DThe picture quality may suffer when you record at
half speed (LP).
DWhen you play back your recording, the machine
will automatically select the correct speed.
Automatic recording from a satellite
receiver (SAT RECORDING)
When this function is switched on, the video recorder will
automatically record the programme selected on the television
by means of a scart cable.
DThe video recorder must be switched off .
a Switch on the TV set and select the programme number
for the video recorder.
b Press the MENU button on the remote control. The main
menu will appear.
c Select the line ’DIRECT RECORD’ with the P r or
P q button.
d Confirm with the OK button.
e Select the function ’ON’ with the P q button. If you
select ’OFF’, the function will be switched off.
f Confirm with the OK button.
g On the TV set, select the programme number you want to
record from.
You can only use this function, when you have a satellite
receiver which can control other equipment by a
’programming’ function.
a Use a scart cable to connect the scart socket
EXT.2 AV 2 to the scart socket on the satellite receiver.
b Put a cassette in the machine. Switch off with the
TV/STANDBY m button on the remote control.
c Hold the MONITOR buton on the remote control, until
’SAT.P’ appears on the video recorder display.
The video recorder is now ready to record. The
EXT.2 AV 2 plug controls the start and the end of the
recording.
DWhen this function is switched on and the video
recorder is switched off, ’x’ appears on the video
recorder display.
DIf you want to cancel this function before the
recording has started, you must hold the
MONITOR button until ’SAT.P’ disappears.
DIf you want to cancel this function while a
programme is being recorded, press the
TV/STANDBY m button on the remote control.
h Press the RECORD/OTR n button with the video recorder
switched off.
DDon’t select another programme number on your TV
set, until the ’search symbol’ on the video recorder
display has disappeared. This can take up to one
minute.
DIf ’NOTV’ appears on the video recorder display, this
means the video recorder cannot find this
programme number. In this case, read the section
’Recording without automatic switch-off’.
15
Page 18

6. PROGRAMMED RECORDING (TIMER)
Use programmed recording to automatically start and stop a
recording at a later date.
To make a programmed recording, your video recorder needs
to know:
* the date you want to make the recording;
* the programme number for the TV channel you want to
record;
* the start and stop time of the recording;
* whether you want to use VPS or PDC
The video recorder stores all the information in a TIMER block.
You can programme up to 6 TIMER blocks a month in advance.
’VPS’ (Video Programming System) and
’PDC’ (Programme Delivery Control) (UK)
With ’VPS and PDC’, the TV station controls the start time and
the length of the recording. This means that the video recorder
switches itself on and off at the right time even if a TV
programme you want to record begins earlier or finishes later
than expected.
You must enter the start time exactly to the minute.
If you want to programme a time that is different from the VPS
or PDC time, you must switch off VPS or PDC.
c Enter the entire PlusCode-programming number (up to 9
digits) printed in your TV guide next to the start time of a
TV programme.
For example, 5-234-89 or 5 234 89
Enter 523489 for the PlusCode-programming number.
If you make a mistake, you can clear your instructions
with the CLEAR (CL), y button.
VIDEOPLUS
523489---
ONCE
-----------------------D/WgSELECT CLEAR gCL
0-9 OK
d Use the SELECT button to select daily or weekly
programming.
’D’: recordings every day from Monday to Friday.
’W’: recordings every week on the same day of the week.
e Confirm with the OK button. Your programming details
will then appear on the TV screen.
DATE PROG START V/P END
01 01 20:00 21:30
Programming a recording
(with ’VIDEO Plus+’)
All the information required for a programming is contained in
the PlusCode-programming number.
a Switch on the TV set and select the programme number
for the video recorder.
b Press the TIMER button on the remote control.
-----------------------CHANGE gTIMER CLEAR gCL
V/P gSELECT OK
DYou need to confirm the programme number the first
time you programme the video recorder with VIDEO
Plus+.
DIf VIDEO Plus+ does not recognise the TV channel,
’SELECT PROG’ will appear on the TV screen.
Instead of ’E2’, you can select the programme
number you want with the number buttons 0-9 and
confirm with the OK button.
DIf ’CODE ERROR’ appears on the TV screen, this
means you entered an incorrect PlusCode number
or the incorrect date. Correct your instructions or
end with the TIMER button.
DIf ’DAILY ERROR’ appears on the TV screen, the
date was incorrectly entered. Daily programming
can only be used for recordings to be made from
Monday to Friday.
DUse the SELECT button to switch ’VPS/PDC’ on or
off.
16
Page 19

DIf you want to set a later end time for a recording,
press the P q button. Each time you press the
P q button, you will add 15 minutes to the end time.
Programming a recording
(without ’VIDEO Plus+’)
f Confirm with the OK button when the information is
correct.
DThe programming information has been stored in a
TIMER block.
g Select the recording speed SP or LP with the
SP/LP, AV button..
h Make sure that the cassette you have put in can be
recorded on.
i Switch off with the TV/STANDBY m button.
The programmed recording will only function when the
video recorder is switched off with the TV/STANDBY m
button.
DIf any of the TIMER blocks are in use, ’k’ will light up
on the video recorder display.
DWhile a programmed recording is being made, you
cannot operate your video recorder manually. If you
want to cancel the programmed recording, press the
TV/STANDBY m button.
DIf the video recorder is switched on a few minutes
before a programmed recording is supposed to
begin, ’TIMER RECORD’ will flash on the TV
screen.
DIf you reach the end of the cassette during a
recording, the video recorder will automatically
eject the cassette.
DIf you forget to load a cassette, ’NO CASSETTE’
will appear on the TV screen and ’k’ will flash on the
video recorder display.
a Switch on the TV set and select the programme number
for the video recorder.
b Press the TIMER button on the remote control twice .
c Select a free TIMER block with the P q or P r button.
Press the TIMER button.
DATE PROG START V/P END
01 01 20:00 21:30
-----------------------NEXT gTIMER CLEAR gCL
-/+ 0-9 D/WgSELECT OK
d With the TIMER , C/Sq or D/Sr button you
can select ’DATE’ (date), ’PROG’ (programme number),
’START’ (start time) and ’END’ (end time).
Enter or change your information with the P q or
P r button, or with the number buttons 0-9 .
DUnder ’DATE’, use the SELECT button to select daily
or weekly programming.
’D’: Recording from Monday to Friday.
’W’: Recordings every week on the same day.
DUnder ’START’, use the SELECT button to switch
’VPS or PDC’ on or off.
e Confirm with the OK button when the information is
correct.
DThe programming information has been stored in a
TIMER block.
DIf you have put in a cassette which cannot be used
for recording, the video recorder will automatically
eject it.
DIf ’TIMER FULL’ appears on the TV screen when
you press the TIMER button, you have used up all
the available TIMER blocks. If you want to clear or
check a TIMER block, select it with the P q or
P r button.
DProgramme numbers ’E1’ and ’E2’ are for
recordings from other sources (through scart socket
EXT.1 AV 1 or EXT.2 AV 2 ).
f Make sure that the cassette you have put in can be
recorded on.
DUse the SP/LP, AV button to select the recording
speed ’SP’ or ’LP’.
g Switch off with the TV/STANDBY m button.
The programmed recording will only function when the
video recorder is switched off with the TV/STANDBY m
button.
17
Page 20

DIf any of the TIMER blocks are in use, ’k’ will light up
on the video recorder display.
DWhile a programmed recording is being made, you
cannot operate your video recorder manually. If you
want to cancel the programmed recording, press the
TV/STANDBY m button.
DIf the video recorder is switched on a few minutes
before a programmed recording is supposed to
begin, ’TIMER RECORD’ will flash on the TV
screen.
How to check or change a programmed
recording (TIMER)
a Switch on the TV set and select the programme number
for the video recorder.
b Press the TIMER button on the remote control twice.
c Select the programmed recording (TIMER) you want to
check or change with the P q or P r button.
DIf you reach the end of the cassette during a
recording, the video recorder will automatically
eject the cassette.
DIf you forget to load a cassette, ’NO CASSETTE’
will appear on the TV screen and ’k’ will flash on the
video recorder display.
DIf you have put in a cassette which cannot be used
for recording, the video recorder will automatically
eject it.
DIf ’TIMER FULL’ appears on the TV screen when
you press the TIMER button, you have used up all
the available TIMER blocks. If you want to clear or
check a programmed recording (TIMER block),
select it with the P q or P r button.
DProgramme numbers ’E1’ and ’E2’ are for
recordings from other sources (through scart socket
EXT.1 AV 1 or EXT.2 AV 2 ).
d Press the TIMER button.
e Select the entry field with the D/Sr or C/Sq
button.
f Change any information with the P r or P q button or
with the 0-9 buttons.
g Confirm with the OK button.
h Make sure that the cassette you have put in can be
recorded on. Switch off with the TV/STANDBY m button.
DThe programmed recording will only function when
the video recorder is switched off with the
TV/STANDBY m button.
DThe video recorder will always record the
programmed recording at the speed you have
selected before the recording starts.
How to clear a programmed recording
18
(TIMER)
a Switch on the TV set and select the programme number
for the video recorder.
b Press the TIMER button on the remote control twice.
c Select the programmed recording (TIMER) you want to
clear with the P r or P q button.
d Press the CLEAR (CL), y button.
e Confirm with the OK button.
Page 21
7. ADDITIONAL FUNCTIONS
Child lock
This function will prevent unauthorised use of your video
recorder. All button-functions will be locked.
DYou can make programmed recordings while the
child lock is on.
a With the video recorder switched on, press the
CHILD LOCK u button on the remote control.
’{’ will appear on the video recorder display.
Keep the remote control in a safe place.
b If you want to switch off the child lock, press the
CHILD LOCK u button again.
’{’ will disappear from the video recorder display.
DIf you press a button when the child lock is on, ’{’
will flash on the display for a few seconds.
Setting the on-screen display (OSD)
You can switch the on-screen display of the current operating
information on or off.
Continuous playback
You can automatically play a cassette again and again. When
the video recorder reaches the end of the tape or the end of
the recording, it will rewind and start again.
a Put a cassette in the machine.
b Press the PLAY G button.
c Press the MONITOR button on the remote control and the
PLAY G button on the video recorder at the same time .
On the video recorder display you will see:
REP
d If you want to cancel continuous playback, repeat
step c .
DDuring continuous playback, no other button will
work. After a power failure, playback will
automatically start again.
a Switch on the TV set and select the programme number
for the video recorder.
b Press the MENU button on the remote control. The main
menu will appear.
CLOCK
OSD
CHANNEL ALLOCATION
CHANNEL/FREQUENCY
MANUAL SEARCH
AUTOINSTALL
FOLLOW TV
DIRECT RECORD
COUNTER
------------------------
-/+ OK
c Select the line ’OSD’ with the P r or P q buttons and
confirm with the OK button.
d Select one of the options shown with the P q button.
’ON’: Shows the OSD for a few seconds only.
’OFF’: Switches off the OSD.
e Confirm with the OK button.
Automatic switch-off (tuner mode)
If you do not use the video recorder for a few minutes in
certain modes (e.g.: STOP), it will switch to standby
automatically. You can cancel this function to use the video
recorder as a television receiver (tuner).
a Hold the STOP h button until +appears on the video
recorder display.
b Select the programme number you want with the P r or
P q button or with the number buttons 0-9 .
c Switch off the video recorder with the TV/STANDBY m
button, if you no longer want to watch TV.
19
Page 22

Reducing picture disturbance (’optimizing
the modulator’)
You may experience picture disturbance if you have not used
a scart cable to connect your video recorder and TV. This is
because another TV station in your reception area may
already be using UHF-channel CH35 or 583MHz.
a Make sure that there is no cassette in the video recorder.
On the video recorder, hold the SYSTEM button for a few
seconds until e.g.: ’M583’ (583Mhz/channel 35) appears
in the display. The video recorder transmits a test picture
on this UHF-channel (or this frequency).
MODULATOR 583
------------------------
-/+
ON/OFF gCL OK
DWhen you press the I button, the video recorder
will search for the next modulator frequency.
b Confirm the new modulator frequency with the OK
button.
c Tune in the TV set to this channel or frequency.
d To end, press the TV/STANDBY m button.
Switching off the modulator
If you cannot clear picture or sound interference, you can
switch off the built-in modulator.
You should only do this if you have connected the video
recorder to the TV set with a scart cable. ’Connecting VCR
without scart cable’ is not possible when the modulator is
switched off.
a Switch on the TV set and select the programme number
for the video recorder.
b Make sure that no cassette is in the video recorder. On
the video recorder, press the SYSTEM button for several
seconds, until, for example, ’M583’ appears on the video
recorder display.
c Hold the CLEAR (CL), y button, until ’MOFF’ (modulator
off) appears on the video recorder display. If you want to
switch the modulator on again, hold the CLEAR (CL), y
button, until ’M583’ (Modulator switched on) appears on
the display.
d To end, press the TV/STANDBY m button.
20
Page 23

8. Before you call an engineer
If, contrary to expectation, you have any problems using this
video recorder, it may be caused by one of the reasons
mentioned below. You can also call the customer service
centre in your country.
You will find the phone number in the enclosed guarantee
leaflet.
Your video recorder does not respond to any button being
pressed:
• There is no power supply: check the power supply
• A programmed recording is currently being made: cancel the
programmed recording with the
• Child lock is on: switch the child lock off.
• Continuous playback is on: switch the continuous playback off.
• There is a technical problem: switch off the mains power supply
for 30 seconds, then switch it on again. If this does not have any
effect, you can:
1. Switch off the mains power supply again.
2. Then switch it on whilst holding down the
on the video recorder.
3. Release the button when ’--:--’ appears on the video recorder
display. All the information stored (TV channels, time and date,
TIMER) will be cleared.
TV/STANDBY m button.
STANDBY m button
Cassette is jammed in the video recorder:
• Don’t use force. Pull out the mains plug for a moment.
Programmed recording does not work:
• You have not set the TIMER properly: check the TIMER blocks.
• You have programmed the wrong time or date: check time and
date.
• You have put in a cassette that cannot be recorded on: undo the
erase protection on the cassette.
• ’PDC’ or ’VPS’ switched on but ’PDC/VPS time’ wrong: enter PDC
or VPS time exactly to the minute. Have your aerial checked.
• After a ’programmed recording with ’VIDEO Plus+’ the
programme number of the TIMER block will not agree with the
required programme number: when you have confirmed the
PlusCode programming number, confirm the TIMER block by
pressing the
number displayed in the ’
pressing the
TIMER button. Then change the programme
PROG’ entry field and confirm by
TIMER button.
There is picture or sound interference on TV reception:
• Turn to chapter ’ADDITIONAL FUNCTIONS’ and read ’Poor TV
reception - optimising the modulator’ and ’Switching off the
modulator’.
• Have your aerial checked.
Remote control does not work:
• Remote control not pointed toward the video recorder: point it at
the video recorder.
• Batteries have run out: change the batteries.
No picture when you play a cassette:
• There is no recording on the cassette: change the cassette.
• You have chosen the wrong programme number on the TV for
playing cassette: on the TV, select the correct programme
number for the video recorder.
• The cable connecting the TV set and the video recorder has
come loose: check the cable.
Poor picture quality when you play a cassette:
• Your TV set is not properly adjusted.
• The cassette badly worn or of poor quality: use new cassette.
• Tracking is not properly adjusted or the video heads are dirty:
turn to chapter ’PLAYBACK’ and read the section ’Cleaning the
video heads’.
• Read the section ’Eliminating picture interference’.
The video recorder will not record:
• The TV channel you want to record is not stored or you selected
the wrong programme number: check TV channels stored.
• You have loaded a cassette which cannot be recorded on: undo
the erase protection on the cassette.
21
Page 24

9. GLOSSARY
Technical terms used
Current tape position : The part of the tape currently being
played.
External source : A device connected via a socket (for
example, scart socket) which is transmitting audio/video
signals to the video recorder.
Index marking : A marking which is automatically made on the
tape at the beginning of every recording. This marking
(recording ID) can be searched for with the Index search
function.
Scart cable : Also known as a Euro-AV cable. This standard
cable is an easy method of connecting various audio and
video devices, computer screens and televisions. Other
signals in addition to audio and video signals can be
transmitted on it.
TV system : There are various systems for transmitting
television signals, for example, PAL, SECAM, PAL BG, SECAM
DK, SECAM L/L, NTSC etc. The system used by your television
depends on which country you are in.
TXT : Also known as Teletext, Fasttext, Videotext, FLOF etc.
OTR : One touch recording. This function enables you to select
the switch-off time in intervals of 30 minutes.
Modulator : An electronic component in a video recorder
which allows audio and video signals to be transmitted via the
aerial cable. Your television receives the signal in the same
way as a signal from a television station.
Modulator frequency : This frequency or channel indicates the
frequency or channel on which the audio or video signal is
transmitted.
UHF frequency range : Channels 21 to 69. The video recorder
’broadcasts’ on channel 35/frequency 583 MHz. This frequency
or channel can be changed. See the section ’Reducing picture
disturbance (’optimizing the modulator’).
OSD (On-screen display) : The largest possible display area
for the video recorder - the screen on your television set.
(WwnnNNNwwnwNNnwnWwnNwwNNnNwwnN)
3103 166 23061
9134/010 VR205/05
22
Page 25

Remote codes
Acura 02 GoldStar 15, 20, 27 Proline 31
Adyson 20 Goodmans 07, 10, 20, 29, 36 Protech 02, 12, 20, 23, 25, 38
Akai 18, 33 Gorenje 35 Quelle 03, 04, 33
Akura 21, 25 Graetz 33 Questa 07
Alba 02, 07, 21 Granada 10, 18, 20 Rank Arena 07
Allorgan 28 Grandin 26 Rediffusion 33
Amplivision 20 Grundig 17 Rex 25
Amstrad 02 HCM 02, 26 Roadstar 02, 21, 25, 38
Anitech 02 Hanseatic 30, 33 SEG 07, 20, 25
Arcam 19, 20 Hinari 02, 07, 21 SEI 12, 28
Asuka 21 Hisawa 26, 40 Saba 15
Audiosonic 15 Hitachi 05, 07, 08, 13, 15, 20, 22 Saisho 02, 04, 25
BPL 26 Huanyu 19, 36 Salora 33
BSR 28 Hypson 25, 26 Sambers 12
BTC 21 ICE 20, 25 Samsung 01, 02, 20, 25, 27, 35
Basic Line 02, 21 ICeS 21 Sandra 19
Baur 03, 33 ITT 33 Sanyo 04, 07, 10, 18
Beko 35 Imperial 23, 35, 38 Schaub Lorenz 33
Binatone 20 Inno Hit 10 Schneider 21, 23, 37
Blaupunkt 17 Interfunk 23, 33 Sei-Sinudyne 03
Blue Sky 21 Intervision 12, 20, 25 Sentra 06
Blue Star 26 Isukai 21 Sharp 07, 11
Bondstec 23 JVC 07, 09 Shorai 28
Boots 20 Kaisui 02, 19, 20, 21, 26 Siarem 12
Brandt 15 Kathrein 01 Siemens 17
Britannia 19 Kingsley 19 Silver 07
Bush 02, 07, 21, 26, 28, 36, 42 Koyoda 02 Sinudyne 12, 28
CGE 23 Leyco 10, 25, 28 Solavox 05
CS Electronics 19 Lloytron 05 Sonitron 18
CTC 23 Luxor 33 Sonoko 02
Carrefour 07 M Electronic 02, 13, 15, 20, 32, 36, 41 Sonolor 18
Cascade 02 Magnadyne 12, 23 Sony 03, 04, 07
Cimline 02 Magnafon 12 Soundwave 38
Clatronic 23, 35 Manesth 20, 25, 30 Standard 02, 20, 21
Condor 30, 35 Marantz 01 Sunkai 28, 31
Contec 02, 07, 19 Matsui 02, 04, 06, 07, 10, 18, 20, 28, 39 Susumu 21
Crown 02, 35, 38 Memorex 02 Tandy 10, 20, 21
Cybertron 21 Metz 34 Tashiko 07, 20
Daewoo 02, 36 Mitsubishi 07, 14, 16 Tatung 10, 20
Dainichi 21 Mivar 19, 27 Tec 20, 23
Dayton 02 Multitech 02, 12, 19 Technema 30
De Graaf 18 Neckermann 01 Technics 24
Decca 10 Nikkai 05, 06, 10, 19, 21, 25 Telefunken 15
Dixi 02 Nobliko 12 Telemeister 30
Dual 42 Nokia 33, 41 Teletech 02
Dual Tec 20 Nordmende 15 Teleton 20
Elite 21, 30 Oceanic 33 Tensai 21, 28, 29, 30
Elta 02 Orion 28, 30, 31 Texet 19, 21
Emerson 33 Osaki 05, 10, 20, 21, 25 Thomson 15
Ferguson 15 Oso 21 Thorn 06, 10, 33
Fidelity 19, 33 Osume 05, 10 Tomashi 26
Finlandia 18, 32 Otake 29 Toshiba 06, 07
Finlux 10, 13, 32 Otto Versand 01, 03, 07, 20, 30 Uher 30
Firstline 02, 19, 20, 23, 28, 31 Palladium 35, 38 Ultravox 12
Fisher 18, 20, 35 Panama 20, 25 Universum 13, 25, 32, 35
Flint 40 Panasonic 24, 34 Videosat 23
Formenti 30 Pathe Cinema 19, 30 Videotechnic 20
Frontech 23, 25 Pausa 02 Visa 02
Fujitsu 10 Perdio 30 Vision 30
Funai 25, 28 Phase 05 Waltham 20
GEC 10, 20 Philco 23 Watson 30
GPM 21 Philips 01, 36 Watt Radio 12
Geloso 02 Pioneer 15 Wega 07
Genexxa 21 Profex 02, 33 White Westinghouse 19, 30
Yoko 20, 25
 Loading...