

Page 1

VR150/58
Thank you for buying a Philips video recorder. This video recorder is one of the most sophisticated and easyto-use video recorders (VCR) on the market. Please take the time to read this operating manual before using
your video recorder. It contains important information and notes regarding operation. The video recorder
should not be turned on immediately after transportation from a cold to a hot area or vice versa, or in conditions of extreme humidity. Wait at least three hours after transporting the device.The video recorder needs
this time in order to become acclimatised to its new environment (temperature, air humidity, etc.).
This video recorder is used for the recording and playback of VHS videocassettes.
Cassettes with the VHS-C label (VHS cassettes for camcorders) may only be used
with a suitable adapter.
We hope you enjoy your new video recorder.
PA L
Important notes regarding operation
Danger: High voltage!
"
Do not remove the top cover as there is
a risk of an electrical shock!
To reduce the risk of fire or electric shock, do
"
not expose this device to rain or moisture.
The video recorder does not contain any
components that can be repaired by the
customer. Please leave all maintenance
work for qualified personnel.
As soon as the video recorder is connected
"
to the power supply, there are some components that are in constant operation. To
switch off the video recorder completely you
must disconnect it from the power supply.
Make sure that air can circulate freely through
!
the ventilation slots on the video recorder. Do
not place the device on an unsteady base.
Make sure that no objects or liquids enter
!
the video recorder. Do not place vases or
the like on the video recorder. If liquid is
spilt into it, immediately disconnect the
video recorder from the power supply and
call After-sales Service for advice.
Do not place any combustible objects on
!
the device (candles, etc.).
Make sure that children do not place any
!
foreign objects within the openings or ventilation slots.
These operating instructions have been
printed on non-polluting paper.
Deposit old batteries at the appropriate collection points.
Please make use of the facilities available in
your country for disposing of the packaging
of the video recorder in a way that helps to
protect the environment.
0VMN03970
HG273ED*****
This electronic device contains many materials that can be recycled. Please enquire
about the possibilities for recycling your old
device.
So that you can identify your machine for service
questions or in the event of theft, enter the serial
number here. The serial number (PROD.NO.) is
printed on the type plate fixed at the back of the
device.
MODEL NO. VR150/58
PROD. NO. ...........................
This product complies with the requirements of
Directive 73/23/EEC +89/336/EEC +93/68 EEC.
Specifications
Voltage: 220-240V/50Hz
Power consumption : 14W
Power consumption (Standby): less than 3W
Rewind time: 260 seconds (cassette E-180)
Dimensions in cm (WxDxH): 36.0x22.6x9.2
Number of video heads : 2
Recording/playback time:
3 hours (SP) (cassette E-180)
6 hours (LP) (cassette E-180)
Supplied accessories
• Operating instructions
• Remote control and 2 batteries
• Aerial Cable
1"2
EN
Page 2
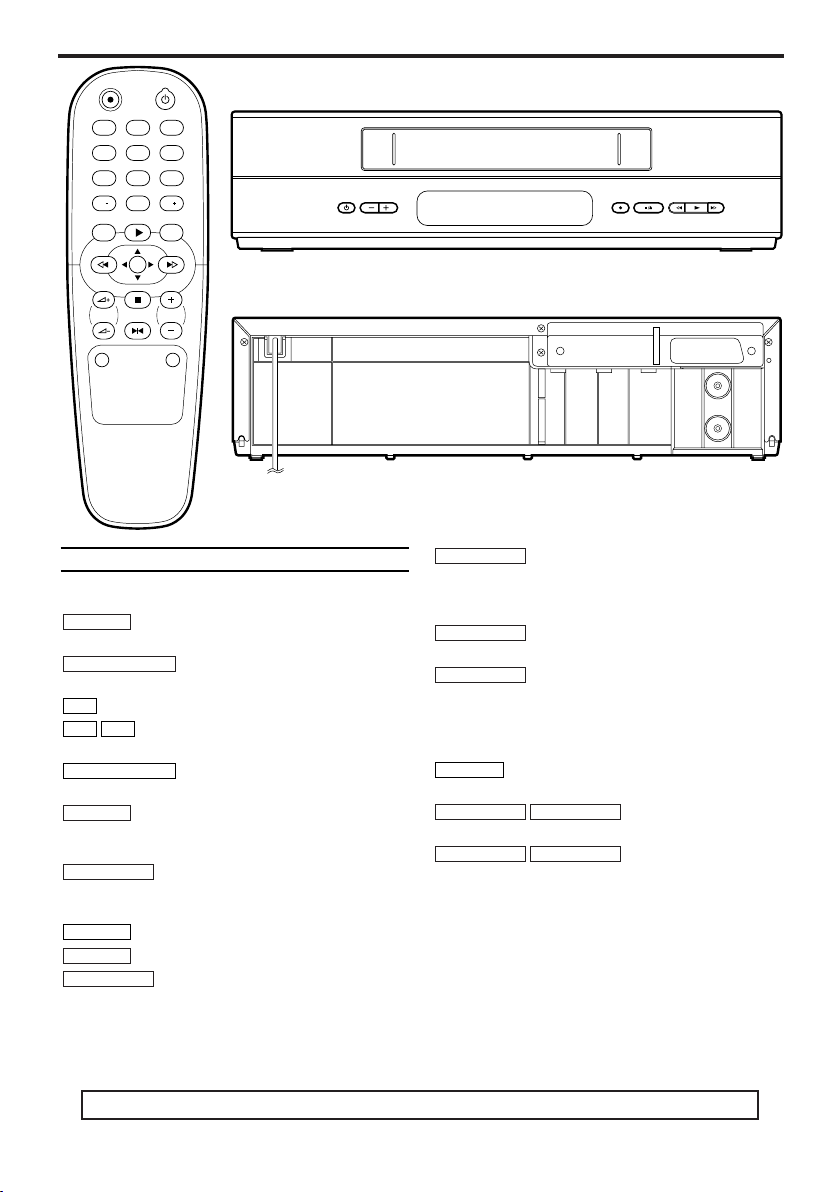
1. Description of controls
1 2 3
4 5 6
7 8 9
0
STILL
STOP
MENU
REW FWD
PLAYSTATUS/EXIT CLEAR
REC STANDBY/ON
TV-PROG.TV-VOL
MUTE SYSTEM
PP
STANDBY/ON PROGRAMME RECORD STOP/EJECT REW. PLAY FWD.
RF OUT
TV
AERIAL
The remote control
Buttons for VCR feature only
I
To record the TV channel selected at this
REC
moment.
STANDBY/ON
function.
0..9
Press to select channels at VCR.
+
playback, press to adjust the tracking.
STATUS/EXIT
screen status display. To exit on-screen menus.
CLEAR
recording (TIMER). To reset the elapsed time counter in
the playback, recording or stop mode.
STILL
step by step. (except for during fast forwarding and fast
rewinding)
SYSTEM
MENU
FWD
fast forward the tape at high speed. During playback,
press to fast forward the tape while the picture stays on
the screen. To store or confirm entry in the menu.
yy
To switch off or on, interrupt menu
To select the programme number. During
P–P
To access or remove the VCR’s on-
To delete last entry. To clear a programmed
2
To stop the tape and play back a picture
To change video (colour) system.
To call up main menu of VCR.
1- B
When tape playback is stopped, press to
0- s
REW
When tape playback is stopped, press to
rewind the tape at high speed. During playback, press
to rewind the tape while the picture stays on the
screen.To return the cursor in the menu.
B- K
PLAY
To play back a tape, select an item in
the menu of VCR.
C- L
STOP
To stop the tape, select an item in the
menu of VCR.
Buttons with TV feature
MUTE
restore the volume.
TV-VOL5
volume.
TV-PROG.
number on the TV.
To eliminate the TV’s sound. Press again to
+
TV-VOL5
+
TV-PROG.
–
To adjust the TV’s
–
To select a programme
You can use this remote control to operate some functions of Philips TVs.
EN
Page 3
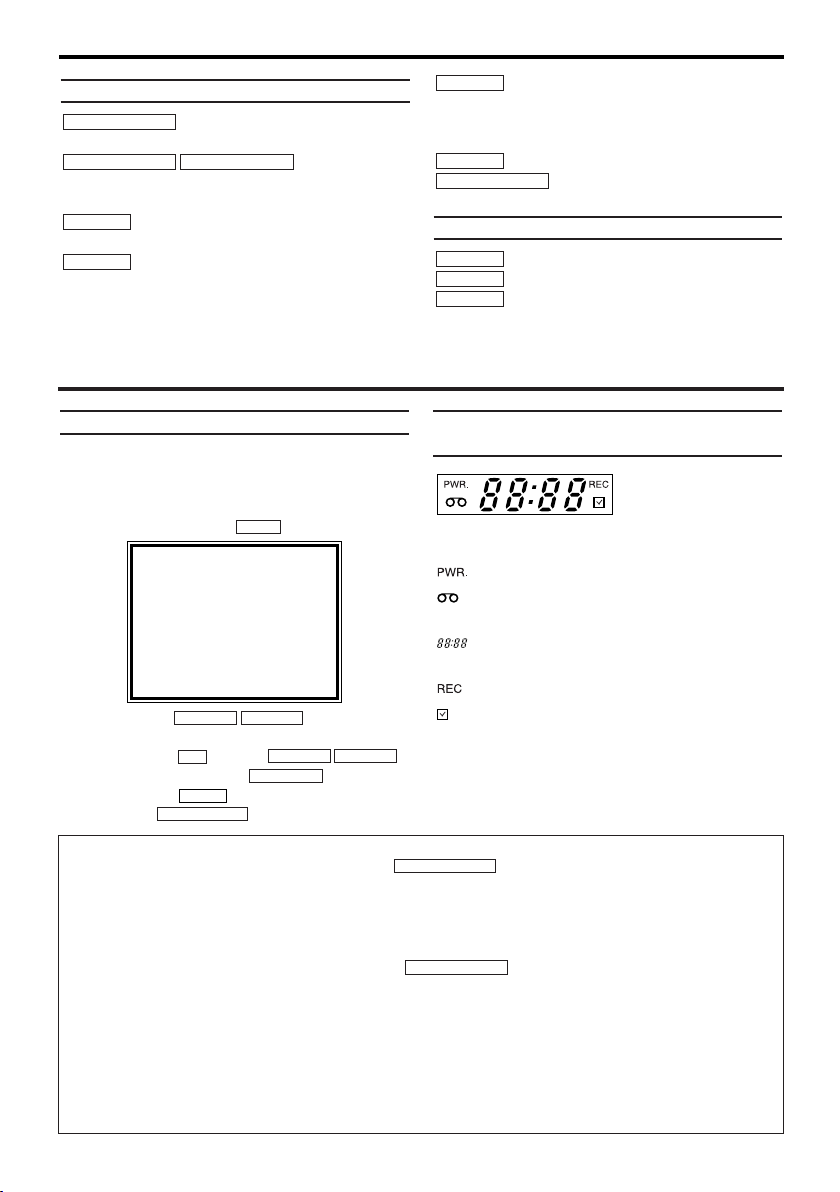
Front of your VCR
To switch off or on, interrupt menu
STANDBY/ON
function.
programme number. During playback, press to adjust
the tracking.
RECORD
moment.
FWD.
When tape playback is stopped, press to fast forward
the tape at high speed. During playback, press to fast
forward the tape while the picture stays on the screen.
yy
PROGRAMME-PROGRAMME+
To record the TV channel selected at this
To select the
REW.
When tape playback is stopped, press to rewind the
tape at high speed. During playback, press to rewind
the tape while the picture stays on the screen.
PLAY
STOP/EJECT
cassette.
Back of your VCR
TV
AERIAL
RF OUT
2. Important notes for operation
To play back a tape.
To stop the tape and eject the
To connect the TV.
To connect the aerial cable.
To connect the TV.
Navigation in the screen menu
You can check/change many functions and set-
The symbols on your video recorder
display
tings of your video recorder via the on-screen
menu. The individual functions are selected, via
the remote control as follows:
Call up the menu: with .
SELECT KL CHOOSE B
→TIMER
RECORD SET UP
VCR SET UP
TUNER SET UP
INITIAL SET UP
END=EXIT
To select: with .
MENU
STOP C-LPLAY B-K
These symbols can light up on your video
recorder display:
When you keep your video recorder on.
When you have put a cassette in the video
recorder.
Display of programme number of the TV
channel / time / RF channel.
When you record.
When you have programmed a recording.
To enter or change your selection: with the
number buttons or with .
To save or confirm: with .
To cancel: with .
To end: with .
0..9
FWD 1- B
CLEAR
STATUS/EXIT
Switching on
You can switch on the video recorder with the button.
STOP C-LPLAY B-K
STANDBY/ON
yy
Automatic switch-off
If the video recorder is not used for several minutes, it switches itself off automatically. This function
can be deactivated (e.g. if you want to use the video recorder as a TV receiver). For more
information, please read the section 'Automatic switch-off' in chapter 'Other functions'.
Time in the display
If you have switched the video recorder off with , the time will show in the display, e.g.
STANDBY/ON
yy
'18:00'.
If the clock has not been set, ' --:-- ' will appear.
Power consumption
The video recorder should always be connected to the mains so as not to affect the use of the TV or
programmed recordings.
If the display has been switched off, your video recorder consumes less than 3W in stand-by.
Power outage/no power
Channel information remains saved for up to 1 year, the time and timer information is saved for up to
1 minute.
3
EN
Page 4
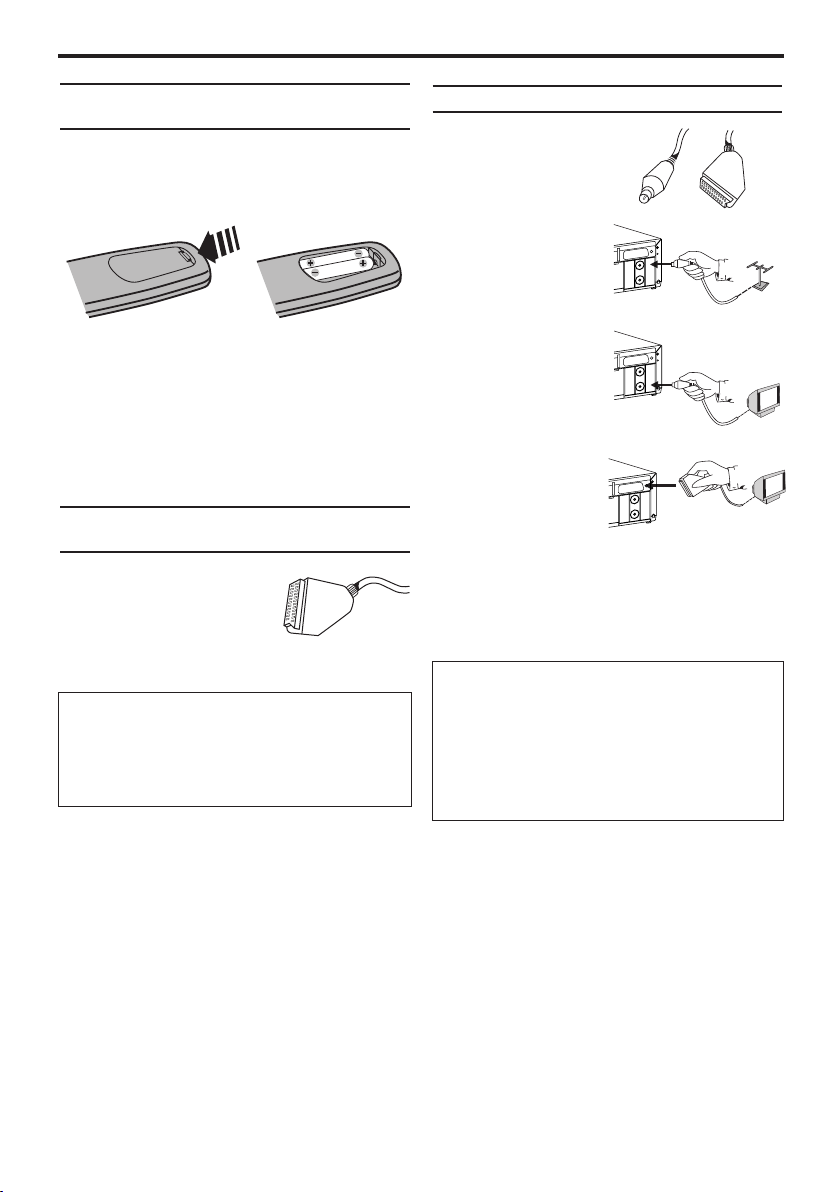
3. Connecting the video recorder
Preparing the remote control for
operation
The remote control and its batteries are packed
separately in the original video recorder packaging. You must install the batteries in the remote
control before use.
1.Ta ke the remote control and the enclosed
1.
batteries (2 batteries).
2.Open the remote control's battery compart-
2.
ment and place the batteries in it as shown in
the picture and close the battery compart-
ment.
The remote control is now ready to use. Its
range is approximately 7 metres.
Connecting your video recorder to
the TV
The necessary cable connections must be made before
you can record or playback
TV programmes using your
video recorder.
We recommend that you use a scart cable to connect your TV and video recorder.
What is a scart cable?
The scart or Euro AV cable serves as the universal connector for picture, sound and control
signals. With this type of connection, there is
practically no loss of quality during the picture
or sound transfer.
Connecting with a scart cable
Have the following
cables ready:
an aerial cable (1, supplied), a scart cable (2,
not supplied).
1.Remove the aerial
1.
cable plug from your
TV. Insert it into the
AERIAL at the back
of the video recorder.
2.Insert one end of the
2.
supplied aerial cable
into the RF OUT at
the back of the video
recorder and the
other end into the
aerial input socket at the back of the TV.
3.Plug one end of a
3.
scart cable into the
scart socket ‘TV’ at
the back of the video
recorder and the other end into the suitable
scart socket on your TV reserved for the
video recorder operation (see your TV's operating instructions).
4.Switch on the TV.
4.
5.Insert AC cable into the wall socket.
5.
My TV has several scart sockets. Which one
should I use?
Select that scart socket which is suited for the
video output as well as for the video input.
My TV has a configuration menu for the
scart socket.
Please configure this scart socket as inputOutput.
12
AERIAL
TV
L
A
I
R
E
A
T
U
O
F
R
TV
RF OUT
L
A
I
R
E
A
T
U
O
F
R
TV
L
A
I
R
E
A
T
U
O
F
R
TV
4
EN
Page 5
6.If the connection was properly made and
PUSH MENU TO CONTINUE
PUSH MENU TO CONTINUE
6.
your TV was automatically switched to the
programme number for the scart socket, you
will see the following picture:
Then, read the section 'Preparation for use' in
the chapter 'Installing your video recorder'.
My screen is empty
• Many TVs are switched to the programme
number for the scart socket by way of a control signal sent through the scart cable.
• If the TV does not automatically switch to the
scart socket programme number, manually
change to the corresponding programme
number on your TV (see your TV's operating
instructions).
Connecting without a scart cable
Have an aerial cable (supplied) ready.
1.Switch off your TV.
1.
2.Remove the aerial
2.
cable plug from the
aerial input socket of
the TV. Insert it into
the AERIAL at the
back of the video
recorder.
3.Insert one end of the
3.
supplied aerial cable
into the RF OUT at
the back of the video
recorder and the
other end into the
aerial input socket at the back of the TV.
4.Insert AC cable into the wall socket.
4.
5.Switch on your TV and select the programme
5.
number used for video playback on your TV
(see your TV's operating instructions).
6.Start the TV's channel search manually as if
6.
you wanted to save a new TV channel until
the next screen appears (see your TV's operating instructions)
.
AERIAL
TV
L
A
I
R
E
A
T
U
O
F
R
TV
RF OUT
L
A
I
R
E
A
T
U
O
F
R
I do not see a Language setting picture
• Check the cable connections.
• Repeat the channel search on your TV.
7.Save this programme number setting on your
7.
TV for video recorder operation.
Then, read the section 'Preparation for use' in
the chapter 'Installing your video recorder'.
Programme number for video recorder operation
You have now saved a programme number for
use by your video recorder as you would a regular TV channel. This programme number must
now be used in future for video recorder playback ('video recorder' TV channel).
5
EN
Page 6
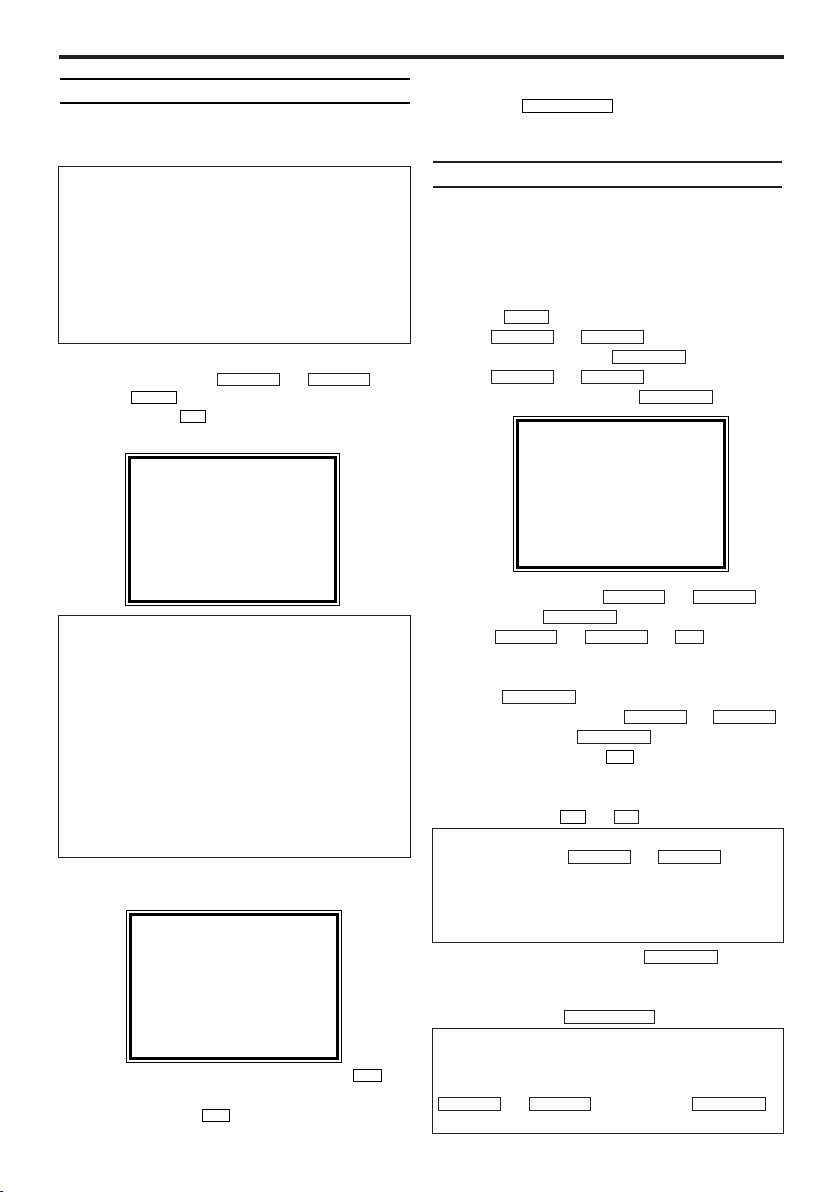
4. Installing your video recorder
7.When all information is correct, save by
Preparation for use
This chapter shows you how to prepare the video
recorder for use. The video recorder automatically
seeks out and stores all available TV channels.
'Aim' correctly
In the following sections, you require the remote
control for the first time. When using, always
aim the front of the remote control at the video
recorder and not at the TV.
Connecting additional devices
After you have connected additional devices
(satellite receiver, etc.) through the aerial cable,
switch them on. The automatic channel search
will recognise them and save them.
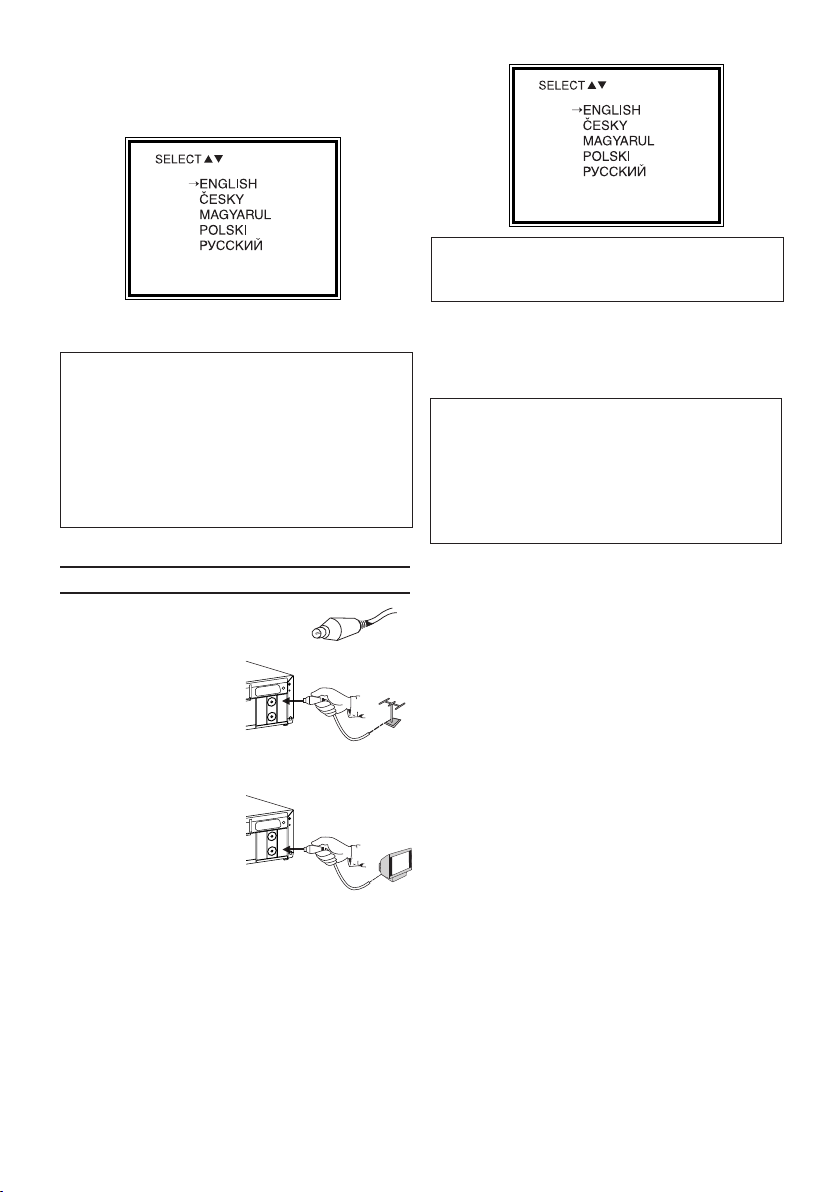
1.Select the desired language for the on-screen
1.
menu by pressing or .
2.Press .
2.
3.Confirm with .
3.
MENU
P+
The automatic TV channel search starts.
PLEASE WAIT
START FINISH
❚❚❚❚❚❚❚❚❚❚❚
❚❚❚❚❚❚❚❚❚❚❚❚
STOP C-LPLAY B-K
7.
pressing .
The preparation for use is now complete.
Manual TV channel search
In some cases it can occur that all of the TV channels are not found and saved during the first installation. In this case, the missing or coded TV channels must be searched for and stored manually.
1.Switch on the TV. If required, select the pro-
1.
gramme number for the video recorder.
2.Press .The main menu will appear.
2.
3.Use or to select 'TUNER
3.
SET UP'. Then press .
4.Use or to select 'MANU-
4.
AL TUNING'. Then press .
STATUS/EXIT
MENU
STOP C-LPLAY B-K
STOP C-LPLAY B-K
MANUAL TUNING
→PROG. P55
CHANNEL 055
SKIP [OFF]
VIDEO MODE [SECAM]
AUDIO MODE [DK]
KL CHOOSE B
SELECT
END=EXIT
FWD 1- B
FWD 1- B
The video recorder does not find any TV
channels during the search
• Select channel 1 on the TV. Can you see the
saved TV channel on the TV?
If not, check the cable connection of the aerial
(aerial socket), video recorder, TV.
• The video recorder searches the entire frequency range in order to find and save the largest
possible number of TV channels. It is possible
that the TV channels in your country are broadcast in a higher frequency range. As soon as
this range is reached during the search, the
video recorder will find the TV channels.
4.The clock setting display appears on the TV
4.
screen.
TIME --:--
DATE --/--/--
END=EXIT
5.Set the time with the number buttons .
5.
6.Set 'DAY', 'MONTH' and 'YEAR' with the
6.
number buttons .
0..9
0..9
or
STOP C-LPLAY B-K
0..9
5.Select 'PROG.' with or
5.
Then press
6.With or
6.
FWD 1- B
STOP C-LPLAY B-K
.
the desired programme number that you want
to use for the TV channel, e.g. 'P01'. Then
FWD 1- B
press .
7.Select 'CHANNEL' with or ,
7.
and confirm with . Then enter the
desired channel with
FWD 1- B
0..9
.
If you set 'SKIP'on for a channel, this channel will be ignored when going through the
+
P–
channels with or .
P
I don't know the channels for my TV stations
In this case, press or in
STOP C-LPLAY B-K
'CHANNEL' to start the automatic channel
search. A changing channel number will appear
on the TV screen. Continue the automatic search
until you have found the desired TV channel.
8.Save the TV channel with .
8.
9.To search for other TV channels, begin again
9.
FWD 1- B
at step 5.
10.To end, press
10.
STATUS/EXIT
.
How do I change 'VIDEO MODE' or 'AUDIO
MODE'?
If you want to change the video or audio mode,
select 'VIDEO MODE' or 'AUDIO MODE' with
or . Then, press
FWD 1- BSTOP C-LPLAY B-K
to select your desired mode.
6
.
, select
STOP C-LPLAY B-K
EN
Page 7
Automatic Tuning
During installation, all available TV channels are
searched for and saved. If the channel assignments of your cable or satellite TV provider
change or if you are re-installing the video
recorder, e.g. after moving house, you can start
this procedure again. This will replace all the TV
channels already saved with the new ones.
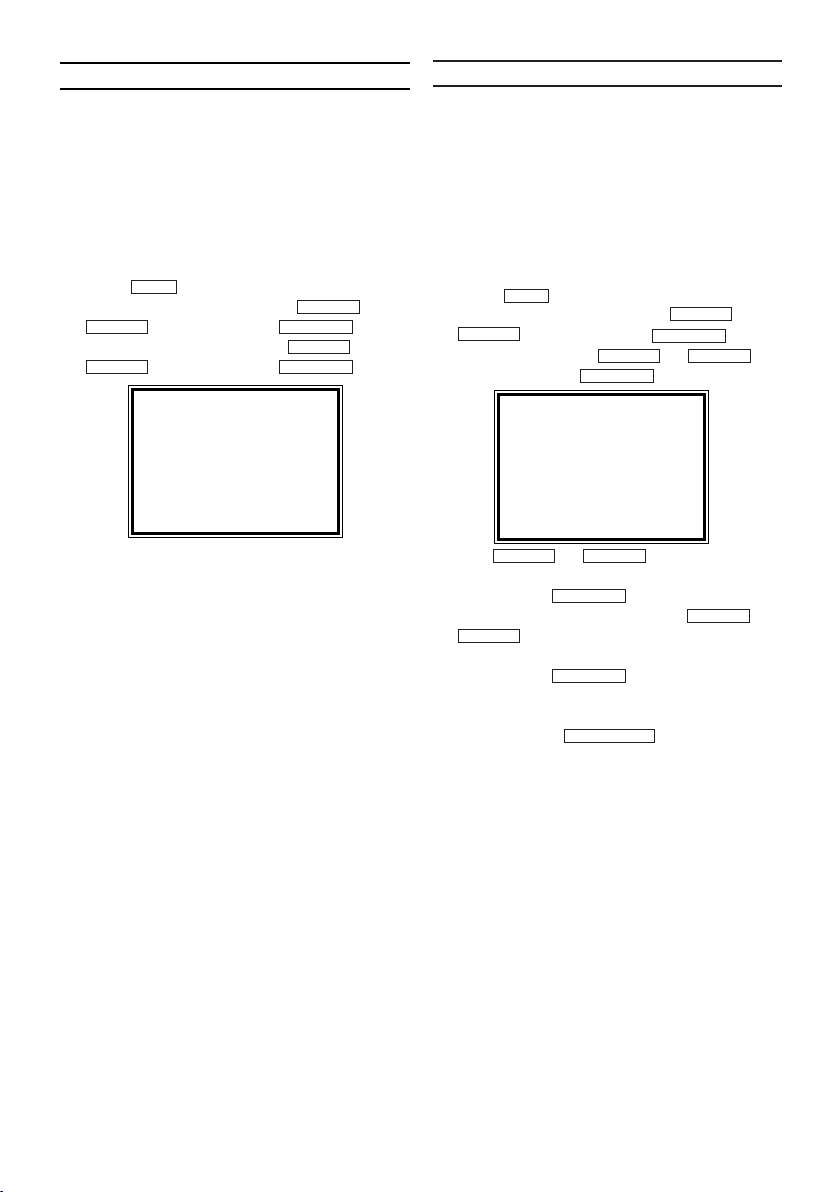
1.Switch on the TV. If required, select the pro-
1.
gramme number for the video recorder.
2.Press . The main menu will appear.
2.
3.
3.
4.Select 'AUTO TUNING' with or
4.
5.The automatic TV channel search starts. This
5.
6.When the TV channel search is complete,
6.
MENU
Select 'TUNER SET UP' with or
and confirm with .
and confirm with
PLEASE WAIT
START FINISH
❚❚❚❚❚❚❚❚❚❚❚
❚❚❚❚❚❚❚❚❚❚❚❚
PLAY B-K
FWD 1- BSTOP C-L
PLAY B-K
FWD 1- BSTOP C-L
.
allows the video recorder to save all available
TV channels. This procedure may take several minutes.
'COMPLETED' will briefly appear on the TV
screen.
Sorting TV channels manually
After you have performed the automatic channel
search you may not agree with the sequence in
which the individual TV channels have been allocated to the programme positions (programme
numbers) of the video recorder.You can use this
function to individually sort the TV channels
already saved.
1.Switch on the TV. If required, select the pro-
1.
gramme number for the video recorder.
2.Press . The main menu will appear.
2.
3.Select 'TUNER SET UP' with
3.
4.Select 'MOVE' with or ,
4.
5.With or , select the saved
5.
6.Confirm with .
6.
7.Move the selected channel with or
7.
8.Confirm with .
8.
9.To assign other TV channels to a programme
9.
10.To end, press .
10.
MENU
STOP C-L
and confirm with .
and confirm with .
FWD 1- B
MOVE
→P01: 02 P06: 90
P02: 03 P07: 99
P03: 05 P08: 121
P04: 10 P09: 124
P05: 74 P10: 130
SELECT KL CHOOSE B
END=EXIT
STOP C-LPLAY B-K
PLAY B-K
FWD 1- B
STOP C-LPLAY B-K
TV channel that you want to change.
STOP C-L
FWD 1- B
to the programme number you want
PLAY B-K
to assign.
FWD 1- B
number, repeat steps 5 to 8.
STATUS/EXIT
7
EN
Page 8
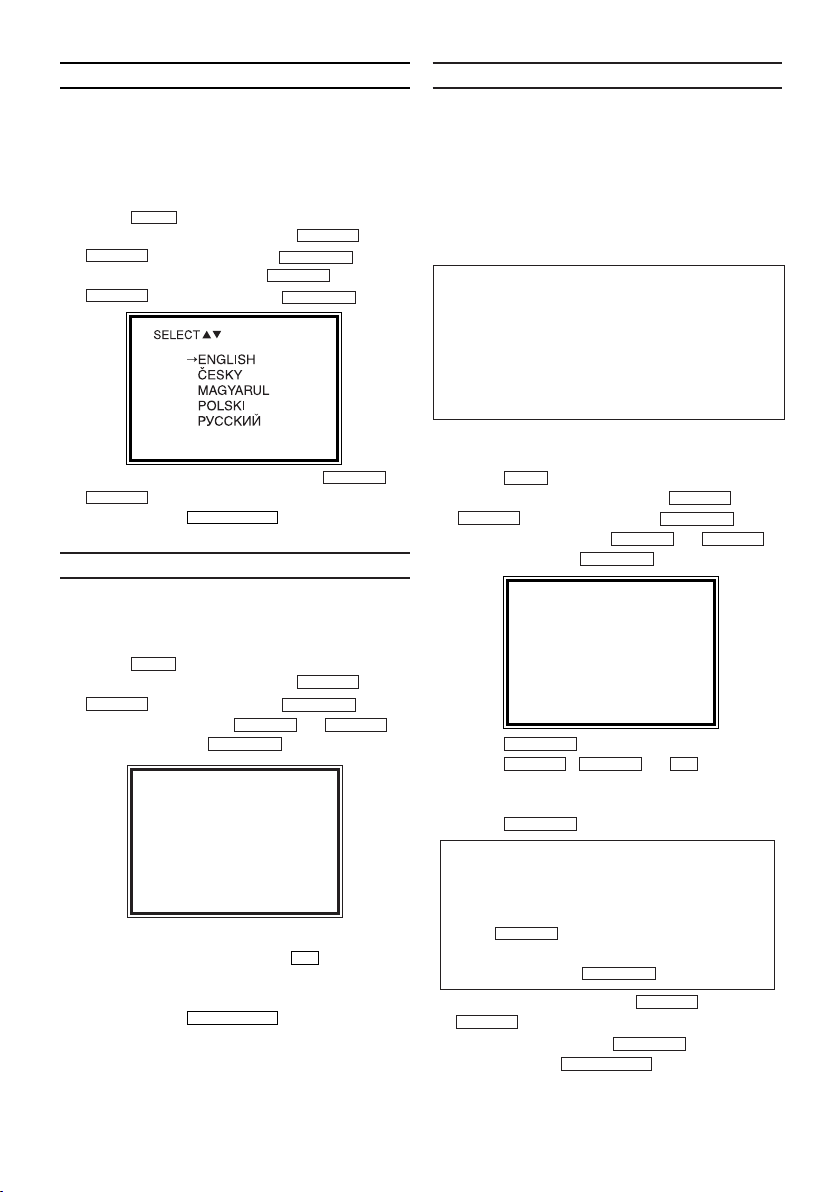
Setting the language
END=EXIT
You can change the language for the TV screen
menu. However, the video recorder display will
only display English text regardless of this setting.
1.Switch on the TV. If required, select the pro-
1.
gramme number for the video recorder.
STOP C-L
STOP C-L
STOP C-L
MENU
and confirm with .
and confirm with .
PLAY B-K
FWD 1- B
PLAY B-K
FWD 1- B
.
STATUS/EXIT
PLAY B-K
2.Press . The main menu will appear.
2.
3.Select 'INITIAL SET UP' with or
3.
4.Select 'LANGUAGE' with or
4.
5.Select the desired language with or
5.
6.To end, press .
6.
Setting the clock
If the display shows an incorrect time or ' --:-- ',
the time and date must be reset manually.
1.Switch on the TV. If required, select the pro-
1.
gramme number for the video recorder.
2.Press . The main menu will appear.
2.
3.Select 'INITIAL SET UP' with or
3.
4.Select 'CLOCK' with or
4.
5.Check the time in 'TIME'. If required,
5.
6.Check 'DAY', 'MONTH' and 'YEAR' in the
6.
7.To end, press .
7.
MENU
STOP C-L
and confirm with .
and confirm with
FWD 1- B
TIME --:--
DATE --/--/--
END=EXIT
please change the time with .
PLAY B-K
FWD 1- B
0..9
same way.
STATUS/EXIT
.
STOP C-LPLAY B-K
Setting the RF out channel
In some reception locations it is possible that a
TV channel will be sent on the same or similar
frequency as the video recorder.
Result: As soon as the video recorder is
switched on, the reception quality for this or several other TV channels will decrease.
The following steps will show you how to change
the pre-set 'transmission' (RF out channel) frequency on the video recorder.
What is RF out channel?
This electronic component in the video recorder
allows the device to transmit audio and video
signals via the aerial cable. These signals can
be received on a TV just like TV channels.
What is RF out channel frequency?
This frequency or channel indicates the channel
on which the audio or video signal is transmitted.
1.Switch on the TV. If required, select the pro-
1.
gramme number for the video recorder.
2.Press . The main menu will appear.
2.
3.Select 'INITIAL SET UP' with or
3.
4.Select 'RF OUT' with or
4.
5.Press .
5.
6.Press ,
6.
7.Press
7.
If you cannot get an interference-free picture
and sound, connect the video recorder and
the TV with a scart cable. Then, switch the
built-in modulator off.
Press repeatedly until “--” appears
next to “RF OUT CH” on the TV screen.
Then confirm with
8.Select 'TV SYSTEM’ with or
8.
9.
9.
10.To end, press .
10.
MENU
STOP C-L
and confirm with .
and cconfirm with .
FWD 1- B
SELECT KL CHOOSE B
→RF OUT CH 36
TV SYSTEM K
END=EXIT
FWD 1- B
STOP C-LPLAY B-K
PLAY B-K
FWD 1- B
0..9
or to select a
free channel between channel 22 and
channled 69 in your area.
FWD 1- B
STOP C-L
STOP C-L
Choose 'K' or 'G' with
.
FWD 1- B
FWD 1- B
STATUS/EXIT
.
PLAY B-K
.
STOP C-LPLAY B-K
8
EN
Page 9
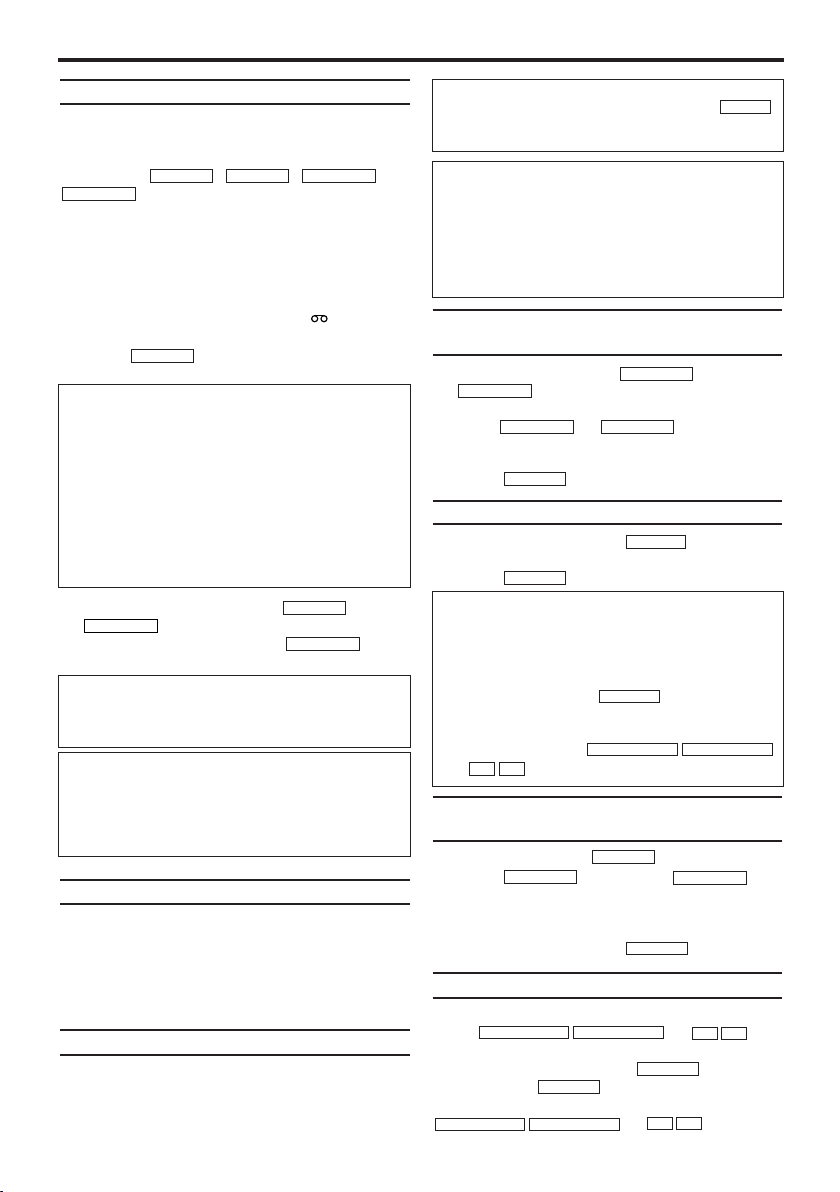
5. Playback
Playing back cassettes
You can operate the video recorder using the
remote control or the buttons on the front of the
video recorder.
If you press , ,
REW
0- s
while the set is in Stand-by, the
FWD 1- BSTOP C-LPLAY B-K
or
power will be automatically turned on.
Additionally, if a cassette was already inserted,
the corresponding operation will be performed.
Your video recorder can only record and play
back standard VHS cassettes.
1.Put a cassette into the cassette slot. The cas-
1.
sette is inserted automatically. ' ' will
appear on the display.
2.Press to view the tape. 'PLAY' will
2.
PLAY B-K
appear on the display.
DIGITAL STUDIO PICTURE CONTROL
Philips has developed a system which produces
the best possible playback quality. For old and
often-used video cassettes, this system reduces
interference. For new or high quality cassettes,
it emphasises the details.
Picture/ sound quality is poor
When playing rental videos or older, poorer
quality cassettes, it may not be possible to completely filter out picture and sound interference.
This is not a fault in your machine. Read the
section 'Manual tracking'.
3.To stop the playback, press or
3.
STOP/EJECT
4.To eject the cassette, press when
4.
on the video recorder.
STOP C-L
STOP/EJECT
the video recorder stops the playback.
Automatic switch-off of special functions
Many functions (e.g. pause, still picture) switch
themselves off automatically after a short time in
order to protect the cassette and to save energy.
Do I need to change the playback speed
when playing back LP recordings?
During playback, the correct speed will automatically be selected. For more information, please
read the section 'Selecting the recording speed
(SP or LP)' in the chapter 'Manual recording'.
Playing back NTSC cassettes
This video recorder can also play back cassettes
that have been recorded in SP [Standard Play]
or SLP [Super Long Play] mode in the NTSC
standard (for example, American cassettes).
However, this only works on PAL-television sets
that are suitable for a picture frequency of 60Hz.
Displaying current tape position
The following information is displayed on the
screen: e.g.: 0:02:45 shows the counter in hours,
minutes and seconds.
SP/LP: will show the recorded speed of your cassette.
How can I set the counter to '0:00:00'?
You can set the counter to '0:00:00' with .
CLEAR
When you put a cassette in the video recorder,
the counter will automatically reset to '0:00:00'.
The counter does not move
This occurs when there are no recordings on a portion of a tape. This is not a fault in your video recorder.
The screen shows '-0:01:20'
If you rewind a cassette from the tape position
'0:00:00', the counter will show for instance,
'-0:01:20' (the cassette was rewound to
1 minute and 20 seconds before '0:00:00').
Searching for a tape position with
picture (scanning)
1.During playback, press (reverse) or
1.
FWD 1- B
2.If you want to search in super high speed,
2.
(forward).
press or once more.
(This function will not operate for a NTSC cassettes playback in SP mode.)
3.Press to resume playback.
3.
PLAY B-K
REW0- s
FWD 1- BREW0- s
Still picture
2
1.During playback, press to stop the
1.
STILL
tape and display a still picture.
2.Press to resume playback.
2.
PLAY B-K
Scanning and still picture interfere with the
picture quality
Please note that the sound is muted during
those functions.
•You may observe noiselines on the TV screen
while in Still mode. This is normal. Note that
each time you press the lines will
STILL
2
change position.
• If you observe a vertical jitter of the picture, sta-
+
bilize it by pressing
or while in Still mode.
P–P+
PROGRAMME
PROGRAMME
Searching for tape position without
picture (forward wind and rewind)
1.Stop the tape with .
1.
2.Press (reverse) or
2.
REW0- s
(forward). 'Fr' or 'FF' will appear on the display for 5 seconds, and then, the real time
counter time will appear.
3.To stop the tape, press .
3.
STOP C-L
FWD 1- B
STOP C-L
Manual tracking
To manually adjust the tracking during playback,
+
PROGRAMME
press or .
PROGRAMME
Tr acking will return to Automatic Tracking
Adjustment when you press , insert a
tape, or press .
PLAY B-K
To remove vertical jitter in a Still picture, press
+
PROGRAMME
PROGRAMME
-
STOP C-L
or .
-
P+
P–P+
P–
9
-
EN
Page 10
6. Manual recording
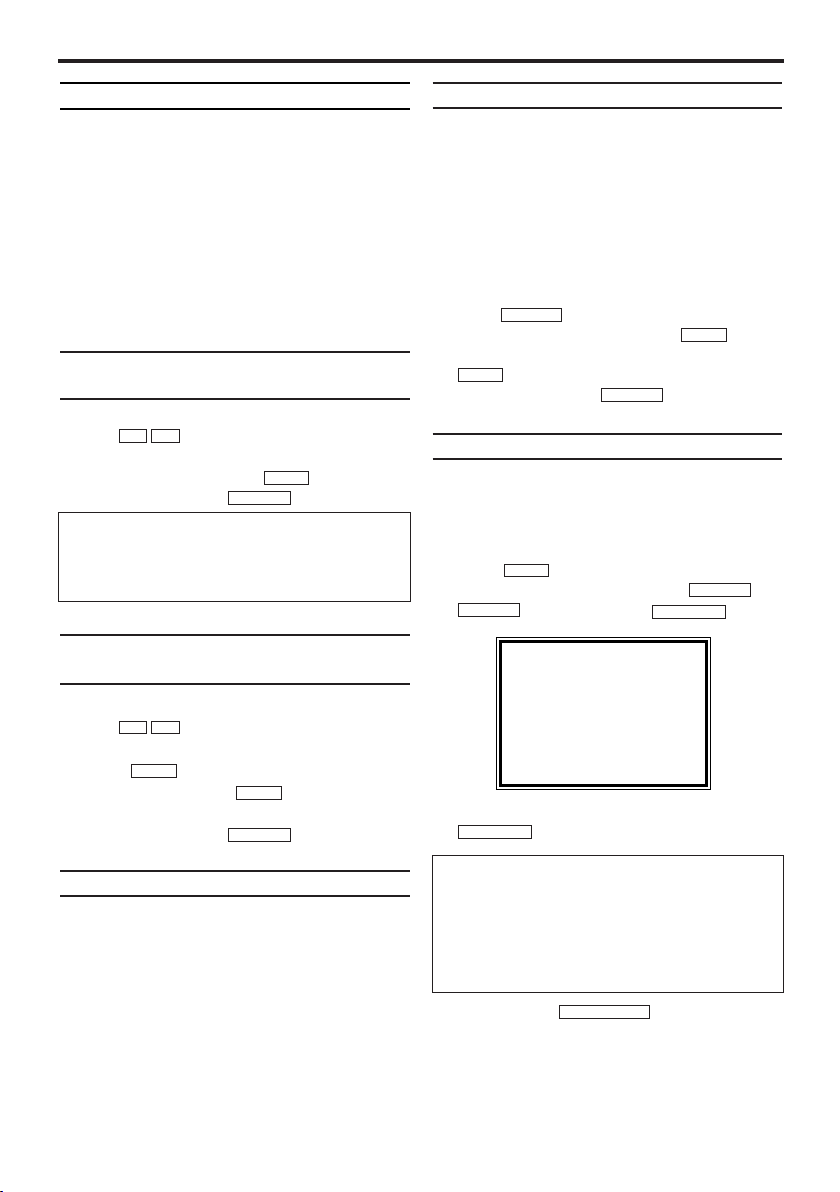
General information
Use 'Manual Recording' to make a spontaneous recording (for example, a programme currently being shown).
If you want to start and stop a recording manually, read the section
matic switch-off'
If you want to start a recording manually but
have it stopped automatically, read the section
'Recording with automatic switch-off'.
(e.g. not to record to the end of the tape)
'Recording without auto-
.
Recording without automatic
switch-off
1.Insert a cassette.
1.
2.Use to select the programme num-
2.
ber you want to record, for example, 'P01'.
3.To start recording, press .
3.
4.Stop recording with .
4.
‘PROTECTED CASETTE CANNOT RECORD’ message briefly appeared in the TV screen, then the
cassette was ejiected.
A cassette without the security tab was inserted. Undo
the erase protection.
P–P+
REC I
STOP C-L
Recording with automatic switch-off
(OTR One-Touch-Recording)
1.Insert a cassette.
1.
2.Use to select the programme num-
2.
ber you want to record.
3.Press .
3.
4.Each time you press you will add 30
4.
minutes to the recording time.
5.Stop recording with .
5.
P–P+
REC I
REC I
STOP C-L
Preventing accidental erasing)
All cassettes (except rental and pre-recorded
cassettes) have a security tab on the back of the
cassette.
To prevent recording over important recordings
(erasing), you can remove this security tab.
If you later decide to record on a protected cassette, simply cover the hole with adhesive tape
or slide the tab to the right.
Lining up recordings (assemble cut)
When you add a further recording to a cassette,
which already has a recording on it, a short
blank (flicker) can appear between the old and
the new recording or the picture itself can flicker.
To help reduce these from occurring, proceed as
follows:
1.Find the tape position of the old recording
1.
where you want to insert the new recording.
2.Look at the last minute of the old recording
2.
(playback).
3.Press at the tape position where the
3.
new recording is to go and press .
4.Now start recording as usual by pressing
4.
REC I
5.Stop recording with .
5.
22
STILL
on the remote control.
STOP C-L
REC I
Selecting the recording speed (SP or LP)
LP allows to double the recording duration on
tape (for example six hours instead of three
hours on a E180 cassette).
1.Switch on the TV. If required, select the
1.
programme number for the video recorder.
2.Press . The main menu will appear.
2.
3.Select 'RECORD SETUP' using or
3.
4.Select the required recording speed with
4.
'SP' / 'LP'
'SP': Standard Play (normal recording speed)
offers the usual first-class picture quality.
'LP': Long Play (half recording speed, double
recording time). 6 hours can be recorded on a
3-hour cassette (E180) with a somewhat
reduced picture quality.
5.To end, press .
5.
MENU
STOP C-L
FWD 1- B
and confirm with
SELECT KL CHOOSE B
→RECORD SPEED [SP]
END=EXIT
.
STATUS/EXIT
PLAY B-K
FWD 1- B
.
10
EN
Page 11
7. Programming a recording (TIMER)
General information
Use a TIMER programming to automatically start
and stop a recording at a later time or date. The
video recorder will switch to the right programme
number and begin recording at the correct time.
With this video recorder, you can pre-programme
up to eight recordings within a period of one
year. To make a programmed recording, your
video recorder needs to know:
* the date you want to make the recording
* the programme number of the TV channel
* the start and stop time of the recording
This information is saved in a 'TIMER' block.
Programming a recording
1.Switch on the TV. If required, select the pro-
1.
gramme number for the video recorder.
2.Press . The main menu will appear.
2.
3.Select 'TIMER' with or .
3.
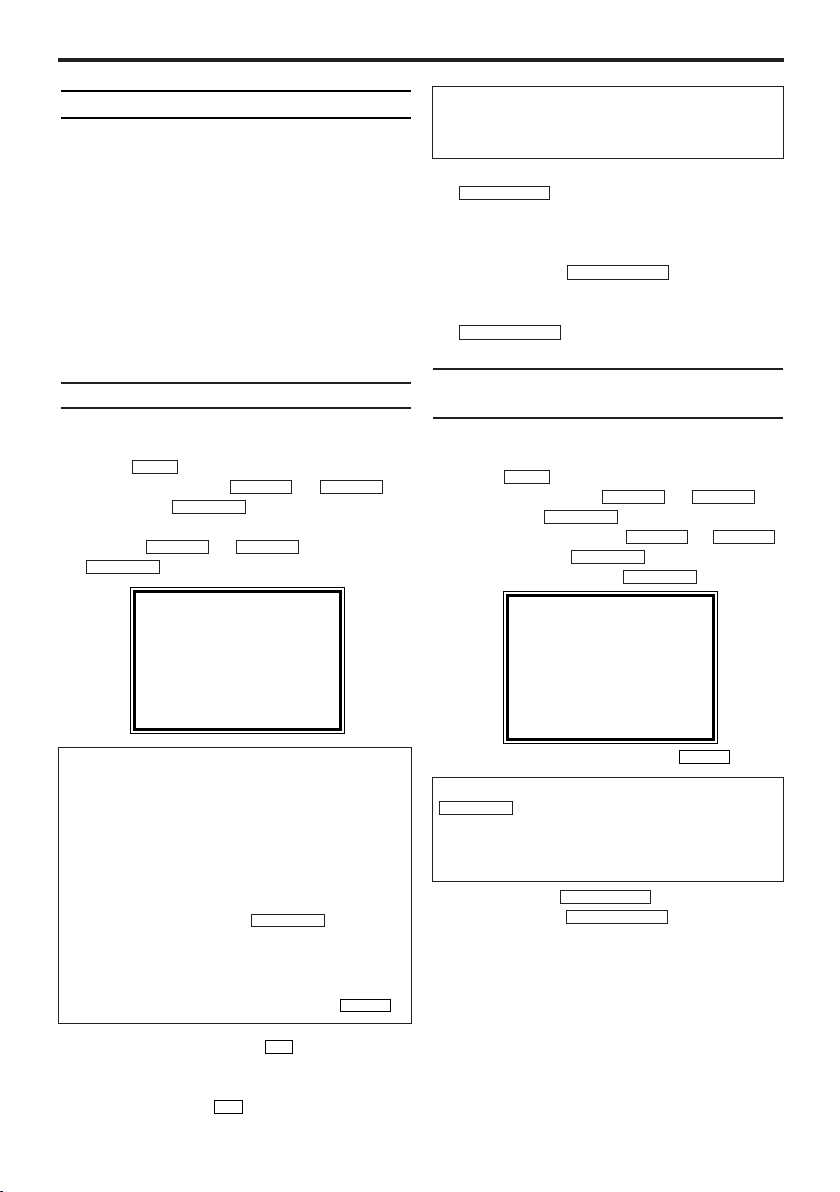
4.Select ‘ONCE’, ‘DAILY’, or ‘WEEKLY’ record-
4.
MENU
Then press .
ing with or . Then press
FWD 1- B
FWD 1- B
STOP C-LPLAY B-K
.
SELECT KL CHOOSE B
→ONCE
DAILY
WEEKLY
TIMER LIST
STOP C-LPLAY B-K
Programme numbers of the ‘TV’ scart socket
You can also programme recordings from external sources via scart socket ‘TV’. Select programme number, 'A/V IN' with 0.0.
7.When all inputs are correct, press
7.
STATUS/EXIT
. The programming information
is stored in a TIMER block.
8.Insert a cassette with an intact security tab
8.
(unprotected).
9.Switch off with .
9.
STANDBY/ON
yy
The programmed recording will only function
when the video recorder is switched off with
STANDBY/ON
yy
.
How to check, or delete a programmed recording (TIMER)
1.Switch on the TV. If required, select the pro-
1.
gramme number for the video recorder.
2.Press . The main menu will appear.
2.
3.Select 'TIMER' with or .
3.
4.Select 'TIMER LIST' with or ,
4.
5.Select timer block with .
5.
MENU
Then press .
and confirm with
FWD 1- B
FWD 1- B
SELECT KL CHOOSE B
ONCE
DAILY
WEEKLY
→TIMER LIST
STOP C-LPLAY B-K
STOP C-LPLAY B-K
.
FWD 1- B
END=EXIT
SelectingONCE/DAILY/WEEKLY recordings
'ONCE': Recording once
'DAILY': Repeated daily recordings from
Monday to Friday
'WEEKLY.': Repeated weekly recordings
(every week on the same day)
Error message : ' FULL '
• If this error message appears after you
select 'ONCE', 'DAILY', or 'WEEKLY' on
TIMER menu and press
FWD 1- B
, then all
TIMER blocks are already programmed. No
more recordings can be programmed. If you
want to clear or check a programmed recording(TIMER block), select the programme number on TIMER LIST menu and press
5.Select TIMER block with .
5.
6.Enter the Start time (START), End time
6.
0..9
CLEAR
(STOP), Programme number (PROG) and the
Date (DATE) with
0..9
END=EXIT
6.To cancel the recording, press .
6.
Timer block disappeared when I pressed
FWD 1- B
.
You have checked all the programmed recordings. If you want to check them again, repeat
steps 2 to 5.
7.To end, press
7.
8.Switch off with
8.
STATUS/EXIT
STANDBY/ON
.
yy
.
11
CLEAR
.
EN
Page 12
How to change a programmed
recording (TIMER)
1.Switch on the TV. If required, select the pro-
1.
gramme number for the video recorder.
2.Press . The main menu will appear.
2.
3.Select 'TIMER' with or .
3.
4.Select ONCE, DAILY, or WEEKLY recording
4.
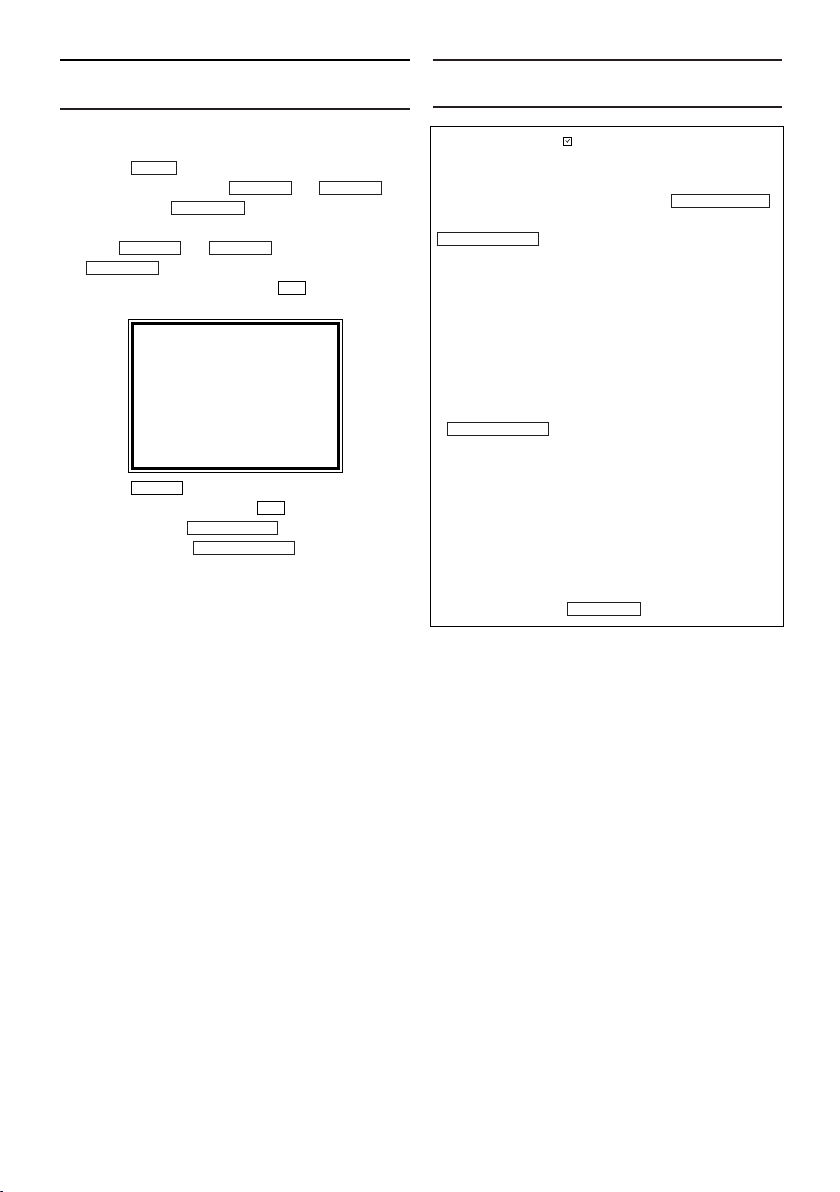
5.Select a TIMER block with . (The flashing
5.
6.Press
6.
7.To end, press
7.
8.Switch off with
8.
MENU
Then press .
with or . Then press
FWD 1- B
FWD 1- B
STOP C-LPLAY B-K
.
STOP C-LPLAY B-K
0..9
number indicates an empty TIMER block.)
ONCE
TIMER - 1 2 3 4 5 6 7 8 -
SELECT TIMER NUMBER
END=EXIT
CLEAR
to delete information and input
correct information with
STATUS/EXIT
STANDBY/ON
0..9
.
.
yy
.
Problems and solutions for programmed recordings
Error message: ' ' flashes in the video
recorder display
•
No cassette was inserted. Insert a cassette and
switch off the video recorder using
Cassette was ejected as soon as the
STANDBY/ON
yy
button was pressed
STANDBY/ON
• A cassette without the security tab was inserted.
Undo the erase protection (chapter 'Manual
recording', section 'Preventing accidental erasing') or insert a different cassette.
'TURN OFF VCR FOR TIMER RECORDING'
flashes on the TV screen
• The video recorder is switched on several minutes before the start of a programmed recording.
Switch off the video recorder with
STANDBY/ON
yy
. A programmed recording (timer)
will only function when the video recorder is
switched off.
Cassette is ejected during recording
•
The end of the tape was reached during recording.
The video recorder does not react
• While a programmed recording is being made,
you cannot operate your video recorder manually. If you want to cancel the programmed
recording, press on the front panel.
STOP/EJECT
yy
.
12
Page 13
8. Other Functions
Changing the video (colour) system
If you playback recordings made on other video
recorders or you want to record from external
sources (via the scart socket), the automatic
video (colour) system switch-over may lead to
colour distortion.
You can switch off the automatic TV system
switch-over as follows.
Video (colour) systems
Other countries, other video (colour) systems:
In central Europe transmissions are broadcast
in the PAL system (Phase Alternation Line)
standard. France uses SECAM (Séquentiel à
mémoire). Middle East countries use MESECAM (Middle East SECAM).In some countries (USA and Japan), TV viewers receive their
programmes as an NTSC signal (National
Television System Committee).
1.Press on the remote control to
1.
SYSTEM
select the TV (colour) system with the least
disruptions during playback.
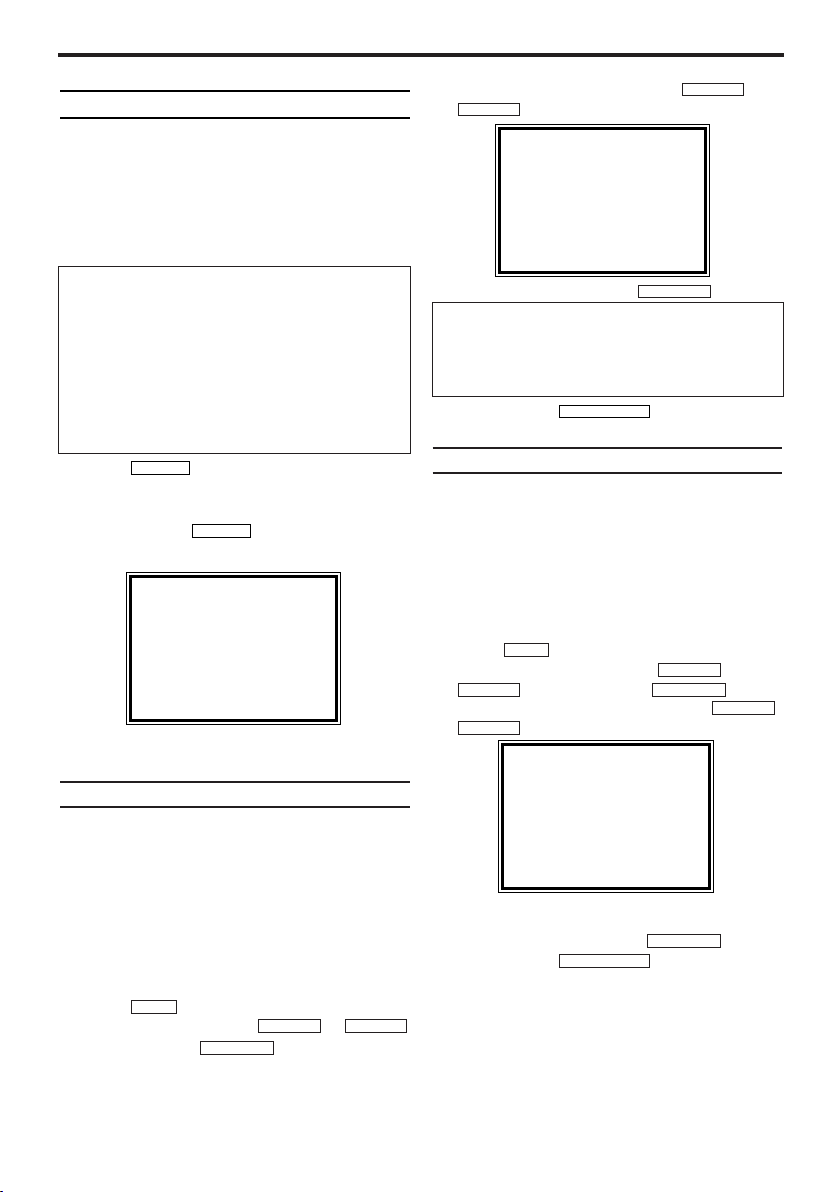
Each pressing , the display will
SYSTEM
change cyclicaly; AUTO, ME-SECAM, PAL.
AUTO
2.After 5 seconds, the OSD will disappear.
2.
Switching the status display off or on
Along with the on screen menu, the status display also displays information on the current
operating status (counter, playback, recording,
TV channel, etc.) on the TV screen.You can
switch off the information about the operating
status so that the status display is not recorded
when copying videocassettes.
1.Switch on the TV. If required, select the pro-
1.
gramme number for the video recorder.
2.Press . The main menu will appear.
2.
3.Select 'VCR SET UP' with or
3.
MENU
and confirm with .
FWD 1- B
STOP C-LPLAY B-K
4.Select 'STATUS DISPLAY' with or
4.
STOP C-L
5.Select 'ON' or 'OFF' with .
5.
.
SELECT KL CHOOSE B
→STATUS DISPLAY [ON]
BLUE BACKGROUND[ON]
AUTO STANDBY [ON]
CLOCK DISPLAY [ON]
END=EXIT
PLAY B-K
FWD 1- B
Which settings can I choose?
'ON': Shows the status display
for a few seconds only.
'OFF': Switches off the status display.
6.To end, press .
6.
STATUS/EXIT
Blue Background on or off
If you want the TV screen to be solid blue when
a weak signal is received, set BLUE BACKGROUND to ‘ON’.The screen will be blue and
the sound will be muted. Or, if you want to
receive the weak signal, set BLUE BACKGROUND to ‘OFF’.
1.Switch on the TV. If required, select the pro-
1.
gramme number for the video recorder.
2.Press . The main menu will appear.
2.
3.Select 'VCR SET UP' using
3.
4.Select 'BLUE BACKGROUND' with
4.
5.Select 'OFF' (no blue background) or 'ON'
5.
6.To end, press .
6.
MENU
and confirm with .
STOP C-L
.
SELECT KL CHOOSE B
STATUS DISPLAY [ON]
→BLUE BACKGROUND [ON]
AUTO STANDBY [ON]
CLOCK DISPLAY [ON]
END=EXIT
(blue background on) with .
STATUS/EXIT
PLAY B-K
FWD 1- BSTOP C-L
FWD 1- B
PLAY B-K
13
EN
Page 14
Automatic switch-off
If you haven't used the video recorder for a few
minutes in certain modes (e.g.: STOP), it will
switch to standby automatically. You can cancel
this function to use the video recorder as a television receiver.
1.Switch on the TV. If required, select the pro-
1.
gramme number for the video recorder.
2.Press . The main menu will appear.
2.
3.Select 'VCR SET UP' using or
3.
4.Select 'AUTO STANDBY' using or
4.
5.Select 'OFF' (no automatic switch-off) or 'ON'
5.
6.To end, press .
6.
MENU
and confirm with .
STOP C-L
(automatic switch-off) with .
FWD 1- B
.
SELECT KL CHOOSE B
STATUS DISPLAY [ON]
BLUE BACKGROUND[ON]
→AUTO STANDBY [ON]
CLOCK DISPLAY [ON]
END=EXIT
STATUS/EXIT
PLAY B-K
FWD 1- B
STOP C-LPLAY B-K
Clock Display
This function allows you to switch the VCR display off. It is useful in case you feel disturbed by
the display-brightness while watching TV in a
dark room. It also reduces the power consumption.
1.Switch on the TV. If required, select the pro-
1.
gramme number for the video recorder.
2.Press . The main menu will appear.
2.
3.Select 'VCR SET UP' using or
3.
4.Select 'CLOCK DISPLAY' using or
4.
MENU
and confirm with .
STOP C-L
.
SELECT KL CHOOSE B
STATUS DISPLAY [ON]
BLUE BACKGROUND[ON]
AUTO STANDBY [ON]
→CLOCK DISPLAY [ON]
PLAY B-K
FWD 1- BSTOP C-L
PLAY B-K
END=EXIT
5.Select 'OFF' (no clock display) or 'ON' (clock
5.
display on) with .
6.To end, press .
6.
FWD 1- B
STATUS/EXIT
14
EN
Page 15
9. Before you call an engineer
If, contrary to expectation, you have any problems using this video recorder, it may be caused
by the following reasons.
Your video recorder does not respond to
any button being pressed:
There is no power supply: check the power supply.
• A programmed recording is currently being
made: if desired, cancel the programmed
recording. Please see the section 'Problems
and solutions for programmed recordings' in
chapter 'Programming a recording (TIMER)'
• There is a technical problem: disconnect from
the mains power supply for 60 seconds, then
connect again.
If this doesn't help, you could reset your video
recorder to the default factory settings.
Resetting devices to default factory settings
* Attention:
All the information stored (TV channels, time
and date, TIMER) will be cleared.
1.Switch off this video recorder with
STANDBY/ON
2.Press and hold and
for 2 seconds or more at the same time.
Cassette is jammed in the video recorder:
• Don't use force. Pull out the mains plug for the
moment. Then, call an engineer.
Remote control does not work:
• Remote control not pointed toward the video
recorder: point it at the video recorder.
• There is a technical problem: Take out the batteries, wait for 10 seconds and place them
back.
• Batteries have run out: change the batteries.
yy
.
STOP/EJECT
PROGRAMME+
No picture when you play a cassette:
• There is no recording on the cassette: change
• You have selected the wrong programme
• The cable connecting the TV and the video
Poor picture quality when you play a cassette:
• Your TV is not properly adjusted.
• The cassette is badly worn or of poor quality:
• Tracking is not properly adjusted: turn to sec-
No recording possible:
• The TV channel you want to record is not
• A cassette was inserted that does not have
There is picture or sound interference on TV
reception:
• Turn to chapter 'Installing your video recorder'
• Have your aerial checked.
the cassette.
number on the TV for playing cassette: on the
TV, select the correct programme number for
the video recorder.
recorder has come loose: check the cable.
use new cassette.
tion 'Manual tracking'.
stored or you selected the wrong programme
number: check TV channels stored.
the security tab (cannot be used to record):
cover the hole with adhesive tape or use a
cassette with an intact security tab. For more
information, please see the section
'Preventing accidental erasing' in chapter
'Manual recording'.
and read 'Setting the RF out channel'.
You can also call the customer service centre
in your country.
The telephone numbers can be found on page
16 of this operating manual. Have the model
number (MODEL NO.) and the production number (PROD.NO.) of your video recorder ready.
15
EN
Page 16

PHILIPS NORGE AS
Sandstuveien 70,
PO Box 1, Manglerud
N-0612 Oslo
NORWAY
Phone: 2274 8250
OY PHILIPS AB
Linnoitustie 11,
02600 Espoo
FINLAND
puh. 09 615 80 250
PHILIPS KUNDTJÄNST
Kista Entré
Knarrarnäsgatan 7
164 85 Stockholm
SWEDEN
Tel: (0)8 598 52 250
PHILIPS POLSKA
Al. Jerozolimskie 195B
02-222 Warszawa
POLSKA
TEL.: (022)-571-0-571
INFOLINKA PHILIPS
Safránkova 1
150 00 Praha 5
CZECH REPUBLIC
TEL.: (02)-330 99 330
PHILIPS Iberia, S.A.
C/Martinez Villergas, 49
28027 MADRID
SPAIN
Phone: 902-11 33 84
PHILIPS AUSTRIA GMBH
Triesterstrasse 64
1101 Wien
AUSTRIA
Tel: 0810 001 203
PHILIPS INFO CENTER
Alexanderstrasse 1
20099 Hamburg
GERMANY
Tel: 0180-53 56 767
SERVICE CONSOMMATEURS PHILIPS
BP 0101
75622 Paris Cédex 13
FRANCE
Phone: 0825-889 789
PHILIPS ELECTRONICS IRELAND LIMITED
Consumer Information Centre
Newstead, Clonskeagh
DUBLIN 14
Phone: 01-7640292
PHILIPS CONSUMER ELECTRONICS
Servizio Consumatori
Via Casati 23
20052 Monza - Milano
ITALY
Phone: 199 118899
PHILIPS MAGYARORSZÁG KFT.
Fehérvári út 84/a.
Budapest 1119
HUNGARY
Phone: (01)-382-1700
PHILIPS PORTUGUESA, S.A.
Consumer Information Centre
Rua Dr. António Loureiro Borge, nr. 5
Arquiparque, Miraflores
P-2795 L-A-VEHLA
PORTUGAL
Phone: 021-4163063
PHILIPS CE, The Philips Centre,
420 - 430 London Road,
Croydon, Surrey
CR9 3 QR
UNITED KINGDOM
Phone: 0208-665-6350
PHILIPS KUNDECENTER
Frederikskaj 6,
1780 København V
DANMARK
Tlf.: 80 88 28 14
PHILIPS REPRESENTATION OFFICE
Ul. Usacheva 35a
119048 MOSCOW
RUSSIA
Phone: 095-937 9300
PHILIPS INFO CENTER
Fegistrasse 5
8957 Spreitenbach
SUISSE
Tel.: 0844-800 544
PHILIPS CUSTOMER CARE CENTER
Twee Stationsstraat 80/
80 Rue des Deux Gares
1070 BRUSSEL/BRUXELLES
BELGIUM (for BENELUX)
Tel: 070-222303
PHILIPS CONSUMENTENLIJN
Postbus 102 5600 AC Eindhoven
NEDERLAND
Tel.: 0900-8406
16
EN
 Loading...