

Philips VR1200/02 User Manual
S
TTable oof CContents
Description of Control
Front Panel
Rear Panel
○○○○○○○○○○○○○○
On-Screen Display
Display Window
Remote Control
Getting Connected Up
VCR to AV TV Connection Using the
SCART Connection
VCR to AV TV Connection Using the
S-Video Connection
Setting Up
○○○○○○○○○○○○○○○○
Auto Set Up/Follow TV
Menu Operations
Power Save Mode
Language Setting
Follow TV
○○○○○○○○○○○○○○
Auto Channel Setting
Manual Channel Setting
Clock Setting
SHOWVIEW® Set Up
Selecting Colour Mode
Basic Operations
Playback
Recording
○○○○○○○○○○○○○○○
○○○○○○○○○○○○○○○
Automatic Operations
Main Features
Tape List
○○○○○○○○○○○○○○
○○○○○○○○○○○○○○○
Timer Recording
Timer Recording Using SHOWVIEW
System
○○○○○○○○○○○○○○○○
Timer Recording
Turbo Timer
○○○○○○○○○○
○○○○○○○○○○○○○○
○○○○○○○○○○
○○○○○○○○○○○
○○○○○○○○○○○○
○○○○○○○○○○
○○○○○○○○○○
○○○○○○○○○○
○○○○○○○○
○○○○○○○○○○○
○○○○○○○○○○○
○○○○○○○○○○○
○○○○○○○○○
○○○○○○○○
○○○○○○○○○○○○○
○○○○○○○○○○
○○○○○○○○
○○○○○○○○○○○○
○○○○○○○○○
○○○○○○○○○○○○○
○○○○○○○○○○○
○○○○○○○○○○○○○
4
Advanced Operations
4
4
4
6
6
8
Special Effect Playbacks
Tracking Adjustments
Index Search
SmartPicture
○○○○○○○○○○○○○○○○
DSPC
Receiving/Recording NICAM Stereo
and Bilingual Programmes
8
Selecting Monitor Sound
Using On-Screen Display
8
9
9
%
%
&
&
(
(
,
,
.
.
/
:
;
;
=
=
>
[
One Touch Recording (OTR)
Record End Search
Selecting Recording Format
Selecting AV1 and AV2 Output/Input
○○○○○○○○○○○○○○○○
Signal
Automatic Satellite Programme
Recording
S-VHS ET
○○○○○○○○○○○○○○
○○○○○○○○○○○○○○
EasyLink Functions
Stabilizing Playback Quality
Audio Dubbing
Tape Duplication
System Connections
Connection to a Satellite Tuner
(Simple Connections)
Connection to a Satellite Tuner (Perfect
Connections)
Connection to a Decoder
Satellite Tuner Control Setting
Operating TV
○○○○○○○○○○○○○○
Operating Satellite Tuner
Before Requesting Service
Specifications
○○○○○○○○○○○○○○
○○○○○○○○○○
○○○○○○○○
○○○○○○○○○
○○○○○○○○○○○○○
○○○○○○○○○○○○○
○○○○○○
○○○○○○○
○○○○○○○
○○○○○
○○○○○○○○○○
○○○○○○
○○○○○○○○○○
○○○○○○
○○○○○○○○○○○○
○○○○○○○○○○○
○○○○○○○○○○○
○○○○○○○○○
○○○○○○○○○○○○○
○○○○○○○
○○○○○○
○○○○○○○○
○○○○○○○○
\
\
]
]
]
^
_
_
{
{
|
|
|
}
V
0
0
1
2
3
3
4
5
6
8
9
!
#
NEDERLANDS
ITALIANO
DEUTSCH
FRANÇAIS
ENGLISH
NEDERLANDS
NEDERLANDS
NEDERLANDS
NEDERLANDS
NEDERLANDS
NEDERLANDS
NEDERLANDS
NEDERLANDS
NEDERLANDS
NEDERLANDS
—
3
—
T
ABLEABLE
S
ABLE
OFOF
OF
C
ONTENTSONTENTS
ONTENTS
SSafety PPrecautions
WARNING: DANGEROUS VOLTAGE
INSIDE
WARNING: TO PREVENT FIRE OR
SHOCK HAZARD, DO
NOT EXPOSE THIS
UNIT TO RAIN OR
MOISTURE.
7 The STANDBY/ON and POWER buttons do
not completely shut off the mains power from
the unit, but switch operating current on or off
only.
7 The rating plate is on the rear of the unit.
Introduction
Congratulations on purchasing your new VCR.
You can’t wait to get it working, but before you do,
spare a few moments to read this brief introduction
to the world of video recording. It may repay you
handsomely in terms of improved results, and
avoiding of costly mistakes.
IMPORTANT
Audio-Visual material may consist of copyrighted
works which must not be recorded without the
authority of the owner of the copyright.
Please refer to relevant laws in your country.
HOWVIEW
S
Development Corporation. The SHOWVIEW system is
manufactured under license from Gemstar Development Corporation.
This product complies with the requirements of
the directive 73/23/EEC+89/336/EEC+93/68/EEC.
is a registered trademarks of Gemstar
®
625
— 2 —
When the equipment is installed in a
cabinet or a shelf, make sure that it has
sufficient space on all sides to allow for
ventilation (10 cm or more both sides, on
top and at the rear.)
When discarding batteries, environmental
problems must be considered and the local
rules or laws governing the disposal of
these batteries must be followed strictly.
Failure to heed the following precautions
may result in damage to the recorder,
remote control or video cassette.
DO NOT place the recorder...
1
... in an environment prone to extreme
temperatures or humidity.
... in direct sunlight.
... in a dusty environment.
... in an environment where strong
magnetic fields are generated.
... on a surface that is unstable or
subject to vibration.
DO NOT block the recorder's ventila-
2
tion openings or holes.
(If the ventilation openings or holes are
blocked by a newspaper or cloth, etc.,
the heat may not be able to get out.)
DO NOT place heavy objects on the
3
recorder or remote control.
DO NOT place anything which might
4
spill on top of the recorder or
remote control.
(If water or liquid is allowed to enter
this equipment, fire or electric shock
may be caused.)
DO NOT expose the apparatus to
5
dripping or splashing.
DO NOT use this equipment in a
6
bathroom or places with water. Also
DO NOT place any containers filled
with water or liquids (such as cosmetics or medicines, flower vases, potted
plants, cups, etc.) on top of this unit.
DO NOT place any naked flame
7
sources, such as lighted candles, on
the apparatus.
AVOID violent shocks to the re-
8
corder during transport.

D
ESCRIPTIONESCRIPTION
ESCRIPTION
S
Front Panel
1
23
OFOF
C
OF
5
4
6
ONTROLSONTROLS
ONTROLS
7
8
9
Open the lid
Rear Panel
1
On-Screen Display
13
OPEN
®
14
2
OUT
S
SORTIE
AUDIO
L
OUT
SORTIE
R
PAUSE
TELEC.
LP20916-003B
6
7
2
PLAY 11:55
3
NICAM STEREO CH01
S-VIDEO
LP20916-003B
10
3
AV1 (L-1)
AV2 (L-2)
15
VIDEO
L AUDIO R
11 12
IN/OUT
ENTREE/SORTIE
IN/DECODER
ENTREE/DECODEUR
8
1
BBC1
16
SAT CONTROL
CONTROLEUR SAT
17
18
4
RF OUT
ANTENNE
SORTIE
5
ANT. IN
ANTENNE
ENTREE
19
9
7
8
AUTO
4
B------------+---- -----+--------+-----E
5
REMAIN 2:59 INDEX -9
6
LP -0:59:59
HIFI
12
— 4 —
9
10
11

S
FFront PPanel
1 STANDBY/ON button
2 S-VHS ET button
(✈P.39)
3 AUDIO DUBBING button
(✈P.41)
4 SPEED button
(✈P.23, P.27, P.28)
5 DISPLAY button
(✈P.23)
6 Cassette compartment
7 REC/OTR ¶ button
(✈P.23, P.36)
8 STOP/EJECT 7 / 0 button
(✈P.22, P.23, P.24)
9 SHUTTLE ring
(✈P.32)
10 S-VIDEO input jack
(✈P.42)
RRear PPanel
1 AC (alternating current) power cord
2 S(Video) OUT jack
(✈P.8, P.42)
3 AV1 (L-1) IN/OUT connector (SCART)
(✈P.8, P.42, P.43, P.44)
4 SAT CONTROL jack
(✈P.46)
5 ANT. (Antenna) IN terminal (from Antenna)
(✈P.8)
11 VIDEO input jack
(✈P.42)
12 AUDIO input jacks
(✈P.42)
13 C. RESET button
(✈P.23)
14 Display window
(✈P.6, P.7)
15 IR (infrared) remote sensor
16 PROGRAMME 5 / ∞ button
(✈P.23, P.33)
17 PLAY 3 button
(✈P.22)
18 PAUSE/STILL 8 button
(✈P.23, P.32)
19 Jog dial
(✈P.32)
6 Remote PAUSE connector
• Enables connection to second VCR equipped
with R.A. EDIT connector.
7 AUDIO OUT jacks
(✈P.8, P.42)
8 AV2 (L-2) IN/DECODER Connector
(✈P.42, P.43, P.44, P.45, P.46)
9 RF OUT terminal (to TV)
(✈P.8)
NEDERLANDS
ITALIANO
DEUTSCH
FRANÇAIS
ENGLISH
NEDERLANDS
NEDERLANDS
NEDERLANDS
NEDERLANDS
NEDERLANDS
NEDERLANDS
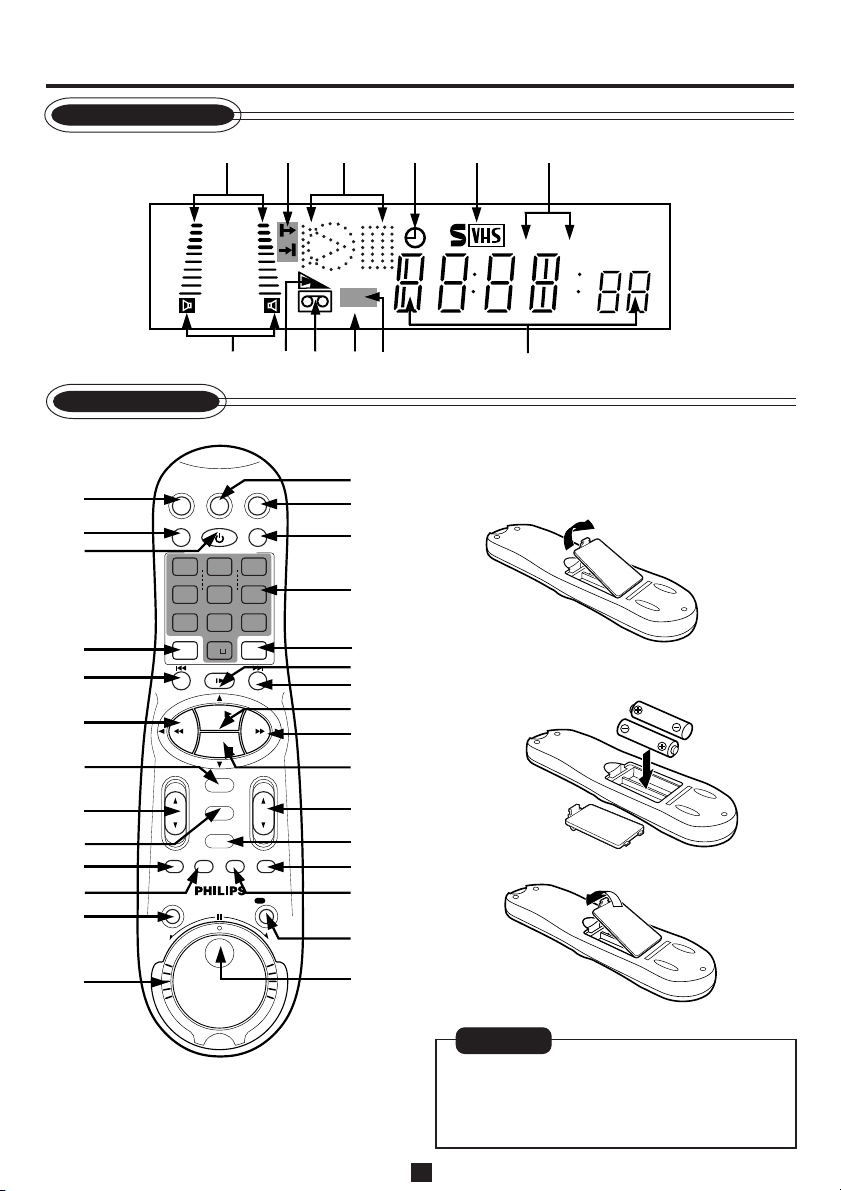
OOn-S-Screen DDisplay
1 Current time
2 Operation mode
3 Receiving broadcast
4 Tape position indicator
5 Remaining tape length
6 Tape speed
7 Channel position no.
8 TV station name
9 Smart Picture setting
10 Sound output mode
11 Index no.
12 Time counter
—
—
5
NEDERLANDS
NEDERLANDS
NEDERLANDS
NEDERLANDS
REC
D
ESCRIPTIONESCRIPTION
ESCRIPTION
S
Display Window
OFOF
OF
C
ONTROLSONTROLS
ONTROLS
(C(C
ONTINUEDONTINUED
ONTINUED
(C
))
)
Remote Control
SAT/
1
2
3
CBL/DBS
VCR/TV
QUICK PROGRAMMING
1-+
*
START STOP DATE
4
GHI
VPS/PDC DAILY
7
PQRS8 TUV9 WXYZ
SPEED DBS/SAT
4
.......... ..........
5
-
REW FF
6
7
8
9
10
11
TURBO
TIMER
JOG/SHTL
12
REV
POWER
2
-+-
5
O
STILL/SLOW
PLAY
STOP
OK/STATUS
MENU
TIMER/EDIT
AUDIO/
MUTE
1
+8
4
0
6
-
15
dB
NORM
7
SMARTPICTURE
+
ABC3 DEF
JKL
WEEKLY
CLEARALT
S.SEARCH
REC END
2
3
VPS/PDC
VCR
91011
8
4
5
SP
6
SEP
12
To insert the batteries:
VCRTV
14
15
1 Remove the battery compartment lid from
the bottom of the remote control.
16
6
MNO
17
18
+
19
20
21
2 Install two AA batteries – R6(SUM-3)/AA –
matching polarity indicated inside the battery
compartment.
22
CHVOL
23
24
TAPE
LIST
REC
/OTR
FWD
25
26
27
28
3 Replace the lid.
13
Using this remote control to operate TV or
satellite tuner
To operate TV, see page 48.
To operate satellite tuner, see page 49.
29
CAUTION
On Battery Replacement
Do not mix old and new batteries. (Also
never mix alkaline batteries with manganese
batteries.)
— 6 —

S
DDisplay WWindow
1 Sound level indicator
2 Programme time indicators
\\
\ : Start programme time.
\\
||
| : Stop programme time.
||
3 Operation mode indicators
‡‡
‡ : Lights up during recording.
‡‡
##
# : Lights up during playback.
##
**
* : Lights up during a pause.
**
##
: “
#” lights up and “
##
dubbing.
#*#*
: “
#*” lights up and “
#*#*
audio dubbing pause.
4
(Timer) indicator
(✈P.27, P.28)
5 S-VHS indicator
Lights up while playing back a tape recorded in
S-VHS format or wih S-VHS ET function, while
recording on an S-VHS tape using S-VHS format
or while recording with S-VHS ET function.
RRemote CControl
1 SAT/CBL/DBS button
(✈P.49)
2 VCR/TV button
(✈P.23)
3 POWER button
4 ALT/SPEED button
(✈P.23, P.27, P.28)
5 STILL/SLOW – / ™ button
(✈P.32)
6 1 (Rewind) / 2 button
(✈P.14, P.22)
7 OK/STATUS button
(✈P.14, P.23)
8 VOL (volume)
(✈P.48)
9 MENU button
(✈P.14)
10 TURBO TIMER button
(✈P.31)
11 AUDIO/MUTE button
(✈P.35, P.48)
12 JOG/SHTL (shuttle) button and lamp
(✈P.32)
13 Shuttle ring
(✈P.32)
14 TV button
(✈P.48)
15 VCR button
55
5 /
55
∞ button
‡‡
‡” blinks during audio
‡‡
‡‡
‡” blinks during
‡‡
∞∞
∞∞
6 Speed indicator
SP – Standard Play
LP – Long Play (2 times recording mode for
PAL signal)
EP – Extended Play (3 times recording mode for
PAL signal)
SLP – Super Long Play (3 times recording mode
for NTSC signal, for NTSC playback only)
7 Sound output mode indicator
(✈P.35)
8 Tape remaining time indicator (✈P.23)
9 ] (Cassette-in) indicator
10 VCR indicator
Lights up when the VCR/TV button is pressed or
when playback is started
11 VPS/PDC indicator
(✈P.31)
12 Digital clock/Counter/Channel indicator
16 SMARTPICTURE button
(✈P.33)
17 Number buttons
(0, 1, 2, 3, 4, 5, 6, 7, 8 and 9)
(✈P.23, P.27, P.28, P.29)
18 CLEAR button
(✈P.29)
19 STILL/SLOW
button
(✈P.32)
20 STILL/SLOW + / £ button
(✈P.32)
21 PLAY 3 / 5 button
(✈P.22)
22 ¡ (Fast forward) / 3 button
(✈P.22)
23 STOP 7 /
∞∞
∞ button
∞∞
(✈P.22, P.23)
24 CH (channel) 5 / ∞ button
(✈P.23, P.28, P.48, P.49)
25 TIMER/EDIT button
(✈P.26, P.27, P.28)
26 TAPE LIST button
(✈P.25)
27 S(kip) SEARCH/REC(ord) END button
(✈P.32, P.37)
28 REC (record)/OTR button
(✈P.23, P.36)
29 Jog dial
7
—
(✈P.32)
—
NEDERLANDS
ITALIANO
DEUTSCH
FRANÇAIS
ENGLISH
NEDERLANDS
NEDERLANDS
NEDERLANDS
NEDERLANDS
NEDERLANDS
NEDERLANDS
NEDERLANDS
NEDERLANDS
NEDERLANDS
NEDERLANDS

G
ETTINGETTING
S
ETTING
CConnection DDiagram
C
ONNECTEDONNECTED
ONNECTED
U
PP
P
Before connecting VCR to TV using
SCART connection or S-Video
Connection, complete the steps below.
• Disconnect the antenna or cable from the TV
and the AC power cord of the TV from the AC
Back of VCR
outlet.
• Connect the indoor or outdoor antenna or
cable to the VCR.
• Connect the VCR to the TV using the RF
coaxial cable.
Cable
VCR to AV TV Connection using the SCART Connection
1 Complete the steps above.
2 Connect the scart cable between the AV1 (L- 1)
IN/OUT connector of the VCR and the TV’s
21-pin AV input connector (SCART).
3 Plug the AC power cords of the VCR and TV
into the AC outlets.
ATTENTION
If no colour appears on the TV screen when
performing Auto Set Up or Follow TV (✈P.9),
set “A/V1 OUTPUT” to appropriate setting on
the Menu screen (✈P.37) after completing Auto
Set Up or Follow TV.
LP20916-003B
AV1 (L-1)
AV2 (L-2)
IN/OUT
ENTREE/SORTIE
IN/DECODER
ENTREE/SORTIE
Outdoor antenna
ANT. IN
ANTENNE
ENTREE
SAT CONTROL
CONTROLEUR SAT
RF OUT
ANTENNE
SORTIE
RF OUT
ANT. IN
ANTENNE
ENTREE
SAT CONTROL
CONTROLEUR SAT
RF OUT
ANTENNE
SORTIE
21-pin
SCART cable
ANT. IN
Back of TV
RF coaxial cable
(supplied)
Back of TV
To TV’s 21-pin
input connector
(SCART)
VCR to AV TV Connection using the S-Video Connection
1 Complete the steps above.
2 Connect an S-Video/Audio cable between the
S-OUT/AUDIO OUT jacks on the VCR and
an S-Video/Audio input jacks on a TV.
3 Plug the AC power cords of the VCR and TV
into the AC outlets.
— 8 —
OUT
S
SORTIE
PAUSE
TELEC.
LP20916-003B
AUDIO
L
OUT
SORTIE
R
S-Video Cable
Audio Cable
TV

S
ETTINGETTING
S
ETTING
U
PP
P
Auto Set Up/Follow TV
For the first time you press the STANDBY/ON
button on the front panel (or POWER button on
the remote control) to turn on the VCR after you
plug the AC power cords, the country set display
will appear on the TV screen and the VCR’s
display window.
By simply selecting the country* and type of
tuner setting (Auto Set Up or Follow TV), the
tuner channels are set automatically.
*If you live in Belgium (BELGIUM) or Switzerland (SUISSE), you also need to select your
language.
If you use Auto Set Up function, clock** and
guide channel numbers** (✈P.20) are also set
automatically.
If you use Follow TV function, the tuner channels
are set by downloading preset data from TV.
Also, the clock** and guide channel numbers**
(✈P.20) are set automatically. However, you can
use this function only when you connect between
VCR and TV equipped with T-V Link, EasyLink,
Megalogic, SMARTLINK, Q-Link, DATA
LOGIC or NEXTVIEWLINK function via fullywired 21-pin SCART cable.
**If you live in Hungary (MAGYARORSZ
Czech Republic (ˇC
ESKÁ REPUBLIKA), Poland
(POLSKA), RUSSIA (HJCCBZ) or other
countries in Eastern Europe (OTHER EASTERN
EUROPE), you have to set them manually.
PPreparation
11
1 Make sure the TV antenna cable is connected
11
correctly and the VCR’s AC power cord is
connected to the AC outlet.
22
2 If you want to use the on-screen display, set
22
the TV to AV mode (with SCART or
S-VIDEO CONNECTION ✈P.8).
If you live in Hungary (MAGYARORSZ
Czech Republic (ˇC
Poland (POLSKA), RUSSIA (H JCCBZ) or
other countries in Eastern Europe (OTHER
EASTERN EUROPE), be sure to use the onscreen display.
33
3 Turn on the VCR by pressing the STANDBY/
33
ON button on the front panel, or press VCR
on the remote control and press POWER.
The Country Set display appears on the TV
screen and/or display window.
ESKÁ REPUBLIKA),
Á
G),
Á
G),
Display window
On-screen display
\ BELGIUM
ˇ
CESKÁ REPUBLICA
DANMARK
DEUTSCHLAND
ESPAÑA
GREECE
ITALIA
MAGYARORSZÁG
NEXT PAGE
SELECT : 5∞ CONFIRM : OK
END : MENU
• If you’re using a SCART connection and the
on-screen display has no colour, perform
“Selecting AV1 and AV2 Output/Input signal”
after Auto Set Up or Follow TV. (✈P.37)
44
4 • If you are referring to the display window,
44
press 5/∞ on the remote control to select
your international telephone country code
of your country.
International Telephone Country Code
BELGIUM : 32 NORGE : 47
ˇ
C
ESKÁ REPUBLIKA : 42 ÖSTERREICH : 43
DANMARK : 45
DEUTSCHLAND : 49 POLSKA : 48
ESPAÑA : 34 PORTUGAL : 351
GREECE : 30 SUISSE : 41
ITALIA : 39 SUOMI : 358
MAGYARORSZÁG : 36 SVERIGE : 46
NEDERLAND : 31 OTHER WESTERN EUROPE : - -
HJCCBZ
OTHER EASTERN EUROPE : EE
• If you are referring to the on-screen display,
press 5/∞ on the remote control to select
your country name.
BELGIUM
ˇ
CESKÁ REPUBLICA
\ DANMARK
DEUTSCHLAND
ESPAÑA
GREECE
ITALIA
MAGYARORSZÁG
NEXT PAGE
SELECT : 5∞ CONFIRM : OK
END : MENU
In this example, DANMARK is selected .
• If you have selected BELGIUM (32) or
SUISSE (41), go to step 5.
• If you have selected MAGYARORSZÁG
(36), CESKÁ REPUBLIKA (42), POLSKA
(48), HJCCBZ (07) or OTHER EASTERN
EUROPE (EE), go to step 6.
• If you have selected any other country
ˇ
name (code), press OK/ STATUS on the
remote control and then go to step 7.
—
9
—
To be continued on the next page
NEDERLANDS
ITALIANO
DEUTSCH
FRANÇAIS
ENGLISH
NEDERLANDS
:07
NEDERLANDS
NEDERLANDS
NEDERLANDS
NEDERLANDS
NEDERLANDS
NEDERLANDS
NEDERLANDS
NEDERLANDS
NEDERLANDS
S
ETTINGETTING
S
ETTING
55
5 Press OK/STATUS. The Language Set display
55
U
PP
P
(C(C
(C
ONTINUEDONTINUED
ONTINUED
appears on the screen and/or display window.
• If you are referring to the display window,
press 5/∞ to select your language code,
then press OK/STATUS. Skip step 6 and go
to step 7.
Language Code
ENGLISH : 01 NORSK : 08
DEUTSCH : 02 SUOMI : 09
FRANCAIS : 03 DANSK : 10
ITALIANO : 04 POLSKI : 11
CASTELLANO : 05 CESTINA : 12
NEDERLANDS : 06 MAGYAR : 13
SVENSKA : 07
International Telephone
Country Code
ˇ ˇ
ZPSR
Language Code
:14
In this example, DEUTSCH is selected for
SUISSE.
• If you are referring to the on-screen display,
press 5/∞ to select your language, then
press OK/STATUS. Skip step 6 and go to
step 7.
NEXT PAGE
NORSK
SVENSKA
NEDERLANDS
CASTELLANO
ITALIANO
FRANCAIS
\ DEUTSCH
ENGLISH
SELECT : 5∞ CONFIRM : OK
END : MENU
66
6 Press OK/STATUS. The Clock Set screen will
66
appear. Press 5/∞ to set the time and then
press OK/STATUS. The “TIME” display
begins blinking. Repeat the same procedure to
set the date and year. Press MENU when clock
setting is finished.
-
TIME --:-- - -:- -
DATE 01/01/01
SET : 5∞ NEXT : OK
END : MENU
• When you set the time, press and hold 5/∞
to change the time by 30 minutes .
• When you set the date, press and hold 5/∞
to change the date by 15 days.
7 The following display appears on the screen
))
)
and/or display window.
• If you use the Auto Set Up function, go to
Auto Set Up below.
• If you use the Follow TV function, go to
Follow TV on page 12.
\ AUTO CH.SET
FOLLOW TV
SELECT : 5∞ CONFIRM : OK
END : MENU
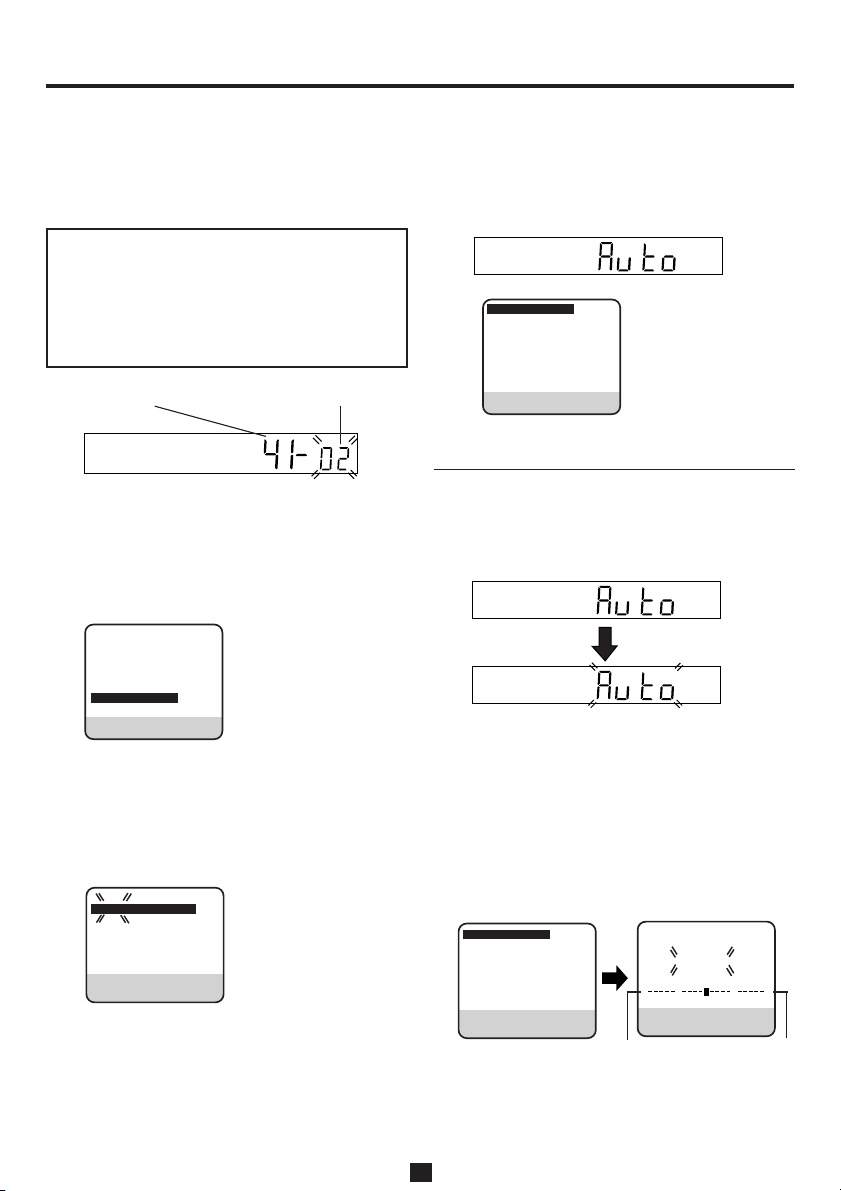
AAuto S Set U Up
Before performing the following steps, be sure to
finish Preparation on page 9.
11
1 • If you are referring to the display window,
11
press 5/∞ to select “Auto” and press OK/
STATUS.
• When you connect VCR to TV equipped
with T-V Link, EasyLink, Megalogic,
SMARTLINK, Q-Link, DATA LOGIC or
NEXTVIEWLINK function via fully-wired
21-pin SCART cable and the TV is turned
on, the VCR automatically performs Follow
TV instead of Auto Set Up.
• If you are referring to the on screen display,
press 5/∞ to select “AUTO CH SET” and
press OK/STATUS.
\ AUTO CH. SET
FOLLOW TV
SELECT : 5∞ CONFIRM : OK
END : MENU
Beginning
As AUTO CH. SET progresses, the “ - ”
mark moves from left to right.
AUTO CH. SET
PLEASE WAIT
++
B E
END : MENU
End
— 10 —

S
Do NOT press any button on the front panel or
remote control until the display window shows
either the display as illustrated in step 2 or “- : - -”.
22
2
22
If the correct current time is displayed on
the display window, the Auto Channel Set
and Clock Set have been completed
successfully. Go to step 3.
If “1” (channel position) is displayed on the
display window, the Auto Clock Set has not
completed (only the Auto Channel Set has).
Go to step 3 and then perform “Clock
Setting” manually. (✈P.20)
• You can check if the Guide Channel
numbers have been set correctly when you
perform S
HOWVIEW Timer Recording
(✈P.27); if the correct channel position
number is displayed on S
HOWVIEW
Programme screen, this confirms that the
Guide Channel number for the S
HOWVIEW
number you enter has been set correctly.
33
3 Press PROGRAMME 5/∞ on the front panel
33
(or CH 5/∞ on the remote control) to make
sure that all necessary stations have been
stored in the VCR’s memory.
• If station names (ID) (✈P.19) have also been
stored in the VCR’s memory, the station
name will be displayed at the top left corner
of the screen for about 5 seconds when the
VCR is tuned to a different station.
• If you want to set the tuner manually such
as to add or skip channels, to change
channel positions, or to set station names,
see pages 16-18.
• If no station is stored in the VCR’s memory,
make sure the TV antenna cable is connected correctly and turn off the VCR
power once, then turn it back on again. Reperform from Preparation on page 9.
Notes:
• Auto channel set function takes place first; it
automatically assigns all receivable stations
in your area.
• Auto clock set function sets the clock automatically by reading the clock setting data
from a station transmitting a PDC signal
while auto channel set is being performed.
• During auto channel set, the VCR recognizes
each station name of the detected stations and
stores them in the VCR’s memory, then
automatically sets S
HOWVIEW system’s
assigned Guide Channel number for those
stations according to the broadcast area.
• In the area where no station TV transmits a
PDC signal, the VCR can perform neither
auto clock set nor auto Guide Channel
number set.
• If there is a power cut, or if you press
STANDBY/ON, POWER
or
MENU
while
Auto Set Up is in progress, Auto Set Up will
be interrupted; be sure to turn off the VCR
power once and try again from step 1.
• Auto clock may not function properly
depending on the reception condition.
NEDERLANDS
ITALIANO
DEUTSCH
FRANÇAIS
ENGLISH
NEDERLANDS
NEDERLANDS
NEDERLANDS
NEDERLANDS
NEDERLANDS
NEDERLANDS
NEDERLANDS
NEDERLANDS
NEDERLANDS
— 11 —
NEDERLANDS
To be continued on next page
ETTINGETTING
S
S
ETTING
U
PP
P
(C(C
(C
ONTINUEDONTINUED
ONTINUED
))
)
IMPORTANT
• In certain reception conditions, station names
may not be stored correctly, and auto Guide
Channel Number Set may not work properly.
If the Guide Channel numbers are not set
properly, when you timer-record a TV
programme using S
will record a TV programme of a different
station. When programming the timer using
HOWVIEW system, be sure to check whether
S
the channel position on which your VCR
receives the broadcasting station you wish to
record is selected. (✈P.27).
• Your VCR memorizes all detected stations
even if reception of some of them is poor. In
these cases picture quality may be poor. To
delete those stations with an unacceptable
picture, see page 17.
INFORMATION
• Language for the on-screen display
Language for the on-screen display is
automatically set depending on the Country
setting you have made in Preparation on page
9 (unless you have selected BELGIUM or
SUISSE), as shown below.
SOUMI [ SOUMI
PORTUGAL [ ENGLISH
DEUTSCHLAND [ DEUTSCH
POLSKA [ POLSKI
NORGE [ NORSK
SVERIGE [ SVENSKA
DANMARK [ DANSK
ÖSTERREICH [ DEUTSCH
ˇ
CESKÁ REPUBLICA [ˇCEˇSTINA
ITALIA [ ITALIANO
MAGYARORSZÁG [ MAGYAR
ESPAÑA [ CASTELLANO
NEDERLAND [ NEDERLANDS
GREECE [ ENGLISH
HJCCBZ [ ZPSR
OTHER WESTERN EUROPE
OTHER EASTERN EUROPE
If you want to change the language setting
manually, see page 15.
HOWVIEW system, the VCR
[ ENGLISH
[ ENGLISH
• Smart Clock
Your VCR is equipped with the Smart Clock
function which provides accurate time
keeping through automatic adjustments at
regular intervals, by reading data from a PDC
signal. If you want to take advantage of this
function, simply set it to “ON”, on the Clock
Set screen. (✈P.20)
FFollow T Tv
Before performing the following steps, be sure to
finish Preparation on page 9.
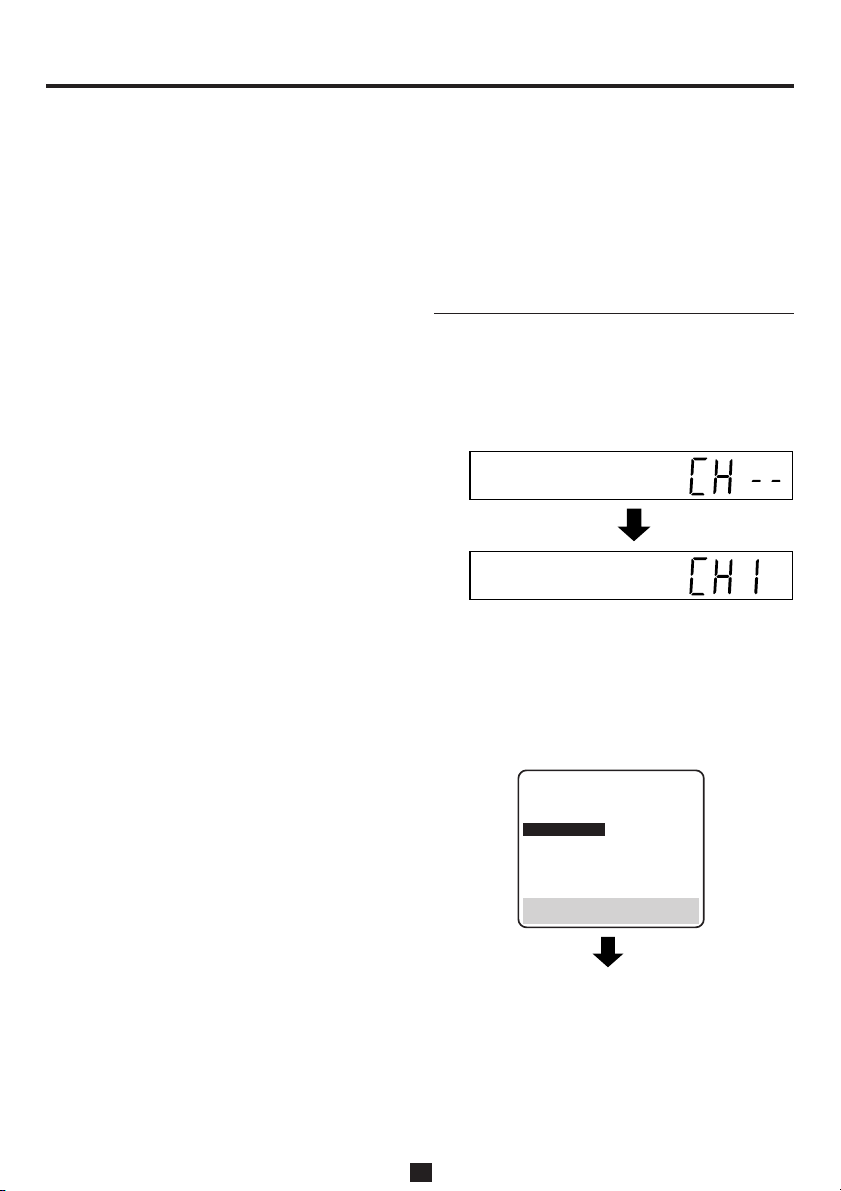
1 • If you are referring to the display window,
press 5/∞ to select “CH – –” and press
OK/STATUS.
Channel position number increases from
“CH 1”.
• If you are referring to the on-screen display,
press 5/∞ to select “FOLLOW TV” and
press OK/STATUS.
AUTO CH. SET
\FOLLOW TV
5
SELECT:
END : MENU
CONFIRM: OK
∞
— 12 —
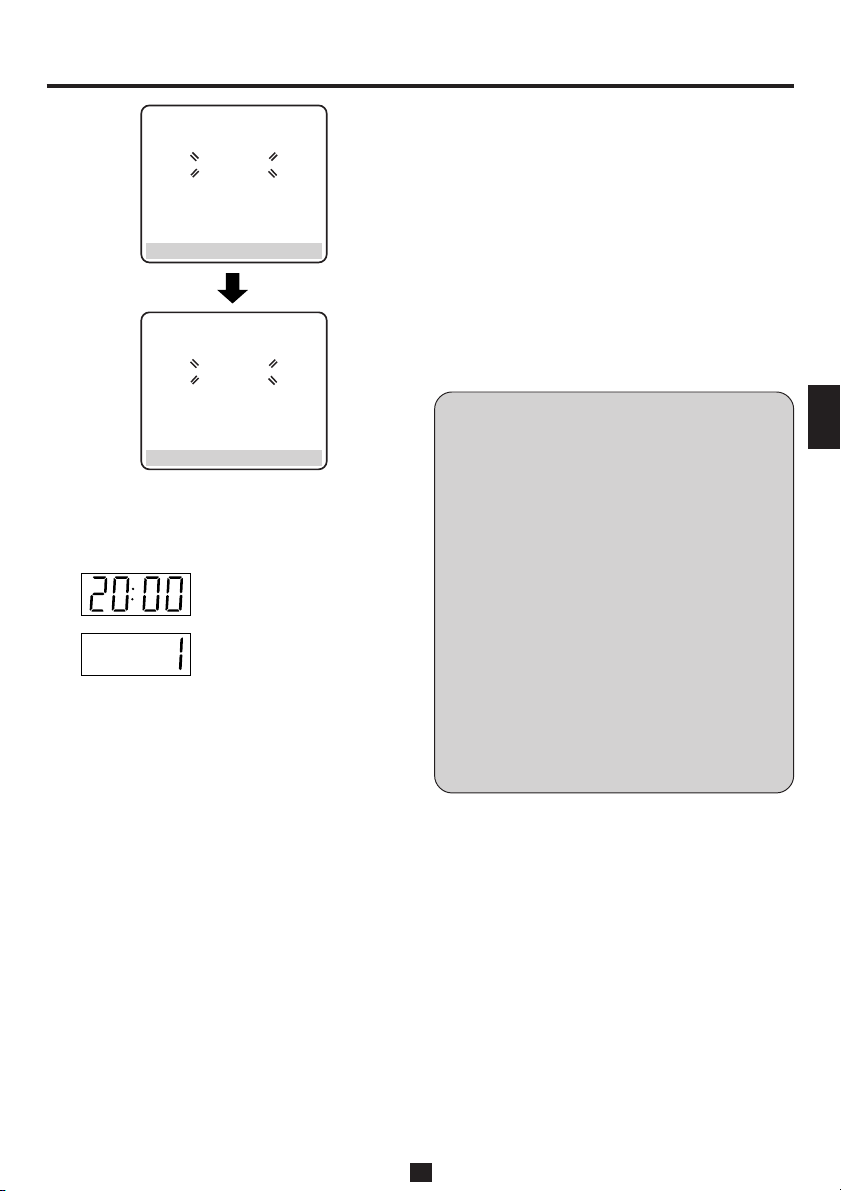
S
END : MENU
FOLLOW TV
PLEASE WAIT
GUIDE CH. SET
PLEASE WAIT
• If station names (ID)(✈P.19) have also been
stored in the VCR’s memory, the station
name will be displayed at the top left corner
of the screen for about 5 seconds when the
VCR is tuned to a different station.
• If you want to set the tuner manually such
as to add or skip channels, to change
channel positions, or to set or station names,
see pages 16–18.
• If no station is stored in the VCR’s memory,
make sure the SCART cable is connected
correctly and press OK/STATUS to re-
perform Follow TV.
NEDERLANDS
ITALIANO
DEUTSCH
FRANÇAIS
END : MENU
Do NOT press any button on the front panel or
remote control until display window shows either
the display as illustrated in step 2 or “– –:– –”.
2 If the correct current time is
displayed on the display
window, the Auto Channel
Set and Clock Set have
been completed successfully. Go to step 3.
If “1” (channel position) is displayed on the
display window, the Auto Clock Set has not
completed (only the Auto Channel Set has).
Go to step 3 and then perform “Clock
Setting” manually. (✈P.20)
• You can check if the Guide Channel
numbers have been set correctly when you
perform S
HOWVIEW Timer Recording
(✈P.27); if the correct channel position
number is displayed on S
HOWVIEW Pro-
gramme screen, this confirms that the Guide
Channel number for the S
HOWVIEW number
you enter has been set correctly.
3 Press PROGRAMME 5/∞ on the front panel
(or CH 5/∞ on the remote control) to make
sure that all necessary stations have been
stored in the VCR’s memory.
Notes:
• In the area where no TV station transmits a
PDC signal, the VCR can perform neither
auto clock set nor auto Guide Channel
number set.
• If there is a power cut, or if you press
STANDBY/ON, POWER
or
MENU
while
downloading or set up is on progress, it will
be interrupted; be sure to turn off the VCR
power once and try again from the beginning.
• Auto clock may not function properly
depending on the reception condition.
• When you perform Follow TV function, be
sure to use fullywired 21-pin SCART cable.
• On this VCR, the characters available for
station’s name (ID) are A-Z, 0-9), -, ∗, + and
(space). Some downloaded station’s name
✈
may differ from those of your TV (
P.19).
IMPORTANT
• In certain reception conditions, station names
may not be stored correctly, and auto Guide
Channel Number Set may not work properly.
If the Guide Channel numbers are not set
properly, when you timer-record a TV
programme using the S
HOWVIEW system, the
VCR will record a TV programme of a
different station. When programming the timer
using the S
HOWVIEW system, be sure to check
whether the channel position on which your
VCR receives the broadcasting station you
wish to record is selected. (✈P.27)
ENGLISH
NEDERLANDS
NEDERLANDS
NEDERLANDS
NEDERLANDS
NEDERLANDS
NEDERLANDS
NEDERLANDS
NEDERLANDS
NEDERLANDS
— 13 —
NEDERLANDS
S
ETTINGETTING
S
ETTING
U
PP
P
(C(C
(C
ONTINUEDONTINUED
ONTINUED
))
)
Menu Operations
Before operating the VCR, be familiar with
the menu operations first because most of the
features built into the VCR can be available
only on the menus.
11
1 Press VCR on the
11
remote control.
22
2 Press MENU to display
22
the main menu screen.
3 3
3 Press PLAY 5 or STOP
3 3
∞ to select a desired
feature on the menu,
then press OK/STATUS.
44
4 When you select a feature, go to the section
44
in this manual and follow the instructions
described there.
To go back to the previous menu screen,
press REW 2.
To exit from the menu operations, press
MENU.
Note:
Menu operating buttons function only when
a menu is on the TV screen. When no menus
is on the TV screen, they function differently.
IMPORTANT
The setup and adjustment procedures
explained hereafter are written under the
following conditions:
• You have turned on the TV and set the TV
to AV mode.
• You have turned on the VCR.
\ VCR SET UP
AUTO TUNER SET UP
MANUAL TUNER SET UP
OUTPUT/INPUT SET UP
INITIAL SET UP
SELECT : 5∞ CONFIRM : OK
END : MENU
Power Save Mode
You can reduce the power consumption while the
VCR is turned off.
11
1 Press VCR.
11
22
2 Press MENU.
22
33
3 Press 5 or ∞ to select
33
“VCR SET UP” then
press OK/STATUS.
44
4 Press 5 or ∞ to select
44
“POWER SAVE” then
press 4 to set to “ON”.
55
5 Press MENU.
55
Notes:
• During Power Save, the display window will
be turned off.
• The Smart Clock function (
work while the Power Save mode is engaged.
• While the VCR is in the Power Save mode,
the picture may be distorted momentarily
when you turn on/off the VCR.
• Power Save does not work when ...
... the VCR is in the Timer mode.
... the VCR’s power is turned off after timer-
recording (or One Touch Recording).
... the Auto Satellite Prog Recording mode
is engaged (✈P.38).
... “A/V2 SELECT” is set to “DECODER”or
“SAT” (✈P.37).
DSPC ON
O. S. D. ON
DIRECT REC ON
AUTO SP=LP TIMER OFF
\ POWER SAVE OFF
AUTO SAT
RECORD LINK OFF
VIDEO STABILIZER OFF
NEXT PAGE
SELECT : 5∞ CHANGE : >
END : MENU
✈
P.20) does not
— 14 —

S
Language Setting
You can also change the language manually.
11
1 Press VCR.
11
22
2 Press MENU.
22
33
3 Press 5 or ∞ to select “AUTO TUNER SET
33
UP”, then press OK/STATUS. The country set
menu appears.
44
4 Press 5 or ∞ to select your country’s name,
44
then press OK/STATUS.
55
5 Press 5 or ∞ to select the language, then
55
press MENU to exit.
Follow TV
When you want to perform Follow TV after
setting channels, perform the following procedure.
For the detail of Follow TV, see pages 9, 12-13.
11
1 Press VCR.
11
22
2 Press MENU.
22
33
3 Press 5 or ∞ to select “AUTO TUNER SET
33
UP”, then press OK/STATUS.
44
4 Press 5 or ∞ to select your country’s name,
44
then press OK/STATUS.
55
5 Press 5 or ∞ to select your preferred lan-
55
guage, then press OK/STATUS.
66
6 Press 5 or ∞ to select “FOLLOW TV”, then
66
press OK/STATUS. The Follow TV screen
appears and then Guide Prog. Set screen
appears.
77
7 Once it is completed, “FOLLOW TV COM-
77
PLETED” is displayed on the screen for about
5 seconds.
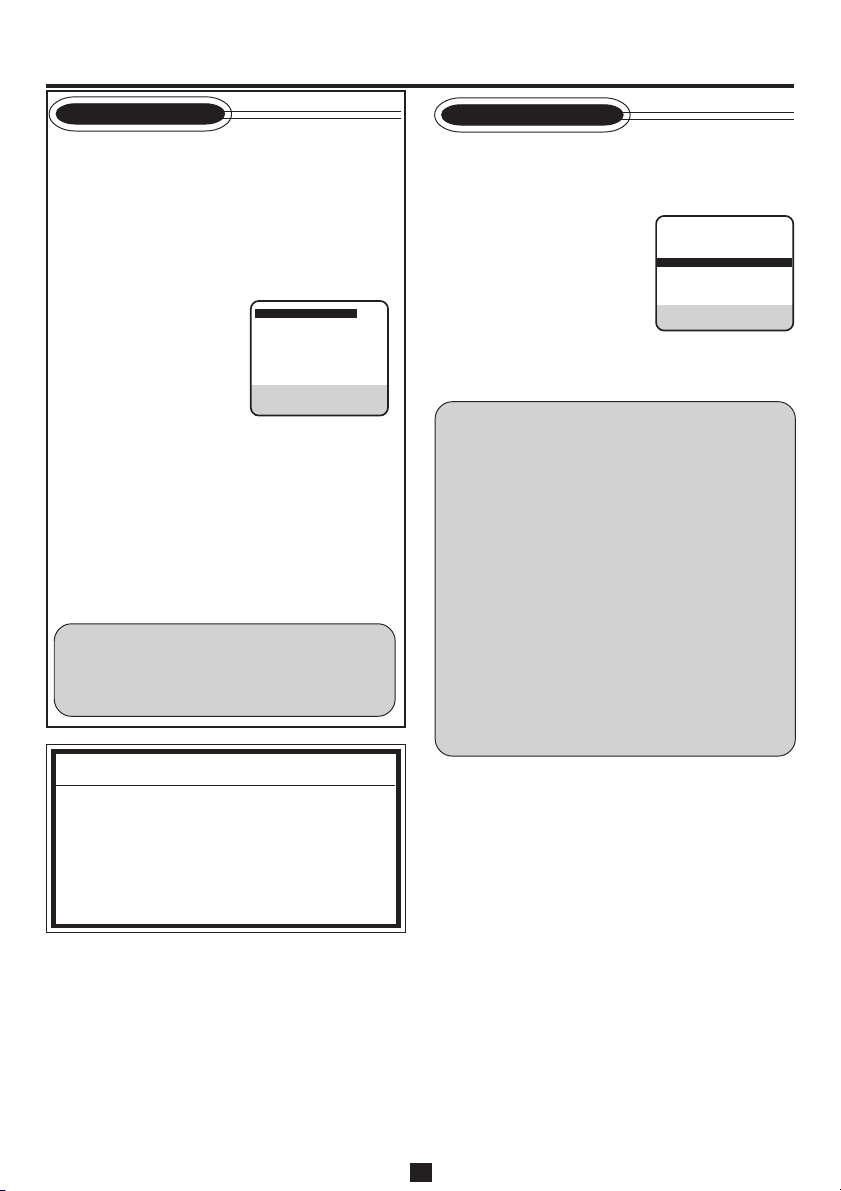
The following screen will
appear after 5 seconds or
if you press MENU.
PR: channel positions
CH: channel numbers
ID: station names (✈P.19)
PR CH ID PR CH ID
01 25 ARD 08 C26 E-SP
02 C08 SKY1 09 C33 3SAT
03 10 ZDF 10 55 WEST
04 C65 RAI1 11 C24 SAT1
05 C31 BBC1 12 C23 OSF
06 C32 BBC2 13 C25 ESPN
07 C24 BBC4 14 C48 20G
SELECT : 5∞23
EDIT : OK
ERASE : CLEAR
END : MENU
C: Cable
• The blueback screen and the programme
currently being broadcasted by the blinking
station appear alternately for 8 seconds each.
• To view the next page, use the 5∞ 23
button on the remote control.
The stations located in the selected country
appear at the top of the list.
• The Guide Channel numbers will also be set
automatically.
88
8 Press MENU to exit the menu operations.
88
NEDERLANDS
ITALIANO
DEUTSCH
FRANÇAIS
ENGLISH
NEDERLANDS
NEDERLANDS
NEDERLANDS
— 15 —
NEDERLANDS
NEDERLANDS
NEDERLANDS
NEDERLANDS
NEDERLANDS
NEDERLANDS
NEDERLANDS
ETTINGETTING
S
S
ETTING
U
PP
P
(C(C
ONTINUEDONTINUED
ONTINUED
(C
))
)
Auto Channel Setting
If you move to another place, you may need to
tune the VCR tuner again for your new residential
area.
11
1 Press VCR.
11
22
2 Press MENU.
22
33
3 Press 5 or ∞ to select “AUTO TUNER SET
33
UP”, then press OK/STATUS.
44
4 Press 5 or ∞ to select your country’s name,
44
then press OK/STATUS.
55
5 Press 5 or ∞ to select your preferred lan-
55
guage, then press OK/STATUS.
66
6 Press 5 or ∞ to select “AUTO CH. SET”,
66
then press OK/STATUS.
AUTO CH. SET
PLEASE WAIT
++
B E
END : MENU
Beginning
The Auto Set screen appears, and remains on
screen while the recorder searches for
receivable stations. As Auto Channel Set
progresses, the “
from left to right.
• When you connect VCR to TV equipped
with T-V Link, EasyLink, Megalogic,
SMARTLINK, Q-Link, DATA LOGIC or
NEXTVIEWLINK function via fully-wired
21-pin SCART cable and the TV is turned
on, the VCR automatically performs Follow
TV instead of Auto Channel Set.
77
7 Once it is completed, “AUTO CH. SET
77
COMPLETED” is displayed on the screen for
about 5 seconds.
The following screen will appear after 5
seconds or if you press MENU.
PR: channel positions
CH: channel numbers
ID: station names (✈P.19)
” mark on the screen moves
PR CH ID PR CH ID
01 25 ARD 08 C26 E-SP
02 C08 SKY1 09 C33 3SAT
03 10 ZDF 10 55 WEST
04 C65 RAI1 11 C24 SAT1
05 C31 BBC1 12 C23 OSF
06 C32 BBC2 13 C25 ESPN
07 C24 BBC4 14 C48 20G
SELECT : 5∞23
EDIT : OK
ERASE : CLEAR
END : MENU
C: Cable
End
• The blueback screen and the programme
currently being broadcast by the blinking
station appear alternately for 8 seconds
each.
• To view the next page, use the 5∞2 3
button on the remote control. The stations
located in the selected country appear at the
top of the list.
• The Guide Channel numbers will also be set
automatically during Auto Channel Set.
8 8
8 Press MENU to exit the menu operations.
8 8
Notes:
• If you perform Auto Channel Set when the
aerial cable is not connected properly, “NO
TV SIGNALS” appears on the screen in step
7. When this happens, make sure of the
aerial connection and press
Auto Channel Set will take place again.
• Depending on reception conditions, the
stations may not be stored in order, and the
station names may not be stored correctly.
OK/STATUS;
Manual Channel Setting
When you want to do channel setting manually,
perform the following procedures as required.
• If you want to ……
……add channels (See below)
……delete unwanted channels (See page 17)
……change the channel positions
(See page 17)
……perform fine-tuning (See page 18)
……descramble programmes when receiving
scrambled broadcasts (See page 18)
……change station names (See page 18)
If you want to add channels
11
1 Press VCR.
11
22
2 Press MENU.
22
33
3 Press 5 or ∞ to select “MANUAL TUNER
33
SET UP ”, then press OK/STATUS.
44
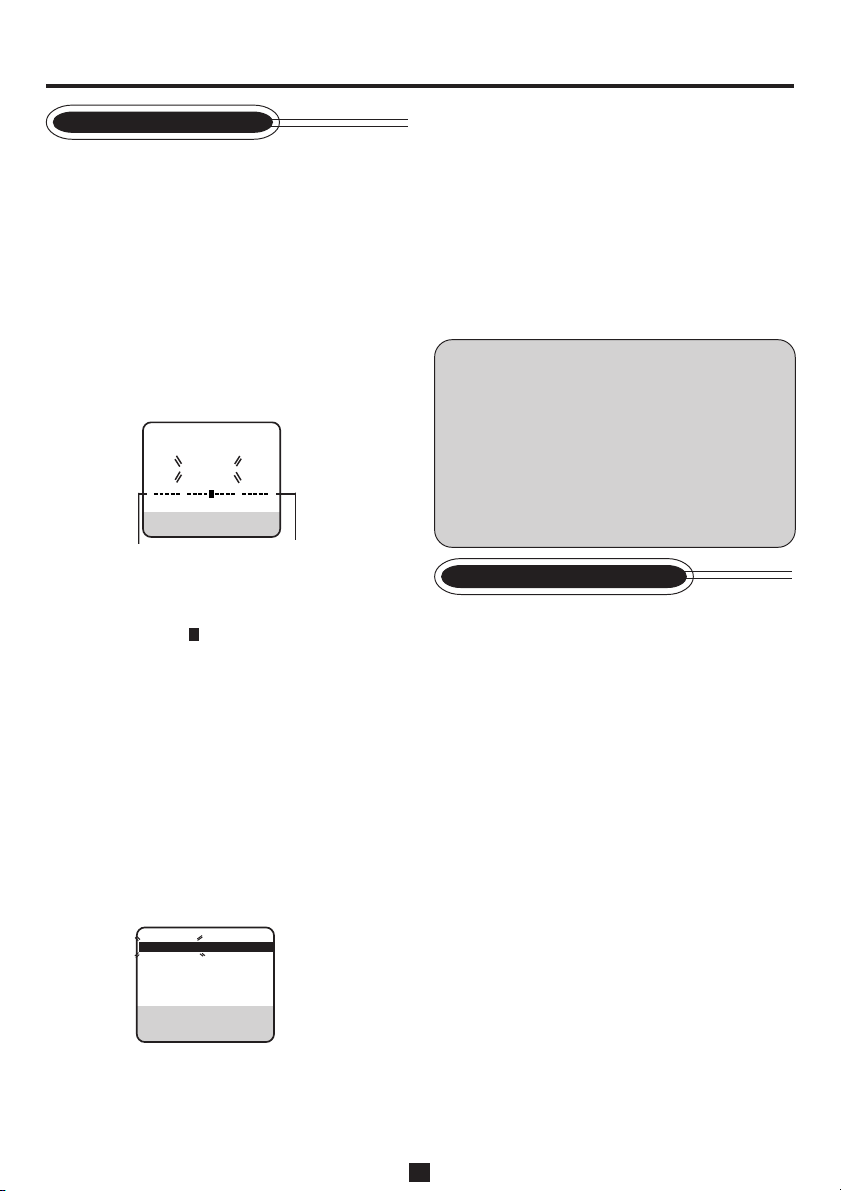
4 Press 5∞ 2 3 until a vacant position in
44
which you want to store a channel begins
blinking.
— 16 —
S
(Ex.) To store in position 12.
PR CH ID PR CH ID
01 25 ARD 08 C26 E-SP
02 CDB SKY1 09 55 WEST
03 10 ZDF 10 C24 SAT1
04 C65 RAI1 11 C23 OSF
05 C31 BBC1 12
06 C32 BBC2 13
07 C33 3SAT 14
SELECT : 5∞23
EDIT : OK
ERASE : CLEAR
END : MENU
– –– –
– –– –
– –– –
The blueback screen and the programme
currently being broadcast by the selected
channel appear alternately for 8 seconds
each.
55
5 Press OK/STATUS. The Manual Channel Set
55
screen appears.
66
6 Press 5 or ∞ to change the band between CH
66
(regular) and CC (cable), then press 3.
PR CH ID FINE DECODER
12 CH01 ------ +/- OFF
SELECT : 5∞ 2 3
EDIT : OK
ERASE : CLEAR
END : MENU
The blueback screen and the programme
currently being broadcast by the selected
channel appear alternately for 8 seconds each.
77
7 Press the Number buttons to input the channel
77
you want to store.
• Input “0” before any single number entries.
• To input the registered station name
(ID)(✈.19), press 3 until “----” begins
blinking, then press 5 or ∞.
• For fine tuning adjustment, press 3 until
“+/–” begins blinking, then press 5 or ∞.
While tuning, “+” or “–” appears.
• When storing a channel that sends scrambled broadcasts, press 3 until “OFF”
(Decoder setting) blinks, then press 5 or ∞
to set “DECODER” to “ON”.
When “A/V2 SELECT” is set to “A/V” or
“SAT”, the “DECODER” setting cannot be
changed (✈P.37).
If you want to delete unwanted channels
You can delete channels manually.
11
1 Press VCR.
11
22
2 Press MENU.
22
33
3 Press 5 or ∞ to select “MANUAL TUNER
33
SET UP” then press OK/STATUS.
The programmed channel information list
appears.
44
4 Press 5 or ∞ until the item you want to delete
44
begins blinking.
55
5 Press CLEAR to delete.
55
The item directly beneath the deleted one
moves up one line.
66
6 Press MENU to exit the menu operations.
66
If you want to change the channel
positions
You can also replace the channel position
numbers.
11
1 Press VCR.
11
22
2 Press MENU.
22
33
3 Press 5 or ∞ to select “MANUAL TUNER
33
SET UP” then press OK/STATUS.
44
4 Press 5 or ∞ until the item you want to
44
change begins blinking, then press OK/
STATUS.
55
5 Press 5 or ∞ to move the station to the new
55
channel position then press OK/STATUS.
Example: If you moved the station in position
4 to position 2, the stations originally in
positions 2 and 3 each move down one space.
66
6 Press MENU to exit the menu operations.
66
NEDERLANDS
ITALIANO
DEUTSCH
FRANÇAIS
ENGLISH
NEDERLANDS
NEDERLANDS
NEDERLANDS
NEDERLANDS
NEDERLANDS
NEDERLANDS
NEDERLANDS
ATTENTION
• If the channels are added, set the Guide
Channel number for that channel (station).
HOWVIEW
(✈“S
®
Set Up” on page 20)
— 17 —
NEDERLANDS
NEDERLANDS
NEDERLANDS
To be continued on the next page
 Loading...