

Page 1
Register your product and get support at
www.philips.com/welcome
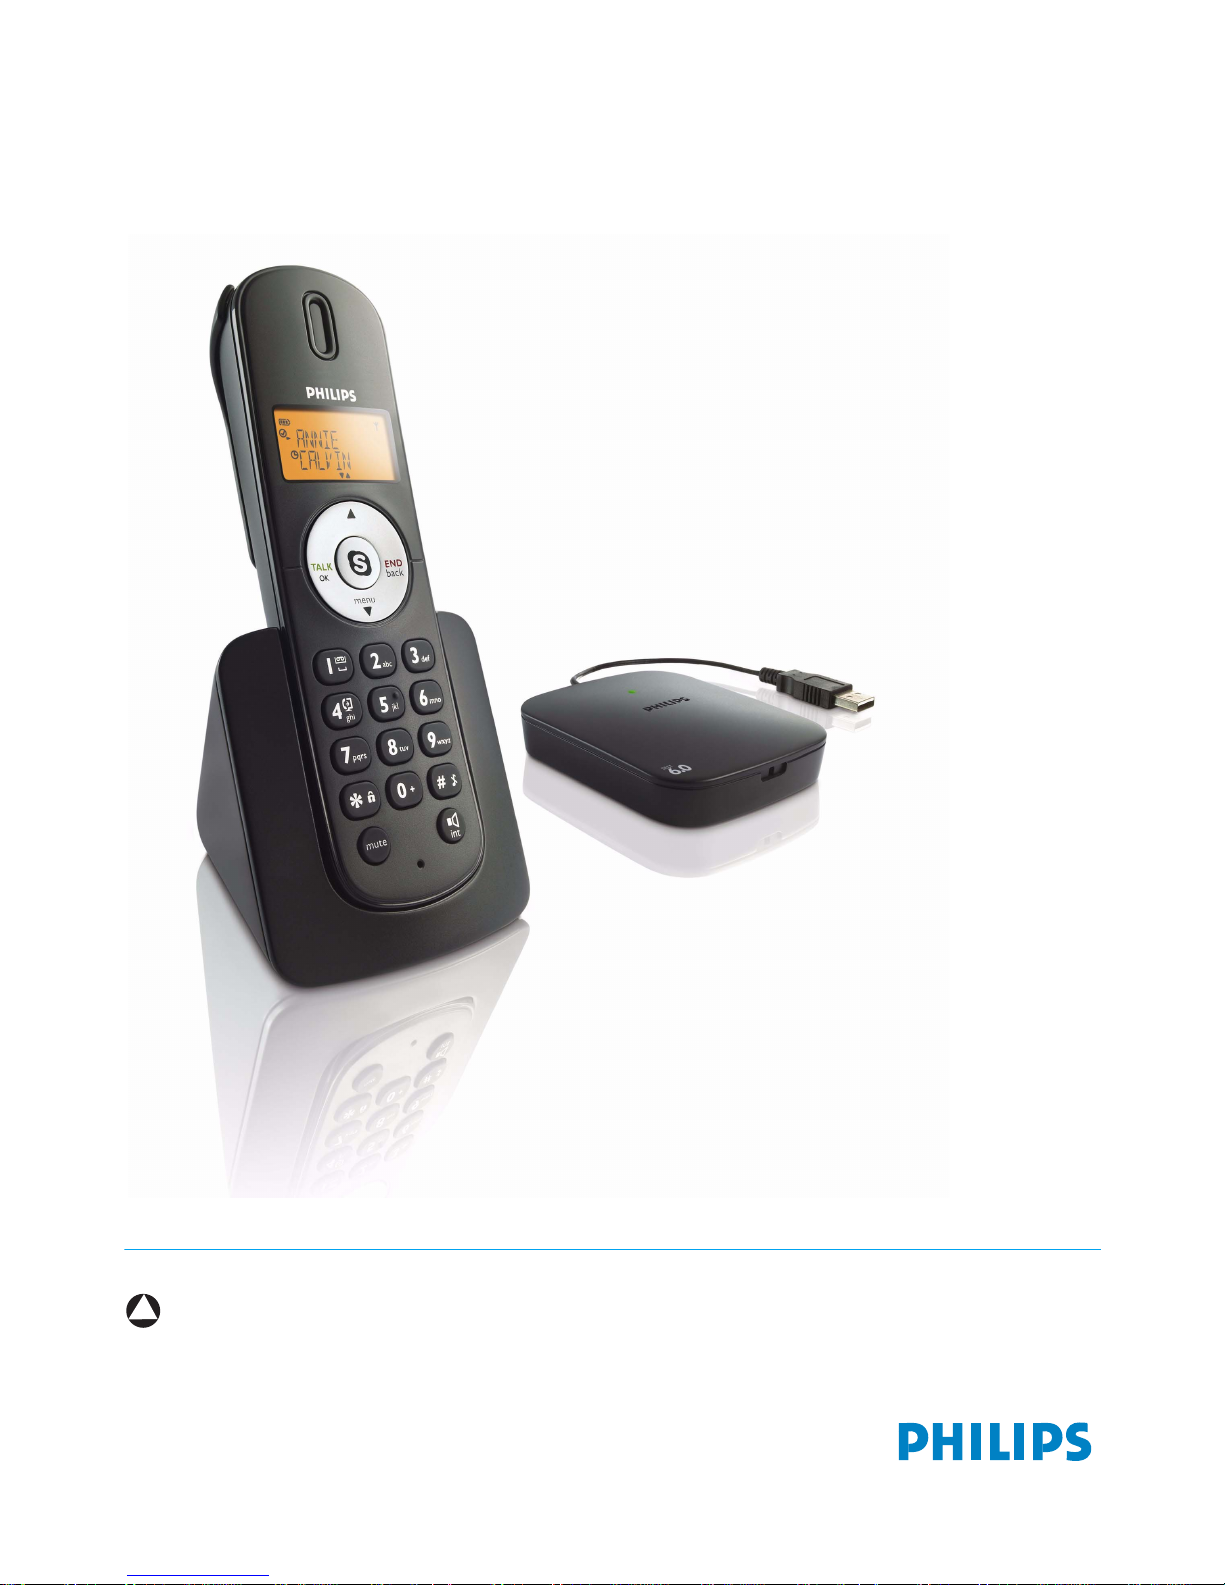
VOIP251
US Cordless Phone
!
Warning
Use only rechargeable batteries.
Charge the handset for 14 hours before use.
Page 2

Page 3

Table of contents
1Important 4
1.1 Terms and Conditions of Use 4
1.2 Power Requirements 4
1.3 Safety Information 4
1.4 Conformity 5
1.5 Recycling & disposal 5
1.6 Disposal instructions for batteries 5
1.7 Recycle your batteries 5
3.5 Checking the signal strength 12
3.6 Checking the battery level 13
3.7 Installing software 13
3.8 Setting up for the first time 13
3.9 Checking Skype connection status 14
3.10 Auto power off 15
3.11 What is standby mode? 15
3.12 Switching your handset on/off 15
1.8 Packaging information 6
4Contact List 16
1.9 Warranty 6
4.1 Viewing the contact list 16
1.10 Electric, Magnetic and Electromagnetic
Fields (“EMF”) 6
4.2 Making a call from the contact list 16
2 Your VOIP251 Cordless Telephone 7
2.1 What’s in the box? 7
2.2 What else you need 7
2.3 The handset 8
2.4 The base station 9
2.5 Display icons 10
2.6 The menus 10
3 Getting Started 12
3.1 Requirements 12
3.2 Connecting your charger 12
4.3 Changing the sorting method 16
5Call 17
5.1 Making a call 17
5.2 Ending a call 17
5.3 Answering a call 17
5.4 Rejecting a call 18
5.5 Turning off the ringer 18
5.6 During a call 18
6 Call Log 20
6.1 Viewing the call records 20
3.3 Charging your handset 12
3.4 Positioning the base station 12
Table of contents
6.2 Making a call 20
7 Conference Calls 21
1
Page 4

7.1 Making a conference call 21
11.3 Setting the key tone 27
7.2 Adding more contacts to a call 21
7.3 Making and receiving additional calls 21
7.4 Ending a conference call 21
8 Intercom 22
8.1 Calling another handset 22
8.2 Transferring a call 22
9 Call Transfer 23
9.1 Enabling call transfer 23
9.2 Transfer to computer 23
9.3 Transfer to handset 24
11.4 Setting the backlight 27
11.5 Setting the screen contrast level 27
11.6 Naming your handset 27
11.7 Auto pick-up 27
11.8 Auto hang-up 28
12 Advanced Settings 29
12.1 Registering another handset 29
12.2 Restoring default settings 29
13 Emergency Management 30
14 Extra Features 31
10 Skype Tools 25
10.1 Contact 25
10.2 Call Log 25
10.3 Presence 25
10.4 Voicemail 25
10.5 Sorting 26
10.6 Call forward 26
10.7 Service 26
11 Setting Options 27
11.1 Setting your handset’s ring tone 27
11.2 Setting your handset’s ring volume 27
14.1 Keypad lock 31
15 Phone Settings 32
15.1 General options 32
15.2 Audio settings 33
15.3 Registration 34
15.4 Alerts 34
15.5 About 35
15.6 Handset locator 36
15.7 Checking for updates 36
15.8 Help 36
16 Text and Numbers 37
2
Table of contents
Page 5

16.1 Entering text and numbers 37
17 Appendix 38
17.1 What is Skype™? 38
17.2 Default (pre-programmed) settings 38
17.3 Phone specifications 38
18 Troubleshooting 40
19 The RBRC© seal 41
20 Compliance information 41
20.1 Caution 41
20.2 Interference 41
20.3 RF Radiation Exposure 42
20.4 Noise 42
20.5 Privacy of Communications 42
20.6 USB Cable 42
20.7 Service Support 42
21 Index 43
Table of contents
3
Page 6

1Important
Take time to read this user manual before you
use your phone. It contains important
information and notes regarding the operation of
your telephone.
1.1 Terms and Conditions of Use
No emergency calls on Skype. Skype is not a
replacement for your ordinary telephone and
can't be used for emergency calls. See Skype's
terms and conditions at www.skype.com/eula and
www.skype.com/tos.
The service will not work if there is a power cut
or broadband failure.
1.2 Power Requirements
The handset requires a power source of two
rechargeable NiMH batteries, size AAA 1.2V
750mAh (HR10/44).
Caution
In case of power failure, communication can be
lost.
This product requires an electrical supply of 120
volts AC. In case of power failure, the
communication can be lost. The Electrical network
is classified as hazardous. The only way to power
down the charger is to unplug the power supply
from the electrical outlet. Ensure that the electrical
outlet is always easily accessible. The voltage on
the network is classified as TNV-3
(Telecommunication Network Voltages), as
defined in the standard UL 60-950.
Handset Charger Adapter
Input: 100-240V 50/60Hz
Output: 7.5VDC 200mA
Caution
Use only the mains adapter supplied with this
equipment. Incorrect adapter polarity or voltage
can seriously damage the unit.
!
Warning
RISK OF EXPLOSION IF BATTERY IS REPLACED
BY AN INCORRECT TYPE. Never use nonrechargeable batteries. Use the recommended
type supplied with this product. NiMH batteries
must be disposed of in accordance with the
applicable waste disposal regulations.
!
Warning
To avoid damage or malfunction:
• Use only the battery type listed in the
instruction manual. Do not use lithium or nonrechargeable batteries, as they can explode.
• Do not allow the charging contacts or the
battery to come into contact with metal
objects. These objects could create a short
circuit across the battery terminals that could
in turn cause the batteries or conductor to
overheat resulting in burns.
• Always use the cables provided with the
product.
1.3 Safety Information
To avoid damage or malfunction:
• Read and follow all warnings and instructions
marked on the product.
• Do not use this product near water, a laundry
tub, in a wet basement, or near a swimming pool.
• Do not allow the charger to come into contact
with liquids.
• Do not place this product on an unstable
surface. The product may fall and be damaged.
• This product should never be placed near or
over a radiator or heat register.
• Do not expose the phone to excessive heat
caused by direct sunlight.
• This product should be operated only from the
type of power source indicated on the label.
• Do not drop your phone or allow objects to
fall on your phone.
• Do not allow anything to rest on the power
cord. Do not locate this product where the
cord will be abused by people walking on it.
• Do not overload wall outlets and extension
cords as this can result in the risk of fire or
electric shoc k.
4
Important
Page 7
• Avoid using a telephone during a storm or
severe weather with lightning. There may be a
risk of electric shock from lightning.
• Do not use this product to report a gas leak in
the vicinity of the leak.
• Do not use the product in places where there
are explosive hazards.
• Do not use this product near intensive care
medical equipment or by any people with
pacemakers.
• Due to the radio signals between base station
and handset, wearers of hearing aids may
experience interference in the form of a
humming noise.
• Active mobile phones in the vicinity may cause
interference.
• Do not let small metal objects come into
contact with the product. This can deteriorate
audio quality and damage the product.
• Do not use any cleaning agents containing
alcohol, ammonia, benzene or abrasives as
these may harm the set.
• Do not open the product as you could be
exposed to high voltages.
• Operating and storage temperatures:
- Operate in a place where the temperature is
always between 0 and 35º C (32 to 95º F).
- Store in a place where the temperature is
always between -20 and 45º C (-4 to 113º F).
- Battery life may be shortened in low
temperature conditions
1.5 Recycling & disposal
Disposal instructions for old products:
The purpose of the WEEE directive (Waste
Electrical and Electronic Equipment; 2002/96/EC)
is to ensure that products are recycled using best
available treatment, recovery and recycling
techniques to ensure human health and high
environmental protection.
Your product is designed and manufactured with
high quality materials and components, which can
be recycled and reused.
Do not dispose your old product in your general
household waste bin.
Find out about the local separate collection
system for electrical and electronic products
marked by this symbol.
Use one of the following disposal options:
• Dispose of the complete product (includin g its
cables, plugs and accessories) in the design ated
WEEE collection facilities.
• If you purchase a replacement product, hand
your complete old product back to the retailer.
He should accept it as required by the WEEE
directive.
SAVE THESE INSTRUCTIONS
1.4 Conformity
Hereby, Philips Consumer Lifestyle declares that
this VOIP251 is in compliance with the essential
requirements and other relevant provisions of
Directive 1999/5/EC. The declaration of
conformity is available at: www.p4c.philips.com
Important
1.6 Disposal instructions for batteries
Batteries should not be disposed of with
general household waste.
1.7 Recycle your batteries
Do not dispose of your rechargeable batteries.
Call the toll free number 1-800-822-8837 to get
instructions on how to recycle your batteries.
5
Page 8

1.8 Packaging information
Philips has marked the packaging with standard
symbols designed to promote the recy cling and
appropriate disposal of your eventual waste.
A financial contribution has been paid to the
associated national recovery & recycling
system.
The labelled packaging material is rec yclable.
1.9 Warranty
The warranty information is available on
www.philips.com/support.
1.10 Electric, Magnetic and
Electromagnetic Fields (“EMF”)
Philips Royal Electronics manufactures and
1
sells many consumer oriented products
which usually, as with any electronic
apparatus, have the ability to emit and receive
electromagnetic signals.
One of Philips’s leading Business Principle s is
2
to take all necessary health and safety
precautions for our products, to comply with
all applicable legal requirements and to stay
well within the EMF standards applicable at
the time of production.
Philips is committed to developing, producing
3
and marketing products that cause no
adverse health effects.
Philips confirms that if its products are
4
handled properly for their intended use, they
are safe to use according to scientific
evidence available today.
Philips plays an active role in the development
5
of international EMF and safety standards,
enabling Philips to anticipate further
developments in standardization for early
integration in its products.
6
Important
Page 9
2 Your VOIP251 Cordless Telephone
Congratulations on your purchase and welcome to Philips!
To fully benefit from the support that Philips offers, register your product at
www.philips.com/welcome.
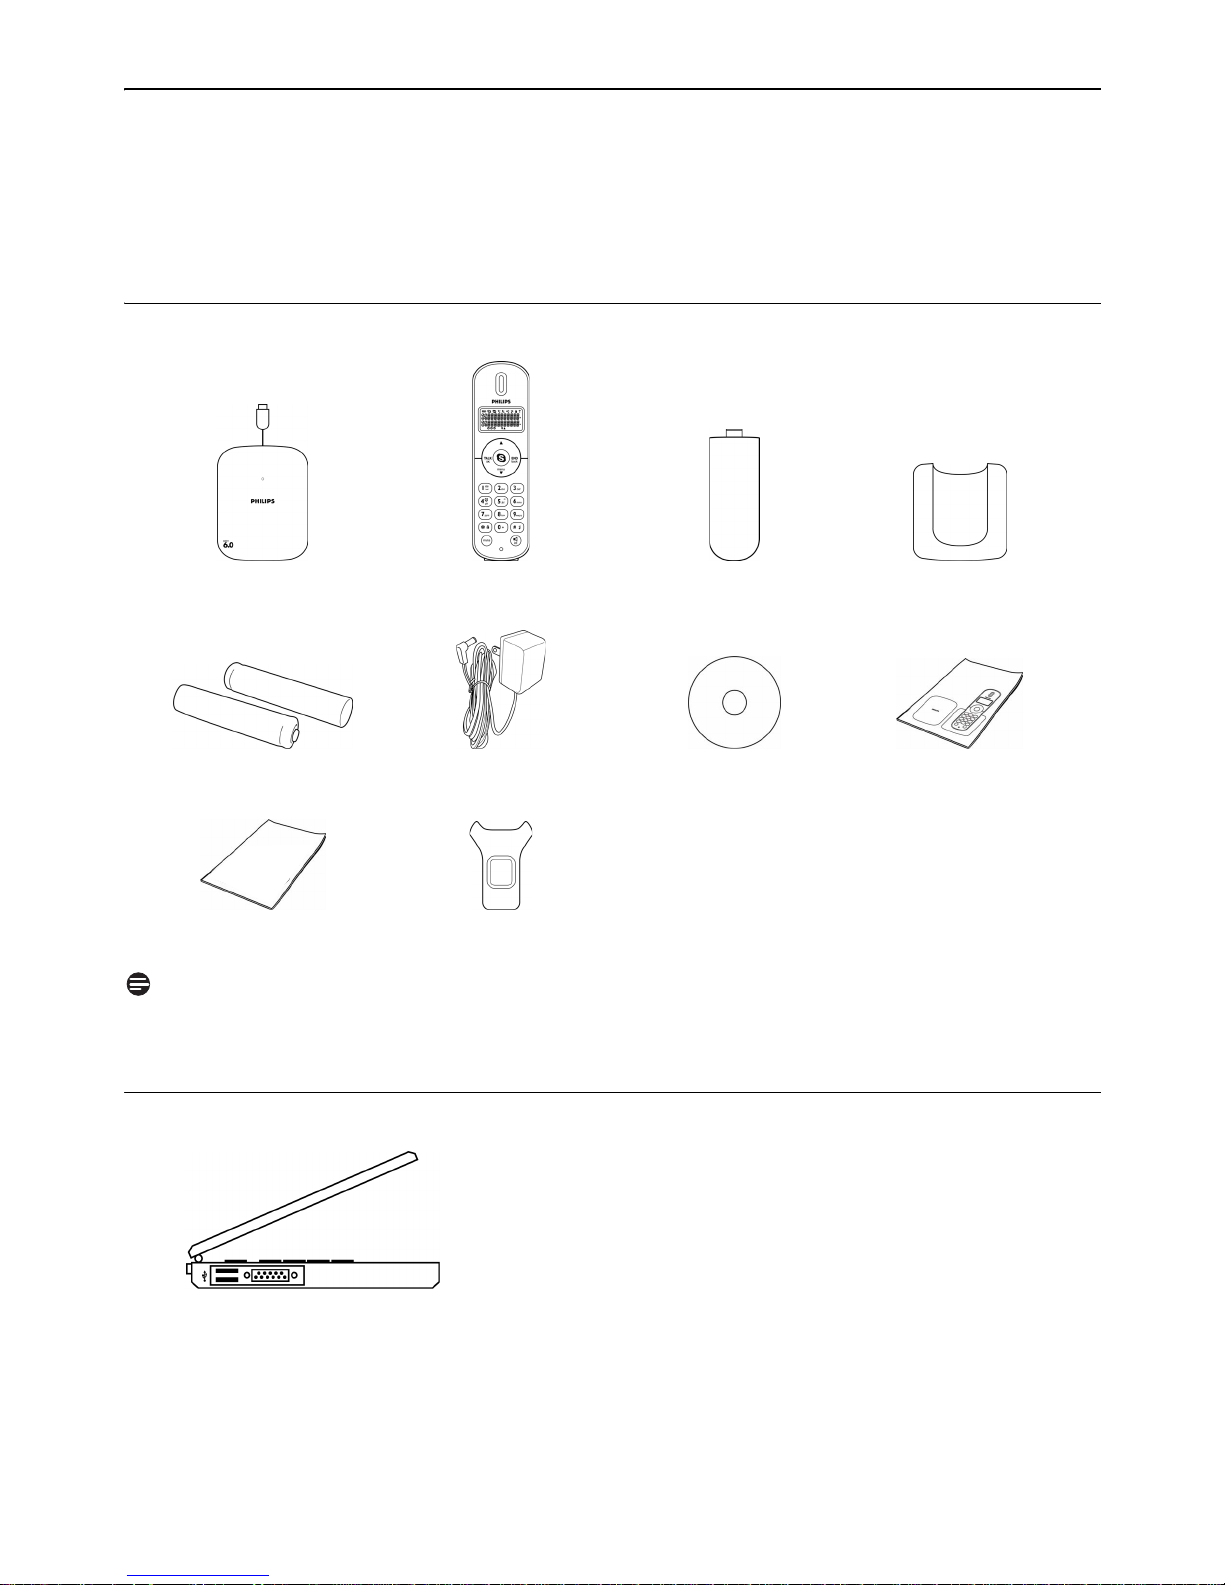
2.1 What’s in the box?
Base Station and
0.9m USB cable
NiMH AAA
Battery x 2
Additional
Handset x 1 Handset battery
Cover x 1
Charger power
adapter
Installation CD
with User Manual
Belt clip
Charger
Quick Start
Guide
Assistance leaflet
Note
*Only the Skype version printed on the Installation CD is guaranteed full compat ibility. New feature s
in upgraded Skype versions may not be available on VOIP251.
2.2 What else you need
• A desktop or laptop with free USB port
• Internet connection (broadband recommended)
• A free standard wall outlet
NEED MORE HELP?
• See the Frequently Asked Questions section in this user guide on page 40.
• Visit our online help www.philips.com/support
Your VOIP251 Cordless Telephone
7
Page 10
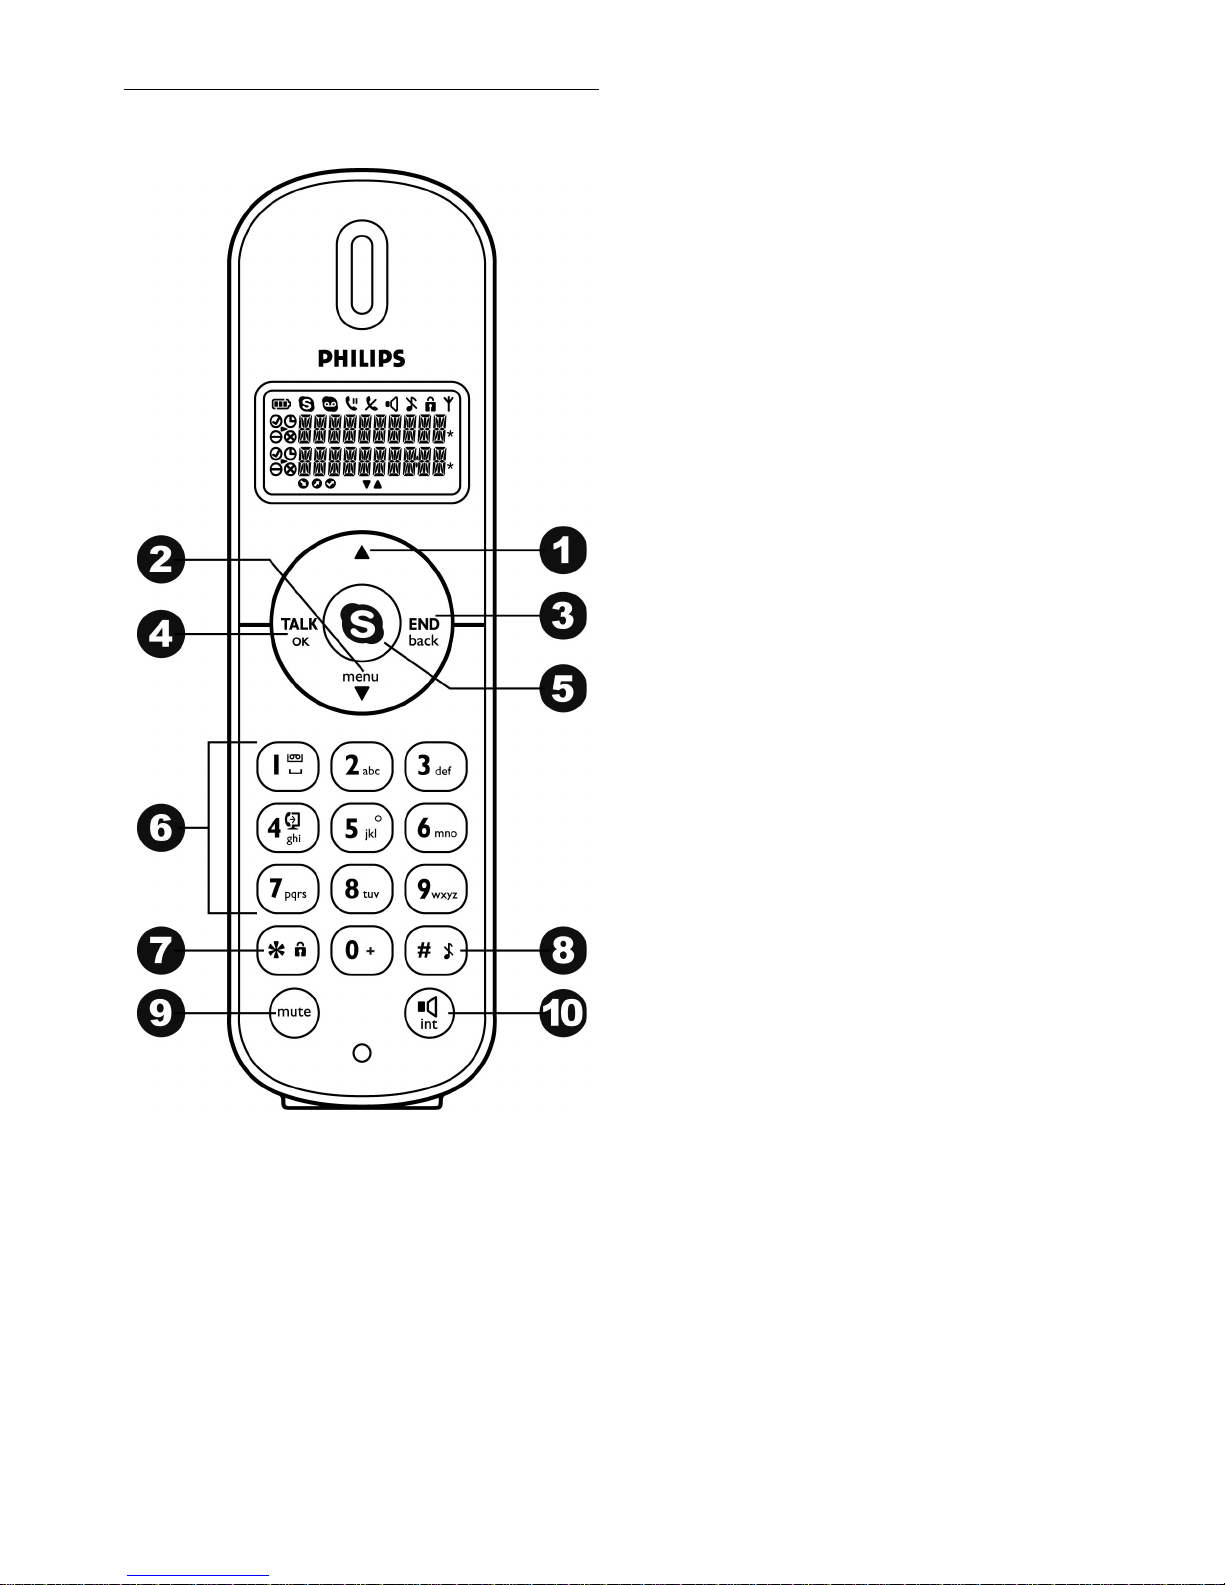
2.3 The handset
1 Up Navigation and Presence key u
Scroll up menu
Increase receiver volume
Enter online status menu
2 Down Navigation and Menu key
Scroll down menu
Decrease receiver volume
Access main menu
3 End and On / Off key
End call
Exit menu
Clear digits
Stop voicemail playback
Power on/off the handset
4 Talk and OK key
Make and answer calls
Hold, resume and toggle calls
Launch conference call
Play voicemail
Confirm a selection
Access call history
5 Skype key
Open contact list
6 Digit keys
Dial digit and enter text
Press and hold 1 key to enter voicemail list
Press and hold 4 key to transfer call to
computer
Press and hold 0 key to enter +
7Star and Keylock key
Enter *
Select contacts for a conference call
Press and hold to lock/unlock keypad
8 Pound and Ringer Off key
Enter #
Press and hold to enable / disable silent mode
9Mute key m
Mute / un-mute microphone
10 Speaker and Intercom key
Turn speaker on / off
Press and hold to make intercom call
s
e
r
*
#
i
d
8
Your VOIP251 Cordless Telephone
Page 11
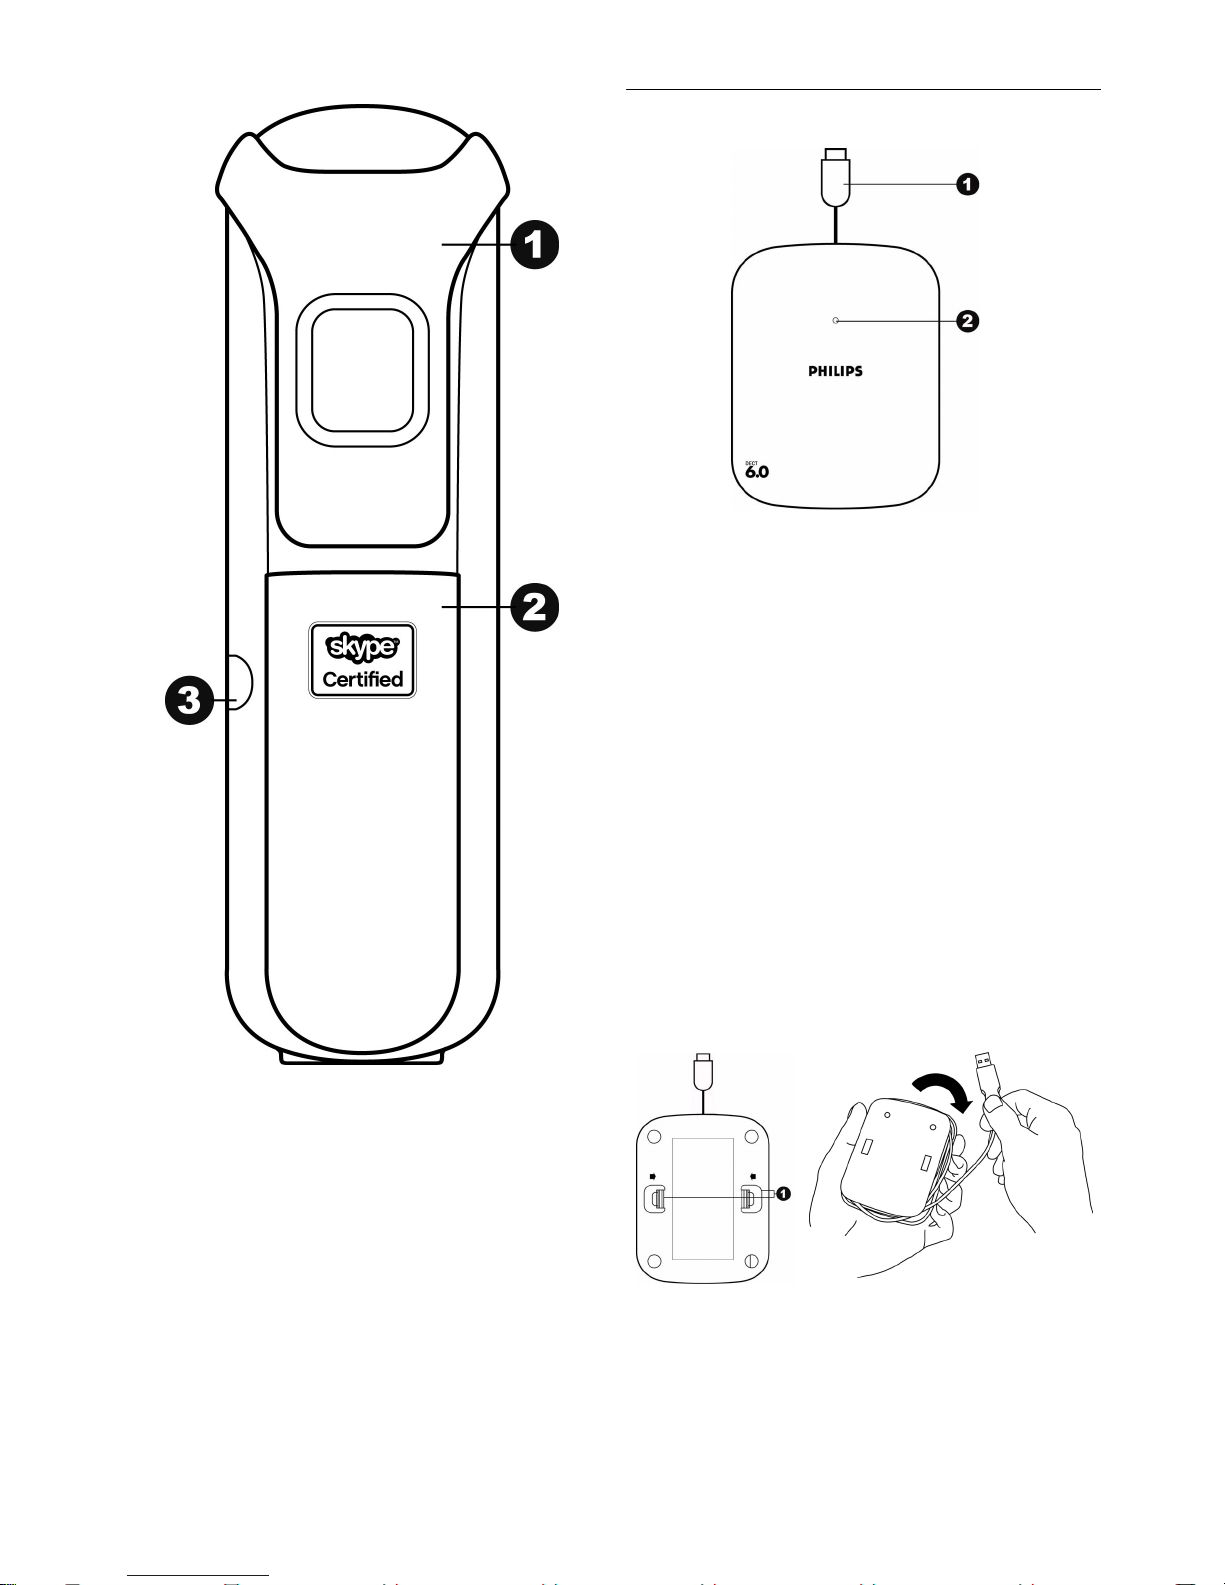
2.4 The base station
1 USB cable
The length of the cable can be customized up
to a length of 0.9m.
Refer to the figure below.
2 Base indicator
Slow Blinking (0.5 second intervals):
Indicates that:
- a call is in progress, OR
- the handset is being paged, OR
- the base station is in registration mode.
Fast Blinking (0.1 second intervals):
Indicates that the phone is receiving a call.
Steady On:
Indicates that the base station is connec ted to
computer.
1Belt clip
2 Battery compartment
Remove battery cover to replace batteries.
3Headset jack
Headset is sold separately.
Your VOIP251 Cordless Telephone
Cover release
The length of the USB cable can be custom ized up
to a length of 0.9m.
1 Squeeze the tabs together.
Lift off the back cover. Uncoil as much of the
cable as is needed.
9
Page 12
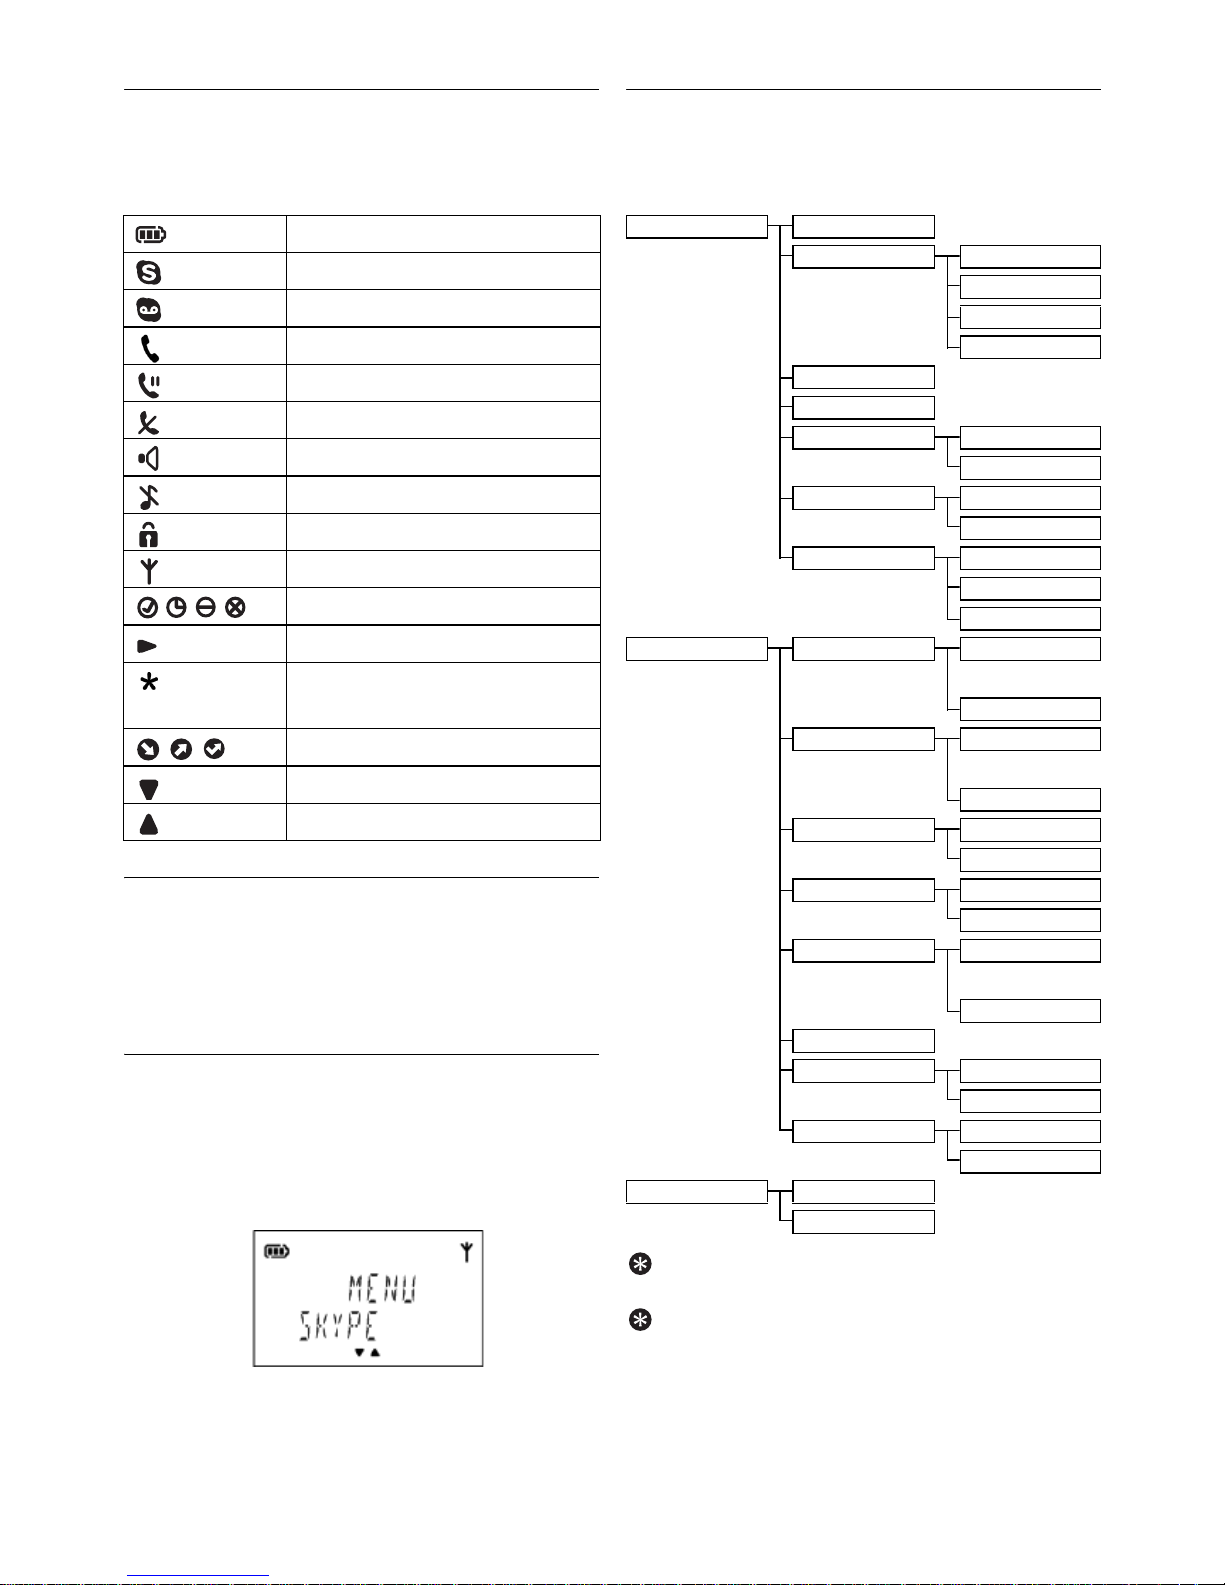
2.5 Display icons
Each icon gives you a visual message about what
is happening on your handset.
2.6.2 Main menu structure
The table below describes the menu tree of your
phone.
Battery
Skype call
Voicemail indicator
Intercom
Hold
Mute on
Speaker on
Silent mode on
Keypad locked
Signal
Skype status
Focus indicator
Conference / new voicemail
marker
Call status
More items below
More items above
2.6 The menus
Your phone offers a variety of features and
functions grouped in the menus. The menus
include the main menu, call log and contact list.
2.6.1 Browsing the main menu
The main menu includes the Skype, Setting and
Advanced menus.
• Short press
d when the handset is in idle to
enter the main menu.
SKYPE CONTACT
CALL LOG ALL
MISSED
INCOMING
OUTGOING
PRESENCE
VOICEMAIL
SORTING STATUS
ALPHANUM
CALL FORWD ON
OFF
SERVICE CREDITS
SKYPEIN
VOICEMAIL
SETTING RING TONE MELODY 1
...
MELODY 10
RING VOL SILENT
...
LEVEL 5
KEY TONE ON
OFF
BACKLIGHT ON
OFF
CONTRAST LEVEL 1
...
LEVEL 5
HS NAME
PICK-UP AUTO
MANUAL
HANG-UP AUTO
MANUAL
ADVANCED REGISTER
RESET
10
Tip
Use
u or d to navigate the menus.
Tip
Quick Exit.
Press and hold e to exit from any
menu instantly. All unconfirmed changes will not
be saved.
Your VOIP251 Cordless Telephone
Page 13

2.6.3 Browsing the call log and contact list
• Short or long press r whe n the handset is in
idle to enter the call log.
• Short press
s when the handset is in idle to
enter the contact list.
Your VOIP251 Cordless Telephone
11
Page 14
3 Getting Started
3.1 Requirements
In order to use this phone, your computer should
meet the following requirements:
• Computer running Windows 2000, Windows
XP, Windows Vista, Mac OS X 10.3.9, 10.4.x
• 800 MHz processor
• Windows: 256 MB RAM and 50 MB HDD
Mac OS X: 512 MB RAM and 40 MB HDD
• Computer should be switched on
Note
Handset may get warm during initial charge. This
is normal. The handset may take a few seconds to
power up.
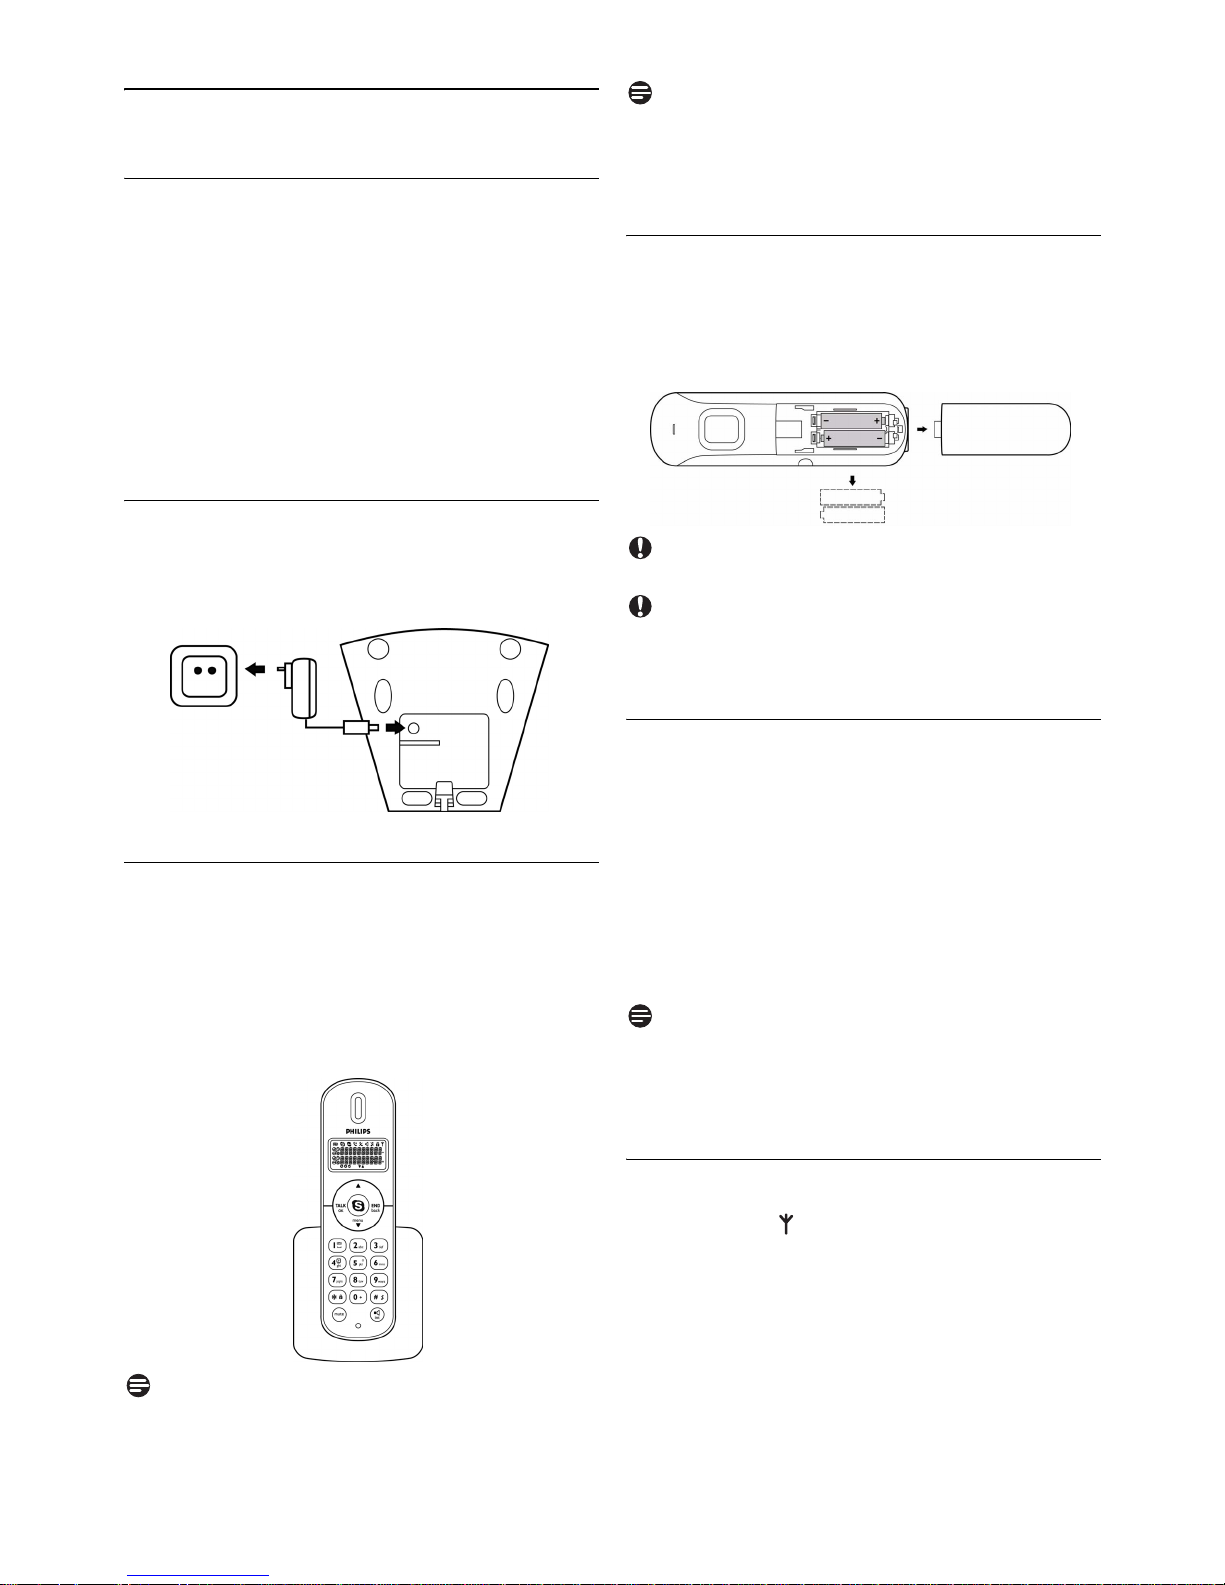
3.3.1 Replacing the batteries
Remove the battery cover and replace the
1
batteries.
Slide the battery door firmly into place.
2
3.2 Connecting your charger
Connect the power adapter of the charger to
1
a standard wall outlet.
3.3 Charging your handset
2 rechargeable batteries are already inserted in
your handset.
Remove the battery pull tab from the handset
1
back.
Place the handset on the charger for charging.
2
Caution
Never use non-rechargeable batteries
Caution
Check the battery polarity when inserting.
Incorrect polarity may damage the product.
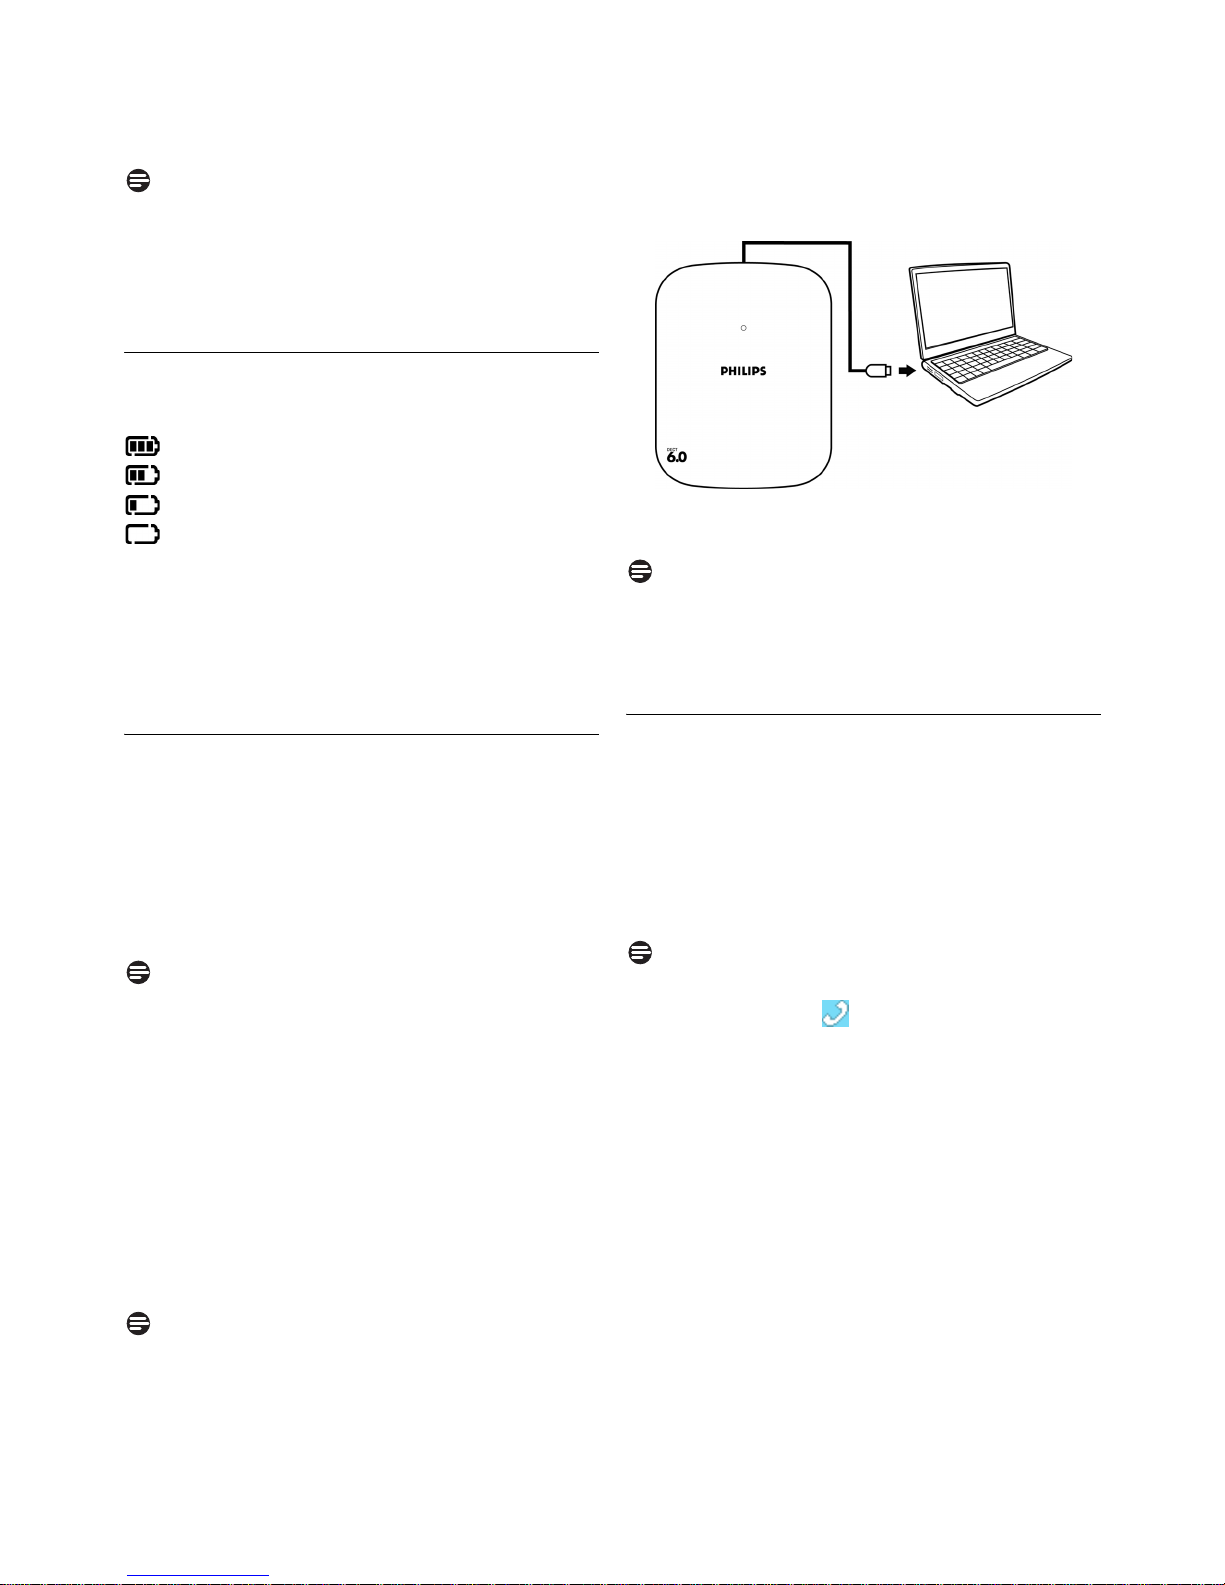
3.4 Positioning the base station
The position in which you place the base station
can have an affect on the range and performance of
your product. Avoid placin g the b ase st atio n too
close to large met al obje cts su ch as fili ng cabi nets,
radiators or electrical appliances. This can impair
the range and sound quality. Buildings with thick
internal and external walls may impair transmission
of signals to and from the base station.
Note
Your base station needs no external power.
Power is supplied by the computer through the
USB cable.
Note
Charge the handset(s) for 14 hours before initial
use!
12
3.5 Checking the signal strength
The signal icon indicates the link status
between your handset and the base station. A
steady icon means your handset and the base
station are linked. A flashing icon means your
handset and the base station are not linked.
If you move too far away from the base station
while you are on the phone, you will hear warning
tones notifying you that your handset is almost
Getting Started
Page 15
out of range - lost link. Take your handset closer
to the base station or your call will be cut off
shortly after the warning.
Note
If your handset has lost link, you will not be able
to make or receive any calls. You will also not be
able to carry out many of the phone’s functions
and features.
3.6 Checking the battery level
The battery icon displays the current battery level.
= 100% full
= 60% full
= 30% full
= Empty. Require charging.
Your handset may power down shortly if it is not
charged after the battery is empty. If you are on
the phone when the battery is nearly empty, you
will hear warning tones. Your call may be cut off
shortly after the warning.
3. Double-click
Follow the instructions on the screen. You
2
VOIP251.dmg
.
will be asked to plug the base station into
your computer during the installation.
Eject the installation CD after installation
3
completes.
Note
If your computer is running Windows 2000, you
may need to restart your computer to complete
the installation.
3.7 Installing software
Before using your phone, you need to install the
software provided on the enclosed CD. You can
choose Automatic or Custom installation.
Insert the installation CD into a CD-ROM (or
1
DVD-ROM) drive on your computer. The
installation program will start automatically.
Note
If the installation program for Windows does not
start automatically:
1. Under Windows Vista, click the Windows
icon. Click
Computer
Under Windows XP, click
Computer
.
Under Windows 2000, click
.
Start
. Click My
My Computer
at
desktop.
2. Navigate to the CD-ROM (or DVD-ROM)
drive.
3. Double-click
Wizard.exe
.
Note
If the installation program for Mac OS X does not
start automatically:
1. Click
in the menu bar. Select
Computer
Go
2. Click VOIP251 CD icon.
3.8 Setting up for the first time
Windows
Make sure that the phone is directly
1
connected to a USB slot on your computer.
If this is your first installation, the VOIP
2
software may be launched automatically. It
depends on your selection during installation.
Note
Connection status.
When the software is
running, a tray icon displays at the bottom
right corner of your desktop.
If the software is not running, start the
3
VOIP251 software by double clicking the
shortcut icon created on your desktop.
Start Skype if the VOIP251 software has not
4
started Skype for you.
Log in to your Skype account.
5
If this is your first time running the VOIP251
6
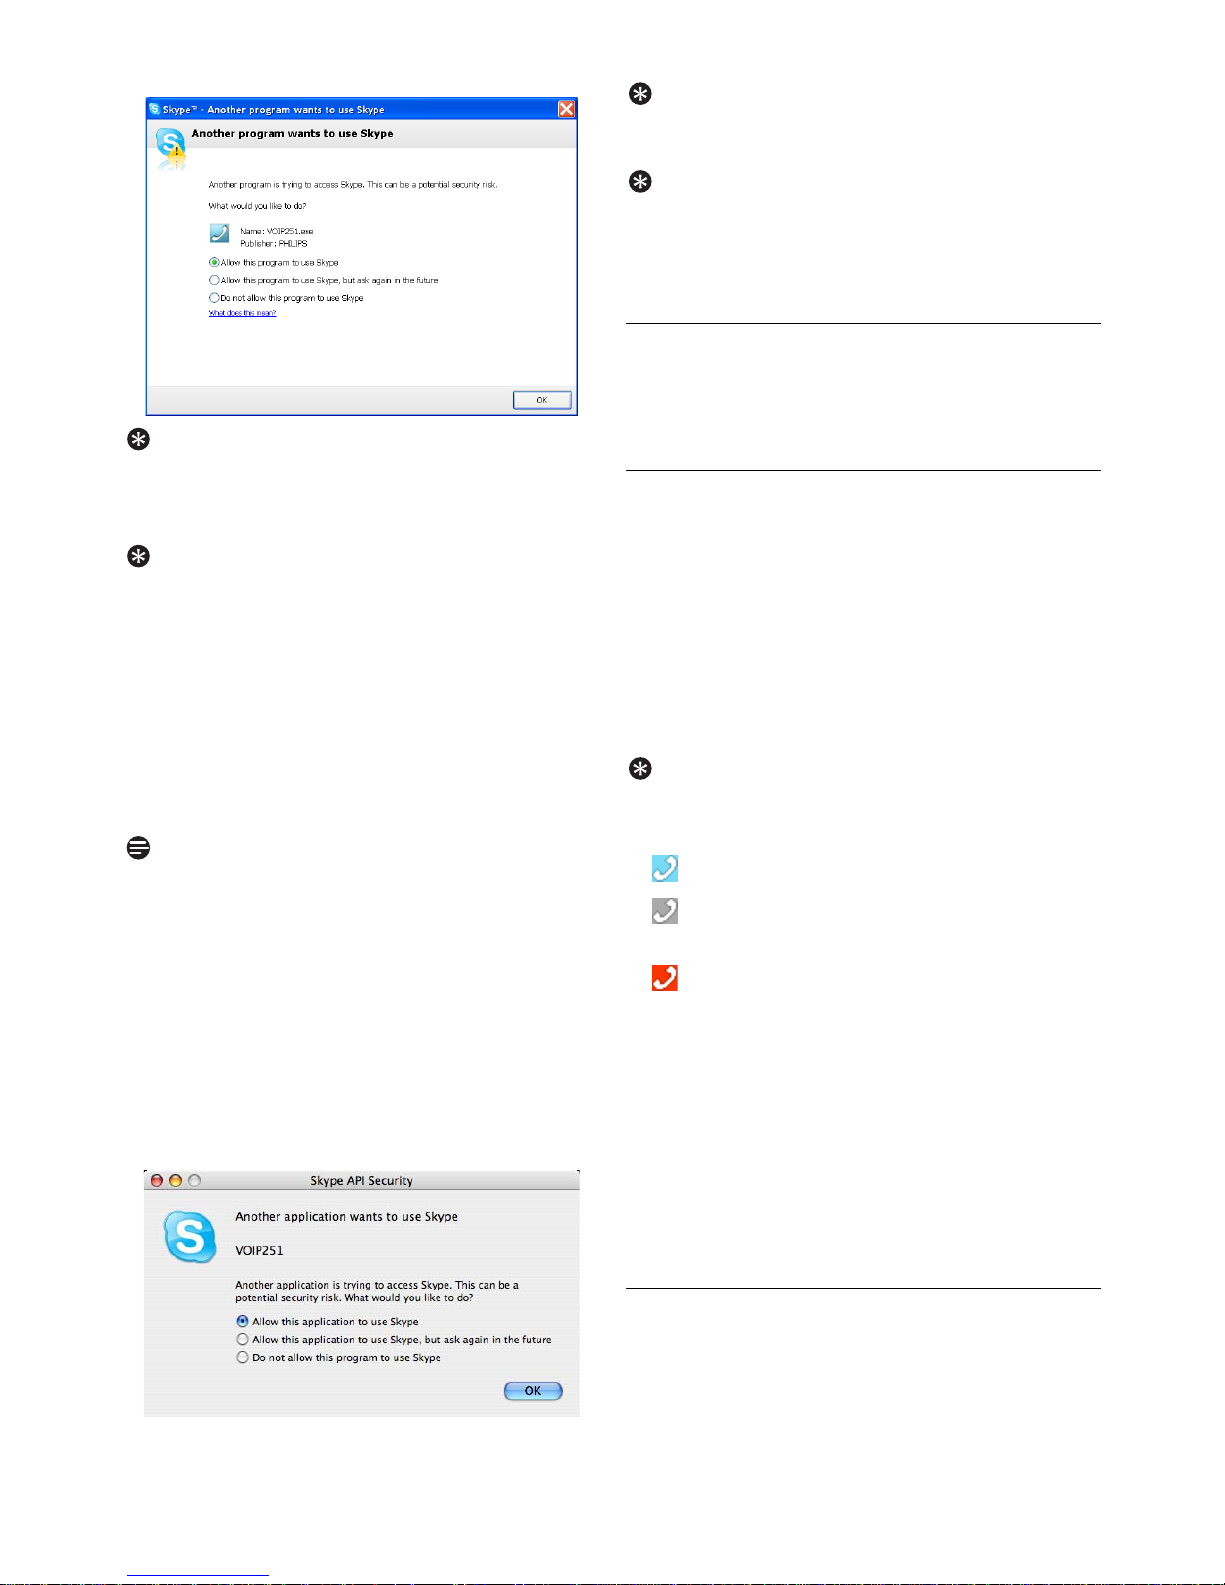
software, you will see the pop-up message
Another program wants to use Skype
Allow this program to use Skype
and click OK.
.
. Select
Getting Started
13
Page 16
Tip
If you don’t have a Skype account, you can find
details on how to create one at
http://www.skype.com.
Tip
Quit software.
Right click the tray icon, and
select Quit. Note that you cannot make or
receive any calls if the software is not running.
Mac OS X
Make sure that the phone is directly
1
connected to a USB slot on your computer.
Go
Click
2
Computer
double-click
in the menu bar and select
. Select the
VOIP251
Applications
.
folder and
Note
Connection status.
When the software is
running, a VOIP251 icon appears in your dock.
Start Skype if the VOIP251 software has not
3
started Skype for you.
Log in to your Skype account.
4
If this is your first time running the VOIP251
5
software, you will see the pop-up message
Another application wants to use Skype.
Select
Allow this application to use Skype
and
click OK.
Tip
If you don’t have a Skype account, you can find details
on how to create one at http://www.skype.com.
Tip
Quit software.
Select
Quit VOIP251
Click
VOIP251
in the menu bar.
. Note that you cannot make
or receive any calls if the software is not running.
3.9 Checking Skype connection status
This option allows you to check if Skype is
running properly.
3.9.1 From your computer
Windows
Double-click t he tray icon.
1
In the VOIP251 Phone Settings window,
2
About
select
If
VOIP251 - OK
3
.
is displayed in the VOIP251
Phone textbox, the connection is normal.
Otherwise, correct the problem according to
the displayed status.
Tip
You can also check your connection status by
looking at the colour of the tray icon:
• = Skype is online and you are logged in.
• = The base is connected but Skype is offline
or you are not logged in.
• = The base is disconnected.
• No icon = VOIP251 software is not running.
Mac OS X
Click the VOIP251 icon in the dock.
1
Click VOIP251 in the menu bar. Select
2
VOIP251 - OK
If
3
is displayed in the VOIP251
About
Phone textbox, the connection is normal.
Otherwise, correct the problem according to
the displayed status.
.
14
3.9.2 From your handset
Your handset gives you a visual indication i f Skype
or the VOIP251 software is not running properly.
• The handset is linked with the base station and
the VOIP251 software is running, but Skype is
Getting Started
Page 17
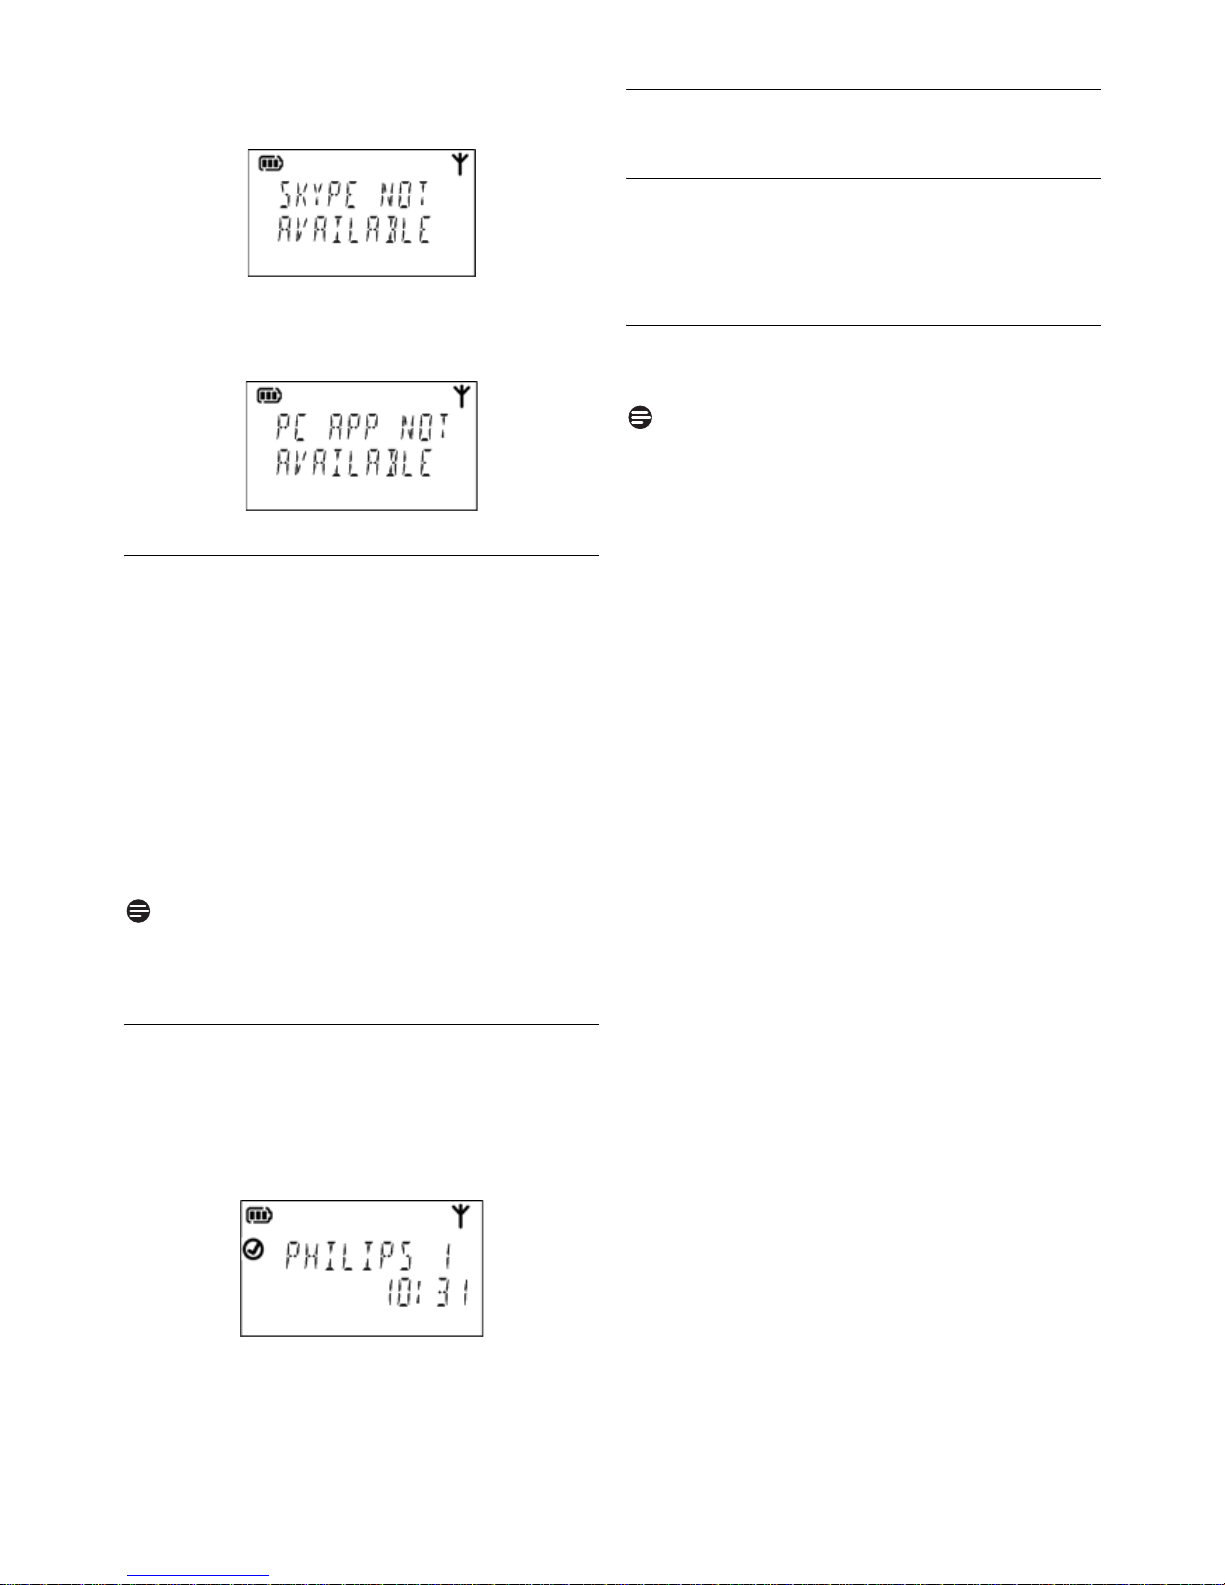
not running or you are not logged in. The tray
icon is grey.
• The handset is linked with the base station but
the VOIP251 software is not running. The tray
icon is not displayed.
3.10 Auto power off
For your phone to work properly, your
computer should be switched on and Skype
should be running.
In order to conserve battery life if your base
station is disconnected or your computer is
switched off, your handset will indicate
SEARCHING
switched off.
To switch your handset ON, press
on the charger.
Note
Your handset will not switch off automatically if it
is on the charger.
for 30 minutes. Then, it will be
e or place it
3.12 Switching your handset on/off
3.12.1 Switching on your handset
e. The handset may take a few
Press
1
seconds to power up.
3.12.2 Switching off your handset
Press and hold
1
Note
Your handset cannot receive any calls if there is
no power.
e.
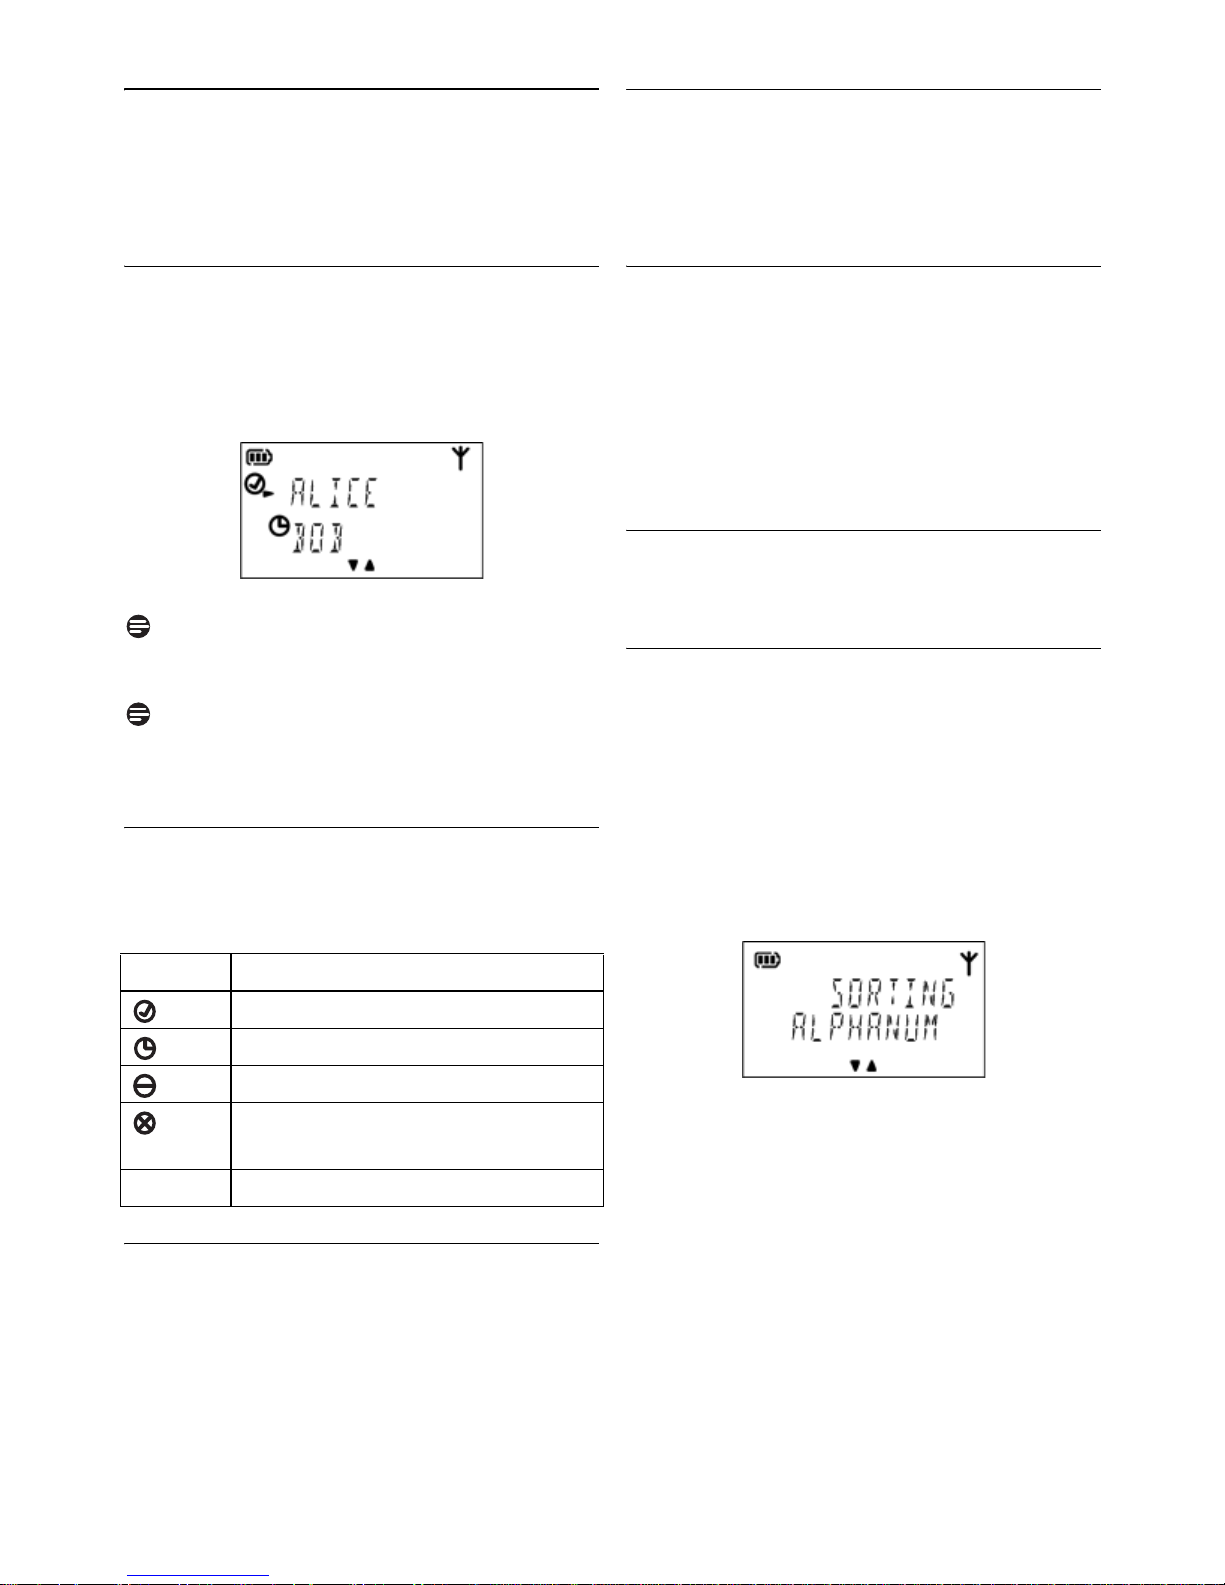
3.11 What is standby mode?
Your phone is in standby mode when it is idle.
The standby screen displays the handset name
and number, Skype user status, time, signal icon
and battery icon.
Getting Started
15
Page 18
4 Contact List
Your phone can retrieve contacts from the
contact list on Skype.
4.1.2.1 Search by scrolling
Press u or d to scroll to the contact you
1
want. Press and hold u or d to start autoscroll. Release to stop scrolling.
4.1 Viewing the contact list
d. Select
Press
1
Select
OR
Press
Scroll to the contact you want.
2
Note
Contact list empty.
the contact list,
Note
If the name contains non-latin characters, the
contact’s Skype name will be displayed instead.
4.1.1 Skype status icon
The status icon indicates the Skype status of each
contact in the contact list.
CONTACT
s.
SKYPE
and press r.
If there are no contacts in
EMPTY
and press r.
will be displayed.
4.1.2.2 Search by first letter
While the contact list is opened, enter the
1
first letter of a contact using the keypad to
search. For example, to search the contact
“Sam”, press 7 four times.
The first contact that begins with the letter S
2
will be selected.
4.2 Making a call from the contact list
See “Calling from contact list” on page 17.
4.3 Changing the sorting method
This setting changes how contacts are sorted in
the contact list, either by Skype status or
following alphanumeric order.
d.
Press
1
Select
2
Select
3
Select the new setting. Press r.
4
• The setting is saved.
SKYPE
SORTING
and press r.
and press r.
Icon Skype status
Online, SkypeMe, Call Forwarding
Away
Not Available, Do Not Disturb
Offline, Invisible, Not Authorized,
Blocked
(no icon) SkypeOut
4.1.2 Searching a contact
You can search your contacts using the
alphanumeric mode or by scrolling the list.
16
Contact List
Page 19
5Call
Your phone supports Skype, SkypeOut and
SkypeIn calls.
Note
Emergency call.
making emergency phone calls when the power
fails. Alternative arrangements should be made
for access to emergency services. See page 38 for
more details.
5.1 Making a call
This section describes the different ways to make
a call.
Note
Signal strength.
making a call and during a call. See “Checking the
signal strength” on page 12.
5.1.1 Calling from contact list
For details on the contact list, see “Contact List”
on page 16.
s during standby mode.
Press
1
Select the contact you want to call.
2
r to dial out the call. The S icon and
Press
3
call timer are displayed.
This phone is not designed for
Check the signal strength before
5.1.3 Calling SkypeOut
Note
Skype credit.
to make SkypeOut calls.
be displayed on the handset if you have no credit.
For details, visit the SkypeOut website at
http://www.skype.com/store/buy/skypeout.html.
Enter the phone number. The phone number
1
shall include +, the international cal ling code,
area code, and subscriber number.
Press
2
displayed.
Tip
To insert +, press and hold
Tip
To clear a digit, press
Note
Low battery.
tones if your handset is almost out of battery.
Charge your handset or your call may soon be cut
off. See “Checking the battery level” on page 13.
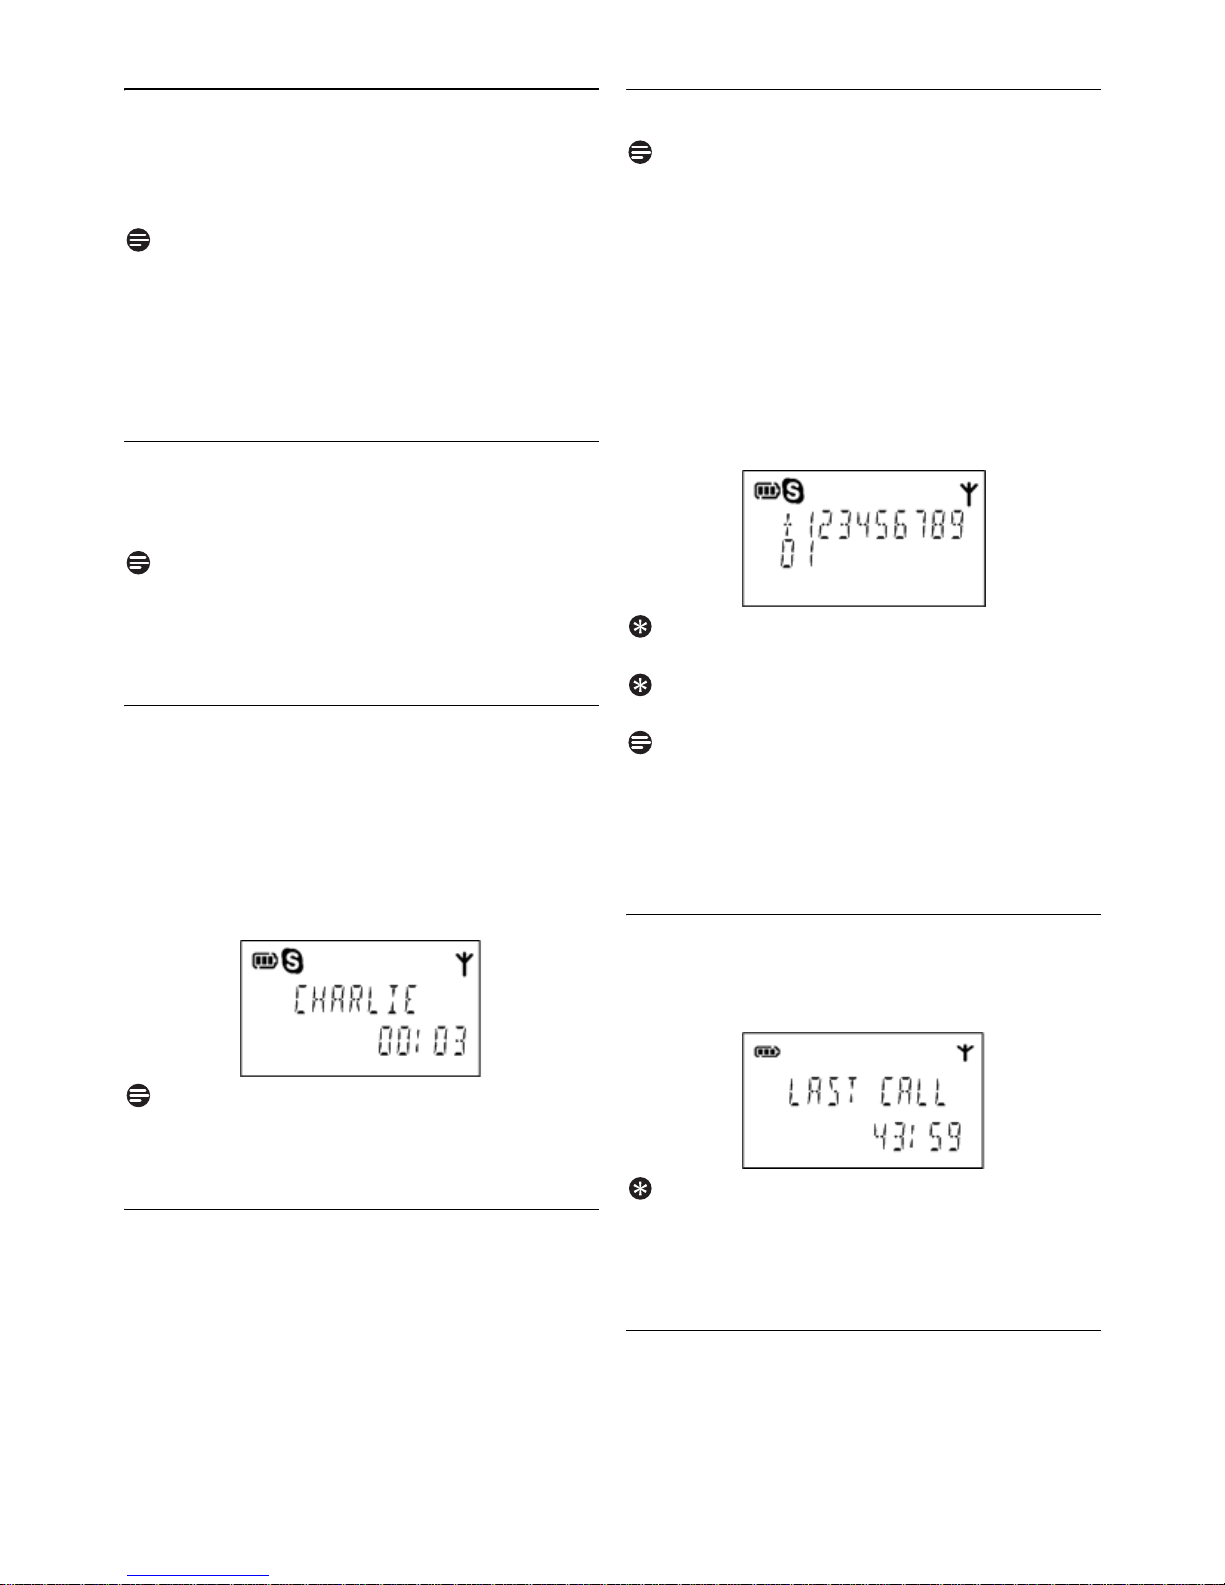
5.2 Ending a call
Press
1
the total time of your call.
You need to purchase Skype credit
NOT SUBSCRIBED
will
r to dial out the call. The S icon is
0.
e.
During a call, you will hear warning
e.
LAST CALL
is displayed along with
Note
Call timer.
your current call.
5.1.2 Calling from the call log
Your phone displays incoming, outgoing and
missed calls. For details, see “Call Log” on
page 20.
Press
1
Select a call record.
2
Press
3
call timer are displayed.
Call
The call timer displays the talk time o f
r during standby mode.
r to dial out the call. The S icon and
Tip
Auto hang-up.
to end the call automatically. See “Au to hang-up”
on page 28.
5.3 Answering a call
When you receive a call, your phone rings and
S icon blinks. Press r to answer the call.
the
Place the handset on the charger
17
Page 20
5.4 Rejecting a call
When a call comes in, you can reject the call by
pressing e.
5.5 Turning off the ringer
You can turn off the ringer for incoming calls.
Press and hold
1
when the phone is ringing. is displayed on
the screen. For details on the ringer setting,
see “Setting your handset’s ring volume” on
page 27.
5.6 During a call
This section describes the features that are
available during a call.
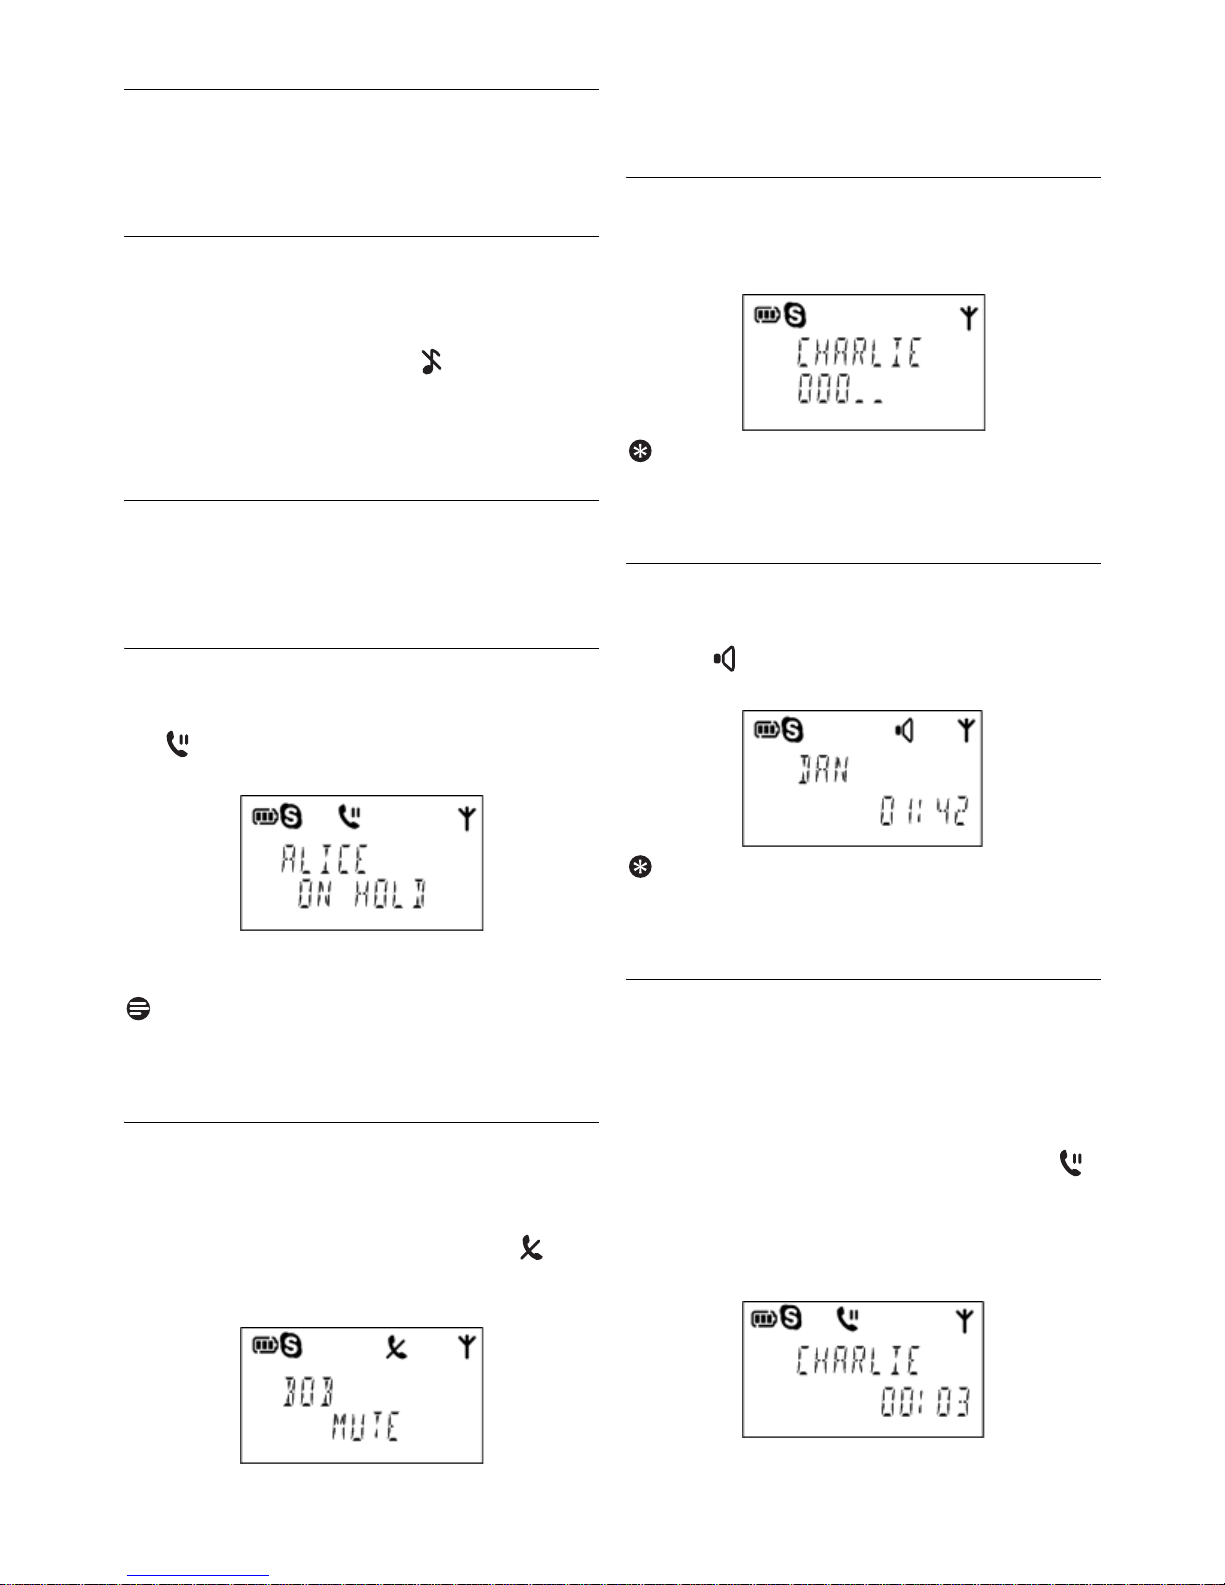
5.6.1 Holding and resuming a call
Press r to hold the call.
1
icon are displayed.
• Voice communication is paused.
# during standby mode or
ON HOLD
and the
m again to un-mute the microphone.
Press
2
You can now communicate with the caller.
5.6.3 Adjusting the earpiece volume
Press u or d to adjust the volume during a
1
call. There are 5 volume levels.
Tip
You can also adjust the earpiece volume from
your computer. See page 34.
5.6.4 Using the speaker
Press i du ring a call to turn the speaker on.
1
The icon is displayed. Press
turn the speaker off.
i again to
r again to resume the call.
Press
2
• Voice communication is resumed.
Note
You are unable to hear the opposite party talking
when the call is put on hold.
5.6.2 Muting the microphone
The mute feature allows you to speak to
someone in the house privately.
m during a call.
Press
1
are displayed. The other party cannot hear
you, but you can still hear his voice.
MUTE
and the icon
Tip
Adjust speaker volume.
call to adjust the speaker volume.
5.6.5 Making additional calls
During a call, you can make other calls.
Press
1
2
3
4
s.
Select the contact you want to call.
r. The call is made to the contact.
Press
The previous call is put on hold and the
icon is displayed.
When the call is established, repeat steps 1-3
to make more calls. Other calls are put on
hold.
Press u or d during a
18
Call
Page 21

Tip
SkypeOut.
if you are already on a call. See “Calling
SkypeOut” on page 17.
Tip
Ending additional calls.
current call. Press
call.
5.6.6 Answering additional calls
During a call, you will hear a call waiting tone and
the name of the caller will be displayed to notify
you that there is another incoming call.
Press
1
put on hold and the icon is displayed.
Tip
Toggling.
current call is put on hold and you are
reconnected to the previous call.
Tip
Combining calls.
up to 9 existing calls into a conference call. See
“Conference Calls” on page 21.
You can dial a SkypeOut number even
Press e to end the
r to resume the previous
r to answer the call. Other calls are
Press r to toggle between calls. The
Press and hold r to combine
Call
19
Page 22
6Call Log
Your phone can retrieve call log records from
Skype, including all incoming, outgoing and missed
calls.
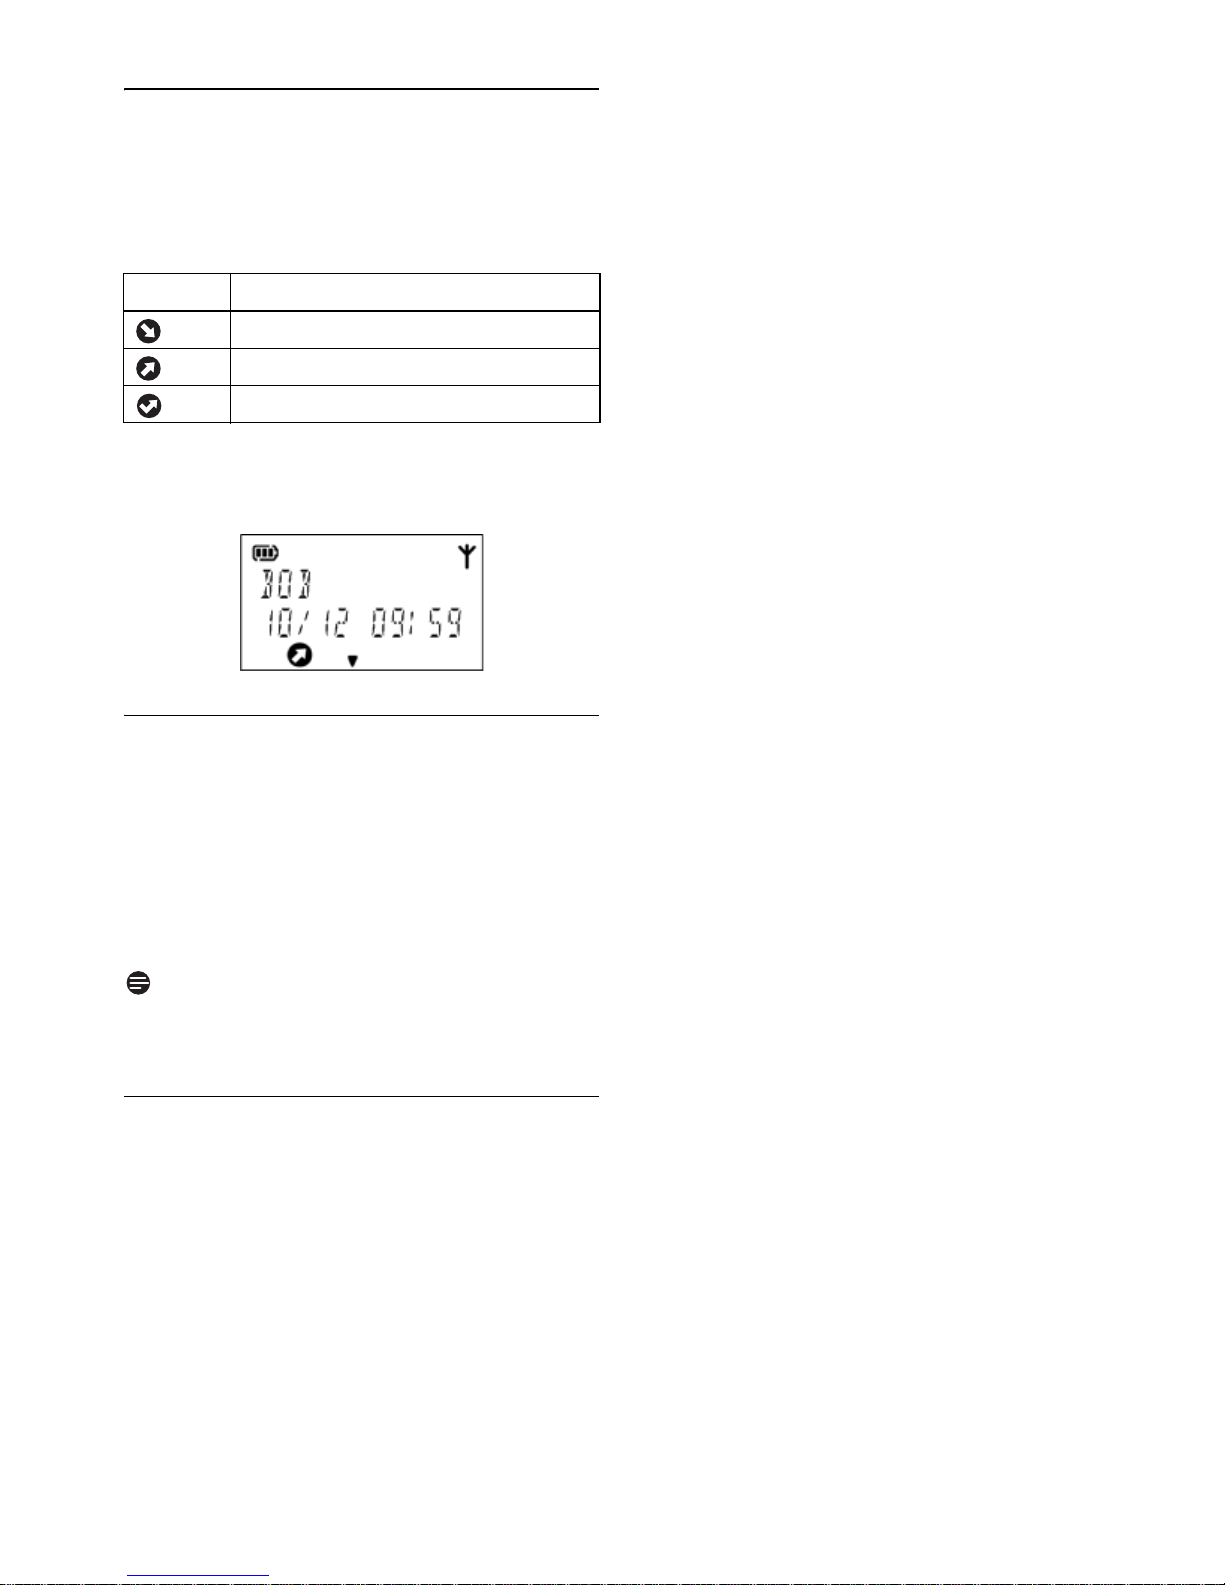
Icon Call
Incoming
Outgoing
Missed
The call log includes information of the caller
name (or
date and time.
CONFERENCE
for conference calls),
6.1 Viewing the call records
Press r when the handset is in standby
1
mode. All call records are displayed.
OR
d. Select
Press
Select
record you want to view. Press r.
Scroll to the call record you want.
2
Note
Call log empty.
EMPTY
log,
6.2 Making a call
To return or redial a call, see “Calling from the
call log” on page 17.
CALL LOG
will be displayed.
SKYPE
, then select the type of
If there are no records in the call
and press r.
20
Call Log
Page 23
7 Conference Calls
A conference call is a conversation between the
handset and up to 9 Skype contacts. You can
make additional calls, including SkypeOut, while
you are on a conference call.
7.1 Making a conference call
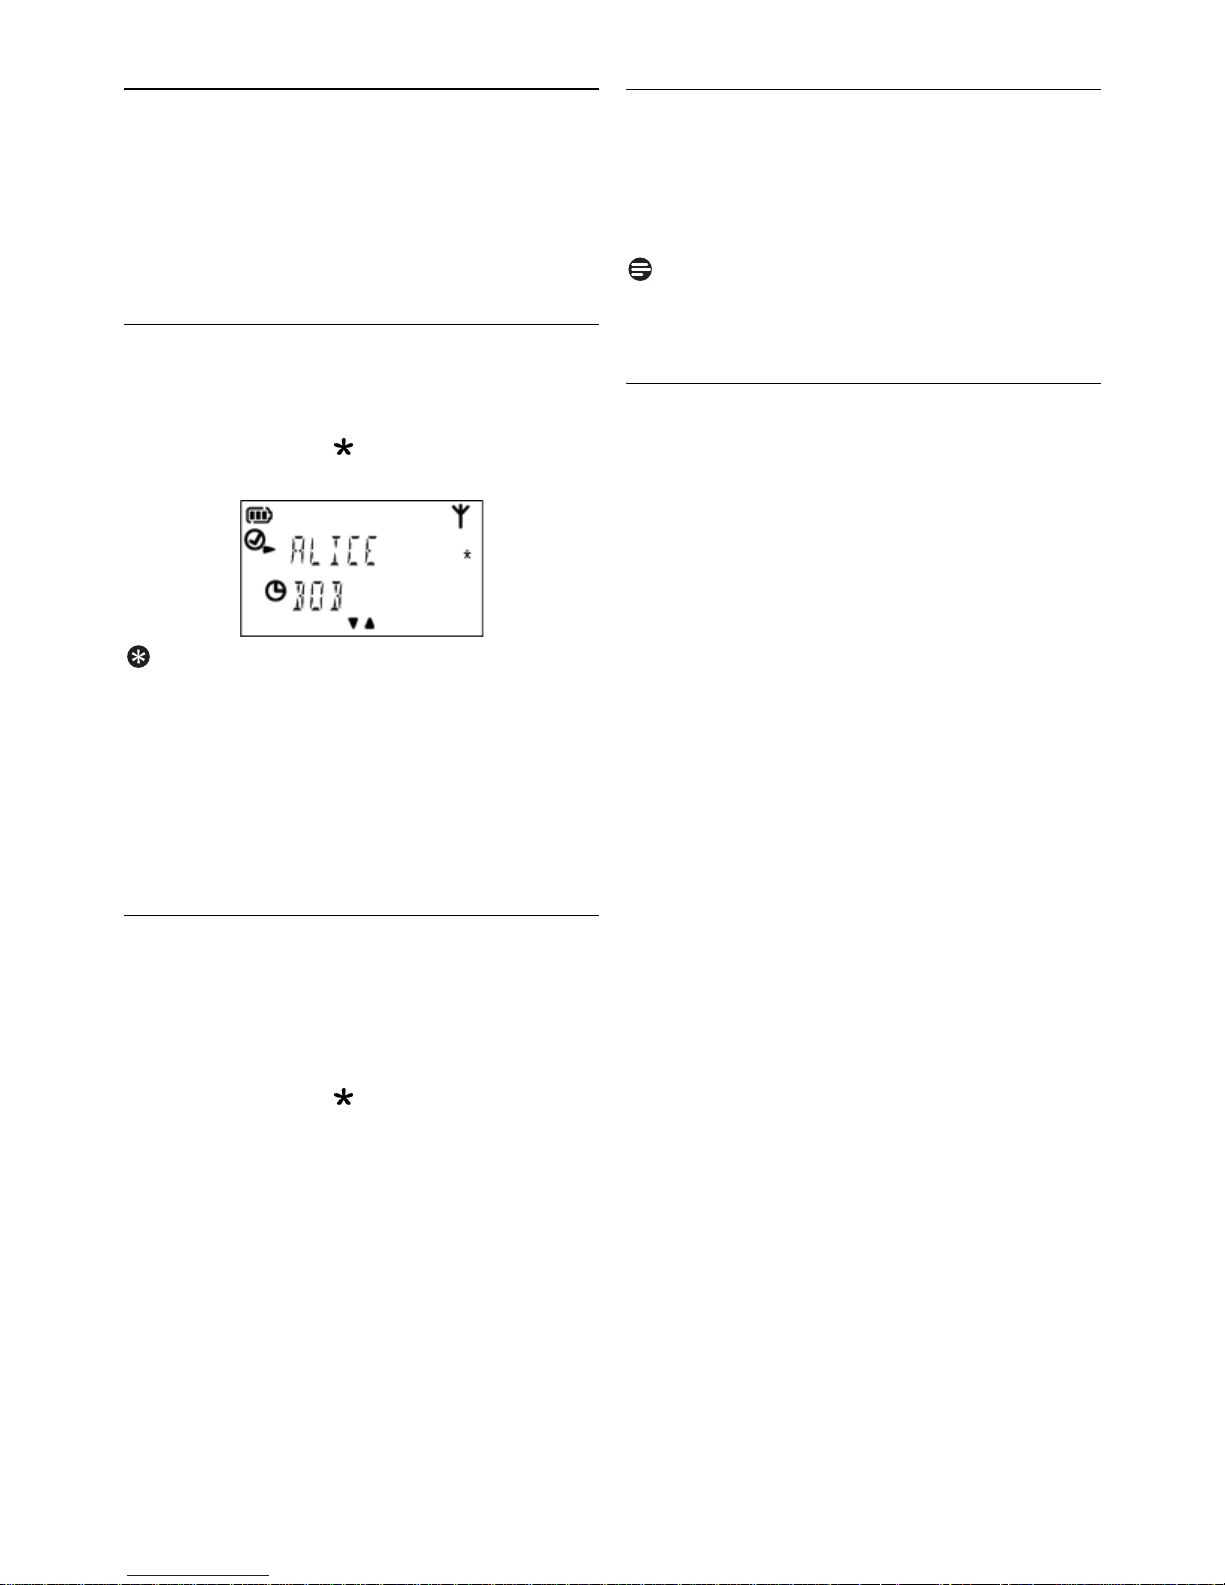
s.
Press
1
Scroll to the first contact you want to call.
2
*. A star icon appears next to the
Press
3
contact.
Tip
Press
* again and the star icon will disappear.
The contact will not be included as a con ference
participant.
Repeat steps 2 and 3 to select more contacts.
4
r.
Press
5
conference call is made to all the contacts you
selected.
CONFERENCE
is displayed and a
7.3 Making and receiving additional calls
During a conference call you can still make and
receive other calls. All contacts participating in
the conference call will be put on hold. See
page 18 for details.
Note
The total number of contacts for the conference
and additional calls cannot be greater than 9.
7.4 Ending a conference call
Press e. If you created the conference call,
1
all calls will end. If you are only a participant,
only your call will end and the conference will
continue without you.
7.2 Adding more contacts to a call
Press s during a call.
1
Scroll to a contact you want to add.
2
OR
Dial a SkypeOut number (see page 17).
3
*. A star icon appears next to the
Press
4
contact.
Repeat steps 2 and 3 to select more contacts.
5
r.
Press
6
conference call is made joining all the
contacts you selected to the existing call.
Conference Calls
CONFERENCE
is displayed and a
21
Page 24
8 Intercom
An intercom call is a call to another handset that
shares the same base station. Up to 4 VOIP251
handsets can share the same base station.
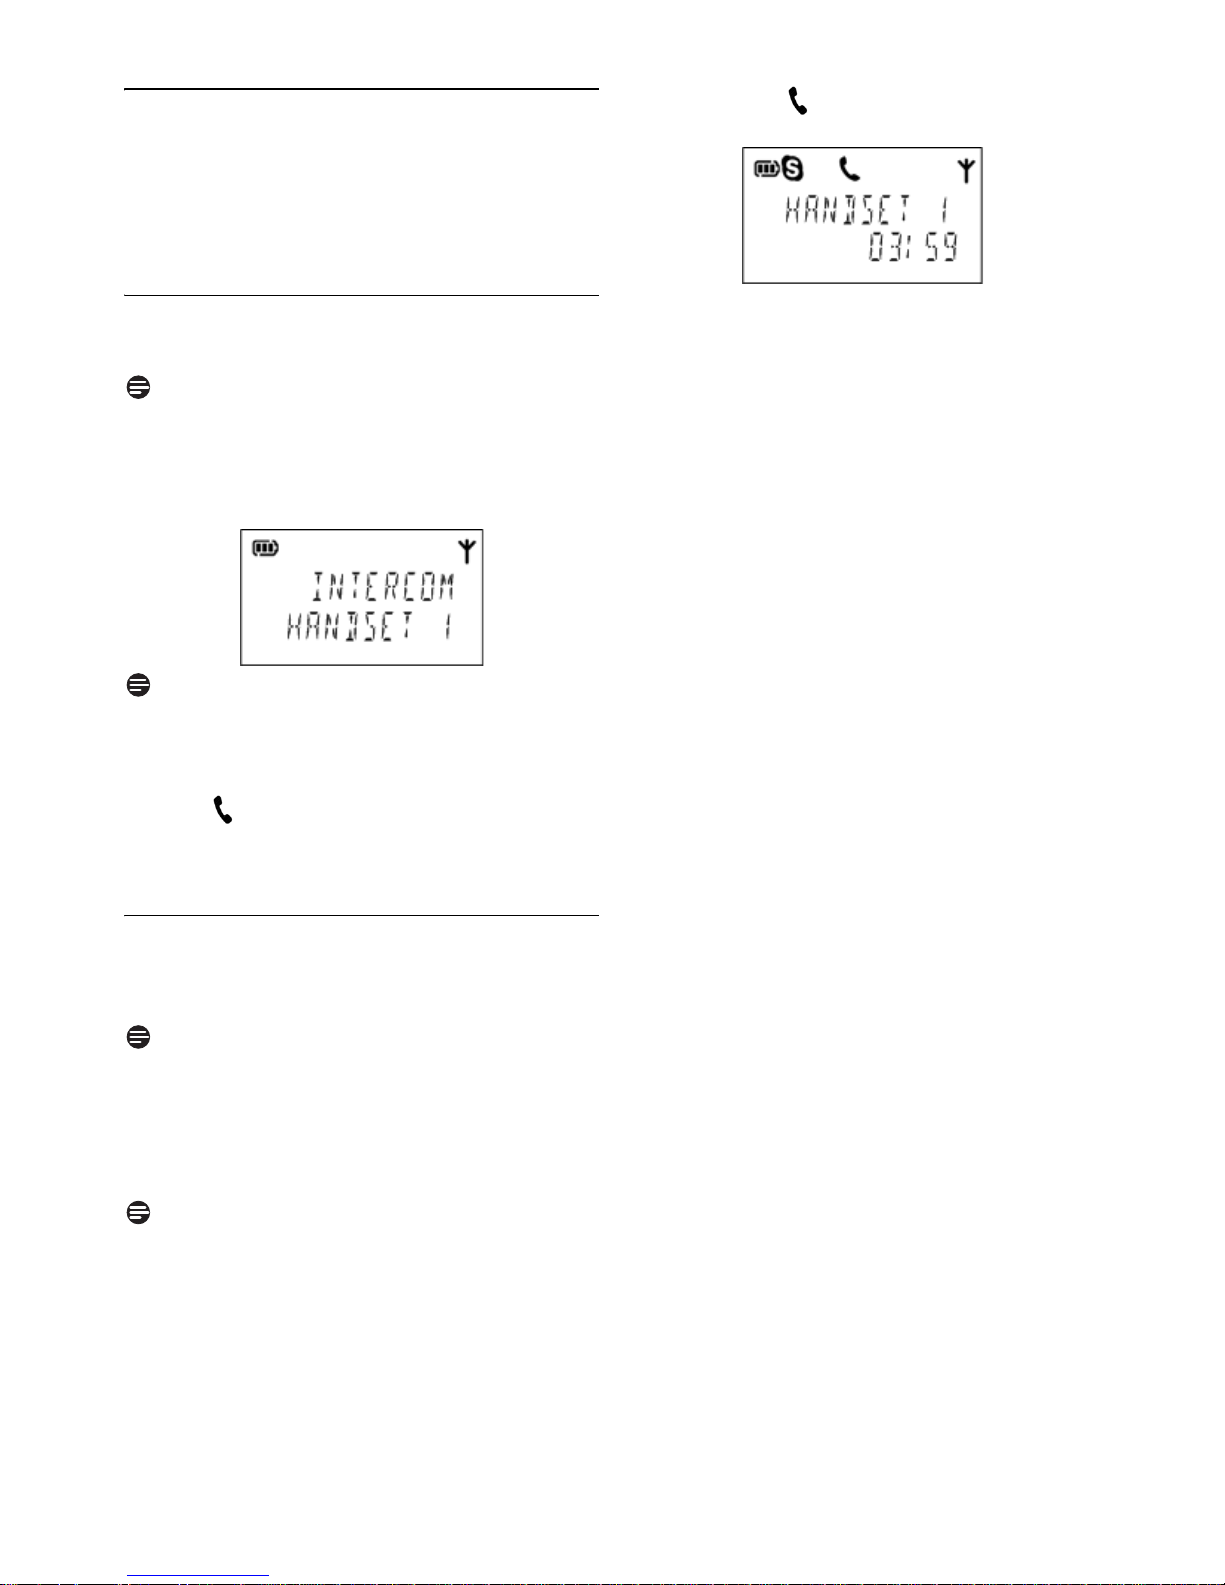
8.1 Calling another handset
Press and hold i.
1
Note
If there is only 1 handset registered to the base,
NOT AVAILABLE
Select the handset number you want. Press
2
r.
is displayed for 3 seconds.
The S and icons are displayed. Wait for
3
the other party to answer your call.
Your call is transferred to the other handset .
4
The other handset now displays the contact
name or SkypeOut number and the call timer.
Your handset hangs up automatically.
Note
If there are only 2 handsets registered to the
base, you can make an intercom call simply by
pressing and holding
The icon is displayed. Wait for the other
3
party to answer your call.
e to cancel or end the intercom call.
Press
4
8.2 Transferring a call
Press and hold i during a call.
1
• The external call is put on hold.
Note
If there is only 1 handset registered to the base,
NOT AVAILABLE
Your call will not be put on hold.
Select the handset number you want. Press
2
i.
is displayed for 3 seconds.
r.
Note
If there are only 2 handsets registered to the
base, you can make an intercom call simply by
pressing and holding
i.
22
Intercom
Page 25
9 Call Transfer
You can transfer Skype call(s) between your
handset and your computer.
9.1 Enabling call transfer
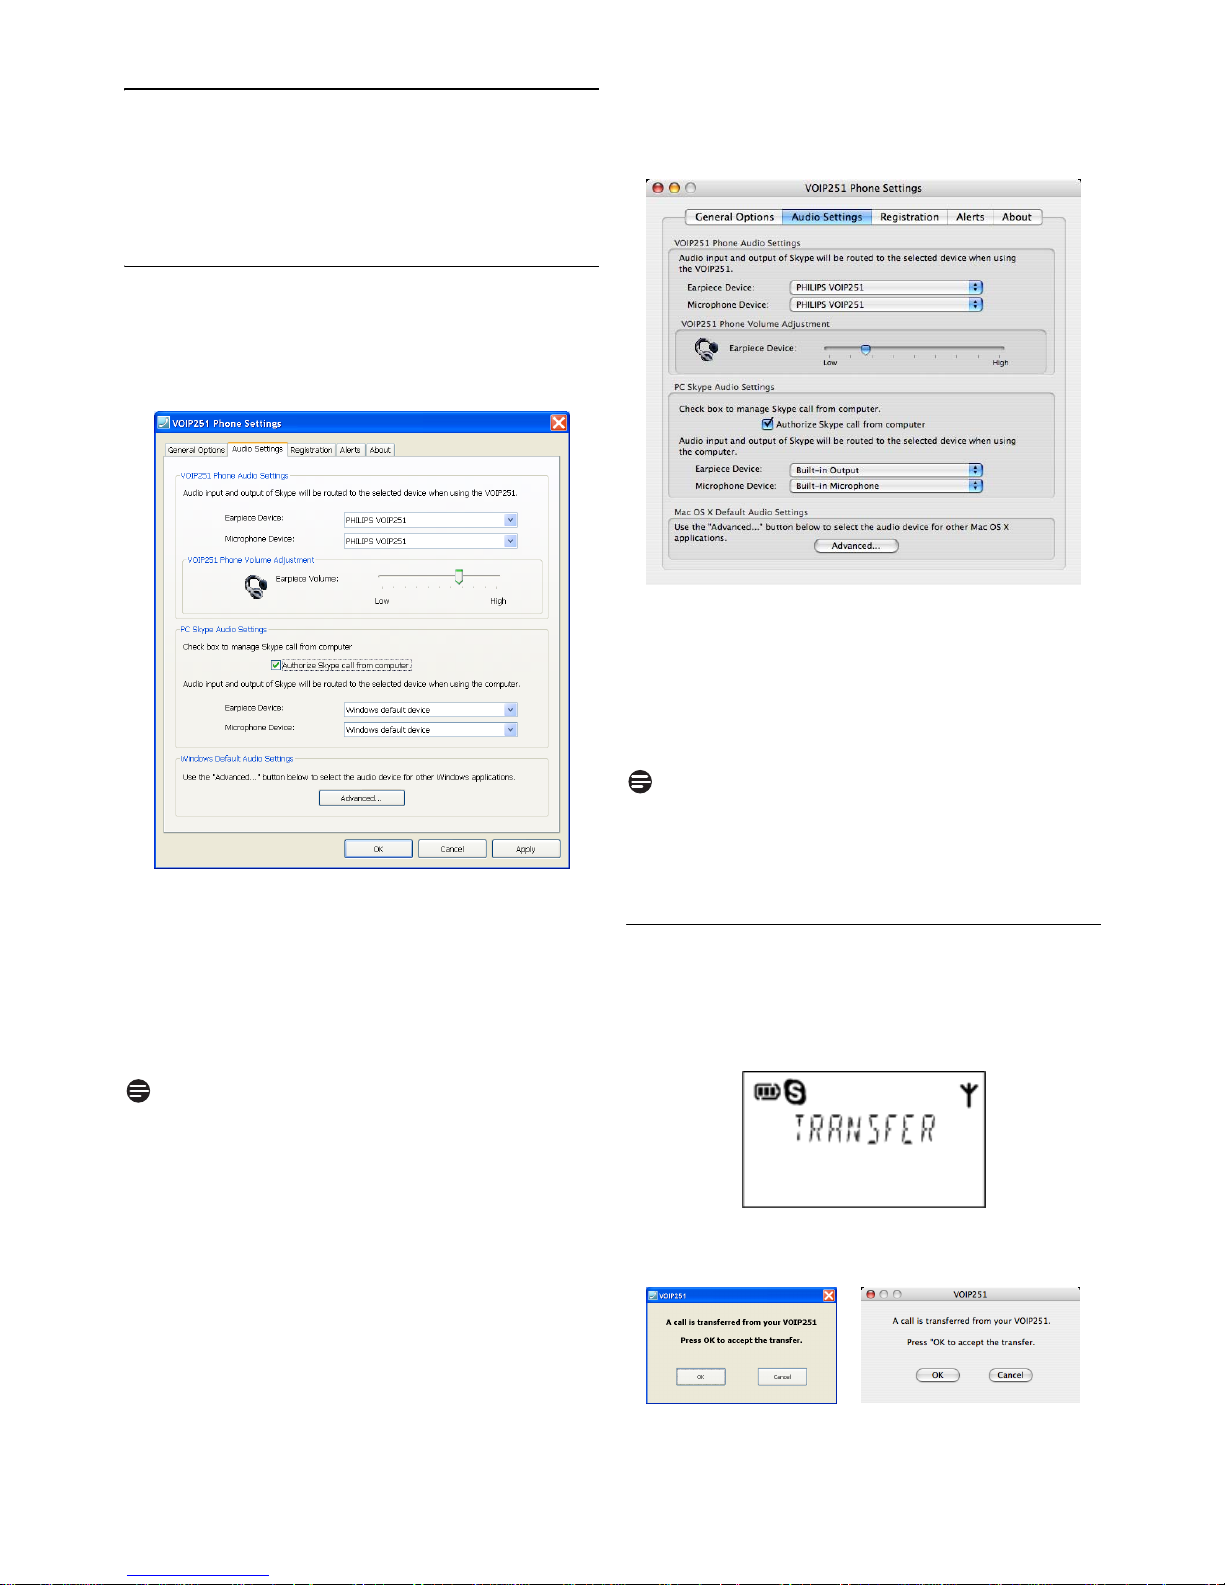
Windows
Open the “VOIP251 Phone Settings” window and
select the
Under PC Skype Audio Settings, check the
1
Audio Settings
“Authorize Skype call from computer” box.
Select a device from the
2
Microphone Device
Click
Apply
3
Transfer Call
4
.
is now available in the tray icon
menu.
Note
The “Authorize Skype call from computer” box
must be checked in order for you to use the
computer’s audio device.
tab.
Earpiece Device
drop down menus.
and
Mac OS X
Open the “VOIP251 Phone Settings” window and
select the
Under Mac Skype Audio Settings, check the
1
Audio Settings
tab.
“Authorize Skype call from computer” box.
Select a device from the
2
Microphone Device
Transfer Call
3
is now available in the VOIP251
Earpiece Device
drop down menus.
and
menu.
Note
The “Authorize Skype call from computer” box
must be checked in order for you to use the
computer’s audio device.
9.2 Transfer to computer
During a call, press and hold
1
4 on your
handset.
TRANSFER
2
is displayed on the handset.
Call Transfer
A dialogue box with a transfer confirmation
3
request displays on your computer.
Click OK on your computer. You can
4
continue the call using your computer’s audio
23
Page 26
device. Your handset returns to standby
mode and the S icon flashes.
9.3 Transfer to handset
Windows
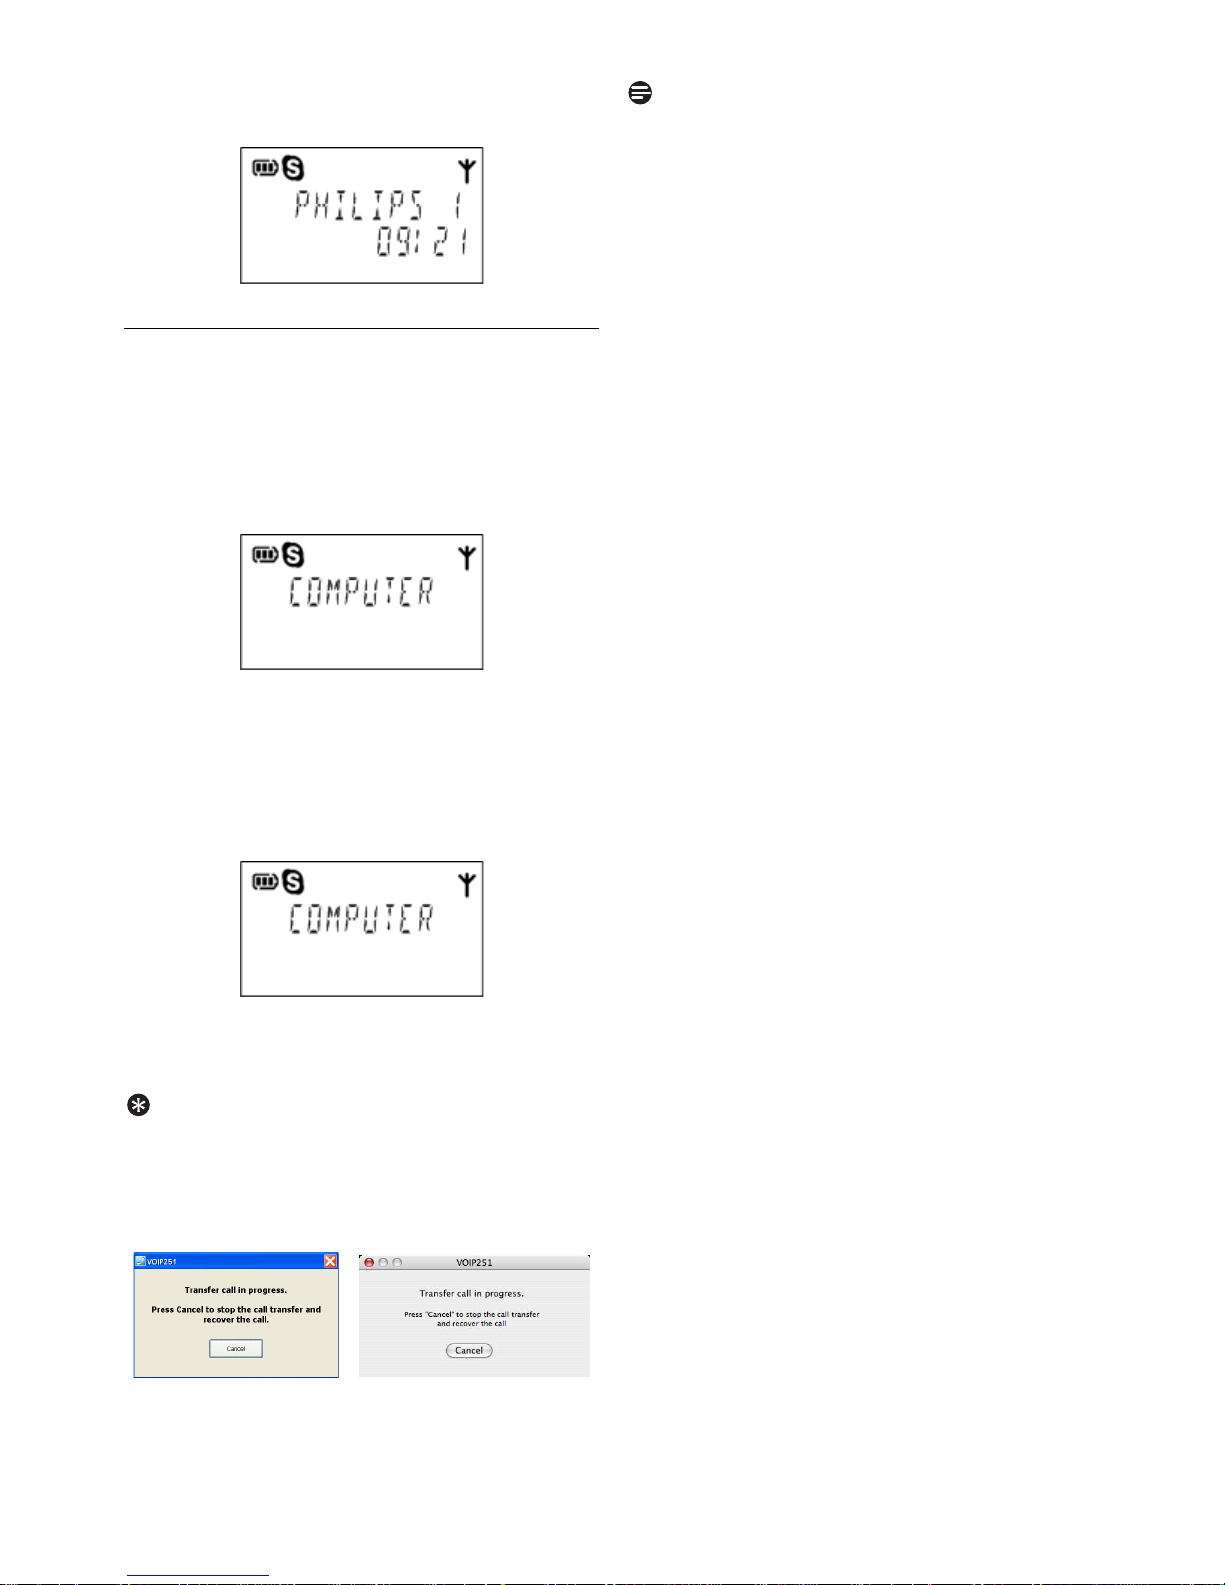
During a call taken on your computer, right
1
click the tray icon. Select
handset rings.
COMPUTER
Transfer Call
is displayed on
the handset and the S icon flashes.
. Your
Note
You will not be able to make a Skype call from
your handset while a call is in progress on your
computer. If you press r,
BUSY
will be
displayed.
Mac OS X
During a call taken on your computer, click
1
VOIP251 in the menu bar. Select
. Your handset rings.
Call
COMPUTER
Transfer
is
displayed on the handset and the S icon
flashes.
Then,
Press
2
r. You can continue the call with your
handset.
Tip
Cancel transfer.
When your computer is
transferring a call to the handset, the pop up
message
Cancel
to stop the transfer.
Transfer call in progress
appears. Click
24
Call Transfer
Page 27
10 Skype Tools
This section describes the Skype tools that you
can access from this phone.
In standby mode:
d.
Press
1
Select
2
Tip
Use u or d to navigate the menus.
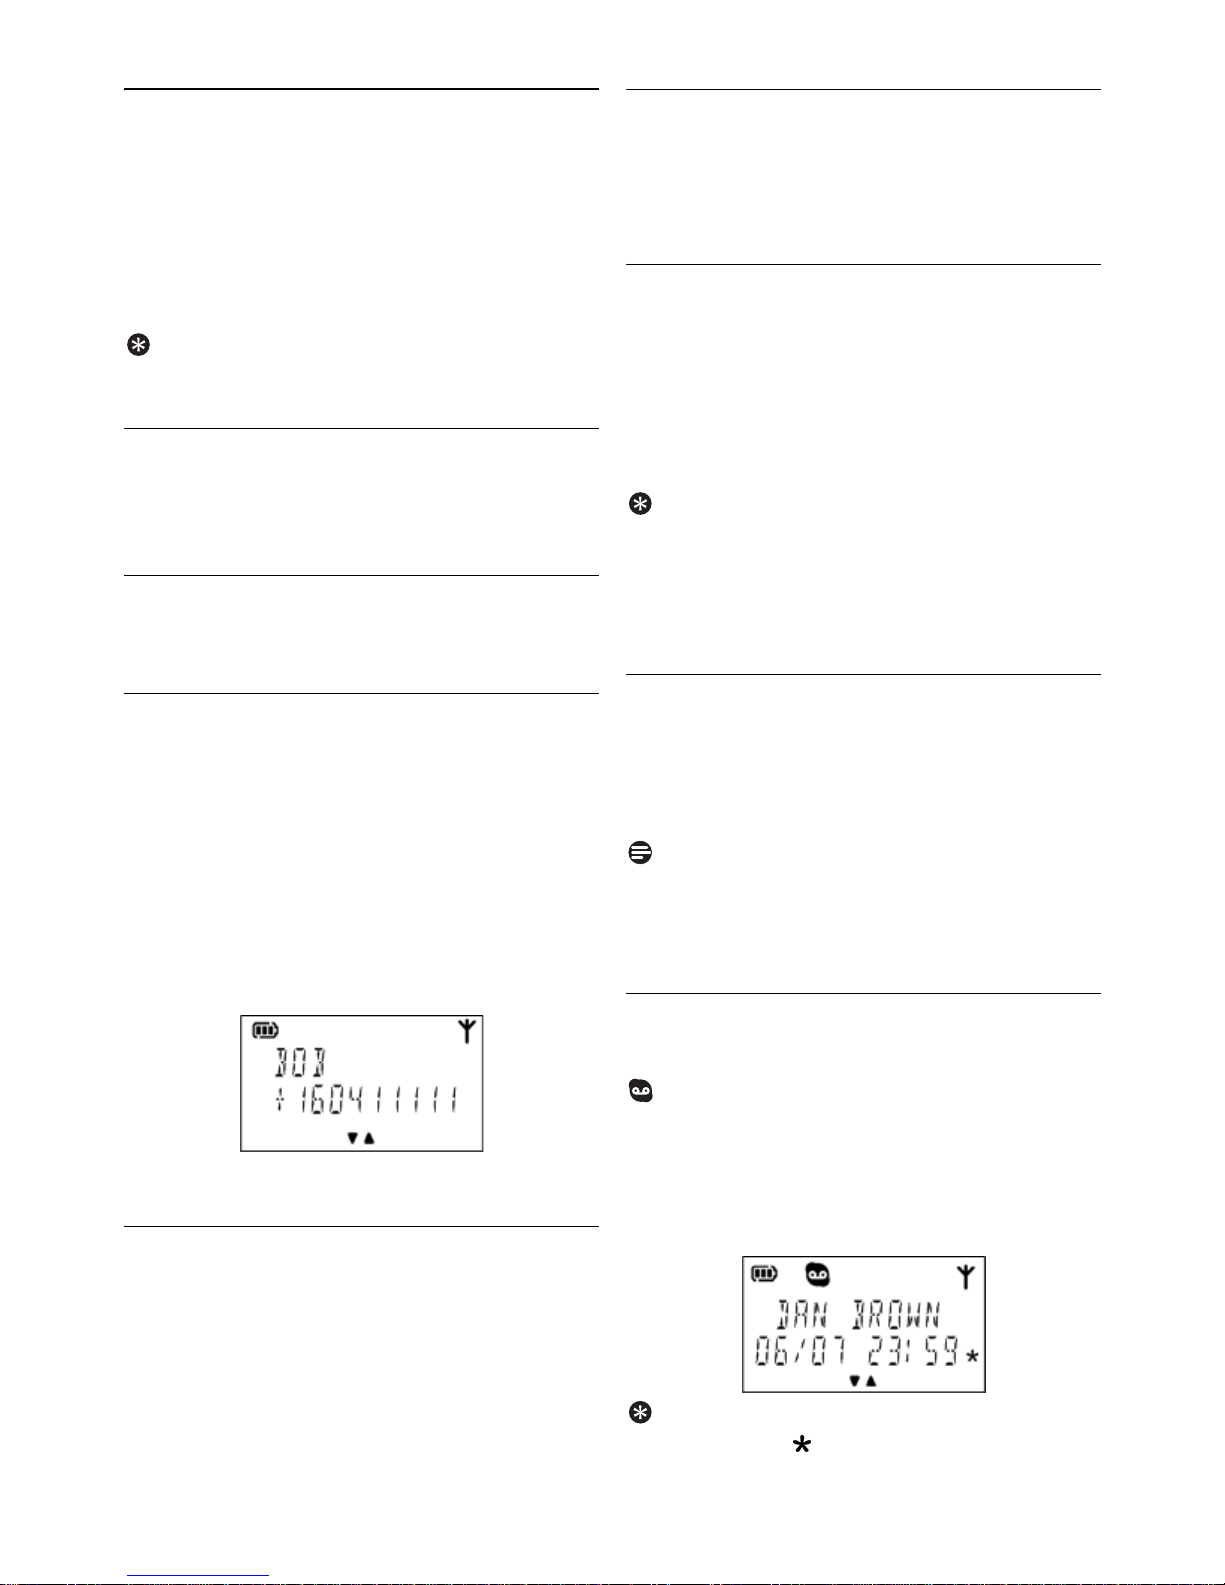
10.1 Contact
You can browse the contact list, view a contact’s
profile and make a Skype call.
10.1.1 Viewing the contact list
See “Contact List” on page 16 for details.
SKYPE
.
10.2 Call Log
You can access records of all incoming, outgoing
and missed calls through the call log. See page 20
for details.
10.3 Presence
You can change your Skype status.
d. Select
Press
1
Select
OR
Press
Scroll to the Skype status you want.
2
Tip
Refer to page 16 for the meaning of each Skype
status icon.
Press
3
• The setting is saved.
PRESENCE
u.
r.
SKYPE
and press r.
and press r.
10.1.2 Viewing a contact’s profile
You can view a contact’s home, office and mobile
phone number.
From the contact list,
Scroll to the contact you want.
1
s. The contact’s home number is
Press
2
displayed.
Press d to view the office and mobile
3
numbers.
s to return to the contact list.
Press
4
10.1.3 Making a call
See “Calling from contact list” on page 17 for
details.
10.4 Voicemail
Your phone supports Skype Voicemail™. You
can browse and listen to voicemails. Visit the
Skype website at www.skype.com to learn more
about how to subscribe to Skype Voicemail™.
Note
Skype credit.
to use Voicemai l.
displayed on the handset if you have no credit.
10.4.1 Retrieving a voicemail
On the handset, you see a blinking voicemail icon
when there are voicemail(s) not retrieved.
Press
1
Select
OR
Press and hold
Select the voicemail record you want.
2
You need to purchase Skype credit
NOT SUBSCRIBED
d. Select
VOICEMAIL
SKYPE
and press r.
and press r
will be
1.
Skype Tools
Tip
New voicemail.
voicemail records. If there is no voicemail,
EMPTY
is displayed.
is displayed next to new
25
Page 28

Press r to play the voicemail.
3
Tip
Change volume.
can press
Stop voicemail.
playback. Press
10.5 Sorting
You can sort your contacts by Skype status or
alphanumerical order. See page 16 for details.
10.6 Call forward
Your phone supports Skype Call Forwarding. You
can have Skype calls redirected to another
number when you are not online. Visit the Skype
website at www.skype.com to learn more about
how to subscribe to call forwarding.
u or d to adjust the earpiece volume.
Tip
While a voicemail is playing, you
Press e to stop voicemail
e again to return to standby.
10.7.2 Checking your skypein subscription
Press d.
1
Select
2
Select
3
SKYPEIN
Press r. Your subscription status is
4
displayed.
10.7.3 Checking your voicemail
Press
1
Select
2
Select
3
VOICEMAIL
Press r. Your subscription status is
4
displayed.
SKYPE
SERVICE
subscription
and press r.
and press r. Select
.
d.
SKYPE
SERVICE
and press r.
and press r. Select
.
10.6.1 Activating/Deactivating call
forwarding
d.
Press
1
Select
2
Select
3
Select the new setting. Press r. Your calls
4
will be forwarded to the number you have
selected via the Skype website.
10.7 Service
You can check your Skype credit balance and
subscription. To purchase Skype credits or
change your subscription, go to www.skype.com.
10.7.1 Checking your skype credits
Press
1
Select
2
Select
3
CREDITS
Press
4
displayed.
SKYPE
CALL FORWD
and press r.
and press r.
d.
SKYPE
SERVICE
and press r.
and press r. Select
.
r. The currency and credit balance is
26
Skype Tools
Page 29

11 Setting Options
You can customize your phone using these
options.
In standby mode:
d.
Press
1
Select
2
Tip
Use u or d to navigate the menus.
SETTING
.
Note
Disable silent mode.
you change the key tone or ringer volume setting.
11.4 Setting the backlight
Press d.
1
Select
2
Select
3
Select the new setting. Press r.
4
• The setting is saved.
SETTING
BACKLIGHT
Silent mode is disabled if
and press r.
and press r.
11.1 Setting your handset’s ring tone
You can choose from 10 different ringer
melodies.
d.
Press
1
Select
2
Select
3
Select the new setting. Press r.
4
• The setting is saved.
11.2 Setting your handset’s ring volume
Your handset has 5 ringer volume levels plus
silent mode.
Press
1
Select
2
Select
3
Select the new setting. Press r.
4
• The setting is saved.
Tip
Silent mode.
mode. No tone will be emitted from the handset.
Press and hold
volume setting.
11.3 Setting the key tone
Key tone is the sound you hear when you press a
key on the handset.
Press
1
Select
2
Select
3
Select the new setting. Press r.
4
• The setting is saved.
SETTING
RING TONE
d.
SETTING
RING VOL
Press and hold # to enable silent
d.
SETTING
KEY TONE
and press r.
and press r.
and press r.
and press r.
# again to return to the previous
and press r.
and press r.
11.5 Setting the screen contrast level
d.
Press
1
Select
2
Select
3
Select the new setting. The contrast changes
4
dynamically, allowing you to see the new
setting before you save it.
Press
5
• The setting is saved.
11.6 Naming your handset
Each handset can have its own name. The name
displays on the screen during standby mode.
Press
1
Select
2
Select
3
Enter or edit the name. Use
4
corrections.
Press
5
• The setting is saved.
Tip
Your handset’s name can be up to 8 characters
long. For details on entering text and numbers,
see page 37.
11.7 Auto pick-up
Auto pick-up enables you to answer an incoming
call by picking up the handset from the charger.
You do not need to press a key to answer the call.
SETTING
CONTRAST
and press r.
r.
d.
SETTING
HS NAME
and press r.
r.
and press r.
and press r.
e to make
Setting Options
27
Page 30

11.7.1 Activating/Deactivating auto pick-up
Press d.
1
Select
2
Select
3
Select the new setting. Press r.
4
SETTING
PICK-UP
and press r.
and press r.
• The setting is saved.
11.8 Auto hang-up
Auto hang-up allows you to end a call by placing
the handset on the charger. You do not need to
press a key to end the call.
11.8.1 Activating/Deactivating auto hang-up
Press
1
2
3
4
d.
Select
Select
Select the new setting. Press r.
SETTING
HANG-UP
and press r.
and press r.
• The setting is saved.
28
Setting Options
Page 31
12 Advanced Settings
12.1 Registering another handset
You can register up to 4 handsets to your base
station. To register an extra handset, use the CD
that comes with the extra handset packaging.
Follow the instructions in this section only if the
extra handset CD has been lost.
Note
UNREGISTER
If
follow the steps below.
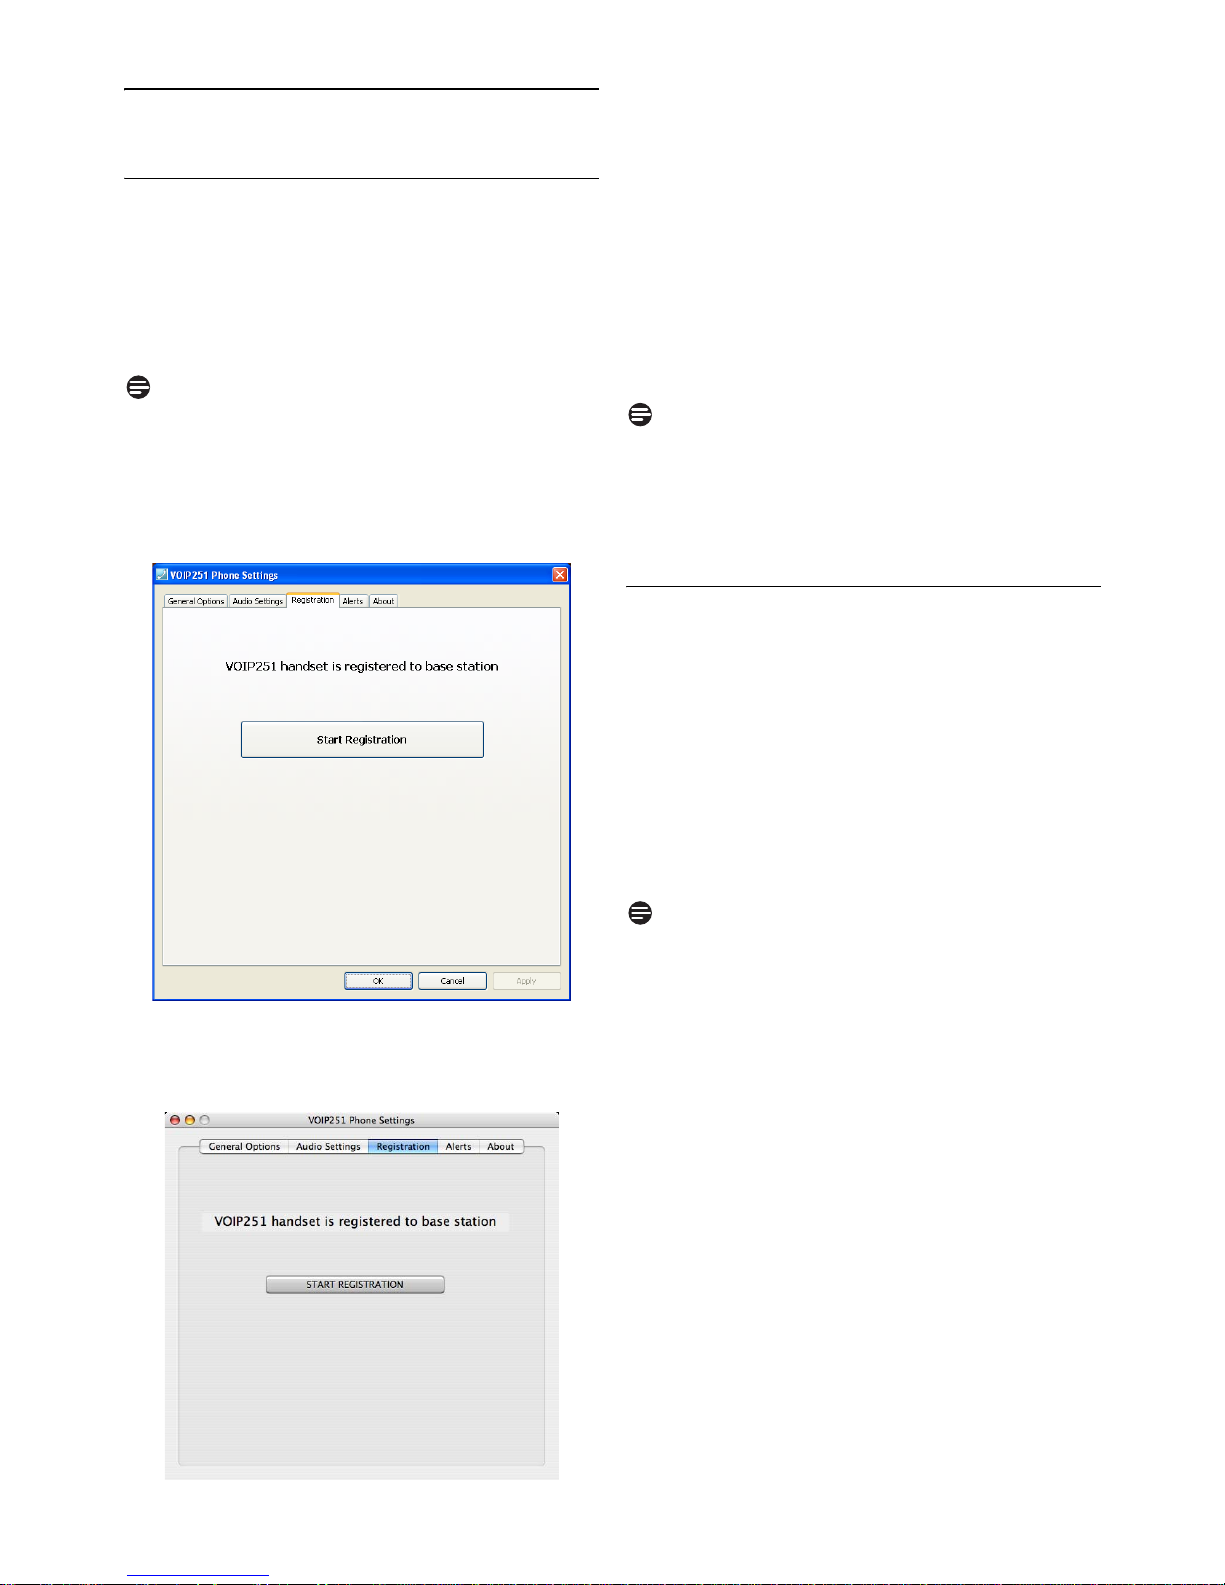
Windows
Open the VOIP251 Phone Settings window and
select the
is displayed on your handset,
Registration
tab.
Then,
Start Registration
Click
1
enters registration mode.
d on your handset.
Press
2
Select
3
Select
4
Your handset starts searching for the base
station.
Registration shall be completed within 60
seconds. The base station automatically
assigns your handset a number.
Note
Each handset can be registered to one base at a
time. If you attempt to register to additional base
stations, the new registration will overwrite the
old one.
12.2 Restoring default settings
The default settings are the original factory
settings for your phone. You can restore your
phone settings to the factory default.
Press
1
Select
2
Select
3
The handset displays a confirmation request.
4
Press r to confirm.
• All settings have been reset.
Note
After reset, the handset displays
seconds and then returns to the
ADVANCED
REGISTER
d.
ADVANCED
RESET
and press r.
. The base station
and press r.
and press r.
and press r.
DONE
RESET
for 3
menu.
Mac OS X
Open the VOIP251 Phone Settings window and
select the
Advanced Settings
Registration
tab.
To see a list of default settings, refer to“Default
(pre-programmed) settings” on page 38.
29
Page 32

13 Emergency Management
Skype cannot dial out emergency calls. If you try
to dial out an emergency number,
EMERGENCY
will be displayed on your handset
and a warning beep will be heard to notify you
that you cannot make the call.
Note
Skype is not a replacement for your ordinary
phone. Make sure you have alternate
arrangements for emergency calling.
NO SUPPORT
30
Emergency Management
Page 33
14 Extra Features
Discover and explore the additional features your
phone offers! Find out how these features can
benefit you and help you make the most of your
phone.
14.1 Keypad lock
You can lock the keypad to prevent accidental
presses on the handset while you are carrying it
around.
14.1.1 Locking/unlocking the keypad
Press and hold
1
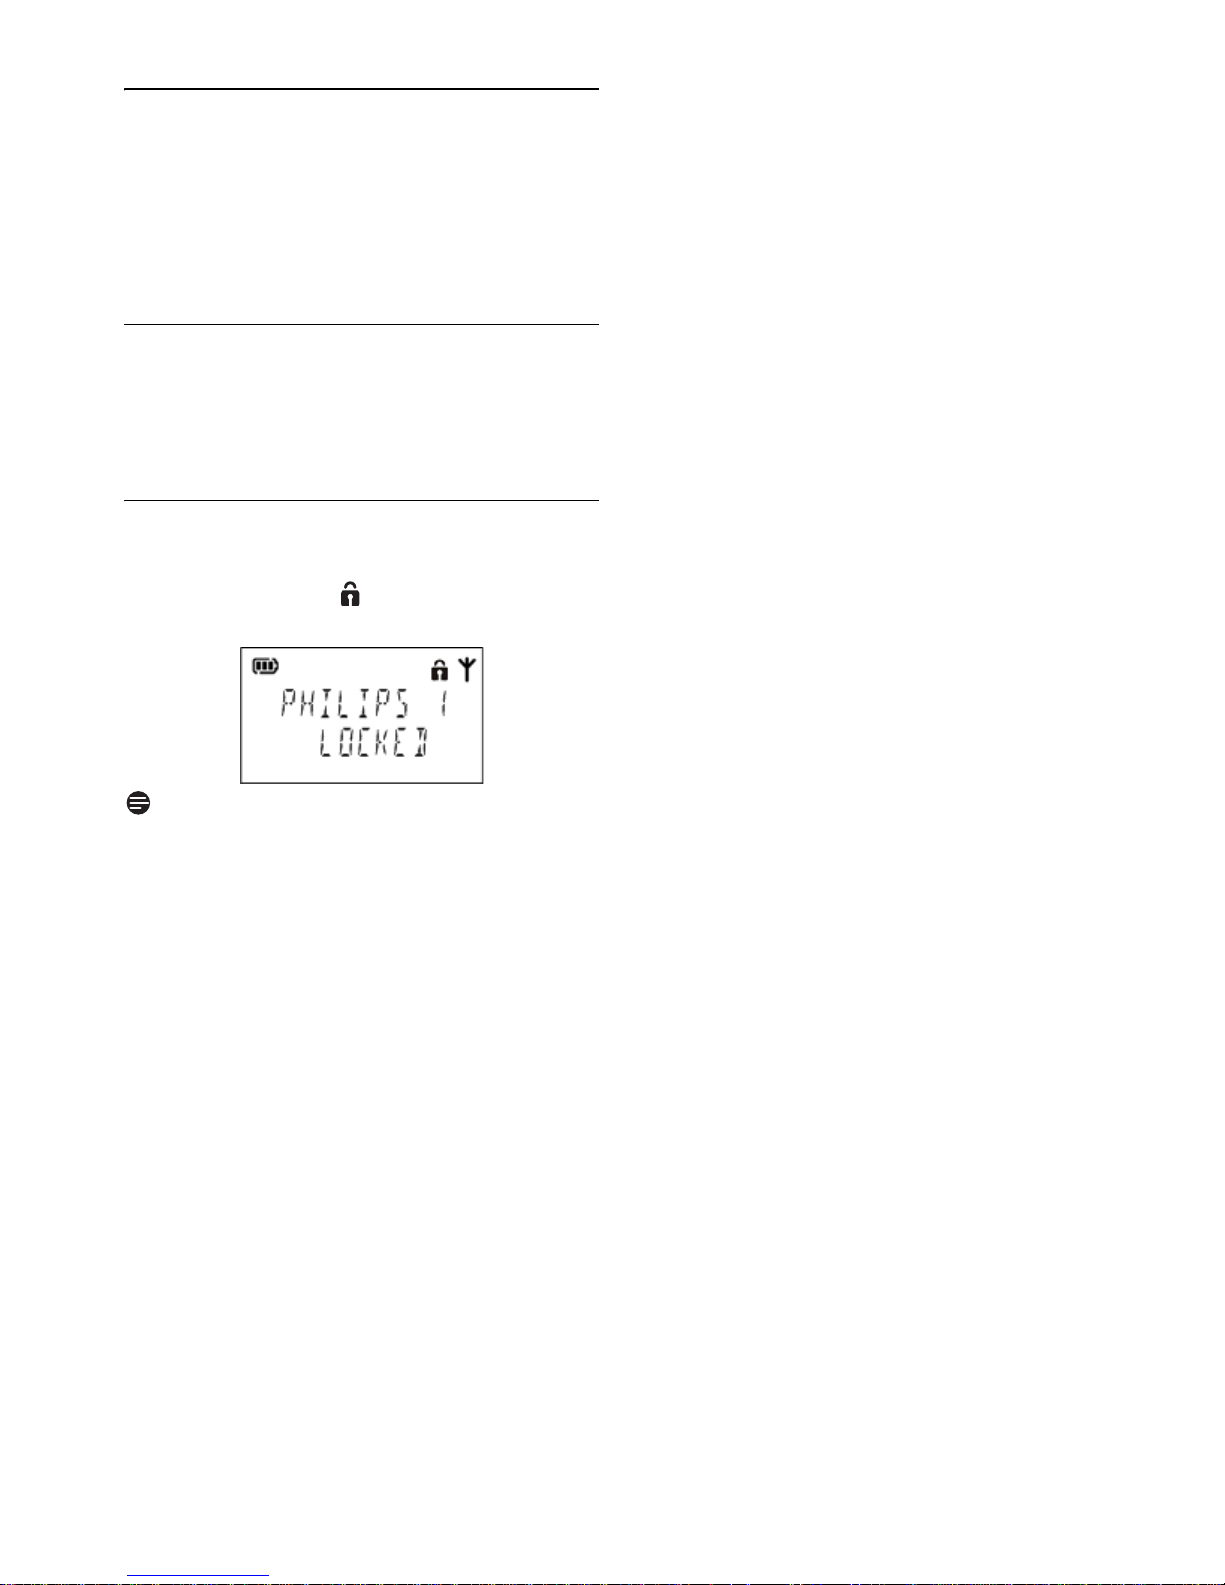
LOCKED
* again to unlock the keypad.
hold
* to lock the keypad.
and the icon displays. Press and
Note
Making calls.
calls when the keypad is locked.
You will not be able to make any
Extra Features
31
Page 34
15 Phone Settings
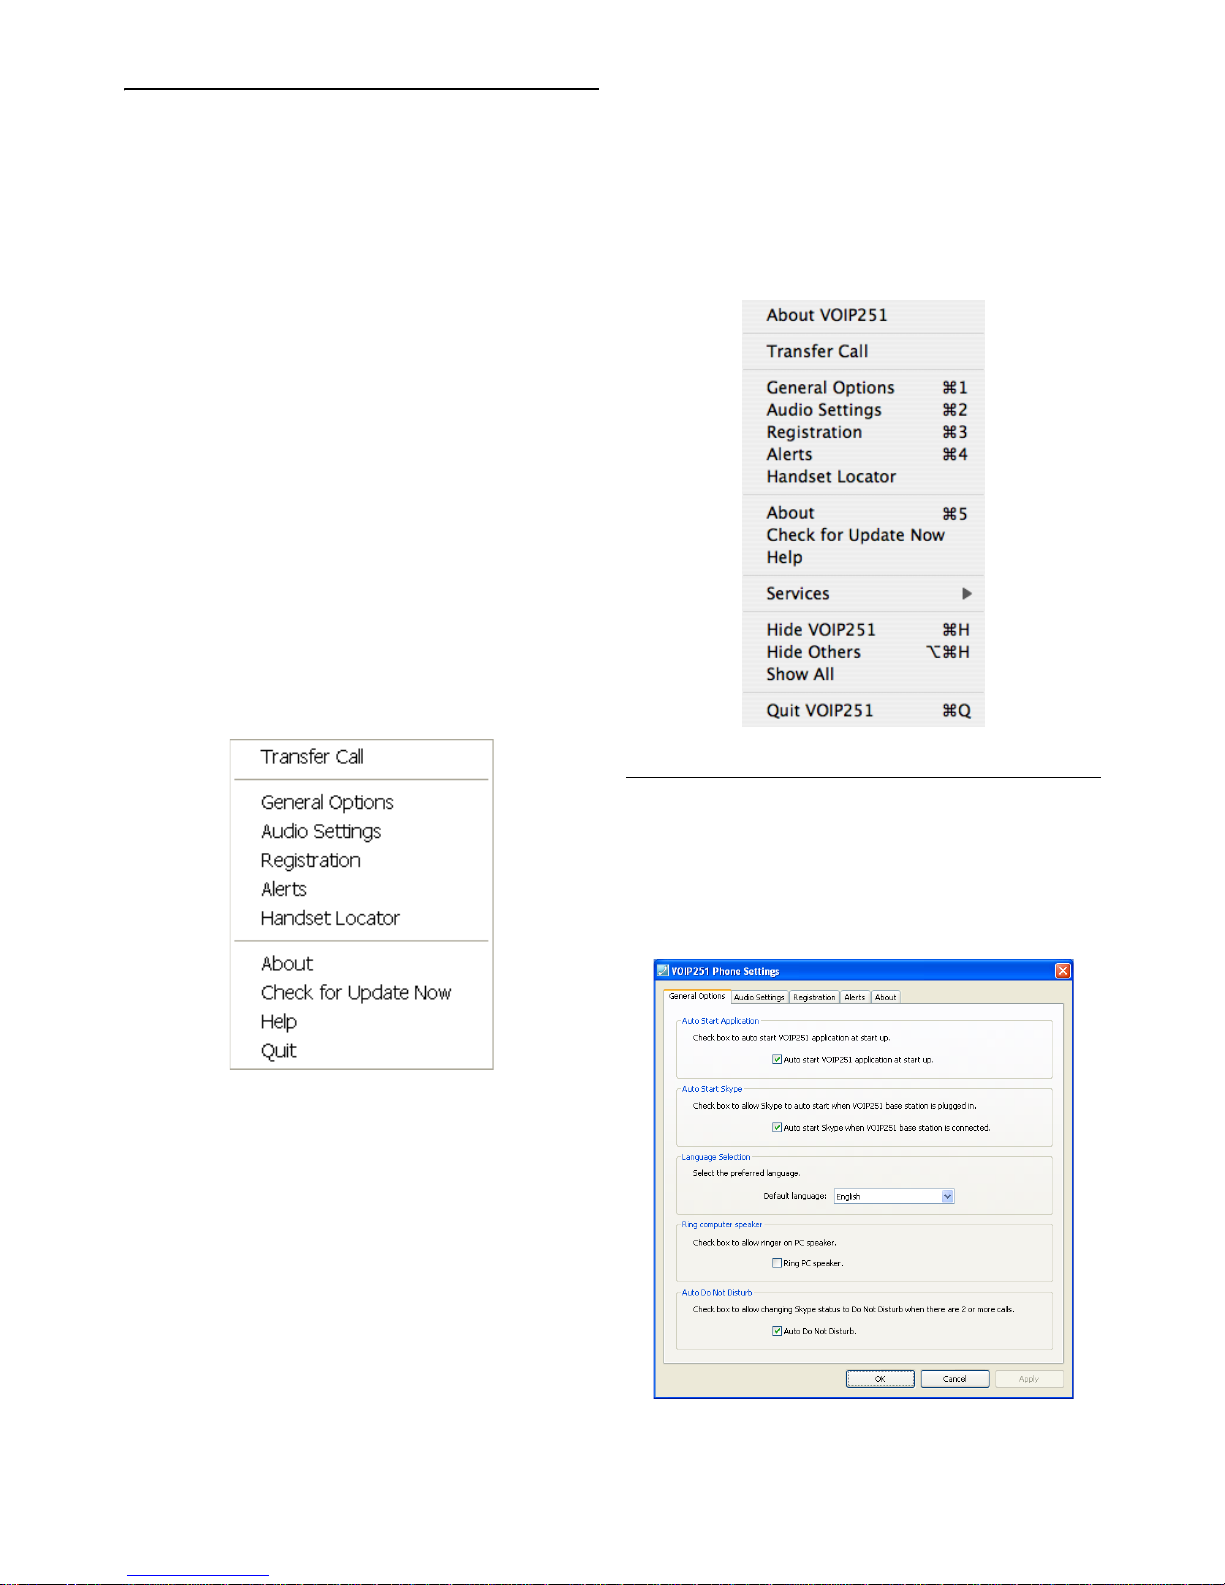
These are the settings available through the PC
application. To start configuring your phone:
Windows
Double-click the tray icon at the bottom right
1
corner of your screen to open the VOIP251
Phone Settings window.
OR
Right-click the tray icon and select one of the
2
following options:
• Transfer Call
•General Options
• Audio Settings
• Registration
• Alerts
• Handset Loc a tor
•About
• Check for Update Now
• Help
• Quit
• Check for Update Now
•Help
•Services
• Hide VOIP251
• Hide Others
• Show All
• Quit VOIP251
Mac OS X
Click on the VOIP251 icon in the dock.
1
Click on VOIP251 in the menu bar and select
2
one of the following options:
• About VOIP251
• Transfer Call
•General Options
• Audio Settings
• Registration
• Alerts
• Handset Loc a tor
•About
15.1 General options
Windows
Open the VOIP251 Phone Settings window and
select the
General Options
tab.
The following settings are available:
32
Phone Settings
Page 35
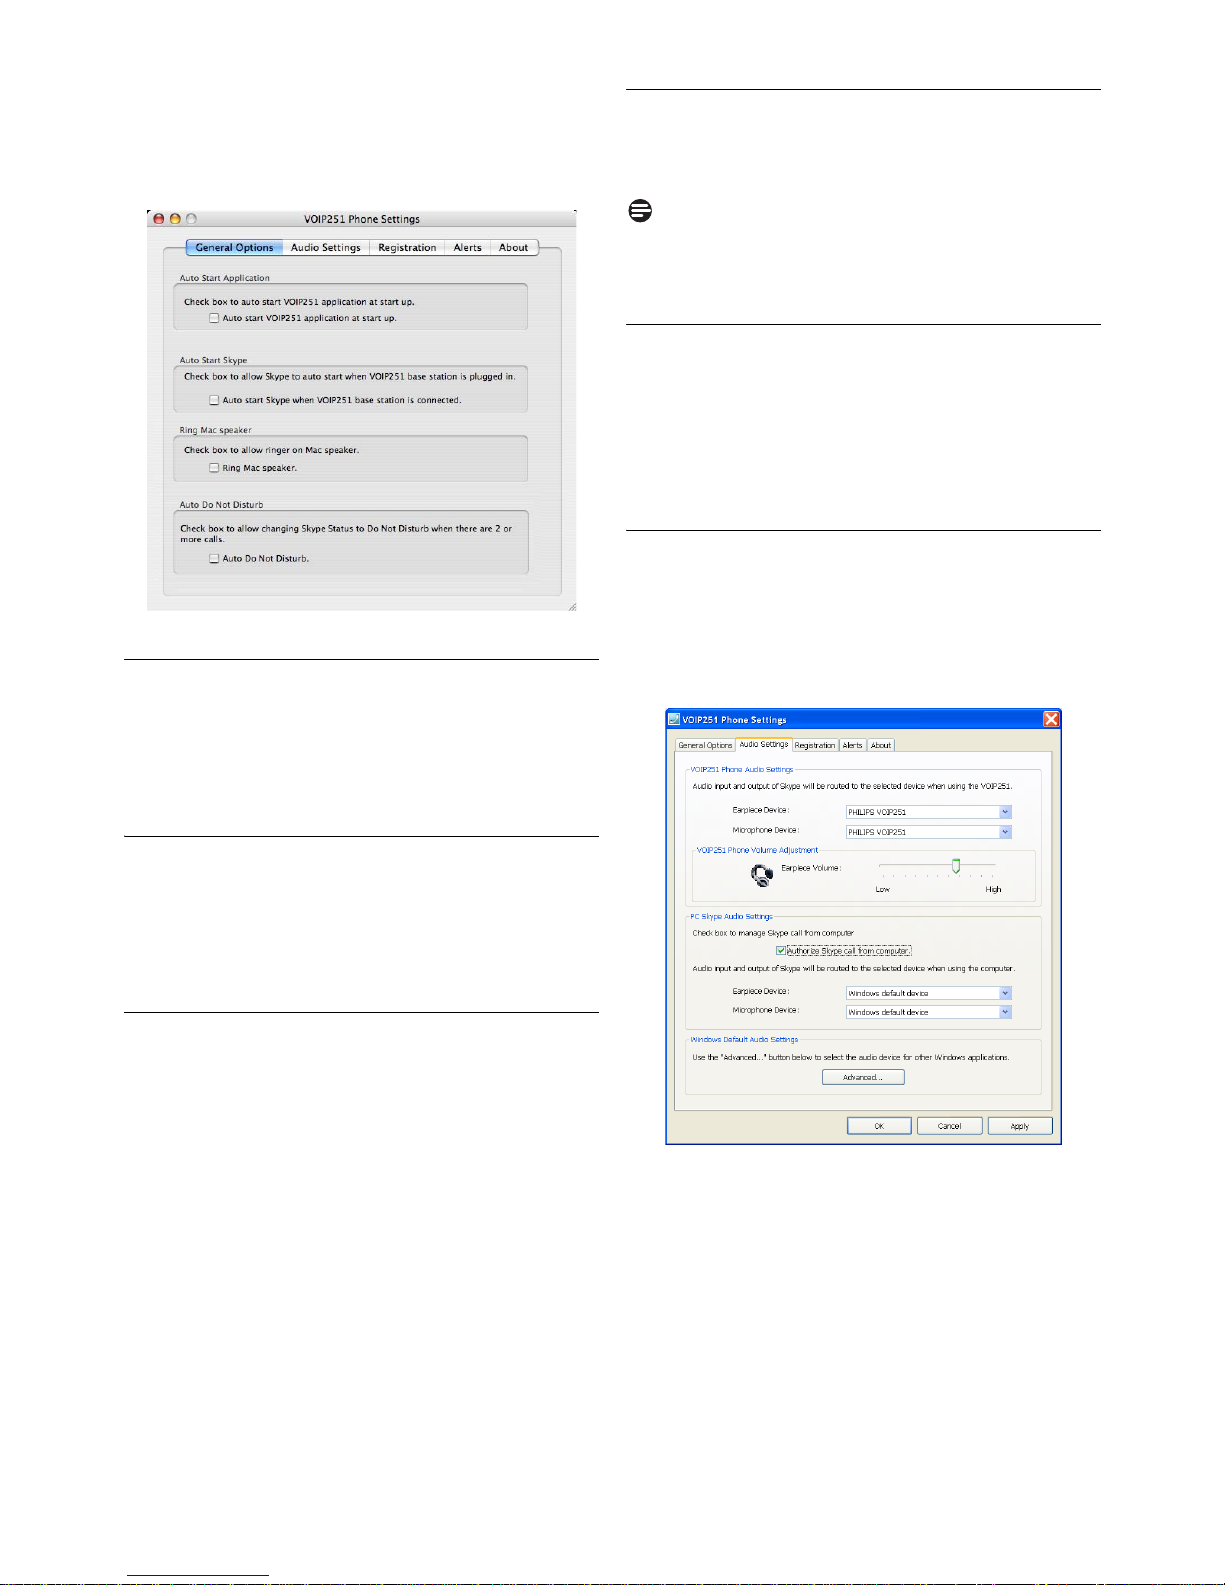
Mac OS X
Open the VOIP251 Phone Settings window and
select the
General Options
tab.
The following settings are available:
15.1.1 Auto start application
When the box is checked, the VOIP251 software
will automatically run when you start your
computer.
15.1.4 Ring computer speaker
When the box is checked, your computer’s
speaker will ring when you receive a Skype call.
Note
Computer Ringer.
You can only enable the
computer ringer when Skype is available.
15.1.5 Auto Do Not Disturb
You can set your Skype status to automatically
change to Do Not Disturb when there are 2 or
more calls. When the box is checked, the feature
is enabled.
15.2 Audio settings
Windows
Open the VOIP251 Phone Settings window and
select the
Audio Settings
tab.
The following settings are available:
15.1.2 Auto start Skype
When the box is checked, Skype will
automatically start when the VOIP251 base
station is plugged into your computer.
15.1.3 Language selection
Windows
Choose a language from the pull down menu
1
2
under
Click
Language Selection
Apply
.
.
• The setting is saved.
Mac OS X
Your VOIP251 handset and software follow the
current language setting on your computer. If you
want to change the VOIP251 display language,
you will need to change your computer setting.
Phone Settings
33
Page 36
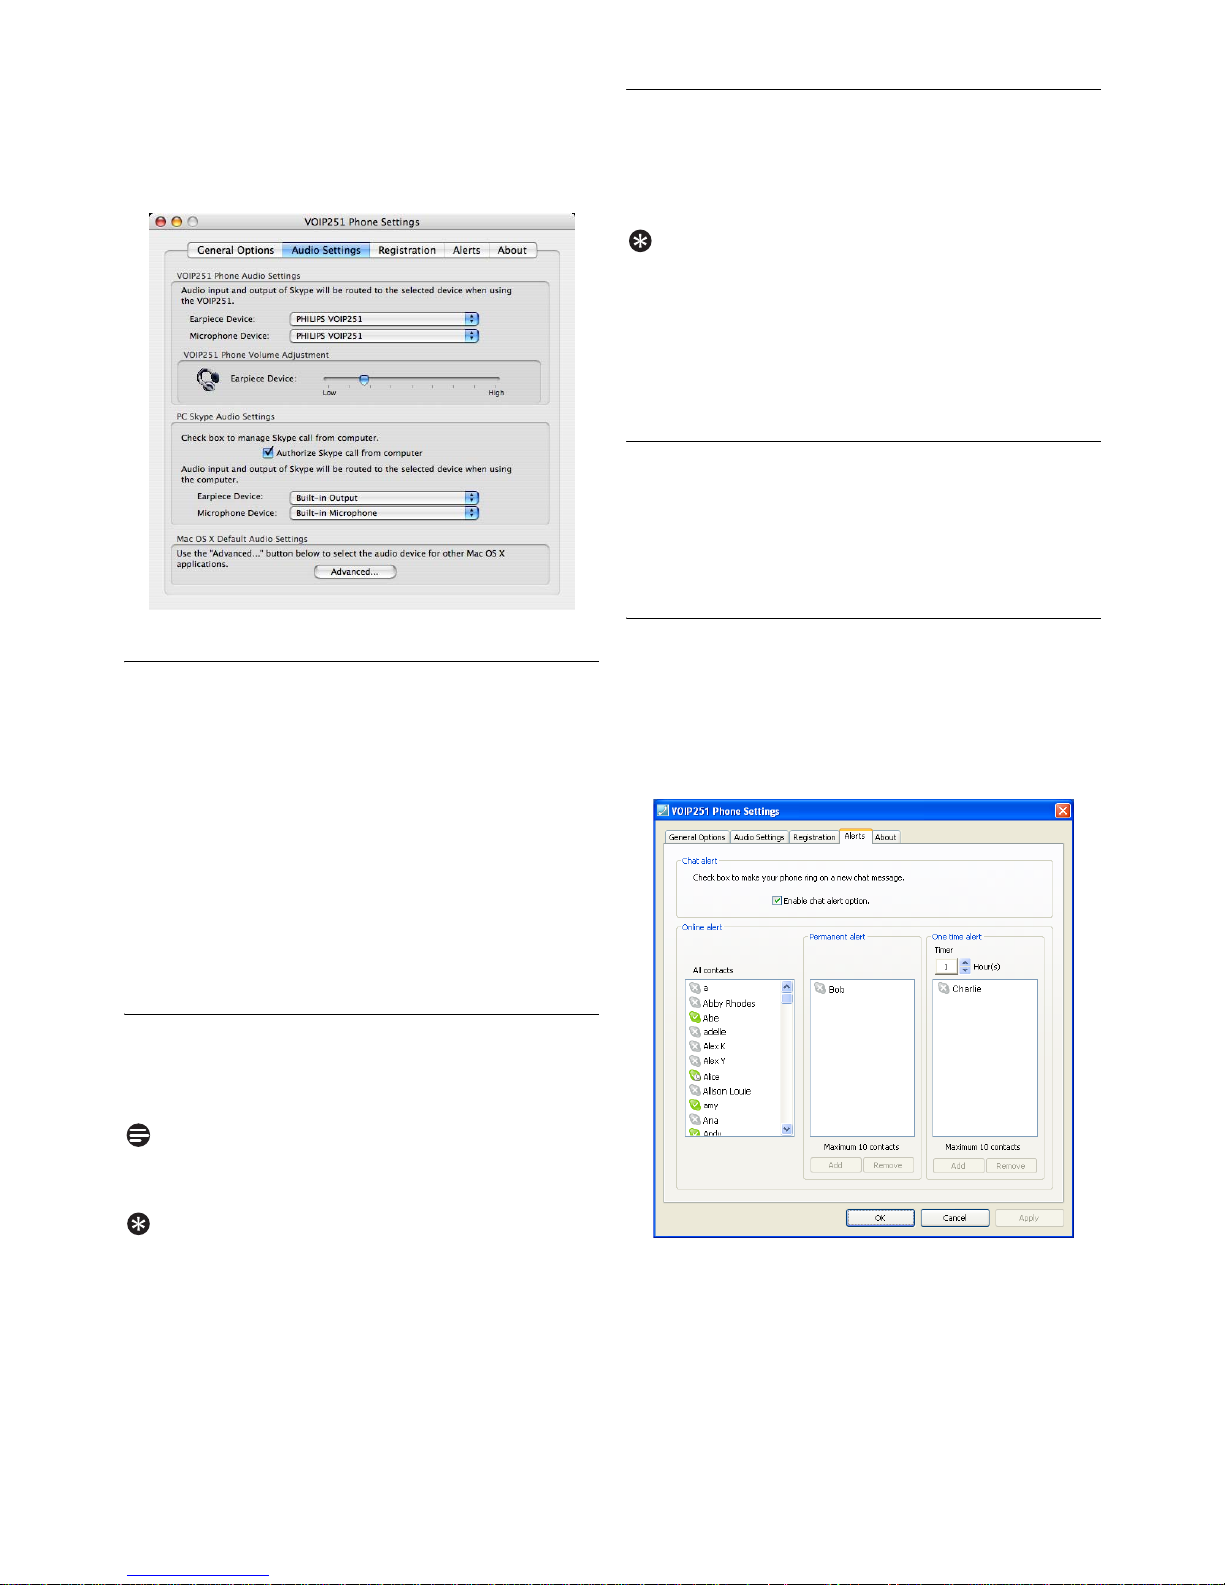
Mac OS X
Open the VOIP251 Phone Settings window and
select the
Audio Settings
tab.
The following settings are available:
15.2.1 VOIP251 Phone Audio Settings
You can choose the audio device that will be used
when you take calls on your phone.
Windows
Select a device from the
1
Microphone Device
Click
Apply
2
.
Earpiece Device
drop down menus.
and
Mac OS X
Select a device from the
1
Microphone Device
Earpiece Device
drop down menus.
and
15.2.3 Skype Audio Settings
You can choose the audio device that will be used
when you take calls on your computer. See
page 23 for details.
Tip
Default audio settings.
You can select the default
audio device for other applications on your
computer. Click
Advanced
. Your computer’s
audio device window will open and you can make
changes to the settings.
15.3 Registration
You can register additional handsets to your base
station. See “Registering another handset” on
page 29.
15.4 Alerts
Windows
Open the VOIP251 Phone Settings window and
select the
Alerts
tab.
The following settings are available:
15.2.2 VOIP251 phone volume adjustment
Adjust the Earpiece Volume bar to change the
earpiece volume of your phone.
Note
When the bar is moved to the lowest position,
the earpiece is muted.
Tip
Adjust earpiece volume.
You can also press u or
d on the handset to adjust the earpiece volume
during a call or while listening to a voicemail.
34
Phone Settings
Page 37
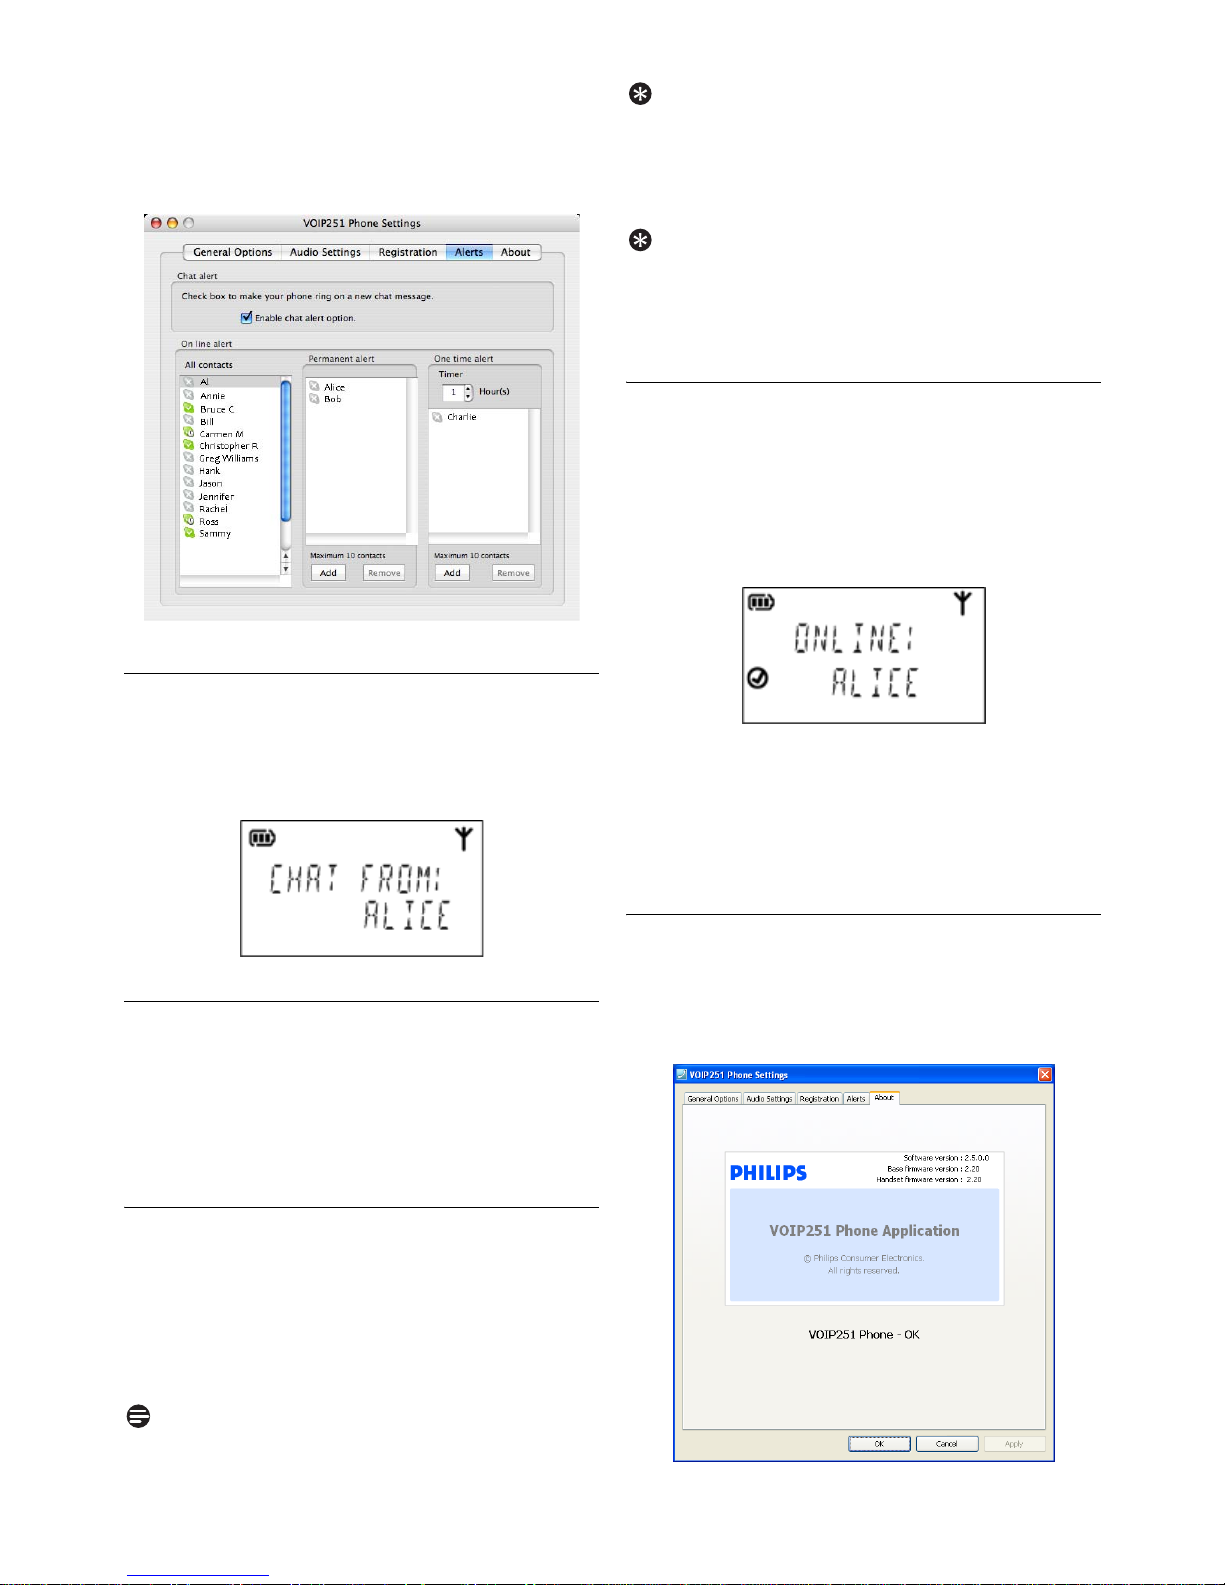
Mac OS X
Open the VOIP251 Phone Settings window and
select the
Alerts
tab.
The following settings are available:
Tip
Alert timer.
When there are contacts in the One
Time Alert list, you can set the timer for up to 24
hours. The list resets to empty when the timer
expires. The Permanent Alert list is not affected.
Tip
Remove contacts.
You can remove contacts by
selecting them in the Permanent or One Time
Alert lists. Click
Remove
.
15.4.4 Receiving an online alert from your
computer
When a contact you selected becomes available,
you will hear an alert tone from the handset. The
name of the contact will be displayed on the
handset for 10 seconds.
15.4.1 Chat alert
When the box is checked, your handset will emit
an alert tone when a chat message is received on
Skype. The name of the contact will be displayed.
15.4.2 Online alert
You can select contacts so that you will be
notified when they become available from offline
status. You can choose to be notified once only
or whenever a contact comes online.
15.4.3 Selecting contacts
1
Under
Online Alert
, select contacts from the
list on the left.
Add
Click
2
Time Alert
under the
list. The contacts are moved to
Permanent Alert
or
One
the list you have chosen.
Note
Maximum number of contacts.
You can select a
maximum of 10 contacts for each type of alert.
Phone Settings
You can do the following once you received an
online alert:
r to make a call to the contact
Press
1
OR
e to return to standby mode.
Press
2
15.5 About
Windows
Open the VOIP251 Phone Settings window and
About
select the
tab.
35
Page 38
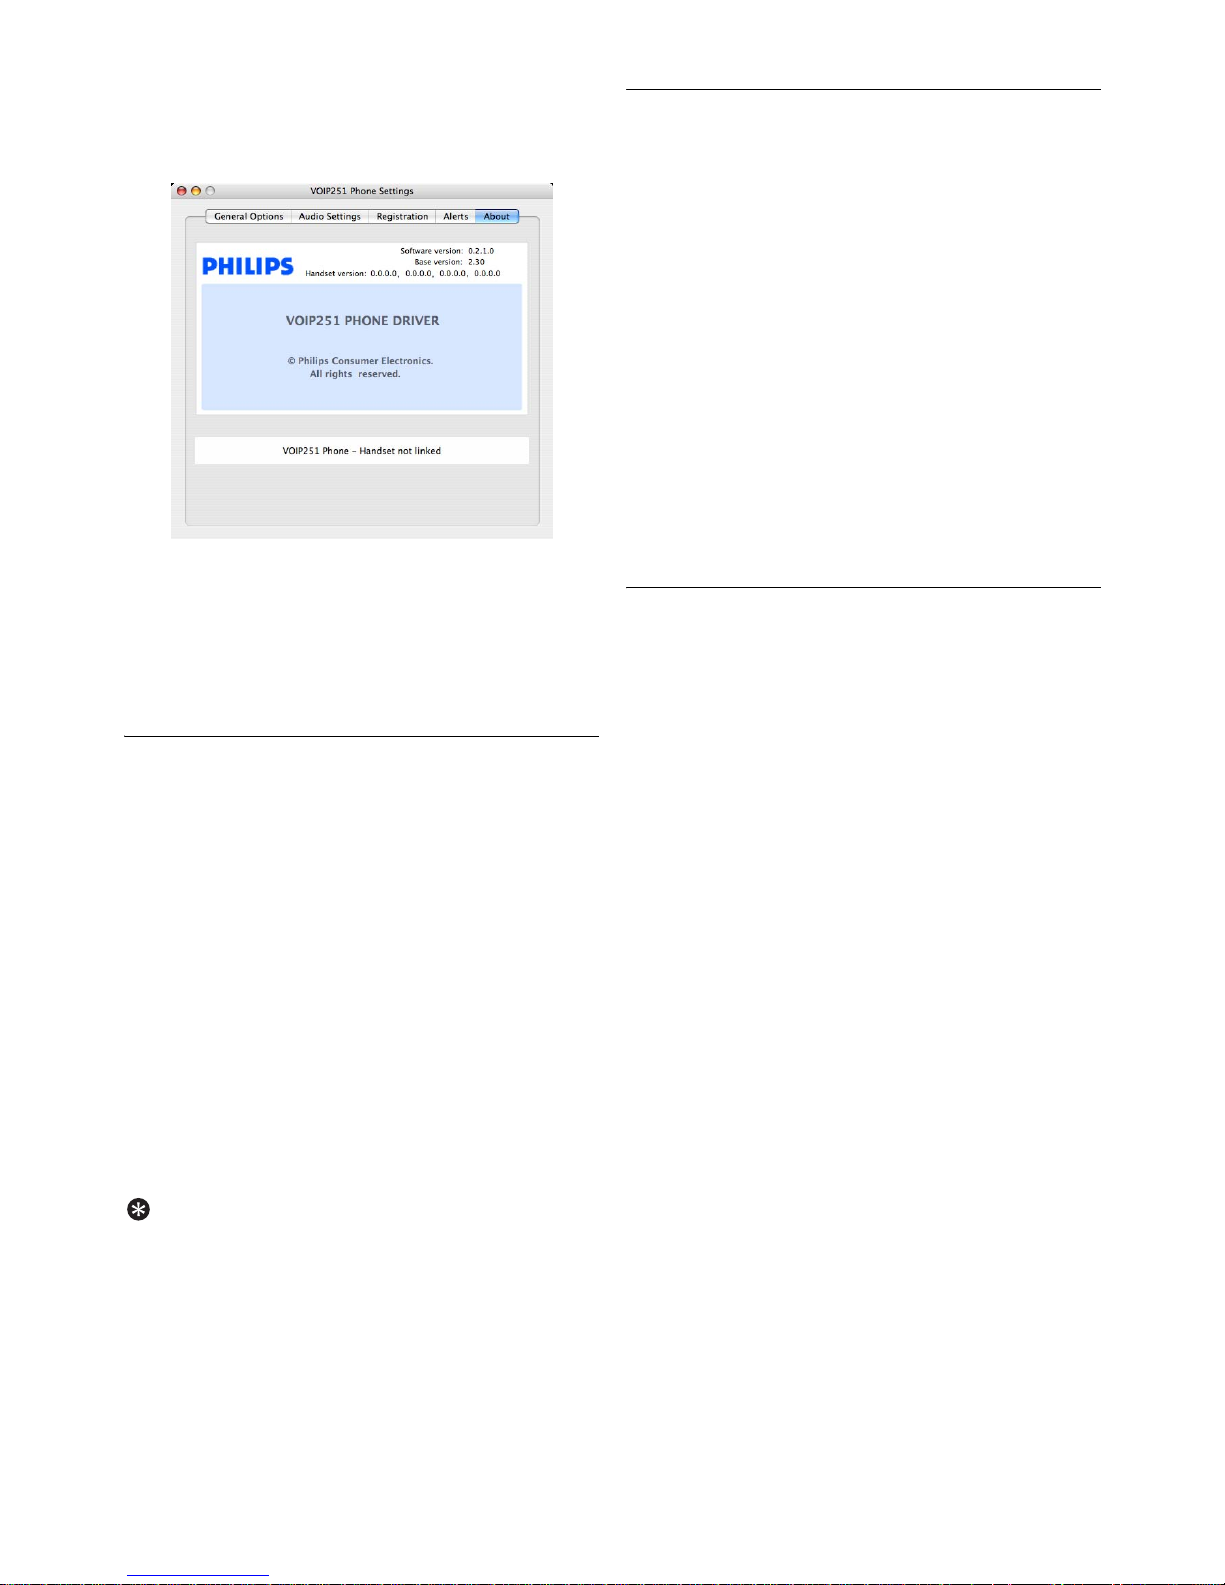
Mac OS X
Open the VOIP251 Phone Settings window and
select the
About
tab.
You can read information about your phone,
including connection status and the software
version you currently have installed. For details
on how to check your connection status, see
page 14.
15.6 Handset locator
Windows
Right click the tray icon and select
1
Locator
STOP HS LOCATOR
Right click on the tray icon and select
2
Handset Locator
. All handsets emit a paging tone.
is displayed.
to stop the paging.
Handset
Stop
Mac OS X
Click the VOIP251 icon in the dock. Click
1
VOIP251 in the menu bar.
Select
2
paging tone.
Handset Locator
STOP HS LOCATOR
. All handsets emit a
is
displayed.
3
Select
Stop Handset Locator
in the menu bar
to stop the paging.
Tip
Stop paging.
You can also press e on the
handset to stop the paging tone. Each handset can
only stop paging for itself.
15.7 Checking for updates
The VOIP251 software automatically checks for
updates every week. You can also check for
updates yourself at any time
Windows
Right click the tray icon and select
1
Update Now
A confirmation screen will appear if updates
2
are available. Click
.
Yes
to start download.
Check for
Mac OS X
Click the VOIP251 icon in the dock.
1
Click VOIP251 in the menu bar and select
2
Check for Update Now
A confirmation screen will appear if updates
3
are available. Click
.
Yes
to start download.
15.8 Help
If you need more help with your VOIP251, you
can visit Philips online support.
Windows
Help
Right click the tray icon and select
1
The Philips support website opens in your
2
.
default browser.
Mac OS X
Click the VOIP251 icon in the dock.
1
Click VOIP251 in the menu bar and select
2
Help
.
The Philips support website opens in your
3
default browser.
36
Phone Settings
Page 39

16 Text and Numbers
You can enter text and numbers for your handset
name and other menu items.
16.1 Entering text and numbers
Find the key with the character you want.
1
Press it as many times as needed for the
2
character you want.
Key Characters
0
1
2
3
4
5
6
7
8
9
Tip
Editing.
0+
space 1
ABC2
DE F 3
GHI 4
JKL5
MNO6
PQRS7
TUV8
WX Y Z 9
Use e to delete characters.
Text and Numbers
37
Page 40

17 Appendix
17.1 What is Skype™?
Skype™ is a piece of software that allows you to
make free calls.
IMPORTANT
No Emergency Calls.
for your ordinary telephone and cannot be used
for emergency calling.
17.1.1Other Skype products
SkypeOut™
SkypeOut is a way to call out from Skype to
landlines and mobile phones.
SkypeIn™
SkypeIn is a number your friends can use to call
you from any phone. You answer in Skype. You
can get numbers in one or more of the places
offered and receive calls in Skype from anywhere
in the world.
Skype Voicemail™
Skype Voicemail takes your calls when you are
busy or offline.
Skype Call Forwarding
Skype Call Forwarding redirects your calls to a
landline, mobile phone or another Skype name.
For more information, visit www.skype.com.
Skype is not a replacement
General Settings - Handset
Contact sorting method Status
(sorted by
online
status)
Auto pick-up Disabled
Auto hang-up Enabled
Display Settings - Computer
Language English
Display Settings Handset
Backlight Enabled
Contrast Level 3
Handset name PHILIPS
Sound Settings - Computer
Chat alert tone Enabled
Contact online alert tone Enabled
Sound Settings - Handset
Silent mode Disabled
Ringer melody Melody 1
Ringer volume Level 3
Key tone Enabled
17.3 Phone specifications
Item Specification
17.2 Default (pre-programmed) settings
General Settings - Computer
Auto start PC application at
Windows start up
Authorize Skype call from
computer
Enable chat alert option Checked
Contact online list Empty
38
Checked
Unchecked
Product name VOIP251
Handset
46 x 163 x 33 mm
dimensions
Handset weight 140 g (with batteries)
110 g (without batteries)
Base station
76 x 97 x 22 mm
dimensions
Base station weight 90 g
Appendix
Page 41

Frequency bands Europe: 1880-1900MHz
South America:
1910-1930MHz
North America (UPCS):
1920-1930MHz
Taiwan: 1880-1895MHz
Number of
channels
North America (UPCS):
60 channels
Taiwan: 96 channels
Others: 120 channels
Range 300 m open field,
50 m indoor
Connection USB
Standby time 150 hours
Talk time 10 hours
Charging time 12 hours
Rechargeable
2 X AAA, NiMH 750 mAh
battery cells
Appendix
39
Page 42

18 Troubleshooting
www.philips.com/support
In this chapter, you will find the most frequently
asked questions and answers about your phone.
Connection
Signal icon flashing
• The handset may be out of range. Move closer.
• If the handset displays
UNREGISTER
, register
the handset. See page 29.
Sound
No parking tone
• The handset may not be placed properly on the
charger. Try again.
• Charging contacts may be dirty. Disconnect the
power supply first and then clean contacts with
a damp cloth.
• Disable silent mode. See page 27.
Cannot hear the other party clearly/
earpiece too loud/quiet
• Refer to page 34 for how to adjust the handset
earpiece volume on your computer.
Product behaviour
Handset on the charger does not charge
• Batteries may be defective. Purchase new ones
from your dealer.
• Check that the batteries are inserted correctly.
• Make sure the handset is placed properly on the
charger. The battery icon animates while charging.
• Make sure that the charger power adapter is
plugged into a wall outlet.
• Make sure that the coaxial jack of the charger
power adapter is plugged into your charger.
• However, if your handset on the charger does
not charge after running for a while, check for
power loss or overcharge. (If your wall outlet
has a switch, is it in the ON position?)
No display
• Check that the batteries are charged.
• Check the power and phone connections.
• Check that the handset is turned on.
Bad audio (crackles, echo, etc.)
• The handset may be nearly out of range. Move
closer to the base station.
• The phone may be receiving interference
from nearby electrical appliance s. Move the
base station.
• The phone may be at a location with thick
walls. Move the base station.
Handset does not ring
• Check that the handset ringer is turned on. See
page 27.
• Check that the USB cable is connected properly.
• Check that Skype online status is not Do Not
Disturb.
Contact list / User status display NOT
AVAILABLE
• The handset may be out of range. Move closer.
• Check that your base station is connected to
the computer.
• Check if Skype is running on the computer.
Start Skype if the VOIP251 software has not
started Skype for you.
• Check that the VOIP251 software is running on
your computer.
Cannot make SkypeOut calls
• Enter + (press and hold 0) before the number
to dial.
• Check your account to see if you have enough
credit.
• Check that the handset is linked to the base
station.
Note
If the above solutions do not help, remove the
power from the handset, unplug the base station
from the computer and restart Skype as well as
the computer software. Wait for 15 minutes and
try again.
You can also visit our online help site at
www.philips.com/support
40
Troubleshooting
Page 43

21 Index
A
Auto Do Not Disturb 33
Auto hang-up 28
Auto pick-up 27
B
Backlight 27
Base station 9
Battery level 13
C
Call forward 26
Call log, viewing 25
Call transfer,
enabling call transfer 23
transfer to computer 23
transfer to handset 24
Call,
answering 17
ending 17
holding 18
making 17
rejecting 18
Calling from the call log 17
Calling SkypeOut 17
Calls, additional 18
Conference call,
adding contacts 21
ending 21
making 21
Connection status 14
Contact list,
making a call from 16
sorting 16
viewing 16
Contact online alert 35
Contrast 27
D
Default settings 38
Default settings, restore 29
E
Earpiece volume, adjusting 18
Emergency Management 30
I
Icons 10
Intercom,
calling 22
transfer 22
K
Key tone 27
Keypad lock 31
M
Menus 10
Mute 18
P
PC ringer 33
R
Ring tone 27
Ring volume 27
S
Signal strength 12
Skype credits, checking 26
Skype presence 25
Skype, auto start 33
Skypein subscription, checking 26
Software,
first time set up 13
installing 13
Speaker 18
Standby mode 15
T
Text and numbers, entering 37
Troubleshooting 40
U
Updates, checking 36
V
Voicemail 25
Voicemail subscription, checking 26
H
Handset 8
Handset locator 36
Handset name 27
Handset on/off 15
Handset, registering 29
Index
43
Page 44

Copyright © 2008 Koninklijke Philips Electronics N.V. All rights reserved.
Trademarks are the property of Koninklijke Philips Electronics N.V. or
their respective owners.
Specifications are subject to change without notice.
Document number: 3111 285 43791
Printed in China
Page 45

THE RBRC© SEAL
The RBRC© seal on the nickel metal hydride battery indicates that Philips Royal Electronics is voluntarily participating in an industry program to collect
and recycle these batteries at the end of their useful lives, when taken out of service within the United States and Canada.
The RBRC© program provides a convenient alternative to placing used nickel metal hydride batteries in the trash or municipal waste, which may be
illegal in your area.
Philips’s participation in RBRC© makes it easy for you to drop off the spent battery at local retailers participating in the RBRC© program or at authorized
Philips product service centers. Please call 1-800-8-BATTERY for information on the Ni-MH battery recycling and disposal bans/restrictions in your area.
Philips’s involvement in this program is part of its commitment to protecting our environment and conserving natural resources.
RBRC© is a registered trademark of Rechargeable Battery Recycling Corporation.
COMPLIANCE INFORMATION
This device complies with Part 15 of the FCC Rules. Operation is subject to the following two conditions: (1) This device may not cause harmful
interference, and (2) This device must accept any interference received, including interference that may cause undesired operation. This device
complies also with RSS-213 of Industry Canada.
Notice: The term “IC.” before the certification number signifies that Industry Canada technical specifications were met. This certification means that the
equipment meets certain radio communications and operational requirements.
This class B digital apparatus complies with Canadian ICES-003.
Cet appareil numérique de la class B est conforme à la norme NMB-003 du Canada.
Caution
Users should ensure for their own protection that the electrical ground connections of the power utility, telephone lines and internal metallic water pipe
system, if present, are connected together. This precaution may be particularly important in rural areas.
Do not attempt to repair or modify this equipment.
Repairs to certified equipment should be made by an authorized maintenance facility designated by the supplier. Any repairs or alterations made by
the user to the equipment may render the equipment void in product warranty and compliance. This could also void the user’s authority to operate the
equipment.
Interference
This equipment has been tested and found to comply with the limits for a Class B digital device, pursuant to Part 15 of the FCC Rules.
This equipment generates uses and can radiate radio frequency energy and, if not installed and used in accordance with the instructions, may cause
harmful interference to radio communications.
However, there is no guarantee that interference will not occur in a particular installation. If this equipment does cause harmful interference to radio or
television reception, which can be determined by turning the equipment off and on, the user is encouraged to try to correct the interference by one or
more of the following measures:
1. Reorient or relocate the receiving antenna.
2. Increase the distance between the equipment and receiver.
3. Connect the equipment into an outlet on a circuit different from that to which the receiver is connected.
4. Consult the dealer or an experienced radio/TV technician for help.
RF Radiation Exposure
This equipment complies with FCC for an uncontrolled environment. This equipment and its antenna must be installed to provide a minimum separation
distance of 20 centimeters from all persons. This transmitter must not be co-located or operated in conjunction with any other antenna or transmitter.
For body-worn operation, compliance is restricted to the belt clip supplied with this product. Use of other accessories may not ensure compliance with
the RF exposure guidelines. Use of belt clip must maintain a separation distance of 3 mm between the back of the unit and the body of the user to
ensure compliance.
Noise
Electrical pulse noise is present at one time or another. This is most intense during electrical storms. Certain kinds of electrical equipment, such as light
dimmers, fluorescent bulbs, motors, fans, etc., also generate pulse noise. Because radio frequencies are susceptible to this, you may on occasion hear
pulse noise through the receiver. This is usually only a minor annoyance and should not be interpreted as a defect of the unit.
Privacy of Communications
Privacy of communications may not be ensured when using this telephone.
USB Cable included in this package must be used with this equipment to ensure compliance with the Class B FCC limit.
Service Support
Philips Accessories & Computer Peripherals
North America1881 Route 46 WestLedgewood, NJ 07852
Phone: (800) 233-8413 www.philips.com/support
 Loading...