

Page 1

Register your product and get support at
www.philips.com/welcome
VOIP151
US USB Corded Phone
Page 2

Page 3

Table of contents
1Important 2
1.1 Power requirements 2
1.2 Important Safety information 2
1.3 Terms and Conditions of use 2
1.4 Environmental Care 2
1.5 Installation requirements 2
1.6 Conformity 2
1.7 Service Support 3
1.8 Warranty 3
1.9 Electric, Magnetic and Electromagnetic
Fields (“EMF”) 3
1.10 FCC Part 15 Declaration of Conformity
Statement 3
2 Your phone 4
2.1 What’s in the box? 4
2.2 What you will also need 4
2.3 Overview of your phone 5
4.2 Answer a Call 11
4.3 End or Reject a Call 11
4.4 Emergency Call Management 11
5 Features during a Call 12
5.1 Adjust Earpiece Volume 12
5.2 Mute Microphone 12
5.3 Put a Call on Hold 12
5.4 Call Waiting 12
5.5 Manage a second call 12
5.6 Conference Call 12
5.7 Activate Computer Handsfree 13
6 Voicemail 14
6.1 Listen to Voicemail 14
6.2 Voicemail Status on computer 14
7Phone Settings 15
2.4 Handset display 7
2.5 Idle screen 7
3 Getting started 8
3.1 Install the software 8
3.2 Setting up for the first time 8
3.3 Connection status 9
4 Call 10
4.1 Make a Call 10
Table of contents
7.1 General Options 15
7.2 Audio Settings 16
7.3 Tone Settings 17
7.4 Shortcut Configuration 18
7.5 Product Information 18
8 Default Settings 19
9 Frequently asked questions 20
10 Index 22
1
Page 4

1Important
Take time to read this user manual before you
use your phone. It contains important
information and notes regarding your phone.
1.1 Power requirements
The computer will provide power through the
USB cable.
1.2 Important Safety information
To avoid damage or malfunction:
• Read and follow all warnings and instructions
marked on the product.
• Do not use this product near water, a laundry
tub, in a wet basement, or near a
swimming pool.
• Do not place this product on an unstable
surface. The product may fall and be damaged.
• This product should never be placed near or
over a radiator or heat register.
• Do not expose the phone to excessive heat
caused by direct sunlight.
• Do not drop your phone or allow objects to
fall on your phone.
• Do not allow anything to rest on the power
cord. Do not locate this product where the
cord will be abused by people walking on it.
• Avoid using a telephone during a storm or
severe weather with lightning. There may be a
risk of electric shock from lightning.
• Do not use this product to report a gas leak in
the vicinity of the leak.
• Do not use the product in places where there
are explosive hazards.
• Do not use this product near intensive care
medical equipment or by any people with
pacemakers.
• Active mobile phones in the vicinity may cause
interference.
• Do not let small metal objects come into
contact with the product. This can deteriorate
audio quality and damage the product.
• Do not use any cleaning agents containing
alcohol, ammonia, benzene or abrasives as
these may harm the set.
• Do not open the product as you could be
exposed to high voltages.
About operating and storage temperatures:
• Operate in a place where the temperature is
always between 0 and 35 °C (32 to 95 °F).
• Store in a place where the temperature is always
between -20 and 45 °C (-4 to 113 °F).
SAVE THESE INSTRUCTIONS
1.3 Terms and Conditions of use
• No emergency calls on Skype. Skype is not a
replacement for your ordinary telephone and
cannot be used for emergency calls. See
Skype's terms and conditions at
www.skype.com/eula and www.skype.com/tos.
• The service will not work if there is a power
cut or broadband failure.
1.4 Environmental Care
Please remember to observe the local regulations
regarding the disposal of your packaging materials
and old phone and where possible promote their
recycling.
1.5 Installation requirements
In order to use the phone, your computer should
meet the following requirements:
• Computer running Microsoft
2000, XP or Vista
• 800 MHz processor
• 256 MB RAM
• Free USB slot on computer
• Internet connection (broadband recommended)
1.6 Conformity
We, Philips declare that the product is in
compliance with the essential requirements and
other relevant provisions of Directive 1999/5/EC.
®
Windows®
2
Important
Page 5

You can find the Declaration of Conformity on
www.p4c.philips.com.
1.7 Service Support
US service center
Philips Accessories & Computer
Peripherals North America1881 Route
46 West Ledgewood, NJ 07852
Phone: (800) 233-8413
E-mail support:
http://www.support.philips.com/support
1.8 Warranty
The warranty information is available on
www.philips.com/support
1.9 Electric, Magnetic and Electromagnetic Fields (“EMF”)
1. Philips Royal Electronics manufactures and
sells many consumer oriented products
which usually, as with any electronic
apparatus, have the ability to emit and receive
electro magnetic signals.
2. One of Philips' leading Business Principles is
to take all necessary health and safety
precautions for our products, to comply with
all applicable legal requirements and to stay
well within the EMF standards applicable at
the time of producing the products.
3. Philips is committed to develop, produce and
market products that cause no adverse health
effects.
4. Philips confirms that if its products are
handled properly for their intended use, they
are safe to use according to scientific
evidence available today.
5. Philips plays an active role in the development
of international EMF and safety standards,
enabling Philips to anticipate further
developments in standardisation for early
integration in its products.
1.10 FCC Part 15 Declaration of Conformity Statement
Warning: Changes or modifications to this
equipment not expressly approved by the party
responsible for compliance could void the user's
authority to operate the equipment.
This device complies with Part 15 of the FCC
Rules. Operation is subject to the following two
conditions:
(1) this device may not cause harmful
interference, and
(2) this device must accept any interference
received, including interference that may cause
undesired operation.
NOTE: This equipment has been tested and
found to comply with the limits for a Class B
digital device, pursuant to Part 15 of the FCC
Rules. These limits are designed to provide
reasonable protection against harmful
interference in a residential installation.
Important
3
Page 6

2Your phone
Congratulations on your purchase and welcome to Philips!
To fully benefit from the support that Philips offers, register your product at
www.philips.com/welcome.
2.1 What’s in the box?
Handset with
1.2m cable
Travel case Quick Start Guide
Note
*Only the Skype version printed on the Installation CD is guaranteed for full compatibility. New
features in upgraded Skype versions may not be available on VOIP151.
2.2 What you will also need
• A desktop or laptop with a free USB port
• Internet connection (broadband recommended)
(contains also the User Manual)
Installation CD*
4
Your phone
Page 7

2.3 Overview of your phone
AEarpiece
B LED
Stay on during a call.
The LED will blink continuously during the
following events:
Flash quickly during an incoming call.
Blink slowly when phone is muted.
Blink slowly when voicemail(s) waiting.
CDisplay
See page 7 for an overview of the display icons.
D Scroll Up Key
Scroll up an item or contact.
Increase earpiece volume.
Clear the last digit or character entered.
Press and hold to automatically browse the
contact list.
E Scroll Down Key
Scroll down an item or contact.
Decrease earpiece volume.
Clear the last digit or character entered.
Press and hold to automatically browse the
contact list.
FTalk Key
Make and answer calls.
Play voicemail.
Access to call history.
Put a call on hold.
Toggle between calls.
Press and hold to start a conference call.
GSkype Key
Focus Skype on computer.
Open the contact list.
Press and hold to start a conference call.
HOff Key
End a call or reject an incoming call.
Stop voicemail.
Press and hold to minimize Skype window and go
back to idle mode.
I Digit 1 and Voicemail list Key
Enter 1.
Press and hold to access voicemail list.
J Digit 0 and + Key
Short press to enter a 0.
Press and hold to enter +.
KMute Key
Mute/unmute a call.
LMicrophone
u
d
r
s
e
0
m
1
2
2
1
Your phone
1. Flashes ON for 100ms and OFF for 100 ms
2. Flashes ON for 500ms and OFF for 500 ms
5
Page 8
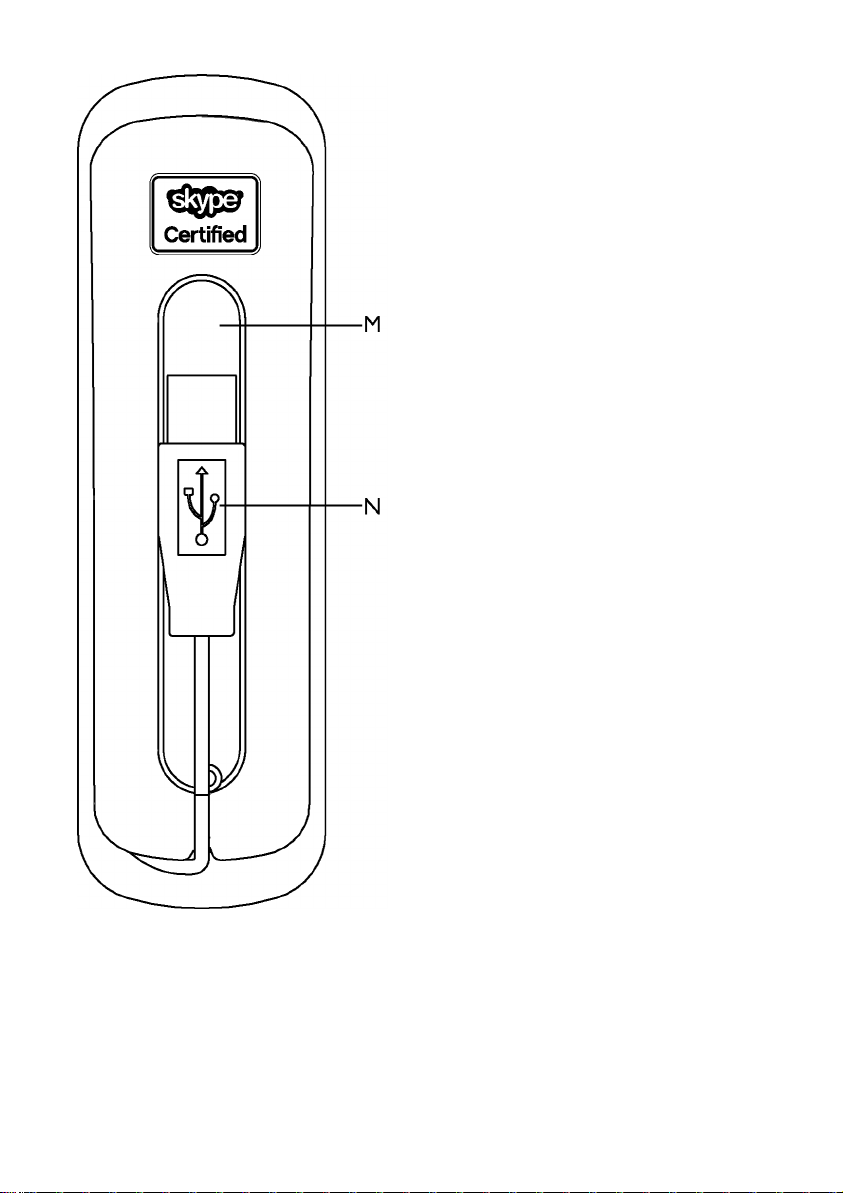
M USB connector grove
Use to contain the USB connector.
N USB connector
Connect the 1.2m long cable to the USB slot on
the computer.
6
Your phone
Page 9

2.4 Handset display
Skype User and Contact status display:
Online / SkypeMe
Away
Not Available / Do Not Disturb (DND)
Offline / Invisible
Specific Handset icons:
Blinking: Mute On
2.5 Idle screen
In idle mode, your Skype status and time will be
displayed on the handset screen:
Your phone
Blinking: Incoming call
Fix: On-going call
Call on hold
On-going Conference call
Ringer Off
7
Page 10

3 Getting started
3.1 Install the software
Note
Please make sure that the USB connector is
NOT plugged in before installation starts.
VOIP151 driver is provided in the enclosed CD.
Unwind the USB cable from your phone.
1
Insert the installation CD into the computer's
2
CD ROM (or DVD ROM) drive.
Note
The VOIP151 driver should start automatically if
Autorun VOIP151 driver at Windows startup
option is ticked during installation.
Note
Use the Skype version provided on the
installation CD for the phone to work
properly. New features from upgraded Skype
version may not be available on VOIP151. Check
compatibility on www.philips.com/support.
Note
If your operating system is Windows 2000, you
need to restart your computer to complete the
installation.
Note
No battery is required. Power for the phone is
supplied by the computer through the USB cable.
The installation program will start
3
automatically.
Follow the instructions on the screen.
4
You will be asked to connect the USB plug
directly to your PC’s USB slot. Connect the
USB plug once instructed.
Go on following instructions on the screen.
5
Exit
Click on
6
Remove the installation CD from the CD
7
when it is finished.
ROM (or DVD ROM) drive.
Tip
If for some reasons the installation does not start
automatically:
START
• In Windows, click on
Run
.
• Type in
explorer
and navigate to the CD ROM
, and then select
(or DVD ROM) drive.
• Double-click on
SetupWizard.exe
.
3.2 Setting up for the first time
Make sure that the phone is directly
1
connected to a USB slot on your computer.
If this is your first installation, the VOIP151
2
may be launched automatically. It depends on
your selection during the installation.
Otherwise, if the driver is not running, start
3
the VOIP151 driver by double clicking the
shortcut icon created on your desktop.
Start Skype if VOIP151 driver has not started
4
Skype for you. Login with your Skype
account.
If this is your first time running the VOIP151,
5
you will see the message
wants to use Skype
to use Skype
and click OK.
Another program
. Select
Allow this program
8
Getting started
Page 11

Note
If you don't have a Skype account, you can find
more details about how to create one on
http://www.skype.com.
Tip
When VOIP151 driver is running, a tray icon will
appear at the bottom right corner of your
computer screen.
3.3 Connection status
When the mouse cursor is placed over the
VOIP151 tray icon, the current status of your
phone will be displayed.
When your phone is ready to be used, the tray
icon is blue and the status will show
Phone - USB connected
.
VOIP151
Otherwise, you can correct the problem
according to the displayed status:
(Blue) USB plugged in, connection to Skype
is normal.
(Grey) USB plugged in, but Skype is not started /
not authorized / user not logged on.
(Red) USB not plugged in.
For further information on how to fix a
connection problem, see page 21.
Getting started
9
Page 12

4Call
Note
Press and hold
e to minimize Skype.
4.1 Make a Call
!
Warning
Skype does not support emergency calls. Please
use the normal telephone line in case of
emergency. For more information, see
“Emergency Call Management” on page 11.
4.1.1 Call from the contact list
Press
1
2
3
When the contact is selected, the first 12
characters of the name will be displayed. After 3
seconds, the screen will automatically scroll once
until the 32nd character.
If the name contains non-latin characters, the
Skype name of the contact will be displayed
instead.
When end user press
displayed on the computer.
s: Your Skype contact list is displayed
on the handset and on the computer.
u/d to select the contact you wish to call.
Press
On the handset, the name and current Skype
status of the contact is displayed.
Press
r to make the call.
Note
Note
s, the contact list is also
4.1.2 Call SkypeOut Number
Use the keypad to dial the number you wish
1
to call.
r to make the call.
Press
2
OR
Press
1
2
3
If you want to make SkypeOut calls, you need to
purchase Skype credits. For more details, please
visit:
http://www.skype.com/store/buy/skypeout.html.
If a SkypeOut call is made and there is not enough
Skype credits,
on the screen for the duration of 10 seconds.
To make a SkypeOut call, it is necessary to dial
the country prefix before dialing the phone
number you are calling, i.e. 00, 011 or +.
For example:
When making calls to North America:
00-1-905-1234567 or 011-1-905-1234567
When making international calls:
00-852-12345678 or +852-12345678
To enter +, press and hold
Press u/d to clear entered numbers.
s: Your Skype contact list is displayed
on the handset and on the computer.
u/d to select the contact you want to
Press
call.
r to make the call.
Press
Note
NO SKYPEOUT
Note
Tip
will be displayed
0.
The name and current Skype status of the
contact is displayed.
10
4.1.3 Call from the Call History list
Short or long press
1
history in idle screen.
u/d to see the whole call history list
Press
2
and to select the contact you wish to call.
r to make the call.
Press
3
r to enter the call
Call
Page 13

Note
Make a short press on e to exit and return to
idle mode.
4.1.4 Contact list TIPS
• E.g. to search a contact “Sam”, press 7 four
times. The first contact that begins with letter
S will be selected.
E.g. to search a SkypeOut contact
“+1233456789”, press
contact that begins with + will be selected.
• Press and hold u/d to start auto-scroll.
Release to stop scrolling.
4.2 Answer a Call
When an incoming call arrives, the phone will
ring, the LED will flash quickly and the phone icon
will blink.
To answer the call, press
displayed.
Note
When you are in “DND” (Do Not Disturb)
status in Skype, the phone will not ring. The LED
on the phone will still flash to notify you of the
incoming call and the phone icon will blink.
Tip
You can set the ringer off through the VOIP151
driver. For more information, see page 17.
0 once. The first
r. Call duration is
4.4 Emergency Call Management
!
Warning
Skype is not a replacement for your ordinary
telephone and cannot be used for emergency
calls. Please use the normal telephone line in case
of emergency.
If the dial out number is an emergency call number
of your country, a pop-up error message
WARNING : This product doesn’t replace your land
“
line phone and cannot be used to call Emergency
” will be displayed on the computer.
services
At the same time,
displayed on the handset for 10 seconds and an
error tone is emitted.
No emergency calls
will be
4.3 End or Reject a Call
To end a call or reject an incoming call, press
Note
The call duration will be displayed on the handset
screen for 5 seconds.
Call
e.
11
Page 14

5 Features during a Call
5.1 Adjust Earpiece Volume
You can increase or decrease the volume of the
caller's voice during a call. There are 8 volume
levels for selection.
u to increase the volume or d to decrease
Press
the volume.
Tip
The microphone volume and the earpiece volume
can also be adjusted through the VOIP151 driver.
For more information, see page 16.
5.2 Mute Microphone
During a call, you may want to speak to someone
privately without the opposite party hearing your
conversation.
m to mute the microphone.
Press
1
• The LED will flash slowly.
•
MUTE
is displayed on the screen during 10
seconds. The icon appears and the screen
returns to previous menu after 10 seconds.
m again to restore communication.
Press
2
Note
You can still hear the opposite party talking when
you mute the microphone.
5.3 Put a Call on Hold
r to put your call on hold.
Press
1
ON HOLD
•
10 seconds. The icon appears and the
screen returns to previous menu after 10
seconds.
Press
2
Note
You are unable to hear the opposite party talking
when the call is put on hold.
is displayed on the screen during
r again to resume your call.
5.4 Call Waiting
When you are on the line and there is a second
incoming call, you will hear a waiting tone on the
earpiece and the LED on the phone will flash
quickly.
5.5 Manage a second call
5.5.1 Answer a second incoming call
r to answer the call.
Press
• The original call is put on hold.
5.5.2 Make a second outgoing call
If you are already on a call, press s to access
1
the contact list or dial the number directly.
For more information on making a SkypeOut
call, see page 10.
u/d to choose a contact.
Press
2
Press
3
5.5.3 Toggle between calls
After accepting the second call, you may press
r to call.
• The original call is put on hold.
r to toggle between the first and second calls.
5.6 Conference Call
This feature allows you to establish
communication with more than 1 person at the
same time. Up to 10 people can be connected in
the same conference.
5.6.1 Initiate a conference call
If you are already on a call, press s to access
1
the contact list or dial the number directly.
For more information on making a SkypeOut
call, see page 10.
u/d to choose a contact for the
Press
2
conference call.
Press
3
r to call.
• The original call is put on hold.
12
Features during a Call
Page 15

Once the call is connected, press and hold
4
r or s to start the conference call.
•
CONFERENCE
seconds and then the call duration is displayed.
The icons will be displayed.
Press e to end the conference call.
5
• If you are the initiator of the conference, all
calls will be stopped. Otherwise, the conference
will continue after you or any other participants
end the call.
Note
When you receive a second incoming call and
wish to establish a conference call, press and hold
stays on the screen for 10
r to start the conference call.
5.6.2 Adding participants to a conference
If you are already on a conference call, press
1
s to access the contact list or dial the
number directly. For more information on
making a SkypeOut call, see page 10.
u/d to choose a contact for the
Press
2
conference call.
Press r to call.
3
•The icon will blink till the new participant
accepts the invitation.
Long-press
4
to the conference.
• Call(s) that had been put on hold will be
resumed.
for 10 seconds and then the call duration is
displayed.
Press
5
• If you are the initiator of the conference, all
calls will be stopped. Otherwise, the conference
will continue after you or any other participants
end the call.
s to allow participant to join in
CONFERENCE
stays on the screen
e to end the conference call.
5.6.3 Incoming call during a conference
You can choose to connect or reject an incoming
call using the Skype interface.
When you connect an incoming call during a
conference, the conference call is automatically
put on hold. The icon blinks and the name
of the new caller is displayed on the screen for 3
seconds.
Note
You can use the Skype interface to switch
between the incoming call and conference call, or
connect the new call to the conference.
5.7 Activate Computer Handsfree
Computer handsfree feature allows the end user
to use the computer audio facilities to activate a
handsfree mode. By default, “Computer
handsfree” mode is set to key
To activate handsfree on the computer, press and
4 on the handset during your call.
hold
Note
To change the default key for handsfree, see
“Shortcut Configuration” on page 18.
4.
Features during a Call
13
Page 16

6Voicemail
6.1 Listen to Voicemail
When there are voicemails waiting to be
retrieved, the LED on the phone will blink slowly.
Note
For details on how to get a voicemail account,
please visit:
http://www.skype.com/products/skypevoicemail/.
Press and hold
1
• On your computer, you will see:
• On the handset, the latest caller's name or
number is displayed:
1 to open the voicemail list.
6.2 Voicemail Status on computer
The following icons show the status of your
voicemails.
Indicates a new voicemail.
Indicates an old voicemail.
Indicates that the voicemail is currently
playing.
Press
e to stop playing.
• If there is no voicemail,
displayed on the handset screen.
Press u/d to select the voicemail you wish
2
to retrieve.
r to listen to the voicemail.
Press
3
Tip
Make a short press on
while it is being played. Press
the voicemail window and return to idle mode.
14
NO MESSAGE
will be
e to stop a voicemail
e again to close
Voicemail
Page 17

7Phone Settings
The VOIP151 driver allows you to customize
your phone to a setting that best suits you.
To start configuring your phone:
Double click the tray icon at the bottom
1
right corner of your computer screen to
open the “VOIP151 Phone Settings” window.
OR
Right-click the tray icon and select one of
1
the four options:
• General Options
• Audio Settings
• Tone Settings
• Shortcut Configuration
The “VOIP151 Phone Settings” window will
2
be opened.
Apply
• Click
• Click
• Click
window
Right-click the tray icon and select
3
In the exit prompt window, click
confirm exit.
Tip
To bypass the exit prompt window, tick on the
Do Not Show This Message Again
clicking
Note
If the VOIP151 driver is closed, calls cannot be
made or received through the phone.
to apply changes.
Cancel
to cancel all changes made.
OK
to apply changes and close the
.
box before
Yes
.
Yes
Quit
to
7.1 General Options
Open the “VOIP151 Phone Settings” window and
select the
General Options
tab.
The following settings are available:
7.1.1 Auto Start Application
When the box is ticked, the VOIP151 computer
software will automatically run when you start
Windows.
7.1.2 Auto Start Skype
When the box is ticked, Skype will start
automatically when VOIP151 phone is plugged
.
into the computer.
7.1.3 Language Selection
Choose a language from the pull-down menu
under
Language Selection
and to change the language, click
. To apply the change
OK
.
Note
To change the language in Skype, open the Skype
Tools,
select
program and go to
Change Language
and then select a language.
Phone Settings
15
Page 18

7.1.4 Ring Computer Speaker
When the box is ticked, it enables the computer
speaker to ring when there is an incoming Skype
call.
Note
This option is available only when Skype is
connected.
7.2.2 Set the audio input device for Skype
Select a device under
Skype’s audio input.
Microphone Device
Philips VOIP151 for Skype
for
is
automatically set as the default audio input device
after VOIP151 installation. (For Vista users,
default audio input device is
Philips VOIP151 for Skype
)
USB VoIP Device
/
7.1.5 Auto Away
When the box is ticked, it disables the Skype
“auto away” function and your Skype status will
always appear as “Online”.
Note
This option is available only when both the phone
and Skype are connected.
7.2 Audio Settings
Open the “VOIP151 Phone Settings” window and
select the
Audio Settings
tab.
7.2.3 Phone Volume Adjustment
Adjust the earpiece volume bar to change the
earpiece volume.
7.2.4 Change Window’s Default Audio
Settings
Click
Advanced...
to choose a different audio
device for other Windows applications (for
example, Windows Media Player).
7.2.4.1 For Windows XP and Vista users
Click
1
Advanced...
Devices Properties
to open
window.
Sound and Audio
The following settings are available:
7.2.1 Set the audio output device for
Skype
Select a device under
Skype’s audio.
Earpiece Device
Philips VOIP151 for Skype
to listen
is
automatically set as the default audio output
device after VOIP151 installation. (For Vista
users, default audio output device is
/
Philips VOIP151 for Skype
Device
USB VoIP
)
16
Select an audio output device under
2
playback
Select an audio input device under
3
recording
.
.
Sound
Sound
Phone Settings
Page 19

Make sure that
4
Use only default devices
is
ticked and click OK.
7.2.4.2 For Windows 2000 user
Click
1
2
3
4
Advanced...
Multimedia Properties
Select an audio output device under
playback
.
Select an audio input device under
recording
Make sure that
to open
Sounds and
window.
.
Use only preferred devices
Sound
Sound
is
ticked and click OK.
Note
It is recommended to set both audio input and
output device on your computer sound card.
Note
By ticking the box
Use only default devices
Windows XP and Vista users) or
preferred devices
(for Windows 2000 user), you
Use only
(for
will be able to separate the audio path of your
computer. Audio from Skype will be emitted at
the phone, while audio from other Windows
applications will be emitted at the selected device.
7.3 Tone Settings
Open the “VOIP151 Phone Settings” window and
select the
Tone Settings
tab.
The following settings are available:
7.3.1 Change ringer melody
Select a melody under
OK
to apply the change.
Default Melody
and click
Note
If your phone is connected to the computer, you
Listen
can click
to hear the melody.
7.3.2 Change ringer volume
Select a volume level under
click
OK
to apply the change. When the bar is
Off
moved to
, the ringer is disabled.
Default Volume
and
7.3.3 Key Tone Settings
Tick on the
Tone Settings
Disable Key Tone
to put the key tone to OFF. To
box under
Key
activate the key tone, untick the box.
Phone Settings
17
Page 20

7.4 Shortcut Configuration
Open the “VOIP151 Phone Settings” window.
Select the
Shortcut Configuration
tab.
Tip
When a shortcut has been validated, press and
hold the key for more than 2 seconds to access
the function.
7.5 Product Information
Open the “VOIP151 Phone Settings” window and
About
select the
tab.
You can set your phone keys
2, 3, 4, 5,
6, 7, 8, 9, * and # as shortcuts to
access the following functions:
• Making quick calls. When you enable this
feature, it opens the contact list window to
choose a contact name.
• Activate Computer handsfree (ON/OFF)
• Open call history
• Change Skype status (DND /Online)
• Start webcam (ON/OFF)
• Activate Call forward (ON/OFF)
• Activate Chat alert (ON/OFF)
Note
“Computer handsfree” mode is set to key
default.
Assigning shortcuts
Action
Under
1
each of the phone keys
Under
2
box to insert a tick for each key function that
you wish to assign.
Click
3
shortcut will be activated.
Note
1 is assigned to access the voicemail by
Key
default and cannot be changed.
, select a shortcut function for
2...9, * and #.
Enabled
, click on the corresponding
OK
to apply the changes. The assigned
4 by
This tab displays the software version, the
firmware version and the connection status of
your phone.
When VOIP151 Phone shown, it could be one of the situations below:
• Skype is not started
• Skype not authorized
• User not logged on.
For further information on how to fix a
connection problem, see page 21.
Skype not logged in
is
18
Phone Settings
Page 21

8 Default Settings
Auto Start Computer
application
Auto Start Skype Ticked
Language English
Ring Computer
Speaker
Always Online ON
Earpiece Device Philips VOIP151 for
Microphone Device Philips VOIP151 for
Earpiece Volume Medium
Default Melody Melody 1
Default Volume Low
Disable Key Tone Unticked
Shortcuts 1 - Voicemail
* For Vista users, the default audio output device
USB VoIP Device/Philips VOIP151 for Skype
is
Ticked
OFF
Skype*
Skype*
4 - Computer
handsfree - Ticked
.
Default Settings
19
Page 22

9Frequently asked questions
see www.philips.com/support
In this chapter, you will find the most frequently
asked questions and answers about your phone.
Set-up
Selected “Do not allow this program to use
Skype” by mistake.
Tools
>
Options
>
• In Skype, go to
Advanced Settings
access to Skype
CHANGE
Skype
Sound
The phone does not ring.
• Make sure that the ringer volume is not set to
off (see page 17).
• Make sure that Skype status is not in “DND”
(Do Not Disturb) mode.
I cannot hear properly!
• Check if the audio path is set correctly under
Skype. To check your audio settings, open the
“VOIP151 Phone Settings” window and select
the
, select
, and then click OK.
Audio Settings
>
Manage other programs’
, select
VOIP151.EXE
Allow this program to use
tab.
Advanced
>
, click
It is recommended to choose
for 2K and Windows XP, or
Skype
/
Philips VOIP151 for Skype
Device
Vista user.
• Turn up the earpiece volume.
Caller cannot hear me at all!
• Microphone may be muted: During a call, press
Philips VOIP151 for
USB VoIP
for Windows
m to unmute the microphone. The icon
disappears.
• Make sure that the call is not on hold: During a
call, press
icon disappears.
No key tone can be heard.
• Enable key tone using the VOIP151 driver (see
page 17).
My audio settings in Skype is not routed to
VOIP151.
• In the Skype window, click on
Options
• Select
Microphone, Speakers
box, and then click
r to resume conversation. The
Tools
. Select
. Select
Audio Settings
Philips VOIP151 for Skype
and
SAVE
Ringing
.
on the left.
in the
pull-down
20
Frequently asked questions
Page 23

Product behaviour
The handset warms up when making a long
call!
• This is a normal behavior. The handset
consumes energy while calling.
Cannot make or receive Skype calls.
• Make sure that your Skype status is not offline.
• Check if the USB cable is connected properly.
• Check if the VOIP151 driver is running (see
page 18).
Cannot make SkypeOut calls.
• Enter 00 (& country code), 011 (& country
code) or + (& country code) before the
number you wish to dial.
• Check your account to see if you have enough
credit. For more details, please visit:
http://www.skype.com/go/store.buy.skypecredit
LED keeps blinking slowly while off call.
• Retrieve your new voicemails.
Connection status shows a VOIP151 tray
icon in grey.
• In Skype, go to
Advanced Settings
access to Skype
CHANGE
Skype
, select
, and then click OK.
Advanced
>
Manage other programs'
, select
VOIP151.EXE
Allow this program to use
>
, click
Tools
>
Options
>
Note
If the above solutions still cannot resolve your
problem, remove the phone from the computer,
and then restart Skype and the VOIP151 driver.
Wait for 15 minutes and try again. For more
information, see www.philips.com/support.
Frequently asked questions
21
Page 24

10 Index
A
Accessories 4
Adjust earpiece volume 12
Answer a call 11
Audio Settings 16
Auto Away 16
Auto Start Application 15
Auto Start Skype 15
C
Call 10
Call from the call history list 10
Call from the Skype contact list 10
Call Waiting 12
Change ringer melody 17
Change ringer volume 17
Computer Handsfree 13
Conference 12
Configure your phone 15
Call forward 18
Chat alert 18
Quick call 18
Webcam 18
Connection status 9
D
Default Settings 19
Direct dialling 10
Disable key tone 17
Display icons 7
E
Earpiece volume 12
Electric, Magnetic and Electromagnetic Fields
("EMF") 3
Emergency call 10
Emergency Call Management 11
End or reject a call 11
F
Features during a Call 12
Frequently asked questions 20
I
Install the driver 8
Installation CD 8
K
Key Tone Settings 17
L
Language Selection 15
LED 5
M
Make a call 10
Make a SkypeOut call 10
Manage a second call 12
Mute Microphone 12
O
Overview of your phone 5
P
Phone Settings 15
Phone Volume Adjustment 16
Power requirements 2
Product behaviour 21
Product Information 18
Put a Call on Hold 12
R
Recycling and disposal 3
Ring Computer Speaker 16
S
Second incoming call 12
Set the default audio input device for Skype 16
Set the default audio output device for Skype 16
Set up for the first time 8
Shortcut Configuration 18
Skype account 9, 10
Skype credits 10
U
USB connector 6
V
Voicemail 14
Voicemail account 14
Voicemail Status 14
VOIP151 driver 8, 15
W
Window’s Default Audio Settings 16
22
Index
Page 25

Page 26

Copyright © 2008 Koninklijke Philips Electronics N.V. All rights reserved.
Trademarks are the property of Koninklijke Philips Electronics N.V. or
their respective owners.
Specifications are subject to change without notice.
Document number: 3111 285 43301
Printed in China
 Loading...