

Page 1

Operating instructions
Bedienungsanleitung
Mode d’emploi
Gebruiksaanwijzing
Istruzioni per l’uso
Instrucciones de nianejo
Bruksanvisning
\mc
PAL
VKR6865
‘tñ¿¿ ?3ö 52 0o5
igg?i7.Tm"5^sas"TiniiiMi
Page 2

Page 3
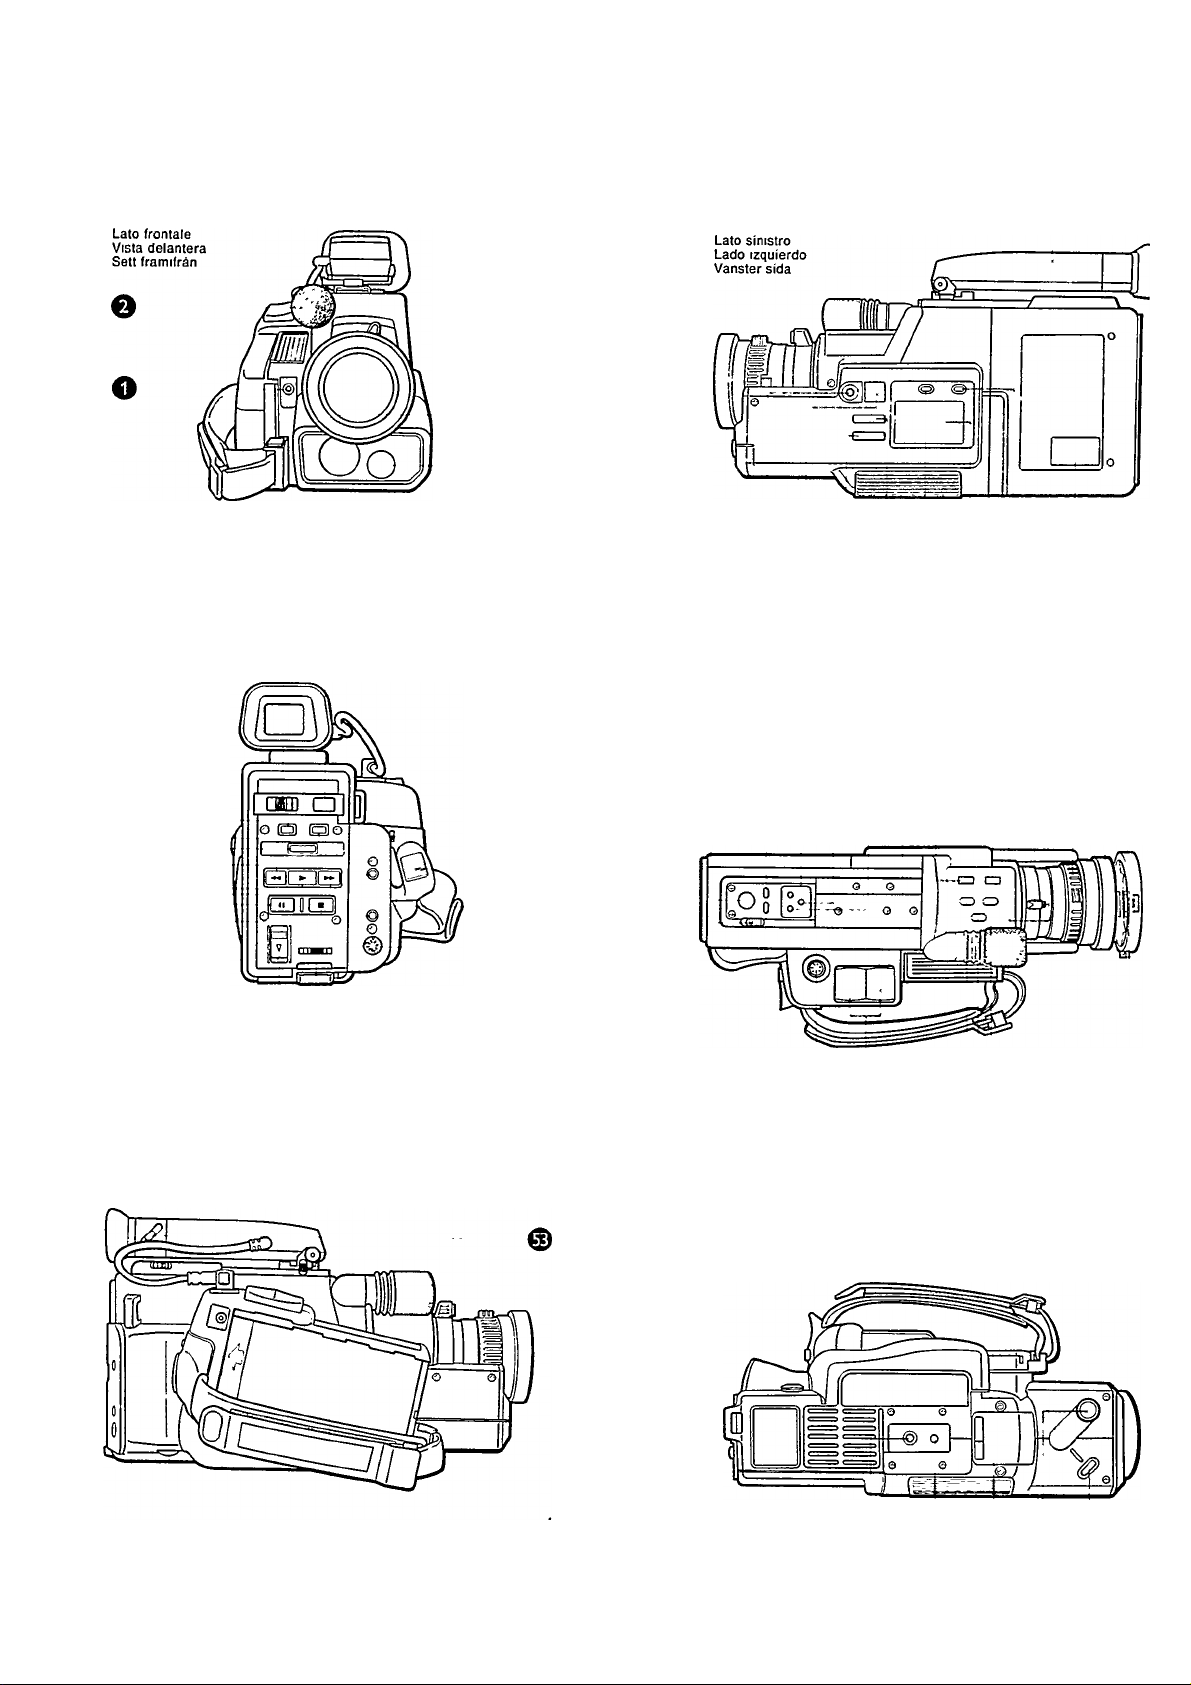
Controls and connectors
Front view
Vorderseite
Vue de face
Vooraanzicht
Rear view
Rückseite
Vue de dos
Achteraanzicht
Lato posteriore
Vista trasera
Sett bakifrén
0
0
0 0
o
e
Left side
Linke Seite
Côté gauche
Linkerkant
O
OOO0000 0
Top view
Oberseite
Vue de dessus
Bovenaanzichtfre
Lato superiore
Vista superior
Sett ovanifran
0 00000000000
0
©
0
0
0
0
Right side
Rechte Seite
Cété droit
Rechterkant
Lato destro
Lado derecho
Hoger sida
® 0
000
0
0
0
Bottom view
Unterseite
Vue de dessous
Onderaanzicht
Veduta parte inferiore
Vísta inferior
Sett underifrán
0
0 0 0 0 0 0 0
0 0 0 ^0
Page 4

Contents
Features........................................................................................................................................................................................... 3
Precautions..................................................................................................................................................................................... 3
Video cassettes .............................................................................................................................................................................. 4
Safety precautions.......................................................................................................................................................................... 5
Camcorder accessories ................................................................................................................................................................ 6
Controis and connections ............................................................................................................................................................. 7
Basic preparations ........................................................................................................................................................................ 10
Power suppiy system .................................................................................................................................................................... 11
Charging the battery pack ............................................................................................................................................................ 12
Loading and unioading a video cassette..................................................................................................................................... 13
Viewfinder indications................................................................................................................................................................... 14
Recording operation...................................................................................................................................................................... 15
Preparations............................................................................................................................................................................... 15
Trigger aiarm system ............................................................................................................................................................... 15
Used time dispiay ..................................................................................................................................................................... 15
Record review function............................................................................................................................................................. 16
Assemble recordings................................................................................................................................................................ 17
Monitoring ................................................................................................................................................................................. 17
Veiwfinder monitoring .............................................................................................................................................................. 17
Warnings ................................................................................................................................................................................... 18
Power save and tape protection circuit ...................................................................................................................................... 18
Assemble recording technique — 1 ............................................................................................................................................ 19
Assemble recording technique — 2............................................................................................................................................. 19
Assemble recording technique — 3............................................................................................................................................. 19
Advanced videography techniques ............................................................................................................................................. 20
Fade-in/out ................................................................................................................................................................................ 20
Focus ......................................................................................................................................................................................... 21
Zooming .................................................................................................................................................................................... 22
High-speed electronic shutter ................................................................................................................................................. 23
Backlight compensation .......................................................................................................................................................... 23
Special recording functions ......................................................................................................................................................... 24
Recording the date/time........................................................................................................................................................... 24
Digital superimpose ................................................................................................................................................................. 25
Editing techniques......................................................................................................................................................................... 28
Insert editing ............................................................................................................................................................................. 28
Tape dubbing ............................................................................................................................................................................ 28
Audio dubbing .......................................................................................................................................................................... 29
Playback.......................................................................................................................................................................................... 30
Preparations.............................................................................................................................................................................. 30
Picture search........................................................................................................................................................................... 31
Still playback............................................................................................................................................................................. 31
Counter memory function........................................................................................................................................................ 31
Connections for playback ............................................................................................................................................................ 32
© When using an TV with Euroconnector ............................................................................................................................ 32
® Connection to a TV not equipped with AV input connectors ........................................................................................... 32
Using the Camcorder as a video camera..................................................................................................................................... 34
Using optional accessories........................................................................................................................................................... 35
Playback by the cassette adapter 22AV5146.......................................................................................................................... 35
Shoe adapter 22AV5157............................................................................................................................................................ 35
RF converter 22AV5158 ........................................................................................................................................................... 35
Remote control unit 22AV5131 ............................................................................................................................................... 36
Tripod mounting........................................................................................................................................................................ 36
Supplemental Information............................................................................................................................................................. 37
In case of difficulty ........................................................................................................................................................................ 38
Specifications ................................................................................................................................................................................ 39
Page 5

Features
Precautions
Allows direct playback with no additional components necessary.
Flying erase head for precise, quaiity assembie/insert editing.
3-page Digital superimpose function for mixing tities or
illustrations into a live recording.
Ultra-compact and ultra-lightweight: a mere 1.2 kg.
Multi-speed electronic shutter for sharp, clear playback of
fast-action shots: 1/50 (standard). 1/250, 1/500 and 1/1000.
Insert editing function.
Audio dubbing facility.
Nev/ly developed high-resolution 1/2 inch field-storage type CCD
(Charge Coupled Device) pickup element.
One-button full-auto operation of focus, exposure, and white
baiance.
Powerfui, tv/o-speed 8:1 power zoom with macro function.
HQ (High Quaiity) system for superlative picture quality.
High-sensitivity/low-lag design: allows shooting in light as low as
10 lux.
Image sensing auto-focus.
Automatic colour tracking white balance with three preset
positions.
Backlight compensation button.
Audio/video fader linked to start/stop trigger.
Large, easy-to-read LCD display.
Ultra-compact adjustable electronic viewfinder (monochrome
CRT. 0.6-inch screen) v;ith diopter control, also for instant
on-the-spot playback.
Selectable automatic date recording function.
Recordable date/time display.
Used time counter.
Retake function for quick re-recording of scenes when
necessary.
Second recording start/stop button provided on top of the
Camcorder.
Dubbing mode sv/itch provided for best results when dubbing.
Selectable quick review function.
Qne-button recording standby mechanism.
Picture search in both directions.
Unique battery pack doubles as palm grip, saving weight and
space.
Ergonomic design with palm grip and finger rest for trigger
control.
Trigger alarm informing the operator with electronic sound when
the start/stop trigger is operated.
Three-vray power supply flexibility: battery pack, AC adapter,
and car battery cord.
For safety, strictly observe the following instructions.
• Do not open the cabinet.
• Prevent inflammables, water and metallic objects from entering
the unit.
• Do not use the unit when there is lightning in the vicinity.
Disconnect the power cable of connected equipment.
Avoid using the unit under the following conditions.
• Places subject to excessive humidity or dust.
• Near appliances generating strong magnetic or electric fields
(speakers, broadcasting antennas, etc.).
• Places subject to soot or steam such as near a cooking stove.
• Places subject to excessive shock or vibration.
• Near a television set (rolling pictures or howling might result).
• Extremely hot places.
Do not expose the unit to high temperatures over S0°C for
long periods.
If the unit should be subjected to direct sunlight, or left in a closed
car in summer, or placed near a heater, the CCD and the auto-focus
sensor may deteriorate and the cabinet may become deformed.
Furthermore, this also may cause the transistors and other
electronic and mechanical parts to malfunction. Remember the
following;
• Do not leave the unit in places of over 50°C.
• Do not use the unit in places of over 40°C.
• Do not use the unit in places of below 0°C.
• Protect the unit from excessively dry or excessively humid
conditions (below 35% or above 80% humidity).
• For long storage, select a place between -10“C and 30°C.
Take special care for protection of the unit.
• Do not allow the unit to become wet.
• Do not leave the unit in closed cars on hot summer days.
• Take special care not to drop the unit or strike it against hard
objects. Protect from shocks during transportation.
Make it a rule to observe the following instructions.
• Do not remove the battery pack or disconnect other power
supply units during recording or playback before pressing the
PQWER switch to QFF. If not observed, this will cause tape
damage.
• When the unit is not in use, remove the battery pack.
Keep the lens and viewfinder eyepiece always clean.
• When the lens is dirty or dusty, blow it off first and then gently
wipe with a soft brush or lens cleaning paper.
• The lens is likely to become moldy if left dirty.
Be careful not to damage the CCD and auto-focus sensor.
• Do not keep the lens directed at extremely bright objects such
as the sun or other light sources for long periods. Although the
CCD is less susceptible to such burn than a tube would be,
caution should be exercised when using this unit. Most
importantly, the lens should be capped except while actually
shooting.
• Do not direct the eyepiece of the viewfinder at the sun.
Page 6
Video cassettes
Auto-focus requires a bit of consideration.
• Do not touch the focus ring while the auto-focus mechanism is in
operation as this could damage the auto-focus mechanism.
• When a filter or a special-effect lens is to be attached to the end
of the lens, be sure to turn power off or switch from the Auto
focus mode to the Manual mode. NEVER attempt to attach a
filter or lens while the auto-focus mechanism is operating as this
will result in malfunctioning. (If a teleconversion or wide-angle
conversion lens is attached, the Auto-focus mode cannot be
used.)
Handle the unit carefully.
• Protect the microphone from excessive shocks.
• Do not carry the unit by holding it only by the viewfinder.
Moisture condensation disenables use of the unit.
• You have observed that pouring a cold liquid into a glass will
cause drops of water to form on the glass's outer surface. This
same phenomenon occurs on the head drum of a video recorder
when the recorder is moved from a cool place to a warm place,
after heating a cold room, under extremely humid conditions or
in a place directly subjected to the cool air from an air
conditioner
• Moisture on the head drum can cause severe damage to the
video tape, and can lead to internal damage to the recorder
Itself.
• If moisture condensation occurs on the head drum, a
condensation warning appears in the counter display and the
unit enters the Stop mode, unable to function. In such a case,
wait for a few hours until the indicator disappears.
Recording onto prerecorded tapes automatically erases the
previously recorded video and audio signals.
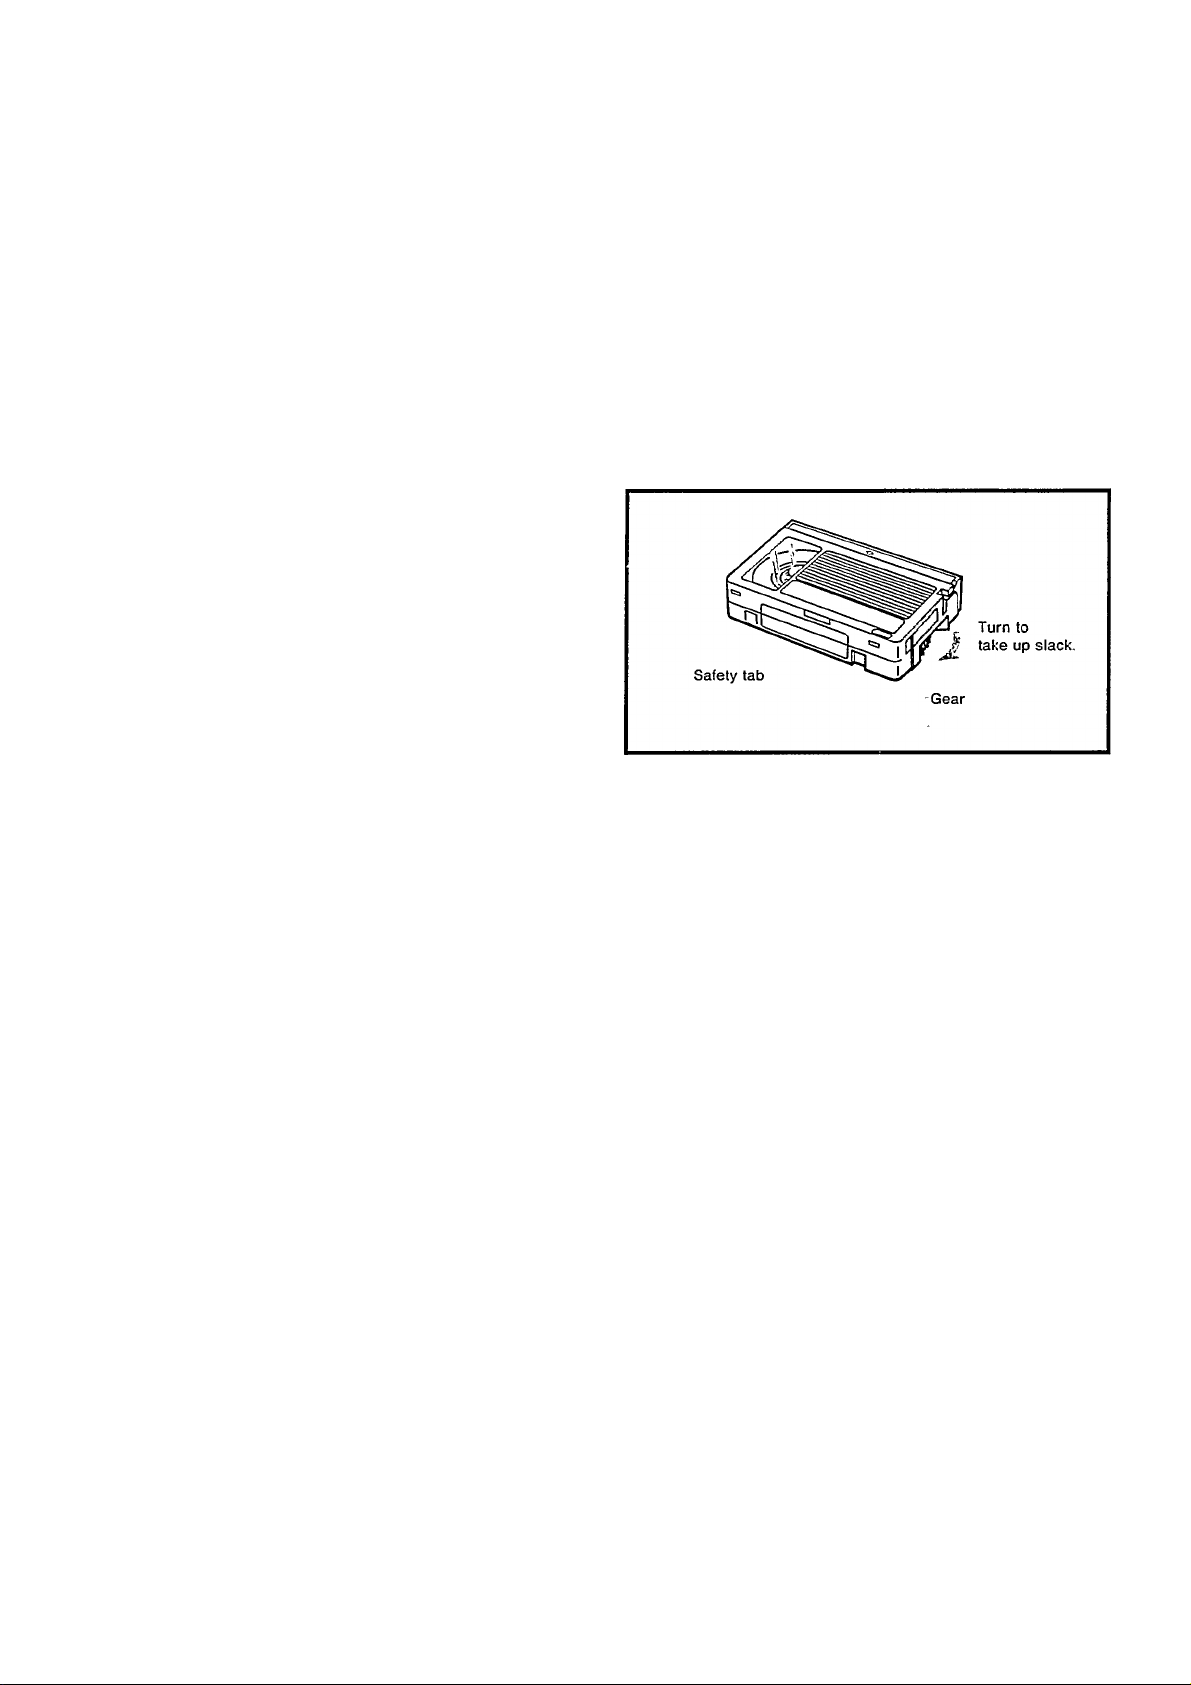
An inverted cassette cannot be inserted.
Do not load and unload the cassette repeatedly without allowing
the tape to run at all. This will slacken the tape and thereby
damage it.
Make certain before loading the cassette that the tape is not
slackened. If there is any slack, turn the gear on the cassette in
the direction of the arrow to take up slack
The cassette is equipped with a safety tab to prevent accidental
erasure. When the tab is removed, recording is impossible. If
you wish to record on a cassette whose tab has been removed,
use adhesive tape to reseal the slot.
To avoid excessive exposure to dust and fingerprints, do not
open the front tape cover.
Maintenance
• When the cabinet is dusty, clean by gently v/iping with a soft
cloth.
• Avoid the use of strong cleaning agents such as benzine or
alcohol as they may damage the cabinet.
• Cleaning should be done only after the battery pack has been
removed or other power units have been disconnected.
Serious malfunctioning
If malfunctioning occurs, stop using the unit immediately and
consult your local PHILIPS dealer.
Storage of cassettes
• Avoid exposing the cassettes to direct sunlight.
Keep them away from heaters.
• Avoid storing the cassettes in humid or dusty places
• Do not drop the cassettes. Do not expose them to violent
vibrations or shocks.
• Do not expose the cassettes to strong magnetic fields (near a
motor, transformer or magnet).
• Place the cassettes in cassette cases and position them vertically.
Page 7

Safety precautions
WARNING:
TO PREVENT FIRE OR SHOCK HAZARD, DO NOT
EXPOSE THIS UNIT TO RAIN OR MOISTURE.
This equipment should be used with DC 9.6 V
The AC Adapter/Battery Charger should be used with 110 — 240 V-^
50/60 Hz only.
CAUTION;
To prevent electric shocks and tire hazards, do NOT use any other
power source
________
only.
IMPORTANT (In the United Kingdom)
Mams Supply (240 V~. 50 Hz only)
IMPORTANT
Do not make any connection to the larger terminal coded E or
Green. The wires in the mams lead are coloured m accordance with
(ollov/ing code:
Blue to N (Neutral) or Black.
Brown to L (Live) or Red.
Warning on lithium battery
The battery used in this device may present a fire or chemical burn
hazard if mistreated. Do not recharge, disassemble, heat above
100°C or incinerate.
Replace battery with CR2025; use of another battery may present a
risk of fire or explosion.
• Dispose of used battery promptly.
• Keep away from children.
• Do not disassemble and do not dispose of in fire.
ATTENTION:-------------------------The system select switch on the side of the optional RF
converter 22AV5158 has been set to G (Continental PAL,
5.5 MHz).
CAUTION:
To prevent shock, do not open the cabinet. No user serviceable
parts inside. Refer servicing to qualified personnel.
If these colours do not correspond with the terminal identifications
of your plug, connect as follows:
Blue wire to terminal coded N (Neutral) or coloured Black.
Brown v/ire to terminal coded L (Live) or coloured Red.
II in doubt — consult a competent electrician.
Note;
IVe recommend that you should disconnect the AC cord from the
outlet.
Before using this Camcorder, read this instruction booklet carefully
so that you will obtain the best results from your Camcorder.
mac
PAL
Cassettes marked IVUSHR can be used vnth this Camcorder.
Notes:
• The rating plate (serial number plate) and safety caution of the
main unit are on its bottom.
• The rating plate (serial number plate) of the viewfinder is on its
bottom.
• The rating plate (serial number plate) of the AC adapterfbattery
charge is on its bottom.
The provided viewfinder is the VF-9000/20. Do not use any other
viewfinder with this Camcorder.
This equipment has been produced to comply with Directive number
87/308/EEC.
Page 8
Camcorder accessories
r'i2S»î4ES3ïi
System carrying case
22AV5185 (optional)
Carrying soft bag
22AV5184 (optional)
Date/time back up
battery CR2025 (supplied)
AC-Adapter 22AV5191
(supplied)
Battery pack
SBC5212 (supplied)
AV output cable SBC5505
(supplied)
Car battery multi charger
22AV5159 (optional)
Shoe adapter
22AV5157 (optional)
Cassette adapter
22AV5146 (optional)
Battery pack
SBC5212 (optional)
Carrying strap
22AV5147 (supplied)
RF-converter
22AV5158 (optional)
Video cassette
SE-C30 (optional)
Super-directional microphone
SBC3070 (optional)
Character generator
22AV5132 (optional)
Car battery cord
SBC5402 (optional)
(optional)
Page 9

Controls and connections
HiifZiim .*■ w ■
Refer to the diagrams on the front foldout page.
O External microphone jack (MIC)
o Exclusive microphone
Omnidirectional condenser microphone for simultaneous sound
recording.
0
8:1 zoom lens
F1.4, f = 8,5 — 68 mm. filter diameter: 52 mm
0 Auto-focus sensor window
Allows light to enter for measuring the camera-to subject
distance.
0 White balance sensor window
Allows light to enter tor white balance adjustment.
0 Electronic viewfinder
For monitoring scenes being shot or the playback picture after
recording. Several on screen indicators are included, as well
as the date/time or used time if selected.
0
FULL AUTO button
Pressing this button puts the focus and white balance under
automatic control and selects the standard shutter speed.
Auto-focus can be cancelled by pressing the FOCUS button:
auto vrhite balance can be cancelled by pressing the
W.BALANCE button; the high-speed shutter can be selected by
pressing the SHUTTER button. Pressing the FULL AUTO button
in the full-auto mode has no effect.
0 FOCUS select button
Switch to AUTO for automatic focus, and switch to MANUAL to
focus manually. Check on the LCD. The focus mode is reversed
each time this button is pressed. The auto-focus mode can also
be selected (together with the auto-white mode) by pressing the
FULL AUTO button.
O SHUTTER select button
Pressing this button switches the shutter between 1/1000 (1000).
1/500 (500), 1/250 (250)-second high-speed shutter and 1/50-
second (STD) speeds, as display on the LCD. The standard
shutter speed can also be selected by pressing the FULL AUTO
button.
0 W.BALANCE select button
The white balance is manually selectable using this button.
Press once to display the current white balance mode in the
LCD. Continue pressing to cycle through the available modes.
; Halogen or tungsten lighting.
iS : Fluorescent lighting.
•j^ : Daylight.
AUTO ; Automatic white balance adjustment.
0 Counter MEMORY button
Press this button after resetting the counter to "0" at a point on
the tape you want to locate later, and the tape will stop
automatically at the counter reading of around "0” during
rewind or fast forward.
0
LCD (liquid crystal display)
White balance (W.BALANCE) mode indicator SHUTTER mode
Focus mode indicator Monitor indicator
FDCUSiEHliS MANUAL
W. BALANCE: HDEI^-aior monitor
SHUTTERSni 1000 500250 .Q
____________
OOOO m
uuuu m
Tape counter Memory mark Battery warning
Condensation warning
Tape counter:
Battery warning:
Condensation warning:
Memory mark:
Symbolic mode indicator
STOP: H
PLAY: ► REWIND:
PAUSE: 11
(STILL) * *
RECORD: 0
Shows from “0" to “9999".
Blinks when the battery power
becomes insufficient for normal
operation'.
Appears when excessive
condensation occurs inside the unit.
Appears when the MEMORY button
is pressed.
QUICK 1
REVIEW; 1 iW
Blinking
FAST
FORWARD:
REVERSE
PICTURE ►
SEARCH:
indicator
Symbolic mode
indicator
RETAKE
RE- ^
WIND:
RETAKE
FOR- ^ ►►
WARD:
TAPE END A
WARNING: "
INSERT: (5
Blinking
Blinking
Blinking
RECORD 11A
PAUSE: • “
FORWARD
PICTURE ^ ►►
SEARCH;
AUDIO DUB: ^
Page 10

0 Counter RESET button
0 Cassette holder
Insert a VHS-C video cassette for recording or playback.
0
POWER switch
Slide to turn the power on. The Stop indicator appears on the
LCD display. Slide again to switch off power.
0 REC standby button
Press to engage the Recording standby mode. To start
recording, press the recording start/stop buttons © or ®.
0 INSERT/MONITOR button
Push this button when you wish to monitor shots before actually
recording them. This function allov/s you to view the scene on
the viewfinder without recording it. Push the STOP button to
release it. To enter the Insert Edit mode, press this button while
in the Recording Standby mode.
0 AUDIO DUB. button
Press this button together with the PLAY button for audio
dubbing.
0 RECORD REVIEW button
If you want to review the end of the recorded segment for
confirmation, press this button from the Record-Pause mode,
the tape will be rewound for about two seconds of programme
time and played back automatically for this section after which
It will stop in the Record-Pause mode in standby for the next
shot.
© REW/PICTURE SEARCH button
Pressing this button in the Stop mode rewinds the tape;
pressing it in the Play mode allows fast play-back in reverse.
0 PLAY button
Press to start playback. When this button is pressed when the
unit is in the Recording pause mode, the unit will enter the
Recording mode.
© FF/PICTURE SEARCH button
Pressing this button in the Stop mode fast-forwards the tape;
pressing it in the Play mode allows fast playback.
0 PAUSE/STILL button
Press to view a still picture during playback or pause playback.
When this button is pressed in the Recording mode, the unit
will enter the Recording pause mode.
0 STOP button
Press to engage the Stop mode.
© EJECT switch
To open the cassette hoider.
© EDIT ON/OFF switch
Normally, set to OFF. For best picture quality when dubbing, set
It to the ON position.
© REMOTE control jack
For connection of the optional 22AV5131 pause remote
controller.
© Earphone jack (PHONE)
© AV OUT connector
Both audio and video signals can be delivered from this
connector.
For playback with a TV set not equipped with AV terminals,
connect the RF-converter 22AV5158 (optional) to this connector
and to the TV. To dub from this unit, connect the AV input
connectors of a second recorder to this connector, using the
provided AV output cable. To play back from this unit to a TV
set. make a connection between this connector and a TV’s AV
input terminal using the AV output cable.
© ALARM ON/OFF switch
Switch to ON to engage the trigger alarm system. Switch to
OFF when you do not wish to use this system. When this switch
IS set to ON. an electronic alarm beeps when the Recording
start/stop button IS pressed to begin recording. The electronic
alarm beeps twice when the Recording start/stop button is
pressed for record pause. This alarm helps prevent recording
errors.
© Thumb rest
Place your thumb on this grooved area next to the start/stop
switch between switch operations.
© Recording start/stop button
Press this button in the Recording Standby mode to start
recording. Pressing it again re-engages the Recording Standby
mode.
© Second recording start/stop button (sub trigger)
Functions exactiy as the other recording start/stop button, for
use when recording with the Camcorder heid iow.
0 DATE/TiME REC ON/OFF button
Press this button when you do not wish to record the date/time
This will remove date/time indications from the viewfinder.
Press again to record date/time. Date/time will reappear in the
viewfinder.
0 DATE/TIME SELECT button
Use to select the portion of the clock or date setting to be
changed. Cycles through the year, month, day, hour, and
minute settings. To end adjustment, press once after selecting
the minute portion.
0 DISPLAY SELECT button
Press this button to select the date/time display and Recording
mode. It cycles through the modes in the following order:
- Auto date ■
record
reserve
The auto-date-record function automatically displays and
records the date for 5 seconds upon turning on the power and
beginning recording. Before recording begins this mode Is
indicated m the viewfinder by auto date record reserve
indication "—.—.—
0 DATE/TIME SET button
Use to set the built-in clock and date function
© Viewfinder mount
Attach the provided viewfinder.
0 TITLE PAGE button
Press this button to select which page of memory you wish to
store your title in. This button only functions when the title is
displayed in the viewfinder.
© TITLE ON/OFF button
Press to mix memorized title or illustration with action being
recoded. Press again to end mixing process.
0 Macro button
Turn the zoom ring v/hile pressing this button for macro
shooting.
0 Manual zoom lever
Use to turn the zoom ring manually.
0 Manual focus ring
Use to turn the focus ring manually.
■ Date —
display
- Date/time ■
display
►Time —
display
Page 11

0 Lens hood
© USED TIME ON/OFF switch
When this switch is set to ON, the viewfinder displays the
elapsed recording time. Switch to OFF to cancel the display.
Unloading the cassette resets the display to ■ OO.OO''. Note that
this convenience functions only when camera shooting is
performed,
© REC TIME RESET button
Press this button to reset the elapsed recording time to zero.
© Viewfinder cable connector
Connect the viewfinder cable.
© Power zoom buttons (W/T)
For automatic zooming at slow speed, press lightly. For regular
speed zooming press firmly. "T" is for telephoto zooming and
•W" IS for wide-angle zooming.
© IMAGE REVERSE button
Press this button to activate the title reverse effect. The function
will sv/itch from positive to negative mode with successive
pressing of this button.
© TITLE MEMORY button
Up to three 'pages ' of memorized titles can be stored. The
digital memory is maintained by the lithium battery which
powers the unit’s clock. Each time this button is pressed, a
previously stored title will be erased, and a new one will be
stored in Its place in the designated page of memory.
© COLOR button
Press this button to select the color for a title or illustration.
The color choices cycle as follows:
black, white, yellow, cyan blue, green, magenta, red. blue.
Press this button repeatedly until the desired color appears.
© Lens cap
Cap the lens v/hen not in use.
© Dioptric adjustment knob
Adjusts the viewfinder lens to suit the operator s eyesight.
© Slots for carrying strap
© TRACKING control
Minimizes noise bars, if observed, during playback.
0 DC IN terminal
For connection of the provided AC adapter/battery charger
22AV5191 and optional car battery cord SBC5402 for DC power
supply.
0 Grip strap
Secures the operator’s hand to the hand grip. Adjusts to fit
hand size.
© Grip-type battery mount
The battery pack serves as a contoured handgrip when
attached to the battery mount.
© Lens cap hook
This keeps the lens cap from swinging during shooting.
Battery pack release lever
©
Tripod mounting socket
©
Stud hole
©
CLOCK BATTERY compartment
©
Holds the lithium battery that powers the date and time
function.
BLC button
©
Iris control is always automatic. For backlight compensation
press this button. While it is being pressed, the iris is 1—2
F-stops wider than the automatic setting.
FADER button
©
To fade out the picture to black blank screen, press this button,
then press the recording start/stop button to start fading out. To
fade in from a black blank screen, press this button, then press
the recording start/stop button to start fading in.
Page 12
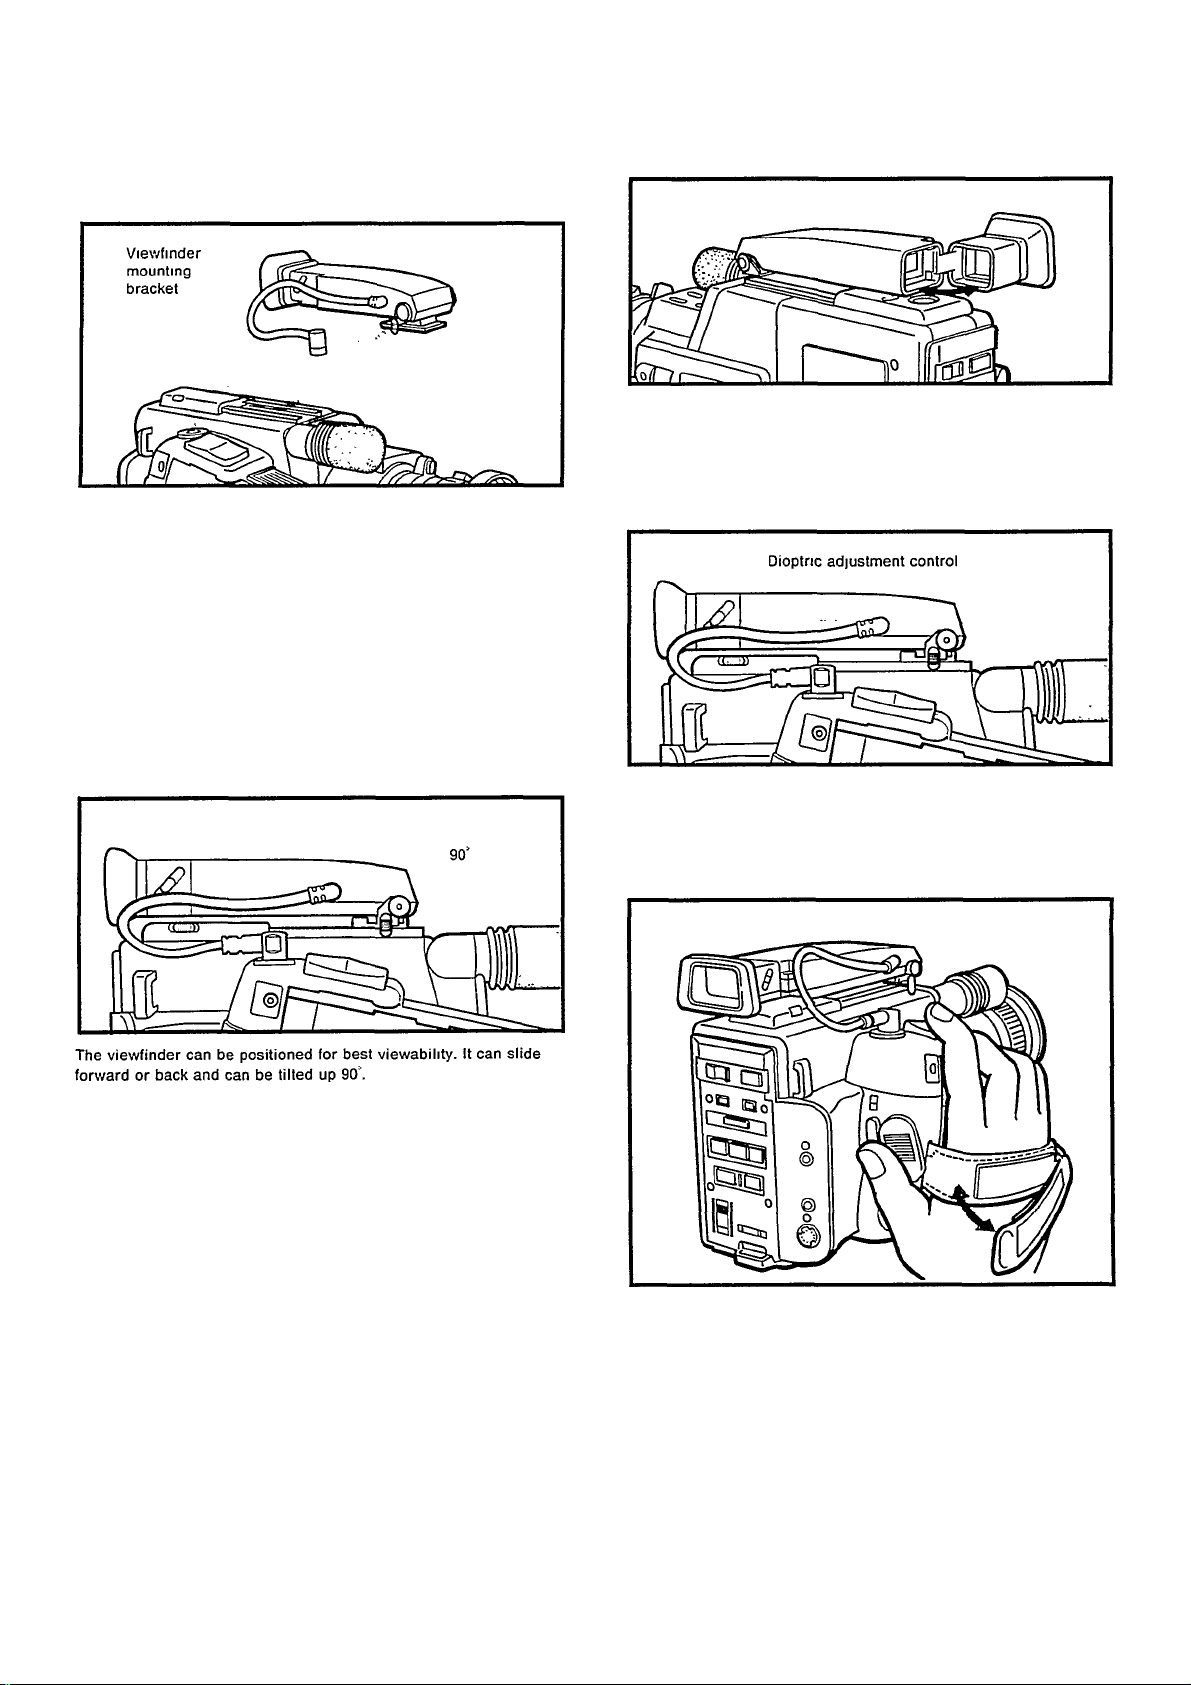
Basic preparations
Switch off the power before mounting or removing the viewfinder.
Mounting the viewfinder
Aiign the viev/finder's coupling fixture with the mounting
1
bracket on the body and slide the fixture into the bracket
while pressing the knob.
Connect the viev/finder cable to the viev/finder cable
2
connector (EVF).
To remove the viewfinder:
Pull out the viewfinder cable and slide the viewfinder out of the
bracket while pressing the knob.
Opening the eyepiece
The viewfinder eyepiece can be opened for cleaning or better viewability in playback.
Dioptric adjustment
Viewfinder adjustment
The viewfinder lens can be adjusted to suit the operator's eyesight
by sliding the dioptric adjustment control.
Adjusting the grip strap
Separate the Velcro strip to expand the loop.
1
10
Pass your right hand through the loop and grasp the hand
2
grip. Adjust the length of the strap to suit your hand size and
refasten the Velcro strip.
Page 13
Power supply system
The convenient 3-way power supply system gives you a choice of
the most appropriate power supply unit, depending on the
application.
CAUTIONS;
• No function Is available without power supply.
• Do not use any power supply other than specified.
• Never attempt to use these power supply units with any
equipment other than the Camcorder.
Where AC power is not available
Use the battery packs:
• SBC5212 (Super High-capacity)
Note:
The battery pack has been kept in the uncharged state for shipment.
Therefore, before use. be sure to charge it. See page 72.
Attaching the battery pack
© Pull down the battery pack release lever.
@ Align the battery pack over the outline in the battery pack mount,
and slide the battery pack into place in the direction of the
arrow.
© Push up on the battery pack release lever, until it locks into
place.
To remove the battery pack, pull down the battery pack release
lever and slide out the battery.
With AC Adapter
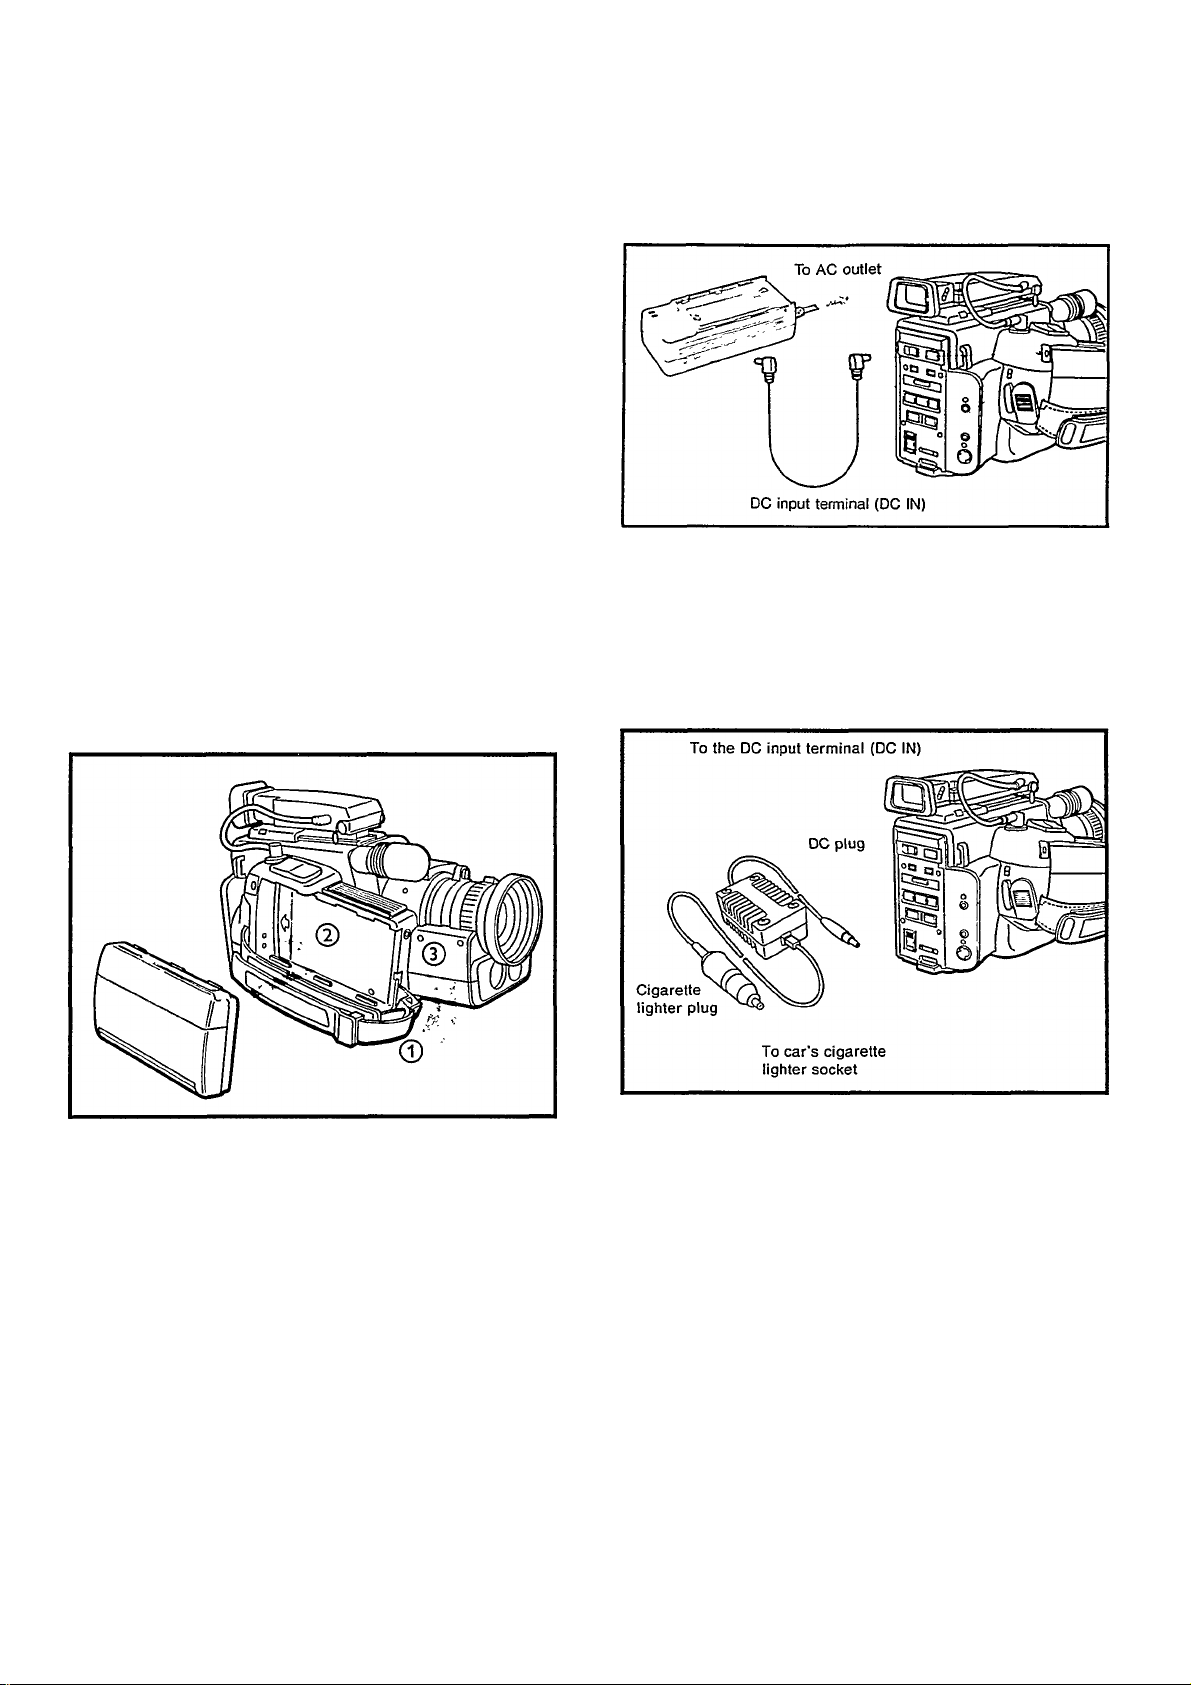
Use the provided AC adapter/battery charger 22AV5191.
In a car
Use the optional SBC5402 car battery cord.
• Leave the car's engine idling when using the car battery. (For
use with 12 V negative-grounded cars only.)
11
Page 14

Charging the battery pack
To charge the battery pack, use the exclusive AC power
adapter/battery charger (provided).
A WORD ON THE EXCLUSIVE BATTERY PACKS
The battery packs are nickel-cadmium batteries. Give attention to
the following to make the most of their characteristics.
Temperature ranges:
The recharging time is based on room temperature of 20"C.
The lov/er the temperature, the longer the recharging time.
For charging ■ 10'C to 35 C
For operating 0 C to 40 C
For storing -10'C to 30'C
The battery pack has been kept in the uncharged state for shipment.
Therefore, before use. charge it.
Charging procedure
Charging time
SBC5212 80 min.
• The charging time differs depending on the ambient temperature
and the condition of the battery pack.
Connect the AC power cord to a wall outlet. (The POWER
1
indicator will light.)
Align the marks on the battery pack and the adapter.
2
Slide the battery pack in the direction of the arrow until it
3
locks in place.
A When charging is completed, the CHARGE indicator that is
” red turns to green.
BE SURE TO CAREFULLY READ THE CAUTION ATTACHED
TO THE BATTERY PACK.
PRECAUTIONS
• If used near a radio, the provided power adapter/battery charger
may interfere with reception.
• Prevent inflammables, water and metallic objects from entering
the unit.
• Do not disassemble or modify the unit.
• Do not apply shocks to the unit.
• Do not subject the unit to direct sunlight.
• Avoid using the unit in extremely hot or humid places.
• Avoid using the unit in places subject to vibrations
Note:
The optional car battery charger can charge the batteries from a
car battery. For details refer the instructions of the 22AV5159
Recording time for the Camcorder
SBC5212 80 min.
• The recording time per charge is influenced by the duration of
recording standby, frequency of zooming, etc. It is safer to have
spare battery packs.
12
Page 15

Loading and unloading a video cassette
LOADING
1
r-ll ” II ^
PAUSE/SIILL STOP
©
V.
S ■
El^
UNLOADING
1
Make sure the unit is in the Stop mode. Press the EJECT
button. The cassette holder will open.
T
©
A'
OFF/CN
V
□’lllllllin
EDIT
—"
Open the cassette holder by pressing the EJECT button.
Note:
Ensure that tape is not slack inside the cassette, then load
the cassette correctly. See page 4.
Remove the cassette.
Close the cassette holder by pushing its centre area.
• When not in use. switch off the power.
Note:
Do not repeat loading and unloading ol the cassette without running
the tape as this will slacken the tape, causing tape damage.
Close the cassette holder by pushing its centre area.
13
Page 16

Viewfinder indications
Focus mode
► • Camera is focused beyond subject
■ ; Focus IS correct
: Camera is focused in front of subject
^ ' Low contrast warning
(Manual/Auto focus)
No indication: Auto-focus is operating
White balance mode setting
ic^ : Daylight
: Fluorescent lighting
■ Halogen or tungsten lighting
No indication ; Auto white balance
is operating.
Fading mode
FADER : Fade function is engaged
FADER : Fading is being performed
No indication ; Fade function is
not engaged
BATTERY...Low battery warning
Title Page indications
1.. .First page
2.. .5.cond page
3.. .Third page
Title Color indications
BK. ..BIack
WH...White
YL...Yellow
CY...Cyan blue
GR...Green
MG...Magenta
RD...Red
BL. ..BIue
Operation mode
REC...Recording is being performed in SP mode
—...Recording standby in SP mode is engaged
REC...Tape end warning (blinking will begin a few minutes before
No indication...Stop or Play mode is engaged
LIGHT...Low-light warning
tape ends)
Used Time Indicator
Lithium battery warning
► E...Lithium battery is exhausted,
or not yet installed.
51000.. .1/1000 shutter mode is
engaged
5500.. .1/500 shutter mode is
engaged
5250.. .1/250 shutter mode is
engaged
No indication...1/50 (standard)
shutter mode is
engaged
Date indications
Time indications
24 hour indications
—.—.— Auto Date Rec is
engaged
14
Page 17

Recording operation
Preparations
^ Attaching the battery pack or AC power adapter.
Slide the POWER switch to turn the power ON.
First remove tape slack, then insert the cassette correctly.
See page 4. (with its safety tab in place.)
Open the cassette holder by pressing the EJECT button.
Trigger alarm system
When the ALARM ON/OFF switch is set to ON, an electronic alarm
beeps when the Recording start/stop button is pressed to begin
recording.
The electronic alarm beeps twice when the Recording start/stop
button is pressed for record pause. This alarm helps prevent
possible recording errors.
Used time display
The accumulated recording time (elapsed or used time) can be
displayed on the viewfinder.
1. Set the USED TIME ON/OFF switch to ON.
The recording time is displayed on the viewfinder screen.
2. II you wish to reset it to "00:00", press the REC TIME RESET
button.
Close the cassette holder by pushing its center area.
Press the REC Standby button. The unit enters the Recording
Standby mode.
Notes;
• When you wish to disengage the Used time display mode, set
the USED TIME ONIOFF switch to OFF.
• Unloading the cassette also resets the display to "00:00".
15
Page 18

For full-auto operation, press the FULL AUTO button.
For manual override, use the W. BALANCE and FOCUS buttons.
• Press the W. BALANCE button so that the required symbol
appears on the viewfinder and on the LCD display.
when the subject is illuminated by a halogen or tungsten
lamp.
cja when the subject is illuminated by a fluorescent lamp
-:gr when you shoot in the daytime outdoors.
• When shooting under fluorescent light, always use the
fluorescent light setting in the manual v/hite balance mode for
best results.
• For manual focus, press the FOCUS button to that MANUAL is
shown on the LCD display. A focus-aid indicator will appear in
the viewfinder. (See page 21.)
• Ins control IS always automatic. Therefore, possible
combinations of auto and manual functions are as follows:
Control
Function \
White
balance
Focus Auto Auto
Ins
FULL W.
Auto
Auto Auto Auto Auto
Manual Auto Manual
FOCUS
Manual Manual
FOCUS
BALANCE
Press the start/stop button.
• This causes the recording indicator to appear on the
viewfinder screen and the LCD. showing that recording is
actually taking place.
Viewfinder
^ A To stop recording temporarily, press the start/stop button
* once again.
LCD display
Record review function
• Be careful not to cover the white balance sensor window,
otherwise correct white balance v/ill not be obtained in the auto
focus mode.
• For high-speed electronic shutter, see page 23.
8
Determine the focus and composition by referring to the
viewfinder image. For zooming, see page 22.
For date/time recording, see page 24.
16
• If you want to review the end of the last recording (or
confirmation, press the RECORD REVIEW button from the
Recording Standby mode, the tape will be rewound (or about 2
seconds of programme time and played back automatically for
this section, after which it v/ill stop in the Recording Standby
mode for the next shot.
Notes:
• The tracking control should be at its centre position.
• Distortion might occur when playback starts. This is normal
Page 19

To restart recording, press the siart/stop button.
• For a pause longer than 3 minutes, press the POWER
sv/itch to OFF.
• If the Recording Standby mode continues for longer than
about 5 minutes, the unit sv/itches itself off automatically.
To restart recording, slide the pov;er on and press the
start/stop button. This makes clean assembled recordings
possible even after a long pause.
Assemble recordings
• Repeating steps 9 — 11 produces assemble recordings.
• If recording is restarted from the Stop mode, a few frames of the
previously recorded picture is replaced with a new recording. To
avoid this, follow the technique described in "Assemble
Recording Technique — 2" on page 19.
12
If you wish to monitor shooting angles, compose scenes, etc.,
without actually recording on the tape, press the MONITOR button,
instead of REG standby button. The aimed-at scene will appear on
the viewfinder screen. For full-auto monitor, also press the FULL
AUTO button. To engage the Recording Standby mode from monitor,
press the REG standby button. To disengage the Monitor mode,
press the STOP button.
• Monitoring is possible whether a cassette is loaded or not.
• With a cassette loaded, monitoring is not possible during rewind
or fast forward.
• The power save circuit does not function during monitoring. (For
power save function, see page 18.)
Viewfinder monitoring
To end recording, press the STOP button.
• After making sure that the tape has stopped, slide the
POWER switch to OFF,
• Rewind the tape to a point from which you want to check the
recording.
• Press the PLAY button, and you can view the playback picture
on the viewfinder screen.
Notes:
• Pressing the PAUSE/STILL button during playback stops the
picture on the viewfinder screen.
• Picture search is also possible in both directions.
17
Page 20

Power save and tape protection
circuit
Warnings
Tape-end warning
Blinking
• The recording indicator blinks on the viewfinder screen and the
LCD a (evj minutes before the end of the tape.
• When the end of the tape is reached during recording, the Stop
mode engages automatically.
Battery warning
Blinking Blinking
Blinking
To save battery power, the Camcorder (when battery operated)
switches itself off automatically in the following situations:
(1) When left for longer than 5 minutes in the Stop mode.
(2) When left for longer than 5 minutes in the Recording Standby
mode.
To protect the tape, the Camcorder (regardless of whether
battery operated or AC powered) releases tape tension slightly
and switches itself off automatically if left for longer than 5
minutes in the Recording Standby mode.
For the same reason, the Camcorder enters the Stop mode and
switches Itself off automatically if left for longer than 5 minutes
in the Still (Play-pause) mode.
Battery operation
STOP
5 minutes
POWER OFF
Battery/AC operation
REC PAUSE
POWER OFF
-BATTERY- I
!
1
Viewfinder
• When the battery power is coming to an end, a battery warning
indication appears in both the viewfinder and the LCD. Replace
the battery pack with a fully charged one.
• After these indications appear, the power turns off automatically.
In this state, however, pressing the POWER switch while holding
EJECT button pressed turns the power on and ejects the
cassette.
I
i
LCD display
csg
Low-light warning
Blinking
PAUSE/STILL
5 minutes
STOP
—
5 minutes 5 minutes
POWER OFF
If the blinking ‘’LIGHT" indicator appears on the viewfinder
screen, the amount of light is insufficient. Increase the lighting.
18
Page 21

Assemble recording technique — 1
(To replace the battery pack during recording)
If the battery v/arning appears in the viewfinder or the LCD
display while recording, stop recording by sliding the POWER
switch to OFF, not the STOP button.
Replace the battery pack with a charged one.
Slide the POWER switch to ON.
• The unit will be in the Recording Standby mode.
Press the recording start/stop button to start recording.
4
Assemble recording technique — 2
(To search for the assemble point with the “Retake” function)
Alter reviewing a recorded segment, you may decide to re-record it
immediately. The Retake function is convenient for this.
Make sure the Camcorder is in the Recording Standby mode.
(If not. engage the mode.)
Press either REW/FF button to reach the point where you
wish a new recording to start. When the REW/FF button is
released the Camcorder will enter the Recording Standby
mode again.
Press the start/stop button to start recording.
Assemble recording technique — 3
(To recorcf onto a partially recordecf tape)
Play back the tape to a point where you wish a new
recording to start.
• Use the PICTURE SEARCH button for faster location.
Press the PAUSE/STILL button at the located point.
• The unit will enter the Still mode.
Press the REC standby button.
• The unit will enter the Recording Standby mode.
Press the Recording start/stop button to start recording.
19
Page 22

Advanced videography techniques
Fade-in/out
The Camcorder is equipped with an automatic fade mechanism for
allowing smooth fade-in and fade-out with a black-coloured blank
screen. Audio also fades in sync with video.
Fade-m
Automatic fade-in
1
Automatic fade-out
start shooting as usual.
1
Determine the composition in the Recording Standby mode
and press the FADER button to reserve the Fade-in mode.
Press the start/stop button The screen will quickly become
black and recording begins. When the start/stop button is
released, fade-in will start. It will be completed in about 5
seconds. If the start/stop button is not released when
pressed, the black picture will remain on the screen and be
recorded.
Press the start/stop button. Fade-out will start and be
completed in about 5 seconds. When completed. Recording
Standby mode is entered. If the start/stop button is not
released when pressed, the final black picture remains on
the screen and continues to be recorded, until the button is
released.
li
PAoe*j
!
i
i:
—
FADER IS displayed in the viewfinder
when fading is reserved, and
continues to be displayed until fading
in or out is completed.
20
Page 23

Focus
Manual focus
Auto-focus
Focus detection zone
• A small area around the center of the
picture, which varies depending on the
zoom and focus conditions, is used to
detect focus. (No actual indication
provided on the screen.).
CAUTIONS;
• Do not touch the focus ring while the auto-focus mechanism is in
operation.
• Be carefui not to cover the auto-focus sensor window, otherwise
accurate focusing will not be possible.
• When not in use. do not leave the Camcorder in the auto-focus
mode vnth power on; otherwise light entering the auto-focus
sensor window will operate the auto-focus mechanism,
consuming power.
Correct focus may not be obtained in the following situations. In
such cases manual focusing should be performed to obtain proper
focus.
Two subjects at different distances overlap
in the same scene.
If the manual focus mode is selected, proceed as follows:
© Zoom in on a subject by pressing the "T" button.
® Focus onto it by turning the focus ring. Refer to the focus aid
indication chart belov/.
@ Determine the composition by pressing the "W" button,
CAUTION;
Covering the white balance sensor while manually focusing will
result in poor colour reproduction.
Note;
When you use the manual focus mode, be sure to focus the lens in
the maximum telephoto position. If you focus in on a certain subject
in the wide-angle position, sharply-focused images cannot be
obta when zoomed up because the depth ' field is reduced at
longer focal lengths.
Slanted lines only.
Low illumination where the under-exposure
indicator appears on the Viewfinder screen.
Minute patterns or identical patterns that
are regularly repeated.
Low-contrast subjects for v/hich the
low-contrast indicator appearts. such as a
smooth, single-colour wall or the blue sky.
Note;
If the lens andfor auto-focus sensor window are smeared with stain
or blurred with condensation, accurate focusing is not possible.
Keep Ihem clean. If they become dirty, wipe with a piece of soft
cloth. When condensation occurs, dry them by wiping with a soft
cloth or wait for conditions in which they become dry.
CAUTION;
Be careful not to touch any buttons inadvertently during shooting.
FOCUS INDICATORS
The focus indicators on the viev/finder screen function in the
manual focus mode.
Condition
Focus point behind
the subject
Correct focus
Focus point in front
of the subject
Indication not
possible because of
low contrast
Indication
Corrective operation
Turn the focus ring
clockwise until the
center square lights.
Keep the focus ring
in the same
position.
Turn the focus ring
counterclockwise
until the center
square lights.
Estimate the subject
distance and set the
focus ring referring
to the distance
scale on it.
21
Page 24

Zooming
When the focal length of the lens is varied by turning the zoom ring,
the image appears to come nearer to or retreat from the viewer.
Zoom in
Zoom out
Engage MACRO
Power zooming
Press "T" for zooming in and "W ' for zooming out. Two zooming
speeds are available. For slow-speed zooming, press lightly. For
regular-speed zooming, press firmly.
Manual zooming
Rotate the zoom lever downwards for zooming in and upwards for
zooming out.
While pressing in the MACRO button, turn the zoom lever in
the direction of the arrow until the number "8.5" on the zoom
ring passes the index line.
Focus
Focus by turning the zoom lever slowly.
Use the zoom lever to focus in the MACRO range.
• Turning the focus ring will slightly alter the angle of view
of the lens.
• The auto-focus mechanism does not function during
macro shooting.
• For best results, it is advisable to increase illumination
when shooting in macro.
Release MACRO
Macro Shot
Normally, focusing is possible only for subjects that are more than
1.1m av/ay from the Camcorder. By setting the lens to the Macro
mode, it IS possible to manually focus in on any subject located
inside that limit, right up to the front of the lens. The MACRO and
ZOOM ranges combined give continuous shooting ability from
close-up to infinity.
Zoom lever
MACRO button
Index line
22
To release the Macro mode, turn the zoom lever in the
direction of the arrow until the number "S.S" passes the
index line.
Page 25

^ w n3iOiA»«‘iT.'Ariac»»i.»»sr»eu<c«xrrc5«a4f3eser3RMs;;:m«*5iR«asaw5»»6ri»t:
High-speed electronic shutter
The Camcorder is equipped v/ith a selectable high-speed shutter
that allov/s better recording of quick movements for sharp, clear
stills or slow-motion playback. Select it when taping fast-action
shots that you want to play back later in Still or Slow-motion mode.
Press the SHUTTER button to switch to the desired electronic
shutter speed. This can be done while recording or in any
other mode. It continues at the selected speed until switched
to another speed.
When finished recording the fast-action scene, switch back to
the standard shutter speed by pressing the SHUTTER button
until STD appears on the LCD.
Backlight compensation
• Press the BLC button. While it is being pressed, the iris is 1—2
F-stops wider than that adjusted automatically.
When excessive lighting is located in back of the subject, correct
exposure may not be obtainable. To compensate for this, use BLC.
Without BLC
With BLC
When selected, the High-speed shutter mode is indicated on the
viev/flnder screen and LCD.
! SIOOO '
1 ‘
Viewfinder LCD display
The standard shutter mode is indicated by STD on the LCD.
Notes:
The High-speed shutter mode requires siightiy more subj'ect
liiumination than the standard Shutter mode. Therefore, the
iow-iight warning may biink in the viewfinder, if so. switch to the
standard Shutter mode.
Picture cofor may be adverseiy affected in the High speed
shutter mode when the subject is iit by aiternatmg dischargetype tight sources such as ftuorescent or mercury-vapor iights.
When ptaying back a section recorded in the High-speed shutter
mode, movement of subjects in the picture may not be smooth.
This is not due to any defect of the unit.
Pressing the FULL AUTO button also restores the shutter speed
to the standard level.
shutter:
1000
LCD display
1
23
Page 26

Special recording functions
Warning on lithium battery
• Dispose of used battery promptly.
• Keep away from children.
• Do not disassemble and do not dispose of in fire.
Recording the date/time
Battery insertion
This battery powers the date/time function.
1. Slide the cover of the CLOCK BATTERY compartment on the
bottom of the Camcorder by pressing lightly on the section
labelled S, in the diagram.
2. Insert the provided lithium battery with the plus (*) side up.
3. Slide the cover on until it clicks.
Note:
Switch off the unit's power before inserting the battery.
Date/time setting
Before adjusting the date and time for the first time or alter
replacing the batteries, 1. 1. 89 blinks in the viewfinder, indicating
the clock needs to be set.
1 Switch the unit's power on, 1. 1. 89 will blink in the viewfinder.
Press the MONITOR button to enter monitor mode.
2 Press the DATE/TIME SELECT button — the year blinks.
3 Press the DATE/TIME SET button to choose the correct number.
4 Press the DATE/TIME SELECT button to select the next item to
change. The item will be changed in the following sequence;
-►Year—► Month —*■ Day —►Hour —► Minutes —► Finish
5. Repeat steps 2 and 3 to set all items. After the minute setting
has been performed, press the DATE/TIME SELECT button, and
Items will cease blinking. For the Auto date record mode, the
auto date record reserve indicator will appear.
When the battery is inserted, the clock will begin functioning.
------
Adjustment
Date/time recording
The date, time, or date and time can be displayed and recorded
according to the selected mode. Press the DISPLAY SELECT button
to cycle through the modes in the following order;
Battery replacement
The battery lasts for about one year. When the lithium battery
warning (► E) appears in the viewfinder, this battery needs to be
replaced. Obtain a new CR2025 lithium battery and follow the
following procedure.
1, Remove the battery by pressing the knob in the direction of the
arrow.
2, Insert the new CR2025 with the plus (+) side up.
3, Slide the cover back until it clicks.
Notes:
• Switch off the unit's power before removing the old battery.
• Replace battery with CR2025 only. Use of another battery may
present risk of fire and explosion.
Auto —
date
record
reserve
When the auto-dafe-record function is selected. “—.——"
appears in the viewfinder, until recording begins. As long as this
function is chosen, the date will be automatically displayed and
recorded for about 5 seconds following the first operation of the
recording start/stop button after the power is switched on.
Auto-date-record reserve indication will cease to be displayed if
the DATE/TIME REC ON/OFF button is set to OFF unless power
is provided again.
Date —
display
-► Date/time ■
display
-Time —
display
24
Page 27

Date/time recording indications
Auto-date-record
Aulo-date-record reserved Auto-date-record executed
Digital Superimpose
The Camcorder digital superimpose function allows 3 titles to be
superimposed on a recording in a choice of 8 colors and either
positive or negative (reversed) styles for more creative video
opportunity.
Ptfi
Creating Titles
Date display
31.12.90
Time display
’
-------------------
14.30
Date/time display
31.12.90
14.30^
Make note of the following guidelines to assure best results.
1. Create titles using dark colors on light backgrounds — black
writing on white paper, for example.
2. Letters should be drawn with broad strokes.
Storing Titles
1
^
Put the unit into the Recording Standby or Monitor mode.
►E
When the ‘> E" indication (lithium battery warning) appears
in the viewfinder, titles cannot be stored. Insert the lithium
battery, or replace the inserted one with a new one
according to the instructions on page 24.
Press the TITLE ON/OFF button.
Even without the lithium battery, the random pattern picture
of an old title may appear. This is not a malfunction.
25
Page 28

PI—P2
Li,
Use the TITLE PAGE button to select the page of memory in
which you v/ant your title to be stored. The page number will
appear on the viewfinder screen.
The page selection can be changed when the TITLE ON/OFF
button IS ON.
When a page of memory contains nothing, it is "empty", and a
pattern of vertical stripes will appear in the viewfinder.
When the power is switched off or the unit is put into the Stop
mode, then the Page mode returns to the page 1 position.
Press the TITLE MEMORY button for about 1 second to store
the title.
• When a title is stored poorly, check to see that the lighting
IS adequate and that the title is drawn with bold strokes,
then shoot the title again.
• Every time the TITLE MEMORY button is pressed, the
previously recorded title stored in that page of memory
will be erased, and replaced with the new title.
Press the COLOR button to select the color in which you
want your title to appear.
PARTY
The colors will cycle in the following order;
Aim the unit at your title in as well-lit a location as possible.
You may also use the provided title easel for this purpose.
• At this point, if the vertical stripes or an old title
appearing in the viewfinder prove bothersome, press the
TITLE ON/OFF button to sv/itch it ott.
• When storing a title, the scene visible in the viewfinder
may differ slightly from that which will be recorded on the
tape.
A photographic slide can be recorded by inserting it in ^ and
inserting a blank white card in "g; of the provided title easel.
Slide up ti 1/8" thick an be used. Illuminate Ig from behind for best
results.
BK
(Black)
t
BL
(Blue)
RD^(Red)
Press the IMAGE REVERSE button to choose negative or
positive style.
To store additional titles, in digital memory pages 2 — 3.
repeat steps 3 — 7 as above.
• The TITLE MEMORY button works in both the Recording
Standby and Monitor modes; care should be exercised not
to press TITLE MEMORY accidentally as this will erase
stored titles.
•WH ------(White)
MG -*
--------
(Magenta)
-YL
(Yellow)
CY
(Cyanblue)
GR
(Green)
26
Page 29

Mixing a titie into a recording
• starting at the beginning of a recording.
Mixing in the middie of a recording
1
Confirm the page, color, and neg/posi style of your title.
Press the TITLE ON/OFF button to switch it off.
Press the TITLE ON/OFF button to display your title on the
viewfinder screen.
Press the TITLE PAGE button until the title you wish to use is
displayed. The pages will cycle from 1 to 3.
Confirm the page, the color, and the neg/posi style. Color
choice and neg/posI style can be changed at this point; press
the COLOR button to select a different color, and the IMAGE
REVERSE button to choose neg/posi style.
Illustration or title
Subject
PI—P2
Li
P3
Press the recording start/stop button to begin recording. The
title will now be mixed with what you are recording.
Press the TITLE ON/OFF button when you wish to end the
titled portion of your recording.
Shoot your live scene by pressing the recording start/stop
button.
Press the TITLE ON/OFF button when you wish to insert your
title, it will be inserted into your ongoing recording at exactiy
that point.
Press the TITLE ON/OFF button again to end the mixing of
your title with the action you are recording.
Notes:
• Color choice, page number, and image reverse selections can
be changed when the title is displayed in the viewiinder.
• The "Color" and "Page number" indications displayed in the
viewiinder will not be recorded on the tape.
• When an "empty" page is called from memory, a pattern of
vertical stripes will appear in the viewfinder.
• When the lithium battery for the unit's clock is exhausted, stored
titles may be lost. For best results, replace the lithium battery
before its one year required replacement date. When the lithium
battery warning appears in the viewfinder, as fong as power is
still supplied to the unit by the main battery pack, or from an AC
source (even if the unit’s power switch is off), the digital memory
will be retained, however, the lithium battery should be replaced
at this time.
27
Page 30

Editing techniques
Insert editing
Insert editing means recording a new scene into a section of prerecorded tape so that a part of the original recording can be replaced with a
new sequence without excessive picture distortion at the edit-in and edit-out points. In the Insert edit mode, the original audio on the normal
audio track remains unchanged.
Located the desired edit-out point on the Camcorder's tape
and press PAUSE/STILL button.
Press RESET button to obtain a "0" reading, then press
MEMORY button to obtain an "M" indication on the LCD.
Press REW/PICTURE SEARCH button to rewind the tape a
little beyond the beginning of the scene you wish to insert.
Press PAUSE/STILL button exactly at the beginning of the
scene you wish to insert.
While holding INSERT/MONITOR button pressed, press
PAUSE/STILL button. The INSERT indicator lights and the
Camcorder enters the Insert edit mode with the scene at
which the Camcorder is aimed appearing on the screen for
monitoring.
Press Recording start/stop button to insert the new sequence.
6
When the counter reading of "0" is reached, insert editing
7
stops automatically and the Camcorder enters the Playback
mode.
Notes:
When the tape reaches the preset edit-out point during the
editing operation, it may stop slightly before or after the
designated point on the tape.
Only video signals are recorded in the Insert edit mode. When
the sound is to be recorded, press the AUDIO DUB and
PAUSEfSTILL buttons simultaneously in the Insert pause mode.
When INSERTIMONITOR and PAUSEfSTILL buttons are pressed
simultaneously again, the unit reenters the Insert edit mode.
Tape dubbing
Connection
1. Set the EDIT ON/OFF switch to ON.
2. Connect the AV OUT connector of the Camcorder to the AV IN connector of the video recorder using the AV output cable SBC5505 (supplied).
3. Connect a television to the video recorder to monitor the picture while dubbing.
Operation
• Put the Camcorder in the Play mode and the connected recorder in the Record mode to copy the recording. To edit out unwanted material,
press the recorder's PAUSE/STILL button.
28
Page 31

Audio dubbing
Audio dubbing means recording a new soundtrack on a pre
recorded tape, i.e, replacing the original sound with new audio
material.
Precautions
• Tapes with their safety tabs removed cannot be audio dubbed.
Reseal the safety tab slot to perform the dubbing.
• If v/hlstling or howling is heard during audio dubbing, reduce the
TV volume or move the microphone farther away from the TV.
• When dubbing from a microphone, connect the microphone to
the Camcorder as shown below.
Locate the desired edit-out point on the Camcorder’s tape
and press PAUSE/STILL button.
Press RESET button to obtain a "0" reading, then press
MEMORY button to obtain an "M" indication on the LCD.
Press REW/PICTURE SEARCH button to locate more quickly
the place on the tape you want audio dubbing to begin.
Press PAUSE/STILL button at the exact beginning point for
audio dubbing.
While pressing AUDIO DUB button, press PAUSE/STILL
button to enter the Audio dub standby mode.
When you are ready with the new audio material, press PLAY
button to begin audio dubbing.
When the counter reading of "0" is reached, audio dubbing
stops automatically and the Camcorder enters the playback
mode.
29
Page 32

Playback
The Camcorder permits playback of recorded IVHSW video cassettes.
For connections refer to pages 32 and 33.
Preparations
• With a television equipped with AV input connectors, set the television's TV/VIDEO switch to VIDEO.
• With a regular television receiver set the aerial select switch of the RF converter 22AV5158 to VIDEO and the TV receiver's channel selector
to your video channel (specified AV channel).
1
r
POWE R R EC . 1
01
m
AUDIO OUb I
O INSERT S
© o
MO NIT OR
RECOROn=n
i
Connect a power supply unit. (Battery or AC operation: see
page 11.)
Slide the POWER switch to ON.
RFVIFW |l
o©
----------------
■>
\
□
1|
Press the PLAY button. Playback will start.
• When the end of the tape is reached during playback, the
Rewind mode engages automatically.
Tracking adjustment
If noise bars appear on the screen, adjust the TRACKING control.
Turn it slowly in either direction to minimize noise bars. After
playing a particular tape, return the TRACKING control to the center
position.
Insert a pre-recorded cassette.
First remove tape slack, then insert the cassette correctly.
See page 13.
30
Page 33

Picture search
Fast-speed playback in the forward direction
Press the FF button in the Play mode. Playback will be speeded up
to 3 times normal speed, as long as the button is being pressed.
Fast-speed reverse playback
Counter memory function
The Camcorder incorporates a counter memory mechanism which
facilitates locating a specific tape segment.
1
Press the RESET button to reset the counter to "0",
Press the REW button in the Play mode. The tape will be played
back In the reverse direction at 3 times normal speed as long as
the button is being pressed.
Still playback
Press the PAUSE/STILL button during playback. The picture will
stop on the screen.
• Alter about 5 minutes of still playback, the unit enters the Stop
mode automatically, for tape protection, and switches itself off.
Notes;
• Noise may appear on the screen during picture search and stiii
playback. This is not due fo any defect of the unit.
• Pictures may become monochrome during picture search. This
Is not due to any delect of the unit.
• For brief scanning, keep the PICTURE SEARCH button pressed
for more than 2 seconds; when you release the button, the
Search mode will be cancelled.
Press the MEMORY button. The “M” mark will appear.
After recording or playback, press the STOP button, then the
REW button. The tape will automatically stop at the counter
reading of around "0".
rPiCTU RE S EA RC HrtiETAKEi
QREW PUY FFS
hll - r IFll
PAUSE/S Tta A
STO P
:ni\
® E JECT g
■JBll
Press the PLAY button to start playback.
Notes:
• The counter memory function is effective in the Fast forward
mode as well.
• To cancel the memory function, press the MEMORY button.
• When the power supply unit is disconnected, all indications on
the LCD disappear and the counter memory function is instantly
cancelled.
__
©
AVtiyOUT
31
Page 34

Connections for playback
0 When using an TV with Euroconnector
• Simply connect the AV OUT terminal of the Camcorder to the VIDEO and AUDIO IN connectors (21-pin. scart) of the television using the
supplied AV output cable.
© Connection to a TV not equipped with AV input connectors
For this situation, use the 22AV5158 RF converter.
Remove the aerial cable from the TV receiver.
1
Connect the aerial cable to the ANTENNA IN terminal of the
2
RF converter.
Connect the RF OUT terminal of the RF converter to the
aerial terminal of the TV receiver using the provided aerial
cable.
Connect the VIDEO/AUDIO INPUT cable of the RF converter
4
to the AV OUT connector of the Camcorder.
Adjust the RF converter output channel according to your
5
VIDEO CHANNEL.
32
Page 35

• RF converter channel adjustment screw
The RF converter permits playback of video and audio recordings
through a TV receiver. The signals from the RF converter are
viewed through a vacant channel not used for broadcasting in your
area. The output frequency of the RF converter has been set to
correspond to a broadcast on UHF channel 36. To view playback
pictures from the Camcorder v/ith your TV receiver, tune its
specified AV channel to UHF channel 36. If channel 36 is employed
lor broadcasting in your area, readjust the RF converter output
channel to one of the vacant channels between 32 and 40. To make
this adjustment, remove the small cap on the back of the RF
converter and turn the adjustment screw with a screwdriver to tune
in a vacant channel.
• TV system select switch (l/G)
When you use a TV receiver built to the British PAL standard, shift
the system select sv/itch to "1".
• RF converter channel adjusting procedure
1. Set the AV channel of the TV receiver to one of the vacant
channels.
2. Power the Camcorder.
3. Put the Camcorder in the Monitor mode (see page 17).
4. Set the VIDEO/TV switch of the RF converter to VIDEO.
5. While monitoring the output signal on the TV screen, turn the RF
converter channel adjustment screw so that the monitored
picture comes in most clearly.
CAUTION;
To view the Camcorder recordings with a TV receiver, use a TV
receiver having a specified AV channel and employ this AV channel
as your VIDEO CHANNEL, otherwise piayback may be disturbed
with vibrating or bending pictures. AV channels refer to channels
exclusively for video piayback: because of AFC circuits applied to
these channets, the piayback pictures can be stabilized. Recent TV
receivers have one or more AV channels.
OPERATION
Viewing video cassettes being played back with
the Camcorder.
To view video cassettes or to monitor the recording, set the
VIDEO/TV switch of the RF converter to VIDEO and the TV channel
selector to the channel corresponding to the RF output channel.
Viewing teievision programmes
Set the VIDEO/TV switch to TV, and the TV receiver will function as
usual.
PRECAUTIONS FOR 22AV5158
• For exclusive use with the Camcorder.
• Do not disassemble or remodel the 22AV5158.
• Do not expose It to strong shocks.
• Unplug the connected equipment during lightning storms. (Never
touch the aerial cable.)
33
Page 36

Using the Camcorder as a video camera
For continuous documentation of longer events, the Camcorder can be used as an independent video camera in combination with either a
deck-type or portable video recorder.
Using a recorder not equipped with a remote pause terminal
• Connect the AV OUT connector of the Camcorder to the AV IN connector of the video recorder using the supplied AV output cable.
Operation
1. Press the MONITOR button. The camera output signal is nov/
available via the AV output cable.
2. Put the connected recorder in the Record mode. Recording will
start Tape start/stop should be controlled with the recorder s
buttons.
Note:
In this configuration, it is possible to obtain a continuous recording
and an edited-out recording of the same event simultaneously,
because the Camcorder s start/stop button only controls the tape
inside itself while another tape loaded in the connected recorder
continues running. To record on the Camcorder's tape, follow the
same recording procedure as mentioned before: press REC standby
and then the start/stop button
34
Page 37

Using optional accessories
Playback by the cassette adapter 22AV5146
The VHS compact video cassettes recorded with the Camcorder can
be played back with a standard VHS VCR by using the optional
cassette adapter (A compact video cassette installed in the
cassette adapter is fully compatible with a standard VHS VCR for
both recording and playback.)
I 22AV5146 cassette adapter
Being battery-operated, the 22AV5146 performs tape loading
and unloading automatically.
Shoe adapter 22AV5157
CAUTION;
Do not attach a video light, its heat could cause malfunctioning of
the Camcorder.
For more details refer to the instruction manual of the 22AV5146.
Note;
During special-effects playback (slow motion, still frame, etc.) the
picture may vibrate or noise bars may appear on the screen.
Inserting the battery into the cassette adapter
Remove the battery cover by sliding it up.
Install one "R6" battery and reattach the cover.
Attaching the optional available character generator 22AV5132 using
the shoe adapter.
Notes;
• Do not adjust the viewfinder angle while using the shoe adapter.
• Run the microphone cord behind the shoe adapter.
RF converter 22AV5158
See page 32.
35
Page 38

Remote control unit 22AV5131
The remote control unit 22AV5131 (optional) permits recording
start/stop to be controlled from a distance.
CUD CD
/
o (p Bb
pa'j:ls’v. stc^
ICDHCIDI
&
Plug the remote control cable into the REMOTE connector.
1
Press the REC standby button to engage the Recording
2
standby mode.
Tripod mounting
Align the screw and camera direction stud of the tripod with the
Camcorder's tripod mounting socket and stud hole, and firmly
tighten the screw.
O To start recording, set the remote control's switch to REC; to
^ stop temporarily, set it to PAUSE.
Note:
FADER will not lunction when remote control unit is connected.
36
Page 39

Supplemental information
What is “color temperature”?
Light is composed of various color components in different
proportions. A relationship exists between the temperature of a light
source and the color components of the emitted light: as the
temperature rises, the color of the light varies from red. orange,
yellow, white to blue in that order. "Color temperature" is a value
that expresses differences in color among light sources, measured
in Kelvin. Bluish light has a higher color temperature than reddish
light.
What is “white balance”?
Making the colors look natural on TV is what white balance is all
about. Because a camera is not as adaptable as the human eye. if a
light source is reddish, white subjects in that light are recorded as
reddish. White balance adjustment is performed to compensate for
color temperature variations of light so that whites are reproduced
as white. Correct white balance makes all other colors correct. The
Camcorder can perform automatic white balance adjustment in the
full-auto mode. Hov/ever. if illumination is insufficient, white balance
adjustment cannot be performed. To obtain correct colors,
therefore, sufficient illumination is essential.
What is “iiluminance”?
Illuminance" is the intensity or brightness of reflected light,
expressed in lux. The Camcorder is designed to provide best
pictures under the conditions of a 700-lux illuminance, although
shooting is possible all the way down to 10 lux. To obtain good
pictures In very bright light, the use of an ND (neutral density) filter
is recommended. (See chart on this page.)
How to get good color pictures
The simplest way is to provide sufficient lighting (close to the
camera's reference illuminance) and accurately adjust the camera
to the color temperature of that lighting. If light sources of different
color temperatures are used together, accurate white balance
adjustment is very difficult. For example, if natural light is mixed
with artificial light, which is likely to occur next to windows, correct
colors of the subject are difficult to obtain. It is recommended in
such cases that curtains in the room be closed to shut out light from
outside. Also, vrhen artificial lighting devices are used, they should
all have the same color temperature. For example, it is
recommended that incandescent or halogen lamps not be used
together with fluorescent lighting.
Color temperatures of various artificial lighting
Type of illumination Color temperature
Tungsten lamp for home use 2.800 К
Tungsten lamp for photographic use
Quartz-halogen lamp
Blue lamp for photographic use
Warm white 3.500 К
Fluorescent lamp
White
Daylight type
3.200 К
5.000 К
4.500 К
6.500 К
illuminance chart
• The values on this chart are approximated to give you a rough
reference.
Unit; Lux
О) *о
= ф
О о>
2 -о
ф
ф
э
я
U
о
я
о
О)
с
я
сс
•о
ф
ф
тэ
с
О)
Minimum lighting
_|
for an object
100.000 - • Clear sky. mid-day. under sunlight
(100.000)
• Clear sky (10:00 a.m.) under sunlight
(65.000)
• Clear sky (3:00 p.m.) under sunlight
(35.000)
• Cloudy sky (mid-day) under sunlight
(32.000)
• Cloudy sky {10:00 a.m.) under
sunlight (25.000)
10.000 -
• By the window during the afternoon
(3.500)
2.000 - • Cloudy sky (one hour after sunrise)
(2.000)
1.000 -
• Clear sky (one hour before sunset)
(1.000)
600 - • Counters at department stores
(500 — 700)
500 -
• Bowling center (500)
• Office under fluorescent light
(400 — 500)
• Library (400 — 500)
• Direct light of a flashlight at 1 m
distance (250)
100 -
• Streetlights at night (150 — 200)
80 -
15 - • Cigarette lighter
(at a distance of 30 cm)
10 -
• Candlelight (at a distance of 20 cm)
(10—15)
37
Page 40

In case of difficulty
What may initially appear to be trouble is not always a real problem. Make sure first.
Symptoms Check points
Power
No power is supplied.
Recording
Recording is impossible.
Picture colors greatly differ from actual
subject colors.
No sound IS recorded with an external
microphone.
Recording does not start. • Have you pressed the REC standby button first?
Playback
Tape IS running, but no playback picture
appears.
Noise bars appear in the playback picture. • Use the TRACKING control to reduce noise bars.
Playback picture is blurred or interrupted,
while TV programmes received are clear.
Tape transport
Tape stops during fast forward or rewind.
Rewinding or fast forwarding is impossible. • Check to see if the tape has already been fully wound on one reel or the other.
Other
No function is available with more than two
mode indicators lit.
Vertical white lines appear when shooting
a very bright object.
• Is the battery pack correctly installed?
• Is the battery pack charged?
• Is the power supply unit correctly connected?
• Is the POWER switch of the connected AC adapter set to ON?
• Check to see if the cassette safety tab is in place. See page 4.
• If in the manual white balance mode, check the setting of the W.BALANCE button.
• Is the microphone's switch set to ON?
• Is the VIDEO/TV switch of the RF converter set to VIDEO?
• Is the TV receiver set to your video channel?
• Video heads may be dirty or worn out. For head cleaning or replacement, consult the
qualified service personnel.
• Is the "M" indication visible in the tape counter?
If so. press the MEMORY button to cancel the memory function.
• If this should happen when using power supply units other than the battery pack, turn their
POWER switch on and off.
With a battery pack, replace it with another charged one.
• This may occur when the background contrasts very much with the object. This is normal.
The Camcorder is a microcomputer-controlled device. External noise and interference might prevent it from functioning properly. In such cases,
first disconnect its power supply unit (battery pack. AC power adapter, etc.); and then reconnect it and proceed as usual from the beginning.
38
Page 41

Specifications
Format
Power source
Power consumption
Signal system
Cassette
Tape speed (SP)
Recording time Max. (SP)
VIDEO
Output
S/N ratio
AUDIO
Output
Microphone input
Pickup
Minimum required
Illumination
Illumination range
Lens
VIewlinder
Selectable high-speed shutter
Colour temperature switching
White balance adjustment
Operating temperature
Operating humidity
Storage temperature
Weight
Dimensions
: VHS standard
: DC 9.6 V =
: 8.0 W
: PAL-type colour signal
■ VHS-C cassettes
: 23.39 mm/sec
' 30 minutes (with SE-C30 cassette)
1 Vp-p, 75 ohms, unbalanced
(via AV OUT connector)
More than 42 dB (with Rohde &
Schwarz noise meter)
-6 dBs, 1 k-ohm
(via AV OUT connector)
-68 dBs, high impedance,
unbalanced
1/2"— format CCD
10 lux (at F/1.4)
10 — 100,000 lux
F/1.4 — 2.0 f = 8.5 — 68 mm,
8:1 two-speed power zoom lens with
auto iris control and macro position,
filter diameter 52 mm
Electronic viewfinder with 0.6"
black/white CRT
1/1000, 1/500, 1/250 and 1/50 sec.
(standard)
Switchable (3,200 K/4,500 K/5,500 K)
Full-auto/preset standard
O'C to 40°C
35% to 80%
-20’C to 50°C
1.2 kg (with viewfinder)
111(W) X 150(H) X 253(D) mm
(incl. viewfinder)
AC adapter 22AV5191
Power requirement
Power consumption
Output
Charging system
Dimensions
Weight
Design and specifications subject to change without notice.
: AC 110 — 240 V~, 50/60 Hz
; 23 watts
: DC 14 V = 1.1 A (Charge)
DC 9.6 V = 1.2 A (Camcorder)
; Constant current, peak detection,
timer controlled
: 69 (W) X 42 (H) x150(D) mm
: Approx. 380 g
39
Page 42

 Loading...