

Page 1

PMDVR8
Trilingual
Front
Cover Art
Page 2

IntroductionTable of Contents
Introduction ...................................................... 3
Button Functions ............................................... 4
DVD/SAT Functions .................................... 6
Tivo/Replay Functions .................................. 7
Audio Fuctions ............................................ 8
TV/VCR/DVR ............................................ 8
Setup ...............................................................9
Battery Installation ....................................... 9
Battery Saver ...............................................9
Code Saver ................................................. 9
Power-On default ........................................ 9
Code Setup ................................................. 9
Code Entry .....................................................10
Direct Code Entry ......................................10
Code Search .............................................10
Brand Search ............................................. 11
Code Identification Feature ............................. 12
Sleep Timer .................................................... 13
Programming Combo Device Codes ............... 14
Controlling Combo Devices ............................ 14
Controlling Devices with Power On and Off .... 14
VCR/DVD/DVR Punch-Through Feature ....... 15
Volume/Mute Control Feature ......................... 15
Setting Volume/Mute Control, Punch-Through . 16
Setting any Mode to use its own Volume/Mute 16
Code Learning ................................................ 17
Tips on Learning ........................................17
IR Transmitter Finder Feature .....................19
Learning Commands .......................................20
Clearing Commands ....................................... 21
Clearing Learned commands for a mode .....21
Master Clear .............................................21
Macros ..........................................................22
Macro Setup .............................................22
Deleting Macros ........................................23
Troubleshooting .............................................. 24
Instrucciones en Español ................................. 26
Manuel d’instruction ....................................... 50
Congratulations on your purchase of Philips Universal
Remote Control. Philips Universal Remotes let you
replace a broken or lost remote or combine more than
one remote into one. In addition, this remote is equipped
with a command learning feature which lets the remote
learn commands from your original equipment remote
control!
This remote control operates the common features of
most but not all models and brands of IR Infrared
Controlled Video Equipment. This remote may provide
functions that are not available on your equipment.
Some functions of your particular equipment (e.g. menu
functions) may not be controlled by this remote. In such
cases, use the original remote control for your
equipment. Please use this manual to become familiar
with your Philips Universal Remote. After you are
familiar with your remote the first thing you need to do is
to install batteries and setup your remote for your
particular product and brand.
We focused on making this remote consumer friendly.
This remote has dedicated DVD and DVR buttons. We
have highlighted the DVD buttons in blue for easy
referencing. We have also highlighted the DVR (Tivo/
Replay) buttons in green for easy referencing on the
remote keypad. In addition to DVD and DVR, we have
included Satellite functionality by adding the Controls,
MENU, GUIDE, PAGE UP/DOWN/LEFT/RIGHT,
ENTER, QUIT/CLEAR, INFO, SELECT and OK buttons
right on the keypad. If there is a function on one of your
original remotes that isn’t on this remote, we’ve added
the easy learning feature that allows you to “learn”
favorite functions from your original remote right on to
this one.
We’ve even taken this one step further and added three
Macro functions. A Macro allows you to program a
series of steps in one keystroke. For example, with one
keystroke, you can program your remote to turn on all
your components.
Thank you for buying a Philips remote and we hope it
will give you many years of service.
32
Page 3
Button Functions
Button Functions, cont.
R
R
DVD
AUDIO
/
C
H
C
/
LIVE TV
BYPASS
A
N
H
TV/VCR/DVR
POWER
CBL
DVR
DISPLAY
INFO
REPEAT
AM/
FM
PREV. CHAN
PP
SUB-T
REPLAY
GUIDE
DSP
MODE
QUIT
CLEAR
SCANSCAN
DELAY
ADVANCE
30.
29.
28.
27.
26.
25.
24.
23.
22.
21.
20.
19.
18.
17.
16.
1.
2.
3.
4.
5.
6.
7.
8.
9.
10.
11.
12.
13.
14.
15.
LEARN
VCR
TV
CD
SAT
CODE
SEARCH
MACRO
FUNCTION
ENTER
GUIDE
CHANNEL
GUIDE
DSP
ON/OFF
MENU
/PROG
T-CENTRAL
DELAY
INSTANT
REPLAY
E
T
P
A
H
P
T
E
CD TAPE TUNER
TV VIDEO1 VIDEO2
LEVEL
LEVEL
PLAY
SLOW
STOP PAUSEREC
ON/OFF-SURR-MODE
PIP SWAP INPUT SLEEP
FC TR
Q.SKIP
R.ZONE S
Note: The REC button must be pressed TWICE to record
from your VCR. For some brands of VCRs, you might need to
press the REC button once, then press it again for three
seconds.
Some buttons on the remote might have functions that are
referred to by different names on the device you are controlling. E.G. PREV.CHAN may be called RECALL, or ENTER
may be called DISPLAY. These differences depend on the
brand and model of your product. Also, this remote can only
operate features that exist on your product. E.G., your
product must have PREV.CHAN ability for the PREV.CHAN
button to operate this feature.
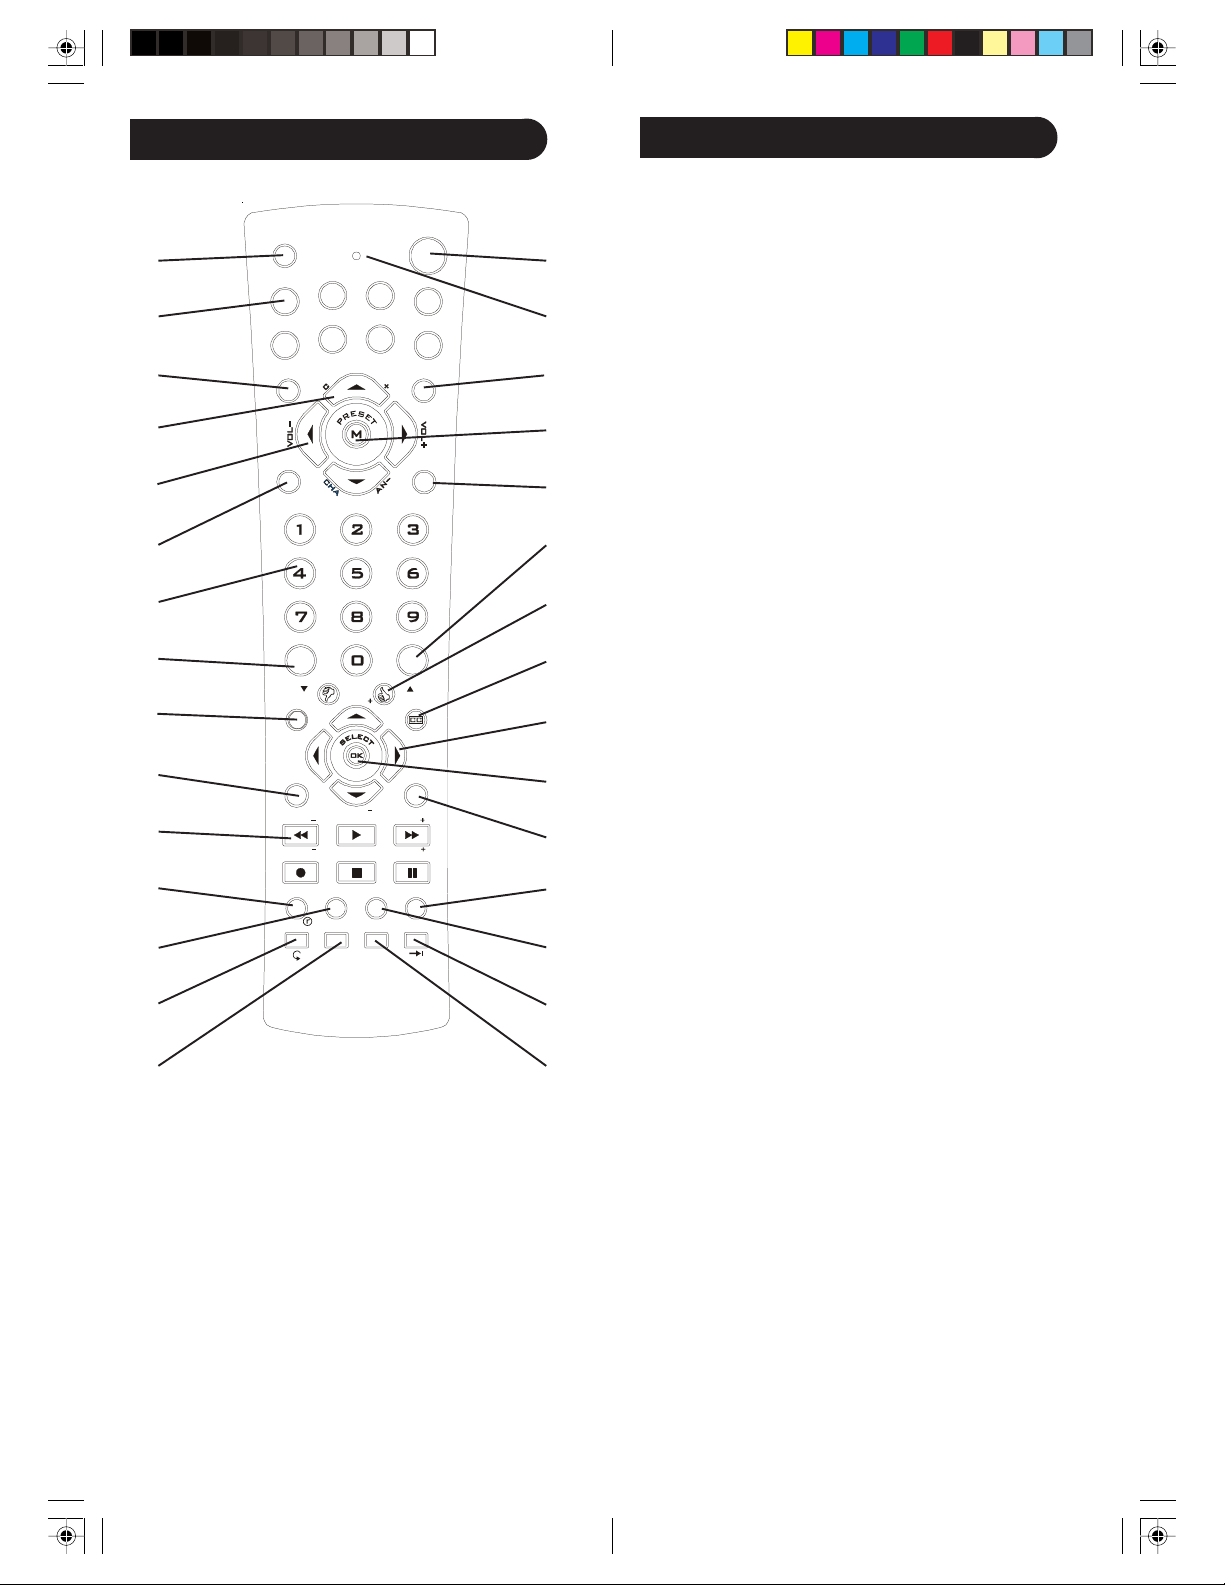
1. LEARN Used to setup learning functions.
2. TV, VCR, DVD, etc. Selects product to be operated.
3. CODE SEARCH Used for setup.
4. CHANNEL UP/DOWN Changes the channels.
CHAPTER +/- controls DVD/CD track selection i.e.
DVD/CD Track Skip Up/Down (in DVD and SAT
modes). Note the VCR buttons also control DVD when
in DVD Mode.
5. VOLUME UP/DOWN Changes the volume level of the
product, normally the TV.
6. MACRO Works with digits 1, 2 and 3, to program and
store up to 3 button-presses of your choice.
7. NUMBERS Enter numbers for direct channel selection.
Some products require Enter to be pressed after channel
selection.
8. ENTER Used after direct channel number entry to
immediately change to the selected channel.
9. GUIDE displays on-screen program or channel guides.
10. MENU brings up the DVD disc Menu screen - use with
the UP, DOWN, LEFT & RIGHT navigation buttons.
11. RECORD, PLAY, STOP, REW, FF, PAUSE VCR
control buttons operate your VCR even when the remote
is set to operate the TV. Also operates DVD Scan -/+.
12. PIP TV Picture-in- Picture control.
13. SWAP Swaps TV PIP screens.
14. INSTANT REPLAY - Replays the last 8 seconds of a
program.
15. R.ZONES Replay Zones - Searches TV listings by
category.
16. BYPASS Manually bypass the ReplayTV encoder.
17. ADVANCE - Catches you up to the live broadcast.
18. INPUT brings up the DVD Player’s Setup Menu.
19. SLEEP Turns off the TV after a period of 1 to 99
minutes.
20. QUIT/CLEAR Used to exit menu functions.
21. OK/SELECT Selects menu items for the device you are
controlling.
22. UP, DOWN, LEFT & RIGHT navigation buttons.
23. CC (SUBTITLE) TV Closed Caption (if your TV has
this feature) or DVD Subtitle toggle.
24. THUMBS UP/DOWN - set your Thumbs ratings.
25. TV/VCR/DVR For some TVs, press repeatedly to select
available viewing sources (antenna, cable box, VCR, etc.).
26. PREV. CHAN Returns to the previously selected
channel, or DVD repeat toggle. REPEAT A-B performs
DVD players “A-B Repeat” (or RPT A.B) function for
repeat play of current Chapter or Track.
27. MUTE Turns off the TV sound while the picture
remains.
28. INFO/DISPLAY Displays/selects on-screen channel
information, etc.
29. Red Indicator Lights when any button is pressed.
30. POWER Turns product On or Off.
54
Page 4

Button Functions, cont.
Button Functions, cont.
DVD Functions (labeled in Blue)
SCAN+ and SCAN- buttons control the speed of Fast
Forward and Reverse Playback respectively.
CHAPTER+ and CHAPTER- buttons respectively
locate the succeeding or preceding Chapters or Tracks
on a disc.
SUB-T button turns the subtitles on or off.
REPEAT button performs DVD players “A-B Repeat” (or
RPT A.B) function for repeat play of current Chapter or
Track.
INFO/DISPLAY button brings up DVD Display or
Control Menu for Chapter/Track/Title number, Time
remaining/elapsed indication, system information, etc.
MENU brings up the DVD disc Menu screen - use with
the UP, DOWN, LEFT & RIGHT navigation buttons.
OK button is used for on-screen Menu selection. Note
some DVD players require the Play button to be used.
QUIT button is used to Exit or Clear on-screen Menu
displays.
PLAY button is used to start Disc playback and for
Menu selection on some DVD players.
STOP button stops Disc playback.
PAUSE button pauses Disc playback - press PLAY to
resume.
INPUT button activates the DVD Player’s SETUP Menu.
SAT Functions
GUIDE button displays on-screen Satellite Channel
Guide.
CHAPTER+ and CHAPTER- buttons perform the
“Page+” and “Page-” function for on-screen Guide
Menus used by some Satellite systems.
INFO/DISPLAY button brings up Satellite Display
screen for current Channel and system information.
MENU brings up the Satellite Menu screen - use with the
UP, DOWN, LEFT & RIGHT navigation buttons.
QUIT button is used to Exit or Clear on-screen Menu
displays.
INPUT button performs the Satellite TV/SAT function.
Tivo/Replay Functions (labeled in Green)
TiVo (code is 0738)
T.CENTRAL - the TiVo button - for TiVo Central.
GUIDE - TiVo Live Guide - the TiVo Program Guide.
INFO/DISPLAY brings up the Channel Banner.
INSTANT REPLAY - Replays the last 8 seconds of a
program.
ADVANCE - Catches you up to the live broadcast.
LIVE TV - goes to Live TV broadcast.
OK - Select key.
THUMBS UP/DOWN - set your Thumbs ratings.
Replay (code is 0938)
R.ZONES Replay Zones - Searches TV listings by
category.
GUIDE Channel Guide - Displays TV listings.
REPLAY GUIDE - Plays your recorded shows.
MENU - Displays ReplayTV Main Menu.
ΛΛ
P
Λ and PV Page Up/Down - Moves one screen at a time
ΛΛ
up or down in ReplayTV guides and menus.
INSTANT REPLAY - Returns 7 seconds and replays a
segment.
ADVANCE Return to Live - Catches you up to Live
Broadcast.
Q.SKIP Quickskip - Skips 30 seconds of a recorded or
delayed show.
OK Select - Chooses an on-screen option; displays
channel surfing display while watching live TV.
r - Commercial Advance i.e. skips the commercials Turns COMMERCIAL ADVANCE on and off for the
current show.
INFO/DISPLAY - Shows program information about
current show.
Tivo and Replay are registered trade marks of their respective owners.
76
Page 5
Button Functions, cont.
Setup
Audio Functions (labeled in Red)
PRESET Used to operate preset channels while in Audio
Mode.
AM/FM Lets you to select the AM/FM band on your
audio receiver.
CD, TAPE, TUNER, TV, VIDEO 1, and VIDEO 2
Used to select your audio receiver’s input source.
(Works in AUDIO Mode, i.e. after pressing Red AUDIO
button).
FUNCTION Selects the different audio input devices.
The number buttons also select the function labeled
above the buttons when in AUDIO Mode.
LEVEL+/LEVEL - Sets the level of the speakers during
test tone Mode.
DSP ON/OFF Enables the receiver’s Digital Signal
Processing (DSP) Mode.
DSP MODE When the DSP Mode is enabled, pressing
this button lets you cycle through the various DSP
Modes.
PROG Lets you program the playback order of tracks on
your disc.
DELAY - and DELAY+ Increases or decreases the delay
between the surround and main speakers when your
receiver is in the surround sound Mode.
ON/OFF, SURR, MODE ON/OFF SURR toggles the
surround Modes on and off. SURR MODE cycles
through your receiver’s various surround sound Mode
settings.
F, C, R, T (Front, Center, Rear, and Test) Adjusts the
levels of the front, center, and rear speakers respectively.
Used with Level + /Level - . The test tone must be
enabled first by pressing the TEST button.
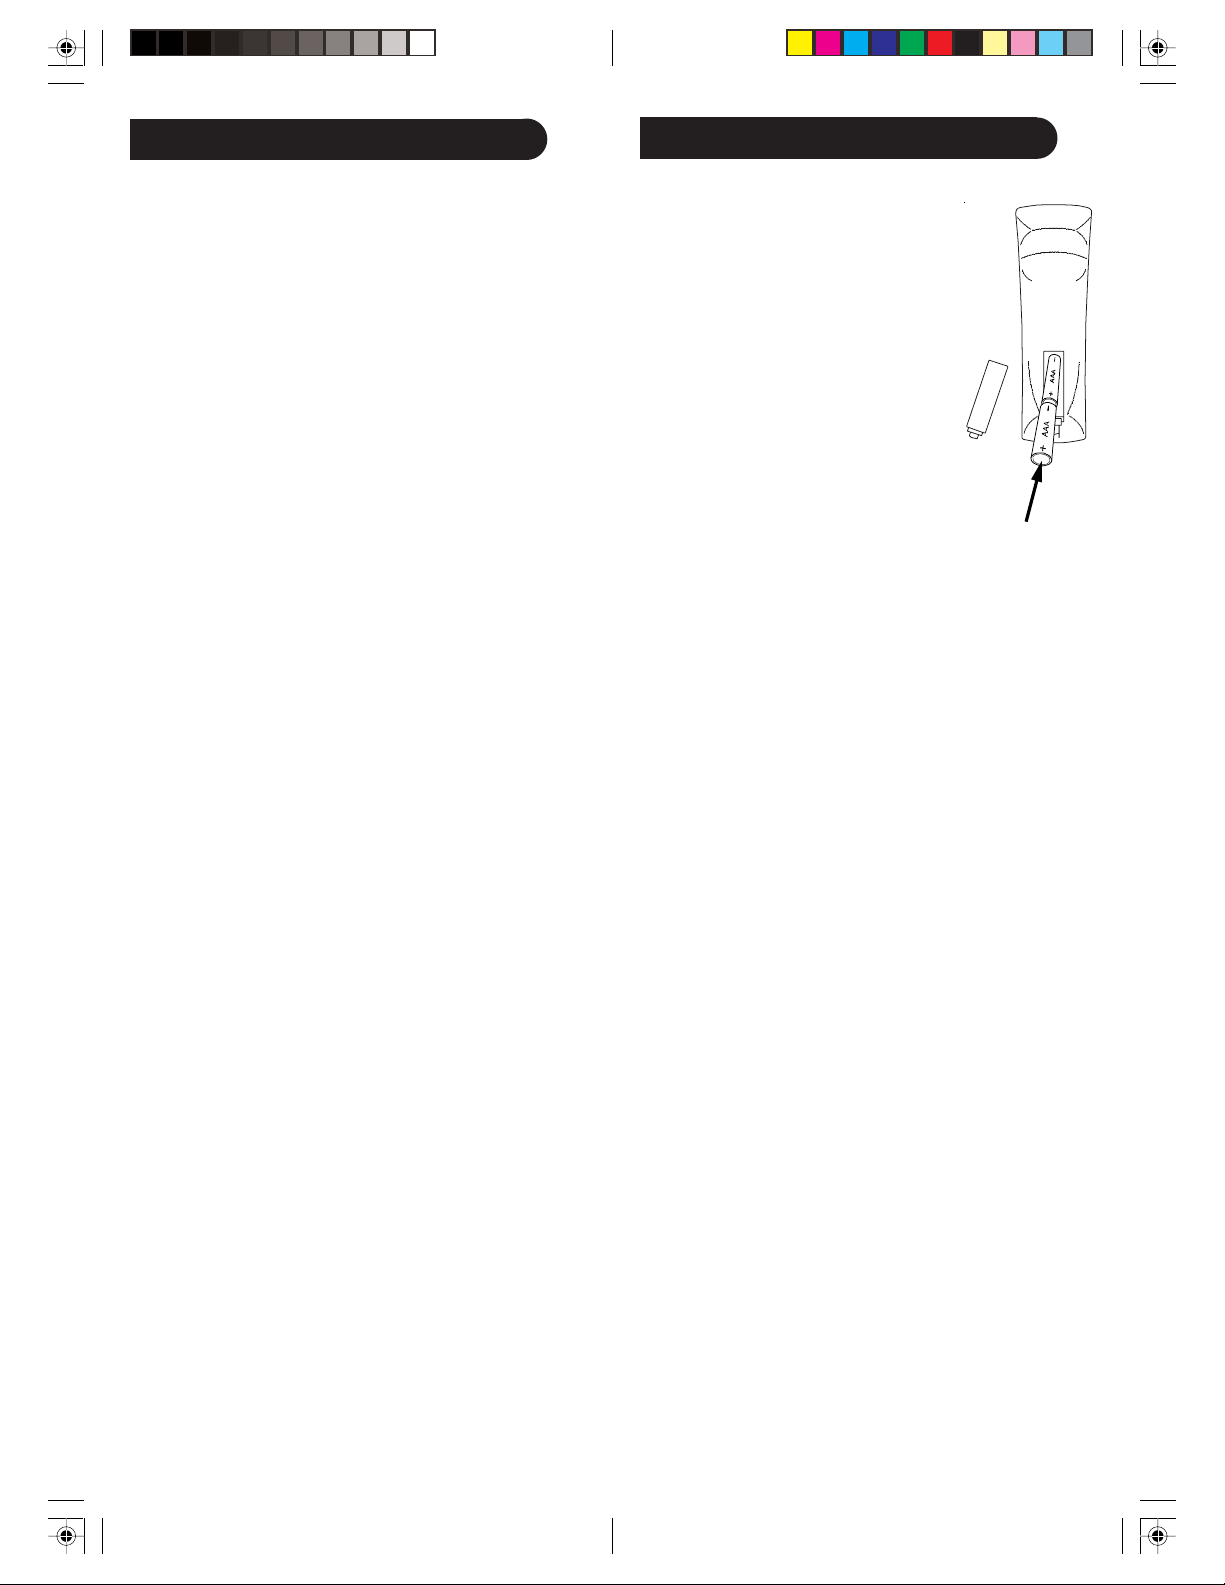
Battery Installation
1. On the back of the remote,
push down on the tab and
lift the cover off.
2. Match the batteries to the
+ and - marks inside the
battery case, then insert 2
AAA Alkaline batteries.
3. Press the battery cover
back into place.
Battery Saver
Your remote automatically turns off if the buttons are
depressed more than 30 seconds. This will save your
batteries should your remote get stuck in a place where
the buttons remain depressed (e.g., between the sofa
cushions).
Code Saver
Codes are stored in permanent memory while you are
changing batteries so you will not lose any codes
stored in the remote while you are changing batteries.
Power-On Default
The remote powers on in TV mode.
Code Setup
TV/VCR/DVR
When in TV mode the TV/VCR/DVR button performs
the INPUT source switch function.
When in a mode that has been programmed for VCR the
TV/VCR/DVR button performs the TV/VCR antenna
switch function.
When in a mode that has been programmed for Cable the
TV/VCR/DVR button performs the A.B switch function.
When in a mode that has been programmed for SAT the
TV/VCR/DVR button performs the TV/SAT switch
function.
When in a mode that has been programmed for DVD the
TV/VCR/DVR button performs the DVD Setup function.
The CODE SEARCH button is used to setup the
remote. You can either setup the remote using the code
for your brand of product, from the code tables (on
separate sheet), or you can search through the library
of codes until you find a code that works for your
product.
Please refer to “Code Search” on page 10 for more
information on using the code search feature to learn
how to search through the library of codes for your
products.
NOTE: You can store any kind of code under any mode
(except TV). I.E. you can store a VCR code under the
CBL button, or a DVD code under the VCR button, etc.
However, you can only store TV codes under the TV
button.
98
Page 6
Direct Code Entry
Code Search, cont.
1. Press and hold the CODE SEARCH button until the
red indicator stays on, then release the CODE
SEARCH button.
2. Press and release the desired mode button (TV,
VCR, etc.). The red indicator blinks, then stays lit.
3. Enter the 4 digit code from the code tables (on
separate sheet). Note: after a valid code entry, the
red indicator turns off. For an invalid code, the red
indicator flashes.
4. With your device on, press CHANNEL UP. If the
device responds, no further programming is required.
Note: If some buttons do not operate your equipment,
try one of the other codes for your brand.
Write your codes down here for easy reference later.
Type Type stored Code
TV
VCR
DVD
CBL
SAT
CD
AUDIO
DVR
Code Search
If your product does not respond after you have tried all
the codes for your brand, or if your brand is not listed,
try searching for your code by following these steps.
1. Manually turn on the device (TV, VCR, etc.) to be
controlled.
2. Press and hold the CODE SEARCH button until the
red indicator stays on, then release the CODE
SEARCH button.
3. Press and quickly release the desired mode button
(TV, VCR, etc.). The red indicator blinks off once.
4. Press the CHANNEL UP button repeatedly (up to
300 times) until the device to be controlled changes
channel. The red indicator blinks off with each
button press. If you accidentally overshoot the
code required, press the CHANNEL DOWN button
to backtrack through the library until the device
changes channel. Pressing CHANNEL UP changes
direction to forward again.
5. Press and release MUTE to install the code.
Most users will store VCR codes under the VCR button,
Cable codes under CABLE, etc. If (for example) you
want to store a VCR code under CABLE, first follow the
procedure for Direct Code Entry (previous page) and
press CABLE in step 2 of Direct Code Entry, then enter
ANY VCR code in step 3 of Direct Code Entry. Then
follow the steps above for Code Search (or Brand
Search, below). Note: If the device does not have a
CHANNEL UP button, use PLAY (VCR only) or
POWER instead. Code Search starts from the currently
stored 4 digit number under that mode.
Code Search by Brand
Lets you search for a code for a specific Brand within
the Code Library for a particular manufacturer.
1. Turn on the device (TV, VCR, etc.) to be controlled.
2. Press and hold the CODE SEARCH button until the
red indicator remains on, then release CODE
SEARCH button.
3. Press and quickly release the desired mode button
(TV, VCR, etc.). The red indicator blinks off once.
4. Press and release the numeric button (0-9)
corresponding to desired Manufacturer (see table on
code list sheet). The red indicator blinks off once.
Note, pressing “0” performs a full library search same
as normal Code Search Method on previous page.
5. Press the CHANNEL UP button ((or POWER or
PLAY (VCR only)) repeatedly until the device to be
controlled changes channel. The red indicator blinks
off with each button press. If you accidentally
overshoot the code required, press the CHANNEL
DOWN button to backtrack through the library until
the device changes channel. Pressing CHANNEL
UP changes direction to forward again.
6. Press and release MUTE to install the code.
Brand Search Method entry is now complete.
Note: When all codes under a Brand have been searched
the red indicator flashes rapidly for 3 seconds.
1110
Page 7

Code Identification Feature
Sleep Timer
The Code Identification Feature allows you to identify
the 4 digit library code stored under your device key. For
example, if you want to find out what 4 digit code is
stored under your TV device key, follow the six steps
below:
1. Press and hold the CODE SEARCH button until the
red indicator stays on. Release the CODE SEARCH
button.
2. Press and release the desired mode button (TV,
VCR, etc.). The red indicator blinks, then stays lit.
3. Press and release the CODE SEARCH button. The
red indicator blinks off.
4. To find the first digit for the code stored under the
mode key pressed in step 2, press each numeric key
from 0-9 in turn. When the red indicator blinks off
the number you pressed is the first digit for the code
you are searching for.
5. To find the second digit, repeat step 4, this time
when the red indicator blinks off this is the second
digit.
6. Repeat step 4 to find the third and fourth digits.
The SLEEP button operates the Sleep function of your
device providing it supports the Sleep function.
Alternatively, you can enable the remote to turn off
your TV after a period of 1 to 99 minutes as shown
below. This feature is only available for the TV Mode
and the remote must be in TV Mode to set a Sleep
Timer. This feature works even if your TV does not
have its own Sleep function.
1. Press and release the TV Mode button.
2. Press and hold the CODE SEARCH button until the
red indicator stays on. Release the CODE SEARCH
button.
3. Press and release the SLEEP button (Note any
previously set Sleep timer is cancelled at this point
and the remote returns to normal operation).
4. Press and release the numeric buttons (01-99) for
the time required. The red indicator blinks off to
indicate button press acceptance and remains off
after the second button press.
5. TV Sleep Timer now set.
6. Leave the Remote pointing towards the TV with an
unobstructed path.
To cancel the Sleep Timer, press and release the
POWER button in TV Mode or repeat Steps 1, 2 and 3
above.
1312
Page 8

Setup, cont.
Setup, cont.
Programming Combo Device Codes
Some Combo devices (e.g. TV/VCR, TV/DVD, DVD/
VCR, etc.) will require you to set up two different Mode
buttons to control both parts of the Combo device. For
example, if you have a TV/DVD Combo, you might need
to set up one code under the TV button to control the
TV part AND a separate code (under any other Mode
button) to control the DVD part.
Controlling Combo Devices
Some Combo devices (e.g. TV/VCR, TV/DVD, DVD/
VCR, etc.) have separate buttons on the original remote
to select the part of the Combo device to be controlled.
For example, if your Combo device is a DVD/VCR then
its original remote might have separate DVD and VCR
buttons for selection of the Combo part you would
control. The equivalent button functions can be found
on your Philips remote by using the device Mode and
CODE SEARCH buttons.
Referring to “Programming with Code Search” on page
10, setup a device Mode (e.g. DVD) with the correct
code for your Combo device. Assuming the DVD/VCR
Combo device is the example and its code is
programmed under DVD Mode, press and hold the
DVD Mode button for more than one second to send
the DVD button command. To send the VCR button
command, quickly press and release the CODE
SEARCH button followed by pressing and releasing the
DVD Mode button. This method can be applied
similarly to all Combo devices (e.g. TV/VCR, TV/DVD,
DVD/VCR, etc.) and is available for all Modes. Note this
feature is not supported by all codes.
Controlling Devices Requiring Separate Power On and
Off Buttons
Some devices (e.g. certain RCA TVs) require separate
Power On and Power Off buttons to turn the device on
and off. The equivalent button functions can be found
on your Philips remote by using the device Mode and
POWER buttons. Referring to “Programming with Code
Search” on page 10, setup a device Mode (e.g. TV) with
the correct code for your device.
Controlling Devices Requiring Separate Power On and
Off Buttons, cont.
To turn the TV off, press and release the POWER
button to transmit the Power Off button command. This
method can be applied similarly to any device and is
available for all Modes. Note this feature is not
supported by all codes.
VCR/DVD/DVR Punch-Through Feature
This remote allows the 6 VCR transport buttons (i.e.
PLAY, PAUSE, STOP, FF, REWIND, and REC) to
Punch-Through control from any Mode programmed
with TV, SAT or Cable codes to the last VCR, DVD or
DVR programmed Mode you used. Normally other
types of remotes only punch-through (from another
Mode) on the 6 VCR buttons to the device programmed
under the VCR Mode button. This is not much use if
you are using a DVD programmed under a Mode other
than VCR. For example, if you have 2 DVD, VCR or DVR
devices programmed into this remote, the last one you
accessed on the remote will be the one that has control
of the 6 VCR transport buttons when in any other
Mode. This feature will not operate if the programmed
TV, SAT or Cable code has its own VCR transport
button control e.g. a TV Combo, SAT/PVR, etc.
Volume/Mute Control and Punch-Through Feature
This remote lets you select which device Mode controls
your Volume/Mute buttons. The remote is initially set
(factory default) for all device Modes programmed with
“Visual” codes (e.g. TV, VCR, DVD, DVR, SAT &
CABLE) and “Audio” codes (e.g. CD & AUDIO) to use
their own Volume/Mute control if present. If the
programmed “Visual” code has no Volume/Mute
operation of its own then those buttons will punchthrough control to the TV Mode device without
needing to change to TV Mode. Please refer to the next
page for more information.
Assuming a TV device is the example and its code is
programmed under TV Mode, to turn your TV on, press
and hold the TV Mode button for more than one
second to transmit the Power On button command.
1514
Page 9

Setup, cont.
Code Learning
Any Mode chosen for Volume/Mute control MUST have
its own Volume/Mute function or the Volume/Mute
buttons will do nothing.
Setting ALL Volume/Mute Control to any one Mode
This routine can set all Modes to “punch-through” to
any one chosen Mode for Volume/Mute button control
without the needing to change to that Mode.
1. Press and hold the CODE SEARCH button until the
red indicator turns on, then release the button.
2. Press and hold the MUTE button until the red
indicator blinks off, then release the button.
3. Press and release the desired Mode button (TV,
VCR, etc.) for Volume/Mute control, the red
indicator blinks then stays on.
4. Press and release the MUTE button and the red
indicator turns off. The red indicator will blink
rapidly for three seconds if the Mode you have
selected has no Volume/Mute control.
5. All other Modes will now punch-through to your
chosen Mode for Volume/Mute control.
6. All “Visual” and “Audio” programmed Modes will
now punch-through to the respective Modes you
have chosen for Volume/Mute control.
Setting any Mode to use its own Volume/Mute Control
This routine can set any Mode to use only its own
Volume/Mute control. Note - If your chosen Mode has
no Volume/Mute functions of its own then the Volume/
Mute buttons will do nothing.
1. Press and hold the CODE SEARCH button until the
red indicator turns on, then release the button.
2. Press and hold the MUTE button until the red
indicator blinks off, then release the button.
3. Press and release the desired Mode button (TV,
VCR, etc.), the red indicator blinks then stays on.
4. Press and release the VOLUME- (Down) button, the
red indicator blinks then stays on.
5. Press and release the MUTE button and the red
indicator turns off.
6. All “Visual” and “Audio” programmed Modes will
now punch-through to the respective Modes you
have chosen for Volume/Mute control.
The learning feature lets you “learn” functions from
your original remote control. For example - you may
want to use your remote to operate the RANDOM
PLAY feature from your original CD remote control.
This remote is equipped with an “easy learning” feature
that lets you “learn” features (such as RANDOM PLAY
from your original CD remote).
Tips On Learning
You can only learn one device type under any one
Mode button e.g. only learn TV codes under the TV
Mode, VCR codes under the VCR Mode, etc. If you are
trying to learn from a “Universal” remote, it might have
more than one code type stored under a Mode. Try
learning from another remote to see if there’s a problem
with the type or brand of remote you are trying to learn
from.
a. Some functions from some types of remotes might
not be able to be learned.
b. No functions may be stored under LEARN, CODE
SEARCH or MACRO buttons.
c. Only one original device type can be learned per
individual Mode.
d. Use fresh batteries for both the Learning Remote
and the Original Remote.
e. Keep at least three feet away from incandescent or
low-energy lights when learning.
f. Perform a Master Clear (see page 21) before learning
and try learning 2 or 3 commands initially. Then
carry out a Master Clear before completely learning
your original remote’s commands.
g. Place the original remote end-to-end with the
Learning Remote so the IR transmitters on both
remotes are directly in line with each other. You may
need to adjust the height of either remote to achieve
this. Use the IR Transmitter Finder feature to assist
you.
h. Keep the distance between the two remotes to
approximately 1 inch and do not move or change the
distance between the two remotes until you have
learned all the required buttons for that Mode.
i. When Learning, do not release the button being
Learned until the red indicator has blinked off for
half a second.
j. Avoid learning your original remote Volume/Mute
buttons unless you are sure these operate the same
device e.g. some original DVD remotes include TV
Volume/Mute button control and can be two
different types of code.
1716
Page 10

Tips On Learning, cont.
IR Transmitter Finder Feature
k. Avoid learning your original remote VCR transport
buttons unless you are sure these operate the same
device e.g. some original TV remotes include VCR
button control and can be two different types of
code.
l. If learning the first or second buttons for a Mode
results in continuous errors then try the following:
i. End the Learn session by pressing the CODE
SEARCH key.
ii. Clear out the learned commands for that Mode.
iii. Check the IR transmitters are correctly aligned
between the two remotes (use the IR Transmitter
Finder facility).
iv. Adjust the distance between the two remotes to be
closer (e.g. half an inch) or a further away (e.g. 2
inches) from each other.
v. Try learning the original remote for that Mode again.
If problems reoccur with the same button check the
original remote button being learned – does it transmit?
Does it operate the target device? Try learning that
button under a different clear Mode. If it learns okay
then it is likely to be a different code type from the
others and cannot be learned under the same Mode.
This feature assists you in identifying where your
original remotes IR transmitter is located and is
particularly useful if your original remote’s IR
transmitter is hidden behind a lens.
1. Point both remotes facing each other by
approximately 1 inch apart (see Tips on Learning on
previous pages)
2. Press and hold the CODE SEARCH button until the
red indicator turns on, then release the button.
3. Press and release the desired Mode button (TV,
VCR, etc.), the red indicator blinks then stays on.
4. Press and release the LEARN button, the red
indicator blinks then stays on.
5. Press and hold any Original Remote button and
move the Original Remote to the left and right, and/
or, up and down in front of the Learning remote IR
transmitter. The red indicator will remain on if no IR
from the Original remote is found and the red
indicator will blink on and off more rapidly when the
IR transmitters are lining up. The point where the
red indicator blinks most rapidly is where the two IR
transmitters are aligned. Note some original remotes
will only transmit IR on the initial button press then
stop. In these cases, quickly press and release the
original remote button repeatedly during this
procedure.
6. You can now learn a button from your original
remote by continuing from “Step 4” in the
“Learning Commands” section on the next page, or,
to exit at this point, press and release the CODE
SEARCH button
1918
Page 11
Learning Commands
Clearing Commands
The learning feature allows you to “learn” functions
from your original remote control. For example - you may
want to use your remote to operate the RANDOM PLAY
feature from your original CD remote control. This
remote is equipped with an “easy learning” feature that
allows you to “learn” features (such as RANDOM PLAY
from your original CD remote) by following the steps
below, and on the next page:
1. Press and hold the CODE SEARCH button until the
red indicator turns on, then release the button.
2. Press and release the desired mode button (TV,
VCR, etc.), the red indicator blinks then stays on.
3. Press and release the LEARN button, the red
indicator blinks then stays on.
4. Press and release the Learning Remote button that
you want to teach (e.g. POWER).
5. Point both remotes facing each other by approximately 1 inch apart (see tips on page 17).
6. Press and hold the Original Remote button (e.g.
Power) until the red indicator blinks once and stays
on. If there is a learning problem, the indicator blinks
for three seconds and stays on. If this happens,
repeat Steps 4 to 6.
7. Repeat Steps 4-6 for other buttons you want to
learn.
8. Press and release the CODE SEARCH button when
all desired remote commands are learned. Code
Learning is now complete.
6.
To Clear all Learned Commands under a mode
Clearing learned commands is helpful if, for example, you
replace your CD player with another brand or model. If
you had learned a feature from your old CD player’s
original remote on to this remote (such as RANDOM
PLAY), that feature would no longer work for your new
CD player. Should you wish to remove or clear one or
more “learned” commands, follow the steps below:
1. Press and hold the CODE SEARCH button until the
red indicator turns on. Release the CODE SEARCH
button.
2. Press and release the button for the mode you want
to clear (TV, VCR, etc.). The red indicator blinks off.
3. Press and release the LEARN button TWICE. The
red indicator blinks off.
4. Press and release the CODE SEARCH button. The
red indicator turns off. All learned Commands under
that mode are now cleared.
Master Clear - To Clear all Learned
Commands under all modes
1. Press and hold the CODE SEARCH button until the
red indicator turns on. Release the CODE SEARCH
button.
2. Press and release the LEARN button TWICE. The
red indicator blinks off.
3. Press and release the CODE SEARCH button. The
red indicator turns off. All Learned commands in the
remote are now cleared.
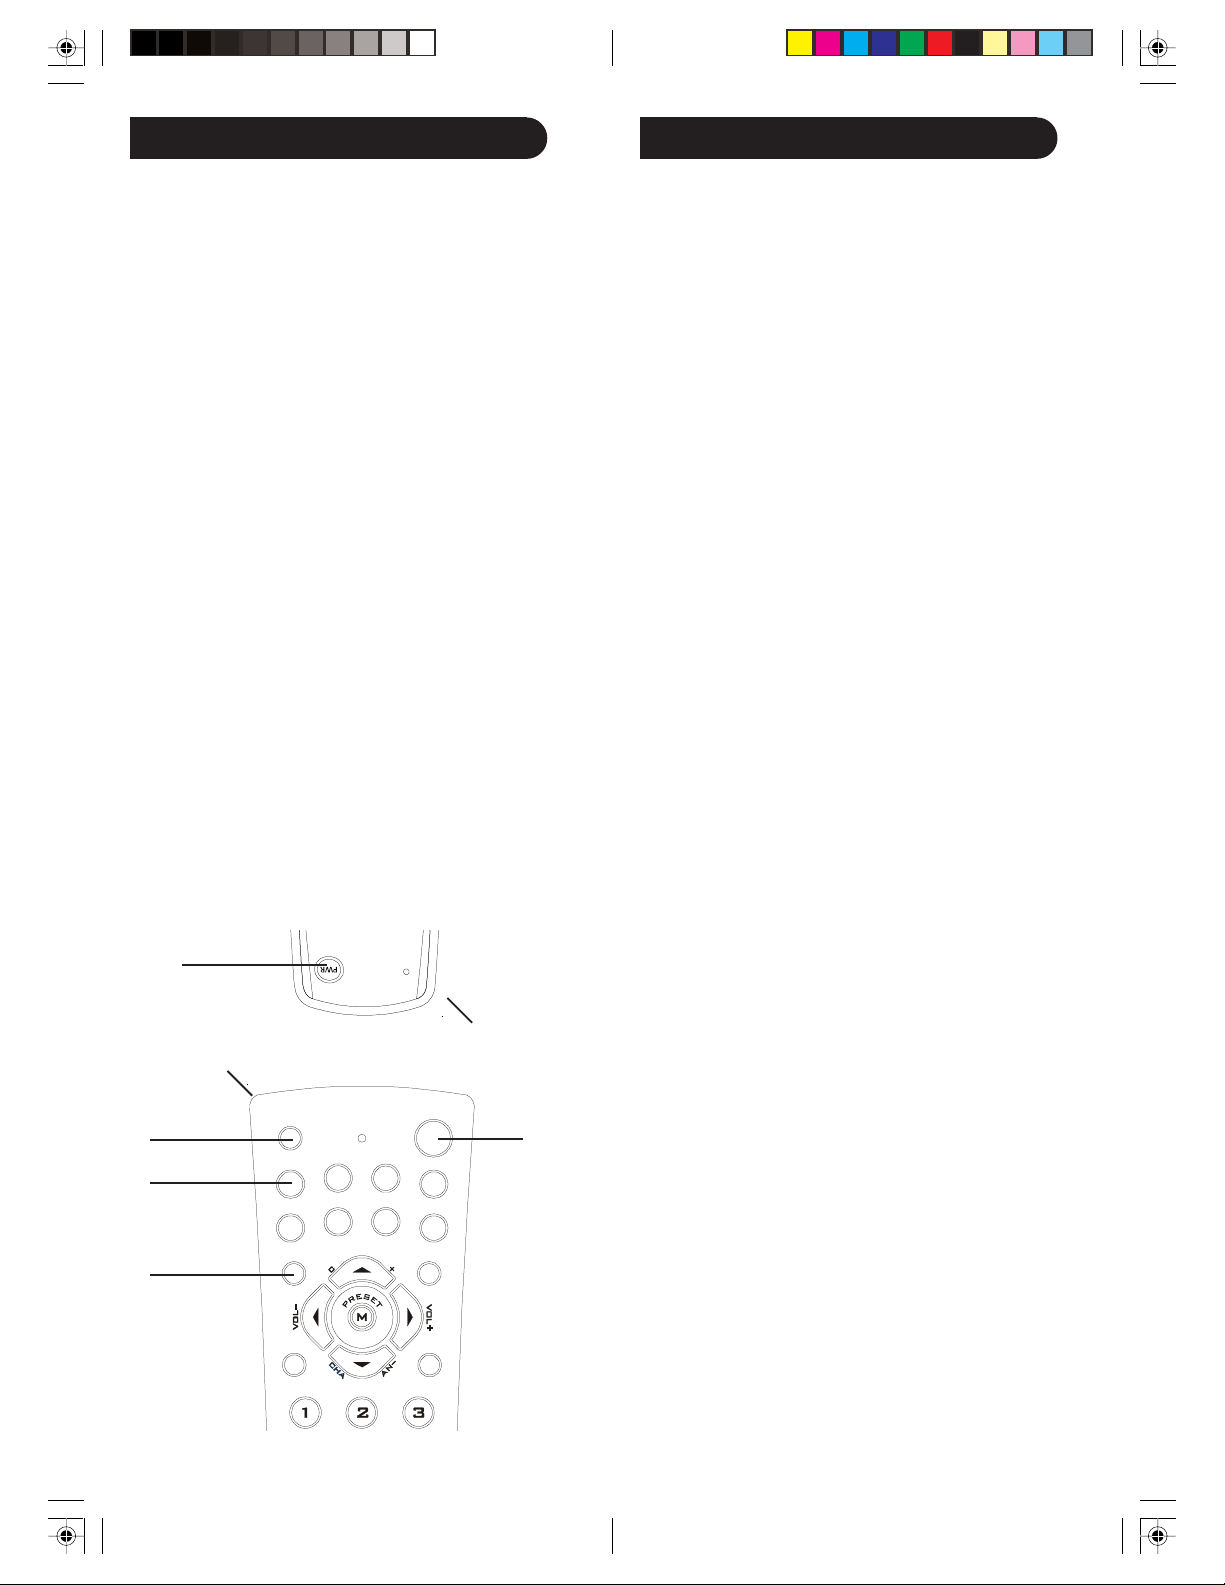
Line up your remotes (that you’re learning from) in front of
the Learning remote, on a hard surface approx. 1 inch apart.
R
/
R
DVD
AUDIO
C
H
A
H
C
/
N
POWER
CBL
DVR
DISPLAY
INFO
REPEAT
AM/
FM
PREV. CHAN
4.
3.
LEARN
VCR
TV
2.
1.
CD
SAT
CODE
SEARCH
MACRO
E
T
P
A
H
P
T
E
CD TAPE TUNER
2120
Page 12
Macros, cont.Macros
The MACRO button, in conjunction with digits 1, 2 and
3, lets you to program and store up to 3 sequences of IR
Commands (button-presses) of your choice. One press
of the respective Macro digit button results in that
sequence of IR commands being sent. Any sequence of
commands that you regularly perform can be reduced to
two button presses (MACRO button followed by digit 1,
2 or 3 button). For example pressing MACRO followed
by a single button can turn on your TV, turn on your
cable box, change to your favorite channel, turn on your
VCR, and tell it to record, etc. A total of 10 button
presses can be stored under each of the 3 Macro digits.
To Setup a Macro
1. Press and hold the CODE SEARCH button until the
red indicator turns on. Release
2. Press and release the MACRO button. The red
indicator blinks off.
3. Press and release digit button where you want to
store the Macro, i.e. button 1, 2, or 3.
4. Press and Release Mode button for the first device
to be controlled in the Macro sequence. *
5. Press and release the buttons you want to be
included in the Macro, in the order you want them to
be sent (maximum of 9). The red indicator blinks off
with each button press.
6. To store the Macro, press and release the MACRO
button. The red indicator turns off. Note, if you
program the maximum of 9 buttons, the Macro will be
automatically stored on the 9th button press and the
red indicator turns off. Macro setup is now complete.
CODE SEARCH.
To activate the Macro press and release the MACRO
button followed (within 20 seconds) by the digit button
1, 2 or 3.
Macro Notes
1. You might want to add “delays” in a Macro
sequence (e.g. to allow for your TV warm-up time).
Delays can be added by using the PAUSE button
followed by the number of seconds delay required.
For example, to enter a delay of 3 seconds, press and
release PAUSE followed by 3 (in step 4 of “To Setup a
Macro” on the previous page). Maximum delay is 9
seconds. It is not possible to have a “0” digit
entered after Pause i.e. there is no zero delay.
2. There is an automatic delay of half a second between
each IR transmission in a Macro sequence.
3. * The first button in a Macro sequence MUST be a
Mode button (TV, VCR, etc.).
To Delete a Macro
1. Press and hold the CODE SEARCH button until the
red indicator turns on. Release the CODE SEARCH
button.
2. Press and release the MACRO button. The red
indicator blinks off.
3. Press and release digit button 1, 2 or 3 for the Macro
you want to delete.
4. Press and hold the CODE SEARCH button. The red
indicator turns off and the Macro is deleted.
4.
1.
2, 6.
3.
LEARN
VCR
TV
CD
SAT
CODE
SEARCH
MACRO
R
/
C
E
T
P
A
H
P
T
E
CD TAPE TUNER
R
DVD
AUDIO
H
A
N
H
C
/
POWER
CBL
DVR
DISPLAY
INFO
REPEAT
AM/
FM
PREV. CHAN
1, 4.
2.
3.
LEARN
VCR
TV
CD
SAT
CODE
SEARCH
MACRO
R
/
E
T
P
A
H
P
T
E
CD TAPE TUNER
R
2322
DVD
AUDIO
C
H
A
H
C
/
N
POWER
CBL
DVR
DISPLAY
INFO
REPEAT
AM/
FM
PREV. CHAN
Page 13

Troubleshooting
Limited Lifetime Warranty
Remote does not operate your product.
• Press the mode button of the product you want to
control.
• Program the remote with a new code.
• Install new batteries. (You might have to reprogram
your remote after installing new batteries.)
• Remote may not be compatible with your product.
Remote does not operate some features of your product.
• Program remote with a new code.
• Remote may not be able to operate all features of
your product or button names might be different
than your product.
Red Indicator blinks after you program a product code.
• Remote did not accept the code.
• Try to program the code again or try a different
code.
For help with setup, please call: 919-573-7854.
The manufacturer warrants that this product shall be free
from defects in material, workmanship and assembly,
under normal use, in accordance with the specifications
and warnings, for as long as you own this product. This
warranty extends only to the original purchaser of the
product, and is nontransferable. Defective products,
together with the dated proof of purchase, must be
returned to the place of purchase for repair or
replacement. THERE ARE NO OTHER EXPRESS
WARRANTIES. Incidental and consequential damages
are disclaimed where permitted by law. This warranty
gives you specific legal rights, and you may also have
other rights which vary from state to state.
Made in China. Quality Assured in USA.
Ledgewood, NJ 07852
2524
Page 14

Introducción Índice
Introducción ......................................................... 27
Funciones de botones ..................................... 28
Funciones de DVD/SAT ................................ 30
Funciones de TiVo/Replay .............................. 31
Funciones de Audio ........................................ 32
TV/VCR/DVR ...............................................32
Preparación .......................................................... 33
Instalación de baterías ....................................33
Ahorrador de baterías..................................... 33
Almacén de códigos ....................................... 33
Encendido por omisión ....................................33
Fijación de códigos ......................................... 33
Ingreso de códigos ...............................................34
Ingreso directo de códigos.............................. 34
Búsqueda de códigos ......................................34
Búsqueda de códigos por marca .................... 35
Identificación de códigos ..................................... 36
Apagado automático ............................................37
Códigos de programación de
equipos combinados ............................................. 38
Control de equipos combinados ........................... 38
Control de equipos con Encendido y Apagado ....38
Control de VCR/DVD/DVR ............................... 39
Control de volumen/silencio ................................. 39
Ajuste de control volumen/silencio ...................... 40
Ajuste de cualquier modo para utilizar su
propio control de volumen/silencio ....................... 40
Transferencia de códigos..................................... 41
Consejos para la transferencia de códigos ..... 41
Función de búsqueda de transmisor IR
(infrarrojo)....................................................... 43
Aprendizaje de comandos .................................... 44
Despejando comandos .........................................45
Despejar comandos transferidos para una
modalidad ........................................................ 45
Despejado maestro ......................................... 45
Macros .................................................................46
Programación de una macro .......................... 46
Borrado de macros .........................................47
Localización y reparación de averías .................. 48
Felicitaciones por su compra del Control remoto
universal Philips. Los controles Philips le permiten
sustituir un control remoto descompuesto o perdido, o
combinar más de un control remoto en una sola unidad.
Además, ¡este control remoto está equipado con una
función de transferencia de comandos que le permite
transferir los comandos de su equipo de control remoto
original!
Este control remoto opera las funciones comunes de la
mayoría de los modelos y marcas de equipo de video de
control por rayos infrarrojos (pero no de todos). Este
control remoto puede ofrecer funciones que no estén
disponibles en su equipo. Es posible que algunas
funciones de su equipo en particular (por ej., menú de
funciones) no se puedan controlar con este control
remoto. En tal caso, utilice el control remoto original de
su equipo. Por favor, use este manual para familiarizarse
con su control remoto universal Philips. Después de
familiarizarse con él, la primera cosa que tiene que hacer
es colocar las baterías y preparar su control remoto para
su aparato y marca en particular.
Nuestro objetivo principal ha sido que este control
remoto fuese fácil de usar. Este control remoto tiene
botones dedicados para DVD y DVR. Hemos resaltado
los botones DVD en azul para facilitar la referencia.
También hemos resaltado los botones de DVR (Tivo/
Replay) en verde para facilitar su empleo en el teclado
del control remoto. Además de DVD y DVR, hemos
incluido funcionalidad de satélite agregando los
botones de Controles, MENU (menú), GUIDE (guía),
PAGE UP/DOWN/LEFT/RIGHT (página arriba, abajo,
izquierda y derecha), ENTER (ingresar), QUIT/CLEAR
(borrar/salir), INFO (información), SELECT
(seleccionar) y OK (aceptar) directamente en el teclado.
Por si hay alguna función en uno de sus controles
remotos originales que no está en este control remoto,
hemos agregado la función de aprendizaje fácil que
permite que este control remoto “aprenda” las
funciones favoritas de sus controles remotos originales.
Incluso hemos llevado esto un paso más adelante y
hemos agregado tres funciones macro (macro
instrucciones). Un macro permite programar una serie de
pasos en la presión de una sola tecla. Por ejemplo, se
puede programar el control remoto para que con la
presión de una sola tecla encienda todos los
componentes.
Gracias por comprar un control remoto Philips y
esperamos que le brinde muchos años de servicio.
2726
Page 15

Funciones de botones
R
R
DVD
AUDIO
/
C
H
C
/
LIVE TV
BYPASS
A
N
H
TV/VCR/DVR
POWER
CBL
DVR
DISPLAY
INFO
REPEAT
AM/
FM
PREV. CHAN
PP
SUB-T
REPLAY
GUIDE
DSP
MODE
QUIT
CLEAR
SCANSCAN
DELAY
ADVANCE
30.
29.
28.
27.
26.
25.
24.
23.
22.
21.
20.
19.
18.
17.
16.
LEARN
1.
2.
3.
TV
SAT
CODE
SEARCH
VCR
CD
E
T
P
A
H
4.
MACRO
5.
6.
P
T
E
CD TAPE TUNER
TV VIDEO1 VIDEO2
7.
FUNCTION
8.
9.
10.
11.
12.
13.
ENTER
LEVEL
GUIDE
CHANNEL
GUIDE
DSP
ON/OFF
MENU
/PROG
T-CENTRAL
INSTANT
LEVEL
PLAY
SLOW
DELAY
STOP PAUSEREC
ON/OFF-SURR-MODE
PIP SWAP INPUT SLEEP
FC TR
Q.SKIP
R.ZONE S
REPLAY
14.
15.
Nota: el botón REC debe oprimirse DOS VECES para grabar
en su videocasetera. Para algunas marcas de
videocaseteras será necesario que oprima el botón REC una
sola vez y enseguida oprimirlo nuevamente durante tres
segundos.
Algunos botones del control remoto pueden tener funciones
con diferentes nombres en el aparato que está controlando.
Por ej, el canal anterior (PREV.CHAN) puede llamarse
RECALL, o ENTER puede llamarse DISPLAY. Estas
diferencias dependen de la marca y del modelo de su aparato.
Además, este control remoto puede operar únicamente las
funciones que existen en su producto. Por ejemplo, su
producto debe estar equipado con canal anterior
(PREV.CHAN) para que el botón de PREV.CHAN funcione.
Funciones de botones
1. LEARN (Aprendizaje) Se emplea para configurar funciones
de aprendizaje.
2. TV, VCR, DVD, etc. Selecciona el equipo que se va a usar.
3. CODE SEARCH (Búsqueda de código) Función empleada
para la configuración del control remoto.
4. CHANNEL UP/DOWN (Canal siguiente/anterior) Cambia de
canal. CHAPTER +/- (Capitulo +/-) Controla la selección de
pistas de DVD/CD, es decir, la pista de DVD/CD para subir/
bajar (en modalidades de DVD y SAT). Observe que los
botones de movimiento de la videocasetera también controlan
el DVD cuando está en la modalidad de DVD.
5. VOLUME UP/DOWN (Subir/bajar volumen) Cambia el
nivel de volumen del equipo, normalmente el del televisor.
6. El botón MACRO, conjuntamente con los dígitos 1, 2 y 3,
permiten programar y almacenar hasta tres secuencias de
comandos infrarrojos (presiones de botones) a su elección.
7. NUMEROS oprima los números para la selección directa de
canales. Algunos aparatos requieren que se oprima Enter
después de la selección del canal.
8. ENTER (Ingresar) Se utiliza después del acceso directo de
canales para cambiar inmediatamente al canal seleccionado.
9. GUIDE (Guía) Presenta en pantalla la guía de
programación.
10. MENU Trae la pantalla del Menú de discos del DVD: Úselo
con los botones de navegación hacia arriba, abajo, izquierda
y derecha.
11. RECORD, PLAY, STOP, REW, FF, PAUSE (Grabar,
reproducir, parar, devolver, adelantar, pausa) los botones de
control de la videocasetera hacen funcionar este aparato
incluso cuando el control remoto esta en la modalidad de
TV. También ejecuta la función DVD Scan +/- (exploración
+/- de DVD).
12. PIP TV (Picture-in-picture, Imagen en imagen) Controla la
presentación en la pantalla del televisor de una imagen
secundaria, en una ventana dentro de la imagen principal.
13. SWAP (Alternar) Permite alternar entre una pantalla y
otra al utilizar la funcion de imagen en imagen en el
televisor.
14. INSTANT REPLAY (repetición instantánea): repite los
últimos ocho segundos de un programa.
15. R.ZONES (zonas Replay): busca listados de programas de
televisión por categoría.
16. BYPASS sobrepasa manualmente el codificador de
ReplayTV.
17. ADVANCE (adelantar): avanza hasta alcanzar la
teledifusión en vivo.
18. INPUT [Configuración (Entrada)] Sirve para que se
presente el menú de configuración de reproductores de
DVD.
19. SLEEP (Apagado automático) Apaga el televisor después
de un período de 1 a 99 minutos.
20. QUIT/CLEAR (Salir/regresar) Sirve para salir de los menús
en pantalla y/o regresar a la anterior selección en pantalla.
21. OK/SELECT (Aceptar) Se utiliza para la selección del
Menú en pantalla.
22. UP, DOWN, LEFT & RIGHT Botones de navegación
(arriba, abajo, izquierda y derecha).
23. CC (SUBTITLE) [Trascripción del audio en pantalla
(subtítulos)] Activa y desactiva la función de trascripción
del audio en pantalla del televisor (si el televisor tiene esta
característica) o los subtítulos de DVD.
24. THUMBS UP/DOWN (pulgares arriba/pulgares abajo): se
emplean para la calificación positiva (thumbs up) o
negativa (thumbs down) de la programación.
25. Botón de TV/VCR/DVR(televisión, videocassetera,
Grabador de video digital) Para algunos televisores, oprima este
botón repetidamente para seleccionar una de las fuentes
disponibles para recibir la imagen (antena, videocasetera, etc.).
26. PREV.CHAN (Canal anterior) Regresa al canal
seleccionado previamente, o botón para repetir el DVD. 1.
REPEAT A-B (Repetir) Ejecuta la función “Repetir A-B” (o
RPT A.B) de los reproductores de DVD para reproducir
repetidamente el capitulo o pista actual.
27. MUTE (Silencio) apaga el sonido de la TV mientras que
permanece la imagen.
28. INFO/DISPLAY Trae la pantalla o el Menú de control del
TV, DVD o Satélite para indicar el numero de Capitulo/
Pista/Titulo, el tiempo restante/transcurrido, información
del sistema, etc.
29. Indicador luminoso rojo se enciende cuando se presiona
cualquier botón.
30. POWER (Encendido) Enciende o apaga el equipo.
2928
Page 16

Funciones de botones
Funciones de botones
Funciones de DVD (con leyendas en azul)
Los botones SCAN+ y SCAN- controlan la velocidad
para adelantar o retroceder la reproducción
respectivamente.
Los botones CHAPTER+ y CHAPTER- localizan
respectivamente los capítulos o pistas siguientes o
precedentes de un disco.
SUB-T [Transcripición en pantalla, subtítulos] Activa y
desactiva la función de transcripción del audio en
pantalla o los subtítulos de DVD.
El botón REPEAT hace las funciones “A-B REPEAT” (o
RPT A.B) de los reproductores de DVD para repetir la
reproducción del capítulo o pista actual.
El botón INFO/DISPLAY trae la pantalla o el Menú de
control del DVD para indicar el número de Capítulo/
Pista/Título, el tiempo restante/transcurrido,
información del sistema, etc.
MENU Trae la pantalla del Menú de discos del DVD:
Úselo con los botones de navegación hacia arriba,
abajo, izquierda y derecha.
El botón OK se utiliza para la selección del Menú en
pantalla. Observe que algunas reproductoras de
QUIT (Salir) Se utiliza para salir de las funciones del
menú.
El botón PLAY se utiliza para iniciar la reproducción del
disco y para la selección del Menú en algunas
reproductoras de DVD.
El botón STOP detiene la reproducción del DVD.
El botón PAUSE hace una pausa en la reproducción del
disco. Oprima PLAY para continuar.
INPUT [Configuración (Entrada)] trae el menú de
configuración de reproductores de DVD.
Funciones de Satélite
El botón “GUIDE” presenta en pantalla la guía del canal
vía satélite.
Los botones “CHAPTER+” y “CHAPTER-” realizan la
función de “Page+” y “Page-” para los menús de guía
en pantalla utilizados en algunos sistemas de satélite.
El botón “INFO/DISPLAY” trae la pantalla vía satélite
que indica la información actual del canal y del sistema.
MENU trae la pantalla del menú vía satélite. Úselo con
los botones de navegación hacia arriba, abajo, izquierda
y derecha.
El botón OK se utiliza para la selección del Menú en
pantalla.
El botón QUIT se utiliza para salir o despejar las
pantallas del menú.
El botón INPUT hace la función de TV/SAT vía satélite.
Funciones para grabadores de video digitales
TiVo/ReplayTV (con leyendas en verde)
TiVo (el código es 738)
T.CENTRAL (Central TiVo): el botón TiVo, para ir a la
pantalla TiVo Central.
GUIDE (Guía): Guía en vivo TiVo, la guía de programas
de TiVo.
INFO/DISPLAY (información/visualizar): presenta la
imagen promocional del canal.
INSTANT REPLAY (repetición instantánea): repite los
últimos ocho segundos de un programa.
ADVANCE (adelantar): avanza hasta alcanzar la
teledifusión en vivo.
LIVE TV (televisión en vivo): va a difusión de
televisión en vivo.
OK (aceptar): tecla de selección.
THUMBS UP/DOWN (pulgares arriba/pulgares abajo):
se emplean para la calificación positiva (thumbs up) o
negativa (thumbs down) de la programación.
Replay (el código es 938)
R.ZONES (zonas Replay): busca listados de programas
de televisión por categoría.
GUIDE (guía): guía de canales, presenta los listados de
programas de televisión.
REPLAY GUIDE (Guía de reproducción): reproduce los
programas grabados.
MENU (menú): presenta el menú principal de ReplayTV.
PL y PV (subir y bajar página): permite moverse una
pantalla a la vez hacia arriba o hacia abajo en las guías y
menús de ReplayTV.
INSTANT REPLAY (repetición instantánea): retrocede
siete segundos y vuelve a reproducir un segmento.
ADVANCE (adelantar): regresa a recepción en vivo;
avanza hasta alcanzar la teledifusión en vivo.
Q.SKIP (salto rápido): saltea 30 segundos de un
programa grabado o retardado.
OK (seleccionar): permite elegir una opción en pantalla;
muestra la visualización de la navegación por los
canales mientras se ve televisión en vivo.
r (saltearse los avisos publicitarios): activa y desactiva
la función COMMERCIAL ADVANCE (saltearse los
anuncios comerciales) para el programa en curso.
INFO/DISPLAY (información/visualizar): muestra la
información relacionada con el programa que se está
viendo.
Tivo y Replay son marcas registradas de sus respectivos propietarios.
3130
Page 17

Funciones de botones
Preparación
Funciones de audio (con leyendas en rojo)
PRESET (preselección): se emplea para seleccionar emisoras
guardadas en memoria cuando el control remoto se encuentra
en el modo audio.
AM/FM (amplitud modulada/frecuencia modulada): permite
seleccionar la banda de AM/FM en el receptor de audio.
CD (disco compacto), TAPE (cinta), TUNER (sintonizador),
TV, VIDEO 1 y VIDEO 2: se emplean para seleccionar la
fuente de entrada del receptor de audio. (Funcionan en el
modo AUDIO, es decir, después de presionar el botón rojo
AUDIO).
FUNCTION (función): selecciona los distintos dispositivos
de entrada de audio. Los botones numéricos también
seleccionan la función designada con leyendas en los botones
en el modo AUDIO.
LEVEL+/LEVEL– (nivel+/nivel-): ajusta el nivel de los
altoparlantes durante el modo de tono de prueba.
DSP ON/OFF (procesador digital de señal encendido/
apagado): habilita el modo DSP (procesador digital de señal).
DSP MODE (modo DSP): cuando el modo DSP está
habilitado, presionando este botón se pueden recorrer las
distintas modalidades de DSP para seleccionar una.
PROG (programar): permite programar el orden de
reproducción de las distintas pistas del disco.
DELAY– y DELAY+ (retardo- y retardo+): aumenta o
disminuye el retardo entre los altoparlantes de efecto
envolvente y los altoparlantes principales cuando el receptor
está en modo de sonido envolvente.
ON/OFF (encendido/apagado), SURR (efecto envolvente),
MODE (modo): ON/OFF SURR activa y desactiva los
modos de efecto envolvente. SURR MODE permite recorrer
las distintas configuraciones de modo de sonido envolvente
del receptor para seleccionar una.
F (frente), C (centro), R (atrás), T (prueba): ajustan los
niveles de los altoparlantes del frente, centro y atrás,
respectivamente. Se emplean con las teclas Level + /Level –
(nivel+ /nivel-). El tono de prueba debe
habilitarse previamente presionando el botón TEST (prueba).
TV/VCR/DVR
Cuando está en la modalidad de TV, el botón TV/VCR/DVR
realiza la función de cambio de fuente de ENTRADA.
Cuando está en una modalidad que se ha programado para la
videocasetera (VCR), el botón
función de cambio de antena de TV/VCR.
Cuando está en una modalidad que se ha programado para
Cable, el botón
A.B.
Cuando está en una modalidad que se ha programado para
SAT, el botón
TV / SAT.
Cuando está en una modalidad que se ha programado para
DVD, el botón
inicial de DVD.
TV/VCR/DVR realiza la función de cambio
TV/VCR/DVR realiza la función de cambio de
TV/VCR/DVR realiza la función de ajuste
TV/VCR/DVR realiza la
Instalación de baterías
1. En la parte posterior de su control
remoto empuje hacia abajo la
lengüeta y levante la tapa.
2. Acomode dos baterías alcalinas AAA
de manera que coincidan los polos
positivo y negativo dentro del
compartimiento de las baterías.
3. Acomode la tapa de las baterías en
su lugar.
Ahorrador de baterías
Su control remoto se desactiva automáticamente si los
botones se oprimen más de 30 segundos continuos. Esto
permite que las baterías conserven su carga en caso de que el
control remoto se atore en un lugar donde los botones se
puedan oprimir solos (por ejemplo, entre los cojines del
sofá).
Almacén de códigos
Los códigos están almacenados en la memoria permanente, así
que no se perderá ningún código almacenado en el control
remoto mientras usted cambia las baterías.
Encendido por omisión
El control remoto se enciende en la modalidad de TV
Fijación de códigos
El botón de búsqueda de códigos (CODE SEARCH) se
utiliza para fijar el control remoto. Puede fijar el control
utilizando el código de su marca de aparato, de las tablas de
códigos (vea la hoja separada), o puede buscar en la biblioteca
de códigos hasta que encuentre un código que funcione para
su aparato. Por favor consulte la sección de “Programación
con búsqueda de códigos” en la página 34 para obtener más
información sobre el uso de la función de búsqueda de códigos
y aprender a hacer una búsqueda en la biblioteca de códigos
para sus productos.
NOTA: También puede almacenar cualquier tipo de código
bajo cualquier modalidad (salvo TV). Es decir, puede
almacenar un código de videocasetera en el botón CBL, o un
código de cable en el botón de VCR, etc. Sin embargo,
únicamente puede almacenar códigos de TV en el botón de
TV.
3332
Page 18

Preparación, cont.
Preparación, cont.
Ingreso Directo de Códigos
1. Oprima, sin soltar, el botón CODE SEARCH hasta que el
indicador rojo permanezca encendido. Suelte el botón
CODE SEARCH.
2. Oprima y suelte el botón de la modalidad deseada (TV,
VCR, etc.). El indicador rojo parpadea y enseguida se
queda encendido.
3. Ingrese el código de 4 cifras de las tablas de códigos (en la
hoja separada). Nota: después de ingresar un código
válido, el indicador rojo se apaga. Cuando se ingresa un
código inválido, el indicador rojo parpadea.
4. Con su aparato encendido, oprima CHANNEL UP. Si el
aparato responde, ya no se requiere ninguna programación
adicional. Nota: si algunos botones no hacen funcionar su
equipo, trate uno de los demás códigos para su marca.
Escriba aquí los códigos para futura referencia.
Tipo Tipo Almacenado Código
TV
VCR
DVD
CBL
SAT
CD
AUDIO
DVR
Programacíon con Búsqueda de codigos
Si su aparato no responde después de haber intentado todos
los códigos de la marca de su aparato, o si la marca no aparece
en la lista, trate de buscar su código siguiendo los pasos a
continuación.
1. Encienda manualmente el aparato (TV, VCR, etc.) que se
habrá de controlar.
2. Oprima, sin soltar, el botón CODE SEARCH hasta que el
indicador rojo permanezca encendido. Suelte el botón
CODE SEARCH.
3. Oprima y suelte el botón de la modalidad deseada (TV,
VCR, etc.). El indicador rojo parpadea una vez.
4. Oprima el botón CHANNEL UP (hacia arriba)
repetidamente (hasta 300 veces) hasta que el aparato
que se ha de controlar cambie de canal. El indicador rojo
parpadea con cada opresión de botón. Si accidentalmente
se pasa del código deseado, oprima el botón CHANNEL
DOWN (hacia abajo) para retroceder hacia la biblioteca
hasta que el aparato cambie de canal. Oprimir el botón
CHANNEL UP cambia la dirección hacia delante
nuevamente.
5. Oprima y suelte el botón MUTE para fijar el código.
Programacíon con Búsqueda de codigos
La mayoría de los usuarios almacenan los códigos de
videocasetera en el botón de VCR, los códigos del Cable en el
botón de CABLE, etc. Por ejemplo, si desea almacenar un
código de videocasetera en cable, siga primero el
procedimiento para la Entrada directa de códigos (página
previa) y oprima CBL en el paso 2 de la Entrada directa de
códigos. A continuación ingrese CUALQUIER código de VCR
en el paso 3 de la Entrada directa de códigos. Luego siga los
pasos anteriores para la Búsqueda de códigos (o Búsqueda
de códigos por marca, vea abajo). Nota: Si el aparato no tiene
un botón de CHANNEL UP (subir de canal), utilice PLAY (en
VCR solamente) o POWER. La búsqueda de códigos inicia a
partir del número de 4 cifras almacenado actualmente bajo esa
modalidad.
Búsqueda de Códigos por Marcas
Le permite buscar un código de una marca específica en la
biblioteca de códigos para un fabricante en particular.
1. Encienda el aparato (TV, VCR, etc.) que se ha de controlar.
2. Oprima sin soltar el botón CODE SEARCH (búsqueda de
códigos) hasta que el indicador rojo permanezca encendido,
y enseguida suelte el botón.
3. Oprima y suelte rápidamente el botón de la modalidad
deseada (TV, VCR, etc.). El indicador rojo parpadea una
vez.
4. Oprima y suelte el botón numérico (0-9) correspondiente
al Fabricante deseado (vea la tabla en la hoja de la lista de
códigos). El indicador rojo parpadea una vez y se apaga.
Observe que al oprimir el “0” se efectúa una búsqueda
completa de la biblioteca igual al Método de búsqueda de
códigos de la página anterior.
5. Oprima el botón CHANNEL UP (subir de canal) ((o
POWER o PLAY (en la videocasetera solamente))
repetidamente hasta que el aparato que se ha de controlar
cambie de canal. El indicador rojo parpadea con cada
opresión de botón. Si accidentalmente se pasa del código
requerido, oprima el botón CHANNEL DOWN (bajar de
canal) para retroceder en la biblioteca hasta que el aparato
cambie de canal. Al oprimir el botón CHANNEL UP se
cambia la dirección para seguir hacia adelante nuevamente.
6. Oprima y suelte MUTE para instalar el código.
La entrada del Método de búsqueda de marca está completo.
Nota: Cuando se han buscado todos los códigos bajo una
Marca, el indicador rojo parpadea rápidamente durante 3
segundos.
3534
Page 19

Preparación, cont.
Preparación, cont.
Función de Identificación de Códigos
La función de identificación de código permite identificar el
código de librería de 4 dígitos almacenado en la tecla del
dispositivo. Por ejemplo, si desea descubrir qué código de 4
dígitos está almacenado en su tecla de TV, siga los seis pasos
siguientes:
1. Oprima, sin soltar, el botón CODE SEARCH hasta que el
indicador rojo permanezca encendido. Suelte el botón
CODE SEARCH.
2. Oprima y suelte el botón de la modalidad deseada (TV,
VCR, etc.). El indicador rojo parpadea y luego permanece
encendido.
3. Oprima y suelte el botón CODE SEARCH. La luz
indicadora parpadea y se apaga.
4. Para encontrar la primera cifra para el código almacenado
bajo el botón de modalidad oprimido en el paso 2, oprima
cada botón numérico del 0 al 9. Cuando la luz indicadora
parpadea y se apaga, el número que oprimió es la primera
cifra para el código que está buscando.
5. Para encontrar la segunda cifra, repita el paso 4, esta vez
cuando la luz indicadora parpadee y se apague, esta es la
segunda cifra.
6. Repita el paso 4 para encontrar los terceros y cuartos
dígitos.
Cronometro de apagado automático
El botón SLEEP (apagado automático) habilita la función de
apagado automático de su dispositivo, proporcionado que su
aparato tenga esta función. Alternativamente, usted pude
programar el control remoto para apagar su TV después de un
periodo de 1 a 99 minutos. Esta característica esta solamente
disponible en el modo TV y el control remoto debe estar en el
modo de TV para fijar el cronometro de apagado automático.
Esta función puede ejecutarse aun si su televisor no tiene esta
característica.
1. Presione y suelte la tecla de modo TV.
2. Presione y mantenga presionado el botón CODE
SEARCH (búsqueda de código) hasta que el indicador rojo
permanezca encendido. Suelte el botón CODE SEARCH.
3. Oprima y suelte el botón SLEEP (observe, el apagado
automático previamente fijado es cancelado a este punto y
el control remoto vuelve a la operación normal).
4. Oprima y suelte los botones numéricos (01-99) para
seleccionar el tiempo que desee que transcurra. El
indicador rojo se apagara brevemente para indicar la
aceptación de la presión del botón y quedara apagado
después de la segunda presión de botón.
5. El cronometro de apagado automático del televisor quedara
configurado.
6. Deje el control remoto apuntando hacia el televisor
sin que haya obstrucción alguna entre ambos
Para cancelar le Cronometro de apagado automático, oprima y
suelte el botón POWER (encendido) en el modo TV, o repita
los pasos 1, 2 y 3 mencionados arriba.
3736
Page 20

Preparación, cont.
Preparación, cont.
Códigos de programación de equipos
combinados
Algunos equipos combinados (combos) (por Ej. TV/VCR,
TV/DVD, DVD/VCR, etc.) requerirán que ajuste dos tipos
diferentes de botones de Modo para controlar ambas partes
del equipo combinado. Por ejemplo, si cuenta con un Combo
TV/DVD, es posible que deba ajustar un código en el botón
TV para controlar la parte de la television y otro código
adicional (en cualquier otro botón de Modo) para controlar la
parte de DVD.
Control de equipos combinados
Algunos equipos combinados (por Ej. TV/VCR, TV/DVD,
DVD/VCR, etc.) tienen botones diferentes en el control
remoto original para seleccionar la parte del equipo
combinado a ser controlado. Por ejemplo, si su equipo
combinado es un DVD/VCR entonces es posible que su
control remoto original tenga botones diferentes para DVD y
VCR para seleccionar la parte del combo que quiera controlar.
Puede encontrar las funciones equivalents a los botones en su
control remoto Philips, utilizando los botones de Modo y
CODE SEARCH del mismo.
Vea “Programación con búsqueda de código” en la Pág. 34
para ajustar un Modo de equipo (por Ej. DVD) con el código
correcto para su equipo combinado. Tomando como ejemplo
el equipo combinado DVD/VCR y asumiendo que su código
está programado bajo el Modo DVD, presione y mantenga
presionado el botón de Modo DVD durante más de un
segundo para enviar el comando del botón DVD. Para enviar
el comando del botón VCR, presione y suelte rápidamente el
botón CODE SEARCH (búsqueda de código) y a
continuación presione y suelte el botón de Modo DVD. Este
método puede ser aplicado en forma similar para todos los
equipos combinados (por Ej. TV/VCR, TV/DVD, DVD/VCR,
etc.) y está disponible para todos los Modos. Nota: Tenga en
cuenta que esta característica no acepta todos los códigos.
Control de equipos que requieren botones de
encendido y apagado diferentes
Algunos equipos (por ej. algunos televisores RCA) requieren
botones diferentes para encender y para apagar el equipo.
Puede encontrar las funciones equivalentes a los botones en
su control remoto Philips, utilizando los botones de Modo y
POWER del mismo. Vea “Programación con búsqueda de
código” en la Pág. 34 para ajustar un Modo de equipo (por ej.
TV) con el código correcto para su equipo. Asumiendo que el
televisor es el ejemplo y que el código a ser programado es el
Modo TV, para encender su TV presione y sostenga el botón
de Modo TV durante más de un segundo para transmitir el
comando del botón de encendido. Paga apagar el televisor,
presione y suelte el botón POWER para
transmitir el comando del botón de apagado.
Este método puede ser aplicado en forma similar para
cualquier equipo y está disponible para todos los Modos.
Nota: Tenga en cuenta que esta característica no admite todos
los códigos.
Función de traspaso de VCR/DVD/DVR
Este control remoto permite la traslación de los 6 botones de
transporte de cinta VCR (PLAY (reproducción), PAUSE
(pausa), STOP (detener), FF (avance), REWIND (rebobinar),
y REC (grabar) desde cualquier Modo programado con
códigos de TV, SAT o CABLE al último Modo de VCR, DVD
o DVR utilizado. Normalmente otros tipos de controles
remotos únicamente permiten traspasar (desde otro Modo)
los 6 botones de VCR al equipo programado en el botón de
Modo VCR. Esto no es de mucha utilidad si está utilizando
un DVD programado en un Modo que no sea VCR. Por
ejemplo, si tiene tres equipos DVD, VCR o DVR
programados en este control remoto, el último que utilizó en
el control remoto será el que tenga el control de los 6 botones
de VCR transportados mientras esté en cualquier otro Modo.
Esta prestación no funcionará si el código de TV, SAT o
CABLE programado tiene su propio control de botones de
transporte de VCR, como por ejemplo un TV Combo, SAT/
PVR, etc.
Control de volumen/silencio y traspaso
Este control remoto le permite seleccionar que Modo de
equipo controla los botones de volumen/silencio.
Inicialmente este control está ajustado (de fábrica) para que
todos los Modos de equipos programados con códigos
“Visual” (por ej. TV, VCR, DVD, DVR, SAT & CABLE) y
códigos de “Audio” (por ej. CD & AUDIO) utilicen su
propia función de control de volumen/silencio cuando la
tengan. Si el código “Visual” programado no tiene operación
propia de volumen/silencio, entonces esos botones
traspasarán el control al equipo del Modo de TV sin
necesidad de cambiar al Modo TV. Por información más
detallada, vea “Ajuste del control de volumen/silencio y
traspaso”. Por favor refiérase a la pagina siguiente.
3938
Page 21

Preparación, cont.
Transferencia de códigos
Cualquier modo seleccionado para el control de
volumen/silencio DEBE contar con su propia función de
volumen/silencio o los botones de volumen/silencio no
funcionaran.
Ajuste de TODOS los controles de Volumen/
Silencio a cualquier modo.
Esta rutina puede ajustar todos los modos para priorizar a
cualquier modo seleccionado para el botón de control de
volumen/silencio sin necesidad de cambiar a ese modo.
1. Presione y mantenga presionado el botón CODE
SEARCH hasta que el indicador rojo se encienda, luego
suéltelo.
2. Presione y mantenga presionado el botón MUTE hasta
que el indicador rojo destelle, luego suéltelo.
3. Presione y suelte el botón de modo deseado (TV, VCR,
etc.) para el control de volumen/silencio, el indicador rojo
destella y luego permanece encendido.
4. Presione y suelte el botón MUTE y el indicador rojo se
apaga. El indicador rojo destellará rápidamente durante
tres segundos si el modo que ha seleccionado no tiene
control de volumen/silencio.
5. Todos los demás modos priorizarán al modo que usted ha
elegido para el control de volumen/silencio.
6. Todos los modos programados “visual” y “audio” ahora
fun- cionaran con los modos respectivos que usted ha
elegido para el control de volumen / silencio.
Configuración de Control de Volumen/
Silencio para Cualquier Modo
Esta rutina puede fijar cualquier modo para el uso solamente
de su propio control de Volumen/Silencio. Nota - si su modo
elegido no tiene ninguna función de volumen/silencio propio
entonces los botones de volumen/silencio no harán nada.
1. Presione y mantenga presionado el botón CODE
SEARCH hasta que el indicador rojo se encienda, luego
suéltelo.
2. Presione y mantenga presionado el botón MUTE hasta
que el indicador rojo deje de destellar, luego suéltelo.
3. Presione y suelte el botón de modo deseado (TV, VCR,
etc.), el indicador rojo destella y luego queda encendido.
4. Presione y suelte el botón de VOLUMEN- (abajo), el
indicador rojo destella y luego queda encendido.
5. Presione y suelte el botón MUTE y el indicador rojo se
apaga.
6. Todos los modos programados “visual” y “audio” ahora
funcionaran con los modos respectivos que usted ha
elegido para el control de volumen/silencio.
La función de aprendizaje (transferencia) le permite a
este control remoto “aprender” funciones de su control
remoto original. Por ejemplo, es posible que usted desee
usar su control remoto la función RANDOM PLAY
(reproducción al azar) del control remoto original de su
reproductor de discos compactos. Este control remoto
esta equipado con una función de “aprendizaje fácil”
que le permite aprender funciones (tales como RANDOM PLAY del control remoto original de su
reproductor de discos compactos).
Consejos Para el Aprendizaje
Solamente puede aprender un tipo de equipo bajo un
botón de modo, o sea, sólo puede aprender códigos de
TV en el modo TV, códigos de VCR en el modo VCR,
etc. Si usted está intentando aprender las funciones de
un control remoto “universal”, podría tener más de un
tipo de código guardado bajo un modo determinado.
Intente aprender funciones de otro control remoto para
verificar si existe un problema con el tipo o marca del
control remoto del cual está intentando adquirirlas.
a. Algunas funciones de algunos tipos de controles
remotos no pueden ser aprendidas.
b. No podrán almacenar funciones bajo los botones
LEARN (aprender), CODE SEARCH (búsqueda de
código) o MACRO.
c. Únicamente puede transferir las funciones de un
tipo de equipo original por modo individual.
d. Utilice baterías nuevas tanto en el control remoto de
aprendizaje como en el original.
e. Durante el proceso de aprendizaje, mantenga una
distancia mínima de tres pies de luces
incandescentes o de baja energía.
f. Antes del aprendizaje ejecute un Despejado
Maestro (ver Pág. 45) e intente adquirir inicialmente
2 o 3 comandos. Luego realice una Despejado
maestro antes de realizar el aprendizaje completo de
los comandos de su control remoto original.
g. Coloque el control original extremo con extremo con
el control de aprendizaje, de modo que los
transmisores infrarrojos de ambos estén
directamente alineados entre sí. Es posible que
tenga que ajustar la altura de alguno de los
controles para lograr esto. Utilice la función de
búsqueda de transmisor IR como ayuda.
4140
Page 22

Consejos Para el Aprendizaje, cont.
Búsqueda de transmisor IR (infrarrojo)
h. Mantenga una distancia de aproximadamente una
pulgada entre los dos remotos y no los mueva ni
cambie la distancia entre ellos, hasta que haya
adquirido todas las funciones de botones para ese
modo.
i. Durante el proceso de aprendizaje, mantenga
presiona do el botón que está siendo adquirido
hasta que el indicador rojo haya destellado durante
medio segundo.
j. Evite transferir las funciones del botón Volume/Mute
de su control remoto original salvo que esté seguro
de que opera el mismo equipo. Tenga en cuenta que
algunos controles remoto de DVD originales
incluyen un botón de control volumen/silencio para
TV y pueden tener dos tipos distintos de código.
k. Evite transferir las funciones de los botones de
transporte de VCR de su control remoto original
salvo que esté seguro de que operan el mismo
equipo. Tenga en cuenta que algunos controles
remotos de TV originales incluyen botones de
control de VCR y pueden tener dos tipos distintos
de código.
l. Si el aprendizaje del primer o segundo botón para un
modo causa sucesivos errores, entonces intente lo
siguiente:
i. Finalice la sesión de aprendizaje presionando la tecla
CODE SEARCH.
ii. Elimine los comandos adquiridos para ese modo.
iii. Verifique que los transmisores IR estén
correctamente alineados entre los dos controles
remoto (utilice la función de búsqueda de transmisor
IR).
iv. Disminuya (media pulgada) o aumente (2 pulgadas)
la distancia entre los dos controles.
v. Intente transferir nuevamente las funciones del
control remoto original para ese modo.
Si surgen problemas nuevamente con el mismo botón,
revise el botón del control remoto original a ser
transferido. ¿Transmite? ¿Opera el equipo destinatario?
Intente adquirir las funciones de ese botón bajo un
modo diferente. Si lo adquiere correctamente
probablemente se trate de un código de tipo diferente a
los otros y no puede ser adquirido bajo el mismo modo.
Esta función le ayuda a identificar donde está ubicado
el transmisor IR de su control remoto original y es
especialmente útil si el mismo está escondido detrás de
un lente.
1. Enfrente ambos controles remotos a una distancia
de aproximadamente 1 pulgada entre ellos (vea
“Consejos para el aprendizaje de códigos” en las
páginas anteriores.)
2. Presione y mantenga presionado el botón de CODE
SEARCH hasta que el indicador rojo se encienda,
luego suéltelo.
3. Presione y suelte el botón del modo deseado (TV,
VCR, etc.), el indicador rojo parpadea y luego
permanece encendido.
4. Presione y suelte el botón LEARN (aprender), el
indicador rojo parpadea y luego permanece
encendido.
5. Presione y mantenga cualquier botón del control
remoto original y mueva el control remoto original a
la izquierda y a la derecha, y/o arriba y abajo frente
al transmisor infrarrojo del control de adquisición. El
indicador rojo permanecerá encendido si no
encuentra la señal infrarroja del remoto original y
destellará más rápido cuando los transmisores
infrarrojos estén alineados. El punto en el cual el
indicador rojo destella con mayor rapidez es donde
los dos transmisores infrarrojos están alineados.
Nota: Algunos controles remotos originales
únicamente transmitirán IR la primera vez que oprima
el botón y luego se detendrán. En estos casos,
rápidamente presione y libere el botón del control
remoto original repetidamente durante este
procedimiento.
6. Ahora podrá aprender las funciones de un botón de
su control remoto original, continuando a partir del
“paso 4” de la sección “Aprendizaje de comandos”
de la página siguiente, o, para salir a esta altura,
presione y libere el botón CODE SEARCH.
4342
Page 23

Aprendizaje de Comandos
Despejando Comandos
La función de aprendizaje le permite a este control
remoto “aprender” funciones de su control remoto
original. Por ejemplo, es posible que usted desee usar
su control remoto para ejecutar la función RANDOM
PLAY (reproducción al azar) del control remoto original
de su reproductor de discos compactos. Este control
remoto está equipado con una función de “aprendizaje
fácil” que le permite aprender funciones (tales como
RANDOM PLAY del control remoto original de su
reproductor de discos compactos) siguiendo los pasos
que se indican a continuación:
1. Presione y mantenga presionado el botón CODE
SEARCH (búsqueda de código) hasta que el indicador
rojo se encienda; luego, suelte el botón.
2. Presione y suelte el botón del modo deseado (TV, VCR,
etc.); el indicador rojo parpadeará y luego quedará
encendido.
3. Presione y suelte el botón LEARN (aprender); el
indicador rojo parpadeará y luego quedará encendido.
4. Presione y suelte el botón del control remoto donde
quiera que quede memorizada la función a aprender [por
ejemplo POWER (encendido)].
5. Apunte ambos controles remotos uno frente al otro, a
una distancia de alrededor de una pulgada (aprox. 2,5 cm)
uno del otro (ver Consejos en la página 41).
6. Presione y mantenga presionado el botón del control
remoto original [por ejemplo PLAY (reproducción)]
hasta que el indicador rojo parpadee una vez y quede
encendido. Si hay algún problema de aprendizaje, el
indicador parpadeará durante tres segundos y quedará
encendido. Si esto ocurre, repita los pasos 4 a 6.
7. Repita los pasos 4 a 6 para los otros botones que quiera
aprender.
8. Presione y suelte el botón CODE SEARCH cuando se
haya concluido el aprendizaje de todos los comandos
deseados del control remoto. El aprendizaje de códigos
está ahora completo.
6.
Para Despejar Todos los Comandos
Transferidos bajo una modalidad
Borrar los comandos que se han aprendido puede serle
útil si, por ejemplo, reemplaza su reproductor de discos
compactos por uno de otra marca o modelo. Si este
control remoto ha aprendido, por ejemplo, la función
RANDOM PLAY (reproducción al azar) del control
remoto original de su viejo reproductor de discos
compactos, esa función podría no poder ejecutarse en
un reproductor nuevo. En caso de que quiera quitar o
borrar uno o más comandos “aprendidos”, siga los
pasos siguientes:
1. Oprima, sin soltar, el botón CODE SEARCH hasta
que se encienda la luz indicadora. Suelte el botón
CODE SEARCH.
2. Oprima y suelte el botón de la modalidad que desee
despejar (TV, VCR, etc.). El indicador parpadea y se
apaga.
3. Oprima y suelte el botón LEARN DOS VECES. El
indicador parpadea y se apaga.
4. Oprima y suelte el CODE SEARCH. El indicador
parpadea y se apaga. Todos los comandos
transferidos bajo esa modalidad se han despejado.
Despejado Maestro: Para Despejar Todos los
Comandos Transferidos, es Decir, Regresar a
las Funciones por Omisión de Fabrica
1. Oprima, sin soltar, el botón CODE SEARCH hasta
que la luz indicadora se encienda. Suelte el botón
CODE SEARCH.
2. Oprima y suelte el botón LEARN DOS VECES. El
indicador parpadea y se apaga.
3. Oprima y suelte el CODE SEARCH. El indicador
parpadea y se apaga. Todos los comandos
transferidos en el control remoto se han despejado.
Alinee el control remoto (del cual está aprendiendo) frente a
frente con el control remoto que realiza el aprendizaje, sobre
una superficie firme, alejados aproximadamente una pulgada
(2,5 cm).
R
DVD
AUDIO
/
C
H
POWER
4.
CBL
DVR
DISPLAY
A
N
LEARN
3.
VCR
TV
2.
1.
SAT
CODE
SEARCH
CD
E
T
P
A
H
4544
Page 24

Macros
Macros, cont.
El botón MACRO, conjuntamente con los dígitos 1, 2 y
3, permiten programar y almacenar hasta tres secuencias
de comandos infrarrojos (presiones de botones) a su
elección. Una presión del respectivo botón de dígito de
macro tiene como resultado el envío de esa secuencia
de comandos infrarrojos. Cualquier secuencia de
comandos que usted ejecute habitualmente puede
reducirse a dos presiones de botones (botón MACRO
seguido por el botón del dígito 1, 2 ó 3). Por ejemplo,
presionar MACRO seguido por un solo botón
puede encender el televisor, encender el receptor
decodificador de cable, cambiar a su canal favorito,
encender la videograbadora, hacer que grabe, etc. Un
total de nueve presiones de botones puede almacenarse
en cada uno de los tres dígitos de macro.
Cómo programar una macro
1. Presione y mantenga presionado CODE SEARCH
(búsqueda de código) hasta que el indicador rojo se
encienda. Suelte CODE SEARCH.
2. Presione y suelte el botón MACRO. El indicador
rojo se apagará brevemente.
3. Presione y suelte el botón del dígito en el que quiera
almacenar la macro, es decir, botón 1, 2 ó 3.
4. Presione y suelte el botón de Modo para el primer
equipo que desee controlar en la secuencia de la
macro.*
5. Presione y suelte los botones que quiera incluir en la
macro, en el orden que quiera que se envíen (hasta
un máximo de nueve). El indicador rojo se apaga
brevemente con cada botón que se presiona.
6. Para almacenar la macro, presione y suelte el botón
MACRO. El indicador rojo se apagará. Note que si
programa el máximo de nueve botones, la macro se
almacenará automáticamente en la novena presión
de botón y el indicador rojo se apagará. La
programación de la macro quedará completa.
Para activar la macro, presione y suelte el botón
MACRO y luego (dentro de los 20 segundos
siguientes) oprima el botón de dígito 1, 2 ó 3.
Notas sobre las macros
1. Puede ser conveniente agregar “retardos” en una
secuencia macro (por ejemplo, para permitir que pase
el tiempo de calentamiento del televisor). Se pueden
agregar retardos empleando el botón PAUSE (pausa)
seguido por el número de segundos de retardo
requeridos. Por ejemplo, para ingresar un retardo de
3 segundos, presione y suelte PAUSE seguido por 3
(en el paso 4 de “Cómo programar una macro” en la
página anterior). El retardo máximo es de nueve
segundos. No es posible ingresar un dígito “0”
después de PAUSE, es decir, no hay retardo cero.
2. Hay un retardo automático de un segundo entre dos
transmisiones infrarrojas sucesivas en una
secuencia macro.
3. * El primer botón de una secuencia macro DEBE ser
un botón de Modo (TV, VCR, etc.).
Cómo borrar una macro
1. Presione y mantenga presionado CODE SEARCH
(búsqueda de código) hasta que se encienda el
indicador rojo. Suelte CODE SEARCH.
2. Presione y suelte el botón MACRO. El indicador
rojo se apagará brevemente.
3. Presione y suelte el botón del dígito 1, 2 ó 3 para la
macro que desee borrar.
4. Presione y mantenga presionado CODE SEARCH.
El indicador rojo se apagará y la macro quedará
borrada.
DVD
POWER
CBL
LEARN
TV
VCR
4.
1.
2, 6.
3.
LEARN
VCR
TV
CD
SAT
CODE
SEARCH
MACRO
R
/
C
E
T
P
A
H
P
T
E
CD TAPE TUNER
R
DVD
AUDIO
H
A
H
C
/
N
POWER
CBL
DVR
DISPLAY
INFO
REPEAT
AM/
FM
PREV. CHAN
1, 4.
2.
3.
CD
SAT
CODE
SEARCH
MACRO
R
/
C
E
T
P
A
H
P
T
E
/
CD TAPE TUNER
R
4746
AUDIO
H
A
N
H
C
DVR
DISPLAY
INFO
REPEAT
AM/
FM
PREV. CHAN
Page 25

Localización y reparación de averías
Garantía limitada de por vida
El Control Remoto no Opera su Producto
• Oprima el botón de modalidad del aparato que desea
controlar.
• Programe el control remoto con un nuevo código.
• Instale baterías nuevas (quizá tenga que reprogramar
su control remoto después de instalar baterías
nuevas).
• Puede ser que el control remoto no sea compatible
con su aparato.
El Control Remoto no Opera Algunas
Funciones de su Aparato
• Programe el control remoto con un código nuevo.
• Puede ser que el control remoto no sea capaz de
operar todas las funciones de su aparato o los
nombres de los botones pueden ser diferentes a los
de su aparato.
La Luz Indicadora Parpadea Después de que
Programa un Código de Producto
• El control remoto no aceptó el código.
• Intente programar el código otra vez o trate un
código
diferente.
El fabricante garantiza que este producto carece de
defectos de material, manufactura o armado, bajo uso
normal y de acuerdo con las especificaciones y
advertencias, durante el tiempo que éste sea de su
propiedad. Esta garantía cubre únicamente al comprador
original del producto y no es transferible.
Los productos defectuosos deben ser devueltos al
comercio vendedor, junto con la prueba de compra que
indique la fecha, para su reparación o reposición. NO
EXISTEN OTRAS GARANTÍAS EXPLÍCITAS. No se
aceptan reclamos por daños incidentales e indirectos,
de acuerdo a lo permitido por la ley. Esta garantía le
otorga derechos legales específicos, y usted puede
tener otros derechos que pueden variar de estado a
estado.
Hecho en China-TC,
Aseguración de calidad en Estados Unidos
Ledgewood, New Jersey 07852
Para solicitar ayuda con la configuración, por favor
llame al teléfono (919) 573-7854.
4948
Page 26

IntroductionTable des matières
Introduction .......................................................... 51
Fonctions des touches .......................................... 52
Fonctions DVD/SAT ...................................... 54
Fonctions TiVo/Replay .................................... 55
Fonctions Audio ..............................................56
TV/VCR/DVR ...............................................56
Configuration ....................................................... 57
Installation des piles ........................................ 57
Économiseur de piles ...................................... 57
Mémorisation des codes .................................57
Mise sous tension pare défaut ........................57
Programmation des codes .............................. 57
Saisie des codes ................................................... 58
Saisie directe des codes.................................. 58
Recherche des codes ..................................... 58
Recherche de marque .................................... 59
Identification des codes ....................................... 60
Sleep .................................................................... 61
Programmation de codes pour téléviseurs
combinés ......................................................... 62
Commande d’appareils combinés ........................ 62
Commande d’appareils avec touches ON/OFF
distinctes ......................................................... 62
Priorité des fonctions des modes
VCR/DVD/DVR ................................................. 63
Commandes de volume/sourdine ......................... 63
Réglage de volume/sourdine en commande
prioritaire ......................................................... 64
Programmation d’un mode pour qu’il contrôle
sa propre commande Volume/Mute ..................... 64
Apprentissage de codes ....................................... 65
Conseils sur l’apprentissage ........................... 65
Fonction de localisation de transmetteur IR ... 67
Apprentissage de commandes ............................. 68
Suppression des commandes ............................... 69
Suppression des commandes apprises d’un
mode ............................................................... 69
Suppression complète ..................................... 69
Macro-commandes ..............................................70
Réglage de macro-commandes ......................70
Suppression de macro-commandes ................71
Dépannage ........................................................... 72
Félicitations! Et merci d’avoir acheté la télécommande
universelle Philips. Grâce à cette télécommande, vous
pouvez remplacer une télécommande brisée ou perdue
ou combiner plusieurs télécommandes en une seule. Elle
comprend en outre une fonction de mémorisation
qui lui permet «d’apprendre» les commandes de votre
télécommande initiale!
Cette télécommande permet d’exécuter les fonctions les
plus courantes de presque tous (mais non pas tous) les
modèles ou marques d’appareil vidéo contrôlés à
l’infrarouge. Elle peut comporter des fonctions non
disponibles sur vos appareils. Il se peut aussi qu’elle ne
vous permette pas d’exécuter certaines de leurs
fonctions (p. ex., les fonctions de menu). Dans un tel
cas, utilisez votre télécommande initiale. Veuillez lire ce
manuel afin de vous familiariser avec votre
télécommande universelle Philips. Cela fait, installez les
piles, puis programmez la télécommande en fonction de
la marque et du modèle de votre appareil.
Nous nous sommes efforcés de rendre cette
télécommande facile à utiliser par le consommateur.
Cette télécommande comporte des touches qui
commandent uniquement le lecteur de DVD ou DVR.
Ces touches sont mises en évidence en bleu sur le
clavier pour faciliter la recherche. Pour la même raison,
les boutons DVR (TiVo/ReplayTV) apparaissent en vert
sur le clavier de la télécommande. En plus des fonctions
du lecteur de DVD ou DVR, la télécommande permet
également d’exécuter les fonctions du système satellite
au moyen des touches MENU, GUIDE, PAGE UP/
DOWN/LEFT/RIGHT, ENTER, QUIT/CLEAR, INFO,
SELECT ou OK, situées à droite du clavier. Si cette
télécommande ne permet pas de réaliser les fonctions de
la télécommande initiale, nous avons ajouté une
fonction de memorization qui « apprend » les fonctions
favorites de la télécommande initiale.
Nous sommes meme allés plus loin en ajoutant trois
fonctions Macro. Une macro vous permet de programmer une série d’étapes sous un seul bouton. Par
exemple, votre télécommande peut être programmée
pour allumer tous vos appareils en appuyant sur un
seul bouton.
Encore une fois, merci d’avoir acheté la télécommande
universelle Philips. Nous espérons qu’elle vous servira
pendant de nombreuses années.
5150
Page 27

Fonctions des touches
R
R
DVD
AUDIO
/
C
H
C
/
LIVE TV
BYPASS
A
N
H
TV/VCR/DVR
POWER
CBL
DVR
DISPLAY
INFO
REPEAT
AM/
FM
PREV. CHAN
PP
SUB-T
REPLAY
GUIDE
DSP
MODE
QUIT
CLEAR
SCANSCAN
DELAY
ADVANCE
28.
30.
27.
29.
26.
28.
25.
27.
24.
26.
23.
25.
22.
24.
21.
23.
20.
22.
19.
21.
18.
20.
17.
19.
16.
18.
15.
17.
16.
LEARN
1.
2.
3.
TV
SAT
CODE
SEARCH
VCR
CD
E
T
P
A
H
4.
MACRO
5.
6.
P
T
E
CD TAPE TUNER
TV VIDEO1 VIDEO2
7.
FUNCTION
8.
9.
10.
11.
12.
13.
ENTER
LEVEL
GUIDE
CHANNEL
GUIDE
DSP
ON/OFF
MENU
/PROG
T-CENTRAL
INSTANT
LEVEL
PLAY
SLOW
DELAY
STOP PAUSEREC
ON/OFF-SURR-MODE
PIP SWAP INPUT SLEEP
FC TR
Q.SKIP
R.ZONE S
REPLAY
14.
15.
REMARQUE: on doit appuyer deux fois sur la touche REC
pour enregistrer à partir du magnétoscope.
Toutefois, dans le cas de certains magnétoscopes, il peut être
nécessaire d’appuyer sur cette touche tout d’abord une fois,
puis une seconde fois durant trios secondes.
Certaines touches de la télécommande peuvent avoir des
fonctions appelées différemment de celles figurant sur votre
appareil. Par exemple, la touche Prev. Ch. peut être appelée
RECALL et la touche ENTER, DISPLAY. Ces differences
sont fonction de la marque et du modèle de votre appareil. De
plus, cette télécommande ne peut exécuter que les fonctions
existant sur votre appareil. Par exemple, votre appareil doit
être muni de la fonction Prev. Ch. pour que la touche du
même nom puisse activer cette fonction.
Fonctions des touches, cont.
1. LEARN Pour configurer les fonctions relatives à la
mémorisation des commandes.
2. TV, VCR, DVD, etc. Pour sélectionner l’appareil choisi.
3. CODE SEARCH Pour programmer la télécommande.
4. CHANNEL UP/DOWN Pour changer de canal. CHAPTER
+/- Pour sélectionner une piste du disque compact ou DVD
ou pour passer directement a une piste précé dente ou
suivante (en mode DVD ou SAT). Remarque : Les touches
de défilement du magnéto scope permettent aussi de
commander le lecteur de DVD en mode DVD).
5. VOLUME UP/DOWN Pour augmenter ou réduire le niveau
du son de l’appareil, habituellement celui du téléviseur.
6. Le bouton MACRO, utilisé conjointement avec les
numéros 1, 2 et 3, vous permet de programmer et de
mémoriser jusqu’à 3 séquences de commandes de votre
choix.
7. NUMBERS Pour entrer directement les numéros de canal.
Certains appareils requièrent que l’on appuie sur la touche
Enter après chaque sélection de canal.
8. ENTER Pour passer directement au canal sélectionne après
l’entrée directe du numéro du canal.
9. GUIDE Permet d’afficher le menu principal en mode
DVD.Pour afficher le guide de programmation a l’écran.
10. MENU permet d’afficher le menu du disque. A utiliser avec
les touches de déplacement UP, DOWN, LEFT et RIGHT.
11. RECORD, PLAY, STOP, REW, FF, PAUSE VCR pour faire
fonctionner le magnétoscope, même lorsque la télé commande
est réglée pour commander le téléviseur. Permet aussi
d’exécuter la fonction Scan -/+ du lecteur de DVD.
12. PIP TV Commande d’incrustation d’image.
13. SWAP Déplacement entre les images incrustées. l’appareil
que l’on désire faire fonctionner.
14. INSTANT REPLAY - Retransmission des dernières 8
secondes d’une émission.
15. R.ZONES – Recherche de grille horaire par catégorie.
16. BYPASS Dévier manuellement l’encodeur de ReplayTV
17. ADVANCE – Retour au cours normal de l’émission.
18. INPUT permet de reprendre la lecture du disque.
19. SLEEP Pour que l’appareil s’éteigne automatiquement après
une période d’une minute à 99 minutes.
20. QUIT/CLEAR Permet de quitter le menu affiche ou de
revenir à l’affichage précédent.
21. OK/SELECT Pour sélectionner les options de menu de.
22. UP, DOWN, LEFT & RIGHT boutons de navigation HUT,
BAS, GAUCHE et DROITE.
23. CC (SUBTITLE) Pour afficher les sous-titres d’une
émission de télévision (si votre téléviseur dispose de cette
fonction) ou le menu des sous-titres du lecteur de DVD.
24. THUMBS UP/DOWN – Évaluation personnelle d’une
émission.
25. TV/VCR/DVR toggle Dans le cas de certains téléviseurs,
permet de sélectionner une source de visualisation
disponible (antenne, câble récepteur, magnétoscope, etc.)
en appuyant plusieurs fois sur la touche.
26 . PREV. CHAN Pour revenir au canal précédemment
sélectionne ou au lecteur de DVD. La touche REPEAT permet
d’exécuter la fonction Repeat A-B ou (RPT A.B) des lecteurs
de DVD pour rejouer la piste ou la plage courante.
27. MUTE Pour couper le son du téléviseur, tout en conservant
l’image.
28. INFO/DISPLAY Permet d’afficher l’information du TV,
lecteur DVD, SAT, le menu de sélection de scènes, plages ou
titres, l’indication de la durée qui reste ou qui s’est écoulée,
l’information sur le système, etc.
29. Témoin Ce témoin s’allume lorsque n’importe quelle touche
est enfoncée.
30. POWER Pour allumer ou éteindre l’appareil.
5352
Page 28

Fonctions des touches, cont.Fonctions des touches, cont.
DVD Functions (labeled in Blue)
SCAN+ et SCAN- permettent de contrôler la vitesse de
l’avance rapide et du rembobinage respectivement.
CHAPTER+ et CHAPTER- permettent de localiser les
chapitres ou pistes suivantes et précédentes sur un
disque.
SUB-T permet d’afficher le menu des sous-titres à des
fins de sélection et d’affichage.
REPEAT permet d’exécuter la fonction A+B Repeat (ou
RPT A.B) des lecteurs de DVD pour rejouer la piste ou
le chapitre courant.
INFO/DISPLAY permet d’afficher l’information du
lecteur DVD, le menu de sélection des scènes, plages
ou titres, l’indication de la durée qui reste ou qui s’est
écoulée, l’information sur le système, etc.
MENU permet d’afficher le menu du disque. A utiliser
avec les touches de déplacement UP, DOWN, LEFT et
RIGHT.
OK Pour sélectionner les options de menu de.
QUIT Permet de quitter le menu affiché ou de revenir à
l’affichage précédent.
PLAY permet de lancer la lecture du disque. Permet
aussi, sur certains lecteurs de DVD, de sélectionner une
option de menu.
STOP permet d’interrompre la lecture du disque.
PAUSE permet d’interrompre momentanément la lecture
du disque; appuyer sur la touche PLAY pour la relancer.
INPUT Permet d’afficher le menu de programmation des
lecteurs de DVD.
Fonctions SAT
GUIDE permet d’afficher le guide sur les canaux
satellites à l’écran.
CHAPTER+ et CHAPTER- permettent d’exécuter les
fonctions PAGE+ et PAGE- pour les menus du guide
apparaissant à l’écran utilisés par certains systèmes
satellites.
INFO/DISPLAY permet d’afficher l’information du
récepteur satellite afin d’obtenir l’information sur le
canal choisi ou sur le système.
MENU permet d’afficher le menu du système satellite –
À utiliser avec les touches de déplacement UP, DOWN,
LEFT et RIGHT.
OK permet de sélectionner de l’information dans le
menu à l’écran.
QUIT permet de quitter ou de supprimer le menu
apparaissant à l’écran.
INPUT permet d’exécuter la fonction TV/SAT du
système satellite.
Fonctions TiVo/ReplayTV (en vert)
TiVo (code 738)
T.CENTRAL – Accès au menu principal TiVo.
GUIDE – Guide TiVo pour connaître la programmation
en cours.
INFO/DISPLAY – Affichage d’une bannière contenant
de l’information sur les canaux (Channel Banner).
INSTANT REPLAY - Retransmission des dernières 8
secondes d’une émission.
ADVANCE – Retour au cours normal de l’émission.
LIVE TV – Accès à l’émission diffusée.
OK – Touche de sélection.
THUMBS UP/DOWN – Évaluation personnelle d’une
émission.
ReplayTV (code 938)
R.ZONES – Recherche de grille horaire par catégorie.
GUIDE – Affichage des grilles horaires.
REPLAY GUIDE – Visionnement des émissions
enregistrées.
MENU – Affichage du menu principal de ReplayTV.
PL and PV – Défilement en amont ou en aval parmi les
guides et menus de ReplayTV, une fenêtre à la fois.
INSTANT REPLAY – Retour en arrière de 7 secondes et
revisionnement d’un segment.
ADVANCE – Retour au cours normal de l’émission.
Q.SKIP – Saut de 30 secondes d’émission enregistrée
ou différée.
OK – Sélection d’une option à l’écran; affichage du surf
sur les canaux pendant le visionnement d’une émission
en cours.
r – (Commercial Advance) – Commande la fonction de
saut de message publicitaire pour l’émission en cours.
INFO/DISPLAY – Affichage d’informations sur
l’émission en cours.
TiVo et ReplayTV sont des marques déposées de leurs propriétaires
respectifs.
5554
Page 29

Fonctions des touches, cont.
Configuration
Fonctions audio (en rouge)
PRESET Utilisation de canaux préréglés en mode
Audio.
AM/FM Sélection de la bande AM/FM sur le
syntoniseur.
CD, TAPE, TUNER, TV, VIDEO 1 et VIDEO 2
Sélection de la source d’entrée sur le syntoniseur
(fonctionne en mode AUDIO, c.-à-d. après
l’enfoncement du bouton rouge AUDIO).
FUNCTION Sélectionne les différents appareils audio.
En mode AUDIO, les boutons numérotés sélectionnent
aussi la fonction inscrite au-dessus des boutons.
LEVEL+/LEVEL – Règle le niveau des enceintes en
mode Essai de tonalité.
DSP ON/OFF Active le mode Traitement numérique du
signal (DSP) du syntoniseur.
DSP MODE En mode DSP, l’activation de ce bouton
permet de parcourir les différents modes DSP.
PROG Programme l’ordre de lecture des pistes du
disque.
DELAY - and DELAY+ Augmente ou diminue le délai
entre les enceintes ambiophoniques (Surround) et les
enceintes principales lorsque le syntoniseur est en
mode Ambiophonique.
ON/OFF, SURR, MODE La fonction ON/OFF SURR
active ou désactive les modes ambiophoniques. SURR
MODE parcourt les différents réglages des modes
ambiophoniques.
F, C, R, T (Front, Center, Rear et Test) Règle les niveaux
des enceintes avant, médianes et arrière,
respectivement. S’utilise conjointement avec Level + /
Level - . L’essai de tonalité doit d’abord être activé en
appuyant sur le bouton TEST.
Installation des piles
1. Pousser sur la languette, puis
retirer le couvercle du logement
des piles situé à l’arrière de la
télécommande.
2. Insérer les deux piles alcalines
AAA en respectant les marques «
+ » et « - » indiquées à l’intérieur
du logement.
3. Replacer le couvercle.
Économiseur de piles
La télécommande est dotée d’une fonction qui la met
automatiquement hors tension lorsqu’on appuie sur une
touche durant plus de 30 secondes. Cette fonction permet de
conserver l’énergie des piles dans l’éventualité ou la
télécommande serait placée de manière à ce qu’unetouche
demeure enfoncée (sous un coussin, par exemple).
Mémorisation des codes
Les codes sont gardés en mémoire de façon permanente, ce
qui permet de changer les piles sans risquer la perte de codes.
Mise sous tension par défaut
La télécommande se met en marche en mode téléviseur.
Programmation des codes
TV/VCR/DVR
En mode téléviseur la touche TV/VCR/DVR permet
d’exécuter la fonction de commutation de la source
INPUT.
En mode magnétoscope, la touche TV/VCR/DVR
permet d’exécuter la fonction de commutation
d’antennes de téléviseur et de magnétoscope.
En mode câblorécepteur, la touche TV/VCR/DVR
permet d’exécuter la fonction de commutation A.B.
En mode SAT, la touche TV/VCR/DVR permet
d’exécuter la fonction de commutation de téléviseur/
système satellite.
En mode lecteur de DVD, la touche TV/VCR/DVR
permet d’exécuter la fonction de configuration du
lecteur de DVD.
La touche de recherche des codes Code Search permet de
programmer la télécommande. Vous pouvez effectuer cette
opération soit en sélectionnant le code de la marque de
l’appareil dans les tables de codes (voir la feuille séparée), soit
en recherchant dans la liste de codes un code approprié à
l’appareil.
Veuillez consulter la section intitulée recherche de code à la
page 58 pour obtenir de plus amples renseignements sur la
façon d’utiliser la fonction de recherche pour rechercher un
code dans la bibliothèque des codes de vos appareils.
REMARQUES: vous pouvez stocker tout type de code sous
n’importe quel mode (sauf le mode téléviseur). Par exemple,
vous pouvez stocker le mode magnétoscope sous la touche
CBL, un code DVD sous la touche VCR, etc. Toutefois, vous
ne pouvez stocker les codes TV que sous la touche TV.
5756
Page 30

Configuration (suite)
Configuration (suite)
Saisie directe des codes
1. Appuyer sur la touche CODE SEARCH jusqu’à ce que le
témoin reste allumé, puis la relâcher.
2. Appuyer sur la touche du mode choisi (TV, VCR, etc.),
puis la relâcher. Le témoin clignote, puis reste allumé.
3. Entrer le code à 4 chiffres sélectionné à partir des tables de
codes (sur une feuille séparée). À noter qu’une fois un
code valide sélectionné, le témoin s’éteint. Lorsqu’un code
non valide est précisé, le témoin clignote.
4. Une fois l’appareil allumé, appuyer sur la touché
CHANNEL UP. Si l’appareil réagit, aucune autre
programmation n’est requise. Remarque : si certaines
touches ne fonctionnent pas, essayer
d’utiliser un autre code qui convient à la marque de
l’appareil.
Inscrire les codes sur cette fiche à des fins de référence.
Type Type Stocke Code
TV
VCR
DVD
CBL
SAT
CD
AUDIO
DVR
Programmation au moyen de la fonction de
recherche des codes
Si l’appareil ne fonctionne pas après avoir essayé tous les
codes de votre marque, ou si la marque ne figure pas sur la
liste, essayez de rechercher le code en suivant les étapes
présentées ci-dessous.
1. Allumer manuellement l’appareil choisi (téléviseur,
magnétoscope, etc.).
2. Appuyer sur la touche CODE SEARCH jusqu’à ce que le
témoin reste allumé, puis la relâcher.
3. Appuyer sur la touche du mode choisi (TV, VCR, etc.),
puis la relâcher. Le témoin rouge clignote une fois.
4. Appuyer sur la touche CHANNEL UP à plusieurs
reprises (jusqu’à 300 fois) jusqu’à ce que l’appareil que
l’on veut faire fonctionner change de canal. Le témoin
rouge clignote chaque fois que vous appuyez sur la touche.
Si l’on dépasse par mégarde le code requis, il suffit
d’appuyer sur la touche CHANNEL DOWN pour
effectuer un repérage arrière dans la liste de codes, et ce,
jusqu’à ce que l’appareil change de canal. La touche
CHANNEL UP permet de modifier la direction et
d’effectuer de nouveau un repérage avant.
5. Appuyer sur la touche MUTE, puis la relâcher pour
stocker le code.
La plupart des utilisateurs stockent les codes du
magnétoscope sous la touche VCR, les codes du système
satellite, sous la touche CABLE, etc. Si (par exemple) vous
désirez stocker le code du magnétoscope sous la touche
CABLE, vous devez tout d’abord exécuter la procédure de
saisie de code directe (page précédente) appuyer sur la
touche CABLE à l’étape 2 de la procédure, puis entrer le
code du magnétoscope à l’étape 3. Exécutez ensuite les
étapes relatives à la recherche de code présentées ci-dessus
(ou à la section Recherche de marque, au-dessous).
Remarque: si l’appareil ne dispose pas d’une touche
CHANNEL UP, utiliser à la place la touche PLAY (pour le
magnétoscope seulement) ou POWER. L’opération de
recherche commence à partir du numéro à 4 chiffres
actuellement stocké sous le mode en question.
Recherche de code par marque
Vous permet de rechercher le code d’une marque particulière
dans la bibliothèque de codes d’un fabricant spécifique.
1. Allumez l’appareil (téléviseur, magnétoscope, etc.) à
commander.
2. Appuyez sur la touche CODE SEARCH et maintenez-la
enfoncée jusqu’à ce que le témoin rouge s’allume, puis
relâchez la touche.
3. Appuyez rapidement sur la touche du mode désiré (TV,
VCR, etc.), puis relâchez-la. Le témoin rouge clignote une
fois.
4. Appuyez sur la touche numérique (0 à 9) correspondant
au fabricant en question (voir le tableau sur la feuille de
liste des codes), puis relâchez-la. Le témoin rouge clignote
une fois. Remarque : La touche ( 0 ) permet d’exécuter une
recherche exhaustive de la bibliothèque semblable à la
méthode de recherche de code normal présentée à la page
précédente.
5. Appuyez sur la touche CHANNEL UP ou POWER ou
PLAY (magnétoscope uniquement) plusieurs fois jusqu’à
ce que l’appareil à commander change de canal. Le témoin
rouge clignote chaque fois que vous appuyez sur la
touche. Si vous dépassez par mégarde le code requis,
appuyez sur la touche CHANNEL DOWN pour revenir
en arrière jusqu’à ce que l’appareil change de canal. La
touche CHANNEL UP permet de rétablir la direction vers
l’avant.
6. Appuyez sur la touche MUTE, puis relâchez-la pour
enregistrer le code. La saisie relative à la méthode de
recherche de marque est maintenant terminée.
Remarque : Une fois que vous avez recherché tous les codes
figurant sous une marque, le témoin rouge clignote
rapidement durant trois (3) secondes.
5958
Page 31

Configuration (suite)
Configuration (suite)
Fonction d’identification des codes
Cette fonction permet d’identifier le code à 4 chiffres de la
liste des codes stocké sous la touche de l’appareil choisi. Par
exemple, pour connaître le code à 4 chiffres stocké sous la
touche du téléviseur, suivre les six étapes précisées cidessous :
1. Appuyer sur la touche CODE SEARCH jusqu’à ce que le
témoin reste allumé, puis la relâcher.
2. Appuyer sur la touche du mode choisi (TV, VCR, etc.),
puis la relâcher. Le témoin clignote, puis reste allumé.
3. Appuyer sur la touche CODE SEARCH, puis la relâcher.
Le témoin clignotera, puis s’éteindra.
4. Pour trouver le premier chiffre du code stocké sous la
touche du mode utilisée à l’étape 2, appuyer sur chaque
touche numérique de 0 à 9. Le témoin clignote brièvement,
puis s’éteint lorsque le numéro de la touché utilisée
correspond au premier chiffre du code recherché.
5. Pour trouver le deuxième chiffre, reprendre l’étape 4.
Encore une fois, le témoin clignote brièvement, puis
s’éteint lorsque le numéro de la touche utilisée correspond
au deuxième chiffre du code recherché.
6. Reprendre l’étape 4 de nouveau pour trouver les troisième
et quatrièmes chiffre.
Minuteur de mise en veille
Le bouton SLEEP (sommeil) met en marche la fonction
SLEEP (sommeil) sur votre appareil en assumant qu’il y est
relie. Autrement, vous pouvez régler votre télécommande
pour éteindre votre téléviseur après une période de 1 a 99
minutes tel que décrit plus bas. Cette fonction n’est
disponible que pur le mode TV (téléviseur) et la
télécommande doit être en mode TV (téléviseur) pour
programmer une minuterie de sommeil SLEEP (sommeil).
Cette caractéristique fonctionne même si votre téléviseur
n’est pas équipe avec la fonction SLEEP (sommeil).
1. Appuyez et relâchez la touche de mode TV (téléviseur).
2. Appuyez sur le bouton CODE SEARCH (recherche du
code) et maintenez-le dans cette position jusqu’à ce que le
voyant rouge reste allume. Relâchez le bouton CODE
SEARCH (recherche du code).
3. Appuyez puis relâchez le bouton SLEEP (sommeil).
(Remarque: toute programmation de minuterie de sommeil
précédente s’annule à ce moment-ci et la télécommande
retrouve sa fonction normale).
4. Appuyez puis relâchez les boutons numériques (01-99)
pour sélectionner la période de temps désirée. Le voyant
rouge cesse de clignoter pour signifier qu’il accepte le
choix de l’entrée par la pression sur le bouton et demeure
ferme lors de la deuxième pression sur le bouton.
5. La minuterie de sommeil du téléviseur est maintenant
programmée.
6. Assurez-vous que la télécommande fait toujours face
au téléviseur, et que l’espace entre les deux appareils
set libre de toute obstruction.
Pour annuler la minuterie sommeil, appuyez puis relâchez le
bouton du mode POWER (mise sous tension) dans le mode
TV (téléviseur) ou répétez les étapes 1, 2, et 3 plus haut.
6160
Page 32

Configuration (suite)
Configuration (suite)
Programmation des combinés
Notez que certains combinés (TV/VCR, TV/DVD, DVD/
VCR, etc.) exigeront de programmer deux boutons différents
pour commander les deux appareils du combiné. Avec un
combiné TV/DVD par exemple, il s’agirait de programmer le
bouton TV pour commander la TV, et un autre bouton (tout
autre bouton de mode) pour commander le DVD.
Contrôle des combinés
Les télécommandes de certains combinés (TV/VCR, TV/
DVD, DVD/VCR, etc.) sont dotées de boutons distincts pour
commander les deux composants du combiné. Par exemple, si
vous possédez un combiné DVD/VCR, la télécommande
d’origine peut être dotée de boutons DVD et VCR distincts
pour commander chacun des composants du combiné. Les
commandes équivalentes sur votre télécommande Philips se
programmeront à partir du bouton du mode de l’appareil et
du bouton CODE SEARCH.
En vous reportant à la rubrique «Programmation par
recherche de code» de la page 58, programmez le bouton du
mode de l’appareil (p.ex. DVD) en saisissant le code qui
correspond à la marque de votre combiné. Dans le cas, par
exemple, d’un combiné DVD/VCR dont le code est
programmé sous le mode DVD, il s’agirait alors de maintenir
enfoncé le bouton du mode DVD pendant au moins une
seconde pour transmettre la commande correspondante. Pour
transmettre la commande du bouton VCR, pressez et relâchez
rapidement le bouton CODE SEARCH, puis pressez et
relâchez le bouton du mode DVD. Cette méthode peut
s’appliquer à tous les types de combinés (TV/VCR, TV/
DVD, DVD/VCR, etc.) et dans tous les modes d’appareil.
Notez cependant que cette fonction n’est pas prise en charge
par tous les codes.
Contrôle des appareils requérant des boutons
de mise sous (On) et hors (Off) tension
distincts
La mise sous tension et hors tension de certains appareils
(p.ex. certaines TV RCA) s’effectue par le biais de boutons
distincts. Les commandes équivalentes sur votre
télécommande Philips s’activeront par le bouton du mode de
l’appareil et le bouton POWER. En vous reportant à la
rubrique «Programmation par recherche de code» de la page
58, programmez le bouton du mode de l’appareil (p.ex. TV)
en saisissant le code qui correspond à la marque de votre
appareil. Dans le cas, par exemple, d’une TV dont le code est
programmé sous le mode TV, il s’agit alors de maintenir
enfoncé le bouton du mode TV pendant au moins une seconde
pour transmettre la commande de mise sous tension. Pour
mettre la TV hors tension, il s’agit de presser et relâcher le
bouton POWER.
Accès direct aux modes VCR/DVD/DVR
Cette télécommande permet aux 6 boutons d’entraînement du
VCR (c.-à-d. PLAY, PAUSE, STOP, FF, REWIND et REC)
d’accéder directement, à partir de n’importe quel mode
programmé avec des codes TV, SAT ou CABLE, au dernier
mode VCR, DVD ou DVR programmé que vous avez utilisé.
En général, les autres types de télécommande limitent à
l’appareil programmé sous le bouton du mode VCR la
fonction d’accès direct (à partir d’un autre mode) sur les 6
boutons VCR. Cette situation n’est pas très commode si
vous utilisez un DVD programmé sous un mode différent du
mode VCR. Par exemple, si vous avez programmé 3 appareils
(DVD, VCR ou DVR) sur la télécommande, c’est le dernier
appareil utilisé qui répondra aux 6 boutons d’entraînement du
VCR, quell que soit le mode dans lequel vous vous trouvez.
L’accès direct ne fonctionnera pas si le code TV, SAT ou
CABLE programmé prend en charge ses propres commandes
d’entraînement du VCR, par exemple dans le cas de certains
combinés : TV/autre appareil, SAT/PVR, etc.
Commande Volume/Mute et fonction d’accès
direct
Cette télécommande permet de choisir le mode d’appareil qui
contrôlera la commande Volume/Mute. La
télécommande est initialement configurée (en usine) pour que
tous les modes programmés avec des codes vidéo (p.ex. TV,
VCR, DVD, DVR, SAT et CABLE) et des codes audio (p.ex.
CD et AUDIO) puissent utiliser leur propre commande
Volume/Mute, si cette dernière est présente. Si le code vidéo
programmé ne prend pas en charge la fonction Volume/Mute,
alors le bouton de mode accèdera directement au mode TV
sans qu’il soit nécessaire de quitter le mode en cours. Veuillez
vous reporter à la rubrique Programmation de la commande
Volume/Mute et de la fonction d’accès direct à la prochaine
page.
Cette méthode peut s’appliquer à tout appareil, dans tous les
modes. Notez cependant que cette fonction n’est pas prise en
charge par tous les codes.
6362
Page 33

Configuration (suite)
Apprentissage de codes
Tout mode dont on souhaite commander la fonction
Volume/Mute DOIT disposer de sa propre fonction
Volume/Mute, sinon les boutons Volume/Mute ne
serviront à rien.
Programmation d’un mode pour qu’il accède
à TOUTES les commandes Volume/Mute
Cette procédure permet à n’importe quel mode d’accéder
directement à la commande Volume/Mute de n’importe quel
autre mode choisi, sans avoir à sortir du mode en cours.
1. Enfoncer la touche CODE SEARCH jusqu’à ce que le
témoin rouge s’allume, puis la relâcher.
2. Enfoncer la touche MUTE jusqu’à ce que le témoin rouge
clignote et s’éteigne, puis la relâcher.
3. Enfoncer puis relâcher la touche de mode voulue (TV,
VCR, etc.) dont la commande de volume/sourdine
deviendra prioritaire. Le témoin clignotera puis restera
allumé.
4. Enfoncer puis relâcher la touche MUTE; le témoin rouge
s’éteindra. Il clignotera rapidement pendant trois secondes
si le mode choisi ne peut pas effectuer la commande de
volume/sourdine.
5. Tous les modes accepteront maintenant la commande
prioritaire de volume/sourdine du mode choisi.
Tous les modes vidéo et audio programmés pourront
maintenant accéder directement aux modes respectifs que
vous avez choisis pour commander la fonction Volume/Mute.
Programmation d’un mode pour qu’il contrôle
sa propre commande Volume/Mute
Cette procédure permet de programmer n’importe quel mode
pour qu’il contrôle sa propre commande Volume/Mute.
Remarque – Si le mode choisi n’est pas doté de sa propre
fonction Volume/Mute, alors les boutons Volume/Mute ne
seront pas fonctionnels.
1. Enfoncer la touche CODE SEARCH jusqu’à ce que le
témoin rouge s’allume, puis la relâcher.
2. Enfoncer la touche MUTE jusqu’à ce que le témoin rouge
clignote et s’éteigne, puis la relâcher.
3. Enfoncer puis relâcher la touche désiré de mode (TV,
magnétoscope, etc.), le témoin clignotera puis
restera allume.
4. Enfoncer puis relâcher la touche VOLUME- voulue. Le
témoin clignotera puis restera allume.
5. Enfoncer puis relâcher la touche MUTE; Le témoin rouge
s’éteindra.
6. Tous les modes vidéo et audio programmés pourront
maintenant accéder directement aux modes respectifs que
vous avez choisis pour commander la fonction Volume/
Mute.
La fonction d’apprentissage permet à la télécommande «
d’apprendre » les commandes effectuées par des
télécommandes fournies avec des appareils afin qu’elle
puisse, par exemple, exécuter la commande de lecture
aléatoire de disques numériques. L’apprentissage de
commandes s’effectue aisément, en suivant les étapes
qui suivent.
Conseils Sur L’Apprentissage
Les commandes apprises par la télécommande doivent
être jumelées aux modes appropriés, c’est-à-dire que
des codes de téléviseur doivent être attribués au mode
TV, ceux de magnétoscope, au mode VCR, ceux de
lecteur DVD, au mode DVD, etc. Si les commandes à
apprendre sont celles d’une télécommande « universelle
», il est possible qu’elles soient composées de codes
multiples attribués à un mode donné. Si l’apprentissage
ne fonctionne pas, il est recommandé d’utiliser plutôt
une télécommande originale afin de déterminer si le
problème est causé par le type ou la marque de la
télécommande.
a. Certaines fonctions effectuées par certains types de
télécommandes ne peuvent pas être apprises.
b. Aucune fonction ne peut être attribuée aux touches
LEARN, CODE SEARCH, ou MACRO.
c. Les commandes d’un appareil doivent être
attribuées au mode correspondant seulement.
d. Utiliser de nouvelles piles, dans les deux
télécomman des, au moment d’effectuer un
apprentissage.
e. Tenir les télécommandes à une distance d’au moins
1 m (3 pi) de tout luminaire à incandescence ou à
basse tension pendant l’apprentissage.
f. Effectuer une suppression complète (se reporter à la
page 69) avant de procéder à l’apprentissage, et ne
programmer que 2 ou 3 commandes pour
commencer; reprendre ensuite la suppression
complète avant d’ap prendre toutes les commandes
d’une télécommande originale.
g. Placer les deux télécommandes bout à bout, de
manière à ce que leurs transmetteurs IR soient orien
tés l’un vers l’autre (il peut être nécessaire d’ajuster
la hauteur des télécommandes; utiliser la fonction de
localisation de transmetteur IR au besoin).
h. Placer les télécommandes à environ 2,5 cm (1 po)
l’une de l’autre; ne pas les déplacer jusqu’à ce que
l’apprentissage des commandes d’un mode soit
terminé.
6564
Page 34

Conseils Sur L ’Apprentissage (suite)
Fonction De Localisation De Transmetteur IR
i. Pendant l’apprentissage, ne relâcher la touche de
commande que lorsque le témoin rouge a cessé de
clignoter pendant une demi-seconde.
j. Éviter l’apprentissage des commandes de volume et
de sourdine d’une télécommande originale, à moins
d’être assuré qu’elles soient destinées au même type
d’ap pareil (p. ex., la télécommande d’un lecteur DVD
peut permettre la commande de volume et de
sourdine d’un téléviseur, ce qui correspond à deux
types de code distincts).
k. Éviter l’apprentissage de commandes de
visionnement, à moins d’être assuré qu’elles soient
destinées au même type d’appareil (p. ex., la
télécommande d’un téléviseur peut comporter des
touches de commande de magnétoscope, ce qui
correspond à deux types de code distincts).
l. Si l’apprentissage d’une ou de deux commandes
d’un mode ne fonctionne pas, essayer de:
i. mettre fin à l’apprentissage en appuyant sur la
touché CODE SEARCH;
ii. Supprimer les commandes apprises pour ce mode;
iii. Vérifier si les transmetteurs IR des deux télécomman
des sont correctement alignés (utiliser la fonction de
localisation de transmetteur IR au besoin);
iv. Rapprocher les deux télécommandes à 1 cm (1/2 po)
l’une de l’autre, ou les éloigner à une distance de 5
cm (2 po);
v. Réessayer l’apprentissage en utilisant une
télécommande originale.
Si le problème persiste, toujours avec la même touche,
vérifier la touche de la télécommande originale
(transmet-elle correctement? effectue-t-elle correctement
la commande de l’appareil?). Essayer ensuite de
reprendre l’apprentissage, mais dans un autre mode
(non programmé). Si cela fonctionne, alors il est
probable que le type de code diffère des autres et ne
peut être accepté dans le mode voulu.
Cette fonction aide à déterminer l’emplacement exact du
transmetteur IR sur une télécommande originale, et est
particulièrement utile lorsque le transmetteur est
dissimulé derrière une lentille opaque.
1. Orienter les deux télécommandes l’une vers l’autre, à
une distance d’environ 2,5 cm (1 po) (se reporter aux
conseils, pages précédentes).
2. Garder enfoncée la touche CODE SEARCH jusqu’à
ce que le témoin s’illumine, puis la relâcher.
3. Appuyer une fois sur la touche de mode voulue (TV,
VCR, etc.); le témoin rouge restera illuminé.
4. Appuyer une fois sur la touche LEARN; le témoin
rouge clignotera puis restera illuminé.
5. Garder enfoncée n’importe quelle touche de la
télécommande originale, puis déplacer la
télécommande vers la gauche, la droite, le haut ou le
bas, en la gardant orientée vers le transmetteur IR de
la télécommande d’apprentissage. Le témoin rouge
resta allumé tant qu’aucun signal IR ne sera capté,
mais clignotera rapidement dès que les deux
transmetteurs seront alignés. Remarque: certaines
télécommandes ne transmettent qu’à la première
pression d’une touche; le cas échéant, on doit
appuyer plusieurs fois sur la touche de la
télécommande originale plutôt que de la garder
enfoncée.
6. Passer ensuite à l’étape 4 des directives d’apprentis
sage (prochaine page), ou appuyer sur la touche
CODE SEARCH pour terminer.
6766
Page 35

Commandes D’Enregistrement
Suppression des commandes
La fonction d’enregistrement vous permet
«d’enregistrer» des commandes de votre télécommande
d’origine. Par exemple, vous souhaitez peut-être utiliser
la commande RANDOM PLAY (LECTURE AU
HASARD) qui se trouve sur votre télécommande
d’origine pour lecteur CD. Cette télécommande est
équipée d’une fonction «enregistrement facile» vous
permettant d’enregistrer des commandes (comme
RANDOM PLAY sur votre télécommande d’origine) en
suivant les étapes ci-dessous et celles de la page
suivante:
1. Pressez le bouton CODE SEARCH (RECHERCHE DE
CODE) et maintenez-le enfoncé jusqu’à ce que le voyant
rouge s’allume, puis relâchez-le.
2. Pressez et relâchez le bouton du mode désiré (TV, VCR,
etc.); le voyant rouge clignote puis reste allumé.
3. Pressez et relâchez le bouton LEARN (ENREGISTRER);
le voyant rouge clignote puis reste allumé.
4. Pressez et relâchez le bouton de la télécommande
enregistrable (p.ex. le bouton POWER) qui doit
enregistrer une commande.
5. Mettez les télécommandes bout à bout à une distance
d’environ 2,5 cm (1 po)(voir les conseils de la page 65).
6. Pressez le bouton de la télécommande d’origine dont il
faut enregistrer la commande (p.ex. RANDOM PLAY)
jusqu’à ce que le voyant rouge clignote une fois puis
s’allume. Si un problème d’enregistrement survient, le
voyant clignote pendant 3 secondes puis s’allume. Dans
cette éventualité, répétez les étapes 4 à 6.
7. Répétez les étapes 4 à 6 pour les autres boutons que vous
voulez enregistrer.
8. Pressez et relâchez le bouton CODE SEARCH une fois
que toutes les commandes désirées sont enregistrées.
L’enregistrement des commandes est maintenant terminé.
Pour Effacer Toutes Les Commandes
Enregistrees Sous Un Mode
L’effacement des commandes enregistrées est commode
si, par exemple, vous remplacez votre lecteur de CD par
une autre marque ou modèle. En effet, une commande
enregistrée à partir de la télécommande d’origine de
votre ancien lecteur de CD (comme la commande
RANDOM PLAY) ne fonctionnerait plus sur votre
nouveau lecteur. Suivez les étapes suivantes pour
effacer une ou plusieurs commandes enregistrées :
1. Appuyer sur la touche «CODE SEARCH» jusqu’à
ce que le témoin s’allume, puis la relâcher.
2. Appuyer sur la touche du mode choisi («TV»,
«VCR», etc.), puis la relâcher. Le témoin clignote
brièvement, puis s’éteint.
3. Appuyer sur la touche «LEARN» DEUX FOIS, puis
la relâcher. Le témoin clignote brièvement, puis
s’éteint.
4. Appuyer sur la touche «CODE SEARCH», puis la
relâcher. Le témoin clignote brièvement, puis
s’éteint. Toutes les commandes mémorisées sous ce
mode sont maintenant supprimées.
Toutes les commandes mémorisées sous ce mode sont
maintenant supprimées.
La Fonction «Master Clear»: Pour Supprimer
Toutes Les Commandes Memorisees, Soit
Revenir Aux Valeurs Par Defaut Établies En
Usine.
6.
Sur une surface rigide, placez la nouvelle télécommande en
ligne avec la télécommande enregistrable, á une distance
d’environ 2,5 cm (1 po) l’une de l’autre.
R
DVD
AUDIO
/
C
H
POWER
4.
CBL
DVR
DISPLAY
A
N
INFO
LEARN
3.
VCR
TV
2.
1.
SAT
CODE
SEARCH
CD
E
T
P
A
H
1. Appuyer sur la touche «CODE SEARCH» jusqu’à
ce que le témoin s’allume, puis la relâcher.
2. Appuyer sur la touche «LEARN» DEUX FOIS, puis
la relâcher. Le témoin clignote brièvement, puis
s’éteint.
3. Appuyer sur la touche «CODE SEARCH», puis la
relâcher. Le témoin clignote brièvement, puis
s’éteint. Toutes les commandes mémorisées sont
maintenant supprimées.
6968
Page 36

Macros, cont.Macros
Le bouton MACRO, utilisé conjointement avec les
numéros 1, 2 et 3, vous permet de programmer et de
mémoriser jusqu’à 3 séquences de commandes de votre
choix. Une pression sur un des numéros de macro
déclenchera la séquence correspondante de
commandes. Autrement dit, chaque séquence de
commandes que vous effectuez régulièrement peut être
réduite à deux pressions de boutons (le bouton
MACRO suivi par le bouton 1, 2 ou 3). Par exemple, le
fait d’appuyer sur MACRO et un numéro peut allumer
votre TV, votre boîtier décodeur, syntoniser votre
chaîne favorite, allumer votre VCR, activer
l’enregistrement, etc. Au total, 9 pressions de bouton
peuvent être enregistrées sous chaque numéro de
macro.
Pour enregistrer une macro
1. Pressez et maintenez enfoncé le bouton CODE
SEARCH jusqu’à ce que le voyant s’allume.
Relâchez le bouton CODE SEARCH.
2. Pressez et relâchez le bouton MACRO. Le voyant
clignote.
3. Pressez et relâchez le bouton du numéro de la macro
à enregistrer, soit 1, 2 ou 3.
4. Pressez et relâchez le bouton du mode qui correspond au premier appareil à contrôler dans la
séquence. *
5. Pressez et relâchez les boutons des commandes à
inclure dans la macro, dans l’ordre souhaité (maximum de 9). Le voyant clignote à chaque pression de
bouton.
6. Pour mémoriser la macro, pressez et relâchez le
bouton MACRO. Le voyant s’éteint. Remarque : Si
vous programmez le maximum de 9 boutons, la macro
sera automatiquement mémorisée à la 9ième pression
de bouton et le voyant s’éteindra. L’enregistrement
de la macro est maintenant terminé.
R
/
C
R
DVD
AUDIO
H
A
H
C
/
N
POWER
CBL
DVR
DISPLAY
INFO
REPEAT
AM/
FM
PREV. CHAN
4.
1.
2, 6.
3.
LEARN
VCR
TV
CD
SAT
CODE
SEARCH
MACRO
E
T
P
A
H
P
T
E
CD TAPE TUNER
Pour activer la macro, pressez et relâchez le bouton
MACRO suivi (dans un délai de 20 secondes) par son
numéro (1, 2 ou 3).
Notes de la section Macros
1. Vous pouvez ajouter des « délais » dans une
séquence de macro (p.ex. pour permettre le
réchauffement de votre TV). Les délais sont ajoutés
par le biais du bouton PAUSE, suivi du nombre de
secondes requis. Par exemple, pour entrer un délai
de 3 secondes, pressez et relâchez le bouton PAUSE,
suivi du chiffre 3 (à l’étape 4 de la rubrique « Pour
enregistrer une macro » de la page précédente). Le
délai maximum est de 9 secondes. Le chiffre « 0 »
’est pas accepté après PAUSE.
2. Un délai automatique de 1 seconde est laissé entre
chaque transmission de commande d’une séquence
de macro.
3. * Le premier bouton d’une séquence de macro DOIT
être un bouton de mode (TV, VCR, etc.).
Pour supprimer une macro
1. Pressez et maintenez enfoncé le bouton CODE
SEARCH jusqu’à ce que le bouton s’allume.
Relâchez le bouton CODE SEARCH.
2. Pressez et relâchez le bouton MACRO. Le voyant
clignote.
3. Pressez et relâchez le bouton numéroté (1, 2 ou 3) de
la macro à effacer.
4. Pressez et maintenez enfoncé le bouton CODE
SEARCH. Le voyant s’éteint et la macro est
supprimée.
R
/
C
R
DVD
AUDIO
H
A
H
C
/
N
POWER
CBL
DVR
DISPLAY
INFO
REPEAT
AM/
FM
PREV. CHAN
1, 4.
2.
3.
LEARN
VCR
TV
CD
SAT
CODE
SEARCH
MACRO
E
T
P
A
H
P
T
E
CD TAPE TUNER
7170
Page 37

Dépannage
Garantie a vie limitée
Le Télécommande ne permet pas de mettre
l’appareil en marche.
• Appuyer sur la touche du mode de l’appareil choisi.
• Programmer la télécommande au moyen d’un
nouveau code.
• Installer des piles neuves. (Une fois les nouvelles
piles installées, il sera peut-être nécessaire de
reprogrammer la télécommande.)
• La télécommande ne convient peut-être pas à
l’appareil.
La Télécommande ne permet pas d’exécuter
certaines fonctions de l’appareil
.
• Programmer la télécommande au moyen d’un
nouveau code.
• La télécommande n’est peut-être pas en mesure
d’exécuter toutes les commandes de l’appareil ou les
indicatifs des touches diffèrent peut-être de ceux de
l’appareil.
Le témoin clignote une fois le code
programmé.
Le fabricant garantit que ce produit ne présentera aucun
défaut de matériel, de fabrication ou d’assemblage dans
des conditions d’utilisation normale conformes aux
spécifications et mises en garde afférentes, et ce aussi
longtemps que ce produit demeure en votre possession.
Cette garantie s’applique seulement à l’acheteur initial
du produit et elle n’est pas transférable. Les produits
défectueux doivent être retournés au point de vente
avec une preuve d’achat datée en vue d’une réparation
ou d’un remplacement. AUCUNE AUTRE GARANTIE
EXPRESSE NE S’APPLIQUE. Dans la mesure où la loi
l’autorise, les dommages accessoires ou indirects ne
sont pas couverts. Cette garantie vous confère des
droits juridiques spécifiques et vous pouvez aussi avoir
d’autres droits qui varient d’un pays à l’autre.
Fabriqué en Chine.
Qualité assurée aux États-Unis.
Ledgewood, NJ 07852, aux États-Unis
• La télécommande n’a pas accepté le code.
• Essayer de reprogrammer le code ou choisir un autre
code.
Pour de L’assistance concernant le réglage, veuillez
composer le 919-573-7854.
7372
Page 38

7574
Page 39

PMDVR8
Trilingual
Back
Cover Art
 Loading...