

Philips TV DVD Combo User Manual

Directions for Use
eed help?
representatives are ready to help you
Vans about your new product We
Connections, First-time Setup, or
We want you
start enjoying your new product ri^t away!
to
can
any of the Features.
CALL US BEFORE YOU CONSIDER
RETURNINGTHEPRODUCT.
f Sg0ipf 3^ f 9
or
Visit US on the web at
www.philips.com
with any ques
■
3121 235 21122
Important!
Return your
Warranty
Registration Card
within 10 days.
See why inside.
PHILIPS

Return your Warranty Registration card today to ensure you
receive all the benefits youVe entitled to.
Once your PHILIPS purchase is registered, youVe eligible to receive all the privileges
of owning a PHILIPS product So complete and return the Wairanty Registration
Card enclosed with your purchase at once. And take advantage of these important benefits.
Warranty
Verification
Registering your product within
10 days confirms your right to maxi
mum protection under the terms and
conditions of your PHILIPS warranty.
Congratulations on your purchase,
and welcome to the “family!”
Dear PHILIPS product owner;
Thank you for your confidence in PHILIPS. You’ve selected one of the best-built, best-backed products available
today. And we’ll do everything in our power to keep you happy with your purchase for many years to come.
As a member of the PHILIPS “family,” you’re entitled to protection by one of the most comprehensive war
ranties and outstanding service networks in the industry.
What’s more, your purchase guarantees you’ll receive all the information and special offers for which you quali
fy, plus easy access to accessories from our convenient home shopping network.
And most importantly you can count on our uncompromising commitment to your total satisfaction.
All of this is our way of saying welcome-and thanks for investing in a PHILIPS product
Sincerely,
Owner
Confirmation
Your completed Warranty
Registration Card serves as
verification of ownership in the
event of product theft or toss.
PHILIPS
Model
Registration
Returning your Warranty Registration
Card right away guarantees you’ll
receive ail the information and special
offers which you qualify for as the
owner of your model.
Lawrence J. Bianford
President and Chief Executive Officer
Know these
safety symbols
CAUTIOIXI
RESK SL£CHHC SHOCK
A
CAUI^ON: to REtNJCE THË (№ ËLE0TRIC SHOCK, OO W3t
REMOVE 001ÆR (OR OACKJ. NO OSER-SERWCtMiE PARTS
№SfDE, REFER SERUICIfItG TO OOUJF1ED SEmACC PERSONNE!..
DORtOTCN^hE
PHILIPS V/s/t our World Wide Web Site at http://www.philips.com
A
P.S. Remember, to get the most from your
PHILIPS product, you must return your
Warranty Registration Card within 10
days. So please mail it to us right now!
A
This “bolt of lightning" indicates uninsulated material within your unit may cause an elec
trical shock. For the safety of everyone in your household, please do not remove product cov
ering.
The “exclamation point" calls attention to features for which you should read the
enclosed literature closely to prevent operating and maintenance problems.
WARNING: TO PREVENT FIRE OR SHOCK HAZARD, DO NOT EXPOSE THIS EQUIP
MENT TO RAIN OR MOISTURE.
CAUTION: To prevent electric shock, match wide blade of plug to wide slot, and fully insert.
ATTENTION: Pour éviter les chocs électriques, introduire la lame la plus large de la fiche dans
la borne correspondante de la prise et pousser jusqu'au fond.
IMPORTANT SAFETY INSTRUCTIONS
Read before operating equipnnent
1.
Read these instructions.
2.
Keep these instructions.
3.
Heed all warnings.
4.
Follow all instructions.
Do not use this apparatus near water.
5.
6.
Clean only with a dry cloth.
7.
Do not block any of the ventilation openings. Install in accordance
with the manufacturers instructions.
Do not install near any heat sources such as radiators, heat regis
8.
ters, stoves, or other apparatus (including amplifiers) that produce
heat.
9.
Do not defeat the safety purpose of the polarized or groundingtype plug. A polarized plug has two blades with one wider than
the other. A grounding type plug has two blades and third ground
ing prong. The wide blade or third prong are provided for your
safety. When the provided plug does not fit into your outlet, con
sult an electrician for replacement of the obsolete outlet.
Protect the power cord from being walked on or pinched particu
10.
larly at plugs, convenience receptacles, and the point where they
exit from the apparatus.
Only use attachments/accessories specified by the manufacturer.
Use only with a cart, stand, tripod, bracket, or table
specified by the manufacturer, or sold with the app
the cart/apparatus combination to avoid injury from tip-over.
Unplug this apparatus during lightning storms or when unused for
long periods of time.
14.
Refer all servicing to qualified service personnel. Servicing is
required when the apparatus has been damaged in any way, such
as power-supply cord or plug is damaged, liquid has been spilled
or objects have fallen into apparatus, the apparatus has been
exposed to rain or moisture, does not operate normally, or has
been dropped.
This product may contain lead and mercury. Disposal of these
15.
materials may be regulated due to environmental considerations.
For disposal or recycling information, please contact your local
authorities or the Electronic Industries Alliance;
Damage Requiring Service - The appliance should be serviced
16.
by qualified service personnel when;
A. The power supply cord or the plug has been damaged; or
aratus. When a cart is used, use caution when moving
www.eiae.org
B. Objects have fallen, or liquid has been .spilled into the appli
ance; or
C. The appliance has been exposed to rain; or
D. The appliance does not appear to operate normally or
exhibits a marked change in performance; or
E. The appliance has been dropped, or the enclosure damaged.
17. Tilt/Stability - All televisions must comply with recommended
international global safety standards for tilt and stability properties
of its cabinet design.
• Do not compromise these design standards by applying exces
sive pull force to the front, or top, of the cabinet which could ulti
mately overturn the product.
• Also, do not endanger yourself, or children, by placing electron
ic equipment/toys on the top of the cabinet. Such items could
unsuspectingly fall from the top of the set and cause product dam
age and/or personal injury.
18. Wail or Ceiling Mounting - The appliance should be mounted to
a wall or ceiling only as recommended by the manufacturer.
19. Power Lines - An outdoor antenna should be located away from
power lines.
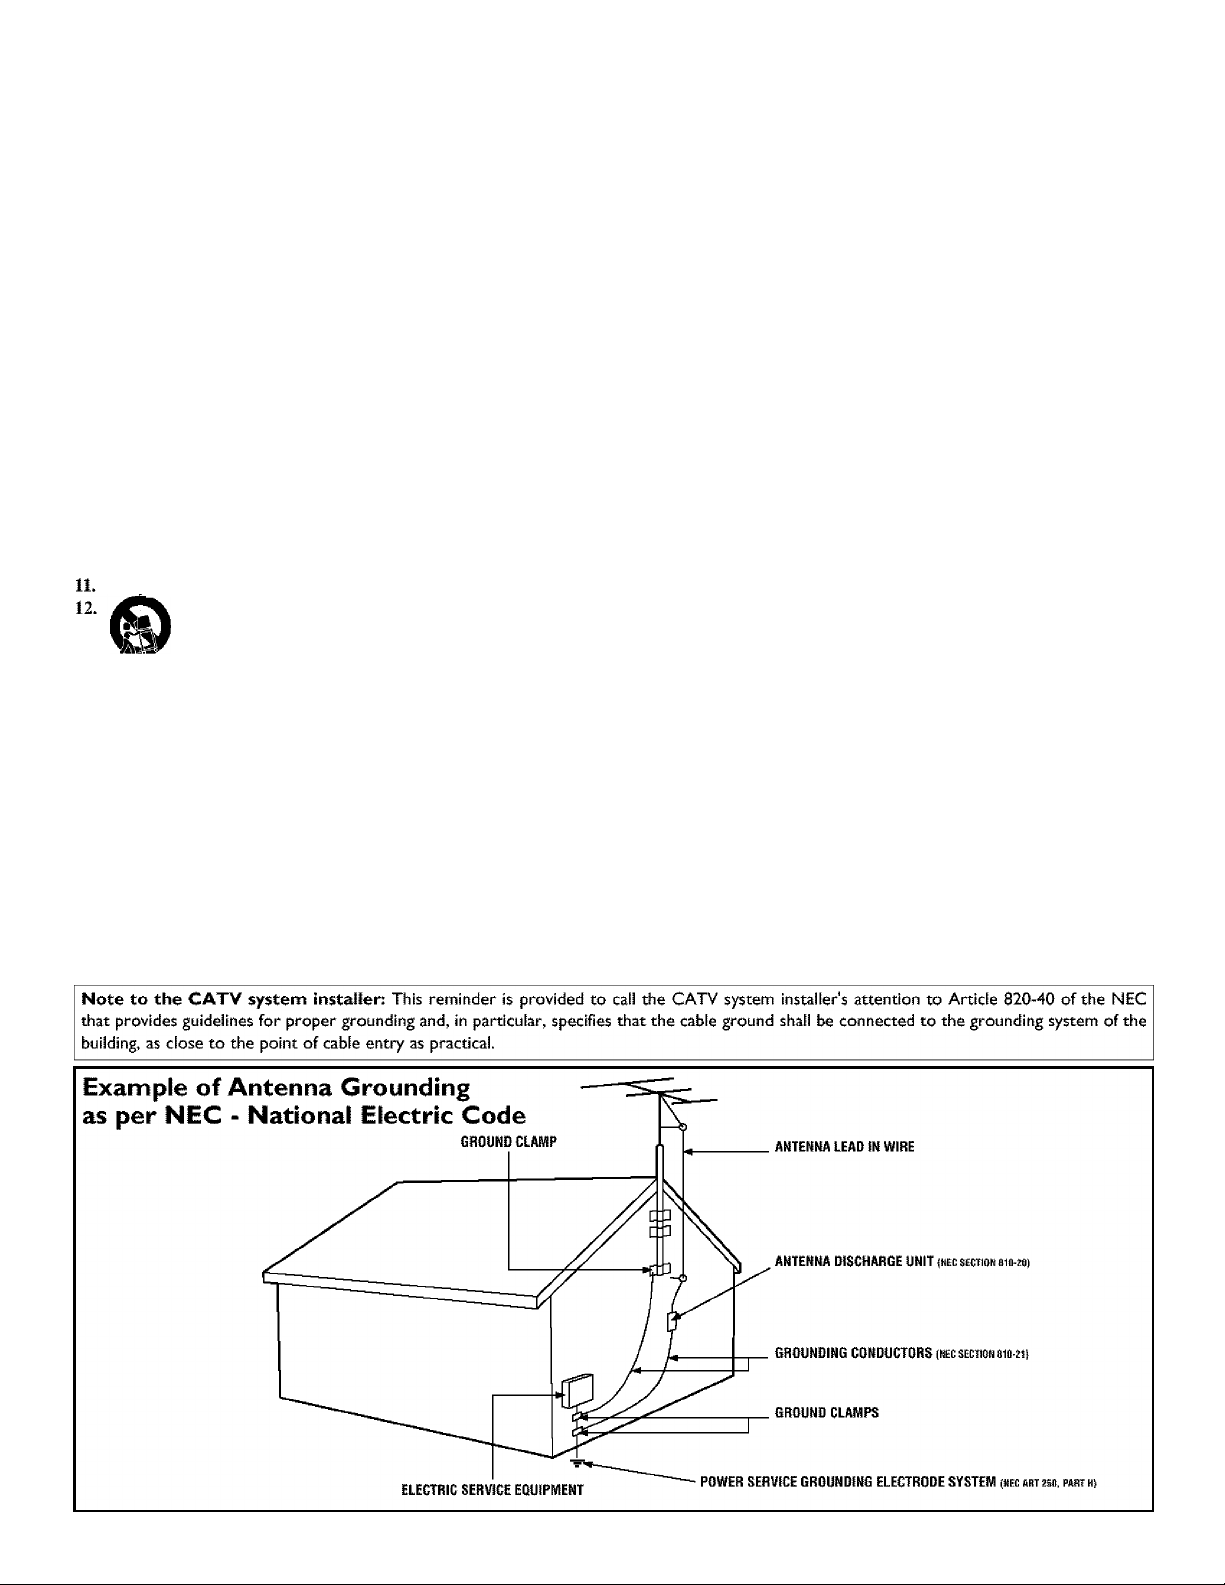
20. Outdoor Antenna Grounding - If an outside antenna is connect
ed to the receiver, be sure the antenna system is grounded so as to
provide some protection against voltage surges and built up static
charges.
Section 810 of the National Electric Code, ANSl/NFPA No. 70
1984, provides information with respect to proper grounding of
the mast and supporting structure, grounding of the lead-in wire to
an antenna discharge unit, .size of grounding connectors, location
of antenna-discharge unit, connection to grounding electrodes, and
requirements for the grounding electrode. See Figure below.
21. Object and Liquid Entry - Care should be taken so that objects
do not fall and liquids are not spilled into the enclosure through
openings.
22. Battery Usage CAUTION - To prevent battery leakage that may
result in bodily injury, property damage, or damage to the unit:
• Install all batteries correctly, with + and - aligned as marked on
the unit.
• Do not mix batteries (old and new or carbon and alkaline, etc.).
• Remove batteries when the unit is not used for a long time.
SAFETY INSTRUCTIONS - Read before operating equipment
Safety Precautions
Warning: To prevent fire or shock hazard, do not expose this equip
ment to rain or moisture.
Federal Communications Commission (FCC) Warning; Any
unauthorized changes or modifications to this equipment void die
user’s authority to operate it.
Laser Safety
This unit employs a laser. Only a qualified service person should
remove the cover or attempt to service this device, due to possible
eye injury.
CAUTION: USE OF CONTROLS OR ADJUSTMENTS OR
PERFORMANCE OF
PROCEDURES OTHER THAN THOSE SPECIFIED HEREIN
MAY RESULT IN
HAZARDOUS RADIATION EXPOSURE.
CAUTION: VISIBLE AND INVISIBLE LASER RADIATION
^U£N OPEN AND INTERLOCK depeaxED. DO NOT
STARE INTO BEAM, THE BEAM IS LOCATED INSIDE,
NEAR THE DECK MECHANISM.
Special Information for Canadian Users
This digital apparatus does not exceed the Class B limits for
radio noise emissions from digital apparatus as set out in the
Radio Interference Regulations of the Canadian Department of
Communications.
Radio/TV Interference
This equipment has been tested and found to comply with the limits
for a Class B digital device, pursuant to Part 15 of the FCC Rules.
These limits are designed to provide reasonable protection against
hannful interference in a residential installation. This equipment gener
ates, uses, and can radiate radio frequency energy and, if not installed
and used in accordance with the instructions, may cause harmful inter
ference to r^o communications. However, there is no guarantee that
interference will not occur in a particular installation. If this equipment
does cause harmful interference to radio or television reception, which
can be detennined by turning the equipment off and on, tte user is
encouraged to try to correct the interfeience by one or more of the fol
lowing measures:
1) Reorient or relocate the receiving antenna.
2) Increase the separation between the equipment and the
receiver,
3) Connect the equipment into an outlet on a circuit different
from that to which the receiver is connected.
4) Consult the dealer or an experienced radio/TV technician for
help.
WARNING
To reduce the risk of fire or electric shock, do not expose this appli
ance to rain or moisture,
CAUTION
Use of controls or adjustments or performance of procedures other
than herein may result in hazardous radiation exposure.
The set complies with the FCC-Rules, Part 15 and with 21 CFR
1040.10.
Copyright Protection
Unauthorized copying, broadcasting, public perfonnance and lending
of Discs are prohibited.
This product incorporates copyright protection technology that is
protected by method claims of certain U.S. patents and other mtellectual property rights owned by M^rovision Corporation and
other rights owners.
Use of this copyright protection technology must be authorized by
Ma:rovision Corporation and is intended for home and other limited
viewing uses only unless otherwise authorized by Macrovision
Corporation, Reverse engineering or disassembly is prohibited.
Declaration of Conformity
Trade Name:
Responsible Party:
Philips
Philips Consumer Electronics North America
PO. Box 14810
Knoxville, TN 37914-1810
(865)521-4316
LASER SAFETY
This unit employs a laser. Due to possible
eye injury, only a qualified service person
should remove the cover or attempt to serv
ice this device.
USE OF CONTROLS OR ADJUST
MENTS OR PERFORMANCE OF
PROCEDURES OTHER THAN
THOSE SPECIFIED HEREIN MAY
RESULT IN HAZARDOUS RADIA
TION EXPOSURE.
LASER
Type
Wave length
Output Power
Beam divergence
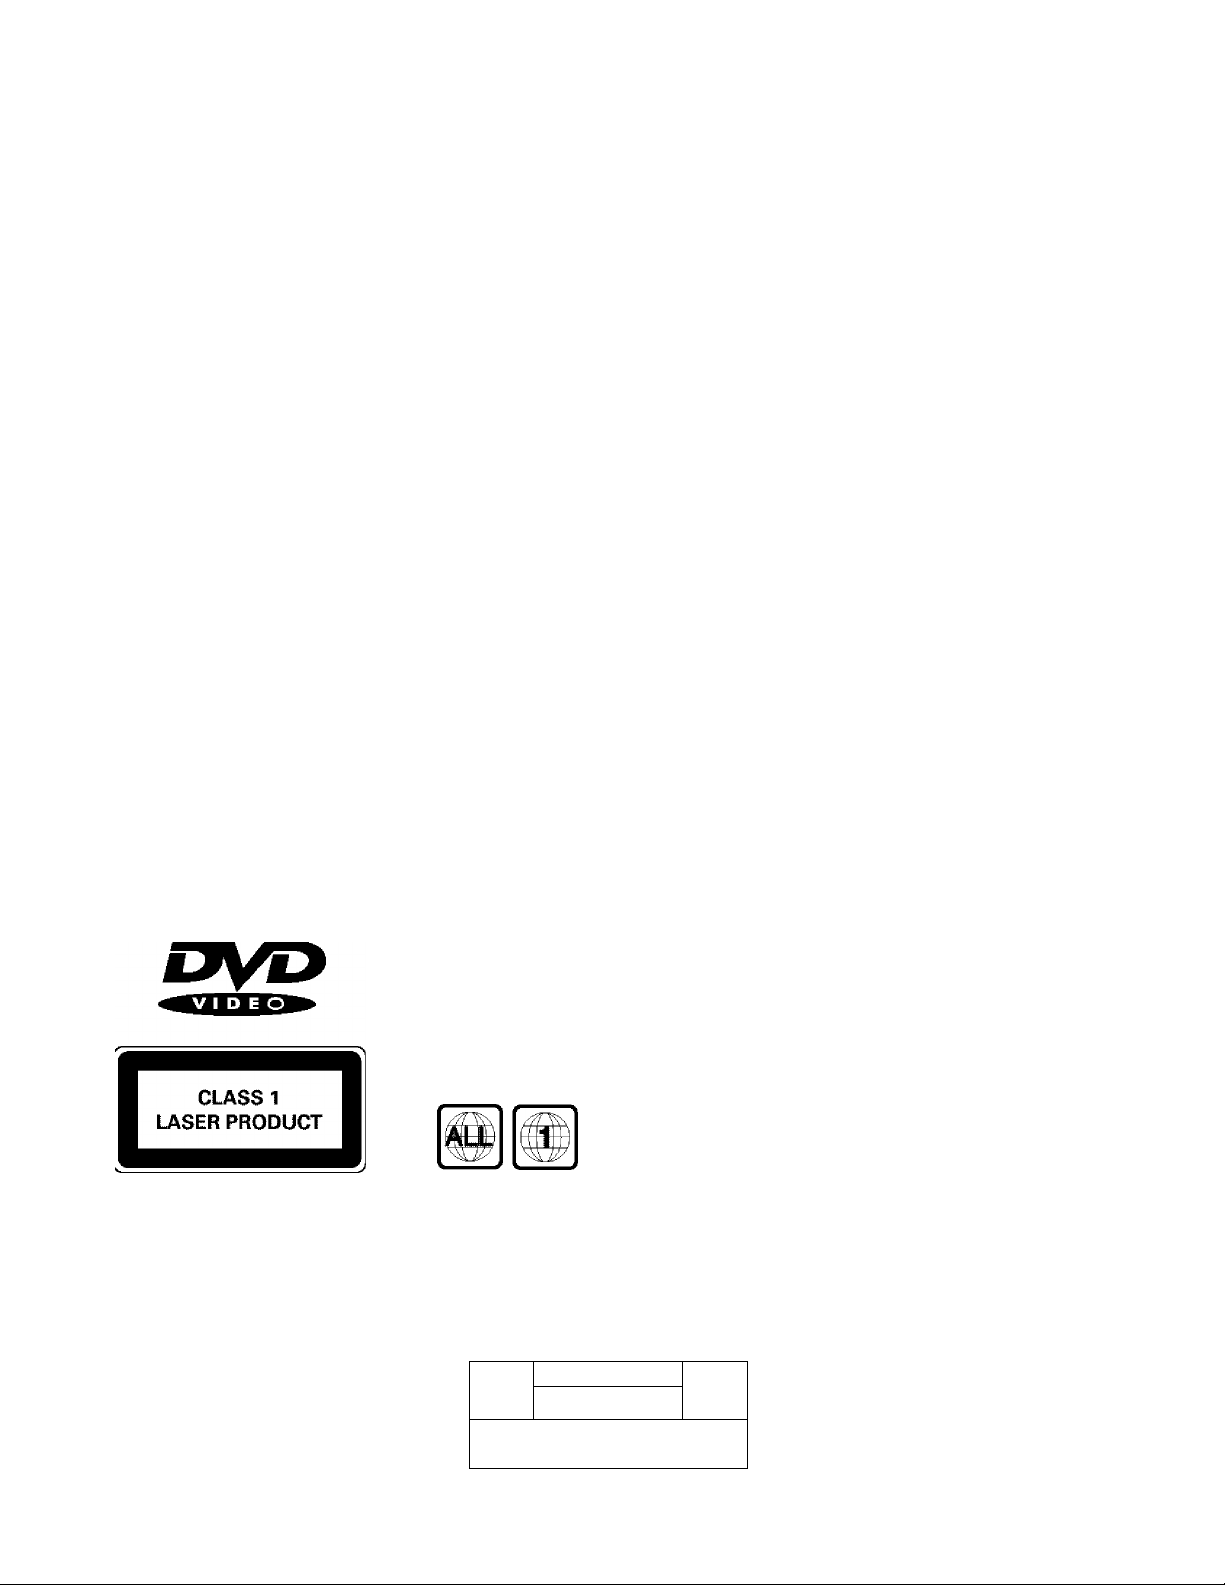
for ALL regions or for Region 1 in order
to play on this TV/DVD Player. You can
not play Discs that are labeled for other
regions. Look for the symbols above on
your DVDs, If these region symbols do
not appear on your DVDs, you can not
play the DVD in this TV/DVD Player.
rrnimTi
RISK (№ EI^CTTtiC SHOCK
A
CiUITIOHi: TO n^UCE T№ IH5K № ELEOÌRIC SHKK, £H3 NOT
BEiyfDlfE ((HI SACK!. NO U^Fl€E№NCEABJ.E PARTS
INSI[^. PEIiER SEfhACRliO Iti SERWCE P£RSON№L
DO hidTOPEN
InGalp/AlGaAs
650 nm (DVD)
790 nm (VCD/CD)
7 mW (DVD)
7 mW (VCD/CD)
28“ (DVD)
32« (VCD/CD)
The region code for
this set is ALL or 1.
DVDs must be labeled
A
NOTE: PICTURES SHOWN MAYBE
DIFFERENT BETWEEN COUNTRIES.
NEVER MAKE OR CHANGE CON
NECTIONS WITH THE POWER
SWITCHED ON.
CAUTION
VISIBLE AND INVISIBLE LASER
RADIATION WHEN OPEN AVOID
EXPOSURE TO BEAM (WARNING
LOCATION: INSIDE ON LASER COVERSHIELD OR THE BACKPLATE OF
SET)
This product incorporates copyright protec
tion technology that is protected by method
claims of certain U.S. patents and other
intellectual property rights owned by
Macrovision Corporation and other rights
owners. Use of this copyright protection
technology must be authorized by
Macrovision Corporation, and is intended
for home and other limited viewing uses
only unless otherwise authorized by
Macrovision Corporation. Reverse engi
neering or disassembly is prohibited.

^ ^ .........................-
introduction
Weicome/Registration of Your TV...............................................2
Safety Instructions
Table of Contents..........................................................................5
Features
Disc Types and Disc Cleaning......................................................6
........................................................................................
....................................................................
3-4
install Menu
How to use the Language Control...................................7
How to use the Tuner Mode Control..............................................8
How to Automatically Program Channels......................................9
How to Add or Delete Channels ..................................................10
Picture Menu
How to use the Picture Adjustment Controls
Sound Menu
■ l!l]
How to Use the Sound Adjustment Controls
Features Menu
Li"
How to Use the Timer Controls
Using the Format Control
Understanding the AutoLock'^'^ Controls .................................15
Setting up the AutoLockT>^ Access Code
How to Block Channels
How to Clear All Blocked Channels at the Same Time .... 18
How to Block All Channels at the Same Time
Blocking Programming Based on Movie Ratings
Blocking Programming Based on TV Ratings ............................21
Other AutoLock'J'^* Blocking Options
How to Use the Active Control
..........................................................
..............................................................
....................................................
......................................
..................................
.....................................
.................
.................
...........................
.......................
14
17
19
20
22
23
Remote Control Use
Setting the Sleeptimer Control ......................................24
How to use the Closed Captioning Control..................................25
Setting the SmartPicture’^^ Control
Setting the SmartSound™ Control
Using the QuadraSurF^i Buttons (Alternate Channel).. .28-29
...........................................
............................................
26
27
6
II
12
13
16
Operating the DVD Player
Operating the DVD Player - Basic Operation
DVD Remote Control Button Descriptions
Menu Bar Operation....................................................................32
Setup Menu
Language (Default Audio, Default Sub-title)
T\ {TV System) ..........................................................................34
Audio Menu (Digital Output) ..................................................35
Features (PBC -Play Back Control)
Access (Parental Level, Change PIN, Disc Lock)
Preference Menu
Sound (Night Mode)
Features (Help Line, Status Window)
Toolbar
Play Option (Disc Navigation, Audio, Sub-title)
Slide Show (Pic Time, Trans Time, Trans Effect)
View (Angle, Zoom, Chapter Review, Rotate)
Search (Time, Fast, Slow, Frame by Frame)
Program (Program, Tracks, Play List, Clear Ail)
Remote Control Features
Audio Button ............................................................................45
Sub-title Button ........................................................................46
Repeat Button
Repeat A-B Button
Bookmark DVD
Audio CD Playback.....................................................................49
.................................................................
...........................................................................
...................................................................
..........................................................................
...............................
.........................................
......................................
...............
...........................
...................
......................
...................
.........................
...........................
....................
30
31
33
36
37
38
39
40
41
42
43
44
47
47
48
General Information
Troubleshooting Tips.....................................................50
Cleaning and Care ......................................................................51
G lossary of Terms .....................................................................52
Index............................................................................................53
Factory Service Location ......................................................54-55
Warranty......................................................................................56
NOTE; It is possible that this owner’s manual may be used
with several different television models. Not all features
(and drawings) discussed In this manual will necessarily
match those found with your television system. This is nor
ma! and does not require you contacting your dealer or
requesting service.

Features
Active Control™ continuously measures and corrects all
incoming signals to help provide the best picture quality. This
feature monitors and corrects both the sharpness control and
noise reduction control.
Audio/Video Jack Panel allows direct connections with accès*
sory devices, providing quality TV picture and sound playback.
Audio Volume Leveler (AVL) Control keeps the TV sound at
an even level. Peaks and valleys in volume that occur during
program changes or commercial breaks are reduced, making for
a more consistent, comfortable sound.
AutoLock™ allows you to block the viewing of certain chan
nels or programs with certain ratings if you do not want your
children to view inappropriate materials.
Auto Pri^ramming scans (when activated) for all available
channels from regular antenna or cable signals and stores only
active broadcast stations in the TV’s memory,
AutoPicture™ allows you to change the picture settings (color,
tint, contrast, etc.) for various types of programming, such as
sports, movies, multimedia (games), or weak signals with the
push of one button.
AutoSound™ allows you to select from three factory-set con
trols and a personal control that you set according to your own
preferences through the on-screen Sound menu. The three fac
tory-set controls (Voice, Music, and Theatre) enable you to tai
lor the TV sound so as to enhance the particular programming
you are watching.
Channel Edit allows you to add or delete channels from the
list stored in the TV’s memory. Channel Edit makes it easy to
limit or expand the number of channels that are available to you
when you press the Channel (-I-) or (—) buttons on your remote
control.
Closed Captioning allows the viewer to read TV program dia
logue or voice conversations as on-screen text.
Contrast + helps you sharpen the picture quality by making
dark portions of the picture darker and light portions brighter.
Infrared Remote Control controls your TV and the built in
DVD player.
On-screen Menu shows helpful messages and instructions for
setting TV feature controls (can be viewed in English, French,
or Spanish).
Sleep Timer automatically turns the TV OFF after a set amount
of time that you choose.
Standard Broadcast (VHF/UHF) or Cable TV (CATV)
channel capability allows for viewing by antenna or cable.
Stereo capability, including a built-in audio amplifier and twin-
speaker system, allows for the reception of TV programs broad
cast in stereo sound.
Surf Button allows you to easily switch among only the chan
nels that are of interest to you (the ones that you have pro
grammed into the TV’s Surf control through the on-screen
menu).
Timer allows you to set your TV to turn itself ON and OFF
once or daily like an alarm clock.
DVD Player plays DVD discs, Video CDs, Audio CDs, Photo
CDs, etc. Create Favorite Track Programs and store them in the
TV/DVD Players memory.
Playable Disc Types
This DVD Player will play Digital Video Discs (DVDs), Audio
CDs, CD-Rs and CD-RW discs. In order to play a DVD or Audio
CD on this DVD Player, make sure the Disc meets the require
ments for the Region Code as described on page 4.
The Discs should contain the logos shown below and meet the
standards listed for each.
Disc
Type
Digital
Video
Disc
Audio
CD
Video
CD
Compact
Disc
Recordable
Compact
Disc
Rewritable
Logo
VID EO
nco—WCT
nmiMuoio
InEnilLVIDCOl
iReconiablel
Contents Disc Size
12 cm
Sound
and
lectures
Sound
Sound
and
Pictures
Sound
Pictures
Sound
Pictures
(singles)
and
(singles)
and
8 cm
12 cm
8 cm
12 cm
8 cm
¡2 cm 74 minutes
Cleaning Discs
Some problems occur because the disc inside the player is dirty. To
avoid these problems clean your discs regularly, in the following
way:
• When a disc becomes dirty, clean it with a CD cleaning cloth.
Wipe the disc from the center out.
Caution; Do not use solvents such as benzine, thinner, commer
cially available cleaners, or anti-static spray intended for analog
discs.
End-of-Life Disposal
Your new television and its packing contain materials that can be
recycled and reused. Specialized companies can recycle your prod
uct to increase the amount of reusable materials and minimize the
amounts that need to be properly disposed.
Your product also uses batteries that should not be thrown away
when depleted, but should be handed in and disposed of as small
chemical waste.
When you replace your existing equipment, please find out about the
local regulations regarding disposal of your old television, batteries,
and packing materials.
Auto Lock, Auto Picture, Auto Sound, Active Control, QuadraSurf
are all registered trademarks of Philips Consumer Electronics Company.
Maximum
Playback Time
Approx. 4 hours
(singie-sided)
Approx. 8 hours
(double-sided)
Approx.
80
minutes
(single-sided)
Approx.
160
minutes
(double-sided)
74 minutes
20 minutes
74 minutes
20 minutes
Copyright © 2002 AH rights reserved.
Disc
Segments
DVDs are
divided into Titles,
which are divided
into Chapters.
Titles and Chapters
are numbered.
Audio CDs are
divided into nun^ered
Tracks, i.e., a track
may be one song.
Video CDs are
divided into Tracks.
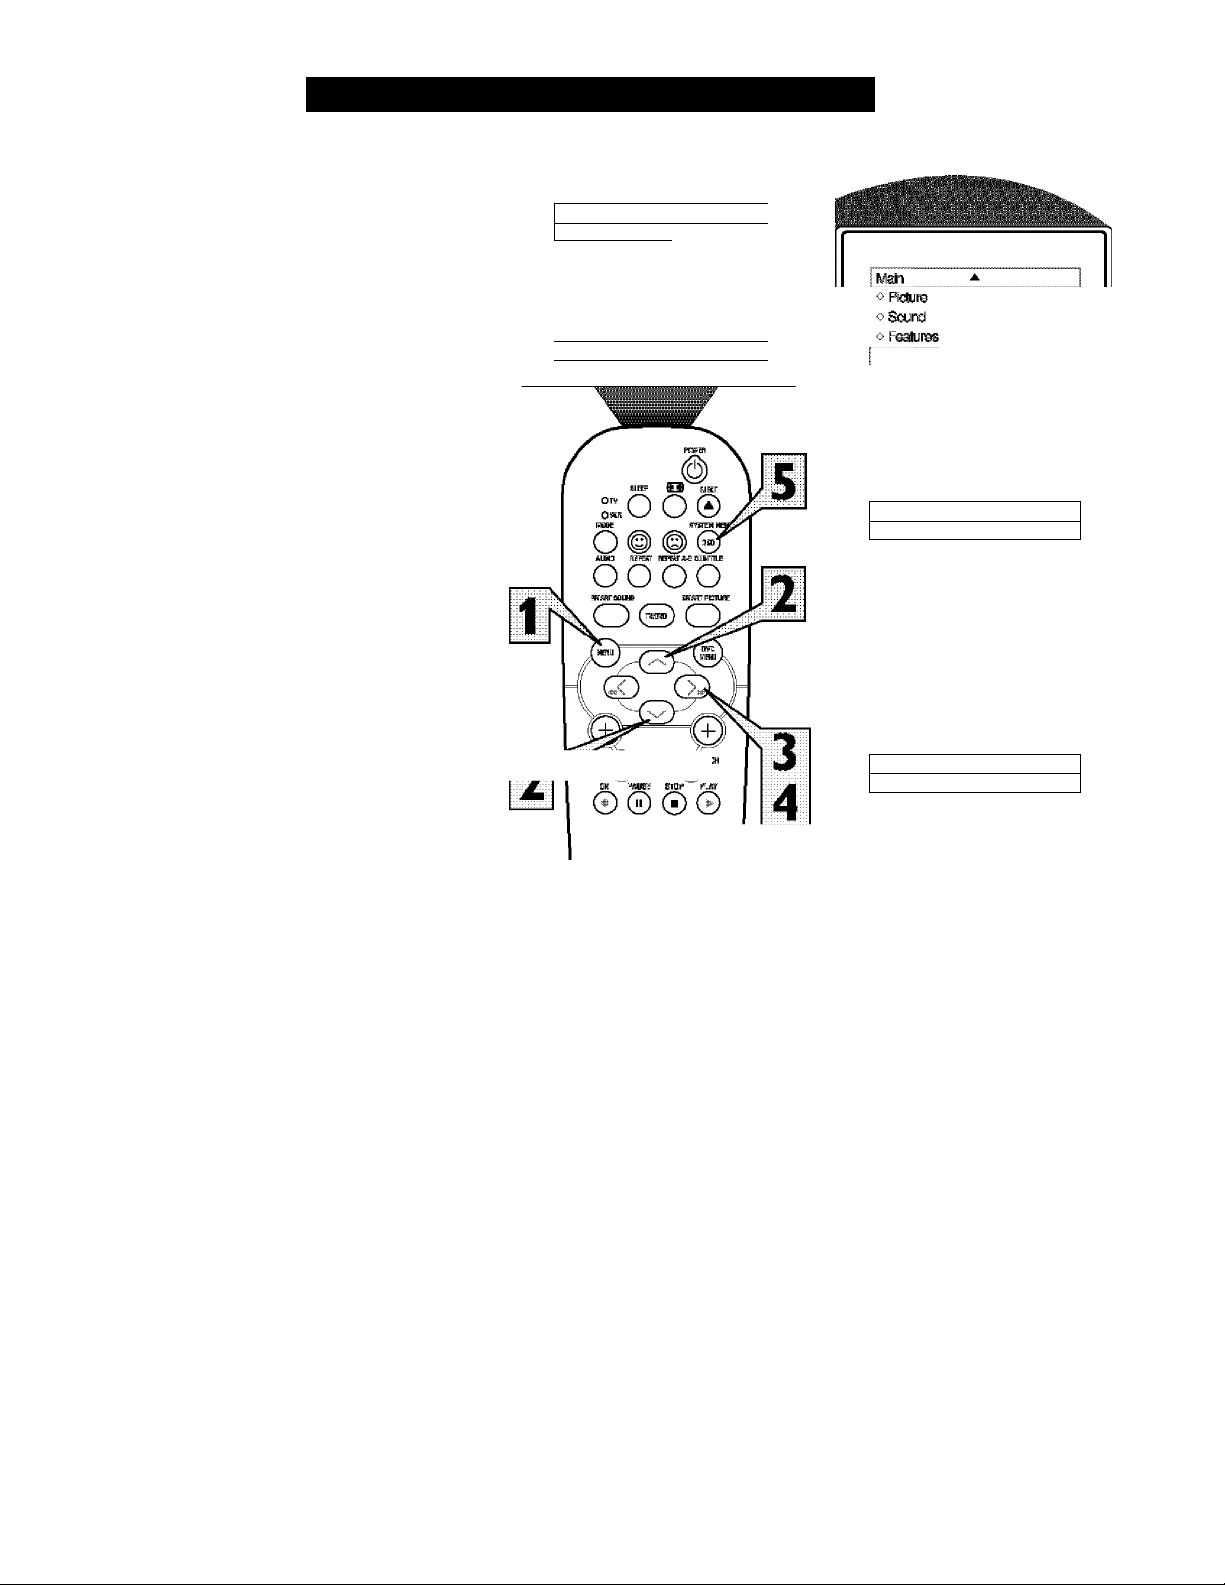
How TO Use the Language Control
TTor our Spanish speaking TV owners an on-
J screen LANGUAGE option is present. With
Ike LANGUAGE control you can set the TV’s
on-screen menu to be shown in either English
or Spanish.
Press the MENU button on tlie
remote to show tlie on-screen meitu.
\
Press the CURSOR UP or DOWN
buttons to scroll Üt-Tougli. the oit-screeit
2
menu luttil the word INSTAIjL is
highlighted.
K^ain
i/Pkituto
i> Sound
0 Featurss
o Instil Sharpne^
▲
►
Color
Petiira
TlrH
iviore...
▼
1
Lisngi!^
Tungr lUods
1
v'insteii
AiHoProgtam
"iri criamal Edt
Press the CURSOR RIGHT button
to display the INSTAIjU, menu features.
3
LANGUAGE will be highlighted.
Press the CURSOR RIGHT button
repeatedly to select ENGLISH or
4
ESPAÑOL (Spanish).
When finished, press the SYSTEM
MENU (OSD) button to remove the
5
menu from the TV’s screen.
Helpful Hint
Tlte Lmiguage contol only makes the TV’s
on-screen MENU items appear in English
or Spanish text.
It does not change the other on-screen text
features such as Closed Caption (CC) TV
shows.
OQO'
® (D ®
® ® ®
® ® ®
© ® O
Instol ^
vLangu®» EinslBn ►
0 Tuner Mocte
o AuteProgfam
o Charnel Eüt
OR
Instalar
V Idioma Esi^ftol ►
0 Sintonía
0 ALito Progfama
0 EdtorCanal
A
7

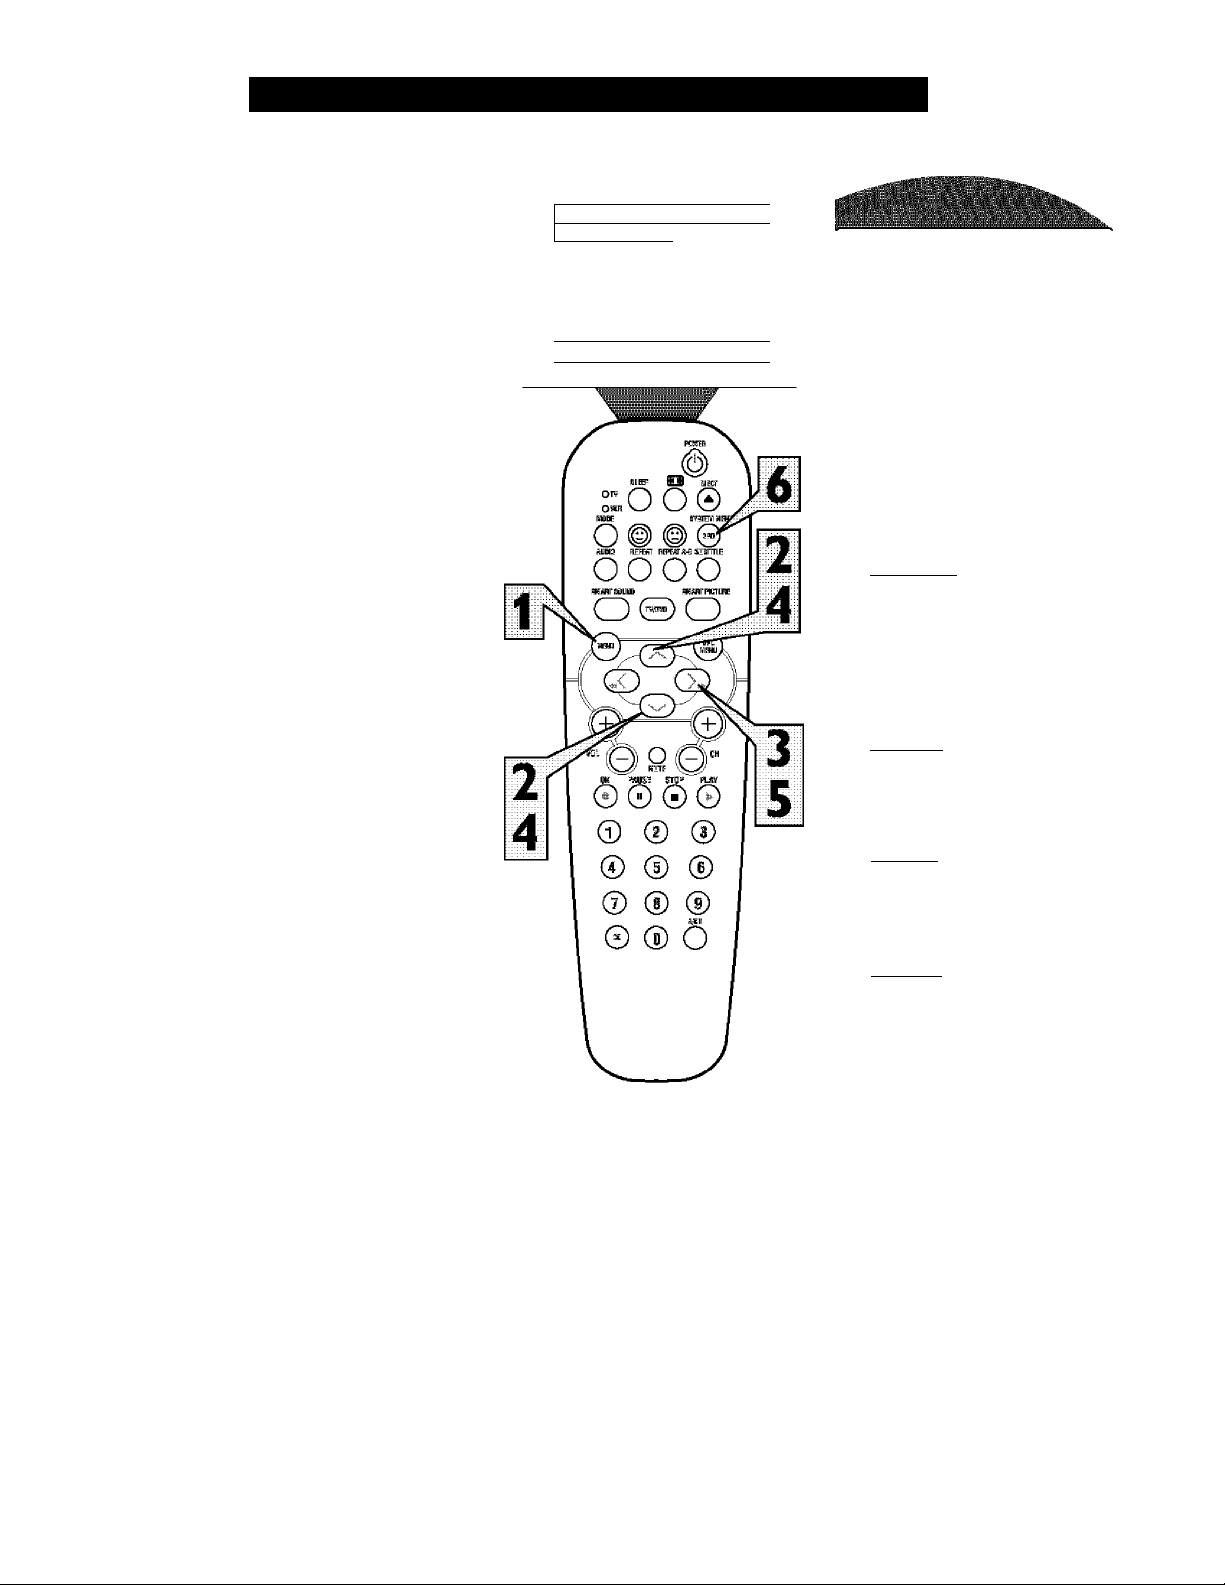
How TO Use the Tuner Mode Control
'he TUNER MODE control allows you to
change the TV’s signal input to either
T
ANTENNA, CABLE or AUTO mode. It’s
Important for the TV to know what type of
signal to look for. {From a Cable TV signal or
a normal Antenna signal.) In the AUTO
mode, when the AUTO PROGRAM feature Is
activated, the TV will automatically ciwose
the correct mode.
Press the MENU button on tlie
remote to show tlie on-screen menu.
\
Press the CURSOR UP or DOWN
buttons to scroll Üt-Tougli. the oit-screeit
2
menu until the word INSTALL is
highlighted.
Press the CURSOR RIGHT button
to display the INSTALL menu fea
3
tures.
Press CURSOR UP or DOWN but
tons to scroll die Install features until
4
the words TUNER MODE is high
lighted.
Press the CURSOR RIGHT button
to select either ANTENNA, CABLE,
5
or AUTO mode.
When fínished, press the SYSTEIVI
M:ENU (OSD) button to remove the
6
on-screen menu from die TV’s screen.
HiiLPiUL Hint
Wlien CABLE is selected, channels 1-125
are available.
Wlien ANTENNA is selected, channels 2
69 are available.
Wlien AUTO is selected, the TV will automadcally set iteelf to die amect mode
based on the type of signal it detects when
die AUTO PROGRAM feature is activated.
How TO Automatically Program Channels
our TV can automutically set itself for
local area (or Cable TV) channels. This
F
makes it easy for you to select only the TV
stations in your area when the CHANNEL
(+), (-) buttons are pressed.
Note: Make sure the antenna or cable signal
connection has been completed before AUTO
PROGRAM is activated.
Press the MENU button on tlie
remote to show tlie on-screen meitu.
Press the CURSOR UP or DOWN
buttons to scroll tlirougl! the oii-scTeeii
1
menu luttil the word INSTAIjL is
highlighted.
Press the CURSOR RIGHT button
to display the INSTALU, menu fea
3
tures.
Press CURSOR UP or DOWN but
tons to scroll die histall features until
4
the words AUTO PROGRAM: are
highlighted.
Press the CURSOR RIGHT button
to start die Auto Program scanning of
5
channels. Auto Programmiing will store
ijll available channels in die TV’s
memory^ then tune to die lowest avail
able cluumel when done.
№in
vpfcüra
* &!und Oslar
oF«Sjrss Piajjrs
o lr№ll
▲
Stiarpne®
Tit
More...
▼
1
h^air
0 Pictura
о Sound
1
0 Fsatii^
vinsbll
Insmil
о Langusa
о Tunar
I удив Program
о Ctiannal ЫН
I Auto Program
oCtenrel 12
о ООООООЙООООООООООООООО
I Auto Pregan
* CHannal 13
o OOOOOOOOOOOOÍíOOOOOOOOO
Langii^
Tuner №>d9
Ants Progfsm
ТП СРиппе! ЕсИ
When ttitished, press the SYSTEM
MENU (OSD) button to remove the
6
menu from the TV’s screen.
Ht U4 CL Hint
Wlien CABLE is selected, channels 1-125
are available.
Wlien ANTENNA is selected, channels 2
69 are available.
Wlien AUTO is selected, the TV will automadcally set iteelf to die aurect mode
based on the type of signal it detects when
die .AUTO PROGR.AM feature is activated.
I Auto Progfain
o Ctiannal 1'1
o oooooooooooooc-oooooooo
9
hannel Edit makes It easy for you to ADD
or DELETE channels from the list of
C
channels stored in the 7T'"ii memory.
Press the MENU button on tlie
remote to show tlie on-screen meitu.
Press the CURSOR UP or DOWN
buttons to scroll Üt-Tougli. the oit-screeit
1
menu until the word INSTALL is
highlighted.
Press the CURSOR RIGHT button
to display the INSTALL menu fea
3
tures.
How TO Add or Delete Channels
№ln
■'^Ptotura
* &iind
o Futura Pictuie
o IhSsll
A I
► iBhgfilness
Color
Steipn^
Tim
Moro..
▼ {
Inslall
Langur
Tuner tWe
Auto Program
Ctiannel EdK
Press the CURSOR UP or DOWN
buttons to scroll die Install features
4
until die words CHANNEL EDIT are
highlighted.
Press the CURSOR RIGHT button
to display the CHANNEL EDIT
5
options.
With the CHANNEL EDIT options
displayed, and CHANNEL NO. high
6
lighted; enter die channel number (widi
the NUMBERED or the CH + orbuttons) you wish to tidd (Skipped
OFF), or delete (Skipped ON) from the
TV’s memoiyi.
Using the CURSOR DO WN button,
scroll die menu to highlight die wtrrd
7
SKIPPED.
Now use the CURSOR RIGHT but
ton to toggle between ON or OFF.
8
If ON is selected die duuinel is
skipped when scrolling channels with
the CH + OT - buttons. If OFF is
selected the channel is not skipped
when scTolling channels with die CH +
or - buttons.
0 Largua^
o Tuner №cb
o Auto Program
Channel EcH *
vCnanrielNo.
o Slapped
Oiamal Edi
* Channel No.
I »'Skipped
Channel [Edit
o ctiarrel Ma
I ¥'Skipped
Clwinel ^kз.
Slapped
12 ►
On ►
Off ►
When finished, press the SYSTEM
MENU (OSD) button to remove die
9
menu from the TV’s screen.
10
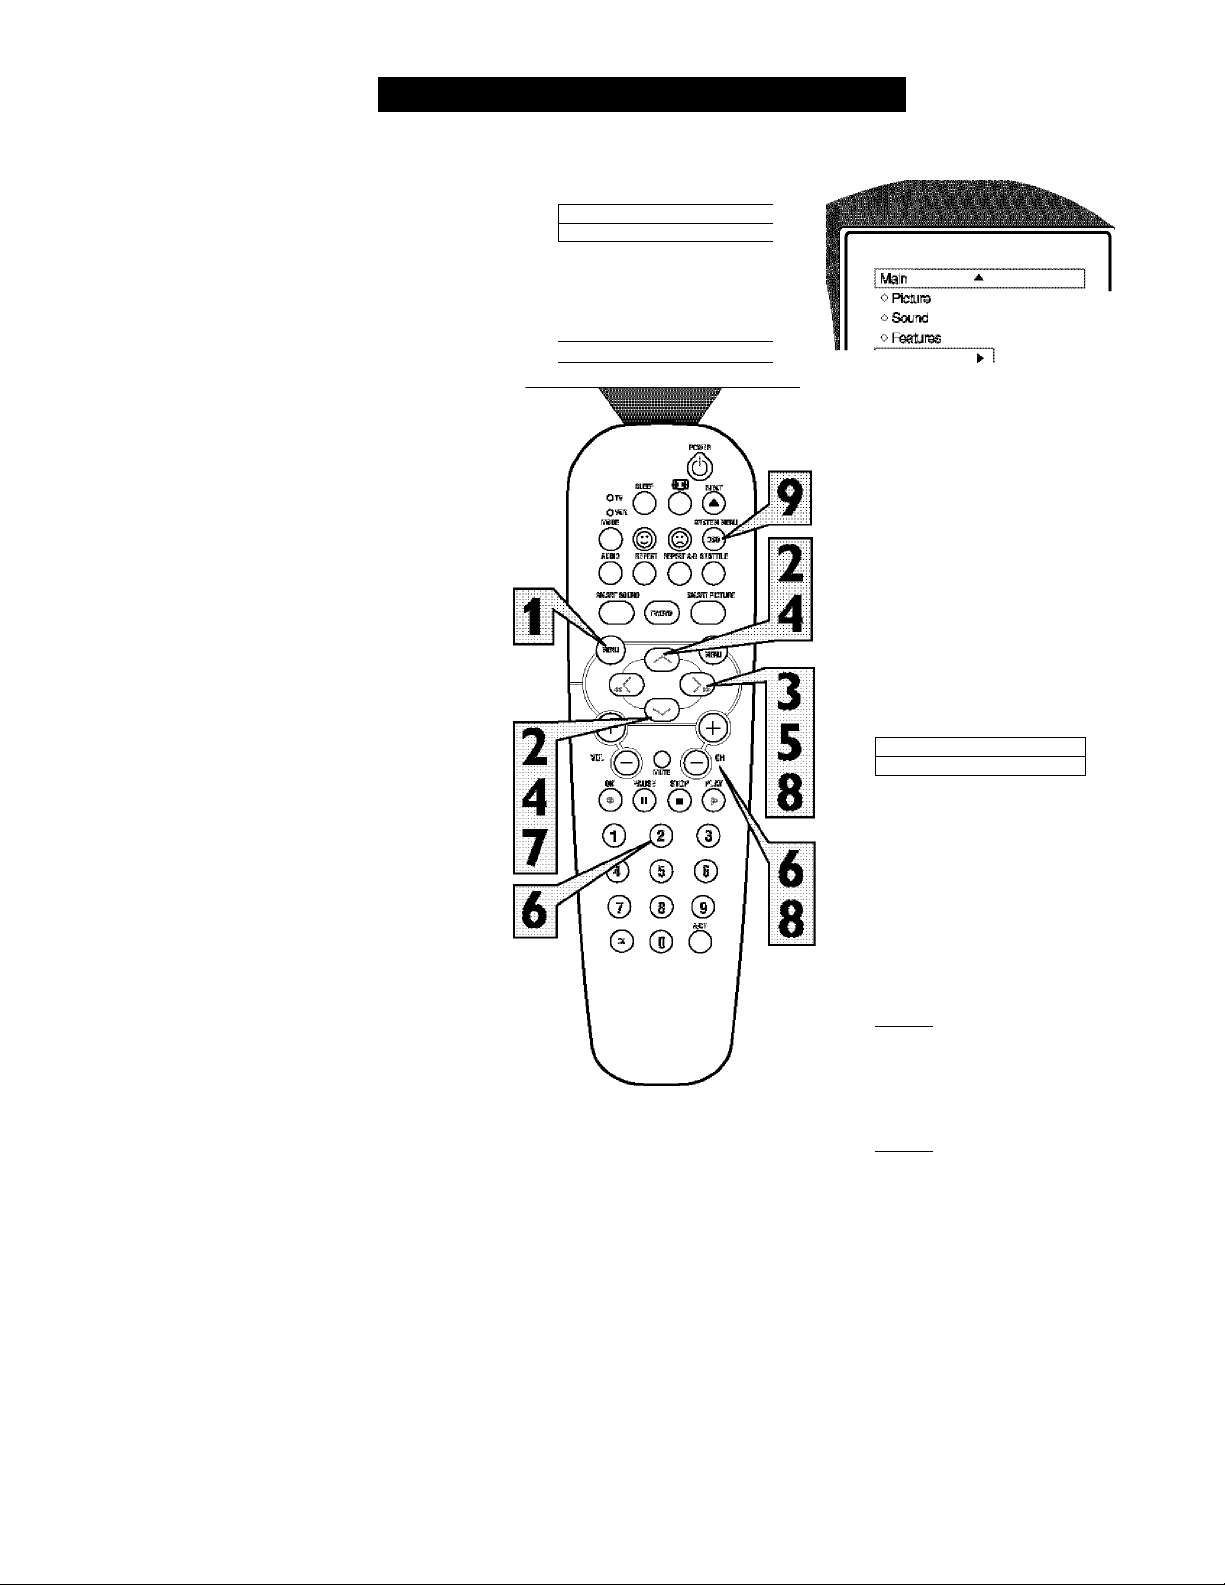
How TO Use the Picture Adjustment Controls
o adjust your TV picture controls, select a
T,
channel and follow the steps shown below:
Press the MEN 11 button on flte remote
to display ftie on-scteeit menu.
1
Press the CURSOR UP or DOWN
buttons uiitQ tlie word PICTURE is
2
Mglilighted.
Press the CURSOR RIGHT button to
display toe PICTURE menu teatures.
3
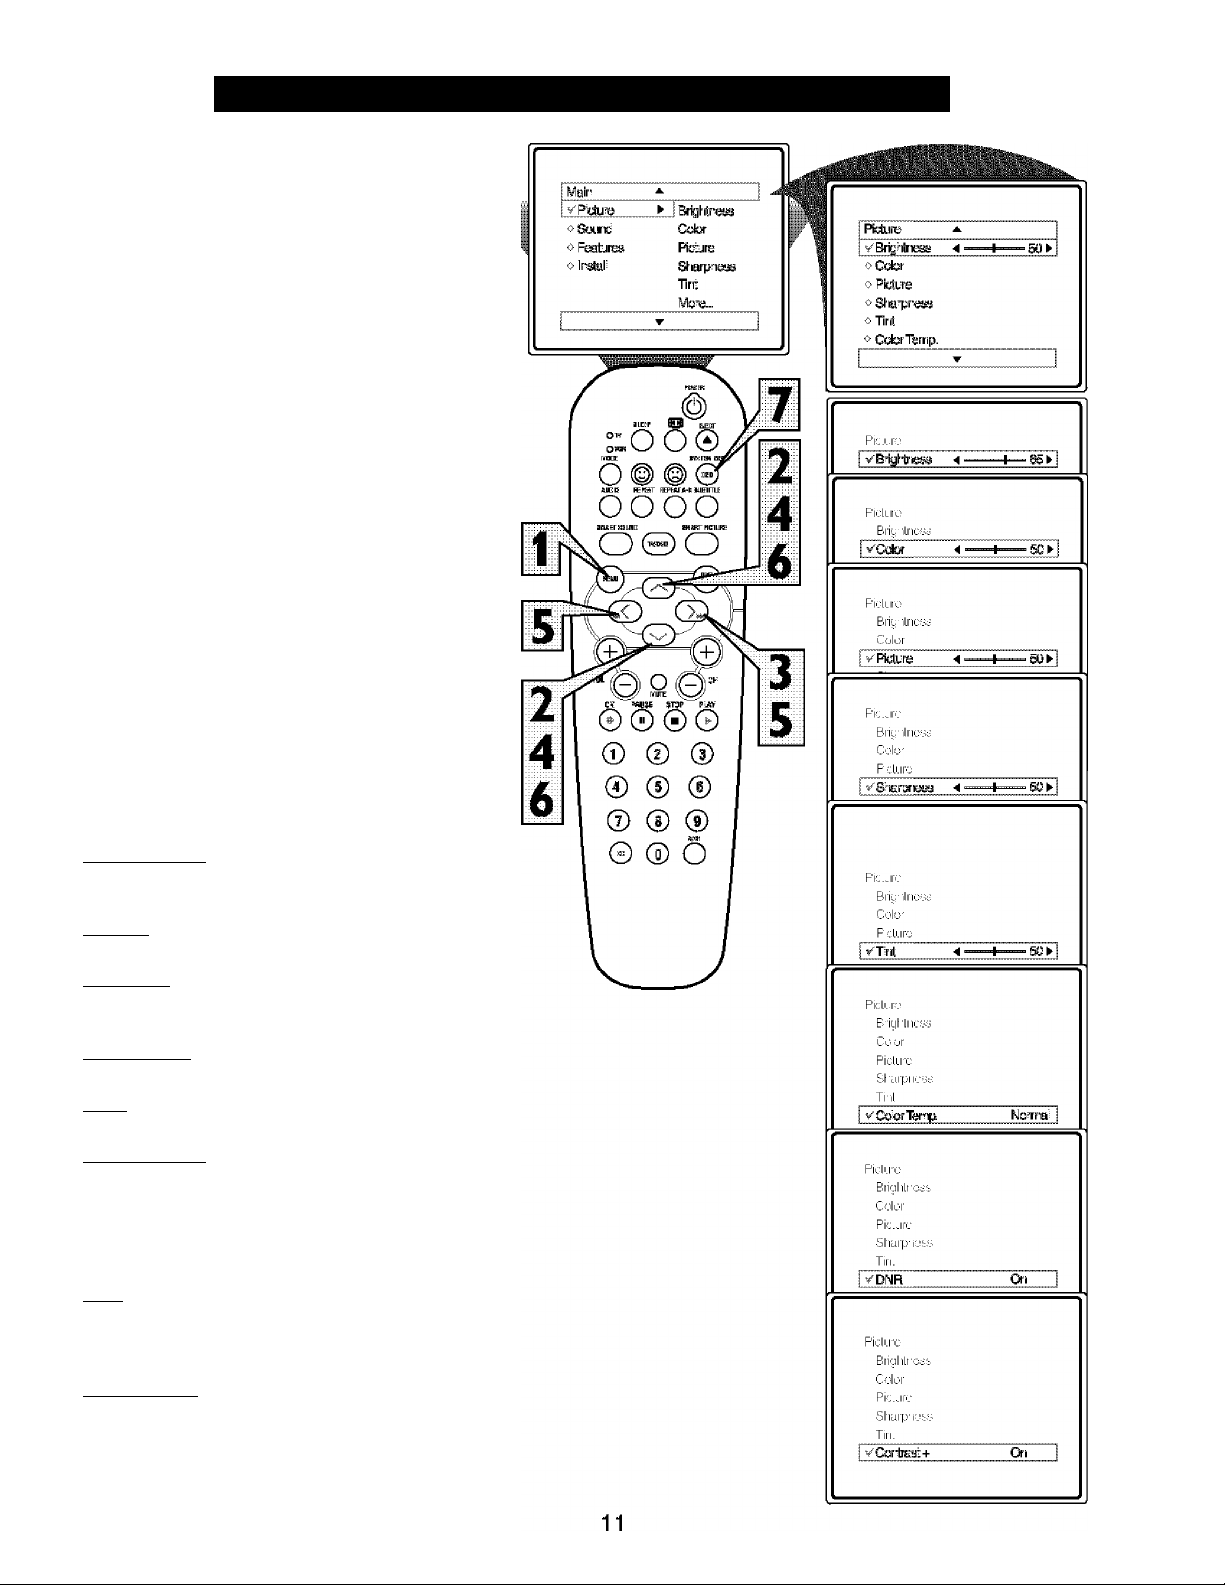
Press CURSOR UP or DOWN but
tons to scroll the Picture features imd
4
liiglilight die control you wi sh to adjust
(Brightness, Qdcir, Picture, Shtupness,
Tint, Color Temp., DNR, or Contrast +).
Press the CURSOR RIGHT or the
CURSOR LEFT buttons to adjust flie
5
selected TOntrol err to mtike selections
for the chosen control.
Press the CURSOR UP or DOWN
buttons to select and adjust other
6
Picture Menu ctintrols.
Wlim finished, press the SYSTEM
MENU (OSD) button to remove tlie
7
menu from tlie TV’s screen.
Helpful Hint
BRIGHTNESS: Press the Cursor Right or
Left buttons until darkest parts of toe picture
are as hriglit as you prefer,
COLOR: Press the Cursor Right or Left
buttons to add or eliminate arlor,
PICTURE: Press the Cursor Right or Left
buttons until lightest parts of toe picture
show good detail,
SHARPNFAS: Press the Cursor Right or
Left buttons to impRwe dehiil in toe picture.
TINT: Press the Cursor Right or Left but
tons to obtain natural skin tones.
COLOR TEMP: Press the Cursor Right
or Left buttons to select NORNIAL, COOL,
or WARM picture preferences. (NORM.AL
will keep toe whites, white; COOL will make
toe whites, bluisli; turd WARM will make the
whites, reddish.)
DNR: Press the Cursor Right or Ijeft but
tons to turn DNR ON err OFF. Djuiamic
Noise Reduction helps to eliminate “noise”
from the picture,
CONTRAST +: Press the Cursor Right or
Left buttons to turn Cbntnist + ON or OFF.
When ON, tois control will optimije the pic
ture contrast firr improved picture clarity.

How TO Use the Sound Adjustment Controls
T^esides the normal volume level control,
£j your TV also has Treble, Bass, Balance,
AVL (automatic volume leveler), Incr.
Surround, Ultra Bass, and Sound
(StereolMono) controls.
Press the MEINU button on tlie remote
to display tlie on-screen menu.
Press the CURSOR UP or CURSOR
DOWN button until the word SOUND
2
is higlilighted.
Press the CURSOR RIGHT button
to display the SOUND menu features.
3
Press the CURSOR UP or CURSOR
DOWN button to scroll the Sound
4
menu features until die amtrol you wish,
to clumge is highlighted {Treble, Bass,
Balance, AYU, Incr. Surround, Ultra
Bass, or Sound).
Press the CURSOR RIGHT or
LEFT button to turn tire adjust or turn
5
the control Qn or Oif.
When finished, press the SYSTEM
MENU (OSD) button to remove die
6
menu from the TV’s screen.
HiiLPFVL Hint
▲
^1‘iclure' ► iBilahTiess
0 Sound Cdsr
0 HKtu'es
0 In^l
1*101115
Steip'oe®
■flrit
hflors...
-r
Sound
oBalgncE
*AVL
o Insr Sunxiund
o UNratteiss
So.'"«
o'lteble
vt = S5^
o hfelanee
OAVL
oiner SummtKl
oUlliHtteiss
▲
4 ===
TREBLE; Press the Cursor Right or l^ft
buttons to adjust the arntTOl, The control
will enlrrmce die high Jieiiuency sounds.
BASS: Press the Cursor Right or Left
buttons to adjust die control. Tlie control
will enluuice die low frequency sounds,
BALANCE: Press the Cursor Right or
Left buttons to adjust die level of sound
coming from die left imd liglit speakers.
AVL: (Auto \tolume Leveler) Press the
Cursor Right or Left buttons to turn the
control On or Off. When On, AVL will level
out the sound being heard when sudden
changes in volume occur during commercial
bleaks or channel changes.
INCR. SURROUND: Press the Cursor
Right or laift buttons to select between
Incr, Surround or Stereo settings (If Stereo),
or select Spatial or Mono (If Mono).
ULTRA B ASS: Press the Cursor Right or
Left buttons to turn Ultra Bass On or Oif.
Ultra Bass will enhance the low tieijuency
sound.
SOUND: Press the Cursor Right or Left
buttons to select between Steieo or Mono
settings. Note: If Steieo is not piesent on a
selected show luid the TV is placed in die
Stereo mode, die sound coming from the TV
will remain in the Mono mode.
0 Tistle
o Balance
j yAVL Q- \
0 Inc- S:;tro:;v*e
*Ut^Bass
Sound
«■ liEolc
ottos
0 tteJanoe
OAVL
o Inor SunmiKl
yllltishte
1 Sound 1
! ^ !
On
SOl'"C
o Itebte
0 tte^
■^tteliinee
oAVL
o Incr SuriTXJndi
1 Sound * 1
o
o Bass
0 Baa'-xe
OAVL
1 ^ Ixf. Surrounc! Steieo
outraltos
1 - i
Sound
0 l^ss
oteteice
OAVL
0 lnDr.SU’!i!)Und
■0 UHi« teSS
»'Ssurd
L = K ^
I
12
How TO Use the Timer Controls
''f Vie Timer controls allow you to use your
1. TV as an alarm dock if set to turn itself
on and off at a specific time. It also can be set
to tune to a specific channel at a specific
time.
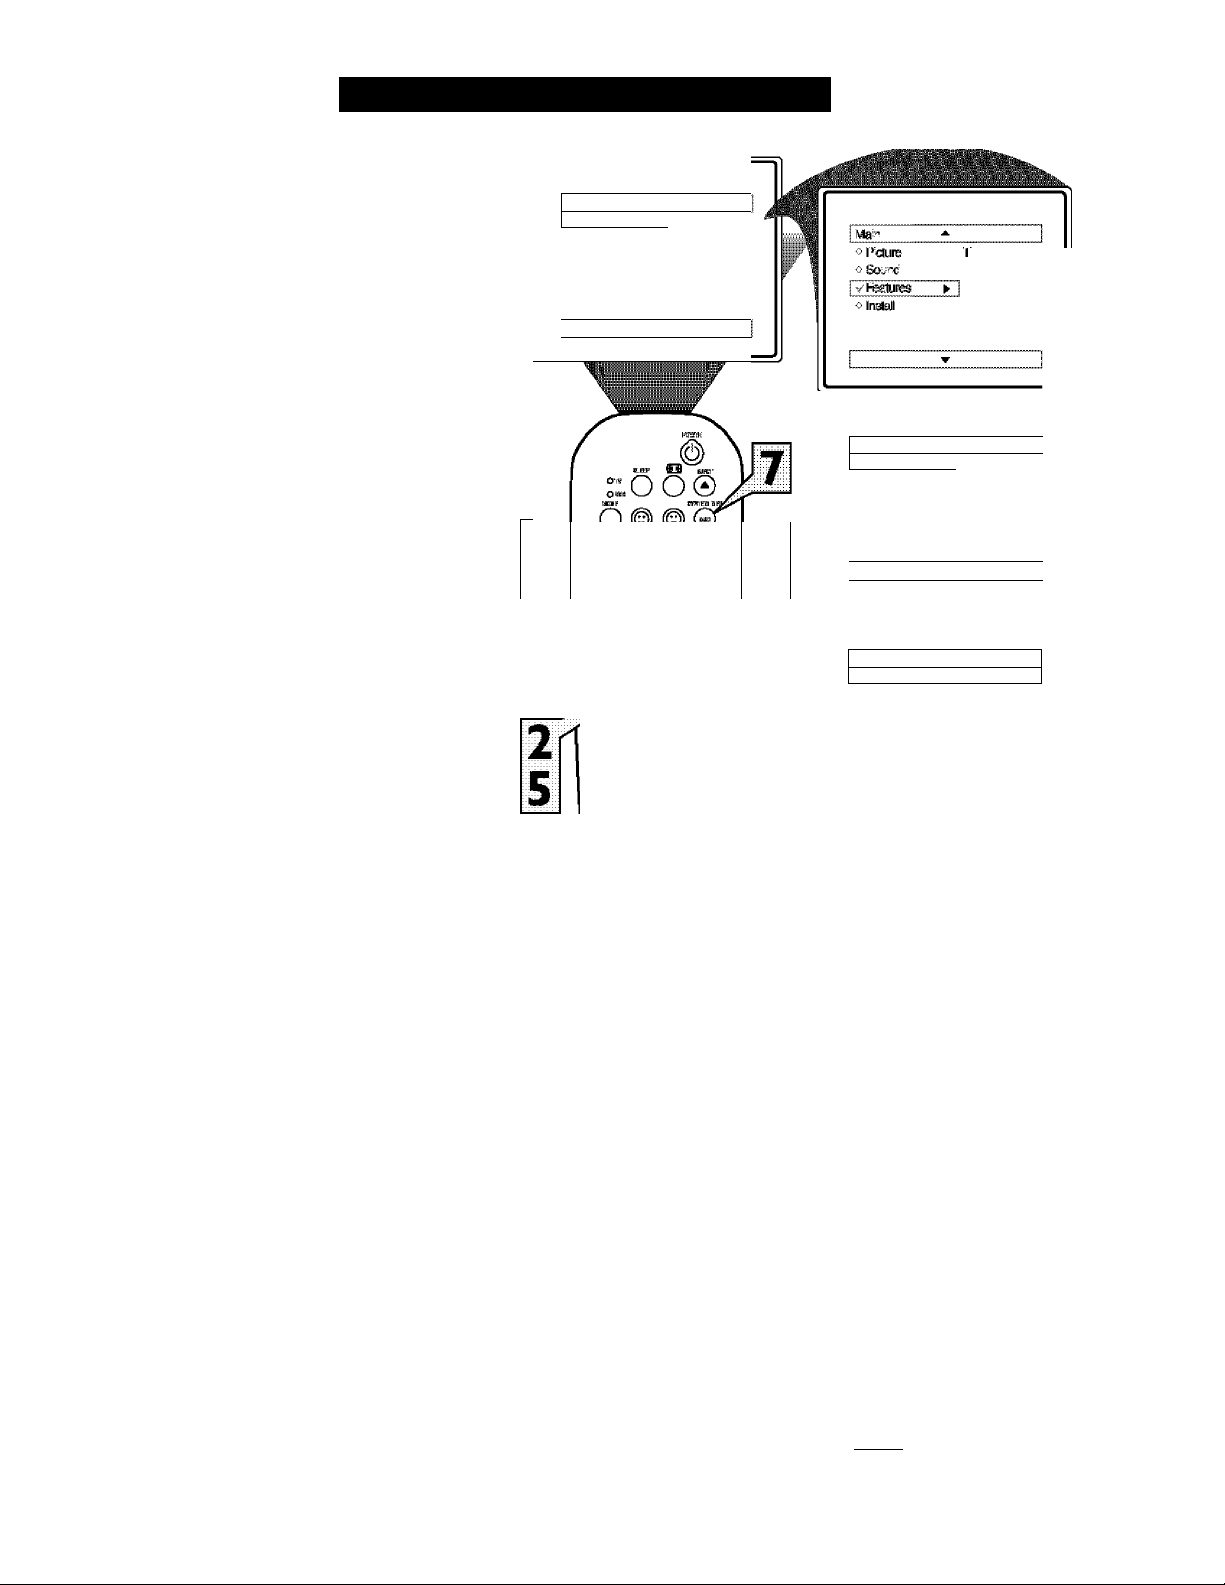
Press the MENU button on tlie
remote to display the oit-screen menu.
1
Press the CURSOR DOWN button
until die word FEATURES is Mgli-
2
lighted.
Press the CURSOR RIGHT button to
display die FEATURES menu optioits.
3
TIMER will be highlighted.
Press the CURSOR RIGHT button
to shi ft the menu to die left and enter
4
the TIMER cmitrol options.
Press the CURSOR UP «r DOWN
button to select mid highlight one of
5
the TIMER Controls. Choose ftxrm
TIME, START TIME, STOP TIME,
CHANNEL, .ACTIVATE, or DISPLAY.
Press the CURSOR LEFT or
RIGHT button to start the control
6
adjustments. Use the buttons described
in the deftiiitions below to ftnisli the
adjustment
'I'lMlt: Enter flic cuTtent time with flic
numboted buttons. Use the Cursor Riglrt
button to move to tire AM/PM area and use
flic Cursor Lett or Rlglit buttons to toggle
AM or PM,
STAItr TIME: Use the numbsared buttons
to enter a start-up dine for tlic TV to turn
on or to tunc a specific channel.
STOP TIME: Use flic, numbered buttons to
enter a time for the TV to sliut itself off.
CHANNEL; Use flic Cursor Lett or Riglit
buttons to select a specific channel, AV
Input, or DVD for flic TV to tunc to at flic
specific Start Time. If a DVD is playing,
flic control can be set to Bookmark DVD.
If Bookmark DVD is selected flic playback
of flic DVD in the spot it was bookmarked
wili resume when flic TV powers itself on.
Please refer to the Bookmark DVD section
of Alls m anual for more detailed instruc
tions (please refer to page 4 8),
AC'lTVATlt: Set flic Timer to prefonn it’s
function ONCE or DAILY,
DISPLAY; Set to ON or OFF. When ON,
flic dme will be displayed ALL flic fitne the
TV in ON. When OFF, the time will only
appear when the SYSTEM MENU (OSD)
button i s pressed.
When finished, press the SYSTEM
MENU (OSD) button to remove die
menu irom the TV’s screen.
Main
»Sound
o f-eaiiies lScV?e
» Instel Steraness
N
▲
►
Brg?T-ess
Cslor
I In:
MSIE...
▼
HUn H;n>№T iUmiLF
oooo
e^
RüJtG ■kRi
Ó
© (¿) ©
© ® ©
© ® ©
® ® ®
0 ® O
limer
o lime
0 SWilme
vStoa'ilTe
o Qiannel Uo
oMms
O Uispl%'
I line?
o
iTe
o ffiart Time
o Slop I’ re
o Chaniiei Na
¥* Asílete
oDispIS^
01:30 l-'M
Oree
13
j
^ J:
Main ^
v'liner ►
»AiíBloclí
o
hoTinal
oAcfeCoTio'
Time?
^Time
o Sat Time
offiBp I re
* Chaniiei Na
o ASivKte
oDisplBr/
o I’me
oSar: liTe
o Sap I’ re
o Channei Ma
*
«■Cisp'ay
Trier
oTIme
o Steri Trie
oSt5p lime
v-ctennelMs.
oAeMe
o
Iner
t>' rime
«■StalTIme
* Stop Time
oCtemell'Is.
oAalvMe
v-Lü^y
iner
AaoLoiSc
Rj-mal
WwCOíVOÍ
J'ííne
Sten i ne
Step lime
ettenreINte
AeMe
□i^aav
A.
10:^ AM
12 :Si F>f:i
10
On
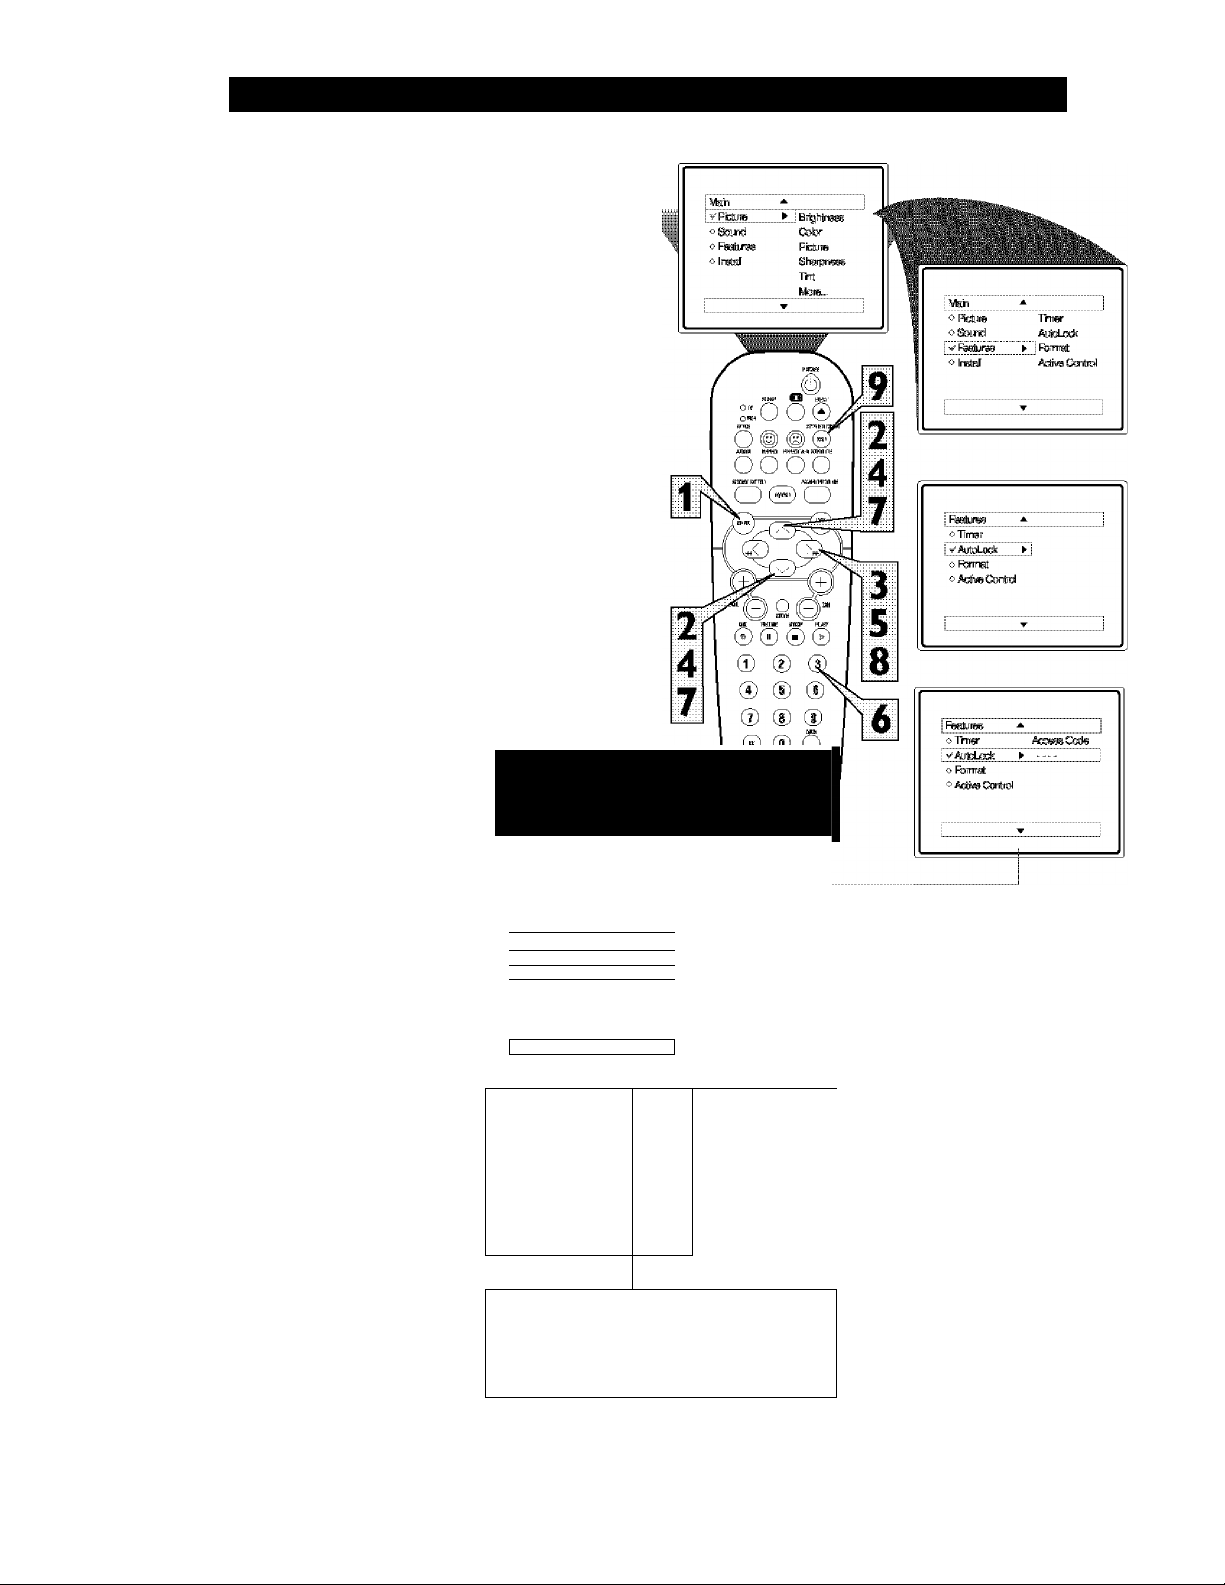
How TO Use the Format Control
any times while watching movies from a
DVD player the image is shown in
M
“letter box" format. This is the format that is
shown in movie theaters. When shown on a TV
screen, the image will have areas of black on
top and bottom of the screen. The FORMAT
Control can help to display the image as close
as possible to its original aspect ratio.
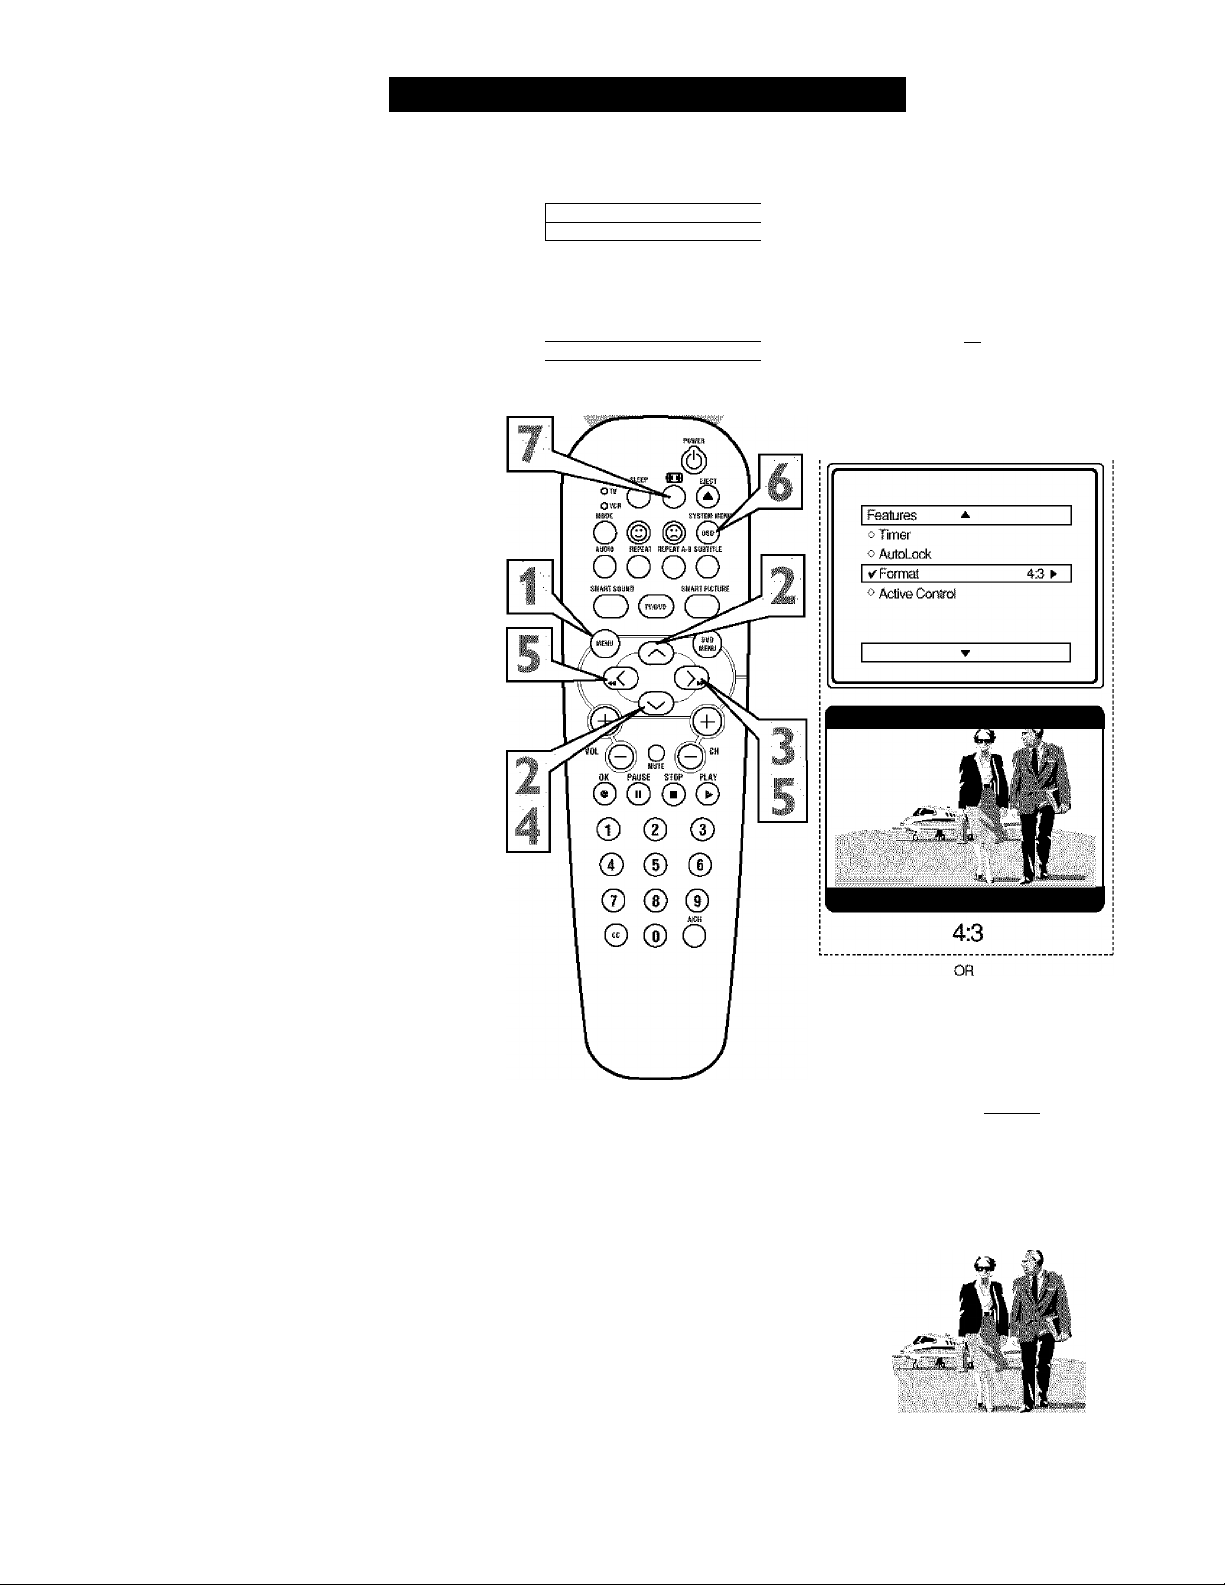
Press the MENU button on the
remote to display the on-screen menu.
Press the CURSOR DOWN button
until the word FEATURES is high
X
lighted.
Press the CURSOR RIGHT button to
display the FEATURES menu options
(Timer, AutoLock, Format, or Active
Control).
Press the CURSOR DOWN button
until the word FORMAT is highlighted.
Main
V Picture
0 Sound
0 Featufes
0 instali
▲ 1
► 1 Briahiiass
Cdor
Picture
Sharjwess
Tint
Mote...
▼ 1
Main
« Rckjfe
i> Sound
I V Features
instali
Timer
AutoLock
► I Format
Aolive Control
Press the CURSOR RIGHT or CUR
SOR LEFT buttons to select one of
the three options 4:3 or Expand 4:3.
4:3 - Standard format for the TV.
Expand 4:3 - Enlarges the picture to
fill out the entire screen area, eliminat
ing the “letter box” effect.
When finished, press the SYSTEM
MENU (OSD) button to remove the
menu from the TV’s screen.
The Expand 4:3 format can also be acti
vated using the FORMAT button
when the onscreen menu is not being
displayed. Pressing this button will tog
gle the standard 4:3 format, the Expand
4:3 format, or Compress 16:9 format.
Fealures
0 Timer
o AutoLook
V Format
o Active Control
£i^d43»
i 4
lilt
iwii
Expand 4:3
Understanding the AutoLock^^ Controls
'I ' he AuioLock™ feature is an intégrât-
Â. eà circuit that receives and processes
data sent by broadcasters, or other pro
gram providers, that contain program con
tent advisories. When programmed by the
viewer, a TV with AutoLock^*^ can respond
to the content advisories and block pro
gram content that may be found objection
able (sui^h as offensive language, violence,
sexual situations, etc.}. This is a great fea
ture to censor the type of viewing children
may watch.
Over the next few pages you’B karn how
to Mock channels and certain rated pro
gramming. Belo w is a brief explanation of
some terms and ratings you will find in the
AutoLock feature.
AutoLock™ offers various BLOCKllNG
controls from which to choose:
Access Code: An Access Cbde must be set
to prevent children from unblocking ques
tionable programming.
Channel Block: Individual cluumels
including the AA' inputs can be blocked
Clear All: Allows you clear all channels
being blocked from your viewing set with
tlie Channel Block Control,
Block All: Allows you to block ALL chan
nels and AA" inputs at one time.
Movie Ratings: Block programming
btised on ratings patterned by the Motion
Pictures Association of America.
TV Ratings: Block programming bttsed
on stiindtffd TV ratings set by TV broad
casters.
To learn more about the Motion Picture
Ratings and die TV Ratings, refer to die
definitions listed on the columns to die
Press the SYSTEM: M:ENli (OSD) but
ton twice to display the AutoLock
review screen. Tliis screen shows what is
activated within the AutoLock settings.
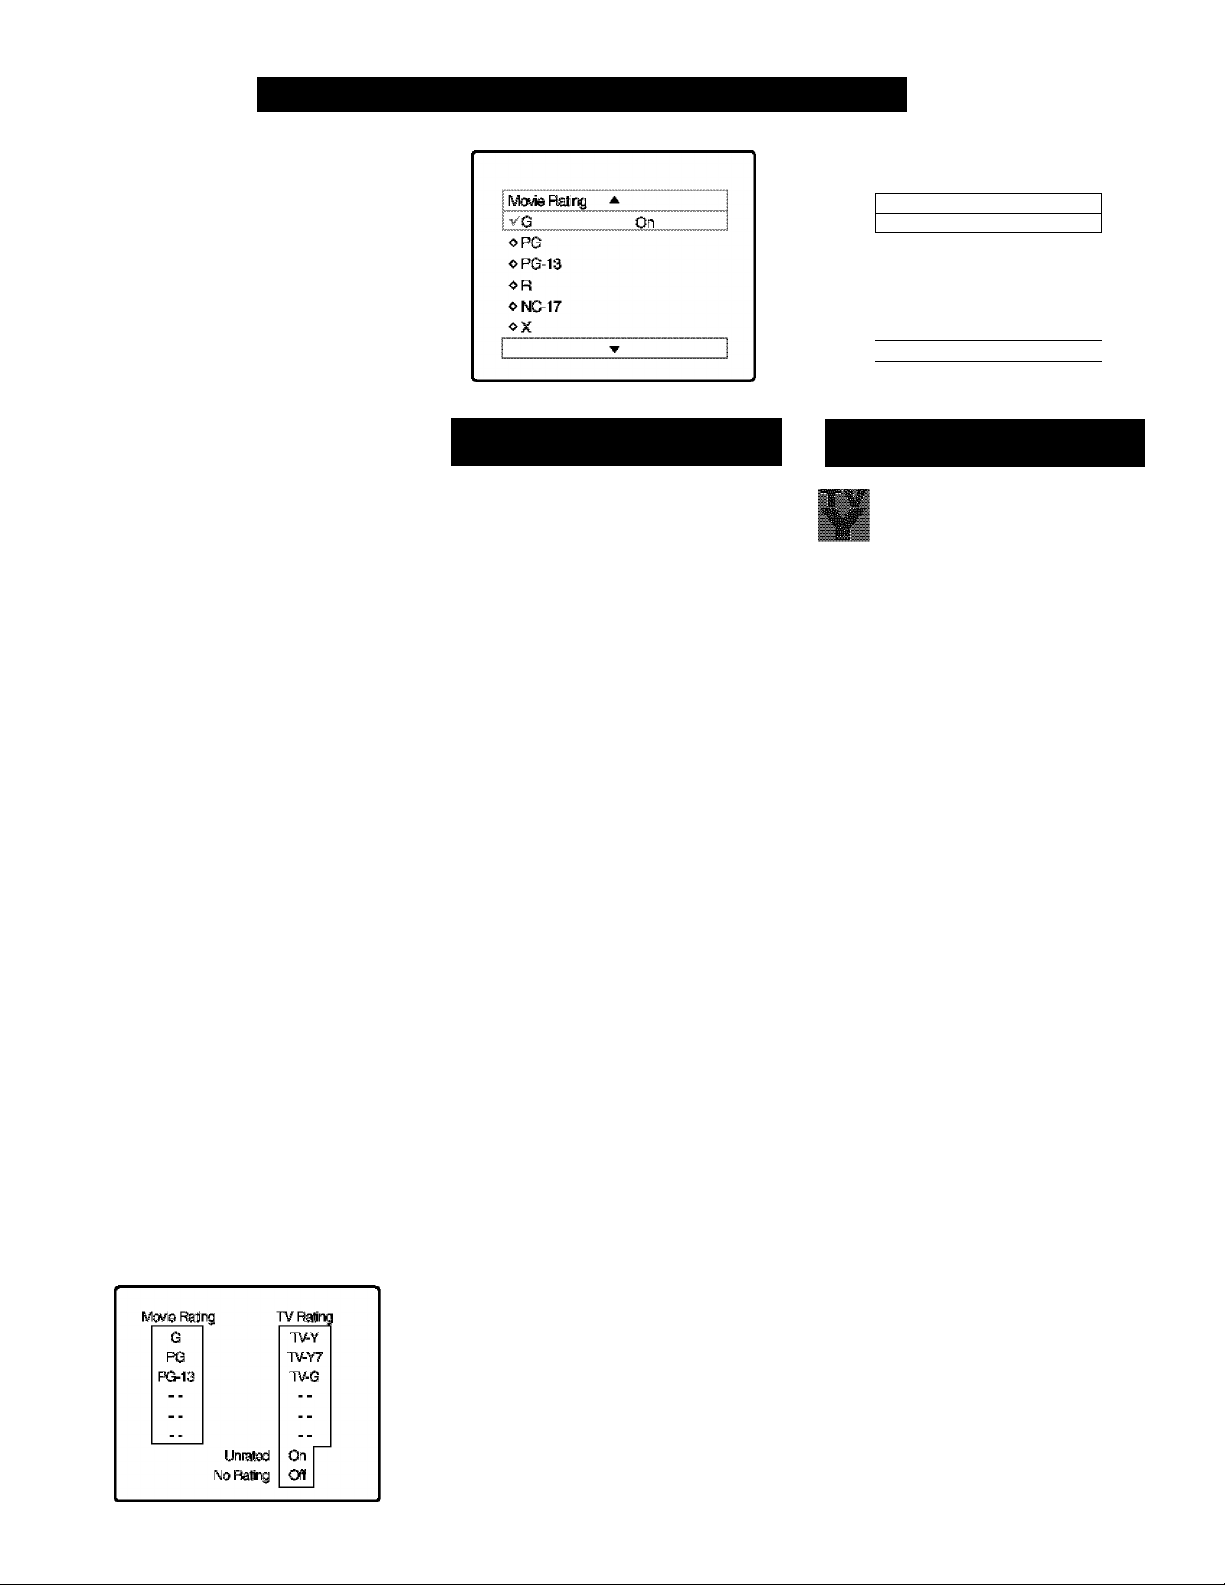
Mt)VIL R atungs
Pk.jgm; AssnaAiiox ojr AMKitir.i)
G: General Audience - .All ages admi t
ted. Most p^irents would find dds progii:«n suitable for all ages. This type of
progrtaaming contains li ttìe or no vio
lence, no strong language, and littìe or
no sexual dialogue or situations,
PG: Pm-ental Guidance Suggested -
This progriimraing contains material thirt
parents may find imsuitable for yoimger
children.) It may contain one or more of
die following; Moderate violence, some
sexual situations, infrequent coarse huiguage, or some suggestive dialogue.
PG-13: Parents Strongly Condoned -
This progrmiuuing contains material thiit
parents may find imsuitable for children
under tìie age of 13. It contains one or
more of the following: violence, sexual sit
uations, coarse language, or suggestive
dialogue.
R: Restricted -This is progritmming is
specifically designed for adults. Anyone
under tlie age of 17 should only view this
programming witìi an accompanying piirent or iidult guardi an. It contiiin s one or
more of the following: intense violence,
intense sexual situations, strong coarse
huiguage, or intensely suggestive dialogue,
NC-17: No one under die age of 17 wiU
be admtted. - This type of programming
should be vi ewed by adults only. It con
tiiins graphic violence, explicit sex, or
crude indecent language.
X; Adults Only - Hiis type of program-
ming contains one or more of die fbUowing: very graphic violence, very graphic
and explicit or indecent sexual acts, very
coarse itnd intensely suggestive Umguage.
15
TV Rating
✓ TVY
OTV-Y7
oTve
v TV-PG
OTV14
❖ TV MA
i'V PaREM AL (ÎUIDLLINLS
frv :i5 ro.a:i h ■ ÂVi i-ïiss)
T\' Y - (AU children - This pro
gram is designed to be appropriate
for all children.} Designed for a
very young audience, mcluding children
ages 2-6. This Qrpe of prograiiuiiing is not
expected to fri^iten younger children,
TV - (Directed to Older
Children " This program is
■
above.} It may be more appropriate for
children, who have acquired the develop
ment skills needed to distinguisii between
make-believe and reality. This program
ming may include mild fantasy iuid comic
violence (FV).
programming contiuns httle or no vio
lence, no strong language, and IMe or no
■
type of programming contiiins one or more
of the following: Moderate violence (V),
coarse language (L), or some suggestive
dialogue (D).
■
gramming contiims one or more of tlie tbl lowing: intense violence (V), intense sexu
and therefore may be unsuitable for chil
dren under 17.) Tliis type of programming
contains one or more of the following;
graphic violence (V). explicit sexual situa
tions (S), or crude indecent language (L).
designed for children age 7 and
7V-G - (General Audience - Most
TV
parents would find this program
statable for all ages.) Tliis type of
sexuiil dialogue or situations.
TV-PG - (Parental Gnidance
Suggested - This program con
tains material that parents may
find unsuitable for younger children.} This
some sexual situations (S), infrequent
TV TV-M - (Parents Strongly
Cautioned - This program con
tains some material that many par
ents would find unsuitable for children
under 14 years of agef Tliis type of pro
al situations (S), strong coarse language
(L), or intensely suggestive dialogue (D).
TV-MA - (Mature Audience Only
TV
- This program is specifically
designed to be viewed by adults
A
On
▼

HI
Setting Up an AutoLock^^ Access Code
ver the next few pages you’ll learn how
to block channels and get a better under
O
standing of the rating terms for certain pro
gramming.
First, let’s start by learning how to set a per
sonal access code:
Prisss the MEINU button on tlie remote
to display tlie on-screen menu.
1
Press the CURSOR UP or DOWN
button until the word FEATURES is
2
highlighted.
Press the CURSOR RIGHT button
to display the FEATURES menu
3
options.
Press the CURSOR UP or DOWN
button until tire words AUTOLOCK
4
are highlighted.
M^n
^Picture ► I EhcíTines?
oSJurrd
o Feature?
ohstsil
A
▼
Color
Picture
^arpneBai
IVfcre-..
*
dPcUre
o Sound
iVF^abdi'?®
d ln?lail AdkraConiol
i ▼
oTirer
I v’AufoLok I
o Formas
o ftiiSiva Donirol
Threr
Ay$oLiX*t
F i FormaJ
Press the CURSOR RIGHT button.
The screen will read, “ACCESS
5
CODE
--------
Using the NUMBERED buttons,
enter 0,7,1,1. “XXXX” appears on
6
the Access Code screen rts you press
the numbered buttons.
“INCORRECT CODE” will appear
on tire screen, and you will need to
enter 0,7,1,1 aguin.
The screen will rtsk you to enter a
“New Code.” Enter a “new” 4 digit
7
code using the NUMBERED buttons.
The scTeen will then, ask you to CON
FIRM die code you just entered.
Enter your new code again. “XXXX”
will appear when you enter your new
aide rmd then display the AutoLock
menu options.
Proceed to the next page to learn more...
Helpful Hint
Parents - it isn’t possible for your child to
unblock a channel witliout knowing your
access code or changing it to a new one. If
your code changes, and you didn’t clumge
it, dren you know it’s been altered by some
one else and blocked channels h ave been
viewed.
o^rnsr A»3№sGiis.'e
oFiyiTTTifl:
o iriiijr
i ^ÁtJOTÜwit ► —
oFoinrat
v'BlockahgimBlF Oft--
o Setup Cc^
oasavAf
o Block All
c- FMr®
oTvftathg
i Feature? *
0 timei CSi3tei
j ► ~X3^
o -mgr
i VAutoLwlt
oFainrat
oAiSweQjttfSiii
.After flic initial Access
Ccxle has btaai set, the cscxle
can Ik changed bv using
ÜK Setup Code Ccsnttol
within AutoLock.
Ule process will foEow the
saitK stops as clescribcd m
this {age.
riteilfí>-ílíí
XX-'-
..........
Faatui'SBs *
o TTfriflir
I vAuto^Kt« ►
o Fcnmal
d AeiweCanttd
o^rnsr AK«(sCiis.'e
r^'iiWoLiWk V'"«
oFiyiTTTíÉ
o TiTTWi'
y’.AjigjjxX
O -CrfTHÍ
OiVSiveCcriiol
AulUxadt: ^ |
oBcwkChsumei
► 1 I-
OCI^AII
oBcwkWl
o IAlws FteSng
dTvFlafrigi
_
--------------
CkjrnftmCkiife
■ i)xb(
.....
16

Afier your personal access code has been
li-set (see previous page), you are now
ready to select the channels you want to
block out or censor.
Press the NUMBERED (or CH +, -)
buttons to tune tlie dmmiel you wish
\
to block or censor.
Press the MENU button on the
remote to show the oit-scteeit menu.
2
Press the CURSOR UP or DOWN
button until tlie word FEATURES is
3
highlighted.
Press the CURSOR RIGHT button
to display die FEATURES menu
4
options.
Press the CURSOR UP or DOWN
button until tlie words AutoLock are
5
highlighted.
How TO Block Channels
6
8
9
10
Press the CURSOR RIGHT button.
‘‘ACCESS CODE” will appear on
die screen.
Enter the correct access code num
ber. “XXXX” shows on the Access
Code display as you press the NUM
BERED buttons. AutoLock menu
options will be di s played.
Press the CURSOR UP or DOWN
buttons until die words BLOCK
CHANNELS are highlighted.
Press the CURSOR RIGHT button
to turn blocking ON or OFF for that
channel, Wlien ON is selected the
channel will be blocked.
Press the CH + or - button to select
odier channels you wish to block.
Repeat step 9 to block the new channel.
HeuU'VL Hint
If you tune to a blocked channel and enter
your Access Code to view die channel, ALL
blocked channels will be viewable until die
TV has been turned off. When die TV is
powered back ON, the previously blocked
channels will be blocked again..
17
How
HI
A fier blocking specific channels there may
zAcome a time when you want to clear all
the channels so they can be viewed. The fol
lowing steps explain how to CLEAR ALL
blocked channels.
Press the MENU button on tlie
remote to show tlie on-screen meitu.
1
Press the CURSOR UP or DOWN
button until the word FEATURES is
2
highlighted.
Press the CURSOR RIGHT button
to display the FEATURES menu
3
options.
Press the CURSOR UP or DOWN
button until the words AutoLock are
4
highlighted.
Press the CURSOR RIGHT button.
TO Clear All Blocked Channels at the Same Time
5
Enter tlie correct access code num
ber. shows on tire Access
6
Code display as you press the NUM
BERED buttnns. AutoLock menu
options will be displayed.
Press the CURSOR UP or DOWN
button until the words CUEAR ALL
7
are highlighted.
Press the CURSOR RIGHT button
to clear all blocked cluumels. Tlie
8
Clear All option will read, “Cleared,"
When finished, press the SYSTEM
MENU (OSD) button to remove die
9
menu from the TV’s screen.
HiiLPriJL Hist
If you tune to a blocked channel and enter
your .Access Code to view the channel, ALL
blocked channels will be viewable until the
TV is powered OFF and dien turned back
ON. Wlien the TV is powered back ON, the
previously blocked channels will be blocked
again.
CLEAR .ALL will not work widi the Movie
and TV Ratings. Tliese options must be
reset individually.
NOTE: The 0,7,1,1 access code shown
on this page is the deluiilt code oi‘ ti
wav lu reset the cede « hen the current
access code is not known.
<>■71 mgr
oFtstTTKt
vAsSfvsCferTtrDi
j ▼
I.AvtoLcdc A
o Betíí ChantTflil
; vClsarAll C1«^
oBcckAI Ui.i
o y<5uis Rating V li^
<* "TV Rating Ji ,|
■ ▼
The Clear All option when activated
will unblock AIjL blocked channels. It
will not affect programming blocked
by the Movie or TV Rating options.
XXXX !
f
rgd'i 1 Í 1.
i...
AitoLock
V Stock Off El
bSetuuCcíís
oQ^Alí
V Stock All
b Ktovia Ftetrtg
oTVFtetrig
.AijtoLock
o HcckChanrial
oSstupCixto
TбйбнБII
.....
o Bode .AI
o Rafrig
Chsinnd 12
Hosted By AjfeLcdc
Charrngl Btoclflng
Acceec CciJe
n
Or, enter your Access
Code to view a tuned
channel that is blocked
with Block Channel.
18

How TO Block All Channels at the Same Time
here may come a time when you want to
Block Mi the television’s channels. Maybe
T
you don’t want your children to watch TV for
a given time. With the Block All control, ALL
available channels (including the A!V Inputs)
can be set to block at the same time.
Press the MENU button on tlie
remote to show tlie on-screen menu.
Press the CURSOR UP or DO\¥N
button until the word FEATURES is
1
highlighted.
Press the CURSOR RIGHT button
to display the FEATURES menu
3
options.
Press the CURSOR UP or DO\¥N
button until the words AutoLtrck are
4
highlighted.
Press the CURSOR RIGHT button.
5
:
OTlTiSr
0 %TTta!
- ■ L ■!
A
► I
Cutties
▼
Enter tbe correct access code num
ber. shows on tlie Access
6
Code display iis you press the NUM
BERED buttons, AutoLock menu
options will be displayed.
Press the CURSOR UP or DO\¥N
button until the words BLOCK ALU
iire highliglited.
Press the CURSOR RIGHT button
to turn Block All ON csr OFF. When
8
ON is selected, ALL available channels
will be blocked.
When finished, press the SYSTEM
MENU (OSD) button to remove tlie
9
menu from the screen.
HF.U^FVL HiKT
Tf you tune to a blocked channel and enter
your Access Code to view the channel, ALL
blocked channels will be viewable until the
TV has been turned off. Wlien the TV is
powered back ON, die previously blocked
channels will be blocked agtun.
NOTE; The <1,7,1,1 access cade shown
ihis page is the dciaull cude or a
wav to reset Ihe code w hen Ihe curreul
access cade is not know n.
i ^satures
oTlmsT
oRjrrKt
oAsSNsCferTtrol
t
AitfesLcrJi
0 Block
bSBtipCcíí&
bCtear.AÍ
Stack Al
o
bTVFteir^
_o Tirrtgr __
vAitoLock ►
oFcrTTKt
oAsSfvsCcrW
<*KcsckC»«intTflil
0<L|?Oid6
oC^rAl
I V^cscIlAII
o ^cjuis lading
oTVi^atj^
Enter your Access Code to
view a tuned channel that is
blocked with Block Channel.
19
 Loading...