

Philips TU7370/SS951P, TU7370/SS211P, TU7370/SS071P, TU7370/SS001P, TU7370 User Manual [sv]
Page 1
Page 2

Conformity, Environment & Safety
Safety information : This equipment is not designed to make emergency calls when power
fails.An alternative should be made available for access to emercgency calls.
Conformity : See page 9.A copy of the original certificate can be obtained on request to the
customer care centre.
Power requirements : This product requires an electrical supply of 220-240 volts, alternating
monophased current, excluding IT installations defined in standard EN 60-950.
WARNING ! The electrical network is classified as dangerous according to criteria in the
standard EN 60-950. The only way to power down this product is to unplug the power supply
from the electrical outlet. Ensure the electrical outlet is located close to the apparatus and is
always easily accessible.
Telephone connection : The voltage on the network is classified as TNV-3 (Telecommunication
Network Voltage as defined in the standard EN 60-950)
Safety precautions : Do not allow the handset to come into contact with water.Do not open
the handset.You could be exposed to high voltages. Do not allow charging contacts or batteries
to come into contact with conductive materials.
Environmental care : Please remember to observe the local regulations regarding the disposal
of your packaging materials, exhausted batteries and old phone and where possible promote
their recycling.
Using GAP standard compliance
The GAP standard guarantees that all DECTTMGAP handsets and base stations comply with a
minimum operating standard irrespective of their make.Your handset is GAP compliant, which
means the minimum guaranteed functions are : take the line, receive a call and dial.
Using Philips base stations
If you register the additional handset to a Philips Zenia 300 Vox base station, the handset will
have all the features described in the corresponding complete set user guide.
If you register the additional handset to a Philips Onis 200 or Zenia base station, only a limited
number of menus will be available. Please refer to the corresponding complete set user guides.
Using a non-Philips GAP base station
To register the Philips additional handset to a non-Philips base station, follow the base station
instructions described by the other manufacturer.Then follow the instructions on page 4 to
register the Philips additional handset. There will be only a few menus availble.
English
Philips has marked the battery and packaging with standard symbols designed to promote the
recycling and appropriate disposal of your eventual waste.
The labelled packaging material is recyclable.
A financial contribution has been paid to the associated national recovery & recycling system.
DECTTMis a trade mark of ETSI registered for the benefit of the implementers of the DECT technology
Conformity,Environment & Safety
1
Page 3
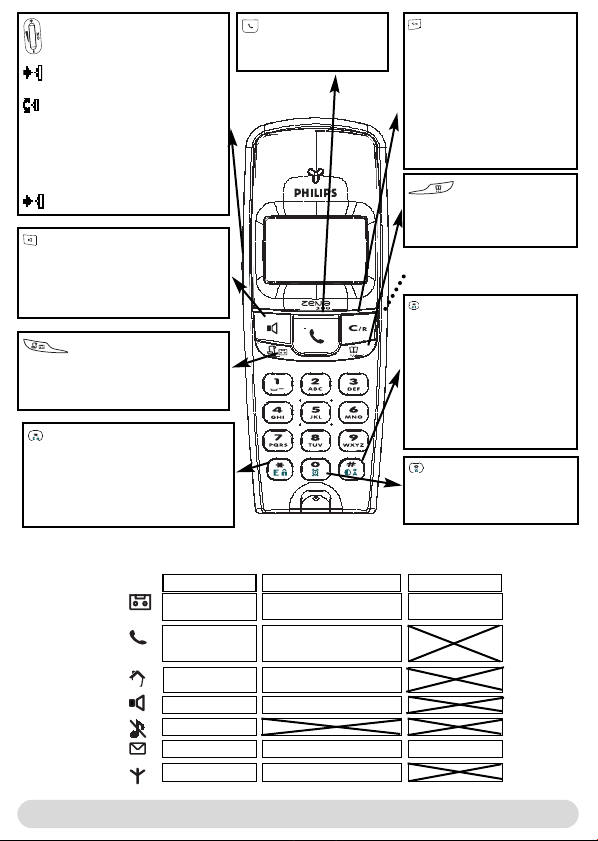
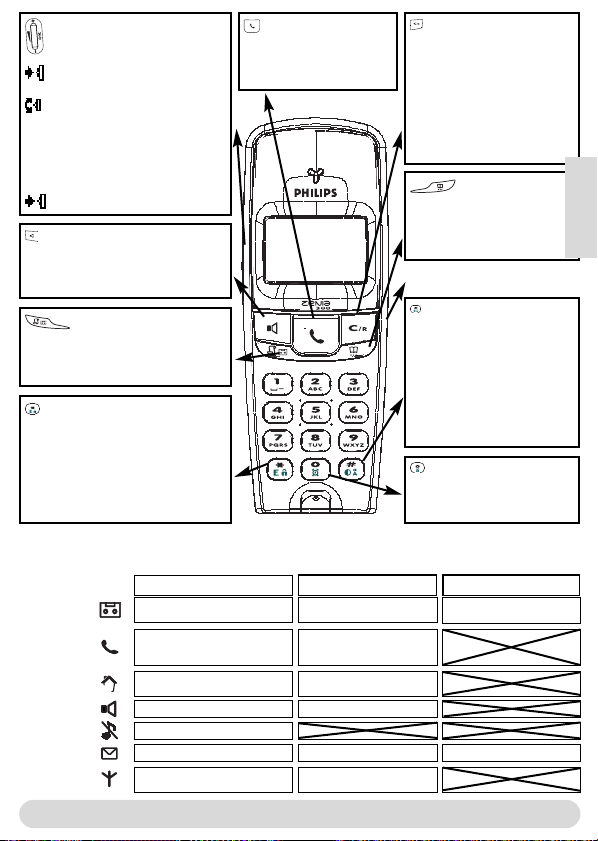
Pilot key
Press to enter the carousel or
validate a menu or an option
Scroll to navigate in the menus &
options or move the cursor
Scroll up to reach Intercom from
idle mode
Scroll down to reach Cheapest
rates prefix from idle mode
Press to unlock the keypad
Loudpeaker
- Press to take the line or activate the
handset loudspeaker during a call
- A long press to activate the base
lloudspeaker
Call log
- A short press to access the call log
- A long press to directly access the
messages list
Keypad lock & Edition
- A short press to insert *
- A long press to lock/unlock the keypad
- A long press to insert (R) when dialling
- Press to enter multitap mode or
®
editor when editing
Eatoni
Icons
Answer machine ON
External call in
progress
Internal call in
progress
Loudspeaker ON
Ringer OFF
SMS function ON
Registered & in range
Line key
- Press to take the line,
answer a call or hang up.
Earpiece
Microphone
Zenia 300 Vox Handset
Blinking
New message on answering.
machine or voice mail
Incoming external call in
progress
Line is already busy
Internal incoming call
Base loudspeaker ON
New SMS
Not registered
Correct key
- To correct a digit when
predialling or a character when
editing
- A short press to go back one
menu
- A long press to return to idle
mode when navigating
- To insert R for operator
services when on line
Phonebook
- A short press to access the
phonebook
- A long press to add a new entry
Headset connector
Do Not Disturb & case
mode
- A short press to insert # when
dialling.
- A long press to activate the Do
Not Disturb mode
- A long press to insert a pause
(P) when dialling
- Press to switch case mode
when editing
Alarm clock
- A short press to dial 0
- A long press to activate/
deactivate the alarm clock
Fast blinkingSteady ON
Answerphone full
SMS memory full
2
The handset
Page 4
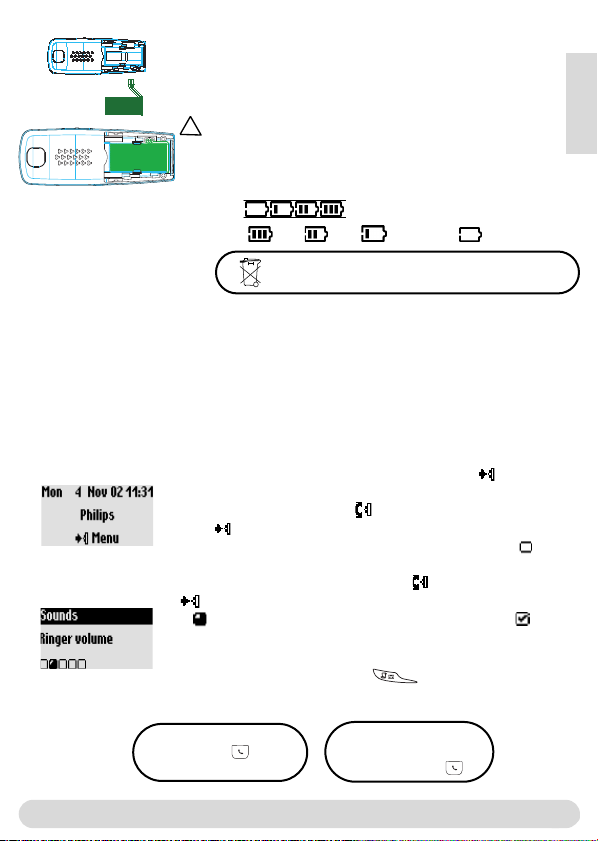
Installing and replacing the batteries
To insert the battery pack, open the battery door on the handset
by sliding it down. Connect the battery pack to the connector
inside the handset. Place the battery with sticker face up and wires
along the left side of the battery pack.
!
When replacing the batteries, only use NiMh.
The battery bars scroll when charging .When charged the icon changes
according to the remaining charge : full , 2/3 , 1/3 and empty .
English
Battery life and range
The batteries should not be disposed of with general household waste .
The battery life is about 250 hours in stand by time (when the handset is in idle mode & ready
to receive a call) and around 16 hours in communication. A battery low alert will inform you that
the handset has to be recharged, if this is during a call, it will end shortly after the alert.
Optimal battery life is reached after 3 cycles of full charge/discharge.
Under ideal conditions, the range is up to 50 m indoors and 300 m outdoors. When reaching the
range limit, the conversation will become crackly, get closer to the base station otherwise you
will be cut off. To reach optimal range place the base station far from electrical appliances.
Understanding the menu system
From idle screen, to access the carousel menu press
The carousel represents a loop of icons that gives access to the first
menu level. Scroll up or down to reach the desired menu.
Press to validate and enter the menu.
The sub menus are listed and represented by little squares at the
bottom of the display.
To reach one particular sub menu scroll and validate your choice
A shows the sub-menu or option you are browsing. A shows
the selected sub-menu or option.
Note : Certain menus are directly accessible via a dedicated key on
the keypad (example the Call log )
Direct dialling
1- Take the line
2- Dial on the keypad
The menu system
Predialling
1- Dial on the keyad
2- Take the line
3
Page 5
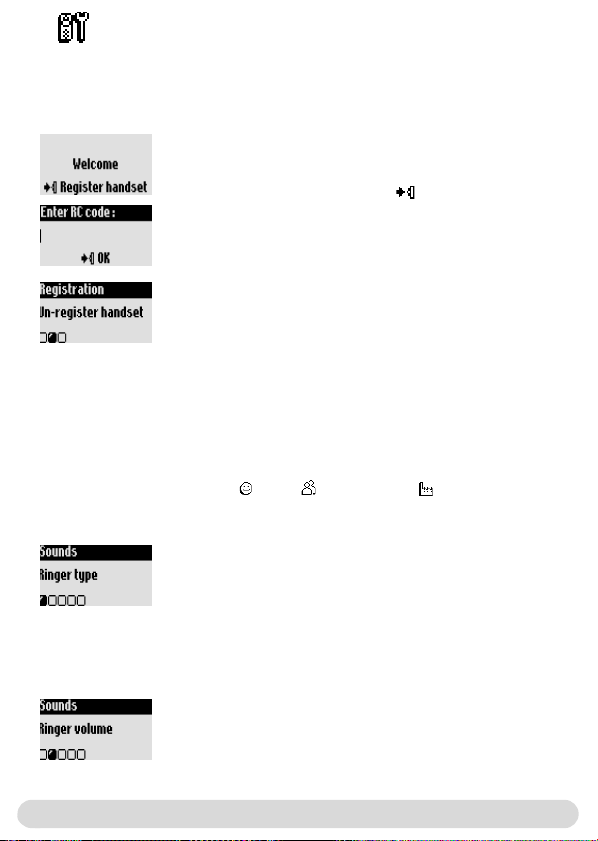
Handset
Registering/un-registering an additional handset
The additional handset will get full capability when it is registered to the base station*.You can
register up to 8 handsets to the Zenia 300 Vox base station.
To register an additional handset
Place the base station in Registration mode as follows :
1- Unplug and plug back in the mains lead
2- With the additional handset press to start the registration
3- Enter the 4-digit RC code written on the sticker placed under
the base station.
To un-register the handset
1- Go to Handset, validate
2- Scroll to Registration, validate
3- Scroll to Un-register handset, validate
4- Choose from the list the handset to un-register, validate
5- Enter the RC code (4-digit code) and validate
* See page 1
Setting the handset sounds
The ringers can be set for :
- The external standard ringer for callers whose number is not stored in the phonebook or
stored with no VIP settings.
- The internal ringer for the intercom (if there are at least 2 handsets).
To set the 3 VIP ringer types : Friends , Family and Professional : see manual Zenia 300.
Subscription to the Caller Line Identification service (CLI) needed.
To set the ringer type
1- Go to Handset, validate
2- Select Sounds, validate
3- Select Ringer type, validate
4- Choose External Std ringer/Internal ringer, validate
5- Select the ringer from the list and validate
To set the ringer volume on the handset
There are 5 ringer volume levels plus the vibration call alert.
1- Go to Handset, validate
2- Select Sounds, validate
3- Select Ringer volume, validate
4- Choose the appropriate volume level and validate
Note :You can activate the vibration call alert. In this case the ringer
will be in silence mode
4
Handset
Page 6
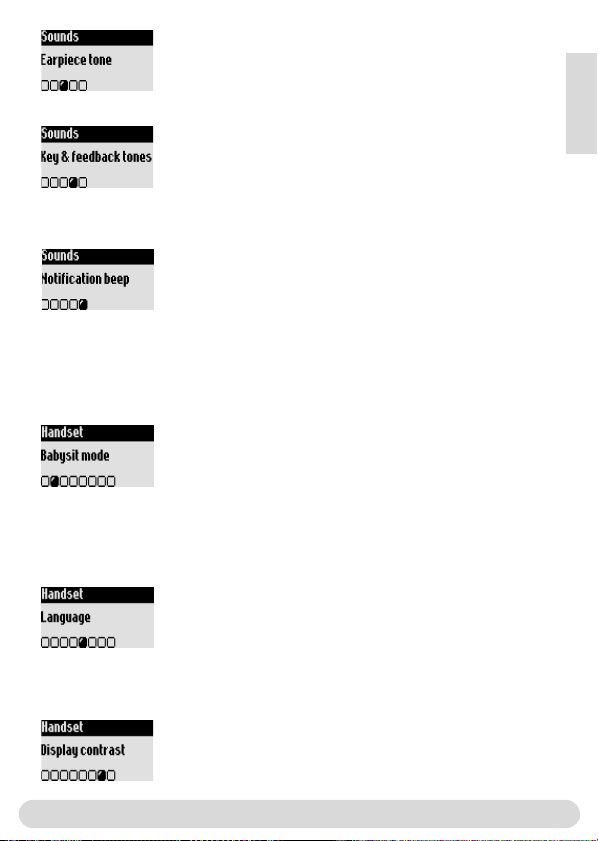
To set the earpiece tone
1- Go to Handset, validate
2- Select Sounds, validate
3- Scroll to Earpiece tone, validate
4- Select Standard, Trebble or bass and validate
To set the key tones & feedback tones
Audio feedback heard when pressing the keys & validating a
setting
Resume from step 1-2 above
3- Scroll to Key and feedback tones, validate
4- Select ON/OFF and validate
To set the notification beep
Audio indicators heard when there is new SMS or a new message
Resume from step 1-2 above
3- Scroll to Notification beep, validate
4- Select ON/OFF and validate
The babysit mode
This feature allows to monitor the babys room. Place the handset in the room to be monitored
and you will hear the noise on the additional handset.
To activate/deactivate the babysit mode
1- Go to Handset, validate
2- Scroll to Babysit mode, validate
3- Select ON/OFF and validate
Note : An intercom is necessary to monitor the room (see page 6).
Changing the language
The additional handset default language is English.
To change the language
1- Go to Handset, validate
2- Scroll to Language, validate
3- Select the language and validate
Warning : Changing the language will not alter the voice prompts of the
answer machine (Zenia 300 Vox or non-Philips base stations).
English
Setting the display contrast
To set the contrast
1- Go to Handset, validate
2- Scroll to Display contrast, validate
3- Select the appropriate level and validate
Handset
5
Page 7

Setting the backlight
To set the backlight
1- Go to Handset, validate
2- Scroll to Backlight, validate
3- Select 10 sec, 20 sec or OFF, validate
6
Handset
Page 8
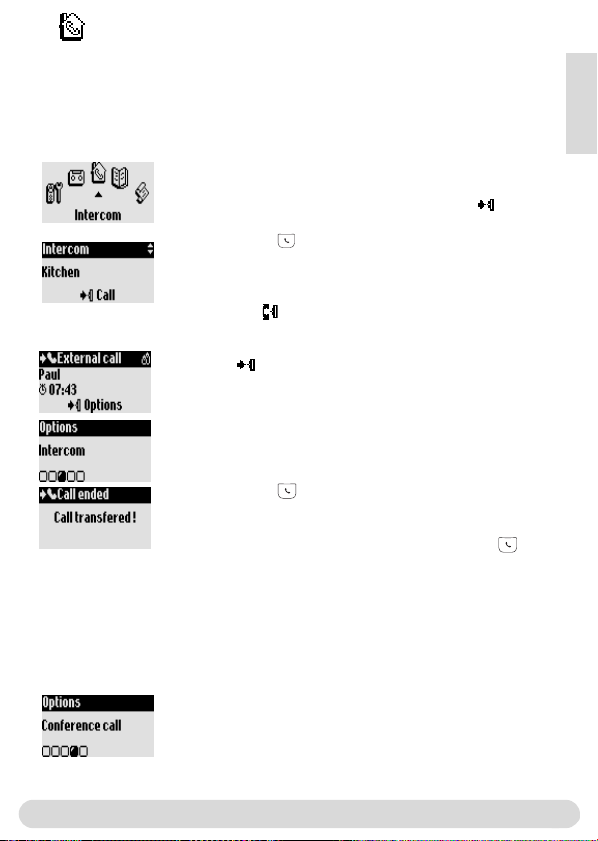
Intercom
Using the intercom (if there are at least 2 handsets)
This feature allows to make internal calls, activate babysit or transfer external calls from one
handset to the other.The intercom is possible with handsets registered to the same base
station.
Internal call or room monitoring activation
1- Go to Intercom, validate
2- If there is only one handset it rings automatically.Otherwise select
from the list the handset/base you want to call and Call
The called handset/base rings
3- Take the line on the called handset/base.
The intercom conversation or the babys room monitoring can start.
Mute is also available.
Note :You can access the Intercom with the pilot key.
In idle mode scroll up.
During an external call you can transfer the call to another handset
1- Press to enter the options
2- Scroll to Intercom, validate
3- If there is only one handset it rings automatically. Otherwise select
from the list the handset/base you want to call
The called handset/base rings. The external call is put on hold.
If there is no answer from the second handset you can resume the
call on the first handset. Use the End Intercom option.
4- Take the line on the other handset/base
Both internal callers can talk together.
5- Use the Transfer option.The call is ended on the first handset.
Note : You can also hang up on the first handset with .
While the call is put on hold the correspondant hears the music (if
music on hold is activated) or beeps.
Switch (between call 1 & 2) and Mute (microphone) are other
options available in the contextual menu.
To share a conference call
Conference call allows one external call to be shared with 2
handsets (in intercom).The 3 people can share the conversation
(no operator subscription is needed).
Resume from step 1-4 above
5- Select Conference call, validate
English
Intercom
7
Page 9
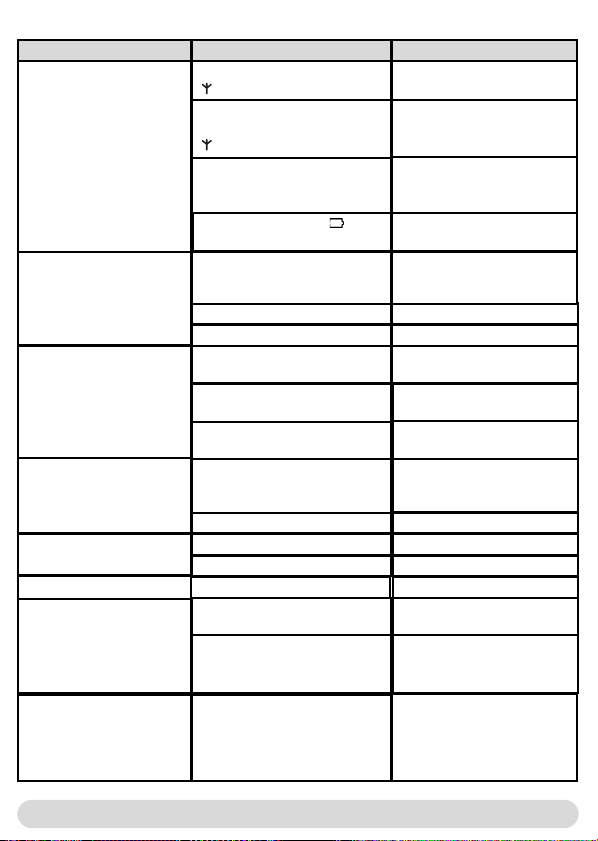
Troubleshooting
Problem
No dial tone.
When the handset is placed
on the charging unit, no
beep is heard.
The batteries remain low
although they have charged
for 12 hours.
An error beep is heard from
the handset when trying to
make a call.
An error beep is heard
during a call.
There is no ringer.
When adding a handset to
the base station, a failure
message is displayed.
Cause Solution
The handset is out of range,
( is not displayed).
The handset has not been
registered to the base station
( is not displayed).
The base station is not
properly connected to the mains
or the telephone line.
The batteries are low ( is
displayed).
The charging unit is not properly
connected to the mains.
Charging contacts are dirty.
Key tones are deactivated.
The charging unit is not properly
connected to the mains.
Handset not registered to base
The batteries are defective or
too old.
Another call is already in
progress from another handset
or the base station.
The base is being consulted
The handset is out of range.
The handset batteries are low
The ringer is deactivated
The procedure has failed
The maximum number of
handset has been reached.
Move closer to the base
station and try again
Register the handset to the
base station (page 4)
Check the connections
Charge batteries (page 3)
Check the connection between
charging unit and mains.
Clean with a clean & dry cloth.
Activate them (page 5)
Check the connection
Register handset to base (page
4)
Contact your dealer.
Purchase new batteries
Retry when the current call is
finished.
Wait until it is available
Move closer to the base
Charge the batteries.
Activate it (page 5).
Try again the procedure again
(page 4).
Un-register a handset (page 4)
Interference during call.
8
You are too far from the base.
The base station is too close to
electrical appliances, reinforced
concrete walls or metal door
frames
Troubleshooting
Get closer to the base station.
Move the base station to find a
better place (the higher the
better).
Page 10

DECLARATION OF CONFORMITY
We,
PHILIPS Consumer, Electronics
DECT & Home Telephony
Route d’Angers
72081 Le Mans Cedex 9
France
Declare that the products Zenia 300, Zenia 300 additional handset and all bundle
combinations are in compliance with ANNEX III of the R&TTE-Directive 1999/5/EC
and then with the following essential requirements :
Article 3.1.a : (protection of the health & the safety of the user) : EN 60950 (2000)
Article 3.1.b : (protection requirements with respect to electromagnetic
compatibility) ETSI EN 301 489-6 V1.1.1 (09/2000) & ETSI EN 301 489-1 V1.3.1
(09/2001)
Article 3.2 : (effective use of the radio spectrum) : EN 301 406 (2001)
The presumption of conformity with the essential requirements regarding Council
Directive 1999/5/EC is ensured.
Date : 16/07/2003 Le Mans
English
Vice President & General Manager
DECT & Home Telephony
Declaration of conformity
9
Page 11

Konformitet, sikkerhet og miljø
Sikkerhetsinformasjon: Utstyret kan ved strømbrudd ikke benyttes for alarmanrop. Benytt i
nødstilfellet et alternativ, f.eks.en mobiltelefon.
Konformitet: PHILIPS erklærer med dette at denne Zenia 300 Vox er i samsvar med de
grunnleggende krav og andre relevante bestemmelser i EU-direktiv 1999/5/EF. En kopi av
konformitetserklæringen kan ved behov fås på forespørsel hos reservedel-kundeservicetjenesten.
Dette produktet kan bare kobles til det analoge telefonnettet som er spesifikt for det respektive
landet, se klebeetikett på emballasjen.
Strømforsyning: Produktet trenger en 230 Volt strømforsyning med enfaset vekselstrøm,
unntagen IT-installasjoner i henhold til standard EN 60-950.
OBS! Det elektriske nettet klassifiseres som farlig i henhold til EN 60-950. Apparatet kan bare
kobles fra nettet ved å trekke ut pluggen. Bruk en lett tilgjengelig veggstikkontakt i nærheten av
apparatet.
Telefonforbindelse: Spenningen i nettet klassifiseres som TNV-3 (Telecommunication Network
Voltages) i henhold til definisjonen i standarden EN 60-950.
Sikkerhetshenvisninger: Hold håndsettet borte fra væsker.Ta verken håndsettet eller
basestasjonen fra hverandre. Du kan utsette deg for farlige spenninger.La reparasjoner alltid
utføres av autorisert kundeservice. Ladningskontaktene og batteriet må ikke komme i kontakt
med ledende materiale.
Miljøvern: Vær oppmerksom på lokale bestemmelser og muligheter for resirkulering når du skal
kaste emballasjemateriale, brukte batterier og gamle telefoner.
Krav i GAP-standard
GAP-standarden garanterer at alle DECTTMGAP-håndsett og basestasjoner oppfyller
standardens minstekrav,uavhengig av merket. Ditt håndsett Zenia 300 Vox og din basestasjon
er i samsvar med GAP-krav,dvs. at følgende funksjoner garanteres: Registrere håndsett, oppta
linjen, motta samtaler og slå numre.
Ved bruk av Philips basestasjoner
Hvis du bruker ekstra håndsettet Zenia 300 Vox på basestasjonen kan du nytte alle beskrevne
funksjoner.
Hvis du registrerer det ekstra håndsettet på basestasjon Onis 200 eller Zenia, er noen
funksjoner ikke tilgjengelige. Se etter i den henholdsvise bruksanvisningen.
Ved bruk av andre basestasjoner (ikke Philips produkter)
For å registrere det ekstra håndsettet på en basestasjon av et annet merke (ikke Philips produkt),
følg anvisningene i produsentens dokumentasjon. Følg nå instruksjonene for registrering av det
ekstra håndsettet på side 4. Ikke alle menyfunksjoner er da tilgjengelige.
Philips har markert batterier og emballasje med standardsymboler for å fremme miljøvennlig
bortfrakting.
Emballasjematerialet og bruksanvisningen kan resirkuleres.
Det grønne punktet betyr at det er gitt et finansielt bidrag til nasjonale institusjoner for gjenvinning og
resirkulering av emballasjematerialet.
DECTTMer et registrert varemerke fra ETSI til fordel for brukere av DECT-teknologi.
1
Konformitet, sikkerhet og miljø
Page 12
Pilot-tast
Trykke: Hente frem karusell eller
bekrefte menyer/alternativer
Bla i menyer og alternativer eller
flytte markør
- Oppover for tilgang til Interkom i
hvilemodus
- Nedover for tilgang til funksjon
Laveste pris
Trykke: Deaktivere tastaturlås
Høyttaler
- Trykke: Opprette forbindelse eller
aktivere håndsettets høyttaler
- Trykke lenge: Aktivere basens høyttaler
Anropslogg
- Trykke: Hente frem og vise anropslogg
- Trykke lenge: Hente frem listen med
talte meldinger
Tastaturlås og redigere
- Trykke kort for å redigere *
- Trykke lenge: Aktivere/deaktivere
tastaturlås
- Trykke lenge: Sette inn blinksignal (R)
- Trykke lenge: Standard- eller Eatoni
editor redigering
Symboler
Konstant PÅ
Telefonsvarer PÅ
Aktivt, eksternt anrop
Aktiv interkom
Håndsett-høyttaler aktivert
Ringesignal deaktivert
SMS-funksjon aktiv
Registrert og innen basens rekkevidde
- Trykke: For å opprette
forbindelse, ta imot eller
avslutte samtale
®
Mikrofon
Samtaletast
Øretelefon
Slettetast
- Slette siffer mens du slår et
nummer eller tegn under
redigering
- Gå tilbake et menynivå
- Trykke lenge: Gå tilbake til
hvilemodus under navigering
- Aktivere R-funksjonen (for
operatørtjenester) mens du er
online
Telefonliste
- Trykke kort: Hente frem
telefonliste
- Trykke lenge: Legge til ny
innføring
Hodetelefontilkobling
Ikke forstyrr-modus/
omkoblingstast
- Trykke kort: Sett inn rutetegn
"#" mens du slår nummeret
- Trykke lenge: Sette inn pausetegn (P) mens du slår nummeret
- Trykke lenge: Aktivere/deaktivere
"Ikke forstyrr"-modusen
- Koble under redigering fra små
til store bokstaver og omvendt
Alarmklokke
- Trykke kort for å slå 0
- Trykk lenge: Koble alarmklokke
inn/ut
Håndsett Zenia 300 Vox
Blinker
Ny melding på telefonsvarer
eller Voice mail
- Innkommende, eksternt anrop
- Linje opptatt
Innkommende, internt anrop
Basestasjon-høyttaler aktivert
Ny SMS
Ikke registrert
Blinker raskt
Telefonsvarer-minne fullt
SMS-minne fullt
Norsk
Håndsett
2
Page 13
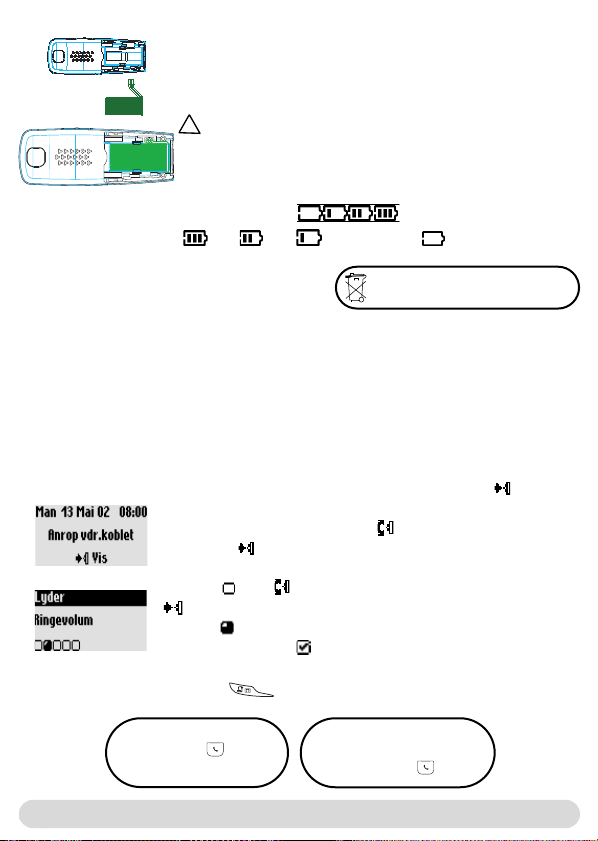
Sette inn og skifte batteripakke
pne batterirommets deksel på batteripakken idet du skyver det
Å
nedover. Tilkoble batteripakken på kontakten i batterirommet. Sett
batteriet med klebeetiketten pekende oppover og ledningstråder
langs venstre side av batteripakken inn i batterirommet.
!
Benytt for utskifting av batteriet utelukkende NiMh-batterier
.
Under ladingen endres batterisymbolets streker:
.
Batterienes status vises: Full , 2/3 , 1/3 og batteri tomt .
Batterikapasitet og rekkevidde
Batterier må ikke kastes i husholdningsavfall.
Fullt oppladete batterier er driftsklare i 300 timer (håndsett i hvilemodus og klart for mottak
av samtaler) og ca.18 timer samtaletid. En pipelyd informerer deg når batteriene må lades opp.
Hvis dette skjer under en samtale, avsluttes samtalen kort etter signalet. Batteriets optimale
kapasitet oppnås etter 3 komplette ladings- og utladingssykler.
Ved gunstige betingelser er rekkevidden i lukkede rom 50 meter og 350 m i det fri. Når
rekkevidden overskrides hører du knitring, gå nærmere til basen ellers avbrytes samtalen. Hold
basestasjonen borte fra elektriske apparater for å nytte optimal rekkevidde.
Menystruktur og betjening
I hvilemodus henter du meny-karusellen frem med tasten
I karusellen finnes symboler plassert i en ringkobling for tilgang til første
menynivå. Bla fremover/bakover med for å nå ønsket meny.
Bekreft med for inngang i menyen.
I det nedre displayområdet fremstilles alle undermenyer som små
kvadrater . Med når du ønsket undermeny, bekreft så valget med
.
Symbolet viser alternativet som du nettopp blar i.Valgt undermeny
merkes med en "hake" .
Bemerk: Noen menyer kan hentes frem direkte via egne taster (f.eks.
anropslogg ).
Direkte anrop
1- Oppta linje .
2- Angi telefonnummer.
Forhåndsdefinert anrop
1- Angi telefonnummer.
2- Oppta linje
.
..
3
Menystruktur og betjening
Page 14
Håndsett
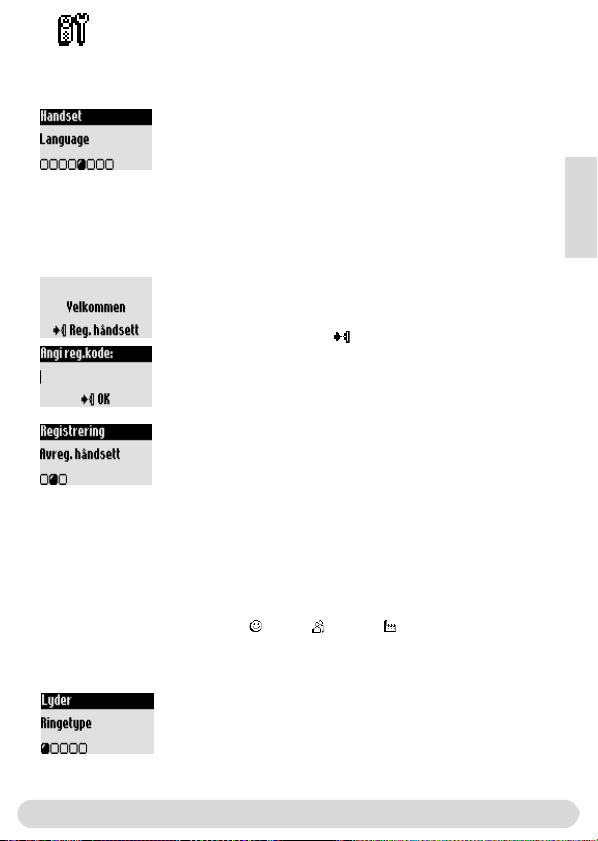
Endre språk
Fra fabrikkens side er engelsk stilt inn på håndsettet.
Endre displayspråket
1- Gå til Handset, bekreft.
2- Rull til Language, bekreft.
3- Velg ønsket språk og bekreft.
OBS: Endring av displayspråket har ingen innflytelse på
telefonsvarerens utgående melding (Zenia 300 Vox eller
andre basestasjoner, ikke fra Philips).
Registrere/avregistrere et ekstra håndsett på basen
Det ekstra håndsettet må være registrert på basen slik at alle funksjoner kan brukes*. På
basen Zenia 300 Vox kan du registrere opp til 8 håndsett.
Registrere et ekstra håndsett
Sett basen i registreringsmodus på følgende måte:
1- Trekk basens nettplugg ut og koble den til igjen.
2- Trykk på håndsettet på for å innlede registreringen.
3- Angi RC-koden (4-sifret kode),bekreft.
Avregistrere et håndsett
1- Gå til Håndsett, bekreft.
2- Rull til Registrering og bekreft.
3- Velg Avregistrere håndsett og bekreft.
4- Velg håndsettet som skal avregistreres fra listen, bekreft.
5- Angi RC-koden (4-sifret kode),bekreft.
Norsk
Innstilling av håndsettets lyder
Du kan stille inn ringetypen for:
- Ekstern standard-ringetype for oppringere som ikke er lagret i telefonlisten eller uten VIPinnstillinger.
- Intern ringetype (hvis det finnes minst to håndsett).
For innstilling av VIP-ringetyper (venner , familie & arbeid ) se bruksanvisning Zenia 300
Vox. For denne funksjonen trenger du overføring av telefonnummeret (CLIP).
Innstilling av ringetype
1- Gå til Håndsett, bekreft.
2- Velg Lyder, bekreft.
3- Velg Ringetype, bekreft.
4- Velg Eksternt std.anrop/Internt anrop, bekreft.
5- Velg ønsket ringetype og bekreft.
Håndsett
* se side 1
4
Page 15
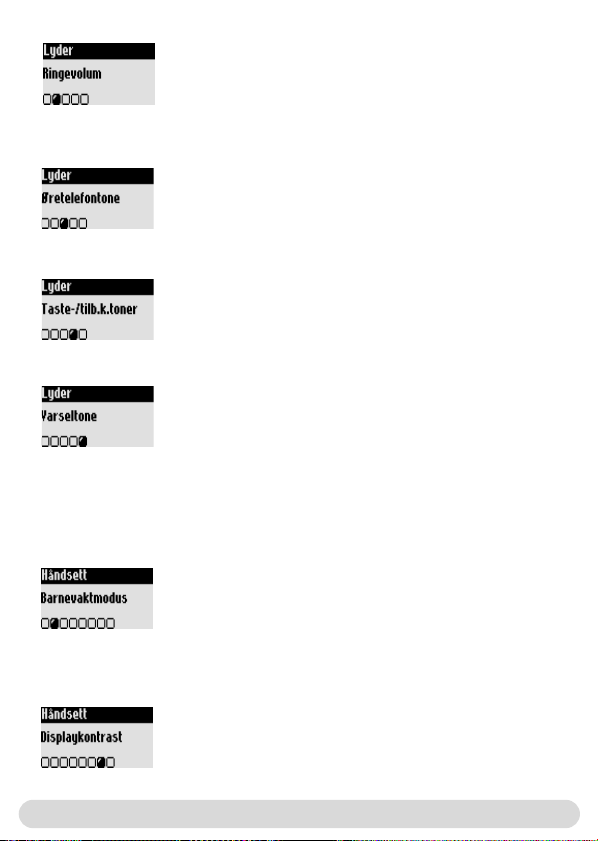
Innstilling av håndsettets ringevolum
Det finnes 5 innstillinger for ringevolumet.
1- Gå til Håndsett, bekreft.
2- Velg Lyder, bekreft.
3- Rull til Ringevolum, bekreft.
4- Velg ønsket volum og bekreft.
Bemerk: Du kan også aktivere vibrasjonsfunksjonen. Ringesignalet er
da utkoblet (stilt inn på stille).
Innstilling av øretelefontone
1- Gå til Håndsett, bekreft.
2- Rull til Lyder, bekreft.
3- Rull til Øretelefontone, bekreft.
4- Velg Standard, Diskant eller Bass og bekreft.
Aktivere/deaktivere taste-/tilb.k.toner
Tastebetjeninger og endringer i innstillingene kan bekreftes med
en pipelyd.
Gjenta trinn oppe 1-2.
3- Rull til Taste-/tilb.k.toner, bekreft.
4- Velg PÅ/AV og bekreft.
Aktivere/deaktivere Varseltone
Varseltonen informerer deg om at en ny SMS eller en talt melding
er ankommet.
Gjenta betjeningstrinn 1-2 oppe.
3- Rull til Varseltone, bekreft.
4- Velg PÅ/AV, bekreft.
Barnevaktmodus
For overvåking av barnerommet. Legg håndsettet i rommet som skal overvåkes; via det ekstra
håndsettet kan du høre alle lyder i rommet.
Aktivere/deaktivere Barnevaktmodus
1- Gå til Håndsett, bekreft.
2- Rull til Barnevaktmodus, bekreft.
3- Velg PÅ/AV, bekreft.
Bemerk: For overvåking av rommet er det nødvendig med interkom
(se side 6).
Innstilling av displaykontrast
Innstilling av displaykontrast
1- Gå til Håndsett, bekreft.
2- Rull til Displaykontrast, bekreft.
3- Velg ønsket kontrastinnstilling og bekreft.
5
Håndsett
Page 16

Innstilling av bakgrunnsbelysning
Innstilling av bakrunnsbelysning
1- Gå til Håndsett, bekreft.
2- Rull til Bakgrunnslys, bekreft.
3- Velg ønsket varighet 10 sek., 20 sek. eller AV, bekreft.
Interkom
Interkom (hvis det finnes minst 2 håndsett)
Med denne funksjonen kan du føre interne samtaler, bruke barnevaktmodusen
(romovervåking), viderekoble eksterne samtaler til et annet håndsett. Funksjonen interkom er
bare mulig mellom håndsett som er registrert på samme basestasjon.
Aktivere interkom eller romovervåking
1- Gå til Interkom, bekreft.
2- Hvis det bare finnes ett ekstra håndsett ringer det automatisk.
Velg ellers ønsket håndsett fra listen og trykk for Anrop.
Det oppringte håndsettet/basen ringer.
3- Ta imot samtalen med på oppringt håndsett/base. Intern
samtale/romovervåking kan starte.
Demp er likeledes mulig.
Bemerk: Funksjonen Interkom kan også hentes frem med Pilottasten. Rull i hvilemodus oppover med .
Du kan viderekoble en ekstern samtale til et annet håndsett.
1- Trykk på for å hente frem alternativet.
2- Rull til Interkom, bekreft.
3- Hvis det bare finnes ett ekstra håndsett, ringer det automatisk.
Velg ellers ønsket håndsett/base fra listen.
Oppringt håndsett/base ringer. Den eksterne samtalen venter.Hvis
det 2. håndsettet ikke melder seg, kan du igjen overta samtalen på 1.
håndsett idet du henter frem alternativet Rediger interkom.
4- Ta imot samtalen med på andre håndsett/base. Begge interne
samtalepartnere kan snakke med hverandre.
5- Velg alternativet Overfør. Samtalen avsluttes på 1. håndsett.
Bemerk: Du kan på det første håndsettet avslutte samtalen med .
Norsk
Håndsett / Interkom
6
Page 17

Mens samtalen venter,hører oppringeren musikken ved venting
(hvis den er aktivert) eller pipelyder.Alternativene Bytt (mellom
samtalepartner 1 og 2) og Demp (mikrofon) står likeledes til
disposisjon i kontekstmenyen.
Konferanseanrop
Med funksjonen konferanseanrop kan et eksternt anrop
forbindes med 2 håndsett (med interkom). De 3 samtalepartnere
kan nå snakke med hverandre. Denne typen konferanseanrop er
ikke avhengig av avtalen.
Gjenta trinn 1-4 oppe.
5- Hent frem alternativet Konferanseanrop og bekreft.
7
Interkom
Page 18

Feilsymptomer
PROBLEM
Ingen summetone.
Ingen pipelyd når håndsettet
settes i basestasjonen.
Etter en ladetid på 12 timer
er batteriene fremdeles ikke
oppladet.
Når du vil ringe med
håndsettet hører du en lyd
som signaliserer feil.
Under en samtale hører du
en lyd som signaliserer feil.
Ingen ring.
Når håndsettet registreres
vises en feilmelding.
Forstyrrelser i linjen når du
ringer.
ÅRSAK
Håndsettet er utenfor basens
rekkevidde ( mangler).
Håndsettet er ikke registrert på
basen. (Symbolet vises ikke).
Basen er ikke koblet korrekt til
strømforsyningen eller
telefonforbindelsen.
Batteriene er utladet (
vises).
Ladestasjonen er ikke korrekt
koblet til strømforsyningen.
Tilsmussete ladekontakter.
Taste-/tilb.k.toner er deaktiverte.
Ladestasjonen er ikke korrekt
koblet til strømforsyningen.
Batteriene er skadete eller for
gamle.
Håndsettet er ikke registrert.
På det andre håndsettet føres en
ekstern samtale.
Basestasjonen er nettopp opptatt.
Håndsett utenfor rekkevidde.
Batteriene er for svake.
Ring er deaktivert.
Registreringen er mislykket.
Maksimalt antall håndsett er nådd.
Avstand fra basen for stor.
Basen er i nærheten av elektriske
apparater, stålbetongvegg eller
metalldører.
symbolet
MULIG LØSNING PÅ
PROBLEMET
Gå nærmere til basen og prøv
på nytt.
Registrer håndsettet på basen
(se side 4).
Kontroller pluggforbindelser.
Lad batteriene (se side 3).
Kontroller pluggforbindelser.
Rengjør med tørr klut.
Aktiver Taste-/tilb.k.toner
(side 5).
Kontroller pluggforbindelser.
Kjøp nye batterier hos
fagforhandleren.
Registrer (side 4).
Prøv på nytt når samtalen er
avsluttet.
Prøv på nytt når basen er igjen
tilgjengelig.
Gå nærmere til basen.
Lad batteriene.
Aktiver ring (side 5).
Trekk basens nettplugg og
koble den til igjen. Registrer
håndsett en gang til.
Avregistrer et håndsett
(se side 4).
Gå nærmere til basen.
Skift basens oppstillingssted
(jo høyere desto bedre).
Norsk
Feilsymptomer
8
Page 19

DECLARATION OF CONFORMITY
We,
PHILIPS Consumer, Electronics
DECT & Home Telephony
Route d’Angers
72081 Le Mans Cedex 9
France
Declare that the products Zenia 300, Zenia 300 additional handset and all bundle
combinations are in compliance with ANNEX III of the R&TTE-Directive 1999/5/EC
and then with the following essential requirements :
Article 3.1.a : (protection of the health & the safety of the user) : EN 60950 (2000)
Article 3.1.b : (protection requirements with respect to electromagnetic
compatibility) ETSI EN 301 489-6 V1.1.1 (09/2000) & ETSI EN 301 489-1 V1.3.1
(09/2001)
Article 3.2 : (effective use of the radio spectrum) : EN 301 406 (2001)
The presumption of conformity with the essential requirements regarding Council
Directive 1999/5/EC is ensured.
Date : 16/07/2003 Le Mans
Vice President & General Manager
DECT & Home Telephony
9
Konformitet
Page 20

Konformitet, säkerhet och miljö
Säkerhetsinformation: Denna utrustningen kan vid strömavbrott ej användas för nödsamtal.
Använd i nödfall något annat alternativ, t.ex. en mobiltelefon.
Konformitet:
Härmed intygar PHILIPS att denna Zenia 300 Vox står I överensstämmelse med
de väsentliga egenskapskrav och övriga relevanta bestämmelser som framgår av direktiv
1999/5/EG.
En kopia av konformitetsförklaringen erhålles på begäran från kundtjänst.
Denna
produkt kan endast anslutas till det analoga telefonnätet i det på förpackningsetiketten angivna
geografiska området.
Elförsörjning: Denna produkt erfordrar en 230 volts elförsörjning med enfas växelström,
med undantag av IT-installationen enligt norm EN 60-950.
Varning! Elnätet klassas som farligt enligt EN 60-950. Apparaten kan skiljas från elförsörjningen
endast genom att dra ur kontakten.Använd därför alltid ett lättåtkomligt vägguttag.
Telefonanslutning: Spänningen i telefonnätet klassas som TNV-3 (Telecommunication
Network Voltages), enligt definition i normen EN 60-950.
Säkerhetsanvisningar: Låt inte telefonluren komma i beröring med vätskor.Plocka aldrig isär
varken telefonlur eller basstation. Det är risk för att komma i beröring med farliga spänningar.
Låt alltid auktoriserad kundtjänst genomföra reparationer.Laddningskontakter och batterier får
ej komma i beröring med ledande föremål.
Miljöskydd: Vid avfallshantering av förpackningsmaterial, förbrukade batterier och uttjänt
telefon skall lokala föreskrifter för återvinning absolut efterföljas.
GAP-standardens uppfyllelse
Genom GAP-standarden säkerställs att alla DECTTM- och GAP-dugliga telefonlurar och basstationer uppfyller standardens minimikrav oberoende av fabrikat.Telefonluren Zenia 300 motsvarar GAP-kraven, dvs. följande funktioner garanteras: belägga linjen, ta emot samtal och ringa.
Vid användning av Philips basstationer
Om du registrerar extraluren Zenia 300 Vox i basstation Zenia 300 har du tillgång till samtliga
beskrivna egenskaper (se bruksanvisningen Zenia 300 Vox).
Om du registrera extraluren i en basstation Onis 200 eller Zenia är vissa menyer inte
tillgängliga. Läs vänligen motsvarande bruksanvisning.
Vid användning av annan basstation (ej Philips)
Följ anvisningarna för basstationen av annat märke för att registrera telefonluren. Genomför
därefter anvisningarna för registrering i föreliggande bruksanvisning, se sid. 4. Beakta att inte alla
menyfunktioner står till förfogande.
Svenska
Philips har märkt batterier/ackumulatorer och förpackningar med standardsymboler för att främja vederbörlig
avfallshantering.
Förpackningsmaterial och bruksanvisning kan lämnas till återvinning.
Ett finansiellt bidrag har lämnats för att främja upparbetning och åter vinning.
DECTTMär ett registrerat varumärke från ETSI till förmån för användare av DECT-teknologi.
Konformitet, säkerhet och miljö
1
Page 21

Pilotknapp
Tryck för att öppna karusell eller
bekräfta meny eller alternativ
- Bläddra i menyer och alternativ
eller placera markör
- Uppåt för åtkomst av Interkom i
viloläge
- Nedåt för åtkomst av Billigast
avgiftfunktion
Tryck: Knapplås AV
Högtalare
- Tryck för att ta linjen eller aktivera
telefonlurens högtalare under samtal
- Tryck länge för att aktivera basens
högtalare
Samtalslista
- Kort tryck öppnar samtalslista
- Långt tryck ger direkt åtkomst till
meddelanden
Knapplås och redigering
- Tryck kort för inmatning av * (asterisk)
- Tryck länge: för att låsa / låsa upp
knapparna i viloläge
- Tryck länge: infoga återuppringningsläge (R)
- Tryck länge: standard- eller Eatoni
textredigering
®
Symboler
Telefonsvarare PÅ
Externt samtal pågår
Internt samtal pågår
Telefonlurens
högtalare aktiv
Ingen rington
SMS-funktion aktiv
Registrerad och inom
räckhåll
2
Uppringningsknapp
- Tryck och ring upp, svara
eller avsluta samtal
Mikrofon
-
Nytt meddelande på TS
eller röstmeddelande
- Inkommande externt samtal
- Ledningen upptagen
Inkommande internt samtal
Basstationens högtalare aktiv
Nytt SMS
Ej registrerad
Ta bort/avbrottsknapp
- Tar bort siffra vid förval eller
tecken vid redigering
- Ett menyläge bakåt
- Tryck länge: återgång till viloläge
vid navigering
- Aktiverar R-funktion under
samtal (för operatörstjänster)
Lur
Telefonbok
- Tryck kort: öppnar telefonbok
- Tryck länge: infogar ny anteckning
Hörlursanslutning
"Stör ej" läge och
omkoppling
- Tryck kort: infogar "#" (ruta) vid
uppringning
- Tryck länge: infogar paustecken (P)
vid uppringning
- Tryck länge: aktiverar/stänger av
"stör ej" läge
- Vid redigering byte mellan små /
stora bokstäver
Väckarklocka
- Tryck kort för att välja 0
- Tryck länge: aktiverar/stänger av
väckarklockan
Zenia 300 Vox telefonlur
Blinkar
Telefonlur
Blinkar snabbtKonstant PÅ
TS-minne fullt
SMS-minne fullt
Page 22

Sätta in och byta ut batteripaketet
För att sätta in batteripaketet öppnar du batterifackslocket på
telefonluren genom att skjuta det nedåt.Anslut batteripaketet till
kontakten i batterifacket. Sätt in batterierna i batterifacket med
etiketten uppåt och anslutnigstrådaran längs vänster sida på
batteripaketet.
!
Vid byte av batterier skall endast uppladdningsbara
NiMh-batterier användas.
Under uppladdningen förändras strecken i batterisymbolen: .
Batteriets status visas: fullt , 2/3 , 1/3 och tomt batteri .
Batteriets hållbarhet och räckvidd
Ett uppladdat batteri har ca 300 timmars passningstid
(telefonlur i viloläge och mottagningsberedd) och ca 18 timmars samtalstid. En signal hörs när
batterierna behöver laddas upp. Sker detta medan telefonsamtal pågår avbryts samtalet strax
efter signalen.
Batterierna uppnår full kapacitet efter 3 fulla laddnings-/urladdningsomgångar.
I gynnsamma förhållanden uppnår räckvidden i slutna rum 50 m och 350 m i det fria.
Överskrids räckvidden hörs ett knastrande ljud. Närma dig basstationen, annars bryts samtalet.
Placera basstationen långt från elektriska apparater för att kunna uppnå bästa räckvidd.
Kasta aldrig batterier i soporna.
Menystruktur och manövrering
Tryck i viloläge på knappen och aktivera menykarusellen.
Karusellen omfattar en ring av symboler med vilka man når första
menyplan. Bläddra framåt/bakåt med för att nå önskad meny.
Bekräfta och öppna menyn med .
Undermenyerna visas som små kvadrater vid displayrutans undre kant.
Med når du önskad undermeny, bekräfta sedan valet med .
Symbolen visar det aktuella alternativ du bläddrar i.
Vald undermeny/alternativ är kännetecknad med en bock .
Obs! Vissa menyer når man direkt via egna knappar (t ex samtalslista
Direkt uppringning
1-Ta linjen .
2- Slå numret.
Menystruktur
Förberedd uppringning
1- Slå numret.
2- Ta linjen .
Svenska
).
3
Page 23

Telefonlur
Byta språk
Vid leverans är engelska inställd i telefonluren.
Byta displayspråk
1. Gå till Handset bekräfta.
2. Bläddra till Language, bekräfta.
3.Välj önskat språk och bekräfta.
Obs! Byte av displayspråk har inget inflytande på utgående
meddelanden från telefonsvararen (Zenia 300 Vox eller basstationer,
andra än Philips).
Registrera / avregistrera extra telefonlur
En extra telefonlur måste registreras i basstationen för att dess kompletta kapacitet skall kunna
nyttjas *. I basstationen Zenia 300 kan max. 8 telefonlurar registreras.
Registrera extra telefonlur
Sätt basstationen i registreringsläge enligt följande:
1- Dra ur basens elkontakt och anslut den igen.
2- Tryck på på telefonluren för att inleda registreringen.
3- Mata in den 4-siffriga RC-koden (etikett på basstationens
undersida) och bekräfta.
Avregistrera extra telefonlur
1- Gå till Telefonlur, bekräfta.
2- Bläddra till Registrering och bekräfta.
3- Bläddra till Avregistr. telefonlur och bekräfta.
4- Välj telefonluren som ska avregistreras ur listan, bekräfta.
5- Mata in den 4-siffriga RC-koden, bekräfta.
Inställning av telefonlurens ljudsignaler
* Se sid. 1
Ringningstypen är inställbar för:
- den externa standardringning för nummer som inte är lagrade i telefonbok och är utan VIPinställning.
- den interna ringningen (om minst två telefonlurar är registrerade).
För inställning av ringningstyp VIP (vänner , familj ,och arbete ) se anvisning Zenia 300 Vox.
För denna funktion erfordras nummerpresentation.
Inställning av ringningstyp
1- Gå till Telefonlur, bekräfta.
2- Välj Ljudsignaler, bekräfta.
3- Välj Ringningstyp, bekräfta.
4- Välj Extern standardringning/intern ringning, bekräfta.
5- Välj önskad ringning och bekräfta.
4
Telefonlur
Page 24

Inställning av volymen för telefonlurens ringning
Ringningen har 5 volymlägen
1- Gå till Telefonlur, bekräfta.
2- Välj Ljudsignaler, bekräfta.
3- Bläddra till Ringningsvolym, bekräfta.
4- Välj önskad volym och bekräfta.
OBS! Du kan också aktivera vibratorfunktionen. Ringsignalen är då
avstängd (inställd på Tyst).
Inställning av hörlurens signal
1- Gå till Telefonlur, bekräfta.
2- Välj Ljudsignaler, bekräfta.
3- Bläddra till Signal hörlur, bekräfta.
4- Välj Standard, Diskant eller Bas och bekräfta.
Inställning av knapp- & bekräftelse signaler
Knappaktivering och inställningsändringar kan bekräftas
med en signal.
Upprepa moment 1-2 ovan.
3- Bläddra till Sign. knappar & bek., bekräfta.
4- Välj AV/PÅ, bekräfta.
Inställning av aviseringssignal
Aviseringssignalen upplyser om nyanlänt SMS eller röstmeddelande.
Upprepa moment 1-2 ovan.
3- Bläddra till Aviseringssignal, bekräfta.
4- Välj PÅ/AV, bekräfta.
Barnvaktsläge
Med denna möjlighet kan även barnkammare övervakas. Placera telefonluren i rummet som ska
övervakas; via extratelefonen kan man höra samtliga ljud i rummet.
Inställning av barnvaktsläge
1- Gå till Telefonlur, bekräfta.
2- Bläddra till Barnvaktsläge, bekräfta.
3- Välj PÅ/AV, bekräfta.
Obs! För övervakning av rummet behövs interkom.(se sid. 6).
Inställning av kontrast
Inställning av kontrast
1- Gå till Telefonlur, bekräfta.
2- Bläddra till Kontrast, bekräfta.
3- Välj önskad kontrastinställning och bekräfta.
Svenska
Telefonlur
5
Page 25

Inställning av bakgrundsljus
Inställning av bakgrundsljus
1- Gå till Telefonlur, bekräfta.
2- Bläddra till Bakgrundsljus, bekräfta.
3- Välj önskad tid, 10 sekunder, 20 sekunder eller AV, bekräfta.
Interkom
Interkom (om minst 2 telefonlurar finns)
Med denna funktion kan interna samtal föras, barnvaktsfunktionen aktiveras och externa samtal
överföras till annan telefonlur. Interkom fungerar endast mellan telefonlurar som är registrerade
i samma basstation.
Ringa internt eller aktivera övervakningsfunktion
1- Gå till Interkom, bekräfta.
2- Om endast en ytterligare telefonlur finns, ringer den automatiskt.
Välj annars önskad telefonlur/basstationen och tryck sedan
för Ring upp.
3- Ta emot samtalet i luren/basen som ringer med .
Internsamtalet/rumsövervakningen kan börja. Tyst är också en
möjlighet.
Obs! Funktionen "Interkom" kan även aktiveras med pilotknappen:
bläddra i viloläge uppåt med .
Ett externt samtal kan överföras till en annan telefonlur.
1- Tryck på och öppna alternativen.
2- Bläddra till Interkom, bekräfta.
3- Om endast en ytterligare telefonlur finns, ringer den automatiskt.
Välj annars önskad lur/basstationen.
Det ringer i den påringda telefonluren/basstationen. Det externa
samtalet väntar.Om den påringda luren/basen inte svarar, kan första
telefonluren ta tillbaka externsamtalet genom att välja Avsluta
interkom.
4- Överta samtalet med på den andra luren /på basen. De båda
internparterna kan tala med varandra.
5- Välj alternativet Överför. Förbindelsen bryts med första
telefonluren.
OBS! På den första telefonluren kan du avsluta samtalet med .
6
Telefonlur / Interkom
Page 26

Medan samtalet väntar hör den väntande en melodi (om sådan är
aktiverad) eller signaler.
Alternativen Växla (mellan lur 1 och 2) och Tyst (mikrofon)
står även till förfogande i menyn.
Flerpartsamtal
Med funktionen flerpartsamtal kan ett externt samtal förbindas
med 2 telefonlurar (via interkom). De 3 samtalsparterna kan så
tala med varandra (utan avtal med operatör).
Upprepa de ovan angivna momenten 1-4.
5-Gå till alternativet Flerpartsamtal och bekräfta.
Svenska
Interkom
7
Page 27

Problemlösningar
Problem
Ingen kopplingston.
Ingen ljudsignal när handtelefonen sätts i laddningsenheten.
Efter 12 timmars
uppladdning är batterierna
fortfarande inte laddade.
Vid försök att ringa med
telefonluren hörs en felsignal.
Felsignal hörs medan
telefonsamtal pågår.
Ingen ringning.
Vid registrering av telefonlur
syns ett felmeddelande.
Störande ljud i ledningen
under samtal.
Möjlig orsak
Telefonluren är utom räckhåll från
basstationen ( syns ej).
Telefonluren är ej registrerad i
basstationen (symbolen syns ej).
Basstationen är inte korrekt
ansluten till eluttaget eller
telefonuttaget.
Batterierna är urladdade
(symbolen syns).
Laddningsenheten är inte korrekt
ansluten till elnätet.
Smutsiga laddningskontakter.
Knappsignalen är ej aktiv.
Laddningsenheten är inte korrekt
ansluten till elnätet.
Batterierna är skadade eller
för gamla.
Telefonluren är inte registrerad.
Externsamtal pågår från annan lur
eller från basstationen.
Basstationen är upptagen.
Telefonluren är utom räckhåll.
Batterierna är för svaga.
Ringningen är inte aktiv.
Registreringen har inte lyckats.
Maximalt antal telefonlurar har
uppnåtts.
Avståndet till basstationen är för
stort. Basen står för nära elektrisk
apparat, armerad betongvägg eller
metalldörr.
Gå närmare basen och försök
Hjälp
på nytt.
Registrera telefonluren i
basstationen (se sid. 4).
Kontrollera kontakterna.
Ladda batterierna (se sid. 3).
Kontrollera förbindelsen
mellan elnät och enhet.
Rengör kontakterna med en
torr trasa.
Aktivera knappsignalen (sid. 5).
Kontrollera förbindelsen
mellan elnät och enhet.
Skaffa nya batterier i
fackhandeln.
Registrera telefonluren (sid. 4).
Försök igen när samtalet är
avslutat.
Försök igen när basstationen
blivit fri.
Gå närmare basstationen.
Ladda batterierna.
Aktivera ringning (sid. 5).
Dra ur basens elkontakt och
anslut den igen. Registrera
telefonluren igen.
Avregistrera en telefonlur (s. 4).
Gå närmare basstation.
Flytta på basstationen till bättre
plats (ju högre desto bättre).
8
Problemlösningar
Page 28

DECLARATION OF CONFORMITY
We,
PHILIPS Consumer, Electronics
DECT & Home Telephony
Route d’Angers
72081 Le Mans Cedex 9
France
Declare that the products Zenia 300, Zenia 300 additional handset and all bundle
combinations are in compliance with ANNEX III of the R&TTE-Directive
1999/5/EC and then with the following essential requirements :
Article 3.1.a : (protection of the health & the safety of the user) : EN 60950 (2000)
Article 3.1.b : (protection requirements with respect to electromagnetic
compatibility) ETSI EN 301 489-6 V1.1.1 (09/2000) & ETSI EN 301 489-1 V1.3.1
(09/2001)
Article 3.2 : (effective use of the radio spectrum) : EN 301 406 (2001)
The presumption of conformity with the essential requirements regarding Council
Directive 1999/5/EC is ensured.
Date : 16/07/2003 Le Mans
Vice President & General Manager
DECT & Home Telephony
Konformitet
Svenska
9
Page 29

Standardinmukaisuus,Turvallisuus ja Ympäristönsuojelu
Turvallisuusohje: Tätä laitteistoa ei voida käyttää hätäpuheluun sähkökatkoksen aikana. Käytä
siinä tapauksessa vaihtoehtoisesti esimerkiksi kännykkää.
Standardinmukaisuus: PHILIPS vakuuttaa täten että Zenia 300 Vox tyyppinen laite on
direktiivin 1999/5/EY oleellisten vaatimusten ja sitä koskevien direktiivin muiden ehtojen
mukainen. Kopio vaatimustenmukaisuusvakuutuksesta voidaan tarvittaessa tilata
varaosapalvelusta. Laatikon etikettiin merkityllä maantieteellisellä alueella voidaan tämä tuote
liittää ainoastaan analogiseen puhelinverkkoon.
Sähköhuolto: Tämä tuote vaatii 230 Voltin vaihtovirtajännitteen, lukuunottamatta standardin
EN 60-950 mukaisia IT-asetuksia.
Huomaa! Sähköverkko on EN 60-950:n mukaisesti luokiteltuna vaarallinen. Laite voidaan
erottaa sähköverkosta vain vetämällä verkkopistoke pistorasiasta. Käytä puhelinta siis
pistorasiasta, joka sijaitsee sen lähellä ja on selkeästi näkyvissä.
Puhelinliitäntä: Puhelinverkon jännitteeksi luokitellaan TNV-3 (Telecommunication Network
Voltages) standardin EN 60-950 mukaisesti.
Turvallisuusohjeita: Pidä luuri etäällä nesteistä. Älä hajota luuria tai tukiasemaa, muussa
tapauksessa voit joutua kosketuksiin vaarallisten jännitteiden kanssa. Anna kaikki korjaustyöt
valtuutetun huoltopalveluhenkilökunnan tehtäväksi. Latauskontaktit ja akut eivät saa koskettaa
sähköäjohtavia kohteita.
Ympäristönsuojelu: Kun hävität pakkausmateriaaleja, käytettyjä akkuja ja käytöstä poistettua
puhelinta, noudata voimassaolevia jätehuoltomääräyksiä ja käytä hyväksi
kierrätysmahdollisuuksia.
GAP-standardin vaatimukset
GAP-standardilla varmistetaan, että kaikki DECTTM- ja GAP-yhteensopivat luurit ja tukiasemat
täyttävät kyseisen standardin vähimmäisvaatimukset, tuotemerkistä riippumatta. Zenia 300 luuri
on GAP-vaatimusten mukainen, toisin sanoen seuraavien toimintojen toimintakykyisyys on
taattu: linjan varaus, puhelujen vastaanotto ja puhelinnumerojen valinta.
Käytettäessä Philips tukiasemia
Jos käytät erillistä Zenia 300 Vox-tukiasemassa, voit käyttää kaikkia kuvattuja toimintoja (katso
Zenia 300 käyttöohje).
Jos rekisteröit lisäluurin Onis 200- tai Zenia-tukiasemaan, osa valikoista ei ole käytettävissä.
Katso vastaava dokumentointi.
Muiden tukiasemien käyttö (muut kuin Philips-tuotteet)
Jos rekisteröit luurin jonkin muun valmistajan (ei Philips) tukiasemaan, noudata kyseisen
valmistajan antamia ohjeita. Suorita sen jälkeen oheisessa käyttöohjeessa annetut
rekisteröintitoimenpiteet, katso sivu 4. Huomaa, että kaikki valikon
toiminnot eivät ole käytettävissä.
Philips on varustanut paristot/akut ja laitteen pakkaukset vakiotunnuksilla,jotka helpottavat tuotteen
kierrätystä ja asianmukaista jätehuoltoa.
Pakkausmateriaali ja käyttöohje ovat kierrätyskelpoisia.
Valmistaja on maksanut Saksassa osuutensa jälleenkäsittelystä ja kierrätyksestä aiheutuvista kuluista.
DECTTMon ETSIn rekisteröity tavaramerkki DECT-teknologian käyttäjien hyväksi.
1
Standardinmukaisuus, turvallisuus ja ympäristönsuojelu
Page 30

Navigointinäppäin
painallus: karusellin kutsu tai
valikkojen/asetusten vahvistaminen
Valikkojen ja asetusten selaus tai
kohdistimen paikoitus
- Ylöspäin: pääsy sisäpuheluun
lepotilassa
- Alaspäin: pääsy edullisimpaan
esivalintaan
painallus: Näppäinlukituksen avaus
Kaiutin
- Painallus:Yhteyden rakentaminen tai
luurin kaiuttimen aktivointi
- Pitkä painallus: Tukiaseman kaiuttimen
aktivointi
Soittajaluettelo
- Painallus: Soittajaluettelon kutsuminen ja
tuonti näytölle
- Pitkä painallus: Puhuttujen viestien kutsu
Näppäinlukitus ja syöttö
- Lyhyt painallus * (tähden) syöttöä varten
- Pitkä painallus: näppäinlukituksen
aktivointi/deaktivointi
- Pitkä painallus: Soittosignaalin lisäys ( R )
- Pitkä painallus:Vakio- tai Eatoni
tekstinsyöttö
Symbolit
®
-
Pysyvästi PÄÄLLÄ
Puhelinvastaaja PÄÄLLÄ
Aktivoitu ulkopuhelu
Aktivoitu sisäpuhelu
Luurin kaiutin aktivoitu
Soittoääni deaktivoitu
Tekstiviestitoiminto aktivoitu
Rekisteröity ja tukiaseman
kantoetäisyysalueella
Puhelu-näppäin
- Painallus:Yhteyden
rakentaminen, Puhelun
vastaanotto tai lopettaminen
Kuuloke
Mikrofoni
Luuri Zenia 300 Vox
Vilkkuu
Uusi viesti vastaajalla tai
Voice mail
- Tuleva ulkopuhelu
- Linja varattu
Tuleva sisäpuhelu
Tukiaseman kaiutin aktivoitu
Uusi tekstiviesti
Ei rekisteröity
Luuri
Poisto-/keskeytys-näppäin
- Virheellisesti syötetyn numeron
tai kirjaimen poisto
- Paluu edeltävälle valikkotasolle
- Pitkä painallus: Navigoitaessa
paluu takaisin lepotilaan
- Puhelinyhteyden aikana
R-toiminnon aktivointi (verkkooperaattoripalveluja varten)
Puhelinluettelo
- Lyhyt painallus: Luettelon tuonti
näytölle
- Pitkä painallus: Merkinnän
lisääminen
Kuulokeliitäntä
"Äänetön"-tila ja
vaihtonäppäin
- Lyhyt painallus: Ruutumerkin "#"
lisääminen puhelinnumeroa
syötettäessä
- Pitkä painallus: Taukomerkin (P)
syöttö puhelinnumeroa
valittaessa
- Pitkä painallus: "Äänetön"-tilan
aktivointi/deaktivointi
- Tekstiä syötettäessä
vaihto pienistä suuriin
kirjaimiin tai päinvastoin
Herätyskello
- Lyhyt painallus: nollan (0) valinta
- Pitkä painallus: Herätyskellon
kytkentä päälle/pois päältä
Vilkkuu nopeasti
Vastaajan muisti täynnä
Tekstiviestimuisti täynnä
2
Suomi
Page 31

Akkupaketin paikalleenasettaminen ja vaihto
Akkupaketin paikalleenasettamista varten on ensin avattava luurin
akkulokeron kansi vetämällä sitä alaspäin. Liitä akku lokerossa olevaan
liitäntään.Aseta akku lokeroon niin, että siinä oleva tarra näyttää
ylöspäin ja liitäntäjohdot kulkevat akkupaketin vasenta sivua pitkin.
!
Akkua vaihdettaessa tulee käyttää ainoastaan NiMh-akkuja.
Lataustoimenpiteen aikana akkusymboleissa olevien palkkien lukumäärä lisääntyy:
Akun varaustilan näyttö: Täysi , 2/3 , 1/3 ja akku tyhjä .
Akun teho ja kantoetäisyys.
Akkuja ei saa hävittää talousjätteiden joukossa.
Täyteenladatuilla akuilla puhelimen käyttövalmius on 300 tuntia (luuri lepotilassa ja käyttövalmiina) ja puheaika 18 tuntia. Piippaava merkkiääni ilmoittaa että akut on ladattava. Jos merkkiääni
alkaa kuulua puhelun aikana, puhelu katkeaa vähän ajan kuluttua merkkiäänen kuulumisesta.
Akun optimaalinen teho saavutetaan kun akku on latautunut/purkautunut
täydellisesti 3 kertaa.
Suotuisissa olosuhteissa kantama on suljetuissa tiloissa 50 metriä ja ulkona 350 metriä.
Kantoetäisyyden ulkopuelelle tultaessa alkaa kuulua särinää. Siirry tällöin lähemmäksi
tukiasemaa, muussa tapauksessa puhelu katkeaa. Pidä tukiasema etäällä sähkölaitteista jotta
kantama pysyy mahdollisimman suurena.
Valikon rakenne ja käyttö
Kutsu valikkokaruselli näytölle lepotilassa näppäimellä ..
Karusellissa on symboleja ensimmäiselle valikkotasolle pääsyä varten.
Valitse haluamasi valikko selaamalla -näppäimellä eteen-/taaksepäin.
Vahvista valikkoon siirtyminen näppäintä painamalla.
Alavalikot näkyvät pieninä ruutuina näytön alareunassa.
-näppäimellä voit siirtyä haluamaasi alavalikkoon.Vahvista valintasi
painamalla .
-symboli näyttää asetuksen, jossa parhaillaan selaat.Valitun
alavalikon/asetuksen kohdalla on "ruksi" .
Huomaa:Tietyt valikot voidaan kutsua suoraan esiin omilla näppäimillä
(esim. puheluloki ).
Suoravalinta
1-
Varaa linja .
2-
Anna puhelinnumero.
Numeron esivalinta
1
- Anna puhelinnumero.
2-
Varaa linja
.
.
3
Valikon rakenne ja käyttö
Page 32

Luuri
Kielen muuttaminen
Toimitettaessa on luurille tulevien tekstien kielenä englanti.
Näytön kielen muuttaminen
1- Valitse "Handset", ja vahvista valinta.
2- Siirry kohtaan "Language (kieli)", vahvista valinta.
3- Valitse haluamasi kieli ja vahvista valinta.
Huomaa: Näytön kielen muuttaminen ei vaikuta puhelinvastaajan
lähteviin viesteihin (Zenia 300 Vox tai muut tukiasemat, ei Philips).
Luurin rekisteröinti tukiasemaan/rekisteröinnin poistaminen
Luuri on rekisteröitävä tukiasemaan jotta sen kaikkia toimintoja voidaan käyttää*.
Zenia 300 Vox-tukiasemaan voidaan rekisteröidä enintään 8 luuria.
Luurin rekisteröinti
Aktivoi tukiaseman rekisteröintitila:
1- Vedä tukiaseman pistoke pistorasiasta ja työnnä takaisin.
2- Paina luurin -näppäintä käynnistääksesi rekisteröinnin.
3- Anna RC-koodi (4-numeroinen koodi,merkitty tukiaseman
alasivulla olevaan tarraan).Vahvista syöttö.
Luurin rekisteröinnin poisto
1- Siirry "Luuri"-tilaan, vahvista.
2- Valitse "Rekisteröinti" ja vahvista.
3- Valitse "Poista rekisteröinti" ja vahvista.
4- Valitse vastaava luuri luettelosta ja vahvista valinta.
5- Anna RC-koodi (4-numeroinen koodi),vahvista .
Suomi
Luurin soittoäänen asetus
Käytettävissäsi on seuraavat asetusmahdollisuudet:
- Voit asettaa ulkoisen vakiosoittoäänen puheluille joiden soittaja ei ole tallennettuna luetteloon
tai on tallennettu ilman VIP-asetuksia.
- Voit asettaa sisäpuheluäänen (jos käytössä on vähintään kaksi luuria).
VIP-soittoäänien (ystävät , perhe ja työ ) asetusohjeet on annettu Zenia 300 Vox-ohjeissa.
Tätä toimintoa varten tarvitset puhelinnumeron välitystoiminnon (CLIP).
Soittoäänen asetus
1- Siirry "Luuri"-valikkoon, vahvista.
2- Valitse "Äänet", vahvista valinta.
3- Valitse "Soittoääni", vahvista valinta.
4- Valitse "Vakiosoittoääni (ulk.) / sisäiset puhelut",
vahvista.
5- Valitse haluamasi soittoääni ja vahvista valinta.
Luuri
* Katso sivu 1
4
Page 33

Luurin soittoäänen voimakkuuden säätö
Käytettävissäsi on 5 eri äänenvoimakkuutta.
1- Siirry valikkoon "Luuri", vahvista valinta.
2- Valitse "Äänet", vahvista valinta.
3- Valitse "Soittokellon äänenvoimakkuus", vahvista valinta.
4- Valitse haluamasi äänenvoimakkuus ja vahvista valinta.
Huomaa: Voit aktivoida värinähälytyksen. Soittoääni on silloin
vaimennettu.
Kuulokeäänen säätö
1- Siirry valikkoon "Luuri", vahvista.
2- Valitse "Äänet", vahvista valinta.
3- Selaa kohtaan "Kuulokeääni", vahvista valinta.
4- Valitse "Vakio", "Diskanti" tai "Basso" ja vahvista valinta.
Näppäinäänten aktivointi/deaktivointi
Voit aktivoida näppäinäänen joka kuuluu näppäimiä painettaessa ja
asetuksia muutettaessa.
Toista ensin edellä luetellut kohdat 1-2.
3- Valitse sitten "Näppäinäänet", vahvista valinta.
4- Valiste PÄÄLLE / POIS ja vahvista valinta.
Ilmoitusäänen aktivointi/deaktivointi
Ilmoitusääni ilmoittaa tekstiviestin tai puhutun viestin saapumisen.
Toista ensin edellä luetellut kohdat 1-2.
3- Valitse sitten "Ilmoitusääni", vahvista valinta.
4- Valitse PÄÄLLE / POIS, vahvista valinta.
Lapsenvahtitila (babysitter)
Lastenhuoneessa vallitsevan tilanteen valvomista varten.Aseta luuri valvottavaan huoneeseen;
kuulet toisesta luurista kaikki huoneessa esiintyvät äänet.
Lapsenvahtitilan aktivointi/deaktivointi
1- Valitse "Luuri", vahvista valinta.
2- Valitse "Lapsenvahtitila", vahvista valinta.
3- Valitse PÄÄLLE / POIS, vahvista valinta.
Huomaa: Lapsenvahtitilaa varten tarvitaan sisäpuhelu (katso sivu 6).
Näytön kontrastin säätö
Näytön kontrastin säätö
1- Valitse "Luuri", vahvista valinta.
2- Siirry "Kontrasti"-kohtaan,vahvista valinta.
3- Valitse haluamasi kontarasti ja vahvista valintasi.
5
Luuri
Page 34

Taustavalon säätö
Taustavalon säätö
1- Valitse "Luuri" ja vahvista valinta.
2- Valitse "Taustavalo" ja vahvista valinta.
3- Valitse haluamasi aika 10 sek., 20 sek. tai POIS, vahvista valinta.
Sisäpuhelu
Sisäpuhelu (mikäli käytössä on vähintään 2 luuria)
Tällä toiminnolla voit soittaa sisäpuheluja, käyttää hyväksesi lapsenvahtitoimintoa (huoneen
valvonta) ja siirtää ulkopuheluja toiseen luuriin. Sisäpuhelu on mahdollinen vain samaan
tukiasemaan rekisteröityjen luurien välillä.
Sisäisen puhelun soitto tai lapsenvahtitilan aktivointi
1- Siirry kohtaan "Sisäpuhelu" ja vahvista valinta.
2- Jos käytettävissäsi on vain yksi muu luuri, se hälyttää
automaattisesti. Muussa tapauksessa voit valita haluamasi
luurin/tukiaseman luettelosta ja painaa "Soita".
Vastaava luuri/tukiasema hälyttää.
3- Ota puhelu vastaan kyseisessä luurissa /tukiasemassa
painamalla . Voit nyt aloittaa sisäpuhelun tai huoneen
valvonnan.
Myös "Mykistys" on mahdollinen.
Huomaa: "Sisäpuhelu"-toiminto voidaan käynnistää myös
navigointinäppäimellä: Vieritä -näppäimellä ylöspäin lepotilassa.
Voit siirtää ulkopuhelun toiseen luuriin.
1- Paina -näppäintä asetusten näytölletuontia varten.
2- Valitse "Sisäpuhelu", vahvista valinta.
3- Jos käytettävissäsi on vain yksi muu luuri, se hälyttää
automaattisesti. Muussa tapauksessa voit valita haluamasi
luurin/tukiaseman luettelosta.
Vastaava luuri/tukiasema hälyttää. Ulkopuhelu siirtyy pitoon. Ellei 2.
luuriin vastata, voit siirtää puhelun takaisin 1. luuriin aktivoimalla
toiminnon "Lopeta sisäpuhelu".
4- Vastaa puheluun painamalla toisen luurin/tukiaseman
-painiketta. Sisäpuhelun osapuolet voivat nyt puhua keskenään.
5- Valitse "Siirto". Puhelu päättyy 1. luurissa.
Huomaa:Voit lopettaa puhelun ensimmäisessä luurissa myös
-näppäintä painamalla.
Suomi
Luuri/Sisäpuhelu
6
Page 35

Puhelun ollessa pidossa odottava osapuoli kuulee musiikkia
(mikäli aktivoitu) tai merkkiäänen. Asetukset "Vaihto"
(vuorottelu) osapuolien 1 ja 2 välillä sekä "Mykistys"
(mikrofoni) ovat myös valikossa käytettävissä.
Konferenssipuhelu
Konferenssipuhelutoiminnolla voidaan ulkoinen puhelu yhdistää 2
luuriin (sisäpuhelulla). Kaikki 3 osapuolta voivat puhua keskenään
(konferenssipuhelut eivät ole riippuvaisia sopimuksesta).
Toista edellä mainitut vaiheet 1-4.
5- Kutsu esiin asetus "Konferenssipuhelu" ja vahvista.
7
Sisäpuhelu
Page 36

Vian etsintä ja korjaus
Ongelma
Ei valintaääntä.
Mahdollinen syy
Luuri on tukiaseman kantoetäisyysalueen ulkopuolella ( puuttuu).
Luuria ei ole rekisteröity
tukiasemaan. (Symboli ei näy).
Tukiasemaa ei ole liitetty
asianmukaisesti pistorasiaan tai
puhelinverkkoon.
Heikot akut (
-symboli näkyy).
Siirry lähemmäksi tukiasemaa ja
Korjaus
yritä uudelleen.
Rekisteröi luuri tukiasemaan
(katso sivu 4).
Tarkasta kytkennät.
Lataa akut (katso sivu 3).
Piippausääntä ei kuulu kun
luuri asetetaan
latauslaitteeseen.
Akut eivät ole täynnä vaikka
niitä on ladattu 12 tuntia.
Kun haluat soittaa luurista,
kuulet virheäänen.
Kuulet virheäänen puhelun
aikana.
Ei soittoääntä.
Näytölle tulee virheilmoitus
kun yrität rekisteröidä luuria.
Häiritseviä ääniä linjalla
puhelun aikana.
Latauslaitetta ei ole liitetty
asianmukaisesti pistorasiaan.
Latauskontaktit likaantuneet.
Näppäinääni deaktivoitu.
Latauslaitetta ei ole liitetty
asianmukaisesti pistorasiaan.
Akut vialliset tai vanhat.
Luuria ei ole rekisteröity.
Ulkopuhelua puhutaan parhaillaan
toisesta luurista.
Tukiasema varattu.
Luuri kantoetäisyysalueen
ulkopuolella.
Heikot akut.
Soittoääni deaktivoitu.
Rekisteröinti epäonnistunut.
Rekisteröitävien luurien
maksimilukumäärä saavutettu.
Etäisyys tukiasemaan liian suuri.
Tukiasema liian lähellä
sähkölaitteita, teräsbetoniseiniä tai
metalliovia.
Standardinmukaisuus
Tarkasta kytkennät.
Puhdista puhtaalla pyyhkeellä.
Aktivoi näppäinääni (sivu 5).
Tarkasta kytkennät.
Osta uudet akut
asiantuntijaliikkeestä.
Rekisteröi luuri (katso sivu 4).
Yritä uudelleen kun puhelu on
lopetettu.
Yritä uudelleen kun tukiasema
on taas käytettävissä.
Siirry lähemmäksi tukiasemaa.
Lataa akut.
Aktivoi soittoääni (katso sivu 5).
Vedä tukiaseman verkkopistoke
ja työnnä taas paikalleen.
Rekisteröi luuri uudelleen.
Poista yhden luurin
rekisteröinti (katso sivu 4).
Siirry lähemmäksi tukiasemaa.
Muuta tukiasema toiseen
paikkaan (mitä korkeammalla,
sen parempi).
8
Suomi
Page 37

DECLARATION OF CONFORMITY
We,
PHILIPS Consumer, Electronics
DECT & Home Telephony
Route d’Angers
72081 Le Mans Cedex 9
France
Declare that the products Zenia 300, Zenia 300 additional handset and all bundle
combinations are in compliance with ANNEX III of the R&TTE-Directive 1999/5/EC
and then with the following essential requirements :
Article 3.1.a : (protection of the health & the safety of the user) : EN 60950 (2000)
Article 3.1.b : (protection requirements with respect to electromagnetic
compatibility) ETSI EN 301 489-6 V1.1.1 (09/2000) & ETSI EN 301 489-1 V1.3.1
(09/2001)
Article 3.2 : (effective use of the radio spectrum) : EN 301 406 (2001)
The presumption of conformity with the essential requirements regarding Council
Directive 1999/5/EC is ensured.
Date : 16/07/2003 Le Mans
Vice President & General Manager
DECT & Home Telephony
9
Virheiden korjaus
Page 38

Standarder, sikkerhed og miljø
Sikkerhedsinformation: Dette apparat er ikke egnet til nødopkald ved strømsvigt.
Anvend i nødstilfælde en anden telefontype, f.eks. en mobiltelefon.
Konformitet: Undertegnede PHILIPS erklærer herved, at Zenia 300 Vox overholder de
væsentlige krav og øvrige relevante krav i direktiv 1999/5/EF. En kopi af
overensstemmelseserklæringen kan efter behov rekvireres fra reservedels-kundeservice. Dette
apparat kan kun tilsluttes det faste, nationale analoge telefonnet, se mærket på emballagen.
Strømforsyning: Dette apparat er beregnet til 220-240 volt strømforsyning med enfaset
vekselstrøm, dog undtaget IT-installationer i henhold til standard EN 60-950.
OBS! Den elektriske strømforsyning klassificeres som farlig i henhold til EN 60-950.
Apparatet kan kun afbrydes fra strømforsyningen ved at udtrække netstikket.
Anvend derfor en let tilgængelig vægstikdåse.
Telefontilslutning: Spændingen i telefonnettet klassificeres som TNV-3
(Telecommunications Network Voltages) i henhold til definitionen i standard EN 60-950.
Sikkerhed: Hold håndsættet væk fra væsker. Hverken håndsættet eller basisstation må skilles
ad. De kan komme i berøring med høj strømspænding. Lad altid reparationen udføre af den
autoriserede kundeservice. Opladerkontakterne samt batteriet må ikke komme i berøring med
ledende genstande.
Miljø: Når emballage, brugte batterier og en udtjent telefon skal bortskaffes,
skal de nationale forskrifter og genanvendelsesmuligheder overholdes.
GAP-normens krav
GAP-normen garanterer,at alle DECTTM- og GAP-håndsæt samt basestationer opfylder
normens minimumkrav uafhængig af produktmærket.
Deres håndsæt Zenia 300 Vox overholder GAP-kravene, dvs., det garanteres, at følgende
funktioner fungerer: Tag en linje, modtag opkald og vælg telefonnumre.
Når der anvendes Philips basestationer
Når De benytter det ekstra håndsæt Zenia 300 Vox på basestationen Zenia 300 Vox er alle
beskrevne funktioner til rådighed (se betjeningsvejledning Zenia 300 Vox).
Når De registrerer det ekstra håndsæt på en basestation Onis 200 eller Zenia, er nogle
menuer ikke til rådighed. Kig venligst efter i den respektive dokumentation.
Når der anvendes andre basestationer (ikke Philips-produkter)
Overhold instruktionerne i producentens dokumentation, når De registrerer det ekstra
håndsæt på en basestation fra en anden producent (ikke Philips-produkt). Gennemfør de
i denne vejledning beskrevne betjeningstrin til registreringen, se side 4.
Vær opmærksom på, at ikke alle menufunktioner er til rådighed.
Philips har markeret batterierne og emballagen med standardsymboler for at hjælpe med
genanvendelsen og bortskaffelsen.
Emballagen og betjeningsvejledningen kan genanvendes.
Der er blevet ydet et økonomisk bidrag til at fremme genvinding og genanvendelse.
Dansk
DECTTMer et indregistreret varemærke fra ETSI til fordel for brugerne af DECT-teknologien.
Standarder, sikkerhed og miljø
1
Page 39

Pilot
Tryk for at hente karrusellen eller
bekræfte menuer/optioner
Rul i menuer og optioner eller
placér cursoren
- Opad for at få adgang til
Intercom i hvilemodus
- Nedad for at få adgang til
funktionen Laveste rater
Tryk for at deaktivere tastaturlåsen
Højttaler
- Tryk for at etablere en forbindelse eller
aktivere håndsættets højttaler
- Langt tryk for at aktivere basens
højttaler
Opkaldslog
- Tryk for at hente og vise opkaldslog
- Langt tryk for at hente listen over de
indtalte beskeder
Tastaturlås og indtastning
- Kort tryk for at indtaste en* (stjerne)
- Langt tryk for at aktivere/deaktivere
tastaturlåsen
- Langt tryk for at indføje
tilbagekaldssignalet (R)
- Langt tryk for standard- eller
®
-editor
Eatoni
Symboler
Vises konstant
Telefonsvarer TIL
Aktivt, eksternt opkald
Aktivt, internt opkald
Håndsæt-højttaler aktiveret
Opringningen er deaktiveret
SMS-funktion aktiv
Registreret og i nærheden af basen
Samtale-tast
- Tryk for at etablere en
forbindelse, besvare eller
afslutte et opkald
Øresnegl
Mikrofon
Håndsæt Zenia 300 Vox
Blinker
Ny besked på telefonsvarer
eller voice mail
- Indgående, eksternt opkald
- Linje optaget
Indgående, internt opkald
Basens højttaler aktiveret
Ny SMS
Ikke registreret
Slet-/afbryd-tast
- Slet et ciffer resp. tegn under
indtastning af telefonnr. resp. tekst
- Gå ét menuniveau tilbage
- Langt tryk for at vende tilbage
til hvilefunktion under navigering
- Aktivér R-funktionen under en
samtale (til operatørtjenester)
Telefonbog
- Kort tryk for at hente
telefonbogen
- Langt tryk for at tilføje
en ny indtastning
Hovedtelefontilslutning
Forstyr ikke og skiftetast
- Kort tryk for at indføje
firkanten "#" under indtastning
af telefonnummer
- Langt tryk for at indføje
pausetegnet (P) under indtastning
af telefonnummer
- Langt tryk for at
aktivere/deaktivere Forstyr ikke
- Skift under indtastning af tekst
fra små til store bogstaver
og omvendt
Vækkeur
- Kort tryk for at vælge 0
- Langt tryk for at slå
vækkeuret til/fra
Blinker hurtigt
Ikke mere plads
i telefonsvarerens hukommelse
Ikke mere plads i SMS-hukommelse
2
Håndsæt
Page 40

Isætning og udskiftning af batterier
For at isætte batteri-enheden, åbnes batteridækslet på håndsættet ved
skubbe det nedad. Tilslut batteri-enheden til forbindelsen inde i
at
håndsættet. Placér batteriet med etiketten opad og tilslutningsledningerne langs venstre side af batteri-enheden inde i håndsættet.
Når batterierne skal udskiftes, må der kun benyttes NiMh-batterier.
!
Under opladning af batterierne forandrer batterisymbolet sig:
.
Batteriernes status vises: Fuld , 2/3 , 1/3 opladet og tomt .
Batterikapacitet og rækkevidde
Batterierne må ikke bortskaffes med husholdningsaffaldet.
Med fuldt opladede batterier får De en standby-driftstid på ca. 300 timer (håndsæt i hvilefunktion
og driftsklar) og ca. 18 timers samtale. En biptone informerer Dem om, når batterierne skal
oplades. Sker dette under en samtale, skal samtalen afsluttes kort efter signalet.
Batterierne opnår deres optimale kapacitet, når de er blevet opladet og afladet tre
gange.
Under gode betingelser er rækkevidden i lukkede rum 50 meter og 350 meter udenfor.
Når rækkevidden overskrides, kan De høre en knitren, og De bør gå tættere på basen,
ellers bliver samtalen afbrudt. Hold basen væk fra elektriske apparater for at udnytte den optimale
rækkevidde.
Menustruktur og betjening
I hvilefunktion henter De menu-karrusellen med tasten ..
I karrusellen er symbolerne koblet i ring og giver adgang til første
menuniveau. Bladre frem/tilbage med for at nå den ønskede menu.
Bekræft med for at åbne menuen.
Undermenuerne vises som små firkanter nede på displayet.
Med når De den ønskede undermenu, bekræft derefter Deres valg
med .
Symbolet viser funktionen, hvori De bladrer i øjeblikket.
Den valgte undermenu/funktion markeres med et "kryds" .
Bemærk: Nogle menuer kan hentes direkte via egne taster
(f.eks. opkaldslog ).
Direkte opkald
1-
Etablér forbindelse med .
2- Indtast telefonnummer
.
Forberedt valg
1- Indtast telefonnummer.
2- Etablér forbindelse med
.
Dansk
Menustruktur og betjening
3
Page 41

Håndsæt
Skift sprog
Håndsættet leveres med det engelske sprog indstillet.
Skift displaysprog
1- Gå til Handset, bekræft.
2- Rul til Language, bekræft.
3- Vælg det ønskede sprog og bekræft.
OBS: Ændring af displaysproget er uden indflydelse på telefonsvarerens
udgående beskeder (Zenia 300 Vox eller andre basestationer ikke fra
Philips).
Registrér/afregistrér et ekstra håndsæt til basen
Det ekstra håndsæt skal være registreret til basen for at samtlige funktioner kan udnyttes*.
På basisstationen Zenia 300 Vox kan der registreres op til
Registrér et ekstra håndsæt
Sæt basen i registreringsfunktion på følgende måde:
1- Træk netstikket ud af basen og tilslut det igen.
2- Tryk på på håndsættet for at starte registreringen.
3- Indtast RC-koden (den firecifrede kode, der fremgår af etiketten
på basens underside), bekræft.
Afregistrér håndsæt
1- Gå til Håndsæt, bekræft.
2- Rul til Registrering og bekræft.
3- Vælg Afregistrér håndsæt og bekræft.
4- Vælg håndsættet, der skal afregistreres, fra listen, bekræft.
5- Indtast RC-koden (4-cifret kode), bekræft.
otte
håndsæt.
Indstil håndsættets lyd
De kan indstille opringningstyper for:
- Den eksterne standard-opringning for opkaldende der ikke er gemt i telefonbogen eller er gemt
uden VIP-indstillinger.
- Den interne opringning (når der findes mindst to håndsæt).
For at indstille VIP-opringningstyperne (venner , familie og arbejde )
se vejledning Zenia 300 Vox. Denne funktion kræver nummervisning (CLIP).
Indstil opringningstype
1- Gå til Håndsæt, bekræft.
2- Vælg Lyd, bekræft.
3- Vælg Opringningstype, bekræft.
4- Vælg Ekstern standard-opringning/Intern opringning,
bekræft.
5- Vælg den ønskede opringning fra listen og bekræft.
4
Håndsæt
* Se side 1
Page 42

Indstil håndsættets opringningsstyrke
Til opringningsstyrke er der fem indstillinger til rådighed.
1- Gå til Håndsæt, bekræft.
2- Vælg Lyd, bekræft.
3- Rul til Opringningsstyrke, bekræft.
4- Vælg den ønskede lydstyrke og bekræft.
Bemærk:Ved aktivering af vibrationsfunktionen ved opkald vil ringetonen
være ude af funktion.
Indstil telefonrørets tone
1- Gå til Håndsæt, bekræft.
2- Rul til Lyd, bekræft.
3- Rul til Øresneglstone, bekræft.
4- Vælg Standard, Diskant eller Bas og bekræft.
Aktivér/deaktivér tast og feedback-toner
Når man trykker på taster eller ændrer indstillinger,
kan dette bekræftes af en biptone.
Gentag ovenstående betjeningstrin 1-2.
3- Rul til Tast og feedback-toner, bekræft.
4- Vælg TIL/FRA og bekræft.
Aktivér/deaktivér adviseringsbip
De hører et adviseringsbip, når der findes en ny SMS eller en indtalt
besked til Dem.
Gentag ovenstående betjeningstrin 1-2.
3- Rul til Adviseringsbip, bekræft.
4- Vælg TIL/FRA, bekræft.
Babysitter-funktion
Til overvågning af børneværelset. Placér håndsættet i dét rum, der skal overvåges.
Via det ekstra håndsæt kan De høre alle lyde i rummet.
Aktivér/deaktivér babysitter-funktion
1- Gå til Håndsæt, bekræft.
2- Rul til Babysitter-funktion, bekræft.
3- Vælg TIL/FRA, bekræft.
Bemærk: For at overvåge rummet er en intercom påkrævet
(se side 6).
Indstil display-kontrast
Indstil display-kontrast
1- Gå til Håndsæt, bekræft.
2- Rul til Display-kontrast, bekræft.
3- Vælg den ønskede kontrastindstilling og bekræft.
Dansk
Håndsæt
5
Page 43

Indstil baggrundslys
Indstil baggrundslys
1- Gå til Håndsæt, bekræft.
2- Rul til Baggrundslys, bekræft.
3- Vælg den ønskede varighed 10 sek., 20 sek. eller FRA, bekræft.
Intercom
Intercom (når mindst to håndsæt er til rådighed)
Med denne funktion kan De føre interne samtaler, bruge babysitter-funktionen (rumovervågning)
og overføre eksterne samtaler til et andet håndsæt.
Intercom fungerer kun mellem håndsæt, der er registreret på samme basestation.
Internt opkald eller aktivering af rumovervågning
1- Gå til Intercom, bekræft.
2- Når der kun findes ét ekstra håndsæt, ringer dette automatisk.
Vælg ellers det ønskede håndsæt/basen fra listen og tryk for
Opkald. Det ringer på det kaldte håndsæt/basen.
3- Besvar opkaldet på det kaldte håndsæt/basen med . Den
interne samtale/rumovervågningen kan starte. Tavs er også mulig.
Bemærk: Funktionen "Intercom" kan også aktiveres med Pilot:
Rul opad med (symbol) i hvilefunktion .
De kan viderestille en ekstern samtale til et andet håndsæt.
1- Tryk på for at hente muligheden.
2- Rul til Intercom, bekræft.
3- Når der kun findes ét ekstra håndsæt, ringer dette automatisk.
Vælg ellers det ønskede håndsæt/basen fra listen.
Det ringer på det kaldte håndsæt/basen. Den eksterne samtale
venter. Når det andet håndsæt ikke melder sig, kan De igen overtage
samtalen på første håndsæt ved at aktivere optionen Afslut
intercom.
4- Overtag samtalen med på det andet håndsæt/på basen.
Begge interne samtalepartnere kan tale med hinanden.
5- Vælg optionen Overfør. Samtalen afbrydes på det første håndsæt.
Bemærk: De kan også afbryde samtalen på det første håndsæt med
.
6
Håndsæt / Intercom
Page 44

Mens samtalen venter, hører den opkaldende musik (hvis Vent
med musik er aktivereret) eller biptoner. Mulighederne Skift
(mellem samtalepartner 1 og 2) og Tavs (mikrofon) står også til
rådighed i baggrundsmenuen.
Telefonmøde
Med funktionen Telefonmøde kan en ekstern opkaldende
overføres til to håndsæt (med intercom). De tre samtalepartnere
kan så tale med hinanden (disse telefonmøder er ikke
kontraktafhængig).
Gentag ovenstående betjeningstrin 1-4.
5- Hent optionen Telefonmøde, bekræft.
Dansk
Intercom
7
Page 45

Selvhjælp ved fejlfinding
PROBLEM
Ingen klartone.
Ingen biptone,
når håndsættet sættes ind
i opladeren.
Selvom batterierne er blevet
opladet i 12 timer, er de
stadigvæk ikke opladet.
Når De vil lave et opkald
med Deres håndsæt,
hører De en fejltone.
Under samtalen hører De
en fejltone.
Ingen opringning.
Under registrering
af et håndsæt vises der en
fejlmelding.
Støj i ledningen
under opkaldet.
Håndsættet er uden for
basens rækkevidde ( mangler).
Håndsættet er ikke registreret på
basen. (Symbolet vises ikke).
Basen er ikke korrekt tilsluttet
strømforsyningen eller til
telefonnettet.
Batterierne er tomme (symbolet
Opladeren er ikke tilsluttet
korrekt til strømforsyningen.
Snavsede kontakter.
Tast og feedback-toner
deaktiverede.
Opladeren er ikke tilsluttet
korrekt til strømforsyningen.
Batterierne er beskadigede
eller for gamle.
Håndsættet er ikke registreret.
På et andet håndsæt føres der
en ekstern samtale.
Basestationen er optaget
i øjeblikket.
Håndsættet uden for rækkevidde.
Batterier næsten afladt.
Opringningen er deaktiveret.
Registreringen er mislykket.
Det maksimale antal håndsæt
er nået.
Distance til basen for stor.
Basen befinder sig i nærheden
af elektriske apparater,
jernbetonvægge eller metaldøre.
MULIG ÅRSAG
).
AFHJÆLPNING
Gå tættere på basisstationen
og prøv igen.
Registrér håndsættet på basen
(se side 4).
Kontrollér stikforbindelserne.
Oplad batterierne (se side 3).
Kontrollér stikforbindelserne.
Rengør kontakterne
med en tør klud.
Aktivér tast og feedback-toner
(side 5).
Kontrollér stikforbindelserne.
Køb nye batterier hos Deres
specialforhandler.
Registrér det (side 4).
Prøv igen, når samtalen
er afsluttet.
Prøv igen, når basen igen
står til rådighed.
Gå tættere på basisstationen.
Oplad batterier.
Aktivér opringning (side 5).
Træk netstikket fra basen
og tilslut det igen.
Registrér håndsættet igen.
Afregistrér et håndsæt
(se side 4).
Gå tættere på basen.
Skift basens placering
(jo højere, jo bedre).
8
Afhjælpning af fejl
Page 46

DECLARATION OF CONFORMITY
We,
PHILIPS Consumer, Electronics
DECT & Home Telephony
Route d’Angers
72081 Le Mans Cedex 9
France
Declare that the products Zenia 300, Zenia 300 additional handset and all bundle
combinations are in compliance with ANNEX III of the R&TTE-Directive 1999/5/EC
and then with the following essential requirements :
Article 3.1.a : (protection of the health & the safety of the user) : EN 60950 (2000)
Article 3.1.b : (protection requirements with respect to electromagnetic
compatibility) ETSI EN 301 489-6 V1.1.1 (09/2000) & ETSI EN 301 489-1 V1.3.1
(09/2001)
Article 3.2 : (effective use of the radio spectrum) : EN 301 406 (2001)
The presumption of conformity with the essential requirements regarding Council
Directive 1999/5/EC is ensured.
Date : 16/07/2003 Le Mans
Dansk
Vice President & General Manager
DECT & Home Telephony
Overensstemmelse med gældende regler
9
Page 47

 Loading...