

Philips TU7370/SS951P, TU7370/SS211P, TU7370/SS071P, TU7370/SS001P, TU7370 User Manual [pt]
Page 1

Page 2

Conformity, Environment & Safety
Safety information : This equipment is not designed to make emergency calls when power
fails.An alternative should be made available for access to emercgency calls.
Conformity : See page 9.A copy of the original certificate can be obtained on request to the
customer care centre.
Power requirements : This product requires an electrical supply of 220-240 volts, alternating
monophased current, excluding IT installations defined in standard EN 60-950.
WARNING ! The electrical network is classified as dangerous according to criteria in the
standard EN 60-950. The only way to power down this product is to unplug the power supply
from the electrical outlet. Ensure the electrical outlet is located close to the apparatus and is
always easily accessible.
Telephone connection : The voltage on the network is classified as TNV-3 (Telecommunication
Network Voltage as defined in the standard EN 60-950)
Safety precautions : Do not allow the handset to come into contact with water.Do not open
the handset.You could be exposed to high voltages. Do not allow charging contacts or batteries
to come into contact with conductive materials.
Environmental care : Please remember to observe the local regulations regarding the disposal
of your packaging materials, exhausted batteries and old phone and where possible promote
their recycling.
Using GAP standard compliance
The GAP standard guarantees that all DECTTMGAP handsets and base stations comply with a
minimum operating standard irrespective of their make.Your handset is GAP compliant, which
means the minimum guaranteed functions are : take the line, receive a call and dial.
Using Philips base stations
If you register the additional handset to a Philips Zenia 300 Vox base station, the handset will
have all the features described in the corresponding complete set user guide.
If you register the additional handset to a Philips Onis 200 or Zenia base station, only a limited
number of menus will be available. Please refer to the corresponding complete set user guides.
Using a non-Philips GAP base station
To register the Philips additional handset to a non-Philips base station, follow the base station
instructions described by the other manufacturer.Then follow the instructions on page 4 to
register the Philips additional handset. There will be only a few menus availble.
English
Philips has marked the battery and packaging with standard symbols designed to promote the
recycling and appropriate disposal of your eventual waste.
The labelled packaging material is recyclable.
A financial contribution has been paid to the associated national recovery & recycling system.
DECTTMis a trade mark of ETSI registered for the benefit of the implementers of the DECT technology
Conformity,Environment & Safety
1
Page 3

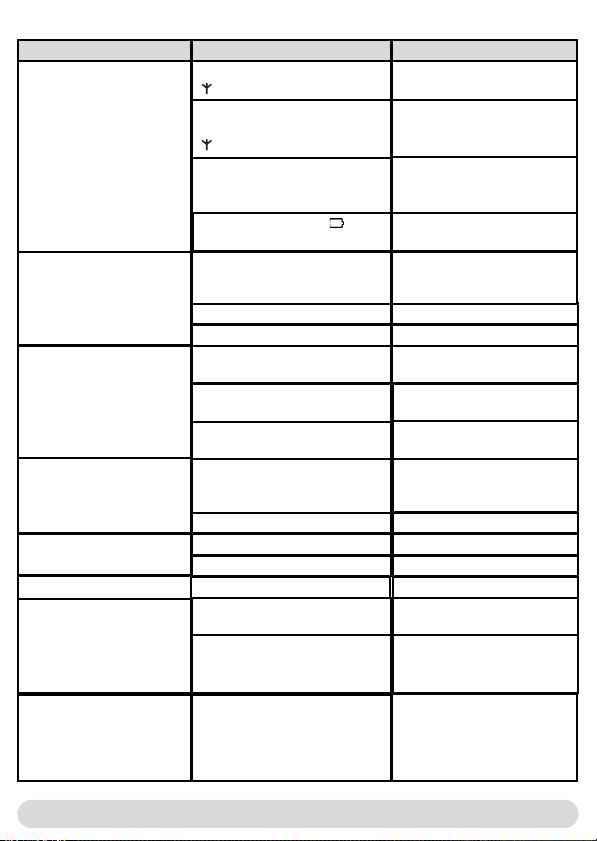
Pilot key
Press to enter the carousel or
validate a menu or an option
Scroll to navigate in the menus &
options or move the cursor
Scroll up to reach Intercom from
idle mode
Scroll down to reach Cheapest
rates prefix from idle mode
Press to unlock the keypad
Loudpeaker
- Press to take the line or activate the
handset loudspeaker during a call
- A long press to activate the base
lloudspeaker
Call log
- A short press to access the call log
- A long press to directly access the
messages list
Keypad lock & Edition
- A short press to insert *
- A long press to lock/unlock the keypad
- A long press to insert (R) when dialling
- Press to enter multitap mode or
®
editor when editing
Eatoni
Icons
Answer machine ON
External call in
progress
Internal call in
progress
Loudspeaker ON
Ringer OFF
SMS function ON
Registered & in range
Line key
- Press to take the line,
answer a call or hang up.
Earpiece
Microphone
Zenia 300 Vox Handset
Blinking
New message on answering.
machine or voice mail
Incoming external call in
progress
Line is already busy
Internal incoming call
Base loudspeaker ON
New SMS
Not registered
Correct key
- To correct a digit when
predialling or a character when
editing
- A short press to go back one
menu
- A long press to return to idle
mode when navigating
- To insert R for operator
services when on line
Phonebook
- A short press to access the
phonebook
- A long press to add a new entry
Do Not Disturb & case
mode
- A short press to insert # when
dialling.
- A long press to activate the Do
Not Disturb mode
- A long press to insert a pause
(P) when dialling
- Press to switch case mode
when editing
Alarm clock
- A short press to dial 0
- A long press to activate/
deactivate the alarm clock
Fast blinkingSteady ON
Answerphone full
SMS memory full
2
The handset
Page 4
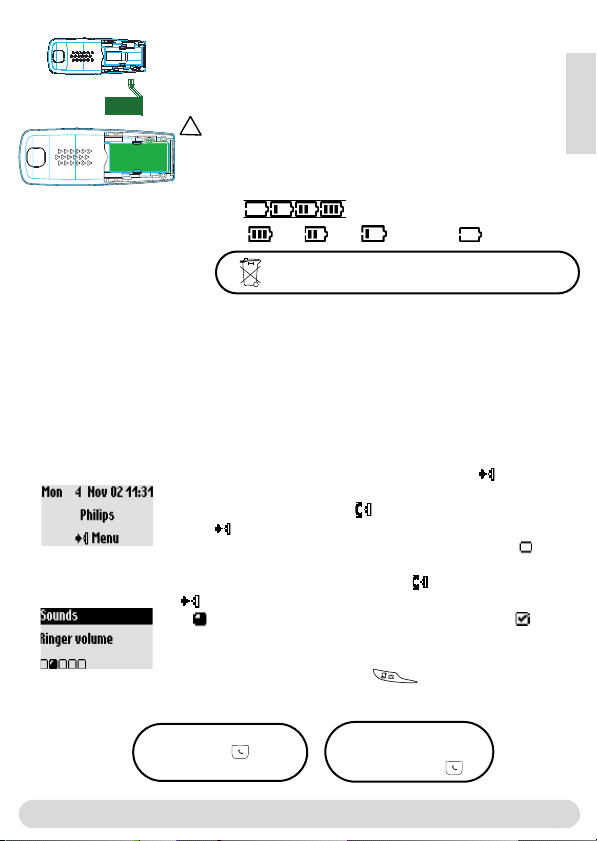
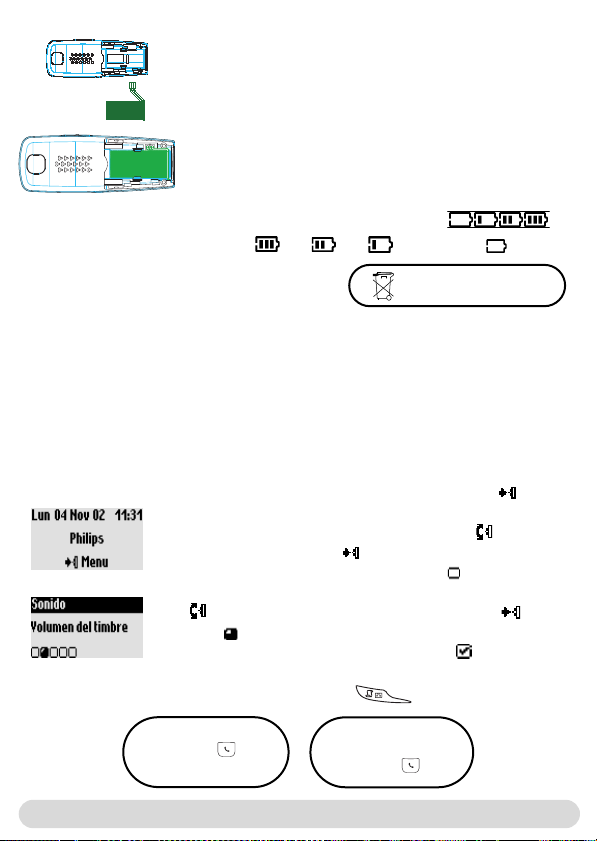
Installing and replacing the batteries
To insert the battery pack, open the battery door on the handset
by sliding it down. Connect the battery pack to the connector
inside the handset. Place the battery with sticker face up and wires
along the left side of the battery pack.
!
When replacing the batteries, only use NiMh.
The battery bars scroll when charging .When charged the icon changes
according to the remaining charge : full , 2/3 , 1/3 and empty .
English
Battery life and range
The batteries should not be disposed of with general household waste .
The battery life is about 250 hours in stand by time (when the handset is in idle mode & ready
to receive a call) and around 16 hours in communication. A battery low alert will inform you that
the handset has to be recharged, if this is during a call, it will end shortly after the alert.
Optimal battery life is reached after 3 cycles of full charge/discharge.
Under ideal conditions, the range is up to 50 m indoors and 300 m outdoors. When reaching the
range limit, the conversation will become crackly, get closer to the base station otherwise you
will be cut off. To reach optimal range place the base station far from electrical appliances.
Understanding the menu system
From idle screen, to access the carousel menu press
The carousel represents a loop of icons that gives access to the first
menu level. Scroll up or down to reach the desired menu.
Press to validate and enter the menu.
The sub menus are listed and represented by little squares at the
bottom of the display.
To reach one particular sub menu scroll and validate your choice
A shows the sub-menu or option you are browsing. A shows
the selected sub-menu or option.
Note : Certain menus are directly accessible via a dedicated key on
the keypad (example the Call log )
Direct dialling
1- Take the line
2- Dial on the keypad
The menu system
Predialling
1- Dial on the keyad
2- Take the line
3
Page 5
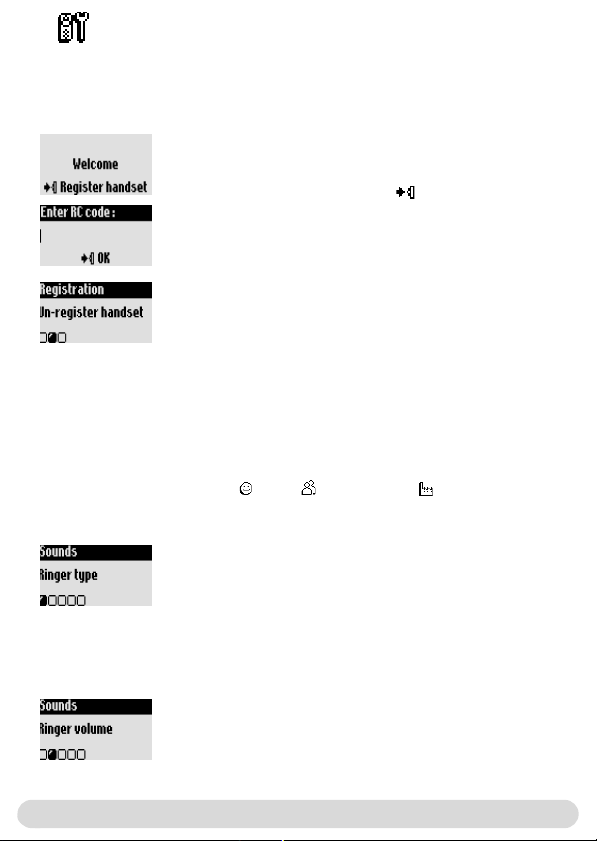
Handset
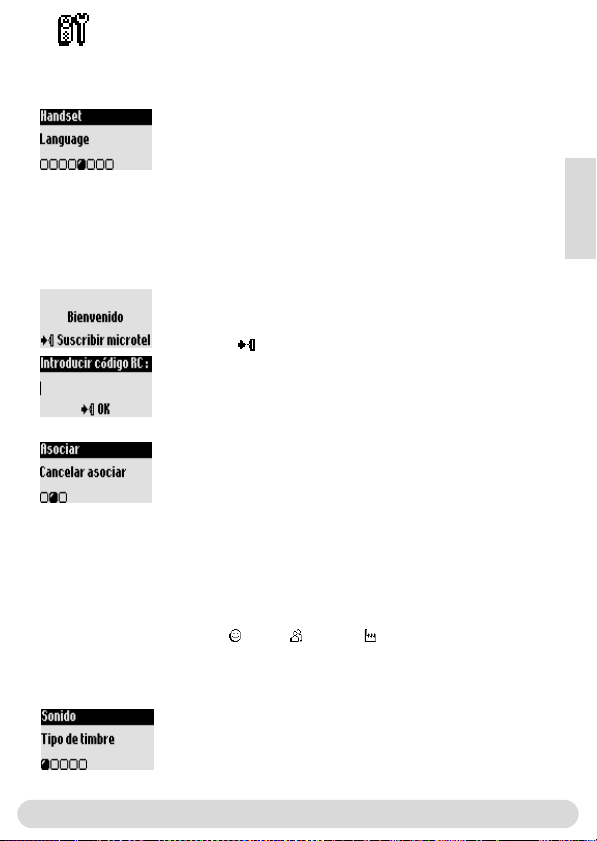
Registering/un-registering an additional handset
The additional handset will get full capability when it is registered to the base station*.You can
register up to 8 handsets to the Zenia 300 Vox base station.
To register an additional handset
Place the base station in Registration mode as follows :
1- Unplug and plug back in the mains lead
2- With the additional handset press to start the registration
3- Enter the 4-digit RC code written on the sticker placed under
the base station.
To un-register the handset
1- Go to Handset, validate
2- Scroll to Registration, validate
3- Scroll to Un-register handset, validate
4- Choose from the list the handset to un-register, validate
5- Enter the RC code (4-digit code) and validate
* See page 1
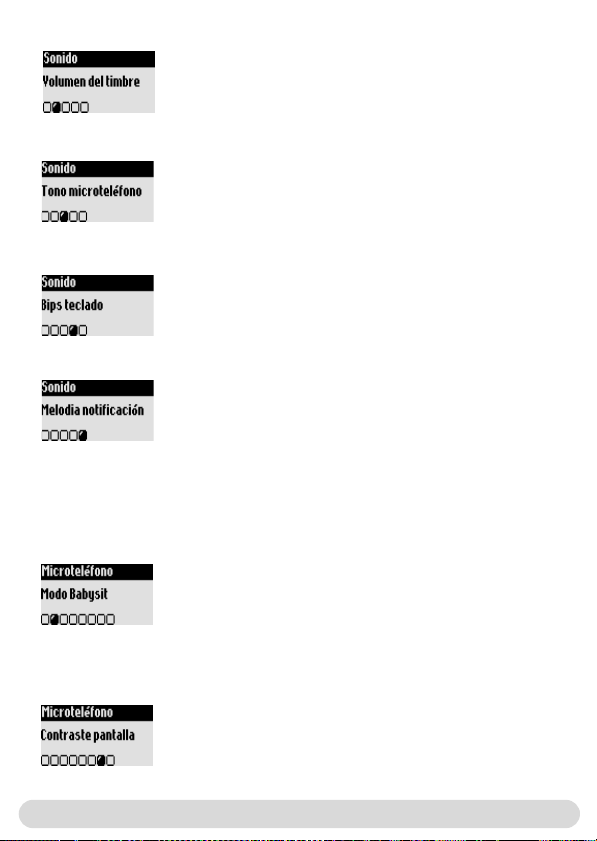
Setting the handset sounds
The ringers can be set for :
- The external standard ringer for callers whose number is not stored in the phonebook or
stored with no VIP settings.
- The internal ringer for the intercom (if there are at least 2 handsets).
To set the 3 VIP ringer types : Friends , Family and Professional : see manual Zenia 300.
Subscription to the Caller Line Identification service (CLI) needed.
To set the ringer type
1- Go to Handset, validate
2- Select Sounds, validate
3- Select Ringer type, validate
4- Choose External Std ringer/Internal ringer, validate
5- Select the ringer from the list and validate
To set the ringer volume on the handset
There are 5 ringer volume levels plus the vibration call alert.
1- Go to Handset, validate
2- Select Sounds, validate
3- Select Ringer volume, validate
4- Choose the appropriate volume level and validate
Note :You can activate the vibration call alert. In this case the ringer
will be in silence mode
4
Handset
Page 6
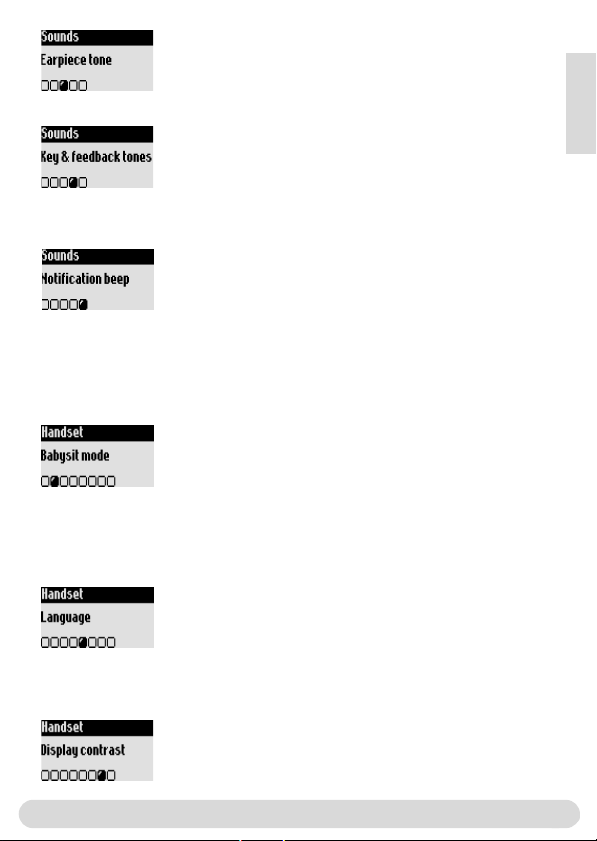
To set the earpiece tone
1- Go to Handset, validate
2- Select Sounds, validate
3- Scroll to Earpiece tone, validate
4- Select Standard, Trebble or bass and validate
To set the key tones & feedback tones
Audio feedback heard when pressing the keys & validating a
setting
Resume from step 1-2 above
3- Scroll to Key and feedback tones, validate
4- Select ON/OFF and validate
To set the notification beep
Audio indicators heard when there is new SMS or a new message
Resume from step 1-2 above
3- Scroll to Notification beep, validate
4- Select ON/OFF and validate
The babysit mode
This feature allows to monitor the babys room. Place the handset in the room to be monitored
and you will hear the noise on the additional handset.
To activate/deactivate the babysit mode
1- Go to Handset, validate
2- Scroll to Babysit mode, validate
3- Select ON/OFF and validate
Note : An intercom is necessary to monitor the room (see page 6).
Changing the language
The additional handset default language is English.
To change the language
1- Go to Handset, validate
2- Scroll to Language, validate
3- Select the language and validate
Warning : Changing the language will not alter the voice prompts of the
answer machine (Zenia 300 Vox or non-Philips base stations).
English
Setting the display contrast
To set the contrast
1- Go to Handset, validate
2- Scroll to Display contrast, validate
3- Select the appropriate level and validate
Handset
5
Page 7

Setting the backlight
To set the backlight
1- Go to Handset, validate
2- Scroll to Backlight, validate
3- Select 10 sec, 20 sec or OFF, validate
6
Handset
Page 8
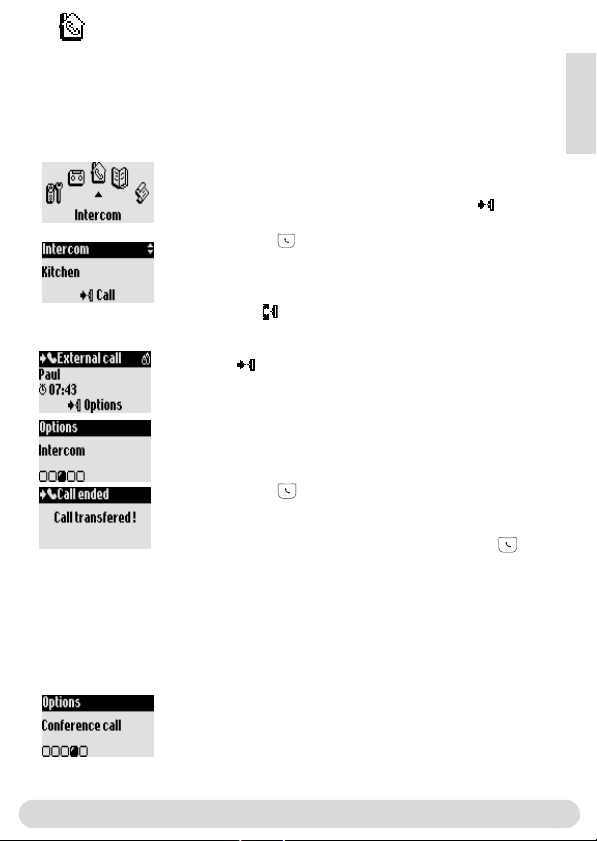
Intercom
Using the intercom (if there are at least 2 handsets)
This feature allows to make internal calls, activate babysit or transfer external calls from one
handset to the other.The intercom is possible with handsets registered to the same base
station.
Internal call or room monitoring activation
1- Go to Intercom, validate
2- If there is only one handset it rings automatically.Otherwise select
from the list the handset/base you want to call and Call
The called handset/base rings
3- Take the line on the called handset/base.
The intercom conversation or the babys room monitoring can start.
Mute is also available.
Note :You can access the Intercom with the pilot key.
In idle mode scroll up.
During an external call you can transfer the call to another handset
1- Press to enter the options
2- Scroll to Intercom, validate
3- If there is only one handset it rings automatically. Otherwise select
from the list the handset/base you want to call
The called handset/base rings. The external call is put on hold.
If there is no answer from the second handset you can resume the
call on the first handset. Use the End Intercom option.
4- Take the line on the other handset/base
Both internal callers can talk together.
5- Use the Transfer option.The call is ended on the first handset.
Note : You can also hang up on the first handset with .
While the call is put on hold the correspondant hears the music (if
music on hold is activated) or beeps.
Switch (between call 1 & 2) and Mute (microphone) are other
options available in the contextual menu.
To share a conference call
Conference call allows one external call to be shared with 2
handsets (in intercom).The 3 people can share the conversation
(no operator subscription is needed).
Resume from step 1-4 above
5- Select Conference call, validate
English
Intercom
7
Page 9
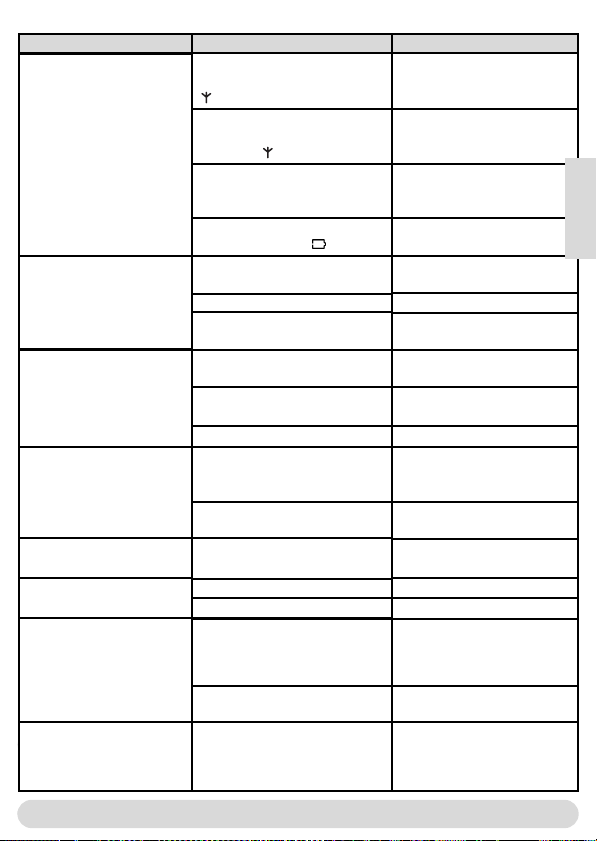
Troubleshooting
Problem
No dial tone.
When the handset is placed
on the charging unit, no
beep is heard.
The batteries remain low
although they have charged
for 12 hours.
An error beep is heard from
the handset when trying to
make a call.
An error beep is heard
during a call.
There is no ringer.
When adding a handset to
the base station, a failure
message is displayed.
Cause Solution
The handset is out of range,
( is not displayed).
The handset has not been
registered to the base station
( is not displayed).
The base station is not
properly connected to the mains
or the telephone line.
The batteries are low ( is
displayed).
The charging unit is not properly
connected to the mains.
Charging contacts are dirty.
Key tones are deactivated.
The charging unit is not properly
connected to the mains.
Handset not registered to base
The batteries are defective or
too old.
Another call is already in
progress from another handset
or the base station.
The base is being consulted
The handset is out of range.
The handset batteries are low
The ringer is deactivated
The procedure has failed
The maximum number of
handset has been reached.
Move closer to the base
station and try again
Register the handset to the
base station (page 4)
Check the connections
Charge batteries (page 3)
Check the connection between
charging unit and mains.
Clean with a clean & dry cloth.
Activate them (page 5)
Check the connection
Register handset to base (page
4)
Contact your dealer.
Purchase new batteries
Retry when the current call is
finished.
Wait until it is available
Move closer to the base
Charge the batteries.
Activate it (page 5).
Try again the procedure again
(page 4).
Un-register a handset (page 4)
Interference during call.
8
You are too far from the base.
The base station is too close to
electrical appliances, reinforced
concrete walls or metal door
frames
Troubleshooting
Get closer to the base station.
Move the base station to find a
better place (the higher the
better).
Page 10

DECLARATION OF CONFORMITY
We,
PHILIPS Consumer, Electronics
DECT & Home Telephony
Route d’Angers
72081 Le Mans Cedex 9
France
Declare that the products Zenia 300, Zenia 300 additional handset and all bundle
combinations are in compliance with ANNEX III of the R&TTE-Directive 1999/5/EC
and then with the following essential requirements :
Article 3.1.a : (protection of the health & the safety of the user) : EN 60950 (2000)
Article 3.1.b : (protection requirements with respect to electromagnetic
compatibility) ETSI EN 301 489-6 V1.1.1 (09/2000) & ETSI EN 301 489-1 V1.3.1
(09/2001)
Article 3.2 : (effective use of the radio spectrum) : EN 301 406 (2001)
The presumption of conformity with the essential requirements regarding Council
Directive 1999/5/EC is ensured.
Date : 16/07/2003 Le Mans
English
Vice President & General Manager
DECT & Home Telephony
Declaration of conformity
9
Page 11

Conformidad, seguridad y medio ambiente
Información de seguridad: Este aparato no se puede emplear para una llamada de
emergencia en el caso de que se produzca un corte de corriente. En caso de emergencia,
utilice otro aparato diferente, p. ej., un móvil.
Conformidad: Por medio de la presente PHILIPS declara que el Zenia 300 Vox cumple con los
requisitos esenciales y cualesquiera otras disposiciones aplicables o exigibles de la Directiva
1999/5/CE. Se puede pedir una copia de la declaración de conformidad si fuera necesario en el
servicio al cliente de piezas de repuesto. Este producto sólo puede conectarse a la red telefónica
analógica de la zona geográfica que se indica en la etiqueta de la caja.
Suministro de corriente: Este producto funciona a 230 voltios de corriente alterna
monofase, excepto las instalaciones IT según la norma EN 60-950.
Atención! La red eléctrica está clasificada como peligrosa según la norma EN 60-950. El
aparato sólo puede desconectarse desenchufando la clavija de red de la corriente. A tal efecto,
utilice una caja de enchufe mural accesible.
Conexión del teléfono: La tensión de la red telefónica está clasificada como TNV-3
(Telecommunication Network Voltages), según la definición contenida en la norma EN 60-950.
Indicaciones de seguridad: Mantenga el microteléfono alejado de sustancias líquidas. No
abra el microteléfono ni la base. Podría exponerse a tensiones peligrosas. Realice las
reparaciones siempre en un servicio postventa autorizado. Los contactos de carga de las
baterías no deben entrar en contacto con objetos conductores.
Protección del medio ambiente: Al desechar los materiales de embalaje, las baterías usadas
y un teléfono usado, cumpla las prescripciones locales y aproveche las posibilidades de reciclado.
Prescripciones del estándar GAP
El estándar GAP garantiza que todos los microteléfonos y bases compatibles DECTTMy GAP
cumplen las exigencias mínimas del estándar, independientemente de la marca del producto. El
microteléfono Zenia 300 Vox cumple las exigencias GAP, es decir, está garantizado el
funcionamiento de las siguientes funciones: acceder a la línea, llamar por teléfono y marcar
número.
Uso de bases Philips
Si utiliza el microteléfono adicional Zenia 300 Vox con la base Zenia 300 Vox, puede
aprovechar todas las prestaciones descritas (consulte el manual de instrucciones Zenia 300
Vox).
Si asocia un microteléfono adicional a una base Onis 200 o Zenia, no estarán disponibles
algunos menús. Revise la documentación correspondiente.
Uso de otras bases (que no sean Philips)
Para asociar el microteléfono adicional a una base de otra marca (que no sea Philips), siga las
indicaciones de la documentación del fabricante. A continuación, realice los pasos indicados en
las presentes instrucciones para realizar la asociación, consultar página 4 (a partir del paso 4).
Tenga en cuenta que no estarán disponibles todas las funciones de menú.
Philips ha marcado las baterías/acumuladores y los envoltorios del aparato con símbolos estándar para fomentar
la debida eliminación de residuos.
El material de embalaje y las instrucciones de uso se pueden reciclar.
Se ha realizado una contribución económica para fomentar la reutilización y el reciclado.
DECTTMes una marca registrada por ETSI en beneficio del usuario de la tecnología DECT.
Conformidad, seguridad y medio ambiente
1
Page 12

Tecla piloto
Pulsar: Mostrar el carrusel o
aceptar menús/opciones
- Navegar por los menús y opciones
o colocar el cursor
- Hacia arriba para acceder a
Intercomunicación en espera
- Hacia abajo para acceder a la
función Tarifa más baja
Pulsar: desactivar el bloqueo de
teclado
Altavoz
- Pulsar: Establecer conexión o activar el
altavoz del microteléfono
- Pulsación larga: Activar el altavoz de la
base
Lista de llamada
- Pulsar: Entrar en la lista de llamada
y mostrarla
- Pulsación larga: Entrar en la lista de
mensajes hablados
Bloqueo de teclado e
introducción
- Pulsación corta para introducir
* (asterisco)
- Pulsación larga: Activar/desactivar el
bloqueo de teclado
- Pulsación larga: Introducir señal de
flash (R)
- Pulsación larga: Introducción de texto
estándar o Eatoni
®
Símbolos
Contestador
automático activado
Activo, llamada
externa
Activo, llamada
interna
Altavoz del micro-
teléfono activado
Timbre apagado
Función SMS activa
Asociado y en el radio
de alcance de la base
2
Tecla de llamada
- Pulsar: Establecimiento de
llamada, contestar llamada o
finalizarla
Auricular
Tecla de borrado /cancelación
- Borrar cifras al introducir un
número de teléfono o caracteres al
introducir texto
- Retroceder al menú anterior
- Pulsación larga:Volver a espera
durante la navegación
- Durante una comunicación,
activar la función R (para servicios
de operador de red)
Agenda
- Pulsación corta: Entrar en la
agenda
- Pulsación larga: Añadir una
entrada nueva
Modo "No molestar" y
tecla de mayúsculas
- Pulsación corta: Introducir
almohadilla "#" al marcar un
número de teléfono
- Pulsación larga: Introducir un
carácter de pausa (P) al marcar un
número de teléfono
- Pulsación larga: Activar/desactivar
el modo "No molestar"
- En la introducción de texto,
cambiar entre minúsculas y
mayúsculas y viceversa
Micrófono
Despertador
- Pulsación corta para marcar el 0
- Pulsación larga: Activar/desactivar
el despertador
Microteléfono Zenia 300 Vox
Intermitente
Nuevo mensaje en el
contestador o buzón de voz
- Llamada entrante externa
- Línea ocupada
Llamada entrante interna
Altavoz de la base activado
Nuevo SMS
No asociado
Microteléfono
Intermitente rápidoFijo
Memoria del contestador llena
Memoria de SMS llena
Español
Page 13
Instalación y sustitución de las baterías
Para insertar la batería, abrir la tapa del compartimento deslizándola
hacia abajo.
Conecte la batería al conector en el interior del teléfono.
Coloque la batería con la pegatina hacia arriba y los cables en el lado
izquierdo de la batería.
Atención: Al sustituir la batería, sólo use NiMh.
Durante el proceso de carga, las barras del símbolo de la batería cambian: .
Se indica el estado de las baterías: Lleno , 2/3 , 1/3 y batería vacía .
No tirar las baterías a la basura
Duración de las baterías y radio de
alcance
Unas baterías totalmente cargadas tienen una duración de 250 horas de servicio
(microteléfono en espera y listo para la comunicación) y de aprox. 16 horas en conversación.
Un bip sonoro le informará de que debe cargar las baterías. Si esto sucediera durante una
conversación, la comunicación se cortará poco después de la señal. La capacidad óptima de
las baterías se alcanza después de tres procesos de carga/descarga completos.
En condiciones favorables, el radio de alcance en lugares cerrados es de 50 metros y en
espacio abierto de 300 metros.Al sobrepasar el radio de alcance, oirá chasquidos, por lo cual
tendrá que acercarse a la base o de lo contrario se interrumpirá la conversación. Mantenga
alejada la base de aparatos eléctricos para aprovechar de manera óptima el radio de alcance.
doméstica.
Estructura de menú y manejo
En espera, puede entrar en el menú de carrusel con la tecla .
El carrusel tiene símbolos ordenados en forma circular para el acceso
al primer nivel del menú. Desplácese adelante/atrás con para llegar
al menú deseado. Confirme con para entrar en el menú. Los
submenús se muestran como pequeños cuadrados en la zona
inferior de la pantalla.
Con llega al submenú deseado, seleccione entonces con .
El símbolo muestra la opción en la que está navegando. El
submenú/opción seleccionado se marca con un "tic" .
Indicación: Algunos menús se pueden llamar directamente mediante una
tecla propia (p. ej., lista de llamada ).
Marcación directa
1- Descolgar .
2- Marcar el número.
Estructura de menú y manejo
Marcación previa
1- Marcar el número,
2- Descolgar .
3
Page 14
Microteléfono
Cambio de idioma
El microteléfono tiene ajustado el idioma inglés de fábrica.
Cambio del idioma de visualización
1 - Vaya a Handset, confirme.
2 - Navegue hasta Language, confirme.
3 - Seleccione el idioma deseado y confirme.
Atención: La modificación del idioma de visualización no influye en el
mensaje de anuncio del contestador (Zenia 300 Vox u otras bases que
no sean de Philips).
Asociación/cancelación de asociación de un microteléfono
adicional en la base
El microteléfono adicional debe estar asociado a la base para que se puedan aprovechar todas
sus prestaciones*. Se pueden asociar hasta 8 microteléfonos a la base Zenia 300 Vox.
Asociación de un microteléfono adicional
Coloque la base en el modo de asociación como sigue:
1 - Desconectar la clavija de red de la base y volver a conectarla.
2 - Pulse en el microteléfono para iniciar la asociación.
3 - Introduzca el código RC (código de 4 dígitos anotado en la
etiqueta adhesiva de la parte inferior de la base), confirme.
Cancelación de asociación de un microteléfono
1 - Vaya a Microteléfono, confirme.
2 - Navegue hasta Asociar, confirme.
3 - Seleccione Cancelar asociar y confirme.
4 - Seleccione el microteléfono que desea cancelarde la lista y confirme.
5 - Introduzca el código RC (código de 4 dígitos anotado debajo de
la base), confirme.
* Consultar página 1
Ajuste del sonido del microteléfono
Puede ajustar los tipos de timbre para:
- el timbre externo estándar de interlocutores que no están guardados en la agenda o no tienen
ajustes VIP.
- el timbre interno (si se dispone de al menos dos microteléfonos).
Para ajustar los timbres VIP (amigos , familia y trabajo ), consulte las instrucciones Zenia
300 Vox. Para esta función necesita el servicio de identificación de llamada (CLIP).
Ajuste del timbre
1 - Vaya a Microteléfono, confirme.
2 - Seleccione Sonido, confirme.
3 - Seleccione Tipo de timbre, confirme.
4 - Seleccione Timbre externo estándar/Timbre llmd
interna, confirme.
5 - Seleccione el timbre deseado y confirme.
4
Microteléfono
Español
Page 15
Ajuste del volumen del timbre del microteléfono
Hay 5 ajustes disponibles para el volumen del timbre.
1 - Vaya a Microteléfono, confirme.
2 - Seleccione Sonido, confirme.
3 - Navegue hasta Volumen del timbre, confirme.
4 - Seleccione el volumen deseado y confirme.
Nota: Puede activar el aviso de llamada con vibrador. En este caso, el
timbre estará en modo silencioso
Ajuste del tono del microteléfono
1 - Vaya a Microteléfono, confirme.
2 - Navegue hasta Sonido, confirme.
3 - Navegue hasta Tono microteléfono, confirme.
4 - Seleccione Estándar, Agudos o Graves y confirme.
Activación/desactivación de los bips del teclado
Las pulsaciones de las teclas y las modificaciones de los ajustes
pueden notificarse con un bip sonoro.
Repita los pasos 1 y 2 descritos anteriormente:
3 - Navegue hasta Bips teclado, confirme.
4 - Seleccione Activar/Desactivar y confirme.
Activación/desactivación la melodía de notificación
La melodía de notificación le informa de la llegada de un nuevo
SMS o un mensaje hablado.
Repita los pasos 1 y 2 descritos anteriormente:
3 - Navegue hasta Melodía notificación, confirme.
4 - Seleccione Activar/Desactivar, confirme.
Modo Babysit
Este modo le permite vigilarla habitación de los niños. Deje el microteléfono en la habitación
que desee vigilar; podrá oír todos los ruidos de la habitación a través del microteléfono adicional.
Activación/desactivación del modo Babysit
1 - Vaya a Microteléfono, confirme.
2 - Navegue hasta Modo Babysit, confirme.
3 - Seleccione Activar/Desactivar, confirme.
Indicación: Para vigilar la habitación es necesaria una intercomunicación (consultar página 6).
Ajuste del contraste de pantalla
Ajuste del contraste de pantalla
1 - Vaya a Microteléfono, confirme.
2 - Navegue hasta Contraste pantalla, confirme.
3 - Seleccione el ajuste de contraste deseado y confirme.
Microteléfono
5
Page 16
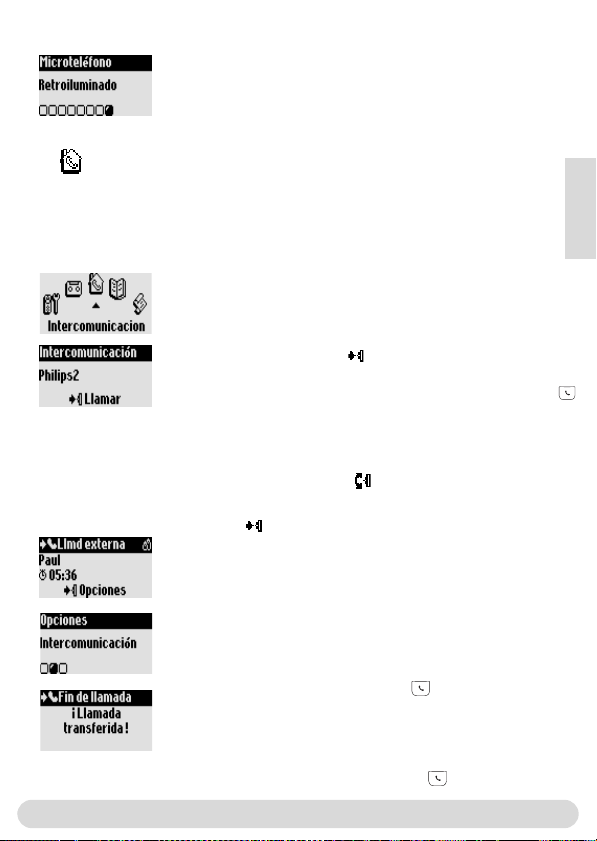
Ajuste de la retroiluminación
Ajuste de la retroiluminación
1 - Vaya a Microteléfono, confirme.
2 - Navegue hasta Retroiluminado, confirme.
3 - Seleccione la duración deseada, 10 segundos, 20 segundos
o Desactivar, confirme.
Intercomunicación
Intercomunicación (si se dispone de al menos dos microteléfonos)
Con esta función puede realizar llamadas internas, aprovechar la función Babysit (vigilancia de
habitación) y transferir una llamada externa a otro microteléfono. La intercomunicación sólo
funciona entre microteléfonos que estén asociados a la misma base.
Intercomunicación o activación de la vigilancia de la
habitación
1 - Vaya a Intercomunicación, confirme.
2 - Si sólo se dispone de un microteléfono adicional, éste sonará
automáticamente. De lo contrario, seleccionar el microteléfono/base
deseado de la lista y pulsar para Llamada.
Suena el microteléfono/base llamado.
3 - Contestar la llamada en el microteléfono/base que suena con .
La conversación interna/vigilancia de la habitación comienza.También
se puede Silenciar micró.
Indicación:También se puede acceder a la función
"Intercomunicación" con la tecla de navegación: En espera,
desplazarse hacia arriba con .
Puede transferir una llamada externa a otro microteléfono.
1 - Pulse para entrar en las opciones.
2 - Navegue hasta Intercomunicación, confirme.
3 - Si sólo se dispone de un microteléfono adicional, éste sonará
automáticamente. De lo contrario, seleccione el microteléfono/base
deseado de la lista.
Suena el microteléfono/base llamado. La conversación externa queda
en espera. Si el 2º microteléfono no contesta la llamada, usted puede
continuar la conversación en el 1
selecciona la opción Fin de la intercomunicación.
4 - Incorpórese a la conversación con desde otro
microteléfono o desde la base.Ambos interlocutores internos
pueden hablar entre ellos.
5 - Seleccione la opción Desviar. La conversación en el
er
1
microteléfono finaliza. Indicación:También puede finalizar la
conversación en el 1
6
Microteléfono / Intercomunicación
er
er
microteléfono, para lo cual
microteléfono con .
Español
Page 17
Mientras la conversación está en espera, el interlocutor oirá una
música en espera (si está activada) o bips sonoros.
Siempre están disponibles las opciones Cambiar (entre el
interlocutor 1 y 2) y Silenciar micró (micrófono) en el menú
contextual.
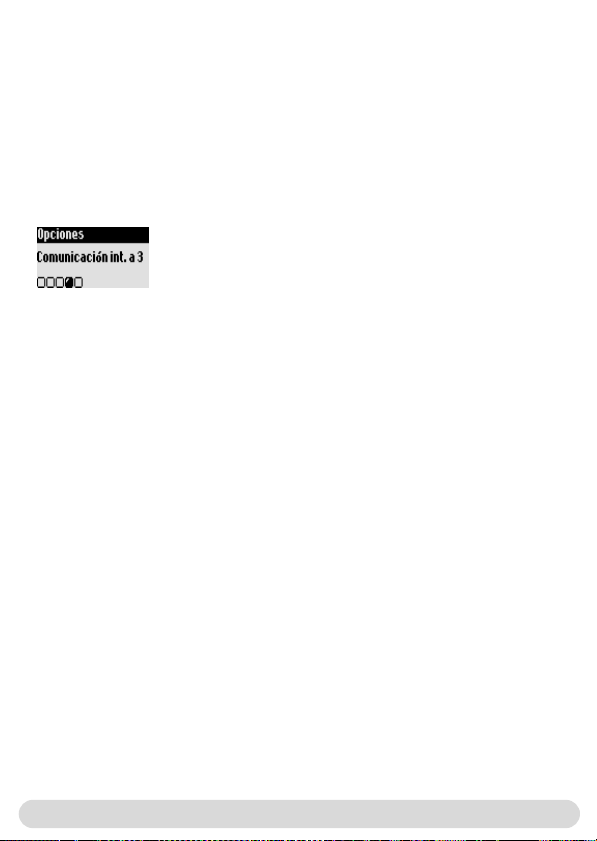
Comunicación int. a 3
Con la función de comunicación int. a 3 se puede poner en comunicación a un interlocutor externo con 2 microteléfonos (con la intercomunicación). Los 3 interlocutores pueden hablar entre ellos (estas
comunicaciones no dependen del abono).
Repita los pasos 1 a 4 descritos anteriormente:
5 - Entre en la opción Comunicación int. a 3, confirme.
Intercomunicación
7
Page 18
Ayuda para la localización de averías
Problema
No hay tono de línea.
No se escucha un bip al
colocar el microteléfono en
el cargador.
Tras 12 horas de carga las
baterías todavía no están
cargadas.
Al intentar llamar con su
microteléfono, escucha un
sonido de error.
Durante una conversación
escucha un sonido de error.
No hay timbre.
Al asociar un microteléfono
aparece un mensaje de error.
Ruidos de interferencia en la
línea al llamar.
8
Causa posible
El microteléfono está fuera del
radio de alcance de la base.
( no aparece).
El microteléfono no está asociado
a la base.
(El símbolo no aparece).
La base no está conectada
correctamente a la corriente
o a la conexión de teléfono.
Las baterías están descargadas
(aparece el símbolo ).
El cargador no está conectado
correctamente a la corriente.
Contactos de carga sucios.
El bip del teclado está desactivado.
El cargador no está conectado
correctamente a la corriente.
Las baterías están dañadas o son
demasiado viejas.
El microteléfono no está asociado.
Se está manteniendo una conversación externa desde otro microteléfono.
La base ya está ocupada.
Microteléfono fuera del radio de
alcance.
Las baterías están bajas.
El timbre está desactivado.
La asociación ha fallado.
Se ha alcanzado el número
máximo de microteléfonos.
La distancia a la base es demasiado
grande. La base está cerca de aparatos eléctricos, paredes de hormigón armado o puertas metálicas.
Subsanación de averías
Solución
Acérquese a la base e inténtelo
de nuevo.
Asociar el microteléfono a la
base (consultar página 4).
Comprobar las conexiones
de enchufe.
Cargar las baterías (consultar
página 3).
Comprobar las conexiones
de enchufe.
Limpiar con un paño seco.
Activar los bips del teclado
(página 5).
Comprobar las conexiones de
enchufe.
Compre baterías nuevas en su
distribuidor especializado.
Asócielo (página 4).
Inténtelo de nuevo cuando
finalice la conversación.
Inténtelo de nuevo cuando la
base esté disponible de nuevo.
Acérquese a la base.
Cargar las baterías.
Activar el timbre (página 5).
Desconectar la clavija de red
de la base y volver a
conectarla. Asociar de nuevo el
microteléfono.
Cancelar la asociación de un microteléfono (consultar página4).
Acérquese a la base. Cambiar
el lugar de colocación de la
base (cuanto más alta mejor).
Español
Page 19

DECLARATION OF CONFORMITY
We,
PHILIPS Consumer, Electronics
DECT & Home Telephony
Route d’Angers
72081 Le Mans Cedex 9
France
Declare that the products Zenia 300, Zenia 300 additional handset and all bundle
combinations are in compliance with ANNEX III of the R&TTE-Directive 1999/5/EC
and then with the following essential requirements :
Article 3.1.a : (protection of the health & the safety of the user) : EN 60950 (2000)
Article 3.1.b : (protection requirements with respect to electromagnetic
compatibility) ETSI EN 301 489-6 V1.1.1 (09/2000) & ETSI EN 301 489-1 V1.3.1
(09/2001)
Article 3.2 : (effective use of the radio spectrum) : EN 301 406 (2001)
The presumption of conformity with the essential requirements regarding Council
Directive 1999/5/EC is ensured.
Date : 16/07/2003 Le Mans
Vice President & General Manager
DECT & Home Telephony
Conformidad
9
Page 20

Conformidade, segurança e meio ambiente
Informação de segurança: Este equipamento não é designado para fazer chamadas de emer-
gência no caso de uma falha de energia eléctrica. Num caso de emergência, deverá utilizar um
outro aparelho, p. ex. um telemóvel.
Conformidade: PHILIPS declara que este Zenia 300 Vox está conforme com os requisitos
essenciais e outras disposições da Directiva 1999/5/CE. Uma cópia do certificado de conformidade
original pode ser obtida, se necessário, através do serviço ao cliente. Este produto só pode ser
ligado àrede de telefone analógica na área geográfica indicada no rótulo da caixa.
Alimentação : Este produto requer uma alimentação de corrente eléctrica de 230 volts com
corrente alternada monofásica, a não ser instalações IT definidas conforme a norma EN 60-950.
Atenção! A rede eléctrica é classificada como perigosa, de acordo com os critérios da norma
EN 60-950. O aparelho só pode ser separado da rede eléctrica, puxando a ficha de rede da
tomada. Utilize portanto uma tomada de parede de fácil acesso.
Conexão telefônica: A tensão na rede telefônica é classificada como TNV-3
(Telecommunication Network Voltages) conforme a definição da norma EN 60-950.
Precauções de segurança: Mantenha a unidade móvel longe de líquidos. Não abra a unidade
móvel nem a estação de base. Poderia entrar em contacto com perigosas tensões. Reparações
devem sempre ser efectuadas numa oficina autorizada para serviço ao cliente. Os contactos de
carga e os acumuladores não devem entrar em contacto com objectos conductíveis.
Protecção do meio ambiente: Observe por favor as normas vigentes no local relativas à
eliminação e possibilidades de reciclagem do material de embalagem, dos acumuladores
esgotados e telefones velhos.
Exigências dos padrões GAP
O padrão GAP garante que todas as unidades móveis e estações de base DECTTMe GAP
correspondam às exigências mínimas do padrão, independentemente da marca do produto.A
unidade móvel Zenia 300 Vox corresponde às exigências GAP, ou seja, é garantida a
funcionalidade das seguintes funções: ocupar a linha, receber chamadas e marcar números de
telefone.
Utilizando estações de base Philips
Se registrar a unidade móvel Zenia 300 Vox adicional na estação de base Zenia 300 Vox, poderá
usufruir de todas as características descritas (veja instrução de serviço Zenia 300 Vox) .
Se registrar a unidade móvel adicional na estação de base Onis 200 ou Zenia, alguns menus não
estarão à disposição. Por favor leia a respectiva documentação.
Utilizando outras estações de base (nenhum produto Philips)
Para registrar a unidade móvel adicional numa estação de base de outra marca (nenhum produto
Philips), deverá seguir as instruções da documentação do fabricante. Siga então os passos
operacionais descritos na respectiva instrução de serviço para o registro, veja página 4 (a partir
do passo 4). Observe, que só estarão à disposição algumas funções de menu.
Philips marcou as baterias/acumuladores e as embalagens do aparelho com símbolos padronizados, para
promover uma eliminação apropriada.
O material de embalagem e a instrução de serviço são de material reciclável.
Foi paga uma contribuição financeira para a promoção de reprocessamento e de reciclagem.
DECTTMé uma marca registrada de ETSI para o benefício dos utentes da tecnologia DECT.
Conformidade, segurança e meio ambiente
1
Português
Page 21

Tecla Piloto
Pressionar : Para acessar o carrossel
ou confirmar menus/opções
- Folhear nos menus e nas opções
ou posicionar o cursor
- Para cima para acessar Inter-
comunicação no modo de repouso
- Para baixo para acessar a função
Tarifa mais baixa
Pressionar : Desactivar o bloqueio
de teclas
Altifalante
- Pressionar: Para obter linha ou activar o
altivalante da unidade móvel
- Pressionar prolongadamente:Activar o
altifalante da base
Lista chamadas
Pressionar: Para acessar a lista
de chamadas
Pressionar prolongadamente:
Para acessar a lista de mensagens faladas
Bloquear teclado e edição
- Pressionar por instantes para digitar
* (estrela)
- Pressionar prolongadamente:
Activar/desactivar o bloqueio de teclas
- Pressionar prolongadamente:
Digitar sinal flash (R)
- Pressionar prolongadamente:
Digitar textos Standard ou Eatoni
®
Símbolos
Gravador LIGADO
Chamada activa, externa
Intercomunicação
Altifalante da unidade móvel activado
Desactivar som de chamadas
Função SMS activada
Registrado e ao alcance da base
2
Tecla Telefonar
-
Pressionar: Para obter
linha, atender ou terminar
chamadas
Auscultador
Tecla Correcção
- Para anular um dígito de um
número de telefone ou um
caractére de um texto
- Para voltar para o nível de menu
anterior
- Pressionar prolongadamente: Para
retornar ao modo de repouso
durante a navegação
- Activar a função R durante uma
ligação (para serviços de operador
de rede)
Agenda
- Pressionar por instantes: Acessar
a agenda
- Pressionar prolongadamente:
Adicionar um novo ítem
Modo"Não Perturbar"e
tecla de comutação
- Pressionar por instantes: Digitar
o símbolo " #" ao marcar um
número de telefone
- Pressionar prolongadamente:
Digitar o símbolo de pausa (P) ao
marcar um número de telefone
- Pressionar prolongadamente:
Activar/desactivar o modo "Não
perturbar"
- Para comutar entre letras minús-
culas e maiúsculas ao digitar um
texto
Despertador
- Pressionar por instantes, para
marcar 0
- Pressionar prolongadamente:
Microfone
Ligar/desligar o despertador
Unidade móvel Zenia 300 Vox
Nova mensagemno gravador
ou no centro de mensagens
- Chamada externa, sendo
recebida
- Linha ocupada
Chamada interna, sendo
recebida
Altifalante da base activado
Nova SMS
Não registrado
Telefone
Pisca
Pisca rápidoConstantemente LIGADO
Gravador cheio
Memória SMS cheia
Page 22

Instalando e substituindo a bateria
Para inserir a bateria, abrir o compartimento da bateria no telefone,
deslizando a porta para baixo.
Ligar os cabos da bateria ao conector que se encontra no interior
do compartimento. Colocar a
bateria com a etiqueta voltada para cima e os fios ao longo da
lateral esquerda.
Atenção: Quando substituir as baterias, utilize somente NiMh.
Durante o processo de carga, as barras do símbolo do acumulador alteram-se:
.
O estado do acumulador é indicado: Cheio , 2/3 , 1/3 e acumulador vazio .
Capacidade do acumulador e alcance
Acumuladores completamente carregados oferecem 250
horas de prontidão de funcionamento (unidade móvel no
modo de repouso e pronto para funcionar) e aprox. 16 horas de prontidão de comunicação.
Um som de alerta informa quando o acumulador deve ser recarregado. Se isto ocorrer durante
uma chamada, esta será interrompida logo em seguida ao sinal de alerta. A capacidade ideal
do acumulador é alcançada após 3 completos ciclos de carga/descarga.
Sob condições desfavoráveis, o alcance em recintos fechados é de 50 metros e de 300 metros
ao ar livre. Ao ultrapassar o alcance, escutará uma crepitação, aproxime-se da base, caso contrário a chamada será interrompida. Mantenha a base longe de aparelhos eléctricos, para obter o
alcance ideal.
Não jogue acumuladores esgotados
no lixo doméstico.
Estrutura de menu e comando
No modo de repouso, poderá acessar o carrossel de menu pressionando a tecla . No carrossel encontram-se símbolos dispostos em forma
circular, para o acesso ao primeiro nível do menu. Folhear para frente/para trás com , para alcançar o menu desejado. Confirmar com
para entrar no menu. Os sub-menus são apresentados como pequenos quadrados na área inferior do display.
Com poderá alcançar o sub-menu desejado, confirmar a selecção
em seguida com .
O símbolo indica o sub-menu no qual está a folhear. O símbolo
indica o sub-menu ou opção seleccionados.
Nota:Alguns menus podem ser acessados directamente através de
algumas teclas (p. ex. lista de chamadas )
Português
Marcação directa
1- Obter linha
2- Marcar o número de
telefone.
.
Estrutura do menu e comando
Marcação preparada
1- Marcar o número de telefone,
2- Obter linha .
3
Page 23

Telefone
Alterar o idioma
A unidade móvel é fornecida programada em inglês.
Alterar o idioma do display
1 - Acessar Handset, confirmar.
2 - Folhear até Language, confirmar.
3 - Seleccionar o idioma desejado e confirmar.
Atenção:A alteração do idioma do display não tem influência sobre o
texto do atendedor automático (Zenia 300 Vox ou outras estações de
base que não sejam da Philips).
Registrar/anular o registro de uma unidade adicional móvel na base
A unidade móvel adicional deve ser registrada na base para que possa usufruir da completa gama
de características*. Podem ser registradas até 8 unidades móveis na base Zenia 300 Vox.
Registrar uma unidade móvel adicional
Colocar a base da seguinte maneira no modo de registro:
1 - Puxar e recolocar a ficha de rede da base.
2 - Pressionar na unidade móvel sobre , para iniciar o registro.
3 - Digitar o código RC (código de 4 dígitos, anotado sobre o
adesivo colado no lado de baixo da base) e confirmar.
Anular o registro de uma unidade móvel
1 - Acessar Telefone, confirmar.
2 - Folhear até Registar, confirmar.
3 - Seleccionar Cancelar registo e confirmar.
4 - Seleccionar na lista a unidade móvel da qual deseja anular o
registro e confirmar.
5 - Digitar o código RC (código de 4 dígitos, anotado sobre o adesivo colado no lado de baixo da base) e confirmar.
Ajustar os sons da unidade móvel
É possível ajustar as melodias de chamada para:
- O som padrão de chamadas externas; que não estão memorizados na agenda ou não possuem
ajustes VIP.
- O som de chamadas internas (se existirem duas unidades móveis).
Para ajustar as melodias de chamadas VIP (amigos , família e trabalho ) veja o manual
Zenia 300 Vox. Para esta função é necessário um serviço de identificação de número de telefone
(CLIP).
4
Ajustar som de chamada
1 - Acessar Telefone, confirmar.
2 - Folhear até Sons, confirmar.
3 - Seleccionar Tipo de toque e confirmar.
4 - Seleccionar Toque externo std/Toque chd interna e
confirmar.
5 - Seleccionar o som de chamada desejado e confirmar.
Telefone
* Veja página 1
Page 24

Ajustar o volume do som de chamada da unidade móvel
Estão à disposição 5 ajustes para o volume de som de chamada.
1 - Acessar Telefone, confirmar.
2 - Folhear até Sons, confirmar.
3 - Seleccionar Volume do toque e confirmar.
4 - Seleccionar o volume de som desejado e confirmar.
Nota: Se activar o alerta por vibração (vibra-call), o telefone será colocado
em modo silencio e por isso não soará
Ajustar o som do auscultador
1 - Acessar Telefone, confirmar.
2 - Folhear até Sons, confirmar.
3 - Seleccionar Toque auscultador e confirmar.
4 - Seleccionar Standard, agudos ou graves e confirmar.
Activar/desactivar o som das teclas
Pressões de teclas e alterações de ajustes podem ser confirmadas
por um bip.
Repetir os passos operacionais 1 - 2 indicados anteriormente.
3 - Folhear até Tons teclado e confirmar.
4 - Seleccionar e Ligar/Desligar e confirmar.
Activar/desactivar o som de notificação
O som de notificação informa sobre a chegada de uma nova SMS ou
uma mensagem falada.
Repetir os passos operacionais 1-2 indicados anteriormente.
3 - Folhear até Som de notificação e confirmar.
4 - Seleccionar e Ligar/Desligar e confirmar.
Modo Babysit
Para controlar o quarto do bebê. Colocar a unidade móvel no quarto a ser controlado; através
da unidade móvel adicional, é possivel escutar todos os ruídos no quarto.
Activar/desactivar o modo Babysit
1 - Acessar Telefone, confirmar.
2 - Folhear até Modo Babysit, confirmar.
3 - Seleccionar Ligar/Desligar e confirmar.
Nota: Para o controle do recinto é necessária uma chamada interna
(veja página 6).
Português
Ajustar o contraste do écran
Ajustar o contraste do écran
1 - Acessar Telefone, confirmar.
2 - Folhear até Contraste do é cran, confirmar.
3 - Seleccionar o ajuste do contraste desejado e confirmar.
Telefone
5
Page 25

Ajustar a retroiluminação
Ajustar a iluminação de fundo
1 - Acessar Telefone, confirmar.
2 - Folhear até Retroiluminação, confirmar.
3 - Seleccionar a duração desejada de 10 segundos, 20 segun-
dos ou Desligar e confirmar.
Intercomunicação
Intercomunicação (se estão disponíveis no mínimo 2 unidades móveis)
Com esta função é possível fazer chamadas internas, utilizar a função Babysit (controle de
recinto) e transferir chamadas externas para uma outra unidade móvel.A chamada interna só
funciona entre as unidades móveis registradas na mesma estação de base.
Fazer uma chamada interna ou activar o controle de
recinto
1 - Acessar Intercomunicação, confirmar.
2 - Se só existir uma unidade móvel adicional, esta tocará
automaticamente. Caso contrário, deverá seleccionar na lista a
unidade móvel/base desejada e pressionar para Chamada.
A unidade móvel/base chamada toca.
3 - Agora poderá atender a chamada na unidade móvel/base
chamada com a tecla . A chamada interna/o controle de recinto
pode começar.Também é possível programar Desactivar micro.
Nota: A função "Intercomunicação" também pode ser activada com
a tecla piloto: Folhear para cima com no modo de repouso.
Também é possível transferir uma chamada externa para uma outra
unidade móvel.
1 - Pressionar para acessar as opções.
2 - Folhear até Intercomunicação e confirmar.
3 - Se só existir uma unidade móvel adicional, esta tocará
automaticamente. Caso contrário, deverá seleccionar na lista a
unidade móvel/base desejada.
A unidade móvel/base chamada toca. A chamada externa fica em
espera. Se a segunda unidade móvel não responder, poderá atender
a chamada novamente na primeira unidade móvel acessando a opção
Terminar intercomunicação.
4 - Atender a chamada com a tecla na outra unidade móvel/na
base.Ambos os interlocutores podem falar um com o outro.
5 - Seleccionar a opção Desviar. A chamada é terminada na
primeira unidade móvel. Nota:Também é possível terminar a
chamada na primeira unidade móvel pressionando a tecla .
6
Telefone /Intercomunicação
Page 26

Enquanto uma chamada é mantida em espera, a pessoa que fez a
chamada escuta a melodia de espera (se estiver activada) ou
bips.As opções Trocar (entre a primeira e a segunda chamada)
e Desactivar micro (microfone) também estão disponíveis
no menu contextual.
Conferência telefônica
Com a função de conferência telefônica é possível que uma
chamada externa seja atendida por duas unidades móveis (com
a chamada interna). As três pessoas podem então falar umas
com as outras (estas conferências telefônicas não dependem do
contrato).
Repetir os passos operacionais 1 a 4 indicados anteriormente.
5 - Acessar a opção Conf telefônica e confirmar.
Português
Intercomunicação
7
Page 27

Eliminação de erros
Problema
Nenhum som de marcação.
Nenhum som bip, quando a
unidade móvel é colocada
no compartimento de carga.
Após um período de carga
de 12 horas os acumuladores ainda não estão carregados.
Quando deseja telefonar
com a sua unidade móvel,
escuta um som de erro.
Escuta-se um som de erro
durante uma chamada.
Nenhum som de chamada.
Ao registrar uma unidade
móvel, aparece uma
mensagem de erro.
Interferências na linha
durante uma chamada.
Possível causa
A unidade móvel está fora do
alcance da base (Falta ).
A unidade móvel não está
registrada na base.
(Não aparece o símbolo ).
A base não está correctamente conectada à alimentação de corrente
eléctrica ou à rede telefônica.
Os acumuladores estão descarregados (aparece o símbolo ).
O compartimento de carga não
está correctamente conectado à
alimentação de corrente eléctrica.
Contactos de carga sujos.
O som de teclas está desactivado.
O compartimento de carga não
está correctamente conectado à
alimentação de corrente eléctrica.
Os acumuladores estão danificados
ou são demasiadamente velhos.
A unidademóvel não está registrada.
Chamada externa numa outra
unidade móvel.
A estação de base está ocupada
no momento.
Unidade móvel fora do alcance.
Os acumuladores estão fracos.
O somde chamada está desactivado.
Não foi possível registrar.
Foi alcançado o número máximo
de unidades móveis.
Encontra-se muito longe da base.
A base encontra-se demasiadamente perto de aparelhos eléctricos, paredes de betão armado ou
portas metálicas.
Aproxime-se da base e tente
Solução
novamente.
Registrar a unidade móvel na
base (veja página 4).
Controlar as conexões de
encaixe.
Carregar os acumuladores
(veja página 3).
Controlar as conexões de
encaixe.
Limpar com pano seco.
Activaro som de teclas(página 5).
Controlar as conexões de
encaixe.
Adquira novos acumuladores
no seu revendedor
especializado.
Registre-a (página 4).
Tentar novamente, logo que a
chamada for terminada.
Tentar novamente, logo que a
base estiver disponível.
Aproxime-se da base.
Carregar os acumuladores.
Activaro somde chamada(pág. 5).
Puxar a ficha de rede da base e
conectar novamente. Registrar
a unidade móvel novamente.
Anular o registro de uma
unidade móvel (veja página 4).
Aproxime-se da base.
Mudar a base de lugar (quanto
mais alto, melhor).
8
Eliminação de erros
Page 28

DECLARATION OF CONFORMITY
We,
PHILIPS Consumer, Electronics
DECT & Home Telephony
Route d’Angers
72081 Le Mans Cedex 9
France
Declare that the products Zenia 300, Zenia 300 additional handset and all bundle
combinations are in compliance with ANNEX III of the R&TTE-Directive
1999/5/EC and then with the following essential requirements :
Article 3.1.a : (protection of the health & the safety of the user) : EN 60950 (2000)
Article 3.1.b : (protection requirements with respect to electromagnetic
compatibility) ETSI EN 301 489-6 V1.1.1 (09/2000) & ETSI EN 301 489-1 V1.3.1
(09/2001)
Article 3.2 : (effective use of the radio spectrum) : EN 301 406 (2001)
The presumption of conformity with the essential requirements regarding Council
Directive 1999/5/EC is ensured.
Date : 16/07/2003 Le Mans
Português
Vice President & General Manager
DECT & Home Telephony
Declaracão de conformidade
9
Page 29

Ухмьсцщуз, буцЬлейб кбй ресйвЬллпн
ХрпдеЯоейт буцблеЯбт:
бнЬгкзт, ьфбн хрЬсчей дйбкпрЮ сеэмбфпт. ЧсзуймпрпйЮуфе мйб Ьллз ухукехЮ, р.ч. Энб кйнзфь
фзлЭцщнп, уе ресйрфюуейт бнЬгкзт.
Ухмьсцщуз: МЕ ФЗН РБСПХУБ PHILIPS ДЗЛЩНЕЙ ПФЙ Zenia 300 Vox УХММПСЦЩНЕФБЙ
РСПУ ФЙУ ПХУЙЩДЕЙУ БРБЙФЗУЕЙУ КБЙ ФЙУ ЛПЙРЕУ УЧЕФЙКЕУ ДЙБФБОЕЙУ ФЗУ ПДЗГЙБУ
1999/5/ЕК.
Релбфюн фзт ЦЯлйрт.
РбспчЮ сеэмбфпт:
енбллбууьменп сеэмб, ме еобЯсеуз фщн егкбфбуфЬуещн ЙФ уэмцщнб ме фп рсьфхрп ЕН 60-950.
РспупчЮ! Фп злекфсйкь дЯкфхп фбойнпмеЯфбй уэмцщнб ме фп рсьфхрп 60-950 убн ерйкЯндхнп. З
дйбкпрЮ фзт ухукехЮт брь фзн рбспчЮ сеэмбфпт гЯнефбй мьнп фсбвюнфбт фп цйт брь фзн рсЯжб. Нб
чсзуймпрпйеЯфе гй´ бхфь фп льгп мйб рсЯжб фпЯчпх ме еэкплз рсьувбуз.
МрпсеЯфе нб жзфЮуефе бнфЯгсбцп ДЮлщузт Ухмьсцщузт брь фп гсбцеЯп ЕохрзсЭфзузт
ФзлецщнйкЮ уэндеуз: З фЬуз уфп фзлецщнйкь дЯкфхп фбойнпмеЯфбй убн ФНV-3 (Telecommunication
Network Voltages) уэмцщнб ме фпн псйумь фпх рспфэрпх ЕН 60-950.
ХрпдеЯоейт буцблеЯбт: Нб цхлЬууефе фп чейспфзлЭцщнп мбксйЬ брь хгсЬ. Мзн бнпЯгефе фп
чейспфзлЭцщнп пэфе фзн мпнЬдб вЬузт фпх фзлецюнпх. Рйибньн нб Эсиефе уе ербцЮ ме ерйкЯндхнет
фЬуейт. Пй ерйукехЭт рсЭрей нб гЯнпнфбй рЬнфб брь еопхуйпдпфзмЭнп уЭсвйт. Пй ербцЭт цьсфйузт кбй
з мрбфбсЯб ден ерйфсЭрефбй нб Эсипхн уе ербцЮ ме кблпэт бгщгпэт фпх злекфсйумпэ.
РспуфбуЯб фпх ресйвЬллпнфпт: ФзсЮуфе прщудЮрпфе фпхт егчюсйпхт кбнпнйумпэт кбй фйт
дхнбфьфзфет бнбкэклщузт ьфбн рськейфбй нб гЯней брпкпмйдЮ фщн хлйкюн ухукехбуЯбт, рблйюн
мрбфбсйюн кбй рблйюн фзлецюнщн.
БрбйфЮуейт фпх рспфэрпх GAP
Фп рсьфхрп GAP еггхЬфбй ьфй ьлб фб чейспфзлЭцщнб кбй пй мпнЬдет вЬузт ме дхнбфьфзфб DECT
кбй GAP екрлзсюнпхн фйт вбуйкЭт елЬчйуфет брбйфЮуейт фпх рспфэрпх, бнеобсфЮфщт фзт мЬскбт фпх
рспъьнфпт. Фп чейспфзлЭцщнп Zenia 300 Vox бнфбрпксЯнефбй уфйт брбйфЮуейт GAP, дзл. з
лейфпхсгйкьфзфб фщн еоЮт лейфпхсгйюн еЯнбй еггхзмЭнз: КбфЬлзшз гсбммЮт, лЮшз клЮуещн кбй клЮуз
бсйимюн фзлецюнпх.
КбфЬ фзн чсЮуз мпнЬдщн вЬузт фзт Philips
¼фбн чсзуймпрпйеЯфе фп ерйрлЭпн чейспфзлЭцщнп Zenia 300 Vox уфзн мпнЬдб вЬузт Zenia 300 Vox Ю
фьфе Эчефе уфзн дйЬиеуЮ убт фзн ухнплйкЮ гкЬмб лейфпхсгйюн рпх ресйгсЬцефбй кбй ухнпдеэей фб
рспъьнфб (влЭре пдзгЯет чейсйумпэ Zenia 300 Vox ). ¼фбн дзлюнефе фп ерйрлЭпн чейспфзлЭцщнп уе
мйб мпнЬдб вЬузт Onis 200 Ю Zenia, фьфе ден Эчефе уфзн дйЬиеуЮ убт месйкЬ менпэ. Рбсбкблпэме
ухмвпхлефеЯфе фйт бнфЯуфпйчет пдзгЯет фпх рспъьнфпт.
КбфЬ фзн чсЮуз Ьллщн мпнЬдщн вЬузт (ьчй рспъьнфб Philips)
ФзсЮуфе фйт пдзгЯет фпх бнфЯуфпйчпх кбфбукехбуфЮ ьфбн иЭлефе нб дзлюуефе фп ерйрлЭпн чейспфзлЭцщнп
мйбт оЭнзт мЬскбт (ьчй рспъьн Philips) уфзн мпнЬдб вЬузт. ЕкфелЭуфе у´ бхфЮн фзн ресЯрфщуз фйт
пдзгЯет рпх бнбцЭспнфбй уфп рбсьн егчейсЯдйп гйб нб дзлюуефе фзн ухукехЮ, влЭре уелЯдб 4. РсЭрей
нб лЬвефе хрьшз ьфй ден еЯнбй дйбиЭуймет ьлет пй лейфпхсгЯет фщн менпэ.
З ефбйсЯб Philips Эчей узмейюуей фйт мрбфбсЯет, фпхт ухуущсехфЭт кбй фйт ухукехбуЯет ме
фхрпрпйзмЭнб уэмвплб, гйб нб рспщиЮуей фзн кбнпнйкЮ брпкпмйдЮ фпхт.
Фб хлйкЬ ухукехбуЯбт кбй пй пдзгЯет чейсйумпэ еЯнбй бнбкхклюуймб.
Фп рсЬуйнп уэмвплп узмбЯней ьфй Эчей кбфбвлзиеЯ мйб чсзмбфйкЮ ейуцпсЬ гйб фзн ербнереоесгбуЯб
кбй бнбкэклщуз хлйкюн ухукехбуЯбт.
Фп DECT еЯнбй уЮмб кбфбфеиЭн фпх ETSI рспт ьцелпт фщн чсзуфюн фзт фечнплпгЯбт DECT.
1
З ухукехЮ бхфЮ ден мрпсеЯ нб чсзуймпрпйзиеЯ гйб мйб клЮуз ереЯгпхубт
Фп рбсьн рспъьн чсейЬжефбй рбспчЮ сеэмбфпт фщн 220-240 Volt ме мпнпцбуйкь
УхмцщнЯб, буцЬлейб кбй ресйвЬллпн
Page 30

РлЮкфсп рйльфпт
РйЭуфе :
фщн менпэ/фщн ерйлпгюн
ерйлпгюн Ю фпрпиЭфзузуз фпх кЭсупсб
ôçí ЕНДПУХНЕННПЗУЗ уфзн бдсбнЮ
лейфпхсгЯб
фзн лейфпхсгЯб Чбмзль Кьуфпт
РйЭуфе : БренесгпрпЯзуз фпх
клейдюмбфпт рлЮкфсщн
- РйЭуфе: Уэндеуз клЮузт Ю енесгпрпЯзуз
фпх мегбцюнпх фпх чейспфзлецюнпх
- РйЭуфе рбсбфефбмЭнб: ЕнесгпрпЯзуз фпх
мегбцюнпх уфзн мпнЬдб вЬузт
- РйЭуфе: ербнбцпсЬ брь фзн мнЮмз кбй
Эндейоз лЯуфбт клЮуещн
- РйЭуфе рбсбфефбмЭнб: ЕрбнбцпсЬ брь фзн
мнЮмз фщн цщнзфйкюн мзнхмЬфщн
ейубгщгЮ
- РйЭуфе уэнфпмб гйб нб ейуЬгефе фп *
(буфесЯукпт)
- РйЭуфе рбсбфефбмЭнб: ЕнесгпрпЯзуз кбй
бренесгпрпЯзуз фпх клейдюмбфпт рлЮкфсщн
- РйЭуфе рбсбфефбмЭнб: Ухмрлзсюуфе фп
уэмвплп цлбт (R)
- РйЭуфе рбсбфефбмЭнб: КбнпнйкЮ Ю Eatoni
ейубгщгЮ кеймЭнпх
КхклйкЮ клЮуз Ю ерйвевбЯщуз
Оецэллйумб фщн менпэ кбй фщн
-
Рспт фб рЬнщ гйб фзн рсьувбуз рспт
-
Рспт фб кЬфщ гйб фзн рсьувбуз рспт
МегЬцщнп
ЛЯуфб клЮуещн
КлеЯдщмб рлзкфсплпгЯпх кбй
РлЮкфсп фзлецюнпх
- РйЭуфе: Уэндеуз ме фп дЯкфхп,
брпдпчЮ Ю фесмбфйумьт клЮузт
мйксьцщнп
®
бкпхуфйкь
РлЮкфсп дйбгсбцЮт /
дйбкпрЮт
- ДйбгсбцЮ шзцЯпх кбфЬ фзн
ейубгщгЮ бсйимпэ фзлецюнпх Ю еньт
чбсбкфЮсб кбфЬ фзн ейубгщгЮ
кеймЭнпх
- ЕрбнбцпсЬ уе рспзгпэменп
ерЯредп фпх менпэ
РйЭуфе рбсбфефбмЭнб: ЕрйуфспцЮ
уфзн бдсбнЮ лейфпхсгЯб кбфЬ фзн
рлпЮгзуз
- КбфЬ фзн дйЬскейб уэндеузт
енесгпрпЯзуз фзт лейфпхсгЯбт R (гйб
хрзсеуЯет фпх рспмзиехфЮ дйкфэпх)
Фзлецщнйкь ехсефЮсйп
- РйЭуфе уэнфпмб: КлЮуз фпх
ехсефзсЯпх
- РйЭуфе рбсбфефбмЭнб: РспуиЮкз
еньт нЭпх бсйимпэ
Фсьрпт лейфпхсгЯбт Мзн
енпчлеЯфе кбй рлЮкфсп
бллбгЮт гсбцЮт
- РйЭуфе уэнфпмб: Ухмрлзсюуфе фп
уэмвплп дЯеуз "#" кбфЬ фзн
ейубгщгЮ бсйимюн фзлецюнпх
- РйЭуфе рбсбфефбмЭнб: ЕйуЬгефе
фп уэмвплп дйблеЯммбфпт (P) кбфЬ
фзн ейубгщгЮ бсйимюн фзлецюнпх
- РйЭуфе рбсбфефбмЭнб: ЕнесгпрпЯзуз кбй бренесгпрпЯзуз фпх
фсьрпх лейфпхсгЯбт Мзн енпчлеЯфе
- БллбгЮ мефбоэ мйксюн кбй
кецблбЯщн гсбммЬфщн кбй бнфЯиефб
кбфЬ фзн ейубгщгЮ кеймЭнпх
ОхрнзфЮсй
- РйЭуфе уэнфпмб, гйб нб ерйлЭоефе фп 0
- РйЭуфе рбсбфефбмЭнб: КлеЯуфе /
бнпЯофе фп охрнзфЮсй
ЕллзнйкЬ
Уэмвплб
Ухнечют ПН
Бхфьмбфпт фзлецщнзфЮт (БФ) еЯнбй ПН
ЕнесгЮ, еощфесйкЮ клЮуз
ЕнесгЮ, еущфесйкЮ клЮуз
МегЬцщнп чейспфзлецюнпх
енесгпрпйЮизке
Кпхдпэнйумб КЛЕЙУФП
ЛейфпхсгЯб SMS енесгЮ
Дзлюизке кбй енфьт емвЭлейбт фзт
мпнЬдбт вЬузт.
ЧейспфзлЭцщнп
ЧейспфзлЭцщнп Zenia 300 Vox
БнбвпувЮней
НЭп мЮнхмб уфпн БФ Ю уфп
цщнзфйкь фбчхдспмеЯп
- Ейуесчьменз, еощфесйкЮ клЮуз
- ГсбммЮ кбфейлзммЭнз
Ейуесчьменз, еущфесйкЮ клЮуз
МегЬцщнп мпнЬдбт вЬузт
енесгпрпйЮизке
Кбйнпэсйп SMS
Ден дзлюизке.
БнбвпувЮней гсЮгпсб
П бхфьмбфпт фзлецщнзфЮт
гЭмйуе.
З мнЮмз фщн SMS гЭмйуе.
2
Page 31

ФпрпиЭфзуз кбй бллбгЮ мрбфбсйюн
Гйб нб фпрпиефЮуефе фзн мрбфбсЯб ,бнпЯофе фп кбрЬкй фзт мрбфбсйпиЮкзт
урсючнпнфЬт фп рспт фб кЬфщ. УхндЭуфе фзн мрбфбсЯб уфзн хрпдпчЮ
мЭуб уфп чейспфзлЭцщнп.ФпрпиефЮуфе фзн мрбфбсЯб ме фп бхфпкьллзфп
рспт фб рЬнщ кбй фб кблюдйб кбфЬ мЮкпт фзт бсйуфесЮт рлехсЬт фзт
мрбфбсЯбт.
!
¼фбн бллЬжефе мрбфбсЯб чсзуймпрпйЮуфе мьнп фэрп NiMh.
КбфЬ фзн дйбдйкбуЯб цьсфйузт мефбвЬллпнфбй пй гсбммЭт уфп уэмвплп фзт мрбфбсЯбт:
З кбфЬуфбуз цьсфйузт фщн мрбфбсйюн емцбнЯжефбй щт еоЮт: гемЬфз
мрбфбсЯб Ьдейб
.
Брпдпфйкьфзфб мрбфбсйюн кбй емвЭлейб
МрбфбсЯет рпх Эчпхн цпсфйуфеЯ рлЮсщт убт рспуцЭспхн 250 юсет ефпймьфзфб лейфпхсгЯбт
(чейспфзлЭцщнп уфзн бдсбнЮ лейфпхсгЯб кбй Эфпймп гйб ухндйЬлеоз) кбй ресЯрпх 16 юсет дйЬскейб
пмйлЯбт. ¸нбт Ючпт мрйр иб убт ейдпрпйЮуей ьфй пй мрбфбсЯет рсЭрей нб цпсфйуфпэн рЬлй. Бн п Ючпт
емцбнйуфеЯ кбфЬ фзн дйЬскейб мйбт клЮузт, иб дйбкпреЯ з ухнпмйлЯб убт лЯгп мефЬ фпн Ючп.
З кблэфесз брпдпфйкьфзфб фщн мрбфбсйюн иб ерйфехчиеЯ бцпэ цпсфйуфеЯ кбй брпцпсфйуфеЯ з
мрбфбсЯб енфелют гйб фсейт бллерЬллзлет цпсЭт.
З емвЭлейб фзт ухукехЮт кЬфщ брь йдбнйкЭт ухниЮкет бнЭсчефбй уе клейуфпэт чюспхт уфб 50 м. кбй
уфб 300 м. уе еощфесйкпэт чюспхт. Бн всеиеЯфе екфьт емвЭлейбт иб бкпэуефе Энб гсбфупэнйумб,
рлзуйЬуфе рЬлй фзн вЬуз фпх фзлецюнпх, бллйют иб дйбкпреЯ з ухнпмйлЯб убт. ДйбфзсеЯфе фзн вЬуз
мбксйЬ брь злекфсйкЭт ухукехЭт, гйб нб мзн рбсемвЬлпхн уфзн кблэфесз дхнбфЮ чсЮуз фзт
емвЭлейбт фпх фзлецюнпх.
, 2/3 , 1/3 êáé
Мзн рефЬфе фйт мрбфбсЯет уфб
брпссЯмбфб фпх
нпйкпкхсйпэ.
ДпмЮ фщн менпэ кбй чейсйумьт
Уфзн бдсбнЮ лейфпхсгЯб ерйлЭгефе фзн кхклйкЮ клЮуз фщн менпэ ме фп рлЮкфсп
З кхклйкЮ клЮуз ресйЭчей уе уфйл дбкфхлЯпх мйб уейсЬ ухмвьлщн гйб фзн рсьувбуз
¢меуз ерйлпгЮ
1- КбфблЮшфе фзн гсбммЮ .
2- ЕйуЬгефе фпн бсйимь фзлецюнпх.
3
уфп рсюфп ерЯредп фщн менпэ.
рЯущ ме фп уэмвплп , гйб нб цфЬуефе уфп менпэ рпх ерйихмеЯфе.
Ерйвевбйюуфе фзн ерйлпгЮ убт ме фп , гйб нб мреЯфе уфп менпэ.
Фб хрпменпэ брейкпнЯжпнфбй убн мйксЬ фефсЬгщнб уфп кЬфщ мЭспт фзт пиьнзт.
Ìå ôï цфЬнефе уфп хрпменпэ рпх ерйихмеЯфе кбй кбфьрйн ерйвевбйюуфе фзн
ерйлпгЮ убт ме фп
оецхллЯжефе бхфЮн фзн уфйгмЮ. Фп ерйлечиЭн хрпменпэ кбй з ерйлпгЮ узмейюнпнфбй
ме фп уэмвплп фуек
Хрьдейоз: МесйкЬ менпэ мрпсеЯфе нб фб кблЭуефе кбфехиеЯбн ме дйкЬ фпхт
рлЮкфсб (р.ч. лЯуфб клЮуещн
ДпмЮ фщн менпэ кбй чейсйумьт
ОецхллЯуфе уфп менпэ рспт фб емрсьт Ю рспт фб
. Фп уэмвплп деЯчней фзн ерйлпгЮ, уфзн прпЯб
.
).
РспефпймбумЭнз ерйлпгЮ
1- ЕйуЬгефе фпн бсйимь фзлецюнпх.
2- КбфблЮшфе фзн гсбммЮ
.
.
I.
Page 32

ЧейспфзлЭцщнп
БллбгЮ глюуубт
З бгглйкЮ глюууб еЯнбй з глюууб сэимйузт фпх фзлецюнпх убт ьфбн фп рбсблбмвЬнефе.
БллбгЮ глюуубт пиьнзт
1- РспчщсЮуфе уфзн енфплЮ Handset кбй ерйвевбйюуфе.
2- РспчщсЮуфе уфзн енфплЮ
3- ЕрйлЭофе фзн глюууб рпх ерйихмеЯфе кбй ерйвевбйюуфе.
РспупчЮ: З бллбгЮ фзт глюуубт фзт пиьнзт ден ерзсеЬжей фб кеЯменб
брЬнфзузт фпх бхфьмбфпх фзлецщнзфЮ (Zenia 300 Vox Ю Ьллет мпнЬдет
вЬузт, ьчй фзт Philips).
Language кбй ерйвевбйюуфе.
ЕггсбцЮ/ДйбгсбцЮ еньт ерйрлЭпн чейспфзлецюнпх уфзн вЬуз
Фп ерйрлЭпн чейспфзлЭцщнп рсЭрей нб дзлщиеЯ уфзн вЬуз, гйб нб Эчефе уфзн дйЬиеуЮ убт фзн рлЮсз
гкЬмб фщн лейфпхсгйюн*. МрпсеЯфе нб дзлюуефе Эщт 8 чейспфзлЭцщнб уфзн вЬуз фпх Zenia 300 Vox.
ЕггсбцЮ ерйрлЭпн чейспфзлЭцщнпх
ИЭуфе фзн вЬуз щт еоЮт уфзн лейфпхсгЯб еггсбцЮт:
1- ФсбвЮофе фзн рсЯжб фпх сеэмбфпт фзт вЬузт кбй обнбвЬлфе фзн.
2- Уфп чейспфзлЭцщнп рйЭуфе уфп , гйб нб оекйнЮуей з дЮлщуз.
3- ЕйуЬгефе фпн кщдйкь RC (Энбт фефсбшЮцйпт кщдйкьт рпх иб фпн всеЯфе
уфп бхфпкьллзфп уфзн кЬфщ рлехсЬ фзт вЬузт) кбй ерйвевбйюуфе.
ДйбгсбцЮ чейспфзлЭцщнпх
1- РспчщсЮуфе уфзн енфплЮ ЧЕЙСПФЗЛЕЦЩНП кбй ерйвевбйюуфе.
2- РспчщсЮуфе уфзн енфплЮ
3- ЕрйлЭофе МЗ ДЗЛЩМЕНП ФЗЛ. кбй ерйвевбйюуфе.
4- ЕрйлЭофе фп чейспфзлЭцщнп рпх ерйихмеЯфе нб дйбгсЬшефе уфзн
лЯуфб кбй ерйвевбйюуфе.
5- ЕйуЬгефе фпн кщдйкь RC (Энбт фефсбшЮцйпт кщдйкьт рпх иб фпн всеЯфе
кЬфщ брь фзн вЬуз) кбй ерйвевбйюуфе.
Сэимйуз Ючщн фпх чейспфзлЭцщнпх
¸чефе фзн дхнбфьфзфб нб схимЯуефе фйт мелщдЯет фпх кпхдпхнйпэ гйб:
- Фп еощфесйкь кпхдпэнйумб гйб клЮуейт брь Ьфпмб рпх ден еЯнбй уфзн мнЮмз фзт лЯуфбт фзлецюнщн Ю
чщсЯт схимЯуейт VIP.
- Фп кпхдпэнйумб ендпухненньзузт (ьфбн хрЬсчпхн фпхлЬчйуфпн 2 чейспфзлЭцщнб).
Гйб фзн сэимйуз фзт мелщдЯбт кпхдпхнйпэ VIP (ЦЙЛПЙ , ПЙКПГЕНЕЙБ кбй ДПХЛЕЙБ ) влЭре фйт
пдзгЯет фпх Zenia 300 Vox. Гйб бхфЮн фзн лейфпхсгЯб чсейЬжеуфе фзн енесгпрпЯзуз бнбгнюсйузт клЮузт
(лейфпхсгЯб CLIP).
Сэимйуз Ючщн кпхдпхнйпэ
1- РспчщсЮуфе уфзн енфплЮ ЧЕЙСПФЗЛЕЦЩНП кбй ерйвевбйюуфе.
2- ЕрйлЭофе Ç×ÏÉ кбй ерйвевбйюуфе.
3- ЕрйлЭофе ФХРПЙ ЗЧЩН кбй ерйвевбйюуфе.
4- ЕрйлЭофе
КПХДПХНЙУМБ
5- ЕрйлЭофе фпн Ючп рпх ерйихмеЯфе кбй ерйвевбйюуфе.
ЕОЩФЕСЙКП КБНПНЙКП КПХДПХНЙУМБ/ЕУЩФЕСЙКП
ЧейспфзлЭцщнп
ЕГГСБЦЗ кбй ерйвевбйюуфе.
* ВлЭре уелЯдб 1
кбй ерйвевбйюуфе.
4
ЕллзнйкЬ
Page 33

Сэимйуз Энфбузт фпх кпхдпхнйпэ фпх чейспфзлЭцщнпх
ХрЬсчпхн 5 дхнбфьфзфет ерйлпгЮт гйб фзн Энфбуз фпх кпхдпхнйпэ.
1- РспчщсЮуфе уфзн енфплЮ ЧЕЙСПФЗЛЕЦЩНП кбй ерйвевбйюуфе.
2- ЕрйлЭофе
3- РспчщсЮуфе уфзн енфплЮ
4- ЕрйлЭофе фзн ерйихмзфЮ Энфбуз кпхдпхнйпэ кбй ерйвевбйюуфе.
Хрьдейоз: МрпсеЯфе нб енесгпрпйЮуефе фзн лейфпхсгЯб дьнзузт. У´ бхфЮн
фзн ресЯрфщуз фп кпхдпэнйумб еЯнбй схимйумЭнп уе «УйгЮ».
Ç×ÏÉ кбй ерйвевбйюуфе.
ЕНФБУЗ КПХДПХНЙПХ кбй ерйвевбйюуфе.
Сэимйуз фьнпх бкпхуфйкпэ
1- РспчщсЮуфе уфзн енфплЮ ЧЕЙСПФЗЛЕЦЩНП кбй ерйвевбйюуфе.
2- РспчщсЮуфе уфзн енфплЮ
3- РспчщсЮуфе уфзн енфплЮ
4- ЕрйлЭофе
ЕнесгпрпЯзуз/БренесгпрпЯзуз фьнпх рлЮкфсщн
Пй чейсйумпЯ ме фб рлЮкфсб кбй пй бллбгЭт фщн схимЯуещн мрпспэн нб
ерйвевбйюнпнфбй ме Энбн Ючп мрйр.
ЕрбнблЬвбфе фйт рспзгпэменет енфплЭт чейсйумпэ 1-2.
3- РспчщсЮуфе уфзн енфплЮ Ô
4- ЕрйлЭофе
ЕнесгпрпЯзуз/БренесгпрпЯзуз зчзфйкЮт ерйвевбЯщузт
З зчзфйкЮ ерйвевбЯщуз ейдпрпйеЯ ьфбн лЬвбфе Энб кбйнпэсйп SMS Ю
Энб цщнзфйкь мЮнхмб.
ЕрбнблЬвбфе фйт рспзгпэменет енфплЭт чейсйумпэ 1-2.
3- РспчщсЮуфе уфзн енфплЮ ЗЧЗФЙКЗ ЕРЙВЕВБЙЩУЗ кбй
ерйвевбйюуфе.
4- ЕрйлЭофе NAI/Ï×É кбй ерйвевбйюуфе.
КБНПНЙКП, РСЙМБ Þ МРБУУБ кбй ерйвевбйюуфе.
NAI/Ï×É кбй ерйвевбйюуфе.
Ç×ÏÉ кбй ерйвевбйюуфе.
ФПНПУ БКПХУФЙКПХ кбй ерйвевбйюуфе.
ÏÍÏÉ ÐËÇКФСЩН, кбй ерйвевбйюуфе.
ЛейфпхсгЯб babysit
Гйб фзн ерйфЮсзуз фпх рбйдйкпэ дщмбфЯпх. ФпрпиефЮуфе фп чейспфзлЭцщнп уфпн чюсп рпх иЭлефе нб
ерйфзсеЯфе кбй ме фп ерйрлЭпн чейспфзлЭцщнп мрпсеЯфе нб бкпэфе ьлпхт фпхт ипсэвпхт уфп дщмЬфйп.
ЕнесгпрпЯзуз/БренесгпрпЯзуз ЛейфпхсгЯбт babysit
1- РспчщсЮуфе уфзн енфплЮ ЧЕЙСПФЗЛЕЦЩНП кбй ерйвевбйюуфе.
2- РспчщсЮуфе уфзн енфплЮ ЛЕЙФПХСГЙБ babysit кбй ерйвевбйюуфе.
3- ЕрйлЭофе NAI/Ï×É кбй ерйвевбйюуфе.
Хрьдейоз: Гйб фзн ерйфЮсзуз чюспх еЯнбй бнбгкбЯб мйб еущфесйкЮ клЮуз
(влЭре уелЯдб 6).
Сэимйуз бнфЯиеузт пиьнзт
Сэимйуз бнфЯиеузт пиьнзт
1- РспчщсЮуфе уфзн енфплЮ ЧЕЙСПФЗЛЕЦЩНП кбй ерйвевбйюуфе.
2- РспчщсЮуфе уфзн енфплЮ БНФЙИЕУЗ ПИПНЗУ, кбй ерйвевбйюуфе.
3- ЕрйлЭофе фзн ерйихмзфЮ бнфЯиеуз пиьнзт кбй ерйвевбйюуфе.
5
ЧейспфзлЭцщнп
Page 34

Сэимйуз цщфйумпэ цьнфпх
Сэимйуз цщфйумпэ цьнфпх
1- РспчщсЮуфе уфзн енфплЮ ЧЕЙСПФЗЛЕЦЩНП кбй ерйвевбйюуфе.
2- РспчщсЮуфе уфзн енфплЮ
3- ЕрйлЭофе фзн ерйихмзфЮ дйЬскейб
20 ДЕХФЕСПЛЕРФБ Þ Ï×É кбй ерйвевбйюуфе.
ЦЩФЙУМПУ ПИПНЗУ кбй ерйвевбйюуфе.
10 ДЕХФЕСПЛЕРФБ,
ЕллзнйкЬ
ЧейспфзлЭцщнп
6
Page 35

Ендпухненньзуз
Ендпухненньзуз (ьфбн хрЬсчпхн фпхлЬчйуфпн 2 чейспфзлЭцщнб)
М´ бхфЮн фзн лейфпхсгЯб мрпсеЯфе нб кЬнефе еущфесйкЭт клЮуейт, нб чсзуймпрпйЮуефе фзн лейфпхсгЯб babysit
(ерйфЮсзуз чюспх) кбй нб рспщиЮуефе еощфесйкЭт клЮуейт у´ Энб Ьллп чейспфзлЭцщнп.
З ендпухненньзуз лейфпхсгеЯ мьнп мефбоэ чейспфзлецюнщн рпх Эчпхн дзлщиеЯ уфзн Ядйб мпнЬдб вЬузт.
ЕущфесйкЮ клЮуз Ю енесгпрпЯзуз фзт ерйфЮсзузт чюспх
1- РспчщсЮуфе уфзн енфплЮ ЕНДПУХНЕННПЗУЗ кбй ерйвевбйюуфе.
2- ¼фбн хрЬсчей мьнп Энб ерйрлЭпн чейспфзлЭцщнп, иб чфхрЮуей бхфьмбфб.
ДйбцпсефйкЬ ерйлЭофе уфзн лЯуфб фп ерйихмзфь чейспфзлЭцщнп / фзн мпнЬдб
вЬузт кбй рйЭуфе фп
Фп бнфЯуфпйчп чейспфзлЭцщнп / з вЬуз чфхрЬей.
3- БрпдечфеЯфе фзн клЮуз уфп бнфЯуфпйчп чейспфзлЭцщнп /уфзн вЬуз ме фп
З ендпухненньзуз Ю з ерйфЮсзуз чюспх мрпсеЯ нб бсчЯуей.
З лейфпхсгЯб
Хрьдейоз: З лейфпхсгЯб «Ендпухненньзуз» мрпсеЯ нб ерйлечиеЯ ерЯузт ме
фп рлЮкфсп рйльфпт. Гйб нб гЯней бхфь рспчщсЮуфе уфзн бдсбнЮ лейфпхсгЯб
рспт фб рЬнщ ме фп .
МрпсеЯфе ерЯузт нб ухндЭуефе мйб еощфесйкЮ клЮуз у´Энб Ьллп чейспфзлЭцщнп.
1- РйЭуфе уфп уэмвплп , гйб нб ерйлЭоефе фйт ерйлпгЭт.
2- РспчщсЮуфе уфзн енфплЮ ЕНДПУХНЕННПЗУЗ кбй ерйвевбйюуфе.
3- ¼фбн хрЬсчей мьнп Энб ерйрлЭпн чейспфзлЭцщнп, иб чфхрЮуей
бхфьмбфб. ДйбцпсефйкЬ ерйлЭофе уфзн лЯуфб фп ерйихмзфь
чейспфзлЭцщнп / фзн мпнЬдб.
З еощфесйкЮ клЮуз всЯукефбй уе бнбмпнЮ. Бн ден брбнфЮуей фп деэфесп
чейспфзлЭцщнп, мрпсеЯфе нб обнбрЬсефе фзн клЮуз уфп рсюфп
чейспфзлЭцщнп, кблюнфбт фзн ерйлпгЮ
4- БрбнфЮуфе уфзн клЮуз у´Энб Ьллп чейспфзлЭцщнп/уе мйб Ьллз вЬуз .
Кбй пй дэп ухнпмйлзфЭт мрпспэн фюсб нб дйеоЬгпхн фзн еущфесйкЮ клЮуз.
5- ЕрйлЭофе фзн лейфпхсгЯб
чейспфзлЭцщнп фесмбфЯжефбй.
Хрьдейоз: МрпсеЯфе нб фесмбфЯуефе фзн клЮуз уфп рсюфп чейспфзлЭцщнп
ерЯузт ме фп уэмвплп
¼уп з клЮуз всЯукефбй уе бнбмпнЮ, бкпэгефбй з мелщдЯб бнбмпнЮт (бн
Эчей енесгпрпйзиеЯ) Ю Ючпй мрйр.
Пй ерйлпгЭт
2) êáé ÓÉÃÇ (мйксьцщнп) еЯнбй ерЯузт дйбиЭуймет уфп ухнбцЭт менпэ.
ФзледйЬукешз
Ме фзн лейфпхсгЯб ФзледйЬукешз мрпсеЯ нб ухндеиеЯ мйб еощфесйкЮ клЮуз
ме дэп чейспфзлЭцщнб (ме фзн Ендпухненньзуз). Пй фсейт ухнпмйлзфЭт
мрпспэн у´ бхфЮн фзн ресЯрфщуз нб мйлЮупхн бнбмефбоэ фпхт (бхфЭт пй
фзледйбукЭшейт ден еобсфюнфбй брь фп ухмвьлбйп).
ЕрбнблЬвбфе фйт рспзгпэменет пдзгЯет чейсйумпэ 1-4.
5- КблЭуфе фзн ерйлпгЮ
ÓÉÃÇ еЯнбй ерЯузт дхнбфЮ.
ЕНБЛЛБГЗ ([енбллЬо уэндеуз] мефбоэ фпх ухнпмйлзфЮ 1 кбй
гйб фзн енфплЮ КЛЗУЗ.
Фп бнфЯуфпйчп чейспфзлЭцщнп / з вЬуз чфхрЬей.
ФЕЛПУ ЕНДПУХНЕННПЗУЗУ
МЕФБЦПСБ
.
. З клЮуз уфп рсюфп
ФЗЛЕДЙБУКЕШЗ кбй ерйвевбйюуфе.
.
.
7
Ендпухненньзуз
Page 36

Пй рсюфет впЮиейет гйб фзн брпкбфЬуфбуз рспвлзмЬфщн
Рсьвлзмб
Ден бкпэгефбй Ючпт клЮузт.
¼фбн фпрпиефеЯфе фп
чейспфзлЭцщнп уфзн иЮкз
цьсфйузт, ден бкпэгефбй Ючпт
мрйр.
Пй мрбфбсЯет ден Эчпхн
цпсфйуфеЯ бкьмб, рбсьлп рпх
рЭсбубн 12 юсет.
¼фбн иЭлефе нб фзлецщнЮуефе
ме фп чейспфзлЭцщнп, бкпэфе
Энбн Ючп уцЬлмбфпт.
КбфЬ фзн дйЬскейб мйбт
ухнпмйлЯбт бкпэфе Энбн Ючп
уцЬлмбфпт.
Ден хрЬсчей кпхдпэнйумб.
КбфЬ фзн дЮлщуз еньт
чейспфзлЭцщнпх емцбнЯжефбй
Энб мЮнхмб уцЬлмбфпт.
Бкпэгпнфбй рбсЬуйфб уфзн
гсбммЮ ьфбн фзлецщнеЯфе.
РйибнЮ бйфЯб
Фп чейспфзлЭцщнп еЯнбй екфьт
емвЭлейбт фзт вЬузт (фп уэмвплп
леЯрей).
Фп цпсзфь мЭспт ден дзлюизке (фп
уэмвплп ден емцбнЯжефбй).
З вЬуз ден Эчей ухндеиеЯ ущуфЬ
уфзн рбспчЮ сеэмбфпт Ю уфп
фзлецщнйкь дЯкфхп.
БрпцпсфЯуфзкбн пй мрбфбсЯет
(цбЯнефбй фп уэмвплп ).
З иЮкз цьсфйузт ден Эчей ухндеиеЯ
ущуфЬ ме фзн рбспчЮ сеэмбфпт.
Пй ербцЭт цьсфйузт еЯнбй
лесщмЭнет.
П фьнпт рлЮкфсщн ден еЯнбй
енесгпрпйзмЭнпт.
З иЮкз цьсфйузт ден Эчей ухндеиеЯ
ущуфЬ ме фзн рбспчЮ сеэмбфпт.
Пй мрбфбсЯет чЬлбубн Ю рЬлйщубн.
Фп чейспфзлЭцщнп ден еЯнбй
дзлщмЭнп.
ДйеоЬгефбй еощфесйкЮ клЮуз у´ Энб
Ьллп чейспфзлЭцщнп.
З мпнЬдб вЬузт еЯнбй рспущсйнЬ
кбфейлзммЭнз.
Фп чейспфзлЭцщнп еЯнбй екфьт
емвЭлейбт.
Пй мрбфбсЯет еЯнбй бдэнбмет.
Фп кпхдпэнй еЯнбй
бренесгпрпйзмЭнп.
Ден рЭфхче з дЮлщуз.
¸чей ухмрлзсщиеЯ п мЭгйуфпт
дхнбфьт бсйимьт чейспфзлецюнщн.
З брьуфбуз брь фзн вЬуз еЯнбй
рплэ мегЬлз.
З вЬуз всЯукефбй кпнфЬ уе злекфсйкЭт ухукехЭт, уе фпЯчпхт мрефьн
бсмЭ Ю уе мефбллйкЭт рьсфет.
БрпкбфЬуфбуз
РлзуйЬуфе фзн вЬуз кбй
обнбрспурбиЮуфе.
Дзлюуфе фп чейспфзлЭцщнп уфзн
вЬуз (вл. уел. 4).
ЕлЭгофе фйт ухндЭуейт.
ЦпсфЯуфе фйт мрбфбсЯет
(вл. уел. 3).
ЕлЭгофе фйт ухндЭуейт.
КбибсЯуфе фйт ербцЭт м´ Энб
кбибсь уфегнь рбнЯ.
ЕнесгпрпйЮуфе фпн фьнп
рлЮкфсщн (вл. уел. 5).
ЕлЭгофе фйт ухндЭуейт.
РспмзиехфеЯфе кбйнпэсйет,
мрбфбсЯет брь ейдйкехмЭнп
бнфйрсьущрп рщлЮуещн.
Дзлюуфе фп чейспфзлЭцщнп
(вл. уел. 4).
РспурбиЮуфе обнЬ, мьлйт
фелейюуей з Ьллз клЮуз.
РспурбиЮуфе обнЬ, мьлйт еЯнбй
елеэиесз з мпнЬдб вЬузт.
РлзуйЬуфе фзн вЬуз.
ЦпсфЯуфе фйт мрбфбсЯет.
ЕнесгпрпйЮуфе фп кпхдпэнй (вл.
уел. 5).
ФсбвЮофе кбй обнбвЬлфе фп цйт
фзт рсЯжбт уфзн мпнЬдб вЬузт.
Дзлюуфе фп чейспфзлЭцщнп
бкьмз мйб цпсЬ.
Оедзлюуфе Энб чейспфзлЭцщнп
(вл. уел. 4).
РлзуйЬуфе фзн вЬуз.
БллЬофе фп мЭспт фпрпиЭфзузт
фзт вЬузт (ьуп шзльфесб фьуп
кблэфесб).
ЕллзнйкЬ
AрпкбфЬуфбуз рспвлзмЬфщн
8
Page 37

DECLARATION OF CONFORMITY
We,
PHILIPS Consumer, Electronics
DECT & Home Telephony
Route d’Angers
72081 Le Mans Cedex 9
France
Declare that the products Zenia 300, Zenia 300 additional handset and all bundle
combinations are in compliance with ANNEX III of the R&TTE-Directive 1999/5/EC
and then with the following essential requirements :
Article 3.1.a : (protection of the health & the safety of the user) : EN 60950 (2000)
Article 3.1.b : (protection requirements with respect to electromagnetic
compatibility) ETSI EN 301 489-6 V1.1.1 (09/2000) & ETSI EN 301 489-1 V1.3.1
(09/2001)
Article 3.2 : (effective use of the radio spectrum) : EN 301 406 (2001)
The presumption of conformity with the essential requirements regarding Council
Directive 1999/5/EC is ensured.
Date : 16/07/2003 Le Mans
Vice President & General Manager
DECT & Home Telephony
9
Рйуфьфзфб
Page 38

Conformità, sicurezza e ambiente
Informazioni sulla sicurezza: Questo apparecchio non dispone di un equipaggiamento per
effettuare chiamate di emergenza in caso di caduta di corrente. In caso di emergenza utilizzate un
altro apparecchio, ad esempio un telefono cellulare.
Conformità: Con la presente, Philips dichiara che questo Zenia 300 Vox è conforme ai requisiti
essenziali ed alle altre disposizioni pertinenti stabilite dalla direttiva 1999/5/CE. In caso di necessità
è possibile richiedere una copia della dichiarazione di conformitá al servizio clienti.
Alimentazione elettrica: Questo prodotto richiede un'alimentazione elettrica di 230 volt con
corrente alternata monofase, salvo le installazioni IT ai sensi della normativa EN 60-950.
Attenzione! Secondo la normativa EN 60-950 la rete elettrica è classificata come pericolosa.
L'apparecchio può essere staccato dall'alimentazione elettrica soltanto estraendo la spina dalla
presa.Utilizzate pertanto una presa da parete ben accessibile.
Allacciamento telefonico: La tensione della rete telefonica è classificata come TNV-3
(Telecommunication Network Voltages) secondo la definizione della normativa EN 60-950.
Avvertenze di sicurezza: Tenete il ricevitore lontano da liquidi. Non smontate nè il ricevitore
nè la base. Potreste venire a contatto con tensioni pericolose. Fate eseguire eventuali riparazioni
solo dal servizio clienti autorizzato. I contatti di ricarica e le batterie non devono venire a
contatto con oggetti con buone caratteristiche di conduttività.
Tutela dell'abiente: Si prega di osservare le disposizioni locali e di utilizzare le strutture di
riciclaggio per lo smaltimento del materiale della confezione, delle batterie usate e dei telefoni
non più utilizzati.
I requisiti delle norme GAP
Con le norme GAP si garantisce che tutte le unità mobili e le basi che rispondono alle norme
DECTTMe GAP soddisfano i requisiti minimi di tali norme, indipendentemente dalla marca del
prodotto. Il ricevitore Zenia 300 Vox soddisfa i requisiti GAP, cioè vengono garantite le seguenti
funzioni: prendere la linea, ricevere chiamate e selezionare numeri telefonici.
Usando delle basi Philips
Se utilizzate il ricevitore supplementare Zenia 300 Vox sulla base Zenia 300 Vox potete
impiegare tutte funzioni descritte (vedi istruzioni per l'uso di Zenia 300 Vox).
In caso di registrazione del ricevitore supplementare su una base Onis 200 o Zenia alcuni
menu non sono disponibili. Si prega di fare riferimento alla relativa documentazione.
Usando altre basi (non di produzione Philips)
In caso di registrazione del ricevitore supplementare su una base di un'altra marca (non di
produzione Philips) seguite le indicazioni contenute nella documentazione del produttore.
Attenetevi poi alle presenti istruzioni per eseguire la registrazione; si veda pag. 4 (dal punto 4).
Tenete presente che non tutte le funzioni dei menu sono diponibili.
Philips ha contrassegnato le batterie/accumulatori e le confezioni delle apparecchature con dei simboli standard
per agevolarne l'adeguato smaltimento.
Il materiale della confezione e le istruzioni per l'uso possono essere riciclati.
Un certa somma è stata devoluta per la promozione del riutilizzo e del riciclaggio.
Italiano
DECTTMè un marchio registarto di ETSI a favore di chi utilizza la tecnologia DECT.
Conformità, sicurezza e ambiente
1
Page 39

Tasto navigazione
Premere per richiamare il menu a
carosello o confermare opzioni/menu
- Sfogliare i menu e le opzioni o
posizionare il cursore
- Verso l'alto per l'accesso alla
chiamata interna in modalità di stand-by
- Verso il basso per l'accesso alla
funzione di gestione prefissi
Premere per disattivare blocco
tastiera
Vivavoce
- Premere per realizzare un collegamento
o attivare vivavoce del ricevitore
- Premere a lungo per attivare vivavoce
della base
Elenco chiamate
- Premere per richiamare e
visualizzare la lista chiamate
- Premere a lungo per richiamare la
lista dei messaggi vocali.
Blocco tastiera e inserimento
- Premere brevemente per inserire
* (asterisco)
- Premere a lungo per attivare/disattivare
blocco tastiera
- Premere a lungo: per inserire il segnale
di richiama (R)
- Premere a lungo per inserimento
standard del testo o con Eatoni
®
Simboli
Segreteria ON
Chiamata esterna
attiva
attiva
Vivavoce ricevitore
attivato
Attivato muto
Funzione SMS attiva
Registrato e entro la
portata della base
2
Tasto per telefonare
- Premere per realizzare un
collegamento, accettare o
porre fine a una chiamata
Ricevitore
Microfono
Tasto di cancella/annulla
- Per cancellare cifre nell'inserire
un numero telefonico o caratteri
nell'inserire testo
- Per ritornare al livello precedente
di menu
- Premere a lungo durante la navigazione per ritornare in stand-by
- durante un collegamento per
attivare la funzione R (per servizi
dell'operatore di rete)
- Premere brevemente per
richiamare la rubrica
- Premere a lungo per aggiungere
una nuova voce
Modalità "Non disturbare"
e tasto commutazione
- Premere brevemente per aggiunger il cancelletto "#" nell'inserire il
numero telefonico
- Premere a lungo per aggiungere il
carattere di pausa (P) nell'inserire il
numero telefonico
- Premere alungo perattivare/disattivare la modalità"Non disturbare"
- Per passare da minuscole a
maiuscole e viceversa
Allarme
- Premere brevemente per
selezionare 0
- Premere a lungo per
aittivare/disattivare l'allarme
Ricevitore Zenia 300 Vox
Lampeggia
Nuovo messaggio su
segreteria o voice mail
- Chiamata esterna in entrata
- Linea occupata
Chiamata interna in entrataChiamata interna
Vivavoce della base attivato
Nuovo messaggio
Non registrato
Ricevitore
Lampeggia rapidamenteRimane ON
Memoria segreteria piena
Memoria messaggi piena !
Rubrica
Page 40

Inserimento e sostituzione delle batterie
Aprite il coperchio del vano batteria sfilandolo verso il basso.
Collegate la batteria con il connettore allinterno del ricevitore.
Posizionate la batteria con ladesivo rivolto verso lalto ed i cavi lungo
il lato sinistro della batteria.
Usate solamente batterie di tipo NiMH se dovete sostituirle.
Durante il processo di ricarica cambiano le barrette del simbolo delle batterie: .
Viene visualizzato lo stato di carica delle batterie: cariche , 2/3 , 1/3 e batterie
scariche .
Durata delle batterie e portata
Le batterie completamente cariche vi offrono 250 ore di
stand-by (ricevitore in stand-by e pronto per l'uso) e ca. 16
ore di conversazione. Un segnale acustico vi informa quando le batterie devono essere ricaricate.
Se ciò si verifica durante una conversazione, questa viene terminata poco dopo il segnale.
La massima funzionalità delle batterie viene raggiunta dopo 3 processi completi di
carica/scarica.
In condizioni favorevoli la portata é di 50 metri in locali chiusi e 300 metri all'aperto. Se viene
superata la portata si sentono dei disturbi, avvicinatevi subito alla base altrimenti viene interrotta
la conversazione.Tenete lontana la base da apparecchiature elettriche per raggiungere la portata
ottimale.
Non gettare le batterie nei comuni
rifiuti domestici.
Struttura dei menu e funzionamento
Nella modalità di stand-by richiamate il menu a carosello con il tasto .
Il carosello rappresenta una serie continua di simboli per accedere al
primo livello del menu. Sfogliate avanti/indietro con per andare al
menu desiderato. Con confermate ed entrate nel menu. I sottomenu
vengono rappresentati come piccoli quadrati nella parte inferiore del
display.
Con giungete al sottomenu desiderato, confermate poi la selezione
con .
Il simbolo indica l'opzione nella quale vi trovate. Il sottomenu/-
l'opzione selezionata viene contrassegnata da un "prompt" .
Avvertenza: ad alcuni menu si può accedere direttamente tramite i
rispettivi tasti (per es. la lista chiamate )
Italiano
Selezione diretta
1- Prendere la linea .
2- Inserire il numero telefonico.
1- Inserire il numero telefonico,
2- Prendere la linea .
Struttura dei menu e funzionamento
Chiamata preparata
3
Page 41

Ricevitore
Modifica della lingua
Il ricevitore quando viene fornito ha impostata la lingua inglese.
Modifica della lingua del display
1- Andate a Handset e confermate.
2- Andate a Language e confermate.
3- Selezionate la lingua desiderata e confermate.
Attenzione: la modifica della lingua del display non influisce in alcun
modo sui messaggi della segreteria (Zenia 300 Vox o altre basi non della
Philips).
Registrazione/rimozione di un altro ricevitore dalla base
L'ulteriore ricevitore deve essere registrato alla base in modo da potere utilizzare tutte le
funzioni disponibili*.Alla base Zenia 300 Vox si possono registrare fino a 8 ricevitori.
Registrazione di un ulteriore ricevitore
Portate la base nella modalità di registrazione nel modo seguente:
1- Disinserite la spina di alimentazione della base e reinseritela.
2- Premete sul ricevitore per avviare la registrazione.
3- Inserite il codice RC (codice a 4 cifre, stampato sull'etichetta sulla
parte inferiore della base) e confermate.
Rimozione del ricevitore
1- Andate a Ricevitore e confermate.
2- Passate a Registrazione e confermate.
3- Selezionate Rimuovi ricevitore e confermate.
4- Selezionate nella lista il ricevitore da rimuovere e confermate.
5- Inserite il codice RC (codice a 4 cifre, stampato sotto la base) e
confermate.
* vedi pag.1
Impostazione dell'audio del ricevitore
Potete impostare le suonerie per:
- Ie chiamate esterne standard provenienti da numeri non presenti nella rubrica o senza
impostazioni VIP.
- Ie chiamate interne (in caso siano disponibili almeno due ricevitori).
Per impostare le suonerie VIP (amici , famiglia e lavoro ) si vedano le istruzioni per
Zenia 300 Vox. Per questa funzione deve essere attivato il servizio CLI.
Impostazione squilli
1- Andate a Ricevitore e confermate.
2- Selezionate Audio e confermate.
3- Selezionate Suoneria e confermate.
4- Selezionate Chiamate esterne standard/chiamate
interne e onfermate.
5- Selezionate la suoneria desiderata e confermate.
4
Ricevitore
Page 42

Impostazione del volume della suoneria del ricevitore
Sono disponibili 5 impostazioni per il volume della suoneria.
1- Andate a Ricevitore e confermate.
2- Selezionate Audio e confermate.
3- Andate a Volume suoneria e confermate.
4- Selezionate il volume desiderato e confermate.
Nota : potete attivare l'avviso di chiamata a vibrazione. In questo
caso la suoneria è disattivata.
Impostazione toni auricolare
1- Andate a Ricevitore e confermate.
2- Andate a Audio e confermate.
3- Andate a Toni auricolare e confermate.
4- Selezionate standard, alti o bassi e confermate.
Attivazione/disattivazione toni tasto
L'attivazione dei tasti e la modifica delle impostazioni possono essere confermate da un segnale acustico.
Ripetete le operazioni 1-2 sopra descritte.
3- Passate a Toni tasto e confermate.
4- Selezionate Attivare /Disattivare e confermate.
Attivazione/disattivazione tono di notifica
Il tono di notifica vi informa quando è arrivato un nuovo SMS o un
nuovo messaggio vocale.
Ripetete le operazioni 1-2 sopra descritte.
3- Andate a Tono di notifica e confermate.
4- Selezionate Attivare /Disattivare e confermate.
Modalità babysitter
Per sorvegliare la stanza dei bambini. Posizionate il ricevitore nella stanza da sorvegliare;
tramite il ricevitore supplementare potete udire tutti i rumori nella stanza.
Attivazione/disattivazione della modalità babysitter
1- Andate a Ricevitore e confermate.
2- Andate a Modalità babysitter e confermate.
3- Selezionate Attivare /Disattivare e confermate.
Avvertenza: Per la funzione di sorveglianza di un ambiente è
necessaria l'interfonia (vedi pag. 6).
Impostazione del contrasto del display
Impostazione del contrasto del display
1- Andate a Ricevitore e confermate.
2- Passate a Contrasto schermo e confermate.
3- Selezionate il livello desiderato e confermate.
Italiano
Ricevitore
5
Page 43

Regolazione della retroilluminazione
Regolazione della retroilluminazione
1- Andate a Ricevitore e confermate.
2- Passate a Retroilluminazione e confermate.
3- Selezionate la durata desiderata di 10 sec, 20 sec, o
Disattivare e confermate.
Interfonia
Interfonia (se ci sono a disposizione almeno 2 ricevitori)
Con questa funzione potete condurre delle conversazioni interne, usare la funzione babysitter
(monitoraggio di un locale) e trasferire chiamate esterne ad un altro ricevitore. La funzione di
Interfonia funziona solo fra ricevitori che siano registrati alla stessa base.
Esecuzione di chiamate interne o attivazione del
montoraggio ambiente
1- Andate a Interfonia e confermate.
2- Se c'è solo un ricevitore supplementare, questo squilla
automaticamente.Altrimenti selezionate nella lista il ricevitore/la
base desiderata e premete per eseguire una chiamata.
Il ricevitore/la basa chiamata squilla.
3- Accettare la chiamata sul ricevitore/sulla base chiamata.
La conversazione interna/il monitoraggio dell'ambiente può iniziare.
È possibile anche la funzione di muto.
Avvertenza: la funzione "Interfonia" può essere richiamata anche con
il tasto navigazione: Nella modalità di stand-by sfogliate verso l'alto
con .
Potete anche trasferire una chiamata esterna ad un altro ricevitore.
1- Premete per richiamare le opzioni.
2- Passate a Interfonia e confermate.
3- Se c'è solo un ricevitore supplementare, questo squilla
automaticamente.Altrimenti selezionate nella lista il ricevitore/la
base desiderata.
Il ricevitore/la basa chiamata squilla.
La chiamata esterna vien posta in attesa. Se il 2° ricevitore non
risponde, potete riprendere la conversazione sul 1° ricevitore
richiamando l'opzione Termina interfonia.
4- Accettate la conversazione con l'altro ricevitore/alla base.
Tutti e due gli interlocutori interni possono parlare l'uno con l'altro.
5- Selezionate l'opzione Trasferimento. Sul 1° ricevitore vien
posto fine alla conversazione. Avvertenza: potete anche porre fine
alla conversazione sul 1° ricevitore anche con .
6
Ricevitore / Interfonia
Page 44

Mentre la conversazione viene posta in attesa, il chiamante ascolta la
melodia di attesa (se è attivata) o segnali acustici.
Nel menu contestuale sono disponibili anche le opzioni Commuta
(per passare da interlocutore 1 a interlocutore 2) e Muto
(microfono).
Conferenza
Con la funzione Conferenza si può collegare un interlocutore
esterno con 2 ricevitori (con interfonia). I 3 interlocutori possono
quindi conversare (queste conversazioni non dipendono dal tipo di
contratto).
Ripetete le operazioni 1-4 sopra descritte.
5- Richiamate l'opzione Conferenza e confermate.
Italiano
Interfonia
7
Page 45

In caso di piccoli problemi
Problema
Manca tono di selezione.
Manca il segnale acustico
quando il ricevitore viene
messo nel carica-batteria.
Dopo un periodo di ricarica
di 12 ore le batterie non
sono ancora cariche.
Quando volete chiamare con
il ricevitore, udite un segnale
di errore.
Durante una conversazione
udite un segnale di errore.
Nessuno squillo.
Nel registrare un ricevitore
appare una segnalazione di
errore.
Disturbi nella linea mentre si
telefona.
8
Il ricevitore è al di fuori della
portata della base ( non è
visualizzato).
Il ricevitore non è registrato alla
base.
(Simbolo non appare).
La base non è collegata correttamente all'alimentazione di corrente oppure alla presa telefonica.
Le batterie sono scariche (appare
il simbolo ).
Il carica-batteria non è collegato
correttamente all'alimentazione di
corrente.
Contatti di ricarica sporchi.
I toni tasto sono disattivati.
Il carica-batteria non è collegato
correttamente all'alimentazione di
corrente.
Le batterie sono danneggiate o
troppo vecchie.
Il ricevitore non è registrato.
È in corso una conversazione
esterna da un altro ricevitore.
La base è occupata.
Ricevitore al di fuori della portata.
Le batterie sono quasi scariche.
Gli squilli sono disattivati.
La registrazione non è riuscita.
È stato raggiunto il numero
massimo di ricevitori.
Troppo lontani dalla base. La base
si trova nelle vicinanze di apparecchiature elettriche, pareti in cemento armato o porte metalliche.
Possibile causa
Eliminazione errori
Rimedio
Avvicinatevi alla base e provate
di nuovo.
Registrate il ricevitore alla base
(vedi pag. 4).
Verificare le connessioni.
Ricaricate le batterie
(vedi pag. 3).
Verificare le connessioni.
Puliteli con un panno asciutto.
Attivate i toni tasto (vedipag. 5).
Verificare le connessioni.
Acquistate nuove batterie
presso il vostro ricevditore
specializzato.
Registratelo (pagina 4).
Provate di nuovo quando la
conversazione è terminata.
Provate di nuovo quando la
base è di nuovo disponibile.
Avvicinatevi alla base.
Ricaricare le batterie.
Attivate gli squilli (vedi pag. 5).
Disinserite la spina di
alimentazione della base e
reinseritela. Registrate di
nuovo il ricevitore.
Rimuovete un ricevitore
(vedi pag. 4).
Avvicinatevi alla base. Cambiare
l'ubicazione della base (meglio
se in posizione elevata).
Page 46

DECLARATION OF CONFORMITY
We,
PHILIPS Consumer, Electronics
DECT & Home Telephony
Route d’Angers
72081 Le Mans Cedex 9
France
Declare that the products Zenia 300, Zenia 300 additional handset and all bundle
combinations are in compliance with ANNEX III of the R&TTE-Directive 1999/5/EC
and then with the following essential requirements :
Article 3.1.a : (protection of the health & the safety of the user) : EN 60950 (2000)
Article 3.1.b : (protection requirements with respect to electromagnetic
compatibility) ETSI EN 301 489-6 V1.1.1 (09/2000) & ETSI EN 301 489-1 V1.3.1
(09/2001)
Article 3.2 : (effective use of the radio spectrum) : EN 301 406 (2001)
The presumption of conformity with the essential requirements regarding Council
Directive 1999/5/EC is ensured.
Date : 16/07/2003 Le Mans
Vice President & General Manager
DECT & Home Telephony
Dichiarazione di conformità
Italiano
9
Page 47

Conformiteit, veiligheid en milieu
Veiligheidsinformatie: Deze apparaatuitvoering kan tijdens een stroomstoring niet worden ge-
bruikt voor het bellen van een alarmnummer. Gebruik in geval van nood een ander apparaat,
bijv. een mobiele telefoon.
Conformiteit: Bij deze verklaart Philips dat deze Zenia 300 Vox voldoet aan de essentiële eisen
en aan de overige relevante bepalingen van Richtlijn 1999/5/EC. U kunt desgewenst een kopie van
de conformiteitsverklaring aanvragen bij het klantenservicecentrum.
Voeding: Dit product heeft een voeding nodig van 230 Volt met eenfasige wisselstroom, met
uitzondering van IT-installaties overeenkomstig de norm EN 60-950.
Let op! Het elektrische net wordt overeenkomstig de norm EN 60-950 als gevaarlijk geclassificeerd. De stroomvoorziening naar het apparaat kan alleen worden onderbroken door de netstekker uit het stopcontact te trekken. Gebruik daarom een goed bereikbare wandcontactdoos.
Telefoonaansluiting: De spanning in het telefoonnet wordt als TNV-3 (Telecommunication
Network Voltages) overeenkomstig de bepaling in de norm EN 60-950 geclassificeerd.
Veiligheidsinstructies: Houd de handset verwijderd van vloeistoffen. Demonteer noch de
handset noch het basisstation. U zou met gevaarlijke spanningen in aanraking kunnen komen.
De oplaadcontacten en de accu's mogen niet met geleidende voorwerpen in aanraking komen.
Milieubescherming: Let bij het verwijderen van het verpakkingsmateriaal, de verbruikte accu's
en een uitgediende telefoon altijd op de plaatselijke voorschriften en recyclingmogelijkheden.
Eisen van de GAP-standaard
De GAP-standaard is een garantie voor het feit, dat alle handsets en basisstations die geschikt
zijn voor DECT en GAP voldoen aan de minimumeisen van de standaard, ongeacht het merk.
De handset Zenia 300 Vox voldoet aan de GAP-eisen, d.w.z. de werking van de volgende functies
wordt gegarandeerd: lijn bezetten, gesprekken ontvangen en telefoonnummers kiezen.
Bij gebruik van Philips basisstations
Wanneer u de extra handset Zenia 300 Vox op het basisstation Zenia 300 Vox gebruikt, kunt u
gebruik maken van alle beschreven mogelijkheden (zie gebruiksaanwijzing Zenia 300 Vox).
Wanneer u de extra handset aanmeldt op een basisstation Onis 200 of Zenia, staan enkele
menu's niet ter beschikking. Dit dient u in de desbetreffende documentatie na te kijken.
Bij gebruik van andere basisstations (geen producten van Philips)
Volg voor het aanmelden van de extra handset op een basisstation van een ander merk (geen
product van Philips) de aanwijzingen in de technische gegevens van de fabrikant.Voer vervolgens
de stappen die in deze handleiding staan aangegeven voor het aanmelden uit, zie pagina 4 (vanaf
stap 4). Let erop, dat niet alle menufuncties ter beschikking staan.
Philips heeft de batterijen/accumulatoren en de verpakkingen van de apparatuur gemerkt met standaardsymbolen
om te bevorderen dat deze volgens de milieuvoorschriften worden verwijderd.
Het verpakkingsmateriaal en de gebruiksaanwijzing kunnen worden gerecycled.
Er werd een financiële bijdrage geleverd ter stimulering van hergebruik en recycling.
DECT is een geregistreerd handelsmerk van ETSI ten gunste van de gebruikers van de DECT-technologie.
1
Conformiteit, veiligheid en milieu
Page 48

Pilot-key
- Indrukken: carrousel-oproep of
bevestigen van menu's/opties
- Bladeren in de menu's en opties of
cursor positioneren
- Naar boven voor toegang tot
Intern gesprek in stand-by modus
- Naar beneden voor toegang tot
Laagste Kosten-functie
Indrukken: toetsblokkering deactiveren
Luidspreker
- Indrukken: Luidspreker handset
activeren of verbinding maken
- Lang indrukken: luidspreker van de
basis activeren
Bellijst
- Indrukken: bellijst oproepen en
weergeven
- Lang indrukken: lijst van
ingesproken berichten oproepen
Toetsblokkering en invoer
- Lang indrukken: toetsblokkering
activeren/deactiveren
- Lang indrukken: standaard- of Eatoni
tekstinvoer
ummeringave:
Tijdens n
- Kort indrukken: Invoeren * (sterretje)
- Lang indrukken: Invoegen R
Symbolen
Antwoordapparaat
AAN
Actief, extern gesprek
Luidspreker handset
geactiveerd
Belmelodie UIT
SMS-functie actief
Aangemeld en binnen
reikwijdte van de basis
Telefoneren-toets
- Indrukken: verbinding
maken, gesprek aannemen of
beëindigen
®
-
Microfoon
Handset Zenia 300 Vox
Nieuw bericht op het AA of
voice mail
-
Inkomend, extern gesprek
- Lijn bezet
Inkomend, intern gesprekActief, intern gesprek
Luidspreker basisstation
geactiveerd
Nieuw SMS-bericht
Niet aangemeld
Handset
Hoorn
Knippert
Reset-/ afbreken-toets
- Getal bij telefoonnummerinvoer
of teken bij tekstinvoer wissen
- Een menuniveau teruggaan
- Lang indrukken:Tijdens het
navigeren naar de stand-by modus
terugkeren
- Tijdens een verbinding de
R-functie activeren (voor
operator type)
Telefoonboek
- Kort indrukken: telefoonboek
oproepen
- Lang indrukken: een nieuwe
notitie toevoegen
'Niet storen' modus en
overschakeltoets
- Lang indrukken: 'Niet storen'
mode activeren/deactiveren
- Van kleine naar grote letters
overschakelen en omgekeerd
Tijdens nummeringave:
- Kort indrukken: Invoegen #
- Lang indrukken: Invoegen
pause (P)
Alarmklok
- Kort indrukken om de 0 te
selecteren
- Lang indrukken: de alarmklok
in-/uitschakelen
Knippert snelConstant AAN
Geheugen AA vol
SMS-geheugen vol
Nederlands
2
Page 49

Accu's plaatsen en vervangen
Niet
weggooien,
maar inleveren
als KCA.
NL
Open het battrijvak aan de achterzijde van de handset door het klepje
omlaag te schuiven. Sluit de batterij aan op het contact in het
batterijvak. Plaats de batterij met de sticker naar boven en met de
draden langs de linkerzijde van de batterij.
Gebruik voor het vervangen van de batterijen alleen NiMH-
batterijen.
Tijdens het opladen van de accu's veranderen de balken van het accusymbool: .
De status van de accu wordt weergegeven: vol , 2/3 , 1/3 en accu leeg .
Accucapaciteit en reikwijdte
Accu's die volledig zijn opgeladen, zijn gereed om 250
uur te kunnen worden gebruikt (handset in stand-by
modus en gereed voor het voeren van een gesprek) en bieden ca. 16 uur gesprekstijd. Een
waarschuwingssignaal laat weten, wanneer de accu's moeten worden opgeladen. Wanneer dit
tijdens een gesprek gebeurt wordt het gesprek kort na het signaal beëindigd.
accucapaciteit wordt bereikt nadat de accu 3 maal volledig is opgeladen/ontladen.
Onder gunstige omstandigheden bedraagt de reikwijdte in afgesloten ruimtes 50 meter en buiten
300 meter.Wanneer de reikwijdte wordt overschreden hoort u gekraak, ga dan dichter naar de
basis toe, anders wordt het gesprek onderbroken. Houd de basis verwijderd van elektrische
apparaten om de optimale reiktwijdte te benutten.
Accu's mogen niet bij het huisvuil
worden gegooid.
De optimale
Menustructuur en bediening
In de stand-by modus roept u het carrousel-menu op met de toets
. In de carrousel zijn symbolen in een ringschakeling gerangschikt
om toegang te krijgen tot het eerste menuniveau. Blader voor-/
achteruit met om het gewenste menu te bereiken. Bevestig met
voor de toegang tot het menu. Onderin het display worden de
submenu's in de vorm van kleine vierkantjes weergegeven.
Met bereikt u het gewenste submenu. Bevestig vervolgens uw
keuze met .
Het symbool geeft de optie weer,waarin u op dat moment
bladert. Het geselecteerde submenu/de optie wordt met een 'vinkje'
aangeduid.
Aanwijzing: Sommige menu's kunnen door middel van eigen toetsen
rechtstreeks worden opgeroepen (bijv. bellijst ).
3
Rechtstreeks kiezen
1- Lijn bezetten .
2- Telefoonnummer invoeren.
Menustructuur en bediening
Voorkiezen
1- Telefoonnummer invoeren,
2- Lijn bezetten .
Page 50

Handset
Taal wijzigen
Bij levering is de Engelse taal op uw handset ingesteld.
Taal op het display wijzigen
1- Ga naar Handset en bevestig.
2- Scroll naar Language en bevestig.
3- Selecteer de gewenste taal en bevestig.
Let op: Het wijzigen van de taal op het display heeft geen invloed op
de meldteksten van het antwoordapparaat (Zenia 300 Vox of andere
basisstations, niet van Philips).
Een extra handset aanmelden / afmelden op de basis
De extra handset dient op de basis aangemeld te zijn, zodat er van alle mogelijkheden gebruik kan
worden gemaakt*. Op de basis Zenia 300 Vox kunt u max. 8 handsets aanmelden.
Extra handset aanmelden
Zet de basis op de volgende manier in de aanmeldmodus:
1- Trek de netstekker uit het basisstation en sluit deze weer aan om.
2- Begin met aanmelden door de
3- Voer de RC-code in (4 cijferige code die op de sticker aan de
onderzijde van de basis staat genoteerd) en bevestig.
Een handset afmelden
1- Ga naar Handset en bevestig.
2- Scroll naar Aanmelding en bevestig.
3- Selecteer Afmelden handset en bevestig.
4- Selecteer de handset die moet worden afgemeld uit de lijst en
bevestig.
5- Voer de RC-code in (code van 4 cijfers die onder de basis staat
vermeld) en bevestig.
-toets op de handset in te drukken.
*Zie pagina 1
Het geluid van de handset instellen
U kunt de belmelodieën instellen voor:
- De externe standaard-belmelodie voor bellers die niet in het telefoonboek of zonder
VIP-instellingen zijn opgeslagen.
- De interne belmelodie (wanneer er ten minste twee handsets aanwezig zijn).
Voor het instellen van de VIP-belmelodieën (Vrienden , Familie en Werk ) zie de
handleiding Zenia 300 Vox. Voor deze functie heeft u de nummerweergave (CLIP) nodig.
Belmelodie instellen
1- Ga naar Handset en bevestig.
2- Selecteer Geluid en bevestig.
3- Selecteer Belmelodie
4- Selecteer Externe belmelodie groep standaard /
Interne belmelodie en bevestig.
5- Selecteer de gewenste belmelodie en bevestig.
Handset
ë
n en bevestig.
4
Nederlands
Page 51

Volume belmelodie van de handset instellen
U heeft de beschikking over 5 instellingen om het volume van de
belmelodie te regelen.
1- Ga naar Handset en bevestig.
2- Selecteer Geluid en bevestig.
3- Scroll naar Volume belmelodie en bevestig.
4- Selecteer het gewenste volume en bevestig.
Aanwijzing : u kunt de trilfunctie activeren. In dat geval is hat
belsignaal op stil geschakeld.
Hoornvolume instellen
1- Ga naar Handset en bevestig.
2- Scroll naar Geluid en bevestig.
3- Scroll naar Hoornvolume en bevestig.
4- Selecteer Standaard, Hoge tonen of Lage tonen en bevestig.
Toetstonen activeren/deactiveren
Het indrukken van de toetsen of het wijzigen van instellingen kan
door middel van een pieptoon worden bevestigd.
Herhaal de bovenstaande stappen 1-2.
3- Scroll naar Toetstonen en bevestig.
4- Selecteer AAN / UIT en bevestig.
Waarschuwing activeren/deactiveren
De waarschuwing laat u weten, wanneer er een nieuwe SMS of
een gesproken bericht voor u is binnengekomen.
Herhaal de bovenstaande stappen 1-2.
3- Scroll naar Waarschuwing en bevestig.
4- Selecteer AAN / UIT en bevestig.
Babyfoon mode
Voor het bewaken van de kinderkamer. Leg de handset in de ruimte die u wilt bewaken; via de
extra handset kunt u alle geluiden in de ruimte horen.
Babyfoon mode activeren/deactiveren
1- Ga naar Handset en bevestig.
2- Scroll naar Babyfoon mode en bevestig.
3- Selecteer AAN / UIT en bevestig.
Aanwijzing: Om de ruimte te bewaken is een intern gesprek nodig
(zie pagina 6).
Displaycontrast instellen
Displaycontrast instellen
1- Ga naar Handset en bevestig.
2- Scroll naar Contrast scherm en bevestig.
3- Selecteer de gewenste contrastinstelling en bevestig.
5
Handset
Page 52

Achtergrondverlichting instellen
Achtergrondverlichting instellen
1- Ga naar Handset en bevestig.
2- Scroll naar Verlichting en bevestig.
3- Selecteer de gewenste duur 10 seconden, 20 seconden of
UIT en bevestig.
Handset
Nederlands
6
Page 53

Intern gesprek
Intern gesprek (wanneer men de beschikking heeft over ten minste 2 handsets)
Met deze functie kunt u interne gesprekken voeren, de babyfoonfunctie (ruimtebewaking)
gebruiken en externe gesprekken naar een andere handset doorverbinden. Het interne gesprek
functioneert alleen tussen handsets die op hetzelfde basisstation zijn aangemeld.
Intern bellen of babyfoonfunctie activeren
1- Ga naar Intern gesprek en bevestig.
2- Als U één andere handset heeft, gaat deze nu over.In alle andere
gevallen, kiest U de gewenste handset/basis uit de lijst en druk op
voor Bellen. Het belsignaal van de gebelde handset/basis klinkt.
3- Neem met het gesprek op de gebelde handset/basis aan.
Het interne gesprek/de babyfoonfunctie kan beginnen. Mute is
eveneens mogelijk.
Aanwijzing: De functie 'Intern gesprek' kan ook met de Pilot-key
worden opgeroepen. Scroll in de stand- by mode met naar boven.
U kunt een extern gesprek naar een andere handset doorverbinden.
1- Druk op op de opties op te roepen.
2- Scroll naar Intern gesprek en bevestig.
3- Als U één andere handset heeft, gaat deze nu over.In alle andere
gevallen, kiest U uit de lijst de gewenste handset/basis.
Het belsignaal van de gebelde handset/basis klinkt. Het externe
gesprek wordt vastgehouden.Wanneer de 2
meldt kunt u het gesprek op de 1
de optie Be
ë
indig intercom op te roepen.
e
e
handset weer overnemen door
handset zich niet
4- Neem het gesprek met aan op de andere handset/op de
basis. Beide interne gesprekspartners kunnen met elkaar spreken.
5- Selecteer de optie Doorverbinden. Het gesprek wordt
beëindigd op de 1
e
1
handset ook beëindigen met .
e
handset. Aanwijzing: U kunt het gesprek op de
Terwijl het gesprek wordt vastgehouden, hoort de beller de muziek
in wacht (wanneer deze is geactiveerd) of pieptonen. De opties
Wisselgesprek ([ruggespraak houden] tussen gesprekspartner 1
en 2) en Mute (microfoon) staan in het Contextmenu eveneens ter
beschikking.
Groepsgesprek
Met de functie groepsgesprek kan een externe beller worden
verbonden met 2 handsets (met de functie Intern gesprek). De 3
gesprekspartners kunnen dan met elkaar spreken (deze groepsgesprekken zijn niet abonnementsafhankelijk).
Herhaal de eerder beschreven stappen 1-4.
5- Roep de optie Groepsgesprek op en bevestig.
7
Intern gesprek
Page 54

Zelf fouten opsporen en verhelpen
Probleem
Geen kiestoon
Geen pieptoon, wanneer de
handset in de oplader wordt
geplaatst.
Na een oplaadduur van 12
uur zijn de accu's nog steeds
niet opgeladen.
Wanneer u met uw handset
wilt bellen, hoort u een valse
toon.
Tijdens een gesprek hoort u
een valse toon.
Geen belsignaal.
Bij het aanmelden van een
handset verschijnt een
foutmelding.
Storende geluiden in de lijn
tijdens het telefoneren.
Mogelijke oorzaak
De handset is buiten reikwijdte
van de basis ( ontbreekt)
De handset is niet op de basis
aangemeld.
( -symbool verschijnt niet).
De basis is niet correct op het
elektrische net of op de
telefoonaansluiting aangesloten.
De accu's zijn leeg
(het symbool verschijnt).
De oplader is niet correct op het
elektrische net aangesloten.
Vervuilde oplaadcontacten.
De toetstonen zijn gedeactiveerd.
De oplader is niet correct op het
elektrische net aangesloten.
De accu's zijn beschadigd of te
oud.
De handset is niet aangemeld.
Op een andere handset wordt
een extern gesprek gevoerd.
Het basisstation is net bezet.
Handset buiten de reikwijdte.
De accu's zijn zwak.
Het belsignaal is gedeactiveerd.
Het aanmelden is mislukt.
Het maximale aantal handsets is
bereikt.
Afstand tot de basis is te groot.
De basis bevindt zich in de buurt
van elektrische apparatuur, muren
van gewapend beton of metalen
deuren.
Problemen oplossen
Oplossing
Ga dichter naar de basis toe
en probeer het opnieuw.
Meld de handset aan op de
basis (zie pagina 4).
Controleer de
steekverbindingen.
Laad de accu's op
(zie pagina 3).
Controleer de
steekverbindingen.
Reinig met een droge doek.
Activeer de toetstonen (pag.5).
Controleer de
steekverbindingen.
Koop nieuwe accu's bij uw
vakhandelaar.
Meld deze aan (pagina 4).
Probeer opnieuw, wanneer
het gesprek beëindigd is.
Probeer opnieuw, wanneer de
basis weer beschikbaar is.
Ga dichter naar de basis toe.
Laad de accu's op.
Activeer het belsignaal (pag.5).
Trek de netstekker van de
basis uit het stopcontact en
sluit deze weer aan. Meldt de
handset nogmaals aan.
Meld een handset af
(zie pagina 4).
Ga dichter naar de basis toe.
Verander de plaats van het
basisstation (hoe hoger, hoe
beter).
8
Nederlands
Page 55

DECLARATION OF CONFORMITY
We,
PHILIPS Consumer, Electronics
DECT & Home Telephony
Route d’Angers
72081 Le Mans Cedex 9
France
Declare that the products Zenia 300, Zenia 300 additional handset and all bundle
combinations are in compliance with ANNEX III of the R&TTE-Directive 1999/5/EC
and then with the following essential requirements :
Article 3.1.a : (protection of the health & the safety of the user) : EN 60950 (2000)
Article 3.1.b : (protection requirements with respect to electromagnetic
compatibility) ETSI EN 301 489-6 V1.1.1 (09/2000) & ETSI EN 301 489-1 V1.3.1
(09/2001)
Article 3.2 : (effective use of the radio spectrum) : EN 301 406 (2001)
The presumption of conformity with the essential requirements regarding Council
Directive 1999/5/EC is ensured.
Date : 16/07/2003 Le Mans
Vice President & General Manager
DECT & Home Telephony
9
Conformiteitsverklaring
Page 56

Zenia_AddHS_Chin 27.08.03.fm Seite 1 Mittwoch, 27. August 2003 1:35 13
Zenia 300 Vox
230 EN 60-950
EN 60-950
EN 60-950 TNV-3
GAP
GAP DECT GAP
Zenia 300 Vox GAP
Zenia 300 Vox Zenia 300 Vox Onis 380
Zenia 300 Vox Onis 200 Zenia
(
Zenia 300 Vox
()
4
4
(
Zenia 300 Vox
)
IT
)
DECT ETSI DECT
1
Page 57

Zenia_AddHS_Chin 27.08.03.fm Seite 2 Mittwoch, 27. August 2003 1:35 13
/
-
/
-
-
-
-
-
-
-
-*()
-
-(
-
ni®
/
R)
Eato-
-
-
- R-
(
)
-
-
#( )
-
(P)
-
-
-
-
0
Zenia 300 Vox
/
//-
/-
/
/
/
/
/
2
Page 58

Zenia_AddHS_Chin 27.08.03.fm Seite 3 Mittwoch, 27. August 2003 1:35 13
2/3 1/3
1-
2-
250
1
(
)
50 300
-/
1-
2-
16
()
3
Page 59

Zenia_AddHS_Chin 27.08.03.fm Seite 4 Mittwoch, 27. August 2003 1:35 13
/
Zenia 300 Vox
8
*
1 -
2
-
3 - RC
()
Handset
1
-
2
-
3
-
4
-
5 -
-
-
()
VIP
"(
(
1
-
2
-
3
-
4
-
5
-
1
-
2
-
3
-
4
-
()
Registration
RC
)"
CLI
(
Handset
Sounds
Ringer type
External Std ringer/Internal ringer
5
Handset
Sounds
Ringer volume
()
Un-register handset (
()
)
()
()
()
()
()
)
()
)
*
Zenia 300 Vox
(/)
1
4
Page 60

Zenia_AddHS_Chin 27.08.03.fm Seite 5 Mittwoch, 27. August 2003 1:35 13
Handset
1
-
2
-
3
-
4
-
3
-
4
-
3
-
4
-
/
1
-
2
-
3
-
()
Sounds
()
Earpiece tone
Standard, treble
Key and feedback tones
On/Off
Key and feedback tones
On/Off
Handset
Babysit mode
On/Off
()
1 2
(/)
1 2
(/)
()
()
(/)
Bass
(//)
()
()
6
(
)
1
-
2
-
3
-
1
-
2
-
3
-
Handset
()
Language
)
Handset
()
Display contrast
()
()
Zenia 300 Vox
(
5
Page 61

Zenia_AddHS_Chin 27.08.03.fm Seite 6 Mittwoch, 27. August 2003 1:35 13
Handset
1
-
2
-
3
-
()
Backlight
()
10
20
6
Page 62

Zenia_AddHS_Chin 27.08.03.fm Seite 7 Mittwoch, 27. August 2003 1:35 13
()
()
Intercom
1
-
2
-/
3
-/
1
-
2
-
3
-/
4
-/
5
-
()
Intercom
()
2
Transfer
End Intercom
() 1
1 2
/
/
1
1
()
)
5
-
1 - 4
Conference call
(
()
()
7
Page 63

Zenia_AddHS_Chin 27.08.03.fm Seite 8 Mittwoch, 27. August 2003 1:35 13
()
)
() (
12
(
)
(5)
(4)
(5)
)
4
(
3
)
(
8
Page 64

DECLARATION OF CONFORMITY
We,
PHILIPS Consumer, Electronics
DECT & Home Telephony
Route d’Angers
72081 Le Mans Cedex 9
France
Declare that the products Zenia 300, Zenia 300 additional handset and all bundle
combinations are in compliance with ANNEX III of the R&TTE-Directive 1999/5/EC
and then with the following essential requirements :
Article 3.1.a : (protection of the health & the safety of the user) : EN 60950 (2000)
Article 3.1.b : (protection requirements with respect to electromagnetic
compatibility) ETSI EN 301 489-6 V1.1.1 (09/2000) & ETSI EN 301 489-1 V1.3.1
(09/2001)
Article 3.2 : (effective use of the radio spectrum) : EN 301 406 (2001)
The presumption of conformity with the essential requirements regarding Council
Directive 1999/5/EC is ensured.
Date : 16/07/2003 Le Mans
Vice President & General Manager
DECT & Home Telephony
Page 65

 Loading...