


Instructions for Use
IntelliVue Cableless
Measurements
CL SpO2 Pod – CL NBP Pod –
CL Respiration Pod
Release D.00
Patient Monitoring


1Table of Contents
1 Introduction and Basic Operation 5
Safety Information 6
Security Information 8
Introducing the IntelliVue Cableless Measurements 10
2 IntelliVue CL SpO2 Pod 13
General Operation of the SpO2 Pod 13
Connection with Host Systems 20
Monitoring SpO2 28
Alarms 34
Local Attended Monitoring 43
SpO2 Default Settings 49
Integrated Battery Handling 50
Accessories 52
Maintenance and Troubleshooting 53
3 IntelliVue CL NBP Pod 55
General Operation of the NBP Pod 55
Connection with Host Systems 62
Monitoring NBP 69
Alarms 77
Local Attended Monitoring 86
NBP Default Settings 91
Integrated Battery Handling 92
Accessories 93
Maintenance and Troubleshooting 97
4 IntelliVue CL Respiration Pod 99
General Operation of the Respiration Pod 99
Connection with Host Systems 100
Monitoring Respiration 104
Technical Alarms (INOPs) 108
Respiration Default Settings 109
Integrated Battery Handling 110
Accessories 111
Maintenance and Troubleshooting 112
5 Cableless Measurement Auxiliary Devices 113
IntelliVue CL Transmitter and IntelliVue CL Hotspot 113
IntelliVue CL Transmitter Base Station 117
3

IntelliVue CL Charging Station 118
Maintenance and Troubleshooting 119
6 Care and Cleaning 121
General Points 121
Cleaning and Disinfecting the IntelliVue Cableless Measurement Devices 122
Disposing of the IntelliVue Cableless Measurement Devices 123
7 Specifications 125
Indications for Use 125
Compatible Medical Devices 127
Symbols 127
Manufacturer's Information 129
Regulatory and Safety Specifications 129
EMC and Radio Regulatory Compliance 130
Safety and Performance Tests 132
Electromagnetic Compatibility (EMC) 132
Accessories Compliant with EMC Standards 133
Electrosurgery Interference/Defibrillation 133
IntelliVue CL SpO2 Pod Specifications 133
IntelliVue CL NBP Pod Specifications 135
IntelliVue CL Respiration Pod Specifications 138
Alarm Specifications for CL NBP, CL SpO2 and CL Resp Pod 140
Telemetry Device Battery Runtime Specifications 141
IntelliVue CL Transmitter Specifications 141
IntelliVue CL Transmitter Base Station Specifications 143
IntelliVue CL Hotspot Specifications 144
Index 147
4

1Introduction and Basic Operation
These Instructions for Use are for clinical professionals using the IntelliVue Cableless Measurements and
their specified compatible accessories.
IntelliVue Cableless Measurements refers to the IntelliVue Cableless Measurements product family
consisting of the IntelliVue CL SpO
Respiration Pod (865218) with their accessories. Also included are the auxiliary devices: the IntelliVue CL
Charging Station (865220), IntelliVue CL Transmitter (865221), IntelliVue CL Transmitter Base Station
(865237) and IntelliVue CL Hotspot (865222).
The IntelliVue Cableless Measurements are used for monitoring and recording arterial oxygen saturation,
pulse rate, noninvasive blood pressure and respiration rate of adult and pediatric patients.
Familiarize yourself with all instructions including warnings and cautions, and attend one of the training
courses, before starting to make measurements with patients. Read and keep the Instructions for Use that
come with any accessories, as these contain important information about care and cleaning that is not
repeated here.
When using the IntelliVue Cableless Measurements with an IntelliVue Patient Monitor, an Avalon Fetal
Monitor, a telemetry system or IntelliVue GuardianSoftware, refer to and adhere to all warnings in the
Instructions for Use of the respective device or software.
This guide may contain descriptions of functionality and features that are not implemented in the
equipment currently shipped to Japan and/or of products that are not currently sold in Japan due to
limitations and restrictions under the applicable local laws and regulations in Japan. Please contact your local
sales representative and/or Philips Customer Support for details.
In these Instructions for Use:
•A warning alerts you to a potential serious outcome, adverse event or safety hazard. Failure to observe
a warning may result in death or serious injury to the user or patient.
•A caution alerts you to where special care is necessary for the safe and effective use of the product.
Failure to observe a caution may result in minor or moderate personal injury or damage to the product
or other property, and possibly in a remote risk of more serious injury.
Pod (865215), IntelliVue CL NBP Pod (865216) and IntelliVue CL
2
1
Display refers to the physical display of the Cableless Measurement Device. Screen refers to everything
you see on the IntelliVue Cableless Measurement's display, such as measurement values, patient data and so
forth.
IntelliVue CL Transmitter/WLAN functionality may not be available in all countries.
5

1 Introduction and Basic Operation
Safety Information
Use Environment
WARNING
• If a patient being monitored by Cableless Measurement Devices moves out of range of the patient
monitor, the measurements are not transmitted to the patient monitor or the Information Center. Keep
the patient monitor with the patient during transport.
• Always make sure that the applied pod is assigned to the correct patient.
Electrical Hazards
WARNING
• Electrical shock hazard: Do not open the device housing. Refer all servicing to qualified service
personnel.
• Always use the supplied power cord with the grounded mains plug to connect the charging station to a
grounded AC mains socket. Never adapt the mains plug from the charging station to fit an ungrounded
AC mains socket.
• Do not use AC mains extension cords or multiple portable socket outlets. If a multiple portable socket
outlet without an approved isolation transformer is used, the interruption of its protective grounding
may result in enclosure leakage currents equal to the sum of the individual ground leakage currents, so
exceeding allowable limits.
• Do not connect any devices that are not supported as part of a system.
Radiofrequency Interference
WARNING
• Short Range Radio connections are subject to interruption due to interference from other radio sources
in the vicinity, including microwaves, bluetooth devices, WLAN devices (802.11b,g,n) and cordless
phones. Depending on the strength and duration of the interference, the interruption may occur for an
extended period. A loss of connection, due to moving out-of-range, interference, or for other reasons,
is indicated with a
SpO₂ Disconnect
important, refer to the Configuration Guide for details.
or cl Resp Disconnect INOP at the host monitor. Correct channel configuration is
Battery Handling
WARNING
• Do not crush or puncture - mechanical abuse can lead to internal damage and internal short circuits
which may not be visible externally.
• Do not incinerate the devices or expose them to temperatures above 60°C (140°F).
No Host Monitoring INOP on the NBP or SpO
Pods, or a cl NBP Disconnect, cl
2
6

Accessories
Maintenance
1 Introduction and Basic Operation
WARNING
• Reuse: Never reuse single-patient sensors, accessories and so forth that are intended for single use, or
single patient use only. Reuse may compromise device functionality and system performance and cause
a potential hazard, in particular with regard to cross-contamination.
• Philips’ approval: Use only Philips-approved accessories. Using non-Philips-approved accessories may
compromise device functionality and system performance and cause a potential hazard.
• Using accessories other than those specified may result in increased electromagnetic emission or
decreased electromagnetic immunity of the IntelliVue Cableless Measurement Devices.
WARNING
• Schedule: Failure on the part of the responsible individual hospital or institution employing the use of
this equipment to implement a satisfactory maintenance schedule may cause undue equipment failure
and possible health hazards.
• Contact: If you discover a problem with any of the equipment, contact your service personnel, Philips,
or your authorized supplier.
• If the IntelliVue Cableless Measurement Device is mechanically damaged, or if it is not working
properly, do not use it for any monitoring procedure on a patient, contact your service personnel.
Care, Cleaning and Disposal
WARNING
• If you spill liquid on the equipment, or if the equipment is accidentally immersed in liquid, contact your
service personnel or Philips service engineer. Do not operate the equipment before it has been tested
and approved for further use.
• Do not use flammable agents for disinfecting the equipment in an oxygen-enriched environment, as
this might lead to sudden ignition of vapors, resulting in injury to the patient or staff.
• To avoid contaminating or infecting personnel, the environment or other equipment, make sure you
disinfect and decontaminate the IntelliVue Cableless Measurement Devices appropriately before
disposing of it in accordance with your country's laws for equipment containing electrical and electronic
parts. For disposal of parts and accessories, where not otherwise specified, follow local regulations
regarding disposal of hospital waste.
7

1 Introduction and Basic Operation
Security Information
Protecting Personal Information
Protecting personal health information is a primary component of a security strategy. Each facility using the
devices must provide the protective means necessary to safeguard personal information consistent with
country laws and regulations, and consistent with the facility’s policies for managing this information.
Protection can only be realized if you implement a comprehensive, multi-layered strategy (including policies,
processes, and technologies) to protect information and systems from external and internal threats.
As per their intended use, the devices operate in the patient vicinity and contain personal and sensitive
patient data. They also include controls to allow you to adapt the devices to the patient's care model.
To ensure the patient's safety and protect their personal health information you need a security concept that
includes:
• Physical security access measures - access to the devices must be limited to authorized users. It is
essential that you consider physical security measures to ensure that unauthorized users cannot gain
access.
• Operational security measures - for example, ensuring that devices are powered off after monitoring
in order to remove patient data from the device.
• Procedural security measures - for example, assigning only staff with a specific role the right to use
the devices.
In addition, any security concept must consider the requirements of local country laws and regulations.
Always consider data security aspects of the network topology and configuration when connecting devices
to shared networks. Your medical facility is responsible for the security of the network, where sensitive
patient data from the monitor may be transferred.
When a device is returned for repair, disposed of, or removed from your medical facility for other reasons,
always ensure that all patient data is removed from the device by powering it off.
NOTE
Log files generated by the devices are used for system troubleshooting and do not contain protected health
data.
About HIPAA Rules
If applicable, your facility’s security strategy should include the standards set forth in the Health Insurance
Portability and Accountability Act of 1996 (HIPAA), introduced by the United States Department of Health
and Human Services. You should consider both the security and the privacy rules and the HITECH Act
when designing policies and procedures. For more information, please visit:
http://www.hhs.gov/ocr/privacy/
About the EU Directives
If applicable, your facility’s security strategy should include the practices set forth in the Directive on the
protection of individuals with regard to the processing of personal data and on the free movement of such
data (Directive 95/46/EC of the European Parliament and of the Council of 24 October 1995). In addition,
your facility should also take into account any additional applicable regulation or statutory requirement.
Philips Product Security Policy Statement
Additional security and privacy information can be found on the Philips product security web site at:
http://www.usa.philips.com/healthcare/about/customer-support/product-security
8

1 Introduction and Basic Operation
Manufacturer Disclosure Statement for Medical Device Security – MDS2
You can view the Manufacturer Disclosure Statements for Medical Device Security (MDS2) for specific
devices at:
http://www.usa.philips.com/healthcare/about/customer-support/product-security
9

1 Introduction and Basic Operation
Introducing the IntelliVue Cableless Measurements
The IntelliVue Cableless Measurement Devices provide measurement values and communicate them to
other system components using a wireless short range radio (SRR) interface.
Introduction
IntelliVue CL SpO2 Pod
The IntelliVue CL SpO
cableless Pulse Oximetry measuring device.
Pod is a battery powered,
2
IntelliVue CL NBP Pod
The IntelliVue CL NBP Pod is a battery powered,
cableless, noninvasive blood pressure (NBP)
measuring device.
10
IntelliVue CL Respiration Pod
The IntelliVue CL Respiration Pod is a battery powered, cableless device for measuring respiration rate
and, optionally, pulse. It also provides basic information about patient posture and activity.

Basic Operation
IntelliVue CL SpO2 Pod and IntelliVue CL NBP Pod
1 Introduction and Basic Operation
The IntelliVue CL SpO
Monitors MP5/MP5SC/MP5T, MP2/X2, IntelliVue Telemetry System Transceivers TRx4841A/
TRx4851A, MX40 wearable patient monitors, Avalon Fetal Monitors, and IntelliVue GuardianSoftware.
Both devices have an LC display and three keys for basic operation:
IntelliVue CL Respiration Pod
The IntelliVue CL Respiration Pod can be used together with IntelliVue Patient Monitors MP5/MP5SC/
MP5T, MP2/X2, or IntelliVue GuardianSoftware. The device has one multi-color LED for status display
and one hardkey for basic operation, e.g. to start a measurement.
Pod and the IntelliVue CL NBP Pod can be used together with IntelliVue Patient
2
1 Integrated monochrome LC display
2 Hardkeys
3 Measurement identifier
1 Multi-color LED
2 Measurement identifier
3 Hardkey
4 Indication for built-in RFID tag
11

1 Introduction and Basic Operation
12
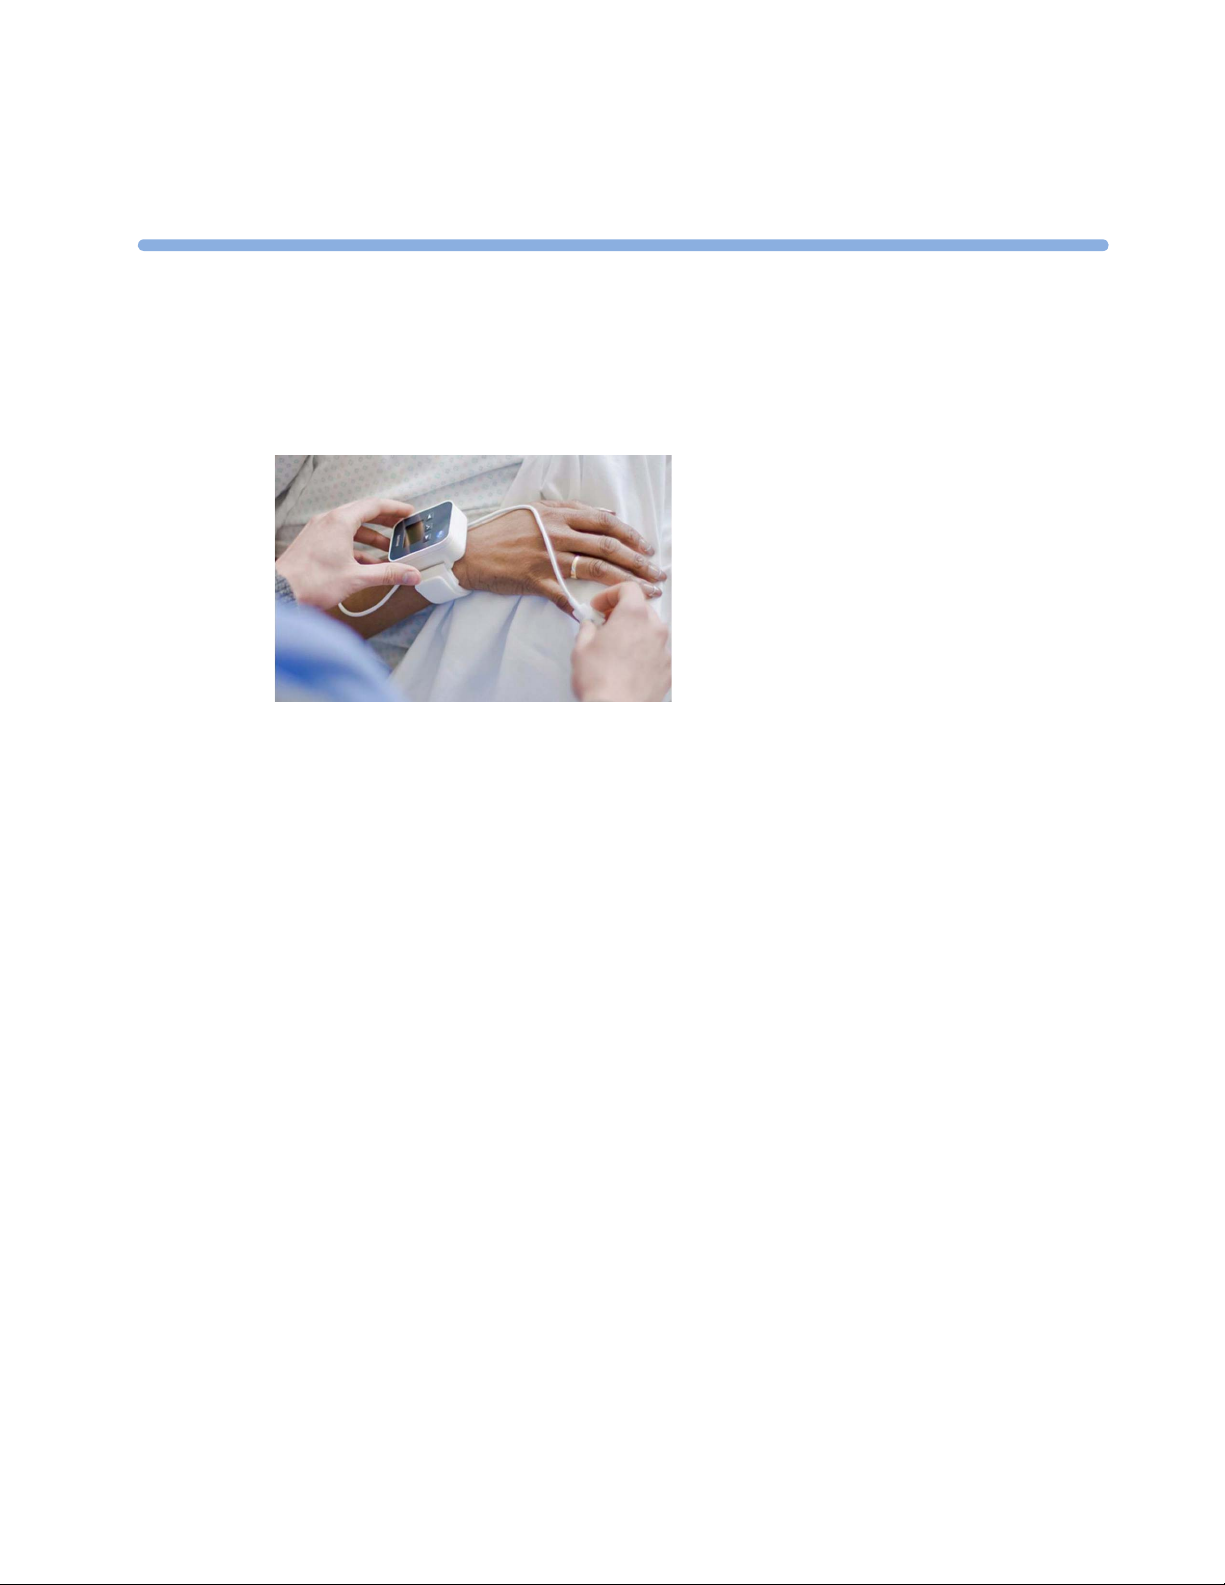
2IntelliVue CL SpO2 Pod
The IntelliVue CL SpO2 Pod is a wrist-worn device; you need a Mobile CL SpO2 Cradle to hold the sensor
connector in place and a wristband to fix the cradle to a patient's arm.
2
Specialized single-patient SpO
regarding the complete set of single-patient supplies, cradle, wristband and sensors, refer to “IntelliVue CL
SpO2 Pod Accessories” on page 52.
sensors are available for use with the IntelliVue CL SpO2 Pod. For details
2
General Operation of the SpO2 Pod
The following sections describe operation on the SpO2 Pod itself. For operation from a patient monitor, see
“Controls Available with a Patient Monitor” on page 25. For operation from an Information Center via a
telemetry system, see “Controls Available with a Telemetry Device” on page 26. For operation with
IntelliVue GuardianSoftware, see “Controls Available with GuardianSoftware” on page 27.
The SpO
the screen. These are used to activate and navigate through the on-screen menus and to select individual
items. The typical operator's position is such that everything on the device's display can be read clearly and
easily.
Switching the Device On
The first time an SpO2 Pod is used, or after the device has been powered off for storage, place it on the
IntelliVue CL Charging Station. This will automatically switch the device on.
If the SpO2 Pod has only been switched off temporarily (see “Switching the Device Off” on page 17), press
any hardkey to turn the device on again.
When an SpO
little later the low-activity screen will be displayed.
Pod has three hardkeys for basic operation and a set of configurable SmartKeys which appear on
2
Pod is not operated, it will automatically switch off the screen lighting after a short time. A
2
13
2 IntelliVue CL SpO2 Pod
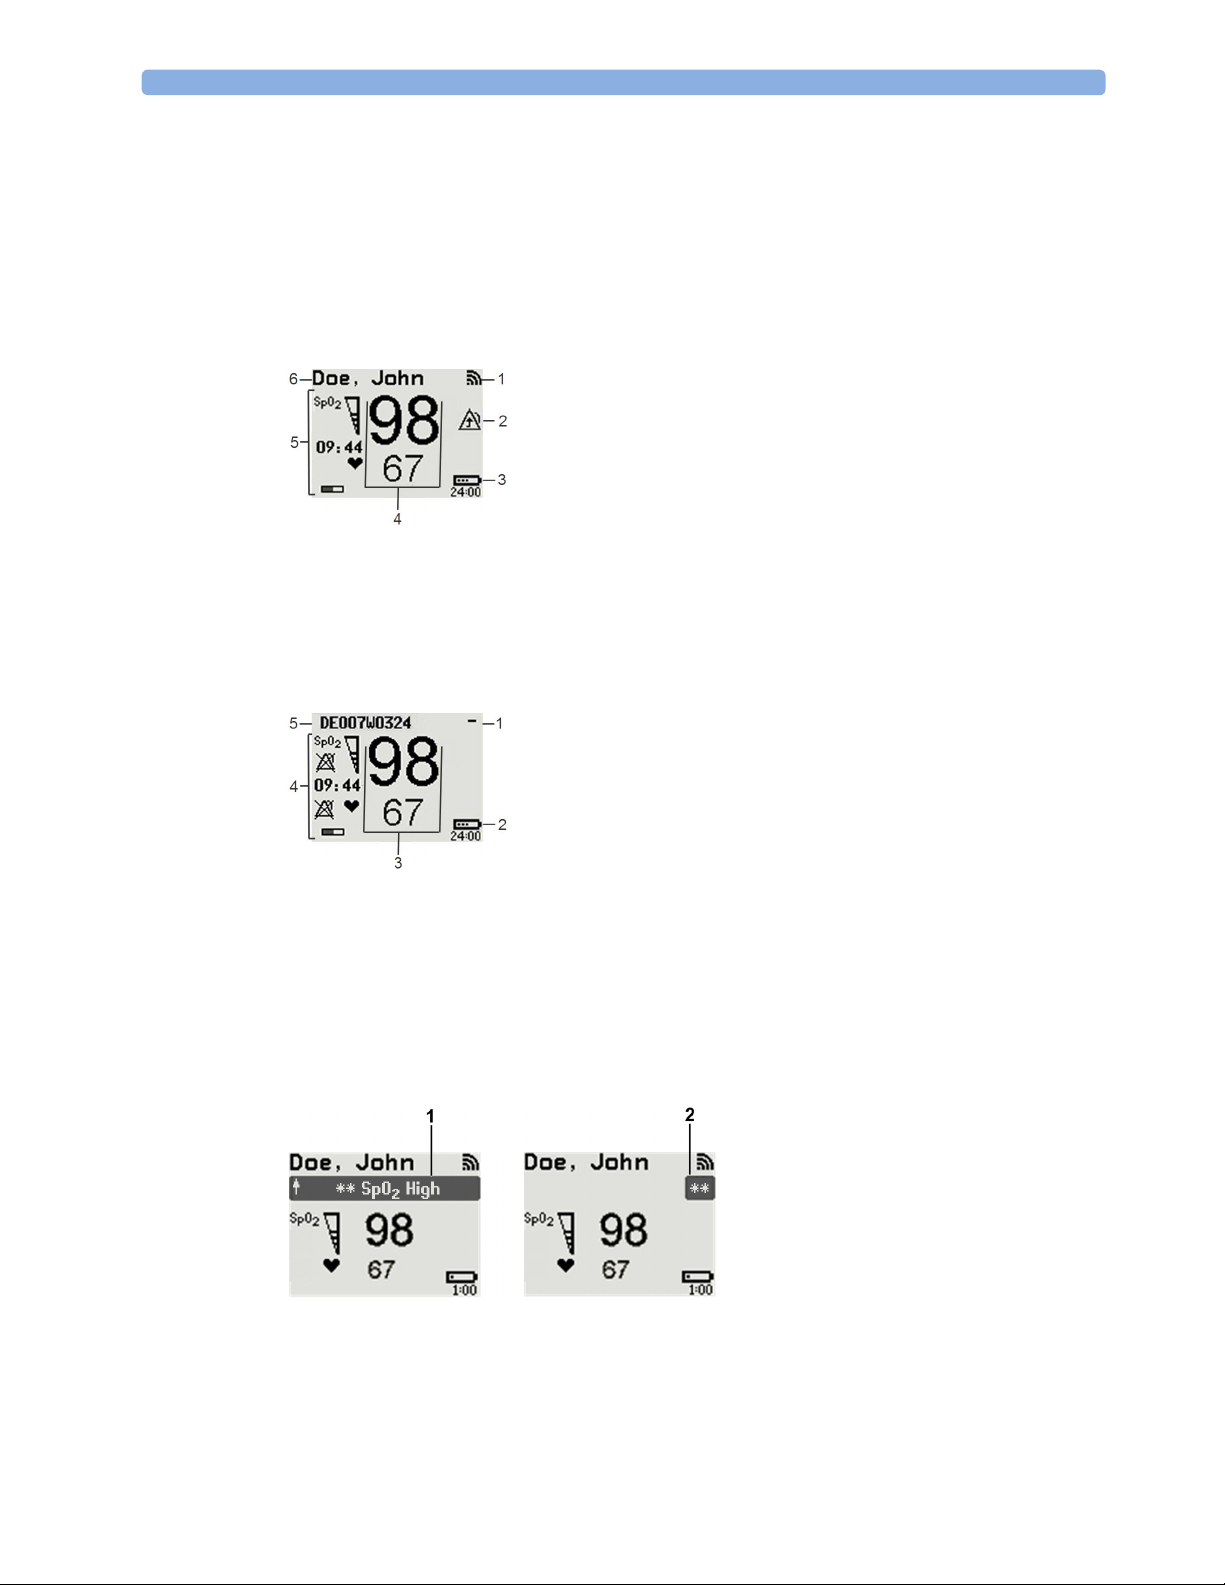
Screen Layout
There are three variations of the Main Screen layout depending on the Alarm status and the general activity
level.
Standard Layout
When assigned to a monitor, telemetry device or a patient in GuardianSoftware:
1 Connection status indicator
2 Indicator that alarming capability has been transferred to
the host (to the monitor or, for the telemetry device, to
the Information Center). No patient alarms will be
announced on the Cableless Measurement Device.
3 Battery indicator
4 Measurement values
5 Measurement-related symbols (see the “Monitoring
SpO2” section for details)
6 Patient identification
Alarm Layout
When not assigned to a monitor or telemetry device:
1 Connection status indicator
2 Battery indicator
3 Measurement values
4 Measurement-related symbols (see the “Monitoring
SpO2” section for details). The Alarms Off symbols
indicate that no physiological alarms are available from
the Cableless Measurement Devices when not assigned
to a host.
5 Cableless Measurement Device equipment label
If an alarm occurs the full alarm message appears at the top of the screen. After the alarm message has been
silenced the alarm indicator is shown as a symbol on the right side of the screen.
1 Full length alarm message
2 Alarm indicator
14

Low-Activity Screen
If the Cableless Measurement Device has not been operated for a while, the screen lighting will switch itself
off and a little later the screen will switch to a pre-configured "low-activity" screen.
When a Cableless Measurement Device Cannot be Activated
If you cannot activate a device by pressing a key, place it on the IntelliVue CL Charging Station. The device
becomes active. Check the battery status. If necessary, leave the device on the charger until the battery is
fully charged.
Using the Hardkeys
The IntelliVue Cableless Measurement Devices have three hardkeys: ◄, , ►.
Use ◄ and ► to navigate through SmartKeys and menus and to select items or to silence alarms.
The three hardkeys also have an additional function when the key is held down for a couple of seconds:
◄ opens the Add To screen to assign a device (or to unassign it when it is already assigned)
2 IntelliVue CL SpO2 Pod
opens the SmartKeys menu
► returns to the Main Screen. If already on the Main Screen, it locks the keys and a lock symbol
appears on the screen above the battery symbol. If keys are already locked, it unlocks the keys and
the lock symbol disappears
Using the SmartKeys
A SmartKey is a graphical key which appears on the screen and gives you fast access to functions.
SmartKeys Menu
Press the hardkey (without any screen element highlighted) to get to the SmartKeys menu.
Use the ◄ and ► hardkeys to move along the row of SmartKeys. The highlighted SmartKey is displayed in
full above the row of SmartKeys. When you use the ◄ or ► hardkey at the end of the row, an
appears and then with further presses you move on to the next page of SmartKeys. To leave the SmartKeys
menu you can use the
Screen.
When the required SmartKey is highlighted, press the key to activate the corresponding function.
To get to the next page of the SmartKeys menu, highlight the rightmost SmartKey then press the ► key.
Exit screen
Exit screen or press the ► hardkey for a couple of seconds to return to the Main
15
2 IntelliVue CL SpO2 Pod
List of Available SmartKeys
SmartKey Text Labels
Main Setup
start an SpO
set the SpO
Add/Remove device
Battery menu
enter
Profiles menu
enter
measurement
2
mode
2
change Screen
put device in standby mode (or power off when pressed for more than two
seconds)
Patient menu
enter
enters the
Alarms menu to access: Alarm Messages, Alarm Limits, Alarms On/
Off/Pause, Alarm Volume.
16
Change alarm volume
Change pulse tone volume

Using the Main Setup Menu
In addition to the hardkeys and SmartKeys for the most needed functions, the Main Setup menu gets you to
all settings that can be adjusted for the respective device. Select the
menu.
Setup
Main Setup
SpO₂
Pulse
Alarms
Patient
Equipment
User Interface
Standby
Profiles
Operating Modes
Date, Time
Battery
Revisions
2 IntelliVue CL SpO2 Pod
Main Setup SmartKey to get to the Main
Switching the Device Off
To put the device in standby mode, select the Standby SmartKey, then Confirm.
If you keep
•
Standby pressed for more than two seconds, you can choose between Standby or Power Off.
Standby means that the display is switched off and the measurements are disabled. Use this option if
your device is not used temporarily. Press any hardkey to turn the device on again.
•
Power Off means that the device is switched off completely and can only be switched on again by
putting it on a charger. Use this option when the device is not used for a longer time or prepared for
storage or shipping.
Auto Standby and Auto Power Off
The device can be configured to automatically go into standby mode after a configurable time span of
inactivity. When in standby mode, the device can be automatically powered off after a configurable time
span. See the IntelliVue Cableless Measurements Configuration Guide for details on how to configure these
settings.
Operating Modes
Your device has four operating modes. Some are passcode protected.
• Monitoring Mode: This is the normal, every day working mode that you use for making
measurements. You can change elements such as measurement modes, patient category and so forth.
When you remove the patient from the device, these elements return to their default values. Changes
can be stored permanently only in Configuration Mode. You may see items, such as some menu
options, that are visible but 'grayed out' so that you can neither select nor change them. These are
present for your information only and can be changed only in Configuration Mode.
• Demonstration Mode: Passcode protected, this is for demonstration purposes only. You must not
change into Demonstration Mode during monitoring.
• Configuration Mode: Passcode protected, this mode is for personnel trained in configuration tasks.
These tasks are described in the Configuration Guide. During installation the Cableless Measurement
Device is configured for use in your environment. This configuration defines the default settings you
work with when you switch on.
17

2 IntelliVue CL SpO2 Pod
• Service Mode: Passcode protected, this is for trained service personnel.
When you switch the device on, it starts up in monitoring mode. To change to a different mode:
1 Use the
2 Select
Main Setup SmartKey to get to the Main Setup menu.
Operating Modes and choose the mode you require.
Using the Patient Menu
The Patient menu allows you to see patient demographics information and to remove a patient from a
device. Patient Demographic information is only displayed if the Cableless Measurement Device is assigned
to a patient monitor or GuardianSoftware.
changed at the Cableless Measurement Device, but only when the device is not assigned to a patient
monitor or telemetry device.
Displaying the Patient Menu
To display the Patient menu,
• select the
• select the
Stop Using a Device for a Patient
To remove a patient from the Cableless Measurement Device,
•in the
All patient data is cleared, settings are reset to the defaults and the device is removed from the monitor or
telemetry device.
Patient SmartKey, or
Main Setup SmartKey followed by Patient.
Patient menu select Free Device.
Patient Category is the only item of patient data which can be
NOTE
Depending on your configuration, when the device is put on the charger, patient data will also be cleared
and the device will be free for another patient.
Using the Device for a New Patient
To use a device for a new patient,
•in the
Patient menu, select New Patient.
If the device was not free, the existing data will be deleted and the profile set to the default.
Using Profiles
A profile is a set of measurement and general settings which have been customized for a particular purpose.
The Cableless Measurement Devices can have four different profiles configured to your requirements. The
default profile is marked with a symbol.
To select a different profile,
1 Select the
2 Select the required profile from the list.
Selecting
Profiles SmartKey or the Main Setup SmartKey followed by Profiles.
New Patient or Free Device will always reset the profile to the default.
18

Setting the Date and Time
If the Cableless Measurement Device is assigned to a patient monitor, telemetry device or
GuardianSoftware, the date and time will be taken from the host. If this is not the case, you can set the date
and time on the Cableless Measurement Device,
1 Select the
Main Setup SmartKey and then Date, Time.
2 Enter the data for date and time one after another.
3 Select
Store Date, Time.
If the time has not been set,
Battery Status
The IntelliVue CL SpO2 Pods show their battery status on their display both in operating and charging
condition. The battery status indicator is located in the lower right corner of the screen during operation
and in the middle of the screen during charging.
Battery Status Menu
Select the Battery SmartKey or Main Setup followed by Battery using the ◄ and ► keys, then press the
key to open the
remaining capacity, voltage, current and temperature.
Battery menu. The Battery menu provides the following information: full-charge and
2 IntelliVue CL SpO2 Pod
--:-- will display on the device.
19

2 IntelliVue CL SpO2 Pod
Connection with Host Systems
The following sections describe how the IntelliVue Cableless Measurement Devices work together with
host systems (Patient Monitors, Fetal Monitors, Telemetry Devices / Information Center or
GuardianSoftware).
IntelliVue Cableless Measurements Use Models
With these patient-worn measurement devices you can measure and transmit a patient's vitals regularly or
on an intermittent data collection basis. There are four typical use models:
With a Patient Monitor
The IntelliVue Cableless Measurement Devices can be used together with an MP5/MP5SC/MP5T, MP2 or
X2 patient monitor (with an SRR interface). They can communicate their measurement values via short
range radio to the monitor. The monitor may be assigned to a patient sector at the IntelliVue Information
Center (IIC). When assigned to the Information Center, certain actions can be performed at both the
patient monitor and the Information Center. See the table “Controls Available with a Patient Monitor” on
page 25.
In situations where patients are becoming more mobile (for example, in step-down/intermediate care units)
the lightweight Cableless Measurement Devices allow increased mobility within the short range radio range,
without giving up vital signs monitoring.
When assigned to a patient monitor, the Cableless Measurement Device can be selected for use in patient
transport at the patient monitor (for details see the Patient Monitor Instructions for Use). In this case, the
Cableless Measurement Device will perform local attended monitoring. The patient must be attended by
a caregiver during transport, to ensure that alarms on the Cableless Measurement Device are recognized. In
local attended monitoring mode, an alarm message text appears in the alarm status area at the top of the
screen indicating the source of the alarm and an alarm tone is issued. See “Alarms” on page 34 for details.
A telemetry device can be assigned to a patient monitor equipped with short range radio at the same time as
any Cableless Measurement Devices are also assigned to this monitor.
When assigned to a patient monitor, the admitted patient name is displayed on the SpO
If the connection between the monitor and the Cableless Measurement Device is lost, an INOP will be
displayed at the monitor:
Pod, and an INOP tone will sound. In this case, visual and audible alarms are still available at the SpO
but it is not possible to change the alarm settings.
cl SpO₂ Disconnect. A No Host Monitoring INOP will be displayed on the SpO
Pod.
2
Pod,
2
2
With a Fetal Monitor
In combination with an Avalon CL Transducer System, the IntelliVue CL SpO2 Pod can be used together
with an Avalon FM 20-50 Fetal Monitor. The SpO
at the Avalon CL Base Station. For information about Avalon Fetal Monitors, the Avalon CL Transducer
System and the Avalon CL Base Station, please refer to the Avalon Fetal Monitor Instructions for Use.
With a Telemetry Device
The Cableless Measurement Devices can be assigned to a patient with the telemetry device TRx4841A/
TRx4851A or an MX40 wearable patient monitor. They can communicate their measurement values via
short range radio to the telemetry device which communicates them to an IntelliVue Information Center to
provide a consolidated set of patient values.
Some of the measurement tasks can be performed remotely from the Information Center. See the table
“Controls Available with a Telemetry Device” on page 26.
If the patient name is available at the Information Center, it will be also displayed on the SpO
20
Pods are assigned to the fetal monitor by docking them
2
Pod.
2

When a Cableless Measurement Device is assigned to a telemetry device, it is not possible for the telemetry
device to be wirelessly assigned or directly connected to a patient monitor.
If the connection between the telemetry device and the Cableless Measurement Device is lost, an INOP will
be displayed at the Information Center:
on the SpO
Pod, and an INOP tone will sound.
2
With IntelliVue GuardianSoftware
The Cableless Measurement Devices can be used together with IntelliVue GuardianSoftware.
GuardianSoftware collects non-continuous vital signs data that are transmitted via a Transmitter, Hotspot
or MP5 from the Cableless Measurement Devices. Using the collected data, it provides trending, review,
reporting and notification. The Guardian Early Warning Scoring (Guardian EWS) application provides
basic assessment guidance, helping you to recognize the early signs of deterioration in your patients.
GuardianSoftware is not intended for monitoring in combination with Cableless Measurement Devices.
Some of the measurement tasks can be performed remotely from GuardianSoftware. See the table
“Controls Available with GuardianSoftware” on page 27. GuardianSoftware also manages the patient data.
If the connection between GuardianSoftware and the Cableless Measurement Device is lost, the connection
symbol will be displayed gray at GuardianSoftware. A
(no alarm sound).
If a patient name is available at GuardianSoftware, it will be also displayed on the Pod. Any update of
patient data will be synchronized between the Pods and GuardianSoftware. The only patient management
action available directly at the Pod is
the Pod and resets the Pod to the default profile. The Pod is unassigned.
2 IntelliVue CL SpO2 Pod
cl SpO₂ Disconnect. A No System Monitor. INOP will be displayed
No System INOP will be displayed on the SpO
Free Device. Selecting Free Device removes the current patient from
Pod
2
Device Compatibility
The IntelliVue CL SpO2 Pods require the following software levels in the associated equipment:
• IntelliVue Patient Monitor - Release H.0 or above
• Avalon Fetal Monitor in combination with an Avalon CL Transducer System - Release J.3 or above
• IntelliVue Information Center - Release M or above
• Philips Patient Information Center iX - Release A or above
• Telemetry device TRx4841A/TRx4851A - Revision D.00.22 or above
• MX40 wearable patient monitor - Revision A.0 or above
• IntelliVue GuardianSoftware - Revision A.0 or above
Availability of Patient Alarms
When the IntelliVue CL SpO2 Pod is used alone, without an assignment to a monitor or telemetry device,
no patient alarms will be generated.
When the IntelliVue CL SpO
radio connection exists, alarms may be announced at the patient monitor or the Information Center.
• When assigned to a patient monitor / fetal monitor: Alarm messages will be displayed and audible
alarm indicators sounded at the monitor in the same way and under the same conditions as for its own
measurements. See the Instructions for Use of the patient monitor for details.
If a Cableless Measurement Device that is assigned to a patient monitor is selected for use in patient
transport at the patient monitor, the Cableless Measurement Device will perform local attended
monitoring. See the Instructions for Use of the patient monitor for details on how to do this. The
patient must be attended by a caregiver during transport, to ensure that alarms on the Cableless
Measurement Device are recognized. In local attended monitoring mode, an alarm message text
Pod is assigned to a patient monitor or telemetry device and a short range
2
21

2 IntelliVue CL SpO2 Pod
appears in the alarm status area at the top of the screen indicating the source of the alarm and an alarm
tone is issued. See “Alarms” on page 34 for details.
• When assigned to a telemetry device: Measurement values sent via the telemetry device to the
IntelliVue Information Center can generate alarms at the Information Center when the values meet the
criteria set there for alarms. The alarms will be announced in the same way as measurements from other
sources. See the Instructions for Use of the Information Center for details.
• When assigned to GuardianSoftware: Measurement values sent via transmitter, hotspot or MP5 to
IntelliVue GuardianSoftware will be visualized in GuardianSoftware. Since IntelliVue GuardianSoftware
is a data management system, no alarms are announced. The IntelliVue Cableless Measurement Devices
will also not generate physiological alarms when connected to IntelliVue GuardianSoftware. See the
Instructions for Use of GuardianSoftware.
Assigning an IntelliVue Cableless Measurement Device to a Host
When an IntelliVue CL SpO2 Pod is used with a host system (patient monitor, telemetry device or
GuardianSoftware), the Pod must be assigned to that host system.
The assignment can be done at the CL SpO
GuardianSoftware).
WARNING
Always make sure that the applied CL SpO
Pod itself or at the host system (patient monitor or
2
Pod is assigned to the correct patient.
2
WARNING
Short Range Radio connections are subject to interruption due to interference from other radio sources in
the vicinity, including microwaves, bluetooth devices, WLAN devices (802.11b,g,n) and cordless phones.
Depending on the strength and duration of the interference, the interruption may occur for an extended
period. A loss of connection, due to moving out-of-range, interference, or for other reasons, is indicated
with a
No Host Monitoring INOP on the SpO
Correct channel configuration is important, refer to the Configuration Guide for details.
Assignment at the Measurement Device
To make an assignment, select:
•the
• hold the ◄ key pressed.
This opens the
range. In order to save power, the list is only visible for a short time; the menu is automatically closed after
40 seconds.
Add/Remove SmartKey , or
Add To menu which lists the available patient monitors and telemetry devices within the SRR
Telemetry device: A telemetry device must be put into assignment mode by pressing the key on the
telemetry device before it can appear in the list. Pressing the key starts an SRR channel search to find
the clearest channel available. During the search all 4 LEDs will blink once per second. The search will
Pod, or a cl SpO₂ Disconnect INOP at the host monitor.
2
22

2 IntelliVue CL SpO2 Pod
take approximately 20-25 seconds. Once a channel is identified, the first LED will light up and blink
once per second to indicate that the telemetry device is ready for assignment.
Add To
Mon 1
Mon 2
Tele 33
Tele 44
1 Select a patient monitor or telemetry system using the ◄ and ► keys.
If you select a patient monitor, the measurement selection key on that monitor will change to show the
type of measurement device.
2 Activate the assignment by pressing the key twice on the measurement device.
The Cableless Measurement Device is assigned to the selected patient monitor or telemetry device. A
telemetry device plays the assignment tone when the assignment is successful. A patient monitor issues
an assignment prompt message.
If the internal measurement in the patient monitor is active (the measurement selection key has a yellow
frame), you will need to confirm that it should be deactivated in favor of the Cableless Measurement Device
you want to assign. To do this:
1 Select the measurement selection key on the monitor.
A prompt message appears with the
2 Select
Confirm to deactivate the internal measurement.
Confirm and Cancel keys.
When the Cableless Measurement Device is assigned, the symbol appears on its display indicating that
alarming capability has been transferred to the host (to the monitor or, for the telemetry device, to the
Information Center). No patient alarms will be announced on the Cableless Measurement Device.
To unassign the measurement device from the monitor or telemetry system, select the
SmartKey, then select
Remove From. After confirmation the SRR connection is disconnected.
Assignment at the Patient Monitor
Assignment at the Patient Monitor
Prepare the Cableless Measurement Device for assignment by activating the
At the patient monitor,
1 Select the Measurement Selection key.
2 Select the
This opens the
Devices:
3 Select the device which you want to assign to the patient in the monitor.
4 The monitor displays the assignment prompt message.
If the internal measurement in the patient monitor is active, you will need to confirm that it should be
deactivated in favor of the Cableless Measurement Device you want to assign.
Add cl Msmt pop-up key.
Add cl Measurement window, which shows the available Cableless Measurement
Add/Remove
Add/Remove SmartKey.
When the Cableless Measurement Device is assigned, the symbol appears on its display indicating that
alarms from the device will be sent to the patient monitor.
23

2 IntelliVue CL SpO2 Pod
An assigned Cableless Measurement Device can be removed in the
more details see the Instructions for Use for your patient monitor.
Assignment with an RFID Reader and Tagged Cableless Devices
You can directly assign all cableless devices that have RFID tags with a Philips HS1-R RFID/barcode
reader. The SpO
Pod used must have an IntelliVue ProxiTag RFID tag adhesively attached.
2
1 Hold the cableless device close to the reader.
Depending on its configuration, the reader beeps, vibrates or indicates via the LEDs when it has read
the tag.
2 Press any hardkey on the cableless device.
The Cableless Measurement Device is now added to the monitor.
If the corresponding internal measurement in the patient monitor is active, you will be asked to confirm that
it should be deactivated in favor of the Cableless Measurement Device by selecting
If a Cableless Measurement of the same type is already assigned to the monitor, you will be asked to confirm
that it should be removed by selecting
Assignment at the Fetal Monitor
The first time an IntelliVue Cableless Measurement Device is used with an Avalon Fetal Monitor, or after a
device has been powered off for storage, place it on the Avalon CL Base Station. This will automatically
switch the device on. The device is assigned automatically to the Fetal Monitor working with the CL Base
Station.
Measurement Selection window. For
Replace.
Replace.
24
NOTE
When you place a Cableless Measurement Device onto an Avalon CL Base Station to assign it to an Avalon
Fetal Monitor, the Cableless Measurement Device is automatically unassigned from the previous patient.
Special Conditions when Working with Fetal Monitors
The following special conditions apply when CL SpO
Pods are operating with an Avalon Fetal Monitor as
2
a host:
•The SpO
Adult.
•The
Pods are intended to measure the maternal SpO2 and Pulse. The patient category is always
2
Pulse measurement is always On. The Pulse: On/Off setting is not available.
• Physiological alarms are only available at the Avalon Fetal Monitor, not at the Cableless Measurement
Devices. Local attended monitoring is not available:
Use for Transp. is not supported. (Local attended
monitoring is used for displaying alarms locally at the Cableless Measurement Devices during patient
transport, when the patient is attended by a caregiver).
• Alarm-related operations (e.g. switching alarms on and off, setting the high and low alarm limits) are
not available when
Alarm Mode is set to INOP only in the Avalon Fetal Monitor. See the Avalon Fetal
Monitor Instructions for Use and Avalon Fetal Monitor Configuration Guide for further information.

2 IntelliVue CL SpO2 Pod
• You can use the
Remove operation at the host to remove Cableless Measurement Devices, as described
in the Avalon Fetal Monitor Instructions for Use.
• Averaging Time is not configurable.
• Smart Alarm Delay is not supported.
• Pulse tone from the CL SpO
Perfusion is always Off and cannot be changed to On.
•
• Perfusion Change Indicator is not supported.
• It is not possible to change the label, it is always
• Continuous mode only. The functions for starting a measurement, selecting the measurement mode
and setting the repetition time are not supported.
• Configuration of
Aging Time (for Aging Numerics) is not possible.
• Pleth wave is not available.
Assignment with GuardianSoftware
To assign a Cableless Measurement Device to a patient in GuardianSoftware:
1 Select the patient on the
2 Take the Cableless Measurement Device from the charger.
3 On the
4 Click
Equipment List tab, select the Cableless Measurement Device on the Available Equipment list,
highlighted in green on top of the list. The device on top of the list is always the one with the most
recent user interaction (taken off the charger, put on the charger, or key pressed).
Use for Patient to assign the device to the patient.
Pod is not supported at the Avalon Fetal Monitor.
2
SpO₂.
Chalkboard.
Controls Available with a Patient Monitor
The controls available when working with the Cableless Measurement Device and a patient monitor are
described in the table below.
Action At the Cableless
Start SpO
Change SpO
Select SpO
Assign SpO
Remove SpO
Change Alarm Limits Yes* Yes No
Place Device in Standby Yes Yes Yes
Alarm Silence Yes Yes Yes
Alarm Off/Pause Yes Yes Yes
* except when SRR connection to host is lost
2
Mode Yes Yes No
2
Repetition Time Yes Yes No
2
Pod Yes Yes No
2
Pod Yes Yes No
2
Measurement
At the Patient
Monitor
At the IIC
Device
Yes Yes No
25

2 IntelliVue CL SpO2 Pod
WARNING
If a patient being monitored by Cableless Measurement Devices moves out of range of the patient monitor,
the measurements are not transmitted to the patient monitor or the Information Center. The measurements
are available on the Cableless Measurement Device only. If this occurs, the
displayed on the measurement device. The measurement device will also sound the INOP tone.
Controls Available with a Telemetry Device
The controls available when working with the Cableless Measurement Device and a TRx4841/TRx4851A
Transceiver or MX40 wearable patient monitor with a short range radio adapter (SRRA) are described in the
table below.
No Host Monitoring message is
Action At the Cableless
At the IIC
Measurement Device
Start SpO
2
Change SpO
Select SpO
2
Assign SpO
Remove SpO
Mode Yes Yes
2
Repetition Time Yes No
Pod Yes No
2
Pod Yes Yes
2
Yes Ye s
Change Alarm Limits No Yes
Place Device in Standby No No
Alarm Silence No Yes
Alarm Off/Pause No Yes
NOTE
When you unplug the ECG cable from the telemetry device and plug it into the monitor associated with the
same patient, the ECG source will automatically be from the monitor. The SpO
measurement devices
2
assigned to the telemetry device will continue to source data to the telemetry device and the Information
Center. You may need to change screens on the patient monitor to see the measurements.
NOTE
The SpO
IntelliVue CL SpO
is available and the IntelliVue CL SpO
measurement sourced from the telemetry device (label: SpO2T) has priority over the
2
measurement. The SpO2T measurement is sent to the Information Center as long as it
2
measurement is available on the measurement device only.
2
26

Controls Available with GuardianSoftware
The controls available when working with the Cableless Measurement Device and GuardianSoftware are
described in the table below.
2 IntelliVue CL SpO2 Pod
Trending
Action At the Cableless
At GuardianSoftware
Measurement Device
Start SpO
2
Yes Yes
Change Mode Yes Yes
Select SpO
Assign SpO
Remove SpO
Repetition Time Yes Yes
2
Pod Yes Yes
2
Pod Yes Yes
2
Place Device in Standby No No
Technical Alarm Silence No Yes
Alarm Off/Pause No No
The IntelliVue Cableless Measurement Devices provide data for trending of parameters. The trended data
are only available via a host system. For details on trends see the Instructions for Use of your host system.
When the connection to the host is lost during measurement, the IntelliVue Cableless Measurement
Devices are able to collect data in a local memory. These data can be uploaded to GuardianSoftware, but
not to other host systems, when a connection is established at a later stage.
27

2 IntelliVue CL SpO2 Pod
Monitoring SpO2
Philips pulse oximetry uses a motion-tolerant signal processing algorithm, based on Fourier artifact
suppression technology (FAST). A sensor is used that transmits light of two different wavelengths through
the tissue of the patient. The measurement principle of pulse oximetry is based on the specific absorption
characteristics of oxyhemoglobin and deoxyhemoglobin and the pulsating arteriolar vascular bed at the
measurement site. It provides four measurements:
• Oxygen saturation of arterial blood (SpO
sum of oxyhemoglobin and deoxyhemoglobin (functional arterial oxygen saturation).
• Pleth waveform - auto-scaled visual indication of patient's pulse which is not directly proportional to
the pulse volume (only on patient monitor, GuardianSoftware or Information Center, if assigned).
• Pulse rate (derived from pleth wave) - detected pulsations per minute.
• Perfusion indicator - numerical value for the pulsatile portion of the measured signal caused by arterial
pulsation (only on patient monitor, if assigned).
NOTE
No alarms are generated for SpO
patient monitor or telemetry device.
The SpO
cardiac defibrillator according to IEC 80601-2-30.
measurement is suitable for use in the presence of electrosurgery and during the discharge of a
2
) - percentage of oxygenated hemoglobin in relation to the
2
and Pulse when measuring SpO2 with the SpO2 Pod not assigned to a
2
SpO2 Sensors
Specialized SpO2 Sensors are available for use with the IntelliVue CL SpO2 Pod. See the “IntelliVue CL
SpO2 Pod Accessories” section for details.
Familiarize yourself with the Instructions for Use supplied with your sensor before using it. In particular,
check that the sensor being used is appropriate for your patient category and application site.
Additional Information
The following documents contain additional information, depending on which accessories you are using:
• Mobile CL Single-Patient SpO
• Mobile CL Reusable SpO
• Mobile CL SpO
1
may not be available in all geographies
Sensor Instructions for Use
2
Sensor1 Instructions for Use
2
Wristband Instructions for Use
2
28
Connecting SpO2 Sensors
1 Connect the sensor to the single patient Mobile CL SpO2 Cradle (if not already connected).
2 IntelliVue CL SpO2 Pod
2 Insert the SpO
Pod into the Mobile CL SpO2 Cradle. The correct orientation is indicated by a
2
matching blue dot inside the cradle.
CAUTION
Make sure that the contacts of the SpO
Pod and the sensor are dry and free of residues.
2
3 Secure the cradle on the patient's arm using the wristband.
a. Feed the free end of the wristband through the slot in the cradle, starting from the underside of the
cradle.
b. Slide the wristband onto the patient's arm and pull the free end until the wristband fits snugly.
c. Close the wristband using the Velcro patch on the free end of the band.
29

2 IntelliVue CL SpO2 Pod
Removing the Pod from the Cradle
To remove the SpO2 Pod from the cradle, pull on the Pod at the opening in the cradle, while holding the
cradle in place on the patient's arm.
Applying the Sensor
1 Choose a finger of the patient that matches the sensor dimension in a way that the sensor optical
components are properly aligned and the sensor is neither too loose nor applies too much pressure to
the finger. For small pediatric patients consider the thumb.
2 Remove colored nail polish from the application site.
3 Apply the sensor to the patient. The application site should match the sensor size so that the sensor can
neither fall off, nor apply excessive pressure. See the sections below for details on applying the different
sensors.
4 Check that the light emitter and the photodetector are directly opposite each other. All light from the
emitter must pass through the patient's tissue.
30
WARNING
Proper Sensor Fit: If a sensor is too loose, it might compromise the optical alignment or fall off. If it is too
tight, for example because the application site is too large or becomes too large due to edema, excessive
pressure may be applied. This can result in venous congestion distal from the application site, leading to
interstitial edema, hypoxemia and tissue malnutrition. Skin irritations or lacerations may occur as a result of
the sensor being attached to one location for too long. To avoid skin irritations and lacerations, periodically
inspect the sensor application site and change the application site regularly.
Venous Pulsation: Do not apply sensor too tightly as this results in venous pulsation which may severely
obstruct circulation and lead to inaccurate measurements.
Ambient Temperature: At elevated ambient temperatures be careful with measurement sites that are not
well perfused, because this can cause severe burns after prolonged application. All listed sensors operate
without risk of exceeding 41°C on the skin if the initial skin temperature does not exceed 35°C.
Extremities to Avoid: Avoid placing the sensor on extremities with an arterial catheter, an NBP cuff or an
intravascular venous infusion line.
 Loading...