

Page 1
TPS17.2A
Chassisname Platform Modelname
TPS17.2ALA MSD8120
32PFH4052/96
32PFH4082/96
Published by Ping.song 1721 Quality Subject to modification 3122 785 20400
© TP Vision Netherlands B.V.
2017
All rights reserved. Specifications are subject to change without notice. Trademarks are the
property of Koninklijke Philips Electronics N.V. or their respective owners.
TP Vision Netherlands B.V. reserves the right to change products at any time without being obliged to adjust
earlier supplies accordingly.
PHILIPS and the PHILIPS’ Shield Emblem are used under license from Koninklijke Philips Electronics N.V.
2017-May-27
Page 2

1.Product inforamtion……….……………………………………………………………………………………3
2.Connections overview……..…..…..………………..…………………………………………………………5
3.Mechanical Instructions………………….…………………………………………………………………….6
Cable dressing (32" 4052/4082 series)……………………………………………………………………6
Assembly/Panel Removal ………………………………………………………………………………………6
4.Service Modes…………….……………….………………….…………………………………………….….10
5.Software upgrading, Error Code and Panel Code………...……………………………………………..13
6.Circuit Descriptions…..……………………….………………………………………………………………14
7.IC Data Sheet……...……………………………………………………………………………………….…..21
8.Circuit Diagrams……………...……………………………………………………………………………….23
8.1 A 715G7734 PSU……………………………………………………………………..……………………23
8.2 B 715G7491 SSB…………………………………………………………………………………………..25
8.3 J 715G8511 IR Panel………………………………………………..…………………………………32
8.4 E 715G8112 Keyboard control panel…………………………………………………………………….33
9.Styling Sheet……………….…………………….……………………………………………………………..34
4052/4082 series 32"………………………………………………………………………………………….34
Published by Ping.song 1721 Quality Subject to modification 3122 785 20400
© TP Vision Netherlands B.V.
2017
All rights reserved. Specifications are subject to change without notice. Trademarks are the
property of Koninklijke Philips Electronics N.V. or their respective owners.
TP Vision Netherlands B.V. reserves the right to change products at any time without being obliged to adjust
earlier supplies accordingly.
PHILIPS and the PHILIPS’ Shield Emblem are used under license from Koninklijke Philips Electronics N.V.
2017-May-27
Page 3

1. Product information
Product information is subject to change without notice.
For detailed procuct information,please visit
www.philips.com/support
Display
Type
Display resolution
• 640×480 - 60Hz
• 800×600 - 60Hz
• 1024×768 - 60Hz
• 1280×1024 - 60Hz ( only
FULL HD)
• 1360×768 - 60Hz
• 1920×1080 - 60Hz ( only
FULL HD)
Input resolution
Video formats
Resolution — Refresh rate
• 480i - 60Hz
• 480p - 60Hz
• 720p - 60Hz
• 1080i - 60Hz
• 1080p - 24Hz,30Hz,60Hz
Dimensions and Weights
32PFH4022/96, 32PFH4052/96,
32PFH4082/96
• without TV stand:
Width 726.49 mm - Height424.26 mm - Depth 79.8
mm - Weight 5.1 kg
• with TV stand:
Width 726.49 mm - Height474.06 mm - Depth 176.56
mm - Weight 5.2 kg
Connectivity
TV Side
• HDMI 1
• HDMI 2
• HDMI 3
• USB x 1
• YPbPr + R/L x 1
Share with Y
• AV
• SPDIF
• Tuner ATV + DTV
• PC
x1 (RCA)
x1
Reception
Aerial input : 75 ohm coaxial (IEC75)
• Tuner bands :
• DVB-T receiver, MPEG-2, MPEG-4, H.264 decoder
• NTSC receiver, Video decoder
Multimedia
Connections
• Picture: JPEG
• Music :MP3
•• Video : MPEG1 / MPEG2 / MPEG4
/ Motion JPEG / RM / RMVB /
MKV / AVI
.
Power
Product specifications are subject to change without
notice. For more specification details of this product,
see www.philips.com/support
Power
• Mains power :
• Ambient temperature : 5°C to 35°C
• Standby Power: <0.5W.
• Power Consumption: <0.5W.
32PFH4052/96: 60W
32PFH4082/96: 60W
AC 110-240V,50/60Hz
Supported TV mounts
To mount the TV, please purchase a Philips TV
Mount or any TV mount compliant with the VESA standard
.To prevent damage to cables and connectors, be sure to
leave a clearance gap of at least 2.2 inches or 5.5cm
between the back of TV to the wall.
Page 4
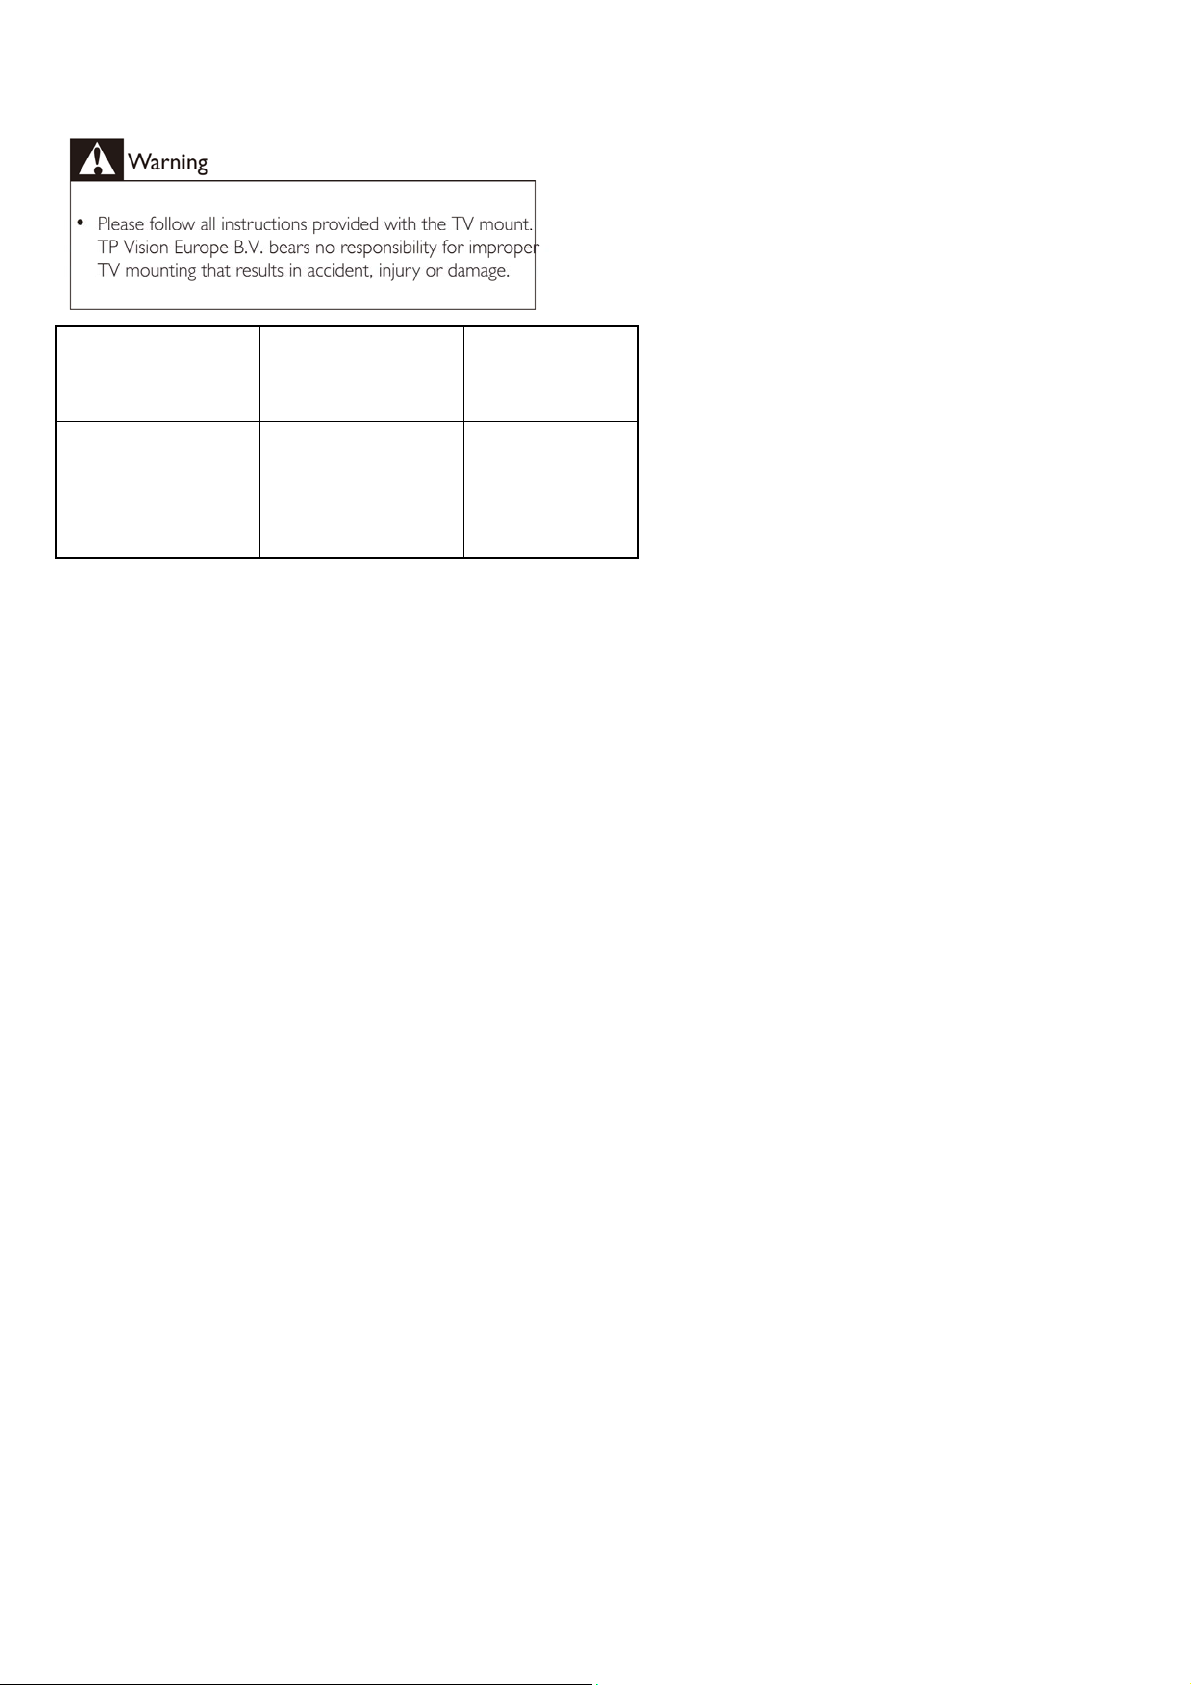
Model No.
32PFH4022/96
32PFH4052/96
32PFH4082/96
Required Pixel
Pitch(mm)
Required
Mounting
Screws
100×100 4×M4
Page 5
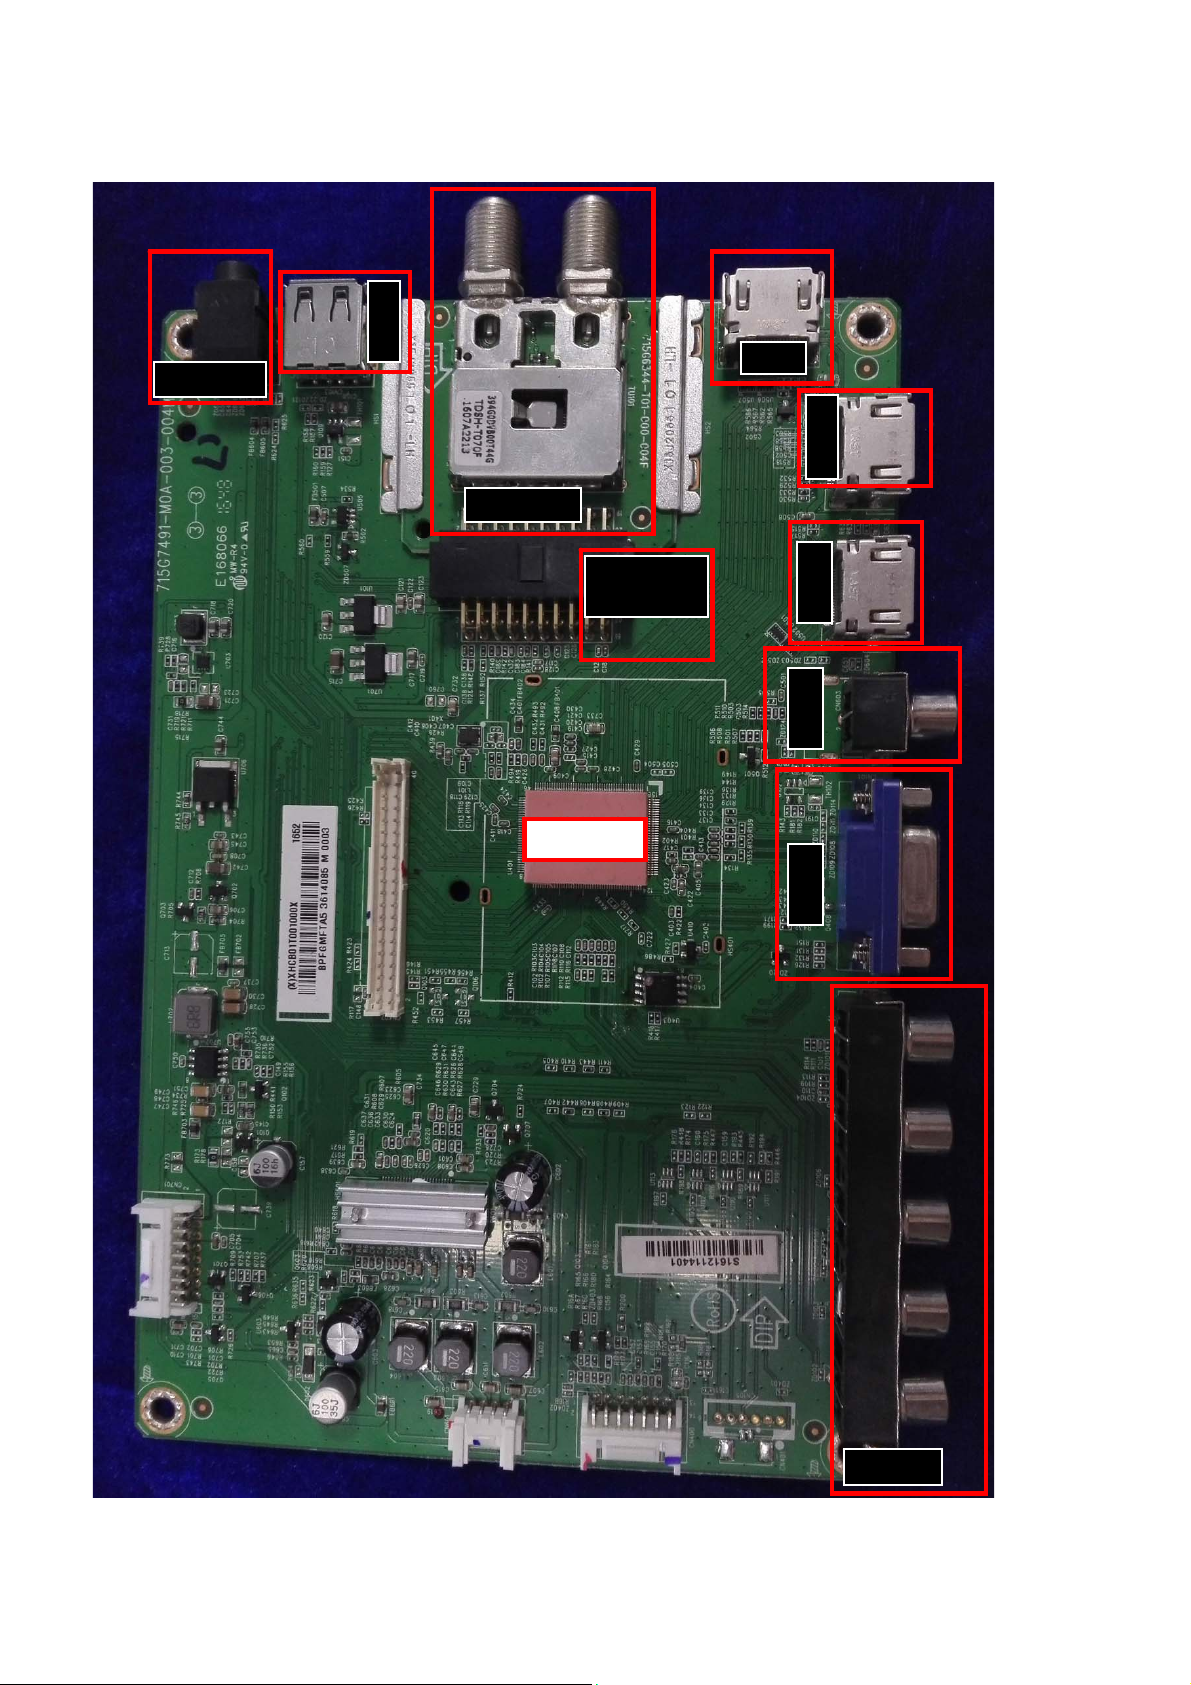
2. Connections Overview
SCALER
AUDIOOUT
USB
TUNER
SERVICE
CONNECTOR
HDMI
HDMI
HDMI
SPDIF
VGA
YPBPR
Page 6
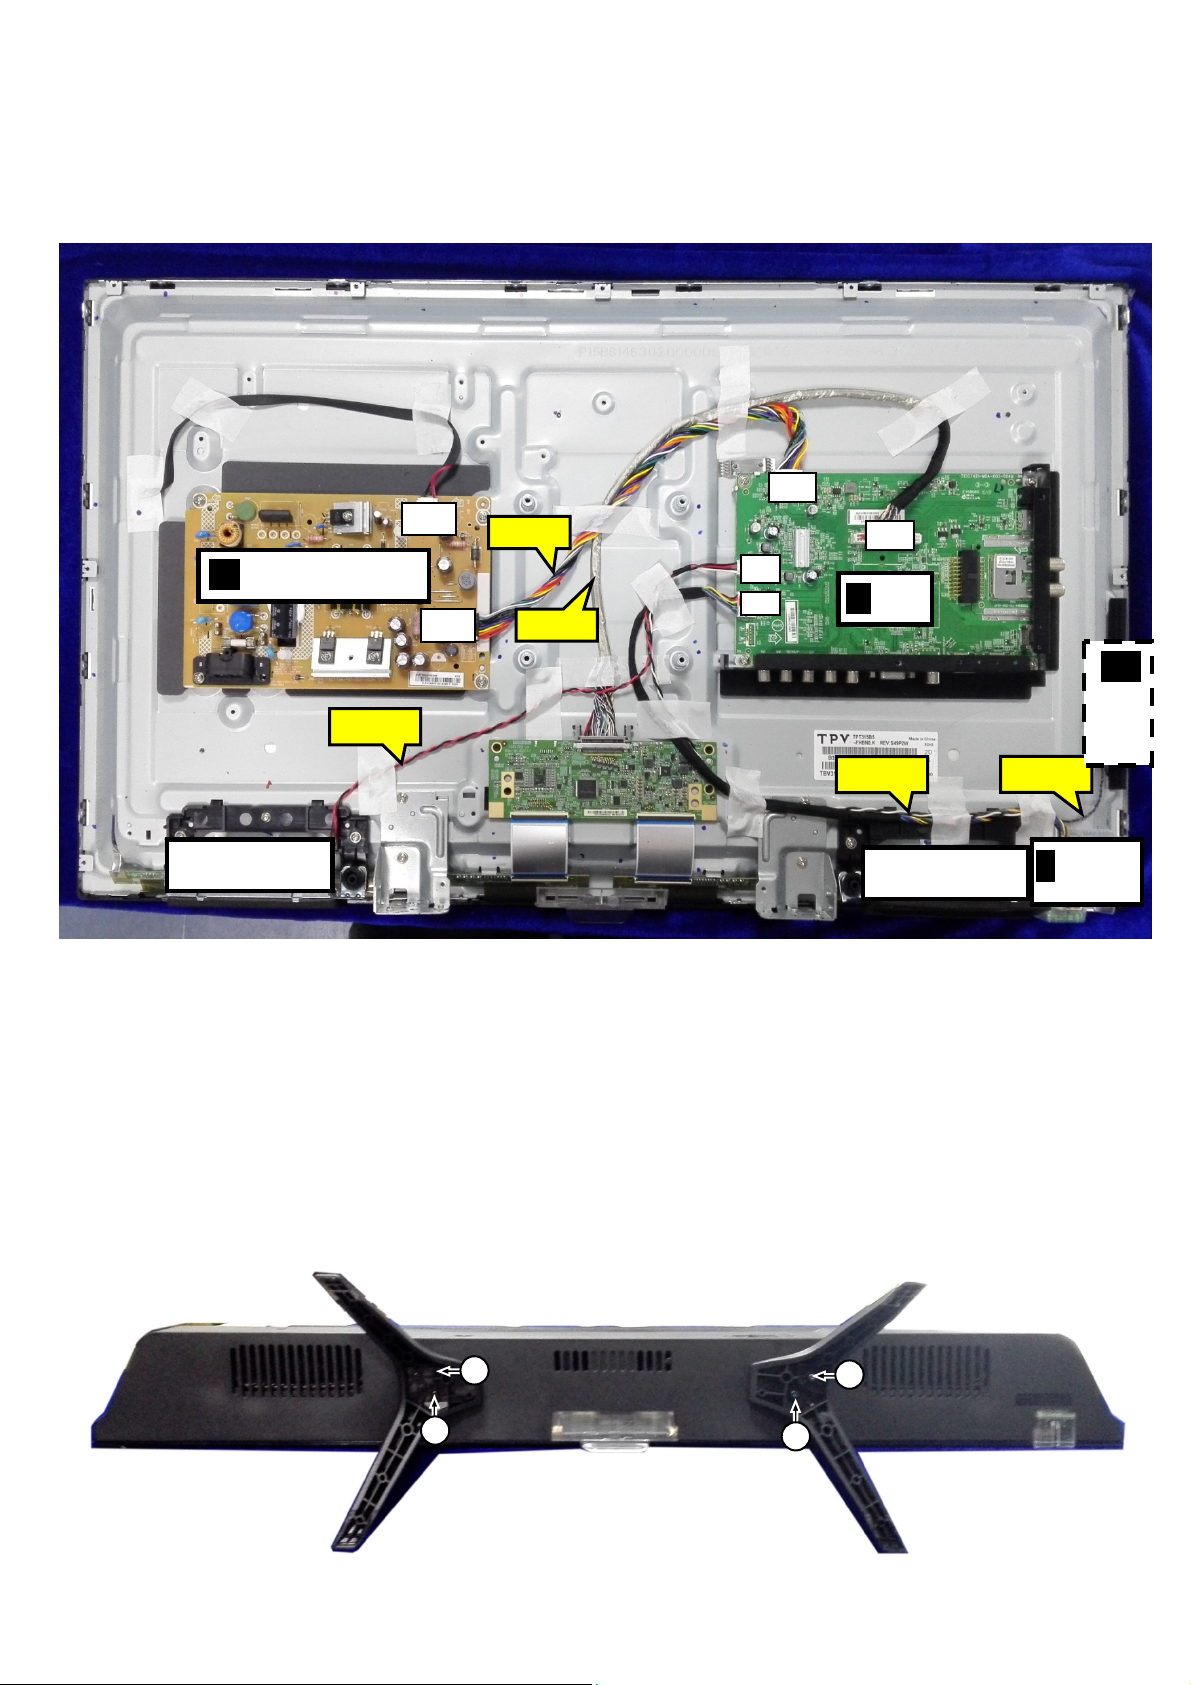
3. Mechanical Instructions
LOUDSPEAKER
/
(
)
LOUDSPEAKER
SSB
3.1 Cable Dressing
CN8601
MAINPOWERSUPPLY
A
(1054)
CN9101
ECN701
ECN402
CN701
CN402
CN
601
CN
400
B
(1053)
E
KEYBOARD
CONTRO
ECN601
(1184)
3.2 Assembly/Panel Removal
3.2.1 Stand removal
1. Remove the fixation screws [1] that secure the stand
2. Take the stand bracket out from the set.
Cable dressing (32" 4052/4082 series)
ECN601
(1184)
ECN400
J
IR
BOARD
1054
L
LED
1
1
1
1
Page 7
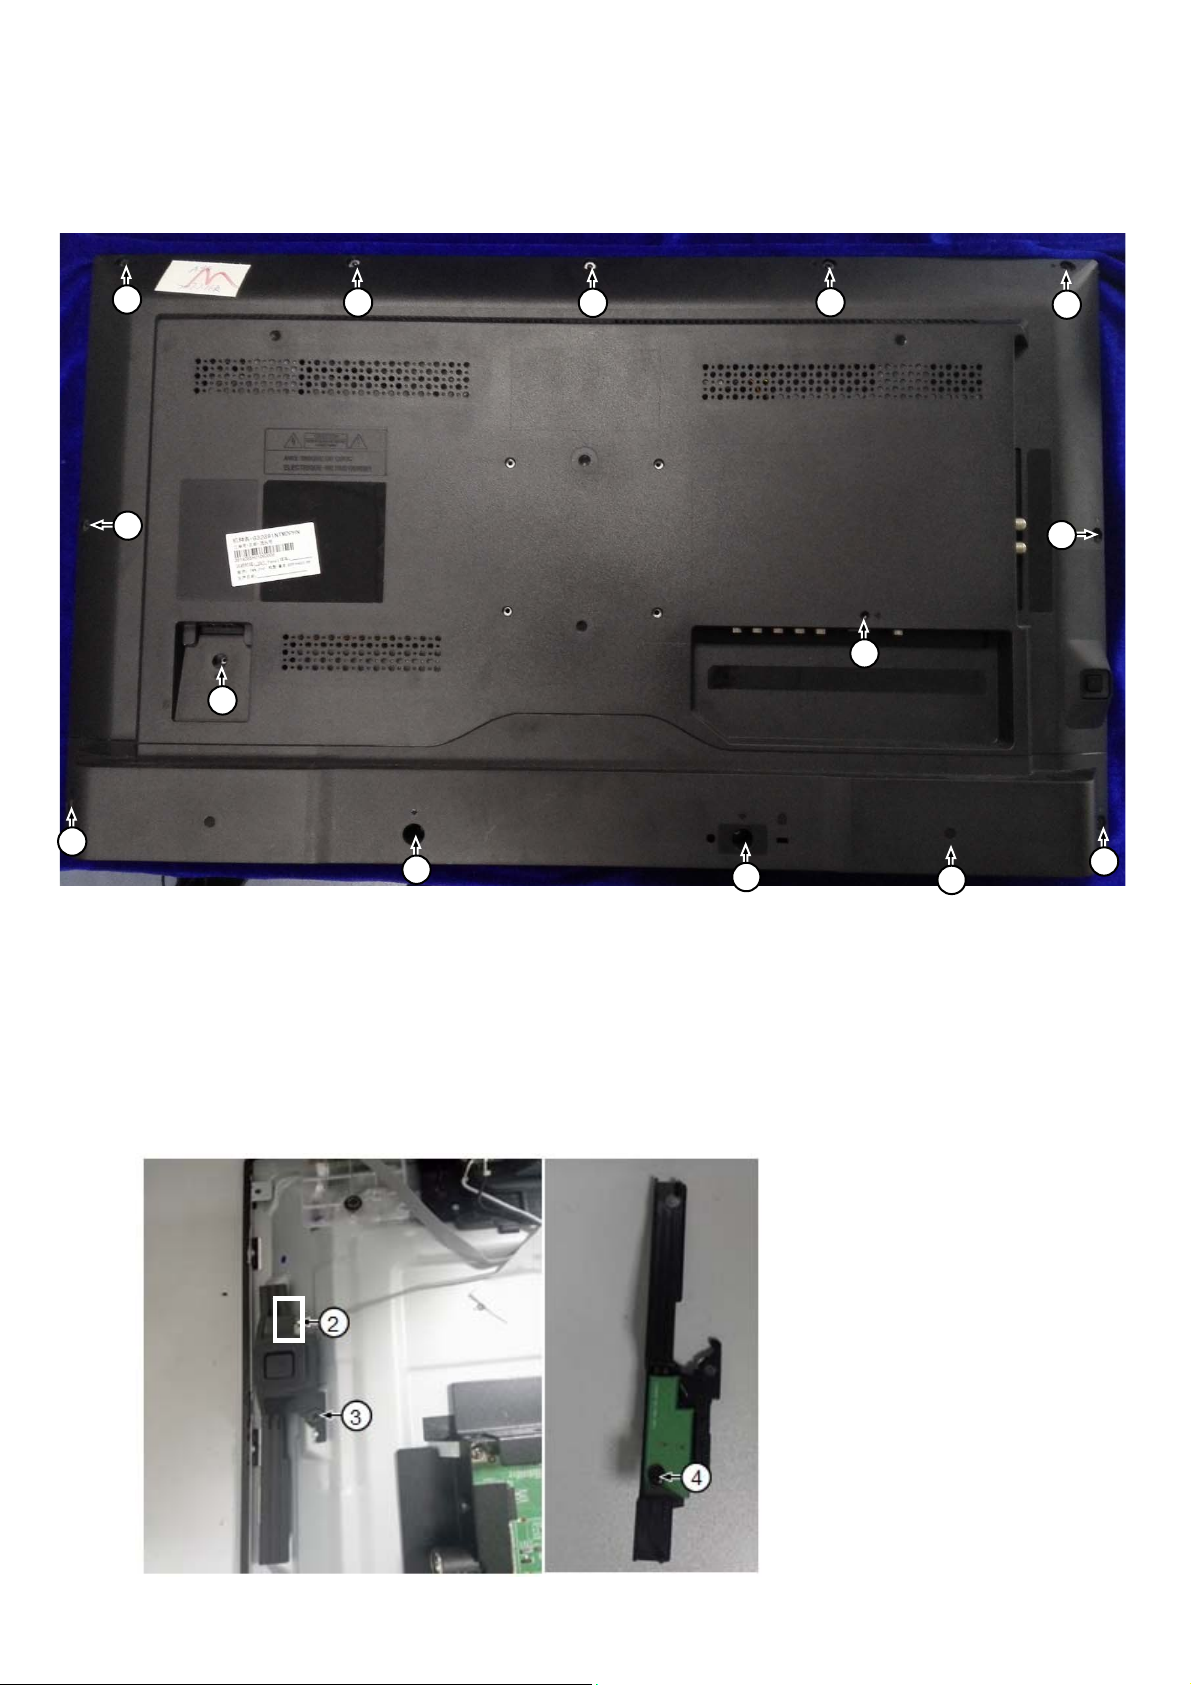
3.2.2 Rear Cover
Warning: Disconnect the mains power cord before removing the rear cover
1. Remove fixation screws [2] and [3] that secure the back cover
2. Gently lift the rear cover from the TV. Make sure that wires and cables are not damaged while lifting the rear cover from the set
2
2
2
3
2
2
2
2
2
3
2
2
2
2
3.2.3 Keyboard Control Unit
1. Release the connector [2] from the SSB Board.
Caution: be careful, the Keyboard is catch on the Back cover, please be careful to avoid damage the fragile connectors!
2. Remove all the fixation screws[3] [4] and the cable from the keyboard control panel and take it out from the panel plate
When defective, replace the whole unit.
Page 8
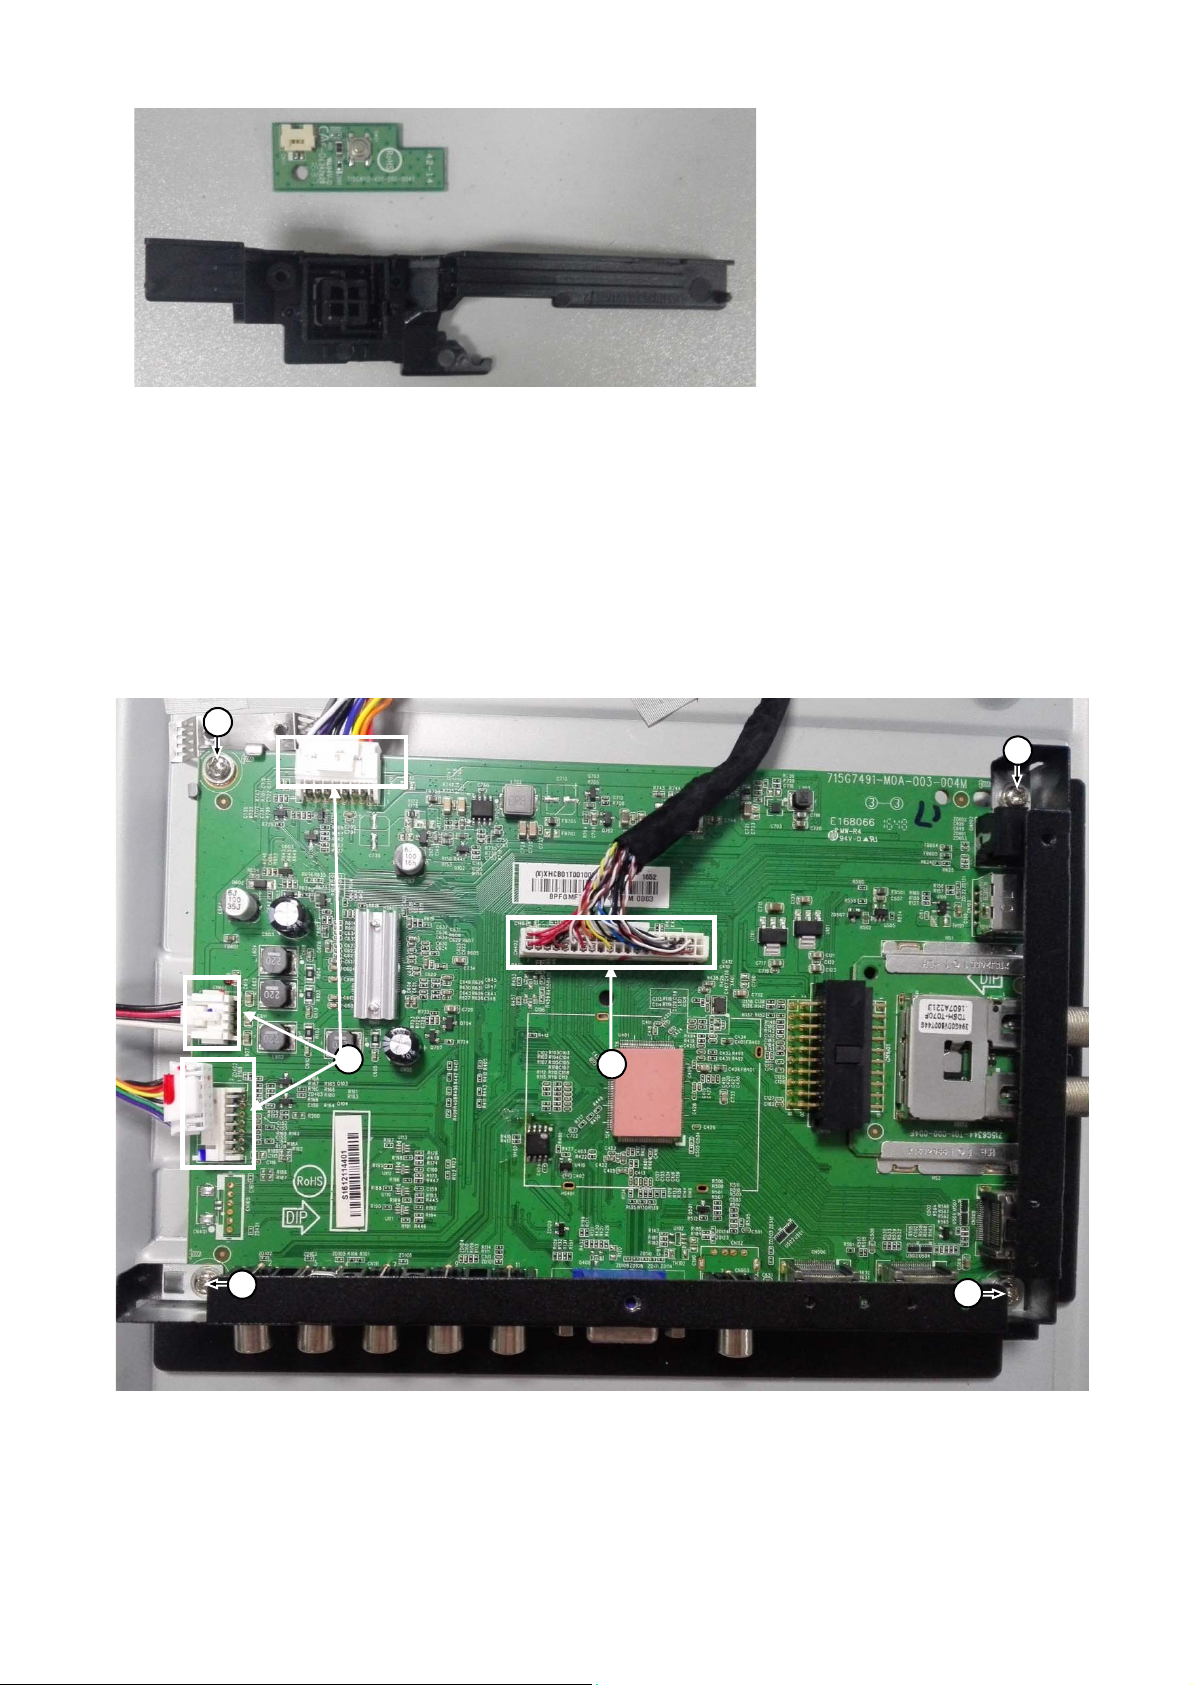
3.2.4 Small Signal Board (SSB)
Caution: it is mandatory to remount all different screws at their original position during re-assembly. Failure to do so may result in damaging the
SSB.
1. Release the clips from the LVDS connector that connect with the SSB[1].
Caution: be careful, as these are very fragile connectors!
1. Unplug all other connectors [2] .
3. Remove all the fixation screws from the SSB [3].
4. The SSB can now be shifted from side connector cover, then lifted and taken out of the I/O bracket.
3
3
2
1
3
3
3
3.2.5 Power Supply Unit (PSU)
Caution: it is mandatory to remount all different screws at their original position during re-assembly. Failure to do so may result in damaging the
PSU.
1. Gently unplug all connectors from the PSU.
2. Remove all fixation screws from the PSU.
Page 9
3. The PSU can be taken out of the set now.
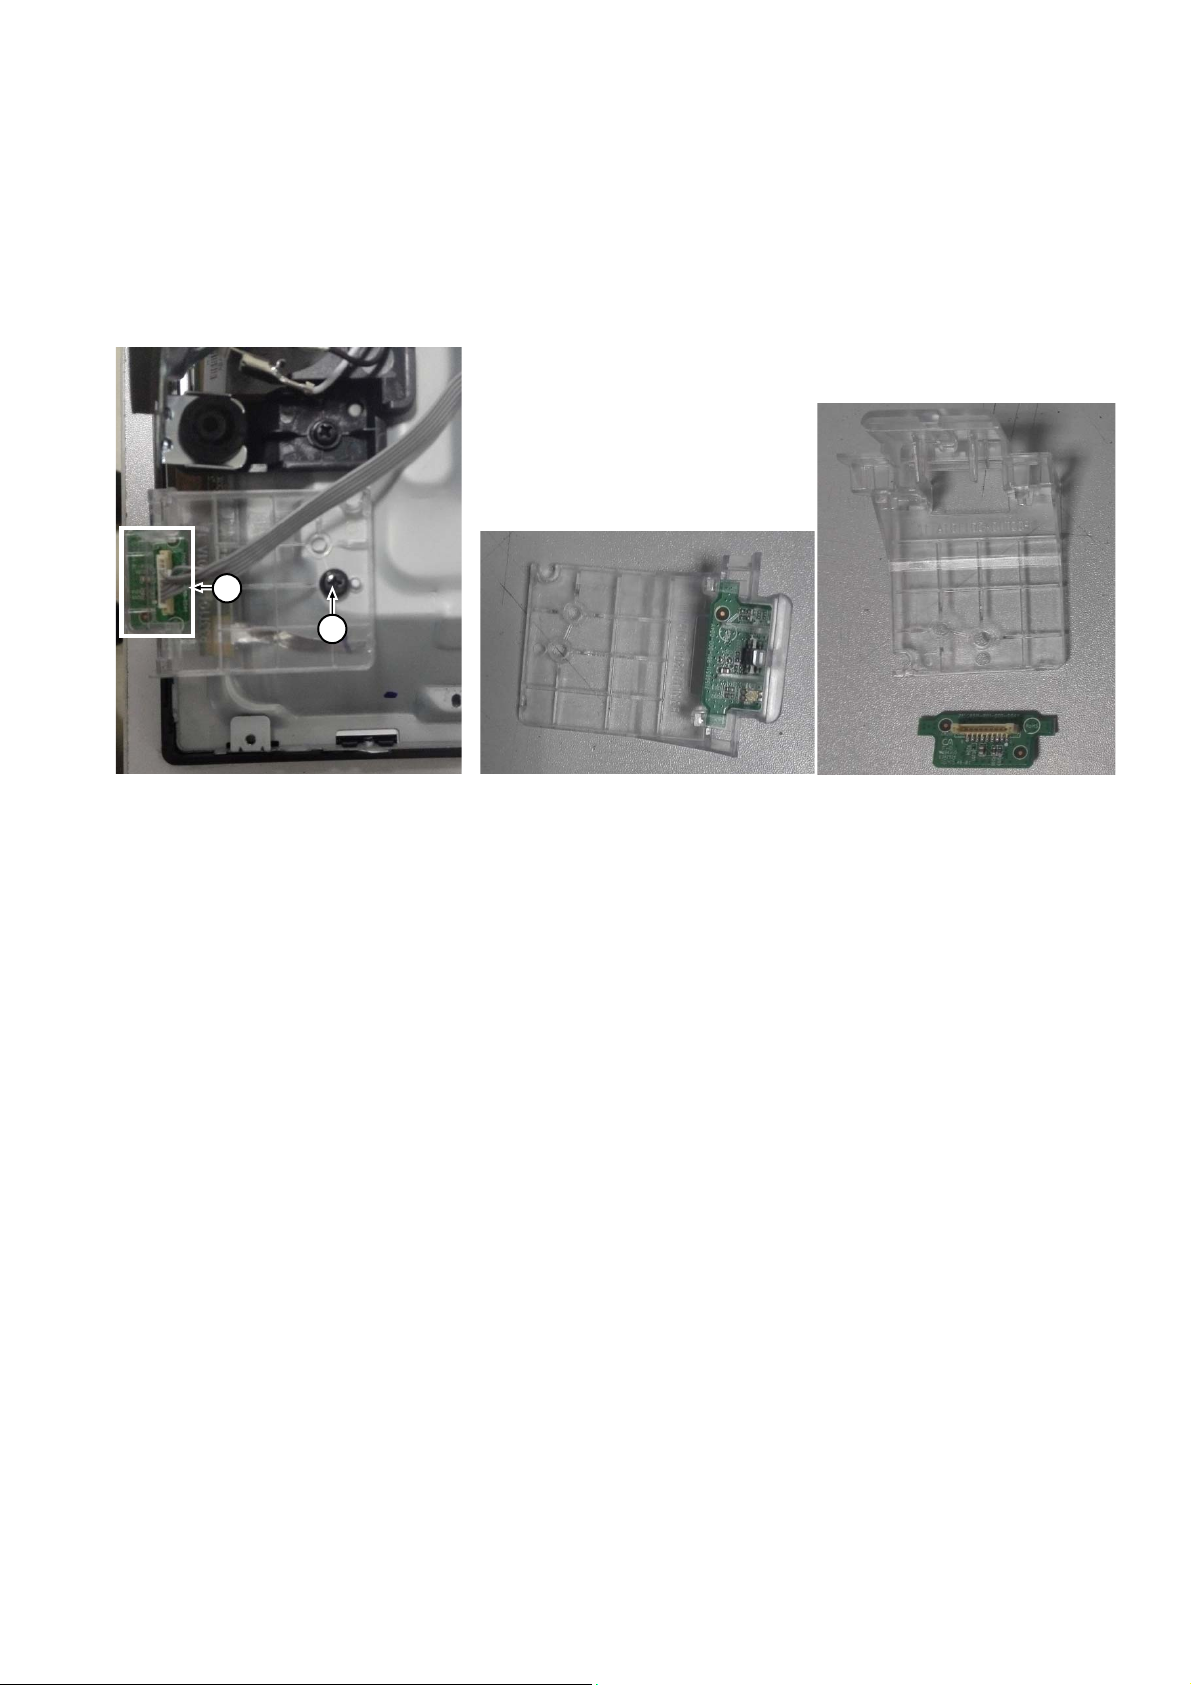
3.2.6 IR board Control Unit
1. Unplug the connector from the SSB.
Caution: be careful, as these are very fragile connectors!
2. Remove all the fixation screws [1] and connector [2] from the IR board control unit.
When defective, replace the whole unit.
2
1
3.2.7 Speakers
1. Gently release the tapes that secure the speaker cables.
2. Unplug the speaker connector from the SSB.
3. Take the speakers out.
When defective, replace the both units.
3.2.9 LCD Panel
3. Remove the SSB as described earlier.
2. Remove the PSU as described earlier.
3. Remove the keyboard control panel as described earlier.
4. Remove the stand bracket as described earlier.
5. Remove the IR/LED as described earlier.
6. Remove the fixations screws that fix the metal clamps to the front bezel. Take out those clamps.
7. Remove all other metal parts not belonging to the panel.
8. Lift the LCD Panel from the bezel.
When defective, replace the whole unit.
Page 10

4. Service Modes
4.1 Service Modes
The Service Mode feature is split into following parts:
Factory Mode.
Customer Service Mode (CSM).SAM and the Factory mode offer features, which can be used by the Service engineer to repair/align a TV set.
The CSM is a Service Mode that can be enabled by the consumer. The CSM displays diagnosis information, which the customer can forward to the
dealer or call centre. In CSM mode, “CSM”, is displayed in the top right corner of the screen. The information provided in CSM and the purpose of
CSM is to:
Increase the home repair hit rate.
Decrease the number of nuisance calls.
Solved customers’ problem without home visit.
Note: For the new model range, a new remote control (RC) is used with some renamed buttons. This has an impact on the activation of the Service
modes. For instance the old “MENU” button is now called “HOME” (or is indicated by a “house” icon).
4.2 Factory mode:
Purpose
To perform extended alignments.
Specifications
Displaying and or changing Panel ID information.
Displaying and or changing Tuner ID information.
Error buffer clearing.
Various software alignment settings.
Testpattern displaying.
Public Broadcasting Service password Reset.
etc.
How to Activate the Factory mode
To activate the Factory mode, use the following method:
Press the following key sequence on the remote control transmitter: from the “menu/home” press “1999”, directly followed by the
“Back/Return” button. Do not allow the display to time out between entries while keying the sequence.
After entering the Factory mode, we can see many items displayed, use the UP/DOWN keys to display the next/previous menu items
Factory mode overview
Page 11
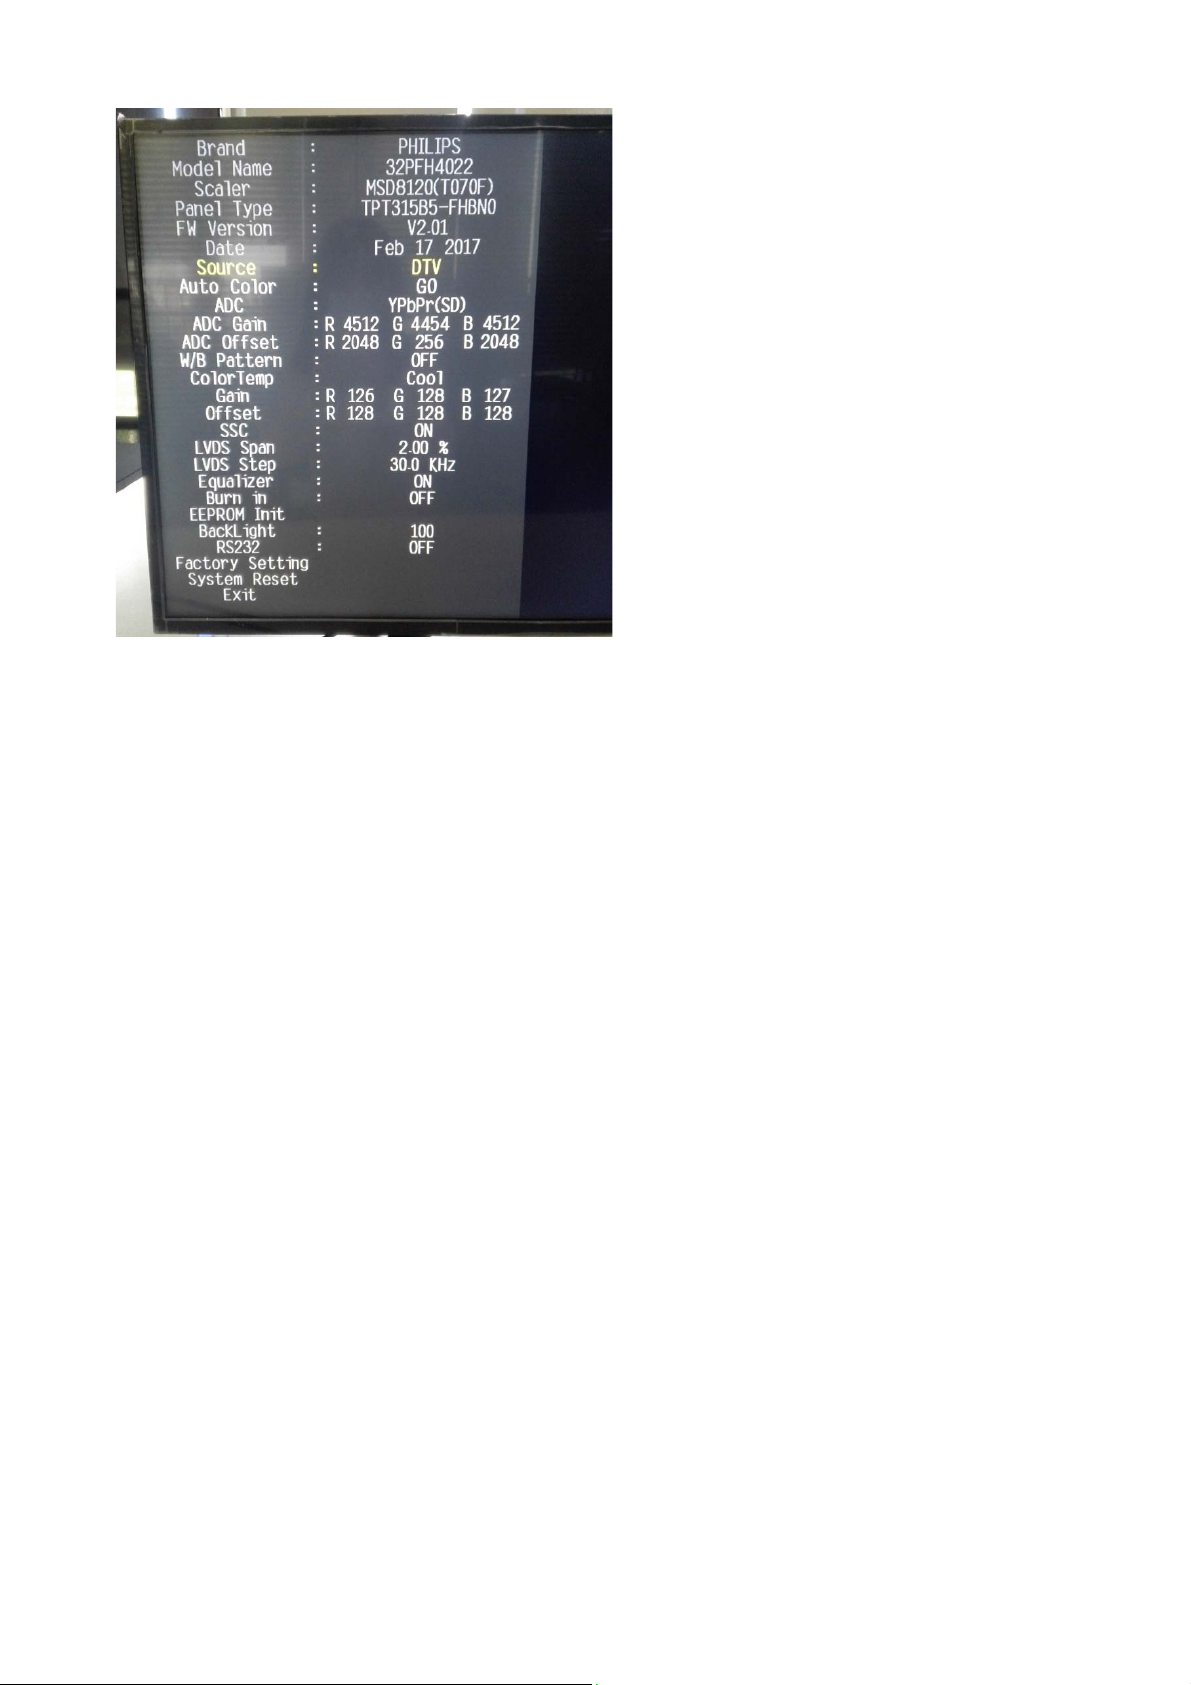
How to Exit the Factory mode
Use one of the following methods:
Select EXIT_FACTORY from the menu and press the “OK” button.
Note: When the TV is switched “off” by a power interrupt, or normal switch to “stand-by” while in the factory mode, the TV will show up in “normal
operation mode” as soon as the power is supplied again. The error buffer will not be cleared.
4.4 Customer Service Mode (CSM)
Purpose
The Customer Service Mode shows error codes and information on the TVs operation settings.The call centre can instruct the customer (by
telephone) to enter CSM in order to identify the status of the set.This helps the call centre to diagnose problems and failures in the TV set before
making a service call.
The CSM is a read-only mode; therefore, modifications are not possible in this mode.
Specifications
Ignore “Service unfriendly modes”.
Line number for every
line (to make CSM language independent).
Set the screen mode to full
screen (all contents on screen is visible).
After leaving the Customer Service Mode, the original settings are restored.
Possibility to use “CH+” or “CH-” for channel surfing, or enter the specific channel number on the RC.
How to Activate CSM
To activate CSM, press the following key sequence on a standard remote control transmitter: “456987” (do not allow the display to time out
between entries while keying the sequence). After entering the Customer Service Mode, the following items are displayed. use the Right/Left keys
to display the next/previous menu items
Note: Activation of the CSM is only possible if there is no (user) menu on the screen!
Page 12
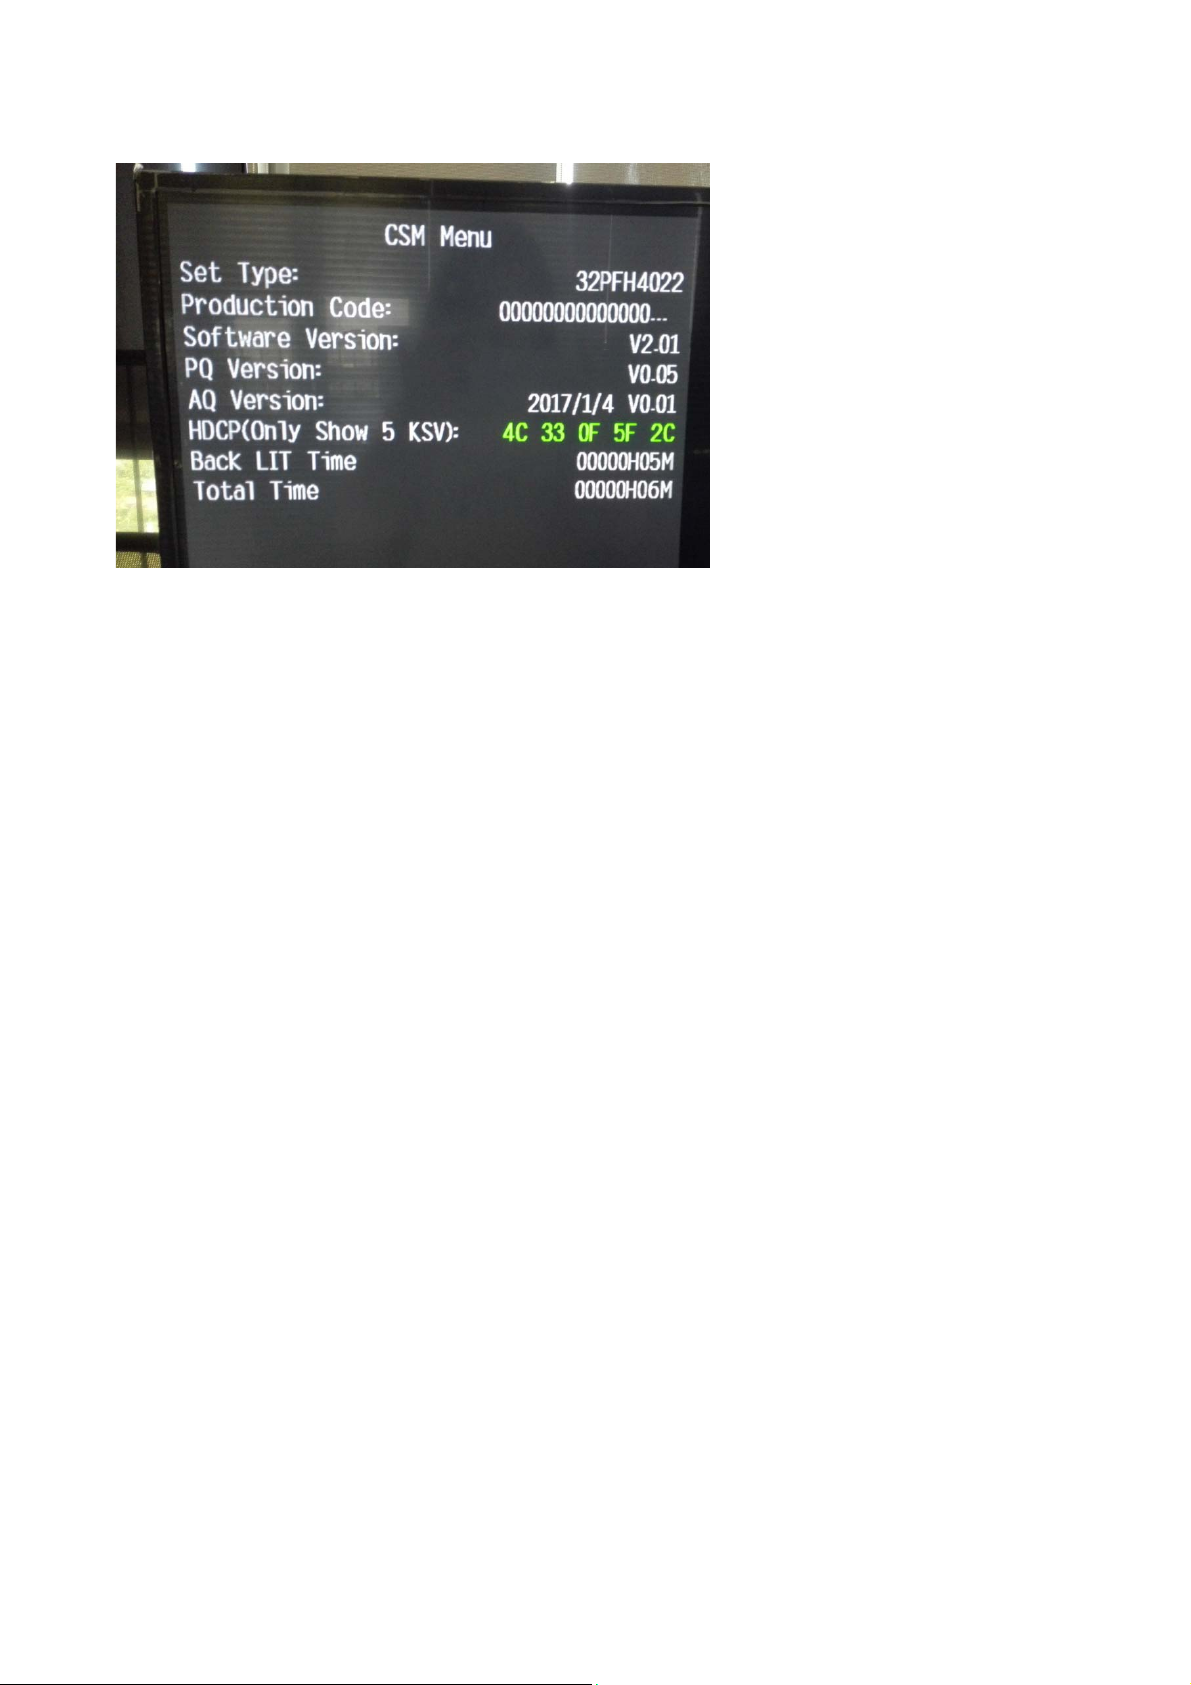
CSM Overview
How to Navigate
By means of the “CURSOR-DOWN/UP” knob (or the scroll wheel) on the RC-transmitter, can be navigated through the menus.
How to Exit CSM
To exit CSM, use one of the following methods.
Press the MENU/HOME button on the remote control transmitter.
Press the POWER button on the remote control transmitter.
Press the POWER button on the television set.
Page 13
5. Software Upgrading, Error code and Panel Code
5.1 Software Upgrading
5.1.1. The following update is for .bin file.
1. Rename the file to “Merge.bin”
Prepare a USB memory.
2.
3. Copy the software to USB flash disk(root directory).
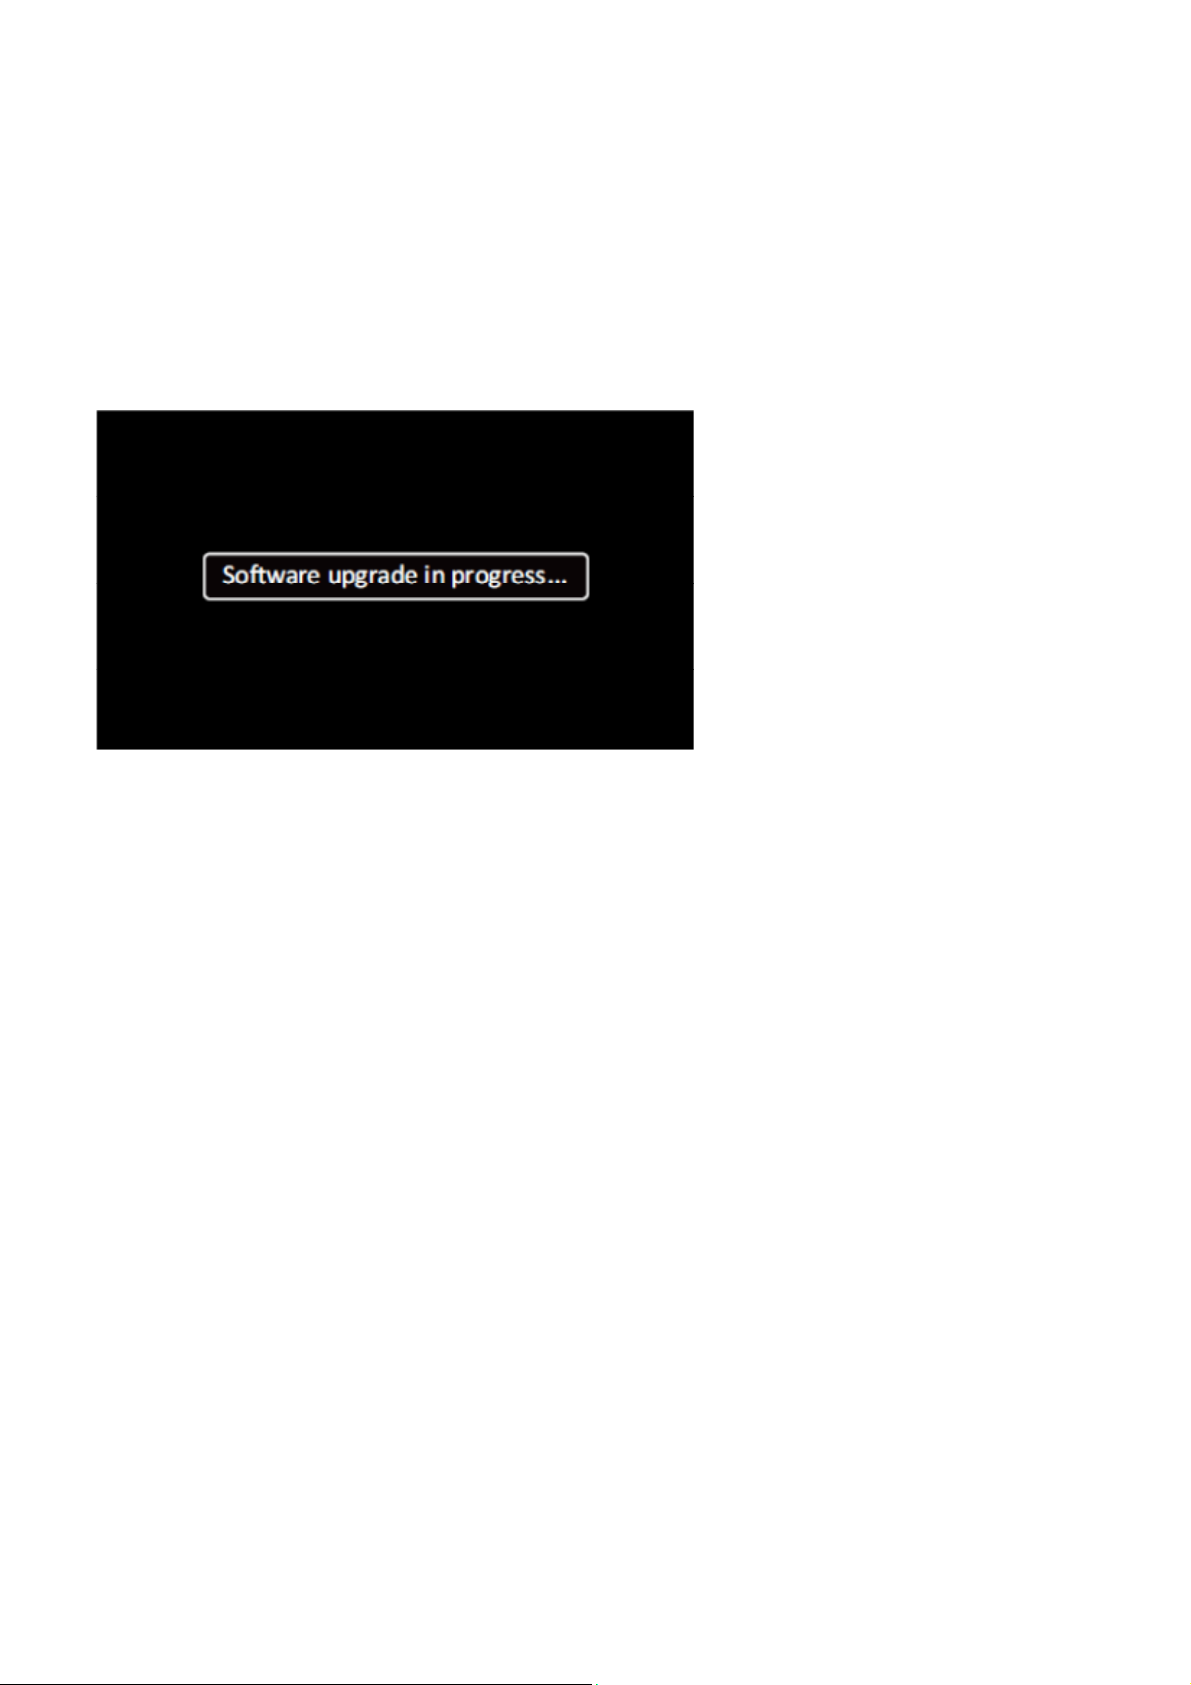
4. Switch off the TV and Insert the USB memory stick that contains the software update files in one of the TV’s USB 2.0 ports.
5. Switch on the TV. The TV will detect the USB memory s tick automatically. Then a window jumps out as below
6. When the TV software is updated, the TV will turn on again automatically. Remove your USB flash drive.
7. We can enter in CSM or Factory mode to check the current software version.
Step 3: Check the SW version
1. After burning software, TV will restart
Press “Menu+1999+back”, enter Factory mode to check if the software version is correct
2.
Caution: Please make sure that software upgrade is finished before unplug the USB and AC power!
Page 14
6. Circuit Descriptions
6.1 Introduction
The TPS17.2A LA is a new chassis launched in AP in 2017. The whole range is covered byMSD8120 platform. The major deltas versus its predecessor
support DVB-T, NTSC with also WIFI/multi-media, Video out
The TPS17.2A LA chassis comes with the following stylings:
series xxPUT4052/xx
series xxPUT4082/xx
6.1.1 Implementation
Key components of this chassis are:
SCALER MSD8120PBM-V5 EPLQFP-156
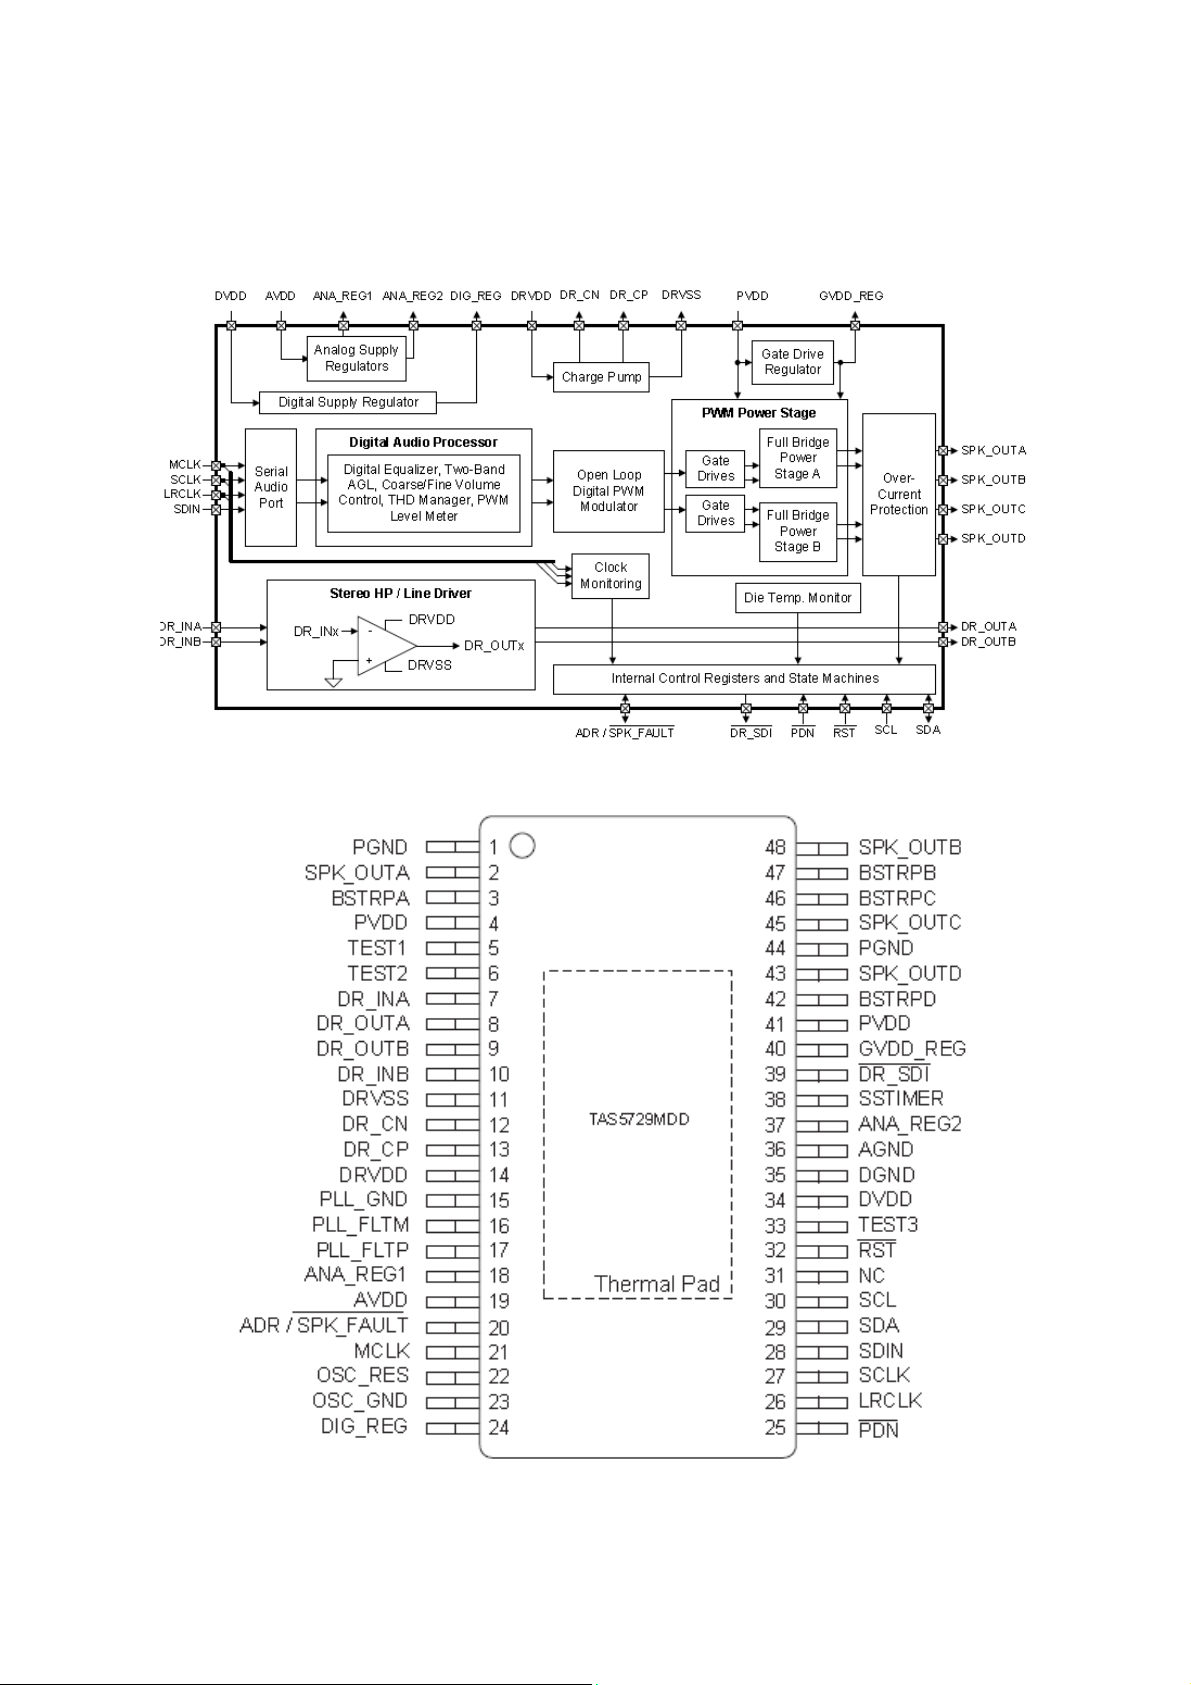
AUDIO TAS5729MDDCAR 10W TSSOP-48
FLASH MX25L6406EM2I-12G 64Mb SOP-8
DC/DC SY8003ADFC 3A 5.5V DFN2x2-8
DC/DC RT6206BHGSP 5.5A 18V SOP-8
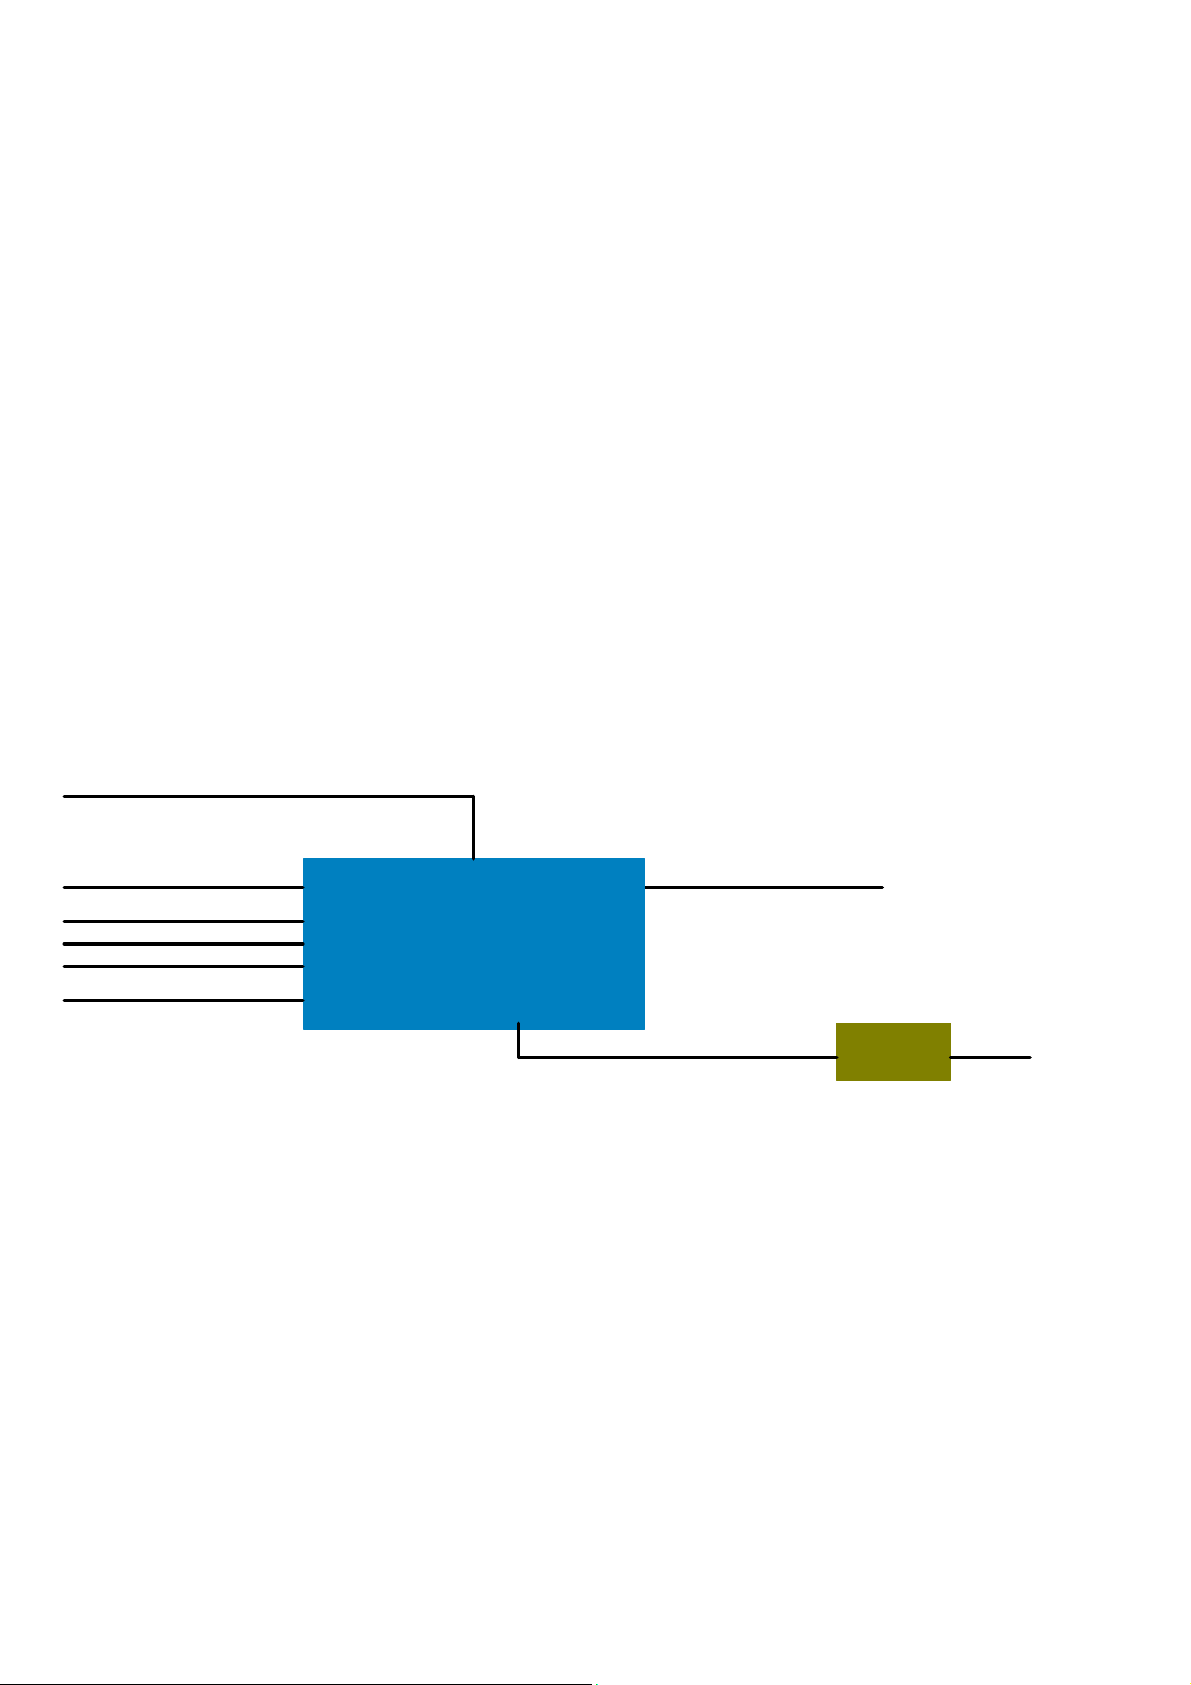
6.1.2 Block diagram
Block Diagram
ATV
DTV
HDMI1,2,3
VGA
YPbPr
AV
USB
IF+/-
MSD8120PBM
S/PDIF
TAS5729MD
SPEAKER
Page 15
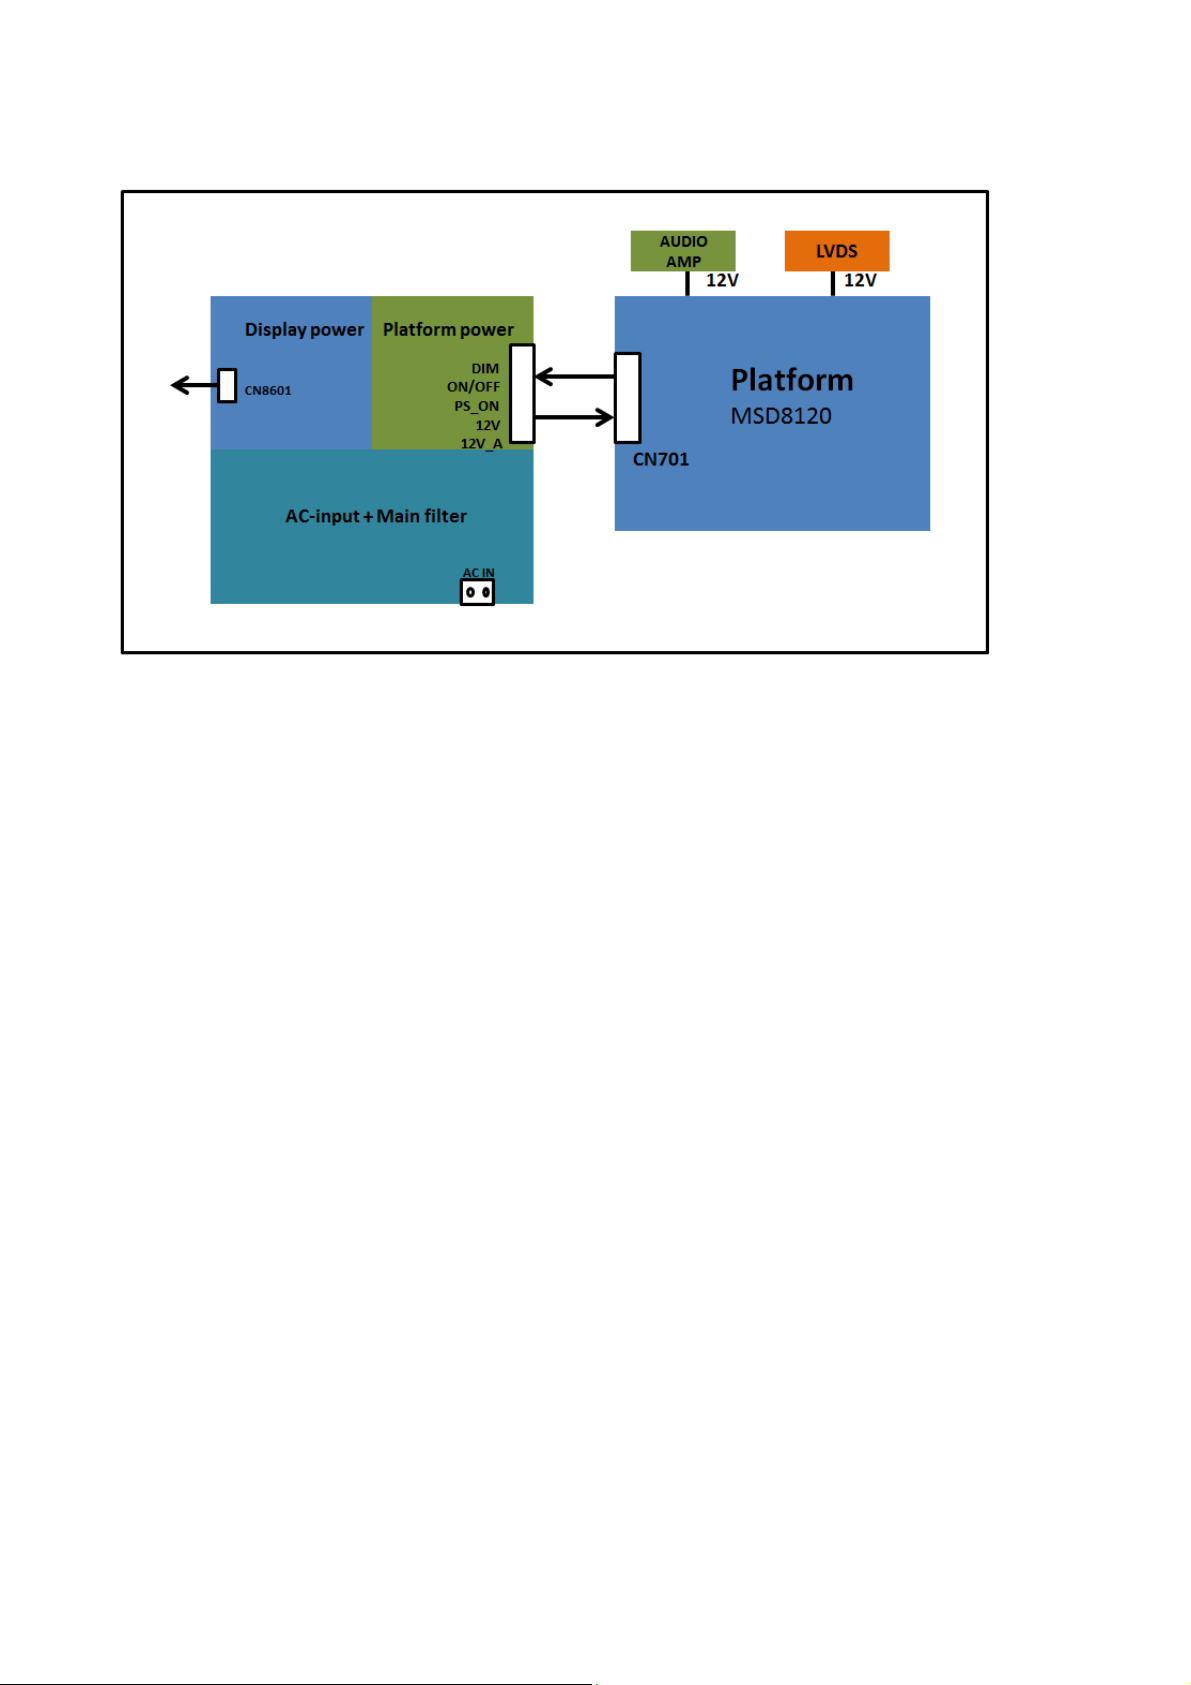
6.2 Power Supply
Power architecture of this platform.
6.2.1 Power Supply Unit
All power supplies are a black box for Service. When defective, a new board must be ordered and the defective one must be returned, unless the main fuse
of the board is broken. Always replace a defective fuse with one with the correct specifications! This part is available in the regular market.
Consult the Philips Service web portal for the order codes of the boards.
Important delta’s with the platform are:
• New power architecture for LED backlight
• “Boost”-signal is now a PWM-signal + continuous variable
The control signals are:
• PS-ON
• Lamp “on/off”
• DIM (PWM) (not for PSDL)
In this manual, no detailed information is available because of design protection issues.
• +12 output (on-mode)
• +12V_audio (audio AMP power)
• Output to the display; in case of
- IPB: High voltage to the LCD panel
- PSL and PSLS (LED-driver outputs)
- PSDL (high frequent) AC-current.
6.2.2 Diversity
The diversity in power supply units is mainly determined by the diversity in displays.
The following displays can be distinguished:
• CCFL/EEFL backlight: power panel is conventional IPB
• LED backlight:
- side-view LED without scanning: PSL power panel
- side-view LED with scanning: PSLS power panel
- direct-view LED without 2D-dimming: PSL power panel
- direct-view LED with 2D-dimming: PSDL power panel.
PSL stands for Power Supply with integrated LED-drivers.
PSLS stands for a Power Supply with integrated LED-drivers with added Scanning functionality (added microcontroller).
Page 16
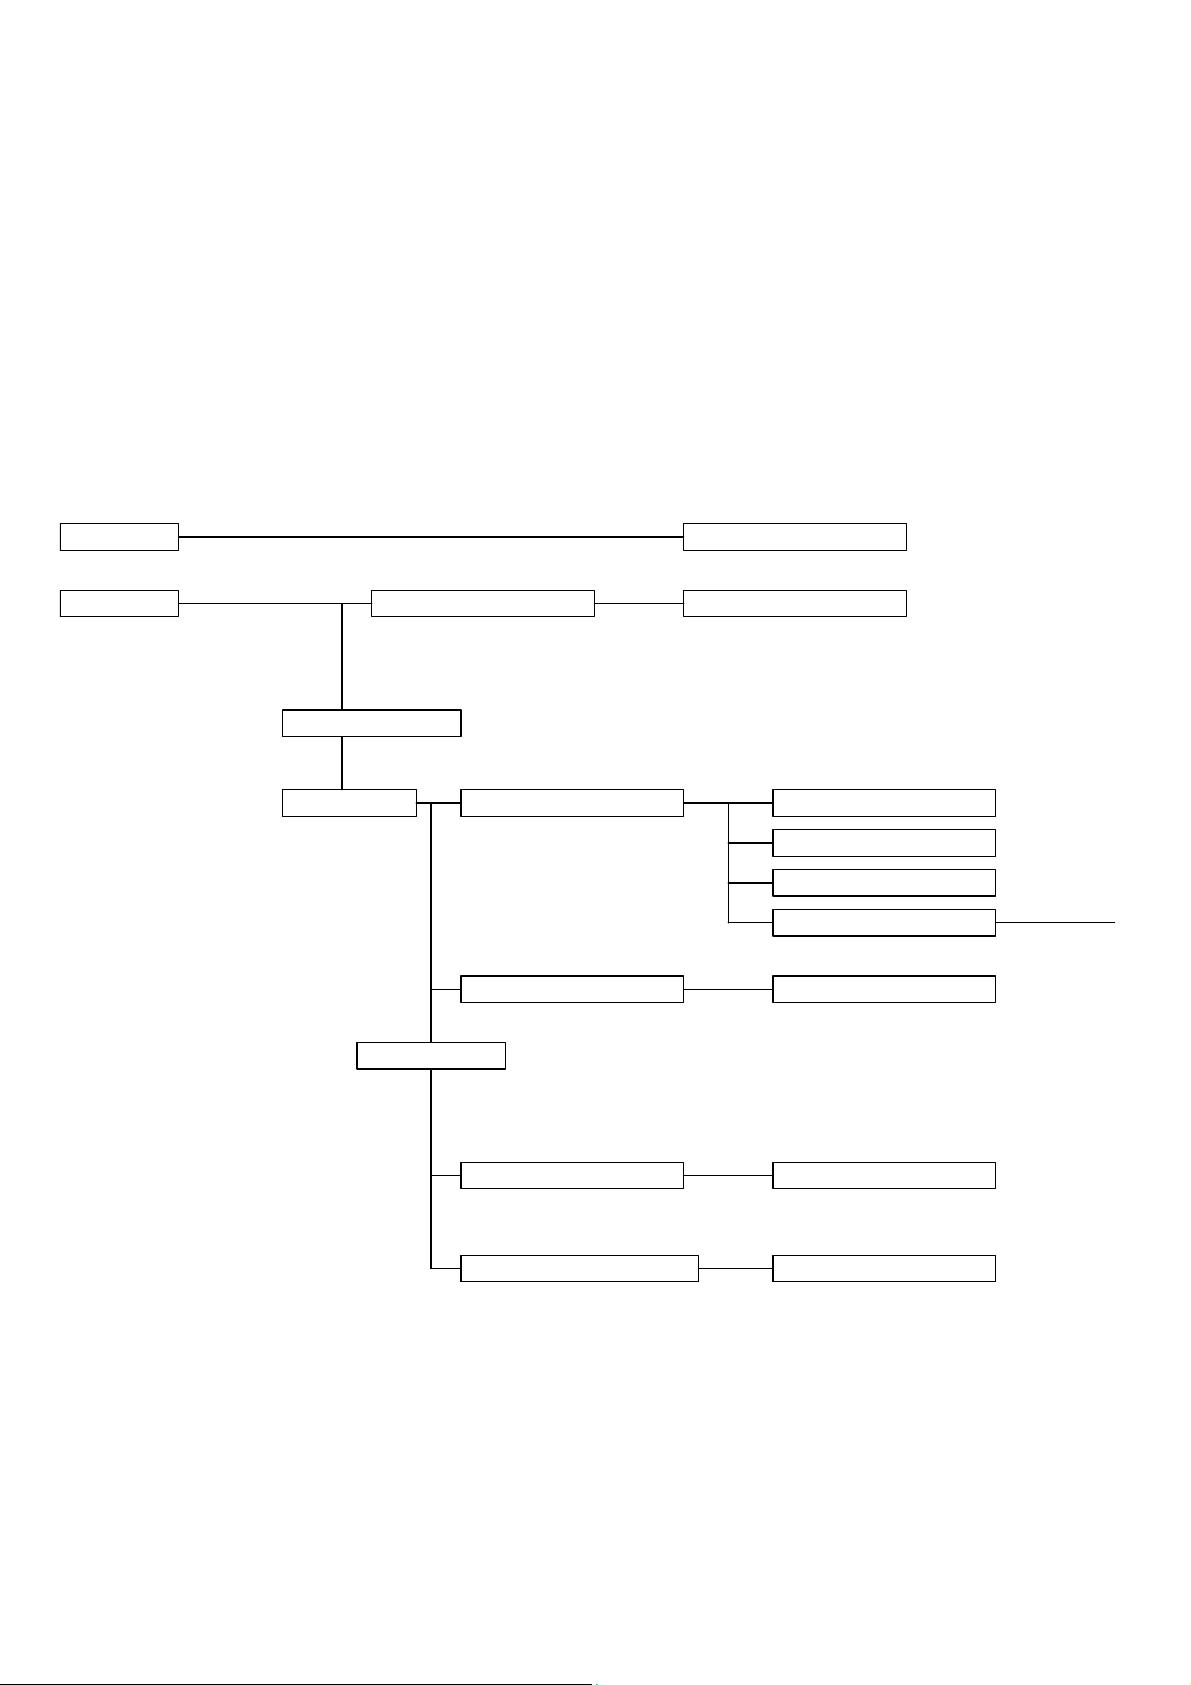
PSDL stands for a Power Supply for Direct-view LED backlight with 2D-dimming.
6.3 DC/DC Converters
The on-board DC/DC converters deliver the following voltages(depending on set execution):
• +3V5-SB, permanent voltage for the Stand-by Power system
• +3V3SB,voltage for IR/Key board
• +12V, input from the power supply for the panel common(active mode)
• +3V3TUNER, supply voltage for tuner
• +5V-SW, input intermediate supply voltage for USB Power
• +12V-AUDIO1 for the AUDIO AMP
6.3.1 Power tree(170520)
+12V_AUD
+12V
Q101 AO3407A
U702 RT6206BHGSP
+5VSB
Q702 AO3401A
U701 AZ1117CH-3.3TRG1
U703 SY8003ADFC
5V_SW
U601 TAS5729MD
PANEL_VCC
3V3_STB
VCCK
U401 MSD8120PBM
U410 G690H293T73
U403 W25Q64FVSSIG
Q704 AO3401A
U401 MSD8120PBM
For Audio Amplifier
For MSD8120PBM
For Reset IC
For SPI Fla s h
DVDD3V3
For MSD8120PBM
U706 AZ1084CD-ADJTRG1
U101 AZ1117CH-3.3TRG1
DDRV
+3V3TUN ER
U401 MSD8120PBM
TU101 TUNER
For MSD8120PBM
For TUNER 3.3V
Page 17
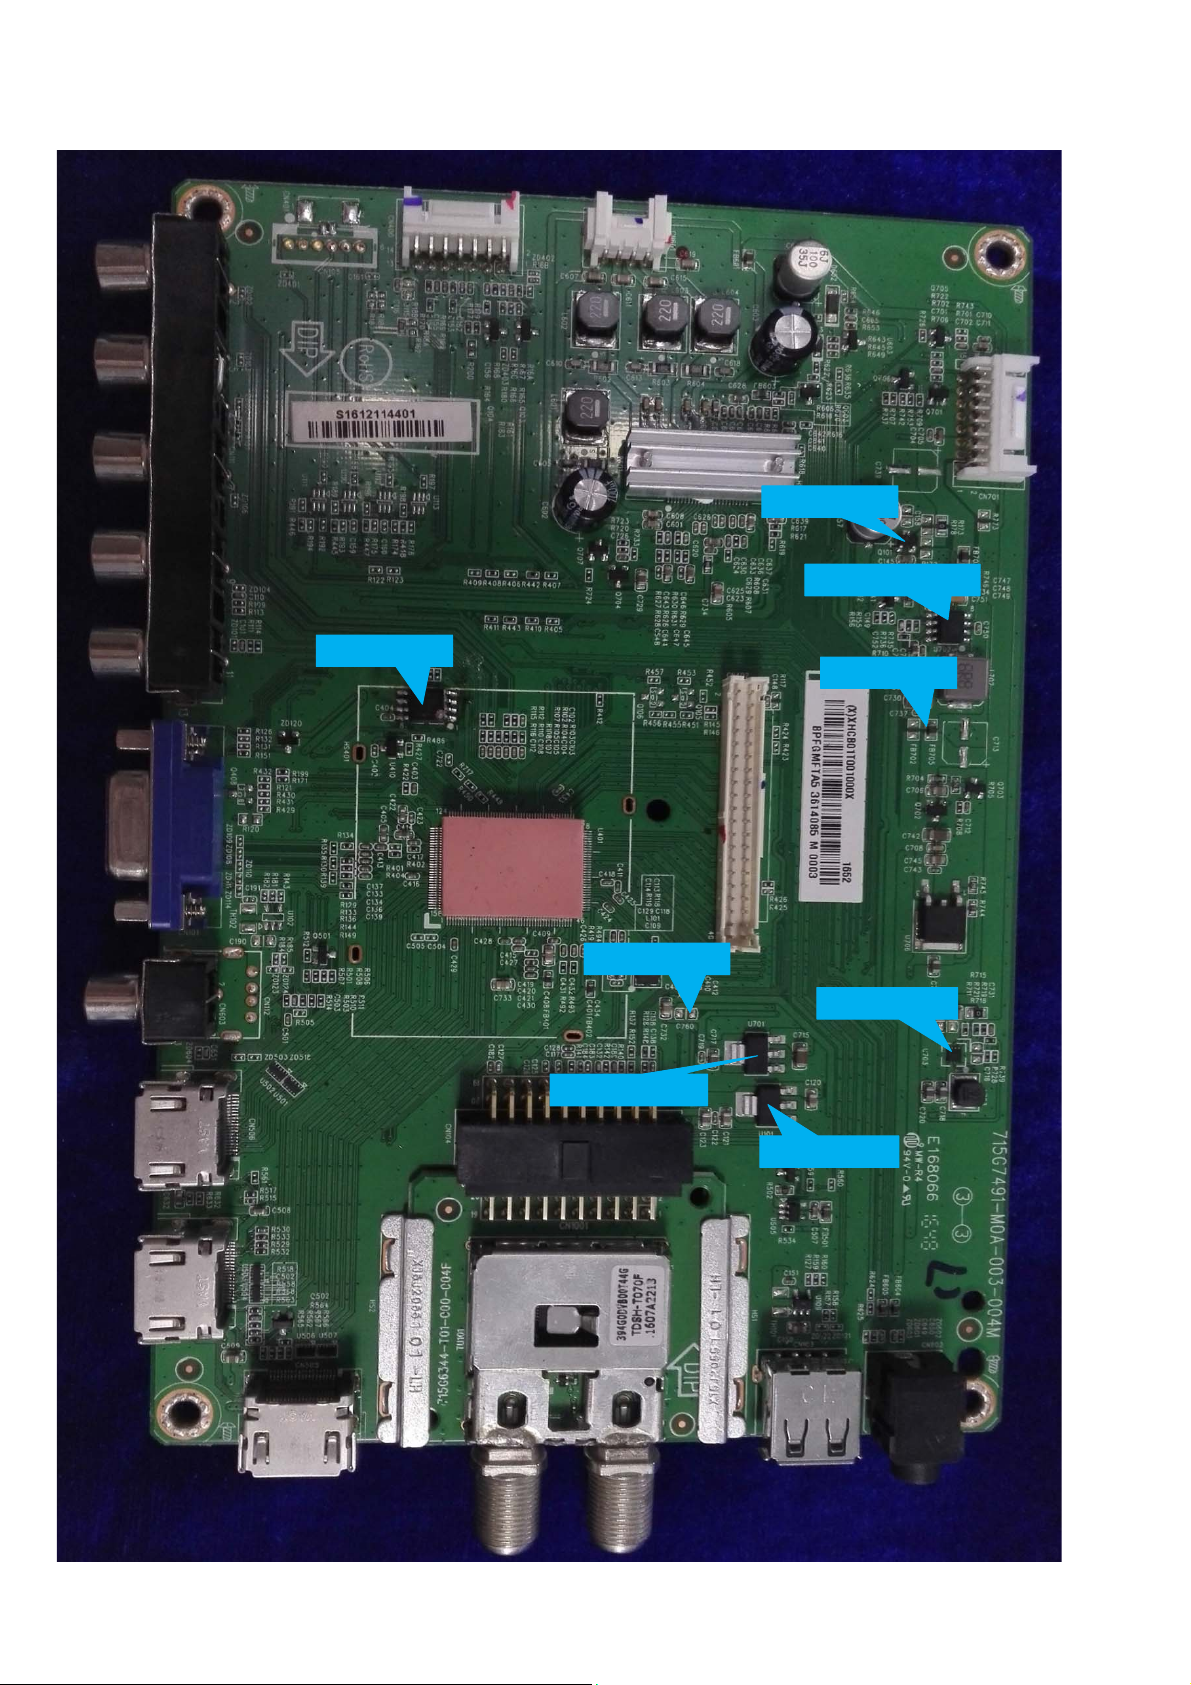
6.3.2 Power layout SSB
Q101,PANELVCC
U702,12VTO+5VSB
U403,3V3SB
FB705,+5VSB
C760,5V_SWTODDR
U701,+5VSBTO+3V3SB
U703,+5VSBTO1.2V
U101,+3V3TUNER
Power SSB Top View
Page 18
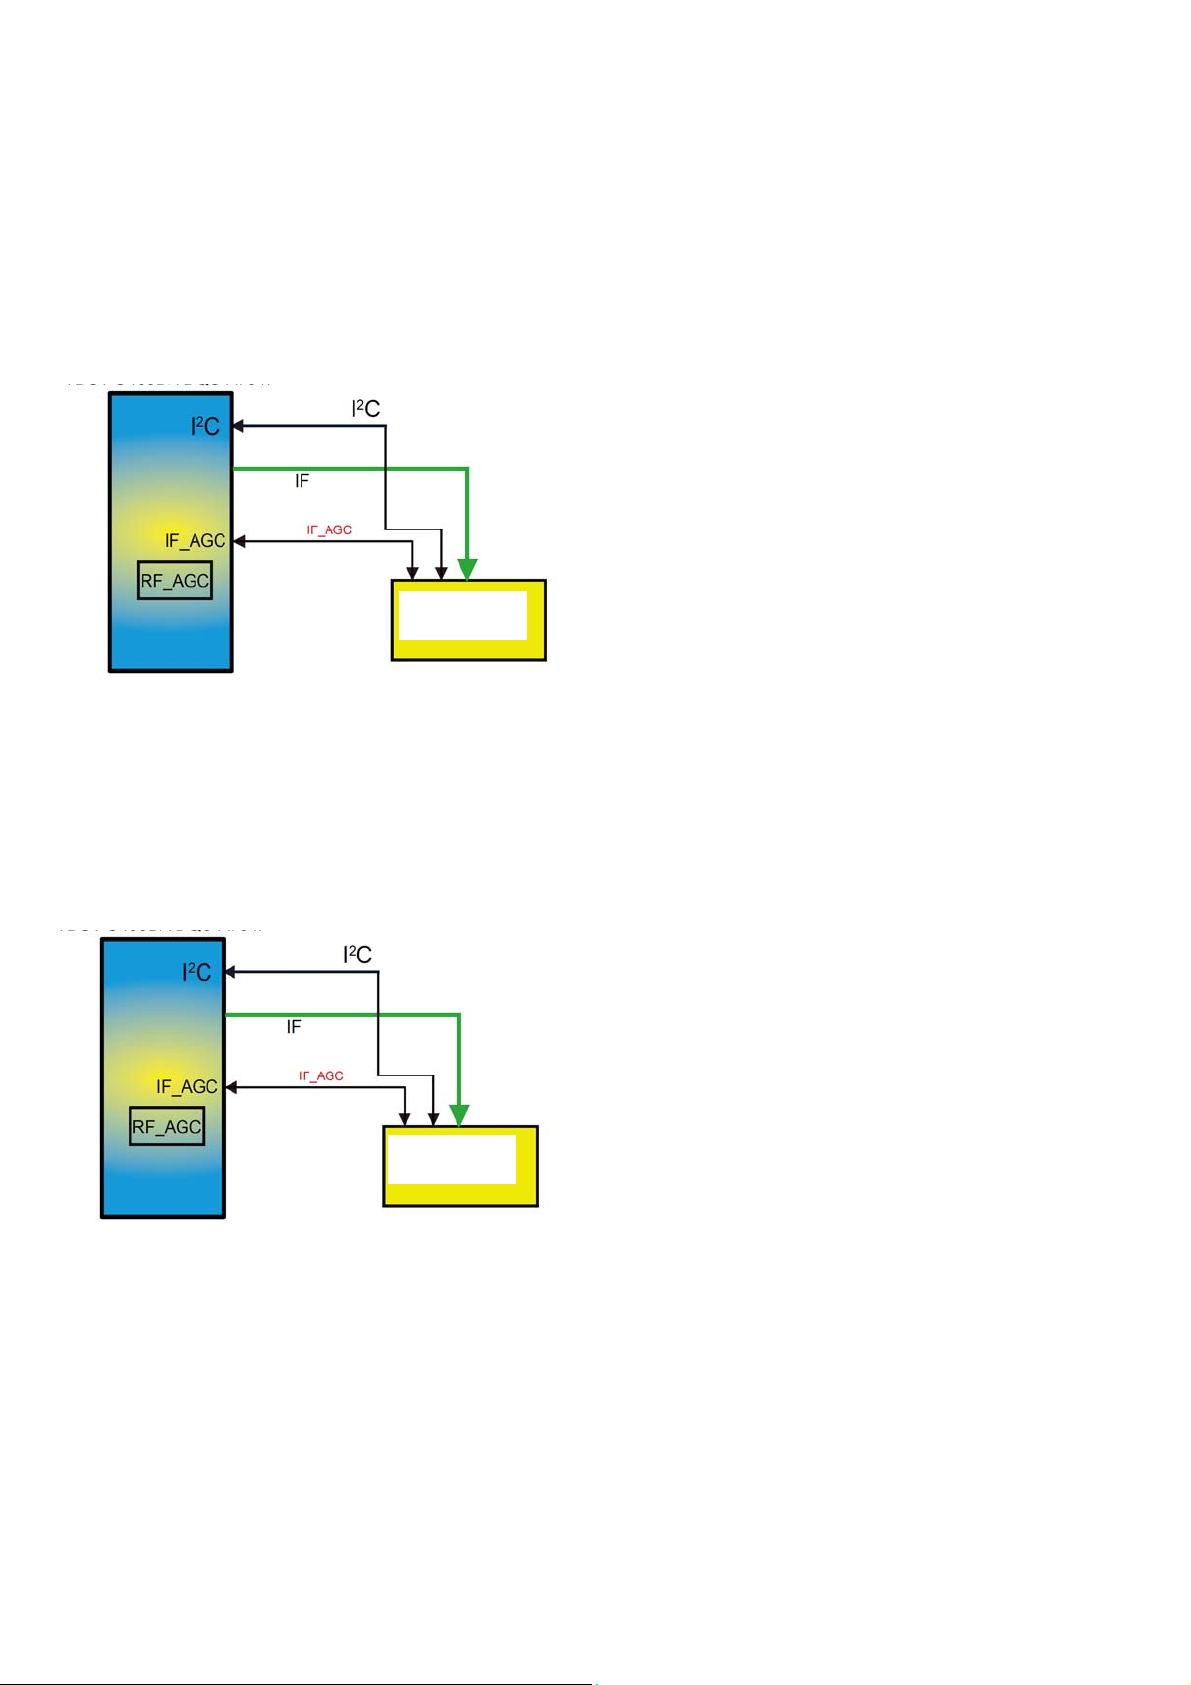
6.4 Front-End Analogue and DVB-C,DVB-T; reception
6.4.1 DVB-C part
The Front-End for analogue tuner consist of the following key components:
• TUNER TW TDSH-T181F
• SCALER MSD8120PBM-V5 EPLQFP-156 Processor
Below find a block diagram of the front-end application for DVB-C part.
TDSH-T181F
MSD8120
6.4.2 DTB-T2 part
The Front-End for DVT part consist of the following key components:
• TUNER
• SCALER MSD8120PBM-V5 EPLQFP-156 Processor
• DEMODULATOR
Below find a block diagram of the front-end application for DTV part.
TW TDSH-T181F
TDSH-T181F
6.5 HDMI
Refer to below for the application.
MSD8120
Page 19
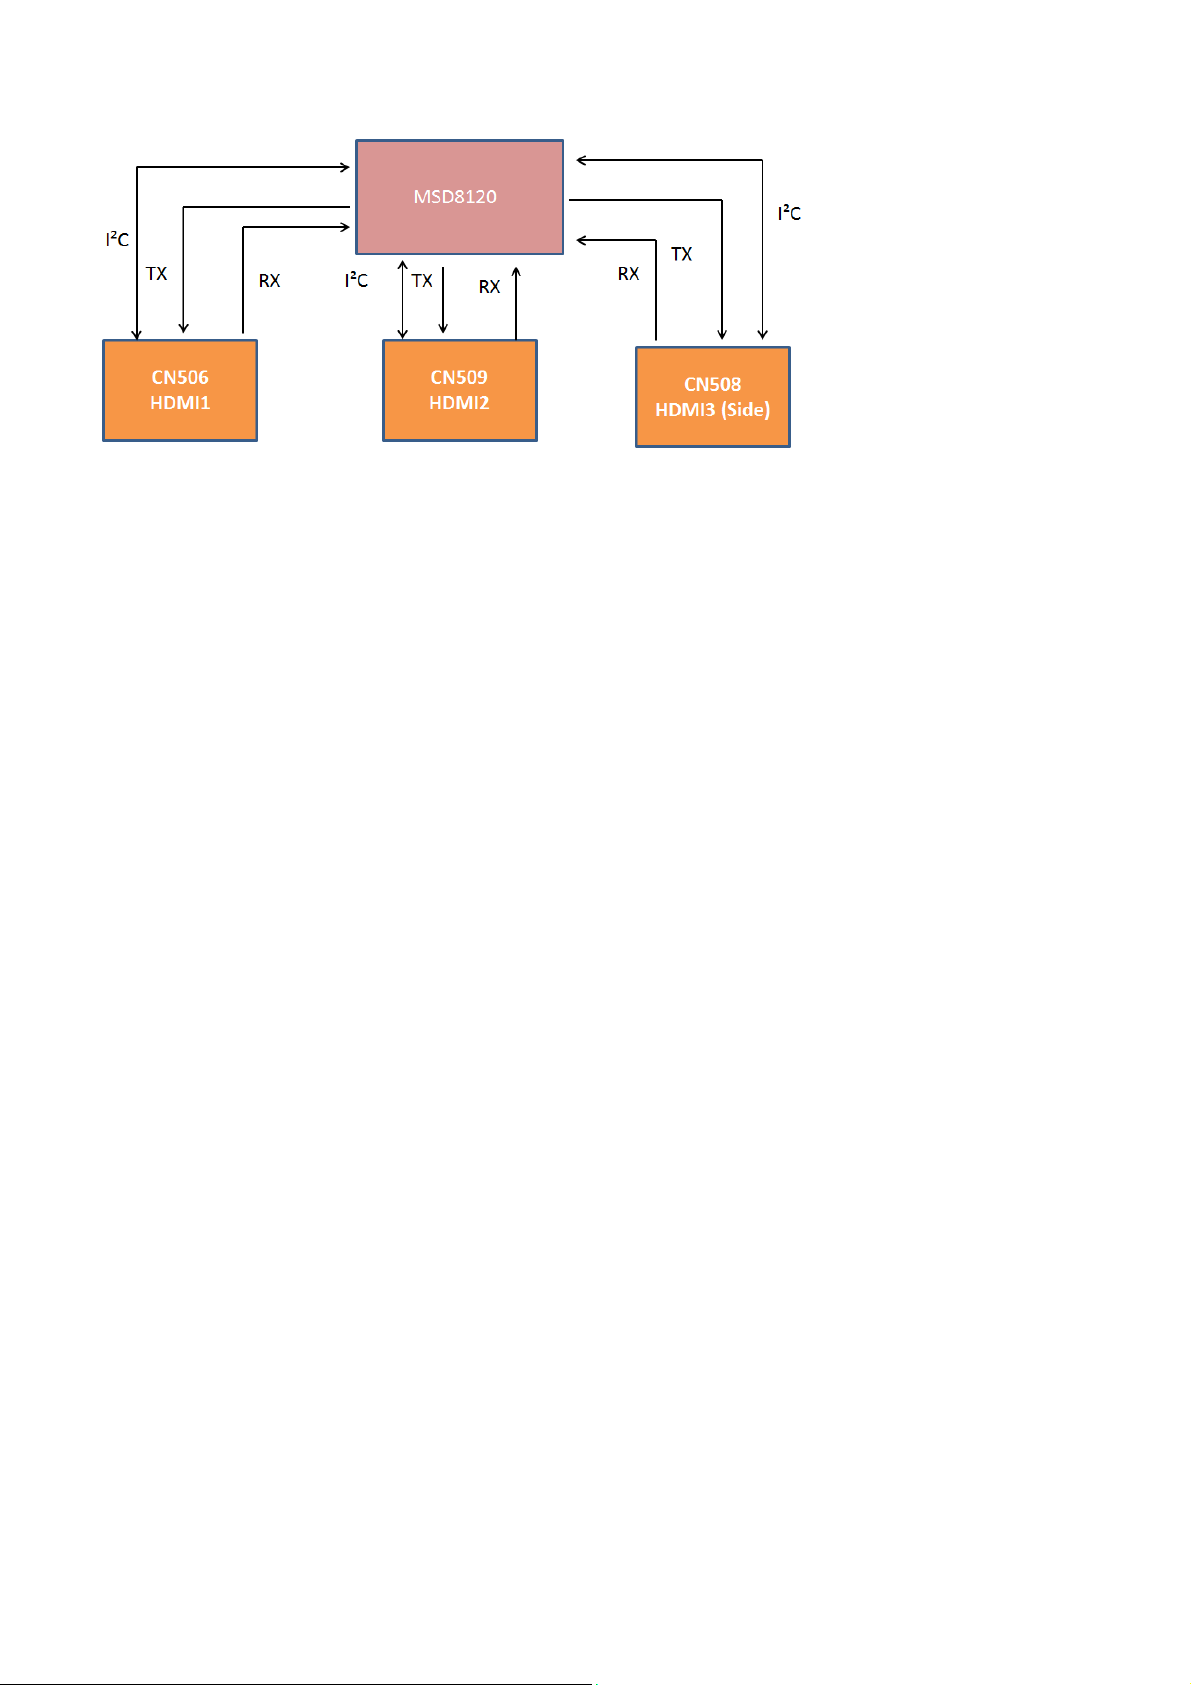
The following HDMI connector can be used:
• HDMI 1: HDMI input ( TV digital interface support HDMI1.4/HDCP1.3) with digital audio/PC DVI input/ARC
• HDMI 2: HDMI input ( TV digital interface support HDCP) with digital audio/PC DVI input/CEC
• HDMI 3: HDMI input ( TV digital interface support HDMI1.4/HDCP1.3) with digital audio/PC DVI input/CEC
• +5V detection mechanism
• Stable clock detection mechanism
• HPD control
• Sync detection
• TMDS output control
6.6 Video and Audio Processing - MSD8120PBM-V5 EPLQFP-156
MSD8120PBM is a highly integrated single chip solution for digital DVB-T/ISDB-T TV system. Key features include:
1. Digital and Analog TV Front-End Demodulator
2. Multi-Standard A/V Format Decoder
3. The MStarACE6UC Video Processor
4. Home Theater Sound Processor
5. Embedded Memory for optimized BOM cost
6. Multiple HDMI 1.4 Compliant Ports with ARC Support
7. One MHL 2.0 Compliant Port
8. Transport-Stream Input for Extended DTV System
MSD8120PBM is a highly integrated TV SoC solution for DVB-T/ISDB-T digital television platform. Integrating latest advanced technologies from MStar
Semiconductor, the world leading TV SoC provider in TV industry,MSD8120PBM provides the most cost-efficient solution for multimedia TV application
with creative and attractive features exclusively presented.
In order to achieve the lowest BOM cost in a multi-media TV platform, MSD8120PBM integrates DTV,DVB-T/ISDB-T demodulator, TV/multi-media
all-purpose AV decoder, VIF demodulator, and advancedSound/Video processors into a single device. This not only reduces the overall BOM significantly,
but also facilitates the design of originally-complicated TV systems for developers. In addition, the memory-embedded solution provided by MSD8120PBM
can reduce the excessive work of memory interface routing on board and the risk of memory performance degradation while powering cost-down in the
total system.
The powerful multimedia A/V decoder inside MSD8120PBM is hosted with a dedicated hardware video codec engine to secure fast and stable video
streaming playback. Moreover, MSD8120PBM is equipped with a DSP specifically designated for audio application, including digital audio format decoding
and advanced sound effects,and a high performance RISC CPU to manipulate all possible routines and house-keeping activities. With extendable USB 2.0
interface, an MSD8120PBM based system can turn into a high quality media-center in a simple manner.
MSD8120PBM supports the latest MHL technology, which allows user to stream audio and full HD video from mobile devices to televisions. Power
management and low-power design of MSD8120PBM makes it possible to charge MHL devices even in standby mode. The MHL/HDMI dual-purpose port
on MSD8120PBM will enable charging if MHL devices are automatically detected.
For standard users, the MSD8120PBM provides multi-standard analog TV support with adaptive 3D video decoding and VBI data extraction. The built-in
audio decoder is capable of decoding FM, AM, NICAM, A2, BTSC and sound standards. MSD8120PBM also supplies all the necessary A/V inputs and
Page 20

outputs to complete a receiver design including HDMI receivers and component video ADCs. All input selection multiplexers for video and audio
are integrated, including full SCART support with CVBS output. The equipped MStar MStarACE-6 color engine is the latest masterpiece of MStar
technologies, providing excellent video and picture quality in Full-HD and large-scale display system. MSD8120PBM also supports an ultra low power
standby mode to meet the latest energy legislative requirements without any additional hardware.
Page 21
7. IC Data Sheets
7.1 TAS5729MDDCAR (IC U601)
Page 22
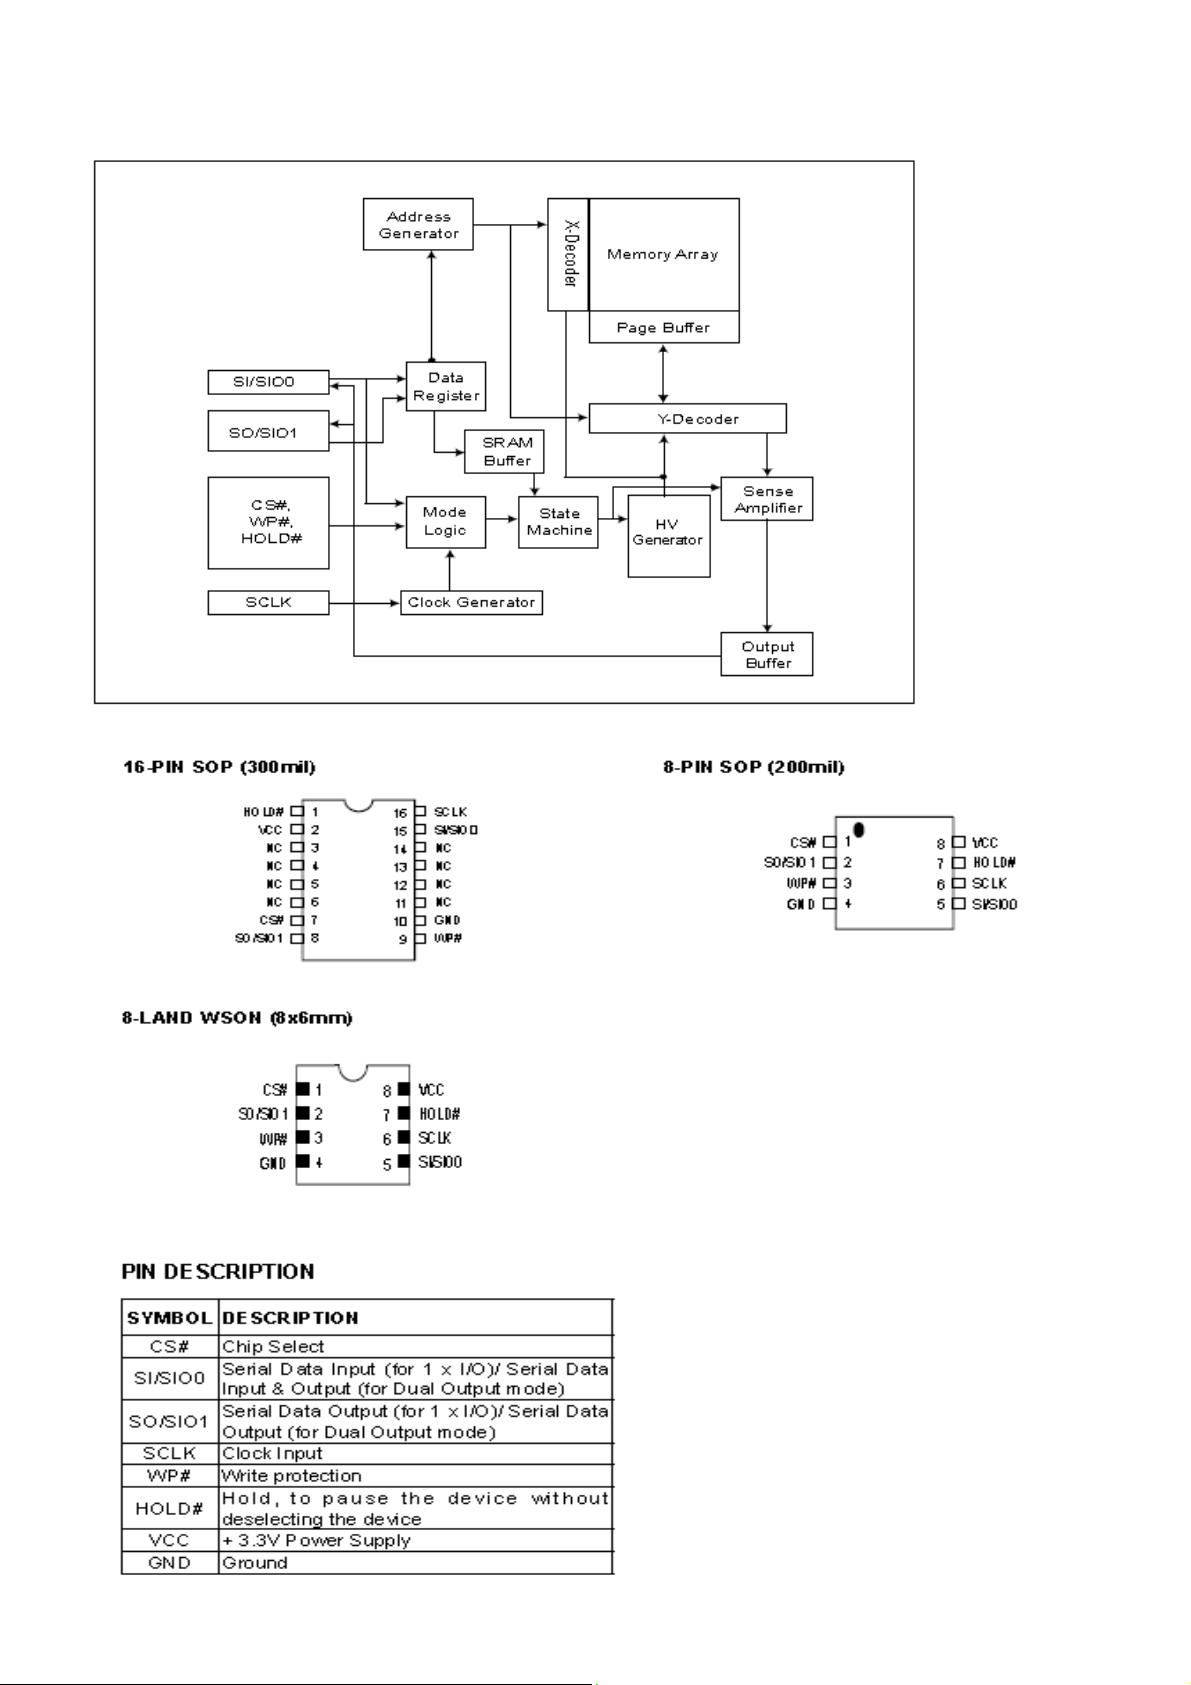
7.2 MX25L6406EM2I-12G (IC U403)
Page 23
T
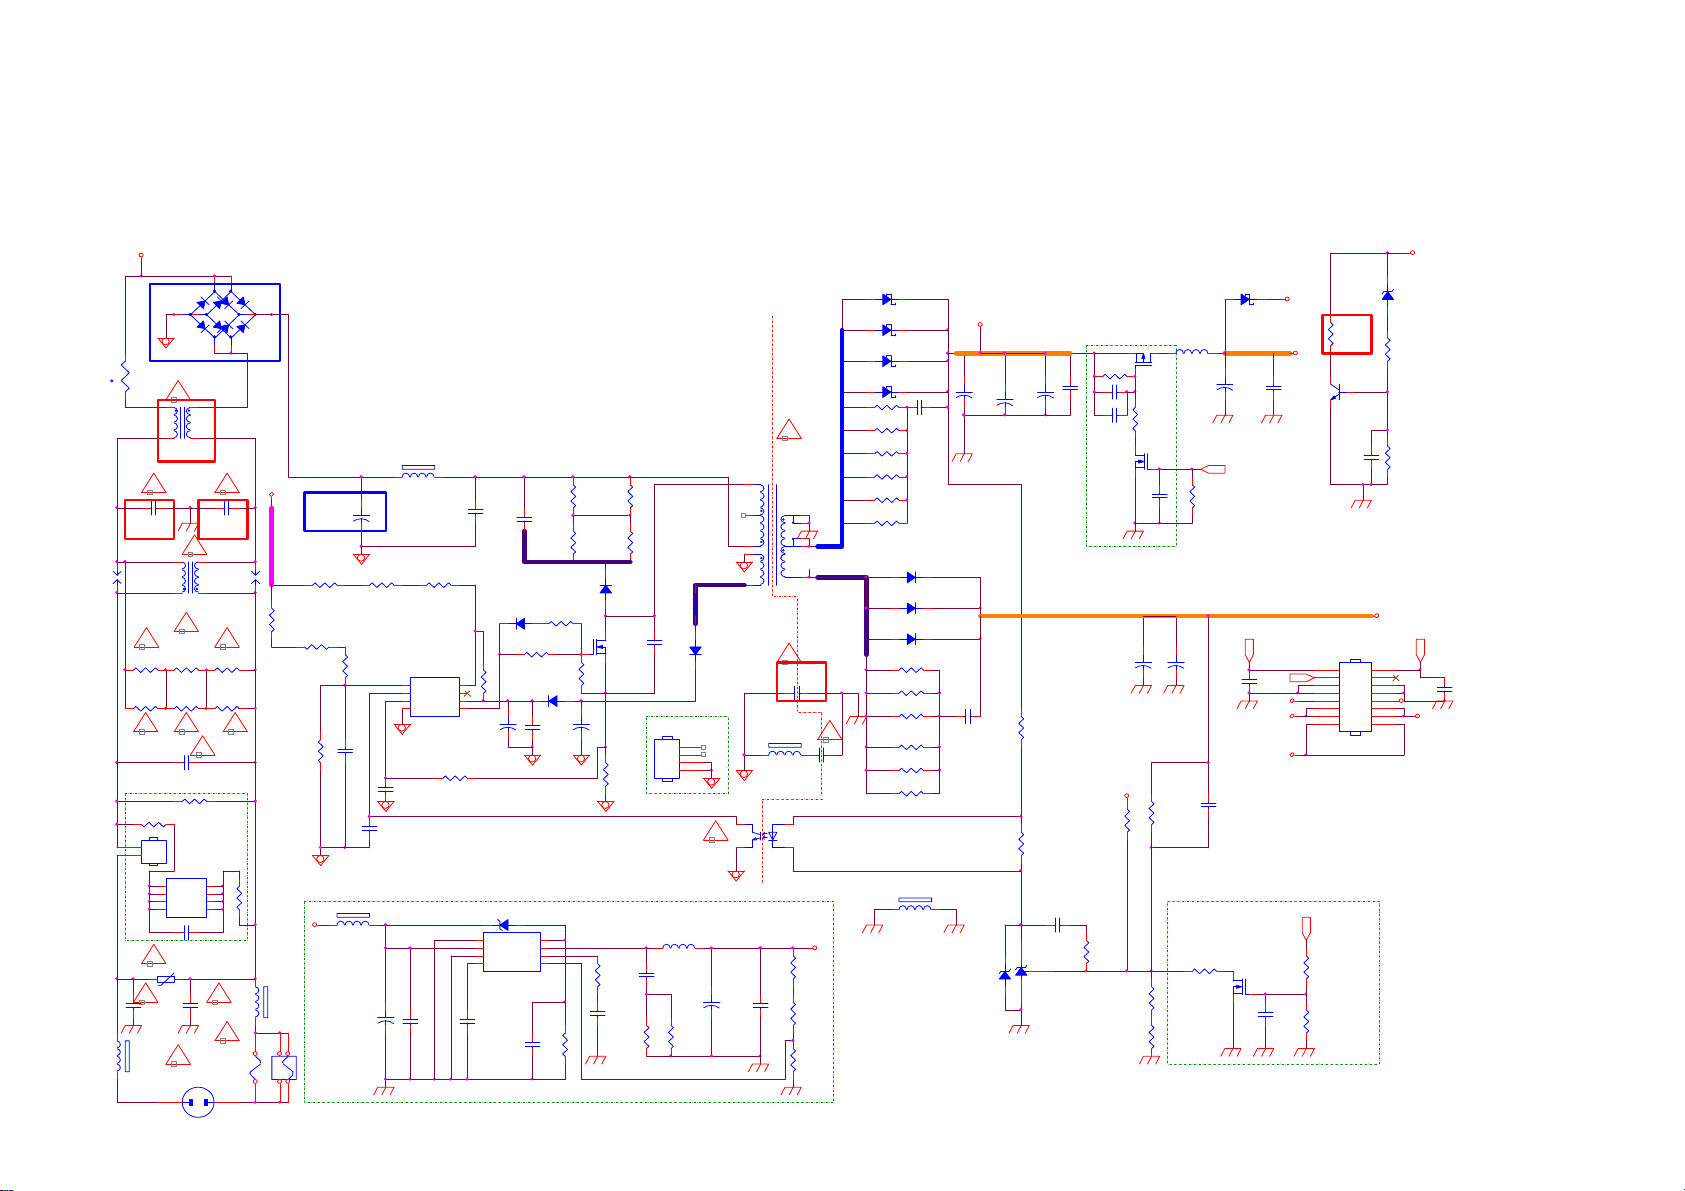
8.Circuit Diagrams
8.1 A 715G7734 PSU
8-1-1 POWER
A
BD9901
NC/KBJ608G-FUC
4
12
NR9901
2.5R
t
!
3
L9903
4mH
! !
C9903
1000PF 250V
3
SG9902 SG9901
NC NC
L9901
18MH
!
R9903
620K +-1% 1/4W
R9905
620K +-1% 1/4W
R9904
620K +-1% 1/4W
R9906
620K +-1% 1/4W
! !!
C9901
470nF 275V
R9909
CN9902
2
NC/CONN
N
1
JUMPER
L
U9901
1
NC
2
D1
3
D1
NC4NC
NC/C AP004DG-TL
C9906
NC/47pF
!
RV9901 680V
C9907
100PF 250V
12
FB9901
!
127R
CN9901
AC 2P
4
-
124
1000PF 250V
!
124
!
R9907
NC
D2
D2
C9910
100PF 250V
BD9902
3
3
GBL408-C
-
+
2
2
C9902
!!
R9901
620K +-1% 1/4W
R9902
620K +-1% 1/4W
8
7
6
5
R9908
!!
!
F9901
NC/T4AL 250V
12
1
12
+
NC
1
FB9902
127R
A
R9127
3.3M 1/4W
R9114
110K
1 2
3 4
F9902
4AH/250V
需破孔!!
100uF 450V
R9112
510K 1/4W
R9128
3.3M 1/4W
+12VS
C9801
510K 1/4W
R9142
3.3M 1/4W
C9125
1NF
FB9301
1 2
NC/BEAD
C9331
NC/470U F 25V
+
R9102
FB9908
BEAD
1 2
1
2
3
C9106
330PF 50V
C9124
1NF
+
R9103
510K 1/4W
U9101
BNO
VCC
FB
CS
VCC
GND4OUT
PF6005AS
1K 1/4W
C9336
NC/220N 50V
NC
R9113
C9113
2.2NF
8
7
6
5
C9102
2.2UF 50V
1
2
3
U9301
NC/AOZ 3015AI
C9334
NC/100N 50V
NC/1N 50V
D9104
IN4148W
R9110
47R 1%
R9146
0 OHM +-5% 1/8W
+
ZD9301
NC/BZT52-B5V1
12
PGND
EN
VIN
LX
AGND
COMP
VCC4FB
C9330
C9103
2.2NF
R9109
10R 1/8W 5%
D9106
IN4148W
C9104
0.1uF 50V
8
7
6
5
NC/3K OHM 1%
R9344
R9104
82K OHM 1%
R9105
82K OHM 1%
D9103
FR107G-A0
Q9101
TK6A65D(STA4,X,M)
R9111
10K OHM +-5% 1/8W
+
C9105
10UF50V
R9101
0.27R 2W
R9345
NC/20K 1%
C9333
NC/2N 2 50V
R9358
NC/30R 1/ 4W
R9106
82K OHM 1%
R9107
82K OHM 1%
C9126
NC/100PF
For Q9101
HS9101
HEAT SINK
C9335
NC/2N2 50V
L9301
1
2
3
4
R9361
NC/30R
R9108
4R7 1/4W 5%
D9105
PR1007G
!
U9102
EL817M(X)
+
NC470UF 25V
4
C9332
5
3
4
2
1
1 2
COLDHOT
!
T9101
POWER X'FMR
!
C9904
1NF 250V
FB9906
NC
1
23
C9323
NC/220N 50 V
L9101
3UH
R9307
NC/270K +-1% 1/8W
330UF 35V
C9116
+
1nF 50V
R9144
NC/8.2K 1/8W
D9109
SR34H
1 2
+
C9111
470UF 25V
PS_ON
C9127
C9129
NC
DIM
+12V_A
Q9106
NC/2N 7002K
C9112
0.1uF 50V
PS_ON
+12V
+5.2V
C9140
NC/1N 50V
+12V_A
+12V
PS_ON
R9130
1K OHM
Q9102
2N3904
C9119
0.1uF 50V
CN9101
CONN
1
3
5
7
9
11
13
15
R9143
NC/100K 1/ 8W 1%
R9145
NC/100K 1/ 8W 1%
D9110
SR510-22
1 2
D9111
SR510-22
1 2
D9112
SR510-22
1 2
D9101
SR510-22
1 2
R9115
22 OHM 1/4W
R9116
22 OHM 1/4W
R9148
22 OHM 1/4W
R9149
22 OHM 1/4W
R9117
8
NC
9
R9150
6
NC
7
10
!
C9908
NC
+5.2V
R9348
NC/10. 5K
R9342
NC/200R
R9347
NC/2K
R9120
22 OHM 1/4W
R9140
22 OHM 1/4W
R9138
22 OHM 1/4W
R9118
NC
R9119
NC
R9139
NC
1 2
D9102
SR515
D9107
SR515
D9108
SR515
FB9302
BEAD
C9107
3.3NF 500V
+12VS
C9121
470uF 25V
+
C9108
470pF 1KV
ZD9104
BZT52-B16G
NC/470uF 25V
C9109
470uF 25V
+
1 2
C9101
C9110
0.1uF 50V
+
R9121
2K4 1/8W 5%
R9122
9.1K OHM
C9117
220nF50V
U9103
TL431G-AE2-R
R9302
NC/100K 1/ 8W
C9307
NC/1uF
C9308
NC/1uF
NC/100N 50V
R9123
43K 1/8W 1%
10K OHM +-5% 1/8W
R9124
9.31K +-1% 1/8W
680R 1/8W 1%
Q9306
NC/P1604ED
C9306
+12VS
R9126
R9141
JUMPER
R9304
NC/ 100K 1/ 8W
Q9305
NC/2N 7002K
NC
330UF 35V
C9122
+
R9125
620K 1/8W 1%
+18V
+18V
ZD9101
BZT52-B22
1 2
470OHM +-5% 1/8W
R9129
R9131
1K 1/8W
ON/OF F
2
4
6
8
C9128
10
1nF 50V
12
+12V_A
14
16
+12V
Page 24
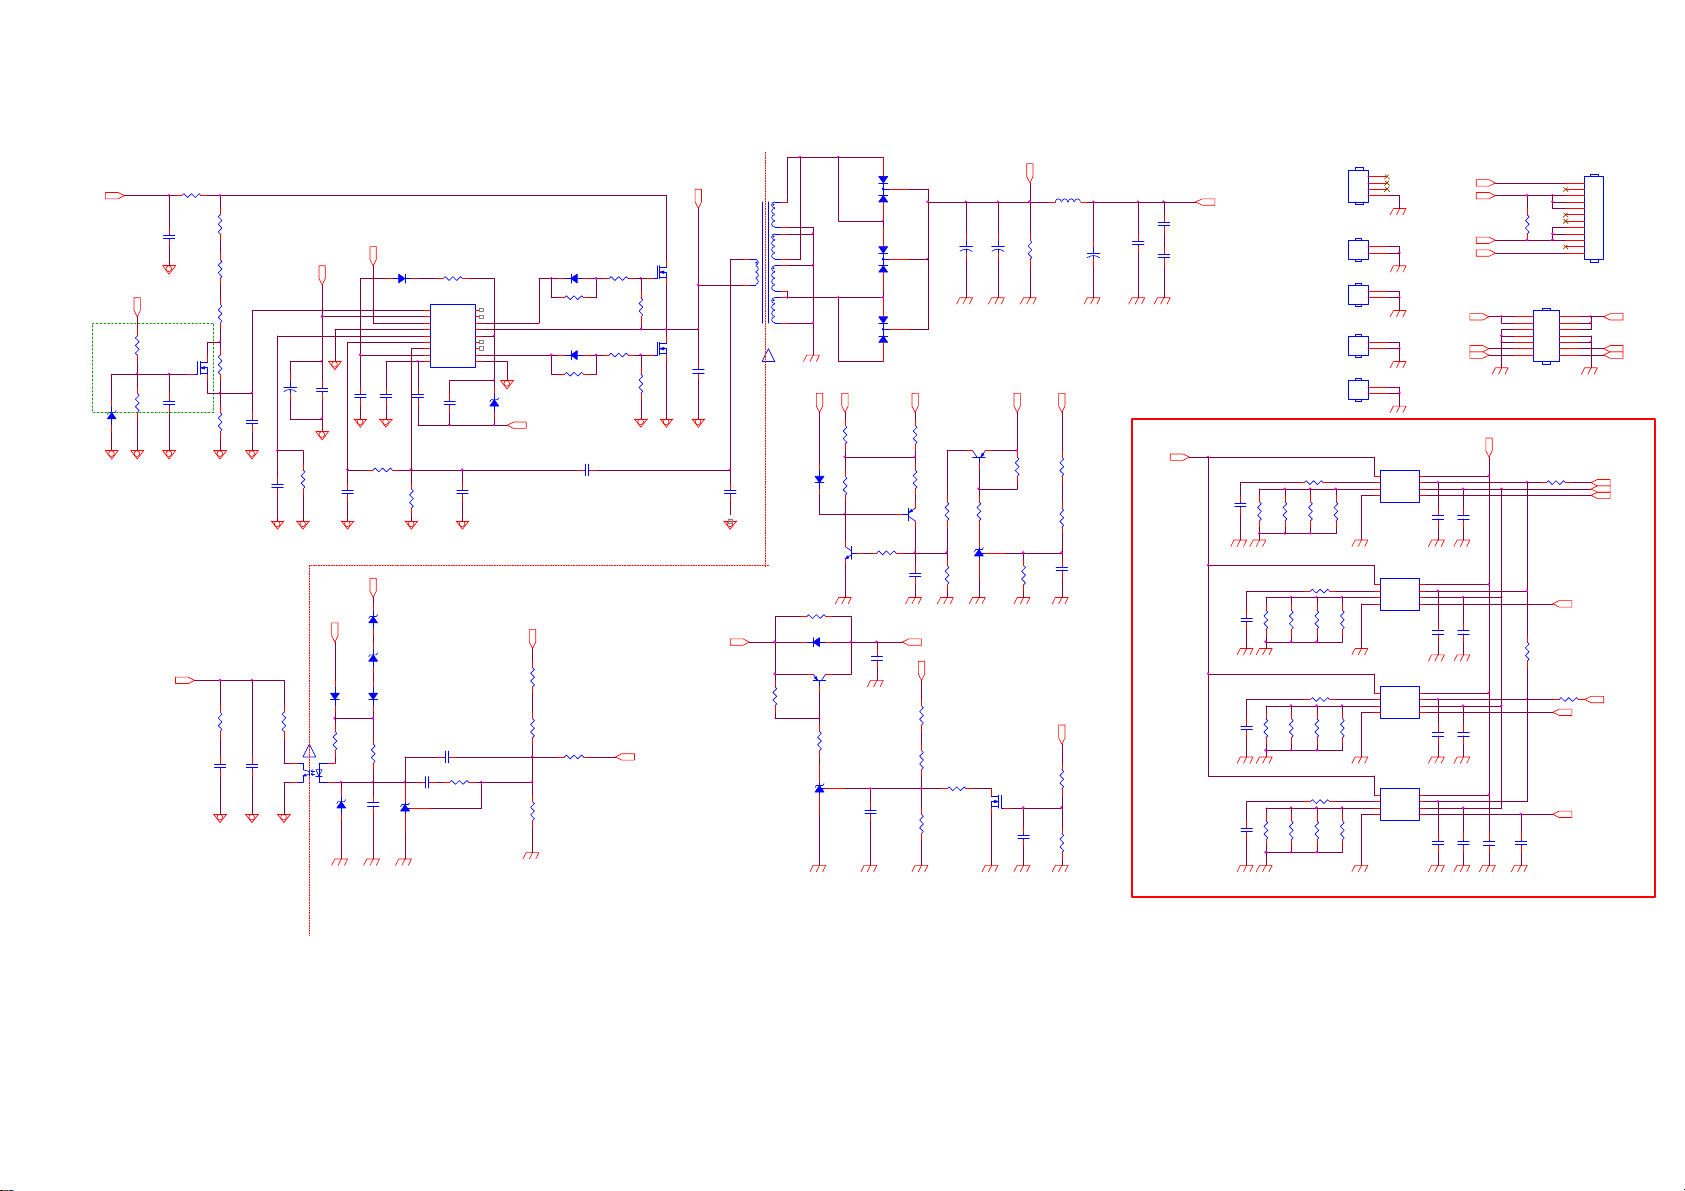
8-1-2 LED Driver
R8101
+VCC 2
For Power Saving
R8162
10K 1/8W 1%
R8163
100K 1/8W 1%
FB_LLC
Q8106
BSS127
0.1R
C8101
1NF
C8142
100N 50V
Vbus
D8111
BZT52-B18
1 2
R8161
NC
R8151
0 OHM +-5% 1/8W
R8136
R8137
1oHM 1% 1/4W
1oHM 1% 1/4W
R8152
0 OHM +-5% 1/8W
R8141
R8140
1oHM 1% 1/ 4W
R8153
NC
NC
R8145NCR8146
R8144
R8154
NC
NC
R8148
R8149NCR8150
1oHM 1% 1/ 4W
HS8101
HEAT SINK
HS8102
HEAT SINK
HS8103
HEAT SINK
HS8104
NC
HS8105
NC
R8138
1oHM 1% 1/4W
R8142
1oHM 1% 1/ 4W
NC
NC
CN8101
1
2
3
4
1
2
1
2
1
2
1
2
U8105
8
COMP
7
GM
6
ISET
5
TPV101AD
U8106
8
COMP
7
GM
6
ISET
5
TPV101AD
U8107
8
COMP
7
GM
6
ISET
5
NC
U8108
NC
8
COMP
7
GM
6
ISET
5
+VLED
-VLED1
R8158
0R05 1/4W
-VLED2
+VLED
+VLED
10
3D_ON
BL_ON/OFF
1
DIM
2
EN
3
VCC
LED4GND
C8127
0.1uF 50V
1
DIM
2
EN
3
VCC
LED4GND
C8129
0.1uF 50V
1
DIM
2
EN
3
VCC
LED4GND
NC
1
DIM
2
EN
3
VCC
LED4GND
NC
C8134
12
14
DIM
1uF
C8128
1uF
C8130
C8132NCC8131
NC
C8135
C8141
100PF 50V
CONN
1
2
3
4
5
6
7
8
9
10
11
12
CN9102
NC
2
1
4
3
6
5
8
7
9
11
13
R8155
10K 1/4W
NC
R8156
R8157
NC
C8140
1NF 500V
-VLED1
-VLED2
-VLED1
BL_ON/OFF
TPV101_VCC
-VLED2
3D_ON
+VLED
+12V
DIM
+
C8116
Q8105
MMBT390 6
+
220UF 100V
R8131
R8132
5K1 1/8W 1%
U8104
AS431AN-E1
VLED1
L8101
3UH
R8118
75K
C8117
220UF 100V
+12V
VLED1
R8160
1K 1/8W 1%
62K 1/8W 1%
R8133
30K 1/8W 1%
R8134
3K3 1/8W 1%
TPV101_VCC
Q8108
NC
NC
C8143
R8171
NC
R8172
NC
C8119
+
1NF 500V
C8118
47UF 100V
FB_LED
C8126
0.1uF 50V
+VLED
C8120
0.1uF 50V
C8121
0.1uF 50V
1uF
C8136
R8135
1oHM 1% 1/4W
1uF
C8137
R8139
1oHM 1% 1/ 4W
NC
C8138
NC
R8143
NC
NC
C8139
R8147
380GL52P193YS0 40V
VS
R8102
1M5 1/4W 1%
R8103
1M5 1/4W 1%
R8104
1M5 1/4W 1%
+
C8103
R8105
C8102
18K 1/8W 1%
0.1uF 50V
C8105
0.47UF 50V
R8116
C8114
R8117
2K43 1/8W 1%
4.7uF 10V
470R 1%
4
10N 50V
C8115
U8102
EL817M(X)
FB_LLC
+VCC 2
22UF 50V
NC
R8106
+12V
D8106
SS1060FL
R8119
2K4 +/-1% 1/8W
!
C8104
1
23
0.1uF 50V
1 2
C8110
R8107
470R 1/8W 1%
C8106
560PF 50V
VLED1
1 2
1 2
D8107
SS1060FL
NC
R8120
ZD8104
BZT52-B30
D8101
R8109
UF4007
10ohm +/-1% 1/ 8W
U8101
SSC9522S
1
18
Vsen
NC
2
17
Vcc
NC
3
16
FB
VGH
4
15
GND
VS
5
14
Css
VB
6
13
OC
NC
7
12
RC
NC
8
11
Reg
VGL
10
RV9COM
1uF
C8111
C8112
5PF
47P 50V
ZD8102
BZT52-B22
ZD8103
BZT52-B22
NC
C8124
R8108
180R 1%
C8123
0.1uF 50V
U8103
AS431AN-E1
C8133
C8122
NC
R8125
47K 1/8W 1%
1uF
1 2
C8107
1nF 50V
D8102
R8110
SS1060FL
10ohm +/-1% 1/8W
R8111
47R 1%
D8103
R8113
SS1060FL
10ohm +/-1% 1/8W
R8114
47R 1%
ZD8101
BZT52-B15
VS
C8108
100PF1KV
VLED1
R8121
39K 1/8W 1%
R8122
51K 1/8W 1%
R8124
10K OHM
R8123
5K6 +-1% 1/8W
FB_LED
Q8101
TK10A50D
R8112
10K 1/8W 1%
Q8102
TK10A50D
C8113
R8115
100PF1KV
10K 1/8W 1%
+12V
1
4
T8101
POWER X'FMR
C8109
27nF
!
R8165
NC
9
6
5
10
7
12
11
8
LED_OVP +12VDV5
D8108
SS1060FL
Q8103
MMBT390 4
R8173
0 OHM +-5% 1/8W
D8110
NC
2 3
Q8107
1
NC
R8166
NC
U8109
NC
3
1
3
1
3
1
R8126
0 OHM +-5% 1/8W
R8127
2K 1/8W 1%
MMBT390 6
R8128
1K 1/8W 1%
C8145
NC
Q8104
C8144
1uF
D8104
FMX-23S
2
D8109
NC
2
D8105
FMX-23S
2
R8129 N C
R8130
C8125
TPV101_VCC
VLED1
R8167
NC
R8168
NC
R8169
NC
1K 1/8W 1%
R8159
5K1 1/8W 1%
R8164
0.1uF 50V
1K 1/8W 1%
R8170
NC
Page 25
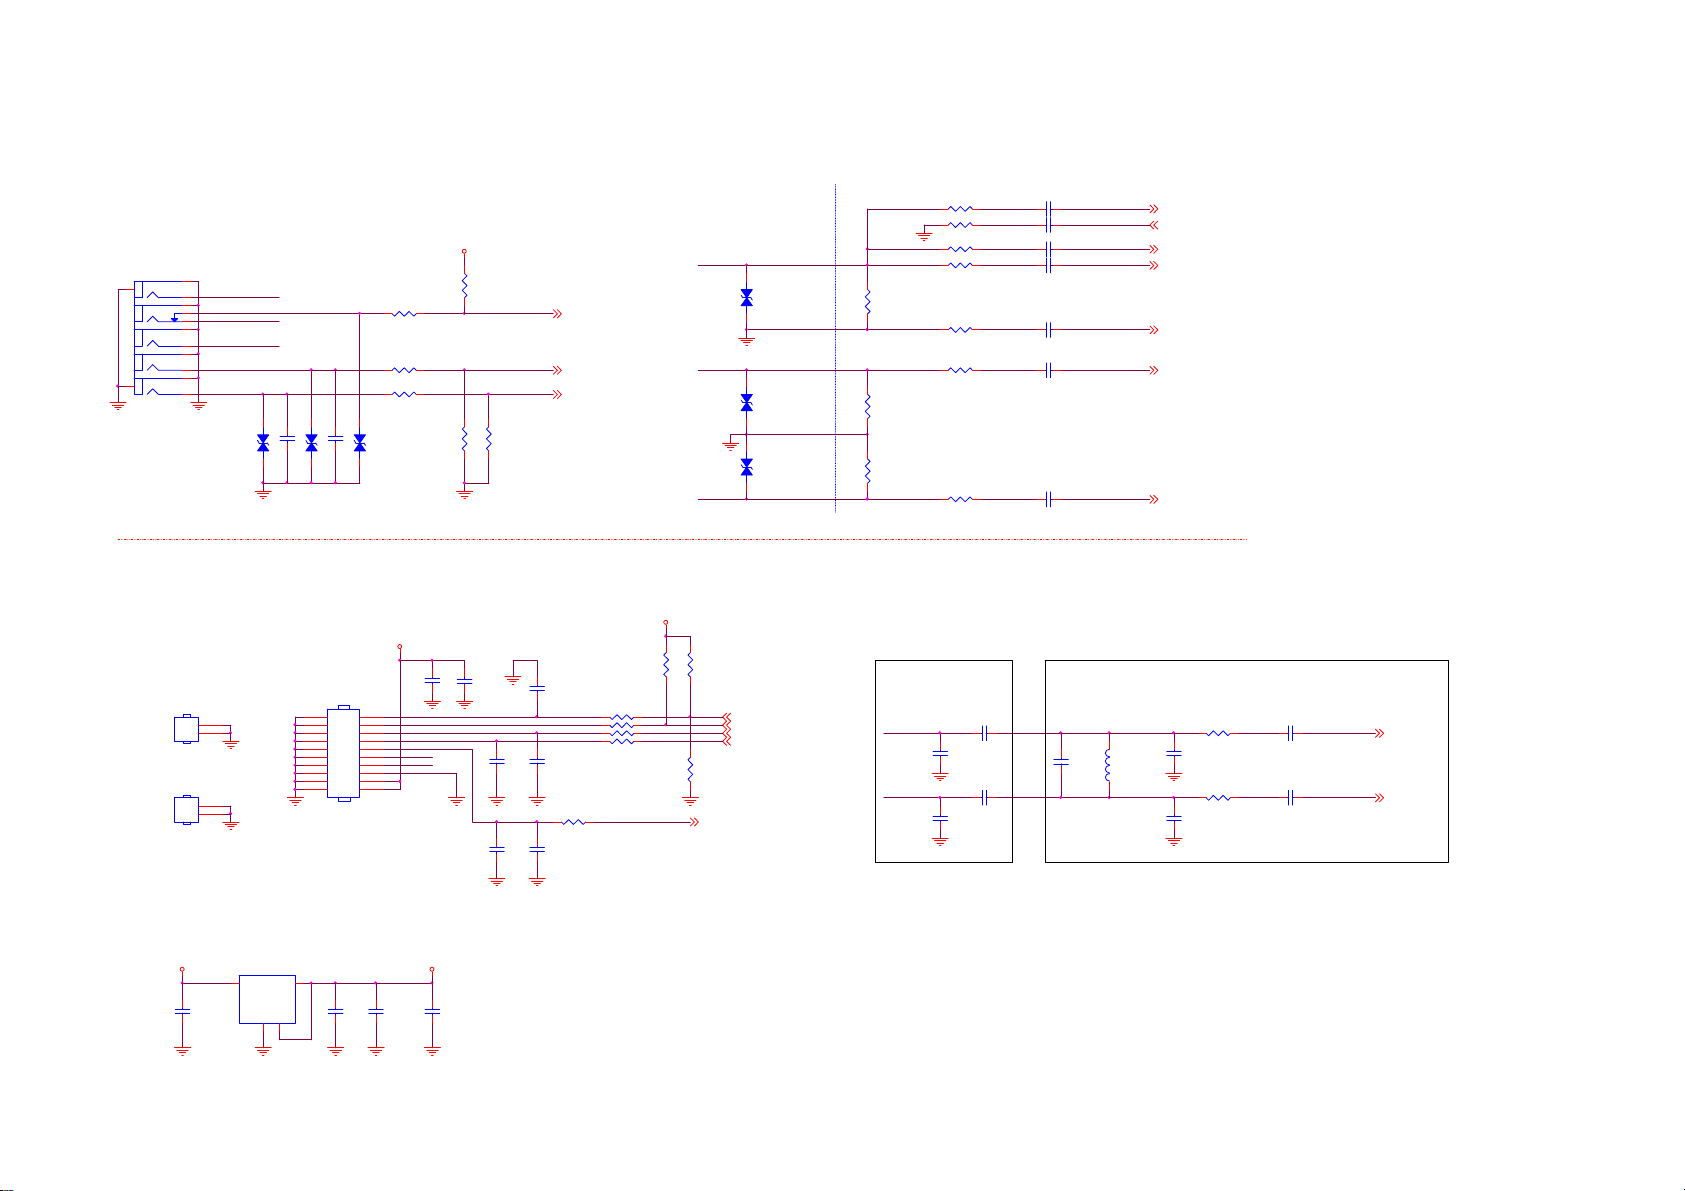
8.2 B 715G7491 SSB
8-2-1 YPbPr&AV/ Tuner
YPbPr Video Input share with CVBS in Y
CN111 RCA JACK
12
13
088G 78G155ACL
1
A
2
Y_IN#1
3
4
B
5
PB_IN#1
6
C
7
PR_IN#1
8
D
9
YPBPR_L_IN#1
10
E
11
YPBPR_R_IN#1
12
12
C101
ZD104
ZD101
NC
NC
3.3NF 50 V
R106 100R 1/16W 5%
R109 10K 1/16W 5%
R111 10K 1/16W 5%
12
C110
ZD105
NC
3.3NF 50 V
TW TUNER
+3V3TUNER
RF Input
(Side)
HS1
2
1
HEAT SINK
HS2
2
1
HEAT SINK
CN104
1
2
3
4
5
6
7
8
9
10
11
12
14
16
18
20
DIF1_OUT2
13
DIF1_OUT1
15
17
19
CONN
DVDD3V3
C182
100NF 16V
R101
4K7 1/16W 5%
PB_DET
YPbPr_L_In0
YPbPr_R_In0
R113
R114
12KOHM +-5% 1/16W
12KOHM +-5% 1/16W
C127
100PF 50V
C132
10PF 50V
C183
100NF 16V
PB_DET (6)
YPbPr_L_In0 (6)
YPbPr_R_In0 (6)
C138
1UF 10V
R148 1K 1/16W 1%
R152 0R05 OHM
R140 390R
R142 100R 1/16W 5%
C189
47PF 50V
R141 100R 1/16W 5%
C184
NC/2.2uF
Nearly Connector
Y_IN#1
12
ZD102
NC
Nearly IC
AV1_IN
R107
75R 1/16W 1%
R102
150OHM 1/16W +/-5 %
R103
180R 1/16W 5%
R104 33R 1/16W 5%
R105 33R 1/16W 5%
R108 68R 1/16W 5%
Connected to connector GND
PB_IN#1 COMP_PB
+3V3TUNER
R137
10K 1/16W 5%
TUN_IF_AGC
PR_IN#1
R138
47K 1/16W 5%
RF_CTRLRF_CTRL
R128
470K
IF_AGC1 (6)
12
ZD103
NC
12
ZD106
NC
RF_CTRL (6)
TU_RST (6)
M_SCL (6,7,8, 10)
M_SDA (6,7,8,10)
R112
75R 1/16W 1%
R115
75R 1/16W 1%
Near tuner CN104
DIF1_OUT2
DIF1_OUT1
R110 33R 1/16W 5%
R116 33R 1/16W 5%
C117
100NF 16V
C125
NC
C128
100NF 16V
C126
NC
C102 47NF 16V
C103 47NF 16V
C104 1nF 50V
C105 47NF 16V
C107 47NF 16V
C108 47NF 16V
C112 47NF 16V
C109
NC/120pF 50V
CVBS0P
CVBS_VCOM
COMP_SOY
COMP_Y
COMP_COM
COMP_PR
L101
NC/0.1UH
CVBS0P (6)
CVBS_VCOM (6)
COMP_SOY (6)
COMP_Y (6)
COMP_COM (6)
COMP_PB (6)
COMP_PR (6)
Near CHIP U4 01
C118
NC
C129
NC
R118 0R05 OHM
R119 0R05 OHM
C113
100NF 16 V
C114
100NF 16 V
TUN_IF-
TUN_IF+
FAT_IN- (6)
FAT_IN+ (6)
TUNER POW ER +3 V3
5V_SW
2nd 356G056351400C00H F
C120
10UF 10V
U101
AZ1117CH -3.3TRG1
3
VOUT
VIN
ADJ(GND)
1
2
C122
4
4
100NF 16V
314mA
+3V3TUNER
C121
C123
10UF 10V
22UF 6.3V
0805 0805
Page 26
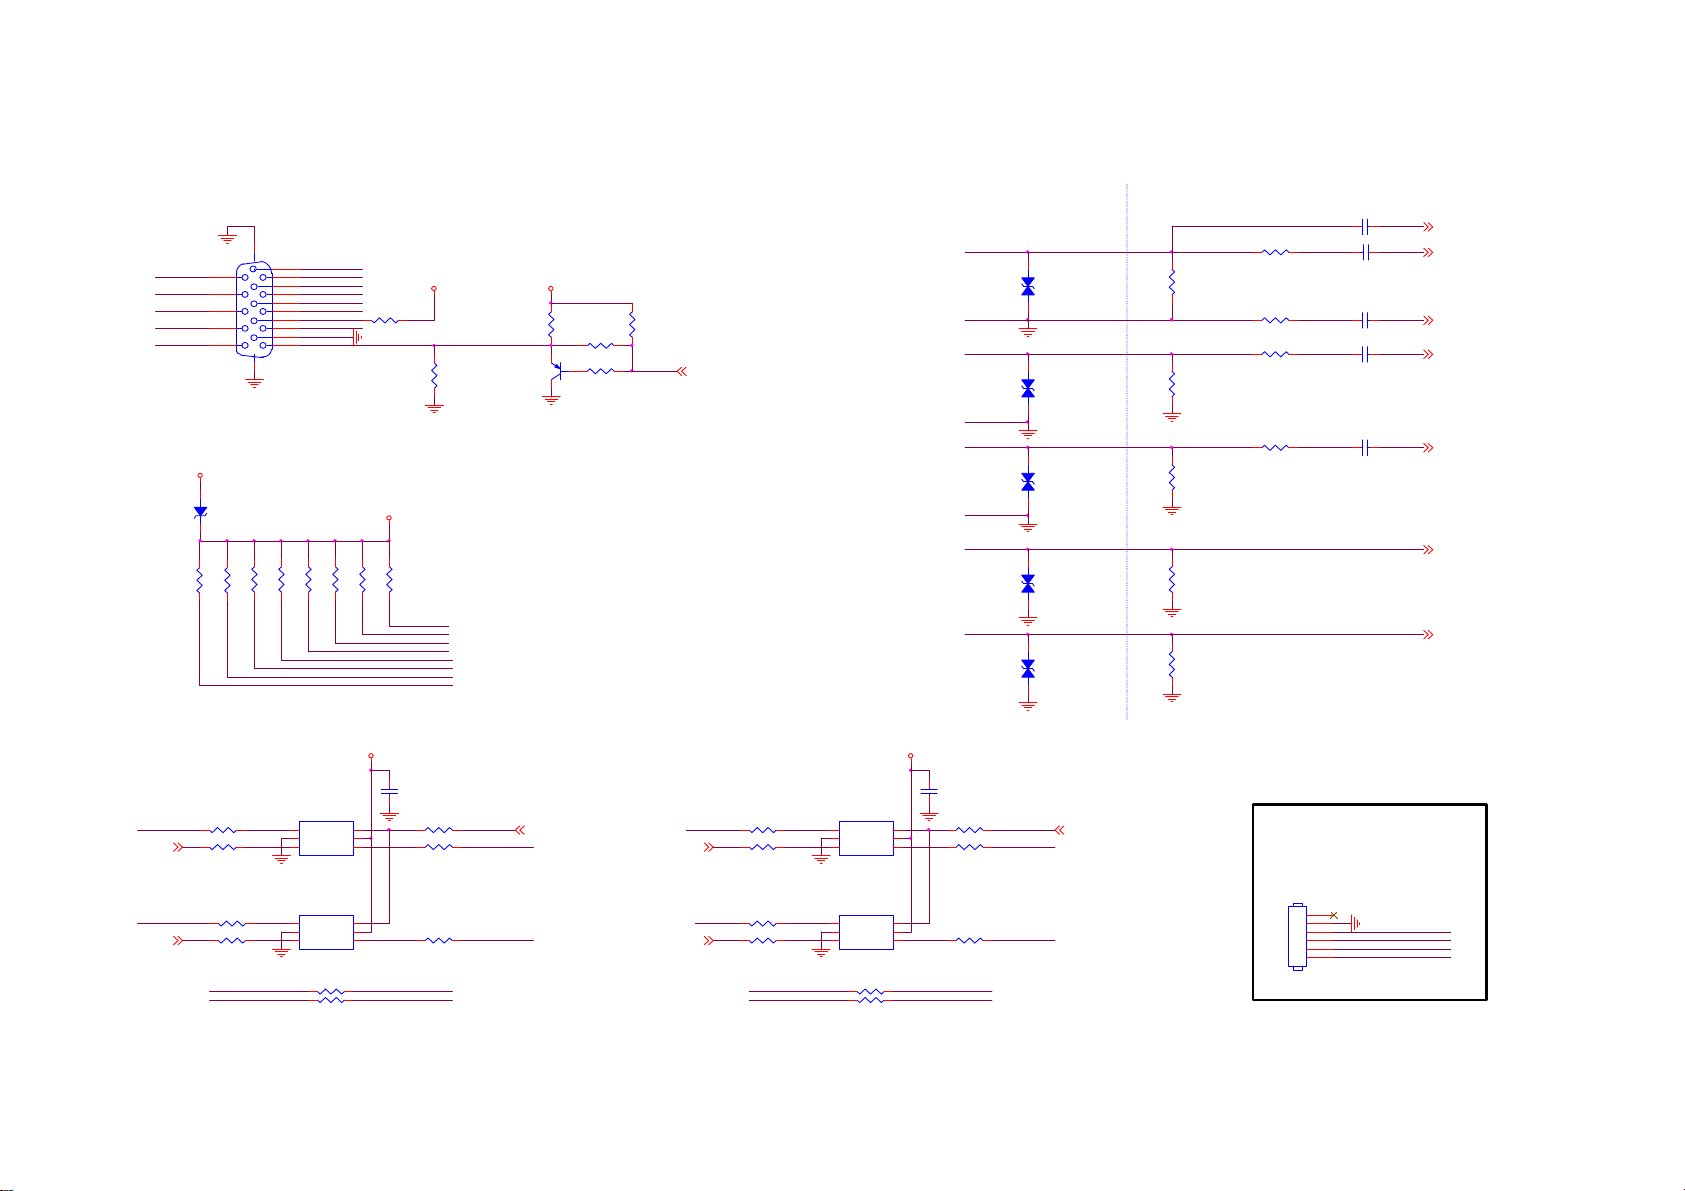
8-2-2 VGA INPUT
VGA
VGA_TX
HSYNC# BLU
VSYNC #
VGASCL
088G353GFF1AXH
+5VSB
13
R122
ZD120
BAT54
NC/4K7 1/16W 5%
NEARLY CONNECTOR NEARLY IC
VGA_SOG
C133
1716
CONN
6
RED_GND
1
11
12
13
14
15
R123
NC/4K7 1/16W 5%
R131
CN101
NC/4K7 1/16W 5%
7
2
8
3
9
4
10
5
R132
NC/4K7 1/16W 5%
RED
GRN_GND
GRNVGASDA
BLU_GND
HT_5V
VGA_RX
RC_OUT
R126
4K7 1/16W 5%
R120 NC/0oHM
VGA_5VSB
VGA_5VSB
R171
R151
4K7 1/16W 5%
4K7 1/16W 5%
R199
DDCA_DA
4K7 1/16W 5%
DDCA_CK
VGA_RX
VGA_TX
VGASDA
VGASCL
HOTEL_TX
HOTEL_RX
VGA_5VSB
R121
0R05 OHM
VGA_5VSB
R432
NC/ 10K 1/ 16W 5%
23
Q408
NC/LMBT3906LT1G
R430
NC/ 100R 1/ 16W 5%
1
R431
NC/ 100R 1/ 16W 5%
R429
NC/10K 1/16W 5%
OIRI
OIRI (6,7)
GRN
GRN_GN D
BLU
BLU_GND
RED
RED_GND
HSYNC#
VSYNC #
12
12
12
12
12
ZD108
NC
ZD109
NC
ZD110
NC
ZD111
NC
ZD114
NC
R129
VGA_HS
VGA_VS
33R 1/16W 5%
R133
68R 1/16W 5%
R134
33R 1/16W 5%
R136
33R 1/16W 5%
R130
75R 1/16W 1%
Connected to connector GND
R135
75R 1/16W 1%
R139
75R 1/16W 1%
R144
10K 1/16W 5%
R149
10K 1/16W 5%
1nF 50V
C134
47NF 16V
C136
47NF 16V
C137
47NF 16V
C139
47NF 16V
VGA_GP
VGA_COM
VGA_BP
VGA_RP
VGA_SOG (6)
VGA_GP (6)
VGA_COM (6)
VGA_BP (6)
VGA_RP (6)
VGA_HS (6)
VGA_VS (6)
VGA_5VSB
C159
U110
ICE-DSU_TX
R188 NC/33R 1/16W 5%
DDCA_DA(5,6)
DDCA_CK(5,6)
R189 NC/33R 1/16W 5%
R190 NC/33R 1/16W 5%
R191 NC/33R 1/16W 5%
DDCA_DA
DDCA_CK VGA_TX
1
B2
2
GND
VCC
B13A
NC/SN74LVC1G3157 DCKR
U111
1
B2
2
GND
VCC
B13A
NC/SN74LVC1G3157 DCKR
R445 0R05 O H M
R446 0R05 O H M
NC/100N16V
6
S
S
R192 NC/33R 1/16W 5%
5
4
R193 NC/33R 1/16W 5%
6
5
4
R194 NC/33R 1/16W 5%
VGASDA
VGASCL
VGASDA
VGASCL
DEBUG_SEL (6)
UART-RX
HOTEL_RX(6)
HOTEL_TX(6)
R196 NC/33R 1/16W 5%
UART-TXICE-DSU_RX
R197 NC/33R 1/16W 5%
R198 NC/33R 1/16W 5%
HOTEL_RX
HOTEL_TX
1
2
NC/SN74LVC1G3157 DCKR
1
2
NC/SN74LVC1G3157 DCKR
VGA_5VSB
U112
6
B2
S
5
GND
VCC
4
B13A
U113
6
B2
S
5
GND
VCC
4
B13A
R447 0R05 OH M
R448 0R05 OH M
C160
NC/100N16V
R174 NC/33R 1/16W 5%R195 NC/33R 1/16W 5%
R175 NC/33 OHM 1/16W
R176 NC/33 OHM 1/16W
VGA_RX
VGA_TX
VGA_RX
DEBUG_SEL (6)
FRC DEBUG
CN105
1
2
3
4
5
6
NC/CONN
ICE-DSU_TX
ICE-DSU_RX
UART-RX
UART-TX
Page 27
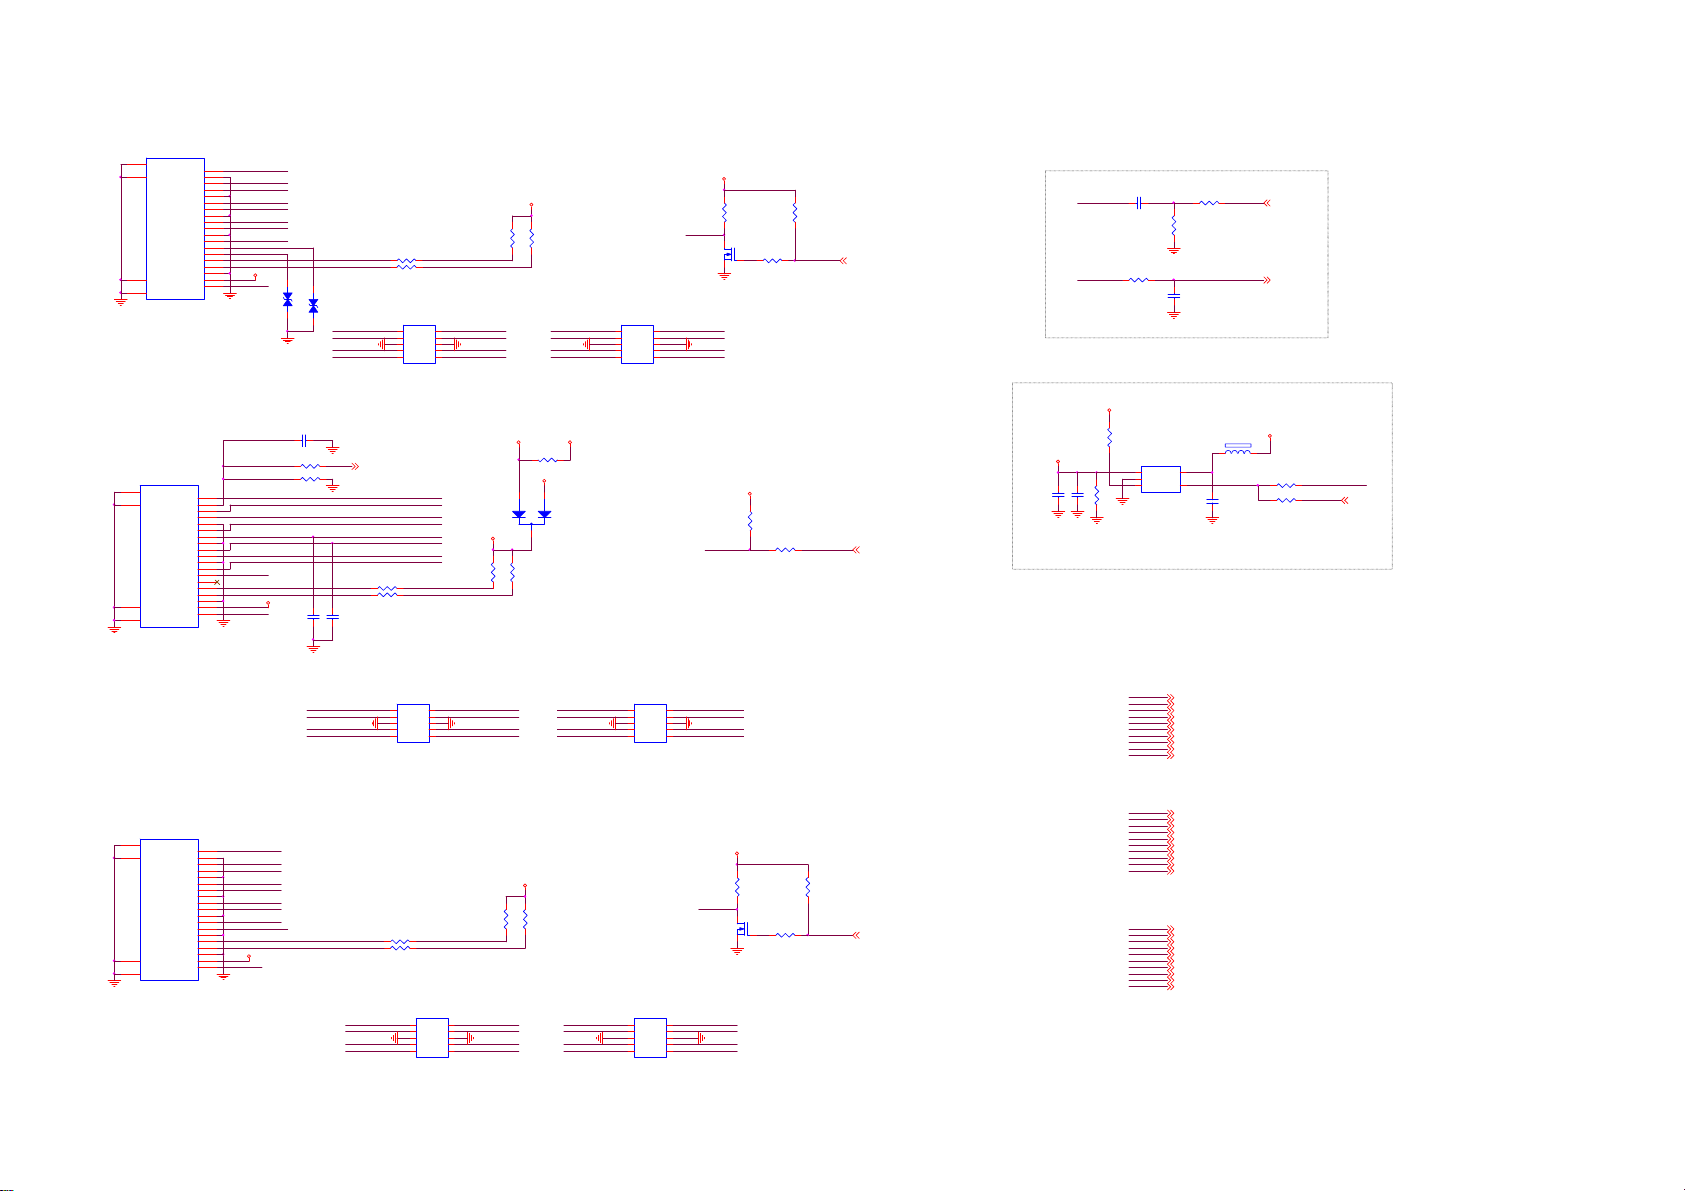
8-2-3 HDMI INPUT
CN506 HDMI
20
SHLD0
1
TMDSD2+
SHLD2
SHLD3
SHLD1
DSHLD0
TMDSD 2TMDSD1+
DSHLD1
TMDSD 1TMDSD0+
DSHLD2
TMDSD 0-
TMDSC +
CSHLD0
DDC_GND
TMDSD2+
DSHLD0
TMDSD 2-
TMDSD1+
DSHLD1
TMDSD 1-
TMDSD0+
DSHLD2
TMDSD 0TMDSC +
CSHLD0
TMDSC-
DDC_GND
TMDSC-
CEC
SCL
SDA
VCC5
HPD
VCC5
NC
2
3
4
5
6
7
8
9
10
11
12
13
CEC
14
NC
15
SCL
16
SDA
17
18
19
HPD
1
2
3
4
5
6
7
8
9
10
11
12
13
14
15
16
17
18
19
22
23
21
HDMI1/ARC
DOWN
CN507 HDMI
20
SHLD0
22
SHLD2
23
SHLD3
21
SHLD1
HDMID-RX2P
HDMID-RX2N
HDMID-RX1P
HDMID-RX1N
HDMID-RX0P
HDMID-RX0N
HDMID-CLKP
HDMID-CLKN
HDMI-CEC
HDMI_ARC
HDMID_5V
HDMID_HPD
MHL_ CAB LE_D ET
HDMI-B-RX0P
HDMI-B-RX0N
HDMI-CEC
HDMIB_5V
HDMIB_5V
HDMIB_HPD
ZD518
ZD503
NC
NC
1 2
1 2
C502 47NF 16V
R558 0R05 1/16W
R518 300K
C504
NC/1PF 50V
HDMID-RX2P
HDMID-RX2N
HDMID-RX1P
HDMID-RX1N
C505
NC/1PF 50V
MHL_CABLE-DET (6)
R510 33R 1/ 16W 5%
R511 33R 1/ 16W 5%
U501
1
CH1
2
CH2
3
VN
4
CH3
CH45NC
AOZ8804DI
HDMIB-RX2P
HDMIB-RX2N
HDMIB-RX1P
HDMIB-RX1N
HDMIB-RX0P
HDMIB-RX0N
HDMIB-CLKP
HDMIB-CLKN
R532 33R 1/16W 5%
R533 33R 1/16W 5%
HDMID_5V
HDMID_HPD
Q501
2N7002K
HDMID-RX0P
HDMID-RX0N
HDMID-CLKP
HDMID-CLKN
HDMIB_HPD
R506
1K 1/16W 5%
HDMID_5V
R508
R501
10K 1/16W 5%
HDMID_SCL
HDMID_SDA
10
HDMID-RX2P
NC
9
HDMID-RX2N
NC
8
VN
7
HDMID-RX1P
NC
6
HDMID-RX1N
HDMIB_SCL
HDMIB_SDA
HDMIB_VCC
R529
47K 1/16W 5%
HDMIB_5V
R561
10R 1/16W 5%
1
R530
47K 1/16W 5%
10K 1/16W 5%
+5VSB
2
3
HDMID-RX0P
HDMID-RX0N
HDMID-CLKP
HDMID-CLKN
AVDD5V_MHL
ZD507
LBAT54CLT1G
1
2
3
4
U502
CH1
CH2
VN
CH3
CH45NC
AOZ8804DI
10
NC
9
NC
8
VN
7
NC
6
R512
4K7 1/16W 5%
HDMIB_5V
R515
NC
R517
33R 1/16W 5%
R507
10K 1/16W 5%
HDMID_HPDIN
HDMIB_HPDIN
HDMID_HPDIN (6)
HDMIB_HPDIN (6)
CEC/ARC
HDMIB_5V
0603
MHL
C508
0805
4.7UF 10% 10V
HDMI_ARC
HDMI-CEC
C509
10UF 10V
0603
C501 1UF 10V
R514
200R 1/16W 5%
+5VSB
R534
4K7 1/16W 5%
R502
NC/7K5
Charge
U505
1
2
OUT
GND
FAULT3EN
STMPS2171STR
R505
NC
C503
4.7PF 50V
IN
R503
0R05 OHM
5
4
2nd 056G 665528 ?
ARC_SPDI F
HDMI_CEC
FB501
1 2
300R
EN_MHL_PWR
C507
4.7UF 10% 10V
0603
ARC_SPDI F (6)
HDMI_CEC (6)
+5VSB
R559
1K 1/16W 5%
R560
NC/33R 1/ 16W 5%
MHL_CABLE_DET
MHL_EN
MHL_ EN ( 6)
HDMID-RX2P
U504
1
HDMIB-RX2P
HDMIB-RX2N
HDMIB-RX1P
HDMIB-RX1N
CN508 HDMI
20
SHLD0
1
TMDSD2+
22
DSHLD0
SHLD2
TMDSD 2-
TMDSD1+
DSHLD1
TMDSD 1-
TMDSD0+
DSHLD2
TMDSD 0TMDSC +
CSHLD0
TMDSC-
DDC_GND
23
SHLD3
21
SHLD1
HDMI3/DVI
SIDE
VCC5
CEC
NC
SCL
SDA
HPD
HDMIA-RX2P
2
3
HDMIA-RX2N
4
HDMIA-RX1P
5
6
HDMIA-RX1N
7
HDMIA-RX0P
8
9
HDMIA-RX0N
10
HDMIA-CLKP
11
12
HDMIA-CLKN
13
HDMI-CEC
14
15
16
17
HDMIA_5V
18
19
HDMIA_HPD
HDMIA-RX2P
HDMIA-RX1P
HDMIA-RX1N
10
CH1
NC
2
9
CH2
NC
3
8
VN
VN
4
7
CH3
NC
6
CH45NC
AOZ8804DI
R566 33R 1/16W 5%
R567 33R 1/16W 5%
U507
1
CH1
NC
2
CH2
NC
3
VN
4
CH3
NC
CH45NC
AOZ8804DI
HDMIA_5V
R562
R564
10K 1/16W 5%
10K 1/16W 5%
HDMIB-RX0P
HDMIB-RX0N
HDMIB-CLKP
HDMIB-CLKN
HDMIA-RX0P
HDMIA-RX0NHDMIA-RX2N
HDMIA-CLKN
HDMIB-RX2P
HDMIB-RX2N
HDMIB-RX1P
HDMIB-RX1N
HDMIA_SCL
HDMIA_SDA
10
HDMIA-RX2P
9
HDMIA-RX2N
8
VN
7
HDMIA-RX1P
6
HDMIA-RX1N
1
2
3
4
1
2
3
4
U503
CH1
CH2
VN
CH3
CH45NC
AOZ8804DI
U506
CH1
CH2
VN
CH3
CH45NC
AOZ8804DI
10
HDMIB-RX0P
NC
9
HDMIB-RX0N
NC
8
VN
7
HDMIB-CLKP
NC
6
HDMIB-CLKN
HDMIA_5V
R568
4K7 1/16W 5%
R563
10K 1/16W 5%
HDMIA_HPDIN
HDMIA_HPDIN (6)
R565
1K 1/16W 5%
HDMIA_HPD
Q502
2N7002K
10
HDMIA-RX0P
NC
9
HDMIA-RX0N
NC
8
VN
7
HDMIA-CLKPHDMIA-CLKP
NC
6
HDMIA-CLKN
HDMID-RX2N
HDMID-RX1P
HDMID-RX1N
HDMID-RX0P
HDMID-RX0N
HDMID-CLKP
HDMID-CLKN
HDMID_SCL
HDMID_SDA
HDMIB-RX2P
HDMIB-RX2N
HDMIB-RX1P
HDMIB-RX1N
HDMIB-RX0P
HDMIB-RX0N
HDMIB-CLKP
HDMIB-CLKN
HDMIB_SCL
HDMIB_SDA
HDMIA-RX2P
HDMIA-RX2N
HDMIA-RX1P
HDMIA-RX1N
HDMIA-RX0P
HDMIA-RX0N
HDMIA-CLKP
HDMIA-CLKN
HDMIA_SCL
HDMIA_SDA
HDMID-RX2P (6)
HDMID-RX2N (6)
HDMID-RX1P (6)
HDMID-RX1N (6)
HDMID-RX0P (6)
HDMID-RX0N (6)
HDMID-CLKP (6)
HDMID-CLKN (6)
HDMID_SCL (6)
HDMID_SDA (6)
HDMIB-RX2P (6)
HDMIB-RX2N (6)
HDMIB-RX1P (6)
HDMIB-RX1N (6)
HDMIB-RX0P (6)
HDMIB-RX0N (6)
HDMIB-CLKP (6)
HDMIB-CLKN (6)
HDMIB_SCL (6)
HDMIB_SDA (6)
HDMIA-RX2P (6)
HDMIA-RX2N (6)
HDMIA-RX1P (6)
HDMIA-RX1N (6)
HDMIA-RX0P (6)
HDMIA-RX0N (6)
HDMIA-CLKP (6)
HDMIA-CLKN (6)
HDMIA_SCL (6)
HDMIA_SDA (6)
Page 28
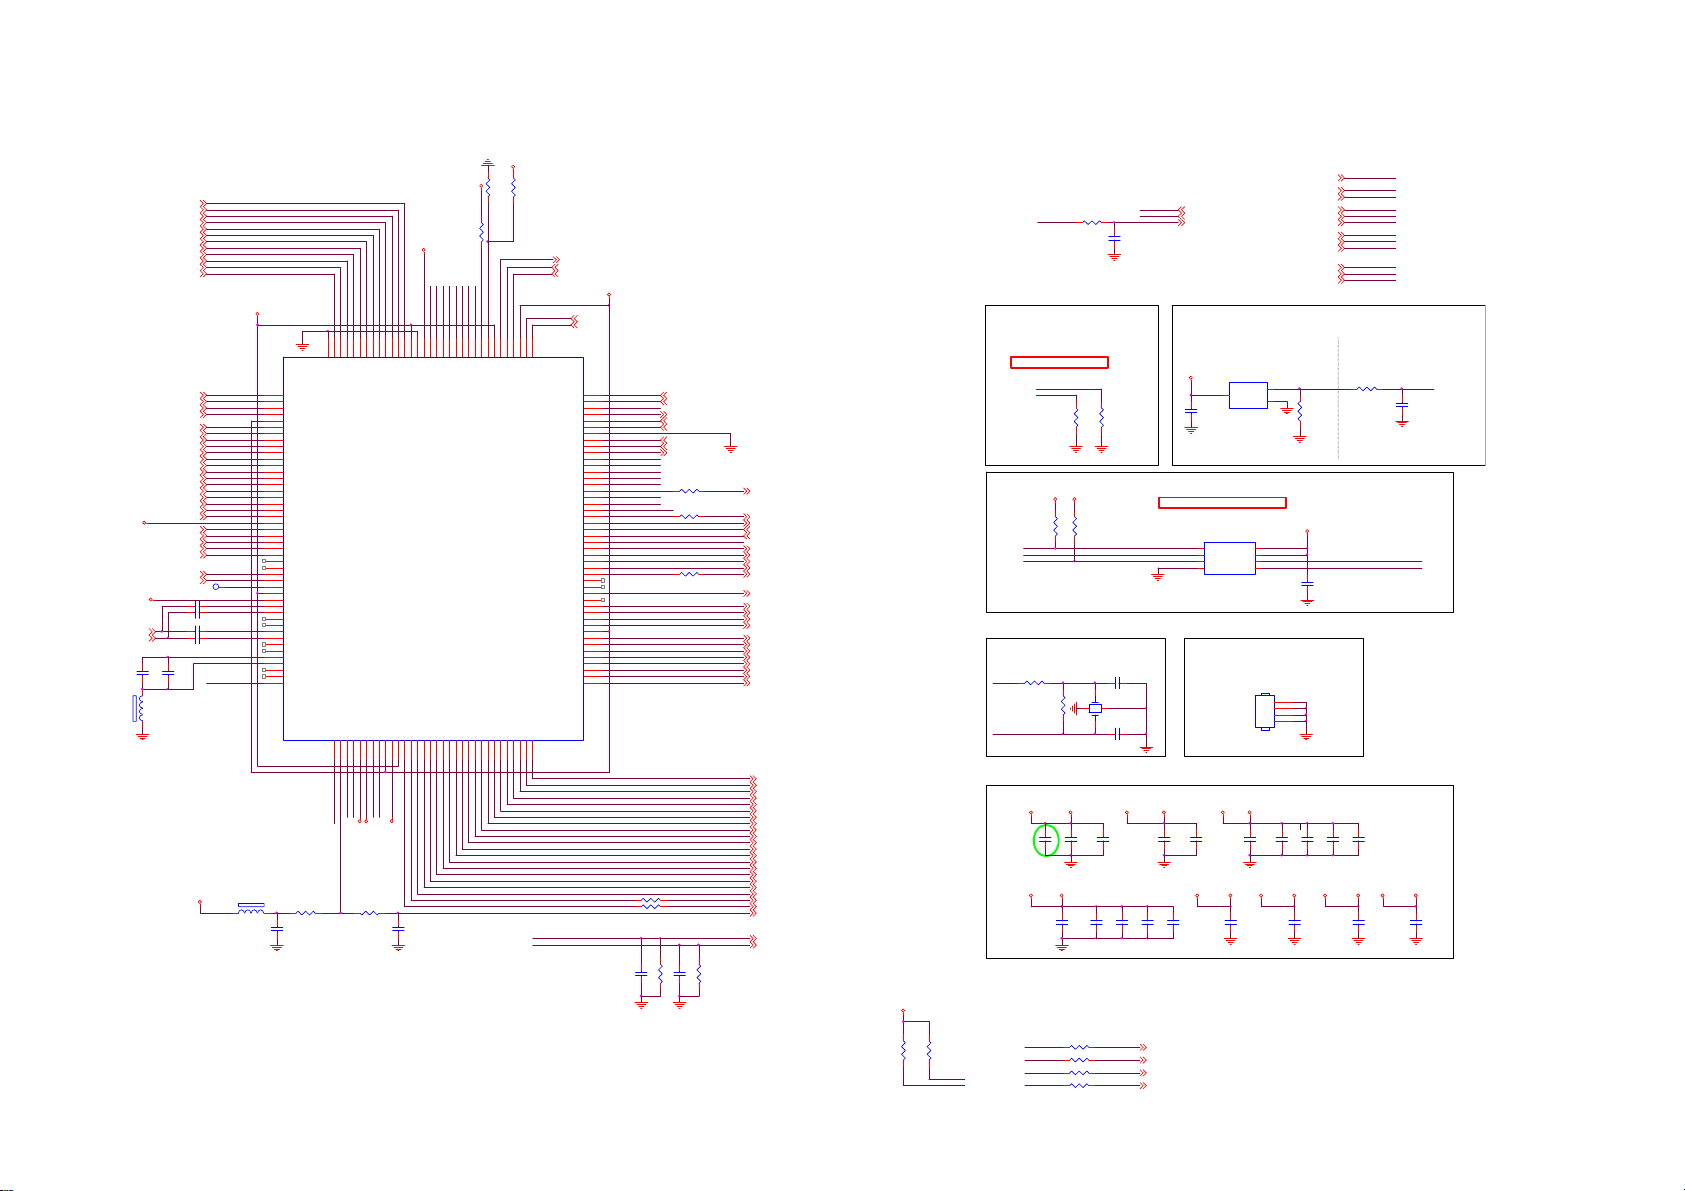
8-2-4 MSD8120PBM
HDMID-CLKN
HDMID-CLKN(5)
HDMID-CLKP
HDMID-CLKP(5)
HDMID-RX0N
HDMID-RX0N(5)
HDMID-RX0P
HDMID-RX0P(5)
HDMID-RX1N
HDMID-RX1N(5)
HDMID-RX1P
HDMID-RX1P(5)
HDMID-RX2N
HDMID-RX2N(5)
HDMID-RX2P
HDMID-RX2P(5)
HDMIB-CLKN
HDMIB-CLKN(5)
HDMIB-CLKP
HDMIB-CLKP(5)
HDMIB-RX0N
HDMIB-RX0N(5)
HDMIB-RX0P
HDMIB-RX0P(5)
HDMIB-RX1N
HDMIB-RX1N(5)
HDMIB-RX1P
HDMIB-RX1P(5)
HDMIB-RX2N
HDMIB-RX2N(5)
HDMIB-RX2P
HDMIB-RX2P(5)
HDMIA-CLKN
HDMIA-CLKN(5)
HDMIA-CLKP
HDMIA-CLKP(5)
HDMIA-RX0N
HDMIA-RX0N(5)
HDMIA-RX0P
HDMIA-RX0P(5)
HDMIA-RX1N
HDMIA-RX1N(5)
HDMIA-RX1P
HDMIA-RX1P(5)
HDMIA-RX2N
HDMIA-RX2N(5)
HDMIA-RX2P
HDMIA-RX2P(5)
VGA_HS
VGA_HS(4)
VGA_BP
VGA_BP(4)
VGA_SOG
VGA_SOG(4)
VGA_GP
VGA_GP(4)
VGA_COM
VGA_COM(4)
VGA_RP
VGA_RP(4)
VGA_VS
AVDD_AU33
YPbPr_R_In0(3)
YPbPr_L_In0(3)
C408
10UF 10V
FB401
60 OHM
1 2
VGA_VS(4)
COMP_PB(3)
COMP_SOY(3)
COMP_Y(3)
COMP_COM(3)
COMP_PR(3)
CVBS0P(3)
CVBS_VCOM(3)
TP1
C419 NC/1UF 10V
C420 NC/1UF 10V
C421 1UF 10V
C430 1UF 10V
C409
100NF 16V
DVDD3V3
COMP_PB
COMP_SOY
COMP_Y
COMP_COM
COMP_PR
CVBS0P
CVBS_VCOM
AUVAG
AUVRM
AMP-AUOUTL0
AVDD3P3_VEDIO
1
AUR0
AUL0
AUR2
AUL2
FB402
1 2
60 OHM
VDDC
1
2
3
4
5
6
7
8
9
10
11
12
13
14
15
16
17
18
19
20
21
22
23
24
25
26
27
28
29
30
31
32
33
34
35
36
37
38
39
40
41
42
43
44
45
46
C401
100NF 16V
U401
RX1N_B
RX1P_B
RX2N_B
RX2P_B
AVDD_MOD
RXCN_A
RXCP_A
RX0N_A
RX0P_A
RX1N_A
RX1P_A
RX2N_A
RX2P_A
HSYNC0
BIN0P
SOGIN0
GIN0P
GIN0M
RIN0P
VSYNC0
AVDD3P3_ADC
BIN1P
SOGIN1
GIN1P
GIN1M
RIN1P
VSYNC1
CVBS1
CVBS0
VCOM
CVBS_OUT1
VDDC
AVDD_AU33
AUR0
AUL0
AUR1
AUL1
AUR2
AUL2
AUR3
AUL3
VAG
VRM
LINEOUTL3
LINEOUTR3
LINEOUTL0
R419
10K 1/16W 5%
154
155
156
157
153
E-PAD
RX0P_B
RX0N_B
RXCP_B
IFAGC48LINEOU TR047VIFP
49
AMP-AUOUTR 0
FAT_IN+
FAT_IN-
IF_AGC
R494 0R05 OHM
151
149
152
150
148
RX2P_D
RX1P_D
RX2N_D
RX1N_D
RXCN_B
XOUT54XIN53AVDD3P3 _DMPLL
VIFM50VDDC57GPIO0/GPIO4 458GPIO1/GPIO4 559VDDIO_CMD
AVDD3P3_DADC
52
55
51
XTALO
XTALI
AVDD_DADC
AVDD_DMPLL
147
RX0P_D
AVDD_M OD
56
145
146
RX0N_D
RXCP_D
GPIO0
AVDD_DDR_CMD
C434
22N 25V
AVDD5V_MHL
144
RXCN_D
GPIO1
AVDD_DDR_DATA
AVDD_DDR_DATA
R4020R05 OHM
R4040R05 OHM
FRC_Panel
KEY2
KEY1
HDMIA_SDA
HDMIA_SCL
HDMIB_HPDIN
HDMIB_SCL
HDMIB_SDA
MHL_CABLE-DET
HDMID_SDA
HDMID_SCL
133
142
135
139
137
134
128
129
143
140
141
VDDC
AVDD_5V
HOTPLUG_B
GND_EFU SE
130
136
138
131
132
GND
SAR1
SAR2
VDDC
MHL_DET
DDCDB_CL
DDCDA_CL
DDCDB_DA
DDCDA_DA
DDCDC_CL
DDCDC_DA
VDDIO_DATA
MSD8120PBM-V5
B_ODD[0]/LVA4+
GPIO7/GPIO5 164B_ODD[1]/LVA4-
GPIO2
GPIO2/GPIO4 660GPIO3/GPIO4 761GPIO5/GPIO4 962GPIO6/GPIO5 0
GPIO3
B_ODD[4]/LVACLK+71B_ODD[5]/LVACLK-72B_ODD[6]/LVA2+73B_ODD[7]/LVA2-74G_ODD[0]/LVA1+
B_ODD[3]/LVA3-
GPIO9/GPIO5 366B_ODD[2]/LVA3+69GPIO8/GPIO5 2
67
68
63
65
GPIO6
GPIO7
GPIO8
75
70
GPIO9
R401NC/0R05 OHM
DDR3 solder R402 R404
DDR2 solder R401
FRC_Panel (7)
KEY2 (7)
KEY1 (7)
AVDD_MOD
USB_DP1
USB_DP1 (7)
USB_DM1
USB_DM1 (7)
127
125
126
SAR0
DP_P1
DM_P1
DDCA_CK
DDCA_DA
SPI_DO
HOTPLUG_A
HOTPLUG_C
TCON 10
LVSYNC
LHSYNC
R_ODD[7]/LVB0R_ODD[6]/LVB0+
R_ODD[5]/LVB1R_ODD[4]/LVB1+
AVDD_MOD
R_ODD[3]/LVB2R_ODD[2]/LVB2+
G_ODD[7] /LVB3G_ODD[6]/LVB3+
G_ODD[5] /LVB4G_ODD[4]/LVB4+
G_ODD[3]/LVA0-
78
AMP-AUOUTL0
AMP-AUOUTR0
DP_P0
DM_P0
RESET
SPI_CK
SPI_CZ
SPI_DI
PWM0
PWM1
TCON 0
TCON 1
TCON 2
TCON 3
TCON 4
TCON 5
TCON 6
TCON 7
TCON 8
TCON 9
124
123
122
121
INT
120
IRIN
119
CEC
118
TEST
117
116
115
ARC
114
113
112
111
110
109
108
107
106
105
104
103
102
101
100
99
98
97
96
95
94
93
LDE
92
LCK
91
90
89
88
87
86
85
84
83
82
81
80
79
AVDD_MOD
R_ODD[1]/LVBCLK-
R_ODD[0]/LVBCLK+
G_ODD[1]/LVA1-76G_ODD[2]/LVA0+
77
USB_DP0
USB_DP0 (7)
USB_DM0
USB_DM0 (7)
ORESET#
PANEL_EN
PANEL_EN (7)
OIRI
OIRI (5,7)
HDMI_CEC
HDMI_CEC (5)
DDCA_CK
DDCA_CK (4,5)
DDCA_DA
DDCA_DA (4,5)
ARC_SPDIF
ARC_SPDIF (5)
SPI_CLK
SPI_CSN
SPI_SDI
SPI_SDO
BL_DIMMING
PWM1
R486 33R 1/16W 5%
HDMIA_HPDIN
HDMID_HPDIN
TCON 0
TCON 1
R409 NC/33R 1/16W 5%
R412 33R 1/16W 5%
DDR2 =>
MSD8120PBN
DDR3 =>
MSD8120PBM
R405 NC/33R 1/16W 5%
R406 NC/33R 1/16W 5%
R492
C431
C432
1nF 50V
1nF 50V
200K
PWR_ON
HP_DET
SPI_WP
AUDIO_RESET
LED_R
RF_CTRL
TU_R ST
MHL_EN
RXO0-
RXO0+
RXO1RXO1+
RXO2RXO2+
RXOCRXOC+
RXO3RXO3+
RXO4RXO4+
RXE0RXE0+
RXE1RXE1+
RXE2RXE2+
RXECRXEC+
RXE3RXE3+
RXE4RXE4+
AU_SD
AU_BCK
AU_MCK
AU_WS
SPDIF
AUDIO_MUTE
BL_ON/OFF
M_SCL
M_SDA
IF_AGC1
AMP-AUOUTL
AMP-AUOUTR
R493
200K
DEBUG_SEL (4)
LED_G (7)
PWR_ON (9)
PB_DET (3)
HP_DET (8)
AUDIO_RESET (8)
LED_R (7)
RF_CTRL (3)
TU_R ST ( 3)
LED_G (7)
MHL_ EN (5)
RXO0- (7)
RXO0+ (7)
RXO1- (7)
RXO1+ (7)
RXO2- (7)
RXO2+ (7)
RXOC- (7)
RXOC+ (7)
RXO3- (7)
RXO3+ (7)
RXO4- (7)
RXO4+ (7)
RXE0- (7)
RXE0+ (7)
RXE1- (7)
RXE1+ (7)
RXE2- (7)
RXE2+ (7)
RXEC- (7)
RXEC+ (7)
RXE3- (7)
RXE3+ (7)
RXE4- (7)
RXE4+ (7)
AU_SD (8)
AU_BCK (8)
AU_MCK (8)
AU_WS (8)
SPDIF (7)
AUDIO_MUTE (8)
BL_ON/OFF (9)
M_SCL (3,7,8, 10)
M_SDA (3,7,8,10)
IF_AGC1 (3)
AMP-AUOUTL (8)
AMP-AUOUTR (8)
MHL_CABLE-DET
MHL_CABLE-DET(5)
HDMI_CEC
HDMI_CEC(5)
ARC_SPDIF
ARC_SPDIF(5)
HDMID_SCL(5)
HDMID_SDA(5)
HDMID_HPDIN(5)
HDMIB_SCL(5)
HDMIB_SDA(5)
HDMIB_HPDIN(5)
HDMIA_SCL(5)
HDMIA_SDA(5)
HDMIA_HPDIN(5)
R427
100K 1/16W
+3V3SB
C433
100NF 16V
C404
100NF 16V
C416
4.7UF 6.3V
HDMID_SCL
HDMID_SDA
HDMID_HPDIN
HDMIB_SCL
HDMIB_SDA
HDMIB_HPDIN
HDMIA_SCL
HDMIA_SDA
HDMIA_HPDIN
R422
100R 1/16W 5%
C417
100NF 16V
AVDD_AU33
Close Scaler
C418
100NF 16V
C428
100NF 16V
ORESET#
C403
100NF 16V
SPI_CLK
SPI_SDI
AVDD3P3_VEDIO
C429
100NF 16V
DVDD3V3
R442
1.8K 1/16W
FAT_IN+
FAT_IN+ (3)
FAT_IN-
FAT_IN- (3)
R450
4K7 1/16W 5%
3
15PF 50V
X401
24MHZ
1
15PF 50V
C411
100NF 16V
C423
100NF 16V
C722
NC
C406
C407
C424
100NF 16V
BRIGHT_ADJ
BRIGHT_ADJ (9)
RESET (H Reset)
+3V3SB
C402
100NF 16V
1st 356G2233073
2nd 356G22330420T R
1
2
3
Shielding Cover
X85T804210100000LH
AVDD_DDR_DATAAVDD_DDR_CMDDDRV VCCK VD DCDDRV
C412
C413
10UF 6.3V 20%
100NF 16V
+3V3SB
C426
C425
100NF 16V
100NF 16V
U410
G690H293T73
RESET
3
Vcc
U403
CS#
VCC
SO/SIO1
HOLD#
WP#
SCLK
GND4SI/SIO0
MX25L6406EM21-12G
AVDD_DMPLL
C427
100NF 16V
2
1
GND
8
7
6
5
HS401
SHIELD
C414
10UF 6.3V 20%
060306030603
+3V3SB
4
3
2
1
C415
100NF 16V
AVDD_DADC
BL_DIMMING
CHIP_CONFIG
{PWM1, PWM0}
B51_NO_EJ
PWM1
BL_DIMMING
SPI FLASH
SPI_CSN
SPI_SDO
SPI_WP
CRYSTAL
XTAL O
R439
0R05 OHM
R428
1M 1/16W
XTAL I
POWER
C405
10UF 6.3V 20%
0603
R717 1K 1/16W 5%
4'h00
R449
4K7 1/16W 5%
+3V3SB+3V3SB
R417
R418
10K 1/16W 5%
4K7 1/16W 5%
2 4
C410
10UF 6.3V 20%
AVDD_MOD+3V3SB +3V3SB+3V3SB
C422
10UF 6.3V 20%
0603
HOTEL MODE SELECT
R443
4K3
M_SDA
M_SCL
GPIO1
GPIO0
TCON 0
TCON 1
R407 33R 1/16W 5%
R408 33R 1/16W 5%
R410 33R 1/16W 5%
R411 33R 1/16W 5%
HOTEL_RX (4)
HOTEL_TX (4)
M_SCL (3,7,8, 10)
M_SDA (3,7,8,10)
Page 29
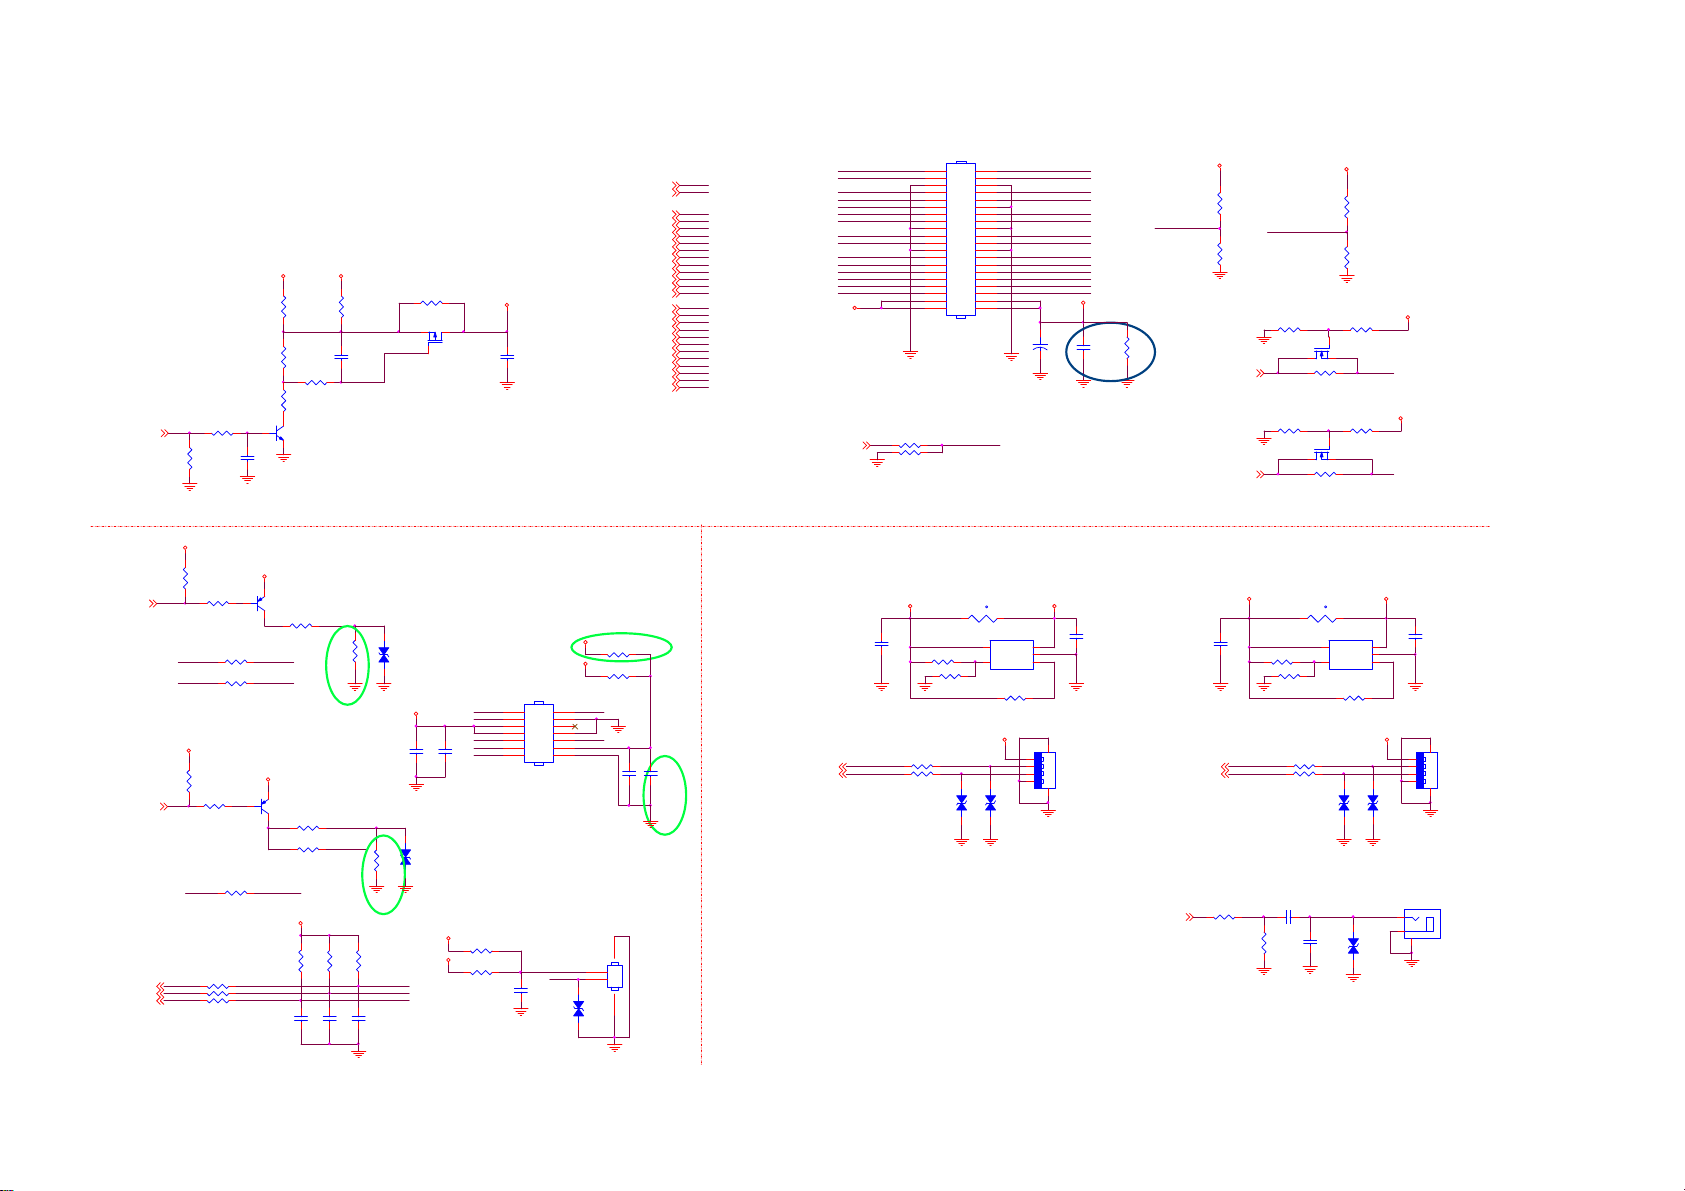
8-2-5 LVDS/USB/KEYIR/SPDIF
FHD LVDS
+5VSB +12V
R172
NC
R150
100K 1/10W
R153 150K
R441
10K 1/10W
PANEL_EN(6)
H PANEL ON
L PA NEL
OFF
LED_R(6)
LED_G(6)
OIRI(5,6)
KEY1(6)
KEY2(6)
R155 4K7 1/ 16W 5%
R156
10K 1/16W 5%
+3V3SB
R161
NC/10K 1/16W 5%
LED_R
R165
10K 1/16W 5%
LED_R LED_RE
R16A
NC/3. 3K 1%
LED_R LED_GE
R166
NC/150OH M 1/16W +/ -5%
+3V3SB
R177
10K 1/16W 5%
LED_G
R179
10K 1/16W 5%
R200
NC/0R 05 1/ 10W
OIRI
R168 100R 1/ 16W 5%
R169 100R 1/16W 1%
KEY2
R170 100R 1/16W 1%
C149
NC
+3V3SB
Q103
MMBT3906
+3V3SB
Q104
MMBT3906
1K 1/16W 5%
NC/1K 1/16W 5%
LED_LOGOLED_G
Q102
MMBT3904
R167
1K 1/16W 5%
R180
R183
+3V3SB
R162
6.8K +-1% 1/16W
C154
100NF 16V
R173
0oHM
C145
470NF 16V
LED_RE
R16B
3.3K 1%
LED_GE
LED_LOGO
R164
R163
10K +-1% 1/16W
6.8K +-1% 1/16W
C155
C156
100PF 50V
100NF 16V
12
ZD402
NC
R16C
3.3K 1%
IR_IN
KEY1_INKEY1
KEY2_IN
R178 NC/0oHM
Q101
AO3407A
PANEL_VCC
C158
NC/10uF 16V
FRC + Panel 2A
C152
1UF 10V
C153
100NF 16V
+3V3SB
DVDD3V3
LED_RE
IR_IN
KEY1_IN
M_SC L
M_SD A
R186 NC/0R05 1/10W
R187 NC/0R05 1/10W
+3V3SB
12
ZD403
NC
0805
KEYIR
CN400
1
3
5
7
9
11
13
CONN
C161
NC/100N F 16V
5V_SW
DVDD3V3
2
4
6
8
10
12
14
Logo
LED_LOGO
LED_GE
KEY2_IN
12
ZD401
NC
M_SC L(3,6,8,10)
M_SD A(3,6,8,10)
RXO0-(6)
RXO0+(6)
RXO1-(6)
RXO1+(6)
RXO2-(6)
RXO2+(6)
RXOC+(6)
RXOC-(6)
RXO3-(6)
RXO3+(6)
RXO4-(6)
RXO4+(6)
RXE0-(6)
RXE0+(6)
RXE1-(6)
RXE1+(6)
RXE2-(6)
RXE2+(6)
RXEC+(6)
RXEC-(6)
RXE3+(6)
RXE3-(6)
RXE4+(6)
RXE4-(6)
R18A NC/0R05 1/10W
R18B 0R05 1/10W
C115 NC/ 10uF 16V
C116 100N F 16V
CN401
2
NC/CONN 2P
1
3 4
USB 2.0
PANEL_VCC
LVDS Power
FRC_Panel(6)
USB_DM0
USB_DM0(6)
USB_DP0
USB_DP0(6)
RXE3RXEC-
RXE2-
BIT_SEL
RXE1RXE0-
RXO3RXOC-
RXO2SCL
RXO1RXO0-
LVDS_SEL_SOC
R145 NC/0R05 1/16W
R146 NC/0R05 1/16W
5V_SW
C151
1UF 10V
R157 5R6 1/ 16W 5%
R158 5R6 1/ 16W 5%
CN402
40
39
38
37
36
35
34
33
32
31
30
29
28
27
26
25
24
23
22
21
20
19
18
17
16
15
14
13
12
11
10
9
8
7
6
5
4
3
2
1
CONN
PANEL_SEL2
1A Loading
TH101
1 2
NC/PTCR
5
4
R159
10K 1/16W 5%
R127
NC/10K 1/16W 5%
R160 10K 1/16W 5%
12
ZD121
NC
RXE4+RXE4RXE3+
RXEC+
RXE2+
RXE1+
RXE0+RXE0+
RXO4+RXO4RXO3+
RXOC+
RXO2+
SDA
RXO1+
RXO0+
PANEL_SEL2
+
C157
100UF 16V
SMT
PANEL_VCC
C148
100NF 25V
BIT_SEL
R117
NC/10K 1/10W
0603
IF FRC USE, NEED NC
USB_5V
t
U109
VOUT
VIN
GND
APL3511CBI-TRG
USB_5V
12
ZD122
NC
C150
1
10UF 10V
2
OCB3EN
0805
1
1234
CN103
2
3
4
USB CONN
6 5
SPDIF
(6)
DVDD3V3
NC/1UF 10V
USB_DM1(6)
USB_DP1(6)
R632 100OHM
R425
NC/4K7 1/ 16W 5%
R426
0R05 1/16W
M_SD A(6)
M_SC L(6)
5V_SW
C191
NC/10K 1/16W 5%
USB_DM1
USB_DP1
LVDS_SEL_SOC
R452 NC/2.2K 1/16W
R453
NC/33 OHM 1/16W
R456 NC/2.2K 1/16W
R457
NC/33 OHM 1/16W
1A Loading
TH102
1 2
NC/PTCR
5
4
R181
R143
NC/10K 1/16W 5%
NC/APL3511C BI-TRG
R182 NC/10K 1/16W 5%
R184 NC / 5R 6 1/ 16W 5%
R185 NC / 5R 6 1/ 16W 5%
C632
Coaxial
1UF16V
C651
R633
330PF 50V
100OHM
DVDD3V3
R423
NC/4K7 1/ 16W 5%
R424
NC/4.7K
PANEL_VCC
R451 NC/3.3K 1/16W
Q105
NC/2N 7002K
SDA
PANEL_VCC
R455 NC/3.3K 1/16W
Q106
NC/2N 7002K
SCL
USB2_5V
t
U102
1
VOUT
VIN
2
GND
OCB3EN
USB2_5V
12
12
ZD123
ZD124
NC
NC
DUAL Lay
2
0603
12
1
ZD604
NC/MLVG0402
388G078G111ACL
C190
NC/10U F 10V
0805
1
2
3
4
CN603
RCA JACK
3
1234
CN112
NC/USB CONN
6 5
A
Page 30
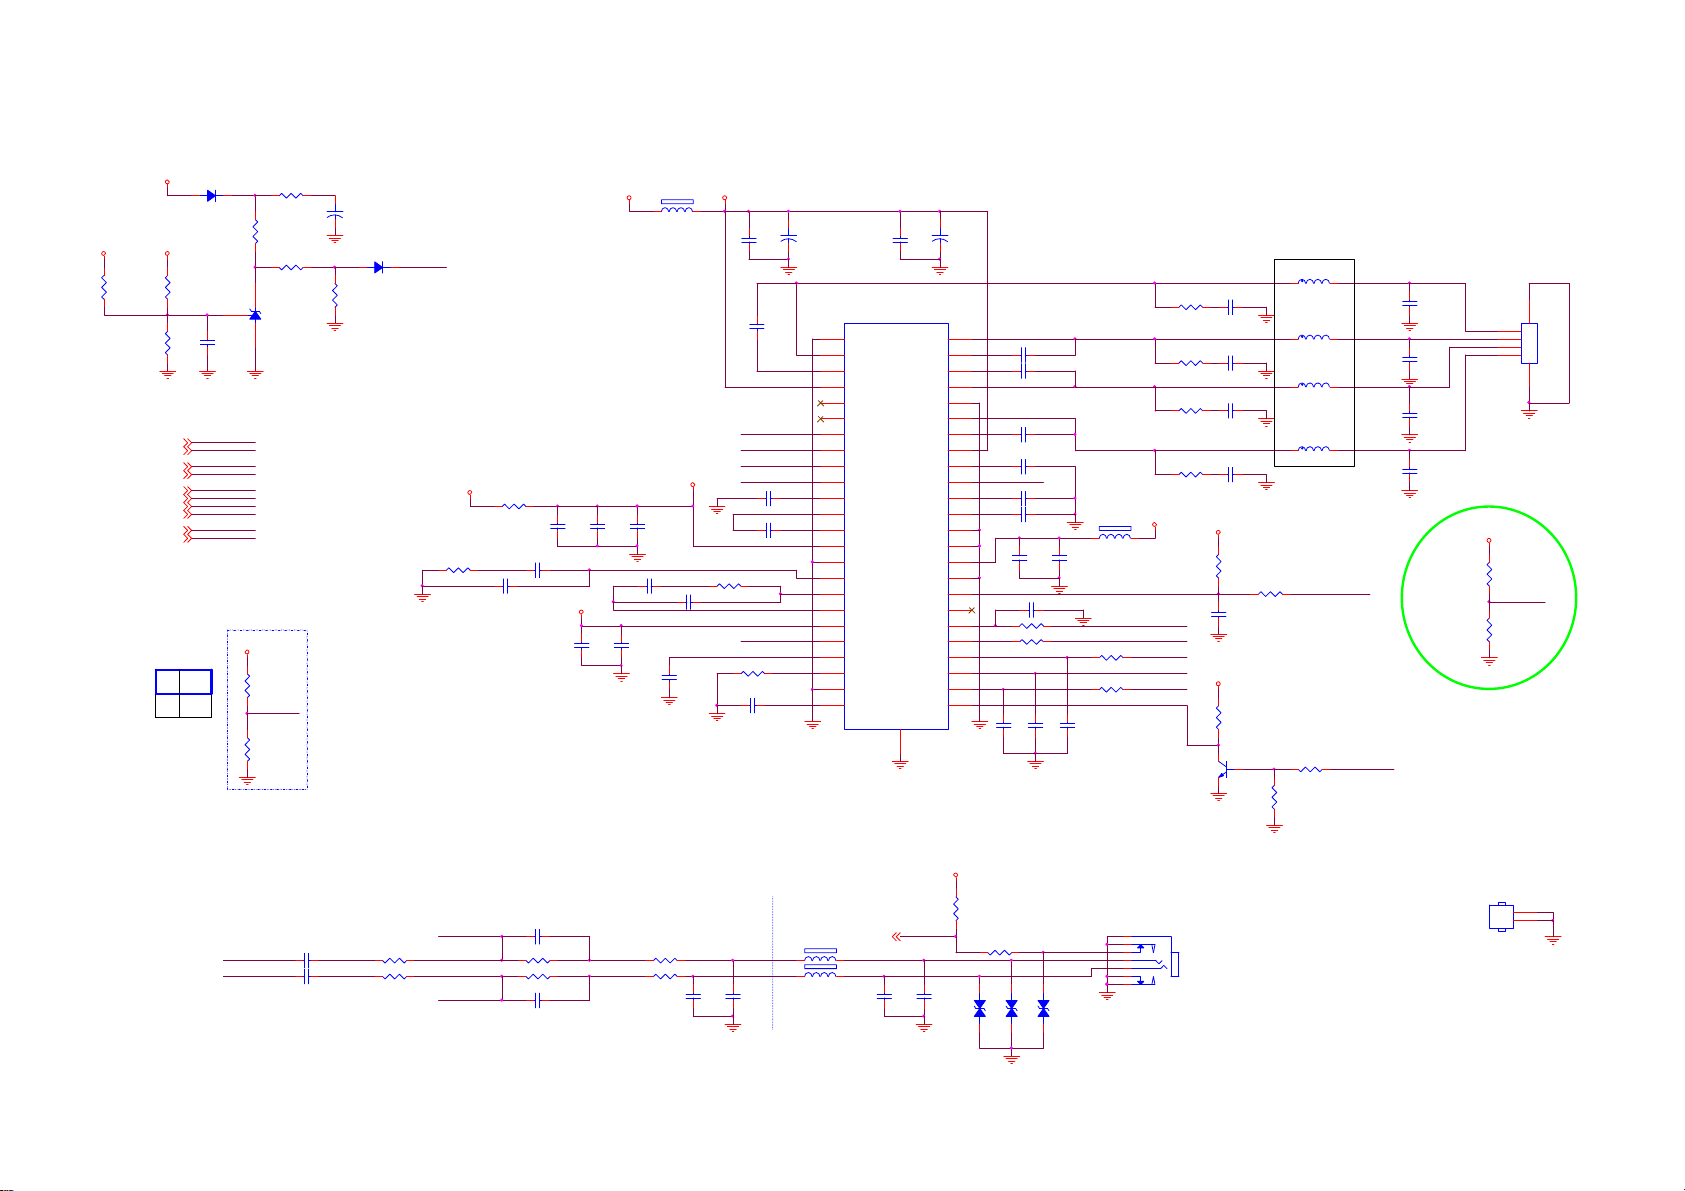
8-2-6 Audio Amp/Headphone Out
D
POP NOISE (AC OFF)
D602
R654
NC
AMP-AUOUTR(6)
AMP-AUOUTL(6)
AU_SD(6)
AU_BCK(6)
AU_MCK(6)
AU_WS(6)
AUDIO_RESET(6)
AUDIO_MUTE(6)
+12V_AUD
+12V+12V_AUD
M_SD A(3,6,7,10)
M_SC L(3,6,7,10)
I2C Address
SS1060FL
R646
3KOHM +-5% 1/16W
R653
C665
100NF 25V
1K 1/16W 5%
M_SDA
M_SCL
AMP-AUOUTR
AMP-AUOUTL
AU_SD
AU_BCK
AU_MCK
AU_WS
AUDIO_RESET
AUDIO_MUTE
Lo
0X54
Hi
0X56
R643
10K 1/16W 5%
AMP_3V3
R619
NC/10K
R621
10K 1/16W 5%
R642
100R 1/16W 5%
R645
51K 1/16W 5%
U603
AS43 1AN-E1
ADR
C664
+
100UF 35V
R649
30K OHM +-1% 1/16W
D603
1N4148WS
PD_MUTE
DVDD3V3
R607 4 70R 1/ 16W 1%
R605 0R05 1/10W
C629 47 NF 16V
C630 4. 7N F 50 V
C623
100NF 16V
0402
AMP_3V3
FB601
+12V_AUD
120R 6A
AMP_3V3
C625
C624
10UF 6. 3V 20%
1UF 10V
0402
C631 47N F 16V R608 470R 1/16W 1%
C633 4. 7N F 50 V
C637
C636
10UF 6. 3V 20%
100NF 16V
C638
22PF 50V
AMP_POWER
12
C620 1U F 10V
C626 1U F 10V
ADR
AU_MCK
R617
18.2K OHM +-1% 1/16W
C639 4. 7U F 10% 1 0V
C601
0.1uF 50V
C608
33nF 50V
HPIN_L
HPOUT_L
HPOUT_R
HPIN_R
C602
+
100UF 35V
U601
1
GND
2
OUTA
3
BSTA
4
PVDD
5
PWM1
6
PWM2
7
HPIL
8
HPOL
9
HPOR
10
HPIR
11
HPVSS
CN12AVDD_REG2
13
CP
14
HPVDD
15
GND
16
FLTM
17
FTLP
18
AVDD_REG1
19
AVDD
20
ADR
21
MCLK
22
ROSC
23
GND
24
DVDD_REG
TAS5729MD
C604
0.1uF 50V
GVDD_REG
SSTIMER
E-Pad
49
OUTB
BSTB
BSTC
OUTC
GND
OUTD
BSTD
PVDD
HP_SD
GND
GND
DVDD
TEST
RESET
SDIN 1
SCLK
LRCLK
PDN
+
NC
SCL
SDA
C603
100UF 35V
48
47
46
45
44
43
42
41
40
39
38
37
36
35
34
33
32
31
30
29
28
27
26
25
C609 33nF 50V
C612 33nF 50V
C616 33nF 50V
C617 1U F 25V
AUDIO_MUTE
C621 2.2nF 50V
C622 100N F 16V
C627
100NF 16V
C634 22PF 50V
R612
680R 1/16W 5%
R614
33R 1/16W 5%
C640
C641
22PF 50V
22PF 50V
1 2
C628
10UF 6. 3V 20%
R616
33R 1/16W 5%
R618
33R 1/16W 5%
C642
22PF 50V
LOUT+
LOUT-
ROUT+
ROUT-
FB603
600 OHM
AMP_3V3
RESET_AMP
M_SC L
M_SD A
AU_SD
AU_BCK
AU_WS
AMP_PDN
R601
18R 1%
R602
18R 1%
R603
18R 1%
R604
18R 1%
C605
330pF 50V
C610
330pF 50V
C613
330pF 50V
C618
330pF 50V
AMP_3V3
R606
10K 1/16W 5%
C635
NC/100PF 50V
AMP_3V3
R620
10K 1/16W 5%
L601 22uH
L602 22uH
L603 22uH
L604 22uH
R610
33R 1/16W 5%
Q603
R622 10K 1/16W 5%
MMBT3904
R623
100K 1/16W
AUDIO_RESET
PD_MUTE
C607
330nF
C611
330nF
C615
330nF
C619
330nF
NC/10K 1/16W 5%
NC/10K 1/16W 5%
R635
R636
L+
LR+
R-
AMP_3V3
CN601
4
3
2
1
5 6
CONN
AUDI O_MUTE
L+
LR+
R-
HeadPhone / Audio Output (Side)
AMP-AUOUTL
C644 2. 2U F 10V
AMP-AUOUTR
C645 2. 2U F 10V
R626 10K +-1% 1/ 16W
R629 10K +-1% 1/ 16W
0402
0402
HPIN_L
HPIN_R
C643 100P F 50 V
R627 33K 1%
R630 33K 1%
C646 100P F 50 V
HPOUT_L
HPOUT_R
Nearly Amplifier
R628 0R 05 OH M
R631 0R 05 OH M
C647
NC/100N16V
C648
NC/100N16V
Nearly Phone Jack
FB604 300R 0.2A
FB605 300R 0.2A
HP_DET(6)
C649
100PF 50V
HP_DET
DVDD3V3
C650
100PF 50V
R624
10K 1/16W 5%
R625 100R 1/16W 5%
12
12
12
ZD601
MLVG0402
ZD602
MLVG04 02
ZD603
NC
20121205 ES
EAR_DET
EAR_L
EAR_R
CN602
1
7
6
2
3
4
5
CONN
088G302G7B1ACL
HeatSink
24*9
HS601
HEAT SINK
P90T0066101
Q90T0092 1
1
2
Page 31
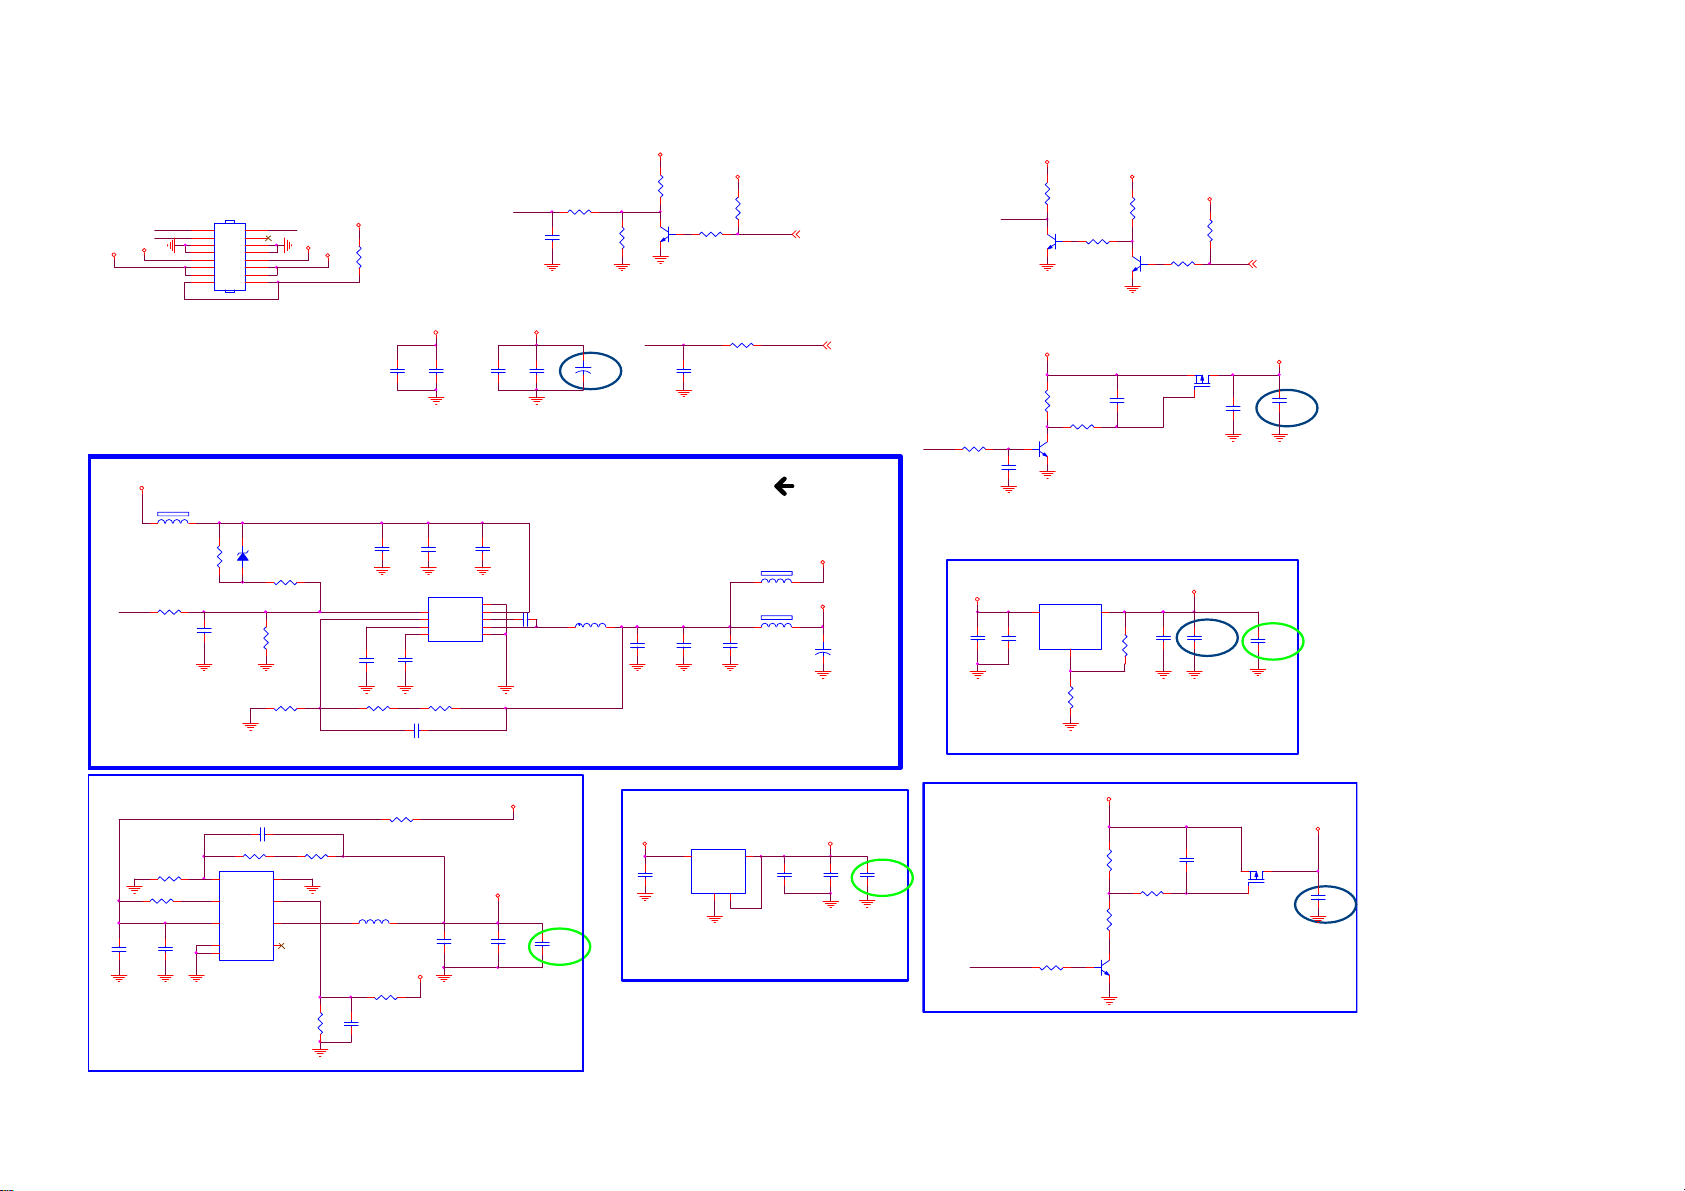
8-2-7 System Power
MAIN POWER
CN701
15
BL_DIM BL_ON
13
PS_ON
FB703
1 2
120R 6A
NC/100K1/ 16W
R725
NC/22 OH M 1/ 16W
R774
11
9
7
5
3
1
CONN
C751
1UF16V
+12V_AUD
+12V
+12V
PS_ON
16
14
12
+12V_AUD
10
8
6
4
2
ZD701
BZT52-B7V5
1 2
R746 3.9K1/16W
R734
7.5K 1/16W
R735
22.1K 1%
+5VSB
R773
+12V
NC/0 OHM +-5% 1/8W
+12V => +5VSB
C753
1UF16V
R736
560R 1/16W 1%
C752 22P 50V
C710
100PF 50V
C747
10UF 25V
C755
10NF 50V
R710 124K 1%
+12V_AUD
1
EN
2
FB
3
VREG5
SS4GND
C711
0.1uF 50V
C748
100NF 25V
U702
GND
BOOT
RT6206BHGSP
5V_SW
Q705
MMBT3904
C701
100PF 50V
1206
+3V3SB
R726
4K7 1/16W 5%
R702
100R 1/16W 5%
C730
22UF 10V
R737
4K7 1/16W 5%
BL_ON/OFF
FB702
NC/120R 6 A
1 2
FB705
120R 6A
1 2
C737
100NF 25V
Back Light On / Off
HI => PO W E R _O F F
LO => POWER_ON
BL_ON/OFF (6)
BRIGHT_ADJ
BRIGHT_ADJ (6)
5V_SW
+5VSB
+
C713
NC/100 UF 16V
SMT
PWR_ON
R708
4K7 1/16W 5%
5V_SW TO DDRV
5V_SW
C745
10UF 10V
1206
R722
4K7 1/16W 5%
+
L702
6.8uH
BL_ON_OFF
R743
8K2 1/16W +/-5%
C739
NC100UF 16V
1206
BL_DIM
C728
22UF 10V
BL_ON
R701
100R 1/16W 5%
C702
1nF 50V
1.6A
+12V
C704
C705
100PF 50V
0.1uF 50V
C749
10UF 25V
9
8
VIN
SW
C750
7
100NF 25V
6
5
PS_ON
C712
1UF 10V
C743
100NF 16V
+5VSB
R706
4K7 1/16W 5%
Q701
MMBT390 4
R709
4K7 1/16W 5%
Q706
MMBT3904
+5VSB
R704
47K
R705
7K5
Q703
MMBT390 4
U706
AZ1084CD-ADJTRG1
VIN3VOUT
1
R745
R2
24R 1/10W 1%
2
GND/ADJ
R1
Vout = 1. 25x (1+R2/ R1)= 1. 5V
+3V3SB
R707
4K7 1/16W 5%
C706
10UF 10V
186mA
R744
120R 1/10W 1%
R753
4K7 1/16W 5%
C744
22UF 6.3V
1206
+3V3SB
Q702
AO3401A
980mA
DDRV
C760
NC/22U F 6.3V
R742
4K7 1/16W 5%
PWR_ON
H => PO W ER _O N
L =>
POWER_OFF
C708
0.1uF 50V
1206
PWR_ON (6)
5V_SW
C742
22uF 10V
C733
10UF 10V
0805
R721 100K 1 %
R2
R711 100K 1/ 16W
C721
C723
22uF 10V
NC/10UF 10V
+5VSB TO Vcor e 1.2V
C731 22PF 50V
R1
1
FB
SGND
2
PG
3
IN
4
PGND
9
PGND
U703 SY8003AD FC
EN
LX
NC
R718 4K7 1/16W 1%R719 100K 1%
8
7
2.04A
6
5
R728
100K 1/16W
176mA
R715 0oHM
L703
2.2uH
+5VSB
R739 10K 1/16W 5%
C716
NC/1U F 16V
+5VSB
403mA
VCCK
C718
C720
22UF 6.3 V
22UF 6.3V
1206
10UF 10V
1206
0805
Vout=0.6(1+R1/R2)=1.228V
C732
+5VSB TO +3V3SB
U701
+5VSB +3V3SB
C715
22uF 10V
AZ1117CH-3.3TRG1
3
2
VOUT
VIN
ADJ(GND)
4
1
4
+3V3SB
C719
100NF 16V
276mA
C717
22UF 6.3V
1206
C734
10UF 10V
0805
SOT223 1A/3.3 V
2nd 356G056351400C00HF ?
+3V3SB TO DVDD3V3
PWR_ON
R724 4K 7 1/16W 5%
+3V3SB
R720
100K 1/16W
R733
47K 1/16W 5%
R723
10K 1/16W 5%
Q707
MMBT3904
C726
100NF 16V
73mA
AO3401A
Q704
DVDD3V3
C729
22UF 6.3V
1206
Page 32
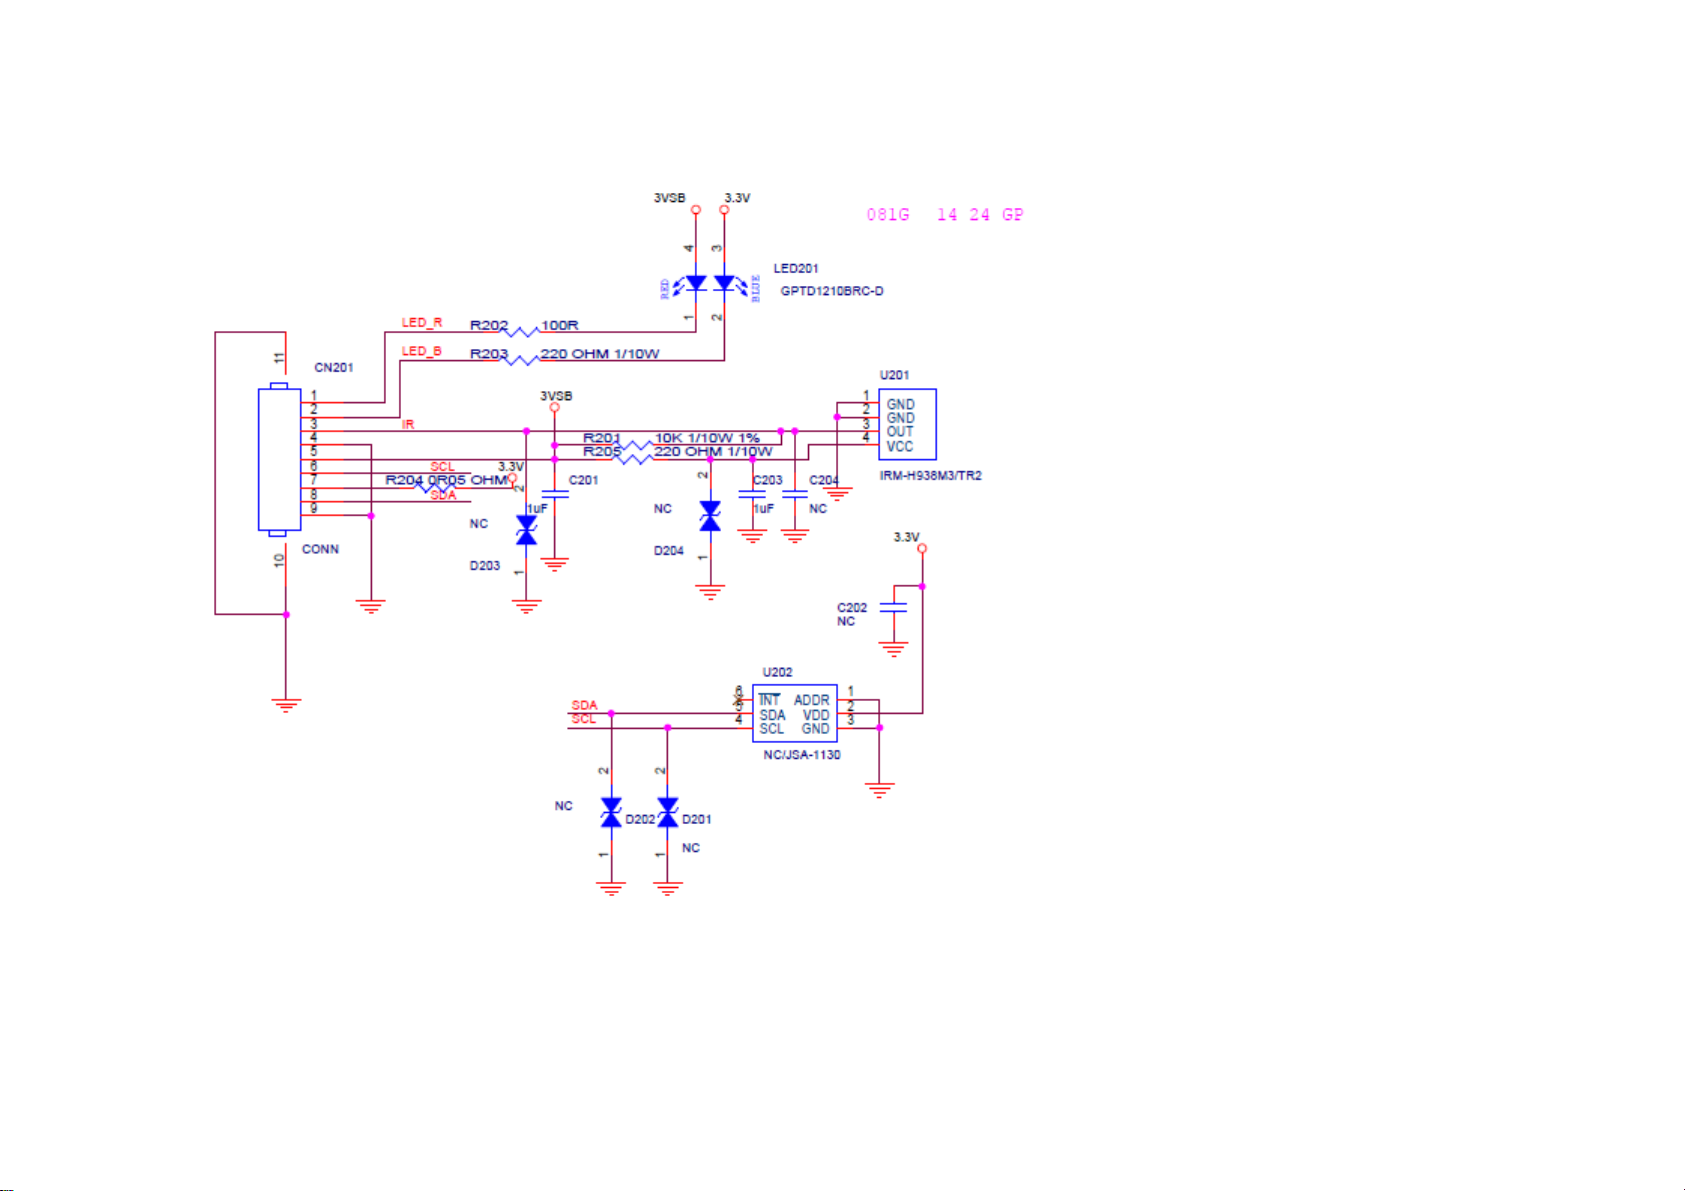
8.3 J 715G8511 IR board
8-3-1 IR BOARD
Page 33
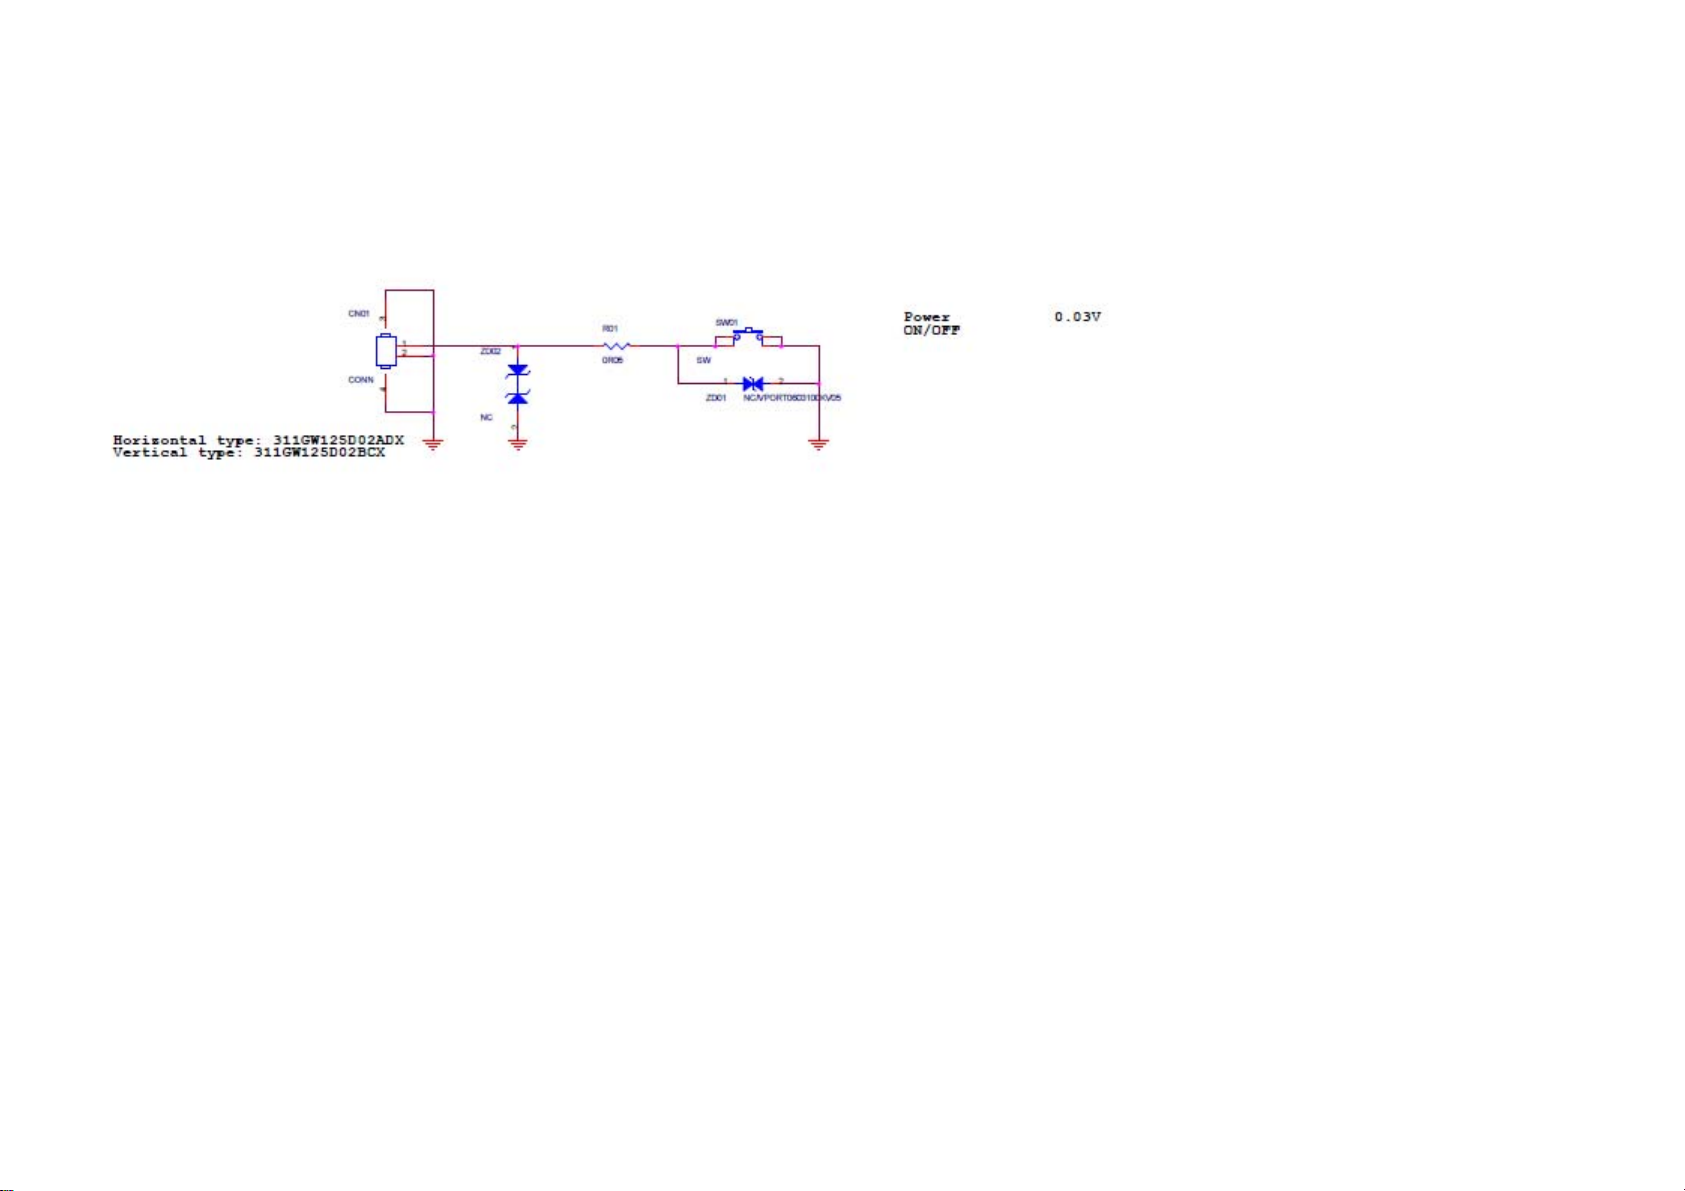
8.4 E 715G8112 KEY board control panel
8-4-1 Key BOARD
Page 34
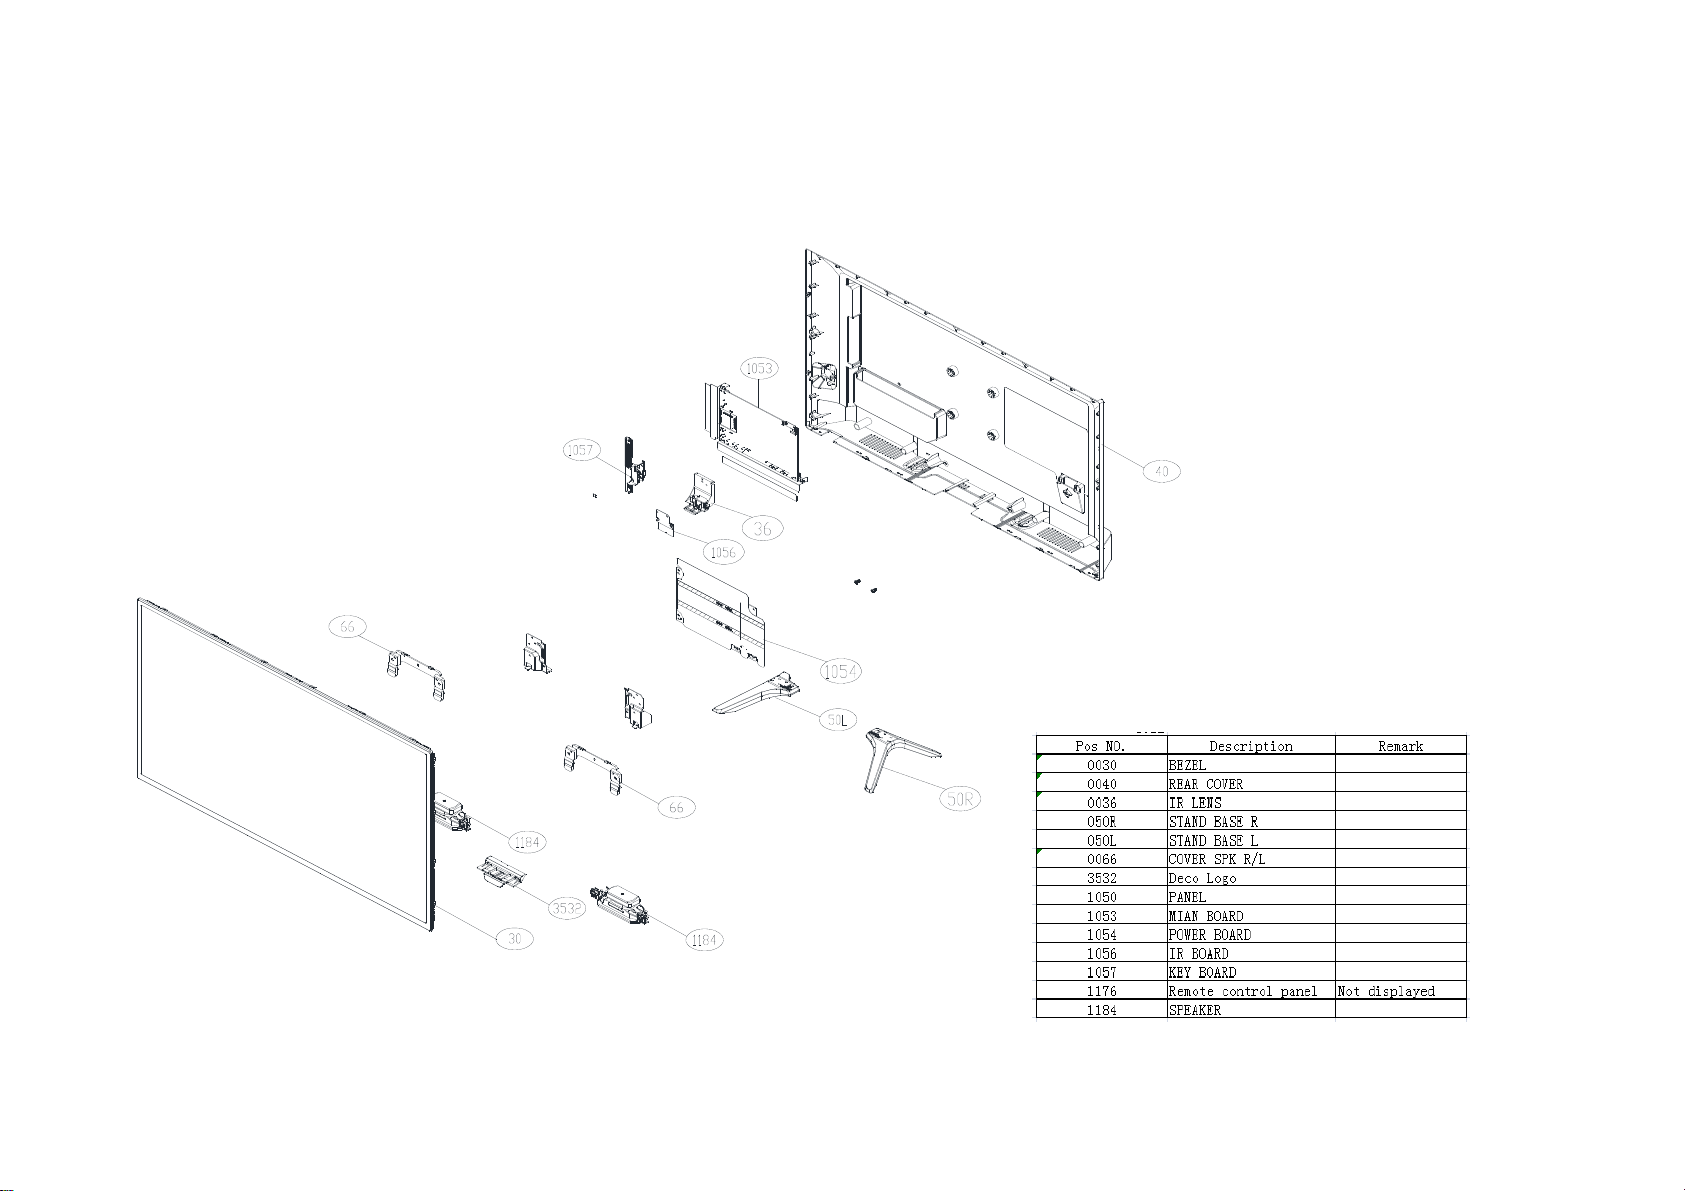
9. Styling Sheets
9.1 4052// 4082 series 32"
Page 35

 Loading...