

Page 1
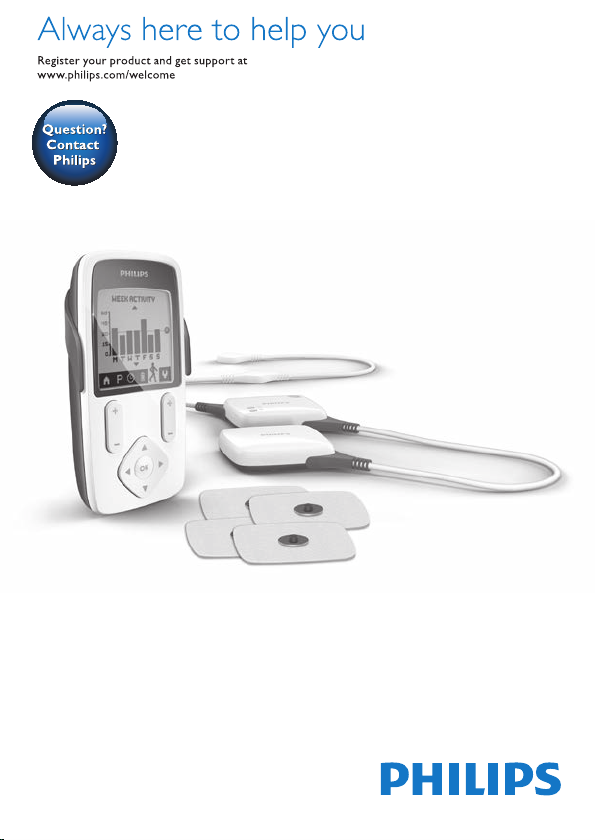
PR3094
PR3093
User manual
Page 2
1
Page 3

ENGLISH 4
DEUTSCH 57
ITALIANO 118
FRANÇAIS 176
PR3094, PR3093
Page 4
4
ENGLISH
Introduction
Congratulations on your purchase and welcome to
Philips! To fully benet from the support that Philips
offers, register your product at www.philips.com/
pain-management/register.
Read this user manual carefully before you use the
Wireless TENS (PR3093) or the Wireless TENS
Pro (PR3094) and save it for future reference. The
Wireless TENS (PR3093) and the Wireless TENS
Pro (PR3094) are available without prescription.
To achieve optimal treatment success with your
Wireless TENS device, you have to use it according
to the treatment instructions in this user manual.
If you need further information or have questions,
please visit www.philips.com/
pain-management or contact the Philips
Consumer Care Centre in your country.
Intended use
The Wireless TENS (PR3093) and the Wireless
TENS Pro (PR3094) are intended to be used by
adult consumers experiencing mild to moderate
chronic musculoskeletal pain. The devices are
intended to be used for transcutaneous electrical
nerve stimulation (TENS) for the purpose of pain
relief and for monitoring activity with the integrated
activity monitor.
The Wireless TENS device may be brought to
appointments with a medically trained healthcare
professional who is responsible for using the TENS
device according to the user manual and who is
skilled in:
- analysing the patient’s activity and treatment
patterns
Page 5

ENGLISH 5
- determining individual treatment and adapting
settings of the TENS device by means of the
Wireless TENS Pro PC Application (PR3094 only)
The Wireless TENS Pro PC Application is only for use
by a healthcare professional in combination with the
Wireless TENS Pro device (PR3094), which enables
the healthcare professional to offer more specic
TENS treatment programs and enables the healthcare
professional to track and analyse the patient’s activity
patterns in relation to the use of the device.
The device is intended to be used and operated by
and on one single adult person. It should always be
used in accordance with the safety information and
operating instructions included in this user manual
and for the purpose for which it is designed.
TENS and pain management
Transcutaneous electrical nerve stimulation (TENS) is a
non-invasive pain relief method for which clinical proof
exists that it can help relieve pain. TENS is used daily
by physiotherapists and other healthcare professionals.
During TENS treatment, electrical pulses are passed
across the intact surface of the skin to activate the
underlying nerves. Clinical evidence suggests that TENS
produces pain relief in a similar way to the nervous
system’s own pain-relief mechanisms, for instance
similar to massaging a painful area.
The pulses are generated by the battery-powered
TENS units, which have to be connected to the selfadhesive hydrogel electrodes. You can choose from
a set of preset TENS programs with different pulse
settings and can adjust the intensity of the pulse
according to your own preference. This booklet
contains information on the placing of the electrodes
and the programs used for treatment.
Page 6

ENGLISH6
Activity monitoring and pain management
We all want to enjoy doing our daily activities.
When you experience pain, however, the instinctive
reaction is to avoid pain by reducing your activity
level. As a result, you become less t and less able
to enjoy doing the things you like. Staying active,
without overdoing it, is important to avoid being
trapped in a persistent pain cycle. The key to selfmanaging your pain is pacing: distributing periods of
activity and periods of rest over the day in a way
that feels most comfortable for you. The key to
pacing is spreading out your activities and ‘taking a
break before you need it’. An activity monitor can
help you keep track of how well you pace your
activities over the day. The remote control of the
Wireless TENS device has a built-in activity monitor
that records your activity when you wear it attached
to your belt or waistband or when you carry it
around in the pocket of your trousers or skirt. It
can record and store the activity data of 60 days. In
this way, you cannot only check your activity pattern
over the last 24 hours, but also your activity pattern
of the previous week and the previous month. If
you want to get more tips on pacing and how to
self-manage your pain, please read the Pain Toolkit
booklet included in the packaging.*
* Note:Only the German version of the Pain Toolkit
is included in the package. If you want to have the
English, French or Italian version, please go to
www.philips.com/pain-management to
download your preferred version.
Page 7

ENGLISH 7
Information for the healthcare professional
(PR3094 only)
The Wireless TENS Pro (PR3094) can be used
in combination with the Wireless TENS Pro PC
Application, which is designed for use by medically
trained healthcare professionals who are responsible
for using the TENS device according to the user
manual and who are skilled in:
- analysing patient activity patterns in relation to
patient treatment patterns using an external PC
application
- determining individual treatment and adapting
settings of the TENS device by means of an
external PC application
The Wireless TENS Pro PC Application enables
healthcare professionals to offer more specic TENS
treatment programs to their patients and to track and
analyse patients’ activity patterns on a PC in relation to
the use of the device and the patient’s pain experience.
The Wireless TENS Pro PC Application is not included
in the package, but can be downloaded on request.
Please go to www.philips.com/tens-download
and leave your contact details. You will receive a link
from where you can download the Wireless TENS
Pro PC Application. Via this link you can also access or
download the user manual of this PC application.
USB cable
The Wireless TENS Pro PC Application works when
the remote control is connected to your PC with
a mini USB cable. You can obtain this standard mini
USB cable in two ways:
1 You can leave your contact details on
www.philips.com/tens-download and
indicate that you would like to receive a mini
USB cable. When we have received your details,
we will send you a mini USB cable by post.
Page 8

ENGLISH8
2 If you received a trial kit from our sales force,
this kit should contain the mini USB cable.
If you have other questions regarding the availability
of the Wireless TENS Pro PC Application or the
mini USB cable, please contact the Consumer Care
Centre in your country.
Important
Contra-indications
Do not use the device if:
- you have a cardiac pacemaker, implanted
debrillator or other implanted metallic or
electronic device (e.g. a drug delivery system),
as use in these cases could cause electric shock,
burns, electrical interference, or even death.
- you have a heart disease.
- you have epilepsy.
- you are pregnant, as the safety of electric
stimulation during pregnancy has not yet been
established.
- you have a cognitive impairment.
Adverse reactions
You should stop using the device and consult your
doctor if you experience adverse reactions from the
device.
Possible adverse reactions may include the following:
- skin irritation beneath the electrodes, although the
gel used on the electrodes is not known to cause
allergic reactions
- burns beneath the electrodes
- headaches or other painful sensations
- nausea or feeling faint
Page 9

ENGLISH 9
Important safety information
Warning
- This is a medical device. Keep the device out of
the reach of children.
- Read this user manual carefully and always adhere
to the treatment instructions.
- This appliance is not intended for use by adults
with reduced sensory or mental capabilities.
- Do not use the device on children.
- Do not use the device if your pain cannot be
clearly dened as mild to moderate muscoskeletal
pain. If you are not certain about the cause of
your pain, consult your doctor.
- If you are in the care of a doctor, consult your
doctor before you use the device.
- Do not apply stimulation on your neck, as
this could cause severe muscle spasms that
could close your airway and result in breathing
difculties and that may also have an adverse
effect on your heart rhythm or blood pressure.
- Do not apply stimulation across your chest
because electric current entering into the chest
may cause heart rhythm disturbances, which could
be lethal.
- Since the effects of stimulation of the brain are
unknown, stimulation should not be applied across
the head and electrodes should not be placed on
opposite sides of the head.
- Be careful when you have a tendency to bleed
internally due to any impact or injury.
- Consult your doctor if you recently had surgery,
as stimulation may have a negative effect on the
healing process.
- Do not apply stimulation over or near cancerous
lesions.
Page 10

ENGLISH10
- Do not apply stimulation over open wounds
or rashes, or over swollen, red, infected or
inamed areas or skin eruptions (e.g. phlebitis,
thrombophlebitis and varicose veins).
- Do not apply stimulation on areas of skin that lack
normal sensation.
- Only apply stimulation to normal, intact, clean and
healthy skin.
- Use of electric stimulation and conductive
electrodes may lead to skin irritation or skin
sensitisation.
- Do not apply stimulation while driving, operating
machines or while performing any other activity
in which electrical stimulation can put you at risk
of injury.
- Do not apply stimulation while sleeping. If the
device is used at bedtime, set the timer to make it
switch off automatically.
- Do not use the device and electrodes internally.
- Do not apply stimulation near electronic
monitoring equipment (e.g. cardiac monitors,
ECG alarms), as this equipment may not operate
properly when the device is in use.
- Do not apply stimulation in the bath, shower or
swimming pool.
- Do not use plaster or tape to attach the
electrodes to the skin.
- Always check the device and the electrodes for
damage before use.
- Do not use the device or an electrode if it is
damaged.
- Do not modify the device or the electrodes.
Page 11

ENGLISH 11
Caution
- Only use this device with the charger, cables,
electrodes and accessories recommended by the
manufacturer.
- The device is not waterproof. Do not use the device
in wet surroundings and prevent it from getting wet.
- The device can be used indoors and outdoors,
but it has not been designed to withstand all
weather conditions.
- The device cannot withstand high and low
temperatures. Please check the operating
conditions in chapter ‘Specications’.
- The USB connection port is only to be used by
a healthcare professional in conjunction with the
Wireless TENS Pro PC Application (PR3094)
supplied by Philips.
- The electrodes have a limited shelf life. Please
check the packaging for the use-by date prior to
use. Do not use electrodes whose use-by date has
expired. For ordering replacement electrodes, see
chapter ‘Ordering accessories’.
- Make sure that you end the treatment by
switching off the TENS units or by setting the
intensity to 0 mA on the remote control before
you remove the TENS units, the extension cable
(if used, PR3094 only), or the electrodes. If you do
not end the treatment, you may experience an
unpleasant sensation in your ngers. This sensation
is not harmful, but can be unpleasant.
- Always use and store the electrodes according to
the instructions in chapters ‘Using the device’ and
‘After use’.
- If the device does not function as described in this
manual, stop using it and contact the Consumer
Care Centre. For contact details, see chapter
‘Guarantee and support’.
Page 12

ENGLISH12
Compliance with standards
- The device meets the relevant standards for this
type of Class IIa electrical medical appliance and
appliances using electrical stimulation for home use.
- This Philips appliance complies with all applicable
standards and regulations regarding exposure to
electromagnetic elds.
Preset programs
Program overview
The device comes standard with 8 preset programs
(PR3093) or 15 preset programs (PR3094). There
are three different TENS types: Conventional TENS,
Burst TENS and Frequency-modulated TENS. For
more details, see below.
Conventional TENS programs
Conventional TENS is a common TENS program
with high-frequency stimulation. It is based on the
Gate Control Theor y that states that this type
of stimulation will cause the transmission of pain
signals in the nervous system to be blocked. It is
comparable to ‘rubbing the pain away’. Most people
use Conventional TENS for 30 minutes per session,
but you can use it as often and as long as you
feel comfortable with. The effect is usually most
perceptible during stimulation. The effect generally
wears off rather quickly when stimulation has ended.
You should adjust the intensity of the program so that
you clearly feel the stimulation. Stimulations should
not give an unpleasant or painful sensation, however.
Page 13

ENGLISH 13
Name of
Conventional
TENS
program
Conventional
Thorough
stimulus
Pre-activity
Soft
stimulus
Deep
stimulus
Radiating
pulse
Program
no. on
remote
control
PR3093
1 1 May give you a continu-
2 2 May give you a more
3 3 May give you a more
- 4 May give you a softer
- 5 May give you a deeper
- 6 May give you a more
Program
no. on
remote
control
PR3094
Burst TENS programs
Burst TENS offers a high-frequency stimulation that
comes in trains of pulses. This type of stimulation is
known to trigger endorphin release. Endorphins are
pain killers produced by the body. You can use Burst
TENS around 30 minutes multiple times a day, for
example 3 times. You are advised to adjust the intensity
of the Burst program so that you feel the stimulation
strongly. Burst programs generally give a sharper
sensation, which can feel somewhat unpleasant. It is also
Program description Sug-
ous tingling stimulation
thorough stimulating
sensation
local and soft stimulating
stimulation
stimulating sensation, e.g.
for sensitive body parts
stimulating sensation
radiating stimulation
sensation
gested
treatment
time
No limit
No limit
No limit
No limit
No limit
No limit
Page 14

ENGLISH14
advised to adjust the intensity to a level that produces
visible muscle contractions in the stimulation area.
These contractions are not harmful. If you nd these
contractions too uncomfortable, you can decrease
the intensity, choose a different program or move the
electrodes to a different place. Burst TENS should
preferably be applied while resting, since it can result in
muscle contraction in the stimulation area.
Name
of
Burst
TENS
program
Continuous
Burst
Slow
kneading
Mild
kneading
Deep
kneading
Diffuse
Burst
Program
no.on
remote
control
PR3093
4 7 May give you a pulsing burst
5 8 May give you a slower and
6 9 May give you a milder burst
- 10 May give you a more local
- 11 May give you a more diffuse
Program
no. on
remote
control
PR3094
* optionally multiple times a day
Program description Sug-
stimulation to release endorphins in your body
massaging burst stimulation
to release endorphins
stimulation to release endorphins in your body
and deeper burst stimulation
to release endorphins in your
body
burst stimulation to release
endorphins in your body
gested
treatment
time
30
min.*
30
min.*
30
min.*
30
min.*
30
min.*
Page 15

ENGLISH 15
Frequency-modulated TENS programs
Frequency-modulated TENS is a program in which
the frequency of the pulse varies from high to low.
This can be more comfortable or effective than
the other programs in some cases. You can use
frequency-modulated TENS for around 30 minutes
multiple times a day, for example 3 times.
Name of
Freq. Mod.
program
Mixed
frequency
Pulsing
massage
Deep
massage
Gentle
massage
Program
no. on
remote
control
PR3093
7 12 May give you a owing
8 13 May give you a more puls-
- 14 May give you a slower and
- 15 May give you a mild ow-
Program
no. on
remote
control
PR3094
* optionally multiple times a day
Program specications
The table below gives information on the frequency,
pulse width and preset time of each program. The
current pulse in all programs has a symmetrical biphase waveform.
Program description Sug-
stimulation sensation
ing stimulation sensation
deeper owing sensation
ing stimulation sensation
gested
treatment
time
30
min.*
30
min.*
30
min.*
30
min.*
Page 16

ENGLISH16
Program
name
Conventional
Thorough
stimulus
Preactivity
Soft
stimulus
Deep
stimulus
Radiating
Pulse
Continuous Burst
Slow
kneading
Mild
kneading
Deep
kneading
Program
no.
PR3093
1 1 Con-
2 2 Con-
3 3 Con-
- 4 Con-
- 5 Con-
- 6 Con-
4 7 Burst 100
5 8 Burst 80 Hz,
6 9 Burst 80 Hz,
- 10 Burst 80 Hz,
Program no.
PR3094
Program
type
ventional
ventional
ventional
ventional.
ventional
ventional
Frequency
100 Hz 200µs contin-
40 Hz 200µs contin-
100 Hz 150µs contin-
80 Hz 60µs contin-
80 Hz 150µs contin-
60 Hz 150µs contin-
Hz, 2
Hz
1 Hz
3 Hz
2 Hz
Pulse
width
250µs 30 min.
200µs 30 min.
200µs 30 min.
150µs 30 min.
Preset
time
uous
uous
uous
uous
uous
uous
Page 17

ENGLISH 17
Program
name
Diffuse
Burst
Mixed
Frequency
Pulsing
massage
Deep
massage
Gentle
massage
Program
no.
PR3093
- 11 Burst 80 Hz,
7 12 Freq.
8 13 Freq.
- 14 Freq.
- 15 Freq.
Program no.
PR3094
Note: With the Wireless TENS Pro (PR3094), healthcare
professionals can use the Wireless TENS Pro PC
application to create and install additional programs
tailored to their patient’s needs as part of a painmanagement regimen.
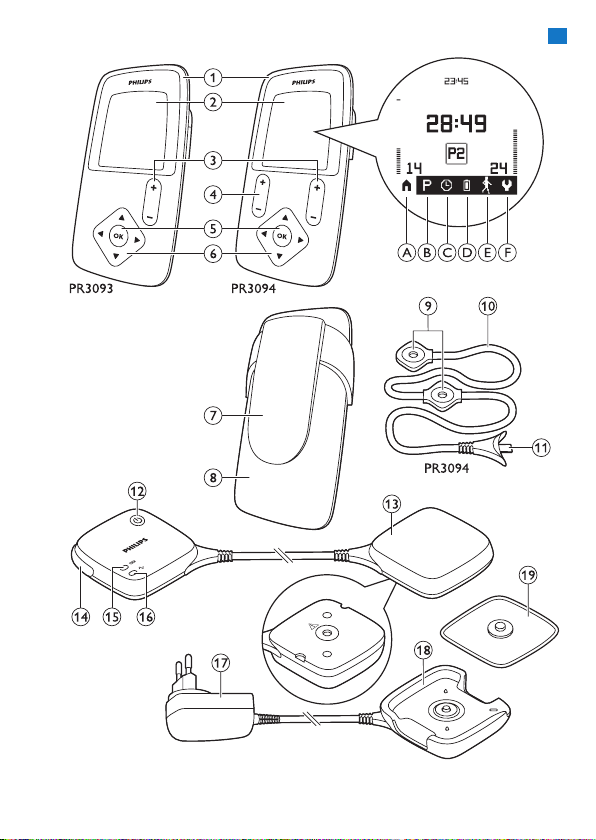
Product overview (Fig. 1)
1 Remote control
2 Display
- A. Home screen symbol
- B. Program screen symbol
- C. Timer screen symbol
- D. Battery symbol
- E. Activity screen symbol
- F. Settings screen symbol
Program
type
Mod.
Mod.
Mod.
Mod.
Frequency
2 Hz
8-100 Hz250µs 30 min.
2-8 Hz 250µs 30 min.
2-80 Hz180µs 30 min.
8-80 Hz150µs 30 min.
Pulse
width
180µs 30 min.
Preset
time
Page 18

ENGLISH18
3 Intensity button (PR3093); intensity button for
extension channel (third and fourth electrode)
(PR3094)
4 Intensity button for main channel (rst and
second electrode) (PR3094)
5 OK button
6 Selector with up, down, right and left arrows
7 Removable belt clip
8 Battery compar tment cover
9 Extension channel connectors for third and
fourth electrode (PR3094 only)
10 Extension channel cable (PR3094 only)
11 Plug to connect extension channel cable to
TENS units (PR3094 only)
12 On/off button of TENS units
13 TENS units
14 Removable corner piece (PR3094 only)
15 Battery status indicator of TENS units
16 Treatment status indicator of TENS units
17 Adapter
18 Charger
19 Self-adhesive hydrogel electrode
Note: You nd the related picture on the inside of the
front cover.
Preparing for use
Charging the TENS units
To be able to use the device, you rst have to
charge the TENS units. Charging the TENS units
takes approx. 3 hours, if the device is at room
temperature. When the rechargeable battery is fully
charged, it contains sufcient energy for approx. 8
hours of continuous use under normal operating
conditions.
Page 19
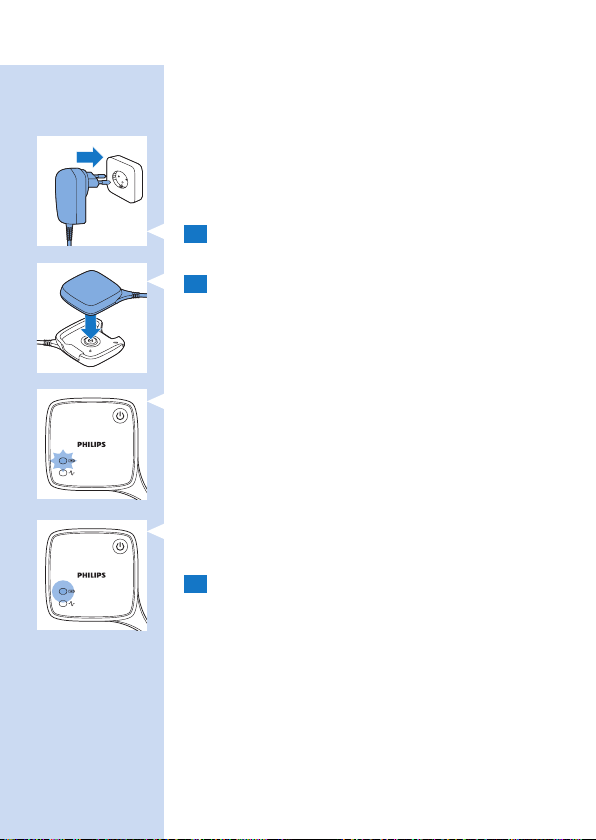
ENGLISH 19
Note: If the rechargeable battery of the TENS units
is not fully charged when you start a treatment, the
batteries may run out during the treatment. We advise
you to always fully charge the TENS units before you
start a treatment.
Note: Treatment is not possible when the TENS units
are charging.
1 Insert the adapter of the charger in a wall
socket.
2 Place the TENS unit with the rechargeable
battery (the one without the on/off button and
the indicators) in the charger.
, The battery status indicator on the other TENS
unit ashes green during charging.
, The battery status indicator stops ashing and is
solid green when the battery is fully charged.
3 Remove the TENS unit from the charger when
the battery is fully charged.
Note: Always disconnect the charger from the mains
after use by removing the adapter from the wall socket.
Page 20
ENGLISH20
Preparing for treatment with two channels
and four electrodes (PR3094 only)
The Wireless TENS pro (PR3094) comes with an
extension cable that allows you to connect two
extra electrodes. Because the Wireless TENS pro
(PR3094) has two channels, its remote control has
two intensity buttons, one for each channel.
Preparing for treatment
1 Remove the detachable corner from the TENS
units to make the socket for the extension
cable accessible.
Note: Store the detachable corner for later use.
Caution: Store the detachable corner out of the
reach of children.
2 Insert the plug of the extension cable into the
socket.
Preparing the remote control
Inserting the batteries in the remote control
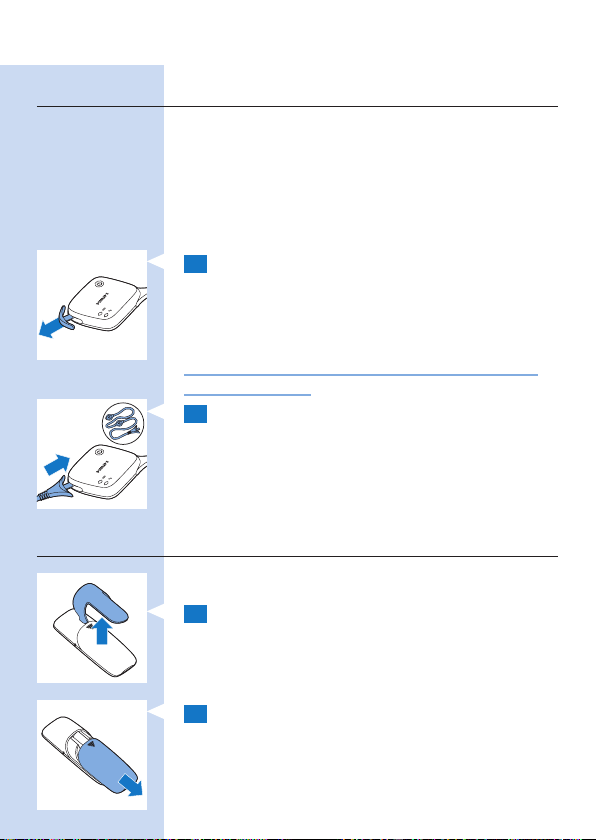
1 Remove the belt clip from the remote control,
if it was attached.
2 Slide the battery compartment cover off the
remote control.
Page 21
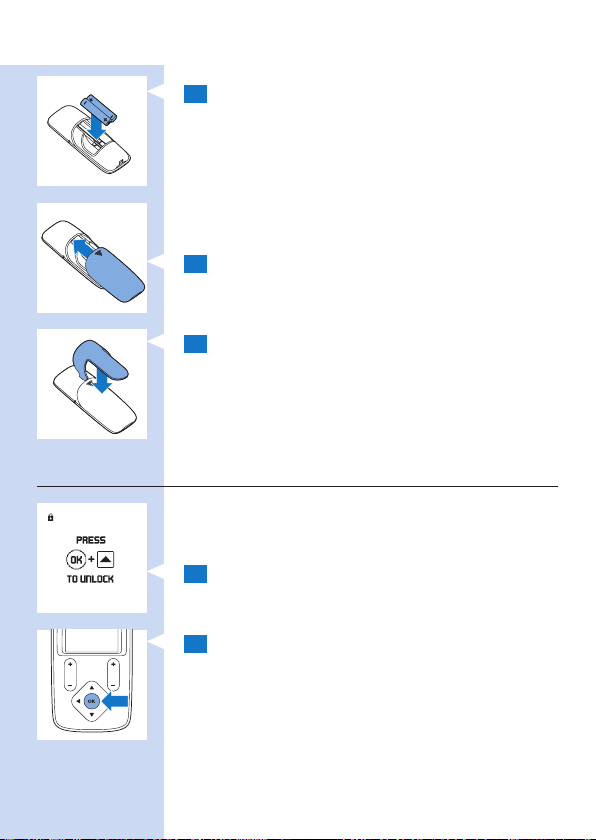
ENGLISH 21
3 Put the two AAA 1.5-volt alkaline batteries in
the remote control.
Note: Make sure that the - and + poles point in the
direction indicated in the battery compartment.
Note: Remove the batteries if you are not going to use
the device for a month or more to prevent battery
leakage.
4 Slide the battery compartment cover back
onto the remote control.
5 If you want to wear the remote control
attached to your belt or waistband, reattach
the belt clip to the remote control. You can
also use the remote control without the belt
clip.
Locking and unlocking the remote control
The control panel of the remote control locks
automatically after some time of inactivity to prevent
accidental operation.
1 When you press a key on the remote control,
the screen prompts you to press the OK
button and then the up arrow.
2 Press the OK button to unlock the remote
control.
Page 22
ENGLISH22
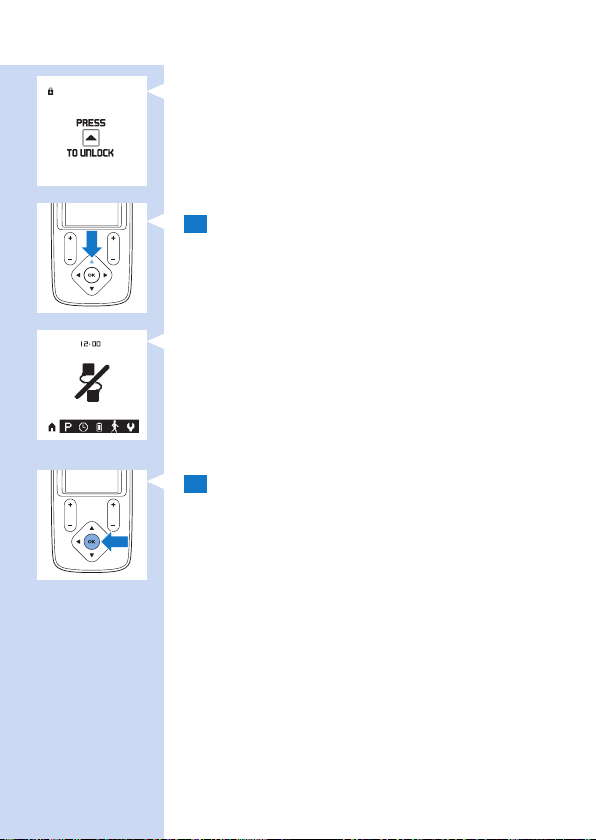
, The screen prompts you to press the up arrow.
3 Press the up arrow on the selector.
, When you unlock the remote control, you can
use the control panel again.
, When you have inserted new batteries and the
TENS units are switched off, the ‘no connection’
screen appears.
Note: This ‘no connection’ screen may also appear
due to other causes (see ‘Error signals on the remote
control’ in chapter ‘Signals on the device’).
4 If you want to lock the remote control, hold
down the OK button for 2 seconds.
Note: There is nothing on the display when the remote
control is locked.
Tip: Lock the remote control when you have started
the treatment. This allows you to wear the remote
control attached to your belt or waistband or in a
pocket without any risk of unintentionally changing the
settings.
Page 23
ENGLISH 23
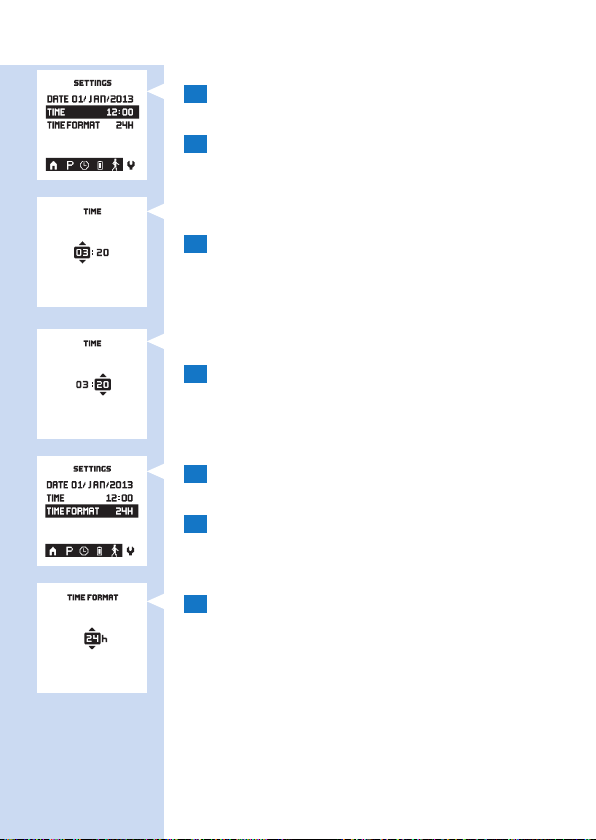
Setting the date and time
If you want to use activity monitoring to keep track
of your activity and treatment pattern, you have to
set the date and time on your remote control.
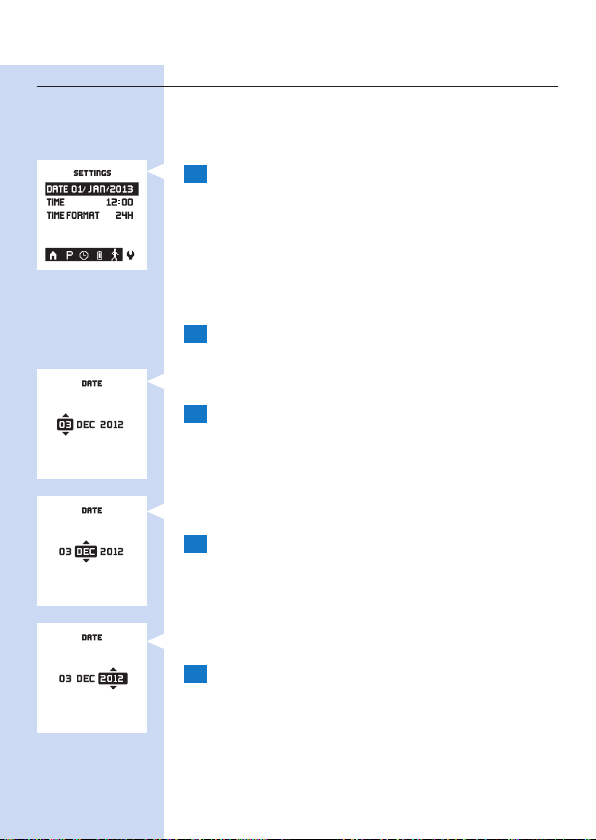
1 The date and time setting screen opens
automatically on the display, with the date eld
highlighted.
Note: This screen only opens automatically at rst use
and if you replace the batteries more than 24 hours
after the batteries ran out. Select the settings screen
symbol to change the date and time in all other cases.
2 Press the OK button to be able to change the
date setting.
, The day eld is highlighted.
3 Use the up or down arrow to choose the day
and press the right arrow to go to the month
eld.
, The month eld is highlighted.
4 Use the up or down arrow to choose the
month and press the right arrow to go to the
year eld.
, The year eld is highlighted.
5 Use the up or down arrow to choose the year
and press the OK button to conrm the date.
Page 24
ENGLISH24
6 Use the down arrow to go to the time setting
eld.
7 Press the OK button to be able to change the
time set.
, The time setting screen opens.
, The hour eld is highlighted.
8 Use the up or down arrow to choose the hour
and press the right arrow to go to the minutes
eld.
, The minutes eld is highlighted.
9 Use the up or down arrow to choose the
minutes and press the OK button to conrm
the time.
10 Use the down arrow to go to the time format
eld.
11 Press the OK button to be able to change the
time format.
12 Use the up or down arrow to toggle between
the 24-hour clock and the 12-hour clock. Press
the OK button to conrm your choice.
Page 25
ENGLISH 25
Using the device
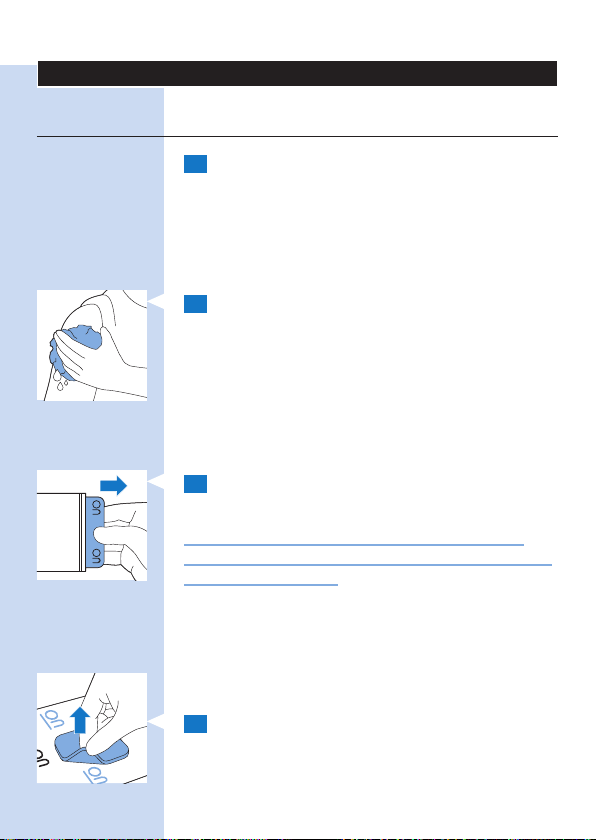
Attaching the electrodes and TENS units
1 Make sure the skin you want to place the
electrodes on looks healthy and is free from
wounds or rashes.
Note: Do not place electrodes on red or inamed
skin and skin with open wounds, cancerous lesions or
rashes.
2 Clean the skin with a moist cloth and dry it.
The skin you want to place the electrodes
on must be dry, clean and free from cream or
lotion.
Note: Dirt, grease or particles left on the skin may
lodge themselves in the hydrogel of the electrodes. This
has an adverse effect on the adhesive power of the
electrodes.
3 Take the electrodes from the plastic bag and
check them for damage and signs of wear.
Caution: Do not use electrodes whose use-by
date has expired. The use-by date is shown on the
resealable plastic bag.
Note: Replace the electrodes when they are damaged or
dirty, when they have lost their adhesive power or when
the stimulation becomes uncomfortable, i.e. when you
experience an unpleasant stinging or biting sensation.
4 Pull the electrode off the liner and place it on
the skin at the place you want to treat. See
section ‘Electrode placement’ below and the
placement guide at the end of this manual.
Page 26
ENGLISH26
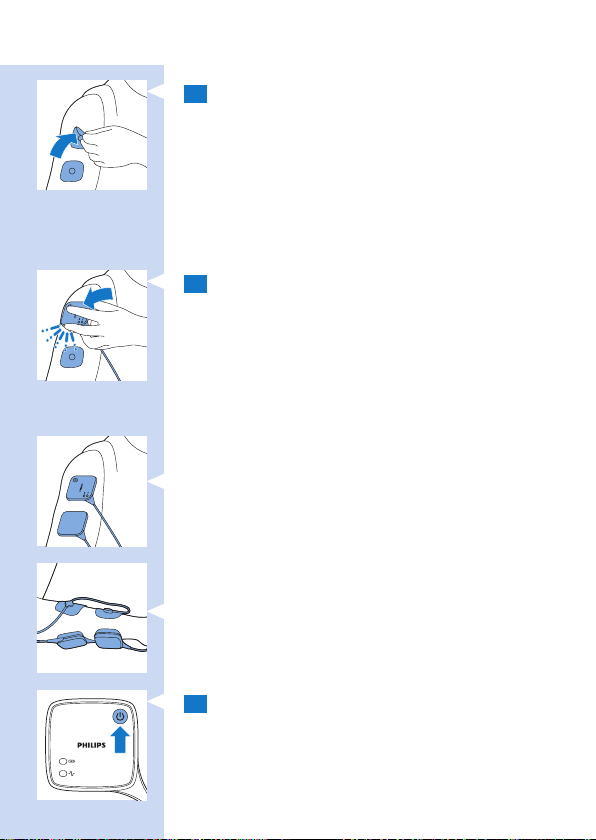
5 Place the second electrode on the body part
you want to treat. In the case of PR3094, you
can also place a third and fourth electrode on
the body part you want to treat.
Note: Always place the electrodes on the skin before
you connect the TENS units
Note: Do not place the electrodes on top of each other
or so close to each other that they touch each other.
6 Attach the TENS units to the electrodes.
The TENS units have magnets in the centre
to ensure easy connection to the metal
connectors of the electrodes. When the TENS
units lock onto the electrodes properly, you
hear a click.
Note: You can wear the electrodes with the TENS units
attached to them under your clothes, also during
treatment.
Note: During many treatment programs, you can
perform all activities allowed as intended use and not
warned against in chapter ‘Important’ when you wear
the TENS units on your body. You can also continue
to wear the TENS units on your body in between
treatments.
Note: If you want to treat with four electrodes (PR3094
only), you rst attach the TENS units to two electrodes
and then you attach the connectors of the extension
cable to the other two electrodes.
7 Press the on/off button to switch the TENS
units to standby.
, The treatment status indicator on the TENS
units ashes green to indicate that they are in
standby and ready for treatment.
Page 27

ENGLISH 27
, If you do not start the treatment within 5
minutes, the TENS units switch off automatically.
If this happens, you rst have to press the on/off
button again to start a treatment.
Electrode placement
To receive maximum results from your stimulation, it
is important to place the electrodes correctly. Always
make sure that you have normal skin sensation in
the place you want to treat before you attach the
electrodes. The optimal place may vary slightly from
person to person, so try moving the electrodes
around until you get the most effective results. In
some cases it can be helpful to mark the spot for
future use. For suggestions regarding placement
of the electrodes, see the placement guide at the
end of this manual. Please note that you may need
assistance to place the electrodes on certain spots
on your body.
As a rule, the electrodes should be placed on or
near the painful area. Stimulation may result in
visible muscle contraction in the stimulation area.
This is not harmful, but if you nd these contractions
uncomfortable, move the electrodes to a different
place.
Do not place electrodes on your neck or across
your chest. Do not place electrodes on red or
inamed skin and skin with open wounds, on
cancerous lesions or rashes.
Start and stop treatment
This is the home screen. On it you see the program,
the treatment time and the intensity selected. On
the menu bar at the bottom of the screen you see
from left to right:
Page 28
ENGLISH28
- The home screen symbol: This symbol is
highlighted when the home screen is displayed.
- The program screen symbol: Select this symbol to
choose a treatment program.
- The timer screen symbol: Select this symbol to set
the treatment duration.
- Battery symbol: Select this symbol to check the
battery status.
- Activity screen symbol: Select this symbol to
select the activity monitor (see section ‘Activity
monitoring’ in this chapter).
- Settings screen symbol: Select this symbol to
change the date or time (see chapter ‘Preparing
for use’ for details on setting the date and time).
Note: The menu bar on the home screen and other
screens disappears after a while, but reappears as
soon as you push a button.
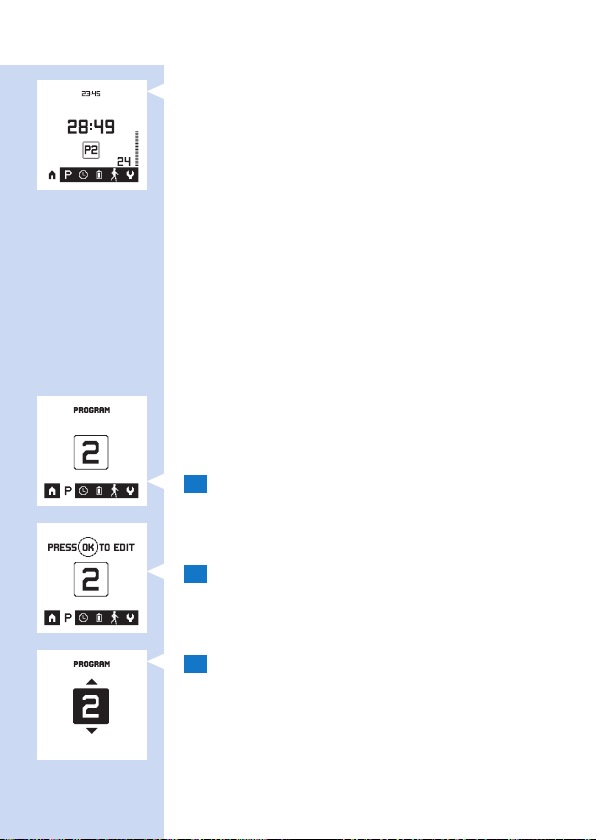
Selecting a program
1 When you want to select another program
than the default program on the home screen,
use the left or right arrow to highlight P for
program on the menu bar.
2 Press the OK button to conrm that you want
to change the selected program.
, The program screen opens with the previously
selected program highlighted.
3 Use the up or down arrow to choose a
program and press the OK button to conrm
your choice.
Note: The program selected is saved as default in the
memory of the remote control. The next time you use
Page 29
ENGLISH 29
the device, this is the program that is used. If you want
to change the program follow steps 1 to 3 above.
Note: The same program applies to both channels of
the Wireless Tens Pro (PR3094).
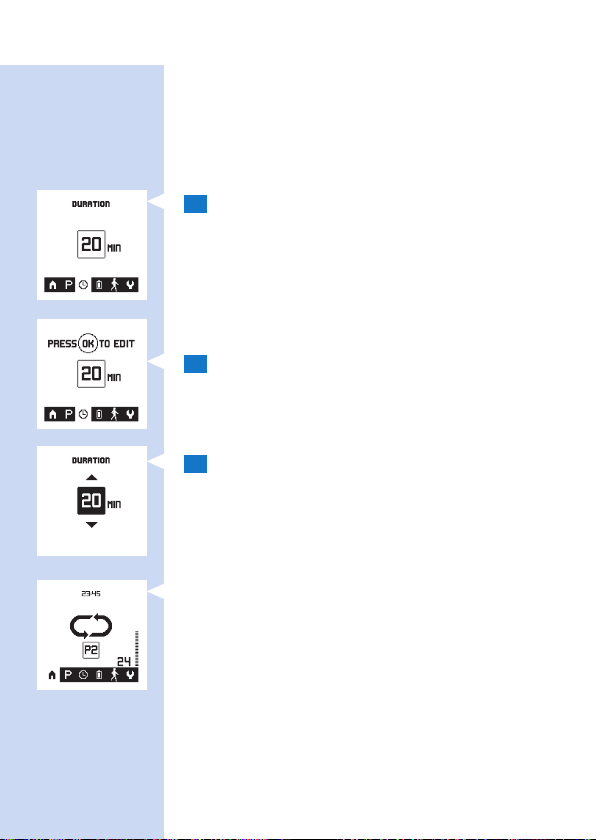
Setting the duration of a program
1 On the home screen you see the duration that
is selected as default. If you want to change the
default duration of the treatment, use the left
or right arrow to highlight the timer icon on
the menu bar.
Note: When you change the program, the duration is
reset to the default duration of that program.
2 Press the OK button to conrm that you want
to change the duration.
, On the timer screen, the default preset duration
is highlighted.
3 Use the up or down arrow to choose the
duration you prefer and press the OK button
to conrm.
- You can set the treatment duration in minutes.
- You can also set the treatment duration to
‘continuous’, the screen shows the continuous symbol
on the display instead of the treatment duration in
minutes. If this symbol ashes on the home screen,
the treatment continues until you end it.
Note: The treatment duration selected is saved as
default in the memory of the remote control. The next
time you use the device, this is the duration setting that
is used. If you want to change the duration, follow steps
4 to 6 above.
Page 30
ENGLISH30
Note: The same duration applies to both channels of
the Wireless TENS Pro (PR3094).
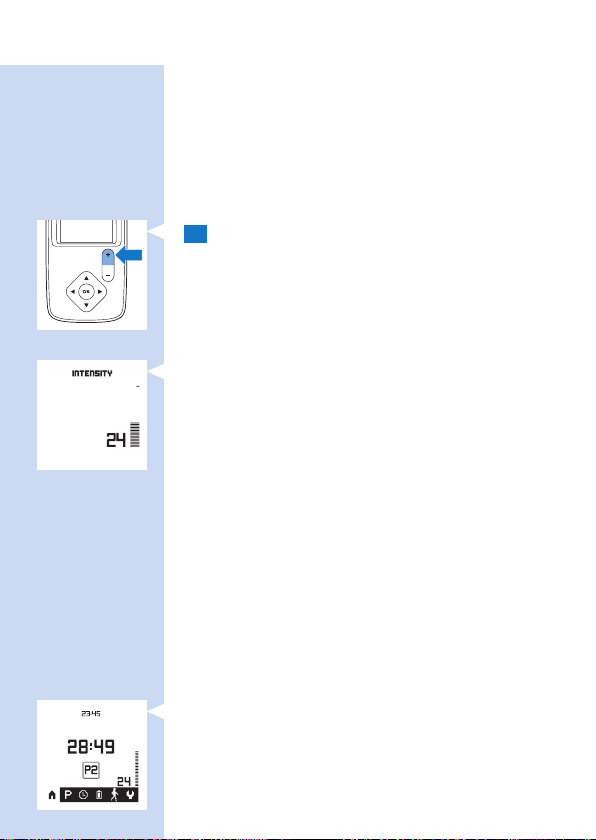
Starting and stopping a treatment (PR3093)
To star t a treatment, you rst have to switch on the
TENS units with the on/off button and then you
press the + side of the intensity button to increase
the intensity.
1 Press + side of the intensity button to set the
intensity. The intensity always starts to increase
from 0 mA. The treatment starts and the timer
starts to count down as soon as the intensity
is higher than 0 mA. The higher the intensity,
the stronger the pulse in the area to which the
electrodes are attached.
, Hold down the + side of the intensity button
to increase the intensity constantly and slowly.
Release the intensity button when you feel you
have found the right level of stimulation.
Note: For Conventional TENS and Frequency-modulated
TENS, you should clearly feel the stimulation, but this
should not be an unpleasant sensation and should not
be painful.
Note: For Burst TENS, you should feel the stimulation
strongly, which generally gives a sharper sensation and can
feel somewhat unpleasant. It is also advised to adjust the
intensity to a level that produces visible muscle contractions
in the stimulation area. These contractions are not harmful.
If you nd the contractions too uncomfortable, you can
decrease the intensity, choose a different program or move
the electrodes to a different place.
, The intensity level is shown in numbers above
the intensity button. The intensity ranges from 0
mA to 60 mA. The intensity level is shown by the
intensity level bar on the right side of the screen.
The higher the bar, the higher the intensity.
Page 31

ENGLISH 31
, When the treatment starts, the treatment status
indicator on the TENS units starts to ash yellow.
, The home screen of the remote control shows
the program selected, the treatment time left
and the intensity selected.
, If the intensity feels uncomfortable, press the
- side of the intensity button to reduce the
intensity constantly and slowly.
Note: Since your body initially adapts to the intensity
of the stimulation, you may have to adjust the intensity
level after some time to ensure optimal stimulation.
2 To end the treatment before the set treatment
time has elapsed or if you set the treatment
duration to ‘continuous’, hold down the - side of
the intensity button for 3 seconds to make the
intensity drop to 0 mA. When the intensity level
is 0 mA, no pulse is emitted by the TENS units.
Note: You can also end the treatment by pressing the
on/off button on the TENS units. In that case, treatment
on both channels stops immediately.
Starting and stopping a treatment (PR3094)
To star t a treatment, you rst have to switch on the
TENS units with the on/off button and then you
press the + sides of the intensity buttons to increase
the intensity.
1 Press the + side of the intensity buttons to set
the intensity for the main and the extension
channel separately and start the treatment.
, Hold down the + side of the intensity button on
the left side of the remote control to increase
the intensity of the main channel. This starts the
pulse between the rst two electrodes.
Page 32

ENGLISH32
, The intensity level is shown in numbers above
the left intensity button. The intensity level is
also shown by the intensity level bar on the left
side of the screen.
, Hold down the + side of the intensity button on
the right side of the remote control to increase
the intensity of the extension channel. This starts
the pulse to the third and the fourth electrode.
, The intensity level is shown in numbers above
the right intensity button. The intensity level is
also shown by the intensity level bar on the right
side of the screen.
2 To end the treatment of one or both channels
before the set treatment time has elapsed or if
you set the treatment duration to ‘continuous’,
hold down the - side of the intensity button for
3 seconds to make the intensity drop to 0 mA.
When the intensity level is 0 mA, no pulse is
emitted by the TENS units.
Note: Because you can operate the two channels
independently, you can stop treatment on one channel
while you continue treatment on the other.
Note: You can also end the treatment by pressing the
on/off button on the TENS units. In that case, treatment
on both channels stops immediately.
Page 33

ENGLISH 33
Activity monitoring
This additional feature available on the remote
control allows you to check your activity pattern
over a day, a week or a month. Since activity and
pacing are important elements in pain management,
the activity monitor included in the remote control
provides you with a tool to check how well you
pace your activities. If you want to know more about
self-managing your pain and the importance of
pacing, please read the Pain Toolkit booklet.
Note: To ensure activity monitoring works effectively, you
have to wear the remote control on or close to your
waist all day. You can attach it to your belt or waistband
with the belt clip or you can carry it around in the
pocket of your trousers or skirt.
Reading the results
1 Press the right arrow to highlight the activity
icon on the menu bar.
2 The rst screen to open is the day view. Use
the up or down arrow to scroll from one
screen to the next.
, The day view shows your activity level over
the last 24 hours. The height of the bars shows
how many minutes you have been active. The
horizontal line (A) shows your average activity
level and allows you to establish if your activity
level over the day was above or below average.
, The week view shows your activity level over the
last 7 days including today. The letters below the
graph indicate the days of the week. The height
of the bars shows how many hours per day
you have been active over the past week. The
horizontal line (A) shows your average activity
level over the past 6 days. This line allows you
Page 34

ENGLISH34
to establish if the activity level in the past week
was above or below average. It also allows you
to establish on which days of the past week your
activity level was above or below average.
, The month view shows your activity level over
the last four weeks including today. The weeks
are indicated by the numbers below the graph.
The height of the bars shows how many hours
per day you have been active over the past
four weeks. The horizontal line (A) shows your
average activity level over the last month. This
line allows you to establish if your activity level
over the last month was below or above average.
It also allows you to establish on which days
your activity level was above or below average.
Activity target (PR3094)
If you are managing your pain with the Wireless
TENS Pro in consultation with a healthcare
professional who uses the Wireless TENS Pro PC
Application (PR3094), the activity monitor will give
your healthcare professional more insight into your
activity and treatment patterns. The PC application
also allows your healthcare professional to set an
activity target. If a target has been set, the horizontal
line will show a (T) instead of an (A).
, The day view shows your activity level over the
last 24 hours. The horizontal line (T) shows
the activity target set level and allows you to
establish if your activity level over the day met
the target.
, The week view shows your activity level over
the last 7 days until today. The horizontal line
(T) shows the activity target set for the week.It
allows you to establish if the activity level over the
past week met the target and on which days your
activity level was higher or lower than the target.
Page 35

ENGLISH 35
, The month view shows your activity level over
the last four weeks until today. The horizontal
line (T) shows your average activity level over
the last month. It allows you to establish if your
activity level over the last month met the target
and on which days your activity level was higher
or lower than the target.
After use
Caution: Make sure that you end the treatment
by switching off the TENS units or by setting the
intensity to 0 mA on the remote control before
you remove the TENS units, the extension cable
(if used, PR3094 only), or the electrodes. If you
do not end the treatment, you may experience an
unpleasant sensation in your ngers. This sensation
is not harmful, but can be unpleasant.
1 Switch off the TENS units by pressing the on/
off button.
2 Detach the TENS units from the electrodes by
pulling them off.
Note: If you forgot to switch off the TENS units, they
will switch off automatically in 5 minutes when they
are detached.
3 Recharge the TENS units to ensure they are
ready for the next treatment.
Page 36

ENGLISH36
4 Peel the electrodes off the skin by pulling at
the edge.
Note: Do not leave the electrodes on the skin overnight.
If you develop skin irritation, try attaching the
electrodes in a different spot. Make sure that you move
the electrodes to a different spot regularly so that you
do apply stimulation at the same spot every day.
Storage of the electrodes
1 Place the electrodes back on the liner.
2 Slide the liner with the electrodes back into
the bag.
3 Reseal the bag for dustfree storage.
Note: To keep the electrodes in good condition and
prevent the hydrogel layer from drying out, always store
them in the resealable bag when they are not attached
to your body for treatment. Seal the resealable bag to
guarantee dustfree storage.
Note: If you want to store electrodes for more than a
month, keep them at temperatures between +5°C and
27°C. Do not store the electrodes in the freezer or the
refrigerator. Avoid extreme heat and exposure to direct
sunlight.
Page 37

ENGLISH 37
Cleaning
Do not immerse the remote control and the TENS
units in water or rinse them under the tap.
Do not immerse the electrodes in water.
1 Clean the remote control, the charger, the
TENS units and the extension cable (PR3094
only) with a damp cloth and a mild cleaning
agent, e.g. dishwashing liquid.
Note: You can also clean them with 70% isopropyl
alcohol (IPA).
Caution: Do not use any other cleaning agents than
the ones mentioned above, as these cleaning agents
could damage the material, e.g. cause loss of gloss.
2 If the electrodes are dirty, put a drop of water
on your nger and gently rub the dirt off the
surface.
Note: Do not use soap or alcohol to clean the
electrodes.
Troubleshooting
This chapter summarises the most common
problems you could encounter with the Wireless
TENS and the Wireless TENS Pro. If you are unable
to solve the problem with the information below,
visit www.philips.com/support for a list of
frequently asked questions or contact the Philips
Consumer Care Centre in your country.
Page 38

ENGLISH38
Problem Possible cause Solution
The remote
control
does not
switch on.
The battery
status
indicator on
the TENS
units ashed
orange and
the device
switched off.
The battery
status
indicator on
the TENS
units is solid
orange.
The batteries
of the remote
control are
empty.
The batteries
are not
correctly
placed.
The remote
control may
be broken.
The battery of
the TENS units
is empty.
The battery of
the TENS units
is low. The
battery icon
on the remote
control ashes.
Replace the batteries (see chapter
‘Preparing for use’).
Open the battery compar tment and
place the batteries correctly (see
chapter ‘Preparing for use’).
Contact the Philips Consumer Care
Centre.
Charge the TENS units (see chapter
‘Preparing for use’).
This means that the battery has 30%
of its capacity left. Recharge the TENS
units as soon as possible (see chapter
‘Preparing for use’).
Page 39

Problem Possible cause Solution
ENGLISH 39
The ‘no
connection
symbol’
is on the
screen (see
chapter
‘Signals on
the device’).
There is no
connection
because the
TENS units
are switched
off.
There is no
connection
because
battery of the
TENS units is
empty.
The TENS
units
overheated
inside. If this
is the case,
the treatment
status indicator
ashes red.
The remote
control is too
far from the
TENS units.
The TENS
units may be
broken.
Check if the TENS units are switched
on. The treatment status indicator
ashes green when the TENS units are
switched on and in standby. If the TENS
units are switched off, press the on/off
button to switch them on.
Charge the TENS units (see chapter
‘Preparing for use’).
Detach the TENS units and let them
cool down. As soon as they have
cooled down sufciently, you can
reattach them to the electrodes
and press the on/off button on the
TENS units to resume treatment. The
TENS units may become warm on
the outside during treatment, but the
temperature never becomes so high
that there is any risk of damage or
injury.
Bring the remote control closer to the
TENS units.
Contact the Philips Consumer Care
Centre.
Page 40

ENGLISH40
Problem Possible cause Solution
There is a
cross on
the display
and I cannot
increase the
intensity
level to
start a
treatment
(see chapter
‘Signals on
the device’).
The cross is
the ‘channel
interrupted’
symbol. It may
indicate that
the electrodes
are not placed
properly.
The ‘channel
interrupted’
symbol may
indicate that
the TENS unit
or units are
not placed on
the electrodes
properly.
Make sure that the electrodes are
attached to the skin properly. Please
note that the ‘channel interrupted’
symbol only disappears when you
increase the intensity.
Check if the TENS units are placed on
the electrodes correctly. Wireless TENS
Pro (PR3094) only: If the ‘channel
interrupted’ symbol is above the left
intensity button, check if the TENS units
are connected properly. If the cross is
above the right intensity button, check
if the connectors of the extension
cable are connected properly. Please
note that the ‘channel interrupted’
symbol only disappears when you
increase the intensity.
Page 41

Problem Possible cause Solution
ENGLISH 41
The battery
symbol on
the menu
bar of the
remote
control
ashes.
The
treatment
status
indicator on
the TENS
units ashes
red and the
treatment
has stopped.
The electrodes
have become
detached from
the skin.
This means
that the
batteries of
the remote
control are
low. The
battery status
indicator on
the TENS units
is solid orange.
The TENS
units
overheated
inside.
The electrodes have lost their adhesive
power because they are dirty or
because they have been used for a
long time. You can try to clean the
electrodes (see chapter ‘Cleaning’).
If this does not help, replace the
electrodes. Please note that the
‘channel interrupted’ symbol only
disappears when you increase the
intensity.
You can continue treatment as long as
the treatment feels the same as usual.
When you press the on/off button
of the TENS units to stop treatment,
replace the batteries.
If the TENS units overheat inside,
remove them from the electrodes and
let them cool down. As soon as they
have cooled down sufciently, you
can reattach them to the electrodes
and press the on/off button on the
TENS units to resume treatment. The
TENS units may become warm on
the outside during treatment, but the
temperature never becomes so high
that there is any risk of damage or
injury.
Page 42

ENGLISH42
Problem Possible cause Solution
I
experienced
an
unpleasant
sensation
when I
touched the
connectors
of the TENS
units or the
electrodes.
The
stimulation
feels
different or
less pleasant
than usual.
You did not
decrease the
intensity to
0 to end the
treatment
before you
removed the
TENS units.
The intensity
is too high or
too low.
The electrodes
are not in the
right place.
The
electrodes are
not properly
attached.
The electrodes
are too dirty.
The electrodes
are worn.
Always decrease the intensity to 0
mA before you remove the TENS
units. In this way you avoid the
unpleasant sensation when you touch
the connectors of the TENS units
or the extension cable, or touch the
electrodes. This sensation is unpleasant
but not harmful.
Press the + or - side of the intensity
button to increase or decrease the
intensity.
Switch off the TENS units and detach
them from the electrodes. Remove
the electrodes from the skin and move
them to a slightly different place.
Switch off the TENS units and detach
them from the electrodes.Check if the
electrodes are attached to the skin
properly.
You can tr y to clean the electrodes
(see chapter ‘Cleaning’). If this does not
help, replace the electrodes.
Replace the electrodes.
Page 43

ENGLISH 43
Signals on the device
Battery status indications on the remote
control
1 To check the battery level of the remote
control or the TENS units, use the left or right
arrow to highlight the battery icon on the
menu bar. The battery screen opens and shows
the charge level of the rechargeable battery
of the TENS units on the left and the charge
level of the batteries of the remote control on
the right. The battery symbol can indicate four
charge levels: full, two-thirds full, one-third full
and empty.
2 When the battery of the TENS units is empty,
the connection is lost and the ‘no connection’
symbol appears on the left.
Error signals on the remote control
Battery low
- The battery symbol at the bottom of the display of
the remote control ashes when the batteries of
the remote control are low. When the batteries run
out completely, the remote control switches off.
- The battery symbol at the bottom of the display
of the remote control also ashes when the
rechargeable battery of the TENS units is low. If
that is the case, the battery status indicator on the
TENS units is solid orange.
Note: The battery symbol starts ashing when the
batteries of the remote control or the rechargeable
battery of the TENS units have less than 30% of their
total capacity left.
Page 44

ENGLISH44
No connection with the TENS units
- This ‘no connection’ symbol on the screen
indicates that there is no connection between the
remote control and the TENS units. This may have
several causes:
1 The rechargeable battery of the TENS units is
empty.
2 The TENS units are switched off.
3 The remote control is out of reach of the TENS
units.
4 If neither of the above applies, there is something
wrong with the TENS units.
Channel interrupted
- The ‘channel interrupted’ symbol (the cross)
on the screen indicates that the corresponding
channel is interrupted.
- If a channel is interrupted, this may have the
following causes:
1 There is no contact between the TENS units and
the electrodes.
2 The electrodes are not attached to the skin
properly.
- When you have made sure the electrodes are
properly attached to the skin and the TENS units
are properly connected to the electrodes, press
the + side of the intensity button to check if the
channel is properly connected. If it is properly
connected, the cross disappears and the intensity
value appears.
Page 45

ENGLISH 45
Indicator signals on the TENS units
Battery status indicator
- The battery status indicator on the TENS units
ashes:
1 The battery status indicator ashes orange
briey when the rechargeable battery is empty
and then the TENS units switch off.
2 The battery status indicator ashes green when
the TENS units are charging.
- The battery status indicator is burning solid:
1 The battery status indicator is solid orange when
the rechargeable battery of the TENS units is
low. The rechargeable battery has only 30% of
its total capacity left. The battery status indicator
also turns solid orange when the batteries of the
remote control are low.
2 The battery status indicator is solid green when
the rechargeable battery is fully charged.
Treatment status indicator
- The treatment status indicator on the TENS units
ashes:
1 The treatment status indicator ashes green
when the TENS units are switched on and in
standby.
2 The treatment status indicator ashes yellow
during treatment to indicate that the treatment
is in progress.
3 The treatment status indicator ashes red when
the TENS units overheated. When the TENS
units become overheated, the treatment stops
automatically and the ‘no connection’ symbol
appears on the display. Detach the TENS units
from the electrodes and let them cool down.
As soon as they have cooled down sufciently,
reattach them and resume treatment.
Page 46

ENGLISH46
Note: It is normal for the TENS units to become warm
during treatment. During normal operation, they do not
become so hot that there is any risk of damage or injury.
Note: If you use the device at maximum setting for
several hours, the TENS units may overheat and switch
off as a safety precaution.
Replacement
Electrodes
Replace the electrodes if:
- they are damaged or torn.
- they are past the use-by date indicated on the
resealable bag.
- they have lost their adhesive power. Never use
plaster or tape to attach them to your skin.
- stimulation feels less strong.
- when the stimulation is uncomfortable, i.e. when
you experience an unpleasant stinging or biting
sensation.
Note: Always replace the electrodes with electrodes
recommended for this device by the manufacturer. New
electrodes can be ordered at www.philips.com/
tens-electrodes.
Batteries of the remote control
Replace the batteries of the remote control when
the battery symbol on the display ashes. Always
replace them with two AAA 1.5-volt alkaline
batteries (see ‘Preparing the remote control’ in
chapter ‘Preparing for use’).
Page 47

ENGLISH 47
Ordering accessories
To buy accessories or spare parts, visit
www.shop.philips.com/service or go to your
Philips dealer. You can also contact the Philips
Consumer Care Centre in your country.
Electrodes
You can order new electrodes on
www.philips.com/tens-electrodes.
Caution: Only use this device with the charger,
cables, electrodes and accessories recommended
by the manufacturer.
Guarantee and support
Your Wireless TENS device has been designed
and developed with the greatest possible care to
guarantee an expected service life of 5 years.
If you need service or information or if you have a
problem, please visit our website at
www.philips.com/support. You can also contact
the Philips Consumer Care Centre in your country.
Its telephone number is:
- Germany: 0800 0007522 (free of charge for calls
within Germany)
- Austria: 0800 880932 (free of charge for landline
calls within Austria; costs for mobile phone calls
depend on provider)
- Switzerland: 0800 002050 (free of charge for
landline calls); 0848 000292 (costs for mobile
phone calls depend on provider)
- United Kingdom: 0844 338 04 89 (5p/min. from a
BT landline, other landline and mobile providers
may charge more)
Page 48

ENGLISH48
Guarantee restrictions
The electrodes are not covered by the terms of the
guarantee because they are subject to wear and
have to be replaced regularly.
Manufacturer’s legal address
Philips Consumer Lifestyle B.V.
Tussendiepen 4 9206 AD Drachten
The Netherlands
Recycling
- This crossed-out wheeled bin symbol on a
product means that the product is covered by
European Directive 2012/19/EU. Please inform
yourself about the local separate collection system
for electrical and electronic products. Never
dispose of the product with normal household
waste. Correct disposal of your product helps
prevent potentially negative consequences for the
environment and human health.
- This symbol indicates that batteries contain
substances that may be harmful to human health
and the environment. Never dispose of batteries
with normal household waste. Follow the local
rules for separate collection of batteries. Correct
disposal of batteries helps prevent potentially
negative consequences for the environment and
human health.
- The TENS units contain a built-in rechargeable
battery that cannot be removed by the user. Take
them to an ofcial collection point or a service
centre to have the rechargeable battery removed.
Page 49

ENGLISH 49
- All plastic parts are marked with recycle symbols.
Specications
Model PR3094, PR3093
Rated voltage(V) - adapter 100-240 ~ 150mA
Rated frequency (Hz) - adapter 50-60
Rated output - adapter 5V , 500 mA
Class Medical device Class IIa
Ingress of water - device except
charger
Ingress of water - charger IP21
Battery type - TENS units Li-Ion
Battery type - remote control 2 AAA 1.5V alkaline batteries
IP22
Pulse output parameters
Frequency range 1-120 Hz
Pulse width 40-400 µs
Current output Max. 60mA at 500-1000 Ohm
Maximum output voltage 120V
Page 50

ENGLISH50
Pulse output parameters
Current pulse shape Biphase symmetrical (net current
Operating conditions
Temperature from 5°C to +40°C
Relative humidity from 15% to 93% (non-condensing)
Atmospheric pressure from 700hPa to 1060hPa
Storage and transport conditions
Temperature - electrodes from 0°C to +40°C
Temperature - device from -10°C to 50°C
Relative humidity less than 93% (non-condensing)
Atmospheric pressure from 700hPa to 1060hPa
Note: If you want to store the electrodes for more than
a month, keep them at temperatures between +5°C
and +27°C.
Note: Do not store the electrodes in the freezer or
refrigerator. Do not leave them in extreme heat, nor
immerse them in water, or leave them outside of the
plastic bag.
0dc)
Page 51

ENGLISH 51
Explanation of symbols
Symbols on the device
- This is the symbol for reference number. This
symbol is followed by the manufacturer’s
reference number, which is the type number of
the device. The type plates on the remote control
and the TENS units show the same type number.
On the type plate of the remote control, the type
number is followed by the letters RC. On the
type plate of the TENS units, the type number is
followed by the letters TU.
- This is the symbol for serial number. This symbol is
followed by the manufacturer’s serial number.
- This symbol means: alternating current.
- This symbol means: direct current.
- This symbol on the remote control, the TENS
units and the extension cable, if provided, means:
protected against access to hazardous parts with
a nger and against vertically falling water drops
when tilted up to 15 degrees.
Page 52

ENGLISH52
- This symbol on the charger means: protected
against access to hazardous parts with a nger and
against vertically falling water drops.
- This symbol means that this device emits nonionising radiation. All devices and systems that
include RF transmitters or that intentionally apply
RF electromagnetic energy must be labelled with
this symbol.
- This symbol means: Type BF (Body Floating)
applied part (i.e. electrode) complying with IEC
60601-1.
- This symbol means ‘Manufactured by’ and appears
next to the address of the legal manufacturer.
- This symbol means: caution TENS output. It is
placed near all electrode connections.
Page 53

ENGLISH 53
- This symbol means: Conforms to EC Directives.
CE stands for ‘Conformité Européenne’. 0344 is
the number of the notied body.
- This symbol means: Do not throw away with the
normal household waste. For further instructions,
see chapter ‘Recycling’.
- This symbol indicates that the adapter is double
insulated (Class II).
- This symbol indicates that the adapter may only be
used indoors.
- This symbol means: Read the user manual before
you start using the device.
Page 54

ENGLISH54
- This symbol means: Keep dry.
- This symbol is the mark that identies the on/off
button.
- This is the TENS pulse symbol. It is shown next to
the treatment status indicator.
- This is the battery symbol. It is shown next to the
battery status indicator.
- This UL classication mark indicates that this
device complies with both Canadian and US
requirements. MEDICAL-APPLIED CURRENT/
ENERGY EQUIPMENT AS TO ELECTRICAL
SHOCK, FIRE AND MECHANICAL HAZARDS
ONLY IN ACCORDANCE WITH ANSI/AAMI
ES60601-1 (2005, C1:09, A2:10), IEC 606011 (2005), CAN/CSA C22.2 No.60601.1 (2008,
R:2011), IEC 60601-2-10 (2012), CAN/CSA
C22.2 No.60601-1-11 (2010)
Page 55

ENGLISH 55
Symbols on electrode bag
- This symbol means: Do not use while driving,
operating machines or performing other activities
that may present a risk of injury.
- This symbol means: Do not use damaged or worn
electrodes or electrodes that have lost their
adhesive power.
- This symbol indicates that the electrodes should
be used by one person and not shared with
others.
- This symbol means: Do not place the electrodes
on top of each other or so close to each other
that they touch each other.
- This symbol means: Do not place electrodes on
your face or neck.
Page 56

ENGLISH56
- This symbol means: Do not place the electrodes
on your chest.
- This symbol means: Do not put the electrodes
on open wounds, cancerous lesions, rashes and
infected or inamed skin.
- This symbol indicates the minimum and maximum
storage temperature for electrodes if they are
stored for more than a month.
- This is the symbol for ‘use by’. It indicates after
which date the electrodes must not be used
anymore.
Electromagnetic emissions and immunity
Electromagnetic Compatibility (EMC)
The Wireless TENS (PR3093) and the Wireless
TENS Pro (PR3094) are approved according to
EMC safety standard EN 60601-1-2. They are
designed to be used in typical domestic or clinical
environments.
Electrode placement guide (Fig. 101)
Page 57

DEUTSCH 57
Einführung
Herzlichen Glückwunsch zu Ihrem Kauf und
willkommen bei Philips! Um das Kundendienstangebot
von Philips vollständig nutzen zu können, sollten Sie Ihr
Produkt unter www.philips.com/
pain-management/register registrieren.
Lesen Sie diese Bedienungsanleitung sorgfältig durch,
bevor Sie das kabellose TENS-Gerät (PR3093) oder
das kabellose TENS-Gerät Pro (PR3094) verwenden,
und bewahren Sie sie für eine spätere Verwendung
auf. Das kabellose TENS-Gerät (PR3093) und das
kabellose TENS-Gerät Pro (PR3094) sind nicht
verschreibungspichtig. Optimale Behandlungserfolge
mit dem kabellosen TENS-Gerät erzielen Sie nur,
wenn Sie es gemäß den Anweisungen in dieser
Bedienungsanleitung verwenden. Wenn Sie weitere
Informationen benötigen oder Fragen haben,
besuchen Sie uns auf www.philips.com/
pain-management, oder wenden Sie sich an ein
Philips Service-Center in Ihrem Land.
Verwendungszweck
Das kabellose TENS-Gerät (PR3093) und das
kabellose TENS-Gerät Pro (PR3094) wurden
zur Verwendung für Erwachsene mit leichten
bis mittleren chronischen Schmerzen des
Bewegungsapparates entwickelt. Die Geräte werden
zur transkutanen elektrischen Nervenstimulation
(TENS) eingesetzt, um Schmerzen zu lindern und die
Beweglichkeit mit dem integrierten Aktivitätsmonitor
zu überwachen.
Das kabellose TENS-Gerät kann zu Terminen bei einem
medizinisch ausgebildeten Therapeuten mitgebracht
werden, der für die richtige Anwendung des TENSGeräts gemäß der Bedienungsanleitung verantwortlich
ist und folgende Kompetenzen aufweist:
Page 58

58
DEUTSCH
- Analyse der Beweglichkeit des Patienten und
Behandlungsmuster
- Bestimmen der individuellen Behandlungs- und
Anpassungseinstellungen des TENS-Geräts mittels
der PC-Anwendung für das kabellose TENS-Gerät
Pro (nur PR3094)
Die PC-Anwendung für das Gerät TENS Pro
ist nur für den Gebrauch durch medizinisches
Fachpersonal in Kombination mit dem kabellosen
TENS-Gerät Pro (PR3094) bestimmt. Sie
ermöglicht es dem Therapeuten, genauere TENSBehandlungsprogramme anzubieten und die
Bewegungsabläufe des Patienten hinsichtlich der
Anwendung des Geräts aufzuzeichnen und zu
analysieren.
Das Gerät darf nur von einer einzigen erwachsenen
Person angewendet und bedient werden. Es sollte
ausschließlich gemäß den Sicherheitshinweisen und
den Anweisungen in dieser Bedienungsanleitung
sowie für den Zweck, für den es entwickelt wurde,
verwendet werden.
TENS und Schmerztherapie
Die transkutane elektrische Nervenstimulation
(TENS) ist eine nicht-invasive Methode zur
Schmerzlinderung, die laut klinischen Tests die
Schmerzlinderung unterstützen kann. TENS wird
täglich von Krankengymnasten und anderen
medizinischen Fachkräften eingesetzt. Während
der TENS-Behandlung werden elektrische Impulse
über die intakte Hautoberäche geleitet, um die
darunter liegenden Nerven zu aktivieren. Klinische
Ergebnisse legen nahe, dass TENS zu einer
Schmerzlinderung führt, die dem körpereigenen
Schmerzlinderungsmechanismus des Nervensystems
entspricht, wie z. B. dem Massieren eines
schmerzenden Bereichs.
Page 59

DEUTSCH 59
Die Impulse werden von den akkubetriebenen
TENS-Komponenten erzeugt, die mit den
selbsthaftenden Hydrogel-Elektroden verbunden
werden müssen. Sie können aus voreingestellten
TENS-Programmen mit verschiedenen
Impulseinstellungen auswählen und die Intensität
der Impulse nach Ihren Vorlieben anpassen.
Diese Broschüre beinhaltet Informationen
zum Positionieren der Elektroden und zu den
Programmen, die zur Behandlung verwendet werden.
Überwachung der Aktivität und
Schmerztherapie
Wir alle möchten unsere täglichen Aktivitäten
genießen. Wenn Sie Schmerzen haben, ist die
instinktive Reaktion, den Schmerz durch weniger
Bewegung zu vermeiden. Folglich nimmt Ihre Fitness
ab, und Sie können nicht mehr alle Dinge tun, die
Ihnen Spaß machen. Die Erhaltung der Beweglichkeit
ist wichtig (ohne es zu übertreiben), um nicht in
einem kontinuierlichen Schmerzzyklus gefangen zu
bleiben. Der Schlüssel zur eigenen Schmerztherapie
ist die richtige Einteilung: Verteilen Sie die Aktivitätsund Ruheperioden so über den Tag, wie es für Sie
am angenehmsten ist. Das wichtigste dabei ist, die
Aktivitäten gleichmäßig zu verteilen und Pausen
einzulegen, bevor diese wirklich erforderlich sind.
Ein Bewegungsmonitor kann Ihnen helfen, die
Verteilung der Aktivitäten über den Tag hinweg zu
überwachen. Die Fernbedienung des kabellosen
TENS-Geräts verfügt über einen eingebauten
Bewegungsmonitor, der Ihre körperliche Aktivität
aufzeichnet, wenn sie ihn an Ihrem Gürtel bzw. am
Bund oder in der Hosen- oder Rockrasche tragen.
Page 60

DEUTSCH60
Er kann die Aktivitätsdaten von 60 Tagen aufzeichnen
und speichern. Auf diese Weise können Sie nicht
nur Ihr Aktivitätsmuster der letzten 24 Stunden
überprüfen, sondern auch das der vorherigen Woche
und des vorherigen Monats. Wenn Sie weitere Tipps
zur Einteilung und zur eigenen Schmerztherapie
benötigen, lesen Sie bitte die mitgelieferte Broschüre
“Toolkit zur Schmerzlinderung”.*
* Hinweis:Es liegt nur die deutsche Version des Toolkits
zur Schmerzlinderung bei. Wenn Sie die englische,
französische oder italienische Ausgabe benötigen,
können Sie diese unter www.philips.com/
pain-management herunterladen.
Informationen für den Therapeuten
(nur PR3094)
Das kabellose Gerät TENS Pro (PR3094) kann
in Kombination mit der dazugehörenden PCAnwendung verwendet werden. Diese wurde
zur Anwendung durch medizinische Fachkräfte
entwickelt, die für die richtige Anwendung des
TENS-Geräts gemäß der Bedienungsanleitung
verantwortlich sind und folgende Kompetenzen
aufweisen:
- Analyse der Aktivitätsmuster des Patienten in
Bezug auf Behandlungsmuster des Patienten
mithilfe einer externen PC-Anwendung
- Bestimmen der individuellen Behandlungs- und
Anpassungseinstellungen des TENS-Geräts mittels
einer externen PC-Anwendung
Die PC-Anwendung für das kabellose Geräte
TENS Pro ermöglicht Therapeuten, ihren Patienten
genauere TENS-Behandlungsprogramme anzubieten
und die Aktivitätsmuster der Patienten bei Gebrauch
des Geräts sowie das Schmerzempnden des
Patienten auf einem PC zu verfolgen und zu
analysieren.
Page 61

DEUTSCH 61
Die PC-Anwendung für das kabellose Gerät TENS
Pro ist nicht im Lieferumfang enthalten, kann aber
auf Wunsch heruntergeladen werden. Hinterlassen
Sie dazu unter www.philips.com/tens-download
Ihre Kontaktdaten. Sie erhalten einen Link, über
den Sie die PC-Anwendung für das kabellose Gerät
TENS Pro herunterladen können. Über diesen Link
steht ebenfalls die Bedienungsanleitung dieser PCAnwendung zum Herunterladen bereit.
USB-Kabel
Die PC-Anwendung für das kabellose Gerät
TENS Pro kann verwendet werden, wenn die
Fernbedienung über ein Mini-USB-Kabel an Ihren PC
angeschlossen ist. Es gibt zwei Möglichkeiten, dieses
standardmäßige Mini-USB-Kabel zu beziehen:
1 Sie können Ihre Kontaktdaten auf
www.philips.com/tens-download
hinterlassen und angeben, dass Sie ein Mini-USBKabel erhalten möchten. Nach Erhalt Ihrer Daten
senden wir Ihnen ein Mini-USB-Kabel auf dem
Postweg zu.
2 Wenn Sie von unseren Vertriebsmitarbeitern ein
Testgerät erhalten haben, sollte das Mini-USB-
Kabel bereits enthalten sein.
Bei weiteren Fragen zur Verfügbarkeit der PCAnwendung für das kabellose Gerät TENS Pro oder
zum Mini-USB-Kabel wenden Sie sich bitte an ein
Service-Center in Ihrem Land.
Page 62

DEUTSCH62
Wichtig
Gegenanzeigen
Verwenden Sie das Gerät nicht, wenn Folgendes
zutrifft:
- Sie haben einen Herzschrittmacher, einen
implantierten Debrillator oder andere
implantierte Metall- oder Elektronikgeräte (z. B.
Systeme zur Verabreichung von Arzneimitteln),
da der Gebrauch in diesen Fällen zu Stromschlag,
Verbrennungen, elektrischen Interferenzen oder
sogar zum Tod führen könnte.
- Sie haben eine Herzkrankheit.
- Sie haben Epilepsie.
- Sie sind schwanger, da die Sicherheit der
elektrischen Stimulation während der
Schwangerschaft noch nicht nachgewiesen wurde.
- Sie haben eine kognitive Behinderung.
Unerwünschte Reaktionen
Sie sollten das Gerät nicht mehr verwenden und
Ihren Arzt konsultieren, wenn unerwünschte
Reaktionen durch das Gerät auftreten.
Zu den unerwünschten Reaktionen zählen u. a.:
- Hautirritationen unter den Elektroden, obwohl
nicht bekannt ist, dass das Gel auf den Elektroden
allergische Reaktionen verursacht
- Verbrennungen unter den Elektroden
- Kopfschmerzen oder andere schmerzhafte
Empndungen
- Übelkeit oder Schwächegefühl
Page 63

DEUTSCH 63
Wichtige Sicherheitshinweise
Warnhinweis
- Dies ist ein medizinisches Gerät. Halten Sie das
Gerät außerhalb der Reichweite von Kindern.
- Lesen Sie diese Bedienungsanleitung sorgfältig
durch, und halten Sie sich stets an die
Anwendungsanweisungen.
- Dieses Gerät ist nicht für Erwachsene mit
verringerten sensorischen oder psychischen
Fähigkeiten geeignet.
- Verwenden Sie das Gerät nicht bei Kindern.
- Verwenden Sie das Gerät nicht, wenn Ihr Schmerz
nicht eindeutig als milder oder mittlerer MuskelSkelett-Schmerz bestimmt werden kann. Wenn Sie
die Ursache für den Schmerz nicht genau kennen,
konsultieren Sie Ihren Arzt.
- Wenn Sie bereits von einem Arzt betreut
werden, konsultieren Sie ihn, bevor Sie das Gerät
verwenden.
- Verwenden Sie das Gerät nicht am Hals, da die
Stimulation schwere Muskelkrämpfe verursachen
könnte, die Ihre Luftröhre verschließen und
zu Atemnot führen könnten, was wiederum
Auswirkungen auf Ihren Herzrhythmus oder
Blutdruck haben könnte.
- Wenden Sie die Stimulation nicht auf Ihrer Brust
an, da in die Brust eindringende elektrische
Ströme Herzrhythmusstörungen verursachen
könnten, die tödlich sein könnten.
- Da die Wirkungen der Stimulation auf das Gehirn
unbekannt sind, sollte die Stimulation nicht am
Kopf angewendet werden, und die Elektroden
sollten nicht an gegenüber liegenden Seiten des
Kopfes positioniert werden.
Page 64

DEUTSCH64
- Gehen Sie besonders vorsichtig vor, wenn Sie ein
erhöhtes Risiko für innere Blutungen aufgrund
einer Prellung oder einer Verletzung haben.
- Konsultieren Sie Ihren Arzt, wenn Sie kürzlich
operiert wurden, da sich die Stimulation negativ
auf den Heilungsprozess auswirken kann.
- Wenden Sie die Stimulation nicht auf oder nahe
Krebsläsionen an.
- Wenden Sie die Stimulation nicht auf offenen
Wunden oder Hautreizungen oder auf geschwollenen,
roten, inzierten oder entzündeten Bereichen
oder Ausschlägen an (z. B. Venenentzündung,
Thrombophlebitis und Krampfadern).
- Wenden Sie die Stimulation nicht auf gefühllosen
Hautpartien an.
- Wenden Sie die Stimulation nur auf normaler,
unversehrter, sauberer und gesunder Haut an.
- Der Gebrauch der elektrischen Stimulation und der
leitfähigen Elektroden kann zu Hautirritationen oder
zu Überempndlichkeit der Haut führen.
- Wenden Sie die Stimulation nicht an, während Sie
ein Fahrzeug führen, eine Maschine bedienen oder
eine andere Aktivität ausführen, bei der durch die
elektrische Stimulation ein Verletzungsrisiko besteht.
- Wenden Sie die Stimulation nicht beim Schlafen
an. Wenn das Gerät im Bett verwendet wird,
sollten Sie den Timer stellen, damit es sich
automatisch ausschaltet.
- Verwenden Sie das Gerät und die Elektroden
nicht innerlich.
- Wenden Sie die Stimulation nicht in der Nähe
von elektronischen Überwachungsgeräten
an (z. B. Herzmonitoren, EKG), da diese
Geräte möglicherweise nicht ordnungsgemäß
funktionieren, wenn das Gerät in Gebrauch ist.
Page 65

DEUTSCH 65
- Wenden Sie die Stimulation nicht in der
Badewanne, unter der Dusche oder im
Schwimmbad an.
- Befestigen Sie die Elektroden nicht mithilfe von
Paster oder Klebeband an der Haut.
- Überprüfen Sie das Gerät und die Elektroden vor
dem Gebrauch immer auf Schäden.
- Verwenden Sie das Gerät oder die Elektroden
nicht, wenn sie beschädigt sind.
- Modizieren Sie weder das Gerät noch die
Elektroden.
Achtung
- Verwenden Sie dieses Gerät mit dem Ladegerät,
den Kabeln, den Elektroden und den Zubehörteilen,
die vom Hersteller empfohlen werden.
- Das Gerät ist nicht wasserdicht. Verwenden
Sie das Gerät nicht in feuchter Umgebung, und
schützen Sie es vor Nässe.
- Das Gerät kann im Haus oder im Außenbereich
verwendet werden, es hält jedoch nicht allen
Witterungen stand.
- Das Gerät verträgt keine hohen und
niedrigen Temperaturen. Bitte prüfen Sie die
Betriebsbedingungen in Kapitel “Technische Daten”.
- Der USB-Anschluss darf nur von einem
Gesundheitsexperten in Verbindung mit der von
Philips bereitgestellten PC-Anwendung für das
kabellose Gerät TENS Pro (PR3094) verwendet
werden.
- Die Elektroden haben eine begrenzte Haltbarkeit.
Bitte überprüfen Sie vor dem Gebrauch das
Haltbarkeitsdatum auf der Verpackung. Verwenden
Sie keine Elektroden, deren Haltbarkeitsdatum
überschritten wurde. Informationen zum Bestellen
von Ersatzelektroden nden Sie in Kapitel
“Zubehör bestellen”.
Page 66

DEUTSCH66
- Vergewissern Sie sich, dass Sie die Behandlung
durch Ausschalten der TENS-Komponenten
oder durch Einstellen der Intensität auf 0 mA
auf der Fernbedienung beenden, bevor Sie die
TENS-Komponenten, das Verlängerungskabel (falls
verwendet, nur PR3094) oder die Elektroden
abnehmen. Wenn Sie die Behandlung nicht
beenden, kann ein unangenehmes Gefühl in Ihren
Fingern auftreten. Dieses Gefühl ist nicht schädlich,
kann jedoch unangenehm sein.
- Verwenden und verwahren Sie die Elektroden
stets gemäß den Anweisungen in den Kapiteln
“Gerät verwenden” und “Nach dem Gebrauch”.
- Wenn das Gerät nicht wie in dieser
Bedienungsanleitung beschrieben funktioniert,
stellen Sie den Gebrauch ein, und wenden Sie sich
an ein Service-Center. Die Kontaktdaten nden
Sie in Kapitel “Garantie und Support”.
Normerfüllung
- Das Gerät erfüllt die geltenden Normen für
elektromedizinische Geräte der Klasse IIa und
für Geräte zur elektrischen Stimulation für den
Heimgebrauch.
- Dieses Philips Gerät erfüllt sämtliche Normen
und Regelungen bezüglich der Exposition in
elektromagnetischen Feldern.
Voreingestellte Programme
Programmübersicht
Auf dem Gerät sind standardmäßig 8 Programme
(PR3093) bzw. 15 Programme (PR3094)
voreingestellt. Es gibt drei verschiedene Arten der
TENS-Behandlung: Konventionelle TENS, BurstTENS und Frequenz-modulierte TENS. Weitere
Informationen erhalten Sie weiter unten.
Page 67

DEUTSCH 67
Konventionelle TENS-Programme
Ein konventionelles TENS-Programm ist ein allgemein
verwendetes Programm mit einer HochfrequenzStimulation. Es basiert auf der Gate-Control-Theorie,
die besagt, dass durch diese Art der Stimulation die
Übertragung von Schmerzsignalen im Nervensystem
unterbunden wird. Vergleichbar ist dies etwa mit dem
“Wegreiben” von Schmerzen. Die meisten Personen
wenden die konventionelle TENS-Behandlung
30 Minuten pro Sitzung an. Sie können sie jedoch so
häug und so lange anwenden, wie es für Sie angenehm
ist. Die Wirkung lässt sich für gewöhnlich am besten
während der Stimulation wahrnehmen. Nach der
Stimulation lässt die Wirkung im Allgemeinen ziemlich
schnell nach. Sie sollten die Intensität des Programms
so einstellen, dass Sie die Stimulation deutlich spüren.
Eine Stimulation sollte keine unangenehmen oder
schmerzhaften Empndungen auslösen.
Name des
konventionellen
TENS-Programms
Konventionell
Starker
Reiz
Vor einer
Aktivität
Programmnr. auf
Fernbedienung
PR3093
1 1 Sorgt für eine dauerhaft
2 2 Sorgt für eine stärkere
3 3 Sorgt für eine lokalere
Programmnr. auf
Fernbedienung
PR3094
Programmbeschreibung Vorge-
kribbelnde Stimulation
Stimulationsempndung
und sanftere Stimulati-
onsempndung
schlagene
Behandlungsdauer
Keine
Begrenzung
Keine
Begrenzung
Keine
Begrenzung
Page 68

DEUTSCH68
Name des
konventionellen
TENS-Programms
Milder Reiz - 4 Sorgt für eine mildere
Tiefgehender
Reiz
Ausstrahlender
Impuls
Programmnr. auf
Fernbedienung
PR3093
- 5 Sorgt für eine tiefere
- 6 Sorgt für eine Stimu-
Programmnr. auf
Fernbedienung
PR3094
Burst-TENS-Programme
Burst-TENS bietet eine Hochfrequenzstimulation
in getakteten Impulsfolgen. Diese Art der
Stimulation ist ein bekannter Auslöser für die
Endorphin-Ausschüttung. Endorphine werden
vom Körper zur Schmerzlinderung produziert.
Sie können Burst-TENS mehrmals täglich etwa
30 Minuten lang anwenden, z. B. 3 Mal am Tag.
Stellen Sie die Intensität des Burst-Programms
so ein, dass Sie die Stimulation deutlich spüren.
Burst-Programme sorgen im Allgemeinen für eine
intensivere Empndung, die sich möglicherweise
etwas unangenehm anfühlt. Es wird ebenfalls
empfohlen, die Intensität auf eine Höhe einzustellen,
bei der sich die Muskeln im Stimulationsbereich
sichtbar zusammenziehen. Diese Kontraktionen
Programmbeschreibung Vorge-
Stimulationsempndung,
z. B. für empndliche
Körperpartien
Stimulationsempndung
lationsempndung mit
einem weiteren Strahlungsradius
schlagene
Behandlungsdauer
Keine
Begrenzung
Keine
Begrenzung
Keine
Begrenzung
Page 69

DEUTSCH 69
sind nicht schädlich. Wenn diese Kontraktionen für
Sie zu unangenehm sind, können Sie die Intensität
verringern, ein anderes Programm auswählen oder
die Elektroden an einer anderen Stelle anbringen.
Burst-TENS sollte vorzugsweise in einer Ruhephase
angewendet werden, da es im Stimulationsbereich zu
Muskelkontraktionen kommen kann.
Name des
BurstTENSProgramms
Kontinuierliche
Impulsfolge
Langsames
Kneten
Mildes
Kneten
Tiefes
Kneten
Programmnr.
auf
Fernbedienung
PR3093
4 7 Bewirkt eine pulsieren-
5 8
6 9 Bewirkt eine mildere
- 10 Bewirkt eine lokalere
Programmnr.
auf
Fernbedienung
PR3094
Programmbeschreibung
de Impulsstimulation,
um Endorphine in Ihrem
Körper auszuschütten
Bewirkt eine langsamere
und massierende Impuls
stimulation, um Endorphine auszuschütten
Impulsstimulation, um
Endorphine in Ihrem
Körper auszuschütten
und tiefere Impulsstimulation, um Endorphine in Ihrem Körper
auszuschütten
Vorgeschlagene
Behandlungsdauer
30 Minuten*
30 Minuten*
-
30 Minuten*
30 Minuten*
Page 70

DEUTSCH70
Name des
BurstTENSProgramms
Diffuse
Impulsfolge
Frequenz-mod.
Programmname
Mischfrequenz
Pulsierende
Massage
Programmnr.
auf
Fernbedienung
PR3093
- 11 Bewirkt eine diffusere
Programmnr. auf
Fernbedienung
PR3093
7 12 Sorgt für eine ie-
8 13 Sorgt für eine pulsie-
Programmnr.
auf
Fernbedienung
PR3094
* optional mehrmals am Tag
Frequenz-modulierte TENS-Programme
Frequenz-modulier te TENS-Programme wechseln
den Impuls zwischen hoch und niedrig. Dies
kann teilweise angenehmer bzw. effektiver als die
anderen Programme sein. Sie können die frequenzmodulierten TENS-Programme mehrmals täglich
etwa 30 Minuten lang anwenden, z. B. 3 Mal am Tag.
Programmnr. auf
Fernbedienung
PR3094
Programmbeschreibung
Impulsstimulation, um
Endorphine in Ihrem
Körper auszuschütten
Programmbeschreibung
ßende Stimulations-
empndung
rende Stimulations-
empndung
Vorgeschlagene
Behandlungsdauer
30 Minuten*
Vorgeschlagene
Behandlungsdauer
30 Minuten*
30 Minuten*
Page 71

DEUTSCH 71
Frequenz-mod.
Programmname
Tiefenmassage
Sanfte
Massage
Programmname
Programmnr. auf
Fernbedienung
PR3093
- 14 Sorgt für eine lang-
- 15 Sorgt für eine sanft
Programmnr.
PR3093
Programmnr. auf
Fernbedienung
PR3094
* optional mehrmals am Tag
Technische Programmdaten
In der Tabelle unten werden Informationen über die
Frequenz, die Impulsbreite und die voreingestellte
Zeit jedes Programms angegeben. Der Stromimpuls
in allen Programmen verläuft in einer symmetrischen
Zweiphasenwelle.
Programmnr.
PR3094
Programmbeschreibung
samere und tiefer
gehende Stimulations-
empndung
ießende Stimulationsempndung
Programmtyp
Frequenz
Impulsbreite
Vorgeschlagene
Behandlungsdauer
30 Minuten*
30 Minuten*
Voreingestellte
Zeit
Konventionell
Starker
Reiz
1 1 Konven-
tionell
2 2 Konven-
tionell
100 Hz 200 µs stu-
fenlos
40 Hz 200 µs stu-
fenlos
Page 72

DEUTSCH72
Programmname
Vor
einer
Aktivität
Milder
Reiz
Tiefgehender
Reiz
Ausstrahlender
Impuls
Kontinuierliche
Impulsfolge
Langsames
Kneten
Mildes
Kneten
Tiefes
Kneten
Diffuse
Impulsfolge
Programmnr.
PR3093
3 3 Konven-
- 4 Konven-
- 5 Konven-
- 6 Konven-
4 7 Impuls-
5 8 Impuls-
6 9 Impuls-
- 10 Impuls-
- 11 Impuls-
Programmnr.
PR3094
Programmtyp
tionell
tionell
tionell
tionell
folge
folge
folge
folge
folge
Frequenz
100 Hz 150 µs stu-
80 Hz 60 µs stu-
80 Hz 150 µs stu-
60 Hz 150 µs stu-
100 Hz,
2 Hz
80 Hz,
1 Hz
80 Hz,
3 Hz
80 Hz,
2 Hz
80 Hz,
2 Hz
Impulsbreite
250 µs 30 Mi-
200 µs 30 Mi-
200 µs 30 Mi-
150 µs 30 Mi-
180 µs 30 Mi-
Voreingestellte
Zeit
fenlos
fenlos
fenlos
fenlos
nuten
nuten
nuten
nuten
nuten
Page 73

DEUTSCH 73
Programmname
Mischfrequenz
Pulsierende
Massage
Tiefenmassage
Sanfte
Massage
Programmnr.
PR3093
7 12 Fre-
8 13 Fre-
- 14 Fre-
- 15 Fre-
Programmnr.
PR3094
Hinweis: Mit dem kabellosen Gerät TENS Pro (PR3094)
können Gesundheitsexperten die dazugehörige PCAnwendung im Rahmen einer Schmerztherapie nutzen, um
zusätzliche Programme zu erstellen und zu installieren, die
speziell auf die Bedürfnisse ihres Patienten abgestimmt sind.
Produktübersicht (Abb. 1)
1 Fernbedienung
2 Anzeige
- A. Symbol für Startbildschirm
- B. Symbol für Programmbildschirm
- C. Symbol für Timerbildschirm
- D. Akkusymbol
- E. Symbol für Aktivitätsbildschirm
- F. Symbol für Einstellungsbildschirm
3 Intensitätstaste (PR3093); Intensitätstaste für
Erweiterungskanal (dritte und vierte Elektrode)
(PR3094)
Programmtyp
q.-mod.8-100 Hz
q.-mod.
q.-mod.
q.-mod.
Frequenz
2-8 Hz 250 µs 30 Mi-
2-80 Hz 180 µs 30 Mi-
8-80 Hz 150 µs 30 Mi-
Impulsbreite
250 µs 30 Mi-
Voreingestellte
Zeit
nuten
nuten
nuten
nuten
Page 74

DEUTSCH74
4 Intensitätstaste für Hauptkanal (erste und zweite
Elektrode) (PR3094)
5 OK-Taste (Bestätigungstaste)
6 Wählschalter mit Nach-oben-, Nach-unten-,
Nach-rechts- und Nach-links-Pfeilen
7 Abnehmbarer Gürtel-Clip
8 Batteriefachabdeckung
9 Erweiterungskanal-Anschlüsse für die dritte und
vierte Elektrode (nur PR3094)
10 Kabel für Erweiterungskanal (nur PR3094)
11 Stecker zum Anschließen des Kabels für den
Erweiterungskanal an die TENS-Komponenten
(nur PR3094)
12 Ein-/Ausschalter der TENS-Komponenten
13 TENS-Komponenten
14 Abnehmbares Eckstück (nur PR3094)
15 Akkustandanzeige der TENS-Komponenten
16 Behandlungsstatusanzeige der TENS-
Komponenten
17 Adapter
18 Ladegerät
19 Selbsthaftende Hydrogel-Elektrode
Hinweis: Das entsprechende Bild nden Sie auf der
Innenseite der Frontabdeckung.
Für den Gebrauch vorbereiten
Die TENS-Komponenten auaden
Um das Gerät verwenden zu können, müssen
Sie zuerst die TENS-Komponenten auaden. Das
Auaden der TENS-Komponenten dauer t ungefähr
3 Stunden, wenn das Gerät Raumtemperatur
hat. Wenn der Akku vollständig aufgeladen ist,
enthält er ausreichend Energie für ungefähr
8 Stunden dauerhaften Gebrauch unter normalen
Betriebsbedingungen.
Page 75

DEUTSCH 75
Hinweis: Wenn der Akku der TENS-Komponenten zu
Beginn der Behandlung nicht vollständig aufgeladen
ist, kann der Energievorrat des Akkus während der
Behandlung erschöpfen. Wir empfehlen Ihnen, die
TENS-Komponenten immer vollständig aufzuladen,
bevor Sie eine Behandlung beginnen.
Hinweis: Es ist keine Behandlung möglich, während die
TENS-Komponenten aufgeladen werden.
1 Stecken Sie den Adapter des Ladegeräts in eine
Steckdose.
2 Setzen Sie die TENS-Komponente mit dem
Akku (diejenige ohne Ein-/Ausschalter und
Anzeigen) in das Ladegerät.
, Die Akkustandanzeige der anderen TENS-
Komponente blinkt während des Auadens grün.
, Die Akkustandanzeige hört auf zu blinken
und leuchtet dauerhaft grün, wenn der Akku
vollständig aufgeladen ist.
3 Nehmen Sie die TENS-Komponente vom
Ladegerät, wenn der Akku vollständig
aufgeladen ist.
Hinweis: Trennen Sie das Ladegerät nach der
Verwendung immer von der Stromversorgung, indem
Sie den Adapter aus der Steckdose ziehen.
Page 76

DEUTSCH76
Behandlungsvorbereitung mit zwei Kanälen
und vier Elektroden (nur PR3094)
Das kabellose TENS-Gerät Pro (PR3094) wird mit
einem Erweiterungskabel geliefert, über das Sie zwei
weitere Elektroden verbinden können. Weil das
kabellose TENS-Gerät Pro (PR3094) zwei Kanäle
aufweist, hat die zugehörige Fernbedienung zwei
Intensitätstasten, eine für jeden Kanal.
Behandlungsvorbereitung
1 Nehmen Sie das abnehmbare Eckstück von den
TENS-Komponenten ab, sodass der Anschluss
für das Erweiterungskabel zugänglich ist.
Hinweis: Bewahren Sie das abnehmbare Eckstück für
den späteren Gebrauch auf.
Achtung: Bewahren Sie das abnehmbare Eckstück
außerhalb der Reichweite von Kindern auf.
2 Stecken Sie den Stecker des
Erweiterungskabels in den Anschluss.
Fernbedienung vorbereiten
Akkus in die Fernbedienung einsetzen
1 Nehmen Sie den Gürtel-Clip gegebenenfalls
von der Fernbedienung ab.
2 Schieben Sie die Batteriefachabdeckung von
der Fernbedienung.
Page 77

DEUTSCH 77
3 Setzen Sie zwei AAA 1,5-Volt-Alkalibatterien in
die Fernbedienung ein.
Hinweis: Vergewissern Sie sich, dass die Plus- und
Minuspole im Batteriefach in die richtige Richtung
zeigen.
Hinweis: Nehmen Sie die Batterien heraus, wenn Sie
das Gerät einen Monat oder länger nicht verwenden,
um ein Auslaufen der Batterien zu verhindern.
4 Schieben Sie die Batteriefachabdeckung zurück
auf die Fernbedienung.
5 Wenn Sie die Fernbedienung an Ihrem Gürtel
oder am Bund tragen möchten, befestigen Sie
den Gürtel-Clip wieder an der Fernbedienung.
Sie können die Fernbedienung auch ohne den
Gürtel-Clip verwenden.
Fernbedienung sperren und entsperren
Das Bedienfeld der Fernbedienung wird automatisch
gesperrt, wenn es eine gewisse Zeit lang inaktiv war,
um eine versehentliche Bedienung zu verhindern.
1 Wenn Sie eine Taste auf der Fernbedienung
drücken, werden Sie dazu aufgefordert, die
OK-Taste und anschließend den Nach-oben-
Pfeil zu drücken.
2 Drücken Sie die OK-Taste, um die
Fernbedienung zu entsperren.
Page 78

DEUTSCH78
, Sie werden aufgefordert, den Nach-oben-Pfeil zu
drücken.
3 Drücken Sie auf dem Wahlschalter den Nach-
oben-Pfeil.
, Wenn Sie die Fernbedienung entsperren, können
Sie das Bedienfeld erneut verwenden.
, Wenn Sie neue Batterien eingesetzt haben und
die TENS-Komponenten ausgeschaltet sind, wird
der “Keine Verbindung”-Bildschirm angezeigt.
Hinweis: Der “Keine Verbindung”-Bildschirm kann
auch aus anderen Gründen angezeigt werden (siehe
“Fehlersignale auf der Fernbedienung” in Kapitel
“Signale auf dem Gerät”).
4 Wenn Sie die Fernbedienung sperren möchten,
halten Sie die OK-Taste 2 Sekunden lang
gedrückt.
Hinweis: Wenn die Fernbedienung gesperrt ist, wird auf
dem Display nichts angezeigt.
Tipp: Sperren Sie die Fernbedienung, nachdem Sie
die Behandlung begonnen haben. Dies ermöglicht
Ihnen, die Fernbedienung am Gürtel oder Bund bzw.
in der Tasche zu tragen, ohne dabei unabsichtlich die
Einstellungen zu ändern.
Page 79

DEUTSCH 79
Datum und Uhrzeit festlegen
Wenn Sie die Aktivitätsüberwachung verwenden
möchten, um den Verlauf Ihrer Aktivität und das
Behandlungsmuster zu verfolgen, müssen Sie das
Datum und die Uhrzeit auf Ihrer Fernbedienung
einstellen.
1 Der Bildschirm für das Datum und die
Uhrzeit wird automatisch angezeigt, wobei das
Datumsfeld hervorgehoben ist.
Hinweis: Dieser Bildschirm öffnet sich nur bei der
ersten Verwendung automatisch und wenn Sie
die Batterien mehr als 24 Stunden, nachdem der
Energievorrat vollständig erschöpft ist, ersetzen. Wählen
Sie in allen anderen Situationen das Einstellungssymbol
aus, um das Datum und die Uhrzeit zu ändern.
2 Drücken Sie die OK-Taste, um die
Datumseinstellung zu ändern.
, Das Tagesfeld ist hervorgehoben.
3 Wählen Sie den Tag mithilfe der Nach-oben-
und Nach-unten-Pfeile aus, und drücken Sie
den Nach-rechts-Pfeil, um zum Monatsfeld zu
wechseln.
, Das Monatsfeld ist hervorgehoben.
4 Wählen Sie den Monat mithilfe der Nach-
oben- und Nach-unten-Pfeile aus, und drücken
Sie den Nach-rechts-Pfeil, um zum Jahresfeld zu
wechseln.
, Das Jahresfeld ist hervorgehoben.
Page 80

DEUTSCH80
5 Wählen Sie das Jahr mithilfe der Nach-oben-
und Nach-unten-Pfeile aus, und drücken Sie die
OK-Taste, um das Datum zu bestätigen.
6 Verwenden Sie den Nach-unten-Pfeil, um zum
Zeiteinstellungsfeld zu wechseln.
7 Drücken Sie die OK-Taste, um die
Zeiteinstellung zu ändern.
, Der Bildschirm zur Zeiteinstellung wird geöffnet.
, Das Stundenfeld ist hervorgehoben.
8 Wählen Sie die Stunde mithilfe der Nach-oben-
und Nach-unten-Pfeile aus, und drücken Sie
den Nach-rechts-Pfeil, um zum Minutenfeld zu
wechseln.
, Das Minutenfeld ist hervorgehoben.
9 Wählen Sie die Minuten mithilfe der Nach-
oben- und Nach-unten-Pfeile aus, und drücken
Sie die OK-Taste, um die Zeit zu bestätigen.
10 Verwenden Sie den Nach-unten-Pfeil, um zum
Feld für das Zeitformat zu wechseln.
11 Drücken Sie die OK-Taste, um das Zeitformat
zu ändern.
12 Wechseln Sie mithilfe der Nach-oben- und
Nach-unten-Pfeile zwischen der 24-Stunden-
Anzeige und der 12-Stunden-Anzeige. Drücken
Sie die OK-Taste, um Ihre Wahl zu bestätigen.
Page 81

DEUTSCH 81
Gerät verwenden
Elektroden und TENS-Komponenten
befestigen
1 Vergewissern Sie sich, dass die Haut, auf der
Sie die Elektroden platzieren möchten, gesund
ist und keine Verletzungen oder Ausschläge
aufweist.
Hinweis: Platzieren Sie die Elektroden nicht auf roter
oder entzündeter Haut oder auf Haut mit offenen
Wunden, Krebsläsionen oder Ausschlägen.
2 Reinigen Sie die Haut mit einem feuchten
Tuch, und trocknen Sie sie. Die Haut, auf der
Sie die Elektroden positionieren möchten,
muss trocken, sauber und frei von Creme oder
Körperlotion sein.
Hinweis: Schmutz, Fett oder Partikel, die sich noch auf
der Haut benden, können in die Hydrogel-Elektroden
eindringen. Dies wirkt sich negativ auf die Haftfähigkeit
der Elektroden aus.
3 Nehmen Sie die Elektroden aus der
Kunststofftasche, und überprüfen Sie sie auf
Schäden und Anzeichen von Verschleiß.
Achtung: Verwenden Sie keine Elektroden
mit abgelaufenem Haltbarkeitsdatum.
Das Haltbarkeitsdatum ist auf der
wiederverschließbaren Kunststofftasche angegeben.
Hinweis: Ersetzen Sie die Elektroden, wenn sie
beschädigt oder schmutzig sind, wenn sie nicht mehr
haften oder wenn die Stimulation unangenehm wird, d. h.
wenn ein unangenehmes stechendes Gefühl auftritt.
Page 82

DEUTSCH82
4 Ziehen Sie die Elektrode aus dem Einsatz, und
positionieren Sie sie auf der zu behandelnden
Stelle der Haut. Siehe Abschnitt “Positionieren
der Elektroden” weiter unten und die
Positionierungsanleitung am Ende dieser
Bedienungsanleitung.
5 Positionieren Sie die zweite Elektrode auf
der zu behandelnden Körperpartie. Wenn
Sie das PR3094 verwenden, können Sie auch
eine dritte und vierte Elektrode auf der zu
behandelnden Körperpartie positionieren.
Hinweis: Positionieren Sie immer zuerst die Elektroden
auf der Haut, bevor Sie die TENS-Komponenten
anschließen.
Hinweis: Positionieren Sie die Elektroden nicht übereinander
bzw. so nahe aneinander, dass sie sich berühren.
6
Befestigen Sie die TENS-Komponenten an den
Elektroden. Die TENS-Komponenten weisen in der
Mitte Magnete auf, um eine einfache Verbindung
zu den Metallanschlüssen der Elektroden
sicherzustellen. Wenn die TENS-Komponenten und
die Elektroden ordnungsgemäß verbunden sind,
hören Sie ein Klicken.
Hinweis: Sie können die Elektroden mit den befestigten
TENS-Komponenten unter Ihrer Kleidung tragen –
auch während der Behandlung.
Hinweis: Während zahlreicher Behandlungsprogramme
können Sie alle Aktivitäten im Anwendungsumfang
durchführen, außer denen, vor denen im Kapitel
“Wichtig” abgeraten wird, wenn Sie die TENSKomponenten am Körper tragen. Sie können die
TENS-Komponenten auch zwischen den Behandlungen
am Körper tragen.
Page 83

DEUTSCH 83
Hinweis: Wenn Sie eine Behandlung mit vier Elektroden
(nur PR3094) durchführen möchten, müssen Sie zuerst
die TENS-Komponenten an den beiden Elektroden und
dann die Stecker des Erweiterungskabels an die beiden
anderen Elektroden anschließen.
7 Drücken Sie den Ein-/Ausschalter, um die
TENS-Komponenten in den Standby-Modus zu
schalten.
, Die Behandlungsstatusanzeige auf den TENS-
Komponenten blinkt grün und zeigt damit an,
dass sie sich im Standby-Modus benden und
einsatzbereit sind.
, Wenn Sie die Behandlung nicht innerhalb
von 5 Minuten beginnen, werden die TENSKomponenten automatisch ausgeschaltet. Wenn
dies geschieht, müssen Sie zum Starten einer
Behandlung zuerst erneut den Ein-/Ausschalter
drücken.
Positionieren der Elektroden
Um optimale Ergebnisse durch die Stimulation zu
erhalten, ist die ordnungsgemäße Positionierung
der Elektroden wichtig. Vergewissern Sie sich stets,
dass die Haut im Behandlungsbereich gesund ist,
bevor Sie die Elektroden befestigen. Die ideale
Stelle kann sich von Person zu Person etwas
unterscheiden. Testen Sie also unterschiedliche
Stellen, bis Sie die effektivsten Ergebnisse erhalten.
In einigen Fällen kann es hilfreich sein, die Stelle für
spätere Behandlungen zu markieren. Vorschläge
zur Positionierung der Elektroden nden Sie in
der Positionierungsanleitung am Ende dieser
Bedienungsanleitung. Bitte beachten Sie, dass Sie
Page 84

DEUTSCH84
möglicherweise Hilfe benötigen, um die Elektroden
an bestimmten Körperstellen anzubringen.
In der Regel sollten die Elektroden auf oder nahe
der schmerzhaften Stelle positioniert werden.
Die Stimulation kann im Stimulationsbereich zu
sichtbaren Muskelkontraktionen führen. Dies ist nicht
schädlich. Wenn Sie diese Kontraktionen jedoch als
unangenehm empnden, bringen Sie die Elektroden
an einer anderen Stelle an.
Positionieren Sie die Elektroden nicht am Hals
oder über Ihrer Brust. Positionieren Sie die
Elektroden nicht auf roter oder entzündeter
Haut, auf offenen Wunden, auf Krebsläsionen oder
Ausschlägen.
Behandlung beginnen und beenden
Dies ist der Startbildschirm. Darauf sehen Sie
das ausgewählte Programm, die ausgewählte
Behandlungsdauer und die ausgewählte Intensität. In
der Menüleiste unten am Bildschirm sehen Sie von
links nach rechts:
- Das Symbol für den Startbildschirm: Dieses
Symbol ist hervorgehoben, wenn der
Startbildschirm angezeigt wird.
- Das Symbol für den Programmbildschirm:
Wählen Sie dieses Symbol aus, um ein
Behandlungsprogramm auszuwählen.
- Das Symbol für den Timerbildschirm: Wählen
Sie dieses Symbol aus, um die Behandlungsdauer
einzustellen.
- Das Akkusymbol: Wählen Sie dieses Symbol aus,
um den Akkustand zu überprüfen.
- Das Symbol für den Aktivitätsbildschirm:
Wählen Sie dieses Symbol aus, um den
Aktivitätsmonitor auszuwählen (siehe Abschnitt
“Aktivitätsüberwachung” in diesem Kapitel).
Page 85

DEUTSCH 85
- Das Symbol für den Einstellungsbildschirm: Wählen
Sie dieses Symbol aus, um das Datum oder die
Uhrzeit zu ändern (weitere Informationen zum
Einstellen von Datum und Uhrzeit erhalten Sie in
Kapitel “Für den Gebrauch vorbereiten”).
Hinweis: Die Menüleiste auf dem Startbildschirm
und andere Bildschirme werden nach einer Weile
ausgeblendet, bei Tastendruck jedoch wieder
eingeblendet.
Programm auswählen
1 Wenn Sie ein anderes Programm als das
Standardprogramm auf dem Startbildschirm
auswählen möchten, verwenden Sie den
Nach-links- oder Nach-rechts-Pfeil, um “P” für
Programm in der Menüleiste hervorzuheben.
2 Drücken Sie die OK-Taste, um zu bestätigen,
dass Sie das ausgewählte Programm ändern
möchten.
, Der Programmbildschirm wird angezeigt,
wobei das zuvor ausgewählte Programm
hervorgehoben ist.
3 Wählen Sie mithilfe des Nach-oben- oder
Nach-unten-Pfeils ein Programm aus, und
drücken Sie zur Bestätigung Ihrer Wahl die
OK-Taste.
Hinweis: Das ausgewählte Programm wird als
Standardwert im Speicher der Fernbedienung
gespeichert. Wenn Sie das Gerät das nächste Mal
verwenden, wird dieses Programm verwendet. Wenn
Sie das Programm ändern möchten, befolgen Sie die
Schritte 1 bis 3 oben.
Page 86

DEUTSCH86
Hinweis: Das gleiche Programm gilt für beide Kanäle
des kabellosen TENS-Geräts Pro (PR3094).
Dauer eines Programms einstellen
1 Auf dem Startbildschirm sehen Sie die Dauer,
die als Standardwert ausgewählt wurde. Wenn
Sie die Standarddauer der Behandlung ändern
möchten, verwenden Sie den Nach-links- oder
Nach-rechts-Pfeil, um das Timersymbol in der
Menüleiste hervorzuheben.
Hinweis: Wenn Sie das Programm ändern, wird die
Dauer auf die Standarddauer dieses Programms
zurückgesetzt.
2 Drücken Sie die OK-Taste, um zu bestätigen,
dass Sie die Dauer ändern möchten.
, Auf dem Timerbildschirm wird der
voreingestellte Standardwert für die Dauer
hervorgehoben angezeigt.
3 Wählen Sie die gewünschte Dauer mithilfe der
Nach-oben- und Nach-unten-Pfeile aus, und
drücken Sie zur Bestätigung die OK-Taste.
- Sie können die Behandlungsdauer in Minuten
einstellen.
- Sie können die Behandlungsdauer auch auf
“Kontinuierlich” einstellen. Auf dem Bildschirm
wird dann das entsprechende Symbol anstelle der
Behandlungsdauer in Minuten angezeigt. Wenn
dieses Symbol auf dem Startbildschirm blinkt, wird
die Behandlung so lange fortgesetzt, bis Sie sie
beenden.
Hinweis: Die ausgewählte Behandlungsdauer wird
als Standardwert im Speicher der Fernbedienung
gespeichert. Wenn Sie das Gerät das nächste Mal
verwenden, wird diese Dauer verwendet. Zum Ändern
der Dauer befolgen Sie die Schritte 4 bis 6 oben.
Page 87

DEUTSCH 87
Hinweis: Dieselbe Dauer gilt für beide Kanäle des
kabellosen TENS-Geräts Pro (PR3094).
Behandlung beginnen und beenden
(PR3093)
Um eine Behandlung zu beginnen, müssen Sie
zuerst die TENS-Komponenten mit dem Ein-/
Ausschalter einschalten und dann die Plus-Seite der
Intensitätstaste drücken, um die Intensität zu erhöhen.
1 Drücken Sie die Plus-Seite der Intensitätstaste,
um die Intensität einzustellen. Die Erhöhung
der Intensität beginnt immer bei 0 mA. Die
Behandlung wird gestartet und der Timer
beginnt mit dem Rückwärtszählen, sobald
die Intensität über 0 mA liegt. Je höher die
Intensität, desto stärker der Impuls im Bereich
mit den befestigten Elektroden.
, Halten Sie die Plus-Seite der Intensitätstaste
gedrückt, um die Intensität konstant und langsam
zu erhöhen. Lassen Sie die Intensitätstaste los,
wenn Sie die richtige Intensität der Stimulation
erreicht haben.
Hinweis: Bei konventionellen und frequenz-modulierten
TENS-Programmen sollten Sie die Stimulation
deutlich spüren, es sollte aber nicht unangenehm oder
schmerzhaft sein.
Hinweis: Bei Burst-TENS-Programmen sollten Sie die
Stimulation stark spüren, da sie im Allgemeinen eine
intensivere Empndung bereitstellen und sich etwas
unangenehm anfühlen können. Es wird ebenfalls empfohlen,
die Intensität auf eine Höhe einzustellen, bei der sich die
Muskeln im Stimulationsbereich sichtbar zusammenziehen.
Diese Kontraktionen sind nicht schädlich. Wenn diese
Kontraktionen für Sie zu unangenehm sind, können Sie
die Intensität verringern, ein anderes Programm auswählen
oder die Elektroden an einer anderen Stelle anbringen.
Page 88

DEUTSCH88
, Die Intensitätseinstellung wird in Zahlen
über der Intensitätstaste angezeigt. Die
Intensität liegt zwischen 0 mA und 60 mA. Die
Intensitätseinstellung wird vom Intensitätsbalken
auf der rechten Seite des Bildschirms
verdeutlicht. Je höher der Balken, desto höher
die Intensität.
, Wenn die Behandlung beginnt, blinkt die
Behandlungsstatusanzeige auf den TENSKomponenten gelb.
, Auf dem Startbildschirm der Fernbedienung
werden das ausgewählte Programm, die
verbleibende Behandlungsdauer und die
ausgewählte Intensität angezeigt.
, Wenn sich die Intensität unangenehm anfühlt,
drücken Sie die Minus-Seite der Intensitätstaste,
um die Intensität kontinuierlich und langsam zu
verringern.
Hinweis: Da sich Ihr Körper anfangs auf die Intensität
der Stimulation einstellt, müssen Sie möglicherweise die
Intensitätseinstellung nach einiger Zeit anpassen, um
eine ideale Stimulation sicherzustellen.
2 Um die Behandlung vor Ablauf der festgelegten
Behandlungsdauer zu beenden, oder wenn
Sie die Behandlungsdauer auf “Kontinuierlich”
eingestellt haben, halten Sie die Minus-Seite der
Intensitätstaste 3 Sekunden lang gedrückt, um
die Intensität auf 0 mA zu verringern. Wenn die
Intensität bei 0 mA liegt, wird von den TENSKomponenten kein Impuls ausgesendet.
Hinweis: Sie können die Behandlung auch durch
Drücken des Ein-/Ausschalters auf den TENSKomponenten beenden. In diesem Fall wird die
Behandlung auf beiden Kanälen sofort beendet.
Page 89

DEUTSCH 89
Behandlung beginnen und beenden
(PR3094)
Um eine Behandlung zu beginnen, müssen Sie
zuerst die TENS-Komponenten mit dem Ein-/
Ausschalter einschalten und dann die Plus-Seiten
der Intensitätstasten drücken, um die Intensität zu
erhöhen.
1 Drücken Sie die Plus-Seite der Intensitätstasten,
um die Intensität für den Haupt- und den
Erweiterungskanal separat einzustellen, und
beginnen Sie die Behandlung.
, Halten Sie die Plus-Seite der Intensitätstaste auf
der linken Seite der Fernbedienung gedrückt,
um die Intensität des Hauptkanals zu erhöhen.
Dadurch wird der Impuls zwischen den ersten
zwei Elektroden gestartet.
, Die Intensitätseinstellung wird in Zahlen
über der linken Intensitätstaste angezeigt.
Die Intensitätseinstellung wird auch durch
den Intensitätsbalken auf der linken Seite des
Bildschirms verdeutlicht.
, Halten Sie die Plus-Seite der Intensitätstaste auf
der rechten Seite der Fernbedienung gedrückt,
um die Intensität des Erweiterungskanals zu
erhöhen. Dadurch wird der Impuls auf die dritte
und vierte Elektrode erweitert.
, Die Intensitätseinstellung wird in Zahlen über
der rechten Intensitätstaste angezeigt. Die
Intensitätseinstellung wird auch durch den
Intensitätsbalken auf der rechten Seite des
Bildschirms verdeutlicht.
Page 90

DEUTSCH90
2 Um die Behandlung auf einem oder auf
beiden Kanälen vor Ablauf der festgelegten
Behandlungsdauer zu beenden, oder wenn
Sie die Behandlungsdauer auf “Kontinuierlich”
eingestellt haben, halten Sie die Minus-Seite der
Intensitätstaste 3 Sekunden lang gedrückt, um
die Intensität auf 0 mA zu verringern. Wenn die
Intensität bei 0 mA liegt, wird von den TENSKomponenten kein Impuls ausgesendet.
Hinweis: Da sich die beiden Kanäle unabhängig
voneinander bedienen lassen, können Sie die
Behandlung auf einem Kanal beenden, während Sie die
Behandlung auf dem anderen fortsetzen.
Hinweis: Sie können die Behandlung auch durch
Drücken des Ein-/Ausschalters auf den TENSKomponenten beenden. In diesem Fall wird die
Behandlung auf beiden Kanälen sofort beendet.
Aktivitätsüberwachung
Diese zusätzliche Funktion auf der Fernbedienung
ermöglicht Ihnen, Ihr Aktivitätsmuster über einen
Tag, eine Woche oder einen Monat zu überprüfen.
Da Aktivität und Zeiteinteilung wichtige Elemente
in der Schmerztherapie sind, stellt Ihnen der in
der Fernbedienung integrierte Aktivitätsmonitor
ein Werkzeug bereit, mit dem Sie überprüfen
können, wie gut Sie Ihre Aktivitäten einteilen. Wenn
Sie mehr über die selbständige Schmerztherapie
und die Bedeutung der Einteilung erfahren
möchten, lesen Sie bitte die Broschüre “Toolkit zur
Schmerzlinderung”.
Page 91

DEUTSCH 91
Hinweis: Um die Wirksamkeit der
Aktivitätsüberwachung sicherzustellen, müssen Sie die
Fernbedienung den ganzen Tag an oder in der Nähe
der Hüfte tragen. Sie können sie am Gürtel oder Bund
mit dem Gürtel-Clip befestigen oder in Ihrer Hosenbzw. Rocktasche tragen.
Ergebnisse ablesen
1 Drücken Sie den Nach-rechts-Pfeil, um
das Aktivitätssymbol in der Menüleiste
hervorzuheben.
2 Als erster Bildschirm öffnet sich die
Tagesansicht. Blättern Sie mit dem Nach-obenoder Nach-unten-Pfeil von einem Bildschirm
zum nächsten.
, Die Tagesansicht zeigt Ihre Aktivität im Verlauf
der letzten 24 Stunden. Die Höhe der Balken
gibt an, wie viele Minuten Sie aktiv waren. Die
horizontale Linie (A) stellt Ihre durchschnittliche
Aktivität dar und unterstützt Sie bei der
Ermittlung, ob Ihre Aktivität im Verlauf des Tages
über oder unter dem Durchschnittswert liegt.
, Die Wochenansicht zeigt Ihre Aktivität am
heutigen Tag und im Verlauf der letzten 7 Tage.
Die Buchstaben unter dem Diagramm geben die
Tage der Woche an. Die Höhe der Balken gibt an,
wie viele Stunden pro Tag Sie in der vergangenen
Woche aktiv waren. Die horizontale Linie (A)
stellt Ihre durchschnittliche Aktivität über die
letzten 6 Tage dar. Diese Linie unterstützt Sie bei
der Ermittlung, ob Ihre Aktivität in der letzten
Woche über oder unter dem Durchschnittswert
liegt. Zudem können Sie bestimmen, an welchen
Tagen der Woche Ihre Aktivität über- oder
unterdurchschnittlich war.
Page 92

DEUTSCH92
, Die Monatsansicht zeigt Ihre Aktivität am
heutigen Tag und im Verlauf der letzten vier
Wochen. Die Wochen werden von den Zahlen
unter dem Diagramm gekennzeichnet. Die
Höhe der Balken gibt an, wie viele Stunden
pro Tag Sie in den vergangenen vier Wochen
aktiv waren. Die horizontale Linie (A) stellt
Ihre durchschnittliche Aktivität über den
letzten Monat dar. Diese Linie unterstützt Sie
bei der Ermittlung, ob Ihre Aktivität im Verlauf
des letzten Monats über oder unter dem
Durchschnittswert liegt. Zudem können Sie
bestimmen, an welchen Tagen Ihre Aktivität über-
oder unterdurchschnittlich war.
Aktivitätsziel (PR3094)
Wenn Sie Ihren Schmerz mit dem kabellosen
Gerät TENS Pro unter Absprache mit einem
Gesundheitsexperten behandeln, der die PCAnwendung für das kabellose Gerät TENS
Pro (PR3094) verwendet, übermittelt der
Aktivitätsmonitor Ihrem Gesundheitsexperten
weitere Informationen zu Ihrer Aktivität und Ihrem
Behandlungsmuster. Mit der PC-Anwendung kann
Ihr Gesundheitsexperte zudem ein Aktivitätsziel
festlegen. Wenn ein Ziel festgelegt wurde, wird an
der horizontalen Linie statt eines “(A)” ein “(T)”
angezeigt.
, Die Tagesansicht zeigt Ihre Aktivität im Verlauf
der letzten 24 Stunden. Die horizontale Linie (T)
stellt das Aktivitätsziel dar, sodass Sie ermitteln
können, ob Ihre Aktivität im Verlauf des Tages die
Zielvorgabe erreicht hat.
Page 93

DEUTSCH 93
, Die Wochenansicht zeigt Ihre Aktivität am
heutigen Tag und im Verlauf der letzten 7 Tage.
Die horizontale Linie (T) stellt das Aktivitätsziel
für die Woche dar. Dadurch können Sie
ermitteln, ob die Aktivität in der vergangenen
Woche die Zielvorgabe erreicht hat, und
an welchen Tagen Ihre Aktivität höher oder
niedriger als das Ziel war.
, Die Monatsansicht zeigt Ihre Aktivität in den
vergangenen vier Wochen bis heute. Die
horizontale Linie (T) gibt Ihr Aktivitätsziel an.
Dadurch können Sie ermitteln, ob die Aktivität
im vergangenen Monat die Zielvorgabe erreicht
hat, und an welchen Tagen Ihre Aktivität höher
oder niedriger als das Ziel war.
Nach dem Gebrauch
Achtung: Vergewissern Sie sich, dass Sie die
Behandlung durch Ausschalten der TENSKomponenten oder durch Einstellen der Intensität
auf 0 mA auf der Fernbedienung beenden, bevor
Sie die TENS-Komponenten, das Verlängerungskabel
(falls verwendet, nur PR3094) oder die Elektroden
abnehmen. Wenn Sie die Behandlung nicht beenden,
kann ein unangenehmes Gefühl in Ihren Fingern
auftreten. Dieses Gefühl ist nicht schädlich, kann
jedoch unangenehm sein.
1 Schalten Sie die TENS-Komponenten durch
Drücken des Ein-/Ausschalters aus.
Page 94

DEUTSCH94
2 Ziehen Sie die TENS-Komponenten von den
Elektroden ab.
Hinweis: Wenn Sie vergessen haben, die TENSKomponenten auszuschalten, werden sie 5 Minuten
nach dem Abziehen automatisch ausgeschaltet.
3 Laden Sie die TENS-Komponenten auf, um sie
für die nächste Behandlung vorzubereiten.
4 Nehmen Sie die Elektroden durch Ziehen an
der Kante von der Haut ab.
Hinweis: Lassen Sie die Elektroden nicht über Nacht
auf der Haut. Wenn Hautirritationen auftreten,
versuchen Sie, die Elektroden an einer anderen Stelle
zu befestigen. Vergewissern Sie sich, dass Sie die
Elektroden regelmäßig an eine andere Stelle setzen,
damit die Stimulation nicht jeden Tag am gleichen Fleck
durchgeführt wird.
Elektroden aufbewahren
1 Legen Sie die Elektroden zurück in den Einsatz.
2 Schieben Sie den Einsatz mit den Elektroden
zurück in die Tasche.
Page 95

DEUTSCH 95
3 Verschließen Sie die Tasche, um eine staubfreie
Aufbewahrung zu gewährleisten.
Hinweis: Damit die Elektroden gut erhalten bleiben
und die Hydrogel-Schicht nicht austrocknet, sollten
Sie die Elektroden stets in der wiederverschließbaren
Tasche aufbewahren, wenn sie nicht verwendet
werden. Verschließen Sie die Tasche, um eine staubfreie
Aufbewahrung zu gewährleisten.
Hinweis: Wenn Sie die Elektroden mehr als einen
Monat nicht verwenden, sollten sie bei einer
Temperatur zwischen 5 °C und 27 ° C aufbewahrt
werden. Bewahren Sie die Elektroden nicht im Gefrieroder Kühlschrank auf. Vermeiden Sie extreme Hitze
und direkte Sonneneinstrahlung.
Pege
Tauchen Sie die Fernbedienung und die TENS-
Komponenten nicht in Wasser, spülen Sie sie auch
nicht unter ießendem Wasser ab.
Tauchen Sie die Elektroden nicht in Wasser.
1 Reinigen Sie die Fernbedienung, das
Ladegerät, die TENS-Komponenten und
das Erweiterungskabel (nur PR3094) mit
einem feuchten Tuch und einem milden
Reinigungsmittel, z. B. Spülmittel.
Hinweis: Sie können zur Reinigung auch 70-prozentiges
Isopropanol (IPA) verwenden.
Achtung: Verwenden Sie nur die oben genannten
Reinigungsmittel, da andere Reinigungsmittel das
Material beschädigen könnten, z. B. Glanzverlust.
Page 96

DEUTSCH96
2 Wenn die Elektroden schmutzig sind, geben
Sie einen Tropfen Wasser auf Ihre Finger, und
reiben Sie den Schmutz vorsichtig von der
Oberäche ab.
Hinweis: Verwenden Sie zum Reinigen der Elektroden
weder Seife noch Alkohol.
Fehlerbehebung
In diesem Abschnitt werden die häugsten
Probleme zusammengestellt, die mit dem kabellosen
TENS-Gerät und dem kabellosen Gerät TENS Pro
auftreten können. Sollten Sie ein Problem mithilfe
der nachstehenden Informationen nicht beheben
können, besuchen Sie unsere Website
www.philips.com/support, auf der Sie eine Liste
mit häug gestellten Fragen nden. Wenden Sie sich
andernfalls an ein Service-Center in Ihrem Land.
Problem Mögliche
Die Fernbedienung
lässt sich
nicht einschalten.
Ursache
Die Batterien
der Fernbedienung sind leer.
Die Batterien
sind nicht richtig eingelegt.
Die Fernbedienung kann
defekt sein.
Lösung
Ersetzen Sie die Batterien (siehe Kapitel
“Für den Gebrauch vorbereiten”).
Öffnen Sie das Batteriefach, und legen
Sie die Batterien richtig ein (siehe Kapitel “Für den Gebrauch vorbereiten”).
Setzen Sie sich mit einem Philips Service-Center in Verbindung.
Page 97

DEUTSCH 97
Problem Mögliche
Die
Akkustandanzeige der
TENS-Komponenten
blinkt
orange, und
das Gerät
hat sich
ausgeschaltet.
Die
Akkustandanzeige der
TENS-Komponenten
leuchtet
dauerhaft
orange.
Auf dem
Bildschirm
wird das
Symbol für
die fehlende
Verbindung
angezeigt
(siehe Kapitel “Signale
auf dem
Gerät”).
Ursache
Der Akku der
TENS-Komponenten ist leer.
Der Ladestand des
Akkus in den
TENS-Komponenten ist
niedrig. Das
Akkusymbol auf der
Fernbedienung
blinkt.
Es besteht
keine Verbindung, weil die
TENS-Komponenten
ausgeschaltet
sind.
Lösung
Laden Sie die TENS-Komponenten auf
(siehe “Für den Gebrauch vorbereiten”).
Dies bedeutet, dass die Kapazität
des Akkus bei 30 % liegt. Laden Sie
die TENS-Komponenten sobald wie
möglich auf (siehe Kapitel “Für den
Gebrauch vorbereiten”).
Prüfen Sie, ob die TENS-Komponenten
eingeschaltet sind. Die Behandlungsstatusanzeige blinkt grün, wenn die
TENS-Komponenten eingeschaltet
und im Standby-Modus sind. Wenn die
TENS-Komponenten ausgeschaltet sind,
schalten Sie sie mit dem Ein-/Ausschalter ein.
Page 98

DEUTSCH98
Problem Mögliche
Ursache
Es besteht
keine Verbindung, weil
der Akku der
TENS-Komponenten leer ist.
Die
TENS-Komponenten haben
sich im Inneren überhitzt.
Wenn dies der
Fall ist, blinkt
die Behandlungsstatusanzeige rot.
Die Fernbedienung ist zu
weit von den
TENS-Komponenten
entfernt.
Die
TENS-Komponenten
können defekt
sein.
Lösung
Laden Sie die TENS-Komponenten auf
(siehe “Für den Gebrauch vorbereiten”).
Nehmen Sie die TENS-Komponenten
ab, und lassen Sie sie abkühlen. Sobald
sie ausreichend abgekühlt sind, können
Sie sie wieder an den Elektroden
befestigen und den Ein-/Ausschalter
auf den TENS-Komponenten drücken,
um die Behandlung fortzusetzen. Die
TENS-Komponenten können während
der Behandlung außen warm werden,
die Temperatur wird jedoch nie so
hoch, dass ein Schadens- oder Verletzungsrisiko besteht.
Führen Sie die TENS-Komponenten
näher an die Fernbedienung heran.
Setzen Sie sich mit einem Philips Service-Center in Verbindung.
Page 99

DEUTSCH 99
Problem Mögliche
Auf dem
Display
wird ein
Kreuz angezeigt, und
ich kann die
Intensitätseinstellung nicht
erhöhen,
um eine
Behandlung
zu beginnen
(siehe Kapitel “Signale
auf dem
Gerät”).
Ursache
Das Kreuz ist
das Symbol
für “Kanal
unterbrochen”. Es kann
bedeuten, dass
die Elektroden
nicht ordnungsgemäß
positioniert
sind.
Das “Kanal
unterbrochen”-Symbol
kann bedeuten, dass die
TENS-Komponenten nicht
ordnungsgemäß an die
Elektroden
angeschlossen
sind.
Lösung
Vergewissern Sie sich, dass die Elektroden ordnungsgemäß auf der Haut
angebracht sind. Bitte beachten Sie, dass
das “Kanal unterbrochen”-Symbol erst
ausgeblendet wird, wenn die Intensität
erhöht wird.
Prüfen Sie, ob die TENS-Komponenten
richtig an die Elektroden angeschlossen
sind. Gilt nur für das kabellose Gerät
TENS Pro (PR3094): Wenn sich das
“Kanal unterbrochen”-Symbol über der
linken Intensitätstaste bendet, sollten
Sie prüfen, ob die TENS-Komponenten
ordnungsgemäß angeschlossen sind.
Wenn das Kreuz über der rechten
Intensitätstaste angezeigt wird, sollten
Sie prüfen, ob die Stecker des Erweiterungskabels ordnungsgemäß angeschlossen sind. Bitte beachten Sie, dass
das “Kanal unterbrochen”-Symbol erst
ausgeblendet wird, wenn die Intensität
erhöht wird.
Page 100

DEUTSCH100
Problem Mögliche
Das
Akkusymbol in der
Menüleiste
der Fernbedienung
blinkt.
Ursache
Die Elektroden haben sich
von der Haut
gelöst.
Dies bedeutet,
dass die Batterien der Fernbedienung fast
leer sind. Die
Akkustandanzeige auf den
TENS-Komponenten leuchtet dauerhaft
orange.
Lösung
Die Elektroden haben ihre Haftfähigkeit
verloren, weil sie schmutzig sind oder
weil sie über einen längeren Zeitraum
hinweg verwendet wurden. Sie können
versuchen, die Elektroden zu reinigen
(siehe Kapitel “Pege”). Wenn dies
nicht hilft, müssen Sie die Elektroden
ersetzen. Bitte beachten Sie, dass das
“Kanal unterbrochen”-Symbol erst
ausgeblendet wird, wenn die Intensität
erhöht wird.
Sie können die Behandlung so lange
fortsetzen, wie sie sich normal anfühlt.
Nachdem Sie den Ein-/Ausschalter der
TENS-Komponenten gedrückt haben,
um die Behandlung zu beenden, sollten
Sie die Batterien ersetzen.
 Loading...