

Philips Television TV, 14PT3685/01E Instruction Manual
1
Introduction
Thank you for purchasing this television set.
Please read the following instructions carefully to familiarise yourself with all
the features available on your set.
We hope our technology meets entirely with your satisfaction.
Installation
Presentation of the television set . . . . . . . . . . . . . . . . . . . . . . . . . . . . . . . . . . 2
The keys on the television set . . . . . . . . . . . . . . . . . . . . . . . . . . . . . . . . . . 2
The remote control keys . . . . . . . . . . . . . . . . . . . . . . . . . . . . . . . . . . . . . . . . . 3
Installing your television set . . . . . . . . . . . . . . . . . . . . . . . . . . . . . . . . . . . . . . . 4
Tuning in to channels . . . . . . . . . . . . . . . . . . . . . . . . . . . . . . . . . . . . . . . . . . . . 5
Selecting the menu language and the country . . . . . . . . . . . . . . . . . . . . . . .5
Automatic store . . . . . . . . . . . . . . . . . . . . . . . . . . . . . . . . . . . . . . . . . . . . . .5
To renumber the programmes found . . . . . . . . . . . . . . . . . . . . . . . . . . . . . 5
Manual tuning . . . . . . . . . . . . . . . . . . . . . . . . . . . . . . . . . . . . . . . . . . . . . . . 6
Naming the external socket . . . . . . . . . . . . . . . . . . . . . . . . . . . . . . . . . . . . 6
Tuning in to FM radio stations . . . . . . . . . . . . . . . . . . . . . . . . . . . . . . . . . . . . . 7
Automatic tuning . . . . . . . . . . . . . . . . . . . . . . . . . . . . . . . . . . . . . . . . . . . . .7
To renumber the radio stations . . . . . . . . . . . . . . . . . . . . . . . . . . . . . . . . . 7
Manual tuning . . . . . . . . . . . . . . . . . . . . . . . . . . . . . . . . . . . . . . . . . . . . . . . 8
Naming the radio stations . . . . . . . . . . . . . . . . . . . . . . . . . . . . . . . . . . . . . . . . .8
Use
Standard use . . . . . . . . . . . . . . . . . . . . . . . . . . . . . . . . . . . . . . . . . . . . . . . . . . . 9
Choice of TV or radio mode . . . . . . . . . . . . . . . . . . . . . . . . . . . . . . . . . . . .9
Selecting the programmes . . . . . . . . . . . . . . . . . . . . . . . . . . . . . . . . . . . . . .9
Screen information . . . . . . . . . . . . . . . . . . . . . . . . . . . . . . . . . . . . . . . . . . . .9
TV light . . . . . . . . . . . . . . . . . . . . . . . . . . . . . . . . . . . . . . . . . . . . . . . . . . . .10
Setting the clock . . . . . . . . . . . . . . . . . . . . . . . . . . . . . . . . . . . . . . . . . . . . .10
Alarm function . . . . . . . . . . . . . . . . . . . . . . . . . . . . . . . . . . . . . . . . . . . . . . . . 11
Adjusting picture and sound . . . . . . . . . . . . . . . . . . . . . . . . . . . . . . . . . . . . . .12
Storing settings . . . . . . . . . . . . . . . . . . . . . . . . . . . . . . . . . . . . . . . . . . . . . .12
Demonstration mode . . . . . . . . . . . . . . . . . . . . . . . . . . . . . . . . . . . . . . . . .12
Locking the set . . . . . . . . . . . . . . . . . . . . . . . . . . . . . . . . . . . . . . . . . . . . . . . .13
Teletext . . . . . . . . . . . . . . . . . . . . . . . . . . . . . . . . . . . . . . . . . . . . . . . . . . . . . . 14
Peripherals
Video recorder . . . . . . . . . . . . . . . . . . . . . . . . . . . . . . . . . . . . . . . . . . . . . 15
Other equipment . . . . . . . . . . . . . . . . . . . . . . . . . . . . . . . . . . . . . . . . . . . 15
Headphones . . . . . . . . . . . . . . . . . . . . . . . . . . . . . . . . . . . . . . . . . . . . . . . . 15
Tips . . . . . . . . . . . . . . . . . . . . . . . . . . . . . . . . . . . . . . . . . . . . . . . . . . . . . . . . 16
Table of Contents
EnglishPolski PyccÍËÈ Magyar FrançaisTürkçe
Cestina
Slovencina
^
^
^
L9 1883.1 GB 1/8 15/11/00 13:10 Page 1
n
a P
2
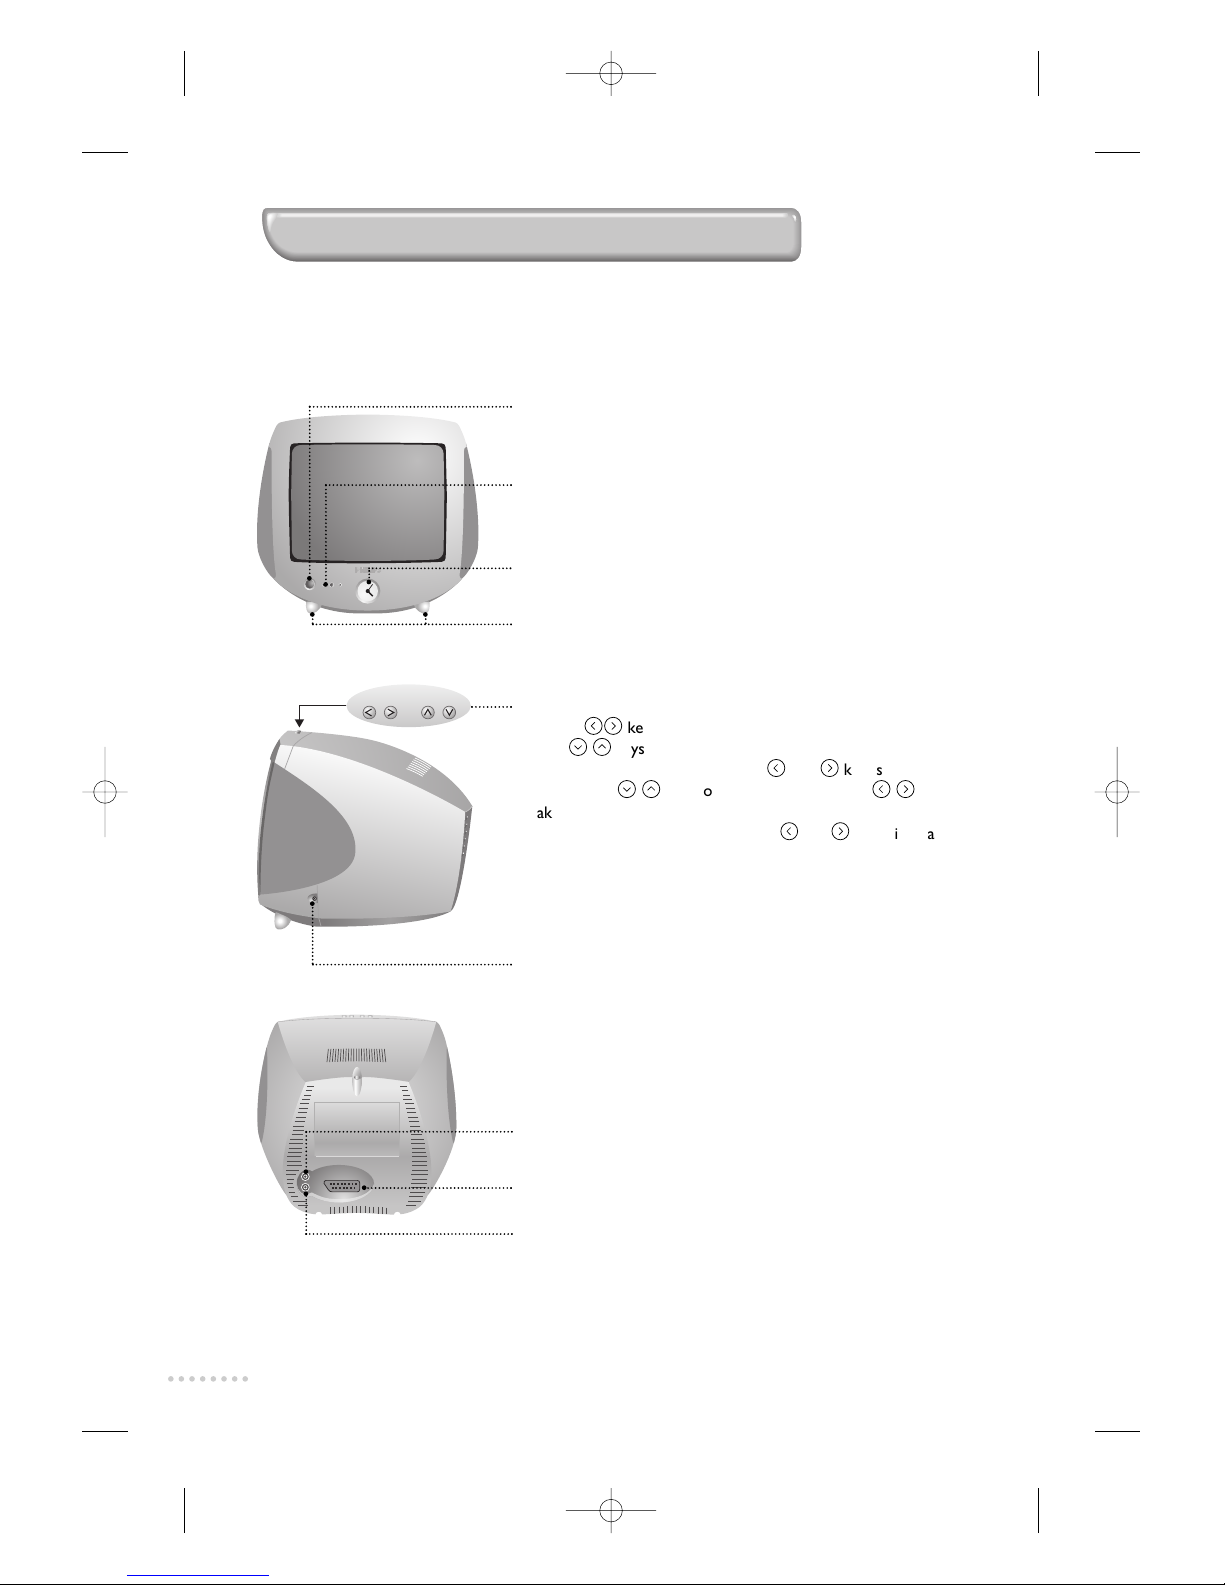
Presentation of the television set
The keys on the TV set:
The a
kl
keys are used to adjust the sound level.
The P
ji
keys are used to select the programmes.
To access the menus, hold down the kand lkeys simultaneously.
Then, use the
ji
keys to select a setting and the
kl
keys to
make an adjustment.
To exit from the menu, hold down the
k
and lkeys.simultaneosly
Note:When the LOCK function is activated, these keys are unavailable
(see page 13).
TV aerial socket (page 4).
Headphone socket (see page 15).
Euroconnector: to connect other appliances (page 15)
Radio aerial socket (page 4).
Your Philips television set is equipped with a new generation of tuner capable of receiving TV
programmes and FM radio stations. Both the feet and the clock on the set are luminous and
backlit.The clock includes an alarm function giving you the choice of waking up to the TV,radio or
3 different melodies.
On - Off key:to switch your television set on or off .
On / Standby indicator (red),
Infra-red receiver,
Alarm indicator
©: green when the alarm function is on.
Clock: the settings are adjusted using the menus (see page 10).
Luminous feet: both the feet and clock can be lit up to provide
background lighting (see page 10).
L9 1883.1 GB 1/8 15/11/00 13:10 Page 2
3
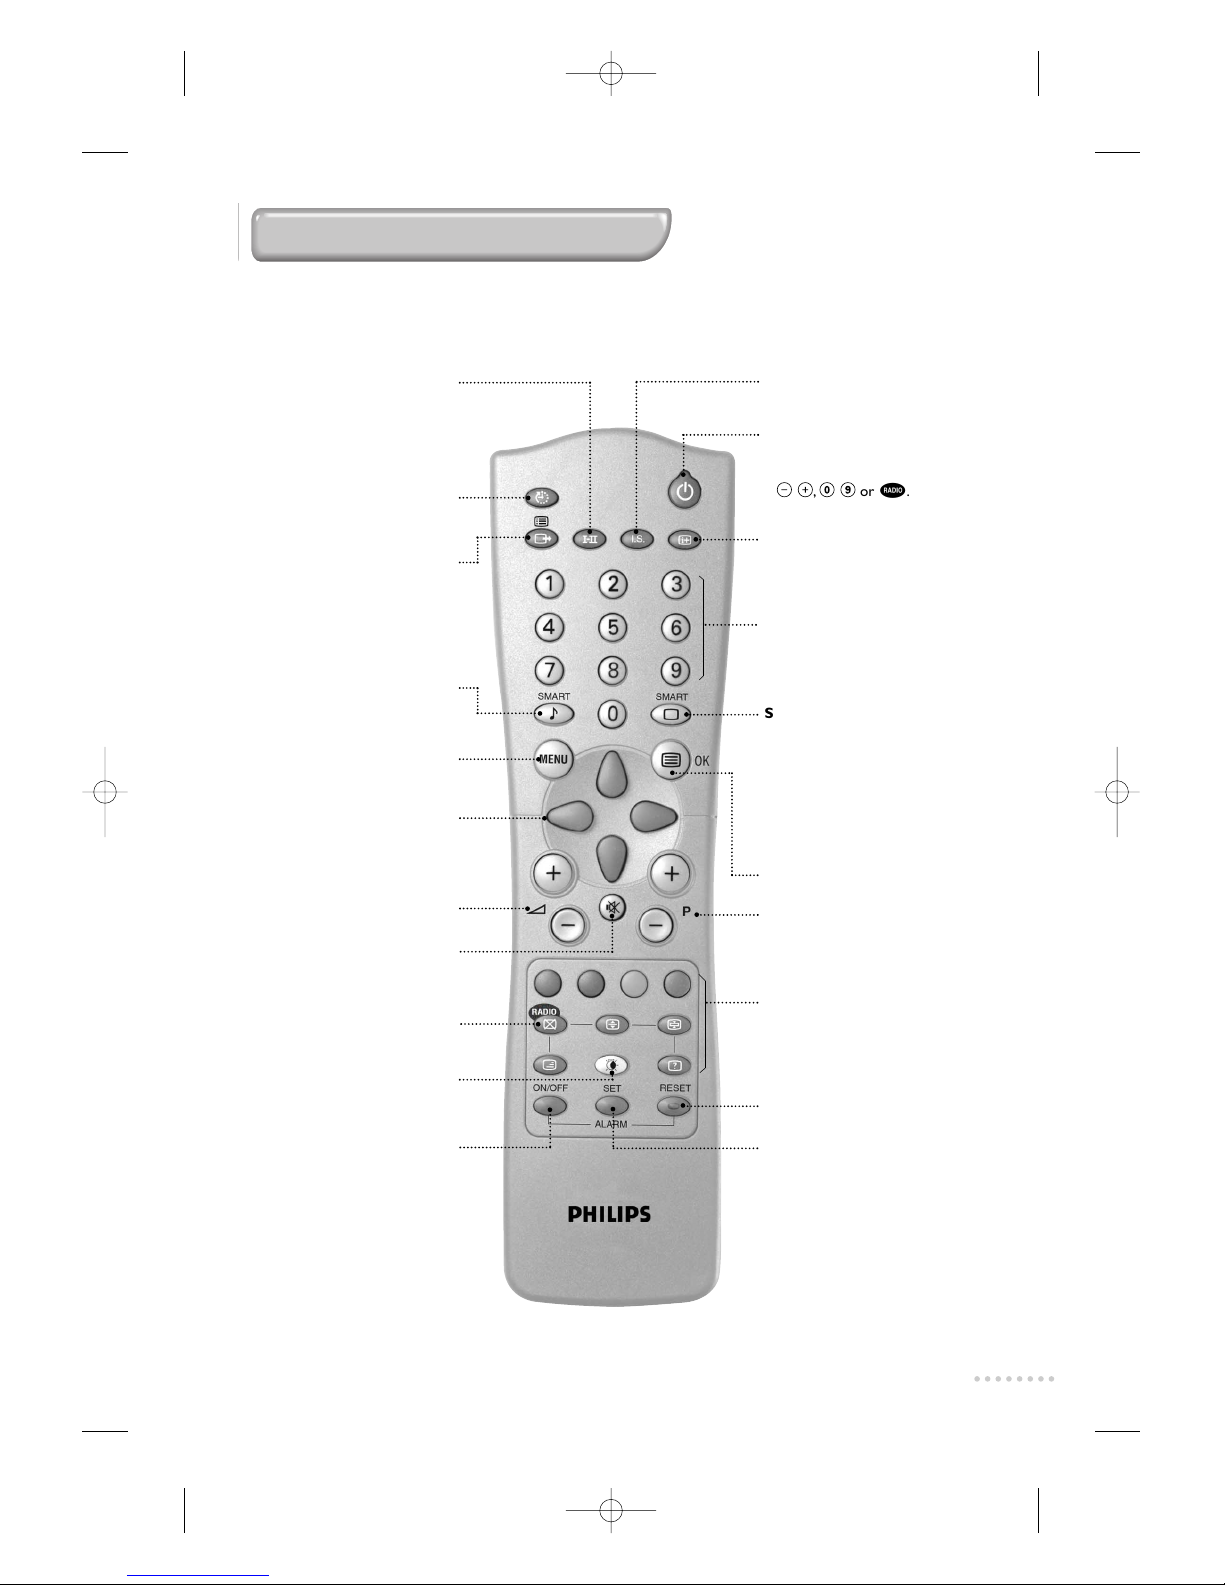
The remote control keys
Sound mode
To switch from FM STEREO (and
NICAM STEREO) programmes to
MONO or, for bilingual transmissions,
to choose between DUAL f and
DUAL g (and NICAM-DUAL f,
NICAM-DUAL g and mono).
Timer
To select an automatic standby
period (from 0 to 240 minutes).
Select EXT socket (p.15) or
to access the list of radio
stations (p. 9)
Smart sound controls
To access the preset sound modes:
(CINEMA, MUSIC, SPEECH and
return to PERSONAL
Menu
To call up or exit the menus.
Note: the menus disappear
automatically after 20 seconds if no
further command is given.
Cursor
These 4 keys allow you to select
the different menus
Volume
To adjust the sound level.
Mute
To disable or enable the sound.
Radio / TV Mode
To switch between the Radio
and TV mode (p. 9).
TV Light
To activate / desactivate the TV
light (p.10).
Alarm on/off
To switch the alarm
function on or off (p. 11).
The green
©light on the television
set comes on when the alarm is
activated.
Incredible Surround
Activates/de-activates the surround
sound effect. In stereo,this gives
the impression of the loudspeakers
being further apart. In mono, a
stereo spatial effect is simulated.
Screen Information
To display the screen information
(p.9).
Numerical keys
For direct access to programmes
and teletext pages.
Teletext (p. 14)
or confirmation key (p.7)
Standby
To set the TV to standby mode.
To switch the set back on, press
P
@ #,0 9
or j.
Smart picture controls
To access a series of settings:
RICH (when the room is very
light), NATURAL (optimum
conditions) SOFT (when the
room is very dark) and return to
PERSONAL.
Select programme
Selects previous or following
programme (p.9).
Teletext keys (p.14)
Alarm off
To turn off the alarm (p. 11).
It will be reactivated 24 hours later at
the programmed time.
Alarm menu
To call up or exit the alarm
menu (p.11).
L9 1883.1 GB 1/8 15/11/00 13:10 Page 3
4
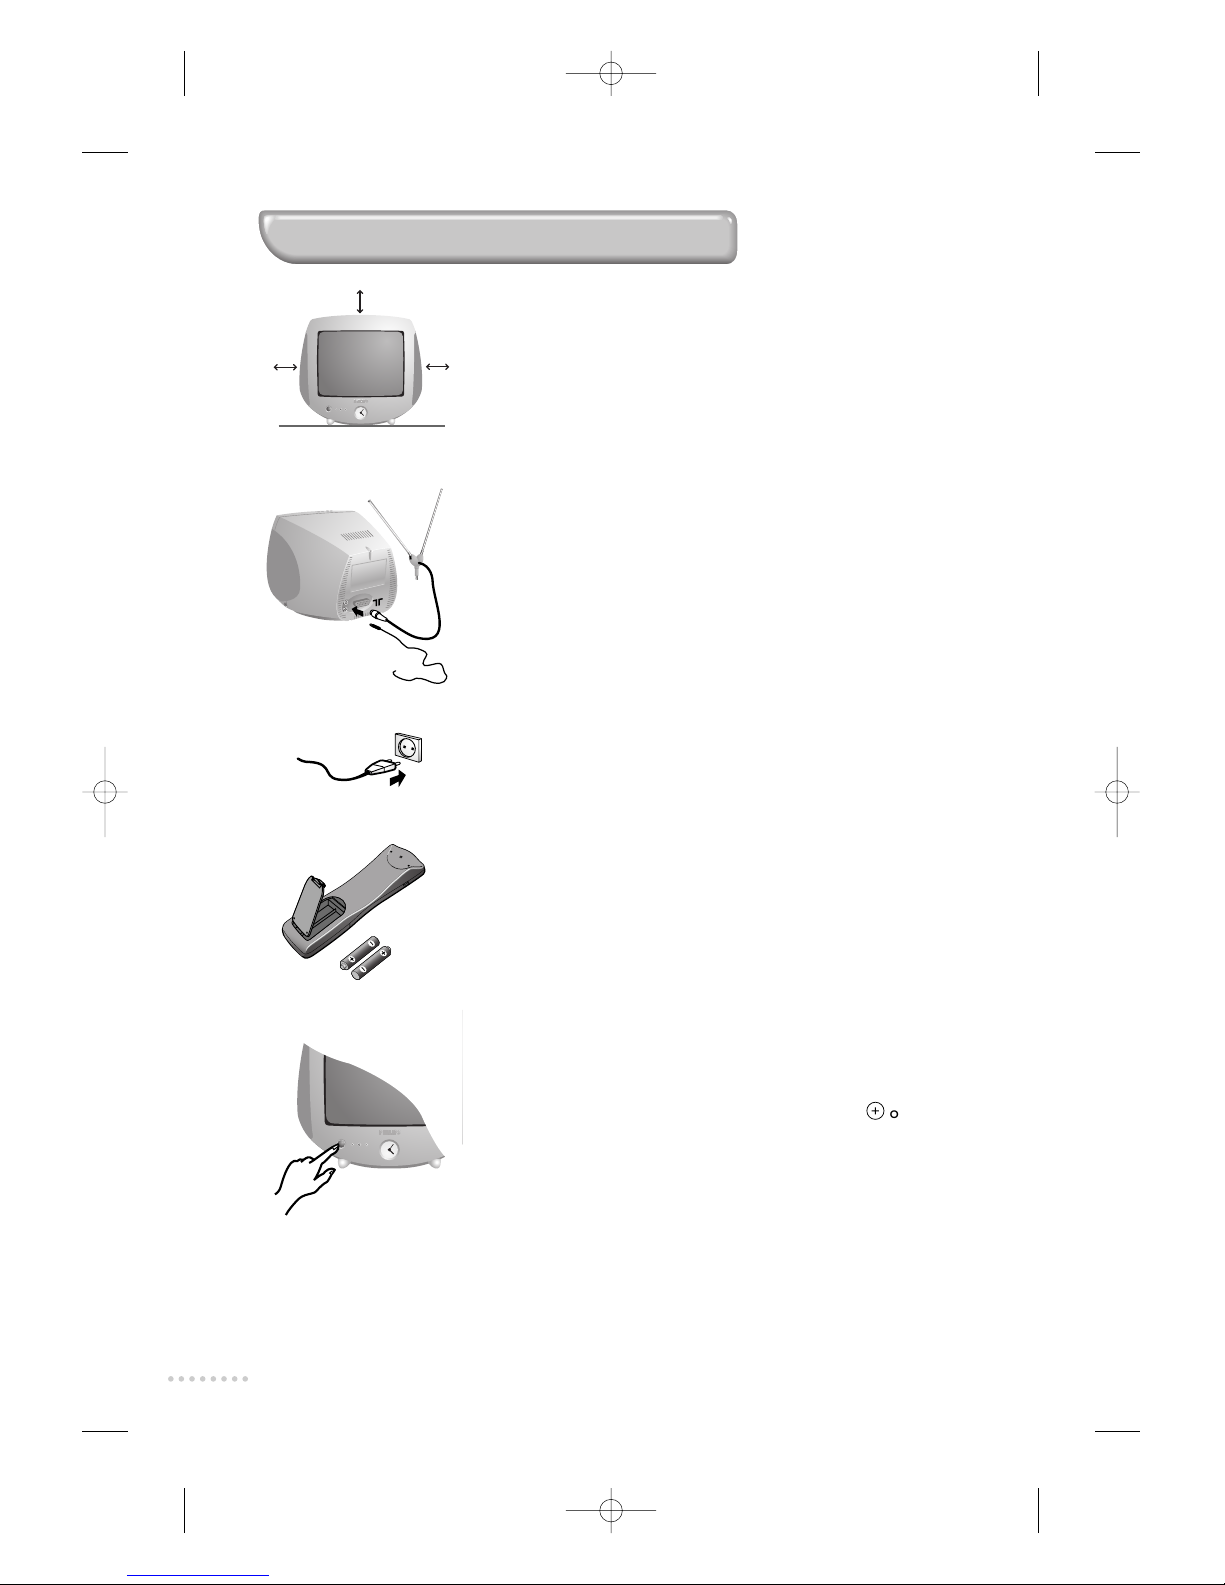
æ Positioning your television set
Place your TV on a solid, stable surface,leaving a space of at least 5
cm around the appliance.
To avoid accidents, do not put anything on the set such as a cloth
or cover, a container full of liquid (vase) or a heat source (lamp).
The set must not be exposed to water.
 Connecting the aerials
The television set is supplied with 2 internal aerials; one for
receiving TV channels, and the other for receiving FM radio
stations.
• Insert the TV aerial plug into the
Msocket at the rear of the set.
• Insert the radio aerial plug into the FM ANT socket.
With portable aerials,the reception may be poor under certain
conditions.You can sometimes improve it by repositioning the aerial. If
the reception remains unsatisfactory, an external aerial should be used.
ê Connecting the power supply
Insert the mains plug into the wall socket
(220-240 V / 50 Hz).
® Remote control
Insert the two R6-type batteries (supplied) making sure that they
are the right way round.
The batteries supplied with this appliance do not contain mercury or nickel
cadmium. Please do not discard your used batteries if you have access to
a recycling facility (if in doubt, consult your dealer). When the batteries are
replaced, use the same type.
† Switching on
To switch on the set, press the on/off key.
A red indicator comes on and the screen lights up.
If the television remains in standby mode, press P
#
on the
remote control.
The hands of the clock move through 360° when the set is
switched on for the first time.
The indicator flashes when you use the remote control.
5 cm
5 cm
5 cm
FM ANT
Installing your television set
L9 1883.1 GB 1/8 15/11/00 13:10 Page 4
5
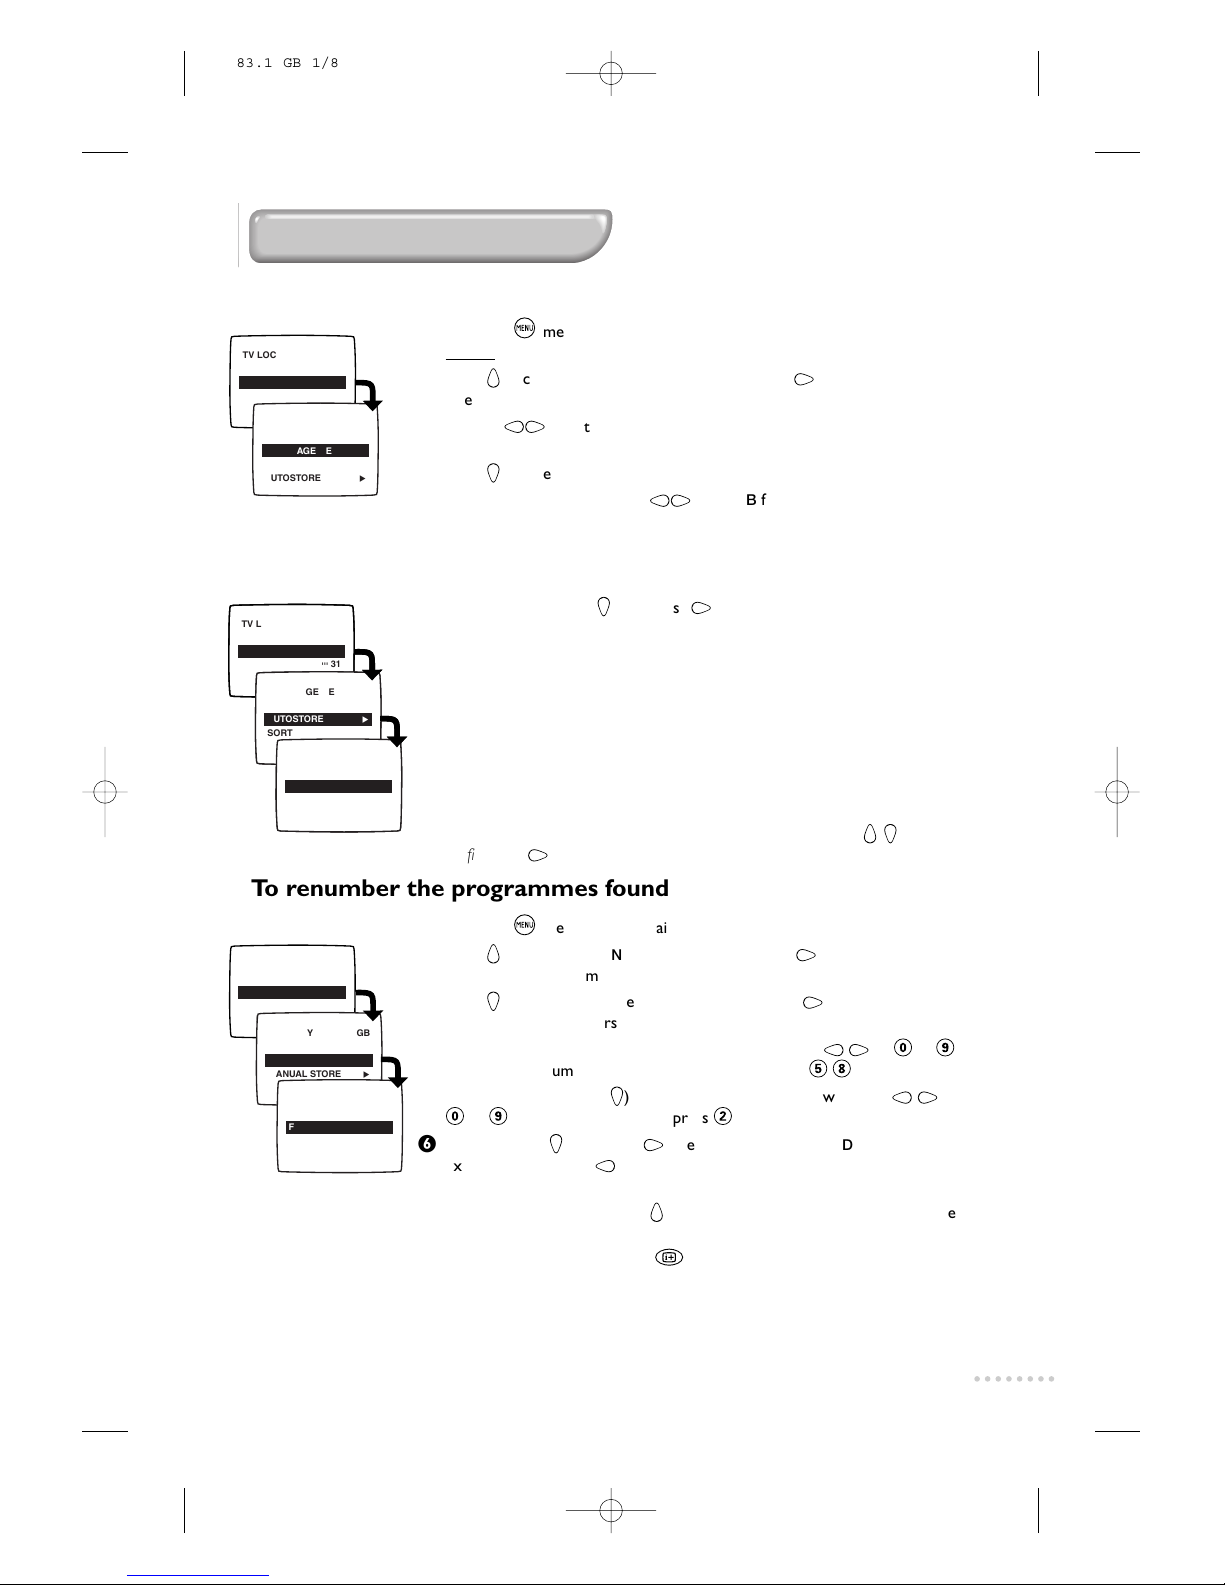
Tuning in to channels
Selecting the menu language and the country
Automatic store
æ Press the
H
menu key.The main menu is displayed.
Remar
k: the set must be in tv mode (if not, press the j key).
 Press
I
once to select INSTALLATION,then press L.
The I
NSTALLATION menu appears.The LANGUAGE option is activated.
ê Use the
KL
keys to select your language.The menus appear in the
language selected. If your language is not available, select
ENGLISH.
® Press
J
to select COUNTRY.
† Select your country using the
KL
keys (GB for Great Britain)
Carry out the above operations
æ to †, then :
Ú Select AUTO STORE (
J
) and press L.Tuning in starts automatically.
The operation takes a few minutes. A display shows the search status and
the number of programmes found. When it has finished, the menu
disappears and the last programme is displayed.
If no programmes are found, refer to the Tips chapter on p. 16.
º If the transmitter or the cable network broadcasts the automatic sort
signal, the programmes will be correctly numbered.
î If not, the programmes found will be numbered in descending order starting
at 59, 58, 57,etc. Use the
SORT menu to renumber them.
Some transmitters or cable networks broadcast their own sort parameters (region,
language, etc.).Where this is the case, make your choice using the
IJ
keys and
confirm with L.
æ Press the
H
menu key.The main menu is displayed.
 Press
I
once to select INSTALLATION,then press,L.
The I
NSTALLATION menu appears.The LANGUAGE option is activated.
ê Press
J
three times to select SORT and then press L .
The
SORT menu appears.The FROM option is activated.
® Select the programme you wish to renumber using keys
KL
or 0to 9.
Example: to renumber the programme 58 as 2, press
58
.
† Selection option A (key
J
) and enter the new number with keys
KL
or
0
to 9(for the example given, press 2).
Ú Select TO (key
J
) and press L.The message EXCHANGED appears, the
exchange takes place (
K
to cancel). In our example programme 58 is
numbered as 2 (and programme 2 as 58).
º Select the option FROM (key
I
) and repeat stages ®to Ú as many times
as there are programmes to renumber.
î To exit from the menus, press
|
.
TV LOCK
TIMER
INSTALLATION
BRIGHTNESS
COLOUR
q
q
q
lllll
'''''
31
lllll
'''''
31
COUNTRY GB
AUTOSTORE q
SORT q
MANUAL STORE q
FROM 78
TO 2
EXCHANGE q
TV LOCK
TIMER
INSTALLATION
BRIGHTNESS
COLOUR
q
q
q
lllll
'''''
31
lllll
'''''
31
LANGUAGE ENGLISH
COUNTRY GB
AUTOSTORE q
SORT q
MANUAL STORE q
AUTOSTORE lllll
'''''
31
To renumber the programmes found
TV LOCK
TIMER
INSTALLATION
BRIGHTNESS
COLOUR
q
q
q
lllll
'''''
31
lllll
'''''
31
LANGUAGE ENGLISH
COUNTRY GB
AUTOSTORE q
TV LOCK
TIMER
INSTALLATION
BRIGHTNESS
COLOUR
q
q
q
lllll
'''''
31
lllll
'''''
31
LANGUAGE ENGLISH
COUNTRY GB
AUTOSTORE q
SORT q
MANUAL STORE q
AUTOSTORE lllll
'''''
31
L9 1883.1 GB 1/8 15/11/00 13:10 Page 5
 Loading...