

Philips TD6611, TD6611/BS191P, TD6611/BH021P, TD6611/BB191P, TD6611/BB081P User Manual
...

PH
O
N
EB
O
O
K
B
A
B
Y
S
I
T
Ad
d
E
n
t
r
y
R
e
m
o
v
e
E
n
t
r
y
Standby
1
4
R
I
N
G
ER
2
H
a
n
d
s
e
t
B
a
s
e
S
t
a
t
i
o
n
A
N
S
W
S
ETU
P
D
a
y
&
T
i
m
e
S
e
t
t
i
n
g
R
e
m
o
t
e
C
o
n
t
r
o
l
C
o
d
e
N
u
m
b
e
r
o
f
R
i
n
g
s
M
e
s
s
a
g
e
R
e
c
o
r
d
i
n
g
3
SETUP
6
C
h
a
n
g
e
B
a
s
e
St
a
t
i
o
n
N
a
m
e
R
e
g
i
s
t
e
r
H
a
n
d
s
e
t
R
e
m
o
ve
H
a
n
d
s
e
t
A
d
d
H
a
n
d
se
t
R
e
c
a
l
l
T
y
p
e
N
e
t
w
o
r
k
T
y
p
e
D
i
a
l
M
o
d
e
A
u
t
o
m
a
t
i
c
D
i
a
l
l
i
n
g
P
a
u
s
e
R
B
A
S
E
S
EL
5
V
o
i
c
e
Pr
o
m
p
t
s
R
e
c
o
r
d
i
n
g
Q
u
a
l
i
t
y
L
a
n
g
u
a
g
e
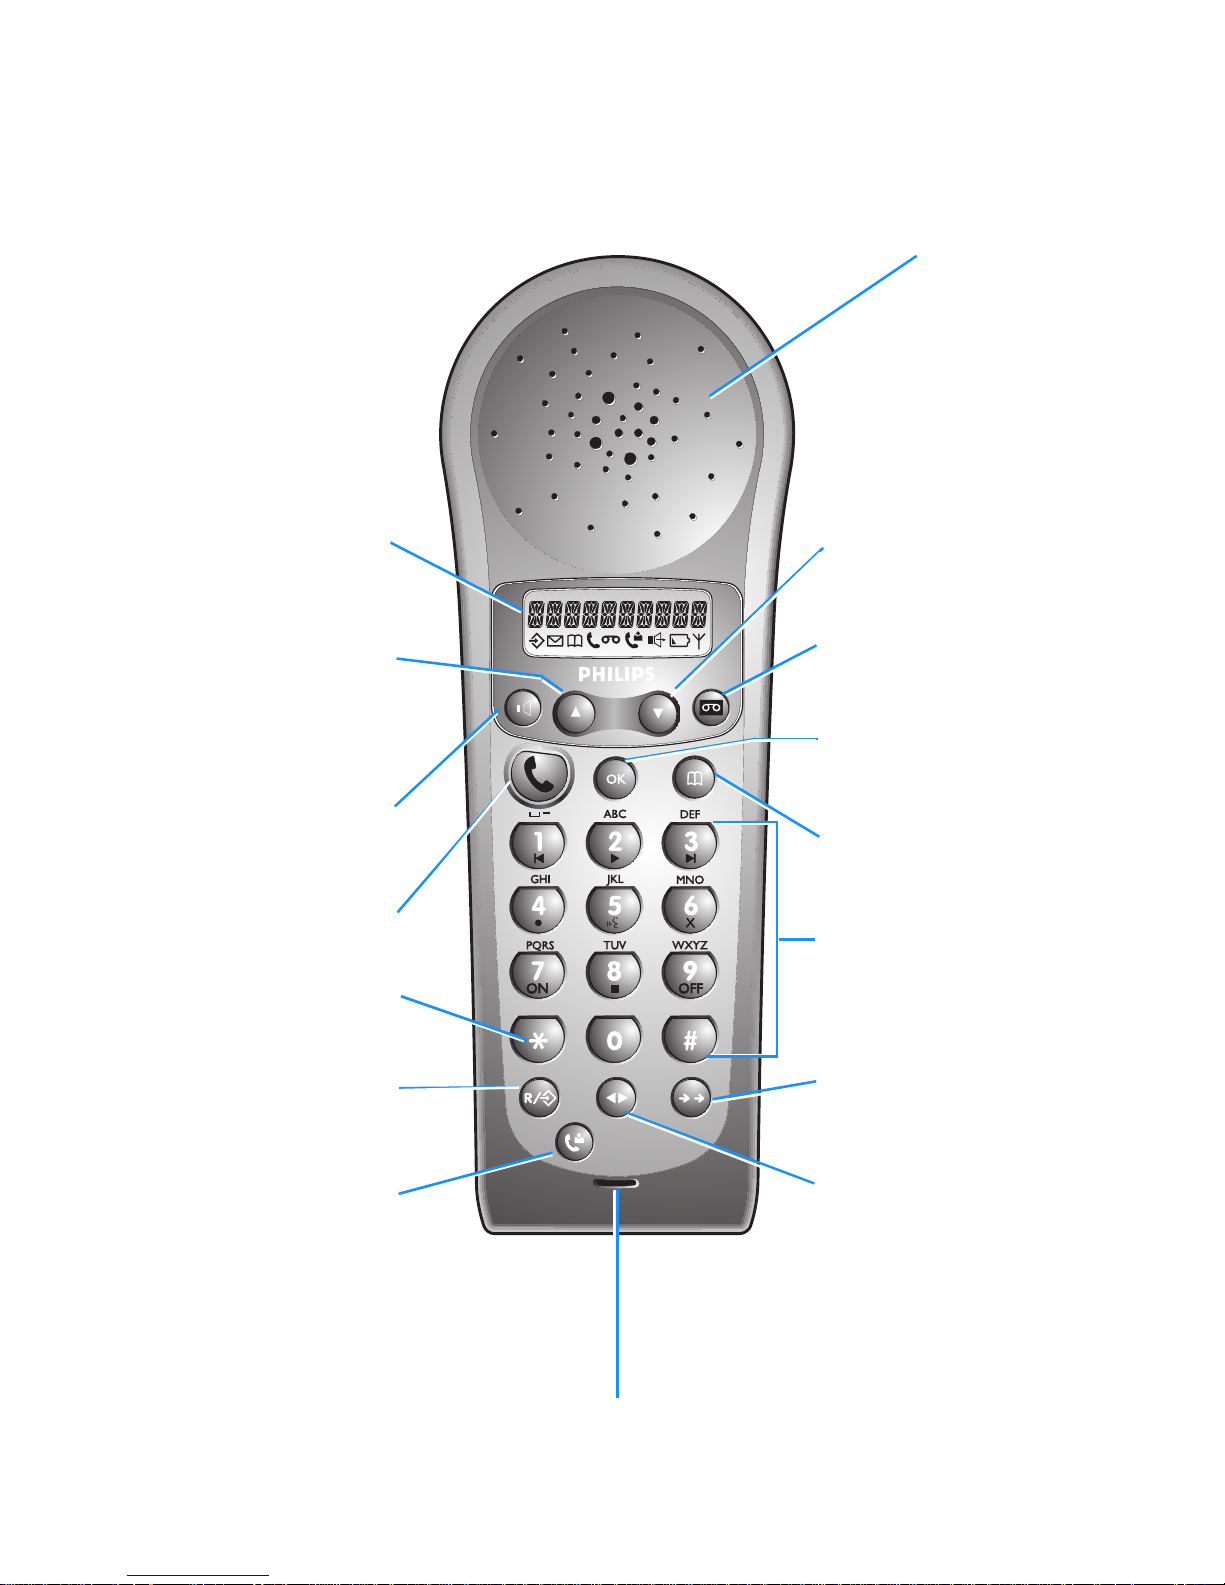
The Onis Vox handset
Microphone
Down Key
Press this key to move through the
menu or to decrease earpiece
volume during calls.
Answering machine Key
Press this key to operate your
answering machine.
OK Key
Press this key to confirm a menu
selection or to scroll the number on
the display.
Phonebook Key
Press this key to consult your
Phonebook.
Number/Character
Keypad
Use these keys for dialling and for
entering characters.
Redial Key
Press this key to redial the last
numbers called.
Internal Call Key
Press this key to make internal calls
and to transfer an outside call to
another handset.
Display
This display tells you what is
happening on your telephone.
Up Key
Press this key to move through
the menu or to increase earpiece
volume during calls or to delete a
character when entering a
number or name.
Loudspeaker Key
Press this key to turn the base or
the handset loudspeaker on or off.
Dialling Key
Use this key to make, answer
or end calls.
Unlock Key
Press and hold this key to unlock
the keypad.
Recall/Menu Key
Press this key to consult the
menus, or to use the Recall
function during a call.
Caller List Key
Press this key to consult the
caller list.
Earpiece

The Onis Vox Base station
Volume Key (+)
Press this key to
increase loudspeaker
volume during calls or
when listening to
messages.
Messages
indicator light
Play/stop key
Press this key to play
the received messages.
Press again this key to
stop.
Next Key
While listening to the
messages, press this
key to play the next
message.
On/Off
answering
machine key with
indicator light
Press this key to switch
on/off the answering
machine.
Power/Line
indicator light
Volume Key (-)
Press this key to
decrease
loudspeaker volume
during calls or when
listening to
messages.
Replay Key
While listening to the
messages, press
this key once/twice
to play the current/
previous message
again.
Erase Key
While listening to the
messages, press this
key once to erase the
current message.
After listening to all
messages, press this
key for 2 seconds to
erase all messages.
Paging Key
Press this key to
make all the
handsets in range
ring.
Base station indicator lights :
See page 32 for explanation.
In the interest of improving its products and services, the manufacturer reserves the rights to modify the
specifications contained in this document at any time and without prior notice.
Copyright © Philips 1998 - All rights reser ved
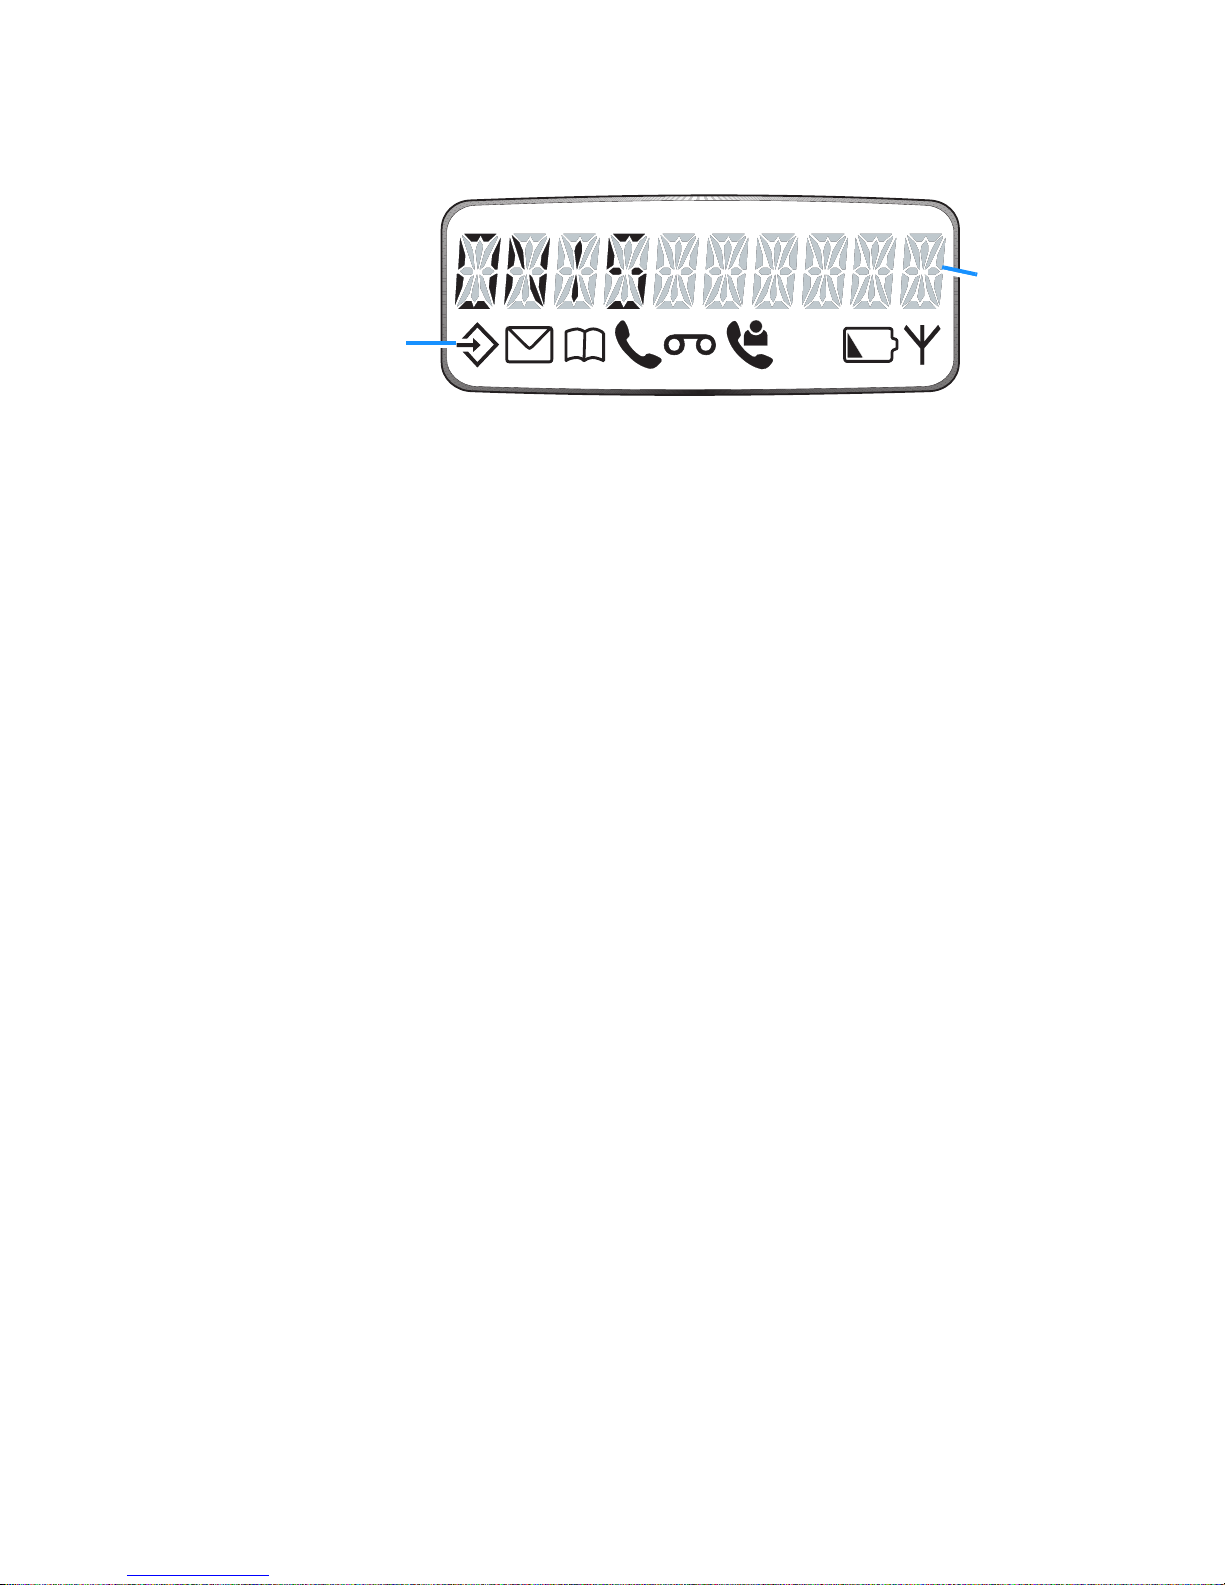
The display
When:
These symbols
tell you what is
happening on
your phone.
This line of the
display shows
up to 10
numbers or
characters.
H
M
is on
- you are consulting the menus.
E
is on
- there are messages on your answering machine.
P
is on
- you are consulting the Phonebook.
t
is on
- a call is in progress.
blinks
- the outside line is ringing.
l
is on
- your answering machine is switched on.
- you have pressed the
r
key to operate your answering machine.
blinks
- your answering machine is answering a call.
U
is on
- there are new entries in the caller list since your last consultation.
H
is on
- the handset loudspeaker is on.
blinks
- the base loudspeaker is on.
b
is on
- the handset is charging when on the base station.
- the battery is discharged when
off
the base station.
A
is on
- your handset is out of the range of the base station.
- your handset is not subscribed to any base station.
- the base station is not powered.

Table of Contents2
Table of Contents
Safety information 4
Installing your Onis 5
Connecting your phone 5
Deciding where to put the base station
5
Connecting the base station
5
Connecting another telephone (UK only)
6
Ringer Equivalence Number or REN (UK only)
6
Charging your handset 6
Battery installation
6
Handset charge
7
Handset discharge
7
Testing your telephone 7
Using your Onis 8
Making a call 8
Answering a call 9
Redialling the last number called 9
Using the handset paging 9
Adjusting the handset earpiece volume 10
Using the handset loudspeaker 10
Using and adjusting the base station loudspeaker 10
Locking the handset keypad 10
The caller list 11
Caller display 11
Caller list functions 11
Consulting the caller list
12
Dialling from the caller list
12
Removing an entry from the caller list
12
Creating a Phonebook entry from the caller list
12
Accessing your answering machine from the caller list
12
Your Onis Answering machine 13
Setting up your answering machine 13
Recording your own outgoing message
13
Setting the day and time
14
Using your answering machine 15
Switching on the answering machine
15
Switching off the answering machine
15
Intercepting calls
16
Call screening
16
Listening to received messages
17
Erasing messages
18
Personalising your answering machine 18
Enabling/Disabling voice prompts
19

Table of Contents 3
Entering a remote control code
19
Changing the number of rings
20
Switching message record on or off
20
Selecting the recording quality
21
Your answering machine’s advanced functions 21
Recording a local message
21
Switching on the answering machine by remote control
22
Calling into your answering machine by remote control
22
Personalising your telephone 23
Entering menu mode 23
Setting the dial mode 23
Selecting the menu language 23
Selecting the ringer melody and volume 24
Handset ringer
24
Base station ringer
24
Using the battery saver 24
Switching on the battery saver
24
Switching off the battery saver
24
Your Phone book 25
The phone book 25
Storing a name and number in your phone book
25
Using the handset keypad to enter characters
25
Making a call using the phone book
26
Removing a name and number from your phone book
26
Using advanced functions 27
Inserting automatic dialling pauses 27
Registering a new handset with your base station 27
Changing the name of your base station 28
Making an internal call 28
Transferring calls 28
Internal call waiting 29
Setting up Baby Sit 29
Registering one handset with several base stations 29
Selecting the base station
29
Removing a handset 30
Connection to a PABX 31
Selecting the network type 31
Setting the recall type 31
Useful tips and maintenance 32
Beeps 32
Base station indicator lights 32
Telephone troubleshooting 33
Answering machine troubleshooting 34
Caring for your phone 35
Battery removal 35

4
Safety information
This equipment is not designed for making emergency
telephone calls when the power fails. Alternative
arrangements should be made for access to emergency
services.
This product may be used legally only in a country where the appropriate authority
has given its specific authorisation. This authorisation appears on a label under
the base station.
The marking on the product certifies its conformity to the technical regulations
for user safety and electromagnetic disturbance which were applicable on the date
of approval in accordance with European Union directive No. N°73/23EEC,
89/336/EEC, 91/263EEC and 93/68EEC.
Power requirements
This product requires an electrical supply of 220-240 volts, alternating
monophased current, excluding IT installations defined in standard EN 60-950.
Warning!
The electrical network is classified as dangerous according to criteria in the
standard EN60-950.
The only way to power down this product is by unplugging the power cable from the
electrical outlet. Ensure the electrical outlet is located close to the apparatus and
is always easily accessible.
To be able to make calls in the event of a power cut, it is recommended that this
telephone be used as a complement to another telephone which does not require
mains power.
Telephone connection:
The voltage on the network is classified as TNV-3 (Telecommunication Network
Voltages, as defined in the standard EN 60-950)
Safety precautions:
•
Do not allow the handset to come into contact with water.
•
Do not open the handset or the base station. This could expose you to high
voltages. Contact our after-sales service for all repairs.
•
Do not allow the charging contacts or the battery to come into contact with
conductive materials such as keys, paper clips, rings, bracelets, etc.
•
Make sure you insert the batteries with their polarities in the correct position
(see page 6).
What you get with your phone
•
1 cordless handset
•
1 base station
•
1 power cable
•
1 telephone cable
•
1 user manual
•
2 standard AA/R6 rechargeable batteries
Installing your Onis 5
Installing your Onis
Connecting your phone
Deciding where to put the base station
• To reduce to a minimum any interference with other electronic devices such as
telephones, televisions, screens, etc. we advise you to place your base station at
least 50 cm from any such device.
• Place the base station on a flat surface such as a desk.
• Do not install the base station in a damp or humid room.
• Do not place the base station near a strong source of heat.
The operating range of your cordless telephone will vary according to your
environment. Significant obstacles such as concrete walls or metallic supports
(windows and door frames, partitions, etc.) will lessen the communication range
between the base station and the handset.
The range can be improved by placing the base station higher than the handset.
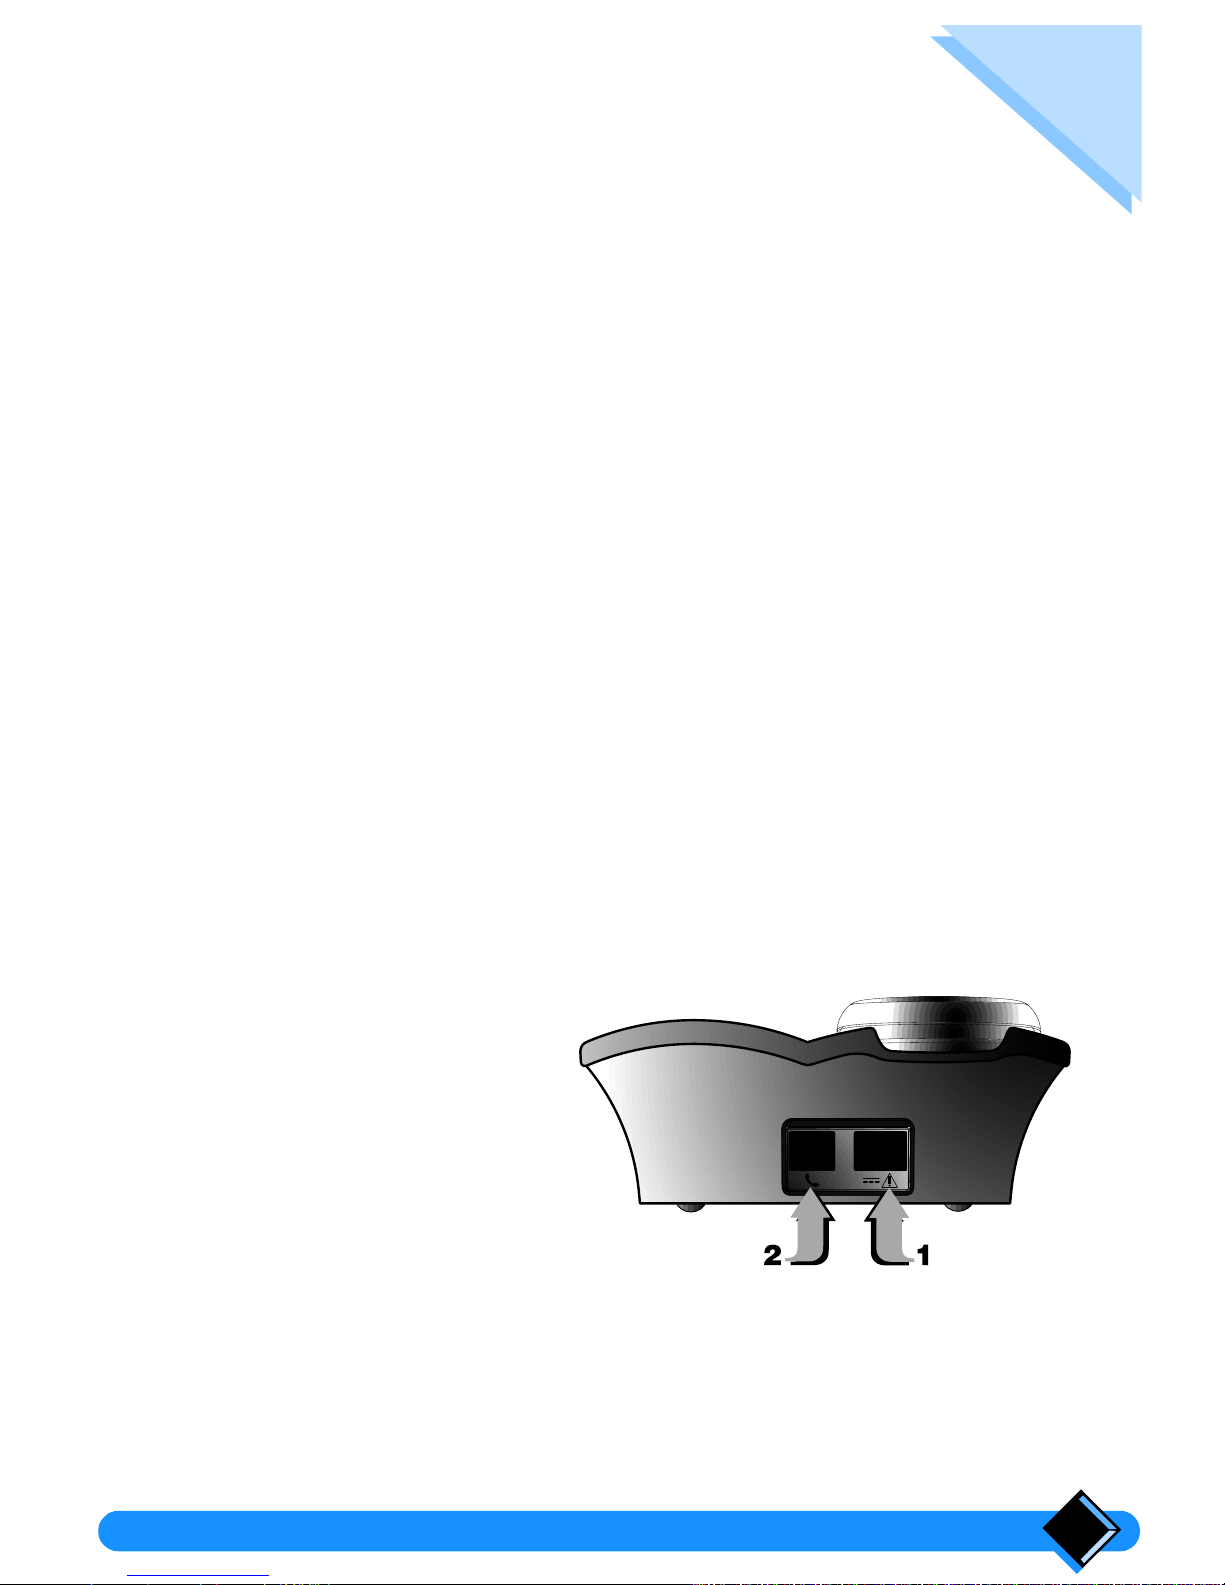
Connecting the base station
Make sure that you connect the power plug to the correct mains voltage of
220-240V.
2 Step two
Plug the power cable
into the base station
and then into the wall
outlet.
Plug the telephone
cable into the base
station and then into
the telephone
connector on the wall.
1 Step one

Installing your Onis6
Connecting another telephone
(UK only)
If you connect a second telephone (standard telephone) on the same line,
please use a
T-Adaptor
.
Ringer Equivalence Number or REN
(UK only)
Your Onis has a Ringer Equivalence Number (REN) of 1.0 . To determine the
maximum number of telephones that can be connected to your line, add together
the individual RENs of all the apparatus you wish to connect. If this total exceeds
four, one or all of your telephones may not ring correctly.
Charging your handset
Your handset is powered by 2 rechargeable AA/R6 batteries. In case of
replacement, you must use the following approved batteries: PHILIPS R6 NC-P,
Saft RC6.
Never use non rechargeable batteries!
The manufacturer is not
liable if these recommendations are not respected.
Battery installation
Slide down and lift off the battery cover.
Insert the new batteries as shown.
Replace the battery cover.
OK
ON
OFF
OK
To B.T. socket
T-Adaptor
Telephone line cord
Another telephone
1
2
3
1 2
3

Installing your Onis 7
Handset charge
Before you use your telephone for the first time, charge the handset for at
least 16 hours.
This precaution helps to lengthen the life of the batteries.
To charge your handset, place it on the base station. The
b
symbol will appear
on the display to indicate that the handset is charging.
When the
b
symbol disappears, your handset is fully charged.
The base station must be connected to a power supply using the power cable
supplied with your phone.
Handset discharge
Shortly before the handset is totally discharged, the
b
symbol appears on the
handset display. If you are in the middle of a call, you will also hear a warning beep.
The handset will switch itself off shortly afterwards. You will need to recharge the
handset before you can use it again.
Testing your telephone
Now that your telephone is installed, try making a call.
•
Press t on the handset. The t symbol appears on the display and you hear
the dial tone.
•
Dial the number. The digits you dial appear on the display and the dial tone
should stop.
If you have problems making your test call, make sure that the telephone cord is
correctly plugged into the telephone network socket and into the base station
socket, that the base station is plugged into a power outlet, and that the base
station light is on.
If your base station is correctly connected but the dial tone does not stop when you
dial the number, you need to change the dial mode. To do this refer to
“Setting the
dial mode”
on page 23.
Tips
- To ensure an optimum handset charge, replace the handset on the
base station regularly.
- The keypad can face upwards or downwards. However, the ringing
tone is louder when the keypad faces downwards.
Using your Onis8
Using your Onis
Making a call
Direct dialling
Press the
t
key on the handset.
The
t
symbol is shown on the display and you hear the dial tone in the
handset earpiece.
Dial the number using the number keys.
The number called is displayed after the last key is pressed.
If the number you enter is longer than 10 digits, the display will scroll the
number to the left to show the last digits.
To hang up, press
t
or replace the handset on the base station.
The duration of your call in minutes and seconds is displayed for 4 seconds.
Dialling with number preparation
This way of dialling allows you to make corrections to the number before dialling.
Dial the number (up to 25 digits) before pressing the
t
key. You can
use the
+
key to make corrections by cancelling the last digit
entered.
If the number you enter is longer than 10 digits, the display will scroll the
number to the left to show the last digits.
Press the
t
key on the handset.
The number prepared is automatically dialled.
You can also press
H
. The handset loudspeaker is activated and the number is
dialled.
To hang up, press
t
or replace the handset on the base station.
The call duration is displayed for 4 seconds.
1
2
3
1
Tip
If you want to see the whole number you have dialled so far, press
o
. The number will scroll to the left if it is longer than 10 digits.
2
3

Using your Onis 9
Answering a call
When someone calls you, the base station and the handset ring, the t symbol
blinks on the handset display and the green power/line indicator light on the base
station flashes.
Press the
t
key on the handset.
The
t
symbol stops blinking on the handset. The green light on the base
station blinks regularly to indicate that a call is in progress.
You can also press
H
. The handset loudspeaker is activated and you can
take the call.
To hang up, press
t
or replace the handset on the base station.
The call duration is displayed for 4 seconds.
Redialling the last number called
Direct redial
Press the
t
key on the handset. Wait for the dial tone.
Press the
B
key on the handset.
The last number called is shown on the display and dialled automatically.
Redial with number correction
Press the B key on the handset.
The last number called is shown on the display. You can use the
+
key to
correct the number.
Note:
You can redial up to the last five dialled numbers by pressing the B key five times
successively.
Press the
t
key on the handset.
Using the handset paging
Handset paging allows you to ring all the handsets subscribed in range of the base
station.
Press
T
once.
All the registered handsets that are in-range start ringing for 20 seconds.
Note:
If you press any key again on the base station, or if a call is incoming or initiated
from a handset, all the handsets will stop ringing.
If a handset comes into range once the paging is initiated on the base station, it will
ring at the next paging indication. In the same manner, if it goes out-of-range during
the paging, it stops ringing.
1
2
1
2
1
2
1
 Loading...