

Philips TD6411/BG131P, TD6411/BG101P, TD6411/BG051P, TD6411/BB191P, TD6411/BB041P User Manual
...Page 1

Page 2
Standby
R
PH
y
r
t
n
E
y
r
t
e
n
v
E
o
d
m
Ad
e
R
K
O
O
B
E
N
O
1
7
SETUP
e
s
u
Pa
g
n
i
l
l
e
a
i
d
D
o
c
M
i
t
l
a
a
i
m
D
o
t
u
A
e
g
n
a
h
C
e
p
y
T
k
r
o
w
t
e
e
p
N
y
T
l
l
ca
e
t
R
e
s
d
n
a
H
d
t
Ad
se
d
n
a
H
e
t
v
e
o
s
m
d
e
n
a
R
H
r
e
t
e
s
i
m
g
a
e
N
R
n
o
i
t
a
t
S
e
s
a
B
EL
S
E
S
A
B
6
T
I
S
Y
B
A
B
5
S
O
S
*
*
4
&
y
a
D
P
ETU
S
W
S
N
A
*
3
g
n
d
i
t
o
t
C
l
Se
o
r
e
t
n
m
i
o
T
C
e
t
N
o
m
e
R
** Onis
S
ER
G
N
e
I
s
R
d
n
a
2
H
s
e
g
n
i
R
f
co
o
e
r
R
e
b
e
g
m
a
u
ss
e
M
Onis Memo
*
only
n
o
i
t
a
t
t
S
e
s
a
B
g
n
i
d
r
only
Page 3
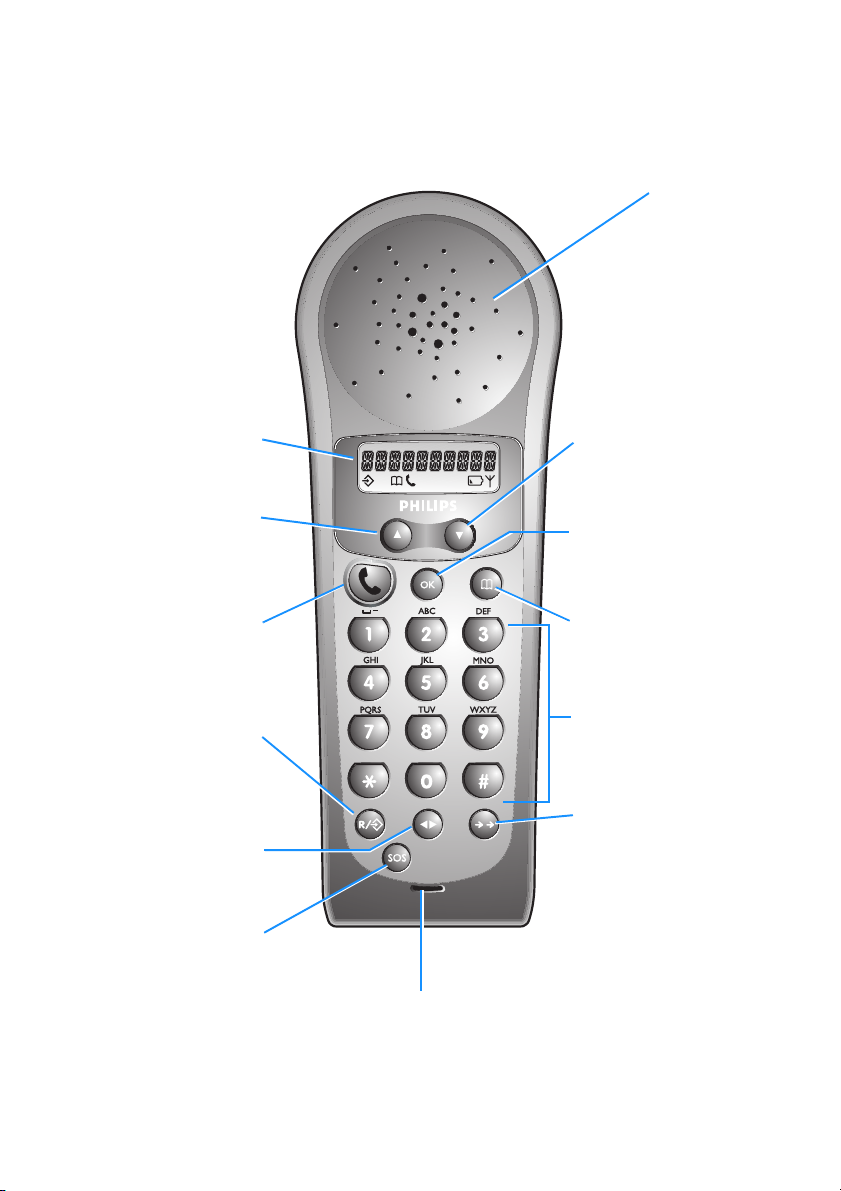
The Onis handset
Earpiece
This display tells you what is
happening on your telephone
Up Key
Display
Press this key to move through the
menu or to increase earpiece
volume during calls or to delete a
character when entering a number
or name.
Dialling Key
Use this key to make, answer
or end calls.
Recall/Menu Key
Press this key to consult the
menus, or to use the Recall
function during a call.
Internal Call Key
Press this key to make internal
calls and to transfer an outside call
to another handset.
SOS Key
Press this key to make an
emergency call.
Microphone
Down Key
Press this key to move through the
menu or to decrease earpiece
volume during calls.
OK Key
Press this key to confirm a menu
selection or to scroll the number on
the display
Phonebook Key
Press this key to consult your
Phonebook.
Number/Character
Keypa d
Use these keys for dialling and for
entering characters.
Redial Key
Press this key to redial the last
number called.
In the interest of improving its products and services, the manufacturer reserves the rights to modify the
specifications contained in this document at any time and without prior notice.
Copyright © Philips 1998 - All rights reser ved
Page 4
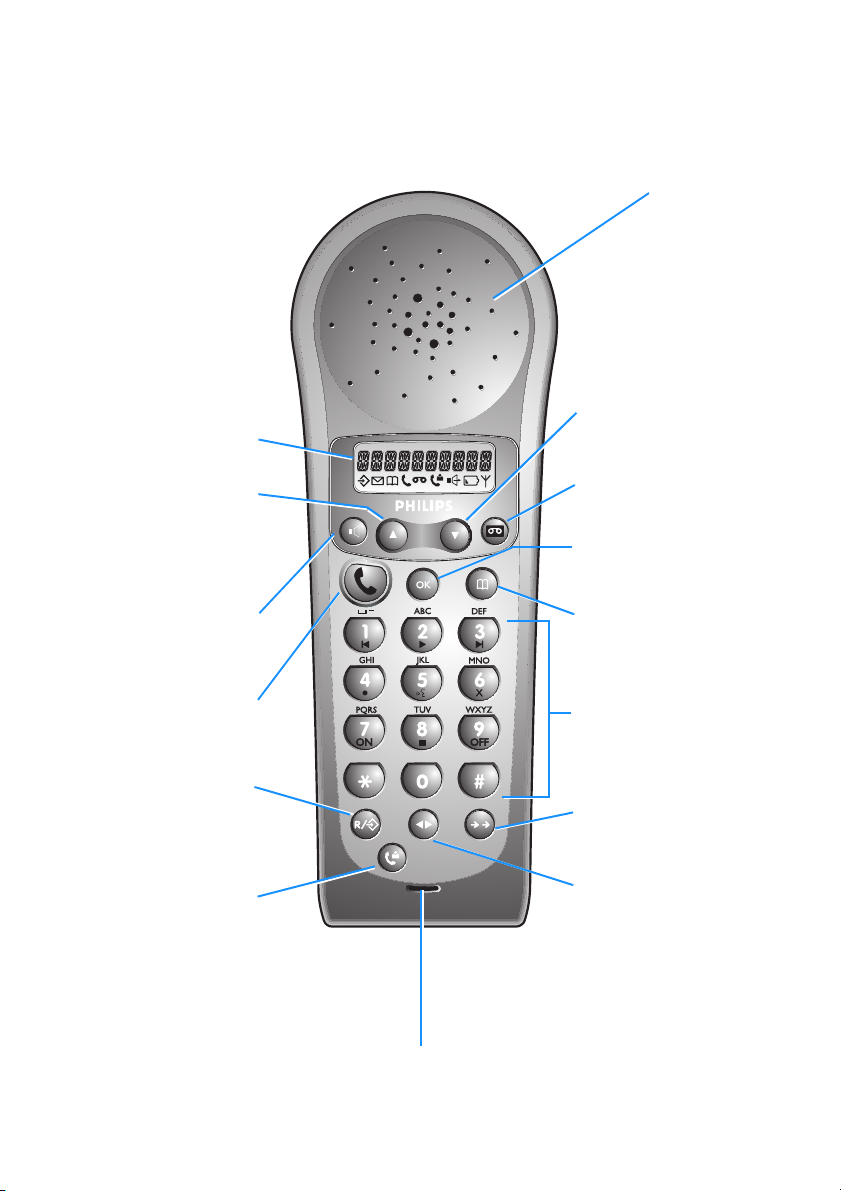
The Onis Memo handset
Down Key
This display tells you what is
happening on your telephone.
Up Key
Display
Press this key to move through
the menu or to increase earpiece
volume during calls or to delete a
character when entering a
number or name.
Loudspeaker Key
Press this key to turn the handset
loudspeaker on or off.
Press this key to move through the
menu or to decrease earpiece
volume during calls.
Memo Recorder Key
Press this key to operate your
memo recorder.
OK Key
Press this key to confirm a menu
selection or to scroll the number on
the display.
Phonebook Key
Press this key to consultyour
Phonebook.
Earpiece
Use this key to make, answer
or end calls.
Recall/Menu Key
Dialling Key
Press this key to consult the
menus, or to use the Recall
function during a call.
Caller List Key
Press this key to consult the
caller list.
Microphone
Number/Character
Keypa d
Use these keys for dialling and for
entering characters.
Redial Key
Press this key to redial the last
number called.
Internal Call Key
Press this key to make intern al calls
and to transfer an outside call to
another handset.
Page 5
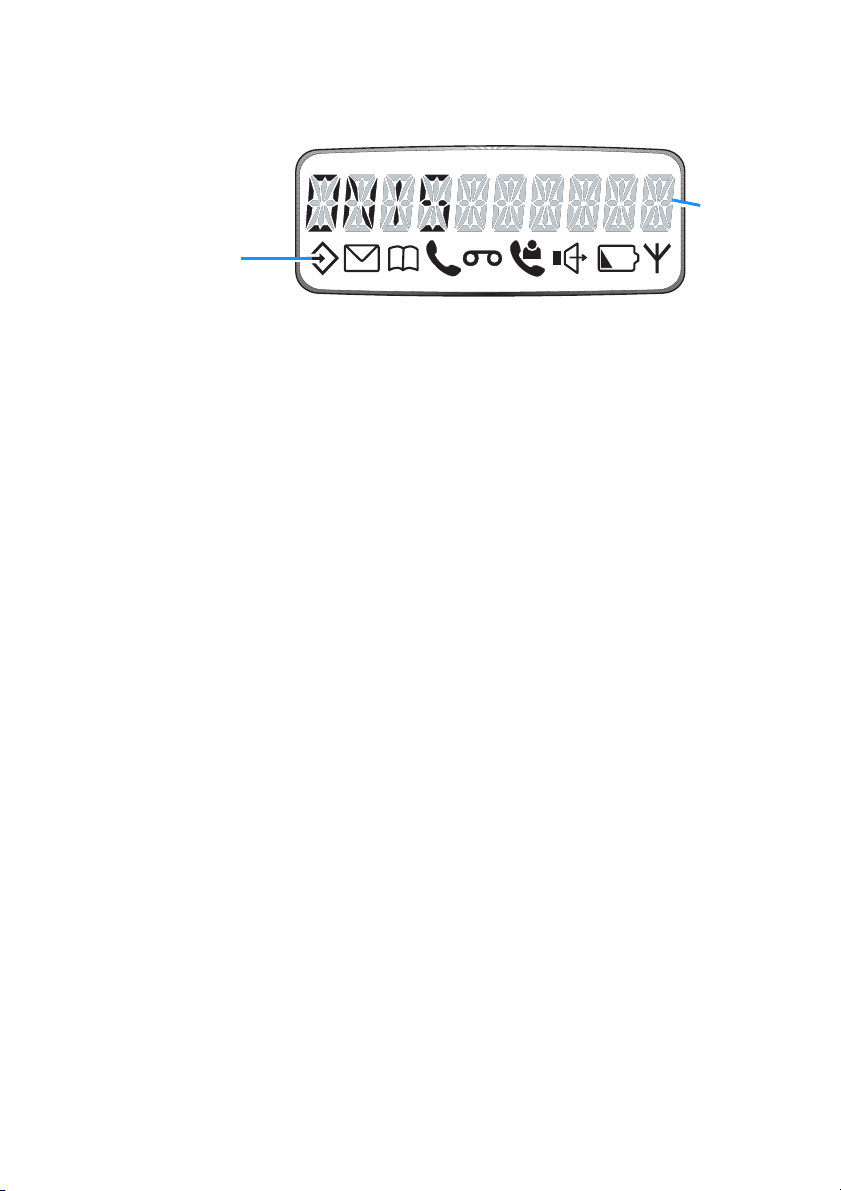
The display
e
These symbols
tell you what is
happening on
your phone.
When:
M
P
t
b
A
is on
is on
is on
blinks
is on
is on
Onis Memo only:
- you are consulting the menus.
- you are consulting the Phonebook.
- a call is in progress.
- the outside line is ringing.
- the handset is charging when on the base station.
- the battery is discharged when
- your handset is out of the range of the base station.
- your handset is not subscribed to any base station.
- the base station is not powered.
off
the base station.
This line of th
display shows
up to 10
numbers or
characters.
E
l
U
h
is on
is on
blinks
is on
is on
- there are messages on your memo recorder.
- your memo recorder is switched on.
- you have pressed the
- your memo recorder is answering a call.
- there are new entries in the caller list since your last consultation.
- the handset loudspeaker is on.
Base station indicator light:
See page 28 for explanation.
r
key to operate your memo recorder.
Page 6

Table of Contents
Safety information 4
Installing your Onis 5
Connecting your phone 5
Deciding where to put the base station
Connecting the base station
Connecting another telephone (UK only)
Ringer Equivalence Number or REN (UK only)
Charging your handset 6
Battery installation
Handset charge
Handset discharge
Testing your telephone 7
Using your Onis 8
Making a call 8
Answering a call 9
Redialling the last number called 9
Adjusting the handset earpiece volume 9
Using the handset loudspeaker (Onis Memo only) 9
The caller list (Onis Memo only) 10
Caller identification 10
Caller list functions 10
Consulting the caller list
Dialling from the caller list
Removing an entry from the caller list
Creating a Phonebook entry from the caller list
Accessing your memo recorder from the caller list
11
11
11
11
11
5
5
6
6
6
7
7
Your Onis Memo recorder (Onis Mémo) 12
Setting up your memo recorder 12
Recording an outgoing message
Setting the day and time
Using your memo recorder 14
Switching on the memo recorder
Switching off the memo recorder
Intercepting calls
Listening to received messages
Erasing messages
Personalising your memo recorder 15
Entering a remote control code
Changing the number of rings
Switching message record on or off
Table of Contents2
12
13
14
14
14
15
15
16
16
17
Page 7

Your memo recorder’s advanced functions 17
Recording a local message
Switching on the memo recorder by remote control
Calling into your memo recorder by remote control
17
18
18
Your Phone book and emergency number 19
The phone book 19
Storing a name and number in your phone book
Using the handset keypad to enter characters
19
19
Personalising your telephone 20
Entering menu mode 20
Setting the dial mode 20
Selecting the ringer melody and volume 21
Handset ringer
Base station ringer
Using the battery saver 21
Making a call using the phone book
Removing a name and number from your phone book
The emergency number (Onis) 22
Storing an emergency number - SOS
Calling the emergency number
21
21
22
22
22
23
Using advanced functions 24
Inserting automatic dialling pauses 24
Registering a new handset with your base station 24
Changing the name of your base station 25
Call waiting 25
Setting up Baby Sit 25
Registering one handset with several base stations 26
Selecting the base station
Removing a handset 26
26
Connection to a PABX 27
Selecting the network type 27
Setting the recall type 27
Useful tips and maintenance 28
Beeps and melodies 28
Base station indicator light 28
Telephone troubleshooting 29
Memo recorder troubleshooting (Onis Memo only) 29
Caring for your phone 30
Battery removal 30
Table of Contents
3
Page 8

Safety information
This equipment is not designed for making emergency
telephone calls when the power fails. Alternative
arrangements should be made for access to emergency
services.
This product may be used legally only in a country where the appropriate authority
has given its specific authorisation. This authorisation appears on a label under
the base station.
The marking on the product certifies its conformity to the technical regulations
for user safety and electromagnetic disturbance which were applicable on the date
of approval in accordance with European Union directive No. N°73/23/EEC,
89/336/EEC, 91/263/EEC and 93/68/EEC.
Power requirements
This product requires an electrical supply of 220-240 volts, alternating
monophased current, excluding IT installations defined in standard EN 60-950.
Warning!
The electrical network is classified as dangerous according to criteria in the
standard EN60-950.
The only way to power down this product is by unplugging the power cable from the
electrical outlet. Ensure the electrical outlet is located close to the apparatus and
is always easily accessible.
To be able to make calls in the event of a power cut, it is recommended that this
telephone be used as a complement to another telephone which does not require
mains power.
Telephone connection:
The voltage on the network is classified as TNV-3 (Telecommunication Network
Voltages, as defined in the standard EN 60-950)
Safety precautions:
Do not allow the handset to come into contact with water.
•
Do not open the handset or the base station. This could expose you to high
•
voltages. Contact our after-sales service for all repairs.
Do not allow the charging contacts or the battery to come into contact with
•
conductive materials such as keys, paper clips, rings, bracelets, etc.
Make sure you insert the batteries with their polarities in the correct position
•
(see page 6).
What you get with your phone
•
1 cordless handset
•
1 base station
•
1 power cable
•
1 telephone cable
•
1 user manual
•
2 standard A A/R6 rechargeable batteries
4
Page 9

Installing your Onis
Connecting your phone
Deciding where to put the base station
To reduce to a minimum any interference with other electronic devices such as
•
telephones, televisions, screens, etc. we advise you to place your base station at
least 50 cm from any such device.
Place the base station on a flat surface such as a desk.
•
Do not install the base station in a damp or humid room.
•
Do not place the base station near a strong source of heat.
•
The operating range of your cordless telephone will vary according to your
environment. Significant obstacles such as concrete walls or metallic supports
(windows and door frames, partitions, etc.) will lessen the communication range
between the base station and the handset.
The range can be improved by placing the base station higher than the handset.
Connecting the base station
Make sure that you connect the power plug to the correct mains voltage of
220-240V.
1 Step one
Plug the power cable
into the base station
and then into the wall
outlet.
2 Step two
Plug the telephone
cable into the base
station and then into
the telephone
connector on the wall.
2 1
Installing your Onis 5
Page 10
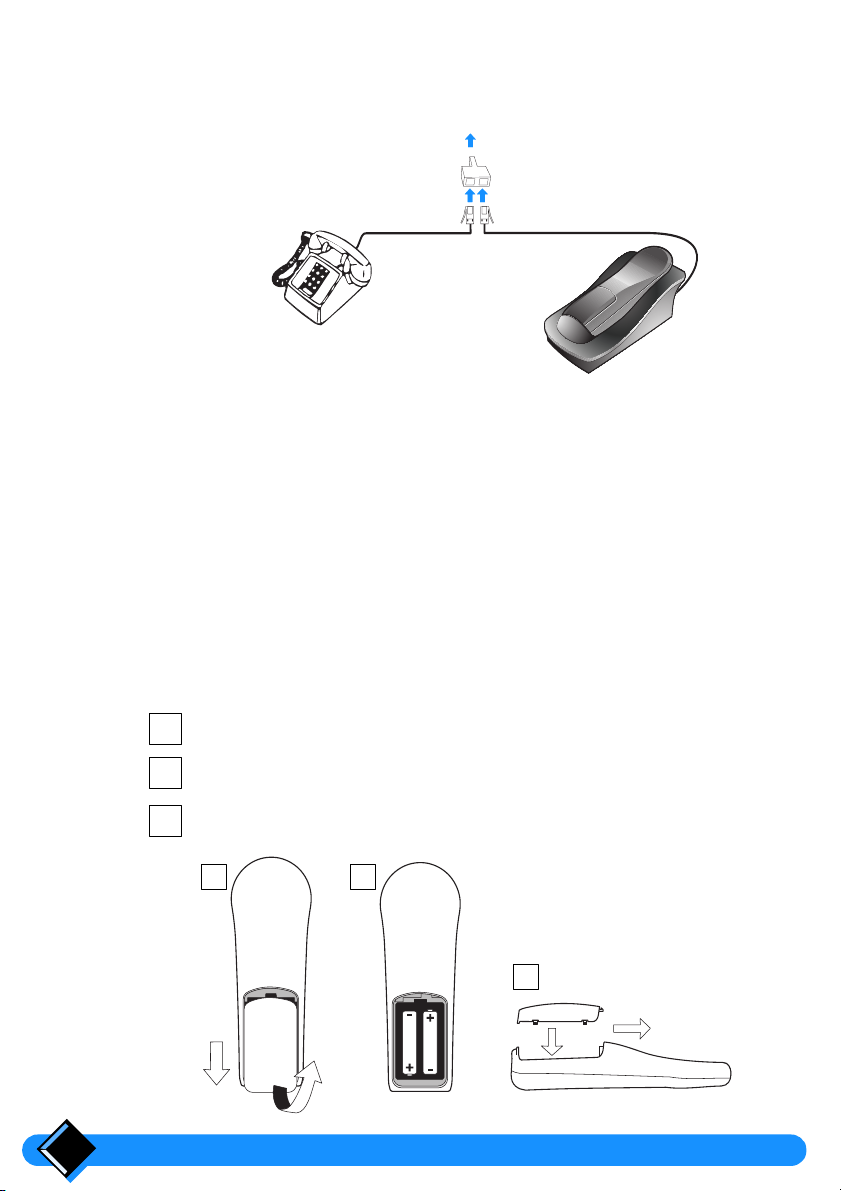
Connecting another telephone
If you connect a second telephone (standard telephone) on the same line,
please use a
Another telephone
T-Adaptor
.
To B.T. socket
(UK only)
T-Adaptor
Telephone line cord
Ringer Equivalence Number or REN
Your Onis has a Ringer Equivalence Number (REN) of 1.0 . To determine the
maximum number of telephones that can be connected to your line, add together
the individual RENs of all the apparatus you wish to connect. If this total exceeds
four, one or all of your telephones may not ring correctly.
Charging your handset
Your handset is powered by 2 rechargeable AA/R6 batteries. In case of
replacement, you must use the following approved batteries: PHILIPS R6 NC-P,
Saft RC6.
liable if these recommendations are not respected.
Batter y installation
1
2
3
Never use non rechargeable batteries!
Slide down and lift off the battery cover.
Insert the new batteries as shown.
Replace the batter y cover.
1 2
(UK only)
The manufacturer is not
3
Installing your Onis6
Page 11

Handset charge
Before you use your telephone for the first time, charge the handset for at
least 16 hours.
To charge your handset, place it on the base station. The b symbol will appear
on the display to indicate that the handset is charging.
This precaution helps to lengthen the life of the batteries.
When the
The base station must be connected to a power supply using the power cable
supplied with your phone.
- To ensure an optimum handset charge, replace the handset on the
base station regularly.
- The keypad can face upwards or downwards. However, the ringing
tone is louder when the keypad faces downwards.
b
symbol disappears, your handset is fully charged.
Handset discharge
Shortly before the handset is totally discharged, the b symbol appears on the
handset display. If you are in the middle of a call, you will also hear a warning beep.
The handset will switch itself off shortly afterwards. You will need to recharge the
handset before you can use it again.
Testing your telephone
Now that your telephone is installed, try making a call.
Press t on the handset. The t symbol appears on the display and you hear
•
the dial tone.
Dial the number. The digits you dial appear on the display and the dial tone
•
should stop.
If you have problems making your test call, make sure that the telephone cord is
correctly plugged into the telephone network socket and into the base station
socket, that the base station is plugged into a power outlet, and that the base
station light is on.
Tips
If your base station is correctly connected but the dial tone does not stop when you
dial the number, you need to change the dial mode. To do this refer to
dial mode”
on page 20.
“Setting the
Installing your Onis 7
Page 12

Using your Onis
Making a call
Direct dialling
1
Press the
The
handset earpiece.
2
Dial the number using the number keys.
The number called is displayed after the last key is pressed.
If the number you enter is longer than 10 digits, the display will scroll the
number to the left to show the last digits.
3
To hang up, press
The duration of your call in minutes and seconds is displayed for 4 seconds.
Dialling with number preparation
This way of dialling allows you to make corrections to the number before dialling.
1
Dial the number (up to 23 digits) before pressing the
use the
entered.
If the number you enter is longer than 10 digits, the display will scroll the
number to the left to show the last digits.
t
key on the handset.
t
symbol is shown on the display and you hear the dial tone in the
t
or replace the handset on the base station.
t
key. You can
key to make corrections by cancelling the last digit
+
Tip
If you want to see the whole number you have dialled so far, press
o
. The number will scroll to the left if it is longer than 10 digits.
2
Press the
The number prepared is automatically dialled.
Onis Memo only:
and the number is dialled.
t
key on the handset.
you can also press
H
. The handset loudspeaker is activated
3
To hang up, press
The call duration is displayed for 4 seconds.
t
or replace the handset on the base station.
Using your Onis8
Page 13

Answering a call
When someone calls you, the base station and the handset ring, the t symbol
blinks on the handset display and the green light on the base station flashes.
1
Press the
t
symbol stops blinking on the handset. The green light on the base
The
station blinks regularly to indicate that a call is in progress.
t
key on the handset.
Onis Memo only:
activated and you can take the call.
2
To hang up, press
The call duration is displayed for 4 seconds.
you can also press H. The handset loudspeaker is
t
or replace the handset on the base station.
Redialling the last number called
Direct redial
1
Press the
2
Press the B key on the handset.
The last number called is shown on the display and dialled automatically.
t
key on the handset. Wait for the dial tone.
Redial with number correction
1
Press the B key on the handset.
The last number called is shown on the display. You can use the
correct the number.
2
Press the
t
key on the handset.
Adjusting the handset earpiece volume
You can adjust the earpiece sound volume during a call by pressing + or -.
You can choose from 3 possible sound levels. The sound level you have selected
will be set for future calls.
+
key to
Using the handset loudspeaker
Your handset is fitted with a loudspeaker so that other people with you can listen to
the conversation.
1
During a call, press H.
The sound is amplified through the loudspeaker at the back of the handset.
2
Adjust the volume of the loudspeaker when it is on, using
3
To turn off the loudspeaker, press
Using your Onis 9
(Onis Memo only)
H
again.
+
or -.
Page 14

The caller list
Caller identification
Your Onis Memo is equipped to receive the telephone number of your callers from
the telephone network. In order to use the functions associated with caller
identification you must subscribe to the caller identification service provided by
your telephone operating company.
When your telephone rings, your handset(s) will display your caller’s number if it is
available from the telephone network. If your caller’s number is stored in the
handset Phonebook with an associated name, this name will be displayed instead
of the number.
Caller list functions
Your Onis can store the identification of up to 20 calls unanswered by the
handset(s). Each entry in the caller list contains:
the caller’s telephone number (up to 23 digits) or the caller’s name (up to 20
•
characters) if this is stored in your Phonbook or supplied by the Network
the day and time of the call
•
the number of calls by the caller (up to 9 calls)
•
(Onis Memo only)
If a call is answered by you, the caller’s number will not be stored in the caller list.
If the same number calls several times, only the last call is kept in the list.
The
in the caller list.
When the caller list is full the oldest entry is removed, even if you have not read it.
The caller list is not deleted if the base station is switched off.
You can consult the caller list, then call back your correspondents directly from the
list or remove the numbers. You can also create a Phonebook entry directly from
the caller list.
symbol is displayed on the handset when there are new entries
U
The caller list (Onis Memo only)10
Page 15

Consulting the caller list
You can only consult the caller list when the handset displays the base station
name and the handset number (Standby mode).
1
Press U to enter the caller list, then + or - to scroll through the list.
2
Press o to toggle between the caller number (or name), day and time
of call, number of calls, and the option
3
Press
REMOVE?
will delete the entry).
to exit the caller list.
U
REMOVE?
(pressing o after
Note:
The entry is considered unread until the “number of calls” is displayed.
Dialling from the caller list
While consulting an entry in the caller list, you can dial the number directly.
1
t
Press
list.
The number is dialled automatically.
or H to return the call of the caller currently displayed in the
Removing an entry from the caller list
While consulting an entry in the caller list, you can choose to delete it.
1
o
Press
The entry is removed and the next entry is displayed.
until
REMOVE?
is displayed. Press o again.
Creating a Phonebook entry from the caller list
While consulting an entry in the caller list, you can automatically create the entry in
the Phonebook, provided that the Phonebook is not full.
1
Press P, enter a name (limited to 10 characters), then press o.
The entry is created even if the number already exists in the Phonebook, or
the name is supplied by the network.
Note that you can cancel the copy operation by pressing P instead of o.
Accessing your memo recorder from the caller list
If the E icon is displayed while consulting an entry in the caller list, it indicates
that a message is associated with the entry. This message can be played by
pressing the r key.
The caller list (Onis Memo only) 11
Page 16

Your Onis Memo recorder
(Onis Mémo)
Your memo recorder offers the following functions:
answering machine only facility with no recording of incoming messages (callers
•
will hear your outgoing message, but will be unable to leave messages).
answering machine and recording facility (callers will be able to leave messages
•
after hearing your outgoing message). You can receive up to 32 messages
within a total capacity of 6 minutes.
If you have received new messages:
the base station indicator light flashes red 3 times every 2 seconds.
•
If your memo recorder is handling a call:
the green indicator light on the base station blinks.
•
the t and l symbols are shown on the handset display, along with the number
•
of messages and the time.
Tip
All the symbols appearing in grey on the keypad refer to the
memo recorder (
playback, s stop, K record, etc.).
V
Setting up your memo recorder
Recording an outgoing message
If you want to record or change an outgoing message, proceed as follows:
1
Press r to enter memo recorder mode then, if message playback
s
star ts, press
l
is displayed.
2
Press K, then v .
RECORD
3
Speak clearly close to the microphone of the handset.
You have up to
4
Once your message is finished, press s to stop recording.
A beep indicates the end of the recording.
To hear your outgoing message, press
is displayed.
Your Onis Memo recorder (Onis Mémo)12
.
seconds to talk.
30
v
.
Page 17

5
Press r to exit memo recorder mode.
Note:
To change your outgoing message, simply record over the previous one by
proceeding as described above.
Checking your outgoing message
1
Press v.
The memo recorder starts playing back the message. The memo recorder
stops automatically at the end of playback (you will hear 1 beep).
2
Press
to exit memo recorder mode.
r
Setting the day and time
You need to enter the day and time so that your memo recorder can time stamp the
messages you receive. When you enter memo recorder mode or when you listen
to your messages, the day and time are displayed.
In the event of a power failure, this operation must be repeated.
Default setting: MON 00:00.
1
Press
2
Press - or + until you reach
3
Press - or + to select a day of the week, then press o to confirm.
4
Press - or + to select the hour, then press o to confirm.
5
Press - or + to select the minutes, then press o to confirm.
6
Press
, press -until you reach
R
to exit menu mode.
R
ANSW SETUP
DAY TIME
, then press o.
, then press o.
Note:
When you switch the unit on again after a power failure, the default day and time
MON 00:00
are:
quickly to indicate that the time setting has been erased.
. After a power failure, the red light on the base station flashes
Your Onis Memo recorder (Onis Mémo) 13
Page 18

Using your memo recorder
When you have installed your Onis and set up the memo recorder (day and time
set), the memo recorder is ready for use.
Switching on the memo recorder
1
Press r to enter memo recorder mode then, if message playback
star ts, press
is displayed. The number of messages and the time are displayed.
l
2
Press ON .
ANSW ON
3
Press
l
You will hear an error beep in the following cases:
is displayed. Your memo recorder is now on.
to leave memo recorder mode.
r
remains displayed to indicate that the memo recorder is on.
s
.
No outgoing message has been recorded. NO
•
The memory is full.
•
ANSW FULL
is displayed.
OUT MES
is displayed.
Switching off the memo recorder
1
Press r then press OFF .
ANSW OFF
2
Press
is displayed. The memo recorder is switched off.
to leave memo recorder mode.
r
Intercepting calls
Using your handset
If your memo recorder has started handling a call and you wish to take it:
1
Press t to take the call.
The memo recorder will stop handling the call. You can talk to the caller.
Using another telephone
If you have another telephone (e.g. a corded telephone) connected in parallel and
you want to intercept the call that your memo recorder is handling:
1
Pick up the receiver and press
The memo recorder will stop handling the call. You can talk to the caller.
twice on the other telephone.
D
Your Onis Memo recorder (Onis Mémo)14
Page 19

Listening to received messages
The E symbol on the handset screen indicates that new messages have been
received.
1
Press
The day, time and number of messages received are displayed.
The memo recorder plays back the messages automatically.
2
To handle your messages during playback, use the following keys:
Press
Press
Press
3
Press
4
Press r to exit memo recorder mode.
to enter memo recorder mode.
r
to play the current message again.
<
twice to hear the previous message again.
<
to listen to the next message.
>
to stop message playback.
s
Erasing messages
Erasing individual messages
1
Press the r key on the handset.
The display shows the day, time and the number of messages received.
The memo recorder plays back the messages automatically.
2
While listening to the messages, press
plays back the message you want to erase.
A beep confirms that the message has been erased. The number of the
received messages displayed is updated automatically.
Erasing all the messages received
when the memo recorder
x
1
Press r , then s . Press and hold x for 2 seconds.
A beep confirms that all the messages have been erased.
Personalising your memo recorder
If you have recorded an outgoing message and set the day and time, your memo
recorder is ready for use. However, you can also personalise the settings on your
memo recorder.
The following settings are available:
Define a remote control code (
•
See
“Entering a remote control code”
Choose the number of times the telephone rings before your memo recorder
•
picks up (Number of rings). See
Decide whether your callers can leave a message (
•
See
“Switching message record on or off”
Your Onis Memo recorder (Onis Mémo) 15
RCC: - - - -
on page 16.
“Changing the number of rings”
)
RECORD ON/OFF
on page 17.
on page 16.
).
Page 20

Entering a remote control code
You need to enter a code in order to be able to use your memo recorder’s remote
control functions from another telephone e.g. to listen to your messages from a
telephone outside your home.
1
Press
2
Press - until you reach
3
Enter your 4 digit code (e.g. 1234), then press
The handset beeps to confirm the code.
4
Press R to exit menu mode.
, then press - until you reach
R
RCC:
, then press o.
ANSW SETUP
.
o
. Press o.
Note:
You can correct an error when you are entering your remote control code (RCC)
by using the
If you wish to change your remote control code, repeat the above procedure.
If you to wish to erase the remote control code during step of the procedure
described above, press
key.
+
3
four times, then press o, and finally press R.
+
Changing the number of rings
You can change the number of times your telephone rings before your memo
recorder answers a call.
1
Press
2
Press - until you reach RINGS, then press o..
3
Press
SAVER, then press
4
Press
, then press - until you reach
R
or + to select 2 RINGS, 3 RINGS, 4 RINGS, 5 RINGS, or TOLL
-
to confirm your choice.
o
to exit menu mode.
R
ANSW SETUP
. Press o.
The Save function TOLL SAVER
This is used when you call into your memo recorder by remote control (see
into your memo recorder by remote control”
When
TOLL SAVER
since you last rang in.
is selected, you can tell if a new message has been received
on page 18).
Your Onis Memo recorder (Onis Mémo)16
“Calling
Page 21

If your memo recorder has received messages, it will answer on the
If no messages have been recorded, it will answer on the
fifth
ring.
Tip
If there are no messages, you can hang up after the
and not pay for the call.
fourth
Switching message record on or off
If you do
function (
If you want callers to be able to leave messages again, switch on the incoming
message record function (
Your Onis Memo is delivered with the message record function set to ON.
want callers to leave message, switch off the message record
not
RECORD OFF
).
RECORD ON
).
third
ring
ring.
1
Press R, then press - until you reach
2
Press - until you reach
3
Press - or + to select ON or OFF, then press o to confirm your
choice.
The handset beeps to confirm the new setting.
4
Press R to exit menu mode.
RECORD
, then press o.
ANSW SETUP
Your memo recorder’s advanced functions
Recording a local message
You can use the memo recorder to leave a message for someone who has access
to your memo recorder. The message will be stored with the received messages.
1
Press r to enter memo recorder mode then, if message playback
star ts, press
2
Press
RECORD
3
Speak clearly within 10 cm of the handset microphone.
4
To stop recording, press
A beep indicates the end of the recording.
The local message will be added to any other messages left by callers. It will
be counted and played back in the same way as the other messages.
5
Press r to exit memo recorder mode.
and then press V right away.
K
is displayed.
s
.
.
s
. Press o.
Your Onis Memo recorder (Onis Mémo) 17
Page 22

Switching on the memo recorder by remote control
Before you can call into your memo recorder by remote control, you need to enter
a remote control code (see
1
Dial your telephone number. Let it ring 9 times.
The memo recorder will start up and send back a waiting tone.
2
Press * on the telephone and enter your remote control code.
3
Press 7 on the telephone keypad and hang up.
Your memo recorder is once again ready to handle calls.
“Entering a remote control code”
on page 16).
Calling into your memo recorder by remote control
You can call into your memo recorder from any telephone by calling your own
telephone number.
If your memo recorder does not answer, the memory is full or the memo recorder
is not switched on.
1
Dial your telephone number then, during the outgoing message, press
on the telephone.
*
2
Enter your 4 digit code.
If the code is correct, your memo recorder will play back any messages
automatically.
If the code is wrong, the outgoing message will be repeated. During the
outgoing message, try entering your code again. The memo recorder will
hang up after 3 unsuccessful attempts.
3
During the call you can enter remote control codes, e.g. 1 to repeat the
current message, 3 to listen to the next message, and so on (see your
Remote Control Memo card for details).
Your Onis handset allows you to enter all available remote control functions
(except “Erase all messages”). The symbols printed on the keys indicate their
remote control function, e.g.
(key 3) to listen to the next message.
>
4
Hang up to end the call.
The memo recorder will return to the mode it was in before your call unless
you press 9 to switch off the memo recorder. If it was on, it stays on and is
ready to handle calls.
Your Onis Memo recorder (Onis Mémo)18
Page 23

Your Phone book and
emergency number
The phone book
Each handset has its own individual phone book with up to 40 names and their
telephone numbers. Names in the phone book are stored in alphabetical order.
Storing a name and number in your phone book
1
2
3
4
5
The name and telephone number are stored in the phone book.
R,
Press
NAME?
Note:
entry, you will need to remove an existing entry first (see page 22).
Enter the new name (ma x. 10 characters) using the handset keypad as
explained below. Press
NUMBER?
Enter the number using the handset keypad (max. 23 digits).
If you want your Onis to pause while dialling the number (for example, after
an international dialling code prefix), press the
dash will appear between the digits on the display to show where the pause
will be inserted.
Press
Your handset beeps to confirm that the name and number have been stored.
Press
, then press o twice.
is displayed, and you can now enter the name.
If the phone book is full,
o
is displayed.
BOOK FULL
to store the name.
will be displayed. To store a new
B
o
to store the number.
to leave menu mode.
R
key to insert a pause. A
Using the handset keypad to enter characters
You can enter characters by pressing the key with the required character on it one
or more times. These characters are engraved on the handset. If you wish to enter
two successive characters which are on the same key, you need to distinguish
-
them by pressing the
+
with the
key.
key between the two characters. You delete a character
For example: to enter
744-444 555 444 7-7777
PH I L I P S
Your Phone book and emergency number 19
PHILIPS
you would press the following keys:
o
Page 24

Personalising your telephone
You can personalise certain features of your telephone using
Entering menu mode
1
Press the R key on the handset.
M
symbol is displayed and will stay on as long as you are in
The
The first menu option,
2
To quit menu mode, press
Setting the dial mode
This option sets the way your telephone sends numbers to the telephone line. You
can choose one of two dial modes (TONE or PULSE).
1
2
3
4
R
Press
Press
Press
Your handset beeps to indicate that the dial mode has been changed.
Press R to leave menu mode.
You can change the dial mode from PULSE to TONE during a call
by pressing
, then press
-
until you reach
+
-
or
to select
*
. The dial mode will return to PULSE after the call.
PHONEBOOK
R
once more or press t.
+
to display
DIAL MODE,
TONE
or
Tip
menu mode
will be shown on the display.
SETUP
. Press o.
then press o.
PULSE
, then press o.
.
menu mode
.
Note:
Although this equipment can use either loop disconnect (PULSE) or DTMF
signalling (TONE), only the performance of the DTMF signalling is subject to
regulatory requirements for correct operation. It is therefore strongly
recommended that the equipment is set to use DTMF signalling of access to public
or private signalling emergency services. DTMF signalling also provides faster call
set up.
(UK only)
Personalising your telephone20
Page 25

Selecting the ringer melody and volume
You can change the ringer melody and volume of both the handset and the base
station. There are three possible ringer melodies (
MELODY 3)
and three volume options (
Handset ringer
LOUD, SOFT
MELODY 1, MELODY 2
or
OFF
or
).
1
Press R, then press
2
3
4
5
6
-
Press
Press
The displayed melody is played on the handset ringer until you scroll to
another melody, or you leave menu mode.
Press
A beep indicates that the melody has been selected.
Press
an option.
A beep indicates that the volume option has been selected.
Press
until you reach
+
-
or
to scroll through the melody options.
o
to choose a melody.
+
-
or
to scroll through the volume options. Press o to choose
R
to leave menu mode.
Base station ringer
To change the ringer melody and volume of the base station, proceed as for
the handset. In step press
Using the battery saver
Use the battery saver if you want to use the handset away from the base station for
a long period of time.
Switching on the battery saver
-
until you reach
HANDSET. Press
-
until you reach
2
RINGERS
o
BASE
. Press o.
.
.
1
Press and hold th
Your handset will beep and switch to battery saver mode.
o
key for 2 seconds.
e
Note:
In batter y saver mode the handset will not ring. However, if someone calls,
the base station will ring.
Switching off the battery saver
The battery saver will switch off as soon as you press a key.
•
The battery saver will also switch off if you place your handset on the base
•
station. The handset will start to recharge if necessary.
Personalising your telephone 21
Page 26

Making a call using the phone book
1
Press P .
The first name in the phone book is displayed.
If the phone book is empty,
2
3
+
-
Press
To see the number associated with the displayed name, press
number will be displayed and will scroll if it is longer than 10 digits. To go
back to the name, press
t
Press
To quit the phone book without dialling, press
or
to scroll through the list of names in your phone book.
to dial the name or number displayed.
BOOK EMPTY
o
again.
will be displayed.
P
again.
o
. The
Removing a name and number from your phone book
1
2
3
4
R,
Press
Press - until you reach
If the phone book is empty,
Press
Both the name and the number are removed from your phone book.
The handset beeps and
ress R to leave menu mode.
P
, then press o.
REMOVE
BOOK EMPTY
+
or - to select a name, then press o to remove that name.
REMOVED
The emergency number (Onis)
Storing an emergency number - SOS
You can dial an emergency number automatically by pressing the S key.
You need to enter your emergency number before you can use the S key.
This number can be changed later if required.
1
2
3
4
R
Press
If there is no emergency number stored, the display will show
you can enter the new number directly, as described below.
If an emergency number is already stored, the display will show this number.
You have to delete this number using
Enter the number using the handset keypad (max. 23 digits).
If you want your Onis to pause while dialling the number (for example, after
an international dialling code prefix), press the
dash will appear between the digits on the display to show where the pause
will be inserted.
Press
A beep confirms that the emergency number has been saved.
ress R to leave menu mode.
P
, then press - until you reach
o
to store the new emergency number.
, then press o.
is displayed.
is displayed.
SOS
. Press o.
NUMBER?
+
before you can enter a new one.
B
key to insert a pause. A
, and
Personalising your telephone22
Page 27

Calling the emergency number
To call an emergency number, press
Note:
S
The
1.
correctly plugged in.
If you have not entered an emergency number, pressing S will be ineffective
2.
as there is no pre-programmed number.
On your
3.
emergency number is to store it in your phonebook. To call this emergency
number, follow the procedure
You can use the
key works only if your handset is charged and your base station is
Onis Memo
, there is no
S
key to store your most frequently called number.
S
S
“Making a call using the phone book”
Tip
and the number is dialled automatically.
key. The only way to store an
on page 22.
Personalising your telephone 23
Page 28

Using advanced functions
Inserting automatic dialling pauses
You can set your Onis to automatically insert a pause after the first dialled digit.
This function applies to external calls only.
1
Press
R
, then press + to display
SETUP
. Press o twice.
2
Press - or + to select either ON or
The handset beeps if the automatic insertion mode is changed.
3
Press R to leave menu mode.
OFF
. Press o.
Registering a new handset with your base station
To register a new handset with your base station, proceed as follows:
1
Unplug the power cable, then plug it in again.
The base station beeps to indicate that it is now in registration mode.
It is also possible to set the base station to registration mode using a handset that has already been
registered. Instead of step 1 above, proceed as follows:
Press R, then press + to display
1.
-
Press
until
2.
3.
Enter the registration code (this is given on a sticker labelled “RC” under the base station). Press
o
.
Your handset beeps to indicate that the base station is now in registration mode.
2
Move the handset to be registered close to the base station and press
R
3
Press
4
Press - until
CODE?
5
Enter the registration code (this is given on a sticker labelled “RC”
under the base station). Press o.
The handset will search for a base station that is in registration mode.
After a few seconds, the name of the base station will be displayed. In this
case go to the next step.
If the handset cannot find a base station,
will need to try again.
6
Press
ADD HS
to enter menu mode.
+
to display
is displayed. Press o.
SETUP
REGISTER
is displayed.
R
to leave menu mode.
. Press o.
SETUP
, then press o.
is displayed, then press o.
FAILED
will be displayed and you
Using advanced functions24
Page 29

Changing the name of your base station
1
2
3
4
Call waiting
When an external call (UK only) or an internal call is in progress, you may receive
another call.
You will be informed of this call by a “call waiting” tone in the earpiece and the
symbol will blink on the display.
If you have an Onis Memo and you subscribe to a caller identification service, the
number (or name, if available) of the waiting caller will also be displayed (UK only).
To answer the waiting call:
1
2
Press R, then press + to display
Press - until
If the base station has a name, this will be displayed. You can delete the
existing name using the + key. If the base station has no name,
NAME?
Enter the new name (max. 8 characters) using the handset keypad
(refer to
o
Press
t
Press
Your handset(s) will ring, announcing the outside call.
Press t (or H Onis Mémo) to answer the waiting call.
BASE NAME
will be displayed.
“Using the handset keypad to enter characters”
. Press R to leave menu mode.
to end the call in progress.
is displayed, then press o.
SETUP
. Press o.
BASE
on page 19).
t
Setting up Baby Sit
The Baby Sit function allows you to monitor sounds in another room (e.g. the
baby’s room). Because Baby Sit is a special type of internal call, it requires two
handsets (of type Onis 6810): one left in the baby’s room and one you keep with
you (the parent handset).
.
manual
Using advanced functions 25
For detailed information, see your extra handset user
Page 30

Registering one handset with several base stations
To register your handset with a new base station, proceed as for
new handset with your base station”
on page 24.
“Registering a
Important:
You can register your handset with a maximum of 4 base stations. If your handset
is already registered with 4 base stations, then remove it from one of the base
stations.
Selecting the base station
Even when your handset is registered with two base stations, it is connected to
only one base station at a time. You have to select the base station each time you
want to change the ‘active’ base station, unless you choose the
the closest base station is automatically detected as soon as the signal of the
previously selected base station is lost.
For example, if you are using your handset with a base station you have named
‘Home’ and you now wish to make a call on a base station you have named ‘Office’,
you will have to select it before you can do so.
1
2
3
4
R
Press
Press + or - until the name of the base station to which you want to be
connected is displayed, or until
AUTO
handset.
Press
Your handset will beep to confirm that it is now searching for the new base
station, or for the closest base station if
Press
, then press - until
mode functions when there is no signal from the base station to the
o
.
R
to leave menu mode.
BASE SEL
AUTO
is displayed.
AUTO
is displayed. Press o.
was selected.
AUTO
option and
Removing a handset
You can remove any handset that is registered with your base station.
1
Press R, then press + to display
2
3
4
5
If the handset that you have removed is the one you are using, it will automatically
switch to its next registered base station.
-
Press
Press + or - to select the handset you wish to remove, then press o.
CODE?
When
station, then press
Your handset will beep to confirm that the handset has been removed.
Press R to leave menu mode.
REMOVE HS
until
is displayed, enter the code “RC” which is under the base
Using advanced functions26
SETUP
is displayed, then press o.
o
.
. Press o.
Page 31

Connection to a PABX
If you use your Onis on a telephone line connected to a PABX (Private Automatic
Branch Exchange), instead of a direct connection to the public telephone network,
it may be necessary to change certain settings on your telephone.
Selecting the network type
To connect your Onis to a PABX you may need to change the network setting.
1
2
3
4
Depending on your PABX, you may need to try different network settings before
you find the best setting.
R
Press
Press - until
Use
selection available. Press
Your handset will beep to indicate that the new network type has been set.
Press
, then press + to display
NETWORK
+
and - to choose one of the possible network settings from the
R
to leave menu mode.
Note:
If you want to reconnect your Onis to the public network again, don’t forget to set
the network type to PUBLIC. The optimum settings for the public network will
automatically be reset.
Setting the recall type
The recall type function defines what signals your telephone sends to the PABX
R
when the recall
PABX settings in the
1
2
R
Press
Press - until
key is pressed during a call. You need to select one of the
NETWORK
, then press + to display
RECALL
SETUP
. Press o.
is displayed, then press o.
o
.
menu before you can choose a recall type.
SETUP
. Press o.
is displayed, then press o.
3
Press + or - to select LONG FLASH or SHORT FLSH, then press o.
Your handset will beep to indicate that the new recall type has been set.
4
Press
R
to leave menu mode.
Connection to a PABX 27
Page 32

Useful tips and maintenance
Beeps and melodies
Outside line call melody
Internal call melody
A long alert beep
Validation beeps
A call waiting tone
•
Someone is calling you on your outside line.
•
Another handset is calling your handset.
•
If the b symbol is displayed, your call is about to be interrupted because
the handset battery is discharged.
•
Your call has been cut due to an error concerning the battery, network line,
radio range, etc.
•
The handset that was called (on an internal call) has hung up.
•
The base station is busy and cannot make an outgoing call at the moment.
•
You tried to listen to the outgoing message of the memo recorder and no
outgoing message has been recorded.
•
You tried to listen to messages received on the memo recorder and no
messages have been recorded.
•
You tried switching on the memo recorder and the memo recorder memory
is full.
•
You tried switching on the memo recorder and no outgoing message has
been recorded.
•
One of the settings of your Onis has been modified.
•
A phone book entry has been stored or removed.
•
The base station has been set to registration mode.
•
One of the settings of the memo recorder has been modified.
•
When you listen to received messages, the end of a message has been
reached (1 beep), all the messages received have been played (2 beeps).
•
The start or the end of a recorded message is been signalled.
•
An outside call arrives while you are in an internal call.
Base station indicator light
Green, steady.
Green, flashing regularly.
Green, flashing in time with
the ringer.
•
The base station is on.
•
An outside call is in progress.
•
An outside call is incoming.
Onis Memo only:
Red, steady.
Red, flashing
(3 blinks every 2 seconds).
Red, flashing quickly.
•
The memo recorder is on.
•
The memo recorder has received new messages.
•
There is a problem with the memo recorder (it is full, or the time setting has
been erased).
Useful tips and maintenance28
Page 33

Telephone troubleshooting
Problem Cause Solution
The line is bad and the A
symbol is displayed.
The handset emits an alert
beep when you try to make
an outside call.
The handset emits an alert
beep when you try to make
an internal call.
The handset has reached its radio range
limit.
An outside call is in progress on another
handset.
A
The
symbol is displayed. The handset
is out of range of the base station.
A
symbol is displayed. The handset
The
is not registered with the base station.
Another handset is using menu mode
and the base station is busy.
The handset you are trying to reach may
be busy in an another call or out of range.
Move closer to the base station
and try again.
Wait for the call to end and try
again.
Move closer to the base station
and try again.
Register the handset with the
base station and try again.
Wait for the other handset to
leave menu mode and try again.
Wait for the other handset to
become available and try again.
Memo recorder troubleshooting (Onis Memo only)
Problem Cause Solution
The memo recorder does not
record your outgoing message.
The memo recorder does not
record the incoming calls.
The memo recorder stopped
automatically.
The red indicator light on the
base station flashes quickly.
NO OUT MES
“
The remote control does not
work.
” is displayed. You have not recorded an outgoing
You are not close enough to the
handset microphone.
The memory is full. Erase messages to free sufficient
You have not switch on the memo
recorder.
The message record switch is set to
off.
The memo recorder memory is full. Erase messages to free sufficient
The memo recorder’s maximum
recording capacity (approx. 6 mn)
has been reached.
A power failure has occurred. Reset the day and time setting of
message.
You have not entered the right code. Try again or see
You have not set a remote control
code.
Record a new outgoing message
closer to the microphone.
memory capacity.
See
“Switching on the memo
recorder”
See
on or off”
memory capacity.
Erase messages to free sufficient
memory capacity.
the handset (see
and time”
See
message”
memo recorder by remote control”
on page 18.
See
code”
on page 14.
“Switching message record
on page 17.
“Setting the day
on page 13).
“Recording an outgoing
on page 12.
“Calling into your
“Entering a remote control
on page 16.
If further troubleshooting is necessary, please contact your PHILIPS Help
Desk.
Useful tips and maintenance 29
Page 34

Caring for your phone
To clean your telephone, first unplug the mains cable and the telephone cable.
Wipe with a cloth or chamois moistened with slightly soapy water, then with a dry
cloth. This will help to keep your telephone looking as good as new.
Note:
Never spray your telephone with cleaning products or solvents. Clean the
charging contacts on the handset and the base station using a dry lint-free cloth.
Batter y removal
1
Slide down and lift off the battery cover.
2
Remove the batteries.
3
Replace the batter y cover.
Warning!
Your rechargeable batteries contains cadmium.
Check your local regulations for special disposal instructions.
Useful tips and maintenance30
Page 35

Remote control
(using a tone telephone)
Remote
control
(using a tone telephone)
1
Dial your telephone number.
2
*
After listening to the outgoing
message, press the
your code (4 digits).
3
During message playback:
Stop message playback
•
Erase message
•
Replay current message
•
Replay previous message
•
Play next message
•
If the memo recorder is not switched on, wait the dial
*
tone after 9 rings.
.....................................6
key, then enter
*
........................8
.......................1
.................1+1
...............................3
Remote
control
(using a tone telephone)
1
Dial your telephone number.
Dial
1
Dial your telephone number.
2
*
After listening to the outgoing
message, press the
your code (4 digits).
3
During message playback:
Stop message playback
•
Erase message
•
Replay current message
•
Replay previous message
•
Play next message
•
If the memo recorder is not switched on, wait the dial
*
tone after 9 rings.
.....................................6
key, then enter
*
........................8
.......................1
.................1+1
...............................3
Remote
control
(using a tone telephone)
1
Dial your telephone number.
Dial
2
*
After listening to the outgoing
message, press the
your code (4 digits).
3
During message playback:
Stop message playback
•
Erase message
•
Replay current message
•
Replay previous message
•
Play next message
•
If the memo recorder is not switched on, wait the dial
*
tone after 9 rings.
.....................................6
key, then enter
*
........................8
.......................1
.................1+1
...............................3
Dial
Page 36

Remote
control (Cont.)
(using a tone telephone)
You have just checked your memo
recorder
4
After listening to your messages, you
have 20 seconds to:
Start message playback
•
Check outgoing message
•
Switch off memo recorder
•
Switch on memo recorder
•
Record an outgoing message
•
Record a local message
•
Stop recording
•
.....................................8
.......................2
.....................5
....................9
.....................7
............4+5
and speak
....................4+2
and speak
Dial
Remote
control (Cont.)
(using a tone telephone)
You have just checked your memo
recorder
4
After listening to your messages, you
have 20 seconds to:
Start message playback
•
Check outgoing message
•
Switch off memo recorder
•
Switch on memo recorder
•
Record an outgoing message
•
Record a local message
•
Stop recording
•
.....................................8
.......................2
.....................5
....................9
.....................7
...........4+5
and speak
....................4+2
and speak
Dial
 Loading...