

Page 1

USER MANUAL
Page 2
Before you start
1
9
Basic functions
Phone book
13
21
Using the menus
33
Using network services
List of accessories
35
A problem ?
37
Page 3
Display
Antenna ring
Fit your favorite colour
antenna ring
Antenna
Earpiece
Soft key
Clear key
Microphone
Soft key
Scroll keys
On/Off
Keypad
Page 4
Before you start
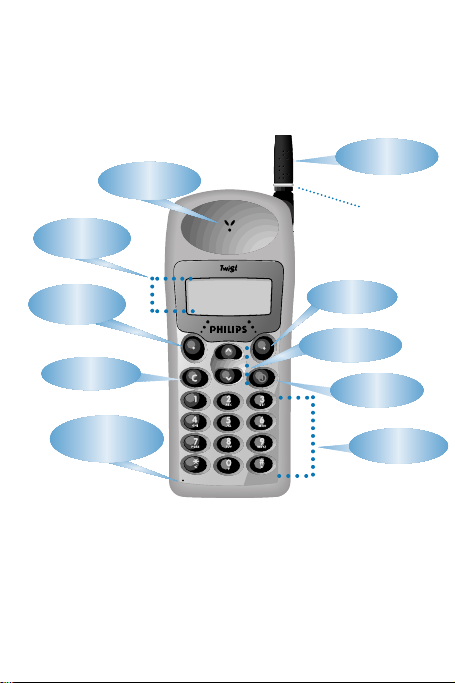
Description of the phone
H
Philips Twist
B
Option End
C
1
A
B
C
D
G
F
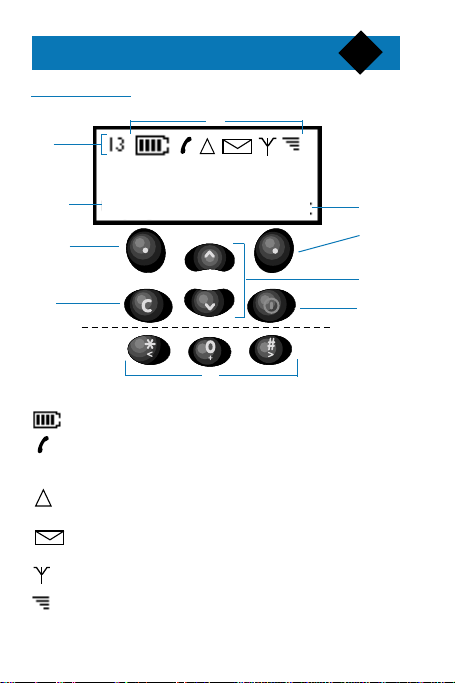
A: Symbols
Battery charge: 4 bars means battery charged.
Telephone: Tel. steady means that a call is in
progress.Tel.flashing means that your phone is ringing.
Roaming: means that you are using a network
other than your home network.
Mail: mail steady means that you received a new text
message. Mail flashing means that the memory is full.
Network: means that the phone is registered
with a network.
Reception quality: 4 bars means the best reception.
E
Page 5

Before you start
▼
▼
▼
B & C: Soft keys
The phone has two ‘soft keys’ (C).The soft keys
do different things at different times.A label (B)
on the display shows what the soft key will do.In
this guide, when we say ‘press End’, what we
mean is ‘press the soft key under the label End’.
D: Scroll keys
Use these keys to ‘scroll’ through menus, phone
book or messages.When it is possible to scroll up
and down, the scroll indicators are shown on
the display.
In standby mode, press to select the Redial
list or to select the Reply list. During a call,
use these keys to set the volume.
E: On/Off button
Press and hold to switch the phone on or off.
F: Right and Left keys
Use these keys to move the cursor right or left
when you enter a text message.When it is possible
to move the cursor, are shown on the display.
G: Clear key
Use this key to clear the display or delete mistakes
you made. Press and hold this key to go back to
standby mode from the Menu options.
H: Index
The index displays one, two characters or nothing
depending on what you are doing.The indications
displayed are as follows: position in the menu or in
a list, number of the active call when receiving two
calls, ‘S’ if the silent mode is activated, ‘*’ to
indicate the currently selected option.
2
Page 6

Before you start
3
Security
Radio waves
Your cellular phone is a radio transmitter/receiver. It
transmits and receives radio waves in the GSM
frequency. The GSM network controls the power at
which the phone transmits (between 0.02 watts and
2 watts).
Your cellular phone complies with all relevant safety
standards.The CE mark on your cellular phone means
that it is compliant with the European directive on
electromagnetic compatibility 89/336/EEC and the
low voltage directive 73/23/EEC.
Safety precautions
Careless use of the phone can result in harm to you
or others. Please read and follow all the security
instructions given here and inquire about local laws
and regulations.
■ Vehicles: check with the manufacturer that
electronic equipment used in your vehicle will not
be affected by radio energy. Avoid using your
phone while driving (it affects your concentration).
Respect the local laws and regulations.
■ Aircraft: switch your phone off when in an aircraft.
It is illegal to use your cellular phone when airborne.
Page 7

Before you start
■ Hospital: switch your phone off near hospitals or
medical equipment. Ask the manufacturer about
the radio wave shielding of any electronic medical
devices which you may use (pacemakers, hearing
aids).
■ Blasting areas: switch your phone off where
blasting is in progress (quarries).
■ Flammable atmospheres: switch your phone
off in areas with a potentially flammable atmosphere
(petrol stations, fuel depots or chemical plants).
■ Safety: use your phone in the normal operating
position (to ear). Do not touch the antenna while a
call is in progress. Do not use your phone with a
damaged antenna (risk of minor skin burn).
■ Children: keep your phone in a safe place, out of
reach of small children.
Using your phone efficiently
To improve the performance of your phone and reduce
radio energy emission and battery consumption:
■ Avoid low reception areas (tunnels or between tall
buildings).If the shows less than 2 bars, move to
another location.
4
Page 8

Before you start
■ Always let your battery discharge completely before
recharging it.
■ Do not use any battery chargers other than those
specified in the PHILIPS catalog. Using another
charger may be dangerous and will invalidate any
approval given to the phone.
■ Do not allow metal objects to short circuit the
battery contact (such as keys in your pocket).
■ Switch the phone off if you are going to leave it
unused for a long time.
■ Store the phone in a clean, dust free place.
■ Keep the phone away from heat.
■ Do not try to disassemble the phone. If it is not
working properly, call the PHILIPS Helpline.
■ Keep the phone dry and do not use harsh chemicals
(such as solvents or detergents) to clean it.To clean
the phone, wipe it with a soft cloth dampened with
a midly soapy water solution.
The SIM card
To use your phone, you must insert a valid SIM card
supplied by your GSM service provider.
When you switch the phone on,it may ask for the PIN
code.The PIN code is the secret code of the SIM card.
You cannot use the SIM card without the PIN code.
5
Page 9
Before you start
The SIM card contains your subscription number and
phone number. It also contains a memory in which
you can store phone numbers and messages. If you
use your SIM card on another phone, you still retain
the same phone number and phone book.
6
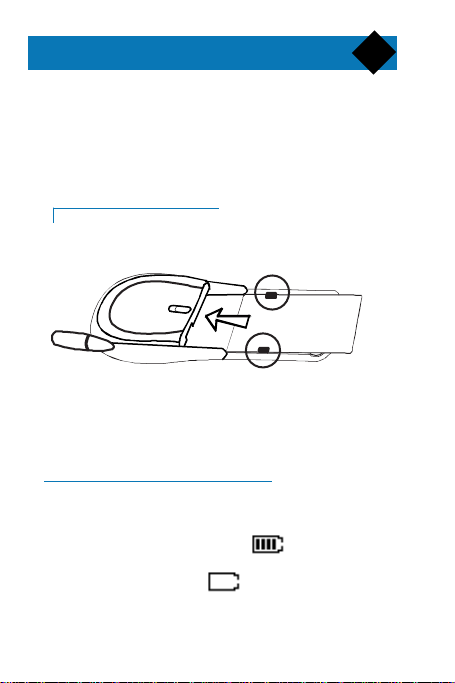
▼
■ Remove the battery.
■ Slide card into the grooves in the phone (the chip
must be facing inwards and towards the bottom of
the phone).
Inserting the SIM card
The battery
Your phone is powered by a rechargeable battery.
Charge the battery after purchase.
Battery charge is shown by the symbol. Each bar
shown represents 25% of charge. If the phone emits a
warning signal and the symbol is shown, you
should charge the battery.
Page 10
Before you start
!!
Charge a new battery for at least 24 hours
before use.
A battery only reaches its maximum capacity
after being totally discharged and recharged 2 or
3 times.
A battery lasts longer if you allow it to fully
discharge from time to time.
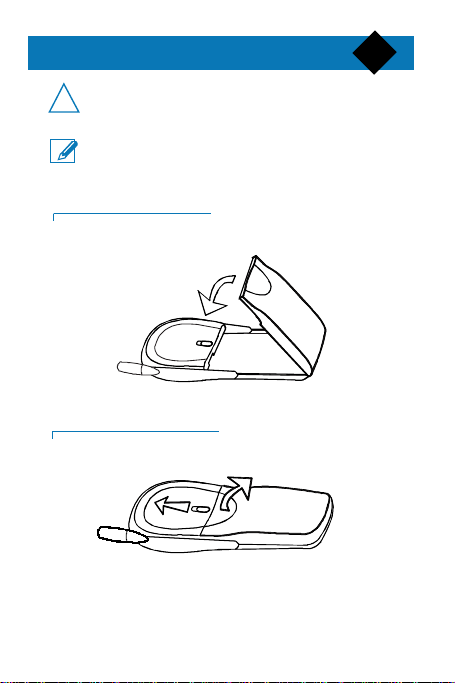
▼
■ Hook the battery onto the hinge at the bottom of
the phone.
■ Swing the battery down and click it into place.
▼
■ Push the latch at the top of the battery.
■ Swing the battery up and then lift it off the phone.
Clipping on the battery
Removing the battery
7
Page 11
Before you start
!!
8
A charger is supplied with the phone.
▼
■ Clip the battery onto the phone.
■ Plug the connector into the round socket at the
base of the phone.
■ Plug the transformer unit into a mains AC power
socket.
■ The symbol indicates the state of the charge
process:
• bars moving - means the battery is charging.
• steady - means the battery is fully charged.
The only way to turn the charger off is to
unplug it.
You can switch the phone on and use it during
charging.
The charger can be connected to an IT power
supply.
If the battery is completely discharged, the battery
icon will only appear 2 to 3 minutes after you
connect the charger.
Charging the battery
Page 12
Basic functions
▼
▼
9
▼
■ Press to switch your phone on.
■ Type your PIN code if activated and press OK
If you enter the wrong PIN code 3 times,
!!
your SIM card will be blocked.
You must then enter the PUK code provided by
your service provider (10 wrong PUK codes entered will totally block your SIM card. Contact your
service provider).
■ Press and hold to switch your phone off.
Switching on/off
Standby mode
After being switched on, your phone goes to standby
mode.Your phone is ready to use.The display is as follows:
network to which
you are connected
If the and the are not displayed, the
network is not currently available. Move to a
!!
different location.
In this guide: operations started from standby
mode are marked . Operations started
during a call are marked
battery charge status (max. :4 bars).
your phone is registered with a network.
quality of reception (max. : 4 bars).
▼
.
Page 13

Basic functions
10
▼
■ Dial the phone number you require.
■ Press Call,
During the call is displayed.
■ Press End to end the call.
Making a call
Answering a call
When a call is received:the phone rings, flashes
and the display shows Ringing or caller number if
your network supports this service.
▼
■ To reject the call, press Reject
If you reject the call, the phone returns to standby
mode and the caller hears the busy tone.
The rejected call may be forwarded to another
number (see Using the menus/Call forward in
page 27).
■ To answer the call press Answer, is displayed.
■ Press End to end the call.
Earpiece volume
▼
■ Press to adjust the earpiece volume.
The display shows 1 to 5 black rectangles to
indicate the volume level (maximum volume = 5
black rectangles).
Page 14

Basic functions
!!
11
Redialling
You can recall the last 10 different numbers dialled.
▼
■ Press to display the Redial list.The last number
you dialled is displayed.
■ Press and select another phone number.
■ Press Call
Replying
You can recall any of the last 10 different numbers
that called you (if your network supports this service).
▼
■ Press to display the Reply list,the last number
that called you is displayed.
■ Press to select another phone number.
■ Press Call
If FDN is present and
you can’t access Redial and Reply list.
Switching the microphone off/on
▼
■ Press and hold Option or to switch the
microphone off. Muted is displayed.
■ Press Unmute to switch the microphone on.
Public Only option is set,
Page 15

Basic functions
Emergency Call
You can make an emergency call without entering
your PIN code.
▼
■ Switch your phone on.
■ Press SOS.The display shows Emergency.
■ Press Call
You can also make an emergency call from the
standby mode by entering 112 and pressing Call.
Depending on your network, you can make an
emergency call with no SIM card in your phone.
Using the Hot Keys
Your phone is provided with functions directly
accessible in standby mode. Pressing and
holding any numeric key of the keypad (1 to 9)
activates one of these functions (Hot Keys).
Reminder: in standby mode, the numeric keys are
pressed normally to dial a phone number.
▼
■ Make sure your phone is in standby mode (the
network's name is displayed).
■ Press and hold a key between and to
activate the associated function.
You can visualise the settings of the Hot Keys
(see Using the menus/Customize in page 31).
12
Page 16

Lists
13
Lists
The electronic phone book contains 4 separate lists :
• Private names list (ADN)
Access to a private list is identical to a classical
phone book. You can prevent its access using the
menu 65, Public Names list and then Name res-
triction.
If FDN is present and Public & Private option is
set, to enter the private names list press Names
then OK or long press on Names.
• Public names list (FDN)
When the option Public Only is set in the menu 65
(Public Names list / Name restriction) the phone
book is a public name list. Its access can't be protected.You can use it as a short list to restrict outgoing calls.
Access to the previous is done by pressing soft
key Names in the idle mode.The maximum num-
ber of entries to FDN and ADN phonebooks
depends on your SIM card.
If FDN is present and Public Only option is set
you can only access public names list.
Alphabetical search and position search work
only in the private list. If wildcard characters "?"
Page 17

Lists
are present in the number in the public list you
can tape digits that take the places of the wildcard
characters. For instance, you can modify number
+33243???? before making a call.
• Redial list
Every time you make a call, the phone number is
recorded in the Redial list.The last 10 different numbers are saved.
• Reply list
Every time you receive a call, the phone number is
recorded in the Reply list (if your network supports
this service).The last 10 different numbers are saved.
14
Page 18

Phone book
!!
15
Making an entry in
▼
■ Dial the phone number.
■ Press Store
■ Enter a name with the keypad (see Entering a name
in page 14).
■ Press OK to confirm the name.
■ Press OK to confirm the phone number.
■ Press to set the position of the entry.This
position is displayed in the index.
■ Press OK to save the entry.
When the SIM card memory is full, you must
delete an entry before you can add another
(see Deleting from the Names list in page 18).
the private Names list
Page 19

Phone book
Entering a name
Each key corresponds to several characters.
Key Upper case Lower case
1 [space]1.:,”!?¡¿’;()&@ [space]1.:,”!?¡¿;()&@
2 ABC2AÄÅÆÇ abc2адежЗ
3 DEF3ÉE∆Φ def3éè∆Φ
4 GHI4ΓI ghi4Γi
5 JKL5Λ jkl5Λ
6 MNO6ÑÒÖ∅ mno6ñòö∅
7 PQRSβΠΘΣ7 pqrs7βΠΘΣ
8 TUV8Üù tuv8üù
9 WXYZ9ΩΞΨ wxyz9ΩΞΨ
0 0+*/-%<>=#£$¥€ § 0+*/-%<>=#£$¥€ §
Press a key several times to select the character
you want. For example:
▼
■ Press 3 times to enter the letter C.
If the next character uses the same key as the
precedent, wait 2 seconds or move the cursor
right.
16
Page 20

Phone book
■ Press or to move the cursor left or
right.
■ Press to enter a space.
■ Press to change between upper and lower
case.
■ Press to delete one character.
■ Press and hold to delete the whole line of
characters.
17
Entering a number
▼
■ Enter numbers using the keypad.
■ Press and hold to enter + instead of the
international prefix.
■ Press to delete one character.
■ Press and hold to delete the whole line of
characters.
All numbers should be entered in their
international format.This means that you can dial
all numbers from any network.
Page 21

Phone book
Making a call from the Names list
You can select an entry from the Names list and
dial it directly.
▼
■ Press Names then OK (or simply press and hold
Names) to select the Names list.
■ Press to select the required entry.
■ Press Call
■ Press End to end your call.
Searching for a name
You can use a short cut to recall an entry from the
private Names list.
▼
■ Press Names
■ Enter the first letter(s) of the name you require.
■ Press Search
■ The display shows the first name which begins with
the letter(s) you entered.
■ Press Call
Changing an entry
You can change the name,number or position of an
entry in the private Names list.
▼
■ Press Names then OK (or simply press and hold Names).
18
Page 22

Phone book
■ Press to select the required entry.
■ Press Option then OK
■ Change the name using the keypad, then press OK
■ Change the number using the keypad,then press OK
■ Change the position using
■ Press OK if the new position is free or Swap if the
new position is in use.
19
Copying an entry into
the private Names list
You can copy a number from the Redial or Reply
list into the Names list.
▼
■ Press to copy from the Reply list or
from the Redial list.
■ Press to show the number you want to copy.
■ Press Option
■ Press to select Store
■ Press OK
■ Enter a name with the keypad and press OK
Page 23

Phone book
■ Press OK to confirm the phone number.
■ Press to set the position of the entry.
■ Press OK if the new position is free or Swap if the
new position is in use.
Deleting from the private Names list
▼
■ Press Names thenOK (or simply press and hold Names)
■ Press to select the required entry.
■ Press Option then . Delete is displayed.
■ Press OK then Yes to confirm the deletion.
20
Deleting from the Reply
and Redial lists
▼
■ Press to delete an entry from the Reply list
or to delete an entry from the Redial list.
■ Press to select the number you want to delete.
■ Press Option
■ Press to show Delete to delete one phone
number from the list or Delete all to delete all
phone numbers from the list.
■ Press OK
Page 24

Using the menus
Your phone has a set of functions arranged in menus
and submenus.The menu system makes it easy for you
to access the phone functions.
How to navigate
▼
■ Press Menu
■ Press to display one of the 7 menus.
■ Press OK to select the menu.
■ Press to scroll through the different submenus.
■ Press OK to select a submenu.
■ Press Exit or to return to the previous display.
Exit to leave the menu
by mode.
Each menu or submenu has a number which is
displayed in the index. Use the menu or submenu
▼
numbers for quick access to a menu.
■ Press Menu
■ Enter the menu or submenu number.
■ Press OK to select the menu or submenu.
■ Press and hold or
system and return to stand-
Short cuts into menus
and submenus
21
Page 25

Using the menus
Settings menu (1)
Use the Settings menu to personalise your phone.
Languages (11)
Set the language of your phone.
Backlight (12)
Switch on/off the backlight function. If selected on,
the keypad and display will light up for 15 seconds
each time you press a key.
Ringer types (13)
Set your preferred melody (8 choices).
Ring volume (14)
Set the volume of the ring tone (3 levels plus silent
mode).
Key tones (15)
Switch on/off the tones you hear when you press a key.
Anykey answer (16)
Switch on/off the function for accepting a call by
pressing any key of the keypad.
Contrast (17)
Set the display contrast level (5 levels).
Own number (18)
Display your phone number.
It needs to be entered first.
Battery alarm (19)
Switch on/off the signal which warns that the battery
needs charging.
22
Page 26

Using the menus
!!
!!
23
Messages menu (2)
Use the messages menu to handle your voice and text
messages. Voice messages are stored in a mailbox by
the network. Text messages are automatically recei-
ved by your phone. If somebody sends you a message
while your phone is off, you will receive it when you
switch your phone on (except for broadcast messages).
Receiving a text message:
Your phone emits a beep (if Incoming alert tone
(26) is activated), is displayed and the text
message is stored in the Saved list.
If flashes, the Saved list is full and you
must delete some text messages.
Voice mail (21)
• Mail box: shows your mail box number if you
have entered it in Box number.Press Call to call
your mailbox.You can also use the Hotkey 1 to call
your Mail Box (see Basic functions/Using the
Hotkeys in page 12).
• Box number: enter or modify your voice
mailbox number.The box number must be entered
to use Hotkey 1.
If FDN is present and Public Only option is
set, you can access your voice mail only if its
number is present in the Public list.
Read new (22)
Use this function to read or delete a new text message.
Page 27

Using the menus
Read all (23)
Use this function to read or delete all text messages
saved in the saved list.
Send message (24)
24
▼
■ Enter your message using the keypad then press OK
■ Enter the phone number to be called or press
Names to select it in the Names list,then press OK
■ Enter the number of the Message centre or press
Names to select it in the Names list, then press OK
■ Press OK to send the message immediately (it can
be saved later) or press then OK to save
your message in the Saved list (the message can be
sent later).
■ Press Exit to quit.
Reply to a saved incoming text message
▼
■ Press List.
■ Press to select Saved list then OK.
message.
■ Press Reply.
Write and send text messages
■ Press to select an incoming text
Page 28

Using the menus
■ Enter the number of the Message centre or press
Names to select it in the Names list,then press OK
■ Send is displayed. Press OK
■ Press OK to save your answer in the Saved list or
press Exit to quit.
▼
■ Press List
■ Press to select Saved list or Standard list then
press OK
■ Press to select a message then press OK
■ Enter the phone number to be called then press
OK or press Names to select an entry in the
Names List.
■ Enter the number of the Message centre or press
Names to select it in the Names list, then press
OK
■ Press OK to send, then press Exit
The Standard list contains standard messages
that are provided with the phone.
Delete (25)
Use this function to delete messages from the Saved List.
Incoming alert tone (26)
Switch on/off the alert tone when a message is
received.
Send a message from a list
25
Page 29

Using the menus
!!
Network menu (3)
Use the Network menu to manage network connections.
Register new network (31)
Use this function to register with another available
network.
A # before a network name indicates that this
network is forbidden.
Preferred networks (32)
Use this function to create and manage a list of your
preferred networks.When you switch your phone
on and several networks are available, your phone
will select one according to this list.
Call meters menu (4)
Use the Call meters menu to show the cost or the
duration of calls.
Last call info (41)
Switch on/off the display of call duration and call
cost after each call.
Call timers (42)
Use this function to display the total duration for
Outgoing, Incoming and Life time calls. Use the
Reset function to reset the Outgoing and
Incoming calls meters to zero.The reset function
requires the security code (see page 29).
When you are registered with a network other
than your home network, you are said to be
‘roaming’. is displayed.
Lifetime calls meter cannot be reset.
26
Page 30

Using the menus
!!
Info during call (43)
Switch on/off the display of call cost or call duration
during each call.
Access to the two following submenus (44)
and (45) requires a PIN2 code and a phase 2
SIM card (see your service provider).
Charge rate (44)
Use this function to enter the currency unit and the
charge rate (cost of a call per unit of time).
Accumulated cost (45)
Display, set and reset the accumulated cost limit.
Display and reset the current accumulated cost.
Services menu (5)
Use the Services menu to activate Network services
provided by the GSM network. The availability of
these functions depends on the network services you
have subscribed to.
Restriction of identification (51)
Switch on/off the function for sending your phone
number to your correspondent.
27
Page 31

Using the menus
!!
!!
Call forward (52)
Divert incoming calls to another number of your
choice.
You can forward different types of incoming calls:
- all calls,
- calls when your phone is busy,
- calls which you did not answer,
- calls received when a network cannot reach you.
Call barring (53)
Barring of incoming calls or outgoing calls.
These functions require the call barring
password provided by your service provider.
Call waiting (54)
Switch on/off the call waiting service (see Using
Network Services in page 31).
Status of services (55)
Show the currently selected network services on
the phone display.
This function calls the network. You may be
charged for it. Check with your network
provider.
28
Page 32

Using the menus
29
Security menu (6)
Use the Security menu to protect your phone against
unauthorised use.
PIN code (61)
Switch on/off the requirement to enter your PIN
code at switch on.
Change PIN (62)
Use this function to change your PIN code.
Options 62 only appears if PIN code is activated.
Change security code (63)
Use this function to change your security code.
When you buy your phone, the security code
is 1234.
Keypad lock (64)
Use this function to prevent accidental activation of the
keys (for example,when the phone is in your pocket).
Press and hold Unlock to unlock the keypad.
Public names (65)
(if ADN/FDN service is available)
Consult
Use this function to consult, edit or delete an entry from
the public list.
Add new
Use this function to add a new entry to the public list.
Page 33

Using the menus
Name restriction
Use this function to switch between the Public Only and
Public & Private options.
When Public & Private is set you can add,change,
delete and read names in both public and private
lists.Access to the ADN is identical to standard phonebook access.
When Public Only is set, the Names list is the
public list.You can only read names from the public
list.Dialing any number except the emergency number and those present in the public list,is forbidden.
Any access to private list is forbidden.
Set to private (only if Public & Private is set)
Use this function to move names from the public to private list.
Set to public (only if Public & Private is set)
Use this function to move names from the private
to public list.
All the functions require the PIN2 code.
Call restriction (65)
(if ADN/FDN service is not available)
Use this function to restrict calls to numbers on the Names
list and/or restrict the lenght of permitted phone numbers.
This function requires the security code.
Change PIN2 (66)
Use this function to change your PIN2 code.Access
to this submenu requires phase 2 SIM card.
30
Page 34

Using the menus
To visualise the current settings of the Hot Keys
▼
■ Press to visualise the setting for each of the
keys (the number of the current key is displayed in
the index).
Hot Keys (71)
Your phone is provided with 9 Hot Keys (key 1 to 9)
that allow you to perform the features you use more
frequently by simply long-pressing on one key.Use this
menu to visualize the hotkey functions :
Long press on key Function
Customize (7)
Call Voice Mail
Keypad Lock
Silent Mode
Operator defined
SOS Call
Operator defined
Operator defined
Operator defined
Operator defined
31
Page 35

Using the menus
• Send message: select a message in the Saved list. You
can send again a saved message to the same number
you originally sent it to.
• Call forward: select function as in Call forward
menu then enter a phone number or select a name
in the Names list.
Some Hot Keys may be locked depending on the
network.
Welcome text (72)
Use this function to change the welcome message
displayed when you switch the phone on.
■ Press and hold to delete the old message.
■ Enter the new welcome message using the keypad.
Autoredial (73)
Switch on/off the Autoredial function.
■ If the number you call is busy, the display shows
User busy. Press Redial, your phone will
automatically try to make the call again a few
second later.
■ If the called number is still busy,it will try again, up
to 10 times.When the called line becomes connected, the phone emits a series of alert beeps.
■ Press Exit to cancel the Autoredial function.
32
Page 36

DTMF tones
33
DTMF tones
The numeric keys of the phone (0 to 9,* and #) always transmit DTMF tones (Dual Tone MultiFrequency) also known as
“ touch tones ”. DTMF tones are used by certain telephone
services such as answering machines, pagers, etc.
Rather than keying in a separate code after each of a series
of requests,you can carry out complex operations in one go.
e.g. To reach ‘Listen to new messages’ in
An answering machine has the following characteristics:
phone number 12345, password 9876, code 3 to
activate the function ‘Listen to new messages’.
▼
■ Enter 12345, 12345 is displayed.
■ Press and hold to enter a wait character.
12345w is displayed.
■ Enter 9876, 12345w9876 is displayed.
■ Press and hold to enter a pause character,
12345w9876p is displayed.
one go
Page 37

DTMF tones
■ Enter 3 and press Call, 12345w9876p3 is
displayed.
This DTMF sequence can also be stored in the
Phone book.
Your phone always interprets the first pause as a
wait character (the rest of the digits are not sent
until your phone is connected).The second pause
is a real pause of 2.5 seconds. To get a longer
pause enter several pause characters.
34
Page 38

List of accessories
3 different
batteries
BHR 155/P 600 mAh NiMH Standard pack
BHR 156/P 600 mAh NiMH Slim pack
BHR 159/P 900 mAh NiMH Business pack
35
Fast Charger
Powers phone and charges battery in
a short time.
European plug ACSR15/P UK plug ACUR15/P
Australian plug ACAR15/P USA plug ACTR15/P
South Afr. plug ACZR15/P
Carry cases Green PBMR/15P Yellow PBYR15/P
Red PBRR/15P Blue PBHR/15P Black PBBR15/P
Brown PBNR/15P Grey PBGR/15P Bordeaux PBPR15/P
Cigarette
Lighter
Po wers phone and charges
battery in a car.
Adaptor
(CLA)
Car Kits
Two different kits are available, very
easy to install:
CKBE/10P
• Basic Car Kit includes a phone
holder and CLA.
CKEE/10P
• Easy handsfree Car Kit: minimum
of installation for a handsfree
solution
Page 39

List of accessories
36
DeskTop
Charger
DTBE 10/P
Handsfree
Headset
HSAE10/P
Charges a battery when connected
to the phone and provides a slot
for an accessory battery.
Combining an ergonomic earpiece
and a microphone to use your
phone in every situation
(walking, riding a bicycle, etc...).
Page 40

A problem ?
Trouble Shooting
Problem Solution
The display shows
BLOCKED when
you switch on.
Somebody tried to use your
phone but didn't know the PIN
code or Unblocking code.
Contact your service provider.
37
The and
symbols are
not showing.
The display doesn't
respond (or
responds slowly)
to key pushes.
Your phone
does not go to
standby mode.
The network connection is lost.
Either you are in a radio shadow (in a tunnel or between tall
buildings) or you are outside of
the network coverage area.Try
from another place.
The display responds more
slowly at very low temperatures.
This is normal and does not
affect the operation of the
phone. Take the phone to a
warmer place and try again.
• Either press and hold
• Or switch off the phone,
check that the SIM card and
battery are installed correctly,
and switch on again.
 Loading...