

Page 1

^ W ' '
r W \ ' ^
1' -^1 ■
//
i
Ì
i
''
Installation
Einstellung
Installation
Installazione
Instaliacion
Instaliatie
STÜ 303
Instaiaqao
PHILIPS
Page 2

SATELLITE FREQUENCY CONVERSION TABLE
Satellite Tuner
Transmitter Freq.
IF Freq.
(MHz)
977 10,977
997 10,997
1016 11,016
1035 11,035
1054
1073 11,073
1094 11,094
1112 11,112
1131
1150 11,150
1169 11,169
1188 11,188
1208 11,208
1227 11,227
1246 11,246
1265 11,265
1284 11,284
1304
1323 11,323
1342
1361
1380 11,380
1399 11,399
1419 11,419
1438 11,438
1457 11,457
1476 11,476
1495 11,495
1515 11,515
1534 11,534
1553 11,553
1572 11,572
1591
1610
1630 11,630
1649 11,649
1668 11,668
1687 11,687
1706 11,706
1726 11,726
1745
1764
1783
1802
1822
1841
1860
1879
1898
1918
1937
1956
1975
1994
(Band 1)
(GHz)
(Bähdll) !
((^Hz)
11,727
11,747
11,766
11,785
Transmitter Freq. \
11,054
11,804
11,823
11,844
11,862
11,131 11,881
11,900
11,919
11,938
11,958
11,977
11,996
12,015
12,034
11,304
12,054
12,073
11,342 12,092
11,361
12,111
12,130
12,149
12,169
12,188
12,207
12,226
12,245
12,265
12,284
12,303
12,322
11,591
11,610
12,341
12,360
12,380
12,399
12,418
12,437
12,456
12,476
-
-
-
-
-
-
-
-
-
-
-
-
-
-
12,495
12,514
12,533
12,552
12,572
12,591
12,610
12,629
12,648
12,668
12,637
12,706
12,725
12,744
This table has been calculated for Philips
Low Noise Converters, with the following
characteristics:
Frequency band I:
10.950 -11.700 GHz (Astra, Eulelsat, etc.)
Local Oscillator Frequency of Low Noise
Converter; 10,000 GHz
Frequency band II:
11.700 - 12.750 GHz (TDF, TVSAT, TELE-X,
Telecom Kopernikus, etc.)
Local Oscillator Frequency of Low Noise
Converter: 10,750 GHZ
STEREO 1 2
MHz
7.02 + 7.20 7.38 + 7.56 7.74 + 7.92
MONO LANGUAGE1 2 3 4
7.02
MHz
6.50
6.60 ffelecom)
7.20 7.38 7.56 7.74 7.92
6.65
5 6
3
7
Audio subcarriers in PAL or SECAM
SOUND SELECTION menu
8
5.8
Page 3

Installation
c© INSTALLATION INSTRUCTIONS
CE> INSTALLATIONSANLEITUNG
CD INSTRUCTIONS D'INSTALLATION
O INSTRUZIONI PER INSTALLAZIONE
CD INSTRUCCIONES DE INSTALLACION
(■
(
(
CD INSTALLATA INSTRUKTIES
CD INSTRUÇÔES PARA AINSTALAÇÂO
^1?
Page 4

Introduction
J
We hope you will enjoy using your new Philips STU 909 multi-standard
satellite tuner. This tuner will open up an entire world of satellite TV reception;
both of the new D2-MAC broadcasts and all today’s conventional PAL
transmissions. In particular, the STU will allow you to receive the increasing
number of programmes broadcast in the new D2-MAC Wide-Screen 16:9
format.
You can use your Philips STU 909 satellite tuner with one or two fixed satellite
dish antennae, or with a motor-controlled rotatable dish which will allow you to
receive programmes from any satellite you wish, if your dish is suitable.
We advise that you ask your Philips dealer to handle the installation of your
Philips satellite dish antenna and your STU 909 tuner.
Safety instructions
To avoid short-circuits, which may cause fire or electric shock, do not expose
this Philips STU 909 receiver to rain or moisture.
Dangerous voltage inside. Do not open the cabinet. There are no user
serviceable parts inside. Repairs should be carried out by qualified service
personnel only.
NEVER connect or modify cables while the receiver is connected to the
mains. Ensure that no objects or fluids pass through the ventilation openings.
Do not put your receiver close to an external source of heat (radiator, etc.).
Ensure that air can circulate freely through the ventilation openings of the
receiver. Your receiver supplies 14 or 18 V DC voltage to your satellite dish
antenna. Make sure you only connect your satellite dish to the satellite dish
inputs, 27 and 28, and nothing else.
MAINS connection
Do not connect the receiver to the mains yet, but continue reading these
Operating Instructions!
NEVER connect or modify cables while the receiver is connected to the mains.
Positioning your Philips STU 909
Satellite Tuner
The STU 909 is intended for use in a domestic environment only and should
never be operated or stored in excessively hot or humid atmospheres.
Choose a position some distance away from radiators or other sources of
heat.
Leave a clear space of at least 3 cm all around the set for ventilation. Make
sure that curtains, cupboards, etc. cannot obstruct the air flow through the
ventilation openings.
Insert batteries in the remote control
O Remove the battery cover located on the back of the remote control handset.
O Insert three batteries (type R03S 1.5 V).
O Replace the battery cover.
Page 5
How to connect
your TVA^CR
The connection descriptions which foliow wiil cover most situations. However,
the instruction manuais for some TV sets may propose alternative connection
schemes. You should follow such instructions where applicable.
Using a Euroconnector gives the best picture and sound quality, especially
with D2-MAC programmes.
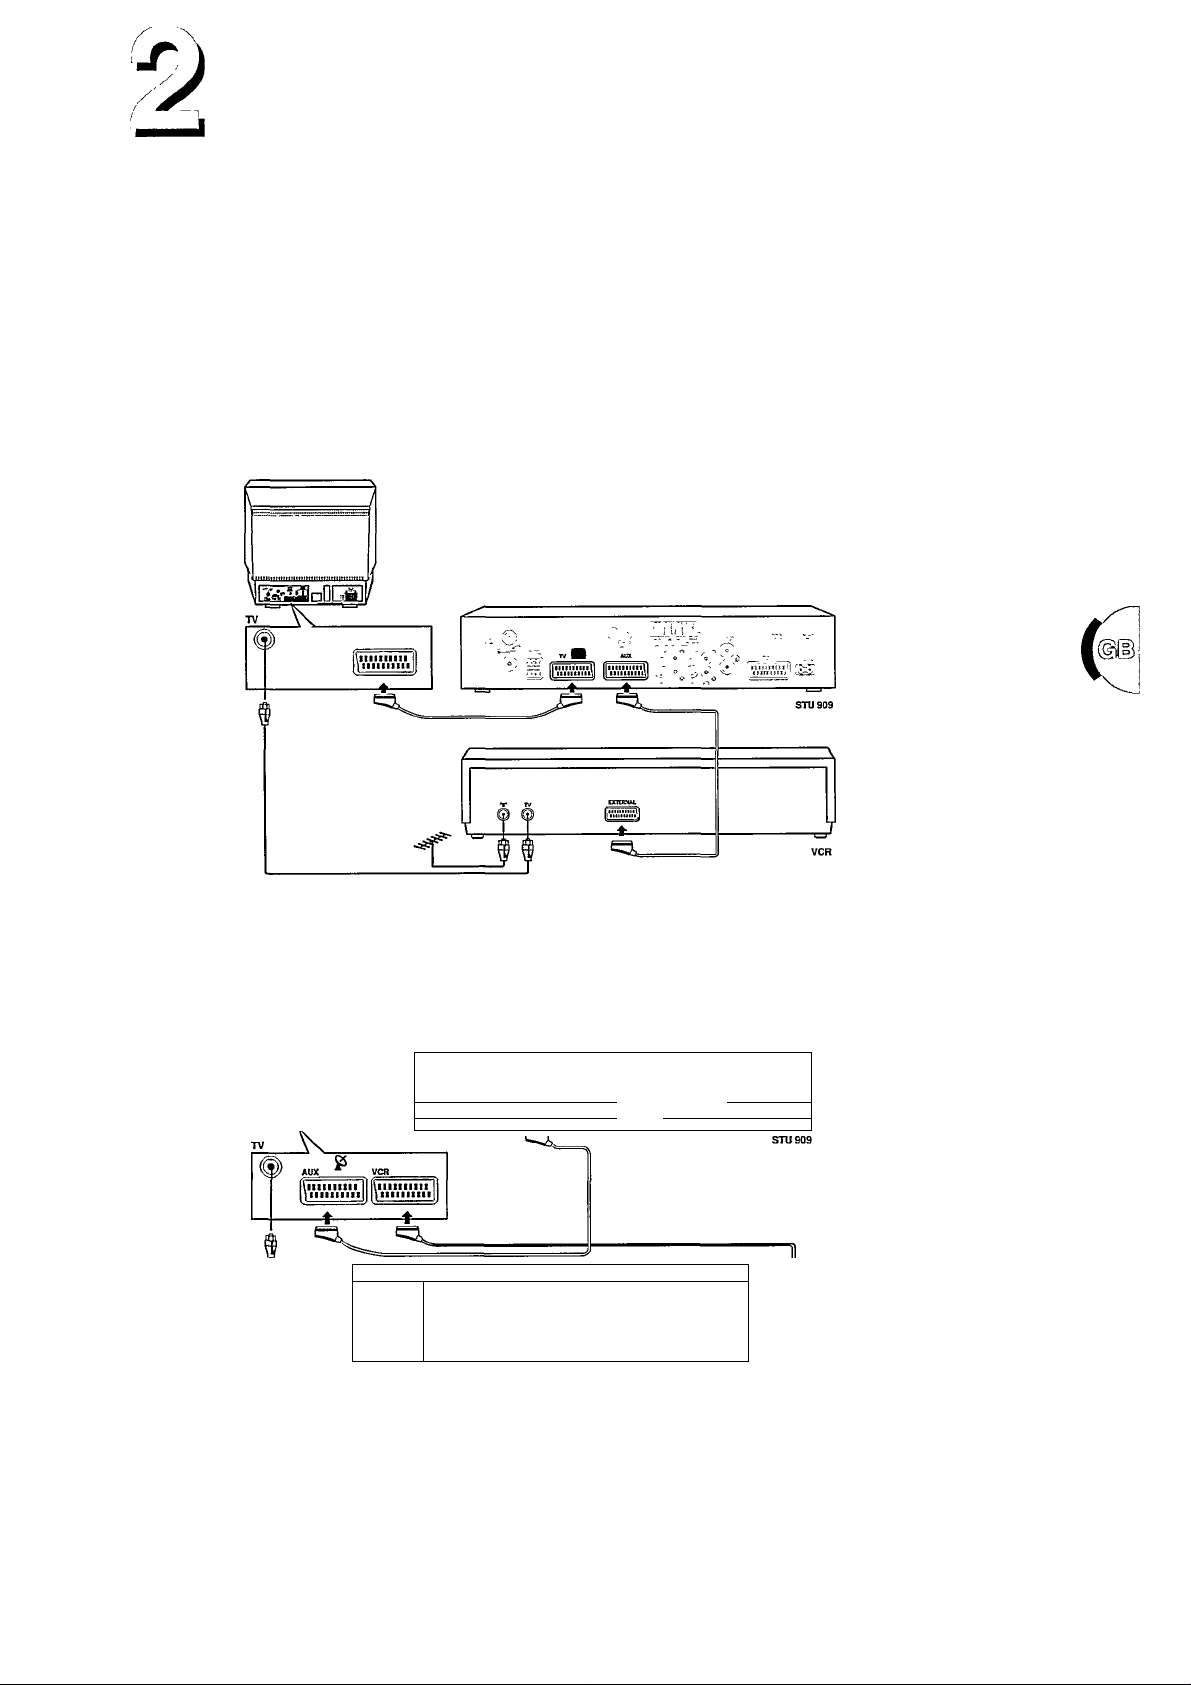
1. To a TV and a VCR, using Euroconnectors
Installation
2. To a Philips TV with ML, PV or SL in its type
number
,
, —, 'S;
inuntltltlHHItHltHMIIIIlllllllltH
z
---------------------------------------------------------------
''■ Zy
[miiiiiiil i
I iiiiiiiii iu
© 6
---------------
♦--------------------------rrr
't
For PHILIPS TV sets with ML, PV or SL in the type number, except for the
Wide-Screen 16:9 TV sets, it is recommended to use the connections as
shown in the drawing and follow the instructions supplied with the TV set.
«X
lllllllllll lll
II illlllll lltl
CDSl"
* 5 » -
----
1
=?
.v.v.v.v.'l iül
^
Note:
The VCR timer feature only works when the TV set is ON.
Page 6
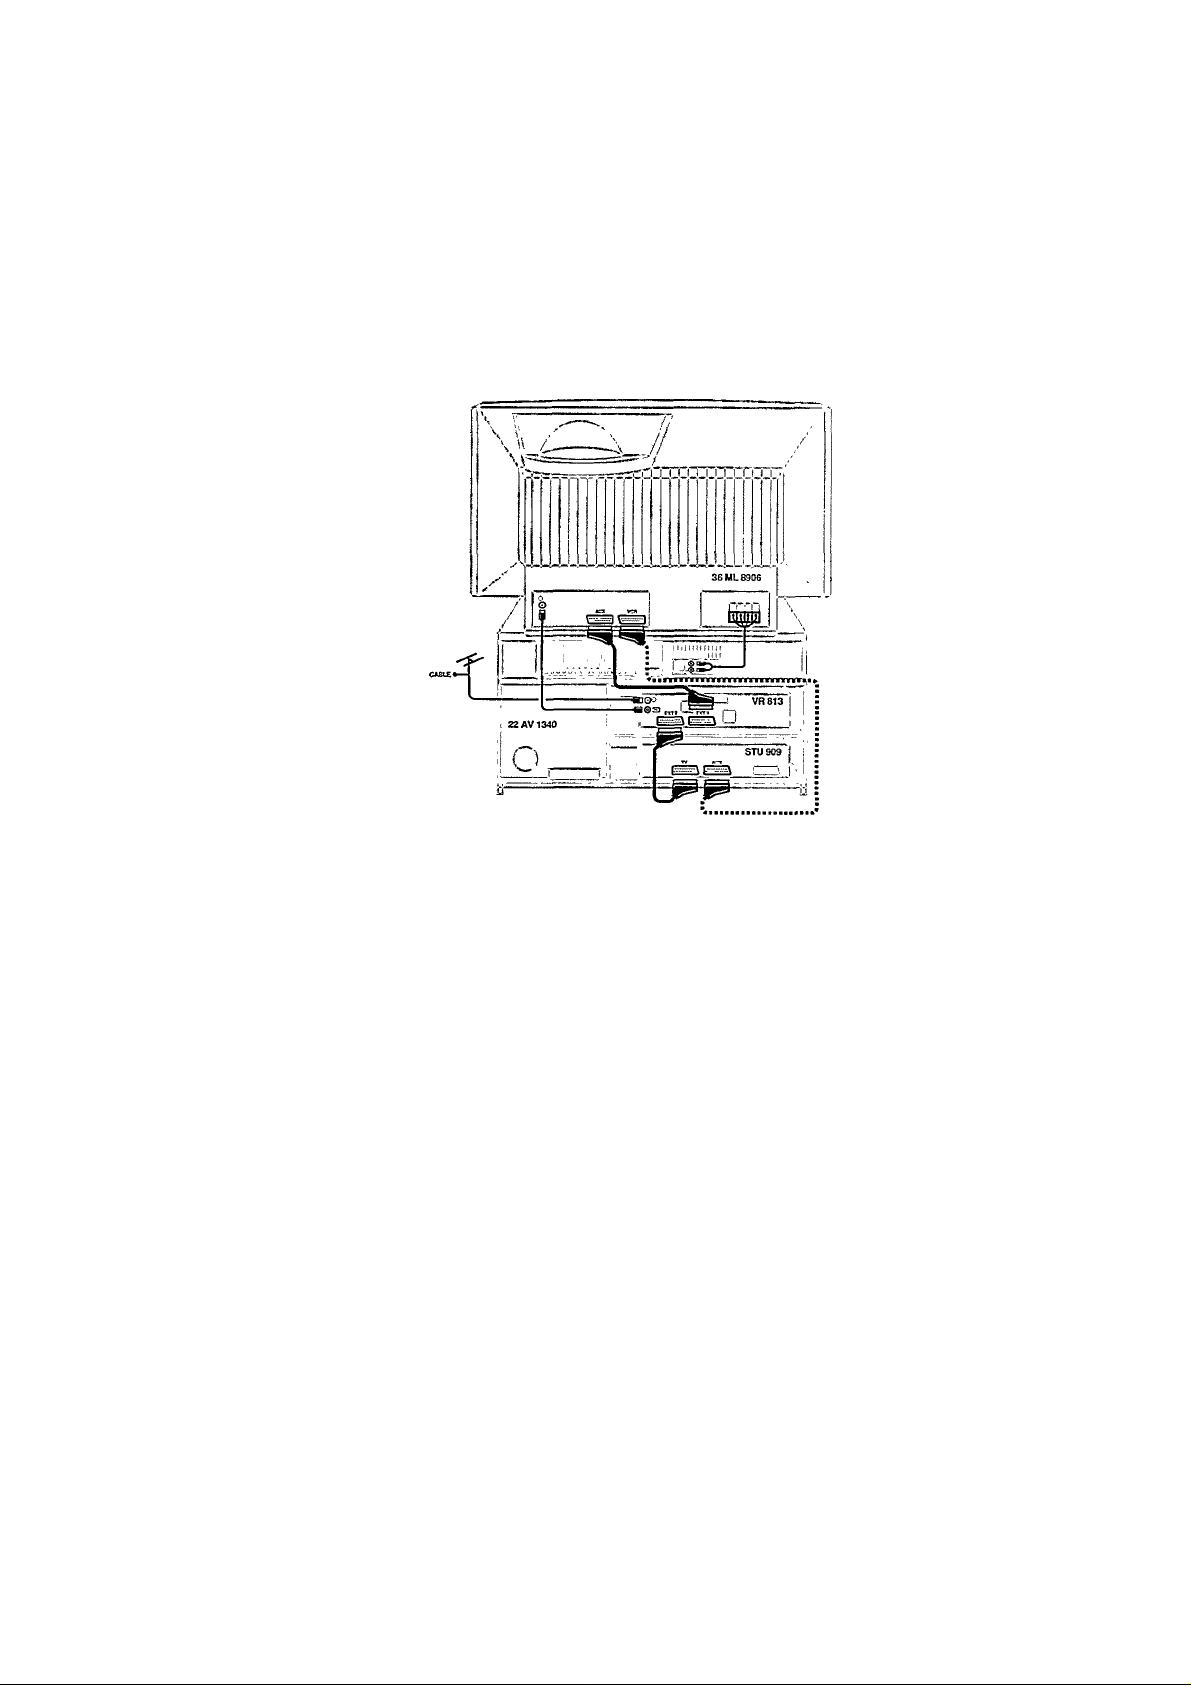
3. To a Philips Wide-Screen TV set (e.g. 36ML8906)
and a Wide-Screen VCR (e.g. VR813)
In order to make automatic recording and display of D2-MAC Wide-Screen
(16:9) pictures possible, a special configuration is recommended as shown in
the drawing.
Note:
In the configuration menu, section 6, item 2 (Wide-Screen TV) needs to be
■YES'.
4. To a TV and a VCR using RF cables
O Connect the cable coming from your normal TV antenna (or cable-TV) to the
input marked CABLE of your STL) 909.
O Connect the ® output to your VCR antenna input using the RF cable
delivered with your STU 909.
O Connect the VCR output to your TV.
O Connect your STU 909 to the mains.
O Press the ON switch.
O Press MENU on your remote control.
O Now tune your TV and VCR to the signal from the STU 909 until you see this
picture. If necessary refer to the manual of your TV and VCR.
O Store the satellite signal under a programme number you do not have in use
yet on your TV and VCR.
If patterning on this or any other programme on your TV occurs, you must
slightly modify the position of the control marked on the back of your
STU 909, using a small screwdriver. Then tune again your TV and VCR.
O If you have any more connections to make, disconnect the STU 909 from the
mains.
1 PROGRAMME LIST
2 SATELLITE LIST
3 SOUND SELECTION
4 RECORD SELECTION
5 HEADPHONE
6 SPECIAL ITEMS
7 SUBTITLE SELECTION
8 PAY TV INFO
9 INSTALLATION
s«l«ctM *9. off
Page 7
)
v\
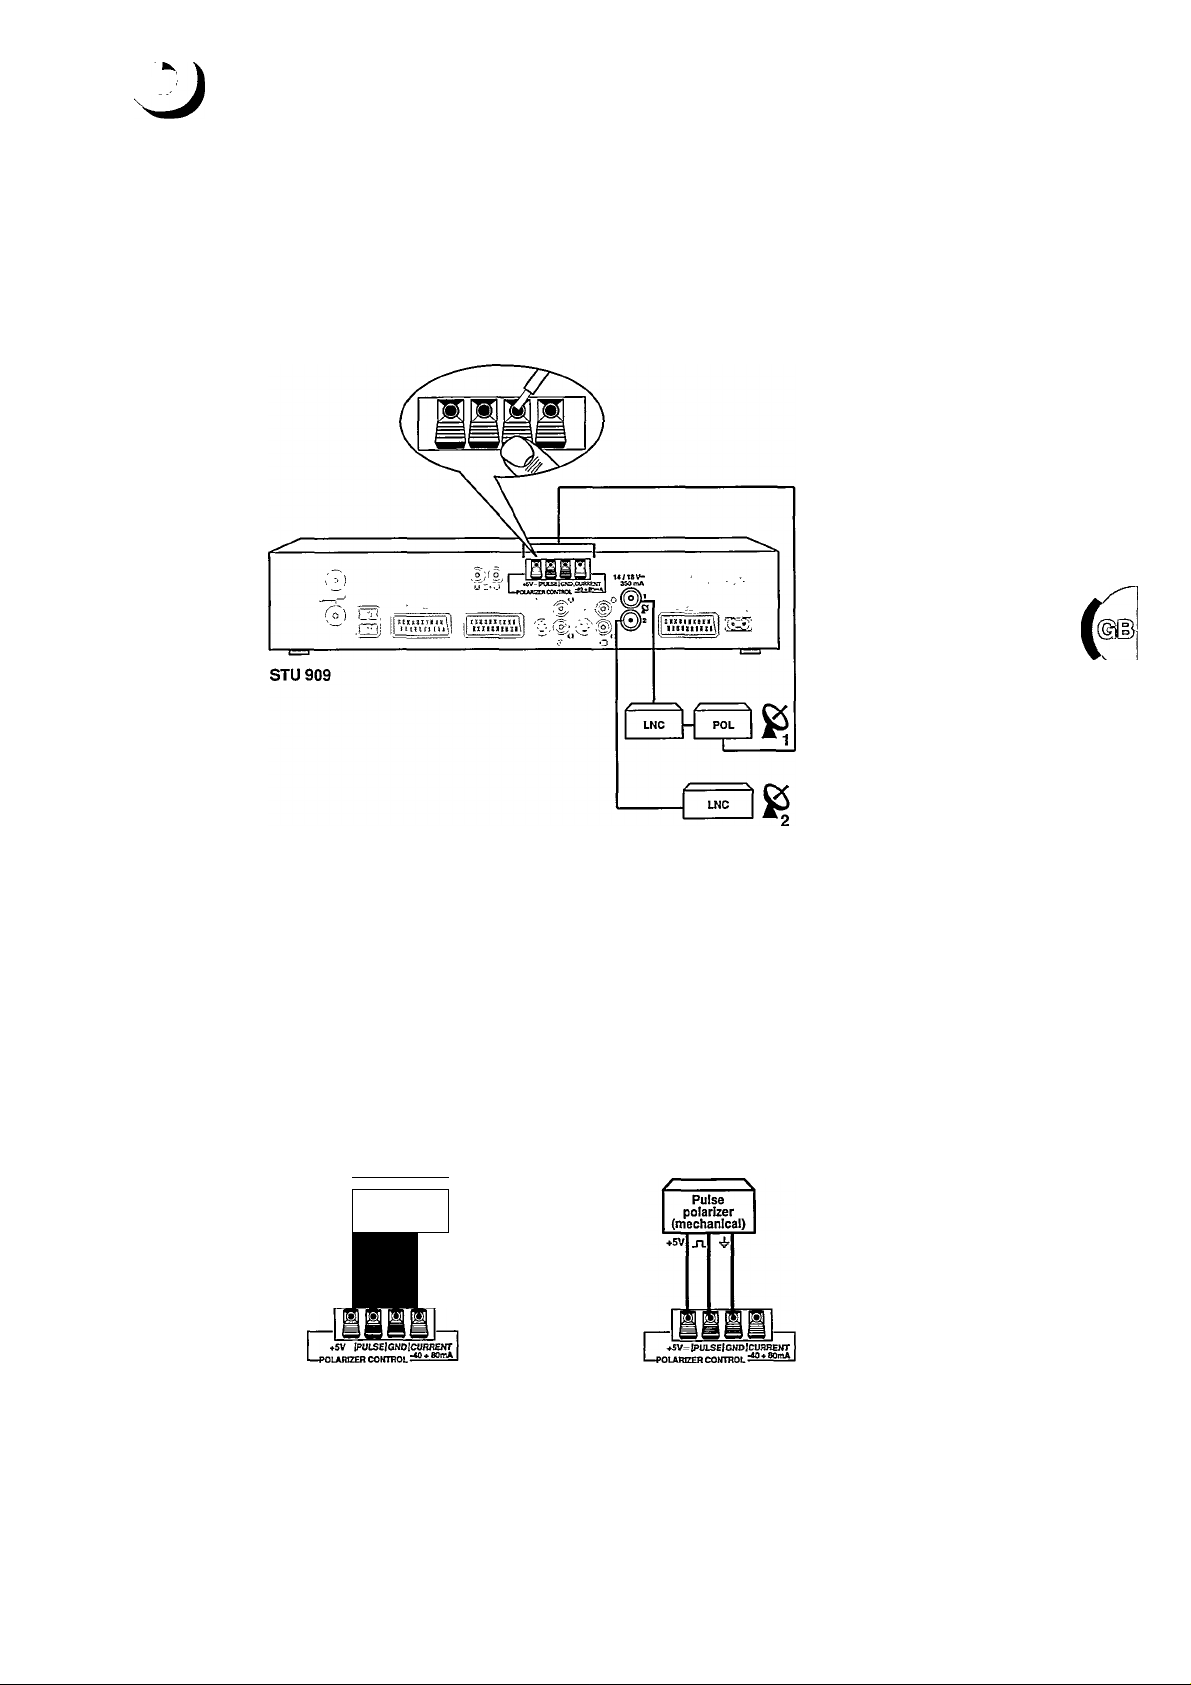
How to connect Satellite
Installation
dishes
Dish inputs
One or two dish antennae can be connected to your satellite tuner as
indicated in the drawing below.
Note:
Before connecting satellite dishes you need to remove the red protection cap
(if present) on the satellite dish inputs.
The connector for dish input 1 is supplied.
Polarizer
The STU 909 can control various kinds of polarizers. Please make sure that
you connect them as indicated in the drawing.
Note:
It is recommended to make known to the satellite tuner the type of polarizer
before you connect it. (see section 6: configuration).
/
Magnetic
polarizer
CURR
Page 8
J
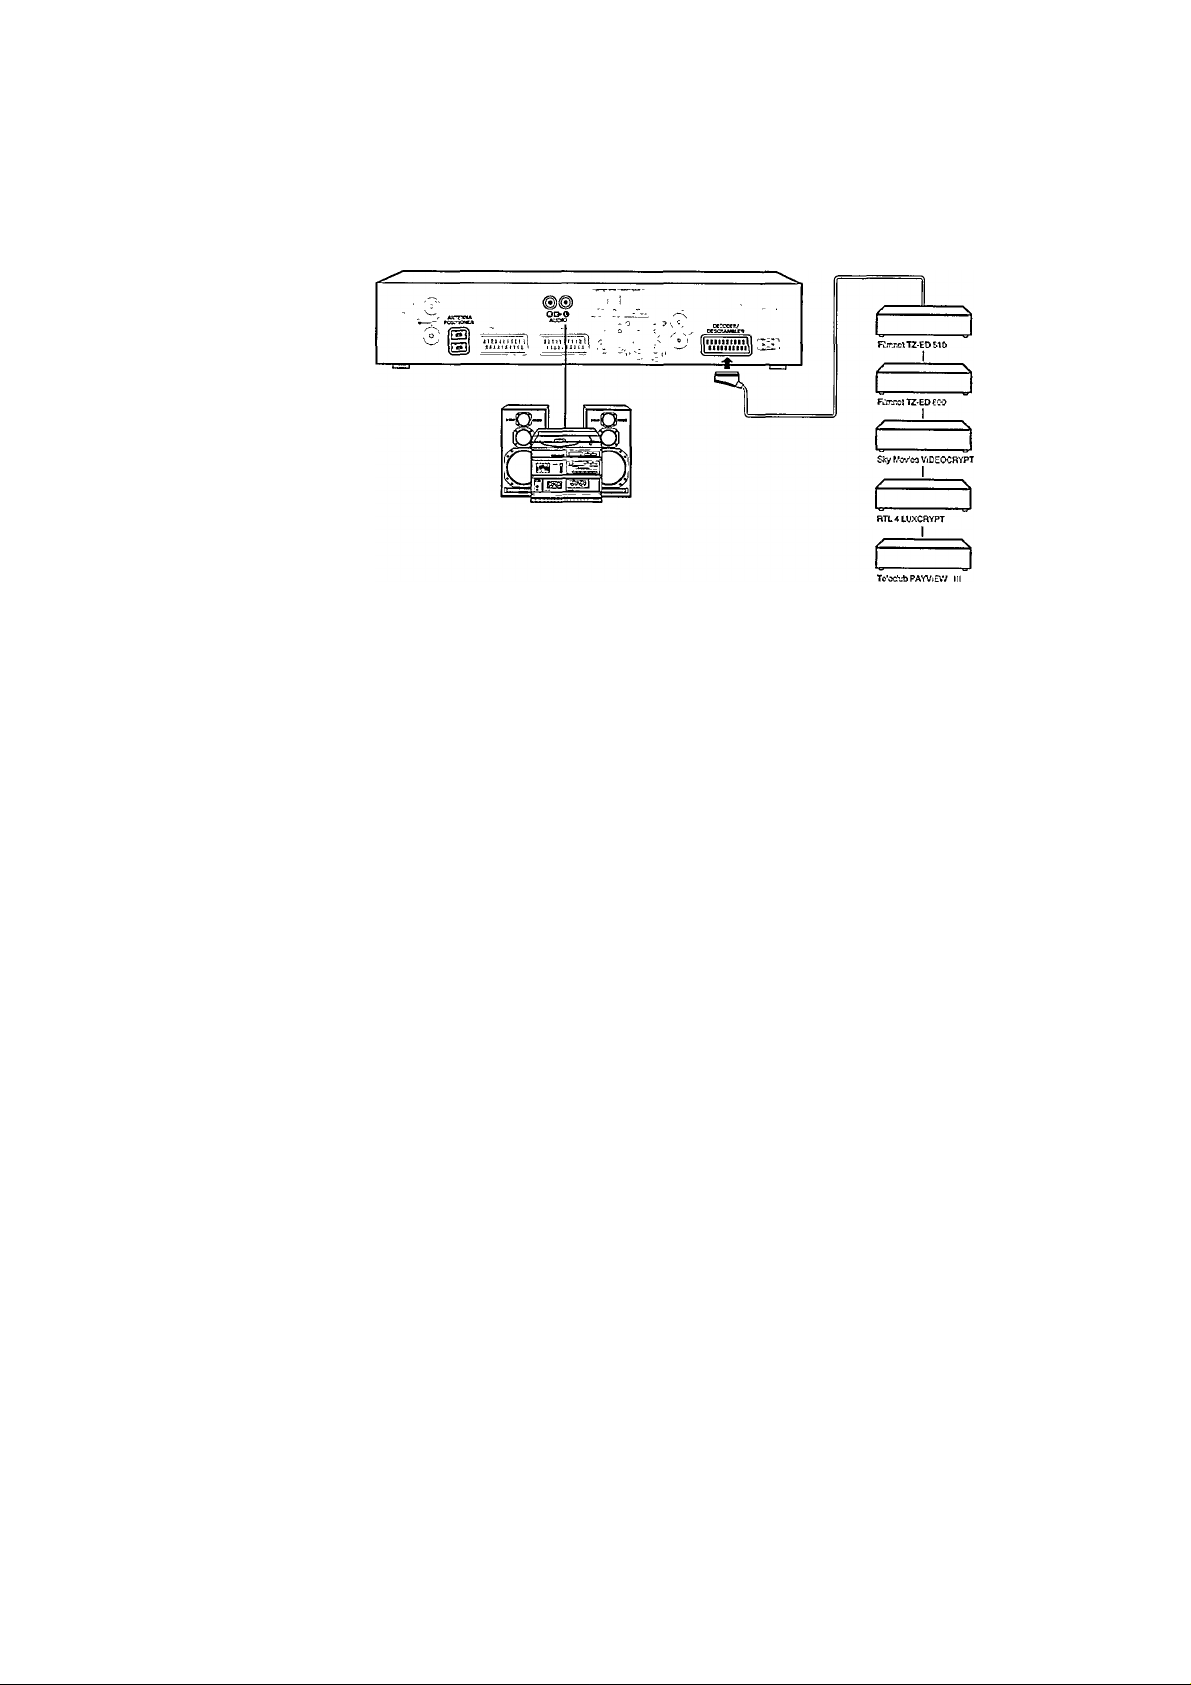
j Additional connections
STU 909
Decoders/Descramblers
O Use connection 29
It is possible that certain combinations of TV sets and decoder/descramblers
can have an adverse effect on teletext quality.
For more information, see the supplied booklet 'Connecting Descramblers and
PAY TV Decoders to your Philips Satellite Tuner'.
Hi-Fi System
If you wish to use your Hi-Fi audio installation to listen to satellite radio sound
programmes, you can connect it to the audio sockets 17.
O Connect the output sockets AUDIO L (left channel) and AUDIO R( right
channel) to a pair of left and right input sockets on your Hi-Fi audio installation.
Page 9

^ How to use the
Installation menu
IMPORTANT
O This circle in front of a sentence indicates that you have to do something.
> This arrow in front of a sentence indicates the result of what you have done.
Installation of your Satellite Tuner is done using on-screen information from a
MENU.
Note;
For D2-MAC programmes, the coloured menu appears in the picture. For PAL
programmes in most cases a black screen will appear. If the picture is needed
for installation, the menu for PAL will be in black and white.
After connecting the mains plug, a lamp lights up in red. This indicates the
STAND-BY position.
Switching your Satellite Tuner ON
O Press key (1) on the front of your Satellite Tuner.
> A lamp lights up in green
or:
O Press the programme a or v key on the Satellite Tuner.
t> A lamp lights up in green.
Installation
On the remote control.
O Press switch D/5f
I> A lamp lights up in green.
Switching OFF
O Press key (!) on the Remote Control or Satellite Tuner.
> A lamp lights up in red.
Calling up the INSTALLATION menu
O Press key MENU
> The MAIN MENU menu appears on the screen
O Select INSTALLATION
> The INSTALLATION menu appears on the screen
I> Lamp ON flashes green
Switching off the menu
O Press key OFF
In the INSTALLATION mode, 6 items are available:
1. Menu language:
Selection of the required menu language
2. Configuration:
'Tells' the Satellite Tuner what equipment is connected;
- number of dishes
- type of dish electronics (LNC’s, Polarizers)
- if an automatic antenna positioner (i.e. SCC 209) is connected
- what kind of TV set you have: Wide-Screen or normal TV set.
1 MENU LANGUAGE
2 CONRGURATION
3 SELECT SATELLITE POSmONS
4 SELECT PROGRAMMES
5 TXT PREFERENCE PAGES
6SETCLOCK
select: 1 • 6, off
INSTALLATION
3. Select satellite positions:
Selecting and naming satellites and their positions.
Page 10

4. Select programmes;
Selecting and naming satellite programmes.
5. TXT preference pages: Storing Teletext preference pages (for D2-MAC
satellite programmes).
6. Set clock: Setting DATE and TIME.
LANGUAGE OPTIONS
(Only necessary if menu is not shown in the required language)
O Press 1
I> The LANGUAGE menu appears on the screen.
O Use the number keys to select the required language.
I> The language selected will now be used for all Satellite Tuner menus.
Return to INSTALLATION
O Press the MENU key.
I> The INSTALLATION menu appears on the screen.
Demonstration mode
The STU 909 has a built-in demonstration mode which is intended for in-shop
promotion.
Switching on the demo mode
Select a D2-MAC programme on the tuner.
o
Press the INSTALL key on the tuner.
o
>
A lamp flashes green.
Press Q on the remote control.
o
Switching off the demo mode
Press OFF.
MENU LANGUAGE
1 ENGLISH
2 DEUTSCH
3 FRANCAtS
4 ESPANOL
5 iTALIANO
6NEDERLANOS
select; 1-6, menu, off
1 MENU LANGUAGE
2 CONFIGURATION
3 SELECT SATELLITE POSmONS
4 SELECT PROGRAMMES
5 TXT PREFERENCE PAGES
6 SET CLOCK
INSTALLATION
»6,011
10
Page 11

Configuration
Installation
Calling up the CONFIGURATION menu
O Press key MENU
\> The MAIN MENU menu appears on the screen
O Select INSTALLATION
> The INSTALLATION menu appears on the screen
1> Lamp ON flashes green
O Press 2
> The CONFIGURATION menu appears on the screen.
Automatic Antenna Positioner
O Press 1 and select the situation which applies to you with - or +.
D> NO if you have one or two 'fixed' dishes.
D> YES if you have a rotatable dish and an antenna positioner.
Note:
The STU 909 is designed to work together with an automatic antenna positioner
(i.e. see 209).
If you use a different antenna positioner, a message will be displayed after
each satellite change.
Wide-Screen TV (16:9)
O Press 2 and select the situation which applies to you with - or +.
> NO, if you have a TV with a normal screen (4:3).
> YES, if you have a wide-screen TV (16:9).
Number of dish antennae
O Press 3 and select the number of dish antennae you have with - or +.
I> 1, if you have one dish antenna.
I> 2, if you have two dish antennae.
1 MENU LANGUAGE
2CONRGURATION
3 SELECT SATELLITE POSmONS
4 SELECT PROGRAMMES
5 TXT PREFERENCE PAGES
6 SET CLOCK
select: 1 - 6, off
1 ANTENNA POSITIONER
2 WIDE SCREEN TV SET (16:9)
3 NUMBER OP DISH ANTENNAE
4 CONRGURATION ANTENNA 1
5 CONHOURATION ANTENNA 2
6 OVERALL POLARIZER SETTINGS
7 SET EAST AND WEST UNITS
select: 1 - 7, -, +
INSTALLATION
CONFIGURATION
>NO<
>NO<
>1<
(■
Configuration Antenna 1
For the dish connected to INPUT 1:
O Press 4.
> The CONFIGURATION ANTENNA 1 menu appears on the screen.
Polarizer type
Signals from a satellite are transmitted with different polarizations.
There are 4 kinds of polarization: horizontal and vertical linear polarization and
left and right hand circular polarization.
For proper reception, you need a device called a polarizer which is located in
the LNC assembly of your dish antenna. This must be connected to the
polarizer socket at the back panel of your Satellite Tuner so that the right
polarization is selected automatically each time you change channels.
LNC (Low Noise Converter)
An LNC is the signal - receiving element in your satellite dish. The tuner has to
know which type of LNC is connected.
O From 1-3 select the type corresponding to your configuration
Note:
If you have a DUAL BAND LNC or the LNC is not powered by the satellite
tuner, option 3 a 14 V/18 Vpolariser is not available.
O Press MENU.
CONFIGURATION ANTENNA 1
1 POLARIZER TYPE > MAGNETIC <
2 LNC POWERED BY TUNER >YES<
3 DUAL BAND LNC >NO<
select; 1 - 3, «, -t-
11
Page 12

Configuration Antenna 2
O Follow the same procedure for the dish connected to INPUT 2 as described
under CONFIGURATION ANTENNA 1.
Adjusting the polarizer settings
The polarizer settings are pre-programmed at the factory. However, due to
local conditions, it might be necessary to deviate from these settings.
The overall Polarizer Adjustment menu enables you possiblility to change the
polarizer settings for all satellite programmes in one go.
This menu is displayed only if the pulse or magnetic polarizer is selected in
the CONFIGURATION ANTENNA menu.
The STU 909 allows you as well to programme the polarizer setting for each
satellite programme individually (fine tune: SKEW) - see section 10.
O Press 6
l> The OVERALL POLARIZER SETTINGS menu appears on the screen.
O Select by pressing 1,2,3 or 4 the polarisation as indicated in the OSD
information at top left.
The highest signal strength, and best picture and sound quality, are selected
by pressing - or +.
Note:
Using programme
av
you can select programmes transmitted in other
polarizations.
Using <—i—> you can select another satellite if required.
O Press MENU.
CONFIGURATION ANTENNA 2
1 POLARIZER TYPE > MAGNETIC <
2 LNC POWERED BY TUNER ■»YES<
3 DUAL BAND LNC >NC*<
select:
OVERALL POLARIZER SETTINGS
SIGNAL STRENGTH 1212
POLARIZATION
1 HORIZONTAL
2 VERTICAL
3 LEFT HAND CIRCULAR
4 RIGHT HAND CIRCULAR
select; 1 • 4. % +. menu, off
53
Rotation limit (East-West)
Note:
Only available if an automatic antenna positioner (i.e. SCO 209) is connected.
To align the dish and set satellite positions, please refer to the instruction
manual of the antenna positioner.
12
Page 13

Installation of a fixed
dish antenna
Before you can select the satellite programmes, make sure that the
configuration (see section 6) is in accordance with your equipment:
- ANTENNA POSITIONER: NO.
-NUMBER OF DISHES: 1.
- Set the LNC and Polarizer types information as described in section 6.
Note:
Make sure that your DISH ANTENNA is connected to input 1.
For your convenience, we have pre-programmed your STU 909 with all the
satellite TV and radio stations that you can receive (see separate list).
However, this list is changing almost daily, and you can obtain the latest
information from your dealer.
Select Satellite positions
Installation
O Press key MENU
> The MAIN MENU menu appears on the screen
O Select INSTALLATION
l> The INSTALLATION menu appears on the screen
I> Lamp ON flashes green
O Press 3: SELECT SATELLITE POSITIONS.
> The SATELLITE POSITIONS menu appears on the screen.
O Press 2: SATELLITE LIST.
O The SATELLITE LIST menu appears on the screen
O Press 1 and select the satellite wanted from the list with - or + .
O Press the MENU key again.
> The SATELLITE POSITION menu appears again on the screen.
O Press 3
[> The word STORED will flash at the upper right corner of the screen.
If your dish antenna is aligned correctly:
O Press OFF.
> Your Satellite Tuner is now ready for use.
Note:
If some programmes are missing , or you are not completely satisfied with the
picture/sound quality, see section 10.
1 MENU UNGUAGE
2C0NRGURAT10N
3 SELECT SATELLITE POSmONS
4 SELECT PROGRAMMES
5 TXT PREFERENCE PAGES
6SETCLOCK
select: 1 - 6, off
1 RND SATELLITE POSITIONS
2 SATELLITE UST
3 STORE SATELLITE DATA
select: 1 > 3, -, +, menu, off
NAME NAME NAME
TELE-X TV-SAT
KOPERN2 TDF
ASTRA A
ASTRA B
EUTUF1
OLYMPUS
1 SELECT SATELLITE
2 NEXTCHARACTER OLYMPUS
select: 1-2,
INSTALLATION
SATELLITE POSITIONS
1
-, +, menu, off
13
Page 14

If your dish antenna needs to be aligned:
O Press OFF
O Press 1
I> The first programme is selected
Align your dish antenna until you receive the correct satellite programme.
Note:
If fine tuning is required, or you want to add programmes, see section 10.
If you want to add a new satellite:
If the required satellite is not pre-programmed in the factory (see enclosed
list), menu item 1 of the SATELLITE POSITIONS menu can help you to align
your dish antenna.
O Press 1 of SATELLITE POSITIONS menu.
I> The FIND SATELLITE POSITIONS menu appears on the screen.
O Press 1.
I> The receiver executes a fast scan of all channels. This allows you to detect a
satellite while moving the dish.
O Press 2.
> A programme is searched automatically which allows tine tuning of the dish
antenna with the help of the signal strength indicator.
O Press MENU.
I> The SATELLITE POSITIONS menu appears on the screen.
SATELLITE POSITIONS
1 FIND SATELLITE POSITIONS
2 SATELLtTE LIST
3 STORE SATELUTE DATA
selecl: t • 3, *. ♦, m»nu, oH
FIND SATELLITE POSITIONS
SIGNAL STRENTHM58
1. SEARCH FOR SATELLITE
2. CHANNEL SEARCH
select: 1«2, menu, off
Name of new satellite/change of existing name
O Press 2.
I> The SATELLITE LIST menu appears on the screen.
O Press 1.
O Using - or +, select an empty location or the name you want to change.
O Press 2 and, using - or +, select a letter or digit.
O Press 2 again and, using - or +, select the next letter or digit.
I> In this way select the new satellite name (max. 7 characters).
If you have entered the satellite name:
O Press MENU.
t> The SATELLITE POSITIONS menu appears on the screen.
O Press 3.
I> The word STORED will flash at the upper right corner of the screen.
Satellite name is stored.
O Press OFF.
1 SATELLITE LIST
NAME
TELE-X TV-SAT
KOPERN2 TDF
ASTRA A
ASTRA B
EUTIIF1
OLYMPUS
1 SELECT SATELUTE
2 NEXT CHARACTER OLYMPUS
select: 1*2,-, ♦. menu, off
NAME
I
14
Page 15

Cj Installation of two fixed
dish antennae
Before you can select the satellite programmes, make sure that the
configuration (see section 6) is in accordance with your equipment:
- ANTENNA POSITIONER: NO.
- NUMBER OF DISHES: 2.
- Set the LNC and Polariser types information as described in section 6.
For your convenience, we have pre-programmed your STU 909 with all the
satellite TV and radio stations that you can receive (see separate list).
However, this iist is changing almost daily, and you can obtain the iatest
information from your dealer.
For Main dish antenna (1):
Note:
Make sure that your MAIN DISH ANTENNA is connected to input ^ 1.
Installation
Select Satellite positions
O Press key MENU
D> The MAIN MENU menu appears on the screen
O Select INSTALLATION
l> The INSTALLATION menu appears on the screen
> Lamp ON flashes green
O Press 3.
O The SATELLITE POSITIONS menu appears on the screen.
O Press 1 and select input >1< with - or +.
O Press 3.
I> The SATELLITE LIST menu appears on the screen.
O Press 1 and select the satellite wanted from the list with - or +.
O Press the MENU key again.
> The SATELLITE POSITIONS menu appears again on the screen.
O Press 4.
> The word STORED will flash at the upper right corner of the screen.
I> The seleted satellite for dish 1 is stored
For aligning your DISH, changing the name of the satellite or adding a new
satellite, see section 7.
1 MENU LANGUAGE
2CONRGURATION
3 SELECT SATELLITE POSITIONS
4 SELECT PROGRAMMES
5 TXT PREFERENCE PAGES
6 SET CLOCK
select: 1 - 6, off
1 ANTENNA INPUT
2 RND SATELLITE POSITIONS
3 SATELLITE UST
4 STORE SATELLITE DATA
select: 1 • 4, 4, menu, off
NAME
TELE-X
KOPERN2
ASTRAA
ASTRA B
EUTUFt
OLYMPUS
1 SELECT SATELLITE
2 NEXT CHARACTER OLYMPUS
select: 2. -, 4, menu, off
INSTALLATION
SATELLITE POSITIONS
m\w\ pr~—
NAME NAME
TV-SAT
TDF
15
Page 16

For second Dish Antenna (2):
Make sure that your second dish antenna is connected to input ^ 2.
O Press key MENU
1> The MAIN MENU menu appears on the screen
O Select INSTALLATION
I> The INSTALLATION menu appears on the screen
> Lamp ON flashes green
O Press 3.
> The SATELLITE POSITIONS menu appears on the screen.
O Press 1 and select input >2< with - or +.
O Press 3
I> The SATELLITE NAME menu appears on the screen.
O Press 1 and using - or +, select a letter or digit.
O Press 1 again and, using - or +, select the next letter or digit.
In this way select the new satellite name (max. 7 characters).
O Press MENU.
> SATELLITE POSITIONS menu appears on the screen.
O Press 4
> The word STORED will flash at the upper right corner of the screen.
[> The selected satellite for DISH 2 is stored.
For alignment of DISH ANTENNA, please refer to section 7.
1 MENU LANGUAGE
2 CONFIGURATION
3 SELECT SATELUTE POSITIONS
4 SELECT PROGRAMMES
5 TXT PREFERENCE PAGES
eSETCLOCK
select: 1 «6, oH
1 ANTENNA INPUT
2 FIND SATELUTE POSITIONS
3 SATELUTE LIST
4 STORE SATELLITE DATA
select: 1 • 4, •, *, menu. ot(
1 NEXT CHARACTER
select: menu, olf
INSTALLATION
SATELLITE POSITIONS
SATELLITE NAME
16
Page 17

Installation of a ratable
dish antenna
Your STU 909 multi standard satellite tuner is equipped to automaticaily
control a rotable dish antenna.
The automatic antenna positioner (i.e. SCC 209) can be connected to
connection 22 as indicated in the drawing beiow.
Installation
SCC 209
Before you can select the satellite programmes, make sure that the
configuration (see section 6) is in accordance with your equipment.
- ANTENNA POSITIONER: YES
- NUMBER OF DISHES: 1
- Set the LNC and Polariser types information as described above.
- Make sure that the antenna positioner (i.e. SCC 209) is connected properly
and switched ON.
Note:
Make sure that your dish antenna is connected to input 5^ 1.
After placing your rotable dish you must first set the rotation limits
(see section 6: Rotation Limit, East-West)
To aiign the dish and set sateiiite positions, please refer to the instruction
manual of the antenna positioner.
17
Page 18

Installation of Satellite
Programmes
This section describes how to select and store new satellite programmes, and
how existing programmes can be changed or deleted.
The STD 909 can receive D2-MAC as well as PAL satellite signals. Generally
the system selection is performed automatically. The 'Sound preference’
menus are different for D2-MAC and PAL.
Note:
In the INSTALL mode it is always possible to remove the menus temporarily
from the screen:
O Press the Q) key on the remote control.
> The menu disappears temorarily from the screen (3 sec).
O Press key MENU
> The MAIN MENU menu appears on the screen
O Select INSTALLATION
l> The INSTALLATION menu appears on the screen
1> Lamp ON flashes green
Note:
It is assumed that the dishes and satellites are installed and that you have
selected the correct satellite antenna input 1 or 2 under SELECT SATELLITE
POSITIONS. If not, first follow the instructions in sections 6, 7, 8 and 9.
O Press 4.
C> The PROGRAMMES menu appears on the screen.
With this menu on the screen you can select all installed satellites with the
help of the <— Î —> keys on your remote control (only for two dish
antennae or rotatable dish).
With the help of the Pv^\ keys on the remote control, you can select all the
programmes from the selected satellite.
O Press 1.
> The FIND PROGRAMMES menu appears on the screen.
O Press 1 and using - or + select the LNC band used:
I - Low band (14 V).
II- High band (18 V)
1 MENU LANGUAOE
2 CONFIGURATION
3 SELECT SATELLITE POSITIONS
4 SELECT PROGRAMMES
5 TXT PREFERENCE PAGES
6 SETCLOCK
select: 1 « 6, off
1 FIND PROGRAMMES
2 PROGRAMME LIST
3 SOUND PREFERENCE
4 STORE
select: 1 >4, menu, off
1 LNC FREQ. BAND ^
2 POLARIZATION SETTINGS
3 SEARCH 1 055 GHZ
4 DIRECT FREQUENCY ENTRY
5 SYSTEM >02MAC<
6 DESCRAMBLER SETTINGS
select: 1 » 6, +. menu, oil
INSTALLATION
PROGRAMMES
FIND PROGRAMMES
18
Note:
Band selection is only possible when a Dual-band LNC is present and
selected in the configuration menu. (See section 6)
O Press 2 (or 1 if dual-band LNC is ‘NO’).
I> The POLARIZER SETTINGS menu appears on the screen.
O Select the polarisation required by pressing 1 to 4.
O Fine-tune (skew) the polarisation using - or +.
I> The signal strength indicator helps your to find the maximum signal strength.
O Press MENU.
Note:
In case you are using a magnetic polarizer, you might need to adjust the
polarizer settings (‘skew’) for each programme,
or:
In case you have a 14V/18V polarizer:
Select HORIZONTAL or VERTICAL by using - or +.
Search:
Press 3 (or 2 if dual-band LNC is ‘NO’).
O
>
An automatic search is performed and the scan stops automatically at the first
detected programme.
POLARIZER SETTINGS
S1GNALSTENGTH;212
POLARIZAnON : 53
-
_________
1 HORIZONTAL
2 VERTICAL
SLEPT HAND CIRCULAR
4 RIGHT HAND CIRCUUR
select: 1 • 4, ♦, menu, off
POLARIZATION
0
POLARIZATION
+ , menu . off
>HORlZONTAL<
Page 19

Programmes can be found via an automatic search or via DIRECT
FREQUENCY ENTRY (Setting the output frequency of the LNC in MHz).
Installation
Direct Frequency Entry:
O Press 4 (or 3 if dual-band LNC is ‘NO’).
> The DIRECT FREQUENCY ENTRY menu appears on the screen.
O By using 0-9 the output frequency of the LNC can be entered directly (only the
first three digits).
O Press MENU.
I> The FIND PROGRAMMES menu appears on the screen.
System recognition Is performed automatically (D2-MAC or PAL).
Misinterpretation can occur with scrambled signals.
Manual override is possible:
O Press 5 (or 4 if dual-band LNC is ‘NO’).
C> Select D2-MAC or PAL by - or +.
External PAL Decoders/Descramblers can be connected to the Decoder/
Descrambler socket. See the enclosed booklet ‘Connecting descramblers and
Pay-TV decoders to your Philips Satellite receiver’.
To change the setting
O Press 6 (or 5 if dual-band LNC is ‘NO’).
I> The DESCRAMBLER SETTINGS menu appears on the screen.
O Press 1.
O Select AUDIO INTERNAL, EXTERNAL or AUTOMATIC by using - or +.
O Press 2.
O Select VIDEO INTERNAL, EXTERNAL or AUTOMATIC by using - or +.
Note:
Internal means audio/video processing in receiver.
External means audio/video processing via external decoder/descrambler.
Automatic means that a connected decoder/descrambler can switch
automatically if this box recognises the signal.
O Press MENU
> The FIND PROGRAMMES menu appears on the screen.
O Press MENU.
I> The PROGRAMMES menu appears on the screen.
DIRECT FREQUENCY ENTRY
FREQUENCY: 1-0 MHZ
SELECT: 0-9, menu, off
FIND PROGRAMMES
1 LNC FREQ. BAND >
2 POLARIZATION SETTINGS
3 SEARCH 1.055 GHZ
4 DIRECT FREQUENCY ENTRY
5 SYSTEM >D2-MAC<
6 DESCRAMBLER SETTINGS
select: 1 - 6, +, menu, ctf
For PAL programmes
DESCRAMBLER SETTINGS
1 AUDIO
2VIDEO
select: 1 - 2, +, menu, off
> INTERNAL <
> AUTOMATIC <
For D2 MAC programmes
DESCRAMBLER SETTINGS
> INTERNAL <
select: menu, off
For PAL programmes
1 RND PROGRAMMES
2 PROGRAMME UST
3 SOUND PREFERENCE
4 STORE
select; 1-4, menu, off
PROGRAMMES
Before you can store the selected programme, you need to:
- Allocate this programme to a programme number.
- If you require, enter the programme name.
- Select the preferred sound channel for this programme.
- Activate noise reduction if required (for D2-MAC only).
For D2 MAC programmes
1 RNDPROGRAMMES
2 PROGRAMME UST
3 SOUND PREFERENCE
4 NOISE REDUCTION RLTER
5 STORE
select: 1 - S, menu, off
PROGRAMMES
19
Page 20

Programme number and name:
O Press 2.
> The PROGRAMME LIST menu appears on the screen.
O Press 1.
O By using - or + select the require programme number.
O Press 2.
O Press - or + to seiect the tirst letter of the programme name.
O Press 2 again and, using - or +, select the next letter.
Continue until you have written the new satellite name (max. 7 characters).
O Press the MENU key.
I> The PROGRAMMES menu appears on the screen.
Sound Preference
For D2-MAC Programmes:
if you make no selection, the programmed menu language will automatically
be used.
Selecting of sound preference:
O Press 3.
I> The SOUND PREFERENCE menu appears on the screen.
O Press 0-8 to make your preferred selection.
r—1
1 PROGRAMME UST ASTRA 1
NO NAME NO. NAME
1 SCSPORT
3 RTL+
4 SCSAT3
7 EUSPORT 18 PRO 7
8 SAT1 19 MTV
12 CHICHAN 20 RADI010
11 PROGRAMME NUMBER. 15
I 2 NEXT CHARACTER RA CL
\ 3 NEXT UST
4 DELETE PROGRAMME NUMBER
15 EXECUTE DELETE
1 select: 1 -5,«.
13 SKY1 21 RALUX
14 SKY MOVIE 23 RASKY
15 SKY NWS
*, menu, off
NO. NAME
For D2 MAC programmes
1 RND PROGRAMMES
2 PROGRAMME UST
3 SOUND PREFERENCE
4 NOISE REDUCTION FILTER
5 STORE
select: 1 - 5. •. ♦, menu, oH
PROGRAMMES
*
You can store a radio programme by:
O Press 9.
O Select RADIO with - or +.
I> Your TV screen will be blanked and the message RADIO SOUND appears
Note:
The language selected will also be used for subtitles.
O Press MENU
t> The PROGRAMMES menu appears on the screen.
Select noise reduction for the picture if required:
O Press 4.
O Select yes or no with - or+.
You can store all the settings as follows:
O Press 5.
t> The word STORED will flash at the right upper corner of the screen.
For PAL programmes:
Selection of sound preferences
O Press 3.
I> The SOUND PREFERENCE menu appears on the screen.
O Press 1-2 and make your selection using - or +.
You can store a radio programme:
O Press 3
O Select TV SOUND or RADIO with - or +.
> if you select RADIO, your screen will be blanked and the message RADIO
SOUND appears.
O Press MENU.
l> The PROGRAMMES menu appears on the screen.
SOUND PREFERENCE
0 ENGU5H
1 GERMAN
2 FRENCH
3 SWEDISH
4 NORWEGIAN
5 SPANISH
GITAUAN
7 DUTCH
6 DANISH
9 SOUND
select: 0«9,», ♦, rtienu, oft
For PAL programmes
SOUND PREFERENCE
1 STEREO >1< 2 3
2 LANGUAGE 1 2 3 4 5 6 78
3 SOUND >TV< RADIO
select: 1»3,», ♦, menu. oH
20
Page 21

You can store all the settings as follows:
O Press 4.
> The word STORED will flash at the right upper corner of the screen
Further programmes can be stored by repeating the above procedure.
You can leave the INSTALL menu by:
O Press OFF
If you want to change a pre-programmed name:
O Switch on your SATELLITE TUNER.
> Lamp ON lights green.
O Select programme to be changed with P
O Press key MENU
l> The MAIN MENU menu appears on the screen
O Select INSTALLATION
> The INSTALLATION menu appears on the screen
> Lamp ON flashes green
O Press 4.
> The PROGRAMMES menu appears on the screen.
O Press 2.
1> The PROGRAMME LIST menu appears on the screen.
O Press 2.
O Press - or + to select the first letter of the programme name.
O Press 2 again and, using - or +, select the next letter.
Continue until you have written the new satellite name (max. 7 characters).
O Press MENU.
> The PROGRAMMES menu appears on the screen
O Press STORE 4 or 5.
1> The word STORED will flash at the right upper corner of the screen
O Press OFF.
> Your receiver is now ready for normal use.
va.
installation
1-----------------------------------------------------------------1
1 PROGRAMME LIST:
NO. NAME NO. NAME
1 SCSPORT
3 RTL+ 14 SKY MOVIE 23 RASKY
4 SCSAT3
7 EUSPORT
8 SAT1
12 CHiCHAN
1 PROGRAMME NUMBER: 15
2 NEXT CHARACTER
3NEXT UST
4 DELETE PROGRAMME NUMBER: |
1 5 EXECUTE DELETE
i select: 1 - 5.
13 SKY1 21 RA LUX
15 SKY NWS
18 PRO 7
19 MTV
20 RADI010
, +. menu, off
ASTRA 1
NO. NAME
RA CL
If you want to delete a pre-programmed programme:
O Switch ON receiver.
> ON lamp lights green.
O Select a programme not to be deleted with P
O Press key MENU
> The MAIN MENU menu appears on the screen
O Select INSTALLATION
l> The INSTALLATION menu appears on the screen
> Lamp ON flashes green
O Press 4.
I> The PROGRAMMES menu appears on the screen.
O Press 2.
> The PROGRAMME LIST menu appears on the screen.
O Press 4.
O Select the programme number to be deleted with - or +.
O Press 5.
> The programme is deleted.
O Press OFF.
va
on the same satellite.
21
Page 22

JlJ
Store teletext preference
pages (only D2-MAC)
storing personal preference pages
You can store up to 20 frequently-used teletext pages.
O Select a satellite and a programme with D2-MAC teletext of which
you want to store your favourite teletext pages.
O Press key MENU
l> The MAIN MENU menu appears on the screen
O Select INSTALLATION
I> The INSTALLATION menu appears on the screen
I> Lamp ON flashes green
O Press 5.
I> The TXT PREFERENCE PAGES menu appears on the screen.
O Press 1.
1> The SATELLITE PROGRAMME PAGE menu appears on the screen.
O Select the first digit for the prefered page number.
^ The name of the chosen satellite and programme appears on the screen.
O Press the two other digits to select the preferred page.
O Repeat this procedure to store the other pages you want.
Storing data
O Press the MENU key.
I> The TXT PREFERENCE PAGES menu appears on the screen.
O Press 2.
t> The word STORED will flash at the right upper corner of the screen
O Press the OFF key.
1 MENU LANGUAGE
aCONRCURATION
3 SELECT SATELLITE POSITIONS
4 SELECT PROGRAMMES
5 TXT PREFERENCE PAGES
6 SET CLOCK
1 SELECT
2 STORE
1
1 SATELLITE PROGRAMME PAGE 1
>
select: 0>3«%+,
INSTALLATION
1«6, ott
TXT PREFERENCE PAGES
1 ‘ 2, mru, oft
TVSAT SAT1
TVSAT
SAT1 345
.menu, off
101
<
Adding/inserting pages
(If the memory is not full)
The SATELLITE PROGRAMME PAGE menu must be on the screen.
O Use - or + to select an empty line or position where you want to insert a
line of new data.
I> A bar indicates the line selected.
O Enter the page number.
The data under the line chosen moves 1 position downwards.
Repeat the procedure for Storing data above.
Changing/erasing pages
(If the list is full.)
The SATELLITE PROGRAMME PAGE menu must be on the screen.
Use - or + to select the line which contains the data you want to change or
erase.
A bar indicates the line selected.
Press 0-.
The data on the line are now erased
o
Enter new data if required.
22
Page 23

Setting time/date
Installation
O Press key MENU
> The MAIN MENU menu appears on the screen
O Select INSTALLATION
> The INSTALLATION menu appears on the screen
t> Lamp ON flashes green
O Press 6.
> The SET CLOCK menu appears on the screen.
O Press 1.
I> The setting for the year changes colour.
O Press - or + to set the year.
O Press 2.
t> The setting for the month changes colour.
O Press - or + to set the month.
O Press 3.
I> The setting for the day changes colour.
O Press - or + to set the day.
O Press 4.
> The setting for the hour changes colour
O Press - or + to set the hour.
O Press 5.
I> The setting for minutes changes colour.
O Press - or + to set the minutes.
Switching OFF the menu
O Press the OFF key.
Cali up the clock settings
O Press
O Press ^ to remove the clock settings from the screen.
1 MENU LANGUAGE
2 CONRGURATION
3 SELECT SATELLITE POSITIONS
4 SELECT PROGRAMMES
5 TXT PREFERENCE PAGES
6 SETCLOCK
select; 1 ~ 6, off
1 YEAR
2 MONTH
3DAY
4HOURS
5 MINUTES
select: 1 - 5,
INSTALLATION
DATE 1991 0515
TIME 20.43
4
, menu, off
(■
Note:
For proper functioning of the clock, the satlllte tuner needs always to be
connected to the mains (interruption of several hours is allowed).
23
Page 24

\
i
;J
Trouble Shooting
No picture
Switch your TV to the external input, as it may not switch automatically.
Are all connectors connected tightly in the sockets?
Is the TV set switched on?
Is the configuration chosen in the configuration menu, according to the
connected equipment? If in doubt, consult your dealer.
Did you press the correct keys on the remote control?
Did you chose the right LNC band (in case you have a dual band LNC)?
Did you choose the right polarisation for the desired programme?
Check the satellite dish equipment outside.
Is the selection of the descrambler input correct?
Poor picture
Adjust the signal strength with the polarisation.
Did you choose the right frequency?
Sound
Did you choose the right sound option?
You can optimise the sound quality with the polarisation setting.
Menu
Did you select the wrong menu? Once more, press MENU or MENU OFF to
exit from the menu.
Connections
Check whether your peripheral equipment is properly connected.
Have you switched on the peripheral equipment?
Pay TV
I have forgotten my secret code:
- contact your programme provider.
My card is inserted properly yet there are no on screen displays for the
programme I want to watch:
- verify that you are tuned to a EuroCrypt programme.
The CHECK CARD message is on the screen:
- verify that your card is a EuroCrypt Smart Card and that the contacts are clean.
The programme which I am entitled to watch scrambles every now and then:
- the broadcast signal may be weak. Optimize your antenna position, if
possible.
No solution
Switch your satellite tuner off and then on again.
NEVER attempt to repair a defective tuner yourself. Check with your dealer
when nothing helps or when:
- error messages appear on the screen
- the lamp in the front start blinking without you having pressed any key on the
remote control.
24
Page 25

Page 26

INFORMATIONS SUR LA GARANTIE ET
LE SERVICE APRÈS-VENTE EN FRANCE
Cet appareil PHILIPS a été fabriqué avec le souci de vous donner entière satisfaction. Sa garantie contractuelle est de la
responsabilité du point de vente.
Cette garantie qui peut varier tant en durée q'en contenu, ainsi que les modalités de service après-vente, doivent vous être précisées
lors de l'achat par le vendeur qui, de plus, vous conseillera en cas de panne ou de défaillance.
A cet effet, il vous est demandé de conserver soigneusement votre facture et/ou le présent document dûment rempli et signé et/ou le
contrat de garantie qui vous aura été remis conformément au décret n° 87-1045 du 22 décembre 1987.
Pour sa part, PHILIPS, soucieux de l'intérêt des consommateurs, apporte sa contribution aux efforts des points de vente, que ce soit
en matière de garantie ou de service après-vente:
matériellement, par la formation, l'assistance technique, la fourniture de pièces détachées,
financièrement, selon des modalités précises définies entre PHILIPS et les points de vente.
RAPPEL: vous bénéficiez en tout étant de cause des dispositions des articles 1641 et suivants du Code Civil relatifs à la garantie
légale.
Aucune garantie ne peut être mise en œvre si la détérioration résulte d'une cause étrangère à l'appareil ou du non respect des
prescriptions d'utilisation.
Service consommateurs PHILIPS:
B.P. 49-77423 MARNE LA VALLE CEDEX 2
Tel.: (1) 64 80 54 54 - Minitel 3615 code: PHILIPS
SNC PHILIPS ELECTRONIQUE DOMESTIQUE - RCS NANTERRE B 333 760 833
Soucieux d'améliorer continuellement la qualité de nos produits, nous nous réservons le droit d'en modifier à tout moment
les caractéristiques.
Page 27

IDENTtTIY CARD
<§E>
GERÄTE
CÔ5
KENNKARTE
CARTE
CsB)
D'IDENTIFICATION
CD
IDENTIRCAT1EKAART
CD
CARTE
CD
D'IDENTIRCAZIONE
TARJETA DE
<X>
INDENTIRCACION
CARTAO DE
CD
INDENTIRCAÇAO
I.D. KORT
<ÉE>
IDENT1RKASJOSKORT Dette kort, sammen med garatbetngelsene (som De fàr av
CD
IDENTIRERINGSKORT
CD
TUNNISTUSKORTn
dD
This card, together with the terms o! guarantee (to be provided by
your dealer), forms the full certificate of guarantee for this appliance.
Diese Karte ist, 2usammen mit den Garantebestimmungen, die Ihr
Händler Ihenen aushàndigt, Ihr Garantieschein für dieses Gerat
Assodée aux conditions de garantie (qui vous sont remises par le
revendeur), cette carte constitute le certificat de garantie de cet
appareil.
Deze kaart vormt, samen met de garantievoorwaarden (welke door
UT.V dealer verstrekt worden), het garaniebev/ijs voor dit apparaaat
Questa cartolina rappresenta ins'eme alle condizioni di garanzìa (da
consegnare dal vostro nvenditore) il documento di garanzia per
questo apparecchio.
La garantía de este aparato se compone de esta tarjeta y de las
cond,dones de garanta que le entregará su concesionano.
Este cartao, em conjunto com as condiçoes de garanta em vigor
(explicadas pello seu vendedor) constituem o certficado de garanta
do seu aparelho.
Dette kort, udfyldt af Deres forhandler, er tlstækkelig
garantdokumentaton for dette apparat.
forhandleren) utgjor garantbevisit for dette apparat
Dette Kort tllsammans med garantivillkoren, som Du fâr av
radiohandlaren, utgor ett fullstandigt garanfebevis for denna produkt.
Tâman laitteen takuutodistus muodostuu tasta kortsta ja
takuuehdoista ôalleenmyyja antaa mukaan).
PHILIPS
SE
DATE DE VENTE DE L'APPAREIL
Type et № de Série
Date de vente:
Vendu par:
3122 126 45281
 Loading...