

Page 1

- #■
PHILIPS
SATELLITENEMPFANGER
RECEPTEUR SATELLITE STEREO
RICEVITORE SATELLITE
SZATELLIT FELVEVODET
STEREO SATELLITE RECEIVER
Page 2

Page 3

Contents
ENGLISiH
J
1. BEFORE YOU START
Safety Instructions.................................................................................2
Mains Connection..................................................................................2
About This Manual
.................................................................................
2. HOW TO CONNECT YOUR RECEIVER
Position your Philips STU 801 Sateilite Receiver
Insert batteries in the remote control
Connecting your sateiiite dish antenna
Connecting your Receiver.....................................................................3
To a TV oniy, using a coaxial cable
To a TV only, using a Euroconnector...................................................5
To a TV and a VCR, using Euroconnectors
To a TV and a VCR, using coaxial cables.............................................7
Connect the Polariser............................................................................8
Aim your dish
Additional connections..........................................................................8
AUDIO L/R...............................................................................................8
DECODER/DESCRAMBLER..................................................................8
.........................................................................................
...................................................
........................
...............................
..................................................
...............................................
......................................................
.........................................
3. HOW TO WATCH SATELLITE TV.................................9
Switch On................................................................................................9
Switch Off
Seiect a Programme...............................................................................9
Controi Your Philips TV Remotely........................................................9
Permanent Programme Ident Display
Audio Mute..............................................................................................9
Audio Mode.............................................................................................9
Programme Status...............................................................................10
The TV/SAT Button...............................................................................10
Change The Sound Volume
Auxiliary Programme...........................................................................10
On-Screen Display Menus...................................................................10
Timer functions
Setting the Ciock..................................................................................10
Setting the Timer.................................................................................11
Cancel an Event...................................................................................11
Instant Timer/Sleep Timer...................................................................12
To operate the Instant Timer/Sleep Timer..........................................12
The Parental Lock.................................................................................12
Personalising the PiN........................................................................ 12
Lock a Programme...............................................................................13
Unlock a Programme...........................................................................13
Receiver Lock.......................................................................................13
VCR record/replay using Euroconnectors.........................................13
4. PERSONALISING YOUR RECEIVER
Instailation Menu..................................................................................14
Modifying Existing Programmes (Menu 1)
Voltage Switching
The Eiectro-Magnetic Polariser...........................................................15
The Mechanical Polariser
Adding New Programmes (frequency scan)
...............................................................................................
..................................................
................................................................
....................................................................................
..........................
........................................
................................................................................
....................................................................
......................................
14
5. SPECIFICATION.........................................................18
6. FAULTFINDING..........................................................20
7. PROGRAMME GUIDE................................................21
PROGRAMME GUiDE (Cent.)
..............................................................
3
10
10
15
15
16
17
22
2
2
3
3
3
4
6
8
9
9
j
Page 4

BEFORE YOU
START
y
J J
BEFORE YOU START
Safety Instructions
j
To avoid short-circuits, w/hich may cause fire or electric shock, do not expose
this Philips STU 801 Satellite Receiver to rain or moisture.
Dangerous voltage inside. Do not open the cabinet.
There are no user serviceable parts inside.
Repairs should be carried out by qualified service personnel only.
NEVER connect or modify cables while the Receiver is connected to the
mains. Always first remove the plug from the wall socket.
Ensure that no objects or fluids pass through the ventilation openings.
If liquid is spilt into the Receiver, disconnect the Receiver from the mains and
consult a qualified service technician.
Do not put your Receiver close to an external source of heat (radiator, etc.)
Ensure that air can circulate freely through the ventilation openings of the
Receiver.
Avoid using the Receiver on soft surfaces or near appliances generating
strong magnetic fields (eg motors, transformers).
Do not use your Receiver in dusty places or where it may be subject to
vibration.
Avoid using your Receiver immediately after moving from a cold to a warm
location and vice versa, or under conditions of high humidity.
if you have to transport your Receiver, avoid violent shocks.
Your Receiver supplies 14 or 18 V DC voltage to your satellite dish antenna.
Make sure you only connect your satellite dish to the satellite dish inputs and
nothing else.
For cleaning, use a damp chamois leather - never use an abrasive.
J
Mains Connection
Before connecting the Receiver to the mains, check that the mains supply
voltage corresponds to the voltage printed on the rear panel of your Receiver.
If the mains voltage is different, consult your dealer.
NEVER connect or modify cables while the Receiver is connected to the
mains. Ensure that the mains plug is not plugged in to the mains supply
before proceeding further.
About This Manuai
This is a manual to help you with the installation and operation of your new
Satellite Receiver.
o
I>
This circle in front of a sentence indicates that you have to
do something.
This arrow in front of a sentence indicates the result of what
you have done.
GB2
Page 5
HOW TO CONNECT YOUR RECEIVER
CONNECTIONS
J
Position your Philips STU 801 Satellite Receiver
The STU 801 is intended for use in a domestic environment oniy and shouid
never be operated or stored in an excessively hot or humid atmosphere.
Choose a position at some distance away from radiators or other sources of
heat.
Leave a clear space of at least 3 cm all around the Receiver for ventilation.
Make sure that curtains, cupboards, etc. cannot obstruct air flow through the
ventilation openings.
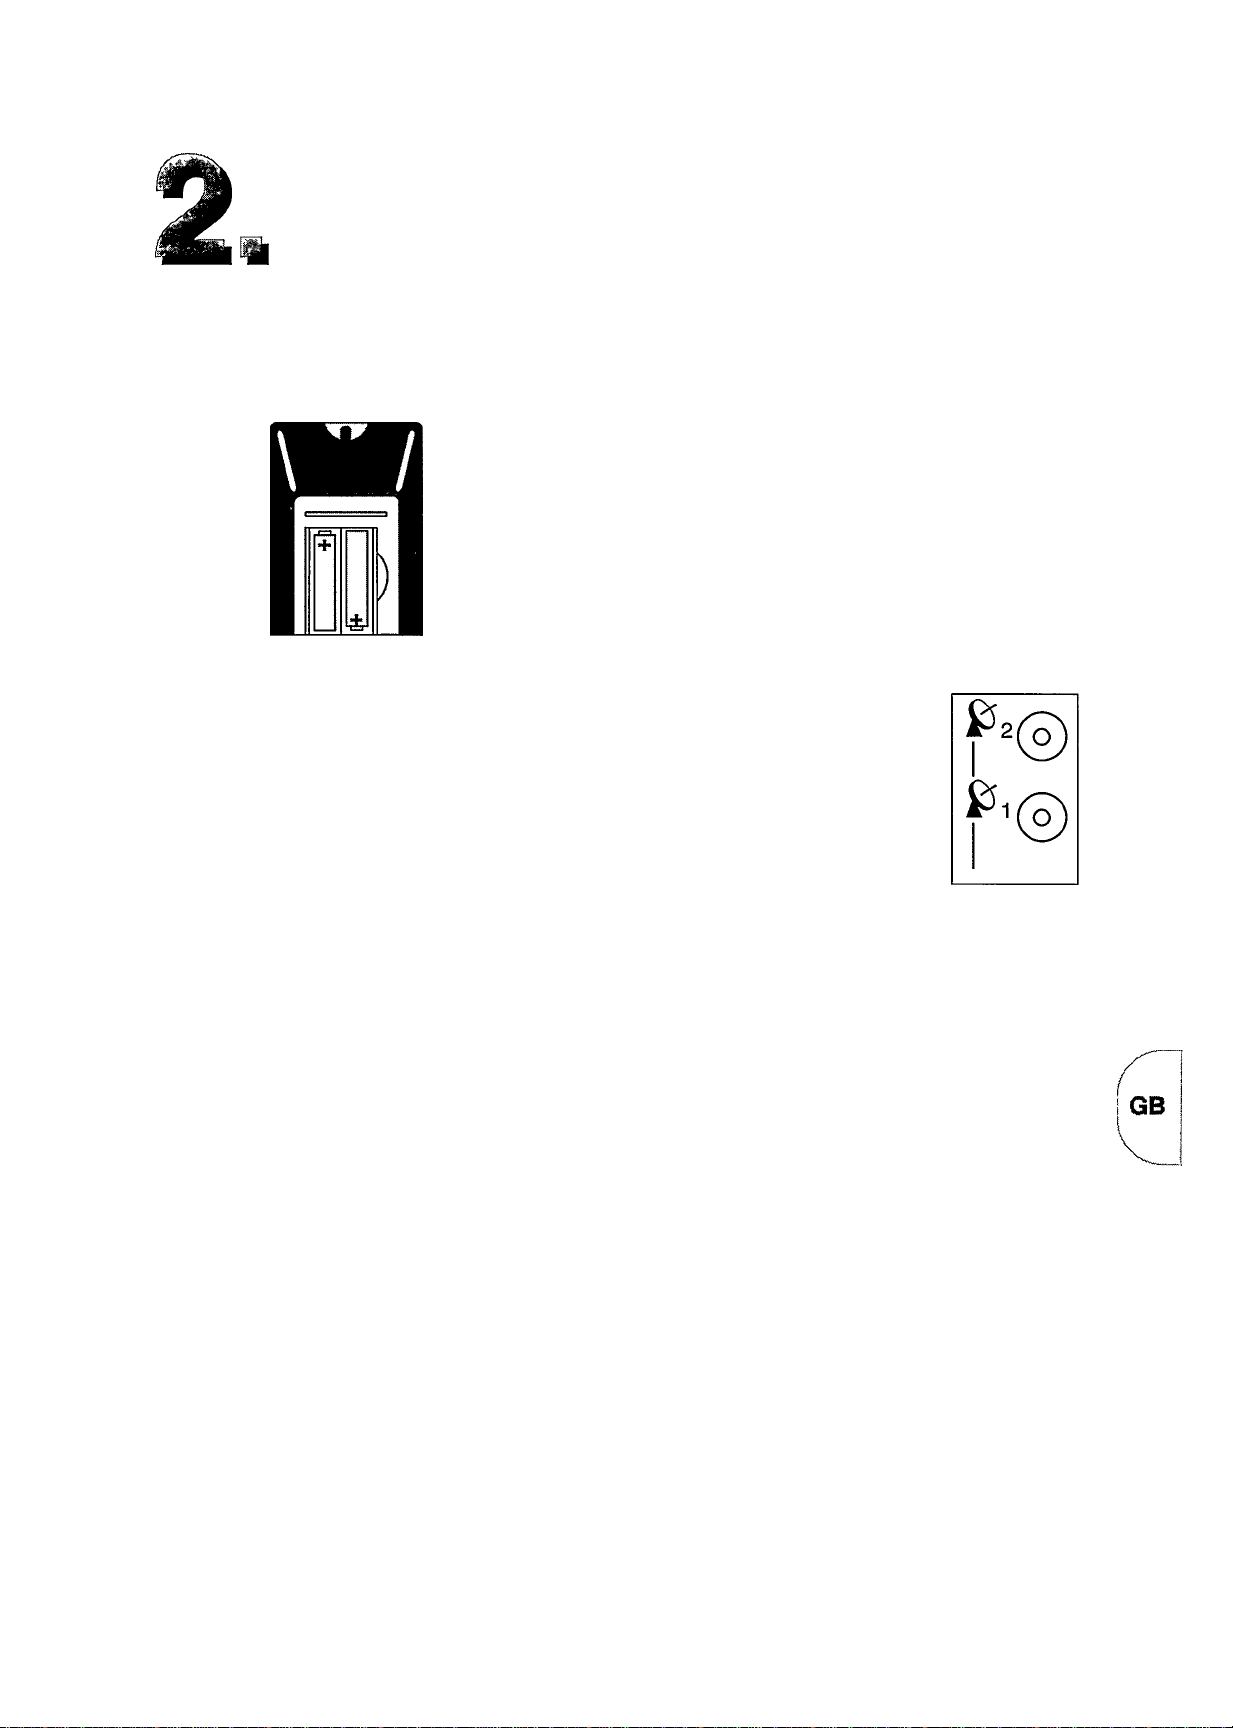
Insert batteries In the remote control
o
o
o
Remove the battery cover located on the
back of the remote control handset.
Insert two batteries (type LR03 1.5 V).
Replace the battery cover.
Connecting your satellite dish antenna
First, install the dish antenna and its receiving element - the Low Noise
Converter (LNC) - according to the manufacturer’s instructions.
Make sure your Satellite Receiver is not connected to the mains while
connecting the dish antenna to your Receiver.
J
Connect the satellite antenna cable to the connector marked on the back
of the Receiver, using the connector supplied with your Receiver.
Connecting your Receiver
This section tells you how to connect the Philips STU 801 Satellite Receiver to
the equipment you already have, such as a TV and Video Cassette Recorder
(VCR).
There are many connection options of which the most common are:
a. To a TV only, using a coaxial cable.
b. To a TV only, using a Euroconnector.
C. To a TV and a VCR, using Euroconnectors.
d. To a TV and a VCR using coaxial cables.
Option B is the best if you have a TV only because it gives the best picture
and sound quality. You will obtain even better sound if you connect the
Receiver to your hi-fi system. See Additional Connections section of this
manual.
Select one of the connection options, then follow the step-by-step instructions
on that page.
GB3
Page 6

CONNECTIONS ■ To a TV only, using a coaxial cable
j
7.
8.
10.
11.
Make the connections as shown in the drawing using the
coaxial cable supplied with your Receiver.
Connect your Receiver to the mains socket.
Switch your TV ON.
Switch the test picture switch on the back of your Receiver to
TEST.
Switch your TV to each of its programme numbers in turn to
check that^your Receiver is not causing interference with
terrestrial programmes.
If there is patterning, or any other interference on the screen,
adjust the TUNE control on the back of the Receiver until you
have a clear picture. Only a small adjustment, sufficient to
remove the patterning, should be made at a time.
Continue this procedure until you have checked all the
programme numbers on your TV.
Select a spare programme number on your TV which you will
always use for satellite programmes - this is now your ‘Satellite
Receiver number'. Tune your TV until you find a picture from
the Receiver.You will know that you are looking at a picture
from the Receiver when you see this picture appear on your TV
screen.
If the reception is poor, use a small screwdriver to turn the tune
control on the Receiver until the reception is clear. Go back to
Step 5.
Switch the test picture switch on the back of the Receiver back
to NORM.
Go to the section Connect Your Polariser or Aim your dish.
J
GB 4
Page 7

J
b
To a TV only, using a Euroconnector
1.
2.
3.
4.
5.
6.
7.
Make the connections as shown in the drawing.
Connect your Receiver to the mains socket.
Switch your TV ON.
Press button number 1 on your Receiver remote control.
Press MENU followed quickly by 1 on your remote control.
The 9 light on your Receiver should now be blinking. Also
your TV should now show the Satellite Receiver picture or. at
least, text on the screen. If not, you may have to select the AA/
input on your TV.
Press VIEW on your remote control.
Go to the section Connect Your Polariser or Aim your dish.
CONNECTIONS
j
GB5
OS
Page 8
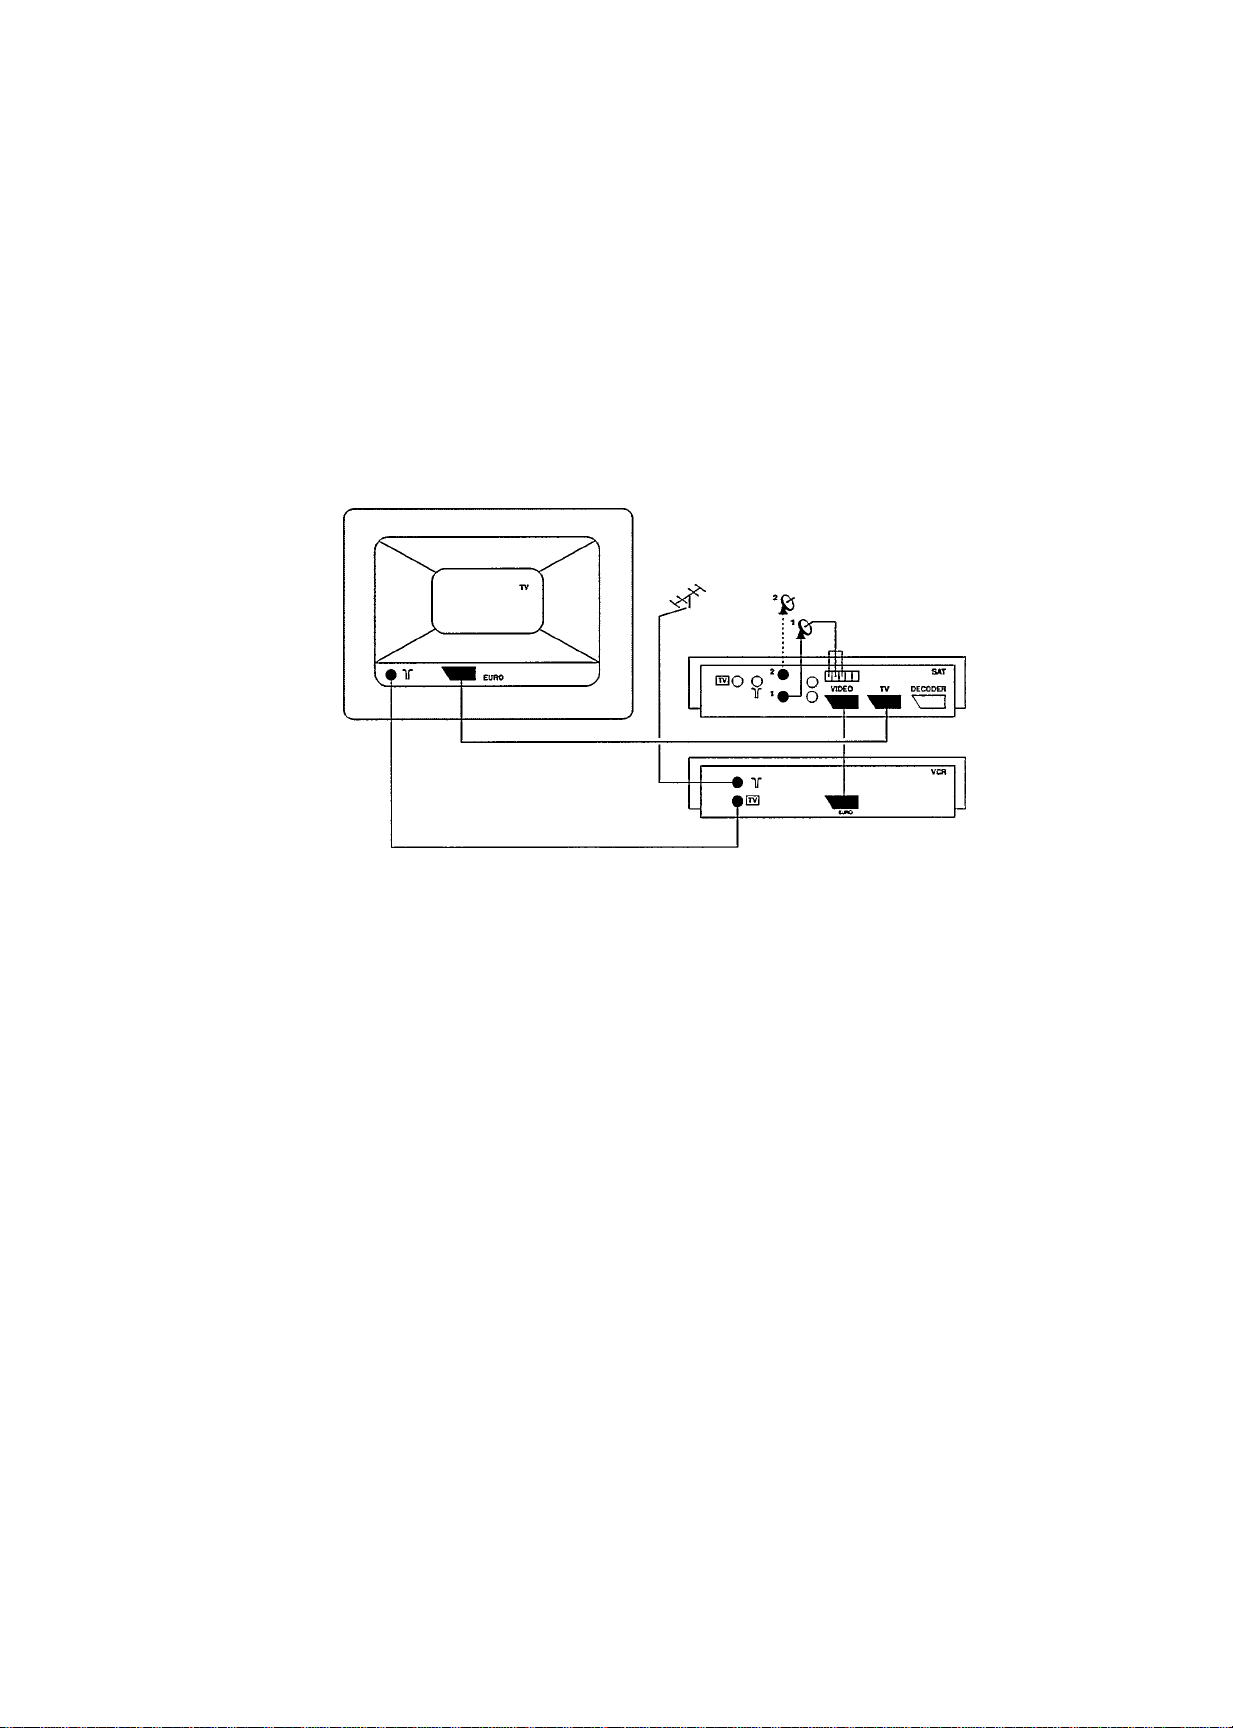
CONNECTIONS ■ To a TV and a VCR, using Euroconnectors
Make the connections as shown in the drawing.
Connect your Receiver to the mains socket.
Switch your TV ON.
Press button number 1 on your Receiver remote control.
Press MENU followed quickly by 1 on your remote control. The
9 light on your Receiver should now be blinking. Also your TV
should now show the Satellite Receiver picture or, at least, text
on the screen. If not, you may have to select the AA/ input on
your TV.
Switch the Receiver to standby using the (!) key on the remote
control. Play a video cassette in your VCR. If you do not see a
picture from the VCR, check the connections as below.
Switch your VCR off.
Press VIEW on your remote control.
Go to the section Connect Your Polariser or Aim your dish.
C
I’-
9.
2.
3.
4.
5.
7.
8.
J
GB6
Page 9

J
d
To a TV and a VCR, using coaxial cables CONNECTIONS
Make the connections as shown in the drawing using the cable
supplied with your receiver.
2.
3.
4.
5.
7.
8.
9.
10.
11.
12.
13.
14.
15.
Connect your Receiver to the mains socket.
Switch your TV ON.
Switch your VCR ON.
Switch the test picture switch on the back of the Receiver to
TEST.
Switch your TV to each of its programme numbers in turn to
check that your Receiver is not causing interference with
terrestrial programmes.
If there is patterning, or any other interference on the screen,
adjust the TUNE control on the back of the Receiver until you
have a clear picture. Only a small adjustment, sufficient to
remove the patterning, should be made at a time.
Continue this procedure until you have checked all the
programme numbers on your TV.
Select a spare programme number on your TV which you will
always use for satellite programmes - this is now your ‘Satellite
Receiver number'. Tune your TV until you find this picture from
the Receiver.
If the reception is poor, use a small screwdriver to turn the
TUNE control on the Receiver until the reception is clear. Go
back to Step 6.
On your TV, select the programme number you use to watch
your VCR.
Select a spare programme number on your VCR which you will
always use for satellite programmes. It is a good idea to use
the same programme number as your TV ‘Satellite Receiver
number’.
Tune your VCR until you find the picture from the Receiver.
If there is patterning, or any other interference on the screen,
adjust the tune control on the back of the Receiver until you
have a clear picture. Only a small adjustment, sufficient to
remove the patterning, should be made at a time.
Now check all the VCR programmes for possible
patterning. Select your Satellite Receiver number on your TV
and check again the TV programmes for possible patterning.
If a problem occurs, go back to Step 7.
Switch the test picture switch on the back of the Receiver to
NORM.
1
GB 7
Page 10

CONNECTIONS a Connect the Polariser
Signais from a satellite are transmitted with different polarisations.
J
There are 4 kinds of polarisation:
Direct Broadcast Satellites DBS (TV satellites like TDF, TV SAT and TELE-X)
transmit with circular polarisation:
Left hand circular = L, or Right hand circular = R.
All other satellites (such as ASTRA) transmit with linear polarisation:
Horizontal = H, or Vertical = V.
For proper reception, you may need a device called a Polariser which is
located in the LNC assembly of your dish antenna. This depends on what
type of dish antenna you have.
If you have a Mechanical Polariser, connect the 3 small leads from your
antenna cable to the Polariser connectors on the back of your Satellite
Receiver:
O the dark lead to GND (coloured Green)
O the red lead to +5V — (coloured Red)
O the white lead to -ru (pulse - coloured White)
If you have an Electro-magnetic Polariser, connect the 2 small leads from
your antenna cable to the polariser connectors on the back of your Receiver:
O the dark lead to the right hand Yellow connector
O the red lead to the left hand Yellow connector
Aim your dish
Consult the Satellite Programme Guide in the back of this manual and choose
a programme number on the satellite at which you will aim your dish.
Now finalise installing your dish following the instructions supplied with the
dish. If you cannot obtain a satisfactory picture, see section 6 ‘FAULT
FINDING’.
ox OX
+ 5V=
CURR
-80 +8
Jl
XX
ENT
OmA
J
GND
Additional connections AUDIO L/R
If you wish to use your hi-fi installation to listen to satellite programmes then
you must connect it to the audio sockets.
Connect the output sockets AUDIO L (left channel) and AUDIO R (right
channel) to a pair of left and right input sockets on your hi-fi installation.
Do not connect AUDIO UR to the sockets marked PHONO of your hi-fi installation.
DECODER/DESCRAMBLER
Your Receiver has the capability of accepting up to two external decoders via
the DECODER/DESCRAMBLER connector.
This DECODER/DESCRAMBLER connector may also be used to connect
another peripheral or (MAC) satellite Receiver, in this case, select
programme 0 (AUX) to watch this peripheral.
Consult your dealer for a suitable lead.
,
0000000000
>0000000000
DECODER/DESCRAMBLER
GB8
Page 11

J
HOW TO WATCH SATELLITE TV
The following information assumes that your satellite dish and Receiver have ;
been correctly installed. If this is not the case, refer to chapter 4
PERSONALISING YOUR RECEIVER, (page14).
Operation is carried out by use of the remote control. When selecting the
on-screen graphics menus, it will be necessary to use 2 keys which must be
pressed within a timeout period (usually 2 seconds between each key press).
3
I This is also true for other multi-key functions.
OPERATION
j
Switch On
After making all the necessary connections (see section 'HOW TO CONNECT
YOUR RECEIVER'), connect the Receiver, TV and/or VCR to the mains
supply and switch on. Select your ‘Satellite Receiver number’ on your TV or
select the AN input on your TV if you use Euroconnectors. When the mains
supply is first connected, the Receiver will be in standby. To bring the
Receiver out of standby, press the <] or [> key or select a programme
number, using the remote control. You may also use the + or - buttons on the
front of the Receiver.
Switch Off
To ‘power down’ the Receiver, press the (!) key on the remote control or the
Receiver. The Receiver will stay in standby mode as long as the mains supply
is connected.
Note: Your Receiver may have been installed by looping the TV aerial through the Receiver. If
this is the case, the Receiver must always be connected to the mains supply in order to watch
terrestrial TV programmes.
Select a Programme
There are 2 modes of operation, single digit mode and double digit mode.
Pressing the -/- key “toggles” between these two modes.
In single digit mode only programmes 0-9 can be directly entered.
In double digit mode, all programmes can be accessed directly by entering the
appropriate 2 digits. In this mode programmes 0-9 must be preceeded by a 0.
It is also possible to browse through all the programmes using the <□ or [>
keys. The programme ident will be displayed briefly in the top right-hand
corner of the TV screen.
Control Your Philips TV Remotely
At the top left side of your Receiver Remote Control unit is a hidden switch. If
you press this in, and continue to hold it down, your Receiver Remote Control
can act as a TV Remote Control for Philips TV's. You can then change TV
programmes by pressing the programme numbers on the Receiver Remote
Control. This function may not work with some older Philips TV sets.
Permanent Programme Ident Display
It is possible to permanently display the programme ident on your TV screen.
This feature is selected by pressing the MENU key followed by the 8 key.
Repeat MENU, 8 to remove the feature.
Audio Mute
o
t>
o
To mute the sound press the key.
The MUTE symbol will appear.
Press again to restore the sound.
PH
TVSAI
o
Audio Mode
The I-II key is used to cycle through all the audio modes. On certain
programmes it is possible to receive multi-language, stereo or radio
transmissions, e.g. Sky One also transmits Sky Radio in addition to the Sky
One soundtrack. To hear these alternative transmissions, press the I-II key to
select the desired mode.
GB9
Page 12

OPERATION I Programme Status
Pressing the CZ) key will display the programme ident, audio mode and audio
j
frequency of the programme you are viewing and also the receivers clock
(flashing if not set).
The TV/SAT Button
With some TV sets, it may be impossible to select a terrestrial TV programme
while the Receiver is switched on. This may happen when you have your
Receiver connected to your TV by means of an A/V connector cable.
If this occurs, you should press the TV/SAT button on your Remote Control
once. Now you can select and watch terrestrial TV programmes.
To return to satellite programmes, press the TV/SAT button once again.
If you have no problem changing TV channels while your Receiver is switched
on, you will not need to use the TV/SAT button.
Change The Sound Volume
If you have a Philips TV, you may be able to control the volume of the sound
with your Receiver remote control. This may not be possible with some older
Philips TV sets. With most other makes of TV sets, the volume button on your
Satellite Receiver Remote Control will have no effect.
Auxiliary Programme
Pressing the 0 key will select an auxiliary programme which is set up to work
with an external (MAC) Receiver connected to the DECODER/
DESCRAMBLER connector. It must be noted that this is in fact Programme
60 and changing the AV source setting for that programme will affect the
function of the 0 key.
Q
O
TV SAT
O
\7
J
On-Screen Display Menus
Certain functions of the Receiver are performed by use of On-Screen Display
menus (O.S.D) e.g. timer functions and modifying or adding new programmes.
Once in a menu, the MENU and O keys are used to move fon/vard and
backward through the parameters and the <□ and [>> keys are used to alter
parameters.
Direct entry using the numeric keys is also possible and shall be highlighted
as we go through the functions. If you want to cancel alterations in a menu,
press the VIEW key and this will remove the menu from your screen and
erase any changes.
Timer functions
The Receiver has a built-in timer facility which allows it to switch on and off at
selected times. The primary use of this is to record satellite events, in conjunc
tion with a VCR, whilst the Receiver is unattended.
NoteJhe Receiver and VCR should have the same start and stop recording times.
Setting the Clock
o
D>
O
O
O
o
o
o
You may also enter the hours and minutes using the numeric keys on your
remote control.
Press MENU followed by 4.
The 9 light on the Receiver will be flashing.
Press or [j> to adjust the day.
Press MENU again.
Press <□ or (3> to adjust the hour.
Press MENU again.
Press <Q or |2> to adjust the minutes.
Press STORE to store your settings.
SO = SUNDAY
MO = MONDAY
Dl = TUESDAY
Ml = WEDNESDAY
DO = THURSDAY
FR = FRIDAY
SA = SATURDAY
GB 10
Note: You need to set the clock again after the Receiver has been disconnected from the mains
supply.
Page 13

J
Setting the Timer
The Timer menu gives you the faciiity to preset up to 4 events each up to 14
days in advance. It is selected by pressing the MENU key followed by the 5
key. The 9 light will be flashing. Again the MENU and (¡) keys are used to
control the menu. If you have not set the Receiver’s clock yet, a message
CLOCK NOT SET will be displayed. In this case, follow the procedure
SETTING THE CLOCK first before setting the timer.
1. EVENT
O Press <□ or Q> to choose an event number
2. PROGRAMME
O Select the programme you want to record using the <] or Q>
keys or the numeric keys on your remote control. The event is
disabled when set to OFF. If a locked programmed is selected,
the programme ident will be preceded by an asterisk (*).
3. DAY
o
Allows you to select the day of the event by using the <3 or O
keys.
The current day will be displayed as TODAY and subsequent
days are prefixed 1 ST or 2ND to cover the relevant week.
4. START
o
Allows you to enter the start time in hours and minutes by direct
entry using the numeric keys or with the <□ or □> keys.
OPERATION
J
5. STOP
O Allows you to enter the stop time.
O To exit the menu press either the VIEW or STORE key.
If any recording times conflict with each other, they are detected by the timer
and an EVENT OVERLAP alarm is displayed on the TV screen. This alarm
may be ignored by pressing the VIEW key in which case the end of the
overlapped event will be lost. The error may be corrected by re-entering the
Timer menu and adjusting the start/stop times.
If a locked programme has been stored in the programme option, the
message EVENT USES LOCKED PROGRAMME will appear on screen. This
programme will have to be unlocked to enable the event to be recorded.
The timer is activated after the Receiver is switched to standby.
Should a Timer event occur while you are watching a satellite programme,
then the 9 light will flash rapidly for one minute. Press (I) to enable this
event. If you ignore the indication, the event will be cancelled.
Note: During a timer event, all remote control commands will be ignored.
Cancel an Event
Assuming that the event has not yet started:
O
O
O
O
o
>
To disable the timer during a timer event, press the (I) key quickly followed
by VIEW.
A message TIMER CANCELLED will be displayed.
Switch the Receiver on
Press MENU followed by 5
Select the event you want to cancel using the <□ or [;>
Press MENU again
Press 0, 0
The event is now set to OFF.
GB11
Page 14

OPERATION I Instant Timer/Sleep Timer
I
The Instant Timer enables you to record transmissions instantaneously and
" switch off the Receiver at a time you set.
To operate the Instant Timer/Sleep Timer
O Press the O Key
t> The 9 light will start to flash.
The current time will be assumed as the start time and the stop time will
default to half an hour from the start time.
Use the numeric keys on the remote control to change the stop time.
O Press STORE.
> The 9 light will now stay on.
All remote control commands will now be ignored.
The Receiver will go to standby when the stop time has been reached.
O Press the O key again to cancel the
Instant Timer/Sleep Timer.
t> A message SLEEP TIMER CANCELLED will be displayed.
The Parental Lock
The parental lock feature of the Receiver allows you to ‘lock out’ some or all of
the satellite programmes. In simple terms, you create a personal identification
number (PIN) and allocate it to the programme you wish to lock to prevent
unauthorised viewing. Once a programme is locked, it can only be viewed by
re-entering the PIN. It is not essential to personalise the PIN, but it is recom
mended.
O
O
J
Personalising the PIN
O Press MENU followed by 7
O Enter 1234 (the default setting) using the numeric keys on
your remote control.
t> The Receiver will now ask for your NEW PIN.
O Enter a new PIN (4 numbers)
t> The Receiver will ask you to CONFIRM PIN.
o Re-enter your new PIN.
l> A message CONFIRMED will appear on the screen.
If your NEW PIN and CONFIRM PIN were not identical, a message FAILED
will be displayed. It will be necessary to repeat the whole sequence.
DO NOT FORGET YOUR PIN!!!
If you forget your PIN you will have to contact your dealer.
GB12
Page 15

J
Lock a Programme
O Press MENU followed by 6
[> A message TO LOCK ENTER PIN will appear.
O Enter your PIN
> A message LOCKED will appear.
If you now select a locked programmed, the message
PROGRAMME LOCKED ENTER PIN will appear.
O Enter your PIN.
If the PIN is correct, the programme will be displayed.
Unlock a Programme
O Select the programme you want to unlock entering your PIN
code
O Press MENU followed by 6
1> A message TO UNLOCK ENTER PIN will appear
O Enter your PIN
> A message UNLOCKED will appear, indicating that this
programme is now permanently unlocked.
Receiver Lock
To avoid accidental changes or unauthorised reprogramming of your Re
ceiver, you can switch on the Receiver Lock. This disables the Installation
menus (MENU 1 and MENU 2) and the frequency scan (MENU 3).
To enable the Receiver Lock, select Programme 0 (AUX) and follow the
procedure to lock a programme.
To regain access, follow the procedure to unlock Programme 0 permanently.
OP^AWH
J
VCR record/replay using Euroconnectors
When using a Euroconnector to connect a VCR, the following must be noted.
To record from the satellite Receiver to a VCR, it will be necessary to select
AUX or AV on the VCR as the programme to record.
When replaying the VCR through the Satellite Receiver, switch the Satellite
Receiver to standby.
Note: This method of replaying is only possible if the TV is also connected using a SCART
lead.
GB13
Page 16

PEaSONAUSING .PERSONALISING YOUR RECEIVER
Installation Menu
In this menu, you will find a number of general settings for your Receiver.
After you have adapted the vaiues to those fitting your instaliation and con
nections, you normally do not have to enter this menu anymore.
O Press MENU foliowed by 2
4
D> The 9 light will be flashing and a menu iike the one shown will
appear on your screen.
If you decide not to modify anything or undo your modifications, press VIEW.
The MENU and O keys are used to move forward and backward through the
menu, and the <I] and Q> are used to alter parameters. When you have
finished your modifications, press STORE to store your settings.
The foiiowing options are available:
CONTRAST MED
LNC1 OFFSET 15
LNC1 ASTRA BAND
LHC 2 MECH
H-POL BASE 15
U-POL BASE 50
J
1. CONTRAST
This is the picture contrast setting. Use the -<] or Q> keys to set the contrast
to LOW, MEDIUM or HIGH. Pressing the STORE key will retain any
adjustments made.
2. LNC 1 OFFSET
If the picture is speckly, it may be necessary to adjust the LNC offset. If you
still have menu 2 on your screen, press STORE (or VIEW).
O Press MENU followed by 1 on your remote control.
I> The 9 light on your Receiver will now be flashing.
Check that the frequency for the chosen programme is correct. (See the
Satellite Programme Guide in the back of this manual). If necessary, correct
the frequency using the <3 or O keys on your remote control.
o
o
o
o
o
o
Press STORE twice.
Press MENU followed by 2.
Press MENU again to select LNC1 OFFSET
Use the <□ or [> key to get a picture as free from sparkles as
possible.
To optimise the picture, it is possible to change programmes
whilst in this menu by directly entering the programme number
using the numeric keys.
Press STORE to store your settings. The same procedure can
be followed for satellite input 2, after you have selected a
programme preset for this input.
GB 14
3. LNC 1
Option 1 Allows you to assign any of 3 frequency bands to dish antenna
input 1. The bands are allocated as follows:
a. ASTRA (10950 -11700 MHz, Astra, Eutelsat, Intelsat)
b. . DBS (11700 -12500 MHz, TDF, TVSAT, TELE-X, Olympus)
C. T-COM (12425 -12675 MHz, Telecom, Kopernikus)
Option 2 Allows you to assign any of 3 types of polariser in use to dish
antenna input 1. These 3 types are:
a. VOLT allows voltage switching to select the correct polarisation
(H for Horizontal, V for Vertical). This is the default setting for
dish input 1.
b. MECH permits either Mechanical or Electro-Magnetic polariser
capability.
C. BEIDE allows dual band LNC switching (e.g. Astra / DBS) in
addition to Mechanical or Electro-Magnetic polariser capability.
Page 17

4. LNC 2
ì
Allows you to assign any of the above mentioned 3 types of polariser in use
to dish antenna input 2. Dish antenna input 2 does not have the frequency
band selection. The satellite channel frequency indication will be:
a.
10750 -11700 (for Astra) if you select VOLT or MECH
PERSONÀÛSING
I
b. 10750 -11700 (for low band, Astra) and 11700 -12500 (for high
band, DBS) if you have selected BAND.
5. H-POL BASE (Only for MECH or BAND dish input selection)
This option sets the poiarity base setting for all the pretuned channels using
the horizontal polarisation. Ensure you are on a channel with horizontal
polarisation, then use the <□ and keys to obtain a picture as free from
sparkles as possible, then press the STORE key. Once correctly set, you
should not enter this option any more.
6. V-POL BASE (Only for MECH or BAND dish input selection)
This option operates in a similar manner to the H-pol Base option described
above. First choose a channel with vertical polarisation, then enter MENU 2
as before, and use the <3 and О keys.
Modifying Existing Programmes (Menu 1)
The Receiver is capable of storing 60 programmes and comes to you aimost
compietely pre-tuned. If you wish to modify or add new programmes the
foilowing section explains the procedures.
О Select the programme you wish to modify
О Press MENU foliowed by 1.
t> The e light wili be flashing and the menu shown wili appear
on your screen. If you decide not to modify anything or undo
your modifications, press VIEW.
The MENU and О keys are used to move forward and backward through the
menu, and the <3 and ¡3> are used to alter parameters. When you have
finished your modifications, press STORE twice to enter your settings.
The following 8 options are available, spread over 2 On Screen Menu pages:
FREiaUENCV 11-318
POLARITV
BASEBAND PAL
AU SOURCE AUTO
DECODER
NEXT MENU
AUTO
U
Note: once the MENU key has been pressed in the DECODER option, the second page witt
automaticatty appear.
1. FREQ
The satellite channel frequency can be adjusted and it is possible to directly
enter the frequency using the numeric keys. For example, for a programme on
the frequency of 11.214GHz, simply press the 1,1,2,1,4 keys.
Note : if LNC1 is seiected the frequencies aliowed will be dependant on the number stored in
the LNC1 frequency option. ( See section "INSTALLATION MENU ",LNC 1)
2. POLARITY
The correct polarity must be assigned to each programme. This receiver can
utiiise Mechanicai and Eiectro-Magnetic types of polarisers, but if you wish to
use a voilage switching type of LNC, you must have seiected VOLT on the
polariser option. (See section 'Instailation Menu'.)
Voltage Switching
LNC’s that automaticaily select horizontal or vertical polarity depending upon
the voilage supplied to the LNC, ensure a value of 18 volts for horizontal
polarity and 14 voits for vertical polarity. These values are not adjustable and
are indicated by the ietter H or V on the screen.
The Electro-Magnetic Polariser
Horizontai and verticai, right hand circular and left hand circular settings are
not indicated as such in this menu, but as a value in the range of 0-63.
GB 15
Page 18

■ The Mechanical Polariser
As with the Electro-Magnetic Poiariser, the poiarity settings of the Mechanical
J
' Poiariser are indicated by a vaiue in the range of 0-63.
Note: If the changes are made to the H-pol Base or V-pol Base in the LNC Offset menu, all 60
Channels will be reset to the new H-pol or V-pol Base setting. Press VIEW In case you decide
not to make any alterations after you have already adapted some parameters.
3. BASEBAND
The baseband output is used to feed an external decoder. This signal falls into
two main categories, PAL or MAC. This option aliows you to switch the
baseband output, provided by the DECODER/DESCRAMBLER socket, to be
either filtered for a PAL decoder or flat for a MAC decoder.
4. AV SOURCE
The Audio and Video source can be seiected from four options:
INT - internal audio and video. In this mode, any external decoder will be
ignored.
AUTO - The default option for most programmes is AUTO so that, if a
decoder providing the correct control signal is used, this decoder wiil be
selected automatically when selecting this programme.
EXT V - Select this option if your decoder only treats the video of an
encrypted programme.
EXT AV- Select this option if your decoder treats both audio and video of an
encrypted programme. This option may have to be selected with some
decoders that do not function if you have seiected AUTO.
Note: If you select EXT V or EXT AV without a decoder fitted, the picture will disappear.
J
5. DECODER
This option is dependant on the setting of the AV source above.
if AV-source is AUTO, this question wiil be ignored.
If AV-source is INT, you can choose between NONE (normally the case) or
INT. Only select INT if your receiver is equiped with an internal VideoCrypt
decoder with Smart Card reader*.
if AV-source is EXT V or EXT AV, you can now select between EXT 1 or
EXT 2. Only select EXT 2 if you have 2 decoders and the special connector
lead connecting them to your Receiver. Consult your dealer for advice about
this connector lead.
Note: For Receivers without an internal VideoCrypt decoder, the D'/cey on the remote control
has no function.
6. AUDIO
When in the Installation menu, the I-II key or-<] and O keys can be used
to select the sound you want to hear. You may refer to the Satellite Pro
gramme Guide in the back of this manual to change or optimise your choice.
7. FREQ
Using the <□ and [>■ keys, this option allows you to vary the audio frequency
for both mono and stereo modes, thus enabling you to tune into programmes
using audio frequencies different to the preset ones. MONO V will now show
that it has been altered from its original setting (eg MONO 3). Use this option
to obtain mono sound settings of 6.60 or 6.65MHz (see Satellite Programme
Guide).
AUDIO STEREO A
FREO 7-02
NAME PR 1
LNC 1
BAND HIGH
PANDA
7-20
ON
GB 16
8. NAME
The default programme ident can be altered with this option. The <3 and [>■
keys select alphas or numerics and pressing MENU will move the cursor to
the next digit and so on. The (D key will move the cursor back.
9. LNC
Your Receiver has 2 dish antenna inputs, thus allowing you to choose which
satellite dish input you wish to use for each programme. If LNC 1 is selected,
the satellite channel frequency range displayed in option 1 is dependant on
the value asigned to the LNC1 frequency band in Menu 2.
Note: the number displayed does not affect the frequency input range.
•INNOVATRONSA-Ucence
Page 19

J
10. BAND i
If BAND is selected in the polariser option in Menu 2, then this option will be
available. It is intended for use with a dual band LNC.
If LOW is selected, the lower band of the dual band LNC will be activated (e.g.
Astra). The voltage supplied to the LNC will be 14 V.
If HIGH is selected, the higher band of the dual band LNC will be activated
(e.g. DBS). The voltage supplied to the LNC will be 18 V.
When all settings are as required, press the STORE key once to store your
settings. This will bring the WHICH PROGRAMME prompt on screen. Select a
programme number you wish to store this information against using the <I] or
[>> keys or the numeric keys. Press the STORE key again. This will store all
the settings for the programme and put the receiver back into normal mode.
Programmes 59 and 60 have been designated TEST and AUX respectively
and cannot be renamed; consequently the NAME option is not available on
these programmes.
Adding New Programmes (frequency scan)
To add new programmes, it will be necessary to first locate them. This can be
easily done using the frequency scan mode:
o
> The 9 light will start blinking.
l> The receiver will scan for programmes on the polarity you were
When the receiver finds a signal, the scanning speed will automatically
decrease. This allows you the time to stop the scanning by pressing MENU.
Automatically, Menu 1 will be displayed to alter other parameters if necessary,
and to store the channel found under a new preset number. Continue as
described in section “Modifying Existing Programmes (Menu 1)”.
O Press VIEW to quickly end the scan.
To scan for programmes on another polarity it is necessary to select a preset
on this other polarity (see the Satellite Programme Guide). Then press MENU
3 again to re-start the scan.
Press MENU followed by 3.
last viewing.
PEBSO№LiSINQ
i
i
I
Other Remote Controls
It is possible to operate your Receiver with a remote control other than the
one delivered with the Receiver. Your Receiver is programmed to function as
“Satellite 2”. The remote control transmits signals in “Satellite 2” codes.
Some multifunctional Philips remote controls have the “SAT” option. If they do
not have the choice between “SAT1” and “SAT2”, they will transmit SAT1
codes. Since your Satellite Receiver is functioning as SAT2, it will not react to
those commands.
But you can change your Receiver from SAT2 to SAT1 and vica versa!
To Change from SAT2 to SAT1:
O Disconnect the Receiver from the mains.
O Reconnect the Receiver to the mains while holding the (*) and
the - button on the front of the Receiver simultaneously for
several seconds.
Now your Receiver will not react to the commands of its own remote control
any more! Use a multifunctional Philips remote control and check if your
Receiver reacts correctly. If this is not the case, follow the procedure below.
To Change from SAT1 to SAT2:
O Disconnect the Receiver from the mains.
o Reconnect the Receiver to the mains while holding the (i) and
the + button on the front of the Receiver simultaneously for
several seconds.
Your Receiver will now resume normal operation with its own remote control.
GB17
Page 20

SPECIFICATION
I SPECIFICATION
5
I PICTURE
Reception of PAL and SECAM satellite signals with excellent quality
Compatible with reception of MAC signals through MAC baseband decoder
MAC signals passed on to TV via RGB for high quality pictures
OPERATION
60 Presets
Fully Remote Controlled
Remote controlled operation and installation using On-Screen Display
48 Channels are factory pre-programmed
4-Event VCR timer with Video Recording lock
Sleeptimer
Parental lock per programme
Receiver lock
RECEPTION
Frequency range
Input level
IF Bandwidth
Demodulator
Threshold
Frequency deviation
:950-1750MHz
:-62 to -25 dBm, 75£2
:27MHz
:PLL with threshold extension
:C/N <6.5dB static
;16-25MHzA/pp (PAL)
:13.5-20MHzA/pp (MAC)
J
VIDEO
PAL/SECAM
:4.8 MHz (-3dB)
SOUND
Frequency response
(DIN 45500) :20Hz -15KHz
Subcarriers
Mono iTunable between 5.0 and 9.99 MHz
Stereo :7.02 and 7.20 MHz
:7.38 and 7.56MHz
:7.74 and 7.92MHz
:8.10and 8.28MHz
:Stereo channels can also be tuned
Noise Reduction System :Panda 1
SATELLITE ANTENNA INTERFACE
Inputs :2 lEC connectors
LNC supply :14V, 18V (500mA) user selectable
Polariser control Pulse (mechanical, 0.8 to 2.2 ms)
iMagnetic (ferrite, -80 to +80 mA)
:“Marconi”type (“13/17V”)
GB 18
Page 21

J
CONNECTIONS
TV
VCR
Decoder/Descrambler
Audio
UHF remodulator
Satellite dish inputs
MISCELLANEOUS
Ambient temperature
Mains
Power consumption
Weight
Dimensions
:Euroconnector for TV/monitor (RGB & CVBS)
:Euroconnector for VCR (CVBS)
:Selectable de-emphasis (PAL/MAC)
:Baseband output
:AudioAfideo input
:CINCH (L + R) 500mV constant level
:Tunable between channel 31-44
:Preset to channel 38
:With test picture generator
:Terrestrial antenna input (lEC female)
:Terrestrial antenna output (lEC male)
:Dish 1 (lEC female)
:Dish 2 (lEC male)Polariser control
:5 fold colour coded click-fits
:+5 to +45 °C
:220to240V +10%,50Hz
:<35W
•.Standby < 16W
:1.8Kg
:360 X 200 X 58mm
SPECIFICATION
I
ACCESSORIES
Remote control
Coaxial antenna cable
lEC connector
Directions for use
DECODER SCART TV SCART VCR SCART
1. Audio Out R (Decoder 1)
2. Audio In R (Decoder 1)
3. Audio Out L (Decoder 1) Audio Out L Audio Out L
4. Audio Earth (Decoder 1)
5. Blue Earth
6. Audio In L (Decoder 1)
7. Blue In
8. Decoder 1 Status CVBS Status CVBS Status
9. Green Earth
10. Decoder 2 Baseband Out
11. Green In
13. Red Earth
14. Decoder 2 Input
15. Red In Red Out
16. RGB status
17. Decoder Earth
18. Decoder 2 Status
19. Decoder 1 Baseband Out
20. Decoder 1 Input
21. Casing Socket Earth
:RC5806
:1.5 meter
:Male for dish input 1
:1 booklet
Audio Out R Audio Out R
- Audio In R
Audio Earth Audio Earth
Blue Earth
Blue Out
Green Earth -
Green Out -
Red Earth
- -
RGB Status
Video Earth
RGB Status Earth -
Video Out
-
Casing Socket Earth
Audio in L
-
-
-
Video Earth
Video Out
Video In
Casing Socket Earth
GB 19
Page 22

FAULT FINDING . FAULT FINDING
J
FAULT
Receiver does not operate
If the Receiver does not give the desired result
I
6
when used
Cannot select TV programmes when Receiver
is switched on
With some TV sets it may be impossible to select
a normal TV programme while the Satellite
Receiver is switched on. This may be the case if,
for example, you have your Satellite Receiver
connected to your TV by means of an /W
connector cable and you want to make a record
ing of a satellite programme while watching a
normal TV programme.
Poor reception
If you have followed carefully the instruction in
section 2 HOW TO CONNECT YOUR
RECEIVER, you should get clear pictures and
sound
CAUSE AND ACTION
- check the power and connection
- check the satellite dish antenna and/or A/V
connections
- verify that the batteries of the remote control are
not exhausted
- disconnect the receiver from the mains and
reconnect it after waiting several seconds.
Note: You will have to set the internal clock again.
If this occurs, you should press the TV/SAT key
on your remote control once.Now you can select
and watch TV programmes.
If you wish to return to the satellite programmes,
press the same TV/SAT key again.
If you have no problem changing TV channels
while your Satellite Receiver is switched on, you
do not need to use the TV/SAT key.
If not, check the section' Modifying Existing
Programmes (Menu 1)' carefully.
- adjust the satellite channel frequency in Menu 1
slightly using the <3 and Q> keys
- check the dish position
If this does not improve things, then the problem
may be due to objects such as buildings or trees
between your dish and the satellite. Ask your
dealer for advice.
Scrolling picture on some programmes
The picture is not stable, scrolls or disappears
and appears all the time.
Remote control does not work
If It seems the Receiver does not react to remote
control commands.
If you have any of the faults shown, take the
required action and, if this does not achieve the
required result
Try to optimise the reception following the
procedure mentioned under Poor Reception. If
this does not give the desired result, you may be
tuned to a programme with conditional access for
which you have no authorisation.
- verify that the 9 light is not lit. If so, the
Receiver is switched on to a timer event or is in
sleep timer mode and does not react to remote
control commands.
If you want to stop the sleeptimer, press O.
If you want to cancel the timer event, press the
(I) key quickly followed by VIEW. The timer
event has now been cancelled and the Receiver
will resume normal operation.
- verify that the batteries of the remote control are
not exhausted.
- check that you did not accidentally
reprogramme the Receiver to 'SATT
(see 'Other Remote Controls' in chapter 4)
- consult your dealer
GB 20
Page 23

J
7,
PROGRAMME GUIDE
SATELLITE ASTRA 1-A 19.2“ East
PR Programme
1 SKY1 11.317 V ASTRA 8 PAL
2 SKY NEWS
3 SKY MOVIES PLUS
EUROSPORT
4
5 MTV
SCREENSPORT
6
LIFESTYLE
7
8 RTL4 11.391 H ASTRA 13 PAL*
g FILMNET
10 TV3
11 SCAN SAT TV1000
12 TELECLUB
13 RTL PLUS
14 SAT-1
15 3SAT 11.347 V ASTRA 10 PAL
16 PRO 7
SATELLITE ASTRA 1-B 19.2° East
PREMIERE
17
18
TELES 11.523 H ASTRA 21 PAL
19
20 TV3 SWEDEN/NORWAY
21
ARD1 PLUS
22 SES VIDEO
23 11.612
24 TV3 DENMARK
25 SKY SPORT
26 11.567 V ASTRA 24
27
28
29
THE MOVIE CHANNEL
30
31
SES INFO 11.597 V ASTRA 26 PAL
32
Frequency
11.376 V
11.435
11.258
11.421 H ASTRA 15 PAL
11.214 H ASTRA 1 PAL
11.273 H
11.362 H ASTRA 11 PAL*
11.244 H ASTRA 3 D2MAC
11.303 H ASTRA 7
11.332 H ASTRA 9
11.229 V
11.288 V ASTRA 6 PAL
11.406 V ASTRA 14 PAL
11.464
11.582 H ASTRA 25
11.641 H ASTRA 29
11.494 H
11.553 H
11.671 H ASTRA 31
11.508 V
11.626 V ASTRA 28
11.685 V ASTRA 32
11.479 V ASTRA 18
11.538 V ASTRA 22
11.656 V ASTRA 30
Pol Transponder
ASTRA 12
V ASTRA 16
V ASTRA 4 PAL
ASTRAS
ASTRA 2
ASTRA 17
H
ASTRA 19
ASTRA 23 PAL MONO 2
ASTRA 27
H
ASTRA 20 PAL (VC) MONO 2
System
PAL
PAL (VC) STEREO A
PAL MONO 2
D2MAC STEREO A*
PAL* MONO 2
PAL
PAL*
D2MAC MONO 2
PAL
D2MAC MONO 2
PAL (VC) MONO 2
Audio Radio
STEREO A SKY RADIO
STEREO A
MONO 2
STEREO A
MON03
STEREO A
MONO 2 RADI010 GOLD
STEREO A*
MONO 2 DEUTSCHE WELLE
MONO 2
STEREO A
MONO 2 STAR SAT
MONO 2
MONO 2
MONO 2
MONO 2
MONO 2
MONO 2
MONO 2
MONO 2
MONO 2
MONO 2
MONO 2
PROGRAMME
POWER FM
ITN NEWS
RTL
OPUS RADIO
DEUTSCHLANDFUNK NATIONAL
EUROPE
ROPA
GUIDE
j
Frequency
STEREO B
STEREO B
STEREO B
STEREO B
STEREO B
STEREO B
STEREO C
STEREO B
STEREOC
* = Encoded
SKY MOVIES PLUS. SKY SPORT and THE MOVIE CHANNEL can only be
viewed via a VideoCrypt decoder.
Note: All these allocations are subject to change.
GB 21
Page 24

PROGRAMME
GUIDE
PROGRAMME GUIDE (Cont.)
I
SATALLITE EUTELSATII F1 13.0° East
Pr Programme
33 SUPERCHANNEL
34 3SAT
35 SAT1 11.095 H
36 EUROSPORT V
SATELLITE EUTELSAT 1 F5 10.0° East
37 RAIUNO
38 TVE - INTERNATIONAL 11.149 H
SATELLITE INTELSAT VA - F4 27.0° West
39 CHILDRENS CHANNEL 11.013 H
40 CNN INTERNATIONAL 11.155
41 DISCOVERY/KINDERNET 11.175
SATELLITE INTELSAT VA -F121.0° West
42 TV10 NORWAY 10.969
43 TV4 NORWAY 11.683 H
SATELLITE TELECOM 1-C 5.0° West
44 CANAL PLUS
45 LA CINQ 12.606
46 M6
SATELLITE TELE-X 5.0° East
47 TV4
SATELLITE OLYMPUS 18.8° West
48 RAISAT 12.168
Frequency Pol
10.987
11.055 H
11.005 H
12.648
12.522 V
12.207 V
V STEREO A
V
H STEREO A
H
V
V
V
j
Audio
MONOV
MONOV
MONO 2
MONOV
MONOV
MONOV
MONOV
MONOV
STEREO A
MONOV
MONOV
MONOV
STEREO A
MONO 2
Note: All these allocations are subject to change.
GB 22
Page 25

Page 26

Page 27

Page 28

<§b)
Ci)
o
CD
IDENTITY CARD
GERÄTEKENNKARTE
CARTE
D’IDENTIFICATION
CARTE
D'IDENTIFICAZIONE
This card together with the terms of guarantee (to be provided by
your dealer) forms the full certificate of guarantee for this appliance.
Diese Karte ist. zusammen mit den Garantiebestimmungen, die Ihr
Händler Ihnen aushändigt, Ihr Garantieschein für dieses Gerät.
Associée aux conditions de garantie (qui vous sont remises par le
revendeur), cette carte constitute le certificat de garantie de cet
appareil.
Questa cartolina rappresenta insieme alle condizioni di garanzia (da
consegnare dal vostro rivenditore) il documento di garanzia per
questo apparecchio.
Ez a lap a jótàllàs feltételeivei egyùtt (az Eladó Kereskedó]e adja)
képezi teijes egészében ennek a készùléknek Garancia Igazolvànyàt.
PHILIPS S
502-9011030
 Loading...