

Philips Streamium NP3500/12, Streamium NP3500 User Manual
Register your product and get support at
www.philips.com/welcome
NP3500/12
EN User manual


3
English
EN
Location and time zone 35
Language 35
Device information 35
Check for software upgrades 36
Demo mode 36
Restore factory settings 36
9 Register NP3500 with Philips 36
Benefits 36
Register NP3500 36
Unregister NP3500 37
Check registration information 37
10 Maintenance 38
Cleaning 38
11 Technical data 38
12 Troubleshooting 40
13 Contact information 41
Contents
1 Important 4
Safety 4
Environmental notices 5
2 Your NP3500 6
Introduction 6
What’s in the box 6
Overview 7
3 Prepare 12
Install batteries into the remote control 12
Connect to an existing audio system 12
Connect external audio devices 12
Connect power supply 13
4 First-time setup 13
Connect to home Wi-Fi/wired network 14
5 Play from home Wi-Fi/wired network 21
Stream from a UPnP server 21
Play Internet radio stations 23
Stream from online music services 27
Search for music 27
6 Use your iPhone as a virtual remote
control 29
Download the application 29
Access the smartphone application 29
Use the virtual remote control 29
7 Multiroom Music 30
8 Settings 31
Play modes 31
Sound settings 31
Display settings 32
Slideshow settings 32
Album art 32
Clicker sound 33
Clock settings 33
Network settings 35
4
i Only use this product indoors. Do
not expose the product to dripping /
splashing water, rain or high humidity.
j Keep this product away from direct
sunlight, naked flames or heat.
k Do not install near any heat sources
such as radiators, heat registers, stoves,
or other electrical equipment (including
amplifiers).
l Do not place any other electrical
equipment on the product.
m Do not place any sources of danger
on the product (e.g. objects containing
liquids, burning candles).
n This product may include batteries.
Please refer to safety and disposal
instructions for batteries in this user
manual.
o This product may contain lead and
mercury. Disposal of these materials
may be regulated due to environmental
considerations. Please refer to disposal
instructions in this user manual.
Warning
Never remove the casing of this apparatus. •
Never lubricate any part of this apparatus. •
Never place this apparatus on other electrical •
equipment.
Keep this apparatus away from direct sunlight, naked
•
flames or heat.
Ensure that you always have easy access to the
•
power cord, plug or adaptor to disconnect this
apparatus from the power.
Where the mains plug or an appliance coupler is
•
used as the disconnect device, the disconnect device
shall remain readily operable.
Risk of overheating! Never install this
apparatus in a confined space. Always leave
a space of at least four inches around this
apparatus for ventilation. Ensure curtains or
other objects never cover the ventilation slots
on this apparatus.
1 Important
Safety
Information for Europe:
Know these safety symbols
The ‘exclamation mark’ calls attention to
features for which you should carefully read
the supplied literature to prevent operating
and maintenance problems.
The ‘lightening bolt’ symbol indicates
uninsulated components within the product
that can cause an electric shock.
To reduce the risk of fire or electric shock, do
not expose the product to rain or moisture
and do not place any ojects filled with liquids,
such as vases, on the product.
a Read these instructions.
b Keep these instructions.
c Heed all warnings.
d Follow all instructions.
e Do not use this product near water.
f Clean only with dry cloth.
g Do not block any ventilation openings.
Install in accordance with the
manufacturer’s instructions.
h Do not remove the casing of this
product.
EN
5
English
Please act according to your local rules and
do not dispose of your old products with your
normal household waste. Correct disposal of
your old product helps to prevent potential
negative consequences for the environment
and human health.
Your product contains batteries covered by
the European Directive 2006/66/EC, which
cannot be disposed with normal household
waste.Please inform yourself about the local
rules on separate collection of batteries
because correct disposal helps to prevent
negative consequences for the environmental
and human health.
Information about the use of batteries:
Caution
Risk of leakage: Only use the specified type of •
batteries. Do not mix new and used batteries. Do
not mix different brands of batteries. Observe
correct polarity. Remove batteries from products
that are not in use for a longer period of time. Store
batteries in a dr y place.
Risk of injury: Wear gloves when handling leaking
•
batteries. Keep batteries out of reach of children
and pets.
Risk of explosion: Do not shor t circuit batteries.
•
Do not expose batteries to excessive heat. Do
not throw batteries into the fire. Do not damage
or disassemble batteries. Do not recharge nonrechargeable batteries.
The making of unauthorized copies of
copy-protected material, including computer
programs, files, broadcasts and sound
recordings, may be an infringement of
copyrights and constitute a criminal offence.
This equipment should not be used for such
purposes.
Environmental notices
This product complies with the radio
interference requirements of the European
Community.
This product complies with the requirement
of the 1999/5/EC directive.
Class II equipment symbol:
This symbol indicates that this product has a
double insulation system.
Modifications
Modifications not authorized by the
manufacturer may void user’s authority to
operate this product.
Your product is designed and manufactured
with high quality materials and components,
which can be recycled and reused.
When this crossed-out wheeled bin symbol
is attached to a product it means that the
product is covered by the European Directive
2002/96/EC.
Please inform yourself about the local separate
collection system for electrical and electronic
products.
EN
6
What’s in the box
Check and identify the contents of your
package:
Main unit•
Remote control with batteries•
AC power adapter•
Software suite on a CD-ROM•
Quick Star t Guide•
2 Your NP3500
Congratulations on your purchase, and
welcome to Philips! To fully benefit from
the suppor t that Philips offers, register your
product at www.philips.com/welcome.
Introduction
This unit can:
connect to the existing home Wi-Fi/•
wired network, which can consist of
computers and UPnP devices;
connect the existing audio systems.•
With these connections, you can
play Internet radio stations and •
*online music services over the
Internet through the existing audio
systems;
play music stored on a computer/•
UPnP server through the existing
audio systems.
Tip
*Online services are available in some countries only. •
EN
7
English
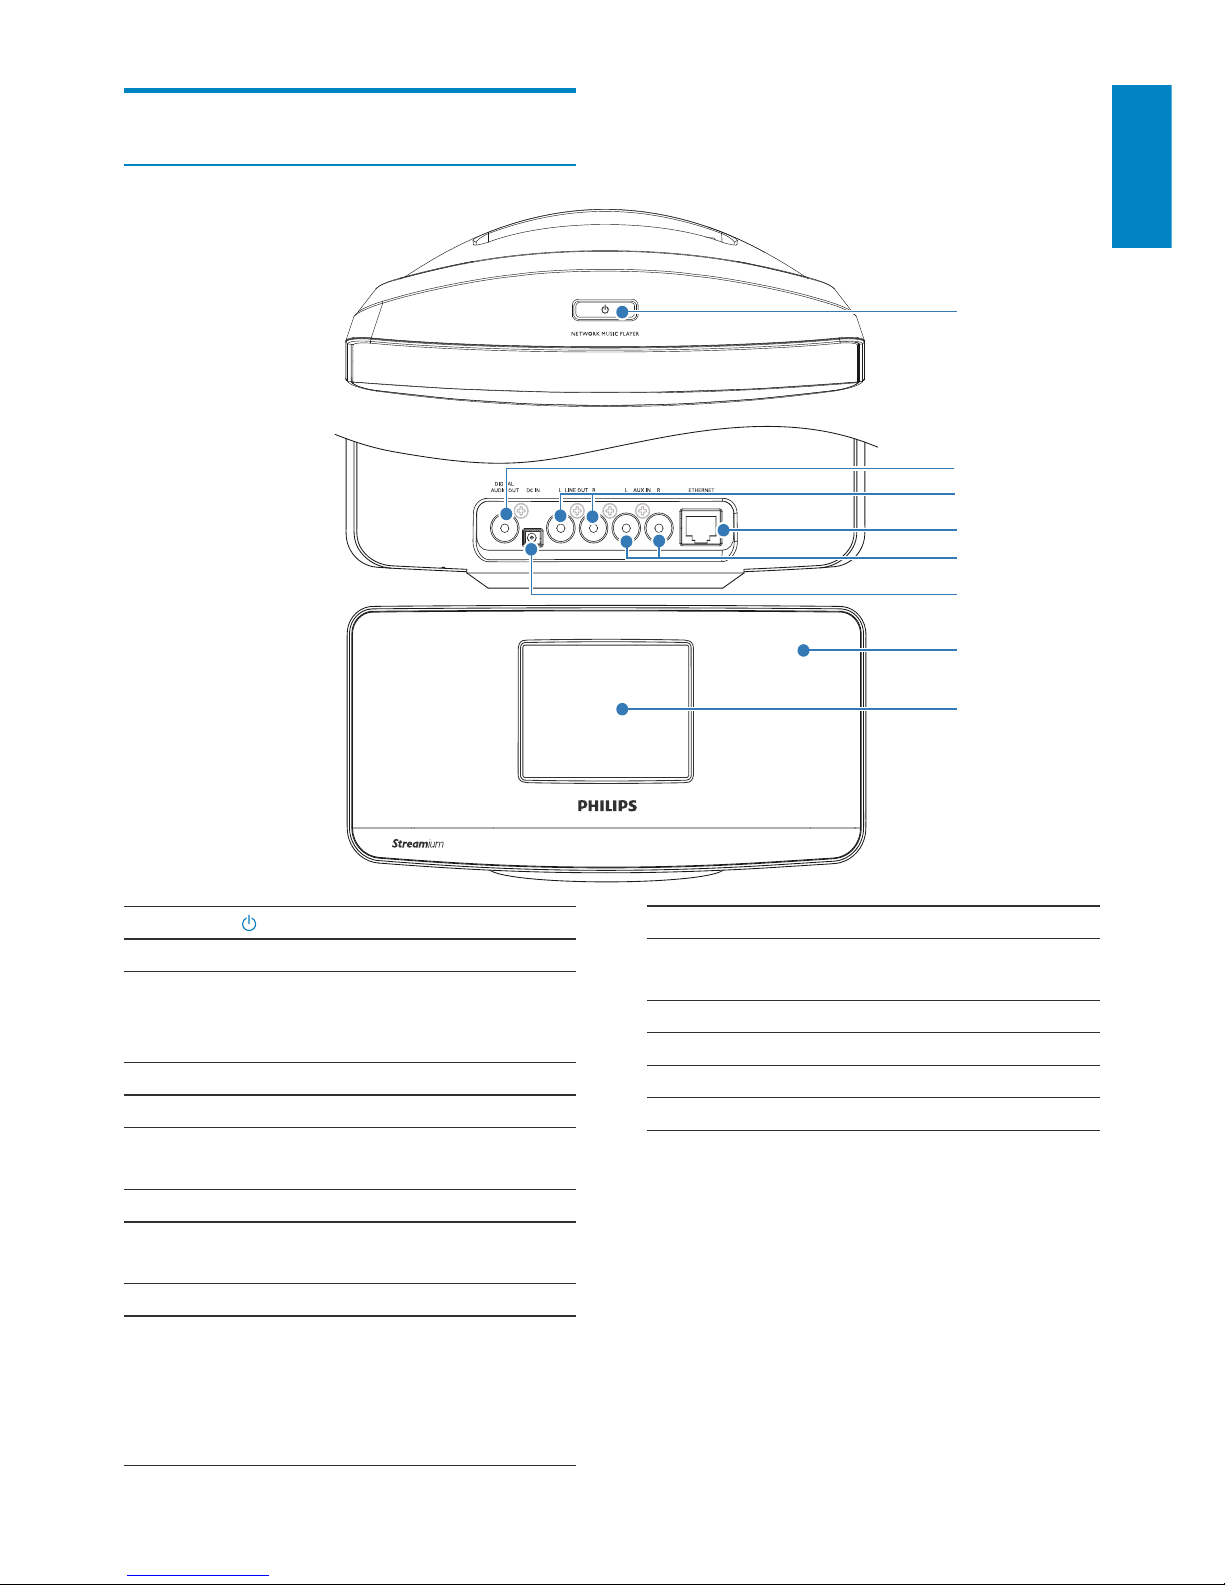
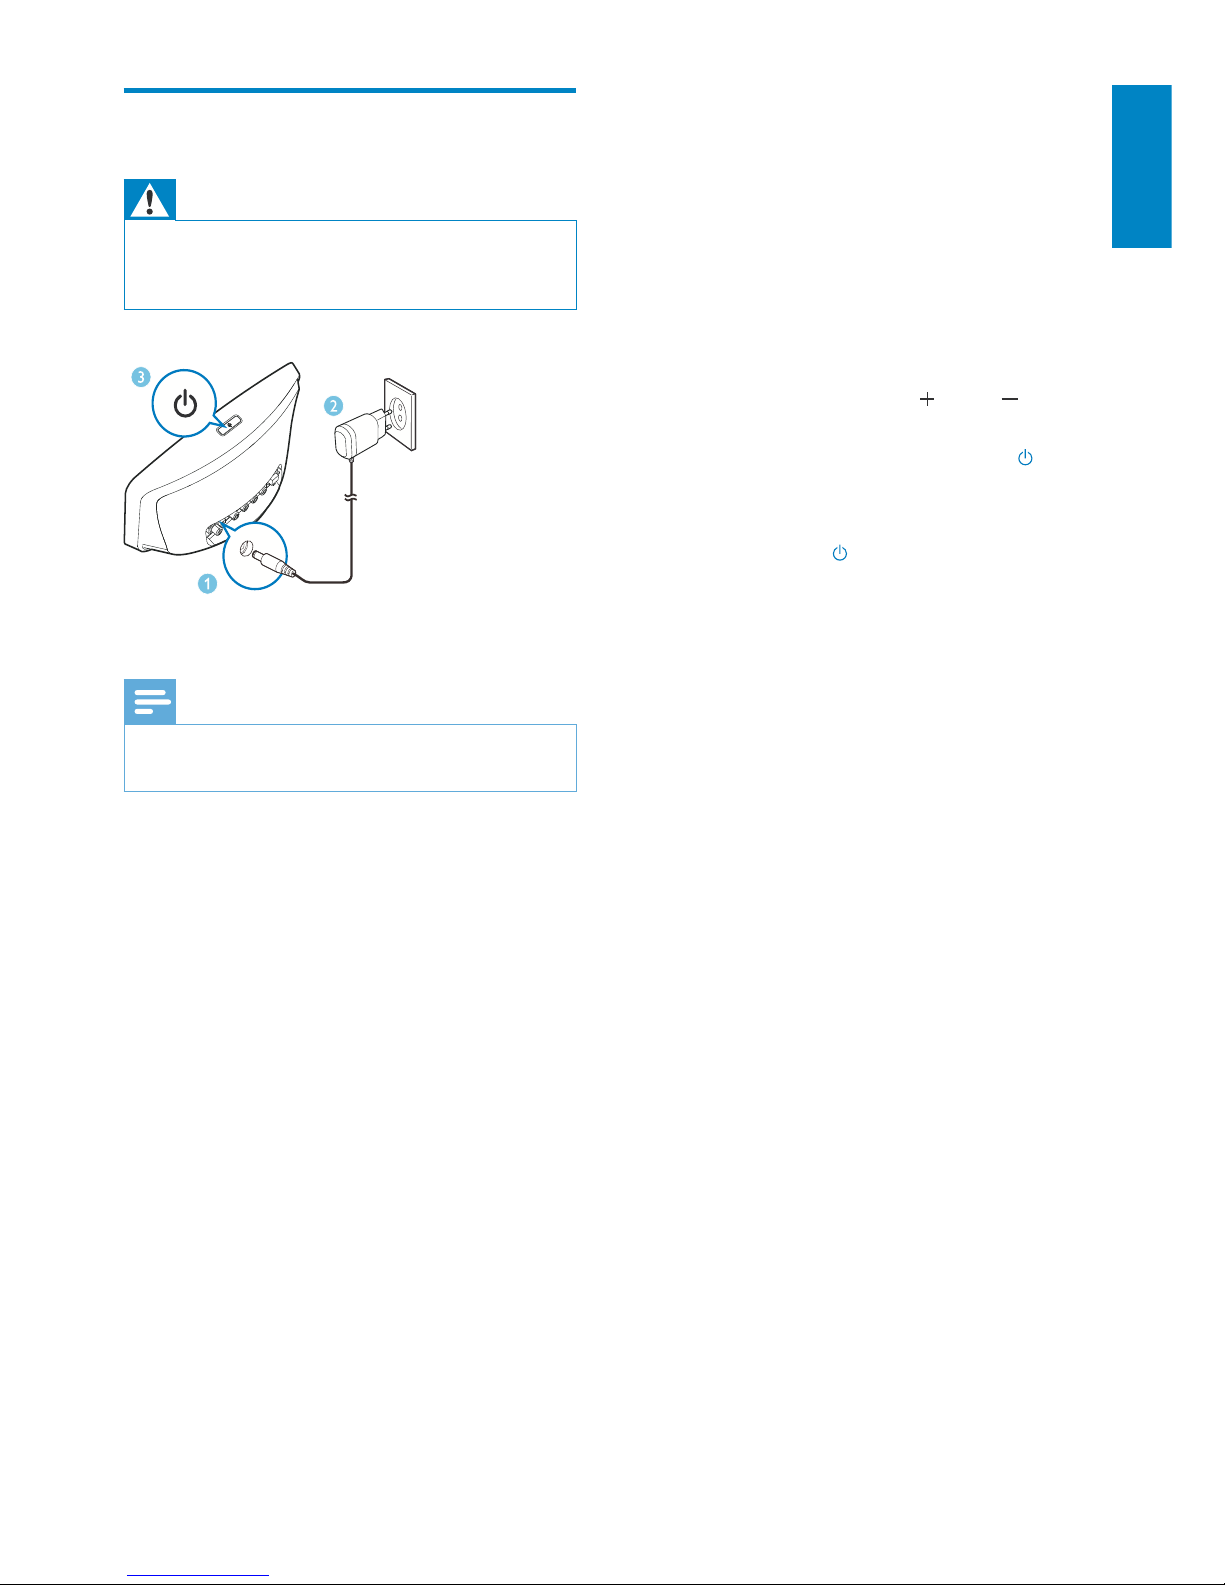
1.
Press to turn on the unit.
To turn off, press to switch to
active standby; or, press and hold
to switch to Eco standby.
Exit Demo mode.
2. DIGITAL AUDIO OUT
Digital audio output to an audio
system.
3. LINE OUT L/R
Analog audio output to an audio
system.
4. ETHERNET
Socket for the Ethernet cable that
connects this unit with the home
Wi-Fi/wired network, if you want
a wired connection to the home
Wi-Fi/wired network.
Overview
Front and rear view
a
b
c
e
f
g
d
h
EN
5. AUX IN (L/R)
Analog audio input socket for an
external audio output device.
6. DC IN
Socket for the AC power adapter
7. IR se nso r
8. LCD display
8
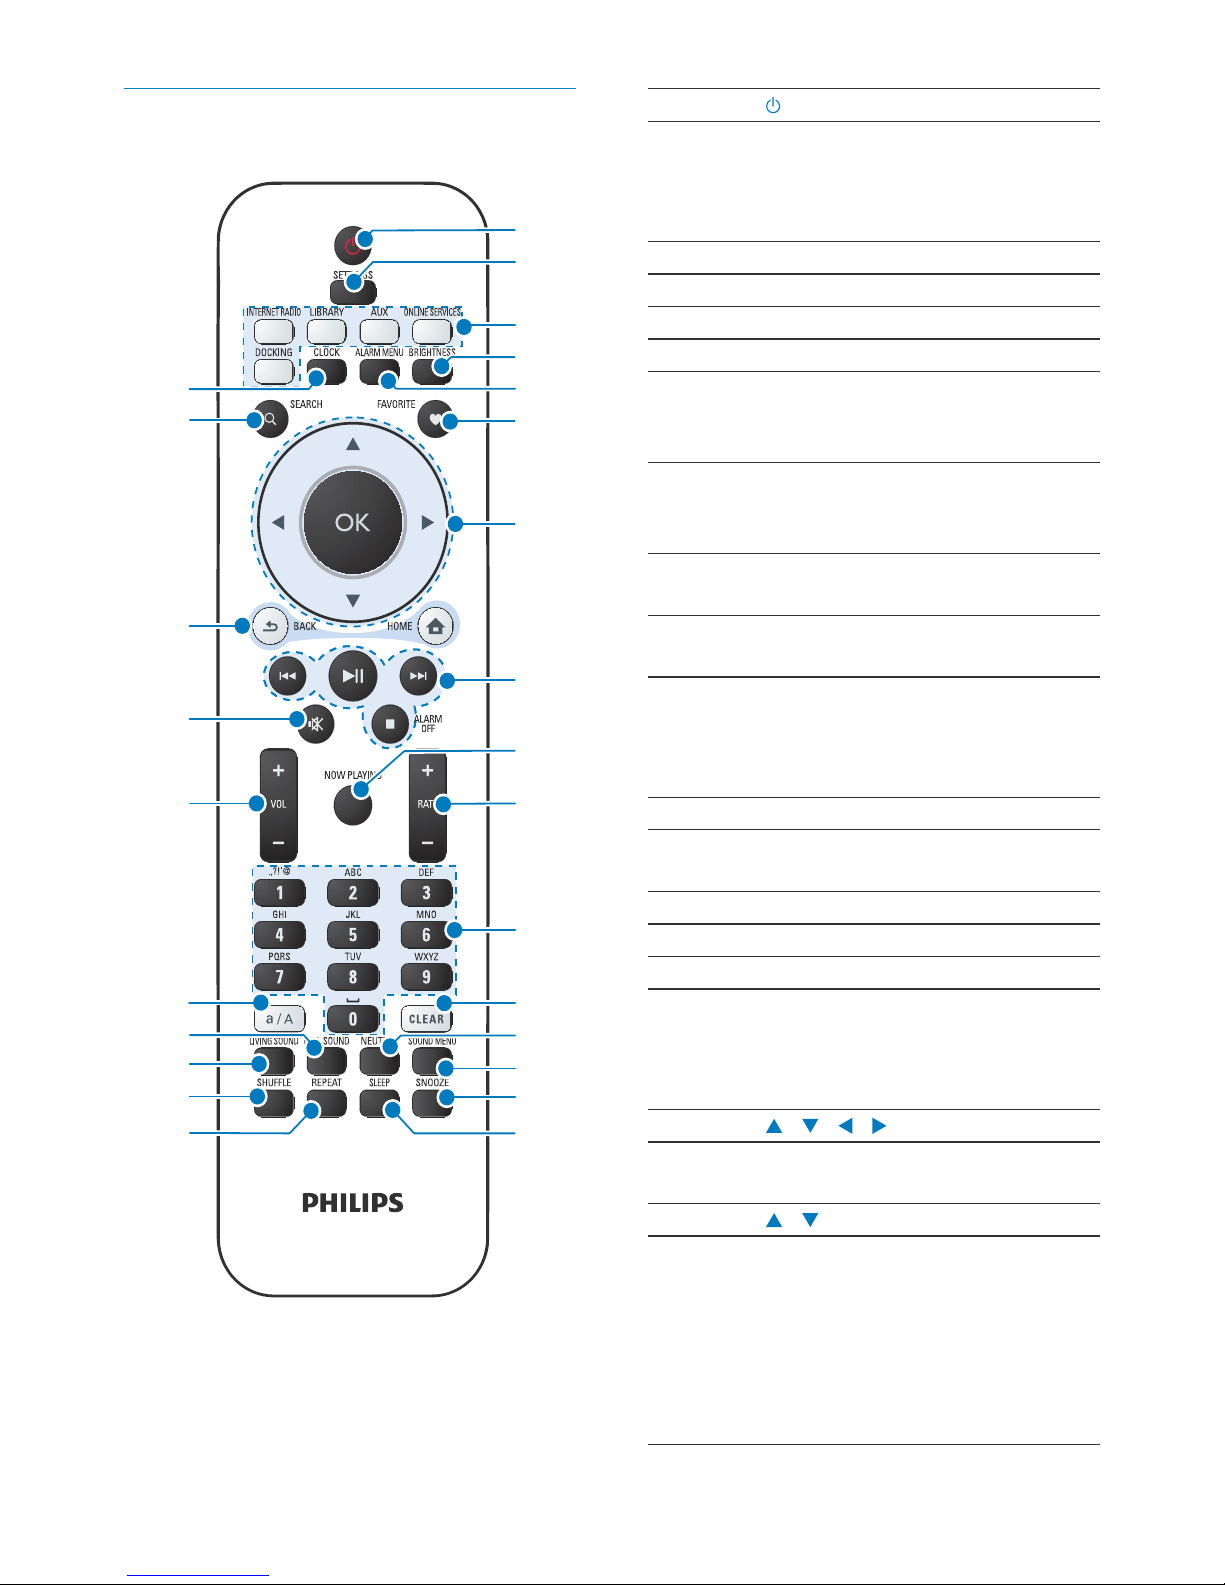
1.
Press to turn on the unit;
To turn off, press to switch to
active standby; or, press and hold
to switch to Eco standby.
Exit Demo mode.
2. SETTINGS
Enter the settings menus.
3. Source selector
Select a media source
(DOCKING is unavailable for
this unit):
INTERNET RADIO: Radio
services provided over the
Internet;
LIBRARY: Media library on a
UPnP media server;
AUX: Connected external audio
device (e.g. an audio system);
ONLINE SERVICES: Supported
music services provided over
the Internet (available in some
countries only).
4. BRIGHTNESS
Select brightness options for the
LCD display.
5. ALARM MENU
Access the alarm menu.
6. FAVORITE
In LIBRARY/INTERNET RADIO
mode:
Add the current station to the list
of Favorite Stations.
7.
/ / /
Navigation buttons
Press to navigate through menus.
/
In LIBRARY/INTERNET RADIO
mode:
Superscroll: In a long list of
options, press and hold to star t
Superscroll. Release to jump
to the first item starting with
current alphabet/number.
Remote control
a
b
c
d
e
f
h
i
j
k
l
m
n
o
p
u
t
s
r
q
y
z
x
v
w
g
EN
9
English
14. SOUND MENU
Enter the menu for sound effect
adjustment.
15. SNOOZE
Stop alarm sound for a period of
time.
16. SLEEP
Set the sleep timer.
17. REPEAT
Select a repeat play option.
18. SHUFFLE
Enable/disable random order play.
19. LIVING SOUND (unavailable for
this version)
20. FULL SOUND
Enable/disable the Full Sound
effect.
21. a/A
Switch between lower and upper
cases.
22.
VOL
Increase/decrease the volume.
23.
Mute/restore sound.
24.
BACK: Go back to previous screen.
HOME: Return to Home screen
(main menu).
25. SEARCH
Star t search/browse based on
alphanumeric entry.
26. CLOCK
Set the clock.
Note
* Rating current music is available only for music •
ser vices that support rating, and is available only in
some countries.
OK
Confirm selection.
8.
/
Search buttons on the play
screen
In LIBRARY mode:
Press to skip to the previous/next
chapter/track.
Start/pause/resume play;
In LIBRARY mode: Start
to play the entire file folder
(SuperPlay™).
/ALARM OFF
Stop play;
Exit Demo mode;
Turn off alarm.
9. NOW PLAYING
Return to play screen.
10.
RATE
In ONLINE SERVICES mode:
Increase/decrease rating* of
current music.
11. Alphanumeric
buttons
For text entry
In INTERNET RADIO mode:
On the radio play screen, press
and hold a numeric button to
store current station in the
location as a preset station.
In LIBRARY/INTERNET RADIO
mode:
Quickjump: In a long list of
options that are sorted in an
alphabetical order, press once or
repeatedly to select an alphabet,
and jump to the first item that
starts with the selected alphabet.
12. CLEAR
Press to delete the previous entry;
Press and hold to delete all entries.
13. NEUTRAL
Turn on or off [Direct source].
EN
10
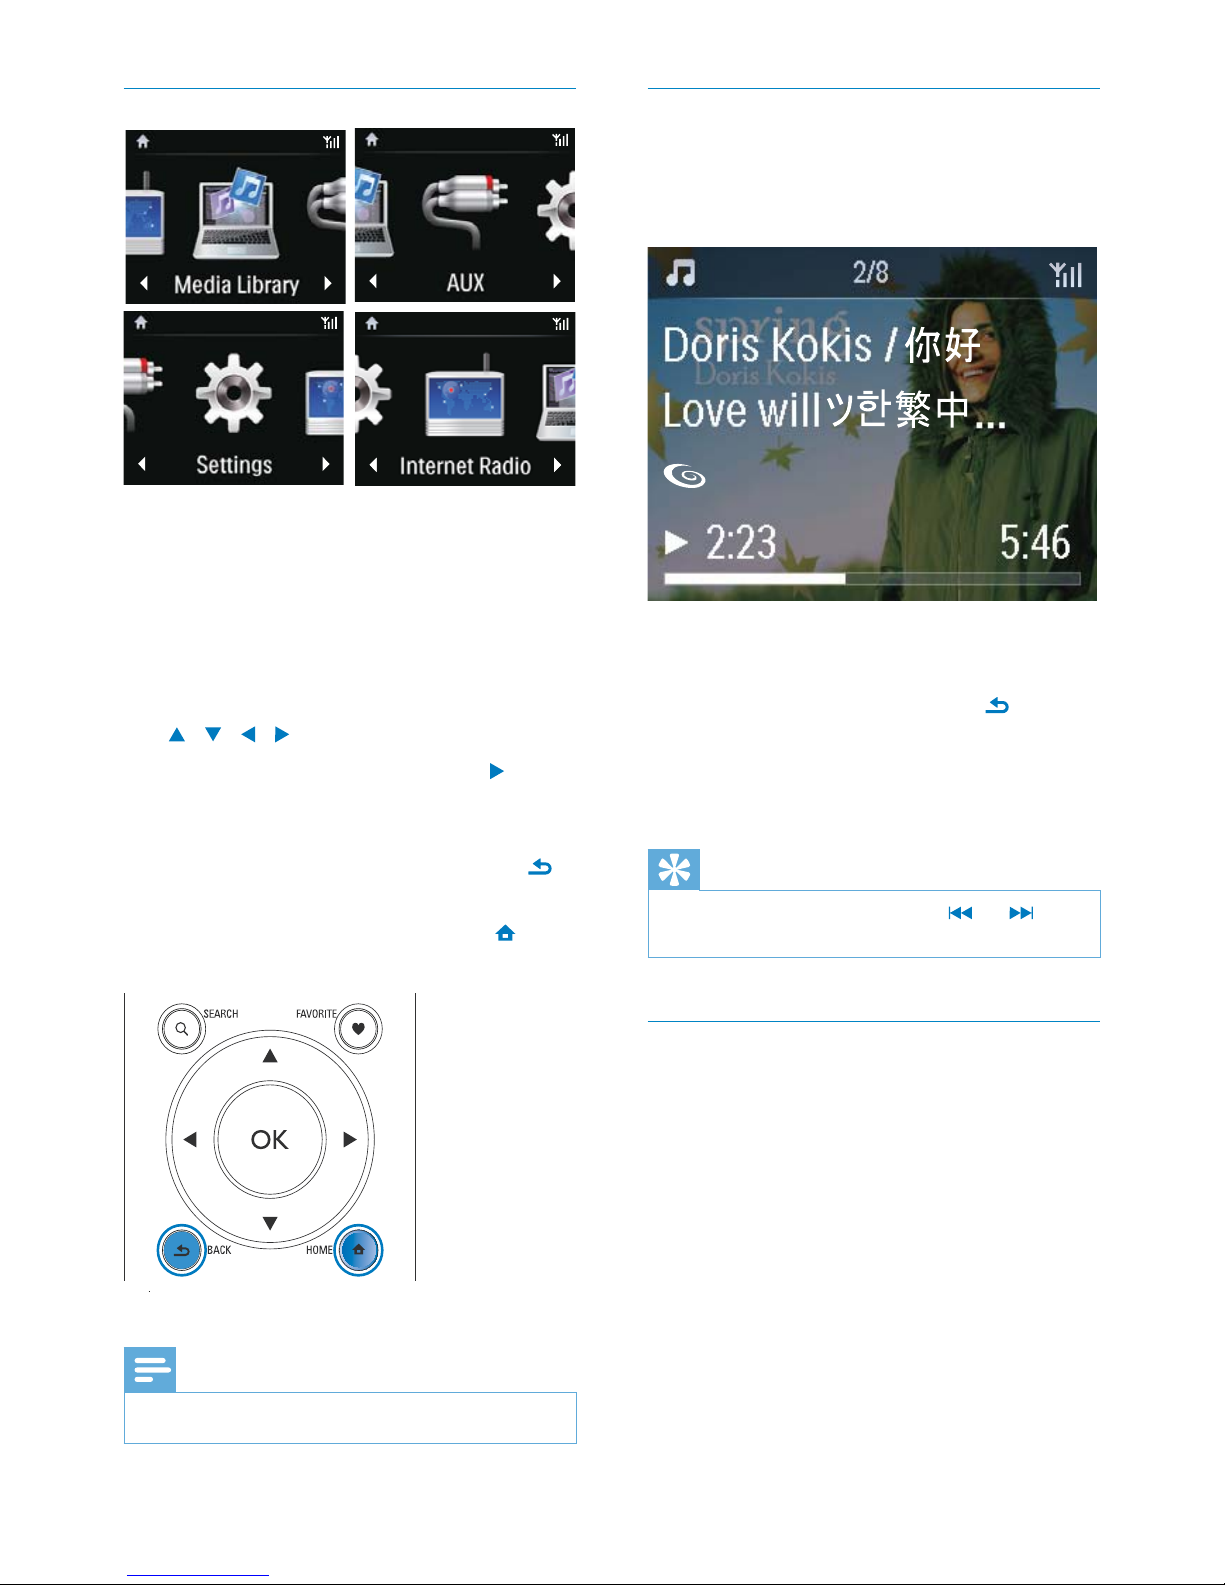
Play screen
In LIBRARY/INTERNET RADIO/ONLINE
SERVICES mode, Play screen appears when
play starts.
To navigate through menus during music play,
do the following:
1 On the remote control, press and
then, use the Navigation buttons.
2 To return to Play screen, press NOW
PLAYING.
Tip
On Play screen, you can also press • and
repeatedly to select songs.
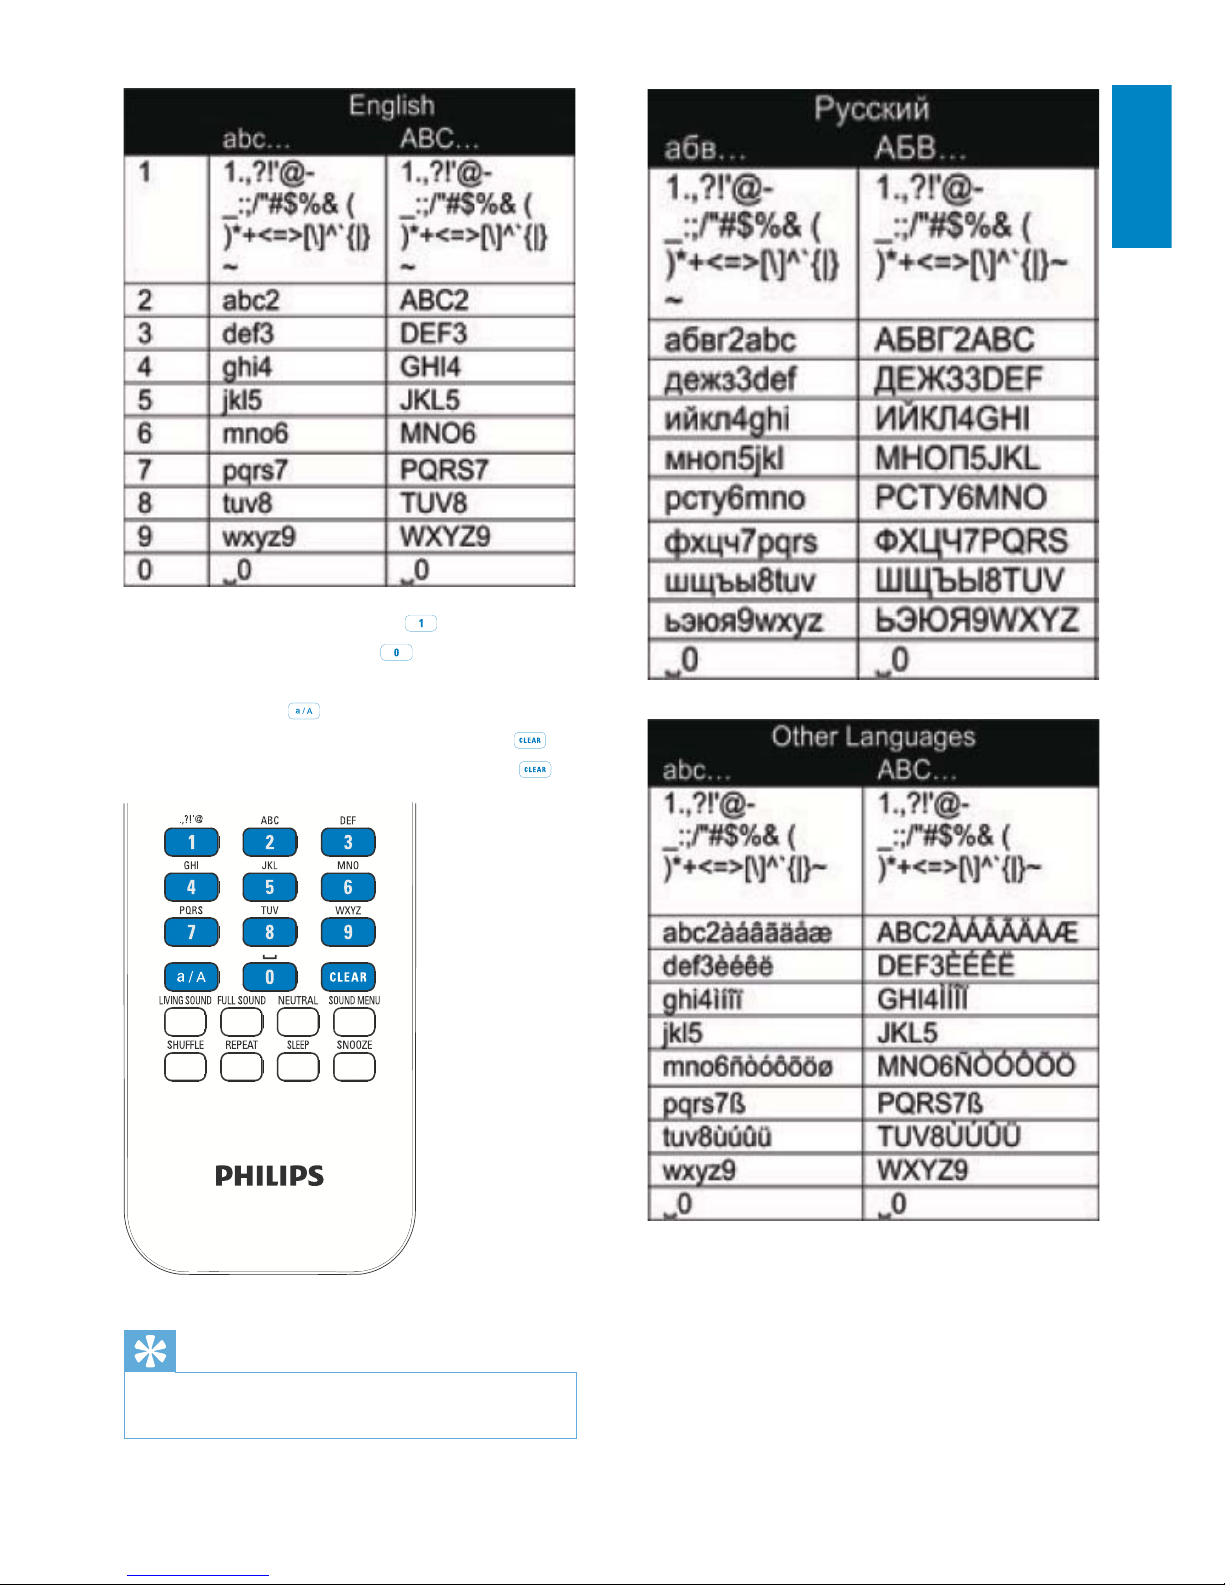
Text entry
To enter text and symbols, you can •
press the corresponding alphanumeric
buttons on the remote control.
Text entry with the remote control
To enter letters/numbers/symbols •
corresponding to the same alphanumeric
button, briefly and repeatedly press the
button.
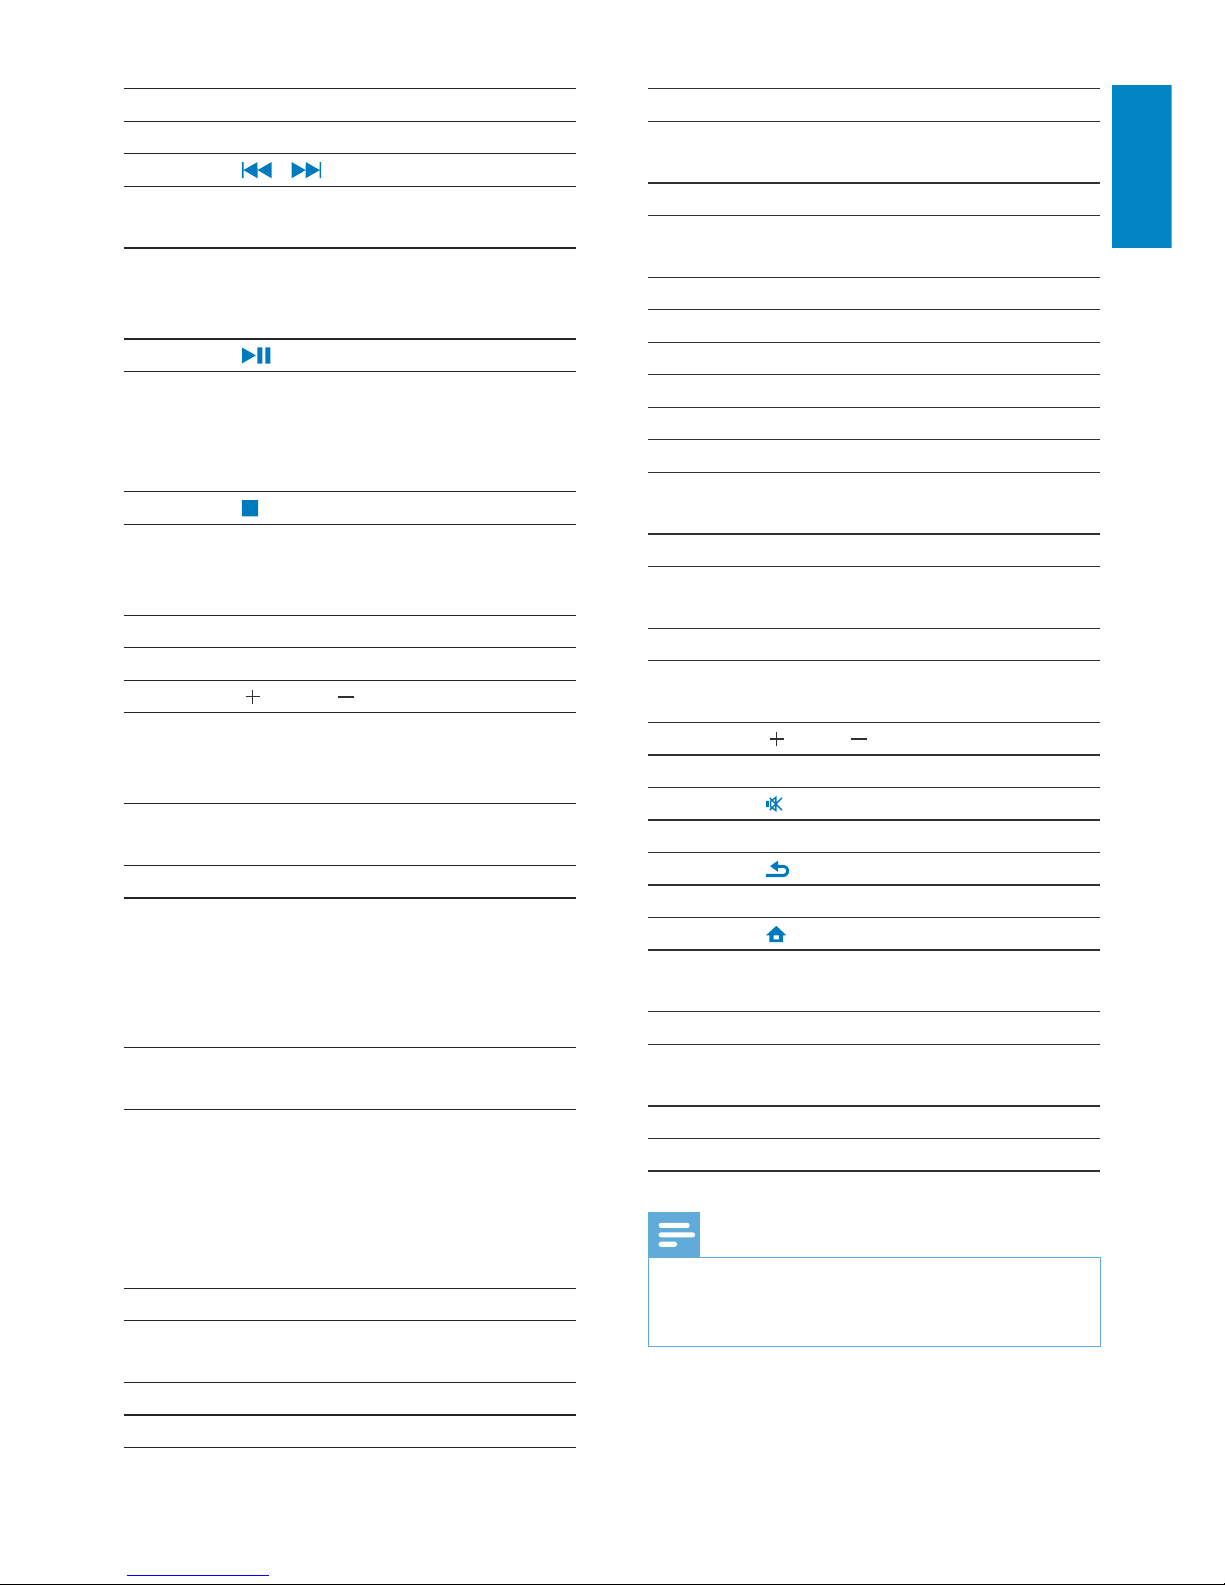
Home screen
On NP3500, you enter Home screen after the
first-time setup is complete.
From Home screen, you can select your
desired music source*, or enter [Settings]
menu. To do so, do the following:
1 On the remote control, press the Source
selector, or use the Navigation buttons
/ / / and OK.
2 To move to the next page, press
repeatedly until you reach the end of the
page.
3 To go back to previous screen, press
BACK.
4 To return to Home screen, press
HOME.
Note
*Online services are available in some countries only. •
EN
11
English
To enter symbols, press • repeatedly.
To enter space, press •
.
To switch between lower and upper •
cases, press
.
To delete previous character, press •
.
To delete all entries, press and hold
.
Tip
For languages other than English, let ters that an •
alphanumeric button corresponds to may vary.
EN
12
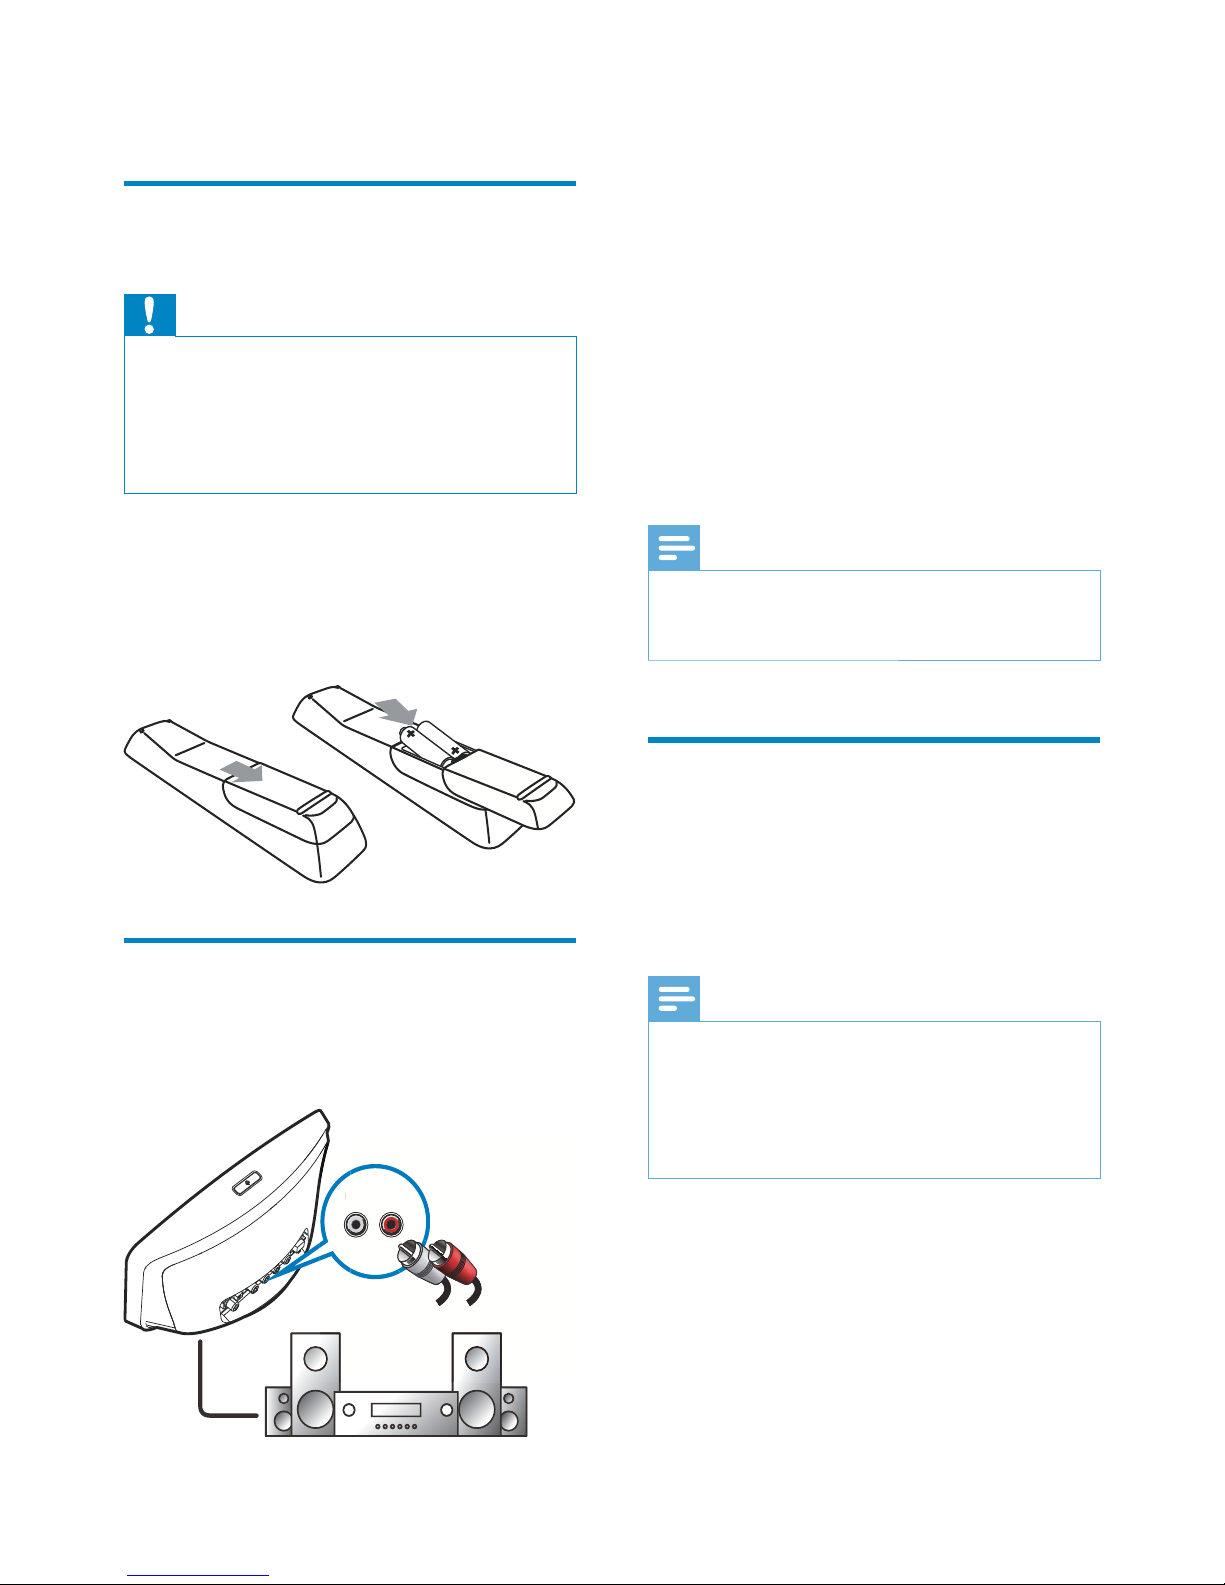
Connect a pair of audio cables (red/white; •
not supplied) to:
the • LINE OUT L/R sockets on the
back of this unit
the audio input sockets on the •
existing audio system
If a digital audio input socket is
available on the existing audio
system, you can also connect a digital
audio cable to:
the • DIGITAL AUDIO OUT on the
back of the unit
the digital audio input socket on the •
existing audio system
Note
When the connection is ready, to listen to music •
from this unit, you need to select the correct source
on the existing audio system.
Connect external audio
devices
With this unit, you can listen to music from
an external audio device through this unit and
the existing audio system.
Note
Make sure that the unit is connected to the existing •
audio system and you have selected the correct
source on the existing audio system.
When the connection is ready, press
• AUX or select
[MP3 Link] from the home screen to switch to the
external device.
3 Prepare
Install batteries into the
remote control
Caution
Risk of explosion! Keep batteries away from heat, •
sunshine or fire. Never discard batteries in fire.
Risk of decreased battery life! Never mix different
•
brands or types of batteries.
Risk of product damage! When the remote control is
•
not used for long periods, remove the batteries.
1 Open the battery compartment.
2 Inser t two AAA R03 batteries with
correct polarity (+/-) as indicated.
3 Close the battery compartment.
Connect to an existing audio
system
To listen to music from this unit, you need to
connect the unit to an existing audio system.
L LINE OUT R
L
LINE OUT R
EN
13
English
4 First-time setup
The first time you turn on NP3500,
1 Select the desired language on the screen
as prompted.
2 To learn major functions on NP3500,
Select • [Yes, show me the demo],
when asked whether to view demo;
If necessary, press •
VOL to
adjust the volume;
To exit the demo play, press •
.
The unit is switched to Eco »
standby.
Press »
again to turn on NP3500,
and restar t the setup.
To proceed to network setup,
Select • [No], when asked whether to
view demo.
3 Select your location and time zone from
the list as prompted.
4 Select [Yes], when asked whether to set
up network connection.
Connect power supply
Warning
Risk of product damage! Ensure that the power •
supply voltage corresponds to the voltage printed on
the back or the underside of the product.
Connect this unit to the power supply.•
Note
The type plate information is located at the bottom •
of the unit.
EN
14
or manual), or switch between different
routers, go to [Settings] > [Network
settings] > [Setup network].
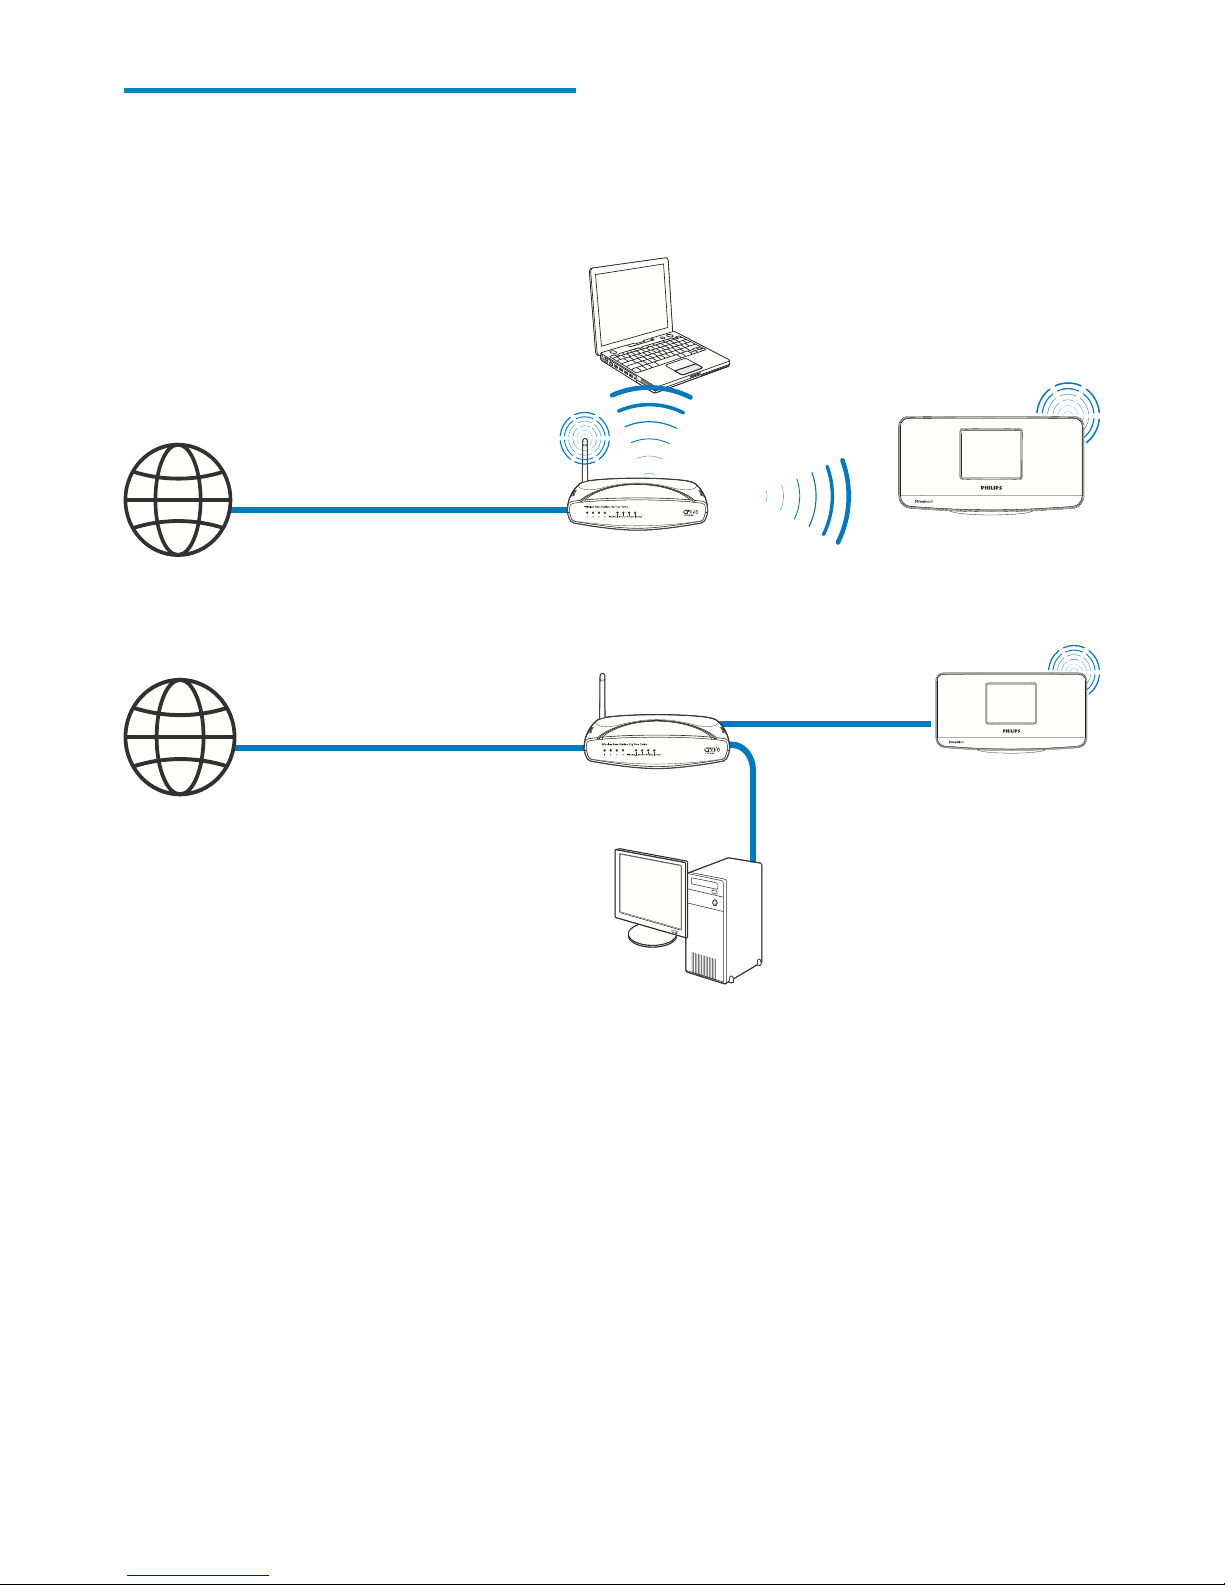
Connect to home Wi-Fi/
wired network
Connect wirelessly
Connect through an Ethernet cable
You can connect NP3500 to home Wi-Fi/
wired network in different ways: wireless or
wired, automatic or manual.
Use a router (or Access Point) for home •
Wi-Fi/wired network. That is, connect
computers/devices to a router.
Connect • NP3500 to the router wirelessly
or through an Ethernet cable.
To have the unit connected to the •
Internet over home Wi-Fi/wired network,
ensure that the router connects to
the Internet directly and no dial-up is
required on the computer.
To switch between different connection •
methods (wireless or wired, automatic
TwonkyMedia Server
(PC/Mac)
NP3500
TwonkyMedia Server
(PC/Mac)
NP3500
EN
15
English
Tip
To use PIN (Personal Identification Number) as the •
setup method: On NP3500, select [Wireless (WiFi)]
> [Pin entry (WPS – PIN)], and write down the PIN
that is displayed on NP3500; On the router, enter
the PIN.
Consult the user manual of the router to learn how
•
to enter the PIN the router.
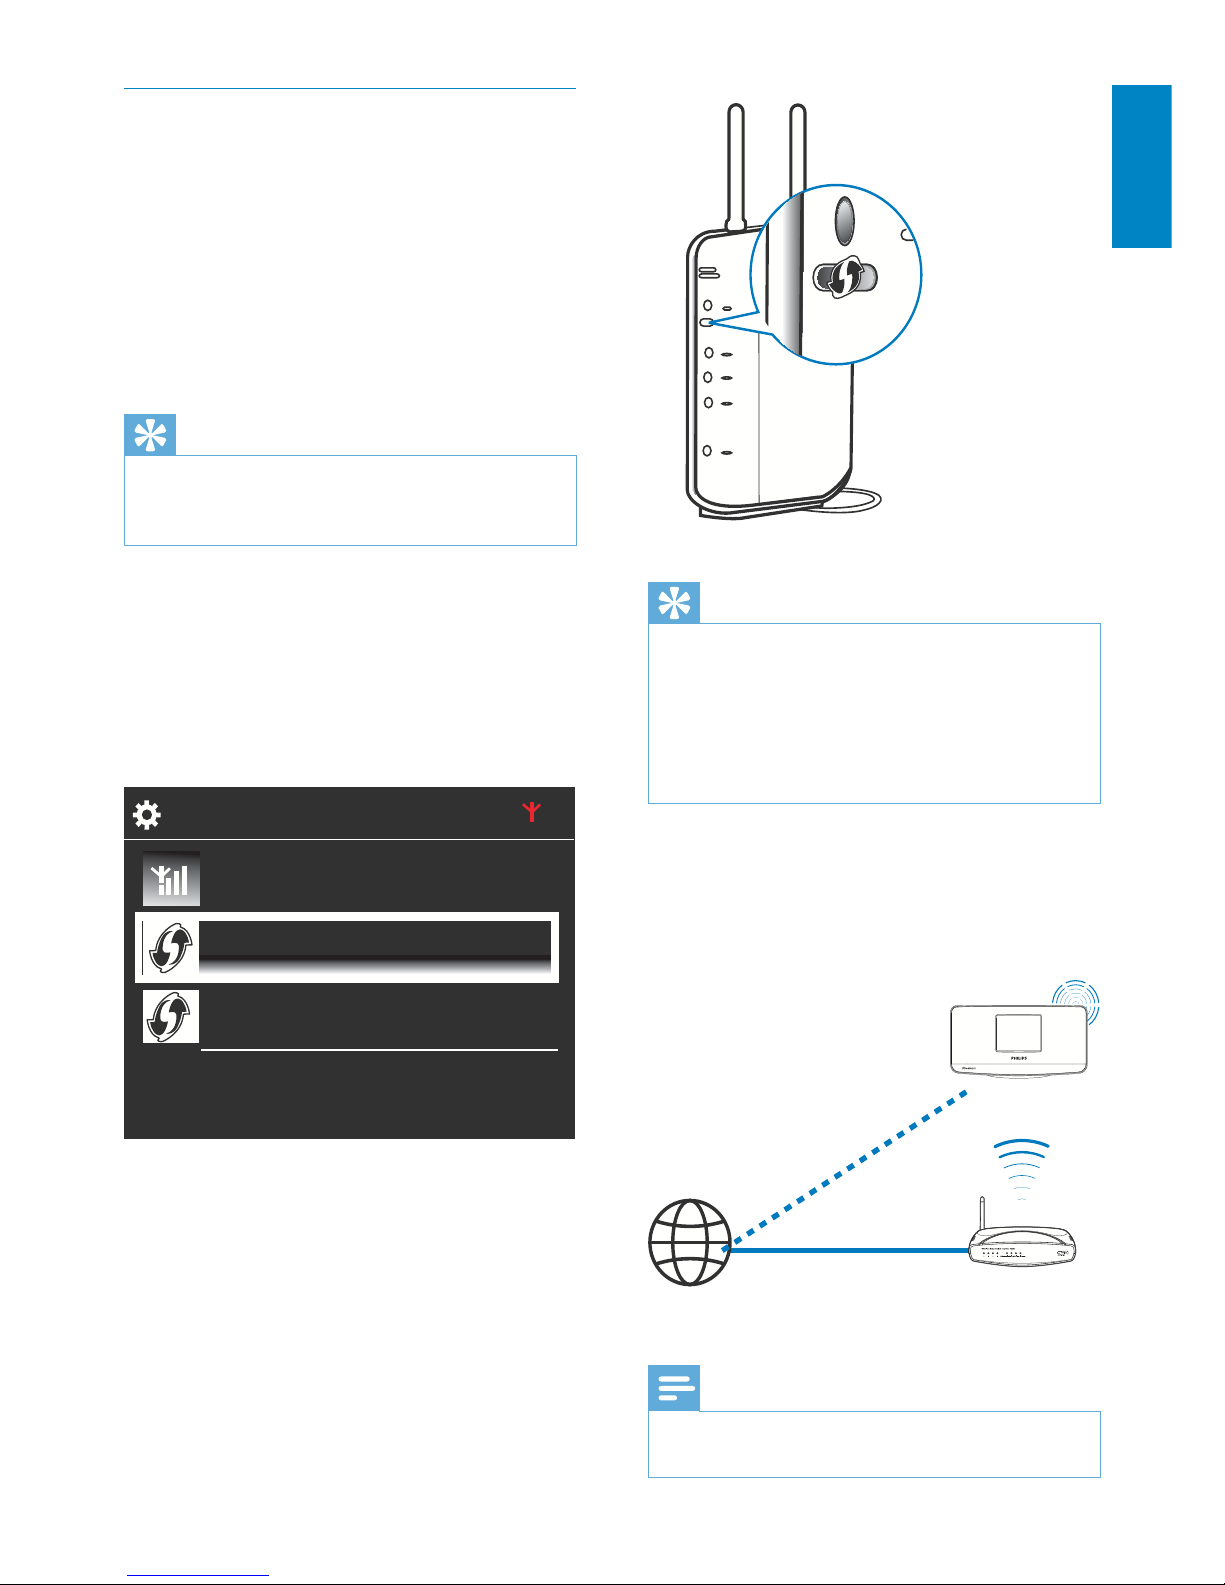
Connect to the Internet
Connect to the Internet as prompted. •
You enter Home screen after the »
first-time setup is complete.
Note
Make sure that the router connects to the Internet •
directly and no dial-up is required on the computer.
Internet
NP3500
Wireless connection: One-touch WiFi Protected Setup (WPS)
NP3500 supports Wi-Fi Protected
Setup(WPS). You can quickly and securely
connect NP3500 to a wireless router that also
supports the WPS.
You can select one of the two setup methods:
PBC (Push Button Configuration), or PIN
(Personal Identification Number).
Tip
Wi-Fi Protected Setup(WPS) is a standard created •
by Wi-Fi Alliance for easy establishment of secure
wireless home network.
Turn on WPS-PBC on NP3500
1 Select [Yes], when asked whether to set
up network connection (see ‘First-time
setup’).
2 Select [Wireless (WiFi)] > [Push button
(WPS – PBC)].
Add NP3500 on the router
Consult the user manual of the router to •
learn how to add a WPS device to the
router. For example:
press and hold the WPS push button.
The router star ts to search for a WPS »
device.
On NP3500, a message appears »
when the connection is completed
successfully.
2/3
Look for network
Push button (WPS...
Pin entry (WPS - PIN)
EN
 Loading...