

Philips Streamium MCi8080/12, Streamium MCi8080 User Manual
Register your product and get support at
www.philips.com/welcome
MCi8080/12
EN User manual


3
English
EN
6 First-time setup 26
Connect to home Wi-Fi/wired network
27
Wireless connection: One-touch
Wi-Fi Protected Setup (WPS) 28
Wireless connection: Enter
encryption key manually 29
Wireless connection: Enter IP
address manually 30
Wired connection 31
Wired connection: Enter IP address
manually 32
7 Play from home Wi-Fi/wired
network 33
Play from the hard disk drive (HDD) 33
Connect the HDD to MCi8080 33
Library on the HDD 33
Play from the HDD 36
Multiroom music 37
Stream from a UPnP server 38
Library on a UPnP server 39
Stream from a UPnP server 39
Play Internet radio stations 41
Tune to Internet radio stations 41
Store preset stations 41
Edit favorite stations 42
Manage Internet radio online 43
Manually add stations online 44
Stream from online music services 45
Stream from Napster 45
Search for music/pictures 46
Alphanumeric search 46
Quickjump 47
Superscroll 47
8 Play music CD/movie DVDs 48
Basic operations 48
48
Use the disc menu 49
Access the disc menu 49
Play movie discs(DVD/DivX/VCD) 49
Pause/Resume/Stop 49
Search 50
Select languages for disc play 50
Program favorite chapters/tracks 50
Contents
1 Important 5
Safety 5
Environmental notices 6
Recycling 7
Trademark notice 7
2 Your MCi8080 9
Introduction 9
What’s in the box 9
Overview 10
Top and front view 10
Rear view 11
Remote control 12
Touch screen 14
Home screen 14
Play screen 15
Text entry 15
3 Prepare 17
Connect the HDD to a computer 17
Copy MCi8080 files to the
computer 17
Copy media files to the HDD 17
Install batteries into the remote
control 18
4 Place the unit 19
Place the speakers 20
5 Connect 21
Connect the main unit and CD/DVD
unit 21
Connect speakers 21
Connect for disc play 22
Connect a TV 22
Connect the FM antenna 23
Connect external audio devices 23
Connect an iPod / iPhone dock 24
Turn on/off 24
Connect power supply 24
Turn on/off 24

4 EN
12 Register MCi8080 with Philips 62
Benefits 62
Register MCi8080 62
Register on the web site 62
Register on the device 62
Unregister MCi8080 63
Check registration information 63
13 Maintenance 64
Cleaning 64
14 Technical data 65
15 Troubleshooting 69
16 Contact information 70
Select play options 51
Select Repeat/Shuffle options 51
Zoom in/out image 51
Change a camera angle 51
9 Play FM radio 52
Tune to FM radio stations 52
Autostore 52
Manual tuning 52
Edit preset stations 52
Listen to FM radio 52
RDS (Radio Data System) 53
Use the RDS for clock setting 53
10 Play from an external audio device
(AUX) 54
Play from an external audio device 54
11 Settings 55
Play modes 55
Sound settings 55
Bass and treble 55
Full sound 55
Direct Source 55
Audio balance 55
Display settings 56
Brightness 56
Wallpaper 56
Screensaver 56
Slideshow settings 56
Album art 56
Clicker sound 57
Clock settings 57
Alarm 57
Sleep timer 58
Date and time 58
Network settings 59
Setup network 59
Device name 60
USB sharing 60
Location and time zone 60
Language 60
Device information 60
Check for software upgrades 60
Demo mode 60
Restore factory settings 61
5
h Do not remove the casing of this
product.
i Only use this product indoors. Do
not expose the product to dripping /
splashing water, rain or high humidity.
j Keep this product away from direct
sunlight, naked flames or heat.
k Do not install near any heat sources
such as radiators, heat registers, stoves,
or other electrical equipment (including
amplifiers).
l Do not place any other electrical
equipment on the product.
m Do not place any sources of danger
on the product (e.g. objects containing
liquids, burning candles).
n This product may include batteries.
Please refer to safety and disposal
instructions for batteries in this user
manual.
o This product may contain lead and
mercury. Disposal of these materials
may be regulated due to environmental
considerations. Please refer to disposal
instructions in this user manual.
Caution
Use of controls or adjustments or •
performance of procedures other than herein
may result in hazardous radiation exposure or
other unsafe operation.
1 Important
Safety
Information for Europe:
Know these safety symbols
The ‘exclamation mark’ calls attention to
features for which you should carefully read
the supplied literature to prevent operating
and maintenance problems.
The ‘lightening bolt’ symbol indicates
uninsulated components within the product
that can cause an electric shock.
To reduce the risk of fire or electric shock, do
not expose the product to rain or moisture
and do not place any ojects filled with liquids,
such as vases, on the product.
a Read these instructions.
b Keep these instructions.
c Heed all warnings.
d Follow all instructions.
e Do not use this product near water.
f Clean only with dry cloth.
g Do not block any ventilation openings.
Install in accordance with the
manufacturer’s instructions.
English
EN
6
Set your volume control at a low setting.
Slowly increase the sound until you can hear it
comfortably and clearly, without distortion.
Listen for reasonable periods of time:
Prolonged exposure to sound, even at
normally ‘safe’ levels, can also cause hearing
loss.
Be sure to use your equipment reasonably and
take appropriate breaks.
Be sure to observe the following guidelines
when using your headphones.
Listen at reasonable volumes for reasonable
periods of time.
Be careful not to adjust the volume as your
hearing adapts.
Do not turn up the volume so high that you
can’t hear what’s around you.
You should use caution or temporarily
discontinue use in potentially hazardous
situations.
Environmental notices
This product complies with the radio
interference requirements of the European
Community.
This product complies with the requirement
of the 1999/5/EC directive.
Warning
Never remove the casing of this apparatus. •
Never lubricate any part of this apparatus. •
Never place this apparatus on other electrical •
equipment.
Keep this apparatus away from direct sunlight,
•
naked flames or heat.
Never look into the laser beam inside this
•
apparatus.
Ensure that you always have easy access to the
•
power cord, plug or adaptor to disconnect this
apparatus from the power.
Where the mains plug or an appliance
•
coupler is used as the disconnect device,
the disconnect device shall remain readily
operable.
Risk of overheating! Never install this
apparatus in a confined space. Always leave
a space of at least four inches around this
apparatus for ventilation. Ensure cur tains or
other objects never cover the ventilation slots
on this apparatus.
Hearing Safety
Listen at a moderate volume:
Using headphones at a high volume can impair
your hearing. This product can produce
sounds in decibel ranges that may cause
hearing loss for a normal person, even for
exposure less than a minute. The higher
decibel ranges are offered for those that may
have already experienced some hearing loss.
Sound can be deceiving. Over time your
hearing ‘comfort level’ adapts to higher
volumes of sound. So after prolonged listening,
what sounds ‘normal’ can actually be loud and
harmful to your hearing. To guard against this,
set your volume to a safe level before your
hearing adapts and leave it there.
To establish a safe volume level:
EN

7
Information about the use of batteries:
Caution
Risk of leakage: Only use the specified type of •
batteries. Do not mix new and used batteries.
Do not mix different brands of batteries.
Observe correct polarity. Remove batteries
from products that are not in use for a longer
period of time. Store batteries in a dry place.
Risk of injury: Wear gloves when handling
•
leaking batteries. Keep batteries out of reach
of children and pets.
Risk of explosion: Do not short circuit
•
batteries. Do not expose batteries to
excessive heat. Do not throw batteries into
the fire. Do not damage or disassemble
batteries. Do not recharge non-rechargeable
batteries.
Battery disposal information:
Your product contains batteries covered by
the European Directive 2006/66/EC, which
cannot be disposed of with normal household
waste.
Please inform yourself about the local rules on
separate collection of batteries. The correct
disposal of batteries helps prevent potentially
negative consequences on the environment
and human health.
Trademark notice
HDMI, and HDMI logo, and High-Definition
Multimedia Interface are trademarks or
registered trademarks of HDMI licensing LLC
in the United States and other countries.
Manufactured under license from Dolby
Laboratories. Dolby and the double-D symbol
are trademarks of Dolby Laboratories.
This apparatus includes this label:
Class II equipment symbol:
This symbol indicates that this product has a
double insulation system.
Modifications
Modifications not authorized by the
manufacturer may void user’s authority to
operate this product.
Recycling
Your product is designed and manufactured
with high quality materials and components,
which can be recycled and reused.
When you see the crossed-out wheel bin
symbol attached to a product, it means the
product is covered by the European Directive
2002/96/EC:
Never dispose of your product with other
household waste. Please inform yourself about
the local rules on the separate collection of
electrical and electronic products. The correct
disposal of your old product helps prevent
potentially negative consequences on the
environment and human health.
English
EN

8
The making of unauthorized copies of copyprotected material, including computer
programs, files, broadcasts and sound
recordings, may be an infringement of
copyrights and constitute a criminal offence.
This equipment should not be used for such
purposes.
This item incorporates copy protection
technology that is protected by U.S. patents
and other intellectual property rights of
Rovi Corporation. Reverse engineering and
disassembly are prohibited.
DivX® and DivX Ultra® are registered
trademarks of DivX, Inc. and are used under
license. DivX Ultra® Certified to play DivX®
video with advanced features and premium
content.
ABOUT DIVX VIDEO: DivX® is a digital
video format created by DivX, Inc. This is
an official DivX Certified device that plays
DivX video. Visit www.divx.com for more
information and software tools to convert
your files into DivX video.
ABOUT DIVX VIDEO-ON-DEMAND: This
DivX Cer tified® device must be registered in
order to play DivX Video-on-Demand (VOD)
content. To generate the registration code,
locate the DivX VOD section in the device
setup menu. Go to vod.divx.com with this
code to complete the registration process and
learn more about DivX VOD.
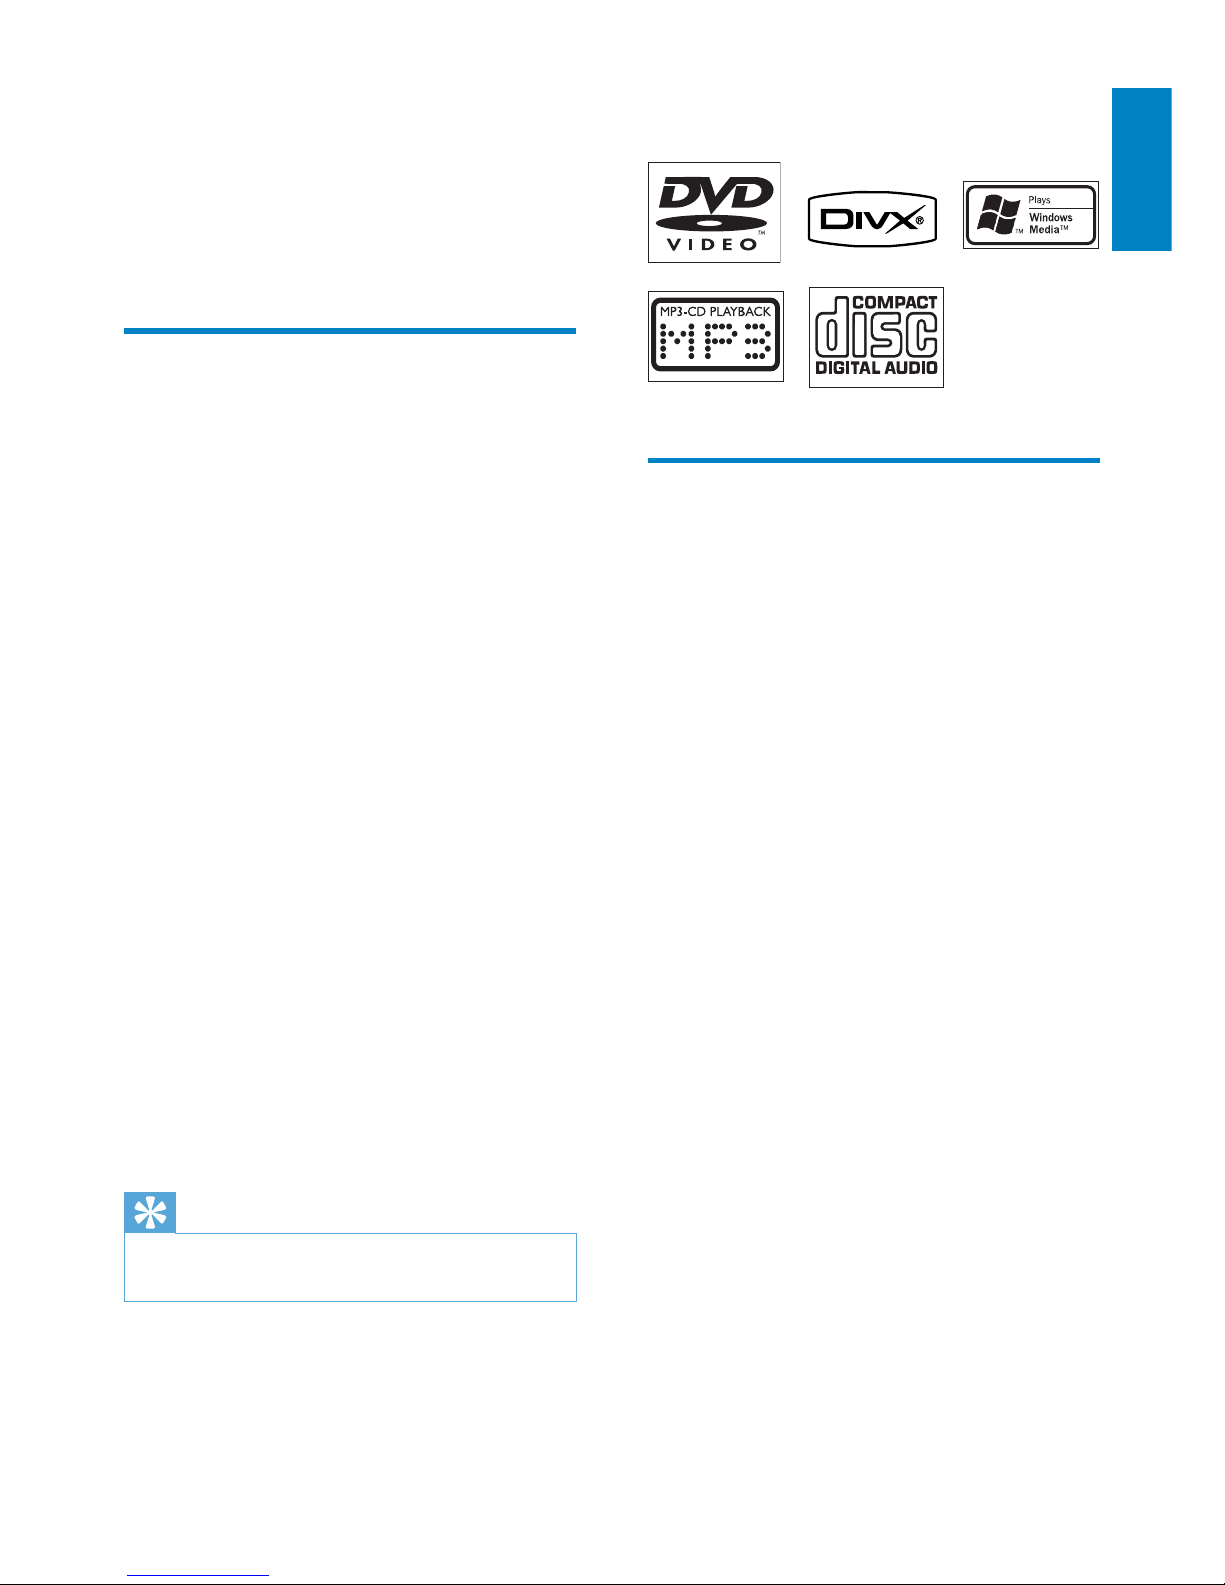
‘DVD Video’ is a trademark of DVD Format/
Logo Licensing Corporation.
Windows Media and the Windows logo are
trademarks, or registered trademarks of
Microsoft Corporation in the United States
and/or other countries.
EN
9
The DVD player on MCi8080 supports these
disc formats:
What’s in the box
Check and identify the contents of your
package:
Main unit and CD/DVD unit•
Hard disk drive (HDD) with a USB •
cable
2 speakers (with connection cables)•
Remote control with batteries•
Composite video cable•
FM T-type antenna•
AC power cord•
Stand for the hard disk drive (HDD)•
Software suite (stored in the •
supplied hard disk drive)
Quick Start Guide•
2 Your MCi8080
Congratulations on your purchase, and
welcome to Philips! To fully benefit from the
support that Philips offers, register your product
at www.philips.com/welcome.
Introduction
MCi8080 can
Connect a hard disk drive (USB mass •
storage device);
Connect to the existing home Wi-Fi/•
wired network, which can consist of
computers and UPnP devices;
Connect the existing home audio/•
video systems, including TV, audio
systems and MP3 players.
Connect an iPod/iPhone dock.•
With such connections, you can
Play music stored on a hard disk •
drive (HDD) through the speakers;
Play Internet radio stations and •
*online music services over the
Internet;
Play movie DVDs on a TV;•
Play music/photos stored on a •
computer/UPnP server;
Play music from an audio system/•
portable media player through the
speakers.
Charge or play your iPod/iPhone •
through this unit.
Tip
*Online services are available in some •
countries only.
English
EN

10
4. LCD display
5. Wi-Fi antenna
6. Disc compartment
7.
Open or close the disc
compartment.
Overview
Top and front view
cab
d
e
g
f
EN
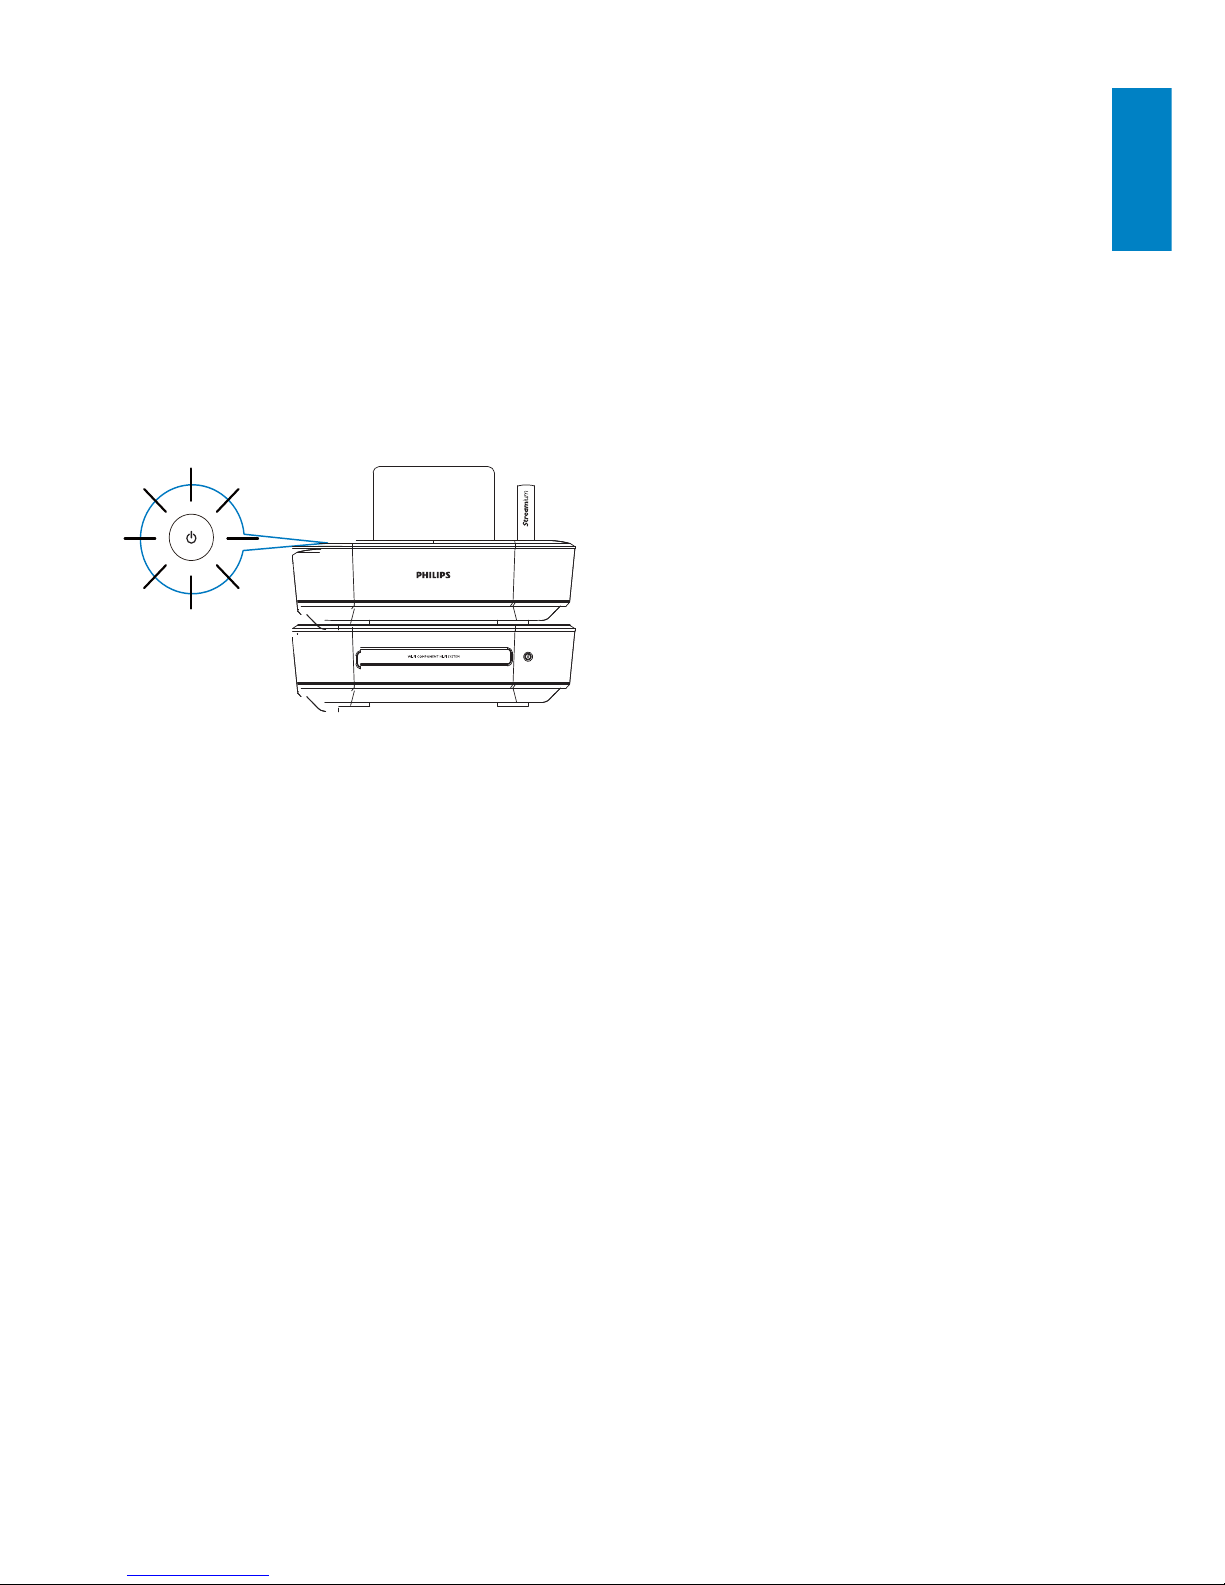
1. STANDBY
Press to turn on the set;
To turn off, press to switch to
active standby; or, press and hold
to switch to Eco standby.
Exit Demo mode.
2.
Mute/ unmute sound.
3. - VOLUME +
Increase/decrease volume.
11
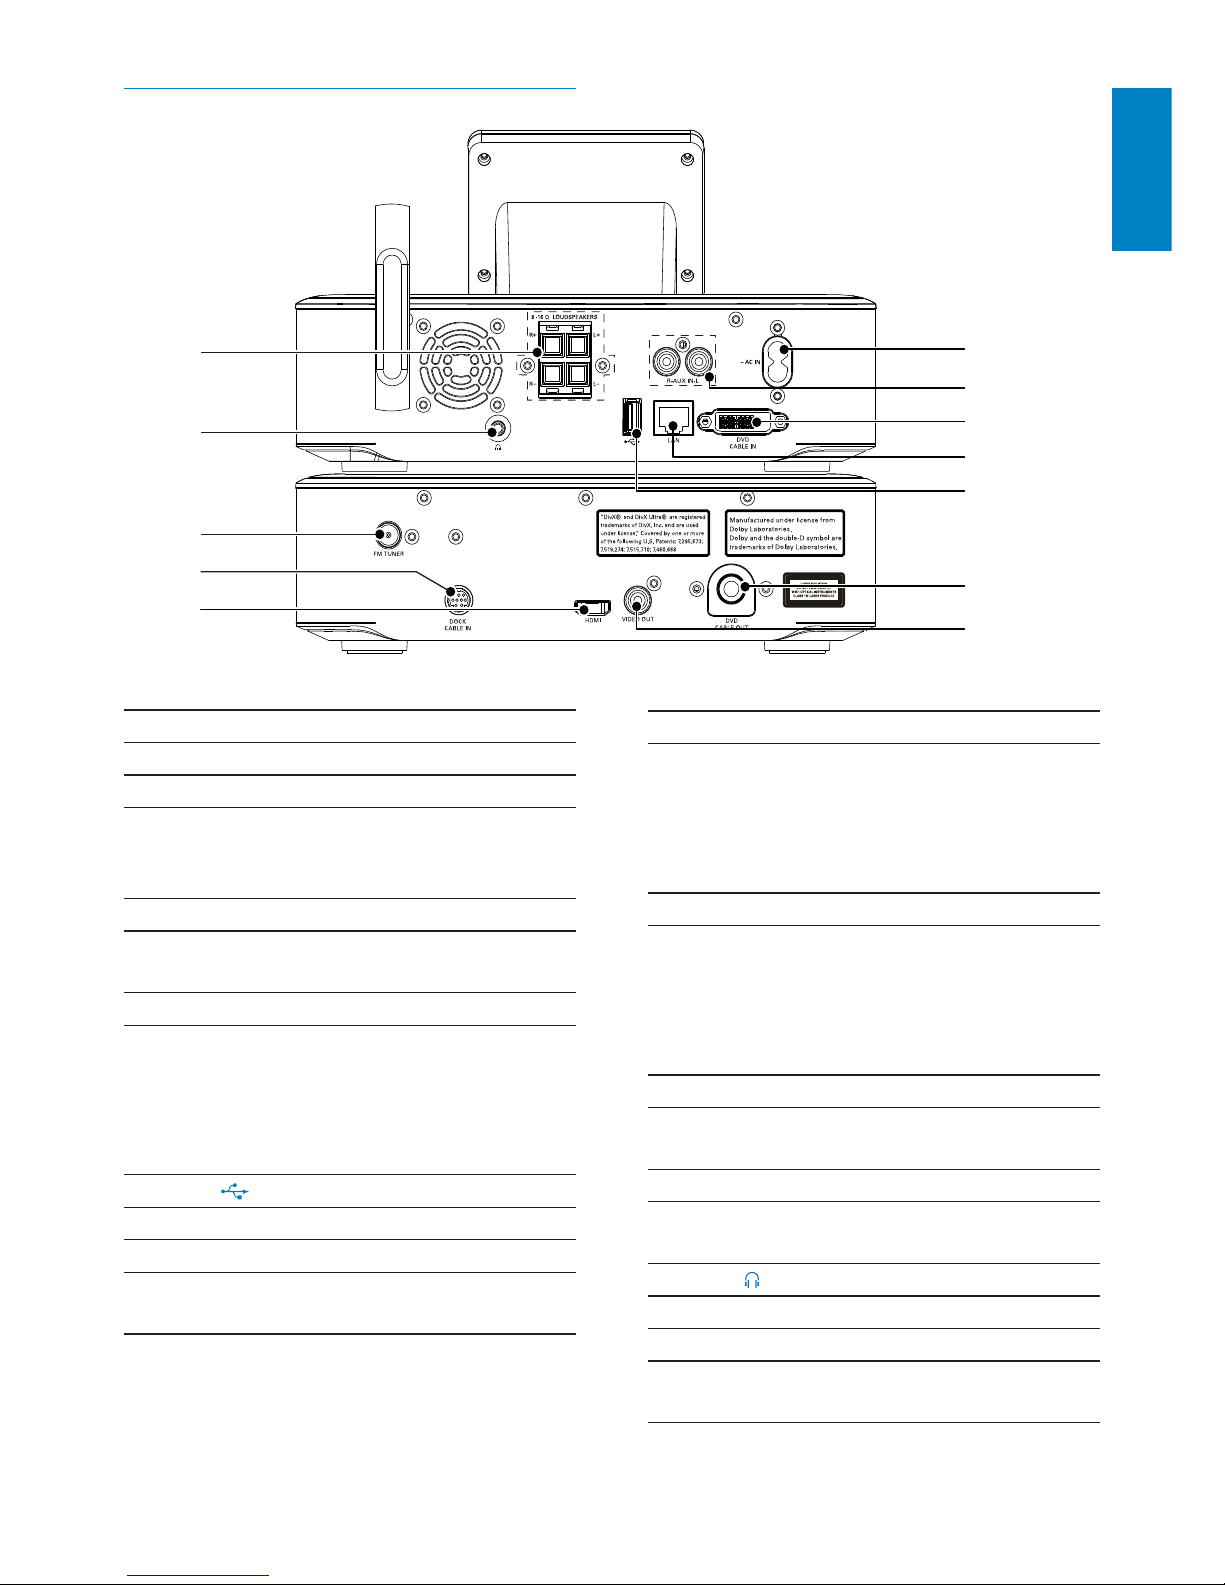
7. VIDEO OUT
Video output socket for the disc
play
for the supplied composite video
cable that connects the disc player
and a standard TV
8. HDMI
Video output socket for the disc
play
for the HDMI cable (not supplied)
that connects the disc player and a
high-definition TV (HDTV)
9. DOCK CABLE IN
Socket for connection of an iPod/
iPhone dock (not supplied)
10. FM TUNER
Socket for connection of the
supplied FM antenna
11.
3.5 mm headphone jack
12. LOUDSPEAKERS
Sockets for connection cables that
connect the supplied speakers
Rear view
a
f
c
d
e
g
h
i
b
j
k
l
English
EN
1. ~ AC IN
for AC power cord
2. AUX IN L / R
Audio input sockets for a portable
media player to play through the
speakers on MCi8080
3. DVD CABLE IN
Socket for connection of the main
unit to the CD/DVD unit
4. LAN
Socket for the Ethernet cable that
connects MCi8080 with the home
Wi-Fi/wired network, if you want a
wired connection to the home WiFi/wired network
5.
USB port for the hard disk drive
6. DVD CABLE OUT
Socket for connection of the CD/
DVD unit to the main unit
12
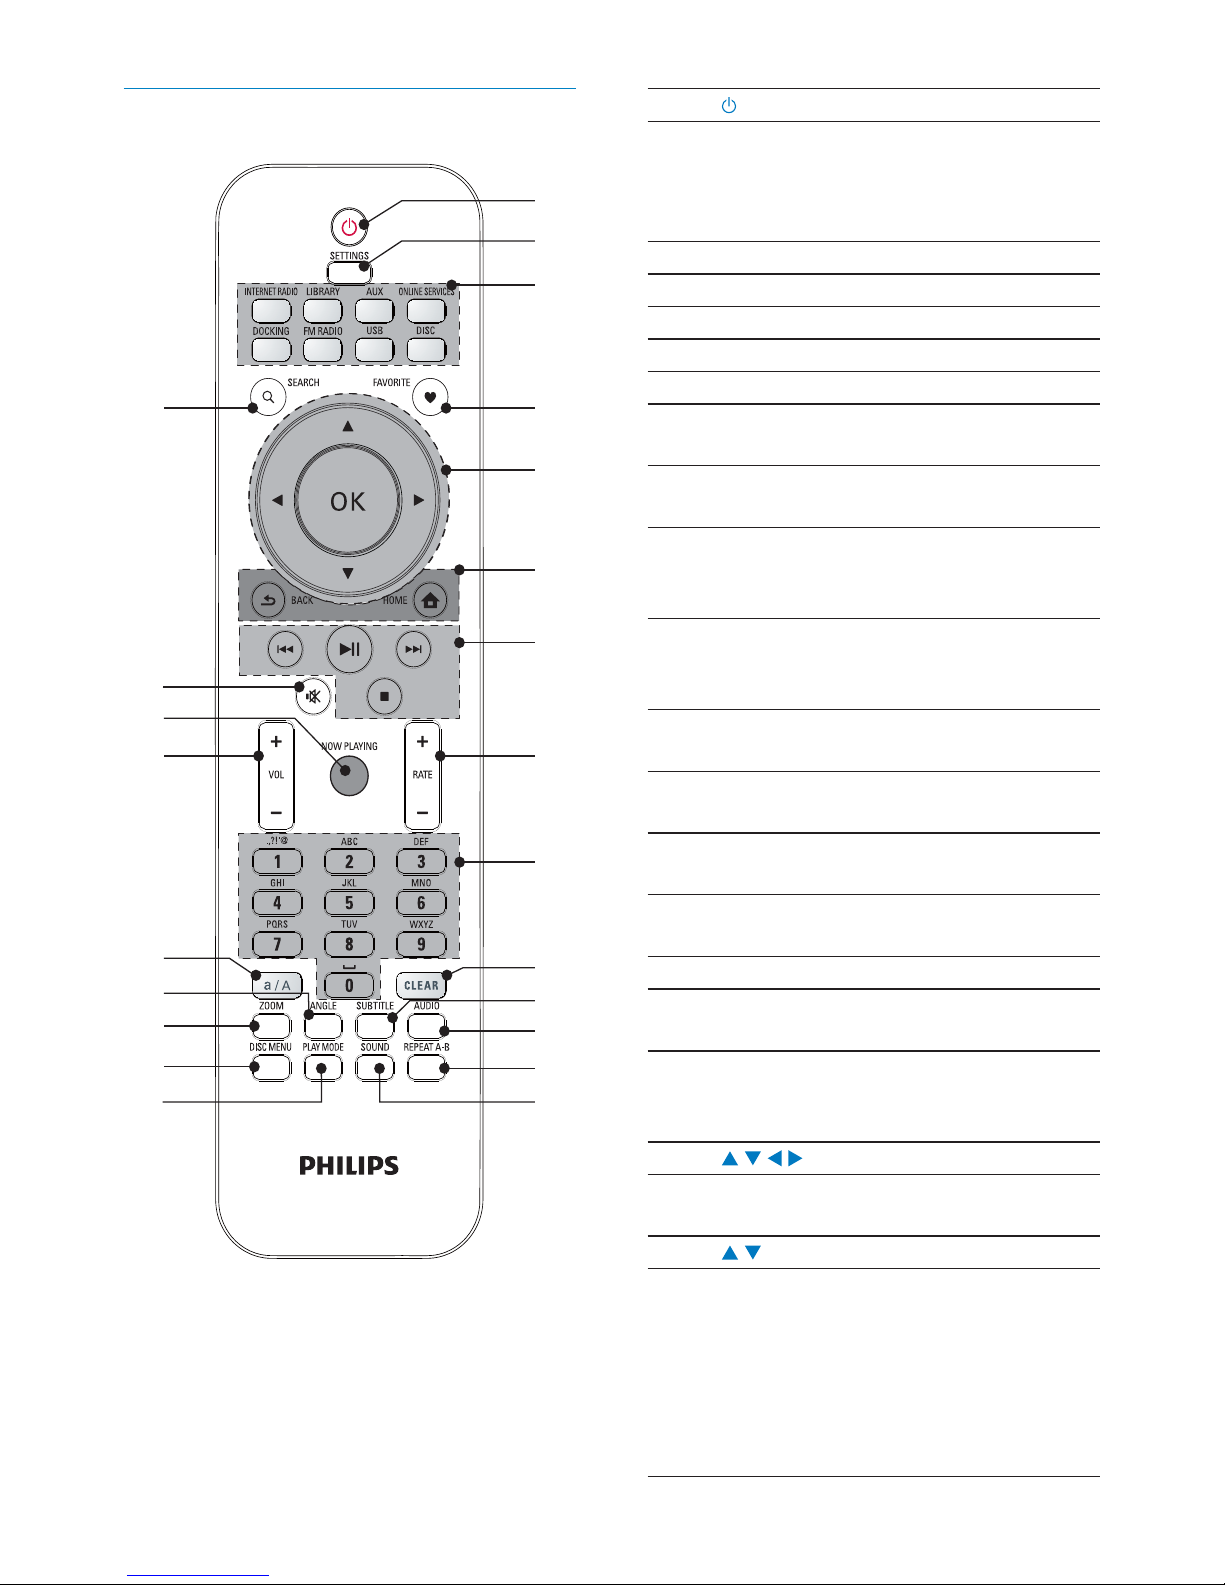
1.
Press to turn on the unit;
To turn off, press to switch to active
standby; or, press and hold to switch
to Eco standby.
Exit Demo mode.
2. SETTINGS
Enter the settings menus.
3. Source selector
Select a media source:
INTERNET RADIO: Radio services
provided over the Internet;
LIBRARY: Media library on a UPnP
media server;
AUX: Connected external audio
device (e.g. an MP3 player or other
portable music players);
ONLINE SERVICES: Supported music
services provided over the Internet
(available in some countries only);
DOCKING: Supported media on the
connected iPod/iPhone;
FM RADIO: FM radio stations, with
RDS (Radio Data System) supported;
USB: Media library on the hard disk
drive connected to the unit;
DISC: DVDs, DivX/WMA/ MP3/
WMA files on discs, and audio CDs.
4. FAVORITE
In LIBRARY mode:
Add songs to the list of favorites.
In INTERNET RADIO mode:
Add current station to the list of
Favorite Stations.
5.
/ / /
Navigation buttons
Press to navigate through menus.
/
In LIBRARY/INTERNET RADIO/USB
mode:
Superscroll: In a long list of options,
press and hold to start Superscroll.
Release to jump to the first item
starting with current alphabet/
number.
Remote control
c
d
e
f
g
i
j
l
m
n
o
k
h
w
q
p
r
t
a
b
s
u
v
EN
13
Quickjump: In a long list of options
that are sorted in an alphabetical
order, press once or repeatedly to
select an alphabet, and jump to the
first item that starts with the selected
alphabet.
10. CLEAR
Press to delete the previous entry;
Press and hold to delete all entries.
11. SUBTITLE
In DISC mode: Select a subtitle language
(for DVD and DivX discs only).
12. AUDIO
In DISC mode:
Select stereo, mono-left, mono-right,
or mix-mono channel (for VCD discs
only);
Select an audio language (for DVD
and DivX discs only).
13. REPEAT A-B
In DISC mode: Repeat a specific
section within a track/disc.
14. SOUND
Select sound settings.
15. PLAY MODE
Select repeat play or random play.
16. DISC MENU
In DISC mode:
Enter or exit the disc menu.
17. ZOOM
In DISC mode: Zoom in/out (for
video discs and picture files on CDs).
18. ANGLE
In DISC mode: Select a camera angle
(for video discs and picture files on
CDs).
19. a/A
Press to switch between lower and
upper cases;
In FM RADIO mode, press in the
list of presets to start editing station
name.
20.
VOL
Increase/decrease the volume.
In DISC mode:
Select an album (for MP3/WMA
CDs).
/
In FM RADIO mode:
Press and hold to start the auto
tuning to the next available station;
Press repeatedly for fine tuning.
OK
Confirm selection.
6.
HOME: Return to Home screen (main
menu).
BACK: Go back to previous screen.
7.
/
In LIBRARY/USB/DISC mode:
Press to skip to the previous/ next
chapter/track;
Start/pause/resume play;
In LIBRARY/USB mode: Start to play
the entire file folder (SuperPlay™).
Stop play;
8.
RATE
In ONLINE SERVICES mode:
Increase/decrease rating* of current
music.
9. Alphanumeric
buttons
For text entry
In INTERNET RADIO/FM RADIO
mode:
On the radio play screen, press
and hold a numeric button to store
current station in the location as a
preset station.
In LIBRARY/INTERNET RADIO/USB
mode:
English
EN
14
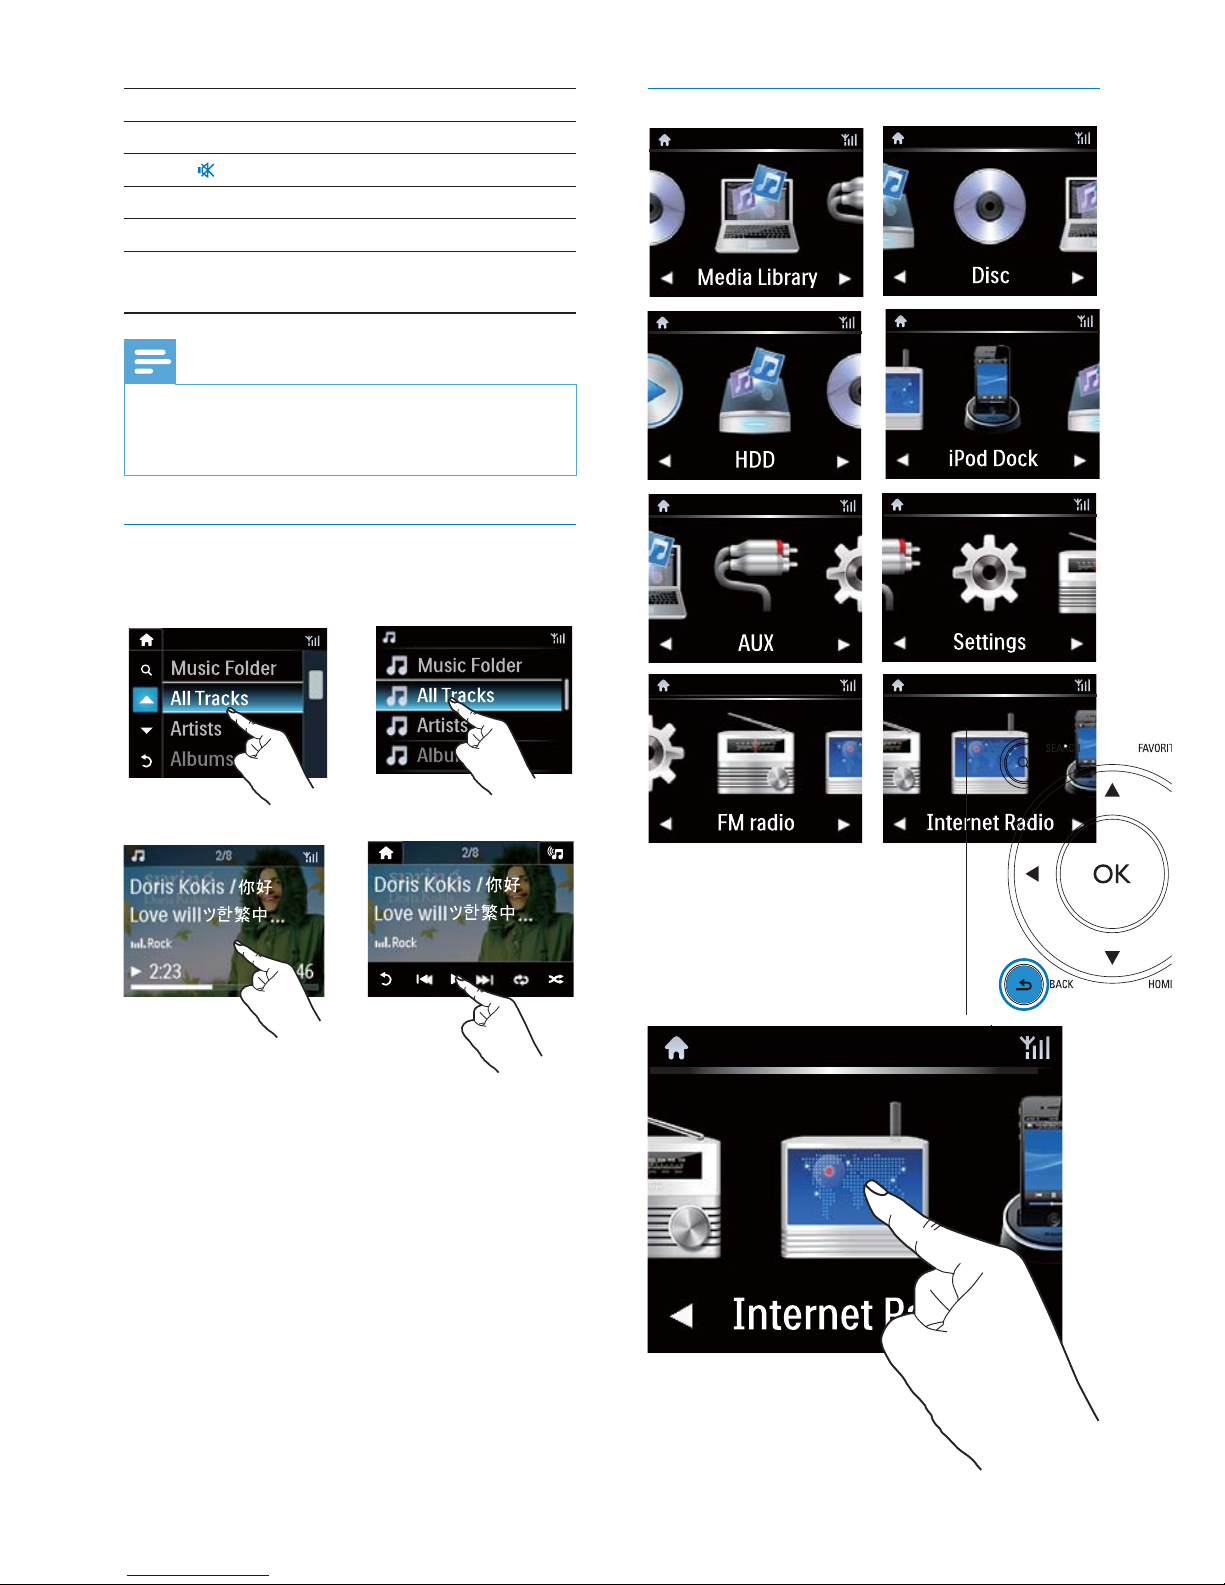
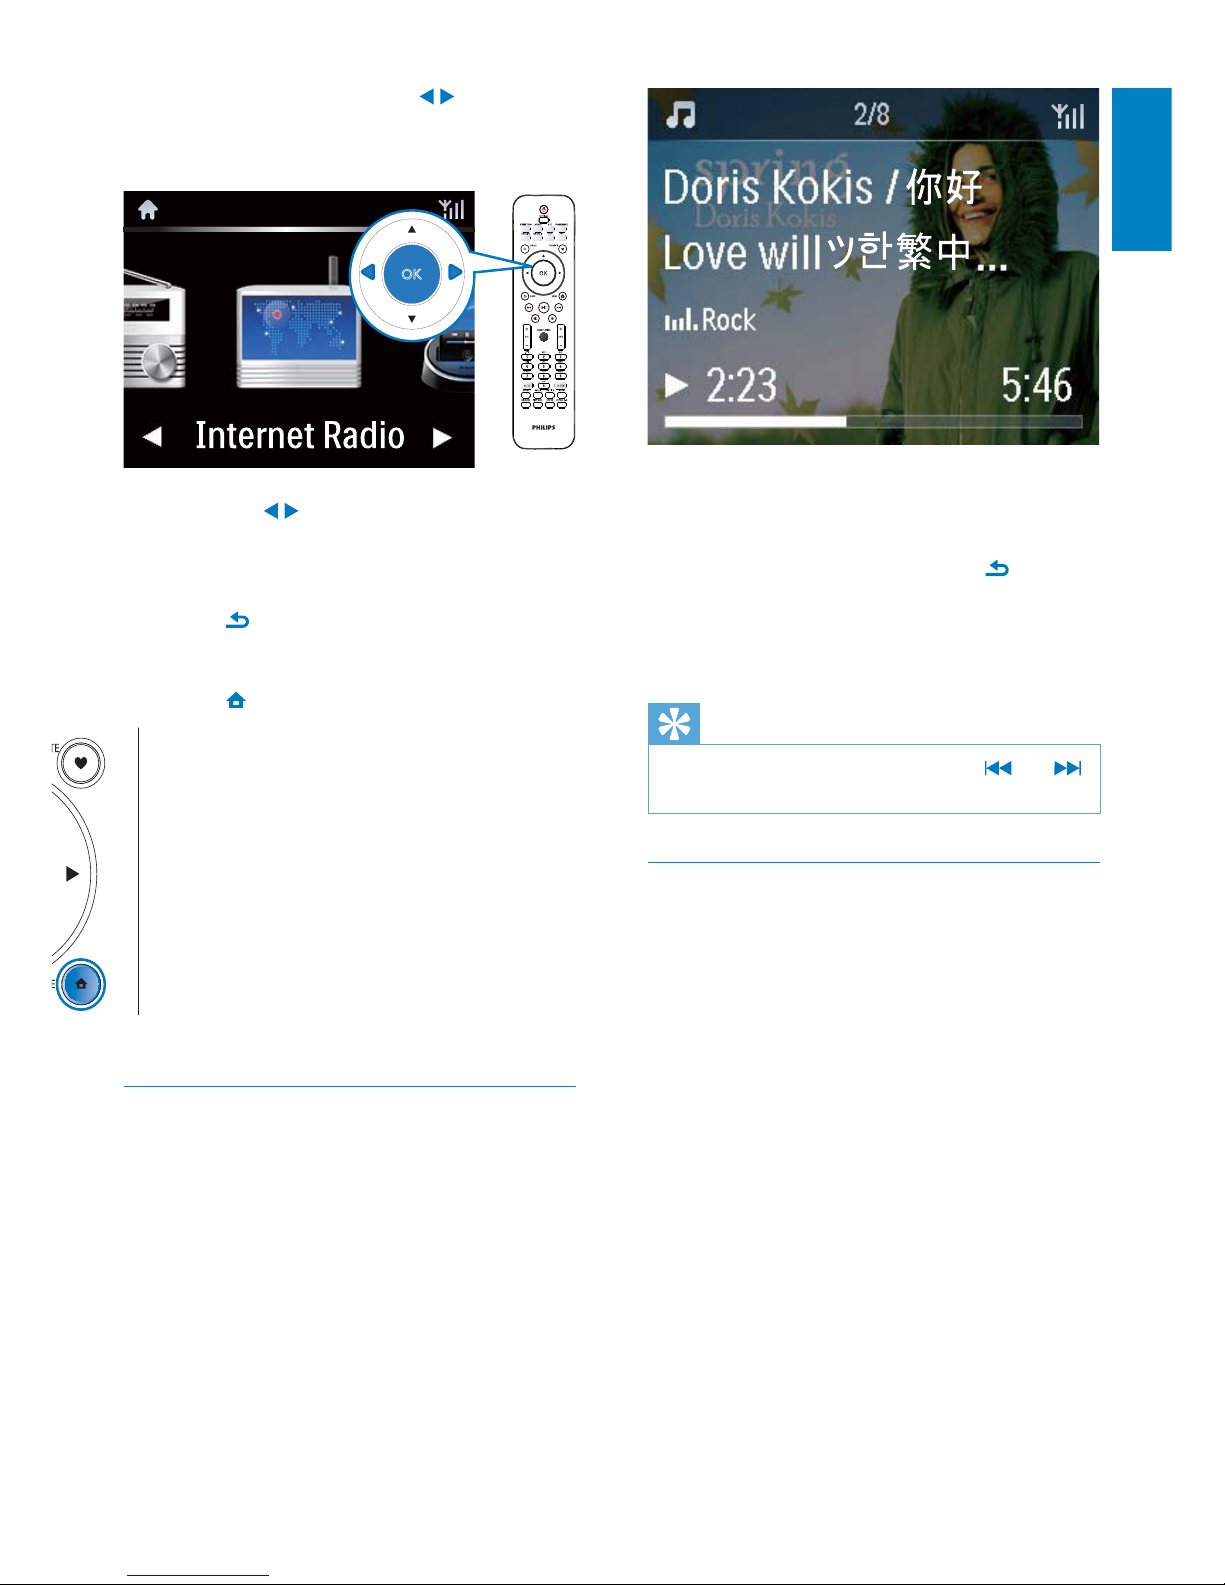
Home screen
On MCi8080, you enter Home screen after
the first-time setup is complete.
To select a music source, or enter the
[Settings] menu
21. NOW PLAYING
Return to play screen.
22.
Mute/unmute sound.
23. SEARCH
Press to start the search/browsing by
alphanumeric entry.
Note
* Rating current music is available only for •
music services that support rating, and is
available only in some countries.
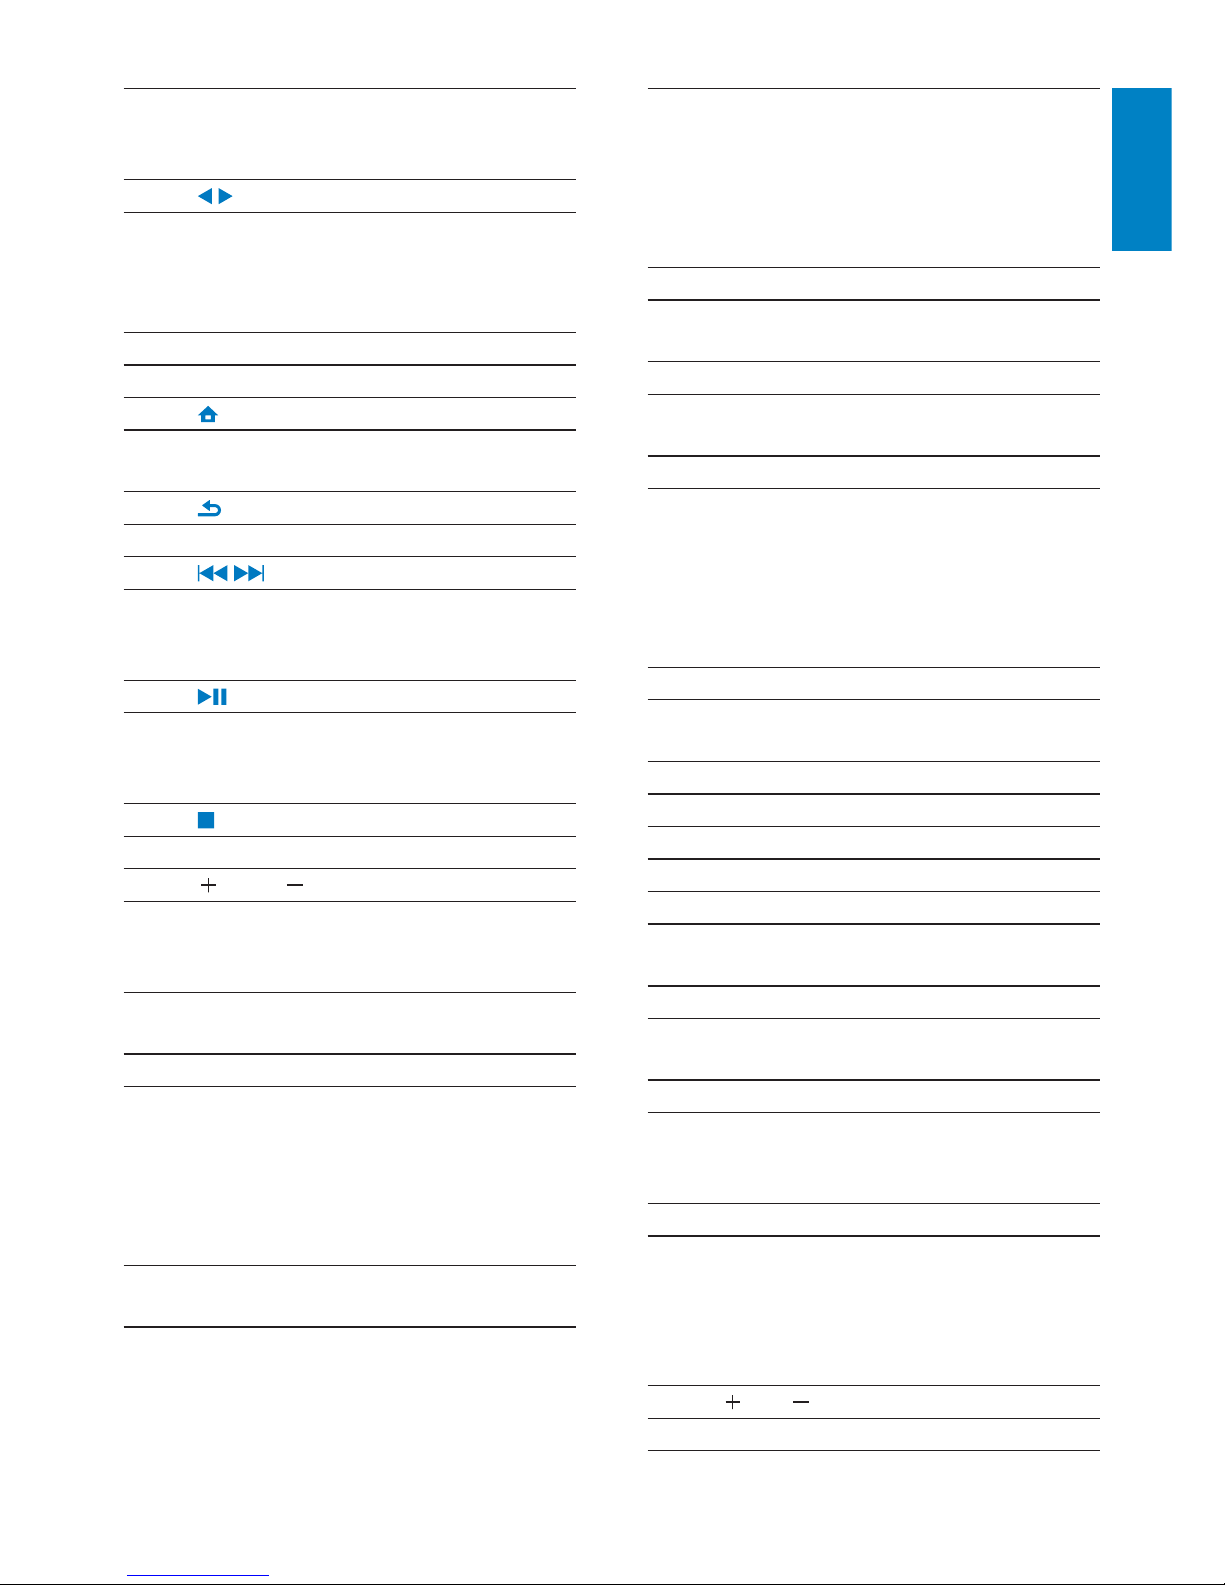
Touch screen
MCi8080 is equipped with a touch screen.
If necessary, tap on the screen to •
show functional buttons;
Tap on the buttons to select •
corresponding functions;
Tap on an option to select. •
EN
15
To navigate through menus during music play,
do the following:
1 On the remote control, press and
then, use the Navigation buttons.
2 To return to Play screen, press NOW
PLAYING.
Tip
On Play screen, you can also press • and
repeatedly to select songs.
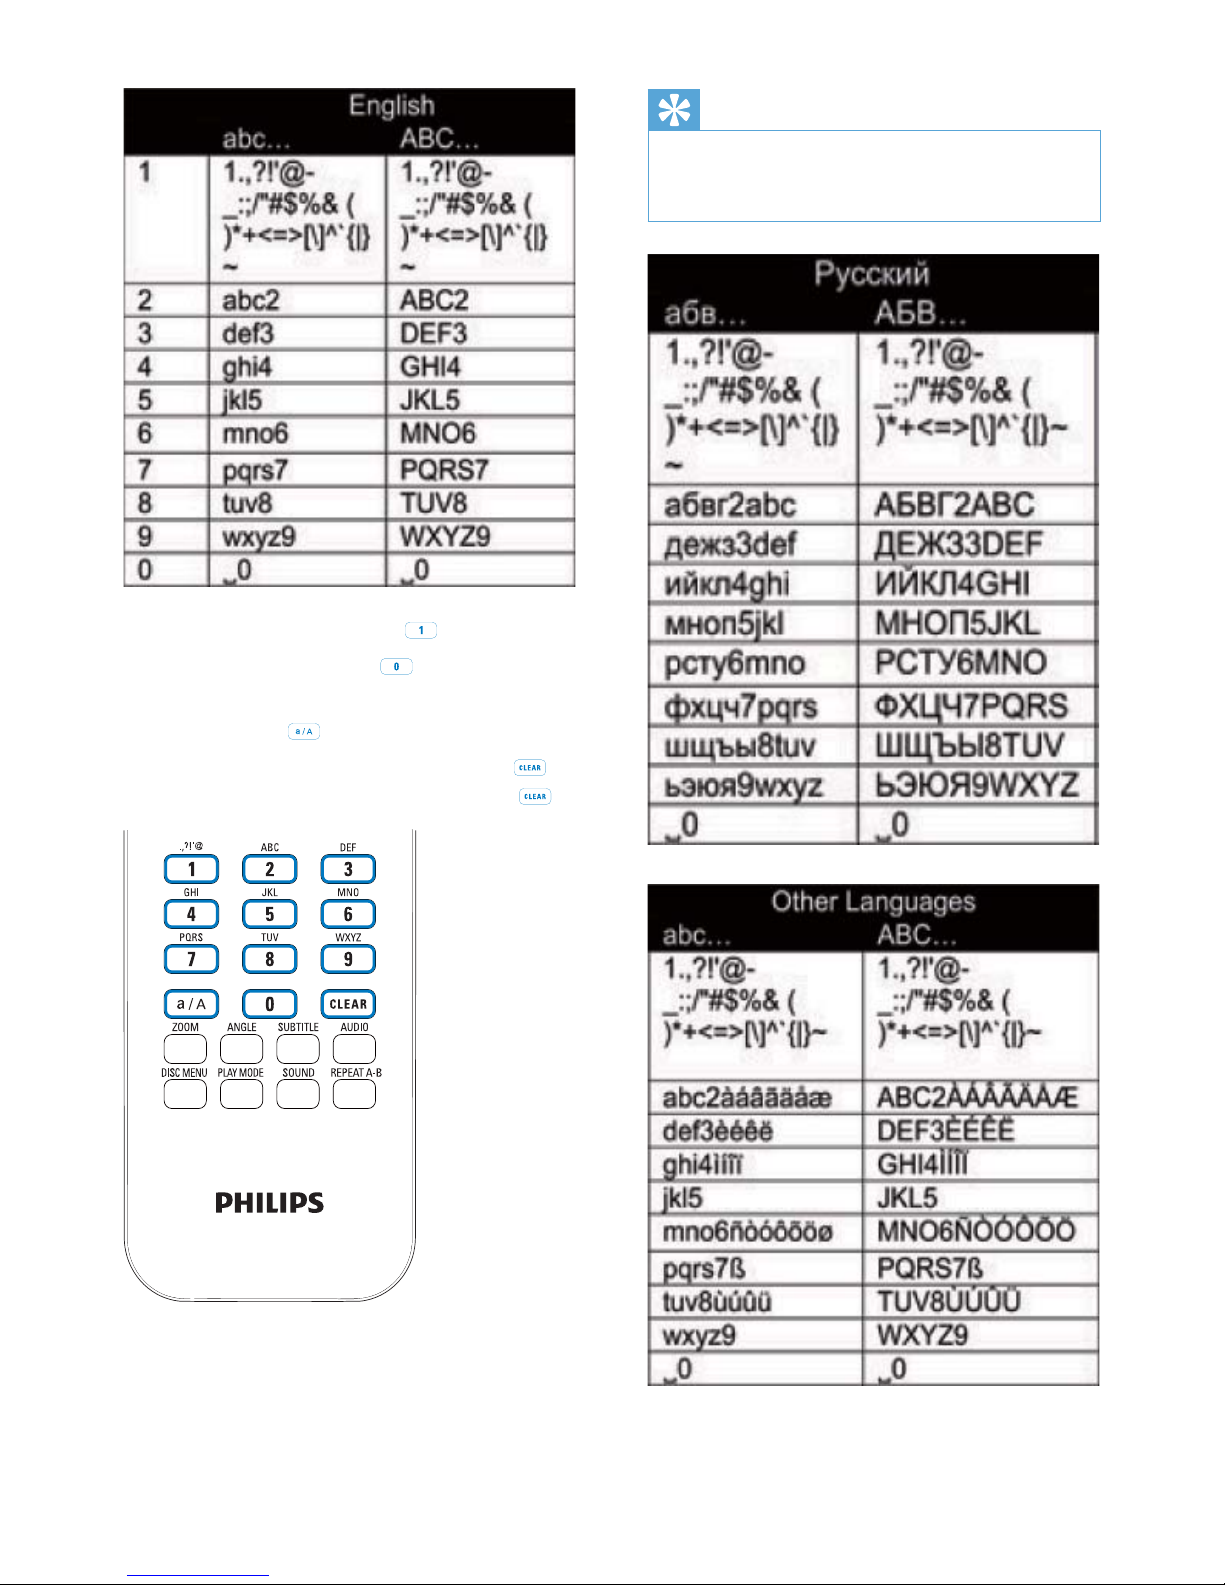
Text entry
To enter text and symbols, you can:
tap on the text box and enter text •
and symbols with the pop-up keypad
directly
press corresponding alphanumeric •
buttons on the remote control
Text entry with the remote control
To enter letters/numbers/symbols •
corresponding to the same alphanumeric
button, briefly and repeatedly press the
button.
On Home screen, tap on • / to navigate
through icons. Tap on the corresponding
icon to select.
Or, press • / /OK on the remote control
to select the desired source.
To go back to previous screen
Press •
BACK.
To return to Home screen
Press •
HOME.
Play screen
In LIBRARY/INTERNET RADIO/ONLINE
SERVICES mode, Play screen appears when
play star ts.
English
EN
16
Tip
For languages other than English, letters that •
an alphanumeric button corresponds to may
vary.
To enter symbols, press • repeatedly.
To enter space, press • .
To switch between lower and upper •
cases, press
.
To delete previous character, press • .
To delete all entries, press and hold .
EN
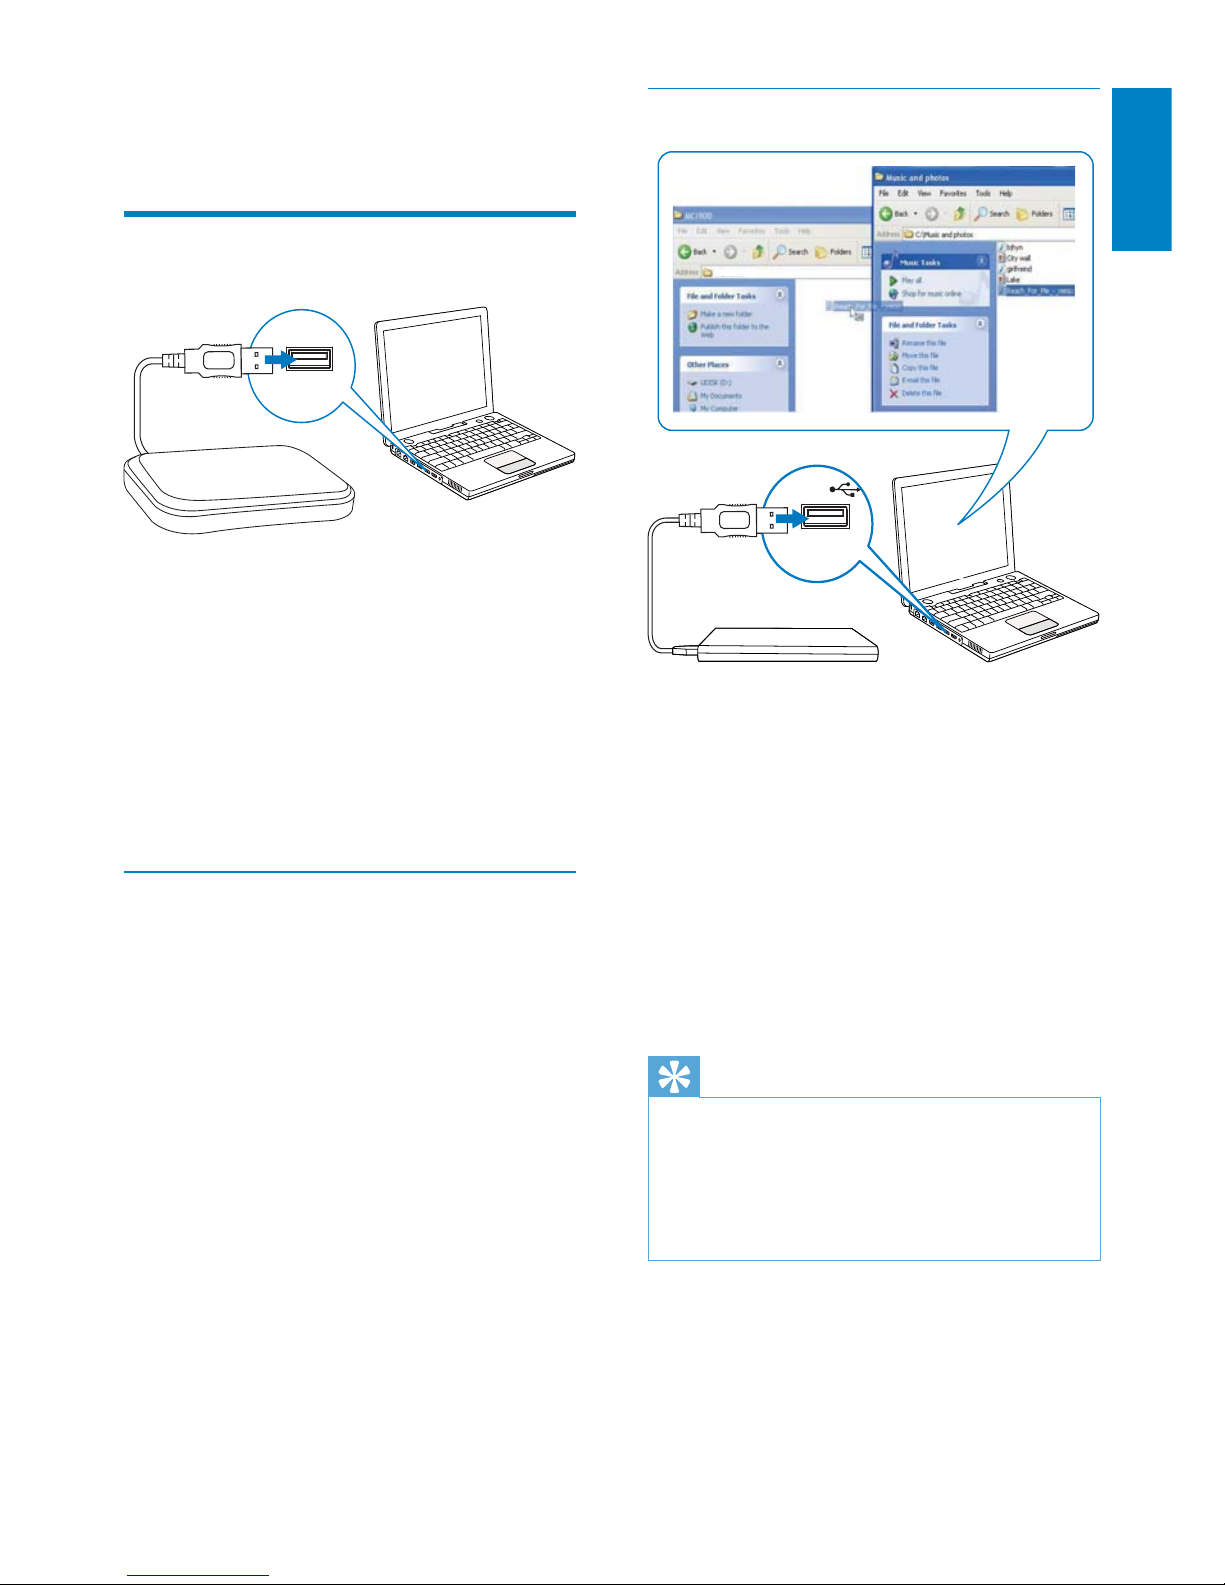
17
Copy media files to the HDD
Transfer music/picture files from the computer
to HDD. You can play music and photos on
MCi8080.
1 On the computer, under [My Computer]
or [Computer],
Find the HDD of • MCi8080;
Find the desired music folder. •
2 From the music/photo folder on your
computer, drag and drop music/picture
files to the HDD.
Tip
Copy media files to the HDD, regardless of •
the folder structure.
The music/picture file transfer may take you
•
some time. You may proceed to next steps
when transferring music/picture files to the
HDD.
D:\MCi8080
3 Prepare
Connect the HDD to a
computer
The supplied hard disk drive (HDD) contains
the PC/Mac software for MCi8080 (Media
Browser/TwonkyMedia Server), video tutorial,
User Manual, and other information about
MCi8080 that may be helpful to you.
Connect the supplied HDD to a •
computer.
Wait till the HDD is detected on »
the computer.
Copy MCi8080 files to the computer
1 On the computer, under [My Computer]
or [Computer],
Find the HDD of • MCi8080;
Find a location on the computer to •
store the MCi8080 files from the
HDD.
2 Drag and drop the “MCI8080” folder
from the HDD to the desired location on
the computer.
English
EN
18
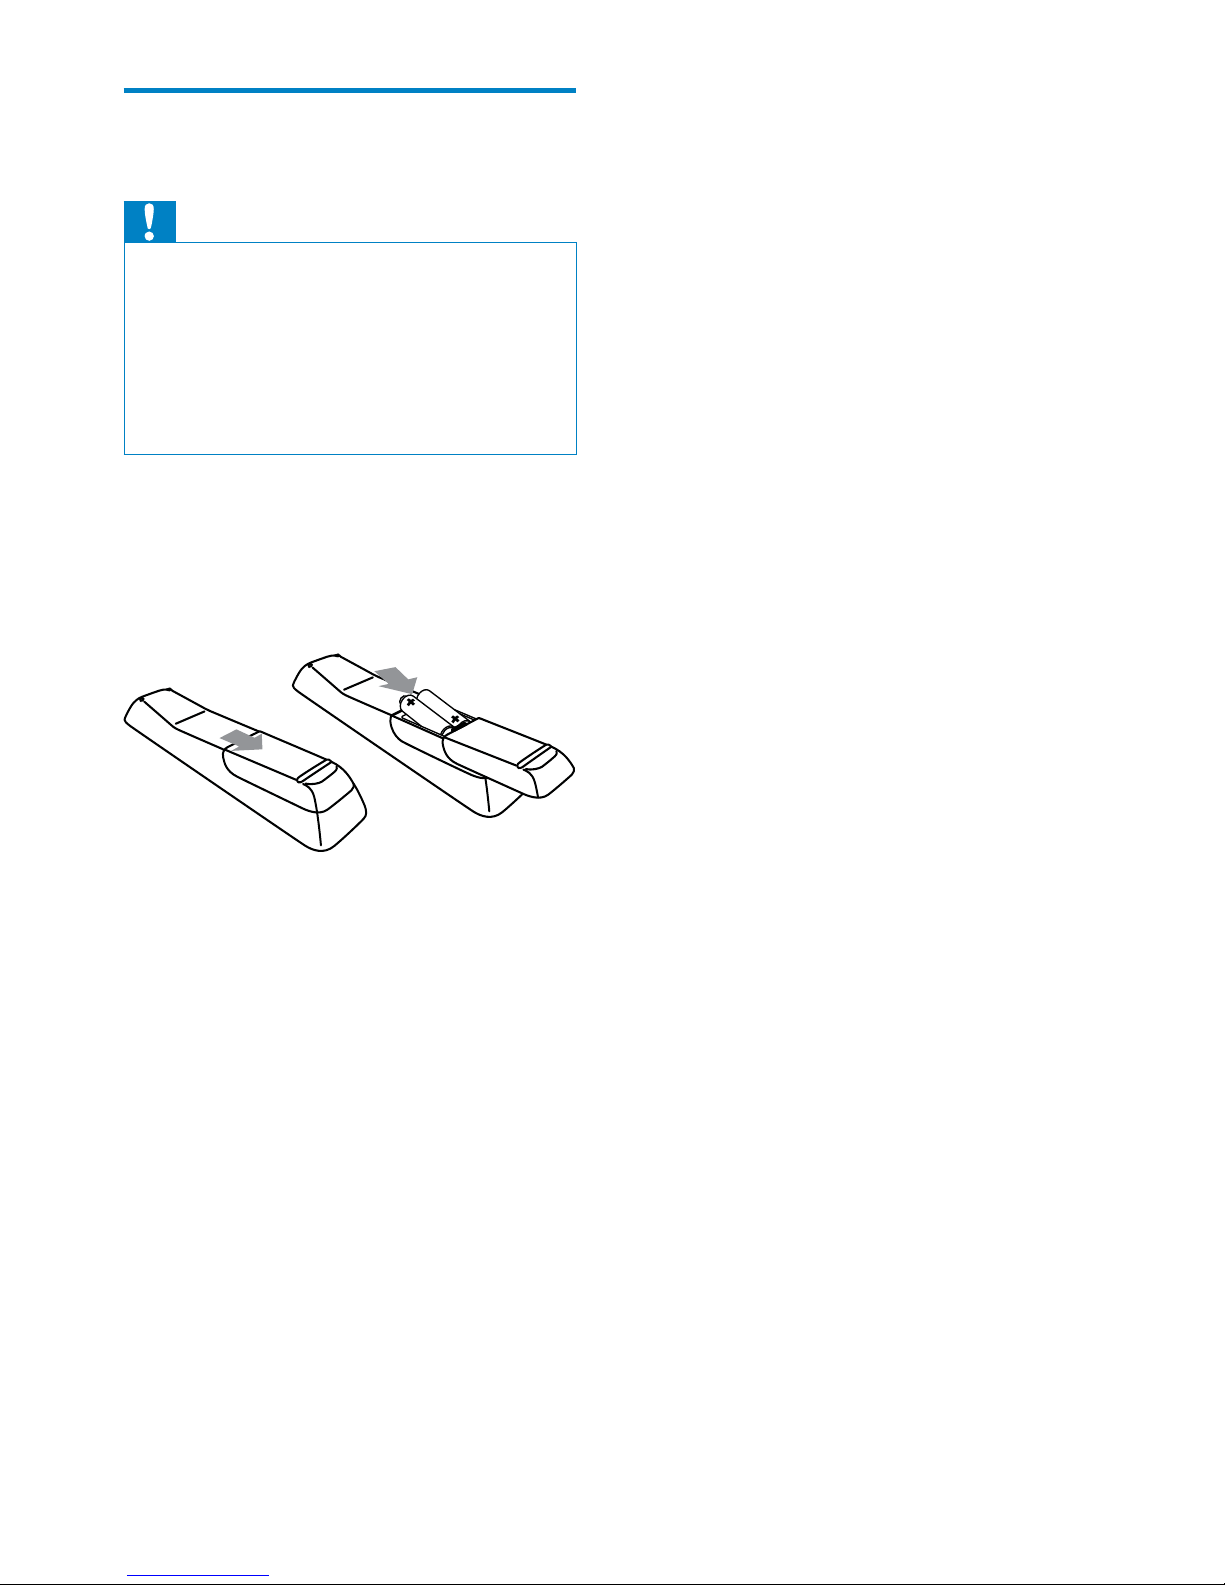
Install batteries into the
remote control
Caution
Risk of explosion! Keep batteries away from •
heat, sunshine or fire. Never discard batteries
in fire.
Risk of decreased battery life! Never mix
•
different brands or types of batteries.
Risk of product damage! When the remote
•
control is not used for long periods, remove
the batteries.
1 Open the battery compartment.
2 Insert two AAA LR03 batteries with
correct polarity (+/-) as indicated.
3 Close the battery compar tment.
EN
19
Note
Never place this unit in an enclosed cabinet. •
Install this unit near the AC outlet where the •
AC power plug can be easily reached.
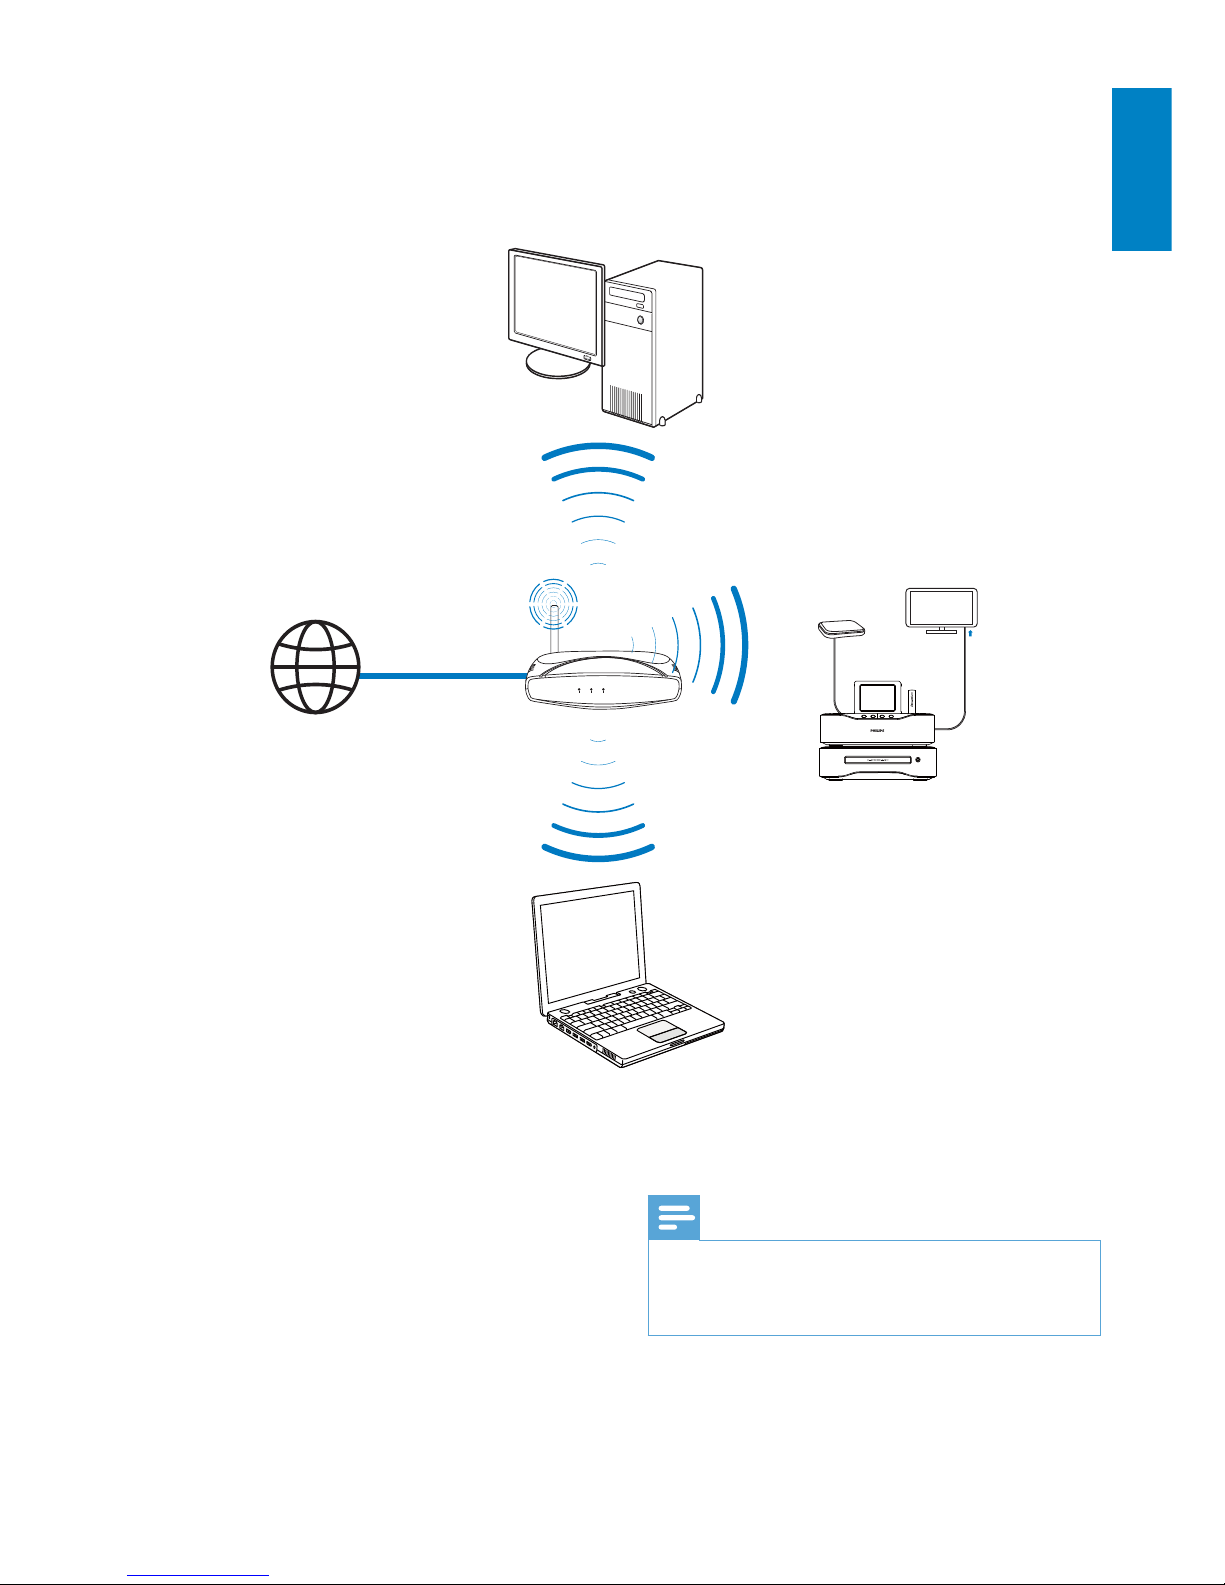
4 Place the unit
Place • MCi8080 near a TV to use the disc
player.
For good Wi-Fi reception, place the unit •
within the coverage of the router/ Access
point (not supplied).
To avoid magnetic interference or •
unwanted noise, never place this
apparatus and speakers too close to any
radiation devices.
TV
TV
Wireless
Modem PC
Power
MCi8080
Internet
English
EN
20
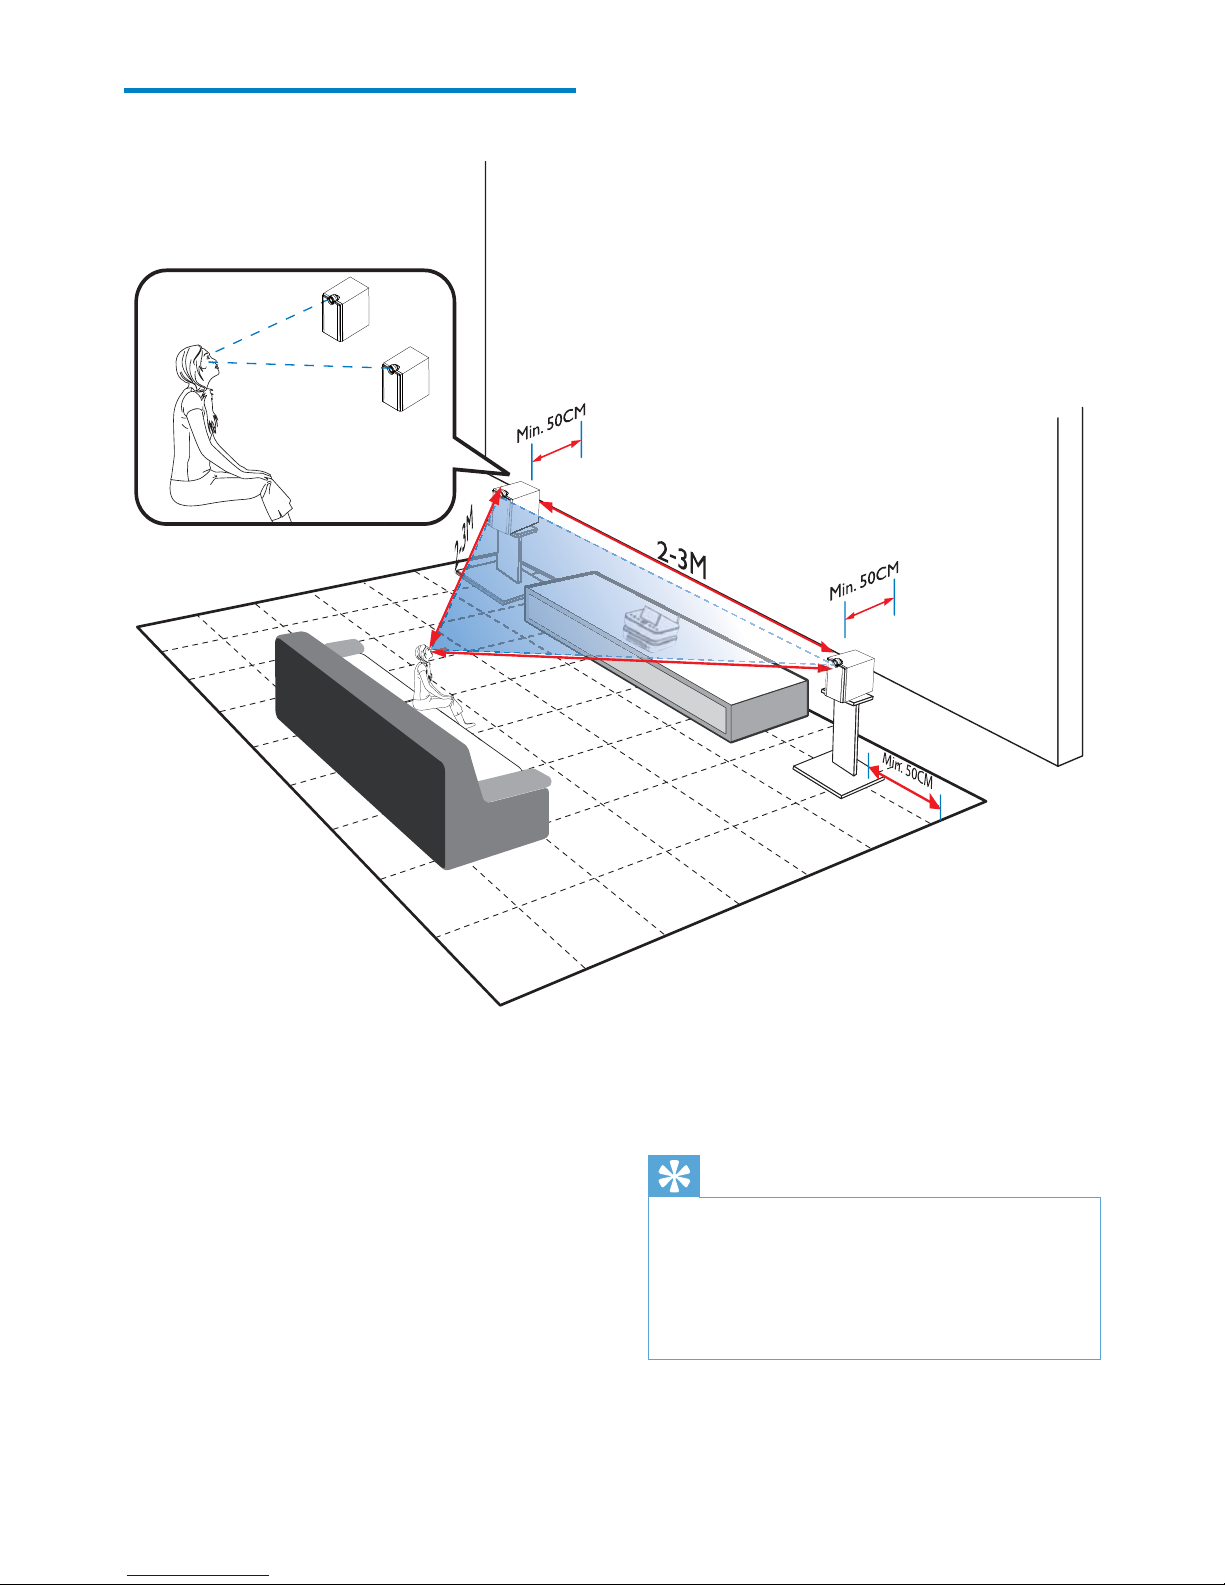
To keep the tweeters unobstructed, •
never place the speakers in between
shelves.
Tip
Alternatively, you can place the speakers on •
the floor or on top of shelves, though not
preferable.
By placing the speakers at least 50 cm away
•
from the rear wall, you can make the bass
tighter and improve your listening experience.
Place the speakers
For the best listening experience:
Place the speakers with the tweeters •
at the ear height, and at least 50 cm
away from the rear wall.
Place the speakers on speaker stands •
to get the best result.
Place the speakers 2 to 3 meters •
away from each other, with the two
speakers and your preferred listening
position forming an equilateral
triangle.
Place the speakers with the tweeters •
facing your preferred listening area.
2-3M
EN

21
For the main unit side:
1 Hold down the socket flap.
2 Insert the stripped part of the wire
completely.
Insert the right speaker wires to “R”, •
left speaker wires to “L”.
Insert the red wires to “+”, black •
wires to “-”.
3 Release the socket flap.
For the speaker side:
4 Unscrew the speaker connectors.
5 For the left speaker, identify the speaker
cable that is connected to the left
connectors on the main unit.
6 Insert fully the red end of the speaker
cable into the red (+) connector.
7 Screw the red (+) connector to secure
the cable.
8 Insert fully the silver end of the speaker
cable into the black (-) connector.
9 Screw the black (-) connector to secure
the cable.
10 Repeat steps 2-6 for the right speaker.
abc
ac
b
5 Connect
Connect the main unit and
CD/DVD unit
As shown, plug the cable into • DVD
CABLE IN.
Connect speakers
Note
Ensure that the colors of the speaker wires and •
terminals are matched.
For optimal sound, use the supplied speakers
•
only.
Connect only speakers with impedance that is
•
the same or higher than the supplied speakers.
Refer to the Specifications section of this manual.
English
EN

22
As shown, connect an HDMI cable (not •
supplied) to:
the • HDMI socket on this unit, and
the • HDMI input socket on the TV.
For TV/ monitor with a DVI jack only, use •
a DVI-to-HDMI adapter.
Tip
As a compact audio/video interface, HDMI •
transmits uncompressed digital data. With the
HDMI connection, high-definition video/audio
contents can present optimum video and
audio quality on a HDTV.
TV
HDMI IN
Connect for disc play
For disc play, make audio/video connections.
Connect a TV
On MCi8080, you can connect a TV through
one of the two video jacks.
Select the video jack that your TV supports:
Composite video (CVBS): for a •
standard TV;
HDMI jack: for a high-definition •
TV compliant with HDMI (High
Definition Multimedia Interface)/DVI
(Digital Visual Interface), and HDCP
(High-bandwidth Digital Contents
Protection).
Using the CVBS jack
As shown, plug the supplied composite •
video cable into the corresponding
sockets.
Using the HDMI jack (sold separately)
Use the HDMI jack to connect a highdefinition TV (HDTV), which is equipped with
HDMI (High Definition Multimedia Interface)
or DVI (Digital Visual Interface), and compliant
with HDCP (High-bandwidth Digital Contents
Protection).
TV
EN
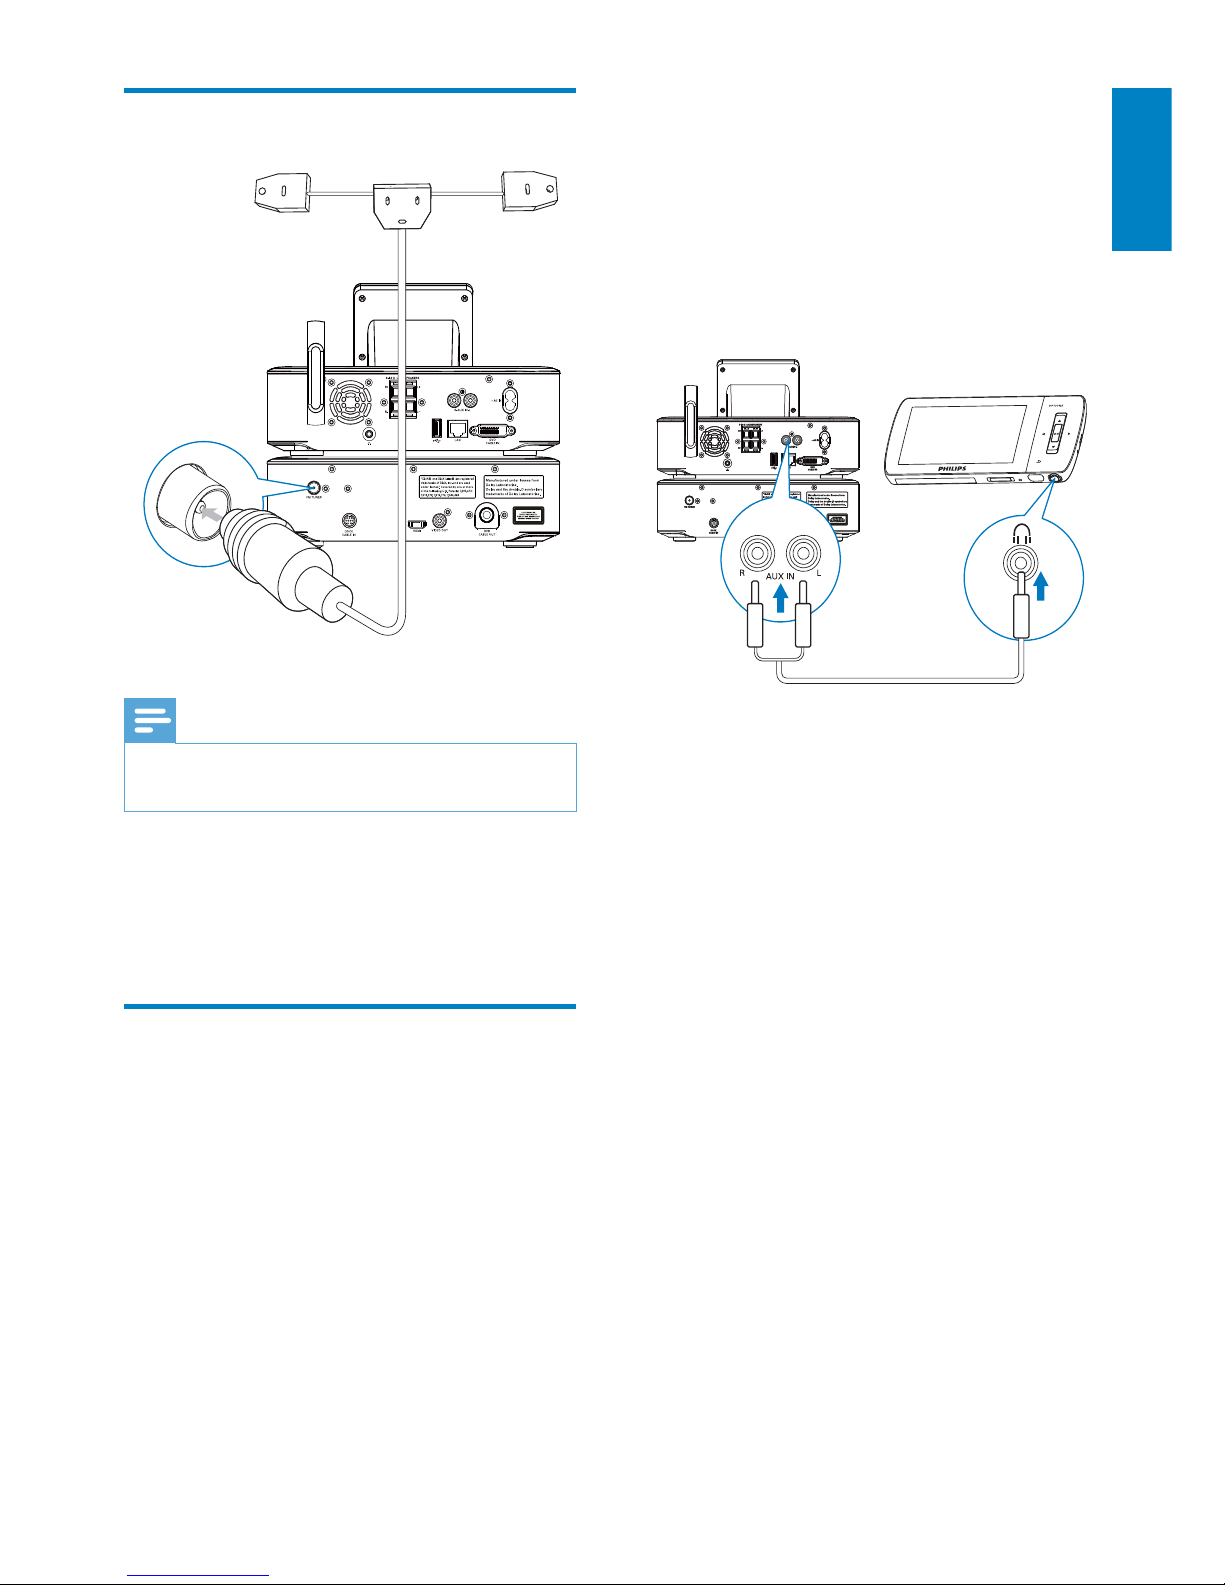
23
Or, to play from a portable media player •
with 3.5mm headphone jack
Connect a headphone to RCA cable (not
supplied) to:
the • AUX IN L / R sockets on this
unit, and
the 3.5mm headphone jack on the •
portable media player.
Connect the FM antenna
Note
Always plug in the FM antenna before tuning •
to an FM radio station.
Connect the supplied FM T-type antenna •
to the FM TUNER socket on the unit;
Stretch the antenna to its full length, and •
fix it on the wall.
Connect external audio
devices
You can listen to an external audio device
through the speakers on MCi8080. To do so, do
the following connections, and then, select the
AUX mode on MCi8080.
Connect audio cables (red/white - not •
supplied) to:
the • AUX IN L / R sockets on this
unit, and
the audio output sockets on the •
external audio device.
English
EN
24
Turn on/off
Connect power supply
Warning
Risk of product damage! Ensure that the •
power supply voltage corresponds to the
voltage printed on the back or the underside
of the product.
Connect • MCi8080 to the power supply.
Note
The type plate information is located at the •
back or at the underside of the product.
Turn on/off
1 Press or a source selector to turn on
the unit.
2 To turn off the unit,
Press •
to switch to active standby;
Or, press and hold • to switch to
Eco standby (energy-saving mode).
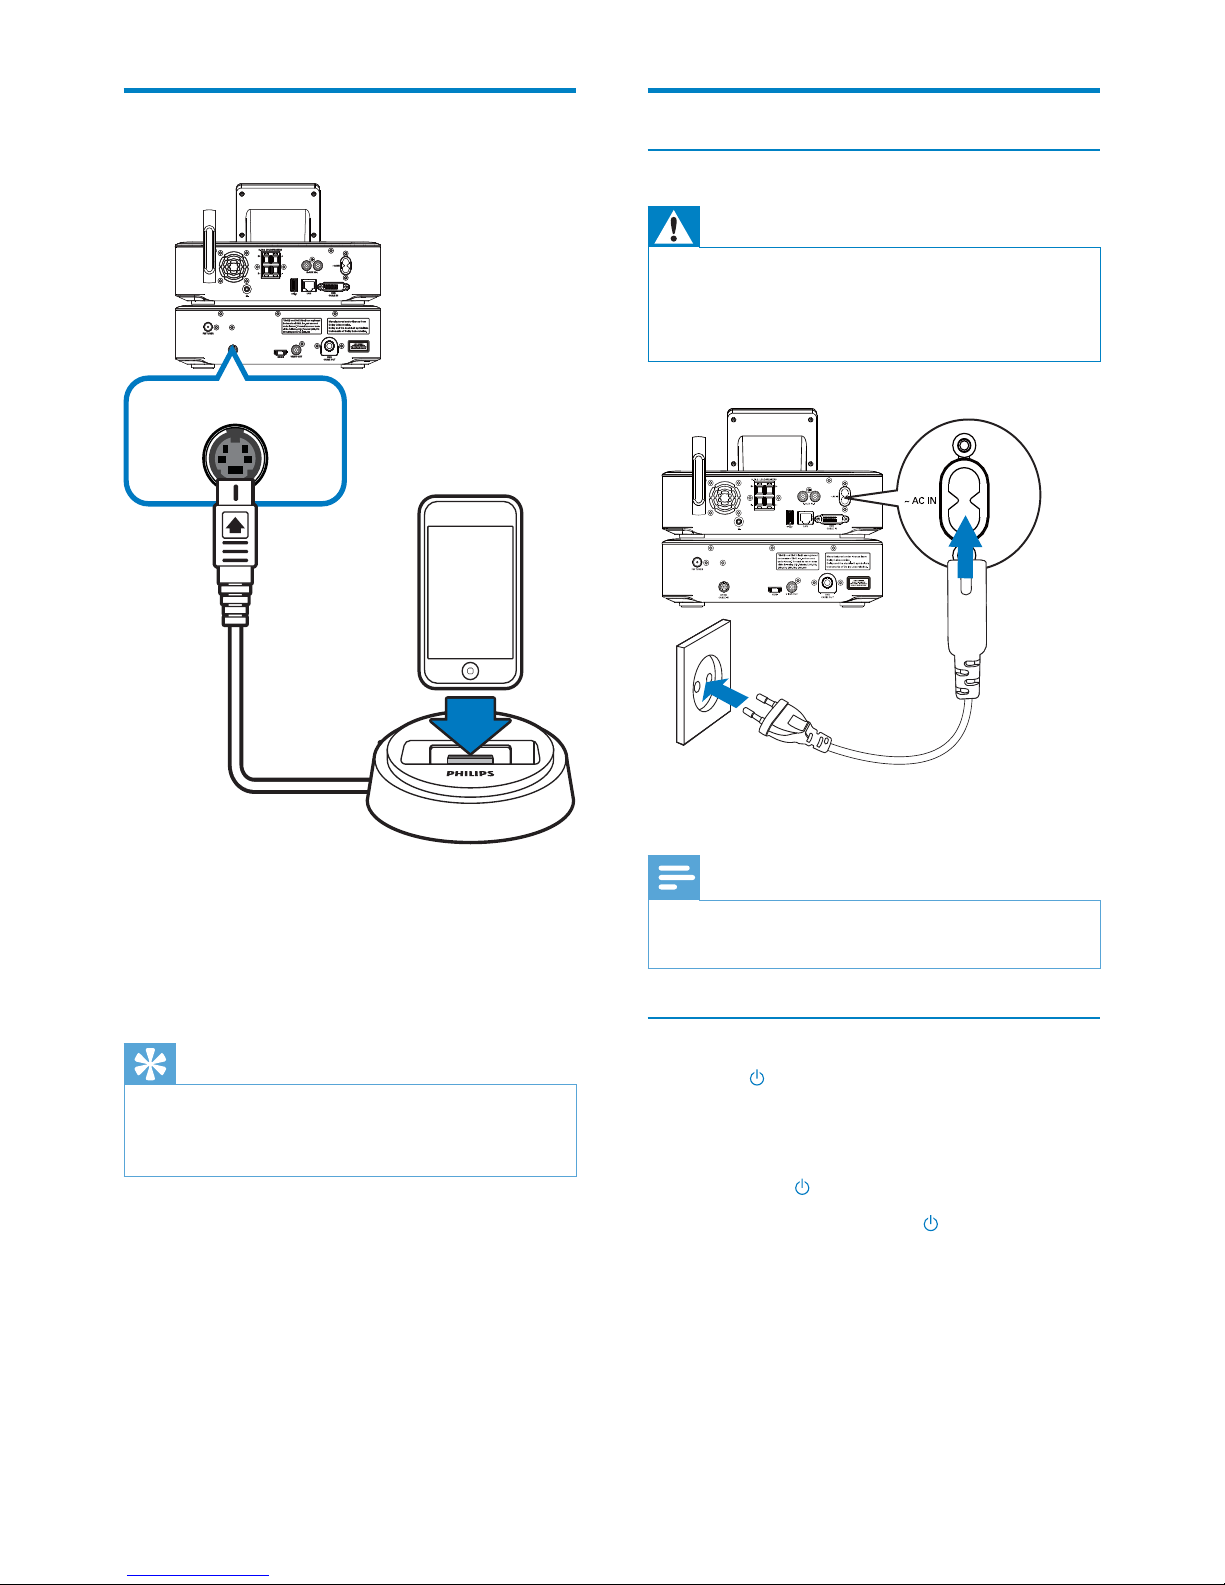
Connect an iPod / iPhone
dock
With the connected iPod / iPhone dock, you
can charge or listen to music from your iPod /
iPhone through this unit.
Connect a dock (not supplied) to the •
DOCK CABLE IN socket on this unit.
Tip
To listen to music from the docked iPod / •
iPhone, first press DOCKING to select the
dock source.
DOCK for iPod
EN
25
Active standby
When in active standby, some major functions
of MCi8080 remain in the normal state of
power consumption, e.g. Wi-Fi connection,
clock display. Thus, MCi8080 can quickly go to
the running state when you switch MCi8080
from active standby to on.
In active standby,
The power indicator lights up red;•
Clock time is displayed if you have set •
clock.
And, the unit is still connected to the Wi-Fi/
wired network.
Auto active standby
If no activity happens on MCi8080 for 20
minutes, MCi8080 can switch to active
standby automatically.
Eco standby
Eco standby is an energy-saving mode. In Eco
standby, all major functions are switched to a
low-power state or off, e.g. micro-processor,
Wi-Fi connection, display, and hard disk.
English
EN

26
6 First-time setup
The first time you turn on MCi8080,
1 Select the desired language on the screen
as prompted.
2 To learn major functions on MCi8080,
Select • [Yes, show me the demo],
when asked whether to view demo;
If necessary, press •
VOL to adjust
the volume;
To exit the demo play, press • .
The unit is switched to Eco »
standby.
Press »
again to turn on MCi8080,
and restart the setup.
To proceed to network setup,
Select • [No], when asked whether to
view demo.
3 Select your location and time zone from
the list as prompted.
4 Select [Yes], when asked whether to set
up network connection.
EN
27
To have the unit connected to the •
Internet over home Wi-Fi/wired network,
ensure that the router connects to
the Internet directly and no dial-up is
required on the computer.
To switch between different connection •
methods (wireless or wired, automatic
or manual), or switch between different
routers, go to [Settings] > [Network
settings] > [Setup network].
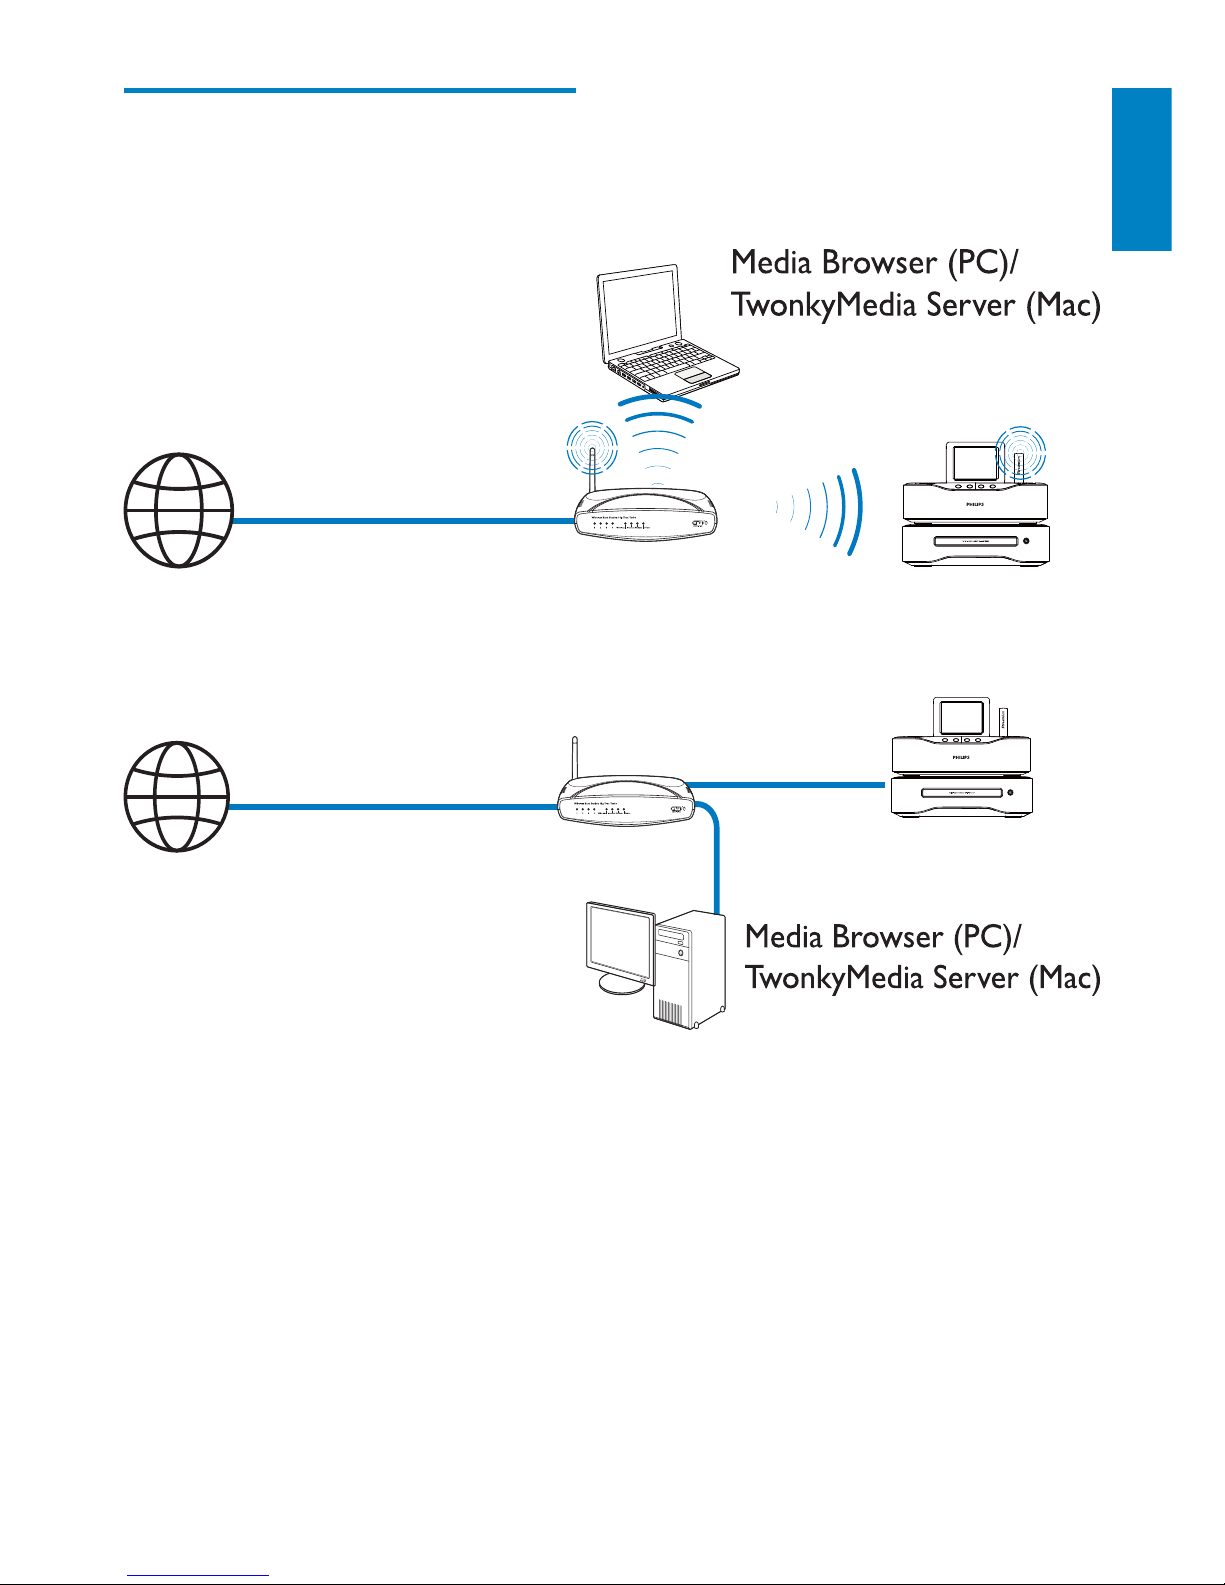
Connect to home Wi-Fi/
wired network
Connect wirelessly
Connect through an Ethernet cable
You can connect MCi8080 to home Wi-Fi/
wired network in different ways: wireless or
wired, automatic or manual.
Use a router (or Access Point) for home •
Wi-Fi/wired network. That is, connect
computers/devices to a router.
Connect • MCi8080 to the router
wirelessly or through an Ethernet cable.
MCi8080
MCi8080
English
EN
28
Tip
To use PIN (Personal Identification Number) •
as the setup method: On MCi8080, select
[Wireless (WiFi)] > [Pin entry (WPS – PIN)],
and write down the PIN that is displayed on
MCi8080; On the router, enter the PIN.
Consult the user manual of the router to learn
•
how to enter the PIN the router.
Connect to the Internet
Connect to the Internet as prompted. •
You enter Home screen after the first- »
time setup is complete.
MCi8080
Internet
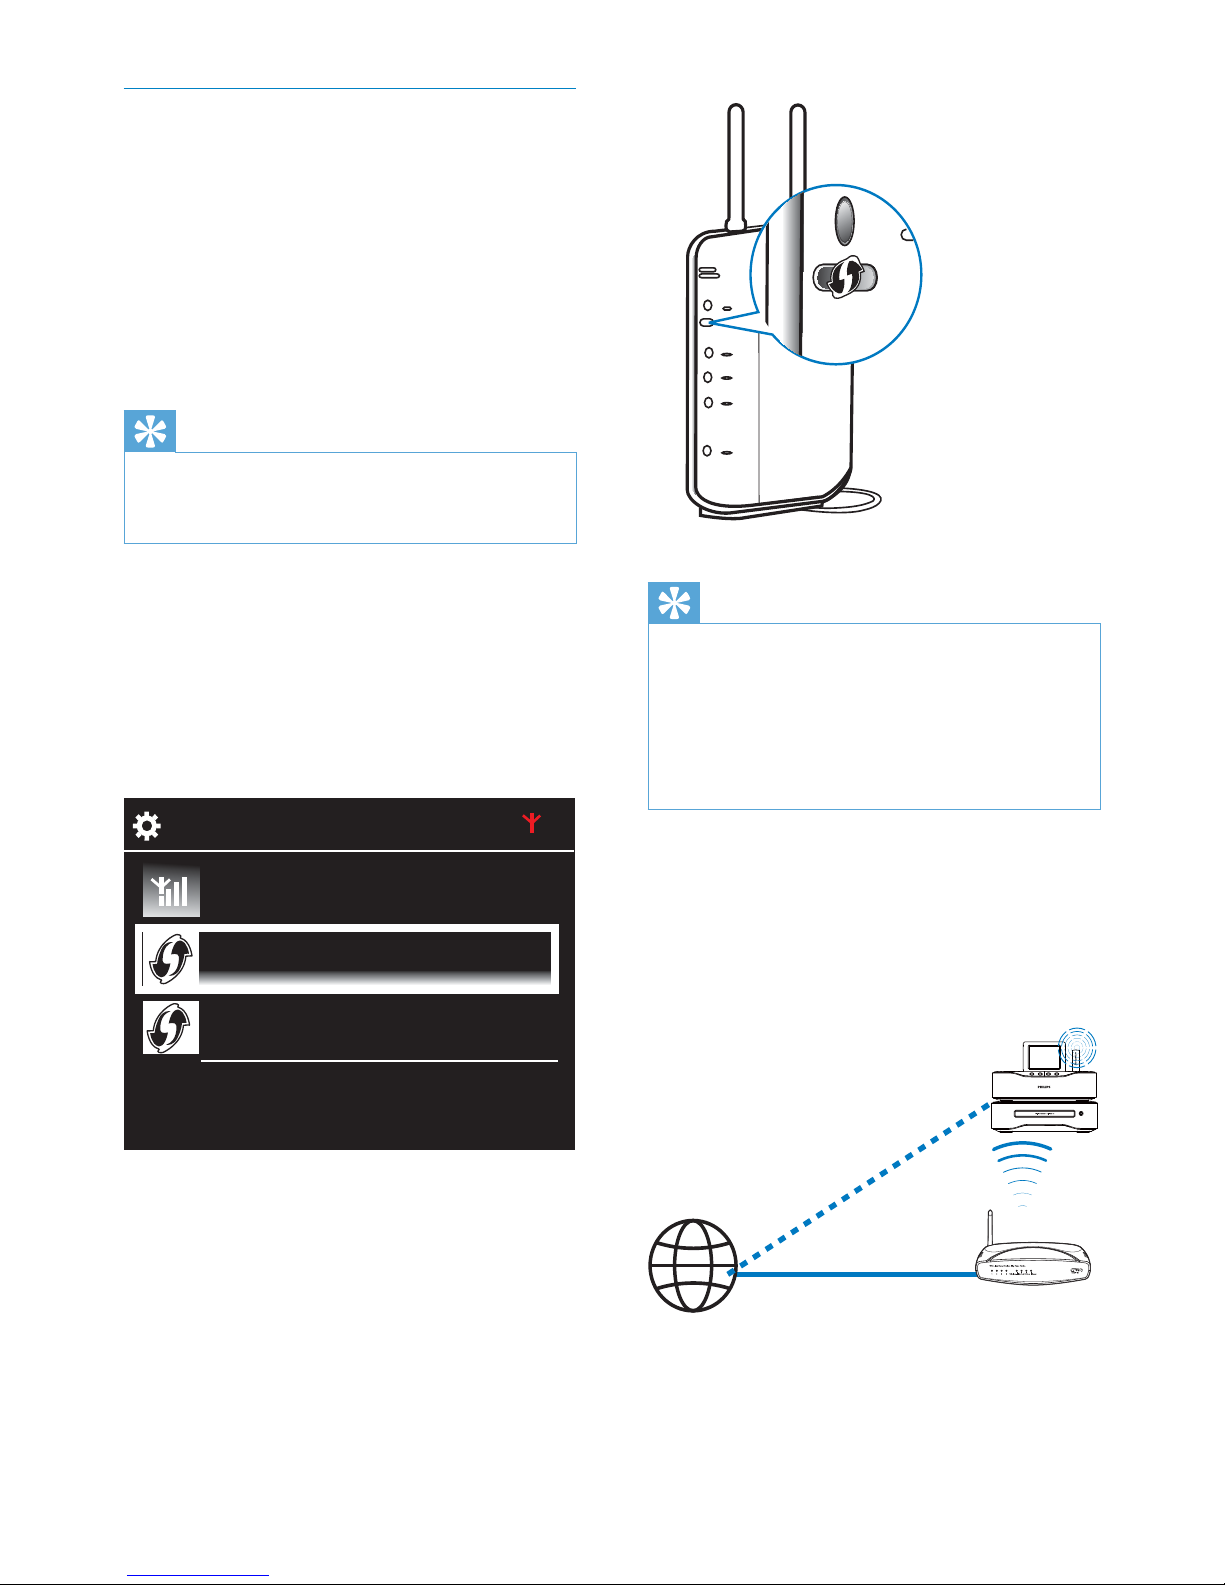
Wireless connection: One-touch WiFi Protected Setup (WPS)
MCi8080 supports Wi-Fi Protected
Setup(WPS). You can quickly and securely
connect MCi8080 to a wireless router that
also supports the WPS.
You can select one of the two setup methods:
PBC (Push Button Configuration), or PIN
(Personal Identification Number).
Tip
Wi-Fi Protected Setup(WPS) is a standard •
created by Wi-Fi Alliance for easy establishment
of secure wireless home network.
Turn on WPS-PBC on MCi8080
1 Select [Yes], when asked whether to set
up network connection (see ‘First-time
setup’).
2 Select [Wireless (WiFi)] > [Push button
(WPS – PBC)].
Add MCi8080 on the router
Consult the user manual of the router to •
learn how to add a WPS device to the
router. For example:
press and hold the WPS push button.
The router starts to search for a WPS »
device.
On MCi8080, a message appears »
when the connection is completed
successfully.
2/3
Look for network
Push button (WPS...
Pin entry (WPS - PIN)
EN
29
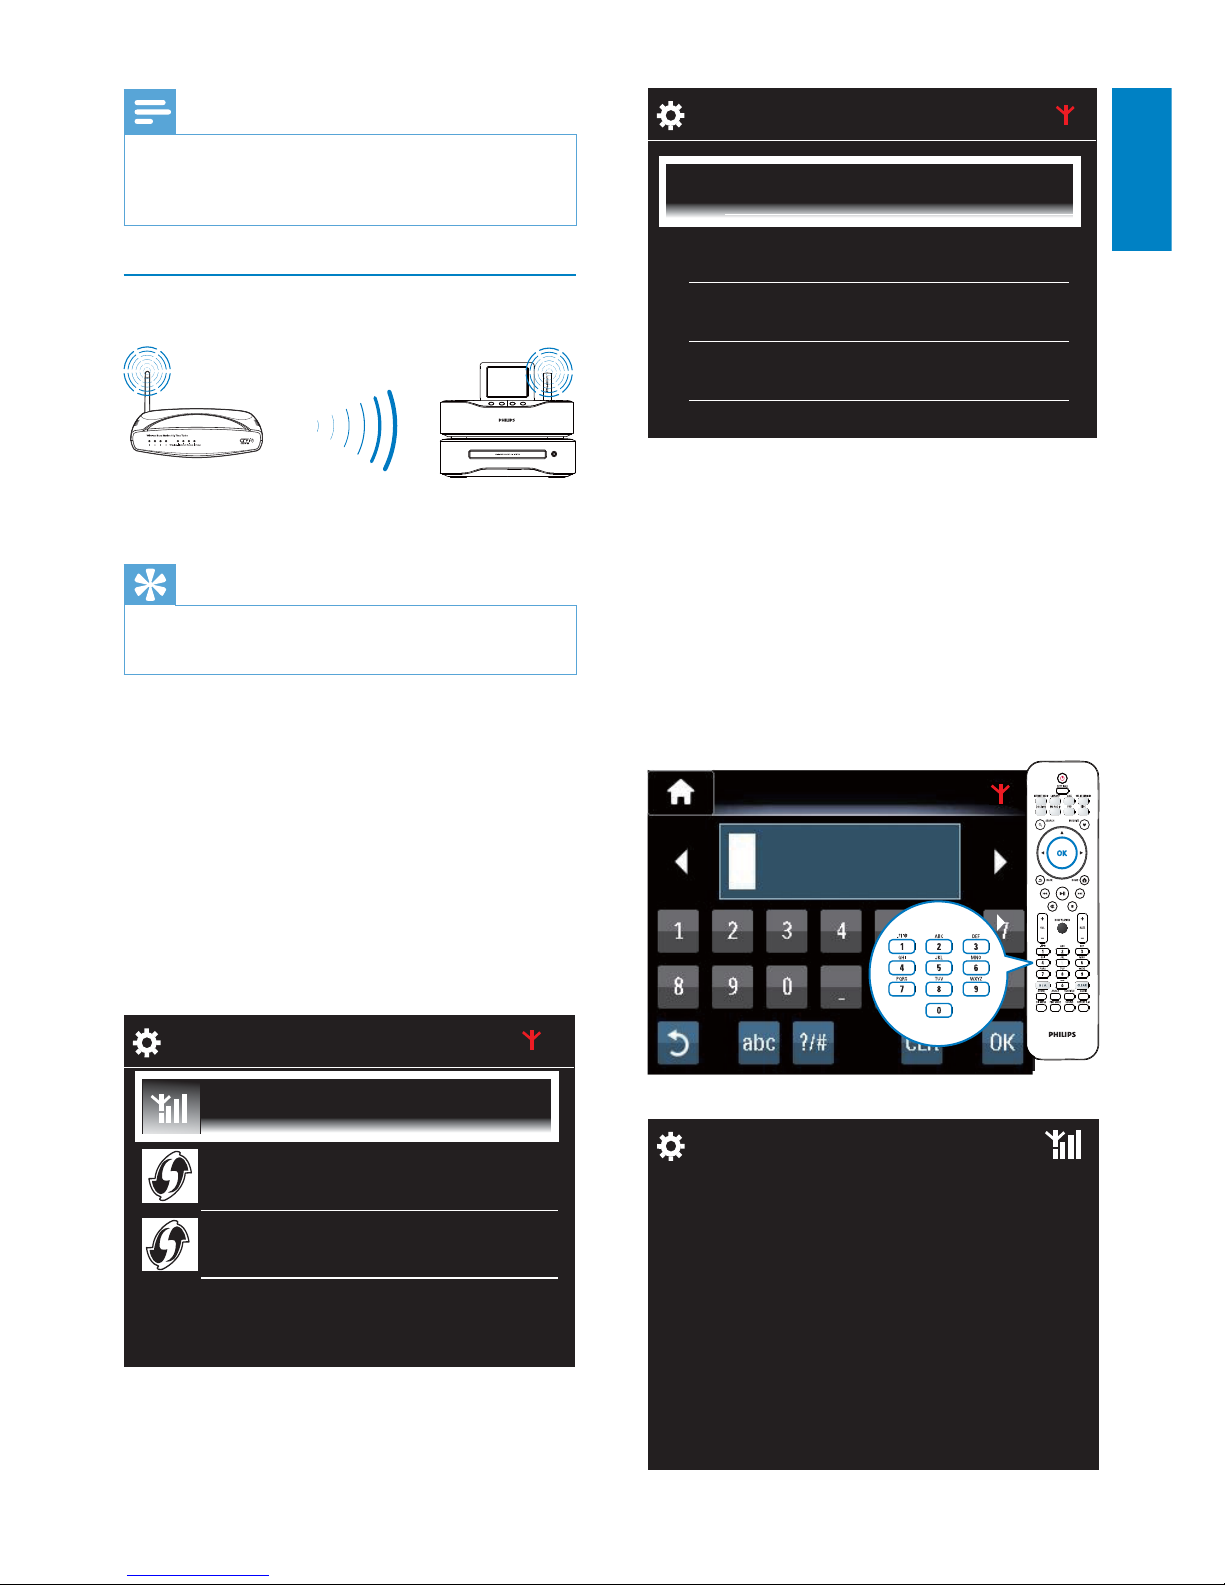
3 Select the desired Wi-Fi network.
4 As prompted, enter the encryption key to
the network.
The unit starts to acquire an IP »
address assigned by the Wi-Fi network
automatically.
A message appears when the »
connection is completed successfully.
1/4
Network A
Network B
Network C
Other ...
WEP key 1
Successfully
connected to
Network A
Note
Ensure that the router connects to the •
Internet directly and no dial-up is required on
the computer.
Wireless connection: Enter
encryption key manually
Tip
Before you start the network setup, have the •
encr yption key to your router ready.
1 Select [Yes], when asked whether to set
up network connection (see ‘First-time
setup’).
2 Select [Wireless (WiFi)] > [Look for
network].
The unit starts to search for wireless »
networks.
A list of available Wi-Fi networks »
appears.
MCi8080
1/3
Look for network
Push button (WPS...
Pin entry (WPS - PIN)
English
EN
30
Get the IP address of the router
Consult the user manual of the router.•
Or, to check for the settings of the router, •
enter the IP address (e.g. 192.168.1.1) in
the web browser (e.g. Internet Explorer)
of the computer, and then, get the
desired information in the setup page.
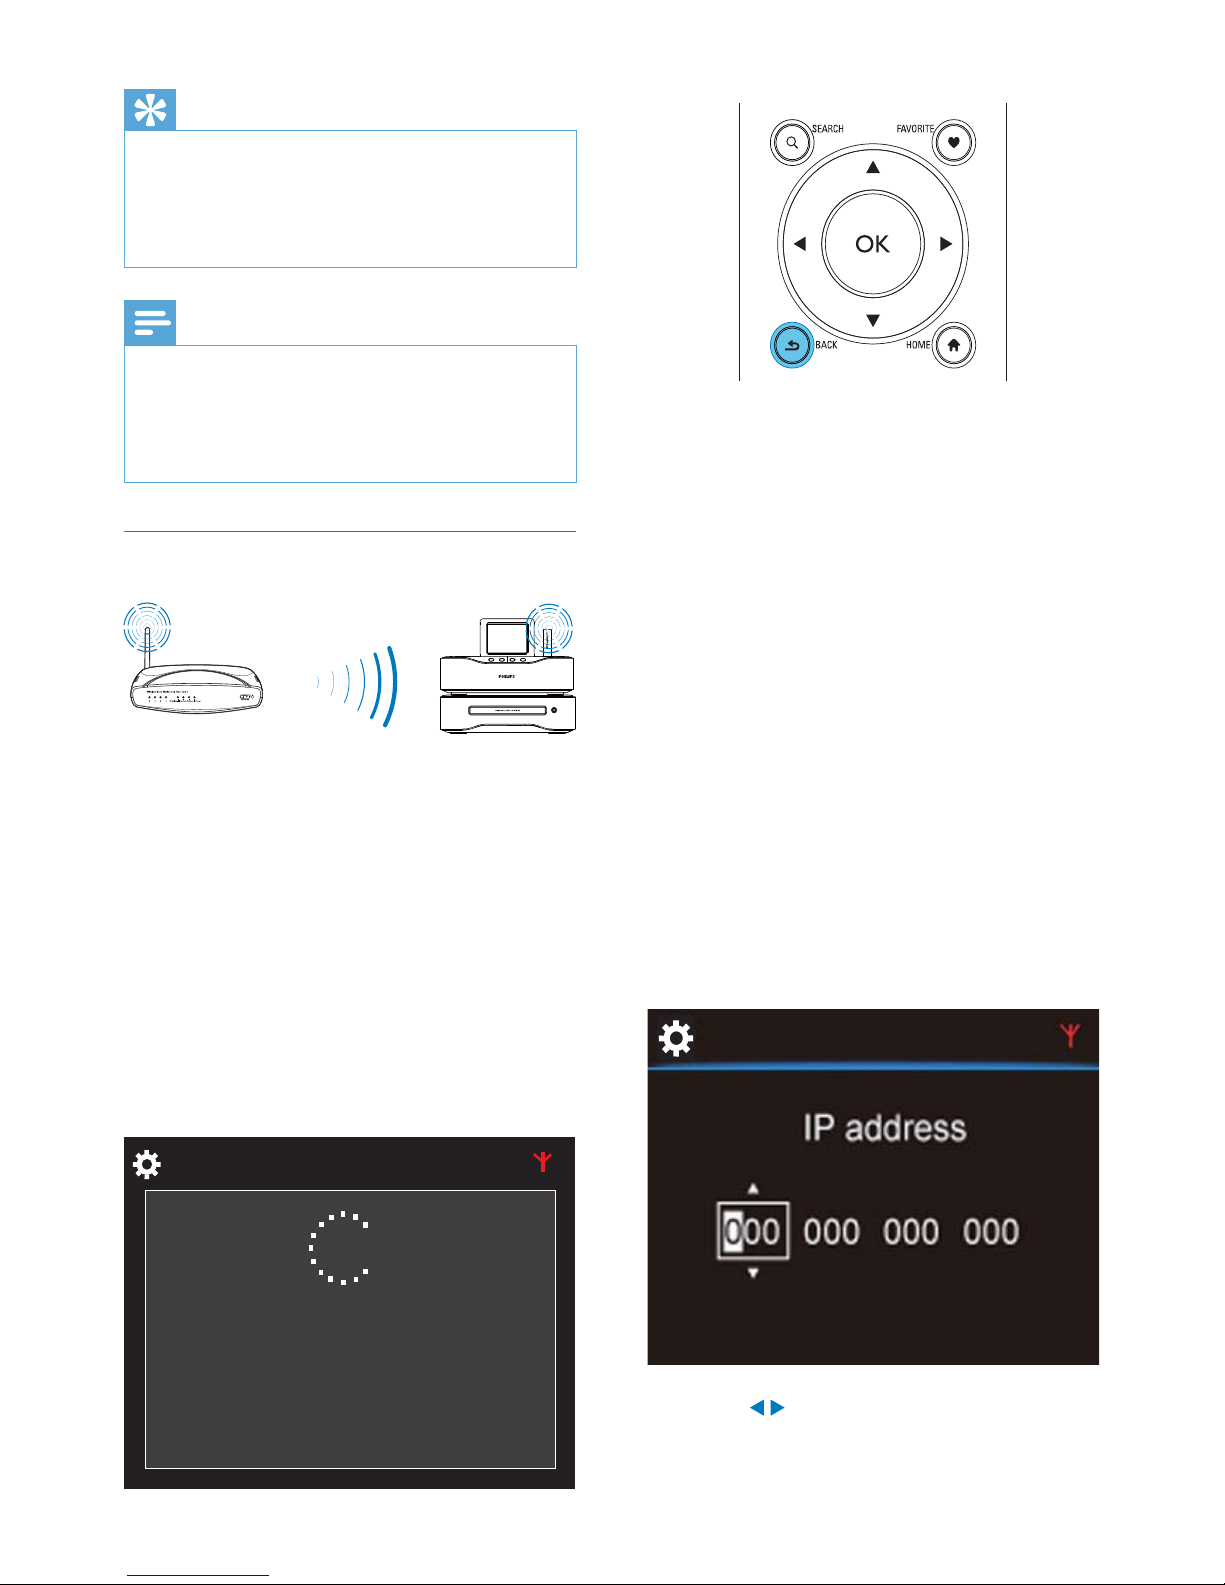
Enter the IP address manually
On the • MCi8080, enter an IP address
that allows the unit to be in the same
subnet as the router.
For example, if the router has
IP address: 192.168.1.1, Subnet mask:
255.255.255.000;
Then, enter the following on the unit:
IP address: 192.168.1.XX (where XX
denotes a number), Subnet mask:
255.255.255.000.
Press • / repeatedly to select the entry
location;
Tip
If you have hidden the SSID of the router (e.g. •
disable the SSID broadcasting), go to the end
of the list of Wi-Fi network. Select [Other...]
> [Manual SSID entry]. In the text box, enter
the name of the router.
Note
The router may fail to assign an IP address, •
if the DHCP (Dynamic Host Configuration
Protocol) is unavailable or disabled on the
router. You may need to enter the IP address
manually, or press BACK to start re-connecting.
Wireless connection: Enter IP address
manually
Stop getting Auto IP
1 Search for the home Wi-Fi network,
and then, connect to the home Wi-Fi
network.
The unit starts to acquire an IP »
address assigned by the Wi-Fi network
automatically.
2 Press BACK on the remote control to
stop getting auto IP.
MCi8080
Acquiring IP address...
Press <Back> to enter
IP address manually
EN
 Loading...