How it Works
Log In / Sign Up
Buy Points
How it Works
FAQ
Contact Us
Questions and Suggestions
Users
Philips
Loading...
S
SQM5322/27
2
SQM5352
SQM5352/27
SQM5562-27
2
SQM5572-27
2
SQM5822
SQM5822-27
4
SQM6125
18
SQM6125/10
SQM6125/93
SQM6175
21
SQM6325
19
SQM6325/00
SQM6325-27
2
SQM6375
16
SQM6375-27
2
SQM6415
24
SQM641500
SQM6415-17
2
SQM6435-17
2
SQM6435-27
SQM6485
24
SQM648500
SQM6485/17
2
SQM6485/27
2
SRC2063
4
SRC2063/27
9
SRC2063WM
5
SRC2063WM/17
7
SRC3036
2
SRC3036/27
3
SRC3036WM
SRC3036WM-17
2
SRM
SRM-230U
SRM5100
22
SRM5100/10
SRM7500
36
SRM7500-10
2
SRM7500/37
SRO
SRP 1001
20
SRP 1001-10
2
SRP1003
5
SRP1003/27
4
SRP1003WM
5
SRP1003WM/17
4
SRP1101
42
SRP110110
5
SRP1103
6
SRP1103/27
8
SRP1103/55
SRP1127
SRP2002
38
SRP200210
4
SRP2003
3
SRP2003/27
7
SRP2003/55
SRP2003WM
5
SRP2003WM/17
2
SRP2004WM
SRP2004WM-17
2
SRP2006
2
SRP2006/27
SRP2006/55
2
SRP2006WM
SRP2006WM/17
SRP2008
2
SRP2008B
35
SRP2008B/86
6
SRP2018
6
SRP2104
3
SRP2104/27
5
SRP3004
48
SRP 3004-10
28
SRP3004-53
6
SRP3011
3
SRP3013
3
SRP3013/27
5
srp3014
8
SRP3014/27
5
SRP4004
40
SRP4004/27
10
SRP4004/55
SRP4004/86
4
SRP4004/87
SRP4004WM
4
SRP4004WM-17
SRP5002
21
SRP5002/10
SRP5004
35
SRP 5004 4 EN 1
5
SRP5004/53
2
SRP500486
3
SRP5004/87
SRP5016
4
SRP5018
3
SRP5018/27
5
SRP504/86
SR T5
Loading...
Loading...
Nothing found
SRP1101
BROCHURE
2 pgs
357.52 Kb
0
BROCHURE
12 pgs
3.48 Mb
0
BROCHURE
2 pgs
367.15 Kb
0
User Manual
1 pgs
4.38 Mb
0
User Manual
2 pgs
488.32 Kb
0
User Manual
12 pgs
3.51 Mb
0
Quick Start Manual
1 pgs
4.15 Mb
0
Specifications
2 pgs
245.28 Kb
0
User Manual [cz]
1 pgs
4.38 Mb
0
User Manual [cz]
2 pgs
378.79 Kb
0
User Manual [da]
1 pgs
4.39 Mb
0
User Manual [da]
13 pgs
3.49 Mb
0
User Manual [da]
2 pgs
366.15 Kb
0
User Manual [de]
12 pgs
3.52 Mb
0
User Manual [de]
2 pgs
373.18 Kb
0
User Manual [el]
1 pgs
4.39 Mb
0
User Manual [el]
13 pgs
3.48 Mb
0
User Manual [es]
13 pgs
3.51 Mb
0
User Manual [es]
2 pgs
364.95 Kb
0
User Manual [fi]
12 pgs
5.2 Mb
0
User Manual [fi]
2 pgs
358.85 Kb
0
User notes [fi]
1 pgs
4.38 Mb
0
User Manual [hu]
2 pgs
384.37 Kb
0
User Manual [it]
13 pgs
3.49 Mb
0
User Manual [it]
2 pgs
364.01 Kb
0
User notes [it]
1 pgs
4.38 Mb
0
User Manual [nl]
12 pgs
3.48 Mb
0
User Manual [nl]
2 pgs
364.34 Kb
0
User Manual [no]
1 pgs
4.38 Mb
0
User Manual [no]
12 pgs
3.46 Mb
0
User Manual [no]
2 pgs
366.21 Kb
0
User Manual [pl]
1 pgs
4.38 Mb
0
User Manual [pl]
2 pgs
381.11 Kb
0
User Manual [pl]
13 pgs
3.49 Mb
0
User Manual [pt]
1 pgs
4.38 Mb
0
User Manual [pt]
2 pgs
365.4 Kb
0
User Manual [ro]
2 pgs
454.68 Kb
0
User Manual [ru]
13 pgs
3.45 Mb
0
User Manual [ru]
2 pgs
384.99 Kb
0
User Manual [sl]
1 pgs
4.38 Mb
0
User Manual [sl]
12 pgs
5.26 Mb
0
User Manual [sv]
2 pgs
365.22 Kb
0
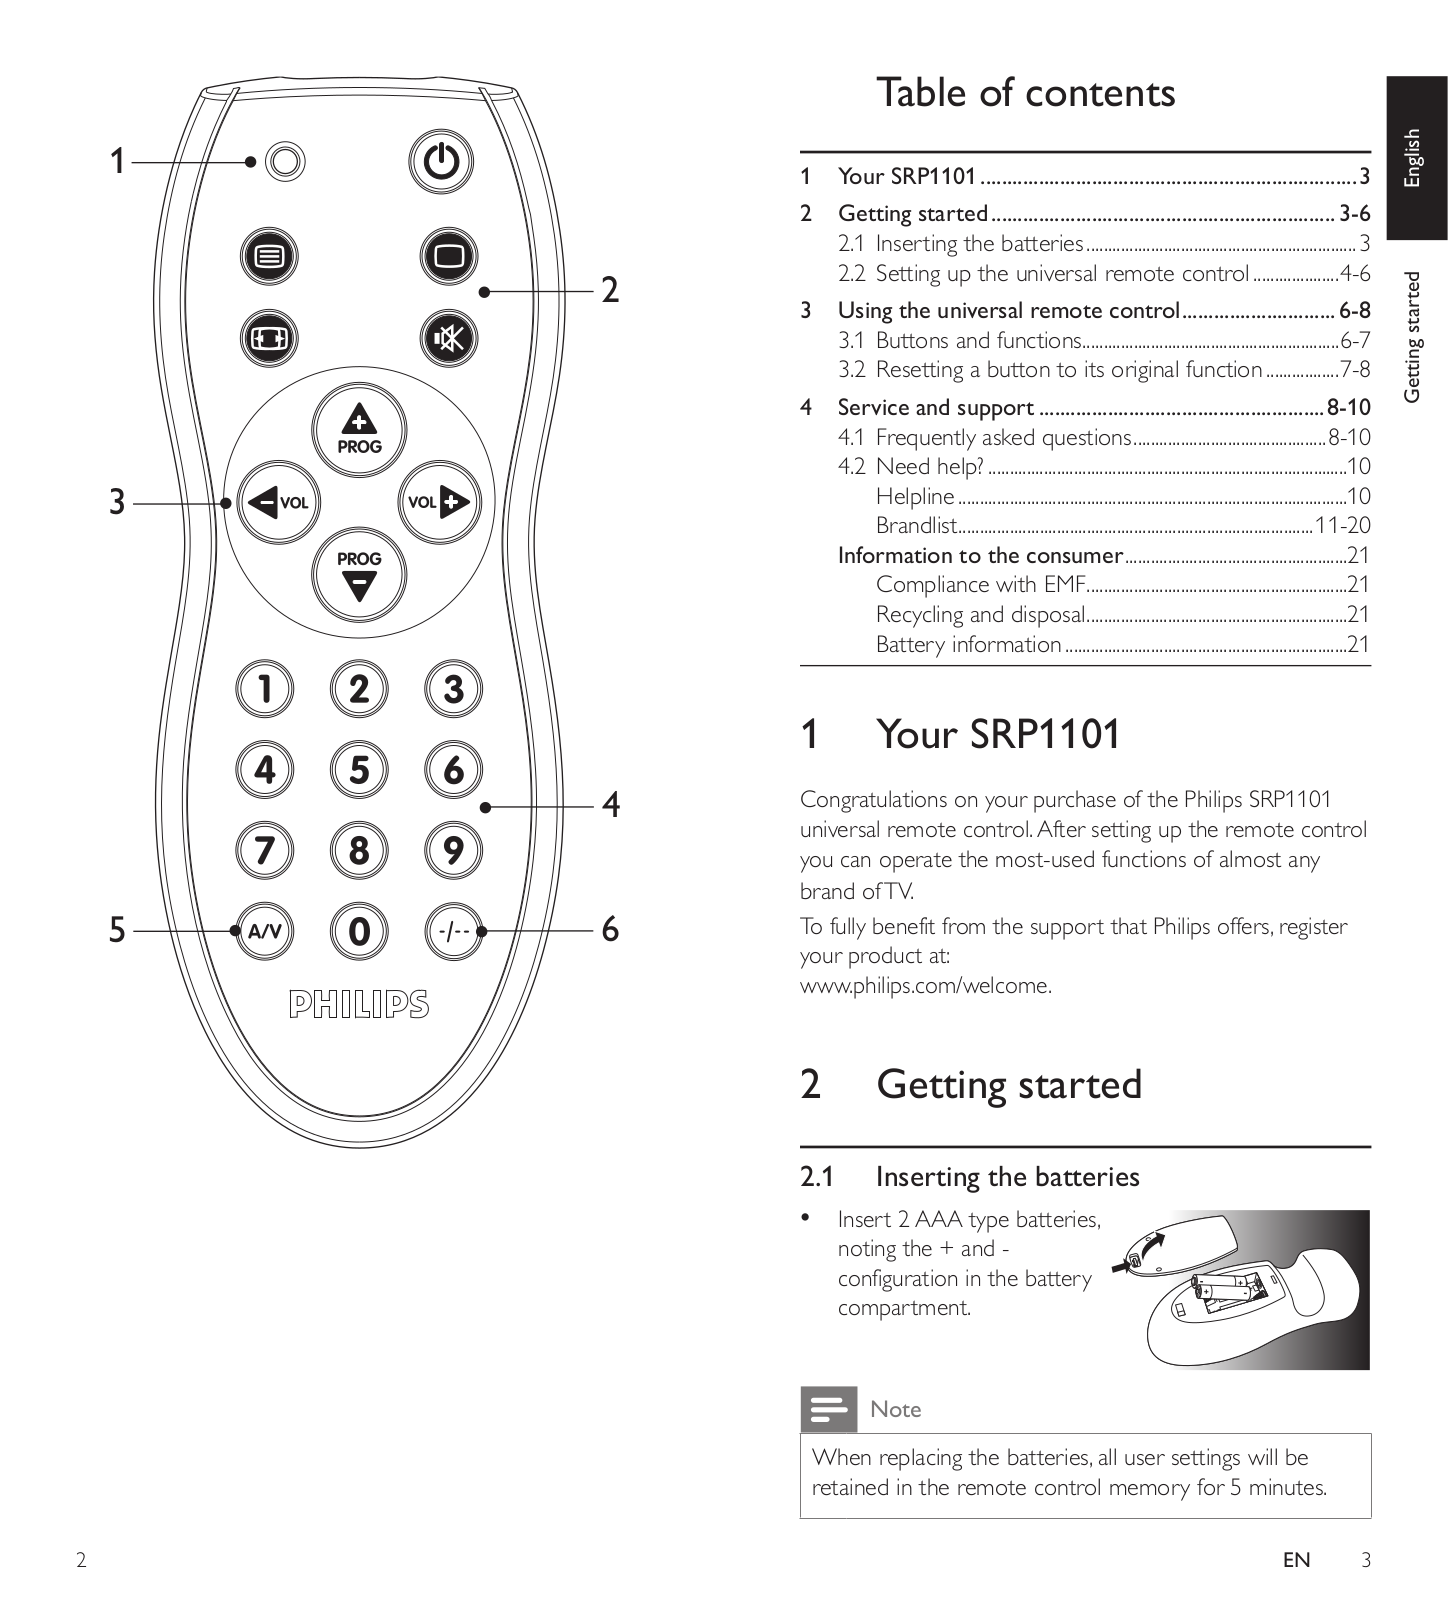
Table of contents
Loading...
Philips SRP1101 BROCHURE
...
Philips BROCHURE
Download
Specifications and Main Features
Frequently Asked Questions
User Manual
Download
Loading...
+
8
hidden pages
Unhide
You need points to download manuals.
1 point = 1 manual.
You can buy points or you can get point for every manual you upload.
Buy points
Upload your manuals
 Loading...