

Page 1
Registeryourproduct QRPinn^^^M/1T
andgetsupportat -Jfxr IWWJVVI I/ I /
www.philips.com/welcome
EN User Manual!
ES Instrucciones de manejo 20
PHILIPS
P1003WM_17__Manual_80_210.indd 1 25-11-09 13:1
Page 2

Table of contents
1 Your Philips remote control
Getting started 6-11
2.1 Battery installation 6
2.2 Code setup 6-10
2.3 Programmingcombodevices 10
2.4 Copy Volume/Mute buttons from
anotherdevice 10-11
Buttonfunctions 12-15
3.1 Generalfunctions 12-15
3.2 Dedicated DVD functions 15
3.3 Dedicated Cable/SAT functions 15
Using the remote control 15-17
4.1 Controlling devices requiring
separate Power On/Off buttons 15-16
4.2 Controllingcombodevices 16-17
5 Troubleshooting
FCC Compliancy
EN
17-19
19
P1003WM_17__Manual_80_210.indd 2 25-11-09 13:1
Page 3

Notes
When replacing the batteries, all user
settings will be retained in the remote
control memory for 5 minutes.
The remote control automatically turns
off if buttons are pressed for more than
30 seconds.
This will save your batteries in case the
remote control gets stuck in a place
where the buttons remain pressed (e.g.,
between the sofa cushions).
Some buttons on the remote control
might have functions that are referred to
by different names on the device you are
controlling.
E.g., GD may be called Recall, Back,
Previous Program, Previous Channel,
Jump or Repeat.
These differences depend on the brand
and model ofyour device.
Also, this remote control can only
operate features that exist on your
device.
E.g., your device must have Previous
Channel ability for the^) button to
operate this feature.
The Record (0) button must be pressed
twice to record. For some brands of DVR,
you might need to press the Record (0)
button once, then press it again for three
seconds.
EN
P1003WM_17__Manual_80_210.indd 3 25-11-09 13:1
Page 4
rr
1
2
3
5
fINPUT) (SETUP
SAT
-{tv^ (cbl) [dvd]
4
vzy
6
® ®
® GD
*?) (5^
(D(D(D
(DCDd)
(DCDd)
©® ©
PHILIPS
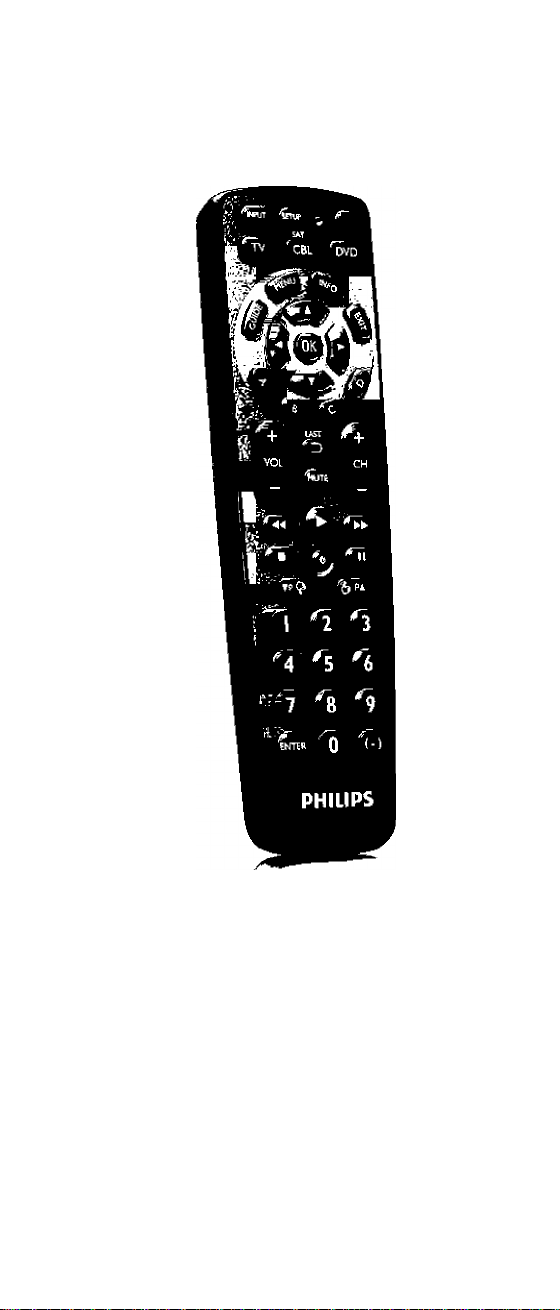
For an overview of the buttons and their
functions refer to chapter 3.
7
4 EN
P1003WM_17__Manual_80_210.indd 4 25-11-09 13:1
Page 5

Your Philips remote control
Congratulations on your purchase ofthis
Philips universal remote control.
Philips universal remote controls enable you
to combine more than one remote control
into one or replace a broken or lost remote
control.
The remote control is equipped with the most
common functions for operating your devices.
After setting up the remote control you can
operate up to 3 different devices with it:
TV, DVD player/recorder (including Blu-ray
player) and all common Cable, Satellite, DTV
and other set top boxes, such as DirecTV,
Comcast, AT&T,Verizon,Time Warner, Scientific
Atlanta,Tivo and many more.
You can also operate other devices with the
remote control by programming the device
code under one ofthe device mode buttons
(except53).
For example: you can program the code for
your DVR under the^t) or^o) button.
For this refer to chapter 2.2.2.
Please carefully read this user manual to
become familiar with your Philips universal
remote control.
To fully benefit from the support that Philips
offers, register your product at:
www.philips.com/welcome
EN
P1003WM_17__Manual_80_210.indd 5 25-11-09 13:1
Page 6
2 Getting started
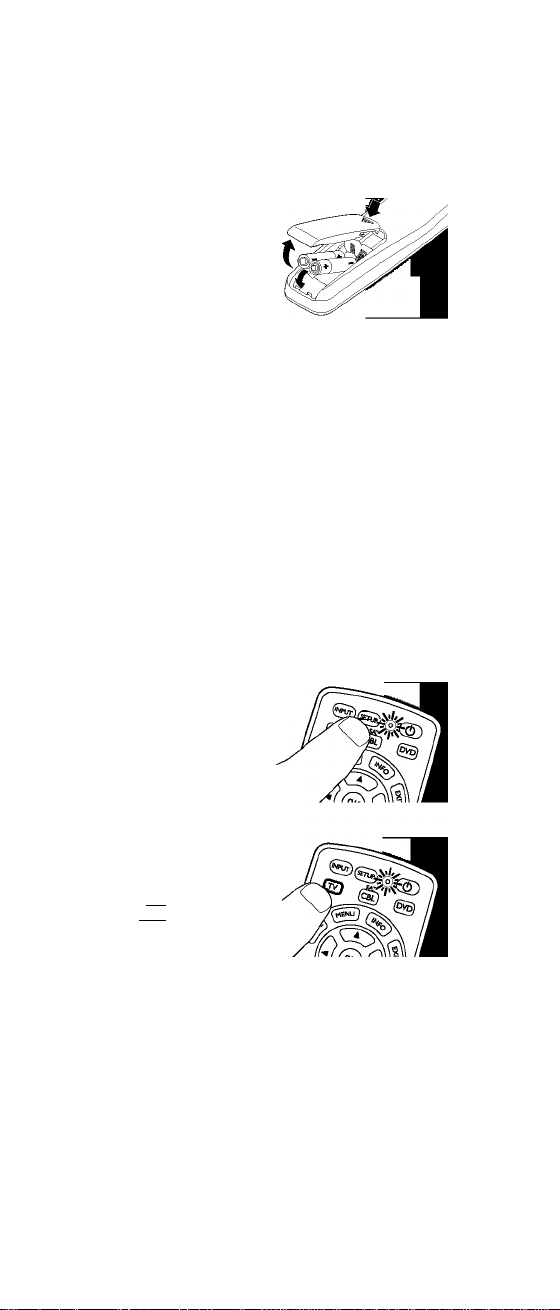
2.1 Battery installation
Insert 2 AAA type
Alkaline batteries,
noting the + and configuration in the
battery
compartment.
2.2 Code setup
The^^ button is used to setup the remote
control.
2.2.1 Code search by brand
Lets you search for a code for a specific
brand within the code library for a particular
manufacturer.
1 Refer to ‘Code Tables’ (at the end of this
chapter) to find the code(s) for your
device(s).
2 Turn on the device (TV, Cable box, Satellite
box, etc.) you wish to operate.
3 Press and hold the
(55) button until
the red light
indicator®
remains lit, then
release the^5)
button.
Press and quickly
release the desired
mode button ^V),
SAT ^^
(cbl) or^/p)).
• The red light
indicator®
flashes off once.
Press and release the digit button (0-9)
corresponding to the desired brand (refer
to ‘Code Tables’ at the end ofthis chapter).
• The red light indicator® flashes off
------
'
EN
P1003WM_17__Manual_80_210.indd 6 25-11-09 13:1
Page 7
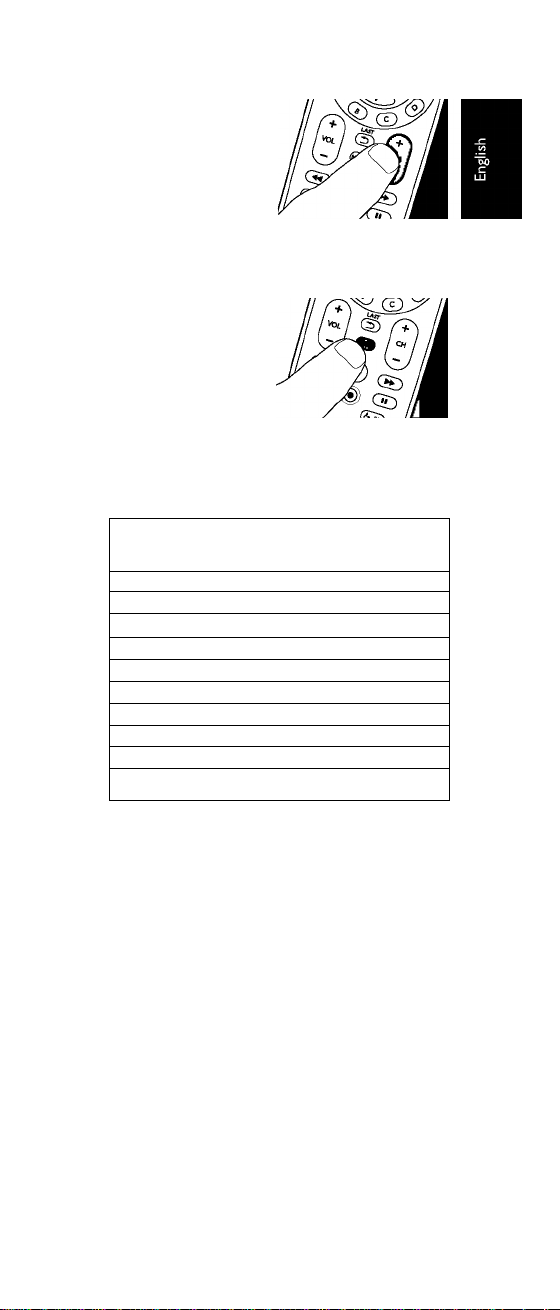
Press the CH +
button (or
Power, or
PLAY,2)
repeatedly until
the device changes ‘
channel.
• The red light indicator® flashes off
with each button press.
Press and release
the^|(^ button to
install (store) the
code.
• Code search
by brand is
now complete.
Code tables
TV
Curtis-Mathes....
Daewoo..............
Emerson
Fisher
.................
GE
......................
Hitachi
................
JVC.....................
LG
......................
Magnavox
Mitsubishi
Panasonic
............
..........
...........
..........
...
6 Philips
...
4 Proscan
...
6 RCA
...
6 Samsung
...
1 Sanyo
...
5 Sharp
...
5 Sony
...
5 Sylvania
...
3 Toshiba
...
5 Zenith
...
4
............
.........
...............
.......
............
.............
..............
.........
..........
.............
........
........
........
........
........
........
........
........
........
........
3
1
1
5
5
4
4
6
4
2
DVD / DVD recorder / Blu-ray / DVR
Apex
......................
Curtis-Mathes
Daewoo
.................
Denon....................4
Emerson................6
Fisher
....................
GE
........................
Hitachi
...................
JVC........................5
LG
.........................
Magnavox
Marantz
.................
Mitsubishi
P1003WM_17__Manual_80_210.indd 7 25-11-09 13:1
.........
.............
..............
2
Panasonic
6
Philips
4
Proscan
RCA......................1
Samsung
6
Sanyo
1
Sharp.....................4
5
Sony
......................
Sylvania
5
Toshiba
3
Yamaha
3
Zenith
5
.............
...................
................
...............
....................
................
.................
.................
....................
EN
4
3
1
5
5
4
6
4
4
2
Page 8

CABLE
GE
...................
Gemini
.............
General RCA
Instrument
Jerrold
..............
Magnavox
Philips..............
.......
.......
.....
4 Pioneer
.....
5 Proscan
......................
Scientific Atlanta. .1
.....
3
.....
2 Tocom................... .3
.....
6 Zenith
.....
6
....................
SAT / DTV / DTV-ATSC / WebTV /
HDTV Set Top Box
Dish
........................
Echostar
..........
......
GE....................
Gemini
.............
General RCA
Instrument........
Hitachi..............
Hughes
............
......
JVC
..................
Magnavox
Panasonic
........
........
......
......
Philips
6
6 Pioneer
.....
1 Primestar
.....
2 Proscan...................1
.....................
.....
6 Samsung
Sharp
.....
5
6 Sony
...................
.....................
5 Toshiba
3 Zenith
.....
4
...................
Notes
.................
................
..................
................
.............
..............
................
.4
.4
.4
.5
...3
...1
...6
...1
...5
...4
...4
...4
...2
If you don’t find the brand for your
device in the table, please use the digit ‘O’.
Pressing ‘O’ performs a full library search.
When all codes under a brand have been
searched for, the red light indicator®
flashes rapidly for 3 seconds.
Ifyou accidentally overshoot the
required code in step 6, press the CH button to backtrack through the library
until the device changes channel.
Pressing the CH + button changes the
search direction to forward again.
EN
P1003WM_17__Manual_80_210.indd 8 25-11-09 13:1
Page 9
2.2.2 Direct code entry 1 Turn on the device (TV, Cable box, Satellite
box, etc.) you wish to operate.
2 Press and hold the
(S™;) button until
the red light
indicator®
remains lit, then
release the55)
button.
Press and release
the desired mode
button ^v~), [cbl)
or^D)).
• The red light
indicator®
flashes, then remains lit.
Enter the 4 digit code from the code tables
(on separate sheet).
With the device turned on, press several
buttons to test if the device responds.
• Ifthe device responds properly, you
have successfully found a valid code for
your device.
Repeat steps 1 to 4 for other devices you
wish to set up the remote control for.
Write your codes down here for easy
reference later.
Device Code
TV
CBL/SAT
DVD/DVR
Notes
After a valid code entry, the red light
indicator® turns off.
For an invalid code, the red light
indicator® flashes first, then turns off.
In this case you have to enter Setup
mode again and enter a new code.
Ifsome buttons do not operate your
equipment, try one ofthe other codes
for your brand.
EN
P1003WM_17__Manual_80_210.indd 9 25-11-09 13:1
Page 10

Note
You can store any kind of code under any
mode (exceptQ^). For example:
you can store a DVR code under the^lD
button, or a CBL code under the^§)
button, etc. However, you can only store TV
codes under the^vl button.
Ifyou^Wish to store a DVR code under e.g.
the^5 button:
• Follow the procedure for‘Direct code
entry’ (chapter 2.2.2) and press^jt) in
step 3.
• Enter any DVR code in step 4.
• Then follow steps S and 6.
2.3 Programming combo devices
For combo devices, in many cases a single code
operates both parts ofthe device (e.g.TV and
DVD). In other cases you need to set up two
codes. For example, ifyou have aTV/DVD combo,
you need to set up one code under the^v~)
button to control the TV part and a separate
code (underthe^it] or^S) button) to
control the DVD part.
2.4 Copy Volume/Mute buttons
from another device
When setting the remote control up for your
devices, the remote control copies the
Volume/Mute settings as follows:
• Ifadevicehasitsown Volume/Mute
buttons in the remote control database,
then these buttons will be used.
• Ifa device has no Volume/Mute buttons in
the remote control database, the Volume/
Mute buttons (+VOL -^^) of the TV will
be used automatically.
You can change which Volume/Mute buttons
are used for a device.
10 EN
P1003WM_17__Manual_80_210.indd 10 25-11-09 13:1
Page 11
2.4.1 SettingVolume/Mute control
for all devices to any single
device
You can set all devices to use theVolume/Mute
buttons of a single device without needing to
change to that device mode.
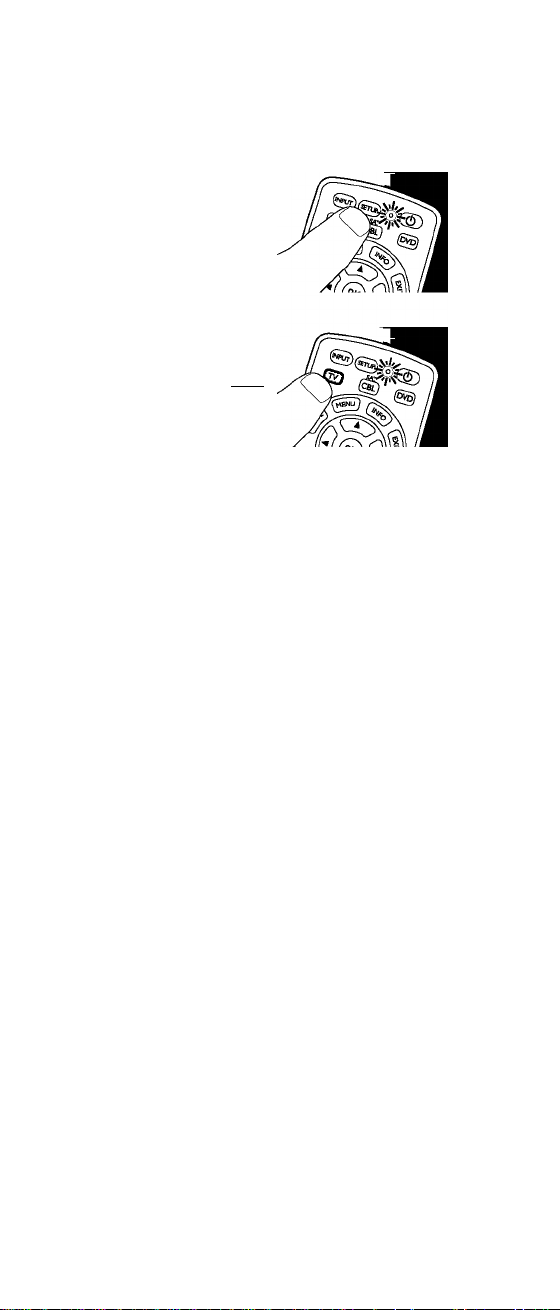
1 Press and hold the
(S™!) button until
the red light
indicator® turns
on, then release
the button.
Press and hold the
(S® button until
the red light
indicator® flashes,
off, then release
the button.
Press and release
the desired device
mode button
SAT
[cbl] or
(^) forVolume/
Mute control, the
red light indicator® flashes then remains
lit.
Press and release the^!$ button.
• The red light indicator® turns off.
• The red light indicator® will blink
rapidly for three seconds if the device
you have selected has no Volume/Mute
control.
• All other devices will now use the
Volume/Mute buttons ofthe selected
device.
Press and release the^^S) button.
• The red light indicator® turns off.
• The selected device will now use its
own Volume/Mute control.
EN 11
P1003WM_17__Manual_80_210.indd 11 25-11-09 13:1
Page 12

Button functions
The illustration on page 4 gives an overview of
all buttons on the remote control.
Try out the buttons you need for operating
your devices.
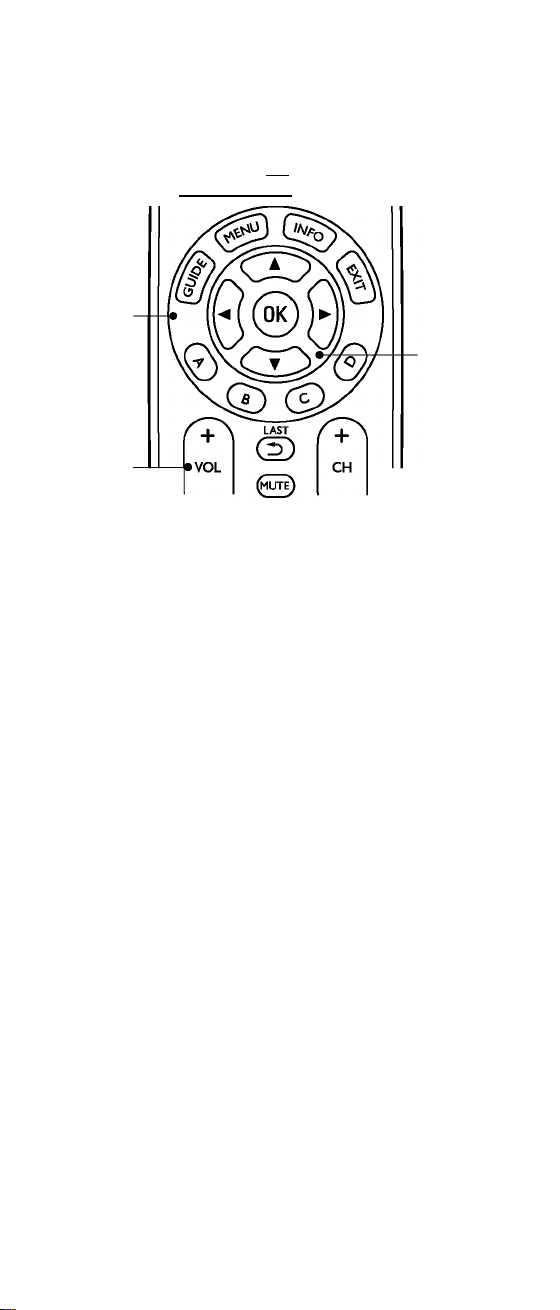
3.1 General functions
Zone 1
(INPUT) (SETUP]
INPUT
SETUP..
Red light
Indicator ^)
Power ^^^).........................Turns devices
For some devices of certain brands, the
Power ^!)~)) buttononlyturnsthedevice
OFF.
In order to turn the device ON, press any
ofthe digit buttons or follow the procedure
described in chapter 4.1.
Zone 2
(Tv~) (Sl) (wd)
Device Mode......................Select device to be
Zone 3 (Outer ring)
........................
Note
..Selects available
source inputs
(Antenna, Cable, etc.)
..Used for setting up
the remote control.
Lights up when any
button is pressed.
On/Off.
operated.buttons
GUIDE. ..Displays on-screen
program or channel
guides.
12 EN
P1003WM_17__Manual_80_210.indd 12 25-11-09 13:1
Page 13

MENU................................Brings up the menu
screen.
Use with the A, 4
1 and ► navigation
buttons.
INFO..................................Displays/selects
on-screen channel
information.
EXIT
..................................
Exits menu functions.
A, B, C, D...........................Context sensitive
buttons for cable and
satellite boxes.
A -Yellow, B - Blue,
C - Red, D - Green.
Zone 4 (Inner ring)
OK.
..........................
A (Up), 4 (Down),
1 (Left), ► (Right)
Zone 5
LAST
(2)
VOL
lev
VOL + / VOL -
LAST
GD
.....................................
MUTE
CH + / CH -
CH
(mote)
u
....................
................................
..................
Confirms your
selection.
..............
Navigation buttons.
Increases/decreases
the volume level of
the device, normally
TV.
Selects previous
channel/goes back in
the menu.
Tu rns the TV sound
Off/On while the
picture remains.
Selects next/previous
channel.
EN 13
P1003WM_17__Manual_80_210.indd 13 25-11-09 13:1
Page 14

Zone 6
• (Record), ► (Play),
■ (Stop), 5 (Rewind),
6 (Fast Forward),
; (Pause).............................Control buttons.
Operate DVR,
VCR, DVD,Aux, etc.
Note
The Record (•) button must be pressed
twice to record. For some brands of DVR,
you might need to press the Record (•)
button once, then press it again for three
seconds.
TP and PA.. ..Select next (A)/
previous (T) page in
various modes
(e.g. ReplayTV
guides and menus
or on-screen guide
menus used by some
Satellite systems).
..Thumbs Up/Down.
Set your Thumbs
ratings.
ZoneCD7
CD CD
CD CD CD
CD CD CD
(ewte^
Digit buttons... ..Direct channel
14 EN
P1003WM_17__Manual_80_210.indd 14 25-11-09 13:1
(D
selection.
Some devices
require ENTER to be
pressed after channel
selection.
Page 15

ENTER.. ..Used after direct
channel number
selection to
immediately change
to the selected
channel.
■■Selects between
one and two-figure
channel numbers.
3.2 Dedicated DVD functions
• INPUT ..Activates the DVD player’s
Setup menu.
• CH + / -
................
Selects next/previous
chapter or track on a disc.
3.3 Dedicated Cable/SAT functions
' INPUT ^ut)) ..SelectsTV or SAT input.
' 4P and P3
'
............
....................
Select previous/next on
screen guide menu.
Thumbs Up/Down. Setyour
Thumbs ratings.
Using the remote
control
4.1 Controlling devices requiring
separate Power On/Off
buttons
Some devices (e.g. certain RCA TVs) require
separate Power On and Power Off buttons to
turn the device ON and OFF.
The equivalent button functions can be found
on your Philips remote control.
1 Turn ON the
device by pressing
the corresponding
Mode button
(cbl) or^D))
for more than
1 second.
EN 15
P1003WM_17__Manual_80_210.indd 15 25-11-09 13:1
Page 16

Press and release
the Power ^D)
button to turn OFF
the device.
Example
After setting up the remote control to
operateyour RCATV,theTV does notturn
ON when you press the Power
№!D) button. In this case the Power ^D)
button only turns OFF the TV.
• To turn ON the TV: press the^^
button for more than 1 second.
• To turn OFF the TV: press the Power
^D) button.
Notes
This method can be applied similarly to
any device and is available for all device
modes.
Note that this feature is not supported
by all codes.
4.2 Controlling combo devices
Some combo devices (e.g.TV/DVR,TV/DVD,
DVD/DVR, etc.) have separate buttons on the
original remote control to select the part of
the combo device to be controlled.
For example, if your combo device is aTV/DVD
then its original remote control might have
separate TV and DVD buttons for selection
ofthe combo part you wish to operate.The
equivalent button functions can be found on
your Philips remote control by using the device
mode (cbl| or^^) and^^ buttons.
Example forTVIDVD combo, programmed under
DVD mode.
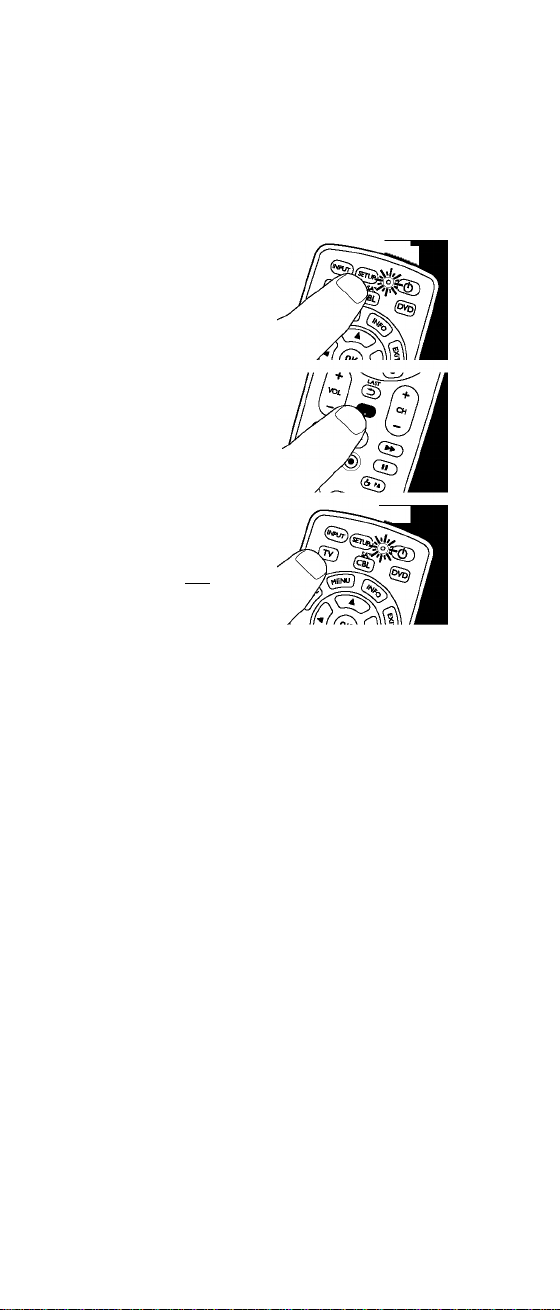
1 Set up the remote control for a device (in
this example TV) as described in chapter
2.2.1 ‘Code search by brand’.
16 EN
P1003WM_17__Manual_80_210.indd 16 25-11-09 13:1
Page 17

Select TV by
pressing the^y~)
mode button for ,
more than 1 second.
• The remote
control sends
out the ‘Select TV’ command.
Press and
immediately release
the^") button.
Then press and
immediately release
the^5 mode
button to select DVD.
• The remote control sends out the
‘Select DVD’ command.
Notes
This method can be applied similarly to
all combo devices (TV/DVR,TV/DVD,
etc.) and is available for all device modes.
Note that this feature is not supported
by all codes.
II
5 Troubleshooting
Note
This remote control operates the common
features of most but not all models and
brands of IR (Infrared) controlled Audio/
Video equipment.This remote control may
provide functions that are not available on
your equipment.
Setup
I cannot enter Setup mode.
Battery level too low or battery lifetime came to
an end.
• Replace the batteries. For this refer to
chapter 2.1.
After replacing the batteries, test ifthe
remote control still operates your devices.
If it does not, you have to set up the
remote control again. For this refer to
chapter 2.
EN 17
P1003WM_17__Manual_80_210.indd 17 25-11-09 13:1
Page 18

Operation
The remote control does not wake up anymore.
Battery level too low or battery lifetime came to
an end.
• Replace the batteries. For this refer to
chapter 2.1.
After replacing the batteries, test ifthe
remote control still operates your devices.
If it does not, you have to set up the
remote control again. For this refer to
chapter 2.
The device I want to operate does not
respond at all/does not respond to all of
the button commands.
• Check ifthe buttons you press are available
on the original remote control ofthe
device.
Wrong code selected during setup.
• Set up the remote control again for the
device.
Ifsome buttons do not operate your
equipment, try one ofthe other codes for
your brand. For this refer to chapter 2.2.2.
It may be that the buttons that you are trying to
use have a different naming on the original remote
control.
• Try out all buttons to find the one(s) you
need.
Batteries
Will my settings be deleted when I replace the batteries?
No. All user settings will be retained in the
remote control memory for 5 minutes.
Warning
(Installed) batteries shall not be exposed to
excessive heat such as sunshine, fire or the
like.
18 EN
P1003WM_17__Manual_80_210.indd 18 25-11-09 13:1
Page 19

Register your product and get support at:
www.philips.com/welcome
Made in China. Manufactured on behalfof
Philips Consumer Lifestyle, 1600 Summer
Street, Stamford CT 06912, USA.
FCC Compliancy
This equipment has been tested and found
to comply with the limits for a Class B digital
device, pursuant to part 15 ofthe FCC Rules.
These limits are designed to provide reasonable
protection against harmful interference in a
residential installation.
This equipment generates, uses and can radiate
radio frequency energy and, if not installed
and used in accordance with the instructions,
may cause harmful interference to radio
communications.
However, there is no guarantee that
interference will not occur in a particular
installation.
Ifthis equipment does cause harmful
interference to radio or television reception,
which can be determined by turning the
equipment offand on, the user is encouraged
to try to correct the interference by one or
more ofthe following measures:
• Reorient or relocate the receiving antenna.
• Increase the separation between the
equipment and receiver.
• Connect the equipment into an outlet on
a circuit different from that to which the
receiver is connected.
• Consult the dealer or an experienced
radio/TV technician for help.
EN 19
P1003WM_17__Manual_80_210.indd 19 25-11-09 13:1
Page 20

Contenido
1 Su mando a distancia de Philips 23
2 Introducción
2.1 Cómo colocar las pilas
2.2 Configuración de códigos
2.3 Programación de dispositivos
combinados
2.4 Copia de los botones de volumen/
silencio de otro dispositivo 29-30
3 Funciones de los botones 30-34
3.1 Funciones generales 30-34
3.2 Funciones específicas de DVD 34
3.3 Funciones específicas de Cable/SAT 34
4 Uso del mando a distancia 35-37
4.1 Control de dispositivos que requieren
botones independientes de encendido/
apagado 35-36
4.2 Control de dispositivos
combinados 36-37
5 Solución de problemas
Compatibilidad con la FCC
24-30
24-28
37-39
24
29
39
20 ES
P1003WM_17__Manual_80_210.indd 20 25-11-09 13:1
Page 21

Notas
Al cambiar las pilas, todos los ajustes de
usuario se guardarán en la memoria del
mando a distancia durante 5 minutos.
El mando a distancia se apaga
automáticamente si se pulsan los
botones durante más de 30 segundos.
Esto preserva la duración de las pilas si
el mando a distancia queda atrapado en
un lugar en el cual los botones queden
pulsados (por ejemplo, entre los cojines
del sofá).
Algunos botones del mando podrían
tener funciones que se denominen de
manera diferente en el dispositivo que
vaya a controlar.
Por ejemplo, GD podría denominarse
Recall, Back, Previous Program, Previous
Channel, Jump o Repeat.
Estas diferencias dependerán de la marca
y del modelo del dispositivo. Además,
este mando a distancia sólo puede
utilizar funciones que existan en el
dispositivo.
Por ejemplo, el dispositivo debe contar
con la función Previous Channel para
que el botón®) pueda utilizar esta
función.
El botón Record (0) debe pulsarse dos
veces para grabar. Para algunas marcas de
DVR, puede que necesite pulsar
Record (0) una vez y, a continuación,
pulsarlo de nuevo durante tres segundos.
ES 21
P1003WM_17__Manual_80_210.indd 21 25-11-09 13:1
Page 22

1
2
3
5
♦input )(SET^
SAT
-^Tv ] [cbl] [dvd]
4
vzy
6
GD © ®
"gD GD
'?) (6 pO
(D®(D
® ®®
©® ®
PHILIPS
J
Para ver una descripción generai de los
botones y de sus funciones, consulte el
capítulo 3.
7
22 ES
P1003WM_17__Manual_80_210.indd 22 25-11-09 13:1
Page 23

Su mando a distancia de Philips
Enhorabuena por la adquisición de este mando
a distancia universal de Philips. Los mandos
a distancia universales de Philips le permiten
combinar varios mandos a distancia en uno
solo, o bien sustituir cualquier mando averiado
o que haya perdido.
El mando a distancia está equipado con las
funciones más utilizadas para el funcionamiento
de los dispositivos.
Una vez configurado el mando a distancia,
podrá controlar hasta 3 dispositivos distintos
con él: el televisor, el reproductor/grabador
de DVD (o un reproductor de Blu-ray Disc) y
cualquier receptor normal por cable, satélite,
TDT, etc. Por ejemplo, DirecTV, Comcast,
AT&T,Verizon,Time Warner, Scientific Atlanta,
Tivo y muchos más.
También puede controlar otros dispositivos
con el mando a distancia programando el
código del dispositivo en uno de los botones
de modo de dispositivo (excepto^^).
Por ejemplo, puede programar el código para el
grabador de vídeo digital en los botones^st) o
(5^. Para ello, consulte el capítulo 2.2.2.
Lea detenidamente este manual de usuario
para familiarizarse con su mando a distancia
universal de Philips.
Para sacar el mayor partido a la asistencia que
proporciona Philips, registre su producto en:
www.philips.com/welcome
ES 23
P1003WM_17__Manual_80_210.indd 23 25-11-09 13:1
Page 24

Introducción
2.1 Cómo colocar las pilas
Inserte 2 pilas
alcalinas del tipo
AAA, teniendo en
cuenta la
configuración de
los polos + y-del
compartimento de las pilas.
2.2 Confíguración de códigos
El botón^^ se usa para configurar el mando
a distancia.
2.2.1 Búsqueda de códigos por marca
Podrá buscar un código correspondiente a una
marca específica en la biblioteca de códigos de
un fabricante concreto.
1 Consulte las tablas de códigos (al final de
este capítulo) para encontrar los códigos
correspondientes a su dispositivo.
2 Encienda el dispositivo (televisor, receptor
por cable, receptor por satélite, etc.) que
desee controlar.
3 Mantenga pulsado
el botón^j^ hasta
que el indicador de
luz roja®
permanezca
encendido y, a
continuación, suelte el botón^y?).
4 Pulse y suelte
rápidamente el
botón de modo
deseado ^®), (cbl) '
o^p)).
• El indicador de
luz roja® parpadea una vez.
5 Pulse y suelte el botón numérico
(0-9) correspondiente a la marca deseada
(consulte las tablas de códigos al final de
este capítulo).
• El indicador de luz roja ® parpadea
24 ES
P1003WM_17__Manual_80_210.indd 24 25-11-09 13:1
Page 25

Pulse el botón
CH + (o Encendido/
Apagado, ('Q') o
PLAY, ►) varias
veces hasta que el
dispositivo cambie
de canal.
• El indicador de luz roja® parpadea
cada vez que pulsa un botón.
Pulse y suelte el
botón^B) para
instalar (guardar) el
código.
• Se habrá
completado la
búsqueda de código por marca.
Tablas de códigos
TV
...
...
....1
....5
...
....3
...
...
6
6
5
5
4
Philips
Proscan
RCA
Samsung
Sanyo
Sharp
Sony
Sylvania
Toshiba
Zenith
Curtis-Mathes.... ....6
Daewoo.............. ....4
Emerson
Fisher
GE
Hitachi
............
.................
......................
................
JVC..................... ....5
LG
......................
Magnavox
Mitsubishi
Panasonic
..........
...........
..........
............
.........
...............
.......
............
.............
..............
.........
..........
.............
........
........
........
........
........
........
........
........
........
.......
3
1
1
5
5
4
4
6
4
2
DVD / grabador de DVD /Blu-ray /
grabador de vídeo digital
Apex
....................
Curtis-Mathes...
Daewoo
.............
Denon
.................
Emerson
.............
Fisher..................
GE......................
Hitachi
................
JVC.....................
LG
.......................
Magnavox
Marantz
...........
..............
Mitsubishi............
P1003WM_17__Manual_80_210.indd 25 25-11-09 13:1
Panasonic
...
2
Philips
...
6
Proscan
...
4
...
4 RCA
...
6 Samsung............. ...5
Sanyo
...
6
Sharp
...
1
Sony........................4
...
5
Sylvania
...
5
...
5 Toshiba
Yamaha............... ...4
...
3
Zenith
...
3
...
5
............
..................
...............
....................
..................
..................
..............
...............
..................
...4
...3
...1
...1
...5
...4
...6
...4
...2
ES 25
Page 26

CABLE
GE
...................
Gemini
.............
General RCA
Instrument
Jerrold
..............
Magnavox
Philips..............
.......
.......
.....
4 Pioneer
.....
5 Prosean
Seientifie Atlanta. .1
.....
3
.....
2 Toeom
.....
6 Zenith
.....
6
.................
................
......................
..................
....................
SAT /TDT /TDT-ATSC /TV web /
sintonizador HDTV
Philips
Dish
........................
EchoStar
..........
GE....................
Gemini
.............
6
.....
6 Pioneer............... ....1
.....
1 Primestar............
.....
2 ProScan
................
.............
General RCA......................1
Instrument........
Hitachi..............
Hughes
JVC
..................
Magnavox
Panasonic
............
........
........
.....
6 Samsung
.....
5 Sharp
.....
6 Sony
.....
5 Toshiba
.....
3 Zenith
.....
4
............
....................4
...................
..............
.................
Notas
....3
...
...
...
...
...
...
.4
.4
.4
.3
.5
6
1
5
4
4
2
Si no encuentra la manca de su dispositivo
en la tabla, por favor utilice el dígito ‘0’.
Presionando ‘0’ se realizará una búsqueda
en todo el listado.
Una vez que se hayan buscado todos los
códigos de una marca, el indicador de luz
roja© parpadeará rápidamente durante
3 segundos.
Si pasa accidentalmente el código
requerido en el paso 6, pulse el botón
CH - para retroceder en la biblioteca
hasta que el dispositivo cambie de canal.
Al pulsar el botón CH +, la dirección
de la búsqueda cambia de nuevo hacia
adelante.
26 ES
P1003WM_17__Manual_80_210.indd 26 25-11-09 13:1
Page 27

2.2.2 Introducción directa de
códigos
1
Encienda el dispositivo (televisor, receptor
por cable, receptor por satélite, etc.) que
desee controlar.
Mantenga pulsado
el botón^^ hasta
que el indicador de
luz roja ®
permanezca
encendido y, a
continuación, suelte el botón^^.
Pulse y suelte el
botón de modo
deseado (cbl)
o^D)).
• El indicador de
luz roja @
parpadea y después permanece
encendido.
Introduzca el código de 4 dígitos de
las tablas de códigos (en una hoja
independiente).
Con el dispositivo encendido, pulse varios
botones para probar si el dispositivo
responde.
• Si el dispositivo responde
adecuadamente, habrá encontrado un
código válido para el mismo.
Repita los pasos del 1 al 4 para configurar
el mando a distancia para otros
dispositivos.
Anote los códigos aquí para una sencilla
referencia posterior.
Dispositivo Código
TV
CBL/SAT
DVD/DVR
ES 27
P1003WM_17__Manual_80_210.indd 27 25-11-09 13:1
Page 28

Notas
Cada vez que se introduce un código
válido, el indicador de luz roja® se
apaga. Si el código no es válido, el
indicador de luz roja ® parpadea
primero y después de apaga. En este
caso, deberá acceder de nuevo al modo
de configuración e introducir un código
nuevo.
Si algunos botones no controlan el
equipo, pruebe uno de los otros códigos
para su marca.
Nota
Puede guardar cualquier tipo de código en
cualquier modo (salvo en el modo de TV). Por
ejemplo, puede.,guardar un código de DVR
en el botón^Jt) o un código de CBL en el
botón^^,etc. No obstante, sólo podrá
guardar códigos del televisor en el botón
O.
Si desea guardar un^^código de DVR en, por
ejemplo, el botón^t):
• Siga el procedimiento para la
‘Introducción directa de códigos’
(capítulo 2.2.2) y pulse el botón^ÍL) en
O SAT
el paso 3.
• Introduzca cualquier código de DVR en el
paso 4.
• A continuación, siga los pasos S y 6.
28 ES
P1003WM_17__Manual_80_210.indd 28 25-11-09 13:1
Page 29

2.3 Programación de dispositivos
combinados
En dispositivos combinados, en muchos casos
un único código controla ambas partes del
dispositivo (por ejemplo,TV y DVD).
En otros casos es necesario que configure
dos códigos. Por ejemplo, si tiene un TV/DVD
combinado, debe configurar un código en el
botón^v~) para controlar la parte del televisor
y otro código (en los botones (oíl) q^d)) para
controlar la parte del DVD.
2.4 Copia de los botones de
volumen/silencio de otro
dispositivo
Al configurar el mando a distancia para sus
dispositivos, éste copia la configuración de
volumen y silencio de la siguiente manera:
• Si un dispositivo tiene sus propios botones
de volumen y silencio en la base de datos
del mando a distancia, se utilizarán estos
botones.
• Si el dispositivo no cuenta con botones
de volumen y silencio en la base de
datos del mando a distancia, se utilizarán
automáticamente los botones de volumen y
silencio (+VOL -/ ^
Puede cambiar los botones de volumen y
silencio que se utilizan para un dispositivo.
3)) del televisor.
2.4.1 Confíguración del control de
volumen/silencio de todos
los dispositivos en un único
dispositivo
Puede configurar todos los dispositivos para
que utilicen los botones de volumen y silencio
de un único dispositivo sin necesidad de
cambiar a ese modo de dispositivo.
1 Mantenga pulsado
el botón^yp)
hasta que el
indicador de luz
roja® se encienda
y, a continuación,
suelte el botón.
ES 29
P1003WM_17__Manual_80_210.indd 29 25-11-09 13:1
Page 30

Mantenga pulsado
el botónos) hasta
que el indicador de
luz roja ®
parpadee y, a
continuación,
suelte el botón.
Pulse y suelte el
botón de modo de
dispositivo deseado,
(ctl) o^d))
para el control del
volumen/silencio;
el indicador de luz roja® parpadea y
después permanece encendido.
Pulse y suelte el botónS).
• El indicador de luz roja® se apaga.
• El indicador de luz roja® parpadeará
rápidamente durante tres segundos si
el dispositivo que ha seleccionado no
dispone de control de volumen/silencio.
• El resto de dispositivos utilizarán ahora
los botones de volumen y silencio del
dispositivo seleccionado.
Pulse y suelte el botón^S).
• El indicador de luz roja® se apaga.
• El dispositivo seleccionado utilizará
ahora su propio control de volumen/
silencio.
Funciones de los
botones
La ilustración que se muestra en la página 22
le proporciona una visión general de todos los
botones del mando a distancia.
Pruebe los botones necesarios para controlar
los dispositivos.
3.1 Funciones generales
Zona 1
(INPUT) (SETUP
1
®(Ü)
INPUT.. ..Selecciona las fuentes
de entrada disponibles
(antena, cable, etc.).
30 ES
P1003WM_17__Manual_80_210.indd 30 25-11-09 13:1
Page 31

SETUP
..................
Se utiliza para
configurar el mando a
distancia.
Indicador de luz
roja
....................................
Se enciende cuando
se pulsa cualquier
botón.
Encendido/Apagado....Enciende o apaga los
^^7)) dispositivos.
Nota
Para algunos dispositivos de ciertas marcas,
el botón Encendido/Apagado ^^^) sólo
apaga el dispositivo.
Para encender el dispositivo, pulse cualquier
botón numérico o siga el procedimiento que
se describe en el capítulo 4.1.
Zona 2
frvi [cbl) [5vd)
Botones de modo de dispositivo
Selecciona el dispositivo que se va a controlar.
Zona 3 (anillo exterior)
GUIDE..
..Muestra las guías de
canales o el programa
en pantalla.
MENU..
.. Hace aparecer la
pantalla del menú.
Utilícelo con
los botones de
navegación A, 4 1 y
2.
INFO.
..Muestra o selecciona
la información de los
canales en pantalla.
EXIT..
..Sale de las funciones
del menú.
ES 31
P1003WM_17__Manual_80_210.indd 31 25-11-09 13:1
Page 32

Botones de
A, B,C,D
..........
Zona 4 (anillo interior)
OK
.................................
3 (Arriba), 4 (Abajo),
1 (Izquierda),
► (Derecha)
.................
Zona 5
LAST
VOL CH
..Botones de contexto
para receptores por
cable o por satélite.
A - Amarillo, B - Azul,
C - Rojo, D - Verde.
..Confirma la selección.
. Eîotones de navegación.
VOL + /VOL -
....................
Aumenta o disminuye
el nivel de volumen
del dispositivo,
normalmente el
LAgT
televisor.
GD.....................................Selecciona el canal
anterior o vuelve
atrás en el menú.
MUTE
................................
Activa o desactiva el
sonido del televisor
mientras continúan
las imágenes.
CH +/CH -
.........................
Selecciona el canal
siguiente o anterior.
32 ES
P1003WM_17__Manual_80_210.indd 32 25-11-09 13:1
Page 33

Zona 6
• (Grabar), ► (Reproducir),
■ (Detener), 5 (Rebobinar),
6 (Avance rápido),
; (Pausa)
............................
Nota
El botón Record (#) debe pulsarse dos veces
para grabar. Para algunas marcas de DVR,
puede que necesite pulsar Record (0) una
vez y, a continuación, pulsarlo de nuevo
durante tres segundos.
Botones de control.
Controlan el DVR,
VCR, DVD,Aux, etc.
4P yAP.
W6.
Zona 7
..Permite seleccionar la
página siguiente (A) o
anterior (4) en varios
modos (por ejemplo,
las guías y menús de
ReplayTV o los menús
de la guía en pantalla
utilizados por algunos
sistemas por satélite).
..Pulgar hacia arriba/
abajo. Permite ajustar
las calificaciones
sobre gustos.
CD ® ®
® ® ®
® ® ®
® ® ®
Botones numéricos Selección directa de
canales. En algunos
dispositivos es
necesario pulsar
ENTER una vez que
se ha seleccionado el
canal.
ES 33
P1003WM_17__Manual_80_210.indd 33 25-11-09 13:1
Page 34

ENTER..
(-)■
..Se utiliza una vez que
se ha seleccionado
el número de canal
directo para cambiar
inmediatamente al
canal seleccionado.
.Selecciona entre
números de canales
de una o dos cifras.
3.2 Funciones específicas de DVD
• INPUT ^üf))...Activa el menú de
configuración del
reproductor de DVD.
CH +/-
..................
Selecciona el capítulo o la
pista siguiente o anterior de
un disco.
3.3 Funciones específicas de
Cable/SAT
INPUT ^ür))....Selecciona la entrada de TV
oSAT.
P 4 y P 3
...............
.....................
Permite seleccionar el
menú de la guía en pantalla
anterior o siguiente.
Pulgar hacia arriba/
abajo. Permite ajustar las
calificaciones sobre gustos.
34 ES
P1003WM_17__Manual_80_210.indd 34 25-11-09 13:1
Page 35

Uso del mando a
distancia
4.1 Control de dispositivos
que requieren botones
independientes de encendido/
apagado
Algunos dispositivos (por ejemplo,
determinados televisores RCA) requieren
botones independientes de encendido
y apagado para encender o apagar el
dispositivo. Las funciones equivalentes del
botón pueden encontrarse en el mando a
distancia de Philips.
1 Encienda el
dispositivo
pulsando el botón
de modo
correspondiente
(cbl) q^d))
durante wás de un segundo.
Pulse y suelte el
botón Encendido/
Apagado ^!^)
para apagar
el dispositivo.
o
D
Ejemplo
Después de configurar el mando a distancia
para controlar el televisor RCA, el televisor
no se enciende al pulsar el botón
Encendido/Apagado ^D).
En este caso, el botón Encendido/Apagado
^D) sólo apaga el televisor.
• Para encender el televisor: pulse el
botón^^ durante más de 1 segundo.
• Para apagar el televisor: pulse el botón
Encendido/Apagado ^D).
ES 35
P1003WM_17__Manual_80_210.indd 35 25-11-09 13:1
Page 36

Notas
Este método puede aplicarse de forma
similar a cualquier dispositivo y está
disponible para todos los modos de
dispositivo.
Tenga en cuenta que no todos los
códigos admiten esta función.
4.2 Control de dispositivos
combinados
Algunos dispositivos combinados (por ejemplo,
un televisor con DVR, un televisor con DVD,
un DVD con DVR, etc.) tienen botones
independientes en el mando a distancia original
para seleccionar la parte del dispositivo
combinado que se va a controlar.
Por ejemplo, si su dispositivo combinado es un
un televisor con DVD, su mando a distancia
original puede tener botones de TV y de DVD
independientes para seleccionar la parte del
dispositivo combinado que desee controlar.
En el mando a distancia de Philips, las
funciones de los botones equivalentes pueden
encontrarse utilizando los botones de modo de
dispositivo ^v), (cbl) q^d)) y^y?).
^^ SAT ^^ ^^
Ejemplo de comblTV/DVD programado en el modo
de DVD.
1 Configure el mando a distancia para un
dispositivo (en este caso, un TV) tal como
se describe en el capítulo
2.2.1 ‘Búsqueda de códigos por marca’.
2 Seleccione TV pulsando el botón^]
durante más de un segundo.
• El mando a distancia envía el comando
‘Seleccionar TV’.
3 Pulse y suelte inmediatamente el botón
(5)5.A continuación, pulse y suelte
inmediatamente el botón de modo^v)
para seleccionar DVD.
• El mando a distancia envía el comando
‘Seleccionar DVD’.
36 ES
P1003WM_17__Manual_80_210.indd 36 25-11-09 13:1
Page 37

Notas
Este método puede aplicarse de forma
similar a cualquier dispositivo combinado
(televisor con DVR, televisor con DVD,
etc.) y está disponible para todos los
modos de dispositivo.
Tenga en cuenta que no todos los
códigos admiten esta función.
5 Solución de problemas
Nota
Este mando a distancia controla las funciones
habituales de la mayoría de los modelos
y marcas de dispositivos de audio y vídeo
controlados por infrarrojos (IR), aunque no
de todos. El mando a distancia puede ofrecer
funciones que no estén disponibles en su
equipo.
Confíguración
No puedo acceder al modo de
configuración.
El nivel de las pilas es demasiado bajo o se ha
agotado la vida útil de las pilas.
• Sustitúyalas. Para obtener más información,
consulte el capítulo 2.1.
Después de sustituir las pilas, compruebe
que el mando a distancia sigue controlando
sus dispositivos. En caso contrario, deberá
volver a configurar el mando a distancia.
Para ello, consulte el capítulo 2.
ES 37
P1003WM_17__Manual_80_210.indd 37 25-11-09 13:1
Page 38

Funcionamiento
El mando a distancia no responde.
El nivel de las pilas es demasiado bajo o se ha
agotado la vida útil de las pilas.
• Sustitúyalas. Para obtener más información,
consulte el capítulo 2.1.
Después de sustituir las pilas, compruebe
que el mando a distancia sigue controlando
sus dispositivos. En caso contrario, deberá
volver a configurar el mando a distancia.
Para ello, consulte el capítulo 2.
El aparato que deseo poner en
funcionamiento no responde en absoluto/
no responde a todos los comandos de los
botones.
• Compruebe si los botones que ha pulsado
están disponibles en el mando a distancia
original del aparato.
Se ha seleccionado un códigoincorrecto durante la
configuración.
• Configure el mando a distancia de nuevo
para el aparato.
Si algunos botones no controlan el equipo,
pruebe uno de los otros códigos para
su marca. Para obtener más información,
consulte el capítulo 2.2.2.
Tal vez los botones queintenta utilizar tienen un
nombre diferente en el mando a distancia original.
• Compruebe todas los botones para
encontrar los que necesita.
Pilas
¿Se borrarán mis ajustes al cambiar las
pilas?
No. Todos los ajustes de usuario se guardarán
en el mando a distancia durante 5 minutos.
Advertencia
No exponga las pilas (insertadas) a
temperaturas altas, como las que emiten la
luz solar, el fuego o similares.
38 ES
P1003WM_17__Manual_80_210.indd 38 25-11-09 13:1
Page 39

Registre su producto y consiga soporte en:
www.philips.com/welcome
Fabricado en China. Fabricado en nombre
de Philips Consumer Lifestyle, 1600 Summer
Street, Stamford CT 06912, USA.
Compatibilidad con la FCC
Este equipo ha sido probado y cumple los
límites establecidos para los dispositivos
digitales de clase B, de acuerdo con la sección
15 del reglamento de la FCC.
Estos límites han sido diseñados para facilitar
suficiente protección frente a interferencias
perjudiciales en una instalación residencial.
Este equipo genera, utiliza y puede irradiar
energía en forma de radiofrecuencia y, si
no se instala y utiliza de acuerdo con las
instrucciones, puede originar interferencias
perjudiciales en las comunicaciones de radio.
Sin embargo, no existe garantía de que las
interferencias no ocurrirán en una instalación
particular.
Si este aparato provoca interferencias que
perjudican la recepción de radio o televisión,
las cuales pueden identificarse encendiendo y
apagando el aparato, recomendamos al usuario
que intente solucionar las interferencias
siguiendo una o más de las siguientes medidas:
• Cambiar la orientación de la antena
receptora o colocarla en otra ubicación.
• Aumentar la separación entre el equipo y
el receptor.
• Conectar el equipo a una toma de
corriente de un circuito distinto al que está
conectado el receptor.
• Para obtener ayuda, póngase en contacto
con el distribuidor o con un técnico de
radio o televisión con experiencia.
ES 39
P1003WM_17__Manual_80_210.indd 39 25-11-09 13:1
Page 40

© 2009 Koninklijke Philips Electronics N.V.
All rights reserved. Reproduction in whole or in
part is prohibited without the prior written consent
of the copyright owner.
The information presented in this document does
not form part of any quotation or contract, is
believed to be accurate and reliable and may be
changed without notice. No liability will be accepted
by the publisher for any consequence of its use.
Publication there of does not convey nor imply
any license under patent- or other industrial or
intellectual property rights.
www.philips.com
November 2009
RTP/RR/4809
P1003WM_17__Manual_80_210.indd 40 25-11-09 13:1
 Loading...