

Philips SPC2050NC/00, SPZ6500/00, SPC2050NC, SPZ6500, SPC2050NC/27 User Manual
...
EN User manual
Register your product and get support at
www.philips.com/welcome
SPC2050NC

2Contents / Things you should know
Contents
1 Things you should know 2-4
Safety precautions 2
Copyright 3
Disclaimer 3
FCC compliance 3
Environmental information 3-4
System requirements 4
Disclaimer of warranty 4
Limitations of damages 4
2 Your WebCam 4
Welcome 4
3 What’s in the box? 5
4 Functional overview 5
5 Installation 6-7
5.1 Installing the WebCam software 6-7
5.2 Connecting the WebCam to
your PC / laptop 7
6 WebCam settings 8-16
6.1 WebCam Companion 8
6.2 Fun settings menu 8-10
6.3 Image settings menu 11-12
6.4 Audio settings menu 12
6.5 Property pages 13-16
7 Operating the WebCam 16
8 Technical data 17
9 Frequently asked questions
(FAQ) 17-20
9.1 How can I adjust image quality? 17-18
9.2 The microphone of my Philips
WebCam does not work
(properly).What should I do? 18-19
9.3 Using my Philips WebCam makes
my PC / laptop run slow.
What should I do? 19-20
9.4 How can I restore the settings
of my Philips WebCam to the
default factory settings? 20
9.5 How can I clean the lens of my
Philips WebCam? 20
1 Things you should know
Please read the following instructions carefully,
and retain them for future reference. It may be
helpful to have the instructions for use for the
PC at hand for reference.
Safety precautions
Observe the following guidelines to ensure that
the WebCam will operate safely and to prevent
defects.
• Do not use your WebCam in environments
outside the following range: temperature:
0°C to 40°C, relative humidity: 45% ~ 85%.
• Do not use or store your WebCam in/under:
– direct sunlight exposure;
– very humid and dusty environment;
– near any kind of heat sources.
• If your WebCam gets wet, dry it with soft
cloth as soon as possible.
• If the lens is dirty, do NOT touch the lens
with your fingers.
• Clean the outside of the WebCam with a soft
cloth.
• Do NOT use cleaning fluids based on alcohol,
methylated spirit, ammonia,etc.
• Do NOT attempt to disassemble or repair
your WebCam by yourself. Do not open the
WebCam. In the event of technical difficulties
return it to your Philips retailer.
• Do NOT use your WebCam in the water.
• Protect the WebCam from oil, vapour, steam,
moisture, and dust.
• Never point the WebCam lens at the sun.

3Things you should know
Copyright
Copyright © 2008 by Philips Consumer
Electronics B.V.
All rights reserved. No part of this publication
may be reproduced, transmitted, transcribed,
stored in a retrieval system or translated into
any language or computer language, in any form
or by any means, electronic, mechanical,
magnetic, optical, chemical, manual or otherwise,
without prior written permission from Philips.
Brands and product names are trademarks or
registered trademarks of their respective
companies.
Disclaimer
Philips makes no warranty of any kind with
regard to this material, including,but not limited
to, the implied warranties of merchantability and
fitness for a particular purpose.
Philips assumes no responsibility for any error
that may appear in this document.Philips makes
no commitment to update nor to keep current
the information contained in this document.
FCC compliance
This device complies with Part 15 of the
FCC Rules.
Operation is subject to the following
two conditions:
1 this device may not cause harmful
interference, and
2 this device must accept any interference
received,including interference that may cause
undesired operation.
Note!
This equipment has been tested and found to
comply with the limits for a Class B digital
device, pursuant to Part 15 of the FCC Rules.
These limits are designed to provide reasonable
protection against harmful interference in a
residential installation.
This equipment generates, uses and can radiate
radio frequency energy and, if not installed and
used in accordance with the instructions, may
cause harmful interference to radio
communications.
However, there is no guarantee that interference
will not occur in a particular installation.
If this equipment does cause harmful
interference to radio or television reception,
which can be determined by turning the
equipment off and on, the user is encouraged to
try to correct the interference by one or more
of the following measures:
• Reorient or relocate the receiving antenna.
• Increase the separation between the
equipment and receiver.
• Connect the equipment to an outlet on a
circuit different from that to which the
receiver is connected.
• Consult the dealer or an experienced
radio/TV technician for help.
Any unauthorized modification to this
equipment could result in the revocation of the
authorization to operate the equipment.
Environmental information
Disposal of your old product
Your product is designed and manufactured with
high quality materials and components, which
can be recycled and reused.
When this crossed-out wheeled bin symbol is
attached to a product it means the product is
covered by the European Directive 2002/96/EC.

4Things you should know / Your WebCam
Please inform yourself about the local separate
collection system for electrical and electronic
products.
Please act according to your local rules and do
not dispose of your old products with your
normal household waste.The correct disposal of
your old product will help prevent potential
negative consequences for the environment and
human health.
Warning
Plastic bags can be dangerous.To avoid danger of
suffocation, keep this bag away from babies and
small children.
System requirements
• Microsoft
®
Windows®XP (SP2) or Vista;
• Intel Pentium
®
4 2.4 GHz or AMD®equivalent
processor;
• 512 MB RAM and 300 MB free hard disk
space;
• One free USB port and CD-ROM or DVD
drive.
Disclaimer of warranty
The software on the CD-ROM supplied is sold
‘as is’ and without warranties whether
expressed or implied. Because of the various
software and hardware environments into which
this program may be put, no warranty of fitness
for a particular purpose is offered.
Limitations of damages
The vendor will not be liable for any indirect,
special, incidental or consequential damages
(including damages for loss of business, loss of
profits, or the like), whether based on breach of
contract, tort (including negligence), product
liability or otherwise, even if the vendor or its
representatives have been advised of the
possibility of such damages and even if a remedy
set forth herein is found to have failed its
essential purpose.
2 Your WebCam
Congratulations on your purchase and welcome
to Philips.To fully benefit from the support that
Philips offers, register your product at
www.philips.com/welcome
Welcome
The Philips SPC2050NC WebCam you have just
purchased is manufactured to the highest
standards and will give you years of trouble-free
use. Brilliant images and amazing sound quality,
that's what you get with the SPC2050NC
WebCam.
After installation, the new WebCam can be used
for all sorts of applications, such as:
Video:
use the Philips SPC2050NC WebCam for video
chatting and video calling.The WebCam works
with Skype,Windows
®
Live Messenger,
Yahoo! Messenger,AOL Instant Messenger,
QQ and other instant messenging and
VoIP (Voice over Internet Protocol) services;
Video sharing:
make your own personal videos and share them
with friends and family via YouTube,
Yahoo! Video, etc.;
Snapshot images:
use the Snapshot button to easily take photos
without using your mouse and share your
photos via Flickr, MySpace, etc.;
Editing and special effects:
edit images and recordings using WebCam
Companion.
The following sections in this manual give a stepby-step description of the installation process
and explain how to use the Philips SPC2050NC
WebCam.
5What’s in the box? / Functional overview
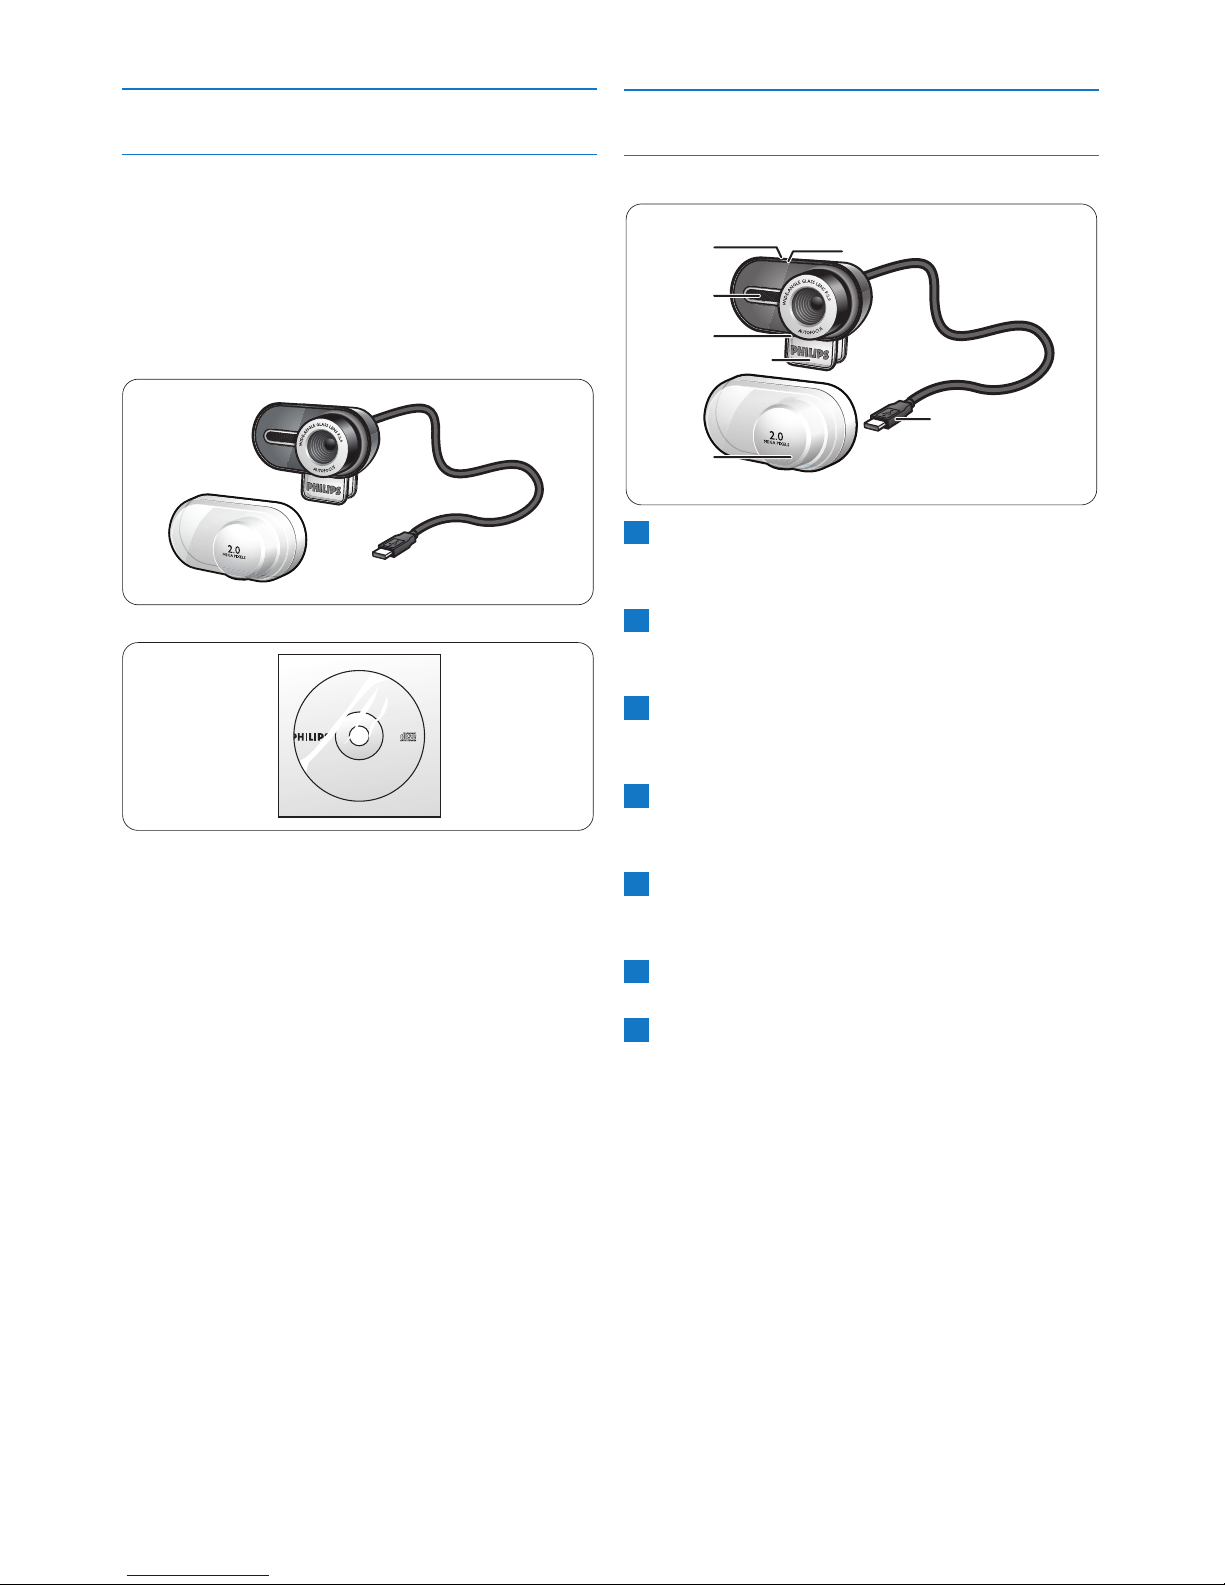
3 What’s in the box?
Please check that the following items are packed
in the Philips SPC2050NC box.
They are provided to help you set up and use
your Philips SPC2050NC.
Philips SPC2050NC WebCam
Installation CD-ROM including user manual
SPC2050NC
Installation CD v.1.00
9082 100 03367
4 Functional overview
Snapshot button
Enables you to take photos without using
your mouse.
Rotating foot
For manually changing the vertical angle of
the WebCam.
Clamp
For attaching the WebCam to your flat PC
monitor or laptop screen.
USB connector
For connecting the WebCam to the
USB port of the PC or laptop.
Two digital microphones
For adding voice and stereo sound when
video calling and video recording.
Power LED
Lights up red when the WebCam is in use.
Cover
For protecting the WebCam when it is not
in use.
7
6
5
4
3
2
1
3
4
6
2
7
5
1
6Installation
5 Installation
5.1 Installing the WebCam software
The software supplied only works on PCs with
the operating systems Microsoft
®
Windows®XP
(SP2) and Vista.Also refer to 1 ‘Things you
should know’ - ‘System requirements’.
Notes
• Unplug all your USB devices (except USB
keyboard and USB mouse) before you start.
• Do not plug in your WebCam yet.
Run the Installation CD-ROM first.
• Have your Windows
®
CD-ROM at hand.
Place the installation CD-ROM in your PC’s /
laptop’s CD-ROM / DVD drive.
• After a couple of seconds the ‘Language
selection’ screen appears.
Note
If the ‘Language selection’ screen does not
appear automatically, open ‘Computer’ or
‘My computer’, double click on the CD,
then double click on the 'Setup.exe' icon.
Select your language.
• Installation continues automatically.
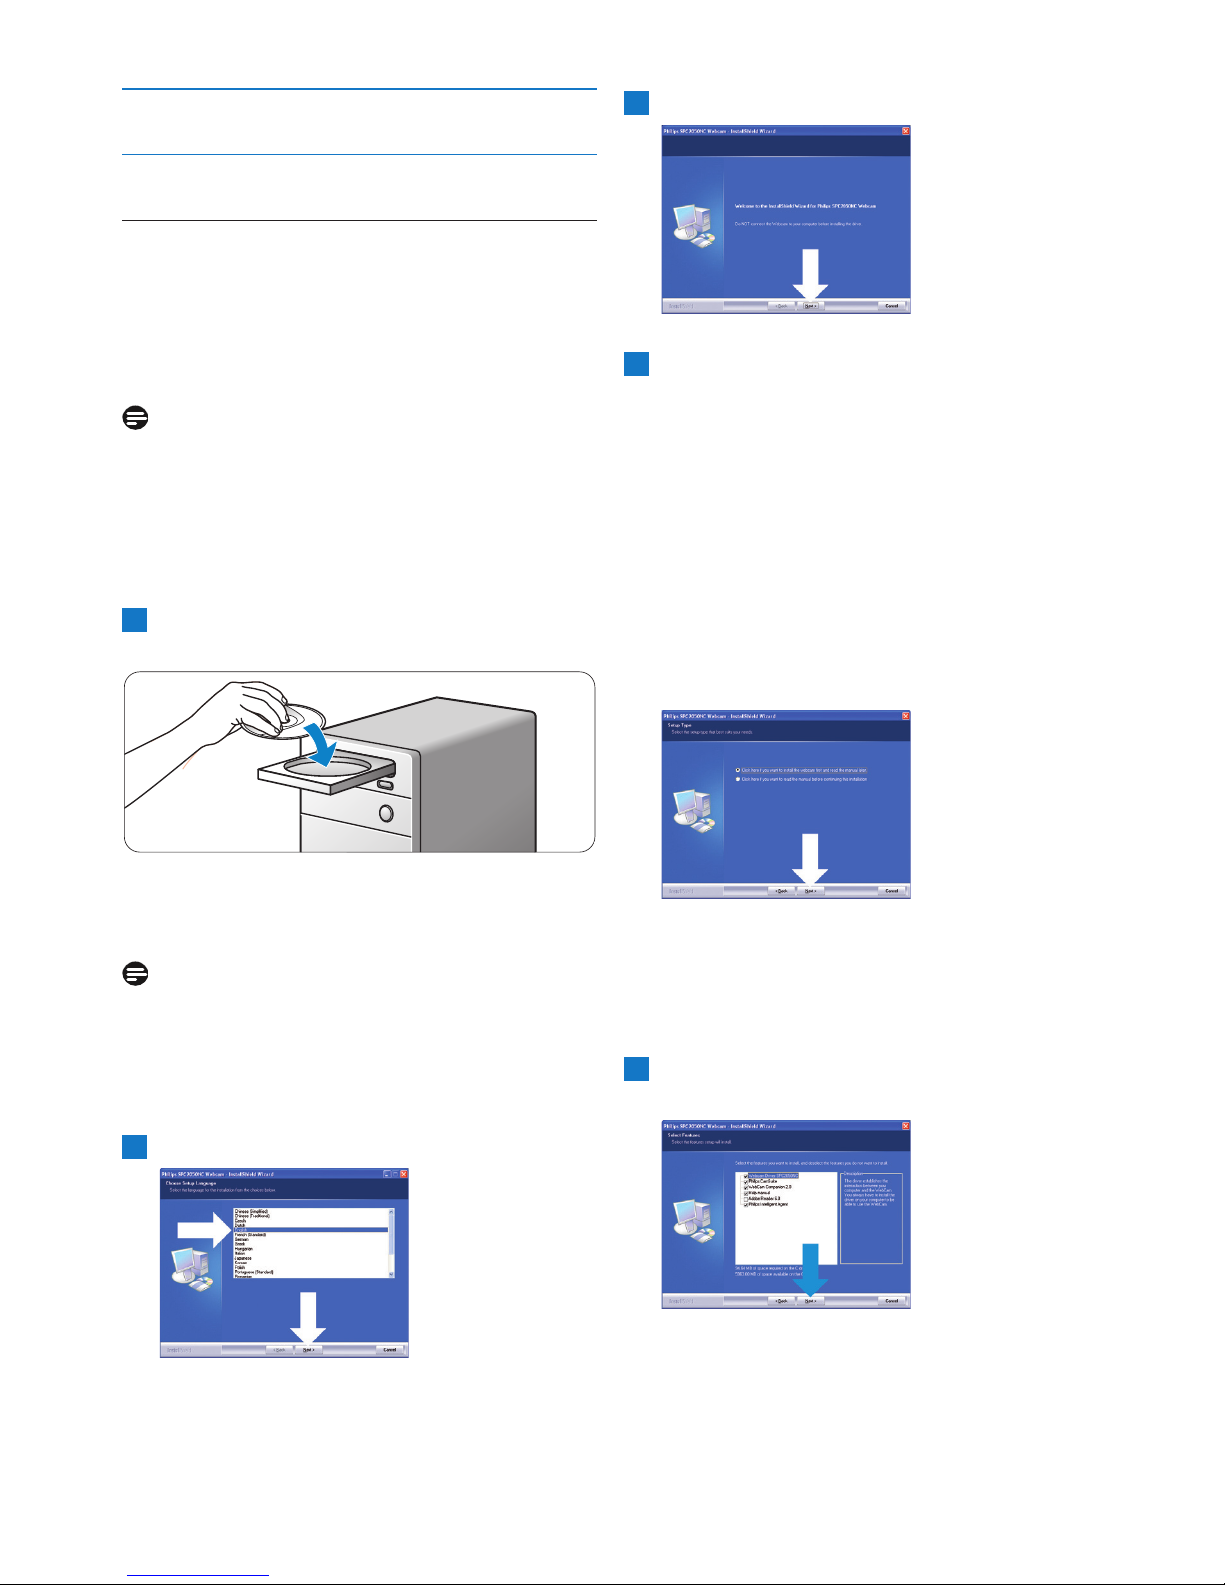
• The ‘Welcome’ screen appears.
2
1
Click ‘Next’ to continue.
• The ‘Manual’ screen appear s.
Select the first option if you wish to
continue installation and read the manual
later.
Or:
Select the second option if you wish to read
the user manual before continuing
installation.You can print out the manual so
you will have it at hand during the rest of the
installation process
Click ‘Next’ to continue.
• The ‘Installation’ screen appears.The items that
can be installed are shown on the left side of
the screen.An explanation of each item is
given on the right side. All required items are
selected by default.
Click the 'Next' button if you wish to install
all items.
5
4
3
7Installation
Or:
If there are certain items you do not wish to
install, check the boxes before these items.
Select at least ‘WebCam Driver
SPC2050NC’ and ‘Philips CamSuite’.
Click the ‘Next’ button.
•The following software license agreement
appears.
Click on ‘Yes’ to continue the installation.
• The following screen appears.
Click ‘Next’ to continue.
• The ‘Reboot’ screen appears.
Select ‘Yes’, then click ‘Finish’ to restart your
PC / laptop.
• After installation, the ‘Philips CamSuite’ shortcut
‘ ’ will be visible in the Windows taskbar
(bottom right of your screen).
• In the ‘Philips CamSuite’ you can adjust the
WebCam settings. For this, refer to
6 ‘WebCam settings’.
You can now connect your WebCam.
9
8
7
6
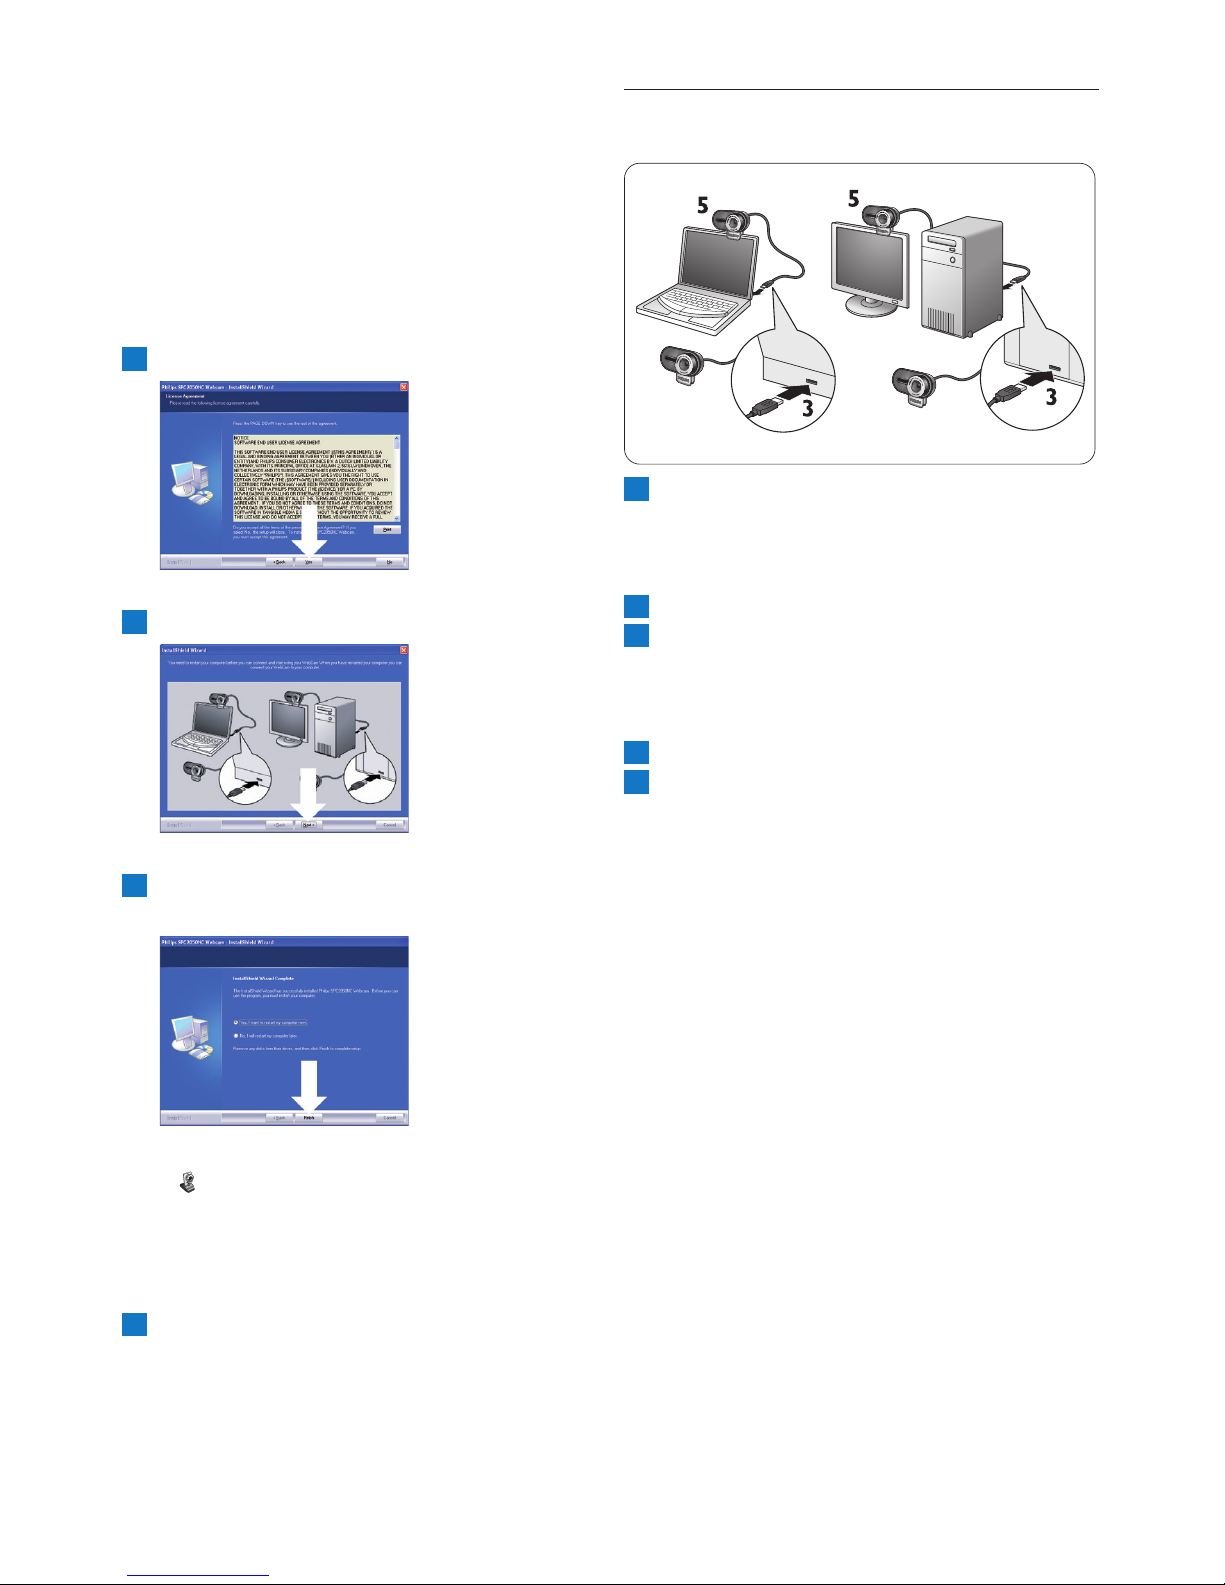
5.2 Connecting the WebCam to your
PC / laptop
Be sure to run the installation CD first,
before connecting the WebCam to the
PC / laptop.For this, refer to 5.1 ‘Installing
the WebCam software’.
Turn on the PC / laptop.
Connect the USB connector of the USB
cable to the USB port of the PC / laptop.
• The WebCam will now derive its power
from the PC / laptop.
Aim the webcam as required.
Use the clamp to attach the WebCam to
your flat PC monitor or laptop screen.
5
4
3
2
1
 Loading...