

Philips SPT1000BC User Manual
Keyboard and mouse set SPT1000
User manual
Guía de usuario
CS
ES
EN
This device complies with Part 15 of the FCC Rules. Operation is subject to the following
two conditions:
1 this device may not cause harmful interference,and
2 this device must accept any interference received, including interference that may cause
undesired operation.
Note!
This equipment has been tested and found to comply with the limits for a Class B digital device,
pursuant to Part 15 of the FCC Rules.These limits are designed to provide reasonable protection
against harmful interference in a residential installation.This equipment generates, uses and can
radiate radio frequency energy and, if not installed and used in accordance with the instructions, may
cause harmful interference to radio communications. However, there is no guarantee that interference
will not occur in a particular installation. If this equipment does cause harmful interference to radio or
television reception, which can be determined by turning the equipment off and on, the user is
encouraged to try to correct the interference by one or more of the following measures:
• Reorient or relocate the receiving antenna.
• Increase the separation between the equipment and receiver.
• Connect the equipment to an outlet on a circuit different from that to which the receiver is
connected.
• Consult the dealer or an experienced radio/TV technician for help.
Any unauthorized modification to this equipment could result in the revocation of the
authorization to operate the equipment.
NOTE:THE MANUFACTURER IS NOT RESPONSIBLE FOR ANY RADIO OR TV
INTERFERENCE CAUSED BY UNAUTHORIZED MODIFICATIONS TO THIS
EQUIPMENT. SUCH MODIFICATIONS COULD VOID THE USER’S AUTHORITY TO
OPERATE THE EQUIPMENT.
FCC compliance
Need Help?
If you have any questions about the Philips SPT1000 keyboard and mouse set,
please contact our helpline for assistance!
You can find the number in the list below.
Country Telephone number
België/Belgique/Belgien (Belgium) . . . . . . . . . . .3 070 222303
China ( ) . . . . . . . . . . . . . . . . . . . . . . . . . . . .3 4008 800 008
Danmark (Denmark) . . . . . . . . . . . . . . . . . . . .3 35-25-8759
Deutschland (Germany) . . . . . . . . . . . . . . . . . .3 0180 536767
Espana (Spain) . . . . . . . . . . . . . . . . . . . . . . . . . .3 902 888 784
Eda (Greece) . . . . . . . . . . . . . . . . . . . . . . .3 0 0800 3122 1280
France . . . . . . . . . . . . . . . . . . . . . . . . . . . . . . . .3 08 09165 0005
Italia (Italy) . . . . . . . . . . . . . . . . . . . . . . . . . . . . .3 899 23 45 06
Luxembourg (Luxemburg) . . . . . . . . . . . . . . . . .3 40 6661 5644
Nederland (Netherlands) . . . . . . . . . . . . . . . . .3 0900 8407
Norge (Norway) . . . . . . . . . . . . . . . . . . . . . . . .3 2270-8111
Österreich (Austria) . . . . . . . . . . . . . . . . . . . . .3 0810 001 203
Portugal . . . . . . . . . . . . . . . . . . . . . . . . . . . . . . .3 2 1359 1442
Schweiz/Suisse/Svizzera (Switzerland) . . . . . . .3 0844 800 544
Suomi (Finland) . . . . . . . . . . . . . . . . . . . . . . . . .3 09 6158 0250
Sverige (Sweden) . . . . . . . . . . . . . . . . . . . . . . . .3 08 5792 9100
United Kingdom . . . . . . . . . . . . . . . . . . . . . . . .3 0906 1010 016
U.S.A. (United States of America) . . . . . . . . . . .3 (919) 573 7854
If your country is not mentioned in the list above, please check our website:
www.philips.com/support
for additional information.
11
www.philips.com
This document is printed on chlorine free produced paper
Data subject to change without notice
Date of purchase - Date de la vente - Verkaufsdatum - Aankoopdatum - Fecha de compra -
Date d’acquisito - Data da adquirição - Ga a - Inköpsdatum - Anskaffelsesdato -
Kjøpedato - Oatopäivä -
Type: SPT1000
Serial nr:
___________________________________________________________
Guarantee certificate
Garantiebewijs
Certificado de garantia
Garantibevis
Certificat de garantie
Certificado de garantia
Garantibevis
Garantieschein
Certificato di garanzia
Garanticertifikat
Takuutodistus
year warranty
année garantie
Jahr Garantie
jaar garantie
año garantia
anno garanzia
år garanti
år garanti
år garanti
vuosi takuu
año garantia
Dealer’s name, address and signature
Nom, adresse et signature du revendeur
Name,Anschrift und Unterschrift des Händlers
Naam, adres en handtekening v.d. handelaar
Nombre, direccion y firma del distribudor
Nome, indirizzo e firma del fornitore
Oa, d a a
Återförsäljarens namn, adress och signatur
Forhandlerens navn,adresse og unterskrift
Forhandlerens navn,adresse og unterskrift
Jälleenmyyjän nimi, osoite ja allekirjoitus
Nome, morada e assinature da loja
3122 4750 1101 Printed in China N’MW/RM/1206
– Wired PS/2 keyboard
– Optical PS/2 mouse
– User manual
What’s in the box
EN
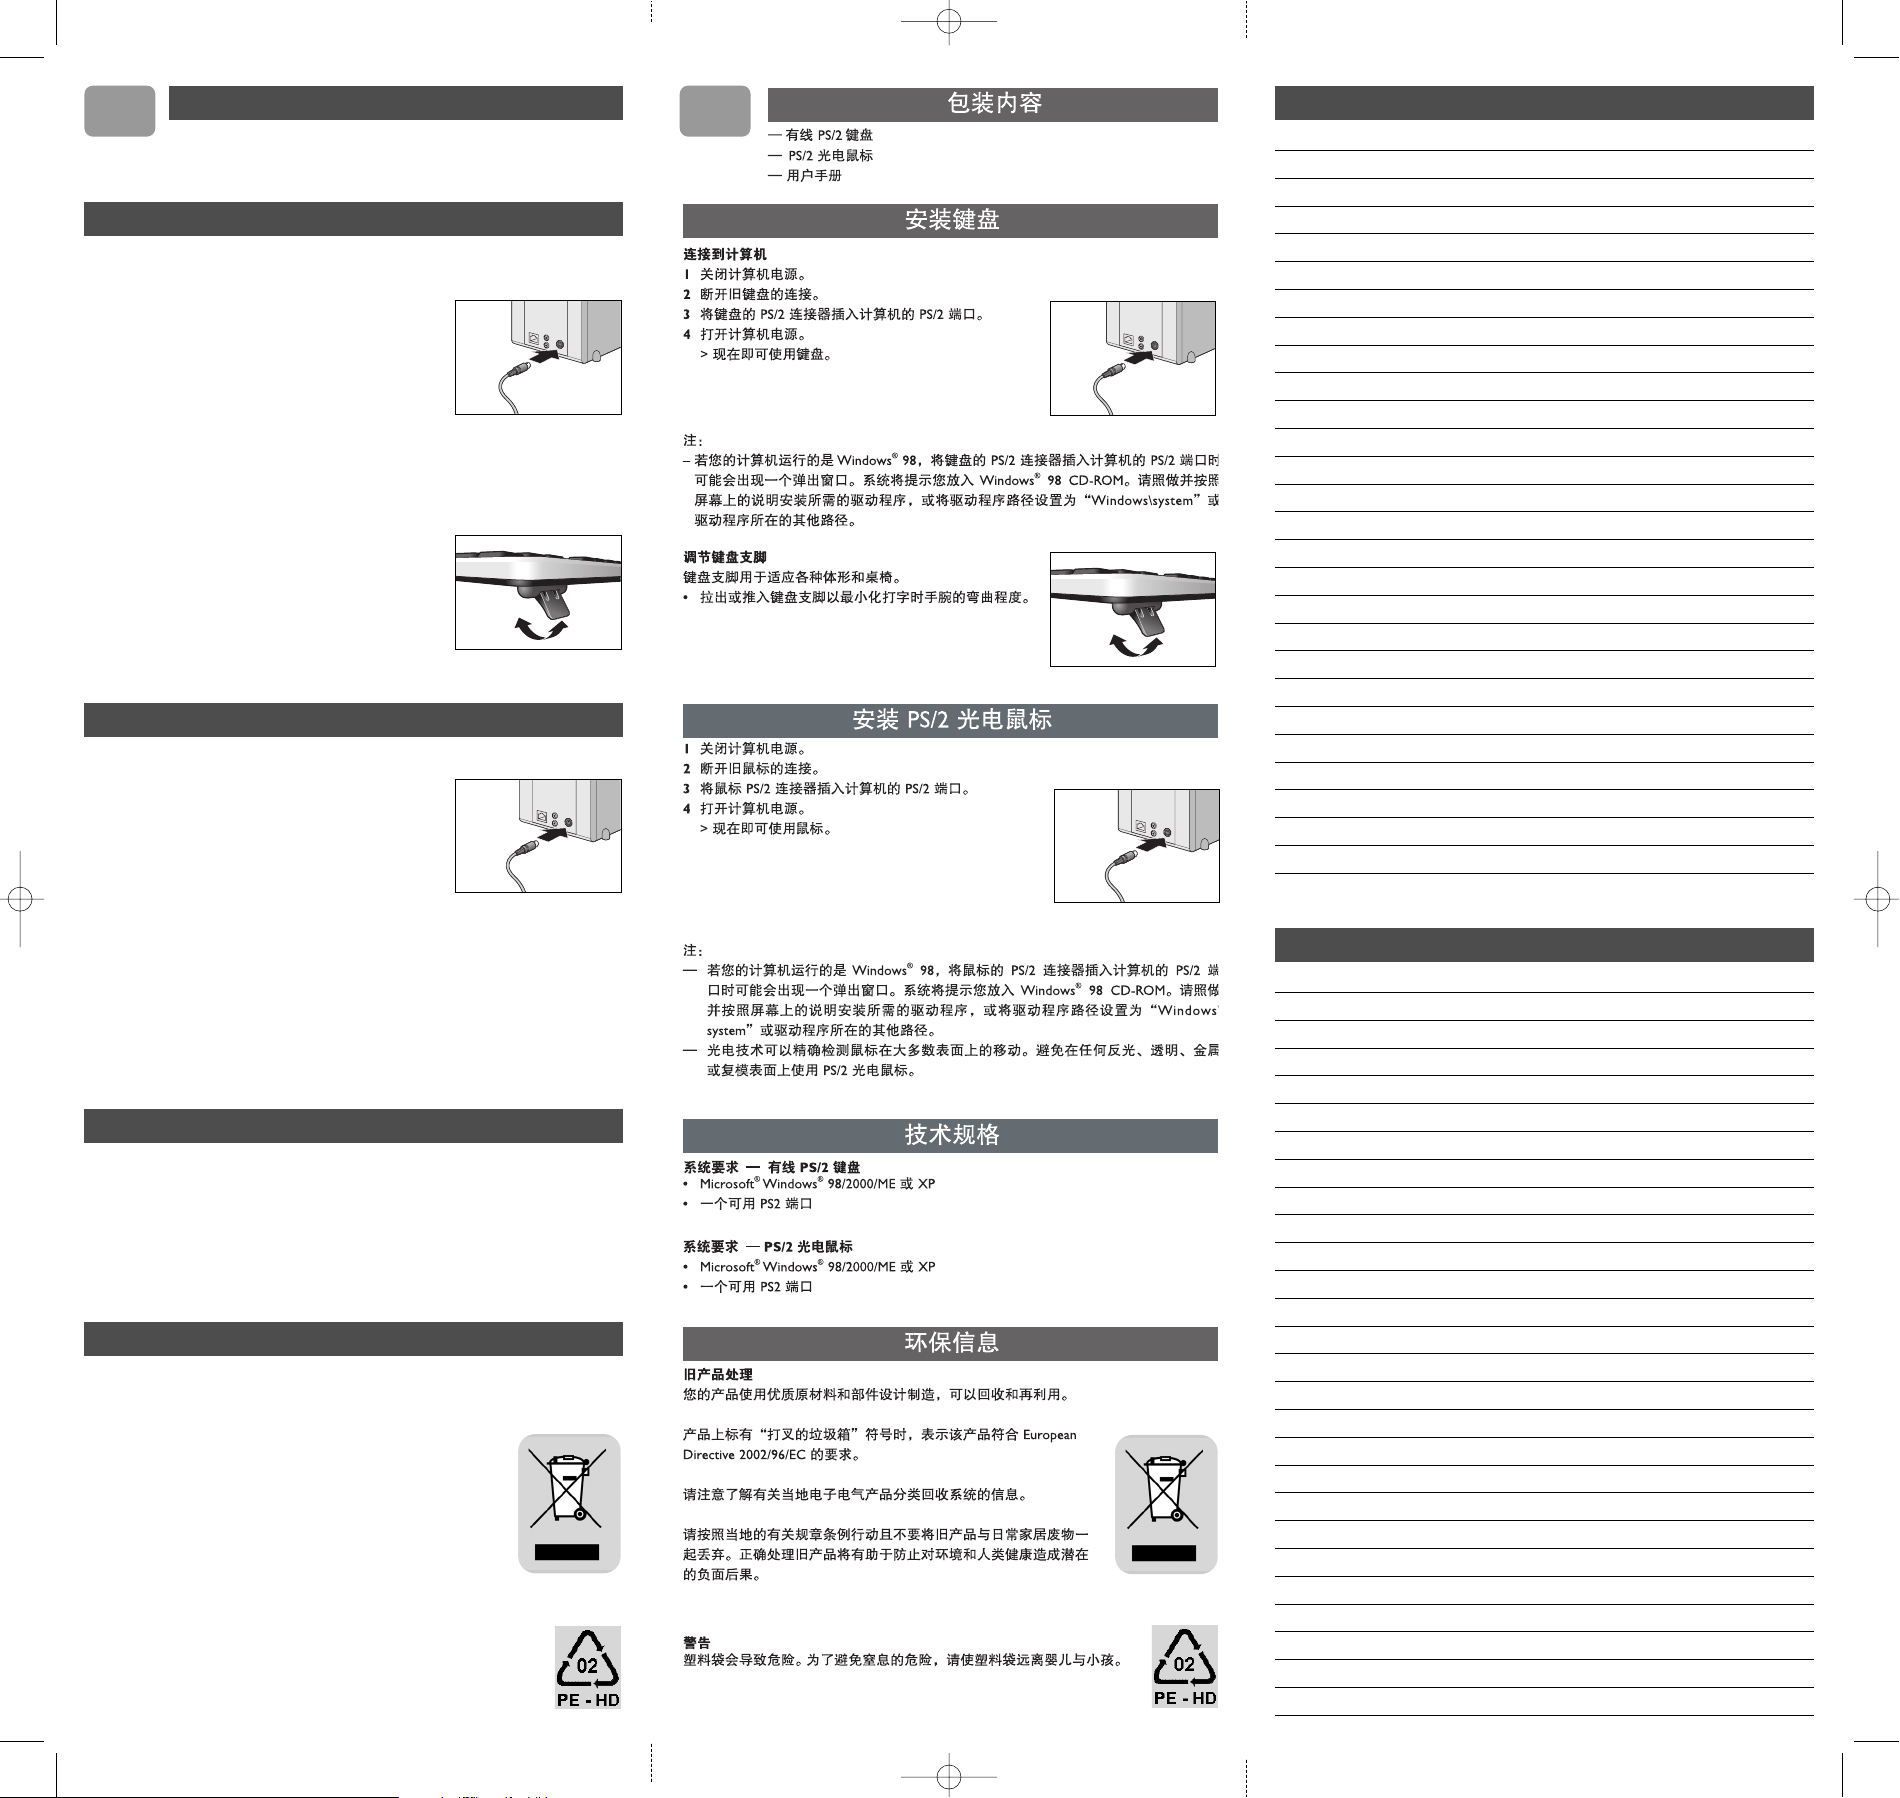
Installing your optical PS/2 mouse
1 Switch off your computer.
2 Disconnect the old mouse.
3 Plug the mouse PS/2 connector into the computer PS/2 port.
4 Switch on your computer.
> The mouse is now ready for use.
Technical specifications
System requirements - Wired PS/2 keyboard
• Microsoft
®
Windows®98/2000/ME or XP
• One free PS2 port
System requirements - Optical PS/2 mouse
• Microsoft
®
Windows®98/2000/ME or XP
• One free PS/2 port
Disposal of your old product
Your product is designed and manufactured with high quality materials and components,
which can be recycled and reused.
When this crossed-out wheeled bin symbol is attached to a product
it means the product is covered by the European Directive 2002/96/EC.
Please inform yourself about the local separate collection system for
electrical and electronic products.
Please act according to your local rules and do not dispose of your old
products with your normal household waste.The correct disposal of your
old product will help prevent potential negative consequences for the
environment and human health.
Environmental information
Installing your keyboard
Connecting to the computer
1 Switch off your computer.
2 Disconnect your old keyboard.
3 Plug the keyboard PS/2 connector into the computer
PS/2 port.
4 Switch on your computer.
> The keyboard is now ready for use.
Notes:
– If your PC runs on Windows
®
98, a pop-up window may appear when you plug the keyboard PS/2
connector into the computer PS/2 port.You will be asked to insert the Windows
®
98 CD-ROM.
Please do so and follow the on-screen instructions for installing the required driver or set the driver
path as ‘Windows\system’ or the other path that the driver located.
Adjusting the keyboard legs
The keyboard legs are designed to accomodate various body
sizes, chairs and desks.
• Pull out or push in the keyboard legs to a position that
minimizes bending of your wrists while typing.
Notes:
– If your PC runs on Windows
®
98, a pop-up window may appear when you plug the mouse PS/2
connector into the PC PS/2 port.You will be asked to insert the Windows
®
98 CD-ROM.
Please do so and follow the on-screen instructions for installing the required driver or set the
driver path as ‘Windows\system’ or the other path that the driver located.
– The optical technology can precisely detect the mouse motion on most surfaces.
Avoid using the optical PS/2 mouse on any reflective, transparant. metallic or complex-pattern
surface.
WARNING
Plastic bags can be dangerous.To avoid danger of suffocation, keep this bag away
from babies and small children.
SPT1000 24-03-2006 17:08 Pagina 1
Notes
Notes
– Teclado PS/2 cableado
– Ratón PS/2 óptico
– Manual del usuario
Contenido de la caja
ES
Instalación del ratón PS/2 óptico
1 Apague el ordenador.
2 Desconecte el ratón antiguo.
3 Enchufe el conector PS/2 del ratón en el puerto PS/2 del
ordenador.
4 Encienda su ordenador.
> El ratón PS/2 óptico está ahora listo para utilizarse.
Notas:
– Si su PC se ejecuta en Windows
®
98, quizás aparezca una ventana emergente cuando enchufe el
conector PS/2 del ratón en el puerto PS/2 del ordenador. Se le pedirá que inserte el CD-ROM de
Windows
®
98. Hágalo y siga las instrucciones en pantalla para instalar el driver requerido o
establezca la ruta del driver como ‘Windows\system’ o la otra ruta que el driver haya localizado.
– La tecnología óptica puede detectar con precisión el movimiento del ratón en la mayoría de
superficies. Evite utilizar el ratón PS/2 óptico sobre superficies reflectantes, transparentes,
metálicas o de diseño complejo.
Especificaciones técnicas
Requisitos del sistema - Ratón PS/2 óptico
• Microsoft
®
Windows®98/2000/ME o XP
• Un puerto PS2 libre
Requisitos del sistema - Teclado PS/2 cableado
• Microsoft
®
Windows®98/2000/ME o XP
• Un puerto PS2 libre
Desecho del producto antiguo
El producto se ha diseñado y fabricado con materiales y componentes de alta calidad, que se
pueden reciclar y volver a utilizar.
Cuando este símbolo de contenedor de ruedas tachado se muestra
en un producto indica que éste cumple la directiva europea 2002/96/EC.
Obtenga información sobre la recogida selectiva local de productos
eléctricos y electrónicos.
Cumpla con la normativa local y no deseche los productos antiguos con
los desechos domésticos. El desecho correcto del producto antiguo
ayudará a evitar consecuencias negativas para el medioambiente y la salud
humana.
Información medioambiental
CS
ADVERTENCIA
Las bolsas de plástico son potencialmente peligrosas.
Mantenga esta bolsa fuera del alcance de los niños para evitar el peligro de asfixia.
Instalación del teclado
Conexión al ordenador
1 Apague su ordenador.
2 Desconecte el teclado antiguo.
3 Enchufe el conector del teclado PS/2 en el ordenador
Puerto PS/2.
4 Encienda su ordenador.
> El teclado está ahora listo para utilizarse.
Notas:
– Si su PC se ejecuta en Windows
®
98, quizás aparezca una ventana emergente cuando enchufe el
conector del teclado PS/2 en el puerto PS/2 del ordenador. Se le pedirá que inserte el CD-ROM de
Windows
®
98. Hágalo y siga las instrucciones en pantalla para instalar el driver requerido o
establezca la ruta del driver como ‘Windows\system’ o la otra ruta que el driver haya localizado.
Ajuste de las patas del teclado
Las patas del teclado están diseñadas para adaptarse a diversos
tamaños de cuerpos, sillas y escritorios.
• Abra o cierre gradualmente las patas del teclado hasta una
posición en la que tenga que doblar las muñecas al mínimo
cuando mecanografíe.
SPT1000 24-03-2006 17:08 Pagina 2
 Loading...