

Page 1

Philips Digital PhotoFrame
BoomBoom
SPF4080P/G7
User Manual
Mode d emploi
Manual del usuario
www.philips.com/welcome
PHILIPS
Page 2

Page 3

Philips Digital PhotoFrame 8" LCD Panel BoomBoom
Copyright
No part of this publication may be reproduced, transmitted,
transcribed, stored in a retrieval system or translated into any
language or computer language, in any form or by any means,
electronic, mechanical, magnetic, optical, chemical, manual or
otherwise, without the prior written permission of the company.
Disclaimer
The company makes no representations or warranties, either
expressed or implied, with respect to the contents hereof and
specifically disclaims any warranties, merchantability or fitness
for any particular purpose. Further, the company reserves the
right to revise this publication and to make changes from time to
time in the contents hereof without obligation to notify any person
of such revision or changes.
Safety instructions
Before operating the Unit, carefully read and follow the
instructions below.
• Retain this User Manual for future reference.
• Read the safety and operating instructions carefully before
using the product. All warnings on the product and in the
operating instructions should be observed.
• Do not place this product under direct sunlight or near heat
sources. The outer casing of this product may become
deformed and the sophisticated sensors inside may become
damaged due to excessive heat.
• Do not use this product near water or allow any liquid to get
inside this product. The moisture may cause short-circuit to
the electronic components and lead to malfunctions.
• Do not use this product near strong electromagnetic
sources, such as a microwave oven. The interference
may cause this product to malfunction.
• Do not drop or apply shock/vibration to this product.
Strong impacts may damage the components inside.
Copyright EN-i
Page 4

Philips Digital PhotoFrame 8" LCD Panel BoomBoom
■ Do not use an unknown power adapter other than the one
supplied with the Unit. Connecting this product to an
unknown power adapter is very dangerous and may iead
to fire orexpiosion.
• Do not cut, bend, modify, or piace heavy objects, on the
power adapter cord. Otherwise the externai insuiation may
be damaged and resuit in short-circuit or fire.
• if there are strange odors or heat emitting from this product
or any signs of maifunction, disconnect the Unit from the
power immediateiy and contact your deaier for inspection or
service.
• Use a smooth, soft cioth to ciean the surface of the screen.
Do not use iiquid cieaners or giass cieaners.
> if a foreign substance or water gets in this product, turn
the power off immediateiy and disconnect the power
adapter. Next, remove the foreign substance or water,
and then send the product to your nearest service center.
■ Do not attempt to disassembie or modify this product, any
unauthorized modifications will void the warranty.
• Although the LCD panel is made with high-precision
technology and has effective pixels of 99.99% or more,
black dots or bright points of light (red, blue or green) may
appear constantly on the LCD panel. This is a structural
property of the LCD panel and is not a malfunction.
EN-M
Safety Instructions
Page 5

Philips Digital PhotoFrame 8" LCD Panel BoomBoom
Table of Contents
Key Features..........................................................................................1
What's in the box-----------------------------------------------------------2
Overview
Remote Controi........................................................................5
Getting Started.........................................................................7
Begin to use.............................................................................9
Using the main menu
ManagingPhotos.....................................................................11
Piaying Siideshow
BoomBoom Music Piayer
Watching Videos......................................................................14
ManagingFiies
Seiecting Source......................................................................16
Viewing Ciock & Caiendar
Setting.....................................................................................-18
BoomBoomSub-Dispiay..........................................................-20
Frequentiy Asked Questions
Specifications
Reguiation & Compiiance.........................................................23
Warranty...................................................................................24
..................................................................................
..............................................................
..................................................................
........................................................
........................................................................
.......................................................
..................................................
...........................................................................
3
10
-12
13
-15
17
-21
22
Table of Contents
EN-iii
Page 6

Philips Digital PhotoFrame 8" LCD Panel BoomBoom
Dear Customer:
Thank you for bringing our Phiiips Digitai PhotoFrame into your
home. Now you wiii be abie to view your growing digitai picture
iibrary in stunning ciarity and share great memories with friends
and famiiy.
To get the most out of your new Phiiips product, piease read
through this entire User Manuai before use.
Key features
BoomBoom is equipped with the foiiowing features:
• Easy piug and piay dispiaying your favorite videos on the handheld
camcorder, compatible with most handheld camcorders
• Play music from your MP3 player on BoomBoom via AUX-in port
• Extend your PC desk top with Extended Display or Mirror Display
with Duo monitor display feature
• Instant music/video playback from your memory card thanks to our
H.264 video support
• Customize Energy Saver providing five intelligent ways to control
power consumption
• Crystal clear audio quality with 2.1 channel stereo speakers
EN-1
Key Features
Page 7
Philips Digital PhotoFrame 8" LCD Panel BoomBoom
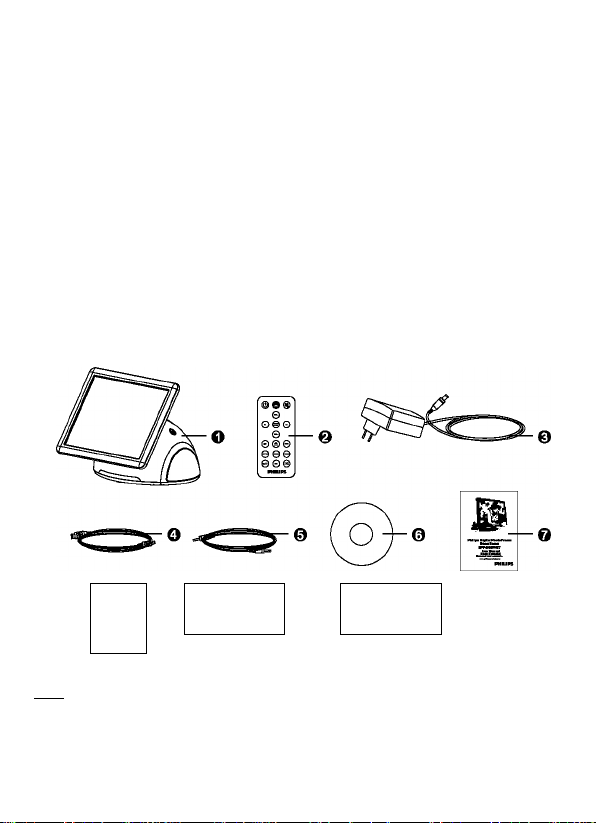
What's in the box
After unpacking, mark sure the following accessories are supplied
with your unit.
1 .BoomBoom
2. Remote control
3. AC power adapter
4. USB cable
5. AudIo cable
6.Installation CD
7. User manual
8. Quick start guide
9. Registration card
fO.Warranty card
Reg istration card"
-©
ilTW Actual product appearance may vary from the illustrations
— ©
Warran ty c ard ~
shown in this User Manual.
What's in the box
EN-2
Page 8

Philips Digital PhotoFrame 8" LCD Panel BoomBoom
Overview
11
Description
No.
1 ESC (ESCAPE) Button
Cancels current operation and/or returns to the previous page.
2
MENU
Displays the pop-up menu.
3 Navigational Guide
Four-way directional pad to scroll up, down, left, and right to
the next item
4 ENTER button
Confirms operation or seiection.
5 Power Button
Press the button to turn on or off the unit.
AUXin
6
Connect your music piayer through this auxiiiary 3.5mm jack
with audio cabie (inciuded).
EN-3
Overview
Page 9

Philips Digital PhotoFrame 8" LCD Panel BoomBoom
PowerJack
Connect one end of the AC power adaptor into the power jack
and the other end into power outlet.
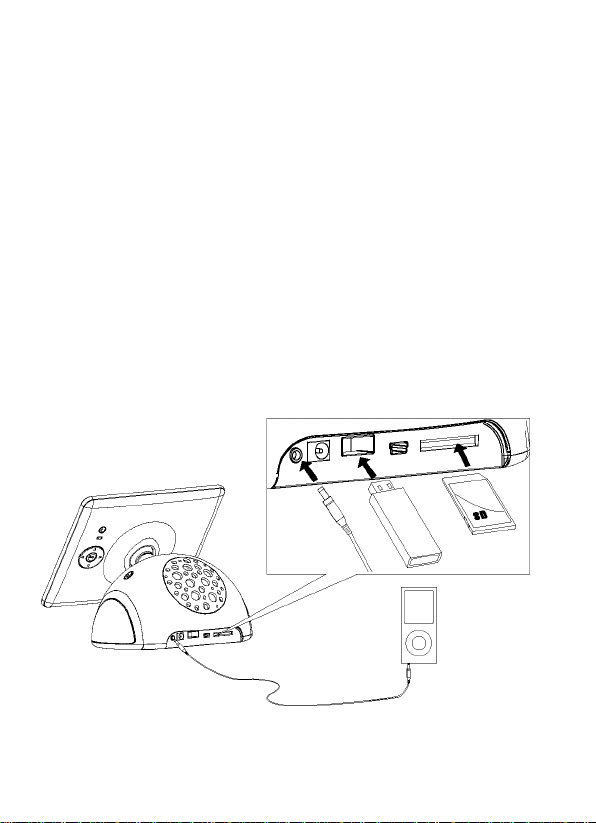
8 USB Input (Type-A)
* Allows for USB flash drives. Playback music, videos, and
pictures stored on the drive.
* Direct copy music and pictures to the device with automatic
prompt when the drive is inserted.
’ Connect your handheld camcorder via USB input and
playback files directly by going into VIDEO mode.
9 Mini USB Port
• Allows you to connect BoomBoom to PC managing files
directly as external memory source.
• To utilize Dual Monitor Feature, install the software
provided and connect BoomBoom to PC as instructed.
10 3-in-1 Card Reader
Insert SD/SDHC, MMC(+), MS to playback your personalized
content. MS Pro, MS Duo and other variations of the memory
card can be used with card adaptors (not included).
11 Woofer
Bass output for the ultimate audio experience.
Overview
EN-4
Page 10

Philips Digital PhotoFrame 8" LCD Panel BoomBoom
Remote Control
No, Icon Description
1
2
3
Turn unit on/off
®
EZ Access button
©
Switch between Slideshow view and Clock view
Activates/deactivates the Mute mode
®
4
5
6
7
8
9
10
Press to adjust the volume or move up/down
0
Confirm selection
©
Moves left/right to the next item. Fast forward or reminds a
0
song when In Play mode
Return to previous page and/or access menu
0
Returns to the home menu
®
Shows option menu
0
© Shortcut to play photos
EN-5
Remote Control
Page 11
Philips Digital PhotoFrame 8" LCD Panel BoomBoom
No, Icon Description
11
© Shortcut to play music
12
13
14
15
Sets current song or album selection to repeat mode
©
Press to piay songs in random order
©
Press to piay music from MP3 player when connected via
0
audio cable
Shortcut to play videos
0
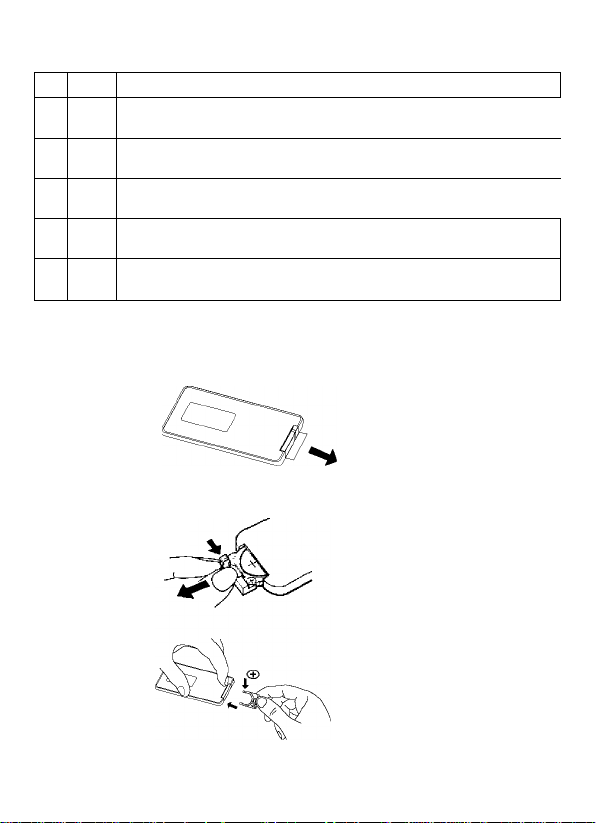
Replacing the remote control Battery
On the back of the remote control, pinch the locking tab then pull.
Replace with a new CR2025 battery, + side up, then Insert the
battery tray.
Step 1:
Step 2:
Remote Control
EN-6
Page 12
Philips Digital PhotoFrame 8" LCD Panel BoomBoom
Getting Started
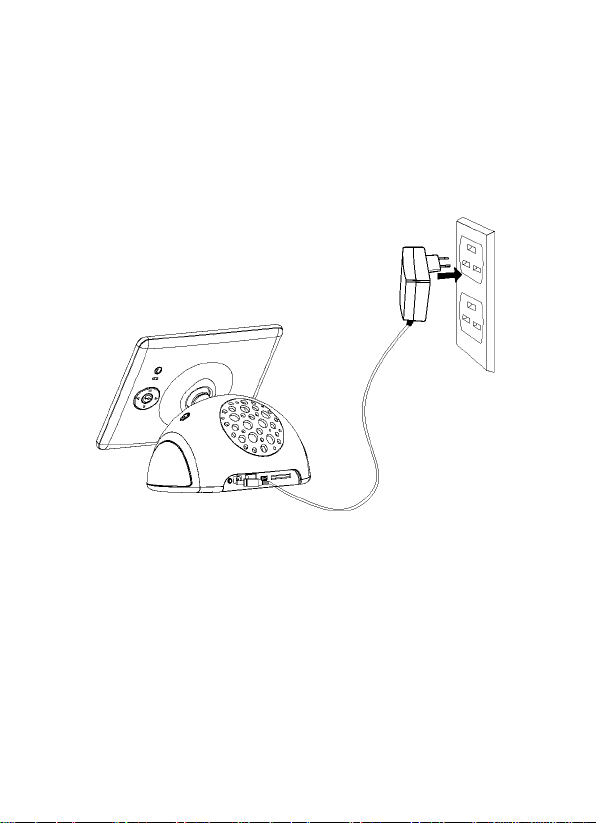
1. Connecting to power
Connect the AC adapter plug to the unit, then the other end to
a power outlet.
Press Power button to turn on the unit.
2. Insert a memory card/USB drive
To play back your own files, Insert a compatible memory card
or USB flash drive that contains supported files into the
corresponding slot on the unit as illustrated below.
To start playback files from the handheld camcorder
a. Power on camcorder and plug it in the into the USB port.
b. Turn on BoomBoom and go to Video mode.
c. Choose USB as a playback source.
d. Select the video you'd like to view and press ENTER to confirm.
EN-7
Getting Started
Page 13
Philips Digital PhotoFrame 8" LCD Panel BoomBoom
2a. Connecting to PC via mini-USB cable
1. Start the computer and turn on BoomBoom.
2. Connect the smaller end of the USB cable to the mini USB port.
3. Connect the other end of the USB cable to a USB port on the
computer, make sure the connectors are fully inserted.
4. Once connected, BoomBoom will enter PC transfer mode.
5. When the computer has BoomBoom connection, it will
appear in "My Computer" as "removable disk".
2b. Connecting your music player via AUX-in input
1. Turn on BoomBoom and the music player.
2. Connect the one end of the audio cable to the headphone
jack of the music player and the other end to AUX-in port.
3. Once connected, press AUX button on your remote to
change music source.
Getting Started
EN-8
Page 14

Philips Digital PhotoFrame 8" LCD Panel BoomBoom
Begin to Use
Smart Copying flies to Internal memory
When insert a memory card or plug a USB Flash Drive,
you’ll be asked "Copy all photos and/or music to
internal memory?”
Select Yes and press ENTER to start copying photos/music to
internal memory
OR
Select NO and press ENTER and BoomBoom will start music/
photo playback from the memory source.
ZL Do not romovo the memory card or USB flash drive before the
copy process Is completed
EN-9
Begin to Use
Page 15
Philips Digital PhotoFrame 8" LCD Panel BoomBoom
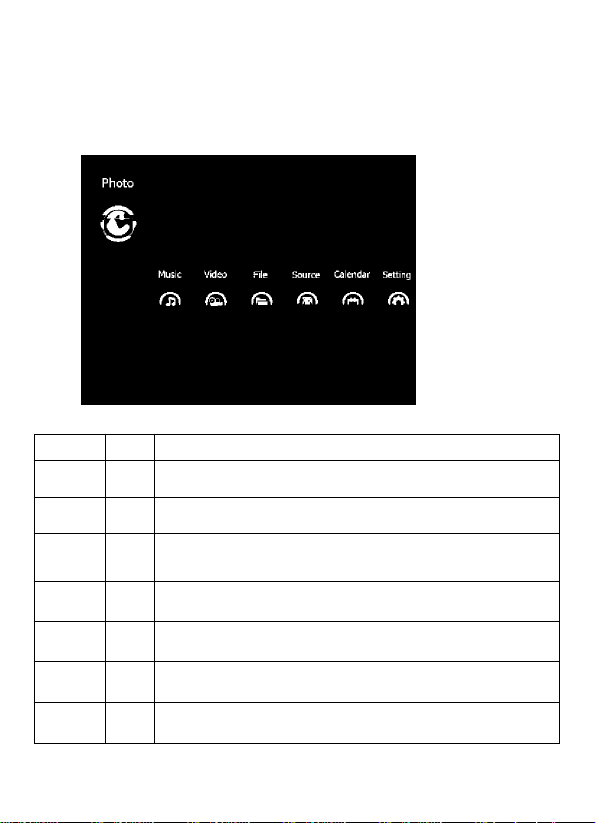
Using the main menu
Use the LEFT and RIGHT buttons on the remote to select an
animated menu icon, press ENTER to confirm selection.
Name
Photo
Music
Video
Source
Calendar Select through clock & calendar skins
Setting
Using the main menu
Icon Description
M
File
Preview, organize, and edit photos
View playlist and playback on music files
Playback favorite videos. Plug and play videos
from handheld camcorders in VIDEO mode.
Preview all content on the memory source.
Choose between internal memory, memory card, or
USB drive to retrieve content.
Setup date/time and general settings
EN-10
Page 16

Philips Digitai PhotoFrame 8" LCD Panel BoomBoom
Managing Photos
Viewing thumbnails
Enter the photo menu. The thumbnails of the first 12 photos will
show on the screen.
1. You can press LEFT and RIGHT buttons to select the photo.
2. Press ENTER/PLAY button to start the slideshow.
'hoto
3. To edit photos, press MENU during thumbnail mode.
(© Photo
ü)l HI
EN-11
1 .1 luAv“
li f O ® 0
Managing Photos
Page 17

Philips Digital PhotoFrame 8" LCD Panel BoomBoom
Five icons wiii appear at bottom of the screen: Copy,
Deiete, Rotate, Photo effect, Muiti seiect"
4. Use LEFT and RiGHT to navigate through options then
confirm with ENTER /PLAY.
• Copy: Copies the selected photo(s) to the memory storage
• Delete: Deiete the seiected photo(s).
• Rotate: Rotate the seiected photo(s).
• Photo effects: Changes photo(s) to Biack/White or Sepia.
• Multi-select: Selects multiple photos for editing.
Playing Slideshows
1. Select a photo and press Enter /Play to start slideshow.
2. To access configure slideshow, press MENU
seiected.
In slideshow mode, press "ENTER/PLAY"to pause or
restart slideshow.
There are seven options to choose from:
Contrast, Brightness, Saturation, Slideshow interval. Transition
effect. Fit to screen. Music on/off.
Playing Slideshows
EN-12
Page 18

Philips Digitai PhotoFrame 8" LCD Panei BoomBoom
Playing slideshow with music
By default, music stored in the selected storage device will
automatically be playing in the background during slideshow.
• Press Vol+/-to adjust volume
■ Press MUTE to turn on/off sound
• Press AUX to select audio-in for music playback from
another source
BoomBoom Music Player
Enter the music menu. Select the track with LEFT/RIGHT
buttons, then confirm by pressing the ENTER/ PLAY.
• Press VOL+/- buttons to adjust the volume.
' Press REPEAT button to toggle between Repeat single
track, Repeat all and No repeat.
• Press SHUFFLE button to toggle between Random and
Sequential playback.
• Press MENU to toggle between Playlist, Now Playing
and Lyrics sub-menus.
• During music playback, press and hold LEFT/RIGHT of
the Navigational guide located on back of the BoomBoom
LCD display for fast forward or rewind.
^ ' iLiSIC
Now Playing Lyrics
EN-13
BoomBoom Music Player
Page 19
Philips Digitai PhotoFrame 8" LCD Panei BoomBoom
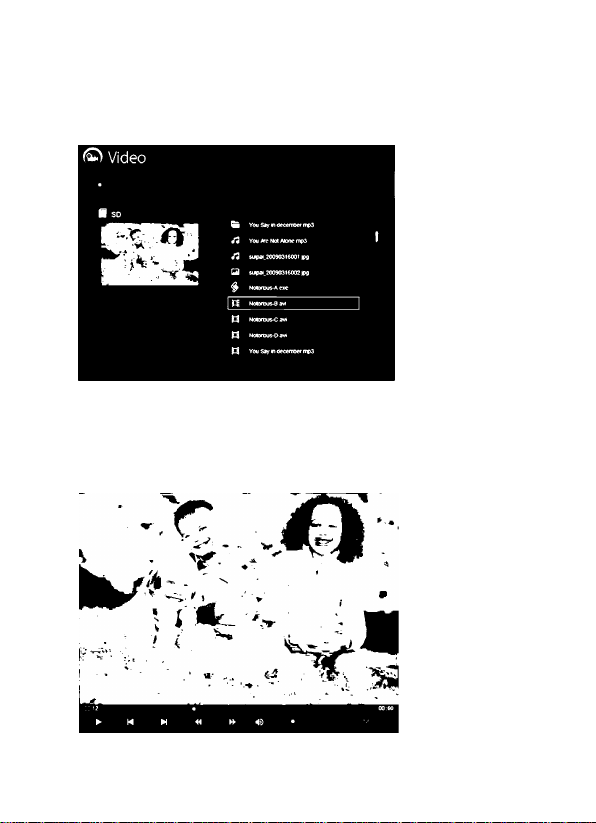
Watching Videos
Enter the Video menu. Select the video with LEFT/RIGHT
buttons, then confirm by pressing the ENTER/ PLAY.
Press the ENTER/PLAY Button to play.
Press VOL+/- buttons to adjust the volume.
During music playback, press and hold LEFT/RIGHT of the
Navigational guide located on back of the BoomBoom LCD
display for fast forward or rewind.
Watching Videos
EN-14
Page 20
Philips Digital PhotoFrame 8" LCD Panel BoomBoom
* To start playback files from the handheld camcorder
A. Power on camcorder and plug it in the into the USB port.
B. Turn on BoomBoom and go to Video mode.
C. Choose USB as a playback source.
□.Select the video you'd like to view and press ENTER to
confirm.
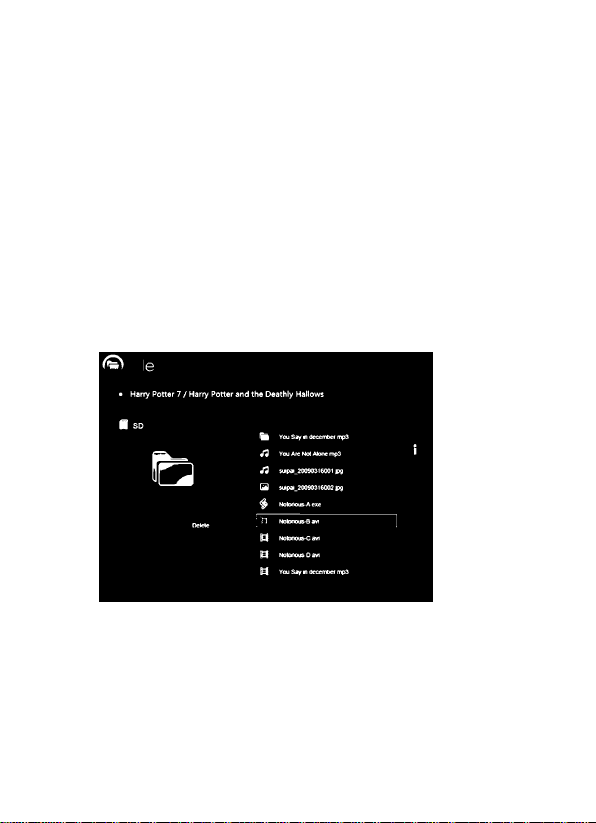
Managing Files
Enter File menu, Choose the file with LEFT/RIGHT buttons
1. Press MENU to bring up option menu to Copy or Delete.
2. Press ENTER/PLAY button to proceed with selection.
EN-15
Managing Files
Page 21

Philips Digital PhotoFrame 8" LCD Panel BoomBoom
Selecting Source
You can select source of files to be viewed, listened and played
on BoomBoom. Press LEFT/RIGHT to toggle between inserted
memory card, USB Flash Drive and internal memory.
NOTE: The ”USB" and "Memory Card” file sources will only
appear when a USB flash drive and a memory card
have been inserted to the PhotoFrame.
Selecting Source
EN-16
Page 22
Philips Digital PhotoFrame 8" LCD Panel BoomBoom
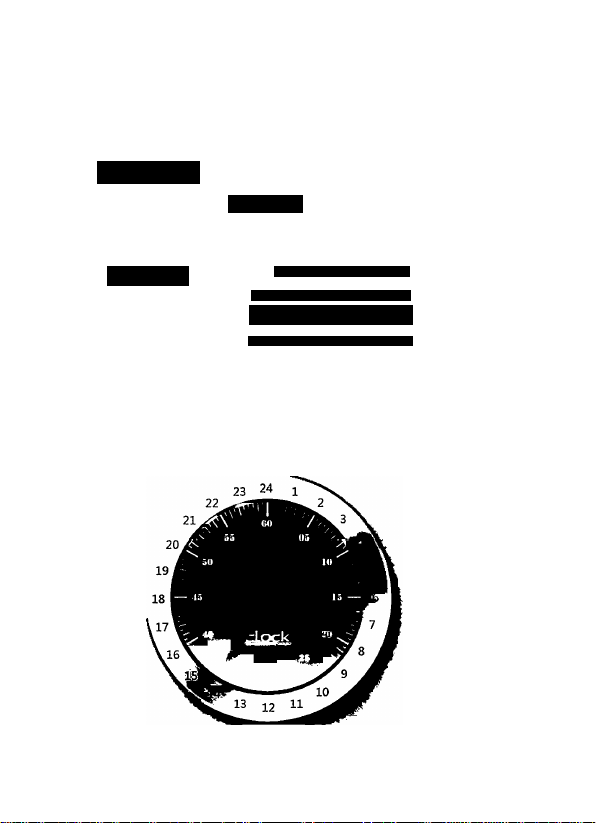
Viewing Clock and Calendar
Enter the calendar screen. Date and time will show on the screen.
1. Press Left/Right buttons to view the previous / next month.
2. Press ENTER/PLAY button to toggle between calendar and clock.
^ Calendar
09:23:56
2 3 4 5 6 7
9 10 11 12 13 14 15
16 m 18 19 20 21 22
23 24 25 26 27 28 29
EZ Access Button allows you to switch between clock mode and
slideshow quickly.
EN-17
viewing Clock and Calendar
Page 23

Philips Digitai PhotoFrame 8" LCD Panei BoomBoom
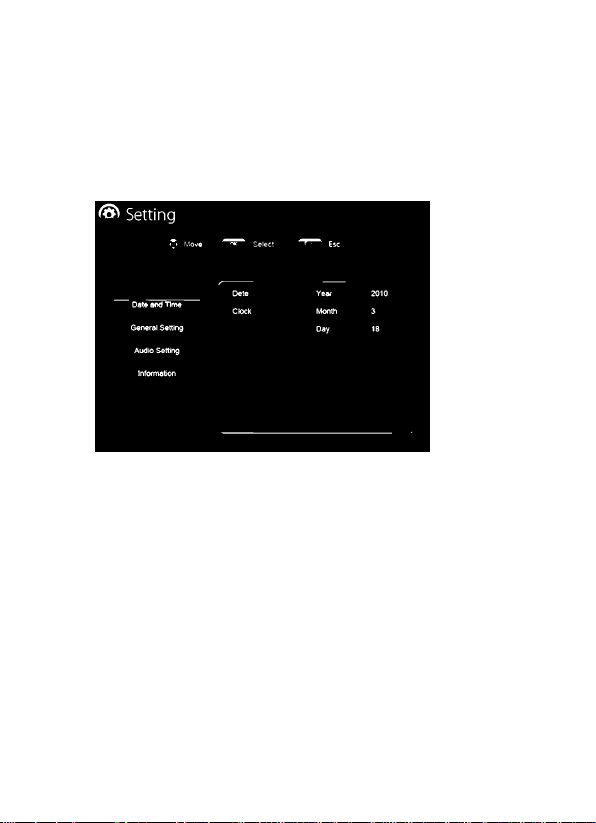
Setting
Enter the setting screen. Press Up/Down buttons to make
selection, press ENTER/PLAY button to confirm.
• Press ESC to return to previous selection.
A. Date and Time
Setting the calendar date and clock.
B. General setting
Press Up/Down buttons to make selection, press ENTER/PLAY
button to confirm.
Choose between: Smart Energy Saver, Brightness, Smart copy.
Alarm, Language, Reset settings, and Software update.
Smart Energy Saver
* When you select OFF, this unitwill operate at full energy
consumption.
* Under Auto Scheduler, the BoomBoom will automatically
power down 50% or 100% during nighttime (21:00~7:00),
and will resume normal power mode during the day
(7:00-21:00).
* Under Save 20% or Save 50%, the BoomBoom will operate
at that indicated power consumption rate at all times.
Setting
EN-18
Page 24
Philips Digital PhotoFrame 8" LCD Panel BoomBoom
A. Audio setting
Choose music playback mode: shuffle On or Off. Repeat single
song, repeat all music or no repeat.
B. Informatlon
Show the unit's model, version, total internal memory and free
memory.
EN-19
Setting
Page 25
Philips Digital PhotoFrame 8" LCD Panel BoomBoom
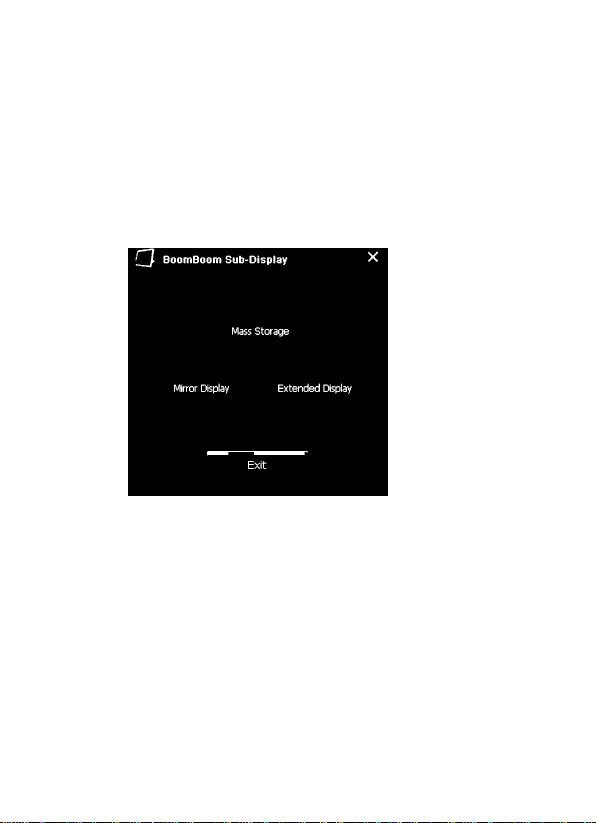
BoomBoom Duo monitor display
A PC Extended Desktop/MIrror Display software is included
with this product.
1 .Install the software to your computer (Microsoft Windows
Systems Only) with installation CD (included).
2.After software installation, connect the BoomBoom to your
computer by using the USB cable (included)
S.Open the software from the PC the follow instructions on
screen.
• Mass Storage: manage files stored on Boom Boom's internal
memory directly through PC. The computer will detect
connection as "removable disk". Double click on the "disk"
to view files.
For second monitor/extended desktop functions, Click on the
"Mirror Disp I ay "or "Extended Di8play”buitons.
• Mirror Display - The screen on the BoomBoom will mirror
your PC’s monitor, displaying exactly what you see on the
PC monitor
• Extended Display- The BoomBoom will act as an extended
monitor of your PC as a "second monitor".
BoomBoom Duo monitor display
EN-20
Page 26

Philips Digital PhotoFrame 8" LCD Panel BoomBoom
Frequently Asked Questions
In case you meet some problems when you use this set, please
read below information before you call for technical assistance
or return the set.
Question Answer
1. Please only use the attached AC and check if the
adaptor firmly plugged into the power outlet.
No power.
2. Please remember to press the power button on
the speaker to turn on the set.
3. One of the safety mechanisms may be operating.
In this event, unplug the unit from power outlet
and try again.
The remote
control does
not work.
It can't be
detected
when
connect
the set to
PC.
EN-21
1 .The distance is too long or the angle exceeds
30 degrees.
2. Replace the remote battery
3. The remote sensor is perturbed by another source.
1. Please turn on the set when connect it to PC.
2. Reconnect the set and your PC.
3. Try to use a different USB port on the PC
Frequently Asked Questions
Page 27

Philips Digital PhotoFrame 8" LCD Panel BoomBoom
Specification
* Display; 8" 4:3 800*600 Digital TFT Panel
■ Memory cards accepted: SD,MMC,MS,MS Pro
* Photo file supported: JPEG.BMP
* Music format supported: MP3, WMA, WAV
* Video format supported: Motion JPEG, MPEG4, H.264(D1)
* USB port; Host & Device *'
■ Internal memory; Approx. 2GB
* Speaker: 2.1 Stereo (2*2W+4W)
■ Power (AC Adapter): lnputAC100-220V; Output DC9V2A
Note:
*' USB Host & USB Device port can only work Individually.
Specifications are subject to change without notice.
Specifications
EN-22
Page 28

Philips Digital PhotoFrame 8" LCD Panel BoomBoom
Regulation & Compliance
Federal Communication Commission (FCC) Notice
This equipment has been tested and found to compiy with the iimits for
a Ciass B digitai device, pursuant to Part 15 of the FCC Ruies. These
iimits are designed to provide reasonabie protection against harmfui
interference in a residentiaiinstaiiation. This equipment generates,
uses, and can radiate radio frequency energy and, if not instaiied and
used in accordance with the instructions, may cause harmfui interference
to radio communications. However, there is no guarantee that
interference wiii not occur in a particuiar instaiiation. if this equipment
does cause harmfui interference to radio orteievision reception, which
can be determined by turning the equipment off and on, the user is
encouraged to try to correct the interference by one or more of the
foiiowing measures:
• Reorient or relocate the receiving antenna.
■ Increase the separation between the equipment and receiver.
' Connect the equipment into an outlet on a circuit different from
that to which the receiver is connected.
• Consult the dealer or an experienced radlo/TV technician for help.
Any changes or modification not expressly approved by the party
responsible forcompliance could void the user's authority to operate the
equipment.
This device complies with Part 15 of the FCC Rules. Operation is subject
to the following two conditions: (1) This device may not cause harmful
interference, and (2) This device must accept any interference received,
including interference that may cause undesired operation.
GNNN International
7060, Koll Center Parkway,
Suite 340 Pleasanton, CA 94566
1-877-784-0999
EN-23
Regulation & Compliance
Page 29

Philips Digital PhotoFrame 8" LCD Panel BoomBoom
Warranty
Please refer to your accompanying Warranty Card for the Warranty
Statement. For customer support or to obtain Warranty service,
please call toll free 1 -877-784-0999 or visit our website
ww№Qhilips.com/suBQort.
Warranty
EN-24
Page 30

Philips Digital PhotoFrame 8" LCD Panel BoomBoom
EN-25
Regulation & Compliance
Page 31

Cadre Photo numérique Philips écran LCD 8" BoomBoom
Droit d’auteur
Aucune partie de cette publication ne peut être reproduite, transmise,
transcrite, stockée dans un système d'extraction ou traduite dans une
langue informatique, sous n’importe quelle
forme ou par n’importe quelle moyen,
électronique, mécanique, magnétique, optique, chimique, ou
autrement, sans l’autorisation écrite préalable de la société.
Responsabilité
La société ne fait aucune représentation ou garantie,
expresse ou implicite, en ce qui concerne le contenu des présentes et
expressément toute garantie de qualité ou d’adéquation
à un usage particulier. En outre, la société se réserve le
droit de réviser cette publication et d’apporter des
modifications de temps en temps dans le contenu sans
obligation d’en avertir les révisions ou modifications.
Consignes de sécurité
Avant de faire fonctionner l'appareil, lisez attentivement et s
uivez les instructions ci-dessous.
Conserver ce manuel pour reterence future.
• Lire les consignes de sécurité et de fonctionnement avant l’utilisation
du produit. Tous les avertissements sur le produit et dans les
instructions de fonctionnement doivent être observées.
• Ne pas placer cet appareil en plein soleil ou près des sources de la
chaleur. L’enveloppe externe de ce produit peut se déformer et les
capteurs sophistiqués à l’intérieur peut être endommagé par la chaleur
excessive.
• Ne pas utiliser ce produit près de l'eau ou de laisser de II quide
de s’introduire dans ce produit. L’humidité peut provoquer un
court-circuit des composants électr oniques et entraîner des
dysfonctionnements.
Droit d'auteur
FR - i
Page 32

Cadre Photo numérique Philips écran LCD 8" BoomBoom
• Ne pas utiliser ce produit près des sources élec tromagnétiques
intenses, comme un four à micro-ondes. L'interférence peut
provoquer un dysfonctionnement de ce produit.
Ne laissez pas tomber ou appliquer de chocs / vibrations à ce
produit. Les impacts forts peuvent endommager les composants
à l'intérieur.
• Ne pas utiliser un adaptateur autre que celui fo urni avec l'appareil.
Connecter ce produit à un adaptateur secteur inconnu est très
dangereux et il peut entraîner d'incendie ou d'explosion.
• Ne pas couper, plier, modifier ni placer des objets lourds sur le
cordon d'a limentation adaptateur. Sinon, l'isolation par l'extérieur
_ peut être endommagé et provoquer un court-circuit ou un incendie.
«S'il y a des odeurs étranges ou émission de la chaleurde ce produit
ou tout autre signe de mauvais fonctionnement, débranchez l'unité
de l'alimentation et contactez votre revendeur pour inspection ou
service.
• Utilisez un chiffon doux pour nettoyer la surface de l'écran.
• Ne pas utiliser de nettoyants liquides ou nettoyants en verre.
• Si un objet étranger ou de l'eau pénètre dans ce produit, éteignez
immédiatement et débranchez l'adaptateur. Ensuite, enlevez l’objet
étranger ou de l'eau, puis envoyer le produit au centre de service.
• Ne tentez pas de démonter ou de modifier ce produit, to ut
modifications non autorisées annule la garantie.
• Bien que le panneau LCD est fabriqué avec la technologie de haute
précision et de pixels effectifs de 99,99% ou plus, il se peut que des
points noirs ou des points lumineux (rouge, bleu ou vert) apparaissent
en permanence sur l'écran LCD. Il s'agit d'un propriété structurelle de
l'écran LCD et il n'est pas un dysfonctionnement.
FR - ii
Conserverce manuel pour référence future.
Page 33

Cadre Photo numérique Philips écran LCD 8" BoomBoom
Table des matières
Consignes de sécurité —
Qu'est-ce que dans ia boite ■
Vue d'ensembie
-------------Téiécommande--------------Mise en route
Commencer à utiiiser
-----------------
-------Utiiisation du menu principai ■
Gestion de Photos
Jouer ie dispositif
-----------
------------Lecteur de musique BoomBoom Regarder des vidéos
Gestion de fichiers
-------------
----------------
Sélection de la source------------
Affichage horloge et calendrier -
Cadre
------------------------------Sous affichage BoomBoom Foire aux questions
--------Spécifications----------------Règlement et de la conformité ■
Garantie
---------------------------
-1
- 2
—3
- 5
.—7
.—9
■—10
— 11
-—12
—13
■~14
—-15
■—16
■—17
— 18
■—20
—21
— 22
—23
-—■24
Table des matières
FR - iü
Page 34

Cadre Photo numérique Philips écran LCD 8" BoomBoom
Cher client:
Merci d'avoir acheté notre Cadre Photo numérique Phiiips.
Maintenant, vous pourrez afficher vos photos numériques en
tant que la bibliothèque avec une étonnant e clarté et de partager
de bons souvenirs avec des amis et la famille.
Pour profiter plus de votre nouveau produit Philips, veillez lire
ce Manuel utilisation avant toute utilisation.
Principales caractéristiques
BoomBoom est doté des caractéristiques suivantes:
• Facile à brancher et afficher vos vidéos préférées sur l'ordinateur
de poche, caméscope, compatible avec la plupart des caméscopes
de poche
• Écouter de la musique de votre lecteur MP3 sur BoomBoom
via le port AUX-in.
• Élargir votre bureau PC avec 'Extended Display (Affichage
d'extension)’ ou Affichage Miroir avec la fonction d'affichage du
moniteur Duo
• La lecture Instant Music / vidéo de votre carte mé moire grâce
à notre support de la vidéo H.264 7
• Personnaliser 'Energy Saver (Économiseur d’énergie)’qui fournit
cinq façons intelligentes de contrôle de consommation d'énergie
• Qualité audio Cristal avec ha ut-parleurs 2.1 canaux stéréo
FR -1
Consignes de sécurité
Page 35

Cadre Photo numérique Philips écran LCD 8" BoomBoom
Contenu de la boîte
Après le déballage, assurez vous que les accessoires suivants
sont fournis avec votre appareil.
1. BoomBoom
2. Télécommande
5. adaptateur secteur AC
4.câbleUSB
5-câble Audio
6. Installation CD
7. Manuel Utilisateur
8. guide de démarrage rapide
9. carte enregistrement
tO.carte garantie
L’apparence du produit réel peut différer des Illustrations
présentées dans ce manuel de l'utilisateur.
Qu'est-ce que dans la boite
FR - 2
Page 36

Cadre Photo numérique Philips écran LCD 8" BoomBoom
Vue d'ensemble
11
Description
. Bouton ESC (ECHAP)
Annuler l'opération en cours et/oudes retours à la pageprécédente.
MENU
Affiche le menu pop-up.
Guide de navigation
3 Quatre voies directionnelles pour faire défile r de haut en bas,
à gauche, et le droit à l'élément suivant
boutons ENTRER
confirmer opération ou sélection.
^ bouton Power
Appuyez sur le bouton pour allumer ou éteindre l'appareil.
AUX in
6 Connectez votre lecteur de musique à cette prise d'entrée auxiliaire
__
de 3,5 mm avec un câble audio (fourni).
___________________
FR - 3
Vue d'ensemble
Page 37

Cadre Photo numérique Philips écran LCD 8" BoomBoom
Jack Power
Branchez une extrémité de l'adaptateur d'alim entation CA dans
la prise d'alimentation et l'autre extrémité dans la prise
électrique mural.
Entrées USB (type A)
‘Permet les lecteurs flash USB de lire la musique, les vidéos et les
images stockées sur le disque. Copier de la musique et des
images à l'appareil avec
• Invite automatique lorsque le disque est Inséré.
■ Connectez votre caméscope de poche via une entrée USB et
lecture des fichiers directement en passant en mode VIDEO.
Mini Port USB
• Il vous permet de connecter BoomBoom au PC gérant les fichiers
directement comme source de mémoire externe.
■ Pour utiliser écran double, Installez le logiciel founis et
communiquer BoomBoom de PC en suivant les instructions.
lecteur de carte 3-en-1
Insérez SD / SDHC, MMC (+),MS à la lecture de votre contenu
10
personnalisé. MS Pro, MS Duo et d'autres variations de la carte
mémoire peut être utilisée avec des adaptateurs de cartes
(non inclus).
Woofer (Caisson de basse)
11
Sortie des basses ultime pour l’audio.
Vue d'ensemble
FR- 4
Page 38

Cadre Photo numérique Philips écran LCD 8" BoomBoom
Télécommande
"n
Q)
3
O
n°
1
2
3
4
5
6
7
8
9
10
FR- 5
Description
Icône
Activer / désactiver l’unité
®
EZ Access bouton
Basculer entre affichage de diapo et d'horloge
Activer / désactiver le mode Silence
Appuyez pour régler le volume ou vers le haut / bas
©
0
Confirmer la sélection
Déplacer la gauche / droite au point suivant. Avance
0
rapide ou rappelle un chanson quand en mode de lecture
Retour à la page précédente et / ou le menu d'accès
0
Retourne au menu d'accueil
®
Affiche le menu option
©
Raccourci pour lire des photos
©
Télécommande
Page 39

Cadre Photo numérique Philips écran LCD 8" BoomBoom
n"
11
12
13
14
15
Description
Icône
© Raccourci pour jouer de la musique
Le mode répéter la chanson en cours ou d'albums
©
Appuyez pour Jouer des chansons dans un ordre aléatoire
©
Appuyez pour Jouer de la musique du lecteur MP3 lorsqu'il
0
est connecté via câble audio
raccourcis pour lire des vidéos
0
Remplaœment de la pile de la télécommande
Sur le dos de la télécommande, pincez la patte de verrouillage, puis tirez.
Remplacez-la par une pile neuve CR2025, + vers le haut, puis Insérez
le plateau de batterie.
Etape 1 :
Étape 2:
Télécommande
FR - 6
Page 40

Cadre Photo numérique Philips écran LCDS" BoomBoom
Mise en route
1. Raccordement électrique
Connectez l'adaptateur de l'appareil, puis l'autre extrémité à une
prise de courant. Appuyez sur bouton d'alimentation pour allumer
l'appareil.
2. Insérez une carte mémoire / disque USB
Pour lire vos propres fichiers, insérez une carte mémoire compatible
ou un lecteur flash USB qui contient les fichiers pris en charge dans le
emplacement correspondant sur l'appa reil comme illustré ci-dessous.
Pour commencer la lecture des fichiers à partir du caméscope de poche
a. Mettez sous tension le caméscope et branchez-le dans le port USB.
b. Allumez BoomBoom et passer en mode vidéo.
c. Choisissez USB comme source de lecture.
d. Sélectionnez la vidéo que vous souhaitez afficher et appuyez sur
ENTRER pour confirmer.
FR - 7
Mise en route
Page 41

Cadre Photo numérique Philips écran LCD 8" Boom Boom
2a. Connexion à un PC via un câbie mini-USB
1. Démarrez l'ordinateur et allumez BoomBoom.
2. Branchez la plus petite extrémité du câble USB au port mini USB.
3. Branchez l'autre extrémité du câble USB à un port USB sur le
ordinateur, assurez-vous que les connecteurs sont bien Insérés.
4. Une fois connecté, BoomBoom entrera en mode de transfert PC.
5. Lorsque l'ordinateur est connecté de BoomBoom, Il sera
apparaissent dans « Poste de travail » comme «disque amovible».
2b. Connexion de votre iecteur de musique via i'entrée AUX-in
1. Allumez BoomBoom et le lecteur de musique.
2. Connectez l'extrémité du câble audio à la sortie écouteur du lecteur
de musique et l'autre extrémité â la prise AUX-in.
3. Une fols connecté, appuyez sur le bouton AUX de votre
télécommande pour source afin de changer de musique.
Mise en route
FR- 8
Page 42

Cadre Photo numérique Philips écran LCD 8" BoomBoom
Commencer à utiliser
Smart Copie de fichiers sur ia mémoire interne
Lorsque insérer une carte mémoire ou de brancher un USB Flash Drive,
il vous sera demandé "Copier toutes les photos et / ou de la musique à
mémoire interne? "
Sélectionnez Oui et appuyez sur ENTRER pour démarrer la copie
des photos / musique dans la mémoire interne
OU
Sélectionnez NO et appuyez sur ENTRER et BoomBoom va commencer
Lecture de musique / de photos de la source de la mémoire.
A Ne pas retirer la carte mémoire ou un lecteur flash USB avant
que le processus de copie soit terminé
FR - 9
Commencer à utiliser
Page 43

Cadre Photo numérique Philips écran LCD 8" BoomBoom
Utilisation du menu principal
utilisez les boutons gauche et droite sur la télécommande pour
sélectionner une icône du menu d'animation, appuyez sur
ENTRER pour confirmer la sélection.
Page 44

Cadre Photo numérique Philips écran LCD 8" BoomBoom
Gestion Photos
Affichervignettes
Entrez dans le menu photo. Les vignettes des 12 premières photos
seront affichées sur l'écran.
1. Vous pouvez appuyer sur les boutons gauche et droite pour
sélectionner la photo.
2. Appuyez sur ENTRER / PLAY pour démarrer le diapo.
3. Pour éditer des photos, appuyez sur MENU en mode vignette.
(S) Photo
FR -11
Ll
if tP O ® 0
Gestion de Photos
Page 45

Cadre Photo numérique Philips écran LCD 8" BoomBoom
Cinq icônes apparaîtront en bas de i'écran: Copie,
Supprimer, Rotation, Effet photo, séiection Muiti "
4. Utiiisez ies touches gauche et droite pour naviguer dans les
options, puis confirmer avec ENTRER / PLAY.
Copier: Copie la photo sélectionnée (s) à la mémoire de stockage
sélectionnés.
Supprimer: pour supprimer la photo sélectionnée (s).
Pivoter: faites pivoter la photo sélectionnée (s).
Effets photo: Changer photo en noir / blanc ou sépia.
Multi-select : Sélectionnez plusieurs photos pour l'édition.:
Lecture de diapo
1. Sélectionnez une photo et appuyez sur Entrée / Play pour lancer
le diapo. En mode diapo, appuyez sur "ENTRER / PLAY" pour
mettre en pause ou reprendre le diapo.
2. Pour accéder à configurer diapo, appuyez sur MENU
Il y a sept options au choix:
Contraste, luminosité, saturation, intervalle de diapo, effet Transition,
Adapter à l'écran, la musique on / off.
Jouer le diapositif
FR- 12
Page 46

Cadre Photo numérique Philips écran LCD 8" BoomBoom
Présenter diapo avec la musique
Par défaut, la musique stockée sur le périphérique de stockage
sélectionné automatiquement en arrière-plan pendant la présentation
de diapositif.
• Appuyez sur Vol + / - pour régler le volume
• Appuyez sur MUTE pour activer / désactiver le son
• Appuyez sur AUX pour sélectionner l'audio pour écouter de la
musique à partir d’une autre source
Lecteur de musique BoomBoom
Entrez dans le menu musique. Sélectionnez la piste avec touches
LEFT / RIGHT, puis validez en appuyant sur la ENTRER / PLAY.
• Appuyez sur VOL + / - pour régler le volume.
• Appuyez sur le bouton REPEAT pour basculer entre Répéter un
seul piste. Répéter tout et ne sont pas répétées.
• Appuyez sur la touche SHUFFLE pour basculer entre la lecture
aléatoire et par ordre.
• Appuyez sur MENU pour alterner entre les sous-menus liste de
lecture. Lecture courante et Lyrics.
• Pendant la lecture de musique, appuyez et maintenez le guide de
navigation GAUCHE / DROITE enfoncé situé sur le dos de l’écran
LCD BoomBoom pour avancer ou reculer rapidement.
FR -13
Lecteur de musique BoomBoom
Page 47

Cadre Photo numérique Philips écran LCD 8" BoomBoom
Regarder des vidéos
Entrez dans le menu Vidéo. Sélectionnez la vidéo à GAUCHE /
DROITE, puis confirmez en appuyant sur la ENTRER / PLAY.
• Appuyez sur la touche ENTRER / PLAY pour jouer.
• Appuyez sur VOL + / - pour régler le volume.
’ Pendant la lecture de musique, appuyez et maintenez GAUCHE /
DROITE du Guide de navigation situé sur le dos de l'écran LCD
BoomBoom pour avancer ou reculer rapidement.
Regarder des vidéos
FR -14
Page 48

Cadre Photo numérique Philips écran LCD 8" BoomBoom
Pour commencer la lecture des fichiers à partir du caméscope de poche
A. Mettez sous tension le caméscope et branchez-le dans le dans
le port USB.
B. Allumez BoomBoom et passez en mode vidéo.
C. Choisissez USB comme source de lecture.
D. Sélectionnez la vidéo que vous souhaitez afficher et appuyez sur
ENTRER pourconfirmer.
Gestion des fichiers
Entrez le menu Fichier, choisissez le fichier avec des boutons
DROITE / GAUCHE
1. Appuyez sur MENU pour faire apparaître le menu option pour
copier ou supprimer.
2. Appuyez sur ENTRER / PLAY pour procéder à la sélection.
FR-15
Gestion de fichiers
Page 49

Cadre Photo numérique Philips écran LCD 8" BoomBoom
Source Sélection
Vous pouvez sélectionner la source des fichiers à consulter, écouter
sur BoomBoom. Appuyez sur GAUCHE / DROITE pour choisir entre
carte mémoire, clé USB et la mémoire interne.
REMARQUE: Les sources du fichier "USB" et "carte mémoire"
n'apparaissent quand un lecteur flash USB et une carte mémoire ont
été Insérés pour la Cadre Photo.
Sélection de la source
FR-16
Page 50

Cadre Photo numérique Philips écran LCD 8" BoomBoom
Affichage Horloge et Calendrier
Entrez dans l'écran du calendrier. Date et heure s'affiche sur l'écran.
1. Appuyez sur les boutons Gauche / Droite pour afficher le mois
précédente / prochain.
2. Appuyez sur le bouton ENTRER / PLAY pour basculer entre
calendrier et l'horloge.
Le bouton Access EZ vous permet de basculer entre le mode
horloge et diapo rapidement.
FR -17
Affichage horloge et calendrier
Page 51

Cadre Photo numérique Philips écran LCD 8" BoonnBoom
Réglages
Entrez dans le mode de réglage d'écran. Appuyez sur Haut / Bas
pour faire sélection, appuyez sur ENTRER / PLAY pour confirmer.
Appuyez sur ESC pour revenir à la sélection précédente.
Date et heure A-
Réglage de la date de calendrier et d'horloge.
B. Général réglage
Appuyez sur Haut / Bas pour faire une sélection, appuyez sur
ENTRER / PLAY bouton pour confirmer.
Choisissez entre: Smart Energy Saver, Luminosité d'image,
copie Smart, alarme, la langue, réinitialisation des réglages, et
mise à jour de logiciels.
Économiseur D’énergie Intelligent
• Lorsque vous sélectionnez OFF, cet appareil va fonctionner à
la consommation d'énergie compléta
• Sous Auto Schedule, laconsommation d’énerge BoomBoom baiss
de 50% ou 100% pendant la nuit automatiquement (21:00~ 7:00)g
et revient en mode normale pendant la journée (7:00 ~ 21:00).
• Sous 20% ou 50%, le BoomBoom fonctionnera à ce taux de
consommation de puissance indiquée à tout moment.
Cadre
FR -18
Page 52

Cadre Photo numérique Philips écran LCD 8" BoomBoom
A. Réglage Audio
Choisissez le mode de lecture de musique: aléa On ou Off.
Répéter un seul chanson, répéter toutes les musiques ou
pas répéter.
B. Information
Voir le modèle de l'unité, la version, le total de mémoire
interne et mémoire libre.
FR -19
Cadre
Page 53

Cadre Photo numérique Philips écran LCD 8" BoomBoom
Affichage moniteur BoomBoom Duo
Un logiciel PC de bureau étendu / Affichage miroir est inclus avec
cette produit.
1. Installez le logiciel sur votre ordinateur (Seuls les systèmes
Microsoft Windows) avec CD Rom d'installation (inclus).
2. Après l'installation du logiciel, connecter l'BoomBoom à votre
ordinateur en utilisant le câble USB (fourni)
S.Ouvrez le logiciel à partir du PC en suivant les instructions sur l’écran.
• Stockage de masse: gérer les fichiers stockés sur la mémoire internes
BoomBoom directement par le PC. L'ordinateur détecte connexion en
tant que "disque amovible". Double-cliquez sur le "disque"pour afficher
les fichiers.
Pour le second moniteur / fonctions de bureau étendu, cliquez sur le Miroir
d'affichage "ou" Extended Display ".
• Affichage miroir - L'écran sur le BoomBoom sera l’image reflétée du
moniteur de votre PC, affichant exactement ce que vous voyez sur
moniteur de PC
• Affichage Extension -Le BoomBoom agira comme un moniteur étendu
de votre PC comme un «moniteur secondaire ".
Sous affichage BoomBoom
FR - 20
Page 54

Cadre Photo numérique Philips écran LCD 8" BoonnBoom
Foire aux questions
Dans le cas où vous rencontrez des problèmes lorsque vous utilisez
cet appareil, veillez lire cl-dessous les informations avant d'appeler
l'assistance technique ou faire retourner l’appareil.
Question Réponse
Pas de
puissance.
1. Veillez utiliser uniquement les AC ci-joint et vérifier
si l’adaptateur est bien branché dans la prise.
2. N'oubliez pas d'appuyer sur le bouton
d'alimentation sur le haut-parleur pour l'activer.
3. Un des mécanismes de sécurité peut être en
fonctionnement.
Dans ce cas, débranchez l'unité de prise de courant
et essayez à nouveau.
La
télécommande
ne
fonctionne pas.
Il ne peut pas
être détecté
lors de la
connexion au
PC.
FR- 21
1 .Le distance est trop longue ou l'angle dépasse
30 degrés.
2. Remplacer la pile de la télécommande
3. Le capteur à distance est perturbé par une autre
source.
1. Veillez activer le Jeu quand il se connecter au PC.
2. Rebranchez l'appareil et votre PC.
3. Essayez d'utiliser un autre port USB sur le PC
Foire aux questions
Page 55

Cadre Photo numérique Philips écran LCD 8" BoomBoom
Spécification
Affichage: 8 "4:3 800 * 600 Groupe Digital TFT
Les cartes mémoire acceptées: SD, MMC, MS, MS Pro
Les fichier photo pris en charge: JPEG, BMP
Format de musique: MP3, WMA, WAV
Format vidéo pris en charge: Motion JPEG, MPEG4, H.264
1port USB: Hôte & Dispositif *
Mémoire interne: Env. 2 Go
Président: 2.1 stéréo (2 * 2W 4 W)
Alimentation (adaptateur secteur): Entrée AC100-220V; sortie 2A DC9V
Note:
* ^USB Host & port périphérique USB ne peut fonctionner individuellement!
Les spécifications sont sujettes à changement sans préavis.
Spécifications
FR- 22
Page 56

Cadre Photo numérique Philips écran LCDS" BoomBoom
Règlement et conformité
Notes Federal Communications Commission (FCC)
Cet équipement a été testé et jugé conforme aux limites d'un appareil
numérique de classe B. Conformément à la partie 15 des Règles de la
FCC. Ces limites sont conçues pour fournir une assurance raisonnable
protection contre les Interférences dans une Installation résidentielle.
Cet équipement peut émettre des fréquences radio et s'il n'est pas
Installé et utilisé conformément aux Instructions, il peut
provoquer des interférences aux communications radio.
Cependant, Il n'exIste aucune garantie que l'Interférence ne se produise
dans une installation particulière. Si cet équipement provoque des
interférences avec la réception radio ou de télévision, qui peut être
détecté en mettant l'équipement hors tension, l'utilisateur est encouragé
à essayer de corriger l'interférence par une des mesures suivantes:
• Réorienter ou déplacer l'antenne de réception.
• Augmenter la distance entre l'équipement et le récepteur.
• Brancher l'équipement dans une prise sur un circuit différent de
celui auquel le récepteur est connecté.
• Consulter le revendeur ou un technicien radio / TV. Règlement et
conformité
Tout changement ou modification non expressément approuvée par
la partie
responsable de la conformité pourrait éviter l'autorité de l'utilisateur
pour faire fonctionner l'équipement.
Cet appareil est conforme à la Partie 15 des règlements de la FCC.
Opération est soumise aux deux conditions suivantes: (1) ce dispositif
pourrait ne pas provoquer d'interférences nuisibles, et (2) cet appareil
doit accepter toute Interférence reçue, y compris les Interférences
qui pourraient causer un fonctionnement indésirable.
GliNii International
7060, Koll Center Parkway,
Suite 340 Pleasanton, CA94566
1-877-784-0999
FR - 23
Règlement et de la conformité
Page 57

Cadre Photo numérique Philips écran LCD 8" BoomBoom
Garantie
Veillez vous référer à votre carte de garantie accompagnant la
Déclaration Garantie. Pour le support technique ou pour obtenir un
service de garantie,veillez appeler 1-877-784-0999 gratuit ou visitez
notre site Web
www.phlllps.com/support.
Garantie
FR- 24
Page 58

Français
in
(N
Page 59

^hilips^Marco^defoto_Digital_LCD_Pa^
Copyright
Ninguna parte de esta publicación se puede reproducir, transmitir,
transcribir, almacenar en un sistema de recuperación o traducir a
cualquier idioma o a lenguaje de programación, en cualquier forma o
por cualquier medios, electrónico, mecán ico, magnético, óptico,
químico, manual o de otra manera, sin el permiso escrito previo
de la compañía.
Negación
La compañía no hace ningunas representaciones o garantía, expresada
o imp licada, con respecto al contenido de esto y niega específicamente
cualqu ier garantías, comercia bilidad o aptitud para cualquier propósito
particular. Además, la compañía reserva el derecho de revisar esta
publicación y de realizar cambios de vez en cuando en el contenido de
esto no es obligatorio notificara cualquier persona de tal revisión o cambio.
Instrucciones de seguridad
• Antes de funcionar la unidad, lea y siga cuidadosamente las
instrucciones abajo.
• Conserve este manual de usuario para la referencia futura.
• Lea las instrucciones de seguridad y de funcionamiento cuidadosamente
antes de usar el producto. Todas las advertencias en el producto y en las
instrucciones de funcionamiento deben ser observadas.
• No coloque este producto bajo luz del sol directa o fuentes de calor
cercanas. La cubierta externa de este producto puede deformirse y el
interior sofisticado de los sensores puede ser dañado debido al calor
excesivo.
• No utilice este producto cerca del agua ni permita que cualquier líquido
consiga dentro deeste producto. La humedad puede causarcortocircuitoj
a los componentes electrónicos y conducir a malfuncionamientos.
• No utilice este producto cerca de fuentes electromágneticas fuertes,
tales como un horno de microondas. La interferencia puede hacer este
producto funcionar incorrectamente.
• No caiga ni aplique el choque/vibración a este producto. Los impactos
fuertes pueden dañar los componentes internos.
ES-i
Page 60

^Philips_Marco_defoto_Digital_LCD_^
• No utilice un adaptador de energía desconocido con excepción de
el que está proporcionado con la unidad. Conectar este producto
con un adaptador de energía desconocido es muy peligroso y puede
conducir al fuego o a la explosión.
• No corte, no doble, no modifique, ni ponga los objetos pesados, en
la cuerda del adaptador de energía. Sí no el aislamiento externo se
puede dañar y causar costo circuito o fuego.
• Si hay olores o calor extraños que emiten de este producto o cualquier
signo demalfuncionamiento, desconecte la unidad de la energía
inmediatamente y entre en contacto con su distribuidor para la
inspección o mantenimiento.
• Utilice un paño liso, suave para limpiar la superficie de la pantalla.
No utilice los limpiadores líquidos o los limpiadores de cristal.
• Si una sustancia o agua extranjera entra en este producto, apague la
energía inmediatamente y desconecte el adaptador de energía.
Después, quite la sustancia extranjera o agua, y después envíe el
producto a su centro de servicio más cercano. No procure desmontar
o modiñcareste producto, cualquier modiñcación desautorizada anulará
la garantía. Aunque el panel de LCD se hace con tecnología de alta
precisión y tiene los píxeles eficaces de 99.99% o más, los puntos
negros o los puntos brillantes de luz (rojo, azul o verde) pueden
aparecer constantemente en el panel de LCD. Ésta es una característica
estructural del panel de LCD y no es un malfuncionamiento.
ES - ii
Page 61

^hiNps_Marco^deJoto^Digital_LCD_Pa^
Contenido
Instrucciones de seguridad —Que hay en la caja
General
-------------------------Control remotoConseguir comenzandoComenzar a usar-------Usar el menú principal —
Manejo de Fotos
Reproducir Diapositiva
Reproductor de Música Boom BoomVer Videos
Manejar Archivos—
Seleccionar FuenteVer Relog y CalendarioConfiguración—
Exhibición BoomBoom
Preguntas hechas con frecuenciaEspecificaciones--------------------Regulación y ConformidadGarantía—
-----------
--------
----------------
--------------------------------
-------------
-1
-2
—3
—5
— 7
—9
— 10
■—11
—12
—13
— 14
—15
—16
—17
—18
—20
—21
—22
—23
— 24
ES - iü
Page 62

^Philips_Marco^deJoto_Digital_LCD_Par^^
Estimado cliente:
Gracias por traer nuestro Philips Marco de Foco Digital en su
hogar. Usted ahora podrá ver su biblioteca digital creciente de imagen
en una claridad imponente y compartir grandes memorias con los
amigos y la familia.
Para conseguir la mayoría de su nuevo producto Philips, por favor lea
a través de este manual de usuario entero antes de usar.
Características claves
Boom Boom se equipa de las características siguientes:
• Fácil conectar y usar para exhibir sus videos preferidos en el
videograbadora portátil, compatible con la mayoría de las
videograbadoras portátiles
• Reproducir música de su reproductor MP3 en Boom Boom vía puerto
AUX-in
• Amplíe su escritorio de la PC con la exhibición extendida o la exhibición
del espejo con la característica de Exhibición de Dúo monitor
■ Reproducción inmediata de Música Arideo de su tarjeta de memoria
gracias a nuestro apoyo de video H.264
• Personalice el ahorrador de energía que proporciona cinco maneras
Inteligentes de controlar el consumo de energía
• Calidad audio clara cristalina con altavoces estereo de 2.1 canales
ES -1
Instrucciones de seguridad
Page 63

^hiNps_Marco^deJoto^Digital_LCD_Pa^
Que hay en la caja
Después de desempaquetar, asegure que los accesorios siguientes
se proporcionan con su unidad.
1. BoomBoom
2. Control remoto
3. Adaptador de corriente CA
4. Cable de USB
5. Cable de audio
6. CD de instalación
7. Manual de usuario
8. Guía de comienzo rápido
9. Tarjeta de registro
10. Tarjeta de arantía
©
Tarjeta de registro ~
-©
ÍTW El aspecto real del producto puede variar de las ilustraciones
— ©
Tarjeta de garantía"
demostradas en este manual de usuario.
Que hay en la caja
Que hay en la caja
ES - 2
Page 64

^RTÍIips_Marco^deJoto^Digital_LCD_^^
Descripción
11
No.1Descripción
Botón ESC (ESCAPE)
Cancela la operación actual y/o vuelve a la página anterior.
MENU
Exhibe el menú.____________________________________
Guía navegacional
El control direccional de cuatro vías para desplazar arriba, abajo,
izquierda, y derecha al artículo siguiente
Botón ENTER
Confirma ia operación o la selección.
Botón Energía
Presione el botón para encender o apagar la unidad.
AUX. in
Conecte a su reproductor de música a través de este conector
auxiliar de 3.5mm con el cable de audio (incluido).
ES-3
General
Page 65

Philips Marco de foto Digital LCD Panel 8" BoomBoom
7 Conector de energía
Conecte un extremo del adaPtador de energía CA en el conector
de energía y el otro extremo en la toma de energía.
8 Entrada USB (Tipo-A)
* Permite cuatro dispositivos USB flash. Reproducir Música, videos,
e imágenes almacenados en el dispositivo.
■ Copia directa de música e imágenes al dispositivo con aviso
automático cuando se inserta el dispositivo.
* Conecte su videocamera portátil vía entrada de USB y reproducir
archivo directamente entrando al modo de VIDEO.
9 Mini puerto de USB
* Permite que usted conecte el Boom Boom a la PC y manejar
archivos directamente como fuente de memoria externa.
* Para utilizar la característica dual monitor, instale el software
proporcionado y conecte el BoomBoom con la PC según las
instrucciones._______________________________________
10 Lector de tarjetas 3 en 1
Inserte SD/SDHC, MMC (+), MS para reproducir su contenido
personalizado. MS Pro, MS Duo y otras variaciones de la tarjeta de
memoria pueden ser utilizados con los adaptadores de tarjeta
(no incluidos).
11 Woofer
Salida de graves para la última experiencia de audio.
General
ES -4
Page 66

^Philips_Marco_deJoto_Digital_L^
Control remoto
No. Icono Descripción
1
2
3 Activar/Desactivar el modo mudo
Encender/Apagar la unidad.
®
Botón de acceso EZ
©
Cambie entre la opinion de Diapositiva y Ver reloj
4
5
6
7
8
9
10
ES - 5
Presione para ajustar el volumen o mover arriba/abajo
©
0
Confirme la selección
Mover a la izquierda/derecha al artículo siguiente. Avanzar
0
0 recordar una canción en modo de reproducir
Volver a la página anterior y/o acceso al menú
0
Volver al menú inicio
®
Demostrar el menú de la opción
©
Acceso directo para reproducir fotos
©
Control remoto
Page 67

Philips Marco de foto Digital LCD Panel 8" BoomBoom
No. Icono Descripción
11
©
Acceso directo para reproducir música
12
13
14
15
Fija la canción o selección actual del álbum al modo de repetir
©
Presione para reproducir canciones aleatorio
©
Presione para reproducir música del reproductor MP3
0
cuando está conectado vía el cable de audio
Acceso directo para reproducir videos
0
Substituir ia batería dei controi
En la parte posteriora del cxintrol, presione la lengüeta de fijación
después jale.
Substituya por una batería nueva CR2025, + lado para arriba, después
Inserte la bandeja de la batería.
Paso 1:
Paso 2:
Control remoto
ES-6
Page 68

^Philips_Marco_deJoto_Digital_LCD_Pa^
Conseguir comenzado
1. El conectar con la energía
Conecte el enchufe de adaptador CA con la unidad, entonces el otro
extremo a una toma de energía.
Presione el botón Power para encender la unidad.
2. Inserte una tarjeta de memoria/dispositivo de USB
Para reproducir sus propios archivos, Inserte una tarjeta de memoria
compatible o dispositivo flash de USB que contenga archivos apoyados
en la ranura correspondiente en la unidad según lo Ilustrado abajo.
Para comenzar a reproducir archivos de la videocamara portátil
a. Encienda la videocamara portátil y conecte en el puerto de USB.
b. Encienda el BoomBoom y vaya al modo de video.
c. Elija el USB como fuente de reproducción.
d. Seleccione el vídeo que usted quiere very presione ENTER para
confirmar.
ES - 7
Conseguir comenzando
Page 69

Philips Marco de foto Digital LCD Panel 8" BoomBoom
2a.Conectar con PC vía el cable minl-USB
1. Encienda la computadora y encienda el Boom Boom.
2. Conecte el extremo pequeño del cable USB con el mini puerto de USB.
3. Conecte el otro extremo del cable USB con un puerto de USB en la
computadora, cerciórese de que los conectadores están Insertados
completamente.
4. Una vez que esté conectado, Boom Boom entra en modo de
transferencia de PC.
5. Cuando la computadora tiene conexión de BoomBoom, aparecerá en
“Mi computadora” como “Disco desprendible”.
2b. Conectar su reproductor de música vía entrada de AUX-in
1. Encienda Boom Boom y reproductor de música.
2. Conecte un extremo del cable de audio con el conector del auricular
del reproductor de música y el otro extremo con el puerto AUX-in.
3. Una vez que esté conectado, presione el botón AUX. en su control
para cambiar fuente de música.
Conseguir comenzando
ES-8
Page 70

^hilipsJ\^arco_deJoto_Digital_LC^
Comenzar a usar
Copiar archivos inteligente a la memoria interna
Cuando inserta una tarjeta de memoria o conecta un dispositivo
de USB flash, ie preguntará a“Copiar todas ias fotos y/o musica
a ia memoria interna?”
Copy all photos to
Internal memory?
lendar Setting
Seieccione sí y presione ENTER para comenzar a copiar iasfotos/música
a ia memoria interna
O
Seieccione NO y presione ENTER y BoomBoom comenzará reproducir
música/foto de ia fuente de memoria.
A No quite el dispositivo de la tarjeta de memoria o dispositivo de
flash USB antes de que se termine el proceso de copia
ES - 9
Comenzar a usar
Page 71

Philips Marco de foto Digitai LCD Panel 8" BoomBoom
Usar el menù principal
utilice los botones izquierdos y derechos en el control para seleccionar
un Icono animado del menú, presione el botón ENTER para confirmar
la selección.
ES-10
Page 72

Philips Marco de foto Digital LCD Panel 8" BoomBoom
Manejo de Fotos
Ver minimagenes
Entre al menú de foto. Las minimagenes de las primeras 12 fotos se
demostrarán en la pantalla.
1. Usted puede presionar los botones Izquierdos y derechos para
seleccionar la foto.
2. Presione el botón ENTER/PLAY para comenzar la diapositiva.
(£) Photo
И Ш
Já
3. Para editar las fotos, presione MENU durante modo de minllmagen.
ES-11
1 "T^
o
ut o © 0
Manejo de Fotos
Page 73

Philips Marco de foto Digitai LCD Panel 8" BoomBoom
Cinco iconos aparecerán en ia parte inferior de ia pantaiia: Copiar,
Borrar, Rotar, Efecto de foto. Multi seleccionar"
4. Use Izquierda y Derecha para navegar con opciones entonces
confirme con ENTER/PLAY.
• Copiar: Copiar la foto seleccionada (s) a la memoria de almacenaje
seleccionada.
• Borrar: Borrar la foto seleccionada (s).
• Rotar: Rotar la foto seleccionada (s).
• Efectos de foto: Cambiar foto (s) a Negro/Blanco o Sepia.
• Multi-seleccione: Seleccione las fotos múltiples para editar.
Reproducir Diapositivas
1. Seleccione una foto y presione Enter/Play para comenzar diapositiva.
En modo de diapositiva, presione “ENTER/PLAY" para pausar o
recomenzar diapositiva.
2. Para tener acceso a configure diapositiva, presione MENU
Hay siete opciones para elegir de:
Contraste, Brillo, Saturación, Intervalo de Diapositiva, Efecto de
transición. Ajustara pantalla,Música Encender/Apagar.
Reproducir Diapositiva
ES -12
Page 74

^Philips_Marco_deJoto_Digital_LCD_Pa^
Reproducir diapositiva con música
Por defecto, música almacenada en el dispositivo de almacenaje
seleccionado será reproducido automáticamente en el fondo durante
diapositiva.
• Presione VOL +/- para ajustar el volumen
• Presione MUTE para encender/apagar sonido.
• Presione AUX. para seleccionar audio-in para reproducir música de
otra fuente
Reproductor de música BoomBoom
Entre al menú de música. Seleccione la pista con los botones
IZQUIERDO/DERECHO, después confírme presionando ENTER/PLAY.
• Presione los botones VOL +/- para ajustar el volumen.
• Presione el botón REPEAT para cambiar entre Repetir una pista,
Repetir todos y No repetir.
• Presione el botón SHUFFLE para cambiar entre Reproducción
Aleatorio y Secuencial.
• Presione MENU para cambiar entre los sub-menus de Playlist,
Reproduciendo ahora y Submenúsde letras.
• Durante reproducción de música, presione y sostenga
IZQUIERDA/DERECHA de la guía navegacional situada detrás de la
Pantalla LCD de BoomBoom para avanzar o retroceder.
ES-13
Reproductor de Música Boom Boom
Page 75

Philips Marco de foto Digital LCD Panel 8" BoomBoom
Ver Videos
Entre al menú de video. Seleccione el vídeo con los botones
IZQUIERDA/DERECHA, después confírmelo presionando ENTER/PLAY.
presione el botón ENTER/PLAY para reproducir.
Presione los botones VOL +/- para ajustar el volumen.
Durante reproducción de música, presione y sostenga
IZQUIERDA/DERECHA de la guía
navegacional situada detrás de la Pantalla LCD de BoomBoom para
avanzar o retroceder.
Ver Videos
ES -14
Page 76

^Riilips_Marco_deJoto_Digital_LCD_Pan^^
• Para comenzar a reproducir archivos de Videocamera portatii
A. Encienda ia videocamera y conecteio en ei puerto USB.
B. Encienda ei Boom Boom y vaya ai modo de video.
C. Eiija ei USB corno fuente de reproducción.
D. Seieccione ei video que usted quiere ver y presione ENTER para
confirmar.
Manejo de Archivos
Entre ai menú de archivo, eiija ei archivo con ios botones
iZQUiERDO/DERECHO
1. Presione MENU para traer ei menú de opción para Copiar o Borrar.
2. Presione ei botón ENTER/PLAY para proceder con ia seiección.
ES -15
Manejar Archivos
Page 77

^hilips_Marco^defoto^Digital_LCD_Pa^
Seleccionar fuente
Usted puede seleccionar la fuente de archivos para ser visto, para
ser escuchado y para ser reproducido en Boom Boom. Presione
IZQUIÉRDA/DERECHA para cambiar entre la tarjeta de memoria
insertada, Dispositivo flash de USB y memoria interna.
NOTA: Las fuentes del archivo “USB” y “Tarjeta de memoria” aparecerán
solamente cuando un dispositivo flash de USB y una tarjeta de memoria
se han insertado al Marco de Foto.
Seleccionar Fuente
ES -16
Page 78

Philips Marco de foto Digital LCD Panel 8" BoomBoom
Ver Reloj y Calendario
Entre en la pantalla del calendarlo. La fecha y hora será demostrado
en la pantalla.
1. Presione los botones izquierda/derecha para ver el mes
anterior/siguiente.
2. Presione el botón ENTER/PLAY paracamblarentreelcalendarloyreloj.
Calendar
09:23:56
2009
SEP
•ji;- MOtJ
1 2
9 10
-
10 11 12 13 14 1&
ie n
23 24
30 31
El botón de acceso EZ permite que usted cambie entre el modo de reloj
y diapositiva rápidamente.
ES-17
Ver Relog y Calendario
Page 79

^hilips_Marco^deJoto^Digital_LCD_Pai^^
Configurar
Entre en la pantalla de configurar. Presione los botones Arríba/Abajo
para hacer la selección, presione el botón ENTER/PLAY para confirmar.
* Presione ESC para volver a la selección anterior.
A. Fecha y Hora
Configurar la fecha de calendario y reloj.
B. Ajuste general
Presione los botones Arriba/Abajo para hacer la selección, presione el
botón ENTER/PLAY para confirmar.
Elija entre: Ahorrador de energía inteligente. Brillo, Copia inteligente.
Alarma, Idioma, Reajustarconfiguraclón, y Actualización de software.
Ahorrador de energía inteligente
• Cuando usted selecciona APAGADO, esta unidad funcionará en
consumo de energía completa.
•Bajo Auto programador, el Boom Boom accionará automáticamente
abajo 50% o 100% durante la noche (21:00-7:00), y reasumirán el
modo normal de energía durante el día (7:00-21:00).
• Bajo ahorrar 20% o ahorrar 50%, el Boom Boom funcionará siempre
en ésa tasa indicada del consumo de energía.
Configuración
ES -18
Page 80

^Philips^Marco^deJoto^Digital^LC^
A. Ajuste de audio
Elija el modo de reproducir música: shuffle Encendido o Apagado.
Repetir una canción, Repetirtoda la música o No Repetir.
B. Información
Demuestre el modelo de la unidad, versión, memoria Interna total y
memoria libre.
ES -19
Configuración
Page 81

^hilips_Marco^deJoto_Digital_LCD_Pai^^
Boom Boom Exhibición de Dúo monitor
Un Software de Pantalla extendido de PC escrítorlo/espejo se Incluye
con este producto.
1. Instale el software a su computadora bolamente sistemas de
Microsoft Windows) con el CD de Instalación (Incluido).
2. Después de la instalación del software, conecte el Boom Boom con
su computadora usando el cable de USB (incluido)
3. Abra el software de PC siguiendo las Instrucciones en la pantalla.
• Memoria de masa: maneje los archivos almacenados en la memoria
interna de BoomBoom directamente a través de la PC. La computadora
detectará la conexión como “disco desprendible”. Doble clic en el
“disco” para ver archivos
Para la función segundo monitor/extender escritorio, ciic en los
botones “Pantalla de espejo” o “Exhibición extendida”.
• Exhibición de espejo - La pantalla en el BoomBoom reflejará el
monitor de su PC.exhIblendoexactamente loque usted veen el
monitorde la PC
• Exhibición extendida - El Boom Boom actuará como monitor
extendido de su PC como “segundo monitor'’.
Exhibición BoomBoom
ES - 20
Page 82

Philips Marco de foto Digital LCD Panel 8" BoomBoom
Preguntas hechas con frecuencia
En caso de que usted encuentre algunos problemas cuando usted
utiliza esta unidad, por favor lea la información de abajo antes de que
usted llame para la asistencia técnica o devuelva la unidad.
Pregunta Respuesta
1. Utilice por favor solamente CA proporcionada y el
cheque si el adaptador es conectado firmemente en
la toma de energía.
Sin energía.
2. Recuerde por favor presionar el botón de energía en
el altavoz para encender la unidad.
3. Uno de los mecanismos de seguridad puede funcionar.
En este evento, desenchufe la unidad de la toma de
energía e intente otra vez.
El control
remoto no
trabaja.
No puede ser
detectado
cuando
conecta la
unidad
con la PC.
ES - 21
1. La demasiado larga o el ángulo excede 30 grados.
2. Sustituya la batería del control
3. El sensor remoto es perturbado por otra fuente.
1. Por favor encienda la unladd cuando es conectado
con la PC.
2. Vuelva a conectar el sistema y su PC.
3. Intente utilizar un diverso puerto de USB en la PC
Preguntas hechas con frecuencia
Page 83

^hilips^Marco^defoto_Digital_LC^
Especificación
Pantalla: 8" 4:3 800 * 600 Panel Digital TFT
Tarjetas de memoria aceptadas: SD, MMC, MS, MS Pro
Archivo de foto apoyado: JPEG, BMP
Formato de mùsica apoyado: MP3, WMA, WAV
Formato video apoyado: Motion JPEG, MPEG4, H.264
Puerto de USB: Host y Dispositivo
Memoria interna: Aproximadamente 2GB
Altavoz: 2.1 Estéreo (2 * 2W+4W)
Energía (adaptador CA): Entrada AC100-220V; Salida DC 9V 2A
Nota:
* USB host y puerto del dispositivo USB solamente pueden trabajar
individualmente. Las especificaciones están conforme a cambio
sin el aviso.
Especificaciones
ES - 22
Page 84

Philips Marco de foto Digital LCD Panel 8" BoomBoom
Regulación y Conformidad
Aviso de la Comisión Federal de Comunicaciones (FCC)
Este equipo se ha probado y se ha encontrado conforme con los límites
para un dispositivo digital de Clase B.Conforme a la parte 15 de las reglas
de la FCC. Estos límites se diseñan para proporcionar la protección
razonable contra interferencia en una instalación residencial. Este
equipo puede irradiar energía de radiofrecuencia y, si no es instalado y
utilizado de acuerdo con las instrucciones, puede causar interferencia a
las radiocomunicaciones.
Sin embargo, no hay garantía que interferencia no ocurrirá en una
instalación particular. Si este equipo causa interferencia a la radio o
recepción de televisión, que puede ser determinada apagando y
encendiendo el equipo, se anima al usuario que intente corregir la
interferencia poruña de las medidas siguientes:
* Reoriente o vuelva a poner la antena de recepción.
* Aumente la separación entre el equipo y receptor.
* Conecte el equipo en un enchufe en un circuito diferente de el con las
cuales el receptor es conectado.
* Consulte al distribuidor o a técnico experimentado de Radio/TV para
la ayuda.
Cualquier cambio o modificación no expreso aprobados por la parte
responsable de conformidad podían evitar la autoridad del usuario para
funcionar el equipo.
Este dispositivo se conforma con la parte 15 de las reglas de la FCC.
La operación está conforme alas dos condiciones siguientes: (1) este
dispositivo no pudo causar interferencia dañosa, y (2) este dispositivo
debe aceptar cualquier interferencia recibida, incluyendo interferencia
_ que puede causar la operación indeseada.
GiiNii International
7060, Koll Center Parkway,
Suite 340 Pleasanton, CA94566
1-877-784-0999
ES-23
Regulación y Conformidad
Page 85

^hilips^Marco^defoto_Digital_LCD_P^
Garantía
Refiera por favor a su tarjeta de acompañamiento de ia garantía para ia
deciaración de garantía.para ia ayuda de diente u obtener servicio de
ia garantía, por favor iiame gratis a 1 -877-784-0999 o visite nuestro Sitio
Web
www.phiiips.com/support.
Garantía
ES-24
Page 86

Philips_Photo_Only_UM_en.book Page 60 Wednesday, August 11, 2010 2:35 PM
Philips and Philips Shield are used under license of
Koninklijke Philips Electronics NV.
© 2010 GiiNii International
All rights reserved.
D.10.10.10
 Loading...