

Page 1

PhotoFrame
Register your product and get
support at:
Enregistrez votre produit pour
obtenir de l’aide sur:
Para registrar su producto y obtener
ayuda técnica acceda a:
www.philips.com/welcome
PhotoFrame
Model Number:
Numéro de Modèle:
Modelo Número:
SPF 3408/G7
SPF 3408T/G7
EN User Manual
Mode d’Emploi FR
ES Manual de Usuario
Philips Eros 8DN UM_0914_book.indb 1 2009/9/17 上午 09:13:33
Page 2

Philips Eros 8DN UM_0914_book.indb 4 2009/9/17 上午 09:13:33
Page 3

Content
Introduction
1. Precautions .................................................................................................... 2
1.1 Basic Safety Precautions and Maintenances ..................................... 2
1.2 Care of the PhotoFrame ..................................................................... 3
2. Your PhotoFrame .......................................................................................... 4
2.1 What’s in the Box? .............................................................................. 4
2.2 Control Buttons and Menu Navigation ................................................ 5
2.3 Memory Device Connection ............................................................... 7
2.3.1 Inserting a Memory Device ....................................................... 7
2.3.2 Removing a Memory Device/ USB Flash Drive ........................ 8
2.4 Production Highlights ......................................................................... 8
3. Getting Started ............................................................................................... 9
3.1 Stand – PhotoFrame Assembly .......................................................... 9
3.2 Connecting the Power Adapter ........................................................... 9
3.3 Turning on your PhotoFrame ............................................................ 10
3.4 Turning off your PhotoFrame ............................................................ 10
3.5 Main Menu ........................................................................................ 10
3.5.1 Accessing the Main Menu ....................................................... 10
3.5.2 Accessing Sub Menu Options ................................................. 10
4. Using your PhotoFrame ............................................................................... 11
4.1 Calendar ........................................................................................... 11
4.2 Clock ................................................................................................ 12
4.3 Photo ................................................................................................ 13
4.3.1 View Photo .............................................................................. 13
4.3.2 Photo Selection ....................................................................... 14
4.3.3 Photo Menu ............................................................................. 14
4.4 Slideshow Setting ............................................................................. 18
4.4.1 Interval ..................................................................................... 18
4.4.2 Play Mode ............................................................................... 19
Philips Eros 8DN UM_0914_book.indb 5 2009/9/17 上午 09:13:33
Page 4

4.4.3 Transition ................................................................................. 20
4.4.4 Collage .................................................................................... 20
4.5 General Setting ................................................................................. 22
4.5.1 Smart Energy Saver ................................................................ 22
4.5.2 Brightness ............................................................................... 23
4.5.3 Language ................................................................................ 24
4.5.4 Reset ....................................................................................... 24
4.5.6 Delete All ................................................................................. 24
4.5.7 Smart Copy ............................................................................. 25
4.6 Date and Time ................................................................................... 26
4.7 Auto Orientation ................................................................................. 27
4.8 Zoom In/Out or Pan Function ............................................................ 27
5. Technical Data ........................................................................................... 28
6. Frequently Asked Questions ..................................................................... 29
7. Service and Warranty ................................................................................ 30
Philips Eros 8DN UM_0914_book.indb 6 2009/9/17 上午 09:13:33
Page 5

Contenu
Introduction
1. Précautions .................................................................................................... 2
1.1 Précautions Basiques de Sécurité et d’Entretien .............................. 2
1.2 Prenez Soin du PhotoFrame .............................................................. 3
2. Votre PhotoFrame ......................................................................................... 4
2.1 Qu’y a-t-il dans la Boîte? .................................................................... 4
2.2 Boutons de Commande et Navigation dans le Menu ......................... 5
2.3 Connexion du Appareil de Mémoire ................................................... 7
2.3.1 Insérer un Appareil de Mémoire ................................................ 7
2.3.2 Retirer un Appareil de Mémoire/ une Clé USB ......................... 8
2.4 Fonctions Principales du Produit ........................................................ 8
3. Démarrage ..................................................................................................... 9
3.1 Assemblage du Support – PhotoFrame ............................................ 9
3.2 Brancher l’Adaptateur d’Alimentation ................................................. 9
3.3 Allumer le PhotoFrame .................................................................... 10
3.4 Eteindre le PhotoFrame ................................................................... 10
3.5 Menu Principal .................................................................................. 10
3.5.1 Accéder au Menu Principal ..................................................... 10
3.5.2 Accéder aux Options de Sous-Menu ...................................... 10
4. Utilisation du PhotoFrame ........................................................................... 11
4.1 Calendrier ......................................................................................... 11
4.2 Horloge ............................................................................................. 12
4.3 Photo ................................................................................................ 13
4.3.1 Afcher les Photos .................................................................. 13
4.3.2 Sélection d'une Photo ............................................................. 14
4.3.3 Menu Photo ............................................................................. 14
4.4 La Mise en Diaporama ..................................................................... 18
4.4.1 Intervalle .................................................................................. 18
4.4.2 Mode de Lecture ..................................................................... 19
Philips Eros 8DN UM_0914_book.indb 7 2009/9/17 上午 09:13:33
Page 6

4.4.3 Transition ................................................................................. 20
4.4.4 Collage .................................................................................... 20
4.5 Mise en Général ................................................................................ 22
4.5.1 Smart Energy Saver ................................................................ 22
4.5.2 Luminosité ............................................................................... 23
4.5.3 Langue .................................................................................... 24
4.5.4 Réinitisaliser ............................................................................ 24
4.5.5 Supprimer Tous ....................................................................... 25
4.5.6 Smart Copie ............................................................................ 25
4.6 La date et l’Heure .............................................................................. 26
4.7 Orientation Automatique .................................................................... 27
4.8 Zoom Avant/Arrière ou Pan .............................................................. 27
5. Spécications ............................................................................................ 28
6. Foire aux Questions .................................................................................. 29
7. Service et Garantie.................................................................................... 30
Philips Eros 8DN UM_0914_book.indb 8 2009/9/17 上午 09:13:33
Page 7

Contenidos
Introducción
1. Normas de Precaución .................................................................................. 2
1.1 Normas Básicas de Seguridad y Mantenimiento. .............................. 2
1.2 Mantenimiento del PhotoFrame ......................................................... 3
2. Su PhotoFrame ............................................................................................. 4
2.1 Contenido de la Caja .......................................................................... 4
2.2 Botones de Control y Menú de Navegación ....................................... 7
2.3 Conexión del Dispositivo de Memoria ................................................ 7
2.3.1 Inserción de un Dispositivo de Memoria ................................... 7
2.3.2 Extracción de un Dispositivo de Memoria/ Memoria Flash USB 8
2.4 Características Destacadas ............................................................... 8
3. Cómo Empezar .............................................................................................. 9
3.1 Ensamblaje Soporte – PhotoFrame ................................................... 9
3.2 Conexión del Adaptador de Alimentación ........................................... 9
3.3 Encendido del PhotoFrame .............................................................. 10
3.4 Apagado del PhotoFrame ................................................................ 10
3.5 Menú Principal .................................................................................. 10
3.5.1 Acceso al Menú Principal ........................................................ 10
3.5.2 Acceso a las Opciones del Submenú ..................................... 10
4. Utilización de su PhotoFrame ...................................................................... 11
4.1 Calendario ........................................................................................ 11
4.2 Reloj ................................................................................................. 12
4.3 Fotografías ....................................................................................... 13
4.3.1 Ver Fotografías ....................................................................... 13
4.3.2 Selección de Fotografías ........................................................ 14
4.3.3 Menú de Fotografías ............................................................... 14
4.4 Presentación .................................................................................... 18
4.4.1 Intervalo ................................................................................... 18
4.4.2 Modo Reproducción ................................................................ 19
Philips Eros 8DN UM_0914_book.indb 9 2009/9/17 上午 09:13:33
Page 8

4.4.3 Transición ................................................................................ 20
4.4.4 Collage .................................................................................... 20
4.5 Conguración General ...................................................................... 22
4.5.1 Smart Energy Saver ................................................................ 22
4.5.2 Brillo ........................................................................................ 23
4.5.3 Idioma ..................................................................................... 24
4.5.4 Restablecer ............................................................................. 24
4.5.5 Borrar Todos ............................................................................ 24
4.5.6 Smart Copia ............................................................................ 25
4.6 Fecha y Hora ..................................................................................... 26
4.7 Orientación Automática ..................................................................... 27
4.8 Función de Aumento / Reducción de Zoom o Desplazam. ............... 27
5. Datos Técnicos .......................................................................................... 28
6. Preguntas más Frecuentes ....................................................................... 29
7. Asistencia Técnica y Garantía ................................................................... 30
Philips Eros 8DN UM_0914_book.indb 10 2009/9/17 上午 09:13:33
Page 9

English
Wall mounting hole
Introduction
Philips PhotoFrame can be placed either vertically or horizontally to t the photos
on display. You can place it on a at surface in a room or hang it on the wall using
the wall mounting hole.
• Mounting your Frame on the Wall
Use wall-anchoring hardware to anchor your frame securely to your wall.
Wall mounting hole
English
1
Philips Eros 8DN UM_0914_book.indb 1 2009/9/17 上午 09:13:33
Page 10
1. Precautions
1.1 Basic Safety Precautions and Maintenances
English
Read the following instructions carefully before connecting and using your
PhotoFrame to reduce the risk of damage, electric shock and injury.
• Do not put excessive pressure on the LCD panel to protect your display from
possible damage. When moving your PhotoFrame, grasp the frame to lift; do not
lift it by placing your hand or ngers on the LCD panel.
• Unplug the PhotoFrame if you are not going to use it for an extensive period of
time.
• Unplug the PhotoFrame if you need to clean it with a slightly damp cloth. The
screen may be wiped with a dry cloth when the power is off. However, never use
alcohol, solvents or ammonia-based liquids.
• Consult a service technician if the PhotoFrame does not operate normally when
you have followed the instructions in this manual.
• The casing cover should be opened only by qualied service personnel.
• Keep the PhotoFrame out of direct sunlight and away from stoves or any other
heat source.
• Keep the PhotoFrame dry. To avoid electric shock or permanent damage to the
set, do not expose it to rain or excessive moisture.
• When positioning the PhotoFrame, make sure the power plug and outlet are
easily accessible.
2
Philips Eros 8DN UM_0914_book.indb 2 2009/9/17 上午 09:13:34
Page 11
English
1.2 Care of the PhotoFrame
• Do Not Drop
PhotoFrame is a complicated electronic device and cannot withstand shock from
being dropped.
• Do Not Expose to Moisture
PhotoFrame is neither moisture proof nor moisture resistant. Exposing it to
moisture or liquid of any kind will very likely damage your PhotoFrame.
• Do Not Hit or Scratch
The LCD panel of PhotoFrame is made of glass and is therefore sensitive to
abnormal force and sharp edges.
• Screen Cleaning
Use only a dry soft cloth to clean your screen.
• Keep the Stand Clear from Cables
Make sure the stand of your PhotoFrame is clear from cables as cables could
snap the stand out of PhotoFrame.
• Temperature and Humidity Limitations
• Operating temperature: 0° ~ 40° (Celsius)
• Storage temperature: -20° ~ 70° (Celsius)
• Humidity: 20% ~ 80%
English
3
Philips Eros 8DN UM_0914_book.indb 3 2009/9/17 上午 09:13:34
Page 12

2. Your PhotoFrame
Phot oFram e
Use r man ual
4XLFN VWDUWJXLGH
3KRWR)UDPH
&RQQHFW
6HWXS
9LHZ
2.1 What’s in the Box?
English
• PhotoFrame
• AC-DC power adapter
• Quick start guide
• Remote control
• User manual
PhotoFrame Quick start guide User manual
AC-DC power adapter Remote control
4
Philips Eros 8DN UM_0914_book.indb 4 2009/9/17 上午 09:13:34
Page 13

English
2.2 Control Buttons and Menu Navigation
• Control Buttons
1 2 3 4 5 6 7
No. Button Functions Description
1 Left Previous item, back to previous menu items
2 Right Next item
3 Up Previous item, “Zoom in”
English
4 Down Next item, "Zoom out"
5 OK Enter submenu
Validate process
Conrm selections
6 Exit Exit menu
Exit process
Exit slideshow
7 EZ Access Toggle
Button
• Use your PhotoFrame by pressing the control buttons in the back.
Play slideshow
Change play mode
Change between photo and clock
5
Philips Eros 8DN UM_0914_book.indb 5 2009/9/17 上午 09:13:34
Page 14
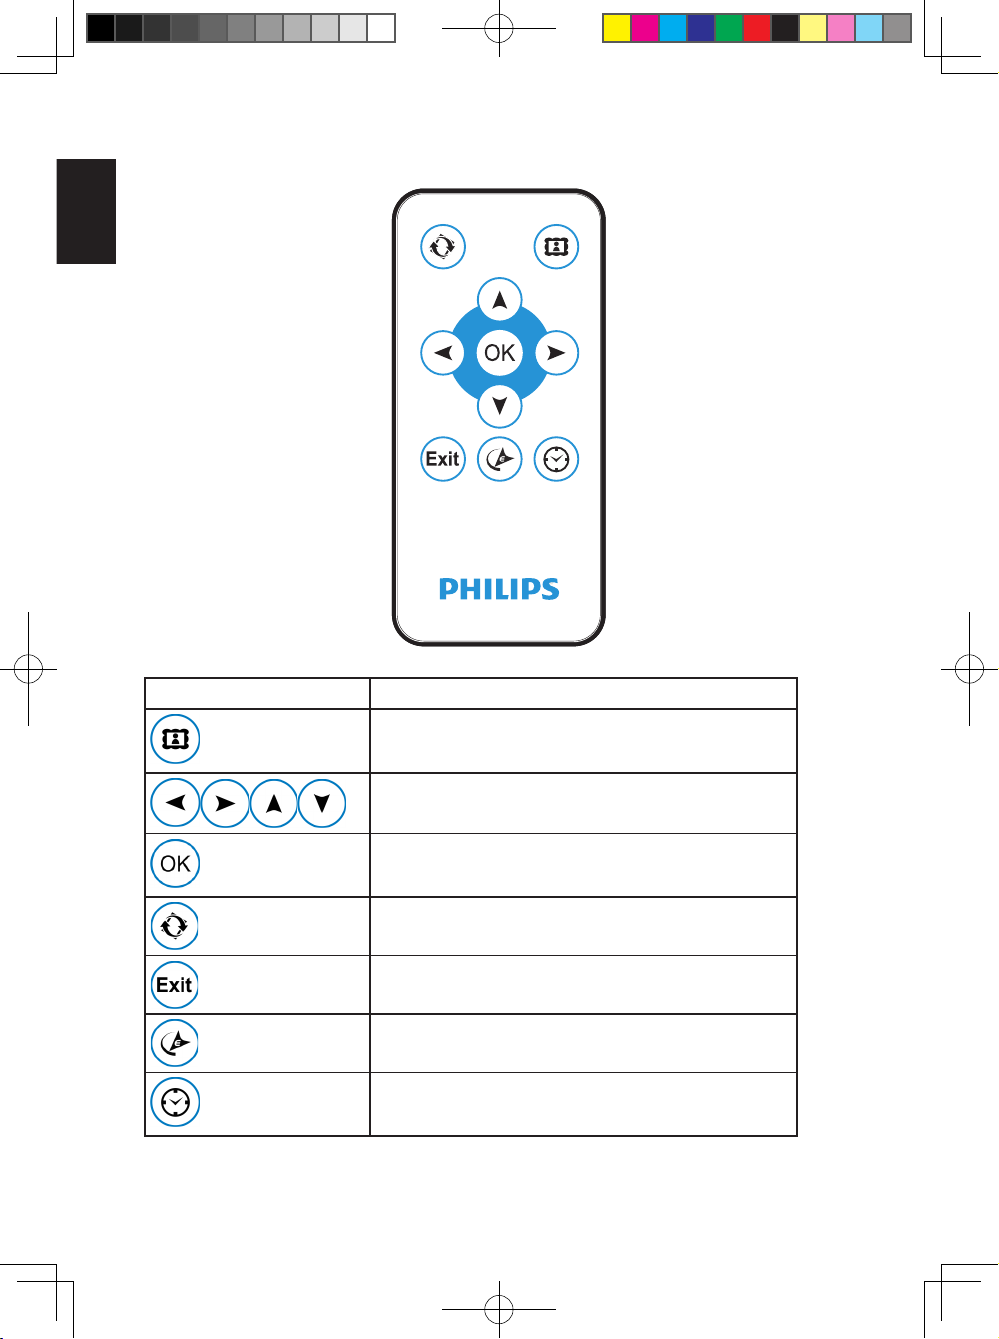
• Remote Control Buttons
English
Illustration Function
Go to collage
Navigation buttons
Conrm the selection, enter the menu
Rotate
Exit the current menu
Smart Energy Saver
EZ Access Toggle button
6
Philips Eros 8DN UM_0914_book.indb 6 2009/9/17 上午 09:13:34
Page 15
English
2.3 Memory Device Connection
English
SD/MMC/xD/MS/MSPro Duo
ON OFF
DC
2.3.1 Inserting a Memory Device
• Insert the memory device into the memory device reader slot in the frame.
• SD/MMC/MMC+/xD/MS/MS Pro/MS Duo cards are supported.
• There is USB port to read a USB ash drive.
• When you insert a memory device, you will be prompted if you want to copy
the pictures to the on board memory on the PhotoFrame, choose Yes to copy
all external memory to internal memory and return to Slideshow (Show the
images in memory device) when the copy completed; you can also choose No,
and return to Slideshow; If no selections made in 15 seconds, the PhotoFrame
starts the slideshow automatically.
Note 1:
Do not remove the memory device immediately after inserting it into the
PhotoFrame or when PhotoFrame is reading the photos in the memory card/USB
drive for the copying option. Wait until the PhotoFrame is done reading the photos.
Note 2:
If the newly plugged memory device is empty or damaged, the PhotoFrame will
have no reaction.
7
Philips Eros 8DN UM_0914_book.indb 7 2009/9/17 上午 09:13:34
Page 16

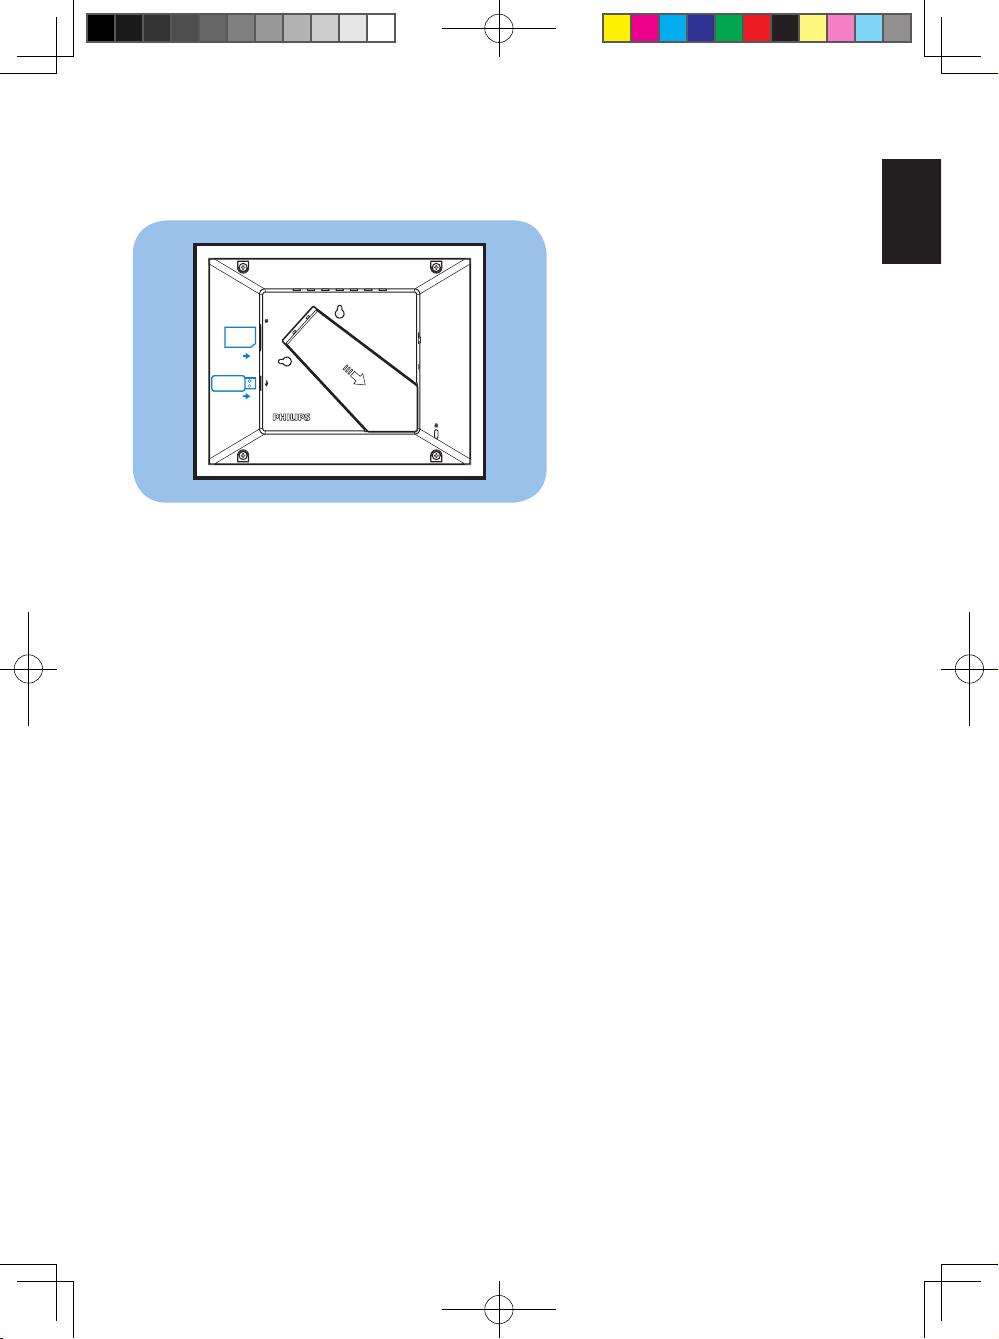
2.3.2 Removing a Memory Device/ USB Flash Drive
• To remove the SD/MMC/ MMC+/xD/MS/MS Pro/ MS Duo cards or a USB ash
English
drive, gently pull them out of the slot.
2.4 Production Highlights
The PhotoFrame is designed to be easy and convenient to use and it provides the
following features:
• Smart Energy Saver provides four intelligent ways of power consumption
management
• Play photo with collage mode (Solo-Photo, Multi-Photo, Valentine's Day, Father’s
Day, Mother’s Day, Christmas, Wedding and Birthday)
• Built-in 128MB memory to store your pictures, available storage capacity will be
less
• Supports the most popular memory cards: SD/MMC/MMC+/xD/MS/MS Pro/MS
Duo
• Thumbnail view and slideshow effect
• Collage Display
• Auto Picture Rotation(Angle Switch)
8
Philips Eros 8DN UM_0914_book.indb 8 2009/9/17 上午 09:13:34
Page 17
English
3. Getting Started
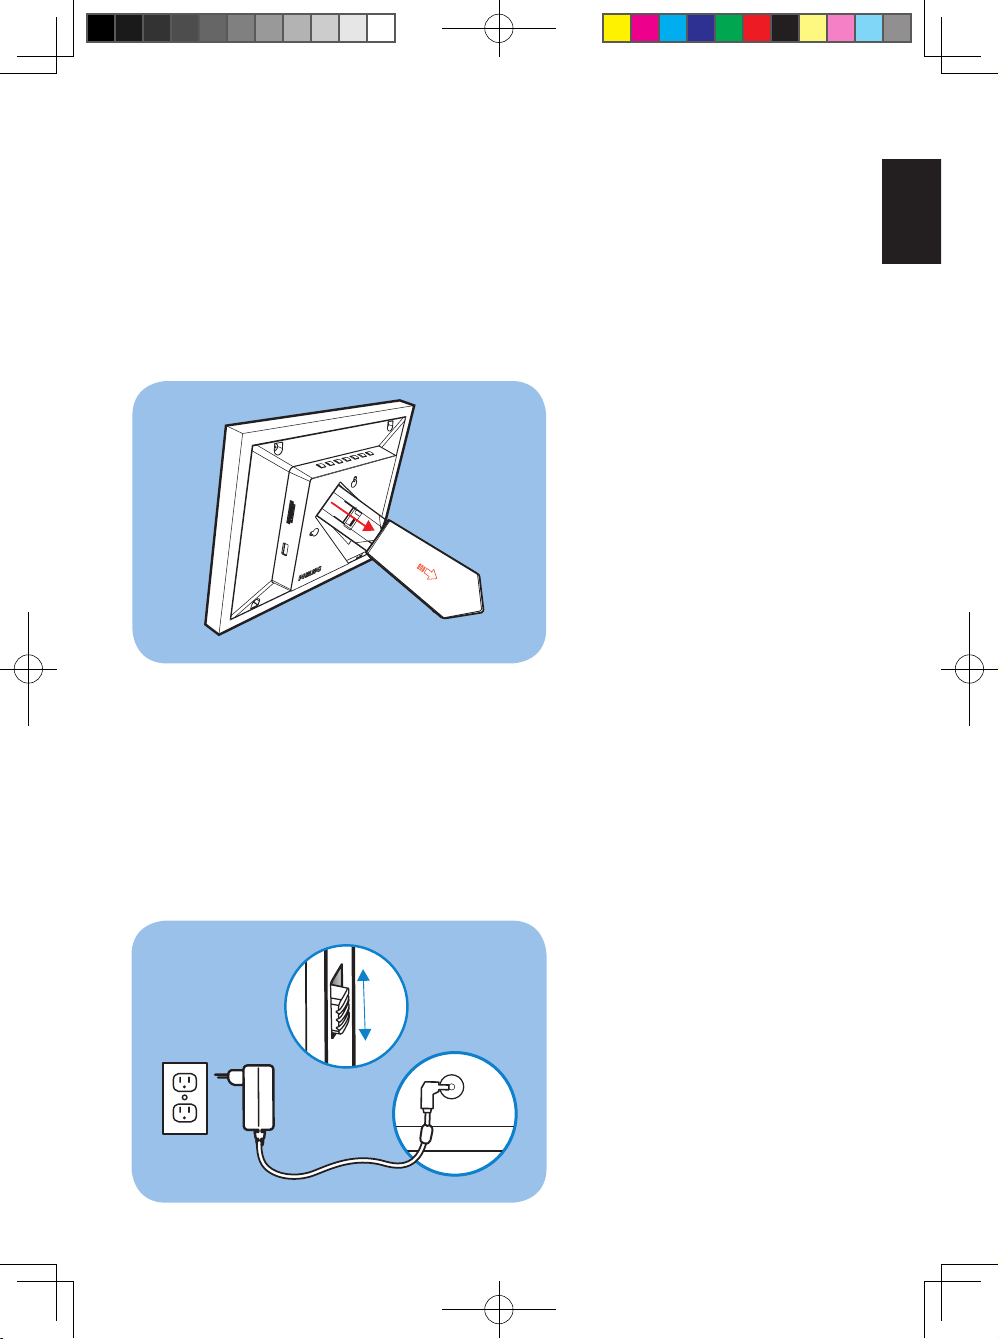
3.1 Stand – PhotoFrame Assembly
English
Step 1: Hold the PhotoFrame in an upright position.
Step 2: Pull out the stand and then slide it out as follows to ensure that the frame
stands upright for the best viewing angle.
Note:
For safety reasons and best stability, Philips recommends adjusting the stand with
the angle dened by the two click positions. Using other positions may cause the
PhotoFrame to fall and it is the responsibility of the user.
3.2 Connecting the Power Adapter
Connect the supplied power adapter from PhotoFrame to a power outlet.
ON
OFF
9
Philips Eros 8DN UM_0914_book.indb 9 2009/9/17 上午 09:13:34
Page 18

3.3 Turning on your PhotoFrame
• Slide the power button on the back upper left side to the “ON” position to turn on
English
your PhotoFrame.
3.4 Turning off your PhotoFrame
• Slide the power button on the back upper left side to the “OFF” position to turn off
your PhotoFrame.
3.5 Main Menu
3.5.1 Accessing the Main Menu
Press OK button during a slide show or clock mode to access the main menu.
3.5.2 Accessing Sub Menu Options
To access the sub menu options starting from the main menu:
• Press OK during a slideshow or clock mode.
• Press Up and Down to select the required sub menu.
• Press OK to access the menu.
• To exit from the menu, press Exit again to return to the slideshow.
10
Philips Eros 8DN UM_0914_book.indb 10 2009/9/17 上午 09:13:34
Page 19

English
4. Using your PhotoFrame
4.1 Calendar
English
The Calendar can be shown in full screen.
• In this main menu, select Calendar, press OK to display the calendar in full
screen.
• Press Up or Down to view the months. It will automatically advance or go to the
previous month when you press the Up or Down button.
• Press OK to go back to the current month.
• When displaying the current month, press OK to go back to the Calendar menu.
Note:
To set the date, please go into the Setting menu and go into the submenu of Date
and Time.
11
Philips Eros 8DN UM_0914_book.indb 11 2009/9/17 上午 09:13:35
Page 20

4.2 Clock
The Clock can be played in two different skins or clock displays.
English
• In main menu, select Clock, use Left or Right to select skins or displays, and
press OK to display clock in full screen.
• In full screen mode, press Left or Right to switch to different skins for clock
displays.
• Press OK to go back to the Clock menu.
Note:
To set the time, please go into the Setting menu and go into the sub menu of Date
and Time.
12
Philips Eros 8DN UM_0914_book.indb 12 2009/9/17 上午 09:13:35
Page 21
English
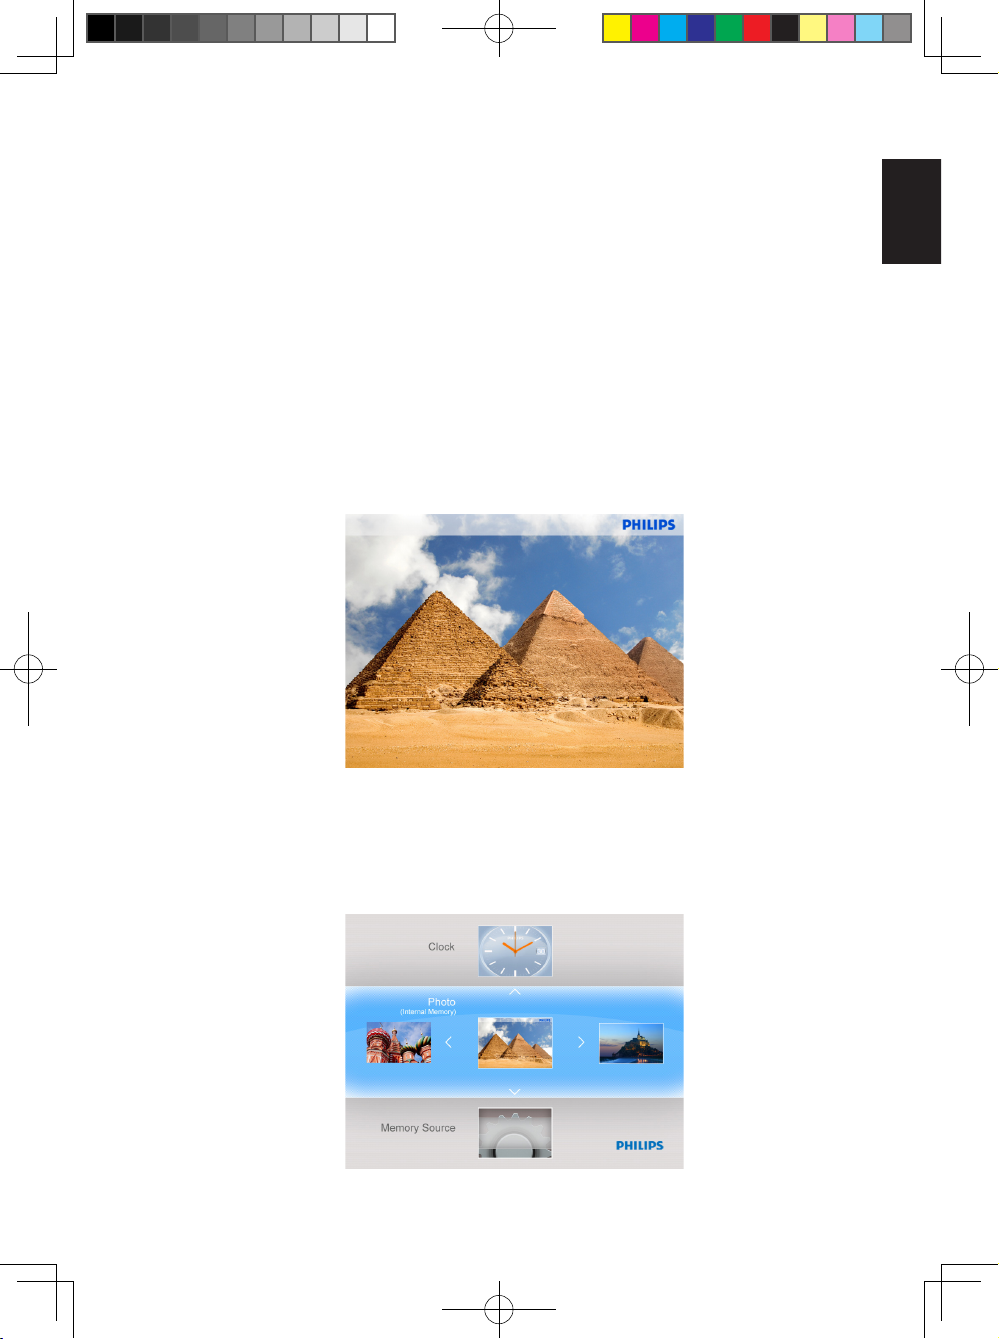
4.3 Photo
4.3.1 View Photo
4.3.1.1 Slideshow Mode
The Slideshow mode automatically starts once you turn on the PhotoFrame.
To play your desired photo source or album in slideshow mode, follow these below
instructions:
• In the main menu, select the Photo option.
• Press Left or Right to select a photo.
• Press EZ Access Toggle button to play the photos in slideshow mode
immediately.
• Photos will automatically slide one by one when Left or Right is pressed.
English
4.3.1.2 Thumbnail Mode
A large number of Photos can be viewed quickly using the thumbnail mode.
• In the main menu, select the Photo menu.
• Use Left or Right to select the photo source to browse.
• Press the EZ Access Toggle button to start playing the slideshow.
13
Philips Eros 8DN UM_0914_book.indb 13 2009/9/17 上午 09:13:35
Page 22
Note:
Thumbnails can be accessed directly from the slideshow mode by pressing the
Exit or OK button.
English
4.3.2 Photo Selection
• Navigate to the Thumbnail mode.
• Press Left or Right to select between photos.
4.3.3 Photo Menu
When a photo is selected, the Photo menu can be accessed directly from the
Thumbnail by pressing the OK button.
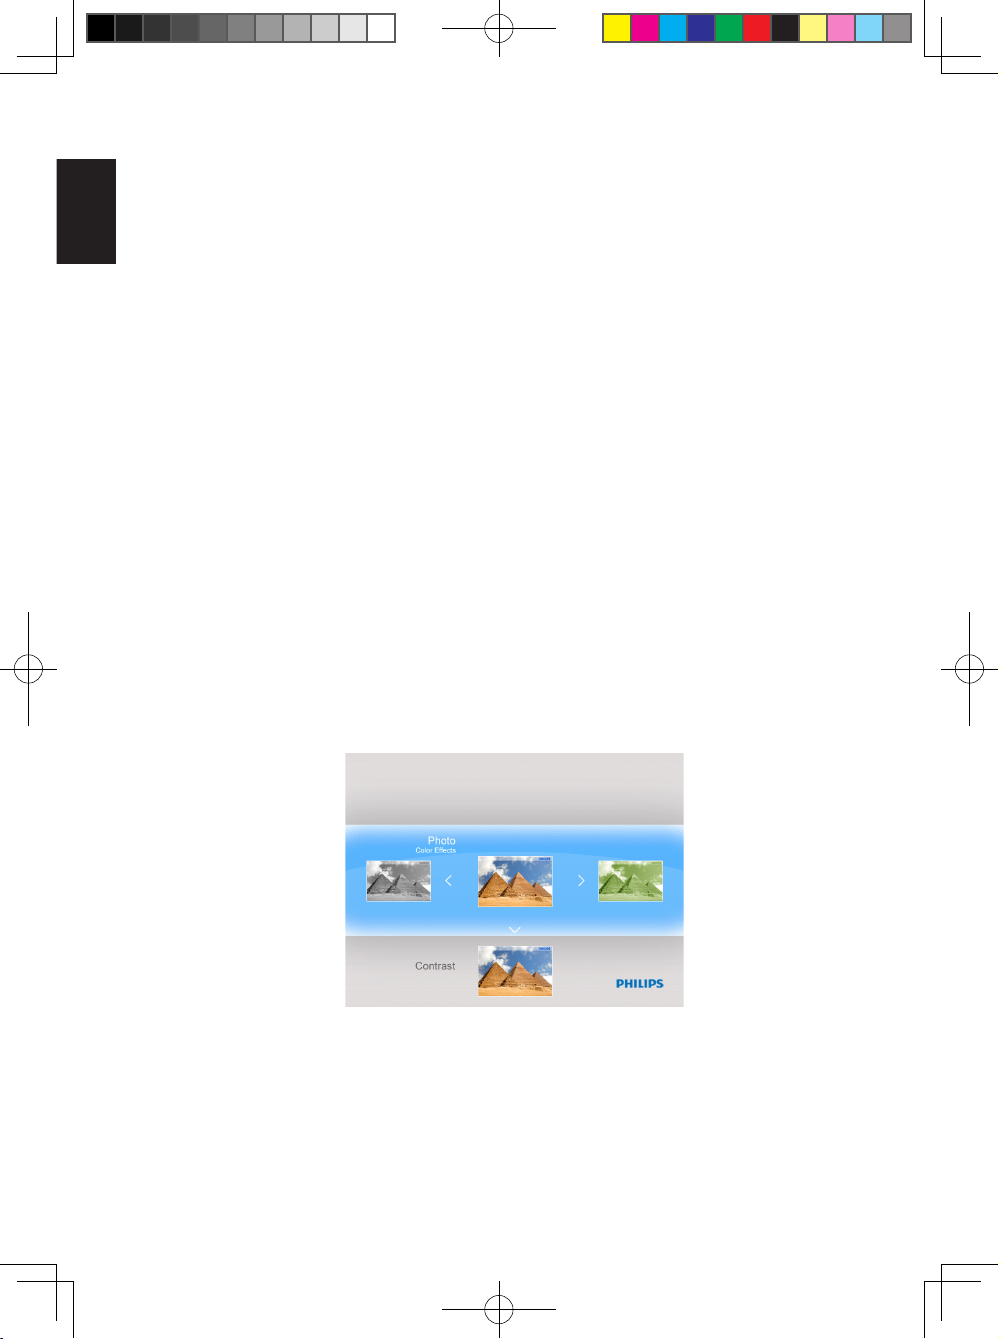
4.3.3.1 Color Effects
• In the thumbnail mode, select the photos to which you want to add effects.
• Press OK button to access the Photo menu options.
• Use Up or Down to go to Color Effects.
• Use Left or Right to go to your desired effect.
• Press OK to apply effect.
• Press Exit button to leave this menu and go back to the main menu.
14
Philips Eros 8DN UM_0914_book.indb 14 2009/9/17 上午 09:13:36
Page 23

English
4.3.3.2 Contrast
• In the thumbnail mode, select the photos to which you want to add effects.
• Press OK button to access the Photo menu options.
• Use Up or Down to go to Contrast.
• Use Left or Right to go to your desired effect.
• Press the EZ Access Toggle button to play the photos in slideshow mode
immediately.
• Photos will automatically slide one by one when Left or Right is pressed.
4.3.3.3 Brightness
• In the Thumbnail mode, select the photos to which you want to add effects.
• Press OK button to access the Photo menu options.
• Use Left or Right to go to your desired effect.
• Press OK to apply effect.
• Press Exit button to leave this menu and go back to the main menu.
English
• Press OK to apply effect.
• Press Exit button to leave this menu and go back to the main menu.
15
Philips Eros 8DN UM_0914_book.indb 15 2009/9/17 上午 09:13:36
Page 24
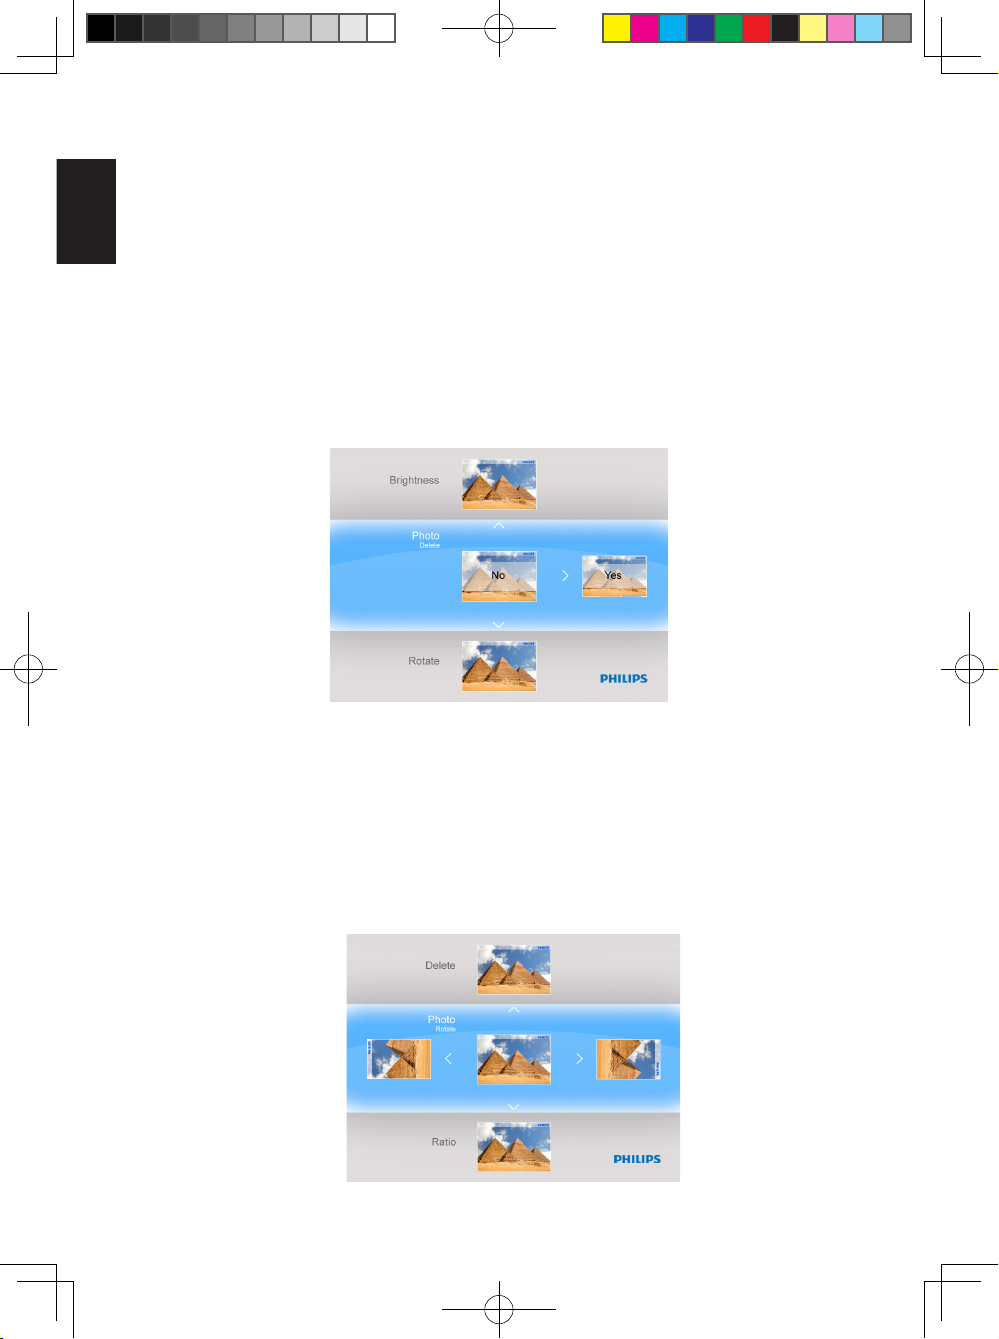
4.3.3.4 Delete
If you need to free up space on the PhotoFrame or a memory device you can
delete photos.
English
• In the thumbnail mode, select the photo you want to delete.
• Press OK button to access the Photo menu options.
• Select Delete.
• Use Right to select Yes.
• Press OK to conrm the deletion.
When you delete a photo, PhotoFrame will return to the Photo menu after
completion.
4.3.3.5 Rotate
The PhotoFrame can change the orientation of photos.
• In the thumbnail mode, select the photo you want to rotate.
• Press OK button to access the Photo menu options.
• Use Down to go to Rotate.
• Use Left or Right to go to the orientation.
16
Philips Eros 8DN UM_0914_book.indb 16 2009/9/17 上午 09:13:37
Page 25
English
• Use OK to conrm the orientation to change.
• Press Exit button to leave this menu and go back to the main menu.
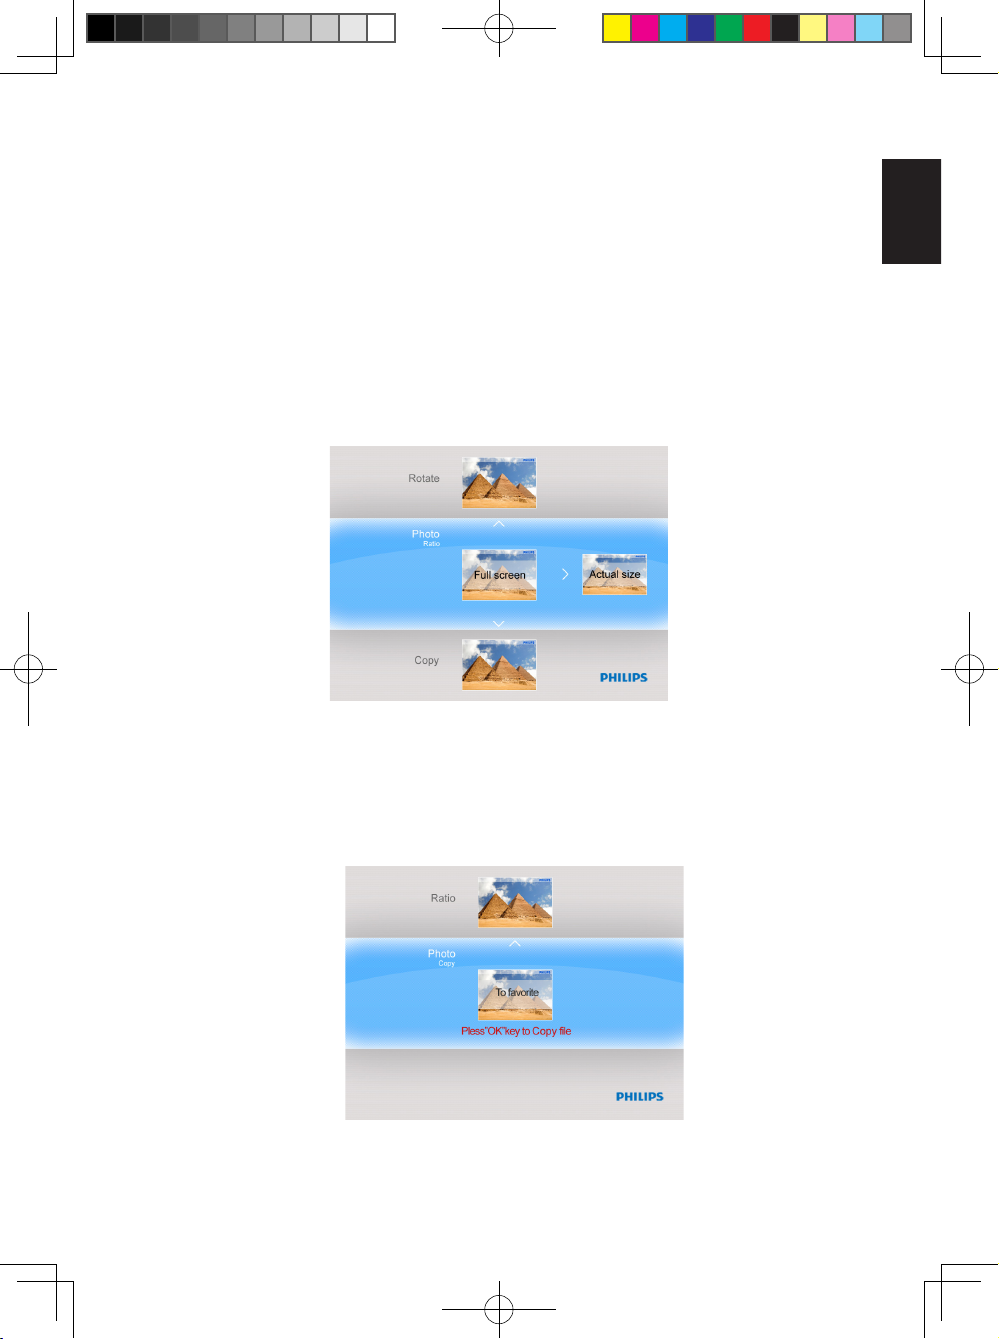
4.3.3.6 Ratio
• In the thumbnail mode, select the photo you want to display.
• Press OK button to access the Photo menu options.
• Use Down to go to Ratio.
• Use Left or Right to select the Full-Screen or Actual Size photo.
• Press Exit button to leave this menu and go back to the main menu.
English
4.3.3.7 Copy
You can copy photos stored on a memory device to the PhotoFrame's internal
memory or from the internal memory to a memory device plugged in the
PhotoFrame.
17
Philips Eros 8DN UM_0914_book.indb 17 2009/9/17 上午 09:13:37
Page 26
• Copy photos to Internal Memory, to Memory card, to USB drive and to
Favorite.
• In the thumbnail mode, select the photo you want to copy.
English
• Press OK button to access the Photo menu options.
• Select Copy.
• Use Left or Right to choose your storage media to copy your photo to Internal
Memory, to Memory card, to USB drive and to Favorite.
• Press OK to start copying.
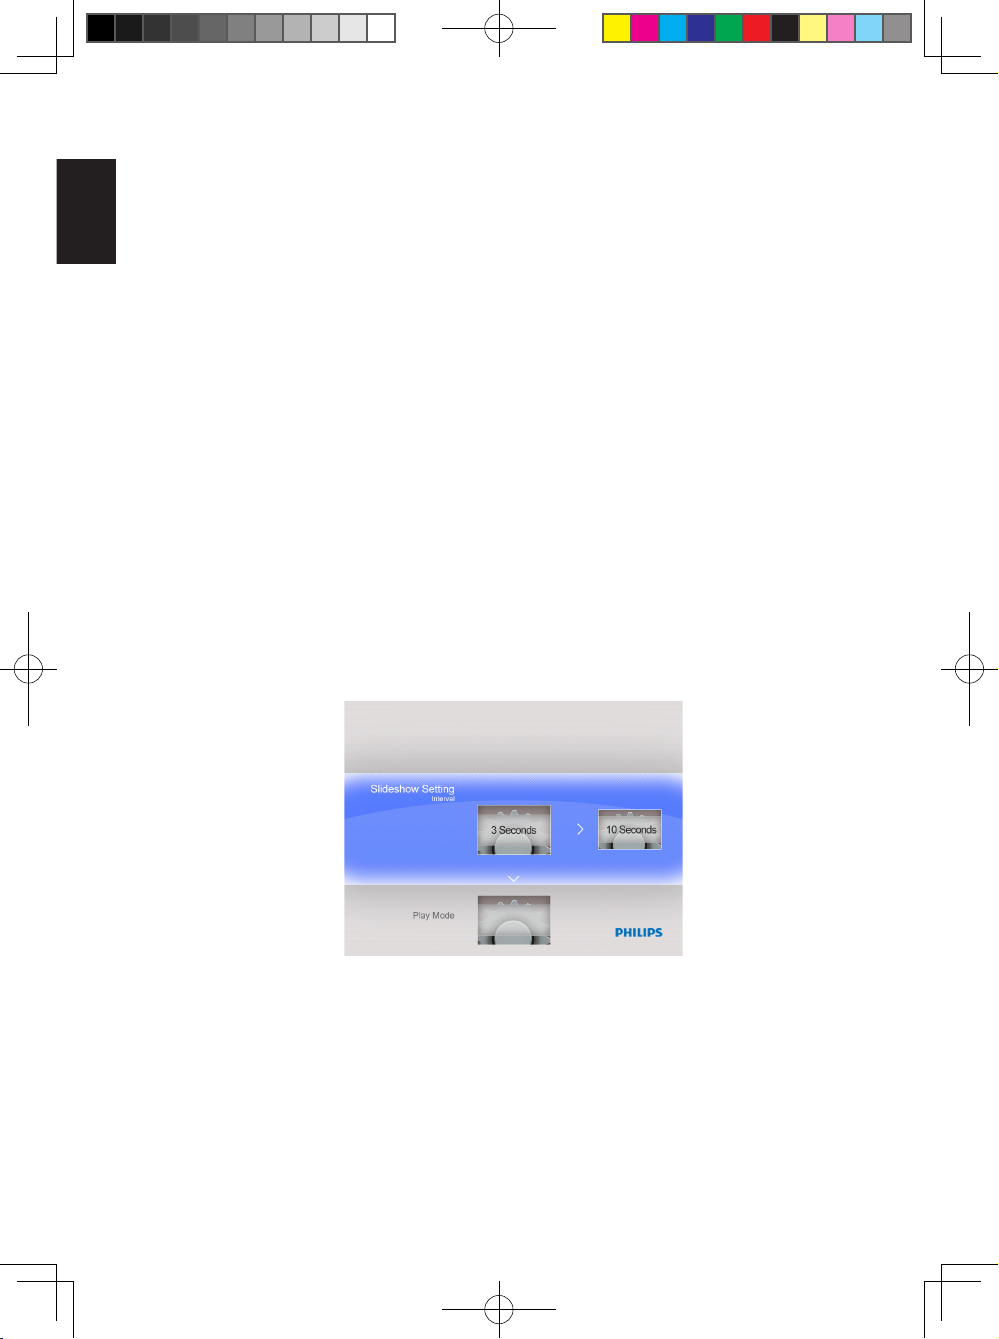
4.4 Slideshow Setting
4.4.1 Interval
Use this function to select how long each photo will be displayed during the
slideshow.
• In the main menu, use Down to access the Setting menu.
• Use Left and press the OK button to access the Slideshow Setting menu.
• Use Up to go to the Interval sub menu.
• Use Left or Right to select the desired transition time: 3 Seconds (default),
10 Seconds, 30 Seconds, 1 Minute.
• Press OK to conrm.
• Press Exit button to leave this menu and go back to the main menu.
18
Philips Eros 8DN UM_0914_book.indb 18 2009/9/17 上午 09:13:37
Page 27
English
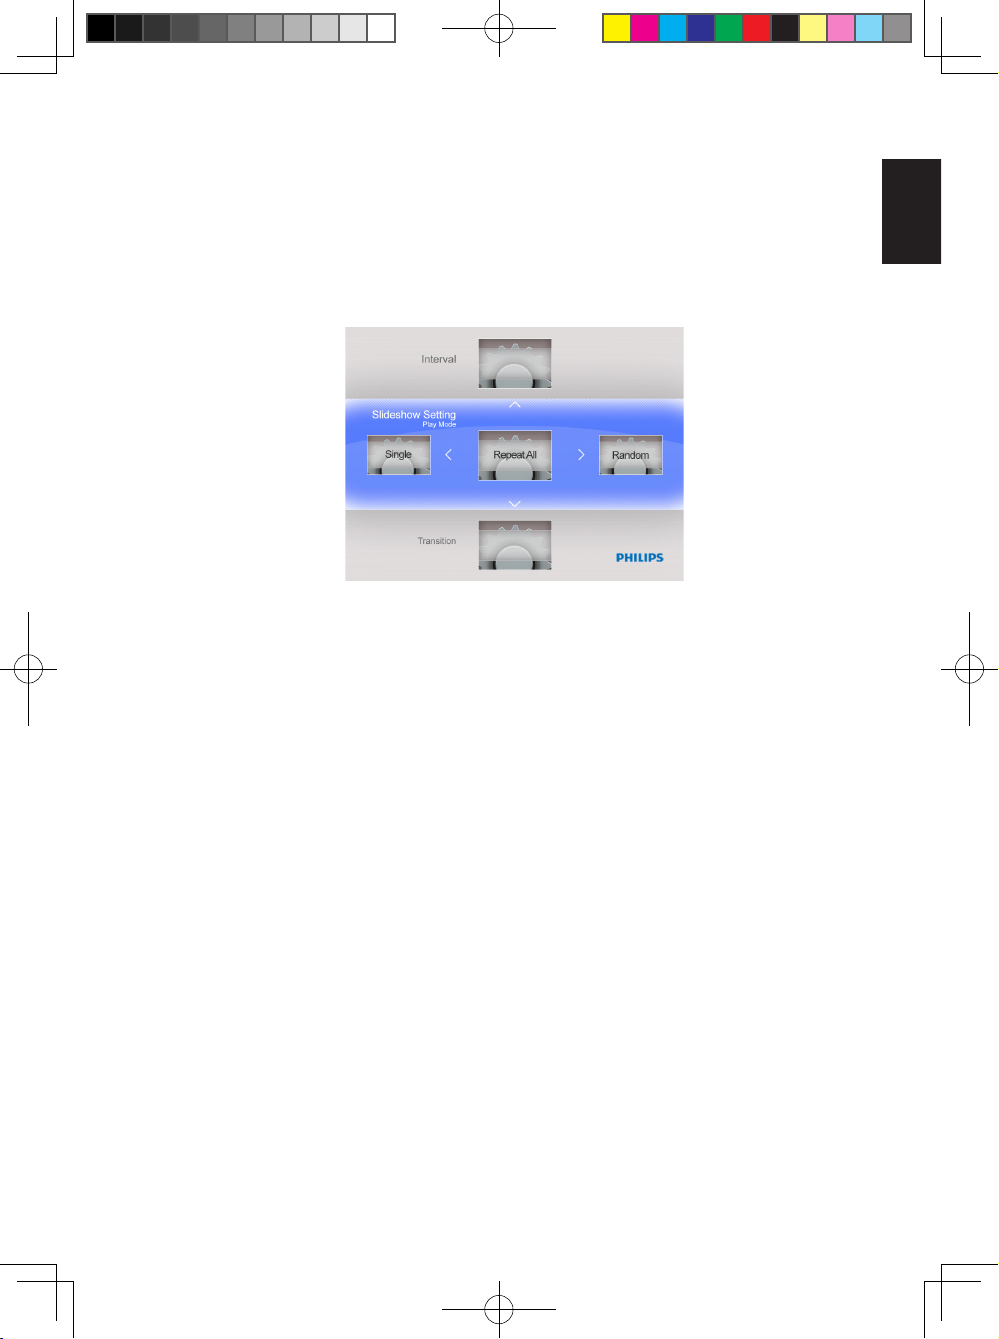
4.4.2 Play Mode
Slideshows can be played in three ways: Random, Repeat all or Single.
• In the main menu, use Down to access the Setting menu.
• Use Right and press the OK button to access the Slideshow Setting menu.
• Use Up or Down to access the Play Mode.
• Use Left or Right to go to Random, Repeat all or Single.
• Press OK to conrm.
• Press Exit to leave this menu and go back to the main menu.
English
19
Philips Eros 8DN UM_0914_book.indb 19 2009/9/17 上午 09:13:38
Page 28
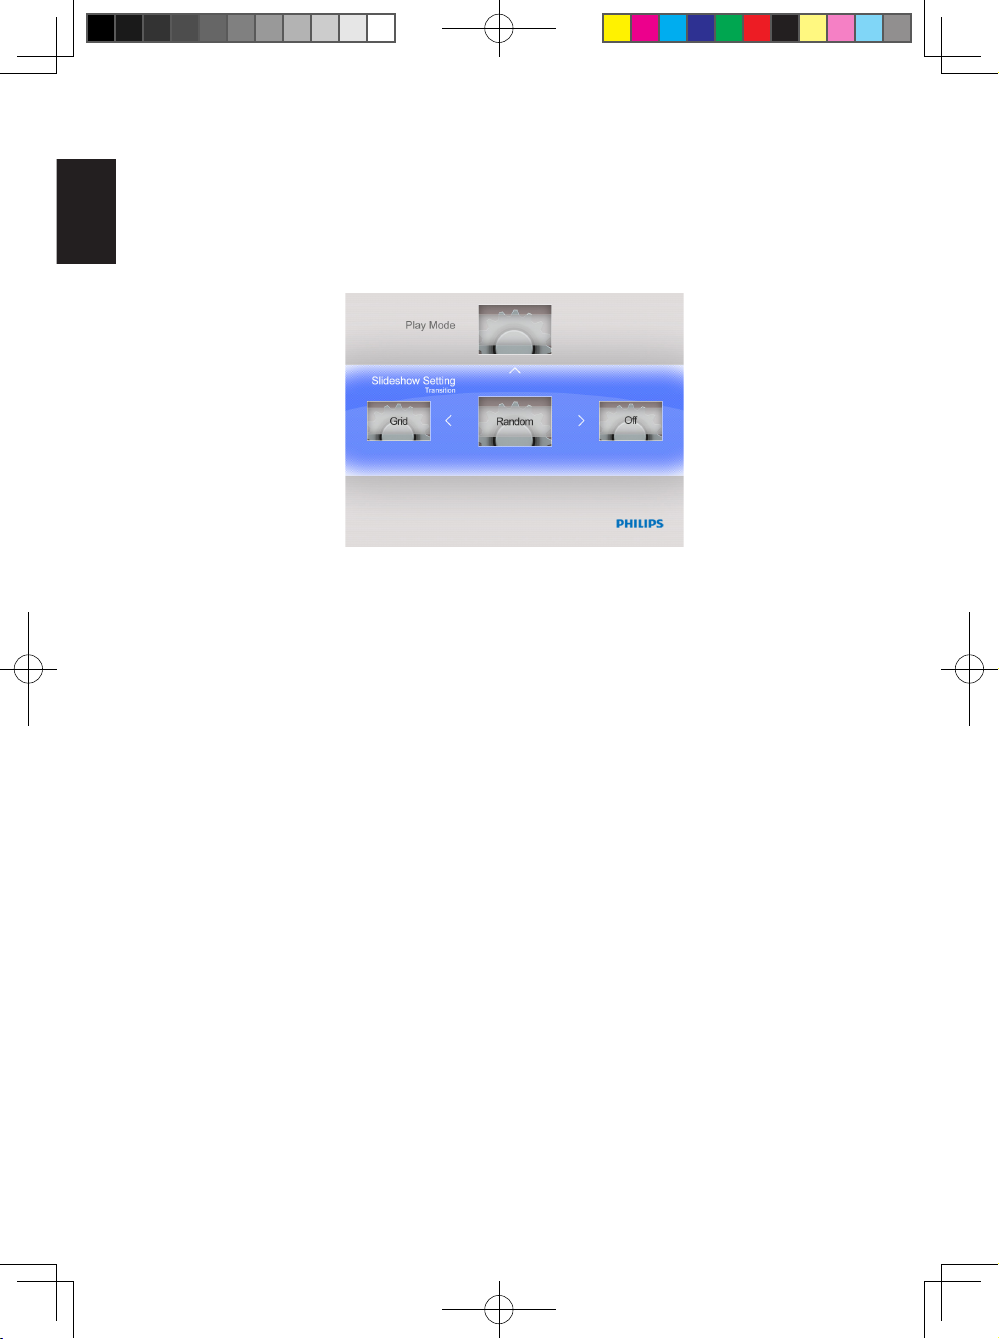
4.4.3 Transition
• In the main menu, use Down to access the Setting menu.
• Use Right and press the OK button to access the Slideshow Setting menu.
English
• Use Down to go to the Transition menu.
• Use Right to select a transition effect like: Off, Fade, Shutter, Cross Comb,
Mask, Brick, Dissolve, Bar, Expansion, Silk, Snail, Scroll, Grid, Random..
• Press OK to conrm.
• Press Exit button to leave this menu and go back to the main menu.
Note:
• This function applies to all the slideshows stored on all media.
• Random plays different effects out of sequence during the slideshow transition.
4.4.4 Collage
Set Collage slideshow to view multiple photos arranged on the screen at the same
time.
• In the main menu, Use Down to access the Setting menu.
• Use Left to go to the Collage menu.
20
Philips Eros 8DN UM_0914_book.indb 20 2009/9/17 上午 09:13:38
Page 29

English
English
• The Collage function is disabled while setting the Play mode to Single.
• Use Right to access Solo-Photo, Multi-Photo, Valentine's Day, Father's Day,
Mother's Day, Christmas, Wedding and Birthday.
• And press OK to save the setting.
• The PhotoFrame will return to the slideshow menu right after the layout
conguration is nished.
• Press Exit button to leave the Slideshow menu and press OK to play the
collage picture.
Note 1:
In Collage mode, the PhotoFrame only plays the photos that are arranged in your
selected layout.
Note 2:
Auto orientation function still works for collage slideshow.
21
Philips Eros 8DN UM_0914_book.indb 21 2009/9/17 上午 09:13:38
Page 30
4.5 General Setting
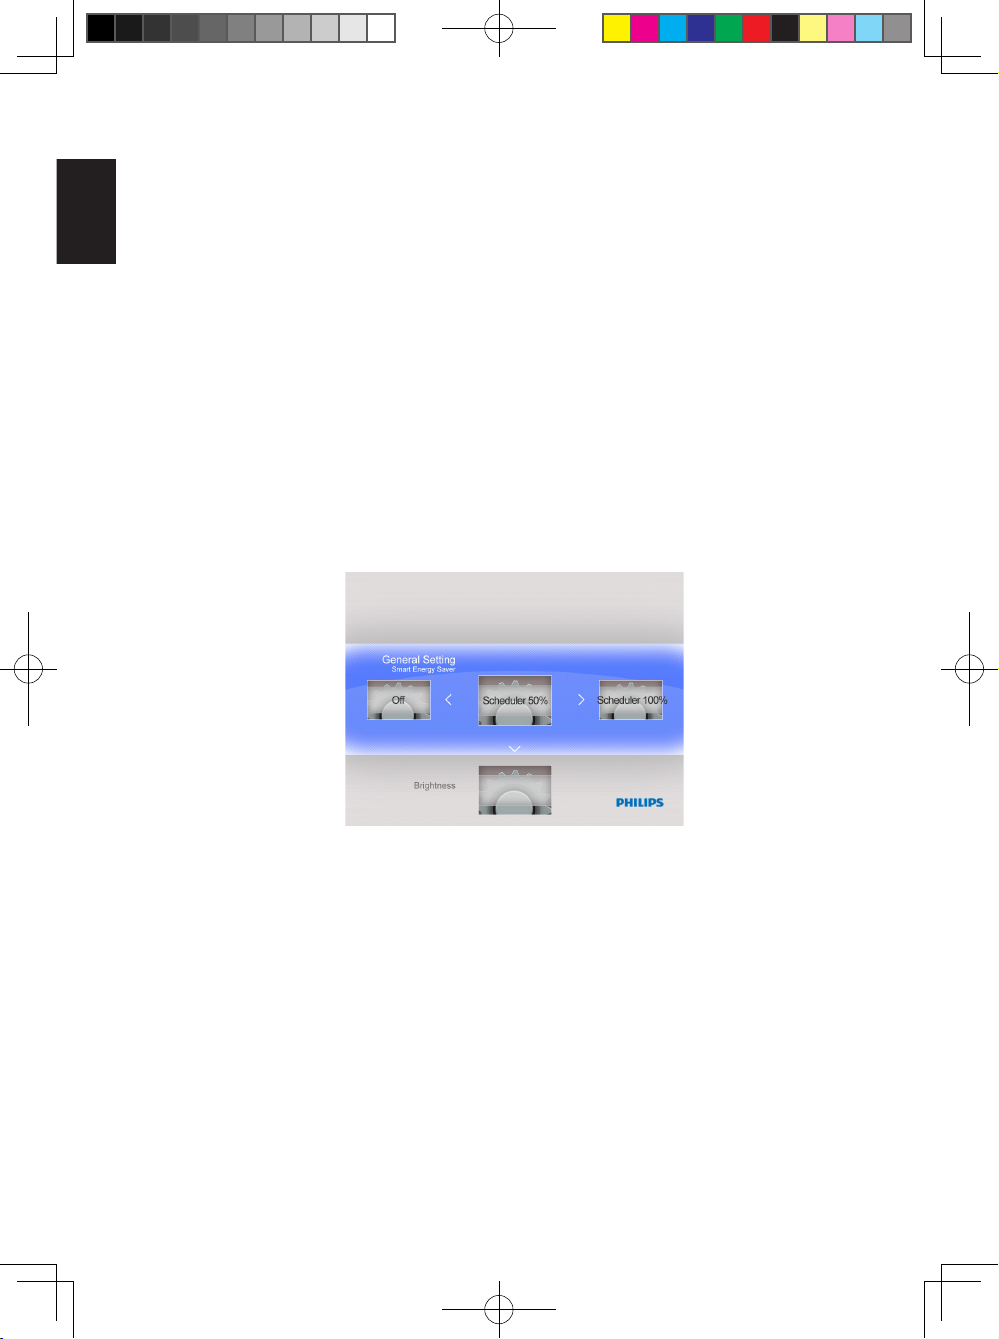
4.5.1 Smart Energy Saver
English
4.5.1.1 Playing Smart Energy Saver
Function Explanation
When you select Scheduler 50% or Scheduler 100%, this unit will automatically
operate at low power consumption during nighttime (21:00PM~7:00AM), and will
resume normal during daytime (7:00AM ~21:00PM);
When you select Save 20% or Save 50%, it will operate at that indicated power
consumption rate full-time.
• In the main menu, use Down to access the Setting menu.
• Use Left or Right to access the General Setting menu.
• Use Up or Down to access the Smart Energy Saver setting menu.
• Use Left or Right to select Scheduler 50% / Scheduler 100% / Save 20% /
Save 50%.
• Press the OK button to conrm the selection.
22
Philips Eros 8DN UM_0914_book.indb 22 2009/9/17 上午 09:13:38
Page 31

English
4.5.1.2 Off
If the Smart Energy Saver is set to "Off", the PhotoFrame will operate at full power.
• In the main menu, use Down to access the Setting menu.
• Use Left or Right to access the General Setting menu.
• Use Up or Down to access the Smart Energy Saver setting menu.
• Use Left or Right to select Off.
• Press the OK button to conrm the selection.
4.5.2 Brightness
Change the brightness settings of the PhotoFrame to achieve the best photo view.
• In the main menu, use Down to access the Setting menu.
• Use Right to access the General Setting options.
• Use Up or Down to access the brightness control.
• Use Left or Right to select the level of brightness: Darker, Normal and
Brighter.
• Press OK button to conrm and return to the previous menu.
English
23
Philips Eros 8DN UM_0914_book.indb 23 2009/9/17 上午 09:13:39
Page 32

4.5.3 Language
Use this section to choose the menu language of the PhotoFrame.
• In the main menu, use Down to access the Setting menu.
English
• Use Right to access the General Setting option.
• Use Up or Down to access the Language menu.
• Use Left or Right to select your preferred language:English, Français,
Deutsch, Español, Nederlands, Português, Italiano.
• Press the OK button to conrm your setting and return to the Setting menu.
The new setting will be effective immediately.
• Press Exit to leave this menu and go back to the main menu.
4.5.4 Reset
Use this section to reset the PhotoFrame to the factory default setting.
• In the main menu, use Down to access the Setting menu.
• Use Right to access the General Setting option.
• Use Up or Down to access the Reset menu.
• Use Left or Right to select Yes or No.
• Press the OK button to conrm your setting and return to the Setting menu.
• Press Exit to leave this menu and go back to the main menu.
4.5.5 Delete All
Use this section to delete the photos.
• In the main menu, use Down to access the Setting menu.
• Use Right to access the General Setting option.
• Use Up or Down to access the Delete All menu.
• Use Left or Right to select Favorite or Internal.
• Press the OK button to conrm your setting and return to the Setting menu.
• Press Exit to leave this menu and go back to the main menu.
24
Philips Eros 8DN UM_0914_book.indb 24 2009/9/17 上午 09:13:39
Page 33

English
4.5.6 Smart Copy
You can copy photos stored on a memory device to the PhotoFrame internal
memory .You may resize the photos when you copy photos.
• In the main menu, use Down to access the Setting menu.
• Use Right to access the General Setting option.
• Use Up or Down to access the Smart Copy menu.
• Use Left or Right to select Album or Original to resize your photos or not.
• Press the OK button to conrm your setting and return to the Setting menu.
• Press Exit to leave this menu and go back to the main menu.
Note:
The PhotoFrame will warn the user with an insufcient memory space message
when there is no enough free internal memory left to hold the photos the user
wishes to copy.
English
25
Philips Eros 8DN UM_0914_book.indb 25 2009/9/17 上午 09:13:39
Page 34

4.6 Date and Time
Use this function to set the date and time of the PhotoFrame.
English
• In the main menu, use Down to access the Setting menu.
• Use Left or Right to access the Date and Time setting menu.
4.6.1 Set Date
• In the Date and Time setting menu, use Left or Right to adjust the date.
• Use Up and Down to move between day, month and year.
• Press the OK button to conrm the set date.
4.6.2 Set Time
• In the Date and Time setting menu, use Left or Right to adjust the time.
• Use Up or Down to move between hours and minutes.
• Press the OK button to conrm the set time.
26
Philips Eros 8DN UM_0914_book.indb 26 2009/9/17 上午 09:13:39
Page 35

English
4.7 Auto Orientation
With this function enabled, your photos will automatically be properly positioned
regardless of your PhotoFrame orientation in a landscape or portrait position.
4.8 Zoom In/Out or Pan Function
Use Zoom In/Out or Pan Function to change the view of the photos.
• In slideshow mode, press OK to the main menu.
• Press EZ Access Toggle button to slideshow.
• Press Left or Right to change slideshow photo, and enter photo view (photo in
Pause state). Pause icon will disappear after 3s.
• Press Up and Down key to Zoom In/Out.
• Press OK to pan and use Pan Function to move Up/Down/Left/Right key.
• Press OK or Exit to photo slideshow again.
English
27
Philips Eros 8DN UM_0914_book.indb 27 2009/9/17 上午 09:13:39
Page 36

5. Technical Data
Picture Display
English
• Screen size: 8”
• Horizontal viewing angle: 60°
• Vertical viewing angle: 40°
• Brightness: 200 cd
• Aspect ratio: 4:3
• Panel resolution: 800×600
Storage Media
• Memory card types: SD/MMC/MMC+/xD/MS/MS Pro/MS Duo type and a USB
ash drive
• Photo format supported: JPEG-up to 20 Megapixels
• Placement supported: Landscape, Portrait, Photo auto orientation
Buttons
• Buttons and controls: 7 control key buttons
1 EZ ACCESS TOGGLE key to change between photo and clock
1 key each to go Up, Down, Right, or Left
1 OK key to go to main menu, edit menu and conrm
1 Exit key to exit
Features
• Playback mode: Slideshow, Thumbnail browse
• Slideshow setting: Interval, Play mode, Transition effects, Collage
• OSD languages: English, French, German, Dutch, Spanish, Portuguese, Italian
• Plug & Play compatibility: Windows 2000/XP/Vista and Mac OS X
• Regulatory approvals: FCC, California 65
28
Philips Eros 8DN UM_0914_book.indb 28 2009/9/17 上午 09:13:39
Page 37

English
6. Frequently Asked Questions
Is the screen touch-enabled?
The screen is not touch-enabled. Use the buttons on the back to control
PhotoFrame.
Can I switch between different slideshows photos by using different memory
cards?
Yes. When a memory card is connected to the PhotoFrame, it’ll slideshow photos
stored on that specic card.
Can I use the PhotoFrame to delete photos on memory cards?
Yes, it supports deletion of photos on devices such as a memory card.
Can I connect the PhotoFrame to a PC via the USB port?
No, the PhotoFrame does not support a connection to a PC via the USB port. The
USB port is only for a USB ash drive.
Can I print photos from PhotoFrame?
No, it does not support direct photo printing.
English
Why doesn’t my PhotoFrame show some of my photos?
Digital cameras take photos and store them in JPEG format according to camera
industry standards. Digital PhotoFrame is designed to show photos following the
same industry standards. Some images, such as web images, scanned images,
or photos in RAW format from professional cameras, are not stored according to
camera industry standards and therefore cannot be correctly displayed on Digital
PhotoFrame. Use PC applications to convert such images into standard JPEG
format for PhotoFrame.
29
Philips Eros 8DN UM_0914_book.indb 29 2009/9/17 上午 09:13:40
Page 38

7. Service and Warranty
One Year Limited Warranty (for US and Canada only)
English
Philips warrants that this product shall be free from defects in material,
workmanship and assembly, under normal use, in accordance with the
specications and warnings, for a period of one year from the date of purchase.
This warranty extends only to the original purchaser of the product, and is not
transferable. To exercise your rights under this warranty, you must provide proof of
purchase in the form of an original sales receipt that shows the product name and
the date of purchase. For customer support or to obtain warranty service, please
call toll free 1-877-784-0999 or visit our website www.philips.com/support.
Federal Communications Commission (FCC) Notice
This equipment has been tested and found to comply with the limits for a Class
B digital device, pursuant to Part 15 of the FCC Rules. These limits are designed
to provide reasonable protection against interference in a residential installation.
This equipment can radiate radio frequency energy and, if not installed and used in
accordance with the instructions, may cause interference to radio communications.
However, there is no guarantee that interference will not occur in a particular
installation. If this equipment does cause interference to radio or television
reception, which can be determined by turning the equipment off and on, the user
is encouraged to try to correct the interference by one of the following measures:
• Reorient or relocate the receiving antenna.
• Increase the separation between the equipment and receiver.
• Connect the equipment into an outlet on a circuit different from that to which the
receiver is connected.
• Consult the dealer or an experienced radio/TV technician for help.
Recycling
• To minimize harm to the environment, the batteries supplied with the PhotoFrame
do not contain mercury or nickel cadmium. If possible, when disposing of
batteries, use recycling means available in your area.
• The PhotoFrame uses materials that can be recycled. To minimize the amount of
waste in the environment, check your area for companies that will recover used
televisions for dismantling and collection of reusable materials, or contact your
dealer for recycling tips.
• Please dispose of the carton and packing material through the proper waste
disposal management in your area.
30
Philips Eros 8DN UM_0914_book.indb 30 2009/9/17 上午 09:13:40
Page 39

Wall mounting hole
Introduction
Le PhotoFrame numérique Philips peut être posé verticalement ou horizontalement
pour s’adapter aux photos afchées. Vous pouvez le poser sur une surface plate
dans une pièce ou le suspendre sur un mur en utilisant le trou de xation murale.
• Installer Votre Cadre sur le Mur
Utilisez le matériel de xation mural pour accrocher votre cadre en toute sécurité
sur votre mur.
Trou de xation murale
Français
1
Philips Eros 8DN UM_0914_book.indb 1 2009/9/17 上午 09:13:40
Page 40

1. Précautions
1.1 Précautions Basiques de Sécurité et d’Entretien
Lisez attentivement les instructions suivantes avent de brancher et d’utiliser votre
PhotoFrame an de réduire le risque de dommage, d’électrocution et de blessure.
Français
• N’appliquez pas une pression excessive sur le panneau numérique an d’éviter
d’endommager votre écran. Lorsque vous déplacez votre PhotoFrame, saisissez
le cadre pour le soulever; ne le soulevez pas en appuyant avec les mains ou les
doigts sur le panneau numérique.
• Débranchez le PhotoFrame si vous n’allez pas l’utiliser pendant une longue
période.
• Débranchez le PhotoFrame avant de le nettoyer et utilisez un chiffon légèrement
humide. L’écran doit être nettoyé avec un chiffon sec quand il est éteint. N’utilisez
jamais de l’alcool, de solvant ou de liquides avec de l’ammoniaque.
• Consultez un technicien d’entretien si le PhotoFrame ne fonctionne pas
normalement et que vous avez suivi toutes les instructions de ce manuel.
• Le couvercle du boîtier ne doit être ouvert que par un réparateur qualié.
• Gardez le PhotoFrame à l’abri de la lumière du soleil, et à distance des
cuisinières ou autres sources de chaleur.
• Gardez le PhotoFrame au sec. Pour réduire le risque d’électrocution ou de
dommage, n’exposez pas l’appareil à la pluie ou à une humidité excessive.
• Lorsque vous installez le PhotoFrame, assurez-vous que la prise d’alimentation
et la prise de courant soient facilement accessibles.
2
Philips Eros 8DN UM_0914_book.indb 2 2009/9/17 上午 09:13:40
Page 41

1.2 Prenez Soin du PhotoFrame
• Ne pas Faire Tomber
Le PhotoFrame est un appareil électronique complexe qui ne supporte pas les
chocs en cas de chute.
• Ne pas Exposer à l’Humidité
Le PhotoFrame n’est ni étanche ni résistant à l’humidité. L’exposition à l’humidité
ou à toute sorte de liquide est très susceptible d’endommager votre PhotoFrame.
• Ne pas Cogner ou Rayer
Le panneau LCD du PhotoFrame est en verre et est donc fragile et facile à se
casser en cas d’impact anormal ou de contact avec des objets tranchants.
• Nettoyage de l’Ecran
Utilisez uniquement un chiffon doux et sec pour nettoyer votre écran.
• Le Support ne doit pas être Enchevêtré dans les Câbles
Assurez-vous que le pied de support de votre PhotoFrame n’est pas enchevêtré
dans les câbles car ceux-ci pourraient faire tomber le PhotoFrame.
• Température et Humidité Maximales
• Température de fonctionnement : 0° à 40° (Celsius)
• Température de stockage : -20° à 70° (Celsius)
• Humidité : 20% ~ 80%
Français
3
Philips Eros 8DN UM_0914_book.indb 3 2009/9/17 上午 09:13:40
Page 42

2. Votre PhotoFrame
Phot oFram e
Mod e d em ploi
2.1 Qu’y a-t-il dans la Boîte?
• PhotoFrame
• Adaptateur de courant CA-CC
Français
• Guide de démarrage rapide
• Télécommande
• Mode d’emploi
3KRWR)UDPH
Guide de démarrage rapide
&RQQHFWHU
5«JODJHV
9LVXDOLVHU
PhotoFrame
Guide de démarrage rapide
Adaptateur de courant CA-CC Télécommande
4
Mode d’emploi
Philips Eros 8DN UM_0914_book.indb 4 2009/9/17 上午 09:13:40
Page 43

2.2 Boutons de Commande et Navigation dans le Menu
• Boutons de Commande
1 2 3 4 5 6 7
No. Bouton Description des Fonctions
1 Gauche Elément précédent, retour aux éléments précé-
dents du menu
2 Droite Elément suivant
Français
3 Haut Elément précédent, « Zoom avant »
4 Bas Elément suivant, « Zoom arrière »
5 OK Ouvrir le sous-menu
Valider le processus
Conrmer les sélections
6 Quitter Quitter le menu
Quitter le processus
Quitter le Diaporama
7 Bouton d’Accès Ra-
pide EZ
Play slideshow
Changer de mode de lecture
Passer de photo à horloge
• Utilisez votre PhotoFrame en appuyant sur les boutons de commande à l’arrière.
5
Philips Eros 8DN UM_0914_book.indb 5 2009/9/17 上午 09:13:40
Page 44

• Boutons de la Télécommande
Français
Illustration Fonction
Aller dans montage
Boutons de navigation
Conrmer la sélection, ouvrir le menu
Faire tourner
Quitter le menu courant
Smart Energy Saver
Bouton d’accès rapide EZ
6
Philips Eros 8DN UM_0914_book.indb 6 2009/9/17 上午 09:13:40
Page 45

2.3 Connexion du Appareil de Mémoire
SD/MMC/xD/MS/MSPro Duo
ON OFF
DC
2.3.1 Insérer un Appareil de Mémoire
• Insérez l’appareil de mémoire dans la fente du lecteur d’appareil de mémoire
du cadre.
• Les cartes SD/MMC/ MMC+/xD/MS/MS Pro/ MS Duo sont prises en charge.
• L’appareil est équipé d’un port USB pour lire les clés USB.
• Lorsque vous insérez un appareil de mémoire, on vous demandera si
vous souhaitez copier les images sur la mémoire intégrée du PhotoFrame,
choisissez « Oui » pour copier toute la mémoire externe sur la mémoire interne
puis retourner au Diaporama (afcher les images dans l’appareil de mémoire)
une fois le copiage terminé; vous pouvez aussi choisir « Non » pour retourner
au Diaporama ; si aucune sélection n'est effectuée dans les 15 secondes, le
PhotoFrame lancera automatiquement le Diaporama.
Remarque 1:
Ne retirez pas l’appareil de mémoire immédiatement après l’avoir inséré dans le
PhotoFrame ou quand le PhotoFrame est en train de lire les photos de la carte
mémoire/du lecteur USB pour l’option de copiage. Patientez jusqu’à ce que
PhotoFrame ait lu les photos.
Remarque 2:
Si l’appareil de mémoire que vous avez branché est vide ou endommagé, Le
PhotoFrame ne réagira pas.
Français
7
Philips Eros 8DN UM_0914_book.indb 7 2009/9/17 上午 09:13:40
Page 46

2.3.2 Retirer un Appareil de Mémoire/ une Clé USB
• Pour retirer les cartes SD/MMC/ MMC+/xD/MS/MS Pro/ MS Duo ou une clé
USB, Tirez-les doucement hors de la fente.
2.4 Fonctions Principales du Produit
Français
Le PhotoFrame est conçu pour être pratique et facile d’utilisation ; il est doté des
caractéristiques suivantes :
• Smart Energy Saver vous fournit quatre manières intelligentes de gérer la
consommation du courant
• Lire les photos en mode Montage (Photo unique, Multi-Photo, St Valentin, Fête
des pères, Fête des mères, Noël, Mariage et Anniversaire)
• Mémoire intégrée de 128 Mo pour sauvegarder vos images, la capacité de
sauvegarde sera inférieure
• Prend en charge les cartes mémoire les plus communes : SD/MMC/ MMC+/xD/
MS/MS Pro/ MS Duo
• Vue en vignettes et effets Diaporama
• Afchage du Montage
• Rotation d’image automatique (Changement d’angle)
8
Philips Eros 8DN UM_0914_book.indb 8 2009/9/17 上午 09:13:41
Page 47

3. Démarrage
3.1 Assemblage du Support – PhotoFrame
Etape 1: Tenez le PhotoFrame debout.
Etape 2: Sortez le support puis faites le glissez légèrement de la manière suivante
pour être sûr que le cadre reste droit an d’obtenir le meilleur angle de
vue.
Remarque :
Pour des raisons de sécurité et de meilleure stabilité, Philips recommande d’ajuster
le support à l’angle déterminé par les positions des deux clics. L’usage d’autres
positions peut faire tomber le PhotoFrame, ceci sera la responsabilité de l’utilisateur.
3.2 Brancher l’Adaptateur d’Alimentation
Français
Branchez l’adaptateur d’alimentation fourni sur le PhotoFrame et sur une prise de
courant murale.
ON
Marche
Arrêt
OFF
9
Philips Eros 8DN UM_0914_book.indb 9 2009/9/17 上午 09:13:41
Page 48

3.3 Allumer le PhotoFrame
• Faites glisser le bouton d’alimentation situé au dos de l’appareil sur la position
« Marche » pour allumer votre PhotoFrame.
Français
3.4 Eteindre le PhotoFrame
• Faites glisser le bouton d’alimentation situé au dos de l’appareil sur la position
« Arrêt » pour éteindre votre PhotoFrame.
3.5 Menu Principal
3.5.1 Accéder au Menu Principal
Appuyez sur OK en mode Diaporama ou horloge pour accéder au menu principal.
3.5.2 Accéder aux Options de Sous-Menu
Pour accéder aux options de sous-menu depuis le menu principal :
• Appuyez sur OK en mode Diaporama ou horloge.
• Appuyez sur Haut et Bas pour sélectionner le sous-menu désiré.
• Appuyez sur OK pour ouvrir le menu.
• Pour quitter le menu, appuyez de nouveau sur Quitter pour revenir au
Diaporama.
10
Philips Eros 8DN UM_0914_book.indb 10 2009/9/17 上午 09:13:41
Page 49

4. Utilisation du PhotoFrame
4.1 Calendrier
Le Calendrier peut être visualisé en plein écran.
• Dans le menu principal, sélectionnez Calendrier, appuyez sur OK pour afcher le
calendrier en plein écran.
• Appuyez sur Haut ou Bas pour voir le mois. Passera automatiquement au mois
suivant ou précédent lorsque vous appuyez sur le bouton Haut ou Bas.
• Appuyez sur OK pour revenir au mois courant.
• Lorsque le mois courant est afché, appuyez sur OK pour revenir au menu du
Calendrier.
Remarque :
Pour régler la date, allez dans le menu Réglage, puis dans le sous-menu Date et
Heure.
Français
11
Philips Eros 8DN UM_0914_book.indb 11 2009/9/17 上午 09:13:41
Page 50

4.2 Horloge
L’Horloge peut être visualisée dans deux habillages ou modes d’afchage
différents.
• Dans le menu principal, sélectionnez Horloge,appuyez sur les boutons Gauche
ou Droite pour sélectionner l’habillage ou l’afchage, puis appuyez sur OK pour
afcher l’horloge en plein écran.
Français
• En mode plein écran, appuyez sur les boutons Gauche ou Droite pour changer d’
habillage de l’horloge.
• Appuyez sur OK pour revenir au menu Horloge.
Remarque :
Pour régler l’heure, allez dans le menu Réglage puis dans le sous-menu Date et
Heure.
12
Philips Eros 8DN UM_0914_book.indb 12 2009/9/17 上午 09:13:41
Page 51

4.3 Photo
4.3.1 Afcher les Photos
4.3.1.1 Mode Diaporama
Le Mode Diaporama démarre automatiquement lorsque vous allumez le PhotoFrame.
Pour lire la source photo ou l’album désiré en mode Diaporama, procédez de la
manière suivante :
• Dans le menu principal, sélectionnez l’option Photo.
• Appuyez sur les boutons Gauche ou Droite pour sélectionner une photo.
• Appuyez sur le Bouton d’Accès Rapide EZ pour afcher immédiatement les
photos en mode Diaporama.
• Les photos déleront automatiquement une à une lorsque vous appuyez sur
les boutons Gauche ou Droite.
Français
4.3.1.2 Mode Vignette
Vous pouvez visionner un grand nombre de photos en utilisant le Mode Vignette.
• Dans le menu principal, sélectionnez le menu Photo.
• Appuyez sur les boutons Gauche ou Droite pour sélectionner la source de
photos à parcourir.
• Appuyez sur le Bouton d’Accès Rapide EZ pour commencer le Diaporama.
13
Philips Eros 8DN UM_0914_book.indb 13 2009/9/17 上午 09:13:42
Page 52

Remarque :
Vous pouvez accéder directement aux vignettes depuis le mode Diaporama en
appuyant sur Quitter ou OK.
4.3.2 Sélection d'une Photo
• Allez au Mode Vignette.
• Appuyez sur Droite ou Gauche pour changer entre les photos.
Français
4.3.3 Menu Photo
Lorsqu’une photo est sélectionnée, vous pourrez accéder directement au Menu
Photo depuis la vignette en appuyant sur le bouton OK.
4.3.3.1 Effets de Couleur
• En Mode Vignette, sélectionnez les photos auxquelles vous souhaitez ajouter
des effets.
• Appuyez sur OK pour accéder aux options du menu Photo.
• Appuyez sur les boutons Haut ou Bas pour aller dans Effets de Couleur.
• Appuyez sur les boutons Gauche ou Droite pour sélectionner l’effet désiré.
• Appuyez sur OK pour appliquer l’effet.
• Appuyez sur Quitter pour quitter ce menu et revenir au menu principal.
14
Philips Eros 8DN UM_0914_book.indb 14 2009/9/17 上午 09:13:42
Page 53

4.3.3.2 Contraste
• En Mode Vignette, sélectionnez les photos auxquelles vous souhaitez ajouter
des effets.
• Appuyez sur OK pour accéder aux options du menu Photo.
• Appuyez sur les boutons Haut ou Bas pour aller dans Contraste.
• Appuyez sur les boutons Gauche ou Droite pour sélectionner l’effet désiré.
• Appuyez sur le Bouton d’Accès Rapide EZ pour afcher immédiatement les
photos en mode Diaporama.
• Les photos déleront automatiquement une à une lorsque vous appuyez sur
les boutons Gauche ou Droite.
4.3.3.3 Luminosité
• En Mode Vignette, sélectionnez les photos auxquelles vous souhaitez ajouter
des effets.
• Appuyez sur OK pour accéder aux options du menu Photo.
• Appuyez sur les boutons Gauche ou Droite pour sélectionner l’effet désiré.
• Appuyez sur OK pour appliquer l’effet.
• Appuyez sur Quitter pour quitter ce menu et revenir au menu principal.
Français
• Appuyez sur OK pour appliquer l’effet.
• Appuyez sur Quitter pour quitter ce menu et revenir au menu principal.
15
Philips Eros 8DN UM_0914_book.indb 15 2009/9/17 上午 09:13:43
Page 54

4.3.3.4 Supprimer
Si vous avez besoin de libérer de l’espace dans le PhotoFrame ou dans l’appareil
de mémoire vous pouvez supprimer des photos.
• En Mode Vignette, sélectionnez la photo que vous souhaitez supprimer.
• Appuyez sur OK pour accéder aux options du menu Photo.
• Sélectionnez Supprimer.
• Appuyez sur le bouton Droite pour sélectionner Oui.
Français
• Appuyez sur OK pour conrmer la suppression.
Lorsque vous supprimez une photo, PhotoFrame retournera au menu Photo une
fois l’action terminée.
4.3.3.5 Tourner
Le PhotoFrame peut changer l’orientation des photos.
• En Mode Vignette, sélectionnez la photo que vous souhaitez faire tourner.
• Appuyez sur OK pour accéder aux options du menu Photo.
• Appuyez sur le bouton Bas pour aller dans Tourner.
• Appuyez sur les boutons Gauche ou Droite pour sélectionnez l’orientation.
16
Philips Eros 8DN UM_0914_book.indb 16 2009/9/17 上午 09:13:43
Page 55

• Appuyez sur le bouton OK pour conrmer le changement d’orientation.
• Appuyez sur Quitter pour quitter ce menu et revenir au menu principal.
4.3.3.6 Taille
• En Mode Vignette, sélectionnez la photo que vous souhaitez afcher.
• Appuyez sur OK pour accéder aux options du menu Photo.
• Appuyez sur le bouton Bas pour aller dans Tourner.
• Appuyez sur les boutons Gauche ou Droite pour sélectionner Plein Ecran ou
Taille Actuelle.
• Appuyez sur Quitter pour quitter ce menu et revenir au menu principal.
4.3.3.7 Copier
Vous pouvez copier les photos enregistrées sur un appareil de mémoire vers
la mémoire interne du PhotoFrame ou bien depuis la mémoire interne vers un
appareil de mémoire branché sur le PhotoFrame.
Français
17
Philips Eros 8DN UM_0914_book.indb 17 2009/9/17 上午 09:13:44
Page 56

• Copier les photos vers la mémoire interne, vers une carte mémoire, vers un
lecteur USB ou vers les Favoris.
• En Mode Vignette, sélectionnez la photo que vous souhaitez copier.
• Appuyez sur OK pour accéder aux options du menu Photo.
• Sélectionnez Copier.
• Appuyez sur les boutons Gauche ou Droite pour choisir le support de
Français
stockage depuis lequel vous souhaitez copier vers votre mémoire interne,
vers une carte mémoire, vers un lecteur USB ou vers les Favoris.
• Appuyez sur OK pour commencer le copiage.
4.4 La Mise en Diaporama
4.4.1 Intervalle
Utilisez cette fonction pour sélectionner la durée d’afchage de chaque photo dans
le Diaporama.
• Dans le menu principal, appuyez sur le bouton Bas pour accéder au menu
Réglage.
• Appuyez sur le bouton Gauche et appuyez sur OK pour accéder au menu La
Mise en Diaporama.
• Appuyez sur le bouton Haut pour aller dans le menu Intervalle.
• Appuyez sur les boutons Gauche ou Droite pour Sélectionnez le temps de
transition désiré. : 3 Secondes (défaut),10 Secondes, 30 Secondes, 1
Minute.
• Appuyez sur OK pour conrmer.
• Appuyez sur Quitter pour quitter ce menu et revenir au menu principal.
18
Philips Eros 8DN UM_0914_book.indb 18 2009/9/17 上午 09:13:44
Page 57

4.4.2 Mode de Lecture
Les diaporamas peuvent être lus de trois manières: Aléatoire, Tout répéter ou
Unique.
• Dans le menu principal, appuyez sur le bouton Bas pour accéder au menu
Réglage.
• Appuyez sur le bouton Droite et appuyez sur OK pour accéder au menu La
Mise en Diaporama.
• Appuyez sur les boutons Haut ou Bas pour accéder au Mode de Lecture.
• Appuyez sur les boutons Gauche ou Droite pour aller sur Unique, Tout
Répéter ou Aléatoire.
• Appuyez sur OK pour conrmer.
• Appuyez sur Quitter pour quitter ce menu et revenir au menu principal.
Français
19
Philips Eros 8DN UM_0914_book.indb 19 2009/9/17 上午 09:13:44
Page 58

4.4.3 Transition
• Dans le menu principal, appuyez sur le bouton Bas pour accéder au menu
Réglage.
• Appuyez sur le bouton Droite et appuyez sur OK pour accéder au menu La
Mise en Diaporama.
• Appuyez sur le bouton Bas pour aller au menu Transition.
Français
• Appuyez sur le bouton Droite pour sélectionner un des effets de transition
suivants : Aucun, Fondu, Store, Peigne croisé, Masque, Brique, Dissolu,
Barre, Expansion, Soie, Escargot, Déroulement, Grille, Aléatoire..
• Appuyez sur OK pour conrmer.
• Appuyez sur Quitter pour quitter ce menu et revenir au menu principal.
Remarque :
• Cette fonction s’applique à tous les diaporamas enregistrés sur tous les médias.
• La fonction Aléatoire joue différents effets pendant la transition du Diaporama.
4.4.4 Collage
Sélectionnez Diaporama Montage pour afcher plusieurs photos en même temps
sur l’écran.
• Dans le menu principal, appuyez sur le bouton Bas pour accéder au menu
Réglage.
• Appuyez sur le bouton Gauche pour aller au menu Collage.
20
Philips Eros 8DN UM_0914_book.indb 20 2009/9/17 上午 09:13:44
Page 59

• La fonction de Montage est désactivée lorsque le mode de lecture est réglé
sur Unique.
• Appuyez sur le bouton Droite pour accéder aux options Photo unique,
Multi-Photo, St Valentin, Fête des pères, Fête des mères, Noël, Mariage et
Anniversaire.
• Et appuyez sur OK pour sauvegarder le réglage.
• Le PhotoFrame reviendra au menu diaporama dès que la conguration est
terminée.
• Appuyez sur Quitter pour quitter le menu Diaporama et appuyez sur OK pour
lire le montage de photos.
Remarque 1:
En Mode Montage, le PhotoFrame lit uniquement les photos se trouvant dans le
montage que vous avez fait.
Remarque 2:
La fonction Orientation automatique fonctionne encore pour le Diaporama montage.
Français
21
Philips Eros 8DN UM_0914_book.indb 21 2009/9/17 上午 09:13:45
Page 60

4.5 Mise en Général
4.5.1 Smart Energy Saver
4.5.1.1 Lecture avec Smart Energy Saver
Explication de la Fonction
Lorsque vous sélectionnez Planicateur de 50% ou Planicateur de 100%, l’appareil
Français
fonctionnera automatiquement en bas régime la nuit (de 21h à 7h), et reprendra en
mode normal le jour (de 7h à 21h);
Lorsque vous sélectionnez Économiser 20% ou Économiser 50%, l’appareil
fonctionnera en permanence avec la consommation de courant indiquée.
• Dans le menu principal, appuyez sur le bouton Bas pour accéder au menu
Réglage.
• Appuyez sur les boutons Gauche ou Droite pour accéder au menu Réglages
Généraux.
• Appuyez sur les boutons Haut ou Bas pour accéder au menu de réglage de
Smart Energy Saver.
• Appuyez sur les boutons Gauche ou Droite pour sélectionner Planicateur de
50% /Planicateur de 100% / Économiser 20% / Économiser 50%.
• Appuyez sur OK bouton pour conrmer la sélection.
22
Philips Eros 8DN UM_0914_book.indb 22 2009/9/17 上午 09:13:45
Page 61

4.5.1.2 Désactivé
Si l’Economiseur d’Energie Intelligent est désactivé, le PhotoFrame fonctionnera à
plein régime.
• Dans le menu principal, appuyez sur le bouton Bas pour accéder au menu
Réglage.
• Appuyez sur les boutons Gauche ou Droite pour accéder au menu Mise en
Général.
• Appuyez sur les boutons Haut ou Bas pour accéder au menu de réglage de
Smart Energy Saver.
• Appuyez sur les boutons Gauche or Droite pour sélectionner Désactivé.
• Appuyez sur OK bouton pour conrmer la sélection.
4.5.2 Luminosité
Changez le réglage de la luminosité du PhotoFrame pour obtenir une image
optimale.
• Dans le menu principal, appuyez sur le bouton Bas pour accéder au menu
Réglage.
• Appuyez sur le bouton de Droite pour accéder aux options de Mise en
Général.
• Appuyez sur les boutons Haut ou Bas pour accéder au contrôle de la
luminosité.
• Appuyez sur les boutons Gauche ou Droite pour sélectionner le niveau de
luminosité: Plus Sombre, Normal et Brillant.
• Appuyez sur OK pour conrmer et revenir au menu précédent.
Français
23
Philips Eros 8DN UM_0914_book.indb 23 2009/9/17 上午 09:13:45
Page 62

4.5.3 Langue
Cette section vous permet de choisir la langue du menu du PhotoFrame.
• Dans le menu principal, appuyez sur le bouton Bas pour accéder au menu
Réglage.
• Appuyez sur le bouton de Droite pour accéder aux options de Mise en
Général.
• Appuyez sur les boutons Haut ou Bas pour accéder au menu Langue.
Français
• Appuyez sur les boutons Gauche ou Droite pour sélectionner votre langue
préférée : English, Français, Deutsch, Español, Nederlands, Português,
Italiano.
• Appuyez sur OK pour conrmer votre réglage et revenir au menu Réglage. Le
nouveau réglage sera immédiatement effectif.
• Appuyez sur Quitter pour quitter ce menu et revenir au menu principal.
4.5.4 Réinitisaliser
Utilisez cette section pour réinitialiser l’appareil aux réglages par défaut.
• Dans le menu principal, appuyez sur le bouton Bas pour accéder au menu
Réglage.
• Appuyez sur le bouton de Droite pour accéder aux options de Mise en
Général.
• Appuyez sur les boutons Haut ou Bas pour accéder au menu Réinitisaliser.
• Appuyez sur les boutons Gauche ou Droite pour sélectionner Oui ou Non.
• Appuyez sur OK pour conrmer votre réglage et revenir au menu Réglage.
• Appuyez sur Quitter pour quitter ce menu et revenir au menu principal.
4.5.5 Supprimer Tous
Cette section vous permet de supprimer des photos.
• Dans le menu principal, appuyez sur le bouton Bas pour accéder au menu
Réglage.
• Appuyez sur le bouton de Droite pour accéder aux options de Mise en
Général.
• Appuyez sur les boutons Haut ou Bas pour accéder au menu Supprimer.
• Appuyez sur les boutons Gauche ou Droite pour sélectionner Favoris ou
Interne.
• Appuyez sur OK pour conrmer votre réglage et revenir au menu Réglage.
• Appuyez sur Quitter pour quitter ce menu et revenir au menu principal.
24
Philips Eros 8DN UM_0914_book.indb 24 2009/9/17 上午 09:13:45
Page 63

4.5.6 Smart Copie
Vous pouvez copier les photos enregistrées sur un appareil de mémoire vers la
mémoire interne du PhotoFrame. Vous pouvez modier la taille des photos lorsque
vous copiez les photos.
• Dans le menu principal, appuyez sur le bouton Bas pour accéder au menu
Réglage.
• Appuyez sur le bouton de Droite pour accéder aux options de Mise en
Général.
• Appuyez sur les boutons Haut ou Bas pour accéder au menu Smart Copie.
• Appuyez sur les boutons Gauche ou Droite pour sélectionner Resize ou
Original et modier ou non la taille de vos photos.
• Appuyez sur OK pour conrmer votre réglage et revenir au menu Réglage.
• Appuyez sur Quitter pour quitter ce menu et revenir au menu principal.
Remarque :
Le PhotoFrame avertira l’utilisateur avec un message quand l’espace dans la
mémoire interne est insufsant pour contenir les photos que l’utilisateur souhaite
copier.
Français
25
Philips Eros 8DN UM_0914_book.indb 25 2009/9/17 上午 09:13:46
Page 64

4.6 La Date et l’Heure
Utilisez cette fonction pour régler la date et l’heure du PhotoFrame.
• Dans le menu principal, appuyez sur le bouton Bas pour accéder au menu
Réglage.
• Appuyez sur les boutons Gauche ou Droite pour accéder au menu de réglage La
Date et l’Heure.
Français
4.6.1 Régler la Date
• Dans le menu de réglage Date et Heure, appuyez sur les boutons Gauche ou
Droite pour ajuster la date.
• Appuyez sur les boutons Haut et Bas pour passer entre les jours, les mois, et
les années.
• Appuyez sur OK pour conrmer la date réglée.
4.6.2 Régler l’Heure
• Dans le menu de réglage Date et Heure, appuyez sur les boutons Gauche ou
Droite pour régler l’heure.
• Appuyez sur les boutons Haut ou Bas pour passer entre les heures et les
minutes.
• Appuyez sur OK pour conrmer l’heure réglée.
26
Philips Eros 8DN UM_0914_book.indb 26 2009/9/17 上午 09:13:46
Page 65

4.7 Orientation Automatique
Cette fonction vous permettra, une fois activée, de positionner automatiquement
vos photos indépendamment de l’orientation de votre PhotoFrame, en position
paysage ou en position portrait.
4.8 Zoom Avant/Arrière ou Pan
Utilisez les fonctions Zoom Avant/Arrière ou Pan pour Changer l’angle de vue des
photos.
• En mode Diaporama, appuyez sur OK pour accéder au menu principal.
• Appuyez sur le Bouton d’Accès Rapide EZ pour aller au Diaporama.
• Appuyez sur Gauche ou Droite pour changer les photos du Diaporama, et entrer
en vue de photos (photo en état Pause). L’icône de Pause disparaîtra après 3
secondes.
• Appuyez sur les boutons Haut et Bas pour Zoomer en Avant/Arrière.
• Appuyez sur OK pour « panner » et utilisez la fonction Pan pour déplacer vers
Haut/Bas/Gauche/Droite.
• Appuyez sur OK ou Quitter pour revenir aux diaporama des photos.
Français
27
Philips Eros 8DN UM_0914_book.indb 27 2009/9/17 上午 09:13:46
Page 66

5. Spécications
Afchage de l’Image
• Taille de l’écran : 8”
• Angle de visualisation horizontal : 60°
• Angle de visualisation vertical : 40°
Français
• Luminosité: 200 cd
• Format: 4:3
• Résolution : 800×600
Média de Stockage
• Types de cartes mémoire : SD/MMC /xD/MS/MS Pro Duo et Clé USB
• Format de photo pris en charge : JPEG-jusqu’à 20 Mégapixels
• Positionnement : Paysage, Portrait, Orientation de photo automatique
Boutons
• Boutons et commandes : 7 boutons de commande
1 BOUTON D’ACCES RAPIDE EZ pour passer entre photo et horloge
1 touche pour Haut, Bas, Droite, et Gauche
1 touche OK pour aller dans le menu principal, éditer le menu et conrmer
1 touche Quitter pour quitter
Caractéristiques
• Mode de lecture: Diaporama, parcourir les Vignettes
• Réglages du Diaporama: Intervalle, Mode de lecture, Effets de transition,
Montage
• Langues d’afchage à l’écran : Anglais, français, allemand, hollandais, espagnol,
portugais, italien
• Compatibilité Plug&Play : Windows 2000/XP/Vista et Mac OS X
• Conformité aux normes : FCC, California 65
28
Philips Eros 8DN UM_0914_book.indb 28 2009/9/17 上午 09:13:46
Page 67

6. Foire aux Questions
Est-ce que l’écran est tactile ?
L’écran n’est pas tactile. Utilisez les boutons au dos du PhotoFrame pour le
contrôler.
Puis-je passer entres les photos de Diaporama de différentes cartes mémoire ?
Oui. Lorsqu’une carte mémoire est insérée dans le PhotoFrame, un diaporama des
photos enregistrées sur cette carte commencera.
Puis-je utiliser le PhotoFrame pour supprimer des photos sur la cartes mémoire ?
Oui, il prend en charge la suppression des photos sur les appareils comme les
carte mémoire.
Puis-je relier le PhotoFrame à un PC via le port USB?
Non, le PhotoFrame ne prend pas en charge les connexions vers un PC via le
porte USB. Le port USB sert uniquement pour les lecteurs ash USB.
Puis-je imprimer des photos à partir du PhotoFrame ?
Non, il ne prend pas en charge l’impression directe des photos.
Français
Pourquoi le PhotoFrame n’afche pas certaines de mes photos?
Les appareils photo numériques prennent des photos et les enregistrent en format
JPEG selon des normes de l’industrie de l’appareil photo. Le PhotoFrame est
conçu pour afcher des photos qui possèdent ces mêmes normes industrielles.
Certaines images, comme les images Web, les images scannées, ou les photos
de format RAW prises avec des appareils professionnels, ne sont pas conformes
aux standards industriels et donc ne peuvent être afchées correctement sur le
PhotoFrame numérique. Utilisez des applications PC pour convertir ces images en
un format JPEG standard pour le PhotoFrame.
29
Philips Eros 8DN UM_0914_book.indb 29 2009/9/17 上午 09:13:46
Page 68

7. Service et Garantie
Garantie Limitée d’un An (pour les USA et le Canada Uniquement)
Philips garantit que ce produit est dépourvu de défaut matériel, de fabrication ou
d’assemblage, et ne dysfonctionnera pas lors d’un usage normal, conforme aux
spécications et avertissements, durant une période d’un an à compter de la date
d’achat. Cette garantie s’applique uniquement à l’acheteur original du produit et
ne peut pas être passée. Pour pouvoir exercer vos droits sous cette garantie,
Français
vous devez fournir une preuve d’achat sous la forme d’un reçu de vente original
sur lequel gure le nom du produit et la date d’achat. Pour contacter le service
clientèle ou obtenir des détails sur la garantie, veuillez appeler notre ligne verte au
1-877-784-0999 ou consulter notre site Internet www.philips.com/support
Remarque de la Commission Fédérales sur les Communications (FCC):
Cet appareil a été testé et trouvé être conforme aux restrictions pour les appareils
numériques de Classe B, conformément à la Partie 15 du Règlement FCC.
Ces restrictions sont destinées à fournir une protection raisonnable contre les
interférences dans les installations résidentielles. Cet appareil peut émettre de
l’énergie de fréquence radio et, s’il n’est pas installé ou utilisé selon les instructions,
peut causer des interférences sur les communications radio.
Cependant, il n’est aucunement garanti qu’aucune interférence ne se produira sur
une installation spécique. Si cet appareil produit des interférences sur la réception
radio ou télé, ce qui peut être déterminé en allumant et en éteignant l’appareil, l’
utilisateur est encouragé à essayer de corriger ces interférences par l’une des
mesures suivantes:
• Réorienter ou repositionner l’antenne de réception.
• Augmenter la distance de séparation entre l’appareil et le récepteur.
• Brancher l’appareil sur une prise située sur un circuit différent de celui auquel est
connecté le récepteur.
• Consulter le revendeur ou un technicien radio/TV qualié.
Recyclage
• An de réduire l’impact sur l’environnement, les batteries fournies avec le
PhotoFrame ne contiennent pas de mercure ni de nickel cadmium. Veuillez
apporter les batteries dans les lieux de recyclages appropriés lorsque vous
souhaitez vous en débarrasser.
• Le PhotoFrame est constitué de matériaux recyclables. Pour réduire au maximum
la quantité de déchets rejetée dans l’environnement, prenez connaissance
des centres de collecte locaux pour les téléviseurs usagés, qui démonteront et
réutiliseront les matériaux, ou bien consultez votre revendeur.
• Eliminez le carton et autres matériaux d’emballage de la manière appropriée.
30
Philips Eros 8DN UM_0914_book.indb 30 2009/9/17 上午 09:13:46
Page 69

Wall mounting hole
Introducción
El Marco de Fotos digital Philips puede colocarse tanto en posición vertical como
horizontal para ajustarse a las fotos mostradas en pantalla. Puede colocarlo sobre
una supercie plana en una habitación o colgarlo en la pared utilizando el oricio
de montaje en pared.
• Montaje del Marco en la Pared
Utilice hardware de sujeción a la pared para anclar su marco de forma segura.
Oricio de montaje en pared
Español
1
Philips Eros 8DN UM_0914_book.indb 1 2009/9/17 上午 09:13:46
Page 70

1. Normas de Precaución
1.1 Normas Básicas de Seguridad y Mantenimiento.
Lea atentamente las siguientes instrucciones antes de conectar y utilizar su
PhotoFrame para reducir el riesgo de daños, descargas eléctricas o heridas.
• No ejerza excesiva presión sobre el panel de cristal líquido para proteger su
pantalla de posibles daños. Para mover su PhotoFrame, sujete el marco para
levantarlo; no lo levante colocando la mano o los dedos sobre el panel de cristal
líquido.
Español
• Desenchufe el PhotoFrame si no va a utilizarlo durante un período largo de
tiempo.
• Desenchufe el PhotoFrame si necesita limpiarlo con un paño ligeramente
humedecido. Puede limpiar la pantalla con un paño seco cuando el aparato esté
apagado. Pero no debe utilizar alcohol, disolventes o líquidos que contengan
amoníaco.
• Consulte a un técnico si el PhotoFrame no funciona adecuadamente una vez
que usted haya seguido las instrucciones de este manual.
• La carcasa sólo debe ser abierta por personal técnico cualicado.
• Mantenga el PhotoFrame alejado de la luz solar directa, de estufas o de
cualquier otra fuente de calor.
• Mantenga el PhotoFrame seco. Para evitar descargas eléctricas o un daño
permanente al producto, no lo exponga a la lluvia o a una humedad excesiva.
• Cuando coloque el PhotoFrame, asegúrese de que el cable y la fuente de
alimentación sean de fácil acceso.
2
Philips Eros 8DN UM_0914_book.indb 2 2009/9/17 上午 09:13:46
Page 71

1.2 Mantenimiento del PhotoFrame
• Evite la Caída del Aparato
El PhotoFrame es un complejo dispositivo electrónico que no puede soportar el
golpe resultante de una caída.
• No lo Exponga a la Humedad
El PhotoFrame no es resistente ni está a prueba de humedad. La exposición
a la humedad o a cualquier tipo de líquido dañará con toda probabilidad su
PhotoFrame.
• No lo Someta a Golpes ni a Rayaduras
El panel de cristal líquido del PhotoFrame está hecho de cristal y por lo tanto es
muy sensible a una presión excesiva o a bordes alados.
• Limpieza de la Pantalla
Utilice sólo un paño seco y suave para limpiar su pantalla.
• Mantenga el Soporte Alejado de los Cables
Asegúrese de que el soporte de su PhotoFrame no esté en contacto con los
cables, ya que éstos podrían desplazar el soporte del PhotoFrame.
• Límites de Temperatura y Humedad
• Temperatura de funcionamiento: 0° ~ 40° (Celsius)
• Temperatura de almacenamiento: -20° ~ 70° (Celsius)
• Humedad: 20% ~ 80%
Español
3
Philips Eros 8DN UM_0914_book.indb 3 2009/9/17 上午 09:13:46
Page 72

2. Su PhotoFrame
Phot oFram e
Man ual de usu ario
2.1 Contenido de la Caja
• PhotoFrame
• Adaptador de alimentacion CA-CC
• Guía de inicio rápido
• Mando a distancia
• Manual de usuario
Español
Guía de inicio rápido
&RQHFWDU
&RQILJXUDFLµQ
9LVWD
3KRWR)UDPH
PhotoFrame Guía de inicio rápido
Adaptador de alimentacion CA-CC Mando a distancia
4
Manual de usuario
Philips Eros 8DN UM_0914_book.indb 4 2009/9/17 上午 09:13:47
Page 73

2.2 Botones de Control y Menú de Navegación
• Botones de Control
1 2 3 4 5 6 7
Nº Botón Descripción de Funciones
1 Izquierdo Elemento anterior, regresar a elementos
anteriores del menú
2 Derecho Próximo elemento
Español
3 Arriba Previous item, “Zoom in”
4 Abajo Next item, "Zoom out"
5 ACEPTAR Acceder al submenú
Validar proceso
Conrmar selección
6 Salir Salir de menú
Salir de proceso
Salir de Secuencia de diapositivas
7 Botón Interruptor para
Acceso Fácil
Play slideshow
Cambiar modo de reproducción
Cambiar de foto a reloj
• Utilice su PhotoFrame pulsando los botones de control en la parte posterior.
5
Philips Eros 8DN UM_0914_book.indb 5 2009/9/17 上午 09:13:47
Page 74

• Botones del Mando a Distancia
Español
IlIustración Función
Ir a collage
Botones de navegación
Conrmar selección, acceder a menú
Rotar
Salir del menú actual
Smart Energy Saver
Botón Interruptor para Acceso Fácil
6
Philips Eros 8DN UM_0914_book.indb 6 2009/9/17 上午 09:13:47
Page 75

2.3 Conexión del Dispositivo de Memoria
SD/MMC/xD/MS/MSPro Duo
ON OFF
DC
2.3.1 Inserción de un Dispositivo de Memoria
• Inserte el dispositivo de memoria en la ranura del lector de memoria del
marco.
• Las siguientes tarjetas son compatibles: SD/MMC/ MMC+/xD/MS/MS Pro/ MS
Duo.
• Existe un puerto USB para leer una memoria ash USB.
• Cuando inserte un dispositivo de memoria se le preguntará si desea copiar
las imágenes a la memoria interna del PhotoFrame. Elija “Sí” para copiar
todo el contenido de la memoria externa a la memoria interna y regresar a la
Secuencia de diapositivas (Muestra las imágenes del dispositivo de memoria)
una vez que el proceso de copia esté completado. También puede elegir No y
regresar a la Secuencia de diapositivas. Si no elije ninguna opción en el plazo
de 15 segundos, el PhotoFrame comenzará la secuencia de diapositivas de
forma automática.
Nota 1:
No extraiga el dispositivo de memoria inmediatamente después de haberlo
insertado en el PhotoFrame o cuando PhotoFrame esté leyendo las fotos de la
tarjeta de memoria/memoria USB para la opción de copia. Espere hasta que el
PhotoFrame haya terminado de leer las fotos.
Nota 2:
Si el dispositivo de memoria que acaba de insertar está vacío o dañado, el
PhotoFrame no realizará ninguna acción.
Español
7
Philips Eros 8DN UM_0914_book.indb 7 2009/9/17 上午 09:13:47
Page 76

2.3.2 Extracción de un Dispositivo de Memoria/ Memoria Flash
USB
• Para extraer las tarjetas SD/MMC/ MMC+/xD/MS/MS Pro/ MS Duo o la
memoria ash USB, retírelas suavemente de la ranura.
2.4 Características Destacadas
El PhotoFrame ha sido diseñado para que su uso sea sencillo y práctico, y
presenta las siguientes características:
Español
• Smart Energy Saver proporciona cuatro formas inteligentes de administrar el
consumo de energía
• Reproducción de fotos en modo collage (Foto Única, Múltiples Fotos, San
Valentín, Día del Padre, Día de la Madre, Navidad, Boda y Cumpleaños)
• Memoria integrada de 128MB para almacenar sus imágenes. La capacidad de
almacenamiento será menor.
• Compatible con las tarjetas de memoria más utilizadas en el mercado: SD/MMC/
MMC+/xD/MS/MS Pro/ MS Duo
• Vistas en miniatura y efecto secuencia de diapositivas
• Vista en Collage
• Rotación automática de la imagen (Cambio de ángulo)
8
Philips Eros 8DN UM_0914_book.indb 8 2009/9/17 上午 09:13:47
Page 77

3. Cómo Empezar
3.1 Ensamblaje Soporte – PhotoFrame
Paso 1: Sostenga el PhotoFrame en posición vertical.
Paso 2: Extraiga el soporte y deslícelo hacia fuera como se muestra en la
ilustración para asegurarse de que el soporte del marco permanezca en
posición vertical y conseguir el mejor ángulo de visualización.
Nota:
Por cuestiones de seguridad y para una óptima estabilidad, Philips recomienda
que se ajuste el soporte con el ángulo denido por las dos marcas de posición. El
uso de otras posiciones puede provocar una caída del PhotoFrame, de la que el
usuario será responsable.
3.2 Conexión del Adaptador de Alimentación
Español
Conecte el adaptador de alimentación proporcionado con el PhotoFrame a una
fuente de alimentación.
ENCENDIDO
ON
APAGADO
OFF
9
Philips Eros 8DN UM_0914_book.indb 9 2009/9/17 上午 09:13:47
Page 78

3.3 Encendido del PhotoFrame
• Deslice el interruptor de encendido situado en la parte superior izquierda en
la parte posterior del aparato a la posición “ENCENDIDO” para encender su
PhotoFrame.
3.4 Apagado del PhotoFrame
• Deslice el interruptor de encendido situado en la parte superior izquierda
en la parte posterior del aparato a la posición “APAGADO” para apagar su
PhotoFrame.
Español
3.5 Menú Principal
3.5.1 Acceso al Menú Principal
Pulse el botón ACEPTAR durante una secuencia de diapositivas o en modo reloj
para acceder al menú principal.
3.5.2 Acceso a las Opciones del Submenú
Para acceder a las opciones del submenú partiendo del menú principal:
• Pulse ACEPTAR durante una secuencia de diapositivas o en modo reloj.
• Pulse Arriba y Abajo para seleccionar el submenú deseado.
• Pulse ACEPTAR para acceder al menú.
• Para salir del menú, pulse Salir de nuevo para regresar a la secuencia de
diapositivas.
10
Philips Eros 8DN UM_0914_book.indb 10 2009/9/17 上午 09:13:47
Page 79

4. Utilización de su PhotoFrame
4.1 Calendario
El calendario puede visualizarse en modo pantalla completa.
• En el menú principal, seleccione Calendario y pulse ACEPTAR para visualizar el
calendario en modo pantalla completa.
• Pulse Arriba o Abajo para visualizar el mes. Avanzará automáticamente o irá al
mes anterior cuando pulse el botón Arriba o Abajo.
• Pulse ACEPTAR para volver al mes actual.
• Cuando se muestre en pantalla el mes actual, pulse ACEPTAR para regresar al
menú Calendario.
Nota:
Para congurar la fecha, acceda al menú Conguración y, a continuación, al
submenú Fecha y Hora.
Español
11
Philips Eros 8DN UM_0914_book.indb 11 2009/9/17 上午 09:13:47
Page 80

4.2 Reloj
El Reloj puede mostrarse con dos diseños o modos de visualización diferentes.
• En el menú principal, seleccione Reloj, utilice Izquierda o Derecha para
seleccionar diseños o visualización y pulse ACEPTAR para visualizar el reloj en
modo pantalla completa..
• En modo pantalla completa, pulse Izquierda o Derecha para cambiar el diseño
en la visualización del reloj.
• Pulse ACEPTAR para regresar al menú Reloj.
Nota:
Español
Para congurar la hora, acceda al menú Conguración y a continuación a Fecha
y Hora en el submenú.
12
Philips Eros 8DN UM_0914_book.indb 12 2009/9/17 上午 09:13:48
Page 81

4.3 Fotografías
4.3.1 Ver Fotografías
4.3.1.1 Modo Secuencia de Diapositivas
El modo Secuencia de diapositivas se inicia de forma automática una vez que
haya encendido el PhotoFrame.
Para reproducir las fotos de la fuente o álbum que desea en modo secuencia de
diapositivas, siga las siguientes instrucciones:
• En el menú principal, selecciones la opción Fotografías.
• Pulse Izquierda o Derecha para seleccionar una Fotografías.
• Pulse el Botón Interruptor para Acceso Fácil para reproducir las fotos en
modo secuencia de diapositivas de forma inmediata.
• Las fotos se mostrarán una a una de forma automática cuando pulse
Izquierda o Derecha.
Español
4.3.1.2 Modo Miniatura
Puede visualizar de forma rápida un gran número de fotos por medio del modo
miniatura.
• En el menú principal, seleccione el menú Fotografías.
• Utilice Izquierda o Derecha para seleccionar la fuente de las fotos que desea
examinar.
• Pulse el Botón Interruptor para Acceso Fácil para comenzar la secuencia
de diapositivas.
Philips Eros 8DN UM_0914_book.indb 13 2009/9/17 上午 09:13:48
13
Page 82

Nota:
Puede acceder a las miniaturas directamente desde el modo de secuencia de
diapositivas pulsando el botón Salir o bien ACEPTAR.
4.3.2 Selección de Fotografías
• Acceda al modo Miniatura.
• Pulse Izquierda o Derecha para seleccionar una foto.
4.3.3 Menú de Fotografías
Una vez que la foto esté seleccionada, puede acceder al menú Fotografías
Español
directamente desde Miniaturas pulsando el botón ACEPTAR.
4.3.3.1 Efectos de Color
• En el modo miniaturas, seleccione las fotos a las que desea añadir efectos.
• Pulse el botón ACEPTAR para acceder a las opciones del menú Fotografías.
• Utilice Arriba o Abajo para acceder a Efectos de Color.
• Utilice Izquierda o Derecha para acceder al efecto deseado.
• Pulse ACEPTAR para aplicar el efecto.
• Pulse el botón Salir para abandonar este menú y regresar al menú principal.
14
Philips Eros 8DN UM_0914_book.indb 14 2009/9/17 上午 09:13:48
Page 83

4.3.3.2 Contraste
• En el modo miniaturas, seleccione las fotos a las que desea añadir efectos.
• Pulse el botón ACEPTAR para acceder a las opciones del menú Fotografías.
• Utilice Arriba o Abajo para acceder a Contraste.
• Utilice Izquierda o Derecha para acceder al efecto deseado.
• Pulse el Botón Interruptor para Acceso Fácil para reproducir las fotos en
modo secuencia de diapositivas de forma inmediata.
• Las fotos se mostrarán una a una de forma automática cuando pulse
Izquierda o Derecha.
4.3.3.3 Brillo
• En el Modo Miniaturas, seleccione las fotos a las que desea añadir efectos.
• Pulse el botón ACEPTAR para acceder a las opciones del menú Fotografías.
• Utilice Izquierda o Derecha para acceder al efecto deseado.
• Pulse ACEPTAR para aplicar el efecto.
• Pulse el botón Salir para abandonar este menú y regresar al menú principal.
Español
• Pulse ACEPTAR para aplicar el efecto.
• Pulse el botón Salir para abandonar este menú y regresar al menú principal.
15
Philips Eros 8DN UM_0914_book.indb 15 2009/9/17 上午 09:13:49
Page 84

4.3.3.4 Eliminar
Si necesita liberar espacio en el PhotoFrame o en el dispositivo de memoria,
puede eliminar fotos.
• En el modo miniaturas, seleccione las fotos que desea eliminar.
• Pulse el botón ACEPTAR para acceder a las opciones del menú Fotografías.
• Seleccione Eliminar.
• Utilice Derecha para seleccionar Sí.
• Pulse ACEPTAR para conrmar la eliminación.
Si elimina una foto, PhotoFrame volverá al menú Fotografías una vez llevada a
cabo la operación.
Español
4.3.3.5 Girar
PhotoFrame puede cambiar la orientación de las fotos.
• En el modo miniaturas, seleccione la foto que desea rotar.
• Pulse el botón ACEPTAR para acceder a las opciones del menú Fotografías.
• Utilice Abajo para acceder a Girar.
• Utilice Izquierda o Derecha para acceder a la selección de orientación.
16
Philips Eros 8DN UM_0914_book.indb 16 2009/9/17 上午 09:13:49
Page 85

• Pulse Aceptar para conrmar la orientación que desea modicar.
• Pulse el botón Salir para abandonar este menú y regresar al menú principal.
4.3.3.6 Relación
• En el modo miniaturas, seleccione la foto que desea visualizar.
• Pulse el botón ACEPTAR para acceder a las opciones del menú Fotografías.
• Utilice Abajo para acceder a Relación.
• Utilice Izquierda o Derecha para seleccionar la foto en Pantalla Completa o
Tamaño Real.
• Pulse el botón Salir para abandonar este menú y regresar al menú principal.
Español
4.3.3.7 Copiar
Puede copiar fotos almacenadas en un dispositivo de memoria a la memoria
interna del PhotoFrame o desde la memoria interna a un dispositivo de memoria
conectado al PhotoFrame.
17
Philips Eros 8DN UM_0914_book.indb 17 2009/9/17 上午 09:13:50
Page 86

• Copie las fotos a la Memoria interna, a una Tarjeta de memoria, a una Unidad
USB o a sus Favoritos.
• Seleccione la foto que desee copiar en el modo de miniatura.
• Pulse el botón ACEPTAR para acceder a las opciones del menú Fotografías.
• Seleccione Copiar.
• Mediante Izquierda o Derecha puede seleccionar la unidad de
almacenamiento para copiar sus fotos a la Memoria Interna, a la Tarjeta de
Memoria, a la memoria USB y a Favoritos.
• Pulse ACEPTAR para comenzar a copiar.
Español
4.4 Presentación
4.4.1 Intervalo
Utilice esta función para seleccionar el tiempo durante el que se mostrará cada
foto durante la secuencia de diapositivas.
• En el menú principal, utilice Abajo para acceder al menú Conguración.
• Utilice Derecha y pulse el botón ACEPTAR para acceder a las opciones del
menú Presentación.
• Utilice Arriba para acceder al menú Intervalo.
• Utilice Izquierda o Derecha para seleccione el intervalo de transición
deseado. 3 Segundos (predeterminado),10 Segundos, 30 Segundos, 1
Minuto.
• Pulse ACEPTAR para conrmar.
• Pulse el botón Salir para abandonar este menú y regresar al menú principal.
18
Philips Eros 8DN UM_0914_book.indb 18 2009/9/17 上午 09:13:50
Page 87

4.4.2 Modo de Reproducción
Las Secuencias de diapositivas pueden reproducirse de tres formas diferentes:
Aleatorio, Repetir todas o Único.
• En el menú principal, utilice Abajo para acceder al menú Conguración.
• Utilice Derecha y pulse el botón ACEPTAR para acceder a las opciones del
menú Presentación.
• Utilice Arriba o Abajo para acceder al Modo de Reproducción
• Utilice Izquierda o Derecha para acceder a Simple,Repetir Todo,Aleatorio.
• Pulse ACEPTAR para conrmar.
• Pulse Salir para abandonar este menú y regresar al menú principal.
Español
19
Philips Eros 8DN UM_0914_book.indb 19 2009/9/17 上午 09:13:50
Page 88

4.4.3 Transición
• En el menú principal, utilice Abajo para acceder al menú Conguración.
• Utilice Derecha y pulse el botón ACEPTAR para acceder a las opciones del
menú Presentación.
• Utilice Abajo para acceder al menú Transición.
Español
• Utilice Derecha para seleccionar un efecto de transición como: Desactivado,
Fundido, Obturador, Barrido cruzado, Máscara, Ladrillos, Disolver, Barras,
Expansión, Seda, Caracol, Desplazamiento, Malla o Aleatorio.
• Pulse ACEPTAR para conrmar.
• Pulse el botón Salir para abandonar este menú y regresar al menú principal.
Nota:
• Esta función se aplica a todas las presentaciones de diapositivas almacenadas
en los dispositivos.
• Aleatorio reproduce diferentes efectos sin seguir un orden durante la transición
de diapositivas.
4.4.4 Collage
Congure la secuencia de diapositivas en Collage para visualizar múltiples fotos
dispuestas en la pantalla al mismo tiempo.
• En el menú principal, utilice Abajo para acceder al menú Conguración.
• Utilice Izquierda para acceder al menú Collage.
20
Philips Eros 8DN UM_0914_book.indb 20 2009/9/17 上午 09:13:51
Page 89

• La función Collage estará desactivada si ha congurado el Modo de
Secuencia como Único.
• Utilice Derecha para acceder a Foto Única, Múltiples Fotos, San Valentín, Día
del Padre, Día de la Madre, Navidad, Boda Cumpleaños.
• Y pulse ACEPTAR para guardar la conguración.
• PhotoFrame regresará al menú Secuencia de diapositivas en cuanto se haya
completado la conguración de presentación.
• Pulse el botón Salir para abandonar el menú de Presentación de diapositivas
y pulse ACEPTAR para reproducir la imagen en collage.
Nota 1:
En el modo Collage, PhotoFrame sólo reproduce las fotos dispuestas en la
presentación que usted haya seleccionado.
Nota 2:
La función de Auto orientación funciona también con las secuencias en collage.
Español
21
Philips Eros 8DN UM_0914_book.indb 21 2009/9/17 上午 09:13:51
Page 90

4.5 Conguración General
4.5.1 Smart Energy Saver
4.5.1.1 Activación Smart Energy Saver
Explicación de la Función
Cuando seleccione el Programador de 50% o Programador de 100%, esta
unidad funcionará de forma automática con bajo consumo durante la noche
(21:00PM~7:00AM), y volverá a su consumo normal durante el día (7:00AM
~21:00PM);
Cuando seleccione Ahorrar un 20% o Ahorrar un 50%, funcionará con el
Español
porcentaje de consumo de energía indicado en todo momento.
• En el menú principal, utilice Abajo para acceder al menú Conguración.
• Utilice Izquierda o Derecha para acceder al menú Conguración General.
• Utilice Arriba o Abajo para acceder al menú de conguración Smart Energy
Saver.
• Utilice Izquierda o Derecha para seleccionar el Programador de 50% /
Programador de 100% / Ahorrar un 20% / Ahorrar un 50%.
• Pulse el botón ACEPTAR para conrmar la selección.
22
Philips Eros 8DN UM_0914_book.indb 22 2009/9/17 上午 09:13:51
Page 91

4.5.1.2 Desactivado
Si la función Ahorro de Energía Inteligente se congura en posición "Apagado", el
PhotoFrame funcionará con el consumo máximo de energía.
• En el menú principal, utilice Abajo para acceder al menú Conguración.
• Utilice Izquierda o Derecha para acceder al menú Conguración General.
• Utilice Arriba o Abajo para acceder al menú de conguración Smart Energy
Saver.
• Pulse Izquierda o Derecha para seleccionar Desactivado.
• Pulse el botón ACEPTAR para conrmar la selección.
4.5.2 Brillo
Cambiar la conguración de brillo del PhotoFrame para conseguir la mejor
visualización de fotos.
• En el menú principal, utilice Abajo para acceder al menú Conguración.
• Utilice Derecha para acceder a las opciones de Conguración General.
• Utilice Arriba o Abajo para acceder al control de brillo.
• Pulse Izquierda o Derecha para seleccionar el nivel de brillo: Más Oscuro,
Normal y Más Brillante.
• Pulse ACEPTAR para conrmar y regresar al menú anterior.
Español
23
Philips Eros 8DN UM_0914_book.indb 23 2009/9/17 上午 09:13:51
Page 92

4.5.3 Idioma
Utilice esta sección para elegir el idioma del menú del PhotoFrame.
• En el menú principal, utilice Abajo para acceder al menú Conguración.
• Utilice Derecha para acceder a las opciones de Conguración General.
• Utilice Arriba o Abajo para acceder al menú de Idioma.
• Utilice Izquierda o Derecha para seleccionar su idioma preferido:English,
Français, Deutsch, Español, Nederlands, Português o Italiano.
• Pulse ACEPTAR para conrmar su conguración y regresar al menú
Conguración. La nueva conguración será efectiva inmediatamente.
Español
• Pulse Salir para abandonar este menú y regresar al menú principal.
4.5.4 Restablecer
Utilice esta sección para restablecer los valores de fábrica.
• En el menú principal, utilice Abajo para acceder al menú Conguración.
• Utilice Derecha para acceder a las opciones de Conguración General.
• Utilice Arriba o Abajo para acceder al menú de Restablecer.
• Pulse Izquierda o Derecha para seleccionar Sí o No.
• Pulse ACEPTAR para conrmar su conguración y regresar al menú
Conguración.
• Pulse Salir para abandonar este menú y regresar al menú principal.
4.5.5 Borrar Todos
Utilice esta sección para eliminar las fotos.
• En el menú principal, utilice Abajo para acceder al menú Conguración.
• Utilice Derecha para acceder a las opciones de Conguración General.
• Utilice Arriba o Abajo para acceder al menú de Borrar.
• Utilice Izquierda o Derecha para seleccionar Favoritos o Interno.
• Pulse ACEPTAR para conrmar su conguración y regresar al menú
Conguración.
• Pulse Salir para abandonar este menú y regresar al menú principal.
24
Philips Eros 8DN UM_0914_book.indb 24 2009/9/17 上午 09:13:52
Page 93

4.5.6 Smart Copia
Puede copiar fotos almacenadas en un dispositivo de memoria a la memoria
interna del PhotoFrame. Puede redimensionar las fotos cuando copia fotos.
• En el menú principal, utilice Abajo para acceder al menú Conguración.
• Utilice Derecha para acceder a las opciones de Conguración General.
• Utilice Arriba o Abajo para acceder al menú de Smart Copia.
• Utilice Izquierda o Derecha para seleccionar Tamaño u Original para
redimensionar las fotos si lo desea.
• Pulse ACEPTAR para conrmar su conguración y regresar al menú
Conguración.
• Pulse Salir para abandonar este menú y regresar al menú principal.
Nota:
El PhotoFrame le advertirá al usuario con un mensaje de memoria insuciente
cuando no hay suciente espacio libre en la memoria interna para guardar las fotos
que el usuario desea copiar.
Español
25
Philips Eros 8DN UM_0914_book.indb 25 2009/9/17 上午 09:13:52
Page 94

4.6 Fecha y Hora
Utilice esta función para congurar la fecha y la hora de PhotoFrame.
• En el menú principal, utilice Abajo para acceder al menú Conguración.
• Utilice los botones Izquierda o Derecha para acceder al menú de conguración
Fecha y Hora.
Español
4.6.1 Conguración de la Fecha
• Utilice los botones Izquierda o Derecha en el menú de conguración Fecha
y Hora para ajustar la fecha.
• Utilice los botones Arriba y Abajo para cambiar el día, el mes y el año.
• Pulse el botón ACEPTAR para conrmar la fecha establecida.
4.6.2 Conguración de la Hora
• Utilice los botones Izquierda o Derecha en el menú de conguración Fecha
y Hora para ajustar la hora.
• Utilice los botones Arriba o Abajo para cambiar las horas y los minutos.
• Pulse el botón ACEPTAR para conrmar la hora establecida.
26
Philips Eros 8DN UM_0914_book.indb 26 2009/9/17 上午 09:13:52
Page 95

4.7 Orientación Automática
Si esta función se encuentra habilitada, sus fotos se mostrarán siempre en la
posición correcta, independientemente de si PhotoFrame se encuentra colocado
en posición horizontal o vertical.
4.8 Función de Aumento / Reducción de Zoom o Desplazam.
Utilice la Función de Acercar / Alejar Zoom o Desplazamiento para cambiar la
vista de las fotos.
• En el modo de presentación, pulse el botón OK para acceder al menú principal.
• Pulse el Botón Interruptor para Acceso Fácil para iniciar la secuencia de
diapositivas.
• Pulse el botón Izquierda o Derecha para cambiar la foto de la secuencia de
diapositivas y acceder a la vista de foto (foto en estado de Pausa). El icono de
pausa desaparecerá después de 3 segundos.
• Pulse los botones Arriba y Abajo para utilizar la función de acercar / alejar
Zoom.
• Pulse el botón ACEPTAR para desplazarse y utilice la Función Desplazamiento
para moverse utilizando los botones Arriba / Abajo / Izquierda / Derecha.
• Pulse los botones ACEPTAR o Salir para continuar con la secuencia de
diapositivas.
Español
27
Philips Eros 8DN UM_0914_book.indb 27 2009/9/17 上午 09:13:52
Page 96

5. Datos Técnicos
Visualización de Imagen
• Tamaño de la pantalla: 8”
• Ángulo de visualización horizontal: 60°
• Ángulo de visualización vertical: 40°
• Brillo: 200 cd
• Relación de aspecto: 4:3
• Resolución del panel: 800×600
Español
Medios de Almacenamiento
• Tipos de tarjeta de memoria: tipos SD / MMC / xD / MS / MS Pro Duo y unidad
ash USB
• Formato de foto admitido: JPEG-hasta 20 megapíxeles
• Modos de disposición admitidos: Horizontal, Vertical y Orientación automática de foto
Botones
• Botones y controles: teclado formado por 7 botones de control
1 BOTÓN INTERRUPTOR PARA ACCESO FÁCIL para cambiar entre los modos
de foto y reloj
1 botón para desplazarse hacia Arriba, Abajo, la Derecha o la Izquierda
1 botón ACEPTAR para acceder al menú principal o al menú de edición y para
conrmar
1 botón Salir para salir
Características
• Modo de reproducción: Secuencia de diapositivas y Exploración de miniaturas
• Conguración de secuencia de diapositivas: Interval, Play mode, Transition
effects, Collage
• Idiomas del menú OSD: inglés, francés, alemán, holandés, español, portugués e
italiano
• Compatibilidad con Plug and Play: Windows 2000 / XP / Vista y Mac OS X
• Homologaciones administrativas: FCC, California 65
28
Philips Eros 8DN UM_0914_book.indb 28 2009/9/17 上午 09:13:52
Page 97

6. Preguntas más Frecuentes
¿Es táctil la pantalla?
No, la pantalla no es táctil. Utilice los botones situados en el panel posterior para
controlar el PhotoFrame Digital.
¿Puedo cambiar entre diferentes fotos de secuencias de diapositivas
utilizando tarjetas de memoria diferentes?
Sí. Al conectar una tarjeta de memoria al PhotoFrame, éste crea una secuencia de
diapositivas con las fotos almacenadas en la tarjeta conectada.
¿Puedo usar el PhotoFrame para eliminar fotos almacenadas en una tarjetas
de memoria?
Sí, es compatible con la eliminación de fotos almacenadas en dispositivos, como
tarjeta de memoria.
¿Puedo conectar el PhotoFrame a un PC mediante un puerto USB?
No, el PhotoFrame no soporta la conexión a un PC mediante el puerto USB. El
puerto USB sirve únicamente para un dispositivo de memoria en miniatura USB.
¿Puedo imprimir fotos desde el PhotoFrame?
No, no admite la impresión directa de fotos.
¿Por qué mi dispositivo PhotoFrame no muestra algunas de mis fotos?
Las cámaras digitales capturan fotos y las almacenan en formato JPEG, de
acuerdo con las normas industriales para cámaras. El PhotoFrame Digital ha sido
diseñado para mostrar fotos que siguen las mismas normas industriales. Algunas
imágenes, como las imágenes procedentes de la web, las imágenes digitalizadas o
las fotos en formato RAW capturadas por cámaras profesionales, no se almacenan
de acuerdo con las normas industriales para cámaras y, por tanto, no pueden
mostrarse correctamente en Digital PhotoFrame. Utilice una aplicación para PC si
desea convertir dichas imágenes al formato estándar JPEG del PhotoFrame.
Español
29
Philips Eros 8DN UM_0914_book.indb 29 2009/9/17 上午 09:13:52
Page 98

7. Asistencia Técnica y Garantía
Garantía limitada de un Año (sólo para EE. UU. y Canadá)
Philips garantiza este producto frente a defectos de materiales, mano de obra
y ensamblaje siempre que se someta a un uso normal de acuerdo con las
especicaciones y advertencias, durante un periodo de un año a partir de la fecha
de compra. Esta garantía cubre únicamente al comprador original del producto y no
es transferible. Si desea ejercitar sus derechos al amparo de esta garantía, deberá
proporcionar una prueba de compra en forma de factura de venta original en la que
aparezca el nombre del producto y la fecha de compra. Si desea solicitar servicios
de atención al cliente o asistencia técnica en garantía llame gratis al 1-877-784-0999
o visite nuestro sitio web a través de la dirección www.philips.com/support
Español
Noticación de la Comisión Federal de Comunicaciones (FCC)
Este equipo ha sido probado y cumple con los límites establecidos para dispositivos
digitales de Clase B, de conformidad con el Apartado 15 de la Normativa de la
FCC. Estos límites están diseñados para garantizar una protección razonable
frente a interferencias en instalaciones domésticas. Este equipo puede emitir
energía de radiofrecuencia, y en caso de no instalarse y utilizarse de acuerdo con
las instrucciones, puede ocasionar interferencias en las comunicaciones por radio.
Sin embargo, no existe garantía de que no se produzcan interferencias en una
instalación en particular. En caso de que este equipo sí produzca interferencias
en la recepción de radio o televisión, hecho que puede determinarse al encender
y apagar el equipo, se recomienda al usuario que trate de corregir la interferencia
mediante una o varias de las siguientes medidas:
• Cambiar la orientación o ubicación de la antena receptora.
• Alejar el equipo del receptor.
• Conectar el equipo a una toma de corriente de un circuito diferente al del receptor.
• Consultar al distribuidor o a un técnico experto en radio o televisión para obtener
ayuda.
Reciclaje
• Con objeto de reducir en lo posible el daño al medioambiente, las baterías
proporcionadas con el PhotoFrame no contienen mercurio ni níquel-cadmio.
De ser posible, utilice los medios de reciclaje disponibles en su zona cuando
deseche las baterías.
• El PhotoFrame utiliza materiales reciclables. Para reducir en lo posible la
cantidad de residuos en el medioambiente, averigüe si existe en su zona alguna
empresa dedicada a la recogida de televisores usados para desmontarlos y
guardar los materiales reutilizables, o contacte con su distribuidor para obtener
información sobre reciclaje.
• Deseche el cartón y el material de embalaje en los puntos establecidos para ello
en su zona.
30
Philips Eros 8DN UM_0914_book.indb 30 2009/9/17 上午 09:13:52
Page 99

Philips Eros 8DN UM_0914_book.indb 31 2009/9/17 上午 09:13:52
Page 100

©2009 Koninklijke Philips N.V.
All rights reserved.
Philips Eros 8DN UM_0914_book.indb 34 2009/9/17 上午 09:13:52
 Loading...