

Page 1
© Royal Philips Electronics N.V. 2010
All rights reserved.
Specifi cations are subject to change without notice.
Trademarks are the proper ty of Koninklijke Philips
Electronics N.V. or their respective owners.
V1.2 Printed in China
Register your product and get support at
www.philips.com/welcome
EN Quick start guide
DE Schnellstartanleitung
ES Guía de confi guración rápida
FR Guide de mise en route
PhotoFrame
IT Guida di avvio rapido
NL Snelstartgids
RU ǗǽǭǿǷǻDz ǽȀǷǻǯǻDZǾǿǯǻ
SPF2307
SPF2327
English
Know these buttons Transfer photos with a storage device
Control Buttons Functions
- Hold to turn on/off the PhotoFrame
- Press to switch mode: slideshow/clock/calendar
- Press to go back step by step
- Hold to access the home screen
MENU - Press to enter/exit a menu
OK (Joystick) - Press to play, pause, or resume slideshow
- Press to confi rm a selection
- Move up/down/right/left to select the upper/lower/right/left option
Know these keypad icons
Input in English
Input in supported European languages
Input in Simplifi ed Chinese
Input in Russian
/ ABC
aA Switch between upper and lower case
Switch to select symbols, punctuations, alphabet or numbers
Enter a blank space
Enter a line break
View a message
Media type supported:
Storage device supported:
1
2 Select an option, and then press OK.
3 Follow the on screen instructions to:
•
View a pop-up message:
If you have a pop-up message, the
PhotoFrame prompts that you have a gift.
Then, press OK to view the message.
View a message via the home screen:
1 In the home screen, select [Message] and
2 Select [View Message], and then press OK.
3 Move the joystick right/left to select a
Photo (JPEG)•
Secure Digital (SD)•
Secure Digital High Capacity (SDHC)•
Multimedia Card (MMC)•
Memory Stick (MS)•
Memory Stick Pro (MS Pro)•
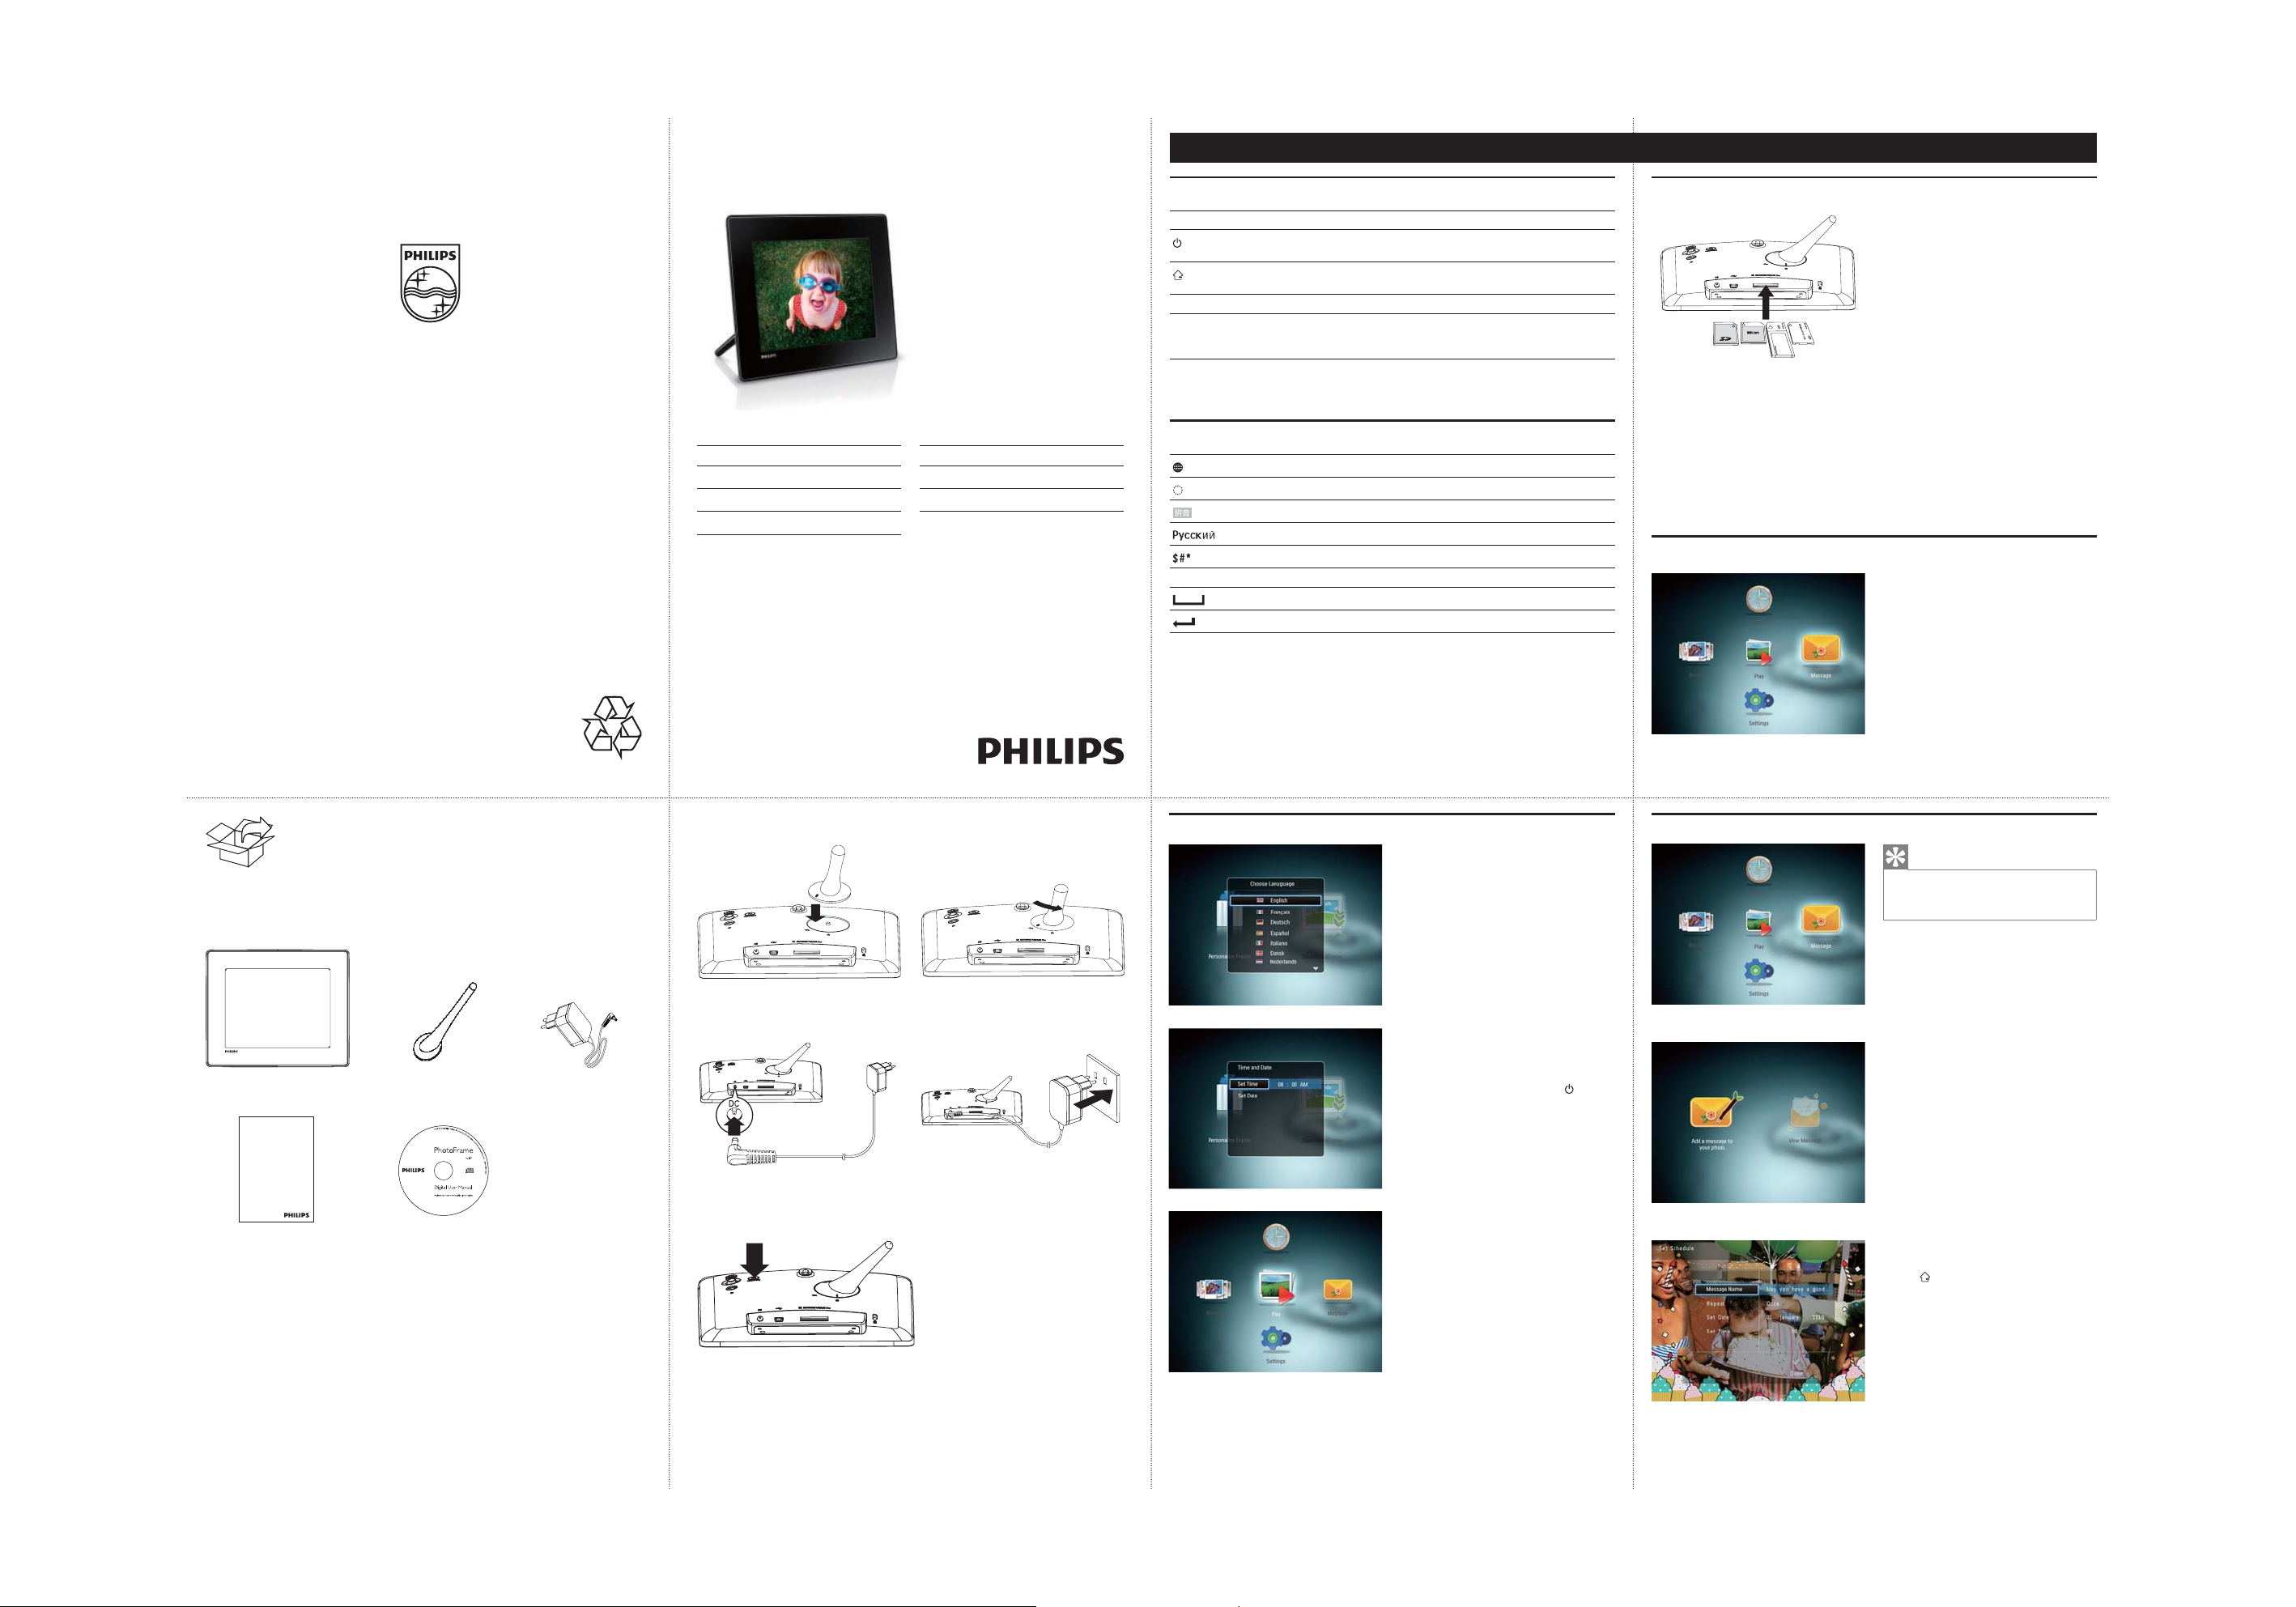
Insert a storage device into the PhotoFrame.
An option menu is displayed.»
Play photos on the storage device
Browse photos on the storage device•
Copy photos on the storage device to •
PhotoFrame
then press OK.
message, and then press OK to view the
message.
Register your product and get support at
www.philips.com/welcome
Quick Start Guide
PhotoFrame
Startup
1 Connect the power cord to the DC socket
of the PhotoFrame and then to a power
supply socket.
A few seconds later, the PhotoFrame »
turns on automatically.
2 Move the joystick up/down to select a
language, and then press OK.
3 Move the joystick up/down/right/left to set
time and date, and then press OK.
4 To start PhotoFrame, select [Start
PhotoFrame] and then press OK.
5 To start slideshow, select [Play] and then
press OK.
• OK.
To pause slideshow, press
• OK again.
To resume slideshow, press
• .
To turn off the PhotoFrame, hold
Create a message
Tip
If there is no message created before, at power up •
select [Personalize Frame] to add a message to
your photo or to view a message.
1 In the home screen, select [Message] and
then press OK.
2 Select [Add Message to your photo], and
then press OK.
3 Move the joystick right or left to select a
message template , and then press OK.
•
Edit the text of the message or change
photo of the message.
•
Set the real time and date if applicable.
Select [Done].
4
The screen prompts you to schedule the »
message.
5 Schedule the message.
• : Enter the name
[Message name]
• : Select a repeat frequencyy
[Repeat]
• : Set the date or day
[Set Date]
• : Set the time
[Set Time]
6 After you complete the message, select
[Done] and press OK.
• [View
To view the available messages, select
Message].
•
To go back to the home screen,
hold .
Page 2
Deutsch
Español
Tastenfunktionen Übertragen von Fotos mit einem Speichergerät
Steuerungstasten Funktionen
- Gedrückt halten zum Ein-/Ausschalten des PhotoFrame
- Drücken, um den Modus zu wechseln: Diashow, Uhr, Kalender
- Drücken, um Schritt für Schritt zurückzugehen
- Gedrückt halten, um zum Startbildschirm zu wechseln
MENU - Drücken, um ein Menü aufzurufen oder zu verlassen
OK (Joystick) - Drücken, um Wiedergabe zu star ten, anzuhalten oder Diashow
fortzusetzen
- Drücken, um eine Auswahl zu bestätigen
- Nach oben/unten/rechts/links bewegen, um die obere/untere/rechte/
linke Option auszuwählen
Wichtige Tastensymbole
Eingabe auf Englisch
Eingabe in einer unterstützten europäischen Sprache
Eingabe in vereinfachtem Chinesisch
Eingabe auf Russisch
/ ABC
aA Wechseln zwischen Klein- und Großbuchstaben
Wechseln zwischen Symbolen, Zeichensetzung, Alphabet oder Ziffern
Einfügen eines Leerzeichens
Einfügen eines Zeilenumbruchs
Anzeigen einer Nachricht
Unterstützte Medientypen:
•
Foto (JPEG)
Unterstützte Speichergeräte:
Secure Digital (SD)•
Secure Digital High Capacity (SDHC)•
Multimedia Card (MMC)•
Memory Stick (MS)•
Memory Stick Pro (MS Pro)•
Verbinden Sie ein Speichergerät mit dem
1
PhotoFrame.
Es wird ein Optionsmenü angezeigt.»
2 Wählen Sie eine Option aus, und drücken
Sie die Taste OK.
3 Folgen Sie den Bildschirmanweisungen, um
Folgendes durchzuführen:
•
Wiedergeben von Fotos auf dem
Speichergerät
•
Durchsuchen von Fotos auf dem
Speichergerät
•
Kopieren von Fotos vom Speichergerät auf
den PhotoFrame
Anzeigen einer Nachricht:
Wenn Sie eine Nachricht haben, zeigt der
PhotoFrame an, dass Sie ein Geschenk
erhalten haben. Drücken Sie dann zum
Lesen der Nachricht OK.
Anzeigen einer Nachricht über den
Startbildschirm:
1 Wählen Sie auf dem Star tbildschirm
[Nachricht], und drücken Sie anschließend OK.
2 Wählen Sie [Nachricht anzeigen], und
drücken Sie dann die Taste OK.
3 Bewegen Sie den Joystick nach rechts/
links, um eine Nachricht auszuwählen, und
drücken Sie dann OK, um die Nachricht
anzuzeigen.
Información sobre estos botones Transferencia de fotos con un dispositivo de almacenamiento
Botones de control Funciones
- Manténgalo pulsado para encender o apagar el PhotoFrame
- Púlselo para cambiar de modo: presentación de diapositivas/reloj/
calendario
- Púlselo para volver atrás paso a paso
- Manténgalo pulsado para acceder a la pantalla de inicio
MENU - Púlselo para acceder al menú o salir del mismo
OK (Mando) - Púlselo para reproducir, poner en pausa o reanudar la presentación de
diapositivas
- Púlselo para confi rmar la selección
- Muévalo hacia arriba/abajo/derecha/izquierda para seleccionar la opción
superior/inferior/derecha/izquierda
Información sobre los iconos del teclado
Entrada en inglés
Entrada en idiomas europeos compatibles
Entrada en chino simplifi cado
Entrada en ruso
/ ABC
aA Cambiar entre mayúsculas y minúsculas
Seleccionar símbolos, puntuación, alfabeto o números
Introducir un espacio en blanco
Introducir un salto de línea
Visualización de un mensaje
Tipos de medios compatibles:
Fotos (JPEG)•
Dispositivo de almacenamiento
compatible:
Secure Digital (SD)•
Secure Digital High Capacity (SDHC)•
Multimedia Card (MMC)•
Memory Stick (MS)•
Memory Stick Pro (MS Pro)•
Inserte un dispositivo de almacenamiento en
1
el PhotoFrame.
Aparece un menú de opciones.»
2 Seleccione una opción y pulse OK.
3 Siga las instrucciones que aparecen en
pantalla para:
•
Reproducir las fotografías del dispositivo de
almacenamiento
•
Explorar las fotografías del dispositivo de
almacenamiento
•
Copiar las fotografías del dispositivo de
almacenamiento al PhotoFrame
Visualización de un mensaje emergente:
Si tiene un mensaje emergente, el
PhotoFrame le avisa de que tiene un
regalo. Pulse OK a continuación para ver
el contenido del mensaje.
Visualización de un mensaje a través de
la pantalla de inicio:
1 En la pantalla de inicio, seleccione [Mensaje]
y pulse OK.
2 Seleccione [Ver mensaje] y pulse OK.
3 Mueva el mando hacia la derecha/
izquierda para seleccionar un mensaje y, a
continuación, pulse OK para ver el mensaje.
Start
1 Verbinden Sie das Netzkabel mit der
DC-Buchse des PhotoFrame und mit einer
Steckdose.
Nach einigen Sekunden schaltet sich der »
PhotoFrame automatisch ein.
2 Bewegen Sie den Joystick nach oben/unten,
um eine Sprache auszuwählen, und drücken
Sie dann OK.
3 Bewegen Sie den Joystick nach oben/
unten/rechts/links, um Uhrzeit und Datum
einzustellen, und drücken Sie anschließend OK.
4 Um den PhotoFrame zu starten, wählen Sie
[PhotoFrame starten] aus, und drücken Sie
anschließend OK.
5 Um eine Diashow zu starten, wählen
Sie [Wiedergabe] aus, und drücken Sie
anschließend OK.
•
Um die Diashow anzuhalten, drücken Sie
auf OK.
•
Um die Diashow fortzusetzen, drücken Sie
erneut auf OK.
•
Um den PhotoFrame auszuschalten, halten
Sie gedrückt.
Erstellen einer Nachricht
Tipp
Wenn zuvor noch keine Nachricht erstellt wurde, •
wählen Sie beim Einschalten [Rahmen personalis.],
um Ihrem Foto eine Nachricht hinzuzufügen oder
eine Nachricht anzuzeigen.
1 Wählen Sie auf dem Star tbildschirm
[Nachricht], und drücken Sie anschließend OK.
2 Wählen Sie [Nachricht zu Ihrem Foto
hinzufügen], und drücken Sie dann .
3 Bewegen Sie den Joystick nach rechts
oder links, um eine Nachrichtenvorlage
auszuwählen, und drücken Sie dann OK.
•
Bearbeiten Sie den Text, oder ändern Sie das
zur Nachricht gehörenden Foto.
•
Stellen Sie ggf. die richtige Uhrzeit und das
richtige Datum ein.
4 Wählen Sie [Fertig].
Sie werden aufgefordert, einen Zeitplan »
für die Nachricht zu erstellen.
5 Erstellen Sie einen Zeitplan für die
Nachricht.
• [Name der Nachricht]: Geben Sie den
Namen ein
• [Wiederholen]: Wählen Sie eine
Wiederholungsfrequenz aus
• [Datum einstellen]: Stellen Sie Datum oder
Tag ein
• [Zeit einstellen]: Stellen Sie die Uhrzeit ein
6 Wenn Sie die Nachricht erstellt haben,
wählen Sie [Fertig], und drücken Sie OK.
•
Um die verfügbaren Nachrichten anzuzeigen,
wählen Sie [Nachricht anzeigen].
•
Um zum Startbildschirm zurückzukehren,
halten Sie gedrückt.
Inicio
1 Conecte el cable de alimentación a la toma
DC del PhotoFrame y a una toma de la
fuente de alimentación.
Unos segundos después, el PhotoFrame »
se enciende automáticamente.
2 Mueva el mando hacia arriba/abajo para
seleccionar un idioma y, a continuación, pulse
OK.
3 Mueva el mando hacia arriba/abajo/derecha/
izquierda para ajustar la fecha y la hora y, a
continuación, pulse OK.
4 Para iniciar el PhotoFrame, seleccione
[Iniciar PhotoFrame] y pulse OK.
5 Para comenzar la presentación de
diapositivas, seleccione [Reproducir] y pulse
OK.
• OK.
Para hacer una pausa, pulse
•
Para reanudar la secuencia, pulse OK de
nuevo.
•
Para apagar el PhotoFrame mantenga
pulsado .
Creación de un mensaje
Consejo
Si no hay ningún mensaje creado anteriormente, •
seleccione [Marco personalizable] al iniciar para
añadir un mensaje a la foto o ver un mensaje.
1 En la pantalla de inicio, seleccione [Mensaje]
y pulse OK.
2 Seleccione [Añadir un mensaje a su foto] y,
a continuación, pulse.
3 Mueva el mando a la izquierda o a la
derecha para seleccionar una plantilla de
mensaje y pulse OK.
•
Edite el texto del mensaje o cambie la foto
del mensaje.
•
Ajuste la hora y fecha real si es necesario.
Seleccione [Hecho].
4
La pantalla le solicitará que programe el »
mensaje.
5 Programe el mensaje.
• [Nombre del mensaje]: introduzca el
nombre
•
[Repetir]: seleccione una frecuencia de
repetición
•
[Confi gurar fecha] : ajuste la fecha o el día
[Confi gurar hora] : ajuste la hora•
Cuando termine el mensaje, seleccione
6
[Hecho] y pulse OK.
•
Para ver los mensajes disponibles, seleccione
[Ver mensaje].
•
Para volver a la pantalla de inicio, mantenga
pulsado .
Page 3

Français
Nederlands
Boutons les plus utiles Transférer des photos depuis un périphérique de stockage
Boutons de
commande
MENU - Appuyez sur ce bouton pour accéder à/quitter un menu
OK (bouton
directionnel)
Fonctions
- Maintenez ce bouton enfoncé pour allumer/éteindre le PhotoFrame
- Appuyez sur ce bouton pour basculer d’un mode à l’autre : diaporama/
horloge/calendrier
- Appuyez sur ce bouton pour revenir aux écrans précédents
- Maintenez ce bouton enfoncé pour accéder à l’écran d’accueil
- Appuyez sur ce bouton pour lire, suspendre ou reprendre la lecture du
diaporama
- Appuyez sur ce bouton pour confi rmer une sélection
- Appuyez sur le haut/le bas/la droite/la gauche du bouton directionnel
pour sélectionner l’option en haut/en bas/à droite/à gauche
Boutons les plus utiles du pavé numérique
Saisie en anglais
Saisie dans les langues européennes prises en charge
Saisie en chinois simplifi é
Saisie en russe
/ ABC
aA Basculer entre majuscules et minuscules
Basculer entre les symboles, la ponctuation, les lettres ou les chiffres
Saisir un espace
Retourner à la ligne
Affi cher un message
Type de support pris en charge :
•
Photo (JPEG)
Périphériques de stockage pris en
charge :
Secure Digital (SD)•
Secure Digital High Capacity (SDHC)•
Multimedia Card (MMC)•
Memory Stick (MS)•
Memory Stick Pro (MS Pro)•
Insérez un périphérique de stockage dans le
1
PhotoFrame.
Un menu d’options s’affi che.»
2 Sélectionnez une option, puis appuyez sur OK.
3 Suivez les instructions affi chées à l’écran
pour :
•
Lire les photos sur le périphérique de
stockage
•
Parcourir les photos stockées sur le
périphérique de stockage
•
Copier les photos du périphérique de
stockage sur le PhotoFrame
Affi cher un message contextuel :
Lorsqu’un message contextuel est
disponible, le PhotoFrame vous indique
que vous avez reçu un cadeau. Appuyez
alors sur OK pour affi cher le contenu du
message.
Affi cher un message via l’écran d’accueil :
1 Dans l’écran d’accueil, sélectionnez
[Message], puis appuyez sur OK.
2 Sélectionnez [Affi cher le message], puis
appuyez sur OK.
3 Appuyez sur la droite/la gauche du bouton
directionnel pour sélectionner un message, puis
appuyez sur OK pour affi cher le message.
Weet wat deze knoppen betekenen Foto’s overbrengen met een opslagmedium
Bedieningsknoppen Functies
- Houd deze knop ingedrukt om het PhotoFrame in of uit te schakelen
- Druk op deze knop om tussen modi te schakelen: diapresentatie/klok/
kalender
- Druk op deze knop om stapsgewijs terug te gaan
- Houd deze knop ingedrukt om het beginscherm te openen
MENU - Druk op deze knop om een menu te openen/sluiten
OK (Joystick) - Druk op deze knop om de diapresentatie te starten, te onderbreken of
te hervatten
- Druk op deze knop om uw keuze te bevestigen
- Beweeg deze knop omhoog/omlaag/naar links/naar rechts om de optie
naar boven/beneden/links/rechts te selecteren
Weet wat pictogrammen op het toetsenblok betekenen
Tekst in Engels invoeren
Tekst in een van de ondersteunde Europese talen invoeren
Tekst in Vereenvoudigd Chinees invoeren
Tekst in Russisch invoeren
/ ABC
aA Wisselen tussen hoofdletters en kleine letters
Overschakelen naar een venster waarin u symbolen, leestekens, letter s of
cijfers kunt selecteren
Een spatie invoeren
Een regeleinde invoeren
Een bericht bekijken
Ondersteunde mediatypen:
Foto (JPEG)
•
Ondersteund opslagapparaat:
Secure Digital (SD)•
Secure Digital High Capacity (SDHC)•
Multimedia Card (MMC)•
Memory Stick (MS)•
Memory Stick Pro (MS Pro)•
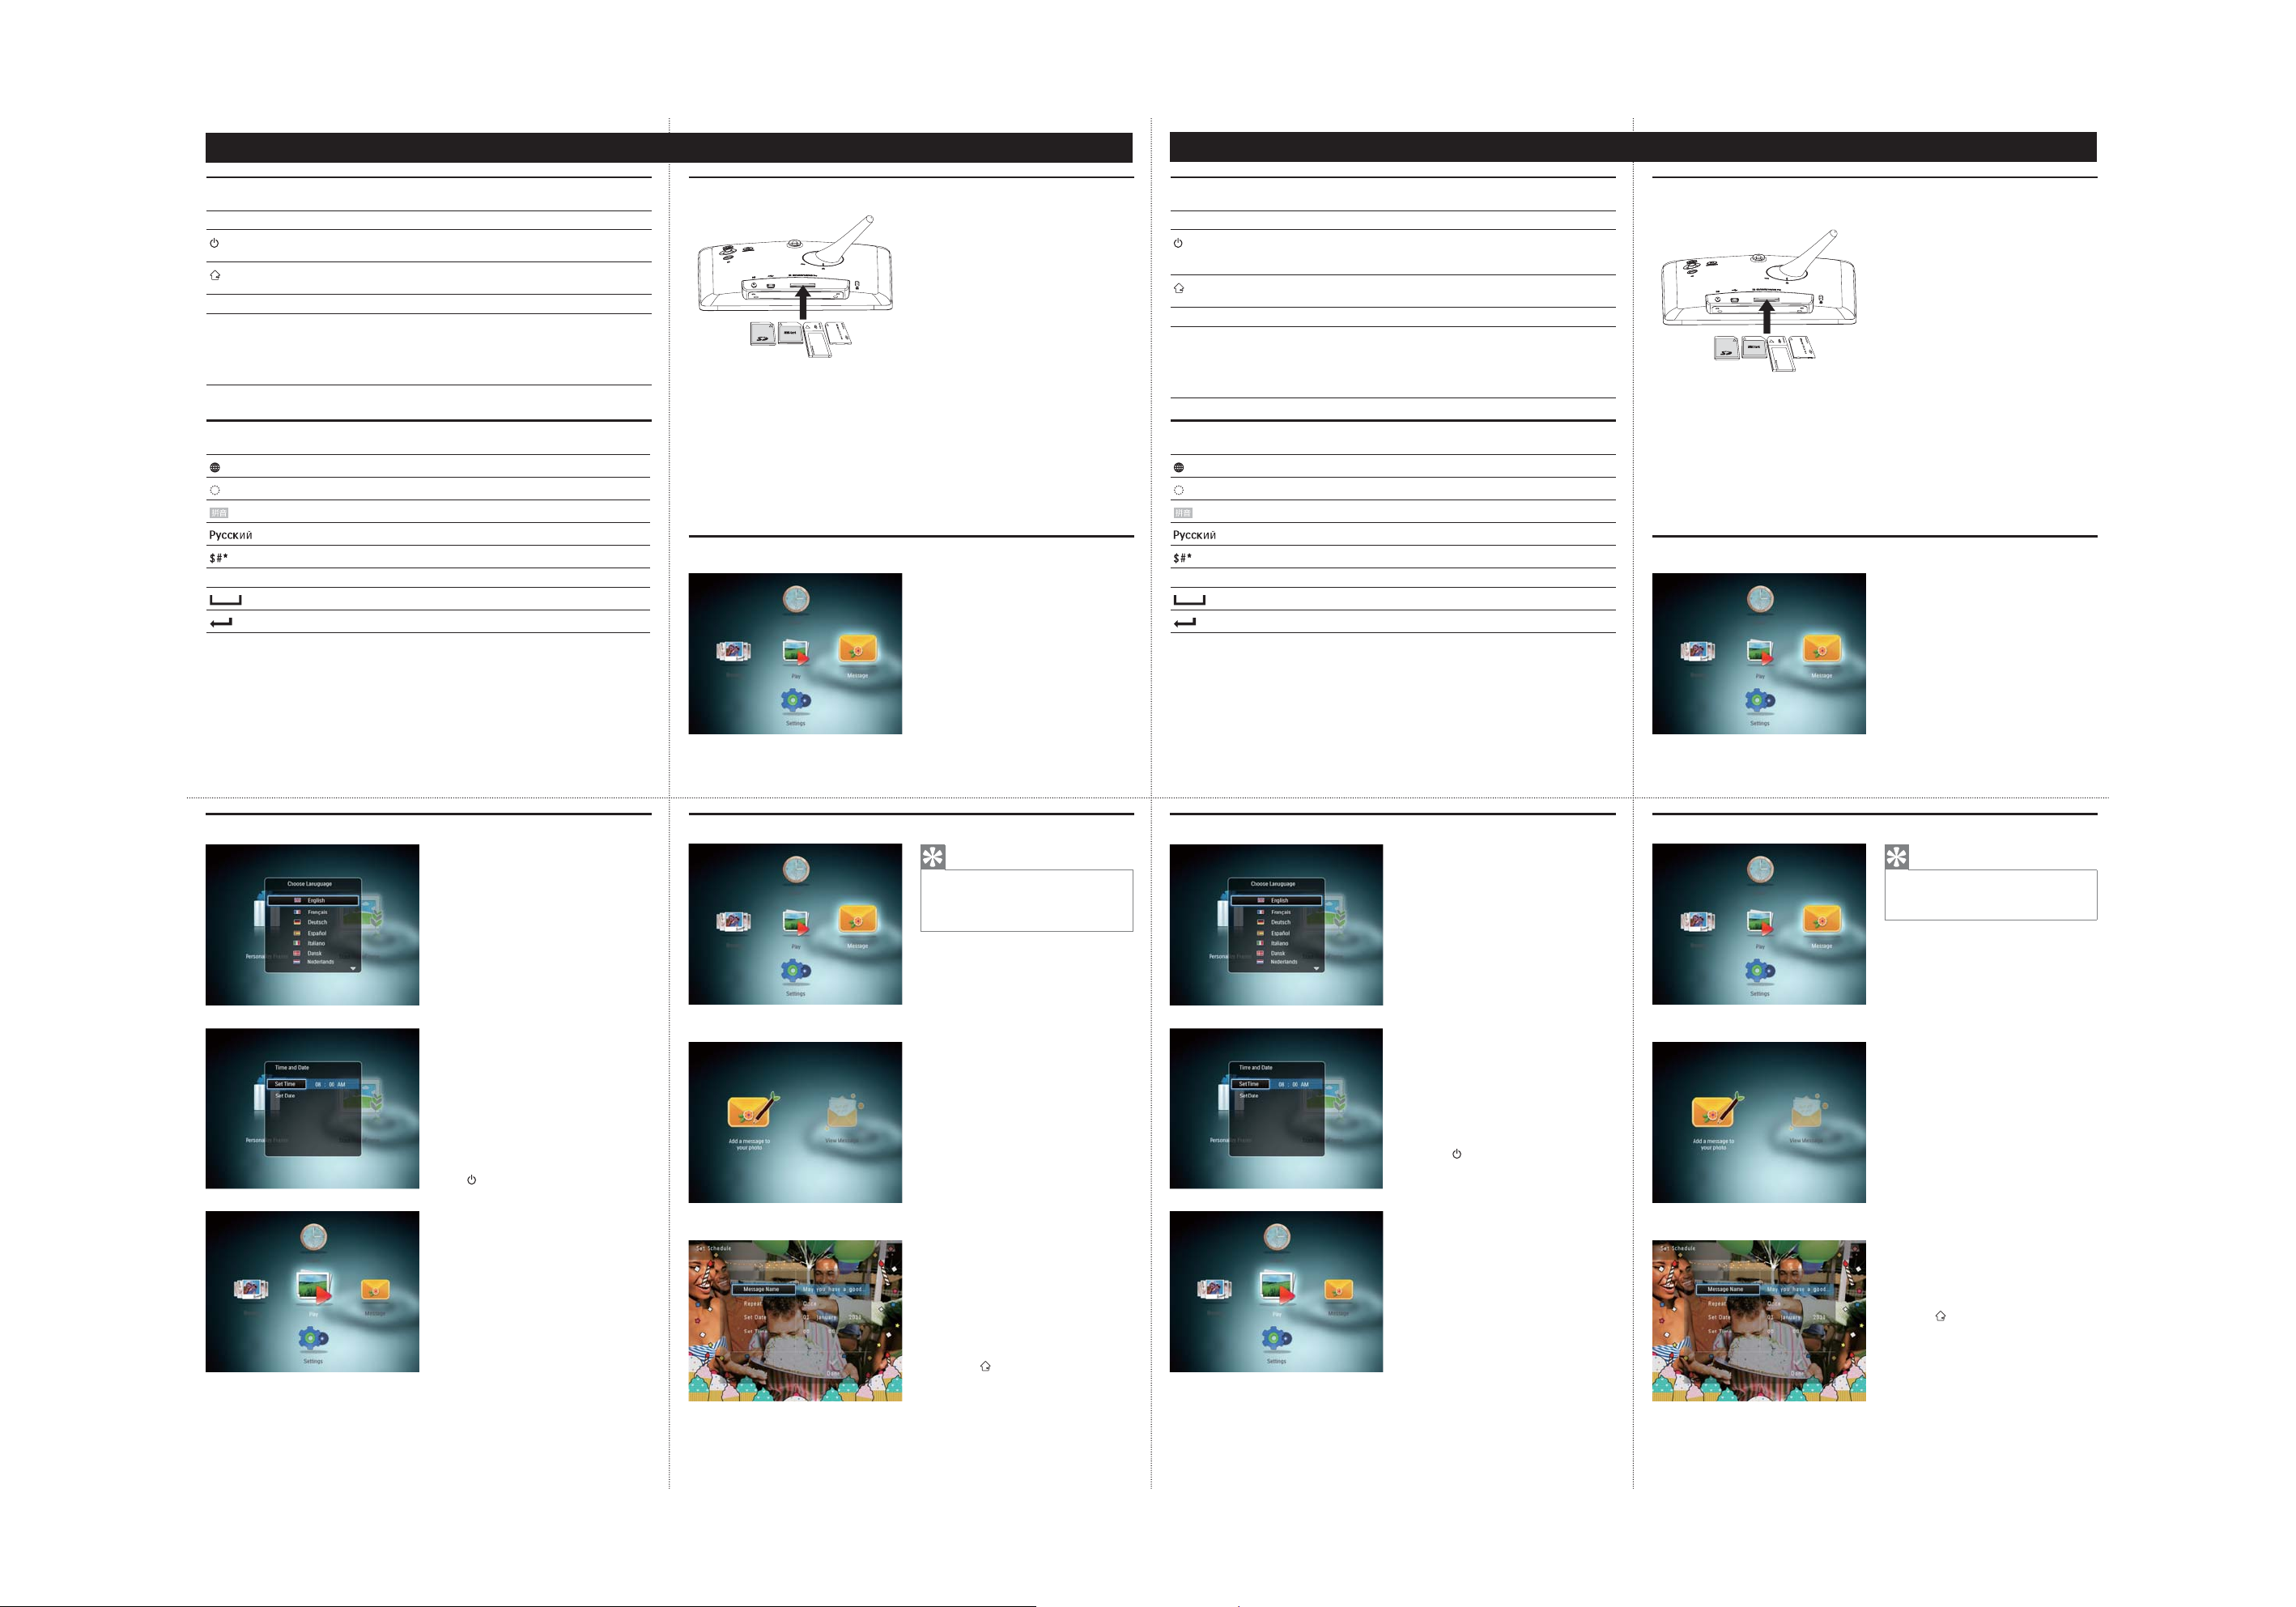
Plaats een opslagmedium in het PhotoFrame.
1
Er wordt een optiemenu weergegeven.»
2 Selecteer een optie en druk vervolgens op
OK.
3 Volg de instructies op het scherm voor het
volgende:
•
Foto’s weergeven die zijn opgeslagen op het
opslagmedium
•
Door foto’s bladeren die zijn opgeslagen op
het opslagmedium
•
Foto’s die zijn opgeslagen op het
opslagmedium naar het PhotoFrame
kopiëren
Een pop-upbericht bekijken:
Als u een pop-upbericht hebt ontvangen,
verschijnt er op het PhotoFrame
een bericht dat u een geschenk hebt
ontvangen. Druk op OK om het bericht
weer te geven.
Een bericht bekijken op het beginscherm:
1 Op het beginscherm selecteert u [Bericht]
en drukt u op OK.
2 Selecteer [Bericht weergeven] en druk
vervolgens op OK.
3 Beweeg de joystick naar rechts/links om een
bericht te selecteren en druk vervolgens op
OK om het bericht te bekijken.
Démarrage
1 Branchez le cordon d’alimentation à la prise
DCdu PhotoFrame, puis à la prise secteur.
Le PhotoFrame s’allume »
automatiquement après quelques
secondes.
2 Appuyez sur le haut ou le bas du bouton
directionnel pour sélectionner une langue,
puis appuyez sur OK.
3 Appuyez sur le haut/le bas/la droite/la
gauche du bouton directionnel pour défi nir
l’heure et la date, puis appuyez sur OK.
4 Pour démarrer le PhotoFrame, sélectionnez
[Démarrer PhotoFrame], puis appuyez sur
OK.
5 Pour lancer un diaporama, sélectionnez
[Lecture], puis appuyez sur OK.
•
Pour suspendre le diaporama, appuyez sur
OK.
•
Pour reprendre le diaporama, appuyez de
nouveau sur OK.
•
Pour éteindre le PhotoFrame, maintenez le
bouton enfoncé.
Création d’un message
Conseil
Si aucun message n’a été créé auparavant, •
sélectionnez [Personnaliser cadre] au démarrage
pour ajouter un message à votre photo ou affi cher
un message.
1 Dans l’écran d’accueil, sélectionnez
[Message], puis appuyez sur OK.
2 Sélectionnez [Ajouter un message à votre
photo], puis appuyez sur .
3 Déplacez la touche de commande vers la
droite ou vers la gauche pour sélectionner
un modèle de message, puis appuyez sur
OK.
•
Modifi ez le texte ou la photo du message.
Défi nissez l’heure et la date, le cas échéant.•
Sélectionnez [Terminé].
4
L’écran vous invite à programmer le »
message.
5 Programmez le message.
• [Nom du message]: saisissez le nom
• [Répéter]: sélectionnez une fréquence de
répétition
• [Défi nir date]: défi nissez la date ou le jour
• [Défi nir heure]: défi nissez l’heure
6 Lorsque votre message est prêt, sélectionnez
[Terminé] et appuyez sur OK.
•
Pour affi cher les messages disponibles,
sélectionnez [Affi cher le message].
•
Pour revenir à l’écran d’accueil, appuyez
sur .
Opstarten
1 Sluit het netsnoer aan op de DC-aansluiting
van het PhotoFrame en vervolgens op een
stopcontact.
Na enkele seconden schakelt het »
PhotoFrame automatisch in.
2 Beweeg de joystick omhoog/omlaag om een
taal te selecteren en druk vervolgens op OK.
3 Beweeg de joystick omhoog/omlaag/naar
rechts/naar links om de tijd en datum in te
stellen en druk vervolgens op OK.
4 Om het PhotoFrame te starten, selecteert u
[PhotoFrame starten] en drukt u op OK.
5 Om een diapresentatie te starten, selecteer t
u [Afspelen] en drukt u op OK.
• OK om de diapresentatie te
Druk op
pauzeren.
•
Druk op OK om de diapresentatie te
hervatten.
• ingedrukt om het PhotoFrame uit
Houd
te schakelen.
Een bericht maken
Tip
Als u nog niet eerder een bericht hebt •
gemaakt, drukt u bij het inschakelen op [Lijst
personaliseren] om een bericht aan uw foto toe
te voegen of een bericht te bekijken.
1 Op het beginscherm selecteert u [Bericht]
en drukt u op OK.
2 Selecteer [Voeg een bericht aan uw foto
toe] en druk vervolgens op .
3 Beweeg de joystick naar rechts of links om
een berichtsjabloon te selecteren en druk
vervolgens op OK.
•
Bewerk de tekst in het bericht of verander
de bijbehorende foto.
•
Stel de actuele tijd en datum in (indien van
toepassing).
4 Selecteer [Gereed].
U wordt gevraagd een tijd en datum »
voor het bericht in te voeren.
5 Een tijd en datum invoeren voor het bericht.
• [Naam bericht]: voer de naam in
• [Herhalen]: voer een herhalingsfrequentie in
• [Datum instellen]: stel de datum of dag in
• [Tijd instellen]: stel de tijd in
6 Als u het bericht hebt voltooid, selecteert u
[Gereed] en drukt u op OK.
•
Als u de beschikbare berichten wilt bekijken,
selecteert u [Bericht weergeven].
•
Als u terug wilt gaan naar het beginscherm,
houdt u ingedrukt.
Page 4

Italiano ǝȀǾǾǷǵǶ
Pulsanti e relativa funzione Trasferimento di foto con un dispositivo di archiviazione
Pulsanti di comando Funzioni
- Tenere premuto questo pulsante per accendere/spegnere PhotoFrame
- Premere questo pulsante per cambiare modalità: presentazione/
orologio/calendario
- Premere questo pulsante per tornare indietro un passo alla volta
- Tenere premuto questo pulsante per accedere alla schermata principale
MENU - Premere questo pulsante per entrare/uscire da un menu
OK (joystick) - Premere questo pulsante per riprodurre, sospendere o riavviare la
presentazione
- Premere questo pulsante per confermare una selezione
- Spostare in alto/in basso/a sinistra/a destra per selezionare l’opzione in
alto/in basso/a sinistra/a destra
Icone del tastierino
Immissione in inglese
Immissione in lingue europee supportate
Immissione in cinese semplifi cato
Immissione in russo
/ ABC
aA Passaggio da lettere maiuscole a minuscole
Interruttore per selezionare simboli, punteggiatura, lettere o numeri
Immettere uno spazio
Immettere un’interruzione di riga
Visualizzazione di un messaggio
Formati multimediali supportati:
•
Foto (JPEG)
Dispositivi di archiviazione supportati:
Secure Digital (SD)•
Secure Digital High Capacity (SDHC)•
Multimedia Card (MMC)•
Memory Stick (MS)•
Memory Stick Pro (MS Pro)•
Inserire un dispositivo di archiviazione
1
all’interno di PhotoFrame.
Viene visualizzato un menu delle opzioni.»
2 Selezionare un’opzione, quindi premere OK.
3 Seguire le istruzioni sullo schermo per :
Riprodurre foto sul dispositivo di
•
archiviazione
•
Cercare foto sul dispositivo di archiviazione
Copiare foto dal dispositivo di archiviazione •
in PhotoFrame
Per visualizzare un messaggio pop-up:
Se compare un messaggio pop-up,
PhotoFrame avverte della ricezione di
un regalo. Premere OK per visualizzare il
contenuto del messaggio.
Per visualizzare un messaggio dalla schermata
principale:
1 Nella schermata principale, selezionare
[Messaggio] e premere OK.
2 Selezionare [Visualizza messaggio], quindi
premere OK.
3 Spostare il joystick a sinistra/a destra per
selezionare un messaggio, quindi premere
OK per visualizzare il messaggio.
ǛǾǺǻǯǺȈDz ǷǺǻǼǷǵ ǗǻǼǵǽǻǯǭǺǵDz ǵǴǻǮǽǭdzDzǺǵǶ Ǻǭ ǴǭǼǻǹǵǺǭȋȆDzDz ȀǾǿǽǻǶǾǿǯǻ
ǗǺǻǼǷǵ ȀǼǽǭǯǸDzǺǵȌ ǡȀǺǷȃǵǵ
- ǚǭdzǹǵǿDz ǵ ȀDZDzǽdzǵǯǭǶǿDz, ȄǿǻǮȈ ǯǷǸȋȄǵǿȉ/ǯȈǷǸȋȄǵǿȉ ȁǻǿǻǽǭǹǷȀ.
- ǚǭdzǹǵǿDz DZǸȌ ǯȈǮǻǽǭ ǽDzdzǵǹǭ: ǾǸǭǶDZ-ȅǻȀ, ȄǭǾȈ ǵǸǵ ǷǭǸDzǺDZǭǽȉ.
- ǚǭdzǵǹǭǶǿDz DZǸȌ Ǽǻȅǭǰǻǯǻǰǻ ǼDzǽDzȂǻDZǭ ǺǭǴǭDZ
- ǚǭdzǹǵǿDz ǵ ȀDZDzǽdzǵǯǭǶǿDz DZǸȌ ǼDzǽDzȂǻDZǭ Ǻǭ ǻǾǺǻǯǺǻǶ ȊǷǽǭǺ.
MENU - ǚǭdzǹǵǿDz DZǸȌ ǯȂǻDZǭ ǯ ǹDzǺȋ ǵ ǯȈȂǻDZǭ ǵǴ ǺDzǰǻ.
OK (ǑdzǻǶǾǿǵǷ)-ǚǭdzǹǵǿDz DZǸȌ ǴǭǼȀǾǷǭ, ǼǽǵǻǾǿǭǺǻǯǷǵ ǵǸǵ ǯǻǴǻǮǺǻǯǸDzǺǵȌ
ǯǻǾǼǽǻǵǴǯDzDZDzǺǵȌ ǾǸǭǶDZ-ȅǻȀ
- ǚǭdzǹǵǿDz DZǸȌ ǼǻDZǿǯDzǽdzDZDzǺǵȌ ǯȈǮǻǽǭ.
- ǜDzǽDzǹDzȆǭǶǿDzǾȉ ǯǯDzǽȂ/ǯǺǵǴ/ǯǼǽǭǯǻ/ǯǸDzǯǻ DZǸȌ ǯȈǮǻǽǭ ǼǭǽǭǹDzǿǽǭ
ǯǯDzǽȂȀ/ǯǺǵǴȀ/ǾǼǽǭǯǭ/ǾǸDzǯǭ
ǛǼǵǾǭǺǵDz ǴǺǭȄǷǻǯ ǷǸǭǯǵǭǿȀǽȈ
ǏǯǻDZ Ǻǭ ǭǺǰǸǵǶǾǷǻǹ
ǏǯǻDZ Ǻǭ ǼǻDZDZDzǽdzǵǯǭDzǹȈȂ DzǯǽǻǼDzǶǾǷǵȂ ȌǴȈǷǭȂ
ǏǯǻDZ Ǻǭ ȀǼǽǻȆDzǺǺǻǹ ǷǵǿǭǶǾǷǻǹ
ǏǯǻDZ Ǻǭ ǽȀǾǾǷǻǹ
/ ABC
aA ǜDzǽDzǷǸȋȄDzǺǵDz ǹDzdzDZȀ ǯDzǽȂǺǵǹ ǵ ǺǵdzǺǵǹ ǽDzǰǵǾǿǽǭǹǵ
ǜDzǽDzǷǸȋȄDzǺǵDz ǹDzdzDZȀ ǹDzǺȋ ǾǵǹǯǻǸǻǯ, ǴǺǭǷǻǯ ǼȀǺǷǿȀǭȃǵǵ, ǮȀǷǯ ǵ
ȃǵȁǽ
ǏǯǻDZ ǼǽǻǮDzǸǭ
ǝǭǴǽȈǯ ǾǿǽǻǷǵ
ǜǽǻǾǹǻǿǽ ǾǻǻǮȆDzǺǵǶ
ǜǻDZDZDzǽdzǵǯǭDzǹȈDz ȁǻǽǹǭǿȈ:
•
ǡǻǿǻǰǽǭȁǵǵ (JPEG)
ǜǻDZDZDzǽdzǵǯǭDzǹȈDz ǺǻǾǵǿDzǸǵ:
Ǘǭǽǿǭ Secure Digital (SD)•
Ǘǭǽǿǭ Secure Digital High Capacity (SDHC)•
Ǘǭǽǿǭ MMC (Multimedia Card)•
Ǘǭǽǿǭ Memory Stick (MS)•
Ǘǭǽǿǭ Memory Stick Pro (MS Pro)•
1 ǜǻDZǷǸȋȄǵǿDz ǴǭǼǻǹǵǺǭȋȆDzDz ȀǾǿǽǻǶǾǿǯǻ Ƿ
ȁǻǿǻǽǭǹǷDz.
ǛǿǻǮǽǭǴǵǿǾȌ ǹDzǺȋ ȁȀǺǷȃǵǶ.»
2 ǏȈǮDzǽǵǿDz ǼǭǽǭǹDzǿǽ, ǴǭǿDzǹ ǺǭdzǹǵǿDz OK.
3 ǞǸDzDZȀǶǿDz ǵǺǾǿǽȀǷȃǵȌǹ Ǻǭ ȊǷǽǭǺDz, ȄǿǻǮȈ
ǯȈǼǻǸǺǵǿȉ ǾǸDzDZȀȋȆǵDz DZDzǶǾǿǯǵȌ.
•
ǏǻǾǼǽǻǵǴǯDzDZDzǺǵDz ȁǻǿǻǰǽǭȁǵǶ Ǻǭ
ǴǭǼǻǹǵǺǭȋȆDzǹ ȀǾǿǽǻǶǾǿǯDz
•
ǜǽǻǾǹǻǿǽ ȁǻǿǻǰǽǭȁǵǶ Ǻǭ ǴǭǼǻǹǵǺǭȋȆDzǹ
ȀǾǿǽǻǶǾǿǯDz
•
ǗǻǼǵǽǻǯǭǺǵDz ȁǻǿǻǰǽǭȁǵǶ Ǿ
ǴǭǼǻǹǵǺǭȋȆDzǰǻ ȀǾǿǽǻǶǾǿǯǭ Ǻǭ ȁǻǿǻǽǭǹǷȀ
ǜǽǻǾǹǻǿǽ ǯǾǼǸȈǯǭȋȆǵȂ ǾǻǻǮȆDzǺǵǶ:
ǒǾǸǵ Ȁ ǯǭǾ DzǾǿȉ ǯǾǼǸȈǯǭȋȆDzDz
ǾǻǻǮȆDzǺǵDz, Ǻǭ ȊǷǽǭǺDz ȁǻǿǻǽǭǹǷǵ
ǼǻȌǯǸȌDzǿǾȌ ǺǭDZǼǵǾȉ ǻ ǿǻǹ, Ȅǿǻ ǯǭǾ
dzDZDzǿ ǾǻǻǮȆDzǺǵDz-ǾȋǽǼǽǵǴ. ǚǭdzǹǵǿDz
OK DZǸȌ ǼǽǻǾǹǻǿǽǭ ǾǻǻǮȆDzǺǵȌ.
ǜǽǻǾǹǻǿǽ ǾǻǻǮȆDzǺǵȌ ǯ ǹDzǺȋ ǻǾǺǻǯǺǻǰǻ
ȊǷǽǭǺǭ:
1 ǚǭ ǻǾǺǻǯǺǻǹ ȊǷǽǭǺDz ǯȈǮDzǽǵǿDz
[ǞǻǻǮȆDzǺǵȌ] ǵ ǺǭdzǹǵǿDz OK.
2 ǏȈǮDzǽǵǿDz [ǜǽǻǾǹǻǿǽDzǿȉ ǾǻǻǮȆDzǺǵDz],
ǴǭǿDzǹ ǺǭdzǹǵǿDz OK.
3 ǑǸȌ ǯȈǮǻǽǭ ǾǻǻǮȆDzǺǵȌ ǼDzǽDzDZǯǵǰǭǶǿDzǾȉ
ǯǼǽǭǯǻ/ǯǸDzǯǻ Ǽǽǵ ǼǻǹǻȆǵ DZdzǻǶǾǿǵǷǭ,
ǴǭǿDzǹ ǺǭdzǹǵǿDz OK DZǸȌ ǼǽǻǾǹǻǿǽǭ
ǾǻǻǮȆDzǺǵȌ.
Avvio
1 Collegare il cavo di alimentazione alla presa
DC di PhotoFrame e alla presa di corrente.
Dopo alcuni secondi, PhotoFrame si »
accende automaticamente.
2 Spostare il joystick in alto/in basso per
selezionare una lingua, quindi premere OK.
3 Spostare il joystick in alto/in basso/a sinistra/a
destra per impostare la data e l’ora, quindi
premere OK.
4 Per avviare PhotoFrame, selezionare [Avvia
PhotoFrame] quindi premere OK.
5 Per avviare la presentazione, selezionare
[Riproduci] quindi premere OK.
•
Per mettere in pausa la presentazione,
premere OK.
•
Per riprendere la presentazione, premere
nuovamente OK.
•
Per spegnere PhotoFrame, tenere premuto
.
Creazione di un messaggio
Suggerimento
Se non vi sono messaggi creati precedentemente, •
all’accensione selezionare [Personalizza cornice]
per aggiungere un messaggio alla foto o per
visualizzare un messaggio.
1 Nella schermata principale, selezionare
[Messaggio] e premere OK.
2 Selezionare [Aggiungi un messaggio alla tua
foto], quindi premere .
3 Spostare il joystick a sinistra/a destra per
selezionare un modello di messaggio, quindi
premere OK.
•
Modifi care il testo del messaggio o cambiare
la foto del messaggio.
•
Impostare la data e l’ora reale, se applicabile.
Selezionare [Fine].
4
Sulla schermata viene visualizzata la »
richiesta di programmare il messaggio.
5 Programmare il messaggio.
• [Nome messaggio]: consente di immettere
il nome
• [Ripeti]: consente di selezionare una
frequenza di ripetizione
• [Imposta data]: consente di impostare la
data o il giorno
• [Imposta ora]: consente di impostare l’ora
6 Una volta completato il messaggio,
selezionare [Fine] , quindi premere OK.
•
Per visualizzare i messaggi disponibili,
selezionare [Visualizza messaggio].
•
Per tornare alla schermata principale, tenere
premuto .
ǚǭȄǭǸǻ ǽǭǮǻǿȈ
1 ǜǻDZǷǸȋȄǵǿDz ȅǺȀǽ ǼǵǿǭǺǵȌ Ƿ ǽǭǴȇDzǹȀ
DC Ǻǭ ȁǻǿǻǽǭǹǷDz ǵ Ƿ ǽǭǴȇDzǹȀ ǵǾǿǻȄǺǵǷǭ
ǼǵǿǭǺǵȌ.
ǤDzǽDzǴ ǺDzǾǷǻǸȉǷǻ ǾDzǷȀǺDZ ȁǻǿǻǽǭǹǷǭ»
ǯǷǸȋȄǵǿǾȌ ǭǯǿǻǹǭǿǵȄDzǾǷǵ.
2 ǑǸȌ ǯȈǮǻǽǭ ȌǴȈǷǭ ǼDzǽDzǹDzȆǭǶǿDzǾȉ ǯǯDzǽȂ/
ǯǺǵǴ Ǽǻ ǹDzǺȋ Ǿ ǼǻǹǻȆȉȋ DZdzǻǶǾǿǵǷǭ,
ǴǭǿDzǹ ǺǭdzǹǵǿDz OK.
3 ǑǸȌ ǺǭǾǿǽǻǶǷǵ ǯǽDzǹDzǺǵ ǵ DZǭǿȈ
ǼDzǽDzǹDzȆǭǶǿDzǾȉ ǯǯDzǽȂ/ǯǺǵǴ /ǯǼǽǭǯǻ/ǯǸDzǯǻ
Ǽǻ ǹDzǺȋ Ǿ ǼǻǹǻȆȉȋ DZdzǻǶǾǿǵǷǭ, ǴǭǿDzǹ
ǺǭdzǹǵǿDz OK.
4 ǑǸȌ ǯǷǸȋȄDzǺǵȌ ȁǻǿǻǽǭǹǷǵ ǯȈǮDzǽǵǿDz
[ǔǭǼȀǾǷ PhotoFrame], ǭ ǴǭǿDzǹ ǺǭdzǹǵǿDz
OK.
5 ǑǸȌ ǯǻǾǼǽǻǵǴǯDzDZDzǺǵȌ ǾǸǭǶDZ-ȅǻȀ
ǯȈǮDzǽǵǿDz [ǏǻǾǼǽǻǵǴǯDzDZDzǺǵDz], ǭ ǴǭǿDzǹ
ǺǭdzǹǵǿDz OK.
•
ǑǸȌ ǼǽǵǻǾǿǭǺǻǯǷǵ ǯǻǾǼǽǻǵǴǯDzDZDzǺǵȌ
ǾǸǭǶDZ-ȅǻȀ ǺǭdzǹǵǿDz ǷǺǻǼǷȀ OK.
•
ǑǸȌ ǯǻǴǻǮǺǻǯǸDzǺǵȌ ǯǻǾǼǽǻǵǴǯDzDZDzǺǵȌ
ǾǸǭǶDZ-ȅǻȀ DzȆDz ǽǭǴ ǺǭdzǹǵǿDz ǷǺǻǼǷȀ OK.
•
ǤǿǻǮȈ ǯȈǷǸȋȄǵǿȉ ȁǻǿǻǽǭǹǷȀ, ǺǭdzǹǵǿDz ǵ
ȀDZDzǽdzǵǯǭǶǿDz .
ǞǻǴDZǭǺǵDz ǾǻǻǮȆDzǺǵȌ
ǞǻǯDzǿ
ǒǾǸǵ DzȆDz ǺDz ǮȈǸǻ ǾǻǴDZǭǺǻ Ǻǵ ǻDZǺǻǰǻ•
ǾǻǻǮȆDzǺǵȌ, ǯ ǹDzǺȋ ǾǻǴDZǭǺǵȌ ǾǻǻǮȆDzǺǵǶ
ǯȈǮDzǽǵǿDz [ǚǭǾǿǽǻǶǷǭ ȁǻǿǻǽǭǹǷǵ], ȄǿǻǮȈ
DZǻǮǭǯǵǿȉ ǷǻǹǹDzǺǿǭǽǵǶ Ƿ ȁǻǿǻǰǽǭȁǵǵ ǵǸǵ
ǼǽǻǾǹǻǿǽDzǿȉ ǾǻǻǮȆDzǺǵDz.
1 ǚǭ ǻǾǺǻǯǺǻǹ ȊǷǽǭǺDz ǯȈǮDzǽǵǿDz
[ǞǻǻǮȆDzǺǵȌ] ǵ ǺǭdzǹǵǿDz OK.
2 ǏȈǮDzǽǵǿDz [ǑǻǮǭǯǵǿȉ ǼǻDZǼǵǾȉ Ƿ ȁǻǿǻ]>,
ǴǭǿDzǹ ǺǭdzǹǵǿDz .
3 ǑǸȌ ǯȈǮǻǽǭ ȅǭǮǸǻǺǭ ǾǻǻǮȆDzǺǵȌ
ǼDzǽDzDZǯǵǰǭǶǿDzǾȉ ǯǼǽǭǯǻ ǵǸǵ ǯǸDzǯǻ Ǽǽǵ
ǼǻǹǻȆǵ DZdzǻǶǾǿǵǷǭ, ǴǭǿDzǹ ǺǭdzǹǵǿDz OK.
•
ǝDzDZǭǷǿǵǽȀǶǿDz ǿDzǷǾǿ ǾǻǻǮȆDzǺǵȌ ǵǸǵ
ǵǴǹDzǺǵǿDz ȁǻǿǻǰǽǭȁǵȋ, ǾǻǼǽǻǯǻdzDZǭȋȆȀȋ
ǾǻǻǮȆDzǺǵDz.
•
ǜǽǵ ǺDzǻǮȂǻDZǵǹǻǾǿǵ ȀǾǿǭǺǻǯǵǿDz
ȁǭǷǿǵȄDzǾǷǻDz ǯǽDzǹȌ ǵ DZǭǿȀ.
4 ǏȈǮDzǽǵǿDz [ǐǻǿǻǯǻ].
ǚǭ ȊǷǽǭǺDz ǼǻȌǯǵǿǾȌ ǼǽDzDZǸǻdzDzǺǵDz»
ǾǻǴDZǭǿȉ ǽǭǾǼǵǾǭǺǵDz ǯǯDzǾǿǵ
ǵǺȁǻǽǹǭȃǵȋ ǻ ǾǻǻǮȆDzǺǵǵ.
5 ǏǯDzDZDzǺǵDz ǵǺȁǻǽǹǭȃǵǵ ǻ ǾǻǻǮȆDzǺǵǵ.
• [ǚǭǴǯǭǺǵDz ǾǻǻǮȆDzǺǵȌ]: ǯǯǻDZ ǺǭǴǯǭǺǵȌ
• [ǜǻǯǿǻǽ]: ǯȈǮǻǽ ȄǭǾǿǻǿȈ ǼǻǯǿǻǽDzǺǵǶ
• [ǠǾǿǭǺǻǯǵǿȉ DZǭǿȀ]: ȀǾǿǭǺǻǯǷǭ DZǭǿȈ ǵǸǵ DZǺȌ
• [ǠǾǿǭǺǻǯǵǿȉ ǯǽDzǹȌ]: ȀǾǿǭǺǻǯǷǭ ǯǽDzǹDzǺǵ
6 ǜǻ ǴǭǯDzǽȅDzǺǵǵ ǯǯǻDZǭ DZǭǺǺȈȂ ǯȈǮDzǽǵǿDz
[ǐǻǿǻǯǻ] ǵ ǺǭdzǹǵǿDz OK.
•
ǑǸȌ ǼǽǻǾǹǻǿǽǭ DZǻǾǿȀǼǺȈȂ ǾǻǻǮȆDzǺǵǶ
ǯȈǮDzǽǵǿDz [ǜǽǻǾǹǻǿǽDzǿȉ ǾǻǻǮȆDzǺǵDz].
•
ǑǸȌ ǯǻǴǯǽǭǿǭ Ƿ ǻǾǺǻǯǺǻǹȀ ȊǷǽǭǺȀ
ǺǭdzǹǵǿDz .
 Loading...