

Page 1
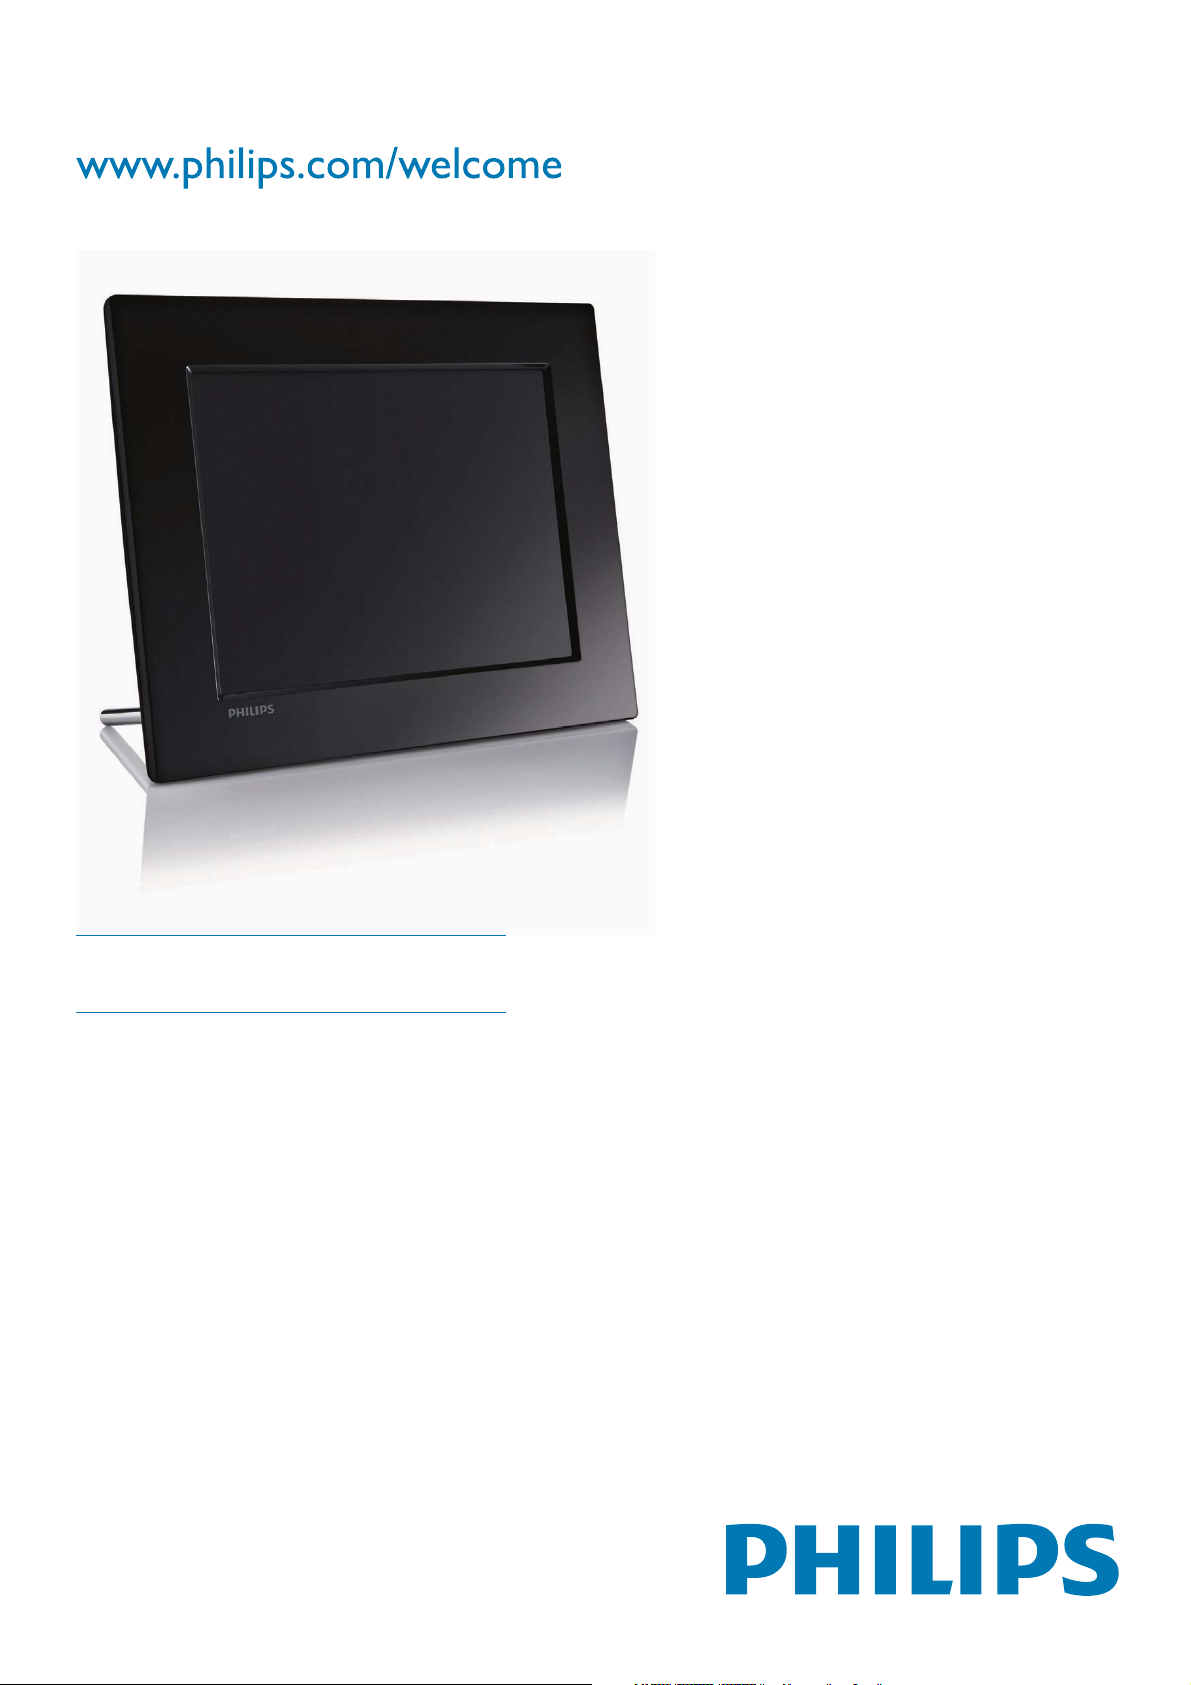
Register your product and get support at
PhotoFrame
SPF2017
SPF2027
SPF2047
EN User manual
Page 2

Contents
1 Important 2
Safety 2
Safety precautions and maintenance 2
Notice 2
Warranty 2
Declaration of Conformity 2
Recycling 3
End of life disposal 3
Recycling Information for Customers 3
Compliance with Electro-Magnetic Field
(EMF) 3
North Europe Information
(Nordic Countries) 4
Banned Substance Declaration 4
2 Your PhotoFrame 5
Introduction 5
What’s in the box 5
Overview of your PhotoFrame 6
3 Get started 8
Install the stand 8
Connect power 8
Turn on the PhotoFrame 8
Connect a storage device 9
Connect PC 10
7 Slideshow 17
Select slideshow sequence 17
Select a transition effect 17
Select slideshow frequency 18
Display collage photos 18
Select photo background 19
8 Setup 21
Select on-screen language 21
Adjust display brightness 21
Protect/Unprotect content of memory card 21
Set an event reminder 22
Create an event reminder 22
Set event time and date 23
Set on/off a reminder 24
Delete a reminder 24
Select a reminder photo 25
Set snooze 26
Set time and date 26
Set time and date format 27
Show clock 28
Set display auto on/off by time 29
View status of the PhotoFrame 30
Set auto orientation 30
Set button sound 31
Set on Demo 31
Set to factory default 32
English
4 Display photos 11
5 Browse photos in thumbnail mode
and access photo menu 12
Copy photos 13
Delete photos 13
Select a photo effect 13
Select a photo frame 14
Rotate a photo 14
Zoom and crop a photo 14
6 Manage an album 15
Create an album 15
Delete an album 16
Rename an album 16
9 Product information 33
10 Frequently asked questions 34
11 Glossar y 35
Need help?
Please visit www.philips.com/welcome where
you can access a full set of supporting materials
such as user manual, the latest software updates
and answers to frequently asked questions.
EN 1
Page 3

1 Important
Safety
Safety precautions and maintenance
Any operation expressly prohibited in
this manual, any adjustments, or assembly
procedures not recommended or authorised in
this manual shall void the warranty.
Never touch, push, rub or strike the screen •
with hard objects as this may damage the
screen permanently.
When the product is not used for long •
periods, unplug it.
Before you clean the screen, turn off •
and unplug the power cord. Only clean
the screen with a soft, water-damp cloth.
Never use substances such as alcohol,
chemicals or household cleaners to clean
the product.
Never place the product near naked •
fl ames or other heat sources, including
direct sunlight.
Never expose the product to rain or •
water. Never place liquid containers, such
as vases, near the product.
Never drop the product. When you drop •
the product, it will be damaged.
Keep the stand away from cables.•
Ensure that you install and use services or •
software only from trustworthy sources
free of virus or harmful software.
This product is designed for indoor use •
only.
Only use the supplied power adaptor for •
the product.
Notice
The making of unauthorized copies of copyprotected material, including computer
programs, fi les, broadcasts and sound
recordings, may be an infringement of
copyrights and constitute a criminal offence.
This equipment should not be used for such
purposes.
Declaration of Conformity
Philips Consumer Lifestyle declares under our
responsibility that the product is in conformity
with the following standards
EN60950-1:2006 (Safety requirement of
Information Technology Equipment)
EN55022:2006 (Radio Disturbance requirement
of Information Technology Equipment)
EN55024:1998 (Immunity requirement of
Information Technology Equipment)
EN61000-3-2:2006 (Limits for Harmonic
Current Emission)
EN61000-3-3:1995 (Limitation of Voltage
Fluctuation and Flicker)
following provisions of directives applicable
73/23/EEC (Low Voltage Directive)
2004/108/EC (EMC Directive)
2006/95/EC (Amendment of EMC and Low
Voltage Directive) and is produced by a
manufacturing organization on ISO9000 level.
Warranty
No components are user serviceable. Do not
open or remove covers to the inside of the
product. Repairs may only be done by Philips
Service Centres and offi cial repair shops. Failure
to do so shall void any warranty, stated or
implied.
2 EN
Page 4

Recycling
Your product is designed and manufactured
with high quality materials and components,
which can be recycled and reused.
When you see the crossed-out wheel bin
symbol attached to a product, it means the
product is covered by the European Directive
2002/96/EC:
Never dispose of your product with other
household waste. Please inform yourself about
the local rules on the separate collection of
electrical and electronic products. The correct
disposal of your old product helps prevent
potentially negative consequences on the
environment and human health.
End of life disposal
making products that can easily be recycled. At
Philips, end-of-life management primarily entails
participation in national take-back initiatives
and recycling programs whenever possible,
preferably in cooperation with competitors.
There is currently a system of recycling up and
running in the European countries, such as The
Netherlands, Belgium, Norway, Sweden and
Denmark.
In U.S.A., Philips Consumer Lifestyle North
America has contributed funds for the
Electronic Industries Alliance (EIA) Electronics
Recycling Project and state recycling initiatives
for end-of-life electronics products from
household sources. In addition, the Northeast
Recycling Council (NERC) - a multi-state
non-profi t organization focused on promoting
recycling market development - plans to
implement a recycling program.
In Asia Pacifi c, Taiwan, the products can be taken
back by Environment Protection Administration
(EPA) to follow the IT product recycling
management process, detail can be found in
web site www.epa.gov.tw.
English
Your new product contains materials that •
can be recycled and reused. Specialized
companies can recycle your product to
increase the amount of reusable materials
and to minimize the amount to be
disposed of.
Please fi nd out about the local regulations •
on how to dispose of your old monitor
from your local Philips dealer.
(For customers in Canada and U.S.A.) •
Dispose of in accordance to local-state and
federal regulations.
For additional information on recycling contact
www.eia.org (Consumer Education Initiative).
Recycling Information for Customers
Philips establishes technically and economically
viable objectives to optimize the environmental
performance of the organization’s product,
service and activities.
From the planning, design and production
stages, Philips emphasizes the importance of
Compliance with Electro-Magnetic
Field (EMF)
Koninklijke Philips Electronics N.V. manufactures
and sells many products targeted at consumers,
which, like any electronic apparatus, in
general have the ability to emit and receive
electromagnetic signals.
One of Philips’ leading Business Principles is to
take all necessary health and safety measures
for our products, to comply with all applicable
legal requirements and to stay well within
the EMF standards applicable at the time of
producing the products.
Philips is committed to develop, produce and
market products that cause no adverse health
effects. Philips confi rms that if its products are
handled properly for their intended use, they
are safe to use according to scientifi c evidence
available today.
Philips plays an active role in the development
of international EMF and safety standards,
EN 3
Page 5

enabling Philips to anticipate further
developments in standardisation for early
integration in its products.
North Europe Information (Nordic
Countries)
VARNING:
FÖRSÄKRA DIG OM ATT HUVUDBRYTARE
OCH UTTAG ÄR LÄTÅTKOMLIGA, NÄR DU
STÄLLER DIN UTRUSTNING PÅPLATS.
Placering/Ventilation
ADVARSEL:
SØRG VED PLACERINGEN FOR, AT
NETLEDNINGENS STIK OG STIKKONTAKT
ER NEMT TILGÆNGELIGE.
Paikka/Ilmankierto
VAROITUS:
SIJOITA LAITE SITEN, ETTÄ VERKKOJOHTO
VOIDAAN TARVITTAESSA HELPOSTI
IRROTTAA PISTORASIASTA.
Plassering/Ventilasjon
ADVARSEL:
NÅR DETTE UTSTYRET PLASSERES, MÅ
DU PASSE PÅ AT KONTAKTENE FOR
STØMTILFØRSEL ER LETTE Å NÅ.
Banned Substance Declaration
This product complies with RoHs and Philips
BSD (AR17-G04-5010-010) requirements.
4 EN
Page 6
2 Your
PhotoFrame
Congratulations on your purchase, and
welcome to Philips! To fully benefi t from the
support that Philips offers, register your product
at www.philips.com/welcome.
Introduction
With Philips Digital PhotoFrame, you can display
JPEG photos in high quality.
You can place it on a fl at surface or hang it on
the wall for a continuous display.
What’s in the box
English
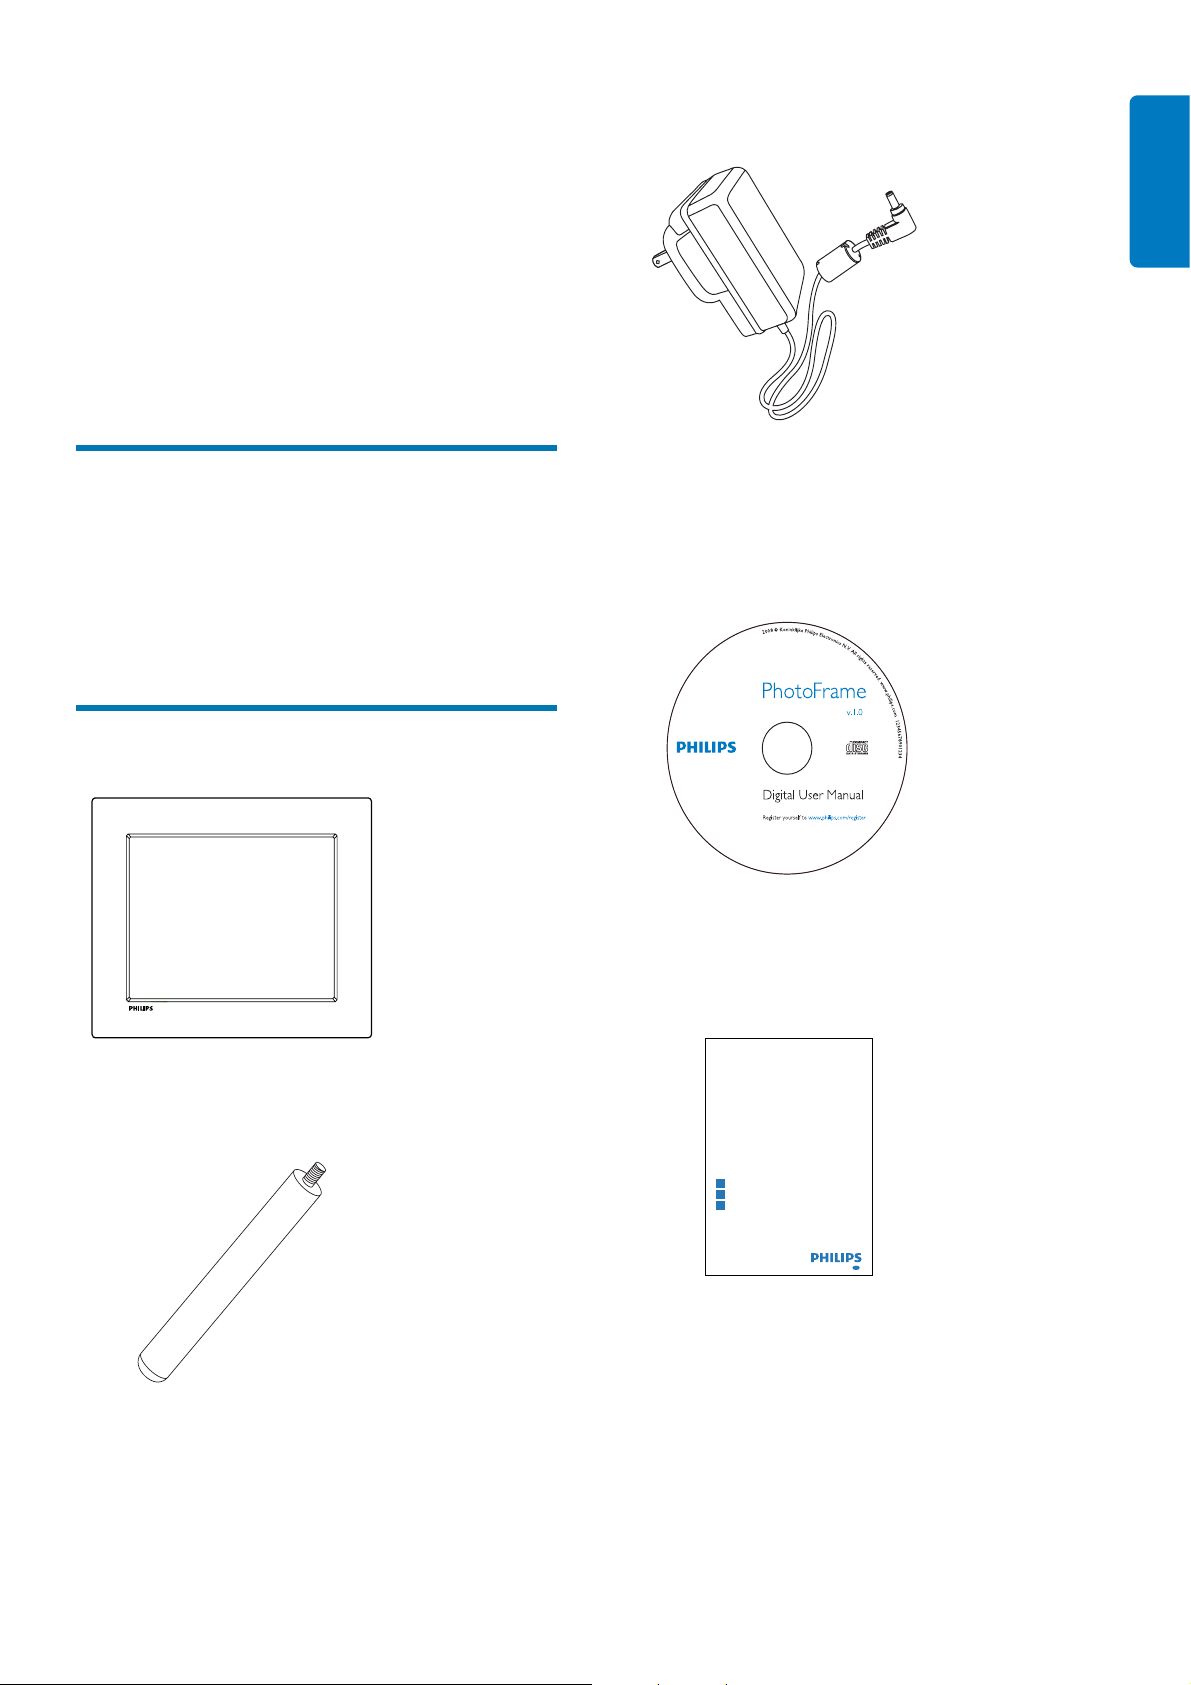
AC-DC power adaptor•
CD-ROM (Digital User Manual)•
PhotoFrame
Philips Digital PhotoFrame•
Quick start guide
1
Get started
Play
2
Setup
3
Eng
Quick Start Guide•
Stand•
EN 5
Page 7
(For SPF2047) Extra silver frame with •
design
Overview of your
PhotoFrame
a
b
c
d
e
f
g
h
i
l
jk
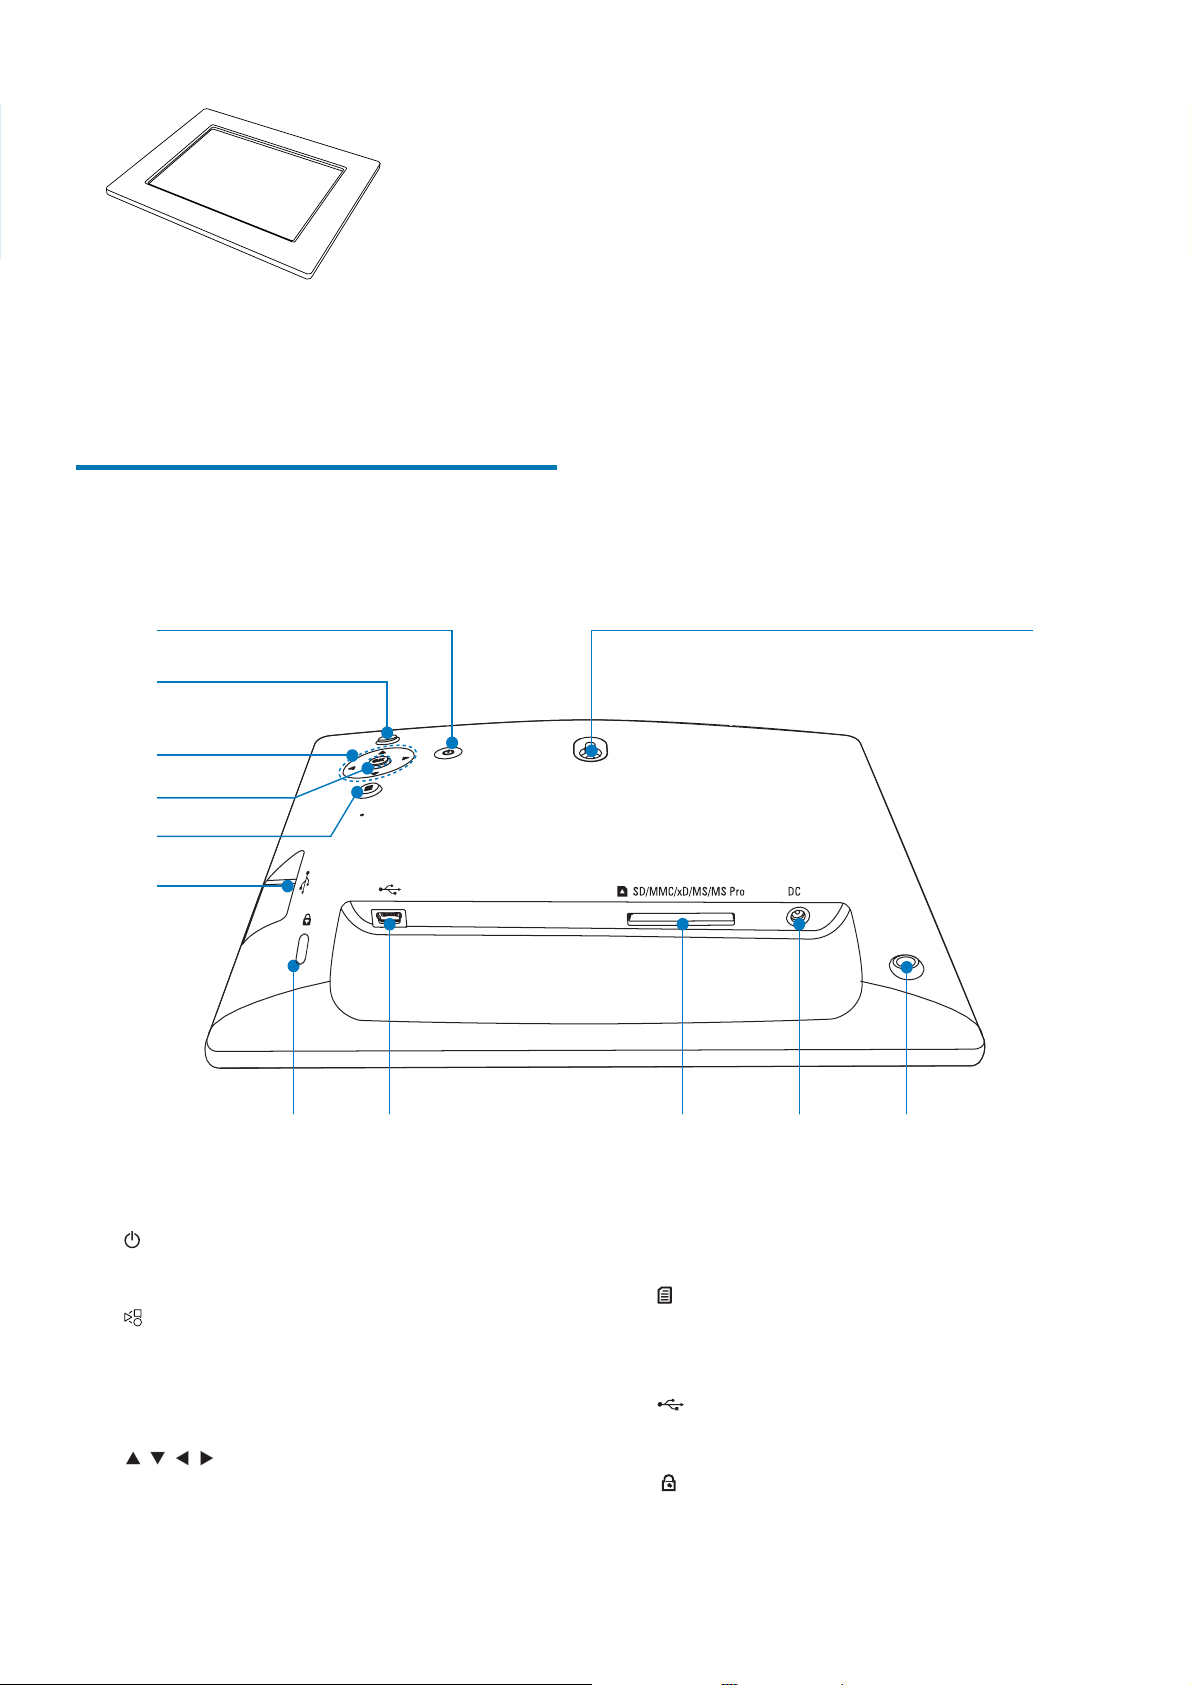
a
b
c
6 EN
/ / /
Turn on/off the PhotoFrame•
Play slideshow•
Toggle between slideshow mode, •
browse mode, and calendar mode
Select the previous/next/right/left •
option
d OK
e
f
g
Confi rm a selection•
Enter the main menu•
Enter/Exit photo menu•
Slot for a USB fl ash drive•
Kensington lock
Page 8

h
Slot for a USB cable to PC•
i
SD/MMC/xD/MS/MS Pro
Slot for an SD/MMC/xD/MS/MS Pro •
card
j DC
Socket for the AC-DC power adaptor•
k Stand hole
l Wall mounting hole
English
EN 7
Page 9
3 Get started
Connect power
Note
Caution
Use the controls only as stated in this user manual.•
Always follow the instructions in this chapter in
sequence.
If you contact Philips, you will be asked for the
model and serial number of this apparatus. The
model number and serial number are on the
back of the apparatus. Write the numbers here:
Model No. __________________________
Serial No. ___________________________
Install the stand
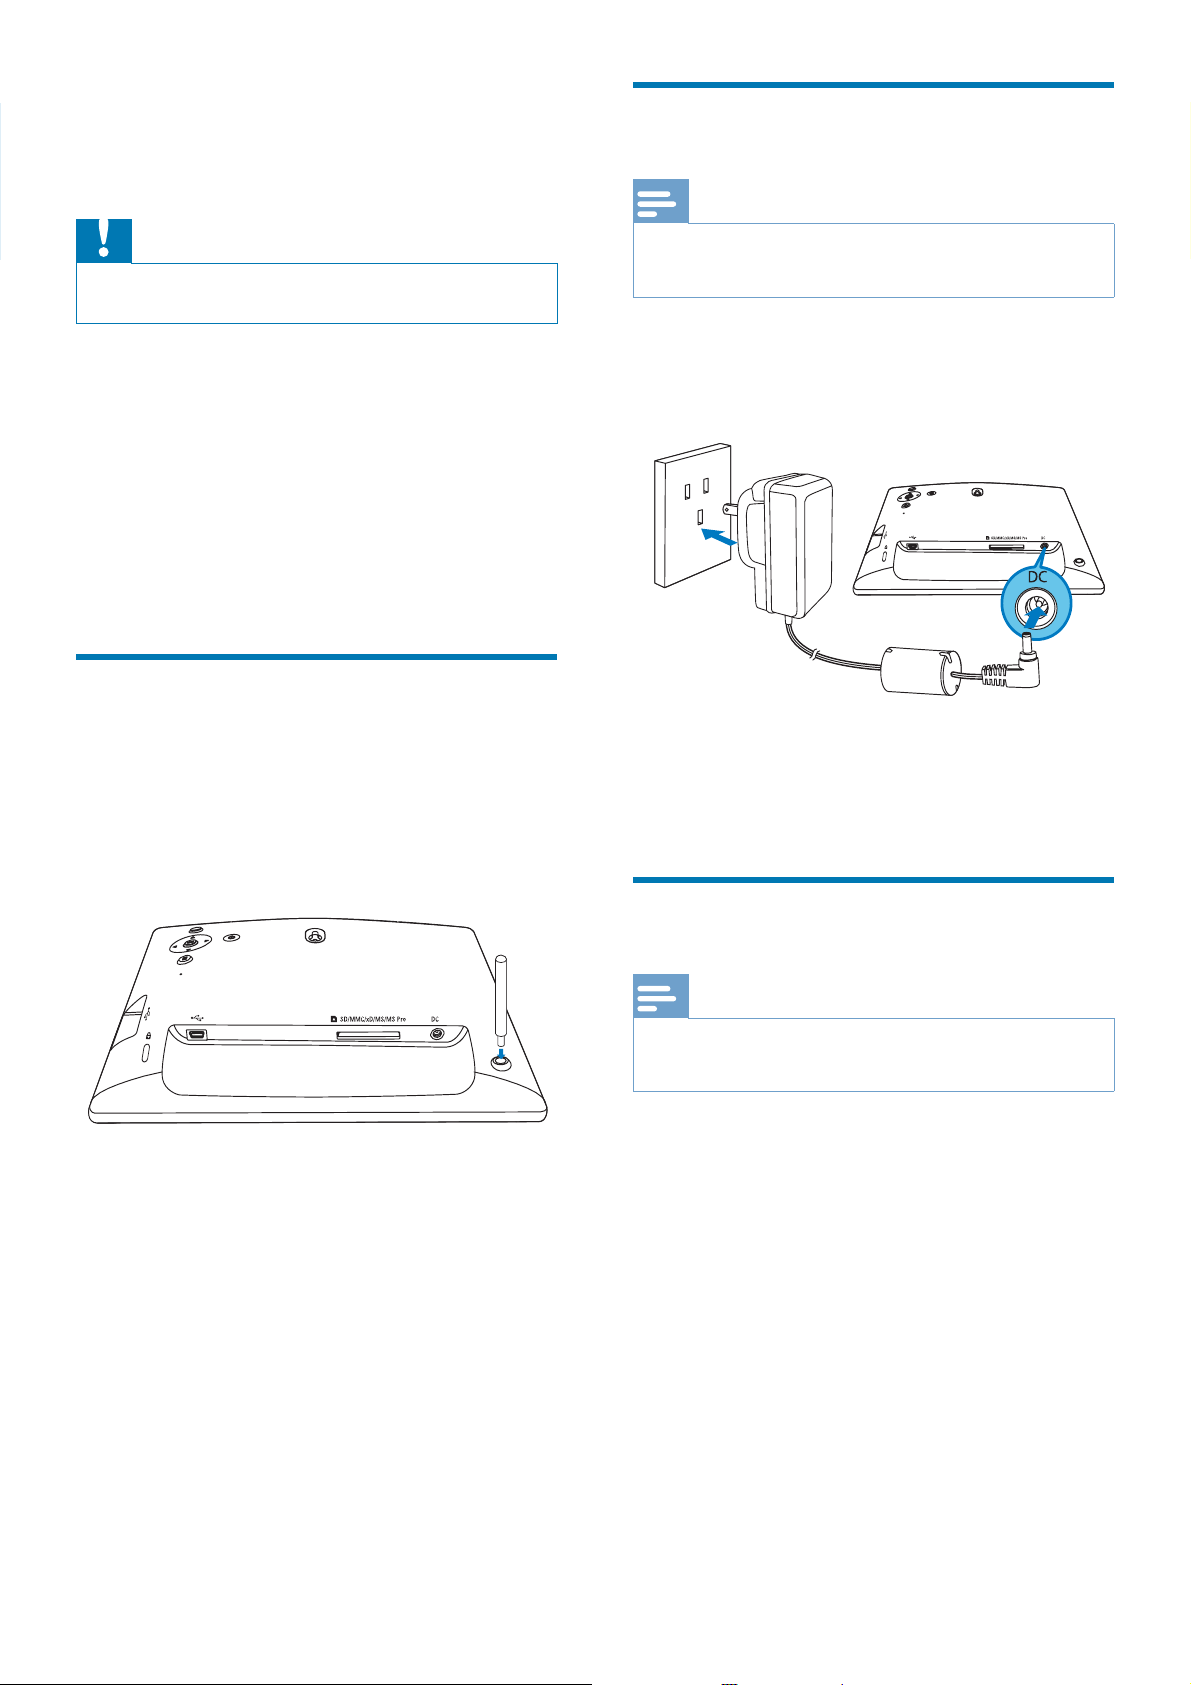
To place the PhotoFrame on a fl at surface, you
need install the supplied stand at the back of
the PhotoFrame.
When you position the PhotoFrame, ensure that the •
power plug and outlet are easily accessible.
1 Connect the power cord to the DC
socket of the PhotoFrame.
b
a
2 Connect the power cord to a power
supply socket.
1 Insert the stand into the PhotoFrame.
2 Screw the stand into the stand hole fi rmly.
Turn on the PhotoFrame
Note
You can only turn off the PhotoFrame after all copy and •
save actions are complete.
8 EN
Page 10
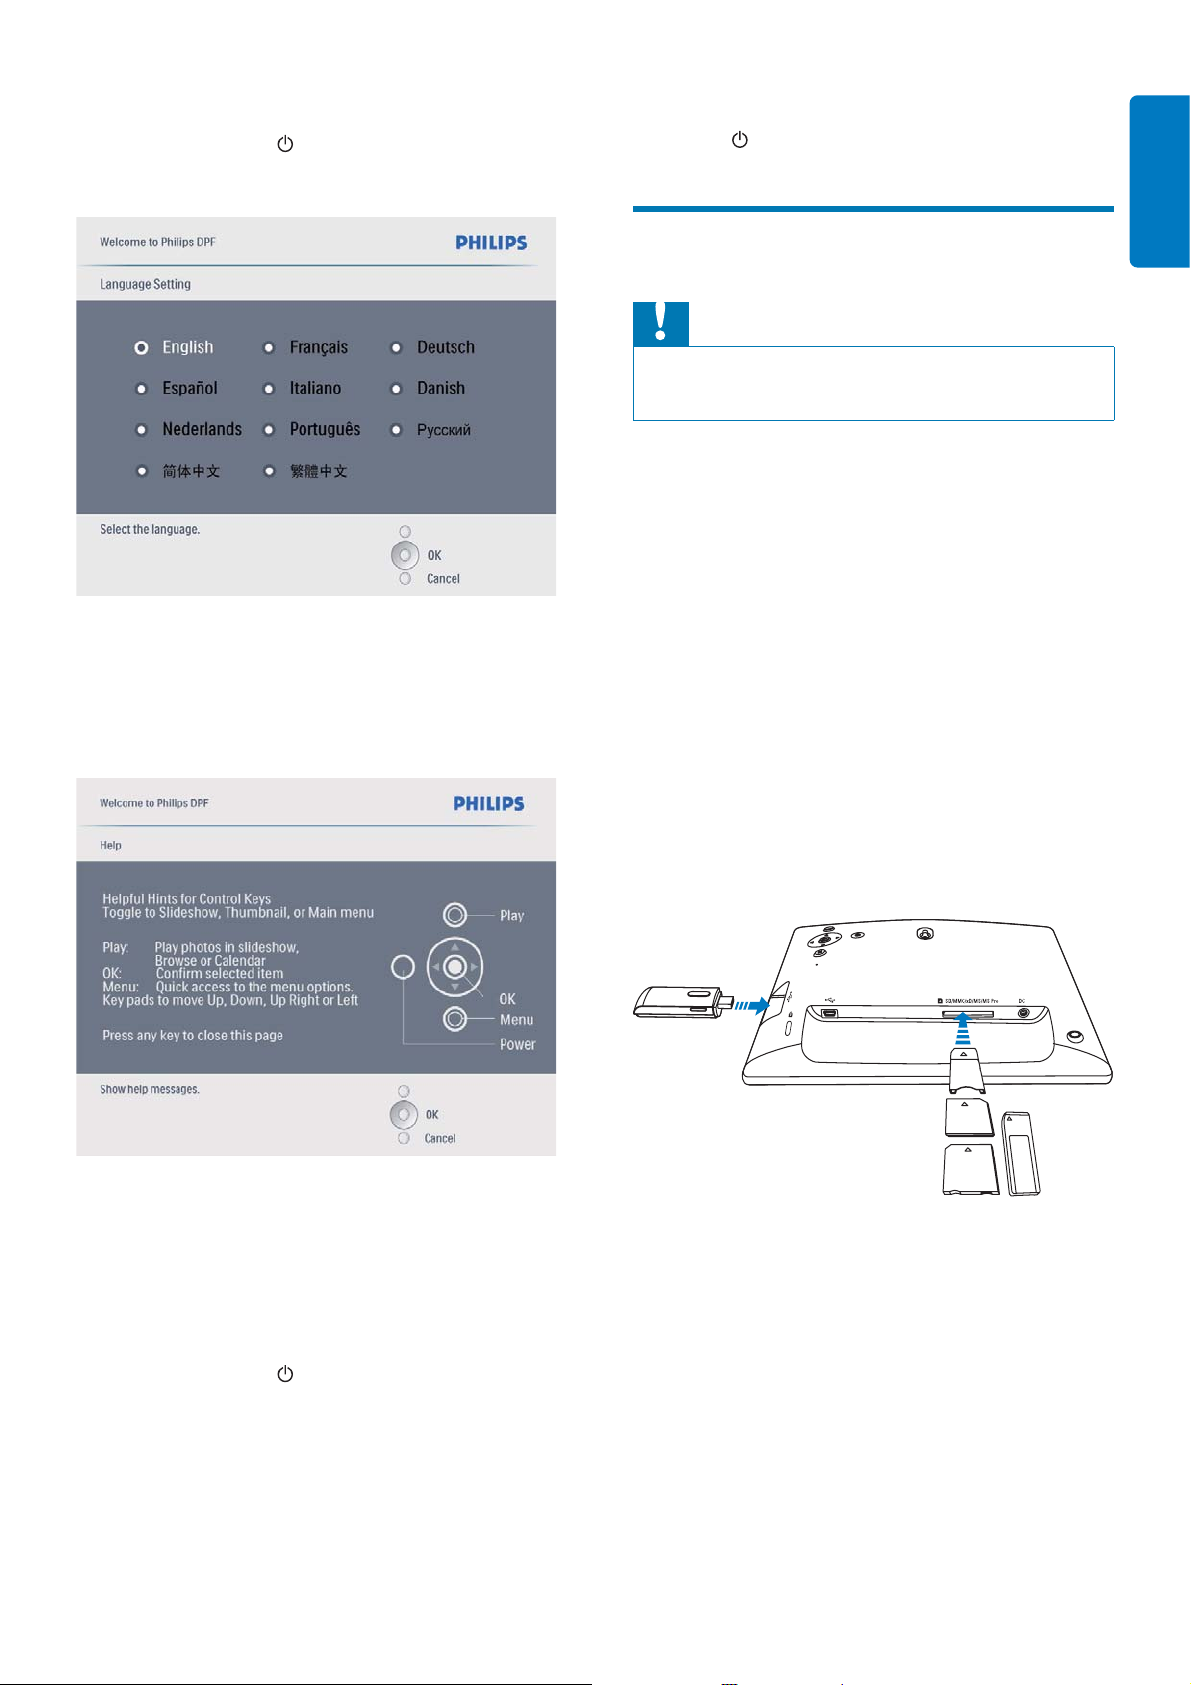
For the fi rst time use:
1 Press and hold for more than 1 second.
The language setting menu is displayed.»
2 Select a language, and press OK to
confi rm.
Help message for control keys is »
displayed.
To turn off the PhotoFrame, press and •
hold
.
Connect a storage device
Caution
Do not remove a storage device from the PhotoFrame •
when fi les are transferring from or to the storage device.
You can play JPEG photos in one of the
following storage device which is connected to
the PhotoFrame:
Secure Digital (SD)•
Secure Digital (SDHC)•
Multimedia Card•
xD card•
Memory Stick•
Memory Stick Pro (with adaptor)•
USB memory drive•
However, we do not guarantee the
operations for all types of memory card
media.
English
3 Press any button to exit the help message.
Photos are displayed in slideshow »
mode.
For other times:
1 Press and hold for more than 1 second.
Help message for control keys is »
displayed.
1 Insert a storage device fi rmly.
Photos in the storage device are »
displayed in slideshow mode.
To remove a storage device, pull it out •
from the PhotoFrame.
2 Press any button to exit the help message.
Photos are displayed in slideshow »
mode.
EN 9
Page 11
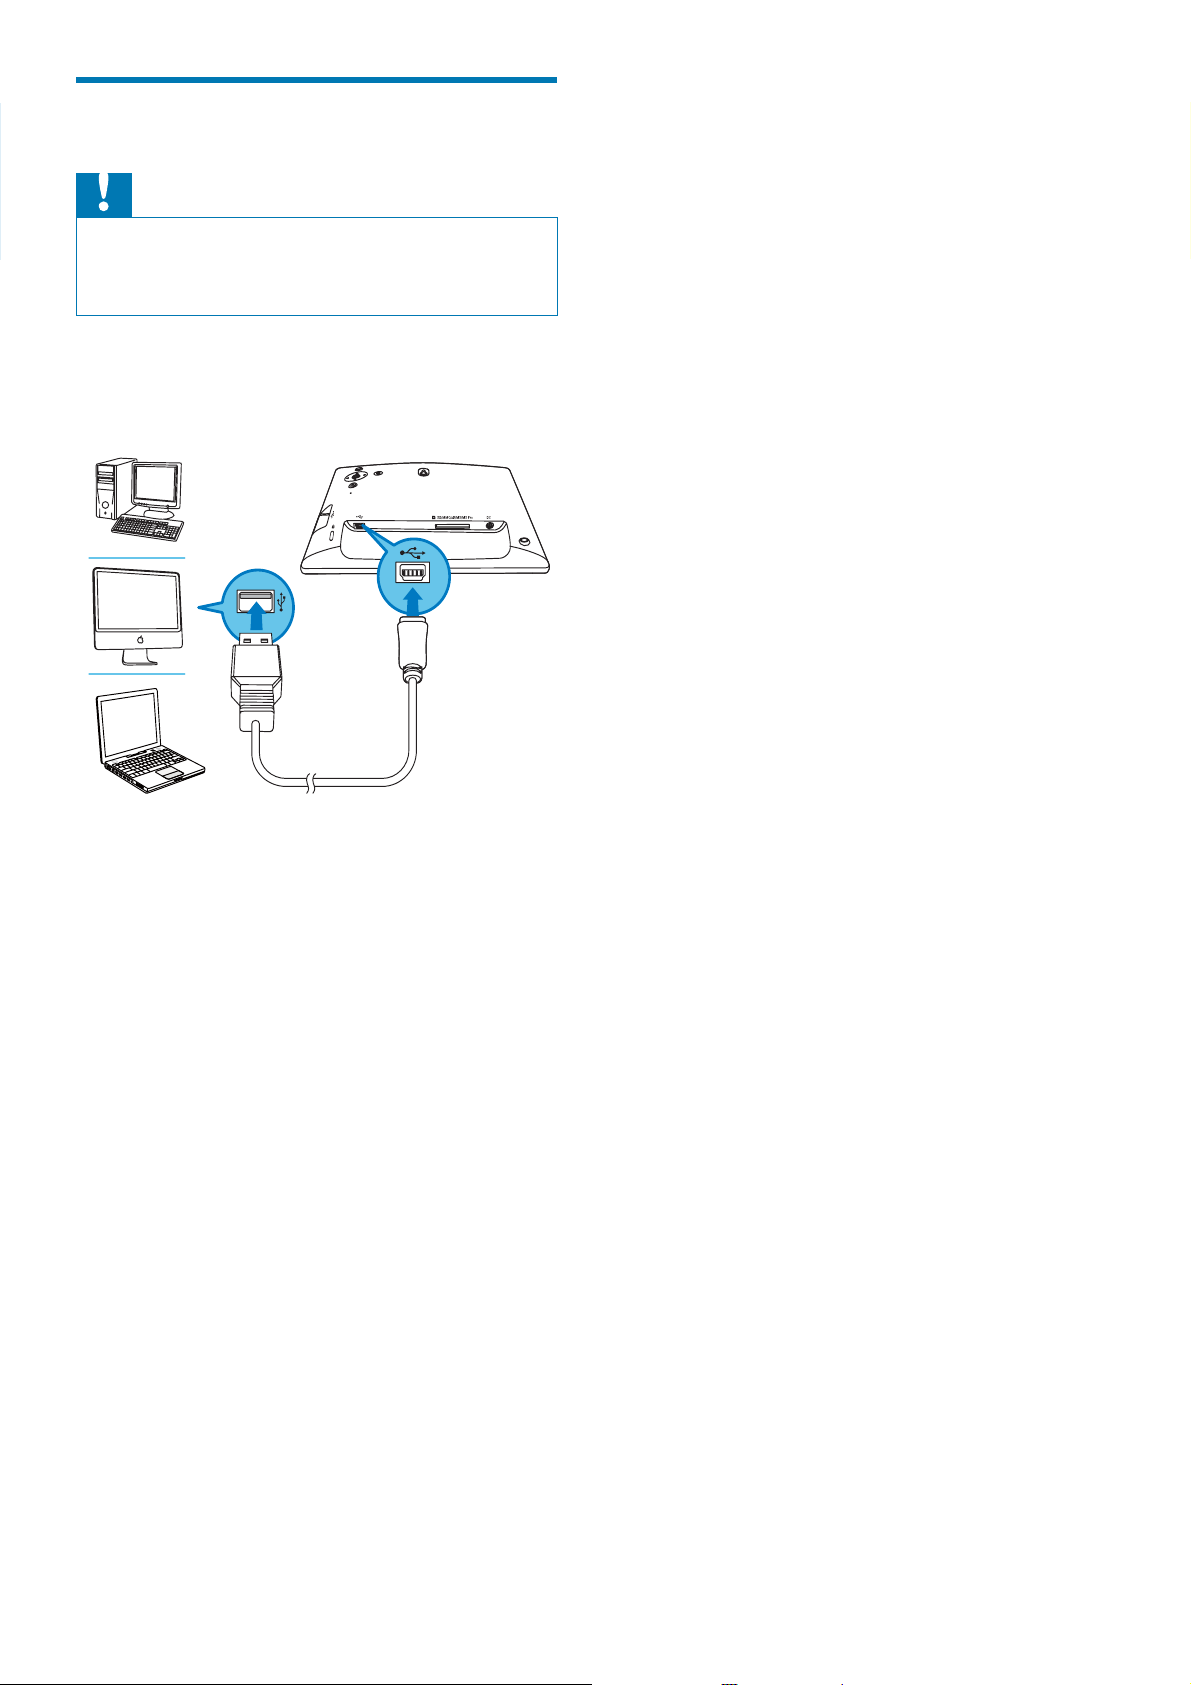
Connect PC
Caution
Do not disconnect the PhotoFrame from the PC when •
fi les are transferring between the PhotoFrame and the
PC.
1 Connect a suitable USB cable to the
PhotoFrame and to the PC.
You can drag and drop photos from »
the PC to the internal memory of the
PhotoFrame.
2 After all copy and save actions are
complete, disconnect the USB cable from
the PC and the PhotoFrame.
10 EN
Page 12
4 Display photos
Note
In slideshow mode, press • / to
display the next/previous photo.
In slideshow mode, press •
between slideshow, browse, and
calendar mode.
to toggle
English
You can play only JPEG photos on the PhotoFrame.•
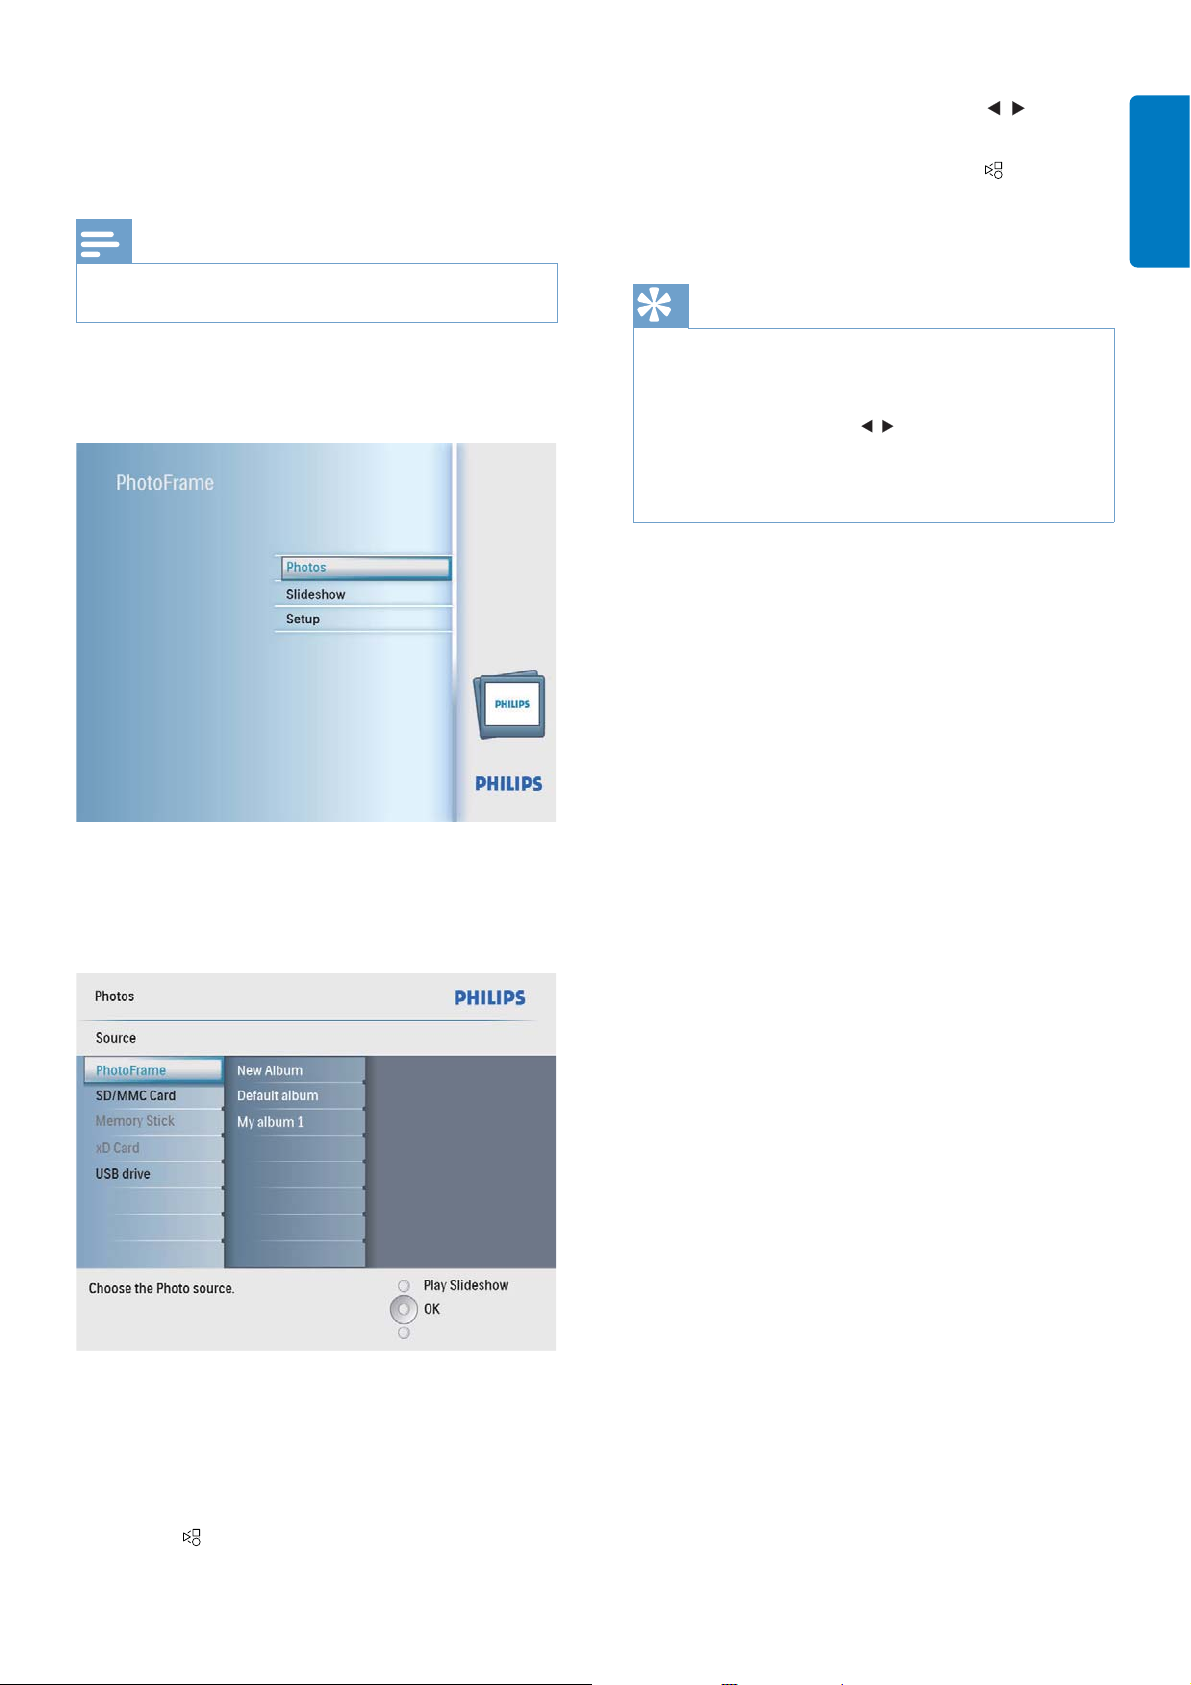
1 In the main menu, select [Photos] and then
press OK to confi rm.
Available photo sources are displayed.»
Tip
In slideshow mode, the PhotoFrame displays all photos •
automatically.
•
In browse mode, the PhotoFrame displays the current
photo and you can press / to display the next/
previous photo.
•
In calendar mode, the PhotoFrame displays photos with
the calendar.
2 Select a photo source, and then press OK
to confi rm.
3 Select an album, and then press OK to
confi rm.
Photos in the album are displayed in »
thumbnail mode.
4 Press to start slideshow play.
EN 11
Page 13
5 Browse photos
in thumbnail
mode and
access photo
menu
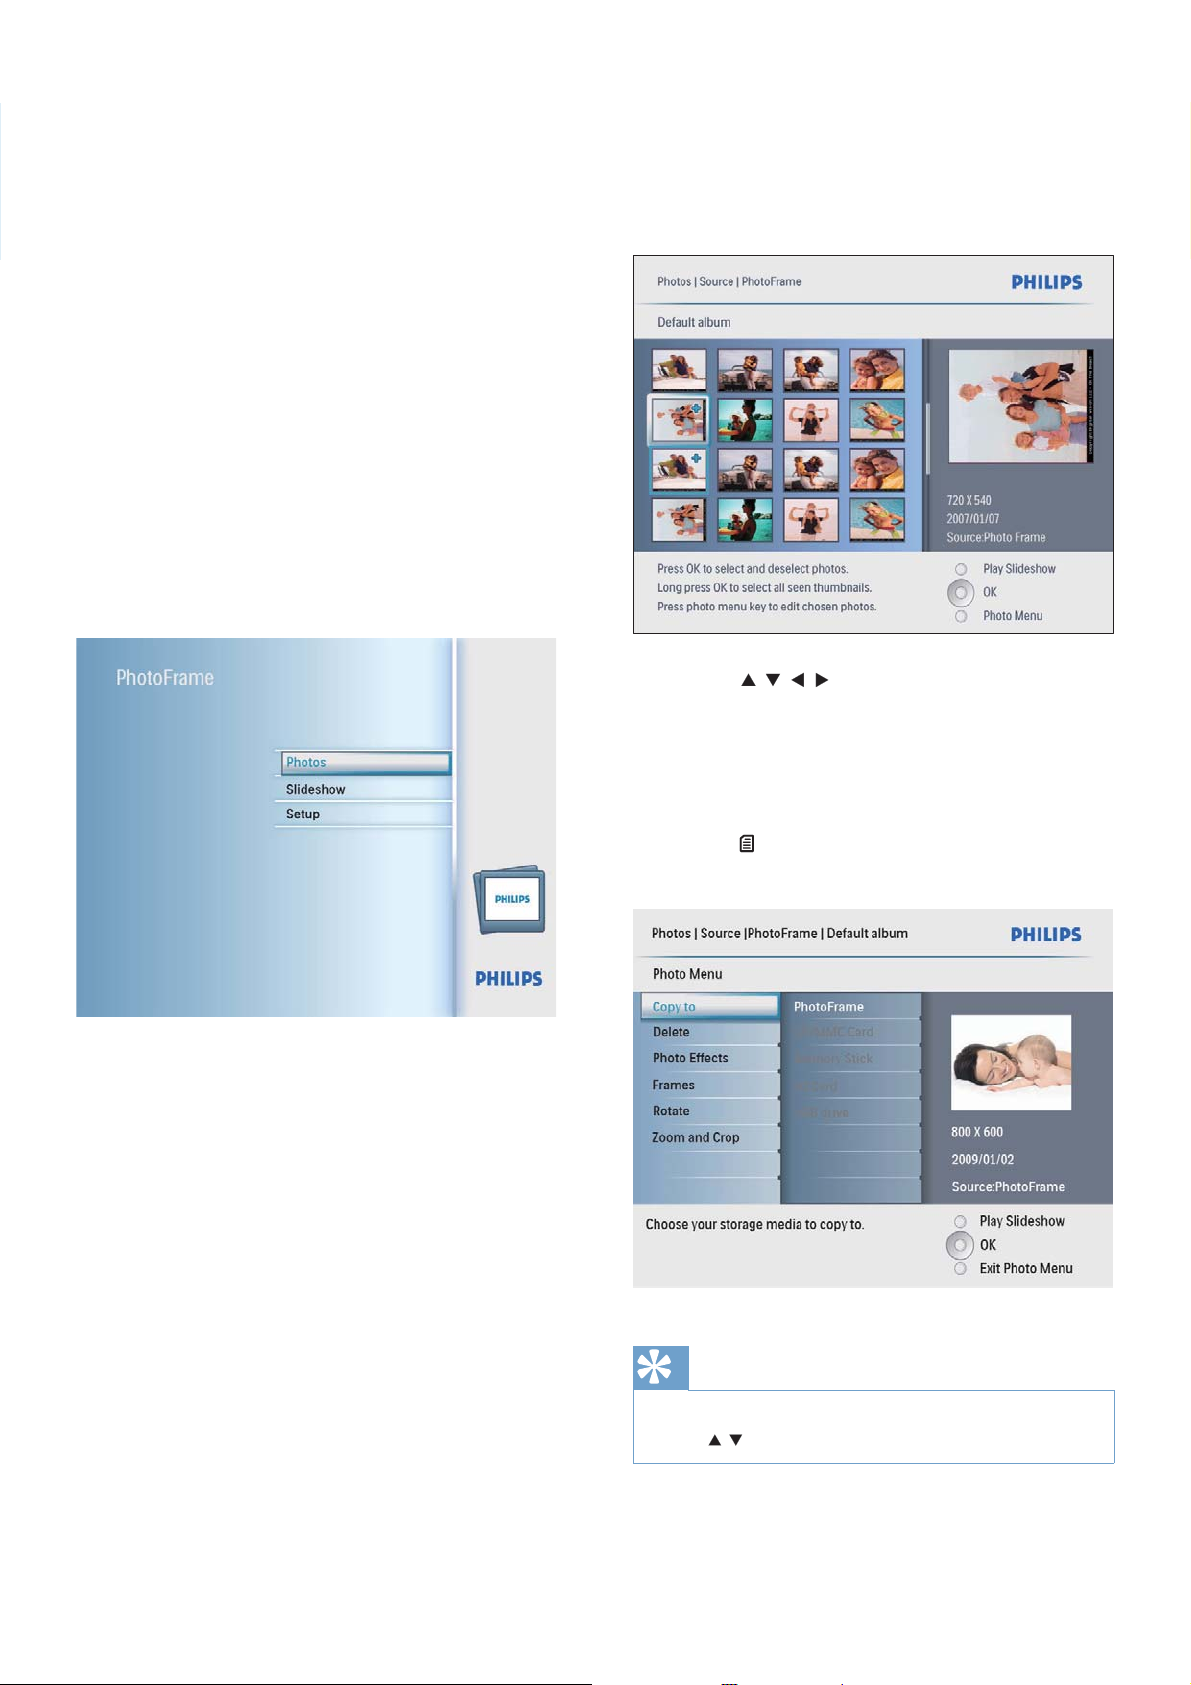
You can browse multiple photos in thumbnail
mode. In thumbnail mode, you can access the
photo menu to edit photos.
1 In the main menu, select [Photos] and then
press OK to confi rm.
3 Select an album, and then press OK to
confi rm.
Photos in the album are displayed in »
thumbnail mode.
4 Press / / / to select a photo, and then
press OK to confi rm.
To select all photos displayed on the •
screen, press and hold OK for more
than 1 second.
In Slideshow or Browse mode, you •
can press OK to browse photos in
thumbnail mode.
2 Select a photo source, and then press OK
to confi rm.
5 Press to access [Photo Menu] and
manage the photo.
Tip
If the number of photos in the album is over 16, you can •
press / to move to the next/previous 16 photos.
12 EN
Page 14
Copy photos
Delete photos
Caution
Never remove a storage device before the copy or •
delete action completes.
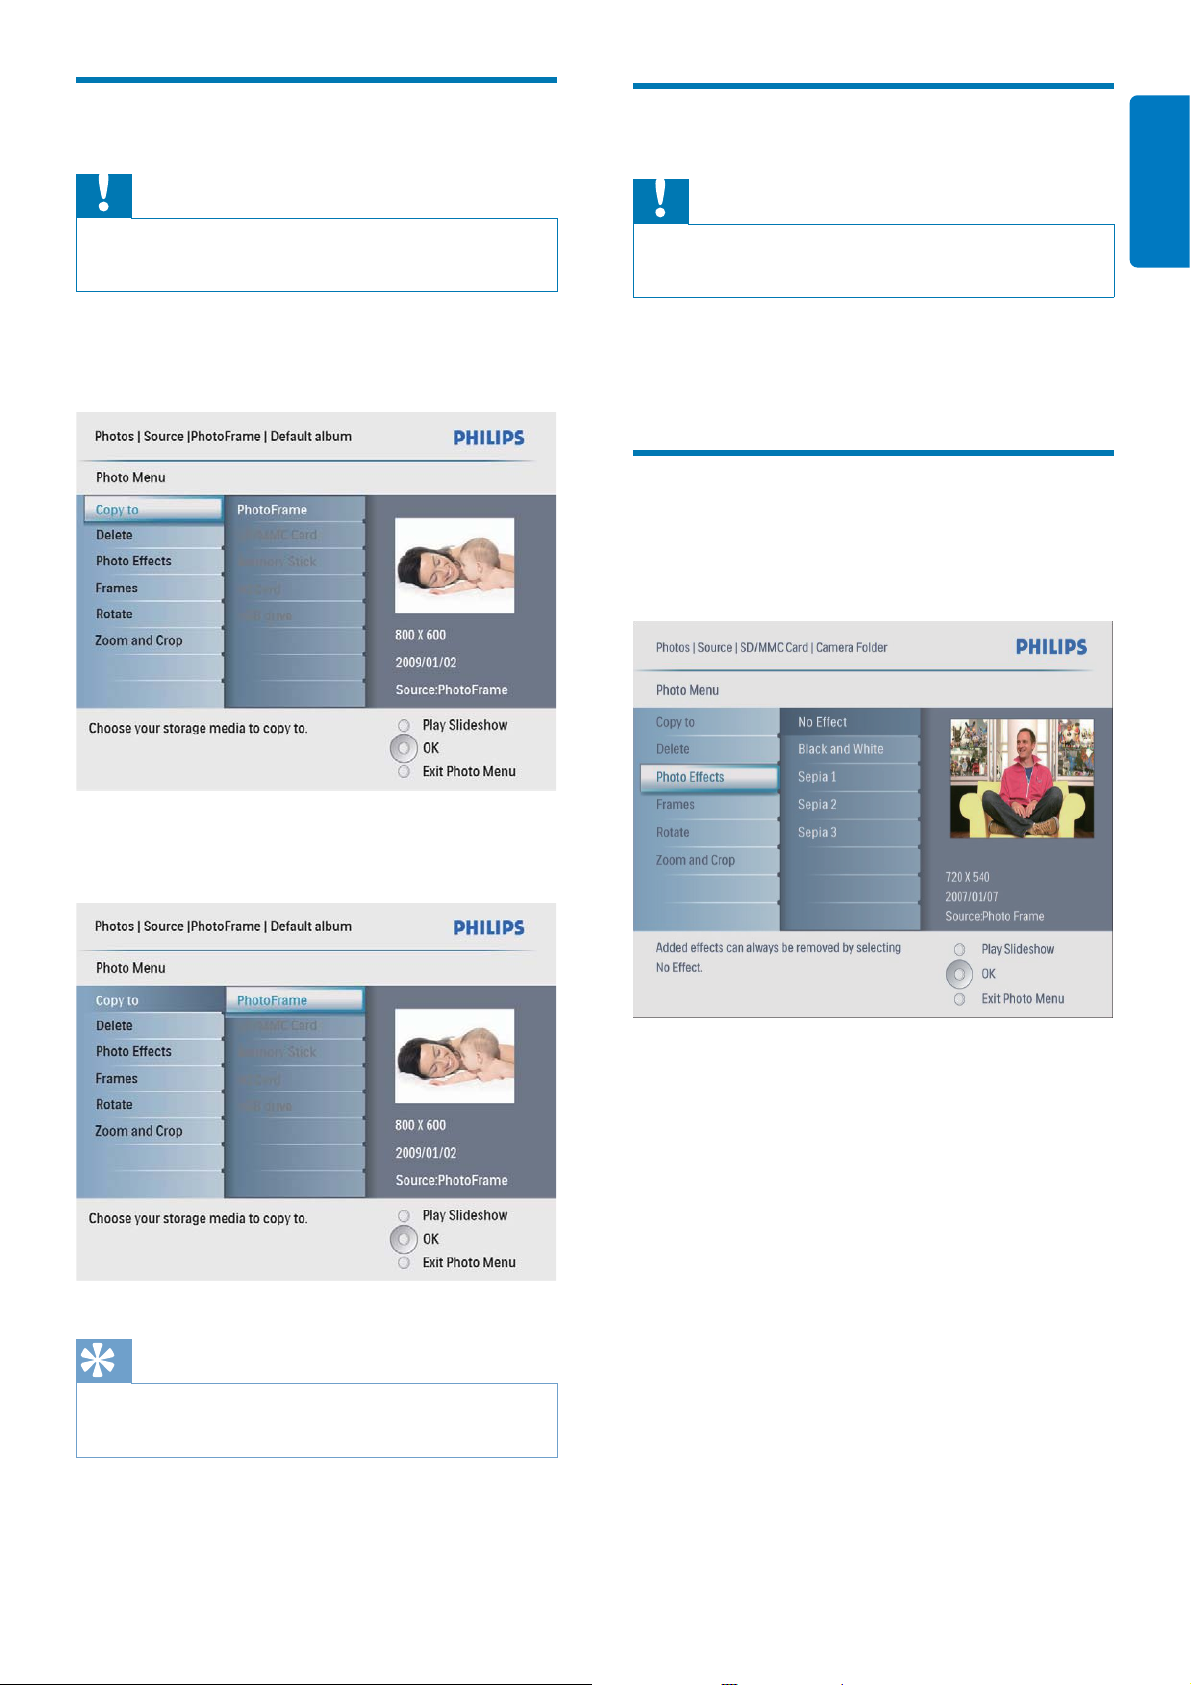
1 In [Photo Menu], select [Copy to] and
then press OK to confi rm.
Caution
Never remove a storage device before the copy or •
delete action completes.
1 In [Photo Menu], select [Delete] and then
press OK to confi rm.
Select a photo effect
1 In [Photo Menu], select [Photo Effects]
and then press OK to confi rm.
English
2 Select a target folder, and then press OK
to start copy.
Tip
When there is not enough memory to store more •
images, an error message is displayed.
2 Select an effect, and then press OK to
confi rm.
EN 13
Page 15
Select a photo frame
Zoom and crop a photo
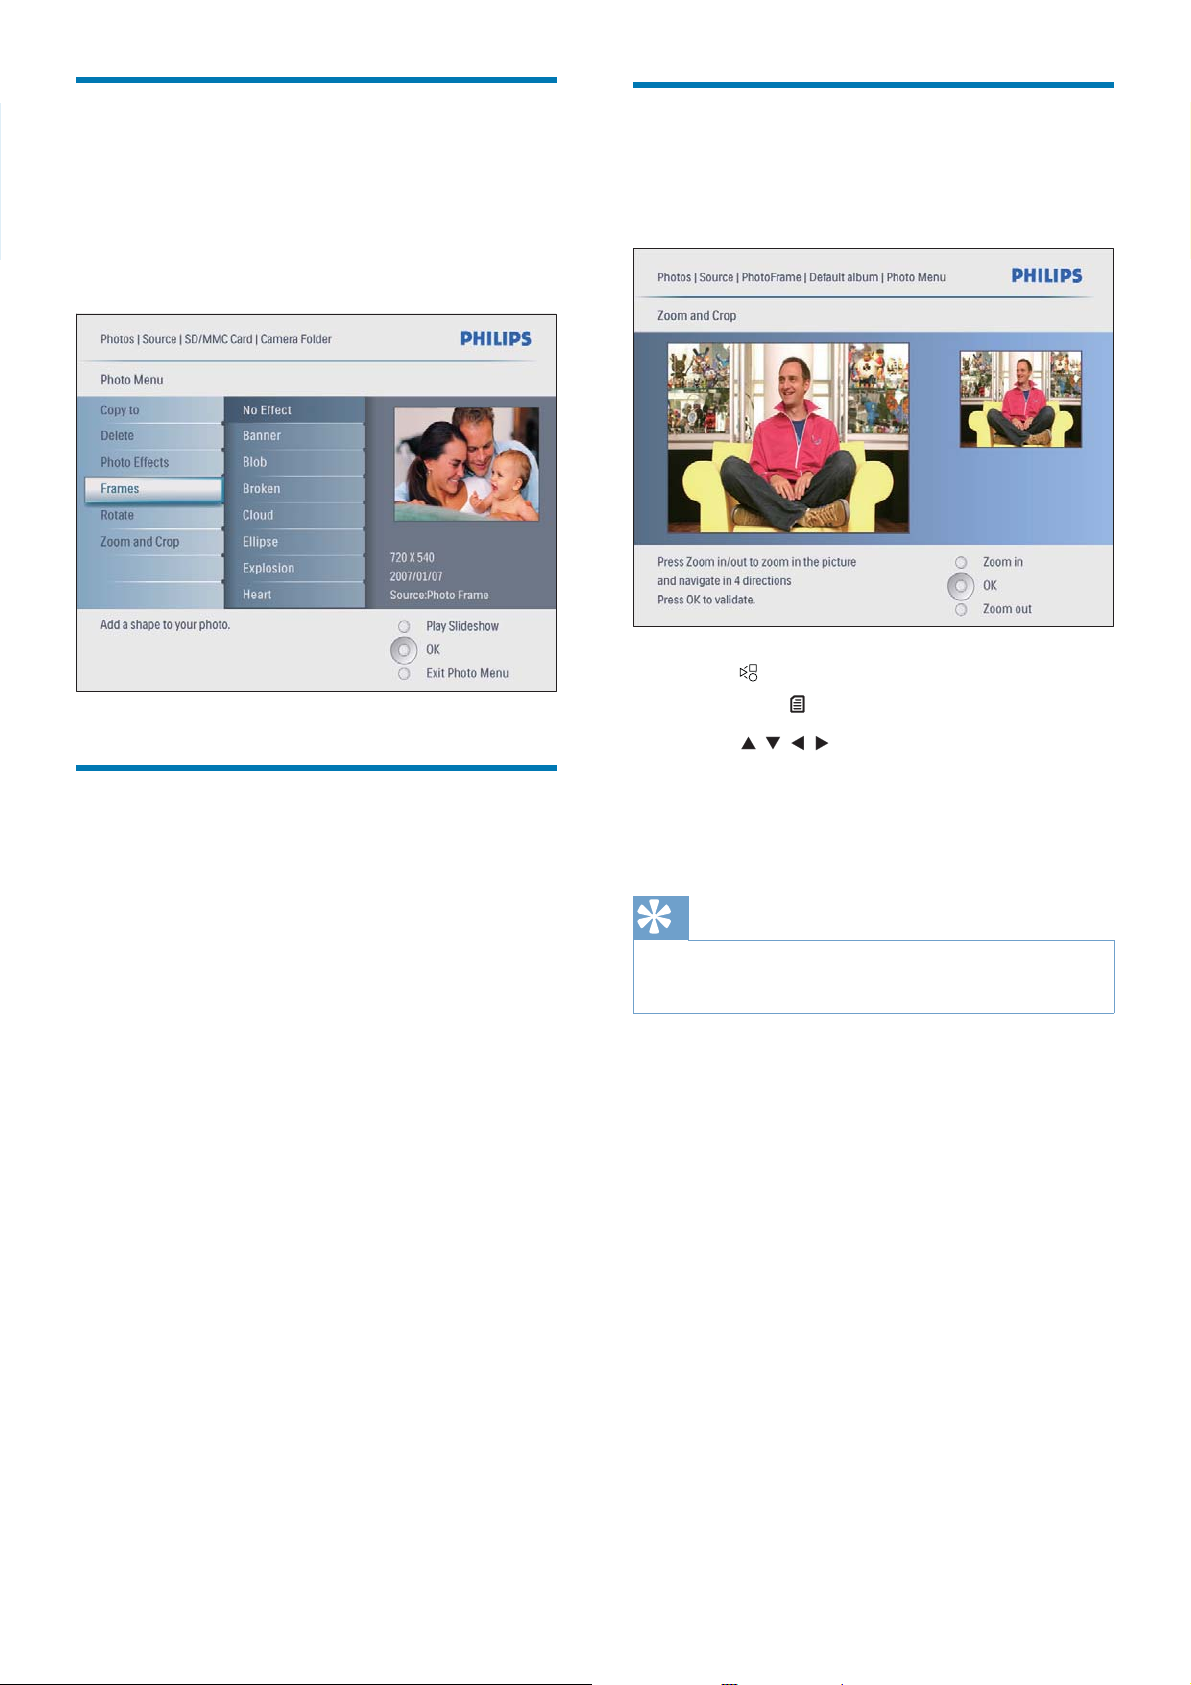
1 In [Photo Menu], select [Frames] and then
press OK to confi rm.
2 Select a frame, and then press OK to
confi rm.
Rotate a photo
1 In [Photo Menu], select [Rotate] and then
press OK to confi rm.
2 Select an orientation, and then press OK
to confi rm.
1 In [Photo Menu], select [Zoom and Crop]
and then press OK to confi rm.
2 Press to zoom in a photo.
Press•
to zoom out a photo.
3 Press / / / to crop the photo, and
then press OK to confi rm.
4 Select [Yes], and then press OK to
confi rm.
Tip
Zoom and crop function is only applied to photos over •
800 x 600 pixel.
14 EN
Page 16
6 Manage an
album
Create an album
You can create an album on the PhotoFrame
and on a storage device connected to the
PhotoFrame.
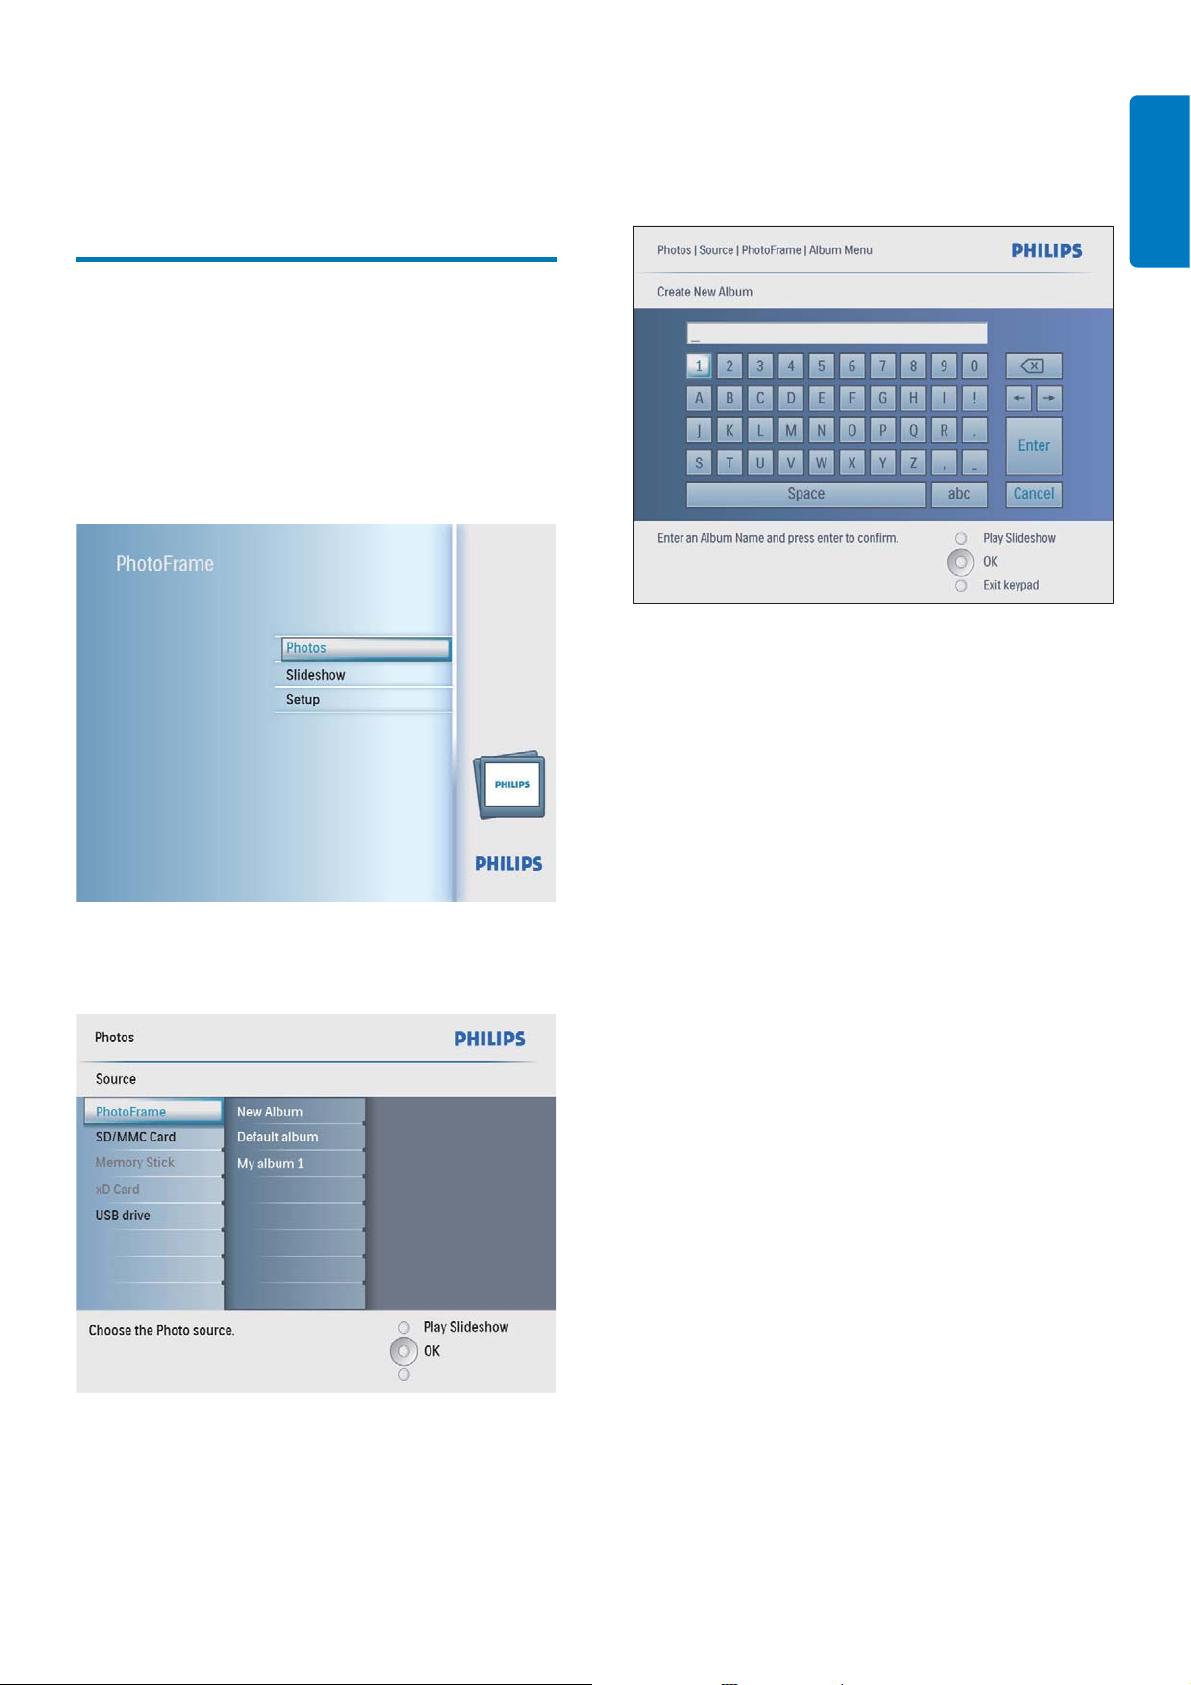
1 In the main menu, select [Photos] and then
press OK to confi rm.
3 Select [New Album], and then press OK
to confi rm.
A keypad is displayed.»
English
4 To enter the new name (up to 24
characters), select an alphabet/number and
then press OK to confi rm.
To switch between uppercase •
and lowercase, select [abc] on the
displayed keypad and then press OK
to confi rm.
2 Select a photo source, and then press OK
to confi rm.
5 When the name is complete, select
[Enter] and then press OK to confi rm.
EN 15
Page 17
Delete an album
Rename an album
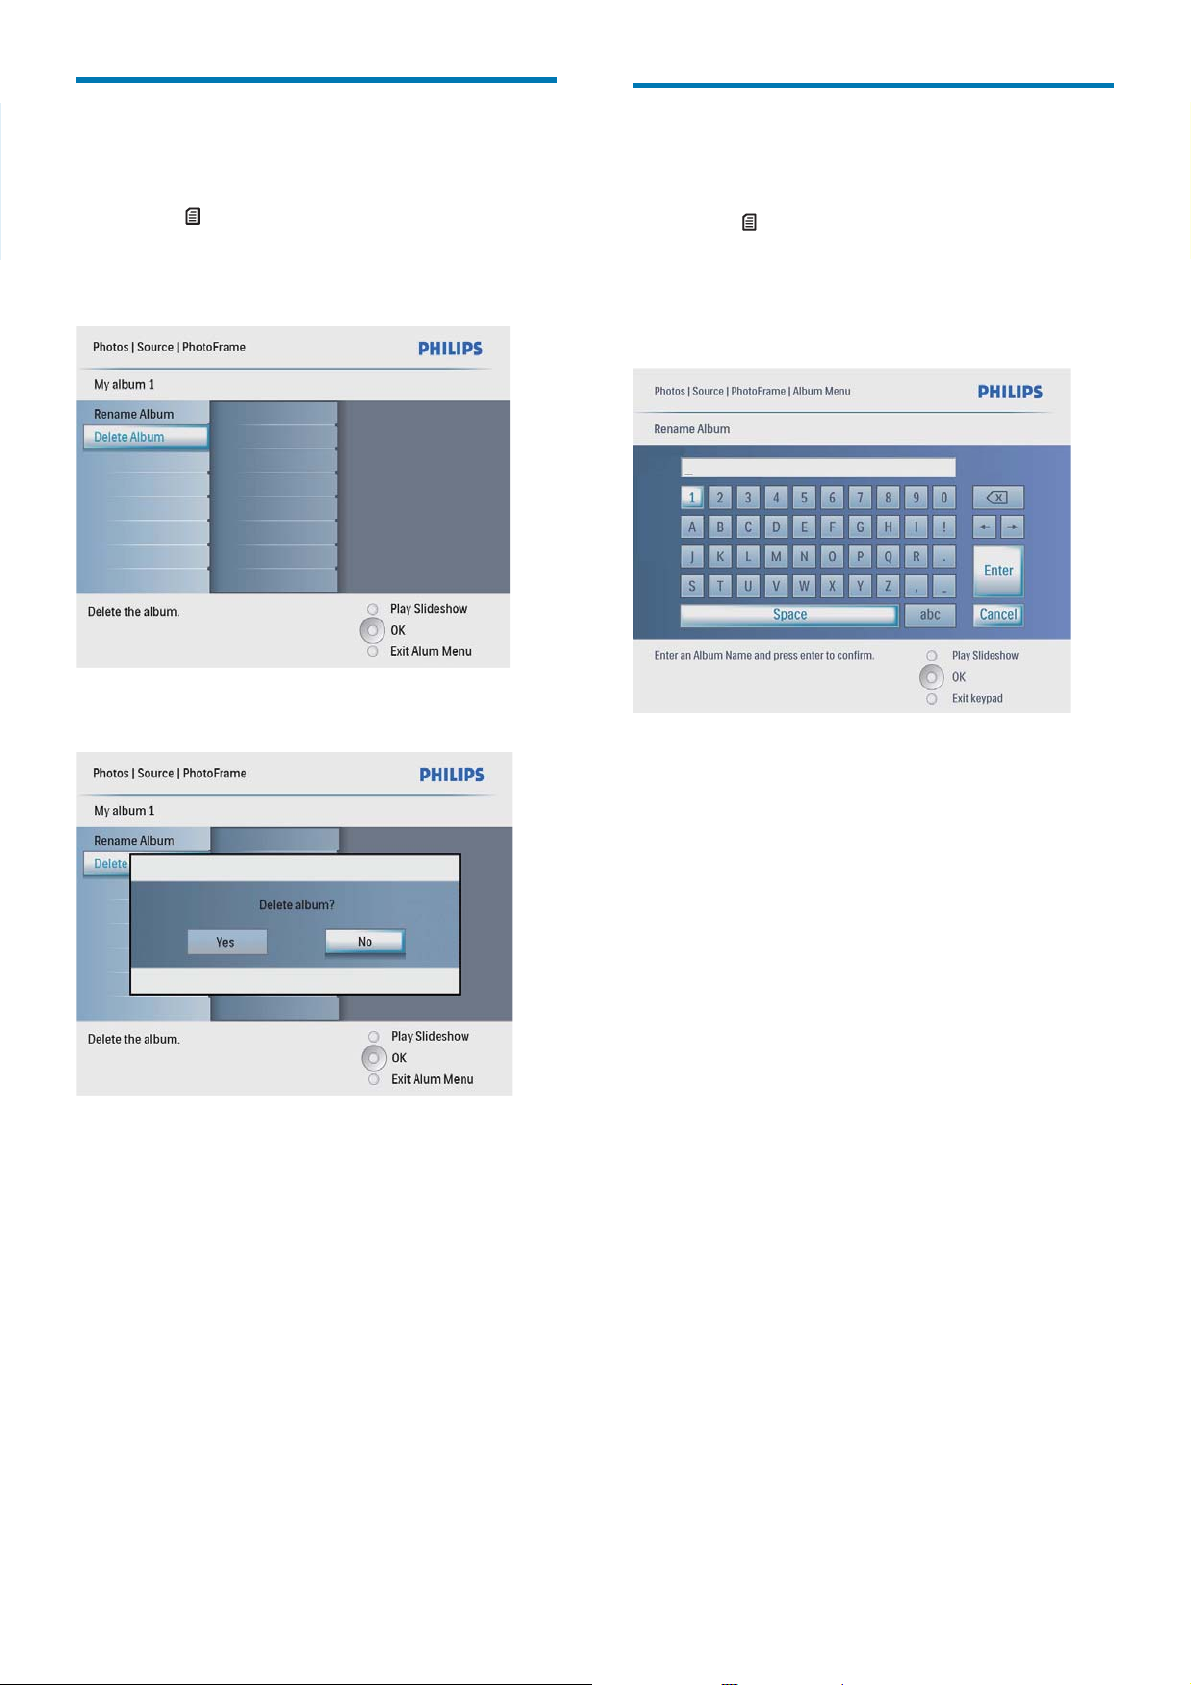
1 Select an album.
2 Press to access the album menu.
3 Select [Delete Album], and then press OK
to confi rm.
A confi rmation message is displayed.»
1 Select an album.
2 Press to access the album menu.
3 Select [Rename Album], and then press
OK to confi rm.
A keypad is displayed.»
4 Select [Yes], and then press OK to
confi rm.
4 To enter the new name (up to 24
characters), select an alphabet/number and
then press OK to confi rm.
To switch between uppercase •
and lowercase, select [abc] on the
displayed keypad and then press OK
to confi rm.
5 When the name is complete, select
[Enter] and then press OK to confi rm.
16 EN
Page 18
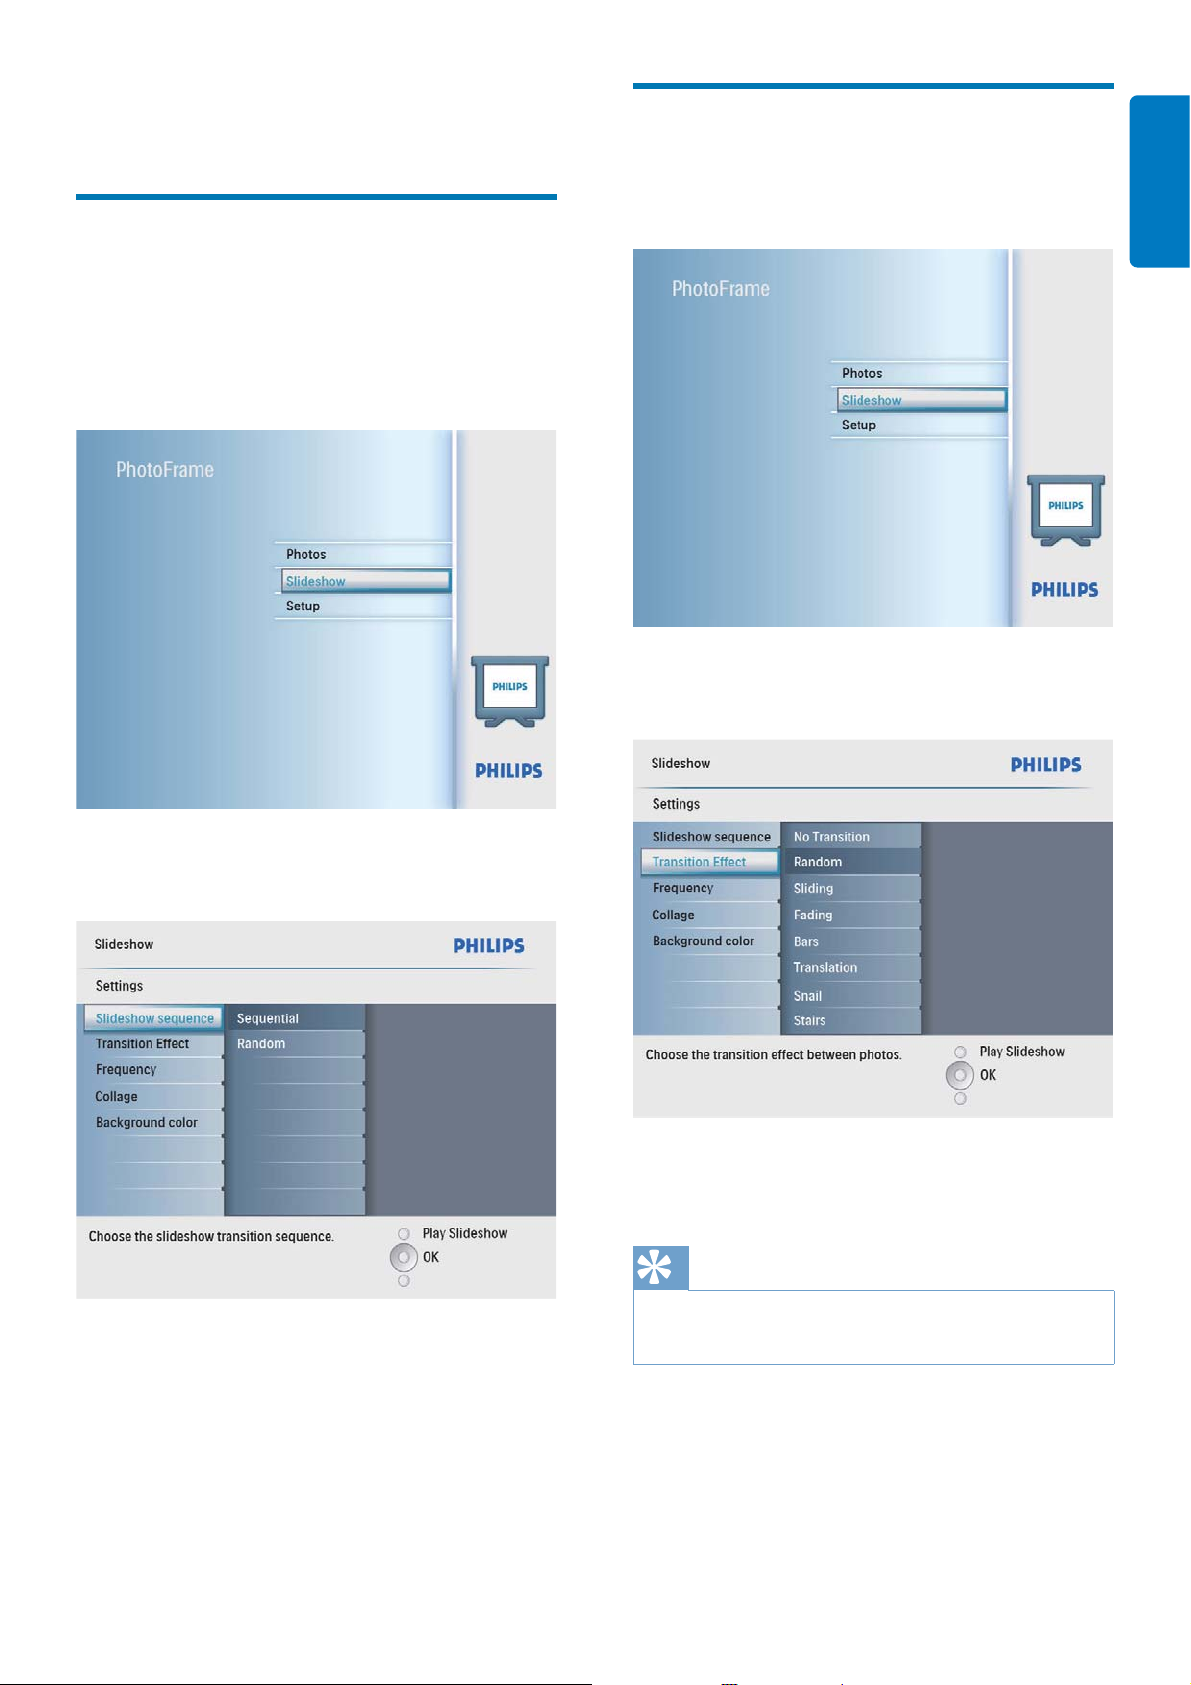
7 Slideshow
Select slideshow sequence
You can display the slideshow in sequence or
randomly.
1 In the main menu, select [Slideshow] and
then press OK to confi rm.
Select a transition effect
1 In the main menu, select [Slideshow] and
then press OK to confi rm.
2 Select [Transition Effect], and then press
OK to confi rm.
English
2 Select [Slideshow sequence], and then
press OK to confi rm.
3 Select an option, and then press OK to
confi rm.
3 Select a transition effect, and then press
OK to confi rm.
Tip
If you select • [Random], all available transition effects
randomly apply to all slideshow photos.
EN 17
Page 19
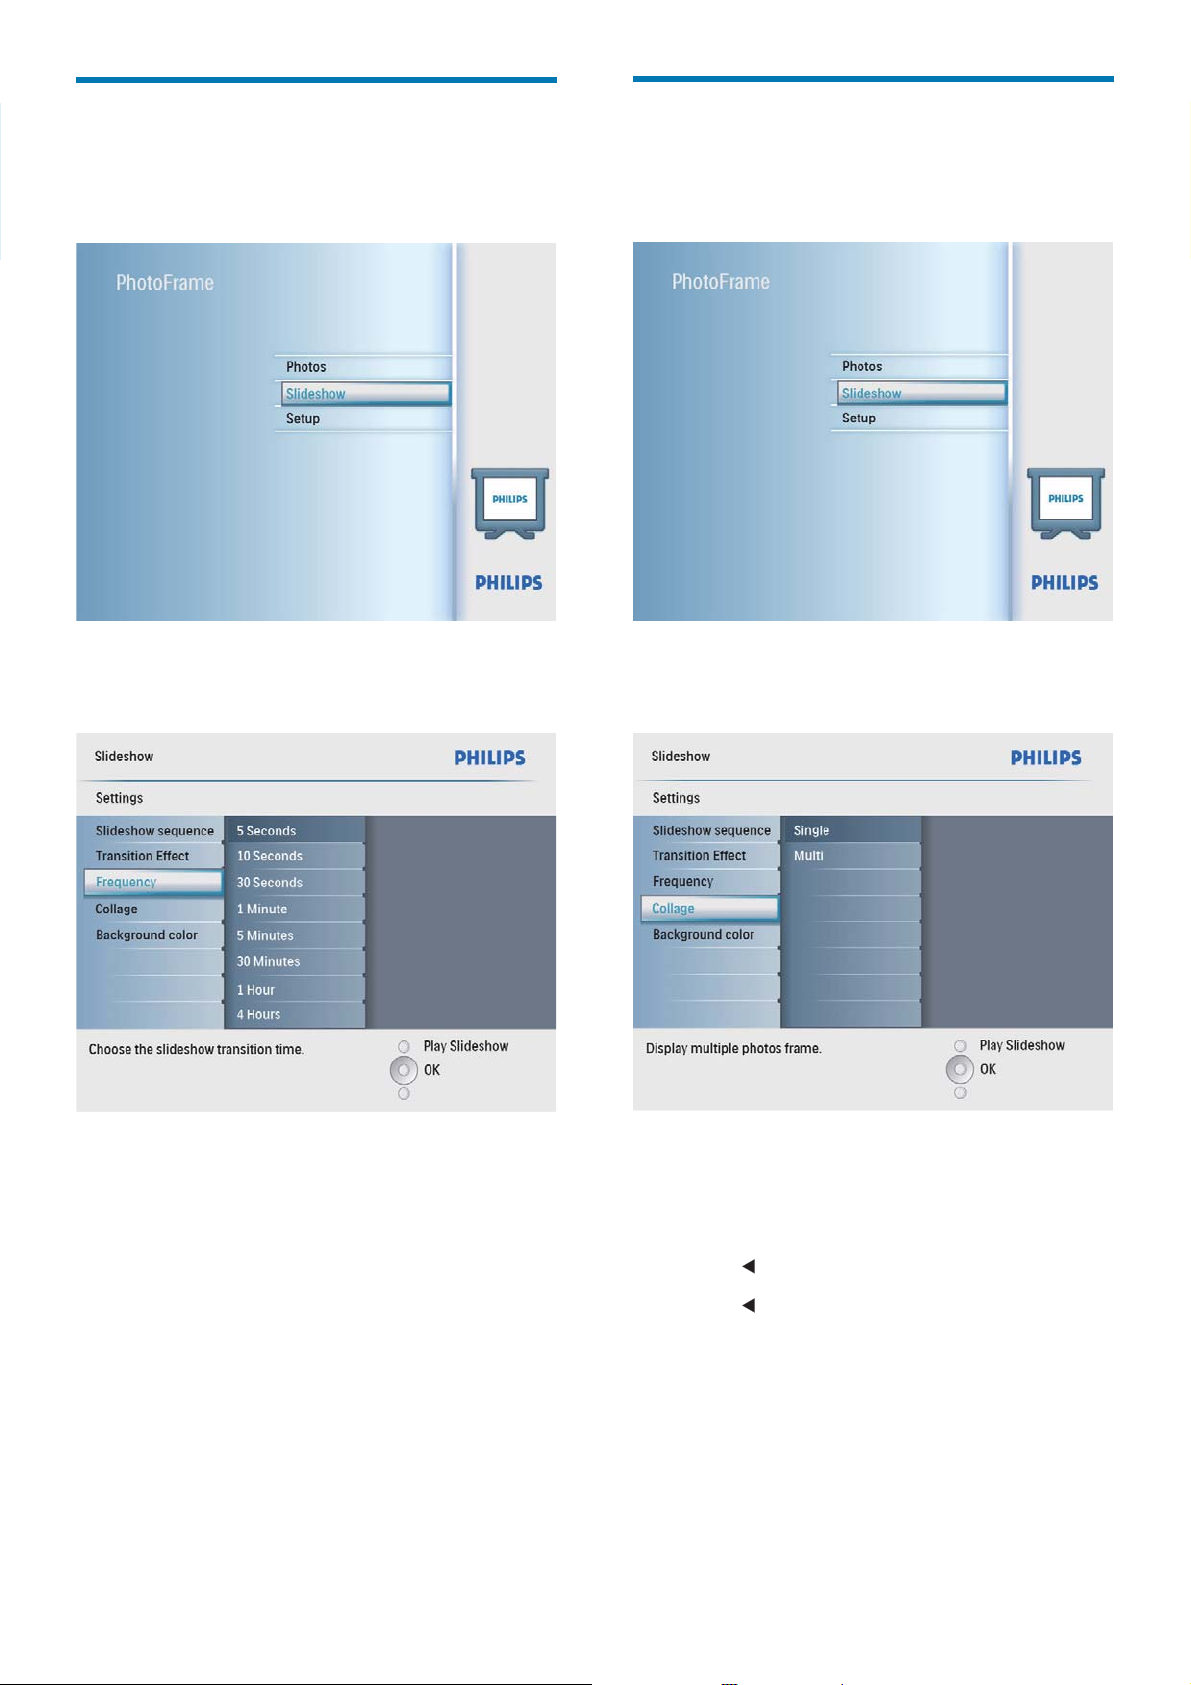
Select slideshow frequency
Display collage photos
1 In the main menu, select [Slideshow] and
then press OK to confi rm.
2 Select [Frequency], and then press OK to
confi rm.
1 In the main menu, select [Slideshow] and
then press OK to confi rm.
2 Select [Collage], and then press OK to
confi rm.
3 Select a transition time, and then press OK
to confi rm.
18 EN
3 Select [Multi], and then press OK to
confi rm.
4 Select a layout.
5 Press (Right) to select [Photo 1].
6 Press (Right) again to access the photo
source options.
7 Select a photo from a photo source.
Page 20
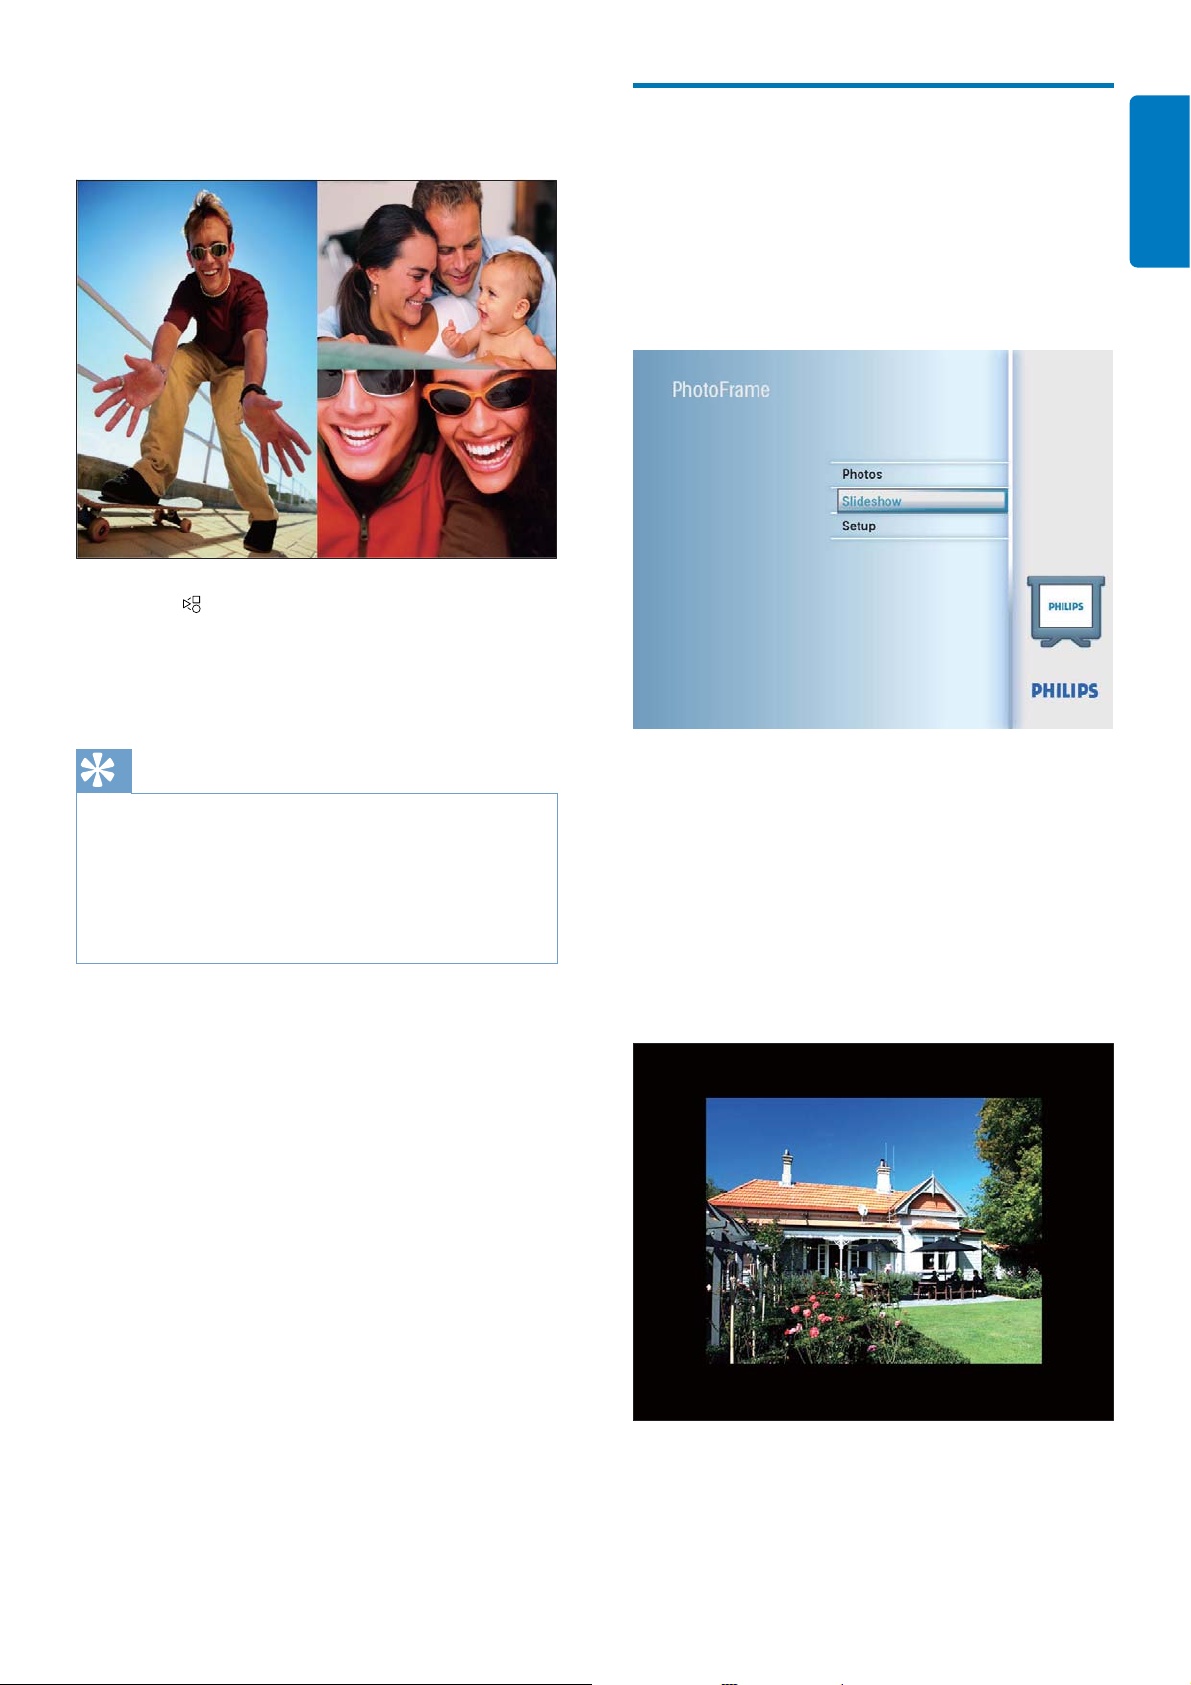
8 Repeat steps 5 to 7 until all photos are
selected for the format.
9 Press to start collage display.
To stop collage display, select •
[Slideshow] > [Collage] > [Single]
and then press OK to confi rm.
Select photo background
You can select a background border color for
photos that are smaller than the screen of the
PhotoFrame.
1 In the main menu, select [Slideshow] and
then press OK to confi rm.
English
Tip
If you select a collage layout, the PhotoFrame displays a •
static collage and the slideshow mode is deactivated.
• [Random] format, the PhotoFrame
If you select
automatically does the random collage base on the
optimal layout of photos and displays the collages in
slideshow mode.
2 Select [Background Color], and then press
OK to confi rm.
3 Select a background color / [Auto fi t] /
[RadiantColor], and then press OK to
confi rm.
If you select a background color, the »
PhotoFrame displays a photo with a
background color or black bar.
If you select » [Auto fi t], the
PhotoFrame extends a photo to fi ll the
screen with picture distortion.
EN 19
Page 21
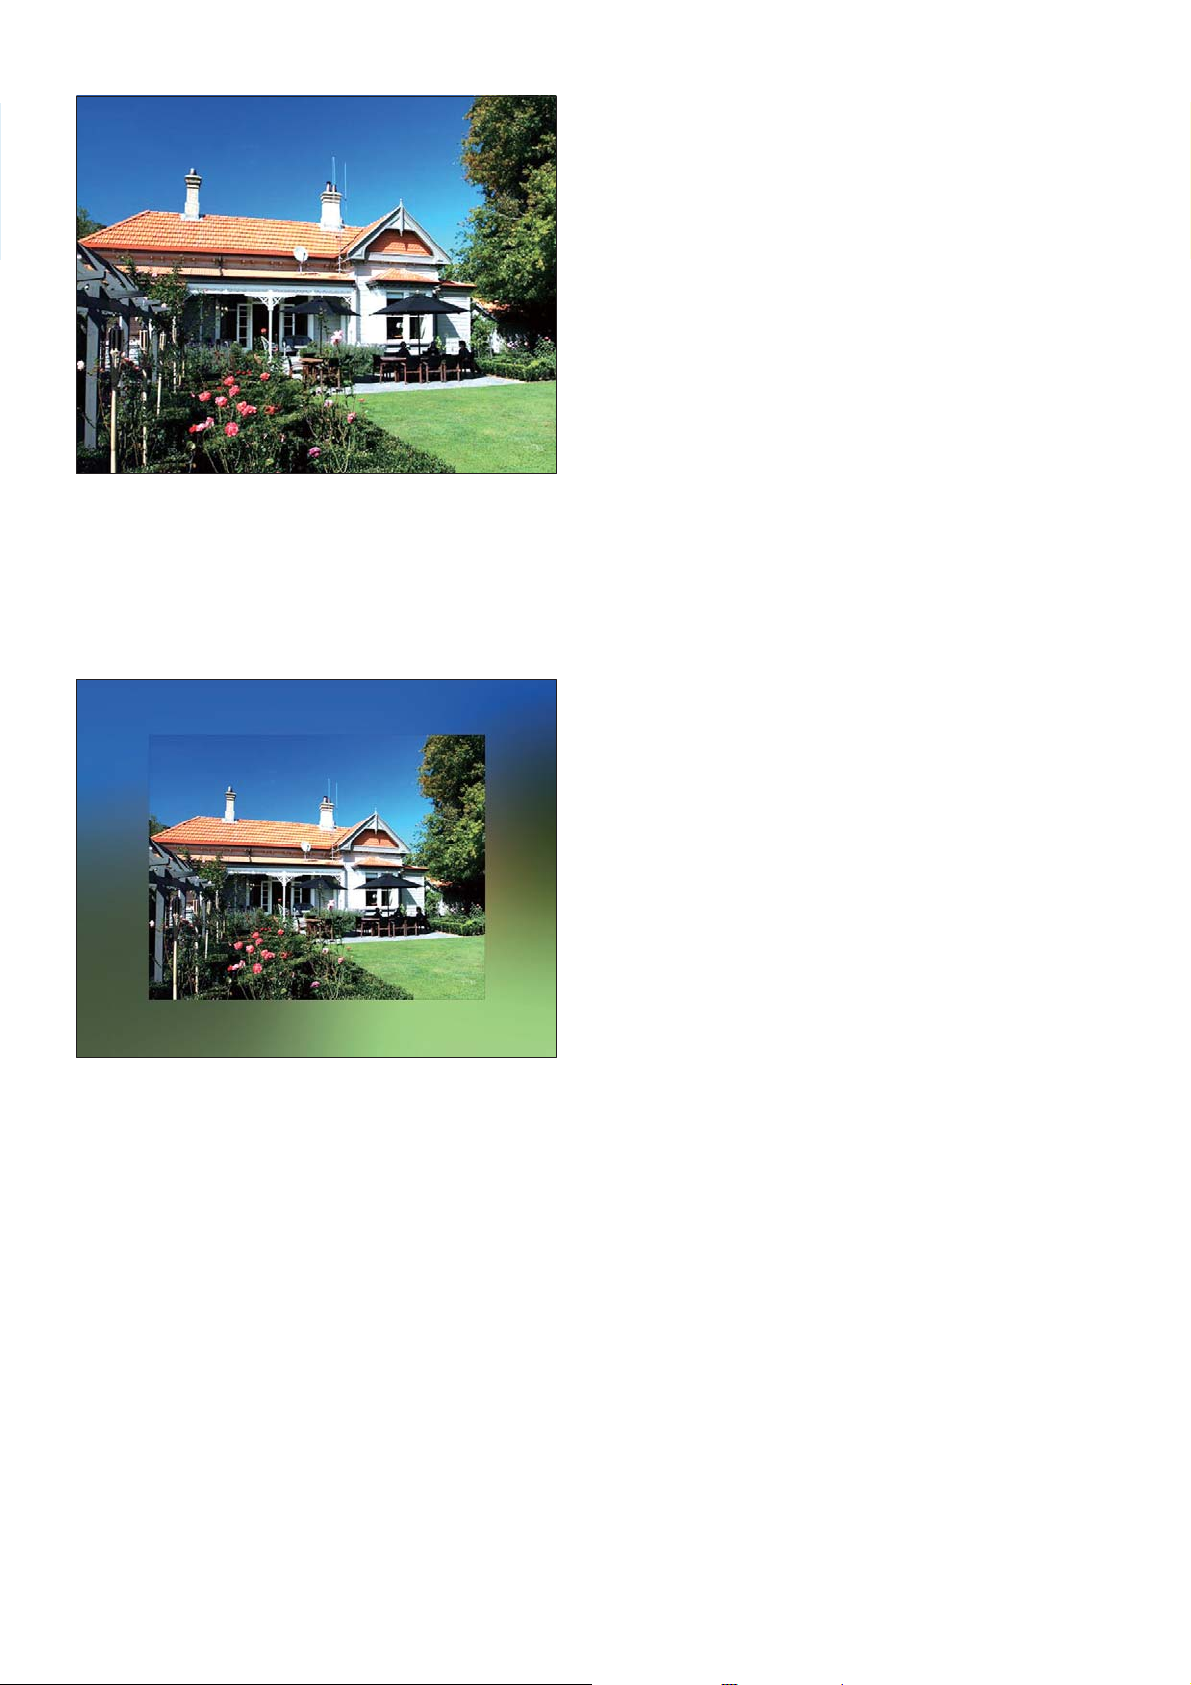
If you select » [RadiantColor], the
PhotoFrame extends the color on the
edges of a photo that is smaller than
the full screen to fi ll the screen without
black bars or aspect ratio distortion.
20 EN
Page 22
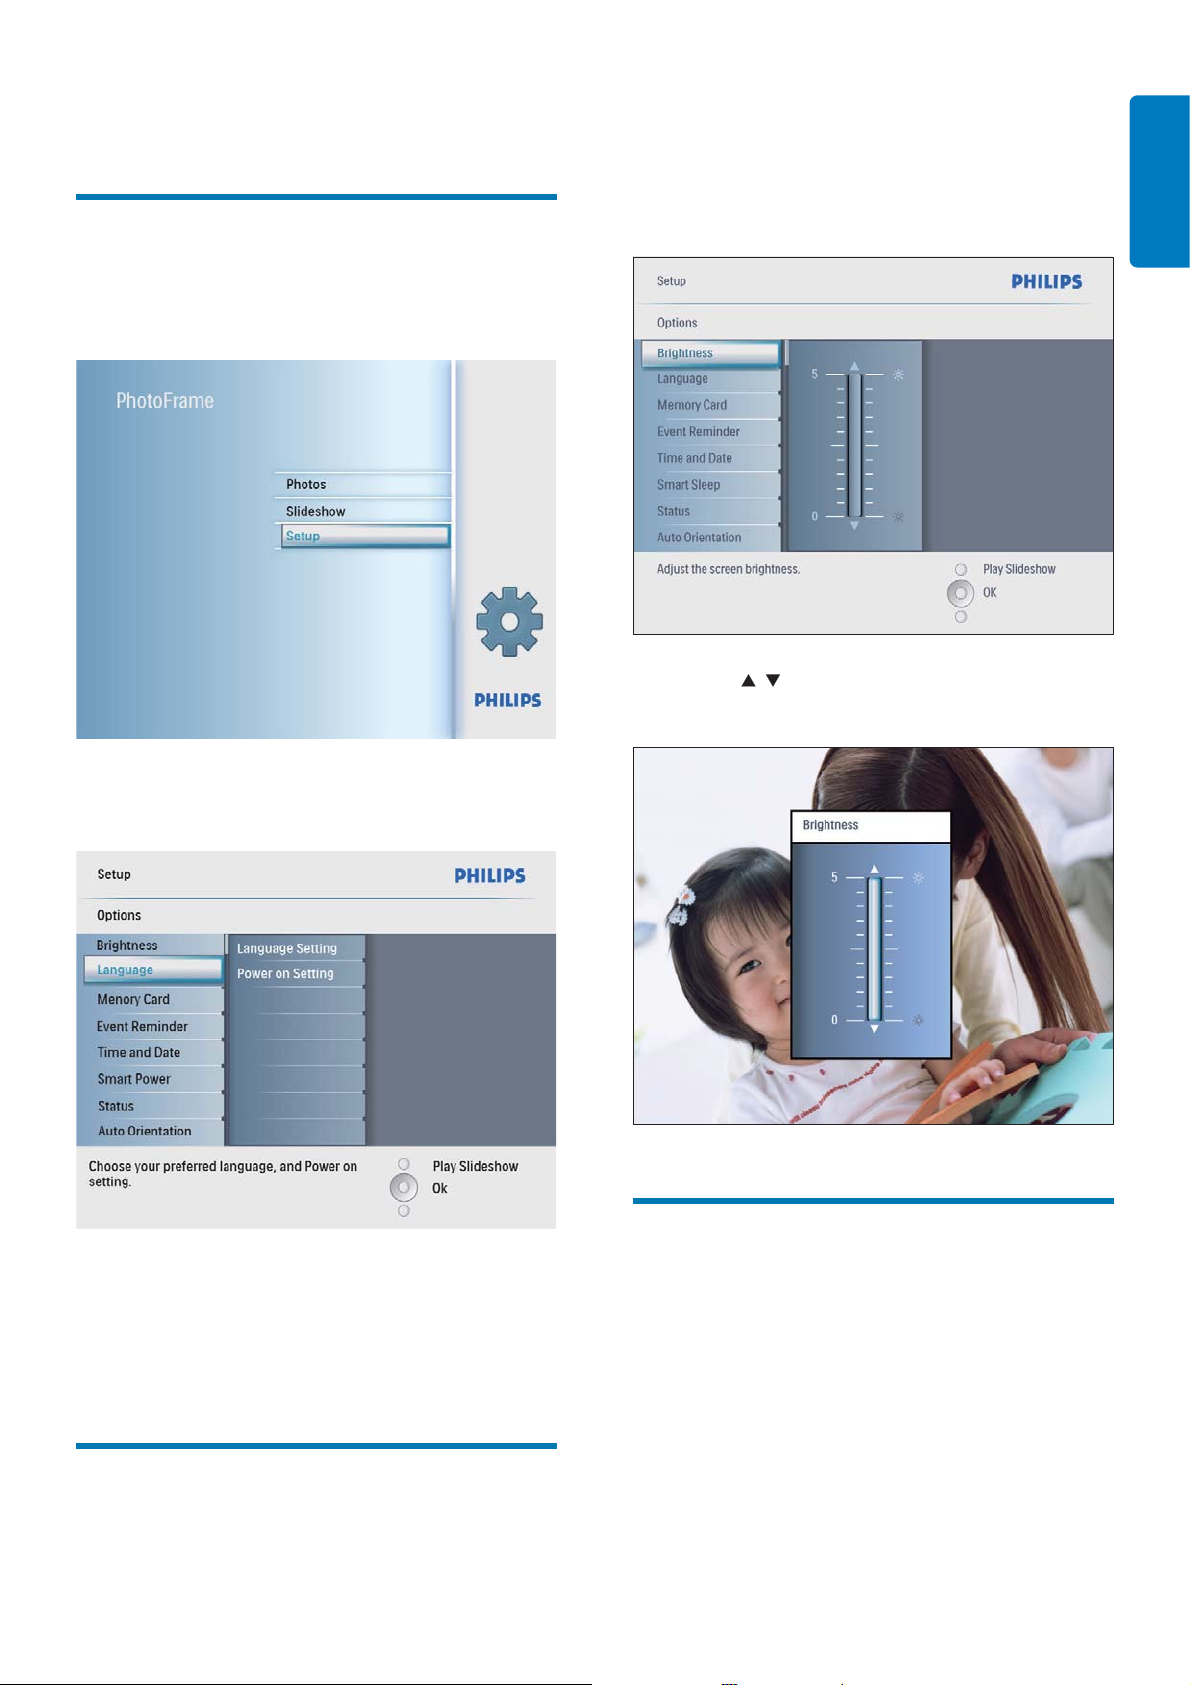
8 Setup
1 In the main menu, select [Setup] and then
press OK to confi rm.
Select on-screen language
1 In the main menu, select [Setup] and then
press OK to confi rm.
2 Select [Brightness], and then press OK to
confi rm.
3 Press / to adjust brightness, and then
press OK to confi rm.
English
2 Select [Language], and then press OK to
confi rm.
3 Select [Language Setting], and then press
OK to confi rm.
4 Select a language, and then press OK to
confi rm.
Adjust display brightness
You can set the brightness of the PhotoFrame
to achieve the best view.
Protect/Unprotect content of
memory card
You can enable the delete function on a storage
device available on the PhotoFrame. To avoid
deleting photos on a storage device, you can
also disable the delete function on a storage
device.
1 In the main menu, select [Setup] and then
press OK to confi rm.
EN 21
Page 23
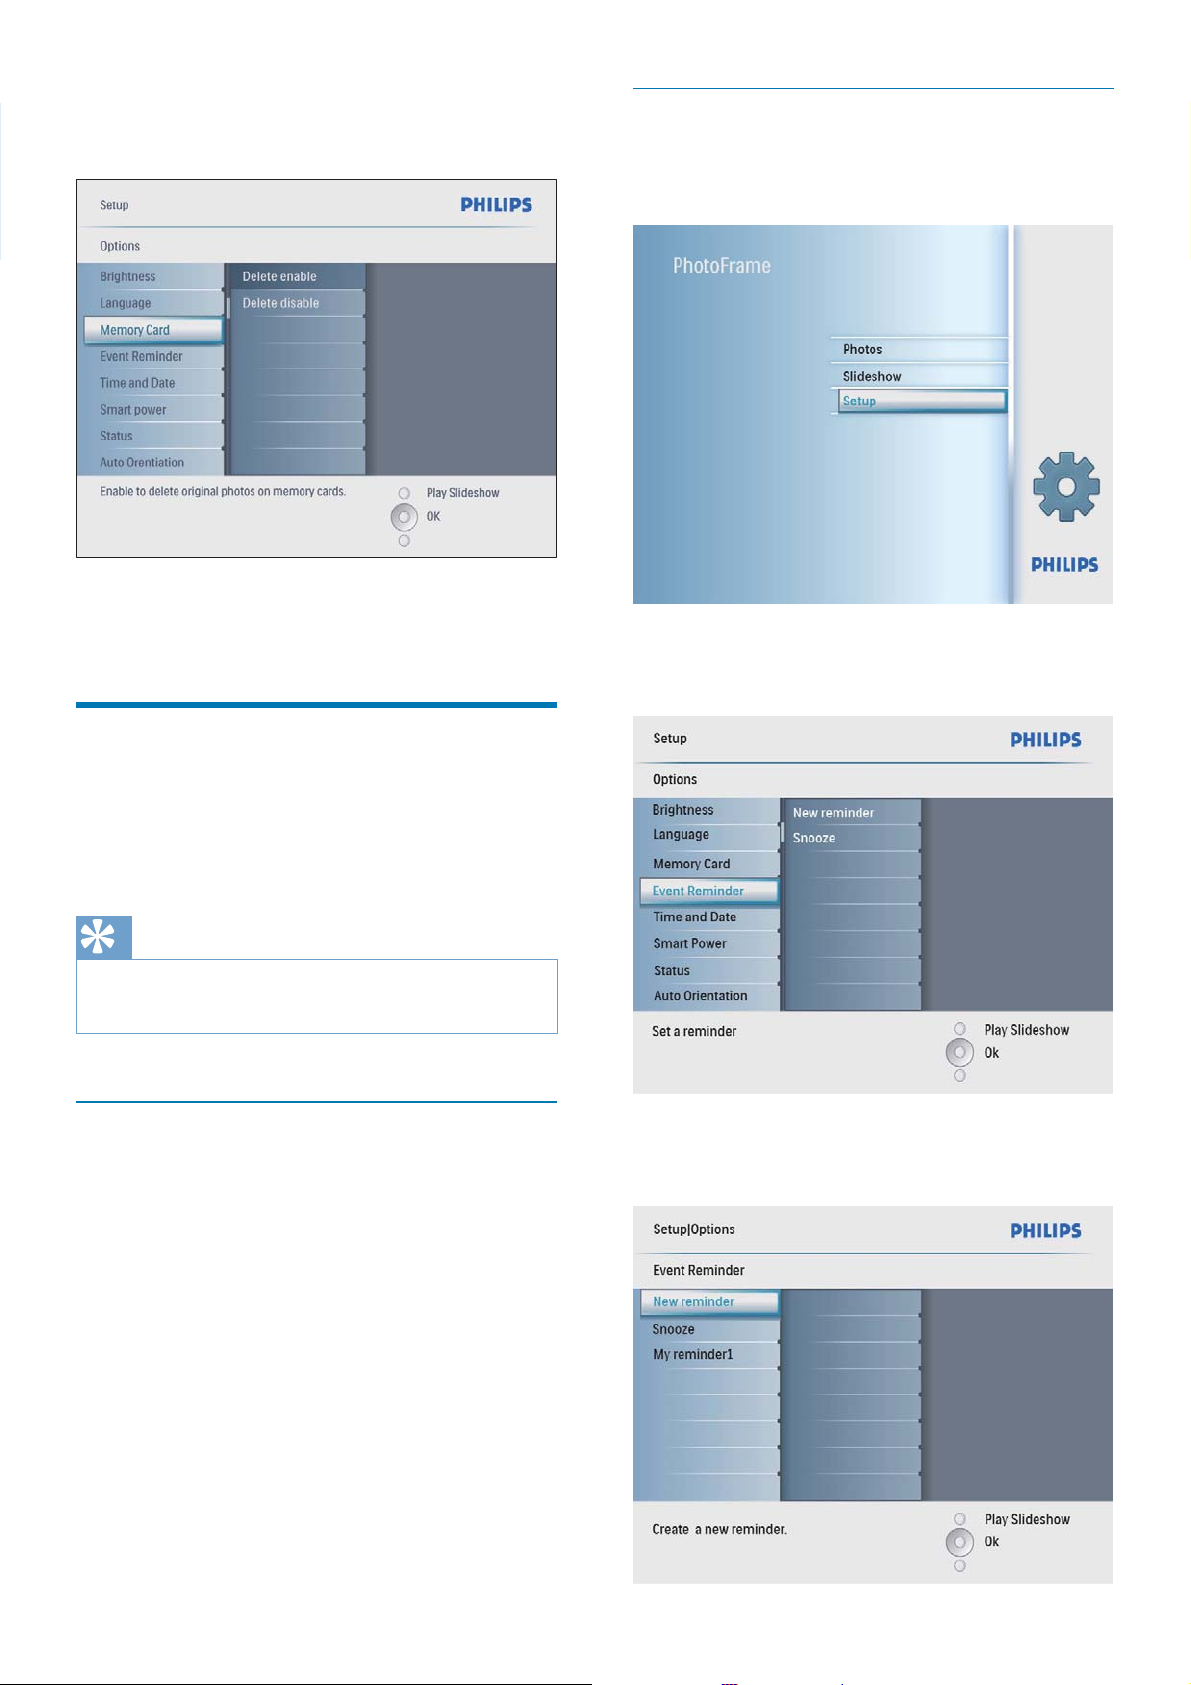
2 Select [Memory Card], and then pres OK
to confi rm.
3 Select [Delete enable] / [Delete disable],
and then press OK to confi rm.
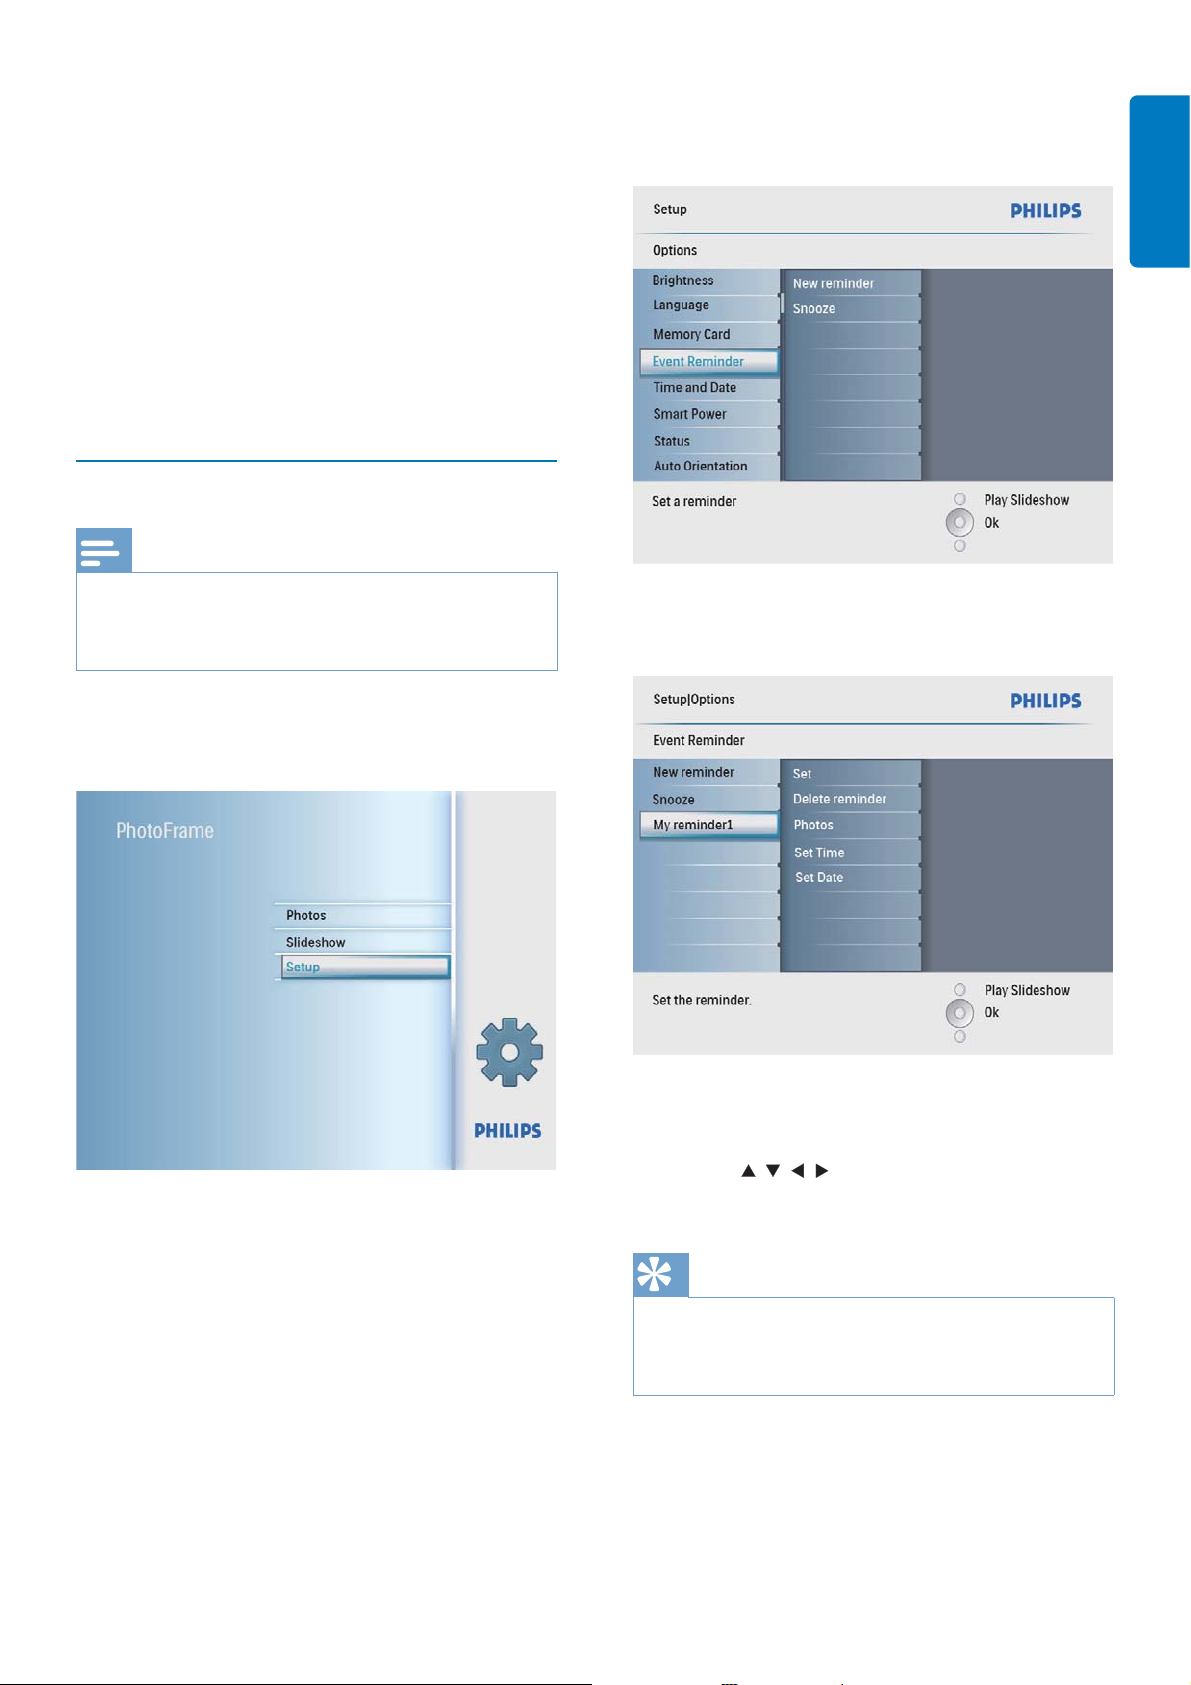
Create an event reminder
1 In the main menu, select [Setup] and press
OK to confi rm.
2 Select [Event Reminder], and then press
OK to confi rm.
Set an event reminder
You can create a reminder for a special event,
and you can also select a photo to be displayed
at a selected time.
Tip
Ensure that you set the current time and date of the •
PhotoFrame before you set an event reminder.
3 Select [New reminder], and then press
OK to confi rm.
22 EN
Page 24
A keypad is displayed.»
4 To enter the new name (up to 24
characters), select an alphabet/number and
then press OK to confi rm.
To switch between uppercase •
and lowercase, select [abc] on the
displayed keypad and then press OK
to confi rm.
5 When the name is complete, select
[Enter] and then press OK to confi rm.
Set event time and date
Note
2 Select [Event Reminder], and then press
OK to confi rm.
English
Ensure that you set the current time and date of the •
PhotoFrame before you set time and date for an event
reminder.
1 In the main menu, select [Setup] and then
press OK to confi rm.
3 Select a reminder, and then press OK to
confi rm.
4 Select [Set time] / [Set date], and then
press OK to confi rm.
5 Press / / / and OK to set the time/
date, and then press OK to confi rm.
Tip
When the reminder alerts, you can press any button •
once to stop the reminder. To stop the snooze function,
press the same button twice.
EN 23
Page 25
Set on/off a reminder
1 In the main menu, select [Setup] and then
press OK to confi rm.
2 Select [Event Reminder], and then press
OK to confi rm.
3 Select a reminder, and then press OK to
confi rm.
4 Select [Set], and then press OK to
confi rmn.
Select• [On] to set the reminder on,
and then press OK to confi rm.
To set the reminder off, select • [Off]
and then press OK to confi rm.
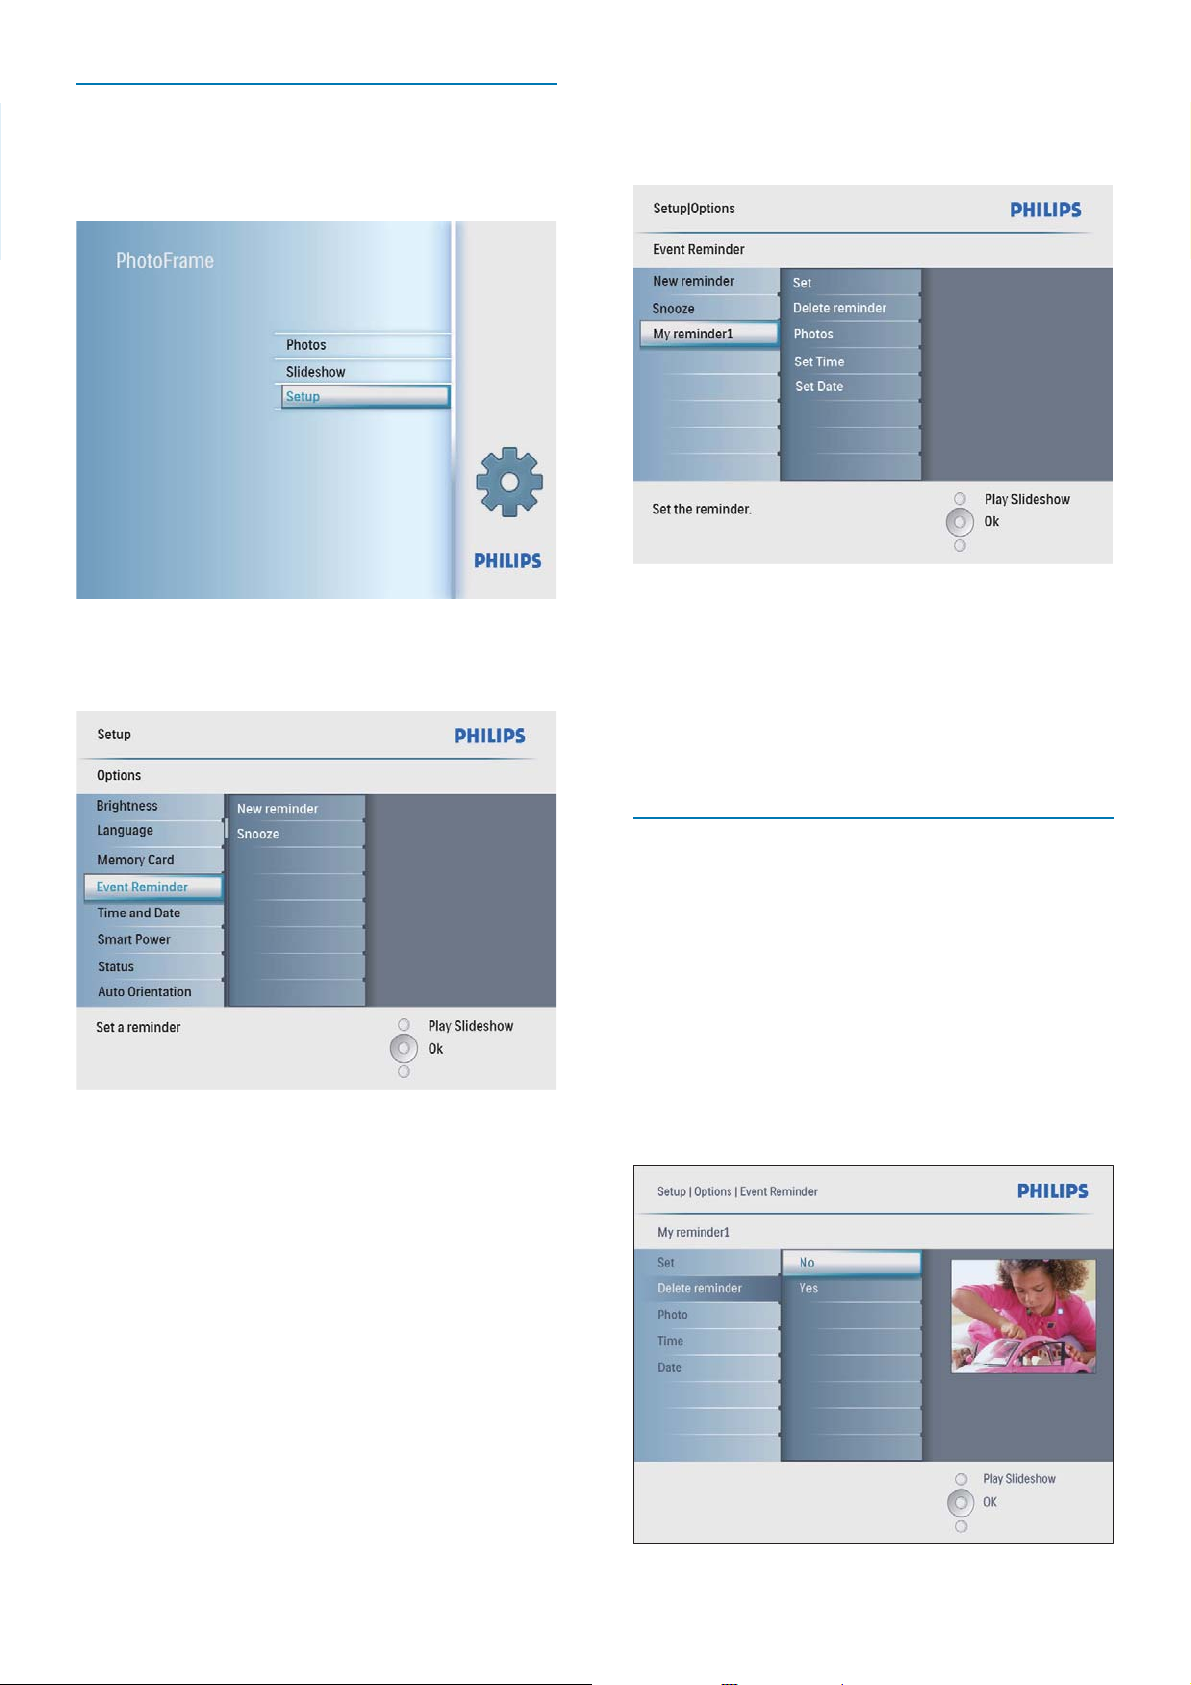
Delete a reminder
1 In the main menu, select [Setup] and then
press OK to confi rm.
2 Select [Event Reminder], and then press
OK to confi rm.
3 Select a reminder, and then press OK to
confi rm.
4 Select [Delete reminder], and then press
OK to confi rm.
24 EN
Page 26
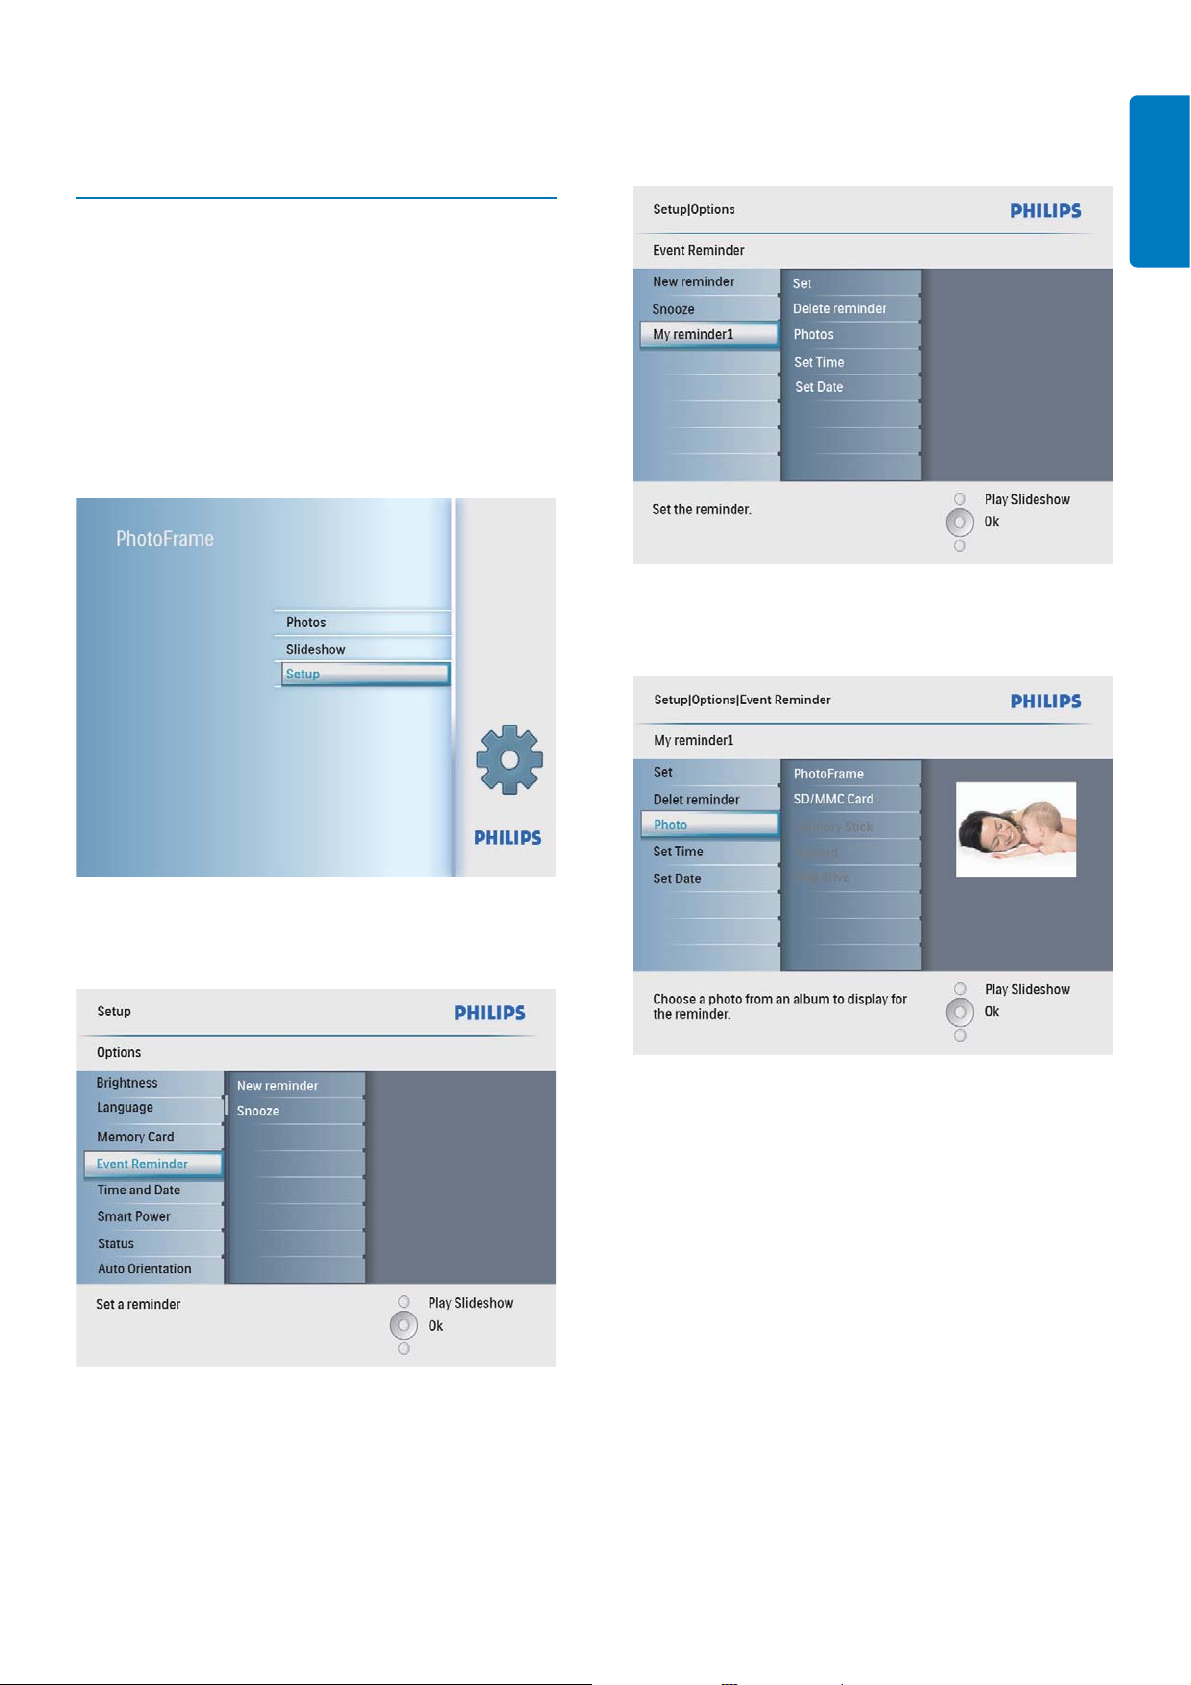
5 Select [Yes], and then press OK to
confi rm.
3 Select a reminder, and then press OK to
confi rm.
Select a reminder photo
You can select a photo to display for a reminder.
Each event reminder activates the latest defi ned
photo only. If there is no defi ned photo, the
reminder takes the default Philips start up
photo.
1 In the main menu, select [Setup] and then
press OK to confi rm.
English
4 Select [Photo], and then press OK to
confi rm.
2 Select [Event Reminder], and then press
OK to confi rm.
5 Select a photo source, and then press OK
to confi rm.
6 Select a photo, and then press OK to
confi rm.
EN 25
Page 27
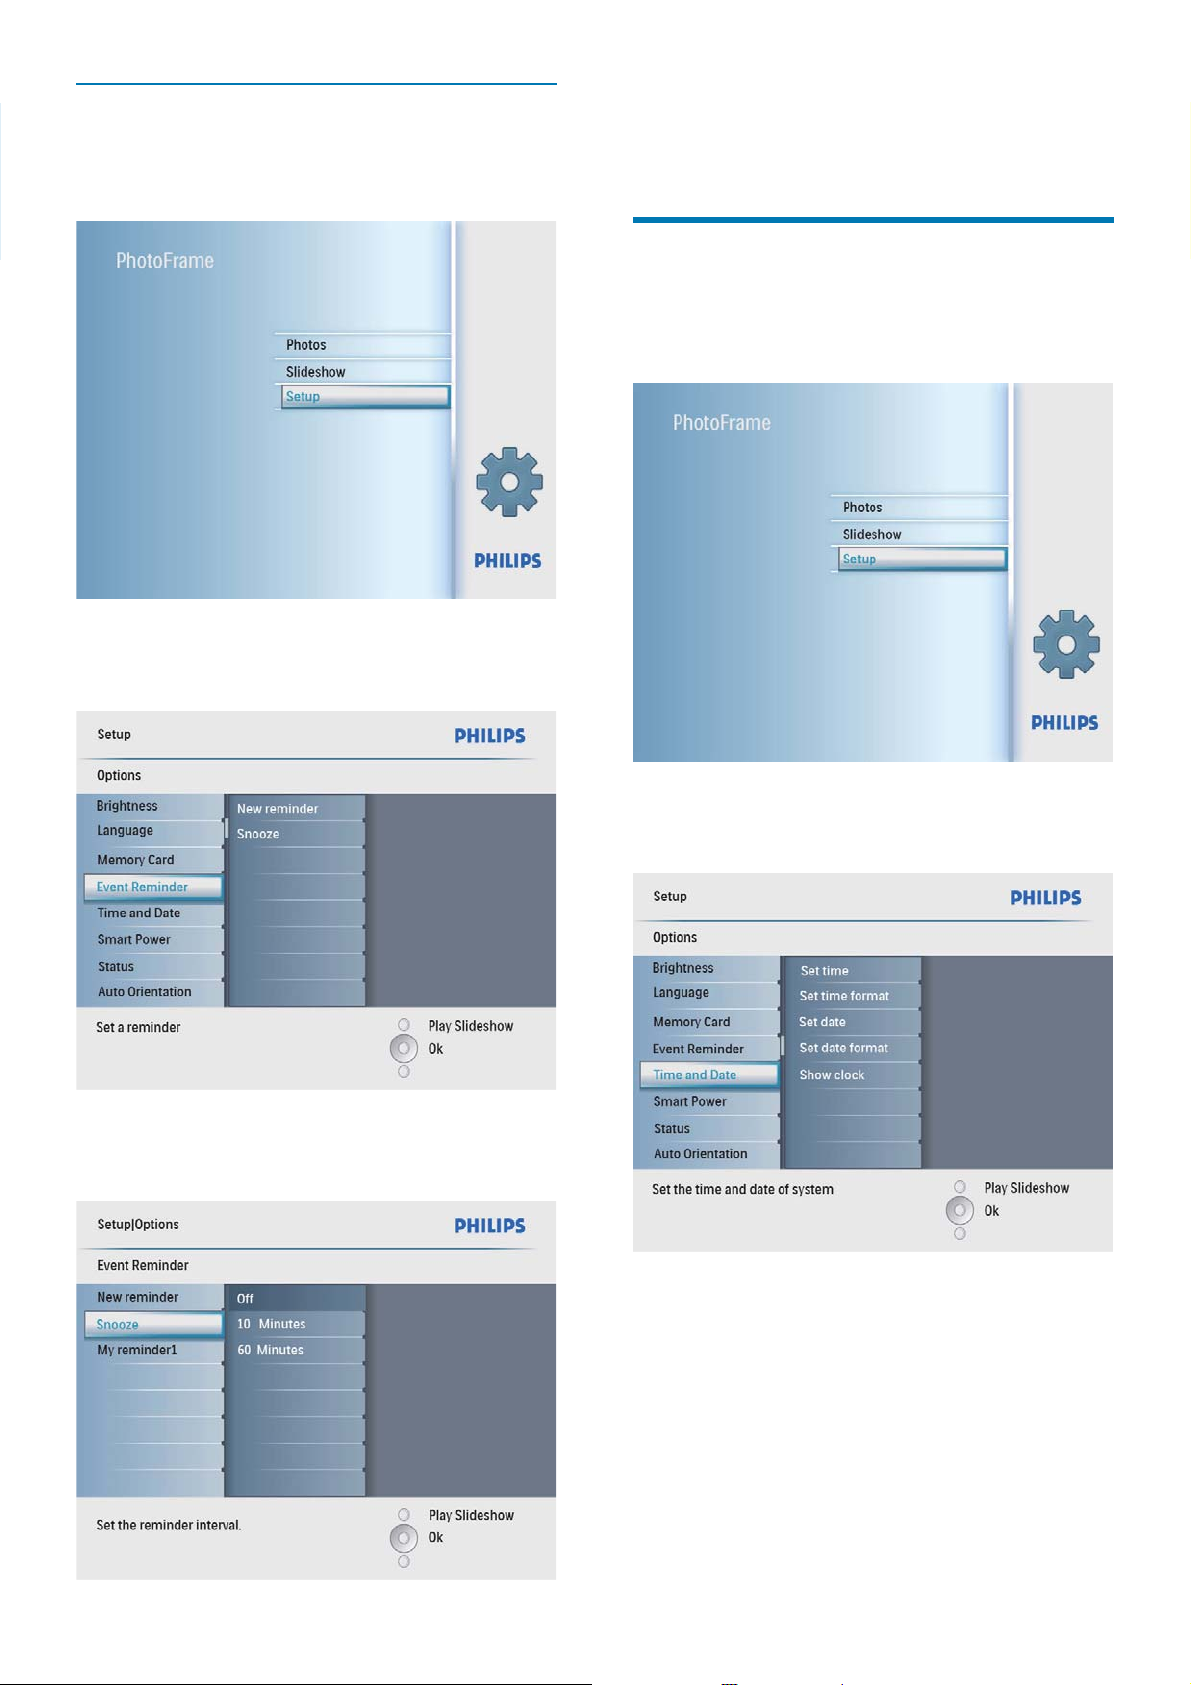
Set snooze
1 In the main menu, select [Setup] and then
press OK to confi rm.
2 Select [Event Reminder], and then press
OK to confi rm.
4 Select an options, and then press OK to
confi rm.
Set time and date
1 In the main menu, select [Setup] and then
press OK to confi rm.
3 Select [Snooze], and then press OK to
confi rm.
2 Select [Time and Date], and then press
OK to confi rm.
26 EN
Page 28
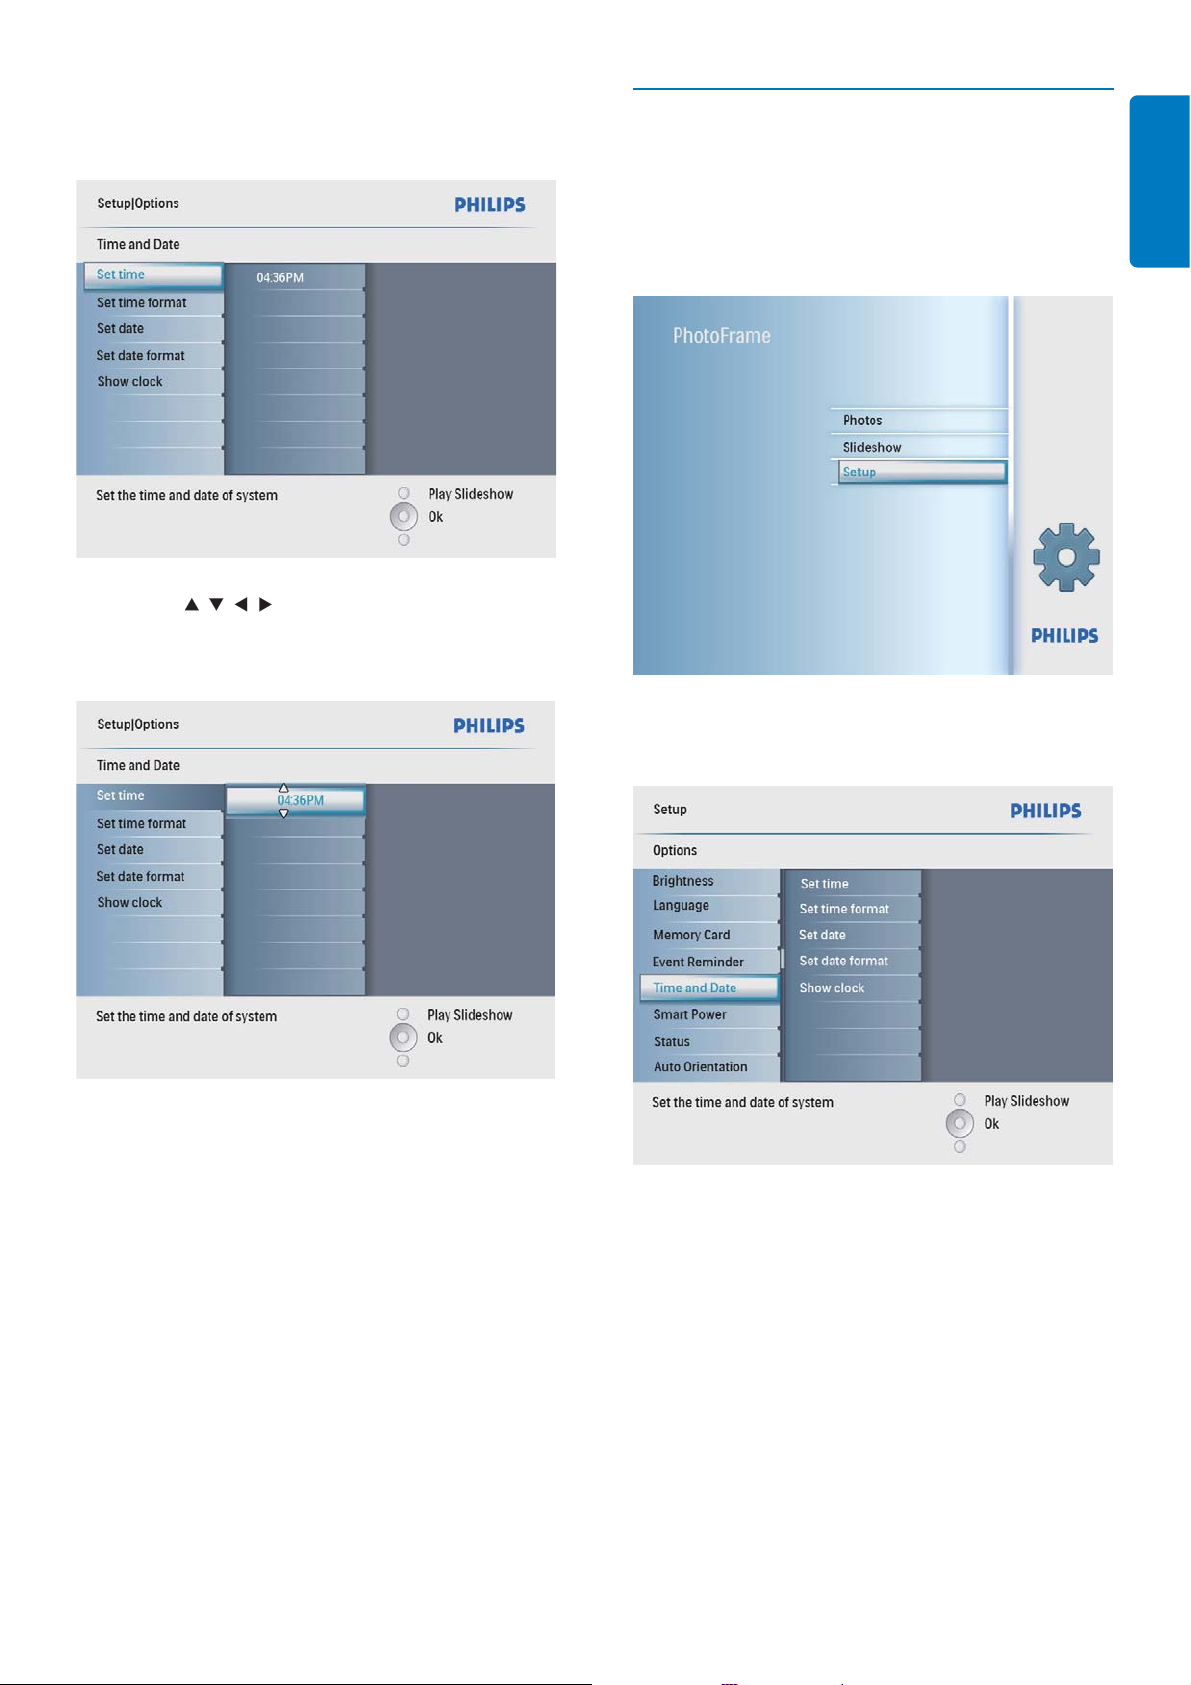
3 Select [Set time] / [Set date], and then
press OK to confi rm.
4 Press / / / and OK to enter the
current time/date, and then press OK to
confi rm.
Set time and date format
You can set the format of the time and date
displayed on the PhotoFrame.
1 In the main menu, select [Setup] and then
press OK to confi rm.
English
2 Select [Time and Date], and then press
OK to confi rm.
EN 27
Page 29
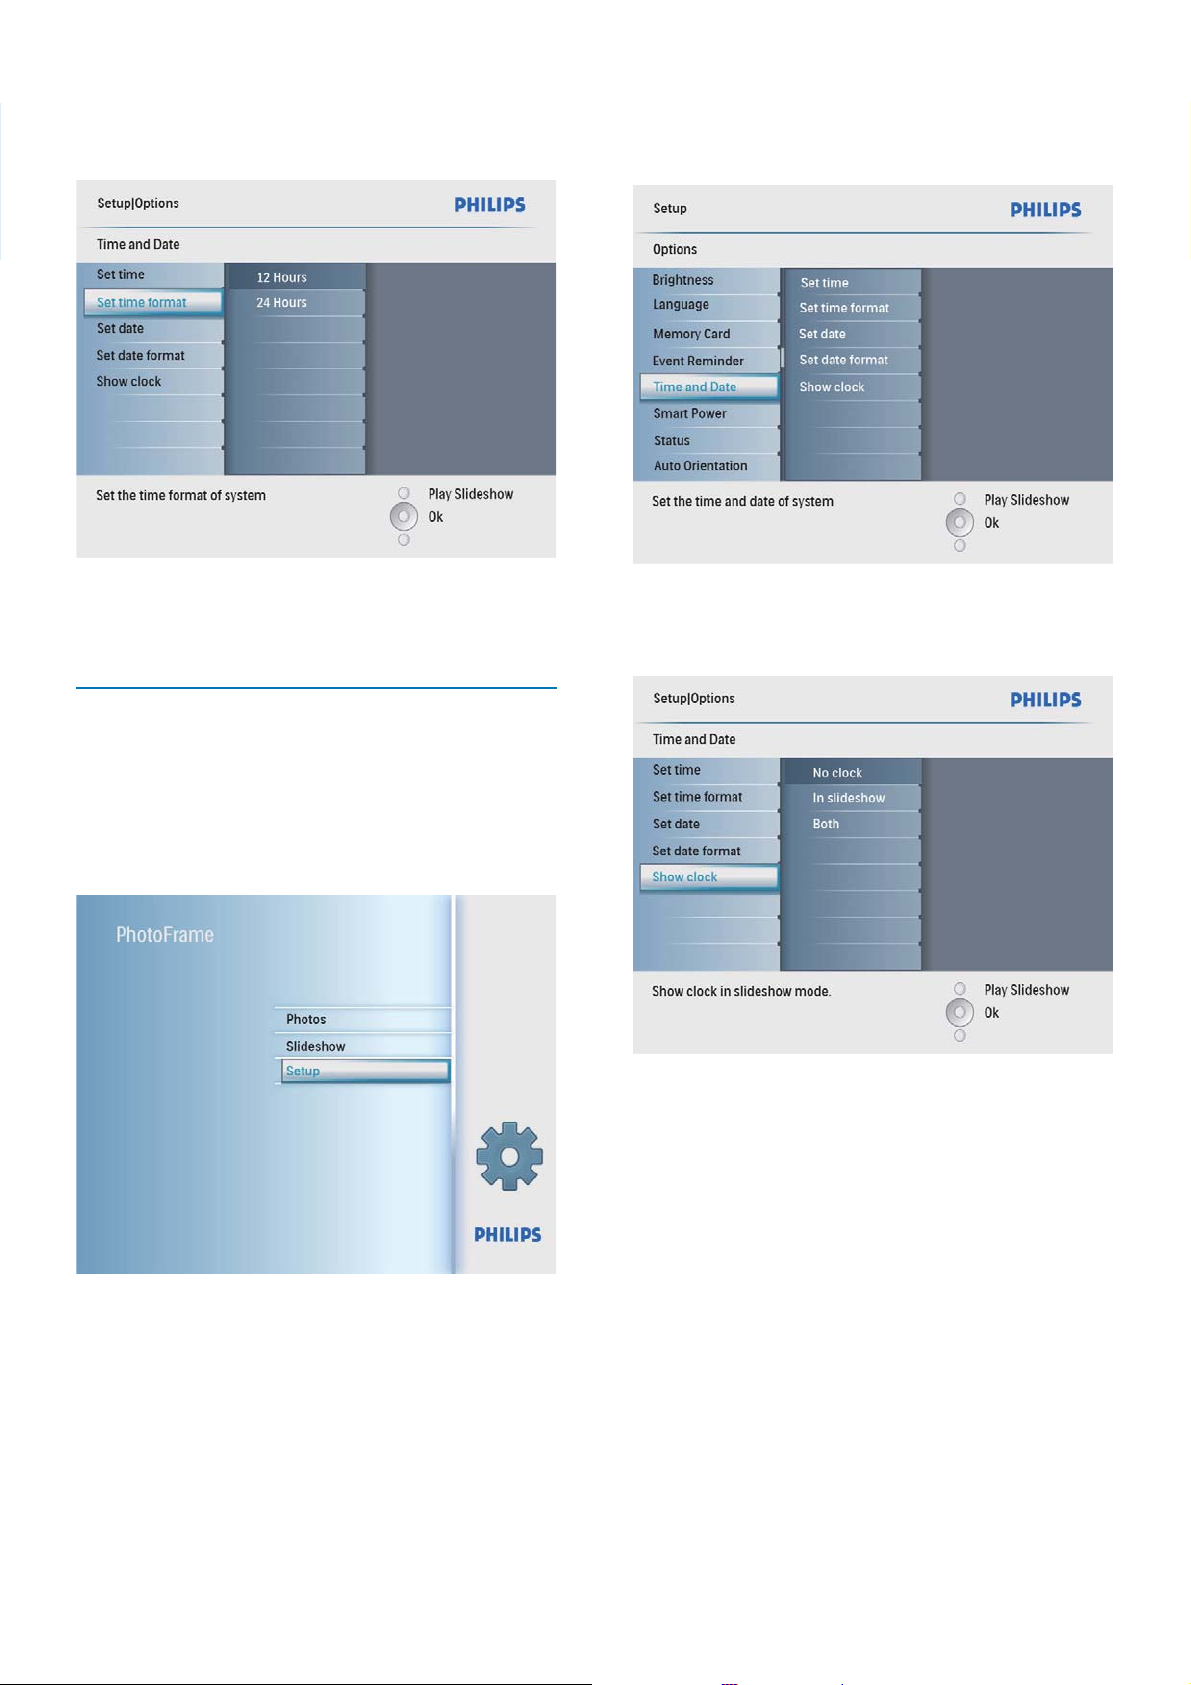
3 Select [Set time format] / [Set date
format], and then press OK to confi rm.
2 Select [Time and Date], and then press
OK to confi rm.
4 Select the time/date format, and then press
OK to confi rm.
Show clock
You can show clock or calendar in slideshow on
the PhotoFrame.
1 In the main menu, select [Setup] and then
press OK to confi rm.
3 Select [Show clock], and then press OK to
confi rm.
4 Select an option, and then press OK to
confi rm.
• [No clock] (No clock is displayed.)
• [In slideshow] (Clock is displayed.)
• [Both] (Both clock and calendar are
displayed.)
28 EN
Page 30
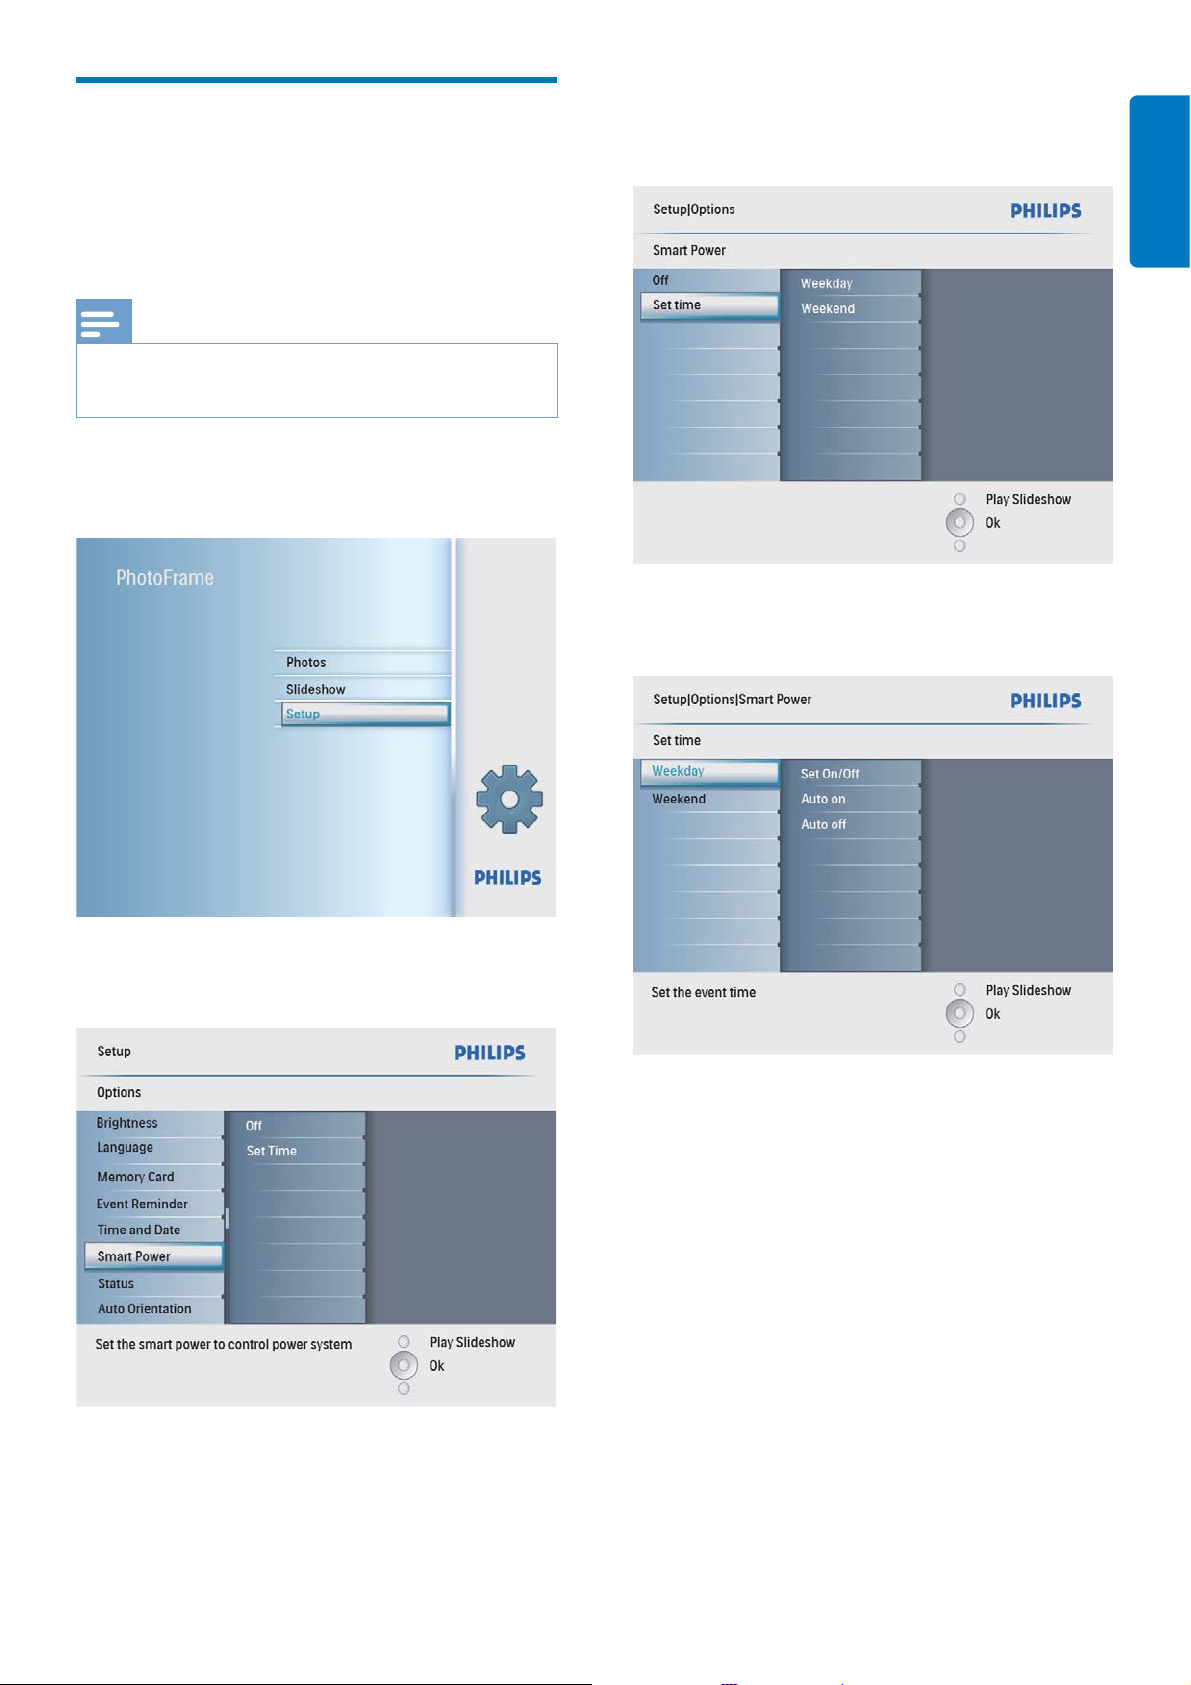
Set display auto on/off by
time
3 Select [Set time], and then press OK to
confi rm.
You can confi gure the time for the PhotoFrame
to turn on or off the display automatically.
Note
Ensure that you set the current time and date of the •
PhotoFrame before you set the auto on/off function.
1 In the main menu, select [Setup] and then
press OK to confi rm.
English
4 Select [Weekday] / [Weekend], and then
press OK to confi rm.
2 Select [Smart power], and then press OK
to confi rm.
5 Select [Auto on] / [Auto off], and then
press OK to confi rm.
To cancel • [Auto on] / [Auto off],
select [Set On/Off] > [Off].
EN 29
Page 31
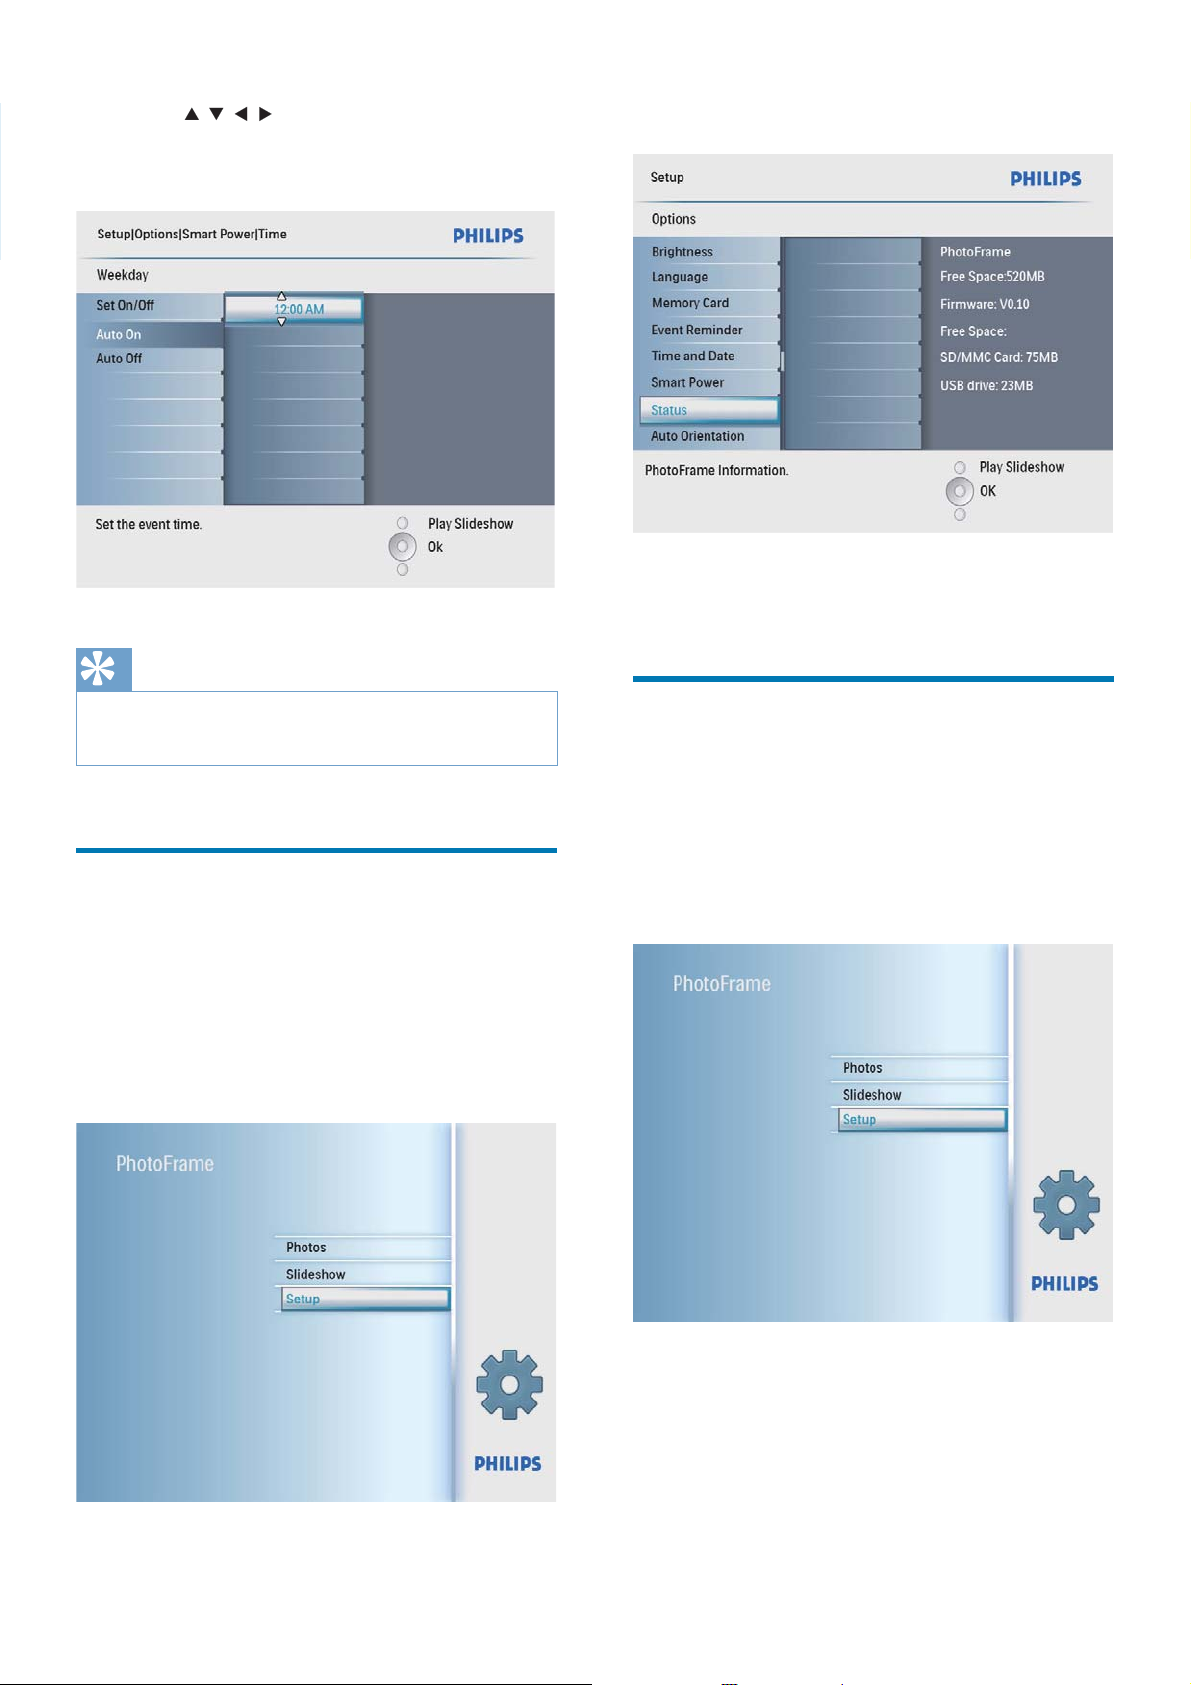
6 Press / / / and OK to set the time for
auto-on/auto-off function, and then press
OK to confi rm.
Tip
2 Select [Status].
The status of the PhotoFrame is »
displayed on the right of the screen.
Weekday: Monday 00:00 to Friday 23:59•
Weekend: Saturday 00:00 to Sunday 23:59•
View status of the
PhotoFrame
You can fi nd the free space, connected media,
and the fi rmware version of the PhotoFrame.
1 In the main menu, select [Setup] and then
press OK to confi rm.
Set auto orientation
You can display photos in the correct
orientation depending the horizontal/vertical
orientation of the PhotoFrame.
1 In the main menu, select [Setup] and then
press OK to confi rm.
30 EN
Page 32
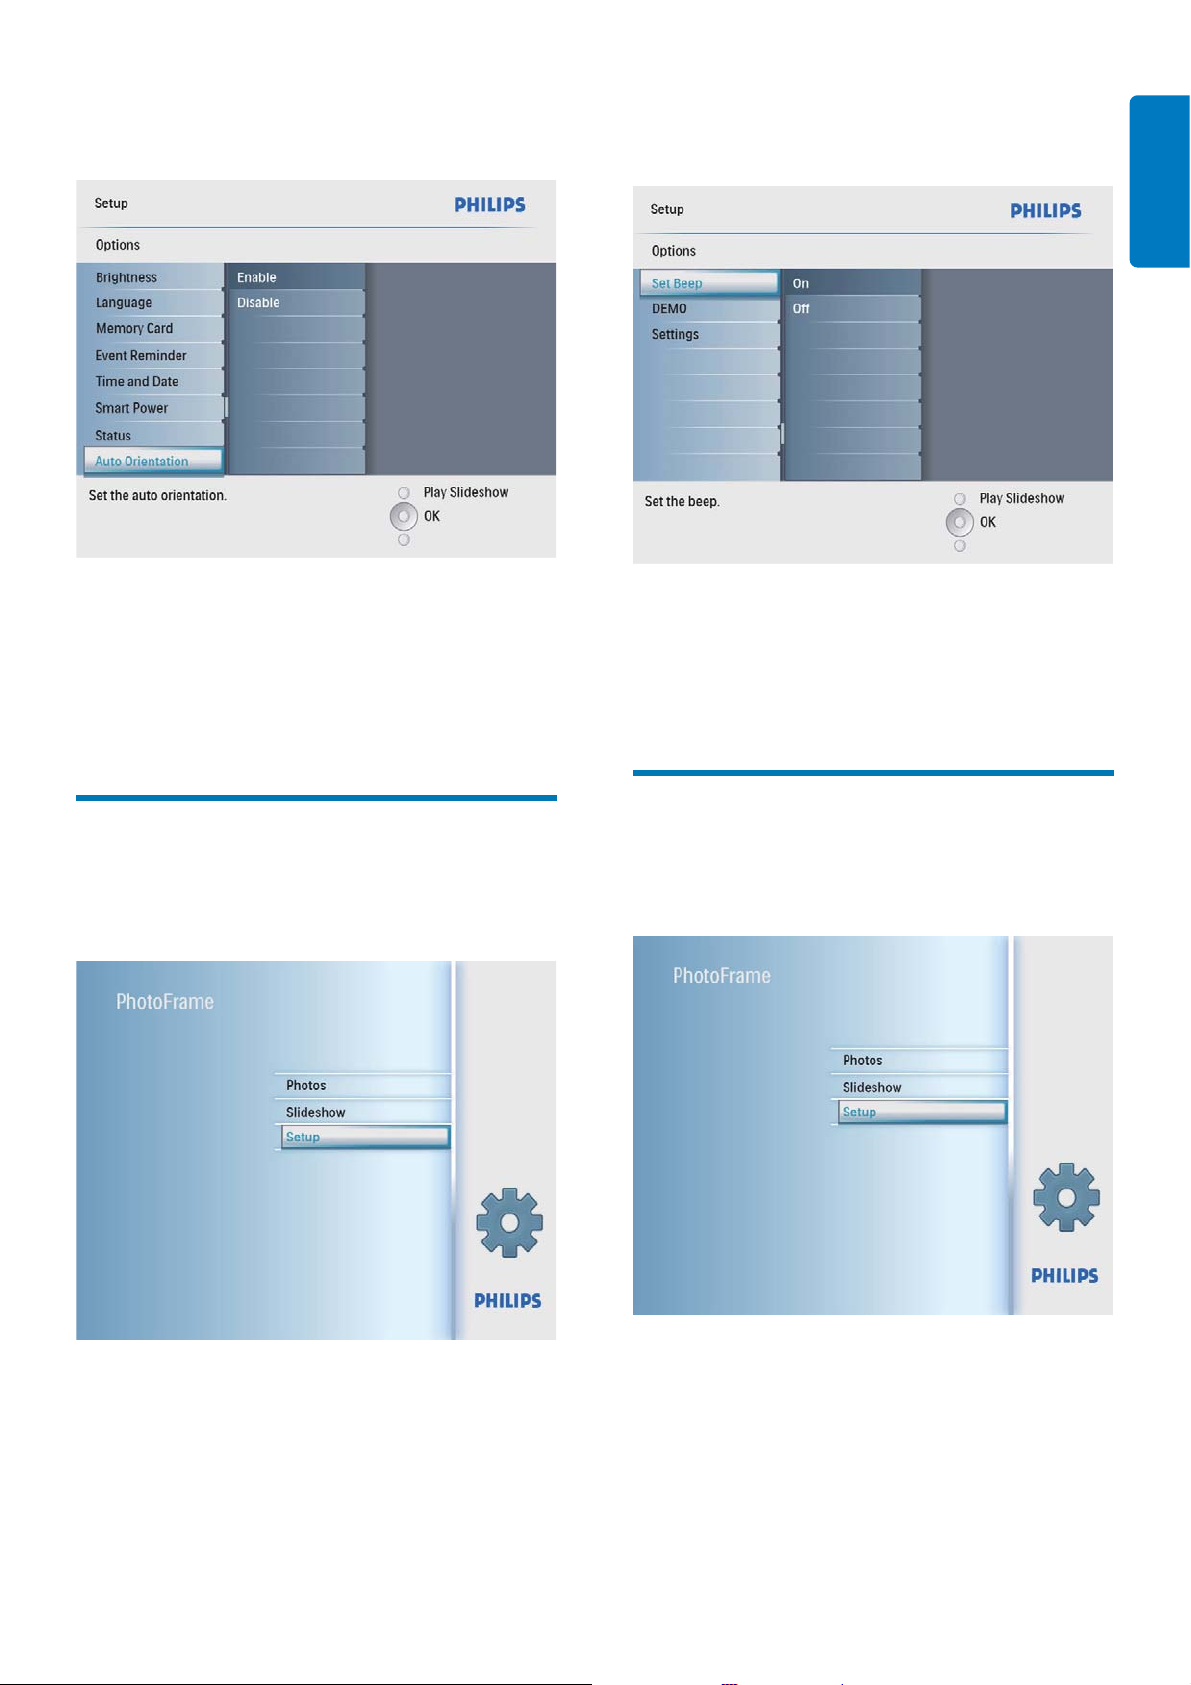
2 Select [Auto Orientation], and then press
OK to confi rm.
2 Select [Set Beep], and then press OK to
confi rm.
English
3 Select [Enable] to set on auto orientation
function, and then press OK to confi rm.
To set off auto orientation function, •
select [Disable] and then press OK
to confi rm.
Set button sound
1 In the main menu, select [Setup] and then
press OK to confi rm.
3 Select [On] to turn on the button sound,
and then press OK to confi rm.
To turn off the button sound, select •
[Off] and then press OK to confi rm.
Set on Demo
1 In the main menu, select [Setup] and then
press OK to confi rm.
EN 31
Page 33
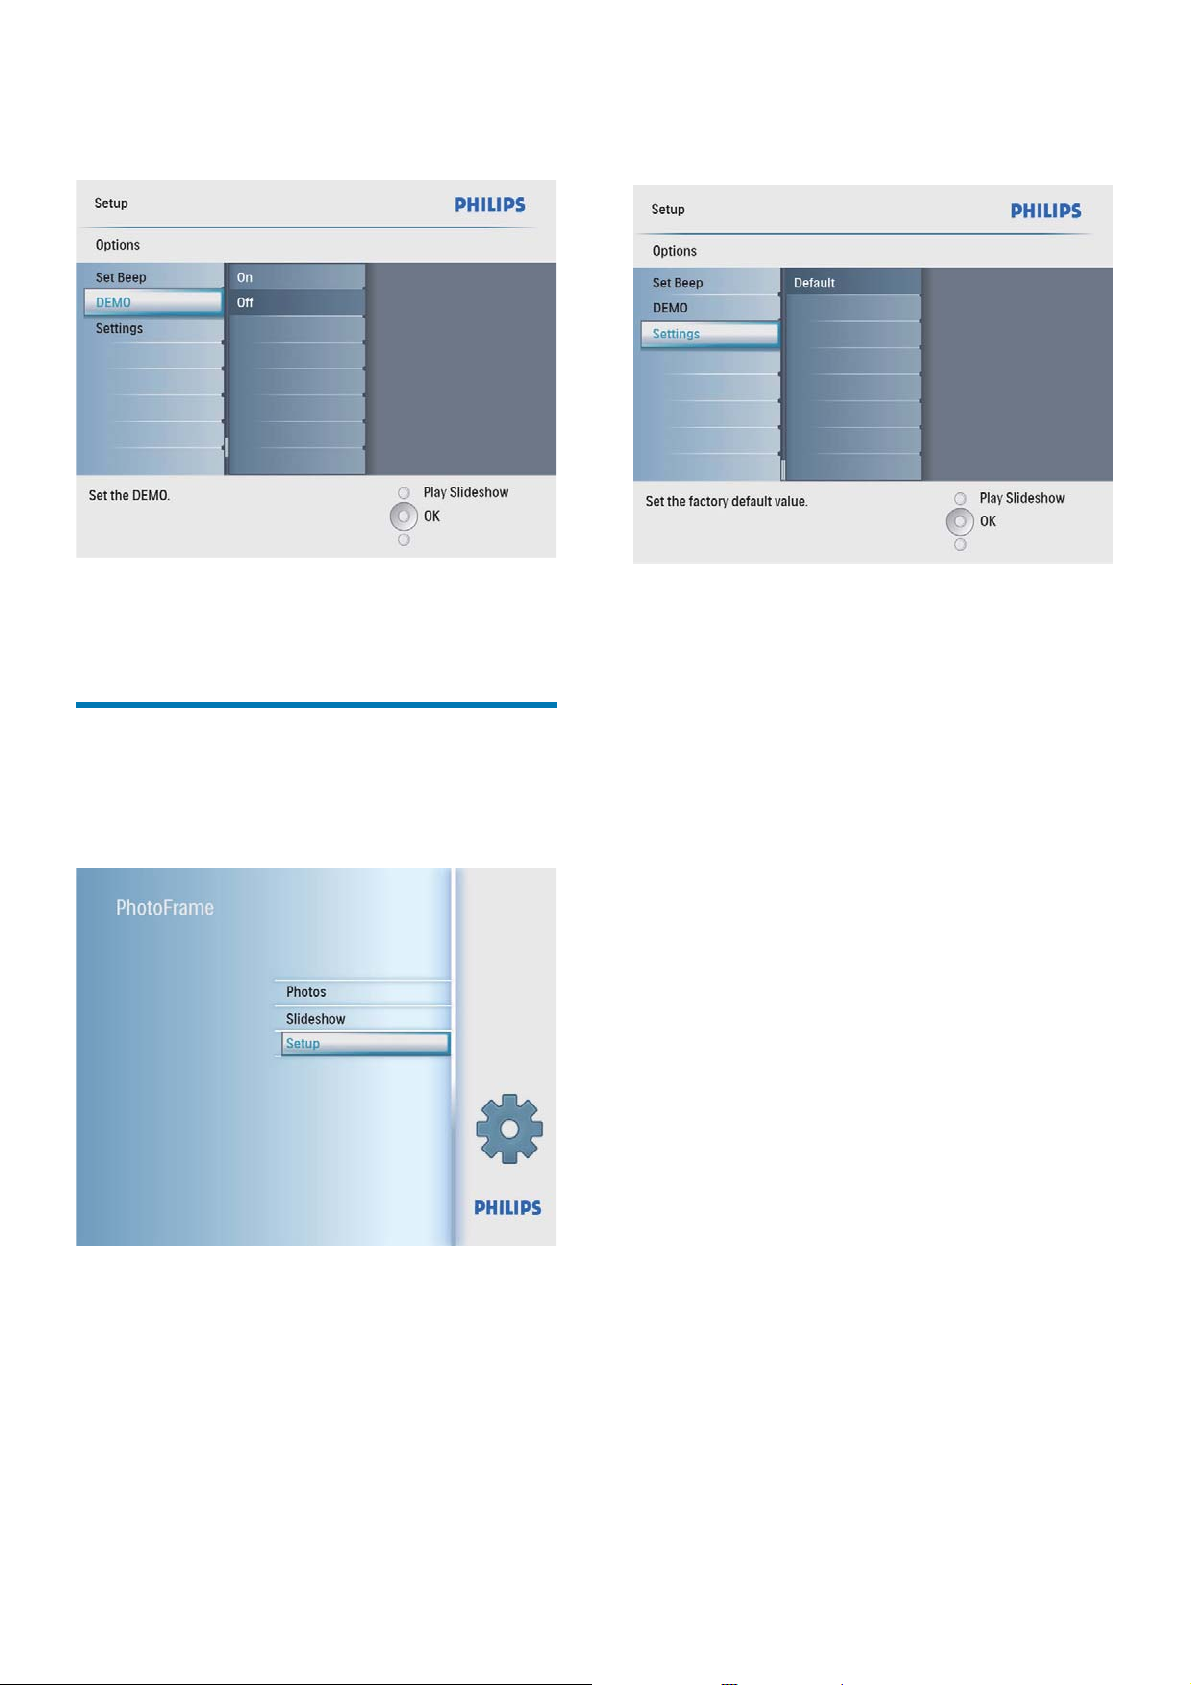
2 Select [DEMO], and then press OK to
confi rm.
2 Select [Settings], and then press OK to
confi rm.
3 Select [On], and then press OK to
confi rm.
Set to factory default
1 In the main menu, select [Setup] and then
press OK to confi rm.
3 Select [Default], and then press OK to
confi rm.
32 EN
Page 34

9 Product
information
Note
Product information is subject to change without prior •
notice.
Picture/Display
Viewing angle: @ C/R > 10, 140° (H)/100° •
(V)
Lifetime, to 50% brightness: 20000 hr•
Aspect ratio: 4:3•
Panel resolution: 800 x 600•
Brightness (typical): 250 cd/m²•
Contrast ratio (typical): 300:1•
Connectivity
USB: USB 2.0 Host, USB 2.0 Slave
Storage media
Memory card types: •
Secure Digital (SD)•
Secure Digital (SDHC)•
Multimedia Card•
xD card•
Memory Stick•
Memory Stick Pro (with adaptor)•
USB: USB fl ash drive•
Built-in memory capacity: 512 MB (For •
up to 500 High Defi nition photos, around
26MB used by system)
Dimensions
Set dimensions (W x H x D): •
194.0 x 158.8 x 23 mm
Set dimensions with stand (W x H x D): •
194.0 x 158.8 x 93.0 mm
Weight (Main unit): 0.359 kg•
Temperature range (operation): 0°C - •
40°C/32°F - 104°F
Temperature range (storage): -10°C - •
60°C/14°F - 140°F
Power
Input: 100 - 240 V ~ 50/60 Hz 0.3 A•
Output: 9 V •
Effi ciency level: IV•
1.0 A
Consumption: System on 7 W•
Power mode supported: AC powered•
Accessories
AC-DC power adaptor•
Stand•
(For SPF2047) Extra silver frame with •
design
Quick Start Guide•
CD-ROM (Digital User Manual)•
Convenience
Card Reader: Built-in•
Photo format supported: JPEG photo (Up •
to 10MB JPEG fi les, Up to 48 Megapixels)
Placement supported: Photo auto •
orientation, Landscape, Portrait
Buttons and controls: 3 buttons, 4-way •
navigation key and enter
Playback mode: Full screen browse, •
Slideshow, Thumbnail browse
Album management: Create, Delete, •
Rename
Photo edit: Copy, Delete, Frames, Rotate, •
Photo Effects, Zoom and Crop
Photo effects: Black and White, Sepia•
Slideshow setting: Slideshow Sequence, •
Transition Effect, Frequency, Collage,
Background Color
Screen background: Black, White, Gray, •
Auto fi t, Radiant color
Setup function: Brightness adjustment, •
Language, Status, Event reminder with
snooze, Beep on/off, Set time and date,
Clock display enable/disable, Auto on/off,
etc
System status: Firmware version, Remaining •
memory
Plug & Play Compatibility: Windows Vista, •
Windows 2000/XP or later
Regulatory Approvals: BSMI, C-Tick, CCC, •
CE, GOST, PSB, Switzerland
Other convenience: Kensington lock •
compatible
On-Screen Display languages: English, •
Spanish, German, French, Italian, Dutch,
Danish, Russian, Simplifi ed Chinese,
Traditional Chinese, Portuguese
English
EN 33
Page 35

10 Frequently
asked questions
Is the LCD screen touch-enabled?
The LCD screen is not touch-enabled. Use the
buttons on the back to control the PhotoFrame.
Can I switch different slideshow photos by
using different memory cards?
Yes. When a memory card is connected to
the PhotoFrame, you can play photos on the
specifi c memory card in slideshow mode.
Will the LCD be damaged, if I keep showing
the same photo for a long time?
No. The PhotoFrame can display the same
photo continuously for 72 hours without any
damage to the LCD screen.
Can I use the PhotoFrame during its display
auto-off periods?
Yes. You can press
PhotoFrame.
Why does my PhotoFrame not show some of
my photos?
The PhotoFrame supports only JPEG photos.
Ensure that these JPEG photos are not
damaged.
Why does the PhotoFrame not go into autooff status after I set it?
Ensure that you set the current time, autooff time, and auto-on time correctly. The
PhotoFrame automatically turns off its display
exactly at the auto-off time. If the time has
already passed for the day, it starts to enter
auto-off status at the specifi ed time from the
next day.
Can I increase the memory size to store more
pictures on the PhotoFrame?
No. The internal memory of the PhotoFrame is
fi xed and cannot be expanded. However, you
could switch between different photos by using
different storage devices on the PhotoFrame.
to wake up the
34 EN
Page 36

11 Glossary
A
Aspect ratio
Aspect ratio refers to the length to height ratio
of TV screens. The ratio of a standard TV is 4:3,
while the ratio of a high-defi nition or wide TV
is 16:9. The letter box allows you to enjoy a
picture with a wider perspective on a standard
4:3 screen.
J
JPEG
A very common digital still picture format. A
still-picture data compression system proposed
by the Joint Photographic Expert Group, which
features small decrease in image quality in
spite of its high compression ratio. Files are
recognized by their fi le extension ‘.jpg’ or ‘.jpeg.’
K
MMC Card
MultiMedia Card. A fl ash memory card that
provides storage for cellphones, PDAs and
other handheld devices. The card uses fl ash
memory for read/write applications or ROM
chips (ROM-MMC) for static information, the
latter widely used for adding applications to a
Palm PDA.
S
SD Card
Secure Digital Memory Card. A fl ash memory
card that provides storage for digital cameras,
cellphones and PDAs. SD Cards use the same
32 x 24mm form factor as the MultiMediaCard
(MMC), but are slightly thicker (2.1mm vs.
1.4mm), and SD Card readers accept both
formats. Cards up to 4GB are available.
X
xD Card
EXtreme Digital Picture Card. A fl ash memory
card used in digital cameras.
English
Kensington lock
A Kensington Security Slot (also called a K-Slot
or Kensington lock). Part of an anti-theft system.
It is a small, metal-reinforced hole found on
almost all small or portable computer and
electronics equipment, particularly on expensive
and/or relatively light ones, such as laptops,
computer monitors, desktop computers,
gaming consoles, and video projectors. It is
used for attaching a lock-and-cable apparatus, in
particular those from Kensington.
M
Memory Stick
Memory Stick. A fl ash memory card for digital
storage on cameras, camcorders and other
handheld devices.
EN 35
Page 37

© 2009 Koninklijke Philips Electronics N.V.
All rights reserved.
UM_V2.0
G
12NC
 Loading...