

Page 1
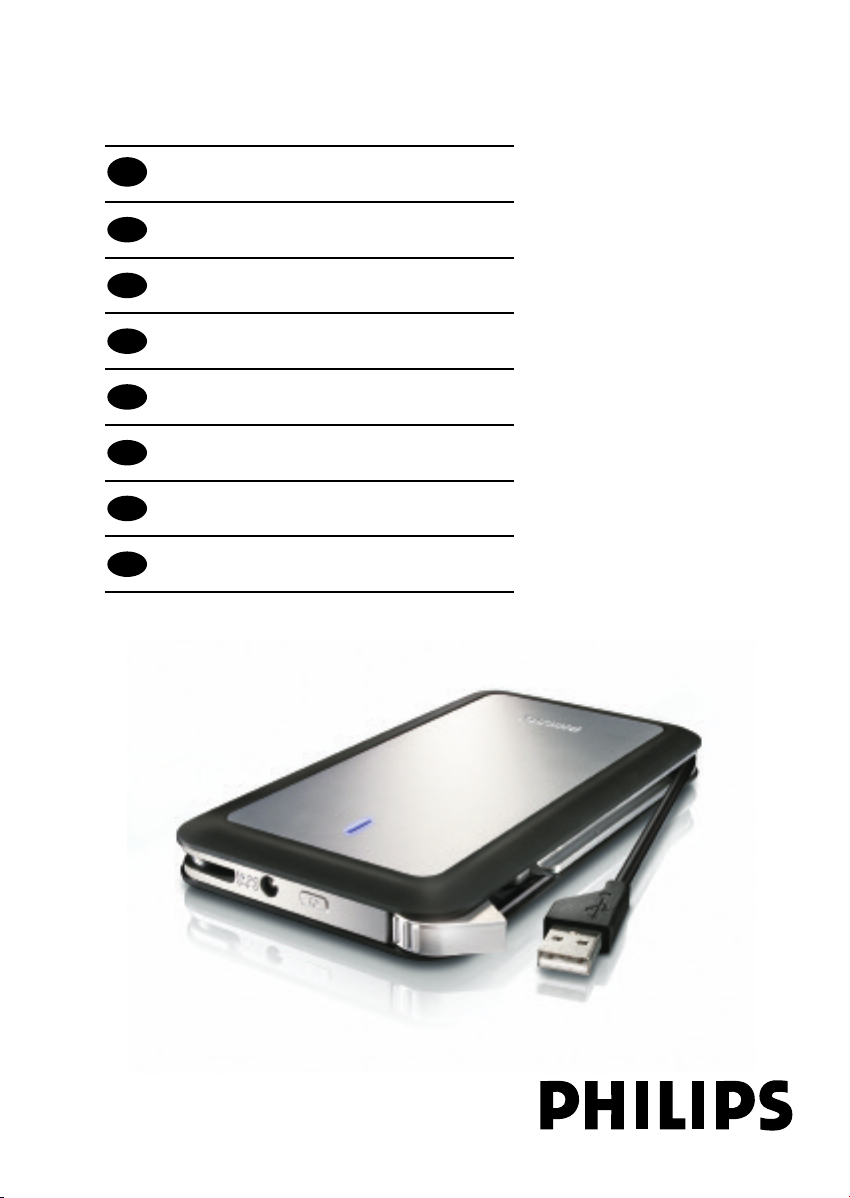
External hard disk SPD5220
SPD5230
EN
User manual 3
F
Manuel d’instructions 9
D
Benutzerhandbuch 15
NL
Gebruikershandleiding 21
ES
Manual del usuario 27
I
Manuale utente 33
PT
Manuel do utilizador 39
TR
Kurulum Kılavuzu 45
SPD5240
SPD5250
Page 2

2
Page 3

Contents
4 What’s in the box?
5 How to connect this external hard disk to
your computer?
5 How to safely disconnect?
6 How to use the One-Click Back-Up button?
6 How to install for Mac, Windows 98 SE
or Windows ME?
7 Warranty, Environment and Safety
8 Specifications
EN
Important note
To start using the One-Click Back-Up button, first activate the
Carry it Easy software (once only) by clicking on the CarryitEasy.exe file located on
your hard disk. For instructions and more information, see page 6.
When the computer does not recognize the hard disk (some
computers provide insufficient bus power),we advise you to use the Y-cable supplied
together with this product. For instructions and more information, see page 5.
3
Page 4
EN
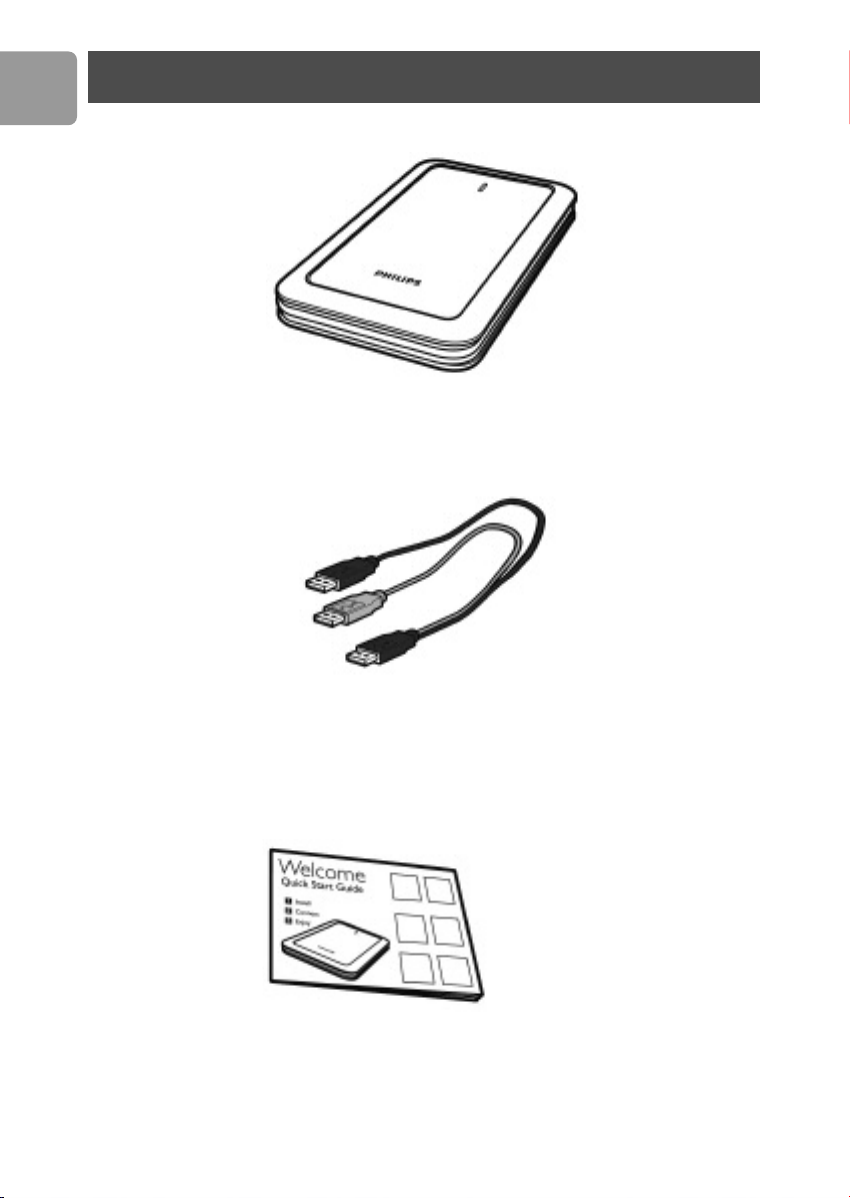
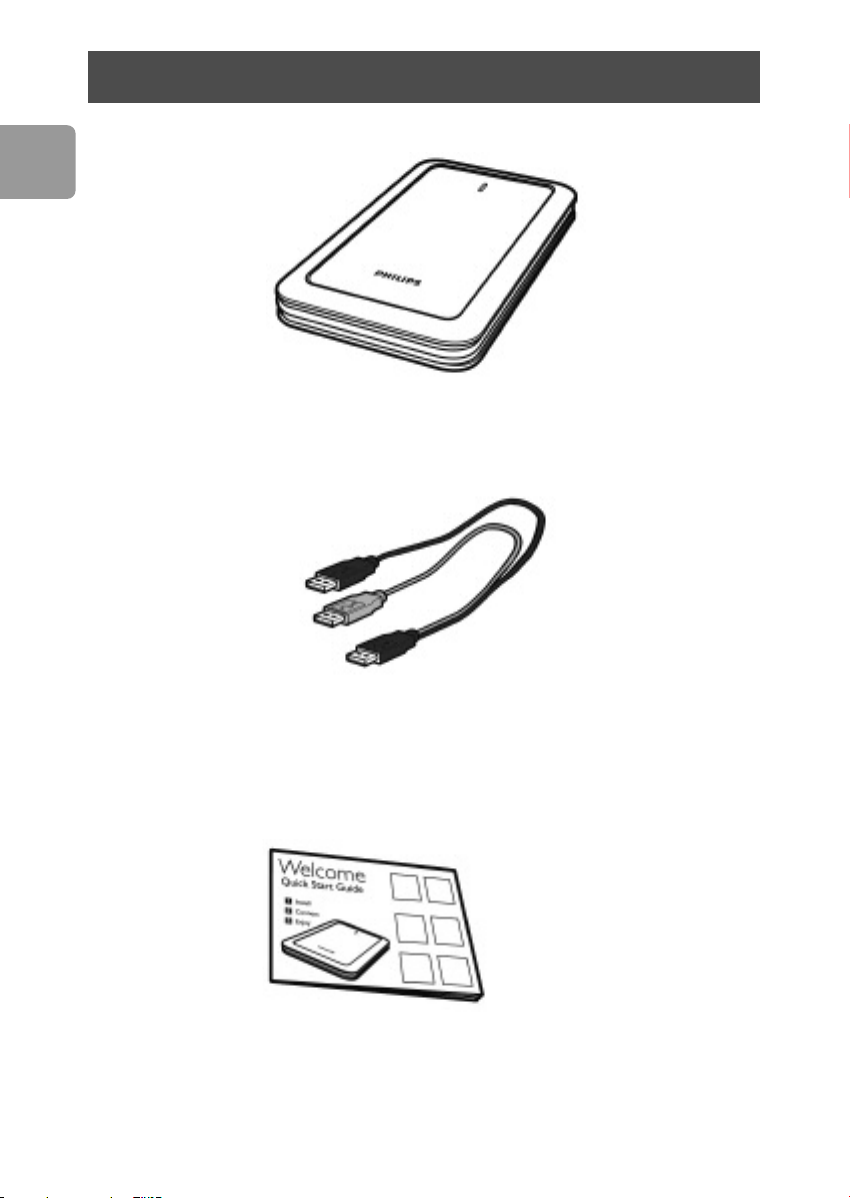
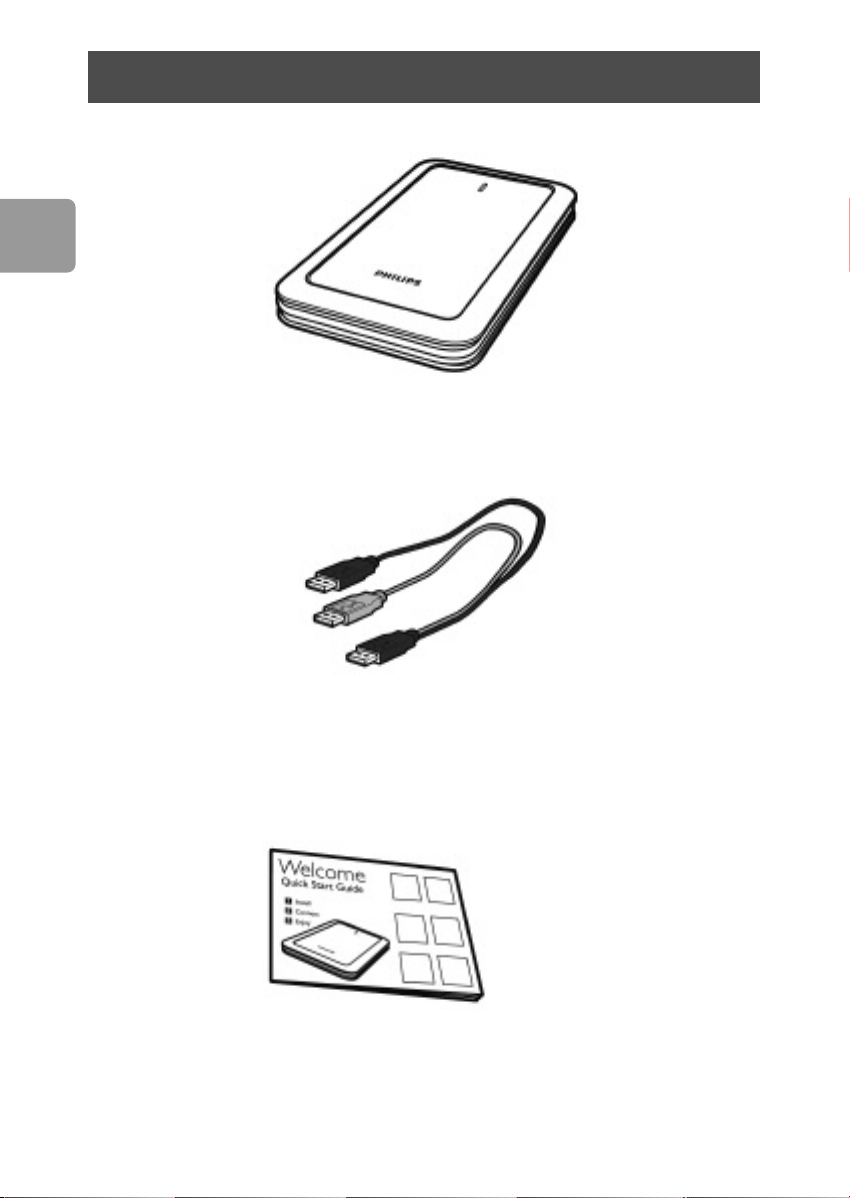
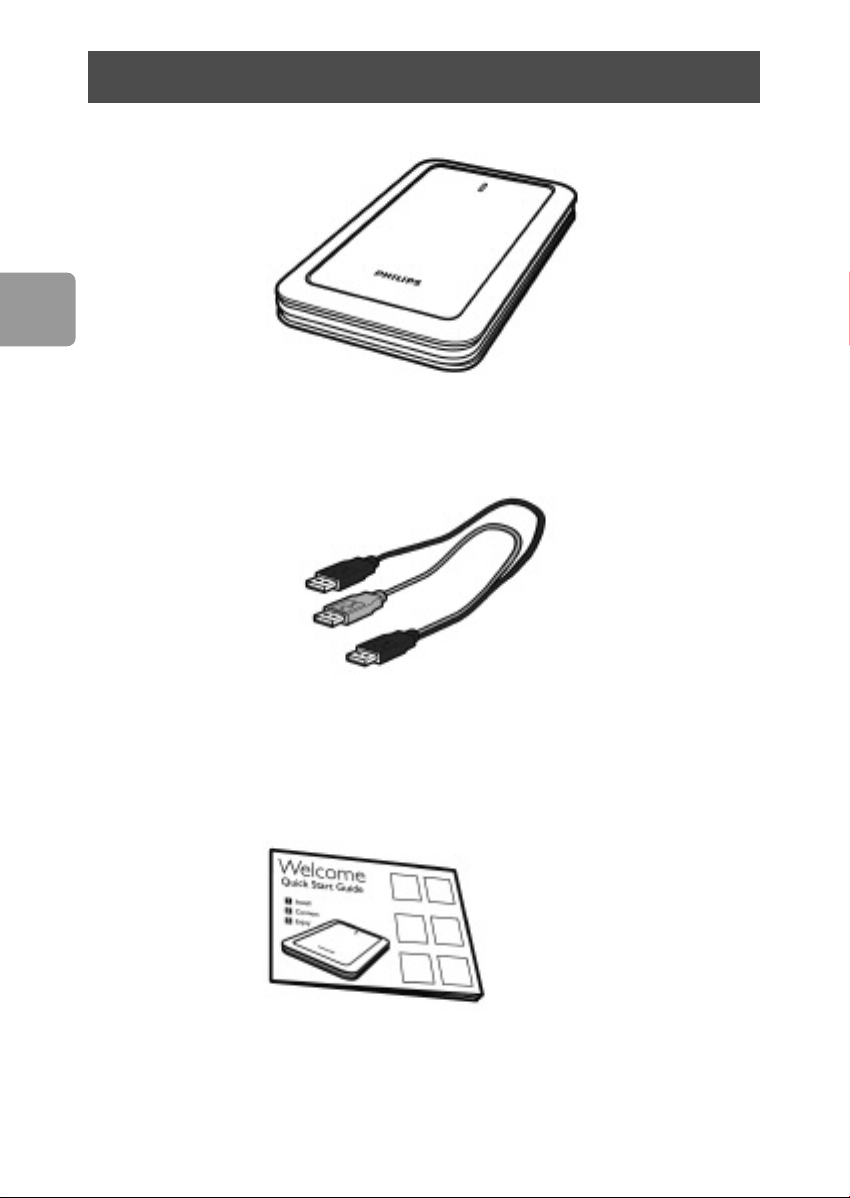
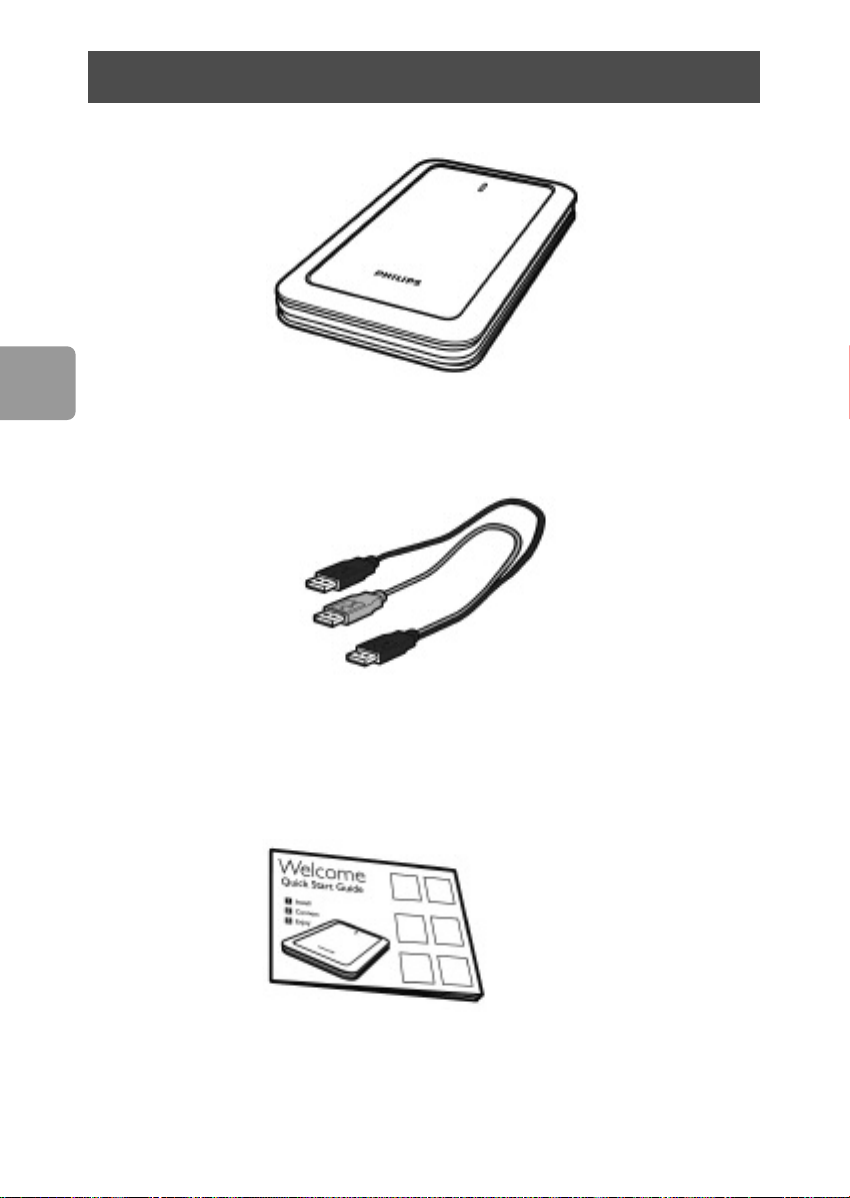
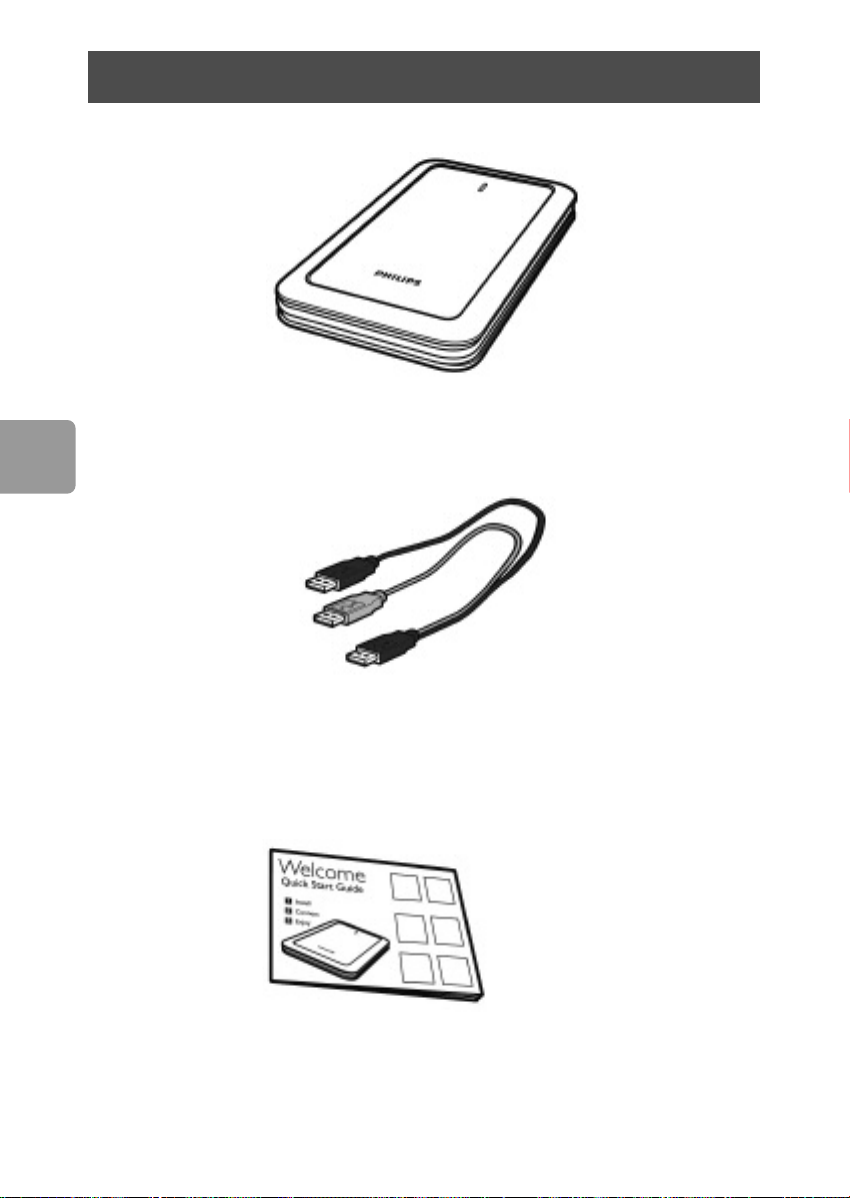
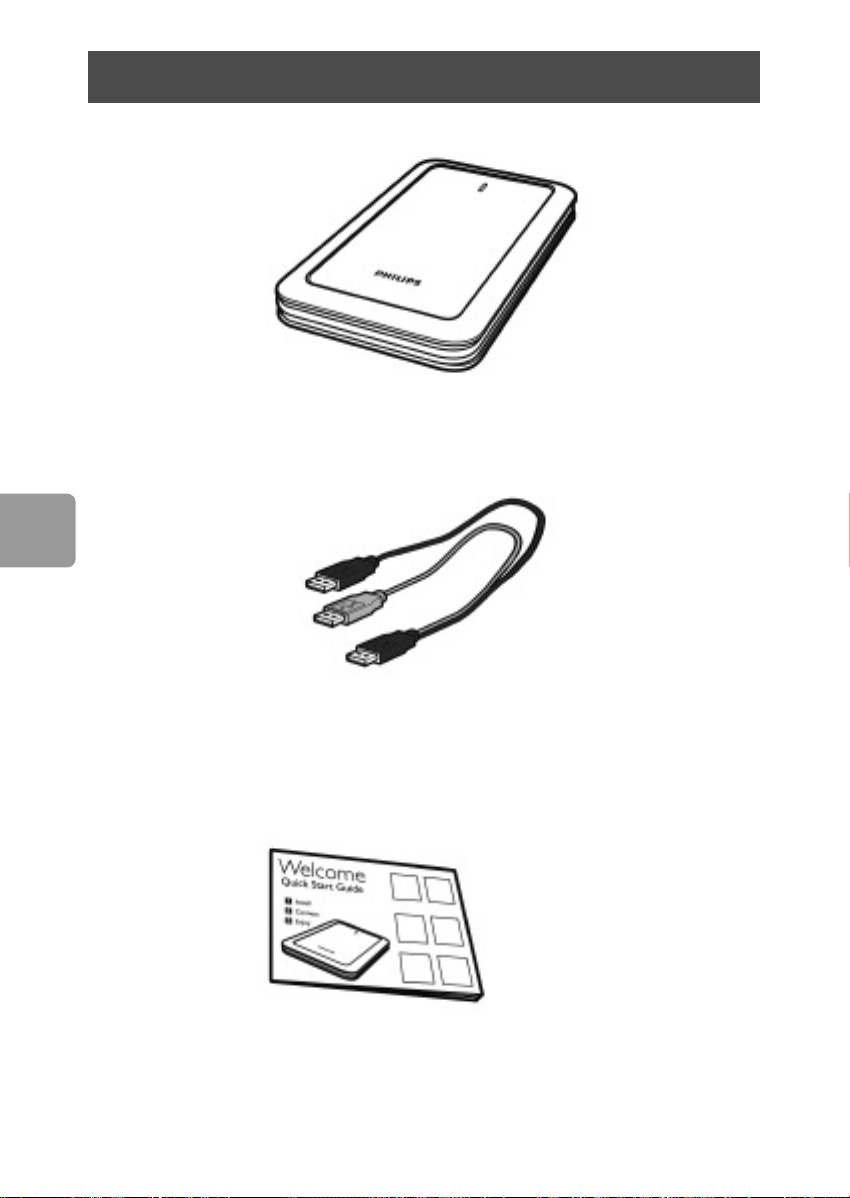
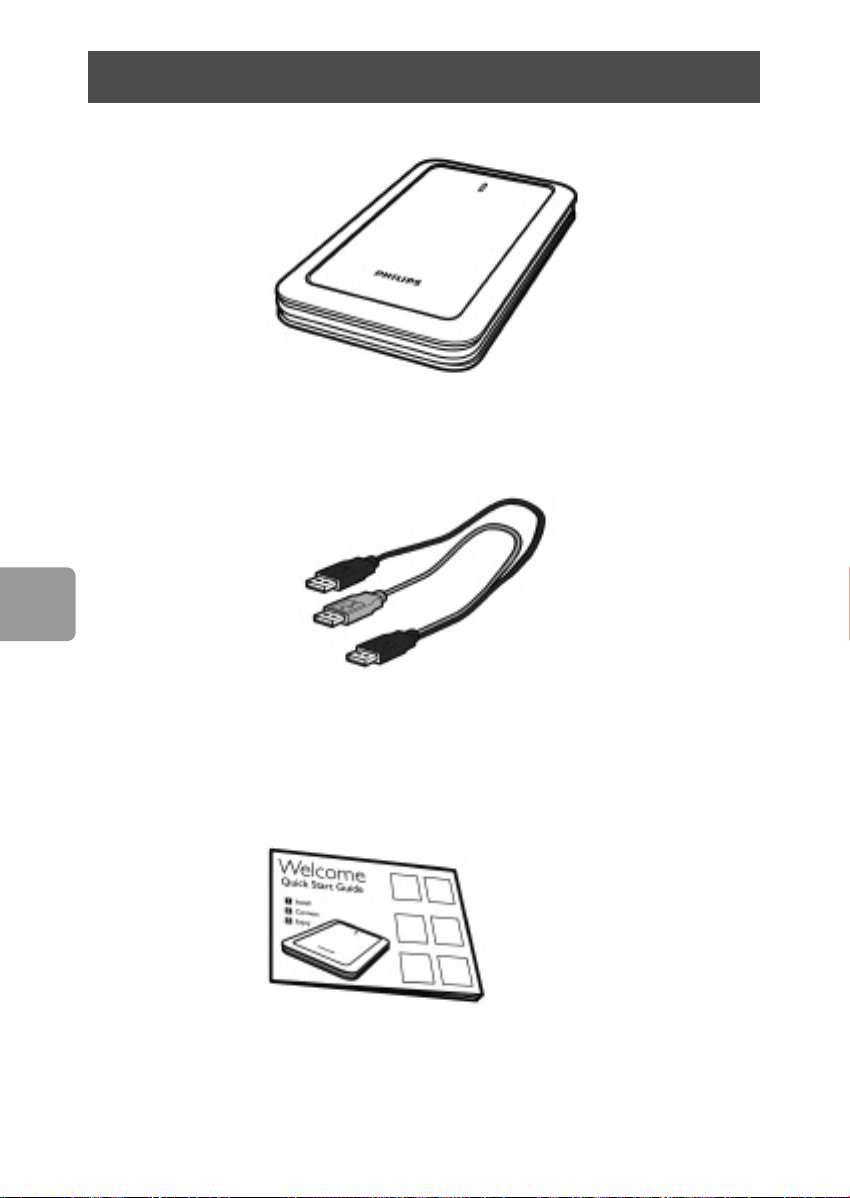
What’s in the box?
A : External hard disk
B : Y-cable
C : Quick Start Guide
4
Page 5
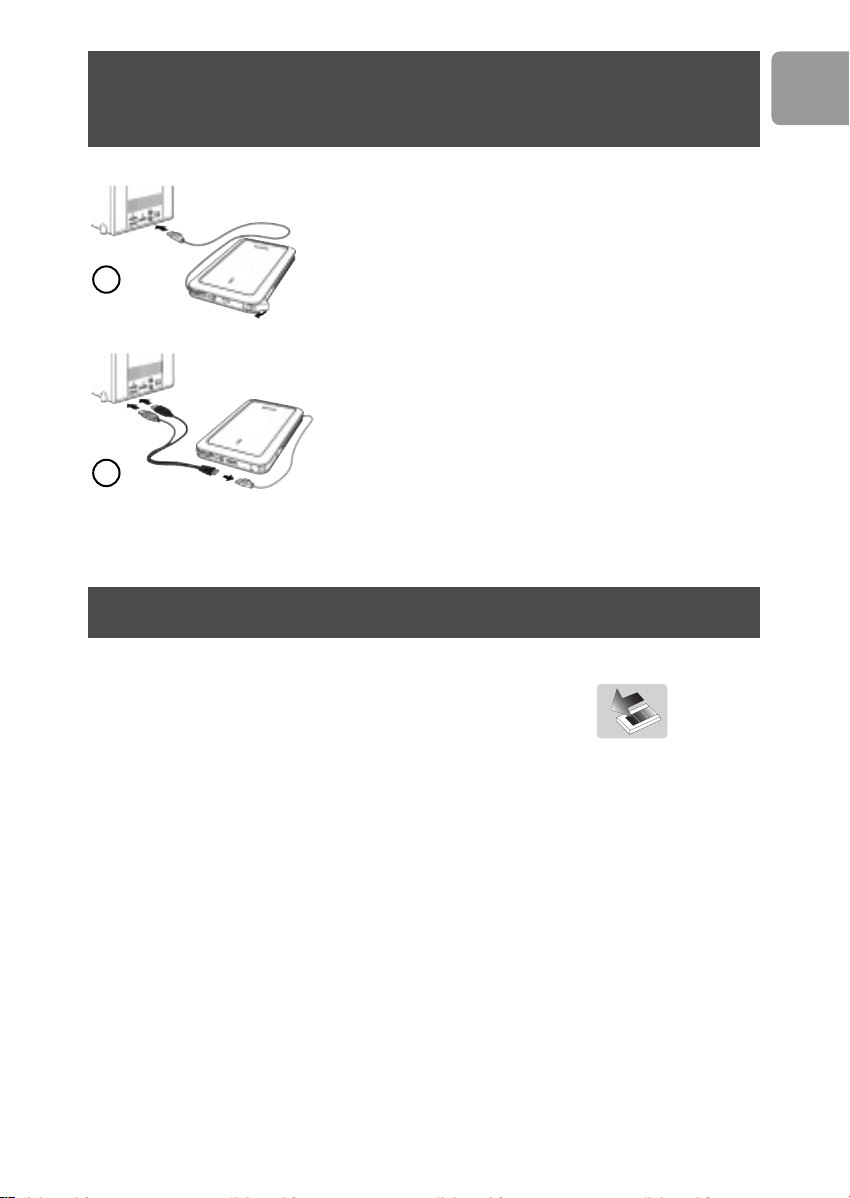
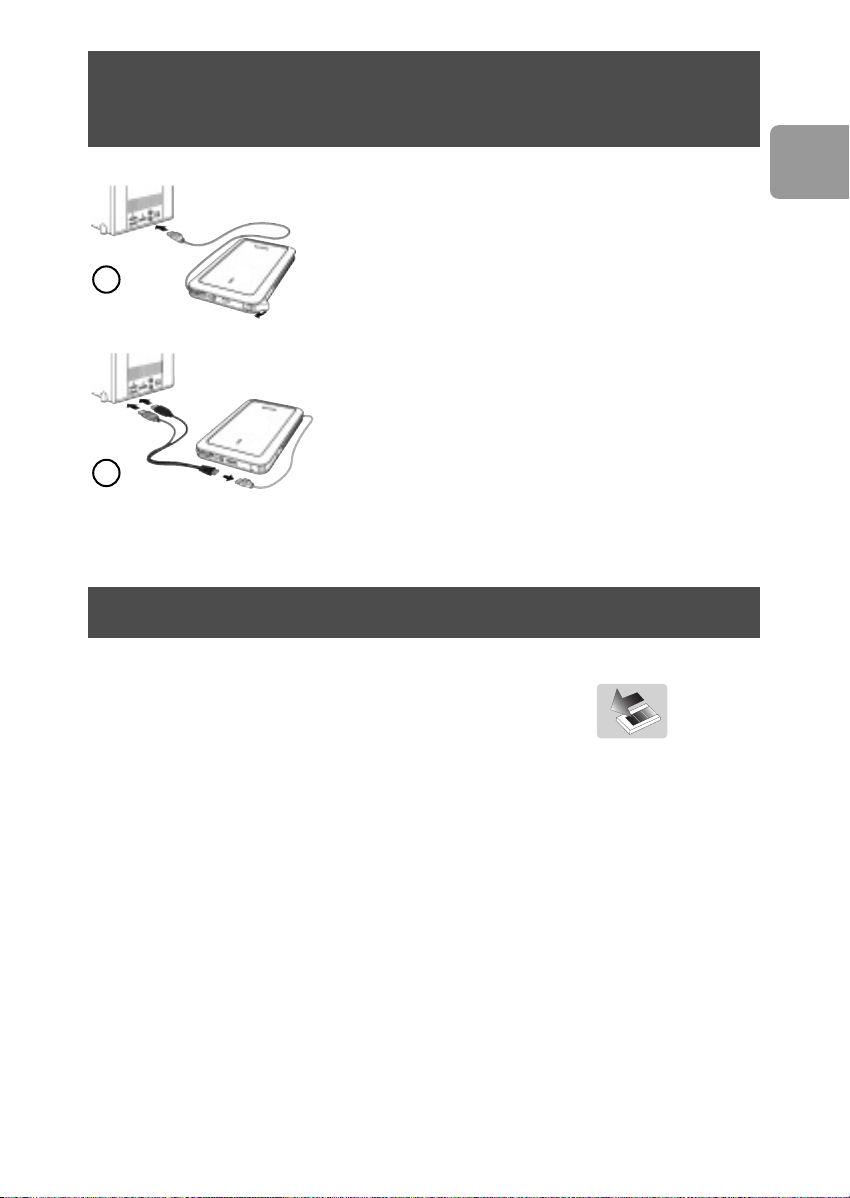
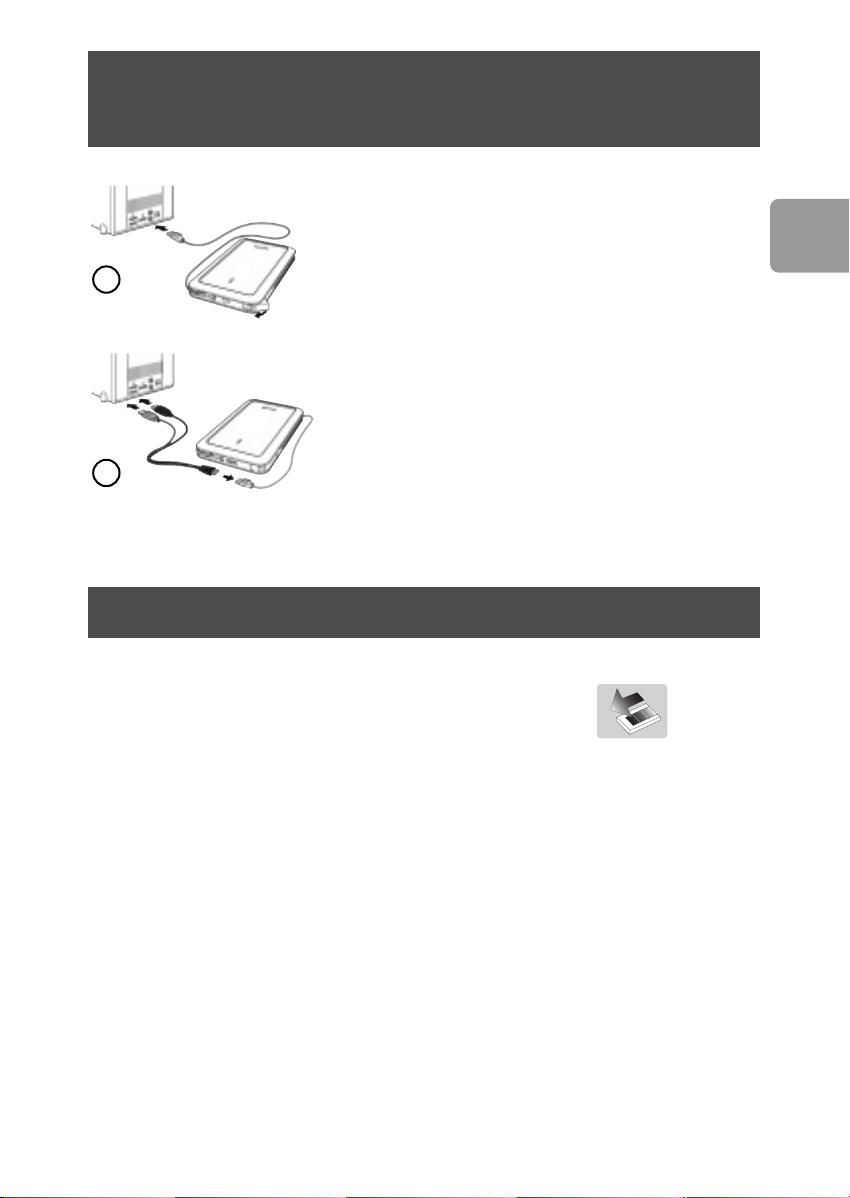
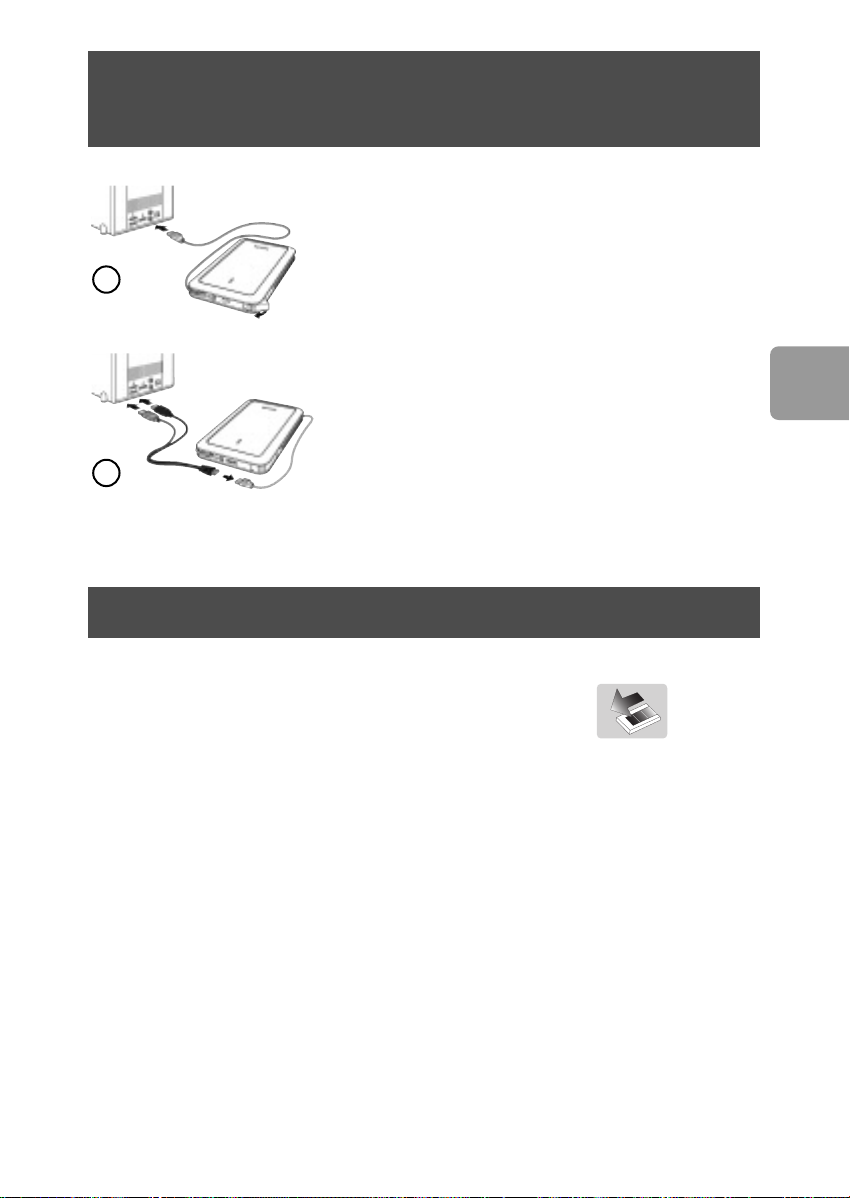
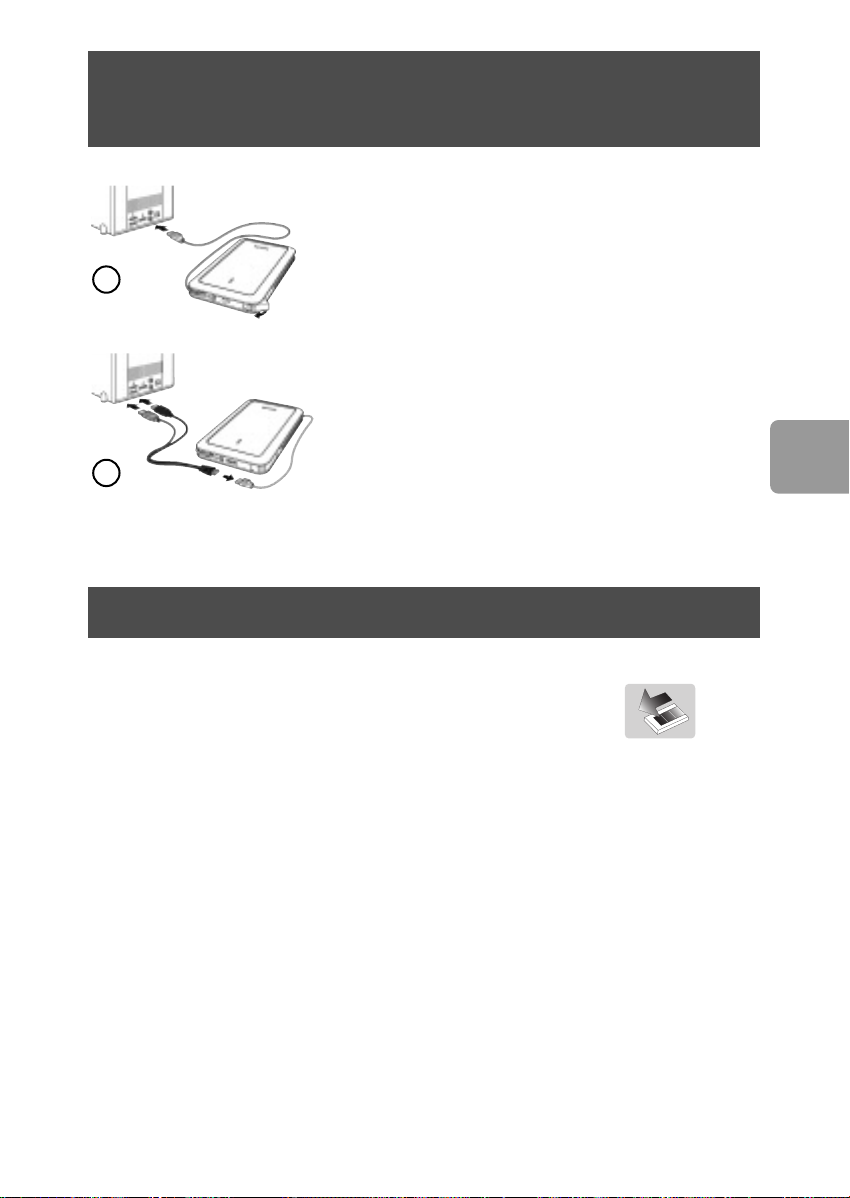
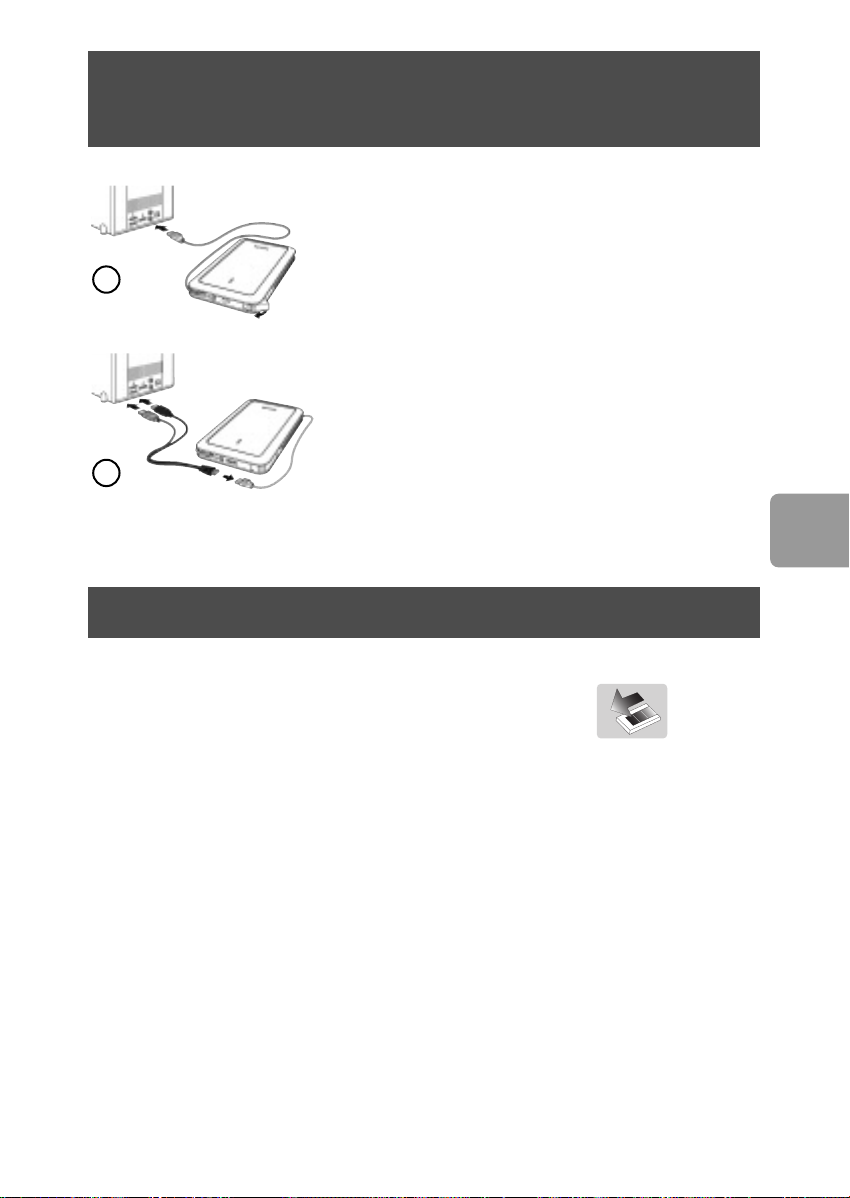
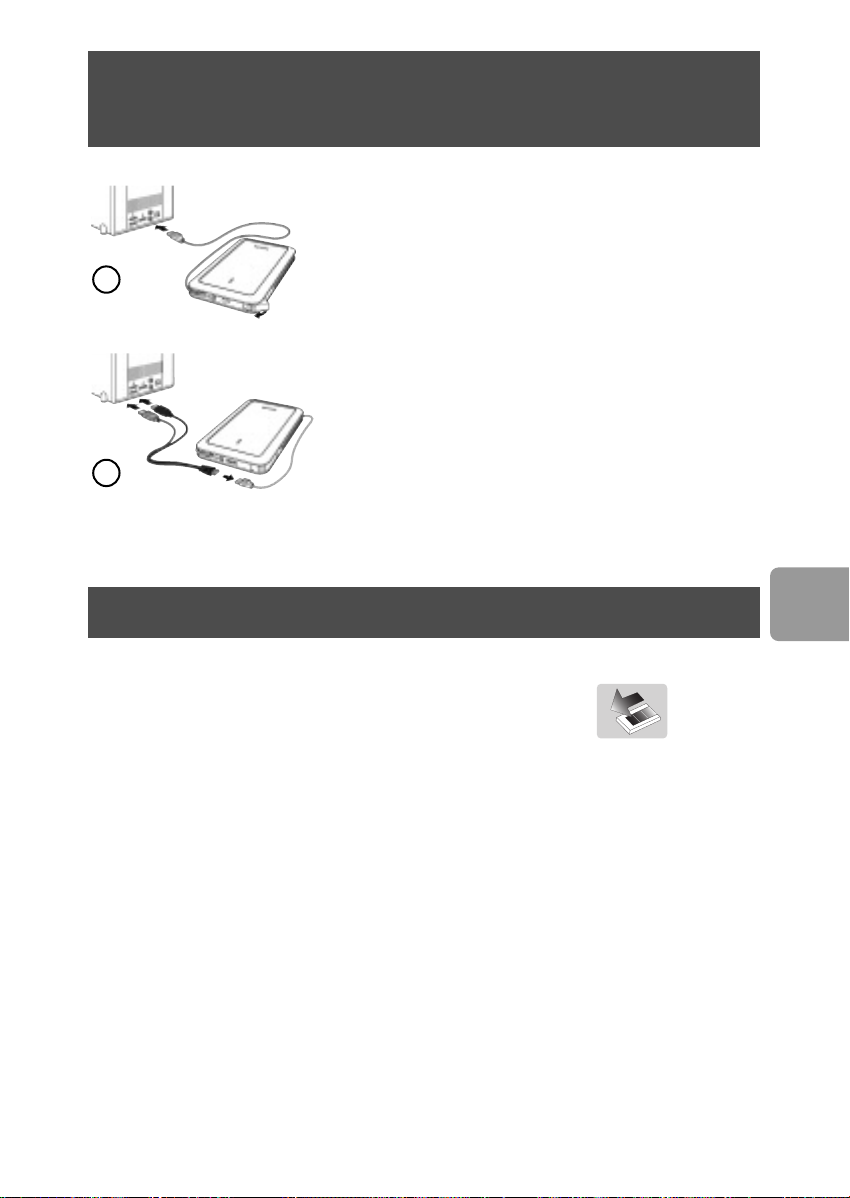
How to connect this external hard disk
on your system?
Plug the wrap around USB cable into an empty
USB port of your computer.
A drive icon, Philips External Hard Disk, appears in
1
2
Windows Explorer. (The computer sometimes needs to
be restarted, before you can use the new hardware).
When the computer does not recognize the hard disk
(some computers provide insufficient bus power), we
advise you to use the Y-cable supplied together with this
product. Connect the Y-cable to the USB cable of the
hard disk and plug in the 2 connectors in the free USB
ports of your computer.The black connector is for data
transfer and power, the gray connector is for additional
power only.
How to safely disconnect?
EN
1 Double-click the Safely Remove Hardware icon
in the task bar in the lower right part of the screen.
2 In the window that appears, select the name of the device that is to be removed,
then click the
3 When the Stop a hardware device screen appears, make sure the correct
information is displayed, and then click the
4 When the message Safe to remove hardware appears, remove the drive
from the computer’s USB port.
Stop button.
OK button.
5
Page 6

EN
How to use the One-Click Back-Up button
For windows only, this functionality doesn’t work with Mac computers
The One-Click Back-Up button allows you to instantly synchronize or back-up your
files with the CoSoSys Carry it Easy software.To launch the software, double-click on
the CarryitEasy.exe file on the hard disk in your Windows explorer. Follow the
instructions on your screen to get started.
See the Carry it Easy manual in the folder manuals on your hard disk for more
instructions and more information.
How to install for Mac,Windows 98 SE
or Windows ME?
The hard disk is preconfigured for Windows 2000 and Windows XP, with a NTFS
format. For Mac,Windows 98SE and Windows ME, the hard disk needs to be
formatted to FAT32.
6
Page 7
Warranty, Environment and Safety
How to find warranty information?
Browse to the Philips warranty folder on the hard disk or look on
www.philips.com/support
You need Adobe Reader software to open these files. If you don’t have Adobe Reader,
you can download it for free on www
The Philips warranty may not apply if damage is caused by accidents, shock, misuse or
neglect.
“The making of unauthorized copies of copy-protected material including computer
programs, files, broadcasts and sound recordings, may be an infringement of copyrights
and constitute a criminal offence.This equipment should not be used for such
purposes.”
WEEE mark: “Information to the Consumer”.
Disposal of your old product
Your product is designed and manufactured with high quality materials and
components, which can be recycled and reused. Please inform yourself about the local
separate collection system for electrical and electronic products, including those
marked by the crossed-out wheel bin symbol. Please act according to your local rules
and do not dispose of your old products with your normal household waste.
.adobe.com.
EN
WARNING
Plastic bags can be dangerous
To avoid danger of suffocation, keep this bag away from babies and small children.
Although this product has been designed with utmost care for long-lasting
performance. Philips does advise you to handle electronics with good care: Avoid
contact with water, exposure to extreme forces.
Please make sure you place the device in a well-ventilated environment, to ensure
longest possible lifetime and optimal performance.
7
Page 8

EN
Specifications
Technical Specifications:
Interface Hi-Speed USB 2.0
Transfer speed 480 Mb/s
Rotational speed 5600 rpm
Cache memory 8 MB
System requirements USB1.1 (USB 2.0 for max. transfer speed)
Windows 2000,Windows XP
Additional information available at our website:
.philips.com/support
www
www.philips.com/storage
8
Page 9

Table des matières
10 Contenu de l'emballage
11 Comment raccorder ce disque dur externe à
votre système ?
11 Déconnexion en toute sécurité
12 Comment utiliser le bouton One-Click Back-Up ?
12 Installation pour Mac, Windows 98 et
Windows ME
13 Garantie, environnement et sécurité
14 Caractéristiques techniques
FR
Note importante
Pour commencer à utiliser le bouton One-Click Back-Up, activer
tout d’abord le logiciel Carry it Easy (une fois seulement) en cliquant sur le fichier
ryitEasy.exe situé sur votre disque dur.Vous trouverez les instructions et plus
Car
d’informations à la page 12.
Si l’ordinateur ne reconnaît pas le disque dur (certains ordinateurs
disposent d’une alimentation bus insuffisante), nous vous recommandons d’utiliser le
câble Y fourni avec ce produit.Vous trouverez les instructions et plus d’informations
à la page 11.
9
Page 10
FR
Contenu de l'emballage
A : Disque dur externe
10
B : câble Y
C : Guide de démarrage rapide
Page 11
Comment raccorder ce disque dur externe
à votre système ?
Raccordez le câble USB à enroulement à un port USB
libre de l'ordinateur. Une icône de lecteur Philips
External Hard Disk apparaît dans l'Explorateur de
1
2
Windows. (Pour utiliser le nouveau matériel, il peut
être nécessaire de redémarrer l'ordinateur.)
Lorsque l’ordinateur ne reconnaît pas le disque dur
(certains ordinateurs disposent d’une alimentation bus
insuffisante), nous vous recommandons d’utiliser le câble
Y fourni avec ce produit. Connecter le câble Y au câble
USB du disque dur et brancher les deux connecteurs
dans les ports USB libres de votre ordinateur. Le
connecteur noir correspond au transfert de données et
à l’alimentation, le connecteur gris sert à l’alimentation
complémentaire uniquement.
Déconnexion en toute sécurité
FR
1 Double-cliquez sur l'icône Safely Remove Hardware
(Retirer le périphérique en toute sécurité) dans la barre
des tâches, dans l'angle inférieur droit de l'écran.
2 Dans la fenêtre qui apparaît, sélectionnez le nom du périphérique à retirer,
puis cliquez sur le bouton
3 Lorsque l'écran Stop a hardware device (Arrêt d'un périphérique matériel)
s'affiche, vérifiez si les informations sont correctes, puis cliquez sur le bouton
4 Lorsque le message Safe to remove hardware (Le matériel peut être retiré
en toute sécurité) apparaît, débranchez le lecteur du port USB de l'ordinateur.
Stop (Arrêter).
OK.
11
Page 12

Comment utiliser le bouton One-Click Back-Up?
FR
Pour Windows uniquement, cette fonctionnalité n’est pas active sur les ordinateurs Mac
Le bouton One-Click Back-Up vous permet de synchroniser instantanément ou
sauvegarder vos fichiers avec le logiciel CoSoSys Carry it Easy. Pour lancer le logiciel,
double-cliquer sur le fichier CarryitEasy.exe sur le disque dur dans votre explorateur
Windows. Suivre les instructions sur votre écran pour commencer.
Se reporter au manuel Carry it Easy dans le dossier comprenant les manuels sur
votre disque dur pour des instructions détaillées et plus d’informations.
Installation pour Mac,Windows 98
et Windows ME
Le disque dur est préconfiguré pour être utilisé avec Windows 2000 et Windows XP
au format NTFS. Pour Mac,Windows 98SE et Windows ME le disque dur doit être
formaté en FAT32.
12
Page 13
Garantie, environnement et sécurité
Comment trouver des informations concernant la
garantie ?
Parcourir le dossier de garantie Philips sur le disque dur ou consulter l’adresse
www.philips.com/support
Vous aurez besoin du logiciel Adobe Reader pour ouvrir ces fichiers. Si vous disposez
pas d'Adobe Reader, vous pouvez le télécharger gratuitement du site www
La garantie Philips peut ne pas s'appliquer si le périphérique est endommagé à la suite
d'un accident, d'un choc, d'un usage impropre ou d'une négligence.
« La création de copies illégales de contenu protégé contre la copie, y compris les
programmes informatiques, les fichiers, les diffusions et les enregistrements sonores,
peut constituer une violation des droits d'auteur et de copie (copyrights) ainsi qu'un
délit. Cet équipement ne doit en aucun cas être utilisé à de telles fins. »
Marque WEEE : “Informations pour le consommateur”.
.adobe.com.
Mise au rebut d'un périphérique usagé
Votre appareil est conçu et fabriqué avec des matériaux et des composants de haute
qualité qui peuvent être recyclés et réutilisés. Renseignez-vous au sujet du système de
collecte et de tri sélectif de votre région en ce qui concerne les produits électriques
et électroniques, y compris ceux caractérisés par le symbole de la poubelle à roulettes
marquée d'une croix.
Veuillez procéder conformément aux règlements locaux et ne pas mettre au rebut vos
appareils usagés avec les ordures ménagères ordinaires.
FR
AVERTISSEMENT
Les sacs en plastique peuvent être dangereux.
Pour écarter tout risque d'étouffement, conservez ce sac hors de portée des bébés et
des enfants en bas âge.
Ce produit a été conçu avec un soin extrême pour des performances durables. Philips
vous recommande cependant de manipuler tout appareil électronique avec soin. En
particulier, il convient d'éviter tout contact avec l'eau et toute exposition à des forces
extrêmes.
Veillez à installer l'appareil dans un endroit bien ventilé, afin de lui garantir une durée
de vie la plus longue possible et des performances optimales.
13
Page 14

DE
Caractéristiques techniques
Interface USB 2.0 (haute vitesse)
Vitesse de transfert 480 Mb/s
Vitesse de rotation 5600 tr/mn
Mémoire cache 8 Mo
Configuration requise USB 1.1 (USB 2.0 pour la vitesse de transfert maximale)
Windows 2000,Windows XP
Vous trouverez de plus amples informations sur notre site Internet :
.philips.com/support
www
www.philips.com/storage
14
Page 15

Inhalt
16 Packungsinhalt
17 Anschließen der externen Festplatte an
Ihr System
17 Sicheres Trennen
18 Wie verwendet man die Schaltfläche
“One-Click Back-Up”?
18 Installation für Mac, Windows 98 SE oder
Windows ME?
19 Garantie, Umwelt und Sicherheit
20 Spezifikationen
DE
Wichtiger Hinweis
Bevor Sie die Schaltfläche “One-Click Back-Up” verwenden,
aktivieren Sie zunächst die „Carry it Easy” Software (nur einmal), indem Sie auf die
auf Ihrer Festplatte befindliche Datei „CarryitEasy.exe“ klicken.Weitere
Anweisungen und zusätzliche Informationen können Sie auf der Seite 18
nachschlagen.
Falls der Computer die Festplatte nicht erkennt (einige Computer
liefern nur eine unzureichende Busleistung), so raten wir Ihnen, das mit diesem
Produkt gelieferte Y-Kabel zu verwenden.Weitere Anweisungen und zusätzliche
Informationen können Sie auf der Seite 17 nachschlagen.
15
Page 16
DE
Packungsinhalt
A : Externe Festplatte
16
B : Y-Kabel
C : Kurzanleitung
Page 17
Anschließen der externen Festplatte
an Ihr System
Schließen Sie das Wrap-Around-USB-Kabel an einen
freien USB-Anschluss an Ihrem PC an. Im Windows
Explorer wird das Laufwerksymbol „Philips External
1
2
Hard Disk“ angezeigt. (Zur Verwendung der neuen
Hardware muss der Computer ggf. neu gestartet werden).
Falls der Computer die Festplatte nicht erkennt (einige
Computer liefern nur unzureichende Busleistung), so
raten wir Ihnen, das mit diesem Produkt gelieferte YKabel zu verwenden. Stecken Sie dazu das Y-Kabel in das
USB-Kabel der Festplatte und stecken Sie die 2 Stecker
in die freien USB-Ports Ihres Computers. Der schwarze
Stecker ist für Datenübertragung und Strom und der
graue Stecker ist nur für zusätzlichen Strombedarf
bestimmt.
Sicheres Trennen
DE
1 Doppelklicken Sie auf das Symbol Hardware sicher
entfernen
in der Taskleiste unten rechts auf dem Bildschirm.
2 Wählen Sie in dem danach angezeigten Fenster den Namen des zu entfernenden
Geräts und klicken Sie auf die Schaltfläche
3 Sobald das Fenster Eine Hardwarekomponente beenden angezeigt wird,
überprüfen Sie, ob die richtigen Informationen angezeigt werden, und klicken dann
auf die Schaltfläche
4 Wenn die Meldung Hardware kann jetzt entfernt werden erscheint,
können Sie die Festplatte aus dem USB-Anschluss Ihres Computers entfernen.
OK.
Beenden.
17
Page 18

DE
Wie verwendet man die Schaltfläche “One-Click
Back-Up”?
Nur für Windows, diese Funktion funktioniert nicht bei Mac Computern.
Die Schaltfläche “One-Click Back-Up” ermöglicht es Ihnen mit der Software “CoSoSys
Carry it Easy” Dateien unverzüglich zu synchronisieren bzw. zu sichern. Um die
Software zu starten, klicken Sie in Ihrem Windows Explorer zweimal auf die auf Ihrer
Festplatte befindliche Datei „CarryitEasy.exe“. Um zu beginnen, folgen Sie den
Anweisungen auf dem Bildschirm.
Weitere Anweisungen und zusätzliche Informationen können Sie im „Carry it Easy“
Handbuch nachschlagen, das sich im Verzeichnis „Handbücher“ auf Ihrer Festplatte
befindet.
Installation für Mac,Windows 98 SE oder
Windows ME?
Die Festplatte ist für Windows 2000 und Windows XP mit dem Format NTFS
vorformatiert. Für Mac, Windows 98SE und Windows ME muss die Festplatte auf
FAT32 umformatiert werden.
18
Page 19
Garantie, Umwelt und Sicherheit
Wie kann ich Garantieinformationen finden?
Blättern Sie zum Verzeichnis “Garantie” von Philips, das sich auf der Festplatte befindet
oder schauen Sie im Internet nach unter: www.philips.com/support
Zum Öffnen dieser Dateien benötigen Sie die Software Adobe Reader.
Wenn Sie Adobe Reader nicht haben, können Sie die Software kostenlos von der
Website www
Die Philips Garantie deckt Schäden nicht ab, die auf Unfälle, Stöße, unsachgemäße
Verwendung oder Vernachlässigung zurückzuführen sind.
„Das Anfertigen ungenehmigter Kopien von urheberrechtlich geschütztem Material,
einschließlich Computerprogrammen, Dateien, Sendungen und Tonaufzeichnungen,
kann ein Bruch von Copyrights und damit ein strafrechtliches Vergehen darstellen.
Diese Ausrüstung sollte nicht für solche Zwecke verwendet werden.“
WEEE-Markierung: „Verbraucherinformation“.
.adobe.com herunterladen.
DE
Entsorgung Ihres alten Produkts
Ihr Produkt wurde mit qualitativ hochwertigen Materialien und Bauteilen entwickelt
und gefertigt, die recycelt und wiederverwertet werden können. Bitte informieren Sie
sich hinsichtlich der örtlichen, getrennten Sammelsysteme für Elektro- und Elektronikabfälle, einschließlich derer, die durch das durchgestrichene Rolltonnensymbol
gekennzeichnet sind.
Bitte halten Sie sich an Ihre örtlichen Vorschriften und entsorgen Sie Ihr altes Produkt
nicht mit Ihrem normalen Haushaltsmüll.
ACHTUNG
Kunststoffbeutel können gefährlich sein.
Diese Beutel von Säuglingen und Kleinkindern fern halten, um Erstickungsgefahr zu
vermeiden.
Obwohl dieses Produkt mit größter Sorgfalt für eine lange Nutzungsdauer entwickelt
wurden, empfiehlt Philips, dass Sie Elektronikteile sorgfältig handhaben.Vermeiden Sie
den Kontakt mit Wasser und extremen Kräften.
Bitte sorgen Sie dafür, dass das Gerät in einem gut belüfteten Umfeld steht, um die
längstmögliche Standzeit und eine optimale Leistung zu gewährleisten.
19
Page 20

DE
Spezifikationen
Schnittstelle USB 2.0 Hi-Speed
Übertragungsgeschwindigkeit 480 MB/s
Drehzahl 5600/min
Cache-Speicher 8 MB
Systemanforderungen USB 1.1 (USB 2.0 für max. Übertragungsgeschwindigkeit)
Windows 2000,Windows XP
Zusätzliche Informationen finden Sie auf unserer Website:
.philips.com/support
www
www.philips.com/storage
20
Page 21

Inhoud
22 Wat zit er in de doos?
23 Deze externe harde schijf aansluiten op
uw systeem
23 Het apparaat veilig loskoppelen
24 Hoe moet u de One-Click Back-up knop
gebruiken?
24 Installatie voor Mac, Windows 98 SE of
Windows ME
25 Garantie, milieu en veiligheid
26 Specificaties
NL
Belangrijk
Om de One-Click Back-Up knop te gaan gebruiken, moet u eerst de
Carry it Easy software (één keer) activeren door op het bestand CarryitEasy.exe op
de harde schijf te klikken. Zie pagina 24 voor instructies en voor meer informatie.
Wanneer de computer de harde schijf niet herkent (sommige
computers hebben onvoldoende busvermogen),adviseren wij u de Y-kabel te
gebruiken die bij dit product is geleverd. Zie pagina 23 voor instructies en voor
meer informatie.
21
Page 22
NL
Wat zit er in de doos?
A : Externe harde schijf
22
B : Y-kabel
C : Korte handleiding
Page 23

Deze externe harde schijf aansluiten
op uw systeem
Sluit de USB-kabel aan op een vrije USB-poort van uw
computer. In Windows Verkenner wordt een stationspictogram, Philips External Hard Disk, weergegeven.
1
2
(Soms moet u de computer opnieuw opstarten voordat
u de nieuwe hardware kunt gebruiken).
Wanneer de computer de harde schijf niet herkent
(sommige computers hebben onvoldoende
busvermogen), adviseren wij u de Y-kabel te gebruiken
die bij dit product is geleverd. Sluit de Y-kabel aan op de
USB-kabel van de harde schijf en steek de 2
aansluitingen in de vrije USB-poorten van uw computer.
De zwarte aansluiting is voor gegevensoverdracht en
stroom, de grijze aansluiting is alleen voor extra stroom.
Het apparaat veilig loskoppelen
NL
1 Dubbelklik op het pictogram Safely Remove Hardware
op de taakbalk in de rechterbenedenhoek van het scherm.
2 Selecteer in het venster dat verschijnt de naam van het apparaat dat moet worden
verwijderd en klik vervolgens op de knop
3 Controleer of in het scherm Stop a hardware device de juiste informatie
wordt weergegeven en klik op
4 Als het bericht Safe to remove hardware wordt weergegeven, koppelt u het
station los van de USB-poort van de computer.
OK.
Stop.
23
Page 24

NL
Hoe moet u de One-Click Back-up knop
gebruiken?
Alleen voor Windows, deze functie werkt niet bij Mac-computers
De One-Click Back-Up knop stelt u in staat om uw bestanden direct te
synchroniseren of er een backup van te maken met de CoSoSys Carry it Easy
software. Om de software te starten moet u in Windows Verkenner dubbelklikken op
het bestand CarryitEasy.exe dat op de harde schijf staat. Ga verder door de instructies
op het scherm te volgen.
Zie de Carry it Easy handleiding in de map met handleidingen op de harde schijf voor
meer aanwijzingen en informatie.
Installatie voor Mac,Windows 98 SE
of Windows ME
De harde schijf is vooraf geconfigureerd voor Windows 2000 en Windows XP, met
een NTFS-formaat.Voor Mac,Windows 98SE en Windows ME moet de harde schijf
worden geformatteerd tot FAT32.
24
Page 25
Garantie, milieu en veiligheid
Waar vindt u informatie over de garantie?
Blader naar de Philips garantiemap op de harde schijf of ga naar
www.philips.com/support
Deze bestanden kunt u lezen met Adobe Reader. Als u dit programma niet hebt,
kunt u het gratis downloaden op www
.adobe.com.
De garantie van Philips komt te vervallen in geval van schade als gevolg van
ongelukken, schokken, misbruik of verwaarlozing.
“Het zonder toestemming maken van kopieën van tegen kopiëren beschermd
materiaal, met inbegrip van computerprogramma’s, bestanden, uitzendingen en geluidsopnamen, kan een schending van het copyright inhouden en kan een overtreding zijn.
Deze apparatuur mag niet voor dergelijke doeleinden worden gebruikt.”
WEEE-markering: “Informatie voor de klant”.
Oude producten opruimen
Uw product is ontworpen en gemaakt met materialen en componenten van hoge
kwaliteit, die kunnen worden gerecycled en hergebruikt. Laat u informeren over het
plaatselijke systeem voor het gescheiden opruimen van elektrische en elektronische
producten, inclusief producten die zijn voorzien van het symbool met de
doorgekruiste verrijdbare afvalbak.
Handel in overeenstemming met de plaatselijke voorschriften en gooi de oude
producten niet weg bij het normale huishoudelijke afval.
WAARSCHUWING
Plastic zakken kunnen gevaarlijk zijn. Om gevaar op verstikking te voorkomen, moet u
deze zak uit de buurt van baby’s en kleine kinderen bewaren.
NL
Dit systeem is zorgvuldig ontworpen met het oog op een langdurige prestatie. Philips
adviseert u elektronica met de nodige zorg te behandelen: vermijd contact met water,
blootstelling aan extreme krachten.
Plaats het apparaat in een goed geventileerde omgeving, zodat hij zo lang mogelijk zo
goed mogelijk blijft presteren.
25
Page 26

NL
Specificaties
Interface Hi-Speed USB 2.0
Overdrachtsnelheid 480 Mb/s
Draaisnelheid 5600 rpm
Cachegeheugen 8 MB
Systeemvereisten USB 1.1 (USB 2.0 voor max. overdrachtsnelheid)
Windows 2000,Windows XP
Ga voor meer informatie naar onze website:
.philips.com/support
www
www.philips.com/storage
26
Page 27

Contenido
28 ¿Qué contiene la caja?
29 ¿Cómo conectar este disco duro externo
en su sistema?
29 ¿Cómo desconectar de forma segura?
30 ¿Cómo se utiliza el botón de Copia de seguridad
con un solo clic?
30 ¿Cómo instalar para Mac, Windows 98 SE
o Windows ME?
31 Garantía, Entorno y Seguridad
32 Especificaciones
ES
Nota importante
Para empezar a utilizar el botón de copia de seguridad con un
solo clic,
el archivo CarryitEasy.exe de su disco duro. Para instrucciones y más información,
consulte la página 30.
Si el ordenador no reconoce el disco duro (algunos ordenadores no
suministran corriente suficiente desde el bus USB), conecte el cable Y suministrado
con el equipo. Para instrucciones y más información, consulte la página 29.
primero active el software Carry it Easy (solo una vez) haciendo clic en
27
Page 28
ES
¿Qué contiene la caja?
A : Disco duro externo
28
B : Cable Y
C : Guía de Inicio rápida
Page 29
¿Cómo conectar este disco duro externo
en su sistema?
Conecte el cable USB enrollado en cualquier puerto
USB libre del ordenador.
Aparece un icono de unidad Philips External Hard Disk
1
2
(Disco duro externo Philips) en el Explorador de
Windows. (Algunas veces es necesario reiniciar el
equipo antes de poder utilizar este nuevo hardware).
Si el ordenador no reconoce el disco duro (algunos
ordenadores no suministran corriente suficiente desde
el bus USB), conecte el cable Y suministrado con el
equipo. Conecte el cable Y en el cable USB del disco
duro y conecte los 2 conectores en los puertos USB
libres de su ordenador. El conector negro es para
transmisión de datos y alimentación, el conector gris es
para alimentación adicional solamente.
¿Cómo desconectar de forma segura?
ES
1 Haga doble clic en el icono Safely Remove Hardware
(Quitar Hardware con seguridad) en la barra de tareas
en la esquina inferior derecha de la pantalla.
2 En la ventana que aparece, seleccione el dispositivo que desea quitar, luego haga
clic en el botón
3 Cuando aparece la pantalla Stop a hardware device (Detener un dispositivo
de hardware) asegúrese de que se muestra la información correcta y haga clic en
el botón
4 Cuando aparece el mensaje Safe to remove hardware (Es seguro retirar el
hardware), quite la unidad del puerto USB del ordenador.
Stop (Detener).
OK (Aceptar).
29
Page 30

¿Cómo se utiliza el botón de Copia de seguridad
con un solo clic?
Sólo para Windows (Esta función no es compatible con el sistema Macintosh)
El botón de copia de seguridad con un solo clic permite la sincronización instantánea
o la copia de seguridad de los archivos con el software CoSoSys Carry it Easy. Para
ejecutar el programa haga doble clic en el archivo CarryitEasy.exe de su disco duro.
Siga las instrucciones en pantalla para utilizarlo.
ES
Consulte el manual de Carry it Easy en la carpeta de manuales del disco duro para
obtener más instrucciones e información.
¿Cómo instalar para Mac,Windows 98 SE
o Windows ME?
El disco duro está preconfigurado para Windows 2000 y Windows XP, con formato
NTFS. En el caso de Macintosh,Windows 98SE y Windows ME el disco duro debe ser
formateado en FAT32.
30
Page 31
Garantía, Entorno y Seguridad
¿Cómo puedo localizar la información de garantía?
Examine la carpeta de garantía Philips del disco duro o vaya a
www.philips.com/support
Necesitará el software Adobe Reader para abrir estos archivos. Si no dispone de
Adobe Reader, puede descargarlo gratuitamente de www
La garantía Philips no se aplicará si el daño se debe a un accidente, golpe, mal uso o
negligencia.
“La creación de copias no autorizadas de material protegido contra copias de
programas informáticos, archivos, material de radiodifusión y grabaciones acústicas,
podría violar los derechos de copyright y constituir un delito. Este equipo no debe ser
utilizado con dicha finalidad”.
Marca WEEE: “Información al consumidor”.
Eliminación del producto antiguo
Este producto ha sido diseñado y fabricado con materiales y componentes de alta
calidad, que pueden ser reciclados y reutilizados. Por favor infórmese acerca del
sistema de recolección independiente local de productos eléctricos y electrónicos,
incluidos aquellos marcados con el símbolo del carrito contenedor tachado.
Por favor actúe de acuerdo a las leyes locales y no deseche los productos viejos con
los desperdicios domésticos.
.adobe.com.
ES
ADVERTENCIA
Las bolsas de plástico pueden ser peligrosas
Para evitar peligro de asfixia, mantenga esta bolsa fuera del alcance de los bebes o
niños pequeños.
Aunque este producto ha sido diseñado con el máximo cuidado para proporcionar un
rendimiento duradero. Philips le recomienda manipular los componentes electrónicos
con mucho cuidado: Evite el contacto con el agua, así como someterlo a fuerzas
extremas.
Por favor asegúrese de colocar el equipo en un lugar bien ventilado, para asegurar una
vida útil duradera y un rendimiento óptimo.
31
Page 32

Especificaciones
Interfaz USB 2.0 de alta velocidad
Velocidad de transferencia 480 Mb/s
Velocidad de giro 5600 rpm
Memoria caché 8 MB
Requisitos del sistema USB 1.1 (USB 2.0 para una velocidad de transferencia máx.)
Windows 2000,Windows XP
ES
Más información disponible en nuestra Web:
.philips.com/support
www
www.philips.com/storage
32
Page 33

Sommario
34 Contenuto della confezione
35 Come collegare il disco rigido esterno al
proprio sistema
35 Come disconnettersi in sicurezza?
36 Come si utilizza il pulsante One-Click Back-Up?
36 Installazione per Mac, Windows 98 SE
o Windows ME
37 Garanzia, Sicurezza e Ambiente
38 Specifiche
IT
Nota importante
Per iniziare a utilizzare il pulsante One-Click Back-Up, fattivare
innanzitutto l'applicazione Carry it Easy (una volta soltanto) cliccando sul file
CarryitEasy.exe che si trova sul disco rigido. Per istruzioni ed ulteriori informazioni
fare riferimento a pag. 36.
Nel caso in cui il computer non riconosca il disco rigido (alcuni
computer forniscono una potenza di bus insufficiente), consigliamo di utilizzare il
cavo a Y fornito in dotazione con il prodotto.Per istruzioni ed ulteriori informazioni
fare riferimento a pag. 35.
33
Page 34
IT
Contenuto della confezione
A : Disco rigido esterno
34
B : Cavo a Y
C : Guida introduttiva
Page 35
Come collegare il disco rigido esterno
al proprio sistema
Connettere il cavo USB ad una porta USB libera del
computer.
In Windows Explorer appare l’icona del disco Philips
1
2
External Hard Disk. (Alle volte il computer deve essere
riavviato prima di poter utilizzare il nuovo hardware).
Nel caso in cui il computer non riconosca il disco rigido
(alcuni computer forniscono una potenza di bus
insufficiente), consigliamo di utilizzare il cavo a Y fornito
in dotazione con il prodotto. Collegare il cavo a Y al
cavo USB del disco rigido e inserire i due connettori
nelle porte USB libere del computer. Il connettore nero
viene utilizzato per il trasferimento dati e
l'alimentazione, quello grigio unicamente per
l'alimentazione aggiuntiva.
Come disconnettersi in sicurezza?
IT
1 Fare un doppio clic sull’icona Safely Remove Hardware
(Rimozione sicura dell’Hardware) sulla barra delle applicazioni
nella parte destra dello schermo.
2 Nella finestra che appare, selezionare il nome del dispositivo da rimuovere e quindi
fare clic sul pulsante
3 Quando appare la finestra Stop a hardware device (Disattivazione di una
periferica hardware) verificare che appaiano le informazioni corrette, quindi fare
clic sul pulsante
4 Quando appare il messaggio Safe to remove hardware (È possibile
rimuovere l’hardware) rimuovere l’unità dalla porta USB del computer.
Stop (Disattiva).
OK.
35
Page 36

Come si utilizza il pulsante One-Click Back-Up?
Solo per Windows, questa funzionalità non è disponibile sui computer Mac
Il pulsante One-Click Back-permette di sincronizzare istantaneamente i file o di
eseguirne il back-up con l'applicazione CoSoSys Carry it Easy. Per lanciare
l'applicazione, fare doppio clic sul file CarryitEasy.exe presente sul disco rigido e
visualizzabile tramite Esplora risorse. Seguire le istruzioni sullo schermo per iniziare.
Consultare il manuale di Carry it Easy contenuto nella cartella manuali del disco rigido
per ulteriori istruzioni e informazioni.
IT
Installazione per Mac,Windows 98 SE
o Windows ME
Il disco rigido è preconfigurato per Windows 2000 e Windows XP, con un formato
NTFS. Per Mac,Windows 98SE e Windows ME il disco rigido deve essere formattato
in FAT32.
36
Page 37
Garanzia, Sicurezza e Ambiente
Come trovare le informazioni sulla garanzia
Raggiungere la cartella della garanzia Philips sul disco rigido o consultare il sito
www.philips.com/support
Per aprire questi file è necessario il software Adobe Reader. Se non fosse disponibile,
è possibile scaricarlo gratuitamente all’indirizzo www
La garanzia Philips può non applicarsi se vengono causati danni dovuti a incidenti, colpi,
uso non corretto o negligenza.
“La produzione di copie non autorizzate di materiale protetto dalla copia, compresi
programmi per computer, file, registrazioni di trasmissioni e audio può costituire una
violazione dei diritti di copyright e costituire un atto criminale. Questo apparecchio
non deve essere utilizzato a tali scopi.”
Contrassegno WEEE: “Informazioni al Consumatore”.
Smaltimento del vecchio prodotto
Il prodotto in dotazione è studiato e progettato con materiali e componenti di elevata
qualità che possono essere riciclati e riutilizzati. La preghiamo di informarsi sul sistema
di raccolta differenziata in vigore localmente per i prodotti elettrici ed elettronici,
compresi quelli contrassegnati con il simbolo del bidone con ruote crociato.
La preghiamo di attenersi alle norme locali e di non smaltire i vecchi prodotti insieme
ai normali rifiuti domestici.
.adobe.com.
IT
AVVERTENZA
I sacchetti di plastica possono essere pericolosi
Per evitare pericoli di soffocamento, tenere questo sacchetto lontano dalla portata di
neonati e bambini piccoli.
Sebbene questo prodotto sia stato studiato con la massima cura per assicurare una
lunga durata, Philips raccomanda di maneggiare gli apparecchi elettronici con estrema
cura: evitare il contatto con l’acqua e l’esposizione a forze estreme.
Accertarsi di posizionare la periferica in un ambiente ben ventilato, per garantire la
vita utile più lunga possibile e prestazioni ottimali.
37
Page 38
Specifiche
Interfaccia USB 2.0 ad alta velocità
Velocità di trasmissione 480 Mb/s
Velocità di rotazione 5600 g/m
Memoria cache 8 MB
Requisiti di sistema USB 1.1 (USB 2.0 per la max. velocità di trasmissione)
Windows 2000,Windows XP
Ulteriori informazioni disponibili sul nostro sito web:
.philips.com/support
www
IT
www.philips.com/storage
38
Page 39

Conteúdo
40 O que está na caixa?
41 Como conectar este disco rígido externo
ao seu sistema?
41 Como desconectar com segurança?
42 Como utilizar o botão Cópia de segurança num
clique?
42 Como instalar para o Windows 98 SE
ou o Windows ME?
43 Garantia, Meio Ambiente e Segurança
44 Especificações
PT
Observação importante
Para começar a utilizar o botão Cópia de segurança num clique,
active primeiro o software Carry it Easy (apenas uma vez), clicando no ficheiro
CarryitEasy.exe localizado no seu disco rígido. Para obter instruções e informações
adicionais, consulte a página 42.
Quando o computador não reconhecer o disco rígido (alguns
computadores não fornecem potência de bus suficiente), recomendamos a utilização
do cabo em Y fornecido juntamente com este produto. Para obter instruções e
informações adicionais, consulte a página 41.
39
Page 40
PT
O que está na caixa?
A : Disco rígido externo
40
B : Cabo em Y
C : Guia de referência rápida
Page 41
Como conectar este disco rígido externo
ao seu sistema?
Conecte o cabo USB enrolado a uma porta USB vazia
do seu computador. Um ícone de unidade, o disco
rígido externo Philips, aparecerá no Windows Explorer.
1
2
(Às vezes é necessário reiniciar o computador antes de
poder usar o novo equipamento).
Quando o computador não reconhecer o disco rígido
(alguns computadores não fornecem potência de bus
suficiente), recomendamos a utilização do cabo em Y
fornecido juntamente com este produto.Ligue o cabo
em Y ao cabo USB do disco rígido e ligue os dois
conectores nas portas USB livres do seu computador.
O conector preto destina-se a transferir dados e a
fornecer alimentação, o conector cinzento serve apenas
para fornecer potência adicional.
Como desconectar com segurança?
PT
1 Clique duas vezes no ícone Safely Remove Hardware
(Remover equipamento com segurança) na barra de tarefas
na parte inferior direita do ecrã.
2 Na janela que aparece, seleccione o nome do dispositivo que deve ser removido e,
depois, clique no botão
3 Quando aparecer o ecrã Stop a hardware device (Parar um dispositivo de
equipamento), certifique-se que são exibidas as informações correctas e, depois,
clique no botão
4 Quando aparecer a mensagem Safe to remove hardware (É seguro remover
o equipamento), remova a unidade da porta USB do computador.
Stop (Parar).
OK.
41
Page 42

PT
Como utilizar o botão Cópia de segurança num
clique?
Apenas para Windows, não funciona em computadores Macintosh
O botão Cópia de segurança num clique permite-lhe instantaneamente sincronizar ou
realizar uma cópia de segurança dos seus ficheiros com o software CoSoSys Carry it
Easy. Para executar o software, faça duplo clique no ficheiro CarryitEasy.exe que se
encontra no seu disco rígido utilizando o explorador do Windows. Siga as instruções
apresentadas no ecrã para começar.
Consulte o manual do software Carry it Easy que se encontra na pasta “manuals” no
seu disco rígido para obter mais instruções e informações.
Como instalar para o Mac,Windows 98 SE
ou o Windows ME?
O disco rígido está pré-configurado para o Windows 2000 e Windows XP, com um
formato NTFS. Para Mac, Windows 98SE e Windows ME o disco rígido precisa ser
formatado para FAT32.
42
Page 43
Garantia, Meio Ambiente e Segurança
Como encontrar informações acerca da garantia?
Procure na pasta “Philips warranty” no disco rígido ou consulte
www.philips.com/support
Você precisará do software Adobe Reader para abrir esses arquivos. Se você não tiver
o Adobe Reader, poderá baixá-lo gratuitamente em www
A garantia da Philips pode não se aplicar se ocorrerem danos causados por acidentes,
choques, má utilização ou negligência.
“A realização de cópias desautorizadas de material protegido contra cópia, incluindo
programas de computador, arquivos, transmissões e gravações sonoras, podem ser
uma violação de direitos autorais e constituem um crime. Este equipamento não deve
ser utilizado com essa finalidade.”
.adobe.com.
Marca WEEE: “Informações para o consumidor”.
Descarte de seu produto antigo
Seu produto foi projetado e fabricado com materiais e componentes de alta
qualidade, que podem ser reciclados e reutilizados. Informe-se sobre seu sistema local
de coleta separada para produtos elétricos e eletrônicos, incluindo aqueles marcados
pelo símbolo de uma cesta de lixo sobre rodas riscada.
Aja de acordo com suas regras locais e não descarte seus produtos antigos
juntamente com seu sistema de coleta domiciliar normal.
ALERTA
Sacos plásticos podem ser perigosos.
Para evitar o perigo de sufocamento,mantenha este saco longe de bebês e crianças
pequenas.
Embora este produto tenha sido projetado com o máximo cuidado para um
desempenho de longa duração, a Philips aconselha que os produtos eletrônicos sejam
tratados com o devido cuidado: evite o contato com a água e a exposição a forças
extremas.
Certifique-se de colocar o aparelho em um ambiente com boa ventilação, para
assegurar a máxima vida útil possível e um desempenho ideal.
PT
43
Page 44

PT
Especificações
T1 USB 2.0 Hi-Speed
Velocidade de transferência 480 MB/s
Velocidade de rotação 5600 rpm
Memória cache 8 MB
Requisitos do sistema USB 1.1 (USB 2.0 para a velocidade máx. de transferência)
Windows 2000,Windows XP
Informações adicionais disponíveis no nosso sítio na Internet:
.philips.com/support
www
www.philips.com/storage
44
Page 45

İçindekiler
46 Kutuda neler var?
47 Bu harici sabit disk sisteminize nasıl bağlanır?
47 Güvenli ayrıma yöntemi
48 One-Click Back-Up (Tek tıkla-Yedekle) düğmesi
nasıl kullanılır?
48 Mac,Windows 98 SE veya Windows ME için nasıl
yükleme yapılır?
49 Garanti, Çevre ve Güvenlik
50 Özellikler
TR
Önemli not:
One-Click Back-Up düğmesini kullanmaya başlamak için, önce sabit
diskinizdeki CarryitEasy.exe dosyasını tıklayarak Carry it Easy Yazılımını (bir sefere
mahsus) etkin hale getiriniz.Talimat ve daha fazla bilgi için 48 sayfasına bakınız.
Bilgisayar sabit diski tanımıyorsa (bazı bilgisayarların veri yolu gücü
yetersizdir), bu ürünle birlikte size verilen Y kablosunu kullanmanızı tavsiye ederiz.
Talimat ve daha fazla bilgi için 47 sayfasına bakınız.
45
Page 46
TR
Kutuda neler var?
A : Harici sabit disk
46
B : Y-kablosu
C : Hızlı Başlama Rehberi
Page 47
Bu harici sabit disk sisteminize nasıl bağlanır?
Windows Explorer’da bir Philips Harici Sabit Disk
sürücü simgesi görüntülenir.
(Yeni donanımı kullanmadan önce bazen bilgisayarın
1
2
yeniden başlatılması gerekebilir).
Bilgisayar sabit diski tanımıyorsa (bazı bilgisayarların veri
yolu gücü yetersizdir), bu ürünle birlikte size verilen Y
kablosunu kullanmanızı tavsiye ederiz.Y kablosunu sabit
diskin USB kablosuna bağlayınız ve 2 konektörü
bilgisayarınızın serbest USB yuvalarına sokunuz. Siyah
konektör veri transferi, gri konektör ise sadece ek güç
içindir.
Güvenli ayrıma yöntemi
1 Ekranın alt sağ tarafındaki Safely Remove Hardware
(Donanımı Güvenli Kaldır) simgesini çift tıklayın.
2 Görüntülenen pencerede kaldırılacak aygıtın adını seçin ve sonra Stop (Durdur)
düğmesine basın.
3 Stop a hardware device (Donanım aygıtını durdur) ekranı görüntülendiğinde,
doğru bilgilerin görüntülendiğinden emin olun ve ardından
tıklayın.
4 Safe to remove hardware (Donanım güvenle kaldırılabilir) ifadesi
görüntülendiğinde sürücüyü bilgisayarın USB bağlantı noktasından çıkarın.
OK (Tamam) düğmesini
TR
47
Page 48

One-Click Back-Up (Tek tıkla-Yedekle) düğmesi
nasıl kullanılır?
Bu işlevsellik Mac bilgisayarlarında çalışmaz, sadece Windows içindir.
One-Click Back-Up düğmesi size dosyalarınızda CoCoSys Carry it Easy yazılımıyla
saniyelik eşzaman veya yedekle işlemi yapma olanağını verir.Yazılımı başlatmak üzere
Windows Gezgini içindeki sabit diskte bulunan CarryitEasy.exe dosyasını çift tıklayınız.
Başlamak için ekrandaki talimatlara uyunuz.
Daha fazla talimat ve daha fazla bilgi için sabit diskinizdeki elkitabı klasöründe bulunan
Carry it Easy elkitabına bakınız.
Mac,Windows 98 SE veya Windows ME
için nasıl yükleme yapılır?
TR
48
Hard diskin,Windows 2000 ve Windows XP için bir NTFS formatı ile.
Mac,Windows 98SE ve Windows ME için ön konfigürasyonu yapılmiş olup, hard disk
FAT32 için format edilme gereksinimi bulunmaktadır.
Page 49

Garanti, Çevre ve Güvenlik
Garanti bilgilerini nasıl bulabilirsiniz?
Sabit diskteki Philips garanti dosyasına göz atınız veya www.philips.com/support a
bakınız.
Dosyaları açmak için, Adobe Reader yazılımına ihtiyacınız bulunmaktadır.
Adobe Reader yazılımınız yoksa,ücretsiz olarak www
indirebilirsiniz.
Philips garantisi, şayet kaza, şok, yanlış kullanım ve ihmal sebebiyle bir zarar söz konusu
ise uygulanmayacaktır.
“Bilgisayar programları, dosyaları, yayım ve ses kayıtlarını içeren kopya engellemeli
materyalin yetkisiz şekilde kopyalanması, bir telif hakları ihlali oluşturabileceği gibi, ceza
gerektiren bir suç meydana getirebilir. Bu ekipman, bu şekildeki amaçlar için
kullanılamaz.”
DÖNÜfiÜM sembolü: “Tüketicinin Bilgisine”.
.adobe.com adresinden
TR
Eski ürününüzün bertaraf edilmesi
Ürününüz, geri dönüşümü olan ve yeniden kullanılabilecek yüksek kalite materyaller ve
bileşenler ile dizayn edilerek üretilmiştir. Çarpı atılmış dönüşüm kutusu sembolü
işaretli olanlar dahil, elektrikli ve elektronik ürünler için yerel ayırma - toplama sistemi
hakkında bilgi sahibi olunuz. Yerel kurallara uygun olarak hareket ediniz ve eski
ürünlerinizi, normal ev atıklarınız ile bertaraf etmeyiniz.
DİKKAT
Plastik poşetler tehlike arz etmektedir.
Boğulma tehlikesinden kaçınmak üzere, bu türlü poşetleri, bebeklerden ve küçük
çocuklardan uzak tutun.
Aynı zamanda bu ürün, uzun süre sağlam kalma performansı açısından, büyük bir
gayret ile dizayn edilmiştir. Philips, elektronik aygıtların dikkat edilerek de olsa
ellenmesini tavsiye etmez: Su ile temastan ve gereğinden fazla güce maruz kalmasından
kaçının.
Aygıtın, mümkün olan en uzun süre kullanılabilmesi ve optimal performansta
çalışabilmesinin garanti edilmesi açısından iyi havalandırılan alanlarda yerleştirilmiş
olduğundan emin olun.
49
Page 50

TR
Özellikler
Ara yüz Hi-Speed USB 2.0
Transfer hızı 480 Mb/s
Rasyonel hız 5600 rpm
Önbellek 8 MB
Sistem gereksinimleri USB 1.1 (maksimum transfer hızı için USB 2.0)
Windows 2000,Windows XP
Ek bilgiler için web sitemize bakabilirsiniz:
.philips.com/support
www
www.philips.com/storage
50
Page 51

Specifications subject to change without notice.
All dimensions shown are approximate.
© 2007 Koninklijke Philips Electronics N.V.
ved.
eser
transmission and/or broadcasting in whole or part is prohibited without the written consent of Philips Electronics N.V.
Reproduction, copying, usage, modifying, hiring, renting, public performance,
All rights r
 Loading...