

Page 1

SPD3200CC
User Manual
Benutzerhandbuch
Manuel d’instructions
Manuale utente
Gebruikershandleiding
Manual del usuario
Manuel do Utilizador
Kurulum Kılavuzu
Instrukcja montażu
Använderhandbok
UK
D
F
I
NL
ES
PT
TR
PL
SV
Page 2

2
Contents
How to connect the SPD3200CC to my computer? 5
How to disconnect the SPD3200CC without shutting down the computer? 15
How to print a label on a disc? 17
How to capture video from a digital DV-camcorder? 25
How to make a video disc from video
files which are on the hard disk or a disc? 29
How to copy a disc? 35
How to make a Data disc? 39
How to make an Audio disc? 45
Warranty, Environment, Safety,
Frequently Asked Questions (FAQ) and Specifications 51
Inhalt
Wie verbindet man den SPD3200CC mit einen Computer? 5
Wie kann man die Verbindung zum SPD3200CC trennen,
ohne den Computer herunterzufahren? 15
Wie druckt man ein Disc-Label? 17
Videos von einem digitalen DV-Camcorder aufnehmen 25
Wie erstellt man eine Video Disk von Video-Dateien,
die sich auf der Festplatte oder einer Disk befinden? 29
Eine Disk kopieren 35
Eine Daten-Disk erstellen 39
Erstellen einer Audio-Disk 45
Garantie, Umwelt, Sicherheit,
Häufig gestellte Fragen (FAQ) und Technische Daten 55
Table des matières
Raccordement du SPD3200CC à mon ordinateur 5
Comment débrancher l’SPD3200CC sans arrêter l’ordinateur? 15
Comment imprimer une étiquette sur le disque ? 17
Comment acquérir les images vidéo d’une caméra numérique DV ? 25
Comment créer un disque vidéo à partir de fichiers vidéo
enregistrés sur le disque dur ou sur un disque ? 29
Comment copier un disque ? 35
Comment créer un disque de données ? 39
Comment créer un disque audio ? 45
Garantie, Environnement, Sécurité,
Questions fréquentes (FAQ) et Caractéristiques techniques 59
Indice
Come collegare il SPD3200CC al computer? 5
Come si disconnette l'SPD3200CC senza spegnere il computer? 15
Come si stampa l'etichetta del disco? 17
Come registrare un video da una DV-camcorder digitale 25
Come si crea un video disc con file video memorizzati
sull'hard disk o su un disco? 29
Come copiare un dischi? 35
Come creare un dischi di dati? 39
Come creare un dischi Audio? 45
Garanzia, Ambiente, Sicurezza, Domande frequenti (FAQ) e Specifiche 63
Inhoud
Hoe sluit ik de SPD3200CC op mijn computer aan? 5
Hoe ontkoppel ik de SPD3200CC zonder de computer uit te zetten? 15
Hoe druk ik een label af op een disc? 17
Hoe kopieer ik de opnames van een digitale DV-camcorder
naar mijn computer? 25
Hoe maak ik een videodisc met bestanden die nu op de
harde schijf of een andere disc staan? 29
Hoe kopieer ik een disc? 35
Hoe maak ik zelf een data-disc? 39
Hoe maak ik zelf een muziek-disc? 45
Garantie, Milieu, Veiligheid, Vaak gestelde vragen (FAQ) en Specificaties 67
UK
D
F
I
NL
Page 3

Índice
¿Cómo conectar SPD3200CC al ordenador? 71
¿Cómo desconectar SPD3200CC sin apagar el ordenador? 81
¿Cómo imprimir una etiqueta en un disco? 83
¿Cómo capturar secuencias de vídeo de una videocámara digital DV? 91
¿Cómo crear un disco de vídeo a partir de archivos de vídeo en el
disco duro u otro disco? 95
¿Cómo copiar un disco? 101
¿Cómo crear un disco de datos? 105
¿Cómo crear un disco de audio? 111
Garantía, Medioambiente, Seguridad,
Preguntas frecuentes (FAQ) y Especificaciones 117
Índice
Como ligar o SPD3200CC ao meu computador? 71
Como desligar o SPD3200CC sem desligar o computador? 81
Como imprimir uma etiqueta em um disco? 83
Como capturar vídeos de um DV camcorder digital? 91
Como criar DVDs de arquivos de vídeo armazenados no disco rígido
ou em um disco? 95
Cómo copiar um disco? 101
Como criar um disco de dados? 105
Como criar um disco de áudio? 111
Garantia, Ambiente, Segurança,
Perguntas mais frequentes (FAQ) e Especificações 121
İçindekiler
Bilgisayarıma SPD3200CC’yi takma şekli? 71
Bilgisayarı kapatmadan SPD3200CC’nin bağlantısını kesme şekli? 81
Bir disk üzerine bir etiket nasıl yazdırılır? 83
Bir dijital/sayısal DV-camcorder’den (DV-kaydedici kamera)
nasıl görüntü yakalanır? 91
Sabit disk ya da bir disk üzerinde bulunan video dosyalarından
nasıl bir video diski yapılır? 95
Bir disk nasıl kopyalanır? 101
Bir disk nasıl yaratılır? 105
Bir Ses diski nasıl yaratılır? 111
Garanti, Çevre, Güvenlik,
Sıkça Sorulan Sorular (FAQ) ve Teknik Özellikler 125
Spis treści
Jak mogę podłączyć napęd SPD3200CC do komputera? 71
Jak odłączyć napęd SPD3200CC nie wyłączając komputera? 81
Drukowanie etykiet na płytach 83
Przechwytywanie obrazu wideo z kamery cyfrowej DV 91
Tworzenie płyty wideo z plików wideo zapisanych na dysku
twardym lub płycie 95
Kopiowanie płyt 101
Nagrywanie płyt z danymi 105
Nagrywanie płyt audio 111
Gwarancja, środowisko, bezpieczeństwo,
Często zadawane pytania (FAQ) oraz specyfikacje 129
Innehåll
Hur ansluter jag SPD3200CC till min dator? 71
Hur kopplar jag bort SPD3200CC utan att stänga av datorn? 81
Hur du skriver ut en etikett på en skiva 83
Hur du fångar video från en digital DV-camcorder 91
Hur du gör en videoskiva från video-filer som finns på en
hårddisk eller en skiva? 95
Hur du kopierar en skiva 101
Hur du gör en dataskiva 105
Hur du gör en audioskiva 111
Garanti, miljö, säkerhet, vanliga frågor (FAQ) och specifikationer 133
E
PT
TR
PL
SV
3
Page 4

Page 5

How to connect the
SPD3200CC to my computer?
Wie verbindet man den SPD3200CC mit einen Computer?
Raccordement du SPD3200CC à mon ordinateur
Come collegare il SPD3200CC al computer?
Hoe sluit ik de SPD3200CC op mijn computer aan?
The next pages show how to connect
your new SPD3200CC to a computer.
Since there are many brands and types
of computers available, the next
photographs show only examples on how
your SPD3200CC could be installed.
For specific information on your
computer, please refer to your
computer manual or contact your local
dealer.
Auf den nächsten Seiten wird erläutert,
wie Sie Ihren neuen SPD3200CC mit
einem Computer verbinden können.
Da Computer von vielen Herstellern in
verschiedenen Ausführungen und Typen
angeboten werden, zeigen die nachstehenden Fotos nur Beispiele für eine
mögliche Installation Ihres SPD3200CC.
Für spezielle Informationen zu Ihrem
Computer schlagen Sie in Ihrem
Computer-Handbuch nach oder
erkundigen Sie sich bei Ihrem
Fachhändler vor Ort.
Les pages qui suivent décrivent le
raccordement de votre nouveau
SPD3200CC à un ordinateur.
Du fait de la diversité des marques et
des types d’ordinateur, les photographies
suivantes ne montrent que quelques
exemples d’installation de votre
SPD3200CC.
Pour plus de détails sur votre ordinateur,
consultez le manuel qui l’accompagne
ou contactez votre revendeur.
Nelle seguenti pagine viene spiegato
come collegare il vostro nuovo
SPD3200CC ad un computer.
Data l'ampia gamma di marche e
modelli di computer disponibile sul
mercato, le seguenti fotografie vanno
considerate come un esempio di
possibile installazione del SPD3200CC.
Per ottenere informazioni specifiche per
il tipo di computer utilizzato, consultate
la guida utente del sistema o contattate
il vostro rivenditore.
De volgende pagina's geven aan hoe u
uw nieuwe SPD3200CC op een
computer aansluit.
Er zijn zo veel typen computers dat de
foto's alleen voorbeelden kunnen
aangeven van het monteren van uw
SPD3200CC.
Raadpleeg de handleiding van uw
computer of neem contact op met uw
leverancier voor meer informatie over
uw computer.
UK D F
I NL
5
Page 6
66
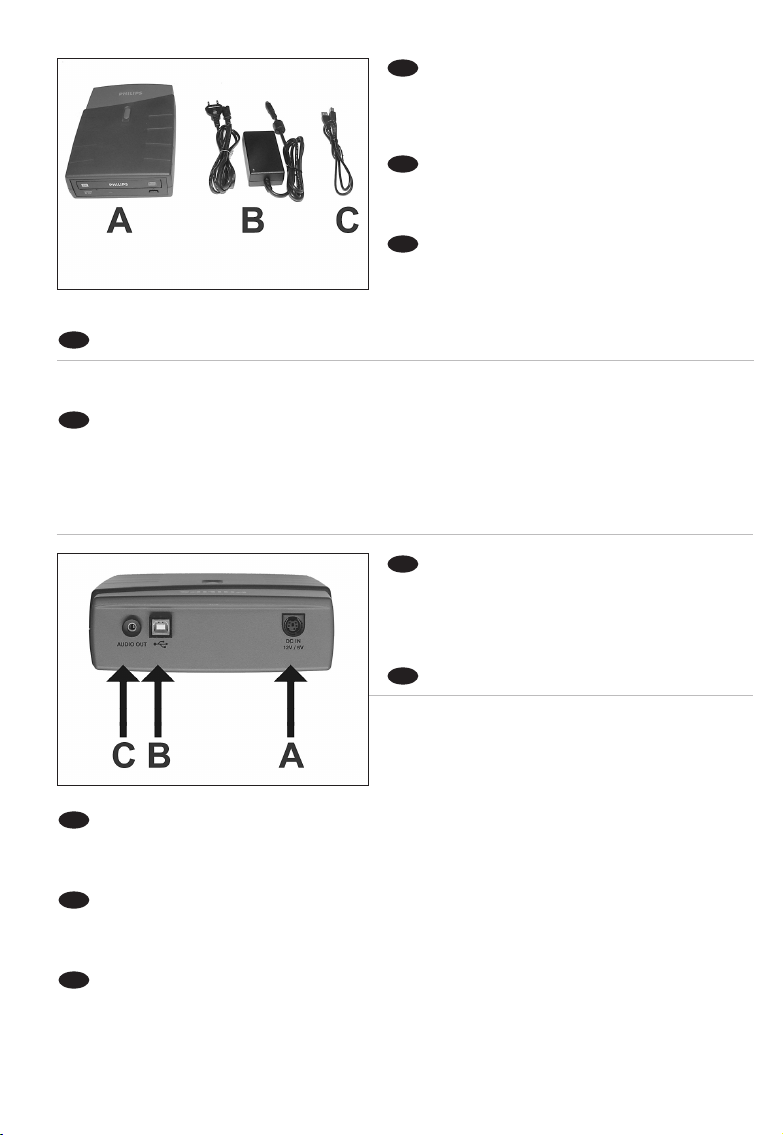
You will find a SPD3200CC device and
following cables in the retail box:
A: SPD3200CC device.
B: Power supply (2 parts).
C: HiSpeed USB Cable.
Der Verpackungskarton enthält die folgenden Teile:
A: SPD3200CC Laufwerk.
B: Netzteil (2 Teile).
C: HiSpeed USB-Kabel.
L’emballage contient un périphérique SPD3200CC
et les câbles suivants :
A : Périphérique SPD3200CC
B : Alimentation (2 éléments)
C : Câble USB haut débit
La confezione include una periferica SPD3200CC ed i seguenti cavi:
A: Periferica SPD3200CC.
B: Alimentatore (2 componenti).
C: Cavo USB ad alta velocità.
De retailverpakking van de SPD3200CC bevat de volgende onderdelen:
A: SPD3200CC-eenheid.
B: Voedingseenheid (2 onderdelen).
C: HiSpeed USB-kabel.
NL
I
F
D
UK
At the back side, you will find the plugs you
need for connecting your SPD3200CC to your
computer.
A: Power.
B: HiSpeed USB.
C: Audio connector.
Auf der Rückseite finden Sie die Anschlüsse, die Sie
zum Anschließen Ihres SPD3200CC an Ihren Computer
benötigen.
A: Stromversorgung.
B: HiSpeed USB.
C: Audio-Steckverbinder.
Au dos se trouvent les connecteurs requis pour brancher votre SPD3200CC à l’ordinateur.
A : Alimentation
B : Port USB haut débit
C : Connecteur audio
Sul retro, si trovano le connessioni per collegare l'SPD3200CC al vostro computer.
A: Alimentazione.
B: USB ad alta velocità.
C: Connettore audio.
Achter op de SPD3200CC vindt u de connectors waarmee u het apparaat op uw computer kunt
aansluiten.
A: Voeding.
B: HiSpeed USB.
C: Audioconnector.
NL
I
F
D
UK
2
1
Page 7
7
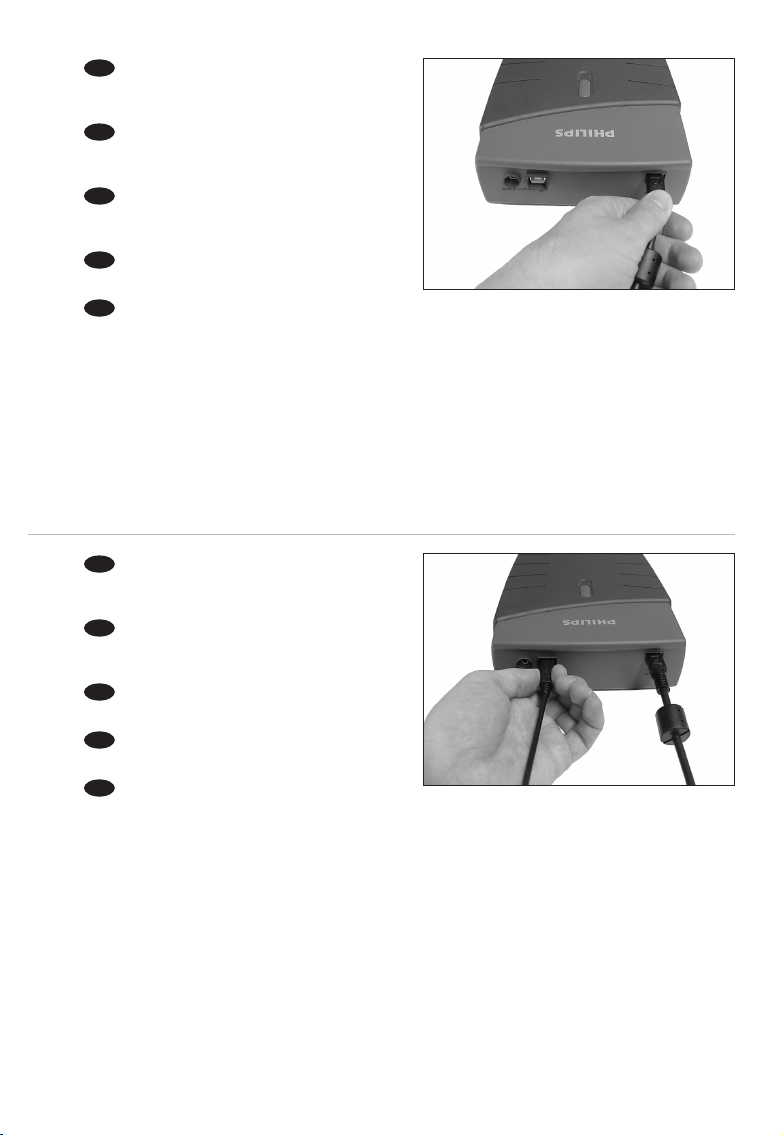
Connect the power cables together and
connect them to the SPD3200CC and a power
outlet.
Verbinden Sie die Stromversorgungskabel
miteinander und mit dem SPD3200CC und einer
Steckdose.
Raccordez les câbles d’alimentation l’un à
l’autre puis branchez-les à l’SPD3200CC et à une
prise secteur.
Collegate i cavi di alimentazione tra loro e
collegateli tra l'SPD3200CC ed una presa elettrica.
Verbind de voedingskabels met elkaar en sluit ze daarna op de SPD3200CC en op een
stopcontact.
NL
I
F
D
UK
3
7
Plug the USB cable in the SPD3200CC.
Do not connect the cable to the computer at this
moment.
Verbinden Sie das USB-Kabel mit dem
SPD3200CC. Verbinden Sie das Kabel zu diesem
Zeitpunkt nicht mit dem Computer.
Branchez le câble USB à l’SPD3200CC.
Ne branchez pas le câble à l’ordinateur pour le moment.
Collegate il cavo USB all'SPD3200CC.
Non collegate ancora il cavo al computer.
Sluit de USB-kabel op de SPD3200CC aan.
Sluit dit kabeltje nog niet op uw computer aan.
NL
I
F
D
UK
4
Page 8
88
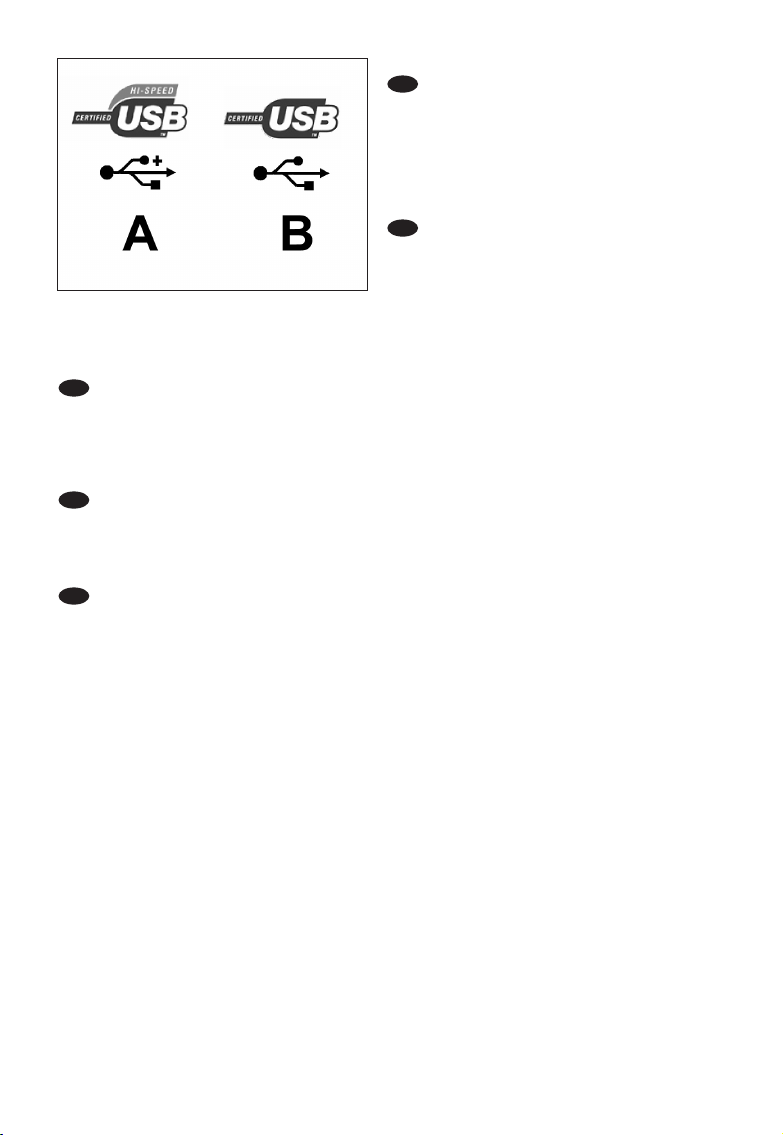
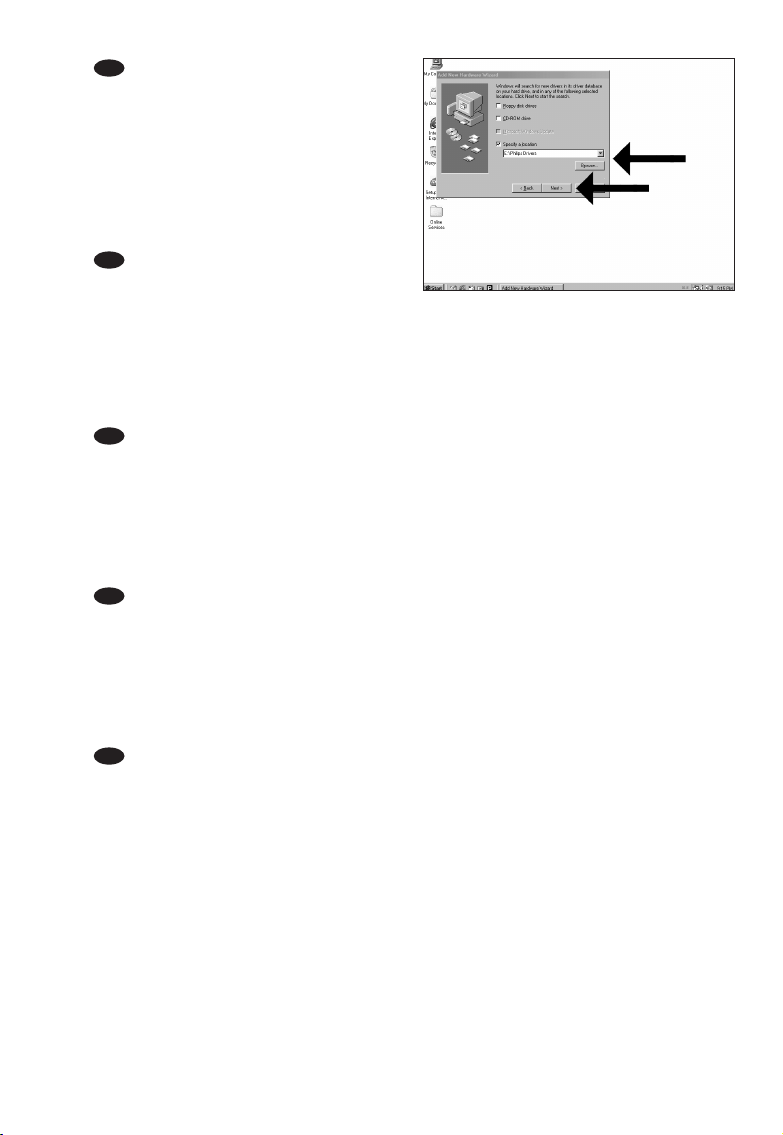
Search for the HiSpeed USB connector
on your PC.
A: Logo for the preferred HiSpeed USB or connector.
B: Logo for the alternative LowSpeed USB connector.
When connected to LowSpeed USB (or USB 1.x),
speeds are limited (4x writing and 6x reading on CD,
0,7x reading on DVD) and it is not possible to write
on DVD or to watch video.
Suchen Sie den HiSpeed USB-Anschluss an
Ihrem PC.
A: Logo für den bevorzugten HiSpeed USBAnschluss.
B: Logo für den alternativen LowSpeed USB-
Anschluss.
Wenn eine Verbindung mit dem LowSpeed USB-Anschluss (oder USB 1.x) hergestellt wird, sind die
Geschwindigkeiten begrenzt (4 fach Schreiben und 6fach Lesen von CD, 0,7 fach Lesen von DVD) und ist
es nicht möglich, auf DVD zu schreiben oder Videos zu sehen.
Repérez le connecteur USB haut débit de votre PC.
A : Logo représentant le port USB haut débit ou le connecteur principal
B : Logo représentant le connecteur USB 1.x
Lorsque le câble est connecté au port USB bas débit (USB 1.x), la vitesse est limitée (4x en écriture et
6x en lecture pour les CD, 0,7x en lecture pour les DVD), et il n’est pas possible d’enregistrer des DVD
ni de regarder des vidéos.
Individuate il connettore USB ad alta velocità sul PC.
A: Logo connettore USB ad alta velocità (preferibile).
B: Logo connettore USB a bassa velocità (in alternativa).
Utilizzando una connessione USB a bassa velocità (o USB 1.x), le velocità sono limitate (4x in scrittura e
6x in lettura su CD, 0,7x in lettura su DVD) e non è possibile scrivere su DVD né guardare video.
Zoek op uw computer naar de HiSpeed USB-connector.
A: Symbool voor snelle HiSpeed USB-connector.
B: Symbool voor tragere LowSpeed USB-connector.
Bij een LowSpeed USB-verbinding (versie USB 1.x) zijn de snelheden beperkt (4x schrijven en 6x lezen
NL
I
F
D
UK
5
Page 9
99
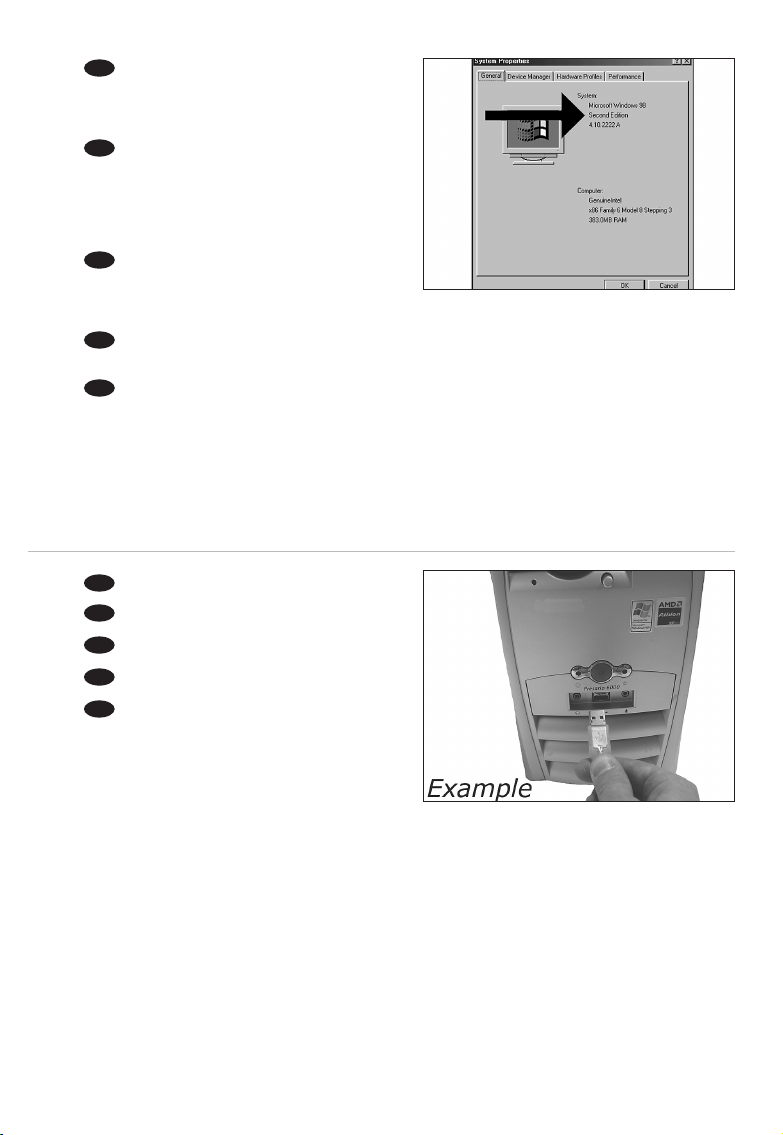
Identify your Operating System by right clicking
on "My Computer" and choosing "Properties".
When you are using Windows 98 Second Edition,
please go to step 11, otherwise continue with step 7.
Identifizieren Sie Ihr Betriebssystem, indem Sie
mit der rechten Maustaste auf "Arbeitsplatz" klicken
und "Eigenschaften" wählen.
Wenn Sie mit Windows 98 Second Edition arbeiten,
fahren Sie bitte mit Schritt 11 fort, andernfalls mit
Schritt 7.
Identifiez votre système d’exploitation en
cliquant avec le bouton droit sur "Poste de travail"
puis en sélectionnant "Propriétés".
Si vous utilisez Windows 98 Deuxième Édition, passez directement à l’étape 11 ; sinon, passez à l’étape 7.
Identificate il sistema operativo facendo clic su "Risorse del computer" e selezionando "Proprietà".
Se utilizzate Windows 98 Second Edition, passate al punto 11, altrimenti procedete al punto 7.
Klik met rechts op "Deze computer" en klik op "Eigenschappen" om na te gaan welk besturingssysteem u gebruikt. Gebruikt u Windows 98 Tweede Edition, ga dan naar stap 11. In andere gevallen gaat u
naar stap 7.
NL
I
F
D
UK
6
Connect the USB cable to the computer.
Schließen Sie das USB-Kabel an den Computer an.
Branchez le câble USB à l’ordinateur.
Collegate il cavo USB al computer.
Sluit de USB-kabel op de computer aan.
NL
I
F
D
UK
7
Page 10
1010
Windows XP will warn you when you
connect the SPD3200CC to a slow USB 1
connection.
Check step 5 again.
This is valid for Windows XP only.
Windows XP warnt Sie, wenn Sie das
SPD3200CC mit einem langsamen USB 1Anschluss verbinden. Kontrollieren Sie erneut
Schritt 5.
Dies gilt nur für Windows XP.
Windows XP affiche un message
d'avertissement si vous avez branché l'SPD3200CC
à un connecteur USB 1 (bas débit). Vérifiez l’étape
5. Cela ne vaut que pour Windows XP.
Windows XP emetterà un avviso alla connessione dell'SPD3200CC ad una connessione USB 1 lenta.
Verificate nuovamente il punto 5.
Questa procedura è valida solo per Windows XP.
Windows XP waarschuwt als u de SPD3200CC op een trage USB 1-connector aansluit.
Controleer via stap 5 of u de juiste connector gebruikt.
Dit geldt alleen voor Windows XP.
NL
I
F
D
UK
9
8
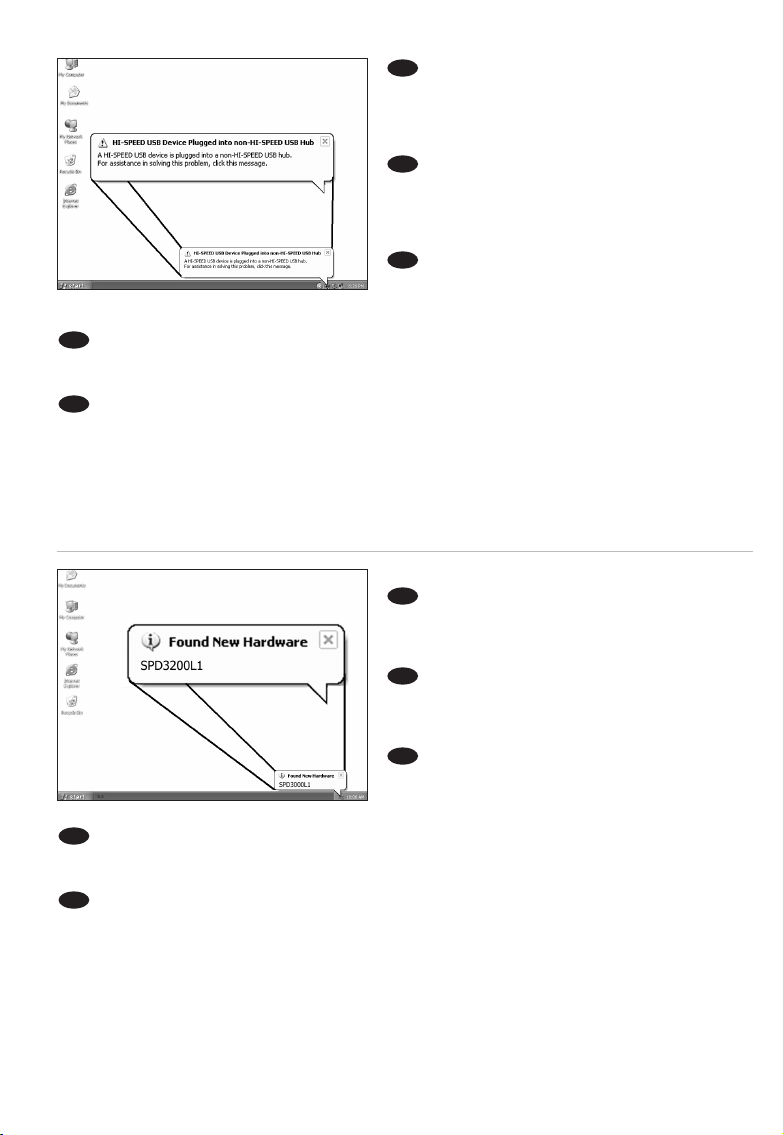
The drivers will be installed automatically.
This may take some seconds.
The popups shown are operating system
dependent.
Die Treiber werden automatisch installiert.
Dies kann einige Sekunden dauern.
Welche Anzeigen auf dem Bildschirm erscheinen,
hängt vom Betriebssystem ab.
Les pilotes sont installés automatiquement.
Cette opération peut prendre quelques secondes.
Les messages affichés varient selon le système
d’exploitation.
I driver verranno installati automaticamente.
Il completamento dell'operazione potrebbe richiedere alcuni secondi.
I messaggi visualizzati dipendono al sistema operativo utilizzato.
De stuurprogramma's worden automatisch geïnstalleerd.
Dit kan enkele seconden duren.
De getoonde vensters verschillen per besturingssysteem.
NL
I
F
D
UK
Page 11
11
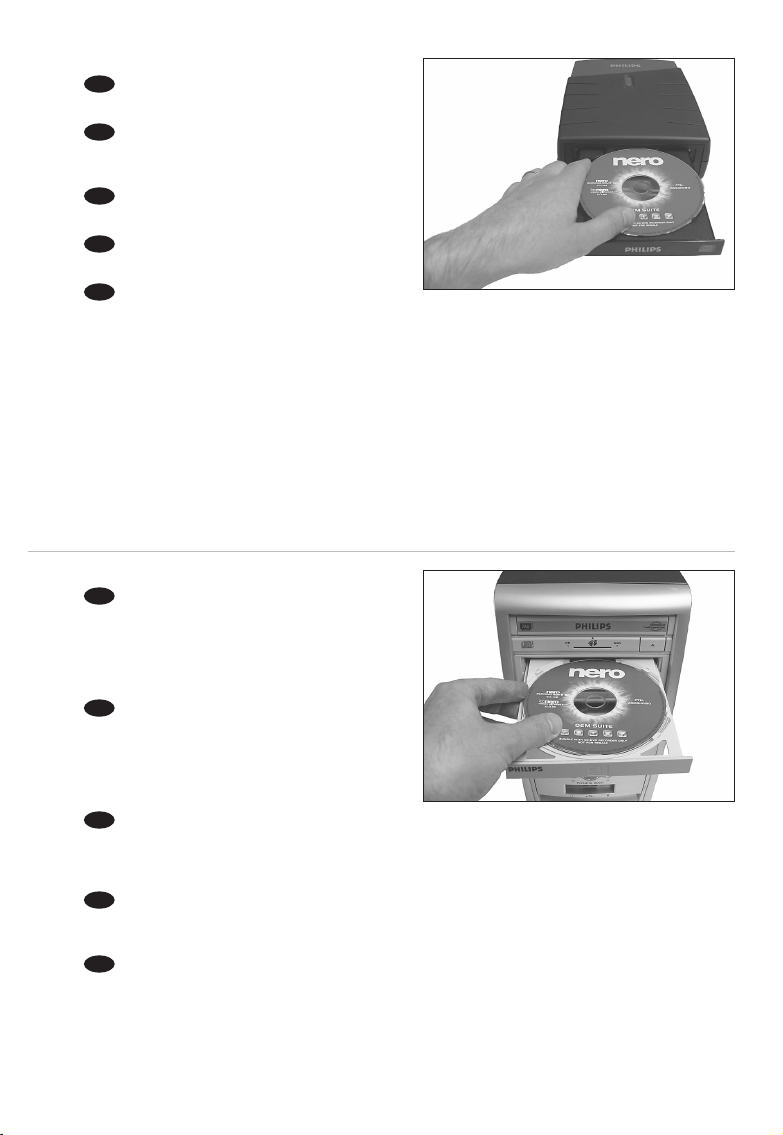
Insert the Nero Disc in the SPD3200CC.
Go to step 15!
Legen Sie die Nero-CD in das SPD3200CCLaufwerk ein.
Fahren Sie mit Schritt 15 fort!
Insérez le disque Nero dans l’SPD3200CC.
Passez à l'étape 15.
Inserite il disco di Nero nell'SPD3200CC.
Procedete al punto 15!
Leg de Nero-CD in de SPD3200CC.
Ga naar stap 15!
NL
I
F
D
UK
10
Windows 98 Second Edition only!
Insert the Nero disc in the CD-ROM device of your
computer, not in the SPD3200CC.
If you do not have a CD-ROM device on your
computer, please refer to the Frequently Asked
Questions.
Nur Windows 98 Second Edition!
Legen Sie die Nero-CD in das CDROM-Laufwerk
Ihres Computers ein, nicht in das SPD3200CC.
Wenn Sie kein CDROM-Laufwerk in Ihrem Computer
haben, sehen Sie bitte bei den häufig gestellten Fragen
nach.
Windows 98 Deuxième Édition uniquement !
Insérez le disque Nero dans le lecteur de CD-ROM de votre ordinateur, et non dans l’SPD3200CC.
Si votre ordinateur n’est pas équipé d’un lecteur de CD-ROM, consultez la section des Questions
fréquentes.
Solo per Windows 98 Second Edition!
Inserite il disco Nero nell'unità CD-ROM del computer, non nell'SPD3200CC.
Se nel computer non è installata un'unità CD-ROM, consultate le Domonde frequenti.
Alleen voor Windows 98 Tweede Edition!
Leg de Nero-disc in het CD-ROM-station van uw computer, niet in de SPD3200CC.
Heeft uw computer geen CD-ROM-station, kijk dan bij "Vaak gestelde vragen".
NL
I
F
D
UK
11
Page 12
1212
Windows 98 Second Edition only!
Wait until this screen pops up.
Nur Windows 98 Second Edition!
Warten Sie, bis diese Anzeige erscheint.
Windows 98 Deuxième Édition uniquement !
Attendez que cet écran apparaisse.
Solo per Windows 98 Second Edition!
Attendete la comparsa di questa finestra.
Alleen voor Windows 98 Tweede Edition!
Wacht tot het volgende scherm verschijnt.
NL
I
F
D
UK
13
12
Windows 98 Second Edition only!
Connect the USB cable to the computer.
Nur Windows 98 Second Edition!
Schließen Sie das USB-Kabel an den Computer an.
Windows 98 Deuxième Édition uniquement !
Branchez le câble USB à l’ordinateur.
Solo per Windows 98 Second Edition!
Collegate il cavo USB al computer.
Alleen voor Windows 98 Tweede Edition!
Sluit de USB-kabel op de computer aan.
NL
I
F
D
UK
Page 13
1313
14
Windows 98 Second Edition only!
The "Add New Hardware Wizard" will pop up.
Follow these steps:
A. Click “Next” in "The wizard searches for new
drivers…:".
B. Choose "Search for the best drivers…".
C. Choose "Specify a location".
D. Browse to the directory "Philips drivers" on the
Nero disc and click Next.
E. The drivers will be installed.
F. Continue with step 15.
Nur Windows 98 Second Edition!
Der Assistent zum Hinzufügen neuer Hardware
("Add New Hardware Wizard") erscheint. Führen Sie
die folgenden Schritte durch:
A. Klicken Sie bei "Der Assistent sucht nach neuen Treibern…:" auf "Weiter".
B. Wählen Sie "Suche nach den besten Treibern…".
C. Wählen Sie "Einen Ort spezifizieren".
D. Durchsuchen Sie das Verzeichnis "Philips drivers" auf der Nero-CD und klicken Sie auf "Weiter".
E. Die Treiber werden installiert.
F. Fahren Sie mit Schritt 15 fort.
Windows 98 Deuxième Édition uniquement !
L’Assistant Ajout de nouveau matériel apparaît.
Procédez comme suit :
A. Cliquez sur "Suivant" lorsque le message "L’Assistant recherche de nouveaux pilotes…" apparaît.
B. Choisissez "Rechercher le meilleur pilote pour votre périphérique…".
C. Choisissez "Emplacement spécifique".
D. Accédez au répertoire "Philips drivers" sur le disque Nero puis cliquez sur Suivant.
E. Les pilotes sont alors installés.
F. Passez à l’étape 15.
Solo per Windows 98 Second Edition!
Compare la finestra "Installazione guidata nuovo hardware".
Svolgete i seguenti passaggi:
A. Fate clic su "Avanti" in "Saranno cercati i nuovi driver…:".
B. Selezionate "Ricercare un driver migliore…".
C. Selezionate "Specificare un percorso".
D. Selezionate la cartella dei driver "Philips drivers" sul disco Nero e fate clic su Avanti.
E. I driver verranno installati.
F. Procedete al punto 15.
Alleen voor Windows 98 Tweede Edition!
De "Wizard Nieuwe hardware toevoegen" verschijnt.
Voer de volgende stappen uit:
A. Klik bij "De wizard zoekt nieuwe stuurprogramma's..." op "Volgende".
B. Selecteer "Naar het beste stuurprogramma zoeken…".
C. Selecteer "Een locatie opgeven".
D. Ga op de Nero-CD naar de map "Philips drivers" en klik daar op "Volgende".
E. De stuurprogramma's worden geïnstalleerd.
F. Ga door met stap 15.
NL
I
F
D
UK
Page 14

1414
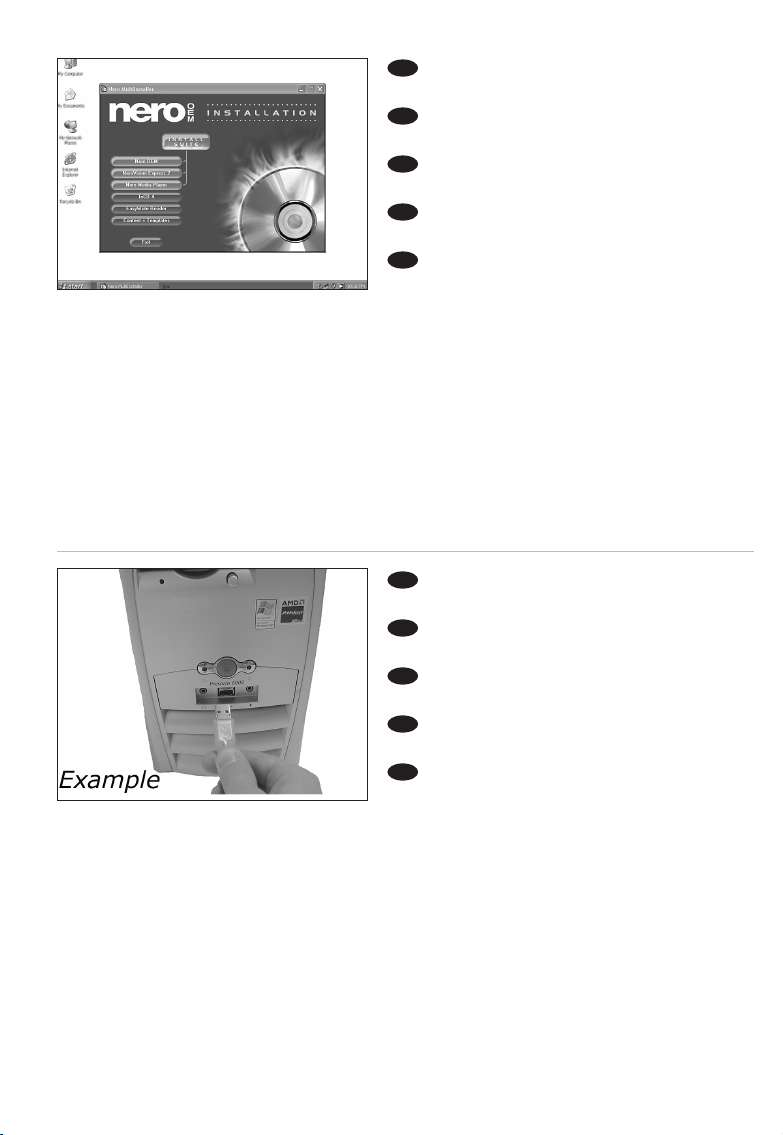
Click on "Install Suite" to install the main
software.
The software will ask to reboot the PC at the end
of the installation process.
Klicken Sie auf "Suite installieren", um die
Haupt-Software zu installieren.
Die Software fordert Sie am Ende des
Installationsvorgangs auf, den PC neu zu booten.
Cliquez sur "Install Suite" (installer la suite)
pour installer le programme principal.
À la fin de l’installation, vous êtes invité à
redémarrer le PC.
Fate clic su "Installa Suite" per installare il software principale.
Il software richiederà di riavviare il PC al termine del processo d'installazione.
Klik op "Install Suite" om het hoofdprogramma te installeren.
Na het installeren vraagt het programma u de computer opnieuw op te starten.
NL
I
F
D
UK
15
After installing the software, you should reboot your computer.
Congratulations.Your Philips device is now ready for use.
How to use it and what software applications you need to perform your tasks,is described in the
next chapters of this How To Manual.
Find more info on www.philips.com/storage
Find updates on on www.philips.com/storageupdates
Nach der Installation der Software sollten Sie Ihren Computer neu starten.
Herzlichen Glückwunsch. Ihr Philips Gerät ist jetzt einsatzbereit.
Wie Sie es benutzen und welche Software-Anwendungen Sie benötigen,um bestimmte
Aufgaben auszuführen, wird in den nächsten Kapiteln dieses Handbuchs beschrieben.
Weitere Informationen finden Sie unter www.philips.com/storage
Updates finden Sie unter www.philips.com/storageupdates
Après avoir installé le logiciel,vous devez redémarrer votre ordinateur.
Félicitations! Votre périphérique Philips est maintenant prêt.
Son mode d’emploi et les applications logicielles requises sont décrits dans les chapitres suivants
de ce manuel d'utilisation.
Pour plus d'infos :www.philips.com/storage
Pour des mises à jour :www.philips.com/storageupdates
Terminata l'installazione del software, è necessario riavviare il computer.
Congratulazioni. La periferica Philips è ora pronta per l'uso.
I seguenti capitoli di questa guida contengono informazioni sull'uso della periferica e sul software
necessario per le varie attività
Per maggiori informazioni, visitare il sito all'indirizzo www.philips.com/storage
Gli aggiornamenti sono disponibili all'indirizzo www.philips.com/storageupdates
Na het installeren van de software moet u de computer opnieuw opstarten.
Gefeliciteerd! Uw Philips-product is nu startklaar.
De volgende hoofdstukken van deze handleiding beschrijven het gebruik en de software die u
nodig hebt.
Bezoek www.philips.com/storage voor meer informatie
Bezoek www.philips.com/storageupdates voor updates
NL
I
F
D
UK
16
Page 15

15
How to disconnect the
SPD3200CC without shutting
down the computer?
Wie kann man die Verbindung zum SPD3200CC trennen,
ohne den Computer herunterzufahren?
Comment débrancher l’SPD3200CC sans arrêter l’ordinateur?
Come si disconnette l'SPD3200CC senza spegnere il computer?
Hoe ontkoppel ik de SPD3200CC zonder de computer uit te zetten?
The next pages show how to disconnect
your new SPD3200CC to a computer.
The screenshots are representing the
Microsoft Windows XP™ operating
system.
Other operating systems may show
different popups.
Auf den nächsten Seiten wird erläutert,
wie Sie Ihr neues SPD3200CCLaufwerk von einem Computer trennen
können.
Die dargestellten Bildschirmanzeigen
beziehen sich auf das Betriebssystem
Microsoft Windows XP™.
Bei anderen Betriebssystemen können
andere Anzeigen erscheinen.
Les pages qui suivent montrent
comment déconnecter votre nouvel
SPD3200CC d’un ordinateur.
Les copies d’écran ont été réalisées
sous le système d’exploitation Microsoft
Windows XP™.
Les messages affichés peuvent varier
selon les systèmes d’exploitation.
Nelle seguenti pagine viene spiegato
come scollegare il vostro nuovo
SPD3200CC dal computer.
Le finestre sono state catturate in
ambiente Microsoft Windows XP™.
Per gli altri sistemi operativi, le finestre
di dialogo risultare differenti.
De volgende pagina's beschrijven hoe u
uw nieuwe SPD3200CC van uw
computer ontkoppelt.
De voorbeeldschermen zijn ontleend
aan het besturingssysteem Microsoft
Windows XP™.
Bij andere besturingssystemen kunnen
deze schermen anders zijn.
UK D F
I NL
15
Page 16
16
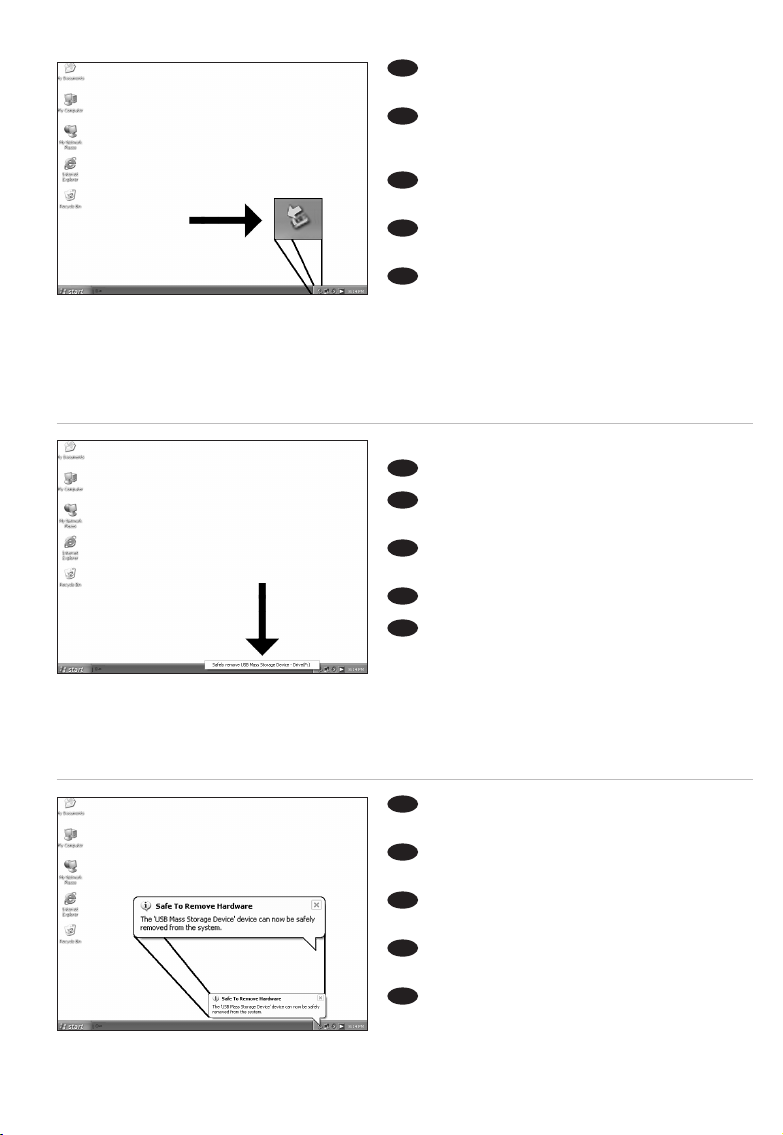
To disconnect the SPD3200CC without
shutting down your computer, click on this symbol.
Um die Verbindung zum SPD3200CC zu
trennen, ohne den Computer herunterzufahren,
klicken Sie auf dieses Symbol.
Pour déconnecter l’SPD3200CC sans arrêter
l’ordinateur, cliquez sur cette icône.
Per disconnettere l'SPD3200CC senza
spegnere il computer, fate clic su questo simbolo.
Klik op dit pictogram als u de SPD3200CC
wilt ontkoppelen zonder uw computer uit te
zetten.
NL
I
F
D
UK
Click on "Safely remove USB…".
Klicken Sie auf "USB auf sichere Weise
entfernen…".
Cliquez sur "Safely remove USB"
(Retirer un périphérique USB en toute sécurité…).
Fate clic su "Rimozione sicura USB…".
Klik op "USB veilig verwijderen…".
NL
I
F
D
UK
2
When this popup appears, you may
disconnect the SPD3200CC.
Wenn diese Anzeige erscheint, können Sie
die Verbindung zum SPD3200CC trennen.
Lorsque ce message apparaît, vous pouvez
déconnecter l’SPD3200CC.
Quando compare questo messaggio potete
scollegare l'SPD3200CC.
Als dit venster verschijnt, kunt u de
SPD3200CC ontkoppelen.
NL
I
F
D
UK
3
1
Page 17
17
How to print a label
on a disc?
Wie druckt man ein Disc-Label?
Comment imprimer une étiquette sur le disque ?
Come si stampa l'etichetta del disco?
Hoe druk ik een label af op een disc?
This manual will show you how to print
a label on a disc using the LightScribe™
functionality.
This can only be done on discs, which
have the LightScribe™ label, not on
“printable” discs. Below is an example
of this logo.
In diesem Handbuch wird beschrieben,
wie man mit der Funktion LightScribe™
ein Disc-Label drucken kann.
Dies ist nur bei Discs mit dem Logo
LightScribe™ möglich, nicht bei
“bedruckbaren” Discs. Dieses Logo
sieht folgendermaßen aus:
Ce manuel vous indique comment
imprimer une étiquette sur le disque
grâce à la fonctionnalité LightScribe™.
Cette opération n’est possible que sur
les disques portant l’étiquette
LightScribe™, pas sur les disques
“imprimables“. Vous trouverez
ci-dessous un exemple de ce logo.
Questa guida descrive come stampare
un etichetta su un disco mediante la
funzione LightScribe™.
Questa funzione presuppone l'uso di
dischi marcati LightScribe™, non su
dischi “stampabili”. Segue un esempio
del logo.
In deze handleiding wordt beschreven
hoe u met behulp van de functie
LightScribe™ een label kunt afdrukken
op een disc.
Dit kan alleen op discs met het label
LightScribe™, niet op "printable" discs.
Hieronder ziet u een voorbeeld van dit
logo.
UK D F
I NL
Page 18
18
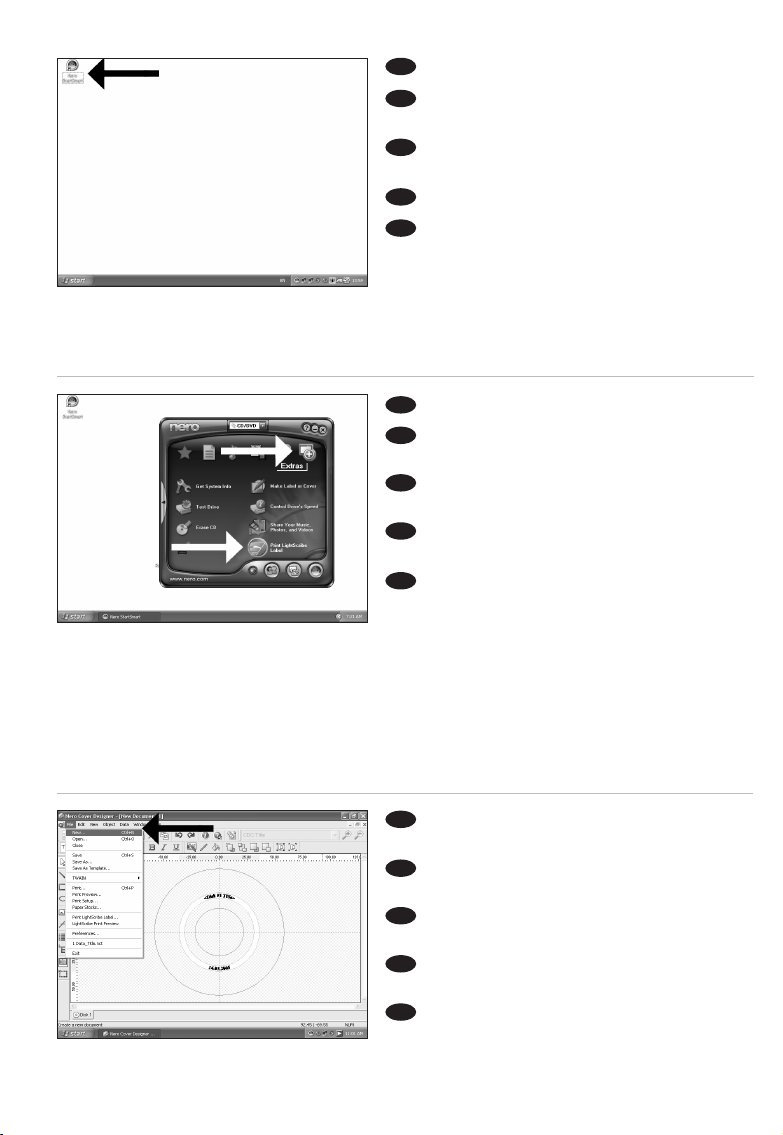
CoverDesigner opens. Choose "File" and
"New".
Der CoverDesigner wird aufgerufen.
Wählen Sie "Datei" und "Neu".
CoverDesigner démarre. Choisissez "Fichier"
et "Nouveau".
Si apre CoverDesigner. Selezionate "File" e
"Nuovo".
CoverDesigner wordt geopend.
Kies "Bestand" en "Nieuw".
Start "Nero StartSmart" from the desktop.
Starten Sie "Nero StartSmart" von Ihrer
Oberfläche aus.
Démarrez "Nero StartSmart" depuis le
bureau de Windows.
Aprite "Nero StartSmart" dal desktop.
Start vanaf het bureaublad het programma
"Nero StartSmart".
D
F
I
NL
Choose "Extra" and "Print LightScribe Label".
Wählen Sie "Extras" und "LightScribe Label
drucken".
Choisissez "Extras" puis "Imprimer l’étiquette
LightScribe".
Selezionate "Extra" e "Stamp. Etichetta
LightScribe".
Selecteer "Extra" en "LightScribe afdrukken".
UK
3
2
1
D
F
I
NL
UK
D
F
I
NL
UK
Page 19
19
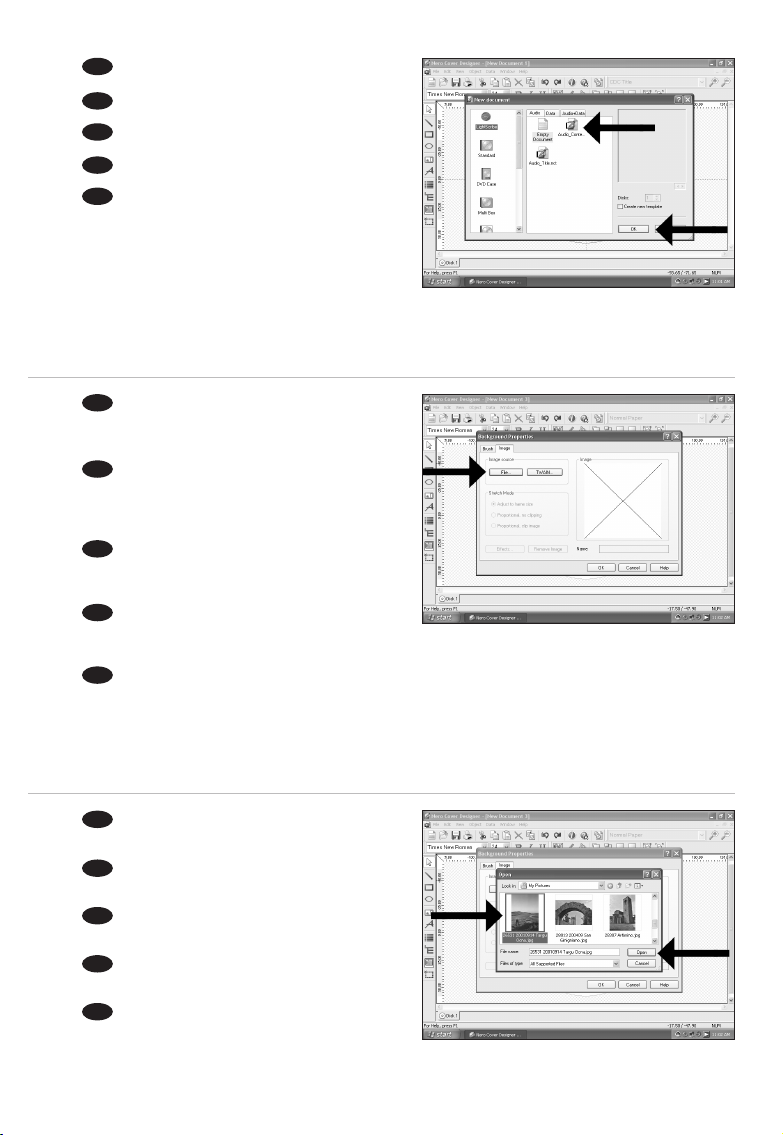
Choose "Empty document" and "OK".
Wählen Sie "Leeres Dokument" und "OK".
Choisissez "Document vide" et "OK".
Selezionate "Documento vuoto" e "OK".
Kies "Leeg document" en "OK".
4
5
6
D
F
I
NL
UK
You can import a picture to fill the complete
surface of the disc by double clicking on the working
area. Click on "File".
Sie können ein Bild importieren, um die
komplette Oberfläche der Disc auszufüllen, indem
Sie den Arbeitsbereich doppelt anklicken. Klicken Sie
auf "Datei".
Vous pouvez importer une image pour
remplir la surface du disque en double-cliquant sur la
zone de travail. Cliquez sur "Fichier".
Facendo doppio clic sull'area di lavoro è
possibile importare un'immagine per coprire
completamente la superficie del disco. Fate clic su "File".
U kunt een afbeelding importeren om het volledige oppervlak van de disc mee te vullen door te
dubbelklikken op het werkgebied. Klik op "Bestand".
D
F
I
NL
UK
Choose your background image and click
"Open".
Wählen Sie Ihr Hintergrundbild und klicken
Sie auf "Öffnen".
Choisissez l’image d’arrière-plan puis cliquez
sur "Ouvrir ".
Selezionate l'immagine di sfondo e fate clic su
"Apri".
Selecteer het achtergrondbeeld en klik op
"Openen".
D
F
I
NL
UK
Page 20
20
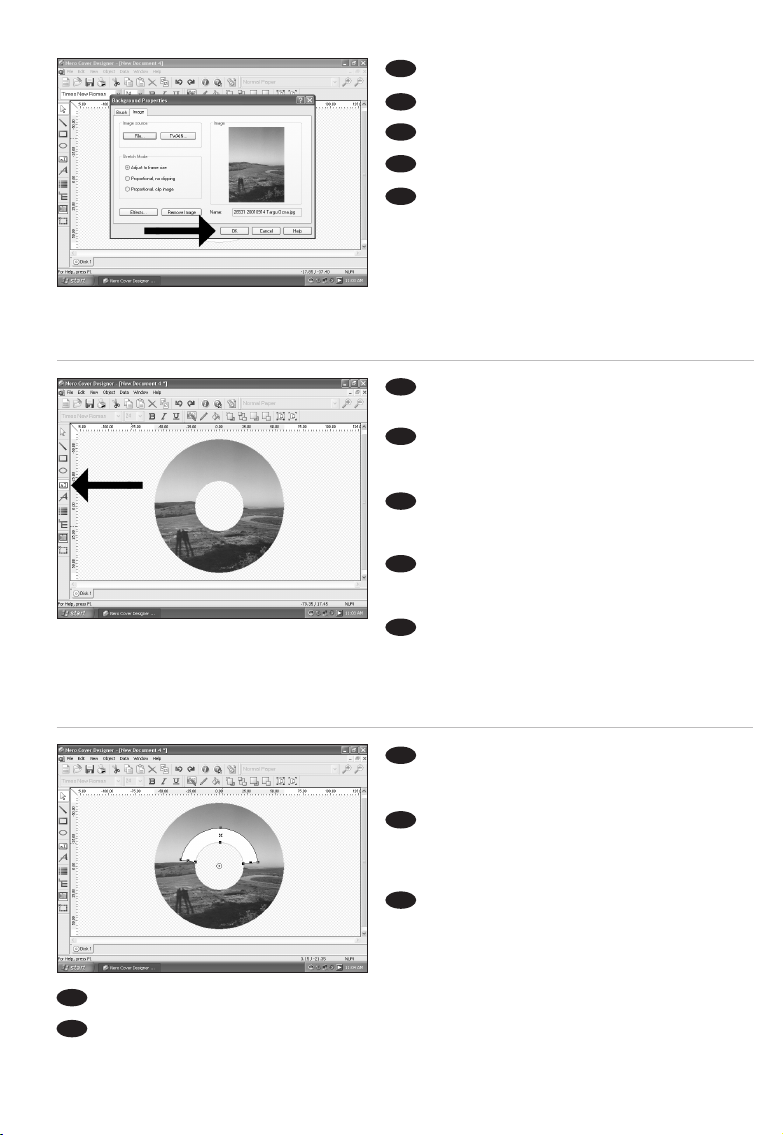
Click "OK".
Klicken Sie auf "OK".
Cliquez sur "OK".
Fate clic su "OK".
Klik op "OK".
UK
D
F
I
NL
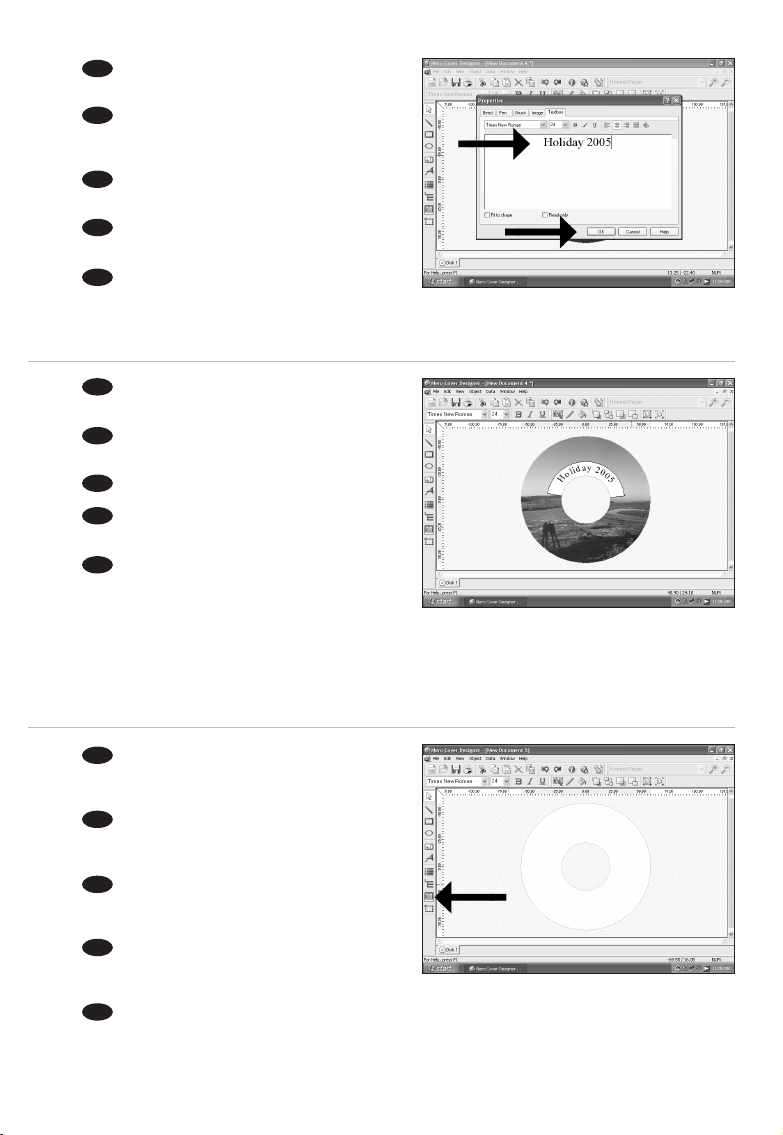
Click on the "Text Box Tool" to enter text.
If you only print text, the disc will be printed faster.
Um Text einzugeben, klicken Sie auf
"Textbox-Werkzeug". Wenn Sie nur Text drucken,
wird die Disc schneller gedruckt.
Cliquez sur l'outil "Boîte de Texte" pour saisir
le texte. Si vous imprimez seulement du texte,
l’impression du disque sera plus rapide.
Fate clic su "Strumento riquadro testo" per
inserire del testo. Se il contenuto è solo testo, la
stampa avverrà con maggiore rapidità.
Klik op "Tekstvak" om tekst in te voeren.
Als u alleen tekst afdrukt, wordt de disc sneller
bedrukt.
UK
D
F
I
NL
9
8
7
Draw the area where you want to add the
text. The programme will bend this to allow faster
printing.
Ziehen Sie das Kreissegment auf, in das der
Text eingefügt werden soll. Das Programm wird
den Text der Kreisform anpassen, um ein
schnelleres Drucken zu ermöglichen.
Dessinez la zone où vous souhaitez ajouter
le texte. Le programme l’adaptera pour accélérer
l’impression.
Indicate l'area in cui aggiungere il testo. Il programma curverà quest'area per accelerarne la stampa.
Schets het gebied waar u de tekst wilt toevoegen. Het programma buigt de tekst om sneller te
kunnen afdrukken.
UK
D
F
I
NL
Page 21
21
10
11
12
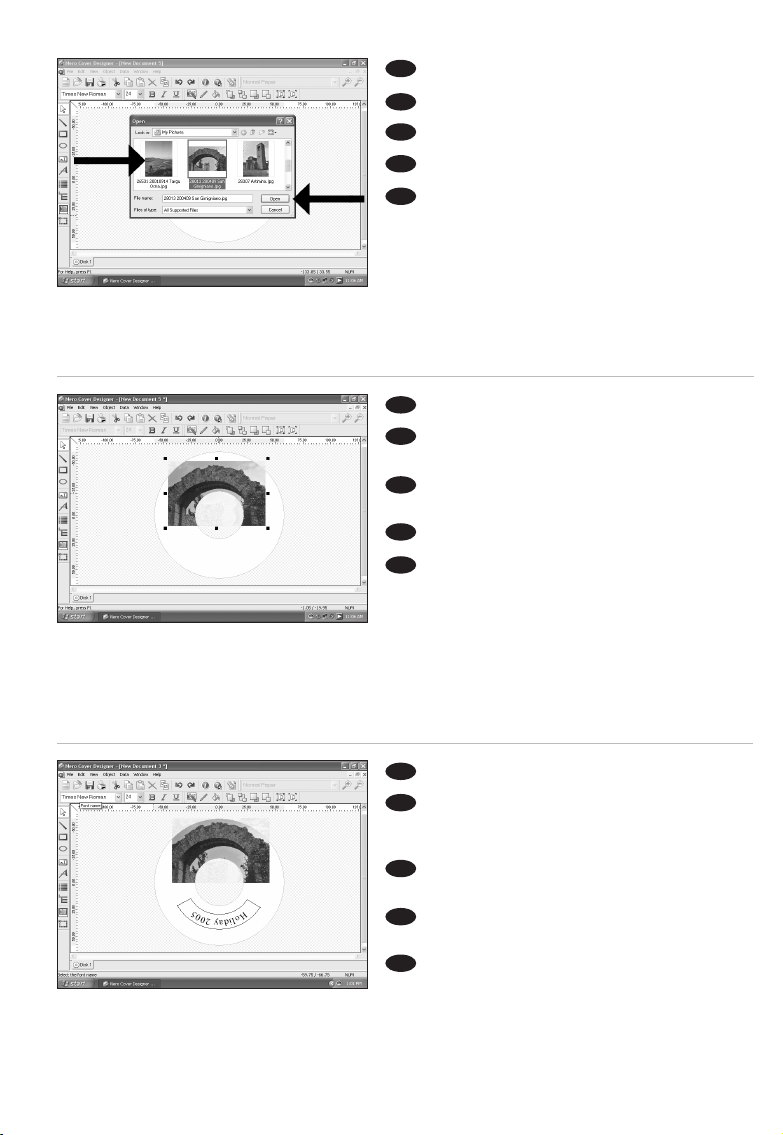
Doubleclick on the text area you just created,
insert the text and click "OK".
Doppelklicken Sie auf den gerade erstellten
Textbereich, geben Sie den Text ein und klicken Sie
auf "OK".
Double-cliquez sur la zone de texte que vous
venez de créer, insérez le texte puis cliquez sur "OK".
Fate doppio clic sull'area di test appena create,
inserite il testo e fate clic su "OK".
Dubbelklik op het tekstvak dat u zojuist hebt
gemaakt, voeg de tekst in en klik op "OK".
D
F
I
NL
UK
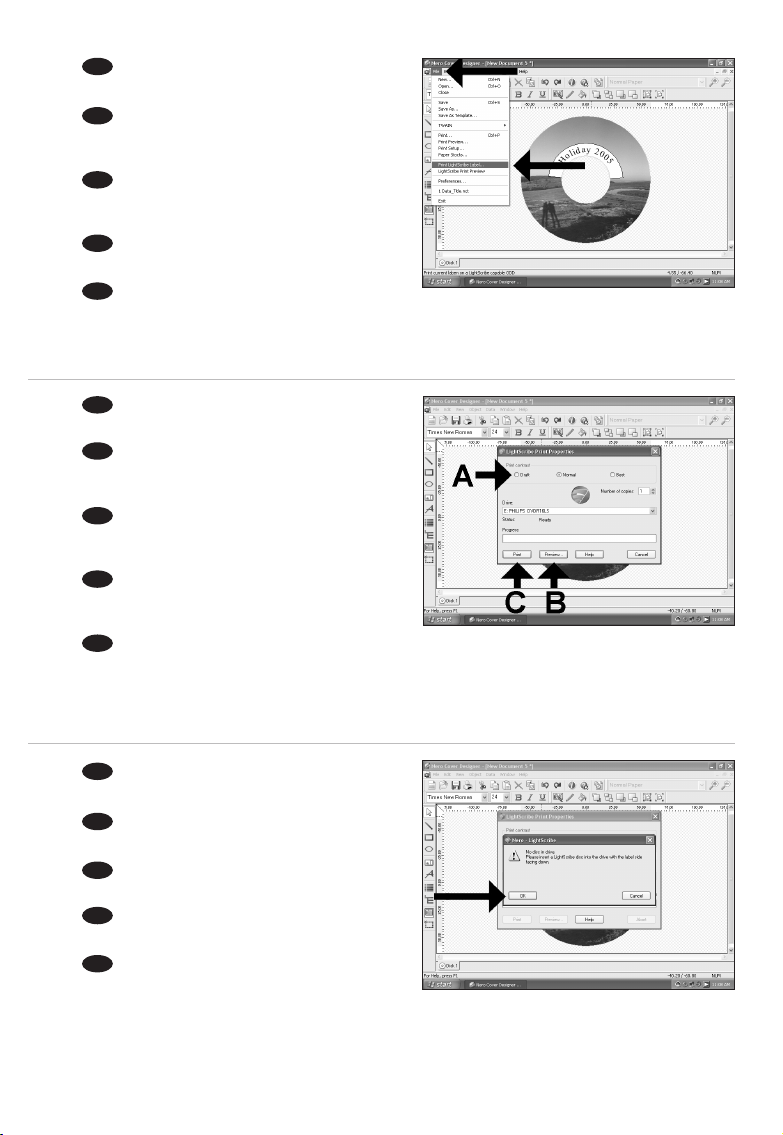
This is how the background and the text
will look.
Hintergrund und Text werden
folgendermaßen aussehen.
Voici l’aspect de l’arrière-plan et du texte.
Ecco un'anteprima del testo e dello sfondo
specificati.
Hier ziet u hoe de achtergrond en de tekst
eruit zullen zien.
D
F
I
NL
UK
Alternatively, you can also position a picture
where you like on the disc area. Click on the "Image
Tool".
Alternativ können Sie auch ein Bild an
beliebiger Stelle auf der Disc-Fläche anordnen.
Klicken Sie auf das "Bild-Werkzeug".
Sinon, vous pouvez également placer une
image à l'endroit de votre choix sur le disque.
Cliquez sur "l’Outil image".
In alternativa, è anche possibile posizionare
un'immagine sull'area del disco. Fate clic su
"Strumento immagine".
U kunt een afbeelding ook op een willekeurige plek op het discoppervlak plaatsen. Klik op "Afbeelding".
D
F
I
NL
UK
Page 22
22
Choose your image and click "Open".
Wählen Sie Ihr Bild und klicken Sie auf "Öffnen".
Choisissez l’image puis cliquez sur "Ouvrir".
Selezionate l'immagine e fate clic su "Apri".
Selecteer de afbeelding en klik op "Openen".
15
14
13
UK
D
F
I
NL
Position the image so that it looks nice.
Positionieren Sie das Bild so, dass das Ganze
gut aussieht.
Placez l’image telle que vous souhaitez la voir
apparaître sur le disque.
Posizionate l'immagine sul disco.
Plaats de afbeelding zodanig, dat u een fraai
ogende disc krijgt.
UK
D
F
I
NL
You can add a text like in steps 8-10.
Auf Wunsch können Sie einen Text
hinzufügen, wie in den Schritten 8 bis 10
beschrieben.
Vous pouvez ajouter du texte, comme aux
étapes 8-10.
Potete aggiungere del testo, come descritto
nei punti 8-10.
U kunt tekst toevoegen zoals bij de stappen
8 - 10 is behandeld.
UK
D
F
I
NL
Page 23
23
16
17
18
When finished designing your label, choose
"File" and "Print LightScribe Label".
Wenn Sie mit der Gestaltung des Labels fertig
sind, wählen Sie "Datei" und "LightScribe Label
drucken".
Lorsque vous avez fini de concevoir
l’étiquette, choisissez "Fichier" et "Imprimer l’étiquette
LightScribe".
Al termine, fare, selezionate "File" e
"Stamp. Etichetta LightScribe".
Als u klaar bent met het ontwerpen van uw
label, kies "Bestand" en "LightScribe afdrukken".
UK
D
F
I
NL
Choose the print quality (A). You can see a
preview (B) and start printing (C).
Wählen Sie den Druckkontrast (A).
Sie können sich eine Vorschau (B) ansehen und dann
den Druckvorgang starten (C).
Choisissez la qualité d’impression (A).
Vous pouvez afficher un perçu avant impression (B)
puis lancer l’impression (C).
Selezionate il contrasto stampa (A).
E' possibile vedere un'anteprima (B) ed avviare la
stampa (C).
Selecteer de afdrukkwaliteit (A). U kunt een voorproef (B) bekijken en beginnen met afdrukken (C)
UK
D
F
I
NL
Insert a Lightscribe disc, the label facing down
and click "OK".
Legen Sie eine Lightscribe Disc mit dem Logo
nach unten ein und klicken Sie auf "OK".
Insérez un disque Lightscribe l’étiquette vers le
bas, puis cliquez sur "OK".
Inserite un disco Lightscribe con l'etichetta
rivolta verso il basso e fate clic su "OK".
Plaats een Lightscribe-disc met de bedrukte
zijde naar beneden en klik op "OK".
UK
D
F
I
NL
Page 24
24
The disc is now printed.
Jetzt wird die Disc bedruckt.
L’impression du disque commence.
Il disco viene quindi stampato.
De disc-label wordt nu afgedrukt.
UK
D
F
I
NL
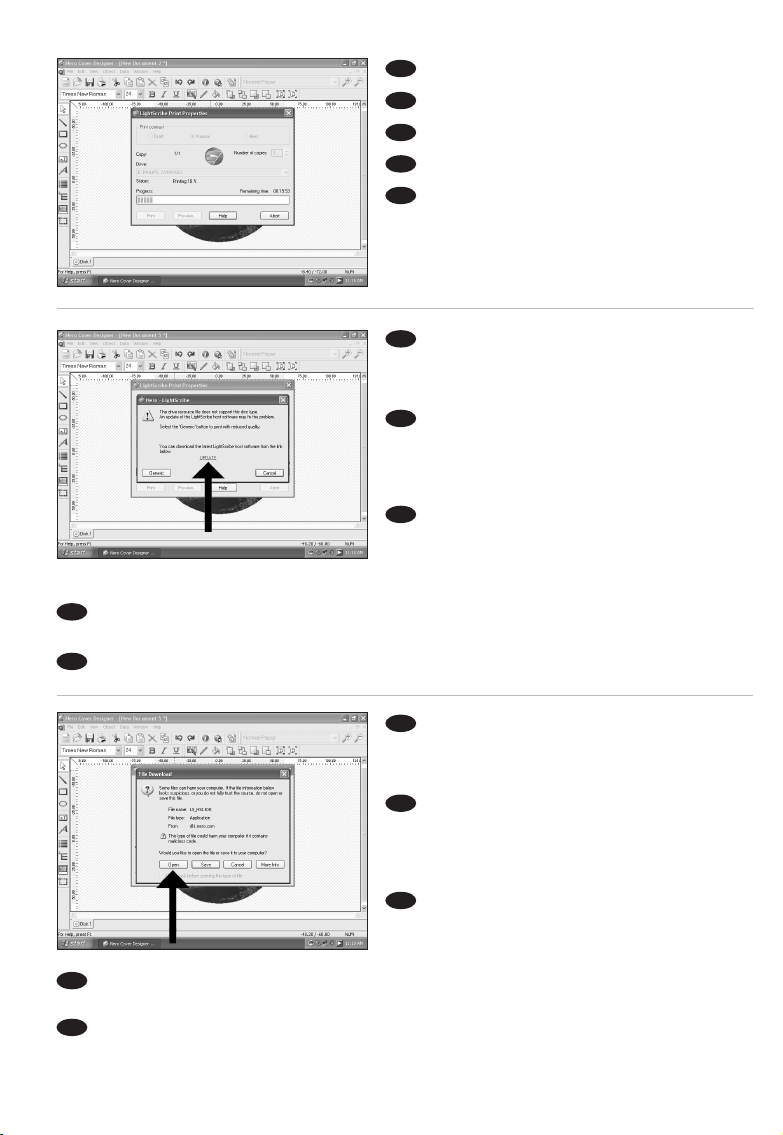
You may be asked to update your
LightScribe application when this is required to
ensure good printing quality. Click "To download
the latest LightScribe Host software click here".
Eventuell werden Sie aufgefordert, Ihre
LightScribe Anwendung zu aktualisieren, wenn dies
erforderlich ist, um eine gute Druckqualität zu
gewährleisten. Klicken Sie auf "To download the
latest LightScribe Host software click here".
Vous pouvez également être amené à
mettre à jour votre application LightScribe si
nécessaire pour bénéficier d’une bonne qualité
d’impression. Cliquez sur "To download the latest
LightScribe Host software click here" (mettre à jour).
Per garantire sempre una buona qualità di stampa può venire richiesto di effettuare l'aggiornamento
dell'applicazione LightScribe. Fate clic su "To download the latest LightScribe Host software click here".
Er kan u worden gevraagd of u uw LightScribe-toepassing wilt bijwerken als dit nodig is om een
goede afdrukkwaliteit te garanderen. Klik op "To download the latest LightScribe Host software click here".
21
20
19
UK
D
F
I
NL
Choose "Open" and click "Next" until the
update has been installed. After the installation, you
will have to cancel the print process (save your
design) and start again.
Wählen Sie "Öffnen" und klicken Sie auf
"Weiter", bis das Update installiert ist. Nach der
Installation muss der Druckvorgang abgebrochen
(speichern Sie Ihren Entwurf) und erneut gestartet
werden.
Choisissez "Ouvrir" puis cliquez sur "Suivant"
jusqu’à ce que l’installation de la mise à jour soit
terminée. Ensuite, vous devez annuler l’impression
(et enregistrer votre image) puis recommencer.
Selezionate "Apri" e fate clic su "Avanti" fio a completare l'installazione dell'aggiornamento.
Al termine dell'installazione, sarà necessario annullare il processo di stampa (salvando il progetto) e riavviarla.
Selecteer "Openen" en klik op "Volgende" totdat de update is geïnstalleerd. Na de installatie moet u het
afdrukproces annuleren (sla uw ontwerp op) en opnieuw beginnen.
UK
D
F
I
NL
Page 25
2525
How to capture video from
a digital DV-camcorder?
Videos von einem digitalen DV-Camcorder aufnehmen
Comment acquérir les images vidéo d’une caméra numérique DV ?
Come registrare un video da una DV-camcorder digitale
Hoe kopieer ik de opnames van een digitale DV-camcorder
naar mijn computer?
This manual shows an example on how
to capture video from a digital
DV-camcorder which is connected via
FireWire (IEEE1394) to the computer.
In diesem Handbuch wird an einem
Beispiel gezeigt, wie ein Video von
einem digitalen DV-Camcorder
aufgenommen wird, der über FireWire
(IEEE1394) an den Computer
angeschlossen ist.
Ce manuel illustre la procédure
d’acquisition d’images vidéo à partir
d’une caméra numérique DV connectée
à l’ordinateur par le biais d’un port
FireWire (IEEE1394).
Questo manuale mostra un esempio di
come registrare un video da una
DV-camcorder digitale connessa al
computer via FireWire (IEEE1394).
Deze handleiding beschrijft het
kopiëren van opnames gemaakt met
een digitale DV-camcorder naar de
computer via een FireWire-aansluiting
(IEEE1394).
The application software used here is:
Nero Vision Express from Nero AG
25
UK D F
I NL
Page 26
26
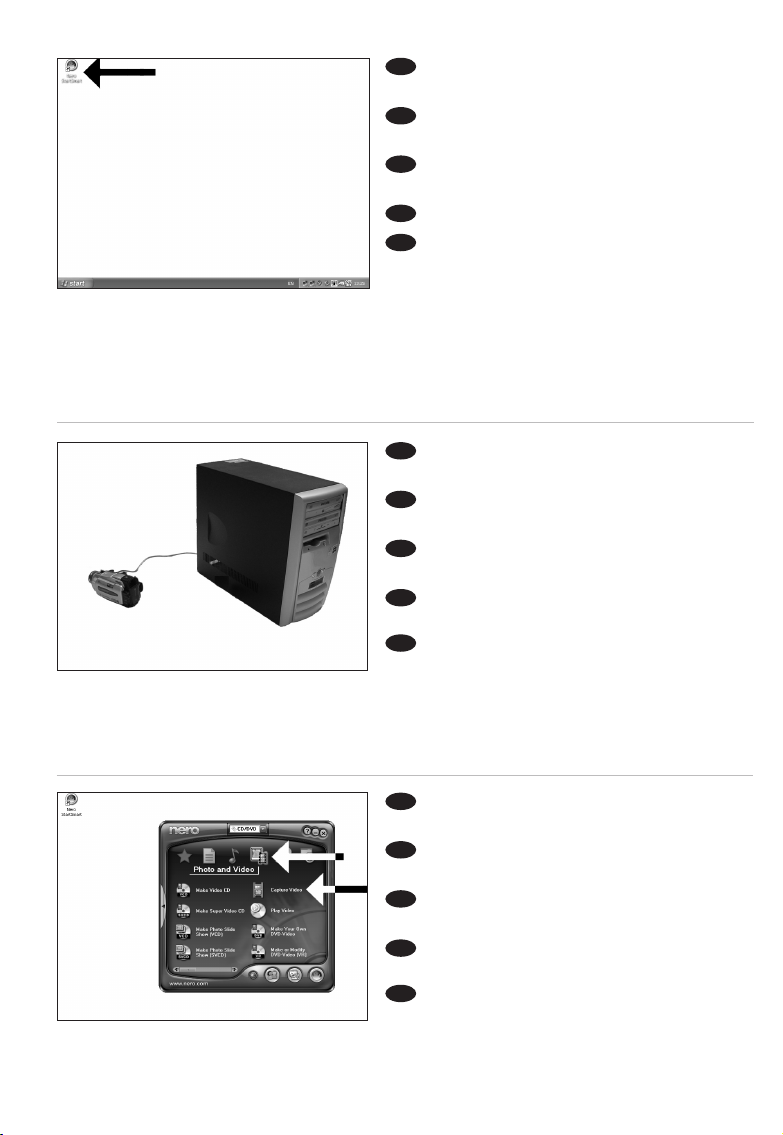
Choose "Photo and video" and click
"Capture video".
Wählen Sie "Photo und Video" und klicken
Sie auf "Video aufnehmen".
Choisissez "Photo et vidéo" puis cliquez sur
"Capturer une vidéo".
Selezionare "Foto e video" e fare clic su
"Cattura video".
Kies "Foto en video" en klik op "Video
vastleggen".
Start "Nero StartSmart" from the
desktop.
Starten Sie "Nero StartSmart" von Ihrer
Oberfläche aus.
Lancez "Nero StartSmart" depuis le
bureau.
Aprire "Nero StartSmart" dal desktop.
Start "Nero StartSmart" vanaf het
bureaublad.
UK
D
F
I
NL
Connect your camera to the computer and
switch it on.
Verbinden Sie Ihre Kamera mit dem
Computer und schalten Sie sie ein.
Connectez votre caméra à l’ordinateur et
allumez-la.
Collegare la camera al computer ed
accendere.
Sluit uw camera op de computer aan en
schakel hem in.
UK
D
F
I
NL
3
2
1
UK
D
F
I
NL
Page 27

27
Choose your DV-Camcorder and use the
buttons to control your DV-camera. Press the "Record"
button to record video.
Wählen Sie Ihren DV-Camcorder und benutzen
Sie die Tasten, um Ihre DV-Kamera zu steuern. Drücken
Sie die Taste "Aufnehmen", um Videoinformationen
aufzunehmen.
Choisissez votre caméscope DV et utilisez les
boutons de commande. Appuyez sur le bouton
"Enregistrer" pour enregistrer de la vidéo.
Selezionate il Camcorder DV ed utilizzate i tasti
per controllare la camera-DV. Premere il tasto "Registra"
per registrare il video.
Selecteer uw DV-Camcorder en gebruik de knoppen om uw DV-camera te bedienen. Druk op de knop
"Opnemen" om videobeelden op te nemen.
UK
D
F
I
NL
4
5
6
During capturing, you will see the progress
here.
Während der Aufnahme sehen Sie hier den
Fortschritt.
La progression de l’acquisition est affichée ici.
Durante la cattura qui viene visualizzata la sua
progressione.
Tijdens het opnemen ziet u hier de voortgang.
UK
D
F
I
NL
When all video sequences are captured, click
"Next".
Wenn alle Videosequenzen aufgenommen
sind, klicken Sie auf "Weiter".
Une fois l’acquisition de toutes les séquences
vidéo terminée, cliquez sur "Suivant".
Dopo aver catturato tutte le sequenze video,
fare clic su "Avanti".
Na het opnemen van alle videofragmenten klikt
u op "Verder".
UK
D
F
I
NL
Page 28
28
Now, go to step 5 of the next chapter (How to make a video disc from files…) to continue.
Fahren Sie jetzt mit Schritt 5 des nächsten Kapitels fort (Herstellen einer Video-Disc aus Dateien …)
Passez maintenant à l’étape 5 du chapitre suivant (Comment créer un disque vidéo à partir de
fichiers…) pour continuer.
Ora, procedete al punto 5 del seguente capitolo (Come si crea un video disco con file…)
Ga nu naar stap 5 van het volgende hoofdstuk (Hoe maak ik een videodisc van bestanden…)
om door te gaan.
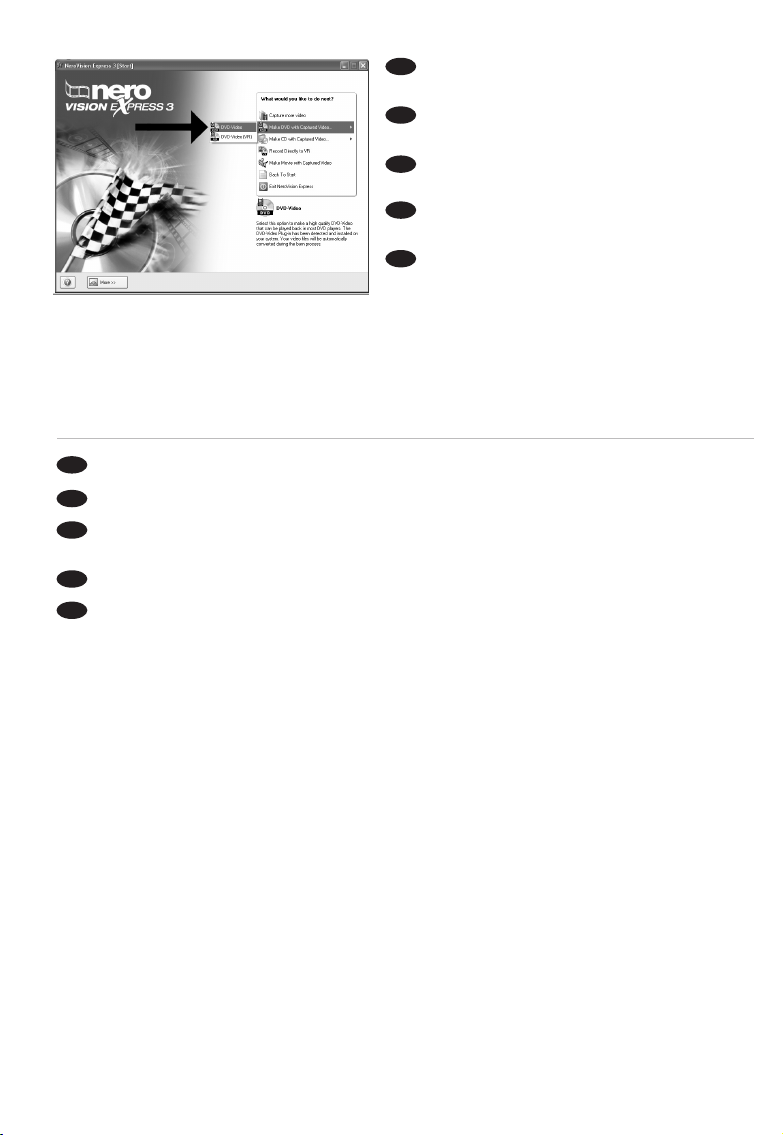
Choose "Make DVD with captured video"
and "DVD-Video".
Wählen Sie "DVD mit aufgenommenen
Videodaten erstellen" und "DVD-Video".
Choisissez "Créer un DVD avec la vidéo
capturée" et "DVD-Vidéo".
Selezionare "Crea DVD con video acquisito"
e "DVD-Video".
Kies "DVD met vastgelegde video maken" en
dan "DVD-Video".
8
7
UK
D
F
I
NL
UK
D
F
I
NL
Page 29
How to make a video disc from video
files which are on the hard disk or a disc?
Wie erstellt man eine Video Disk von Video-Dateien,die sich auf der Festplatte
oder einer Disk befinden?
Comment créer un disque vidéo à partir de fichiers vidéo enregistrés
sur le disque dur ou sur un disque ?
Come si crea un video disc con file video memorizzati sull'hard disk o su un disco?
Hoe maak ik een videodisc met bestanden die nu op de harde schijf
of een andere disc staan?
This manual will show you how to make
a DVD-Video from source files which
are stored on your hard disc or on one
or more discs and that can be played in
most DVD-players.
A DVD Video is a DVD disc with video
files in a special format, which you can
play on a DVD Video Player or on a
DVD-ROM.
In dieser Anleitung wird beschrieben,
wie man eine DVD-Video Disk von
Quelldateien erstellen kann, die auf der
Festplatte oder auf einer oder
mehreren Disks gespeichert sind und
die mit den meisten DVD-Spielern
wiedergegeben werden kann. Eine DVD
Video ist eine DVD Disk mit VideoDateien in einem speziellen Format, die
mit einem DVD Video Player oder einem
DVD-ROM Laufwerk wiedergegeben
werden kann.
Ce manuel vous enseigne comment
créer un DVD vidéo lisible sur la plupart
des lecteurs de DVD à partir de fichiers
source présents sur votre disque dur ou
sur un ou plusieurs disques.
Un DVD vidéo est un DVD contenant
des fichiers vidéo dans un format
spécial que vous pouvez lire sur un
lecteur de DVD vidéo ou de DVD-ROM.
Questa guida spiega come realizzare
un DVD-Video contenente file
memorizzati sul vostro disco rigido o su
uno o più dischi, riproducibile sulla
maggioranza dei lettori DVD.
Un DVD Video è un disco DVD
contenente file video in un formato
speciale, riproducibile su un lettore DVD
Video o su un DVD-ROM.
Deze handleiding geeft aan hoe
bestanden die nu op uw harde schijf of
op een of meer andere discs staan op
een DVD-Video-disc brandt die u in de
meeste DVD-spelers kunt afspelen.
Een DVD-Video is een DVD-disc met
videobestanden in een format dat u
kunt afspelen in een DVD-videospeler
of een DVD-ROM.
UK D F
I NL
The application software used here is:
Nero Vision Express from Nero AG
29
Page 30
30
Start "Nero StartSmart" from the desktop.
Starten Sie "Nero StartSmart" von Ihrer
Oberfläche aus.
Lancez "Nero StartSmart" depuis le bureau.
Aprire "Nero StartSmart" dal desktop.
Start "Nero StartSmart" vanaf het
bureaublad.
UK
D
F
I
NL
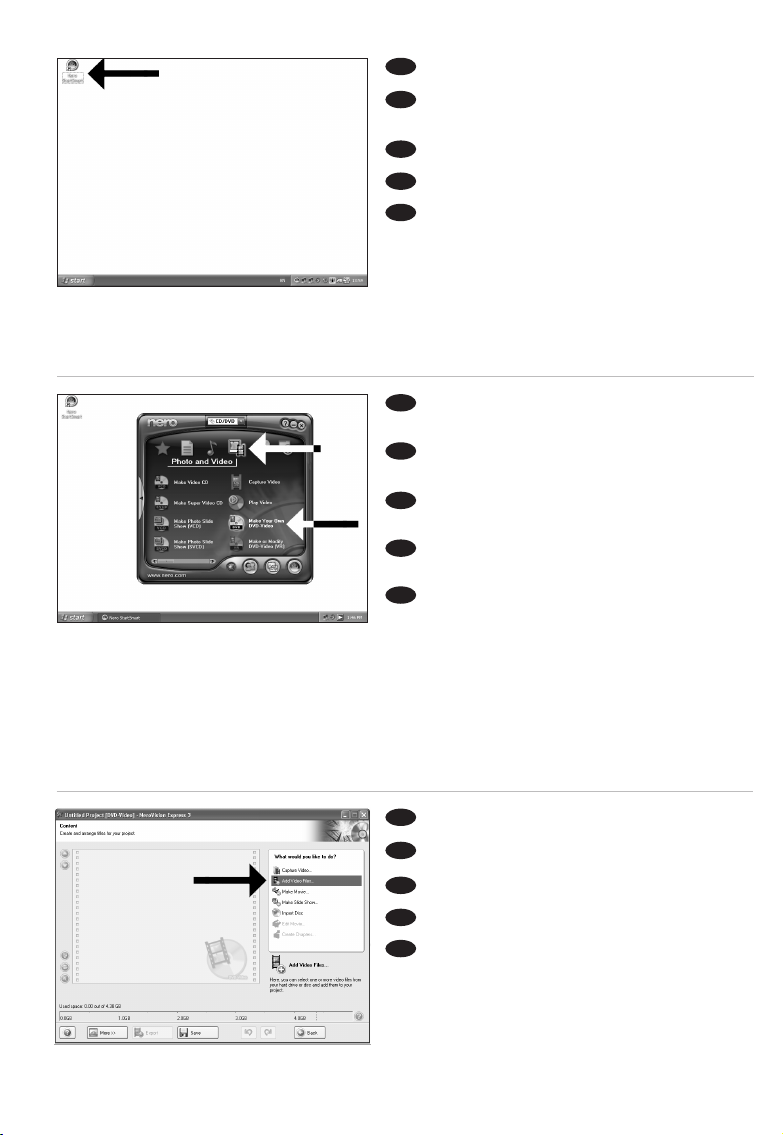
Choose "Photo and video" and
"Make DVD-Video".
Wählen Sie "Foto und Video" und
"Eigenes DVD-Video erstellen".
Choisissez "Photo et vidéo" puis cliquez sur
"Créer votre propre DVD-vidéo".
Selezionare "Foto e video" e
"Creare il proprio DVD-Video".
Kies "Foto en video" en dan
"Maak uw eigen DVD-Video".
Choose "Add Video files".
Wählen Sie "Video-Dateien hinzufügen".
Choisissez "Ajouter des fichiers vidéo".
Selezionare "Aggiungi file video"
Kies "Videobestanden toevoegen".
3
2
1
UK
D
F
I
NL
UK
D
F
I
NL
Page 31
31
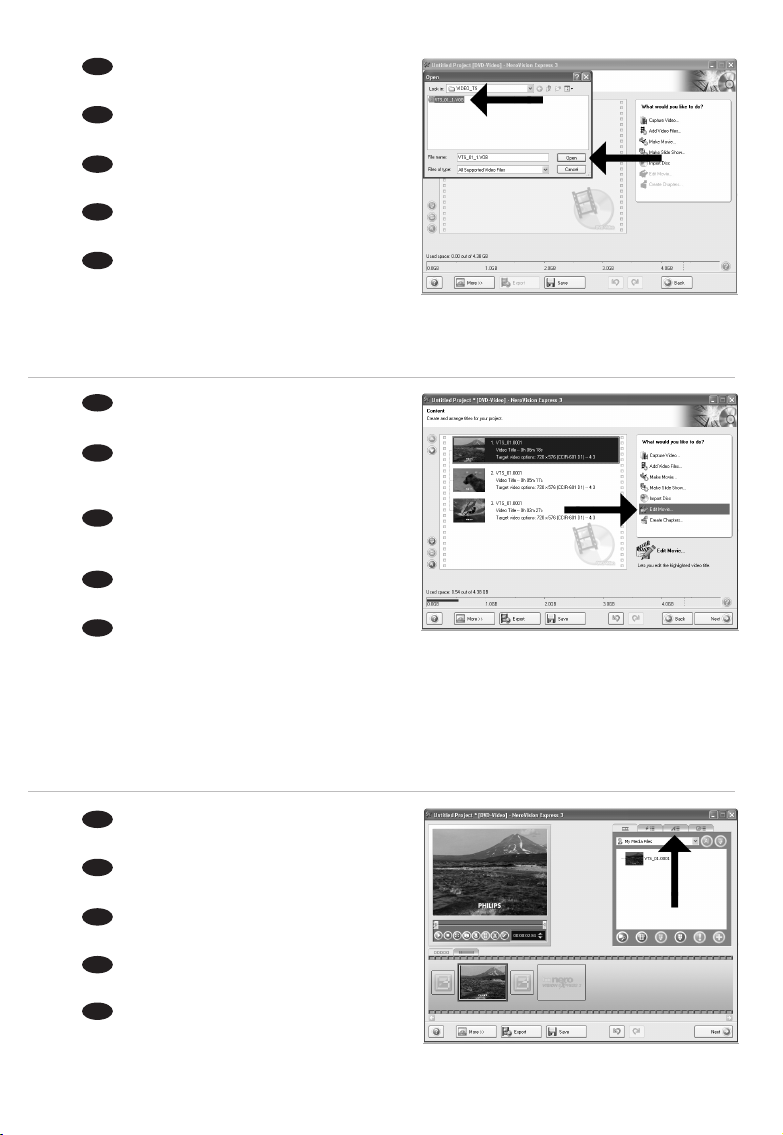
Choose the files you want to add and click
"Open".
Wählen Sie die hinzuzufügenden Dateien und
klicken Sie auf "Öffnen".
Sélectionnez les fichiers à ajouter puis cliquez
sur "Ouvrir".
Selezionare i file da aggiungere e fare clic su
"Apri"
Kies de bestanden die u wilt toevoegen en klik
op "Openen".
4
5
6
UK
D
F
I
NL
The movies you loaded are shown here.
You can edit them by choosing "Edit Movie".
Hier werden die geladenen Filme gezeigt.
Sie können sie editieren, indem Sie "Film bearbeiten"
wählen.
Les films que vous venez de charger sont
répertoriés ici. Vous pouvez les monter en
choisissant "Editer le film".
Qui sono visualizzati i filmati caricati.
E' possibile modificarli selezionando "Modifica Filmato".
Hier ziet u welke bestanden u hebt
toegevoegd. U kunt die bewerken door "Film bewerken" te kiezen.
UK
D
F
I
NL
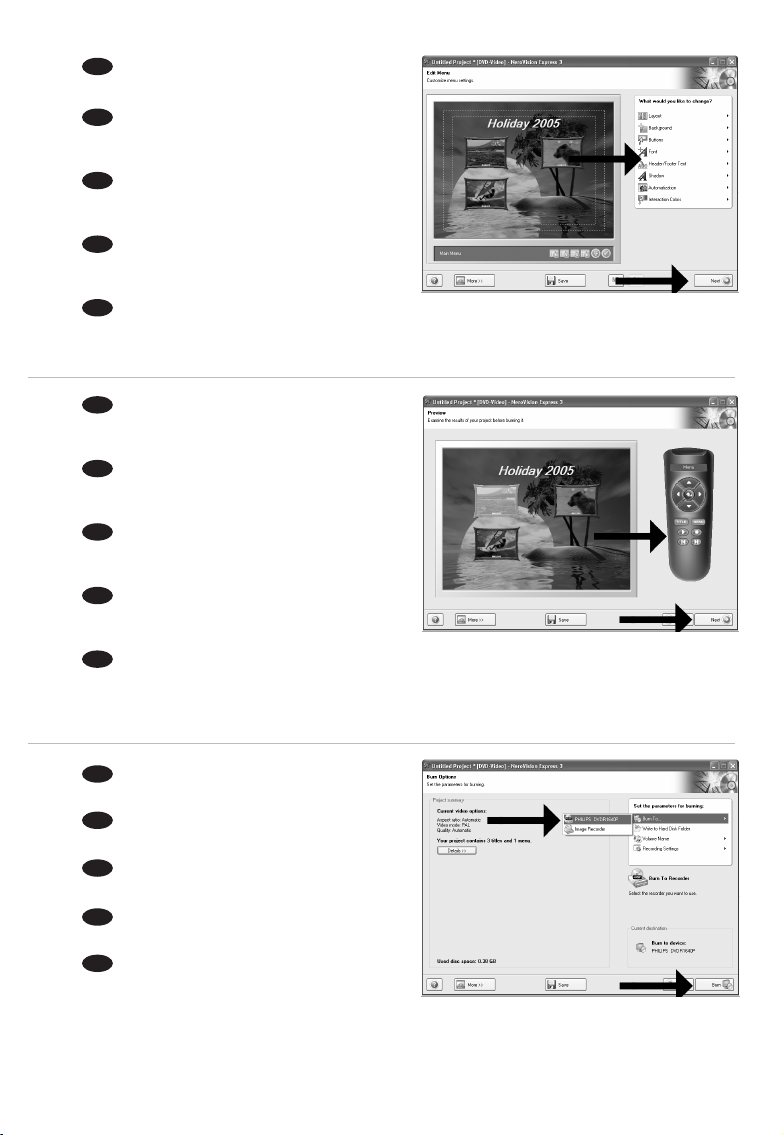
In the Edit Movie screen, you can add video
effects, text effects and transitions.
Auf der Anzeige Edit Movie können Sie Videoeffekte, Texteffekte und Übergänge hinzufügen.
L’écran Edit Movie vous permet d’ajouter des
effets vidéo et textuels, ainsi que des transitions.
Nello schermo Edit Movie, è possibile
aggiungere effetti video, effetti testo e transizioni.
In het scherm "Edit Movie" kunt u video- en
teksteffecten en overgangen toevoegen.
UK
D
F
I
NL
Page 32

32
After editing all files, choose "Next".
Nach dem Editieren aller Dateien wählen Sie
"Weiter".
Une fois tous les fichiers modifiés, choisissez
"Suivant".
Dopo aver modificato tutti i file, fare clic su
"Avanti".
Na het bewerken van alle bestanden klikt u
op "Volgende".
UK
D
F
I
NL
You can also trim the recorded video.
When done, choose "Next".
Sie können das aufgezeichnete Videomaterial
auch schneiden.
Wenn Sie fertig sind, wählen Sie "Weiter".
Vous pouvez également couper la vidéo
enregistrée.
Lorsque vous avez terminé, choisissez "Suivant".
E' anche possibile tagliare il video registrato.
Al termine, fare clic su "Avanti".
Ook kunt u de opgenomen video verfraaien.
Klik op "Volgende" zodra u tevreden bent.
9
8
7
UK
D
F
I
NL
Enter the title in the "Header" field and click
"Edit menu" to change the layout and background of
the disc menu.
Geben Sie den Titel in das Feld "Kopfzeile" ein
und klicken Sie auf "Menübearbeiten", um das Layout
und den Hintergrund des Disc-Menüs zu ändern.
Saisissez le titre dans le champ "En-tête" et
cliquez sur "Editiz le menu" pour modifier la mise en
page et l’arrière-plan du menu disque.
Inserite il titolo nel campo "Intestazion" e fate
clic su "Modif. menu" per cambiare la disposizione e lo
sfondo del menu del disco.
Voer de titel in het veld "Koptekst" in en klik op "Bewerken menu" om de opmaak en achtergrond van
het disc-menu te wijzigen.
UK
D
F
I
NL
Page 33
33
10
11
12
You can change the layout, the background,
add titles, … here. When done, choose "Next".
Hier können Sie das Layout und den
Hintergrund ändern, Titel hinzufügen, usw.
Wenn Sie fertig sind, wählen Sie "Weiter".
Cet écran vous permet de modifier la
disposition, l'arrière-plan, d'ajouter des titres, etc.
Lorsque vous avez terminé, choisissez "Suivant".
Qui è possibile modificare la disposizione, lo
sfondo, aggiungere titoli.... Al termine, fare clic su
"Avanti".
Hier kunt u de layout en achtergrond aanpassen, titels toevoegen ... enz. Klik op "Volgende" zodra u
tevreden bent.
UK
D
F
I
NL
You can preview the finished movie by
pressing on the thumbnails. When done, choose
"Next".
Wenn Sie auf die Thumbnail-Symbole klicken,
sehen Sie eine Vorschau des fertiggestellten Films.
Wenn Sie fertig sind, wählen Sie "Weiter".
Vous pouvez afficher un aperçu du film en
appuyant sur les miniatures. Lorsque vous avez
terminé, choisissez "Suivant".
Selezionando le miniature è possibile
visualizzare un'anteprima del filmato realizzato.
Al termine, fare clic su "Avanti".
Klik op een miniatuur als u een afgeronde film wilt beoordelen. Klik op "Volgende" zodra u tevreden bent.
UK
D
F
I
NL
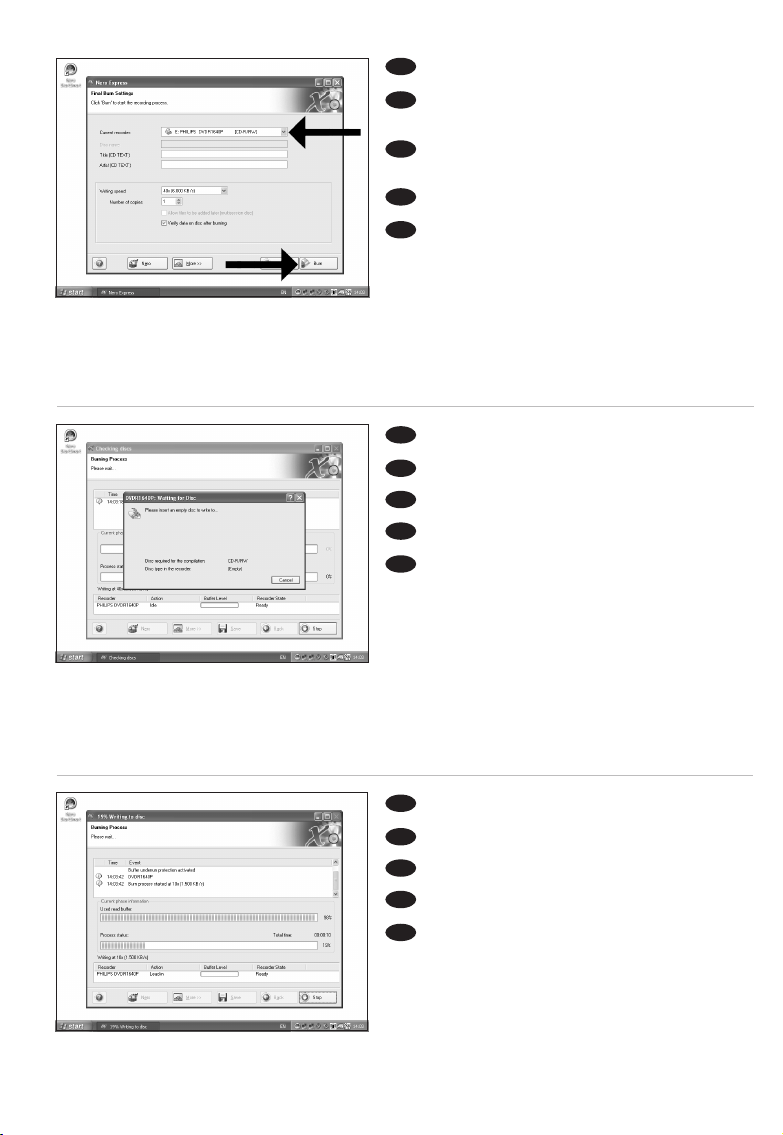
Choose "Burn to", choose your recorder and
choose "Burn".
Wählen Sie "Brennen auf", wählen Sie Ihren
Recorder und klicken Sie auf "Brennen".
Choisissez "Graver sur" puis le périphérique
d’enregistrement et choisissez "Graver".
Selezionare "Masterizza Su", specificare il
recorder e fare clic su "Scrivi".
Kies "Branden naar", kies de recorder en klik op
"Branden".
UK
D
F
I
NL
Page 34

34
NeroVision Express is transcoding and
burning your disc.
NeroVision Express transcodiert und
brennt Ihre Disk.
NeroVision Express procède au
transcodage et à la gravure de votre disque.
NeroVision Express è in fase di trascodifica
e scrittura del disco.
NeroVision Express zet de informatie om
en brandt die op de disc.
UK
D
F
I
NL
Congratulations, your disc has been written
successfully. Click "OK". You may exit the
application now.
Herzlichen Glückwunsch – Ihre Disk wurde
erfolgreich erstellt. Klicken Sie auf "OK".
Sie können jetzt die Anwendung verlassen.
Félicitations, votre disque est prêt.
Cliquez sur "OK". Vous pouvez maintenant fermer
l’application.
Congratulazioni, il disco è stato scritto
correttamente. Fare clic su "OK". Ora è possibile
chiudere l'applicazione.
Gefeliciteerd! Uw disc is met succes gebrand. Klik op "OK". U kunt het programma nu afsluiten.
UK
D
F
I
NL
14
13
Page 35
How to copy a disc?
Eine Disk kopieren
Comment copier un disque?
Come copiare un dischi?
Hoe kopieer ik een disc?
This manual shows an example of how
to copy a disc.
In diesem Handbuch wird an einem
Beispiel gezeigt, wie eine Disk kopiert
wird.
Ce manuel illustre la procédure de
copie d’un disque.
Questo manuale contiene informazioni
su come copiare un dischi.
Deze handleiding beschrijft het
kopiëren van een disc.
UK D F
I NL
The application software used here is:
Nero - Burning Rom from Nero AG
35
Page 36

36
Start "Nero StartSmart" from the desktop.
Starten Sie "Nero StartSmart" von Ihrer
Oberfläche aus.
Lancez "Nero StartSmart" depuis le bureau.
Aprire "Nero StartSmart" dal desktop.
Start "Nero StartSmart" vanaf het
bureaublad.
Choose the source drive and insert the
source disc in this drive.
Wählen Sie das Quelllaufwerk und legen Sie
die Quell-Disk in dieses Laufwerk ein.
Choisissez le disque source puis insérez-le
dans le lecteur source.
Selezionare lettore sorgente ed inserire il
disco di origini in questa unità.
Kies het bronstation en leg de bronschijf in
dat station.
Choose "Copy and Backup" and click "Copy
CD" or "Copy DVD".
Wählen Sie "Kopieren und Sichern" und
klicken Sie auf "CD kopieren" oder
"DVD kopieren".
Choisissez "Copier et sauvegarder" puis
cliquez sur "Copier CD" ou "Copier DVD".
Selezionare "Copia e Backup" e fare clic su
"Copia CD" ovvero "Copia DVD".
Kies "Kopiëren en backup" en klik op "CD
kopiëren" of "DVD kopiëren".
UK
D
F
I
NL
3
2
1
UK
D
F
I
NL
UK
D
F
I
NL
Page 37
37
Choose the destination drive.
Wählen Sie das Ziellaufwerk.
Choisissez l’unité de destination.
Selezionare drive di destinazione.
Kies het doelstation.
4
5
6
UK
D
F
I
NL
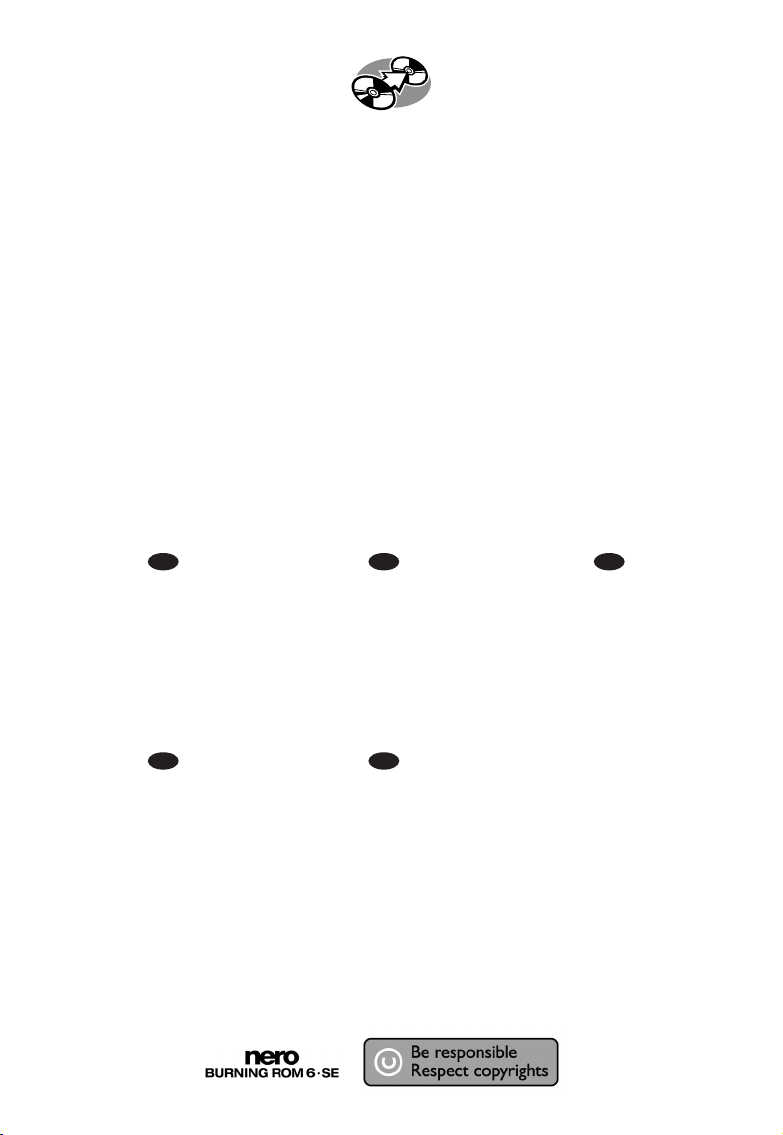
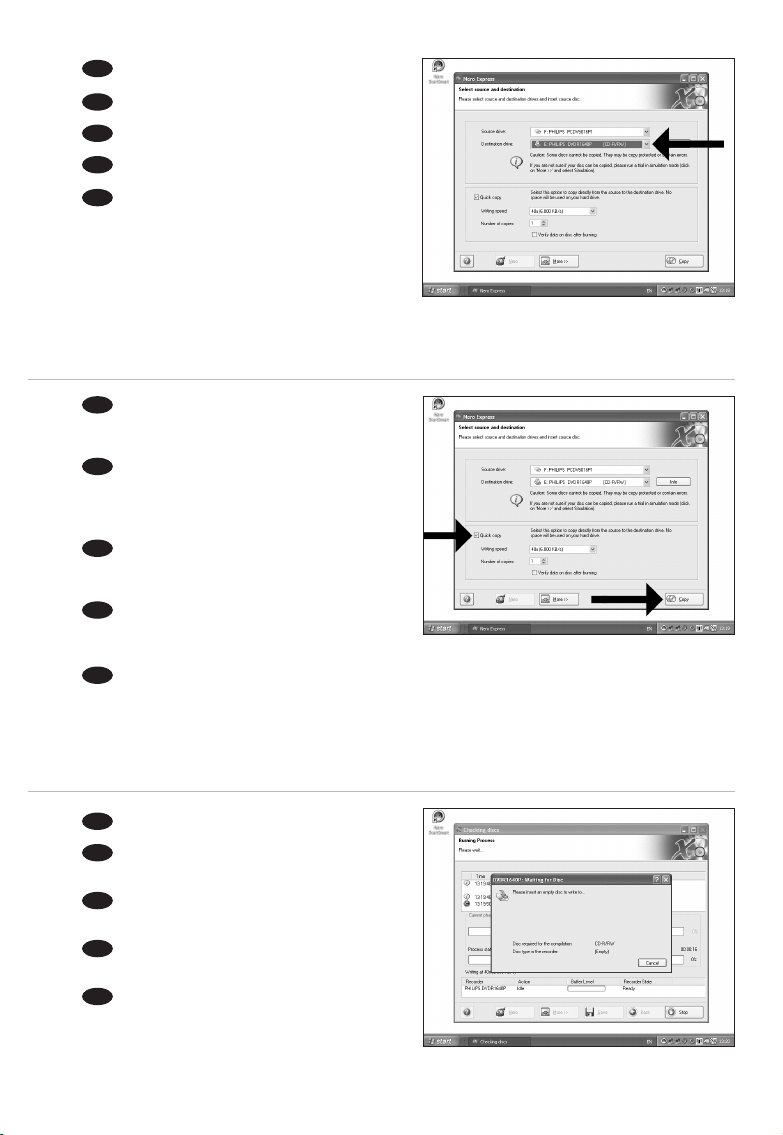
If possible, you may mark the checkbox
"Quick copy" if your source drive is fast enough.
Otherwise, unmark the checkbox. Click "Burn".
Wenn Ihr Quelllaufwerk schnell genug ist,
können Sie bei Bedarf das Kästchen "Direktkopie"
ankreuzen. Andernfalls löschen Sie das Kreuz oder
Häkchen in dem Kästchen. Klicken Sie auf "Kopieren".
Si votre lecteur source est suffisamment
rapide, vous pouvez cocher l’option "Copie rapide".
Sinon, décochez cette case. Cliquez sur "Copier".
Se possibile, selezionare la casella "Copia
rapida" se l'unità sorgente è sufficientemente veloce.
Altrimenti, deselezionare la casella. Fare clic su "Copia".
Indien mogelijk kunt u het vakje "Snel kopiëren" aanvinken, maar alleen als uw bronstation snel
genoeg is. Is dat niet zo, verwijder dan het vinkje. Klik op "Kopiëren".
UK
D
F
I
NL
Insert an empty disc in your destination drive.
Legen Sie eine leere Disk in Ihr Ziellaufwerk
ein.
Insérez un disque vierge dans votre lecteur de
destination.
Inserire un disco vuoto nell'unità di
destinazione.
Leg een lege schijf in het doelstation.
UK
D
F
I
NL
Page 38

38
"Nero" will now burn your disc.
"Nero" wird jetzt Ihre Disk brennen.
"Nero" grave alors votre disque.
"Nero" inizierà a scrivere sul disco.
"Nero" zal nu uw CD branden.
Congratulations, your disc has been written
successfully. Click "OK". You may exit the
application now.
Herzlichen Glückwunsch – Ihre Disk wurde
erfolgreich erstellt. Klicken Sie auf "OK". Sie können
jetzt die Anwendung verlassen.
Félicitations, votre disque est prêt. Cliquez
sur "OK". Vous pouvez maintenant fermer
l’application.
Congratulazioni, il disco è stato scritto
correttamente. Fare clic su "OK". Ora è possibile
chiudere l'applicazione.
Gefeliciteerd! Uw disc is met succes gebrand. Klik op "OK". U kunt het programma nu afsluiten.
8
7
UK
D
F
I
NL
UK
D
F
I
NL
Page 39

393939
How to make a Data disc?
Eine Daten-Disk erstellen
Comment créer un disque de données ?
Come creare un dischi di dati?
Hoe maak ik zelf een data-disc?
This manual shows you an example of
how to make a Data disc.
In diesem Handbuch wird an einem
Beispiel gezeigt, wie eine Daten-Disk
erstellt wird.
Ce manuel illustre la procédure de
création d’un disque de données.
Questo manuale contiene informazioni
su come creare un dischi di dati.
Deze handleiding beschrijft het maken
van een data-disc.
UK D F
I NL
The application software used here is:
Nero - Burning Rom from Nero AG
39
Page 40
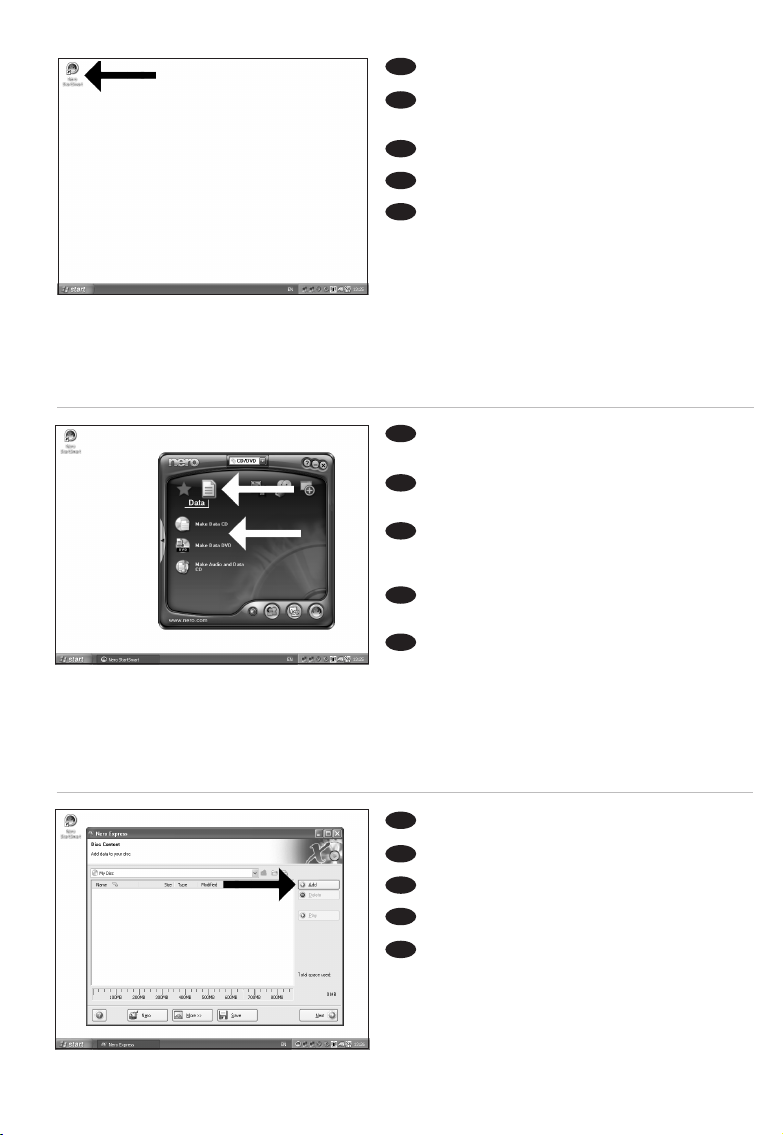
Choose "Data" and click "Make a data CD"
or "Make a data DVD".
Wählen Sie "Daten" und klicken Sie auf
"Daten CD erstellen" oder "Daten DVD erstellen".
Choisissez "Données" puis cliquez sur "Créer
un CD de données" ou "Créer un DVD de
données".
Selezionare "Dati" e fare clic su "Creare CD
dati" ovvero "Creare DVD dati".
Kies "Data" en klik op "Data-cd maken" of
"Data-dvd maken".
40
UK
D
F
I
NL
Start "Nero StartSmart" from the desktop.
Starten Sie "Nero StartSmart" von Ihrer
Oberfläche aus.
Lancez "Nero StartSmart" depuis le bureau.
Aprire "Nero StartSmart" dal desktop.
Start "Nero StartSmart" vanaf het
bureaublad.
Click "Add".
Klicken Sie auf "Hinzufügen".
Cliquez sur "Ajouter".
Fare clic su "Aggiungi".
Klik op "Toevoegen".
UK
D
F
I
NL
UK
D
F
I
NL
3
2
1
Page 41

41
Choose the files to burn and click "Add".
Wählen Sie die zu brennenden Dateien und
klicken Sie auf "Hinzufügen".
Choisissez les fichiers à graver puis cliquez sur
"Ajouter".
Selezionare i file da scrivere e fare clic su
"Aggiungi".
Selecteer de bestanden die u op de disc wilt
branden en klik op "Toevoegen".
4
5
6
UK
D
F
I
NL
When all files are added, click "Finished".
Wenn alle Dateien hinzugefügt sind, klicken
Sie auf "Fertig".
Une fois tous les fichiers ajoutés, cliquez sur
"Terminé".
Dopo aver aggiunto tutti i file, fare clic su
"Finito".
Klik op "Voltooid" als alle bestanden zijn
toegevoegd.
UK
D
F
I
NL
Click "Next".
Klicken Sie auf "Weiter".
Cliquez sur "Suivant".
Fare clic su "Avanti".
lik op "Volgende".
UK
D
F
I
NL
Page 42
42
Choose the drive you use for burning and
click "Burn".
Wählen Sie das Laufwerk zum Brennen der
Disk und klicken Sie auf "Brennen".
Choisissez le lecteur à utiliser pour la gravure
puis cliquez sur "Graver".
Selezionare l'unità da utilizzare per la
scrittura e fare clic su "Scrivi".
Kies de recorder waarmee u de disc wilt
branden en klik op "Branden".
Insert an empty disc.
Legen Sie eine leere Disk ein.
Insérez un disque vierge.
Inserire un disco vuoto.
Plaats een lege disc in uw recorder.
9
8
7
UK
D
F
I
NL
UK
D
F
I
NL
"Nero" will now burn your disc.
"Nero" wird jetzt Ihre Disk brennen.
"Nero" grave alors votre disque.
"Nero" inizierà a scrivere sul disco.
"Nero" zal nu uw disc branden.
UK
D
F
I
NL
Page 43

43
10
Congratulations, your disc has been written
successfully. Click "OK". You may exit the application
now.
Herzlichen Glückwunsch – Ihre Disk wurde
erfolgreich erstellt. Klicken Sie auf "OK". Sie können
jetzt die Anwendung verlassen.
Félicitations, votre disque est prêt. Cliquez sur
"OK". Vous pouvez maintenant fermer l’application.
Congratulazioni, il disco è stato scritto
correttamente. Fare clic su "OK". Ora è possibile
chiudere l'applicazione.
Gefeliciteerd! Uw disc is met succes gebrand.
Klik op "OK".U kunt het programma nu afsluiten.
UK
D
F
I
NL
Page 44

44
Page 45

45
How to make an
Audio disc?
Erstellen einer Audio-Disk
Comment créer un disque audio ?
Come creare un dischi Audio?
Hoe maak ik zelf een muziek-disc?
This manual shows you an example of
how to make an Audio disc which can
be played in any CD-Player
n diesem Handbuch wird beschrieben,
wie eine Audio-Disk erstellt wird, die
von jedem CD-Player abgespielt
werden kann.
Ce manuel illustre la procédure de
création d’un disque audio qui pourra
être lu sur n’importe lecteur de CD.
Questo manuale contiene informazioni
su come creare un dischi Audio
che potrà essere letto da un CD-Player.
Deze handleiding beschrijft het maken
van een muziek-disc om in een normale
cd-speler af te spelen.
UK D F
I NL
The application software used here is:
Nero - Burning Rom from Nero AG
45
Page 46

Choose "Audio" and "Make Audio CD".
Wählen Sie "Audio" oder "Audio CD
erstellen".
Choisissez "Audio" puis "Créer un CD
audio".
Selezionare "Audio" e fare clic su "Crea CD
audio".
Kies "Audio" en dan "Audio-cd maken".
46
Start "Nero StartSmart" from the desktop.
Starten Sie "Nero StartSmart" von Ihrer
Oberfläche aus.
Lancez "Nero StartSmart" depuis le
bureau.
Aprire "Nero StartSmart" dal desktop.
Start "Nero StartSmart" vanaf het
bureaublad.
Click "Add".
Klicken Sie auf "Hinzufügen".
Cliquez sur "Ajouter".
Fare clic su "Aggiungi".
Klik op "Toevoegen".
UK
D
F
I
NL
3
2
1
UK
D
F
I
NL
UK
D
F
I
NL
Page 47

47
Select the audio files (*.wav) you want to have
on your new audio disc and click "Add".
Wählen Sie die Audio-Dateien (*.wav), die Sie
auf Ihrer neuen Audio-Disk wünschen, und klicken
Sie auf "Hinzufügen".
Sélectionnez les fichiers audio (*.wav) que
vous souhaitez placer sur le nouveau disque puis
cliquez sur "Ajouter".
Selezionare i file audio (*.wav) da includere
nel nuovo disco audio e fare clic su "Aggiungi".
Selecteer de audiobestanden (*.wav) die u op
de nieuwe disc wilt branden en klik op "Toevoegen".
UK
D
F
I
NL
4
5
6
When all files are added, click "Finished".
Wenn alle Dateien hinzugefügt sind, klicken
Sie auf "Fertig".
Une fois tous les fichiers ajoutés, cliquez sur
"Terminé".
Dopo aver aggiunto tutti i file, fare clic su
"Finito".
Klik op "Voltooid" als alle bestanden zijn
toegevoegd.
UK
D
F
I
NL
Click "Next".
Klicken Sie auf "Weiter".
Cliquez sur "Suivant".
Fare clic su "Avanti".
Klik op "Volgende".
UK
D
F
I
NL
Page 48
48
Choose your recorder and click "Burn".
Wählen Sie Ihren Recorder und klicken Sie
auf "Brennen".
Choisissez le périphérique d'enregistrement
puis cliquez sur "Graver".
Selezionare il recorder e fare clic su "Scrivi".
Kies uw recorder en klik op "Branden".
Insert an empty disc.
Legen Sie eine leere Disk ein.
Insérez un disque vierge.
Inserire un disco vuoto.
Plaats een lege disc in uw recorder.
9
8
7
UK
D
F
I
NL
UK
D
F
I
NL
"Nero" will now burn your disc.
"Nero" wird jetzt Ihre Disk brennen.
"Nero" grave alors votre disque.
"Nero" inizierà a scrivere sul disco.
"Nero" zal nu uw disc branden.
UK
D
F
I
NL
Page 49

49
10
Congratulations, your disc has been written
successfully. Click "OK". You may exit the application
now.
Herzlichen Glückwunsch – Ihre Disk wurde
erfolgreich erstellt. Klicken Sie auf "OK". Sie können
jetzt die Anwendung verlassen.
Félicitations, votre disque est prêt. Cliquez sur
"OK". Vous pouvez maintenant fermer l’application.
Congratulazioni, il disco è stato scritto
correttamente. Fare clic su "OK". Ora è possibile
chiudere l'applicazione.
Gefeliciteerd! Uw disc is met succes gebrand.
Klik op "OK". U kunt het programma nu afsluiten.
UK
D
F
I
NL
Page 50

50
Page 51

51
How to find warranty information?
1
Insert the Nero disc again, and click "Exit".
2
Click on the "My Computer" icon on your desktop
or click "Start", "My Computer".
3
Click with the right mouse button on the "Nero"
icon and choose "Explore".
4
Choose the "Philips Warranty" folder and you will
find the warranty documents.
If you do not have Adobe Acrobat Reader, you can
find it in the folder "Acrobat Reader" on this disc or
find it for free on http://www.adobe.com
"The making of unauthorised copies of copy-protected material, including computer programmes,
files, broadcasts and sound recordings, may be an infringement of copyrights and constitute a
criminal offence.
This equipment should not be used for such purposes."
WEEE mark: "Information to the Consumer"
Disposal of your old product
Your product is designed and manufactured with high quality materials and components, which can
be recycled and reused.
Please inform yourself about the local separate collection system for electrical and electronic
products, including those marked by following symbol.
Please act according to your local rules and do not dispose of your old products with your normal
household waste.
WARNING
Plastic bags can be dangerous.
To avoid danger of suffocation, keep this bag away from babies and small children.
Warranty, Environment, Safety, Frequently Asked
Questions (FAQ) and Specifications
UK
Page 52

5252
Frequently Asked Questions (FAQ)
Question 1: I have a Windows 98 Second Edition PC and there is no CDROM device in
the computer but I have another PC. How do I install the drivers?
1. Start another computer.
2. Insert the Nero disc for the SPD3200CC into the CDROM device.
3. Click "Exit" when the Nero Installation screen appears.
4. Click on "My Computer".
5. Click on the "Nero"-logo.
6. Click on the right mouse button and choose "Explore".
7. Go to the directory "Philips Drivers".
8. Copy the contents of this directory on a floppy disc.
9. Attach your SPD3200CC to your Windows 98SE computer.
10. When Windows asks for the drivers, insert the floppy from step 8 and point windows to this floppy.
11. The drivers will be installed. You can now use your SPD3200CC to install the software by inserting the
Install disc.
Question 2: I have a windows 98 Second Edition PC and there is no CDROM device in the
computer but I have access to the internet. How do I install the drivers?
1. Start the computer.
2. Start Internet Explorer (or another web browser).
3. Go to the Philips website: http://www.philips.com/support
4. Choose "Drivers and manuals".
5. Search for the SPD3200CC.
6. Download the Windows 98SE drivers.
7. Unzip the drivers and remember where you saved the unzipped drivers.
8. Plug in the SPD3200CC.
9. When Windows asks for drivers, refer to the location where you saved the drivers in step 7.
10. Your SPD3200CC will work now.
Question 3: How do I keep my SPD3200CC in good shape?
1. Do not expose to moisture, rain, sand or heat.
2. Place it on a firm, flat surface.
3. Keep away from domestic heat and direct sunlight.
4. Give the SPD3200CC enough place: approx. 2,5cm (1 inch) to all sides is required.
5. Do not place anything on the SPD3200CC.
Question 4: I have connected the SPD3200CC to an USB connector but Windows does
not react and the SPD3200CC is not recognized.
1. Make sure the SPD3200CC is connected properly to a power outlet.
2. Make sure the USB connectors are switched on (also in the PC Bios, consult your PC manual).
3. Check if all drivers are installed (run windows update, check your PC manual and download if required
drivers for the PC from the manufacturer’s website).
Question 5: Burning or reading takes far too long. How does this come?
1. You have connected the SPD3200CC to a low speed USB connector, which has a very limited
throughput. Connect the drive to a highspeed USB adapter.
2. You may have to install drivers for your USB-adapter. Consult the manual and or download drivers
from the manufacturer’s website.
Page 53

53
Question 6: I inserted a disc and it is not played.
1. Ensure the disc label is facing up.
2. Clean the disc.
3. Check whether the disc has the same region code as the player.
4. Check if the disc is defective by trying another disc.
5. Check to see if the disc is defective, badly scratched or warped (not flat).
Question 7: Player does not respond to some operating commands during playback.
Check whether a PC connection is active. Unplug the USB cable to de-activate the PC connection. The
operations may not be permitted by the disc. Refer to the instructions of the disc.
Question 8: I tried to burn a disc and this failed. What happened?
1. Check to ensure that there are no scratches or finger marks on the disc.
2. Use a new disc and retry the writing sequence.
3. Use a different (Philips) branded disc to check that your drive is working correctly.
Question 9: I cannot read from a disc.
1. Check to ensure that there are no scratches or finger marks on the disc.
2. Use another disc and retry to see if your drive can read a other disc.
Question 10: How can I clean a dirty disc?
Some problems may occur because the disc inside the player is dirty. To avoid these problems clean your
discs regularly, in the following way:
When a disc becomes dirty, clean it with a cleaning cloth. Wipe the disc from the center out, in a straight
line.
Question 11: May I use chemicals to clean a disc?
No, do not use solvents such as benzene, thinner, commercially available cleaners, or anti-static spray
intended for analogue discs.
Question 12: May I use cleaning discs to clean the lens of the SPD3200CC?
No, do not use commercially available cleaning discs to clean the lens, as these discs may damage the
optical unit.
Page 54

54
Maximum write speeds:
48x on CD-Recordable
24x on UltraSpeed CD-ReWritable
16x on DVD+R
8x on DVD+R Double Layer
8x on DVD+RW
16x on DVD-R
4x on DVD-R Dual Layer
6x on DVD-RW
The actual write speed may be lower as this is disc dependent.
Maximum read speeds:
48x on CD
16x on DVD
The SPD3200CC reads following discs:
CD / CD-R / CD-RW formats both 8cm & 12cm discs (up to 99 min).
DVD Disc Format: DVD-ROM, DVD-Video, DVD+R, DVD+R Double layer, DVD+RW, DVD-R,
DVD-R Dual Layer, DVD-RW formats both 8cm & 12cm discs.
Interface: HiSpeed USB (USB 2.0)
Typical access time: 160ms
Buffer Size: 2 MB
Temperature:
Operating temperature should be between +5ºC and +40ºC (41ºF and 104ºF)
Storage temperature should be between –20ºC and +60ºC (–4ºF and 140ºF)
MTBF: 75.000 hours at 20% duty cycle.
Specifications
Page 55

55
Wie findet man Garantie-Informationen?
1
Legen Sie die Nero Disk wieder ein und klicken Sie auf
"Exit".
2
Klicken Sie auf das Symbol "My Computer" auf Ihrer
Oberfläche oder klicken Sie auf "Start", "My Computer".
3
Klicken Sie mit der rechten Maustaste auf das Symbol
"Nero" und wählen Sie "Explore".
4
Wählen Sie den Ordner "Philips Warranty"; hier finden
Sie die Garantiedokumente.
Wenn Sie keinen Adobe Acrobat Reader haben,
können Sie ihn im Ordner "Acrobat Reader" auf dieser
CD finden bzw. kostenlos von der Website
http://www.adobe.com herunterladen.
"Die unbefugte Vervielfältigung urheberrechtlich geschützter Werke, einschließlich
Computerprogramme, Dateien, Rundfunksendungen und musikalischer Werke, kann eine
Verletzung des Urheberrechts darstellen und eine Strafbarkeit begründen.
Dieses Gerät darf zu den genannten mißbräulichen Zwecken nicht verwendet werden."
WEEE Kennzeichnung: "Kundeninformationen"
Entsorgung Ihres alten Geräts
Ihr Gerät wurde unter Verwendung hochwertiger Materialien und Komponenten entwickelt und
hergestellt, die recycelt und wieder verwendet werden können.
Befindet sich dieses Symbol (durchgestrichene Abfalltonne auf Rädern) auf dem Gerät, bedeutet dies,
dass für dieses Gerät die Europäischen Richtlinie 2002/96/EG gilt.
Informieren Sie sich über die geltenden Bestimmungen zur getrennten Sammlung von Elektro- und
Elektronik-Altgeräten in Ihrem Land. Richten Sie sich bitte nach den geltenden Bestimmungen in Ihrem
Land, und entsorgen Sie Altgeräte nicht über Ihren Haushaltsabfall. Durch die korrekte Entsorgung
Ihrer Altgeräte werden Umwelt und Menschen vor möglichen negativen Folgen geschützt.
ACHTUNG
Kunststoffbeutel können gefährlich sein.
Um Erstickungsgefahr zu vermeiden bitte diesen Beutel von Kindern fernhalten.
Garantie, Umwelt,Sicherheit,Häufig gestellte
Fragen (FAQ) und Technische Daten
D
Page 56

56
Häufig gestellte Fragen (FAQ)
Frage 1: Ich habe einen PC mit Windows 98 Second Edition und es befindet sich kein
CDROM-Laufwerk im Computer, aber ich habe noch einen anderen PC. Wie kann ich die
Treiber installieren?
1. Starten Sie den anderen Computer.
2. Legen Sie die Nero-CD für das SPD3200CC in das CDROM-Laufwerk ein.
3. Klicken Sie auf "Beenden", wenn die Anzeige für die Nero Installation erscheint.
4. Klicken Sie auf "Arbeitsplatz".
5. Klicken Sie auf das "Nero"-Logo.
6. Klicken Sie mit der rechten Maustaste und wählen Sie "Explore".
7. Gehen Sie zum Verzeichnis "Philips Drivers".
8. Kopieren Sie den Inhalt dieses Verzeichnisses auf eine Diskette.
9. Verbinden Sie Ihr SPD3200CC mit Ihrem Windows 98SE Computer.
10. Wenn Windows Sie nach den Treibern fragt, legen Sie die Diskette aus Schritt 8 ein und weisen Sie
Windows diese Diskette an.
11. Die Treiber werden installiert. Sie können jetzt Ihr SPD3200CC benutzen, um die Software zu
installieren, indem Sie die Install-CD einlegen.
Frage 2: Ich habe einen PC mit Windows 98 Second Edition und es befindet sich kein
CDROM-Laufwerk im Computer, aber ich habe Zugang zum Internet. Wie kann ich die
Treiber installieren?
1. Starten Sie den Computer.
2. Starten Sie den Internet Explorer (oder einen anderen Web-Browser).
3. Gehen Sie zur Philips Website: http://www.philips.com/support
4. Wählen Sie "Drivers and manuals".
5. Suchen Sie nach SPD3200CC.
6. Laden Sie die Windows 98SE Treiber herunter.
7. Entzippen Sie die Treiber und merken Sie sich, wo Sie die entzippten Treiber speichern.
8. Stecken Sie das SPD3200CC ein.
9. Wenn Windows Sie nach Treibern fragt, verweisen Sie auf das Verzeichnis, in dem Sie die Treiber bei
Schritt 7 gespeichert haben.
10. Ihr SPD3200CC wird jetzt funktionieren.
Frage 3: Wie halte ich mein SPD3200CC in guter Verfassung?
1. Setzen Sie das System nicht Feuchtigkeit, Regen, Sand oder Wärmequellen aus.
2. Stellen Sie es auf eine stabile und ebene Unterlage.
3. Halten Sie es von Heizkörpern und anderen Wärmequellen fern und schützen Sie es vor direkter
Sonneneinstrahlung.
4. Sorgen Sie dafür, dass um das SPD3200CC herum genügend freier Raum ist: ca. 2,5 cm (1 Zoll) auf
allen Seiten.
6. Legen Sie keine Gegenstände auf das SPD3200CC.
Frage 4: Ich habe das SPD3200CC mit einem USB-Anschluss verbunden, aber Windows
reagiert nicht und das SPD3200CC wird nicht erkannt.
1. Vergewissern Sie sich, dass das SPD3200CC korrekt mit einer Steckdose verbunden ist.
2. Vergewissern Sie sich, dass die USB-Anschlüsse eingeschaltet sind (auch im PC BIOS; sehen Sie in
Ihrem PC-Handbuch nach).
3. Prüfen Sie, ob alle Treiber installiert sind (führen Sie das Windows Update aus, lesen Sie in Ihrem PCHandbuch nach und laden Sie bei Bedarf Treiber für Ihren PC von der Website des Herstellers
herunter).
Page 57

57
Frage 5: Das Brennen oder Lesen dauert viel zu lange. Woran liegt das?
1. Sie haben das SPD3200CC mit einem langsamen USB-Anschluss verbunden, der einen sehr
begrenzten Durchsatz hat. Verbinden Sie das Laufwerk mit einem Highspeed-USB-Adapter.
2. Eventuell müssen Sie Treiber für Ihren USB-Adapter installieren. Sehen Sie im Handbuch nach oder
laden Sie die Treiber von der Website des Herstellers herunter.
Frage 6: Ich habe eine CD eingelegt und es wird nichts wiedergegeben.
1. Kontrollieren, ob die CD mit der bedruckten Seite nach oben eingelegt wurde.
2. Reinigen Sie die CD.
3. Prüfen Sie, ob die CD den gleichen Regionalcode hat wie der Spieler.
4. Kontrollieren Sie, ob die CD defekt ist. Probieren Sie zu diesem Zweck eine andere CD aus.
5. Prüfen Sie, ob die CD defekt, stark verkratzt oder verzogen (nicht flach) ist.
Frage 7: Der Spieler reagiert während der Wiedergabe nicht auf alle Befehle.
Prüfen Sie, ob die PC-Verbindung aktiv ist. Ziehen Sie das USB-Kabel heraus, um die PC-Verbindung zu
deaktivieren. Die CD lässt bestimmte Bedienungsfunktionen eventuell nicht zu. Beachten Sie das Begleitheft
der CD.
Frage 8: Ich habe versucht, eine CD zu brennen, aber das hat nicht funktioniert. Was ist
geschehen?
1. Vergewissern Sie sich, dass sich keine Kratzer oder Fingerabdrücke auf der CD befinden.
2. Legen Sie eine neue CD ein und wiederholen Sie die Schreibsequenz.
3. Legen Sie eine andere Marken-CD (Philips) ein, um zu prüfen, ob das Laufwerk korrekt funktioniert.
Frage 9: Ich kann nicht von einer CD lesen.
1. Vergewissern Sie sich, dass sich keine Kratzer oder Fingerabdrücke auf der CD befinden.
2. Legen Sie eine andere CD ein und wiederholen Sie den Vorgang, um zu prüfen, ob Ihr Laufwerk eine
andere CD lesen kann.
Frage 10: Wie kann ich eine verschmutzte CD reinigen?
Manche Fehlfunktionen können auf Verunreinigungen der eingelegten CD zurückzuführen sein.
Damit solche Probleme gar nicht erst auftreten, sollten Sie Ihre CDs regelmäßig reinigen.
Gehen Sie dabei folgendermaßen vor:
Wenn eine CD verschmutzt ist, reinigen Sie sie mit einem weichen Tuch. Wischen Sie dabei geradlinig von
der Mitte zum Rand.
Frage 11: Darf ich Chemikalien zum Reinigen einer CD verwenden?
Nein, verwenden Sie weder Lösungsmittel wie Waschbenzin, Verdünner und im Handel erhältliche
Reinigungsmittel noch Antistatik-Sprays für herkömmliche Schallplatten.
Frage 12: Darf ich Reinigungs-CDs verwenden, um die Linse des SPD3200CC zu reinigen?
Nein, verwenden Sie keine im Handel erhältlichen Reinigungs-CDs zum Reinigen der Linse, da diese CDs
die optische Einheit beschädigen können.
Page 58

58
Maximale Schreibgeschwindigkeit:
48fach auf CD-Recordable
24fach auf UltraSpeed CD-ReWritable
16fach auf DVD+R
8fach auf DVD+R Double Layer
8fach auf DVD+RW
16fach auf DVD-R
4fach auf DVD-R Dual Layer
6fach auf DVD-RW
Die tatsächliche Schreibgeschwindigkeit kann geringer sein, weil sie von der Disk abhängt.
Maximale Lesegeschwindigkeit:
48fach von CD
16fach von DVD
Das SPD3200CC-Laufwerk eignet sich zum Lesen der folgenden CDs:
CD / CD-R / CD-RW Formate auf 8 cm & 12 cm CDs (bis zu 99 min).
DVD Disk Format: DVD-ROM, DVD-Video, DVD+R, DVD+R Double Layer, DVD+RW, DVD-R,
DVD-R Dual Layer, DVD-RW Formate auf 8 cm & 12 cm CDs.
Interface: HiSpeed USB (USB 2.0)
Typische Zugriffszeit: 160 ms
Größe des Zwischenspeichers: 2 MB
Temperatur:
Die Temperatur sollte bei Betrieb zwischen +5 ºC und +40 ºC liegen.
Die Temperatur sollte bei der Lagerung zwischen –20 ºC und +60 ºC liegen.
Mittlerer Ausfallabstand 75.000 Std. bei 20% Einschaltdauer
Technische Daten
Page 59

59
Comment trouver les informations relatives à la garantie?
1
Réinsérez le disque Nero et cliquez sur "Quitter".
2
Cliquez sur l’icône "Poste de travail" de votre bureau
ou cliquez sur "Démarrer" puis "Poste de travail".
3
Cliquez avec le bouton droit sur l’icône "Nero" et choisissez
"Explorer".
4
Choisissez le dossier "Philips Warranty" :
vous y trouverez les documents relatifs à la garantie.
Si vous n'avez pas Adobe Acrobat Reader, vous le
trouverez dans le dossier Acrobat Reader de ce disque.
Il est également disponible gratuitement à l'adresse
http://www.adobe.com.
« La réalisation de copies non autorisées de tout matériel dont la reproduction est interdite,
notamment les programmes informatisés, dossiers, émissions ou enregistrements sonores, peut
représenter une contrefaçon de droits et constituer une infraction.
Cet équipement ne doit pas servir à de telles utilisations. »
Marquage WEEE : « Informations pour le consommateur »
Mise au rebut des produits en fin de vie
Ce produit a été conçu et fabriqué avec des matériaux et composants recyclables de haute qualité.
Le symbole d'une poubelle barrée apposé sur un produit signifie que ce dernier répond aux
exigences de la directive européenne 2002/96/EC.
Informez-vous auprès des instances locales sur le système de collecte des produits électriques et
électroniques en fin de vie.
Conformez-vous à la législation en vigueur et ne jetez pas vos produits avec les déchets ménagers.
Seule une mise au rebut adéquate des produits peut empêcher la contamination de l'environnement
et ses effets nocifs sur la santé.
AVERTISSEMENT
Les sacs en plastique peuvent être dangereux.
Pour eviter danger d’etouffement tenir ce sachet loin de la portee des enfants.
Garantie, Environnement,Sécurité,Questions
fréquentes (FAQ) et Caractéristiques techniques
F
Page 60

60
Questions fréquentes (FAQ)
Question 1 : Je possède un PC fonctionnant sous Windows 98 Deuxième Édition
sans lecteur de CD-ROM, mais je possède aussi un autre PC. Comment installer
les pilotes ?
1. Démarrez un autre ordinateur.
2. Insérez le disque Nero de l’SPD3200CC dans le lecteur de CD-ROM.
3. Cliquez sur "Exit" lorsque la fenêtre Nero Installation apparaît.
4. Cliquez sur "Poste de travail".
5. Cliquez sur le logo "Nero".
6. Cliquez avec le bouton droit de la souris et choisissez "Explorer".
7. Accédez au répertoire "Philips Drivers".
8. Copiez le contenu de ce répertoire sur une disquette.
9. Connectez votre SPD3200CC à votre ordinateur fonctionnant sous Windows 98SE.
10. Lorsque Windows vous demande les pilotes, insérez la disquette créée à l’étape 8 et indiquez à
Windows qu’il doit les rechercher sur celle-ci.
11. Les pilotes sont alors installés. Vous pouvez désormais utiliser votre SPD3200CC pour installer le
logiciel en insérant le disque Install.
Question 2 : Je possède un PC fonctionnant sous Windows 98 Deuxième Édition
sans lecteur de CD-ROM, mais je dispose d’un accès Internet. Comment installer
les pilotes ?
1. Démarrez l’ordinateur.
2. Lancez Internet Explorer (ou un autre navigateur web).
3. Accédez au site Philips : http://www.philips.com/support
4. Choisissez "Drivers and manuals" (Pilotes et manuels).
5. Recherchez le SPD3200CC.
6. Téléchargez les pilotes pour Windows 98SE.
7. Décompressez les pilotes en notant l’emplacement des fichiers décompressés.
8. Branchez l’SPD3200CC.
9. Lorsque Windows vous demande les pilotes, indiquez l’emplacement où vous les avez décompressés à
l’étape 7.
10. Votre SPD3200CC est alors prêt à être utilisé.
Question 3 : Comment assurer l’entretien de mon SPD3200CC ?
1. Ne l’exposez pas à l’humidité, à la pluie, à la poussière ou à la chaleur.
2. Installez-le sur une surface plane et stable.
3. Tenez-le à l’écart de tout appareil de chauffage et de la lumière directe du soleil.
4. Laissez suffisamment d’espace autour de votre SPD3200CC : approximativement 2,5 cm au minimum.
5. Ne placez aucun objet sur l'SPD3200CC.
Question 4 : J’ai branché l’SPD3200CC à un connecteur USB mais Windows ne le
reconnaît pas.
1. Assurez-vous que l'SPD3200CC est bien branché à une prise secteur.
2. Assurez-vous que les connecteurs USB sont activés (également dans le BIOS du PC ; consultez le
manuel de celui-ci).
3. Vérifiez si tous les pilotes sont installés (exécutez Windows Update, consultez le manuel de votre PC
et, le cas échéant, téléchargez les pilotes requis depuis le site web du constructeur).
Question 5 : La gravure ou la lecture est anormalement lente. Quelle en est la raison ?
1. Vous avez branché l’SPD3200CC à un connecteur USB bas débit. Branchez le lecteur à un connecteur
USB haut débit.
2. Il peut être nécessaire d’installer les pilotes de votre adaptateur USB. Consultez le manuel ou
téléchargez les pilotes depuis le site web du constructeur.
Page 61

61
Question 6 : J’ai inséré un disque, mais la lecture est inopérante.
1. Assurez-vous que l’étiquette du disque est sur le dessus.
2. Nettoyez le disque.
3. Vérifiez que le disque a le même code de zone que le lecteur.
4. Vérifiez si le disque n’est pas défectueux en insérant un autre disque.
5. Vérifiez si le disque n’est pas défectueux, rayé ou gondolé.
Question 7 : Le lecteur ne répond pas à certaines commandes pendant la lecture.
Vérifiez si la connexion avec le PC est active. Débranchez le câble USB pour désactiver la connexion avec
le PC. Ces commandes ne sont peut-être pas autorisées avec ce disque. Consultez les instructions
concernant celui-ci.
Question 8 : J’ai tenté de graver un disque, mais l’opération a échoué. Que s’est-il passé ?
1. Assurez-vous que le disque n’est pas rayé ou ne porte pas de traces de doigts.
2. Utilisez un nouveau disque et relancez la gravure.
3. Utilisez un disque de marque différente (Philips) pour vous assurer que votre lecteur fonctionne
correctement.
Question 9 : Je ne parviens pas à lire un disque.
1. Assurez-vous que le disque n’est pas rayé ou ne porte pas de traces de doigts.
2. Utilisez un autre disque et réessayez pour vous assurer que votre lecteur peut le lire.
Question 10 : Comment nettoyer un disque encrassé ?
Certains problèmes peuvent être dus à l’encrassement du disque inséré dans le lecteur.
Pour éviter ce genre de problème, nettoyez vos disques régulièrement en procédant comme suit:
Lorsqu'un disque est sale, utilisez un chiffon pour le nettoyer. Essuyez-le en partant du centre vers les bords
et en ligne droite.
Question 11 : Puis-je utiliser des produits chimiques pour nettoyer un disque ?
Non ; évitez les solvants tels que le benzène, le diluant pour peinture, les détergents du commerce ou les
aérosols antistatiques conçus pour les disques analogiques.
Question 12 : Puis utiliser des disques de nettoyage avec la lentille de l’SPD3200CC?
Non. Vous ne devez en aucun cas utiliser des disques de nettoyage du commerce, car ils risquent
d'endommager l'unité optique.
Page 62

62
Vitesses maximales en écriture :
48x sur CD inscriptible
24x sur CD réinscriptible ultrarapide
16x sur DVD+R
8x sur DVD+R Double couche
8x sur DVD+RW
16x sur DVD-R
4x sur DVD-R Dual couche
6x sur DVD-RW
La vitesse d’écriture réelle peut être inférieure selon le type de disque.
Vitesses maximales en lecture :
48x sur CD
16x sur DVD
L’SPD3200CC lit les disques suivants :
CD / CD-R / CD-RW 8 cm et 12 cm (jusqu'à 99 minutes).
DVD : DVD-ROM, DVD-Video, DVD+R, DVD+R double couche, DVD+RW, DVD-R,
DVD-R Dual couche, DVD-RW 8 cm et 12 cm.
Interface : USB haut débit (USB 2.0)
Temps d’accès moyen : 160 ms
Capacité du tampon : 2 Mo
Températures :
La température en fonctionnement doit être comprise entre +5° C et +40° C.
La température d’entreposage doit être comprise entre –20° C et +60° C.
MTBF de 75.000 heures à 20% d'utilisation
Caractéristiques techniques
Page 63
63
Come si accede alle informazioni sulla garanzia
memorizzate?
1
Inserire nuovamente il disco Nero e fare clic su "Esci".
2
Fare clic sull'icona "Risorse del computer" nel desktop
oppure fare clic su "Start", "Risorse del computer".
3
Fare un clic destro sull'icona "Nero" e selezionare
"Esplora".
4
Selezionare la cartella "Philips Warranty" che contiene i
documenti relativi alla garanzia.
Se non si ha Adobe Acrobat Reader, è possibile
reperirlo nella cartella "Acrobat Reader" di questo disco
oppure è possibile scaricarlo dall'indirizzo
http://www.adobe.com
"Copie non autorizzate di materiale protetto da copie, inclusi programmi per computer,
documenti, registrazioni di radiogrammi e suoni, possono essere una violazione del copyright e
costituire un illecito penale.
Questa apparecchiatura non può essere utilizzata a tali scopi."
Indicativo WEEE: "Informazioni per il consumatore"
Smaltimento di vecchi prodotti
Il prodotto è stato progettato e assemblato con materiali e componenti di alta qualità che possono
essere riciclati e riutilizzati.
Se su un prodotto si trova il simbolo di un bidone con ruote, ricoperto da una X, vuol dire che il
prodotto soddisfa i requisiti della Direttiva comunitaria 2002/96/CE.
Informarsi sulle modalità di raccolta, dei prodotti elettrici ed elettronici, in vigore nella zona in cui si
desidera disfarsi del prodotto. Attenersi alle normative locali per lo smaltimento dei rifiuti e non
gettare i vecchi prodotti nei normali rifiuti domestici. Uno smaltimento adeguato dei prodotti aiuta a
prevenire l'inquinamento ambientale e possibili danni alla salute.
ATTENZIONE
I sacchetti di plastica possono essere pericolosi.
Per evitare pericoli di soffocamento non lasciare questo saccheto alla portata dei bambini.
Garanzia, Ambiente, Sicurezza,
Domande frequenti (FAQ) e Specifiche
I
Page 64

64
Domande frequenti (FAQ)
Domanda 1: Utilizzo un PC con Windows 98 Second Edition in cui non è installata
un'unità CDROM, ma posseggo un altro PC. Come devo procedere per installare i driver?
1. Avviate l'altro computer.
2. Inserite il disco di Nero per l'SPD3200CC nell'unità CDROM.
3. Fate clic su "Exit" (Esci) alla comparsa dello schermo d'installazione di Nero.
4. Fate clic su "Risorse del computer".
5. Fate clic sul logo "Nero".
6. Fate un clic destro e selezionate "Esplora".
7. Accedete alla cartella dei driver "Philips Drivers".
8. Copiate il contenuto di questa cartella su un dischetto.
9. Collegate l'SPD3200CC al vostro computer Windows 98SE.
10. Quando Windows richiede i driver, inserite il floppy prodotto al punto 8 e confermate a Windows
l'uso di questo dischetto.
11. I driver verranno installati. Ora è possibile utilizzare il vostro SPD3200CC per installare il software
tramite il disco d'installazione Install.
Domanda 2: Utilizzo un PC con Windows 98 Second Edition in cui non è installata
un'unità CDROM, ma ho possibilità di accedere ad Internet. Come devo procedere per
installare i driver?
1. Avviate il computer.
2. Aprite Internet Explorer (od un altro browser Web)
3. Accedete al sito Web di Philips: http://www.philips.com/support
4. Selezionate "Drivers and manuals" (Driver e manuali)
5. Ricercate SPD3200CC
6. Scaricate i driver per Windows 98SE
7. Scompattate il file zip dei driver ed annotate la posizione dove avete salvato i file
8. Collegate l'SPD3200CC
9. Quando Windows richiede i driver, specificate la posizione in cui avete salvato i driver al punto 7.
10. L'SPD3200CC ora funziona correttamente.
Domanda 3: Come mantengo l'SPD3200CC in ottima forma?
1. Non esponetelo all'umidità, pioggia od eccessivo calore.
2. Collocatelo su una superficie stabile e piana.
3. Tenetelo lontano da caloriferi e luce solare diretta.
4. Lasciate dello spazio libero attorno all'SPD3200CC: circa 2,5cm per lato.
5. Non poggiate alcun oggetto sopra all'SPD3200CC.
Domanda 4: Ho collegato l'SPD3200CC ad un connettore USB ma Windows non reagisce
il alcun modo e l'SPD3200CC non viene riconosciuto.
1. Assicuratevi di aver collegato correttamente l'SPD3200CC ad una presa elettrica.
2. Assicuratevi che i connettori USB siano abilitati (anche nel BIOS del PC, a questo proposito, consultate
la Guida del PC).
3. Verificate di aver installato tutti i driver (accedete a Windows Update, controllate la guida del PC e
scaricate, se necessari, i driver per il PC dal sito Web del produttore).
Domanda 5: La scrittura o lettura richiedono un tempo eccessivamente lungo. Qual è il
motivo?
1. Avete collegato SPD3200CC ad un connettore USB a bassa velocità, che presenta un throughput
molto limitato. Collegate l'unità ad un adattatore USB ad alta velocità.
2. Potrebbe essere necessario installare i driver per l'adattatore USB. Consultate la guida o scaricate i
driver dal sito Web del produttore.
Page 65

65
Domanda 6: Ho inserito un disco, ma non viene riprodotto.
1. Verificate che l'etichetta del disco sia rivolta verso l'alto.
2. Pulite il disco.
3. Controllate se il disco è codificato per lo stesso codice regionale impostato nel lettore.
4. Controllate se il disco è difettoso, provandone un altro.
5. Verificate la superficie del disco per rilevare difetti, graffi o deformazioni (disco non piano)
Domanda 7: Il lettore non risponde ad alcuni comandi operativi, durante la riproduzione.
Verificate se è attiva una connessione al PC. Scollegate il cavo USB per disattivare la connessione al PC. I
comandi potrebbero essere non previsti a livello di disco. Consultate le istruzioni a corredo del disco.
Domanda 8: Ho tentato di scrivere un disco, ma l'operazione non è andata a buon fine.
Casa è accaduto?
1. Verificate che sulla superficie del disco non siano presenti graffi od impronte.
2. Utilizzate un altro disco e ripetete la sequenza di scrittura.
3. Utilizzate un disco di marca differente (Philips) per verificare se l'unità funziona correttamente.
Domanda 9: Non riesco a leggere il disco.
1. Verificate che sulla superficie del disco non siano presenti graffi od impronte.
2. Utilizzate un altro disco e riprovate per verificare se l'unità è in grado di leggere.
Domanda 10: Come si pulisce un disco sporco?
Alcuni problemi potrebbero insorgere perché il disco inserito nel lettore è sporco. Per evitare questi
inconvenienti, pulite regolarmente i dischi, procedendo come segue:
Quando un disco è sporco, pulitelo con un panno di pulizia, con passate radiali, dal centro del disco verso
l'esterno.
Domanda 11: E' possibile utilizzare agenti chimici per pulire i dischi?
No, non utilizzate solventi, quali benzina, solventi, detergenti domestici o spray antistatici destinati a dischi
analogici.
Domanda 12: E' possibile utilizzare dischi di pulizia per pulire l'ottica dell'SPD3200CC?
No, non utilizzate i dischi di pulizia in commercio per pulire l'ottica, poiché questi tipi di disco potrebbero
danneggiare l'unità ottica.
Page 66

66
Velocità in scrittura max:
48x su CD-R
24x su CD-RW ultraveloci
16x su DVD+R
8x su DVD+R Doppio layer
8x su DVD+RW
16x su DVD-R
4x su DVD-R Dual layer
6x su DVD-RW
La velocità in scrittura effettiva può risultare inferiore poiché legata alla natura del disco.
Velocità in lettura max:
48x su CD
16x su DVD
SPD3200CC è in grado di leggere i seguenti dischi:
Dischi CD / CD-R / CD-RW in formato 8 cm e 12 cm (fino a 99 min).
Dischi DVD: DVD-ROM, DVD-Video, DVD+R, DVD+R doppio layer, DVD+RW,
DVD-R, DVD-R Dual layer, DVD-RW in formato 8 cm e 12 cm.
Interfaccia: USB ad alta velocità (USB 2.0)
Tempo di accesso tipico: 160 ms
Dimensione buffer: 2 MB
Temperatura:
La temperatura operativa deve essere compresa tra +5ºC e +40ºC
La temperatura in stoccaggio deve essere compresa tra –20ºC e +60ºC
MTBF 75000 con 20% di utilizzo
Specifiche
Page 67

67
Waar vind ik informatie over de garantie?
1
Leg de Nero-CD weer in de lade en klik op "Sluiten".
2
Klik op het bureaublad op het pictogram
"Deze computer" of klik op "Start" en dan op
"Deze computer".
3
Klik met de rechtermuisknop op het pictogram "Nero"
en daarna op "Verkennen".
4
Ga naar de map "Philips Warranty". Daar vindt u
documentatie over de garantie.
Als u het programma Adobe Acrobat Reader nog niet
hebt, kunt u het vinden in de map "Acrobat Reader" op
deze disk of gratis downloaden via http://www.adobe.com
"Het zonder toestemming vervaardigen van kopieën van auteursrechtelijk beschermde werken,
inclusief computer programma’s, bestanden, uitzendingen en geluidsopnames, kan een inbreuk op
auteursrechten en een strafbaar feit zijn.
De apparatuur dient niet voor dergelijke doeleinden gebruikt te worden."
WEEE-markering: "Informatie voor de consument"
Verwijdering van uw oude product
Uw product is vervaardigd van kwalitatief hoogwaardige materialen en onderdelen, welke gerecycled
en opnieuw gebruikt kunnen worden.
Als u op uw product een doorstreepte afvalcontainer op wieltjes ziet, betekent dit dat het product
valt onder de EU-richtlijn 2002/96/EC.
Win inlichtingen in over de manier waarop elektrische en elektronische producten in uw regio
gescheiden worden ingezameld. Neem bij de verwijdering van oude producten de lokale wetgeving
in acht en plaats deze producten niet bij het gewone huishoudelijke afval. Als u oude producten
correct verwijdert voorkomt u negatieve gevolgen voor het milieu en de volksgezondheid.
PAS OP
Plastic zakken kunnen gevaarlijk zijn.
Om gevaar van verstikking te voorkomen houd de zak buiten bereik van kleine kinderen.
Garantie, Milieu, Veiligheid,
Vaak gestelde vragen (FAQ) en Specificaties
NL
Page 68

68
Vaak gestelde vragen (FAQ)
Vraag 1: Mijn computer met Windows 98 Tweede Edition heeft geen CD-ROM-station,
maar ik heb een andere PC. Hoe kan ik de stuurprogramma's installeren?
1. Start de andere computer op.
2. Leg de Nero-CD voor de SPD3200CC in het CD-ROM-station.
3. Klik op "Verlaten" zodra het Nero-installatiescherm verschijnt.
4. Klik op "Deze computer".
5. Klik op het "Nero"-logo.
6. Klik met de rechtermuisknop en kies "Verkennen".
7. Ga naar de map "Philips drivers".
8. Kopieer de inhoud van deze map naar een diskette.
9. Sluit de SPD3200CC aan op uw computer met Windows 98SE.
10. Als Windows om stuurprogramma's vraagt, plaats dan de diskette (zie stap 8) en kies die in Windows.
11. De stuurprogramma's worden geïnstalleerd. U kunt uw SPD3200CC nu gebruiken om de software
met behulp van de installatie-CD te installeren.
Vraag 2: Mijn computer met Windows 98 Tweede Edition heeft geen CD-ROM-station,
maar ik heb wel een Internet-verbinding. Hoe kan ik de stuurprogramma's installeren?
1. Start de computer op.
2. Start Internet Explorer (of een andere web browser).
3. Ga naar de website van Philips: http://www.philips.com/support
4. Kies daar "Drivers and manuals".
5. Zoek naar de SPD3200CC.
6. Download de stuurprogramma's voor Windows 98SE.
7. Pak de stuurprogramma's uit (Unzip) en onthoud waar u de uitgepakte stuurprogramma's opslaat.
8. Sluit de SPD3200CC aan.
9. Als Windows om stuurprogramma's vraagt, geef dan de locatie aan die in stap 7 is gebruikt.
10. Nu werkt uw SPD3200CC.
Vraag 3: Hoe houd ik mijn SPD3200CC optimaal in vorm?
1. Stel het product niet bloot aan vocht, regen, zand of hitte.
2. Zet het product op een stevig en egaal oppervlak.
3. Houd het product uit de buurt van warmtebronnen en rechtstreeks zonlicht.
4. Zorg voor voldoende ruimte rond uw SPD3200CC: rondom moet aan elke kant ongeveer 2,5 cm
vrije ruimte blijven.
5. Zet nooit voorwerpen op de SPD3200CC.
Vraag 4: Ik heb de SPD3200CC op een USB-connector aangesloten, maar Windows
herkent het product niet en reageert er niet op.
1. Controleer of de SPD3200CC correct op een stopcontact is aangesloten.
2. Zorg dat de USB-connectors zijn geactiveerd. (Ook in het BIOS van uw PC. Kijk in de handleiding van
uw PC.)
3. Controleer of alle stuurprogramma's zijn geïnstalleerd. (Installeer een update van Windows, kijk in uw
PC-handleiding en download indien nodig stuurprogramma's voor de PC vanaf de site van de
fabrikant.)
Vraag 5: Branden of lezen van een disc duurt veel te lang. Wat is de oorzaak?
1. U hebt de SPD3200CC op de trage USB-connector aangesloten. Dit beperkt de datasnelheid
aanzienlijk. Sluit het product op de snelle USB-connector aan.
2. Misschien moet u stuurprogramma's voor uw USB-interface installeren. Kijk in de handleiding en
download indien nodig stuurprogramma's vanaf de site van de fabrikant
Page 69

69
Vraag 6: Ik heb een disc geplaatst, maar die wordt niet afgespeeld.
1. Controleer of de disc met de bedrukte zijde naar boven is geplaatst.
2. Maak de disc schoon.
3. Controleer of de disc en de speler dezelfde regiocode hebben.
4. Plaats een andere disc om na te gaan of de eerste defect is.
5. Controleer of de disc defect, sterk bekrast of verbogen is.
Vraag 7: Tijdens het afspelen reageert de speler niet op sommige bedieningshandelingen.
Controleer of de verbinding met de PC correct is aangesloten. Maak de USB-kabel los om de verbinding
met de PC op te heffen. Sommige opdrachten werken niet bij bepaalde typen discs. Raadpleeg de
instructies bij de disc.
Vraag 8: Het branden van een disc is mislukt. Wat is de oorzaak?
1. Controleer of de disc geen krassen of vingerafdrukken bevat.
2. Probeer het branden nog een keer met een nieuwe disc.
3. Gebruik een ander merk disc (Philips) om na te gaan of uw brander goed werkt.
Vraag 9: Een disc wordt niet gelezen.
1. Controleer of de disc geen krassen of vingerafdrukken bevat.
2. Probeer of het lezen van een andere disc wel correct werkt.
Vraag 10: Hoe kan een vuile disc schoonmaken?
Sommige problemen kunnen een gevolg zijn van vuil op een disc. Voorkom fouten door discs als volgt
regelmatig schoon te maken:
Verwijder vuil van ene disc met een schoon doekje. Wrijf alleen in een rechte lijn vanuit het midden naar
de randen van de disc.
Vraag 11: Mag ik een disc met schoonmaakmiddelen reinigen?
Nee. Gebruik nooit oplosmiddelen als benzine, thinner, huishoudreinigers of antistatische sprays voor
analoge media.
Vraag 12: Mag ik de lens in de SPD3200CC schoonmaken met reinigings-CD's?
Nee. Gebruik geen reinigings-CD's om de lens schoon te maken, want zulke discs kunnen de optische
onderdelen beschadigen.
Page 70

7070
Maximale schrijfsnelheid:
48x op CD-Recordable
24x op UltraSpeed CD-ReWritable
16x op DVD+R
8x op DVD+R Dubbellaags
8x op DVD+RW
16x op DVD-R
4x op DVD-R Dual Layer
6x op DVD-RW
De daadwerkelijke schrijfsnelheid kan lager zijn, omdat die van de disc afhankelijk is.
Maximale leessnelheid:
48x vanaf CD
16x vanaf DVD
De SPD3200CC leest de volgende typen discs:
CD / CD-R / CD-RW, zowel discs van 8 cm als 12 cm (tot 99 min.)
DVD-typen: DVD-ROM, DVD-Video, DVD+R, DVD+R dubbellaags, DVD+RW, DVD-R,
DVD-R Dual Layer, DVD-RW, zowel discs van 8 cm als 12 cm
Interface: HiSpeed USB (USB 2.0)
Nominale toegangstijd: 160 ms
Buffergeheugen: 2 MB
Temperatuur:
Tijdens gebruik moet de temperatuur tussen +5ºC en +40ºC zijn.
Buiten gebruik moet de temperatuur tussen –20ºC en +60ºC zijn.
MTBF 75.000 uur bij 20% inschakeltijd
Specificaties
Page 71

71
¿Cómo conectar SPD3200CC
al ordenador?
Como ligar o SPD3200CC ao meu computador?
Bilgisayarıma SPD3200CC’yi takma şekli?
Jak mogę podłączyć napęd SPD3200CC do komputera?
Hur ansluter jag SPD3200CC till min dator?
En las páginas siguientes se muestra
cómo conectar la nueva SPD3200CC a
un ordenador.
Debido a que hay muchas marcas y
tipos de ordenadores en el mercado,
las fotografías siguientes muestran
únicamente algunos ejemplos de
instalación de SPD3200CC.
Para obtener información específica
acerca de su ordenador, consulte el
manual del ordenador o póngase en
contacto con su distribuidor local.
As páginas seguintes mostram como
ligar o seu novo SPD3200CC a um
computador.
Uma vez que existem muitas marcas e
tipos de computadores disponíveis, as
fotografias seguintes apresentam
apenas exemplos de como o
SPD3200CC pode ser instalado.
Para informações específicas relativas
ao seu computador, consulte o manual
do computador ou contacte o seu
revendedor local.
İzleyen sayfalar, yeni SPD3200CC’nizi
bir bilgisayara takma şeklini
göstermektedir.
Piyasada bir çok marka ve tipte
bilgisayar bulunduğundan, izleyen
fotoğraflar; sadece SPD3200CC’nizin
nasıl kurulabileceğine dair örnekleri
göstermektedir.
Bilgisayarınız hakkında daha
teknik/ayrıntılı bilgi için, bilgisayarınızın
kılavuzunuza bakınız yada yerel
satıcınız ile temasa geçiniz.
Poniżej znajduje się opis sposobu
podłączenia nowego napędu
SPD3200CC do komputera.
Ponieważ istnieje bardzo dużo marek i
typów komputerów, na zdjęciach
przedstawiono jedynie przykładowe
podłączenie urządzenia.
Szczegółowe informacje o komputerze
można znaleźć w jego instrukcji obsługi
lub otrzymać od lokalnego sprzedawcy.
På följande sidor finns en beskrivning av
hur du ansluter din nya SPD3200CC till
en dator.
Eftersom det finns många datormärken
och -typer visar följande bilder bara
exempel på hur din SPD3200CC kan
installeras.
Om du vill ha särskild information om
din dator läser du datorhandboken eller
kontaktar din lokala leverantör.
E PT TR
PL SV
Page 72

72
En la parte posterior encontrará las
conexiones que necesita para conectar
SPD3200CC al ordenador.
A: Alimentación.
B: HiSpeed USB.
C: Conector de audio.
Na parte traseira do dispositivo irá
encontrar as fichas de que necessita para ligar o
SPD3200CC ao computador.
A: Alimentação.
B: USB HiSpeed.
C: Conector de áudio.
Arka tarafta, SPD3200CC’yi bilgisayarınıza takmak için gerek duyacağınız fişleri bulacaksınız.
A: Güç.
B: HiSpeed (Yüksek hızlı) USB.
C: Odyo/Ses konektörü.
W tylnej części znajdują się gniazda potrzebne do podłączenia napędu SPD3200CC do
komputera.
A: Zasilanie.
B: HiSpeed USB.
C: Gniazdo audio.
På baksidan finns de uttag som krävs för att ansluta SPD3200CC till datorn.
A: Ström.
B: HiSpeed USB.
C: Ljudanslutning.
SV
PL
TR
PT
E
2
1
En la caja encontrará un dispositivo
SPD3200CC y los siguientes cables:
A: Dispositivo SPD3200CC.
B: Fuente de alimentación (2 piezas).
C: Cable HiSpeed USB.
No pacote do produto SPD3200CC que
adquiriu irá encontrar, entre outros, os seguintes
itens:
A: Dispositivo SPD3200CC.
B: Cabo de alimentação (2 peças).
C: Cabo USB HiSpeed.
Perakende kutusunda, bir SPD3200CC
aygıtı ve aşağıdaki kablolar bulunmaktadır
A: SPD3200CC aygıtı.
B: Güç kaynağı (2 parça).
C: HiSpeed (Yüksek hızlı) USB Kablosu.
Opakowanie zawiera następujące elementy:
A: Napęd SPD3200CC.
B: Kabel zasilający (2 części).
C: Kabel HiSpeed USB.
I förpackningen finns SPD3200CC-enheten och följande kablar
A: SPD3200CC-enhet.
B: Strömförsörjningsenhet (2 delar).
SV
PL
TR
PT
E
Page 73

73
Conecte los cables de alimentación entre sí y
conéctelos a SPD3200CC y a una toma eléctrica.
Ligue os cabos de alimentação entre si e
ligue-os em conjunto ao SPD3200CC e a uma
tomada eléctrica.
Güç kablolarını birlikte bağlayıp SPD3200CC
ve bir güç prizine onları takınız.
Połącz kable zasilające i podłącz je do napędu
SPD3200CC i wyjścia zasilania.
Koppla ihop strömkablarna och anslut dem
till SPD3200CC och ett strömuttag.
SV
PL
TR
PT
E
3
Conecte el cable USB a SPD3200CC.
No conecte el cable al ordenador todavía.
Ligue o cabo USB ao SPD3200CC.
Não ligue ainda o cabo ao computador.
USB kablosunu SPD3200CC’ne takınız.
Bu aşamada, kabloyu bilgisayara takmayınız.
Podłącz kabel USB do napędu SPD3200CC.
Nie podłączaj jeszcze kabla do komputera.
Anslut USB-kabeln till SPD3200CC.
Anslut inte kabeln till datorn vid denna tidpunkt.
SV
PL
TR
PT
E
4
Page 74

74
Busque el conector HiSpeed USB en el PC.
A: Logotipo del conector HiSpeed USB preferente.
B: Logotipo del conector LowSpeed USB
alternativo.
Con la conexión a LowSpeed USB (o USB 1.x),
las velocidades están limitadas (escritura a 4x y
lectura a 6x en CD, lectura a 0,7x en DVD) y no es
posible grabar en DVD ni ver vídeo.
Procure o conector USB HiSpeed no PC.
A: Logotipo de ligação ou conector USB HiSpeed
preferencial.
B: Logotipo de conector USB LowSpeed alternativo.
Quando estiver ligado a USB LowSpeed (ou a USB
1.x), as velocidades são limitadas (4x para gravação e 6x para leitura com CD, 0,7x de leitura com DVD) e
não é possível a gravação em DVD ou ver vídeos.
PC’niz üzerindeki HiSpeed (Yüksek hızlı) USB konektörün aranması.
A: Tercih edilen HiSpeed (Yüksek hızlı) USB yada konektör için logo.
B: Alternatif LowSpeed (Düşük hızlı) USB konektör için logo.
LowSpeed (Düşük hızlı) USB (yada USB 1.x)’ye takıldığında, hızlar sınırlıdır (CD üzerinde 4x yazma ve 6x
okuma, DVD üzerinde 0,7x okuma) ve DVD üzerine yazmak ya da video seyretmek olanaklı değildir.
Znajdź port HiSpeed USB w komputerze szukając:
A: Logo lub gniazda preferowanej magistrali HiSpeed USB.
B: Logo lub gniazda alternatywnej magistrali LowSpeed USB.
Podłączenie do magistrali LowSpeed USB (lub USB 1.x) spowoduje ograniczenie prędkości (CD: zapis 4x i
odczyt 6x; DVD: odczyt 0,7x) oraz uniemożliwienie zapisu płyt DVD lub odtwarzania filmów.
Leta rätt på datorns HiSpeed USB-anslutning.
A: Logotyp för HiSpeed USB-anslutningen som du helst bör ansluta till.
B: Logotyp för den alternativa LowSpeed USB-anslutningen.
Om du ansluter till LowSpeed USB (eller USB 1.x) är hastigheten begränsad (4x vid skrivning till och 6x vid
läsning från CD, 0,7x vid läsning från DVD) och det går inte att skriva till DVD eller titta på video.
SV
PL
TR
PT
E
5
Page 75

75
Para identificar su sistema operativo, haga clic
con el botón derecho en "Mi PC" y seleccione
"Propiedades".
Si utiliza Windows 98 Second Edition, vaya al paso 11;
en caso contrario, vaya al paso 7.
Identifique o seu sistema operativo clicando
no botão direito do rato sobre "My Computer"
(O meu computador) e escolhendo "Properties"
(Propriedades).
Se estiver a utilizar o Windows 98 Second Edition,
avance para o passo 11, caso contrário continue
para o passo 7.
"My Computer" (Bilgisayarım) üzerine sağ
tuşla tıklatarak ve "Properties" (Özellikler)'i seçerek İşletim Sisteminizi belirleyiniz.
Windows 98 Second Edition (İkinci Sürüm)'ü kullanıyorsanız, 11. adıma geçiniz yada 7. adımdan devam
ediniz.
Sprawdź, jaki posiadasz system operacyjny, klikając prawym przyciskiem myszy ikonę "My
Computer" (Mój komputer) i wybierając "Properties" (Właściwości).
Jeśli używasz systemu Windows 98 Second Edition, przejdź do punktu 11. W innym przypadku przejdź
do punktu 7.
"Properties" (Egenskaper).
Om du använder Windows 98 Second Edition går du till steg 11. I annat fall fortsätter du med steg 7.
SV
PL
TR
PT
E
6
Conecte el cable USB al ordenador.
Ligue o cabo USB ao computador.
USB kablosunu bilgisayara takınız.
Podłącz kabel USB do komputera.
Anslut USB-kabeln till datorn.
SV
PL
TR
PT
E
7
Page 76
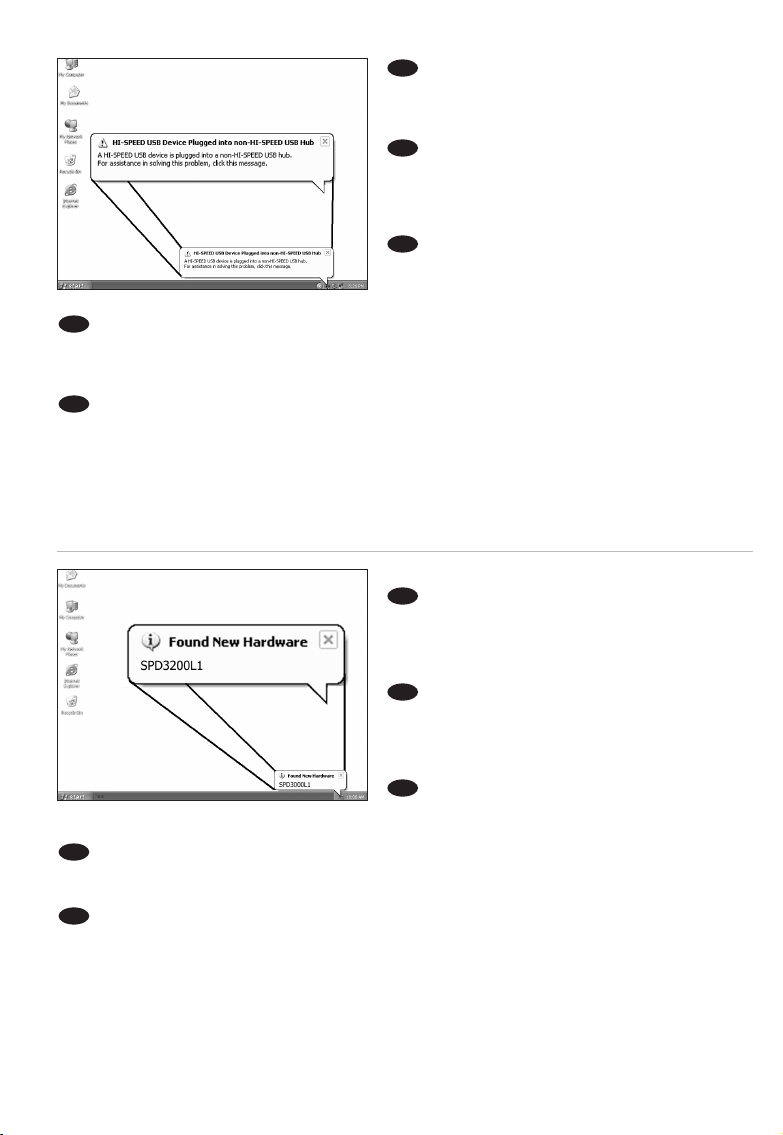
76
Windows XP le avisará cuando conecte
SPD3200CC a una conexión USB 1 lenta.
Revise de nuevo el paso 5.
Esto es válido sólo para Windows XP.
O Windows XP irá avisá-lo quando ligar o
SPD3200CC a uma ligação USB 1 lenta.
Consulte novamente o passo 5.
Esta indicação é válida apenas para o Windows
XP.
Windows XP; SPD3200CC’yi yavaş bir USB
1 bağlantısına taktığınızda, sizi uyaracaktır.
5. adımı yeniden kontrol ediniz.
Bu sadece Windows XP için geçerlidir.
Po podłączeniu napędu SPD3200CC do starego portu USB 1, system Windows XP wyświetli
ostrzeżenie.
Ponownie sprawdź punkt 5.
Dotyczy to tylko systemu Windows XP.
Windows XP varnar dig om du ansluter SPD3200CC till en långsam USB 1-anslutning.
Kontrollera steg 5 igen.
Det gäller endast Windows XP.
SV
PL
TR
PT
E
9
8
Los controladores se instalarán
automáticamente.
Esto puede tardar unos segundos.
Las ventanas emergentes que aparecen
dependerán del sistema operativo.
Os controladores serão instalados
automaticamente.
Esta operação poderá demorar alguns segundos.
As mensagens "pop-up" dependem do sistema
operativo.
Sürücülerin kurulum işlemi, otomatik olarak
yapılacaktır. Bu birkaç saniye sürebilir.
Gösterilen açılır menüler, işletim sistemine bağlıdır.
Instalacja sterowników przebiegnie automatycznie.
Może to potrwać kilka sekund.
Wyświetlane ekrany różnią się odpowiednio do systemu operacyjnego.
Drivrutinerna installeras automatiskt.
Det kan ta några sekunder.
Vilka popupmeddelanden som visas beror på operativsystemet.
SV
PL
TR
PT
E
Page 77

77
Inserte el disco de Nero en SPD3200CC.
Vaya al paso 15.
Introduza o disco do software Nero no
SPD3200CC.
Avance para o passo 15!
SPD3200CC’ye Nero diskini yerleştiriniz.
15. adıma geçiniz!
Włóż płytę programu Nero do napędu
SPD3200CC.
Przejdź do punktu 15!
Sätt in Nero-skivan i SPD3200CC.
SV
PL
TR
PT
E
10
¡
Sólo para Windows 98 Second Edition!
Inserte el disco de Nero en la unidad de CD-ROM del
ordenador, no en SPD3200CC.
Si el ordenador no tiene CD-ROM, consulte la sección
Preguntas frecuentes.
Apenas para o Windows 98 Second Edition!
Introduza o disco do software Nero na unidade de
CD-ROM do computador, e não no SPD3200CC.
Se não possuir uma unidade de CD-ROM no
computador, consulte as Perguntas mais frequentes
(FAQ).
Sadece Windows 98 Second Edition (İkinci
Sürüm)!
Nero diskini, bilgisayarınızın CD-ROM aygıtına yerleştiriniz, SPD3200CC’ye değil.
Bilgisayarınızda bir CD-ROM aygıtı yok ise, lütfen Sıkça Sorulan Sorular bölümüne bakınız.
Dotyczy tylko systemu Windows 98 Second Edition!
Włóż płytę programu Nero do napędu CD-ROM komputera - nie do napędu SPD3200CC.
Jeśli w komputerze nie ma napędu CD-ROM, zapoznaj się z najczęściej zadawanymi pytaniami.
Endast Windows 98 Second Edition!
Sätt i Nero-skivan i datorns CD-ROM-enhet, inte i SPD3200CC.
Om du inte har en CD-ROM-enhet i datorn läser du Vanliga frågor.
SV
PL
TR
PT
E
11
Page 78

78
¡
Sólo para Windows 98 Second Edition!
Espere a que aparezca esta pantalla.
Apenas para o Windows 98 Second Edition!
Espere até que este ecrã seja apresentado.
Sadece Windows 98 Second Edition (İkinci
Sürüm)! Bu ekran açılıncaya kadar bekleyiniz.
Dotyczy tylko systemu Windows 98 Second
Edition! Zaczekaj, aż zostanie wyświetlony ten
ekran.
Endast Windows 98 Second Edition!
Vänta tills den här skärmen visas.
SV
PL
TR
PT
E
13
12
¡
Sólo para Windows 98 Second Edition!
Conecte el cable USB al ordenador.
Apenas para o Windows 98 Second Edition!
Ligue o cabo USB ao computador.
Sadece Windows 98 Second Edition
(İkinci Sürüm)! USB kablosunu bilgisayara takınız.
Dotyczy tylko systemu Windows 98 Second
Edition! Podłącz kabel USB do komputera.
Endast Windows 98 Second Edition!
Anslut USB-kabeln till datorn.
SV
PL
TR
PT
E
Page 79
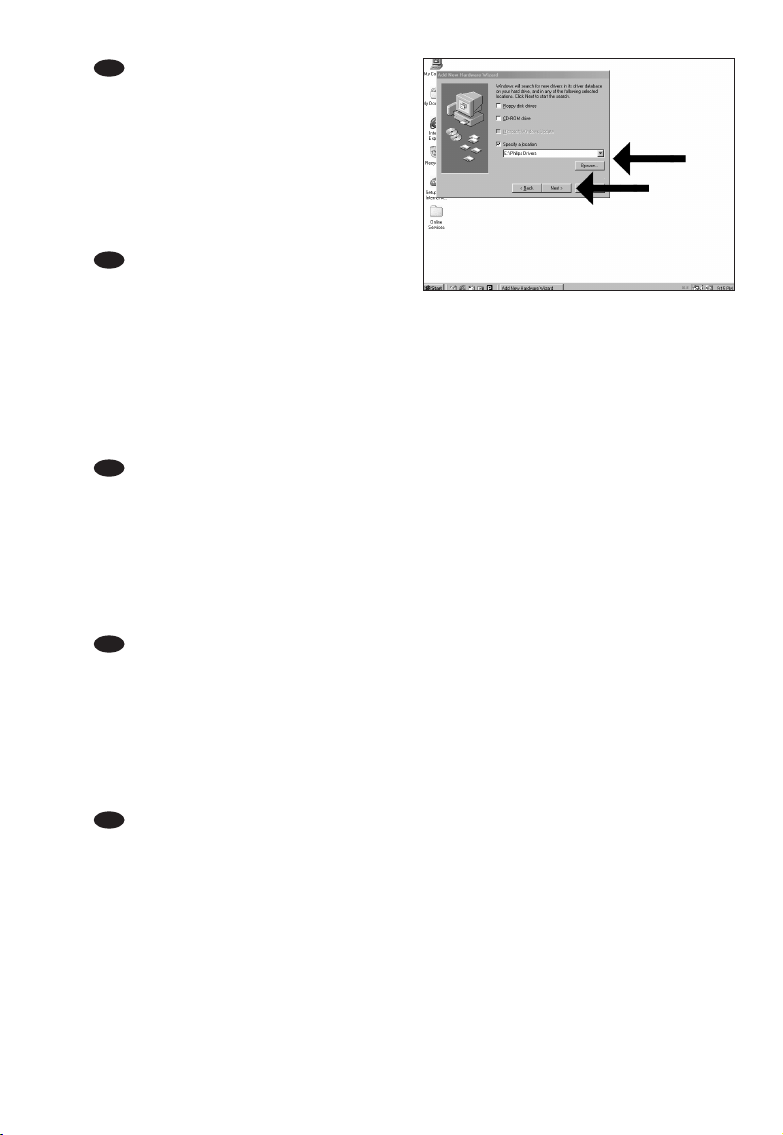
79
14
¡
Sólo para Windows 98 Second Edition!
Aparece el "Asistente para agregar nuevo hardware".
Siga estos pasos:
A. Haga clic en "Siguiente" en "El asistente buscará
nuevos controladores…:".
B. Seleccione "Buscar los mejores controladores…".
C. Seleccione "Especificar una ubicación".
D. Busque el directorio "Philips drivers" en el disco de
Nero y haga clic en Siguiente.
E. Los controladores se instalarán.
F. Continúe con el paso 15.
Apenas para o Windows 98 Second Edition!
O "Add New Hardware Wizard" (Assistente
Adicionar Novo Hardware) será apresentado. Siga
estes passos:
A. Clique em "Next" (Seguinte) em "The wizard searches for new drivers…:" (Este assistente procura
novos controladores para:).
B. Escolha "Search for the best drivers…" (Procurar o melhor controlador para o dispositivo.).
C. Escolha "Specify a location" (Especificar uma localização:).
D. Procure até encontrar o directório "Philips Drivers" (Controladores Philips) no disco de software
Nero e clique em "Next" (Seguinte).
E. Os controladores serão instalados.
F. Avance para o passo 15.
Sadece Windows 98 Second Edition (İkinci Sürüm)!
"Add New Hardware Wizard" (Yeni Donanım Ekle Sihirbazı)açılacak. Bu adımları takip ediniz:
A. "The wizard searches for new drivers…:" (Sihirbaz yeni sürüleri arıyor) içinde "Next" (İleri) üzerine
tıklatınız.
B. "Search for the best drivers…" (En iyi sürücüleri ara)’yı seçiniz.
C. "Specify a location" (Bir konum belirt)’i seçiniz.
D. Nero diski içindeki "Philips drivers" (Philips sürücüleri) dizinine göz atınız ve Next (İleri) üzerine
tıklatınız.
E. Sürücülerin kurulum işlemi, yapılacaktır.
F. 15. adımdan devam ediniz.
Dotyczy tylko systemu Windows 98 Second Edition!
Pojawi się okno "Add New Hardware WIzard" (Kreator dodawania nowego sprzętu). Wykonaj
następujące czynności:
A. Kliknij "Next" (Dalej) w oknie "The wizard searches for new drivers…:" (Kreator wyszuka teraz
nowe sterowniki…:).
B. Zaznacz "Search for the best drivers…" (Wyszukaj najlepsze sterowniki…).
C. Zaznacz "Specify a location" (Podaj lokalizację).
D. Przejdź do katalogu "Philips drivers" na płycie programu Nero i kliknij "Next" (Dalej).
E. Rozpocznie się instalacja sterowników.
F. Przejdź do punktu 15.
Endast Windows 98 Second Edition!
Guiden "Add New Hardware Wizard" (Lägg till ny maskinvara) visas. Följ dessa steg:
A. Klicka på "Next" (Nästa) i "The wizard searches for new drivers…:" (Guiden söker efter nya
drivrutiner).
B. Välj "Search for the best drivers…" (Sök efter de bästa drivrutinerna).
C. Välj "Specify a location" (Ange en plats).
D. Bläddra till katalogen "Philips drivers" (Philips-drivrutiner) på Nero-skivan och klicka på Next
(Nästa).
E. Drivrutinerna installeras.
F. Fortsätt med steg 15.
SV
TR
TR
PT
E
Page 80

80
Haga clic en "Install Suite" para instalar el
software principal.
El programa le pedirá que reinicie el PC al final del
proceso de instalación.
Clique em "Install Suite" (Instalar conjunto)
para instalar o software principal.
O software irá pedir-lhe que reinicie o PC no final
do processo de instalação.
Ana yazılımın kurulumunu yapmak için
"Install Suite" (Yazılım Paketini Kur) üzerine
tıklatınız.
Kurulum işleminin sonunda yazılım, PC’yi yeniden
başlatmanızı isteyecektir.
Kliknij "Install Suite", aby zainstalować główny program.
Po zakończeniu instalacji pojawi się komunikat, aby ponownie uruchomić komputer.
Klicka på "Install Suite" (Installera fil) för att installera huvudprogramvaran.
I slutet av installationen får du ett meddelande om att starta om datorn.
SV
PL
TR
PT
E
15
Una vez instalado el software, debe reiniciar el ordenador.
Enhorabuena. Ahora podrá utilizar el dispositivo Philips.
En los capítulos siguientes de este manual se describe cómo utilizar el dispositivo y las aplicaciones de
software que necesita para realizar cada tarea.
Encontrará más información en www.philips.com/storage
Encontrará actualizaciones en www.philips.com/storageupdates
Depois de instalar o software, deve reiniciar o seu computador.
Parabéns. O seu dispositivo Philips está agora pronto a usar.
O modo de operação e as aplicações de software de que irá necessitar para realizar as suas tarefas
estão descritos nos capítulos seguintes deste "Manual Sobre Como…".
Encontre mais informações em www.philips.com/storage
Encontre actualizações em www.philips.com/storageupdates
Yazılımın kurulumunu yaptıktan sonra, bilgisayarınızı yeniden başlatmanız gerekli olacaktır.
Tebrikler. Philips aygıtınız artık kullanıma hazırdır.
Onu kullanma şekliniz ve ihtiyaç duyacağınız yazılım uygulamaları, bu Kullanma Kılavuzunun izleyen
bölümlerinde anlatılmaktadır.
Daha fazla bilgiyi www.philips.com/storage sitesinde bulabilirsiniz
Güncellemeleri www.philips.com/storageupdates sitesinde bulabilirsiniz
Po zakończeniu instalacji oprogramowania, uruchom ponownie komputer.
Gratulacje! Napęd Philips jest gotowy do użytku.
Sposób obsługi oraz wymagane oprogramowanie zostały opisane w dalszych rozdziałach tej instrukcji.
Dodatkowe informacje znajdujà si´ na stronie www.philips.com/storage
Aktualizacje znajdujà si´ na stronie www.philips.com/storageupdates
När du har installerat programvaran bör du starta om datorn.
Grattis! Nu är din Philips-enhet klar att använda.
Hur du använder den och vilka programtillämpningar du behöver för att utföra dina uppgifter beskrivs i
följande kapitel i denna handbok.
Mer information finns på www.philips.com/storage
Uppdateringar finns på www.philips.com/storageupdates
SV
PL
TR
PT
E
16
Page 81

81
¿Cómo desconectar
SPD3200CC
sin apagar el ordenador?
Como desligar o SPD3200CC sem desligar o computador?
Bilgisayarı kapatmadan SPD3200CC’nin bağlantısını kesme şekli?
Jak odłączyć napęd SPD3200CC nie wyłączając komputera?
Hur kopplar jag bort SPD3200CC utan att stänga av datorn?
En las páginas siguientes se explica
cómo desconectar su nueva
SPD3200CC de un ordenador.
Las ilustraciones representan el sistema
operativo Microsoft Windows XP™.
En otros sistemas operativos pueden
aparecer pantallas diferentes.
As páginas seguintes mostram como
desligar o seu novo SPD3200CC de um
computador.
As imagens do ecrã apresentadas
representam o sistema operativo
Microsoft Windows XP™.
Outros sistemas operativos podem
apresentar mensagens
"pop-up"
diferentes.
İzleyen sayfalar, yeni SPD3200CC’nizin
bilgisayara olan bağlantısını kesme
şeklini göstermektedir.
Ekran resimleri; Microsoft Windows XP™
işletim sistemini temsil etmektedir.
Diğer işletim sistemleri; farklı açılır
menülerini gösterebilir.
Poniżej znajduje się opis sposobu
odłączenia nowego napędu
SPD3200CC do komputera.
Zrzuty ekranowe zostały wykonane w
systemie operacyjnym Microsoft
Windows XP™.
Ekrany komunikatów w innych
systemach mogą się różnić.
På följande sidor finns en beskrivning av
hur du kopplar bort din nya
SPD3200CC från en dator.
Skärmbilderna representerar operativsystemet Microsoft Windows XP™.
Andra operativsystem kan visa andra
popupmeddelanden.
E PT TR
PL SV
Page 82

82
Para desconectar SPD3200CC sin apagar el
ordenador, haga clic en este símbolo.
Para desligar o SPD3200CC sem desligar o
computador, clique neste símbolo.
Bilgisayarınızı kapatmaksızın
SPD3200CC’nin bağlantısını kesmek için, bu
sembol üzerine tıklatınız.
Aby odłączyć napęd SPD3200CC nie
wyłączając komputera, kliknij ten symbol.
Klicka på den här symbolen om du vill
koppla bort SPD3200CC utan att stänga av
datorn.
SV
PL
TR
PT
E
Haga clic en "Quitar hardware con
seguridad…".
Clique em "Safely remove USB…"
(Remover em segurança USB…).
"Safely remove USB…" (Güvenlice USB’yi
çıkar...) üzerine tıklatınız.
Kliknij "Safely remove USB…"
(Bezpieczne odłączanie urządzeń USB…).
Klicka på "Safely remove USB…"
(Säker borttagning av USB).
SV
PL
TR
PT
E
2
Cuando aparezca esta pantalla, puede
desconectar SPD3200CC.
Quando esta mensagem "pop-up" surgir,
pode desligar o SPD3200CC.
Bu açılır menü belirdiğinde,
SPD3200CC’nin bağlantısını kesebilirsiniz.
Kiedy pojawi się to okno, możesz odłączyć
napęd SPD3200CC.
När det här popupmeddelandet visas kan
du koppla bort SPD3200CC.
SV
PL
TR
PT
E
3
1
Page 83

83
¿Cómo imprimir una
etiqueta en un disco?
Como imprimir uma etiqueta em um disco?
Bir disk üzerine bir etiket nasıl yazdırılır?
Drukowanie etykiet na płytach
Hur du skriver ut en etikett på en skiva
En este manual se explica cómo
imprimir una etiqueta en un disco
mediante la función LightScribe™.
Esto sólo se puede hacer en discos que
tengan la etiqueta LightScribe™, no en
discos “imprimibles”. Véase una
muestra de este logotipo a
continuación.
Este manual mostrará como imprimir
uma etiqueta em um disco com o
recurso LightScribe™.
Isso pode ser feito em discos que
apresentam a etiqueta do
LightScribe™, não em discos
“imprimíveis”. Veja a seguir um
exemplo deste logotipo.
Bu kılavuz; LightScribe™ işlevselliğini
kullanarak bir disk üzerinde bir etiketin
nasıl yazdırabileceğinizi gösterecektir.
Bu, sadece LightScribe™ etiketi
bulunan diskler üzerinde yapılabilir,
“yazdırılabilir” diskler üzerinde ise
yapılamaz. Aşağıdaki, bu logonun bir
örneğidir.
Ta instrukcja opisuje sposób
drukowania etykiety na płycie za
pomocą narzędzia LightScribe™.
Jest to możliwe tylko na płytach
posiadających etykiety LightScribe™,
a nie na płytach „umożliwiających
drukowanie”. Poniżej znajduje się
przykład tego logo.
Den här bruksanvisningen visar hur du
skriver ut en etikett på en skiva med
LightScribe™-funktionen.
Detta kan bara göras på skivor med en
LightScribe™-etikett, inte på
“utskrivbara” skivor. Nedan visas ett
exempel på denna logotyp.
E PT TR
PL SV
Page 84

84
Se abre CoverDesigner. Seleccione "Archivo"
y "Nuevo".
O Cover Designer será aberto.
Escolha "Arquivo" e "Novo".
Cover Designer (Kapak Tasarımcısı) açılır.
"Dosya" ve "Yeni" yi seçiniz.
Uruchomi się program Cover Designer.
Kliknij "Plik" i "Nowy".
Cover Designer startar. Välj "Arkiv" och "Nytt".
Inicie "Nero StartSmart" en el escritorio.
Inicie o "Nero StartSmart" a partir da área de
trabalho.
Masaüstünden "Nero StartSmart"ı başlatınız.
Uruchom program "Nero StartSmart" z pulpitu.
Starta "Nero StartSmart" från skrivbordet.
PT
TR
PL
SV
Seleccione "Herramientas" y "Imprimir
etiqueta LightScribe".
Escolha "Extras" e "Imprimir etiqueta do
Lightscribe".
"Ek Ayarlar" ve "LightScribe Etiketi yazdır"
ı seçiniz.
Kliknij "Dodatki" i "Wypal etykietę LightScribe".
Välj "Extra" och "Skriv ut Lightscribe etikett".
E
3
2
1
PT
TR
PL
SV
E
PT
TR
PL
SV
E
Page 85

85
Seleccione "Documento vacío" y haga clic en
"OK".
Escolha "Documento vazio" e clique em "OK".
"Begeyi Bosalt" öğesini seçin. "OK" üzerine
tıklatınız.
Wybierz opcję "Pusty dokument" i kliknij "OK".
Välj "Tomt dokument" och klicka på "OK".
4
5
6
PT
TR
PL
SV
E
Puede importar una imagen que ocupe toda la
superficie del disco haciendo doble clic en el área de
trabajo. Haga clic en "Archivo".
É possível importar uma figura para preencher
toda a superfície do disco clicando duas vezes na
área de trabalho. Clique em "Arquivo".
Çalışma bölgesi üzerine iki kez tıklatarak diskin
tüm yüzeyini dolduracak bir resim alabilirsiniz.
"Dosya" üzerine tıklatınız.
Możesz importować obraz, aby wypełnić całą
przestrzeń płyty, klikając dwukrotnie obszar roboczy.
Kliknij "Plik".
Du kan importera en bild för att fylla hela ytan på skivan genom att dubbelklicka på arbetsområdet.
Klicka på "Fil".
PT
TR
PL
SV
E
Seleccione su imagen de fondo y haga clic en
"Abrir".
Escolha a imagem de fundo e clique em
"Abrir".
Arkaplan görüntünüzü seçip "Aç" üzerine
tıklatınız.
Wybierz obraz tła i kliknij "Otwórz".
Välj din bakgrundsbild och klicka på "Öppna".
PT
TR
PL
SV
E
Page 86

86
Haga clic en "Aceptar".
Clique em "OK".
"OK" üzerine tıklatınız.
Kliknij "OK".
Klicka på "OK".
E
PT
TR
PL
SV
Haga clic en la "Herramienta Cuadro de
texto" para insertar el texto. Si sólo imprime texto,
el disco se imprimirá más rápido.
Clique na "Ferramenta caixa de texto" para
digitar o texto. Se imprimir apenas texto, o disco
será impresso mais rapidamente.
Metni girmek için "Yazı Kutusu Aleti" üzerine
tıklatınız. Eğer sadece metni yazdırırsanız, disk daha
hızlı yazdırılacaktır.
Kliknij "Narzędzie wstawiania pola
tekstowego", aby wpisać tekst. Jeśli drukujesz sam
tekst, drukowanie etykiety płyty potrwa krócej.
Klicka på "Textboxverktyg" för att föra in text. Om du bara vill skriva ut text kommer skivan att
skrivas ut snabbare.
E
PT
TR
PL
SV
9
8
7
Trace el área en la que desea añadir el texto.
El programa la curvará para permitir una impresión
más rápida.
Desenhe a área à qual deseja adicionar o
texto. O programa irá curvá-la para acelerar a
impressão.
Metni eklemek istediğiniz bölgeyi çiziniz.
Program, daha hızlı yazdırmaya olanak verecek
şekilde bunu eğecektir.
Narysuj obszar, w którym chcesz umieścić
tekst. Program wygnie go, aby przyspieszyć
drukowanie.
Rita området där du vill lägga till text. Programmet anpassar detta för att få en snabbare utskrift.
E
PT
TR
PL
SV
Page 87
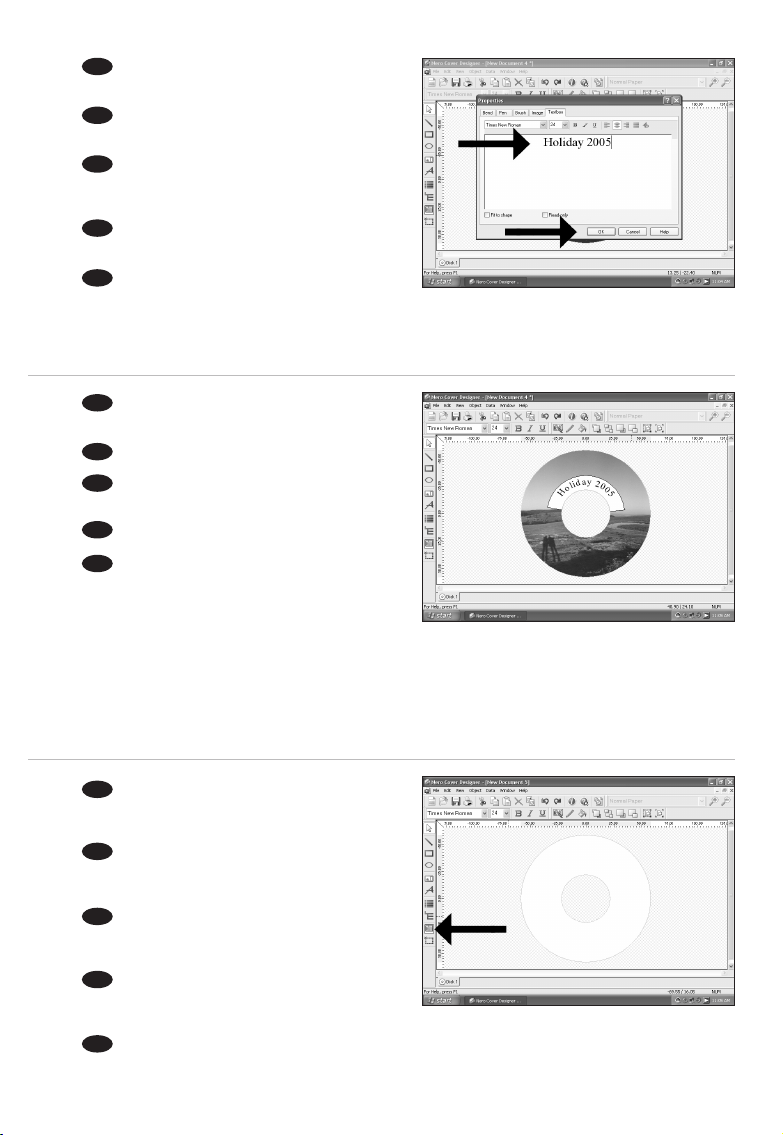
87
10
11
12
Haga doble clic en el área de texto que acaba
de crear, inserte el texto y haga clic en "Aceptar".
Clique duas vezes na área do texto que
acabou de criar, insira o texto e clique em "OK".
Yaratmış olduğunuz metin bölgesi üzerine iki
kez tıklatarak, metni yerleştiriniz ve "OK" üzerine
tıklatınız.
Kliknij dwukrotnie obszar utworzonego tekstu,
wstaw tekst i kliknij "OK".
Dubbelklicka på textområdet som du just
skapat, infoga texten och klicka på "OK".
PT
TR
PL
SV
E
Éste será el aspecto que tendrá el fondo y el
texto.
Esta será a aparência do fundo e do texto.
Bu, arkaplan ve metnin nasıl görüneceğini
gösterir.
Tak będzie wyglądać tło i tekst.
Så här kommer bakgrunden och texten att se ut
PT
TR
PL
SV
E
Si lo prefiere, también puede colocar una
imagen en el lugar que desee del área del disco.
Haga clic en la "Herramienta Imagen".
Como opção, você também poderá
posicionar uma figura onde desejar na área de disco.
Clique na "Ferramenta imagem".
Bir başka seçenek olarak, disk bölgesine de
beğendiğiniz bir resmi konumlandırabilirsiniz. "Kalıp
Aleti" üzerine tıklatınız.
Alternatywnie możesz również umieścić obraz
w dowolnym miejscu na płycie. Kliknij "Narzędzie
wstawiania obrazu".
Alternativt kan du placera en bild på skivområdet. Klicka på "Bildverktyg".
PT
TR
PL
SV
E
Page 88

88
Seleccione su imagen y haga clic en "Abrir".
Escolha a sua imagem e clique em "Abrir".
Kalıbınızı/Görüntünüzü seçip "Aç" üzerine
tıklatınız.
Wybierz obraz i kliknij "Otwórz".
Välj din bild och klicka på "Öppna".
15
14
13
E
PT
TR
PL
SV
Coloque la imagen para que quede bien.
Posicione adequadamente a imagem.
Kalıbı/Görüntüyü hoş görünecek şekilde
konumlandırınız.
Umieść obraz w żądanym miejscu.
Placera bilden på lämpligt ställe.
E
PT
TR
PL
SV
Puede añadir un texto como en los pasos 8-10.
É possível adicionar um texto como nas etapas
8 a 10.
8-10. adımlarında olduğu gibi bir metin
ekleyebilirsiniz.
Możesz dodać tekst, zgodnie z opisem w
punktach 8-10.
Du kan lägga till text enligt steg 8-10.
E
PT
TR
PL
SV
Page 89

89
16
17
18
Una vez que haya terminado de diseñar su
etiqueta, seleccione "Archivo" y "Imprimir etiqueta
LightScribe".
Ao concluir a criação de sua etiqueta, escolha
"Arquivo" e "Imprimir etiqueta LightScribe".
Etiketinizi tasarımlama işlemini
tamamladığınızda, "Dosya" ve "Lightscribe Etiketini
Bastır"ı seçiniz.
Po zakończeniu projektowania etykiety, kliknij
"Plik" i "Drukuj etykietę LightScribe".
När du är klar med din etikettdesign väljer du
"Arkiv" och "Skriv ut LightScribe-etikett".
E
PT
TR
PL
SV
Seleccione la calidad de impresión (A). Puede
ver una vista preliminar (B) e iniciar la impresión (C).
Escolha a qualidade de impressão (A).
É possível exibir uma revisualização (B) e Imprimir (C).
Basım/Yazdırma kalitesini (A) seçiniz.
Bir önizleme (B) görebilir ve basım/yazdırma işlemini
(C) başlatabilirsiniz.
Wybierz jakość wydruku (A). Możesz
wyświetlić podgląd (B) i rozpocząć drukowanie (C).
Välj utskriftskvalitet (A). Du kan se en preview
(B) och starta utskrift (C).
E
PT
TR
PL
SV
Inserte un disco Lightscribe, con la etiqueta
hacia abajo, y haga clic en "Aceptar".
Insira um disco Lightscribe, com a etiqueta
voltada para baixo e clique em "OK".
Etiketli yüzü aşağı bakacak şekilde bir
Lightscribe diski yerleştirip "OK" (TAMAM) üzerine
tıklatınız.
Umieść płytę LightScribe etykietą skierowaną
w dół i kliknij "OK".
Sätt i en Lightscribe-skiva med etiketten nedåt
och klicka på "OK".
E
PT
TR
PL
SV
Page 90
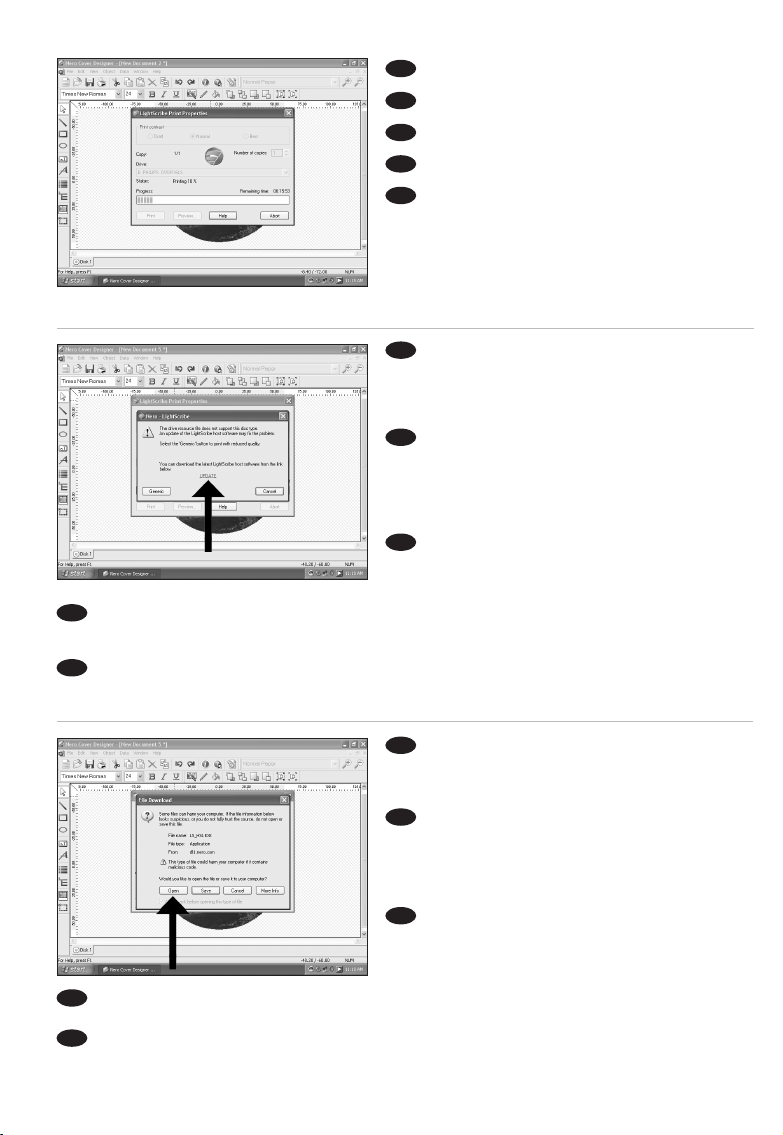
90
El disco ya está impreso.
O disco será impresso.
Disk şimdi yazdırılmaktadır.
Rozpocznie się drukowanie.
Skivan skrivs nu ut.
E
PT
TR
PL
SV
Puede que el sistema le pida que actualice su
aplicación LightScribe cuando sea necesario para
garantizar una buena calidad de impresión. Haga clic
en
"To download the latest LightScribe Host software
click here
".
É possível que o sistema solicite a atualização do
seu aplicativo LightScribe quando necessário para
garantir uma boa qualidade de impressão. Clique em
"To download the latest LightScribe Host software
click here" (Para fazer o download da versão mais
recente do LightScribe Host, clique aqui).
İyi yazdırma kalitesini sağlamada gerekli
olduğunda, LightScribe uygulamanızı güncellemeniz
istenebilir.
"En son LightScribe Host yazılımını indirmek
için buraya tıklatınız
" ibaresinin üzerine tıklatınız.
Może pojawić się monit o przeprowadzenie aktualizacji programu LightScribe, jeśli będzie to konieczne
do zapewnienia dobrej jakości wydruku. Kliknij
"Aby pobrać najnowszą wersję programu LightScribe Host kliknij
tutaj
".
Eventuellt ombeds du att uppdatera ditt LightScribe-program för att försäkra en bra utskriftskvalitet. Klicka
på
"Klicka här för att hämta senaste versionen av LightScribe värdprogram".
21
20
19
E
PT
TR
PL
SV
Seleccione "Abrir" y haga clic en "Siguiente"
hasta que se instale la actualización. Tras la
instalación, tendrá que cancelar el proceso de
impresión (guardar su diseño) y volver a empezar
Escolha "Abrir" e clique em "Avançar" até
que a atualização tenha sido instalada. Após a
instalação, será necessário cancelar o processo de
impressão (salve a etiqueta criada) e inicie-o
novamente.
"Aç"ı seçip güncellemenin kurulumu yapılana
kadar "İleri" üzerine tıklatınız. Kurulumdan sonra,
yazdırma/basım işlemini iptal etmeniz (tasarımınızı
saklayınız) ve yeniden başlatmanız gerekli olacaktır.
Kliknij "Otwórz" i klikaj "Dalej" aż do zakończenia aktualizacji. Po zakończeniu instalacji musisz
anulować proces drukowania (zapisz swój projekt) i rozpocząć go ponownie.
Välj "Öppna" och klicka på "Nästa" tills uppdateringen har installerats. Efter installationen måste du
avbryta utskriften (spara din design) och börja om.
E
PT
TR
PL
SV
Page 91

91
¿Cómo capturar secuencias de vídeo
de una videocámara digital DV?
Como capturar vídeos de um DV camcorder digital?
Bir dijital/sayısal DV-camcorder’den (DV-kaydedici kamera)
nasıl görüntü yakalanır?
Przechwytywanie obrazu wideo z kamery cyfrowej DV
Hur du fångar video från en digital DV-camcorder
Este manual muestra un ejemplo que
explica cómo capturar una secuencia
de vídeo de una videocámara digital DV
conectada al ordenador mediante el
puerto FireWire (IEEE1394).
Este manual mostra um exemplo de
como capturar vídeos de um DV
camcorder digital conectado por
FireWire (IEEE1394) ao computador.
Bu kılavuz; bilgisayara FireWire
(IEEE1394) ile takılı bir dijital DVcamcorder’dan (DV-kaydedici kamera)
nasıl görüntü yakalanacağı hakkında
bir örneği göstermektedir.
Ta instrukcja zawiera prezentuje
przykładowy sposób przechwytywania
obrazu wideo z kamery cyfrowej DV,
podłączonej do komputera przez
złącze FireWire (IEEE1394).
I den här bruksanvisningen behandlas
exempel på hur du fångar video från en
digital DV-camcorder som är ansluten
till datorn via FireWire (IEEE1394).
The application software used here is:
Nero Vision Express from Nero AG
E PT TR
PL SV
Page 92
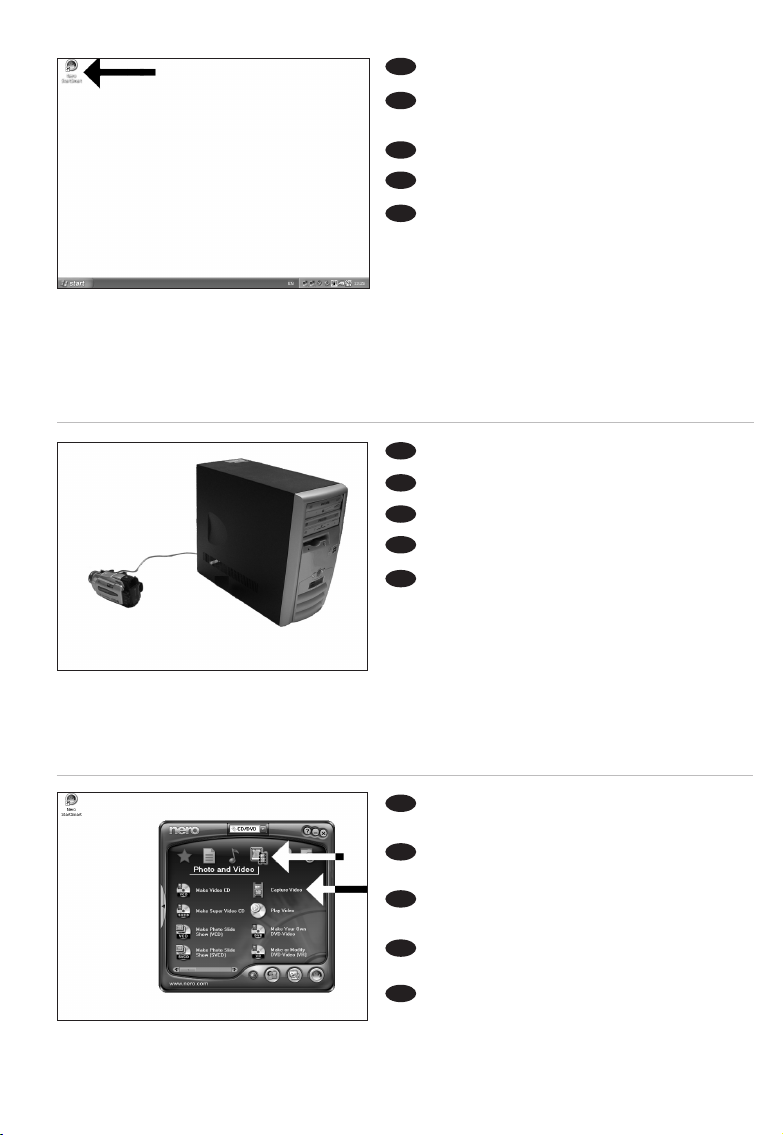
92
Seleccione "Foto y vídeo" y haga clic en
"Capturar vídeo".
Escolha "Foto e Vídeo" e clique em "Capturar
vídeo".
"Fotoğraf ve video"yu seçip "Video yakala"
üzerine tıklatınız.
Kliknij "Foto i wideo" oraz "Przechwyć
wideo".
Välj "Foto och video" och klicka på "Fånga
video".
Inicie "Nero StartSmart" desde el escritorio.
Inicie o "Nero StartSmart" a partir da área de
trabalho.
Masaüstünden "Nero StartSmart"ı başlatınız.
Uruchom program "Nero StartSmart" z pulpitu.
Starta "Nero StartSmart" från skrivbordet.
E
PT
TR
PL
SV
Conecte la cámara al ordenador y enciéndala.
Conecte a sua câmera ao computador e ligue-a.
Kameranızı bilgisayara takıp çalıştırınız.
Podłącz kamerę do komputera i uruchom.
Anslut din kamera till datorn och slå på den.
E
PT
TR
PL
SV
3
2
1
E
PT
TR
PL
SV
Page 93

93
Seleccione su videograbadora digital y utilice los
botones para controlar su cámara digital. Pulse el
botón "Grabar" para grabar vídeo.
Escolha o seu DV Camcorder e use os botões
para controlar a sua DV câmera. Pressione o botão
"Gravar" para gravar o vídeo.
DV-Camcorder’ınızı (DV-kaydedici kamera) seçip
DV-kameranıza kumanda etmede düğmeleri kullanız.
Videoyu kaydetmek için "Kaydet" düğmesine basınız.
Wybierz posiadaną kamerę DVi użyj przycisków,
aby nią sterować. Naciśnij przycisk "Nagraj", aby nagrać
obraz wideo.
Välj din DV-Camcorder och använd kontrollknapparna för din DV-kamera. Tryck på "Bränn"-knappen
för att spela in video.
E
PT
TR
PL
SV
4
5
6
Durante la captura, verá el progreso de la
misma aquí.
Durante a captura, você verá o andamento aqui.
Yakalama esnasında, işlemin ilerlemesini burada
göreceksiniz.
W trakcie przechwytywania, tutaj możesz
obserwować postęp operacji.
Inspelningsförloppet ser du här.
E
PT
TR
PL
SV
Una vez capturadas las secuencias de vídeo,
haga clic en "Siguiente".
Quando todas as seqüências de vídeo
estiverem capturadas, clique em "Avançar".
Tüm video dizisi yakalandığında, "İleri" üzerine
tıklatınız.
Po przechwyceniu wszystkich sekwencji wideo,
kliknij "Dalej".
När alla videosekvenser har fångats klickar du
på "Nästa".
E
PT
TR
PL
SV
Page 94
94
Ahora pase al paso 5 del siguiente capítulo (Cómo crear vídeo a partir de archivos…) para continuar
Agora, vá para a etapa 5 do próximo capítulo (Como criar DVDs de arquivos…) para continuar.
Şimdi, devam etmek için bir sonraki bölümün 5. adımına geçiniz (Dosyalardan bir video diski yapma
yöntemi…).
Aby kontynuować, przejdź do punktu 5 kolejnego rozdziału (Tworzeniepłyty wideo z plików…).
Fortsätt nu med steg 5 i nästa kapitel (Hur du gör en videoskiva från filer…).
Seleccione "Crear DVD con vídeo
capturado" y "DVD-Vídeo".
Escolha "Criar DVD com o vídeo capturado"
e "DVD-Video".
"Yakalanan video ile DVD yap" ve "DVD-
Video"yu seçiniz.
Kliknij "Utwórz DVD z przechwyconych
wideo" i "DVD-Video".
Välj "Skapa DVD med fångad video" och
"DVD-video".
8
7
E
PT
TR
PL
SV
E
PT
TR
PL
SV
Page 95

95
¿Cómo crear un disco de vídeo a partir de
archivos de vídeo en el disco duro u otro disco?
?Como criar DVDs de arquivos de vídeo armazenados no disco rígido ou em um disco?
Sabit disk ya da bir disk üzerinde bulunan video dosyalarından nasıl bir video diski yapılır?
Tworzenie płyty wideo z plików wideo zapisanych na dysku twardym lub płycie
Hur du gör en videoskiva från video-filer som finns på en hårddisk eller en skiva?
Este manual le muestra cómo crear un
DVD-Vídeo a partir de archivos de
origen almacenados en el disco duro o
en uno o más discos que pueda ser
reproducido en la mayoría de los
lectores de DVD.
Este manual irá mostrar como criar um
DVD a partir de arquivos que estejam
armazenados em seu disco rígido ou
em um ou mais discos e que podem
ser reproduzidos na maioria dos DVD
players.
Bu kılavuz; sabit diskinizde ya da bir
yada daha fazla disk üzerinde saklanan
ve çoğu DVD-çalarlarda
çalınabilecek/oynatılabilecek kaynak
dosyalardan bir DVD-Video’yu nasıl
yapabileceğinizi gösterecektir.
Ta instrukcja prezentuje sposób
tworzenia płyty DVD-Video z plików
źródłowych, zapisanych na dysku
twardym lub na jednej lub kilku płytach,
którą można będzie odtwarzać w
większości odtwarzaczy DVD.
Den här bruksanvisningen visar hur du
gör en DVD-video från källfiler som har
lagrats på din hårddisk eller på en eller
flera skivor och som kan spelas på de
flesta DVD-spelarna.
E PT TR
PL SV
The application software used here is:
Nero Vision Express from Nero AG
Page 96

96
Inicie "Nero StartSmart" desde el escritorio.
Inicie o "Nero StartSmart" a partir da área de
trabalho.
Masaüstünden "Nero StartSmart"ı başlatınız.
Uruchom program "Nero StartSmartv z
pulpitu.
Starta "Nero StartSmart" från skrivbordet.
E
PT
TR
PL
SV
Seleccione "Foto y vídeo" y haga clic en "Crear
DVD de vídeo proprio".
Escolha "Foto e Vídeo" e "Crie seu próprio
DVD de vídeo".
"Fotoğraf ve video" ve "Kendi DVD-Video’nu
yarat"ı seçiniz.
Kliknij "Foto i wideo" oraz "Twórz własne
DVD-Video".
Välj "Foto och video" och "Gör din egen dvd-
video".
Seleccione "Añadir archivos de vídeo".
Escolha "Adicionar arquivos de vídeo".
"Video dosyası ekle"yi seçiniz.
Kliknij „Dodaj pliki wideo”.
Välj "Addera videofiler".
3
2
1
E
PT
TR
PL
SV
E
PT
TR
PL
SV
Page 97
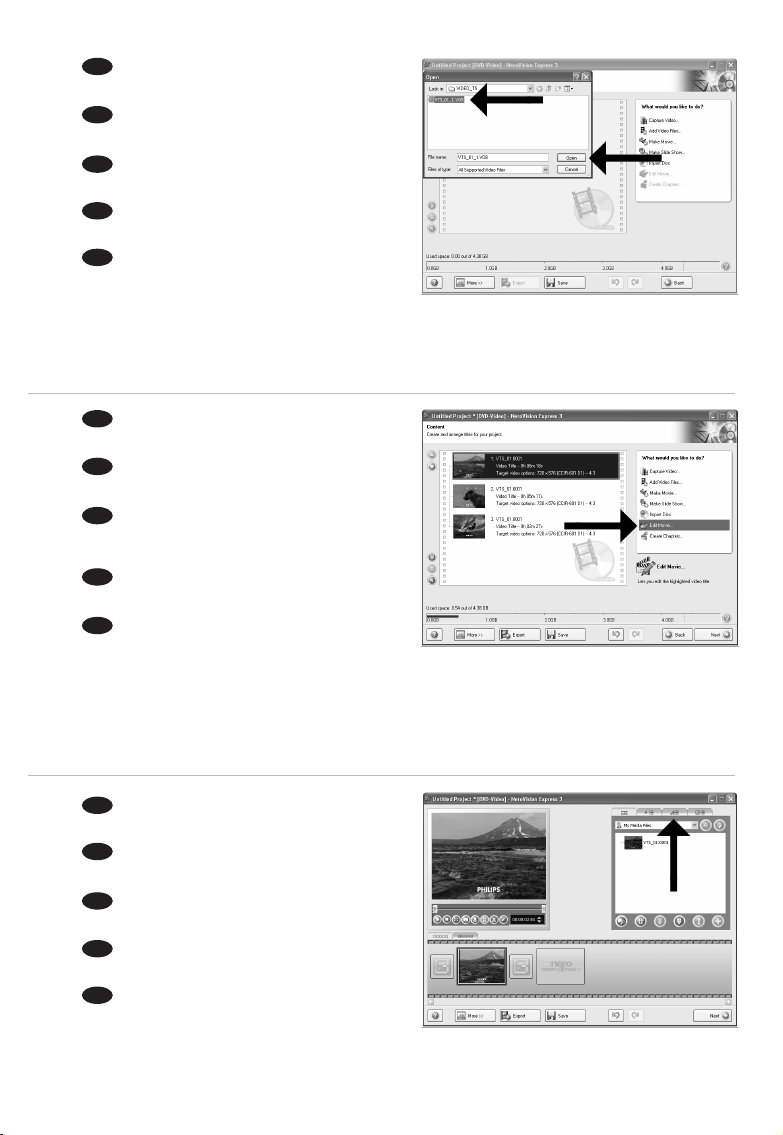
97
Seleccione los archivos que desea añadir y
haga clic en "Abrir".
Escolha os arquivos que deseja adicionar e
clique em "Abrir".
Eklemek istediğiniz dosyaları seçip "Aç" üzerine
tıklatınız.
Wybierz pliki, które chcesz dodać i kliknij
"Otwórz".
Välj filerna som ska läggas till och klicka på
"Öppna".
4
5
6
E
PT
TR
PL
SV
Los vídeos que ha cargado se muestran aquí.
Puede editarlos seleccionando "Editar película".
Os filmes carregados serão exibidos aqui.
É possível editá-los escolhendo "Editar filme".
Yüklediğiniz filmler, burada gösterilir.
"Filmi Düzenle"yi seçerek onlar üzerinde düzenleme
yapabilirsiniz.
Załadowane filmy są wyświetlane tutaj.
Możesz je edytować, klikając "Edytuj film".
De filmer som du har laddat visas här.
Du kan redigera dem genom att välja "Redigera film".
E
PT
TR
PL
SV
En la pantalla Edit Movie puede añadir efectos
de vídeo, de texto y transiciones.
Na tela Editar filme, você poderá adicionar
efeitos de vídeo, efeitos de texto e transições.
Filmi Düzenle ekranında, video efektleri, metin
efektleri ve geçişler ekleyebilirsiniz.
W oknie Edytuj film, możesz dodawać efekty
wideo, efekty tekstowe i przejścia.
På skärmen för filmredigering kan du lägga till
videoeffekter, texteffekter och övergångar.
E
PT
TR
PL
SV
Page 98

98
Cuando haya editado todos los archivos,
haga clic en "Siguiente".
Após editar todos os arquivos, escolha
"Avançar".
Tüm dosyalar üzerinde düzenleme yaptıktan
sonra, "İleri"yi seçiniz.
Po zakończeniu edycji wszystkich plików
kliknij "Dalej".
När du har redigerar alla filer, välj "Nästa".
E
PT
TR
PL
SV
También puede recortar el vídeo grabado.
Cuando termine, haga clic en "Siguiente".
Também é possível fazer adaptações no
vídeo gravado. Ao concluir o procedimento,
escolha "Avançar".
Kaydedilen video üzerinde kırpma da
yapabilirsiniz. Tamamlandığında, "İleri"yi seçiniz.
Możesz również przycinać nagrane wideo.
Po zakończeniu kliknij "Dalej".
Du kan också trimma en inspelad video.
När du är klar, välj "Nästa".
9
8
7
E
PT
TR
PL
SV
Introduzca el título en el campo "Cabecera" y
haga clic en "Editar menú" para cambiar el diseño y
el fondo del menú del disco.
Digite o título no campo "Cabeçalho" e
clique em "Editar menu" para alterar o layout e o
plano de fundo do menu do disco.
"Başlık" alanı içindeki başlığı giriniz ve disk
menüsünün yerleşimini ve arkaplanını değiştirmek
için "Menü düzenle" üzerine tıklatınız.
Wpisz tytuł w polu "Nagłówek" i kliknij
"Edycja menu", aby zmienić układ i tło menu płyty.
För in titlar i fältet "Header" och klicka på "Redigera meny" för att ändra layout och bakgrund för
diskmenyn.
E
PT
TR
PL
SV
Page 99

99
10
11
12
Aquí puede cambiar la presentación, el fondo,
añadir títulos, etc. Cuando termine, haga clic en
"Siguiente".
É possível alterar o layout, o plano de fundo,
adicionar títulos etc. aqui. Ao finalizar o procedimento,
clique em "Avançar" duas vezes.
Burada…, yerleşimi, arkaplanı değiştirebilir,
başlık ekleyebilirsiniz. Tamamlandığında, "İleri"yi iki
kez seçiniz.
Tutaj możesz zmienić układ, tło oraz dodać
tytuły. Po zakończeniu kliknij dwukrotnie "Dalej".
Du kan ändra layout, bakgrund, göra titlar… här. När du är klar, välj "Nästa" två gånger.
E
PT
TR
PL
SV
Puede obtener una vista preliminar del vídeo
pulsando sobre las imágenes en miniatura. Cuando
termine, haga clic en "Siguiente".
É possível visualizar o filme acabado
pressionando as miniaturas. Ao finalizar o
procedimento, escolha "Avançar".
Simgeleşmiş resimler üzerine basarak
tamamlanan filmlerin önizlemesini yapabilirsiniz.
Tamamlandığında, "İleri"yi seçiniz.
Możesz obejrzeć gotowy film, klikając
miniaturki. Po zakończeniu kliknij "Dalej".
Du kan förhandsgranska den färdiga filen genom att trycka på miniatyrbilden. När du är klar, välj "Nästa".
E
PT
TR
PL
SV
Seleccione "Grabar en", elija su grabadora y
haga clic en "Grabar".
Escolha "Gravar em", o seu gravador e
"Gravar".
"Farklı Yazdır"ı seçiniz, kaydedicinizi seçip
"Yazdır"ı seçiniz.
Kliknij "Zapis na", wybierz nagrywarkę i kliknij
"Zapis".
Välj "Bränn med", välj din spelare och välj
"Bränn".
E
PT
TR
PL
SV
Page 100

100
NeroVision Express está transcodificando
y grabando el disco.
O NeroVision Express irá transcodificar e
gravar o seu disco.
NeroVision Express; kod çevrimi yapıyor
ve diskiniz yazıyor/kaydediyor.
Program NeroVision Express transkoduje i
nagrywa płytę.
NeroVision Express omvandlar kod och
bränner din skiva.
E
PT
TR
PL
SV
Enhorabuena, su disco se ha grabado
correctamente. Haga clic en "Aceptar".
Ahora puede cerrar la aplicación.
Parabéns, o seu disco foi gravado com êxito.
Clique em "Não". Agora, você poderá fechar o
aplicativo.
Tebrikler, diskinize başarıyla yazdırıldı.
"Hayır" üzerine tıklatınız. Şimdi uygulamadan
çıkabilirsiniz.
Gratulacje! Zapis płyty zakończył się
pomyślnie. Kliknij "Nie". Możesz zakończyć pracę
programu.
Grattis! din skiva har bränts utan fel. Klicka på "Nej". Du kan avsluta programmet nu.
E
PT
TR
PL
SV
14
13
 Loading...