

Page 1
Instructions for use
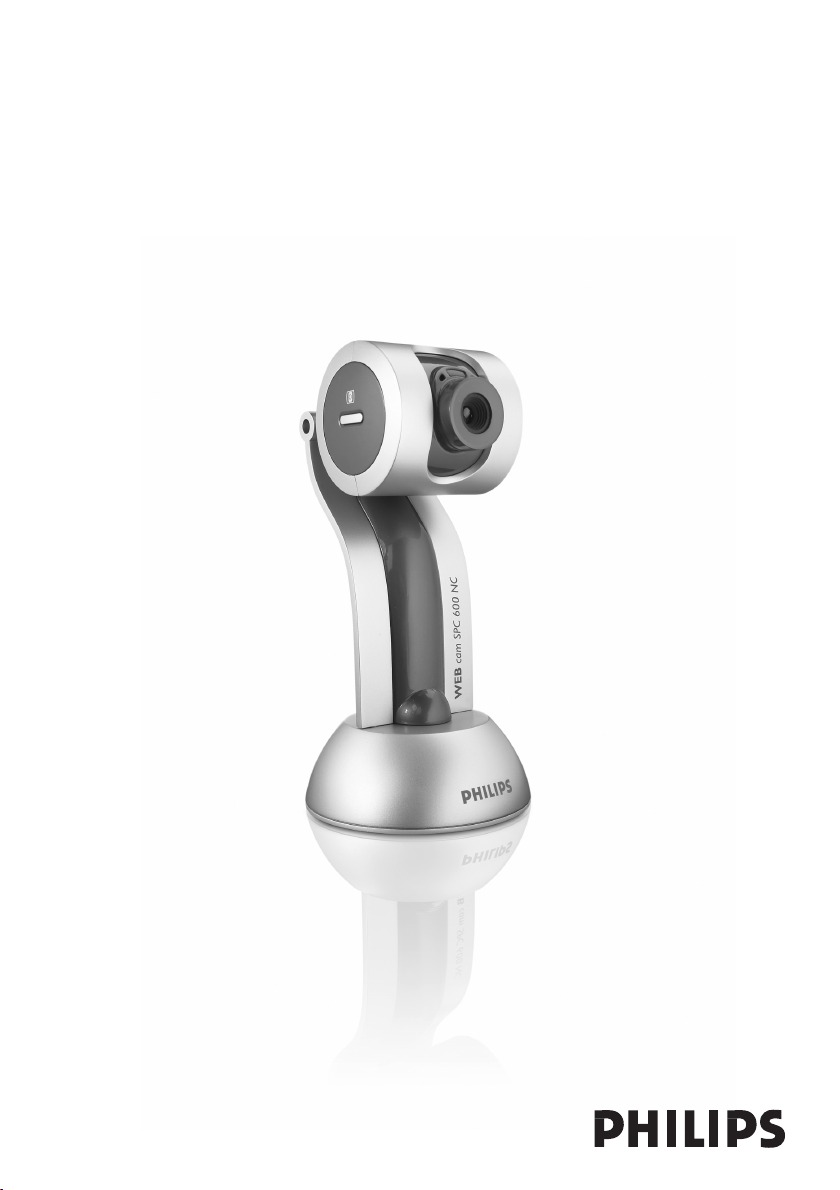
Philips SPC 600NC PC Camera
Page 2

ENGLISH2
Introduction
Philips SPC 600NC PC Camera
The Philips SPC 600NC PC Camera you have just purchased is manufactured to the highest
standards and will give you years of trouble-free use. Brilliant images and blazing colours, that's
what you get with the SPC 600NC PC Camera. Forget about installing interface cards and
separate power supplies, because you don't need them any more. Power is supplied direct to the
camera through the USB cable and the camera returns audio and video straight to your PC!
After installation, the new camera can be used for all sorts of applications, such as:
• Video conferencing: use the Philips SPC 600NC PC Camera for video chatting and
conferencing (the Philips SPC 600NC PC Camera works with MSN Messenger,Yahoo!
Messenger, AOL Messenger,Windows NetMeeting and Windows Messenger);
• Video e-mail / Video capture: create your own video presentations, video mail, product
demonstrations, training videos, Internet clips etc.;
• Snapshot images: use images in presentations, create postcards, or send them via e-mail or
on diskette.The camera works with all applications that use the TWAIN interface to acquire
an image.
• Editing and special effects: after recording the images you want with the Philips SPC 600NC
PC Camera, the images can be easily edited using image or video editing programs.
The following sections in this manual give a step-by-step description of the installation process
and explain how to use the Philips SPC 600NC PC Camera.
Page 3

ENGLISH 3
Contents
Introduction......................................................................................................................2
1.Things you should know ..........................................................................................4-5
Safety precautions........................................................................................................................................................................4
Copyright..........................................................................................................................................................................................4
Pack contents.................................................................................................................................................................................5
2. Functional overview.....................................................................................................6
3. Installation.................................................................................................................7-9
Installing the camera software .........................................................................................................................................7-8
Connecting the camera to your PC.................................................................................................................................9
4. Camera settings....................................................................................................10-13
General controls........................................................................................................................................................................10
Picture controls...................................................................................................................................................................11-13
Audio controls............................................................................................................................................................................13
5. Using the applications..........................................................................................14-17
VLounge .........................................................................................................................................................................................14
MSN Messenger ........................................................................................................................................................................14
Yahoo! Messenger.....................................................................................................................................................................15
AOL Instant Messenger.........................................................................................................................................................15
Microsoft Netmeeting.....................................................................................................................................................16-17
Making snapshots using Windows
®
XP .......................................................................................................................17
6.Technical specifications..............................................................................................18
7. Important information.........................................................................................19-20
Disclaimer......................................................................................................................................................................................19
FCC compliance ........................................................................................................................................................................19
Environmental information..................................................................................................................................................20
System requirements..............................................................................................................................................................20
Disclaimer of warranty...........................................................................................................................................................20
Limitation of damages............................................................................................................................................................20
8. Helpline.......................................................................................................................21
9.Warranty.....................................................................................................................22
.......................................................................1.Things you should know
Page 4

ENGLISH4
1.Things you should know
Please read the following instructions carefully, and retain them for future reference.
It may be helpful to have the instructions for use for the PC at hand for reference.
Safety precautions
Observe the following guidelines to ensure that the camera will operate safely and to prevent
defects.
• Do not use your camera in environments outside the following range: temperature:
0°C to 40°C, relative humidity: 45% ~ 85%.
• Do not use or store your camera in/under:
– direct sunlight exposure;
– very humid and dusty environment;
– near any kind of heat sources;
• If your camera gets wet, dry it with soft cloth as soon as possible.
• If the lens is dirty Do NOT touch the lens with your fingers.
• Clean the outside of the camera with a soft cloth.
• Do NOT use cleaning fluids based on alcohol,methylated spirit, ammonia, etc.
• Do NOT attempt to disassemble or repair your camera by yourself. Do not open the
camera. In the event of technical difficulties return it to your Philips retailer.
• Do NOT use your camera in the water.
•Protect the camera from oil, vapour, steam, moisture, and dust.
•Never point the camera lens at the sun.
Copyright
Copyright© 2003 by Philips Consumer Electronics B.V. All rights reserved. No part of this
publication may be reproduced, transmitted, transcribed, stored in a retrieval system or translated
into any language or computer language, in any form or by any means, electronic, mechanical,
magnetic, optical, chemical, manual or otherwise, without prior written permission from Philips.
Brands and product names are trademarks or registered trademarks of their respective
companies.
Page 5
SPC 600
NC
SPC 600 NC
Installation CD v.1.00
9082 100 03367
ENGLISH 5
Pack contents
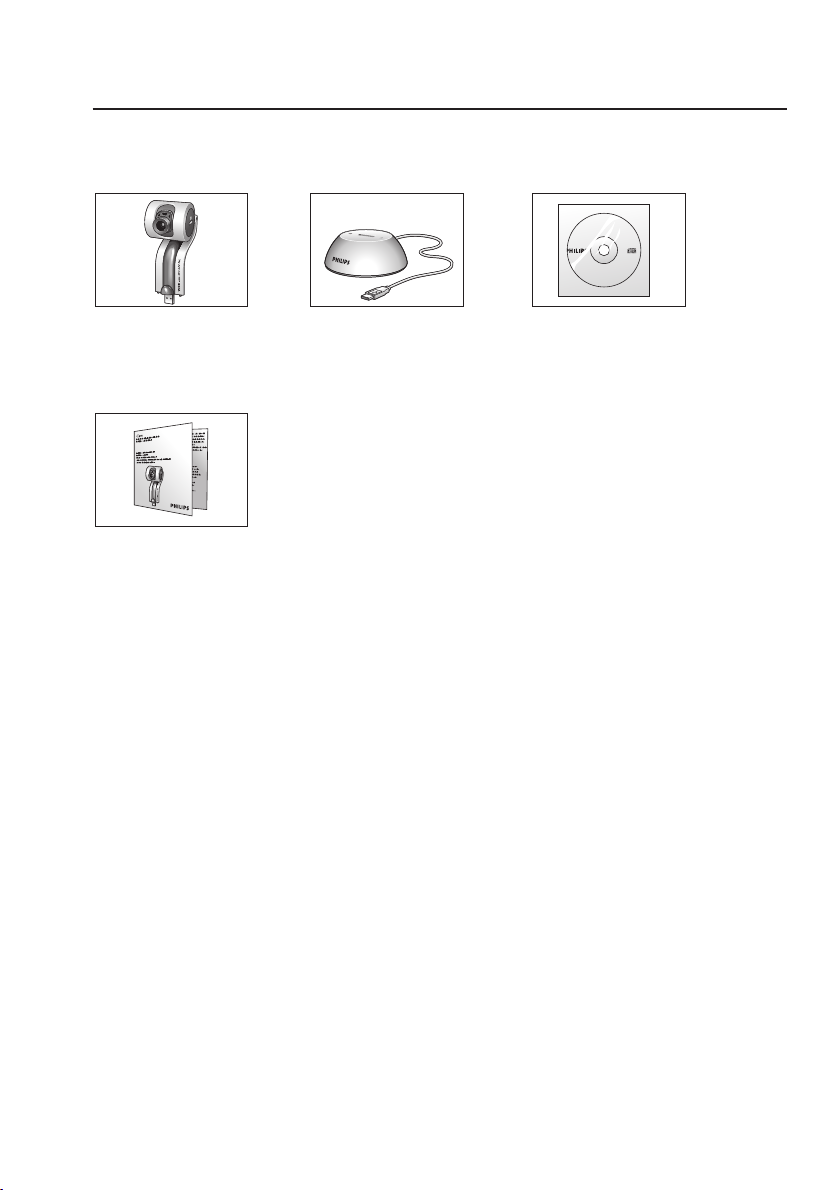
Please check that the following items are packed in the Philips SPC 600NC box.
They are provided to help you set up and use your Philips SPC 600NC.
Philips SPC 600NC Docking station for Installation CD-ROM
PC Camera for PC camera and including manual
USB devices
Quick Installation Guide
Page 6

ENGLISH6
2. Functional overview
1
2
3
0
9
8
4
5
6
7
1 Viewing angle
For manually changing the vertical angle of the camera.
2 QuickLaunch button
For quick and easy start-up of the VLounge software.
3 Rotating lens
For adjusting the focus of the image manually.
4 USB connector
For connecting the camera to the USB port of the docking base/stand.
5 USB port
For connecting the docking base/stand to the USB connector of the camera.
6 Docking base/stand
– For stable placement of the SPC 600NC PC Camera.
– For connecting USB devices to your PC.
7 USB cable
For connecting the camera to a USB port of the PC.
The camera will derive its power from the PC when it is connected.
8 Snapshot button
For taking photos.
9 Built in digital microphone
For adding sound when video chatting and recording.
10 Activity LED
Lights up when the camera is in use.
Page 7
ENGLISH 7
3. Installation
Installing the camera software
The software supplied only works on PCs with the operating systems Microsoft®Windows
98SE, ME, 2000 and XP.
Notes!
– Unplug all your USB devices (except USB keyboard and USB mouse) before you start.
– Do not plug in your USB camera yet. Run the Installation CD-ROM first.
– Have your Windows
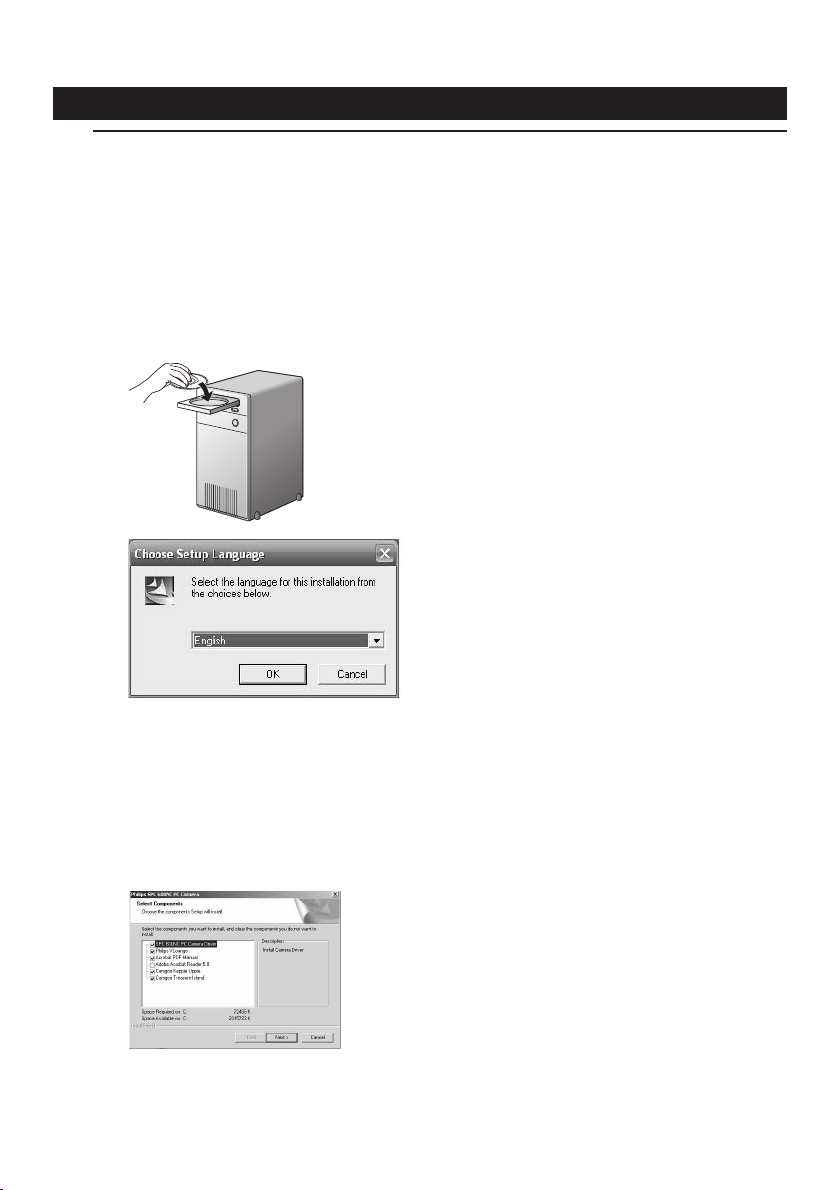
1 Place the installation CD-ROM in your computer's CD-ROM-/DVD drive.
®
CD-ROM at hand.
®
> After a couple of seconds the the ‘Language selection’ screen appears automatically.
Note!
If the 'Language selection' screen does not appear automatically, open the Microsoft
®
Windows
Explorer and double click on the 'Set-up.exe' icon in the CD-ROM directory.
2 Select your language and click on the 'OK' button.
> The following screen appears.
3 Select at least the ‘SPC 600NC PC Camera Driver’ and click on the 'OK' button.
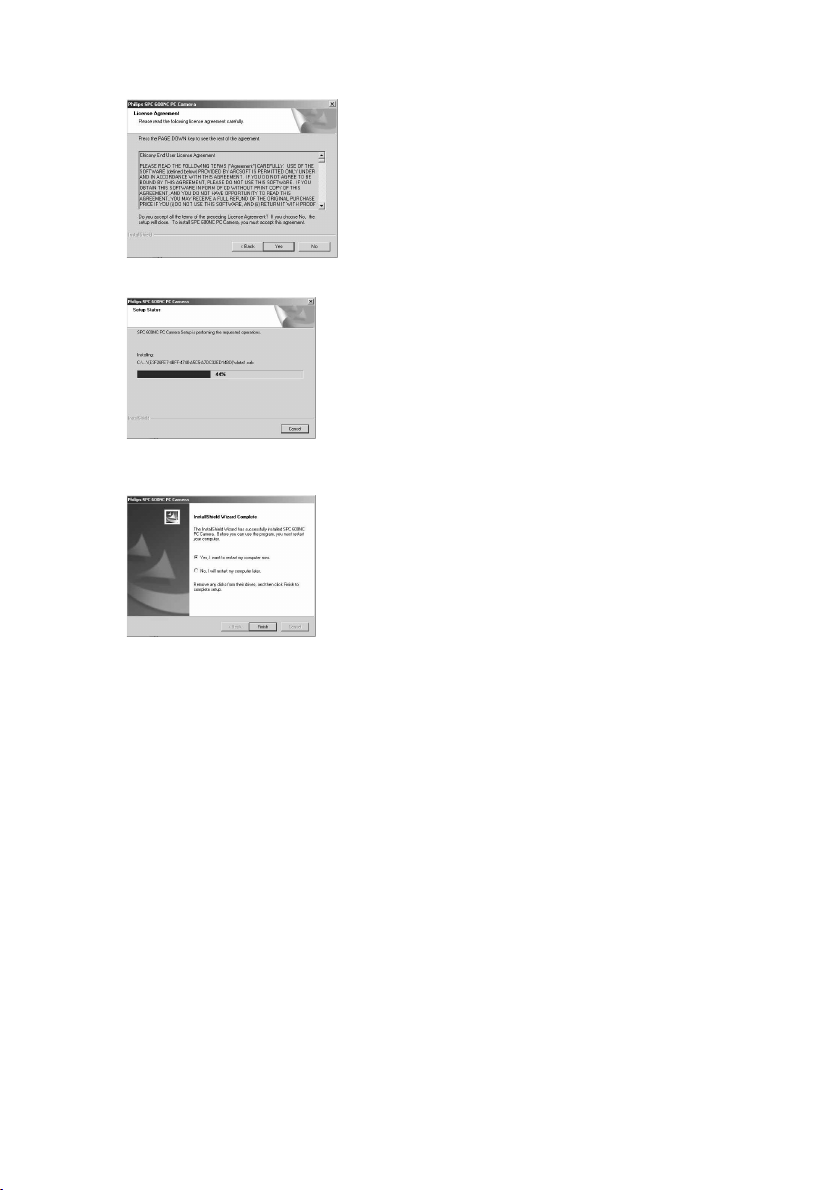
> The following software license agreement appears.
Click on 'Agree' to continue the installation.
®
Page 8
ENGLISH8
> The following screen, including a progress bar, appears.
> The screen below appears when the installation was successful.
You can now connect your PC Camera.
Note!
The SPC 600NC PC Camera is 'XP Plug & Play'.
This means if you are running Windows XP and you have installed Service Pack 2 and the latest
Microsoft Windows XP updates you don't need to install the SPC 600NC PC Camera driver.
Simply plug in the camera and you can start using your SPC 600NC PC Camera.
Page 9
ENGLISH 9
Connecting the camera to your PC
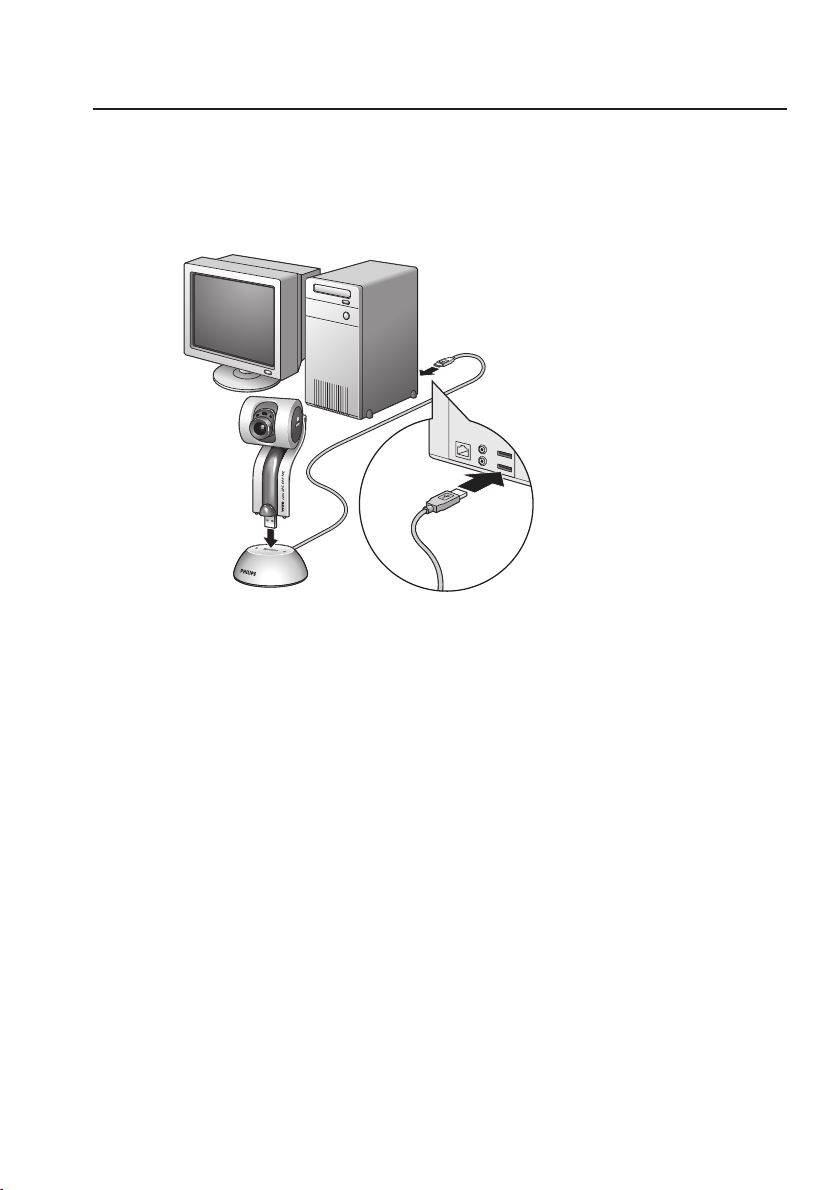
1 Be sure to run the installation CD first, before connecting the camera to the PC.
2 Turn on the PC.
3 Connect the USB plug of the USB cable to a USB port of the PC.
4 Insert the camera’s USB connector into the USB port of the docking base/stand. Push it down
gently until it clicks into position.
> The camera will now derive its power from the PC.
Page 10
ENGLISH10
4. Camera settings
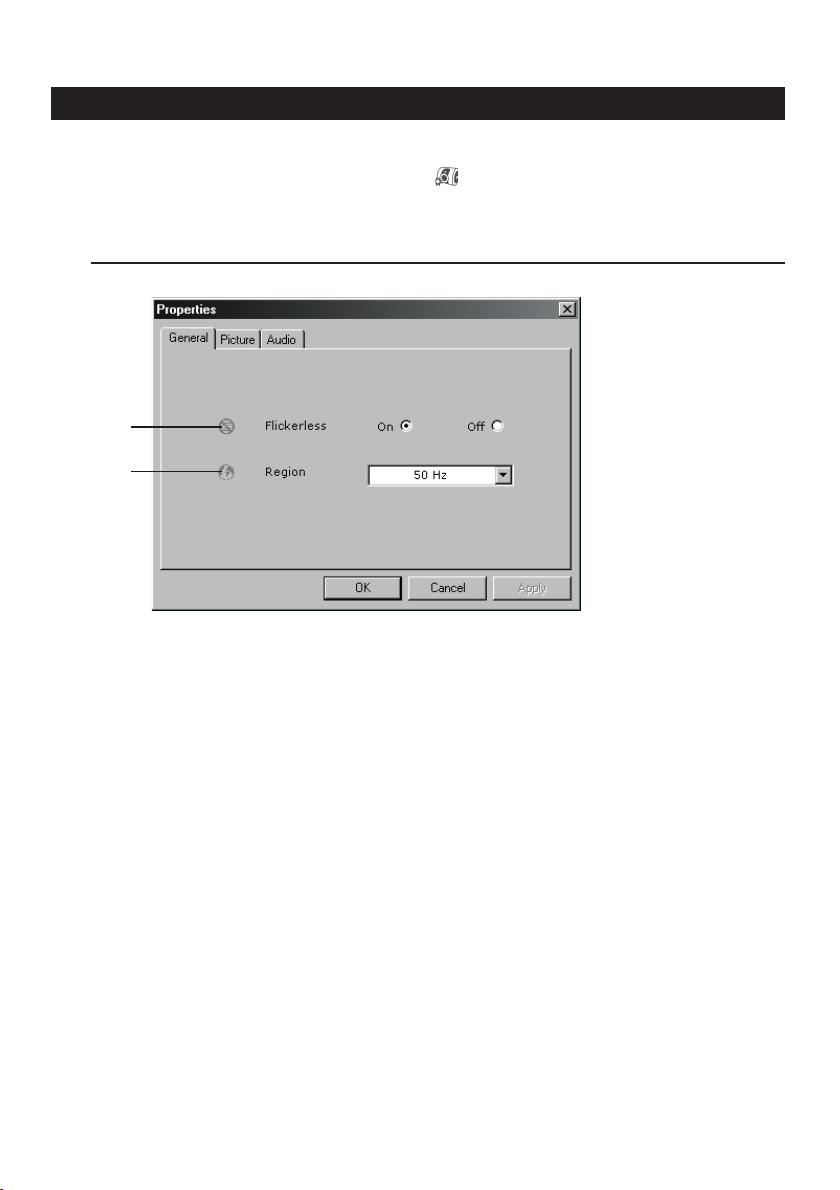
The Philips SPC 600NC properties (audio and video) can be changed from within an application,
or independently by clicking the VProperty icon ‘ ’ which can be found in the Windows taskbar
bottom right of your screen. Most applications can show a 'live preview' video image on your
monitor. Always use this option to see the effect of changed settings on your screen.
General controls
1
2
1 Flickerless
The Flickerless option should only be used under flickering light conditions (e.g. fluorescent
or neon lamps) to prevent flickering or strangely coloured video images. If this option is used
under normal lighting conditions the video image may be overexposed.
2 Region
If you are using the Philips SPC 600NC in Europe, select '50 Hz' and if you are using the
Philips SPC 600NC in North America, select '60 Hz'. For Asia this setting is dependent on
the local mains output. E.g. for China, select ‘50 Hz’ and for Taiwan, select ‘60Hz’.
Please check your local mains output to find the correct ‘Region’ setting.
Page 11
Picture controls
3
4
5
6
7
8
9
0
!
@
#
$
%
^
ENGLISH 11
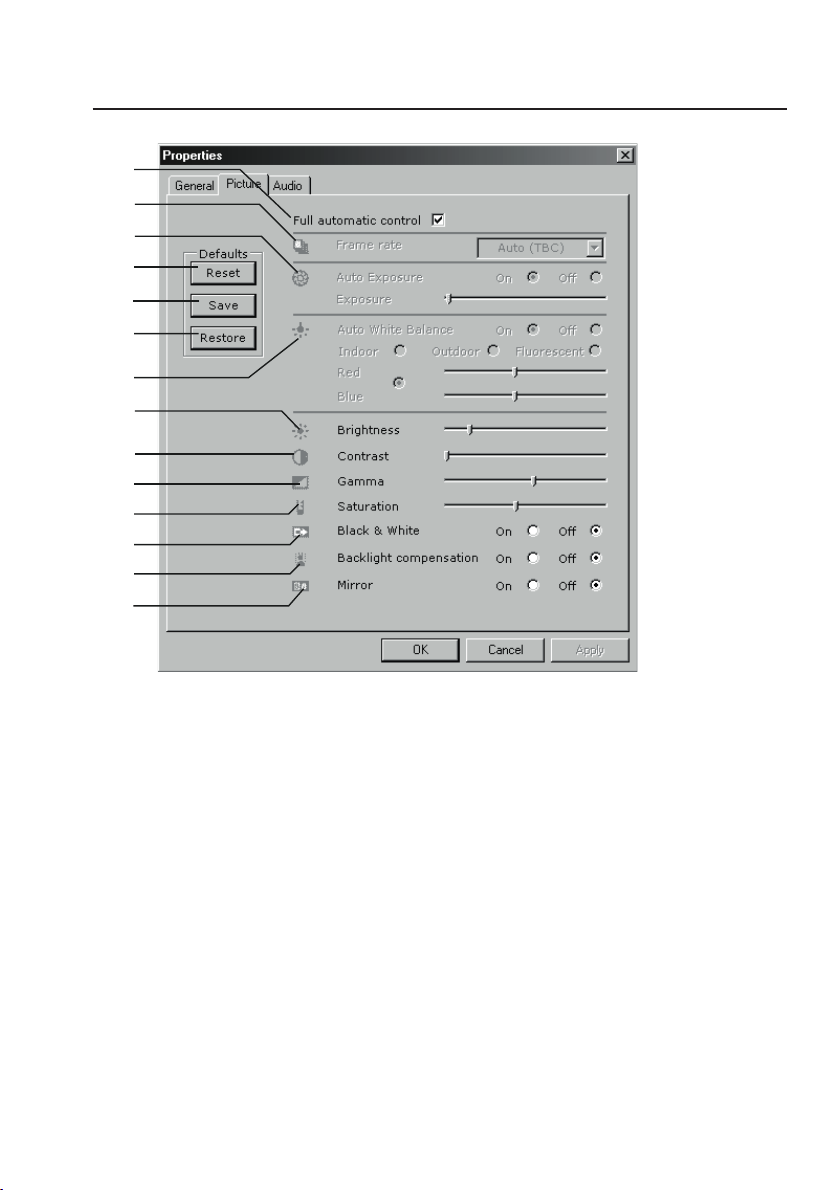
3 Full automatic control: on/off
This full automatic control mode provides a very easy way to get the best out of your
Philips SPC 600NC PC Camera. Or you can choose to have maximum manual control over
the camera settings by switching the full automatic control mode off. Full automatic control
'on' is the preferred setting for normal use.
Techniques active within full automatic control mode are:
– Automatic exposure control and automatic white balance control, to provide the best video
source signal possible;
– Automatic frame rate selection for improved camera sensitivity in low light conditions.
4 Frame rate
You can use the scroll open menu to set the frame rate of the video you wish to capture.
E.g. 30 fps means that the PC Camera will capture video at 30 frames per second.
5 Auto Exposure & Exposure slider
The exposure is the amount of light received by the sensor and is determined by how long
the sensor is exposed to capture a snapshot or video frame.The result depends on the
sensitivity of the sensor. The PC Camera will find the optimal setting if you select the
automatic exposure option.You can use the exposure slider if you would like to set the
camera according to your personal preferences.
Page 12

ENGLISH12
6 Reset
Press this button if you would like to reset the camera settings to the default factory
settings.
7 Save
Press this button if you would like to save your personal preferred settings.
8 Restore
Press this button if you would like to restore your personal preferred settings.
9 Auto White Balance
Most light sources are not 100% pure white but have a certain ‘colour temperature’.
Normally our eyes compensate for lighting conditions with different colour temperatures. If
the automatic white balance is selected, the camera will search for an object which the
camera knows the colour temperature of and will compensate all the other colorus in the
view of the camera accordingly.
You can also select the ‘Indoor’, ‘Outdoor’ and ‘Fluorescence’ options to provide the camera
with more information to find the right setting.You can use the ‘Red’ and ‘Blue’ sliders if you
would like to set the camera according to your personal preferences.
0 Brightness
Brightness enables you to adjust the brightness of the displayed image or video to suit your
own preference. Use the slider to find your preferred setting.
! Contrast
Contrast enables you to control the ratio between dark and light according to your own
preference. Use the slider to find your preferred setting.
@ Gamma
Gamma enables you to brighten dark areas within the displayed image or video and visualize
more details without over-exposing already light areas. Use the slider to find your preferred
setting.
# Saturation
Saturation enables you to set the colour reproduction from black and white to a full colour
image or video according to your own preference. Use the slider to find your preferred
setting.
$ Black and white
The 'Black and white' checkbox is used to switch from colour images to black and white and
back.
Page 13
ENGLISH 13
% Backlight compensation
Tu rn on the backlight compensation to improve the image quality when you have a scene
where the background has a high illumination level (for instance when you are sitting in front
of a bright light).
^ Mirror
Clicking the 'Mirror Image' checkbox flips the image horizontally.You can use this feature
when you want to use the Philips SPC 600NC and monitor as a mirror, or to take pictures
of mirrored images.
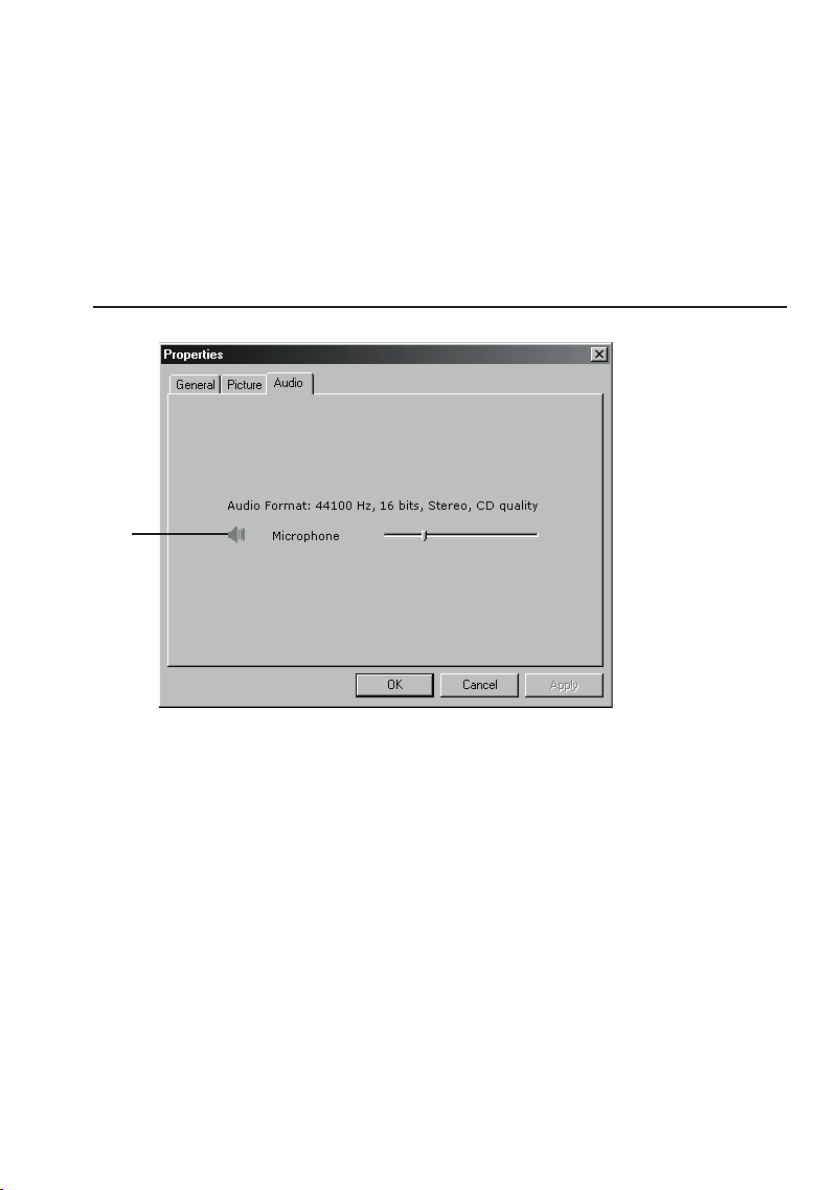
Audio controls
&
& Volume slider
This slider provides manual control over the microphone volume.
Page 14
ENGLISH14
5. Using the applications
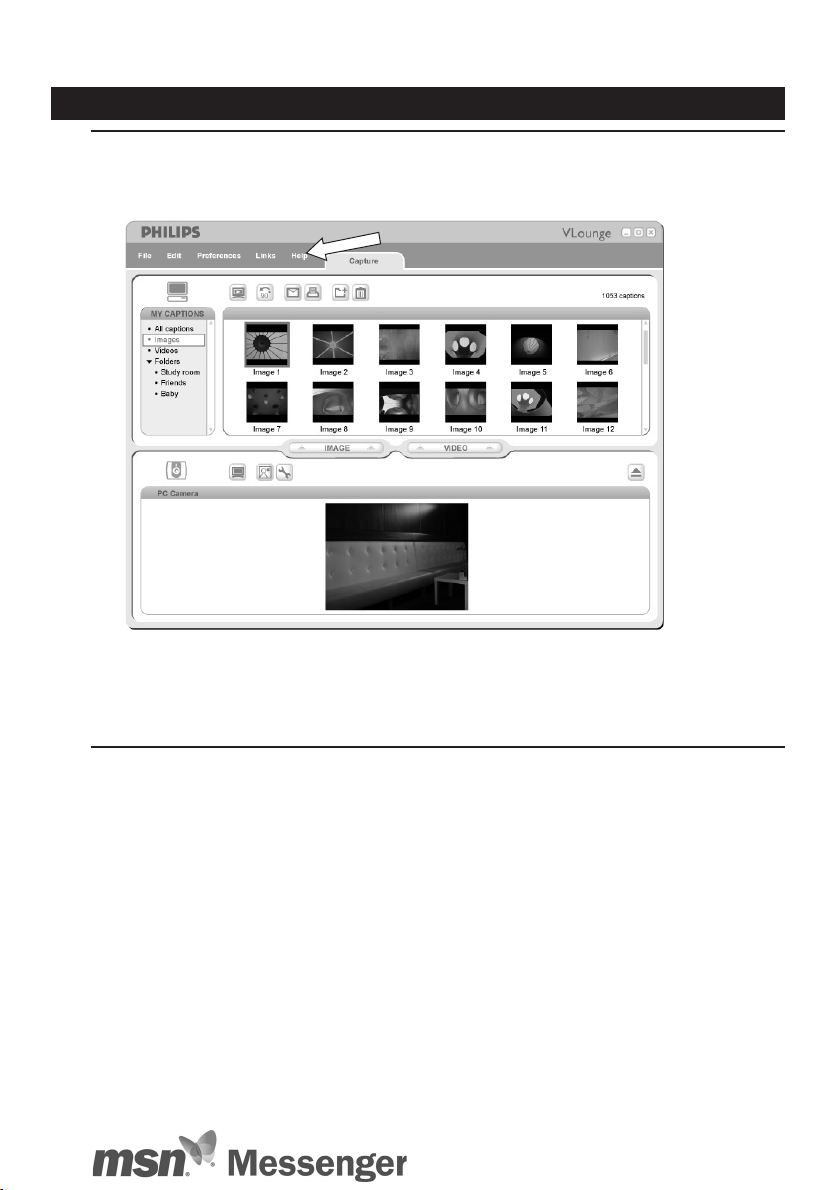
VLounge
• For quick and easy start-up of the VLounge software, press the camera’s QuickLaunch
button.
• For additional support read the 'Help' documentation within the 'Help' option of the
menubar of VLounge.
MSN messenger
You can download and install MSN Messenger via Microsoft MSN Messenger websites.
In the list below you will find the website address for your country for downloading MSN
Messenger:
USA - http://messenger.msn.com Norway - http://messenger.msn.no
Germany - http://messenger.msn.de Finland - http://messenger.msn.fi
France - http://messenger.msn.fr Sweden - http://messenger.msn.se
United Kingdom - http://messenger.msn.co.uk Denmark - http://messenger.msn.dk
Spain: - http://messenger.msn.es The Netherlands - http://messenger.msn.nl
Por tugal - http://messenger.msn.com Austria - http://messenger.msn.at
Italy - http://messenger.msn.it Swiss (German) - http://messenger.msn.ch
Belgium (Dutch) - http://messenger.msn.be Swiss (French) - http://messenger.fr.msn.ch
Belgium (French) - http://messenger.fr.msn.be
Please follow the on-screen instructions during downloading and installation of MSN Messenger.
Page 15
ENGLISH 15
Yahoo! Messenger
You can download and install Yahoo! Messenger via Yahoo! Messenger websites. In the list below
you will find the website address for your country for downloading Yahoo! Messenger:
USA - http://messenger.yahoo.com Norway - http://no.messenger.yahoo.com/
Germany - http://de.messenger.yahoo.com/ Finland - http://messenger.yahoo.com
France - http://fr.messenger.yahoo.com/ Sweden - http://se.messenger.yahoo.com/
United Kingdom - http://uk.messenger.yahoo.com Denmark - http://dk.messenger.yahoo.com/
Spain - http://es.messenger.yahoo.com/ The Netherlands - http://messenger.yahoo.com
Por tugal - http://messenger.yahoo.com Austria - http://messenger.yahoo.com
Italy - http://it.messenger.yahoo.com/ Swiss - http://messenger.yahoo.com
Belgium - http://messenger.yahoo.com
Please follow the on-screen instructions during downloading and installation of Yahoo! Messenger.
AOL Instant Messenger
You can download and install AOL Instant Messenger via the America Online website.
Please find below the website address for downloading AOL Instant Messenger:
http://www.aim.com/
Please follow the on-screen instructions during downloading and installation of AOL Instant
Messenger.
Page 16
ENGLISH16
Microsoft NetMeeting
Microsoft NetMeeting is a standard application that comes with your Windows operating system
(from Windows 98SE onwards). Windows NetMeeting is already installed on your PC during the
installation of your Windows operating system.To create a shortcut on your PC's desktop you
need to do the following:
1 Use the Windows search option within the Windows 'Start' menu.
2 Search for 'NetMeeting' on your C:\ drive.
3 The search utility will find the following: .
4 Click on using your right mouse button and select:
'Send To
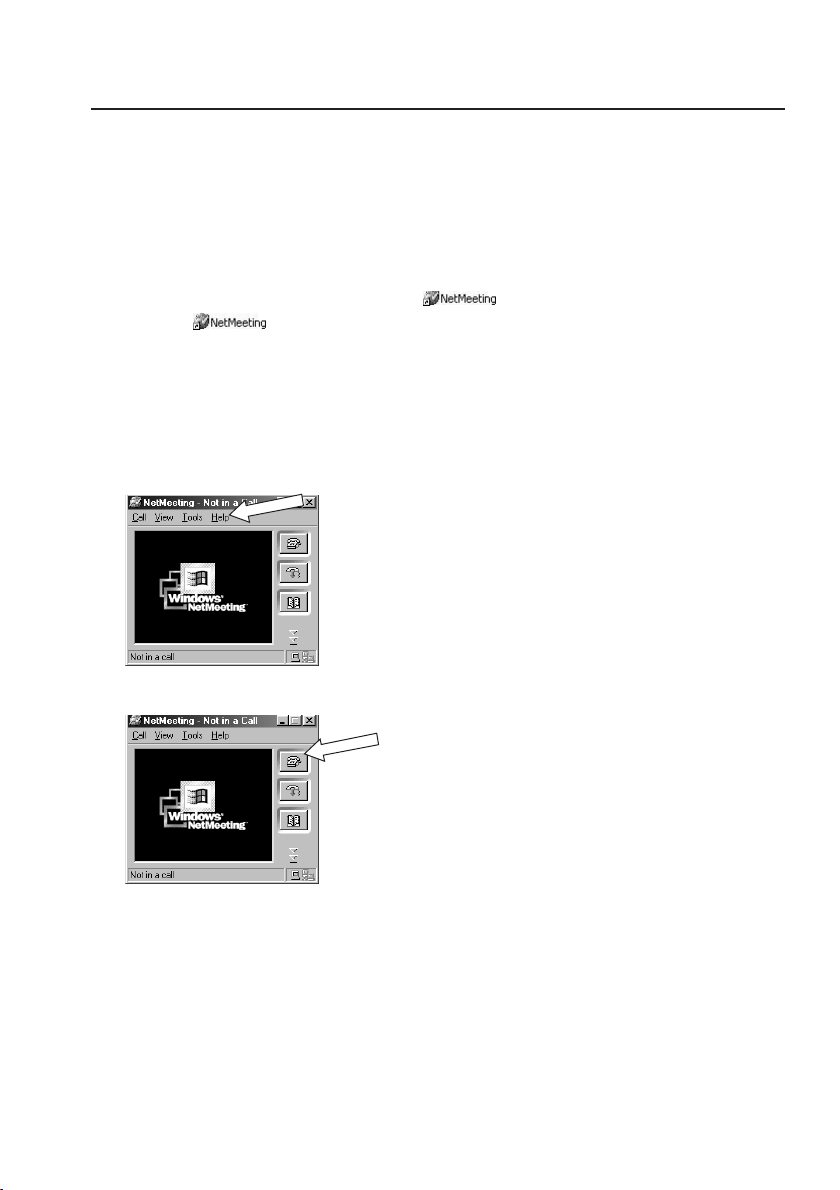
To initiate a video chat:
1 Double click on the 'NetMeeting Shortcut' on your PC's Desktop to start a NetMeeting
session.
2 Click on 'Help'
You can ask your meeting partner to find out his/her IP address in the same way.
→ Desktop (create shortcut)'.
→ 'About NetMeeting' and find out your local IP address.
3 Click the telephone icon.
4 In the 'Place A Call' dialogue box, fill in your partner's IP address in 'To: '
5 Click on 'Call' and wait for response.
Note!
If you or your partner are/is behind a firewall or is using a proxy server (common for office users),
please refer to NetMeeting Help about detail solutions.
Page 17

ENGLISH 17
To respond to an incoming call:
1 You can choose 'Automatically Accept Calls' or you can accept manually.
2 When the 'Incoming Call' dialogue box appears, click on 'Accept'.
Notes!
– Only two computers in a NetMeeting conference can use audio for communication.All other
participants must communicate through other options, like Chat or the shared Whiteboard.
–You can also initiate a video conference with more than one partner. Please read Help in
Microsoft
®
NetMeeting.
Making snapshots using Windows® XP
You can use Microsoft®Windows®XP to make snapshots with your Philips SPC 600NC
PC Camera.
If you need additional support, please refer to the ‘Help’ topics of Microsoft
Search for ‘Get picture’.
®
Windows®XP.
Page 18

ENGLISH18
6.Technical specifications
Sensor............................................................................................................................................................................ VGA CMOS
Video resolution (Max.) ......................................................................................................................... VGA (640 x 480)
Image resolution (Max.)...................................................................................................................... SVGA (800 x 600)
Illumination .......................................................................................................................................................................... < 5 lux
Integrated lens........................................................................................................................................................................ F=2.8
Data format................................................................................................................................................................... I420, IYUV
Interfacing.......................................................................................................... USB 2.0 compatible (2.1m USB cable)
Microphone................................................................................................................................. Built in digital microphone
Power ..................................................................................................................................................... Supplied via USB cable
Voltage requirements.............................................................................................................................. 5V ( ), 0.5A
Page 19

ENGLISH 19
7. Important information
Disclaimer
Philips makes no warranty of any kind with regard to this material, including, but not limited to,
the implied warranties of merchantability and fitness for a particular purpose. Philips assumes no
responsibility for any error that may appear in this document. Philips makes no commitment to
update nor to keep current the information contained in this document.
FCC compliance
This device complies with Part 15 of the FCC Rules. Operation is subject to the following two
conditions:
1 this device may not cause harmful interference, and
2 this device must accept any interference received, including interference that may cause
undesired operation.
Note!
This equipment has been tested and found to comply with the limits for a Class B digital device,
pursuant to Part 15 of the FCC Rules.These limits are designed to provide reasonable protection
against harmful interference in a residential installation.This equipment generates, uses and can
radiate radio frequency energy and, if not installed and used in accordance with the instructions, may
cause harmful interference to radio communications. However, there is no guarantee that interference
will not occur in a particular installation. If this equipment does cause harmful interference to radio or
television reception, which can be determined by turning the equipment off and on, the user is
encouraged to try to correct the interference by one or more of the following measures:
• Reorient or relocate the receiving antenna.
• Increase the separation between the equipment and receiver.
• Connect the equipment to an outlet on a circuit different from that to which the receiver is
connected.
• Consult the dealer or an experienced radio/TV technician for help.
Any unauthorized modification to this equipment could result in the revocation of the
authorization to operate the equipment.
Page 20
ENGLISH20
Environmental information
All redundant packaging has been omitted.We have done our utmost to make the
packaging easily separable into four materials: cardboard, polystyrene foam,
PET and polyethylene.Your set consists of materials which can be recycled if
disassembled by a specialized company. Please observe the local regulations
regarding the disposal of packaging, exhausted batteries and old equipment.
WARNING
Plastic bags can be dangerous.To avoid danger of suffocation, keep this bag away
from babies and small children.
Information to the Consumer
Disposal of your old product
Your product is designed and manufactured with high quality materials and components, which
can be recycled and reused.
When this crossed-out wheeled bin symbol is attached to a product it means the
product is covered by the European Directive 2002/96/EC.
Please inform yourself about the local separate collection system for electrical and
electronic products.
Please act according to your local rules and do not dispose of your old products with your
normal household waste.The correct disposal of your old product will help prevent potential
negative consequences for the environment and human health.
System requirements
• Microsoft®Windows®98SE/2000/ME or XP;
®
• Pentium
• 128MB RAM and 100 MB free hard disk space;
• One free USB port and CD-ROM or DVD drive.
III, 500 Mhz or equivalent;
Disclaimer of warranty
The software on the CD-ROM supplied is sold ‘as is’ and without warranties whether expressed
or implied. Because of the various software and hardware environments into which this program
may be put, no warranty of fitness for a particular purpose is offered.
Limitations of damages
The vendor will not be liable for any indirect, special, incidental or consequential damages
(including damages for loss of business, loss of profits, or the like), whether based on breach of
contract, tort (including negligence), product liability or otherwise, even if the vendor or its
representatives have been advised of the possibility of such damages and even if a remedy set
forth herein is found to have failed its essential purpose.
Page 21

ENGLISH 21
8. Helpline
Need Help?
If you have any questions about the Philips SPC 600NC Camera, please contact our helpline for
assistance! You can find the number in the list below.
Before you call, please read this manual carefully.You will be able to solve most of your problems.
The model number of the camera is SPC 600NC.
Date of purchase: _____ /_____ /______
day /month /year
If you have any questions about the Philips SPC 600NC Camera, please contact our helpline for
assistance! You can find the number in the list below. Before you call, please read this manual carefully
and/or go to www.philips.com/support.You will be able to solve most of your problems.
België/ Belgien/ Belgique Nederland
070 222 303 0900 8407
Danmark Norge
35-25-8759 2270-8111
Deutschland Österreich
0180 5356 767 0810 001 203
España Portugal
902 888 784 2 1359 1442
France Schweiz/ Suisse/ Svizzera
08 9165 0005 0844 800 544
¢¢º Suomi
0 0800 3122 1280 09 6158 0250
Italia Sverige
899 23 45 06 08 5792 9100
Luxemburg/ Luxembourg UK (United Kingdom)
40 6661 5644 0906 1010 016
Page 22
ENGLISH22
9.Warranty
Guarantee certificate
Garantiebewijs
Certificado de garantia
Garantibevis
Certificat de garantie
Certificado de garantia
Ǽ
Garantibevis
year warranty
année garantie
Jahr Garantie
jaar garantie
año garantia
anno garanzia
Garantieschein
Certificato di garanzia
Garanticertifikat
Takuutodistus
Á¹Æ¼º Ǽ
år garanti
år garanti
år garanti
vuosi takuu
año garantia
22
Type: SPC 600NC
Serial no: ___________________________________________________________________
Date of purchase - Date de la vente - Verkaufsdatum - Aankoopdatum - Fecha de compra - Date d’acquisito -
Data da adquirição - Gª¹µª µ¹º - Inköpsdatum - Anskaffelsesdato - Kjøpedato - Oatopäivä -
Dealer’s name, address and signature
Nom, adresse et signature du revendeur
Name,Anschrift und Unterschrift des Händlers
Naam, adres en handtekening v.d. handelaar
Nombre, direccion y firma del distribudor
Nome, indirizzo e firma del fornitore
www.philips.com
Data subject to change without notice
µª¾¸Èªµ, Ç¿¼ ¡ ¿¸µ¹À ¾µ¿ ª¸. ¸¹µª¿¾
Återförsäljarens namn, adress och signatur
Forhandlerens navn,adresse og unterskrift
Forhandlerens navn,adresse og unterskrift
Jälleenmyyjän nimi, osoite ja allekirjoitus
Nome, morada e assinature da loja
0682
 Loading...