

Page 1
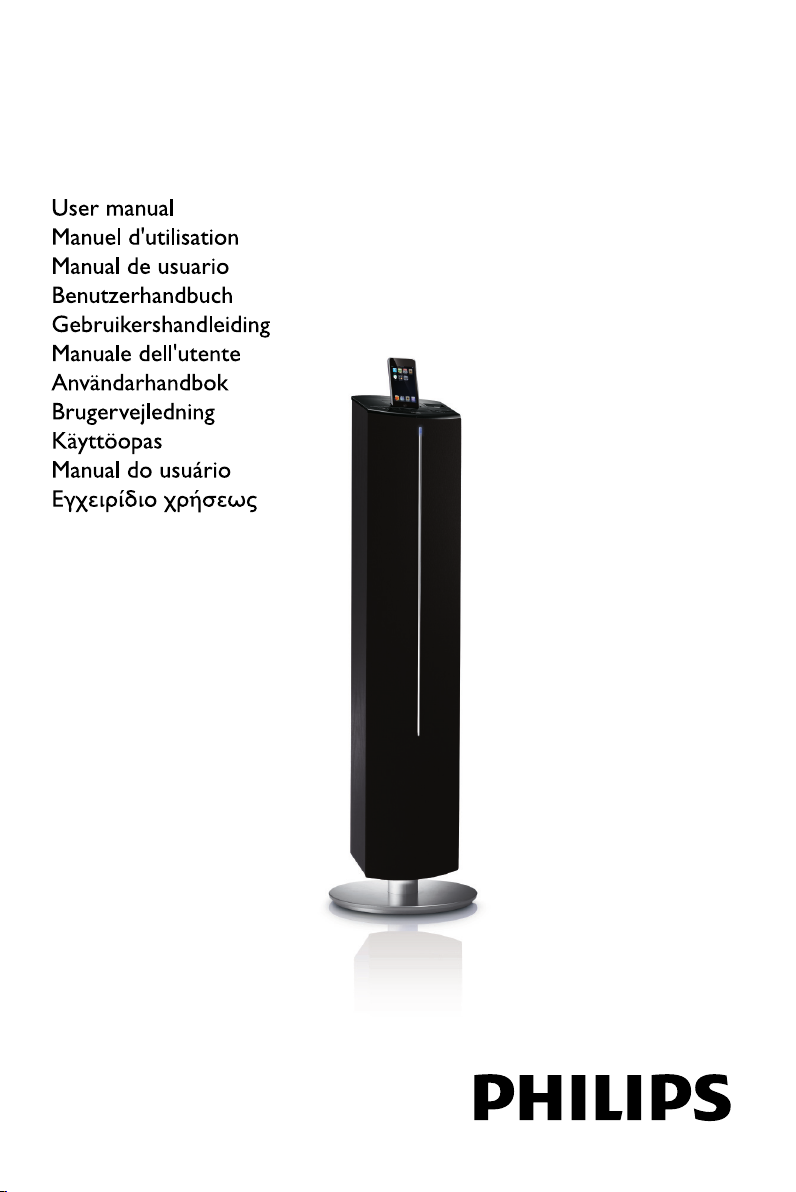
Docking Entertainment System
Register your product and get support at
www.philips.com/welcome
DC570
Page 2
DOCKING ENTERTAINMENT SYSTEM DC570
7
8
9
0
!
@
POWER
1
2
SOURCE
DSC
DBB
PRESET
+
VOLUME
+
3
4
5
AUX
FM
6
3
Page 3
SHU FFLE
ALBUM/
PRESET
REPEAT
SLEEP
MUTE
SET TIME
TIMER PROG
USB MENU AUX
POWER TUNER
VOL
DSC
DBB
TUNING
TUNING
+
2
3
5
6
8
7
1
9
0
!
#
@
$
%
^
4
4
Page 4

Important notes for users in the
U.K.
Mains plug
This apparatus is fitted with an approved 13
Amp plug. To change a fuse in this type of plug
proceed as follows:
1 Remove fuse cover and fuse.
2 Fix new fuse which should be a BS1362 5 Amp,
A.S.T.A. or BSI approved type.
3 Refit the fuse cover.
If the fitted plug is not suitable for your socket
outlets, it should be cut off and an appropriate
plug fitted in its place.
If the mains plug contains a fuse, this should
have a value of 5 Amp. If a plug without a fuse
is used, the fuse at the distribution board
should not be greater than 5 Amp.
Note: The severed plug must be disposed of to
avoid a possible shock hazard should it be
inserted into a 13 Amp socket elsewhere.
How to connect a plug
The wires in the mains lead are coloured with
the following code: blue = neutral (N),
brown = live (L).
¶ As these colours may not correspond with the
colour markings identifying the terminals in
your plug, proceed as follows:
– Connect the blue wire to the terminal
marked N or coloured black.
– Connect the brown wire to the terminal
marked L or coloured red.
– Do not connect either wire to the earth
terminal in the plug, marked E (or e) or
coloured green (or green and yellow).
Before replacing the plug cover, make certain
that the cord grip is clamped over the sheath
of the lead - not simply over the two wires.
Italia
DICHIARAZIONE DI CONFORMITA’
Si dichiara che l’apparecchio DC570 Philips
risponde alle prescrizioni dell’art. 2 comma 1 del
D.M. 28 Agosto 1995 n. 548.
Fatto a Eindhoven
Philips Consumer Electronics
Philips, Glaslaan 2
5616 JB Eindhoven, The Netherlands
Norge
Typeskilt finnes på apparatens underside.
Observer: Nettbryteren er sekundert
innkoplet. Den innebygde netdelen er
derfor ikke frakoplet nettet så lenge
apparatet er tilsluttet nettkontakten.
For å redusere faren for brann eller elektrisk
støt, skal apparatet ikke utsettes for regn eller
fuktighet.
CAUTION
Visible and invisible laser radiation. If
the cover is open, do not look at the
beam.
Copyright in the U.K.
Recording and playback of material may
require consent. See Copyright Act 1956 and
The Performer’s Protection Acts 1958 to 1972.
5
Page 5

DK
Advarsel: Usynlig laserstråling ved åbning
når sikkerhedsafbrydere er ude af funktion.
Undgå utsættelse for stråling.
Bemærk: Netafbryderen er sekundært
indkoblet og ofbryder ikke strømmen fra
nettet. Den indbyggede netdel er derfor
tilsluttet til lysnettet så længe netstikket
sidder i stikkontakten.
S
Klass 1 laseraparat
Varning! Om apparaten används på annat
sätt än i denna bruksanvisning specificerats,
kan användaren utsättas för osynlig
laserstrålning, som överskrider gränsen för
laserklass 1.
Observera! Stömbrytaren är sekundärt
kopplad och bryter inte strömmen från
nätet. Den inbyggda nätdelen är därför
ansluten till elnätet så länge stickproppen
sitter i vägguttaget.
SF
Luokan 1 laserlaite
Var oitus! Laitteen käyttäminen muulla
kuin tässä käyttöohjeessa mainitulla tavalla
saattaa altistaa käyttäjän
turvallisuusluokan 1 ylittävälle
näkymättömälle lasersäteilylle.
Oikeus muutoksiin varataan. Laite ei
saa olla alttiina tippu-ja roiskevedelle.
Huom. Toiminnanvalitsin on kytketty
toisiopuolelle, eikä se kytke laitetta irti
sähköverkosta. Sisäänrakennettu verkkoosa on kytkettynä sähköverkkoon aina
silloin, kun pistoke on pistorasiassa.
6
Page 6

Index
English ------------------------------------------------ 8
Français -------------------------------------------- 24
Español --------------------------------------------- 40
Deutsch --------------------------------------------- 56
Nederlands ---------------------------------------- 73
Italiano ---------------------------------------------- 91
Svenska ------------------------------------------- 108
English
Français
EspañolDeutschNederlandsItalianoSvenskaDanskSuomi
Dansk --------------------------------------------- 125
Suomi --------------------------------------------- 142
Português ---------------------------------------- 158
----------------------------------------- 175
Português
7
Page 7

Contenido
Español
Información General
Información medioambiental ........................... 41
Accesorios incluido ........................................... 41
Información sobre seguridad ........................... 41
Preparativos
Conexiones posteriores ................................... 42
Conectando un dispositivo USB ........................... 43
Conectando un dispositivo no-USB .....................43
Antes de utilizar el control remoto ............... 43
Colocación de la pila en el control remoto . 43
Controles
Unidad principal .................................................. 44
Mando a distancia ............................................... 45
Funciones básicas
Para activar el sistema ....................................... 46
Para conmutación a mode de espera Eco
Power .................................................................... 46
Seleccionar el modo de espera ....................... 46
Modo de Espera Automático para el Ahorro de
Energía .................................................................. 46
Ajustes de volumen y de sonido ..................... 46
Control del sonido ............................................ 46
Funciones de reproducción USB
Los modos de reproducción: SHUFFLE y
REPEAT ................................................................. 47
Programación de pistas ..................................... 48
Cómo volver a acceder a las pistas
programadas ........................................................ 48
Modificación de las pistas programadas ........ 48
Eliminación de pistas programadas ................ 48
Fuentes externas
Uso de un dispositivo que no es USB ........... 50
Utilizando un dispositivo USB de almacenaje
masivo ................................................................... 50
Reproduciendo desde un dispositivo USB de
almacenaje masivo ....................................................50
Reloj/Temporizador/
Desconexión automátic
Ajuste del reloj ................................................... 52
Ajuste del temporizador .................................. 52
Detención de la alarma ........................................... 52
Ajuste de temporizador de dormitado ......... 52
Base para iPod
Reproductores iPod compatibles ................... 53
Selección del adaptador de base adecuado .. 53
Uso de los adaptadores de base ..................... 53
Reproducción de un reproductor portátil iPod
................................................................................ 53
Carga de la batería del iPod con la base ....... 53
Especificaciones ...................................... 54
Resolución de problemas .............. 55
Recepción de radio
Sintonización de emisoas de radio ................. 49
Programación de emisoras de radio .............. 49
Programación automática .......................................49
Programación manual .............................................. 49
Sintonización de una presintonía .................... 49
40
Page 8

Información General
Felicidades por la adquisición y bienvenido a
Philips
Para sacar el mayor partido a la asistencia que
proporciona Philips, registre el producto en
www.philips.com/welcome.
Información medioambiental
Se ha prescindido de cualquier material de
embalaje innecesario. Hemos puesto el
mayorempeño en que el embalaje sea fácilmente
separable en tres materiales: cartón (caja),
poliestireno expandible (amortiguación) y
polietileno (bolsas, plancha protectora de
espuma).
Los materiales que componen el equipo son
reciclables y reutilizables si son desmontados
poruna empresa especializada. Observe las
normas locales concernientes a la eliminación de
los materiales de embalaje, pilas usadas y equipos
desechables.
Accesorios incluido
– mando a distancia (con pila)
– antena de cable de FM
–4 adaptadores de base para iPod
– 3.5 mm cable de entrada de líne
Información sobre seguridad
● Antes de hacer funcionar el sistema, compruebe
que la tensión de servicio indicada en la placa de
especificaciones (o la indicación de tensión
mostrada junto al selector de tensión) de su
sistema sea idéntica a la tensión de su fuente de
alimentación local. En caso contrario, consulte a
su distribuidor.
● Coloque el sistema sobre una superficie plana,
dura y estable.
● Coloque el sistema en un lugar con ventilación
adecuada para evitar la acumulación interna de
calor del sistema. Permita que haya un espacio
libre de 10 cm detrás y encima de la unidad y de
5 cm a ambos lados, como mínimo.
● No se debe obstaculizar la ventilación cubriendo
los orificios de ventilación con artículos. como
periódicos, manteles, cor tinas, etc..
● No exponga el aparato, las pilas o los discos a
humedad, lluvia, arena o calor excesivo causado
por equipo de calefacción o la luz directa del sol.
● No debe colocar ninguna fuente de llamas,
como una vela encendida, sobre el aparato.
● No debe colocar ningún objeto con líquido,
como por ejemplo un jarrón, sobre el aparato.
● Instale el sistema cerca de una toma eléctrica
CA y con fácil acceso a la clavija eléctrica CA.
● Las partes mecánicas del aparato contienen
cojinetes autolubricantes, que no deben
lubricarse.
● Los aparatos no deben exponerse a las gotas o
salpicaduras.
● Cuando el sistema está en modo de
espera (STANDBY), sigue consumiendo
algo de energía. Para desconectar
completamente el sistema de la fuente
de alimentación, desenchufe el sistema
de la toma de corriente de CA de pared.
● No permita que los niños utilicen sin vigilancia
aparatos eléctricos. No permita que los niños o
adultos con capacidades físicas, sensoriales o
mentales reducidas o personas con falta de
experiencia/ conocimiento, utilicen aparatos
eléctricos sin vigilancia.
Notas para el desecho de
pilas/baterías
El producto contiene pilas cubiertas por la
Directiva europea 2006/66/EC, que no se
pueden eliminar con la basura doméstica
normal. Infórmese de la legislación local
sobre la recogida selectiva de pilas ya que
el desecho correcto ayuda a evitar
consecuencias negativas para el medio
ambiente y la salud humana.
Español
41
Page 9

Preparativos
Español
FM wire antenna
Antena de
alambre FM
Conexiones posteriores
La placa de especificaciones está situada en
la parte posterior de su sistema.
A Alimentación
● Before connecting the power cord to the wall
outlet, ensure that all other connections have
been made.
¡ADVERTENCIA!
–For optimal performance, use only the
original power cord.
– Nunca haga ni cambie conexiones con la
corriente activada.
Para evitar sobrecalentar el sistema, se ha
incorporado un circuito de seguridad. Por
consiguiente, su sistema puede pasar
automáticamente al modo de espera bajo
condiciones extremas. Si ocurre esto, permita
que el sistema se enfríe antes de volver a
utilizarlo (no disponible para todas las versiones).
42
B Conexión de antenas
Conecte la antena FM suministrada al terminal
FM. Extienda y coloque la antena FM para
obtener una recepción óptima.
Nota:
– Coloque la antena FM lejos de los cables del
altavoz para evitar que se produzcan interferencias
eléctricas.
C Conexiones opcionales
No se suministra el equipo y los cables de
conexión. Para más detalles, consulte las
instrucciones de funcionamiento para el equipo
conectado.
Page 10

Preparativos
1
2
3
CR2025
Conectando un dispositivo USB
Conectando un dispositivo USB de almacenaje
masivo al equipo inalámbrico, podrá disfrutar de
la música almacenada en el dispositivo a través
de los potentes altavoces del equipo inalámbrico.
● Introduzca el conector USB del dispositivo USB
en la toma del equipo.
para los dispositivos con cable USB:
1 Introduzca un extremo del cable USB a la toma
del equipo.
2 Introduzca la otra clavija del cable USB en el
terminal de salida USB del dispositivo USB
Conectando un dispositivo no-USB
Utilice un line-in para conectar los terminales
AUX IN de salida de audio analógico de un
equipo externo (TV, VCR, reproductor de disco
láser, reproductor de DVD o reproductor de
CD).
Antes de utilizar el control
remoto
1 Retire la sábana protectora de plástico.
2 Seleccione la fuente que desea controlar
pulsando una de las teclas de selección de fuente
en el control remoto (por ejemplo USB,
TUNER).
3 Seguidamente seleccione la función deseada (por
ejemplo ÉÅ).
Colocación de la pila en el
control remoto (litio CR2025)
1 Presione la ranura en el compartimento de la
pila.
2 Extraiga el compartimiento de la pila.
3 Coloque una nueva pila y vuelva introducir
completamente el compartimiento de pilas hasta
la posición original.
Español
¡PRECAUCIÓN!
– Las pilas contienen sustancias
químicas, por lo tanto deben desecharse
correctamente.
Retire la sábana protectora de plástico
43
Page 11

Controles
Unidad principal
1 USB DIRECT
– jack para conectar esta equipo a una entrada del
dispositivo USB externo.
2 ÉÅ
– (iPod/USB) para iniciar o interrumpir la
Español
reproducción.
3 S/ T
iPod/ USB ..........busca hacia atrás o adelante
dentro de una pista.
................................. salta al comienzo del álbum
actual, anterior o siguiente.
CLOCK ............... ajusta las horas en la función de
reloj/alarma.
TUNER ............... sintoniza emisoras FM de alta o
baja frecuencia.
4 VOLUME -/+
– ajusta el volumen.
5 Pantalla
– visualiza la inparamación sobre la unidad.
6 FM antena
– mejora la recepción de FM
7 BASE para iPod
– soporte para adaptadores de base utilizados
para conectar el reproductor iPod a la base y
reproducirlo o recargarlo a través de este
sistema.
8 Power
– activa el sistema en la última fuente de sonido
reproducida.
– cambia el sistema al modo de espera.
9 Source
– para seleccionar la fuente de sonido
correspondiente: USB, iPod, FM o AUX.
0 PRESET -/+
– (USB) salta al comienzo de la pista anterior o
siguiente.
– ajusta las horas en la función de reloj/alarma.
– selecciona emisoras de radio presintonizadas.
DBB
– mejora los graves.
DSC
– sirve para seleccionar diferentes efectos de
sonido.
! IR
– apunte el control remoto a este sensor.
@ AUX
– para conectar un dispositivo auxiliar.
44
Page 12

Controles
Mando a distancia
1 iPod
– selecciona la fuente de sonido para el
reproductor iPod.
2 Power
– cambia el sistema al modo de espera.
3 ÉÅ
– (iPod/USB) para iniciar o interrumpir la
reproducción.
4 Menu
– accede al menú del iPod.
5 USB
– selecciona la fuente de sonido del reproductor
de audio USB.
6 REPEAT/SHUFF
– (USB) toggles track/album playback options e.g.
repeat or random order mode.
7 ALBUM/PRESET3 / 4
– (USB) salta al comienzo de la pista anterior o
siguiente.
– selecciona emisoras de radio presintonizadas.
DBB
– mejora los graves.
DSC
– sirve para seleccionar diferentes efectos de
sonido.
8 SLEEP
– Selecciona la hora de desconexión automática.
9 TUNER
– selecciona la radio FM como fuente de sonido.
0 TUNING -/+
TUNER ............... sintoniza emisoras FM de alta o
baja frecuencia.
CLOCK ............... ajusta las horas en la función de
reloj/alarma.
! S / T
iPod/ USB ..........busca hacia atrás o adelante
dentro de una pista.
................................. salta al comienzo del álbum
actual, anterior o siguiente.
CLOCK ............... ajusta los minutos en la función
de reloj/alarma.
@ Timer
– activa/desactiva el modo de ajuste de alarma.
– activa/desactiva la alarma
# AUX
– selecciona la fuente de sonido de otro equipo
de audio.
$ PROG/SET TIME
– (TUNER) programa emisoras de radio.
– ajusta la función de reloj.
– (USB) programa pistas.
% VOLUME -/+
– ajusta el volumen.
^ MUTE
– activa y desactiva la función del sonidon.
Observaciones del mando a distancia
– Seleccione primero la fuente que desea
manejar presionando uno de los botones de
selección de fuente en el mando a distancia
(por ej. USB/AUX).
–A continuación, seleccione la función
deseada (por ej. ÉÅ, S , T).
Español
45
Page 13

Funciones básicas
POWER TUNER
Español
TUNING
cambiar a modo de espera Eco energía o
viceversa.
Seleccionar el modo de espera
● Pulse Powe r (o Pow er en el mando a
distancia).
➜ El nivel de volumen (hasta un nivel de
+
volumen máximo de 12), el último modo
seleccionado, la fuente y las presintonías del
sintonizador se almacenarán en la memoria del
sistema.
TUNING
USB MENU AUX
SHU FFLE
REPEAT
ALBUM/
PRESET
SLEEP
TIMER PROG
SET TIME
DSC
VOL
DBB
MUTE
Importante!
Antes de poner en funcionamiento el
sistema, asegúrese de haber realizado
correctamente todos los preparativos.
Para activar el sistema
● Pulse Power en el equipo.
➜ El sistema conmutará a la última fuente
seleccionada.
● Pulse SOURCE en el equipo repetidamente, o
USB, AUX, iPod o TUNER en el control
remoto.
➜ El sistema conmutará a la fuente seleccionada.
Modo de Espera Automático
para el Ahorro de Energía
La función de ahorro de energía hace que el
sistema cambie automáticamente al modo de
espera 15 minutos después de que el dispositivo
USB o iPod conectado haya llegado al final de la
última pista y no se haya pulsado ningún botón.
Ajustes de volumen y de sonido
1 Ajuste VOLUME -/+ para aumentar o reduzca
el nivel del sonido.
➜El visualizador muestra VOL un número del 0-
32.
s2 Pulse MUTE en el mando a distancia para
interrumpir el sonido inmediatamente.
➜ La reproducción continuará sin sonido y
aparecerá MUTE.
● Para volver a activar la reproducción de sonido:
– vuelva a pulsar MUTE;
– ajuste los controles de volumen;
– cambiar la fuente.
Para conmutación a mode de
espera Eco Power
● Mantenga pulsado Power (Power en el
control remoto) en el modo activo.
➜ El aparato activa el modo de espera Eco
energía o el modo.
● Si el aparato está en modo, pulse y mantenga
pulsado Power durante 3 segundos o más para
46
Page 14

Funciones básicas Funciones de reproducción USB
Control del sonido
Vd. sólo puede seleccionar uno de los
mandos del sonido cada vez: DBB o DSC.
DBB (refuerzo dinámico de graves)
El ajuste DBB aumenta la respuesta de graves.
iPod/AUX
● Pulsado ALBUM/PRESET 4 en el control
remoto o PRESET - en el panel para activar o
desactivar la función DBB.
USB/TUNER
● Mantenga pulsado ALBUM/PRESET 4 en el
control remoto o PRESET - en el panel
durante más de 2 segundos para activar o
desactivar la función DBB.
DSC (control digital del sonido)
El ajuste DSC ofrece un tipo distinto de
preajuste del ecualizador de sonido.
iPod/AUX
1 Pulsado ALBUM/PRESET 3 o PRESET +
en el panel para acceder al modo DSC.
2 Pulse PRESET + repetidamente para
seleccionar: CLASSIC, JAZZ, POP o ROCK.
USB/TUNER
1 Mantenga pulsado ALBUM/PRESET 3 o
PRESET + en el panel durante más de
2 segundos para acceder al modo DSC.
2 Pulse PRESET + repetidamente para
seleccionar: CLASSIC, JAZZ, POP o ROCK.
JAZZ, POP o ROCK.
Los modos de reproducción:
SHUFFLE y REPEAT
Es posible seleccionar o cambiar los modos
diferentes antes de la reproducción o durante la
misma. Los modos de reproducción también
REPEAT pueden combinarse con la función de
programación.
1 Para seleccionar el modo de reproducción, pulse
REPEAT/SHUFF antes o durante la
reproducción hasta que la pantalla muestre la
función deseada.
➜ Si aparece onE, la pista actual se reproducirá
de forma repetida.
➜ Si aparece ALb, el álbum actual se
reproducirá de forma repetida.
➜ Si aparece ALL, se reproducirán todas las
pistas de forma repetida.
➜ Aparecerá SHUFF si la reproducción
aleatoria está activada, y desaparecerá si está
desactivada.
2 Para volver a la reproducción normal, pulse
REPEAT/SHUFF hasta que los diferentes
modos de oFF dejen de visualizarse.
● También se puede pulsar 9 para cancelar el
modo de reproducción.
Nota:
– No se pueden activar las funciones de repetición
y reproducción aleatoria de forma simultánea.
Español
47
Page 15

Funciones de reproducción USB
POWER TUNER
+
Español
TUNING
TUNING
USB MENU AUX
SHU FFLE
REPEAT
ALBUM/
PRESET
TIMER PROG
DSC
DBB
SLEEP
SET TIME
VOL
MUTE
Cómo volver a acceder a las
pistas programadas
Puede volver a acceder a las pistas que ya están
programadas y modificar la programación.
1 Pulse PROG/SET TIMErepetidamente para
acceder de nuevo a cada pista programada.
Modificación de las pistas
programadas
1 Pulse PROG/SET TIME repetidamente hasta
llegar a la pista programada que desee.
2 Pulse S/T para seleccionar el número de
pista deseado
● Para elegir pistas de diferentes álbumes, pulse
ALBUM/PRESET 3/4 para seleccionar el
número de álbum que desee.
3 Pulse PROG/SET TIME para confirmar el
número de pista que desee guardar.
Eliminación de pistas
programadas
1 Para eliminar la programación, mantenga pulsado
PROG/SET TIME durante más de 2 segundos.
➜ CLR aparece..
Programación de pistas
Realice la programación en la posición STOP
(parada) para seleccionar y almacenar hasta
20 pistas en la memoria.
1 Pulse PROG/SET TIME en el mando a
distancia para introducir el modo de
programación.
➜ Pr 01 aparece y PROG parpadea.
2 Pulse S/T para seleccionar la pista deseada.
● MP3 CD, Pulse ALBUM/PRESET 3 4 para
seleccionar la pista deseada.
3 Pulse PROG/SET TIME para confirmar el
número de pista que desea almacenar.
4 Repita los pasos del 2 al 3 para seleccionar y
almacenar todas las pistas deseadas.
➜ Si intenta programar más de 20 pistas,
aparece FULL en la pantalla.
5 Para comenzar la reproducción del programa,
pulse ÉÅ directamente.
48
Page 16

POWER TUNER
+
TUNING
TUNING
USB MENU AUX
SHU FFLE
REPEAT
ALBUM/
PRESET
SLEEP
TIMER PROG
SET TIME
DSC
VOL
DBB
MUTE
Sintonización de emisoas de
radio
1 Pulse TUNER varias veces para seleccionar el
sintonizador como fuente.
2 Pulse S/T y suelte el botón.
➜ El sistema comenzará a buscar una emisora
de radio que tenga una señal con suficiente
potencia.
3 Repita el paso 2 hasta que encuentre la emisora
que desee.
● Para sintonizar una emisora de recepción débil,
pulse S/T brevemente varias veces.
Recepción de radio
Programación de emisoras de
radio
Se pueden almacenar hasta un total de 20
emisoras de radio.
Programación automática
La programación automática comenzará en la
presintonía número 1 y se anularán todas las
presintonías anteriores.
● Pulse PROG/SET TIME durante más de dos
segundos para activar la programación.
➜ Se han programado todas las emisoras
disponibles.
Programación manual
1 Sintonice con la emisora que desee (vea
“Sintonización de emisoras de radio”).
2 Pulse PROG/SET TIME para activar la
programación.
➜ PROG parpadea en el visualizador.
3 Pulse ALBUM/PRESET 3 4 para asignar a la
emisora un número del 1 al 20.
4 Vuelva a pulsar PROG/SET TIME para
confirmar el ajuste.
➜ Desaparece PROG y aparece el número de
presintonía y la frecuencia de la emisora.
5 Repita los cuatro puntos mencionados para
almacenar otras emisoras.
● Las presintonías se pueden borrar, simplemente
almacenando otras en su lugar.
Sintonización de una presintonía
● Pulse ALBUM/PRESET 3 4 hasta
seleccionar en pantalla el número de presintonía
deseado.
Español
49
Page 17

Fuentes externas
+
página de controles de este manual para obtener
información acerca de las funciones de
reproducción básicas.
SOURCE
POWER
DSC
DBB
PRESET
+
Español
Uso de un dispositivo que no es
USB
1 Conecte las terminales de salida de audio del
equipo externo (televisor, VCR, reproductor de
disco láser, reproductor de DVD o reproductor
de CD) a los terminales AUX de su sistema.
2 Pulse AUX para seleccionar el modo externo.
Notas:
–Para más detalles, consulte las instrucciones de
funcionamiento del equipo conectado.
USB MENU AUX
Utilizando un dispositivo USB de
almacenaje masivo
Conectando un dispositivo USB de almacenaje
masivo al equipo inalámbrico, podrá disfrutar de
la música almacenada en el dispositivo a través
de los potentes altavoces del equipo inalámbrico.
1 Compruebe que el aparato USB está
adecuadamente conectado (Consulte
Preparativos: Conexiones opcionales).
2 Pulse USB una o más veces para seleccionar
USB.
– no AUdIO aparece cuando no se encuentra
ningún archivo audio en el dispositivo USB.
3 Consulte la guía de configuración rápida o la
Reproduciendo desde un dispositivo USB
VOLUME
+
de almacenaje masivo
Dispositivos USB de almacenaje masivo
compatibles
podrá utilizar:
– memoria flash USB (USB 2.0 ó USB1.1)
– reproductores flash USB (USB 2.0 ó USB1.1)
INFORMACIÓN RELATIVA A USB
DIRECTO:
1. Compatibilidad de la conexión USB con este
producto:
a) Este producto es compatible con la mayoría de
los dispositivos de almacenamiento masivo USB
(MSD) que cumplen los estándares de USB MSD.
i) Los dispositivos de almacenamiento masivo
más comunes son unidades flash, Memory
Sticks, lápices USB, etc.
ii) Si aparece el mensaje "Unidad de disco" en
el ordenador después de haber conectado el
dispositivo de almacenamiento masivo, lo más
probable es que sea compatible con MSD y
funcione con este producto.
b) Si el dispositivo de almacenamiento masivo
necesita una pila o fuente de alimentación:
Asegúrese de tener una pila nueva o cargue
primero el dispositivo USB y, a continuación,
vuelva a conectarlo al producto.
2. Tipo de música compatible:
a) Este dispositivo sólo es compatible con música
no protegida que tenga la siguiente extensión de
archivo:
.mp3
.wma
b) La música adquirida a través de tiendas de
música online no es compatible, ya que está
protegida por la Gestión de derechos digitales
(DRM, del inglés Digital Rights Management).
c) Los nombres de archivo que terminen con las
siguientes extensiones no son compatibles:
.wav; .m4a; .m4p; .mp4; .aac, etc.
3. La reproducción de archivos de audio a través
de los altavoces del sistema no es posible si
conecta directamente el ordenador a la toma USB.
50
Page 18

Formatos compatibles:
– USB o formato del archivo de memoria
FAT12, FAT16, FAT32 (tamaño del sector :
512 - 4096 bytes)
– MP3 con índice de bits (índice de datos): 32-
320 Kbps e índice de bits variable
– WMA versión 9 o anterior
– Directorio incluyendo un máximo de 8
niveles
– Número de álbums/ carpetas: máximo 99
– Número de pistas/títulos: máximo 999
– Información ID3 v2.0 o posterior
– Nombre del archivo en Uicode UTF8
(longitud máxima: 128 bytes)
El sistema no reproducirá o no será
compatible con los siguientes formatos:
–Álbums vacíos: un álbum vacío es un álbum
que no contiene archivos MP3/WMA, y que
no aparecerá mostrado en el visualizador.
– Los formatos de archivos no compatibles se
ignorarán. Es decir, por ejemplo los
documentos Word o los archivos MP3 con
extensión .dlf se ignorarán y no se
reproducirán.
–AAC, WAV, PCM archivos audio
– Archivos WMA con protección DRM
– Archivos WMA en formato Lossless
Fuentes externas
Español
51
Page 19

Reloj/Temporizador/Desconexión automátic
➜ Aparece .
➜ Los dígitos del reloj despertador parpadean.
➜ Si no ha ajustado la hora del reloj, "Error"
POWER TUNER
+
TUNING
Español
TUNING
USB MENU AUX
SHU FFLE
TIMER PROG
REPEAT
ALBUM/
PRESET
SLEEP
SET TIME
DSC
VOL
DBB
MUTE
Ajuste del reloj
El reloj utiliza el formato horario de 24 horas.
Important!
– Para establecer el reloj en modo de bajo
consumo de corriente, mantenga pulsado
POWER en el equipo durante 3 segundos o
más para cambiar a modo en espera normal en
primer lugar antes de continuar con el siguiente
procedimiento.
1 En modo de espera, Pulse PROG/SET TIME
durante más de 3 segundos.
➜ Los dígitos del reloj parpadean.
2 Pulse ALBUM/PRESET 3 4 para ajustar los
minutos.
3 Pulse S/T para ajustar las horas.
4 Pulse PROG/SET TIME para confirmar la hora.
Ajuste del temporizador
El temporizador puede ajustarse únicamente en
el modo de espera.
Despiértese con una emisora de radio FM o con
la música de su dispositivo USB o iPod. Es
necesario configurar la hora del reloj antes de
utilizar éste como reloj despertador.
1 Pulse TIMER durante más de dos segundos
para acceder al modo de ajuste de alarma.
52
aparecerá durante unos instantes.
2 Pulse TUNING +/- para ajustar los minutos.
3 Pulse S/T para ajustar las horas.
4 Pulse iPod, TUNER o USB para seleccionar la
fuente de sonido.
5 Pulse TIMER para confirmar el ajuste de la
alarma.
➜ La pantalla vuelve a la hora del reloj.
Nota:
El modo TUNER (sintonizador) será la fuente
predeterminada si:
– Su dispositivo USB no contiene archivos MP3 o
WMA.
– Ha olvidado conectar un dispositivo USB.
– Ha olvidado conectar el iPod.
Detención de la alarma
● Para cancelar la alarma, pulse TIMER en el
modo de espera o en el modo de reproducción.
➜ aparece si este ajuste está activado, y
desaparece si está desactivado.
Ajuste de temporizador de
dormitado
El temporizador Sleep hace que la unidad se
apague por si misma después de un tiempo
preseleccionado.
1 Pulse SLEEP en el control remoto repetidamente
para seleccionar un período de tiempo.
➜ Las selecciones son las siguientes (tiempo en
minutos):
120120
90 90
90 ™
90 90
60 60
60 ™
60 60
120 ™
120120
➜ SLEEP desaparece.
2 Para visualizar el tiempo restante del
temporizador de desconexión automática, pulse
SLEEP .
Nota:
– Si vuelve a pulsar SLEEP, el tiempo restante del
temporizador de desconexión automática
cambiará a la siguiente opción predeterminada
más breve.
Por desactivar el temporizador de
dormitado
● Pulse SLEEP repetidamente hasta que aparezca
"0FF" , o pulse el botón Power.
3030
30 ™
3030
1515
15 ™
1515
OFF OFF
OFF …
OFF OFF
Page 20

Base para iPod
Reproductores iPod compatibles
● El sistema de base de entretenimiento es
compatible con todos los modelos existentes de
iPod de Apple que tengan conectores de 30
patillas.
Selección del adaptador de base
adecuado
● Se incluyen cuatro adaptadores para que encajen
los diferentes modelos de iPod, incluidos el iPod
touch (8 GB, 16 GB), iPod classic (80 GB, 160
GB), iPod nano de tercera generación (4 GB, 8
GB), iPod de quinta generación (30 GB, 60 GB,
80 GB), iPod nano de segunda generación (2 GB,
4 GB, 8 GB) y iPod nano de primera generación
(1 GB, 2 GB, 4 GB).
Uso de los adaptadores de base
● Antes de conectar el reproductor a la base,
introduzca en la base el adaptador
correspondiente para poder ajustar
correctamente el reproductor que se va a
conectar.
Reproducción de un reproductor
portátil iPod
1 Conecte el reproductor portátil iPod
correctamente en la base. Asegúrese de que el
adaptador de base sea compatible.
● Asegúrese de que ha encendido el reproductor
iPod antes de seleccionar iPod como fuente.
2 Pulse iPod en el control remoto, para
seleccionar la fuente iPod.
➜ Aparece el icono de base para iPod .
3 La reproducción se inicia automáticamente. Las
funciones de reproducción, como reproducción,
omisión de pistas, búsqueda rápida y pausa, se
pueden manejar mediante los controles del
sistema y el control remoto.
Carga de la batería del iPod con
la base
● En el modo iPod, conecte el reproductor portátil
iPod directamente a la base para cargarlo.
Nota:
–Por motivos de AHORRO DE ENERGÍA, NO ES
POSIBLE cargar el iPod o un dispositivo USB si el
equipo principal está en modo de espera
económico.
Español
53
Page 21

Especificaciones
AMPLIFICADOR
Potencia de salida..................................................................
...................................................................... 50W+2 x 25W
Relación señal ruido ...................................... ≥ 70 dBA
Respuesta de frecuencia50 Hz – 20 KHz, ± 3 dB
Sensibilidad de entrada AUX ...... 0.5 V (max. 2 V)
Español
SUBWOOFER
Respuesta de frecuencia ................... 50 Hz – 1KHz
Impedancia ....................................................................... 8 Ω
Potencia nominal ....................................................... 50W
ALTAVOZ DE MEDIO RANGO
Respuesta de frecuencia ............ 160 Hz – 16 KHz
Impedancia ....................................................................... 4 Ω
Potencia nominal ............................................... 2 x 25W
SINTONIZADOR
Banda de FM........................................ 87.5 – 108 MHz
Sensibilidad a 75 Ω
– FM ................................................................................ 20dBf
Distorsión armónica total .................................... ≤ 1%
Respuesta de frecuencia
– FM .............................................................. 63 – 6000 Hz
Relación señal ruido
– FM ....................................................................... ≥ 50 dBA
REPRODUCTOR DE USB
USB ................................................................... 12Mb/s, V1.1
........... se podrán reproducir archivos MP3/WMA
Número de álbums/carpeta .................. máximo 99
Número de pistas/título ........................ máximo 999
GENERAL
Alimentación C.A .................. 220-240 V /50-60 Hz
Dimensiones (l x a x p) 300 x 300 x 1024 (mm)
Peso .............................................................................. 10.1 kg
Consumición de energía en espera ...............<7 W
Las especificaciones y el aspecto externo
están sujetos a cambios sin notificación
previa.
54
Page 22

Resolución de problemas
ADVERTENCIA
¡No abra el sistema ya que hay el riesgo de recibir una sacudida eléctrica! El usuario no debe
intentar reparar el sistema bajo ninguna circunstancia, ya que esto anularía la garantía.
Si ocurre una avería, en primer lugar compruebe los puntos detallados a continuación antes de
llevar el sistema a que se repare. Si no es posible solucionar un problema siguiendo estos
consejos, consulte al distribuidor o centro de servicio.
Problema
Aparece “NO USb”.
Mala recepción de radio.
No reacciona cuando se pulsa cualquier
botón.
No hay sonido o el sonido es malo.
El control remoto no funciona
correctamente.
La función de alarma no funciona.
El ajuste de reloj/temporizador ha sido
borrado.
Solución
✔ Conecte un dispositivo USB.
✔ Las señal es demasiado débil, ajuste la antena o
conecte una antena externa para obtener una
recepción mejor.
✔ Aumente la distancia al televisor o VCR.
✔ Desenchufar y volver a enchufar el cable de CA
y volver a activar el sistema.
✔ Ajustar el volumen.
✔ Comprobar que los altavoces estén conectados
correctamente.
✔ Seleccionar la fuente (por ejemplo TUNER)
antes de pulsar el botón de función (3/4, S/
T).
✔ Reducir la distancia al sistema.
✔ Colocar la pila con sus polos (signos +/–) de la
forma indicada.
✔ Cambiar la pila.
✔ Apuntar en la dirección del sensor del sistema.
✔ Ajustar el reloj correctamente.
✔ Pulsar TIMER para activar el temporizador.
✔ Ocurrió un corte de corriente o se desconectó
el cable de alimentación. Volver a ajustar el reloj/
temporizador.
Español
55
Page 23

English
Français
Español
Por tuguês
Español
Deutsch
Deutsch
Nederlands
Nederlands
Italiano
Italiano
Svenska
Svenska
Meet Philips at the Internet
http://www.philips.com
Dansk
Dansk
Suomi
Suomi
Português
Português
Polski
Polski
DC570
© 2010 Koninklijke Philips Electronics N.V.
All rights reserved.
DC570_UM_12_V2.0
 Loading...