

Page 1

01GB01COV.fm Page 1 Tuesday, November 25, 2008 11:41 AM
Register your product and get support at
www.philips.com/welcome
US-EN Additional Handset
SE6580
Warning
Use only rechargeable batteries.
Charge the handset for 24 hours before use.
Page 2
01GB01COV.book Page 2 Wednesday, November 19, 2008 5:04 PM
Page 3
01GB01COV.book Page 1 Wednesday, November 19, 2008 5:04 PM
Table of contents
1 Safety Information 3
1.1 Equipment Approval
1.1.1 Notification to the Local
1.1.2 Rights of the Phone
1.2 Interference Information 4
1.3 Hearing Aid Compatibility
1.4 FCC RF Radiation Exposure
2Important 5
2.1 Power requirements 6
2.2 Electric, Magnetic and
2.3 Recycle your batteries 7
3The RBRC
3.1 Service Centers 8
4 Your phone 10
4.1 What’s in the box 10
4.2 Overview of your handset 11
4.3 Display icons and Messages13
5 Getting started 14
5.1 Connect the charger 14
5.2 Install the batteries 14
5.3 Charge the batteries 14
5.4 Remove/Attach belt clip 15
5.5 Install optional headset 15
Information 3
Telephone Company 3
Company 4
(HAC) 5
Statement 5
Electromagnetic Fields
(“EMF”) 7
®
seal 7
6 Registration 15
6.1 Registering the handset 15
6.1.1 Easy registration 16
6.1.2 Manual registration 16
6.2 Checking the signal
7 Using the Handset 16
7.1 Make a call 16
7.1.1 Predialing 16
7.1.2 Direct dialing 16
7.2 Answer a call 16
7.3 End a call 16
8 Using the Intercom and
8.1 Using the Intercom 17
8.1.1 Intercom another unit 17
8.1.2 Transfer an external call to
8.1.3 Answer an external call
8.1.4 Switch between an
8.2 Conference calling 18
8.2.1 Establish a three-party
9 Personal settings 19
9.1 Change the Handset Name 19
9.2 Handset Tones 19
9.2.1 Set the Ring Volume 19
9.2.2 Set the Ring Tones 19
9.2.3 Activate/Deactivate Key
strength 16
Conference Calling 17
another unit 17
during intercom 18
internal and external call 18
conference call 18
Beep 20
Table of contents
1
Page 4

01GB01COV.book Page 2 Wednesday, November 19, 2008 5:04 PM
9.3 Change the Display
9.4 Select the Display
9.5 Select the Color Theme 20
9.6 Set the Display Contrast 21
9.7 Set the Backlight Time 21
9.8 Deactivate/Activate Auto
10 Advanced settings 22
10.1 Registration 22
10.2 Unregister 22
11 Technical data 22
12 INDEX 23
Language 20
Wallpaper 20
Hang-Up 21
2
Table of contents
Page 5

01GB01COV.book Page 3 Wednesday, November 19, 2008 5:04 PM
A plug and jack used to connect this
1Safety
Information
1.1 Equipment Approval
Information
Your telephone equipment is approved
for connection to the public switched
telephone network and is in compliance
with parts 15 and 68, FCC Rules and
Regulations and the Technical
Requirements for Telephone Terminal
Equipment published by the ACTA.
1.1.1 Notification to the Local
Te l e p h one C o m p a ny
On the bottom of this equipment is a
label indicating, among other
information, the US number and Ringer
Equivalence Number (REN) for the
equipment. You must, upon request,
provide this information to your
telephone company.
The REN is useful in determining the
number of devices you may connect to
your telephone line and still have all of
these devices ring when your telephone
number is called. In most (but not all)
areas, the sum of the RENs of all devices
connected to one line should not exceed
5. To be certain of the number of devices
you may connect to your line as
determined by the REN, you should
contact your local telephone company.
equipment to the premises wiring and
telephone network must comply with the
applicable FCC Part 68 rules and
requirements adopted by the ACTA. A
compliant telephone cord and modular
plug is provided with this product. It is
designed to be connected to a
compatible modular jack that is also
compliant. See installation instructions
for details.
Notes
• This equipment may not be used on
coin service provided by the
telephone company.
• Party lines are subject to state tariffs,
and therefore, you may not be able to
use your own telephone equipment if
you are on a party line. Check with
your local telephone company.
• Notice must be given to the
telephone company upon permanent
disconnection of your telephone from
your line.
• If your home has specially wired alarm
equipment connected to the
telephone line, ensure the installation
of this product does not disable your
alarm equipment. If you have
questions about what will disable
alarm equipment, consult your
telephone company or a qualified
installer.
Safety Information
3
Page 6

01GB01COV.book Page 4 Wednesday, November 19, 2008 5:04 PM
1.1.2 Rights of the Phone
Company
Should your equipment cause trouble on
your line, which may harm the telephone
network, the telephone company shall,
where practicable, notify you that
temporary discontinuance of service may
be required. Where prior notice is not
practicable and the circumstances
warrant such action, the telephone
company may temporarily discontinue
service immediately. In case of such
temporary discontinuance, the telephone
company must:
(1) promptly notify you of such
temporary discontinuance; (2) afford you
the opportunity to correct the situation;
and (3) inform you of your right to bring
a complaint to the Commission pursuant
to procedures set forth in Subpart E of
Part 68, FCC Rules and Regulations.
The telephone company may make
changes in its communications facilities,
equipment, operations or procedures
where such action is required in the
operation of its business and not
inconsistent with FCC rules and
Regulations. If these changes are
expected to affect the use or
performance of your telephone
equipment, the telephone company must
give you adequate notice, in writing, to
allow you to maintain uninterrupted
service.
1.2 Interference Information
This device complies with Part 15 of the
FCC Rules. Operation is subject to the
following two conditions:
(1) this device may not cause harmful
interference; and (2) this device must
accept any interference received,
including interference that may cause
undesired operation.
This equipment has been tested and
found to comply with the limits for a
Class B digital device, pursuant to Part 15
of the FCC Rules.
These limits are designed to provide
reasonable protection against harmful
interference in a residential installation.
This equipment generates, uses, and can
radiate radio frequency energy and, if not
installed and used in accordance with the
instructions, may cause harmful
interference to radio communications.
However, there is no guarantee that
interference will not occur in a particular
installation.
If this equipment does cause harmful
interference to radio or television
reception, which can be determined by
turning the equipment off and on, the
user is encouraged to try to correct the
interference by one or more of the
following measures:
• Reorient or relocate the receiving
antenna (that is, the antenna for radio
or television that is “receiving” the
interference).
• Reorient or relocate and increase the
separation between the
telecommunications equipment and
receiving antenna.
4
Safety Information
Page 7
01GB01COV.book Page 5 Wednesday, November 19, 2008 5:04 PM
• Connect the telecommunications
equipment to an outlet on a circuit
different from that to which the
receiving antenna is connected.
If these measures do not eliminate the
interference, please consult your dealer
or an experienced radio / television
technician for additional suggestions.
Also, the Federal Communications
Commission has prepared a helpful
booklet, “How To Identify and Resolve
Radio/TV Interference Problems”. This
booklet is available from the U.S.
Government Printing Office,
Washington, D.C. 20402.
Please specify stock number 004-00000345-4 when ordering copies.
Notice: The changes or modifications
not expressly approved by the party
responsible for compliance could void
the user’s authority to operate the
equipment.
1.3 Hearing Aid Compatibility
(HAC)
This telephone system meets FCC and
Industry Canada standards for Hearing
Aid Compatibility.
1.4 FCC RF Radiation Exposure
Statement
This equipment complies with FCC RF
radiation exposure limits set forth for an
uncontrolled environment. This
equipment should be installed and
operated with a minimum distance of
20 centimeters between the radiator and
your body. This transmitter must not be
co-located or operating in conjunction
with any other antenna or transmitter.
For hand held operation, this phone has
been tested and meets the FCC RF
exposure guidelines. Use of other
accessories may not ensure compliance
with FCC RF exposure guidelines.
2Important
Take time to read this user manual
before you use your phone. It contains
important information and notes
regarding your phone.
NOTICE: This product meets the
applicable Industry Canada technical
specifications.
The equipment must be installed using an
acceptable method of connection. The
customer should be aware that
compliance with the above conditions
may not prevent degradation of service
in some situations.
Repairs to certified equipment should be
made by an authorized Canadian
maintenance facility designated by the
supplier. Any repairs or alterations made
by the user to this equipment, or
equipment malfunctions, may give the
telecommunications company cause to
request the user to disconnect the
equipment.
Important
5
Page 8

01GB01COV.book Page 6 Wednesday, November 19, 2008 5:04 PM
Users should ensure for their own
protection that the electrical ground
connections of the power utility,
telephone lines and internal metallic
water pipe systems, if present, are
connected together. This precaution may
be particularly important in rural areas.
CAUTION: Users should not attempt to
make such connections themselves, but
should contact the appropriate electric
inspection authority, or electrician, as
appropriate.
NOTES: This equipment may not be used
on coin service provided by the
telephone company.
2.1 Power requirements
• This product requires an electrical
supply of 100-240 volts AC. In case of
power failure, the communication can
be lost.
• The electrical network is classified as
hazardous. The only way to power
down the charger is to unplug the
power supply from the electrical
outlet. Ensure that the electrical
outlet is always easily accessible.
Warning
To avoid damage or malfunction:
• Do not allow the charging contacts or
the battery to come into contact with
metal objects.
• Do not open the unit as you could be
exposed to high voltages.
• Do not allow the charger to come
into contact with liquids.
• Never use any other battery than the
one delivered with the product or
recommended by Philips: risk of
explosion.
• Always use the cables provided with
the product.
• Handsfree activation could suddenly
increase the volume in the earpiece to
a very high level: make sure the
handset is not too close to your ear.
• This equipment is not designed to
make emergency calls when the
power fails. An alternative has to be
made available to allow emergency
calls.
• Do not expose the phone to
excessive heat caused by heating
equipment or direct sunlight.
• Do not drop the phone or allow
objects to fall on the phone.
• Do not use any cleaning agents
containing alcohol, ammonia, benzene,
or abrasives as these may harm the
set.
• Do not use the product in places
where there are explosive hazards.
• Do not let small metal objects come
into contact with the product. This
can deteriorate audio quality and
damage the product.
• Active mobile phones in the vicinity
may cause interference.
About operating and storage
temperatures:
• Operate in a place where the
temperature is always between 0 and
35º C (32 to 95º F).
• Store in a place where the
temperature is always between -20
and 70º C (-4 to 158º F).
6
Important
Page 9

01GB01COV.book Page 7 Wednesday, November 19, 2008 5:04 PM
• Battery life may be shortened in low
temperature conditions.
2.2 Electric, Magnetic and
Electromagnetic Fields
(“EMF”)
1. Philips Royal Electronics
manufactures and sells many
consumer-oriented products, which
usually, as with any electronic
apparatus, have the ability to emit
and receive electromagnetic signals.
2. One of Philips’ leading Business
Principles is to take all necessary
health and safety precautions for
our products, to comply with all
applicable legal requirements and to
stay well within the EMF standards
applicable at the time of producing
the products.
3. Philips is committed to developing,
producing and marketing products
that cause no adverse health effects.
4. Philips confirms that if its products
are handled properly for their
intended use, they are safe to use
according to the scientific evidence
avai lable today.
5. Philips plays an active role in the
development of international EMF
and safety standards, enabling Philips
to anticipate further developments
in standardization for early
integration into its products.
2.3 Recycle your batteries
Do not dispose of your rechargeable
batteries. Call the toll fee number 1-800822-8837 to get instructions on how to
recycle your batteries.
3 The RBRC® seal
The RBRC® Seal
on the nickel metal
hydride battery
indicates that
Philips Royal
Electronics is
participating in an industry program to
collect and recycle these batteries at the
end of their useful lives, when taken out
of service within the United States and
Canada.
The RBRC
convenient alternative to placing used
nickel metal hydride batteries into the
trash or municipal waste, which may be
illegal in your area.
Philips’ participation in RBRC
easy for you to drop off the spent battery
at local retailers participating in the
RBRC
product service centers.
Please call 1-800-8-BATTERY for
information on NiMH battery recycling
and disposal bans/restrictions in your
area. Philips’ involvement in this program
®
®
program or at authorized Philips
voluntarily
program provides a
®
makes it
The RBRC® seal
7
Page 10
01GB01COV.book Page 8 Wednesday, November 19, 2008 5:04 PM
is part of its commitment to protecting
our environment and conserving natural
resources.
®
RBRC
is a registered trademark of
Rechargeable Battery Recycling
Corporation.
3.1 Service Centers
US service center
Philips Accessories & Computer
Peripherals North America1881 Route
46 West Edgewood, NJ 07852
Phone: (800) 233-8413
E-mail support:
http://www.support.philips.com/support
8
The RBRC® seal
Page 11
01GB01COV.book Page 9 Wednesday, November 19, 2008 5:04 PM
The RBRC® seal
9
Page 12
01GB01COV.book Page 10 Wednesday, November 19, 2008 5:04 PM
4 Your phone
Congratulations on your purchase and welcome to Philips!
This manual only explains part of the functions of your handset. For details on other
functions, refer to the manual provided with the base station.
To fully benefit from the support that Philips offers, register your product at
www.philips.com/welcome.
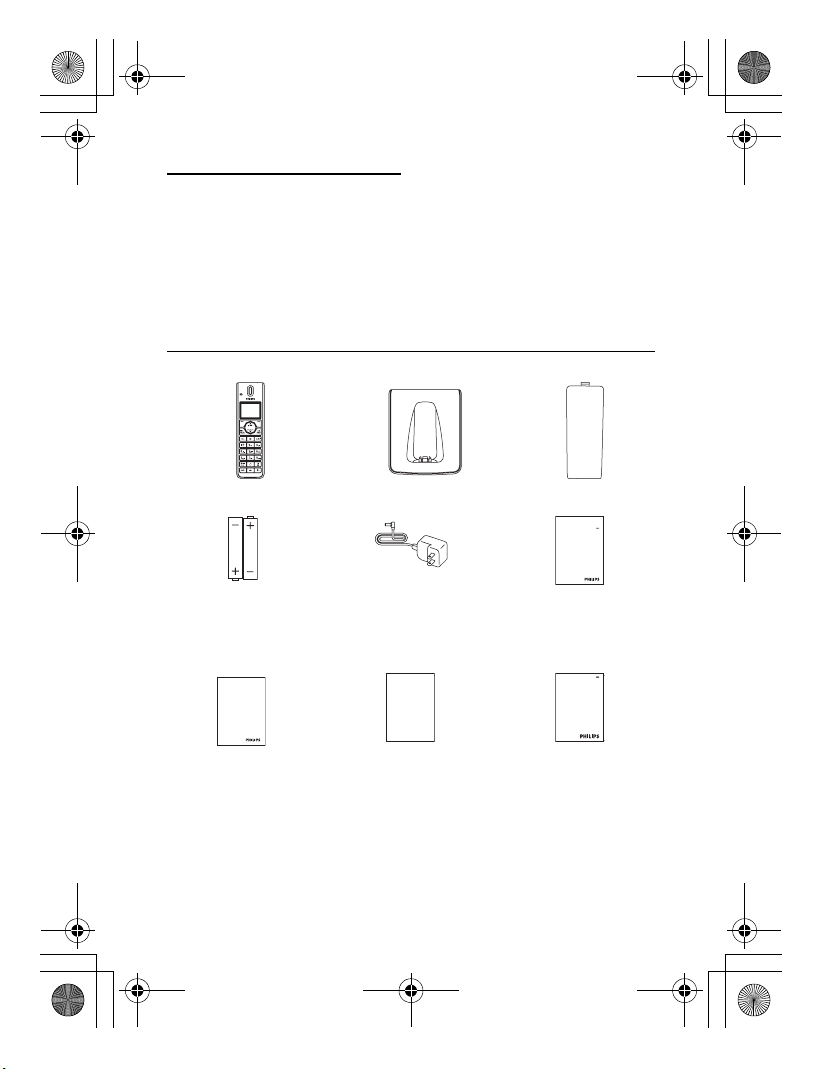
4.1 What’s in the box
Handset with belt clip Charger Battery door
2 AAA rechargeable
batteries
Guarantee
10
Power supply User manual
Do not return leaflet Quick Start Guide
Yo ur ph on e
Page 13
01GB04C02.fm Page 11 Thursday, November 20, 2008 2:08 PM
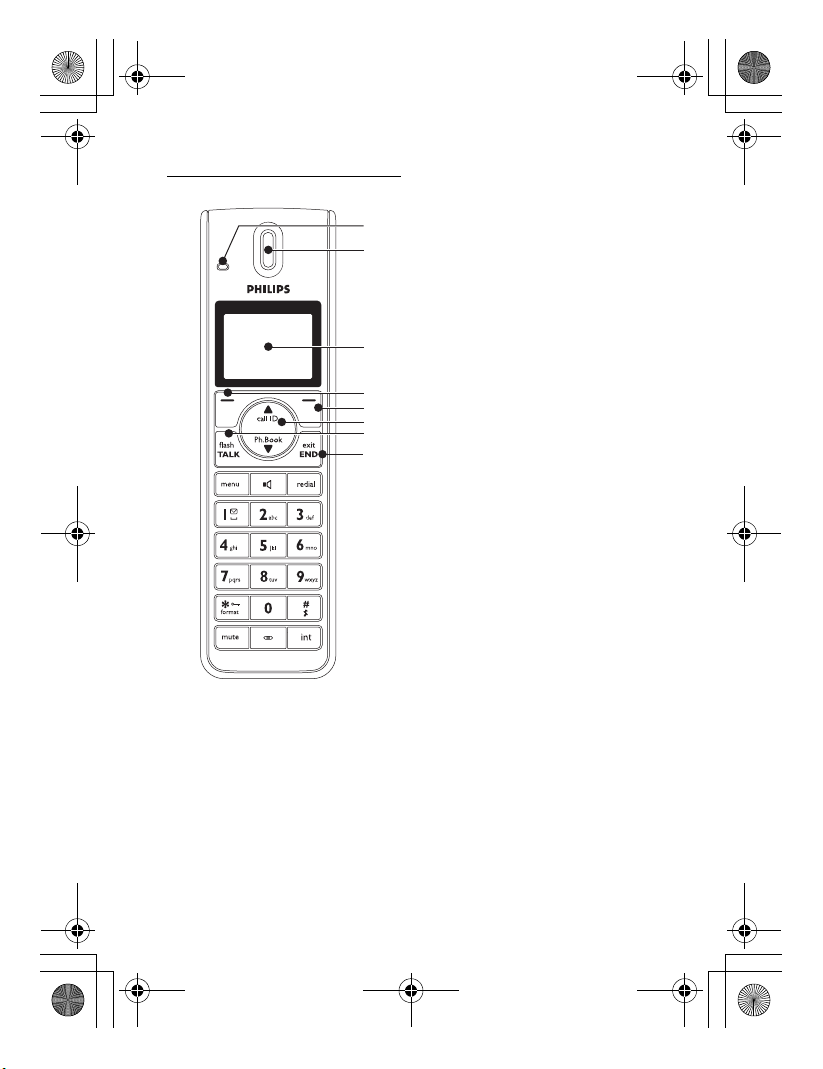
4.2 Overview of your handset
A
B
C
D
E
F
G
H
AEvent LED
The event LED on your handset blinks
when there is a new message recorded
on your telephone answering machine. If
you have subscribed to Caller Line
Identification, the event LED also blinks
when there is a new call, or a new voice
mail message.
BEarpiece
CDisplay
See section 4.3 for an overview of the
display icons.
D Select key o
In a menu, selects the function displayed
on the screen or goes to the next lower
level. Also used to confirm entries (for
example, when setting date and time).
EBack/Clear key c
When making an entry, press to clear
(delete) a character or number, or long
press to clear all.
When navigating menus, press to move
to the previous higher menu level (Back
is displayed).
F Navigation keys n
In idle mode: Scroll up u to access the
Call log and scroll down d to access
the Phonebook.
During a call: Scroll n to increase or
decrease earpiece and speaker volume.
Editing and entry: Move to the previous
character u or next character d.
In other modes: Scroll up u and down
d a menu list or go to the previous
or next record in the Phonebook, Redial
list, or Call log.
GTalk key t
In idle mode : Make or answ er an ext erna l
call or answer an incoming internal call.
During a call: Activate the flash function.
In other modes: Dial the selected
number in the Phonebook, Redial list, or
Call log.
H Hang-up/Exit key h
In idle mode: Long press (5 seconds) to
switch off the handset.
When the handset is switched off: Long
press (1 second) to switch it on.
Yo ur p ho ne
11
Page 14
01GB04C02.fm Page 12 Thursday, November 20, 2008 1:39 PM
During a call: Hang up a call.
In other modes: Press to return to idle
mode.
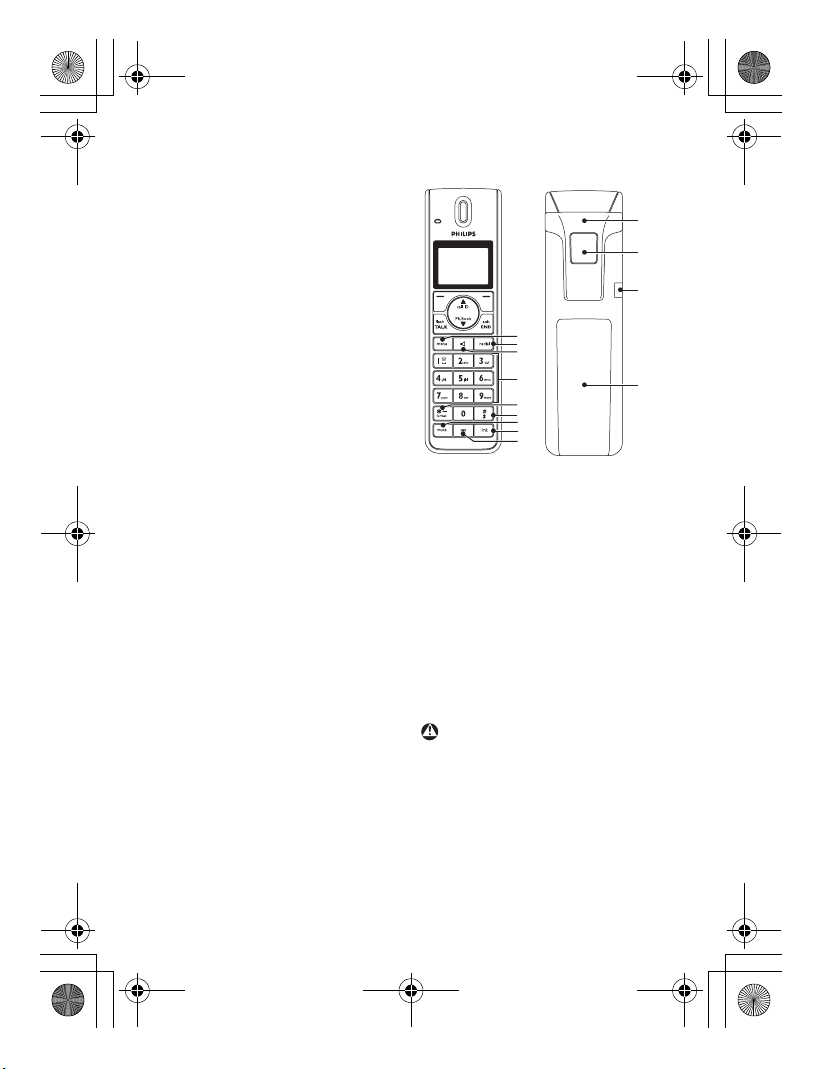
IMenu key m
In idle mode: Go to the main menu.
JRedial key r
Access the Redial list in idle mode.
KLoudspeaker key l
In idle mode: Turn on the loudspeaker
and dial the number. Answer an incoming
call using handsfree mode.
During a call: Toggle the loudspeaker on/
off.
L Number keys
Use to dial numbers and write
I
J
K
L
M
N
O
P
Q
characters.
Refer to the manual provided with the
base station for the functions of keys 1
and 2.
When using keys 3 to 9, a long press
dials one of your direct memory access
numbers.
M */Keypad lock & Format key *
In idle mode: Long press to lock/ unlock
keypad.
Predialing or editing: Press to enter a “*”.
Off hook: Long press to temporarily
switch to tone (DTMF) dialing if using
pulse.
During call log display: Toggles area code
and long distance display on/off.
N #/Ringer on/off & Pause key #
In idle mode: Long press to turn the
ringer on/off.
Dialing or editing: Long press to insert a
pause (during predialing) and short press
to insert a “#”.
OMute key s
When off hook: Deactivate/activate the
microphone.
P Call transfer key & Intercom
key i
In idle mode: Initiate an internal call.
During a call: Short press to hold the line
and page another handset. Long press to
set up a conference between an external
call and two handsets.
Q Microphone
RBelt clip
S Loudspeaker (underneath the
belt clip)
Warning
Handsfree activation can suddenly
increase the volume of the earpiece to a
very high level. Make sure the handset is
not too close to your ear.
T Headset jack
U Battery door
Editing: Short press to switch upper/
lower case.
R
S
T
U
12
Yo ur ph on e
Page 15
01GB01COV.book Page 13 Wednesday, November 19, 2008 5:04 PM
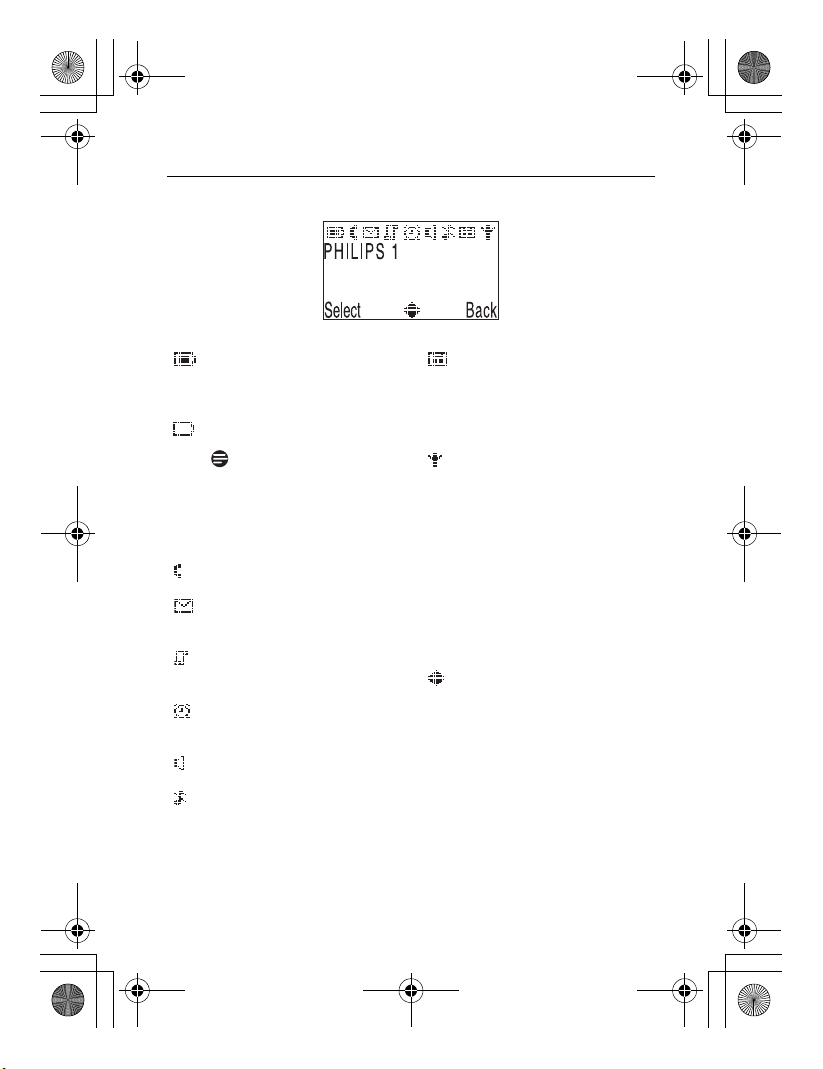
4.3 Display icons and Messages
Indicates that the battery is fully
charged. This icon blinks during
charge and when the battery is
low.
When the Icon is empty the
battery is practically discharged.
Note
If
War ning Batt
with a blinking battery icon,
batteries of the wrong type are
installed in the handset. Replace
with batteries of the correct type.
Blinks when there is an incoming
call. Steady On during a call.
If you subscribe to voice mail
service, blinks when there is
new voice mail.
Blinks when there are new and
missed calls in the call log
records.
Appears when the alarm clock
is activated. Blinks when the
alarm time comes.
Appears when the loudspeaker
is activated.
Appears when the ringer is off.
Yo ur p ho ne
flashes together
Steady on when the answering
machine is on. Blinks when
messages have been received by
the answering machine; blinks
rapidly when the answering
machine memory is full.
Indicates that the handset is
registered and within range of
the base station. Blinks when
the handset is out of range or is
searching for a base.
Select/OKSelect
appears when in menu
mode. Press the key directly
below to move to the next menu
level or to confirm a selection.
OK appears to request
confirmation of an operation.
Press the key directly below to
confirm.
Indicates that more options are
available in a scroll list, or that
you can adjust the volume.
Back/
Back appears when in menu
mode. Press the key directly
Clear
below to return to the previous
menu level.
Clear appears when making an
entry. Press the key directly
below to clear (delete) a
character or number when
making an entry. Long press to
clear all.
13
Page 16
01GB04C02.fm Page 14 Thursday, November 20, 2008 1:50 PM
5 Getting started
Be sure to charge the handset for at least
24 hours before using it for the first time.
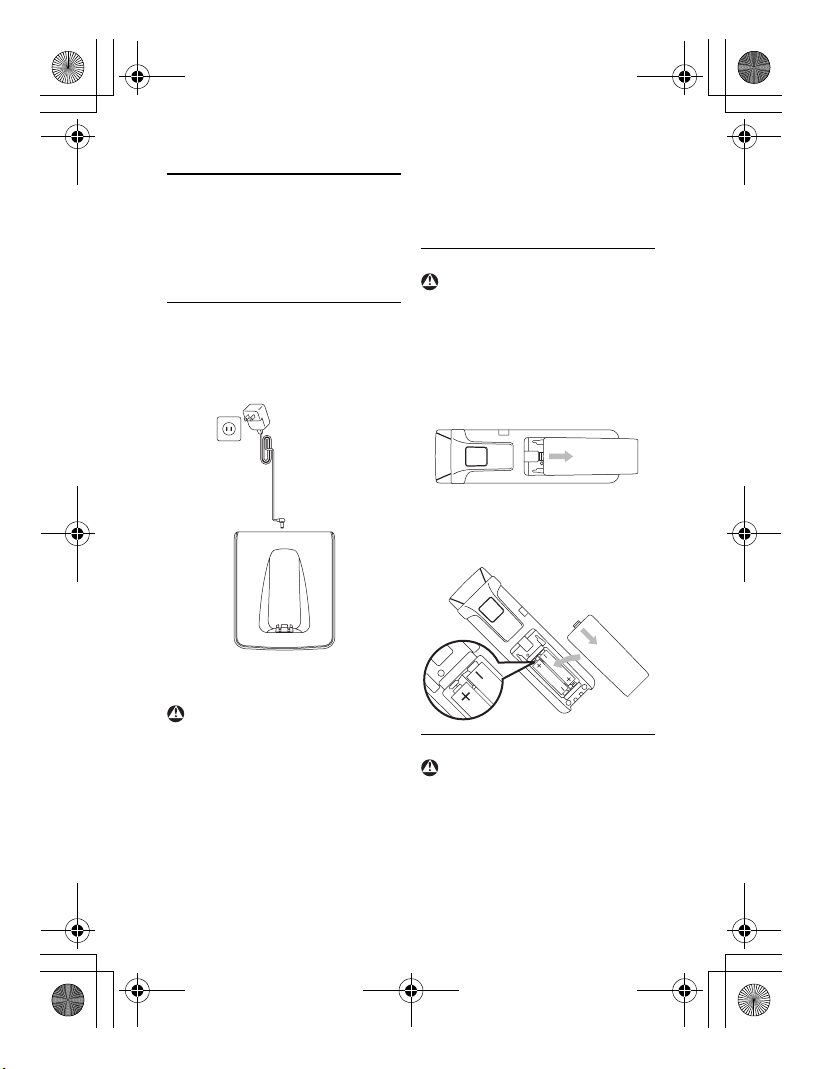
5.1 Connect the charger
1 Place the charger near a power
outlet.
2 Connect the power cable to the
connector on the charger.
3 Connect the other end of the
power cable to the power outlet.
Warning
Power is applied when the power
adaptor is plugged into the charger and
connected to the power outlet. The only
way to power down the charger is to
unplug the power adaptor from the
power outlet. Therefore, ensure that the
power outlet is easily accessible.
The power adaptor must be connected
correctly, as incorrect connection could
damage the unit.
5.2 Install the batteries
Warning
Always use the AAA rechargeable
batteries supplied with your handset. If
alkaline batteries are used instead of
rechargeable batteries, “Warning Batt”
will show on the display and the battery
icon will blink quickly.
1 Slide out the battery cover.
2 Place the batteries in the correct
polarity as indicated and replace the
cover.
5.3 Charge the batteries
Warning
The handset must be charged for at least
24 hours before using it for the first time.
When the battery level becomes low, the
low battery sensor warns you by blinking
the battery icon. If this occurs during a
conversation, an alert tone sounds to
14
Getting started
Page 17
01GB04C02.fm Page 15 Thursday, November 20, 2008 1:50 PM
inform you that the battery is low. If the
battery level becomes exceedingly low,
the phone automatically switches off
shortly after the icon starts blinking and
any function in progress will not be
saved.
1 Place the handset in the cradle of
the charger with the display facing
forward. A beep is emitted if the
handset is placed correctly.
2 The battery icon on the display
blinks during charging.
3 The battery icon becomes
steady when the handset is fully
charged.
Note
Optimal battery life is reached after 3
cycles of complete charging (over 15
hours) and discharging, allowing
approximately 12 hours of talk-time and
150 hours of stand-by time.
The indoor and outdoor ranges of the
handset are up to 50 meters and 300
meters, respectively. When the handset
moves beyond the operation range, the
antenna icon will blink.
Tip
When you reach the range limit the
conversation may become crackly. Move
closer to the base.
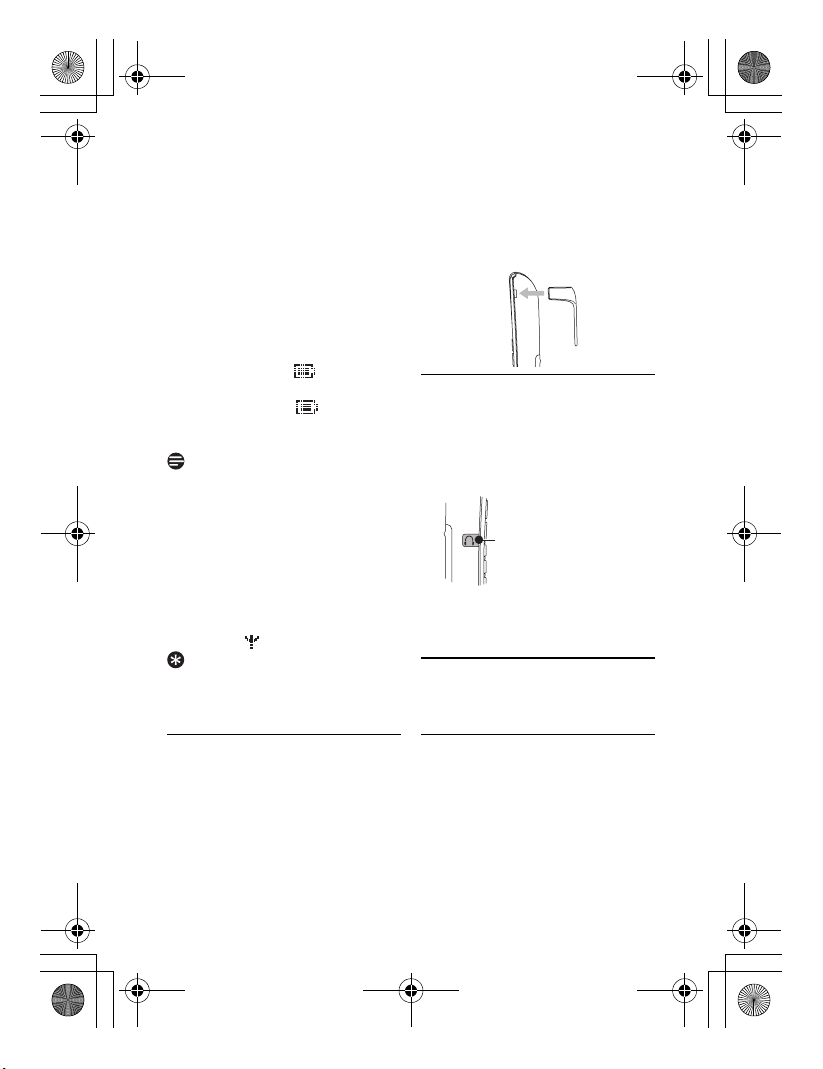
5.4 Remove/Attach belt clip
A belt clip allows you to carry your
handset on your belt.
1 To remove the belt clip, simply pull
the clip away from the handset.
2 To attach the belt clip to your
handset, fit the tabs on the belt clip
into the slots at the back of the
handset and push into place.
5.5 Install optional headset
Your handset may be used with an
optional headset (not included in the box).
To use this feature, insert the headset plug
into the headset jack. Your handset is
ready for hands-free conversations.
Diameter: 2.5 mm
6 Registration
6.1 Registering the handset
You must register your handset to the
base station before you can use it. Up to
8 handsets can be registered to one base
station.
The PIN is required before you can
register or unregister handsets.
By default, the PIN is 0000.
Registration
15
Page 18
01GB01COV.book Page 16 Wednesday, November 19, 2008 5:04 PM
6.1.1 Easy registration
1 Insert the unregistered handset into
the base station to automatically
begin registration.
2 Registering… is displayed on the
screen.
• Upon successful registration, a
validation tone is emitted and the
handset number (1 to 8) will be
assigned by the base
automatically.
6.1.2 Manual registration
1 Power on the handset.
2 On the base station, press and hold
a for 3 seconds. A beep sounds to
indicate that the base station is
ready to accept registration. (No
beep sounds on the SE650.)
Note
If no action is taken on the handset
within 90 seconds, the registration
procedure will be aborted. If this
happens, repeat from Step 1.
3 On the handset, press m, scroll n
to Advanced Set and press o
Select.
4 Scroll n to Register and press
o Select.
5 Enter the PIN when prompted and
press o OK to confirm.
Registering… is displayed on the
screen.
• Upon successful registration, a
validation tone is emitted and the
handset number (1 to 8) is
assigned by the base station
automatically.
6.2 Checking the signal strength
When you power on the registered
handset, the display will show the word
“Searching” and the Antenna icon
flashes until the handset locks onto its
subscribed base. Then the display shows
the standby display.
7 Using the Handset
7.1 Make a call
7.1.1 Predialing
Enter the number (maximum 24 digits)
and then press t or l.
7.1.2 Direct dialing
Press t or l and then dial the
number.
7.2 Answer a call
When the phone rings, press t or l.
7.3 End a call
To end a conversation, press h.
16
Using the Handset
Page 19
01GB01COV.book Page 17 Wednesday, November 19, 2008 5:04 PM
to answer on the base station when
8 Using the Intercom
and Conference
Calling
8.1 Using the Intercom
The intercom feature allows you to make
free internal calls, transfer external calls
from one handset to another and use the
conference option. With the SE658, you
can also make internal calls or
conference between the handset and the
base station.
8.1.1 Intercom another unit
1 Press i in idle mode.
• Intercom is established
immediately:
If there is only one handset
registered to the SE658 base
station;
If there are only two handsets
registered to the SE650/655 base
station.
2 If there is more than one (with the
SE658) or two (with the SE650/655)
registered handset(s), scroll n to
select the unit to call and press o
Select.
• Once the intercom call is
initiated the icon is displayed
on the handset.
3 Press t to answer an intercom
call on the called handset (or l
using the SE658 base station).
Note
Pressing h on any handset (or l on
the base station when using the SE658
base station) will exit intercom mode and
return other units to idle mode. If an
external call arrives during intercom
mode and you want to accept this call,
you must first exit intercom mode.
8.1.2 Transfer an external call to
another unit
1 During the call, press i to put the
external call on hold (the caller can
no longer hear you).
• The display shows the numbers
of the handsets registered to the
base (and the base as well, when
used with the SE658 base
station).
2 Select n to the unit you wish to
transfer your external call to and
press o Select.
3 Press t on the called unit to
answer the internal call, where both
internal callers can talk.
• Intercom is established.
4 Press h on the first unit to
transfer the external call to the
called handset.
• The external call is transferred.
Note
If there is no answer from the called unit,
press i to resume the external call.
Using the Intercom and Conference Calling
17
Page 20
01GB05C05.fm Page 18 Thursday, November 20, 2008 1:53 PM
8.1.3 Answer an external call
during intercom
1 During intercom, a new call tone is
emitted when there is an incoming
external call.
2 Press h to exit intercom mode.
3 Press t to pick up the external
call.
8.1.4 Switch between an internal
and external call
During the call, press i to switch
between an internal or external call.
8.2 Conference calling
The conference call feature allows an
external call to be shared with two
handsets (when used with the SE650/
655/658 base station), one handset and
the base (when used with the SE658 base
station). The three parties can share the
conversation and no network
subscription is required.
8.2.1 Establish a three-party
conference call
1 During the call, press i to put the
external call on hold (the caller can
no longer hear you).
• The display shows the numbers
of available handsets (and the
base station when used with the
SE658 base station).
2 Scroll n to the number of the unit
you wish to establish the conference
call with and press o Select.
3 Press t on the called handset (or
l if the base station is called
when using the SE658 base station)
to answer the internal call, where
both internal callers can talk.
• Intercom is established.
4 Press c Conf. soft key or long
press i on the first unit to start
the three party conference.
• Conference will be displayed on
the screen once the conference
call is established.
18
Using the Intercom and Conference Calling
Page 21
01GB01COV.book Page 19 Wednesday, November 19, 2008 5:04 PM
9 Personal settings
9.1 Change the Handset Name
You can name the handset and display the
handset name in idle mode. The default
handset name is Philips.
1 Press m in idle mode, scroll n to
Per so na l Set and press o
Select.
2 Handset Name is highlighted.
Press o Select.
3 The last stored name is displayed.
Press c Clear to delete the
characters one by one or a long
press to delete all.
4 Enter the new name and press o
OK to confirm.
• A validation tone is emitted and
the screen returns to the
Per so nal Set menu.
9.2 Handset Tones
9.2.1 Set the Ring Volume
Danger
When the handset rings during an
incoming call, please do not hold the
handset too close to your ear as the
volume of the ringing tone may damage
your hearing.
There are 5 ringer volume levels plus
progressive and off. The default is level 3.
1 Press m in idle mode, scroll n to
Per sonal Set, and press o
Select.
2 Scroll n to Handset Tones and
press o Select. Ring Volume is
highlighted. Press o Select.
3 Scroll n to your desired volume
level. The ring tone sounds at each
level.
4 Press o OK to confirm.
• A validation tone is emitted and
the screen returns to the
Handset Tones menu.
Note
If ring volume is set to off, the icon
will be displayed on the screen. If ring
volume is set to progressive, the ringer
will start at level 1 and go up one level
volume every ring.
9.2.2 Set the Ring Tones
There are 15 ring tones available on your
handset.
1 Press m in idle mode, scroll n to
Per sonal Set, and press o
Select.
2 Scroll n to Handset Tones and
press o Select. Then scroll n to
Ring Tones and press o Select.
3 Scroll n to your desired melody.
The melodies will play as you scroll
them.
4 Press o Select to set the ring
tone.
• A validation tone is emitted and
the screen returns to the
Handset Tones menu.
Personal settings
19
Page 22
01GB01COV.book Page 20 Wednesday, November 19, 2008 5:04 PM
9.2.3 Activate/Deactivate Key
Beep
A single beep tone is emitted when a key
is pressed. You can enable or disable the
key beep.
1 Press m in idle mode, scroll n to
Per so na l Set, and press o
Select.
2 Scroll n to Handset Tones and
press o Select. Then scroll n to
Key Beep and press o Select.
3 Scroll n to select On or Off and
press o Select to confirm.
• A validation tone is emitted and
the screen returns to the
Handset Tones menu.
9.3 Change the Display Language
Your handset can support different
display languages.
1 Press m in idle mode, scroll n to
Per so na l Set, and press o
Select.
2 Scroll n to Language and press
o Select.
3 Scroll n to your desired language
and press o Select to confirm.
• A validation tone is emitted and
the screen returns to the
Per so nal Set menu.
Note
Once the display language is set, the
option menus on the handset will
immediately switch to display in the
selected language.
9.4 Select the Display Wallpaper
There are 3 wallpaper images available on
your handset as well as an option to set it
off.
1 Press m in idle mode, scroll n to
Per sonal Set, and press o
Select.
2 Scroll n to Wallpaper and press
o Select.
3 Scroll n to your desired wallpaper.
The image on the display will change
as you scroll.
4 Press o Select to confirm.
• A validation tone is emitted and
the screen returns to the
Per sonal Set menu.
9.5 Select the Color Theme
There are 4 color themes available on
your handset.
1 Press m in idle mode, scroll n to
Per sonal Set, and press o
Select.
2 Scroll n to Color Theme and
press o Select.
3 Scroll n to your desired color
theme. The color theme used on
the display will change as you scroll.
4 Press o Select to confirm.
• A validation tone is emitted and
the screen returns to the
Per sonal Set menu.
20
Personal settings
Page 23
01GB01COV.book Page 21 Wednesday, November 19, 2008 5:04 PM
9.6 Set the Display Contrast
You can change the contrast of the text
on the display. There are 5 contrast levels
available. The default is level 3.
1 Press m in idle mode, scroll n to
Per so na l Set, and press o
Select.
2 Scroll n to Contrast and press
o Select.
3 Scroll n to the desired display
contrast, and press o Select to
confirm.
• A validation tone is emitted and
the screen returns to the
Per so nal Set menu.
9.7 Set the Backlight Time
You can change the backlight timing for
the display. There are 3 options available:
20, 40, or 60 seconds.
1 Press m in idle mode, scroll n to
Per so na l Set, and press o
Select.
2 Scroll n to Backlight Time and
press o Select.
3 Scroll n to the desired backlight
time, and press o Select to
confirm.
• A validation tone is emitted and
the screen returns to the
Per so nal Set menu.
If Auto Hang-up is set to Off, putting the
handset back on the cradle while in talk
mode will switch the handset to hands
free talk mode. This allows you to charge
the handset during calls.
The default setting for Auto Hang-up is
On.
1 Press m in idle mode, scroll n to
Per sonal Set, and press o
Select.
2 Scroll n to Auto Hang-up and
press o Select.
3 Scroll n to On or Off and press
o Select to confirm.
• A validation tone is emitted and
the screen returns to the
Per sonal Set menu.
9.8 Deactivate/Activate Auto
Hang-Up
If Auto Hang-up is set to On, it will
automatically release the line when the
phone is put back on the cradle.
Personal settings
21
Page 24
01GB01COV.book Page 22 Wednesday, November 19, 2008 5:04 PM
10 Advanced settings
10.1 Registration
Please refer to section 6.1 on how to
register the handset.
10.2 Unregister
1 Press m in idle mode, scroll n to
Advanced Set and press o
Select.
2 Scroll n to Unregister and press
o Select.
3 Enter the PIN when prompted and
press o OK to confirm.
4 Scroll n to select the handset
number to unregister and press o
Select. Press o Select again to
confirm.
• A validation tone is emitted to
indicate successful unregistration.
11 Technical data
Display
• Color LCD with backlight
• Selectable wallpaper
• Selectable color theme
General telephone features
• Caller name & number identification
• 5 standard + 10 polyphonic ringer
melodies
• Wideband synthesis for receiver and
loudspeaker
Phonebook list, Redial list and Call
log
• Phonebook list with 200 entries
• Redial list with 10 entries
• Call log with 50 entries
Battery
• 2 × AAA, 600mAh batteries
Radio specifications
• Frequency Band: 1920 - 1930Mhz
• Maximum output power: 120mW
Weight and dimensions
Handset:
• 128.5 grams
• 160mm × 28mm × 46mm
(H × D × W)
Charger:
• 77 grams
• 69mm × 96mm × 82mm
(H × D × W)
Temperature range
• Operation: Between 0 and 35ºC
(32 to 95ºF).
• Storage: Between -20 and 70ºC
(-4 to 158ºF).
Relative humidity
• Operation: Up to 95% at 40°C
• Storage: Up to 95% at 40°C
22
Advanced settings / Technical data
Page 25
01GB01COV.book Page 23 Wednesday, November 19, 2008 5:04 PM
12 INDEX
A
Activate/Deactivate Key Beep 20
Advanced settings 22
Answer a call 16
Answer an external call during
intercom 18
C
Change the Display Language 20
Change the Handset Name 19
Charge the batteries 14
Checking the signal strength 16
Conference calling 18
Connect the charger 14
D
Deactivate/Activate Auto Hang-Up 21
Direct dialing 16
Display icons and Messages 13
E
Easy registration 16
End a call 16
Establish a three-party conference call 18
G
Getting started 14
H
Handset Tones 19
I
Install optional headset 15
Install the batteries 14
Intercom another unit 17
M
Make a call 16
Manual registration 16
O
Overview of your handset 11
P
Personal settings 19
Power requirements 6
Predialing 16
R
Registering the handset 15
Registration 15
Remove/Attach belt clip 15
S
Select the Color Theme 20
Select the Display Wallpaper 20
Set the Backlight Time 21
Set the Display Contrast 21
Set the Ring Tones 19
Set the Ring Volume 19
Switch between an internal and external
call 18
T
Technical data 22
Transfer an external call to another
unit 17
U
Unregister 22
Using the Handset 16
INDEX
23
Page 26
01GB01COV.book Page 24 Wednesday, November 19, 2008 5:04 PM
Using the Intercom 17
W
What’s in the box 10
Y
Your phone 10
24
INDEX
Page 27
01GB01COV.book Page 27 Wednesday, November 19, 2008 5:04 PM
UUZZ21693ZZ(0)
Page 28
01GB07BCO.fm Page 28 Thursday, November 20, 2008 11:15 AM
©2008 Koninklijke Philips Electronics N.V.
All rights reserved
Reproduction in whole or in part is prohibited without the
written consent of the copyright owner
Document order number: 3111 285 49871 (US-EN)
 Loading...