

Page 1
Register your product and get support at
www.philips.com/welcome
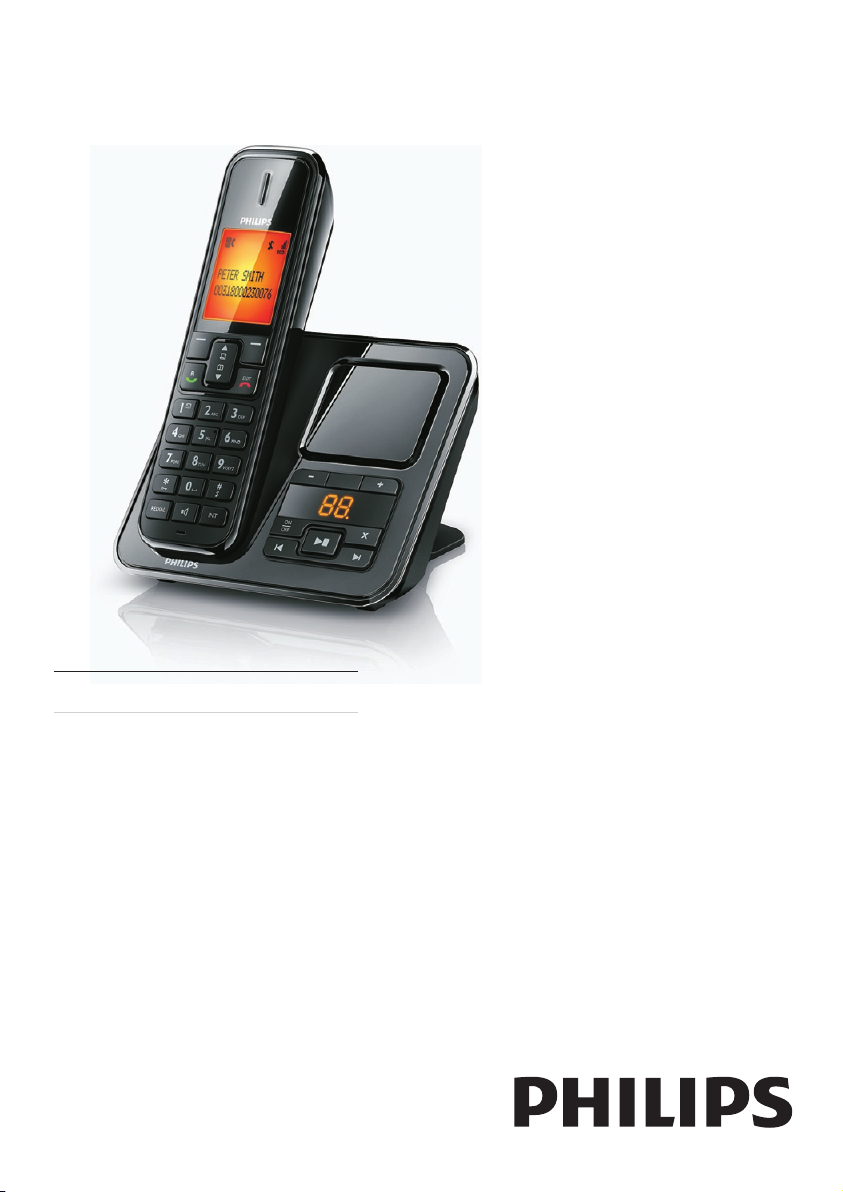
SE571
SE576
EN User manual
Page 2

Philips Consumer Lifestyle
Philips Consumer Lifystyle AMB 544-9056
HK-1032-SE57x 2010
........................................................ ...........................................................................
(Report No. / Numéro du Rapport) (Year in which the CE mark is affixed / Année au cours
de laquelle le marquage CE a été apposé)
EC DECLARATION OF CONFORMITY
(DECLARATION DE CONFORMITE CE)
We / Nous, PHILIPS CONSUMER LIFESTYLE B.V.
(Name / Nom de l’entreprise)
TUSSENDIEPEN 4, 9206 AD DRACHTEN, THE NETHERLANDS
(address / adresse)
Declare under our responsibility that the electrical product(s):
(Déclarons sous notre propre responsabilité que le(s) produit(s) électrique(s):)
SE571, SE576
....................................................................... ...........................................................
PHILIPS
(brand name, nom de la marque) (Type version or model, référence ou modèle)
DECT Phone
_
(Telecommunication Terminal Equipment)
..............................................................................................
(
product description, description du produit)
To which this declaration relates is in conformity with the following harmonized standards:
(Auquel cette déclaration se rapporte, est conforme aux normes harmonisées suivantes)
(title, number and date of issue of the standard / titre, numéro et date de parution de la norme)
_
EN 301 406 V2.1.1:2009
EN 301 489-1 V1.8.1:2008; EN 301 489-6 V1.3.1:2008
EN 60950-1:2006/A11:2009
_
EN 50360:2001; EN 50385:2002
Following the provisions of :
(Conformément aux exigences essentielles et autres dispositions pertinentes de:)
1999/5/EC (R&TTE Directive) (Directive R&TTE 1999/5/CE)
2009/125/EC (ErP Directive)
- EC/1275/2008
- EC/278/2009
And are produced under a quality scheme at least in conformity with ISO 9001 or CENELEC
Permanent Documents
(Et sont fabriqués conformément à une qualité au moins conforme à la norme ISO 9001 ou aux Documents Permanents CENELEC)
The Notified Body ............... ...................... performed ..... ........... ..................
BABT 0168
...............................
Notified Body Opinion
(L’Organisme Notifié) (Name and number/ nom et numéro) (a effectué) (description of intervention /
description de l’intervention)
And issued the certificate, ........ .................................................... .....
NA
(et a délivré le certificat) (certificate number / numéro du certificat)
Remarks:
(Remarques:)
........................................................... ..............................................................................
Drachten, The Netherlands, 09.08.2010 A.Speelman, CL Compliance Manager
..............
(place,date / lieu, date)
(signature, name and function / signature, nom et fonction)
Page 3

Contents
1 Important safety instructions 5
Declaration of conformity 5
Use GAP standard compliance 6
Compliance with EMF 6
Disposal of your old product and batteries 6
2 Your SE571/SE576 8
What is in the box 8
Overview of the phone 9
Overview of the base station 10
Display icons 11
3 Get started 12
Connect the base station 12
Wall mount the base station 13
Install the handset 14
Check the battery level 14
Set the date and time 15
Set the date and time format 15
What is standby mode? 15
Check the signal strength 15
Switch your handset On/Off 15
4 Calls 16
Make a call 16
Answer a call 17
Adjust the earpiece volume 17
Mute the microphone 17
Turn the speaker on or off 17
Make a second call 17
Answer a second call 18
Toggle between two calls 18
Make a conference call 18
6 Text and numbers 21
Enter text and number 21
Switch between uppercase and lower
case 21
7 Phonebook 22
View the phonebook 22
Search a record 22
Call from the phonebook 22
Access the phonebook during a call 22
Add a record 22
Set the melody 23
Edit a record 23
Delete a record 23
Delete all records 23
8 Call log 24
View the call records 24
Return a call 24
Delete a call record 24
Delete all call records 24
Save a call record to the phonebook 24
9 Redial list 25
View the redial records 25
Redial a call 25
Save a redial record to the phonebook 25
Delete a redial record 25
Delete all redial records 25
10 Self-denedsettings 26
Personalize the phone display 26
Personalize the sounds 26
English
5 Intercom and conference calls 19
Make a call to another handset 19
Transfer a call 19
Make a conference call 19
EN
3
Page 4

11 Call features 28
Auto hang up 28
Auto conference 28
Dial mode 28
Select the recall duration 28
Manage the area code 29
Auto prex 29
First ring 30
ECO mode 30
12 Extra features 31
Alarm clock 31
Auto clock 31
Keypad lock 32
Locate the handset 32
13 Advanced settings 33
Register the handsets 33
Unregister the handsets 33
Restore default settings 34
Network type 34
14 Telephone answering machine 35
Turn on/off the answering machine 35
Set the answering machine language 35
Set the answer mode 35
Announcements 36
Incoming messages (ICM) 37
15 Default settings 40
16 Technical data 41
17 Frequently asked questions 42
4 EN
Page 5
1 Important safety
instructions
Power requirements
This product requires an electrical supply •
of 100-240 volts AC. In case of power
failure, the communication can be lost.
The voltage on the network is classied •
as TNV-3 (Telecommunication Network
Voltages), as dened in the standard EN
60950.
Do not expose the phone to excessive heat •
caused by heating equipment or direct sunlight.
Do not drop your phone or allow objects to •
fall on your phone.
Do not use any cleaning agents containing •
alcohol, ammonia, benzene, or abrasives as
these may harm the set.
Do not use the product in places where there •
are explosive hazards.
Do not let small metal objects come into •
contact with the product. This can deteriorate
audio quality and damage the product.
Active mobile phones in the vicinity may cause •
interference.
Metallic objects may be retained if placed near •
or on the handset receiver.
English
Warning
The Electrical network is classied as •
hazardous. The only way to power down the
charger is to unplug the power supply from
the electrical outlet. Ensure that the electrical
outlet is always easily accessible.
To avoid damage or malfunction
Caution
Use only the power supply listed in the user •
instructions.
Use only the batteries listed in the user •
instructions.
Do not allow the charging contacts or the •
battery to come into contact with metal
objects.
Do not open the handset, base station or •
charger as you could be exposed to high
voltages.
Do not allow the charger to come into contact •
with liquids.
Risk of explosion if battery is replaced by an •
incorrect type.
Dispose of used batteries according to the •
instructions.
Always use the cables provided with the •
product.
For pluggable equipment, the socket-outlet •
shall be installed near the equipment and shall
be easily accessible.
Handsfree activation could suddenly increase •
the volume in the earpiece to a very high level:
make sure the handset is not too close to your
ear.
This equipment is not designed to make •
emergency calls when the power fails. An
alternative has to be made available to allow
emergency calls.
About operating and storage temperatures
Operate in a place where temperature is •
always between 0°C to +35°C (32°F to
95°F).
Store in a place where temperature is •
always between -20°C and +45°C (-4° F
to 113° F).
Battery life may be shortened in low •
temperature conditions.
Declaration of conformity
Hereby Philips Consumer Lifestyle, P&A,
declares that the SE571/SE576 is in compliance
with the essential requirements and other
relevant provisions of Directive 1999/5/EC.
You can nd the Declaration of Conformity on
www.p4c.philips.com.
This product has been designed, tested and
manufactured according the European R&TTE
directive 1999/5/EC. Following this directive,
this product can be brought into service in the
following countries:
EN
5
Page 6

Use GAP standard compliance
The GAP standard guarantees that all DECT™
GAP handsets and base stations comply with
a minimum operating standard irrespective of
their make. The handset and base station are
GAP compliant, which means they guarantee
the minimum functions: register a handset,
take the line, make a call and receive a call. The
advanced features may not be available if you
use them with other makes. To register and use
this handset with a GAP compliant base station
of different make, rst follow the procedure
described in the manufacturer’s instructions,
then follow the procedure described in this
manual for registering a handset. To register a
handset from different make to the base station,
put the base station in registration mode, then
follow the procedure described in the handset
manufacturer’s instructions.
Compliance with EMF
Koninklijke Philips Electronics N.V. manufactures
and sells many products targeted at consumers,
which, like any electronic apparatus, in
general have the ability to emit and receive
electromagnetic signals.
One of Philips’ leading Business Principles is to
take all necessary health and safety measures
for our products, to comply with all applicable
legal requirements and to stay well within
the EMF standards applicable at the time of
producing the products.
Philips is committed to develop, produce and
market products that cause no adverse health
effects. Philips conrms that if its products are
handled properly for their intended use, they
are safe to use according to scientic evidence
available today.
Philips plays an active role in the development
of international EMF and safety standards,
enabling Philips to anticipate further
developments in standardization for early
integration in its products.
Disposal of your old product and batteries
Your product is designed and manufactured
with high quality materials and components,
which can be recycled and reused.
When this crossed-out wheeled bin symbol is
attached to a product it means that the product
is covered by the European Directive 2002/96/
EC. Please inform yourself about the local
separate collection system for electrical and
electronic products.
Please act according to your local rules and
do not dispose of your old products with your
normal household waste.
Correct disposal of your old product helps to
prevent potential negative consequences for the
environment and human health.
Your product contains batteries covered by the
European Directive 2006/66/EC, which cannot
be disposed with normal household waste.
Please inform yourself about the local rules
on separate collection of batteries because
correct disposal helps to prevent negative
consequences for the environmental and
human health.
When this logo is attached to a product, it
means a nancial contribution has been paid to
the associated national recovery and recycling
system.
6 EN
Page 7

Environmental information
All unnecessary packaging has been omitted.
We have tried to make the packaging easy to
separate into three materials: cardboard (box),
polystyrene foam (buffer) and polyethylene
(bags, protective foam sheet.)
Your system consists of materials which can
be recycled and reused if disassembled by
a specialized company. Please observe the
local regulations regarding the disposal of
packaging materials, exhausted batteries and old
equipment.
Your product contains batteries covered by the
European Directive 2006/66/EC, which cannot
be disposed of with normal household waste.
Please inform yourself about the local rules on
separate collection of batteries. The correct
disposal of batteries helps prevent potentially
negative consequences on the environment and
human health.
English
EN
7
Page 8
2 Your SE571/
SE576
Congratulations on your purchase and welcome
to Philips!
To fully benet from the support that Philips
offers, register your product at www.philips.
com/welcome.
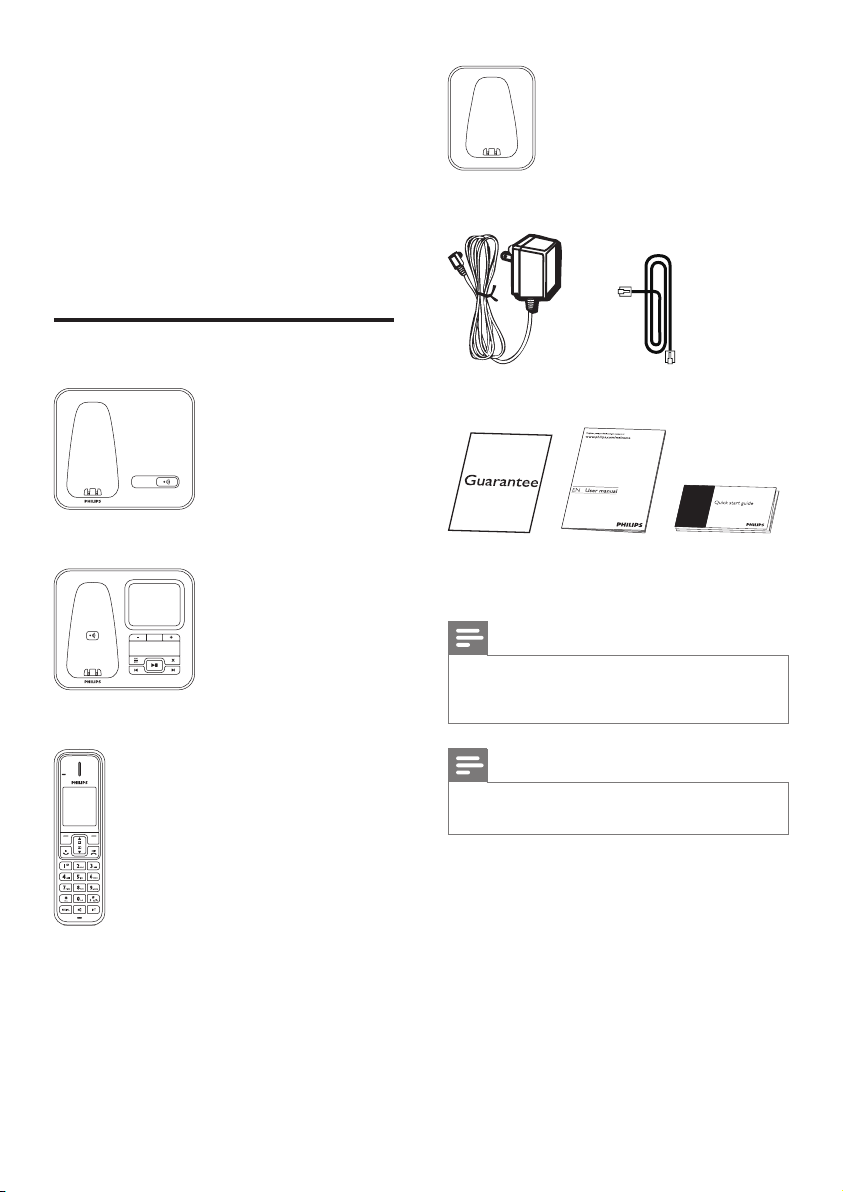
What is in the box
Base station with bracket (SE571)
Base station with bracket (SE576)
Charger**
Power adapter** Line cord*
Guarantee User Manual Quick start
guide
Note
*In some countries, you have to connect the •
line adapter to the line cord, then plug the line
cord to the telephone socket.
Handset**
8 EN
Note
**In multi-handset packs, there are additional •
handsets and chargers and power adapters.
Page 9
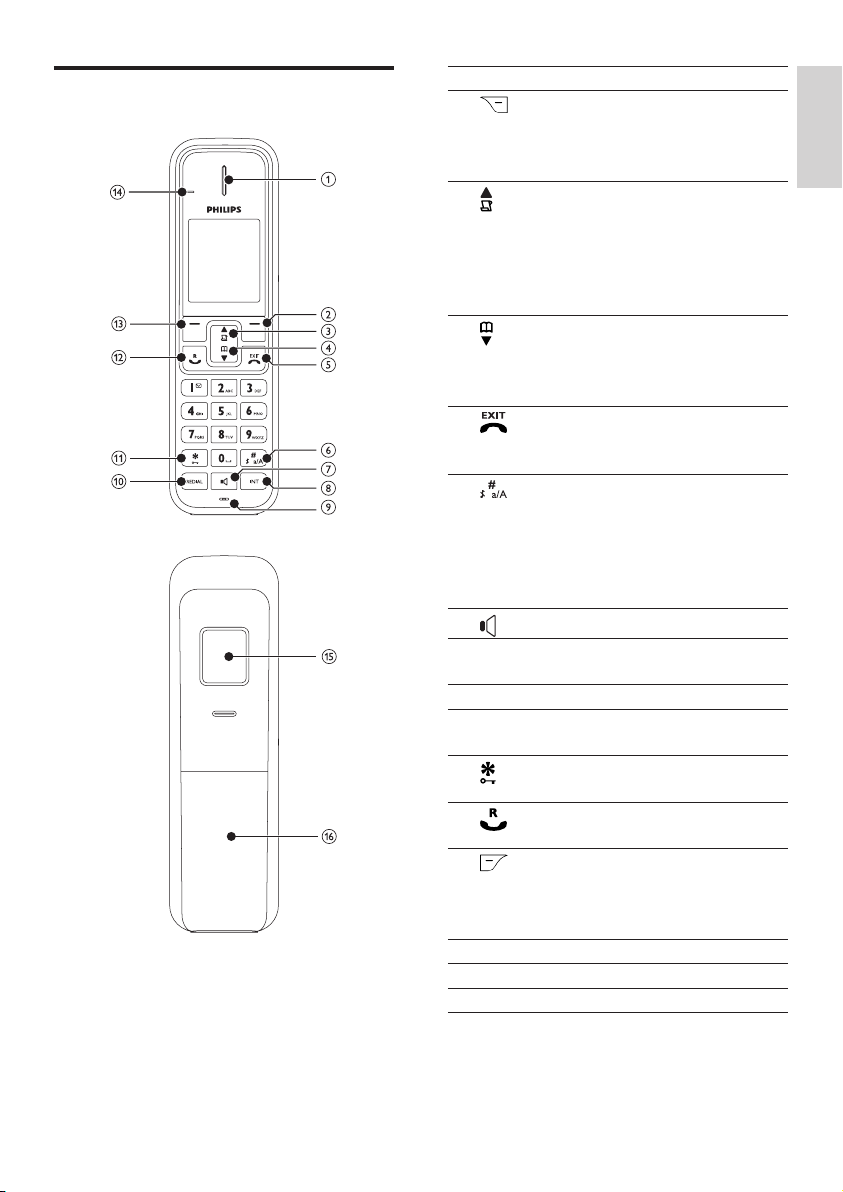
Overview of the phone
a
Earpiece
b
Select the function •
displayed on the handset
screen directly above the
English
key.
c
Scroll up on the menu.•
Increase the earpiece/•
speaker volume.
Enter the call list, text •
message and answering
machine.
d
Scroll down on the menu.•
Decrease the earpiece/•
speaker volume.
Enter the phonebook.•
e
End the call.•
Exit the menu/operation.•
Turn the handset on/off.•
f
Press it to enter a pause.•
Press and hold to turn the •
ringer on/off.
Switch between the lower •
and upper case during text
editing.
g
h
INT Make the intercom call.•
Turn the speaker on/off.•
Make the conference call.•
i
Microphone
j
REDIAL Enter redial list and dial the •
recent number.
k
Press and hold to lock/•
unlock keypad.
l
Make and receive calls.•
Send the ash signal.•
m
Select the function •
displayed on the handset
screen directly above the
n
LED indicator
o
Loudspeaker
p
Battery door
key.
EN
9
Page 10
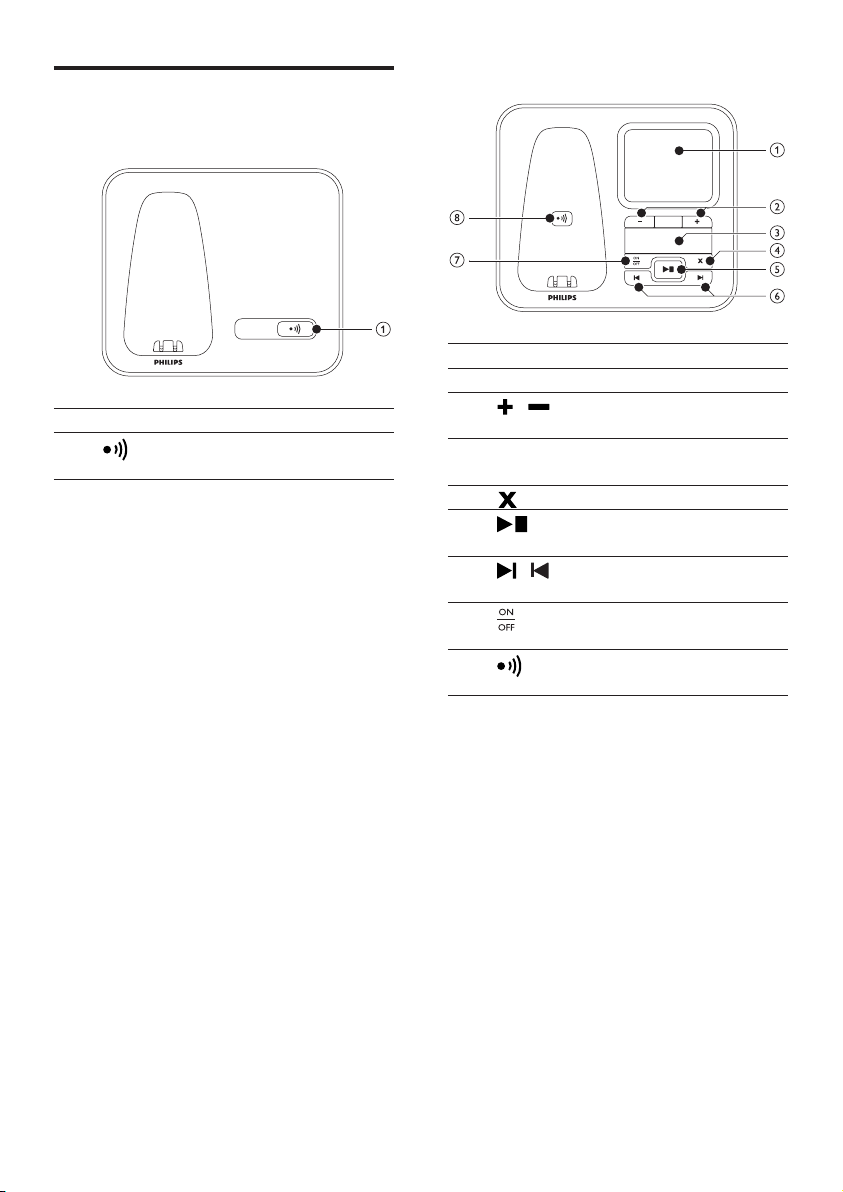
Overview of the base station
SE571
SE576
Key Name Descriptions
a
Find handsets.•
Enter registration mode.•
Key Name Descriptions
a
Loudspeaker
b
/ Increase/decrease the •
speaker volume.
c
LED
indicator
d
e
Displays the answering •
machine status.
Delete messages.•
Play messages.•
Stop messages playback.•
f
/ Skip forward/backward •
during playback.
g
Turn the answering •
machine on/off.
h
Find handsets•
Enter registration mode•
10 EN
Page 11
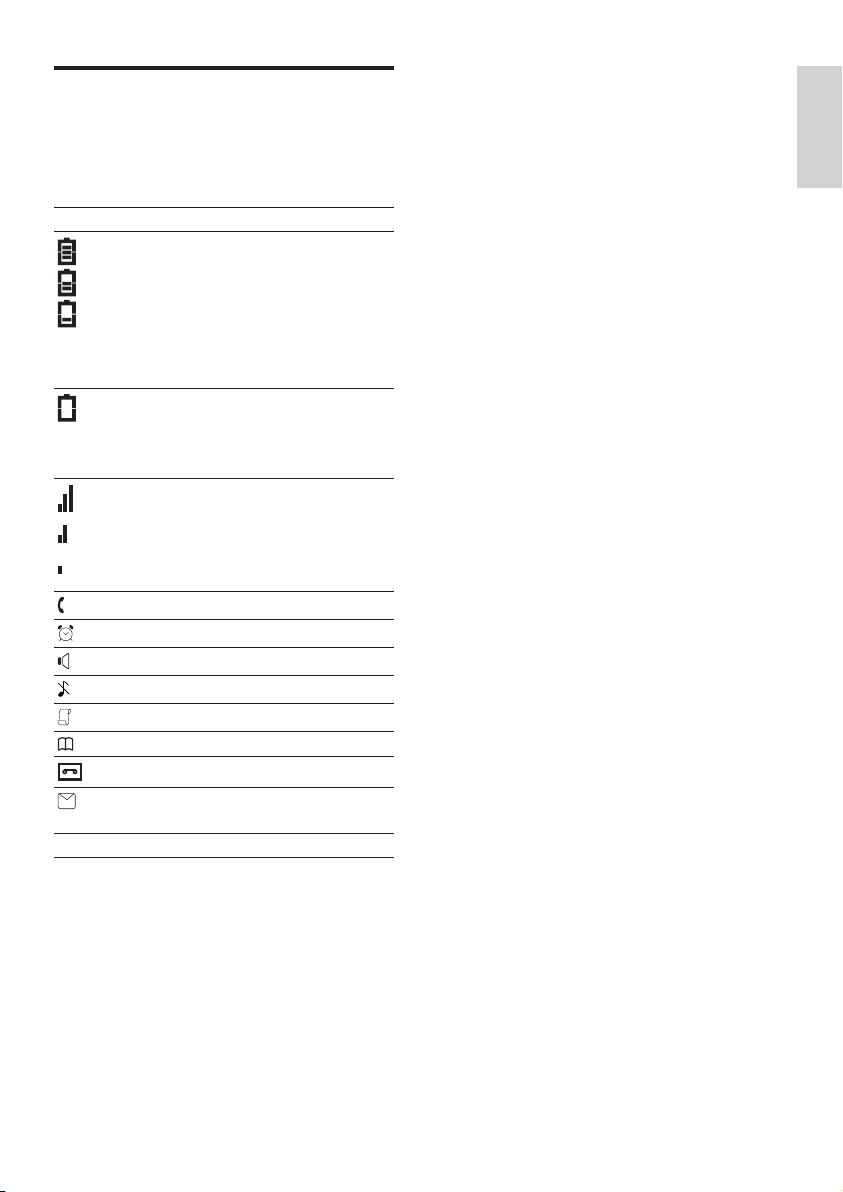
Display icons
In standby mode, the icons shown on the main
screen tell you what features are available on
your handset.
Icon Descriptions
ECO The ECO mode is activated.
When the handset is off the base
station/charger, the bars indicate
the battery level (full, medium
and low).
When the handset is on the base
station/charger, the bars keep
scrolling until charging completes.
The empty battery icon ashes
and you hear an alert tone.
The battery is low and needs
recharging.
It displays the link status
between the handset and base
station. The more bars are
shown, the better the signal
strength is.
The call is in progress.
The alarm is activated.
The speaker is on.
The ringer is off.
Call log
Phonebook
Answering machine
There is an unheard voice
message.
English
EN
11
Page 12
3 Get started
Caution
Ensure you have read the safety instructions in •
the “Impor tant” section before you connect
and install your handset.
Connect the base station
Warning
Risk of product damage! Ensure that the •
power supply voltage corresponds to the
voltage printed on the back or the underside
of the phone.
Use only the supplied power adapter to charge •
the batteries.
Note
If you subscribe to the digital subscriber line •
(DSL) high speed internet service through
your telephone line, ensure you install a DSL
lter between the telephone line cord and
the power socket.. The lter prevents noise
and caller ID problems caused by the DSL
inter ference. For more information on the DSL
lters, contact your DSL ser vice provider.
The type plate is located on the bottom of the •
base station.
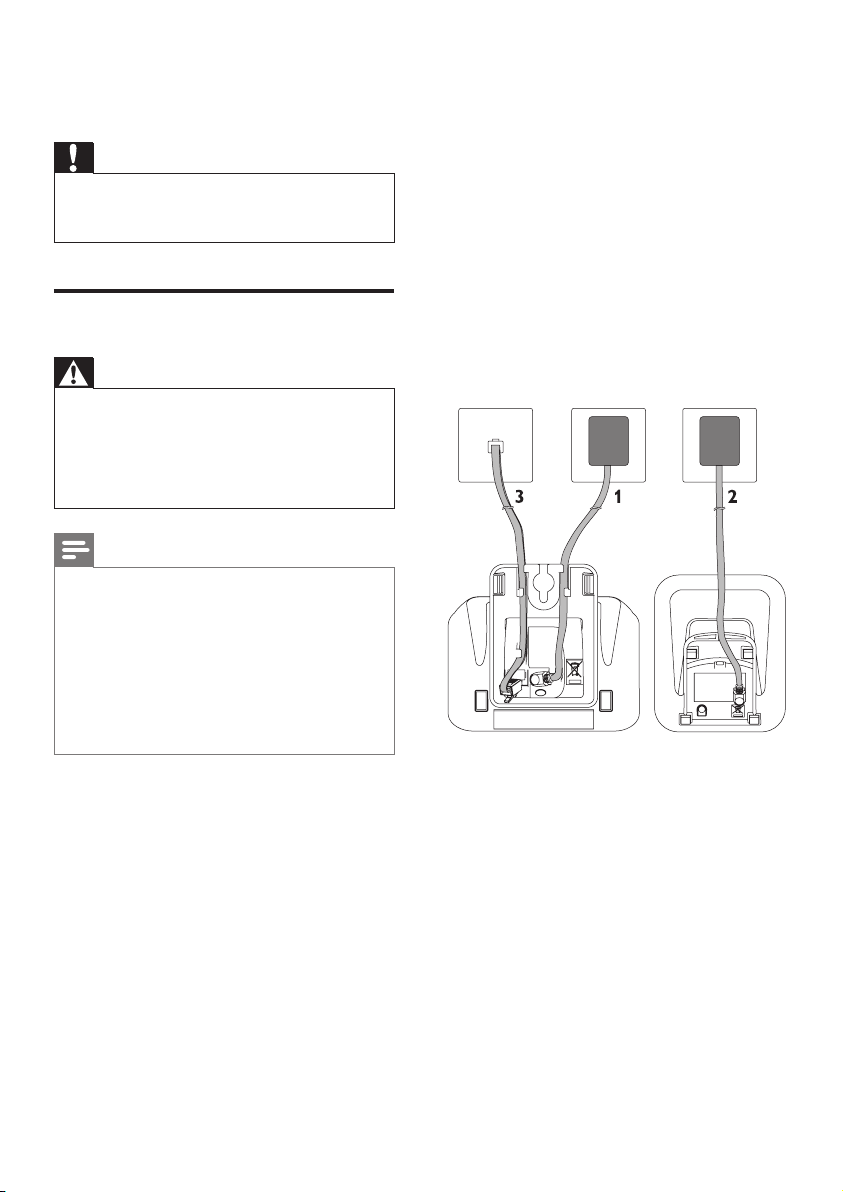
1 Connect each end of the power adapter
to:
the DC input jack at the bottom of •
the base station;
the power socket on the wall.•
2 Connect each end of the power adapter
to (for multi handset packs):
the DC input jack at the bottom of •
the extra handset charger.
the power socket on the wall.•
3 Connect each end of the line cord to:
the telephone socket at the bottom •
of the base station;
the telephone socket on the wall.•
12 EN
Page 13
Wall mount the base station
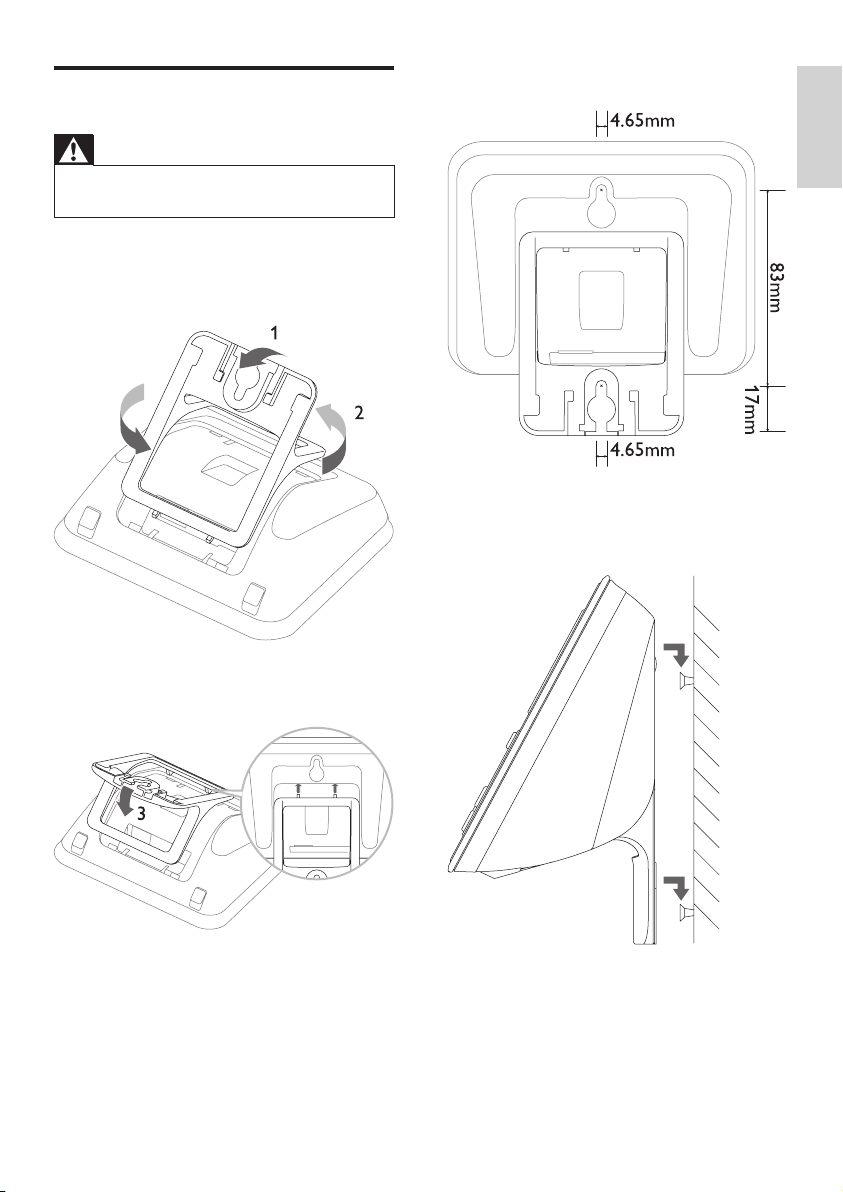
4 Insert screws (not included) into the wall.
Warning
You must follow the instructions below to wall •
mount the base station.
1 Remove the bracket from the base
station.
2 Turn the bracket around.
3 Re-insert the bracket into the back of the
base station.
English
5 Align the mounting holes on the back of
the base station with the screws on the
wall.
13
EN
Page 14
Install the handset
Caution
Risk of explosion! Keep batteries away from •
heat, sunshine or re. Never discard batteries
in re.
Use only the supplied batteries. •
Risk of decreased battery life! Never mix •
different brands or types of batteries.
Note
Check the battery level
Charge the batteries for 8 hours before rst •
use.
Warning
Check the battery polarity when inserting in •
the batter y compartment. Incorrect polarity
may damage the product.
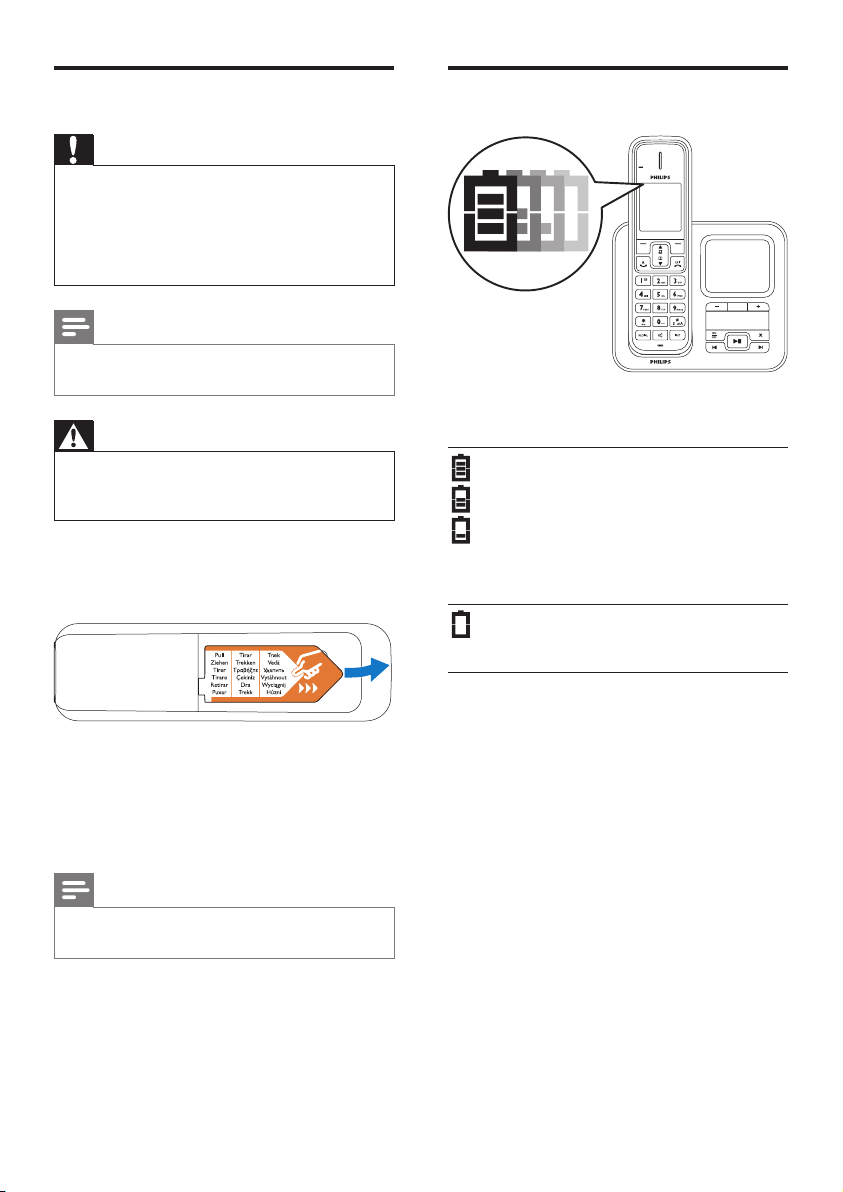
1 The batteries are pre-installed in the
handset. Pull the battery tape off from
the battery door before charging.
2 Place the handset on the base station to
charge the handset. When the handset is
placed correctly on the base station, your
hear a docking sound.
The handset starts charging. »
Note
If the handset becomes warm when the •
batteries are being charged, it is normal.
The battery icon displays the current battery
level.
The handset turns off if the batteries are empty.
If you are on the phone, you hear warning
tones when the batteries are almost empty. The
call gets disconnected after the warning.
When the handset is off the base
station/charger, the bars indicate
the battery level (full, medium
and low).
When the handset is on the base
station/charger, the bars keep
scrolling until charging completes.
The empty battery icon ashes.
The battery is low and needs
recharging.
14 EN
Page 15
Set the date and time
Check the signal strength
1 Select [MENU] > [CLOCK & ALARM] >
[SET DATE/TIME], then press [SELECT]
to conrm.
2 Press the numeric buttons to enter the
date, then press [OK] to conrm.
On the handset, the time set menu is »
displayed.
3 Press the numeric buttons to enter the
time.
If the time is in 12-hour format, press •
to select [AM] or [PM].
4 Press [OK] to conrm.
Set the date and time format
1 Select [MENU] > [CLOCK & ALARM] >
[SET FORMAT], then press [SELECT] to
conrm.
2 Select [DATE FORMAT] or [TIME
FORMAT].
3 Select the setting. Select [DD/MM] or
[MM/DD] as the date display and [12
HOURS] or [24 HOURS] as the time
display. Then press [SELECT] to conrm.
The setting is saved. »
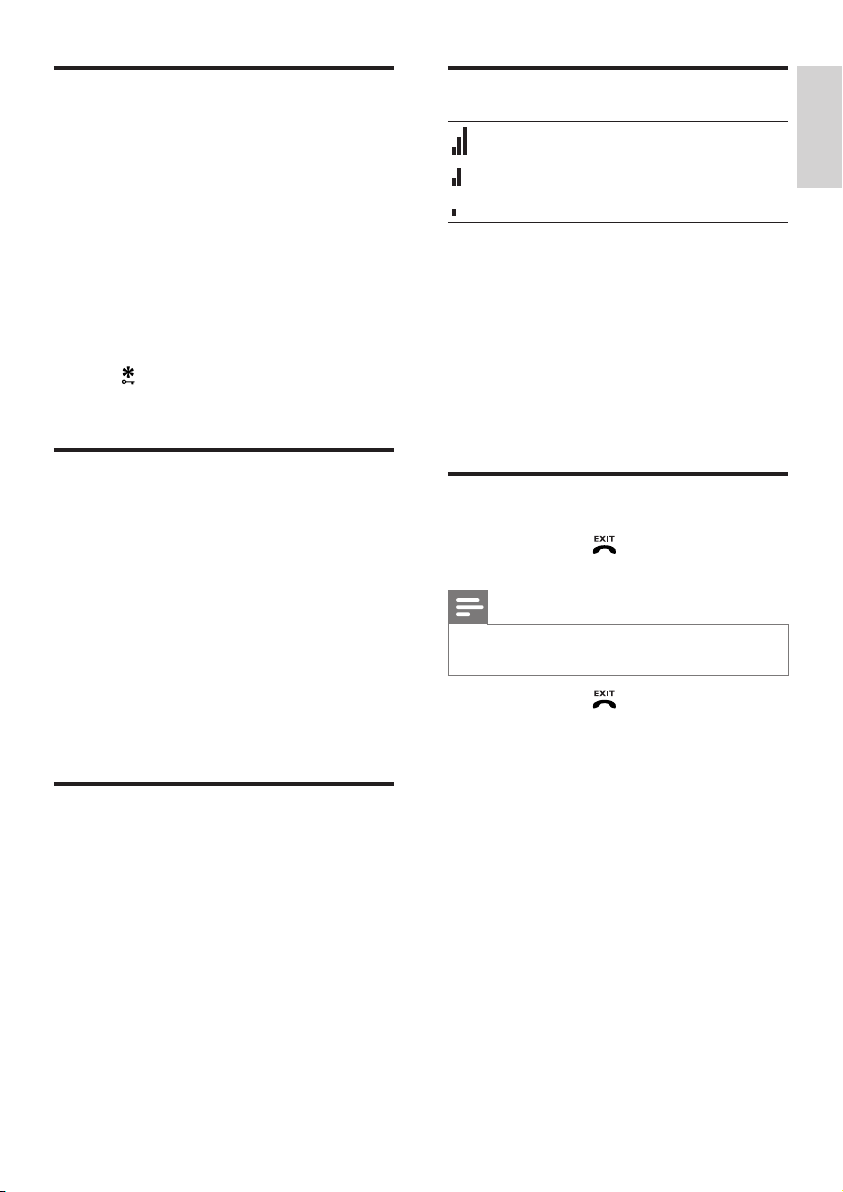
It displays the link status between
the handset and base station. The
more bars are shown, the better
the signal strength is.
Ensure the handset is linked to the base •
station before you make or receive calls
and carry out the phone functions and
features.
If you hear warning tones when you are •
on the phone, the handset is almost out
of battery or the handset is out of range.
Charge the battery or move the handset
nearer to the base station.
Switch your handset On/Off
Press and hold • to switch off the
handset. The handset’s screen turns off.
Note
When the handset is switched off, no call can •
be received.
Press and hold • to switch on the
handset. It takes a few seconds for the
handset to power up.
English
What is standby mode?
Your phone is in standby mode when it is idle.
The standby screen displays the handset name,
handset number, date and time, signal icon, and
battery icon.
EN
15
Page 16
4 Calls
Note
When the power fails, the phone cannot •
access emergency services.
Redial the most recent number
1 Press .
2 Press REDIAL.
3 Press [SELECT].
The most recent number is then dialed »
out.
Tip
Check the signal strength before you make •
a call or when you are in a call. For more
information, see “Check the signal streng th” in
the Get started section.
Make a call
You can make a call in these ways:
Quick call•
Dial before you call•
Redial the most recent number•
Call from the redial list.•
Call from the phonebook list•
Call from the call log•
Quick call
1 Press .
2 Dial the phone number.
The number is dialed out. »
The duration of your current call is »
displayed.
Call from the redial list
You can make a call from the redial list.
Tip
For more information, see “Redial a call” in the •
Redial list section.
Call from the phonebook
You can make a call from the phonebook list.
Tip
For more information, see “Call from the •
phonebook” in the Phonebook section.
Call from the call log
You can return a call from the outgoing,
received or missed call log.
Tip
For more information, see “Return a call” in •
the Call log section.
Dial before you call
1 Dial the phone number
To erase a digit, press • [CLEAR].
To enter a pause, press and hold • .
2 Press to dial out the call.
16 EN
Note
The call timer displays the talk time of your •
current call.
Note
If you hear warning tones, the handset is •
almost out of battery or the handset is out
of range. Charge the battery or move the
handset nearer to the base station.
Page 17
End a call
You can end a call in these ways:
Press • ; or
Place the handset to the base station •
or charging cradle if the auto hang up
is activated.
Answer a call
When the phone rings, press or to
answer the call.
Mute the microphone
1 Select [MUTE] during a call.
The handset displays » [MUTE ON].
The caller cannot hear you, but you »
can still hear his voice.
2 Select [UNMUTE] to unmute the
microphone.
You can now communicate with the »
caller.
English
Warning
When the handset rings or when the •
handsfree is activated, keep the handset away
from your ear to avoid ear damage.
Note
The caller ID service is available if you have •
registered to the caller ID service with your
service provider.
Tip
When there is a missed call, the handset •
displays a notication message.
Turn off the ringer for all incoming
calls
There are two ways to turn off the ringer:
1 Press and hold in standby mode.
» displays on the screen.
2 When the phone rings, press [SILENT].
Turn the speaker on or off
Press .
Make a second call
Note
This service is network dependent. •
1 Press during a call.
The rst call is put on hold. »
2 Dial the second number.
The number displayed on the screen is »
dialed out.
Adjust the earpiece volume
Press or to adjust the volume during a call.
The earpiece volume is adjusted and »
the phone is back to the call screen.
EN
17
Page 18
Answer a second call
Note
This is a country dependent setting. •
When there is a periodical beep to notify you
of an incoming call, you can answer the call in
these ways:
1 Press and to answer the call.
The rst call is put on hold, and you »
are now connected to the second call.
2 Press and to end the current call
and answer the rst call.
Toggle between two calls
1 Press and .
The current call is put on hold, and you »
are now connected to the other call.
Make a conference call
Note
This service is network dependent. Check with •
the service provider for additional charges.
When you are connected to two calls, •
press [OK], select [CONFERENCE] and
then press [OK] again to conrm; or
Press • , then .
The two calls are combined and a »
conference call is established.
18 EN
Page 19
5 Intercom and
conference calls
An intercom call is a call to another handset
that shares the same base station. A conference
call involves a conversation among you, another
handset user and the outside callers.
Make a call to another handset
Note
If the base station only has 2 registered •
handsets, press INT to make a call to another
handset.
While you are on the phone
You can go from one handset to another
during a call:
1 Press INT.
2 The current caller is put on hold.
3 Select a handset number, then press
[SELECT] to conrm.
Wait for the other side to answer your »
call.
Toggle between calls
Press INT to switch between the outside call
and the intercom call.
Transfer a call
English
1 Press INT. The handsets available for
intercom are displayed.
2 Select a handset number, then press
[SELECT] to conrm.
The selected handset rings. »
3 Press on the selected handset.
The intercom is established. »
4 Press to cancel or end the intercom
call.
Note
If the selected handset is occupied in a call, you •
hear a busy tone.
1 Press INT during a call.
2 Select a handset number, then press
[SELECT] to conrm.
3 Press when the other side answers
your call.
The call is now transferred to the »
selected handset.
Make a conference call
A 3-way conference call is a call between you,
another handset user and the outside callers. It
requires two handsets to share the same base
station.
EN
19
Page 20
During an external call
1 Press INT to initiate an internal call.
The handsets available for intercom are »
displayed.
The external caller is put on hold. »
2 Select or enter a handset number, then
press [SELECT] to conrm.
The selected handset rings. »
3 Press on the selected handset.
The intercom is established. »
4 Press and hold INT on your handset.
You are now on a 3-way conference »
call with the external call and the
selected handset.
5 Press to end the conference call.
Note
Press • to join an ongoing conference with
another handset if [ADVANCED SET] >
[CONFERENCE] is set to [ON].
During the conference call
1 Press INT to put the external call on hold
and go back to the internal call.
The external call is put on hold. »
2 Press INT to toggle between the external
and internal call.
3 Press and hold INT to establish the
conference call again.
Note
If a handset hangs up during the conference •
call, the other handset remains connected to
the external call.
20 EN
Page 21
6 Text and
numbers
You can enter text and numbers for handset
name, phonebook records, and other menu
items.
Example to write “Paul”
Press 7 once: P
Press 2 once: a
Press 8 two times: u
Press 5 three times: l
Switch between uppercase and lower case
English
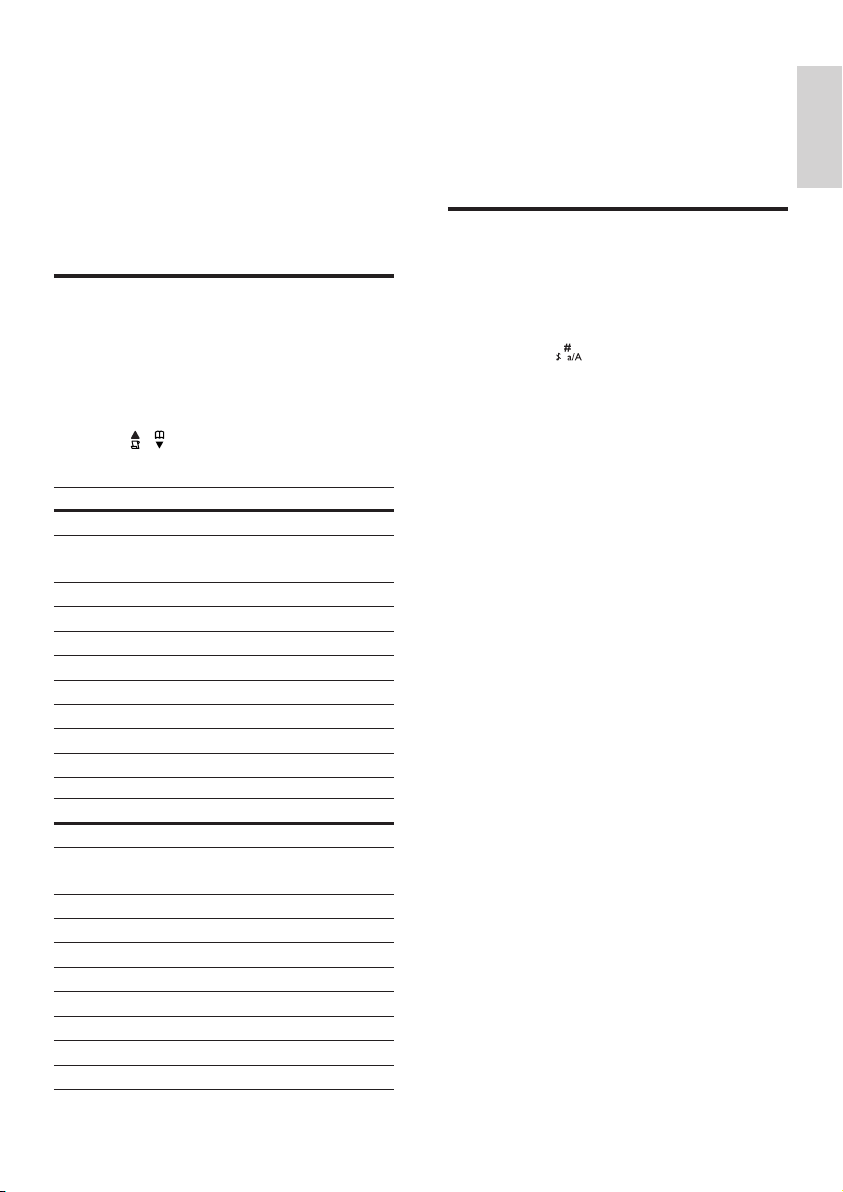
Enter text and number
1 Press once or several times on the
alphanumeric key to enter the selected
character.
2 Press [CLEAR] to delete the character.
Press / to move the cursor left and
right.
Key Characters (Upper case)
0 SP . 0 , / : ; “ ‘ ! ¡ ? ¿ * + - % \ ^ ~ |
1 1 @ _ # = < > ( ) & £ $ ¥ [ ] { } ¤
§ ...
2 A B C 2 À Â Æ Á Ã Ä Å Ç
3 D E F 3 È É Ě Ë Δ Φ
4 G H I 4 Ğ Í Ï İ Γ
5 J K L 5 Λ
6 M N O 6 Ñ Ó Ô Õ Ö
7 P Q R S 7 Ş Π Θ Σ
8 T U V 8 Ù Ú Ü
9 W X Y Z 9 Ø Ω Ξ Ψ
Key Characters (Lower case)
0 SP . 0 , / : ; “ ‘ ! ¡ ? ¿ * + - % \ ^ ~ |
1 1 @ _ # = < > ( ) & £ $ ¥ [ ] { } ¤
§ ...
2 a b c 2 à â æ á ã ä å ç
3 d e f 3 è é ê ë ę Δ Φ
4 g h i 4 ğ í ì ï ı Γ
5 j k l 5 Λ
6 m n o 6 ñ ó ô õ ö ò
7 p q r s 7 ß ş Π Θ Σ
8 t u v 8 ù ú ü μ
9 w x y z 9 ø Ω Ξ Ψ
By default, the rst letter of each word in a
sentence is uppercase and the rest is lowercase.
Press and hold to switch between the
uppercase and lowercase letters.
EN
21
Page 22
7 Phonebook
This phone has a phonebook that stores up
to 200 records. You can access the phonebook
from the handset. Each record can have a name
up to 14 characters long and a number up to
24 digits long.
There are 2 direct access memories (keys
and ). Depending on your country, keys
and are preset to the voice mail number
and information service number of your service
provider respectively. When you press and hold
on the key in standby mode , the saved phone
number is dialed automatically.
View the phonebook
Note
Entertherstcharacterofacontact
1 Press or select [MENU] >
[PHONEBOOK] > [LIST] to access the
phonebook list.
2 Press the alphanumerical key that
corresponds to the character.
The rst record that starts with this »
character is displayed.
Call from the phonebook
1 Press or select [MENU] >
[PHONEBOOK] > [LIST] to access the
phonebook.
2 Select a contact in the phonebook list.
3 Press to make the call.
You can view the phonebook on one handset •
only each time.
1 Press or select [MENU] >
[PHONEBOOK] > [LIST] to access the
phonebook menu.
2 Select a contact and view the available
information.
Search a record
You can search the phonebook records in these
ways:
Scroll the contacts list.•
Enter the rst character of the contact.•
Scroll the contact list
1 Press or select [MENU] >
[PHONEBOOK] > [LIST] to access the
phonebook menu.
2 press and to scroll through the
phonebook entries.
Access the phonebook during a call
1 Press [OPTION], select [PHONEBOOK]
then press [SELECT] again to conrm.
2 Select the contact, then press [SELECT]
to conrm.
The number can be viewed. »
3
Press [SELECT] again to dial out the number.
Add a record
Note
If your phonebook memory is full, the handset •
displays a notication message. Delete some
records to add new ones.
1 Select [MENU] > [PHONEBOOK] >
[NEW ENTRY], then press [SELECT] to
conrm.
2
Enter the name then press [OK] to conrm.
22 EN
Page 23
3 Enter the number, then press [ SAVE] to
conrm.
Edit a record
Tip
For more information on how to edit the •
name and number, see the section on Text
and numbers.
Note
The phonebook only saves new number. •
Tip
Press and hold • to insert a pause.
Your new record is saved. »
Tip
For more information on how to edit the •
numbers and name, see the section on Text
and numbers.
Set the melody
You can personalize the melody played when
someone in the
phonebook calls you.
Note
Ensure you have subscribed the caller line •
identication service before you have this
feature.
1 Select [MENU] > [PHONEBOOK] >
[EDIT ENTRY], then press [SELECT] to
conrm.
2 Select the contact, then press [SELECT]
to conrm.
3 Edit the name, then press [OK] to conrm.
4 Edit the number, then press [ SAVE] to
conrm.
The record is saved. »
Delete a record
1 Select [MENU] > [PHONEBOOK]
> [DELETE], then press [SELECT] to
conrm.
2 Select a contact, then press [OK] to
conrm
»
The record is deleted.
Delete all records
1 Select [MENU] > [PHONEBOOK]
> [DELETE ALL], press [SELECT] to
conrm.
The handset displays a conrmation »
request.
2 Press [OK] to conrm.
All records are deleted. »
English
1 Select [MENU] > [PHONEBOOK]
> [SELECT MELODY], then press
[SELECT] to conrm.
2 Select a contact, then press [VIEW].
3 Press [SELECT] to set or change the
melody for the contact.
4 Select a melody for the contact, then
press [SELECT] to conrm.
The melody is set. »
EN
23
Page 24
8 Call log
Delete a call record
The call log stores the call history of all
outgoing, missed or received calls. The incoming
call history includes the name and number
of the caller, call time and date. This feature is
available if you have registered to the caller ID
service with your service provider.
Your phone can store up to 50 call records. The
call log icon on the handset ashes to remind
you of any unanswered calls. If the caller allows
the display of his identity, you can view his
name or number. The call records are displayed
in chronological order with the most recent
received call at the top of the list.
Note
Ensure the number in the call list is valid before •
you can call back directly from the call list.
View the call records
1 Press .
2 Select [CALL LIST], then press [SELECT]
to conrm.
The incoming call log is displayed. »
3 Select a record, then press [OPTION]
for more available information.
Return a call
1 Press .
2 Select [CALL LIST], then press
[SELECT].
3 Select a record on the list.
4 Press to make the call.
1 Press .
2 Select [CALL LIST].
3 Select a record, then press [OPTION] to
conrm.
4 Select [DELETE], then press [SELECT]
to conrm
The record is deleted. »
Delete all call records
1 Press .
2 Select [CALL LIST].
3 Press [OPTION] to enter the options
menu.
4 Select [DELETE ALL], then press
[SELECT] to conrm
The handset displays a conrmation »
requests.
5 Press [OK] to conrm.
All records are deleted. »
Save a call record to the phonebook
1 Press .
2 Select [CALL LIST].
3 Select a record, then press [OPTION] to
conrm.
4 Select [SAVE NUMBER], then press
[SELECT] to conrm.
5 Enter and edit the name, then press [OK]
to conrm.
6 Enter and edit the number, then press
[S AVE] to conrm.
The record is saved. »
24 EN
Page 25

9 Redial list
Delete a redial record
The redial list stores the call history of dialed
calls. It includes the names and/or numbers you
have called. This phone can store up to 10 redial
records.
View the redial records
1 Press REDIAL to enter the list of dialed
calls.
2 Select a record, press [SELECT].
Redial a call
1 Press REDIAL.
2 Select the record you want to call. Press
.
The number is dialed out. »
Save a redial record to the phonebook
1 Press REDIAL to enter the list of dialed
calls.
2 Select a record, then press [SELECT]
then [OPTION].
3 Select [SAVE NUMBER] > [SELECT] to
conrm.
4 Enter and edit the name, then press [OK]
to conrm.
5 Enter and edit the number, then press
[S AVE] to conrm.
The record is saved. »
1 Press REDIAL to enter the list of dialed
calls.
2 Select a record, then press [SELECT]
then [OPTION].
3 Select [DELETE] > [SELECT].
The record is deleted. »
Delete all redial records
1 Press REDIAL to enter the list of dialed
calls.
2 Press [SELECT] then [OPTION] to enter
the options menu.
3 Select [DELETE ALL] > [SELECT] to
conrm.
4 The handset displays a conrmation
request.
5 Press [OK] to conrm.
All records are deleted. »
English
EN
25
Page 26
10 Self-defined
Personalize the sounds
settings
Customize the settings to make it your own
phone.
Personalize the phone display
Name the handset
The name of the handset can be up to 14
characters. It is displayed on the handset
screen in standby mode.
1 Select [MENU] > [PERSONAL SET]
> [HANDSET NAME], then press
[SELECT] to conrm.
2 Enter or edit the name. To erase a
character, press [CLEAR].
3 Press [OK] to conrm.
The setting is saved. »
Set the display language
Note
This feature only applies to models with •
multiple-language suppor t.
Languages available for selection vary with •
different countries.
1 Select [MENU] > [PERSONAL SET] >
[LANGUAGE], then press [SELECT] to
conrm.
2 Select a language, then press [SELECT]
to conrm.
The setting is saved. »
Set the handset’s ringtone
You can select from 15 ringtones.
1 Select [MENU] > [PERSONAL SET] >
[HANDSET TONES] > [RING TONES],
then press [SELECT] to conrm.
2 Select a ringtone, then press [SELECT]
to conrm.
The setting is saved. »
Set the handset’s ringtone volume
You can select among 6 ringtone volume
levels or [OFF].
1 Select [MENU] > [PERSONAL SET]
> [HANDSET TONES] > [RING
VOLUME], then press [SELECT] to
conrm.
2 Select a volume level, then press
[SELECT] to conrm.
The setting is saved. »
Tip
To turn off the ringtone, press and hold • in
standby mode. Then displays on the screen.
Set the key tone
Key tone is the sound made when you press a
key on the handset.
1 Select [MENU] > [PERSONAL SET] >
[HANDSET TONES] > [KEY BEEP],
then press [SELECT] to conrm.
2 Select [ON]/[OFF], then press [SELECT]
to conrm.
The setting is saved. »
26 EN
Page 27

Set the docking tone
Docking tone is the sound made when you
place the handset on the base station/charger.
1 Select [MENU] > [PERSONAL SET] >
[HANDSET TONES] > [DOCKING
TONE], then press [SELECT] to conrm.
2 Select [ON]/[OFF], then press [SELECT]
to conrm.
The setting is saved. »
Enhance the audio quality
XHD (Extreme High Denition) sound
mode is an exclusive feature which transmits
high delity signals to the handset. It makes
the phone conversations sound like real-life
conversations.
When you are in standby mode,
1 Select [MENU] > [ADVANCED SET] >
[XHD SOUND], then press [SELECT] to
conrm.
2 Select the new setting, then press
[SELECT] to conrm.
The setting is saved. »
When you are in a call,
1 Press [OPTION] to enter the options
menu.
2 Change the XHD setting.
3 Press [SELECT] to conrm
The setting is saved. »
English
EN
27
Page 28
11 Call features
Dial mode
The phone supports a number of call-related
features that help you handle and manage the
calls.
Auto hang up
To end a call, simply place the handset on the
base station or charging cradle.
Activate/Deactivate auto hang up
1 Select [MENU] > [PERSONAL SET]
> [AUTO HANG-UP], then press
[SELECT] to conrm.
2 Select [ON]/[OFF], then press [SELECT]
to conrm.
The setting is saved. »
Note
The speaker is on automatically when: 1. the •
auto hang up is off; 2. you place the handset
to the base station or charging cradle when
talking on the phone.
Note
This feature only applies to models that •
support both tone and pulse dial.
Dial mode is the telephone signal used in your
country. The phone supports tone (DTMF) and
pulse (rotary) dial. Consult the service provider
for detailed information.
Set the dial mode
1 Select [MENU] > [ADVANCED SET] >
[DIAL MODE], then press [SELECT] to
conrm.
2 Select a dial mode, then press [SELECT]
to conrm.
The setting is saved. »
Note
If your phone is in pulse dial mode, press •
during a call for temporary tone mode.
displays. Digits entered for this call are then
sent out as tone signals.
Auto conference
To join an external call with another handset,
press .
Activate/Deactivate auto conference
1 Select [MENU] > [ADVANCED SET] >
[CONFERENCE], then press [SELECT]
to conrm.
2 Select [ON]/[OFF], then press [SELECT]
to conrm.
The setting is saved. »
28 EN
Select the recall duration
Ensure that the recall time is set correctly
before you can answer a second call. In normal
case, the phone is already preset for the recall
duration. You can select among 3 options:
[SHORT], [MEDIUM] and [LONG]. The
number of available options varies with different
countries. For details, consult your service
provider.
Page 29
Set the recall duration
1 Select [MENU] > [ADVANCED SET] >
[RECALL TIME], then press [SELECT] to
conrm.
2 Select an option, then press [SELECT] to
conrm.
The setting is saved. »
Manage the area code
Autoprex
This feature checks and formats your outgoing
call number before it is dialed out. The prex
number can replace the detect number you
set in the menu. For example, you set 604 as
the detect number and 1250 as the prex.
When you have dialed out a number such as
6043338888, your phone changes the number
to 12503338888 when it dials out.
Note
English
Note
This feature only applies to models with area •
code support.
You can dene an area code (up to 5 digits).
This area code is automatically removed from
an incoming call if it matches with the code you
dene. Then the phone number is saved in the
call log without an area code.
Activate auto removal of the area
code
1 Select [MENU] > [ADVANCED SET] >
[AREA CODE], then press [SELECT] to
conrm.
2 Enter the area code, then press [OK] to
conrm.
The setting is saved. »
Deactivate auto removal of the area
code
1 Select [MENU] > [ADVANCED SET] >
[AREA CODE], then press [SELECT] to
conrm.
2 Press [CLEAR] to delete all the digits.
3 Press [OK] to conrm.
The setting is saved. »
The maximum length of a detect number is 5 •
digits. The maximum length of an auto prex
number is 10 digits.
Setautoprex
1 Select [MENU] > [ADVANCED SET] >
[AUTO PREFIX], then press [SELECT]
to conrm.
2 Enter the detect number, then press
[OK] to conrm.
3 Enter the prex number, then press [OK]
to conrm.
The setting is saved. »
Note
To enter a pause, press and hold • .
Note
If the prex number is set and the detect •
number is left empty, the prex number is
added to all outgoing calls.
Note
The feature is unavailable if the dialed number •
starts with * and #.
EN
29
Page 30
First ring
If you have subscribed for caller ID service with
your service provider, your phone can suppress
the rst ring before the caller ID displays on
the screen. After the phone is reset, it can
detect automatically if the caller ID service
is subscribed and start to suppress the rst
ring. You can change this setting to suit your
preference. This feature only applies to models
with rst ring suppor t.
Turntherstringon/off
1 Select [MENU] > [ADVANCED SET] >
[FIRST RING], then press [SELECT] to
conrm.
2 Select [ON]/[OFF], press [SELECT] to
conrm.
The setting is saved. »
Note
To reset the rst ring status, go to the reset •
menu.
ECO mode
The ECO mode reduces the transmission
power of the handset and base station.
1 Select [MENU] > [ADVANCED SET] >
[ECO], then press [SELECT] to conrm.
2 Select [ON]/[OFF] , then press
[SELECT] to conrm.
The setting is saved. »
» ECO is displayed in standby mode
Note
When the • ECO mode is activated, the
connection range between the handset and
the base station can be reduced.
30 EN
Page 31
12 Extra features
Your phone offers you extra features which
keep you organized and informed while on the
move.
Alarm clock
Your phone has a built-in alarm clock. Check the
information below to set your alarm clock.
Set the alarm
1 Select [MENU] > [CLOCK & ALARM]
> [ALARM], then press [SELECT] to
conrm.
2 Select [ON ONCE] or [ON DAILY],
then press [SELECT] to conrm.
3 Enter an alarm time.
4 Press [OK] to conrm.
The alarm is set and » is displayed on
the screen.
Note
Set the alarm melody
1 Select [MENU] > [CLOCK & ALARM]
> [ALARM TONE], then press [SELECT]
to conrm.
2 Select a new melody, then press
[SELECT] to conrm.
The setting is saved. »
Note
The alarm volume is set to the same level as •
the ringer volume. If the ringer is off, the alarm
volume is set to level 1.
Auto clock
Note
This service is network dependent. •
Note
Ensure you have the caller ID service before •
you have this feature.
English
Press • to switch between [AM]/[PM]
Turn off the alarm
When the alarm rings
1 Press any key to turn off the alarm.
Before the alarm rings
1 Select [MENU] > [CLOCK & ALARM]
> [ALARM], then press [SELECT] to
conrm.
2 Select [OFF], then press [SELECT] to
conrm.
The setting is saved. »
It synchronizes the date and time on your
phone with the public switched telephone
network (PSTN) automatically. For the date to
be synchronized, ensure the current year is set.
1 Select [MENU] > [CLOCK & ALARM] >
[AUTO CLOCK], then press [SELECT]
to conrm.
2 Select [ON]/[OFF]. Press [SELECT].
The setting is saved. . »
31
EN
Page 32
Keypad lock
You can lock the keypad to prevent accidental
button presses.
Lock the keypad
1 Press and hold in standby mode.
The keypad is locked. »
Note
When the keypad is locked, no call can be •
made. You can still answer the incoming calls.
The keypad is unlocked during the call but is
locked automatically after you nish the call.
Unlock the keypad
1 Press and hold .
The keypad is unlocked. »
Locate the handset
1 Press on the base station.
All handsets connected to this base »
station ring.
2 Press on the base station again to stop
ringing.
All handsets stop ringing; or »
3 Press any key on one handset to stop
ringing.
32 EN
Page 33
13 Advanced
settings
4 Press [OK] to conrm the PIN.
Registration is completed in less than 2 »
minutes. The base automatically assigns
a handset number to the handset.
English
Register the handsets
You can register additional handsets to the base
station. The base station can register up to 5
handsets.
Auto registration
1 Place the unregistered handset on the
base station.
The handset detects the base station »
and start to register automatically.
Registration is completed in less than 2 »
minutes. The base station automatically
assigns a handset number to the
handset.
Manual registration
If auto registration fails, register your handset
manually to the base station.
1 Select [MENU] > [ADVANCED SET]
> [REGISTER], then press [SELECT] to
conrm.
2 Press and hold on the base station for
5 seconds until you hear a conrmation
beep.
3 Enter the system PIN. Press [CLE AR] to
make corrections.
Note
If the PIN is incorrect or no base is found •
within a certain period, your handset displays
a notication message. Repeat the above
procedure if registration fails.
Note
The preset PIN is 0000. No change can be •
made on it.
Unregister the handsets
If two handsets share the same base station, you
can unregister a handset with another handset.
1 Select [MENU] > [ADVANCED SET] >
[UNREGISTER], then press [SELECT] to
conrm.
2 Enter the system PIN. Press [CLE AR] to
make corrections.
3 Select the handset number to be
unregistered.
4 Press [SELECT] to conrm.
The handset is unregistered. »
Tip
The handset number displays beside the •
handset name in standby mode.
EN
33
Page 34
Restore default settings
You can reset your phone settings to the
original factory settings.
1 Select [MENU] > [ADVANCED SET]
> [RESET], then press [SELECT] to
conrm.
The handset displays a conrmation »
request.
2 Press [OK] to conrm.
All settings are reset. »
The welcome screen displays. »
Tip
For more information about the default •
settings, see the section on Default settings.
Network type
Note
This feature only applies to models with •
network type suppor t.
1 Select [MENU] > [ADVANCED SET]
> [NETWORK TYPE], then press
[SELECT] .
2 Select a network type, then press
[SELECT].
The setting is saved. »
34 EN
Page 35
14 Telephone
answering
machine
Note
Available only for SE576. •
Your phone includes a telephone answering
machine that records unanswered calls when
it is on. By default, the answering machine is
set to the [ANSWER & REC.] mode. You can
also access the answering machine remotely
and change the settings through the answering
machine menu on the handset.
The LED indicator on the base station lights up
when the answer machine is on.
Set the answering machine language
English
Note
This feature only applies to models with •
multiple-language suppor t.
The answering machine language is the language
for the announcements.
1 Select [MENU] > [ANSWER MACHINE]
> [SETTINGS] > [VOICE LANGUAGE],
then press [SELECT] to conrm.
2 Select a language, then press [SELECT]
to conrm.
The setting is saved. »
Set the answer mode
Turn on/off the answering machine
You can turn on/off the answering machine
through the base station or the handset.
Through the handset
1 Select [MENU] > [ANSWER
MACHINE] > [ANSWER ON/OFF],
then press [SELECT] to conrm.
2 Select [ON]/[OFF], then press [SELECT]
to conrm.
The setting is saved. »
Through the base
1 Press to turn on/off the answering
machine in standby mode.
Note
When the answering machine is switched on, it •
answers incoming calls after a certain number
of rings based on the ring delay setting.
You can set the answering machine and
select if the callers can leave messages. Select
[ANSWER & REC.] if you allow the callers to
leave messages. Select [ANSWER ONLY] if you
forbid the callers to leave messages.
1 Select [MENU] > [ANSWER
MACHINE] > [ANSWER MODE], then
press [SELECT] to conrm.
2 Select an answer mode, then press
[SELECT] to conrm.
The setting is saved. »
Note
If the memory is full, the answering machine •
switches to [ANSWER ONLY] mode
automatically.
35
EN
Page 36
Announcements
The announcement is the message your caller
hears when the answering machine picks up the
call. The answering machine has 2 pre-recorded
announcements: the [ANSWER & REC.] mode
and [ANSWER ONLY] mode.
Record an announcement
The maximum length of the announcement
you can record is 3 minutes. The newly
recorded announcement automatically
replaces the old one.
1 Select [MENU] > [ANSWER
MACHINE] > [ANNOUNCEMENT],
then press [SELECT] to conrm.
2 Select [ANSWER & REC.] or [ANSWER
ONLY ] , then press [SELECT] to conrm.
3 Select [RECORD], then press [SELECT]
to conrm.
4 Start recording close to the microphone
after the beep.
5 Press [OK] to stop recording or the
recording stops after 3 minutes.
You can listen to the newly recorded »
announcement on the handset.
Note
To restore the pre-recorded announcement, •
delete your current announcement.
Note
Ensure that you speak close to the microphone •
when you record an announcement.
Listen to the announcement
1 Select [MENU] > [ANSWER
MACHINE] > [ANNOUNCEMENT],
then press [SELECT] to conrm.
2 Select [ANSWER & REC.] or [ANSWER
ONLY ] , then press [SELECT] to conrm.
3 Select [ PL AY ], then press [SELECT] to
conrm.
You can listen to the current »
announcement.
Note
You can no longer listen to the announcement •
when you pick up an incoming call.
Delete an announcement
1 Select [MENU] > [ANSWER
MACHINE] > [ANNOUNCEMENT],
then press [SELECT] to conrm.
2 Select [ANSWER & REC.] or [ANSWER
ONLY ] , then press [SELECT] to conrm.
3 Select [DELETE], then press [SELECT]
to conrm.
The handset displays a conrmation »
request.
4 Press [SELECT] to conrm.
5 The pre-recorded announcement is
restored.
Note
No pre-recorded announcement can be •
deleted.
36 EN
Page 37
Incoming messages (ICM)
Each message can be up to 3 minutes long. When
you receive new messages, the new message
indicator ashes on the answering machine and
the handset displays a notication message.
Note
If you pick up the phone when the caller leaves •
a message, the recording stops and you can
talk to the caller directly.
Note
If the memory is full, the answering machine •
switches to [ANSWER ONLY] automatically.
Delete old messages to receive new ones.
Listen to the incoming messages
You can listen to the incoming messages in the
sequence they are recorded.
From the base
Start/Stop listening: Press • .
Adjust the volume: Press • / .
Skip backward: •
- When you listen to the messages, press
to listen to the message from the
beginning.
- During the rst second of the current
message, press to listen to the
previous message.
Skip forward: Press • to skip to the next
message.
Delete the current message: Press • .
From the handset
1 Select [MENU] > [ANSWER
MACHINE] > [PL AY ], then press
[SELECT] to conrm.
New messages start playing. Old »
messages start playing if there is no
new message.
Select • [BACK] to stop listening.
Select • [OPTION] to enter the options
menu.
Press • / to increase/decrease the
volume.
Delete an incoming message
From the base
1 Press when you listen to the message.
The current message is deleted. »
From the handset
1 When you listen to the message, select
[OPTION] to enter the options menu.
2 Select [DELETE], then press [OK] to
conrm.
The current message is deleted. »
Delete all old incoming messages
From the base
1 Press and hold in standby mode.
All old messages are permanently »
deleted.
English
Note
No deleted messages can be recovered. •
37
EN
Page 38
From the handset
1 Select [MENU] > [ANSWER
MACHINE] > [DELETE ALL], then press
[SELECT] to conrm.
The handset displays a conrmation »
request.
2 Press [OK] to conrm.
All old messages are permanently »
deleted.
Note
You can delete the read messages only. No •
deleted messages can be recovered.
Call screening
You can hear the caller while he is leaving a
message. Press to pick up the call.
1 Select [MENU] > [ANSWER MACHINE]
> [SETTINGS] > [RING DELAY], then
press [SELECT] to conrm.
2 Select a new setting, then press
[SELECT] to conrm.
The setting is saved. »
Note
Ensure that the answering machine is switched •
on before this feature can be applied.
Tip
When you access the answering machine •
remotely, you are recommended to set the ring
delay to [ECONOMY] mode. This is a cost
effective way to manage your messages. When
there are new messages, the answering machine
picks up the call after 3 rings; When there is no
messages, it picks up the call after 5 rings.
From the base
Press / to adjust the speaker volume
during call screening. The lowest volume level
turns off the call screening.
Set the sound quality of the message
You can adjust the sound quality of the
messages received from the answering machine.
1 Select [MENU] > [ANSWER MACHINE]
> [SETTINGS] > [MSG QUALITY], then
press [SELECT] to conrm.
2 Select the new setting, then press
[SELECT] to conrm.
The setting is saved. »
Set the ring delay
You can set the number of times the phone
rings before the answering machine picks up
the call.
Remote access
You can operate your answering machine
when you are away from home. Simply make
a call to your phone with a touch tone phone
and enter your 4-digit PIN code.
Note
The remote access PIN code is the same as •
your system PIN. The preset PIN is 0000.
Change the PIN code
1 Select [MENU] > [ANSWER MACHINE]
> [SETTINGS] > [REMOTE ACCESS] >
[CHANGE PIN], then press [SELECT] to
conrm.
2 Enter the old PIN, then press [OK] to
conrm.
3 Enter the new PIN code, then press [OK]
to conrm.
4 Enter the new PIN code again, then press
[OK] to conrm.
The setting is saved. »
38 EN
Page 39
Activate/deactivate the remote access
You can allow or block remote access to the
answering machine.
1 Select [MENU] > [ANSWER MACHINE]
> [SETTINGS] > [REMOTE ACCESS] ,
then press [SELECT] to conrm.
2 Select a new setting, then press
[SELECT] to conrm.
The setting is saved. »
Access the answering machine
remotely
1 Make a call to your home number with a
touch tone phone.
2 Enter # when you hear the
announcement.
3 Enter your PIN code.
You now have access to your »
answering machine, and you can now
listen to the new messages.
Note
Remote access commands
Key Function
1 Repeat the current or listen to
the previous message.
2 Listen to messages.
3 Skip to the next message.
6 Delete the current message.
7 Switch the answering machine
on.
(not available when you listen to
the messages).
8 Stop listening to the message.
9 Switch the answering machine
off.
(not available when you listen to
the messages).
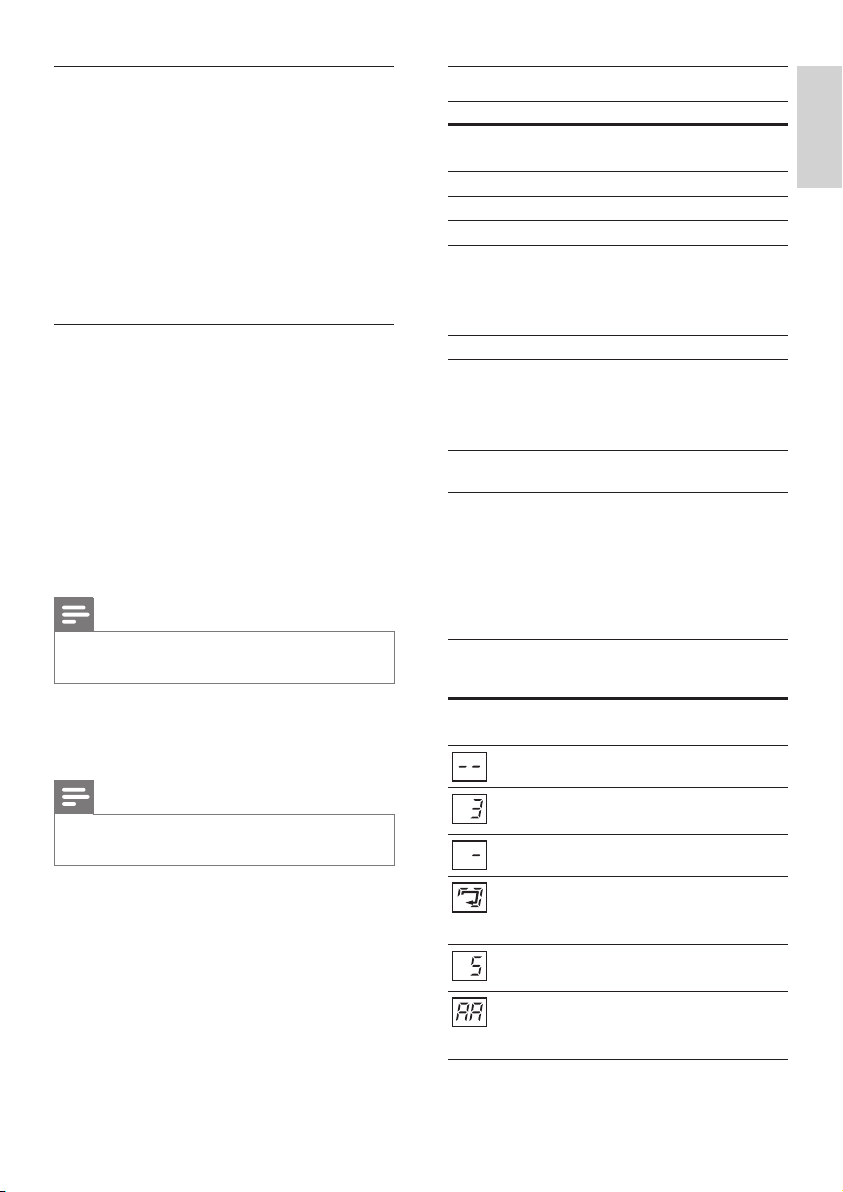
Behavior of the LED display on the
base station
The table below shows you the current status
with different LED display behavior on the
base station.
English
You have 2 chances to enter the correct PIN •
code before your phone hangs up.
4 Press a key to carry out a function. See
the Remote access commands table
below for a list of available functions.
Note
When there is no message, the phone hangs up •
automatically if no key is pressed for 8 seconds.
LED
display
No
display
Answering
machine
status
Off --
On No message
On Steady on: message full
On Flashing: memory full
On Scrolling when recording
On Displays the volume
On Flashing: remote access/
Message status
with 3 new messages
the incoming message or
announcement.
level.
listen to messages from
the handset
EN
39
Page 40
15 Default settings
Language* Country dependent
Handset name PHILIPS
Date 01/01/10
Date format* DD/MM
Time* Country dependent
Time format* Country dependent
Auto clock On
Alarm Off
Phonebook list Unchanged
Auto hang up On
Recall time* Country dependent
Area code Empty
Carrier code Empty
Network type PSTN (DECT phone
for connection to
the public switched
telephone network)
First ring* Country dependent
Conference Off
Handset ring
melody*
Receiver volume Volume 3
Handset speaker
volume
Handset ring volume Level 3
Handset key beep On
XHD sound On
Incoming call log Empty
Redial list Empty
Country dependent
Level 3
Answering Machine
Ans machine status On
Ans machine mode [ANSWER & REC.]
Base call screening On
Announcement
memory
Incoming message
memory
Remote access Off
PIN code 0000
Voice language Country dependent
Ring delay 5 rings
Speaker volume Level 3
Note
*Country dependent features •
Pre-recorded
announcement
Empty
40 EN
Page 41

16 Technical data
Display
Amber LCD backlight•
General telephone features
Dual mode caller name & number •
identication
Conference call and voicemails•
Intercom•
Maximum talk time: 17 hours•
Phonebook list, Redial list and Call log
Phonebook list with 200 entries•
Redial list with 10 entries•
Call log with 50 entries•
Battery
2 x AAA NiMH 1.2V Rechargeable •
750mAh batteries
Adapter
Base and charger
Salom Electric (Xiamen) Co., Ltd. : SSW-•
1920: Input 100-240V 50/60Hz 200mA
Output: DC6V 500mA
Power consumption
Power consumption at standby mode: •
around 0.6W (SE271); 0.65W (SE576)
Weight and dimensions (SE571)
Handset: 137.8 grams•
163.4 x 47.2 x 29.5 mm (H x W x D)•
Base: 145.2 grams•
130.4 x 111.2 x 87.7 mm (H x W x D)•
Charger: 51.2 grams•
96.2 x 80.2 x 74.2mm (W x H x D)•
Weight and dimensions (SE576)
Handset: 137.8 grams•
163.4 x 47.2 x 29.5 mm (H x W x D)•
Base: 188.6 grams•
130.4 x 111.2 x 87.7 mm (H x W x D)•
Charger: Charger: 51.2 grams•
96.2 x 80.2 x 74.2 mm (H x W x D)•
Temperature range
Operation: 0°C to +35°C (32°F to 95°F)•
Storage: -20°C to +45°C (-4°F to 113°F)•
Relative humidity
Operation: Up to 95% at 40°C•
Storage: Up to 95% at 40°C•
English
EN
41
Page 42
17 Frequently
asked questions
No signal bar displays on the screen.
The handset is out of range. Move it •
closer to the base station.
If the handset displays •
[UNREGISTERED], register the handset.
Tip
For more information, see “Register the •
handsets” on the Advanced settings section.
If I fail to register the additional handsets to
the base station, what do I do?
Your base memory is full. Unregister the unused
handsets and try again.
No dialing tone
Check your phone connections. •
The handset is out of range. Move it •
closer to the base station.
No docking tone
The handset is not placed properly on the •
base station/charger.
The docking tone setting is off. •
The charging contacts are dirty. •
Disconnect the power supply rst and
clean the contacts with a damp cloth.
I cannot change the settings of my voice mail,
what do I do?
The voice mail service is managed by your
service provider but not the phone itself.
Contact your service provider to change the
settings.
The handset on the charger does not charge.
Ensure the batteries are inserted •
correctly.
Ensure the handset is placed properly on •
the charger. The battery icon animates
when charging.
Batteries are defective. Purchase new •
ones from your dealer.
No display
Ensure the batteries are charged. •
Ensure there are power and phone •
connections.
Bad audio (crackles, echo, etc.)
The handset is nearly out of range. Move •
it closer to the base station.
The phone receives interference from •
the nearby electrical appliances. Move the
base station away from them.
The phone is at a location with thick •
walls. Move the base away from them.
The handset does not ring.
Ensure the handset ringtone is turned on.
The caller ID does not display.
The service is not activated. Check with •
your service provider.
The caller’s information is withheld or •
unavailable.
When I see [WAITING…] on the screen,
what is happening with the phone?
The phone is recalling the memory of the
phonebook and call log. Both information are
stored in the base station. Then the handset
retrieves the data from the base station after
a few seconds. When you press / the call
log/phonebook information is displayed on the
handset.
The handset loses connection with the base
or the sound is distorted during a call.
Check if the ECO mode is activated. Turn it
off to increase the handset range and enjoy
the optimal call conditions.
Note
If the above solutions do not help, disconnect •
the power supply from both the handset and
base station. Try again after 1 minute.
42 EN
Page 43

ANNEX 1
English Hereby, Philips Consumer Lifestyle, BU P&A, declares that this [type of equipment] is in
compliance with the essential requirements and other relevant provisions of Directive
1999/5/EC.
Finnish Philips Consumer Lifestyle, BU P&A vakuuttaa täten että [type of equipment) tyyppinen
laite on direktiivin 1999/5/EY oleellisten vaatimusten ja sitä koskevien direktiivin muiden
ehtojen mukainen.
Dutch Hierbij verklaart, Philips Consumer Lifestyle, BU P&A dat het toestel [type of
equipment] in overeenstemming is met de essentiële eisen en de andere relevante
bepalingen van richtlijn 1999/5/EG.
French Par la présente, Philips Consumer Lifestyle, BU P&A, déclare que l’appareil [type
of equipment] est conforme aux exigences essentielles et aux autres dispositions
pertinentes de la directive 1999/5/CE
Swedish Härmed intygar, Philips Consumer Lifestyle, BU P&A, att denna (type of equipment]
står I överensstämmelse med de väsentliga egenskapskrav och övriga relevanta
bestämmelser som framgår av direktiv 1999/5/EG.
Danish Undertegnede Philips Consumer Lifestyle, BU P&A erklærer herved, at følgende udstyr
[type of equipment] overholder de væsentlige krav og øvrige relevante krav i direktiv
1999/5/EF
German Hiermit erklärt Philips Consumer Lifestyle, BU P&A die Übereinstimmung des Gerätes
[Type of equipment] mit den grundlegenden Anforderungen und den anderen
relevanten Festlegungen der Richtlinie 1999/5/EG.
Greek ΜΕ ΤΗΝ ΠΑΡΟΥΣΑ Philips Consumer Lifestyle, BU P&A ΔΗΛΩΝΕΙ ΟΤΙ [type of
equipment] ΣΥΜΜΟΡΦΩΝΕΤΑΙ ΠΡΟΣ ΤΙΣ ΟΥΣΙΩΔΕΙΣ ΑΠΑΙΤΗΣΕΙΣ ΚΑΙ ΤΙΣ
ΛΟΙΠΕΣ ΣΧΕΤΙΚΕΣ ΔΙΑΤΑΞΕΙΣ ΤΗΣ ΟΔΗΓΙΑΣ 1999/5/ΕΚ
Italian Con la presente Philips Consumer Lifestyle, BU P&A dichiara che questo (type of
equipment) è conforme ai requisiti essenziali ed alle altre disposizioni pertinenti stabilite
dalla direttiva 1999/5/CE.
Spanish Por medio de la presente, Philips Consumer Lifestyle, BU P&A, declara que el (type
of equipment) cumple con los requisitos esenciales y cualesquiera otras disposiciones
aplicables o exigibles de la Directiva 1999/5/CE
Portuguese Philips Consumer Lifestyle, BU P&A declara que este [type of equipment] está
conforme com os requisitos essenciais e outras disposições da Directiva 1999/5/CE.
Property of Philips Consumer Lifestyle
Page 44

0168
© 2010 Koninklijke Philips Electronics N.V.
All rights reserved. IFU_SE571-576_EN_V1.1
WK10335
 Loading...