

Page 1
SDV4235/10
EN Amplied indoor antenna 2
FR Antenne intérieure avec amplication 7
DE Verstärkte Zimmerantenne 13
ES Antena amplicada para interiores 19
PT Antena interior amplicada 25
IT Antenna da interni amplicata 31
SV Förstärkt inomhusantenn 37
NL Versterkte binnenantenne 43
Register your product and get support at:
www.philips.com/welcome
EL εσωτερική κεραία με
ενίσχυση σήματος 49
CS Zesilovací anténa pro vnitřní použití 55
PL Antena pokojowa ze wzmocnieniem 61
HU Beltéri antennaerősítő 67
TR Amplikasyonlu iç mekan anteni 73
RU комнатная антенна с усилителем 79
FI Vahvistettu sisäantenni 85
Page 2

Table of Contents
1. Important 2
2. Your indoor television antenna 3
2.1 Product overview 3
3. Getting Started 4
3.1 Installation 4
3.2 Connect to your TV 4
3.3 Using with an external antenna 4
or other video source
4. Using your television antenna 5
4.1 For VHF/FM reception 5
4.2 For UHF reception 5
4.3 Setting up a digital tuner 6
with this antenna
5. Frequently asked questions 6
6. Warranty and service 6
1 Important
Take time to read this manual before you use
your Philips indoor television antenna. It contains
important information and notes regarding
installation and set up.
© 2008 Koninklijke Philips Electronics N.V.
All rights reserved. Reproduction in whole or in
part is prohibited without the written consent of
the copyright owner. Trademarks are the
property of Koninklijke Philips Electronics N.V.
or their respective owners.
D Note
The SDV4235/10 has 2 options for a power
supply AC or DC:
a) AC power cord (230 – 240V) included
b) 12V DC socket (cord/adapter not included)
Disposal of your old product
Your product is designed and manufactured with
high quality materials and components, which
can be recycled and reused.
When this crossed-out wheeled bin
symbol is attached to a product it
means the product is covered by the
European Directive 2002/96/EC
Please inform yourself about the local
separate collection system for electrical and
electronic products.
Please act according to your local rules and
do not dispose of your old products with your
normal household waste. The correct disposal
of your old product will help prevent potential
negative consequences for the environment and
human health.
Take the package to your local recycling center.
Page 3
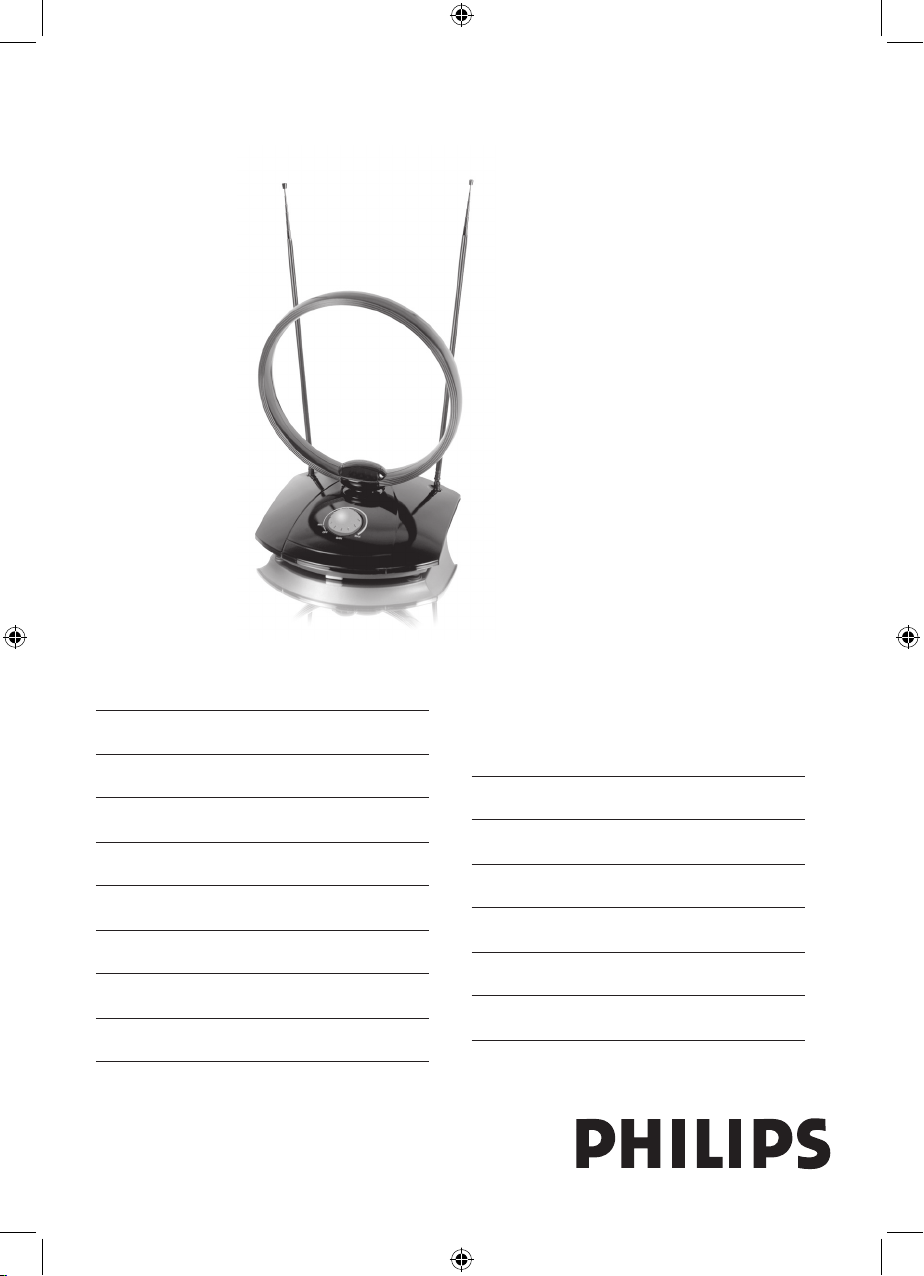
3
2 Your indoor
television antenna
Congratulations on your purchase and
welcome to Philips!
To fully benet from the support that Philips
offers, register your product at
www.philips.com/welcome.
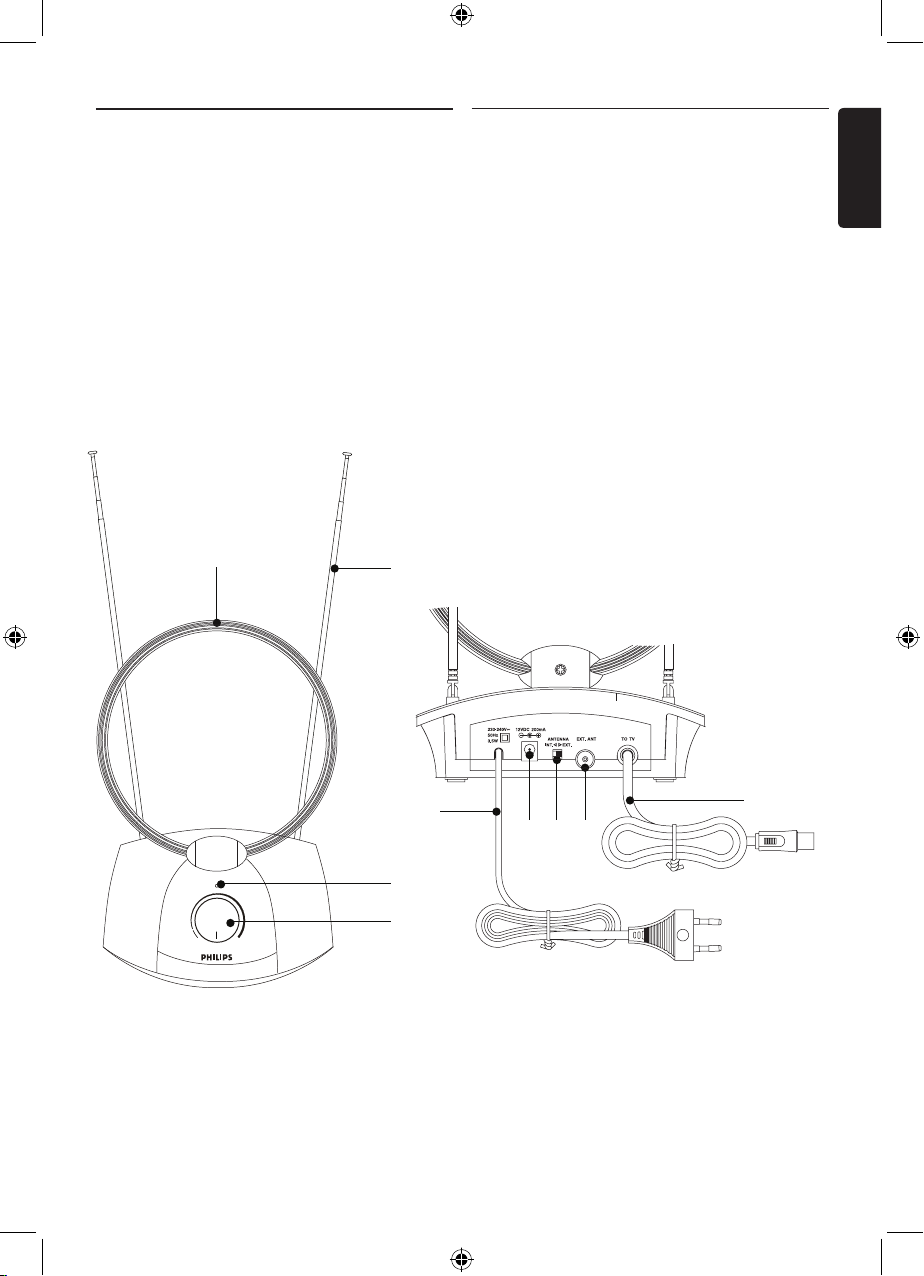
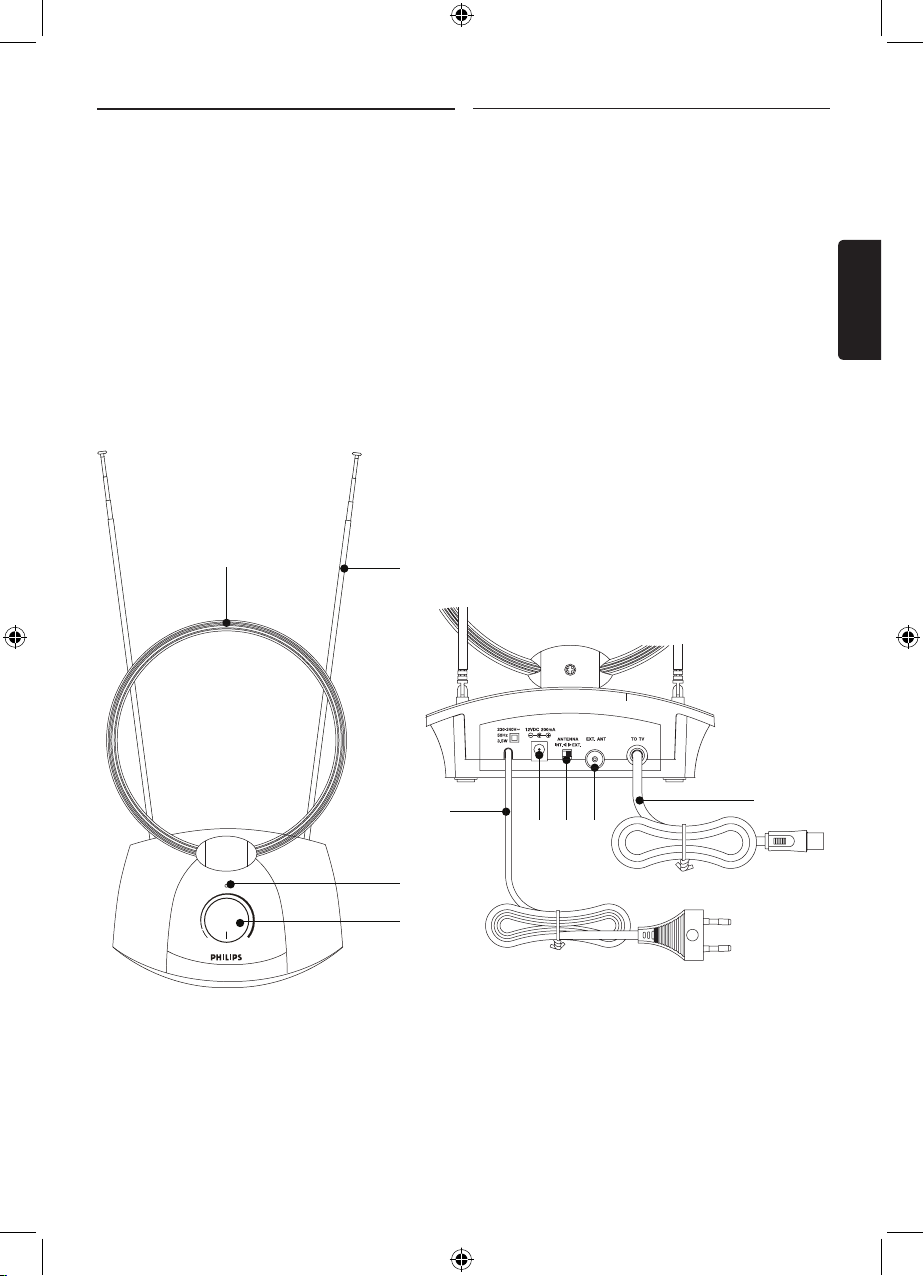
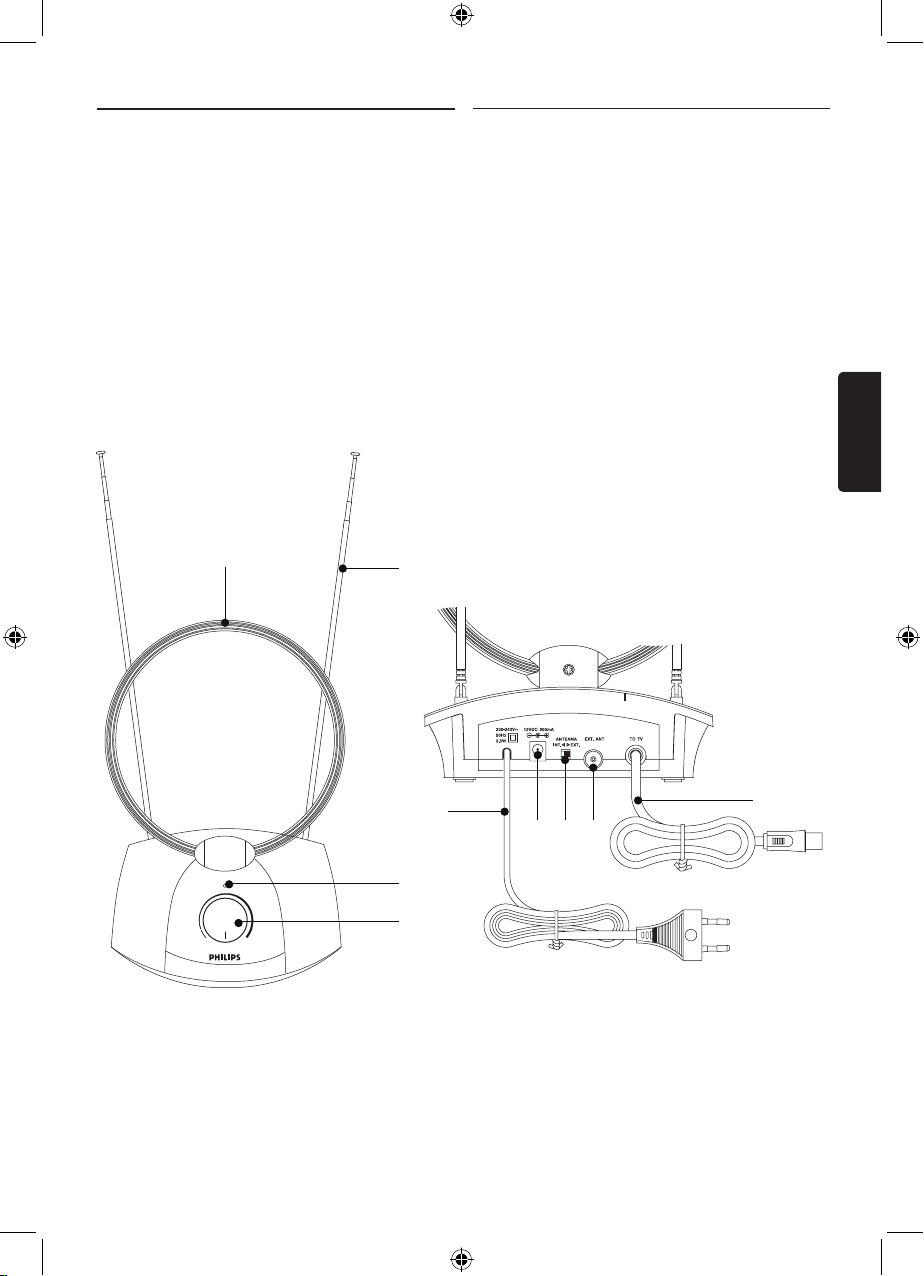
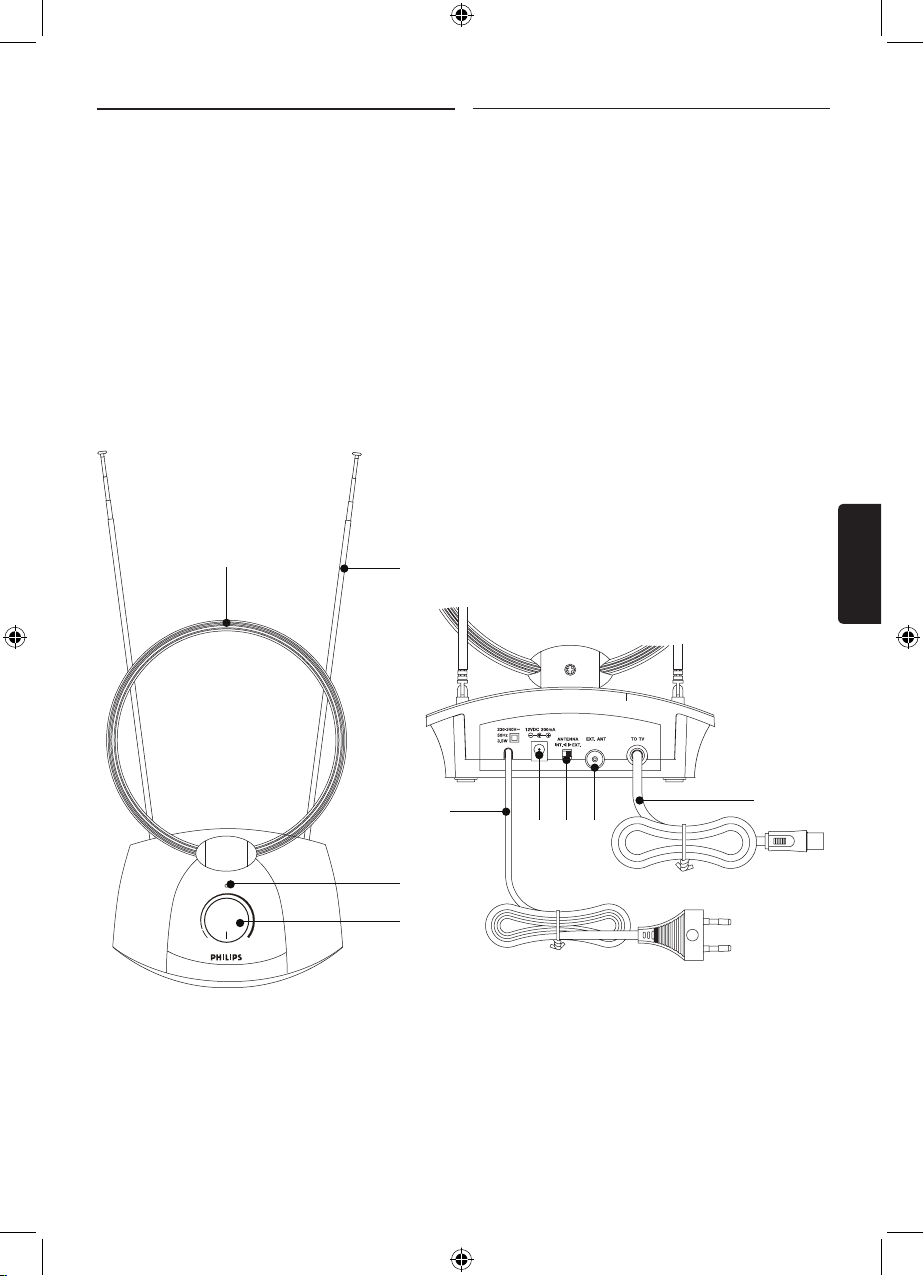
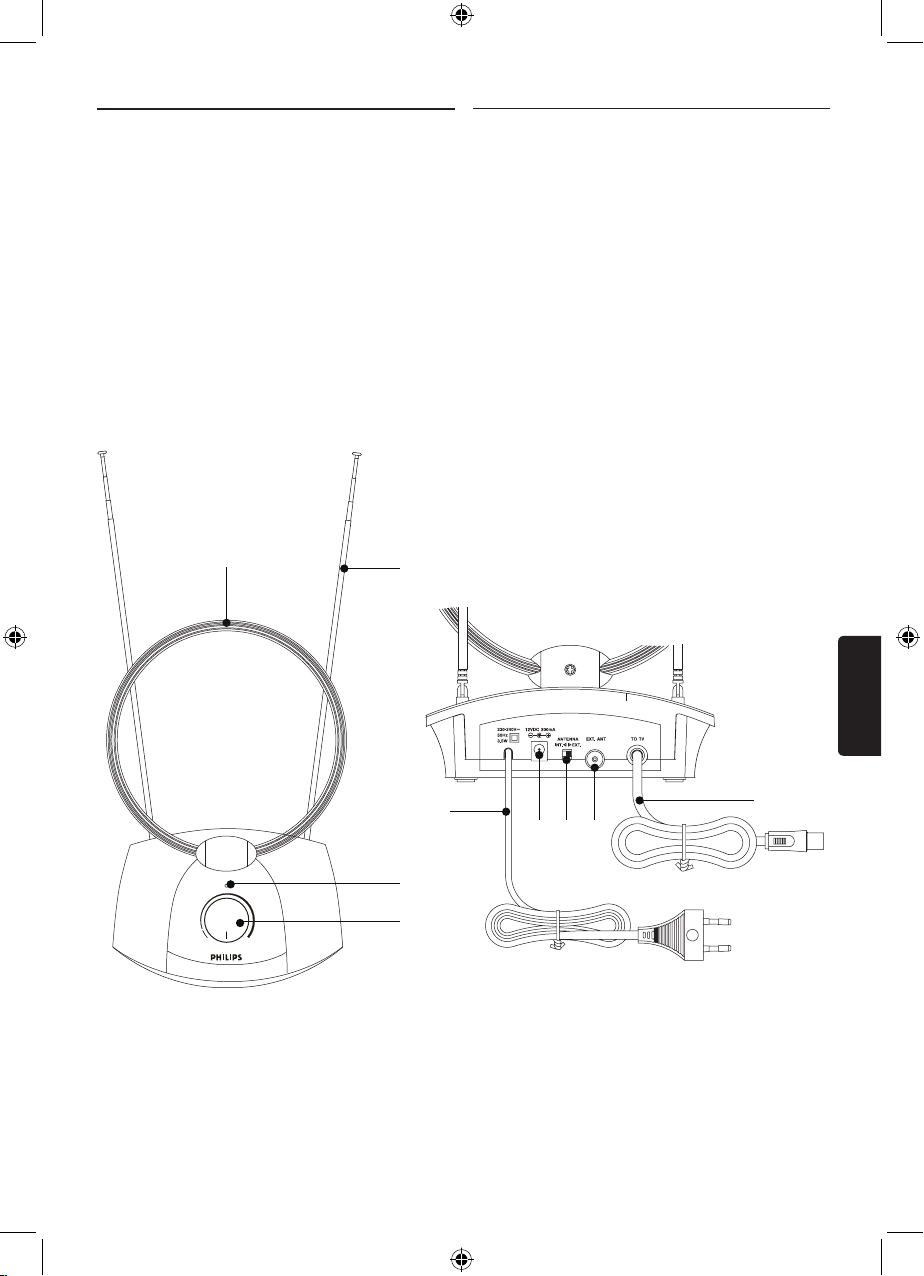
2.1 Product overview
A VHF antenna
B UHF antenna
C Signal gain indicator
D Power switch/gain control knob
E 230-240V AC power supply (included)
F 12V DC power connection
(12V DC power adaptor, not included)
G AB switch
H Ext. antenna connection
I Out to TV connection
MIN
OFF
MAX
GAIN
A
B
I
F G H
E
C
D
ENGLISH
Page 4

4
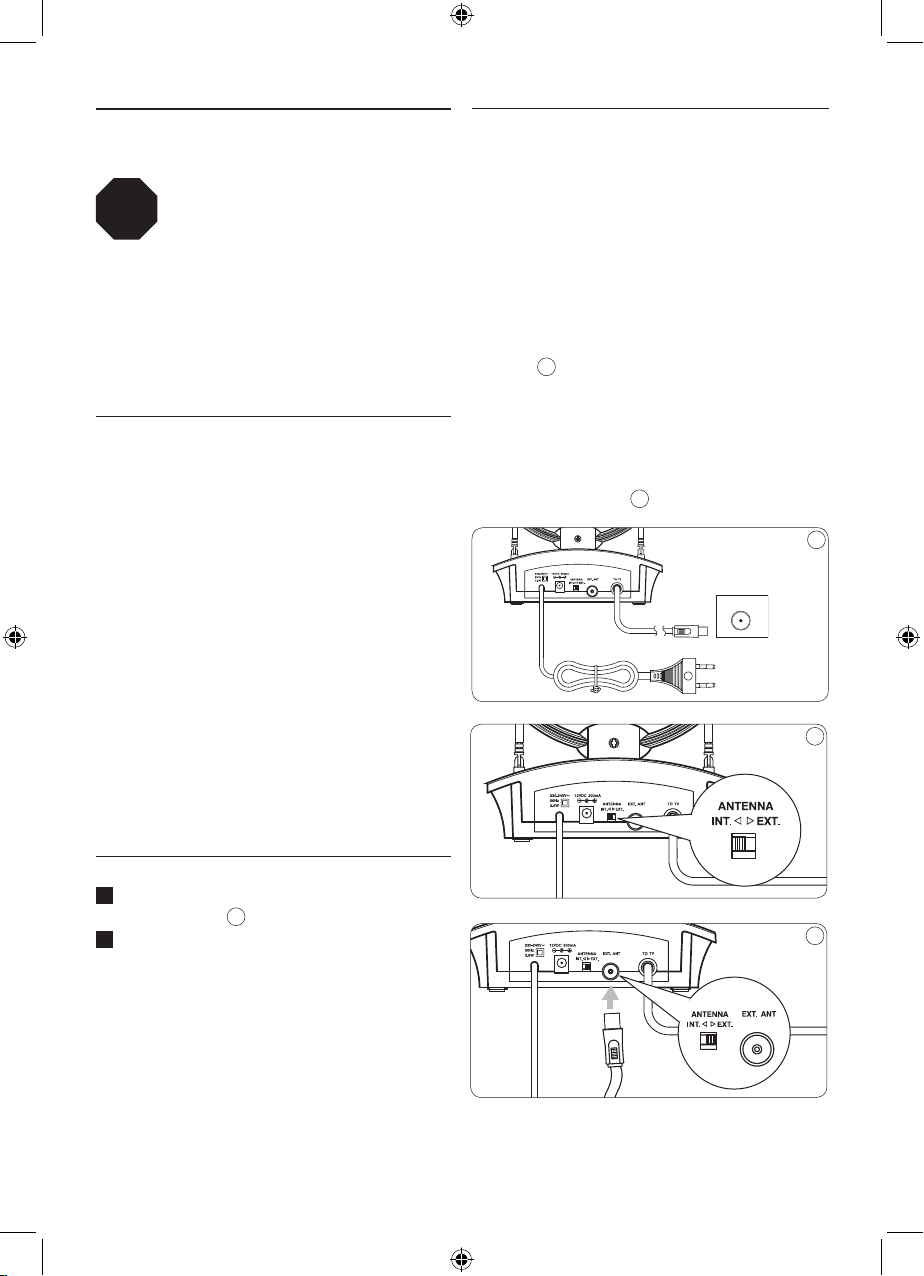
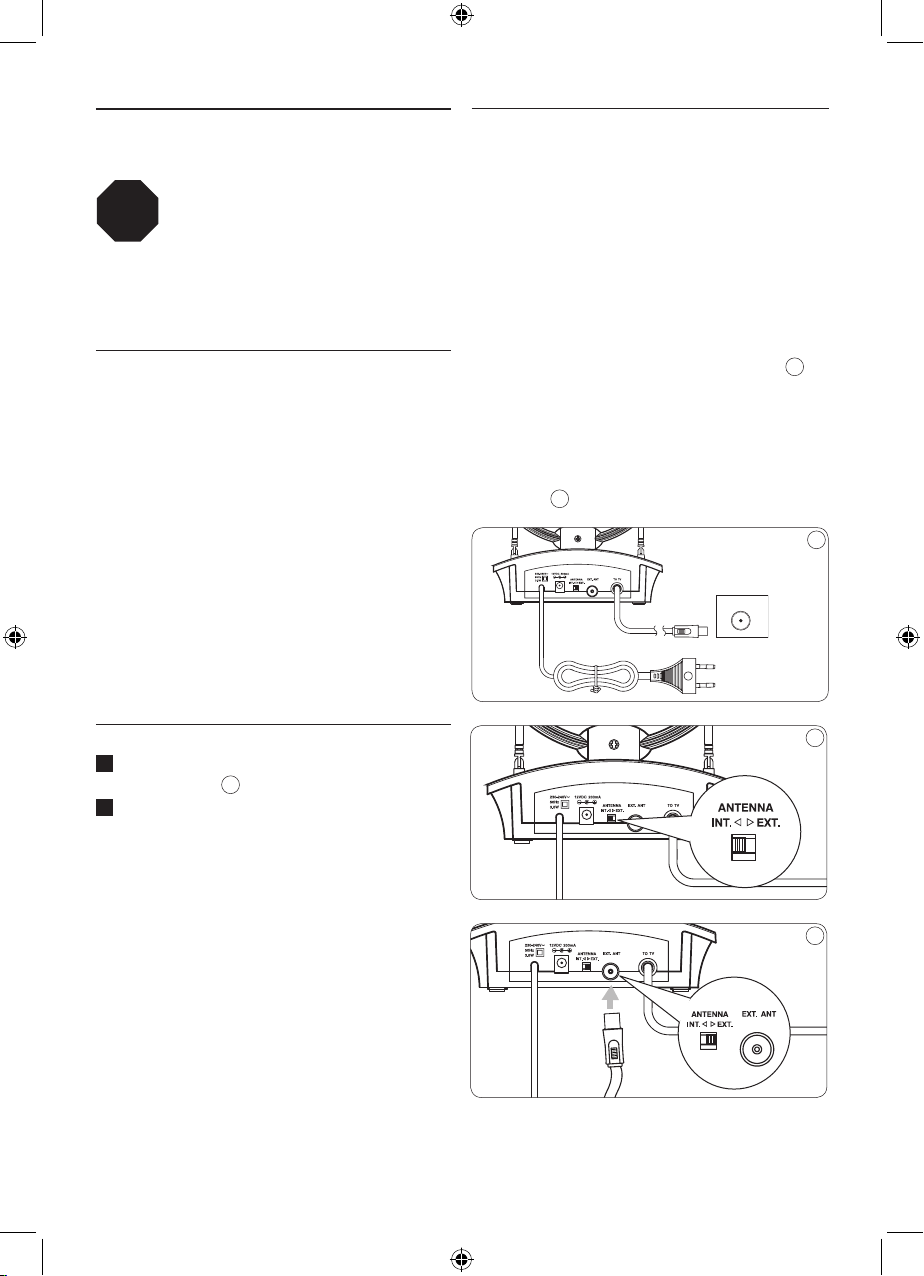
3.3 Using with an external antenna or
other video source
Your antenna is equipped with a mode selector
switch (A/B switch) that allows you to have
more than one video source.
To use your SDV4235/10 as an internal
amplied TV antenna simply slide the switch
to INT position. To use an external antenna
or other video source simply slide the switch
to EXT position. 2
If you are using the antenna with the switch
in the EXT position, make sure that your
external antenna or other video source is
connected to the EXT ANT input located
on the back of the antenna.
3
3 Getting Started
Before you start: For this antenna
to work properly, you must access
the menu on the television you are connecting
this antenna to (consult your television owner’s
manual) then set it to receive the signal from an
ANTENNA instead of CABLE or SATELLITE.
3.1 Installation
Determining Signal Strength
Before Installation determine the best location
for optimum reception. It is important for the
antenna to have an unobstructed path to the
transmitter. For best results, the antenna should
be facing the transmitter location.
E Tip
Where possible, choose a location near a
window which will give the antenna a clear view
of the transmitter.
E Tip
Do not place the antenna on a metal surface.
3.2 Connect to your TV
1 Connect the signal output on the antenna
to the TV.
1
2 Connect the power supply from the antenna
to a 230-240V outlet.
-or-
Connect 12V DC adaptor plug (not
included) to antenna and plug in.
STOP
2
3
ANT.
TV
1
Page 5
5
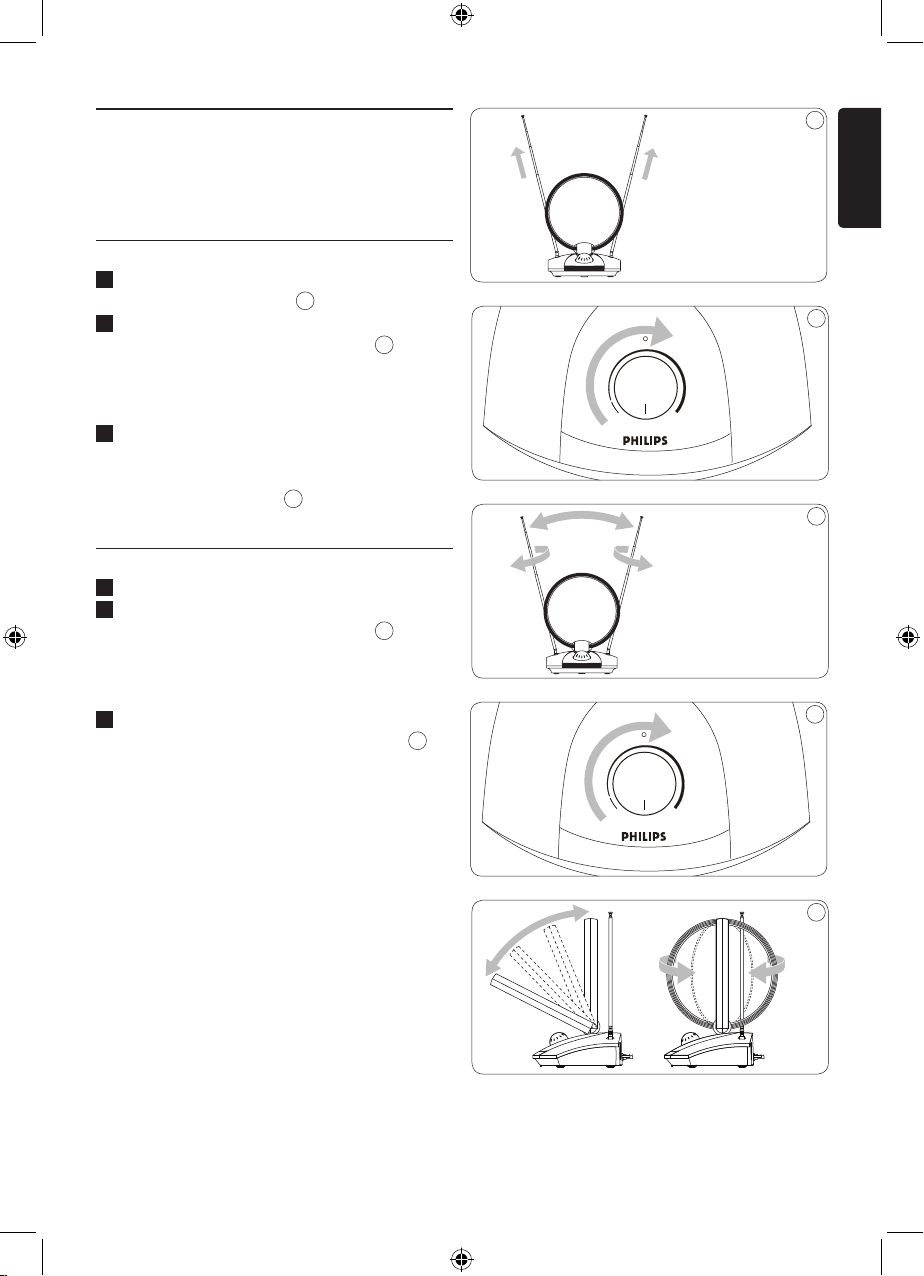
4 Using your indoor
television antenna
4.1 For VHF/FM reception
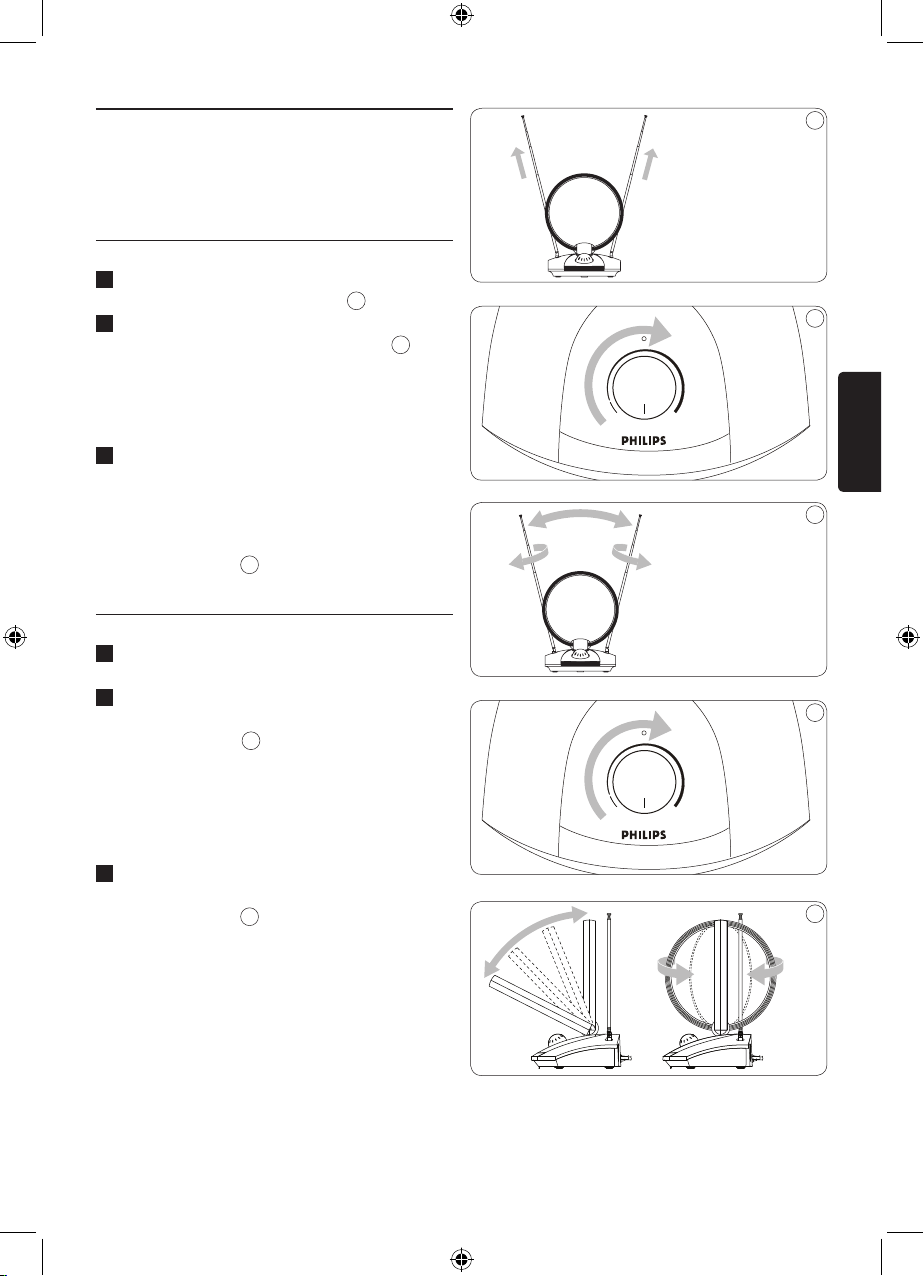
1 Extend the telescoping dipoles to the
longest possible length.
4
2 Turn on the amplier by rotating the gain
control knob to the max position.
5
D Note
You may need to turn the gain control down to
a lower setting for best reception.
3 Turn your TV or FM radio to the desired
channel/station. Adjust the dipoles (moving
in different directions up and down) until
reception is achieved.
6
4.2 For UHF reception
1
Turn your TV to the desired channel.
2
Turn on the amplier by rotating the gain
control knob to the max position.
7
D Note
You may need to turn the gain control down to
a lower setting for best reception.
3
Tilt or Swivel the UHF loop towards the
transmitter until reception is achieved.
8
4
MIN
OFF
MAX
GAIN
5
MIN
OFF
MAX
GAIN
7
6
ENGLISH
8
Page 6
6
4.3 Setting up a digital tuner
with this antenna
Digital TV tuners require you to program the
tuner with the available channels in your area.
Generally this automatic process is part of the
set –up of the tuner. However, if you do not
have the antenna set up properly you may nd
that the tuner receives no viewable channels.
If you have access to a rooftop antenna or
another antenna which is currently connected
to a digital tuner you may use the antenna
to program the tuner. The channels will be
memorized in the tuner - which will make
aligning this antenna easier.
Another method is to connect the antenna
directly to your TV (not using the tuner) and
tune to analogue channels to nd best location
of the antenna, then re-connect the digital tuner
– if you have adequate signal level you should be
able to program the tuner.
5 Frequently asked questions
Will this antenna work with
Analogue transmissions?
Yes, this antenna is capable of receiving
analogue television broadcasts in the UHF and
VHF bandwidths.
Will this antenna receive digital or work
with HD-DVB broadcasts?
Yes, this antenna is designed to receive Digital
DVB and HDTV broadcasts in the UHF &
VHF bandwidths.
Can the antenna be powered by a DC
power supply in a boat, RV or camper?
Yes, there is a DC power socket located on the
back of the antenna. Plug you cable/adapter (not
included) into the antenna and then into your
power source.
Where should I place the antenna in
order to get the best reception possible?
Where possible, choose a location that is near
a window which will give the antenna a clear
view of the transmitter.
D Note
For best reception you should also avoid
placing the antenna on a metal surface which
may cause interference.
How do I know how much gain
(amplication) is required to receive a
clear picture?
Once you have the VHF dipoles extended to the
longest length turn on the amplier. It is easiest
to start with the maximum gain and then reduce
as needed. In some case you may receive a
clearer picture with less gain than the
maximum setting.
Can I set this antenna up
with a digital tuner?
Yes, this antenna can be set up with a digital
tuner. See section 4.3 of your user manual.
6 Warranty & Service
Warranty information can be found at:
www.philips.com/welcome
For technical support, send us an email with the
model number of the product and a detailed
description of your problem to:
accessorysupport@philips.com
Page 7
7
FRANÇAIS
Table des matières
1. Important 8
2. Votre antenne TV intérieure
9
2.1 Présentation 9
3. Mise en route 10
3.1 Installation 10
3.2 Connexion au téléviseur 10
3.3 Utilisation avec une antenne externe 10
ou une autre source vidéo
4. Utilisation de votre antenne TV 11
4.1 Pour la réception VHF/FM 11
4.2 Pour la réception UHF 11
4.3 Réglage d’un tuner 13
numérique avec l’antenne
5. Foire aux questions
12
6. Garantie et service
12
Page 8
8
1 Important
Prenez le temps de lire ce manuel avant
d’utiliser votre antenne TV intérieure Philips. Il
contient en effet des informations et remarques
importantes concernant l’installation et la
conguration du produit.
© 2008 Koninklijke Philips Electronics N.V.
Tous droits réservés. Toute reproduction,
partielle ou intégrale, est interdite sans le
consentement écrit préalable du détenteur des
droits d’auteur. Les marques commerciales sont
la propriété de Koninklijke Philips Electronics
N.V. ou de leurs détenteurs respectifs.
D Remarque
L’antenne SDV4235/10 est dotée de 2 options
pour une alimentation CA ou CC :
a) cordon d’alimentation CA
(230 - 240 V) inclus
b) prise 12 V CC
(cordon/adaptateur non inclus)
Mise au rebut des produits en fin de vie
Ce produit a été conçu et fabriqué avec des
matériaux et composants recyclables de
haute qualité.
Le symbole d’une poubelle barrée
apposé sur un produit signie que ce
dernier répond aux exigences de
la directive européenne 2002/96/EC.
Informez-vous auprès des instances locales sur
le système de collecte des produits électriques
et électroniques en n de vie.
Conformez-vous à la législation en vigueur
et ne jetez pas ce produit avec les déchets
ménagers. Seule une mise au rebut adéquate des
produits peut empêcher la contamination de
l’environnement et ses effets nocifs sur la santé.
Apportez l’emballage dans votre centre de
recyclage local.
Page 9
9
FRANÇAIS
2 Votre antenne
TV intérieure
Félicitations pour votre achat et bienvenue
chez Philips.
Pour profiter pleinement de l’assistance
Philips, enregistrez votre produit sur le site
à l’adresse suivante :
www.philips.com/welcome.
2.1 Présentation
A Antenne VHF
B Antenne UHF
C Indicateur de gain de signal
D Bouton d’alimentation/bouton
de contrôle du gain
E Alimentation 230-240 V CA (incluse)
F Connexion d’alimentation 12 V CC
(adaptateur d’alimentation
12 V CC non inclus)
G Commutateur A/B
H Connexion d’antenne externe
I Sortie pour connexion TV
MIN
OFF
MAX
GAIN
A
B
I
F G H
E
C
D
Page 10
10
3.3 Utilisation avec une antenne externe
ou une autre source vidéo
Votre antenne est équipée d’un commutateur
de sélection de mode (commutateur A/B) qui
permet de connecter plusieurs sources vidéo.
Pour utiliser l’antenne SDV4235/10 en tant
qu’antenne TV intérieure avec amplicateur,
positionnez le commutateur sur INT.
Pour utiliser une antenne externe ou une
autre source vidéo, positionnez le commutateur
sur EXT. 2
Si vous positionnez le commutateur sur EXT,
assurez-vous que votre antenne externe ou
que votre autre source vidéo est bien
connectée à l’entrée EXT ANT située à
l’arrière de l’antenne. 3
3 Mise en route
Avant de commencer : Pour que
l’antenne fonctionne correctement,
accédez au menu du téléviseur auquel vous
connectez l’antenne (consultez le manuel
d’utilisation du téléviseur), puis réglez les
paramètres de sorte que le téléviseur reçoive
le signal émis par l’ANTENNE et non par le
CÂBLE ou le SATELLITE.
3.1 Installation
Détermination de l’intensité du signal
Avant l’installation, déterminez le meilleur
emplacement pour bénécier d’une réception
optimale. Il est important de ne pas entraver le
chemin entre l’antenne et le transmetteur. Pour
de meilleurs résultats, l’antenne doit être placée
face au transmetteur.
E Conseil
Choisissez, si possible, un emplacement situé
près d’une fenêtre : l’antenne identiera
clairement la position du transmetteur.
E Conseil
Ne placez pas l’antenne sur une
surface métallique.
3.2 Connexion au téléviseur
1 Connectez la sortie de signal de l’antenne
au téléviseur.
1
2 Connectez l’alimentation de l’antenne à
une prise 230-240 V.
-ou-
Connectez la che de l’adaptateur 12 V CC
(non incluse) à l’antenne, puis branchez-la.
STOP
2
3
ANT.
TV
1
Page 11

11
FRANÇAIS
4 Utilisation de votre
antenne TV intérieure
4.1 Pour la réception VHF/FM
1
Étendez les dipôles télescopiques
au maximum.
4
2 Allumez l’amplicateur en tournant le
bouton de contrôle du gain jusqu’à la
position maximale.
5
D Remarque
Vous devrez peut-être régler le bouton de
contrôle du gain sur une position plus basse
pour obtenir une meilleure réception.
3 Allumez votre téléviseur ou radio FM sur
la chaîne/station souhaitée. Réglez les dipôles
(en les déplaçant dans différentes directions
vers le haut et le bas) jusqu’à obtenir une
réception satisfaisante.
6
4.2 Pour la réception UHF
1
Allumez votre téléviseur sur
la chaîne souhaitée.
2
Allumez l’amplicateur en tournant le
bouton de contrôle du gain jusqu’à
la position maximale.
7
D Remarque
Vous devrez peut-être régler le bouton de
contrôle du gain sur une position plus basse
pour obtenir une meilleure réception.
3
Inclinez ou orientez l’antenne à boucle
UHF vers le transmetteur jusqu’à obtenir
une réception satisfaisante.
8
4
MIN
OFF
MAX
GAIN
5
MIN
OFF
MAX
GAIN
7
6
8
Page 12
12
4.3 Réglage d’un tuner numérique
avec l’antenne
Vous devez programmer le tuner TV numérique
avec les chaînes disponibles dans votre zone.
Généralement, ce processus automatique fait
partie de la conguration du tuner. Cependant,
si votre antenne n’est pas correctement
congurée, il est possible que le tuner ne
reçoive aucune chaîne visible.
Si vous avez accès à une antenne de toit ou à
une autre antenne actuellement connectée à un
tuner numérique, utilisez-la pour programmer le
tuner qui mémorisera les chaînes. Cela facilitera
l’alignement de cette antenne.
Vous pouvez également connecter l’antenne
directement à votre téléviseur (sans utiliser
le tuner) et régler les chaînes analogiques
pour rechercher le meilleur emplacement de
l’antenne. Ensuite, connectez à nouveau le
tuner numérique (si vous avez trouvé le niveau
de signal qui convient, vous pourrez programmer
le tuner).
5 Foire aux questions
Cette antenne fonctionne-t-elle avec les
transmissions analogiques ?
Oui, cette antenne peut recevoir les émissions
TV analogiques sur les bandes passantes UHF
et VHF.
Cette antenne peut-elle recevoir ou
fonctionner avec les émissions TV
numériques ou HD-TNT ?
Oui, cette antenne est conçue pour recevoir les
émissions TV numériques TNT et TVHD sur les
bandes passantes UHF et VHF.
Peut-on brancher l’antenne sur
l’alimentation CC d’un bateau, d’une
caravane ou en camping ?
Oui, vous trouverez une prise d’alimentation
CC à l’arrière de l’antenne. Connectez votre
câble/adaptateur (non inclus) à l’antenne, puis
branchez-le sur votre source d’alimentation.
Où dois-je placer l’antenne pour obtenir
la meilleure réception possible ?
Choisissez, si possible, un emplacement situé
près d’une fenêtre : l’antenne identiera
clairement la position du transmetteur.
D Remarque
Pour une réception optimale, évitez de placer
l’antenne sur une surface métallique qui pourrait
causer des interférences.
Comment connaître le niveau de gain
(amplication) nécessaire pour recevoir
une image nette ?
Une fois les dipôles VHF étendus au maximum,
allumez l’amplicateur. Le plus facile est de
commencer avec le gain maximal, puis de réduire
progressivement si nécessaire. Dans certains cas,
vous pouvez recevoir une image plus nette avec
moins de gain qu’avec le réglage maximal.
Puis-je congurer cette antenne
avec un tuner numérique ?
Oui, cette antenne peut être congurée avec un
tuner numérique. Consultez la section 4.3 du
manuel d’utilisation.
6 Garantie et service
Les informations de garantie sont disponibles
sur le site : www.philips.com/welcome.
Pour obtenir une assistance technique, envoyez
un e-mail contenant la référence du produit et
une description détaillée de votre problème à
l’adresse : accessorysupport@philips.com
Page 13
13
DEUTSCH
Inhaltsverzeichnis
1. Wichtig 14
2. Ihre Zimmerfernsehantenne
15
2.1 Produktüberblick 15
3. Erste Schritte 16
3.1 Einrichtung 16
3.2 Anschluss an den Fernseher 16
3.3 Verwendung mit externer Antenne 16
oder anderer Videoquelle
4. Verwendung der Fernsehantenne 17
4.1 Für VHF/FM-Empfang 17
4.2 Für UHF-Empfang 17
4.3 Einrichtung eines Digitaltuners 18
mit dieser Antenne
5. Häug gestellte Fragen (FAQ)
18
6. Garantie und Service
18
Page 14
14
1 Wichtig
Lesen Sie vor der Verwendung Ihrer
Philips Zimmerfernsehantenne diese
Bedienungsanleitung. Sie enthält wichtige
Informationen und Hinweise zur Installation
und Einrichtung.
© 2008 Koninklijke Philips Electronics N.V.
Alle Rechte vorbehalten. Die Vervielfältigung
als Ganzes oder in Teilen ohne schriftliche
Genehmigung des Urheberrechtsinhabers
ist verboten. Die Marken sind Eigentum von
Koninklijke Philips Electronics N.V. oder der
jeweiligen Firmen.
D Hinweis
Die SDV4235/10 hat zwei
Stromversorgungsanschlüsse:
a) Netzkabel (230 - 240 V) im
Lieferumfang enthalten
b) 12 V DC-Eingang (Kabel/Adapter nicht im
Lieferumfang enthalten)
Entsorgung Ihres alten Geräts
Ihr Gerät wurde unter Verwendung
hochwertiger Materialien und Komponenten
entwickelt und hergestellt, die recycelt und
wieder verwendet werden können.
Bendet sich dieses Symbol
(durchgestrichene Abfalltonne
auf Rädern) auf dem Gerät, bedeutet
dies, dass für dieses Gerät die
europäische Richtlinie 2002/96/EG gilt.
Informieren Sie sich über die geltenden
Bestimmungen zur getrennten Sammlung
von Elektro- und Elektronik-Altgeräten in
Ihrem Land.
Richten Sie sich bitte nach den geltenden
Bestimmungen in Ihrem Land, und entsorgen Sie
Altgeräte nicht über Ihren Haushaltsabfall. Durch
die korrekte Entsorgung Ihrer Altgeräte werden
Umwelt und Menschen vor möglichen negativen
Folgen geschützt.
Entsorgen Sie die Verpackung vorschriftsgemäß.
Page 15
15
DEUTSCH
2 Ihre
Zimmerfernsehantenne
Herzlichen Glückwunsch zu Ihrem Kauf und
willkommen bei Philips!
Um den von Philips bereitgestellten
Kundendienst in vollem Umfang nutzen zu
können, registrieren Sie Ihr Produkt unter
www.philips.com/welcome.
2.1 Produktüberblick
A VHF-Antenne
B UHF-Antenne
C Signalverstärkungs-Anzeige
D Netzschalter/Verstärkungsregelung
E 230 -240 V AC-Stromversorgung
(im Lieferumfang enthalten)
F 12 V DC-Anschluss (12 V DC-Netzteil,
nicht im Lieferumfang enthalten)
G AB-Schalter
H Externer Antennenanschluss
I TV-Ausgang
MIN
OFF
MAX
GAIN
A
B
I
F G H
E
C
D
Page 16

16
3.3 Verwendung mit externer Antenne
oder anderer Videoquelle
Ihre Antenne ist mit einem Schalter zur
Modusauswahl (A/B-Schalter) ausgestattet,
mit dem Sie über mehrere Videoquellen
verfügen können.
Um Ihre SDV4235/10 als verstärkte
Zimmerfernsehantenne zu verwenden, stellen
Sie den Schalter auf die Position INT. Um eine
externe Antenne oder andere Videoquelle zu
verwenden, stellen Sie den Schalter auf die
Position EXT. 2
Falls Sie die Antenne auf der Position EXT
verwenden möchten, stellen Sie sicher, dass Ihre
externe Antenne oder andere Videoquelle am
EXT ANT-Eingang auf der Rückseite der Antenne
angeschlossen ist. 3
3 Erste Schritte
Vor dem Start: Damit diese Antenne
ordnungsgemäß funktioniert,
müssen Sie über das Menü des Fernsehgeräts,
an das Sie die Antenne anschließen möchten, die
Signaleinstellung von KABEL oder SATELLIT auf
ANTENNE ändern. Informationen dazu nden
Sie im Handbuch Ihres Fernsehgeräts..
3.1 Einrichtung
Bestimmen der Signalstärke
Ermitteln Sie vor der Einrichtung den besten
Standort für optimalen Empfang. Es dürfen keine
Hindernisse zwischen der Antenne und dem
Sender bestehen. Für ideale Ergebnisse sollte die
Antenne in Richtung des Standorts des Senders
ausgerichtet werden.
E Tipp
Wählen Sie, falls möglich, einen Standort in
der Nähe eines Fensters aus, um eine ideale
Verbindung zwischen Antenne und Sender
zu ermöglichen.
E Tipp
Stellen Sie die Antenne nicht auf metallischen
Oberächen auf.
3.2 Anschluss an den Fernseher
1 Verbinden Sie die Antenne mit dem
Signalausgang am Fernsehgerät.
1
2 Verbinden Sie die Antenne mit einem
230 - 240 V-Netzteil.
– oder –
Schließen Sie einen 12 V-DC-Adapterstecker
(nicht im Lieferumfang enthalten)
an die Antenne an.
STOP
2
3
ANT.
TV
1
Page 17
17
DEUTSCH
4 Verwenden Ihrer
Zimmerfernsehantenne
4.1 Für VHF/FM-Empfang
1 Fahren Sie die Teleskop-Dipole auf
die höchstmögliche Länge aus.
4
2 Schalten Sie den Verstärker ein, indem Sie
an der Verstärkungsregelung drehen.
5
D Hinweis
Für optimalen Empfang müssen Sie die
Verstärkungsregelung eventuell auf eine
niedrigere Position stellen
3
Stellen Sie den gewünschten Kanal oder
Sender auf Ihrem Fernsehgerät oder
FM-Radio ein. Stellen Sie die Dipole ein
(bewegen Sie diese dazu in verschiedene
Richtungen auf- und abwärts), bis Sie
Empfang haben.
6
4.2 Für UHF-Empfang
1
Stellen Sie den gewünschten Kanal auf
Ihrem Fernsehgerät ein.
2
Schalten Sie den Verstärker ein, indem Sie
die Verstärkungsregelung auf die maximale
Position stellen.
7
D Hinweis
You may need to turn the gain control down
to Für optimalen Empfang müssen Sie die
Verstärkungsregelung eventuell auf eine
niedrigere Position stellen.
3
Neigen oder drehen Sie die UHF-Schleife
in Richtung des Senders, bis Sie
Empfang haben.
8
4
MIN
OFF
MAX
GAIN
5
MIN
OFF
MAX
GAIN
7
6
8
Page 18
18
4.3 Einrichtung eines Digitaltuners
mit dieser Antenne
Bei digitalen TV-Tunern müssen Sie die in Ihrem
Bereich verfügbaren Kanäle in Ihrem Tuner
programmieren. Dieser automatische Vorgang ist
Teil der Einrichtung des Tuners. Falls Sie jedoch
die Antenne nicht ordnungsgemäß eingerichtet
haben, werden Sie feststellen, dass der Tuner
keine Kanäle ndet.
Falls Sie Zugriff auf eine Dachantenne oder eine
andere an einen Digitaltuner angeschlossene
Antenne haben, können Sie den Tuner über die
Antenne programmieren. Die Kanäle werden
im Tuner gespeichert, was die Einrichtung der
Antenne erleichtert.
Eine weitere Möglichkeit zum Ermitteln des
besten Standorts ist der direkte Anschluss der
Antenne an Ihr Fernsehgerät (nicht über den
Tuner) und die Einstellung analoger Kanäle.
Schließen Sie den Digitaltuner dann erneut
an. Falls Sie einen ausreichenden Signalpegel
erhalten, sollten Sie den Tuner
programmieren können.
5 HäuggestellteFragen
Ist diese Antenne mit analoger
Übertragung kompatibel?
Ja, diese Antenne kann analoge Fernsehsender
über die UHF- und VHF-Bandbreite empfangen.
Empfängt diese Antenne digitale oder
HD-DVB-Sender?
Ja, diese Antenne empfängt digitale DVB-
und HDTV-Übertragungen über die UHF &
VHF-Bandbreiten
Kann die Antenne auch über eine
DC-Stromversorgung in einem Boot,
Wohnwagen oder ähnlichem
betrieben werden?
Ja, auf der Rückseite der Antenne bendet sich
eine DC-Stromquelle. Stecken Sie Ihr Kabel/
Ihren Adapter (nicht im Lieferumfang enthalten)
in die Antenne und in Ihre Stromquelle.
Wo sollte ich die Antenne aufstellen, um
den besten Empfang zu erhalten?
Wählen Sie, falls möglich, einen Standort in
der Nähe eines Fensters aus, um eine ideale
Verbindung zwischen Antenne und Sender
zu ermöglichen.
D Hinweis
Für idealen Empfang sollten Sie die Antenne
nicht auf metallischen Oberächen aufstellen, um
Störungen zu vermeiden.
Woher weiß ich, welche Verstärkung
erforderlich ist, um ein klares Bild
zu empfangen?
Schalten Sie den Verstärker ein, sobald Sie die
VHF-Dipole auf die maximale Länge eingestellt
haben. Beginnen Sie mit der maximalen
Verstärkung und senken Sie diese dann je
nach Bedarf. Manchmal erhalten Sie mit einer
niedrigeren Verstärkung ein klareres Bild.
Kann ich diese Antenne
mit einem Digitaltuner einrichten?
Ja, diese Antenne kann mit einem Digitaltuner
eingerichtet werden. Informationen
hierzu nden Sie unter Abschnitt 4.3
Ihrer Bedienungsanleitung.
6 Garantie und Kundendienst
Informationen zur Garantie erhalten Sie unter:
www.philips.com/welcome
Falls Sie technische Unterstützung benötigen,
senden Sie für uns eine E-Mail mit der
Modellnummer des Produkts und einer genauen
Beschreibung Ihres Problems an:
accessorysupport@philips.com
Page 19
19
ESPAÑOL
Tabla de contenido
1. Importante 20
2. Antena de televisión
21
para interiores
2.1 Información general del producto 21
3. Introducción 22
3.1 Instalación 22
3.2 Conexión al televisor 22
3.3 Uso con una antena externa 22
u otra fuente de video
4. Uso de la antena de televisión 23
4.1 Recepción de VHF/FM 23
4.2 Recepción de UHF 23
4.3 Conguración de un sintonizador 24
digital con esta antena
5. Preguntas frecuentes
24
6. Garantía y servicio técnico
24
Page 20
20
1 Importante
Lea este manual detenidamente antes de utilizar
la antena de televisión para interiores Philips,
pues contiene información y notas de suma
utilidad sobre su instalación y conguración.
© 2008 Koninklijke Philips Electronics N.V.
Todos los derechos reservados. Se prohíbe
la reproducción parcial o total del presente
documento sin el consentimiento escrito del
titular de los derechos de propiedad intelectual.
Las marcas comerciales son propiedad de
Koninklijke Philips Electronics N.V. o sus
respectivos titulares.
D Nota
La antena SDV4235/10 ofrece 2 opciones para
alimentación CA o CC:
a) Cable de corriente CA
(230 – 240 V) incluido
b) Entrada CC de 12 V
(no se incluye cable/ adaptador)
Eliminación de productos sin uso
El producto ha sido diseñado y fabricado con
materiales y componentes de alta calidad que
pueden reciclarse y volver a utilizarse.
Si un producto incluye el símbo
o de un contenedor de residuos
con ruedas tachado, signica que
queda incluido en la directiva
europea 2002/96/EC
Solicite información acerca del sistema local
de recolección selectiva de productos eléctricos
y electrónicos.
Cumpla con las normas locales y no deseche
sus productos anteriores junto con los residuos
habituales del hogar. La correcta eliminación del
producto ayudará a prevenir posibles efectos
negativos para el medio ambiente y la salud.
Lleve el empaque al centro de reciclado local.
Page 21
21
ESPAÑOL
2 Antena de televisión
para interiores
Bienvenido a Philips.
Felicitaciones por su compra.
Para utilizar los servicios de asistencia técnica de
Philips, registre su producto en
www.philips.com/welcome.
2.1 Información general del producto
A Antena VHF
B Antena UHF
C Indicador de ganancia de señal
D Interruptor eléctrico y perilla de
control de ganancia
E Alimentación de 230-240 V CA (incluida)
F Conexión eléctrica de 12 V CC
(no se incluye el adaptador de 12 V CC)
G Interruptor AB
H Conexión de antena externa
I Conexión de salida de TV
MIN
OFF
MAX
GAIN
A
B
I
F G H
E
C
D
Page 22

22
3.3 Uso con una antena externa u
otra fuente de video
La antena cuenta con un interruptor de
selección de modo (interruptor A/B) que le
permite utilizar más de una fuente de video.
Para utilizar la antena SDV4235/10 como una
antena interna de TV amplificada, simplemente
deslice el interruptor hasta la posición INT.
Para utilizar una antena externa u otra fuente
de video, deslice el interruptor hasta la
posición EXT. 2
Si utiliza la antena con el interruptor en la
posición EXT, asegúrese de que la antena
externa o fuente de video se encuentre
conectada a la entrada EXT ANT ubicada en la
parte posterior de la antena.
3
3 Introducción
Procedimientos preliminares:
Para que la antena funcione
correctamente, es necesario acceder al menú
del televisor al que se conectará (consulte el
manual del usuario del televisor) y congurarlo
para recibir la señal de una ANTENA en lugar
del servicio de CABLE o SATÉLITE.
3.1 Instalación
Determinación de la potencia de señal
Antes de la instalación es necesario determinar
cuál es el mejor lugar para que la recepción
sea óptima. Es importante que la trayectoria
desde la antena hasta el transmisor no presente
obstrucciones. Para obtener mejores resultados,
la antena debe estar orientada hacia el lugar
donde se encuentra el transmisor.
E Sugerencias
De ser posible, elija un lugar cercano a una
ventana para que no existan interferencias entre
la antena y el transmisor.
E Sugerencias
No coloque la antena sobre una
supercie metálica.
3.2 Conexión al televisor
1 Conecte la salida de señal de la antena
al televisor.
1
2 Conecte el cable de alimentación de la
antena a una toma de 230-240 V.
-O bien-
Conecte un adaptador de 12 V CC
(no se incluye) a la antena y enchúfelo.
2
3
ANT.
TV
1
ALTO
Page 23
23
ESPAÑOL
4 Uso de la antena de
televisión para interiores
4.1 Recepción de VHF/FM
1 Extienda los dipolos telescópicos hasta
la máxima longitud posible.
4
2 Gire la perilla de control de ganancia
hasta alcanzar la posición máxima para
encender el amplicador.
5
D Nota
Puede ser necesario dejar el control de ganancia
en un nivel más bajo para mejorar la recepción.
3
Sintonice el canal de TV o la emisora de
radio FM que desee. Ajuste los dipolos
(mediante un movimiento ascendente y
descendente) hasta que la recepción de la
señal sea satisfactoria.
6
4.2 Recepción de UHF
1
Sintonice el canal de TV deseado.
2
Gire la perilla de control de ganancia hasta
alcanzar la posición máxima para encender
el amplicador.
7
D Nota
Puede ser necesario dejar el control de ganancia
en un nivel más bajo para mejorar la recepción.
3
Incline o gire el bucle de UHF hacia el
transmisor hasta que la recepción de la
señal sea satisfactoria.
8
4
MIN
OFF
MAX
GAIN
5
MIN
OFF
MAX
GAIN
7
6
8
Page 24
24
4.3 Conguración de un sintonizador
digital con esta antena
Los sintonizadores de TV digital requieren que
el usuario programe el sintonizador con los
canales disponibles en el área. Por lo general,
este proceso automático es parte de la
conguración del sintonizador. Sin embargo, si
la antena no está congurada correctamente es
posible que el sintonizador no reciba la señal de
ningún canal.
Si tiene acceso a una antena de techo u otra
antena que se encuentre conectada a un
sintonizador digital puede utilizar la antena
para programar el sintonizador. El sintonizador
memorizará los canales y esto facilitará la
alineación de la antena.
Otro método consiste en conectar la antena
directamente al televisor (sin utilizar el
sintonizador) y sintonizar canales analógicos
para detectar la mejor ubicación de la antena.
A continuación deberá volver a conectar el
sintonizador digital. Si el nivel de señal es
adecuado podrá programar el sintonizador.
5 Preguntas frecuentes
¿Funciona la antena con transmisiones
analógicas?
Sí. Esta antena puede recibir transmisiones de
televisión analógicas en los anchos de banda
VHF y UHF.
¿La antena recibe transmisiones digitales
o transmisiones HD-DVB?
Sí. La antena ha sido diseñada para recibir
transmisiones HDTV y DVB digitales en los
anchos de banda UHF y VHF.
¿La antena puede utilizar una fuente de
alimentación CC en una embarcación,
vehículo recreativo o cámper?
Sí. La antena cuenta con una toma CC en su
parte posterior. Conecte el cable o adaptador
(no se incluyen) a la antena y luego a la fuente
de alimentación.
¿Dónde debo colocar la antena para
obtener la mejor recepción posible?
De ser posible, elija un lugar cercano a una
ventana para que no existan interferencias entre
la antena y el transmisor.
D Nota
Para lograr óptima recepción, evite asimismo
colocar la antena sobre una supercie metálica,
ya que esto puede causar interferencias.
¿Cómo puedo saber cuál es la ganancia
(amplicación) necesaria para obtener
una imagen clara?
Encienda el amplicador una vez que haya
extendido los dipolos VHF hasta la máxima
longitud posible. Es más fácil comenzar con
la ganancia máxima e ir disminuyendo el nivel
según sea necesario. En algunos casos es posible
que reciba una imagen más clara con un nivel de
ganancia inferior al valor máximo.
¿Puedo congurar la antena
con un sintonizador digital?
Sí. Esta antena puede congurarse con un
sintonizador digital. Consulte la sección 4.3 del
manual del usuario.
5 Garantía y servicio técnico
Puede consultar la información sobre la garantía
en: www.philips.com/welcome
Para obtener asistencia técnica, envíe un
mensaje de correo electrónico con el número
de modelo del producto y una descripción
detallada del problema a:
accessorysupport@philips.com
Page 25
25
PORTUGUÊS
Índice
1. Importante 26
2. A sua antena televisiva interior
27
2.1 Visão geral do produto 27
3. Como iniciar 28
3.1 Instalação 28
3.2 Ligar ao televisor 28
3.3 Usar com uma antena externa 28
ou outra fonte de vídeo
4. Usar a antena de televisão 29
4.1 Para recepção VHF/FM 29
4.2 Para recepção UHF 29
4.3 Congurar um sintonizador 30
digital com a antena
5. Perguntas mais frequentes
30
6. Garantia e assistência
30
Page 26
26
1 Importante
Leia este manual antes de usar a antena de
televisão interior Philips. Contém notas e
informações importantes relativas à
instalação e conguração.
© 2008 Koninklijke Philips Electronics N.V.
Todos os direitos reservados. A reprodução,
parcial ou total, é proibida sem o acordo escrito
do proprietário dos direitos de autor. As marcas
comerciais são propriedade de Koninklijke
Philips Electronics N.V. ou dos seus
respectivos proprietários.
D Nota
A SDV4235/10 tem 2 opções de alimentação
– CA ou CC:
a) Cabo de alimentação de CA
(230–240 V) incluído
b) Tomada de CC de 12 V
(cabo/adaptador não incluído)
Eliminação do seu antigo produto
O seu produto foi concebido e fabricado com
materiais e componentes de alta qualidade, que
podem ser reutilizados e reciclados.
Quando este símbolo (com um
caixote de lixo traçado) está
axado a um produto, signica que
o produto é abrangido pela
Directiva Europeia 2002/96/CE.
Informe-se acerca do sistema de recolha
selectiva local para produtos eléctricos
e electrónicos.
Proceda de acordo com as regulamentações
locais e não elimine os produtos obsoletos
com o lixo doméstico. A eliminação correcta
de produtos obsoletos evita potenciais
consequências nocivas para o ambiente e para
a saúde pública.
Leve a embalagem para o centro
de reciclagem local.
Page 27
27
PORTUGUÊS
2 A sua antena
televisiva interior
Parabéns pela sua compra e
bem-vindo à Philips!
Para beneficiar na totalidade do suporte que a
Philips oferece, registe o seu produto em
www.philips.com/welcome.
2.1 Visão geral do produto
A Antena VHF
B Antena UHF
C Indicador de ganho do sinal
D Botão de ligar/desligar e controlo de ganho
E Alimentação de CA de 230-240 V (incluída)
F Ligação de CC de 12 V
(adaptador de CC de 12 V, não incluído)
G Interruptor AB
H Ligação à antena externa
I Saída para ligação ao televisor
MIN
OFF
MAX
GAIN
A
B
I
F G H
E
C
D
Page 28
28
3.3 Usar com uma antena externa
ou outra fonte de vídeo
A sua antena encontra-se equipada com um
interruptor de selecção de modo (interruptor
A/B) que lhe permite obter mais de uma fonte
de vídeo.
Para usar a sua SDV4235/10 como uma antena
de televisão interna amplificada, basta deslizar o
interruptor para a posição INT. Para usar uma
antena externa ou uma fonte de vídeo, basta
deslizar o interruptor para a posição EXT. 2
Se usar a antena com o interruptor na
posição EXT, certique-se de que a sua antena
externa ou outra fonte de vídeo está ligada à
entrada EXT ANT localizada na parte posterior
da antena.
3
3 Como iniciar
Antes de iniciar: Para garantir o
funcionamento correcto desta antena,
deve aceder ao menu do televisor ao qual liga
a antena (consulte o manual do televisor) e
congurar a recepção do sinal de ANTENA em
vez de CABO ou SATÉLLITE.
3.1 Instalação
Determinar a força do sinal
Antes de instalar, escolha o melhor local para
garantir a melhor recepção. É importante que
não existam obstáculos entre a antena e o
transmissor. Para obter os melhores resultados,
a antena deve encontrar-se virada para a
localização do transmissor.
E Dica
Quando possível, escolha um local perto da
janela que proporcione à antena uma recepção
sem obstáculos do transmissor.
E Dica
Não coloque a antena em superfícies metálicas.
3.2 Ligar ao televisor
1 Ligue a saída do sinal à antena
do televisor.
1
2 Ligue a alimentação da antena à tomada
de 230-240 V.
-ou-
Ligue a cha do adaptador de CC de 12 V
(não incluído) à antena e ligue à tomada.
2
3
ANT.
TV
1
PARAR
Page 29

29
PORTUGUÊS
4 A sua antena de
televisão interior
4.1 Para recepção VHF/FM
1 Estenda os dípolos telescópicos ao
maior comprimento possível.
4
2 Ligue o amplicador rodando o botão
de controlo de ganho para a
posição máxima.
5
D Nota
Pode ser necessário congurar o controlo de
ganho para a denição inferior de modo a obter
a melhor recepção.
3 Ligue o televisor ou rádio FM no canal/
estação pretendidos. Ajuste os dípolos
(movendo-os em direcções diferentes para
cima e para baixo) até obter recepção.
6
4.2 Para recepção UHF
1
Ligue o televisor no canal pretendido.
2
Ligue o amplicador rodando o botão
de controlo de ganho para a
posição máxima.
7
D Nota
Pode ser necessário congurar o controlo de
ganho para a denição inferior de modo a obter
a melhor recepção.
3
Incline ou gire a antena UHF na direcção
do transmissor até obter recepção.
8
4
MIN
OFF
MAX
GAIN
5
MIN
OFF
MAX
GAIN
7
6
8
Page 30

30
4.3 Congurar um sintonizador
digital com a antena
Os sintonizadores de televisão digital requerem
a programação do sintonizador com os canais
disponíveis na sua área. Em geral, este processo
automático faz parte da conguração do
sintonizador. Contudo, se a sua antena não tiver
sido congurada correctamente, é possível que
o sintonizador não receba canais visualizáveis.
Se possuir acesso a uma antena de telhado
ou a outra antena ligada a um sintonizador
digital, pode usar a antena para programar o
sintonizador. Os canais serão memorizados no
sintonizador, tornando mais fácil o alinhamento
da antena.
Em alternativa, poderá ligar a antena
directamente ao televisor (sem usar o
sintonizador) e ligue os canais analógicos de
modo a encontrar o melhor local para a antena.
Em seguida, volte a ligar o sintonizador digital
– se possuir um nível de sinal adequado, deverá
conseguir programar o sintonizador.
5 Perguntas mais frequentes
Esta antena pode receber
transmissões analógicas?
Sim, esta antena pode receber transmissões
televisivas analógicas nas bandas UHF e VHF.
Esta antena pode receber ou é compatível
com transmissões HD-DVB?
Sim, esta antena foi concebida para receber
transmissões de DVB Digital e HDTV nas
bandas UHF e VHF.
Esta antena pode ser alimentada por uma
fonte de CC numa embarcação, veículo
recreativo ou autocaravana?
Sim, existe uma tomada de CC na parte
posterior da antena. Ligue o cabo/adaptador
(não incluídos) à antena e à fonte de
alimentação.
Onde devo colocar a antena para obter a
melhor recepção possível?
Quando possível, escolha um local perto da
janela que proporcione à antena uma recepção
sem obstáculos do transmissor.
D Nota
Para obter uma recepção ideal, deve evitar
colocar a antena em superfícies metálicas que
podem causar interferências.
Como posso saber o ganho
(amplicação) necessário para uma
recepção de imagem nítida?
Depois de estender os dípolos VHF ao maior
comprimento possível, ligue o amplicador. É
mais fácil começar pelo ganho máximo e reduzir
conforme necessário. Em alguns casos, é possível
receber uma imagem mais nítida com menos
ganho do que na denição máxima.
Posso congurar a antena
com um sintonizador digital?
Sim, esta antena pode ser congurada com um
sintonizador digital. Consulte a secção 4.3 do
manual do utilizador.
6 Garantia e Assistência
Pode consultar os dados da garantia em:
www.philips.com/welcome
Para obter assistência técnica, envie-nos uma
mensagem de correio electrónico, indicando o
número de modelo do produto e uma descrição
pormenorizada do problema, para o endereço:
accessorysupport@philips.com
Page 31

31
ITALIANO
Sommario
1. Importante 32
2. Antenna da interni per televisori
33
2.1 Panoramica del prodotto 33
3. Informazioni preliminari 34
3.1 Installazione 34
3.2 Collegamento al televisore 34
3.3 Utilizzo con un’antenna esterna 34
o un’altra sorgente video
4. Utilizzo dell’antenna
35
per televisori
4.1 Per la ricezione VHF/FM 35
4.2 Per la ricezione UHF 35
4.3 Impostazione di un sintonizzatore 36
digitale tramite l’antenna
5. Domande frequenti
36
6. Garanzia e assistenza 36
Page 32

32
1 Importante
Leggere attentamente questo manuale prima
di utilizzare l’antenna Philips da interni per
televisori, poiché contiene informazioni
importanti e note sull’installazione e
l’impostazione dell’apparecchio.
© 2008 Koninklijke Philips Electronics N.V.
Tutti i diritti riservati. La riproduzione parziale
o totale è vietata senza previa autorizzazione
scritta di chi detiene i diritti di copyright. I
marchi sono di proprietà di Koninklijke Philips
Electronics N.V. o dei rispettivi detentori.
D Nota
Il modello SDV4235/10 dispone di 2 opzioni di
alimentazione CA o CC:
a) Cavo di alimentazione CA
(230-240 V) incluso
b) Presa da 12 V CC
(cavo/adattatore non incluso)
Smaltimento di vecchi prodotti
Il prodotto è stato progettato e assemblato
con materiali e componenti di alta qualità che
possono essere riciclati e riutilizzati.
Se su un prodotto si trova il simbolo
di un bidone con ruote ricoperto da
una X, vuol dire che il prodotto
soddisfa i requisiti della Direttiva
comunitaria 2002/96/CE
Informarsi sulle modalità di raccolta, dei prodotti
elettrici ed elettronici, in vigore nella zona in cui
si desidera disfarsi del prodotto.
Attenersi alle normative locali per lo
smaltimento dei riuti e non gettare i vecchi
prodotti nei normali riuti domestici. Uno
smaltimento adeguato dei prodotti aiuta a
prevenire l’inquinamento ambientale e possibili
danni alla salute.
Portare la confezione al centro di raccolta più
vicino per il riciclaggio.
Page 33

33
ITALIANO
2 Antenna da interni
per televisori
Congratulazioni per l’acquisto e
benvenuto in Philips!
Per trarre completo vantaggio dall’assistenza
offerta da Philips, registrare il prodotto su
www.philips.com/welcome.
2.1 Panoramica del prodotto
A Antenna VHF
B Antenna UHF
C Indicatore ricezione segnale
D Manopola di alimentazione/controllo segnale
E Alimentazione 230-240 V CA (inclusa)
F Collegamento per alimentazione da 12 V CC
(adattatore di alimentazione 12 V CC
non incluso)
G Interruttore AB
H Collegamento per antenna esterna
I Uscita per collegamento TV
MIN
OFF
MAX
GAIN
A
B
I
F G H
E
C
D
Page 34

34
3.3 Utilizzo con un’antenna esterna
o un’altra sorgente video
L’antenna è dotata di un interruttore di
selezione della modalità (interruttore A/B) che
consente di utilizzare più di una sorgente video.
Per utilizzare il modello SDV4235/10 come
antenna da interni amplificata per televisori,
spostare l’interruttore nella posizione INT. Se
si utilizza un’antenna esterna o una sorgente
video di altro tipo, spostare l’interruttore nella
posizione EXT. 2
Se l’interruttore dell’antenna è nella posizione
EXT, assicurarsi che l’antenna esterna o la
sorgente video siano collegate all’ingresso EXT
ANT che si trova sul retro dell’antenna. 3
3 Informazioni preliminari
Afnché questa antenna funzioni
correttamente, è necessario
accedere al menu del televisore a cui è collegata
(consultare il manuale del televisore), quindi
impostarlo in modo che riceva il segnale tramite
ANTENNA anziché via CAVO o SATELLITE.
3.1 Installazione
Come determinare la forza del segnale
Antes de la instalación es necesario determinar
cuál es el mejor lugar para que la recepción
sea óptima. Es importante que la trayectoria
desde la antena hasta el transmisor no presente
obstrucciones. Para obtener mejores resultados,
la antena debe estar orientada hacia el lugar
donde se encuentra el transmisor.
E Suggerimento
Ove possibile, scegliere una posizione in
prossimità di una nestra, per permettere il
libero accesso al trasmettitore.
E Suggerimento
Non posizionare l’antenna su una
supercie di metallo
3.2 Collegamento al televisore
1 Collegare l’uscita del segnale dell’antenna
al televisore.
1
2 Collegare l’alimentazione dall’antenna alla
presa da 230-240 V.
-oppure-
Collegare l’adattatore 12 V CC
(non incluso) all’antenna.
2
3
ANT.
TV
1
Arresto
Page 35

35
ITALIANO
4 Utilizzo dell’antenna
da interni per televisori
4.1 Per la ricezione VHF/FM
1 Estendere totalmente le due antenne. 4
2 Accendere l’amplicatore ruotando
al massimo la manopola del controllo
del segnale.
5
D Nota
Per una ricezione ottimale potrebbe
essere necessario ridurre l’impostazione
della manopola.
3
Accendere il televisore o la radio FM
impostandoli sul canale/stazione preferiti.
Regolare le antenne (spostandole
in direzioni diverse verso il basso o
verso l’alto) no a che si raggiunge la
ricezione ottimale.
6
4.2 Per la ricezione UHF
1
Sintonizzare il televisore sul
canale desiderato.
2
Accendere l’amplicatore ruotando
al massimo la manopola del controllo
del segnale.
7
D Nota
Per una ricezione ottimale potrebbe
essere necessario ridurre l’impostazione
della manopola.
3
Angolare o ruotare l’anello UHF
verso il ricevitore no ad ottenere
la ricezione desiderata.
8
4
MIN
OFF
MAX
GAIN
5
MIN
OFF
MAX
GAIN
7
6
8
Page 36

36
4.3 Impostazione di un sintonizzatore
digitale tramite l’antenna
I sintonizzatori TV digitali devo effettuare la
sintonizzazione dei canali digitali disponibili
nella propria zona. Di solito questo processo
automatico fa parte dell’installazione del
sintonizzatore. Tuttavia, se l’antenna non è
impostata correttamente, il sintonizzatore può
non ricevere alcun segnale per l’impostazione
dei canali.
Se si ha accesso ad un’antenna montata sul
tetto o collegata al sintonizzatore digitale,
quest’ultimo può essere sintonizzato con
questi apparecchi. I canali vengono salvati nella
memoria del sintonizzatore e l’allineamento con
l’antenna sarà più facile.
Un altro metodo consiste nel collegare
l’antenna direttamente al televisore (senza
usare il sintonizzatore) e sintonizzare i canali
analogici per trovare la collocazione per una
ricezione migliore. Successivamente si dovrà
ricollegare il sintonizzatore digitale e, se il
segnale è sufciente, sarà possibile eseguire la
programmazione del sintonizzatore.
5 Domande frequenti
L’antenna funziona anche per le
trasmissioni analogiche?
Sì, questa antenna è in grado di ricevere
trasmissioni televisive analogiche nelle bande
UHF e VHF.
L’antenna può ricevere segnali digitali o
funzionare con le trasmissioni HD-DVB?
Sì, questa antenna è progettata per ricevere
segnali DVB digitali e trasmissioni HDTV nelle
bande UHF e VHF.
L’antenna può essere alimentata tramite
l’alimentazione CC di una barca, di una
roulotte o di un camper?
Sì, sul retro dell’antenna è presente una
presa CC. Collegare il cavo/adattatore (non in
dotazione) all’antenna e quindi alla presa
di corrente.
Dove deve essere posizionata l’antenna
per ottenere una ricezione ottimale?
Ove possibile, scegliere una posizione in
prossimità di una nestra, per permettere il
libero accesso al trasmettitore.
D
Nota
Per una ricezione ottimale l’antenna non deve
essere posizionata su superci metalliche che
possono causare interferenze.
Come si può conoscere il livello ottimale
di ricezione (amplicazione) che consente
di ottenere immagini nitide?
Una volta che le due antenne VHF sono
completamente estese, accendere l’amplicatore.
Il metodo migliore consiste nell’ottenere la
ricezione massima e quindi di ridurla al bisogno.
In alcuni casi un segnale inferiore può consentire
di ottenere immagini più nitide.
È possibile utilizzare l’antenna
con un sintonizzatore digitale?
Sì, l’antenna può essere utilizzata con un
sintonizzatore digitale. Vedere la sezione
4.3 del presente manuale.
6 Garanzia e assistenza
Le informazioni sulla garanzia sono disponibili
all’indirizzo: www.philips.com/welcome
Per assistenza tecnica, inviare un’e-mail con
il numero di modello del prodotto e una
descrizione dettagliata del problema riscontrato
a: accessorysupport@philips.com
Page 37

37
SVENSKA
Innehållsförteckning
1. Viktigt 38
2. Din TV-antenn för inomhusbruk
39
2.1 Produktöversikt 39
3. Komma igång 40
3.1 Installation 40
3.2 Anslutning till TV:n 40
3.3 Användning med en extern 40
antenn eller annan videokälla
4. Använda TV-antennen 41
4.1 För VHF/FM-mottagning 41
4.2 För UHF-mottagning 41
4.3 Kongurera en digital 42
mottagare med antennen
5. Vanliga frågor
42
6. Garanti och service
42
Page 38

38
1 Viktigt
Läs igenom den här handboken innan du
använder Philips TV-antenn för inomhusbruk.
Den innehåller viktig information och
kommentarer om installation och konguration.
© 2008 Koninklijke Philips Electronics N.V.
Med ensamrätt. Reproduktion av hela handboken
eller delar av den är förbjuden utan skriftligt
tillstånd från copyrightinnehavaren. Varumärkena
tillhör Koninklijke Philips Electronics N.V. eller
deras respektive ägare.
D Obs!
SDV4235/10 har 2 alternativ för
strömförsörjning, AC och DC:
a) AC-kabel (230 – 240 V) medföljer
b) 12 V DC-uttag (sladd/adapter medföljer ej)
Kassering av din gamla produkt
Produkten har utvecklats och tillverkats av
högkvalitativa material och komponenter som
går att återvinna och återanvända.
När den här symbolen med en
överkryssad papperskorg visas
på produkten innebär det att
produkten omfattas av
direktiv 2002/96/EG
Ta reda på var du kan hitta närmaste
återvinningsstation för elektriska och
elektroniska produkter.
Följ de lokala reglerna och släng inte gamla
produkter i det vanliga hushållsavfallet. Genom
att kassera dina gamla produkter på rätt sätt
kan du bidra till att minska eventuella negativa
effekter på miljö och hälsa.
Kassera förpackningen på en lokal
återvinningsstation.
Page 39

39
SVENSKA
2 Din TV-antenn
för inomhusbruk
Grattis till köpet och välkommen till Philips!
Om du vill dra fullständig nytta av den support
som Philips erbjuder registrerar du produkten
på www.philips.com/welcome.
2.1 Produktöversikt
A VHF-antenn
B UHF-antenn
C Signalförstärkningsindikator
D Strömbrytare/förstärkningsreglage
E 230-240 V AC nätaggregat (medföljer)
F 12 V DC nätanslutning
(12 V DC-nätadapter, medföljer ej)
G AB-omkopplare
H Ext. antennanslutning
I Utgång till TV-anslutning
MIN
OFF
MAX
GAIN
A
B
I
F G H
E
C
D
Page 40

40
3.3 Användning med en extern antenn
eller annan videokälla
Antennen är försedd med en omkopplare för
lägesval (AB-omkopplare) som gör det möjligt
att ha fler än en videokälla.
Om du vill använda din SDV4235/10 som
en intern förstärkt TV-antenn sätter du
omkopplaren i INT-läge. Om du vill använda en
extern antenn eller annan videokälla sätter du
omkopplaren i EXT-läge. 2
Om du använder antennen med omkopplaren
i EXT-läge ska den externa antennen eller
videokällan vara ansluten till EXT ANT-ingången
på antennens baksida.
3
3 Komma igång
Innan du börjar: För att antennen
ska fungera korrekt måste du öppna
menyn på den TV som du ansluter antennen till
(se TV:ns användarhandbok) och ställa in den så
att signalen tas emot från en ANTENN istället
för KABEL eller SATELLIT.
3.1 Installation
Fastställa signalstyrka
Före installationen kontrollerar du vilken
placering som ger optimal mottagning. Det
är viktigt att området mellan antennen och
sändaren inte är blockerat. För bäst resultat bör
antennen placeras mitt emot sändaren.
E Tips
Välj om möjligt en placering nära ett fönster så
att området mellan antennen och sändaren inte
är blockerat.
E Tips
Placera inte antennen på en metallyta.
3.2 Anslutning till TV:n
1
Anslut signalutgången på antennen
till TV:n.
1
2 Anslut antennens nätsladd till ett
230-240 V uttag.
-eller-
Anslut en 12 V DC-adapterkontakt
(medföljer ej) till antennen och koppla in den.
2
3
ANT.
TV
1
STOPP
Page 41

41
SVENSKA
4 Använda TV-antennen
för inomhusbruk
4.1 För VHF/FM-mottagning
1 Dra ut teleskopdipolerna till längsta
möjliga längd.
4
2 Slå på förstärkaren genom att rotera
förstärkningsreglaget till maximalt läge.
5
D Obs!
Du kanske behöver vrida ned
förstärkningsreglaget till en lägre inställning för
bäst mottagning.
3
Ställ in TV:n eller FM-radion på önskad kanal.
Justera dipolerna (yttas i olika riktningar
upp och ned) tills signaler tas emot.
6
4.2 För UHF-mottagning
1
Ställ in TV:n på önskad kanal.
2
Slå på förstärkaren genom att rotera
förstärkningsreglaget till maximalt läge.
7
D Obs!
Du kanske behöver vrida ned
förstärkningsreglaget till en lägre inställning för
bäst mottagning.
3
Luta eller vrid UHF-loopen mot sändaren
tills signaler tas emot.
8
4
MIN
OFF
MAX
GAIN
5
MIN
OFF
MAX
GAIN
7
6
8
Page 42

42
4.3 Kongurera en digital-TV-mottagare
med antennen
För digital-TV-mottagare krävs att du
programmerar mottagaren med de kanaler som
är tillgängliga i området. I allmänhet är det en
automatisk process som ingår i kongurationen
av mottagaren. Om antennen inte är korrekt
kongurerad kan det dock hända att mottagaren
inte tar emot några visningsbara kanaler.
Om du har tillgång till en takantenn eller någon
annan antenn som är ansluten till en digital-TVmottagare kan du använda antennen till
att programmera mottagaren. Kanalerna
memoreras i mottagaren, vilket gör det enklare
att justera antennen.
Ett annat sätt är att ansluta antennen direkt till
TV:n (utan att använda mottagaren) och söka
efter analoga kanaler för att hitta den bästa
antennplaceringen. Återanslut sedan digital-TVmottagaren – om du har en tillräcklig signalnivå
bör du kunna programmera mottagaren.
5 Vanliga frågor
Fungerar antennen med
analoga sändningar?
Ja, antennen kan ta emot analoga TV-sändningar
med UHF- och VHF-bandbredd.
Kan antennen ta emot digitala sändningar
och HD-DVB-sändningar?
Ja, antennen är konstruerad för att ta emot
digitala DVB- och HDTV-sändningar med UHFoch VHF-bandbredd.
Kan antennen drivas med likström i en
båt, husvagn eller husbil?
Ja, det nns ett DC-uttag på baksidan av
antennen. Anslut kabeln/adaptern (medföljer ej)
till antennen och därefter till strömkällan.
Var ska jag placera antennen för att få
bästa möjliga mottagning?
Välj om möjligt en placering nära ett fönster så
att området mellan antennen och sändaren inte
är blockerat.
D
Obs!
För bäst mottagning bör du även undvika att
placera antennen på en metallyta, eftersom detta
kan orsaka störningar.
Hur vet jag hur mycket förstärkning som
krävs för att få en tydlig bild?
När du har förlängt VHF-dipolerna maximalt
slår du på förstärkaren. Det är enklast att börja
med maximal förstärkning och sedan minska den
efter behov. I vissa fall kan du få en tydligare bild
med mindre förstärkning än den maximala.
Kan jag kongurera antennen
med en digital-TV-mottagare?
Ja, antennen kan kongureras med en digital-TVmottagare. Se avsnitt 4.3 i handboken.
5 Garanti och service
Garantiinformation nns på:
www.philips.com/welcome
Om du vill ha teknisk support skickar du epost med produktens modellnummer och en
detaljerad beskrivning av problemet till:
accessorysupport@philips.com
Page 43

43
NEDERLANDS
Inhoudsopgave
1. Belangrijk 44
2. Uw televisieantenne voor binnen 45
2.1 Productoverzicht 45
3. Aan de slag 46
3.1 Installatie 46
3.2 Aansluiten op uw TV 46
3.3 Gebruiken met een externe 46
antenne of een andere videobron
4. Uw televisieantenne gebruiken 47
4.1 Voor VHF/FM-ontvangst 47
4.2 Voor UHF-ontvangst 47
4.3 Een digitale tuner installeren met 48
deze antenne
5. Veelgestelde vragen 48
6. Garantie en service 48
Page 44

44
Neem bij de verwijdering van oude producten
de lokale wetgeving in acht en doe deze
producten niet bij het gewone huishoudelijke
afval. Als u oude producten correct verwijdert,
voorkomt u negatieve gevolgen voor het milieu
en de volksgezondheid.
Breng de verpakking naar een
plaatselijk inzamelpunt.
1 Belangrijk
Neem de tijd om deze handleiding te lezen
voordat u de Philips-televisieantenne voor
binnen gebruikt. Deze handleiding bevat
belangrijke informatie over de installatie
en het instellen.
© 2008 Koninklijke Philips Electronics N.V.
Alle rechten voorbehouden. Het geheel of
gedeeltelijk kopiëren van dit document is
verboden zonder schriftelijke toestemming
van de eigenaar van het auteursrecht.
Handelsmerken zijn het eigendom van
Koninklijke Philips Electronics N.V. of
hun respectieve eigenaars.
D Opmerking
De SDV4235/10 heeft 2 opties voor
stroomvoorziening: AC of DC
a) Netsnoer (230 - 240 V) meegeleverd
b) 12 V DC-aansluiting (snoer/adapter niet
meegeleverd)
Verwijdering van uw oude product
Uw product is vervaardigd van kwalitatief
hoogwaardige materialen en onderdelen,
welke gerecycled en opnieuw gebruikt
kunnen worden.
Als u op uw product een doorstreepte
afvalcontainer op wieltjes ziet,
betekent dit dat het product valt
onder de EU-richtlijn 2002/96/EG.
Win inlichtingen in over de manier waarop
elektrische en elektronische producten in
uw regio gescheiden worden ingezameld.
Page 45

45
NEDERLANDS
2 Uw televisieantenne
voor binnen
Gefeliciteerd met uw aankoop en welkom
bij Philips!
Wilt u volledig proteren van de ondersteuning
die Philips u kan bieden? Registreer dan uw
product op : www.philips.com/welcome.
2.1 Productoverzicht
A VHF-antenne
B UHF-antenne
C Indicator signaalversterking
D Aan-uitknop/versterkerknop
E Stroomvoorziening van 230 - 240 V
(meegeleverd)
F 12 V DC-stroomaansluiting
(12 V DC-adapter, niet meegeleverd)
G AB-schakelaar
H Externe-antenneaansluiting
I Uitgang voor TV-aansluiting
MIN
OFF
MAX
GAIN
A
B
I
F G H
E
C
D
Page 46

46
3.3 Gebruiken met een externe antenne
of andere videobron
Uw antenne beschikt over een modusschakelaar
(A/B-schakelaar) waarmee u meerdere
videobronnen kunt aansluiten.
Als u de SDV4235/10 als een TV-antenne met
interne versterker wilt gebruiken, schuift u de
schakelaar naar de INT-stand. Als u een externe
antenne of andere videobron wilt gebruiken,
schuift u de schakelaar naar de EXT-stand. 2
Als u de antenne gebruikt met de schakelaar in de
EXT-stand, controleer dan of de externe antenne
of andere videobron is aangesloten op de EXT
ANT-ingang op de achterkant van de antenne.
3
3 Aan de slag
Voordat u begint: Om deze antenne
goed te laten werken, moet u het
menu op de televisie waarop u de
antenne aansluit openen (raadpleeg de
gebruikershandleiding van uw TV) en instellen
dat de TV het signaal ontvangt van een
ANTENNE en niet van de KABEL of SATELLIET.
3.1 Installatie
Signaalsterkte bepalen
Bepaal voordat u de antenne installeert de beste
plaats voor optimale ontvangst. Het is belangrijk
dat er zich geen andere objecten bevinden
tussen de antenne en de zender. De antenne
moet in de richting wijzen van de zender voor
het beste resultaat.
E Tip
Kies waar mogelijk een plaats bij het raam.
Hierdoor wordt het signaal niet onderbroken.
E Tip
Plaats de antenne niet op een
metalen ondergrond.
3.2 Aansluiten op uw TV
1 Sluit de signaaluitvoer van de antenne aan op
de TV 1
2 Sluit de stroomvoorziening van de antenne
aan op een stopcontact van 230 - 240 V.
- of -
Sluit de DC-adapter van 12 V (niet
meegeleverd) aan op de antenne en het
stopcontact.
STOP
2
3
ANT.
TV
1
Page 47

47
NEDERLANDS
4 Uw televisieantenne voor
binnen gebruiken
4.1 Voor VHF/FM-ontvangst
1 Schuif de uitschuifbare dipoolantennes
volledig uit. 4
2 Schakel de versterker in door de
versterkerknop op de maximale stand
te zetten.
5
D Opmerking
U moet de versterkerknop mogelijk op een
lagere stand zetten voor de beste ontvangst.
3
Zet uw TV of FM-radio op het gewenste
kanaal of station. Pas de dipoolantennes
aan door deze in verschillende richtingen
omhoog en omlaag te bewegen tot u
ontvangst hebt. 6
4.2 Voor UHF-ontvangst
1
Schakel op uw TV het gewenste kanaal in.
2
Schakel de versterker in door de
versterkerknop op de maximale stand
te zetten.
7
D Opmerking
U moet de versterkerknop mogelijk op een
lagere stand zetten voor de beste ontvangst.
3 Kantel of draai de UHF-lus in de richting
van de zender tot u ontvangst hebt.
8
4
MIN
OFF
MAX
GAIN
5
MIN
OFF
MAX
GAIN
7
6
8
Page 48

48
4.3 Een digitale tuner installeren met
deze antenne
Op de tuner van digitale TV-tuners moet
u de in uw omgeving beschikbare kanalen
programmeren. Meestal is dit automatische
proces onderdeel van het instellen van de
tuner. Als u de antenne echter niet juist hebt
ingesteld, is het mogelijk dat de tuner geen
kanalen ontvangt met een goede ontvangst.
Als u een antenne op het dak of een andere
antenne hebt die op een digitale tuner is
aangesloten, kunt u de tuner programmeren met
de antenne. De kanalen worden op de tuner
opgeslagen. Hierdoor wordt het richten van de
antenne gemakkelijker.
Een andere methode is om de antenne
rechtstreeks aan te sluiten op uw TV (zonder de
tuner te gebruiken) en af te stemmen op analoge
kanalen om de juiste plaats voor de antenne te
bepalen. Sluit vervolgens de digitale tuner weer
aan. Als u een goed signaalniveau hebt, moet u
de tuner kunnen programmeren.
5 Veelgestelde vragen
Werkt deze antenne met analoge
uitzendingen?
Ja, deze antenne is geschikt voor het ontvangen
van analoge televisie-uitzendingen in UHF- en
VHF-bandbreedte.
Kan deze antenne ook digitale
uitzendingen of HD-DVB-uitzendingen
ontvangen?
Ja, deze antenne is ontworpen voor het
ontvangen van digitale DVB- en HDTVuitzendingen in UHF- en VHF-bandbreedte.
Kan ik de antenne aansluiten op een DCstroomvoorziening op een boot of in een
caravan of camper?
Ja, de antenne heeft een DC-stroomaansluiting
aan de achterkant. Sluit uw kabel/adapter (niet
meegeleverd) aan op de antenne en op uw
voedingsbron.
Waar kan ik de antenne het beste
plaatsen voor de best mogelijke
ontvangst?
Kies waar mogelijk een plaats bij het raam.
Hierdoor wordt het signaal niet onderbroken.
D Opmerking
Voor de beste ontvangst moet u de antenne niet
op een metalen ondergrond plaatsen die storing
zou kunnen veroorzaken.
Hoe weet ik hoeveel versterking is vereist
voor een helder beeld?
Als u de VHF-dipoolantennes volledig hebt
uitgeschoven, schakelt u de versterker in.
Het is het eenvoudigst om te beginnen met
de maximale versterking en deze zo nodig te
verminderen. In sommige gevallen hebt u een
betere ontvangst met minder versterking dan
met maximale versterking.
Kan ik de antenne installeren
met een digitale tuner?
Ja, u kunt de antenne installeren met een
digitale tuner. Raadpleeg paragraaf 4.3 van uw
gebruikershandleiding.
6 Garantie en service
Informatie over garantie kunt u vinden op:
www.philips.com/welcome
Als u technische ondersteuning nodig hebt, kunt
u een e-mail sturen met het modelnummer van
het product en een gedetailleerde beschrijving
van het probleem. Stuur uw e-mail naar:
accessorysupport@philips.com
Page 49

ΕΛΛΗΝΙΚΆ
Πίνακαςπεριεχομένων
1. Σημαντικό 50
2. Η εσωτερική κεραία τηλεόρασης 51
2.1 Προεπισκόπηση προϊόντος 51
3. Ξεκινώντας 52
3.1 Εγκατάσταση 52
3.2 Σύνδεση στην τηλεόραση 52
3.3 Χρήση με εξωτερική κεραία ή 52
άλλη πηγή βίντεο
4. Χρήση της κεραίας τηλεόρασης 53
4.1 Για λήψη VHF/FM 53
4.2 Για λήψη UHF 53
4.3 Ρύθμιση ψηφιακού δέκτη με 54
την κεραία
5. Συχνές ερωτήσεις 54
6. Εγγύηση & σέρβις 54
Page 50

Συμμορφωθείτε με την ισχύουσα τοπική
νομοθεσία και μην απορρίπτετε τα παλιά σας
προϊόντα μαζί με τα οικιακά απορρίμματα. Η
σωστή απόρριψη των παλιών σας προϊόντων
θα βοηθήσει στη μείωση των πιθανών
αρνητικών επιπτώσεων για το περιβάλλον και
την ανθρώπινη υγεία.
Παραδώστε το προϊόν στο τοπικό κέντρο
ανακύκλωσης.
1 Σημαντικό
Αφιερώστε λίγο χρόνο για να διαβάσετε
το παρόν εγχειρίδιο χρήσης πριν
χρησιμοποιήσετε την εσωτερική κεραία
τηλεόρασης της Philips. Περιλαμβάνει
σημαντικές πληροφορίες και σημειώσεις
σχετικά με την εγκατάσταση και τη ρύθμιση.
© 2008 Koninklijke Philips Electronics N.V.
Με την επιφύλαξη παντός δικαιώματος.
Απαγορεύεται η αναπαραγωγή όλου ή
μέρους του παρόντος χωρίς προηγούμενη
έγγραφη συγκατάθεση του ιδιοκτήτη
πνευματικών δικαιωμάτων. Τα εμπορικά
σήματα αποτελούν ιδιοκτησία της Koninklijke
Philips Electronics N.V. ή των αντίστοιχων
ιδιοκτητών τους.
D Σημείωση
Το SDV4235/10 έχει 2 επιλογές για
τροφοδοσία ρεύματος AC ή DC:
α) Καλώδιο ρεύματος AC (230 – 240V),
συμπεριλαμβάνεται
β) Υποδοχή DC 12V (καλώδιο
προσαρμογέας δεν συμπεριλαμβάνονται)
Απόρριψη παλιού προϊόντος
Το προϊόν αυτό έχει σχεδιαστεί και
κατασκευαστεί με υψηλής ποιότητας υλικά και
εξαρτήματα που μπορούν να ανακυκλωθούν
και να ξαναχρησιμοποιηθούν.
Όταν ένα προϊόν φέρει την ένδειξη
ενός διαγραμμένου κάδου με ρόδες,
τότε το προϊόν αυτό καλύπτεται από
την Ευρωπαϊκή οδηγία 2002/96/EΚ
Παρακαλούμε να ενημερωθείτε σχετικά με
το τοπικό σύστημα ξεχωριστής συλλογής
ηλεκτρικών και ηλεκτρονικών προϊόντων.
Page 51

51
ΕΛΛΗΝΙΚΆ
2 Ηεσωτερικήκεραία
τηλεόρασης
Συγχαρητήρια για την αγορά σας και
καλωσορίσατε στη Philips!
Για να επωφεληθείτε πλήρως από τις
προσφορές της Philips, δηλώστε το προϊόν
σας στη διεύθυνση
www.philips.com/welcome.
2.1 Προεπισκόπηση προϊόντος
A Κεραία VHF
B Κεραία UHF
C Ένδειξη απολαβής σήματος
D Διακόπτης ρεύματος/διακόπτης ελέγχου
απολαβής
E Καλώδιο ρεύματος AC 230-240V
(συμπεριλαμβάνεται)
F Σύνδεση DC 12V
(τροφοδοτικό DC 12V δεν
συμπεριλαμβάνεται)
G Διακόπτης AB
H Σύνδεση εξωτερικής κεραίας
I Σύνδεση εξόδου σε τηλεόραση
MIN
OFF
MAX
GAIN
A
B
I
F G H
E
C
D
Page 52

52
3.3 Χρήση με εξωτερική κεραία ή άλλη
πηγή βίντεο
Η κεραία διαθέτει επιλογέα λειτουργίας
(διακόπτη A/B) που σας επιτρέπει να έχετε
περισσότερες από μία πηγές βίντεο.
Για να χρησιμοποιήσετε την SDV4235/10 ως
εσωτερική κεραία τηλεόρασης με ενίσχυση
σήματος, απλά πιέστε το διακόπτη στη
θέση INT. Για να χρησιμοποιήσετε εξωτερική
κεραία ή άλλη πηγή βίντεο, πιέστε το
διακόπτη στη θέση EXT. Εάν χρησιμοποιείτε
την κεραία με το διακόπτη στη θέση EXT,
βεβαιωθείτε ότι η εξωτερική κεραία ή άλλη
πηγή βίντεο είναι συνδεδεμένη στην είσοδο
EXT ANT που βρίσκεται στο πίσω μέρος της
κεραίας. 2
Εάν χρησιμοποιείτε την κεραία με το διακόπτη
στη θέση EXT, βεβαιωθείτε ότι η εξωτερική
κεραία ή άλλη πηγή βίντεο είναι συνδεδεμένη
στην είσοδο EXT ANT που βρίσκεται στο
πίσω μέρος της κεραίας.
3
3 Ξεκινώντας
Προτού ξεκινήσετε: Για να
ασφαλίσετε τη σωστή λειτουργία
της κεραίας, πρέπει να μπείτε στο μενού της
τηλεόρασης στην οποία πραγματοποιείτε τη
σύνδεση για να τη ρυθμίσετε (συμβουλευθείτε
το εγχειρίδιο χρήσης της τηλεόρασής
σας) έτσι ώστε να λαμβάνει σήμα από την
ΚΕΡΑΙΑ και όχι μέσω ΚΑΛΩΔΙΑΚΗΣ ή
ΔΟΡΥΦΟΡΙΚΗΣ λήψης.
3.1 Εγκατάσταση
Προσδιορισμός ισχύς σήματος
Πριν την εγκατάσταση, βρείτε την κατάλληλη
θέση για βέλτιστη λήψη σήματος. Είναι
σημαντικό να μην παρεμβάλλονται εμπόδια
μεταξύ της κεραίας και του πομπού. Για
βέλτιστα αποτελέσματα, η κεραία θα πρέπει
να είναι στραμμένη προς τον πομπό.
E Συμβουλή
Εάν υπάρχει δυνατότητα, επιλέξτε μια
θέσηκοντά σε παράθυρο έτσι ώστε να
εξασφαλίζεται η απρόσκοπτη επικοινωνία
της κεραίας με τον πομπό.
E Συμβουλή
Μην τοποθετείτε την κεραία πάνω σε
μεταλλική επιφάνεια.
3.2 Σύνδεση στην τηλεόραση
1 Συνδέστε την έξοδο σήματος της
κεραίας στην τηλεόραση. 1
2
Συνδέστε το καλώδιο ρεύματος από την
κεραία σε πρίζα 230-240V.
- ή -
Συνδέστε το βύσμα ενός τροφοδοτικού
12V DC (δεν συμπεριλαμβάνεται) στην
κεραία και συνδέστε τη στην πρίζα.
STOP
2
3
ANT.
TV
1
Page 53

53
ΕΛΛΗΝΙΚΆ
4 Χρήσητηςεσωτερικής
κεραίαςτηλεόρασης
4.1 Για λήψη VHF/FM
1 Επεκτείνετε τα τηλεσκοπικά δίπολα στο
μέγιστο δυνατό μήκος τους. 4
2 Ενεργοποιήστε τον ενισχυτή
περιστρέφοντας το διακόπτη ελέγχου
απολαβής στη μέγιστη ρύθμιση.
5
D Σημείωση
Ενδέχεται να χρειάζεται να ρυθμίσετε το
διακόπτη ελέγχου απολαβής σε χαμηλότερη
θέση για βέλτιστη λήψη.
3 Συντονίστε την τηλεόραση ή το
ραδιόφωνο FM στο κανάλι/σταθμό
που θέλετε. Προσαρμόστε τα δίπολα
(μετακινώντας τα σε διαφορετικές
κατευθύνσεις πάνω και κάτω) μέχρι να
επιτύχετε λήψη. 6
4.2 Για λήψη UHF
1
Συντονίστε την τηλεόρασή σας στο
κανάλι που θέλετε.
2
Ενεργοποιήστε τον ενισχυτή
περιστρέφοντας το διακόπτη ελέγχου
απολαβής στη μέγιστη ρύθμιση. 7
D Σημείωση
Ενδέχεται να χρειάζεται να ρυθμίσετε το
διακόπτη ελέγχου απολαβής σε χαμηλότερη
θέση για βέλτιστη λήψη.
3 Κλίνετε ή περιστρέψτε το βρόγχο UHF
προς τον πομπό μέχρι να επιτύχετε
λήψη.
8
4
MIN
OFF
MAX
GAIN
5
MIN
OFF
MAX
GAIN
7
6
8
Page 54

54
4.3 Ρύθμιση ψηφιακού δέκτη
με την κεραία
Οι ψηφιακοί δέκτες τηλεόρασης απαιτούν
προγραμματισμό του δέκτη με τα διαθέσιμα
στην περιοχή κανάλια. Γενικά, αυτή η διαδικασία
πραγματοποιείται αυτόματα και αποτελεί μέρος
της ρύθμισης του δέκτη. Ωστόσο, εάν δεν έχετε
ρυθμίσει σωστά την κεραία, ο δέκτης ενδέχεται
να μην λαμβάνει κανάλια με δυνατότητα
προβολής.
Εάν έχετε πρόσβαση σε κεραία οροφής ή άλλη
κεραία η οποία είναι συνδεδεμένη σε ψηφιακό
δέκτη, μπορείτε να χρησιμοποιήσετε την κεραία
για να προγραμματίσετε το δέκτη. Τα κανάλια
θα αποθηκευθούν στο δέκτη με αποτέλεσμα την
ευκολότερη ευθυγράμμιση της κεραίας.
Μια άλλη μέθοδος είναι να συνδέσετε την κεραία
απευθείας στην τηλεόραση (χωρίς χρήση δέκτη)
και να συντονιστείτε σε αναλογικά κανάλια
για να εντοπίσετε τη βέλτιστη θέση για την
κεραία σας. Στη συνέχεια, επανασυνδέστε τον
ψηφιακό δέκτη. Εάν το επίπεδο σήματος επαρκεί,
μπορείτε να προγραμματίσετε το δέκτη.
5 Συχνέςερωτήσεις
Λειτουργεί η κεραία με αναλογικές
μεταδόσεις?
Ναι, η κεραία έχει δυνατότητα λήψης αναλογικών
τηλεοπτικών σημάτων σε εύρη ζώνης UHF
και VHF.
Η κεραία θα πραγματοποιεί λήψη
ψηφιακών σημάτων ή θα λειτουργεί με
μεταδόσεις HD-DVB?
Ναι, η κεραία είναι σχεδιασμένη έτσι ώστε να
πραγματοποιεί λήψη ψηφιακών μεταδόσεων
DVB και HDTV σε εύρη ζώνης UHF & VHF.
Μπορεί η κεραία να λειτουργήσει με
τροφοδοσία ρεύματος DC σε σκάφος,
όχημα αναψυχής ή τροχόσπιτο?
Ναι, στο πίσω μέρος της κεραίας υπάρχει
υποδοχή ρεύματος DC. Συνδέστε το καλώδιο/
προσαρμογέα (δεν συμπεριλαμβάνονται) στην
κεραία και, έπειτα, στην πηγή τροφοδοσίας
ρεύματος.
Πού πρέπει να τοποθετήσω την κεραία για
βέλτιστη λήψη?
Εάν υπάρχει δυνατότητα, επιλέξτε μια
θέση κοντά σε παράθυρο έτσι ώστε να
εξασφαλίζεται η απρόσκοπτη επικοινωνία της
κεραίας με τον πομπό.
D Σημείωση
Για βέλτιστη λήψη πρέπει να αποφεύγετε την
τοποθέτηση της κεραίας πάνω σε μεταλλική
επιφάνεια η οποία ενδέχεται να προκαλέσει
παρεμβολές.
Πώς θα ξέρω την τιμή απολαβής
(ενίσχυσης) που απαιτείται για λήψη
καθαρής εικόνας?
Μόλις επεκτείνετε τα δίπολα VHF στο μέγιστο
μήκος τους, ενεργοποιήστε τον ενισχυτή. Είναι
ευκολότερο να ξεκινήσετε με ρύθμιση μέγιστης
απολαβής και να τη μειώνετε ανάλογα. Σε
ορισμένες περιπτώσεις ενδέχεται να λάβετε
καθαρότερη εικόνα με ρύθμιση μικρότερης
απολαβής.
Μπορώ να ρυθμίσω την κεραία
με ψηφιακό δέκτη?
Ναι, η κεραία μπορεί να ρυθμιστεί με ψηφιακό
δέκτη. Δείτε την ενότητα 4.3 του εγχειριδίου
χρήσης.
6 Garantie en service
Πληροφορίες σχετικά με την εγγύηση
μπορείτε να βρείτε στη διεύθυνση:
www.philips.com/welcome.
Για τεχνική υποστήριξη, αποστείλετε email με
τον αριθμό μοντέλου του προϊόντος και μια
λεπτομερή περιγραφή του προβλήματος στη
διεύθυνση: accessorysupport@philips.com
Page 55

55
ČEŠTINA
Obsah
1. Důležité informace 56
2. Televizní anténa pro
57
vnitřní použití
2.1 Přehled o výrobku 57
3. Začínáme 58
3.1 Instalace 58
3.2 Připojení k televizi 58
3.3 Použití s venkovní anténou 58
nebo jiným zdrojem obrazu
4. Použití televizní antény 59
4.1 Příjem signálu VHF/FM 59
4.2 Příjem signálu UHF 59
4.3 Nastavení digitálního 60
tuneru s touto anténou
5. Nejčastější dotazy 60
6. Záruka a služby 60
Page 56

56
Řiďte se místními pravidly a nelikvidujte staré
výrobky spolu s běžným domácím odpadem.
Správná likvidace starého výrobku pomáhá
předcházet případným nepříznivým účinkům na
životní prostředí a lidské zdraví.
Zaneste celé balení do místního zařízení
pro recyklaci.
1 Důležitéinformace
Před použitím televizní antény Philips pro
vnitřní použití si pečlivě přečtěte tuto příručku.
Obsahuje důležité informace a poznámky týkající
se instalace a nastavení.
© 2008 Koninklijke Philips Electronics N.V.
Všechna práva vyhrazena. Kopírování celé
příručky nebo její části bez písemného souhlasu
vlastníka autorských práv je zakázáno.
Ochranné známky jsou majetkem společnosti
Koninklijke Philips Electronics N.V. nebo jejich
příslušných vlastníků.
D Poznámka
U antény SDV4235/10 jsou 2 možnosti napájení
- střídavým a stejnosměrným proudem:
a) síťová šňůra, stř. (230 – 240 V)
je součástí dodávky
b) 12voltová zásuvka, ss (kabel/adaptér není
součástí dodávky)
Likvidace starého výrobku
Tento výrobek je navržen a vyroben z materiálů
a komponentů nejvyšší kvality, které je možné
recyklovat a opětovně použít.
Pokud je výrobek označen tímto
symbolem přeškrtnutého kontejneru,
znamená to, že výrobek podléhá
evropské směrnici 2002/96/EC
Informujte se o místním systému sběru tříděného
odpadu elektrických a elektronických výrobků.
Page 57

57
ČEŠTINA
2 Televizní anténa pro
vnitřnípoužití
Blahopřejeme vám k zakoupení našeho výrobku
a vítáme vás u společnosti Philips!
Chcete-li využít všechny výhody podpory, které
společnost Philips nabízí, zaregistrujte svůj
výrobek na adrese
www.philips.com/welcome.
2.1 Přehled o výrobku
A Anténa VHF
B anténa UHF
C Indikátor zesílení signálu
D Tlačítko zapnutí napájení/ovládání zesilování
E 230-240V napájení, stř. (je součástí dodávky)
F 12V připojení napájení, ss (12V napájecí
adaptér ss, není součástí dodávky)
G Přepínač AB
H Připojení venkovní antény
I Výstup pro připojení k televizoru
MIN
OFF
MAX
GAIN
A
B
I
F G H
E
C
D
Page 58

58
3.3 Použití s venkovní anténou nebo
jiným zdrojem obrazu
Anténa je vybavena přepínačem režimů
(přepínač A/B), který umožňuje více než
jeden zdroj obrazu.
Chcete-li použít anténu SDV4235/10 jako vnitřní
zesilovací anténu, posuňte přepínač do polohy
INT. Chcete-li použít venkovní anténu či jiný
zdroj obrazu, jednoduše posuňte vypínač
do polohy EXT. 2
Pokud používáte anténu s přepínačem v poloze
EXT, zajistěte, aby venkovní anténa či jiný zdroj
obrazu byly připojeny ke vstupu EXT ANT, který
je umístěn na zadní straně antény.
3
3 Začínáme
Než začnete: Aby tato anténa
správně fungovala, je třeba mít
přístup do nabídky na televizi, ke které anténu
připojujete (další informace najdete v návodu
k televizoru), dále je třeba nastavit televizor na
příjem signálu z ANTÉNY namísto KABELU
či SATELITU.
3.1 Instalace
Určování síly signálu
Před instalací určete nejlepší umístění pro
optimální příjem. Je důležité, aby od antény
směrem k vysílači nebyly žádné překážky. Pro
zajištění nejlepších výsledků by anténa měla
směřovat k umístění vysílače.
E Tip
Pokud je to možné, vyberte umístění blízko
okna, které anténě poskytuje pohled na vysílač
bez překážek.
E Tip
Neumísťujte anténu na kovový povrch.
3.2 Připojení k televizoru
1 Připojte výstup signálu na anténě k
televizoru. 1
2 Připojte napájení z antény k zásuvce 230-240 V.
-nebo-
Připojte zástrčku 12V adaptéru ss není
součástí dodávky) k anténě a zapojte ji.
STOP
2
3
ANT.
TV
1
Page 59

59
ČEŠTINA
4 Používánítelevizníantény
provnitřnípoužití
4.1 Příjem signálu VHF/FM
1 Prodlužte teleskopické dipóly na největší
možnou délku. 4
2 Otočením ovládacího tlačítka zesilování
do polohy max zapněte zesilovač.
5
D Poznámka
Pro dosažení nejlepšího příjmu bude možná
třeba otočit ovládací tlačítko na nižší nastavení.
3 Nalaďte TV nebo rádio FM na požadovaný
kanál/stanici. Nastavte dipóly (pohybem
různými směry nahoru a dolů), dokud se
neobjeví signál. 6
4.2 Příjem signálu UHF
1
Nalaďte TV na požadovaný kanál.
2
Zesilovač zapnete otočením tlačítka
ovládání zesilování do polohy max.
7
D Poznámka
Pro dosažení nejlepšího příjmu bude možná
třeba otočit ovládací tlačítko na nižší nastavení.
3
Sklopte či natočte smyčku UHF směrem k
vysílači, dokud se neobjeví signál.
8
4
MIN
OFF
MAX
GAIN
5
MIN
OFF
MAX
GAIN
7
6
8
Page 60

60
4.3 Nastavení digitálního
tuneru s touto anténou
Digitální televizní tunery vyžadují
naprogramování kanály dostupnými ve vaší
oblasti. Obecně je tento automatický proces
součástí nastavení tuneru. Pokud však anténa
není správně nastavena, můžete zjistit, že tuner
nepřijímá žádné kanály, které by bylo možné
sledovat.
Pokud máte přístup k anténě na střeše
nebo jiné anténě, která je právě připojena k
digitálnímu tuneru, můžete tuto anténu použít k
programování tuneru. Tuner si kanály zapamatuje,
což usnadní seřízení této antény.
Další metoda je připojení antény přímo k
televizoru (bez pomoci tuneru) a naladění
analogových kanálů pro určení nejlepšího
umístění antény. Potom znovu připojte digitální
tuner – pokud máte odpovídající úroveň signálu,
měli byste moci naprogramovat tuner.
5 Častédotazy
Bude tato anténa fungovat pro
analogové vysílání?
Ano, tato anténa může přijímat analogové
televizní vysílání v šířkách pásma UHF a VHF.
Bude tato anténa přijímat digitální
či HD-DVB vysílání?
Ano, tato anténa je navržena pro příjem
digitálního vysílání DVB a HDTV v šířkách pásma
UHF a VHF.
Je možné napájet tuto anténu
stejnosměrným proudem na lodi, v
obytném voze či obytném přívěsu?
Ano, zásuvka pro napájení stejnosměrným
proudem je umístěna na zadní straně antény.
Zastrčte kabel/adaptér (není součástí dodávky)
do zdroje napájení.
Kam umístit anténu, aby byl zajištěn
nejlepší možný signál?
Pokud je to možné, vyberte umístění blízko
okna, které anténě poskytuje pohled na vysílač
bez překážek.
D Poznámka
Abyste zajistili nejlepší příjem, neměli byste
rovněž umisťovat anténu na kovový povrch,
který může způsobit rušení.
Jak poznám, jaké zesílení je třeba pro
dosažení čistého obrazu?
Po prodloužení dipólů VHF na největší možnou
délku, zapněte zesilovač. Nejsnadnější je začít s
maximálním zesílením a pak ho podle potřeby
snižovat. V některých případech můžete
dosáhnout čistšího obrazu s nižším zesílením
než při nastavení na maximální hodnotu.
Lze tuto anténu nastavit
s digitálním tunerem?
Ano, tuto anténu lze nastavit s digitálním
tunerem. Viz část 4.3 v uživatelské příručce.
6Zárukaaservis
Informace o záruce jsou na webové stránce:
www.philips.com/welcome
Potřebujete-li technickou podporu, pošlete
e-mail s číslem modelu a podrobným popisem
problému na adresu:
accessorysupport@philips.com
Page 61

POLSKIE
Spistreści
1. Ważne 62
2. Pokojowa antena telewizyjna 63
2.1 Opis produktu 63
3. Wprowadzenie 64
3.1 Instalacja 64
3.2 Podłączanie do telewizora 64
3.3 Korzystanie z anteny zewnętrznej 64
lub innego źródła sygnału wideo
4. Obsługa anteny telewizyjnej 65
4.1 Odbiór sygnału w paśmie VHF/FM 65
4.2 Odbiór sygnału w paśmie UHF 65
4.3 Konguracja anteny 66
i tunera cyfrowego
5. Często zadawane pytania 66
6. Gwarancja i serwis 66
Page 62

62
Należy przestrzegać lokalnych przepisów i nie
wyrzucać zużytych produktów elektronicznych
wraz z normalnymi odpadami gospodarstwa
domowego. Ścisłe przestrzeganie wytycznych w
tym zakresie pomaga chronić środowisko naturalne
oraz ludzkie zdrowie.
Opakowanie należy oddać do lokalnego punktu
zbiórki surowców wtórnych.
1 Ważne
Przed rozpoczęciem użytkowania pokojowej
anteny telewizyjnej należy zapoznać się z
niniejszą instrukcją obsługi. Zawiera ona
ważne informacje i uwagi dotyczące instalacji i
konguracji ustawień tego urządzenia.
© 2008 Koninklijke Philips Electronics N.V.
Wszelkie prawa zastrzeżone. Kopiowanie
całości lub części tego dokumentu bez uzyskania
pisemnej zgody
właściciela praw autorskich jest zabronione.
Znaki towarowe są własnością rmy Koninklijke
Philips Electronics N.V. lub innych odpowiednich
producentów.
D Uwaga
Antena telewizyjna SDV4235/10 może być
zasilana prądem przemiennym lub stałym.
a) Przewód zasilający AC (230 – 240 V)
w zestawie
b) Gniazdo zasilania prądem stałym:
12 V (przewód/adapter nie należy do zestawu)
Usuwanie zużytych produktów
Niniejszy produkt został zaprojektowany i
wykonany w oparciu o wysokiej jakości materiały
i podzespoły, które poddane recyklingowi mogą
być ponownie użyte.
Jeśli na produkcie znajduje się symbol
przekreślonego pojemnika na śmieci
na kółkach, podlega on postanowieniom
Dyrektywy Europejskiej 2002/96/WE.
Należy zapoznać się lokalnymi zasadami zbiórki
i segregacji sprzętu elektrycznego i elektronicznego.
Page 63

63
POLSKIE
2 Pokojowa antena
telewizyjna
Gratulujemy zakupu i witamy wśród klientów
firmy Philips!
Aby w pełni korzystać z pomocy technicznej
oferowanej przez firmę Philips, należy
zarejestrować produkt pod adresem
www.philips.com/welcome.
2.1 Opis produktu
A Antena VHF
B Antena UHF
C Wskaźnik wzmocnienia sygnału
D Włącznik zasilania/pokrętło
regulacji wzmocnienia
E Przewód zasilania 230-240 V AC (w zestawie)
F Gniazdo zasilania 12 V DC
(adapter do gniazda 12 V DC
niedołączony do zestawu)
G Przełącznik AB
H Złącze anteny zewnętrznej
I Złącze wyjściowe do podłączania telewizora
MIN
OFF
MAX
GAIN
A
B
I
F G H
E
C
D
Page 64

64
3.3 Korzystanie z anteny zewnętrznej
lub innego źródła sygnału wideo
Antena telewizyjna jest wyposażona w
przełącznik wyboru trybu (przełącznik A/B),
który pozwala na korzystanie z więcej niż
jednego źródła sygnału wideo.
Aby używać anteny SDV4235/10 jako
wewnętrznej anteny telewizyjnej ze
wzmocnieniem, ustaw przełącznik
w położeniu INT. Aby korzystać z anteny
zewnętrznej lub innego źródła sygnału wideo,
ustaw przełącznik w położeniu EXT.
2
Jeśli przełącznik anteny znajduje się w położeniu
EXT, upewnij się, że przewód anteny zewnętrznej
lub innego źródła sygnału wideo został
podłączony do wejściowego gniazda EXT ANT,
znajdującego się na tylnej ściance anteny. 3
3 Czynnościwstępne
Zanim rozpoczniesz: Aby zapewnić
prawidłowe działanie anteny, w
menu podłączanego telewizora (patrz instrukcja
obsługi telewizora) spośród opcji źródła
sygnału telewizyjnego ANTENNA, CABLE lub
SATELLITE wybierz opcję odbioru z anteny.
3.1 Instalacja
Określanie siły sygnału
Przed instalacją anteny wybierz położenie
zapewniające najlepszy odbiór sygnału. Na
drodze przesyłu sygnału pomiędzy anteną a
nadajnikiem nie powinny znajdować się żadne
przeszkody. Ustawienie anteny przodem
do nadajnika zapewnia najlepsze działanie
urządzenia.
E Wskazówka
Jeśli jest to możliwe, ustaw antenę blisko okna,
aby zapewnić jej optymalne położenie względem
nadajnika.
E Wskazówka
Nie stawiaj anteny na metalowej powierzchni.
3.2 Podłączanie do telewizora
1 Połącz wyjściowe gniazdo anteny z gniazdem
telewizora. 1
2 Podłącz przewód zasilający do gniazdka
elektrycznego o mocy 230–240 V.
-lub-
Podłącz adapter 12 V DC (niedołączony
do zestawu) do gniazda anteny i podłącz
urządzenie do źródła zasilania.
STOP
2
3
ANT.
TV
1
Page 65

65
POLSKIE
4 Obsługapokojowej
anteny telewizyjnej
4.1 Odbiór sygnału w paśmie VHF/FM
1 Rozłóż teleskopowe dipole na maksymalną
długość. 4
2 Włącz wzmacniacz sygnału, obracając
pokrętło regulacji wzmocnienia sygnału
do ustawienia maksymalnego.
5
D Uwaga
W celu uzyskania najlepszego odbioru konieczne
może być późniejsze wybranie niższego
ustawienia.
3 Wybierz w telewizorze lub radiu FM żądany
kanał telewizyjny/stację radiową. Dostosuj
położenie dipoli (poruszając nimi w różnych
kierunkach w górę i w dół), aż do uzyskania
dobrego odbioru sygnału. 6
4.2 Odbiór sygnału w paśmie UHF
1
Wybierz w telewizorze żądany
kanał telewizyjny.
2
Włącz wzmacniacz sygnału, obracając
pokrętło regulacji wzmocnienia do
ustawienia maksymalnego.
7
D Uwaga
W celu uzyskania najlepszego odbioru
konieczne może być późniejsze wybranie
niższego ustawienia.
3
Pochylaj lub obracaj ramę anteny UHF
w kierunku nadajnika, aż do momentu
uzyskania dobrego odbioru sygnału.
8
4
MIN
OFF
MAX
GAIN
5
MIN
OFF
MAX
GAIN
7
6
8
Page 66

66
4.3 Konguracja anteny i
tunera cyfrowego
Aby odbierać cyfrowe tunery telewizyjne należy
odpowiednio zaprogramować tuner do odbioru
kanałów telewizyjnych dostępnych na danym
obszarze. Automatyczny proces programowania
stanowi zazwyczaj jeden z etapów konguracji
ustawień tunera. Jednak nieprawidłowe
ustawienie anteny może uniemożliwić
prawidłowe wyświetlenie kanałów.
Jeśli do tunera cyfrowego podłączono antenę
dachową lub inną, można za jej pomocą
zaprogramować kanały tunera. Zostaną one
zapisane w pamięci urządzenia, co ułatwi
dostosowanie położenia anteny pokojowej.
Można także podłączyć antenę bezpośrednio
do telewizora (bez korzystania z tunera) i
znaleźć najlepsze położenie anteny, wyszukując
kanały analogowe. Następnie należy podłączyć
ponownie tuner cyfrowy. Jeśli siła sygnału
telewizyjnego jest odpowiednia, możliwe będzie
zaprogramowanie tunera.
5 Częstozadawanepytania
Czy antena umożliwia odbiór
transmisji analogowych?
Tak, antena pozwala na odbieranie programów
telewizji analogowej w paśmie UHF oraz VHF..
Czy antena umożliwia odbiór programów
telewizji cyfrowej i obsługę sygnału HD-DVB?
Tak, antena umożliwia odbiór cyfrowego sygnału
Digital DVB i HDTV w paśmie UHF oraz VHF.
Czy antena może być zasilana prądem
stałym na łodzi lub w przyczepie
turystycznej i kempingowej?
Tak, na tylnej ściance anteny znajduje się gniazdo
zasilania prądem stałym. Podłącz przewód/
adapter (niedołączony do zestawu), a następnie
podłącz urządzenie do źródła zasilania.
Gdzie należy umieścić antenę, aby uzyskać
najlepszy odbiór sygnału?
Jeśli jest to możliwe, ustaw antenę blisko
okna, aby zapewnić jej optymalne położenie
względem nadajnika.
D Uwaga
Aby uzyskać dobry odbiór, unikaj stawiania
anteny na metalowej powierzchni, ponieważ
może ona spowodować zakłócenia sygnału.
Skąd będę wiedzieć jaka wartość
wzmocnienia jest wymagana do uzyskania
czystego obrazu?
Po rozłożeniu dipoli VHF na maksymalną
długość włącz wzmacniacz. Zalecany jest wybór
ustawienia maksymalnego, a następnie, jeśli to
konieczne, zmniejszanie wartości wzmocnienia.
Niekiedy czystszy obraz uzyskuje się po
wybraniu niższego ustawienia.
Czy możliwa jest konguracja anteny
z tunerem cyfrowym?
Tak, konguracja anteny z tunerem cyfrowym
jest możliwa. Patrz część 4.3 instrukcji obsługi.
6 Gwarancja i serwis
Informacje dotyczące gwarancji można znaleźć
na stronie internetowej:
www.philips.com/welcome
Aby skorzystać z serwisu technicznego, numer
modelu urządzenia oraz dokładny opis usterki
należy przesłać pocztą elektroniczną na adres:
accessorysupport@philips.com
Page 67

67
MAGYAR
Tartalomjegyzék
1. Fontos! 68
2. A beltéri televíziós antenna 69
2.1 A termék áttekintése 69
3. Bevezetés 70
3.1 Használatbavétel 70
3.2 Csatlakoztatás TV-készülékhez 70
3.3 Külső antennával vagy 70
videoforrással való használat
4. A televíziós antenna használata 71
4.1 VHF/FM vétel 71
4.2 UHF vétel 71
4.3 Digitális tuner beállítása 72
az antennával
5. Gyakran ismétlődő kérdések 72
6. Jótállás és szerviz 72
Page 68

68
Kérjük, a helyi szabályok gyelembevételével járjon
el, és ne dobja az elhasznált terméket a háztartási
hulladékgyűjtőbe. A feleslegessé vált készülék helyes
kezelése segít megelőzni a környezet és az emberi
egészség károsodását.
A csomagolóanyagot a helyi újrahasznosító
gyűjtőhelyen helyezze el.
1 Fontos tudnivalók
Kérjük, olvassa el gyelmesen az útmutatót a
Philips beltéri televíziós antenna használatbavétele
előtt. Fontos információkat és megjegyzéseket
tartalmaz az eszköz telepítésével és beállításával
kapcsolatban.
© 2008 Koninklijke Philips Electronics N.V.
Minden jog fenntartva. Az eszközt a szerzői jog
tulajdonosának előzetes írásos hozzájárulása
nélkül tilos részben vagy egészben lemásolni.
Minden védjegy a Koninklijke Philips Electronics
N.V. céget vagy a megfelelő
jogtulajdonosokat illeti.
D Megjegyzés
Az SDV4235/10 áramellátása történhet
hálózatról vagy egyenáramról.
a) Váltakozó áramú hálózati kábel (230 – 240 V)
(tartozék)
b) 12 V-os egyenfeszültségű csatlakozó (a
csomag nem tartalmazza a kábelt / adaptert)
Az elhasznált termék hulladékkezelése
Ezt a terméket minőségi, újrafeldolgozható
és újrahasznosítható anyagok és alkatrészek
felhasználásával tervezték és készítették.
A termékhez kapcsolódó áthúzott
kerekes kuka szimbólum azt jelenti,
hogy a termék a 2002/96/EK
európai irányelv hatálya alá esik
Kérjük, tájékozódjon az elektromos és elektronikus
hulladékok szelektív gyűjtésének helyi rendszeréről.
Page 69

69
MAGYAR
2 A beltéri televíziós
antenna
Gratulálunk a termék megvásárlásához!
Üdvözöljük a Philips világában!
A Philips által biztosított teljes körű
támogatáshoz itt regisztrálhatja termékét:
www.philips.com/welcome.
2.1 A termék áttekintése
A VHF antenna
B UHF antenna
C Jelerősítés jelzőfény
D Bekapcsoló- / erősítés-szabályozó gomb
E 230-240 V-os hálózati tápegység (tartozék)
F 12 V-os DC tápcsatlakozó
(a csomag nem tartalmazza a
12 V-os DC adaptert)
G A/B kapcsoló
H Külső antenna csatlakozó
I Kimenet a TV csatlakoztatásához
MIN
OFF
MAX
GAIN
A
B
I
F G H
E
C
D
Page 70

70
3.3 Külső antennával vagy videoforrással
való használat
Az antenna üzemmódválasztó (A/B) kapcsolóval
felszerelt; ennek segítségével egynél több
videoforrást is beállíthat.
Az SDV4235/10 beltéri televíziós
antennaerősítőként való használatához
egyszerűen csúsztassa a kapcsolót
INT állásba. Külső antenna vagy más videoforrás
használatához csúsztassa a kapcsolót
EXT állásba. 2
Ha az antenna használata közben a kapcsoló
EXT pozícióban van, ellenőrizze, hogy a külső
antennát vagy a videoforrást csatlakoztatta-e az
antenna hátoldalán levő EXT ANT bemenetbe.
3
3 Bevezetés
Mielőtt hozzáfogna: Ahhoz, hogy az
antenna megfelelően működjön,
nyissa meg annak a televíziónak a menüjét,
amelyhez az antennát csatlakoztatja (erről lásd a
TV-készülék használati útmutatóját). A menüben
állítsa be az ANTENNA opciót bemeneti
jelforrásnak a CABLE (kábel) vagy a SATELLITE
(műhold) helyett.
3.1 Használatbavétel
A jelerősség meghatározása
Használatbavétel előtt keresse meg azt a helyet,
ahol optimális a jel vétele. Fontos, hogy az
antenna és az adókészülék közötti „rálátás”
szabad legyen. A legjobb eredményt akkor érheti
el, ha az antenna az adókészülék irányába néz.
E Tanács
Lehetőség szerint ablak közeli helyet keressen,
ahonnan az antenna szabadon rálát az
adókészülékre.
E Tanács
Ne helyezze az antennát fém felületre.
3.2 Csatlakoztatás a TV-készülékhez
1 Csatlakoztassa az antennán levő jelkimenetet
a TV-készülékhez. 1
2 Csatlakoztassa az antenna tápegységét a
230-240 V-os aljzatba.
- vagy -
Csatlakoztassa a 12 V-os DC adapter dugaszát
(a csomag nem tartalmazza) az antennába.
STOP
2
3
ANT.
TV
1
Page 71

71
MAGYAR
4 A beltéri televíziós
antennahasználata
4.1 VHF/FM vétel
1 Húzza ki a teleszkópos dipól antennát a
lehető leghosszabbra. 4
2 Az erősítés-szabályozó gomb max. állásba
forgatásával kapcsolja be az erősítőt.
5
D Megjegyzés
Előfordulhat, hogy a legjobb vétel érdekében
alacsonyabb állásba kell forgatnia az erősítésszabályozó gombot.
3
Kapcsolja be a TV-készüléket vagy FM rádiót,
és állítsa be a megfelelő csatornát. Mozgassa
fel-le a dipól antennákat különböző irányba,
amíg megfelelő a vétel. 6
4.2 UHF vétel
1
Állítsa be a megfelelő csatornát a
TV-készüléken.
2
Az erősítés-szabályozó gomb max. állásba
forgatásával kapcsolja be az erősítőt.
7
D Megjegyzés
Előfordulhat, hogy a legjobb vétel érdekében
alacsonyabb állásba kell forgatnia az
erősítés-szabályozó gombot.
3
Döntse vagy forgassa el az UHF
hurokantennát az adókészülék felé,
amíg megfelelő a vétel. 8
4
MIN
OFF
MAX
GAIN
5
MIN
OFF
MAX
GAIN
7
6
8
Page 72

72
4.3 Digitális tuner beállítása az
antennával
Digitális TV tunerek esetében programozza be
a tunert az elérhető csatornákra. Ez általában
automatikusan megtörténik a tuner beállítása
során. Ha azonban nem állította be megfelelően
az antennát, előfordulhat, hogy a tuner nem veszi
az elérhető csatornákat.
Ha a készülékhez tetőantenna vagy egyéb
antenna kapcsolódik, az adott antennát is
használhatja a tuner beprogramozásához. A
tuner tárolja a csatornákat, ami egyszerűbbé
teszi az antenna beállítását.
Egy másik módszerrel az antennát közvetlenül
is csatlakoztathatja a TV-készülékhez (a
tuner használata nélkül), és analóg csatornák
hangolásával keresheti meg a megfelelő helyet
az antenna számára. Azt követően csatlakoztassa
ismét a digitális tunert. Ha a jel szintje megfelelő,
programozza a tunert.
5 Gyakranismétlődőkérdések
Az antenna használható
analóg adásokhoz?
Igen, az antenna képes analóg TV-adások vételére
az UHF és VHF sávszélességen.
Az antenna alkalmas digitális vagy
HD-DVB adások vételére?
Igen, az antennát digitális DVB és HDTV adások
UHF és VHF sávszélességen történő vételére
terveztük.
Az antenna működtethető-e egyenáramú
áramforrásról hajón, lakókocsiban
vagy sátorban?
Igen, az antenna hátoldalán található egy
DC aljzat. Csatlakoztassa a kábelt / adaptert
(a csomag nem tartalmazza) az antennába, majd
az áramforrásba.
Hol helyezzem el az antennát a lehető
legjobb vétel eléréséhez?
Lehetőség szerint ablak közeli helyet keressen,
ahonnan az antenna szabadon „rálát” az
adókészülékre.
D Megjegyzés
A legjobb vétel eléréséhez ne helyezze az
antennát fém felületre, mert az interferenciát
okozhat.
Honnan tudhatom, mekkora erősítés
szükséges a tiszta kép eléréséhez?
Húzza ki a dipól antennákat a lehető
leghosszabbra, majd kapcsolja be az erősítőt.
Először válassza a maximális erősítést,
majd szükség szerint csökkentse azt. Néha
előfordulhat, hogy kisebb erősítéssel tisztább
képet kap, mint a maximális erősség
beállítása mellett.
Beállíthatom az antennát
digitális tunerhez is?
Igen, az antenna együttműködik a digitális
tunerekkel. Lásd erről az útmutató 4.3. részét.
6 Garancia és szerviz
A garanciával kapcsolatos tudnivalókat a
következő címen érheti el:
www.philips.com/welcome
Műszaki támogatás igénylése esetén küldjön
számunkra egy e-mailt, amelyben megadja a
készülék típusszámát, és részletesen leírja a
problémát. Címünk:
accessorysupport@philips.com
Page 73

73
TÜRKÇE
İçindekiler
1. Önemli! 74
2. İç mekan televizyon anteniniz 75
2.1 Ürüne genel bakış 75
3. Başlarken 76
3.1 Kurulum 76
3.2 TV’nize bağlama 76
3.3 Harici anten veya diğer video 76
kaynağı ile kullanma
4. Televizyon anteninizi kullanma 77
4.1 VHF/FM alımı için 77
4.2 UHF alımı için 77
4.3 Bu antenle dijital radyo kurulumu 78
5. Sıkça sorulan sorular 78
6. Garanti ve servis 78
Page 74

74
Lütfen, yerel kurallara uygun hareket edin ve
eskiyen ürünlerinizi, normal ev atıklarınızla birlikte
atmayın. Eskiyen ürününüzün atık işlemlerinin doğru
biçimde gerçekleştirilmesi, çevre ve insan sağlığı
üzerinde olumsuz etkilere yol açılmasını önlemeye
yardımcı olacaktır.
Pilleri yerel geri dönüşüm merkezine teslim edin.
1 Önemli
Philips iç mekan televizyon anteninizi
kullanmadan önce bu kılavuzu mutlaka okuyun.
Kılavuz kurulum ve ayarlara yönelik önemli
bilgiler ve uyarılar içermektedir.
© 2008 Koninklijke Philips Electronics N.V.
Tüm Hakları saklıdır. Telif hakkı sahibinin yazılı
izni olmaksızın tamamen ya da kısmen
çoğaltılamaz. Ticari markalar, Koninklijke
Philips Electronics N.V. şirketinin veya kendi
sahiplerinin malıdır.
D Not
SDV4235/10’un AC ve DC olmak üzere güç
kaynağı için 2 seçeneği vardır:
a) AC güç kablosu (230 – 240V) birlikte verilir
b) 12V DC soketi (kablo/adaptör birlikte
verilmez)
Eski ürününüzün atılması
Ürününüz, geri dönüşüme tabi tutulabilen ve
yeniden kullanılabilen, yüksek kalitede malzeme
ve parçalardan tasarlanmış ve üretilmiştir.
Bir ürüne çarpı işaretli tekerlekli çöp
arabası sembollü etiket yapıştırılması,
söz konusu ürünün 2002/96/EC sayılı
Avrupa Birliği Direkti kapsamında
olduğu anlamına gelir.
Lütfen, elektrikli ve elektronik ürünlerin
toplanması ile ilgili bulunduğunuz yerdeki sistem
hakkında bilgi edinin.
Page 75

75
TÜRKÇE
2 İçmekantelevizyon
anteniniz
Bu ürünü satın aldığınız için tebrik ederiz.
Philips’e hoş geldiniz!
Philips tarafından sunulan destek hizmetlerinden
tam olarak faydalanabilmek için lütfen ürününüzü
aşağıdaki adreste kaydettirin:
www.philips.com/welcome.
2.1 Ürüne genel bakış
A VHF anteni
B UHF anteni
C Sinyal kazanç göstergesi
D Güç anahtarı/kazanç kontrolü düğmesi
E 230-240V AC güç kaynağı (birlikte verilir)
F 12V DC güç bağlantısı
(12V DC güç adaptörü, birlikte verilmez)
G AB anahtarı
H Harici anten bağlantısı
I TV bağlantı çıkışı
MIN
OFF
MAX
GAIN
A
B
I
F G H
E
C
D
Page 76

76
3.3 Harici anten veya diğer video kaynağı
ile kullanma
Anteniniz bir video kaynağından daha fazlasını
sağlayan mod seçicisi anahtarıyla (A/B anahtarı)
donatılmıştır.
SDV4235/10’u dahili amplikasyonlu bir TV
anteni olarak kullanmak için anahtarı INT
konumuna çevirin. Harici bir anten veya
diğer video kaynağı kullanmak için anahtarı
EXT konumuna çevirin. 2
Anteni EXT konumunda kullanıyorsanız harici
anteninizin veya diğer video kaynağının antenin
arkasındaki EXT ANT girişine bağlı olduğundan
emin olun.
3
3 Başlarken
Başlamadan önce: Bu antenin düzgün
çalışması için anteni bağladığınız
televizyonun menüsüne girmeniz,
(televizyonunuzun kullanım kılavuzuna bakın)
daha sonra televizyonu sinyali KABLO veya
UYDU yerine ANTEN’den almaya ayarlamanız
gerekir.
3.1 Kurulum
Sinyal Gücünü Belirleme
Kurulumdan önce optimum alım için en iyi
konumu belirleyin. Anten ile verici arasında engel
olmaması önemlidir. En iyi sonuç için anten
vericinin konumuna doğru bakmalıdır.
E İpucu
Mümkünse, vericiyi net görmesi için anteni
pencereye yakın bir yere yerleştirin.
E İpucu
Anteni metal bir yüzeye yerleştirmeyin.
3.2 TV’nize bağlama
1 Antenin sinyal çıkışını TV’ye bağlayın. 1
2 Güç kaynağını kullanarak anteni 230-240V
prize bağlayın.
- veya -
Anteni 12V DC adaptör şini (birlikte
verilmez) antene bağlayın ve prize takın.
2
3
ANT.
TV
1
DUR
Page 77

77
TÜRKÇE
4 İçmekantelevizyon
anteninizi kullanma
4.1 VHF/FM alımı için
1 Teleskop dipollerini sonuna kadar uzatın.
4
2 Kazanç kontrolü düğmesini maks konumuna
döndürerek amplikatörü açın. 5
D Not
En iyi alım için kazanç kontrolünü daha düşük bir
ayara indirmeniz gerekebilir.
3 TV veya FM radyonuzu istediğiniz kanala/
istasyona çevirin. Alım gerçekleşinceye kadar
dipolleri ayarlayın (farklı yönlerde yukarı ve
aşağı hareket ettirerek). 6
4.2 UHF alımı için
1
TV’nizi istediğiniz kanala çevirin.
2
Kazanç kontrolü düğmesini maks konumuna
döndürerek amplikatörü açın.
7
D Not
En iyi alım için kazanç kontrolünü daha düşük bir
ayara indirmeniz gerekebilir.
3
Alım gerçekleşinceye kadar UHF halkasını
vericiye doğru eğin ve döndürün.
8
4
MIN
OFF
MAX
GAIN
5
MIN
OFF
MAX
GAIN
7
6
8
Page 78
78
4.3 Bu antenle dijital radyo kurulumu
Dijital TV radyoları, radyoyu bölgenizdeki
kanallarla proglamlamanızı gerektirir. Genelde
bu otomatik süreç radyo kurulumunun bir
parçasıdır. Ancak, uygun şekilde kurulmuş bir
anteniniz yoksa radyonun görünür hiçbir kanalı
çekmediğini fark edebilirsiniz.
Bir çatı antenine veya dijital bir radyoya bağlı
olan diğer bir antene erişebiliyorsanız, radyoyu
proglamlamak için anteni kullanabilirsiniz.
Kanallar bu anteni daha kolay hizalayacak olan
radyonun hafızasına alınacaktır.
Başka bir yöntem anteni doğrudan TV’nize
bağlamak (radyoyu kullanmadan) ve antenin
en iyi konumunu bulmak için analog kanallar
ayarlamaktır. Yeterli sinyal seviyesi varsa radyoyu
ayarlayabilmeniz gerekir.
5 Sıksorulansorunlar
Bu anten Analog yayınlarla çalışır mı?
Evet, bu anten UHF ve VHF bant genişliğindeki
analog televizyon yayınlarını alabilir.
Bu anten dijital veya HD-DVB
yayınlarını alır mı?
Evet, bu anten UHF ve VHF bant genişliğindeki
Dijital DVB ve HDTV yayınlarını alacak şekilde
tasarlanmıştır.
Anten teknede, karavanda veya kampta
bir DC güç sağlayıcısıyla elektriğe
bağlanabilir mi?
Evet, antenin arkasında bir DC güç soketi vardır.
Kablonu/adaptörünüzü (birlikte verilmez) önce
antene ve daha sonra güç kaynağına takın.
Mümkün olan en iyi alımı elde etmek için
anteni nereye yerleştirmeliyim?
Mümkünse, vericiyi net görmesi için anteni
pencereye yakın bir yere yerleştirin.
D Not
En iyi alım için anteni parazite neden olabilecek
metal bir yüzeye yerleştirmemelisiniz.
Net görüntü almak için ne kadar
kazanç (amplikasyon) gerektiğini nasıl
bilebilirim?
VHF dipollerini sonuna kadar uzattıktan sonra
amplikatörü açın. Maksimum kazançla başlayıp,
gerektiği kadar azaltmak en kolay yöntemdir. Bazı
durumlarda, maksimum ayardan daha az kazançla
daha net görüntü elde edebilirsiniz.
Bu anteni bir dijital radyo ile
kurabilir miyim?
Evet, bu anten bir dijital radyo ile kurulabilir.
Kullanım kılavuzunuzda bölüm 4.3’e bakın.
6 Garanti ve servis
Garanti bilgilerini bulmak için:
www.philips.com/welcome
Teknik destek için ürünün model numarası ve
sorununuzun detaylı açıklamasıyla birlikte bize
e-posta gönderin:
accessorysupport@philips.com
Page 79

79
РУССКИй
Содержание
1. Внимание! 80
2. Комнатная телевизионная
81
антенна
2.1 Внешний вид и органы управления 81
3. Начало работы 82
3.1 Установка 82
3.2 Подключение к телевизору 82
3.3 Использование с внешней антенной 82
или другим источником видеосигнала
4. Использование телевизионной
83
антенны
4.1 Для приема волн метрового 83
диапазона (VHF/FM)
4.2 Для приема волн дециметрового 83
диапазона (UHF)
4.3 Настройка цифрового тюнера для 84
данной антенны
5. Ответы на часто
84
задаваемые вопросы
6. Гарантия и обслуживание 84
Page 80

80
Соблюдайте требования местного
законодательства по утилизации отходов и
не выбрасывайте вышедшие из строя изделия
вместе с бытовыми отходами. Правильная
утилизация поможет избежать возможных
отрицательных последствий для окружающей
среды и здоровья людей.
Сдавайте упаковку в местное учреждение по
утилизации отходов.
1 Важныесведения
Перед использованием комнатной антенны
Philips внимательно прочитайте настоящее
руководство. В нем содержатся важные
сведения и примечания по установке и
настройке устройства.
© 2008 Компания Koninklijke
Philips Electronics N.V.
Все права сохранены. Полное или частичное
воспроизведение материалов документа
возможно только с письменного разрешения
владельца. Товарные знаки являются
собственностью компании Koninklijke Philips
Electronics N.V.
D Примечание
Антенна SDV4235/10 может работать с
2 видами источников электропитания
переменного или постоянного тока:
а) Кабель питания переменного тока
(230 – 240 В) входит в комплект
б) Разъем 12 В переменного тока (кабель/
адаптер не входят в комплект)
Утилизация отслужившего
оборудования
Данное изделие сконструировано и
изготовлено из высококачественных
материалов и компонентов, которые
подлежат переработке и вторичному
использованию.
Если изделие маркировано значком
с изображением перечеркнутого
мусорного контейнера,это означает,
что изделие попадает под действие
директивы Европейского
Парламента и Совета 2002/96/EC
Выясните правила местного законодательства
по вопросу раздельной утилизации
электрических и электронных изделий.
Page 81
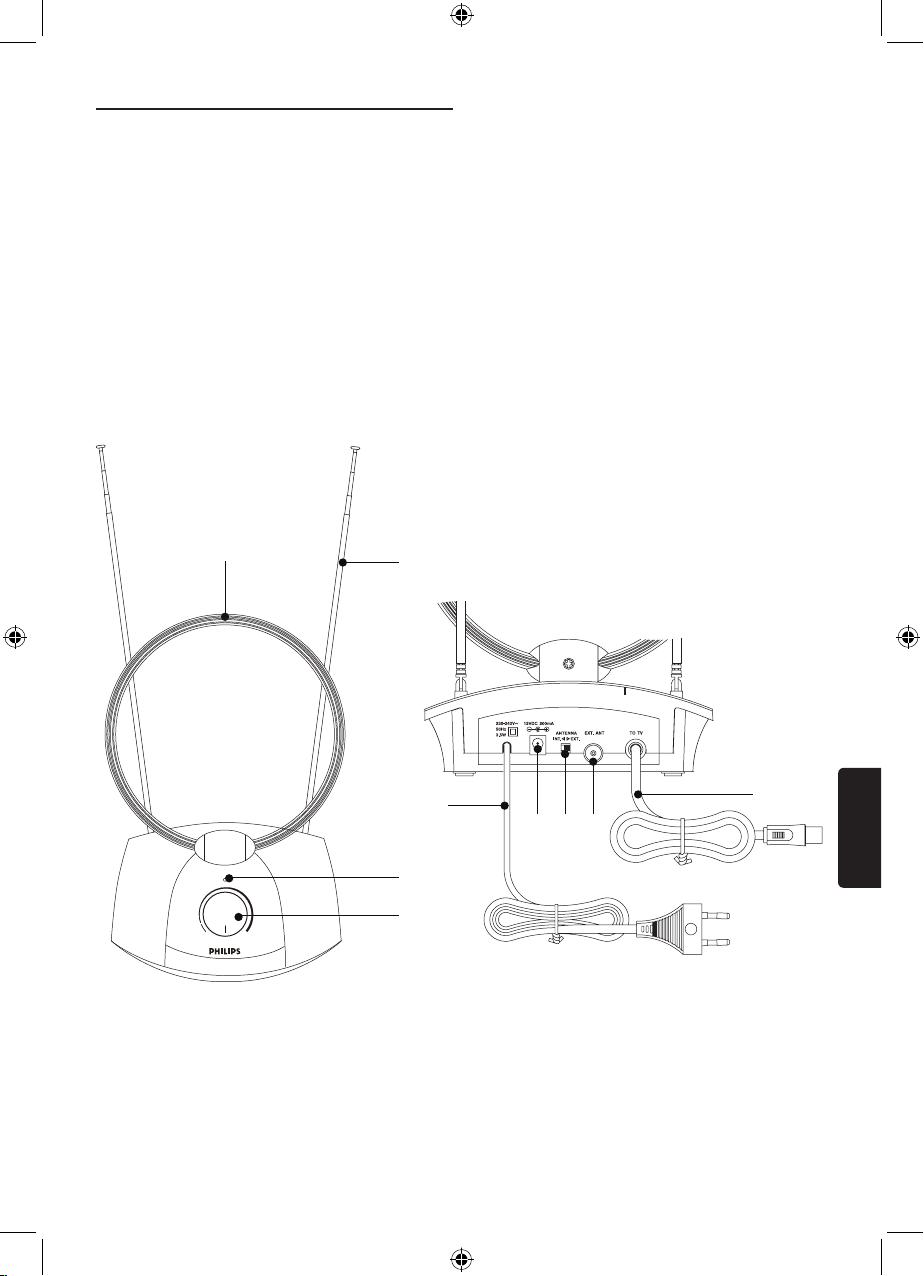
81
РУССКИй
2 Комнатная
телевизионнаяантенна
Поздравляем с покупкой и добро пожаловать
в сообщество Philips!
Чтобы воспользоваться полным набором
услуг по техническому обслуживанию
продукции Philips, зарегистрируйте ваше
изделие по адресу
www.philips.com/welcome.
2.1 Внешний вид и органы управления
A Антенна метрового диапазона (VHF)
B Антенна дециметрового диапазона (UHF)
C Индикатор усиления сигнала
D Ручка выключения питания/регулятора
усиления
E Кабель питания 230-240 В
(входит в комплект)
F Подключение источника электропитания
12 В постоянного тока (сетевой
адаптер 12 В постоянного тока,
не входит в комплект)
G Двухпозиционный переключатель
H Подключение внеш.антенны
I Выход для подключения телевизора
MIN
OFF
MAX
GAIN
A
B
I
F G H
E
C
D
Page 82

82
3.3 Использование с внешней
антенной или другим источником
видеосигнала
Антенна оборудована переключателем
режимов (двухпозиционный переключатель),
который позволяет использовать более
одного источника видеосигнала.
Для использования SDV4235/10 как внутреннюю
телевизионную антенну с усилителем просто
передвиньте переключатель в положение
INT. Для использования внешней антенны или
другого источника видеосигнала передвиньте
переключатель в положение EXT. 2
При использовании антенны с ереключателем
в положении EXT, убедитесь, что внешняя
антенна или другой источник видеосигнала
подключены к входу EXT ANT, расположенному
на задней стороне антенны.
3
3 Началоработы
Перед началом: Для правильной
работы антенны, зайдите в
меню телевизора, к которому вы
подключаете антенну (обратитесь к
руководству пользователя для телевизора),
затем установите прием сигнала от
АНТЕННЫ, а не через КАБЕЛЬ или
со СПУТНИКА.
3.1 Установка
Определение мощности сигнала
Перед установкой определите наилучшее
расположение антенны для достижения
оптимального качества приема. Важно, чтобы
между антенной и источником сигнала не
было никаких препятствий. Для получения
наилучших результатов антенна должна быть
направлена в сторону источником сигнала.
E Подсказка
По возможности, выберите расположение
рядом с окном, что обеспечит отсутствие
препятствий между антенной и
источником сигнала.
E Подсказка
Не помещайте антенну на металлическую
поверхность.
3.2 Подключение к телевизору
1 Подключите выходной сигнал антенны к
телевизору. 1
2 Подключите шнур питания антенны к
розетке 230-240 В.
- или -
Подключите штекер адаптера 12 В
постоянного тока (не входит в комплект) к
антенне, а затем к источнику питания.
2
3
ANT.
TV
1
Стоп
Page 83

83
РУССКИй
4 Использованиекомнатной
телевизионнойантенны
4.1 Для приема волн метрового
диапазона (VHF/FM)
1 Выдвиньте телескопические антенны на
максимальную длину. 4
2 Включите усилитель, повернув
ручку регулятора в положение
“максимально”. 5
D Примечание
Для получения наилучшего уровня сигнала,
возможно, потребуется повернуть ручку
регулятора в положение с меньшим
значением.
3 Настройте телевизор или FM-радио на
нужный канал/станцию. Регулируйте
телескопические антенны (выдвигая
или сдвигая антенны) для достижения
уверенного приема. 6
4.2 Для приема волн дециметрового
диапазона (UHF)
1
Настройте телевизор на нужный канал.
2
Включите усилитель, повернув ручку
регулятора в положение
“максимально”.
7
D Примечание
Для получения наилучшего уровня сигнала,
возможно, потребуется повернуть ручку
регулятора в положение с меньшим
значением.
3
Наклоняйте или поворачивайте рамку
ДМВ (UHF) по направлению к источнику
сигнала для достижения уверенного
приема. 8
4
MIN
OFF
MAX
GAIN
5
MIN
OFF
MAX
GAIN
7
6
8
Page 84
84
4.3 Настройка цифрового тюнера для
данной антенны
Для цифровых ТВ-тюнеров требуется
программирование тюнера для приема
доступных в вашем районе каналов. Обычно,
этот автоматический процесс является частью
настройки тюнера. Однако если антенна была
настроена неправильно, то качество приема
может оказаться неудовлетворительным.
Если у вас есть доступ к антенне, установленной
на крыше дома, или к другой антенне, которая
на данный момент подключена к цифровому
тюнеру, вы можете использовать ее для
программирования тюнера. Каналы будут
занесены в память тюнера - что упростит
настройку данной антенны.
Или можно подключить антенну напрямую
к телевизору (без использования тюнера) и,
настроив телевизор на аналоговые каналы,
найти наилучшее расположение для антенны.
Повторно подключите цифровой тюнер –
при достаточном уровне сигнала вы сможете
запрограммировать тюнер
5 Ответыначасто
задаваемыевопросы
Будет ли данная антенна работать с
аналоговым сигналом?
Да, антенна может принимать сигналы
аналогового телевещания в диапазонах ДМВ
(UHF) и МВ (VHF).
Будет ли данная антенна принимать или
работать с цифровым телевещанием
стандарта HD-DVB?
Да, антенна предназначена для приема
цифрового телевещания стандартов DVB и
HDTV в диапазонах ДМВ (UHF) и МВ (VHF).
Может ли антенна питаться от источника
постоянного тока на яхте или в трейлере?
Да, на задней стороне антенны расположен
разъем для источника постоянного тока.
Подключите кабель/адаптер (не входят в
комплект) к антенне, а затем к источнику
питания.
Где поместить антенну для достижения
наилучшего уровня приема?
По возможности, выберите расположение
рядом с окном, что обеспечит отсутствие
препятствий между антенной и источником
сигнала.
D Примечание
Для достижения наилучшего уровня приема
не помещайте антенну на металлическую
поверхность, которая может вызвать
нежелательные помехи.
Как определить какое требуется
усиление для приема четкого
изображения?
После выдвижения телескопических
антенн МВ (VHF) на максимальную
длину, включите усилитель. Проще всего
начать с максимального усиления, а затем
уменьшать его при необходимости. В
некоторых случаях можно получить четкое
изображение при меньшем усилении, а не
при максимальном.
Можно ли настроить данную антенну
для работы с цифровым тюнером?
Да, антенна может быть настроена для
цифрового тюнера. См. раздел 4.3 инструкция
по эксплуатации.
6Гарантияитехническое
обслуживание
Информацию о гарантии можно найти на
сайте: www.philips.com/welcome
Teknik destek için ürünün model numarası ve
sorununuzun detaylı açıklamasıyla birlikte bize
e-posta gönderin: accessorysupport@philips.com
Page 85

85
SUOMI
Sisällysluettelo
1. Tärkeää 86
2. TV-sisäantenni 87
2.1 Tuotteen esittely 87
3. Alkutoimet 88
3.1 Asentaminen 88
3.2 Liittäminen televisioon 88
3.3 Käyttäminen ulkoisen antennin tai 88
muun videolähteen kanssa
4. TV-antennin käyttäminen 89
4.1 VHF/FM-vastaanotto 89
4.2 UHF-vastaanotto 89
4.3 Käyttäminen digitaalisen 90
virittimen kanssa
5. Usein kysyttyjä kysymyksiä 90
6. Takuu- ja huoltotiedot 90
Page 86

86
Toimi paikallisten sääntöjen mukaan äläkä hävitä
vanhoja tuotteita tavallisen kotitalousjätteen
mukana. Vanhan tuotteen asianmukainen
hävittäminen auttaa ehkäisemään terveydelle
haitallisia negatiivisia ympäristövaikutuksia.
Vie pakkaus paikalliseen kierrätyskeskukseen.
1 Tärkeää
Tutustu tähän oppaaseen ennen Philipsin TVsisäantennin käyttämistä. Oppaassa on tärkeitä
asennustietoja ja -huomautuksia.
© 2008 Koninklijke Philips Electronics N.V.
Kaikki oikeudet pidätetään. Osittainenkin
kopiointi on kielletty ilman tekijänoikeuden
haltijan kirjallista lupaa.
Tavaramerkit ovat Koninklijke Philips Electronics
N.V.:n tai omistajiensa omaisuutta.
D Huomautus
SDV4235/10:n kanssa voi käyttää joko
vaihtovirtalähdettä (AC) tai tasavirtalähdettä
(DC):
a) AC-virtajohto (230 – 240 V) sisältyy
pakkaukseen
b) 12 V:n DC-liitäntä (johtoa/verkkolaitetta ei
toimiteta laitteen mukana)
Vanhan tuotteen hävittäminen
Tuotteesi on suunniteltu ja valmistettu
laadukkaista materiaaleista ja komponenteista,
jotka voidaan kierrättää ja käyttää uudelleen.
Tuotteeseen kiinnitetty yliviivatun
roskakorin kuva tarkoittaa, että tuote
kuuluu Euroopan parlamentin ja
neuvoston direktiivin 2002/96/EC
soveltamisalaan.
Ota selvää sähkölaitteille ja elektronisille laitteille
tarkoitetusta kierrätysjärjestelmästä alueellasi.
Page 87
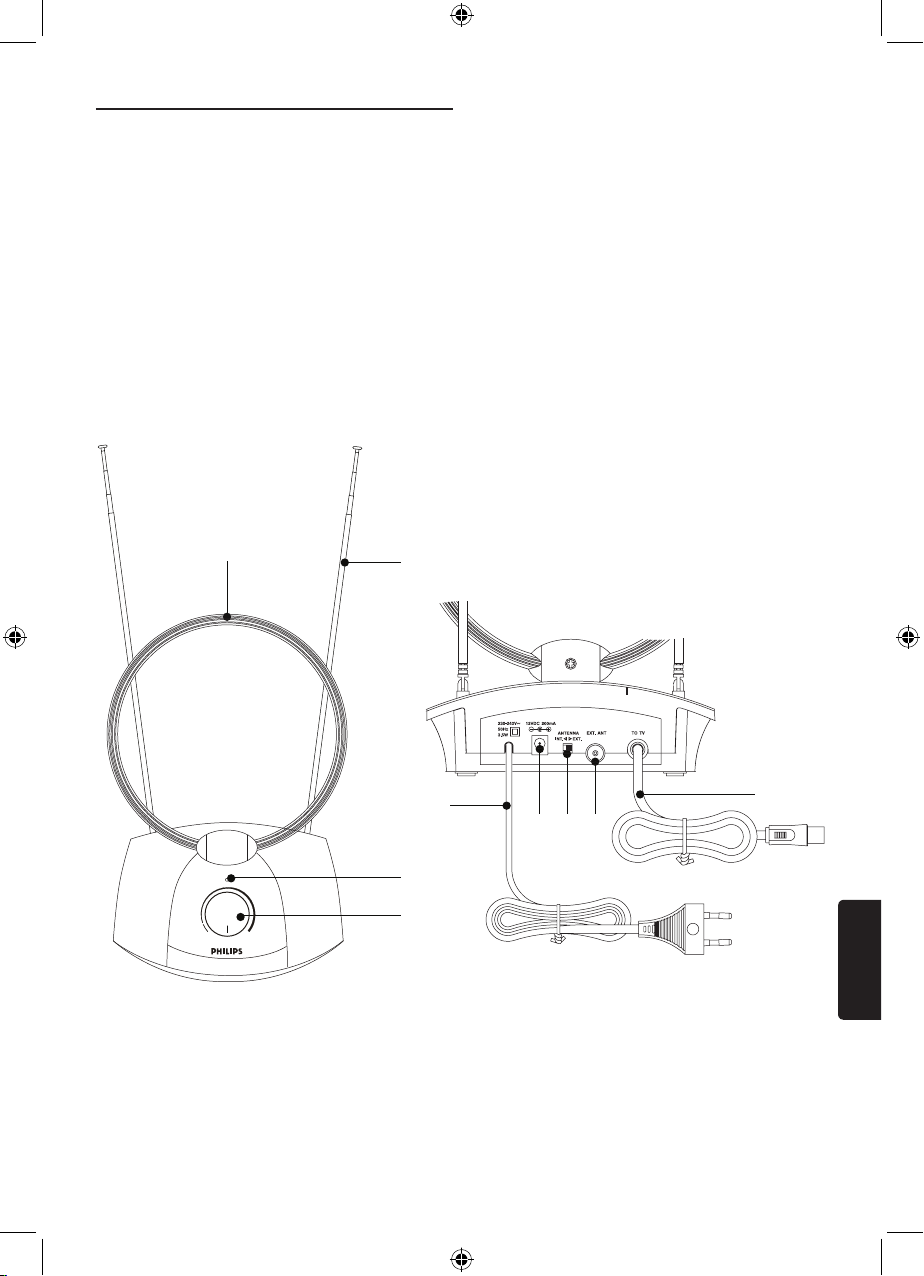
87
SUOMI
2 TV-sisäantenni
Olet tehnyt erinomaisen valinnan ostaessasi
Philips-laitteen!
Hyödynnä Philipsin tuki ja rekisteröi
tuotteesi osoitteessa
www.philips.com/welcome.
2.1 Tuotteen esittely
A VHF-antenni
B UHF-antenni
C Signaalivahvistuksen ilmaisin
D Virtakytkin / vahvistuksen hallintasäädin
E 230 - 240 V:n AC-virtalähde (sisältyy
pakkaukseen)
F 12 V:n DC-virtaliitäntä
(12 V:n DC-verkkolaitetta ei
toimiteta laitteen mukana)
G AB-kytkin
H Ulkoisen antennin liitäntä
I TV-lähtöliitäntä
MIN
OFF
MAX
GAIN
A
B
I
F G H
E
C
D
Page 88

88
3.3 Käyttäminen ulkoisen antennin tai
muun videolähteen kanssa
Antennissa on tilanvalintakytkin (A/B-kytkin),
joka mahdollistaa useamman kuin yhden
videolähteen käytön.
Voit käyttää SDV4235/10:tä television
vahvistettuna sisäantennina kääntämällä kytkimen
INT-asentoon. Jos haluat käyttää ulkoista
antennia tai muuta videolähdettä, käännä kytkin
EXT-asentoon. 2
Jos käytät antennia EXT-asennossa, varmista, että
ulkoinen antenni tai muu videolähde on liitetty
antennin takaosan EXT ANT -liitäntään.
3
3 Alkutoimet
Ennen aloittamista: Jotta antenni
toimisi oikein, siihen kytketty
televisio on määritettävä vastaanottamaan
signaalia ANTENNISTA - ei KAAPELISTA
tai SATELLIITISTA (ohjeita on televisiosi
käyttöoppaassa).
3.1 Asentaminen
Signaalin voimakkuuden määrittäminen
Määritä ennen asennusta antennille paras sijainti
optimaalista vastaanottoa varten. On tärkeää,
että antennilla on esteetön yhteys lähettimeen.
Signaali on paras, kun antenni suunnataan
lähetintä kohti.
E Vihje
On suositeltavaa sijoittaa antenni lähelle ikkunaa,
jonka läpi sillä on selkeä yhteys lähettimeen.
E Vihje
Älä aseta antennia metallipinnalle.
3.2 Liittäminen televisioon
1 Liitä antennin signaalilähtö televisioon. 1
2 Kytke antennin virtalähde 230 - 240 V:n
pistorasiaan.
- tai Kytke 12 V:n DC-verkkoliitin (ei toimiteta
laitteen mukana) antenniin ja pistorasiaan.
2
3
ANT.
TV
1
Lopeta
Page 89

89
SUOMI
4 TV-sisäantennin käyttäminen
4.1 VHF/FM-vastaanotto
1
Vedä antennin piikit ääriasentoon asti. 4
2 Ota vahvistin käyttöön kääntämällä
vahvistussäädin maksimiasentoon.
5
D Huomautus
Parasta signaalia varten vahvistin on ehkä
säädettävä alhaisemmalle tasolle.
3 Säädä TV tai FM-radio halutulle kanavalle
tai asemalle. Säädä antennin piikkejä
(liikuta eri suuntiin ylös ja alas),
kunnes signaali on sopiva. 6
4.2 UHF-vastaanotto
1
Aseta TV halutulle kanavalle.
2
Ota vahvistin käyttöön kääntämällä
vahvistussäädin maksimiasentoon.
7
D Huomautus
Parasta signaalia varten vahvistin on ehkä
säädettävä alhaisemmalle tasolle.
3
Kallista tai käännä UHF-silmukkaa, kunnes
signaali löytyy. 8
4
MIN
OFF
MAX
GAIN
5
MIN
OFF
MAX
GAIN
7
6
8
Page 90

90
4.3 Käyttäminen digitaalisen
virittimen kanssa
Digitaalinen TV-viritin on ohjelmoitava
vastaanottamaan alueellasi lähetettäviä kanavia.
Yleensä tämä tehdään automaattisesti virittimen
asennusvaiheessa. Jos antennia ei ole asennettu
oikein, viritin ei kuitenkaan välttämättä löydä
yhtään kanavaa.
Jos käytettävissäsi on kattoantenni tai muu
valmiiksi digitaaliseen virittimeen kytketty
antenni, voit ohjelmoida virittimen niiden avulla.
Kanavat jäävät virittimen muistiin, mikä helpottaa
tämän antennin asentamista.
Toinen vaihtoehto on liittää antenni suoraan
televisioon (jolloin viritintä ei käytetä) ja
määrittää antennin paras sijainti hakemalla
analogisia kanavia. Kytke sitten digitaalinen viritin
uudelleen. Jos signaalitaso on riittävä, virittimen
ohjelmoinnin pitäisi onnistua
5 Usein kysytyt kysymykset
Tukeeko antenni analogisia lähetyksiä?
Kyllä, tämä antenni pystyy vastaanottamaan
analogisia televisiolähetyksiä UHF- ja VHFtaajuuksilla.
Tukeeko antenni digitaalista signaalia,
ja voiko sen avulla katsoa HD-DVBlähetyksiä?
Kyllä, antenni on suunniteltu vastaanottamaan
digitaalisia DVB- ja HDTV-lähetyksiä UHF- ja
VHF-taajuuksilla.
Voiko antennin liittää DC-virtalähteeseen
veneessä tai matkailuautossa?
Kyllä, antennin takana on DC-virtaliitäntä. Kytke
kaapeli tai verkkolaite (lisävaruste) antenniin
ja virtalähteeseen.
Mihin antenni pitäisi sijoittaa, jotta se
toimisi parhaiten?
Jos mahdollista, sijoita antenni lähelle ikkunaa,
jonka läpi sillä on selkeä yhteys lähettimeen.
D Huomautus
Antennia ei pitäisi sijoittaa metallipinnalle, sillä
se voi häiritä signaalia.
Mistä tiedän, kuinka paljon vahvistusta
selkeään kuvaan vaaditaan?
Ota vahvistin käyttöön, kun olet laajentanut
VHF-antennipiikit ääriasentoon. Helpointa on
käyttää aluksi täyttä vahvistustasoa ja pienentää
sitä tarvittaessa. Joissain tapauksissa kuva on
parempi silloin, kun vahvistustaso ei ole liian
suuri.
Voiko antennia käyttää
digitaalisen virittimen kanssa?
Kyllä, antennia voi käyttää digitaalisen virittimen
kanssa. Lisätietoa on käyttöoppaan luvussa 4.3.
6 Takuu- ja huoltotiedot
Takuutietoja on osoitteessa
www.philips.com/welcome
Teknistä tukea voit saada lähettämällä meille
sähköpostiviestin, josta käy ilmi tuotteen
mallinumero sekä ongelman tarkka kuvaus.
Lähetä viestisi osoitteeseen
accessorysupport@philips.com
Page 91

© 2008 Koninklijke Philips Electronics N.V.
All rights reserved.
 Loading...