

Page 1
SCF883
Specifications are subject to change without notice
Le specifiche sono soggette a modifica senza preavviso
© 2018 Koninklijke Philips N.V.
© 2018 Koninklijke Philips N.V. (KPNV)
All rights reserved.
Tutti i diritti riservati.
4241 354 04451
EN User manual 5
DA Brugervejledning 27
DE Benutzerhandbuch 50
FI Käyttöopas 76
FR Mode d’emploi 98
NL Gebruiksaanwijzing 124
NO Brukerhåndbok 148
SV Användarhandbok 170
A
B
C
D
E
1
F
G
H
I
J
K
Z
Y
X
W
V
U
L
M
N
O
P
T
S
R
Q
Page 2
2
3
4
5
26
27
28
29
MAX.
6
10
14
MAX.
7
11
15
8
12
16
2
1
1
9
13
2
30
34
31
32
33
2
1
17
18
19
20
22 23 24
21
1
2
25
1
2
Page 3

Refer to the pictures on the folded pages at the front and back of the
user manual.
Contents
Important 6
Introduction 11
General description 11
Before rst use 12
Using the appliance 12
Ingredients and steaming time 19
Cleaning and descaling 20
Storage 22
Recycling 22
Guarantee and service 22
Troubleshooting 22
Technical specications 26
5ENGLISH
Page 4

6 ENGLISH
Important
Read this user manual carefully before you use the appliance and save it for future
reference.
Danger
- Never immerse the main unit in water or any other liquid.
Do not rinse it under the tap.
Warning
- Check that the voltage indicated on the appliance
corresponds to the local mains voltage before you
connect the appliance.
- Do not use the appliance if the plug, the power cord
or the appliance itself is damaged. If the power cord is
damaged, you must have it replaced by Philips; a service
center authorised by Philips or similarly qualied persons
in order to avoid a hazard.
- This appliance can be used by persons with reduced
physical, sensory or mental capabilities or lack of
experience and knowledge if they have been given
supervision or instruction concerning use of the appliance
in a safe way and if they understand the hazards involved.
- Children shall not play with the appliance (including the
accessories).
- This appliance shall not be used by children. Keep the
appliance and its cord out of reach of children (including
the accessories).
- Cleaning and user maintenance shall not be made by
children.
- Do not touch the blades, especially when the appliance
is plugged in. The blades are very sharp.
- Take care in handling the sharp blades when emptying
the jar and during cleaning.
- If the blades become stuck, unplug the appliance before
you remove the ingredients blocking the blades.
- The appliance gets hot during or shortly after steaming
(especially surfaces with this symbol “ ”) and may cause
burns when touched. Only lift the jar by its handle.
Page 5

7ENGLISH
- Hot steam comes out of the jar during steaming and
when its lid is removed.
- Beware of hot steam that comes out of the water tank
when you open its lid.
- When the steaming cycle is nished, hot steam will
continue to come out of the steam outlet on the water tank
lid and the steam hole in the jar for some time. Be careful
when you lift the jar o the main unit.
- If the appliance is used improperly, hot steam could
escape from the edge of the water tank lid. Refer to the
“Troubleshooting” chapter for preventing or resolving
this.
- Take extra caution when pouring hot liquid into the jar as
the liquid may splash.
- Always put previously blended food in the storage pot if
you want to reheat or defrost food with this appliance.
- Do not use this appliance to chop hard and sticky
ingredients.
- Never use bleach or chemical sterilizing solutions/tablets
in the appliance.
- Never use scouring pads, abrasive cleaners or aggressive
liquids such as gasoline, acetone or alcohol to clean the
appliance.
- Always let the appliance cool down for 10 minutes after
one steaming cycle before you start steaming again.
- Do not let the appliance blend for more than 30 seconds
at a time. If you have not nished blending after 30
seconds, release the button to stop blending and wait
a few seconds before you continue. If the main unit
becomes hot, let it cool down for a few minutes before
you continue.
- Never put water or any other liquid in the jar for steaming
to avoid damaging the appliance.
- Always remove the storage pot lid before using the pot
to heat up food in a microwave.
Page 6

8 ENGLISH
Caution
- Never use any accessories or parts from other
manufacturers or that Philips does not specically
recommend. If you use such accessories or parts, your
guarantee becomes invalid.
- Do not place the appliance on or near an operating or
still hot stove or cooker.
- Always switch o the appliance and disconnect from
supply when it is left unattended and before assembling,
disassembling, changing accessories, cleaning or
approaching parts that move in use.
- Always unplug the appliance and let it cool down before
you clean it.
- Always turn the control knob to the o position (OFF)
every time after steaming, reheating, or defrosting.
- Never use the jar or any other part of the appliance
(except the storage pots) in a microwave, as the metal
parts of the jar handle and blade unit are not suitable for
this use.
- Never sterilize the jar or any other part of the appliance
(except the storage pots) in a sterilizer or in a microwave,
as the metal parts of the jar handle and blade unit are
not suitable for this use.
- This appliance is intended for household use only. If the
appliance is used improperly or for professional or semiprofessional purposes or if it is not used according to the
instructions in the user manual, the guarantee becomes
invalid and Philips refuses any liability for damage
caused.
- Place the appliance on a stable, horizontal, and level
surface. The appliance emits hot steam during use. Make
sure there is enough free space around it to prevent
damage to cabinets or other objects.
- Do not use the appliance if it has fallen or is damaged in
any way. Take it to an authorized Philips service center
for repair.
- Never use the steam function without water in the water
tank.
Page 7

- Always disconnect the device from supply if it’s left
unattended.
- Make sure that the water in the tank does not exceed
the MAX water level marking on the side of the water
tank (250 ml) or the MAX water level indication in the
water tank.
- Make sure the water tank lid is correctly locked before
putting the jar on the main unit.
- When you steam ingredients, make sure that you do not
ll the jar beyond the top of the plastic part of blade unit
(g. b).
- When you blend liquids, do not exceed the MAX ll level
indicated on the jar (720 ml) (g. c).
- Do not lift and move the appliance while it is in
operation.
- Do not insert any object into the steam outlet on the
water tank lid or the steam inlet on the jar lid.
- Never rell the water tank during steaming, as hot water
and steam may come out of the appliance.
- Always make sure that the jar lid has cooled down after
steaming before you open it to add more ingredients for
blending.
- Never run this appliance’s power supply through an
external switching device, such as a timer, or connect it
to a circuit that is regularly switched on and o.
- Always check the temperature of the cooked food on the
back of your hand to make sure it is safe for your baby.
- Always check the consistency of the food for your baby.
For guidance on what food consistencies are appropriate
for dierent ages, refer to the professional weaning
advice that comes with this appliance, or seek advice
from a doctor or consultant.
- Only use the provided spatula for taking food out of the
jar.
- Regular descaling prevents damage to the appliance.
- The storage pot provided with this appliance is not a
children feeding utensil. Do not feed children directly
from the storage pot.
9ENGLISH
Page 8

10 ENGLISH
- Before using the storage pot, clean it thoroughly, and
then sterilize it with a Philips Avent sterilizer or place
the storage pot in boiling water for 5 minutes. This is to
ensure hygiene. Make sure that there is enough water
in the container when using boiling water to sterilize
the storage pot, and that the pot does not contact the
container for too long, to avoid heat deformation.
- Make sure that the amount of food in the storage pot
does not exceed the maximum scale marked on the side
of the pot, otherwise the pot may leak.
- When reheating or defrosting food, make sure that
the storage pot lid is closed tightly before putting the
storage pot in the jar, otherwise the pot may leak when
you take it out of the jar.
- Heating food with the provided storage pot in a
microwave may produce localized high temperatures in
the food and may aect its nutritional value. Always stir
heated food to ensure even heat distribution and test
the temperature before serving.
- Do not select the grill function if you use a combination
microwave (with grill function) to reheat or defrost food
with the storage pots. If you have just nished a grilling
process, wait until the microwave has cooled down
before putting the storage pots in it, as the residual heat
can cause damage to the storage pots.
Safety systems
For your safety during use, this appliance is equipped with a built-in safety lock.
This appliance will only function if all parts have been assembled correctly.
Assembling all parts correctly will disarm the built-in safety lock.
This appliance is also equipped with an overheat safety stop function. Overheating
can occur if the time between two steaming cycles is too short. If the appliance’s
overheat safety stop activates during a steaming cycle, turn the control knob back
to the o position (OFF) and let the appliance cool down for a few minutes. After
this, you can use the appliance again.
Electromagnetic elds (EMF)
This Philips appliance complies with all applicable standards and regulations
regarding exposure to electromagnetic elds.
Page 9

Introduction
Congratulations on your purchase and welcome to Philips Avent! To fully benet
from the support that Philips Avent oers, register your product at
www.philips.com/welcome.
This 4-in-1 healthy baby food maker helps all parents in preparing nutritious meals
for their babies with steaming and blending functions combined in one appliance.
You can also use the baby food maker to defrost and warm up baby food.
General description
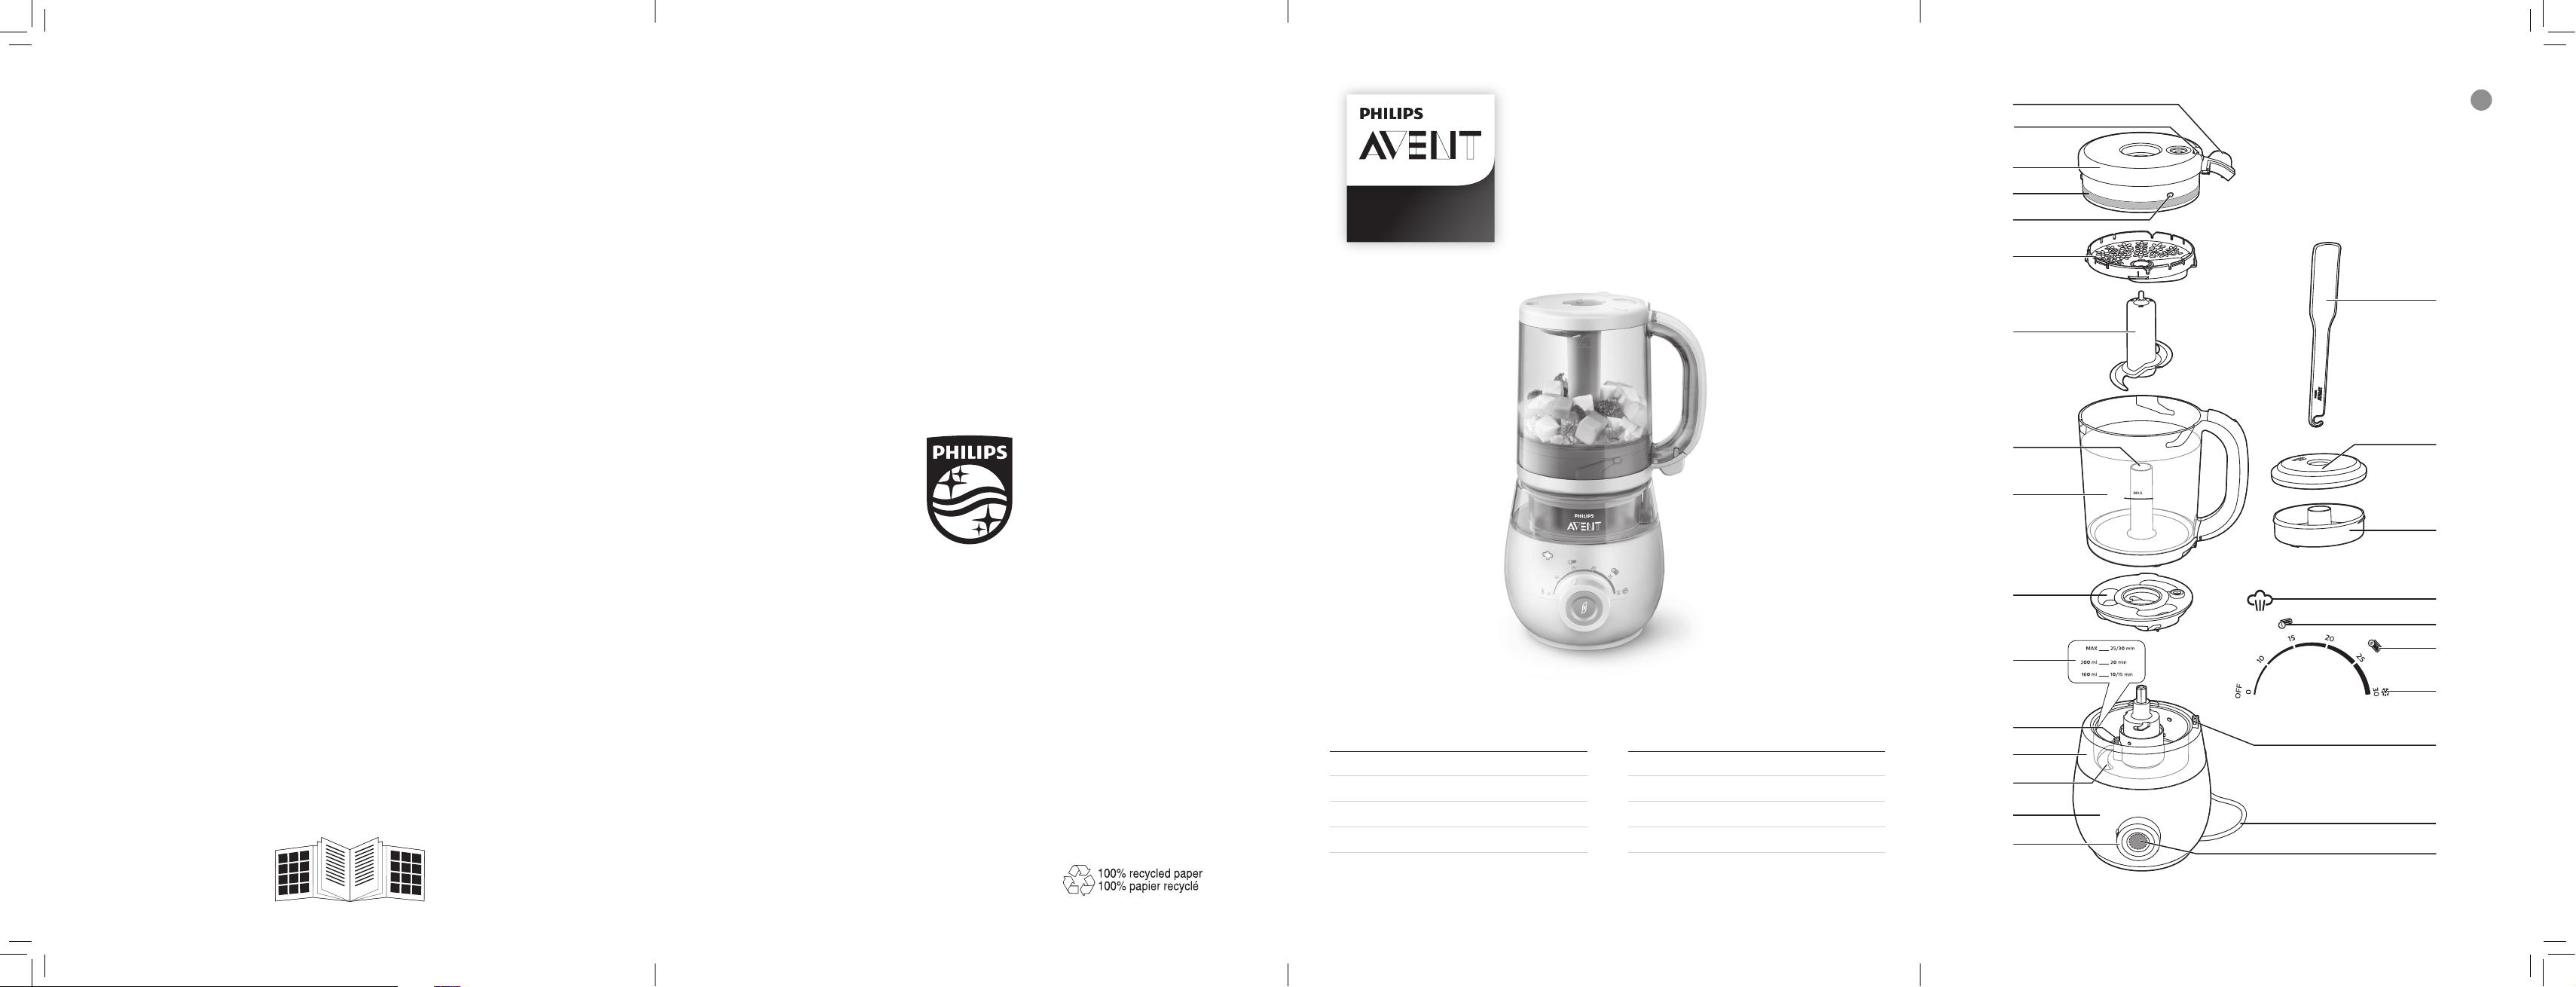
Product overview (g. a)
A Lid tab
B Connector on the jar lid
C Jar lid
D Sealing ring
E Locking pin
F Sieve
G Blade unit
H Blade unit holder
I Jar
J Water tank lid
K Water level markings
L MAX water level indication
M Water tank (not detachable)
N Boiler
O Main unit
P Control knob
Q Blending button
R Power cord
S Locking area on the water tank
11ENGLISH
Controls overview (g. a)
T Defrost setting
U Reheat setting for the 240 ml storage pot
V Reheat setting for the 120 ml storage pot
W Steaming light
Accessories (g. a)
X Storage pot
Y Storage pot lid
Z Spatula
Page 10
12 ENGLISH
Before rst use
1 Remove all packaging material from the appliance.
2 Clean all parts thoroughly before rst use. Refer to the chapter “Cleaning
and descaling”.
3 We recommend running one steaming cycle with an empty jar before using
the appliance for the rst time. Refer to chapters “Filling the water tank” and
“Steaming”.
Using the appliance
Caution
• Always check the temperature of the cooked food on the back of your hand to
make sure it is safe for your baby.
This appliance is intended for steaming fresh, solid ingredients and blending them
to the consistency of your choice. Please refer to the enclosed recipe booklet for
some tasty and nutritious recipe ideas. The appliance can also be used for just
steaming or blending only. For blending only, refer to the chapter “Blending without
steaming”.
This appliance can also be used to defrost or reheat cooked food that has been
stored in the specially designed storage pots. Always use these storage pots to
defrost or reheat blended foods. Defrosting or reheating without the storage pots
will cause the food to drop through the sieve into the jar lid.
Never put the jar with blended food inside in the steaming position on the main
unit.
Never steam the same batch of raw ingredients for longer than 30 minutes or more
than once.
This appliance is NOT intended for the following purposes.
- Steaming frozen raw ingredients
- Steaming previously blended food without the storage pot
- Steaming the same ingredients for more than 30 minutes
- Cooking rice and pasta
- Blending rst, then steaming
- Heating or reheating liquids such as soup, sauces or water
- Keeping food warm for several hours
- Cutting hard ingredients such as ice cubes and sugar cubes, or sticky
ingredients like cheese
Page 11
13ENGLISH
Filling the water tank
Note
• Make sure that the water in the tank does not exceed the MAX water level
marking on the side of the water tank (250 ml) or the MAX water level
indication in the water tank.
• We recommend using soft or puried water, as the minerals in mineral or tap
water cause limescale buildup to occur more quickly inside the water tank.
• Except for materials needed for descaling, never put any liquids other than
water in the water tank.
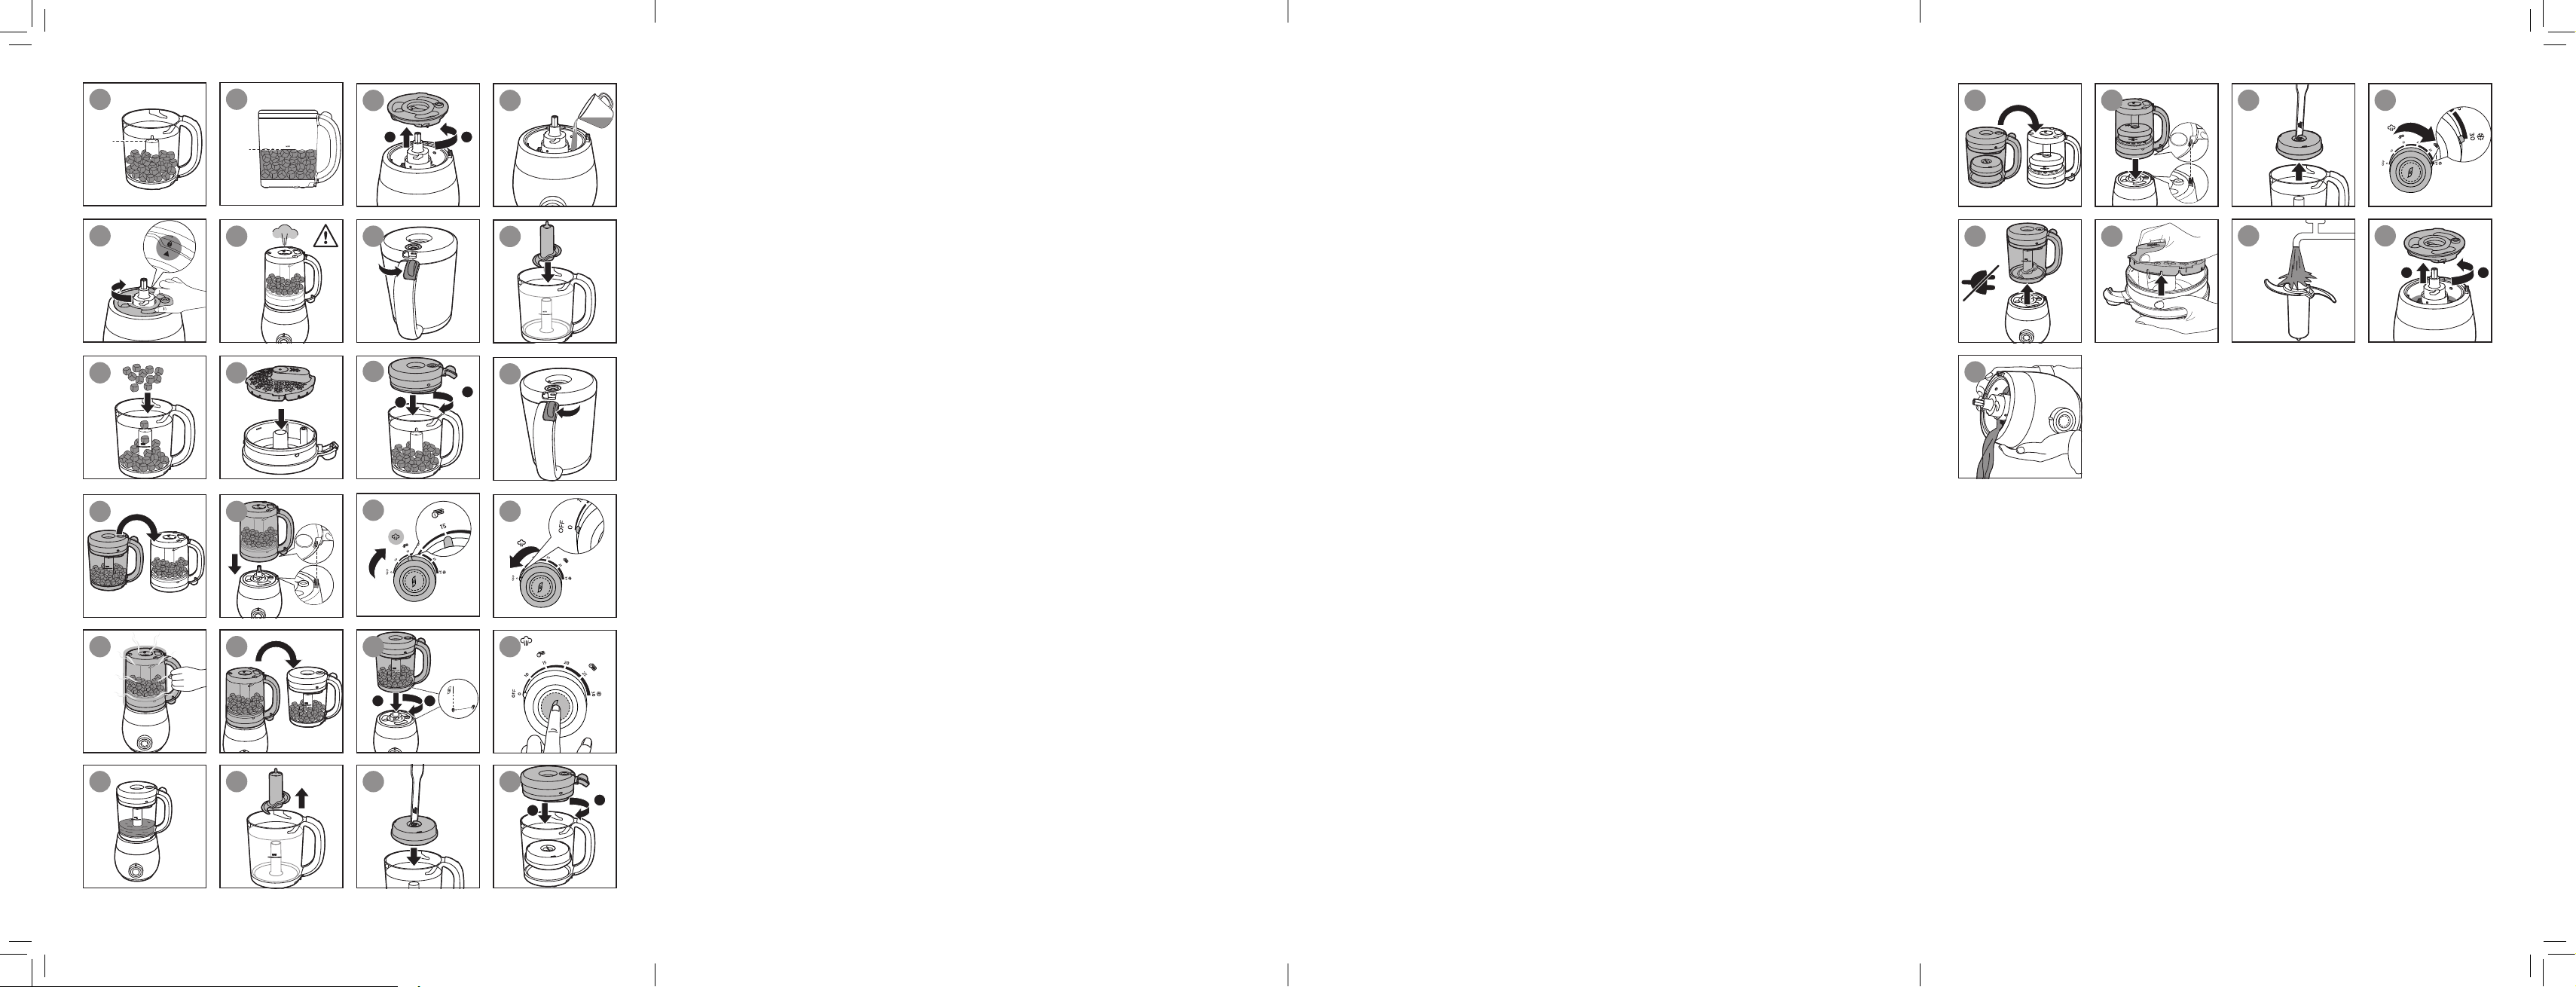
1 Turn the water tank lid counterclockwise to open the water tank (g d), then
follow the water level markings on the water tank and ll with water to the
required level according to the chapter “Ingredients and steaming time” in
the user manual or the enclosed recipe booklet (Fig. e).
2 Put the water tank lid on the water tank and turn the lid clockwise to lock it
securely in place (Fig. f).
» When the water tank lid is correctly locked in place, the icon on the
water tank lid will line up with the icon on the water tank.
Note
• Always make sure that you have locked the water tank lid before the
appliance starts operating.
Steaming
Caution
• Hot steam or hot water can burn your ngers. Do not touch, and never let
children touch any hot parts of the appliance or the steam coming from the
top of the appliance, as this may cause scalding. (Fig. g).
Note
• Always defrost frozen raw ingredients before placing them in the jar for
steaming. Shake o any excess water from the defrosted ingredients before
placing them in the jar.
• Do not ll past the top edge of the plastic part of blade unit when adding
ingredients.
• Never put water or any other liquid in the jar for steaming to avoid damaging
the appliance.
• The appliance will not start steaming if the jar is not correctly locked in place.
• Make sure that the sealing ring is assembled around the jar lid before
steaming, and that the at side of the sealing ring is facing out.
Page 12
14 ENGLISH
1 Push the lid tab counterclockwise to release the lid from the jar (Fig. h).
2 If the blade unit is not in the jar, put it on the blade unit holder in the jar
(Fig. i).
3 We recommend cutting solid ingredients into small pieces (cubes not bigger
than 1cm).
4 Put the ingredients in the jar (Fig. j).
5 Press the sieve into the jar lid (Fig. k).
6 Place the jar lid on the jar and turn it clockwise to close it securely (Fig. l).
Note
• The jar has grooves that help smoothly guide the locking pins and lock the lid
in place. Make sure that the lid tab slides into the handle of the jar (Fig. m).
7 If you have not yet lled the water tank with water for steaming, refer to
the chapter “Filling the water tank” and add water to the water tank before
putting the jar on the main unit.
Note
• Make sure the water tank lid is correctly locked in place before placing the jar
on the main unit.
8 Flip the jar over with the jar lid on the bottom (Fig. n).
9 Align the connector on the jar lid to the locking area on the water tank, and
then place the jar on the main unit with the jar lid on the bottom (Fig. o).
Press the jar downwards to lock it rmly on the main unit, and make sure the
handle is on the right-hand side.
10 If the control knob is not in the o position (OFF), turn it to the o position
rst.
11 Plug in the appliance.
12 Turn the control knob to select the steaming time you need (Fig. p). Refer
to the table in the chapter “Ingredients and steaming time” and the recipe
booklet for the recommended steaming time.
» The steaming light will turn white to indicate that the appliance is
steaming.
» When the steaming cycle is nished, the appliance will beep and the
steaming light will go out.
13 Turn the control knob back to the o position (OFF) (Fig. q). Wait 2 minutes,
or until there is no more steam coming from the top of the appliance before
removing the jar.
Caution
• If you intend to start another steaming cycle, let the appliance cool down for
10 minutes, and empty any remaining water out of the water tank before you
rell and start a new steaming cycle.
Page 13
15ENGLISH
14 To blend the steamed ingredients, refer to chapter “Blending after steaming”.
15 There may still be some water remaining in the water tank after a steaming
cycle. This is normal. Wait until the appliance cools down to room
temperature, then empty the water tank of all residual water. To empty or
clean the water tank, refer to the chapter “Cleaning and descaling”.
Blending after steaming
Caution
• The jar and the lid will become hot after the steaming cycle. Only hold the jar
by the specially designed heat-resistant handle. (Fig. r).
• Always make sure that the lid of the jar is correctly closed and locked in place while
the appliance is in use.
• Always make sure that the jar lid has cooled down after steaming before you
open it to add more ingredients (do not ll the jar past the top edge of the
plastic part of blade unit), or to remove the remaining water from the jar.
• If you have added additional liquids, never put the jar in the steam position, as
the liquid will go through the sieve.
1 From the steaming position, lift the jar by the handle and turn it upside
down (Fig. s). Shake the jar to allow the steamed ingredients to move to the
bottom of the jar where the blending blades are.
2 If needed, remove the jar lid and add additional ingredients for blending
(e.g. water for purees or additional cooked ingredients like rice or pasta).
Place the jar lid back on the jar before you start blending.
3 Place the jar on the main unit with the lid on the top, align the icon on the
jar with the icon on the main unit, and turn the jar clockwise to securely
lock it in place on the main unit (Fig. t). Make sure the handle is on the
right-hand side.
» When the jar is correctly locked in place on the main unit, the icon on
the jar will line up with the icon on the main unit.
4 Push and hold the blending button to start blending until the ingredients are
blended to the consistency of your choice (Fig. u).
Caution
• Do not let the appliance blend for more than 30 seconds at a time. If you have not
nished blending after 30 seconds, release the button to stop blending and wait
a few seconds before you continue. If the main unit becomes hot, let it cool down
for a few minutes before you continue.
5 When you have nished blending, release the blending button (Fig. v).
6 Unplug the appliance.
7 Remove the blade unit. Be careful when you remove the blade unit as it
might be hot. Remove the blended food from the jar. If necessary, use the
spatula included with this appliance.
Page 14
16 ENGLISH
Blending without steaming
This appliance is intended for the following purposes.
- Pureeing steamed and cooked ingredients
- Blending uids and fruits
Caution
• The appliance is not intended for cutting hard ingredients such as ice cubes
and sugar cubes or sticky ingredients like cheese.
• If you have added liquids to the jar, never put the jar in the steam position, as
the liquid will go through the sieve.
Note
• When blending ingredients with uids, make sure you do not ll the jar past
the MAX ll level indicated on the jar.
• Do not ll past the top edge of the plastic part of blade unit when adding
ingredients.
• Never put the jar with blended food inside in the steaming position on the
main unit.
• If the ingredients stick to the wall of the jar, or if the blended ingredients are still
too solid, release the blending button, remove the jar from the main unit, and
loosen the ingredients with the spatula or add some liquid (e.g. drinking water)
until the blended food has the right consistency for your baby’s age. When adding
liquid in the jar, do not ll the jar past the MAX ll level indicated on the jar.
• Make sure that the blended baby food has the right consistency before you
serve it. For guidance on what food consistencies are appropriate for dierent
ages, refer to the professional weaning advice that comes with this appliance,
or seek advice from a doctor or consultant.
• Do not process large quantities of solid ingredients at the same time. Process
these ingredients in a series of small batches to get a ner texture.
1 Put the blade unit on the blade unit holder in the jar (Fig. i).
2 Cut solid ingredients into small pieces (cubes not bigger than 1 cm) before
you put them in the jar.
3 Put the ingredients in the jar (Fig. j).
4 Press the sieve into the jar lid (Fig. k).
5 Place the lid on the jar and turn it clockwise to close it securely (Fig. l).
Note
• The jar has grooves that help smoothly guide the locking pins and lock the lid
in place. Make sure that the lid tab slides into the handle of the jar (Fig. m).
6 Place the jar on the main unit with the lid on the top, align the icon on the
jar with the icon on the main unit, and turn the jar clockwise to securely
lock it in place on the main unit (Fig. t). Make sure the handle is on the
right-hand side.
Page 15
17ENGLISH
» When the jar is correctly locked in place on the main unit, the icon on
the jar will line up with the icon on the main unit.
7 Push and hold the blending button to start blending until the food is properly
blended (Fig. u).
Caution
• Do not let the appliance blend for more than 30 seconds at a time. If you have
not nished blending after 30 seconds, release the button to stop blending
and wait a few seconds before you continue. If the main unit becomes hot, let
it cool down for a few minutes before you continue.
8 When you have nished blending, release the blending button (Fig. v).
9 Unplug the appliance.
10 Remove the blade unit. Be careful when you remove the blade unit as it
might be hot. Remove the blended food from the jar. If necessary, use the
spatula included with this appliance.
Reheating
A 120 ml storage pot is included with the appliance. Use the storage pot to reheat
the baby food you have made with the appliance.
Note
• A pack (SCF876) containing 2 storage pots with capacity of 120 ml and 240 ml
can be purchased separately in some markets.
• Always put previously blended food in the storage pot to reheat.
• Make sure that the sealing ring is assembled around the jar lid before
reheating, and that the at side of the sealing ring is facing out.
1 Pour the appropriate amount of water into the water tank.
» If you are using the 120 ml storage pot, pour 160 ml of water into the water
tank (i.e. to the water level marking for 10/15 min.) ; if you are using the
240 ml storage pot, pour water to the MAX water level marking indicated
on the side of the water tank or the MAX water level indication in the
water tank.
2 Put the water tank lid on the water tank and turn the lid clockwise to lock it
securely in place (Fig. f).
» When the water tank lid is locked correctly in place, the icon on the
water tank lid will line up with the icon on the water tank.
3 Take the blade unit out of the jar (Fig. w).
4 Flip the storage pot over and place it onto the blade unit holder in the jar
(Fig. x).
5 Place the jar lid on the jar and turn it clockwise to close it securely (g. y).
Page 16
18 ENGLISH
Note
• The jar has grooves that help smoothly guide the locking pins and lock the lid
in place. Make sure that the lid tab slides into the handle of the jar (Fig. m).
6 Flip the jar over with the jar lid on the bottom (Fig. z).
7 Align the connector on the jar lid to the locking area on the water tank, and
then place the jar on the main unit with the jar lid on the bottom (Fig. {).
Press the jar downwards to lock it rmly on the main unit, and make sure the
handle is on the right-hand side.
Note
• Make sure the water tank lid is correctly locked in place before placing the jar
on the main unit.
8 If the control knob is not in the o position (OFF), turn it to the o position
rst.
9 Plug in the appliance.
10 Turn the control knob to select the reheat time that matches with the storage
pot placed in the jar (Fig. p).
» Choose 15 minutes ( ) if using the 120 ml storage pot; choose 25
minutes ( ) if using the 240 ml storage pot.
» The steaming light will turn white to indicate that the appliance is
reheating.
11 When the reheating cycle is nished, the appliance will beep and the
steaming light will turn o.
12 Turn the control knob back to the o position (OFF) (Fig. q). Wait 2 minutes,
or until there is no more steam coming from the top of the appliance before
removing the jar.
13 Open the jar lid, and use the hook on the spatula to take the storage pot out
(Fig. |).
14 There may still be some water remaining in the water tank after a reheating
cycle. This is normal. Wait until the appliance cools down to room
temperature, then empty the water tank of all residual water. To empty or
clean the water tank, refer to the chapter “Cleaning and descaling”.
Defrosting
If you have used the special storage pots to freeze blended food, you can use
the appliance to gently defrost the frozen food.
Note
• Always put previously blended food in the storage pot to defrost.
• Make sure that the sealing ring is assembled around the jar lid before
defrosting, and that the at side of the sealing ring is facing out.
Page 17

19ENGLISH
1 Fill the water tank with water up to the MAX water level marking indicated on
the side of the water tank or the MAX water level indication in the water tank.
2 Follow steps 2 to 8 in the chapter “Reheating”.
3 Turn the control knob and select 30 minutes (Fig. }).
» The steaming light will turn white to indicate that the appliance is
defrosting.
4 When the defrosting cycle is nished, the appliance will beep and the
steaming light will turn o.
5 Turn the control knob back to the o position (OFF) (Fig. q). Wait 2 minutes,
or until there is no more steam coming from the top of the appliance before
removing the jar.
6 Open the lid and use the hook on the spatula to take the storage pot out
(Fig. |).
7 There may still be some water remaining in the water tank after a defrosting
cycle. This is normal. Wait until the appliance cools down to room
temperature, then empty the water tank of all residual water. To empty or
clean the water tank, refer to chapter “Cleaning and descaling”.
Note
• Only defrost the same batch of food once.
• After defrosting, we recommend running another reheating cycle to thoroughly
heat up the food.
Ingredients and steaming time
Type of food Ingredient Approximate
steaming time (min.)*
Fruit Apple 15 160
Orange/mandarin 15 160
Peach 10 160
Pear 15 160
Pineapple 20 200
Plum 10 160
Strawberry 15 160
Vegetables Asparagus 15 160
Broccoli 15 160
Carrot 20 200
Cauliower 15 160
Celery 15 160
Eggplant 15 160
Fennel 15 160
French beans 20 200
Water level in the
water tank (ml)
Page 18
20 ENGLISH
Type of food Ingredient Approximate
steaming time (min.)*
Leek 15 160
Onion 15 160
Peas 15 160
Bell pepper 15 160
Potato 20 200
Pumpkin 15 160
Spinach 15 160
Swede 15 160
Sweet corn 15 160
Sweet potato 15 160
Tomato 15 160
Turnip 15 160
Zucchini 15 160
Meat Chicken, beef, lamb,
pork etc.
Fish Salmon, whiting,
sole, cod, trout etc.
* Steam times may vary. The approximate timings are based on all ingredients
being cut into small cubes, no larger than 1cm, and a total weight of 250g.
20 200
15 160
Water level in the
water tank (ml)
Cleaning and descaling
Cleaning
Caution
• Clean the appliance after every use.
• Never immerse the main unit in water. Never rinse the main unit under the tap.
• Never use bleach or chemical sterilizing solutions/tablets in the appliance.
• Never use scouring pads, abrasive cleaners or aggressive liquids such as
gasoline, acetone or alcohol to clean the appliance.
Note
• All parts, except the main unit, can also be cleaned in the dishwasher.
• Always assemble the sealing ring around the jar lid after you have removed it
for cleaning, and make sure the at side of the sealing ring is facing out.
Page 19

1 Unplug the appliance and remove the jar from the main unit (Fig. ~).
2 Push the lid tab counterclockwise to release the jar lid from the jar (Fig. h).
3 Grab the protrusion on the sieve and pull one side of the sieve out rst, and
then release the sieve from the jar lid (Fig. ).
4 Dissemble the sealing ring from the jar lid for cleaning when necessary.
5 Remove the blade unit (Fig. w).
6 Thoroughly clean the blade unit under the tap immediately after use. Make
sure you also rinse the inside of the blade unit tube (Fig. €).
Caution
• Handle the blade unit very carefully. The cutting edges are very sharp.
7 Turn the water tank lid counterclockwise and remove it from the water tank
(Fig. ).
8 Wash the water tank lid under the tap.
9 Pour out any excess water in the tank. If necessary, pour fresh water into the
water tank (Fig. e) and ush it out (Fig. ‚). Repeat as necessary until the
water tank is clean.
10 Clean all other parts that come into contact with food in hot water with
detergent immediately after use.
11 Dry the main unit and all parts after washing.
21ENGLISH
Descaling the water tank
For optimum performance, we recommend descaling the appliance every 4 weeks.
To reduce the build up of limescale, we recommend using soft or puried water for
steaming, reheating or defrosting.
To descale the appliance, follow the descaling instructions below.
1 Make sure the appliance is switched o.
2 Mix 80 ml of white vinegar (6% acetic acid) with 80 ml of water, or you can
use citric acid with warm water to descale the water tank.
3 Add the solution to the boiler in the water tank.
4 Put the water tank lid on the water tank and turn the lid clockwise to lock it
securely in place.
5 Wait for 6 hours/overnight or until all limescale has dissolved.
6 Pour the used solution out of the water tank (Fig. ‚).
7 If the limescale buildup has not completely dissolved, repeat the descaling
cycle from step 1 to 6 in this chapter.
8 Pour some fresh water into the water tank (Fig. e) and ush it out (Fig. ‚).
Repeat as necessary until the water tank is clean.
9 Rinse the water tank lid thoroughly under the tap.
10 Fill the water tank with 200 ml of water and let the appliance complete a
20-minute steaming cycle with the empty jar before you use the appliance
with food again.
Page 20
22 ENGLISH
Storage
1 Empty the water tank before you store the appliance (Fig. ‚).
2 Make sure all parts are clean and dry before you store the appliance (refer to
the chapter “Cleaning and descaling”).
3 Store the appliance with the blade unit in the jar to prevent damage.
4 Always make sure that the lids for both the water tank and the jar are
correctly locked in place for storage.
Recycling
This symbol means that this product shall not be disposed of with normal
household waste (2012/19/EU).
Follow your country’s rules for the separate collection of electrical and
electronic products. Correct disposal helps prevent negative consequences
for the environment and human health.
Guarantee and service
If you need information or if you have problems, please visit the Philips website
at www. philips. com / avent or contact the Philips Customer Care Center in your
country (refer to the enclosed worldwide guarantee leaet for details). If there is no
Customer Care Center in your country, go to your local Philips dealer.
Troubleshooting
This chapter summarizes the most common problems you could encounter with
the appliance. If you are unable to solve the problem with the information below,
contact the Consumer Care Center in your country.
Problem Possible cause Solution
The appliance
does not work.
The steaming light
does not turn
on.
This appliance is
equipped with a
safety lock. This
appliance will not
work if the parts
are not assembled
correctly onto the
main unit.
The appliance is not
connected to the
power supply.
Assemble all parts correctly. Before
steaming, the jar should be placed on
the main unit vertically with the jar lid on
the bottom; before blending, put the jar
on the main unit with the lid on the top,
and lock the jar by turning it clockwise.
Put the plug in the outlet.
Page 21
Problem Possible cause Solution
The water tank
gives o an
unpleasant smell
during the rst few
times of use.
The appliance
does not generate
steam.
Steam is leaking
from the water
tank.
The ingredients
are not
completely
heated through.
The jar is not placed
on the main unit
correctly.
You have started a
second steaming
cycle immediately
after the previous
one has nished.
The control knob has
not been turned to
the o position (OFF)
after the previous
steaming cycle was
nished.
You have not prewashed the water
tank before use.
You have not put
water in the water
tank.
There is too much
limescale buildup in
the water tank.
The water tank lid is
not closed correctly.
The jar is not
assembled correctly
on the main unit.
The steam outlet
on the water tank
lid is blocked by
contamination or
limescale buildup.
The steam inlet on
the jar lid is blocked
by contamination.
The pieces in the jar
are too big.
Place the jar on the main unit correctly
with the jar lid on the bottom.
Switch o the appliance and allow it to
cool down for 10 minutes before you
start a second steaming cycle.
Turn the control knob to the o position
(OFF) rst, and then turn it again to
choose the operating time.
Refer to the chapter “Cleaning and
descaling” to clean the water tank, and
then nish a steaming cycle with an
empty jar.
Switch o and unplug the appliance,
and then add water to the water tank.
Descale the water tank. Refer to the
section “Descaling” in the chapter
“Cleaning and descaling”.
Close the water tank lid correctly. Make
sure the icon on the water tank lid is
lined up with the icon on the water
tank.
Place the jar correctly on the main unit.
Clean the steam outlet on the water tank
lid.
Clean the steam inlet on the jar lid.
Cut the food into smaller pieces (cubes
no bigger than 1 cm).
23ENGLISH
Page 22

24 ENGLISH
Problem Possible cause Solution
There is too much
food in the jar.
There is too much or
too little water in the
water tank.
The steaming time is
too short.
The jar is not placed
on the main unit
correctly.
There is too much
limescale buildup in
the water tank.
The jar lid leaks. There is too much
food in the jar.
The jar lid is not
locked onto the jar
correctly.
The sealing ring
around the jar lid
is not assembled
correctly or is not
assembled.
The blending
function does not
work.
There is too much
food in the jar.
The jar is not placed
on the main unit
correctly.
The jar lid is not
locked onto the jar
correctly.
You are using the
appliance to blend
sticky food such as
cheese.
Decrease the amount of food in the jar.
Add the correct amount of water
according to the steaming time. Check
the recipe booklet and/or the table in
the chapter “Ingredients and steaming
time” to make sure that you add the
correct amount of water according to the
steaming time for the ingredients you
want to steam or the recipe you want to
prepare.
Select a longer steaming time
(30 minutes tops).
Place the jar on the main unit correctly
with the jar lid on the bottom.
Descale the water tank. Refer to the
section “Descaling” in the chapter
“Cleaning and descaling”.
Switch o the appliance and process a
smaller quantity.
Place the jar lid on the jar and turn it
clockwise to close it securely.
Make sure the sealing ring is correctly
assembled around the jar lid with the at
side facing out.
Switch o the appliance and process a
smaller quantity. Raw food put in the jar
should not exceed top of the blade unit.
Place the jar on the main unit with the
lid on the top, align the icon on the jar
with the icon on the main unit, and
turn the jar clockwise to securely lock it
in place on the main unit.
Place the jar lid on the jar and turn it
clockwise to close it securely.
Check the recipe booklet and use
appropriate ingredients to blend.
Page 23

Problem Possible cause Solution
The appliance
makes a lot of
noise, produces
an unpleasant
smell, is hot to
touch, emits
smoke, etc.
The appliance
produces a lot
of noise and
vibration during
blending.
Temperature of
the defrosted
food is still low.
The storage pot
leaks during
reheating/
defrosting.
Water in the
water tank has
an unusual color
when you pour it
out of the water
tank or when it
enters the jar
during steaming,
or the water in the
water tank has an
unpleasant smell.
You have been
using the blending
function continuously
for more than 30
seconds.
There is too much
food in the jar.
You have been using
the blending function
for too long.
The sieve is not
attached to the jar lid.
There is too much
food in the storage
pot.
Food in the storage
pot is too viscous.
The storage pot lid is
not closed correctly.
Food particles have
entered the water
tank during use.
Stop blending and let the appliance cool
down for a few seconds and then start
blending again.
Switch o the appliance and process a
smaller quantity.
Do not let the appliance blend
continuously for more than 30 seconds
at a time.
Make sure that the sieve is attached to
the jar lid.
Make sure that the amount of food in
the storage pot does not exceed the
maximum scale marked on the side of
the pot.
Let the appliance cool down for 10
minutes and defrost again.
Before putting the storage pot in the jar
to reheat/defrost, make sure that the lid
is closed correctly.
Clean the water tank according to the
instructions in the chapter “Cleaning and
descaling”. Use the appliance strictly
according to the instructions. Make sure
you do not overll the water tank with
water (max. 250 ml) and that you do not
overll the jar with food (do not ll the
jar past the top edge of the plastic part
of blade unit). Do not steam the same
ingredients for more than 30 minutes or
add liquid to the jar to steam. After you
have put liquids in the jar, never put the
jar in the steaming position with the jar
lid on the bottom.
25ENGLISH
Page 24

26 ENGLISH
Problem Possible cause Solution
There are white
spots on the water
tank, water tank
lid, jar, jar lid and
sieve.
The surfaces that
come into contact
with food are
discolored.
The appliance
sounds 5 times
and the steaming
light ashes during
steaming, reheating
or defrosting.
There are food
residues in the
inner layer at the
bottom of the jar.
There is limescale
buildup on these
parts.
Food colorings may
discolor the parts that
come into contact
with food.
The jar is out of
position or removed
from the main unit
during processing.
Water in the water
tank is not enough
for the selected
processing time.
There is too much
limescale buildup in
the water tank.
Small food residue
particles get into the
inner layer at the
bottom of the jar
during cleaning.
This is normal. Remove the limescale
periodically. Clean the water tank lid,
jar, jar lid and sieve with a moist cloth.
Descale the water tank. Refer to the
section “Descaling” in the chapter
“Cleaning and descaling”.
This is normal. All parts are still safe to
use and will do no harm to the cooked
food.
Turn the control knob to the o position
(OFF), check the water amount in the
water tank, place the jar on the main unit
correctly, and reselect the processing
time to start again.
Turn the control knob to the o position
(OFF), and add enough water for the
selected processing time.
Descale the water tank. Refer to the
section “Descaling” in the chapter
“Cleaning and descaling”.
Remove the jar from the main unit. Remove
the jar lid and blade unit from the jar.
Flip the jar, align the small hole on the
bottom to a tap and ush water into the
small hole. Use warm water to achieve a
better cleaning result.
Hold the jar handle and shake the jar for
about 15 seconds to mix the water with
the accumulated residues.
Pour out the water from the small hole.
Repeat above steps for several times
until the residues are cleaned.
Technical specications
- Voltage/wattage: See type plate on the bottom of the appliance
- Maximum water capacity of the water tank: 250 ml
- Maximum capacity of the jar: 1050 ml
- Operating temperature: 10°C to 40°C
- Protection: Temperature-controlled heating system
Page 25

Se billederne på de foldede sider foran og bag på brugervejledningen.
Indhold
Vigtigt 28
Indledning 33
Generel beskrivelse 33
Før apparatet tages i brug 34
Sådan bruges apparatet 34
Ingredienser og dampningstider 41
Rengøring og afkalkning 43
Opbevaring 44
Genbrug 44
Garanti og service 45
Fejlnding 45
Tekniske specikationer 49
27DANSK
Page 26

28 DANSK
Vigtigt
Læs denne brugsvejledning omhyggeligt igennem, inden apparatet tages i brug, og
gem den til eventuelt senere brug.
Fare
- Nedsænk aldrig hovedenheden i vand eller anden
væske. Skyl den ikke under vandhanen.
Advarsel
- Kontroller, at den angivne netspænding på apparatet
svarer til den lokale netspænding, før du slutter strøm til
apparatet.
- Brug aldrig apparatet, hvis netstik, netledning eller selve
apparatet er beskadiget. Hvis netledningen beskadiges,
må den kun udskiftes af Philips, et autoriseret Philipsserviceværksted eller en tilsvarende kvaliceret fagmand
for at undgå enhver risiko.
- Dette apparat kan bruges af personer med reducerede
fysiske, sensoriske eller mentale evner eller manglende
erfaring og viden, hvis de er blevet instrueret i sikker brug
af apparatet og forstår de medfølgende risici.
- Børn må ikke lege med apparatet (herunder tilbehøret).
- Dette apparat må ikke bruges af børn. Hold apparatet
og ledningen til apparatet uden for børns rækkevidde
(herunder tilbehøret).
- Rengøring og vedligeholdelse må ikke foretages af børn.
- Undgå at røre ved knivene, når apparatet er sluttet til
strømmen. Knivene er meget skarpe.
- Vær forsigtig, når du rører ved de skarpe knive, tømmer
blenderglasset og rengør apparatet.
- Hvis knivene sætter sig fast, skal stikket tages ud af
stikkontakten, inden de fastsiddende ingredienser
fjernes.
- Apparatet bliver varmt under eller umiddelbart efter
dampning (særligt overader med symbolet " ")
og kan give forbrændinger ved berøring. Løft altid
blenderglasset i håndtaget.
Page 27

29DANSK
- Der kommer varm damp ud af glasset under dampning
og når låget fjernes.
- Vær opmærksom på den varme damp, der kommer ud af
vandtanken, når du åbner låget.
- Når dampningen er afsluttet, vil varm damp i et stykke
tid fortsætte med at komme ud af dampudtaget på
vandtankens låg og af damphullet i glasset. Vær forsigtig,
når du løfter blenderglasset af hovedenheden.
- Hvis apparatet anvendes forkert, kan der komme varm
damp ud fra kanten af vandtankens låg. Se kapitlet
"Fejlnding" for at undgå eller afhjælpe dette.
- Vær ekstra forsigtig, når der hældes varm væske i glasset,
da væsken kan sprøjte.
- Læg altid tidligere blendet mad i
opbevaringsbeholderen, hvis du vil genopvarme eller
optø maden med dette apparat.
- Brug ikke dette apparat til at hakke hårde og klæbrige
ingredienser.
- Brug aldrig blegemiddel eller kemiske
steriliseringsopløsninger/tabletter i apparatet.
- Brug aldrig skuresvampe eller skrappe rengøringsmidler
såsom benzin, acetone eller sprit til rengøring af
apparatet.
- Lad altid apparatet køle af i 10 minutter efter en
dampning, før du påbegynder endnu en dampning.
- Lad ikke apparatet blende i mere end 30 sekunder ad
gangen. Hvis du ikke er færdig med at blende efter 30
sekunder, skal du slippe knappen for at stoppe med at
blende og vente et par sekunder, inden du fortsætter.
Hvis hovedenheden bliver varm, skal den køle ned et par
minutter, inden du fortsætter.
- For at undgå beskadigelse af apparatet må du aldrig
komme vand eller andre væsker i blenderglasset til
dampning.
- Fjern altid låget fra opbevaringsbeholderen, inden
denne bruges til opvarmning af mad i en mikrobølgeovn.
Page 28

30 DANSK
Forsigtig
- Brug aldrig tilbehør eller dele fra andre fabrikanter eller
tilbehør/dele, som ikke specikt er anbefalet af Philips.
Hvis du anvender en sådan type tilbehør eller dele,
annulleres garantien.
- Stil ikke apparatet på eller i nærheden af en ovn eller et
komfur, der er i brug eller stadig er varmt.
- Sluk altid for apparatet, og tag stikket ud af
stikkontakten, hvis det efterlades uden opsyn, og før
samling, adskillelse, udskiftning af tilbehør, rengøring,
samt før du kommer i nærheden af dele, der bevæger sig
under brug.
- Tag altid stikket ud af stikkontakten, og lad apparatet
afkøle, før det rengøres.
- Drej altid kontrolknappen til slukket position (OFF) hver
gang efter dampning, genopvarmning eller optøning.
- Brug aldrig blenderglasset eller en anden del af
apparatet (bortset fra opbevaringsbeholderne) i en
mikrobølgeovn, da metaldelene i glassets håndtag og
knivenheden ikke er egnet til dette.
- Brug aldrig blenderglasset eller en anden del af
apparatet (bortset fra opbevaringsbeholderne) i en
sterilisator eller i en mikrobølgeovn, da metaldelene i
glassets håndtag og knivenheden ikke er egnet til dette.
- Dette apparat er kun beregnet til almindelig
husholdningsbrug. Hvis apparatet anvendes forkert
eller til professionelle eller semi-professionelle formål
eller på en måde, der ikke er i overensstemmelse med
brugsvejledningen, bortfalder garantien og dermed
Philips' ansvar for eventuelle skader.
- Stil apparatet på et stabilt, vandret og jævnt underlag.
Apparatet udleder varm damp under brug. Sørg for,
at der er tilstrækkelig plads omkring det for at undgå
beskadigelse af skabe eller andre genstande.
- Brug ikke apparatet, hvis det er blevet tabt på gulvet eller
på anden måde er blevet beskadiget. Medbring det til et
autoriseret Philips servicecenter til reparation.
- Brug aldrig dampfunktionen uden vand i vandtanken.
Page 29

- Sørg for, at vandet i tanken ikke overstiger mærket for
maksimal vandstand (MAX) på siden af vandtanken
(250 ml) eller indikatoren for maksimal vandstand (MAX) i
vandtanken.
- Sørg for, at låget på vandtanken er låst korrekt, før
blenderglasset anbringes på hovedenheden.
- Når du damper ingredienser, må du ikke fylde
blenderglasset højere end toppen af plasticdelen af
knivenheden (g. b).
- Når du blender væsker, må du ikke overskride det
maksimale fyldningsniveau, der er angivet med MAX på
blenderglasset (720 ml) (g. c).
- Undlad at løfte og ytte apparatet, mens det er i brug.
- Stik ikke genstande ind i dampudtaget på vandtankens
låg eller i dampindtaget på blenderglassets låg.
- Genopfyld aldrig vandtanken under dampning, da varmt
vand og damp kan komme ud af apparatet.
- Sørg altid for, at blenderglassets låg er kølet af efter
dampning, inden du åbner det for at påfylde ere
ingredienser, der skal blendes.
- Lad aldrig apparatets strømforsyning løbe gennem en
ekstern koblingsenhed, som f.eks. en timer, og tilslut den
ikke til et kredsløb, som jævnligt tændes og slukkes.
- Kontroller altid den tilberedte mads temperatur på
din håndryg for at sikre, at du kan give maden til dit barn.
- Kontroller altid konsistensen af maden til barnet. En
vejledning i, hvilken konsistens af maden der er bedst
egnet til forskellige aldre, kan ses i de professionelle råd
om fravænning, der følger med apparatet, eller du kan
søge råd hos en læge eller rådgiver.
- Brug kun den medfølgende spatel til at tage maden ud
af blenderglasset.
- Regelmæssig afkalkning forhindrer skader på apparatet.
- Opbevaringsbeholderen til dette apparat er ikke et
redskab til madning af småbørn. Småbørn må ikke
mades direkte fra opbevaringsbeholderen.
- Inden opbevaringsbeholderen tages i brug, skal den
rengøres grundigt og derefter steriliseres med en
31DANSK
Page 30

32 DANSK
Philips Avent sterilisator, eller opbevaringsbeholderen
anbringes i kogende vand i 5 minutter. Dette er for at
sikre hygiejnen. For at undgå deformation pga. varmen
skal du sørge for, at der er nok vand i dampkogeren,
når der bruges kogende vand til at sterilisere
opbevaringsbeholderen, og at beholderen ikke er i
kontakt med dampkogeren alt for længe..
- Sørg for, at mængden af mad i opbevaringsbeholderen
ikke overstiger maksimumsmærket på siden af
beholderen, ellers kan beholderen lække.
- Ved genopvarmning eller optøning af mad skal du sørge
for, at opbevaringsbeholderens låg er lukket tæt til, inden
beholderen anbringes i glasset, ellers kan beholderen
lække, når du tager den ud af glasset.
- Hvis maden varmes med den medfølgende
opbevaringsbeholder i en mikrobølgeovn, kan der lokalt
skabes høje temperaturer i maden, som kan påvirke dens
næringsværdi. Rør altid rundt i opvarmet mad for at sikre, at
varmen er jævnt fordelt, og tjek temperaturen før servering.
- Vælg ikke grillfunktionen, hvis du bruger en kombimikrobølgeovn (med grillfunktion) til genopvarmning
eller optøning af mad med opbevaringsbeholdere. Hvis
du netop har afsluttet en grillproces, skal du vente,
indtil mikrobølgeovnen er kølet af, inden du sætter
opbevaringsbeholdere ind i den, da restvarmen kan
forårsage beskadigelse af opbevaringsbeholderne.
Sikkerhedssystemer
For din egen sikkerhed under brug er apparatet udstyret med en indbygget
sikkerhedslås. Apparatet fungerer kun, hvis alle dele er samlet korrekt. En korrekt
samling af alle dele vil frakoble den indbyggede sikkerhedslås.
Apparatet er også udstyret med en overophedningssikring. Overophedning kan
forekomme, hvis tidsrummet mellem to dampninger er for kort. Hvis apparatets
overophedningssikring aktiveres under en dampning, drejes kontrolknappen til
slukket position (OFF), og apparatet afkøles nogle minutter. Derefter kan du bruge
apparatet igen.
Elektromagnetiske felter (EMF)
Dette Philips-apparat overholder alle branchens gældende standarder og regler
angående eksponering for elektromagnetiske felter.
Page 31

Indledning
Tillykke med dit køb, og velkommen til Philips Avent! Hvis du vil have fuldt udbytte
af den support, som Philips Avent tilbyder, kan du registrere dit produkt på www.
philips.com/welcome.
Denne 4-i-1-babyfoodprocessor til sund mad hjælper forældre med at lave
nærende mad til deres babyer med dampnings- og blenderfunktioner samlet
i ét apparat. Du kan også bruge babyfoodprocessoren til at optø og opvarme
babymad.
Generel beskrivelse
Produktoversigt (g. a)
A Tap på låg
B Stik på blenderglaslåg
C Blenderglaslåg
D Tætningsring
E Låsestift
F Si
G Knivenhed
H Holder til knivenhed
I Blenderglas
J Vandtankens låg
K Vandstandsmærker
L MAX-vandstandsindikation
M Vandtank (ikke aftagelig)
N Vandkoger
O Hovedenhed
P Kontrolknap
Q Blenderknap
R Netledning
S Låseområde på vandtanken
33DANSK
Oversigt over betjeningsknapper (g. a)
T Optøningsindstilling
U Genopvarmningsindstilling til 240 ml opbevaringsbeholder
V Genopvarmningsindstilling til 120 ml opbevaringsbeholder
W Dampindikator
Page 32

34 DANSK
Tilbehør (g. a)
X Opbevaringsbeholder
Y Låg til opbevaringsbeholder
Z Spatel
Før apparatet tages i brug
1 Fjern al emballage fra apparatet.
2 Rengør alle dele grundigt, før de bruges første gang. Se kapitlet "Rengøring
og afkalkning".
3 Vi anbefaler, at der foretages én dampning med et tomt blenderglas, inden
apparatet bruges første gang. Se kapitlerne "Påfyldning af vandtanken" og
"Dampning".
Sådan bruges apparatet
Forsigtig
• Kontroller altid den tilberedte mads temperatur på din håndryg for at sikre, at
du kan give maden til dit barn.
Apparatet er beregnet til dampning af friske, faste ingredienser og blendning af
disse til en konsistens efter eget valg. Se vedlagte opskriftshæfte for at få gode
idéer til nogle velsmagende og nærende opskrifter. Apparatet kan også bruges
til blot at dampe eller blende. Hvis du kun ønsker at blende, henvises til kapitlet
"Blendning uden dampning".
Apparatet kan også bruges til at optø eller genopvarme tilberedt mad, der har
været opbevaret i de specialdesignede opbevaringsbeholdere. Brug altid disse
opbevaringsbeholdere til at optø eller genopvarme blendet mad. Optøning og
genopvarmning uden opbevaringsbeholderne får maden til at løbe gennem sien
og ind i blenderglassets låg.
Anbring aldrig blenderglasset med blendet mad i hovedenhedens
dampningsposition.
Damp aldrig den samme portion råvarer i mere end 30 minutter, og heller ikke mere
end én gang.
Apparatet er IKKE beregnet til følgende formål.
- Dampning af frosne råvarer
- Dampning af tidligere blendet mad uden opbevaringsbeholderen
- Dampning af de samme ingredienser i mere end 30 minutter
- Tilberedning af ris og pasta
- Blendning først, derefter dampning
- Opvarmning eller genopvarmning af væsker som f.eks. suppe, saucer eller vand
- At holde mad varm i ere timer
Page 33

- Hakning af hårde ingredienser som f.eks. isterninger og sukkerknalder eller
klæbrige ingredienser som ost
Påfyldning af vandtanken
Bemærk
• Sørg for, at vandet i tanken ikke overstiger mærket for maksimal vandstand
(MAX) på siden af vandtanken (250 ml) eller indikatoren for maksimal
vandstand (MAX) i vandtanken.
• Vi anbefaler, at du bruger blødt eller renset vand, da mineralerne i poste- eller
brugsvand hurtigere medfører kalkaejringer inde i vandtanken.
• Bortset fra materialer, der anvendes til afkalkning, må der aldrig hældes andre
væsker end vand i vandtanken.
1 Drej låget på vandtanken mod uret for at åbne vandtanken (g. d),
følg derefter vandstandsmærkerne på vandtanken, og fyld vand i til det
ønskede niveau i henhold til kapitlet "Ingredienser og dampningstid" i
brugervejledningen eller det medfølgende opskriftshæfte (g. e).
2 Sæt låget på vandtanken, og drej det med uret for at låse det fast (g. f).
» Når vandtankens låg er korrekt fastlåst, vil ikonet på vandtankens låg
ugte med for ikonet på vandtanken.
Bemærk
• Sørg altid for, at du har låst låget på vandtanken, inden apparatet startes.
35DANSK
Dampning
Forsigtig
• Varm damp eller varmt vand kan brænde dine ngre. Rør ikke ved og lad
aldrig børn røre ved apparatets varme dele eller den damp, der kommer ud fra
toppen af apparatet, da dette kan medføre skoldning. (Fig. g).
Bemærk
• Optø altid frosne råvarer, inden du lægger dem i blenderglasset til dampning.
Ryst overskydende vand fra de optøede ingredienser, inden du lægger dem i
blenderglasset.
• Du må ikke fylde blenderglasset højere end den øverste kant på plasticdelen
af knivenheden, når du tilsætter ingredienser.
• For at undgå beskadigelse af apparatet må du aldrig komme vand eller andre
væsker i blenderglasset til dampning.
• Apparatet starter ikke dampningen, hvis blenderglasset ikke er fastlåst korrekt.
• Sørg for, at tætningsringen sidder rundt om blenderglassets låg før dampning,
og at tætningsringens ade side vender udad.
Page 34

36 DANSK
1 Skub lågets tap mod uret for at dreje låget af blenderglasset (g. h) .
2 Hvis knivenheden ikke er i blenderglasset, sættes den på holderen til
knivenheden i glasset (g. i).
3 Vi anbefaler, at faste ingredienser hakkes i små stykker (terninger på højst 1
cm).
4 Kom ingredienserne i blenderglasset (g. j).
5 Tryk sien ned i blenderglassets låg (g. k).
6 Anbring låget på blenderglasset, og drej det med uret for at lukke det sikkert
(g. l).
Bemærk
• Glasset har riller, der hjælper med at føre låsestifterne og låse låget på plads.
Sørg for, at lågets tap glider ind i blenderglassets håndtag (g. m).
7 Hvis du endnu ikke har fyldt vandtanken med vand til dampning, henvises
der til kapitlet "Påfyldning af vandtanken", og vand påfyldes vandtanken,
inden blenderglasset anbringes på hovedenheden.
Bemærk
• Sørg for, at låget på vandtanken er låst korrekt på plads, inden blenderglasset
anbringes på hovedenheden.
8 Vend blenderglasset om med glassets låg på bunden (g. n).
9 Lad tilslutningsstykket på blenderglassets låg ugte med låseområdet på
vandtanken, og anbring derefter blenderglasset på hovedenheden med
blenderglassets låg på bunden (g. o). Tryk blenderglasset nedad for at låse
det fast på hovedenheden, og sørg for, at håndtaget er på højre side.
10 Hvis kontrolknappen ikke er i slukket position (OFF), skal den drejes til
slukket position.
11 Sæt stikket i stikkontakten.
12 Drej kontrolknappen for at vælge den dampningstid, du ønsker (g. p).
Der henvises til tabellen i kapitlet "Ingredienser og dampningstid" og
opskriftshæftet for oplysninger om den anbefalede dampningstid.
» Dampindikatoren lyser hvidt for at vise, at apparatet damper.
» Når dampningen er afsluttet, bipper apparatet, og dampindikatoren
slukker.
13 Drej kontrolknappen tilbage til slukket position (OFF) (g. q). Vent 2 minutter
eller indtil der ikke længere kommer damp ud fra toppen af apparatet, inden
blenderglasset tages af.
Forsigtig
• Hvis du vil starte en anden dampning, skal du lade apparatet køle af i
10 minutter og tømme vandtanken for evt. overskydende vand, før du
genopfylder og starter en ny dampning.
Page 35

14 Der henvises til kapitlet "Blendning efter dampning" for oplysninger om
blendning af dampede ingredienser.
15 Der kan stadig være lidt vand tilbage i vandtanken efter en dampning.
Dette er normalt. Vent, indtil apparatet er afkølet til stuetemperatur, og tøm
derefter vandtanken for alt overskydende vand. Der henvises til kapitlet
"Rengøring og afkalkning" for oplysninger om tømning og rengøring af
vandtanken.
Blendning efter dampning
Forsigtig
• Blenderglasset og låget bliver varme efter dampning. Hold kun blenderglasset
i det dertil specialdesignede, varmebestandige håndtag. (Fig. r).
• Sørg altid for, at blenderglassets låg er korrekt lukket og låst på plads, når
apparatet er i brug.
• Sørg altid for, at blenderglassets låg er kølet af efter dampning, inden du åbner
det for at påfylde ere ingredienser (Du må ikke fylde blenderglasset højere
end den øverste kant på plasticdelen af knivenheden) eller for at tømme
overskydende vand ud af blenderglasset.
• Hvis du har tilsat ekstra væsker, må du aldrig anbringe blenderglasset i
dampningsposition, da væsken vil løbe igennem sien.
1 Fra dampningspositionen løftes blenderglasset i håndtaget og vendes om
(g. s). Ryst blenderglasset for at lade de dampede ingredienser falde ned i
bunden af glasset til blenderknivene.
2 Om nødvendigt tages blenderglassets låg af, og der tilsættes ekstra
ingredienser til blendning (f.eks. vand til puréer eller ekstra kogte
ingredienser som ris eller pasta). Sæt blenderglassets låg på glasset igen,
inden du starter blendningen.
3 Anbring blenderglasset på hovedenheden med låget på toppen, lad ikonet
på blenderglasset ugte med ikonet på hovedenheden, og drej glasset
med uret for at låse det på plads på hovedenheden (g. t). Sørg for, at
håndtaget er på højre side.
» Når blenderglasset er låst korrekt på plads på hovedenheden, ugter
ikonet på glasset med ikonet på hovedenheden.
4 Tryk på og hold knappen blenderknappen nede for at starte blendningen,
indtil ingredienserne er blendet til den ønskede konsistens (g. u).
37DANSK
Forsigtig
• Lad ikke apparatet blende i mere end 30 sekunder ad gangen. Hvis du ikke er
færdig med at blende efter 30 sekunder, skal du slippe knappen for at stoppe
med at blende og vente et par sekunder, inden du fortsætter. Hvis hovedenheden
bliver varm, skal den køle ned et par minutter, inden du fortsætter.
5 Når du er færdig med at blende, slippes blenderknappen (g. v).
6 Tag stikket ud af stikkontakten.
Page 36

38 DANSK
7 Fjern kniven. Vær forsigtig, når du fjerner kniven, eftersom den kan være
varm. Tag den blendede mad ud af blenderglasset. Brug om nødvendigt den
medfølgende spatel.
Blendning uden dampning
Apparatet er beregnet til følgende formål.
- Purering af dampede og kogte ingredienser
- Blendning af ydende ingredienser og frugt
Forsigtig
• Apparatet er ikke beregnet til hakning af hårde ingredienser som f.eks.
isterninger og sukkerknalder eller klæbrige ingredienser som ost.
• Hvis du har tilsat væsker i blenderglasset, må du aldrig anbringe glasset i
dampningsposition, da væsken vil løbe igennem sien.
Bemærk
• Når du blender ingredienser med væsker, skal du sørge for, at du ikke fylder
blenderglasset mere op end til MAX-niveauindikatoren på glasset.
• Du må ikke fylde blenderglasset højere end den øverste kant på plasticdelen
af knivenheden, når du tilsætter ingredienser.
• Anbring aldrig blenderglasset med blendet mad i hovedenhedens
dampningsposition.
• Hvis ingredienserne sidder fast på indersiden af blenderglasset, eller hvis de
blendede ingredienser stadig er for faste, skal du slippe blenderknappen, tage
blenderglasset af hovedenheden og løsne ingredienserne med spatlen eller
tilsætte væske (f.eks. drikkevand), indtil den blendede mad har den rigtige
konsistens til dit barns alder. Når du tilsætter væske i blenderglasset, skal du
sørge for ikke at fylde blenderglasset mere op end til MAX-niveauindikatoren
på glasset.
• Sørg for, at den blendede babymad har den rigtige konsistens, inden du
serverer den. En vejledning i, hvilken konsistens af maden der er bedst egnet
til forskellige aldre, kan ses i de professionelle råd om fravænning, der følger
med apparatet, eller du kan søge råd hos en læge eller rådgiver.
• Tilbered ikke store mængder faste ingredienser i blenderglasset på én gang.
Tilbered disse ingredienser i små portioner ad gangen for at få en nere
konsistens.
1 Sæt knivenheden fast på knivenhedsholderen i blenderglasset (g. i).
2 Skær faste ingredienser i små stykker (terninger på højst 1 cm), inden du
putter dem i blenderglasset.
3 Kom ingredienserne i blenderglasset (g. j).
4 Tryk sien ned i blenderglassets låg (g. k).
5 Anbring låget på blenderglasset, og drej det med uret for at lukke det sikkert
(g. l).
Page 37

39DANSK
Bemærk
• Glasset har riller, der hjælper med at føre låsestifterne og låse låget på plads.
Sørg for, at lågets tap glider ind i blenderglassets håndtag (g. m).
6 Anbring blenderglasset på hovedenheden med låget på toppen, lad ikonet
på blenderglasset ugte med ikonet på hovedenheden, og drej glasset
med uret for at låse det på plads på hovedenheden (g. t). Sørg for, at
håndtaget er på højre side.
» Når blenderglasset er låst korrekt på plads på hovedenheden, ugter
ikonet på glasset med ikonet på hovedenheden.
7 Tryk på og hold blenderknappen nede for at starte blendningen, indtil maden
er ordenligt blendet (g. u).
Forsigtig
• Lad ikke apparatet blende i mere end 30 sekunder ad gangen. Hvis du ikke
er færdig med at blende efter 30 sekunder, skal du slippe knappen for at
stoppe med at blende og vente et par sekunder, inden du fortsætter. Hvis
hovedenheden bliver varm, skal den køle ned et par minutter, inden du
fortsætter.
8 Når du er færdig med at blende, slippes blenderknappen (g. v).
9 Tag stikket ud af stikkontakten.
10 Fjern kniven. Vær forsigtig, når du fjerner kniven, eftersom den kan være
varm. Tag den blendede mad ud af blenderglasset. Brug om nødvendigt den
medfølgende spatel.
Genopvarmning
En 120 ml opbevaringsbeholder følger med apparatet. Brug
opbevaringsbeholderen til at genopvarme den babymad, du har tilberedt på
apparatet.
Bemærk
• En pakke med 2 opbevaringsbeholdere med en kapacitet på 120 ml og 240 ml
(SCF876) kan købes særskilt på nogle markeder.
• Hæld altid tidligere blendet mad i opbevaringsbeholderen til genopvarmning.
• Sørg for, at tætningsringen sidder rundt om blenderglassets låg før
genopvarmning, og at tætningsringens ade side vender udad.
1 Hæld en passende mængde vand i vandtanken.
» Hvis du bruger opbevaringsbeholderen på 120 ml, skal du hælde 160
ml vand i vandtanken (dvs. til vandstandsmærket for 10/15 min.). Hvis
du bruger opbevaringsbeholderen på 240 ml, skal du hælde vand
til MAX-vandstandsmærket på siden af vandtanken eller til MAXvandstandsindikatoren i vandtanken.
Page 38

40 DANSK
2 Sæt låget på vandtanken, og drej det med uret for at låse det fast (g. f).
» Når vandtankens låg er korrekt fastlåst, vil ikonet på vandtankens låg
ugte med ikonet på vandtanken.
3 Tag knivenheden ud af blenderglasset (g. w).
4 Vend opbevaringsbeholderen på hovedet, og anbring den i knivenhedens
holder i blenderglasset (g. x).
5 Anbring låget på blenderglasset, og drej det med uret for at lukke det sikkert
(g. y).
Bemærk
• Glasset har riller, der hjælper med at føre låsestifterne og låse låget på plads.
Sørg for, at lågets tap glider ind i blenderglassets håndtag (g. m).
6 Vend blenderglasset om med glassets låg på bunden (g. z).
7 Lad tilslutningsstykket på blenderglassets låg ugte med låseområdet på
vandtanken, og anbring derefter blenderglasset på hovedenheden med
blenderglassets låg på bunden (g. {). Tryk blenderglasset nedad for at låse
det fast på hovedenheden, og sørg for, at håndtaget er på højre side.
Bemærk
• Sørg for, at låget på vandtanken er låst korrekt på plads, inden blenderglasset
anbringes på hovedenheden.
8 Hvis kontrolknappen ikke er i slukket position (OFF), skal den drejes til
slukket position.
9 Sæt stikket i stikkontakten.
10 Drej kontrolknappen for at vælge den genopvarmningstid, der passer til den
opbevaringsbeholder, som er anbragt i blenderglasset (g. p).
» Vælg 15 minutter ( ), hvis du bruger opbevaringsbeholderen på 120 ml.
Vælg 25 minutter ( ), hvis du bruger opbevaringsbeholderen på 240 ml.
» Dampindikatoren lyser hvidt for at vise, at apparatet genopvarmer.
11 Når genopvarmningen er afsluttet, bipper apparatet, og dampindikatoren
slukker.
12 Drej kontrolknappen tilbage til slukket position (OFF) (g. q).
Vent 2 minutter eller indtil der ikke længere kommer damp ud fra toppen af
apparatet, inden blenderglasset tages af.
13 Åbn blenderglassets låg, og brug krogen på spatlen til at tage
opbevaringsbeholderen ud (g. |).
14 Der kan stadig være lidt vand tilbage i vandtanken efter en genopvarmning.
Dette er normalt. Vent, indtil apparatet er afkølet til stuetemperatur, og tøm
derefter vandtanken for alt overskydende vand. Der henvises til kapitlet
"Rengøring og afkalkning" for oplysninger om tømning og rengøring af
vandtanken.
Page 39

41DANSK
Optøning
Hvis du har brugt specielle opbevaringsbeholdere til at fryse blendet mad ned i,
kan du bruge apparatet til forsigtigt at optø den frosne mad.
Bemærk
• Hæld altid tidligere blendet mad i opbevaringsbeholderen til optøning.
• Sørg for, at tætningsringen sidder rundt om blenderglassets låg før optøning,
og at tætningsringens ade side vender udad.
1 Fyld vandtanken med vand op til mærket for maksimal vandstand (MAX) på
siden af vandtanken eller MAX-vandstandsindikation i vandtanken.
2 Følg trin 2 til 8 i kapitlet "Genopvarmning".
3 Drej kontrolknappen, og vælg 30 minutter (g. }).
» Dampindikatoren lyser hvidt for at vise, at apparatet foretager en
optøning.
4 Når optøningen er afsluttet, bipper apparatet, og dampindikatoren
slukker.
5 Drej kontrolknappen tilbage til slukket position (OFF) (g. q). Vent 2
minutter eller indtil der ikke længere kommer damp ud fra toppen af
apparatet, inden blenderglasset tages af.
6 Åbn låget, og brug krogen på spatlen til at tage opbevaringsbeholderen ud
(g. |).
7 Der kan stadig være lidt vand tilbage i vandtanken efter en optøning. Dette er
normalt. Vent, indtil apparatet er afkølet til stuetemperatur, og tøm derefter
vandtanken for alt overskydende vand. Der henvises til kapitlet "Rengøring
og afkalkning" for oplysninger om tømning og rengøring af vandtanken.
Bemærk
• Optø kun den samme portion mad én gang.
• Efter optøning anbefaler vi, at der køres en ekstra genopvarmning, hvor maden
varmes grundigt op.
Ingredienser og dampningstider
Madvare Ingredienser Omtrentlig
dampningstid
(min.)*
Frugt Æble 15 160
Appelsin/mandarin 15 160
Fersken 10 160
Pære 15 160
Ananas 20 200
Blomme 10 160
Vandstand i
vandtanken (ml)
Page 40

42 DANSK
Madvare Ingredienser Omtrentlig
dampningstid
(min.)*
Jordbær 15 160
Grøntsager Asparges 15 160
Broccoli 15 160
Gulerod 20 200
Blomkål 15 160
Selleri 15 160
Aubergine 15 160
Fennikel
Grønne bønner 20 200
Porre 15 160
Løg 15 160
Ærter 15 160
Peberfrugt 15 160
Kartoel 20 200
Græskar 15 160
Spinat 15 160
Kålroe 15 160
Sukkermajs 15 160
Sød kartoel 15 160
Tomat 15 160
Majroer 15 160
Squash 15 160
Kød Kylling, oksekød, lam,
svin osv.
Fisk Laks, hvilling, adsk,
torsk, ørred osv.
* Dampningstiderne kan variere. De omtrentlige tider er baseret på, at alle
ingredienser er skåret i små terninger på ikke mere end 1 cm, og en samlet vægt
på 250 g.
15 160
20 200
15 160
Vandstand i
vandtanken (ml)
Page 41

43DANSK
Rengøring og afkalkning
Rengøring
Forsigtig
• Rengør altid apparatet efter brug.
• Kom aldrig hovedenheden ned i vand. Skyl aldrig hovedenheden under
rindende vand.
• Brug aldrig blegemiddel eller kemiske steriliseringsopløsninger/tabletter i
apparatet.
• Brug aldrig skuresvampe eller skrappe rengøringsmidler såsom benzin,
acetone eller sprit til rengøring af apparatet.
Bemærk
• Alle dele, undtagen hovedenheden, kan også vaskes i opvaskemaskine.
• Sæt altid tætningsringen omkring blenderglassets låg, når du har haft fjernet
og rengjort den, og sørg for, at tætningsringens ade side vender udad.
1 Tag stikket ud af stikkontakten, og tag blenderglasset af hovedenheden
(g. ~).
2 Skub lågets tap mod uret for at dreje blenderglassets låg af blenderglasset
(g. h) .
3 Tag fat om fremspringet på sien, og træk den ene side af sien ud først, og tag
derefter sien ud af blenderglassets låg (g. ).
4 Adskil tætningsringen fra blenderglassets låg for om nødvendigt at rengøre
den.
5 Afmonter knivenheden (g. w).
6 Rengør knivenheden grundigt under rindende vand straks efter brug. Sørg
også for at skylle indersiden af knivenhedens rør (g. €).
Forsigtig
• Håndter knivenheden meget forsigtigt. Knivbladenes ægge er meget skarpe.
7 Drej låget på vandtanken mod uret, og fjern det fra vandtanken (g. ).
8 Vask vandtankens låg under rindende vand.
9 Hæld evt. overskydende vand ud af tanken. Hæld om nødvendigt frisk vand
i vandtanken (g. e), og skyl den (g. ‚). Gentag om nødvendigt, indtil
vandtanken er ren.
10 Rengør alle dele, der kommer i kontakt med maden, i varmt vand med
opvaskemiddel umiddelbart efter brug.
11 Tør hovedenheden og alle dele af efter vask.
Page 42

44 DANSK
Afkalkning af vandtanken
For at opnå optimal ydeevne anbefaler vi, at apparatet afkalkes hver 4. uge. For at
mindske dannelsen af kalkaejringer anbefaler vi, at du bruger blødt eller renset
vand til dampning, genopvarmning eller optøning.
Følg nedenstående anvisninger til afkalkning for at afkalke apparatet.
1 Kontroller, at apparatet er slukket.
2 Bland 80 ml hvid eddike (6 % eddikesyre) med 80 ml vand, eller brug
citronsyre med varmt vand til at afkalke vandtanken.
3 Hæld opløsningen over kedlen i vandtanken.
4 Sæt låget på vandtanken, og drej det med uret for at låse det fast.
5 Vent i 6 timer/til næste dag eller indtil alle kalkaejringer er opløst.
6 Hæld den brugte opløsning ud af vandtanken (g. ‚).
7 Hvis kalkaejringerne ikke er helt opløst, gentages afkalkningsprocessen fra
trin 1 til 6 i dette kapitel.
8 Hæld frisk vand i vandtanken (g. e), og skyl den (g. ‚). Gentag om
nødvendigt, indtil vandtanken er ren.
9 Skyl vandtankens låg grundigt under rindende vand.
10 Fyld vandtanken med 200 ml vand, og lad apparatet udføre en 20 minutters
dampning med tomt blenderglas, inden du bruger apparatet til mad igen.
Opbevaring
1 Tøm vandtanken, inden du stiller apparatet væk (g. ‚).
2 Sørg for, at alle dele er rene og tørre, inden du stiller apparatet væk
(se kapitlet "Rengøring og afkalkning").
3 Opbevar apparatet med knivenheden i blenderglasset for at undgå
beskadigelse.
4 Sørg altid for, at lågene til både vandtanken og blenderglasset er låst korrekt
på plads, inden du stiller apparatet væk.
Genbrug
Dette symbol betyder, at dette produkt ikke må bortskaes sammen med
almindeligt husholdningsaald (2012/19/EU).
Følg dit lands regler for særskilt indsamling af elektriske og elektroniske
produkter. Korrekt bortskaelse er med til at forhindre negativ påvirkning af
miljøet og menneskers helbred.
Page 43

45DANSK
Garanti og service
Hvis du har brug for oplysninger, eller hvis du har problemer, kan du gå til Philips'
websted på www. philips. com / avent eller kontakte Philips Kundecenter i dit land
(se yderligere oplysninger om vores verdensomspændende garanti i vedlagte
folder). Hvis der ikke ndes et kundecenter i dit land, bedes du kontakte din lokale
Philips-forhandler.
Fejlnding
I dette kapitel beskrives de mest almindelige problemer, der kan opstå med dit
apparat. Hvis du ikke kan løse problemet ud fra nedenstående oplysninger, skal du
kontakte kundecentret i dit land.
Problem Mulig årsag Løsning
Apparatet fungerer ikke. Apparatet er udstyret
med en sikkerhedslås.
Apparat fungerer
ikke, hvis delene ikke
samles korrekt på
hovedenheden.
Dampindikatoren
tænder ikke.
Vandtanken afgiver
en ubehagelig lugt, de
første par gange den
bruges.
Apparatet er ikke sluttet til
strømforsyningen.
Blenderglasset er ikke
anbragt korrekt på
hovedenheden.
Du har startet en anden
dampning umiddelbart
efter, den foregående er
afsluttet.
Kontrolknappen er ikke
blevet drejet til slukket
position ( OFF), efter den
tidligere dampning blev
afsluttet.
Du har ikke vasket
vandtanken før brug.
Saml alle dele korrekt. Før
dampning skal blenderglasset
anbringes lodretstående
på hovedenheden
med blenderglasset på
bunden. Inden blendning
anbringes blenderglasset på
hovedenheden med låget på
toppen, og glasset låses fast
ved at dreje det med uret.
Sæt stikket i stikkontakten.
Anbring blenderglasset
korrekt på hovedenheden
med blenderglassets låg på
bunden.
Sluk for apparatet, og lad det
køle af i 10 minutter, inden du
starter en anden dampning.
Drej kontrolknappen til slukket
position ( OFF), og drej den
derefter igen for at vælge den
ønskede driftstid.
Se kapitlet "Rengøring og
afkalkning" vedrørende
rengøring af vandtanken, og
afslut derefter dampningen
med et tomt blenderglas.
Page 44

46 DANSK
Problem Mulig årsag Løsning
Apparatet producerer
ingen damp.
Damp siver ud fra
vandtanken.
Ingredienserne er ikke
varmet helt igennem.
Du har ikke kommet vand
i vandtanken.
Der er for mange
kalkaejringer i
vandtanken.
Vandtankens låg er ikke
lukket korrekt.
Blenderglasset er ikke
monteret korrekt på
hovedenheden.
Dampudtaget på
vandtankens låg er
blokeret af urenheder og
kalkaejringer.
Dampindtaget på
blenderglassets låg er
tilstoppet af urenheder.
Stykkerne i blenderglasset
er for store.
Der er for meget mad i
blenderglasset.
Der er for meget eller for
lidt vand i vandtanken.
Dampningstiden er for
kort.
Blenderglasset er ikke
anbragt korrekt på
hovedenheden.
Sluk for strømmen og tag
stikket ud af stikkontakten,
og hæld derefter vand i
vandtanken.
Afkalk vandtanken. Se
afsnittet "Afkalkning" i kapitlet
"Rengøring og afkalkning".
Luk vandtankens låg korrekt.
Sørg for, at ikonet på
vandtankens låg ugter med
ikonet på vandtanken.
Anbring blenderglasset korrekt
på hovedenheden.
Rengør dampudtaget på
vandtankens låg.
Rengør dampindtaget på
blenderglassets låg.
Skær maden i mindre stykker
(terninger på maks. 1 cm).
Reducer mængden af mad i
blenderglasset.
Tilsæt den korrekte
mængde vand i henhold
til dampningstiden. Læs
opskriftshæftet og/
eller tabellen i kapitlet
"Ingredienser og
dampningstid" for at være
sikker på, at du tilsætter den
korrekte mængde vand i
henhold til dampningstiden
for de ingredienser, du vil
dampe, eller den opskrift, du
vil tilberede.
Vælg en længere
dampningstid (maks. 30
minutter).
Anbring blenderglasset
korrekt på hovedenheden
med blenderglassets låg på
bunden.
Page 45

Problem Mulig årsag Løsning
Blenderglassets låg
lækker.
Blenderfunktionen
virker ikke.
Apparatet larmer
kraftigt, afgiver en
ubehagelig lugt, er
varmt at røre ved,
udsender røg osv.
Der er for mange
kalkaejringer i
vandtanken.
Der er for meget mad i
blenderglasset.
Blenderglassets låg er
ikke låst korrekt fast på
blenderglasset.
Tætningsringen rundt om
blenderglassets låg er
ikke monteret korrekt eller
er ikke monteret.
Der er for meget mad i
blenderglasset.
Blenderglasset er ikke
anbragt korrekt på
hovedenheden.
Blenderglassets låg er
ikke låst korrekt fast på
blenderglasset.
Du bruger apparatet til at
blende klæbrig mad som
f.eks. ost.
Du har brugt
blenderfunktionen
uafbrudt i mere end 30
sekunder.
Der er for meget mad i
blenderglasset.
Du har brugt
blenderfunktionen for
længe.
Afkalk vandtanken. Se
afsnittet "Afkalkning" i kapitlet
"Rengøring og afkalkning".
Sluk for apparatet, og tilbered
en mindre portion.
Anbring låget på
blenderglasset, og drej det
med uret for at lukke det
sikkert.
Sørg for, at tætningsringen
er monteret korrekt omkring
blenderglassets låg med den
ade side udad.
Sluk for apparatet, og tilbered
en mindre portion. Rå mad
i blenderglasset må ikke
overstige det øverste af
knivenheden.
Anbring blenderglasset på
hovedenheden med låget
på toppen, lad ikonet på
blenderglasset ugte med
ikonet på hovedenheden,
og drej glasset med uret
for at låse det på plads på
hovedenheden.
Anbring låget på
blenderglasset, og drej det
med uret for at lukke det
sikkert.
Læs opskriftshæftet, og brug
passende ingredienser til
blendning.
Stop blendningen, lad
apparatet køle af i et par
sekunder, og start derefter
blenderen igen.
Sluk for apparatet, og tilbered
en mindre portion.
Lad ikke apparatet blende
uafbrudt i mere end 30
sekunder ad gangen.
47DANSK
Page 46

48 DANSK
Problem Mulig årsag Løsning
Apparatet laver megen
støj og vibrerer under
blendningen.
Temperaturen af den
optøede mad er stadig
lav.
Opbevaringsbeholderen
lækker under
genopvarmning /
optøning.
Vandet i vandtanken har
en usædvanlig farve,
når du hælder det ud
af vandtanken, eller
når det kommer ind i
blenderglasset under
dampning, eller vandet
i vandtanken har en
ubehagelig lugt.
Der er hvide pletter
på vandtanken,
vandtankens låg,
blenderglasset,
blenderglassets låg og
sien.
Sien er ikke sat på
blenderglassets låg.
Der er for meget mad i
opbevaringsbeholderen.
Maden i
opbevaringsbeholderen
er for tyktydende.
Opbevaringsbeholderens
låg er ikke lukket korrekt.
Der er kommet
madpartikler i vandtanken
under brug.
Der er kalkaejringer på
disse dele.
Sørg for, at sien er sat på
blenderglassets låg.
Sørg for, at mængden af mad
i opbevaringsbeholderen ikke
overstiger maksimumsmærket
på siden af beholderen.
Lad apparatet køle af i 10
minutter, og fortsæt derefter
optøningen.
Før opbevaringsbeholderen
anbringes i blenderglasset
til genopvarmning/optøning,
skal du sørge for, at låget er
lukket korrekt.
Rengør vandtanken ved at
følge vejledningen i kapitlet
"Rengøring og afkalkning".
Brug udelukkende apparatet
i henhold til anvisningerne.
Sørg for, at du ikke overfylder
vandtanken med vand (maks.
250 ml) og ikke overfylder
blenderglasset med mad (Du
må ikke fylde blenderglasset
højere end den øverste
kant på plasticdelen af
knivenheden). Damp ikke de
samme ingredienser i mere
end 30 minutter, eller tilsæt
væske i blenderglasset for at
dampe. Når du har kommet
væsker i blenderglasset, må
du aldrig anbringe glasset i
dampningspositionen med
blenderglassets låg på bunden.
Dette er normalt. Fjern
kalkaejringer med
jævne mellemrum.
Rengør vandtankens
låg, blenderglasset,
blenderglassets låg og sien
med en fugtig klud. Afkalk
vandtanken. Se afsnittet
"Afkalkning" i kapitlet
"Rengøring og afkalkning".
Page 47

Problem Mulig årsag Løsning
De overader, der
kommer i berøring
med maden, bliver
misfarvede.
Apparatet udsender
5 toner, og
dampindikatoren blinker
under dampning,
genopvarmning eller
optøning.
Der er madrester i
inderlaget i bunden af
glasset.
Farvestoer fra fødevarer
kan misfarve dele, der
kommer i berøring med
maden.
Blenderglasset er ikke
anbragt korrekt eller er
taget af hovedenheden
under tilberedningen.
Mængden af vand i
vandtanken er ikke
tilstrækkelig til den valgte
tilberedningstid.
Der er for mange
kalkaejringer i
vandtanken.
Små partikler af madrester
kommer ind i inderlaget i
bunden af glasset under
rengøringen.
Dette er normalt. Alle dele kan
stadig bruges sikkert og vil ikke
skade den tilberedte mad.
Drej kontrolknappen til
slukket position (OFF),
kontroller mængden af
vand i vandtanken, anbring
blenderglasset korrekt på
hovedenheden, og genvælg
tilberedningstiden for at starte
igen.
Drej kontrolknappen til slukket
position (OFF), og tilsæt
tilstrækkeligt vand til den
valgte tilberedningstid.
Afkalk vandtanken. Se
afsnittet "Afkalkning" i kapitlet
"Rengøring og afkalkning".
Fjern glasset fra
hovedenheden. Fjern glassets
låg og kniven fra glasset.
Vend glasset, sæt det lille hul
i bunden mod en vandhane,
og skyl vand ind i det lille hul.
Brug varmt vand for at opnå et
bedre rengøringsresultat.
Hold i håndtaget på glasset,
og ryst glasset i ca. 15
sekunder for at blande vandet
med de ophobede rester.
Hæld vandet ud fra det lille
hul.
Gentag de ovenstående trin
ere gange, indtil resterne er
blevet fjernet.
49DANSK
Tekniske specikationer
- Spænding/watt: Se identikationspladen i bunden af apparatet
- Maks. vandkapacitet i vandtanken: 250 ml
- Maks. kapacitet i glasset: 1.050 ml
- Driftstemperatur: 10 °C til 40 °C
- Beskyttelse: Temperaturstyret opvarmningssystem
Page 48

50 DEUTSCH
Beachten Sie die Abbildungen auf den gefalteten Seiten auf der Vorder- und
Rückseite der Bedienungsanleitung.
Inhalt
Wichtig 51
Einführung 57
Allgemeine Beschreibung 57
Vor dem ersten Gebrauch 58
Verwenden des Geräts 58
Zutaten und Dampfgarzeiten 67
Reinigen und Entkalken 68
Aufbewahrung 69
Recycling 70
Garantie und Kundendienst 70
Fehlerbehebung 70
Technische Daten 75
Page 49

Wichtig
Lesen Sie diese Bedienungsanleitung vor dem Gebrauch des Geräts aufmerksam
durch, und bewahren Sie sie für eine spätere Verwendung auf.
Gefahr
- Tauchen Sie das Hauptgerät niemals in Wasser oder
andere Flüssigkeiten. Spülen Sie das Gerät nicht unter
ießendem Wasser ab.
Warnung
- Bevor Sie das Gerät in Betrieb nehmen, prüfen Sie, ob
die Spannungsangabe auf dem Gerät mit der örtlichen
Netzspannung übereinstimmt.
- Verwenden Sie das Gerät nicht, wenn der Netzstecker,
das Netzkabel oder das Gerät selbst defekt oder
beschädigt sind. Ist das Netzkabel defekt, darf es nur
von einem Philips Service-Center, einer von Philips
autorisierten Werkstatt oder einer ähnlich qualizierten
Person durch ein Original-Ersatzkabel ausgetauscht
werden, um Gefährdungen zu vermeiden.
- Dieses Gerät kann von Personen mit verringerten
physischen, sensorischen oder psychischen Fähigkeiten
oder Mangel an Erfahrung und Kenntnis verwendet
werden, wenn sie bei der Verwendung beaufsichtigt
wurden oder Anweisung zum sicheren Gebrauch des
Geräts erhalten und die Gefahren verstanden haben.
- Kinder dürfen nicht mit dem Gerät spielen (auch nicht
mit dem Zubehör).
- Dieses Gerät sollte nicht von Kindern verwendet werden.
Halten Sie das Gerät und das Netzkabel (einschließlich
des Zubehörs) außerhalb der Reichweite von Kindern.
- Die Reinigung und Wartung darf nicht von Kindern
durchgeführt werden.
- Berühren Sie die Messer nicht, besonders wenn das
Gerät an das Stromnetz angeschlossen ist. Die Messer
sind sehr scharf.
- Seien Sie beim Umgang mit den scharfen Messern, beim
Leeren des Bechers und während der Reinigung sehr
vorsichtig.
51DEUTSCH
Page 50

52 DEUTSCH
- Wenn die Messer blockiert sind, ziehen Sie stets
den Netzstecker aus der Steckdose, bevor Sie die
blockierenden Zutaten entfernen.
- Das Gerät ist während und kurz nach dem
Dampfgarvorgang heiß (besonders an den mit dem
Symbol " " gekennzeichneten Oberächen). Der
Kontakt mit diesen Stellen kann Verbrennungen
verursachen. Heben Sie den Becher nur am Handgri an.
- Während des Dampfgarvorgangs und beim Önen des
Deckels tritt heißer Dampf aus dem Becher aus.
- Vorsicht vor heißem Dampf, der beim Abnehmen des
Deckels aus dem Wassertank entweicht.
- Sobald der Dampfgarzyklus abgeschlossen ist, tritt
eine Zeitlang weiterhin Dampf aus dem Auslass am
Deckel des Wassertanks und aus der Dampfönung
im Becher aus. Nehmen Sie den Deckel vorsichtig vom
Hauptgerät ab.
- Wenn das Gerät nicht ordnungsgemäß verwendet
wird, könnte heißer Dampf am Rand des Deckels des
Wassertanks austreten. Informationen dazu, wie Sie
dieses Verhalten vermeiden oder korrigieren können,
nden Sie im Kapitel "Fehlerbehebung".
- Gehen Sie besonders vorsichtig vor, wenn Sie heiße
Flüssigkeiten in den Becher geben, da diese spritzen
können.
- Geben Sie bereits gemixte Speisen immer in den Becher
zur Nahrungsaufbewahrung, wenn Sie diese mit dem
Gerät aufwärmen oder auftauen möchten.
- Verwenden Sie dieses Gerät niemals zum Hacken harter
oder stückiger Zutaten.
- Verwenden Sie niemals Bleiche oder chemische
Sterilisierungslösungen/-tabletten im Gerät.
- Benutzen Sie zum Reinigen des Geräts weder
Scheuerschwämme und -mittel noch aggressive
Flüssigkeiten wie Benzin, Azeton oder Alkohol.
Page 51

- Lassen Sie das Gerät nach einem Dampfgarzyklus
immer 10 Minuten abkühlen, bevor Sie einen neuen
Dampfgarvorgang starten.
- Lassen Sie den Mixer nicht länger als 30 Sekunden
ohne Unterbrechung laufen. Wenn der Mixvorgang nach
30 Sekunden noch nicht abgeschlossen ist, lassen Sie
die Taste los, um den Vorgang zu unterbrechen. Warten
Sie einige Sekunde, bevor Sie mit dem Mixen fortfahren.
Wenn das Hauptgerät heiß wird, lassen Sie es einige
Minuten abkühlen, bevor Sie mit der Verwendung
fortfahren.
- Geben Sie nie Wasser oder andere Flüssigkeiten in den
Becher, um Schaden am Gerät zu vermeiden.
- Entfernen Sie den Vorratsbehälter, bevor Sie ihn zum
Aufwärmen von Speisen in einer Mikrowelle verwenden.
Vorsicht
- Verwenden Sie niemals Zubehör oder Teile, die von
Drittherstellern stammen bzw. nicht von Philips
empfohlen werden. Wenn Sie diese(s) Zubehör oder Teile
verwenden, erlischt Ihre Garantie.
- Stellen Sie das Gerät niemals auf oder in die Nähe eines
Herds oder Kochers, der in Betrieb oder noch heiß ist.
- Schalten Sie das Gerät immer aus, und trennen Sie es
von der Stromversorgung, wenn Sie es unbeaufsichtigt
lassen und bevor Sie es zusammensetzen,
auseinandernehmen, reinigen, Zubehörteile
austauschen oder Teile anfassen, die sich während des
Gebrauchs bewegen.
- Ziehen Sie vor dem Reinigen stets den Netzstecker aus
der Steckdose, und lassen Sie das Gerät abkühlen.
- Stellen Sie den Drehschalter nach jedem Dampfgar-,
Aufwärm- oder Auftauvorgang in die ausgeschaltete
Position (OFF).
- Verwenden Sie den Becher oder andere Teile des
Geräts (bis auf den Aufbewahrungsbehälter) nie in
einer Mikrowelle, da die Metallteile des Gris und die
Messereinheit dafür nicht geeignet sind.
53DEUTSCH
Page 52

54 DEUTSCH
- Sterilisieren Sie den Becher oder andere Teile des
Geräts (bis auf den Aufbewahrungsbehälter) nie in
einem Sterilisator, da die Metallteile des Gris und die
Messereinheit dafür nicht geeignet sind.
- Dieses Gerät ist nur für den Gebrauch im Haushalt
bestimmt. Bei unsachgemäßem Gebrauch oder
Verwendung für halbprofessionelle oder professionelle
Zwecke oder bei Nichtbeachtung der Anweisungen in
der Bedienungsanleitung erlischt die Garantie. In diesem
Fall lehnt Philips jegliche Haftung für entstandene
Schäden ab.
- Stellen Sie das Gerät auf eine stabile, waagerechte
und ebene Unterlage. Das Gerät gibt während der
Verwendung heißen Dampf ab. Stellen Sie sicher, dass
um das Gerät herum genügend Platz ist, um Schäden an
Schränken oder anderen Gegenständen zu vermeiden.
- Verwenden Sie das Gerät nicht, wenn es
heruntergefallen oder anderweitig beschädigt ist. Lassen
Sie es von einem autorisierten Philips Service-Center
reparieren.
- Verwenden Sie die Dampfgarfunktion niemals, wenn sich
kein Wasser im Wassertank bendet.
- Stellen Sie sicher, dass der Füllstand im Behälter die
Markierung MAX an der Seite des Wassertanks (250 ml)
oder die Wasserstandsanzeige MAX im Wassertank nicht
überschreitet.
- Stellen Sie sicher, dass der Deckel des Wassertanks
richtig xiert ist, bevor Sie den Becher auf das
Hauptgerät setzen.
- Wenn Sie Zutaten dampfgaren, stellen Sie sicher, dass
Sie den Becher nicht höher als bis zur Plastikkante der
Messereinheit befüllen (Abb. b).
- Wenn Sie Flüssigkeiten mixen, überschreiten Sie nicht
die Füllstandsmarkierung MAX auf dem Becher (720 ml)
(Abb. c).
- Heben Sie das Gerät nicht an, und bewegen Sie es nicht,
während es in Betrieb ist.
Page 53

- Führen Sie keine Gegenstände in den Dampfauslass
am Deckel des Wassertanks oder den Dampfeinlass am
Becherdeckel ein.
- Füllen Sie keinesfalls Wasser während des
Dampfgarvorgangs nach, da heißes Wasser oder Dampf
aus dem Gerät austreten kann.
- Stellen Sie nach dem Dampfgaren immer sicher, dass
der Becherdeckel abgekühlt ist, bevor Sie ihn önen, um
weitere Zutaten zum Mixen hinzuzugeben.
- Steuern Sie die Stromversorgung dieses Geräts niemals
über ein externes Schaltgerät, wie eine Zeitschaltuhr,
und verbunden Sie es niemals mit einem Stromkreis, der
regelmäßig ein- und ausgeschaltet wird.
- Prüfen Sie die Temperatur der gekochten Mahlzeit stets
auf Ihrem Handrücken, um sicherzustellen, dass sie für
Ihr Baby geeignet ist.
- Prüfen Sie stets die Konsistent der Mahlzeiten für
Ihr Baby. Hinweise zur geeigneten Konsistenz für die
einzelnen Altersbereiche nden Sie im professionellen
Beikostleitfaden im Lieferumfang dieses Geräts, oder
fragen Sie Ihren Arzt oder Berater.
- Verwenden Sie nur den im Lieferumfang enthaltenen
Schaber, um Lebensmittel aus dem Becher zu nehmen.
- Durch regelmäßiges Entkalken können Schäden am
Gerät vermieden werden.
- Der im Lieferumfang dieses Geräts enthaltene
Vorratsbehälter dient nicht zum Füttern von
Kindern. Füttern Sie Ihr Kind niemals direkt aus dem
Aufbewahrungsbehälter.
- Bevor Sie den Vorratsbehälter verwenden, reinigen
Sie ihn gründlich, und sterilisieren Sie ihn dann in
einem Philips Avent Sterilisator, oder kochen Sie den
Vorratsbehälter 5 Minuten lang in Wasser aus. So stellen
Sie die Hygiene des Behälters sicher. Stellen Sie sicher,
dass sich genügend Wasser im Behälter bendet,
wenn Sie den Vorratsbehälter mit kochendem Wasser
sterilisieren. Achten Sie darauf, dass der Behälter den
55DEUTSCH
Page 54

56 DEUTSCH
Topf nicht zu lange berührt, um Verformungen durch
Hitze zu vermeiden.
- Stellen Sie sicher, dass die Nahrungsmenge im
Vorratsbecher nicht die Maximal-Skala auf der
Innenseite des Bechers übersteigt. Andernfalls könnte
etwas aus dem Becher austreten.
- Wenn Sie Lebensmittel aufwärmen oder auftauen, stellen
Sie sicher, dass der Deckel des Aufbewahrungsbechers
fest geschlossen ist, bevor Sie ihn in den Becher setzen.
Andernfalls können Nahrungsmittel aus dem Behälter
austreten, wenn Sie ihn aus dem Becher nehmen.
- Das Aufwärmen von Lebensmitteln mit dem
Aufbewahrungsbecher in einer Mikrowelle kann zu
unregelmäßiger Temperaturverteilung führen und den
Nährwert der Nahrung beeinträchtigen. Rühren Sie
erwärmte Speisen immer, damit die Wärme gleichmäßig
verteilt wird, und überprüfen Sie die Temperatur, bevor
Sie Ihr Baby füttern.
- Wenn Sie eine Mikrowelle mit Grillfunktion verwenden,
aktivieren Sie keinesfalls die Grillfunktion, um
Lebensmittel im Vorratsbehälter aufzuwärmen. Wenn Sie
kurz zuvor die Grillfunktion verwendet haben, lassen Sie
die Mikrowelle abkühlen, bevor Sie den Vorratsbehälter
hineinstellen, da die Restwärme den Behälter
beschädigen kann.
Sicherheitssysteme
Um eine sichere Verwendung zu gewährleisten, ist dieses Gerät mit einer
integrierten Sicherheitssperre ausgestattet. Das Gerät funktioniert nur, wenn alle
Teile korrekt zusammengesetzt wurden. Wenn alle Teile richtig zusammengebaut
wurden, wird die integrierte Sicherheitssperre deaktiviert.
Dieses Gerät verfügt zudem über einen Überhitzungsschutz. Überhitzung kann
auftreten, wenn zwei Dampgarzyklen zu schnell nacheinander durchgeführt
werden. Wenn der Überhitzungsschutz des Geräts während eines Dampfgarzyklus
aktiviert wird, drehen Sie den Drehschalter in die ausgeschaltete Position (OFF),
und lassen Sie das Gerät einige Minuten abkühlen. Anschließend kann das Gerät
wieder verwendet werden.
Page 55

Elektromagnetische Felder
Dieses Philips Gerät erfüllt sämtliche Normen und Regelungen bezüglich der
Exposition in elektromagnetischen Feldern.
Einführung
Herzlichen Glückwunsch zu Ihrem Kauf und willkommen bei Philips Avent! Um die
Unterstützung von Philips Avent optimal nutzen zu können, sollten Sie Ihr Produkt
unter www.philips.com/welcome registrieren.
Dieser gesunde 4-in-1-Babynahrungszubereiter unterstützt Eltern bei der
Zubereitung nahrhafter Mahlzeiten für Babys mit einer kombinierten Dampfgarerund Mixerfunktion in nur einem Gerät. Sie können den Babynahrungszubereiter
auch verwenden, um Babynahrung aufzutauen und zu erwärmen.
Allgemeine Beschreibung
Produktübersicht (Abb. a)
A Deckellasche
B Verbindungsstück am Becherdeckel
C Becherdeckel
D Dichtungsring
E Verriegelungsstift
F Sieb
G Messereinheit
H Halterung der Messereinheit
I Becher
J Deckel des Wasserbehälters
K Wasserstandsanzeigen
L Wasserstandsanzeige MAX
M Wassertank (nicht abnehmbar)
N Durchlauferhitzer
O Hauptgerät
P Drehschalter
Q Mixtaste
R Netzkabel
S Arretierbereich am Wassertank
57DEUTSCH
Übersicht über die Bedienelemente (Abb. a)
T Auftau-Stufe
U Aufwärmeinstellung für den Vorratsbehälter mit 240 ml
V Aufwärmeinstellung für den Vorratsbehälter mit 120 ml
W Dampfanzeige
Page 56

58 DEUTSCH
Zubehör (Abb. a)
X Aufbewahrungsbehälter
Y Deckel des Aufbewahrungsbehälters
Z Teigschaber
Vor dem ersten Gebrauch
1 Entfernen Sie das Verpackungsmaterial vom Gerät.
2 Reinigen Sie alle Teile vor der ersten Verwendung gründlich. Beachten Sie die
Anweisungen im Kapitel "Reinigen und Entkalken".
3 Wir empfehlen, vor der ersten Verwendung des Geräts einen Dampfgarzyklus
mit einem leeren Becher durchzuführen. Beachten Sie die Anweisungen in
den Kapiteln "Füllen des Wassertanks" und "Dampfgaren".
Verwenden des Geräts
Vorsicht
• Prüfen Sie die Temperatur der gekochten Mahlzeit stets auf Ihrem
Handrücken, um sicherzustellen, dass sie für Ihr Baby geeignet ist.
Dieses Gerät ist zum Dampfgaren frischer, fester Zutaten und zum anschließenden
Mixen dieser Zutaten bis zur gewünschten Konsistenz vorgesehen. Köstliche und
nahrhafte Rezeptvorschläge nden Sie im beigefügten Rezeptbuch. Das Gerät
kann auch nur zum Garen bzw. Mixen verwendet werden. Wenn Sie nur mixen
möchten, beachten Sie die Anweisungen im Kapitel "Mixen ohne Dampfgaren".
Dieses Gerät kann auch zum Auftauen oder Aufwärmen bereits gekochter
Mahlzeiten verwendet werden, die im speziell entwickelten Vorratsbehälter
aufbewahrt wurden. Verwenden Sie immer den Aufbewahrungsbehälter, um
gemixte Mahlzeiten aufzutauen oder aufzuwärmen. Wenn Sie Mahlzeiten ohne
den Vorratsbehälter auftauen oder erwärmen, können die Lebensmittel durch das
Sieb in den Becherdeckel tropfen.
Setzen Sie den Becher mit den gemixten Zutaten niemals in die Dampfgarposition
des Hauptgeräts.
Dämpfen Sie dieselbe Portion von rohen Zutaten niemals länger als 30 Minuten
oder mehr als einmal.
Dieses Gerät ist NICHT für folgende Zwecke bestimmt:
- Dampfgaren gefrorener roher Zutaten
- Dampfgaren von bereits gemixten Mahlzeiten ohne Aufbewahrungsbehälter
- Dampfgaren derselben Zutaten länger als 30 Minuten
- Kochen von Reis und Nudeln
- Erst Mixen dann Dampfgaren
- Erwärmen oder Aufwärmen von Flüssigkeiten, wie Suppe, Soßen oder Wasser
- Warmhalten von Lebensmitteln über mehrere Stunden
Page 57

59DEUTSCH
- Schneiden von harten Zutaten, wie Eiswürfel und Würfelzucker, oder klebriger
Zutaten, wie Käse
Füllen des Wassertanks
Hinweis
• Stellen Sie sicher, dass der Füllstand im Behälter die Markierung MAX an
der Seite des Wassertanks (250 ml) oder die Wasserstandsanzeige MAX im
Wassertank nicht überschreitet.
• Wir empfehlen die Verwendung von weichem oder geltertem Wasser, da die
in Mineralwasser oder Leitungswasser enthaltenen Mineralien schneller zu
Kalkablagerungen im Wassertank führen können.
• Geben Sie abgesehen von Entkalkungsmitteln niemals andere Flüssigkeiten
als Wasser in den Wassertank.
1 Drehen Sie den Deckel des Wassertanks im Uhrzeigersinn, um den
Wassertank zu önen (Abb. d). Füllen Sie den Wassertank mithilfe der
Füllstandsmarkierungen bis zur gewünschten Höhe. Beachten Sie dabei
erforderlichen Wassermengen im Kapitel "Zutaten und Dampfgarzeiten" in
der Bedienungsanleitung oder im beigefügten Rezeptbuch (Abb. e).
2 Setzen Sie den Deckel des Wassertanks auf den Wassertank, und drehen Sie
den Deckel im Uhrzeigersinn, um ihn zu xieren (Abb. f).
» Wenn der Deckel des Wassertanks sicher xiert ist, ist das Symbol
auf dem Deckel des Wassertanks am Symbol auf dem Wassertank
ausgerichtet.
Hinweis
• Stellen Sie stets sicher, dass der Deckel des Wassertanks ordnungsgemäß
verriegelt ist, bevor Sie das Gerät bedienen.
Dampfgaren
Vorsicht
• Heißer Dampf kann zu Verbrennungen an den Fingern führen. Berühren Sie
keine heißen Teile des Geräts oder den Dampf, der aus der Oberseite des
Geräts austritt, da diese Verbrennungen verursachen können. Achten Sie
darauf, dass Kinder das Gerät oder den Dampf nicht berühren. (Abb. g).
Page 58

60 DEUTSCH
Hinweis
• Tauen Sie gefrorene rohe Zutaten immer auf, bevor Sie sie in den Becher
geben, um sie sie dampfzugaren. Schütten Sie überschüssiges Wasser von
aufgetauten Zutaten ab, bevor Sie sie in den Becher geben.
• Füllen Sie den Becher nicht höher als bis zur Plastikkante der Messereinheit
ein.
• Geben Sie nie Wasser oder andere Flüssigkeiten in den Becher, um Schaden
am Gerät zu vermeiden.
• Das Gerät beginnt den Dampfgarvorgang erst, wenn der Becher richtig
angebracht wurde.
• Bevor Sie mit dem Dampfgaren beginnen, stellen Sie sicher, dass der
Dichtungsring korrekt am Becherdeckel angebracht wurde und die ache Seite
des Dichtungsrings nach außen zeigt.
1 Drücken Sie die Deckellasche gegen den Uhrzeigersinn, um den Deckel vom
Becher zu entfernen (Abb. h).
2 Falls die Messereinheit noch nicht im Becher eingesetzt ist, setzen Sie sie auf
die entsprechende Halterung im Becher (Abb. i).
3 Wir empfehlen, feste Zutaten in kleine Stücke zu schneiden (max. 1 cm große
Würfel).
4 Geben Sie die Zutaten in den Becher (Abb. j).
5 Drücken Sie das Sieb in den Becherdeckel (Abb. k).
6 Setzen Sie den Becherdeckel auf den Becher, und drehen Sie ihn im
Uhrzeigersinn, um ihn zu xieren (Abb. l).
Hinweis
• Der Becher verfügt über Rillen, die die Verriegelungsstifte führen und den
Becher xieren. Stellen Sie sicher, dass die Deckellasche am Gri des Bechers
einrastet (Abb. m).
7 Wenn Sie den Wassertank noch nicht mit der entsprechenden Menge
Wasser für den Dampfgarvorgang gefüllt haben, lesen Sie die Anweisungen
im Kapitel "Füllen des Wassertanks", und geben Sie das Wasser in den
Wassertank. Setzen Sie dann den Becher auf das Hauptgerät.
Hinweis
• Stellen Sie sicher, dass der Deckel des Wassertanks richtig xiert ist, bevor Sie
den Becher auf das Hauptgerät setzen.
8 Drehen Sie den Becher um, sodass der Becherdeckel zum Boden zeigt
(Abb. n).
9 Richten Sie das Verbindungsstück am Becherdeckel am Arretierbereich des
Wassertank aus, und setzen Sie dann den Becher auf das Hauptgerät, sodass
der Becherdeckel nach unten zeigt (Abb. o). Drücken Sie den Becher nach
unten, bis er sicher im Hauptgerät einrastet, und achten Sie darauf, dass der
Gri sich auf der rechten Seite bendet.
Page 59

61DEUTSCH
10 Wenn der Drehschalter sich nicht in der in der ausgeschalteten Position (OFF)
bendet, drehen Sie ihn zunächst in diese Position.
11 Stecken Sie den Netzstecker in die Steckdose.
12 Wählen Sie mit dem Drehschalter die gewünschte Dampfgarzeit aus
(Abb. p). Die empfohlenen Dampfgarzeiten nden Sie in der Tabelle im
Kapitel "Zutaten und Dampfgarzeiten" und im Rezeptbuch.
» Die Dampfanzeige leuchtet weiß, um anzuzeigen, dass das Gerät den
Dampfgarvorgang durchführt.
» Sobald der Dampfgarzyklus abgeschlossen ist, gibt das Gerät einen
Piepton aus, und die Dampfanzeige erlischt.
13 Drehen Sie den Drehschalter wieder in die ausgeschaltete Position (OFF)
(Abb. q). warten Sie 2 Minuten oder bis kein Dampf mehr aus der Oberseite
des Geräts austritt, bevor Sie den Becher entfernen.
Vorsicht
• Falls Sie einen weiteren Dampfgarzyklus durchführen möchten, lassen Sie das
Gerät 10 Minuten lang abkühlen, und entfernen Sie sämtliches verbleibendes
Wasser aus dem Wassertank, bevor Sie ihn neu füllen und einen neuen
Dampfgarzyklus starten.
14 Um die dampfgegarten Zutaten zu mixen, beachten Sie die Anweisungen im
Kapitel "Mixen nach dem Dampfgaren".
15 Nach einem Dampfgarzyklus kann Wasser im Wassertank zurückbleiben. Das
ist normal. Warten Sie, bis das Gerät auf Zimmertemperatur abgekühlt ist,
und gießen Sie dann sämtliches verbleibendes Wasser aus dem Wassertank.
Anweisungen zum Reinigen des Wassertanks nden Sie im Kapitel "Reinigen
und Entkalken".
Mixen nach dem Dampfgaren
Vorsicht
• Der Becher und der Deckel werden beim Dampfgaren heiß. Fassen Sie den
Becher nur am speziellen hitzebeständigen Gri an (Abb. r).
• Vergewissern Sie sich stets, dass der Becherdeckel richtig geschlossen und
xiert ist, wenn Sie das Gerät verwenden.
• Achten Sie darauf, dass der Becherdeckel nach dem Dampfgaren abgekühlt
ist, bevor Sie ihn önen, um weitere Zutaten hineinzugeben (Befüllen Sie den
Becher nicht über den oberen Rand des Plastikteils der Messereinheit) oder
um das restliche Wasser aus dem Becher zu gießen.
• Falls Sie zusätzliche Flüssigkeit hinzugegeben haben, bringen Sie den Becher
nie in der Dampfgarposition an, da die Flüssigkeit ansonsten durch das Sieb
austritt.
Page 60

62 DEUTSCH
1 Fassen Sie den Becher in der Dampfgarposition am Gri an, und drehen Sie
ihn um (Abb. s). Schütteln Sie den Becher, um alle dampfgegarten Zutaten
an den Boden des Bechers zu den Mixermessern zu bewegen.
2 Entfernen Sie bei Bedarf den Becherdeckel, und geben Sie weitere zu
mixende Zutaten hinzu (z. B. Wasser für Pürees oder weitere bereits gegarte
Zutaten, wie Reis oder Nudeln). Setzen Sie den Becherdeckel wieder auf den
Becher, bevor Sie mit dem Mixen beginnen.
3 Setzen Sie den Becher auf das Hauptgerät, sodass der Deckel nach oben
zeigt, richten Sie das Symbol am Becher am Symbol des Hauptgerät
aus, und drehen Sie dann den Becher im Uhrzeigersinn, um ihn am
Hauptgerät zu xieren (Abb. t). Achten Sie darauf, dass der Gri sich auf
der rechten Seite bendet.
» Wenn der Becher richtig im Hauptgerät eingerastet ist, ist das Symbol
am Symbol auf dem Hauptgerät ausgerichtet.
4 Halten Sie die Mixtaste gedrückt, um den Mixvorgang zu starten, und mixen
Sie die Zutaten bis zur gewünschten Konsistenz (Abb. u).
Vorsicht
• Lassen Sie den Mixer nicht länger als 30 Sekunden ohne Unterbrechung
laufen. Wenn der Mixvorgang nach 30 Sekunden noch nicht abgeschlossen ist,
lassen Sie die Taste los, um den Vorgang zu unterbrechen. Warten Sie einige
Sekunde, bevor Sie mit dem Mixen fortfahren. Wenn das Hauptgerät heiß
wird, lassen Sie es einige Minuten abkühlen, bevor Sie mit der Verwendung
fortfahren.
5 Wenn Sie den Mixvorgang abgeschlossen haben, lassen Sie die Mixtaste los
(Abb. v).
6 Ziehen Sie den Netzstecker aus der Steckdose.
7 Entfernen Sie die Messereinheit. Seien Sie vorsichtig, wenn Sie die
Messereinheit entfernen. Sie ist möglicherweise heiß. Nehmen Sie die
gemixten Lebensmittel aus dem Becher. Verwenden Sie bei Bedarf den im
Lieferumfang des Geräts enthaltenen Schaber.
Mixen ohne Dampfgaren
Dieses Gerät ist für folgende Zwecke bestimmt:
- Pürieren dampfgegarter und gekochter Zutaten
- Mixen von Flüssigkeiten und Obst
Vorsicht
• Das Gerät ist nicht zum Schneiden von harten Zutaten, wie Eiswürfel und
Würfelzucker, oder klebriger Zutaten, wie Käse, vorgesehen.
• Falls Sie Flüssigkeit in den Becher gegeben haben, bringen Sie den Becher
nie in der Dampfgarposition an, da die Flüssigkeit ansonsten durch das Sieb
austritt.
Page 61

Hinweis
• Wenn Sie Zutaten mit Flüssigkeiten mixen, füllen Sie den Becher nie über die
Füllstandsmarkierung MAX am Becher hinaus.
• Füllen Sie den Becher nicht höher als bis zur Plastikkante der Messereinheit
ein.
• Setzen Sie den Becher mit den gemixten Zutaten niemals in die
Dampfgarposition des Hauptgeräts.
• Falls die Zutaten an der Innenwand des Bechers hängenbleiben oder die
gemixten Zutaten noch zu fest sind, lassen Sie die Mixtaste los, nehmen
Sie den Becher vom Hauptgerät, und lösen Sie die Zutaten mit dem Spatel,
oder geben Sie etwas Flüssigkeit (z. B. Trinkwasser) hinzu, bis die gemixten
Lebensmittel die richtige Konsistenz für Ihr Baby erreicht haben. Wenn
Sie Flüssigkeiten in den Becher geben, füllen Sie den Becher nie über die
Füllstandsmarkierung MAX am Becher hinaus.
• Achten Sie darauf, dass die gemixte Babynahrung die richtige Konsistenz hat,
bevor Sie sie servieren. Hinweise zur geeigneten Konsistenz für die einzelnen
Altersbereiche nden Sie im professionellen Beikostleitfaden im Lieferumfang
dieses Geräts, oder fragen Sie Ihren Arzt oder Berater.
• Verarbeiten Sie keine größeren Mengen von festen Zutaten gleichzeitig.
Verarbeiten Sie die Zutaten nacheinander in kleinen Portionen, um eine
feinere Textur zu erreichen.
1 Setzen Sie die Messereinheit auf die Halterung im Becher (Abb. i).
2 Schneiden Sie feste Zutaten in kleine Stücke (max. 1 cm große Würfel), bevor
Sie sie in den Becher geben.
3 Geben Sie die Zutaten in den Becher (Abb. j).
4 Drücken Sie das Sieb in den Becherdeckel (Abb. k).
5 Setzen Sie den Deckel auf den Becher, und drehen Sie ihn im Uhrzeigersinn,
um ihn zu xieren (Abb. l).
63DEUTSCH
Hinweis
• Der Becher verfügt über Rillen, die die Verriegelungsstifte führen und den
Becher xieren. Stellen Sie sicher, dass die Deckellasche am Gri des Bechers
einrastet (Abb. m).
6 Setzen Sie den Becher auf das Hauptgerät, sodass der Deckel nach oben
zeigt, richten Sie das Symbol am Becher am Symbol des Hauptgerät aus,
und drehen Sie dann den Becher im Uhrzeigersinn, um ihn am Hauptgerät zu
xieren (Abb. t). Achten Sie darauf, dass der Gri sich auf der rechten Seite
bendet.
» Wenn der Becher richtig im Hauptgerät eingerastet ist, ist das Symbol
am Symbol auf dem Hauptgerät ausgerichtet.
7 Halten Sie die Mixtaste gedrückt, um mit dem Mixen zu beginnen. Mixen Sie
die Zutaten, bis das gewünschte Ergebnis erreicht ist (Abb. u).
Page 62

64 DEUTSCH
Vorsicht
• Lassen Sie den Mixer nicht länger als 30 Sekunden ohne Unterbrechung
laufen. Wenn der Mixvorgang nach 30 Sekunden noch nicht abgeschlossen ist,
lassen Sie die Taste los, um den Vorgang zu unterbrechen. Warten Sie einige
Sekunde, bevor Sie mit dem Mixen fortfahren. Wenn das Hauptgerät heiß
wird, lassen Sie es einige Minuten abkühlen, bevor Sie mit der Verwendung
fortfahren.
8 Wenn Sie den Mixvorgang abgeschlossen haben, lassen Sie die Mixtaste los
(Abb. v).
9 Ziehen Sie den Netzstecker aus der Steckdose.
10 Entfernen Sie die Messereinheit. Seien Sie vorsichtig, wenn Sie die
Messereinheit entfernen. Sie ist möglicherweise heiß. Nehmen Sie die
gemixten Lebensmittel aus dem Becher. Verwenden Sie bei Bedarf den im
Lieferumfang des Geräts enthaltenen Schaber.
Aufwärmen
Im Lieferumfang des Geräts ist ein Vorratsbehälter mit einem Fassungsvermögen
von 120 ml enthalten. Verwenden Sie den Aufbewahrungsbehälter, um
Babynahrung aufzuwärmen, die Sie mit dem Gerät zubereitet haben.
Hinweis
• Eine Packung mit 2 Aufbewahrungsbehältern mit einem Fassungsvermögen
von 120 ml und 240 ml (SCF876) ist in einigen Märkten separat erhältlich.
• Geben Sie bereits gemixte Lebensmittel immer in den Aufbewahrungsbehälter,
um sie aufzuwärmen.
• Bevor Sie mit dem Aufwärmen beginnen, stellen Sie sicher, dass der
Dichtungsring korrekt am Becherdeckel angebracht wurde und die ache Seite
des Dichtungsrings nach außen zeigt.
1 Geben Sie die gewünschte Menge Wasser in den Wassertank.
» Wenn Sie den Vorratsbehälter mit 120 ml verwenden, geben Sie
160 ml Wasser in den Wassertank (d. h. bis zur Wasserstandsanzeige
für 10/15 min). Wenn Sie den Vorratsbehälter mit 240 ml verwenden,
fügen Sie Wasser bis zur Wasserstandsanzeige MAX auf der Seite des
Wassertanks oder im Wassertank hinzu.
2 Setzen Sie den Deckel des Wassertanks auf den Wassertank, und drehen Sie
den Deckel im Uhrzeigersinn, um ihn zu xieren (Abb. f).
» Wenn der Deckel des Wassertanks sicher xiert ist, ist das Symbol
auf dem Deckel des Wassertanks am Symbol auf dem Wassertank
ausgerichtet.
3 Nehmen Sie die Messereinheit aus dem Becher (Abb. w).
4 Drehen Sie den Vorratsbehälter um, und setzen Sie ihn auf die Halterung der
Messereinheit im Becher (Abb. x).
Page 63

65DEUTSCH
5 Setzen Sie den Becherdeckel auf den Becher, und drehen Sie ihn im
Uhrzeigersinn, um ihn zu xieren (Abb. y).
Hinweis
• Der Becher verfügt über Rillen, die die Verriegelungsstifte führen und den
Becher xieren. Stellen Sie sicher, dass die Deckellasche am Gri des Bechers
einrastet (Abb. m).
6 Drehen Sie den Becher um, sodass der Becherdeckel zum Boden zeigt
(Abb. z).
7 Richten Sie das Verbindungsstück am Becherdeckel am Arretierbereich des
Wassertank aus, und setzen Sie dann den Becher auf das Hauptgerät, sodass
der Becherdeckel nach unten zeigt (Abb. {). Drücken Sie den Becher nach
unten, bis er sicher im Hauptgerät einrastet, und achten Sie darauf, dass der
Gri sich auf der rechten Seite bendet.
Hinweis
• Stellen Sie sicher, dass der Deckel des Wassertanks richtig xiert ist, bevor Sie
den Becher auf das Hauptgerät setzen.
8 Wenn der Drehschalter sich nicht in der in der ausgeschalteten Position (OFF)
bendet, drehen Sie ihn zunächst in diese Position.
9 Stecken Sie den Netzstecker in die Steckdose.
10 Wählen Sie je nach Vorratsbehälter im Becher mit dem Drehschalter die
gewünschte Aufwärmzeit aus (Abb. p).
» Wenn Sie den Vorratsbehälter mit 120 ml verwenden, wählen Sie
15 Minuten ( ), wenn Sie den Vorratsbehälter mit 240 ml verwenden,
wählen Sie 25 Minuten ( ).
» Die Dampfanzeige leuchtet weiß, um anzuzeigen, dass das Gerät den
Aufwärmvorgang durchführt.
11 Sobald der Aufwärmvorgang abgeschlossen ist, gibt das Gerät einen Piepton
aus, und die Dampfanzeige erlischt.
12 Drehen Sie den Drehschalter wieder in die ausgeschaltete Position (OFF)
(Abb. q). warten Sie 2 Minuten oder bis kein Dampf mehr aus der Oberseite
des Geräts austritt, bevor Sie den Becher entfernen.
13 Önen Sie den Becherdeckel, und verwenden Sie den Haken oder Spatel, um
den Vorratsbehälter herauszunehmen (Abb. |).
14 Nach einem Aufwärmzyklus kann Wasser im Wassertank zurückbleiben. Das
ist normal. Warten Sie, bis das Gerät auf Zimmertemperatur abgekühlt ist,
und gießen Sie dann sämtliches verbleibendes Wasser aus dem Wassertank.
Anweisungen zum Reinigen des Wassertanks nden Sie im Kapitel "Reinigen
und Entkalken".
Page 64

66 DEUTSCH
Auftauen
Falls Sie den speziellen Vorratsbehälter zum Einfrieren von gemixten
Lebensmitteln verwendet haben, können Sie diese mit dem Gerät schonend
auftauen.
Hinweis
• Geben Sie bereits gemixte Lebensmittel immer in den Aufbewahrungsbehälter,
um sie aufzutauen.
• Bevor Sie mit dem Auftauen beginnen, stellen Sie sicher, dass der
Dichtungsring korrekt am Becherdeckel angebracht wurde und die ache Seite
des Dichtungsrings nach außen zeigt.
1 Füllen Sie den Behälter bis zur Markierung MAX an der Seite des
Wassertanks oder der Wasserstandsanzeige MAX im Wassertank mit Wasser.
2 Befolgen Sie die Schritte 2 bis 8 im Kapitel "Aufwärmen".
3 Wählen Sie mit dem Drehschalter 30 Minuten aus (Abb. }).
» Die Dampfanzeige leuchtet weiß, um anzuzeigen, dass das Gerät den
Auftauvorgang durchführt.
4 Sobald der Auftauvorgang abgeschlossen ist, gibt das Gerät einen Piepton
aus, und die Dampfanzeige erlischt.
5 Drehen Sie den Drehschalter wieder in die ausgeschaltete Position (OFF)
(Abb. q). warten Sie 2 Minuten oder bis kein Dampf mehr aus der Oberseite
des Geräts austritt, bevor Sie den Becher entfernen.
6 Önen Sie den Deckel, und verwenden Sie den Haken oder Spatel, um den
Vorratsbehälter herauszunehmen (Abb. |).
7 Nach einem Auftauzyklus kann Wasser im Wassertank zurückbleiben. Das
ist normal. Warten Sie, bis das Gerät auf Zimmertemperatur abgekühlt ist,
und gießen Sie dann sämtliches verbleibendes Wasser aus dem Wassertank.
Anweisungen zum Reinigen des Wassertanks nden Sie im Kapitel "Reinigen
und Entkalken".
Hinweis
• Tauen Sie eine Portion Lebensmittel nie mehr als einmal auf.
• Nach dem Auftauen sollten Sie einen Aufwärmvorgang durchführen, um
sicherzustellen, dass die Lebensmittel gleichmäßig aufgewärmt wurden.
Page 65

Zutaten und Dampfgarzeiten
67DEUTSCH
Art der
Speise
Obst Apfel 15 160
Gemüse Spargel 15 160
Fleisch Hähnchen, Rindeisch,
Fisch Lachs, Weißsch, Seezunge,
* Die Garzeit kann variieren. Die durchschnittlichen Dampfgarzeiten gelten für in
maximal 1 cm große Würfel geschnittene Zutaten mit einem Gesamtgewicht von
250 g.
Zutaten Durchschnittliche
Dampfgarzeit
(min)*
Orange/Mandarine 15 160
Prsich
Birne 15 160
Ananas 20 200
Paume 10 160
Erdbeere
Brokkoli 15 160
Karotten 20 200
Blumenkohl 15 160
Sellerie 15 160
Aubergine 15 160
Fenchel 15 160
Grüne Bohnen 20 200
Lauch 15 160
Zwiebel 15 160
Erbsen 15 160
Paprika 15 160
Kartoeln 20 200
Kürbis 15 160
Spinat 15 160
Kohlrüben 15 160
Mais 15 160
Süßkartoel 15 160
Tomaten 15 160
Rüben 15 160
Zucchini 15 160
Lamm, Schweineeisch usw.
Kabeljau, Forelle usw.
10
15 160
20 200
15 160
Wassermenge im
Wassertank (ml)
160
Page 66

68 DEUTSCH
Reinigen und Entkalken
Pege
Vorsicht
• Reinigen Sie das Gerät nach jedem Gebrauch.
• Tauchen Sie das Hauptgerät keinesfalls in Wasser. Reinigen Sie das
Hauptgerät niemals unter ießendem Wasser.
• Verwenden Sie niemals Bleiche oder chemische Sterilisierungslösungen/tabletten im Gerät.
• Benutzen Sie zum Reinigen des Geräts weder Scheuerschwämme und -mittel
noch aggressive Flüssigkeiten wie Benzin, Azeton oder Alkohol.
Hinweis
• Alle Teile (mit Ausnahme des Hauptgeräts) können auch in der Spülmaschine
gereinigt werden.
• Bringen Sie immer den Dichtungsring am Becherdeckel an, nachdem Sie ihn
zur Reinigung entfernt haben, und stellen Sie sicher, dass die ache Seite des
Dichtungsrings nach außen zeigt.
1 Ziehen Sie den Netzstecker des Geräts, und nehmen Sie den Becher vom
Hauptgerät (Abb. ~).
2 Drücken Sie die Deckellasche gegen den Uhrzeigersinn, um den Deckel vom
Becher zu entfernen (Abb. h).
3 Fassen Sie das Sieb am Vorsprung an, und ziehen Sie zuerst eine Seite des
Siebs heraus. Lösen Sie dann das Sieb vom Becherdeckel (Abb. ).
4 Entfernen Sie den Dichtungsring vom Becherdeckel, um ihn bei Bedarf zu
reinigen.
5 Entfernen Sie die Messereinheit (Abb. w).
6 Reinigen Sie die Messereinheit sofort nach der Verwendung gründlich unter
ießendem Wasser. Achten Sie darauf, auch die Innenseite des Schlauchs an
der Messereinheit abzuspülen (Abb. €).
Vorsicht
• Gehen Sie mit der Messereinheit vorsichtig um. Die Klingen sind sehr scharf.
7 Drehen Sie den Deckel des Wassertanks gegen den Uhrzeigersinn, und
nehmen Sie ihn vom Wassertank (Abb. ).
8 Reinigen Sie den Wassertank unter ießendem Wasser.
9 Gießen Sie im Behälter vorhandenes Restwasser ab. Geben Sie bei
Bedarf frisches Wasser in den Wassertank (Abb. e), und spülen Sie ihn
aus (Abb. ‚). Wiederholen Sie diesen Vorgang so oft wie nötig, bis der
Wassertank sauber ist.
Page 67

69DEUTSCH
10 Reinigen Sie alle anderen Teile, die mit Lebensmitteln in Kontakt gekommen
sind, sofort nach der Verwendung mit heißem Wasser und etwas Spülmittel.
11 Trocknen Sie das Hauptgerät und alle Teile nach dem Reinigen ab.
Entkalken des Wassertanks
Um eine optimale Leistung zu gewährleisten, sollten Sie das Gerät alle vier Wochen
entkalken. Verwenden Sie weiches oder geltertes Wasser zum Dampfgaren,
Aufwärmen oder Auftauen, um Kalkablagerungen im Gerät zu minimieren.
Zum Entkalken des Geräts befolgen Sie die nachstehenden Anweisungen:
1 Vergewissern Sie sich, dass das Gerät ausgeschaltet ist.
2 Mischen Sie 80 ml Haushaltsessig (mit 6 % Essigsäure) mit 80 ml Wasser.
Alternativ können Sie auch Zitronensäure und warmes Wasser verwenden,
um den Wassertank zu entkalken.
3 Geben Sie die Lösung in den Boiler des Wassertanks.
4 Setzen Sie den Deckel des Wassertanks auf den Wassertank, und drehen Sie
den Deckel im Uhrzeigersinn, um ihn zu xieren.
5 Warten Sie 6 Stunden bzw. eine Nacht oder bis der gesamte Kalk gelöst ist.
6 Gießen Sie die verbleibende benutzte Lösung aus dem Wassertank (Abb. ‚).
7 Falls die Kalkablagerungen sich nicht vollständig aufgelöst haben,
wiederholen Sie die Schritte 1 bis 6 des Entkalkungsvorgangs in diesem
Kapitel.
8 Geben Sie frisches Wasser in den Wassertank (Abb. e), und spülen Sie
ihn aus (Abb. ‚). Wiederholen Sie diesen Vorgang so oft wie nötig, bis der
Wassertank sauber ist.
9 Spülen Sie den Deckel des Wassertanks gründlich unter ießendem Wasser
ab.
10 Füllen Sie 200 ml Wasser in den Wassertank, und lassen Sie das Gerät
bei leerem Becher einen kompletten Dampfgarvorgang von 20 Minuten
durchlaufen, bevor Sie es wieder für die Zubereitung von Nahrung
verwenden.
Aufbewahrung
1 Leeren Sie den Wassertank, bevor Sie das Gerät aufbewahren (Abb. ‚).
2 Stellen Sie sicher, dass alle Teile sauber und trocken sind, bevor Sie das
Gerät verstauen (siehe Kapitel "Reinigung und Pege").
3 Setzen Sie die Messereinheit in den Becher ein, wenn Sie das Gerät
verstauen, um Schäden zu vermeiden.
4 Stellen Sie stets sicher, dass die Deckel des Wassertank und des Bechers
korrekt angebracht wurden, bevor Sie das Gerät aufbewahren.
Page 68

70 DEUTSCH
Recycling
Dieses Symbol bedeutet, dass das Produkt nicht mit dem normalen
Hausmüll entsorgt werden kann (2012/19/EU).
1. Altgeräte können kostenlos an geeigneten Rücknahmestellen
abgegeben werden.
2. Diese werden dort fachgerecht gesammelt oder zur Wiederverwendung
vorbereitet. Altgeräte können Schadstoe enthalten, die der Umwelt
und der menschlichen Gesundheit schaden können. Enthaltene
Rohstoe können durch ihre Wiederverwertung einen Beitrag zum
3. Die Löschung personenbezogener Daten auf den zu entsorgenden
4. Hinweise für Verbraucher in Deutschland: Die in Punkt 1
Umweltschutz leisten.
Altgeräten muss vom Endnutzer eigenverantwortlich vorgenommen
werden.
genannte Rückgabe ist gesetzlich vorgeschrieben. Sammel- und
Rücknahmestellen in Deutschland: https://www.stiftung-ear.de/
Garantie und Kundendienst
Benötigen Sie weitere Informationen oder treten Probleme auf, besuchen Sie bitte
die Philips Website unter www. philips. com / avent, oder setzen Sie sich mit einem
Philips Service-Center in Ihrem Land in Verbindung (Details siehe Garantieschrift).
Sollte es in Ihrem Land kein Service-Center geben, wenden Sie sich bitte an Ihren
lokalen Philips Händler.
Fehlerbehebung
In diesem Kapitel sind die häugsten Probleme aufgeführt, die beim Gebrauch
Ihres Geräts auftreten können. Sollten Sie ein Problem mithilfe der nachstehenden
Informationen nicht beheben können, wenden Sie sich bitte an das Philips ServiceCenter in Ihrem Land.
Problem Mögliche Ursache Lösung
Das Gerät
funktioniert nicht.
Die Dampfanzeige
leuchtet nicht.
Das Gerät verfügt über
eine Sicherheitssperre.
Das Gerät funktioniert
erst, wenn alle Teile
korrekt am Hauptgerät
angebracht wurden.
Das Gerät ist nicht an
die Stromversorgung
angeschlossen.
Bauen Sie alle Teile richtig
zusammen. Setzen Sie vor dem
Dampfgaren den Becher vertikal
auf das Hauptgerät, sodass der
Becherdeckel nach unten zeigt.
Setzen Sie vor dem Mixen den
Becher so auf das Hauptgerät, dass
der Deckel nach oben zeigt, und
xieren Sie den Becher, indem Sie
ihn im Uhrzeigersinn drehen.
Stecken Sie das Netzteil in die
Steckdose.
Page 69

Problem Mögliche Ursache Lösung
Der Wassertank
gibt bei den ersten
Einsätzen einen
unangenehmen
Geruch ab.
Das Gerät erzeugt
keinen Dampf.
Es tritt Dampf aus
dem Wassertank
aus.
Der Becher ist nicht
ordnungsgemäß am
Hauptgerät angebracht.
Sie haben direkt nach
einem Dampfgarzyklus
einen zweiten
Dampfgarzyklus gestartet.
Der Drehschalter
wurde nicht in die
ausgeschaltete
Position (OFF) gestellt,
nachdem der vorherige
Dampfgarzyklus
abgeschlossen wurde.
Sie haben den
Wassertank vor der
Verwendung nicht
gereinigt.
Der Wassertank enthält
kein Wasser.
Es bendet sich zu viel
Kalk im Wassertank.
Der Deckel des
Wassertanks ist nicht
richtig geschlossen.
Der Becher wurde nicht
richtig am Hauptgerät
angebracht.
Der Dampfauslass
am Deckel des
Wassertanks ist durch
Verschmutzungen oder
Kalk verstopft.
Setzen Sie den Becher
ordnungsgemäß auf das
Hauptgerät, sodass der
Becherdeckel nach unten zeigt.
Schalten Sie das Gerät aus, und
lassen Sie es 10 Minuten lang
abkühlen, bevor Sie einen zweiten
Dampfgarzyklus starten.
Stellen Sie den Drehschalter
zunächst in die ausgeschaltete
Position (OFF), und drehen Sie ihn
dann erneut, um die Betriebszeit
auszuwählen.
Beachten Sie die Anweisungen im
Kapitel "Reinigen und Entkalken",
um den Wassertank zu reinigen,
und führen Sie dann einen
Dampfgarzyklus mit einem leeren
Becher durch.
Schalten Sie das Gerät aus, ziehen
Sie den Netzstecker, und füllen Sie
dann Wasser in den Wassertank.
Entkalken Sie den Wassertank.
Beachten Sie die Anweisungen im
Abschnitt "Entkalken" des Kapitels
"Reinigen und Entkalken".
Schließen Sie den Deckel des
Wassertanks richtig. Achten Sie
darauf, dass das Symbol am
Deckel des Wassertanks am Symbol
auf dem Wassertank ausgerichtet
ist.
Bringen Sie den Becher richtig am
Hauptgerät an.
Reinigen Sie den Dampfauslass am
Deckel des Wassertanks.
71DEUTSCH
Page 70

72 DEUTSCH
Problem Mögliche Ursache Lösung
Die Zutaten sind
nicht gleichmäßig
aufgewärmt.
Der Beckerdeckel
ist undicht.
Die Mixfunktion
funktioniert nicht.
Der Dampfeinlass am
Becherdeckel ist durch
Verschmutzungen
verstopft.
Die Stücke im Becher sind
zu groß.
Es benden sich zu viele
Zutaten im Mixbecher.
Es bendet sich zu viel
oder zu wenig Wasser im
Wassertank.
Die Dampfgarzeit ist zu
kurz.
Der Becher ist nicht
ordnungsgemäß am
Hauptgerät angebracht.
Es bendet sich zu viel
Kalk im Wassertank.
Es benden sich zu viele
Zutaten im Mixbecher.
Der Beckerdeckel wurde
nicht richtig auf dem
Becher angebracht.
Der Dichtungsring
des Becherdeckels ist
nicht oder nicht richtig
angebracht.
Es benden sich zu viele
Zutaten im Mixbecher.
Reinigen Sie den Dampfeinlass am
Becherdeckel.
Schneiden Sie die Zutaten in
kleinere Stücke (max. 1 cm große
Würfel).
Geben Sie weniger Lebensmittel in
den Becher.
Geben Sie die richtige
Wassermenge für die Dampfgarzeit
ein. Beachten Sie das Rezeptbuch
und/oder die Tabelle im Kapitel
"Zutaten und Dampfgarzeiten",
um sicherzustellen, dass Sie die
richtige Menge Wasser für die
Dampfgarzeit der Zutaten oder
des zuzubereitenden Rezepts
verwenden.
Wählen Sie eine längere
Dampfgarzeit (maximal 30 Minuten).
Setzen Sie den Becher
ordnungsgemäß auf das
Hauptgerät, sodass der
Becherdeckel nach unten zeigt.
Entkalken Sie den Wassertank.
Beachten Sie die Anweisungen im
Abschnitt "Entkalken" des Kapitels
"Reinigen und Entkalken".
Schalten Sie das Gerät aus, und
verarbeiten Sie kleinere Mengen.
Setzen Sie den Becherdeckel auf
den Becher, und drehen Sie ihn im
Uhrzeigersinn, um ihn zu xieren.
Stellen Sie sicher, dass der
Dichtungsring korrekt am
Becherdeckel angebracht
wurde und die ache Seite des
Dichtungsrings nach außen zeigt.
Schalten Sie das Gerät aus, und
verarbeiten Sie kleinere Mengen.
Die Lebensmittel dürfen maximal
bis zur Oberkante der Messereinheit
reichen.
Page 71

Problem Mögliche Ursache Lösung
Das Gerät ist
sehr laut, gibt
unangenehme
Gerüche von sich,
läuft heiß, raucht
usw.
Das Gerät ist beim
Mixen sehr laut
und vibriert.
Die Lebensmittel
wurden nicht
ausreichend
aufgetaut.
Der
Vorratsbehälter
ist während des
Aufwärmens/
Auftauens
undicht.
Der Becher ist nicht
ordnungsgemäß am
Hauptgerät angebracht.
Der Beckerdeckel wurde
nicht richtig auf dem
Becher angebracht.
Sie verwenden das Gerät,
um klebrige Zutaten wie
Käse zu mixen.
Sie haben die Mixfunktion
länger als 30 Sekunden
am Stück verwendet.
Es benden sich zu viele
Zutaten im Mixbecher.
Sie haben die Mixfunktion
zu lange verwendet.
Das Sieb wurde nicht am
Becherdeckel angebracht.
Es benden sich
zu viele Zutaten im
Aufbewahrungsbehälter.
Die Lebensmittel im
Vorratsbehälter sind zu
dicküssig.
Der Deckel des
Aufbewahrungsbehälters
ist nicht richtig
geschlossen.
Setzen Sie den Becher auf das
Hauptgerät, sodass der Deckel nach
oben zeigt, richten Sie das Symbol
am Becher am Symbol des
Hauptgerät aus, und drehen Sie
dann den Becher im Uhrzeigersinn,
um ihn am Hauptgerät zu xieren.
Setzen Sie den Becherdeckel auf
den Becher, und drehen Sie ihn im
Uhrzeigersinn, um ihn zu xieren.
Beachten Sie das Rezeptbuch,
und verwenden Sie nur zum Mixen
geeignete Zutaten.
Beenden Sie den Mixvorgang,
und lassen Sie das Gerät einige
Sekunden abkühlen. Starten Sie
dann den Mixvorgang erneut.
Schalten Sie das Gerät aus, und
verarbeiten Sie kleinere Mengen.
Lassen Sie den Mixer nicht
länger als 30 Sekunden ohne
Unterbrechung laufen.
Stellen Sie sicher, dass das Sieb am
Becherdeckel angebracht ist.
Stellen Sie sicher, dass die
Nahrungsmenge im Vorratsbecher
nicht die Maximal-Skala auf der
Innenseite des Bechers übersteigt.
Lassen Sie das Gerät 10 Minuten
lang abkühlen, und tauen Sie die
Lebensmittel dann erneut auf.
Stellen Sie sicher, dass der Deckel
richtig geschlossen ist, bevor
Sie den Vorratsbehälter zum
Aufwärmen/Auftauen in den Becher
geben.
73DEUTSCH
Page 72

74 DEUTSCH
Problem Mögliche Ursache Lösung
Das Wasser im
Wassertank
hat eine
ungewöhnliche
Farbe, wenn
Sie es aus dem
Wassertank
gießen oder wenn
es während des
Dampfgarens
in den Becher
gelangt, bzw.
das Wasser im
Wassertank riecht
unangenehm.
Auf dem
Wassertank,
Deckel des
Wassertanks,
Becher,
Becherdeckel und
Sieb sind weiße
Punkte erkennbar.
Die Oberächen,
die in Berührung
mit Lebensmitteln
kommen, sind
verfärbt.
Das Gerät piept
fünf Mal, und die
Dampfanzeige
blinkt während
des Dampfgar-,
Aufwärm- oder
Auftauvorgangs.
Nahrungspartikel sind
während des Betriebs
in den Wasserbehälter
gelangt.
Es bendet sich Kalk auf
diesen Teilen.
Lebensmittelfarben
können zu einer
Verfärbung der Teile
führen, die mit den
Lebensmitteln in
Berührung kommen.
Der Becher wurde nicht
richtig angebracht oder
während des Vorgangs
vom Hauptgerät entfernt.
Reinigen Sie den Wassertank
gemäß den Anweisungen im Kapitel
"Reinigen und Entkalken". Beachten
Sie unbedingt die Anweisungen für
die Verwendung des Geräts. Achten
Sie darauf, nicht zu viel Wasser
in den Wassertank (max. 250 ml)
und nicht zu viele Lebensmittel
in den Becher (Befüllen Sie
den Becher nicht über den
oberen Rand des Plastikteils der
Messereinheit) zu geben. Dämpfen
Sie dieselben Zutaten nicht länger
als 30 Minuten, und geben Sie
während des Dampfgarvorgangs
keine Flüssigkeiten in den Becher.
Wenn Sie Flüssigkeit in den Becher
gegeben haben, befestigen Sie den
Becher nie in der Dampfgarposition,
sodass der Becherdeckel nach
unten zeigt.
Das ist normal. Entfernen Sie Kalk
regelmäßig. Reinigen Sie den Deckel
des Wassertanks, den Becher, den
Becherdeckel und das Sieb mit
einem feuchten Tuch. Entkalken
Sie den Wassertank. Beachten
Sie die Anweisungen im Abschnitt
"Entkalken" des Kapitels "Reinigen
und Entkalken".
Das ist normal. Alle Teile können
weiterhin sicher verwendet werden
und beeinträchtigen die gekochten
Lebensmittel nicht.
Drehen Sie den Drehschalter in
die ausgeschaltete Position (OFF),
prüfen Sie die Wassermenge im
Wassertank, setzen Sie den Becher
korrekt in das Hauptgerät ein, und
wählen Sie die Verarbeitungszeit
erneut aus, um den Vorgang neu zu
starten.
Page 73

Problem Mögliche Ursache Lösung
Es sind
Lebensmittelreste
in der
Innenschicht an
der Unterseite des
Bechers.
Das Wasser im
Wassertank reicht
für die ausgewählte
Verarbeitungszeit nicht
aus.
Es bendet sich zu viel
Kalk im Wassertank.
Kleine Rückstände
von Nahrungspartikeln
gelangen während
der Reinigung in die
Innenschicht des Bechers.
Drehen Sie den Drehschalter in die
ausgeschaltete Position (OFF), und
geben Sie genügend Wasser für
die ausgewählte Verarbeitungszeit
hinzu.
Entkalken Sie den Wassertank.
Beachten Sie die Anweisungen im
Abschnitt "Entkalken" des Kapitels
"Reinigen und Entkalken".
Nehmen Sie den Becher aus dem
Hauptgerät. Entfernen Sie den
Deckel und die Messereinheit.
Drehen Sie den Becher, halten Sie
das kleine Loch an der Unterseite
unter einen Wasserhahn und lassen
Sie Wasser hineinlaufen. Verwenden
Sie warmes Wasser für ein besseres
Reinigungsergebnis.
Halten Sie den Bechergri fest und
schütteln Sie den Becher ca. 15
Sekunden lang, um das Wasser mit
den angesammelten Rückständen
zu vermischen.
Gießen Sie das Wasser aus dem
kleinen Loch.
Wiederholen Sie die oben
genannten Schritte mehrere Male,
bis alle Rückstände beseitigt sind.
75DEUTSCH
Technische Daten
- Spannung/Wattleistung: Siehe Geräteetikett an der Unterseite des Geräts.
- Maximales Fassungsvermögen des Wassertanks: 250 ml
- Maximales Fassungsvermögen des Bechers: 1050 ml
- Betriebstemperatur: 10 °C bis 40 °C
- Schutz: Temperaturgesteuertes Aufwärmsystem
Page 74

76 SUOMI
Kuvat löytyvät käyttöoppaan alussa ja lopussa olevista liepeistä.
Sisällys
Tärkeää 77
Johdanto 82
Yleiskuvaus 82
Käyttöönotto 83
Käyttö 83
Ainekset ja höyrytysajat 90
Puhdistus ja kalkinpoisto 91
Säilytys 92
Kierrätys 93
Takuu ja huolto 93
Vianmääritys 93
Tekniset tiedot 97
Page 75

Tärkeää
Lue tämä käyttöopas huolellisesti ennen käyttöä ja säilytä se myöhempää tarvetta
varten.
Vaara
- Älä koskaan upota päälaitetta veteen tai muuhun
nesteeseen. Älä huuhtele sitä juoksevalla vedellä.
Varoitus
- Tarkista, että laitteeseen merkitty käyttöjännite vastaa
paikallista verkkojännitettä, ennen kuin liität laitteen
pistorasiaan.
- Älä käytä laitetta, jos pistoke, johto tai itse laite on
vaurioitunut. Jos virtajohto on vahingoittunut, vaihdata
se oman turvallisuutesi vuoksi Philipsin valtuuttamassa
huoltoliikkeessä tai muulla ammattitaitoisella korjaajalla.
- Laitetta voivat käyttää myös henkilöt, joiden fyysinen
tai henkinen toimintakyky on rajoittunut tai joilla ei
ole kokemusta tai tietoa laitteen käytöstä, jos heitä
on neuvottu laitteen turvallisesta käytöstä tai tarjolla
on turvallisen käytön edellyttämä valvonta ja jos he
ymmärtävät laitteeseen liittyvät vaarat.
- Lasten ei pidä leikkiä laitteella (ei myöskään sen
lisävarusteilla).
- Lapset eivät saa käyttää laitetta. Pidä laite (myös
lisävarusteet) ja sen johto poissa lasten ulottuvilta.
- Lasten ei saa antaa puhdistaa tai huoltaa laitetta.
- Älä koske teriin etenkään laitteen ollessa kytketty
verkkovirtaan. Terät ovat hyvin teräviä.
- Ole varovainen, kun käsittelet teriä, tyhjennät kannun ja
puhdistat laitteen.
- Jos terä juuttuu paikalleen, irrota pistoke pistorasiasta
ennen kuin irrotat kiinni juuttuneet ainekset.
- Laite kuumenee höyrytyksen aikana tai pian sen jälkeen
(etenkin -symbolilla merkityt pinnat) ja voi aiheuttaa
koskettaessa palovamman. Nosta kannu aina kahvasta.
- Kannusta tulee kuumaa höyryä höyrytyksen aikana ja
kantta irrotettaessa.
77SUOMI
Page 76

78 SUOMI
- Varo kuumaa höyryä, jota tulee vesisäiliöstä kantta
avattaessa.
- Vesisäiliön kannen ja kannun höyryaukoista tulee
kuumaa höyryä vielä jonkin aikaa höyryttämisen
jälkeenkin. Ole varovainen nostaessasi kannua pois
päälaitteesta.
- Jos laitetta käytetään väärin, kuumaa höyryä voi päästä
ulos vesisäiliön kannen reunasta. Katso ohjeet tämän
ongelman välttämiseen tai ratkaisemiseen kohdasta
Vianmääritys.
- Ole erityisen varovainen, kun kaadat kuumaa nestettä
kannuun, jotta neste ei pääse läikkymään.
- Jos uudelleenlämmität tai sulatat aiemmin soseutettua
ruokaa laitteella, tee se aina säilytysastian avulla.
- Älä hienonna laitteella kovia tai tahmeita ruoka-aineita.
- Älä koskaan käytä laitteessa valkaisuaineita tai
kemiallisia sterilointiliuoksia/-tabletteja.
- Älä käytä laitteen puhdistamiseen naarmuttavia tai
syövyttäviä puhdistusaineita tai -välineitä (kuten
bensiiniä, asetonia tai alkoholia).
- Anna laitteen jäähtyä höyrytyksen jälkeen 10 minuutin
ajan, ennen kuin käynnistät uuden höyrytystoiminnon.
- Älä soseuta laitteella kerralla kauemmin kuin 30
sekuntia. Jos sekoitus ei ole valmis 30 sekunnin kuluttua,
irrota painikkeesta ja odota muutaman sekunnin ajan,
ennen kuin jatkat soseuttamista. Jos päälaite kuumenee,
anna sen jäähtyä muutaman minuutin ajan, ennen kuin
jatkat sen käyttöä.
- Välttääksesi laitteen vahingoittumisen älä koskaan laita
vettä tai muuta nestettä höyrytyskannuun.
- Irrota säilytysastian kansi, ennen kuin lämmität ruokaa
astiassa mikroaaltouunissa.
Varoitus
- Älä koskaan käytä muita kuin Philipsin valmistamia tai
suosittelemia lisävarusteita tai -osia. Jos käytät muita
osia, takuu ei ole voimassa.
- Älä aseta laitetta kuumalle liedelle tai sen lähelle.
Page 77

79SUOMI
- Katkaise aina laitteen virta ja irrota laitteen virtajohto
pistorasiasta, kun aiot jättää laitteen ilman valvontaa,
sekä ennen lisäosien kokoamista, purkamista tai
vaihtamista tai liikkuvien osien puhdistamista tai
käsittelyä.
- Irrota pistoke pistorasiasta ja anna laitteen jäähtyä
ennen puhdistamista.
- Käännä valitsin OFF-asentoon aina höyryttämisen,
uudelleenlämmittämisen tai sulattamisen jälkeen.
- Älä koskaan käytä kannua tai laitteen muita osia (paitsi
säilytysastioita) mikroaaltouunissa. Kannun kahvan ja
teräyksikön metalliosat eivät sovellu mikroaaltouuniin.
- Älä koskaan steriloi kannua tai laitteen muita osia (paitsi
säilytysastioita) sterilointilaitteessa tai mikroaaltouunissa.
Kannun kahvan ja teräyksikön metalliosat eivät sovellu
sterilointilaitteeseen ja mikroaaltouuniin.
- Tämä laite on tarkoitettu vain kotitalouksien käyttöön.
Jos laitetta käytetään väärin tai (puoli-)ammatillisessa
tarkoituksessa tai jos sitä on käytetty käyttöohjeen
vastaisesti, takuu mitätöityy, eikä Philips vastaa
mahdollisista vahingoista.
- Aseta laite tukevalle, tasaiselle ja vaakasuoralle alustalle.
Laite tuottaa kuumaa höyryä käytettäessä. Varmista, että
laitteen ympärillä on tarpeeksi tilaa, jotta sen tuottama
kuuma höyry ei vahingoita esim. kaappeja tai muita
esineitä.
- Älä käytä laitetta, jos se on pudonnut lattialle
tai vaurioitunut muutoin. Vie laite Philipsin
huoltoliikkeeseen korjattavaksi.
- Älä käytä höyrytystoimintoa, jos vesisäiliössä ei ole vettä.
- Varmista, että säiliön vesimäärä ei ylitä kylkeen merkittyä
enimmäistasoa (MAX).
- Varmista, että vesisäiliön kansi on tiiviisti paikallaan,
ennen kuin asetat kannun päälaitteeseen.
- Kun höyrytät aineksia, älä täytä kannua liian täyteen.
Varmista, että ruoka ei peitä teräyksikön muovista
yläreunaa (kuva b).
Page 78

80 SUOMI
- Kun käytät soseuttaessasi nesteitä, älä ylitä kannuun
merkittyä MAX-enimmäistasoa (720 ml) (kuva c).
- Älä nosta tai siirrä laitetta käytön aikana.
- Älä aseta mitään esineitä vesisäiliön kannen
höyrynpoistoaukkoon tai kannun kannen
höyryntuloaukkoon.
- Älä lisää vesisäiliöön vettä höyrytyksen aikana. Laitteesta
voi roiskua kuumaa vettä ja höyryä.
- Varmista aina, että kansi on jäähtynyt höyrytyksen
jälkeen, ennen kuin avaat sen ja lisäät aineksia
soseutettavaksi.
- Älä liitä laitetta aikakytkimeen tai vastaavaan
kytkimeen tai piiriin, jonka virta katkaistaan ja kytketään
säännöllisesti.
- Tarkista aina ruoan lämpötila kämmenselälläsi, ennen
kuin alat syöttää lasta.
- Tarkista ruoan koostumus, ennen kuin alat syöttää
lasta. Löydät lisätietoa eri ikäisille lapsille sopivasta
ruoan koostumuksesta laitteen mukana toimitetuista
vieroitusvinkeistä. Voit myös kysyä lisää neuvolasta tai
lääkäriltä.
- Kun otat ruokaa kannusta, käytä ainoastaan laitteen
mukana toimitettua lastaa.
- Säännöllinen kalkinpoisto estää laitetta
vahingoittumasta.
- Laitteen mukana toimitettavaa säilytysastiaa ei saa
käyttää välineenä lapsen syöttämiseen. Älä syötä lasta
suoraan säilytysastiasta.
- Ennen kuin otat säilytysastian käyttöön, puhdista
se huolellisesti ja steriloi se Philips Avent
-sterilointilaitteella tai keittämällä sitä kiehuvassa
vedessä viiden minuutin ajan. Steriloinnilla varmistetaan
hyvä hygienia. Jos steriloit säilytysastian keittämällä,
varmista, että kattilassa on riittävästi vettä. Älä pidä
astiaa kattilassa liian kauan, jotta kuumuus ei pääse
pehmentämään ja pilaamaan sitä.
Page 79

- Täytä säilytysastia ruoalla korkeintaan astian laitaan
merkittyyn maksimitasoon saakka. Muuten astia saattaa
vuotaa yli.
- Kun uudelleenlämmität tai sulatat ruokaa, varmista, että
säilytysastian kansi on tiiviisti paikallaan, ennen kuin
laitat astian kannuun. Muuten astia saattaa vuotaa, kun
otat sen pois kannusta.
- Jos lämmität ruokaa säilytysastiassa mikroaaltouunissa,
ruoka voi kuumentua epätasaisesti. Mikroaaltouunissa
lämmittäminen saattaa vaikuttaa ruoan ravintoarvoihin.
Sekoita lämmittämäsi ruoka huolellisesti, jotta lämpö
jakautuu tasaisesti. Tarkista ruoan lämpötila aina ennen
kuin alat syöttää lasta.
- Jos lämmität tai sulatat säilytysastiassa olevaa ruokaa
mikroaaltouunissa, älä valitse uunin grillitoimintoa.
Jos olet juuri lopettanut grillitoiminnon käytön, odota,
kunnes mikroaaltouuni on jäähtynyt, ennen kuin
laitat säilytysastiat uuniin. Lämpö saattaa vaurioittaa
säilytysastioita.
81SUOMI
Turvajärjestelmät
Tämä laite on varustettu sisäänrakennetulla turvakytkimellä. Laite toimii vain, jos
osat on koottu oikein. Kun osat ovat asianmukaisesti paikoillaan, sisäänrakennettu
turvakytkin sallii käynnistämisen.
Laite on varustettu myös ylikuumenemissuojalla. Ylikuumeneminen on mahdollista,
jos tauko kahden höyrytyksen välillä on liian lyhyt. Jos ylikuumenemissuoja
sammuttaa laitteen höyrytyksen aikana, aseta valitsin OFF-asentoon ja anna
laitteen jäähtyä muutaman minuutin ajan. Tämän jälkeen voit alkaa taas käyttää
laitetta.
Sähkömagneettiset kentät (EMF)
Tämä Philips-laite vastaa kaikkia sähkömagneettisia kenttiä (EMF) koskevia
standardeja ja säännöksiä.
Page 80

82 SUOMI
Johdanto
Onnittelut tekemäsi ostoksen johdosta ja tervetuloa Philips Avent -käyttäjäksi!
Käytä hyväksesi Philips Avent -tuki ja rekisteröi tuote osoitteessa
www.philips.com/welcome.
4-in-1-vauvanruokakoneen avulla terveellisen vauvanruoan valmistaminen
sujuu vanhemmilta helposti, koska höyrytys- ja soseutustoiminnot ovat
samassa laitteessa. Voit käyttää konetta myös vauvanruoan sulattamiseen ja
lämmittämiseen.
Yleiskuvaus
Tuotteen yleiskuva (kuva a)
A Kannen läppä
B Kannun kannen liitin
C Kannun kansi
D Tiiviste
E Lukitusnasta
F Siivilä
G Teräyksikkö
H Teräyksikköteline
I Kulho
J Vesisäiliön kansi
K Vesimäärän merkinnät
L Vesimäärän MAX-merkintä
M Vesisäiliö (ei irrotettava)
N Boileri
O Päälaite
P Valitsin
Q Soseutuspainike
R Virtajohto
S Vesisäiliön lukitusalue
Asetusten yleiskuva (kuva a)
T Sulatusasetus
U Lämmitysasetus 240 ml:n säilytysastialle
V Lämmitysasetus 120 ml:n säilytysastialle
W Höyrytysvalo
Page 81

83SUOMI
Lisävarusteet (kuva a)
X Säilytysastia
Y Säilytysastian kansi
Z Lasta
Käyttöönotto
1 Poista laitteesta kaikki pakkausmateriaalit.
2 Puhdista kaikki osat huolellisesti ennen ensimmäistä käyttökertaa. Katso
ohjeet kohdasta Puhdistus ja kalkinpoisto.
3 Suosittelemme, että teet yhden höyrytyksen tyhjällä kannulla, ennen kuin
käytät laitetta varsinaisesti ensimmäisen kerran. Katso lisätietoja kohdista
Vesisäiliön täyttäminen ja Höyrytys.
Käyttö
Varoitus
• Tarkista aina ruoan lämpötila kämmenselälläsi, ennen kuin alat syöttää lasta.
Tämä laite on tarkoitettu tuoreiden, kiinteiden ainesten höyryttämiseen ja niiden
soseuttamiseen vauvanruoaksi. Löydät terveellisiä ja herkullisia ruokaohjeita
mukana toimitetusta reseptikirjasesta. Laitetta voi käyttää myös pelkkään
höyryttämiseen tai soseuttamiseen. Jos haluat vain soseuttaa ruokaa, katso
lisätietoja kohdasta Soseuttaminen höyryttämättä.
Laitteen avulla voi myös sulattaa tai uudelleenlämmittää aiemmin soseutettua
ruokaa, jota on säilytetty Philips Avent -säilytysastioissa. Kun sulatat tai
uudelleenlämmität ruokaa, tee se aina näissä astioissa. Jos et käytä säilytysastioita,
ruoka putoaa siivilän läpi kannun kannelle.
Kun kannussa on sosetta, älä aseta kannua päälaitteeseen sen ollessa
höyrytysasennossa.
Älä höyrytä samoja raakoja aineksia kauemmin kuin 30 minuuttia kerrallaan tai
useammin kuin kerran.
Laitetta EI ole tarkoitettu:
- jäisten ainesten höyryttämiseen
- aiemmin soseutetun ruoan höyryttämiseen ilman säilytysastiaa
- samojen ainesten höyryttämiseen yli 30 minuutin ajan
- riisin ja pastan valmistamiseen
- ensin soseuttamiseen, sitten höyryttämiseen
- nesteiden (esim. keitot, kastikkeet tai vesi) lämmittämiseen ja
uudelleenlämmittämiseen
- ruoan pitämiseen lämpimänä useiden tuntien ajan
- kovien ainesten (esim. jääkuutiot ja sokeripalat) tai tahmeiden ainesten (esim.
juusto) leikkaamiseen
Page 82

84 SUOMI
Vesisäiliön täyttäminen
Huomautus
• Varmista, että säiliön vesimäärä ei ylitä kylkeen merkittyä enimmäistasoa
(MAX).
• Suosittelemme käyttämään pehmeää tai puhdistettua vettä, sillä hanaveden
mineraalit voivat kerryttää kalkkia vesisäiliöön nopeammin.
• Älä laita vesisäiliöön muita nesteitä kuin vettä (paitsi silloin, kun poistat kalkkia
säiliöstä).
1 Avaa vesisäiliö kääntämällä sen kantta vastapäivään (kuva d). Lisää
säiliöön sopiva määrä vettä tasomerkintöjen mukaisesti. Katso ohjeita veden
määrästä käyttöoppaan kohdasta Ainekset ja höyrytysajat tai mukana
toimitetusta reseptikirjasesta (kuva e).
2 Aseta kansi vesisäiliön päälle. Kiinnitä kansi tiiviisti paikalleen kääntämällä
sitä myötäpäivään (kuva f).
» Kun vesisäiliön kansi on oikein paikallaan, kannen -merkki ja vesisäiliön
-merkki osuvat kohdakkain.
Huomautus
• Varmista, että olet lukinnut vesisäiliön kannen paikalleen, ennen kuin
käynnistät laitteen.
Höyryttäminen
Varoitus
• Kuuma höyry tai vesi voi polttaa sormesi. Älä koske laitteen kuumiin osiin
tai sen päältä tulevaan höyryyn, äläkä anna myöskään lasten koskea niihin.
Kuumuus voi aiheuttaa palovammoja (kuva g).
Huomautus
• Sulata jäiset ainekset, ennen kuin asetat ne kannuun höyryttämistä varten.
Ravista liika vesi sulatetuista aineksista, ennen kuin laitat ne kannuun.
• Kun lisäät aineksia, varmista, että ruoka ei peitä teräyksikön muovista
yläreunaa.
• Välttääksesi laitteen vahingoittumisen älä koskaan laita vettä tai muuta
nestettä höyrytyskannuun.
• Laite ei aloita höyrytystä, jos kannu ei ole kunnolla paikallaan.
• Varmista ennen höyryttämistä, että tiiviste on hyvin paikallaan kannun kannen
ympärillä ja että tiivisteen litteä puoli osoittaa ulospäin.
1 Irrota kansi kannusta työntämällä kannen läppää vastapäivään (kuva h).
2 Jos teräyksikkö ei ole kannussa, aseta se kannun teräyksikkötelineeseen
(kuva i).
Page 83

85SUOMI
3 Suosittelemme kuutioimaan kiinteät aineet pieniksi paloiksi (enintään 1 cm).
4 Mittaa aineet sekoituskannuun (kuva j).
5 Paina siivilä paikalleen kannun kanteen (kuva k).
6 Aseta kansi kannun päälle ja sulje se kääntämällä myötäpäivään (kuva l).
Huomautus
• Kannussa on urat, joiden avulla lukitusnastat ja kannen saa ohjattua helposti
paikoilleen. Varmista, että kannen läppä liukuu kannun kahvaan (kuva m).
7 Jos et ole vielä täyttänyt vesisäiliötä höyryttämistä varten, katso ohjeet
kohdasta Vesisäiliön täyttäminen. Lisää vettä vesisäiliöön, ennen kuin asetat
kannun päälaitteeseen.
Huomautus
• Varmista, että vesisäiliön kansi on tiiviisti paikallaan, ennen kuin asetat kannun
päälaitteeseen.
8 Käännä kannu ylösalaisin niin, että sen kansi tulee pohjaksi (kuva n).
9 Kohdista kannen liitin vesisäiliön lukitusalueeseen. Aseta kannu
päälaitteeseen niin, että kansi on pohjana (kuva o). Paina kannua alaspäin,
jolloin se lukittuu paikalleen päälaitteeseen. Varmista, että kahva on oikealla
puolella.
10 Jos valitsin ei ole OFF-asennossa, käännä se siihen.
11 Työnnä pistoke pistorasiaan.
12 Valitse haluamasi höyrytysaika kiertämällä valitsinta (kuva p). Löydät tietoa
suositelluista höyrytysajoista kohdan Ainekset ja höyrytysaika taulukosta ja
reseptikirjasesta.
» Höyrytysvalo muuttuu valkoiseksi ja ilmaisee, että laitteen
höyrytystoiminto on käytössä.
» Kun höyrytystoiminto on päättynyt, laitteesta kuuluu merkkiääni ja
höyrytysvalo sammuu.
13 Käännä valitsin takaisin OFF-asentoon (kuva q). Odota kaksi minuuttia tai
kunnes laitteen päältä ei enää tule höyryä, ennen kuin irrotat kannun.
Varoitus
• Jos haluat jatkaa höyryttämistä, anna laitteen ensin jäähtyä 10 minuutin
ajan. Poista vesisäiliöön mahdollisesti jäänyt vesi, ennen kuin täytät säiliön
uudelleen ja aloitat höyrytyksen.
14 Katso ohjeet höyrytettyjen ainesten soseuttamiseen kohdasta Soseutus
höyryttämisen jälkeen.
15 Vesisäiliöön saattaa jäädä vettä vielä höyrytystoiminnon
päättymisen jälkeen. Tämä on normaalia. Odota, kunnes laite jäähtyy
huoneenlämpöiseksi. Poista sitten ylimääräinen vesi vesisäiliöstä. Katso
ohjeet vesisäiliön tyhjentämiseen ja puhdistamiseen kohdasta Puhdistus ja
kalkinpoisto.
Page 84

86 SUOMI
Soseutus höyryttämisen jälkeen
Varoitus
• Kannu ja sen kansi kuumenevat höyryttämisen aikana. Tartu kannuun aina
lämmönkestävästä kahvasta (kuva r).
• Varmista, että kannun kansi on tiiviisti paikallaan, kun laite on käytössä.
• Varmista aina, että kansi on jäähtynyt höyrytyksen jälkeen, ennen kuin avaat
sen ja lisäät aineksia (varmista, että ainekset eivät peitä teräyksikön muovista
yläreunaa) tai poistat jäljelle jääneen veden kannusta.
• Jos olet lisännyt kannuun nestettä, älä valitse höyrytysasentoa, sillä neste
kulkee siivilän läpi.
1 Jos höyrytysasento on valittuna, nosta kannu kahvasta ja käännä se
ylösalaisin (kuva s). Ravista kannua, jotta höyrytetyt ainekset siirtyvät sen
pohjalle, missä soseutusterät ovat.
2 Irrota tarvittaessa kannun kansi ja lisää soseutettavia aineksia (esim. vettä tai
keitettyä riisiä tai pastaa). Aseta kansi takaisin kannuun, ennen kuin aloitat
soseuttamisen.
3 Aseta kannu päälaitteeseen siten, että kannun kansi on ylöspäin.
Kohdista kannun -merkki päälaitteen -merkin kanssa. Käännä kannua
myötäpäivään, jotta se lukittuu paikalleen päälaitteeseen (kuva t).
Varmista, että kahva on oikealla puolella.
» Kun kannu on oikein paikallaan päälaitteessa, kannun -merkki ja
päälaitteen -merkki osuvat kohdakkain.
4 Aloita soseuttaminen painamalla soseutuspainiketta. Pidä sitä painettuna.
kunnes ruoka saavuttaa haluamasi koostumuksen (kuva u).
Varoitus
• Älä soseuta laitteella kerralla kauemmin kuin 30 sekuntia. Jos sekoitus ei ole
valmis 30 sekunnin kuluttua, irrota painikkeesta ja odota muutaman sekunnin
ajan, ennen kuin jatkat soseuttamista. Jos päälaite kuumenee, anna sen
jäähtyä muutaman minuutin ajan, ennen kuin jatkat sen käyttöä.
5 Kun olet valmis, päästä irti soseutuspainikkeesta (kuva v).
6 Irrota pistoke pistorasiasta.
7 Irrota teräyksikkö. Ole varovainen, kun irrotat teräyksikköä, sillä se saattaa
olla kuuma. Ota soseutettu ruoka pois kannusta. Tarvittaessa voit käyttää
apuna laitteen mukana toimitettua lastaa.
Soseuttaminen höyryttämättä
Laite on tarkoitettu:
- höyrytettyjen ja keitettyjen ruoka-aineiden soseuttamiseen
- nesteiden ja hedelmien soseuttamiseen
Page 85

Varoitus
• Laitetta ei ole tarkoitettu kovien ainesten (esim. jääkuutiot ja sokeripalat) tai
tahmeiden ainesten (esim. juusto) leikkaamiseen.
• Jos olet lisännyt kannuun nestettä, älä valitse höyrytysasentoa, sillä neste
kulkee siivilän läpi.
Huomautus
• Kun käytät soseuttaessasi nesteitä, varmista, että täytät kannun enintään
MAX-merkkiin asti.
• Kun lisäät aineksia, varmista, että ruoka ei peitä harmaan teräyksikön
yläreunaa.
• Kun lisäät aineksia, varmista, että ruoka ei peitä teräyksikön muovista
yläreunaa.
• Jos ruokaa jää kiinni kannun laitoihin tai jos soseutetut ainekset ovat edelleen
liian kiinteitä, päästä irti soseutuspainikkeesta ja ota kannu pois päälaitteesta.
Sekoittele aineksia lastalla tai lisää nestettä (esim. juomavettä), kunnes soseen
koostumus on sopiva lapsesi ikään nähden. Kun lisäät nestettä, varmista, että
täytät kannun enintään MAX-merkkiin asti.
• Varmista, että soseutetun vauvanruoan koostumus on oikeanlainen, ennen
kuin alat syöttää lasta. Löydät lisätietoa eri ikäisille lapsille sopivasta ruoan
koostumuksesta laitteen mukana toimitetuista vieroitusvinkeistä. Voit myös
kysyä lisää neuvolasta tai lääkäriltä.
• Älä käsittele kerralla suurta määrää kiinteitä aineksia. Kun hienonnat ne
pienissä osissa, soseesta tulee sileämpää.
87SUOMI
1 Aseta terä kannussa olevaan teräyksikkötelineeseen (kuva i).
2 Kuutioi kiinteät aineet pieniksi paloiksi (enintään 1 cm), ennen kuin lisäät ne
kannuun.
3 Mittaa aineet sekoituskannuun (kuva j).
4 Paina siivilä paikalleen kannun kanteen (kuva k).
5 Aseta kansi kannun päälle ja sulje se kääntämällä myötäpäivään (kuva l).
Huomautus
• Kannussa on urat, joiden avulla lukitusnastat ja kannen saa ohjattua helposti
paikoilleen. Varmista, että kannen läppä liukuu kannun kahvaan (kuva m).
6 Aseta kannu päälaitteeseen siten, että kannun kansi on ylöspäin.
Kohdista kannun -merkki päälaitteen -merkin kanssa. Käännä kannua
myötäpäivään, jotta se lukittuu paikalleen päälaitteeseen (kuva t).
Varmista, että kahva on oikealla puolella.
» Kun kannu on oikein paikallaan päälaitteessa, kannun -merkki ja
päälaitteen -merkki osuvat kohdakkain.
7 Aloita soseuttaminen painamalla soseutuspainiketta. Pidä sitä painettuna.
kunnes ruoka saavuttaa haluamasi koostumuksen (kuva u).
Page 86

88 SUOMI
Varoitus
• Älä soseuta laitteella kerralla kauemmin kuin 30 sekuntia. Jos sekoitus ei ole
valmis 30 sekunnin kuluttua, irrota painikkeesta ja odota muutaman sekunnin
ajan, ennen kuin jatkat soseuttamista. Jos päälaite kuumenee, anna sen
jäähtyä muutaman minuutin ajan, ennen kuin jatkat sen käyttöä.
8 Kun olet valmis, päästä irti soseutuspainikkeesta (kuva v).
9 Irrota pistoke pistorasiasta.
10 Irrota teräyksikkö. Ole varovainen, kun irrotat teräyksikköä, sillä se saattaa
olla kuuma. Ota soseutettu ruoka pois kannusta. Tarvittaessa voit käyttää
apuna laitteen mukana toimitettua lastaa.
Uudelleenlämmitys
Laitteen mukana toimitetaan 120 ml:n säilytysastia. Käytä tätä astiaa, kun haluat
uudelleenlämmittää laitteella valmistamaasi vauvanruokaa.
Huomautus
• Joissakin kaupoissa myydään pakkausta (SCF876), joka sisältää kaksi
säilytysastiaa (tilavuudet 120 ml ja 240 ml).
• Uudelleenlämmitä aiemmin soseutettu ruoka aina säilytysastiassa.
• Varmista ennen uudelleenlämmittämistä, että tiiviste on hyvin paikallaan
kannun kannen ympärillä ja että tiivisteen litteä puoli osoittaa ulospäin.
1 Kaada sopiva määrä vettä vesisäiliöön.
» Jos käytät 120 ml:n säilytysastiaa, kaada vesisäiliöön 160 ml vettä (eli 10/15
minuutin merkintään saakka). Jos käytät erikseen ostamaasi 240 ml:n
säilytysastiaa, kaada vettä vesisäiliön MAX-merkintään saakka.
2 Aseta kansi vesisäiliön päälle. Kiinnitä kansi tiiviisti paikalleen kääntämällä
sitä myötäpäivään (kuva f).
» Kun vesisäiliön kansi on oikein paikallaan, kannen -merkki ja vesisäiliön
-merkki osuvat kohdakkain.
3 Irrota teräyksikkö kannusta (kuva w).
4 Käännä säilytysastia ylösalaisin ja aseta se kannun teräyksikkötelineeseen
(kuva x).
5 Aseta kansi kannun päälle ja sulje se kääntämällä myötäpäivään (kuva y).
Huomautus
• Kannussa on urat, joiden avulla lukitusnastat ja kannen saa ohjattua helposti
paikoilleen. Varmista, että kannen läppä liukuu kannun kahvaan (kuva m).
6 Käännä kannu ylösalaisin niin, että sen kansi tulee pohjaksi (kuva z).
Page 87

7 Kohdista kannen liitin vesisäiliön lukitusalueeseen. Aseta kannu
päälaitteeseen niin, että kansi on pohjana (kuva {). Paina kannua alaspäin,
jolloin se lukittuu paikalleen päälaitteeseen. Varmista, että kahva on oikealla
puolella.
Huomautus
• Varmista, että vesisäiliön kansi on tiiviisti paikallaan, ennen kuin asetat kannun
päälaitteeseen.
8 Jos valitsin ei ole OFF-asennossa, käännä se siihen.
9 Työnnä pistoke pistorasiaan.
10 Valitse sopiva uudelleenlämmitysaika säilytysastian mukaan kiertämällä
valitsinta (kuva p).
» Jos käytät 120 ml:n säilytysastiaa, valitse 15 minuuttia ( ). Jos käytät
erikseen ostamaasi 240 ml:n säilytysastiaa, valitse 25 minuuttia ( ).
» Höyrytysvalo muuttuu valkoiseksi ja ilmaisee, että laitteen
uudelleenlämmitystoiminto on käytössä.
11 Kun uudelleenlämmitystoiminto on päättynyt, laitteesta kuuluu merkkiääni
ja höyrytysvalo sammuu.
12 Käännä valitsin takaisin OFF-asentoon (kuva q). Odota kaksi minuuttia tai
kunnes laitteen päältä ei enää tule höyryä, ennen kuin irrotat kannun.
13 Avaa kannun kansi ja ota säilytysastia pois lastan koukun avulla (kuva |).
14 Vesisäiliöön saattaa jäädä vettä vielä uudelleenlämmitystoiminnon
päättymisen jälkeen. Tämä on normaalia. Odota, kunnes laite jäähtyy
huoneenlämpöiseksi. Poista sitten ylimääräinen vesi vesisäiliöstä. Katso
ohjeet vesisäiliön tyhjentämiseen ja puhdistamiseen kohdasta Puhdistus ja
kalkinpoisto.
89SUOMI
Pakasteen sulatus
Jos olet pakastanut soseuttamaasi ruokaa säilytysastioissa, voit sulattaa sen
laitteen avulla.
Huomautus
• Sulata aiemmin soseutettu, pakastettu ruoka aina säilytysastiassa.
• Varmista ennen sulattamista, että tiiviste on hyvin paikallaan kannun kannen
ympärillä ja että tiivisteen litteä puoli osoittaa ulospäin.
1 Lisää vesisäiliöön vettä korkeintaan merkittyyn enimmäistasoon (MAX) asti.
2 Noudata kohdan Uudelleenlämmitys vaiheissa 2–8 annettuja ohjeita.
3 Valitse ajaksi 30 minuuttia kääntämällä valitsinta (kuva }).
» Höyrytysvalo muuttuu valkoiseksi ja ilmaisee, että laitteen
sulatustoiminto on käytössä.
4 Kun sulatustoiminto on päättynyt, laitteesta kuuluu merkkiääni ja
höyrytysvalo sammuu.
Page 88

90 SUOMI
5 Käännä valitsin takaisin OFF-asentoon (kuva q). Odota kaksi minuuttia tai
kunnes laitteen päältä ei enää tule höyryä, ennen kuin irrotat kannun.
6 Avaa kansi ja ota säilytysastia pois lastan koukun avulla (kuva |).
7 Vesisäiliöön saattaa jäädä vettä vielä sulatustoiminnon päättymisen jälkeen.
Tämä on normaalia. Odota, kunnes laite jäähtyy huoneenlämpöiseksi. Poista
sitten ylimääräinen vesi vesisäiliöstä. Katso ohjeet vesisäiliön tyhjentämiseen
ja puhdistamiseen kohdasta Puhdistus ja kalkinpoisto.
Huomautus
• Älä sulata yhtä ruokaerää useammin kuin kerran.
• Kun olet sulattanut ruoan, uudelleenlämmitä se läpikotaisin.
Ainekset ja höyrytysajat
Ruokalaji Ainesosa Arvioitu
höyrytysaika (min)*
Hedelmät Omena 15 160
Appelsiini/mandariini 15 160
Persikka 10 160
Päärynä 15 160
Ananas 20 200
Luumu 10 160
Mansikka 15 160
Kasvikset Parsa 15 160
Parsakaali 15 160
Porkkana 20 200
Kukkakaali 15 160
Varsiselleri 15 160
Munakoiso 15 160
Fenkoli 15 160
Tarhapavut 20 200
Purjo 15 160
Sipuli 15 160
Herneet 15 160
Paprika 15 160
Peruna 20 200
Kurpitsa 15 160
Pinaatti 15 160
Lanttu 15 160
Maissi 15 160
Bataatti 15 160
Veden määrä
vesisäiliössä (ml)
Page 89

91SUOMI
Ruokalaji Ainesosa Arvioitu
höyrytysaika (min)*
Tomaatti 15 160
Nauris 15 160
Kesäkurpitsa 15 160
Liha Kana, nauta, lammas,
sika jne
Kala Lohi, meriantura,
turska, taimen jne.
* Höyrytysajat voivat vaihdella. Arvioidut ajat on laskettu sillä oletuksella, että
ainekset on pilkottu pieniksi kuutioiksi (enintään 1 cm) ja ainesten kokonaispaino
on 250 g.
20 200
15 160
Veden määrä
vesisäiliössä (ml)
Puhdistus ja kalkinpoisto
Puhdistus
Varoitus
• Puhdista laite aina käytön jälkeen.
• Älä upota päälaitetta veteen. Älä huuhtele päälaitetta juoksevalla vedellä.
• Älä koskaan käytä laitteessa valkaisuaineita tai kemiallisia sterilointiliuoksia/-
tabletteja.
• Älä käytä laitteen puhdistamiseen naarmuttavia tai syövyttäviä
puhdistusaineita tai -välineitä (kuten bensiiniä, asetonia tai alkoholia).
Huomautus
• Päälaitetta lukuun ottamatta kaikki osat voi pestä astianpesukoneessa.
• Jos irrotat kannun kannen tiivisteen puhdistusta varten, muista asettaa se
takaisin paikalleen. Varmista, että tiivisteen litteä puoli osoittaa ulospäin.
1 Irrota pistoke pistorasiasta ja irrota kannu päälaitteesta (kuva ~).
2 Irrota kansi kannusta työntämällä kannen läppää vastapäivään (kuva h).
3 Ota kiinni siivilän ulkonemasta ja vedä ensin ulos sen toinen laita. Irrota
sitten koko siivilä kannun kannesta (kuva ).
4 Irrota tarvittaessa puhdistusta varten myös tiiviste kannun kannesta.
5 Irrota teräyksikkö (kuva w).
6 Puhdista teräyksikkö huolellisesti juoksevalla vedellä heti käytön jälkeen.
Muista huuhdella myös teräyksikön putken sisäpuoli (kuva €).
Varoitus
• Käsittele teräyksikköä varovasti. Terät ovat erittäin teräviä.
Page 90

92 SUOMI
7 Kierrä vesisäiliön kantta vastapäivään ja irrota se vesisäiliöstä (kuva ).
8 Pese vesisäiliön kansi juoksevalla vedellä.
9 Kaada säiliöstä ylimääräinen vesi pois. Kaada vesisäiliöön tarvittaessa
raikasta vettä (kuva e) ja huuhtele säiliö (kuva ‚). Toista tarvittaessa,
kunnes vesisäiliö on puhdas.
10 Puhdista aina ruoan kanssa kosketuksissa olleet muut osat lämpimällä
pesuainevedellä heti käytön jälkeen.
11 Kuivaa päälaite ja kaikki osat pesun jälkeen.
Kalkin poistaminen vesisäiliöstä
Suosittelemme kalkinpoistoa 4 viikon välein, jotta laitteen suorituskyky pysyy
parhaana mahdollisena. Jotta kalkkia pääsisi muodostumaan mahdollisimman
vähän, suosittelemme käyttämään höyryttämisessä, uudelleenlämmittämisessä ja
sulattamisessa pehmeää tai puhdistettua vettä.
Poista kalkki seuraavien ohjeiden mukaisesti.
1 Varmista, että laitteesta on katkaistu virta.
2 Sekoita 80 ml ruokaetikkaa (6 % etikkaa) ja 80 ml vettä. Voit käyttää
kalkinpoistoon myös sitruunahapon ja lämpimän veden seosta.
3 Lisää kalkinpoistoaine vesisäiliön boileriin.
4 Aseta kansi vesisäiliön päälle. Kiinnitä kansi tiiviisti paikalleen kääntämällä
sitä myötäpäivään.
5 Odota kuuden tunnin ajan (tai yön yli, jos mahdollista), jotta säiliö puhdistuu
kalkista.
6 Kaada käytetty kalkinpoistoliuos säiliöstä (kuva ‚).
7 Jos kalkkikertymät eivät ole puhdistuneet täysin, toista vaiheet 1–6.
8 Kaada vesisäiliöön raikasta vettä (kuva e) ja huuhtele säiliö (kuva ‚). Toista
tarvittaessa, kunnes vesisäiliö on puhdas.
9 Huuhtele vesisäiliön kansi huolellisesti juoksevalla vedellä.
10 Lisää vesisäiliöön 2 dl vettä ja käytä laitetta yhden 20 minuutin
höyrytystoiminnon ajan kannun ollessa tyhjä. Sen jälkeen voit käyttää
laitetta jälleen ruoanlaittoon.
Säilytys
1 Tyhjennä vesisäiliö, ennen kuin laitat laitteen säilytykseen (kuva ‚).
2 Varmista, että kaikki osat ovat puhtaita ja kuivia, ennen kuin laitat laitteen
säilytykseen (katso kohta Puhdistus ja kalkinpoisto).
3 Laita laitteen säilytyksen ajaksi terä kannuun.
4 Varmista ennen säilytykseen laittamista, että vesisäiliön ja kannun kannet
ovat tiiviisti paikoillaan.
Page 91

Kierrätys
Tämä merkki tarkoittaa, että tätä tuotetta ei saa hävittää tavallisen
kotitalousjätteen mukana (2012/19/EU).
Noudata maasi sähkö- ja elektroniikkalaitteiden erillistä keräystä koskevia
sääntöjä. Asianmukainen hävittäminen auttaa ehkäisemään ympäristölle ja
ihmisille mahdollisesti koituvia haittavaikutuksia.
Takuu ja huolto
Jos haluat lisätietoja tai laitteen kanssa on ongelmia, tutustu Philipsin
verkkosivustoon osoitteessa www. philips. com / avent tai ota yhteys paikalliseen
Philipsin asiakaspalveluun (yhteystiedot löytyvät laitteen mukana toimitetusta
takuulehtisestä). Jos maassasi ei ole kuluttajapalvelukeskusta, ota yhteys
paikalliseen Philips-jälleenmyyjään.
Vianmääritys
Tämä osio esittää lyhyesti yleisimmät ongelmat, joita saatat kohdata käyttäessäsi
laitetta. Jos ongelma ei ratkea alla olevien ohjeiden avulla, ota yhteyttä maasi
kuluttajapalvelukeskukseen.
Ongelma Mahdollinen syy Ratkaisu
Laite ei toimi. Laitteessa on
turvalukko. Laite
ei toimi, jos osia
ei ole kiinnitetty
päälaitteeseen oikein.
Höyrytysvalo ei
pala.
Laitetta ei ole liitetty
virtalähteeseen.
Kannu ei ole kunnolla
kiinni päälaitteessa.
Olet käynnistänyt
uuden
höyrytystoiminnon
välittömästi edellisen
päätyttyä.
Asenna kaikki osat oikein
paikoilleen. Jos haluat
höyryttää ruokaa, aseta kannu
päälaitteeseen pystyasennossa
siten, että kannun kansi
on pohjana. Jos haluat
soseuttaa ruokaa, aseta kannu
päälaitteeseen siten, että kansi
on ylöspäin. Käännä kannua
myötäpäivään, jotta se lukittuu
paikalleen.
Työnnä pistoke pistorasiaan.
Aseta kannu päälaitteeseen siten,
että kannun kansi on pohjana.
Katkaise laitteesta virta ja anna
sen jäähtyä 10 minuutin ajan,
ennen kuin käynnistät toisen
höyrytyksen.
93SUOMI
Page 92

94 SUOMI
Ongelma Mahdollinen syy Ratkaisu
Vesisäiliöstä lähtee
epämiellyttävää
hajua muutamalla
ensimmäisellä
käyttökerralla.
Laite ei tuota lainkaan
höyryä.
Vesisäiliöstä vuotaa
höyryä.
Ainekset eivät
kuumennu täysin.
Valitsinta ei
ole käännetty
OFF-asentoon
höyrytystoiminnon
päätyttyä.
Et ole pessyt
vesisäiliötä ennen
käyttöä.
Et ole lisännyt
vesisäiliöön vettä.
Vesisäiliössä on liikaa
kalkkia.
Vesisäiliön kansi ei ole
kunnolla paikallaan.
Kannu ei ole kunnolla
kiinni päälaitteessa.
Vesisäiliön kannen
höyrynpoistoaukkoon
on kertynyt
epäpuhtauksia tai
kalkkia, jotka tukkivat
sen.
Kannun kannen
höyryntuloaukkoon
on kertynyt
epäpuhtauksia, jotka
tukkivat sen.
Kannussa olevat
ainekset ovat liian
suurina paloina.
Kannussa on liikaa
ruokaa.
Käännä valitsin OFF-asentoon.
Valitse sitten käyttöaika
kääntämällä valitsinta uudelleen.
Katso ohjeet vesisäiliön
puhdistamiseen kohdasta
Puhdistus ja kalkinpoisto. Tee yksi
höyrytys tyhjällä kannulla.
Sammuta laite ja irrota se
pistorasiasta. Lisää sitten
vesisäiliöön vettä.
Poista kalkki vesisäiliöstä. Katso
ohjeet kohdasta Puhdistus ja
kalkinpoisto – Kalkin poistaminen
vesisäiliöstä.
Sulje vesisäiliön kansi tiiviisti.
Varmista, että kannen -merkki
ja vesisäiliön -merkki osuvat
kohdakkain.
Aseta kannu oikein paikalleen
päälaitteeseen.
Puhdista vesisäiliön kannen
höyrynpoistoaukko.
Puhdista kannun kannen
höyryntuloaukko.
Kuutioi ruoka pienemmiksi
paloiksi (enintään 1 cm).
Vähennä kannussa olevan ruoan
määrää.
Page 93

Ongelma Mahdollinen syy Ratkaisu
Vesisäiliössä on liikaa
tai liian vähän vettä.
Höyrytysaika on liian
lyhyt.
Kannu ei ole kunnolla
kiinni päälaitteessa.
Vesisäiliössä on liikaa
kalkkia.
Kannun kansi vuotaa. Kannussa on liikaa
ruokaa.
Kansi ei ole tiiviisti
kiinni kannussa.
Kannun kannen
tiiviste ei ole oikein
paikallaan tai tiiviste
puuttuu kokonaan.
Soseutustoiminto ei
toimi.
Kannussa on liikaa
ruokaa.
Kannu ei ole kunnolla
kiinni päälaitteessa.
Kansi ei ole tiiviisti
kiinni kannussa.
Olet yrittänyt
soseuttaa laitteella
tahmeaa ruokaa
(esim. juustoa).
Lisää sopiva määrä vettä
höyrytysajan mukaan. Tarkista
oikea vesimäärä valmistettavalle
reseptille tai höyrytettäville
aineksille reseptikirjasesta ja/tai
kohdan Ainekset ja höyrytysajat
taulukosta.
Valitse pidempi höyrytysaika
(enintään 30 minuuttia).
Aseta kannu päälaitteeseen siten,
että kannun kansi on pohjana.
Poista kalkki vesisäiliöstä. Katso
ohjeet kohdasta Puhdistus ja
kalkinpoisto – Kalkin poistaminen
vesisäiliöstä.
Katkaise laitteesta virta ja
vähennä aineiden määrää.
Aseta kansi kannun päälle ja sulje
se kääntämällä myötäpäivään.
Varmista, että tiiviste on kunnolla
paikallaan kannun kannessa
ja että sen litteä puoli osoittaa
ulospäin.
Katkaise laitteesta virta ja
vähennä aineiden määrää.
Voit täyttää kannun raakaaineilla korkeintaan teräyksikön
yläreunaan saakka.
Aseta kannu päälaitteeseen siten,
että kannun kansi on ylöspäin.
Kohdista kannun -merkki
päälaitteen -merkin kanssa.
Käännä kannua myötäpäivään,
jotta se lukittuu paikalleen
päälaitteeseen.
Aseta kansi kannun päälle ja sulje
se kääntämällä myötäpäivään.
Tutustu reseptikirjasen ohjeisiin
sopivien raaka-aineiden käytöstä.
95SUOMI
Page 94

96 SUOMI
Ongelma Mahdollinen syy Ratkaisu
Laite pitää kovaa
ääntä, siitä lähtee
epämiellyttävää hajua
tai käryä, se tuntuu
käteen kuumalta jne.
Laitteesta lähtee
kova ääni ja se tärisee
soseutuksen aikana.
Sulatettu ruoka on liian
kylmää.
Säilytysastia vuotaa
uudelleenlämmityksen
tai sulatuksen aikana.
Vesisäiliön vesi on
epätavallisen väristä
kaataessasi sitä pois
vesisäiliöstä tai sen
siirtyessä kannuun
höyrytyksen aikana,
tai vesisäiliön vesi
on epämiellyttävän
hajuista.
Olet käyttänyt
soseutustoimintoa
kerralla kauemmin
kuin 30 sekunnin ajan.
Kannussa on liikaa
ruokaa.
Olet käyttänyt
soseutustoimintoa
liian kauan.
Siivilä ei ole kiinni
kannun kannessa.
Säilytysastiassa on
liikaa ruokaa.
Säilytysastian ruoka
on liian tahmeaa.
Säilytysastian kansi
ei ole kunnolla
paikallaan.
Ruoan palasia on
päässyt vesisäiliöön
käytön aikana.
Keskeytä soseuttaminen ja anna
laitteen jäähtyä muutaman
sekunnin ajan, ennen kuin jatkat.
Katkaise laitteesta virta ja
vähennä aineiden määrää.
Älä soseuta laitteella kerralla
kauemmin kuin 30 sekuntia.
Varmista, että siivilä on kunnolla
kiinni kannun kannessa.
Täytä säilytysastia ruoalla
korkeintaan astian laitaan
merkittyyn maksimitasoon saakka.
Anna laitteen jäähtyä 10 minuuttia
ja kokeile sulatustoimintoa
uudelleen.
Varmista, että kansi on tiiviisti
kiinni, ennen kuin asetat
säilytysastian kannuun
uudelleenlämmitystä tai sulatusta
varten.
Puhdista vesisäiliö kohdan
Puhdistus ja kalkinpoisto
ohjeiden mukaisesti. Käytä laitetta
ainoastaan ohjeiden mukaan.
Varmista, ettet täytä vesisäiliötä
liian täyteen (enintään 250 ml)
etkä laita kannuun liikaa ruokaa
(varmista, että ainekset eivät peitä
teräyksikön muovista yläreunaa).
Älä höyrytä samoja aineksia yli 30
minuutin ajan äläkä lisää nestettä
kannuun höyryttäessäsi. Jos olet
lisännyt kannuun nestettä, älä
valitse höyrytysasentoa (kannun
kansi pohjana).
Page 95

Ongelma Mahdollinen syy Ratkaisu
Vesisäiliössä, vesisäiliön
kannessa, kannussa,
kannun kannessa ja
siivilässä on valkoisia
pilkkuja.
Ruoan kanssa
kosketuksissa olevat
pinnat värjäytyvät.
Laite päästää
viisi äänimerkkiä
ja höyrytysvalo
vilkkuu höyrytyksen,
uudelleenlämmityksen
tai sulatuksen aikana.
Kannun välipohjassa
voi olla ruoanjäämiä.
Osiin on kertynyt
kalkkia.
Ruoan väriaineet
saattavat värjätä osia,
jotka ovat kosketuksissa
ruoan kanssa.
Kannu ei ole kunnolla
paikallaan tai se on
irrotettu päälaitteesta
kesken toiminnon.
Vesisäiliössä ei
ole tarpeeksi vettä
valitulle käyttöajalle.
Vesisäiliössä on liikaa
kalkkia.
Puhdistuksen aikana
kannun välipohjaan
voi jäädä pieniä
ruoanjäämiä.
Tämä on normaalia. Puhdista kalkki
säännöllisin väliajoin. Puhdista
vesisäiliön kansi, kannu, kannun
kansi ja siivilä kostealla liinalla. Poista
kalkki vesisäiliöstä. Katso ohjeet
kohdasta Puhdistus ja kalkinpoisto –
Kalkin poistaminen vesisäiliöstä.
Tämä on normaalia. Kaikkia osia
on silti turvallista käyttää, eivätkä
ne vahingoita ruokaa.
Käännä valitsin OFF-asentoon,
tarkista veden määrä vesisäiliössä,
aseta kannu kunnolla paikalleen
päälaitteeseen ja käynnistä
toiminto uudelleen valitsemalla
haluamasi käyttöaika.
Käännä valitsin OFF-asentoon
ja lisää vettä, kunnes sitä on
riittävästi.
Poista kalkki vesisäiliöstä. Katso
ohjeet kohdasta Puhdistus ja
kalkinpoisto – Kalkin poistaminen
vesisäiliöstä.
Irrota kannu laitteesta. Irrota kansi
ja teräyksikkö kannusta.
Käännä kannu ympäri ja ohjaa
vesihanasta tuleva vesi kannun
pohjassa olevaan pieneen reikään.
Saat parhaan puhdistustuloksen
käyttämällä lämmintä vettä.
Pidä kiinni kannun kahvasta ja
ravista kannua noin 15 sekuntia,
jotta ruoanjäämät irtoavat ja
sekoittuvat veteen.
Kaada vesi ulos pienestä reiästä.
Toista edellä kuvatut vaiheet, kunnes
kaikki ruoanjäämät ovat irronneet.
97SUOMI
Tekniset tiedot
- Jännite/teho: Katso laitteen pohjassa olevaa arvokilpeä
- Vesisäiliön enimmäistilavuus: 250 ml
- Kannun enimmäistilavuus: 1 050 ml
- Käyttölämpötila: 10–40 °C
- Suojaus: Lämpötilasäädelty lämmitysjärjestelmä
Page 96

98 FRANÇAIS
Reportez-vous aux images des pages pliées au début et à la n du mode
d'emploi.
Contenu
Important 99
Introduction 105
Description générale 105
Avant la première utilisation 106
Utilisation de l'appareil 106
Ingrédients et temps de cuisson 115
Nettoyage et détartrage 116
Rangement 117
Recyclage 118
Garantie et service 118
Dépannage 118
Spécicités techniques 123
Page 97

Important
Lisez attentivement ce mode d'emploi avant d'utiliser l'appareil et conservez-le
pour un usage ultérieur.
Danger
- Ne plongez jamais l'unité principale dans l'eau ni dans
tout autre liquide. Ne rincez pas l'appareil sous le
robinet.
Avertissement
- Avant de brancher l'appareil, vériez que la tension
indiquée correspond à celle du secteur dans votre
région.
- N'utilisez jamais l'appareil si la prise, le cordon
d'alimentation ou l'appareil lui-même sont
endommagés. Si le cordon d'alimentation est
endommagé, il doit être remplacé par Philips, par un
Centre Service Agréé Philips ou par un technicien qualié
an d'éviter tout accident.
- Cet appareil peut être utilisé par des personnes dont les
capacités physiques, sensorielles ou intellectuelles sont
réduites ou des personnes manquant d'expérience et
de connaissances, à condition que ces personnes soient
sous surveillance ou qu'elles aient reçu des instructions
quant à l'utilisation sécurisée de l'appareil et qu'elles
aient pris connaissance des dangers encourus.
- Les enfants ne doivent pas jouer avec l'appareil
(y compris les accessoires).
- Cet appareil ne doit pas être utilisé par des enfants.
Tenez l'appareil et son cordon hors de portée des
enfants (y compris les accessoires).
- Le nettoyage et l'entretien ne doivent pas être eectués
par des enfants.
- Ne touchez pas les lames, surtout lorsque l'appareil est
branché. Les lames sont en eet très coupantes.
- Des précautions doivent être prises lors de la
manipulation des couteaux aûtés, lorsqu’on vide le bol
et lors du nettoyage.
99FRANÇAIS
Page 98

100 FRANÇAIS
- Toujours déconnecter l’appareil de l’alimentation si on le
laisse sans surveillance.
- Si les lames se bloquent, débranchez toujours l'appareil
avant de retirer les ingrédients à l'origine du blocage.
- L'appareil devient chaud pendant la phase de cuisson
vapeur et le reste un peu après (en particulier les
surfaces portant le symbole « »), ce qui peut
provoquer des brûlures en cas de contact. Soulevez le
bol uniquement par sa poignée.
- De la vapeur brûlante s'échappe du bol lors de la
cuisson et lorsque vous retirez le couvercle.
- Prenez garde à la vapeur brûlante qui s'échappe du
réservoir d'eau lorsque vous ouvrez son couvercle.
- Une fois le cycle de cuisson vapeur terminé, de la vapeur
brûlante continue à s'échapper pendant quelques
instants des orices situés sur le couvercle du réservoir
d'eau et sur le bol. Faites attention en enlevant le bol de
l'unité principale.
- Si l'appareil n'est pas utilisé correctement, de la
vapeur brûlante peut s'échapper autour du couvercle
du réservoir d'eau. Reportez-vous au chapitre
« Dépannage » pour empêcher ou résoudre ce problème.
- Soyez très prudent(e) lorsque vous versez du liquide
brûlant dans le bol an d'éviter les éclaboussures.
- Mettez toujours les aliments préalablement mixés dans
le pot de conservation si vous souhaitez les réchauer
ou les décongeler avec cet appareil.
- N'utilisez pas cet appareil pour hacher des ingrédients
durs et collants.
- Ne versez jamais d'eau de javel ou de solutions/tablettes
de stérilisation chimiques dans l'appareil.
- N'utilisez jamais de tampons à récurer, de produits
abrasifs ou de détergents agressifs tels que de l'essence,
de l'acétone ou de l'alcool pour nettoyer l'appareil.
- Laissez toujours refroidir l'appareil pendant 10 minutes
après un cycle de cuisson vapeur avant d'en démarrer un
nouveau.
Page 99

- Ne mixez pas avec l’appareil pendant plus de 30
secondes consécutives. Si vous n’avez pas terminé le
mixage après 30 secondes, relâchez le bouton pour
arrêter le mixage et attendez quelques secondes avant
de poursuivre. Si l’unité principale chaue, laissez-la
refroidir pendant quelques minutes avant de poursuivre.
- Ne versez jamais d'eau ou tout autre liquide dans le bol
an d'éviter d'endommager l'appareil.
- Retirez toujours le couvercle du pot de conservation
avant de l'utiliser pour réchauer des aliments dans un
four à micro-ondes.
Attention
- N'utilisez jamais d'accessoires ou de pièces d'un
autre fabricant ou n'ayant pas été spéciquement
recommandés par Philips. L'utilisation de ce type
d'accessoires ou de pièces entraîne l'annulation de la
garantie.
- Ne placez pas l'appareil sur ou à proximité d'une
plaque chauante ou d'une cuisinière en cours de
fonctionnement ou encore chaude.
- Lorsque l’appareil doit être laissé sans surveillance,
éteignez-le et débranchez-le systématiquement.
De même, éteignez et débranchez l’appareil avant
tout montage, démontage, nettoyage, changement
d’accessoire, nettoyage et manipulation des pièces
mobiles.
- Débranchez toujours l'appareil et laissez-le refroidir
avant de le nettoyer.
- Placez toujours le bouton de commande sur la position
d'arrêt (OFF) à la n de chaque opération de cuisson
vapeur, réchauage ou décongélation.
- Ne mettez jamais le bol ou une autre partie de l’appareil
dans un micro-ondes (à l’exception des pots de
conservation) car les parties métalliques de la poignée
du bol et de l'ensemble lames ne sont pas adaptées à
cette utilisation.
101FRANÇAIS
Page 100

102 FRANÇAIS
- Débranchez l’appareil avant tout montage ; démontage ;
nettoyage ou manipulation des pièces détachables.
- Ne stérilisez jamais le bol ou une autre partie de
l’appareil dans un stérilisateur (à l’exception des pots de
conservation) car les parties métalliques de la poignée
du bol et de l'ensemble lames ne sont pas adaptées à
cette utilisation.
- Cet appareil est destiné à un usage domestique
uniquement. S'il est employé de manière inappropriée,
à des ns professionnelles ou semi-professionnelles,
ou en non-conformité avec les instructions du mode
d'emploi, la garantie devient caduque et Philips décline
toute responsabilité concernant les dégâts occasionnés.
- Placez l'appareil sur une surface horizontale, stable et
plane. L'appareil diuse de la vapeur brûlante pendant
son utilisation. Veillez à laisser susamment d'espace
libre tout autour pour éviter d'endommager vos placards
ou tout autre objet.
- N'utilisez pas l'appareil s'il est tombé ou s'il est
endommagé de quelque manière que ce soit. Conez la
réparation de l'appareil à un Centre Service Agréé Philips.
- N'utilisez jamais la fonction de cuisson vapeur sans avoir
mis de l'eau dans le réservoir d'eau.
- Assurez-vous que la quantité d'eau versée dans le
réservoir ne dépasse pas le repère maximal situé sur le
côté du réservoir (250 ml) ni l'indication du niveau d'eau
maximal présente à l'intérieur.
- Veillez à ce que le couvercle du réservoir d'eau soit
correctement verrouillé avant de placer le bol sur l'unité
principale.
- Lorsque vous préparez des ingrédients à la vapeur,
veillez à ne pas remplir le bol au-delà du bord de la
partie en plastique de l’ensemble lames (g. b).
- Lorsque vous mixez des liquides, ne dépassez pas le
niveau de remplissage MAXIMAL indiqué sur le bol
(720 ml) (g. c).
- Ne soulevez pas et ne déplacez pas l'appareil en cours
d'utilisation.
 Loading...