

Page 1
SCF862
Specifications are subject to change without notice
© 2017 Koninklijke Philips N.V.
All rights reserved.
4241 354 01884
100% recycled paper
Page 2
A
1
2
1
2
P
O
S
R
Q
2
1
2
1
6
2
3 4
7
1
MAX.
1
8 9
2
5
B
C
D
E
10
11 12 13
N
1
2
L
M
L
2
14 15 16
17
1
2
K
1
MAX.
J
a
I
18 19 20 21
b
c
d
H
G
22 23 24
F
Page 3

English 6
Čeština 28
Eesti 51
Қазақша 75
Македонски 97
Polski 125
Русский 151
SCF862
Page 4
6 ENGLISH
Refer to the pictures on the folded pages at the front and
back of the user manual.
Table of Contents
Important 7
Introduction 11
General description 11
Before rst use 12
Using the appliance 12
Cleaning and descaling 21
Storage 23
Recycling 23
Guarantee and service 23
Troubleshooting 23
Technical specications 27
Page 5

Important
Read this user manual carefully before you use the appliance and save it
for future reference.
Danger
- Never immerse the main unit in water or any other liquid.
Do not rinse it under the tap.
Warning
- Check that the voltage indicated on the appliance
corresponds to the local mains voltage before you
connect the appliance.
- Do not use the appliance if the plug, the power cord
or the appliance itself is damaged. If the power cord
is damaged, you must have it replaced by Philips; a
service center authorised by Philips or similarly qualied
persons in order to avoid a hazard.
- This appliance shall not be used by persons with
reduced physical, sensory or mental capabilities or lack
of experience and knowledge unless they have been
given supervision or instruction concerning use of the
appliance in a safe way and if they understand the
hazards involved.
- Children shall not play with the appliance (including the
accessories).
- This appliance shall not be used by children. Keep the
appliance and its cord out of reach of children (including
the accessories).
- Cleaning and user maintenance shall not be made by
children.
- Do not touch the blades, especially when the appliance
is plugged in. The blades are very sharp.
- Take care in handling the sharp blades when emptying
the jar and during cleaning. Always disconnect the
device from supply if it’s left unattended.
- If the blades become stuck, unplug the appliance before
you remove the ingredients blocking the blades.
7ENGLISH
Page 6

8 ENGLISH
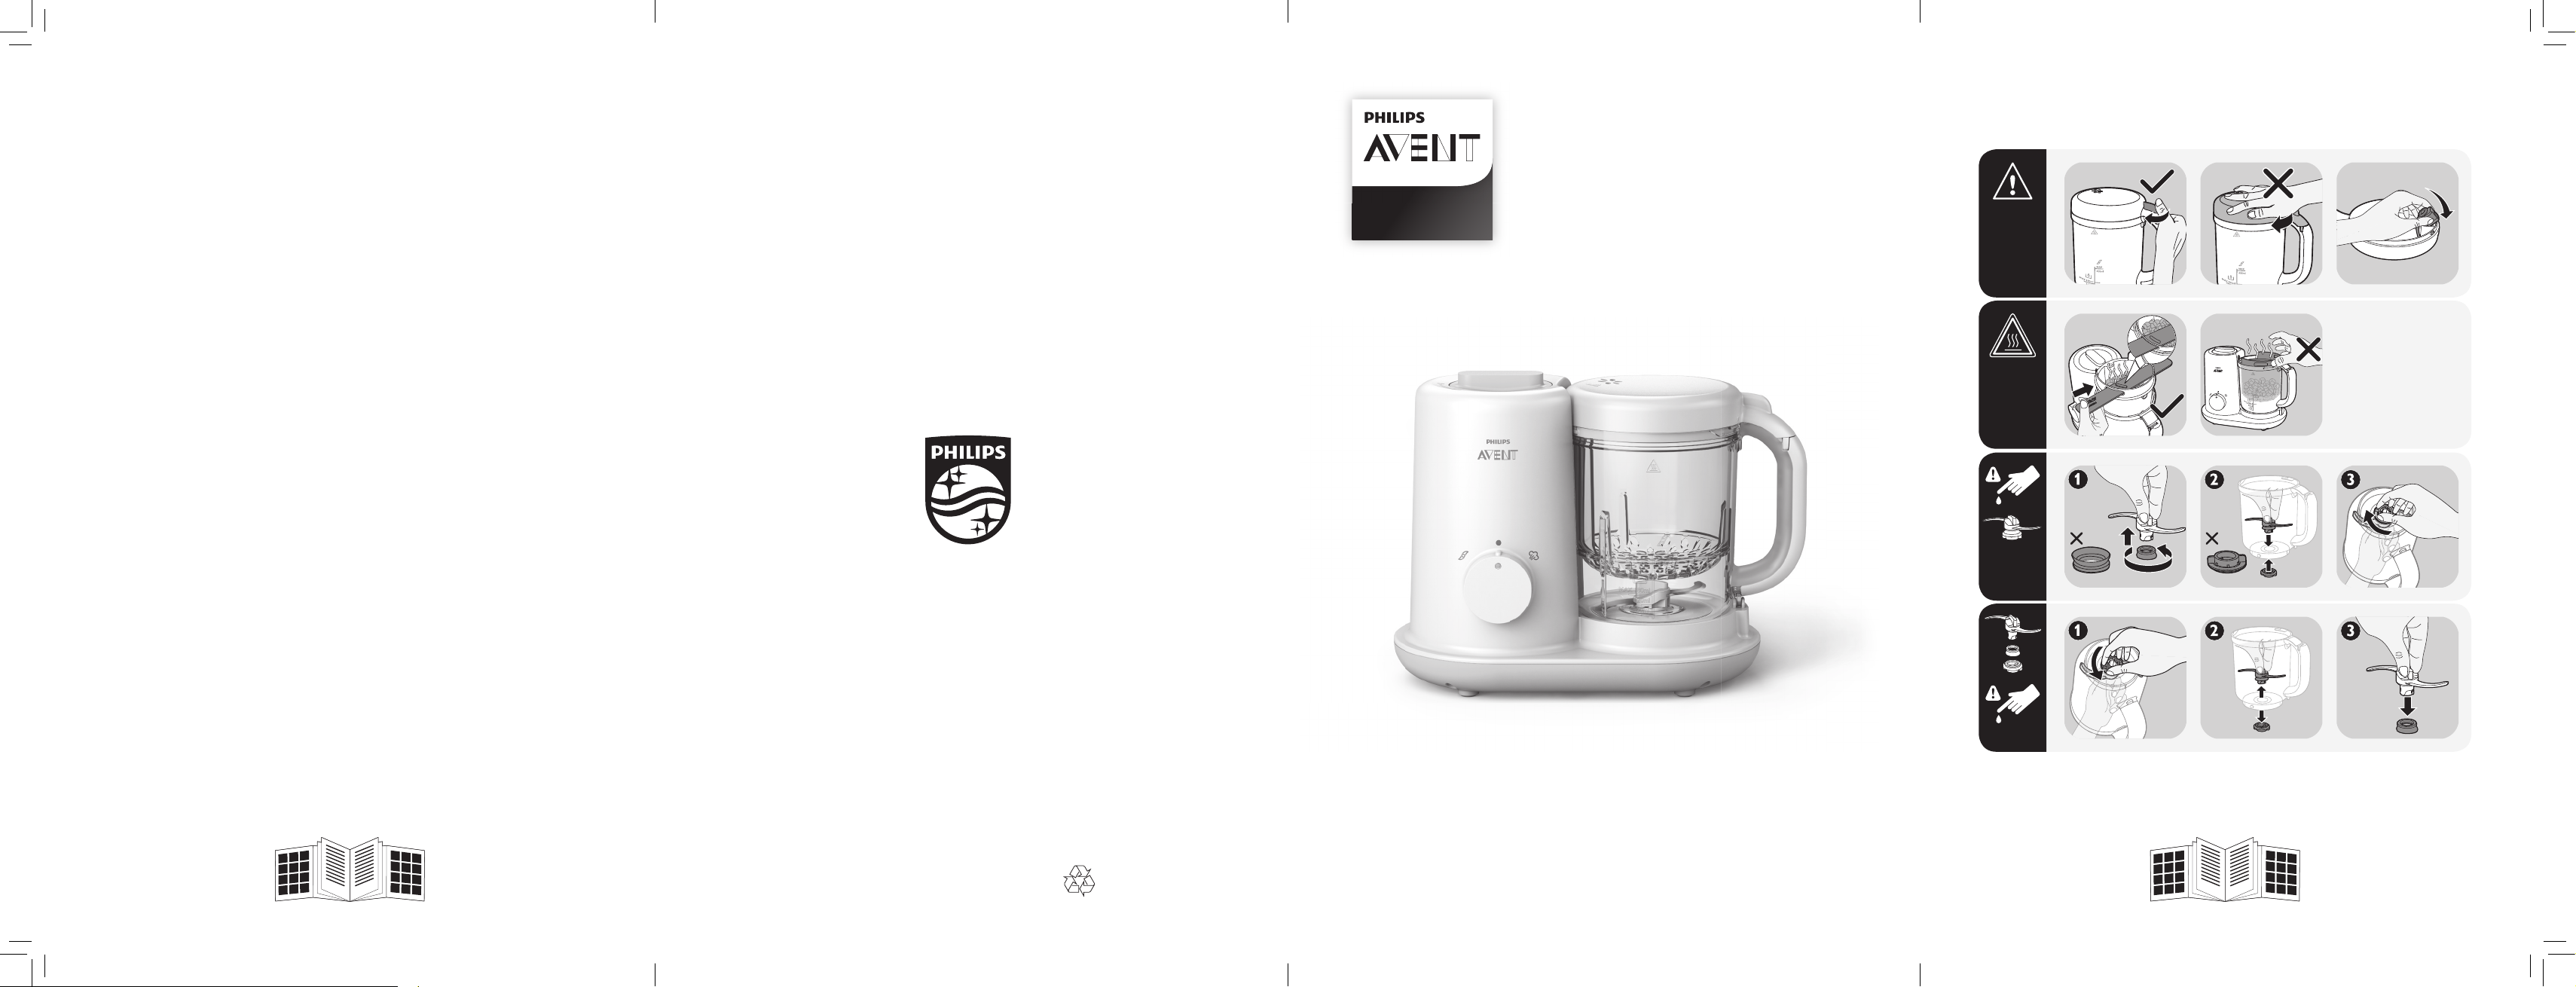
- The appliance including jar lid gets hot during or shortly
after steaming (especially surfaces with this symbol “ ”)
and may cause burns when touched. The jar lid should
only be opened by using the lid tab. To lift the basket,
spatula must be used. To lift the jar, hold the jar by its
handle.
- Be aware that hot steam comes out of the jar during
steaming and when its lid is removed.
- Be aware of hot steam that comes out of the water tank
when you open its lid.
- Do note that hot steam will continue coming out from
the steam vent on jar lid for some time when steam
cycle is completed. Be careful when you open the jar lid.
- If the appliance is not assembled properly, hot steam
could escape from the edge of the water tank lid. Refer
to the “Troubleshooting” chapter for preventing or
resolving this.
- Do not use this appliance to chop hard and sticky
ingredients.
- Never use bleach or chemical sterilizing solutions/
tablets on the appliance.
- Never use scouring pads, abrasive cleaners or aggressive
liquids such as gasoline, acetone or alcohol to clean the
appliance.
- Always let the appliance cool down for 10 minutes after
one steaming cycle before you start steaming again.
- Do not let the appliance blend for more than 30
seconds at a time. If you have not nished blending
after 30 seconds, release the knob to stop blending and
wait a few seconds before you continue. If the main unit
becomes hot, let it cool down for a few minutes before
you continue.
- Never pour any liquid into the jar for steaming.
Caution
- Never use any accessories or parts from other
manufacturers or that Philips does not specically
Page 7

recommend. If you use such accessories or parts, your
guarantee becomes invalid.
- Do not place the appliance on or near an operating or
still hot stove or cooker.
- Switch o the appliance and disconnect from supply
before changing accessories or approaching parts that
move in use.
- Always unplug the appliance and let it cool down before
you clean it.
- Turn the control knob to the o position every time after
steaming.
- Never use the jar or any other part of the appliance in
a microwave, as the metal parts of the jar handle and
blade unit are not suitable for this use.
- Never sterilize the jar or any other part of the appliance
in a sterilizer or in a microwave, as the metal parts of the
blade unit are not suitable for this use.
- This appliance is intended for household use only. If the
appliance is used improperly or for professional or semiprofessional purposes or if it is not used according to the
instructions in the user manual, the guarantee becomes
invalid and Philips refuses any liability for damage
caused.
- Place the appliance on a stable, horizontal, and level
surface. The appliance emits hot steam during use. Make
sure there is enough free space around it to prevent
damage to cabinets or other objects.
- Do not use the appliance if it has fallen or is damaged in
any way. Take it to an authorized Philips service center
for repair.
- Never use the steam function without water in the water
tank.
- Make sure that the water in the tank does not exceed
180ml.
- Make sure the water tank lid is correctly locked before
steaming.
- When blending, do not exceed the MAX food blending
volume level indicated on the jar (400 ml).
9ENGLISH
Page 8

10 ENGLISH
- Do not lift and move the appliance while it is in
operation.
- Do not insert any objects into the water tank steam
outlet, jar lid steam inlet and steam path on basket.
- Never rell the water tank during steaming, as hot water
and steam may come out of the appliance.
- Always make sure that the jar lid of the water tank has
cooled down before you open it.
- Never run this appliance’s power supply through an
external switching device, such as a timer, or connect it
to a circuit that is regularly switched on and o.
- Always check the temperature of the cooked food on
the back of your hand to make sure it is safe for your
baby.
- Always check the consistency of the food for your
baby. For guidance on what food consistencies are
appropriate for dierent ages, refer to weaning guide
available for download on Philips website, or seek
advice from a doctor or consultant.
- Only use the spatula provided for lifting the basket and
emptying food from jar as instructed (g. o).
- Regular descaling prevents damage to the appliance.
- Make sure that the amount of food in the steaming
basket does not exceed the top edge of steam path on
basket, otherwise the path may be blocked.
- Noise level: Lc= 88 dB[A]
Safety systems
For your safety during use, this appliance is equipped with a built-in safety
lock. This appliance will only function if all parts have been assembled
correctly. Assembling all parts correctly will disarm the built-in safety lock.
This appliance is also equipped with an overheat safety stop function.
Overheating can occur if the time between two steaming cycles is too
short. If the appliance’s overheat safety stop activates during a steaming
cycle, let the appliance cool down for a few minutes. After this, you can
use the appliance again.
Page 9

Electromagnetic elds (EMF)
This Philips appliance complies with all applicable standards and
regulations regarding exposure to electromagnetic elds.
Introduction
Congratulations on your purchase and welcome to Philips Avent! To fully
benet from the support that Philips Avent oers, register your product at
www.philips.com/welcome.
This Essential baby food maker help parents to prepare nutritious meals
for their babies with steaming and blending functions combined in one
appliance.
General description
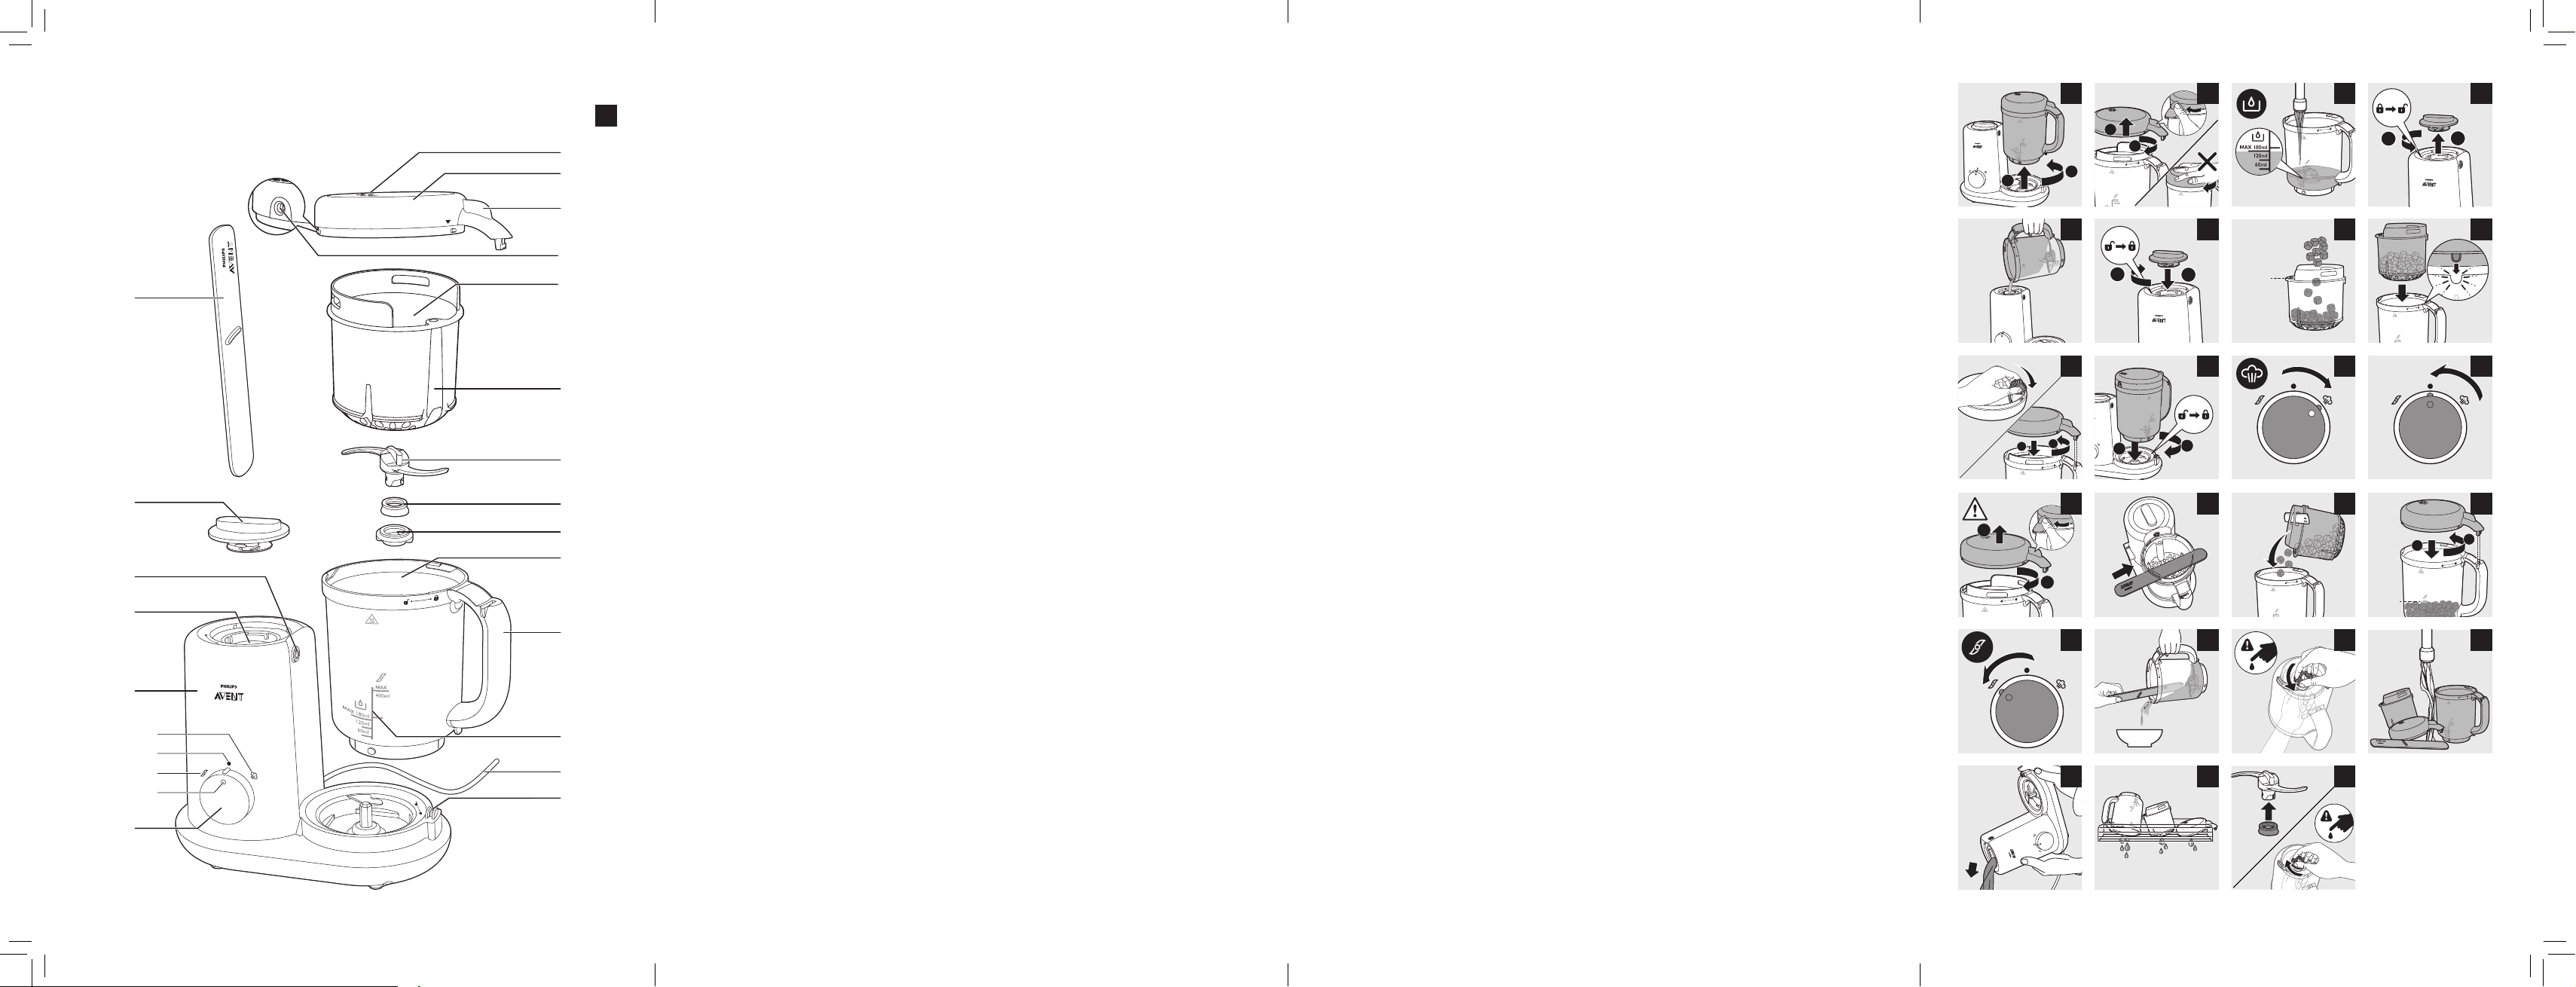
Product overview (g. a)
Spatula
A
B Water tank lid
C Water tank steam outlet
D Water tank
E Main unit
F Control knob
a “Steam” position
b “O” position
c “Blend” position
d Power indicator (steaming)
G Jar lock switch
H Power cord
I Water level and Food volume indication
J Jar handle
K Steaming and blending jar
L Blade unit
M Blade shaft seal
N Steam path on basket
O Steaming basket
P Jar lid steam inlet
Q Lid tab
R Jar lid
S Jar lid steam vent
11ENGLISH
Page 10
12 ENGLISH
Before rst use
1 Remove all packaging materials from the appliance.
2 Clean all parts thoroughly before rst use. Refer to the “Cleaning and
descaling” chapter.
3 We recommend running one steaming cycle with an empty steaming
basket and empty jar before using the appliance for the rst time.
Refer to the “Filling the water tank” and “Steaming” chapters.
Using the appliance
Caution
• Always check the temperature and consistency of the cooked food on
the back of your hand to make sure it is safe for your baby.
This appliance is intended for steaming fresh, solid ingredients before
blending to the consistency required for babies. Normally, you would
steam the ingredients rst and blend them afterwards. However, you can
also use the appliance for steaming only or blending only. When using
the appliance for blending only, you can skip the “Filling the water tank”
and “Steaming” sections and follow the instructions in the “Blending only”
section.
This appliance is NOT intended for the following purposes.
- Steaming the same ingredients for more than 30 minutes
- Steaming frozen raw ingredients
- Blending rst, then steaming
- Heating liquids such as soup, sauces or water
- Reheating food
- Defrosting food
- Cooking rice or pasta
- Cutting hard ingredients such as ice cubes and sugar cubes, or sticky
ingredients like cheese
Page 11
Filling the water tank
Caution
• Before using the jar to measure water, please rinse the jar and make
sure it is clean.
• Before using jar to measure water, ensure the blade unit including
the blade shaft seal is assembled correctly. The at side of the blade
shaft seal should face upwards (g. x).
Note
• Ensure the water in the tank does not exceed 180 ml. The water level
indication can be found on the blending jar.
• We recommend using soft or puried water, as the minerals in mineral
water or tap water may cause limescale buildup to occur more quickly
inside the water tank.
• Except for using white vinegar for descaling, never put any liquids
other than water in the water tank.
1 Push the handle of the steaming and blending jar backwards to
remove it from the main unit (g. b). Fill with water to the right
volume according to the “Ingredients and steaming time” chapter in
the user manual (g. d).
2 Turn the water tank lid counterclockwise to open it (g. e), then ll
with water using the blending jar (g. f). Do not exceed the MAX
180 ml (g. d).
3 Put the water tank lid back on and turn the lid clockwise to lock it
securely in place (g. g).
13ENGLISH
Note
• Always make sure that you have locked the water tank lid before the
appliance starts operating.
Page 12
14 ENGLISH
Steaming
Caution
• Ensure the blade unit including the blade shaft seal is assembled
correctly. The at side of the blade shaft seal should face upwards
(g. x).
• Hot steam or hot water can burn your ngers. Do not touch, and never
let children touch any hot parts of the appliance or the steam coming
from the top of the appliance, as this may cause scalding.
Note
• Ingredients need to be washed, peeled and cut into small cubes no
bigger than 1cm before you steam.
• Always defrost frozen raw ingredients before placing them in the
steaming basket for steaming. Shake o any excess water from the
defrosted ingredients before placing them in the jar.
• The appliance will not start steaming if the jar and jar lid are not
assembled and positioned correctly on the main unit (g. j & k).
1 Push the lid tab clockwise to remove the lid from the blending jar
(g. c).
2 Put solid ingredients (cut into cubes of around 1 cm) into the
steaming basket. The ingredients should not exceed the top edge of
the steam path on the basket (g. h).
3 When placing the basket back into the jar, make sure the steam path
is on the opposite side to the handle. You will hear a gentle “click”
when the basket slots into the correct position (g. i).
4 Place the jar lid on the jar and turn it counterclockwise to lock it
securely (g. j).
5 Lock the jar back onto the main unit by sliding it clockwise (g. k).
Note
• The main unit has grooves that help smoothly guide the locking pins
and lock the jar in place. Make sure that jar is securely locked on the
main unit before steaming or blending.
6 If you have not yet lled the water tank with water for steaming, refer
to the “Filling the water tank” chapter and add water to it before
getting started.
Page 13
Note
• Make sure the water tank lid is correctly locked in place.
7 Plug in the appliance.
8 Turn the control knob to steam setting (g. l). Refer to the table in
the “Ingredients and steaming time” chapter for the recommended
water volume for steaming.
» The yellow light will turn on, indicating the appliance is steaming.
» When the steaming cycle is nished, the appliance will
automatically turn o and the indicator light will go out.
9 After steaming, turn the control knob back to the “o” position
(g. m). Wait 2 minutes or until there is no more steam coming from
the top of the jar before removing it.
Caution
• If you intend to start another steaming cycle, let the appliance cool
down for 10 minutes and empty any remaining water out of the water
tank before you rell and start a new steaming cycle.
Note
15ENGLISH
• Do not turn the control knob to “o” position before the steaming
cycle nished, so as to avoid insucient steaming and water left in
the tank.
Blending after steaming
Caution
• Ensure the blade unit including the blade shaft seal is assembled
correctly. The at side of the blade shaft seal should face upwards
(g. x).
• The jar and jar lid will become hot after the steaming cycle. Only hold
the jar by the handle.
• Only use the lid tab for opening the jar lid.
• Only use the spatula to lift the basket after steaming.
• Always ensure the lid and jar are assembled and positioned correctly
on the main unit (g. j & k) when the appliance is in use.
Page 14
16 ENGLISH
1 To remove the blending jar from the main unit, hold the handle and
push backwards to unlock the jar (g. b).
2 Push the lid tab to open the jar lid (g. c).
3 Use the spatula provided to take the steaming basket out of the jar.
Insert the spatula through the holes on the basket (with the word
“Avent” facing upwards) and lift it up (g. o).
4 Pour the steamed food into the blending jar by holding the spatula
(g. p).
Note
• No need to pour out the water collected in the jar. Mix it with the
steamed food for blending.
5 Put the blending jar lid back and lock it in place (g. q). Do not put
the steaming basket back in the jar when preparing for blending.
6 Shake the blending jar to evenly distribute the ingredients.
7 If needed, remove the jar lid and add additional ingredients for
blending (e.g. water for purees or additional cooked ingredients like
rice or pasta). Do not exceed the MAX food volume of 400 ml.
8 Place the blending jar back on the main unit. Turn the jar to lock into
position. Ensure the jar is secure and the handle is positioned directly
above the jar lock switch. Make sure the handle is on the right-hand
side (g. k).
9 To start blending, turn the knob to “blend” position until the
ingredients are blended to the consistency of your choice (g. r).
Caution
• Do not let the appliance blend for more than 30 seconds at a time.
If you have not nished blending after 30 seconds, release the knob
to stop blending and wait a few seconds before you continue. If the
main unit becomes hot, let it cool down for a few minutes before you
continue.
10 Unplug the appliance.
11 Remove the jar from the main unit and open the jar lid (g. n).
12 Use the spatula to transfer the food from the jar to your bowl or plate
(g. s).
Page 15
Blending only
Caution
• Ensure the blade unit including the blade shaft seal is assembled
correctly. The at side of the blade shaft seal should face upwards
(g. x).
• Always make sure that the lid of the blending jar is correctly locked in
place while the appliance is in use.
Note
• Ingredients need to be washed, peeled and cut into small cubes no
bigger than 1cm before you blend.
1 Remove the blending jar from the main unit and push the lid tab to
open the jar. (g. b & g. c).
2 Pour the chopped food into the blending jar without the steaming
basket. Do not exceed the MAX amount of 400 ml.
3 Put the blending jar lid back and lock it in place (g. q). Shake the
blending jar to ensure the ingredients are evenly distributed.
4 Place the blending jar back on the main unit and lock it securely in
place.
5 To start blending, turn the knob to “blend” position until the
ingredients are blended to the consistency of your choice (g. r).
17ENGLISH
Note
• If the ingredients stick to the wall of the jar, or if the blended
ingredients are still too solid, release the blending knob, remove the
jar from the main unit, and loosen the ingredients with the spatula,
add some drinking water until the blended food has the right
consistency for your baby’s age.
Caution
• Do not let the appliance blend for more than 30 seconds at a time.
If you have not nished blending after 30 seconds, release the knob
to stop blending and wait a few seconds before you continue. If the
main unit becomes hot, let it cool down for a few minutes before you
continue.
6 Unplug the appliance.
7 Remove the jar from the main unit and open the jar lid (g. n).
Page 16

18 ENGLISH
8 Use the spatula to transfer the food from the jar to your bowl or plate
(g. s).
Ingredients and steaming time
Type of
food
Fruit Apple 20 120
Vegetables Asparagus 20 120
Meat Chicken, beef, lamb,
Fish Salmon, whiting, sole,
Ingredient Approximate
steaming time
(min.)*
Orange/mandarin 20 120
Peach 10 60
Pear 20 120
Pineapple 30 180
Plum 10 60
Strawberry 20 120
Broccoli 20 120
Carrot 30 180
Cauliower 20 120
Celery 20 120
Eggplant 20 120
Fennel 30 180
French beans 30 180
Leek 20 120
Onion 20 120
Peas 20 120
Bell pepper 20 120
Potato 30 180
Pumpkin 20 120
Spinach 20 120
Swede 20 120
Sweet corn 20 120
Sweet potato 20 120
Tomato 20 120
Turnip 30 180
Zucchini 20 120
30 180
pork etc.
20 120
cod, trout etc.
Water level in the
water tank (ml)
Page 17

* All food must be cut into small cubes of no bigger than 1 cm. The
steaming time estimation is based on 200 g of food. Adjust the steaming
time according to the actual food quantity.
* Steam times may vary due to voltage uctuation.
Recipe examples
19ENGLISH
(1) Precious
puree of
potato and
broccoli*
(2) Bananas
about
avocado*
(3) Veggie
heaven*
(4) Meat
mates*
(5) My rst
muesli*
Ingredient Water volume
and steaming
time
• 140 g potato
70 g broccoli
• 50 g banana
• 50 g avocado
• 80 g
cauliower
• 90 g potato
• 60 g carrot
• 250 g beef
/ lamb /
chicken
breast / pork
• 100 g peach
• 100 g pear
• 50 g
blueberries
• Add 120 ml
water and
steam for
about 20 min
• No need to
steam
• Add 180ml
water and
steam for
about 30 min
• Add 180ml
water and
steam for
about 30 min
• Add 120ml
water and
steam for
about 20 min
Blending
• Blend 3-5 times for
15 seconds each
• Add 60 ml milk
• Blend 3-5 times for
15 seconds each
• Blend 2-3 times for
15 seconds each
• Blend 3-5 times for
15 seconds each
• If required, mix
1 tablespoon of
meat puree with 3
tablespoons of pureed
vegetables [refer to
the veggie heaven
recipe (3)]
• Blend 2-3 times for 5
seconds each
• After blending, divide
the puree into 5
portions. Mix 1 portion
with 100 g rolled oats
for each serving
Page 18

20 ENGLISH
(6) Cod and
potato party*
(7) Happy
broccoli ever
after *
(8) Sunny
asparagus *
Ingredient Water volume
and steaming
time
• 100 g cod
• 150g potato
• Add 180ml
water and
steam for
about 30 min
• 120 g salmon
• 120 g broccoli
• Add 120ml
water and
steam for
about 20 min
• 240 g
asparagus
• Add 120 ml
water and
steam for
about 20 min
Blending
• Blend 2-3 times for 5
seconds each
• After blending, divide
the puree into 5
portions. Mix 1 portion
with 100 g well cooked
rice porridge for each
serving
• Blend 2-3 times for 5
seconds each
• After blending, divide
it into 4 portions. Mix
1 portion with 140 g
well-cooked pasta
shells for each serving
• No need to blend
• After steaming, divide
the asparagus into 3
portions. Mix 1 portion
with 100 g cooked
new potato wedges
and 20 g minced
parmesan cheese for
each serving
* Ingredients need to be washed, peeled and cut into small cubes no
bigger than 1 cm before processing.
* Always check the food temperature and consistency before feeding.
* The above recipes are designed for babies at dierent weaning stages.
We suggest:
* Recipes 1-2 for the rst stage of weaning (around 4-6 months)
* Recipes 3-4 for the second stage of weaning (around 6-8 months)
* Recipes 5-6 for the third stage of weaning (around 9-12 months)
* Recipes 7-8 for the fourth stage of weaning (above 12 months)
* But because babies are individuals and grow at dierent paces, please
choose suitable recipes based on your baby’s development.
Page 19
Cleaning and descaling
Cleaning
Caution
• Clean the appliance straight after every use.
• Never immerse the main unit and water tank in water or rinse it under
the tap.
• Never use bleach or chemical sterilizing solutions/tablets in the
appliance.
• Never use scouring pads, abrasive cleaners or aggressive liquids such
as gasoline, acetone or alcohol to clean the appliance.
• You can clean the steaming basket, steaming and blending jar,
blade unit and jar lid in the dishwasher. Before putting them in the
dishwasher, please rinse these parts under tap water immediately
after use. Do not immerse them in water with parts that have not been
cleaned.
• Always reinsert the blade shaft seal back in the blending unit after
you have removed it for cleaning. Make sure the at side of the blade
shaft seal is facing upwards.
21ENGLISH
1 Unplug the appliance and remove the jar from the main unit.
2 Push the lid tab clockwise to release the jar lid (g. c).
3 Rinse the steaming basket, steaming and blending jar, jar lid and
spatula under tap water to remove food residues (g. u).
4 The blade unit can be disassembled for rinsing if need be (g. t).
5 Remove the blade shaft seal from the blending unit for cleaning if
necessary.
Caution
• Handle the blade unit very carefully to avoid injury as the cutting
edges are sharp.
6 Turn the water tank lid counterclockwise and remove it from the
water tank.
7 Wash the water tank lid under the tap.
8 If necessary, pour fresh water into the water tank and ush it out.
Repeat as necessary until the water tank is clean. Do not leave water
in the water tank (g. v).
9 Dry the main unit and all parts after cleaning (g. w).
Page 20
22 ENGLISH
10 Assemble all the parts when they are dry.
Note
• Parts that come into contact with food such as the steaming basket
and jar might be colored by food. This is normal. All parts are still safe
to use and will do no harm to the cooked food.
Descaling the water tank
For optimum performance, we recommend descaling the appliance every
2-4 weeks. To reduce the buildup of limescale, we recommend using soft
or puried water for steaming.
Do not turn on the appliance with descaling solution in the water tank.
To descale the appliance, follow the descaling instructions below.
1 Make sure the appliance is switched o.
2 Mix 80 ml of white vinegar (6% acetic acid) with 80 ml of water.
Alternatively, you can use citric acid with warm water to descale the
water tank.
3 Add the solution to the water tank.
4 Put the water tank lid on the water tank and turn the lid clockwise to
lock it securely in place.
5 Wait for 6 hours/overnight or until all limescale has dissolved.
6 Pour the used solution out of the water tank.
7 If the limescale buildup has not completely dissolved, repeat the
descaling process in this chapter from step 1 to 6.
8 Pour some fresh water into the water tank and ush it out. Repeat as
necessary until the water tank is clean.
9 Rinse the water tank lid thoroughly under the tap.
10 Fill the water tank with 180 ml of water and let the appliance
complete a steaming cycle with the jar empty before you use the
appliance with food again.
Storage
1 Empty the water tank before you store the appliance.
2 Make sure all parts are clean and dry before you store the appliance
(refer to the “Cleaning and descaling” chapter).
3 Store the appliance with the blade unit in the jar to prevent damage.
Page 21
23ENGLISH
4 Always make sure that the lids for both the water tank and the jar are
correctly locked in place for storage.
Recycling
This symbol means that this product shall not be disposed of
with normal household waste (2012/19/EU).
Follow your country’s rules for the separate collection of
electrical and electronic products. Correct disposal helps
prevent negative consequences for the environment and
human health.
Guarantee and service
If you need information or if you have any problems, please visit the Philips
website at www. philips. com / avent or contact the Philips Customer Care
Center in your country (refer to the enclosed worldwide guarantee leaet
for details). If there is no Customer Care Center in your country, go to your
local Philips dealer.
Troubleshooting
This chapter summarizes the most common problems you may encounter
with the appliance. If you are unable to solve the problem with the
information below, contact the Consumer Care Center in your country.
Problem Possible cause Solution
The appliance
does not work.
The steaming
light
not turn on.
does
This appliance is
equipped with a
safety lock. This
appliance will not
work if the parts
are not assembled
correctly on the
main unit.
The appliance is
not connected to
the power supply.
The jar is not
placed on the main
unit correctly.
Assemble all parts correctly.
Before steaming, the jar lid
should be placed on the jar and
locked correctly by turning it
counterclockwise. Put the jar back
on the main unit vertically and lock
the jar by turning it clockwise.
Insert the plug in the outlet.
Place and lock the jar on the main
unit correctly.
Page 22

24 ENGLISH
Problem Possible cause Solution
You have started a
second steaming
cycle immediately
Switch o the appliance and allow it
to cool down for 10 minutes before
you start a second steaming cycle.
after the previous
one has nished.
The water tank
gives o an
unpleasant
smell during the
You have not prewashed the water
tank before use.
Refer to the "Cleaning and
descaling" chapter to clean the
water tank, then nish a steaming
cycle with an empty jar.
rst few uses.
The appliance
does not
generate steam.
You have not put
water in the water
tank.
There is too much
limescale buildup
in the water tank.
The steam path,
water tank steam
outlet and jar lid
steam inlet have
Switch o and unplug the appliance,
then add water to the water tank.
Descale the water tank. Refer to the
"Descaling" section in the "Cleaning
and descaling" chapter.
Check the water tank steam outlet,
jar lid steam inlet and the steam
path and ensure there is nothing
blocking them.
been blocked.
Steam is leaking
from the water
tank.
The water tank
lid is not closed
correctly.
The jar is not
assembled
Close the water tank lid correctly
by turning it from unlock to lock
position.
Place the jar correctly on the main
unit.
correctly on the
main unit.
The jar lid steam
Clean the jar lid steam inlet.
inlet is blocked.
The ingredients
are not cooked
The pieces in the
jar are too big.
Cut the food into smaller pieces
(cubes of around 1 cm).
thoroughly.
There is too much
food in the jar.
Decrease the amount of food in the
jar.
The amount of food should not
exceed the top edge of the steam
path on the basket.
Page 23
Problem Possible cause Solution
There is too little
water in the water
tank.
Add the correct amount of water
for the steaming time. Check the
"Ingredients and steaming time"
chapter to make sure that you
have added the correct amount of
water for the steaming time of the
ingredients you want to steam or the
recipe you want to prepare.
The food in the
jar is spilling out.
Excessive steam
vapor is leaking
from the jar lid.
The blending
function does
not work.
There is too much
limescale buildup
in the water tank.
There is too much
food in the jar.
The jar lid is not
tted onto the jar
correctly.
There is too much
food in the jar.
Descale the water tank. Refer to the
"Descaling" section in the "Cleaning
and descaling" chapter.
Switch o the appliance and process
a smaller quantity.
Place the jar lid on the jar and
turn it counterclockwise to close it
securely.
Switch o the appliance and
process a smaller quantity. Never
put so much food in the jar that the
lid does not close. We advise that
the MAX food volume for blending
should not exceed 400 g.
The jar is not
placed on the main
unit correctly.
Place the jar on the main unit
with the lid on the top, align the
handle on the jar with the
on the main unit, and turn the jar
counterclockwise to securely lock it
in place on the main unit.
The jar lid is not
locked onto the jar
correctly.
You are using the
appliance to blend
sticky food such as
cheese.
You have been
using the
blending function
Place the jar lid on the jar and
turn it counterclockwise to close it
securely.
Check the ingredients and steaming
time table or recipe examples
and choose ingredients that are
appropriate for blending.
Stop blending and let the appliance
cool down for a few seconds and
then start blending again.
continuously for
more than 30
seconds.
25ENGLISH
icon
Page 24

26 ENGLISH
Problem Possible cause Solution
Blended food
result is not
good enough.
Blending is not
enough.
Ingredients are
not suciently
preprocessed.
Blend the ingredients for a few more
times. Do not blend continuously for
more than 30 seconds at a time.
Ingredients need to be washed,
peeled and cut into small cubes no
bigger than 1cm before you steam
and blend.
Too few or too
much food volume
Increase or decrease food volume
for appropriately blending.
to blend.
Steaming time is
not sucient.
Add correct amount of water for
sucient steaming time. Refer to
the “Ingredients and steaming time”
chapter.
The ingredients
are dry and stick to
the wall of the jar
during blending.
After steaming, no need to pour out
the water collected in the jar. Mix it
with the steamed food for blending.
If you use blending function only
(without steaming), add suitable
amount of drinking water in jar,
mix with food ingredients before
blending.
The appliance is
noisy, produces
There is too much
food in the jar.
Switch o the appliance and process
a smaller quantity.
an unpleasant
smell, is hot to
touch, emits
smoke, etc.
The jar lid is not
closed properly.
You have been
using the blending
function for too
Place the jar lid on the jar and close
it securely.
Do not let the appliance blend
continuously for more than
30 seconds at a time.
long.
There are white
spots on the
water tank and
water tank lid.
There is limescale
buildup on these
parts.
This is normal. Remove the
limescale periodically. Clean the
water tank lid and jar lid with a moist
cloth. Descale the water tank. Refer
to the "Descaling" section in the
"Cleaning and descaling" chapter.
Page 25

Problem Possible cause Solution
The surfaces of
the appliance
that come
into contact
with food are
discolored.
The blending jar
leaks.
Food colorings
may discolor the
parts that come
into contact with
food.
The blade unit is
not assembled
correctly.
Incorrect assembly
of the blade shaft
seal on the blade
unit.
This is normal. This does not aect
the quality and the performance of
the appliance. All parts are still safe
to use and will do no harm to the
cooked food.
Tighten the blade unit.
Assemble the blade shaft seal
correctly (g.
x).
Technical specications
- Voltage/wattage: See type plate on the bottom of the appliance
- Maximum water capacity of the water tank: 180 ml
- Maximum capacity of the blending jar: 400 ml
- Operating temperature: 10°C to 40°C / 50°F to 104°F
- Protection: Temperature-controlled heating system
27ENGLISH
Page 26
28 ČEŠTINA
Řiďte se podle obrázků na složených stránkách na
začátku a konci uživatelské příručky.
Obsah
Důležité 29
Úvod 33
Všeobecný popis 33
Před prvním použitím 34
Použití přístroje 34
Čištění přístroje a odstranění vodního kamene 43
Uskladnění 45
Recyklace 45
Záruka a servis 46
Odstraňování problémů 46
Technické údaje 50
Page 27

Důležité
Před použitím přístroje si pečlivě přečtěte tuto uživatelskou příručku a
uschovejte ji pro budoucí použití.
Nebezpečí
- Nikdy neponořujte hlavní jednotku do vody nebo do jiné
tekutiny. Neoplachujte ji pod tekoucí vodou.
Varování
- Dříve než přístroj připojíte do sítě, zkontrolujte, zda
napětí uvedené na přístroji souhlasí s napětím v místní
elektrické síti.
- Pokud byste zjistili závadu na zástrčce, na napájecím
kabelu nebo na přístroji, dále jej nepoužívejte. Pokud by
byl poškozen napájecí kabel, musí jeho výměnu provést
společnost Philips, autorizovaný servis společnosti
Philips nebo obdobně kvalikovaní pracovníci, aby se
předešlo možnému nebezpečí.
- Přístroj nesmějí používat osoby se sníženými
fyzickými, smyslovými nebo duševními schopnostmi
nebo nedostatkem zkušeností a znalostí, s výjimkou
případů, kdy jsou pod dohledem nebo byly poučeny
o bezpečném používání přístroje a rozumí všem rizikům
spojeným s používáním přístroje.
- S přístrojem (včetně příslušenství) si nesmí hrát děti.
- Přístroj nesmějí používat děti. Přístroj a napájecí kabel
(včetně příslušenství) udržujte mimo dosah dětí.
- Čištění a uživatelskou údržbu nesmí provádět děti.
- Nedotýkejte se nožů, zejména dokud je přístroj připojen
k napájecí síti. Nože jsou velmi ostré.
- Při manipulaci s ostrými noži, při vyprazdňování nádoby
a během čištění buďte opatrní. Vždy odpojte zařízení od
napájení, pokud je ponecháno bez dozoru.
- Pokud se nože zablokují, nejprve odpojte přístroj ze
sítě a pak vyjměte suroviny, které zablokování nožů
způsobily.
29ČEŠTINA
Page 28

30 ČEŠTINA
- Během přípravy v páře nebo krátce po ní se přístroj
včetně víka nádoby zahřeje na vysokou teplotu (hlavně
plochy označené symbolem „ “) a při dotyku mohou
způsobit popáleniny. Víko nádoby by se mělo otevírat
pouze pomocí jazýčku víka. K vytažení košíku je nutné
použít stěrku. Pokud chcete vytáhnout nádobu, uchopte
nádobu za rukojeť.
- Pamatujte, že při přípravě v páře a po sejmutí víka
vychází z nádoby horká pára.
- Dávejte pozor na horkou páru, která po otevření víka
vychází z nádržky na vodu.
- Pamatujte, že ještě nějaký čas po ukončení cyklu
přípravy v páře bude z parního otvoru ve víku nádoby
vycházet horká pára. Při otvírání víka nádoby buďte
opatrní.
- Pokud je přístroj nesprávně sestaven, může z okraje
víka nádržky na vodu unikat horká pára. Informace, jak
tomu zabránit nebo jak tento problém řešit, naleznete
v kapitole „Řešení problémů“.
- Přístroj nepoužívejte k sekání tvrdých a lepivých surovin.
- Do přístroje nikdy nevkládejte bělidla ani chemické
sterilizační roztoky nebo tablety.
- K čištění přístroje nikdy nepoužívejte drátěnky, abrazivní
čisticí prostředky ani agresivní tekuté přípravky, jako je
například benzín, aceton nebo alkohol.
- Po každém parním cyklu nechte přístroj 10 minut
vychladnout, než začnete s dalším ohříváním.
- Nenechávejte přístroj nepřetržitě mixovat déle než
30 sekund. Pokud je nutné mixovat déle než 30 sekund,
uvolněte knoík, přerušte mixování a před pokračováním
počkejte několik sekund. Pokud se hlavní jednotka
zahřeje na vysokou teplotu, nechte ji několik minut
ochladit, a teprve poté pokračujte v práci.
- Do napařovací nádoby nikdy nenalévejte žádnou
tekutinu.
Page 29

Upozornění
- Nikdy nepoužívejte příslušenství nebo díly od jiných
výrobců nebo takové, které nebyly doporučeny
společností Philips. Použijete-li takové příslušenství
nebo díly, pozbývá záruka platnosti.
- Přístroj neumísťujte na zapnutý nebo ještě horký sporák
či vařič ani do jeho blízkosti.
- Před výměnou příslušenství, nebo než se přiblížíte
k dílům, které se během provozu pohybují, vypněte
přístroj a odpojte napájení.
- Před čištěním vždy odpojte přístroj ze sítě a nechte ho
vychladnout.
- Po každé přípravě v páře otočte ovládací knoík do
vypnuté polohy.
- Nikdy nádobu ani další části přístroje nepoužívejte
v mikrovlnné troubě, neboť některé části rukojeti a
nožové jednotky jsou z kovu a nejsou pro používání
v mikrovlnné troubě vhodné.
- Nikdy nádobu ani další části přístroje nesterilizujte
v mikrovlnné troubě nebo ve sterilizátoru, neboť kovové
části nožové jednotky nejsou pro takové používání
vhodné.
- Přístroj je určen výhradně pro použití v domácnosti.
Pokud by byl používán nesprávným způsobem, pro
profesionální či poloprofesionální účely nebo v případě
použití v rozporu s pokyny v této uživatelské příručce,
pozbývá záruka platnosti a společnost Philips odmítá
jakoukoliv zodpovědnost za způsobené škody.
- Přístroj postavte na stabilní, vodorovný a vyrovnaný
povrch. Během používání vychází z přístroje horká pára.
Aby nedošlo k poškození skříněk nebo jiných předmětů,
nechte kolem přístroje dostatek prostoru.
- Přístroj nepoužívejte, pokud spadl na zem nebo je
jakýmkoli způsobem poškozený. Nechte ho opravit
v autorizovaném servisním centru Philips.
- Parní funkci nepoužívejte v případě, že v nádržce na
vodu není voda.
31ČEŠTINA
Page 30

32 ČEŠTINA
- Ujistěte se, že voda v nádržce na vodu nepřesahuje
180 ml.
- Před přípravou v páře se ujistěte, že je víko nádržky na
vodu správně nasazeno.
- Při mixování nepřesahujte rysku MAX maximálního
objemu mixovaného jídla, který je uveden na nádobě
(400 ml).
- Nezdvihejte a nepřemísťujte přístroj, pokud je v provozu.
- Do výstupu páry nádržky na vodu, parního vstupu
víka nádoby a trasy páry na koši nevkládejte žádné
předměty.
- Během přípravy v páře nádržku na vodu nedoplňujte,
protože by z přístroje mohla uniknout horká voda a pára.
- Než otevřete víko nádržky na vodu, vždy se ujistěte, že
vychladlo.
- Napájecí zdroj přístroje nikdy nepoužívejte s externím
přepínacím zařízením, například časovačem, a
nepřipojujte ho k obvodu, který se pravidelně zapíná a
vypíná.
- Teplotu připraveného jídla vždy vyzkoušejte na hřbetu
ruky, abyste se přesvědčili, že je pro dítě bezpečné.
- Vždy vyzkoušejte konzistenci jídla, než ho podáte dítěti.
Pokyny ohledně toho, jaká konzistence stravy je vhodná
pro děti různého věku, najdete v průvodci přechodu na
tuhou stravu, který je k dispozici ke stažení na webové
stránce společnosti Philips, nebo vám je poskytne lékař
či poradce.
- K vytahování koše a vyprazdňování jídla z nádoby podle
pokynů používejte pouze dodanou stěrku (obr. o ).
- Pravidelné odstraňování vodního kamene zabraňuje
poškození přístroje.
- Ujistěte se, že množství jídla v napařovacím koši
nepřesahuje horní okraj trasy páry na koši, jinak by se
trasa mohla zablokovat.
- Hladina hluku: Lc= 88 dB[A]
Page 31

33ČEŠTINA
Bezpečnostní systémy
S ohledem na bezpečné použití je přístroj vybaven vestavěným
bezpečnostním vypínačem. Přístroj je funkční pouze v případě, že jsou
všechny součásti správně sestaveny. Vestavěný bezpečnostní vypínač se
deaktivuje po správném sestavení všech součástí.
Přístroj je také vybaven funkcí vypnutí při přehřátí. K přehřátí může dojít
v případě, že přestávka mezi dvěma parními cykly je příliš krátká. Pokud se
během cyklu přípravy v páře aktivuje zabezpečení proti přehřátí, nechte
přístroj několik minut vychladnout. Poté můžete přístroj znovu použít.
Elektromagnetická pole (EMP)
Tento přístroj Philips odpovídá všem platným normám a předpisům
týkajícím se elektromagnetických polí.
Úvod
Gratulujeme k nákupu a vítáme Vás mezi uživateli výrobků společnosti
Philips Avent. Chcete-li využívat všech výhod podpory nabízené
společností Philips Avent, zaregistrujte svůj výrobek na stránce
www.philips.com/welcome.
Tento základní přístroj pro přípravu dětské stravy pomáhá rodičům připravit
pro děti výživná jídla pomocí funkcí napařování a mixování, které jsou
zkombinovány v jednom přístroji.
Všeobecný popis
Přehled výrobku (obr. a)
Stěrka
A
B Víko nádržky na vodu
C Výstup páry nádržky na vodu
D Nádržka na vodu
E Hlavní jednotka
F Ovládací knoík
a Pozice „Pára“
b Pozice „Vypnuto“
c Pozice „Mixování“
d Kontrolka napájení (pára)
G Přepínač zámku nádoby
Page 32

34 ČEŠTINA
H Napájecí kabel.
I Ryska úrovně tekutin a množství potravin
J Rukojeť nádoby
K Parní a mixovací nádoba
L Nožová jednotka
M Zámek nožové hřídele
N Trasa páry na koši
O Napařovací košík
P Parní vstup víka nádoby
Q Jazýček víka
R Víko nádoby
S Parní otvor víka nádoby
Před prvním použitím
1 Z přístroje odstraňte veškerý obalový materiál.
2 Před prvním použitím důkladně očistěte všechny součásti. Informace
naleznete v kapitole „Čištění a odstranění vodního kamene“.
3 Před prvním použitím přístroje doporučujeme nechat proběhnout
jeden parní cyklus s prázdným napařovacím košem a prázdnou
nádobou. Viz kapitoly „Naplnění nádržky na vodu“ a „Napařování“.
Použití přístroje
Upozornění
• Teplotu a konzistenci připraveného jídla vždy vyzkoušejte na hřbetu
ruky, abyste se přesvědčili, že je pro dítě bezpečné.
Tento přístroj je určen k napařování čerstvých, tuhých ingrediencí a
následnému rozmixování na konzistenci potřebnou pro děti. Běžně se
nejprve ingredience připraví v páře a poté se rozmixují. Přístroj je však také
možné použít pouze k napařování nebo pouze k mixování. Když přístroj
používáte pouze k mixování, můžete přeskočit části „Plnění nádržky na
vodu“ a „Napařování“ a postupovat podle pokynů v části „Pouze mixování“.
Tento přístroj NENÍ určen pro následující účely.
- Přípravu stejných složek pokrmu v páře déle než 30 minut
- Přípravu mražených surovin v páře
- Nejprve mixování, poté příprava v páře
- Ohřívání tekutin, jako jsou polévky, omáčky nebo voda
- Opětovný ohřev pokrmu
Page 33

- Rozmrazování pokrmů
- Vaření rýže nebo těstovin
- Krájení tvrdých surovin, jako jsou kostky ledu nebo kostky cukru, nebo
lepivých surovin, jako je sýr
Naplnění nádržky na vodu
Upozornění
• Než budete pomocí nádoby odměřovat vodu, nádobu vypláchněte a
ujistěte se, že je čistá.
• Než budete pomocí nádoby odměřovat vodu, zajistěte, aby byla
nožová jednotka včetně zámku nožové hřídele správně sestavená.
Plochá strana zámku nožové hřídele by měla směřovat nahoru
(obr. x).
Poznámka
• Ujistěte se, že voda v nádržce na vodu nepřesahuje 180 ml. Ryska
hladiny vody se nachází na mixovací nádobě.
• Doporučujeme používat měkkou nebo vyčištěnou vodu, protože
minerály v minerální nebo kohoutkové vodě mohou urychlovat tvorbu
vodního kamene uvnitř nádržky na vodu.
• Kromě bílého octa na odstranění vodního kamene do nádržky na vodu
nelijte žádné jiné tekutiny, než je voda.
35ČEŠTINA
1 Zatlačte rukojeť napařovací a mixovací nádoby dozadu a vyjměte
nádobu z hlavní jednotky (obr. b). Doplňte vodu na správný objem
podle kapitoly „Potraviny a doba napařování“ v uživatelské příručce
(obr. d).
2 Otočte víkem nádržky na vodu proti směru hodinových ručiček a
otevřete ji (obr. e), poté nádržku naplňte vodou pomocí mixovací
nádoby (obr. f). Nepřekračujte hodnotu MAX – 180 ml (obr. d).
3 Dejte víko nádržky na vodu zpět a otočením ve směru hodinových
ručiček jej bezpečně upevněte na místo (obr. g).
Poznámka
• Před spuštěním přístroje musí být víko nádržky na vodu vždy zajištěné
na místě.
Page 34

36 ČEŠTINA
Napařování
Upozornění
• Nožová jednotka včetně zámku nožové hřídele musí být správně
sestavena. Plochá strana zámku nožové hřídele by měla směřovat
nahoru (obr. x).
• Horká pára nebo horká voda vám může spálit prsty. Nedotýkejte se
žádných horkých součástí přístroje ani páry vycházející z horní části
přístroje a zabraňte dětem, aby se jich dotkly, protože může dojít
k opaření.
Poznámka
• Před přípravou v páře je třeba ingredience omýt, oloupat a nakrájet na
kostičky velké maximálně 1 cm.
• Mražené syrové suroviny vždy rozmrazte a teprve poté je umístěte do
napařovacího koše k přípravě v páře. Než rozmrazené suroviny vložíte
do nádoby, otřepejte z nich přebytečnou vodu.
• Přístroj nezačne napařovat, pokud nejsou nádoba a víko nádoby
správně sestavené a usazené na hlavní jednotce (obr. j a k).
1 Otočte jazýčkem víka ve směru hodinových ručiček a sejměte víko
z mixovací nádoby (obr. c).
2 Vložte do napařovacího koše tuhé ingredience (nakrájené na kostky
o velikosti zhruba 1 cm). Ingredience by neměly převýšit horní okraj
trasy páry na koši (obr. h).
3 Při vkládání koše zpět do nádoby se ujistěte, že je trasa páry na
opačné straně než rukojeť. Když koš zapadne do správné pozice,
uslyšíte jemné cvaknutí (obr. i).
4 Víko nádoby umístěte na nádobu a otočením proti směru hodinových
ručiček ho zajistěte na místě (obr. j).
5 Upevněte nádobu zpět do hlavní jednotky zasunutím ve směru
hodinových ručiček (obr. k).
Poznámka
• Na hlavní jednotce jsou drážky, které usnadňují navádění zajišťovacích
kolíků a zajištění nádoby na místě. Než začnete napařovat nebo
mixovat, ujistěte se, že je nádoba bezpečně upevněna na hlavní
jednotce.
Page 35

6 Pokud jste dosud nenaplnili vodou nádržku na vodu, podívejte se do
kapitoly „Plnění nádržky na vodu“ a než začnete, přidejte do ní vodu.
Poznámka
• Ujistěte se, že víko nádržky na vodu správně sedí na místě.
7 Přístroj připojte do sítě.
8 Otočte ovládací knoík do polohy napařování (obr. l). Doporučený
objem vody pro napařování najdete v tabulce v kapitole „Potraviny a
doba napařování“.
» Rozsvítí se žlutá kontrolka, což znamená, že přístroj napařuje.
» Po dokončení cyklu přípravy v páře se přístroj automaticky vypne
a kontrolka zhasne.
9 Po napařování otočte ovládací knoík zpět do polohy vypnuto
(obr. m). Než nádobu sejmete, počkejte 2 minuty, nebo až z horní
části nádoby přestane vycházet pára.
Upozornění
• Pokud se chystáte spustit další parní cyklus, nechte přístroj na
10 minut vychladnout a z nádržky na vodu vylijte zbývající vodu. Poté
nádržku znovu naplňte a můžete začít nový parní cyklus.
37ČEŠTINA
Poznámka
• Nepřepínejte knoík ovládání do polohy „Vypnuto“ před dokončením
parního cyklu, aby nedocházelo k nedostatečnému napaření a aby v
nádržce nezůstávala voda.
Mixování po napaření
Upozornění
• Nožová jednotka včetně zámku nožové hřídele musí být správně
sestavena. Plochá strana zámku nožové hřídele by měla směřovat
nahoru (obr. x).
• Nádoba a víko nádoby budou po parním cyklu horké. Nádobu držte
pouze za rukojeť.
• Víko nádoby otvírejte pouze pomocí jazýčku víka.
• Po napařování vytahujte koš pouze pomocí stěrky.
• Vždy se ujistěte, že jsou víko a nádoba správně sestaveny a správně
usazeny na hlavní jednotce (obr. j a k), když se přístroj používá.
Page 36

38 ČEŠTINA
1 Pokud chcete z hlavní jednotky vyjmout mixovací nádobu, uchopte
rukojeť a zatlačením dozadu uvolněte nádobu (obr. b).
2 Zatlačením na jazýček víka otevřete víko nádoby (obr. c).
3 Pomocí dodané stěrky vytáhněte napařovací koš z nádoby. Stěrku
vložte skrze otvory na koši (nápis „Avent“ musí směřovat nahoru) a
zvedněte jej nahoru (obr. o).
4 Potraviny připravené v páře přemístěte do mixovací nádoby tak, že
budete držet stěrku (obr. p).
Poznámka
• Vodu nashromážděnou v nádobě není nutné vylévat. Zkombinujte ji s
jídlem připraveným v páře a rozmixujte je.
5 Vraťte zpět víko nádoby a upevněte jej na místě (obr. q). Při přípravě
na mixování nevkládejte zpět do nádoby napařovací koš.
6 Zatřeste s mixovací nádobou, aby se ingredience rovnoměrně
rozložily.
7 Podle potřeby sejměte víko nádoby a přidejte další suroviny, které
chcete rozmixovat (například vodu do pyré nebo další uvařené
suroviny jako rýži nebo těstoviny). Nepřekračujte maximální objem
MAX – 400 ml.
8 Mixovací nádobu umístěte zpět na hlavní jednotku. Otočením
zajistěte nádobu na místě. Postarejte se, aby nádoba bezpečně
seděla na místě a rukojeť byla umístěna přímo nad přepínačem
zámku nádoby. Rukojeť se musí nacházet na pravé straně (obr. k).
9 Mixovat začnete tak, že otočíte knoík do pozice „mixování“ a
mixujete, dokud nemají ingredience požadovanou konzistenci
(obr. r).
Upozornění
• Nenechávejte přístroj nepřetržitě mixovat déle než 30 sekund. Pokud
je nutné mixovat déle než 30 sekund, uvolněte knoík, přerušte
mixování a před pokračováním počkejte několik sekund. Pokud se
hlavní jednotka zahřeje na vysokou teplotu, nechte ji několik minut
ochladit, a teprve poté pokračujte v práci.
10 Odpojte přístroj z napájení.
11 Sejměte nádobu z hlavní jednotky a otevřete víko nádoby (obr. n).
12 Pomocí stěrky přemístěte jídlo z nádoby do misky nebo na talíř
(obr. s).
Page 37

Pouze mixování
Upozornění
• Nožová jednotka včetně zámku nožové hřídele musí být správně
sestavena. Plochá strana zámku nožové hřídele by měla směřovat
nahoru (obr. x).
• Při používání přístroje musí být víko mixovací nádoby vždy řádně
zajištěné na místě.
Poznámka
• Před mixováním je třeba ingredience omýt, oloupat a nakrájet na
kostičky velké maximálně 1 cm.
1 Sejměte mixovací nádobu z hlavní jednotky a zatlačením na jazýček
víka nádobu otevřete. (obr. b a obr. c).
2 Nakrájené potraviny vložte do mixovací nádoby bez napařovacího
koše. Nepřekračujte maximální objem MAX – 400 ml.
3 Vraťte zpět víko nádoby a upevněte jej na místě (obr. q). Zatřeste
s mixovací nádobou, aby se ingredience rovnoměrně rozložily.
4 Vložte mixovací nádobu zpět do hlavní jednotky a bezpečně ji
zajistěte na místě.
5 Mixovat začnete tak, že otočíte knoík do pozice „mixování“ a
mixujete, dokud nemají ingredience požadovanou konzistenci (obr. r).
39ČEŠTINA
Poznámka
• Pokud se suroviny přichytí na stěny nádoby nebo pokud jsou
rozmixované suroviny stále příliš tuhé, uvolněte tlačítko mixování,
sejměte nádobu z hlavní jednotky a uvolněte suroviny stěrkou
a přidejte pitnou vodu, aby měl rozmixovaný pokrm správnou
konzistenci s ohledem na věk dítěte.
Upozornění
• Nenechávejte přístroj nepřetržitě mixovat déle než 30 sekund. Pokud
je nutné mixovat déle než 30 sekund, uvolněte knoík, přerušte
mixování a před pokračováním počkejte několik sekund. Pokud se
hlavní jednotka zahřeje na vysokou teplotu, nechte ji několik minut
ochladit, a teprve poté pokračujte v práci.
6 Odpojte přístroj z napájení.
7 Sejměte nádobu z hlavní jednotky a otevřete víko nádoby (obr. n).
Page 38

40 ČEŠTINA
8 Pomocí stěrky přemístěte jídlo z nádoby do misky nebo na talíř
(obr. s).
Suroviny a délka přípravy v páře
Typ
potraviny
Ovoce Jablko 20 120
Zelenina Chřest 20 120
Potravina Přibližná
délka přípravy
v páře (min.)*
Pomeranč/mandarinka 20 120
Broskev 10 60
Hruška 20 120
Ananas 30 180
Švestka 10 60
Jahoda 20 120
Brokolice 20 120
Mrkev 30 180
Květák 20 120
Celer 20 120
Lilek 20 120
Fenykl 30 180
Fazole 30 180
Pórek 20 120
Cibule 20 120
Hrášek 20 120
Kapie 20 120
Brambora 30 180
Dýně 20 120
Špenát 20 120
Tuřín 20 120
Kukuřice 20 120
Sladká brambora
(batát)
Rajče 20 120
20 120
Hladina vody
v nádržce na
vodu (ml)
Page 39

41ČEŠTINA
Typ
potraviny
Maso Kuřecí, hovězí, skopové,
Ryba Losos, treska, platýs,
* Všechny potraviny je třeba nakrájet na malé kostky o velikosti maximálně
1 cm. Odhad doby napařování je založen na 200 g potravin. Dobu
napařování upravte podle skutečného množství jídla.
* Doby napařování se mohou lišit v závislosti na kolísání napětí.
Potravina Přibližná
délka přípravy
v páře (min.)*
Tuřín 30 180
Cuketa 20 120
30 180
vepřové apod.
20 120
pstruh apod.
Hladina vody
v nádržce na
vodu (ml)
Příklady receptů
(1) Prima
pyré
z brambor a
brokolice*
(2) Banány
s avokádem*
(3)
Zeleninový
ráj*
(4) Masová
mňamka*
Potravina Objem vody
a doba
napařování
• 140 g
brambor, 70 g
brokolice
• 50 g banánů
• 50 g avokáda
• 80 g květáku
• 90 g brambor
• 60 g mrkve
• 250 g
hovězího /
jehněčího
/ kuřecích
prsou /
vepřového
• Přidejte
120 ml vody a
napařujte asi
20 min
• Není třeba
napařovat
• Přidejte
180 ml vody a
napařujte asi
30 min
• Přidejte
180 ml vody a
napařujte asi
30 min
• 3–5krát promixujte,
• Přidejte 60 ml mléka
• 3–5krát promixujte,
• 2–3krát promixujte,
• 3–5krát promixujte,
• Pokud chcete,
Mixování
vždy po dobu
15 sekund
vždy po dobu
15 sekund
vždy po dobu
15 sekund
vždy po dobu
15 sekund
smíchejte 1 lžíci
masového pyré se
3 lžícemi zeleninového
pyré [viz recept
Zeleninový ráj (3)]
Page 40

42 ČEŠTINA
Potravina Objem vody
Mixování
a doba
napařování
• 100 g broskví
• 100 g hrušek
• 50 g borůvek
(5) Moje
první müsli*
• Přidejte
120 ml vody a
napařujte asi
20 min
• 2–3krát promixujte,
vždy po dobu
5 sekund
• Po rozmixování
rozdělte pyré na
5 porcí. Každou porci
smíchejte se 100 g
drcených ovesných
vloček
• 100 g tresky
• 150 g
brambor
(6) Párty
s treskou
brambory*
• Přidejte
180 ml vody a
napařujte asi
30 min
• 2–3krát promixujte,
vždy po dobu
5 sekund
• Po rozmixování
rozdělte pyré na
5 porcí. Každou porci
smíchejte se 100 g do
měkka uvařené rýžové
kaše
• 120 g lososa
• 120 g
brokolice
(7) S brokolicí
mě baví svět
*
• Přidejte
120 ml vody a
napařujte asi
20 min
• 2–3krát promixujte,
vždy po dobu
5 sekund
• Po rozmixování
rozdělte na 4 porce.
Každou porci
smíchejte se 140 g
do měkka uvařených
těstovinových
mušliček
(8) Veselý
chřest *
• 240 g chřestu • Přidejte
120 ml vody a
napařujte asi
20 min
• Není třeba mixovat
• Po přípravě v páře
rozdělte chřest na
3 porce. Každou porci
smíchejte se 100 g
vařených nových
brambor nakrájených
na měsíčky a 20 g
mletého parmezánu
* Před zpracováním je třeba ingredience omýt, oloupat a nakrájet na
kostičky velké maximálně 1 cm.
* Před krmením vždy zkontrolujte teplotu a konzistenci pokrmu.
Page 41

43ČEŠTINA
* Výše uvedené recepty jsou určeny pro děti v různých fázích přechodu na
tuhou stravu. Navrhujeme:
* Recepty 1–2 pro první fázi přechodu na tuhou stravu (kolem
4–6 měsíců)
* Recepty 3–4 pro druhou fázi přechodu na tuhou stravu (kolem
6–8 měsíců)
* Recepty 5–6 pro třetí fázi přechodu na tuhou stravu (kolem
9–12 měsíců)
* Recepty 7–8 pro čtvrtou fázi přechodu na tuhou stravu (nad 12 měsíců)
* Protože se však děti vyvíjejí individuálně a rostou různým tempem, zvolte
vhodné recepty podle stupně vývoje vašeho dítěte.
Čištění přístroje a odstranění vodního kamene
Čištění
Upozornění
• Hned po každém použití přístroj vyčistěte.
• Hlavní jednotku a nádržku na vodu nikdy neponořujte do vody ani
neoplachujte pod tekoucí vodou.
• Do přístroje nevkládejte bělidla ani chemické sterilizační roztoky nebo
tablety.
• K čištění přístroje nikdy nepoužívejte drátěnky, abrazivní čisticí
prostředky ani agresivní tekuté přípravky, jako je například benzín,
aceton nebo alkohol.
• Napařovací koš, napařovací a mixovací nádobu, nožovou jednotku
a víko nádoby můžete mýt v myčce. Než tyto díly do myčky vložíte,
ihned po použití je opláchněte vodou z kohoutku. Neponořujte je do
vody spolu se součástmi, které ještě nejsou umyté.
• Zámek nožové hřídele vždy po jeho vyjmutí za účelem umytí vložte
zpět do mixovací jednotky. Plochá strana zámku nožové hřídele musí
směřovat nahoru.
1 Odpojte přístroj ze sítě a vyjměte nádobu z hlavní jednotky.
2 Zatlačením na jazýček víka proti směru hodinových ručiček uvolněte
víko nádoby (obr. c).
3 Opláchněte napařovací koš, napařovací a mixovací nádobu, víko
nádoby a stěrku vodou z kohoutku, abyste odstranili zbytky jídla
(obr. u).
Page 42

44 ČEŠTINA
4 Nožovou jednotku lze v případě potřeby kvůli opláchnutí rozebrat
(obr. t).
5 Pokud je třeba jej umýt, vyjměte zámek nožové hřídele z mixovací
jednotky.
Upozornění
• S nožovou jednotkou zacházejte velmi opatrně, abyste se neporanili,
protože ostří jsou nabroušená.
6 Víko nádržky na vodu otočte proti směru hodinových ručiček a
sejměte ho z nádržky na vodu.
7 Opláchněte víko nádržky na vodu pod tekoucí vodou.
8 Pokud je třeba, nalijte do nádržky na vodu čerstvou vodu a poté ji
vylijte. Podle potřeby tuto akci opakujte, dokud nebude nádržka na
vodu čistá. V nádržce na vodu nenechávejte vodu (obr. v).
9 Po mytí hlavní jednotku a všechny součásti osušte (obr. w).
10 Všechny součásti smontujte, až budou suché.
Poznámka
• Součásti, které přicházejí do styku s potravinami, jako je napařovací
koš a nádoba, se od potravin mohou zabarvit. To je normální jev.
Všechny součásti lze nadále bezpečně používat bez škodlivého vlivu
na upravované jídlo.
Odstranění vodního kamene
Aby přístroj co nejlépe fungoval, doporučujeme každé 2–4 týdny provádět
odstraňování vodního kamene. Aby se tvorba vodního kamene omezila,
doporučujeme k přípravě pokrmů v páře používat měkkou nebo vyčištěnou
vodu.
Pokud je v nádržce roztok na odstranění vodního kamene, přístroj
nezapínejte.
Odstranění vodního kamene z přístroje provádějte podle následujících
pokynů.
1 Ujistěte se, že je přístroj vypnutý.
2 Smíchejte 80 ml bílého octa (6% kyselina octová) s 80 ml vody. Další
možností je odstranit z nádržky na vodu vodní kámen kyselinou
citrónovou rozmíchanou v teplé vodě.
3 Roztok nalijte do nádržky na vodu.
Page 43

45ČEŠTINA
4 Nasaďte na nádržku na vodu víko a zajistěte ho na místě otočením
doprava.
5 Nechte působit 6 hodin nebo přes noc, až se veškerý vodní kámen
rozpustí.
6 Použitý roztok vylijte z nádržky na vodu.
7 Pokud se nahromaděný vodní kámen zcela nerozpustil, zopakujte
postup odstranění vodního kamene od kroku 1 do kroku 6 v této
kapitole.
8 Do nádržky na vodu nalijte čerstvou vodu a poté ji vylijte. Podle
potřeby tuto akci opakujte, dokud nebude nádržka na vodu čistá.
9 Důkladně opláchněte víko nádržky na vodu tekoucí vodou.
10 Než přístroj znovu použijete na přípravu pokrmu, do nádržky na vodu
nalijte 180 ml vody a nechte přístroj dokončit parní cyklus s prázdnou
nádobou.
Uskladnění
1 Před uložením přístroje vyprázdněte nádržku na vodu.
2 Před uskladněním přístroje zkontrolujte, zda jsou všechny součásti
čisté a suché (viz kapitola „Čištění přístroje a odstranění vodního
kamene“).
3 Nožovou jednotku skladujte v přístroji, předejdete tak jejímu
poškození.
4 Víko nádržky na vodu i víko nádoby musí být před uskladněním
pevně nasazené.
Recyklace
Tento symbol znamená, že výrobek nelze likvidovat s běžným
komunálním odpadem (2012/19/EU).
Řiďte se pravidly vaší země pro sběr elektrických a
elektronických výrobků. Správnou likvidací pomůžete předejít
negativním dopadům na životní prostředí a lidské zdraví
Page 44

46 ČEŠTINA
Záruka a servis
Pokud potřebujete informace nebo máte jakékoli potíže, navštivte
webovou stránku společnosti Philips na adrese www. philips. com / avent
nebo kontaktujte středisko péče o zákazníky společnosti Philips ve vaší
zemi (podrobnosti naleznete v přiloženém záručním listu s celosvětovou
platností). Pokud se ve vaší zemi středisko péče o zákazníky společnosti
Philips nenachází, obraťte se na místního prodejce výrobků Philips.
Odstraňování problémů
V této kapitole najdete shrnutí nejběžnějších problémů, s nimiž se můžete
u přístroje setkat. Pokud vám uvedené informace nepomohou váš problém
vyřešit, kontaktujte středisko péče o zákazníky ve své zemi.
Problém Možná příčina Řešení
Přístroj
nefunguje.
Kontrolka
přípravy v páře
nesvítí.
Přístroj je vybaven
bezpečnostním
vypínačem.
Přístroj lze spustit
pouze v případě,
že všechny
součásti jsou
správně umístěny
na hlavní
jednotce.
Přístroj není
připojen ke zdroji
napájení.
Nádoba není
správně nasazena
na hlavní
jednotce.
Spustili jste
druhý parní
cyklus okamžitě
po dokončení
prvního.
Všechny součásti správně sestavte.
Před napařováním by víko nádoby
mělo být na nádobě a bezpečně
zajištěné na místě otočením
proti směru hodinových ručiček.
Nádobu umístěte svisle zpět na
hlavní jednotku a nádobu zajistěte
otočením proti směru hodinových
ručiček.
Vložte zástrčku do zásuvky.
Nádobu správně umístěte na hlavní
jednotku a zajistěte na místě.
Než začnete druhý parní cyklus,
přístroj vypněte a nechte ho na
10 minut vychladnout.
Page 45

Problém Možná příčina Řešení
Nádržka
na vodu
produkuje
při prvních
několika
Před použitím jste
nádržku na vodu
neomyli.
Vyčistěte nádržku na vodu
podle kapitoly „Čištění přístroje
a odstranění vodního kamene“
a poté nechte proběhnout parní
cyklus s prázdnou nádobou.
použitích
nepříjemný
zápach.
Přístroj
nevytváří páru.
Nenaplnili jste
nádržku na vodu.
Přístroj vypněte a odpojte
z napájení a poté naplňte vodou
nádržku na vodu.
V nádržce na vodu
se nachází příliš
velké množství
vodního kamene.
Odstraňte z nádržky na vodu
vodní kámen. Podívejte se do části
„Odstranění vodního kamene“
v kapitole „Čištění přístroje a
odstranění vodního kamene“.
Trasa páry, výstup
páry nádržky na
vodu a parní vstup
víka nádoby jsou
Zkontrolujte parní výstup nádržky
na vodu, parní vstup víka nádoby
a trasu páry a zajistěte, aby je nic
neblokovalo.
zablokované.
Z nádržky na
vodu uniká
pára.
Víko nádržky na
vodu není správně
zavřené.
Nádoba není
správně nasazena
Víko nádržky na vodu správně
uzavřete tak, že jím otočíte
z odemčené do zamčené pozice.
Nasaďte nádobu správně na hlavní
jednotku.
na hlavní
jednotku.
Parní vstup
Vyčistěte parní vstup víka nádoby.
víka nádoby je
blokován.
Ingredience
nejsou
Kusy v nádobě
jsou příliš velké.
Krájejte potraviny na menší kousky
(kostičky o velikosti asi 1 cm).
dostatečně
uvařené.
V nádobě je příliš
mnoho potravin.
Uberte z nádoby část surovin.
Množství potravin by nemělo
převýšit horní okraj trasy páry na
koši.
47ČEŠTINA
Page 46

48 ČEŠTINA
Problém Možná příčina Řešení
V nádržce na
vodu je příliš málo
vody.
Doplňte správné množství vody
podle délky přípravy v páře.
V kapitole „Potraviny a doba
napařování“ se ujistěte, že jste
přidali správné množství vody
podle délky přípravy ingrediencí,
které chcete připravit v páře, nebo
podle receptu, který chcete použít.
V nádržce na vodu
se nachází příliš
velké množství
vodního kamene.
Odstraňte z nádržky na vodu
vodní kámen. Podívejte se do části
„Odstranění vodního kamene“
v kapitole „Čištění přístroje a
odstranění vodního kamene“.
Jídlo v nádobě
se vylévá ven.
Z víka
nádoby uniká
nadměrné
V nádobě je příliš
mnoho potravin.
Víko nádoby není
správně nasazeno
na nádobě.
Vypněte přístroj a zpracovávejte
menší množství potravin.
Víko umístěte na nádobu a
otočením proti směru hodinových
ručiček jej bezpečně uzavřete.
množství páry.
Funkce
mixování
nefunguje.
V nádobě je příliš
mnoho potravin.
Vypněte přístroj a zpracovávejte
menší množství potravin. Nikdy
nedávejte do nádoby tolik potravin,
aby víko nebylo možné zavřít.
Doporučujeme, aby maximální
objem potravin MAX na mixování
nepřekročil 400 g.
Nádoba není
správně nasazena
na hlavní
jednotce.
Postavte nádobu na hlavní
jednotku víkem nahoru, zarovnejte
rukojeť na nádobě s ikonou
hlavní jednotce a otočte nádobu
proti směru hodinových ručiček,
čímž ji zajistíte na hlavní jednotce.
Víko nádoby není
správně nasazeno
na nádobě.
Používáte přístroj
ke smíchání
lepivé potraviny,
například sýru.
Víko umístěte na nádobu a
otočením proti směru hodinových
ručiček jej bezpečně uzavřete.
Zkontrolujte tabulku potravin a dob
napařování nebo příklady receptů
a vyberte si ingredience, které jsou
vhodné k mixování.
na
Page 47

Problém Možná příčina Řešení
Používáte funkci
mixování déle než
30 sekund bez
Přerušte mixování a nechte přístroj
několik sekund vychladnout, poté
začněte znovu mixovat.
přerušení.
Výsledný
mixovaný
pokrm není
Mixování není
dostatečné.
Mixujte suroviny ještě nějakou
dobu. Nemixujte nepřetržitě déle
než 30 sekund.
dostatečně
jemný.
Suroviny nejsou
dostatečně
připravené.
Před přípravou v páře a mixováním
je třeba ingredience omýt, oloupat
a nakrájet na kostičky velké
maximálně 1 cm.
Množství potravin,
které se mají
Podle potřeby odeberte nebo
přidejte mixované potraviny.
mixovat, je příliš
velké nebo příliš
malé.
Nedostatečná
doba přípravy v
páře.
Doplňte správné množství vody
pro dostatečně dlouhou přípravu v
páře. Viz kapitola „Potraviny a doba
napařování“.
Suroviny jsou
suché a při
mixování se
přichytávají na
stěny nádoby.
Po dokončení přípravy v páře není
nutné vodu nashromážděnou
v nádobě vylévat. Zkombinujte
ji s jídlem připraveným v páře a
rozmixujte je. Pokud používáte
pouze funkci mixování (bez
přípravy v páře), přidejte do nádoby
dostatečné množství pitné vody a
před mixováním ji promíchejte se
surovinami.
Přístroj je
hlučný,
V nádobě je příliš
mnoho potravin.
Vypněte přístroj a zpracovávejte
menší množství potravin.
produkuje
nepříjemný
zápach, je
horký na dotyk,
vychází z něj
kouř atd.
49ČEŠTINA
Page 48

50 ČEŠTINA
Problém Možná příčina Řešení
Na nádržce na
vodu a víku
nádržky na
vodu jsou bílé
skvrnky.
Plochy
přístroje,
které přijdou
do styku
s potravinami,
změnily barvu.
Mixovací
nádoba teče.
Víko nádoby není
správně zavřeno.
Používáte funkci
mixování příliš
dlouho.
Na těchto
součástech se
usazuje vodní
kámen.
Kvůli barvivům
obsaženým
v potravinách
mohou plochy,
které se dostávají
do styku
s potravinami,
ztrácet barvu.
Nožová jednotka
není správně
sestavena.
Nesprávné
sestavení zámku
nožové hřídele na
nožové jednotce.
Víko nádoby umístěte na nádobu a
bezpečně jej uzavřete.
Nenechávejte přístroj nepřetržitě
mixovat déle než 30 sekund.
To je normální jev. Pravidelně
odstraňujte vodní kámen. Víko
nádržky na vodu a víko nádoby
očistěte navlhčeným hadříkem.
Odstraňte z nádržky na vodu
vodní kámen. Podívejte se do části
„Odstranění vodního kamene“
v kapitole „Čištění přístroje a
odstranění vodního kamene“.
To je normální jev. Tento jev nemá
žádný vliv na kvalitu a výkon
přístroje. Všechny součásti lze
nadále bezpečně používat bez
škodlivého vlivu na upravované
jídlo.
Utáhněte nožovou jednotku.
Sestavte zámek nožové hřídele
správně (obr.
x).
Technické údaje
- Napětí/příkon: Viz štítek na spodní části přístroje
- Maximální kapacita nádržky na vodu: 180 ml
- Maximální kapacita mixovací nádoby: 400 ml
- Provozní teplota: 10 °C až 40 °C / 50 °F až 104 °F
- Ochrana: Teplotně řízený systém ohřevu
Page 49

Pildid on ära toodud kasutusjuhendi alguses ja lõpus
lahtivolditavatel lehekülgedel.
Sisukord
Tähtis! 52
Tutvustus 56
Üldine kirjeldus 56
Enne esimest kasutamist 57
Seadme kasutamine 57
Puhastamine ja katlakivi eemaldamine 67
Hoiustamine 69
Ringlussevõtt 69
Garantii ja hooldus 69
Veaotsing 69
Tehnilised andmed 74
51EESTI
Page 50

52
EESTI
Tähtis!
Enne seadme kasutamist lugege seda kasutusjuhendit hoolikalt ja hoidke
see edaspidiseks alles.
Oht
- Ärge kastke põhiseadet vette ega mõne muu vedeliku
sisse. Ärge loputage seda kraani all.
Hoiatus
- Enne seadme vooluvõrku ühendamist kontrollige,
kas seadmele märgitud toitepinge vastab kohaliku
elektrivõrgu pingele.
- Ärge kasutage seadet, kui selle pistik, toitejuhe või seade
on kahjustatud. Kui toitejuhe on rikutud, laske ohtlike
olukordade vältimiseks toitejuhe vahetada Philipsi
hoolduskeskuses, Philipsi volitatud hoolduskeskuses või
kvalitseeritud isikul.
- Seda seadet ei tohi kasutada füüsilise, meele- või
vaimse puudega isikud või isikud, kellel puuduvad
kogemused ja teadmised, välja arvatud siis, kui neid
valvatakse või neile on antud juhendid seadme ohutu
kasutamise kohta ja nad mõistavad sellega seotud ohte.
- Lapsed ei tohi seadmega (ega selle tarvikutega)
mängida.
- Lapsed ei tohi seda seadet kasutada. Hoidke seade (sh
tarvikud) ja toitejuhe lastele kättesaamatus kohas.
- Lapsed ei tohi seadet puhastada ega hooldada.
- Kui seade on elektrivõrku ühendatud, ärge terasid
puudutage. Terad on väga teravad.
- Olge ettevaatlik teravate lõiketerade käsitsemisel, purgi
tühjendamisel ja puhastamisel. Ühendage seade alati
seinakontaktist lahti, kui see jääb järelevalveta.
- Kui lõiketerad kiiluvad kinni, eemaldage seade
vooluvõrgust enne lõiketerade külge kleepunud ainete
ära võtmist.
- Seade (kaasa arvatud kannu kaas) muutub aurutamise
ajal või kohe pärast seda kuumaks (eriti sümboliga „ „
Page 51

53EESTI
tähistatud pinnad) ning võib katsumisel põhjustada
põletushaavu. Kannu kaant tuleks avada ainult kaane
sakist kinni hoides. Korvi tõstmiseks tuleb kasutada
spaatlit. Tõstke kannu käepidemest.
- Arvestage, et aurutamise ja kaane eemaldamise ajal
tuleb kannust kuuma auru.
- Arvestage, et veepaagi kaane avamisel tuleb selle alt
kuuma auru.
- Arvestage, et pärast aurutamistsükli lõppemist tuleb
kannu kaanes olevast auruavast veel mõne aja vältel
auru. Olge kannu kaane avamisel ettevaatlik.
- Kui seade ei ole korralikult kokku pandud, võib veepaagi
kaane serva vahelt auru tulla. Selle vältimiseks või
lahendamiseks vaadake peatükki „Tõrkeotsing“.
- Ärge kasutage seadet kõvade ja kleepuvate
koostisainete hakkimiseks.
- Ärge kunagi kasutage seadme juures valgendit või
keemilisi steriliseerimislahuseid või -tablette.
- Ärge kunagi kasutage seadme puhastamiseks
küürimiskäsnu, abrasiivseid puhastusvahendeid ega
ka agressiivseid vedelikke nagu bensiini, atsetooni või
alkoholi.
- Laske seadmel pärast aurutamistsüklit 10 minutit
jahtuda, enne kui alustate taas aurutamist.
- Ärge laske seadmel peenestada üle 30 sekundi korraga.
Kui te ei jõua peenestamist 30 sekundi jooksul lõpetada,
vabastage peenestamisnupp ja oodake mõned sekundit,
enne kui jätkate. Kui põhiseade muutub kuumaks, laske
sellel enne jätkamist mõned minutid jahtuda.
- Ärge valage aurutamiseks kannu sisse mingeid vedelikke.
Ettevaatust
- Ärge kunagi kasutage teiste tootjate poolt tehtud
tarvikuid või osi, mida Philips ei ole eriliselt soovitanud.
Selliste tarvikute või osade kasutamisel kaotab garantii
kehtivuse.
- Ärge asetage seadet töötava või kuuma ahju või pliidi
peale.
Page 52

54
EESTI
- Enne tarvikute vahetamist või kasutamise ajal liikuvatele
osadele lähenemisel lülitage seade välja ja eemaldage
toitejuhe seinakontaktist.
- Enne hoiustamist võtke alati pistik seinakontaktist välja
ja laske seadmel jahtuda.
- Keerake juhtnupp alati pärast aurutamist väljalülitatud
asendisse.
- Ärge kunagi kasutage kannu ega seadme teisi osi
mikrolaineahjus, sest kannu käepideme ja lõiketera
metallist osad ei sobi mikrolaineahjus kasutamiseks.
- Ärge kunagi steriliseerige kannu ega seadme teisi osi
sterilisaatoris või mikrolaineahjus, sest lõiketera metallist
osad ei sobi selliseks kasutamiseks.
- Seade on mõeldud kasutamiseks vaid
kodumajapidamises. Seadme väärkasutusel, kasutamisel
professionaalsel või poolprofessionaalsel eesmärgil või
kui seadet ei kasutata kasutusjuhendile vastavalt, kaotab
garantii kehtivuse, kusjuures Philips ei võta endale
vastutust põhjustatud kahjustuste eest.
- Asetage seade kindlale, horisontaalsele ja tasasele
pinnale. Seade väljutab kasutamise ajal kuuma auru.
Veenduge, et selle ümber on piisavalt vaba ruumi, et
mitte kahjustada köögikappe või teisi esemeid.
- Ärge kasutage mingil juhul seadet, mis on kusagilt alla
kukkunud või muul moel kahjustatud. Viige see volitatud
Philipsi teeninduskeskusesse parandamisele.
- Ärge kunagi kasutage aurutamisfunktsiooni, kui
veepaagis ei ole vett.
- Kontrollige, et veepaagi tase ei ületaks 180 ml.
- Enne aurutamist veenduge, et veepaagi kaas on
korralikult lukustatud.
- Ärge ületage toidu püreestamise maksimaalset kogust,
mis on kannul (400 ml) tähistatud tasemega MAX.
- Ärge tõstke ega liigutage seadet, kui see parasjagu
töötab.
Page 53

55EESTI
- Ärge sisestage veepaagi auru väljastusavasse, kannu
kaane auru sisselaskeavasse ega nõu aurukanalitesse
võõrkehi.
- Ärge kunagi täitke veepaaki aurutamise ajal, kuna
seadmest võib tulla kuma vett ja auru.
- Enne veepaagi kaane avamist veenduge alati, et see on
maha jahtunud.
- Ärge kunagi ühendage seda seadet välise
lülitusseadmega, nagu nt taimeriga, ega skeemiga, mida
elektrivõrk korrapäraselt sisse-välja lülitab.
- Enne lapse toitmist proovige valminud toidu
temperatuuri ohutuse huvides alati oma käeseljal.
- Enne beebi toitmist kontrollige alati toidu konsistentsi.
Täpsemat teavet, millise koostisega toit sobib
erinevas vanuses beebidele, leiate Philipsi veebilehelt
allalaaditavast võõrutusjuhendist või küsides arstilt või
nõustajalt.
- Kasutage nõu tõstmiseks ja kannust toidu väljavõtmiseks
ainult kaasasolevat spaatlit (jn o).
- Regulaarne katlakivi eemaldamine väldib seadme
kahjustamist.
- Veenduge, et aurutamisnõus oleva toidu kogus ei ületa
nõu aurusuunajate ülemist serva, kuna vastasel korral
võib auru liikumistee olla takistatud.
- Müratase: Lc= 88 dB[A]
Ohutussüsteemid
See seade on varustatud sisseehitatud turvalukuga, et tagada teie ohutus
seadme kasutamise ajal. See seade töötab ainult siis, kui kõik osad on
õigesti kokku pandud. Kui kõik osad on õigesti kokku pandud, siis turvalukk
vabaneb.
Seade on varustatud ka ülekuumenemise eest kaitsva väljalülitusega.
Kui kahe aurutamistsükli vaheline aeg on liiga lühike, võib seade üle
kuumeneda. Kui seadme ülekuumenemise ohutuslüliti aktiveerib
aurutamise ajal , laske seadmel mõni minut jahtuda. Pärast seda võite
seadet uuesti kasutada.
Page 54

56
EESTI
Elektromagnetväljad (EMF)
See Philipsi seade vastab kõikidele kokkupuudet elektromagnetiliste
väljadega käsitlevatele kohaldatavatele standarditele ja õigusnormidele.
Tutvustus
Õnnitleme ostu puhul ja tervitame teid Philipsi Aventi poolt! Philipsi Aventi
pakutava tootetoe eeliste täielikuks kasutamiseks registreerige oma toode
veebilehel www.philips.com/welcome.
Selle põhivajaduste täitmiseks mõeldud beebitoidu valmistaja aurutamisja püreestamisfunktsioonide abil saab beebidele valmistada toitvaid
eineid.
Üldine kirjeldus
Toote ülevaade (jn a)
Spaatel
A
B Veenõu kaas
C Veepaagi auru väljalaskeava
D Veepaak
E Põhiseade
F Juhtnupp
a “Auru” asend
b Asend “Väljas”
c „Segamise” asend
d Toite märgutuli (aurutamisel)
G Kannu lukustuslüliti
H Toitejuhe
I Veetaseme ja toidukoguse näidik
J Kannu käepide
K Kann aurutamiseks ja püreestamiseks
L Lõiketera
M Lõiketera võlli tihend
N Nõu aurukanal
O Aurutusnõu
P Kannu kaane auru sisselaskeava
Q Kaane sakk
R Kannu kaas
S Kannu kaane auruava
Page 55

57EESTI
Enne esimest kasutamist
1 Eemaldage seadme küljest kõik pakkematerjalid.
2 Puhastage kõik osad pärast esmakasutust hoolikalt. Vt jaotist
„Puhastamine ja katlakivi eemaldamine“.
3 Soovitame enne seadme esmakordset kasutamist läbida üks
aurutamistsükkel tühja aurutamisnõu ja kannuga. Vt peatükke
„Veepaagi täitmine“ ja „Aurutamine“.
Seadme kasutamine
Ettevaatust
• Enne lapse toitmist proovige valminud toidu temperatuuri ja
konsistentsi ohutuse huvides alati oma käeseljal.
See seade on mõeldud värskete tahkete toiduainete aurutamiseks ja
püreestamiseks, et saavutada beebidele sobiv konsistents. Tavaliselt tuleks
koostisained esmalt aurutada ja seejärel püreestada. Samas saab seadet
kasutada ka ainult aurutamiseks või püreestamiseks. Kui kasutate seadet
üksnes püreestamiseks, võite peatükid “Veepaagi täitmine” ja “Aurutamine”
vahele jätta ning järgida juhiseid peatükis „Ainult püreestamine“.
See seade EI ole mõeldud alltoodud kasutusviisideks.
- Samade koostisainete aurutamine rohkem kui 30 minuti vältel
- Tooreste külmutatud koostisainete aurutamine
- Esmalt püreestamine, seejärel aurutamine
- Suppide, kastmete, vee või teiste vedelike soojendamine
- Toidu ülessoojendamine
- Toidu sulatamine
- Riisi või pasta valmistamine
- Kõvade koostisainete, näiteks jää- ja suhkrutükkide purustamine, või
kleepuvate koostisainete, näiteks juustu peenestamine.
Page 56

58
EESTI
Veepaagi täitmine
Ettevaatust
• Enne, kui kasutate kannu veekoguse mõõtmiseks, loputage kann
puhtaks.
• Enne, kui kasutate kannu veekoguse mõõtmiseks, veenduge, et
lõiketera moodul, sealhulgas võllitihend, on korralikult kokku pandud.
Lõiketera võlli tihendi lame külg peaks jääma ülespoole (jn x).
Märkus
• Kontrollige, et veepaagi tase ei ületaks 180 ml. Veetaseme näidik asub
segamiskannul.
• Soovitame kasutada pehmet või puhastatud vett, seest mineraal-
või kraanivees sisalduvad mineraalid võivad põhjustada veepaagis
kiiremat katlakivi teket.
• Ärge pange veepaaki ühtegi vedelikku peale vee, välja arvatud
toiduäädikaga katlakivi eemaldamiseks.
1 Lükake aurutamis- ja püreestamisnõu käepidet tahapoole, et
see põhiseadme küljest eemaldada (jn b). Täitke veega vastavalt
kasutusjuhendi peatükis “Koostisained ja aurutamisaeg” kirjutatule
(jn d).
2 Veepaagi kaane avamiseks keerake seda vastupäeva (jn e), seejärel
täitke see segamiskannu abil veega (jn f). Ärge ületage MAXtaseme märgist (180 ml) (jn d).
3 Pange veenõu kaas tagasi ja keerake päripäeva kindlalt kinni (jn g).
Märkus
• Enne seadme sisselülitamist veenduge alati, et veepaagi kaas on
lukustatud.
Page 57

59EESTI
Aurutamine
Ettevaatust
• Veenduge, et lõiketera moodul, sealhulgas võllitihend, on korralikult
kokku pandud. Lõiketera võlli tihendi lame külg peaks jääma
ülespoole (jn x).
• Kuum aur või kuum vesi võib sõrmi põletada. Ärge puudutage ja ärge
laske lastel seadme kuumi detaile ega seadme kohale tõusvat auru
puudutada, sest see võib põhjustada põletusi.
Märkus
• Koostisosasid tuleb enne aurutamist pesta, koorida ja lõigata
väikesteks kuni 1 cm suurusteks kuubikuteks.
• Enne külmutatud tooreste koostisainete aurutamisnõusse panemist
tuleb need üles sulatada. Enne sulatatud koostisainete kannu
asetamist raputage neilt liigne vesi maha.
• Kui kann ja kannu kaas ei ole õigesti kokku pandud ja põhiseadmele
paigaldatud, siis seade ei alusta aurutamist (jn j ja k).
1 Lükake segamiskannu kaane sakki päripäeva, et kaas eemaldada
(jn c).
2 Pange tahked koostisained (umbes 1 cm suurusteks kuubikuteks
lõigatuna) aurutusnõusse. Koostisained ei tohiks ulatuda nõus
kõrgemale kui auru liikumistee ülemine serv (jn h).
3 Kui panete nõu tagasi kannu, tuleb veenduda, et auru liikumistee on
käepideme vastasküljel. Kui nõu sobitub õigesse asendisse, kõlab
õrn klõpsatus (jn i).
4 Asetage kaas kannu peale ja pöörake seda lukustamiseks vastupäeva
(jn j).
5 Lukustage kann tagasi põhiseadmele, libistades seda päripäeva
(jn k).
Märkus
• Põhiseadmel on sooned, mis aitavad lukustustihvte sujuvalt
suunata ja kannu paika lukustada. Enne aurutamist või püreestamist
veenduge, et kann on kindlalt põhiseadmele lukustatud.
6 Kui te pole veel veepaaki aurutamiseks veega täitnud, vaadake
peatükki „Veepaagi täitmine“ ja lisage paaki vett.
Page 58

60
EESTI
Märkus
• Veenduge, et veepaagi kaas on korralikult lukustatud.
7 Ühendage seade vooluvõrku.
8 Keerake juhtnupp asendisse „Auru seadistus“ (jn l). Vaadake tabelit
peatükis “Koostisained ja aurutamisaeg“, et leida soovitatavad
veekogused aurutamiseks.
» Kollane märgutuli süttib, mis näitab, et seade aurutab.
» Kui aurutamistsükkel on lõppenud, lülitub seade automaatselt
välja ja märgutuli kustub.
9 Pärast aurutamist keerake juhtnupp tagasi asendisse „O“ (jn m).
Enne kannu eemaldamist oodake kaks minutit või seni, kuni kannust
ei tõuse enam auru.
Ettevaatust
• Kui kavatsete käivitada uue aurutamistsükli, laske seadmel 10 minutit
jahtuda ja eemaldage veepaagist järelejäänud vesi, enne kui paagi
uuesti täidate ja uut aurutamistsüklit alustate.
Märkus
• Ebapiisava aurutamise vältimiseks ärge keerake nuppu väljalülitatud
asendisse enne aurutamistsükli lõppu ja ärge jätke vett mahutisse.
Püreestamine pärast aurutamist
Ettevaatust
• Veenduge, et lõiketera moodul, sealhulgas võllitihend, on korralikult
kokku pandud. Lõiketera võlli tihendi lame külg peaks jääma
ülespoole (jn x).
• Kann ja kannu kaas muutuvad pärast aurutamistsüklit kuumaks.
Hoidke kannu ainult käepidemest.
• Kasutage kannu kaane avamiseks ainult spetsiaalset sakki.
• Tõstke nõud pärast aurutamist ainult spaatli abil.
• Veenduge alati, kas kann ja kannu kaas on õigesti kokku pandud ja
põhiseadmele paigaldatud (jn j ja k), kui seadet kasutatakse.
1 Segamiskannu põhiseadmelt eemaldamiseks tuleb käepidemest
kinni hoida ja suruda tahapoole, et kann vabastada (jn b).
2 Kannu kaane avamiseks lükake vastavat sakki (jn c).
Page 59

3 Aurutamisnõu kannust väljavõtmiseks tuleb kasutada kaasasolevat
spaatlit. Sisestage spaatel läbi nõus olevate avade (sõna „Avent“
ülespoole) ja tõstke see üles (jn o).
4 Valage aurutatud toit spaatlist kinni hoides segamiskannu (jn p).
Märkus
• Kannu kogunenud vett ei ole vaja välja valada. Segage see aurutatud
toiduga blenderdamiseks kokku.
5 Pange segamiskannu kaas tagasi ja lukustage see paigale
(jn q). Ärge pange aurutusnõud tagasi kannu, kui valmistute
püreestamiseks.
6 Raputage segamiskannu, et koostisained ühtlaselt laiali jaotada.
7 Vajaduse korral eemaldage kannu kaas ja lisage püreestamiseks
lisakoostisosi (nt vett püreede jaoks või teisi keedetud koostisaineid,
nt riis või pasta). Ärge ületage toiduainete MAX-taseme märgist
(400 ml).
8 Asetage segamiskann põhiseadmele tagasi. Keerake nõud, et see
paika lukustada. Veenduge, et kann on kinnitatud ja käepide paikneb
otse kannu lukustuslüliti kohal. Veenduge, et käepide paikneb
paremal küljel (jn
k).
9 Püreestamise alustamiseks pöörake nupp püreestamise asendisse
ja hoidke, kuni koostisained on peenestatud teile sobivale
konsistentsile (jn r).
61EESTI
Ettevaatust
• Ärge laske seadmel peenestada üle 30 sekundi korraga. Kui te
ei jõua peenestamist 30 sekundi jooksul lõpetada, vabastage
peenestamisnupp ja oodake mõned sekundit, enne kui jätkate. Kui
põhiseade muutub kuumaks, laske sellel enne jätkamist mõned
minutid jahtuda.
10 Eemaldage seadme pistik seinakontaktist.
11 Eemaldage kann põhiseadmelt ja avage kaas (jn n).
12 Kasutage spaatlit, et toit kannust kaussi või taldrikule tõsta (jn s).
Page 60

62
EESTI
Ainult püreestamine
Ettevaatust
• Veenduge, et lõiketera moodul, sealhulgas võllitihend, on korralikult
kokku pandud. Lõiketera võlli tihendi lame külg peaks jääma
ülespoole (jn x).
• Veenduge alati, et segamiskannu kaas on seadme kasutamise ajal
korralikult oma kohale lukustunud.
Märkus
• Koostisosasid tuleb enne blenderdamist pesta, koorida ja lõigata
väikesteks kuni 1 cm suurusteks kuubikuteks.
1 Eemaldage segamiskann põhiseadmelt ja vajutage kaane sakile, et
kann avada. (jn b ja jn c).
2 Valage peenestatud toit segamiskannu, mille sees puudub
aurutamisnõu. Ärge ületage toiduainete MAX-kogust (400 ml).
3 Pange segamiskannu kaas tagasi ja lukustage see paigale (jn q).
Raputage segamiskannu, et koostisained ühtlaselt laiali jaotada.
4 Asetage segamiskann põhiseadmele tagasi ja lukustage kindlalt
paika.
5 Püreestamise alustamiseks pöörake nupp püreestamise asendisse
ja hoidke, kuni koostisained on peenestatud teile sobivale
konsistentsile (jn r).
Märkus
• Kui koostisosad kleepuvad kannu seinale või kui blenderdatud
koostisosad on ikka liiga tahked, vabastage blenderdamise nupp,
eemaldage kann põhiseadmelt ja eemaldage koostisosad seina
küljest spaatliga, seejärel lisage veidi joogivett, kuni püreestatud toit
on teie lapse vanusest lähtuvalt õige konsistentsiga.
Ettevaatust
• Ärge laske seadmel peenestada üle 30 sekundi korraga. Kui te
ei jõua peenestamist 30 sekundi jooksul lõpetada, vabastage
peenestamisnupp ja oodake mõned sekundit, enne kui jätkate. Kui
põhiseade muutub kuumaks, laske sellel enne jätkamist mõned
minutid jahtuda.
6 Eemaldage seadme pistik seinakontaktist.
Page 61

7 Eemaldage kann põhiseadmelt ja avage kaas (jn n).
8 Kasutage spaatlit, et toit kannust kaussi või taldrikule tõsta (jn s).
Koostisained ja aurutamisajad
63EESTI
Toidu liik Koostisained Umbkaudne
aurutamisaeg
(min)*
Puuvili Õun 20 120
Apelsin/mandariin 20 120
Virsik 10 60
Pirn 20 120
Ananass 30 180
Ploom 10 60
Strawberry 20 120
Aedvili Spargel 20 120
Brokoli 20 120
Porgand 30 180
Lillkapsas 20 120
Seller 20 120
Baklažaan 20 120
Apteegitill 30 180
Prantsuse oad 30 180
Porrulauk 20 120
Sibul 20 120
Herned 20 120
Paprika 20 120
Kartul 30 180
Kõrvits 20 120
Spinat 20 120
Kaalikas 20 120
Magus mais 20 120
Magus kartul 20 120
Tomat 20 120
Naeris 30 180
Veetase
veepaagis (ml)
Page 62

64
EESTI
Toidu liik Koostisained Umbkaudne
aurutamisaeg
(min)*
Suvikõrvits 20 120
Liha Kana-, looma-, lamba-,
sealiha jne
Kala Lõhe, merlang, lest,
tursk, forell jne
* Kogu toit tuleb lõigata väikesteks kuubikuteks, mis ei ole suuremad kui
1 cm. Hinnanguline aurutamisaeg on võetud 200 g toidukoguse alusel.
Reguleerige aurutamisaega vastavalt tegelikule toidukogusele.
* Aurutamisajad võivad sõltuda pingekõikumistest.
30 180
20 120
Veetase
veepaagis (ml)
Näidisretseptid
(1) Väärtuslik kartuli- ja
spargelkapsapüree*
(2) Banaanid
avokaadoga*
(3) Taevalikud
köögiviljad*
(4) Lihavalik*
Koostisained Veekogus ja
aurutamisaeg
• 140 g kartulit
ja 70 g
spargelkapsast
• 50 g banaani
• 50 g avokaadot
• 80 g lillkapsast
• 90 g kartulit
• 60 g porgandit
• 250 g loomaliha
/ lambaliha /
kana rinnaliha /
sealiha
• Lisage
120 ml vett
ja aurutage
umbes
20 min
• Ei ole vaja
aurutada
• Lisage
180 ml vett
ja aurutage
umbes
30 min
• Lisage
180 ml vett
ja aurutage
umbes
30 min
Segamine
• Püreestage 3-5
korda, iga kord
15 sekundit.
• Lisage 60 ml piima
• Püreestage 3-5
korda, iga kord
15 sekundit.
• Püreestage 2-3
korda, iga kord
15 sekundit.
• Püreestage 3-5
korda, iga kord
15 sekundit.
• Vajadusel segage
1 sl lihapüreed 3 sl
köögiviljapüreega
[vt retsepti
„Taevalikud
köögiviljad“ (3)]
Page 63

65EESTI
(5) Minu
esimene müsli*
(6) Pidu tursa
ja kartuliga*
(7) Igavesti
rõõmus
spargelkapsas*
Koostisained Veekogus ja
aurutamisaeg
• 100 g virsikut
• 100 g pirni
• 50 g mustikaid
• Lisage
120 ml vett
ja aurutage
umbes
20 min
• 100 g turska
• 150 g kartulit
• Lisage
180 ml vett
ja aurutage
umbes
30 min
• 120 g lõhet
• 120 g spargel-
kapsast
• Lisage
120 ml vett
ja aurutage
umbes
20 min
Segamine
• Püreestage 2-3
korda, iga kord
5 sekundit.
• Pärast
püreestamist
jaotage püree
5 portsu. Iga
serveeringu
jaoks segage üks
portsjon 100 g
kaerahelvestega
• Püreestage 2-3
korda, iga kord
5 sekundit.
• Pärast
püreestamist
jaotage püree
5 portsu. Iga
serveeringu
jaoks segage üks
portsjon 100 g
pehme riisipudruga
• Püreestage 2-3
korda, iga kord
5 sekundit.
• Pärast
püreestamist
jaotage see
4 portsu. Iga
serveeringu
jaoks segage
üks portsjon
140 g pehme
merekarbikujulise
pastaga
Page 64

66
EESTI
Koostisained Veekogus ja
Segamine
aurutamisaeg
• 240 g sparglit • Lisage
120 ml vett
ja aurutage
umbes
20 min
(8) Päikeseline
spargel *
• Ei ole vaja
püreestada
• Pärast aurutamist
jaotage spargel
3 portsu. Iga
serveeringu
jaoks segage
üks portsjon
100 g küpsetatud
värskete kartulite
lõikudega ja
20 g hakitud
parmesaniga
* Koostisained tuleb enne töötlemist pesta, koorida lõigata väikesteks
kuubikuteks, mis ei ole suuremad kui 1 cm.
* Enne toitmist kontrollige alati toidu temperatuuri ja konsistentsi.
* Ülaltoodud retseptid on mõeldud erinevates võõrutamise etappides
beebidele. Soovitame toimida järgmiselt.
* Retseptid 1-2 võõrutamise esimeses etapis (ligikaudu 4-6 kuud)
* Retseptid 3-4 võõrutamise teises etapis (ligikaudu 6-8 kuud)
* Retseptid 5-6 võõrutamise kolmandas etapis (ligikaudu 9-12 kuud)
* Retseptid 7-8 võõrutamise neljandas etapis (rohkem kui 12 kuud)
* Kuna aga beebid arenevad igaüks omas tempos, valige palun retseptid
vastavalt oma beebi arengule.
Page 65

Puhastamine ja katlakivi eemaldamine
Puhastamine
Ettevaatust
• Puhastage seadet alati kohe pärast kasutamist.
• Ärge kunagi kastke põhiseadet ja veepaaki vette ega loputage kraani
all.
• Ärge kunagi kasutage seadmes valgendit või keemilisi
steriliseerimislahuseid või -tablette.
• Ärge kunagi kasutage seadme puhastamiseks küürimiskäsnu,
abrasiivseid puhastusvahendeid ega ka agressiivseid vedelikke nagu
bensiini, atsetooni või alkoholi.
• Aurutusnõud, aurutus- ja segamiskannu, lõiketeraseadet ja
kannu kaant võib pesta nõudepesumasinas. Palun loputage
neid detaile kohe pärast kasutamist kraani all, enne kui need
nõudepesumasinasse panete. Ärge kastke neid detaile vette koos
detailidega, mida ei ole veel puhastatud.
• Kui olete lõiketera võlli tihendi segamisseadmest puhastamiseks
eemaldanud, paigutage see alati pärast tagasi. Veenduge, et lõiketera
võlli tihendi lame külg on ülespoole.
67EESTI
1 Võtke seade elektrivõrgust välja ja eemaldage nõu põhiseadme
küljest.
2 Kannu kaane vabastamiseks lükake kaane sakki päripäeva (jn c).
3 Loputage aurutusnõu, aurutamis- ja segamiskann, kannu kaas ja
spaatel kraani all, et eemaldada toidujäägid (jn u).
4 Lõiketera saab vajaduse korral loputamiseks lahti võtta (jn t).
5 Vajaduse korral eemaldage puhastamiseks segamisseadme lõiketera
võlli tihend.
Ettevaatust
• Olge lõiketera käsitsemisel väga ettevaatlik. Selle lõikeservad on väga
teravad.
6 Keerake veepaagi kaant vastupäeva ja eemaldage see veepaagi
küljest.
7 Peske veepaagi kaant kraani all.
Page 66

68
EESTI
8 Vajadusel valage puhast vett veepaaki ja loputage see välja.
Vajadusel korrake, kuni veepaak on puhas. Ärge jätke vett veepaaki
(jn v).
9 Kuivatage põhiseade ja kõik osad pärast puhastamist ära (jn w).
10 Kui detailid on kuivad, pange need uuesti kokku.
Märkus
• Toiduainetega kokkupuutuvad osad nagu aurutusnõu ja kann võivad
värvi külge võtta. See on normaalne. Kõiki detaile on ikka turvaline
kasutada ja need ei mõjuta valmistatavat toitu.
Veepaagist katlakivi eemaldamine
Parima tulemuse saavutamiseks soovitame seadmest katlakivi eemaldada
iga 2-4 nädala järel. Katlakivi kogunemise vähendamiseks soovitame
kasutada aurutamisel pehmet või puhastatud vett.
Ärge lülitage seadet sisse, kui veepaagis on katlakivi eemaldamise vedelik.
Seadme katlakivist puhastamisel järgige allpool toodud katlakivi
eemaldamise juhiseid.
1 Veenduge, et seade on välja lülitatud.
2 Segage 80 ml söögiäädikat (6% äädikhapet) 80 ml veega. Teise
variandina võite veepaagist katlakivi eemaldamiseks kasutada soojas
vees lahustatud sidrunhapet.
3 Lisage lahus veepaaki.
4 Pange veenõu kaas veepaagile ja keerake päripäeva kindlalt kinni.
5 Oodake 6 tundi/üleöö või seni, kuni kogu katlakivi on lahustunud.
6 Valage kasutatud lahus veepaagist välja.
7 Kui katlakivi pole täielikult lahustunud, korrake selles peatükis
kirjeldatud katlakivi eemaldamise protsessi 1. kuni 6. sammuni.
8 Valage puhast vett veepaaki ja loputage see välja. Vajadusel korrake,
kuni veepaak on puhas.
9 Loputage veepaagi kaant põhjalikult kraani all.
10 Enne, kui seadmesse uuesti toitu panete, täitke veenõu 180 ml
ulatuses veega ning laske seadmel läbida üks aurutamistsükkel tühja
kannuga.
Page 67

Hoiustamine
1 Enne seadme hoiustamist tühjendage veepaak.
2 Enne seadme hoiustamist veenduge, et kõik osad oleksid puhtad ja
kuivad (vt ptk „Puhastamine ja katlakivi eemaldamine”).
3 Hoiustamiseks asetage lõiketera kannu, et vältida kahjustusi.
4 Veenduge alati, et nii veepaagi kui kannu kaaned on hoiustamiseks
kindlalt paika lukustatud.
Ringlussevõtt
See sümbol tähendab, et seda toodet ei tohi visata tavaliste
olmejäätmete hulka (2012/19/EL).
Järgige elektriliste ja elektrooniliste toodete lahuskogumise
kohalikke eeskirju. Õigel viisil kasutusest kõrvaldamine aitab ära
hoida võimalikke kahjulikke tagajärgi keskkonnale ja inimese
tervisele.
Garantii ja hooldus
69EESTI
Kui vajate teavet või abi, külastage palun Philipsi veebisaiti aadressil
www. philips. com / avent või võtke ühendust oma riigi Philipsi
klienditeeninduskeskusega (kontaktandmed leiate kaasasolevalt üleilmselt
garantiilehelt). Kui teie riigis ei ole klienditeeninduskeskust, pöörduge
Philipsi toodete edasimüüja poole.
Veaotsing
See peatükk annab ülevaate üldistest probleemidest, mis võivad selle
seadmega seoses tekkida. Kui te ei suuda probleemi alltoodud teabe abil
lahendada, võtke ühendust oma riigi klienditeeninduskeskusega.
Probleem Võimalik põhjus Lahendus
Seade ei tööta. Seadmel on
ohutuslukk. Kui
detailid ei ole
põhiseadmele
õigesti
paigaldatud, siis
seade ei tööta.
Pange kõik osad õigesti. Enne
aurutamist tuleks kannu kaas
asetada kannule ja õigesti
lukustada, keerates seda
vastupäeva. Pange kann püstiselt
tagasi põhiseadmele ja lukustage,
pöörates seda päripäeva.
Page 68

70
EESTI
Probleem Võimalik põhjus Lahendus
Aurutamise
märgutuli
lülitu sisse.
Seade ei ole
ei
ühendatud
vooluvõrku.
Kann ei ole
põhiseadmele
Ühendage pistik toitepessa.
Paigaldage ja lukustage kann
õigesti põhiseadmele.
õigesti
paigaldatud.
Olete käivitanud
teise aurutustsükli
kohe pärast
Lülitage seade välja ja laske
sellele 10 minutit jahtuda, enne kui
alustate järgmist aurutamistsüklit.
eelmise
lõpetamist.
Esimestel
kasutuskordadel
tuleb veepaagist
ebameeldivat
lõhna.
Seade ei tekita
auru.
Te pole veepaaki
enne kasutamist
loputanud.
Te ei ole veepaaki
vett pannud.
Veepaagi puhastamiseks
vt jaotist „Puhastamine ja
katlakivi eemaldamine“, seejärel
läbige tühja kannuga üks
aurutamistsükkel.
Lülitage seade välja ja tõmmake
toitepistik pistikupesast välja,
seejärel lisage veepaaki vett.
Veepaaki on
kogunenud liiga
palju katlakivi.
Eemaldage veepaagist katlakivi.
Vt peatükist „Puhastamine ja
katlakivi eemaldamine“ jaotist
„Katlakivi eemaldamine“.
Auru liikumistee,
veepaagi auru
väljalaskeava ja
kannu kaane auru
Kontrollige veepaagi auru
väljastusava, kannu kaane auru
sisselaskeava ja nõu aurukanaleid
ummistuste suhtes.
sisselaskeava on
blokeeritud.
Veepaagist lekib
auru.
Veepaagi kaas
ei ole korralikult
suletud.
Kann ei ole
põhiseadmele
Sulgege veepaagi kaas on õigesti,
keerates selle vabastatud asendist
lukustatud asendisse.
Paigutage kann õigesti
põhiseadmele.
õigesti kokku
pandud.
Kannu kaane auru
sisselaskeava on
Puhastage kannu kaane auru
sisselaskeava.
ummistunud.
Page 69

Probleem Võimalik põhjus Lahendus
Toit pole läbi
küpsenud.
Kannu asetatud
tükid on liiga
suured.
Lõigake toit väiksemateks
tükkideks (umbes 1 cm suurusteks
kuubikuteks).
71EESTI
Toit lekib
kannust välja.
Kannu kaanest
lekib liigselt
auru.
Püreestamisfunktsioon ei
tööta.
Kannus on liiga
palju toitu.
Veepaagis on liiga
vähe vett.
Veepaaki on
kogunenud liiga
palju katlakivi.
Kannus on liiga
palju toitu.
Kannu kaas ei
ole paigaldatud
õigesti.
Kannus on liiga
palju toitu.
Kann ei ole
põhiseadmele
õigesti
paigaldatud.
Kannu kaas ei ole
õigesti kannule
lukustatud.
Vähendage kannus oleva toidu
kogust.
Toit ei tohiks ulatuda nõus
kõrgemale kui auru liikumistee
ülemine serv.
Lisage aurutamisajale vastav
veekogus. Kontrollige peatükist
"Koostisained ja aurutamisaeg“,
kas olete lisanud soovitud
koostisainetele või retseptile
vastava koguse vett.
Eemaldage veepaagist katlakivi.
Vt peatükist „Puhastamine ja
katlakivi eemaldamine“ jaotist
„Katlakivi eemaldamine“.
Lülitage seade välja ja töödelge
väikeste portsude kaupa.
Asetage kaas kannu peale ja
pöörake seda lukustamiseks
vastupäeva.
Lülitage seade välja ja töödelge
väikeste portsude kaupa. Ärge
kunagi pange kannu nii palju toitu,
et kaas ei sulgu. Soovitame mitte
korraga püreestada rohkem kui
400 g toitu.
Paigutage kann koos kaanega
põhiseadmele, joondage kannu
käepide
ikooniga põhiseadmel
ja pöörake kannu vastupäeva, et
see põhiseadmel kindlalt paika
lukustada.
Asetage kaas kannu peale ja
pöörake seda lukustamiseks
vastupäeva.
Page 70

72
EESTI
Probleem Võimalik põhjus Lahendus
Kasutate seadet
kleepuvate
toiduainete,
näiteks juustu
peenestamiseks.
Olete kasutanud
püreestamisfunktsiooni järjest
Kontrollige koostisainete ja
aurutamisaegade tabelit ja
näidisretsepte ning valige
koostisaineid, mis sobivad
püreestamiseks.
Lõpetage püreestamine, laske
seadmel mõni minut jahtuda ja
seejärel püreestage edasi.
rohkem kui 30
sekundit.
Blenderdustulemus ei ole
piisavalt hea.
Ei ole piisavalt
blenderdatud.
Koostisosasid
ei ole piisavalt
eeltöödeldud.
Blenderdage koostisosi veel
mõned korrad. Ärge blenderdage
järjest kauem kui 30 sekundit.
Koostisosasid tuleb enne
aurutamist ja blenderdamist
pesta, koorida ja lõigata
väikesteks kuni 1 cm suurusteks
kuubikuteks.
Blenderdamiseks
on liiga vähe
või liiga palju
Sobivaks blenderdamiseks
suurendage või vähendage
toiduainete kogust.
toiduaineid.
Aurutamisaeg ei
ole piisav.
Lisage õiges koguses vett, et
aurutamisaeg oleks piisav.
Vaadake peatükki „Koostisosad ja
aurutamisajad“.
Koostisosad
on kuivad ja
kleepuvad
blenderdamise
ajal kannu
seintele.
Kannu kogunenud vett ei ole
vaja pärast aurutamist välja
valada. Segage see aurutatud
toiduga blenderdamiseks
kokku. Kui kasutate ainult
blenderdamisfunktsiooni (ilma
aurutamiseta) lisage kannu
õiges koguses joogivett ja
segage koostisosasid enne
blenderdamist.
Page 71

Probleem Võimalik põhjus Lahendus
Seade on
mürarikas,
Kannus on liiga
palju toitu.
Lülitage seade välja ja töödelge
väikeste portsude kaupa.
levitab
ebameeldivat
lõhna, on
katsudes kuum,
temast tuleb
suitsu jne.
Kannu kaas ei ole
korralikult suletud.
Olete kasutanud
püreestamisfunkt-
Asetage kaas kannu peale ja
sulgege see kindlalt.
Ärge laske seadmel püreestada
üle 30 sekundi korraga.
siooni liiga pikalt
järjest.
Veepaagil ja
selle kaanel on
valged laigud.
Nendele osadele
on kogunenud
katlakivi.
See on normaalne. Eemaldage
regulaarselt katlakivi. Puhastage
veepaagi kaant ja kannu kaant
niiske lapiga. Eemaldage
veepaagist katlakivi. Vt peatükist
„Puhastamine ja katlakivi
eemaldamine“ jaotist „Katlakivi
eemaldamine“.
Toiduainetega
kokkupuutuvad
seadme osad on
värvi muutnud.
Toiduainetega
kokkupuutuvad
seadme osad
võivad toidu
värvide mõjul
See on normaalne. See ei mõjuta
seadme kvaliteeti ja jõudlust. Kõiki
detaile on ikka turvaline kasutada
ja need ei mõjuta valmistatavat
toitu.
tooni muuta.
Segamiskann
lekib.
Lõiketerade
moodul ei ole
Pingutage lõiketerade moodulit.
korrektselt kokku
pandud.
Lõiketera mooduli
võllitihend on
Paigaldage lõiketera võlli tihend
õigesti (jn
valesti kokku
pandud.
73EESTI
x).
Page 72

74
EESTI
Tehnilised andmed
- Pinge/võimsus: vt tüübiplaati seadme põhja all
- Veepaagi maksimaalne mahutavus: 180 ml
- Segamiskannu maksimaalne mahutavus: 400 ml
- Töötemperatuur 10…40 °C (50…104 °F).
- Kaitse: ülekuumenemise kaitselüliti
Page 73

Пайдаланушынұсқаулығыныңалдыменартындажинақталған
беттердегісуреттердіқараңыз.
Мазмұны
Маңызды 76
Кіріспе 79
Жалпысипаттама 80
Алғашқыретқолданаралдында 80
Құрылғынықолдану 81
Тазалаужәнеқақтыкетіру 89
Сақтау 91
Өңдеу 91
Кепілдікжәнеқызметкөрсету 91
Ақаулықтардышешу 91
Техникалықерекшеліктер 95
75ҚАЗАҚША
Page 74

76 ҚАЗАҚША
Маңызды
Құралды қолданбастан бұрын осы пайдаланушы нұсқаулығын мұқият оқып шығыңыз
да, оны келешекте қарау үшін сақтап қойыңыз.
Қауіпті
- Негізгі құрылғыны ешқашан суға немесе басқа сұйықтыққа
батырмаңыз. Ағын су астында жумаңыз.
Ескерту
- Құралды қоспастан бұрын, онда көрсетілген кернеудің жергілікті
желі кернеуіне сәйкес келетінін тексеріп алыңыз.
- Штепсельдік ұшы, қуат сымы немесе өзі зақымданған болса,
құралды қолданбаңыз. Қуат сымы зақымданған болса, қауіпті
жағдай орын алмауы үшін, оны тек Philips компаниясында,
Philips мақұлдаған қызмет орталығында немесе білікті мамандар
ауыстыруы керек.
- Құралды қауіпсіз пайдалану жөніндегі нұсқаулар беріліп, басқа
біреу қадағалаған және құралды пайдалануға қатысты қауіпқатерлер түсіндірілген жағдайда, осы құралды физикалық, сезу
немесе ойлау қабілеті шектеулі, білімі мен тәжірибесі аз адамдар
пайдалана алады.
- Балалар құрылғымен (қосалқы құралдармен қоса) ойнамауы
керек.
- Бұл құрылғыны балалардың пайдалануына болмайды. Құралды
және оның сымын балалардың қолдары жетпейтін жерде
сақтаңыз (қосалқы құралдарымен қоса).
- Тазалау және пайдаланушының қызмет көрсету жұмысын
балалар орындамауы керек.
- Пышақтардың жүзін ұстамаңыз (әсіресе құрал қуат көзіне
қосулы тұрған кезде). Пышақтар өте өткір.
- Құмыраны босату және тазалау барысында үшкір пышақтармен
абай болыңыз. Құрылғы қолданылмаса, оны қуат көзінен
ажыратыңыз.
- Пышақ кептеліп қалған жағдайда пышаққа тұрып қалған
ингредиенттерді алмас бұрын құралды розеткадан ажыратыңыз.
- Булаудан кейін құрылғы құмыра қақпағымен шамалы немесе
қысқа уақыт ыстық болады (әсіресе, « » таңбалы беттер)
Page 75

және түрткен кезде күйіп қалу қаупі бар. Құмыра қақпағы тек
қақпақ ілмегімен ашылуы керек. Себетті көтеру үшін қалақша
пайдаланылуы қажет. Құмыраны көтеру үшін құмыраны
тұтқасынан ұстаңыз.
- Булау барысында және қақпағын алған кезде ыстық бу
құмырадан шығатынын тексеріңіз.
- Қақпақты ашқан кезде ыстық бу су ыдысынан шығатынын
тексеріңіз.
- Бу циклі аяқталған кезде құмыра қақпағындағы бу шығаратын
саңылаудан ыстық бу шығатынын ескеріңіз. Құмыра қақпағын
ашу кезінде абай болыңыз.
- Егер құрылғы дұрыс жинақталмаса, ыстық бу су ыдысы
қақпағының шетінен шығуы мүмкін. Бұл мәселенің алдын алу
немесе шешу үшін «Ақаулықтарды жою» тарауын қараңыз.
- Бұл құрылғыны қатты және жабысқақ ингредиенттерді турау
үшін пайдаланбаңыз.
- Құрылғыда ағартқышты немесе химиялық стерильдеу
ерітінділерін/таблеткаларын ешқашан пайдаланбаңыз.
- Құрылғыны тазалауға жуу губкаларын, абразивті тазалау
құралдарын немесе бензин, ацетон не спирт сияқты агрессивті
сұйықтықтарды ешқашан пайдаланбаңыз.
- Қайта булауды бастамастан бұрын бір булау циклінен кейін
құрылғыны 10 минут суытыңыз.
- Бір қолданғанда араластыру құралын 30 секундтан артық
уақытқа қоспаңыз. Егер 30 секундтан кейін араластыру
аяқталмаса, араластыруды тоқтату үшін тұтқаны босатып,
қайта жалғастырмастан бұрын бірнеше секунд күтіңіз. Егер
негізгі құрылғы қызса, жалғастырмастан бұрын бірнеше минут
суытыңыз.
- Булау үшін құмыраға ешқашан сұйықтық құймаңыз.
77ҚАЗАҚША
Абайлаңыз
- Басқа өндірушілер шығарған немесе Philips компаниясы нақты
ұсынбаған қосалқы құралдар мен бөлшектерді пайдаланбаңыз.
Ондай қосалқы құралдар мен бөлшектерді пайдалансаңыз,
кепілдік өз күшін жояды.
- Құралды қосылып тұрған не болмаса әлі ыстық пештің немесе
плитаның үстіне де, қасына да қоймаңыз.
Page 76

78 ҚАЗАҚША
- Қолдану кезінде қозғалатын қосалқы құралдарын немесе жақын
бөлшектерін ауыстырар алдында құрылғыны өшіріп, қуат көзінен
ажыратыңыз.
- Тазарту үшін, алдымен құралды розеткадан ажыратып, суытып
алу керек.
- Басқару тұтқасын булаған сайын өшіру күйіне бұраңыз.
- Микротолқынды пеште құмыраны немесе құралдың басқа
бөлігін пайдаланбаңыз, себебі құмыра тұтқасы мен пышақтың
металл бөліктерін онда қолдануға болмайды.
- Құмыраны немесе құралдың басқа бөлігін қысқа толқынды
пеште немесе стерилизаторда стерилдеуге болмайды, себебі
пышақтың металл бөліктері мұндай қолданыс үшін қолайлы
емес.
- Бұл құрал тек үйде қолдануға жасалған. Құрылғыны дұрыс
қолданбаса, кәсіби немесе жартылай кәсіби мақсаттарда
қолданса, пайдаланушы нұсқаулығындағы нұсқауларға сәйкес
қолданбаса, кепілдік жарамсыз болады және Philips компаниясы
болған зақымдарға байланысты кез келген жауапкершіліктен бас
тартады.
- Құралды тұрақты, көлденең және тегіс бетке қойыңыз. Құралды
пайдалану барысында ыстық бу бөлінеді. Шкафтарға немесе
басқа нысандарға зақым келтірмеу үшін айналасында бос
орынның жеткілікті екенін тексеріңіз.
- Егер құрал құласа немесе зақымдалса, оны пайдаланбаңыз.
Жөндету үшін өкілетті Philips қызмет көрсету орталығына
апарыңыз.
- Су ыдысындағы сусыз бу функциясын ешқашан пайдаланбаңыз.
- Ыдыстағы су 180 мл-ден аспайтынын тексеріңіз.
- Булау алдында су ыдысының қақпағы дұрыс құлыпталғанын
тексеріңіз.
- Араластыру кезінде құмырада көрсетілген МАКС тағам
араластыру көлемі деңгейінен (400 мл) асырмаңыз.
- Жұмыс істеп жатқан кезде құралды көтермеңіз және
жылжытпаңыз.
- Су ыдысының бу шығысына, құмыра қақпағының бу кірісіне және
себеттегі бу жолына ешбір нысанды салмаңыз.
- Булау кезінде су ыдысын толтырмаңыз, себебі ыстық су мен бу
құралдан шығуы мүмкін.
Page 77

79ҚАЗАҚША
- Су ыдысының қақпағын ашу алдында суығанын үнемі тексеріңіз.
- Таймер сияқты сыртқы қосу құрылғысы арқылы құралдың қуат
көзін іске қоспаңыз немесе жүйелі түрде қосылып-өшетін
тізбекке қосыңыз.
- Балаңызға қауіпсіз екенін тексеру үшін әрқашан пісірілген
тағамның температурасын қолыңыздың сыртымен тексеріңіз.
- Сәби үшін тағам сәйкестігін тексеріңіз. Тағам құрамы әр түрлі
жастарға сәйкестігі туралы нұсқау үшін Philips веб-торабынан
жүктеп алуға қолжетімді шығару нұсқаулығын қараңыз немесе
дәрігерден не кеңесшіден көмек сұраңыз.
- Себетті көтеруге және құмыра тағамын босатуға берілген
қалақшаны нұсқауға сәйкес ғана пайдаланыңыз (o суреті).
- Жүйелі түрде қақты кетіру құралға зақым келтірмейді.
- Булау себетіндегі тағам мөлшері себеттегі бу жолының үстіңгі
шетінен аспайтынын тексеріңіз, болмаса жол құлыпталуы мүмкін.
- Шу деңгейі: Lc = 88 дБ[А]
Қауіпсіздікжүйелері
Пайдалану барысындағы қауіпсіздік үшін осы құрал кірістірілген қауіпсіздік құлпымен
жабдықталады. Егер барлық бөліктер дұрыс бекітілсе, құрал жұмыс істейді. Барлық
бөліктерді дұрыс бекіту кірістірілген қауіпсіздік құлпын босатады.
Сонымен қатар, бұл құрал артық қызу қауіпсіздігін тоқтату функциясымен
жабдықталады. Егер екі булау циклі арасындағы уақыт тым қысқа болса, артық қызу
орын алуы мүмкін. Егер құрылғы артық қызса, қауіпсіз тоқтату булау циклі барысында
белсендірілсе, құрылғының бірнеше минут сууына мүмкіндік беріңіз. Осыдан кейін
құралды қайта пайдалануға болады.
Электромагниттікөрістер(ЭМӨ)
Осы Philips құрылғысы электромагниттік өрістерге қатысты барлық қолданыстағы
стандарттар мен ережелерге сәйкес келеді.
Кіріспе
Осы өнімді сатып алуыңызбен құттықтаймыз және Philips Avent компаниясына
қош келдіңіз! Philips Avent ұсынатын қолдауды толық пайдалану үшін, өнімді
www.philips.com/welcome торабында тіркеңіз.
Осы маңызды сәби тағамын жасағыш ата-аналарға бір құрылғыда біріктірілген
булау және араластыру функцияларымен сәбилеріне нәрлі тағамдар дайындауына
көмектеседі.
Page 78

80 ҚАЗАҚША
Жалпысипаттама
Өнімгешолу(a-сур.)
Қалақша
A
B Субагініңқақпағы
C Суыдысыныңбушығарусаңылауы
D Суыдысы
E Негізгібөлік
F Басқарутұтқасы
a «Бу»күйі
b «Өшірулі»күйі
c «Араластыру»күйі
d Қуатиндикаторы(булау)
G Құмыранықұлыптауқосқышы
H Тоқсымы
I Судеңгейінжәнетамақмөлшерінкөрсеткіш
J Құмыратұтқасы
K Бушығаратынжәнеараластыратыныдыс
L Пышақтар
M Пышақбілігініңбекітпесі
N Себеттегібужолы
O Букәрзеңкесі
P Ыдысқақпағыныңбукіретінсаңылауы
Q Қақпақілмегі
R Құмырақақпағы
S Ыдысқақпағыныңбушығаратынсаңылауы
Алғашқыретқолданаралдында
1 Құралданбүкілорауыштардыалыңыз.
2 Алғашқыпайдаланбастанбұрынбарлықбөліктеріндұрыстаптазалаңыз.
«Тазалаужәнеқақтыкетіру»тарауынқараңыз.
3 Құралдыбіріншіретпайдаланарданбұрынбосбулаусебетіменжәнебос
құмыраменбірбулауциклініскеқосуұсынылады.«Суыдысынтолтыру»
және«Булау»тарауларынқараңыз.
Page 79

81ҚАЗАҚША
Құрылғынықолдану
Абайлаңыз
• Балаңызғақауіпсізекенінтексеруүшінәрқашанпісірілгентағамның
температурасынжәнесәйкестігінқолыңыздыңсыртыментексеріңіз.
Бұл құрылғы сәбилерге талап етілетін сәйкестікке дейін араластыру алдында таза,
қатты ингредиенттерді булауға арналған. Алдымен, ингредиенттерді булап, одан
кейін оларды араластырыңыз. Дегенмен, құрылғыны тек булауға немесе араластыруға
пайдалануға болады. Құрылғыны тек араластыруға пайдалану кезінде «Су ыдысын
толтыру» және «Булау» бөлімдерін өткізіп жіберіп, «Тек араластыру» бөліміндегі
нұсқауларды орындаңыз.
БұлқұралкелесімақсаттарғаАРНАЛМАҒАН.
- Бірдей ингредиенттерді 30 минуттан артық булау
- Мұздатылған шикізаттарды булау
- Алдымен араластырып, одан кейін булау
- Сорпа, дәмдеуіштер немесе су сияқты сұйықтық түрлерін қыздыру
- Тағамды қайта қыздыру
- Тағамды еріту
- Күріш немесе паста пісіру
- Мұз кесектері және қант түйірлері сияқты қатты ингредиенттерді немесе сыр
сияқты жабысқақ ингредиенттерді турау
Суыдысынтолтыру
Абайлаңыз
• Суөлшеуүшінқұмыраныпайдалануалдындақұмыраныкөтеріптазалаңыз.
• Суөлшеуүшінқұмыраныпайдалануалдындапышақбілігібекітпелеріменқоса
пышақдұрысжинақталғанынтексеріңіз.Пышақбілігібекітпесініңтегісжағы
жоғарықаратылуыкерек(xсуреті).
Естесақтаңыз
• Ыдыстағы су 180 мл-ден аспайтынын тексеріңіз. Су деңгейі көрсеткішін
араластыру құмырасынан таба аласыз.
• Жұмсақ немесе тазартылған суды пайдалану ұсынылады, себебі минералды
судағы немесе ағын судағы минералдардан су ыдысында жылдам қақтың
жиналуы мүмкін.
• Қақты кетіруге қажет сіркесуды ескермегенде судан басқа сұйықтық түрлерін су
ыдысына құймаңыз.
Page 80

82 ҚАЗАҚША
4 Негізгіқұрылғыданжоюүшінбулаужәнеараластыруқұмырасыныңтұтқасын
керібасыңыз(b суреті).Пайдаланушынұсқаулығындағы«Заттаржәнебулау
уақыты»тарауынасәйкесдұрыскөлемгедейінсутолтырыңыз(dсуреті).
5 Суыдысыныңқақпағынашуүшінсағаттілінеқарсыбұраңыз(eсуреті),одан
кейінараластыруқұмырасыменсуғатолтырыңыз(f суреті).МАКС180мл
деңгейіненасырмаңыз(dсуреті).
6 Суыдысыныңқақпағынкерісалып,орнынақауіпсізтүрдеқұлыптауүшін
қақпақтысағаттілініңбағытыменбұраңыз(gсуреті).
Естесақтаңыз
• Құрылғыныпайдаланбастанбұрынсуыдысықақпағыныңқұлыпталғанын
тексеріңіз.
Буменүтіктеу
Абайлаңыз
• Пышақбілігібекітпелеріменқосапышақдұрысжинақталғанынтексеріңіз.
Пышақбілігібекітпесініңтегісжағыжоғарықаратылуыкерек(xсуреті).
• Ыстықбунемесеыстықсусаусақтардыкүйдіруімүмкін.Құралдыңыстық
бөліктеріннемесеқұралүстіненшығатынбудытүртпеңізжәнебалалардың
түртуінемүмкіндікбермеңіз,себебікүйіпқалуқаупібар.
Естесақтаңыз
• Буменөңдеудіңалдында,ингредиенттердішайыңыз,тазартыңызжәнеөлшемі
1см-денаспайтынкішігірімтекшетүріндекесіңіз.
• Булауғаарналғанбулаусебетінемұздатылғаншикіингредиенттердісалмастан
бұрынерітіңіз.Құмырағасалмастанбұрынерітілгензаттарданбөлінгенартық
судышайқаптөгіңіз.
• Егерқұмыражәнеқұмырақақпағынегізгіқұрылғығадұрысжинақталып
орналастырылмаса,құрылғыбулаудыбастамайды(jжәнеk суреттері).
1 Араластыруқұмырасынанқақпақтыжоюүшінқақпақілмегінсағаттілінің
бағытыменбасыңыз(cсуреті).
2 Булаусебетінеқаттыингредиенттер(шамамен1смтекшелергекесіңіз)
салыңыз.Ингредиенттерсебеттегібужолыныңүстіңгішетіненаспауыкерек
(h суреті).
3 Себеттіқұмырағакерісалукезіндебужолықарсыжақтаекендігінтексеріңіз.
Себетдұрыскүйгеөткенкезде«сырт»еткендыбысестисіз(i суреті).
4 Құмырақақпағынқұмырағасалып,дұрыстапқұлыптауүшінсағаттілінеқарсы
бұраңыз(j суреті).
Page 81

5 Сағаттілініңбағытыменсырғытуарқылықұмыранынегізгіқұрылғыға
құлыптаңыз(k суреті).
Естесақтаңыз
• Негізгіқұрылғыдақұлыптауістіктерінтегісбағыттауғажәнеқұмыраныорнына
құлыптауғакөмектесетінсаңылауларбар.Булаунемесеараластыруалдында
құмыранегізгіқұрылғыдадұрысқұлыпталғанынтексеріңіз.
6 Егербулауғаарналғансулыыдысәлітолтырылмаса,«Суыдысынтолтыру»
тарауынқарап,жұмыстыбастауалдындасуқосыңыз.
Естесақтаңыз
• Суыдысыныңқақпағыорнынадұрысқұлыпталғанынтексеріңіз.
7 Құралдықуаткөзінеқосыңыз.
8 Басқарутұтқасынбупараметрінебұраңыз(l суреті).Булауғаұсынылғансу
көлеміүшін«Заттаржәнебулаууақыты»тарауындағыкестеніқараңыз.
» Құрылғының булайтынын көрсететін сары жарық қосылады.
» Булау циклі аяқталған кезде құрылғы автоматты түрде өшіп, индикатор
жарығы өшеді.
9 Булауданкейінбасқарутұтқасынкері«өшірулі»күйінебұраңыз(m суреті) .
Құмыраныалмасбұрын2минутнемесеүстіненбушығуытоқтағаншакүтіңіз.
83ҚАЗАҚША
Абайлаңыз
• Егербасқабулауциклінбастаукерекболса,құралда10минутсуытып,қайта
толтыружәнежаңабулауциклінбастамастанбұрынсуыдысындағықалған
судыбосатыңыз.
Естесақтаңыз
• Буменжеткіліксізөңдеудіболдырмаужәнесудысыйымдықтақалдырмау
үшін,буменөңдеуциклыаяқталғанғадейінбасқарутұтқасын«Сөнд.»күйіне
қоймаңыз.
Page 82

84 ҚАЗАҚША
Булауданкейінараластыру
Абайлаңыз
• Пышақбілігібекітпелеріменқосапышақдұрысжинақталғанынтексеріңіз.
Пышақбілігібекітпесініңтегісжағыжоғарықаратылуыкерек(xсуреті).
• Булауцикліненкейінқұмыражәнеқұмырақақпағықызады.Құмыранытек
тұтқасынанұстаңыз.
• Құмырақақпағынашуғатекқақпақілмегінпайдаланыңыз.
• Булауданкейінсебеттікөтеругетекқалақшапайдаланыңыз.
• Құрылғыныпайдаланукезіндеқақпақпенқұмыранегізгіқұрылғыда(jжәне
kсуреттері)дұрысжинақталыпорналастырылғанынүнемітексеріңіз.
1 Негізгіқұрылғыданараластыруқұмырасыналуүшінтұтқаныұстап,құмыраны
құлыптанбосатуүшінкерібасыңыз(b.суреті).
2 Құмырақақпағынашуүшінқақпақілмегінбасыңыз(c суреті).
3 Булаусебетінқұмыраданалуүшінберілгенқалақшаныпайдаланыңыз.
Себеттегітесіктерарқылықалақшанысалып(жоғарықаратылған«Avent»
сөзімен),оныкөтеріңіз(oсуреті).
4 Қалақшаныұстауменбуланғантағамдыараластыруқұмырасынақұйыңыз
(pсуреті).
Естесақтаңыз
• Құмырағажиналғансудытөкпеукерек.Оныараластыруүшінбуменөңделген
өнімдерменараластырыңыз.
5 Араластыруқұмырасықақпағынкерісалып,орнынқұлыптаңыз(qсуреті).
Араластыруғадайындаукезіндебулаусебетінкеріқұмырағасалмаңыз.
6 Ингредиенттердібірқалыптытаратуүшінараластыруқұмырасыншайқаңыз.
7 Қажетболғандақұмырақақпағыналып,араластыруғақосымшазаттар
қосыңыз(мысалы,езбесуынемесекүрішнепастасияқтықосымшапіскен
заттар).400млМАКСтағамкөлеміненасырмаңыз.
8 Араластыруқұмырасынкерінегізгіқұрылғығасалыңыз.Орнынақұлыптау
үшінқұмыраныбұраңыз.Құмыраныңбекітілгенінжәнетұтқаныңқұмыраны
құлыптауқосқышынанжоғарыорналастырылғанынтексеріңіз.Тұтқаоңжақта
екендігінтексеріңіз(kсуреті).
9 Араластырудыбастауүшінингредиенттердітаңдауғасәйкесараластырғанша
тұтқаны«араластыру»күйінебұраңыз(rсуреті).
Page 83

Абайлаңыз
• Бірқолданғандаараластыруқұралын30секундтанартықуақытқақоспаңыз.
Егер30секундтанкейінараластыруаяқталмаса,араластырудытоқтатуүшін
тұтқаныбосатып,қайтажалғастырмастанбұрынбірнешесекундкүтіңіз.Егер
негізгіқұрылғықызса,жалғастырмастанбұрынбірнешеминутсуытыңыз.
10 Құралдырозеткаданажыратыңыз.
11 Құмыранынегізгіқұрылғыданалып,құмырақақпағынашыңыз(n суреті).
12 Тағамдықұмырадантостағанғанемесетақтағатасымалдауүшінқалақша
пайдаланыңыз(s суреті).
Текараластыру
Абайлаңыз
• Пышақбілігібекітпелеріменқосапышақдұрысжинақталғанынтексеріңіз.
Пышақбілігібекітпесініңтегісжағыжоғарықаратылуыкерек(x суреті).
• Құрылғыныпайдаланукезіндеараластыруқұмырасыныңқақпағыорнында
дұрысқұлыпталғанынтексеріңіз.
Естесақтаңыз
85ҚАЗАҚША
• Араластырудыңалдында,ингредиенттердішайыңыз,тазартыңызжәнеөлшемі
1см-денаспайтынкішігірімтекшетүріндекесіңіз.
1 Араластыруқұмырасыннегізгіқұрылғыданалып,құмыраныашуүшінқақпақ
ілмегінбасыңыз.(b және c суреттері).
2 Кесілгентағамдыараластыруқұмырасынабулаусебетінсізқұйыңыз.400мл
МАКСмөлшеріненасырмаңыз.
3 Араластыруқұмырасықақпағынкерісалып,орнынқұлыптаңыз(qсуреті).
Ингредиенттердібірқалыптытаратуүшінараластыруқұмырасыншайқаңыз.
4 Араластыруқұмырасынкерінегізгіқұрылғығасалып,орнынақауіпсіз
құлыптаңыз.
5 Араластырудыбастауүшінингредиенттердітаңдауғасәйкесараластырғанша
тұтқаны«араластыру»күйінебұраңыз(r суреті).
Естесақтаңыз
• Егерзаттарқұмырақабырғасынажабыссанемесеараластырылғанзаттарәлі
деқаттыболса,араластырутұтқасынбосатып,негізгіқұрылғыданқұмыраны
алып,араластырылғантағамсәбижасынасәйкестенгеншекүрекшемен
ингредиенттердіалыңыз,шамалыішетінсуқұйыңыз.
Page 84

86 ҚАЗАҚША
Абайлаңыз
• Бірқолданғандаараластыруқұралын30секундтанартықуақытқақоспаңыз.
Егер30секундтанкейінараластыруаяқталмаса,араластырудытоқтатуүшін
тұтқаныбосатып,қайтажалғастырмастанбұрынбірнешесекундкүтіңіз.Егер
негізгіқұрылғықызса,жалғастырмастанбұрынбірнешеминутсуытыңыз.
6 Құралдырозеткаданажыратыңыз.
7 Құмыранынегізгіқұрылғыданалып,құмырақақпағынашыңыз(nсуреті).
8 Тағамдықұмырадантостағанғанемесетақтағатасымалдауүшінқалақша
пайдаланыңыз(sсуреті).
Заттаржәнебулаууақыты
Тамақтүрі Ингредиенттер Тиістібулау
уақыты(мин.)*
Жеміс
жидек
Көкөністер Қояншөп 20 120
Алма 20 120
Апельсин/мандарин 20 120
Шабдалы 10 60
Алмұрт 20 120
Ананас 30 180
Қара өрік 10 60
Құлпынай 20 120
Броколли 20 120
Сәбіз 30 180
Түрлі түсті капуста 20 120
Сельдерей 20 120
Кәді 20 120
Фенхель 30 180
Баданалар 30 180
Пияз 20 120
Пияз 20 120
Бұршақ 20 120
Бұрыш 20 120
Картоп 30 180
Асқабақ 20 120
Суыдысындағысу
деңгейі(мл)
Page 85

87ҚАЗАҚША
Тамақтүрі Ингредиенттер Тиістібулау
уақыты(мин.)*
Шпинат 20 120
Тарна 20 120
Тәтті жүгері 20 120
Тәтті картоп 20 120
Қызанақ 20 120
Шомыр 30 180
Асқабақ 20 120
Ет Тауық, сиыр, қой, шошқа,
т.б.
Балық Албырт, мерланг, теңіз тілі,
нәлім, бақтақ, т.б.
* Барлық тағам 1 см үлкен емес, кішкентай текшелерге кесілуі қажет. Булау
уақытының болжамы 200 г тағамға негізделеді. Нақты тағам мөлшеріне сәйкес
булау уақытын реттеңіз.
* Булау уақыты кернеу ауытқуына байланысты өзгеруі мүмкін.
30 180
20 120
Суыдысындағысу
деңгейі(мл)
Рецептмысалдары
(1) Тәтті картоп
пюресі және
брокколи*
(2) Банан және
авокадо*
(3) Вегетариан
тағамы*
Ингредиенттер Сукөлеміжәне
булаууақыты
• 140 г картоп 70 г
брокколи
• 50 г банан
• 50 г авокадо
• 80 г түрлі-түсті
орамжапырақ
• 90 г картоп
• 60 г сәбіз
• 120 мл су
қосу және
шамамен 20
мин булау
• Булау керек
емес
• 180 мл су
қосу және
шамамен 30
мин булау
• Әрқайсысын 3-5 рет 15
секунд араластыру
• 60 мл сүт қосу
• Әрқайсысын 3-5 рет 15
секунд араластыру
• Әрқайсысын 2-3 рет 15
секунд араластыру
Шайқау
Page 86

88 ҚАЗАҚША
(4) Етті
тағамдар*
(5) Менің
алғашқы
мюслиім*
(6) Нәлім және
картоп бөлігі*
(7) Үнемі
бақытты
брокколи *
(8) Күнді
қояншөп *
Ингредиенттер Сукөлеміжәне
булаууақыты
• 250 г сиыр
еті / қой еті /
тауықтың төс еті
/ шошқа еті
• 100 г шабдалы
• 100 г алмұрт
• 50 г қаражидек
• 180 мл су
қосу және
шамамен 30
мин булау
• 120 мл су
қосу және
шамамен 20
мин булау
• 100 г нәлім
• 150 г картоп
• 180 мл су
қосу және
шамамен 30
мин булау
• 120 г ақсерке
• 120 г брокколи
• 120 мл су
қосу және
шамамен 20
мин булау
• 240 г қояншөп • 120 мл су
қосу және
шамамен 20
мин булау
Шайқау
• Әрқайсысын 3-5 рет 15
секунд араластыру
• Талап етілген жағдайда
1 шай қасық ет
пюресін 3 шай қасық
көкөніс пюресімен
араластырыңыз
[вегетариан тағамы
рецептін қараңыз (3)]
• Әрқайсысын 2-3 рет 5
секунд араластыру
• Араластырудан кейін
пюрені 5 бөлікке бөліңіз.
Әрбір қызмет үшін
1 бөлікті 100 г сұлы
қауызымен араластыру
• Әрқайсысын 2-3 рет 5
секунд араластыру
• Араластырудан кейін
пюрені 5 бөлікке бөліңіз.
Әрбір қызмет үшін 1
бөлікті 100 г жақсы
піскен күріш ботқасымен
араластыру
• Әрқайсысын 2-3 рет 5
секунд араластыру
• Араластырудан кейін
оны 4 бөлікке бөліңіз.
Әрбір қызмет үшін 1
бөлікті 140 г жақсы
піскен пастамен
араластыру
• Араластыру керек емес
• Булаудан кейін
қояншөпті 3 бөлікке
бөліңіз. 1 бөлікті 100
г піскен жаңа картоп
сыналарымен және 20
г туралған пармезан
ірімшігімен араластыру
Page 87

89ҚАЗАҚША
* Ингредиенттер қолдану алдында жуылып, тазаланып, 1 см үлкен емес кішкентай
текшелерге кесілуі керек.
* Тамақ ішу алдында тағам температурасы мен сәйкестігін үнемі тексеріңіз.
* Жоғарғы рецепттер әр түрлі емшектен шығару кезеңдеріндегі сәбилерге арналған.
Ұсынысымыз:
* Алғашқы емшектен шығару кезеңіне арналған 1-2-ші рецепттер (шамамен 4-6 ай)
* Екінші емшектен шығару кезеңіне арналған 3-4-ші рецепттер (шамамен 6-8 ай)
* Үшінші емшектен шығару кезеңіне арналған 5-6-шы рецепттер (шамамен 9-12 ай)
* Төртінші емшектен шығару кезеңіне арналған 7-8-ші рецепттер (шамамен 12 ай)
* Сәбилер жеке тұлғалар болғандықтан және әр түрлі ортада өсетіндіктен, сәбидің
өсуіне байланысты үйлесімді рецепттер таңдаңыз.
Тазалаужәнеқақтыкетіру
Тазалау
Абайлаңыз
• Құрылғынықолданғансайынтазалаңыз.
• Негізгіқұрылғыменсуыдысынешқашансуғабатырмаңызнемесеағынсуда
жумаңыз.
• Құрылғыдаағартқыштынемесехимиялықстерильдеуерітінділерін/
таблеткаларынешқашанпайдаланбаңыз.
• Құрылғынытазалауғажуугубкаларын,абразивтітазалауқұралдарыннемесе
бензин,ацетоннеспиртсияқтыагрессивтісұйықтықтардыешқашан
пайдаланбаңыз.
• Булаусебетін,булаужәнеараластыруқұмырасын,пышақтыжәнеқұмыра
қақпағыныдысжуғыштатазалауғаболады.Олардыыдысжуғышқасалу
алдындаосыбөлшектердіқолданыстанкейінбірденағынсудажуыңыз.
Олардытазаланбағанбөліктеріменсуғабатырмаңыз.
• Тазалауүшіналғаннанкейінпышақбілігініңбекітпесінараластыру
құрылғысынакеріқайтасалмаңыз.Пышақбілігібекітпесініңтегісжағыжоғары
қаратылуыкерек.
1 Құрылғыныажыратып,құмыранынегізгіқұрылғыданалыңыз.
2 Құмырақақпағыншешуүшінқақпақілмегінсағаттілініңбағытыменбасыңыз
(c суреті).
3 Тағамқалдықтарынжоюүшінбулаусебетін,булаужәнеараластыру
құмырасын,құмырақақпағынжәнеқалақшаныағынсудажуыңыз(u суреті).
4 Пышақтыкерекболғандажууүшінбөлшектеугеболады(t суреті).
Page 88

90 ҚАЗАҚША
5 Қажетболғандаараластыруқұрылғысынанпышақбілігібекітпесіналыңыз.
Абайлаңыз
• Үшкіркесетіншеттеріненжарақаттанбауүшінпышақтыөтемұқият
қолданыңыз.
6 Суыдысыныңқақпағынсағаттілінеқарсыбұрап,суыдысынаналыңыз.
7 Суыдысықақпағынағыптұрғансуменжуыңыз.
8 Қажетболғандатазасудысуыдысынақұйып,онышайыңыз.Суыдысы
тазаланғаншақайталаңыз.Судысуыдысындақалдырмаңыз(v суреті) .
9 Жуғаннанкейіннегізгіқұрылғыменбарлықбөліктерінқұрғатыңыз(w суреті).
10 Барлықбөлшектерқұрғақболғандажинақтаңыз.
Естесақтаңыз
• Булаусебетіжәнеқұмырасияқтытағамменбайланысатынбөлшектер
тағамменбоялуымүмкін.Бұләдеттегінәрсе.Барлықбөліктердіәліде
пайдалануғаболадыжәнепісірілгентағамғазиянкелтірмейді.
Суыдысықағынкетіру
Оңтайлы өнімділік үшін құрылғы қағын 2-4 апта сайын кетіруді ұсынамыз. Қақтың
түзілуін азайту үшін булау үшін жұмсақ немесе тазартылған су пайдалану ұсынылады.
Тазалау ерітіндісінен тұратын құрылғыны су ыдысына бұрмаңыз.
Құрал қағын кетіру үшін төмендегі қақ кетіру нұсқауларын орындаңыз.
1 Құрылғыныңөшірілгенінтексеріңіз.
2 80млақсіркесуды(6%сіркеқышқылы)80млсуменараластырыңыз.Болмаса,
суыдысыныңқағынкетіруүшінлимонқышқылынжылысуменпайдалануға
болады.
3 Суыдысынаерітіндіқосыңыз.
4 Суыдысынасуыдысықақпағынсалып,орнынақауіпсізтүрдеқұлыптауүшін
қақпақтысағаттіліменбұраңыз.
5 6сағат/түнібойынемесебарлыққақерігеншекүтіңіз.
6 Суыдысынанпайдаланылғанерітіндінітөгіңіз.
7 Егерқаққұрылымытолығыменерімесе,қақкетірупроцесіносытараудағы
1-6қадамдарынқайталаңыз.
8 Тазасудысуыдысынақұйып,онышайыңыз.Суыдысытазаланғанша
қайталаңыз.
9 Суыдысықақпағынағыптұрғансуменшайыңыз.
Page 89

91ҚАЗАҚША
10 Суыдысын180млсументолтырып,құралдытағамменқайтапайдаланбастан
бұрынбосқұмыраменбулауциклінорындауғамүмкіндікберіңіз.
Сақтау
1 Құралдысақтамастанбұрынсуыдысынбосатыңыз.
2 Құралдысақтапқоймастанбұрын,оныңбарлықбөліктерініңтазажәнеқұрғақ
екенінтексеріңіз(«Тазалаужәнеқақтыкетіру»тарауынқараңыз).
3 Құралдызақымдамауүшінпышақтықұмыраішіндесақтаңыз.
4 Суыдысыменқұмырақақпақтарысақтауорнындақұлыпталғанынтексеріңіз.
Өңдеу
Бұл таңба осы өнімді қалыпты тұрмыстық қалдықпен тастауға
болмайтынын білдіреді (2012/19/EU).
Электр және электрондық өнімдердің қалдықтарын бөлек жинау
жөніндегі еліңіздің ережелерін сақтаңыз. Қоқысқа дұрыс тастау
қоршаған ортаға және адам денсаулығына тиетін зиянды әсердің алдын
алуға көмектеседі.
Кепілдікжәнеқызметкөрсету
Егер ақпарат керек болса немесе кез келген мәселелер туындаса,
www. philips. com / avent Philips веб-торабына кіріңіз немесе еліңіздегі Philips
тұтынушыға қолдау көрсету орталығына хабарласыңыз (қосымша мәліметтер үшін
берілген дүниежүзілік кепілдік бетін қараңыз). Егер еліңізде тұтынушыларға қолдау
көрсету орталығы болмаса, онда жергілікті Philips компаниясының дилеріне барыңыз.
Ақаулықтардышешу
Бұл тарауда құралда орын алуы мүмкін ең көп кездесетін ақаулықтар жинақталған.
Егер төменде берілген ақпарат көмегімен ақаулық жойылмаса, еліңіздегі
тұтынушыларды қолдау орталығына хабарласыңыз.
Page 90

92 ҚАЗАҚША
Ақаулық Мүмкінсебептер Шешімі
Құрал жұмыс
жасамайды.
Булау шамы
қосылмайды.
Бұл құрал қауіпсіздік
құлпымен
жабдықталған. Егер
бөліктері негізгі
құрылғыға дұрыс
бекітілмесе, құрал
жұмыс істемейді.
Құрал қуат көзіне
қосылмаған.
Құмыра негізгі
құрылғыға дұрыс
Барлық бөліктерді дұрыстап бекітіңіз.
Булау алдында құмыра қақпағы сағат
тіліне қарсы бұраумен құмыраға
салынып, дұрыс құлыпталуы керек.
Құмыраны негізгі құрылғыға тігінен
салып, сағат тілінің бағытымен бұрау
арқылы құмыраны құлыптаңыз.
Тығынды розеткаға жалғаңыз.
Құмыраны негізгі құрылғыға дұрыс салып
құлыптаңыз.
салынбайды.
Бастапқы булау
аяқталғаннан кейін
екінші цикл дереу
Құралды өшіріп, екінші булау циклін
бастамастан бұрын 10 минут суытып
алыңыз.
басталды.
Алғашқы бірнеше
қолданыстан
кейін су
Қолданбастан бұрын
су ыдысы алдын ала
жуылмаған.
Су ыдысын тазалау үшін «Тазалау және
қақты кетіру» тарауын қарап, одан кейін
бос құмырамен булау циклін аяқтаңыз.
ыдысынан
жағымсыз иіс
шығады.
Құрал бу
шығармайды.
Су ыдысына су
құймағансыз.
Су ыдысында
түзілген қақ мөлшері
тым көп.
Бу жолы, су
ыдысының бу
шығысы және
құмыра қақпағының
Құралды өшіріп, ажыратыңыз да су
ыдысына су құйыңыз.
Су ыдысы қағын кетіріңіз. «Тазалау және
қақты кетіру» тарауындағы «Қақты
кетіру» бөлімін қараңыз.
Су ыдысының бу шығысын, құмыра
қақпағының бу кірісін және бу жолын
тексеріп, ешбір кедергі жоқтығын
тексеріңіз.
бу кірісі құлыпталды.
Су ыдысынан бу
шығады.
Су ыдысы қақпағы
дұрыс жабылмаған.
Су ыдысының қақпағын құлыптан босату
күйінен құлыптау күйіне бұраумен
жабыңыз.
Құмыра негізгі
құрылғыға дұрыс
Құмыраны негізгі құрылғыға дұрыстап
салыңыз.
бекітілмеген.
Құмыра қақпағының
Құмыра қақпағының бу кірісін тазалаңыз.
бу кірісі құлыпталады.
Page 91

Ақаулық Мүмкінсебептер Шешімі
Тағамның
құрамдас
Құмырадағы
бөліктер тым үлкен.
Тағамды кішкентай бөліктерге кесіңіз
(шамамен 1 см текшелер).
бөліктері дұрыс
піспейді.
Құмыра ішіндегі
тағам мөлшері тым
көп.
Су ыдысындағы су
жеткіліксіз.
Құмырадағы тағам мөлшерін азайтыңыз.
Тағам мөлшері себеттегі бу жолының
үстіңгі шетінен аспауы керек.
Булау уақыты бойынша судың дұрыс
мөлшерін қосыңыз. Булау керек
ингредиенттерді булау уақытына
немесе әзірлеу керек рецептіне
арналған судың дұрыс мөлшері
қосылғанын тексеру үшін «Заттар және
булау уақыты» тарауын тексеріңіз.
Құмырдағы тағам
төгілуде.
Су ыдысында
түзілген қақ мөлшері
тым көп.
Құмыра ішіндегі
тағам мөлшері тым
Су ыдысы қағын кетіріңіз. «Тазалау және
қақты кетіру» тарауындағы «Қақты
кетіру» бөлімін қараңыз.
Электр құралын өшіріңіз және өнімнің
аз көлемін дайындаңыз.
көп.
Артық бу құмыра
қақпағынан
кемуде.
Араластыру
функциясы жұмыс
істемейді.
Құмыра қақпағы
құмыраға дұрыс
бекітілмейді.
Құмыра ішіндегі
тағам мөлшері тым
көп.
Құмыра қақпағын құмыраға салып,
дұрыстап жабу үшін сағат тіліне қарсы
бұраңыз.
Электр құралын өшіріңіз және өнімнің
аз көлемін дайындаңыз. Құмыра қақпағы
жабылмауы үшін тым көп тағамды
ешқашан салмаңыз. Араластыруға
арналған МАКС тағам көлемін 400 г
асырмау ұсынылады.
Құмыра негізгі
құрылғыға дұрыс
салынбайды.
Құмыраны қақпағымен негізгі құрылғыға
салып, құмырадағы тұтқаны негізгі
құрылғыдағы
негізгі құрылғыдағы орнына дұрыстап
бекіту үшін құмыраны сағат тіліне қарсы
бұраңыз.
Құмыра қақпағы
құмыраға дұрыс
құлыпталмайды.
Құмыра қақпағын құмыраға салып,
дұрыстап жабу үшін сағат тіліне қарсы
бұраңыз.
93ҚАЗАҚША
белгішесімен туралап,
Page 92

94 ҚАЗАҚША
Ақаулық Мүмкінсебептер Шешімі
Құралды ірімшік
сияқты жабысқақ
тағамды араластыру
үшін қолданып
Ингредиенттер мен булау уақыты
кестесін немесе рецепт мысалдарын
тексеріп, араластыруға сәйкес
ингредиенттерді таңдаңыз.
жатырсыз.
Араластыру
функциясын 30
секундтан артық
Араластыруды тоқтатып, құралды
бірнеше секунд суытып, араластыруды
қайта бастаңыз.
үздіксіз пайдаланып
жатырсыз.
Өнімдердің
онша жақсы
араластырылмауы.
Жеткіліксіз
араластыру.
Ингредиенттерді бірнеше рет
араластырыңыз. Араластыру құралын
үздіксіз 30 секундтан артық уақытқа
қоспаңыз.
Ингредиенттер
алдын ала жеткіліксіз
өңделген.
Бумен өңдеудің және араластырудың
алдында, ингредиенттерді шайыңыз,
тазартыңыз және өлшемі 1 см-ден
аспайтын кішігірім текше түрінде кесіңіз.
Араластыру үшін
өнімдердің көлемі
Араластыру үшін азық-түлік көлемін
тиісінше арттырыңыз немесе азайтыңыз.
тым аз немесе тым
көп.
Бумен өңдеу уақыты
жеткіліксіз.
Булау уақыты жеткілікті болуы үшін
судың дұрыс мөлшерін қосыңыз.
«Ингредиенттер және бумен өңдеу
уақыты» бөлімін қараңыз.
Ингредиенттер
құрғақ болған соң,
араластырылған
кезде құмыраның
қабырғасына
жабысып қалады.
Бумен өңдегеннен кейін, құмыраға
жиналған суды төкпеу керек. Оны
араластыру үшін бумен өңделген
өнімдермен араластырыңыз. Егер сіз
тек араластыру функциясын (бумен
өңдеусіз) пайдаланатын болсаңыз,
ішетін судың тиісті мөлшерін құмыраға
құйыңыз да, араластырудың алдында
ингредиенттермен араластырыңыз.
Құрылғы шулы,
жағымсыз иіс
шығарады,
Құмыра ішіндегі
тағам мөлшері тым
көп.
Электр құралын өшіріңіз және өнімнің
аз көлемін дайындаңыз.
түрткенде ыстық,
түтін шығарады,
т.б.
Page 93

Ақаулық Мүмкінсебептер Шешімі
Су ыдысында
және су
ыдысының
қақпағында ақ
дақтар бар.
Тағамға тиетін
құрылғы беттері
түссізделеді.
Араластыру
құмырасы кемиді.
Құмыра қақпағы
дұрыс жабылмаған.
Араластыру
функциясы тым ұзақ
пайдаланылды.
Осы бөліктерде қақ
түзіледі.
Тағам түстері
тағаммен
байланысатын
бөліктерді
түссіздендіруі
мүмкін.
Пышақ дұрыс
жинақталмайды.
Пышақтағы пышақ
білігі бекітпесін
дұрыс жинақтамау.
Құмыра қақпағын құмыраға салып,
дұрыстап жабыңыз.
Бір қолданғанда араластыру құралын
үздіксіз 30 секундтан артық уақытқа
қоспаңыз.
Бұл әдеттегі нәрсе. Қақты жүйелі түрде
жойыңыз. Су ыдысының қақпағын
және құмыра қақпағын дымқыл
шүберекпен тазалаңыз. Су ыдысы қағын
кетіріңіз. «Тазалау және қақты кетіру»
тарауындағы «Қақты кетіру» бөлімін
қараңыз.
Бұл әдеттегі нәрсе. Бұл құрылғының
сапасы мен өнімділігіне әсер етпейді.
Барлық бөліктерді әлі де пайдалануға
болады және пісірілген тағамға зиян
келтірмейді.
Пышақты бекітіңіз.
Пышақ білігі бекітпесін дұрыс
жинақтаңыз (
95ҚАЗАҚША
x суреті).
Техникалықерекшеліктер
- Кернеу/ватт: 220-240В ~, 50-60 Гц
- Қыздыру қуаты 330 Вт
- Араластыру қуаты 100 Вт
- Су ыдысының ең жоғарғы су сыйымдылығы: 180 мл
- Араластыру құмырасының ең жоғарғы сыйымдылығы: 400 мл
- І қауіпсіздік класы
- Пайдалану
- Температура: +10°C ~ +40°C
- Салыстырмалы ылғалдылық: 40°C температурасында 20% ~ 90%,
конденсациясыз
- Атмосфералық қысым: 84~101.3 kPa
- Сақтау шарттары
- Температура: -20°C ~ +60°C
- Салыстырмалы ылғалдылық: 45°C температурасында 10~90% ,
(конденсациясыз)
- Атмосфералық қысым: 84 ~101.3 kPa
- Қорғаныс: температура қадағаланатын қыздыру жүйесі
Page 94

96 ҚАЗАҚША
Балалардың негізгі тамағын дайындауға арналған құрылғы: SCF862
Қазақстан Республикасында сатып алынған тауарға қатысты шағымдарды
қабылдайтын заңды тұлға: «Филипс Казахстан» ЖШС Манас көшесі, 32А, 503-кеңсе,
050008, Алматы қаласы, Қазақстан
Юр. лицо принимающее претензии в отношении товара, приобретенного на
территории Республики Казахстан: ТОО «Филипс Казахстан» ул.Манаса, 32А офис
503, 050008 Алматы, Казахстан
Өндіруші: “Филипс Консьюмер Лайфстайл Б.В.”, Туссендиепен 4, 9206 АД, Драхтен,
Нидерланды
Қытайда жасалған.
Ресей және Кедендік Одақ территориясына импорттаушы: “ФИЛИПС” ЖШҚ,
Ресей Федерациясы, 123022 Мәскеу қаласы, Сергей Макеев көшесі, 13- үй, тел.
+7 495 961-1111
Егер басқа материал ретінде белгіленбесе, жәшік ішіндегі барлық бума материалдары
қайта өңделмелі қағаздан жасалады; жәшік сыртынан PAP белгісін қараңыз
Page 95

Погледнете ги сликите на превитканите страници во
предниот и задниот дел на упатството за користење.
Содржина
Важно 98
Вовед 103
Општ опис 103
Пред првата употреба 104
Користење на апаратот 104
Чистење и отстранување бигор 116
Меморија 118
Рециклирање 118
Гаранција и сервисирање 118
Отстранување на проблеми 119
Технички спецификации 124
97МАКЕДОНСКИ
Page 96

98 МАКЕДОНСКИ
Важно
Внимателно прочитајте го ова упатство за користење пред да
започнете да го користите апаратот и зачувајте го за во иднина.
Опасност
- Никогаш не ја потопувајте главната единица во
вода или каква било друга течност. Не го плакнете
апаратот под чешма.
Предупредување
- Проверете дали напонот назначен на апаратот
одговара на локалниот напон на струјата пред да го
поврзете апаратот.
- Не го користете апаратот ако приклучокот, кабелот
за напојување или самиот апарат се оштетени.
Доколку е оштетен кабелот за напојување, тој мора
да биде заменет од страна на Philips; сервисен
центар овластен од страна на Philips или слично
квалификувани лица за да се избегне опасност.
- Овој апарат не треба да го користат лица со
ограничени физички, сензорни или ментални
можности или недостаток на искуство и знаење,
освен ако се надгледувани или советувани за
користењето на апаратот на безбеден начин и ги
разбираат потенцијалните опасности.
- Децата не треба да си играат со апаратот
(вклучувајќи ги и додатоците).
- Овој апарат не треба да го користат деца. Чувајте го
апаратот и неговиот кабел подалеку од дофатот на
децата (вклучувајќи ги и додатоците).
- Децата не треба да го чистат или да го одржуваат
апаратот.
- Не ги допирајте сечилата, особено кога апаратот е
приклучен во струја. Сечилата се многу остри.
- Внимавајте при ракувањето со острите сечила кога
го празните бокалот и при чистењето. Секогаш
Page 97

99МАКЕДОНСКИ
исклучувајте го уредот од струја доколку го оставате
без надзор.
- Доколку сечилата се заглават, исклучете го апаратот
од струја пред да ги отстраните материјалите што ги
блокираат сечилата.
- Уредот, вклучувајќи го и капакот на бокалот, се
загрева при користењето на пареата или набрзо
потоа (особено површините со овој симбол „ “) и
може да предизвика изгореници доколку го допрете.
Капакот на бокалот треба да се отвора само со
помош на јазичето за отворање на капакот. За да ја
подигнете корпата, мора да користите лопатка. За да
го подигнете бокалот, држете го бокалот за неговата
рачка.
- Имајте предвид дека при користењето на пареата и
при отстранувањето на капакот, од бокалот излегува
жешка пареа.
- Внимавајте на жешката пареа која излегува од
резервоарот за вода кога ќе го отворите неговиот
капак.
- Имајте предвид дека жешката пареа ќе продолжи да
излегува од отворот за пареа на капакот на бокалот
извесно време по завршувањето на циклусот на
пареа. Внимавајте кога го отворате капакот на
бокалот.
- Доколку апаратот не е правилно склопен, жешката
пареа може да излегува од работ на капакот на
резервоарот за вода. Погледнете го поглавјето
„Отстранување на проблеми“ за да го спречите или
решите овој проблем.
- Не го користете овој апарат за сечкање тврди или
лепливи материјали.
- Немојте да користите белило или хемиски раствори/
таблети за стерилизација на апаратот.
- Немојте да користите сунѓери, абразивни средства
за чистење или агресивни течности како бензин,
ацетон или алкохол за чистење на апаратот.
Page 98

100 МАКЕДОНСКИ
- Секогаш оставајте го апаратот да се излади околу
10 минути по циклусот на користење на пареата пред
да започнете друг циклус на пареа.
- Не го користете апаратот за блендирање подолго
од 30 последователни секунди. Ако сѐ уште не сте
завршиле со блендирањето по изминувањето на
30-те секунди, отпуштете го копчето за да го запрете
блендирањето и причекајте неколку секунди пред да
продолжите. Ако главната единица многу се загрее,
причекајте да се излади неколку минути пред да
продолжите.
- Немојте да истурате каква било течност во бокалот
кога сакате да користите пареа.
Внимание
- Немојте да користите додатоци или делови од
други производители или од производители кои
не се посебно препорачани од страна на Philips.
Ако користите такви додатоци или делови, вашата
гаранција станува неважечка.
- Не го ставајте апаратот на, или во близина на
функционална или сѐ уште жешка рерна или шпорет.
- Исклучете го уредот и откачете го кабелот од струја
пред да ги замените дополнителните делови или
пред да се доближите до деловите кои се движат
при употреба.
- Секогаш исклучувајте го апаратот од струја и
оставете го да се излади пред да почнете го чистите.
- Секогаш вртете го контролното копче во позиција
„исклучено“ по користењето на пареа.
- Немојте да го користите бокалот или некој
друг дел од апаратот во микробранова печка,
бидејќи металните делови на рачката на бокалот
и единицата со сечила не се погодни за таква
употреба.
- Немојте да го стерилизирате бокалот или некој
друг дел од апаратот во стерилизатор или во
микробранова печка, бидејќи металните делови
Page 99

101МАКЕДОНСКИ
на рачката на бокалот и единицата со сечила не се
погодни за таква употреба.
- Уредот е наменет само за домашна употреба. Ако
апаратот не се користи правилно, се користи за
професионална или полупрофесионална намена
или не се користи во согласност со инструкциите
во упатството за користење, гаранцијата станува
неважечка, а Philips не прифаќа каква било
одговорност за настанатата штета.
- Поставувајте го апаратот на стабилна, хоризонтална
и рамна површина. Уредот испушта жешка пареа за
време на користењето. Проверете дали има доволно
слободен простор околу апаратот за да се спречи
оштетување на кујнските елементи.
- Не го користете апаратот доколку тој паднал или
се оштетил на каков било начин. Однесете го на
поправка во овластен сервисен центар на Philips.
- Немојте да ја користите функцијата за пареа ако нема вода во
резервоарот за вода.
- Погрижете се водата во резервоарот да не преминува 180ml.
- Проверете дали капакот на резервоарот за вода е
правилно затворен пред да ја користите пареата.
- При блендирањето, не го надминувајте нивото
на волумен на блендираните состојки MAX кое е
назначено на бокалот (400 ml).
- Немојте да го подигнувате или да го движите
апаратот додека тој работи.
- Немојте да вметнувате какви било предмети во
излезот за пареа на резервоарот за вода, влезот
за пареа на капакот на бокалот или на патеката на
пареата во корпата.
- Немојте да го дополнувате резервоарот со вода
за време на користењето на пареата, бидејќи од
апаратот може да излезе жешка вода и пареа.
- Секогаш проверувајте дали капакот на резервоарот
за вода се изладил пред да го отворите.
Page 100

102 МАКЕДОНСКИ
- Немојте да го спроведувате напојувањето на овој
апарат преку надворешен апарат за вклучување,
како тајмер, и не го поврзувајте во коло кое често се
вклучува или исклучува.
- Секогаш проверувајте ја температурата на
зготвената храна на задниот дел од дланката за да
се уверите дека таа е безбедна за вашето бебе.
- Секогаш проверувајте ја густината на храната за
вашето бебе. За повеќе информации во врска со тоа
каква густина на храната одговара на различните
возрасти, погледнете го водичот за одвикнување од
мајчино млеко на веб-сајтот на Philips или побарајте
совет од доктор или консултант.
- Користете ја само испорачаната лопатка за
подигнување на корпата и празнење на храната од
бокалот во согласност со инструкциите (сл. o).
- Редовното отстранување на бигорот го спречува
оштетувањето на апаратот.
- Проверете дали количината на храна во корпата за
пареа не го надминува горниот раб на патеката на
пареата во корпата, во спротивно може да дојде до
блокирање на патеката.
- Ниво на бучава: Lc= 88 dB[A]
Безбедносни системи
За ваша безбедност при користењето, овој апарат е опремен со
вградено безбедносно заклучување. Овој апарат функционира само
доколку сите делови се правилно вградени. Правилното вградување
на сите делови ќе го оневозможи вграденото безбедносно
заклучување.
Овој апарат исто така е опремен и со безбедносна функција за
запирање во случај на прегревање. Доколку времето помеѓу два
циклуси на пареа е прекратко, може да дојде до прегревање. Доколку
функцијата за безбедносно за запирање на апаратот во случај на
прегревање се активира за време на циклус на пареа, оставете го
апаратот да се олади неколку минути. Потоа повторно можете да го
користите апаратот.
 Loading...