


Single/Double
electric breast pump
Premium
SCF398, SCF396
www.philips.com/mybreastpump
Foldout left only
CB
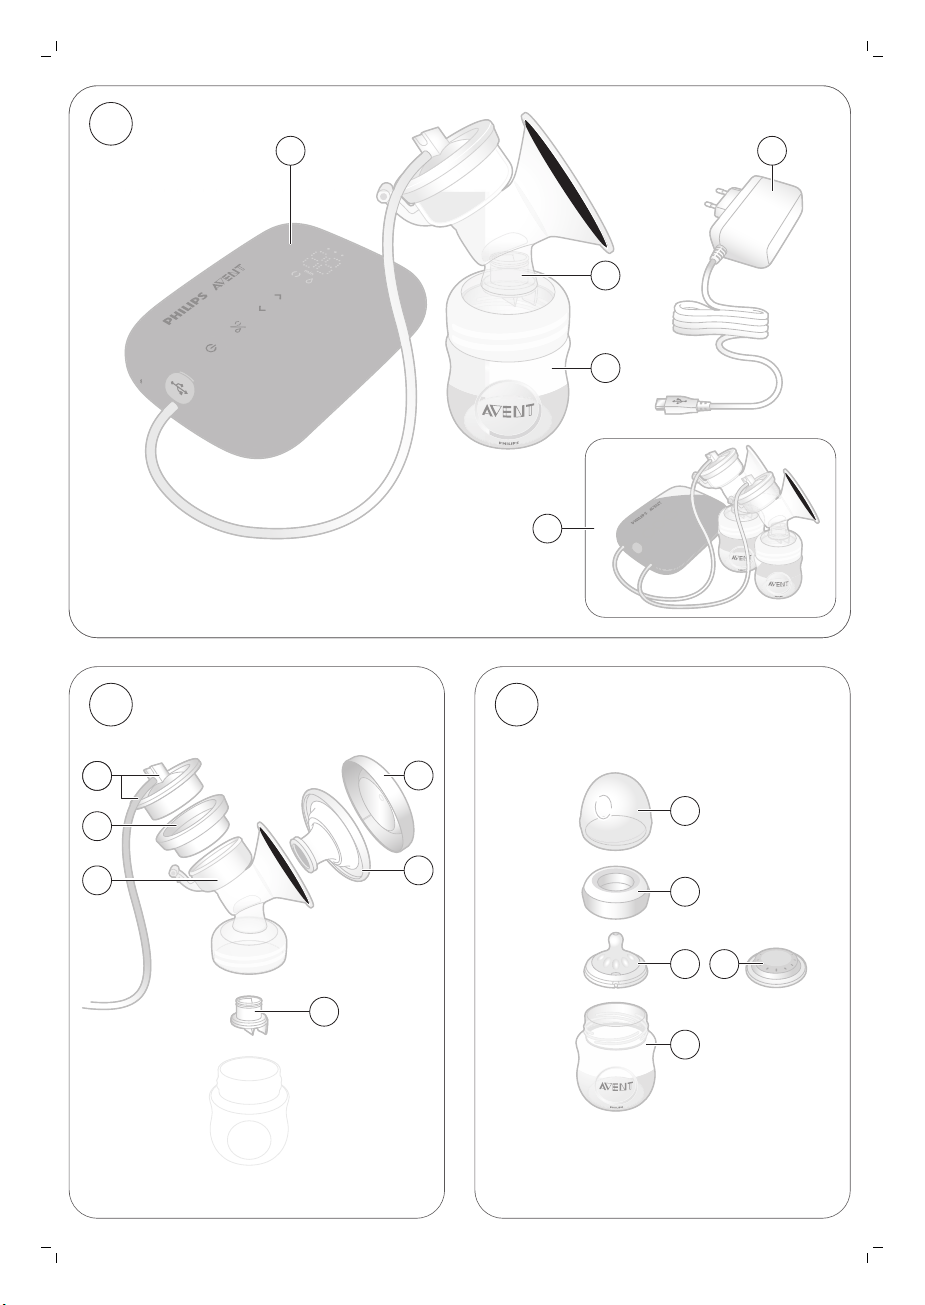
A
A1
A2
A3
C5
C3 C4
C2
C1
A4
B1
B2
B3
B4
B5
B6
A5


English
Contents
Introduction __________________________________________________________________________________________ 5
General description __________________________________________________________________________________ 6
Intended use _________________________________________________________________________________________ 6
Important safety information ________________________________________________________________________ 6
Before first use _______________________________________________________________________________________ 10
Cleaning and disinfecting ____________________________________________________________________________ 10
Using the breast pump _______________________________________________________________________________ 13
Feeding breast milk with the bottle__________________________________________________________________ 20
Compatibility _________________________________________________________________________________________ 22
Ordering accessories _________________________________________________________________________________ 22
Recycling______________________________________________________________________________________________ 22
Battery removal instructions _________________________________________________________________________ 23
Warranty and support ________________________________________________________________________________ 24
Troubleshooting ______________________________________________________________________________________ 24
Supplemental information __________________________________________________________________________ 26
Storage conditions ___________________________________________________________________________________ 27
Electromagnetic fields (EMF) ________________________________________________________________________ 27
Technical information ________________________________________________________________________________ 27
Explanation of symbols ______________________________________________________________________________ 28
5
English
Introduction
Congratulations on your purchase and welcome to Philips Avent! To fully benefit from the support
that Philips Avent offers, register your breast pump at www.philips.com/welcome.
The Philips Avent single/double electric breast pump Premium is inspired by babies and their natural
suction movement. The soft silicone cushion stimulates the nipple with gentle massaging movements,
helping you to express milk comfortably and effectively. The combination of suction and nipple
stimulation triggers fast milk flow. The no-lean-forward design enables you to sit in a relaxed, upright
position while expressing.
Healthcare professionals and the World Health Organization recommend breast milk as the primary
source of nutrition during the first year of life, combined with solid food after the first 6 months. This is
because your breast milk is specially adapted to your baby’s needs and helps to protect your baby
against infection and allergies. To breastfeed longer, you can express and store your milk so that your
baby can still enjoy the benefits of it, even if you cannot be there to provide it yourself. As the pump is
compact, quiet and discrete to use, you can take it with you anywhere, allowing you to express milk at
your own convenience and to maintain your milk supply.
If breastfeeding goes well, it is advisable (unless recommended otherwise by your healthcare
professional) to wait until your milk supply and breastfeeding schedule are established (normally at
least 2 to 4 weeks after giving birth) before you start expressing.
English

6
English
General description
Note: The numbers mentioned below refer to the numbers on the figure of the front foldout page
of this user manual.
Note: The double breast pump comes with two pieces of the items shown in Figures B and C.
Product description (Fig. A)
A1 Motor unit
A2 Breast pump kit
A3 Bottle
Breast pump kit (Fig. B)
B1 Silicone tube and cap
B2 Silicone diaphragm
B3 Pump body
Philips Avent Natural Bottle (Fig. C)
C1 Bottle cap
C2 Screw ring
C3 Teat
A4 Adapter
A5 Double breast pump
B4 Cover
B5 Cushion
B6 White valve
C4 Sealing disc
C5 Bottle
Accessories
There are multiple versions of this breast pump package, which all come with a different combination
of the following Philips Avent accessories:
-
Breast pads
-
Travel bag
-
Insulation pouch
-
Cleaning brush
* For these accessories, a separate user manual is provided.
-
Storage cups with adapter*
-
Breast milk storage bags*
-
Natural bottles
-
Breast pump belt*
Intended use
The Philips Avent single/double electric breast pump Premium is intended to express and collect milk
from the breast of a lactating woman.
The device is intended for a single user.
Important safety information
Read this user manual carefully before you use the breast pump and save it for future reference.
This user manual can also be found online on the Philips Avent website: www.philips.com/avent.

Warnings
English
7
-
Never use the breast pump while you are pregnant, as pumping
can induce labor.
Warnings to avoid choking, strangulation and injury:
-
This breast pump is not intended for use by persons (including
children) with reduced physical, sensory or mental capabilities, or
lack of experience and knowledge. Such persons can only use this
breast pump if they are supervised by or have received proper
instruction concerning use of the appliance by a person
responsible for their safety.
-
Do not allow children or pets to play with the motor unit, the
adapter, packaging materials or accessories.
-
Always unplug the breast pump after use and when fully charged.
Warnings to prevent transmitting infectious diseases:
-
If you are a mother who is infected with Hepatitis B, Hepatitis C or
Human Immunodeficiency Virus (HIV), expressing breast milk will
not reduce or remove the risk of transmitting the virus to your
baby through your breast milk.
English
Warnings to avoid electric shock:
-
Inspect the breast pump, including the adapter, for signs of
damage before each use. Do not use the breast pump if the
adapter or plug is damaged, if it does not work properly or if it has
been dropped or submerged in water.
-
Only use the adapter (S009AHz050yyyy) provided with this
breast pump.
-
Always ensure that it is easy to disconnect the device from the
mains in case of malfunction.
Warnings to avoid contamination and to ensure hygiene:
-
For hygienic reasons, the breast pump is only intended for
repeated use by a single user.

8
English
-
Clean and disinfect all parts before first use and after each use.
-
Do not use antibacterial or abrasive cleaning agents to clean the
breast pump parts as this may cause damage.
-
Wash your hands thoroughly with soap and water before you
touch breast pump parts and breasts to prevent contamination.
Avoid touching the inside of containers or lids.
Warnings to avoid breast and nipple problems including pain:
-
Do not use the breast pump if the silicone diaphragm appears to
be damaged or broken. See chapter ‘Ordering accessories’ for
information on how to obtain replacement parts.
-
Only use accessories and parts recommended by Philips Avent.
-
No modification of the breast pump is allowed. If you do so, your
warranty becomes invalid.
-
Never use the breast pump while you are sleepy or drowsy to
avoid lack of attention during use.
-
Always switch off the breast pump before you remove the pump
body from your breast, in order to release the vacuum.
-
If the vacuum is uncomfortable or causes pain, switch off and
remove the breast pump from your breast.
-
Do not continue pumping for more than five minutes at a time if
you do not succeed in expressing any milk. Try to express at
another time during the day.
-
If the process becomes very uncomfortable or painful, stop using
the pump and consult your healthcare professional.
Warnings to prevent damage and malfunction of the breast pump:
-
Portable radio frequency (RF) communications equipment
(including mobile phones and peripherals such as antenna cables
and external antennas) should not be used closer than 30cm
(12in) to any part of the breast pump, including adapter. This
could have negative effect on the performance of the breast
pump.

English
-
Use of this equipment adjacent to or stacked with other
equipment should be avoided because it could result in improper
operation.
Battery safety instructions
-
Only use thisproduct for its intended purpose as described in this
user manual. Any misuse can cause electric shock, burns, fire and
other unexpected hazards.
-
To charge the battery, only use the detachable supply unit
provided with the product. Do not use an extension cord.
-
Charge, use and store the product at the temperature ranges
indicated in the technical specifications table in this user manual.
-
Always unplug the product when it is fully charged.
-
Do not burn products and their batteries and do not expose them
to direct sunlight or to high temperatures (e.g. in hot cars or near
hot stoves). Batteries may explode if overheated.
-
If the product becomes hot, changes color, gives off an abnormal
smell or if charging takes much longer than usual, stop using and
charging it.
-
Do not place products and their batteries in microwave ovens or
on induction cookers.
-
This product contains a rechargeable battery that is nonreplaceable. Do not open the product to replace the rechargeable
battery.
9
English
Cautions
Cautions to prevent damage to and malfunctioning of the breast
pump:
-
Prevent the adapter and motor unit from coming into contact with
water.
-
Never put the motor unit or the adapter in water or in a
dishwasher, as this causes permanent damage to these parts.
10
English
-
Keep the adapter and the silicone tubes away from heated
surfaces to avoid overheating and deformation of these parts.
Before first use
Disassemble, clean and disinfect all parts that come into contact with breast milk before you use the
breast pump for the first time and after every use.
Fully charge the device before you use it for the first time or after a long period of non-use.
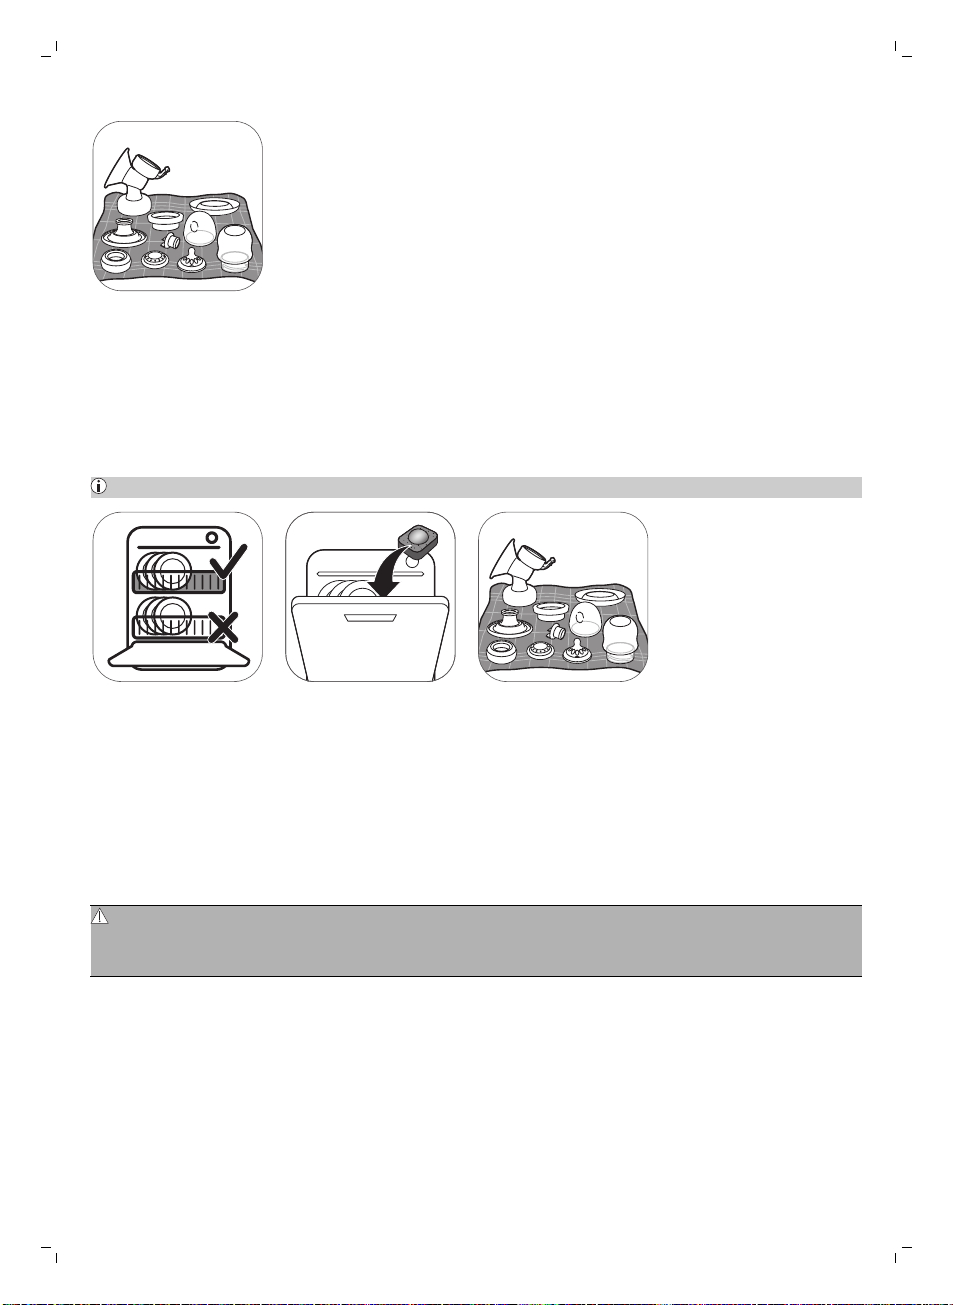
Cleaning and disinfecting
Overview
Clean and disinfect the parts that come into contact with the breast and breast milk as described
below:
When How
Clean and disinfect before first use
and after every use.
The following parts do not come into contact with the breast and breast milk; clean them as described
below:
When How
Clean when needed. Wipe with a clean, damp cloth with
Disassemble all parts and then
clean them as described in chapter
'Cleaning' and disinfect them as
described in chapter 'Disinfecting'.
water and mild detergent.
5 min.
English
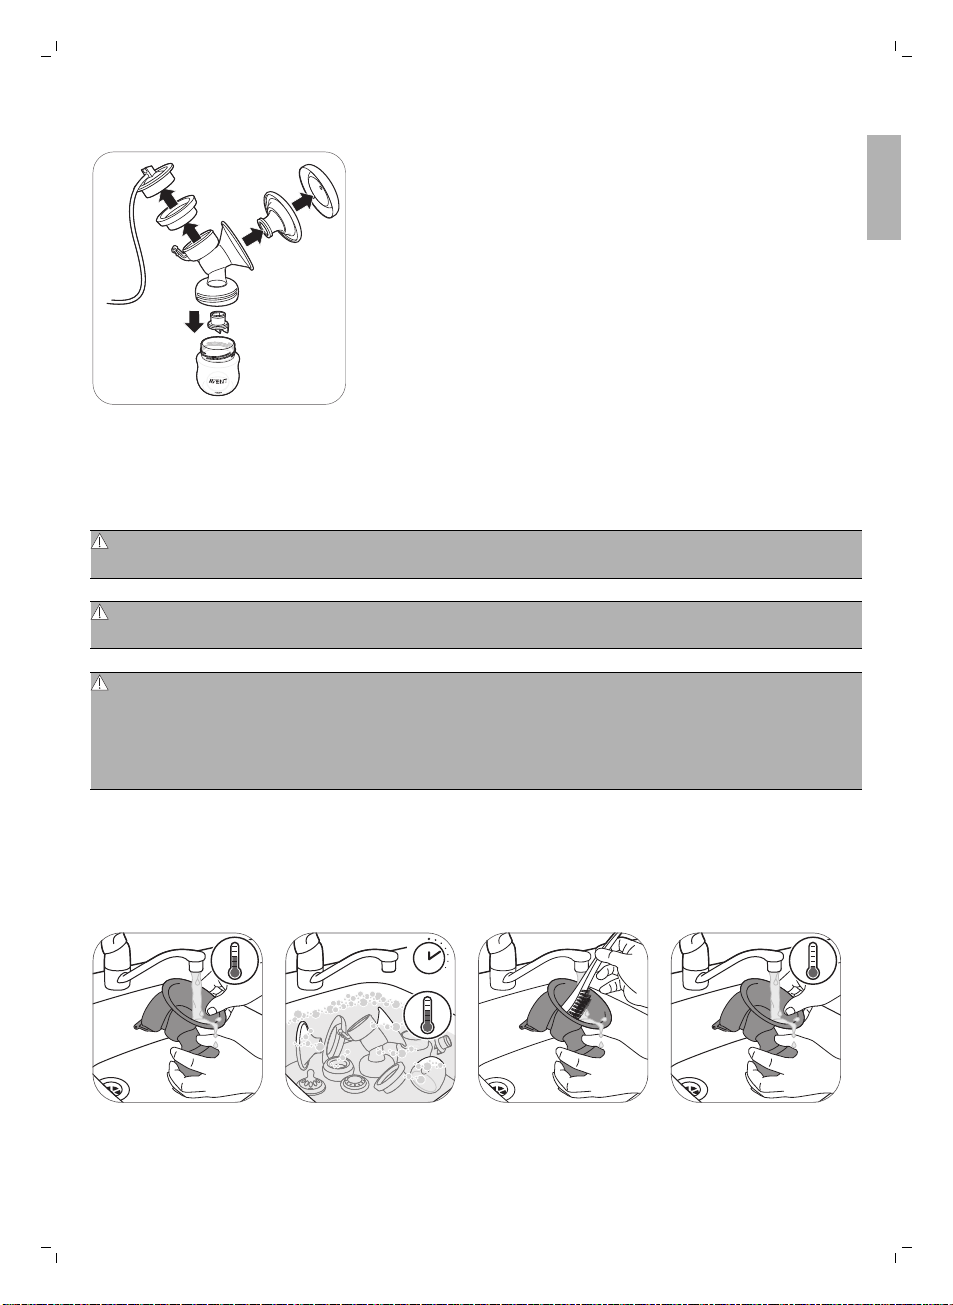
Step 1: Disassembling
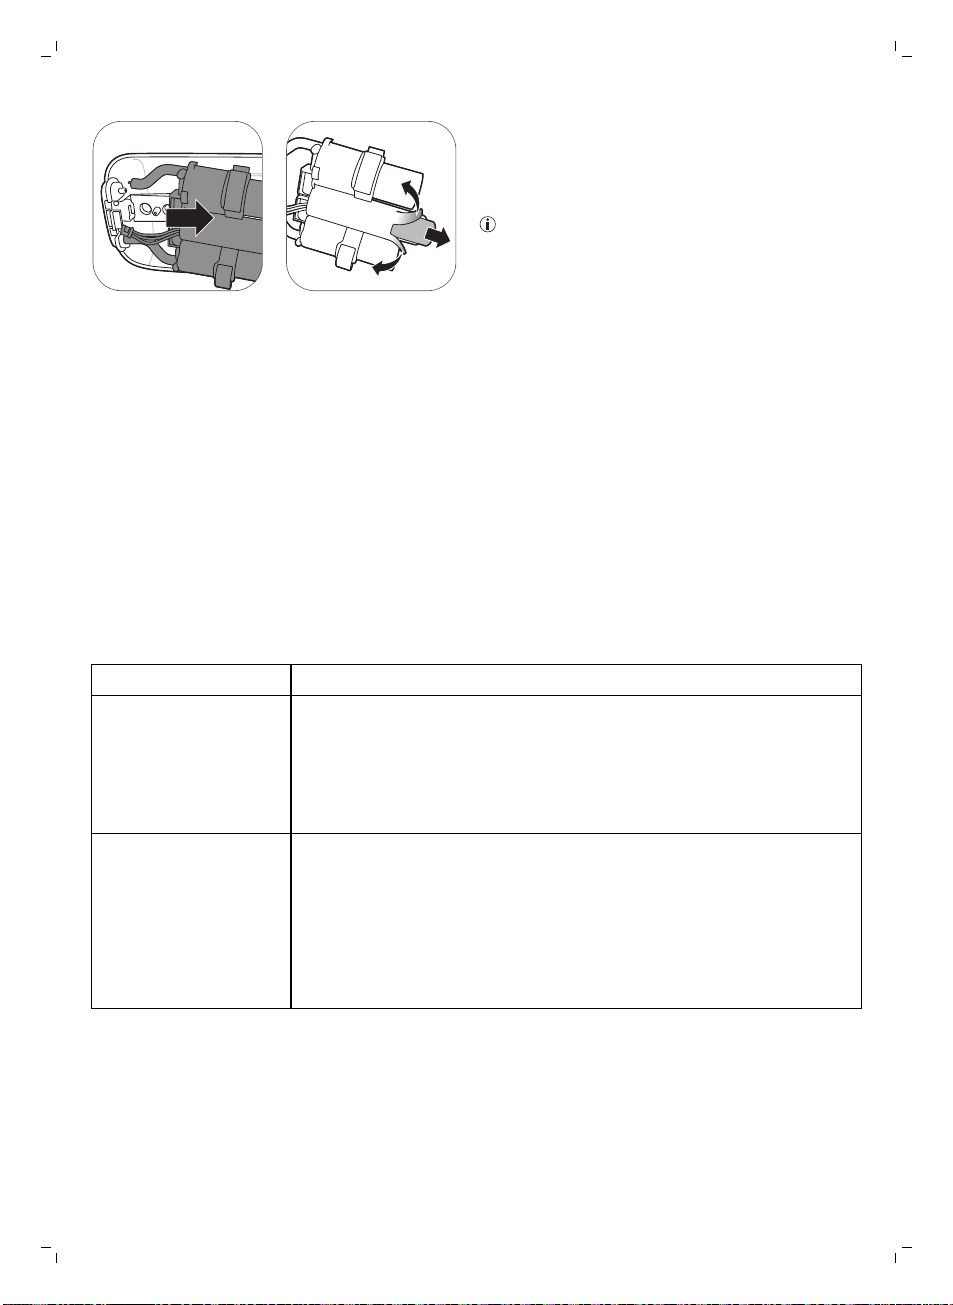
Make sure that you remove the white valve from the breast pump.
Step 2: Cleaning
The parts that come in contact with milk can be cleaned manually or in the dishwasher.
Warning: Do not use antibacterial or abrasive cleaning agents to clean the breast
pump parts as this may cause damage.
Caution: Never put the motor unit or the adapter in water or in a dishwasher, as this
causes permanent damage to these parts.
11
English
Caution: Be careful when you remove and clean the white valve. If it gets damaged,
your breast pump does not function properly. To remove the white valve, gently pull at
the ribbed tab on the side of the valve. To clean the white valve, rub it gently between
your fingers in warm water with some dishwashing liquid. Do not insert objects into the
white valve, as this may cause damage.
Step 2A: Manual cleaning
Supplies needed:
-
Mild dishwashing liquid
-
Drinking-quality water
-
Soft, clean brush
1. Rinse all parts under a
running
tap with
lukewarm water.
2. Soak all parts for
5minutes
with some mild
dishwashing liquid.
in warm water
-
Clean tea towel or drying rack
-
Clean sink or bowl
3. Clean all parts with a
cleaning
brush.
4. Thoroughly rinse all
parts
under a running
tap with drinking-quality
water.
12
English
5. Leave all parts to airdry on a clean tea towel
or drying rack.
Step 2B: Cleaning in the dishwasher
Supplies needed:
-
Mild dishwashing liquid or a dishwashing tablet
-
Drinking-quality water
Note: Food colorings may discolor parts.
1. Place all parts on the
top rack of the
dishwasher.
2. Put dishwashing liquid
or a tablet in the
machine and run a
standard program.
3. Leave all parts to airdry on a clean tea towel
or drying rack.
Step 3: Disinfecting
Supplies needed:
-
A household pot
-
Drinking-quality water
Caution: During disinfection with boiling water, prevent the bottle or other parts from
touching the side of the pan. This can cause irreversible product deformation or damage
that Philips cannot be held liable for.
5 min.
English
13
English
1. Fill a household pot
with enough water to
cover all parts and place
all parts in the pot. Let
the water boil for
5minutes. Make sure
the parts do not touch
the side of the pot.
2. Allow the water to
cool down.
3. Gently remove the
parts from the water.
Place the parts on a
clean surface/tea towel
or drying rack to air-dry.
4. Store the dry items in
a clean, dry and covered
container.
Using the breast pump
Cushion size
The Philips Avent single/double electric breast pump Premium has a soft, active cushion. It gently
stimulates your nipple to trigger milk flow. The cushion is made of flexible silicone, that adapts to up
to 99.98% of women, fitting nipple sizes up to 30mm.
Charging the breast pump
Fully charge the battery before you use the breast pump for the first time and when the battery is low.
Fully charging the battery takes up to 4hours.
1. Switch off the device. 2. Insert the adapter into
the wall socket and
insert the small plug at
the other end into the
motor unit.
3. The battery is
charging.
4. When the battery is
fully charged, remove
the adapter from the
wall socket and pull the
small plug out of the
motor unit.
14
English
Battery indicator light description
All lights are steady
on.
The battery is fully
charged.
* One session is the equivalent of 20 minutes (double electric breast pump) or 30 minutes (single
electric
breast pump).
First light is steady
on.
The battery is
charged sufficiently
for one session.*
First light flashes
slowly.
The battery is low,
charging needed.
First light flashes
quickly.
The battery is very
low, the device will
soon stop
operating.
Battery lights light
up one by one and
go out all together.
The battery is
charging.
Assembling the breast pump
Make sure you have cleaned and disinfected the parts of the breast pump that come into contact with
milk.
Warning: Be careful, when you have disinfected the breast pump parts by boiling
them, they can be very hot. To prevent burns, only start assembling the breast pump
when disinfected parts have cooled down.
Warning: Wash your hands thoroughly with soap and water before you touch breast
pump parts and breasts to prevent contamination. Avoid touching the inside of
containers or lids.
Check the breast pump kit parts for wear or damage before use and replace them if necessary.
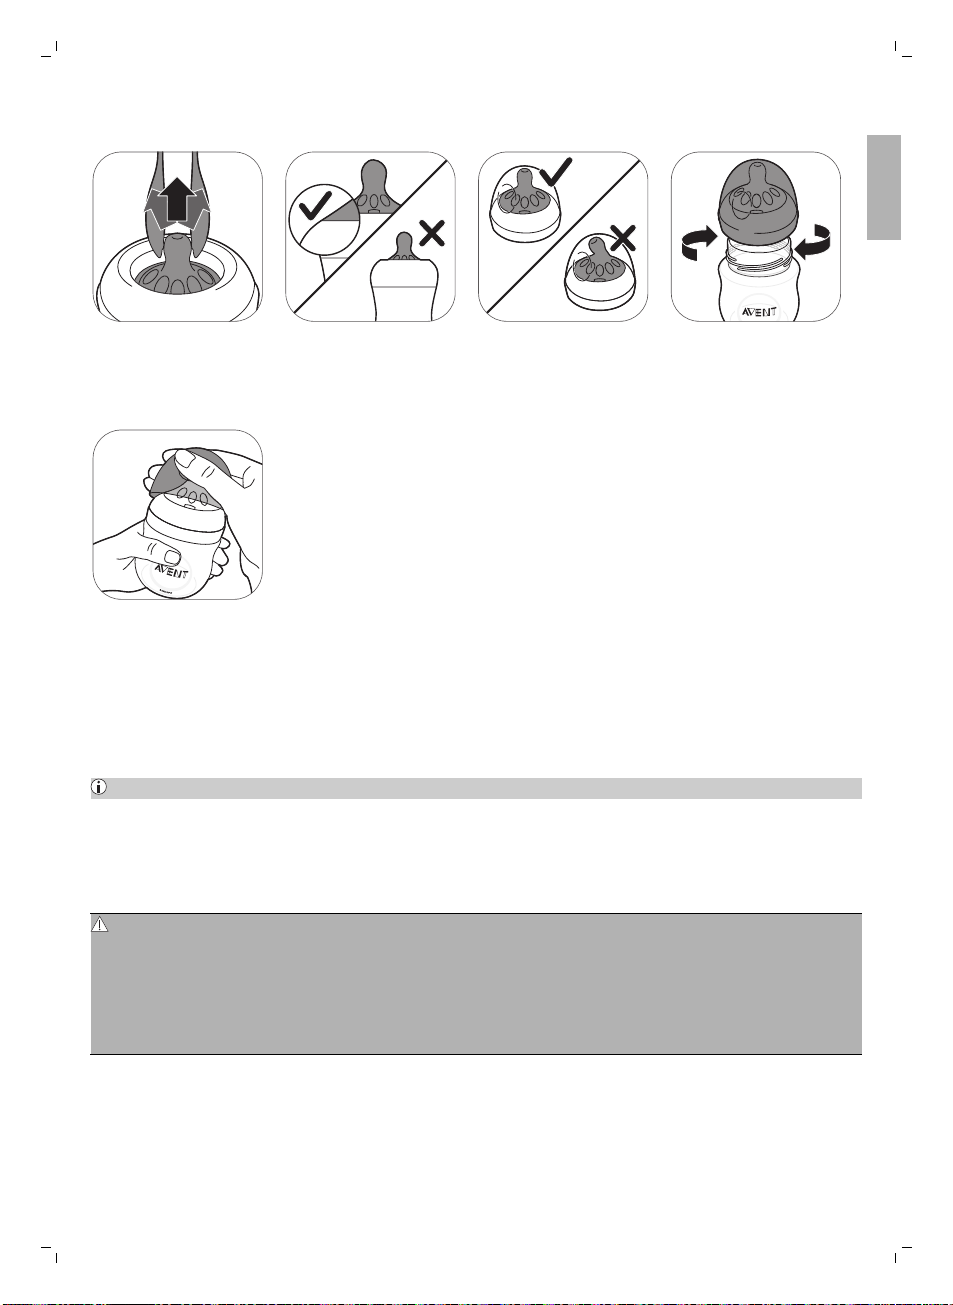
Note: Correct placement of the cushion, silicone diaphragm and silicone tube is essential for the
breast pump to form a proper vacuum.
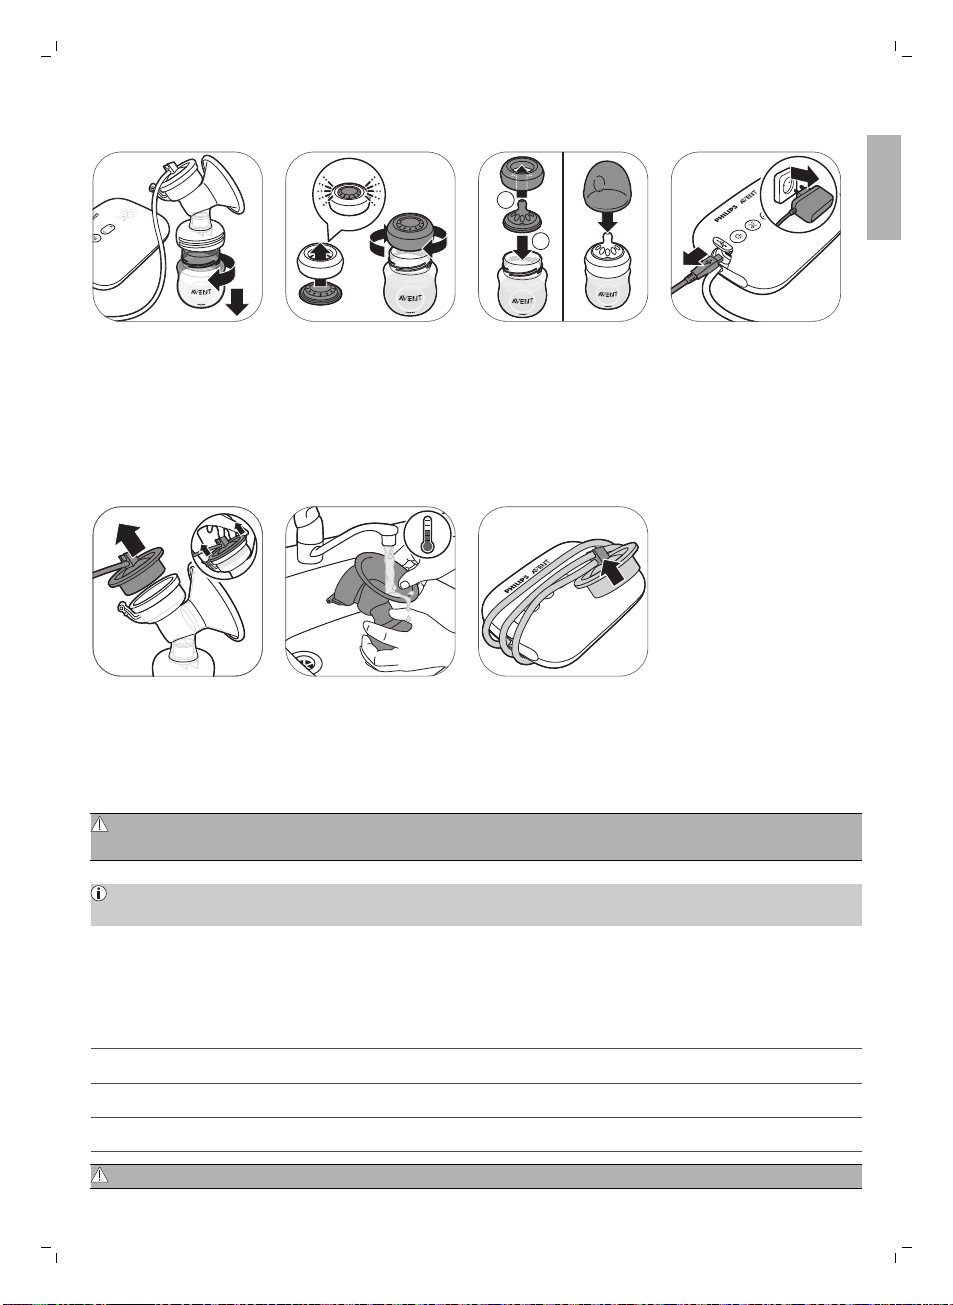
1. Wash your hands
thoroughly with soap
and water.
2. Push the white valve
in the pump body as far
as possible.
3. Screw the pump body
onto the bottle.
4. Place the cushion in
the pump body and
make sure that the rim
covers the pump body.
English
15
English
4A Push the inner part of
the cushion into the
funnel against the line
(indicated with an
arrow).
7. Connect the tube(s) to
the motor unit.
5. Place the silicone
diaphragm in the pump
body.
8A. When the breast
pump is charged, you
can use it cordless. Press
and hold the on/off
button until the device
switches on.
5A Make sure that the
silicone diaphragm fits
securely around the rim
by pressing it down with
your thumbs.
8B. You can also use the
breast pump connected
to the wall socket. If the
battery is low, insert the
adapter into the wall
socket and insert the
small plug at the other
end into the motor unit.
6. Attach the silicone
tube and cap onto the
silicone diaphragm.
Push down the cap until
it is securely in place.
9. The breast pump is
now ready for use.
Note: You can place
the cover over the
cushion to keep the
breast pump clean while
you are preparing for
expressing.
7
1 3 5
4 6
8
2
1
2
3
4
16
English
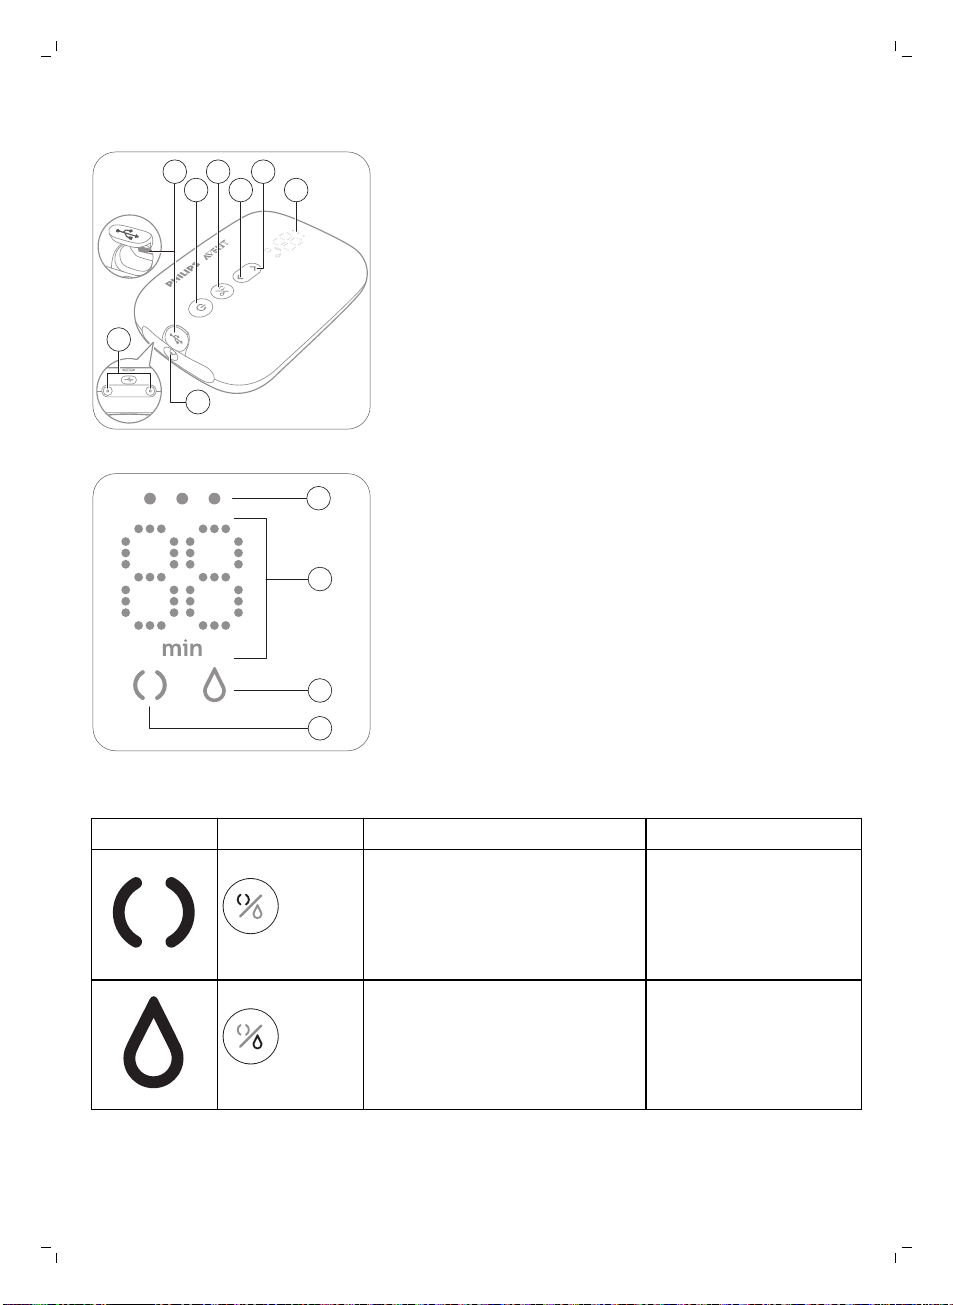
Motor unit part description
1 USB power inlet
2 On/off button with
pause/play function
3 Mode selection button
4 'Level down' button
5 'Level up' button
6 LED display
7 Tubing port for single breast
pump
8 Tubing ports for double
breast pump
LED display description
1 Battery indicator lights
2 Timer (minutes) and vacuum
level indication
3 Expression icon
4 Stimulation icon
Explanation of modes
The breast pump has two modes. Below you find an explanation of these modes.
Mode icons Mode Explanation No. of suction levels
Stimulation mode Mode to stimulate the breast to
Expression mode Mode for efficient milk removal
start up the milk flow.
after milk has started flowing. After
90 sec. of stimulation, the device
automatically switches to the
expression mode.
8 suction levels
16 suction levels
English
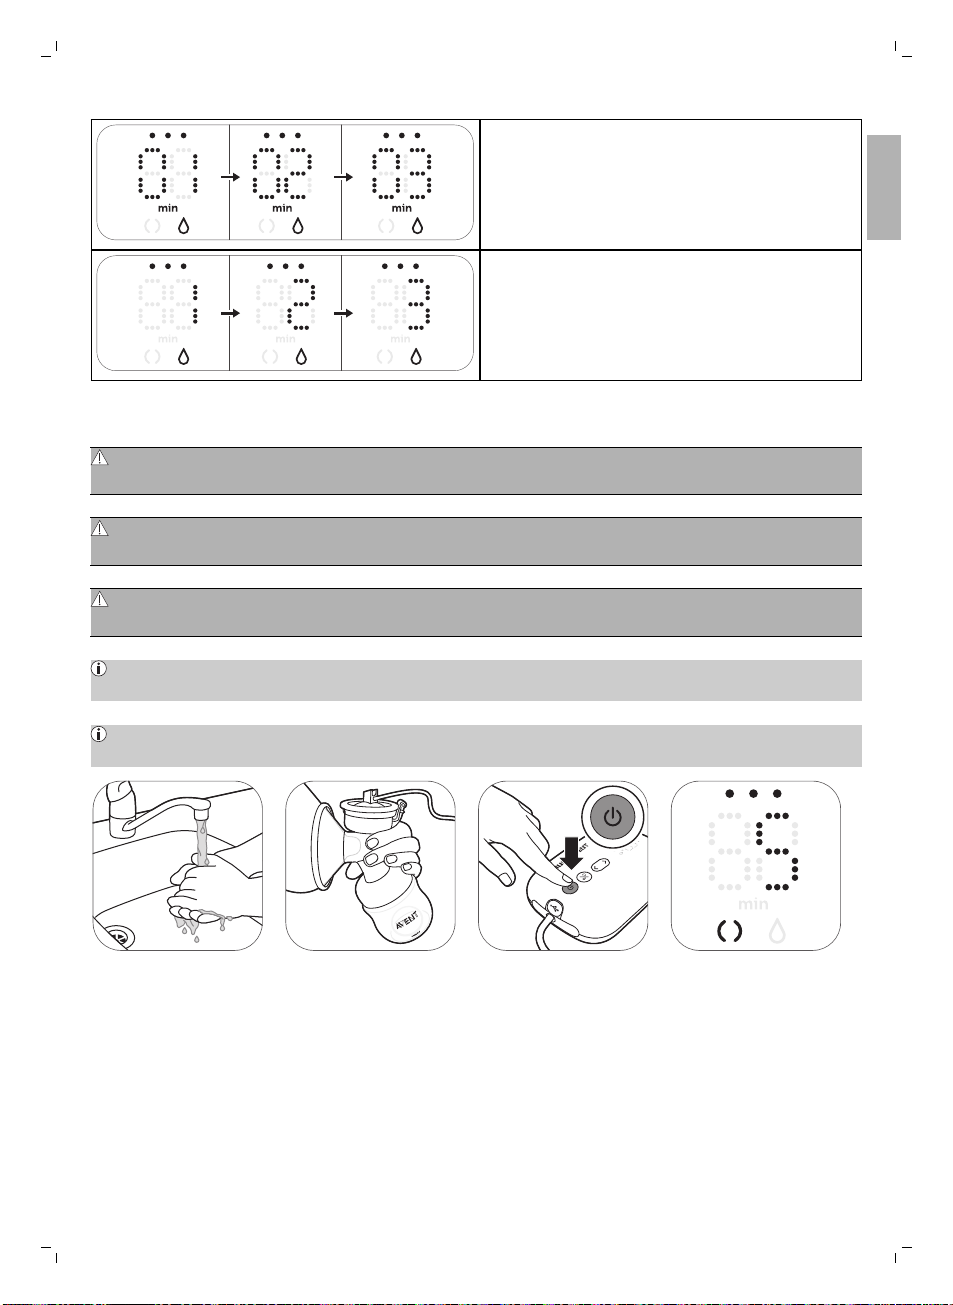
The number on the display shows the running
time in minutes.
When you change the suction level, the display
shows the selected suction level for a few
seconds and then shows the running time again.
Pumping instructions
Warning: Before you remove the pump body from your breast, always switch off the
breast pump to release the vacuum.
Warning: Do not continue pumping for more than 5 minutes at a time if you do not
succeed in expressing any milk. Try to express at another time during the day.
Warning: If the process becomes very uncomfortable or painful, stop using the pump
and consult your healthcare professional.
17
English
Note: If you regularly express more than 125ml/4floz per session, you can purchase and use a
260ml/9floz Philips Avent Natural bottle to prevent overfilling and spillage.
Note: The breast pump can be used cordless if it is sufficiently charged, but you can also use it
connected to the wall socket.
1. Wash your hands
thoroughly with soap
and water and make
sure that your breast is
clean.
2. Place the breast pump
kit onto your breast.
Make sure that you
center your nipple.
3. Press and hold the
on/off button until the
device switches on. The
indicator lights go on to
indicate that the device
is in stimulation mode.
4. The breast pump
starts in stimulation
mode and slowly
increases its vacuum to
the last used stimulation
suction level (or level 5
when used for the first
time).
3 sec.
18
English
5. The display shows the
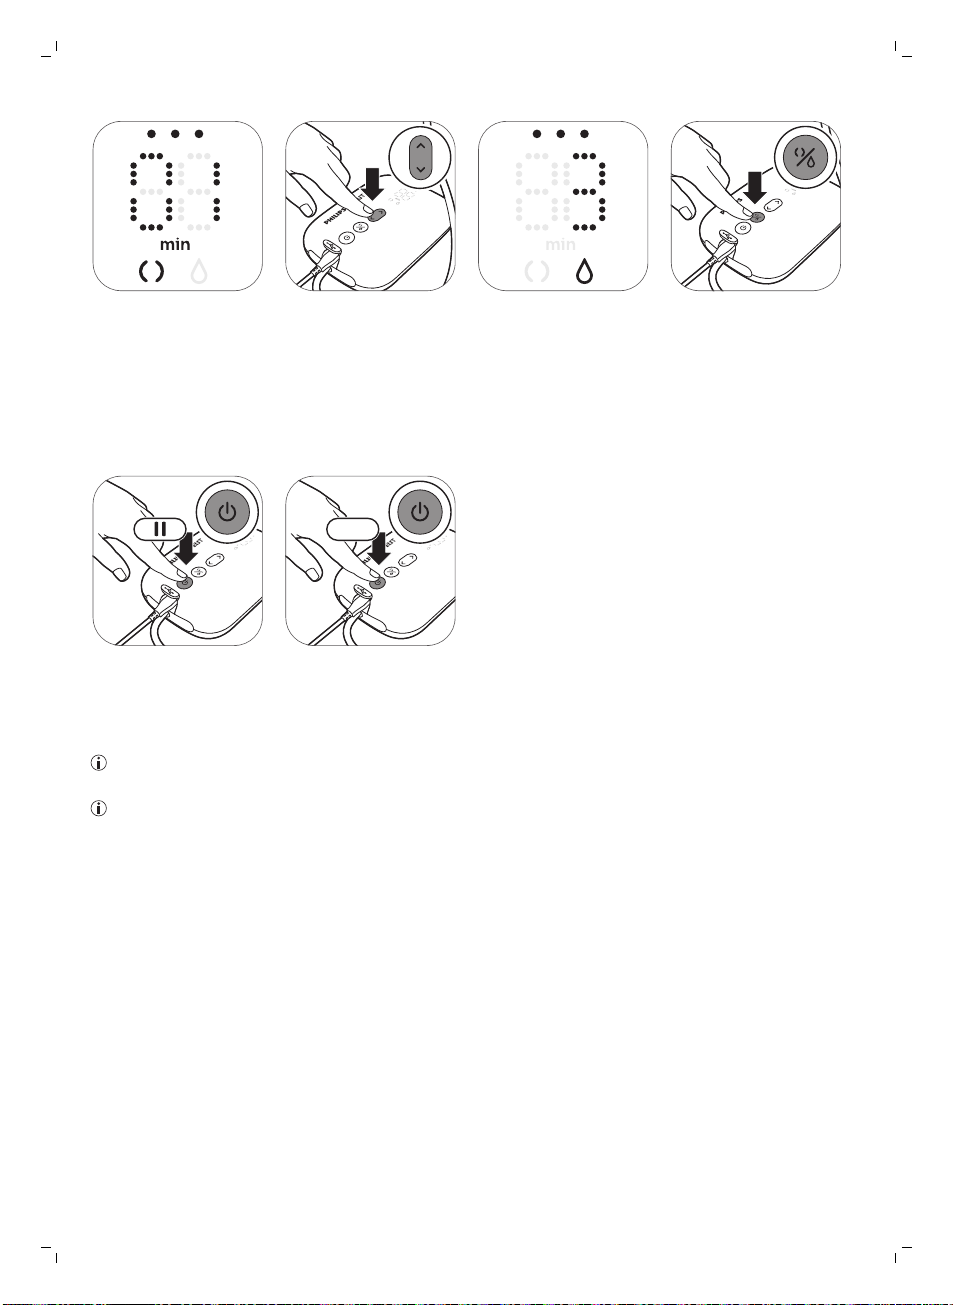
running time.
9. Briefly press the
on/off button if you
want to pause. To
continue, briefly press
the on/off button again.
Tip: For optimal expression, choose the highest setting that still feels comfortable. This setting may
differ across different sessions.
Tip: You can use the double breast pump as a single breast pump by connecting only the tube of
one pump kit to the motor unit.
6. Use the 'level up' and
'level down' buttons to
change the suction level
to your preference.
10. Press and hold the
on/off button to switch
off.
7. After 90 seconds the
breast pump will switch
smoothly to expression
mode and slowly
increase its vacuum to
the last used expression
suction level (or level 11
when used for the first
time).
8. If your milk starts
flowing earlier or if you
want to switch from
expression to
stimulation mode, you
can switch modes with
the mode selection
button.
After use
1
2
English
19
English
1. Unscrew the bottle. 2A. To store the breast
4. Remove the silicone
tube and cap from the
breast pump kit.
milk: close the bottle
with the sealing disc and
screw ring.
5. Disassemble and
clean all parts that have
been in contact with
breast milk (see
'Cleaning and
disinfecting').
2B. To prepare the bottle
for feeding your baby:
place a teat in a screw
ring and screw the
assembled screw ring
onto the bottle. Seal the
teat with the bottle cap
(see 'Assembling the
bottle').
6. For easy storage, wrap
the silicone tube around
the motor unit and clip
the cap onto the tube.
3. Unplug the adapter
from the wall socket and
motor unit.
Warning: Refrigerate or freeze expressed milk immediately or keep it at a temperature
of 16-29 °C (60-85 °F) for a maximum of 4 hours before you feed your baby.
For more information about the breast pump and tips for expressing milk, visit
www.philips.com/avent.
Storing breast milk
Below you find guidelines for storing breast milk:
Storage location Temperature Max. storage duration
Room 16-29⁰C (60-85⁰F) 4 hours
Refrigerator 4
Freezer < -4⁰C (25⁰F) 6-12 months
Warning: Never refreeze thawed breast milk to avoid a decrease in milk quality.
⁰C (39⁰F)
4 days
20
English
Warning: Never add fresh breast milk to frozen breast milk to avoid a decrease in milk
quality and unintended thawing of the frozen milk.
Feeding breast milk with the bottle
Warning: For your child's safety and health
-
Always use this bottle with adult supervision.
-
Never use feeding teats as a soother, to prevent a choking hazard.
-
Continuous and prolonged sucking of fluids will cause tooth decay.
-
Always check the food temperature before you feed your baby.
-
Keep all components not in use out of the reach of children.
-
Keep the bottle cap away from children to avoid suffocation.
-
Do not allow children to play with small parts or walk/run while using bottles.
-
Inspect all parts before use and pull the feeding teat in all directions. Throw away any part at the
first signs of damage or weakness.
-
Always discard any breast milk that is left over at the end of a feed.
Caution: To avoid damage to the bottle
-
Do not place in a heated oven, plastic can melt.
-
Plastic material properties may be affected by disinfection and high temperatures. This can affect
the fit of the bottle cap.
-
Do not leave a feeding teat in direct sunlight or heat, or leave in disinfectant for longer than
recommended because this may damage the product.
Before using the bottle
-
Inspect the bottle and feeding teat before each use and pull the feeding teat in all directions to
prevent a choking hazard. Throw away at the first signs of damage or weakness.
-
Clean and disinfect the bottle before first use and after every use.
Assembling the bottle
English
21
English
1. The teat is easier to
assemble if you wriggle
it upwards instead of
pulling it up in a straight
line.
5. To remove the cap,
place your hand over the
cap and your thumb in
the dimple of the cap.
2. Make sure you pull the
teat through until its
lower part is aligned with
the screw ring.
3. Make sure you place
the cap vertically onto
the bottle so that the
teat sits upright.
4. Screw the screw ring
with teat and cap on the
bottle.
Heating breast milk
If you use frozen breast milk, let it defrost completely before you heat it.
Note: If you need to feed your baby quickly, you can defrost the milk in a bowl of hot water.
Heat the bottle with defrosted or refrigerated breast milk in a bowl of hot water or in a bottle warmer.
Remove the screw ring and sealing disc from the bottle.
Always stir or shake heated breast milk to ensure even heat distribution and test the temperature
before serving.
Warning: It is not recommended to use a microwave to warm up breast milk.
Microwaves might alter the quality of breast milk and destroy some valuable nutrients
and may produce localized high temperatures. If you heat up breast milk in the
microwave, only place the container without screw ring, teat and cap in microwave.
Always stir heated breast milk to ensure even heat distribution and check the
temperature before serving.
22
English
Choosing the right teat for your baby
Philips Avent Natural teats are available with different flow rates. The breast
pump comes with teat number 1. This is a 0m+ teat, ideal for newborn and
breastfed babies of all ages.
Use a lower flow rate if your baby chokes often, if milk dribbles out of its
mouth during feeding or if it has trouble adjusting to the drinking speed. Use a
higher flow rate if your baby falls asleep during feeding, gets frustrated or if
feeding takes very long.
Philips Avent Natural teats are clearly numbered on the side, to indicate flow rate. For more
information, see www.philips.com/avent.
Storing the bottles
-
Store all parts in a dry, clean and covered container.
-
Do not leave a feeding teat in direct sunlight or heat, or leave in disinfectant (‘sterilizing solution’)
for longer than recommended, as this may weaken the parts.
-
For hygiene reasons, we recommend to replace the teats after 3 months.
Compatibility
The Philips Avent single/double electric breast pump Premium is compatible with all baby bottles in
the Philips Avent Natural range and Philips Avent Storage cups with adapter. We do not recommend
to use the Philips Avent Natural Glass bottles with the breast pump.
Ordering accessories
To buy accessories or spare parts, visit www.philips.com/parts-and-accessories or go to your Philips
dealer. You can also contact the Philips Consumer Care Center in your country.
When you order spare teats, make sure that you use a teat with the correct flow rate for your baby
(see 'Choosing the right teat for your baby') and do not mix Philips Avent Anti-colic bottle parts and
teats with parts of the Philips Avent Natural bottles. They do not fit and could cause leakage or other
issues.
Recycling
-
This symbol means that this product shall not be disposed of with normal household waste
(2012/19/EU).
English
-
This symbol means that this product contains a built-in rechargeable battery which shall not be
disposed of with normal household waste (2006/66/EC). Please take your product to an official
collection point or a Philips service center to have a professional remove the rechargeable battery.
-
Follow your country’s rules for the separate collection of electrical and electronic products and
rechargeable batteries. Correct disposal helps prevent negative consequences for the environment
and human health.
23
Battery removal instructions
-
When you handle batteries, make sure that your hands, the product and the batteries are dry.
-
To prevent batteries from heating up or releasing toxic or hazardous substances, do not modify,
pierce or damage products and batteries and do not disassemble, short-circuit, overcharge or
reverse charge batteries.
-
To avoid accidental short-circuiting of batteries after removal, do not let battery terminals come
into contact with metal object (e.g. coins, hairpins, rings). Do not wrap batteries in aluminum foil.
Tape battery terminals or put batteries in a plastic bag before you discard them.
-
If batteries are damaged or leaking, avoid contact with the skin or eye. If this occurs, immediately
rinse well with water and seek medical care.
Note: Only remove the rechargeable battery when you discard the product. Before
you remove the battery, make sure that the product is disconnected from the wall socket
and that the battery is completely empty.
English
Note: Take any necessary safety precautions when you handle tools to open the
product and when you dispose of the rechargeable battery.
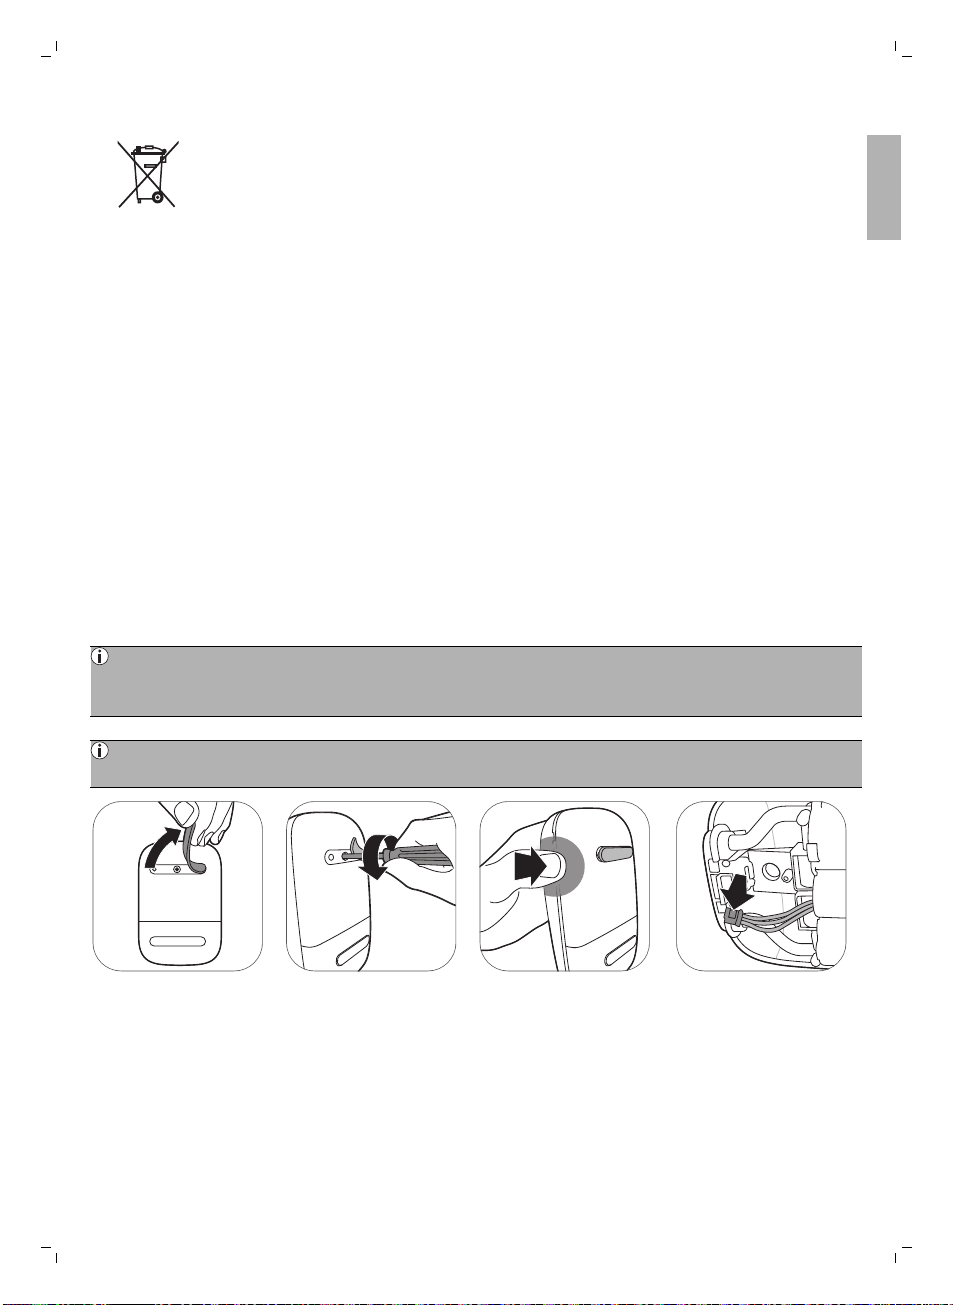
1. Remove the rubber
feet from the bottom of
the motor unit.
2. Remove the screw
with a torx screwdriver.
3. Open the motor unit
by pressing at the sides
of the device.
4. Disconnect the
connectors from the
printed circuit board.
24
English
Note: Dispose of the
rechargeable battery at a
separate local collection
point. Other parts can be
5. Remove the frame
from the motor unit.
6. Cut or fold the edges
of the plastic battery
frame. Remove the
battery from the plastic
battery frame.
disposed at a specific
place for disposal of
electric equipment.
Warranty and support
If you need information or support, please visit www.philips.com/support or read the international
warranty leaflet.
Troubleshooting
This chapter summarizes the most common problems you could encounter with the appliance. If you
are unable to solve the problem with the information below, visit www.philips.com/support for a list
of frequently asked questions or contact the Consumer Care Center in your country.
Problem
I experience pain when I
use the breast pump.
Solution
Choose a suction level that is comfortable for you.
-
Check if the silicone diaphragm is undamaged (does not have small
-
cracks, holes etc.).
Ensure that your nipple is placed in the center of the cushion.
-
If the pain persists, stop using the breast pump and consult your
-
healthcare professional.
The breast pump does
not switch on while it is
connected to the wall
socket.
Only use the adapter supplied.
-
Make sure that the adapter has been inserted correctly into the wall
-
socket and that the small plug has been inserted correctly into the
motor unit.
Connect the adapter to another wall socket. Then press and hold the
-
on/off button to check if the breast pump can be switched on.
If the problem persists, contact the Consumer Care Center via
-
www.philips.com/support.
Problem Solution
The breast pump does
not switch on (indicator
lights do not go on).
The breast pump is not
charging.
Make sure that the battery is charged (see 'Charging the breast pump')
-
or connect the breast pump to the the wall socket.
Only use the adapter supplied.
-
Make sure that the adapter has been inserted correctly into the wall
-
socket and that the small plug has been inserted correctly into the
motor unit.
The breast pump is too cold or too hot for charging. Let the breast
-
pump acclimatize to room temperature for 30minutes.
If the problem persists, contact the Consumer Care Center via
-
www.philips.com/support.
English
25
English
Charging of the breast
pump takes very long.
I do not feel any
suction/the suction level
is too low.
The suction of the breast
pump is too strong.
Only use the adapter supplied.
-
Make sure that the adapter has been inserted correctly into the wall
-
socket and that the small plug has been inserted correctly into the
motor unit.
The breast pump is too cold or too hot. It is recommended to charge
-
the breast pump at room temperature.
If the problem persists, contact the Consumer Care Center via
-
www.philips.com/support.
If possible, try a higher suction level.
-
Check if the silicone diaphragm is assembled correctly (see
-
'Assembling the breast pump').
Check if the white valve is undamaged and assembled correctly (see
-
'Assembling the breast pump').
Check if the other parts of breast pump are intact and assembled
-
correctly (see 'Assembling the breast pump').
Make sure that the pump is positioned correctly on the breast to allow
-
a seal between breast pump and breast.
If you still do not feel any suction, please contact the Consumer Care
-
Center via www.philips.com/support.
If possible, try a lower suction level. When you express for the first
-
time, start with the default suction level (level 5 in stimulation mode,
level 11 in expression mode) and increase/decrease the level when
needed. During different expression sessions, different levels may feel
most comfortable for you.
Make sure that you only use the breast pump parts provided with this
-
breast pump.
Check if the silicone diaphragm is undamaged (does not have small
-
cracks, holes etc.).
If the problem persists, contact the Consumer Care Center via
-
www.philips.com/support.
I express little/no milk
when I use my breast
pump.
If you do not feel enough suction, please check Troubleshooting item
-
'I do not feel any suction/the suction level is too low'.
If you are using the Philips Avent breast pump for the first time, you
-
may
need to acquire some practice before you are able to express
any milk. More expressing tips can be found on the Philips Avent
website www.philips.com/avent.
26
English
Problem Solution
When I switch on the
breast pump after
storage, it does not start
working immediately.
Make sure that the battery is fully charged (see 'Charging the breast
-
pump') or connect the breast pump to the wall socket.
Perhaps you stored the breast pump at a temperature below the
-
minimum storage temperature or above the maximum storage
temperature. Let the breast pump acclimatize in a room of
20°C/68°F for 30minutes to adjust its temperature to the operating
range (5°C/41°F to 40°C/104°F).
The display shows ‘Er’
and the device switches
off automatically.
If you are operating the breast pump on battery power, let it cool
-
down for 30minutes and try to switch it on again.
If you are operating the breast pump with the adapter connected to
-
the wall socket, check if you are using the adapter that was supplied
with the device.
If the problem persists, contact the Consumer Care Center via
-
www.philips.com/support.
Supplemental information
Below some common breastfeeding-related conditions are described. If you experience any of these
symptoms, contact a healthcare professional or breastfeeding specialist.
Common
breastfeedingrelated condition
Pain sensation Pain felt on the breast or nipple, or felt as a response to the suction being
Sore nipples Persistent pain in the nipples at the beginning of the pumping session, or
Engorgement Swelling of the breast. The breast may feel hard, lumpy and tender. May
Bruise, thrombus A reddish-purple discoloration that does not blanch when pressed. When a
Injured tissue on nipple
(nipple trauma)
Description
above a comfortable level.
that lasts throughout the entire pumping session, or pain between sessions.
include erythema (redness) of the breast area and fever. Usually occurs
during the first days of lactation.
bruise fades, it may become green and brown.
Fissures or cracked nipples.
-
Skin tissue peeling off the nipple. Normally occurs in combination with
-
cracked nipples and/or blisters.
Nipple tear.
-
Blister. Looks like small bubbles on the surface of the skin.
-
Bleeding. Cracked or torn nipples can lead to bleeding of the affected
-
area.
Clogged mammary
ducts
A red, tender lump on the breast. May include erythema (redness) of the
breast area. Can lead to mastitis (breast inflammation) and fever if left
untreated.
English
Storage conditions
Keep the breast pump out of direct sunlight as prolonged exposure may cause discoloration. Store
the breast pump and its accessories in a safe, clean and dry place.
If the device has been stored in a hot or cold environment, place it in an environment with a
temperature of 20°C (68°F) for 30 minutes to let it reach a temperature within the usage conditions
(5°C to 40°C / 41°F to 104°F) before you use it.
Fully charge the battery before storing your breast pump for an extended period of time.
Electromagnetic fields (EMF)
This Philips device complies with all applicable standards and regulations regarding exposure to
electromagnetic fields.
Technical information
Single breast pump Double breast pump
Vacuum level Stimulation: -60 to -200 mbar (-45 to -150 mmHg)
Expression: -60 to -360 mbar (-45 to -270 mmHg)
Adjustable in steps of 20 mbar
Intermittent vacuum
Cycle speed 53-120 cycles/min. 53-120 cycles/min.
Motor unit rated input 5 V d.c. / 1.1 A 5 V d.c. / 1.8 A
27
English
Mains adapter rated input External mains adapter 100-240 V a.c. / 50-60Hz
Mains adapter rated
output
Adapter type number S009AHz050yyyy The letters "yyyy" represent the output current from
Battery Rechargeable battery: 3.6V2600mAh (non-replaceable)
Operating conditions Temperature 5°C to 40°C (41°F to 104°F)
Storage and
transportation conditions
Operating pressure 700 - 1060hPa (<3000 m altitude)
Net weight 230g 310g
External dimensions Motor unit: 145 mm x 95 mm x 45mm (LxWxH)
Device classification IEC 60335-1: System: Class II; motor unit: Class III Construction
Materials ABS, Silicone (motor unit)
5 V d.c. / 1.1 A 5 V d.c. / 1.8 A
0100 (1000mA) to 0180 (1800mA), increments in steps of 100mA. The
letter "z" denotes type of plug, it can be: U, V, B, S, C, A, D, K, T, I, E, F.
Relative humidity 15 to 90% (non-condensing)
Temperature -20°C to 45°C (-4°F to 113°F)
Relative humidity up to 90% (non-condensing)
Polypropylene,
Silicone (other parts)
28
English
Single breast pump Double breast pump
Service life 500 hours
Mode of operation Continuous operation Non-continuous operation
55min on, 180min off at 22°C
(72°F) (duty cycle 23%)
20min on, 90min off at 40°C
(104°F) (duty cycle 18%)
Ingress protection IP22 (motor unit), IP20 (adapter)
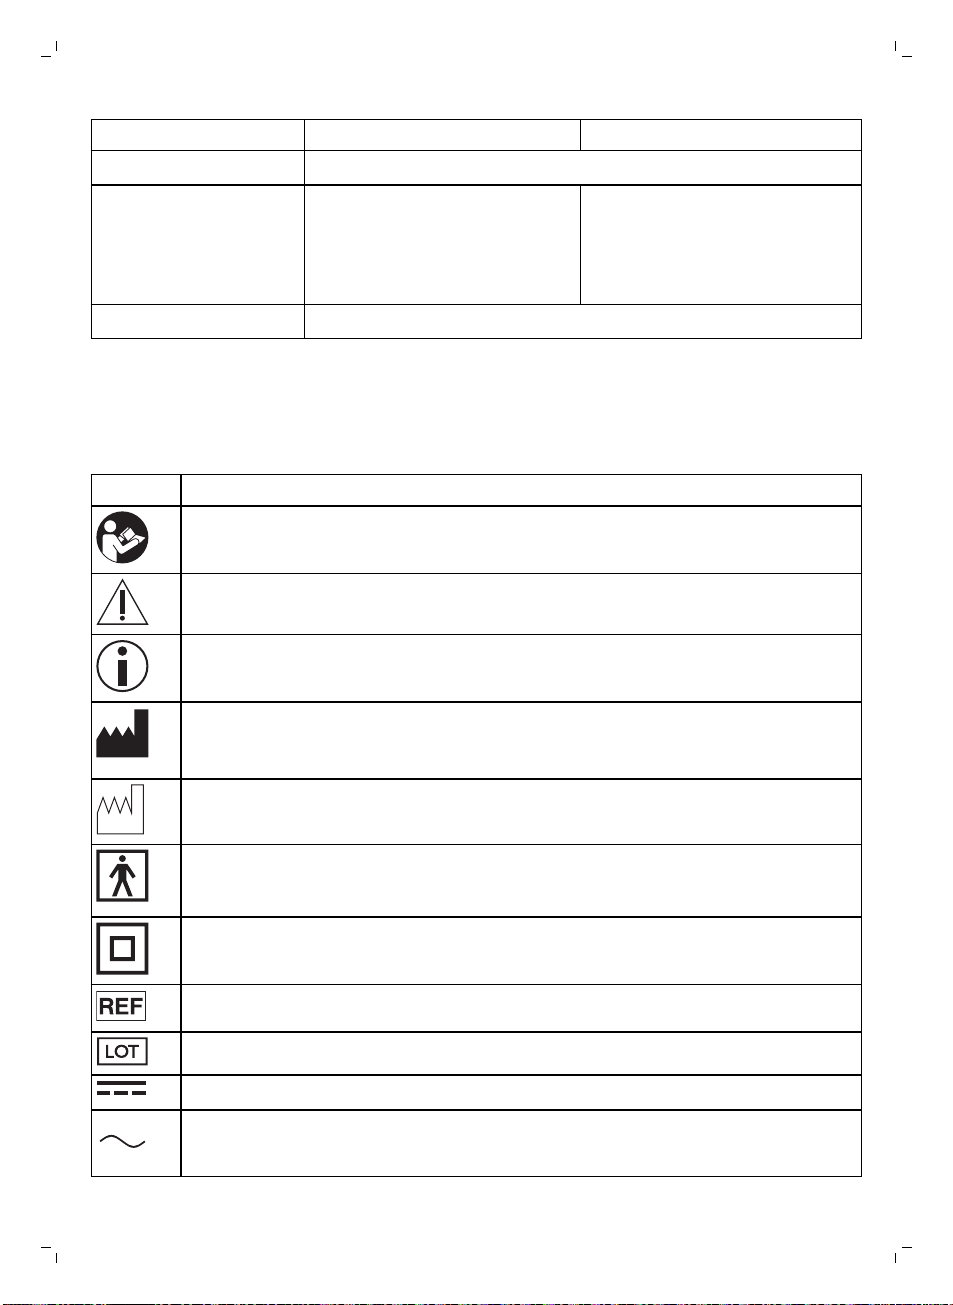
Explanation of symbols
The warning signs and symbols are essential to ensure that you use this device safely and correctly
and to protect you and others from injury. Below you find the meaning of the warning signs and
symbols on the label and in the user manual.
Symbol Explanation
Indicates to follow the instructions for use.
Indicates important information such as warnings and cautions.
Indicates usage tips, additional information or a note.
Indicates the manufacturer.
Manufactured for: Philips Consumer Lifestyle BV, Tussendiepen 4, 9206 AD Drachten -
The Netherlands
Indicates the manufacturing date.
Indicates that the part of the appliance that comes into physical contact with the user
(also known as the applied part) is of type BF (Body Floating) according to IEC 60601-1.
The applied part is the breast pump kit.
Indicates 'Class II Equipment'. The adapter is double-insulated (Class II).
Indicates manufacturer's catalog number of the breast pump.
Indicates the batch number of the breast pump.
Indicates 'direct current'.
Indicates 'alternating current'.

Symbol Explanation
Indicates that the manufacturer has taken all necessary measures to ensure that the
device complies with the applicable safety legislation for distribution within the
European Community.
Indicates separate collection for electrical and electronic equipment in accordance with
the EU directive. Electrical waste products should not be disposed of with household
waste. See chapter 'Recycling' for more information.
Indicates that this product contains a built-in rechargeable battery which shall not be
disposed of with normal household waste (2006/66/EC). See chapter 'Recycling' for
more information.
Indicates the protection against ingress of solid foreign objects and against harmful
effects due to the ingress of water.
Indicates the manufacturer's serial number of the breast pump.
Indicates USB.
Indicates the relative humidity upper limits to which the device can be safely exposed:
up to 90%.
Indicates the storage and transportation temperature limits to which the device can be
safely exposed: -20°C to 45°C/-4°F to 113°F.
English
29
English
Indicates Forest Stewardship Council. The FSC trademarks enable consumers to choose
products that support forest conservation, offer social benefits, and enable the market
to provide an incentive for better forest management.
Indicates that an object is capable of being recycled - not that the object has been
recycled or will be accepted in all recycling collection systems.
Indicates that the packaging should be recycled and packaging fees have been paid to
the green dot recycling organizations.
Indicates 2-year Philips worldwide guarantee.
Indicates that a specific adapter is required for connecting the breast pump.

30
Deutsch
Inhalt
Einführung ___________________________________________________________________________________________ 30
Allgemeine Beschreibung ____________________________________________________________________________ 31
Vorgesehener Verwendungszweck __________________________________________________________________ 31
Wichtige Sicherheitsinformationen __________________________________________________________________ 31
Vor dem ersten Gebrauch____________________________________________________________________________ 36
Reinigung und Desinfektion _________________________________________________________________________ 36
Milchpumpe verwenden _____________________________________________________________________________ 40
Muttermilch mit der Flasche füttern _________________________________________________________________ 47
Kompatibilität ________________________________________________________________________________________ 49
Bestellen von Zubehör _______________________________________________________________________________ 49
Recycling______________________________________________________________________________________________ 50
Anleitung zum Entfernen von Akkus_________________________________________________________________ 50
Garantie und Support ________________________________________________________________________________ 51
Fehlerbehebung______________________________________________________________________________________ 51
Zusätzliche Informationen ___________________________________________________________________________ 54
Aufbewahrung________________________________________________________________________________________ 54
Elektromagnetische Felder (EMF) ___________________________________________________________________ 54
Technische Daten ____________________________________________________________________________________ 55
Erklärung der Symbole _______________________________________________________________________________ 56
Einführung
Herzlichen Glückwunsch zu Ihrem Kauf und willkommen bei Philips Avent! Um den Support von
Philips optimal zu nutzen, registrieren Sie Ihre Milchpumpe bitte unter www.philips.com/welcome.
Die Philips Avent elektrische Einzel-/Doppelmilchpumpe Premium ahmt die natürliche
Saugbewegung Ihres Babys nach. Das weiche Silikonkissen regt die Brustwarze mit sanften
Massagebewegungen an und hilft Ihnen dabei, Milch bequem und effektiv abzupumpen. Die
Kombination aus Saugen und Stimulation der Brustwarten regt den Milchfluss schnell an. Das Design
ist so konzipiert, dass Sie sich beim Abpumpen nicht nach vorne beugen müssen, sondern eine
entspannte, aufrechte Position einnehmen können.
Gesundheitsexperten und die Weltgesundheitsorganisation empfehlen Muttermilch im ersten
Lebensjahr als Hauptnahrung – nach den ersten 6 Monaten in Kombination mit fester Nahrung. Ihre
Muttermilch ist speziell auf die Bedürfnisse Ihres Babys abgestimmt und trägt zum Schutz Ihres Baby
vor Infektionen und Allergien bei. Die Milchpumpe kann Ihnen dabei helfen, länger zu stillen. Sie
können Ihre Milch abpumpen und aufbewahren, sodass Ihr Baby selbst dann davon profitieren kann,
wenn sie nicht selbst vor Ort sein können. Da die Pumpe kompakt, leise und diskret in der
Verwendung ist, können Sie sie überallhin mitnehmen. So können Sie Ihre Milch abpumpen, wann
immer Sie möchten, und Ihren Milchfluss aufrecht erhalten.
Damit sich das Stillen gut einspielt, ist es ratsam, (sofern Ihnen in Rücksprache mit medizinischem
Fachpersonal nichts anderweitiges empfohlen wurde) mit dem Abpumpen der Milch so lange zu
warten, bis sich Ihr Milchfluss an einen festen Zeitplan zum Stillen angepasst hat (sofern Ihnen Ihr
medizinisches Fachpersonal nichts anderweitiges empfohlen wurde). Normalerweise dauert dies nach
der Entbindung mindestens 2 bis 4 Wochen.
Deutsch

Deutsch
Allgemeine Beschreibung
Hinweis: Die unten aufgeführten Zahlen verweisen auf die Zahlen in der Abbildung auf der
ausklappbaren Vorderseite dieser Bedienungsanleitung.
Hinweis: Bei der Doppelmilchpumpe werden die in Abbildung B und C dargestellten Teile in
doppelter Ausführung geliefert.
Produktbeschreibung (Abb. A)
A1 Motoreinheit
A2 Milchpumpen-Set
A3 Flasche
Milchpumpen-Set (Abb. B)
B1 Silikonschlauch mit Kappe
B2 Silikonmembran
B3 Pumpengehäuse
Philips Avent Natural Flasche (Abb. C)
C1 Flaschenkappe
C2 Schraubring
C3 Sauger
A4 Adapter
A5 Doppelmilchpumpe
B4 Abdeckung
B5 Kissen
B6 Weißes Ventil
C4 Verschlussdeckel
C5 Flasche
31
Deutsch
Zubehör
Es gibt mehrere Versionen dieses Milchpumpen-Produkts. Die folgenden Zubehörteile von Philips
Avent sind in den jeweiligen Packungen unterschiedlich kombiniert:
-
Brustpads
-
Tasche
-
Warmhaltetasche
-
Reinigungsbürste
* Die Handhabung dieser Zubehörteile wird ein einer gesonderten Bedienungsanleitung erläutert.
-
Mehrwegbecher mit Adapter*
-
Muttermilchbeutel*
-
Natural Flaschen
-
Milchpumpengürtel*
Vorgesehener Verwendungszweck
Die komfortable elektrische Philips Avent Einzel-/Doppelmilchpumpe Premium eignet sich zum
Abpumpen von Milch aus der Brust stillender Frauen.
Das Gerät ist für einen einzelnen Benutzer vorgesehen.
Wichtige Sicherheitsinformationen
Lesen Sie diese Bedienungsanleitung vor dem Gebrauch der Milchpumpe aufmerksam durch, und
bewahren Sie sie für eine spätere Verwendung auf.
Diese Bedienungsanleitung ist auch online auf der Philips Avent Website verfügbar:
www.philips.com/avent.

32
Deutsch
Warnhinweise
-
Verwenden Sie die Milchpumpe nicht während der
Schwangerschaft, da das Pumpen die Geburt einleiten kann.
Warnhinweise zur Vermeidung von Erstickung, Strangulation und
Verletzungen:
-
Diese Milchpumpe ist nicht für Benutzer (einschließlich Kinder)
mit eingeschränkten physischen, sensorischen oder psychischen
Fähigkeiten bzw. ohne jegliche Erfahrung oder Vorwissen
geeignet. Diese Personen können diese Milchpumpe nur
verwenden, wenn eine angemessene Aufsicht oder
entsprechende Anleitung zur Benutzung des Geräts durch eine
verantwortliche Person sichergestellt ist.
-
Lassen Sie Kinder oder Haustiere nicht mit der Motoreinheit, dem
Netzstecker, der Verpackung oder den Zubehörteilen spielen.
-
Ziehen Sie den Stecker der Milchpumpe nach jedem Gebrauch
und wenn der Akku vollständig aufgeladen ist aus der Steckdose.
Warnhinweise zur Verhinderung der Übertragung von
Infektionskrankheiten:
-
Wenn Sie eine Mutter sind, die mit Hepatitis B, Hepatitis C oder
dem Humanen Immundefizienz-Virus (HIV) infiziert ist, wird das
Abpumpen der Muttermilch das Risiko, das Virus über Ihre
Muttermilch an Ihr Baby zu übertragen, nicht verringern oder
beseitigen.
Warnhinweise zur Vermeidung von Stromschlägen:
-
Prüfen Sie die Milchpumpe (einschließlich des Adapters) vor dem
Gebrauch auf Anzeichen von Beschädigung. Verwenden Sie die
Milchpumpe nicht, wenn der Adapter oder der Netzstecker
beschädigt ist, nicht ordnungsgemäß funktioniert,
heruntergefallen ist oder in Wasser getaucht wurde.
-
Verwenden Sie nur den Adapter (S009AHz050yyyy), der im
Lieferumfang der Milchpumpe enthalten ist.

Deutsch
-
Achten Sie immer darauf, dass sich das Gerät im Störungsfall
leicht vom Netz trennen lässt.
Warnhinweise zur Vermeidung von Verunreinigungen und zur
Gewährleistung der erforderlichen Hygiene:
-
Aus Hygienegründen sollte die Milchpumpe nur von einer
einzigen Person verwendet werden.
-
Reinigen und desinfizieren Sie vor dem ersten Gebrauch sowie
nach jedem Gebrauch alle Teile.
-
Verwenden Sie bei der Reinigung der Milchpumpenteile keine
antibakteriellen Reiniger oder Scheuermittel, da dies zu
Beschädigungen führen kann.
-
Waschen Sie sich vor dem Anfassen der Brustpumpenteile und
Brüste gründlich die Hände mit Wasser und Seife, um
Verunreinigungen zu vermeiden. Vermeiden Sie es, die Innenseite
der Behälter oder Deckel zu berühren.
Warnhinweise zur Vermeidung von schmerzenden Brüsten und
Brustwarzen sowie anderen Problemen:
-
Verwenden Sie die Milchpumpe nicht, wenn die Silikonmembran
Beschädigungen aufweist. Informationen zum Bestellen von
Ersatzteilen finden Sie unter "Bestellen von Zubehör".
-
Verwenden Sie nur das Zubehör und die Teile, die von Philips
Avent empfohlen werden.
-
Änderungen an der Milchpumpe sind unzulässig. Nehmen Sie
Änderungen vor, erlischt die Garantie.
-
Verwenden Sie die Milchpumpe nicht, wenn Sie sich schläfrig oder
müde fühlen, um mangelnde Aufmerksamkeit während des
Gebrauchs zu vermeiden.
-
Schalten Sie die Milchpumpe immer aus, bevor Sie das
Pumpengehäuse von der Brust nehmen, um das Vakuum zu
lösen.
-
Wenn das Vakuum unangenehm ist oder Schmerzen verursacht,
dann schalten Sie die Milchpumpe aus und nehmen Sie sie von
der Brust.
33
Deutsch

34
Deutsch
-
Pumpen Sie nicht länger als jeweils fünf Minuten, wenn sich keine
Milch abpumpen lässt. Versuchen Sie das Abpumpen zu einer
anderen Tageszeit erneut.
-
Wenn der Vorgang sehr unangenehm oder schmerzhaft wird,
dann verwenden Sie die Pumpe nicht mehr, und konsultieren Sie
Ihren Arzt oder medizinisches Fachpersonal.
Warnhinweise zur Vermeidung von Produktschäden und fehlfunktionen:
-
Tragbare Hochfrequenz-Kommunikationsgeräte (wie z. B.
Mobiltelefone und Peripheriegeräte wie Antennenkabel und
externe Antennen) sollten mit einem Abstand von mindestens
30cm (12in) zu sämtlichen Teilen der Milchpumpe (einschließlich
Netzstecker) betrieben werden. Andernfalls könnte dies die
Leistung der Milchpumpe beeinträchtigen.
-
Verwenden Sie dieses Gerät nicht in der Nähe von anderen
Geräten oder auf anderen Geräten stehend, da dies zu
Fehlfunktionen führen kann.
Batterie-Sicherheitsanweisungen
-
Verwenden Sie dieses Produkt nur für den in dieser
Bedienungsanleitung beschriebenen, vorgesehenen Zweck.
Falscher Gebrauch kann zu Stromschlag, Verbrennungen, Brand
und anderen unerwarteten Gefahren führen.
-
Verwenden Sie nur das im Lieferumfang des Produkts enthaltene
abnehmbare Netzteil, um die Batterie aufzuladen. Verwenden Sie
kein Verlängerungskabel.
-
Laden, benutzen und verwahren Sie das Produkt in den
Temperaturbereichen, die in der Tabelle der technischen Daten in
dieser Bedienungsanleitung angegebenen sind.
-
Trennen Sie das Produkt von der Stromversorgung, wenn es
vollständig aufgeladen ist.

Deutsch
-
Verbrennen Sie keine Produkte und Batterien. Setzen Sie sie
weder direktem Sonnenlicht noch hohen Temperaturen aus (z.B.
in heißen Autos oder in der Nähe von heißen Herden). Batterien
und Akkus können explodieren, wenn sie überhitzen.
-
Wenn das Produkt heiß wird, die Farbe wechselt, einen
ungewöhnlichen Geruch abgibt oder wenn das Laden viel länger
dauert als gewöhnlich, beenden Sie die Verwendung und das
Laden.
-
Legen Sie die Produkte und die Batterien nicht in Mikrowellen
oder auf Induktionsherde.
-
Dieses Produkt verfügt über einen Akku, der nicht austauschbar
ist. Öffnen Sie das Produkt nicht, um den Akku auszutauschen.
Vorsichtsmaßnahmen
Vorsichtsmaßnahmen zur Vermeidung von Schäden und
Fehlfunktionen der Milchpumpe:
-
Verhindern Sie, dass der Adapter und die Motoreinheit mit Wasser
in Berührung kommen.
-
Legen Sie die Motoreinheit und den Netzstecker nie in Wasser
oder die Spülmaschine, da dies permanente Schäden an den
Teilen verursacht.
-
Halten Sie Adapter und die Silikonschläuche von heißen
Oberflächen fern, um ein Überhitzen und eine Verformung dieser
Teile zu vermeiden.
35
Deutsch

36
Deutsch
Vor dem ersten Gebrauch
Zerlegen, reinigen und desinfizieren Sie vor der ersten Benutzung sowie nach jedem Gebrauch alle
Teile, die mit Muttermilch in Kontakt kommen.
Laden Sie das Gerät vor dem ersten Gebrauch und nach längerer Gebrauchspause vollständig auf.
Reinigung und Desinfektion
Übersicht
Reinigen und desinfizieren Sie die Teile, die mit der Brust und Muttermilch in Kontakt kommen, wie
unten beschrieben:
Wann Wie
Reinigen und desinfizieren Sie die
Teile vor dem ersten sowie nach
jedem Gebrauch.
Die folgenden Teile kommen nicht in Kontakt mit der Brust und Muttermilch; reinigen Sie sie wie unten
beschrieben:
Wann Wie
Nach Bedarf reinigen. Wischen Sie mit einem sauberen,
Nehmen Sie alle Teile auseinander,
und reinigen Sie diese, wie im
Kapitel „Reinigung“ beschrieben.
Desinfizieren Sie sie anschließend
wie im Kapitel „Desinfektion“
beschrieben.
feuchten Tuch mit Wasser und
mildem Reinigungsmittel ab.

Deutsch
Schritt1: Zerlegen
Achten Sie darauf, das weiße Ventil aus der Milchpumpe zu nehmen.
Schritt2: Reinigung
Die Teile, die mit Milch in Kontakt kommen, können manuell oder in der Spülmaschine gereinigt
werden.
Warnhinweis: Verwenden Sie bei der Reinigung der Milchpumpenteile keine
antibakteriellen Reiniger oder Scheuermittel, da dies zu Beschädigungen führen kann.
Achtung: Legen Sie die Motoreinheit und den Netzstecker nie in Wasser oder die
Spülmaschine, da dies permanente Schäden an den Teilen verursacht.
37
Deutsch
Achtung: Seien Sie vorsichtig, wenn Sie das weiße Ventil herausnehmen und es
reinigen. Wenn es beschädigt wird, funktioniert die Milchpumpe nicht mehr
ordnungsgemäß. Um das weiße Ventil herauszunehmen, ziehen Sie vorsichtig an der
gerippten Lasche auf der Seite des Ventils. Um das weiße Ventil zu reinigen, reiben Sie
es in warmem Spülwasser vorsichtig mit Ihren Fingern. Führen Sie keine Gegenstände in
das weiße Ventil ein, da es dadurch beschädigt werden könnte.

5 min.
38
Deutsch
Schritt2A: Manuelles Saugen
Erforderliches Zubehör:
-
Mildes Geschirrspülmittel
-
Wasser in Trinkwasserqualität
-
Weiche, saubere Bürste
-
Sauberes Geschirrtuch oder Abtropfgestell
-
Sauberes Spülbecken oder saubere
Schüssel
1. Spülen Sie alle Teile
unter fließendem,
lauwarmem Wasser ab.
5. Lassen Sie alle Teile
auf einem sauberen
Geschirrtuch oder
Abtropfgestell trocknen.
2. Legen Sie alle Teile für
5Minuten in warmes
Wasser mit etwas
mildem
Geschirrspülmittel.
Schritt2B: Reinigen im Geschirrspüler
Erforderliches Zubehör:
-
Milder Geschirrreiniger oder ein Geschirrspültab
-
Wasser in Trinkwasserqualität
Hinweis: Lebensmittelfarben können Teile verfärben.
3. Reinigen Sie alle Teile
mit einer
Reinigungsbürste.
4. Spülen Sie alle Teile
gründlich unter
fließendem Wasser in
Trinkwasserqualität ab.

5 min.
Deutsch
39
1. Legen Sie alle Teile in
den oberen Korb der
Spülmaschine.
2. Geben Sie
Geschirrspülmittel oder
einen Geschirrspültab in
die Maschine, und
führen Sie ein
Standardprogramm aus.
3. Lassen Sie alle Teile
auf einem sauberen
Geschirrtuch oder
Abtropfgestell trocknen.
Schritt3: Desinfektion
Erforderliches Zubehör:
-
Ein normaler Topf
-
Wasser in Trinkwasserqualität
Achtung: Sorgen Sie während der Desinfektion durch kochendes Wasser dafür, dass
die Flasche oder andere Teile nicht die Seiten des Topfs berühren. Dies kann definitive
Produktverformungen oder Beschädigungen zur Folge haben, für die Philips nicht
haftbar gemacht werden kann.
1. Füllen Sie einen
haushaltsüblichen Topf
mit genügend Wasser,
um alle Teile zu
bedecken, und legen Sie
alle Teile in den Topf.
Lassen Sie das Wasser
5Minuten lang kochen.
Achten Sie darauf, dass
die Teile die Seitenwand
des Topfs nicht
berühren.
2. Lassen Sie das Wasser
abkühlen.
3. Nehmen Sie die Teile
vorsichtig aus dem
Wasser. Legen Sie die
Teile auf eine saubere
Oberfläche/ein
Geschirrtuch oder ein
Abtropfgestell, um Sie
trocknen zu lassen.
4. Bewahren Sie die
trockenen Teile in einem
sauberen, trockenen
Behälter mit Deckel auf.
Deutsch

40
Deutsch
Milchpumpe verwenden
Kissengröße
Die Philips Avent Einzel-/Doppelmilchpumpe verfügt über ein weiches Massagekissen. Es stimuliert
sanft Ihre Brustwarze, um den Milchfluss auszulösen. Das Kissen besteht aus flexiblem Silikon, das
sich an die Brüste von 99,98% der Frauen anpasst, und für bis zu 30mm große Nippel geeignet ist.
Milchpumpe aufladen
Laden Sie den Akku vor dem ersten Gebrauch der Milchpumpe oder wenn der Akku fast leer ist auf.
Das vollständige Aufladen des Akkus dauert bis zu 4Stunden.
1. Schalten Sie das Gerät
aus.
2. Stecken Sie den
Adapter in die
Steckdose, und
schließen Sie den
kleinen Stecker am
anderen Ende an die
Motoreinheit an.
3. Der Akku wird
geladen.
4. Wenn der Akku
vollständig geladen ist,
dann ziehen Sie den
Netzstecker aus der
Steckdose und den
kleinen Stecker aus der
Motoreinheit.
Akkuanzeige
Alle Lichter
leuchten konstant.
Der Akku ist
vollständig
geladen.
* Eine Sitzung entspricht 20Minuten (Doppelpumpe) oder 30Minuten (Einzelpumpe).
Das erste Licht
leuchtet konstant.
Der Akku reicht für
eine Sitzung.*
Erstes Licht blinkt
langsam.
Der Akkustand ist
niedrig; der Akku
muss geladen
werden.
Erstes Licht blinkt
schnell.
Der Akku ist fast
leer; das Gerät
funktioniert bald
nicht mehr.
Die Akku-Lichter
leuchten
nacheinander auf
und gehen dann
alle zusammen aus.
Der Akku wird
geladen.
Milchpumpe zusammensetzen
Vergewissern Sie sich, dass Sie die Teile der Milchpumpe gereinigt und desinfiziert haben, die mit
Milch in Kontakt kommen.

Deutsch
Warnhinweis: Seien Sie vorsichtig, wenn Sie die Teile der Milchpumpe in kochendem
Wasser desinfiziert haben, können diese sehr heiß sein. Um Verbrennungen zu
vermeiden, sollten Sie die Milchpumpe erst zusammensetzen, wenn die desinfizierten
Teile abgekühlt sind.
Warnhinweis: Waschen Sie sich vor dem Anfassen der Brustpumpenteile und Brüste
gründlich die Hände mit Wasser und Seife, um Verunreinigungen zu vermeiden.
Vermeiden Sie es, die Innenseite der Behälter oder Deckel zu berühren.
Überprüfen Sie die Teile des Milchpumpen-Sets vor Gebrauch auf Abnutzung oder Beschädigung und
ersetzen Sie sie bei Bedarf.
Hinweis: Damit die Milchpumpe ein geeignetes Vakuum bilden kann, müssen das Kissen, die
Silikonmembran und der Silikonschlauch richtig platziert werden.
41
Deutsch
1. Waschen Sie Ihre
Hände gründlich mit
Wasser und Seife.
4A Drücken Sie den
inneren Teil des Kissens
im Trichter gegen die
Linie (mit einem Pfeil
gekennzeichnet)..
2. Stecken Sie das weiße
Ventil so weit wie
möglich in das
Pumpengehäuse.
5. Setzen Sie die
Silikonmembran in das
Pumpengehäuse ein.
3. Schrauben Sie das
Pumpengehäuse auf die
Flasche.
5A Stellen Sie sicher,
dass die Silikonmembran
sicher auf dem Rand
sitzt, indem Sie sie mit
den Daumen nach unten
drücken.
4. Setzen Sie das Kissen
in das Pumpengehäuse
ein, und achten Sie
darauf, dass der Rand
des Kissens das
Pumpengehäuse
bedeckt.
6. Befestigen Sie den
Silikonschlauch mit
Kappe an der
Silikonmembran.
Drücken Sie die Kappe
herunter, bis sie sicher
sitzt.

42
Deutsch
7. Verbinden Sie den
Schlauch/die Schläuche
mit der Motoreinheit.
Hinweis: Sie können
die Abdeckung auf das
Massagekissen legen,
um die Milchpumpe
während der
Vorbereitung zum
Abpumpen sauber zu
halten.
8A. Wenn die
Milchpumpe aufgeladen
ist, können Sie sie
kabellos verwenden.
Halten Sie den Ein/Ausschalter gedrückt,
bis sich das Gerät
einschaltet.
8B. Sie können auch die
Milchpumpe auch
verwenden, während Sie
an die Steckdose
angeschlossen ist. Wenn
der Akkustand niedrig ist,
dann stecken Sie den
Netzstecker in die
Steckdose und
verbinden Sie den
kleinen Stecker am
anderen Ende mit der
Motoreinheit.
9. Die Milchpumpe ist
jetzt einsatzbereit.

Beschreibung des Motoreinheit
7
1 3 5
4 6
8
2
1
2
3
4
1 USB-Anschlussbuchse
2 Ein-/Austaste mit
Pause/Play-Funktion
3 Moduswahltaste
4 „Intensität senken“-Taste
5 „Intensität steigern“-Taste
6 LED-Anzeige
7 Schlauchanschluss für
Einzelmilchpumpe
8 Schlauchanschlüsse für
Doppelmilchpumpe
LED-Display
1 Akkuanzeige
2 Timer (Minuten) und
Vakuumstärke
3 Abpumpmodus
4 Stimulationsmodus
Deutsch
43
Deutsch
Erklärung der Modi
Die Milchpumpe verfügt über zwei Modi. Unten finden Sie eine Erklärung dieser Modi.
ModusSymbole
Modus Erklärung Anzahl der Saugstufen
Stimulationsmodus
Abpumpmodus Modus für ein effizientes
Stimulationsmodus, um die Brust
und den Milchfluss anzuregen.
Abpumpen, nachdem der
Milchfluss eingesetzt hat. Nach
einer 90-sekündigen Massage
wechselt das Gerät automatisch in
den Abpumpmodus.
8 Saugstufen
16 Saugstufen

44
Deutsch
Die Ziffer auf dem Display zeigt die Betriebszeit
in Minuten an.
Wenn Sie die Saugintensität ändern, zeigt das
Display für einige Sekunden die ausgewählte
Saugstufe. Danach wird wieder die Betriebszeit
angezeigt.
Abpumpen
Warnhinweis: Schalten Sie die Milchpumpe stets aus, bevor Sie das Pumpengehäuse
von der Brust nehmen, um das Vakuum zu lösen.
Warnhinweis: Pumpen Sie nicht länger als jeweils 5 Minuten, wenn sich keine Milch
abpumpen lässt. Versuchen Sie das Abpumpen zu einer anderen Tageszeit erneut.
Warnhinweis: Wenn der Vorgang sehr unangenehm oder schmerzhaft wird, dann
verwenden Sie die Pumpe nicht mehr, und konsultieren Sie Ihren Arzt oder medizinisches
Fachpersonal.
Hinweis: Wenn Sie regelmäßig mehr als 125ml/4floz pro Sitzung abpumpen, können Sie eine
Philips Avent Natural Flasche mit einem Fassungsvermögen von 260ml/9floz erwerben, um ein
Überlaufen zu verhindern.
Hinweis: Die Milchpumpe kann kabellos verwendet werden, wenn Sie ausreichend aufgeladen ist.
Sie können Sie aber auch verwenden, während Sie an die Steckdose angeschlossen ist.
1. Waschen Sie Ihre
Hände gründlich mit
Wasser und Seife, und
vergewissern Sie sich,
dass Ihre Brust sauber
ist.
2. Drücken Sie das
Milchpumpen-Set sanft
gegen Ihre Brust.
Vergewissern Sie sich,
dass Ihre Brustwarze
sich in der Mitte
befindet.
3. Halten Sie den Ein/Ausschalter gedrückt,
bis sich das Gerät
einschaltet. Die
Betriebsanzeige leuchtet
auf und zeigt an, dass Ihr
Gerät sich im
Stimulationsmodus
befindet.
4. Die Milchpumpe
beginnt im
Stimulationsmodus und
steigert Ihre
Saugintensität langsam
auf die zuletzt
verwendete Saugstufe
(bzw. Stufe 5 beim
ersten Gebrauch).

3 sec.
Deutsch
45
5. Auf dem Display wird
die Betriebszeit
angezeigt.
9. Wenn Sie eine Pause
einlegen möchten, dann
drücken Sie kurz die Ein/Austaste. Um
fortzufahren, drücken
Sie die Ein-/Austaste
kurz erneut.
Tipp: Um ein optimales Abpumpergebnis zu erzielen, sollten Sie sich höchste Stufe wählen, die sich
noch angenehm anfühlt. Welche Stufe das ist, kann sich von Sitzung zu Sitzung unterscheiden.
Tipp: Sie können die Doppelmilchpumpe auch als Einzelmilchpumpe verwenden, indem Sie
lediglich den Schlauch einer Pumpeneinheit mit der Motoreinheit verbinden.
6. Verwenden Sie die
Tasten „Intensität
senken“ und „Intensität
steigern“, um die
Saugintensität nach
Belieben zu ändern.
10. Drücken und halten
Sie die Ein-/Austaste,
um das Gerät
abzuschalten.
7. Nach 90Sekunden
wechselt die
Milchpumpe in den
Abpumpmodus und
steigert Ihre
Abpumpintensität
langsam auf die zuletzt
verwendete
Abpumpintensität (bzw.
Stufe 11 beim ersten
Gebrauch).
8. Wenn Ihr Milchfluss
früher einsetzt oder Sie
vom Abpump- in den
Stimulationsmodus
wechseln möchten,
dann können Sie die
Moduswahltaste
drücken, um den Modus
zu wechseln.
Deutsch

1
2
46
Deutsch
Nach dem Gebrauch
1. Schrauben Sie die
Flasche ab.
4. Entfernen Sie den
Silikonschlauch und die
Verschlusskappe vom
Milchpumpen-Set.
2A. So bewahren Sie die
Muttermilch auf:
Schließen Sie die
Flasche mit dem
Verschlussdeckel und
dem Schraubring.
5. Zerlegen und reinigen
Sie alle Teile, die mit
Muttermilch in Kontakt
waren (siehe 'Reinigung
und Desinfektion').
2B. So bereiten Sie die
Flasche vor, wenn Sie Ihr
Baby füttern möchten:
Setzen Sie einen Sauger
in einen Schraubring
und schrauben Sie den
zusammengesetzten
Schraubring auf die
Flasche. Setzen Sie die
Verschlusskappe (siehe
'Die Flasche
zusammensetzen') auf
die Flasche, um den
Sauger zu verschließen.
6. Wickeln Sie zur
einfachen
Aufbewahrung den
Silikonschlauch um die
Motoreinheit, und
befestigen Sie die Kappe
am Schlauch.
3. Ziehen Sie den
Netzstecker aus der
Steckdose und der
Motoreinheit.
Warnhinweis: Kühlen Sie die abgepumpte Milch sofort oder frieren Sie sich ein, oder
bewähren Sie vor dem Füttern Ihres Babys für maximal 4 Stunden bei deiner Temperatur
von 16-29 °C (60-85 °F) auf.
Weitere Informationen zur Milchpumpe und Tipps zum Abpumpen von Milch finden Sie unter
www.philips.com/avent.

Deutsch
Muttermilch aufbewahren
Nachstehend finden Sie wichtige Hinweise zur Aufbewahrung von Muttermilch:
Aufbewahrungsort Temperatur Max. Aufbewahrungsdauer
Zimmer 16-29⁰C (60-85⁰F) 4 Stunden
Kühlschrank 4⁰C (39⁰F) 4Tage
47
Gefrierfach < -4⁰C (25⁰F) 6bis12Monate
Warnhinweis: Um eine Beeinträchtigung der Milchqualität zu vermeiden, sollten Sie
aufgetaute Muttermilch nicht wieder einfrieren.
Warnhinweis: Um eine Beeinträchtigung der Milchqualität und ein unbeabsichtigtes
Auftauen der gefrorenen Milch zu vermeiden, sollten Sie frische Muttermilch niemals mit
gefrorener Muttermilch vermischen.
Muttermilch mit der Flasche füttern
Warnhinweis: Für die Sicherheit und Gesundheit Ihres Kindes
-
Kinder sollten diese Flasche nur unter Aufsicht von Erwachsenen benutzen.
-
Um Erstickungsgefahr vorzubeugen, sollten Sie die Sauger nie als Schnuller verwenden.
-
Ununterbrochenes und anhaltendes Saugen von Flüssigkeiten kann Karies verursachen.
-
Bevor Sie Ihr Baby füttern, sollten Sie die Temperatur der Nahrung überprüfen.
-
Bewahren Sie alle nicht verwendeten Einzelteile außerhalb der Reichweite von Kindern auf.
-
Halten Sie die Verschlusskappe der Flasche von Kindern fern, da sie daran ersticken könnten.
-
Erlauben Sie es Kindern nicht, mit kleinen Einzelteilen zu spielen oder zu gehen/laufen, während
sie aus Flaschen trinken.
-
Untersuchen Sie alle Teile vor Gebrauch, und ziehen Sie den Sauger in alle Richtungen. Entsorgen
Sie ein Teil bei ersten Anzeichen von Beschädigung oder Abnutzung.
-
Entsorgen Sie nach dem Füttern stets die gesamte restliche Muttermilch.
Deutsch
Achtung: So vermeiden Sie eine Beschädigung der Flasche
-
Legen Sie die Teile des Produkts nicht in einen heißen Ofen, da Kunststoff schmelzen kann.
-
Die Eigenschaften des Kunststoffmaterials können durch Desinfektion und hohe Temperaturen
beeinträchtigt werden. Dies kann Auswirkungen auf die Passung der Verschlusskappe haben.
-
Setzen Sie den Sauger nie direkter Sonneneinstrahlung oder Hitze aus, und legen Sie ihn nicht
länger als empfohlen in Desinfektionsmittel, da dies das Produkt beschädigen kann.

48
Deutsch
Vor Gebraucht der Flasche
-
Überprüfen Sie die Flasche und den Sauger vor jedem Gebrauch, und ziehen Sie den Sauger in alle
Richtungen, um einer Erstickungsgefahr vorzubeugen. Entsorgen Sie ihn bei ersten Anzeichen von
Beschädigung oder Abnutzung.
-
Reinigen und desinfizieren Sie die Flasche vor dem ersten Gebrauch und nach jedem Gebrauch.
Die Flasche zusammensetzen
1. Der Sauger kann
einfacher befestigt
werden, wenn Sie ihn
während der
Aufwärtsbewegung hinund herbewegen,
anstatt ihn gerade nach
oben zu ziehen.
5. Um die Kappe
abzunehmen, legen Sie
Ihre Hand über die
Kappe und Ihren
Daumen in die
Vertiefung der Kappe.
2. Vergewissern Sie sich,
dass Sie den Sauger
soweit nach oben
durchziehen, bis der
untere Teil mit dem
Schraubring bündig ist.
3. Achten Sie darauf, die
Kappe senkrecht auf die
Flasche zu setzen, damit
der Sauger aufrecht
steht.
4. Schrauben Sie den
Schraubring mit Sauger
und Verschlusskappe
auf die Flasche.
Muttermilch erhitzen
Wenn Sie gefrorene Muttermilch verwenden, lassen Sie die Milch zunächst vollständig auftauen, bevor
Sie sie erhitzen.
Hinweis: Wenn Sie Ihr Baby sofort füttern müssen, können Sie die Milch in einer Schüssel mit
heißem Wasser auftauen.
Erhitzen Sie die Flasche mit aufgetauter oder gekühlter Muttermilch in einer Schüssel mit heißem
Wasser oder in einem Fläschchenwärmer. Nehmen Sie den Schraubring und den Verschlussdeckel
von der Flasche.
Rühren Sie erwärmte Muttermilch immer um, oder schütteln Sie sie, um eine gleichmäßige
Wärmeverteilung zu gewährleisten. Prüfen Sie die Temperatur vor dem Füttern.

Deutsch
Warnhinweis: Es wird empfohlen, Muttermilch nicht in der Mikrowelle zu erwärmen.
Mikrowellen könnten die Qualität der Muttermilch beeinträchtigen. Wertvolle
Nährstoffe könnten verloren gehen, und es können punktuell hohe Temperaturen
entstehen. Möchten Sie die Muttermilch dennoch in der Mikrowelle erwärmen, dann
stellen Sie den Behälter ohne Schraubring, Sauger und Verschlusskappe in die
Mikrowelle. Rühren Sie erwärmte Muttermilch immer um, um eine gleichmäßige
Wärmeverteilung zu gewährleisten. Prüfen Sie die Temperatur vor dem Füttern.
Der richtige Sauger für Ihr Baby
Die Philips Avent Natural Sauger sind mit verschiedenen Durchflussmengen
erhältlich. Im Lieferumfang der Milchpumpe ist der Sauger Nr. 1 enthalten.
Dabei handelt es sich um einen Sauger für 0m+, der für Neugeborene und
Stillkinder jeden Alters verwendet werden kann.
Wenn sich Ihr Baby oft verschluckt, beim Trinken Milch aus seinem Mund
tropft, oder es Probleme hat, sich an die Trinkgeschwindigkeit anzupassen,
dann verwenden Sie einen Sauger mit einer geringeren Durchflussmenge.
Verwenden Sie eine höhere Durchflussmenge, wenn Ihr Baby während des
Fütterns einschläft, frustriert ist oder wenn das Füttern sehr lange dauert.
Auf dem Philips Avent Natural Sauger befindet sich seitlich eine deutlich sichtbare Ziffer, die die
Durchflussmenge angibt. Weitere Informationen finden Sie auf www.philips.com/avent.
Flaschen aufbewahren
-
Bewahren Sie alle Teile in einem trockenen, sauberen Behälter mit Deckel auf.
-
Setzen Sie den Sauger nie direkter Sonneneinstrahlung oder Hitze aus, und legen Sie ihn nicht
länger als empfohlen in Desinfektionsmittel ("Sterilisierungslösung"), da dies die Teile beschädigen
kann.
-
Aus hygienischen Gründen sollten Sie die Sauger alle drei Monate austauschen.
49
Deutsch
Kompatibilität
Die Philips Avent elektrische Einzel-/Doppelmilchpumpe Premium ist mit allen Flaschen der Philips
Avent Natural Serie und mit Philips Avent Mehrwegbechern mit Adapter kompatibel. Die Verwendung
der Philips Avent Natural Glasflaschen ist in Kombination mit der Milchpumpe nicht zu empfehlen.
Bestellen von Zubehör
Um Zubehör oder Ersatzteile zu kaufen, besuchen Sie www.philips.com/parts-and-accessories, oder
suchen Sie Ihren Philips Händler auf. Sie können sich auch an das Philips Service-Center in Ihrem
Land wenden.
Wenn Sie Ersatzsauger bestellen, dann achten Sie darauf, die Sauger mit der richtigen
Durchflussmenge für Ihr Baby (siehe 'Der richtige Sauger für Ihr Baby') zu verwenden, und die Teile
und Sauger der Philips Avent Anti-Kolik-Flaschenteile und der Philips Avent Natural Flaschen nicht zu
vermischen. Sie passen nicht zusammen und könnten auslaufen oder andere Probleme verursachen.

50
Deutsch
Recycling
-
Dieses Symbol bedeutet, dass das Produkt nicht mit dem normalen Hausmüll entsorgt werden
kann (2012/19/EU).
-
Dieses Symbol bedeutet, dass das Produkt einen Akku enthält, der nicht mit dem normalen
Hausmüll entsorgt werden darf (2006/66/EG). Bitte geben Sie das Produkt bei einer offiziellen
Sammelstelle oder einem Philips Service-Center ab, um den Akku fachgerecht ausbauen zu lassen.
1 Altgeräte/Altakkus/Batterien können kostenlos an geeigneten Rücknahmestellen abgegeben
werden.
2 Diese werden dort fachgerecht gesammelt oder zur Wiederverwendung vorbereitet.
Altgeräte/Altakkus/Batterien können Schadstoffe enthalten, die der Umwelt und der menschlichen
Gesundheit schaden können. Enthaltene Rohstoffe können durch ihre Wiederverwertung einen
Beitrag zum Umweltschutz leisten.
3 Die Löschung personenbezogener Daten auf den zu entsorgenden Altgeräten muss vom
Endnutzer eigenverantwortlich vorgenommen werden.
4 Hinweise für Verbraucher in Deutschland: Die in Punkt 1 genannte Rückgabe ist gesetzlich
vorgeschrieben. Altgeräte mit Altbatterien und/oder Altakkus, die nicht vom Altgerät umschlossen
sind, sind vor der Abgabe an einer Rücknahmestelle von diesen zu trennen. Dies gilt nicht, falls die
Altgeräte für eine Wiederverwendung noch geeignet (d.h. funktionstüchtig) sind und von den
anderen Altgeräten getrennt werden. Sammel- und Rücknahmestellen in DE:
https://www.stiftung-ear.de/; für Batterien auch Rückgabe im Handel möglich.
Anleitung zum Entfernen von Akkus
-
Achten Sie beim Umgang mit Batterien darauf, dass Ihre Hände, das Produkt und die Batterien
beim Einsetzen der Batterien trocken sind.
-
Um die Aufheizung oder die Freisetzung giftiger oder gefährlicher Substanzen durch Batterien zu
verhindern, sollten Sie die Batterien nicht zerlegen, modifizieren, durchbohren oder beschädigen.
Sie sollten die Batterien nicht kurzschließen, überladen oder entladen.
-
Um ein versehentliches Kurzschließen von Batterien nach dem Entfernen zu vermeiden, dürfen die
Batterieanschlüsse nicht mit Metallobjekten in Kontakt kommen (z.B. Münzen, Haarnadeln, Ringe).
Wickeln Sie die Batterien nicht in Alufolie. Stecken Sie die Batterien in einen Plastikbeutel, bevor
Sie sie entsorgen.
-
Wenn Batterien beschädigt oder undicht sind, vermeiden Sie den Kontakt mit der Haut oder dem
Auge. Wenn dies der Fall ist, spülen Sie die entsprechende Stelle sofort gründlich mit Wasser.
Suchen Sie medizinische Hilfe.

Deutsch
Hinweis: Bauen Sie den wiederaufladbaren Akku nur zur Entsorgung des Produkts aus.
Bevor Sie den Akku entfernen, stellen Sie sicher, dass das Produkt nicht an einer
Steckdose eingesteckt ist und dass der Akku vollständig entleert ist.
Hinweis: Treffen Sie angemessene Sicherheitsvorkehrungen, wenn Sie das Produkt
mithilfe von Werkzeugen öffnen und den Akku entsorgen.
51
Deutsch
1. Nehmen Sie die
Gummifüße an der
Unterseite der
Elterneinheit ab.
5. Entfernen Sie den
Rahmen von der
Motoreinheit.
2. Entfernen Sie die
Schraube mit einem
Torxschraubendreher.
6. Schneiden oder falten
Sie die Enden des
Akkurahmens aus
Kunststoff. Nehmen Sie
den Akku aus dem
Kunststoffrahmen.
3. Öffnen Sie die
Motoreinheit, indem
seitlich auf das Gerät
drücken.
Hinweis: Entsorgen Sie
den Akku an einem
örtlichen Wertstoffhof.
Andere Teile können an
einer Sammelstelle für
elektrische Geräte
entsorgt werden.
4. Entfernen Sie die
Stecker von der
gedruckten Platine.
Garantie und Support
Für Unterstützung und weitere Informationen besuchen Sie die Philips Website unter
www.philips.com/support, oder lesen Sie die internationale Garantieschrift.
Fehlerbehebung
In diesem Kapitel sind die häufigsten Probleme aufgeführt, die beim Gebrauch des Geräts auftreten
können. Sollten Sie ein Problem mithilfe der nachstehenden Informationen nicht beheben können,
besuchen Sie unsere Website unter www.philips.com/support, und schauen Sie in der Liste „Häufig
gestellte Fragen“ nach, oder wenden Sie sich an das Philips Service-Center in Ihrem Land.

52
Deutsch
Problem Lösung
Ich habe Schmerzen,
wenn ich die
Milchpumpe verwende.
Wählen Sie eine Saugstufe, die für Sie angenehm ist.
-
Prüfen Sie die Silikonmembran auf Beschädigungen (kleine Risse,
-
Löcher etc.).
Achten Sie darauf, dass sich Ihre Brustwarze in der Mitte des Kissens
-
befindet.
Haben Sie weiterhin Schmerzen, dann stellen Sie die Nutzung der
-
Milchpumpe ein und wenden Sie sich an Ihren Arzt/Ihre
Hebamme/Ihre Stillberaterin.
Die Milchpumpe schaltet
sich nicht ein, wenn sie
an die Steckdose
angeschlossen ist.
Die Milchpumpe lässt
sich nicht einschalten
(Anzeigen leuchten nicht
auf).
Die Milchpumpe lädt
nicht auf.
Das Aufladen der
Milchpumpe dauert sehr
lange.
Verwenden Sie ausschließlich den mitgelieferten Adapter.
-
Vergewissern Sie sich, dass der Netzstecker ordnungsgemäß in die
-
Steckdose gesteckt wurde und der kleine Stecker richtig mit der
Motoreinheit verbunden wurde.
Stecken Sie den Netzstecker in eine andere Steckdose ein. Halten Sie
-
dann den Ein-/Ausschalter gedrückt, um zu überprüfen, ob die
Milchpumpe eingeschaltet werden kann.
Sollte das Problem weiterhin bestehen, wenden Sie sich via
-
www.philips.com/support an den Kundenservice.
Überprüfen Sie, ob der Akku aufgeladen (siehe 'Milchpumpe
-
aufladen') ist, oder schließen Sie die Milchpumpe an eine Steckdose
an.
Verwenden Sie ausschließlich den mitgelieferten Adapter.
-
Vergewissern Sie sich, dass der Netzstecker ordnungsgemäß in die
-
Steckdose gesteckt wurde und der kleine Stecker richtig mit der
Motoreinheit verbunden wurde.
Die Milchpumpe ist zu kalt oder zu heiß zum Laden. Lassen Sie die
-
Milchpumpe 30Minuten lang akklimatisieren, bis sie Raumtemperatur
erreicht hat.
Sollte das Problem weiterhin bestehen, wenden Sie sich via
-
www.philips.com/support an den Kundenservice.
Verwenden Sie ausschließlich den mitgelieferten Adapter.
-
Vergewissern Sie sich, dass der Netzstecker ordnungsgemäß in die
-
Steckdose gesteckt wurde und der kleine Stecker richtig mit der
Motoreinheit verbunden wurde.
Die Milchpumpe ist zu heiß oder zu kalt. Es wird empfohlen, die
-
Milchpumpe bei Zimmertemperatur aufzuladen.
Sollte das Problem weiterhin bestehen, wenden Sie sich via
-
www.philips.com/support an den Kundenservice.

Problem Lösung
Ich spüre keine
Saugwirkung bzw. die
Saugwirkung ist zu
niedrig.
Wenn möglich, dann versuchen Sie es mit einer höheren Saugstufe.
-
Prüfen Sie, ob die Silikonmembran richtig (siehe 'Milchpumpe
-
zusammensetzen') zusammengesetzt ist.
Prüfen Sie, ob das weiße Ventil unbeschädigt und richtig (siehe
-
'Milchpumpe zusammensetzen') zusammengesetzt ist.
Prüfen Sie, ob die anderen Teile der Milchpumpe intakt und (siehe
-
'Milchpumpe zusammensetzen') richtig zusammengesetzt sind.
Vergewissern Sie sich, dass die Pumpe so auf die Brust aufgesetzt ist,
-
dass zwischen Brust und Pumpe ein Vakuum entstehen kann.
Wenn Sie dennoch keine Saugwirkung spüren, dann kontaktieren Sie
-
den Kundenservice bitte via www.philips.com/support.
Deutsch
53
Deutsch
Die Saugwirkung der
Milchpumpe ist zu stark.
Es wird wenig/keine
Milch abgepumpt, wenn
ich meine Milchpumpe
verwende.
Wenn ich die
Milchpumpe nach der
Aufbewahrung
einschalte, beginnt Sie
nicht sofort, zu arbeiten.
Wenn möglich, dann versuchen Sie es mit einer niedrigeren Saugstufe.
-
Wenn Sie zum ersten Mal Milch abpumpen, dann beginnen Sie mit der
Standard-Saugstufe (Stufe 5 im Stimulationsmodus, Stufe 11 im
Abpumpmodus) und erhöhen/senken Sie die Intensität nach Bedarf.
Bei unterschiedlichen Sitzungen können sich unterschiedliche Stufen
für Sie am angenehmsten anfühlen.
Vergewissern Sie sich, dass Sie nur die im Lieferumfang der
-
Milchpumpe enthaltenen Zubehörteile für diese Milchpumpe
verwenden.
Prüfen Sie die Silikonmembran auf Beschädigungen (kleine Risse,
-
Löcher etc.).
Sollte das Problem weiterhin bestehen, wenden Sie sich via
-
www.philips.com/support an den Kundenservice.
Wenn die Saugwirkung nicht stark genug ist, dann sehen Sie den
-
Punkt „Ich spüre keine Saugwirkung bzw. die Saugwirkung ist zu
niedrig“.
Wenn Sie die Philips Avent Milchpumpe zum ersten Mal verwenden,
-
kann es sein, dass Sie etwas Übung benötigen, bevor es Ihnen gelingt,
Milch abzupumpen. Weitere Tipps rund um das Abpumpen finden Sie
auf der Philips Avent-Website www.philips.com/avent.
Überprüfen Sie, ob der Akku vollständig aufgeladen (siehe
-
'Milchpumpe aufladen') ist, oder schließen Sie die Milchpumpe an die
Steckdose an.
Vielleicht haben Sie die Milchpumpe bei einer Temperatur unter der
-
minimalen oder über der maximalen Lagertemperatur aufbewahrt.
Lassen Sie die Milchpumpe 30Minuten lang in einem Raum mit einer
Temperatur von 20°C/68°F akklimatisieren, bis sich die Temperatur
im Betriebsbereich (+5°C /41°F bis 40°C/104°F) befindet.
Auf dem Display wird
„Er“ angezeigt, und das
Gerät schaltet sich
automatisch aus.
Wenn Sie die Milchpumpe mit Akkubetrieb betreiben, dann lassen Sie
-
sie 30Minuten lang abkühlen, und versuchen Sie anschließend, sie
wieder einzuschalten.
Wenn Sie die Milchpumpe über den an die Steckdose
-
angeschlossenen Netzstecker betreiben, dann überprüfen Sie, ob Sie
den Netzstecker verwenden, der im Lieferumfang des Geräts
enthalten war.
Sollte das Problem weiterhin bestehen, wenden Sie sich via
-
www.philips.com/support
an den Kundenservice.

54
Deutsch
Zusätzliche Informationen
Nachstehend werden einige allgemeine Erkrankungen beschrieben, die mit dem Stillen in
Zusammenhang stehen können. Wenn Sie eines dieser Symptome haben, wenden Sie sich an einem
Gesundheitsexperten oder eine Stillberaterin.
Allgemeine, auf das
Stillen
zurückzuführende
Erkrankung
Schmerzen Über einem erträglichen Niveau liegende Schmerzen in der Brust oder
Beschreibung
Brustwarze oder in Reaktion auf das Saugen.
Wunde Brustwarzen Anhaltende Schmerzen in den Brustwarzen zu Beginn des Pumpvorgangs
Milchstau Schwellung der Brust. Die Brust fühlt sich hart oder knotig und ist
Prellung, Blutgerinnsel Eine rötlich-violette Verfärbung, die nicht heller wird, wenn man auf sie
Verletztes
Brustwarzengewebe
(Brustwarzentrauma)
Verstopfte Milchkanäle Eine roter, empfindlicher Knoten in der Brust. Die Brust ist möglicherweise
oder während des gesamten Pumpvorgangs oder Schmerzen zwischen den
einzelnen Abpumpsitzungen.
empfindlich. Die Brust ist möglicherweise gerötet (Erythem). Es kann Fieber
auftreten. Tritt gewöhnlich in den ersten Tagen der Stillzeit auf.
drückt. Wenn eine Prellung verblasst, kann sie grün oder braun werden.
Rissige oder aufgesprungene Brustwarzen.
-
Hautgewebe löst sich von den Brustwarzen. Tritt normalerweise in
-
Kombination mit gebrochenen Brustwarzen und/oder Blasen auf.
Wunde Brustwarzen.
-
Bläschen Wie kleine Bläschen auf der Hautoberfläche.
-
Bluten. Aufgesprungene oder rissige Brustwarzen können im
-
betroffenen Bereich bluten.
gerötet (Erythem). Ohne Behandlung kann dies zu einer Mastitis
(Brustentzündung) und Fieber führen.
Aufbewahrung
Setzen Sie die Milchpumpe keinem direkten Sonnenlicht aus, da dies über längere Zeit Verfärbungen
verursachen kann. Bewahren Sie die Milchpumpe und ihre Zubehörteile an einem sicheren, sauberen
und trockenen Ort auf.
Wenn das Gerät in einer heißen oder kalten Umgebung aufbewahrt wurde, dann stellen Sie es vor
Gebrauch für 30 Minuten in eine Umgebung mit einer Temperatur von 20°C (68°F), um eine
Temperatur innerhalb der Nutzungsbedingungen zu erreichen (5°C bis 40°C / 41°F bis 104°F).
Laden Sie den Akku vollständig auf, bevor Sie die Milchpumpe über einen längeren Zeitraum
aufbewahren.
Elektromagnetische Felder (EMF)
Dieses Philips Gerät erfüllt alle einschlägigen Normen und Vorschriften hinsichtlich möglicher
Gefährdung durch elektromagnetische Felder.

Technische Daten
Einzelmilchpumpe Doppelmilchpumpe
Vakuumstärke Stimulation: -60 bis -200mbar (-45 bis -150mmHg)
Abpumpen: -60 bis -360mbar (-45 bis -270mmHg)
Einstellbar in Schritten von 20mbar
Intermittierendes Vakuum
Deutsch
55
Geschwindigkeit 53-120 Zyklen/min. 53-120 Zyklen/min.
Nenneingangsleistung
Motoreinheit
Nenneingangsspannung
Netzstecker
Ausgangsspannung
Netzstecker
Typennummer des
Adapters
Batterie Akku: 3,6V2600mAh (nicht austauschbar)
Betrieb Temperatur 5°C bis 40°C (41°F bis 104°F)
Umgebungsbedingungen
– Aufbewahrung und
Transport
Betriebsdruck 700-1060hPa (< 3000m Höhe)
Nettogewicht 230g 310g
Abmessungen Motoreinheit: 145mm x 95mm x 45mm (L x B x H)
Geräteklasse IEC60335-1: System: Klasse II; Motoreinheit: Bau der Klasse III
5V DC / 1,1A 5V DC / 1,8A
Externer Netzstecker 100-240V AC / 50-60Hz
5V DC / 1,1A 5V DC / 1,8A
S009AHz050yyyy Die Buchstaben "yyyy" stehen für den Ausgangsstrom
von 0100 (1000mA) bis 0180 (1800mA) dar, abgestuft in Schritten von
100mA. Der Buchstabe "z" bezeichnet den Steckertyp. Optionen sind: U,
V, B, S, C, A, D, K, T, I, E, F.
Relative Luftfeuchtigkeit 15 bis 90% (nicht kondensierend)
Temperatur -20°C bis 45°C (-4°F bis 113°F)
Relative Luftfeuchtigkeit von bis zu 90% (nicht kondensierend)
Deutsch
Materialien ABS, Silikon (Motoreinheit)
Polypropylen, Silikon (andere Teile)
Betriebsdauer 500 Stunden
Betriebsmodus Dauerbetrieb Nicht-kontinuierlicher Betrieb
55Min. ein, 180Min. aus bei 22°C
(72°F) (Einschaltdauer 23%)
20Min. ein, 90Min. aus bei 40°C
(104°F) (Einschaltdauer 18%)
Schutzart IP22 (Motoreinheit), IP20 (Adapter)

56
Deutsch
Erklärung der Symbole
Um den sicheren und ordnungsgemäßen Betrieb des Geräts zu gewährleisten und Verletzungen zu
vermeiden, müssen sämtliche Warnzeichen und Symbole beachtet werden. Nachstehend finden Sie
eine Erklärung der auf dem Gerät angebrachten und in der Bedienungsanleitung verwendeten
Warnzeichen und Symbole.
Symbol Erklärung
Es ist die Bedienungsanleitung zu befolgen.
Dieses Symbol weist auf wichtige Informationen hin, z.B. Warnungen und Warnhinweise.
Dieses Symbol weist den Benutzer auf Tipps zur Verwendung, zusätzliche Informationen
oder ein Hinweis hin.
Gibt den Hersteller an.
Hergestellt für: Philips Consumer Lifestyle BV, Tussendiepen 4, 9206 AD Drachten,
Niederlande.
Gibt das Herstellungsdatum an.
Ein Teil des Geräts, das in physischen Kontakt mit dem Benutzer kommt (auch
Anwendungsteil genannt), entspricht gemäß IEC 60601-1 dem Typ BF (Body Floating).
Anwendungsteil ist hier das Milchpumpen-Set.
Gerät der KlasseII. Der Adapter ist zweifach isoliert (KlasseII).
Dieses Symbol gibt die Hersteller-Katalognummer der Milchpumpe an.
Gibt die Chargennummer der Milchpumpe an.
Gleichstrom.
Wechselstrom.
Der Hersteller hat alle erforderlichen Vorkehrungen getroffen, um sicherzustellen, dass
das Gerät den Sicherheitsvorschriften entspricht, die für die Verbreitung in der
Europäischen Gemeinschaft gelten.
Getrennte Entsorgung elektrischer und elektronischer Geräte entsprechend EURichtlinie. Elektrische Altgeräte sollten nicht im Hausmüll entsorgt werden. Weitere
Informationen finden Sie im Kapitel „Recycling“.
Zeigt an, dass das Produkt einen Akku enthält, der nicht mit dem normalen Hausmüll
entsorgt
„Recycling“.
werden darf (2006/66/EG). Weitere Informationen finden Sie im Kapitel

Symbol Erklärung
Das Gerät ist gegen das Eindringen fester Fremdkörper und gegen schädliche
Auswirkungen aufgrund des Eindringens von Wasser geschützt.
Dieses Symbol gibt die Seriennummer des Herstellers der Milchpumpe an.
Verfügt über einen USB-Anschluss.
Gibt die relative Luftfeuchtigkeit an, der das Gerät maximal ausgesetzt werden darf,
ohne Schaden zu nehmen: bis zu 90%.
Dieses Symbol gibt den Temperaturbereich an, in dem das Gerät aufbewahrt und
transportiert werden kann, ohne Schaden zu nehmen: -20°C bis 45°C/-4°F bis 113°F.
Logo des Forest Stewardship Council. Durch FSC-zertifizierte Marken kann der
Verbraucher Produkte auswählen, die die Walderhaltung unterstützen, soziale Vorteile
bieten und dem Markt einen Anreiz für eine bessere Forstwirtschaft geben.
Gibt an, dass ein Objekt recyclingfähig ist, nicht dass das Objekt recycelt wurde oder in
allen Recycling-Sammelsystemen angenommen wird.
Die Verpackung sollte recycelt werden. An die „Grüner Punkt“-Recyclingorganisationen
wurde eine entsprechende Recyclinggebühr entrichtet.
Deutsch
57
Deutsch
Weltweite 2-jährige Philips-Garantie.
Dieses Symbol weist darauf hin, dass ein bestimmter Netzstecker erforderlich ist, um die
Milchpumpe anzuschließen.

58
Français
Sommaire
Introduction __________________________________________________________________________________________ 58
Description générale _________________________________________________________________________________ 59
Application ___________________________________________________________________________________________ 59
Informations de sécurité importantes _______________________________________________________________ 59
Avant la première utilisation _________________________________________________________________________ 64
Nettoyage et désinfection ___________________________________________________________________________ 64
Utilisation du tire-lait_________________________________________________________________________________ 67
Nourrir votre bébé avec un biberon de lait maternel _______________________________________________ 75
Compatibilité _________________________________________________________________________________________ 77
Commande d'accessoires____________________________________________________________________________ 77
Recyclage_____________________________________________________________________________________________ 77
Instructions de retrait de la batterie _________________________________________________________________ 78
Garantie et assistance________________________________________________________________________________ 79
Dépannage ___________________________________________________________________________________________ 79
Informations supplémentaires ______________________________________________________________________ 81
Conditions de stockage ______________________________________________________________________________ 82
Champs électromagnétiques (CEM) _________________________________________________________________ 82
Informations techniques _____________________________________________________________________________ 82
Explication des symboles ____________________________________________________________________________ 83
Introduction
Félicitations pour votre achat et bienvenue chez PhilipsAvent! Pour bénéficier pleinement de
l'assistance PhilipsAvent, enregistrez votre tire-lait sur le site www.philips.com/welcome.
Le tire-lait électrique simple/double Premium de PhilipsAvent est inspiré des bébés et de leur
mouvement de succion naturel. Le coussin en silicone souple stimule le mamelon avec des
mouvements de massage légers, vous aidant ainsi à tirer votre lait confortablement et efficacement.
L’association du mouvement de succion et de compression du mamelon stimule une production de
lait rapide. L’appareil est conçu pour vous permettre de tirer confortablement du lait en position
assise verticale, sans avoir à vous pencher en avant.
Les professionnels de santé et l'Organisation mondiale de la santé recommandent le lait maternel
comme source principale de nutrition pendant la première année, associé à des aliments solides
après les 6premiers mois. Cela est dû au fait que votre lait maternel est spécialement adapté aux
besoins de votre bébé et aide à le protéger contre les infections et allergies. Pour allaiter plus
longtemps, vous pouvez tirer et conserver votre lait afin que votre bébé puisse toujours en bénéficier,
même lorsque vous ne pouvez pas l'allaiter vous-même. Le tire-lait étant compact et discret, vous
pouvez le prendre partout avec vous. Grâce à lui, vous pourrez tirer votre lait à votre propre
convenance et maintenir votre lactation.
Si l'allaitement se passe bien pour vous, il est recommandé (sauf indication contraire de votre
professionnel de santé) d'attendre que votre lactation et votre allaitement soient bien établis (en
règle générale, au moins 2 à 4semaines après l'accouchement) avant d'utiliser un tire-lait.
Français

Français
Description générale
Remarque: Les nombres mentionnés ci-dessous se rapportent aux nombres de la figure sur la
page dépliante avant de ce mode d'emploi.
Remarque: Le tire-lait double est fourni avec deuxexemplaires des éléments représentés sur les
figuresB et C.
Description du produit (fig.A)
A1 Bloc moteur
A2 Tire-lait
A3 Biberon
Tire-lait (fig.B)
B1 Tube en silicone et capuchon
B2 Diaphragme en silicone
B3 Corps du tire-lait
Biberon Natural PhilipsAvent (fig.C)
C1 Bouchon du biberon
C2 Bague d'étanchéité
C3 Tétine
A4 Adaptateur
A5 Tire-lait double
B4 Couvercle
B5 Coussin
B6 Valve blanche
C4 Disque d'étanchéité
C5 Biberon
59
Français
Accessoires
Ce tire-lait est proposé en plusieurs versions, chacune d’entre elles avec une combinaison différente
des accessoires Philips Avent suivants:
-
Coussinets d’allaitement
-
Trousse de transport
-
Étui isotherme
-
Brosse nettoyante
*Un mode d'emploi séparé est fourni pour ces accessoires.
-
Pots de conservation avec adaptateur*
-
Sachets de conservation du lait maternel*
-
Biberons Natural
-
Ceinture pour tire-lait*
Application
le tire-lait électrique simple/double Premium de PhilipsAvent est conçu pour tirer et recueillir le lait
du sein d’une femme allaitante.
L'appareil est destiné à être utilisé par une seule personne.
Informations de sécurité importantes
Lisez attentivement ce mode d'emploi avant d'utiliser le tire-lait et conservez-le pour un usage
ultérieur.
Ce mode d'emploi est également disponible en ligne sur le siteWeb de PhilipsAvent:
www.philips.com/avent.

60
Français
Avertissements
-
N'utilisez jamais le tire-lait si vous êtes enceinte car cela pourrait
déclencher des contractions.
Avertissements pour éviter l'étouffement, la strangulation et les
blessures :
-
Ce tire-lait n'est pas destiné à un usage par des personnes
(notamment des enfants) aux capacités physiques, sensorielles
ou mentales réduites, ou par des personnes manquant
d'expérience ou de connaissances. Ces personnes peuvent
utiliser ce tire-lait uniquement si elles sont surveillées ou ont reçu
des instructions appropriées concernant l'utilisation de l'appareil
de la part d'une personne responsable de leur sécurité.
-
Ne laissez pas les enfants ou les animaux jouer avec le bloc
moteur, l'adaptateur, les matériaux d'emballage ou les
accessoires.
-
Débranchez toujours le tire-lait après utilisation et lorsqu’il est
complètement chargé.
Avertissements pour éviter la transmission de maladies
infectieuses :
-
Si vous êtes mère et infectée par le virus de l'hépatite B, de
l'hépatite C ou du VIH (immunodéficience humaine), le tirage du
lait maternel ne réduira pas et n'éliminera pas le risque de
transmission du virus à votre bébé à travers le lait maternel.
Avertissements pour éviter tout risque d'électrocution :
-
Avant chaque utilisation, vérifiez que le tire-lait, y compris
l'adaptateur, ne présentent pas de signes de détérioration.
N'utilisez pas le tire-lait si l'adaptateur ou le cordon
d'alimentation est endommagé, s'il ne fonctionne pas
correctement ou s'il a été immergé dans l'eau.
-
Utilisez exclusivement l’adaptateur (S009AHz050yyyy) fourni
avec le tire-lait.

Français
-
Veillez à toujours pouvoir débrancher l’appareil de la prise secteur
en cas de dysfonctionnement.
Avertissements pour éviter les contaminations et pour garantir
une bonne hygiène :
-
Pour des raisons d'hygiène, le tire-lait est uniquement destiné à
l'usage répété d'une seule utilisatrice.
-
Nettoyez et désinfectez toutes les pièces avant la première
utilisation et après chaque utilisation.
-
Afin d'éviter tout dommage, n'utilisez jamais de produits abrasifs
ou antibactériens pour nettoyer les pièces du tire-lait.
-
Lavez-vous soigneusement les mains à l'eau savonneuse avant
de toucher les pièces du tire-lait et vos seins afin d'éviter toute
contamination. Évitez de toucher l'intérieur des récipients ou des
couvercles.
Avertissements afin d'éviter des problèmes aux seins et aux
mamelons ainsi que la douleur :
-
N'utilisez pas le tire-lait si le diaphragme en silicone semble
endommagé ou cassé. Reportez-vous au chapitre «Commande
d'accessoires» pour plus d'informations sur comment obtenir des
pièces de rechange.
-
Utilisez uniquement les accessoires et les pièces recommandés
par PhilipsAvent.
-
Aucune modification du tire-lait n'est autorisée. Toute
intervention entraîne l'annulation de votre garantie.
-
N'utilisez jamais le tire-lait lorsque vous êtes endormie ou
somnolente afin d'éviter le manque d'attention durant l'utilisation.
-
Éteignez toujours le tire-lait avant de retirer le corps du tire-lait
de votre sein pour relâcher l'aspiration.
-
Si l'aspiration est inconfortable ou douloureuse, éteignez le tirelait et retirez-le de votre sein.
-
Cessez de tirer votre lait pendant plus de cinq minutes de suite si
vous ne parvenez pas à en exprimer. Essayez de tirer votre lait à
un autre moment de la journée.
61
Français

62
Français
-
Si le processus devient très inconfortable ou douloureux, cessez
d'utiliser le tire-lait et consultez votre professionnel de santé.
Avertissements pour éviter tout dommage ou dysfonctionnement
du tire-lait :
-
Les équipements de communication radiofréquence mobiles
(notamment les téléphones portables et les périphériques tels
que les câbles d'antenne et les antennes externes) ne doivent pas
être utilisés à moins de 30cm (12po) de toute partie du tire-lait,
dont l'adaptateur. Cela pourrait nuire au bon fonctionnement du
tire-lait.
-
Évitez d'utiliser cet équipement à proximité d'autres équipements
ou de l'empiler avec d'autres produits, car cela pourrait entraîner
un fonctionnement incorrect.
Consignes de sécurité sur les piles
-
N'utilisez jamais ce produit à d'autres fins que celles décrites dans
ce mode d'emploi. Toute utilisation abusive risquerait de
provoquer des décharges électriques, des brûlures, un incendie
ou d´autres dangers imprévus.
-
Pour charger la batterie, veuillez uniquement utiliser le bloc
d’alimentation amovible fourni avec le produit. N'employez pas
de rallonge.
-
Chargez, utilisez et conservez le produit dans les plages de
température indiquées dans le tableau des spécifications
techniques de ce mode d’emploi.
-
Débranchez toujours le produit lorsqu'il est entièrement chargé.
-
Ne brûlez pas les produits et leurs piles et ne les exposez pas à la
lumière directe du soleil ni à des températures élevées (parex.
dans une voiture en plein soleil ou près d'un poêle chaud). Les
piles peuvent exploser en cas de surchauffe.
-
Si le produit devient chaud, change de couleur, dégage une odeur
anormale ou met beaucoup plus de temps à se charger que
d'habitude, cessez de l'utiliser et de le charger.

Français
-
Ne placez pas les produits et leurs piles dans un four à microondes ou sur une table de cuisson à induction.
-
Ce produit contient une batterie rechargeable qui ne peut être
remplacée. N’ouvrez pas le produit pour remplacer la batterie
rechargeable.
Précautions
63
Avertissements pour éviter tout dommage ou dysfonctionnement
du tire-lait :
-
Empêchez l'adaptateur et le bloc moteur d'entrer en contact avec
l'eau.
-
Ne placez jamais le bloc moteur ou l'adaptateur dans l'eau ou
dans un lave-vaisselle, car cela risque de les endommager de
manière permanente.
-
Éloignez l'adaptateur et les tubes en silicone des surfaces
chauffées afin d'éviter la surchauffe et la déformation des
composants.
Français

64
Français
Avant la première utilisation
Désassemblez, nettoyez et désinfectez toutes les pièces qui entrent en contact avec le lait maternel
avant d'utiliser le tire-lait pour la première fois et après chaque utilisation.
Chargez complètement l’appareil avant la première utilisation ou après une longue période de nonutilisation.
Nettoyage et désinfection
Aperçu
Nettoyez et désinfectez les pièces qui entrent en contact avec le sein et le lait maternel, comme
indiqué ci-dessous:
Quand Comment
Nettoyez et désinfectez avant la
première utilisation et après chaque
utilisation.
Les pièces suivantes n'entrent pas en contact avec le sein et le lait maternel. Nettoyez-les comme
indiqué ci-dessous:
Quand Comment
Nettoyez si nécessaire. Essuyez à l'aide d'un chiffon propre
Désassemblez toutes les pièces,
nettoyez-les comme indiqué dans
le chapitre «Nettoyage», puis
désinfectez-les comme décrit au
chapitre «Désinfection».
et humidifié avec de l'eau et un
détergent doux.

Étape1: Démontage
Français
65
Veillez à retirer la valve blanche du tire-lait.
Étape2: Nettoyage
Les pièces qui entrent en contact avec le lait maternel peuvent être nettoyées à la main ou au lavevaisselle.
Avertissement : Afin d'éviter tout dommage, n'utilisez jamais de produits abrasifs ou
antibactériens pour nettoyer les pièces du tire-lait.
Attention : Ne placez jamais le bloc moteur ou l'adaptateur dans l'eau ou dans un
lave-vaisselle, car cela risque de les endommager de manière permanente.
Attention : Retirez et nettoyez la valve blanche avec précaution. Si vous
l'endommagez, votre tire-lait ne fonctionnera pas correctement. Pour retirer la valve
blanche, tirez doucement sur la languette nervurée sur le côté de la valve. Pour nettoyer
la valve blanche, frottez-la doucement entre vos doigts à l'eau chaude savonneuse.
N'introduisez pas d'objets dans la valve blanche, car vous pourriez l'endommager.
Français

5 min.
66
Français
Étape2A: Nettoyage manuel
Matériel nécessaire :
-
Liquide vaisselle doux
-
Eau potable de bonne qualité
-
Brosse douce et propre
-
Serviette propre ou support de séchage
-
Évier ou bol propre
1. Rincez toutes les
pièces à l'eau tiède sous
le robinet.
5. Laissez sécher toutes
les pièces sur une
serviette propre ou un
support de séchage.
2. Mettez toutes les
pièces à tremper dans
de l’eau chaude avec un
peu de liquide vaisselle
doux pendant 5minutes.
3. Nettoyez toutes les
pièces avec une brosse
de nettoyage.
Étape2B: Nettoyage au lave-vaisselle
Matériel nécessaire :
-
Pastille pour lave-vaisselle ou liquide vaisselle doux
-
Eau potable de bonne qualité
Remarque: Les colorants alimentaires peuvent décolorer les pièces.
4. Rincez soigneusement
toutes les pièces à l’eau
potable.
1. Placez toutes les
pièces sur le
compartiment supérieur
du
lave-vaisselle.
2. Mettez du liquide
vaisselle ou
dans le lave-vaisselle et
lancez un programme
standard.
une pastille
3. Laissez sécher toutes
les pièces sur
serviette propre ou un
support de séchage.
une

5 min.
Français
Étape3: Désinfection
Matériel nécessaire :
-
Une casserole
-
Eau potable de bonne qualité
Attention : Lors de la désinfection à l'eau bouillante, veillez à éviter que le biberon ou
d'autres pièces ne touchent le côté de la casserole. Cela peut provoquer des dommages
ou déformations irréversibles du produit, dont Philips ne peut être tenu responsable.
67
Français
1. Remplissez une
casserole avec assez
d’eau pour couvrir
toutes les pièces et
placez-les à l’intérieur.
Laissez l’eau bouillir
pendant 5minutes.
Veillez à ce que les
pièces ne touchent pas
la paroi de la casserole.
2. Laissez l'eau refroidir. 3. Retirez doucement les
pièces de l'eau. Laissez
sécher les pièces à l'air
libre en les plaçant sur
une surface propre, une
serviette propre ou un
support de séchage.
4. Rangez les pièces
sèches dans un récipient
propre, sec et fermé.
Utilisation du tire-lait
Taille du coussin
Le tire-lait électrique simple/double Premium de PhilipsAvent est doté d’un coussin actif et doux. Il
stimule en douceur votre mamelon pour déclencher la lactation. Le coussin en silicone souple
convient à 99,98% des femmes et s’adapte à des tailles de mamelons jusqu’à 30mm.

68
Français
Charge du tire-lait
Chargez entièrement le tire-lait avant sa première utilisation et lorsque la batterie est faible. Une
charge complète dure jusqu’à 4heures.
1. Éteignez l’appareil. 2. Branchez l’adaptateur
sur la prise secteur et
insérez la petite fiche à
l’autre extrémité dans le
bloc moteur.
3. La batterie est en
charge.
4. Lorsque la batterie est
complètement chargée,
débranchez l’adaptateur
de la prise secteur et
retirez la petite fiche du
bloc moteur.
Description des voyants de la batterie
Tous les voyants
sont allumés.
La batterie est
complètement
chargée.
* Une séance équivaut à20minutes (tire-lait électrique double) ou à30minutes (tire-lait électrique
simple).
Le premier voyant
est allumé.
La batterie est
suffisamment
chargée pour une
séance.*
Le premier
voyantclignote
lentement.
La batterie est
faible et doit être
chargée.
Le premier voyant
clignote
rapidement.
La batterie est très
faible, l’appareil va
bientôt cesser de
fonctionner.
Les voyants de la
batterie s’allument
l’un après l’autre et
s’éteignent tous
ensemble.
La batterie est en
charge.
Assemblage du tire-lait
Assurez-vous que vous avez nettoyé et désinfecté les pièces du tire-lait qui entrent en contact avec le
lait maternel.
Avertissement : Soyez prudent après avoir désinfecté les pièces du tire-lait en les
plongeant dans l'eau bouillante. Celles-ci peuvent être très chaudes. Pour éviter les
brûlures, commencez l'assemblage du tire-lait une fois les pièces désinfectées
refroidies.
Avertissement : Lavez-vous soigneusement les mains à l'eau savonneuse avant de
toucher les pièces du
tire-lait et vos seins afin d'éviter toute contamination. Évitez de
toucher l'intérieur des récipients ou des couvercles.

Français
Avant utilisation, vérifiez si les pièces du tire-lait sont usées ou endommagées et remplacez-les si
nécessaire.
Remarque: Il est nécessaire que le coussin, le diaphragme en silicone et le tube en silicone soient
bien positionnés pour que le tire-lait aspire correctement.
69
1. Lavez-vous
soigneusement les
mains avec de l'eau
savonneuse.
4A Poussez la partie
intérieure du coussin
dans l'entonnoir contre
la ligne (indiquée par
une flèche)..
2. Insérez la valve
blanche aussi loin que
possible dans le corps
du tire-lait.
5. Placez le diaphragme
en silicone dans le corps
du tire-lait.
3. Vissez le corps du tirelait sur le biberon.
5A Assurez-vous que le
diaphragme en silicone
couvre parfaitement le
bord en appuyant
doucement dessus avec
vos pouces.
4. Placez le coussin
dans le corps du tirelait et veillez à ce que
les bords du couvercle
recouvrent le corps du
tire-lait.
6. Fixez le tube en
silicone et le capuchon
sur le diaphragme en
silicone. Abaissez le
bouchon jusqu'à ce qu'il
soit correctement fixé.
Français
7. Fixez le(s) tube(s) au
bloc moteur.
8A. Lorsque le tire-lait
est chargé, vous pouvez
l’utiliser sans fil.
Maintenez le bouton
marche/arrêt enfoncé
jusqu’à ce que l’appareil
s’allume.
8B. Vous pouvez
également utiliser le tirelait branché sur la prise
secteur. Si la batterie est
faible, branchez
l’adaptateur sur la prise
secteur et insérez la
petite fiche à l’autre
extrémité dans le bloc
moteur.
9. Le tire-lait est
désormais prêt à
l'emploi.

7
1 3 5
4 6
8
2
1
2
3
4
70
Français
Remarque: Vous
pouvez placer le
couvercle sur le coussin
afin que le tire-lait reste
propre pendant que
vous vous préparez à
tirer votre lait.
Description des pièces du bloc moteur
1 Prise d'alimentation USB
2 Bouton marche/arrêt avec
fonctionpause/lecture
3 Bouton de sélection de
mode
4 Bouton de baisse d'intensité
5 Bouton de hausse
d'intensité
6 Afficheur LED
7 Orifice pour tube de tire-lait
simple
8 Orifices pour tube de tire-
lait double
Description de l’afficheur LED
1 Voyants d’état de la batterie
2 Indicateur du minuteur
(minutes) et du niveau
d’aspiration
3 Icône du mode extraction
4 Icône du mode stimulation

Français
Explication des modes
Le tire-lait propose deuxmodes. Vous trouverez ci-dessous une description de ces modes.
Icônes des
modes
Mode Explication Nombre de niveaux
d’aspiration
Mode stimulation Mode pour stimuler le sein et
démarrer la production de lait.
8niveaux d’aspiration
71
Mode extraction Mode d’extraction du lait efficace
lorsque le lait a commencé à couler.
Après 90secondes de stimulation,
l’appareil passe automatiquement
en mode extraction.
Le nombre affiché sur l’afficheur indique la durée
de fonctionnement en minutes.
Lorsque vous changez de niveau d’aspiration,
l’afficheur indique le niveau d’aspiration
sélectionné pendant quelques secondes, puis
affiche de nouveau la durée de fonctionnement.
16niveaux d’aspiration
Instructions de tirage
Avertissement : Avant de retirer le corps du tire-lait de votre sein, éteignez toujours le
tire-lait pour relâcher l'aspiration.
Avertissement : Cessez de tirer votre lait pendant plus de cinq minutes de suite si
vous ne parvenez pas à en tirer. Essayez de tirer votre lait à un autre moment de la
journée.
Français
Avertissement : Si le processus devient très inconfortable ou douloureux, cessez
d’utiliser le tire-lait et consultez votre professionnel de santé.
Remarque: Si vous tirez régulièrement plus de 125ml/4floz de lait, vous pouvez acheter et utiliser
un biberon Natural de PhilipsAvent de 260ml/9floz afin d’éviter tout débordement ou déversement.
Remarque:
également l’utiliser branché sur la prise murale.
Le tire-lait peut être utilisé sans fil s’il est suffisamment chargé, mais vous pouvez

72
Français
1. Lavez-vous
soigneusement les
mains avec de l'eau
savonneuse et veillez à
ce que votre sein soit
propre.
5. L’afficheur indique la
durée de
fonctionnement.
2. Placez le tire-lait sur
votre sein. Assurez-vous
que votre mamelon est
centré.
6. Utilisez les boutons de
hausse et de baisse
d'intensité pour changer
de niveau d'aspiration à
votre convenance.
3. Maintenez le bouton
marche/arrêt enfoncé
jusqu’à ce que l’appareil
s’allume. Les voyants
s’allument pour indiquer
que l’appareil est en
mode stimulation.
7. Après 90secondes, le
tire-lait passe
doucement en mode
d'expression et
augmente
progressivement
l'aspiration jusqu'au
dernier niveau
d'expression utilisé (ou
jusqu'au niveau11 lors
de la première
utilisation).
4. Le tire-lait démarre en
mode de stimulation et
augmente
progressivement son
aspiration jusqu'au
dernier niveau
d'aspiration utilisé (ou
jusqu'au niveau5 lors de
la première utilisation).
8. Si votre lait
commence à s'écouler
plus tôt ou si vous
souhaitez passer du
mode d'expression au
mode de stimulation,
vous pouvez changer de
mode manuellement à
l'aide du bouton de
sélection de mode.

3 sec.
1
2
Français
73
9. Appuyez brièvement
sur le bouton
marche/arrêt si vous
souhaitez mettre
l'appareil en pause. Pour
reprendre l'aspiration,
appuyez de nouveau
brièvement sur le
bouton marche/arrêt.
Astuce: Pour un tirage optimal, choisissez le réglage le plus élevé qui reste confortable. Ce réglage
peut varier d'une session à l'autre.
Astuce: Vous pouvez utiliser le tire-lait double comme un tire-lait simple en branchant uniquement
le tube d'un tire-lait sur le bloc moteur.
10. Pour éteindre le tirelait, maintenez le bouton
marche/arrêt enfoncé.
Après utilisation
1. Dévissez le biberon. 2A. Pour conserver le lait
maternel: fermez le
biberon avec le disque
et la bague d'étanchéité.
2B. Pour préparer le
biberon afin de nourrir
votre bébé: placez une
tétine dans une bague
d'étanchéité et vissez la
bague assemblée sur le
biberon. Fermez la tétine
avec le capuchon (voir
'Assemblage du
biberon') du biberon.
3. Débranchez
l'adaptateur de la prise
secteur et du bloc
moteur.
Français

74
Français
4. Retirez le tube en
silicone et le capuchon
du tire-lait.
5. Désassemblez et
nettoyez toutes les
pièces qui sont entrées
en contact avec le lait
(voir 'Nettoyage et
désinfection') maternel.
6. Pour un rangement
aisé, enroulez le tube en
silicone autour du bloc
moteur et encliquetez le
capuchon sur le tube.
Avertissement : Placez le lait au réfrigérateur ou au congélateur ou conservez-le à une
température de 16 à 29 °C (60 à 85 °F) pendant 4 heures maximum avant de nourrir votre
bébé.
Pour plus d'informations sur le tire-lait et des conseils pour tirer votre lait, consultez la page
www.philips.com/avent.
Conservation du lait maternel
Vous trouverez ci-dessous les recommandations relatives à la conservation du lait maternel:
Lieu de conservation Température Durée de conservation max.
Pièce 16à 29°C (60à 85°F) 4heures
Réfrigérateur 4°C (39°F) 4jours
Congélateur <-4°C (25°F) 6 à 12mois
Avertissement : Ne recongelez jamais le lait maternel décongelé afin d'éviter que la
qualité du lait ne se détériore.
Avertissement : N'ajoutez jamais de lait maternel frais à du lait maternel congelé afin
d'éviter que la qualité du lait ne se détériore et que le lait ne se décongèle
involontairement.

Français
Nourrir votre bébé avec un biberon de lait maternel
Avertissement: Pour la sécurité et la santé de votre enfant
-
Ne laissez jamais un enfant utiliser ce biberon sans surveillance.
-
N'utilisez jamais les tétines d'alimentation comme une sucette, afin d'éviter les risques
d'étouffement.
-
La succion continue et prolongée de liquide entraîne l'apparition de caries.
-
Vérifiez toujours la température des aliments avant de commencer à nourrir votre bébé.
-
Rangez tous les éléments non utilisés hors de portée des enfants.
-
Tenez le capuchon du biberon à l'écart des enfants pour éviter tout risque d'étouffement.
-
Ne laissez pas les enfants jouer avec les petites pièces ou marcher/courir tout en utilisant un
biberon.
-
Examinez toutes les pièces avant chaque utilisation et tirez la tétine dans toutes les directions.
Jetez les pièces au moindre signe de détérioration ou de fragilité.
-
Jetez toujours le lait maternel restant après utilisation.
Attention: Pour éviter d'endommager le biberon
75
Français
-
Ne pas placer dans un four chaud, peut faire fondre le plastique.
-
La désinfection et les températures élevées peuvent modifier les propriétés du plastique. Cela peut
déformer le capuchon du biberon.
-
N'exposez pas la tétine d'alimentation directement aux rayons du soleil ou à une source de chaleur
et ne la laissez pas dans un produit désinfectant plus longtemps que la durée recommandée, car
cela pourrait l'endommager.
Avant d'utiliser le biberon
-
Examinez le biberon et la tétine avant chaque utilisation, et tirez cette dernière dans tous les sens
pour éviter un risque d'étouffement. Jetez la sucette au moindre signe de détérioration ou de
fragilité.
-
Nettoyez et désinfectez le biberon avant la première utilisation et après chaque utilisation.

76
Français
Assemblage du biberon
1. Il est plus facile
d’installer la tétine en la
tirant par petits à-coups
plutôt qu’en la tirant
d’un coup.
5. Pour enlever le
capuchon, placez votre
main sur le capuchon et
votre pouce dans le
creux de ce dernier.
2. Assurez-vous de tirer
correctement la tétine
jusqu'à ce que sa partie
inférieure soit alignée
avec la bague
d'étanchéité.
3. Assurez-vous que le
capuchon est placé
verticalement sur le
biberon afin que la
tétine reste droite.
4. Vissez la bague
d'étanchéité avec la
tétine et le capuchon sur
le biberon.
Chauffage du lait maternel
Si vous utilisez du lait maternel congelé, laissez-le décongeler complètement avant de le chauffer.
Remarque: Si vous devez nourrir immédiatement votre bébé, vous pouvez décongeler le lait dans
un bol d'eau chaude.
Chauffez le biberon contenant du lait maternel décongelé ou réfrigéré dans un bol d'eau chaude ou
dans un chauffe-biberon. Retirez la bague et le disque d'étanchéité du biberon.
Mélangez ou secouez toujours le lait maternel chauffé afin de garantir une répartition homogène de la
chaleur et vérifiez la température avant de nourrir votre bébé.
Avertissement : Il n’est pas recommandé d’utiliser un four à micro-ondes pour
réchauffer le lait maternel. Les micro-ondes peuvent altérer la qualité du lait maternel,
détruire certains nutriments précieux et entraîner des températures élevées localisées.
Si vous réchauffez le lait maternel au micro-ondes, placez seulement le conteneur, sans
bague d’étanchéité, tétine ni capuchon dans le four. Mélangez toujours le lait maternel
chauffé afin de garantir une répartition homogène de la chaleur et vérifiez la
température avant de nourrir votre bébé.

Français
Choix de la tétine adaptée à votre bébé
Les tétines Natural de PhilipsAvent offrent chacune différents débits. Le tirelait est fourni avec la tétine n°1. Il s’agit d’une tétine 0m+, idéale pour les
nouveau-nés et bébés allaités de tout âge.
Utilisez un débit inférieur si votre bébé s'étouffe souvent, laisse échapper du
lait en tétant ou s'il a du mal à s'adapter au débit. Choisissez un débit plus
élevé si votre bébé s'endort en tétant, s'il s'impatiente ou lorsque la tétée
dure très longtemps.
Les tétines Natural de PhilipsAvent sont clairement numérotées sur le côté pour indiquer le débit.
Pour plus d’informations, rendez-vous sur www.philips.com/avent.
77
Rangement des biberons
-
Conservez toutes les pièces dans un récipient sec, propre et fermé.
-
N'exposez pas la tétine d'alimentation directement au soleil ou à une source de chaleur et ne la
laissez pas dans un produit désinfectant (solution stérilisante) plus longtemps que la durée
recommandée car cela pourrait en fragiliser les pièces.
-
Pour des raisons d'hygiène, nous vous recommandons de remplacer les tétines au bout de 3mois.
Compatibilité
Le tire-lait électrique simple/double Premium de PhilipsAvent est compatible avec tous les biberons
Natural de PhilipsAvent et les pots de conservation avec adaptateur PhilipsAvent. Nous vous
recommandons de ne pas utiliser le tire-lait avec des biberons en verre Natural de PhilipsAvent.
Commande d'accessoires
Pour acheter des accessoires ou des pièces de rechange, consultez le site Web
www.philips.com/parts-and-accessories ou rendez-vous chez votre revendeur Philips. Vous pouvez
également contacter le ServiceConsommateursPhilips de votre pays.
Lorsque vous commandez des tétines de rechange, veillez à utiliser une tétine au débit adapté à votre
bébé (voir 'Choix de la tétine adaptée à votre bébé') et ne mélangez pas les pièces et les tétines des
biberons anti-colique PhilipsAvent avec les pièces des biberons Natural PhilipsAvent. Elles ne sont
pas adaptées et peuvent provoquer des fuites ou d'autres problèmes.
Recyclage
Français
-
Ce symbole signifie que ce produit ne doit pas être jeté avec les déchets ménagers (2012/19/EU).

78
Français
-
Ce symbole signifie que ce produit contient une batterie rechargeable intégrée, qui ne doit pas être
mise au rebut avec les déchets ménagers (2006/66/CE). Veuillez déposer votre produit dans un
point de collecte agréé ou un centre de service après-vente Philips pour faire retirer la batterie
rechargeable par un professionnel.
-
Respectez les réglementations de votre pays concernant la collecte séparée des appareils
électriques et électroniques et des piles rechargeables. La mise au rebut appropriée des piles
permet de protéger l'environnement et la santé.
Instructions de retrait de la batterie
-
Lorsque vous manipulez des piles, assurez-vous de bien sécher vos mains, le produit et les piles.
-
Pour éviter que les piles ne surchauffent ou qu'elles ne dégagent des substances toxiques ou
dangereuses, ne pas démonter, modifier, percer ni endommager les produits et les piles et ne pas
court-circuiter, surcharger ni inverser les piles.
-
Pour éviter de court-circuiter accidentellement les piles après les avoir retirées, ne laissez pas les
bornes des piles entrer en contact avec des objets métalliques (par ex., pièces de monnaie,
épingles à cheveux, anneaux). N'enveloppez pas les piles dans du papier d'aluminium. Collez les
bornes des piles avec du ruban adhésif ou mettez les piles dans un sac en plastique avant de les
jeter.
-
Si les piles sont endommagées ou fuient, évitez tout contact avec les yeux ou la peau. Si cela se
produit, laver immédiatement et abondamment avec de l'eau et consulter un médecin.
Remarque : Ne retirez la pile rechargeable que lorsque vous mettez le produit au
rebut. Avant d’enlever la pile, assurez-vous que le produit est débranché de la prise
secteur et que la pile est complètement vide.
Remarque : Respectez toutes les mesures de sécurité nécessaires lorsque vous
utilisez des outils pour ouvrir le produit et lorsque vous jetez la pile rechargeable.
1. Retirez les pieds en
caoutchouc de la base
du bloc moteur.
2. Retirez la vis à l’aide
d’un tournevis Torx.
3. Ouvrez le bloc moteur
en appuyant sur les
côtés de l’appareil.
4. Débranchez les
connecteurs du circuit
imprimé.

Français
Remarque: Jetez la
batterie rechargeable
dans un point de tri
sélectif. Les autres pièces
5. Retirez le cadre du
bloc moteur.
6. Coupez ou repliez les
bords du cadre en
plastique de la batterie.
Retirez la batterie du
cadre en plastique.
peuvent être jetées dans
un endroit prévu pour les
appareils électriques.
Garantie et assistance
Si
vous avez besoin d'une assistance ou d'informations supplémentaires, consultez le site Web
www.philips.com/support ou lisez le dépliant sur la garantie internationale.
Dépannage
Cette rubrique récapitule les problèmes les plus courants que vous pouvez rencontrer avec l'appareil.
Si vous ne parvenez pas à résoudre un problème à l'aide des renseignements ci-dessous, rendezvous sur le site www.philips.com/support et consultez la liste des questions fréquemment posées ou
contactez le ServiceConsommateursPhilips de votre pays.
Problème Solution
Je ressens une douleur
lorsque j’utilise le tirelait.
Choisissez un niveau d’aspiration que vous trouvez confortable.
-
Vérifiez que le diaphragme en silicone n’est pas endommagé (qu’il n’y
-
a pas de petites fissures, trous, etc.).
Vérifiez que votre mamelon est placé au centre du coussin.
-
Si la douleur persiste, cessez d’utiliser le tire-lait et consultez votre
-
professionnel de santé.
79
Français
Le tire-lait ne s’allume
pas alors qu’il est
branché sur une prise
murale.
Utilisez exclusivement l’adaptateur fourni.
-
Assurez-vous que l’adaptateur est correctement inséré dans la prise
-
secteur et que la petite fiche l’est également dans le bloc moteur.
Branchez l’adaptateur sur une autre prise murale. Maintenez le
-
bouton marche/arrêt enfoncé pour vérifier si le tire-lait peut s’allumer.
Si le problème persiste, contactez le ServiceConsommateurs
-
via le site www.philips.com/support.
Philips

80
Français
Problème Solution
Le tire-lait ne s’allume
pas (les voyants ne
s’allument pas).
Assurez-vous que la batterie est chargée (voir 'Charge du tire-lait') ou
-
branchez le tire-lait sur une prise murale.
Le tire-lait ne charge
pas.
La charge du tire-lait
dure très longtemps.
Je ne sens pas
d’aspiration/le niveau
d’aspiration est trop
faible.
L’aspiration du tire-lait
est trop forte.
Utilisez exclusivement l’adaptateur fourni.
-
Assurez-vous que l’adaptateur est correctement inséré dans la prise
-
secteur et que la petite fiche l’est également dans le bloc moteur.
Le tire-lait est trop froid ou trop chaud pour la charge. Laissez le tire-
-
lait s’acclimater à la température ambiante pendant 30minutes.
Si le problème persiste, contactez le ServiceConsommateursPhilips
-
via le site www.philips.com/support.
Utilisez exclusivement l’adaptateur fourni.
-
Assurez-vous que l’adaptateur est correctement inséré dans la prise
-
secteur et que la petite fiche l’est également dans le bloc moteur.
Le tire-lait est trop chaud ou trop froid. Il est recommandé de charger
-
le tire-lait à température ambiante.
Si le problème persiste, contactez le ServiceConsommateursPhilips
-
via le site www.philips.com/support.
Si possible, essayez un niveau d’aspiration plus élevé.
-
Vérifiez si le diaphragme en silicone est correctement (voir
-
'Assemblage du tire-lait') assemblé.
Assurez-vous que la valve blanche n’est pas endommagée et qu’elle
-
est correctement (voir 'Assemblage du tire-lait') assemblée.
Assurez-vous que les autres pièces du tire-lait sont intactes et
-
correctement (voir 'Assemblage du tire-lait') assemblées.
Vérifiez que la pompe est correctement positionnée sur votre sein
-
pour créer une étanchéité entre le tire-lait et le sein.
Si vous ne sentez toujours pas d’aspiration, veuillez contacter le
-
ServiceConsommateursPhilips via le site www.philips.com/support.
Si possible, essayez un niveau d’aspiration plus faible. Lorsque vous
-
tirez du lait pour la première fois, commencez par le niveau
d’aspiration par défaut (niveau5 en mode de stimulation, niveau11 en
mode d’expression) et augmentez/diminuez le niveau selon votre
convenance. Les niveaux qui vous paraissent confortables peuvent
varier selon les sessions.
Assurez-vous que vous utilisez uniquement les pièces fournies avec
-
ce tire-lait.
Vérifiez que le diaphragme en silicone n’est pas endommagé (qu’il n’y
-
a pas de petites fissures, trous, etc.).
Si le problème persiste, contactez le ServiceConsommateursPhilips
-
via le site www.philips.com/support.
Je tire peu/pas de lait
lorsque j’utilise mon tirelait.
Si vous ne ressentez pas assez d’aspiration, référez-vous au point «Je
-
ne sens pas d’aspiration/le niveau d’aspiration est trop faible» dans la
section de dépannage.
Si vous utilisez le tire-lait PhilipsAvent pour la
-
possible que vous ayez besoin de vous familiariser avec l’appareil
avant de pouvoir tirer du lait. Vous trouverez d’autres astuces sur le
site Web de Philips Avent www.philips.com/avent.
première fois, il est

Problème Solution
Lorsque j’allume le tirelait après une période
de stockage, il ne
démarre pas
immédiatement.
Assurez-vous que la batterie est complètement chargée (voir 'Charge
-
du tire-lait') ou branchez le tire-lait sur une prise murale.
Vous avez peut-être stocké le tire-lait à une température inférieure ou
-
supérieure aux températures de stockage admissibles. Laissez le tirelait dans une pièce à 20°C/68°F pendant 30minutes afin d’adapter
sa température à la plage de températures de fonctionnement
(5°C/41°F à 40°C/104°F).
Français
81
L’afficheur indique «Er»
et l’appareil s’éteint
automatiquement.
Si vous utilisez le tire-lait sur batterie, laissez-le refroidir pendant
-
30minutes et essayez de le rallumer.
Si vous utilisez le tire-lait avec l’adaptateur branché sur la prise
-
murale, vérifiez que vous utilisez l’adaptateur fourni avec l’appareil.
Si le problème persiste, contactez le ServiceConsommateursPhilips
-
via le site www.philips.com/support.
Informations supplémentaires
Retrouvez ci-dessous les problèmes les plus communs liés à l’allaitement. Si vous présentez l’un des
symptômes suivants, contactez un professionnel de santé ou un spécialiste de l’allaitement.
Problèmes les plus
communs liés à
l’allaitement
Sensation de douleur Douleur ressentie sur le sein ou le mamelon, ou due au fait que l’aspiration
Mamelons douloureux Douleur persistante dans les mamelons au début ou durant toute la
Engorgement Gonflement du sein. Le sein peut paraître dur, grumeleux et se révéler
Ecchymose, thrombus Une décoloration rougeâtre/violette qui ne blanchit pas lorsque vous
Description
soit trop importante.
période de tirage du lait, ou douleur entre les sessions.
sensible. Les symptômes peuvent inclure un érythème (rougeurs) de la
poitrine et de la fièvre. Se produit généralement au cours des premiers
jours d’allaitement.
appuyez dessus. Lorsqu’une ecchymose s’estompe, elle peut devenir verte
et brune.
Français
Tissus blessés sur les
mamelons
(traumatisme du
mamelon)
Canaux galactophores
obstrués
Crevasses ou gerçures aux mamelons.
-
Peau morte sur le mamelon. Se produit normalement en combinaison
-
avec des mamelons gercés et/ou des cloques.
Déchirure du mamelon.
-
Cloque. Ressemble à des petites bulles à la surface de la peau.
-
Saignement Les mamelons gercés ou déchirés peuvent entraîner un
-
saignement de la zone affectée.
Une grosseur rouge et sensible sur le sein. Les symptômes peuvent inclure
un érythème (rougeurs) de la poitrine. Peut provoquer une mammite
(inflammation du sein) et de la fièvre en l’absence de traitement.

82
Français
Conditions de stockage
N'exposez pas le tire-lait directement aux rayons du soleil, car une exposition prolongée pourrait
provoquer une décoloration. Rangez le tire-lait et ses accessoires dans un endroit sûr, propre et sec.
Si l'appareil a été rangé dans un environnement chaud ou froid, placez-le dans un environnement
dont la température est de 20°C (68°F) pendant 30minutes, pour qu'il atteigne une température
dans les conditions d'utilisation (5°C à 40°C/ 41°F à 104°F) avant de l'utiliser.
Chargez entièrement la batterie avant de ranger votre tire-lait pendant une période prolongée.
Champs électromagnétiques (CEM)
Cet appareil Philips est conforme à toutes les normes et à tous les règlements applicables relatifs à
l'exposition aux champs électromagnétiques.
Informations techniques
Tire-lait simple Tire-lait double
Niveau d’aspiration Stimulation: -60 to -200mbar (-45 to -150mmHg)
Extraction: -60 to -360mbar (-45 to -270mmHg)
Réglable par incréments de 20mbar
Aspiration intermittente
Vitesse du cycle 53à 120cycles/min 53à 120cycles/min
Entrée nominale du bloc
moteur
Entrée nominale de
l’adaptateur secteur
Sortie nominale de
l’adaptateur secteur
Référence de l’adaptateur S009AHz050yyyy Les lettres yyyy représentent le courant de sortie
Batterie Batterie rechargeable: 3,6V2600mAh (non remplaçable)
Conditions de
fonctionnement
Conditions de stockage et
de transport:
Pression de
fonctionnement
Poids net 230g 310g
Dimensions externes Bloc moteur:
Classe d’appareil CEI 60335-1:
5V c.c./ 1,1A 5V c.c./ 1,8A
Adaptateur secteur externe 100-240V c.a. / 50-60Hz
5V c.c./ 1,1A 5V c.c./ 1,8A
de0100 (1000ma) à0180 (1800ma), par incréments de 100ma. La
lettre «z» correspond au type de prise, qui peut être: U, V, B, S, C, A, D,
K, T, I, E, F.
Température: 5°C à 40°C (41°F à 104°F)
Humidité relative: 15 à 90% (sans condensation)
Température: 20°C à 45°C (-4°F à 113°F)
Humidité relative: jusqu’à 90% (sans condensation)
700 - 1060hPa (<3000m d’altitude)
145 mm x 95 mm x 45mm (LxlxH)
Système: classe II; bloc moteur: construction de classe III

Français
Tire-lait simple Tire-lait double
Matériaux ABS, silicone (bloc moteur)
Polypropylène, silicone (autres pièces)
Durée de vie 500heures
Mode de fonctionnement Fonctionnement continu Fonctionnement non continu
55min sous tension, 180min hors
tension à 22°C (72°F) (taux
d’utilisation de 23%)
20min sous tension, 90min hors
tension à 40°C (104°F) (taux
d’utilisation de 18%)
83
Protection contre la
pénétration d’eau
IP22 (bloc moteur), IP20 (adaptateur)
Explication des symboles
Les symboles et les signes d'avertissement sont indispensables pour garantir une utilisation sûre et
correcte de cet appareil, ainsi que pour protéger les utilisateurs. Vous trouverez ci-dessous la
signification des signes et symboles d’avertissement figurant sur l’étiquette et dans le mode d’emploi.
Symbole Explication
Indique de suivre les instructions d’utilisation.
Indique des informations importantes telles que des avertissements et des
avertissements.
Indique les conseils d'utilisation, des informations supplémentaires ou une remarque.
Indique le nom du fabricant.
Fabriqué pour: PhilipsConsumerLifestyleBV, Tussendiepen4, 9206AD Drachten -
Pays-Bas.
Indique la date de fabrication.
Indique que la partie de l’appareil qui est en contact physique avec l’utilisateur
(également appelée la partie appliquée) est de typeBF (Body Floating) conformément à
la norme CEI60601-1. Les parties appliquées sont les pièces du tire-lait.
Français
Indique qu’il s’agit d’un équipement EM de classeII. Cet adaptateur dispose d’une
double isolation (classeII).
Indique le numéro de catalogue du fabricant du tire-lait.
Indique le numéro de lot du tire-lait.

84
Français
Symbole Explication
Indique que le courant est continu.
Indique que le courant est alternatif.
Indique que le fabricant a pris toutes les mesures nécessaires pour s’assurer que
l’appareil est conforme aux normes de sécurité applicables en matière de distribution au
sein de la Communauté européenne.
Indique une collecte séparée pour les appareils électriques et électroniques
conformément à la directive européenne. Les déchets électriques ne doivent pas être
mis au rebut avec les déchets d’ordures ménagères. Reportez-vous au chapitre
«Recyclage» pour plus d’informations.
Signifie que ce produit contient une batterie rechargeable intégrée, qui ne doit pas être
mise au rebut avec les déchets ménagers (2006/66/CE). Reportez-vous au chapitre
«Recyclage» pour plus d’informations.
Indique une protection contre la pénétration d’objets solides étrangers et contre les
effets nocifs dus à l’infiltration d’eau.
Indique le numéro de série du fabricant du tire-lait.
Indique un connecteur USB.
Indique les limites maximales d'humidité relative que peut supporter l'appareil: jusqu’à
90%.
Indique les limites de température de stockage et de transport auxquelles l’appareil
peut être exposé en toute sécurité: -20°C à 45°C/-4°F à 113°F.
Conseil de bonne gestion forestière. Les marques déposéesFSC permettent aux
consommateurs de choisir les produits qui soutiennent la conservation des forêts,
offrent des avantages sociaux et permettent au marché d’inciter à une meilleure gestion
des forêts.
Indique qu’un objet peut être recyclé, et non pas qu’un objet a été recyclé ou sera
accepté dans tous les systèmes de collecte pour recyclage.
Indique que l’emballage doit être recyclé et que des frais d’emballage ont été versés aux
organismes de recyclage (point vert).
Indique une garantie internationale Philips d’une durée de deuxans.
Indique qu'un adaptateur spécifique est nécessaire pour le branchement du tire-lait.

Italiano
85
Sommario
Introduzione _________________________________________________________________________________________ 85
Descrizione generale _________________________________________________________________________________ 86
Uso previsto __________________________________________________________________________________________ 87
Informazioni di sicurezza importanti_________________________________________________________________ 87
Primo utilizzo _________________________________________________________________________________________ 90
Pulizia e disinfezione _________________________________________________________________________________ 91
Uso del tiralatte_______________________________________________________________________________________ 94
Somministrazione del latte materno con il biberon_________________________________________________ 101
Compatibilità _________________________________________________________________________________________ 103
Ordinazione degli accessori__________________________________________________________________________ 103
Riciclaggio ____________________________________________________________________________________________ 103
Istruzioni per la rimozione della batteria ____________________________________________________________ 104
Garanzia e assistenza ________________________________________________________________________________ 105
Risoluzione dei problemi_____________________________________________________________________________ 105
Informazioni aggiuntive ______________________________________________________________________________ 107
Condizioni di conservazione _________________________________________________________________________ 108
Campi elettromagnetici (EMF) _______________________________________________________________________ 108
Informazioni tecniche ________________________________________________________________________________ 108
Spiegazione dei simboli ______________________________________________________________________________ 109
Italiano
Introduzione
Congratulazioni per l'acquisto e benvenuti in Philips Avent! Per trarre il massimo vantaggio
dall'assistenza fornita da Philips Avent, registrate il tiralatte all'indirizzo www.philips.com/welcome.
Il tiralatte elettrico singolo/doppio Philips Avent Premium si ispira ai neonati e al loro naturale
movimento di suzione. La morbida coppa in silicone stimola il capezzolo con delicati movimenti
massaggianti, per estrarre il latte in modo confortevole ed efficace. La combinazione di suzione e
stimolazione del capezzolo provoca un rapido flusso del latte. Il design particolare consente di sedere
in posizione comoda con la schiena dritta durante l'estrazione del latte.
Gli operatori sanitari e l'Organizzazione Mondiale della Sanità consigliano il latte materno come
principale fonte di nutrimento durante il primo anno di vita, unito ad alimenti solidi dopo i primi 6
mesi. Il latte materno, infatti, è adatto alle specifiche esigenze del bambino e contribuisce a
proteggerlo da infezioni e allergie. Per allattare al seno più a lungo, potete estrarre e conservare il latte
in modo che il bambino possa godere dei suoi benefici anche in vostra assenza. Il tiralatte è compatto,
silenzioso e discreto da usare, pertanto potete portarlo con voi ovunque, con il vantaggio di poter
estrarre il latte quando vi è comodo e mantenere la scorta di latte.
Se allattate al seno, è opportuno (salvo diverso parere del vostro medico) attendere che la
produzione di latte e la routine di allattamento si siano stabilizzate (normalmente a distanza di
almeno 2-4 settimane dal parto) prima di iniziare a estrarre il latte.
Italiano

86
Italiano
Descrizione generale
Nota: i numeri citati sotto si riferiscono ai numeri della figura riportata nella pagina pieghevole della
copertina anteriore di questo manuale dell'utente.
Nota: il tiralatte doppio viene fornito con due pezzi degli elementi illustrati nelle figure B e C.
Descrizione del prodotto (Fig. A)
A1 Gruppo motore
A2 Kit tiralatte
A3 Biberon
Kit tiralatte (Fig. B)
B1 Tubo in silicone e coperchio
B2 Diaframma in silicone
B3 Tiralatte
Biberon Philips Avent Natural (Fig. C)
C1 Cappuccio del biberon
C2 Ghiera
C3 Tettarella
A4 Adattatore
A5 Tiralatte doppio
B4 Coperchio
B5 Coppa
B6 Valvola bianca
C4 Dischetto sigillante
C5 Biberon
Accessori
Sono disponibili più versioni di questo tiralatte, fornite con diverse combinazioni dei seguenti
accessori Philips Avent:
-
Assorbilatte
-
Borsa da viaggio
-
Custodia isolante
-
Spazzolina per la pulizia
* Per questi accessori viene fornito un manuale dell'utente separato.
-
Vasetti con adattatore*
-
Sacchetti per la conservazione del latte
materno*
-
Biberon Natural
-
Cinturino per tiralatte*

Italiano
Uso previsto
Il tiralatte elettrico singolo/doppio Premium Philips Avent è destinato all'estrazione e alla raccolta del
latte dal seno della donna in allattamento.
Il dispositivo è destinato a una singola utente.
Informazioni di sicurezza importanti
Prima di utilizzare il tiralatte, leggete attentamente il presente manuale dell'utente e conservatelo per
eventuali riferimenti futuri.
Il presente manuale dell'utente è disponibile anche online sul sito Web Philips Avent:
www.philips.com/avent.
Avvertenze
87
-
Non usate mai il tiralatte in gravidanza, poiché il pompaggio può
indurre il travaglio.
Avvertenze per evitare soffocamento, strangolamento e lesioni:
-
Questo tiralatte non è adatto all'uso da parte di persone (inclusi
bambini) con capacità fisiche, sensoriali o mentali ridotte, prive di
esperienza o conoscenze adeguate. Tali persone possono
utilizzare questo tiralatte solo se assistite o istruite in merito
all'uso dell'apparecchio da una persona responsabile della loro
sicurezza.
-
Non lasciate che bambini o animali domestici giochino con il
gruppo motore, l'adattatore, i materiali di imballaggio o gli
accessori.
-
Scollegare sempre il tiralatte dopo l'uso e quando è
completamente carico.
Avvertenze per evitare la trasmissione di malattie infettive:
-
Se siete affette da Epatite B, Epatite C o HIV, l'estrazione del latte
dal seno non ridurrà o eliminerà il rischio di trasmissione del virus
al vostro bambino tramite il latte materno.
Italiano

88
Italiano
Avvertenze per evitare scosse elettriche:
-
Ispezionate il tiralatte, incluso l'adattatore, prima di ogni uso per
controllare che non vi siano segni di danni. Non usate il tiralatte
se l'adattatore o la spina sono danneggiati, non funzionano
correttamente, sono stati fatti cadere o immersi in acqua.
-
Utilizzate solo l'adattatore (S009AHz050yyyy) fornito con questo
tiralatte.
-
Accertatevi sempre che sia facile scollegare il dispositivo dalla
rete in caso di malfunzionamento.
Avvertenze per evitare la contaminazione e garantire l'igiene:
-
Per motivi igienici, il tiralatte è destinato esclusivamente all'uso
ripetuto da parte di un solo utente.
-
Pulite e disinfettate tutte le parti prima di utilizzarle per la prima
volta e dopo ogni uso.
-
Non usate detergenti antibatterici o abrasivi per pulire le parti del
tiralatte, per non danneggiarle.
-
Lavate accuratamente le mani con acqua e sapone prima di
toccare le parti del tiralatte e il seno, per evitare di contaminarli.
Evitate di toccare l'interno di contenitori e coperchi.
Avvertenze per evitare disturbi e dolori al seno e ai capezzoli:
-
Non usate il tiralatte nel caso in cui il diaframma in silicone appaia
danneggiato o rotto. Per informazioni su come ottenere le parti di
ricambio, consultate il capitolo "Ordinazione degli accessori".
-
Utilizzate solo gli accessori e le parti consigliati da Philips Avent.
-
Non sono consentite modifiche al tiralatte. Qualora vengano
apportate modifiche, la garanzia decade.
-
Non usate mai il tiralatte quando avete sonno o siete molto
stanche per evitare cali di attenzione durante l'uso.
-
Spegnete sempre il tiralatte prima di staccarlo dal seno per
eliminare il vuoto.
-
Se il vuoto provoca disagio o dolore, spegnete il tiralatte e
staccatelo dal seno.

Italiano
-
Non continuate a pompare per più di cinque minuti alla volta se
non riuscite ad estrarre il latte. Fermatevi e provate in un altro
momento della giornata.
-
Se l'operazione risulta molto disagevole o dolorosa, interrompete
l'uso del tiralatte e consultate un medico.
Avvertenze per evitare danni e malfunzionamenti del tiralatte:
-
Non utilizzate apparecchiature di comunicazione portatili a
radiofrequenza (RF) (compresi telefoni cellulari e periferiche quali
cavi di antenna e antenne esterne) a una distanza inferiore a
30cmda qualsiasi parte del tiralatte, compreso l'adattatore,
poiché questo potrebbe avere un effetto negativo sulle
prestazioni del tiralatte.
-
L'uso dell'apparecchio adiacente ad altri apparecchi o impilato
con essi deve essere evitato in quanto potrebbe causare un
funzionamento scorretto.
Istruzioni di sicurezza per le batterie
-
Non utilizzate questoprodotto per scopi diversi da quelli indicati
nel presente manuale dell'utente. Eventuali utilizzi impropri
possono causare scosse elettriche, ustioni, incendi e altri pericoli
imprevisti.
-
Per caricare la batteria, utilizzate solo l'unità di alimentazione
rimovibile fornita con il prodotto. Non utilizzate cavi di prolunga.
-
Caricate, utilizzate e conservate il prodotto negli intervalli di
temperatura indicati nella tabella delle specifiche tecniche
riportata nel presente manuale dell'utente.
-
Scollegate sempre il prodotto quando è completamente carico.
-
Non bruciate i prodotti e le loro batterie e non esponeteli alla luce
solare diretta o ad alte temperature (ad es. in automobili
surriscaldate calde o vicino fornelli roventi). Le batterie possono
esplodere se surriscaldate.
-
Se il prodotto si surriscalda, cambia colore, emana un odore
strano o se la ricarica richiede molto più tempo del solito,
smettete di utilizzarlo o di caricarlo.
89
Italiano

90
Italiano
-
Non collocate i prodotti e le relative batterie in forni a microonde
o su fornelli a induzione.
-
Questo prodotto contiene una batteria ricaricabile non
sostituibile. Non aprite il prodotto per sostituire la batteria
ricaricabile.
Avvertenze
Avvertenze per evitare danni e malfunzionamento del tiralatte:
-
Evitate che l'adattatore e il gruppo motore vengano a contatto
con l'acqua.
-
Non inserite mai il gruppo motore o l'adattatore in acqua o in
lavastoviglie, poiché potreste danneggiare in modo permanente
queste parti.
-
Tenete l'adattatore e i tubi in silicone lontano dalle superfici calde
per evitarne il surriscaldamento e la deformazione.
Primo utilizzo
Smontate, pulite e disinfettate tutte le parti che vengono a contatto con il latte materno prima di
utilizzare il tiralatte per la prima volta e dopo ogni uso.
Caricate il dispositivo completamente prima di utilizzarlo per la prima volta o dopo un lungo periodo
di inattività.

Italiano
Pulizia e disinfezione
Panoramica
Pulite e disinfettate le parti che vengono a contatto con il seno e il latte materno come descritto di
seguito:
Quando Come
91
Pulite e disinfettate prima del primo
utilizzo e dopo ogni uso.
Le parti seguenti non entrano in contatto con il seno e il latte materno; pulitele nel modo descritto di
seguito:
Smontate tutte le parti e pulitele
come indicato nel capitolo "Pulizia",
quindi disinfettatele come indicato
nel capitolo "Disinfezione".
Quando Come
Effettuate la pulizia secondo
necessità.
Pulite con un panno pulito e umido,
con acqua e un detergente delicato.
Italiano

5 min.
92
Italiano
Passo 1: Smontaggio
Assicuratevi di rimuovere la valvola bianca dal tiralatte.
Passo 2: Pulizia
Le parti che vengono a contatto con il latte possono essere pulite manualmente o in lavastoviglie.
Avvertenza: Non usate detergenti antibatterici o abrasivi per pulire le parti del
tiralatte, per non danneggiarle.
Attenzione: Non inserite mai il gruppo motore o l'adattatore in acqua o in
lavastoviglie, poiché potreste danneggiare in modo permanente queste parti.
Attenzione: prestate attenzione quando rimuovete e pulite la valvola bianca. Se si
danneggia, il tiralatte non funziona correttamente. Per rimuovere la valvola bianca,
tirate delicatamente la linguetta sul lato della valvola. Per pulire la valvola bianca,
strofinatela delicatamente tra le dita in acqua calda con un po' di detersivo liquido per
stoviglie. Non inserite oggetti nella valvola bianca, poiché potrebbero danneggiarla.
Passaggio 2A: Pulizia manuale
Occorrente:
-
Detersivo delicato per stoviglie
-
Acqua potabile
-
Spazzolina morbida e pulita
1. Risciacquate tutte le
parti
sotto acqua
corrente tiepida.
2. Immergete tutte le
parti per
acqua calda con un po'
di detersivo liquido per
stoviglie delicato.
5minuti in
-
Canovaccio o rastrelliera puliti
-
Lavandino o recipiente pulito
3. Pulite tutte le parti
con l'apposita
spazzolina.
4. Risciacquate
accuratamente tutte le
parti
sotto il rubinetto
con acqua corrente
potabile.

5. Lasciate asciugare
tutte le parti su un
canovaccio o una
rastrelliera puliti.
Passaggio 2B: Pulizia in lavastoviglie
Occorrente:
-
Detersivo liquido per stoviglie delicato o pasticca per lavastoviglie
-
Acqua potabile
Nota: la pigmentazione degli alimenti può scolorire le parti.
Italiano
93
Italiano
1. Posizionate tutte le
parti sul ripiano
superiore della
lavastoviglie.
2. Inserite il detersivo o
una pastiglia nella
lavastoviglie e avviate un
programma standard.
3. Lasciate asciugare
tutte le parti su un
canovaccio o una
rastrelliera puliti.
Passo 3: Disinfezione
Occorrente:
-
Pentola
-
Acqua potabile
Attenzione: Durante la disinfezione con acqua bollente, prestate attenzione affinché
il biberon o altre parti non tocchino il bordo della pentola. Ciò potrebbe causare danni o
deformazioni irreversibili al prodotto, di cui Philips non può essere ritenuta
responsabile.

5 min.
94
Italiano
1. Riempite una pentola
con acqua sufficiente
per ricoprire tutte le parti
e inserite tutte le parti
nella pentola. Lasciate
bollire l'acqua per
5minuti. Assicuratevi
che le parti non tocchino
le pareti della pentola.
2. Lasciate raffreddare
l'acqua.
3. Estraete
delicatamente le parti
dall'acqua. Posizionate
le parti su una
superficie/un
canovaccio o una
rastrelliera puliti e
lasciatele asciugare.
4. Riponete le parti
asciutte in un
contenitore pulito,
asciutto e coperto.
Uso del tiralatte
Dimensione della coppa
Il tiralatte elettrico singolo/doppio Philips Avent Premium ha una coppa morbida e attiva che stimola
delicatamente il capezzolo per provocare il flusso del latte. La coppa, realizzata in silicone flessibile,
risponde alle esigenze del 99,98% delle donne, adattandosi a capezzoli di dimensioni fino a 30mm.
Caricamento del tiralatte
Caricare completamente la batteria prima di utilizzare il tiralatte per la prima volta e quando risulta
scarica. La ricarica completa della batteria richiede fino a 4ore.
1. Spegnere il dispositivo. 2. Collegate l'adattatore
alla presa di corrente a
muro e inserite lo
spinotto all'altra
estremità nel gruppo
motore.
3. La batteria è in carica. 4. Quando la batteria è
completamente carica,
scollegate l'adattatore
dalla presa di corrente a
muro e tirate lo spinotto
dal gruppo motore.

Descrizione delle spie della batteria
Italiano
95
Tutte le spie sono
accese fisse.
La batteria è
completamente
carica.
* Una sessione equivale a 20 minuti (tiralatte elettrico doppio) o 30 minuti (tiralatte elettrico singolo).
Assemblaggio
Assicuratevi che le parti del tiralatte che vengono a contatto con il latte siano pulite e disinfettate.
La prima spia è
accesa fissa.
La batteria è
sufficientemente
carica per una
sessione.*
del tiralatte
La prima spia
lampeggia
lentamente.
La
batteria è
scarica, è
necessaria la
ricarica.
La prima spia
lampeggia
rapidamente.
La
batteria è quasi
scarica, il
dispositivo
smetterà presto di
funzionare.
Le spie della
batteria si
accendono una ad
una e si spengono
tutte insieme.
La batteria è in
carica.
Avvertenza: prestate attenzione dopo avere disinfettato le parti del tiralatte
facendole bollire, poiché potrebbero essere molto calde. Per evitare ustioni, montate il
tiralatte solo quando le parti disinfettate si sono raffreddate.
Avvertenza: Lavate accuratamente le mani con acqua e sapone prima di toccare le
parti del tiralatte e il seno, per evitare di contaminarli. Evitate di toccare l'interno di
contenitori e coperchi.
Prima dell'uso controllate le parti del kit tiralatte per verificare che non siano usurate o danneggiate e,
se necessario, sostituitele.
Nota: il posizionamento corretto della coppa, del diaframma in silicone e del tubo in silicone è
fondamentale affinché il tiralatte crei un vuoto adeguato.
Italiano
1. Lavate accuratamente
le mani con acqua e
sapone.
2. Inserite la valvola
bianca nel corpo del
tiralatte spingendola più
a fondo possibile.
3. Avvitate il corpo del
tiralatte sul biberon.
4. Inserite la coppa nel
corpo del tiralatte e
verificate che il bordo
ricopra il corpo del
tiralatte.

96
Italiano
4A Spingete la parte
interna della coppa
nell'imbuto fino alla linea
(indicata dalla freccia)..
7. Collegate il/i tubo/i al
gruppo motore.
5. Inserite il diaframma in
silicone nel corpo del
tiralatte.
8A. Quando il tiralatte è
carico, è possibile
utilizzarlo senza fili.
Tenete premuto il
pulsante di
accensione/spegnimen
to finché l'apparecchio
non si accende.
5A Assicuratevi che il
diaframma in silicone
aderisca bene al bordo
premendolo con i pollici.
8B. È inoltre possibile
utilizzare il tiralatte
collegato alla presa a
muro. Se la batteria è
scarica, inserite
l'adattatore alla presa di
corrente a muro e
inserite lo spinotto
all'altra estremità nel
gruppo motore.
6. Posizionate il tubo in
silicone e il coperchio
sul diaframma in
silicone. Spingete il
coperchio finché non è
posizionato
correttamente in sede.
9. Il tiralatte è pronto
per l'uso.
Nota: potete
posizionare il coperchio
sulla coppa per
mantenere il tiralatte
pulito mentre vi
preparate per
l'estrazione.

Descrizione delle parti del gruppo motore
7
1 3 5
4 6
8
2
1
2
3
4
1 Porta USB
2 Pulsante on/off con
funzione di pausa/avvio
3 Pulsante di selezione
modalità
4 Pulsante "Riduci livello"
5 Pulsante "Aumenta livello"
6 Display LED
7 Attacco per tubo per
tiralatte singolo
8 Attacchi per tubi per tiralatte
doppio
Descrizione del display a LED
1 Spie della batteria
2 Timer (minuti) e indicazione
del livello di vuoto
3 Icona di espressione
4 Icona di stimolazione
Italiano
97
Italiano
Spiegazione delle modalità
Il tiralatte presenta due modalità. Di seguito è fornita una spiegazione di tali modalità.
Icone della
modalità
Modalità Spiegazione N. di livelli di
aspirazione
Modalità di
stimolazione
Modalità di
estrazione
Modalità per stimolare il seno a
produrre il flusso del latte.
Modalità per un'efficiente
estrazione del latte dopo che il
latte comincia a scorrere. Dopo 90
secondi di stimolazione,
l'apparecchio passa
automaticamente alla modalità di
estrazione.
8 livelli di aspirazione
16 livelli di aspirazione

98
Italiano
Il numero sul display mostra il tempo di
esecuzione in minuti.
Quando si modifica il livello di aspirazione, il
display mostra il livello selezionato per alcuni
secondi, quindi compare di nuovo il tempo di
esecuzione.
Istruzioni di pompaggio
Avvertenza: spegnete sempre il tiralatte prima di staccarlo dal seno per eliminare il
vuoto.
Avvertenza: Non continuate a pompare per più di 5 minuti alla volta se non riuscite ad
estrarre nemmeno una piccola quantità di latte. Fermatevi e provate in un altro
momento della giornata.
Avvertenza: Se l'operazione risulta molto disagevole o dolorosa, interrompete l'uso
del tiralatte e consultate un medico.
Nota: Se estraete regolarmente più di 125 ml per sessione, potete acquistare e utilizzare un
biberon Natural Philips Avent da 260 ml per evitare che il contenitore si riempia troppo eil latte
fuoriesca.
Nota: Il tiralatte può essere utilizzato senza fili se è sufficientemente carico, ma è anche possibile
utilizzarlo collegato alla presa a muro.
1. Lavate accuratamente
le mani con acqua e
sapone e assicuratevi
che il seno sia pulito.
2. Posizionate il kit
tiralatte sul seno.
Assicuratevi che il
capezzolo sia centrato.
3. Tenete premuto il
pulsante di
accensione/spegnimen
to finché l'apparecchio
non si accende. Le spie
di segnalazione si
accendono a indicare
che l'apparecchio è in
modalità di
stimolazione.
4. Il tiralatte si avvia in
modalità di stimolazione
e aumenta lentamente il
vuoto fino all'ultimo
livello di aspirazione di
stimolazione utilizzato (o
fino al livello 5 quando
viene utilizzato per la
prima volta).

3 sec.
Italiano
99
5. Il display mostra il
tempo di esecuzione.
9. Se desiderate fare una
pausa, premete
brevemente il pulsante
on/off. Per riprendere,
premete di nuovo
brevemente il pulsante
on/off.
Suggerimento: per un'estrazione ottimale, selezionate l'impostazione più elevata che non provoca
disagio. Tale impostazione può variare da una sessione all'altra.
Suggerimento: è possibile utilizzare il tiralatte doppio come tiralatte singolo collegando solo il tubo
di un kit tiralatte al gruppo motore.
6. Utilizzate i pulsanti
"Aumenta livello" e
"Riduci livello" per
modificare il livello di
aspirazione in base alle
vostre preferenze.
10. Tenete premuto il
pulsante on/off per
spegnere.
7. Dopo 90 secondi, il
tiralatte passa
gradualmente alla
modalità di estrazione e
aumenta lentamente il
vuoto fino all'ultimo
livello di aspirazione di
estrazione utilizzato (o
fino al livello 11 quando
viene utilizzato per la
prima volta).
8. Se il latte inizia a
scorrere prima o se
desiderate passare dalla
modalità di estrazione
alla modalità di
stimolazione, potete
cambiare modalità con il
pulsante di selezione
modalità.
Italiano

1
2
100
Italiano
Dopo l'uso
1. Svitate il biberon. 2A. Per conservare il
4. Rimuovete il tubo in
silicone e il cappuccio
dal kit tiralatte.
latte materno: chiudete
il biberon con il
dischetto sigillante e la
ghiera.
5. Smontate e pulite
tutte le parti che sono
state a contatto con il
latte materno (vedere
'Pulizia e disinfezione').
2B. Per preparare il
biberon per la poppata
del bambino: inserite
una tettarella in una
ghiera e avvitate la
ghiera assemblata sul
biberon. Sigillate la
tettarella con il
cappuccio del biberon
(vedere 'Assemblaggio
del biberon').
6. Per riporre facilmente
l'apparecchio, avvolgete
il tubo in silicone intorno
al gruppo motore e
fissate il coperchio al
tubo.
3. Scollegate l'adattatore
dalla presa a muro e dal
gruppo motore.
Avvertenza: refrigerate o congelate immediatamente il latte estratto o mantenetelo a
una temperatura di 16-29 °C per 4 ore al massimo prima di darlo al bambino.
Per ulteriori informazioni sul tiralatte e suggerimenti per l'estrazione del latte, visitate il sito
www.philips.com/avent.
Conservazione del latte materno
Di seguito sono fornite indicazioni per la conservazione del latte materno:
Luogo di conservazione Temperatura Durata massima di
Stanza 16-29⁰C 4 ore
Frigorifero 4⁰C
Congelatore < -4⁰C da 6 a 12 mesi
conservazione
4 giorni
 Loading...