

SCF334, SCF332
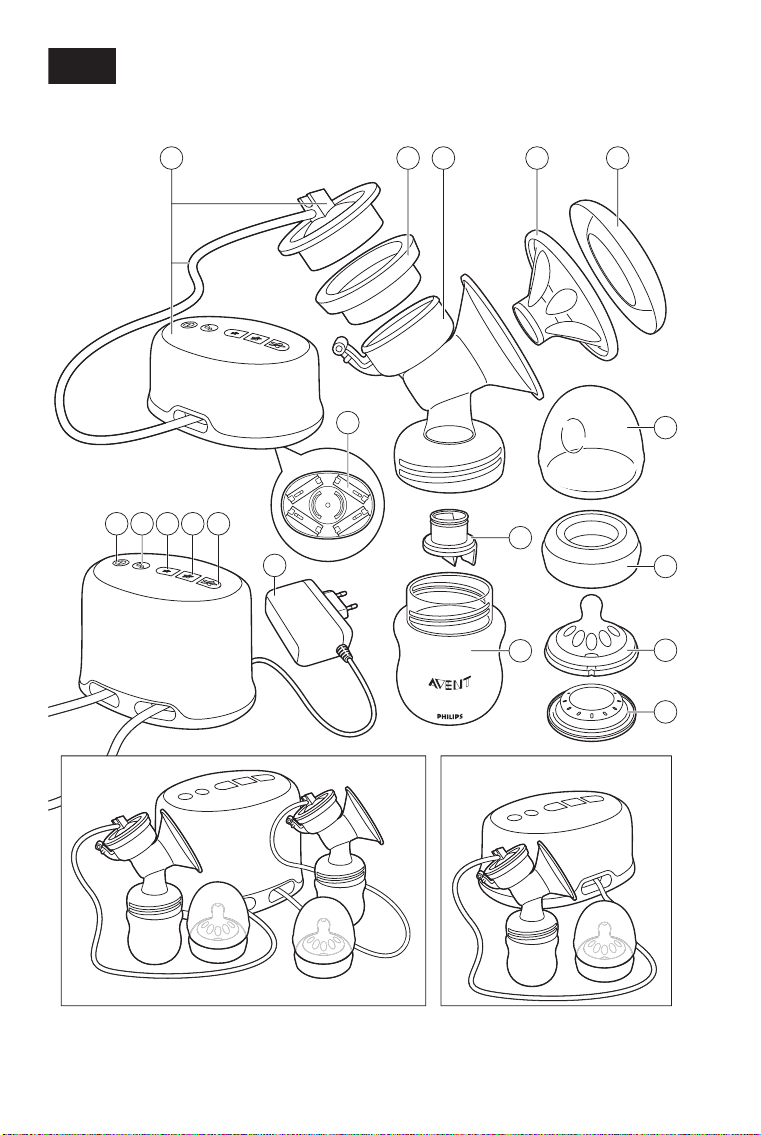
Fig. A
1 2 4 5
768 10 11
9
12
3
13
14
15
16
17
18
SCF334
SCF332


English 6
Čeština 28
Lietuviškai 50
Magyar 72
Slovensky 95
Українська 118

English
6
Contents
Introduction __________________________________________________________________________7
General description (Fig. A) ______________________________________________________________7
Intended use ________________________________________________________________________ 8
Important safety information ___________________________________________________________ 8
Contraindications _____________________________________________________________________ 8
Preparing for use _____________________________________________________________________ 9
Cleaning and sanitizing ________________________________________________________________ 9
Find the best cushion for you ___________________________________________________________ 11
Assembling the breast pump ___________________________________________________________ 11
Using the breast pump ________________________________________________________________ 12
When to express milk _________________________________________________________________ 12
Tips ________________________________________________________________________________ 13
Operating the breast pump _____________________________________________________________ 13
Storing breast milk ____________________________________________________________________ 14
Compatibility ________________________________________________________________________ 14
Feeding _____________________________________________________________________________ 15
For your child‘s safety and health _______________________________________________________ 15
Before rst use _______________________________________________________________________ 15
Cleaning bottles ______________________________________________________________________ 16
Assembling bottles ___________________________________________________________________ 16
Heating breast milk ___________________________________________________________________ 16
Maintenance and storage of bottles _____________________________________________________ 16
Additional information _________________________________________________________________ 16
Choosing the right teat for your baby_____________________________________________________ 17
Replacement ________________________________________________________________________ 17
Batteries ____________________________________________________________________________ 17
Recycling ___________________________________________________________________________ 17
Removing the batteries ________________________________________________________________ 18
Ordering accessories __________________________________________________________________ 18
Accessories __________________________________________________________________________ 18
Additional items ______________________________________________________________________ 18
Warranty and support _________________________________________________________________ 18
Troubleshooting ______________________________________________________________________ 19
Supplemental information ____________________________________________________________ 20
Technical information ________________________________________________________________ 20
EMC information ____________________________________________________________________ 20
Usage and storage conditions ___________________________________________________________24
Technical specications ________________________________________________________________25
Explanation of symbols _______________________________________________________________ 26

English
Introduction
Congratulations on your purchase and welcome to Philips Avent! To fully benet from the support
that Philips Avent oers, register your product at www.philips.com/welcome.
The Philips Avent breast pump has a unique design that enables you to sit in a more comfortable
position while expressing. The soft massage cushion* is designed to feel soft and warm and to mimic
your baby’s suckling action to provide milk ow - comfortably and gently. The breast pump starts in
a gentle mode that helps to stimulate your milk ow. You can then choose from three suction modes,
according to your own personal comfort. The pump is easy to assemble and operate and all parts that
come into contact with breast milk are dishwasher-safe.
Healthcare professionals say that breast milk is the best nutrition for babies during the rst year,
combined with solid food after the rst 6 months. Your breast milk is specially adapted to your baby’s
needs and help protect your baby against infection and allergies. A breast pump can help you to
breastfeed longer. You can express and store your milk so that your baby can still enjoy the benets,
even if you cannot be there to provide it yourself. As the pump is compact, quiet and discrete to
use, you can take it with you anywhere, allowing you to express milk at your own convenience and
maintain your milk supply.
This breast pump is for household use only.
*The cushions included with this pump were designed to comfortably t the majority of mothers.
However, if you need it, you can buy a larger cushion separately.
General description (Fig. A)
Figure A. The numbers mentioned below refer to the numbers on the gure of the front foldout
page of this user manual.
1 Motor unit with silicone tube and cap *
2 Silicone diaphragm *
3 Pump body *
4 Massage cushion *
5 Cover *
6 Battery housing (single electric breast pump only)
7 On/o button
8 Stimulation button
9 Low suction button
10 Medium suction button
11 Deep suction button
12 Adapter
13 White valve *
14 Philips Avent Natural bottle *
15 Dome cap *
16 Screw ring *
17 Nipple *
18 Sealing disc *
*Note:The twin electric breast pump comes with two pieces of the marked parts, except for the
motor unit.
SCF332 contains: single electric breast pump (including 1 bottle), breast pads
SCF334 contains: twin electric breast pump (including 2 bottles), breast pads, travel bag
7

English
8
Intended use
The Philips Avent Comfort Single/Twin electric breast pump is intended to express and collect milk
from the breast of a lactating woman.
The device is intended for a single user.
Important safety information
Read this user manual carefully before you use the breast pump and save it for future reference.
This user manual can also be found online via the Philips Avent website: www.philips.com/avent
Contraindications
Never use the breast pump while you are pregnant, as pumping can induce labor.
Warning
Warnings to avoid choking, strangulation and injury:
- Do not allow children or pets to play with the motor unit, the adapter or accessories.
- Children should be supervised to ensure that they do not play with the appliance.
- Always unplug the breast pump immediately after use.
- Do not leave the breast pump unattended when it is plugged in.
- This breast pump is not intended for use by persons (including children) with reduced physical,
sensory or mental capabilities, or lack of experience and knowledge. Such persons can only use
this breast pump if they are supervised by or have received proper instruction concerning use of
the appliance by a person responsible for their safety.
Warnings to avoid electric shock:
- Inspect the breast pump, including the adapter, for signs of damage before each use. Do not use
the breast pump if the adapter or plug is damaged, if it does not work properly or if it has been
dropped or submerged in water.
Warnings to prevent burns:
- Only use the adapter indicated on the appliance to prevent overheating of the adapter.
- Non-rechargable batteries are not to be recharged to prevent overheating and leaking of batteries.
Warnings to avoid poisoning and contamination and to ensure hygiene:
- For hygienic reasons, the breast pump is only intended for repeated use by a single user.
- Clean, rinse and sanitize all pump parts, except the motor unit, the tube and cap and the adapter,
before each use.
- Only store breast milk collected with a cleaned and sanitized pump.
- Do not use the breast pump if the silicone diaphragm appears to be damaged or broken.
See chapter ‘Ordering accessories’ for information on how to obtain replacement parts.
- Do not use antibacterial or abrasive cleaning agents when you clean breast pump parts.
- If you are not going use the appliance for a long period of time, remove the batteries to prevent
leaking of batteries.

English
Warnings to avoid breast and nipple problems and pain:
- Do not attempt to remove the pump body from your breast while under vacuum. Switch o the
appliance and break the seal between your breast and the pump funnel with your nger. Remove
the pump from your breast.
- Never use the breast pump while you are sleepy or drowsy to avoid lack of attention during use.
- Always switch o the breast pump before you remove the pump body from your breast to release
the vacuum.
- Never use any accessories or parts from other manufacturers or that Philips Avent does not
specically recommend. This could lead to improper working of the appliance and could inuence
Electromagnetic Compatibility (EMC). If you use such accessories or parts, your warranty becomes
invalid.
- Do not continue pumping for more than ve minutes at a time if you do not succeed in expressing
any milk. Try to express at another time during the day.
- If the process becomes very uncomfortable or painful, stop using the pump and consult your
breastfeeding advisor.
- If the pressure generated is uncomfortable or causes pain, switch o the appliance, break the seal
between the breast and the pump body with your nger and remove the pump from your breast.
- Never drop or insert any foreign object into any opening.
Caution
Caution to prevent damage to and malfunctioning of the product:
- Prevent the adapter and motor unit from coming into contact with water.
- Keep the adapter and the silicone tubes away from heated surfaces to avoid overheating and
deformation of these parts.
- Never put the motor unit or the adapter in water, in a dishwasher or in a sanitizer.
- Although the breast pump is compliant with applicable EMC directives, it may still be susceptible
to excessive emissions and/or may interfere with other equipment. A consequence can be that
the breast pump switches o or goes into error mode. To prevent interference, keep other electric
equipment away from the breast pump during expressing (see 'Technical information').
- There are no user serviceable parts inside the motor unit of the breast pump. No modication of
equipment is allowed. If you do, your warranty becomes invalid.
- Do not short-cut the supply terminals of the batteries.
9
Preparing for use
Cleaning and sanitizing
The motor unit, the silicone tube, cap and the adapter do not require cleaning and sanitizing, as they
do not come into contact with breast milk. Clean and sanitize all other parts of the breast pump
before rst use. Also clean these parts after each subsequent use and sanitize them before each
subsequent use.
Caution: Never put the motor unit or the adapter in water, in a dishwasher or in a sanitizer, as this
causes permanent damage to these parts.

English
10
Cleanable parts
Clean the following parts before (rst) use and after each subsequent use. Please check the list in the
General Description section to see which items are included with your breast pump.
Breast pump parts:
- Silicone diaphragm
- Pump body
- Massage cushion
- White valve
- Cover
Bottle parts:
- Philips Avent Natural bottle
- Dome cap
- Screw ring
- Teat
- Sealing disc
Supplies needed for cleaning:
Washing in sink Washing in dishwasher
- Mild dishwashing liquid - Mild dishwashing liquid/tablet
- High quality drinking water - High quality drinking water
- Soft brush or clean dish towel
- Clean sink or bowl
Warning: Do not use antibacterial or abrasive cleaning agents when you are cleaning.
1 Disassemble the breast pump and bottle completely. Also remove the white valve from the breast
pump.
Caution: Be careful when you remove the white valve and when you clean it. If it gets damaged,
your breast pump does not function properly. To remove the white valve, gently pull at the
ribbed tab on the side of the valve.
2 Wash the parts in the sink or dishwasher.
Washing in sink: Detach all parts and soak for 5 minutes in hot water with some mild dishwashing
liquid. Clean all parts with a soft brush or clean dish towel and then rinse them thoroughly (Fig. 2).
Washing in dishwasher: Clean the parts, except the motor unit, the silicone tube and cap and the
adapter, in the dishwasher (on the top rack only).
Note: To clean the valve, rub it gently between your ngers in warm water with some washing-up
liquid. Do not insert objects into the valve, as this may cause damage.

English
11
Disinfection (optional)
After cleaning, if you also want to disinfect, you can boil the parts in water in a household pot.
Supplies needed for disinfection:
- A household pot
- High-quality drinking water
Disinfect the parts in the following way:
Fill a household pot with enough water to cover all parts. Bring the water to boil. Place the parts in
the household pot and boil them for 5 minutes (Fig. 3). During disinfection with boiling water, prevent
the bottle or other parts from touching the side of the pan. This can cause irreversible product
deformation or damage that Philips cannot be held liable for.
Allow water to cool and gently remove the parts from the water. Place the parts neatly on a clean
paper towel or in a clean drying rack and allow them to air dry. Avoid using cloth towels to dry the
parts because they can carry germs and bacteria that are harmful to your baby.
Find the best cushion for you
Expressing breast milk should be comfortable. Therefore we oer 3 soft exible cushions: a 19.5 mm
massage cushion (supplied with your breast pump) and a 25 mm massage cushion.
For optimal comfort and performance, you should choose the optimal cushion for your nipples (Fig. 4).
19,5 mm: Massage cushion,
25 mm: Massage cushion (not included):
1 Start with the standard 19,5 mm massage cushion supplied with your breast pump. You can nd
the size of the cushion on the cushion itself (Fig. 5).
2 If the cushion is too small, purchase the larger 25 mm cushion (see ‘Ordering accessories’).
A too small cushion can cause pain or less eective expression (Fig. 6).
Assembling the breast pump
Note: Make sure you have cleaned and sanitized the appropriate parts of the breast pump.
1 Wash your hands thoroughly before you handle the cleaned parts.
Warning: Be careful, the cleaned parts may still be hot. Only start assembling the
breast pump when cleaned parts have cooled down.
Note: You may nd it easier to assemble the breast pump while it is wet.
2 Insert the white valve into the pump body from underneath. Push the valve in as far as possible
(Fig. 7).
3 Screw the pump body clockwise onto the bottle until it is securely xed (Fig. 8).
4 Insert the silicone diaphragm into the pump body from above. Make sure it ts securely around the
rim by pressing down with your ngers to ensure a perfect seal (Fig. 9).
5 Insert the cushion into the funnel-shaped section of the pump body (Fig. 10).
6 Push in the inner part of the cushion as far as possible and make sure that it is perfectly sealed all
around the rim of the pump body (Fig. 11).

English
12
7 Press in between the petals to remove any trapped air (Fig. 12).
Note: Place the cover over the cushion to keep the breast pump clean while you prepare for
expressing.
Warning: Always use the breast pump with a cushion.
8 Insert the adapter into the wall socket and insert the plug at the other end into the motor unit
(Fig. 13).
The adapter reference code is indicated on the bottom of the appliance. Only use the indicated
adapter with the appliance.
- For battery operation (single electric breast pump only), turn the bottom of the motor unit in the
direction indicated by the marks on the bottom (step 1 (Fig. 14)) and remove it (step 2 (Fig. 14)).
Insert four new 1.5V AA batteries (or 1.2V, in case of rechargeable batteries) into the battery housing.
Check the markings on the housing of the battery for the correct polarity. Reattach the bottom to
the motor unit.
Note: A new set of batteries provides 1-3 hours of operating time. Rechargeable batteries will lose
capacity over time and may cause a decrease in operating time.
Note: If you have inserted batteries in the battery housing of the motor unit and plug in the adapter,
the breast pump will run from on electrical power. The batteries cannot be charged in the unit.
Warning: Do not mix dierent type of batteries.
Warning: Do not mix used and new batteries.
9 Attach the silicone tube and cap onto the diaphragm. Push down the cap until it is securely in
place (Fig. 15).
Using the breast pump
When to express milk
If breastfeeding goes well, it is advisable (unless advised otherwise by your healthcare professional/
breastfeeding advisor) to wait until your milk supply and breastfeeding schedule are established
(normally at least 2 to 4 weeks after giving birth) before you start expressing.
Exceptions:
- If breastfeeding does not go well immediately, expressing regularly can help to establish and
maintain your milk supply.
- If you are expressing milk for your baby to be given in hospital.
- If your breasts are engorged (painful or swollen), you can express a small amount of milk before or
between feeds to ease the pain and to help your baby latch on more easily.
- If you have sore or cracked nipples, you may wish to express your milk until they are healed.
- If you are separated from your baby and wish to continue to breastfeed when you are reunited,
you should express your milk regularly to stimulate your milk supply.
You need to nd the optimum times of the day to express your milk, for example just before or after
your baby’s rst feed in the morning when your breasts are full, or after a feed if your baby has not
emptied both breasts. If you have returned to work, you may need to express during a break. Using
a breast pump requires practice and it may take several attempts before you succeed. Fortunately,
the Philips Avent electric breast pump is easy to assemble and use so you will soon get used to
expressing with it.

English
13
Tips
- Familiarize yourself with the breast pump and how to operate it before you use it for the rst time.
- Choose a time when you are not in a rush and will not be interrupted.
- A photograph of your baby can help encourage the ‘let-down’ reex.
- Warmth can also help: try to express after a bath or shower, or place a warm cloth or Philips Avent
Thermopad on the breast for a few minutes before you start expressing.
- You may nd it easier to express while your baby is feeding from the other breast, or immediately
after a feed.
- If expressing becomes painful, stop and consult your breastfeeding advisor or healthcare
professional.
Operating the breast pump
1 Wash your hands thoroughly and make sure your breasts are clean.
2 Relax in a comfortable chair (you may wish to use cushions to support your back). Make sure you
have a glass of water nearby.
3 Press the assembled pump body against your breast. Make sure that your nipple is centered,
so that the massage cushion creates an airtight seal (Fig. 16).
For twin electric breast pump users: The twin electric breast pump enables you to express milk
from both breasts at the same time. However, you can also use the appliance to express from one
breast in just the same way. Attach both assembled pump bodies to the silicone tube and cap.
We recommend to place the cover over the other one.
4 Make sure that your nipple ts correctly in the cushion. See for correct size of cushion, section
"Find the best cushion for you".
5 Press the on/o button (Fig. 17).
- The breast pump automatically starts up in stimulation mode and the on/o button and the
stimulation button light up.
- You begin to feel the suction on your breast.
6 Once your milk starts owing, you can adopt a slower rhythm by pressing the lowest suction button
(Fig. 18).
- This button lights up instead of the stimulation button.
Note: Do not worry if your milk does not ow immediately. Relax and continue pumping. The rst
few times you use the breast pump, you may need to use a higher suction mode to get your milk
owing.
7 Depending on your own personal comfort, you may wish to use a higher suction mode that
provides deeper suction. You can always return to a lower suction mode (Fig. 19). You can turn o
the breast pump whenever you like by pressing the on/o button (Fig. 20).
Note: You do not need to use all suction modes, only use the modes that are comfortable for you.
Warning: Always turn o the breast pump before you remove the pump body from
your breast to release the vacuum.
Warning: Do not continue pumping for more than 5 minutes at a time if you do not
succeed in expressing any milk. Try to express at another time during the day.
8 On average, you need to pump for 10 minutes to express 60-125ml (2-4 oz) of breast milk from
one breast. However, this is just an indication and varies from woman to woman.
Note: If you regularly express more than 125ml per session, you can purchase and use a 260ml/9
oz Philips Avent bottle to prevent overlling and spillage.

English
14
9 When you have nished expressing, turn o the breast pump (Fig. 20) and carefully remove the
pump body from your breast.
10 Unscrew the bottle from the pump body. You have multiple options:
- Insert a sanitized sealing disc into a sanitized screw ring and screw this onto the bottle (Fig. 21).
The expressed milk in the bottle is ready for storage.
- Alternatively, assemble a sanitized nipple and screw ring onto the bottle according to the
instructions (see 'Feeding'). Seal the nipple with the dome cap (Fig. 22).
11 Unplug the adapter from the wall outlet to disconnect the appliance from the electrical power.
Unplug the motor unit from the adapter. Unplug the silicone tube and cap from the silicone
diaphragm. For easy storage, wrap the silicone tube around the motor unit and clip the cap onto
the tube (Fig. 23).
12 Clean the other used parts of the breast pump according to the instructions in section ‘Cleaning
and sanitizing’.
Storing breast milk
Warning: Only store breast milk collected with a cleaned and sanitized pump to ensure
hygiene.
Breast milk can be stored in the fridge (not in the door) for up to 48 hours. Expressed milk should be
refrigerated immediately. If you store milk in the fridge to add to during the day, only add milk that
has been expressed into a sanitized bottle or storage cup. Breast milk can be stored in the freezer for
up to three months as long as it is kept in either sanitized bottles tted with a sanitized screw ring and
sealing disc or sanitized storage cups. Clearly label the bottle or storage cup with the date and time of
expression and use older breast milk rst. If you intend to feed your baby with the expressed breast
milk within 48 hours, you can store the breast milk in the fridge in an assembled Philips Avent bottle or
storage cup.
Do’s
- Always refrigerate or freeze expressed milk immediately.
- Only store milk collected with a sanitized breast pump in sanitized bottles.
Don’ts
- Never refreeze thawed breast milk.
- Never add fresh breast milk to frozen breast milk.
Compatibility
The Philips Avent electric breast pump is compatible with Philips Avent bottles in our range and
Philips Avent Storage cups. When you use other Philips Avent bottles, use the same type of nipple
that was supplied with that bottle. For details on how to assemble the nipple and general cleaning
instructions, see section 'Feeding' and section 'Cleaning'. These details can also be found on our
website, www.philips.com/support.
- Spare nipples are available separately. Make sure you use a nipple with the correct ow rate when
you feed your baby. To buy accessories or spare parts, visit www.shop.philips.com/service or go
to your Philips dealer. You can also contact the Philips Consumer Care Center in your country.
- Do not mix Philips Avent Anti-colic bottle parts and nipples with parts of the Philips Avent Natural
bottles. They may not t and could cause leakage or other issues.
- The high-quality plastic Philips Avent Natural bottle is compatible with most Philips Avent breast
pumps, spouts, sealing discs and cup tops.

English
Feeding
You can feed your baby with breast milk from Philips Avent bottles and storage cups.
For your child's safety and health
Warning
Warnings to prevent harm to children:
- Always use bottles and nipples with adult supervision. Do not
allow your child to play with small parts or walk/run while using
bottles or cups.
- Never use feeding nipples as a soother, to prevent choking
hazard.
- Continuous and prolonged sucking of uids will cause tooth
decay.
- Always check the temperature of the food before you feed your
baby to prevent burns.
- Throw away any part at the rst signs of damage or weakness.
- Keep all components not in use out of the reach of children.
- Do not alter the product or parts of it in any way. This may result
in unsafe functioning of the product.
Cautions to avoid damage to the product:
- Do not place in a heated oven, plastic can melt.
- Plastic material properties may be aected by disinfection and
high temperatures. This can aect the t of the dome cap.
- Do not leave a feeding nipple in direct sunlight or heat, or leave
in disinfectant for longer than recommended because this may
damage the product.
15
Before rst use
Before rst use, disassemble all parts, clean and optionally disinfect the bottle. Inspect the bottle
and feeding nipple before each use and pull the feeding nipple in all directions to prevent a choking
hazard. Throw away at the rst signs of damage or weakness.

English
16
Cleaning bottles
To ensure hygiene, clean the parts of the bottle mentioned in section 'Cleaning' before each use. Also
clean all parts after each subsequent use. You can optionally disinfect by following the instructions in
section 'Disinfection (optional)' .
Make sure that you wash your hands thoroughly and that the surfaces are clean before contact
with cleaned components. Excessive concentration of detergents may eventually cause plastic
components to crack. Should this occur, replace immediately. Inspect the bottle and feeding nipple
before each use and pull the feeding nipple in all directions to prevent a choking hazard. Throw away
any part at the rst signs of damage or weakness.
Assembling bottles
When you assemble the bottle, make sure you place the dome cap vertically onto the bottle so that
the nipple sits upright (Fig. 24). To remove the dome cap, place your hand over the dome cap and
your thumb in the dimple of the dome cap (Fig. 25). The nipple is easier to assemble if you wriggle it
upwards instead of pulling it up in a straight line (Fig. 26). Make sure you pull the nipple through until
its surface is level with the surface of the screw ring (Fig. 27).
Heating breast milk
If you use frozen breast milk, let it defrost completely before you heat it.
Note: In case of an emergency, you can defrost the milk in a bowl of hot water.
Heat the bottle or storage cup with defrosted or refrigerated breast milk in a bowl of hot water or in
a bottle warmer. Remove the screw ring and sealing disc from the bottle or remove the lid from the
storage cup.
Always stir or shake heated food to ensure even heat distribution and test the temperature before
serving. Take extra care when you heat up food in a microwave as heating food in a microwave oven
may produce localized high temperatures.
Note: We do not recommend heating breast milk in the microwave because when breast milk
becomes too warm, nutrients and vitamins are damaged.
Note: You can purchase and use Philips Avent bottle warmer to heat up the milk.
Maintenance and storage of bottles
Inspect the bottle and feeding nipple before each use and pull the feeding nipple in all directions to
prevent a choking hazard. Throw away at the rst signs of damage or weakness. For hygiene reasons,
we recommend replacing nipples after 3 months. Keep nipples in a dry, covered container. When not
in use, do not leave the nipples in sunlight or heat, or leave in disinfectant ('sterilizing solution') for
longer than recommended, as this may weaken the nipple. Do not place in a heated oven. Store the
bottles in a dry location.
Additional information
The Philips Avent nipples are available with dierent ow rates to help your baby with drinking.
Over time, you can change the nipple to accomodate the individual needs of your baby.

English
Choosing the right teat for your baby
The Philips Avent teats are available with dierent ow rates to help your baby with drinking. Over
time you can change the teat accommodating the individual needs of your baby. Philips Avent teats
are clearly numbered on the side to indicate ow rate (see image). Make sure you use a teat with the
correct ow rate when you feed your baby. Use a lower ow rate if your baby chokes, is leaking milk
or has trouble adjusting to the drinking speed. Use a higher ow rate if your baby falls asleep during
feeding, gets frustrated or when feeding takes a very long time.
Teats are available for 0m, 0m+, 1m+, 3m+, 6m+, variable ow (I/II/III) and thick feed (Y).
(0) The teat for 0m can be used from day one. Extra soft silicone teat and it is the lowest ow rate
available. Ideal for newborn and breastfed babies of all ages. The teat only has one opening for uids
and the number 0 is shown on the teat.
(1) The teat for 0m+ has an extra soft silicone teat. Ideal for newborn and breastfed babies of all ages.
The number 1 is shown on the teat.
(2) The teat for 1m+ has an extra soft silicone teat. Ideal for breastfed babies of all ages. The number 2
is shown on the teat.
(3) The teat for 3m+ has an extra soft silicone teat. For bottle fed babies at 3 months of age and up.
The number 3 is shown on the teat.
(4) The teat for 6m+ has a bite resistant silicone teat. The sturdier teat is ideal for bottle fed babies
at 6 months of age and up. The number 4 is shown on the teat.
(I/II/III) Variable ow: has a bite resistant silicone teat. The sturdier teat, with an adjustable ow rate
to babies convenience is ideal for bottle fed babies at 3 months of age and up. The teat has one slot
cut on the top for uid and the markings I, II, III on the edges of the teat.
(Y) Thick feed: has a bite resistant silicone teat. The sturdier teat, designed for thicker feeds is ideal
for bottle fed babies at 6 months of age and up. The teat has one Y cut for uid and the symbol Y
on the teat.
Note: Every baby is unique and your baby's individual needs may vary from the description of ow
rates.
17
Note: Teat (0) might not be available in your country, please check www.philips.com/avent.
Replacement
Batteries
When using the breast pump (single electric breast pump) on batteries, always use four 1.5 AA
batteries (or 1.2V in case of rechargeable batteries). Remove the rechargeable batteries from the motor
unit before charging them.
Remove exhausted batteries and dispose of them safely, see chapter 'Recycling'. For instructions on
how to replace the batteries, see chapter ‘Preparing for use’.

English
18
Recycling
- This symbol means that this product shall not be disposed of with normal household waste
(2012/19/EU) (Fig. 28).
- This symbol means that this product contains disposable batteries which shall not be disposed of
with normal household waste (2006/66/EC) (Fig. 29).
- Follow your country's rules for the separate collection of electrical and electronic products and
batteries. Correct disposal helps prevent negative consequences for the environment and human
health.
Removing the batteries
Follow the steps below to remove batteries from the appliance (single electric breast pump only).
1 Before removing the batteries, make sure the motor unit is turned o and the adapter is unplugged.
2 To remove the batteries, turn the bottom of the motor unit in the direction indicated by the marks
on the bottom (step 1) and remove it (step 2 (Fig. 30)).
3 Remove the four 1.5V AA batteries (or 1.2V in case of rechargeable batteries) from the battery
housing.
4 Reattach the bottom to the motor unit.
Ordering accessories
To buy accessories or spare parts, visit www.shop.philips.com/service or go to your Philips dealer.
You can also contact the Philips Consumer Care Center in your country (see the international warranty
leaet for contact details).
Accessories
Additional items
The following items may be included. Please check the list in the section General Description to see
which items are included with your breast pump.
- Disposable breast pads
- Cover
- Sealing discs
- Travel bag
Warranty and support
If you need information or support, please visit www.philips.com/support or read the international
warranty leaet.

English
Troubleshooting
This chapter summarizes the most common problems you could encounter with the appliance. If you
are unable to solve the problem with the information below, visit www.philips.com/support for a list
of frequently asked questions or contact the Consumer Care Center in your country.
Problem Solution
I experience pain when I
use the breast pump
The breast pump is
scratched
The breast pump does
not work and the on/o
button ashes.
Stop using the breast pump and consult your breastfeeding advisor. If the
pump does not come away easily from the breast, it may be necessary to
break the vacuum by placing a nger between the breast and Massage
Cushion.
In case of regular use, some light scratching is normal and does not
cause problems. However, if a part of the breast pump becomes badly
scratched or cracks, stop using the breast pump and contact the Philips
Consumer Care Center or visit www.shop.philips.com/service to obtain
a replacement part. Be aware that combinations of detergents, cleaning
products, sanitizing solution, softened water and temperature uctuations
may, under certain circumstances, cause the plastic to crack. Avoid
contact with abrasive or antibacterial detergents as these can damage
the plastic.
First check if you have assembled the breast pump correctly and make
sure that there is no kink in the tube.To prevent interference keep other
electric equipment, like mobile phone or laptop, away from the breast
pump while expressing.If you are using the single electric breast pump
with batteries, replace the batteries according to the instructions in
the user manual.If you are using the breast pump on electrical power,
check to make sure you are using the adapter that was supplied with the
product.If the problem persists, contact the Consumer Care center via
www.philips.com/support.
19
I do not feel any suction. Check if you have assembled the breast pump correctly by following
The pump has too much
suction.
the steps in section 'preparing for use'. Make sure that the silicone tube
is rmly attached to the motor unit and to the cap and diaphragm.Also
make sure that the pump is positioned correctly on the breast to allow for
vacuum to occur. If you still do not feel any suction, please contact the
Consumer Care center via www.philips.com/support.
Follow below guidelines if you experience too much suction with your
breast pump:
- Make sure you only use the Philips Avent comfort breast pump’s parts.
- Make sure you have assembled the comfort breast pump with the
massage cushion: not using the massage cushion can result in too much
vacuum.
- When using a breast pump for the rst time, you may experience the
suction level as too high at rst. Practicing can help. If the problem
persists, consult your breastfeeding advisor.

English
20
Supplemental information
Below some common breastfeeding-related conditions are described. If you experience any of these
symptoms, contact a healthcare professional or breastfeeding specialist.
Symptom
Pain sensation Perceived pain of breast or nipple.
Sore nipples Persistent pain in the nipples at the beginning of the pumping period, or
Engorgement Swelling of the breast. The breast may feel hard, lumpy and tender.
Bruise, thrombus A reddish-purple discoloration that does not blanch when pressed.
Blistering Looks like small bubbles on the surface of the skin.
Injured tissue on nipple
(nipple trauma)
Bleeding Cracked or teared nipples can lead to bleeding of the aected area.
Clogged mammary
ducts
that lasts throughout the entire pumping period, or hurts between sessions,
much similar to the pain felt during breastfeeding.
May include erythema (redness) of the breast area and fever.
When a bruise fades, it becomes green and brown.
- Fissures or cracked nipples.
- Skin tissue peeling o the nipple. Normally occurs in combination with
cracked nipples and/or blisters.
- Nipple tear.
A red, tender lump on the breast. May include erythema (redness) of the
breast area and fever. Can lead to Mastitis (breast inammation) if left
untreated.
Technical information
EMC information
The Philips Avent breast pump needs special precautions regarding EMC and needs to be installed
and put into service according to the EMC information provided in this section.
Portable and mobile RF communications equipment can aect the Philips Avent breast pump.
The electronic breast pump has no essential performance. Due to EMC inuences, like wireless home
network devices, mobile phones or cordless telephones, the breast pump can turn o or go into error
mode. This will not lead to unacceptable risks. To prevent interference, keep other electric equipment
at least 3.3 feet/1.0 m away from the breast pump during expressing and do not stack with other
electrical equipment. Cable length of the adapter: 2.50 meter/ 8.2 feet.
Electromagnetic Compatibility (EMC, IEC 60601-1-2)
Declaration – electromagnetic emissions
The Philips Avent breast pump is intended for use in the electromagnetic environment specied
below. The user of the Philips Avent breast pump should assure that it is used in such an environment.

English
Emissions test Compliance Electromagnetic environment – guidance
RF emissions
CISPR 11
RF emissions
CISPR 11
Harmonic
emissions IEC
61000-3-2
Voltage
uctuations/ icker
emissions IEC
61000-3-3
Declaration – electromagnetic immunity
The Philips Avent breast pump is intended for use in the electromagnetic environment specied
below. The user of the Philips Avent breast pump should assure that it is used in such an environment.
Group 1 The Philips Avent breast pump uses RF energy only for its
Class B
Class A
Complies
internal function. Therefore, its RF emissions are very low and
are not likely to cause any interference in nearby electronic
equipment.
The Philips Avent breast pump is suitable for use in all
establishments, including domestic establishments and those
directly connected to the public low voltage power supply
network that supplies buildings used for domestic purposes.
21
IMMUNITY test IEC 60601 test level Compliance level Electromagnetic
environment –
guidance
Electrostatic discharge
(ESD) IEC 61000-4-2
Electrical fast transient/
burst IEC 61000-4-4
SurgeIEC 61000-4-5 ± 1 kV line(s) to line(s) ± 1 kV line(s) to line(s) Mains power quality
± 6 kV contact± 8 kV air ± 6 kV contact± 8 kV air Floors should be wood,
± 2 kV for power supply
lines
± 2 kV for power supply
lines
concrete or ceramic tile.
If oors are covered
with synthetic material,
the relative humidity
should be at least 30 %.
Mains power quality
should be that of a
typical residential or
hospital environment.
should be that of a
typical residential or
hospital environment.

22
English
IMMUNITY test IEC 60601 test level Compliance level Electromagnetic
environment –
guidance
Voltage dips, short
interruptions and
voltage variations on
power supply input
lines IEC 61000-4-11
Power
frequency(50/60 Hz)
magnetic eldIEC
61000-4-8
<5 % UT (>95 % dip in
UT) for 0,5 cycle40 %
UT (60 % dip in UT)
for 5 cycles70 % UT
(30 % dip in UT) for 25
cycles<5 % UT (>95 %
dip in UT) for 5 s
3 A/m 3 A/m Power frequency
<5 % UT (>95 % dip in
UT) for 0,5 cycle70 %
UT (30 % dip in UT)
for 25 cycles<5 % UT
(>95 % dip in UT) for 5 s
Mains power quality
should be that of a
typical residential or
hospital environment.
If the user of the Philips
Avent breast pump
requires continued
operation during power
mains interruptions,
it is recommended
that the Philips Avent
breast pump be
powered from an
uninterruptible power
supply or a battery.
Interruptible electric
supply can cause the
breast pump to turn
o. This is acceptable
as this will not lead to
unacceptable risks.
magnetic elds
should be at levels
characteristic of a
typical location in a
typical residential or
hospital environment.
Note: UT is the a.c. mains voltage prior to application of the test level.
Declaration – electromagnetic immunity
The Philips Avent breast pump is intended for use in the electromagnetic environment specied
below. The user of the Philips Avent breast pump should assure that it is used in such an environment.

English
23
Immunity
test
IEC
60601
test
Compli ance
level
Electromagnetic environment – guidance
level
Conducted
RF IEC
61000-4-6
Radiated RF
IEC 610004-3
Note 1: At 80 MHz and 800 MHz, the higher frequency range applies.
Note 2: These guidelines may not apply in all situations. Electromagnetic propagation is aected by
absorption and reection from structures, objects and people.
Field strengths from xed transmitters, such as base stations for radio (cellular/cordless) telephones
and land mobile radios, amateur radio, AM and FM radio broadcast and TV broadcast cannot be
predicted theoretically with accuracy. To assess the electromagnetic environment due to xed RF
transmitters, an electromagnetic site survey should be considered. If the measured eld strength in the
location in which the Philips Avent breast pump is used exceeds the applicable RF compliance level
above, the Philips Avent breast pump should be observed to verify normal operation. If abnormal
performance is observed, additional measures may be necessary, such as re-orienting or relocating
the Philips Avent breast pump.
Over the frequency range 150 kHz to 80 MHz, eld strengths should be less than [3] V/m.
Recommended separation distances between portable and mobile RF communications equipment
and the Philips Avent breast pump
The Philips Avent breast pump is intended for use in a home healthcare environment in which
radiated RF disturbances are not controlled
The user of the Philips Avent breast pump can help prevent electromagnetic interference by
maintaining a minimum distance between portable and mobile RF communications equipment
(transmitters) and the Philips Avent breast pump as recommended below, according to the maximum
output power of the communications equipment.
3 Vrms
150 kHz
to 80
MHz
3 V/m
80 MHz
to 2,5
Ghz
3 Vrms Portable and mobile RF communications equipment should
3 V/m 80 MHz to 800 Mhz d=1,17 √P 800 MHz to 2,5 GHz d=2,33 √P
be used no closer to any part of the Philips Avent breast
pump, including cables, than the recommended separation
distance calculated from the equation applicable to the
frequency of the transmitter.Recommended separation
distance d=1,17 √P The breast pump can be turned o.
where P is the maximum output power rating of the transmitter
in watts (W) according to the transmitter manufacturer and
d is the recommended separation distance in metres (m).
Field strengths from xed RF transmitters, as determined
by an electromagnetic site survey, should be less than the
compliance level in each frequency range. Interference may
occur in the vicinity of equipment marked with the following
symbol:
with applicable EMC directives, it may still be susceptible
to excessive emissions and/or may interfere with other
equipment. A consequence can be that the breast pump turns
o or the on/o button starts ashing (see troubleshooting for
more information), which is acceptable as this will not lead to
unacceptable risks. To prevent interference, keep other electric
equipment away from the breast pump during expressing.
Caution: Although the breast pump is compliant

English
24
Separation distance according to frequency of transmitter m
Rated maximum output
power of transmitter W
0,01 0,12 0,12 0,23
0,1 0,38 0,38 0,73
1 1,2 1,2 2,3
10 3,8 3,8 7,3
100 12 12 23
For transmitters rated at a maximum output power not listed above, the recommended separation
distance d in metres (m) can be estimated using the equation applicable to the frequency of the
transmitter, where P is the maximum output power rating of the transmitter in watts (W) according to
the transmitter manufacturer.
NOTE 1: At 80 MHz and 800 MHz, the separation distance for the higher frequency range applies.
NOTE 2:These guidelines may not apply in all situations. Electromagnetic propagation is aected by
absorption and reection from structures, objects and people.
150 kHz to 80
MHz outside ISM
bandsd=1,17 √P
80 MHz to 800
MHzd=1,17 √P
800 MHz to 2,5 GHz
d=2,33 √P
Usage and storage conditions
Keep the breast pump out of direct sunlight as prolonged exposure may cause discoloration. Store
the breast pump and its accessories in a safe, clean and dry place.
If the appliance has been stored in a hot or cold environment, place it in the usage environment to let
it reach a temperature within the usage conditions ( 41°F / 5°C to 104°F / 40°C ) before you use it.
Usage conditions
Temperature 41°F (+5°C) to 104°F (+40°C)
Relative humidity 15% to 93% (non-condensing)
Atmospheric pressure 700 and 1060 Pa air pressure
Storage conditions
Temperature -13°F (-25°C) to 158°F (70°C)
Relative humidity 15% to 93% (non-condensing)

English
Technical specications
The adapter is not a part of the medical electric equipment, but is a separate power supply within the
medical electric system.
Mains input Voltage: 100-240V
Mains input Current: 1000mA
Mains input Frequency: 50-60Hz
25
Batteries (only for single electric
breast pump):
Single electric breast pump Adapter type number: VS0332
Twin electric breast pump Adapter type number: VT0334
Non rechargeable batteries: 4 x 1.5V AA
Rechargeable batteries: 4 x 1.2V, min. capacity 2000 mAh, max.
capacity 2100 mAh.
Output Voltage: 5V
Output Current: 1000mA
Type of Current: DC
Protection class: Class 2
Output Voltage: 9V
Output Current: 1100 mA
Type of Current: DC
Protection class: Class 2
English
26
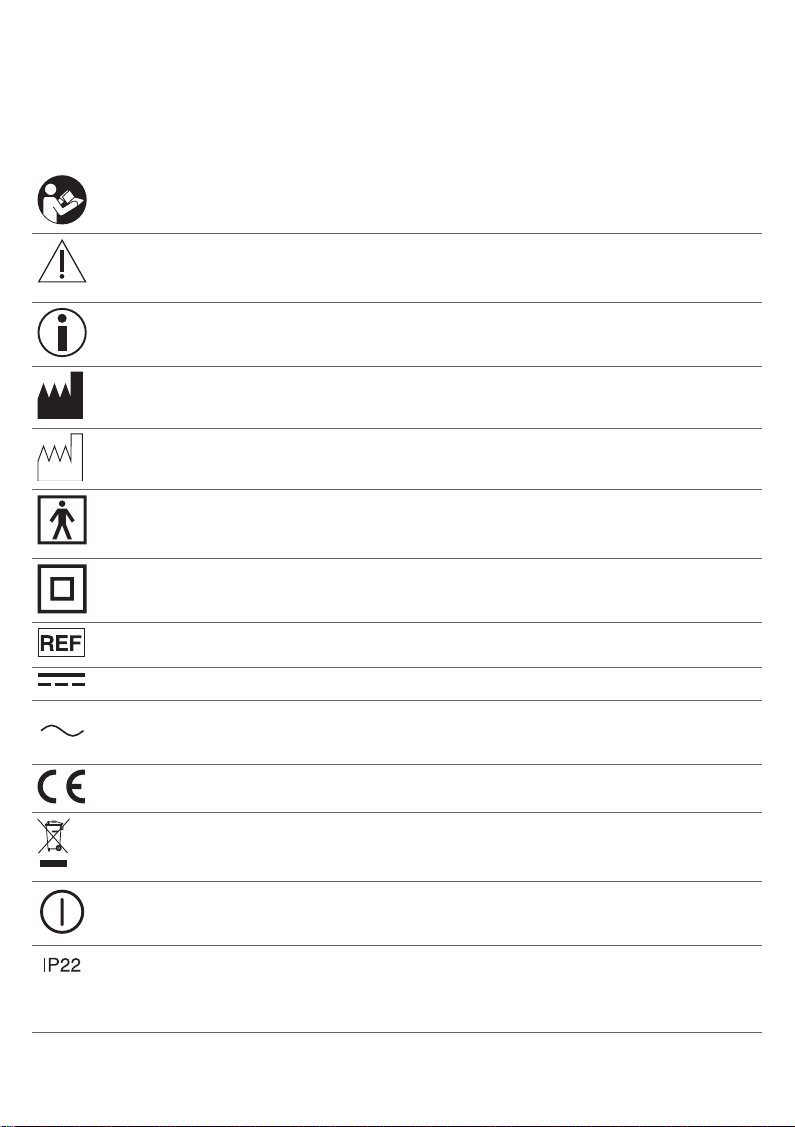
Explanation of symbols
The warning signs and symbols are essential to ensure that you use this product safely and correctly
and to protect you and others from injury. Below you nd the meaning of the warning signs and
symbols on the label and in the user manual.
Symbol for 'follow instructions for use'.
Indicates the need for the user to consult the instructions for use for important cautionary
information such as warnings and precautions that cannot, for a variety of reasons, be
presented on the medical appliance itself.
Indicates usage tips, additional information or a note.
Indicates the manufacturer, as dened in the IEC 60601-1 which contains a reference to
the ISO 15223-1:2012.
Indicates manufacturing date
This symbol means that the part of the appliance that comes into physical contact with
the user (also known as the applied part) is of type BF (Body Floating) according to IEC
60601-1. The applied are part 3 and 4 of the general description overview (Fig.A)
Symbol for 'Class II Equipment'. The adapter is double insulated (Class II).
Indicates manufacturer's catalog number of the appliance.
Symbol for 'direct current'.
Symbol for 'alternating current.
Compliance to the Low Voltage Directive
Separate collection for electrical and electronic equipment in accordance with the
EU directive.Electrical waste products should not be disposed of with household waste.
See chapter 'Recycling' for more information.
Press button to switch on and to switch o.
IP22: The rst number 2: Protected against solid foreign objects of 12,5 mm Ø and greater.
The second number: Protected against vertically falling water drops when enclosure is
tilted up to 15°. Vertically falling drops shall have no harmful eects when the enclosure is
tilted at any angle up to 15° on either side of the vertical.

English
Indicates the manufacturer's serial number so that a specic medical appliance can be
identied.
EurAsian Conformity Mark
Symbol for the 2 year Philips warranty.
Battery powered (only for single electric breast pump)
UL (Underwriters Laboratories) testing according to the household standard
RCM Tick Mark– Australia
Lot number
Handle with care
Keep dry
Indicates the relative humidity limits to which the appliance can be safely exposed:
15% to 93%.
27
104°F
40°C
41°F
5°C
Indicates the storage and transportation temperature limits to which the medical appliance
can be safely exposed: 41°F to 104°F / 5°C to 40°C.
Forest Stewardship Council- The FSC trademarks enable consumers to choose products
that support forest conservation, oer social benets, and enable the market to provide an
incentive for better forest management

Čeština
28
Obsah
Úvod ______________________________________________________________________________ 29
Všeobecný popis (obr. A) _____________________________________________________________ 29
Zamýšlené použití ___________________________________________________________________ 30
Důležité bezpečnostní informace _______________________________________________________ 30
Kontraindikace ______________________________________________________________________ 30
Příprava k použití _____________________________________________________________________ 31
Čištění a sterilizace ____________________________________________________________________ 31
Nalezení nejvhodnějšího polštářku pro vás ________________________________________________33
Sestavení odsávačky __________________________________________________________________33
Používání odsávačky _________________________________________________________________ 34
Kdy odsávat mléko __________________________________________________________________ 34
Tipy ________________________________________________________________________________35
Ovládání odsávačky ___________________________________________________________________35
Skladování mateřského mléka _________________________________________________________ 36
Kompatibilita _______________________________________________________________________ 36
Krmení ______________________________________________________________________________37
Pro bezpečnost a zdraví vašeho dítěte ___________________________________________________37
Před prvním použitím _________________________________________________________________37
Čištění lahví ________________________________________________________________________ 38
Sestavování lahví ____________________________________________________________________ 38
Ohřívání mateřského mléka ___________________________________________________________ 38
Údržba a skladování lahví _____________________________________________________________ 38
Dodatečné informace ________________________________________________________________ 39
Výběr vhodného dudlíku pro vaše dítě __________________________________________________ 39
Výměna ____________________________________________________________________________ 39
Akumulátory ________________________________________________________________________ 39
Recyklace __________________________________________________________________________ 40
Vyjmutí baterií ______________________________________________________________________ 40
Objednávání příslušenství _____________________________________________________________ 40
Příslušenství ________________________________________________________________________ 40
Další položky _______________________________________________________________________ 40
Záruka a podpora_____________________________________________________________________ 41
Řešení problémů _____________________________________________________________________ 41
Doplňující informace __________________________________________________________________42
Technické informace __________________________________________________________________42
Informace o elektromagnetické kompatibilitě ______________________________________________42
Podmínky skladování a používání ______________________________________________________ 46
Technické specikace _________________________________________________________________47
Popis významu symbolů _______________________________________________________________47

Čeština
Úvod
Společnost Philips Avent vám blahopřeje ke koupi a vítá vás! Chcete-li plně využívat výhod, které
nabízí společnost Philips Avent, zaregistrujte výrobek na adrese www.philips.com/welcome.
Odsávačka Philips Avent má jedinečný design, který vám umožňuje při odsávání sedět v pohodlnější
poloze. Měkký masážní polštářek* je navržen tak, aby byl na dotyk měkký a teplý a imitoval sání
dítěte, abyste dosáhla proudění mléka – pohodlně a jemně. Odsávačka se spouští v jemném režimu,
který pomáhá stimulovat proudění mléka. Poté si můžete vybrat ze tří režimů sání podle toho, který
je vám nejpříjemnější. Odsávačka se snadno skládá a ovládá a všechny součásti, které přicházejí do
kontaktu s mateřským mlékem, je možné mýt v myčce na nádobí.
Odborníci na zdraví říkají, že mateřské mléko (po šesti měsících života dítěte zkombinované s pevnou
stravou) je pro děti v prvním roce jejich života tou nejvhodnější stravou. Vaše mateřské mléko je
speciálně přizpůsobeno potřebám vašeho dítěte a pomáhá ho chránit před infekcemi a alergiemi.
Odsávačka vám může pomoci kojit déle. Své mléko můžete odsát a uschovat, aby vašemu dítěti bylo
k dispozici, i když nejste přítomna. Jelikož je odsávačka kompaktní, tichá a její použití je diskrétní,
můžete si ji vzít kamkoli, mléko odsávat, když se vám to hodí, a udržet si tvorbu mléka.
Tato odsávačka je určena výhradně k domácímu používání.
* Polštářky dodávané s touto odsávačkou byly navrženy tak, aby byly pohodlné pro většinu matek.
V případě potřeby nicméně můžete samostatně zakoupit větší polštářek.
Všeobecný popis (obr. A)
Obrázek A. Níže uvedená čísla odpovídají číslům na obrázku na přední rozkládací stránce této
uživatelské příručky.
1 Motorová jednotka se silikonovou hadičkou a víčkem *
2 Silikonová membrána *
3 Tělo odsávačky *
4 Masážní polštářek *
5 Kryt *
6 Přihrádka na baterie (pouze samostatná odsávačka)
7 Vypínač
8 Tlačítko pro stimulaci
9 Tlačítko pro méně intenzivní odsávání
10 Tlačítko pro středně intenzivní odsávání
11 Tlačítko pro intenzivní odsávání
12 Adaptér
13 Bílý ventil *
14 Lahev Philips Avent Natural *
15 Kopulový uzávěr *
16 Zajišťovací kroužek *
17 Bradavka *
18 Těsnicí víčko *
* Poznámka: S dvojitou elektrickou odsávačkou jsou dodávány dva kusy od každé označené části
s výjimkou motorové jednotky.
SCF332 obsahuje: samostatnou elektrickou odsávačku (včetně jedné lahve), prsní vložky
SCF334 obsahuje: dvojitou elektrickou odsávačku (včetně dvou lahví), prsní vložky, cestovní tašku
29

Čeština
30
Zamýšlené použití
Samostatná nebo dvojitá elektrická odsávačka Philips Avent Comfort je určena k odsávání a sběru
mléka z prsů kojících žen.
Přístroj je určen pro jednoho uživatele.
Důležité bezpečnostní informace
Před použitím odsávačky si pečlivě přečtěte tuto uživatelskou příručku a uschovejte ji pro budoucí
použití.
Tuto uživatelskou příručku naleznete také online na webových stránkách Philips Avent:
www.philips.com/avent
Kontraindikace
Odsávačku nepoužívejte v těhotenství, protože odsávání může vyvolat porod.
Varování
Varování pro zabránění udušení, uškrcení a zranění:
- Nenechávejte děti ani domácí mazlíčky, aby si hrály s motorovou jednotkou, adaptérem nebo
s příslušenstvím.
- Dohlédněte na to, aby si s přístrojem nehrály děti.
- Odsávačku mateřského mléka vždy ihned po použití odpojte ze zásuvky.
- Nenechávejte zapojenou odsávačku mateřského mléka bez dohledu.
- Tato odsávačka není určena k používání osobami (včetně dětí) s omezenými fyzickými, smyslovými
nebo duševními schopnostmi nebo nedostatkem zkušeností a znalostí. Takové osoby mohou tuto
odsávačku používat pouze pod dohledem nebo pokud obdržely řádné pokyny ohledně používání
přístroje od osoby zodpovědné za jejich bezpečnost.
Varování pro zabránění úrazu elektrickým proudem:
- Před každým použitím zkontrolujte, zda odsávačka včetně adaptéru nevykazuje známky poškození.
Odsávačku nepoužívejte, pokud naleznete poškození adaptéru nebo zástrčky, pokud odsávačka
nefunguje správně nebo pokud spadla na zem nebo byla ponořena do vody.
Varování pro zabránění popáleninám:
- Abyste předešli přehřívání adaptéru, používejte pouze adaptér uvedený na přístroji.
- Nenabíjecí baterie se nesmí nabíjet, hrozí jejich přehřátí a vytečení elektrolytu.
Varování pro zabránění otravě a kontaminaci a pro zajištění řádné hygieny:
- Z hygienických důvodů je odsávačka určena pro opakované používání pouze jedinou osobou.
- Před každým použitím vyčistěte, vypláchněte a proveďte sterilizaci všech součástí odsávačky
s výjimkou motorové jednotky, hadičky a víčka a adaptéru.
- Uchovávejte pouze mateřské mléko získané pomocí čisté a sterilizované odsávačky.
- Nepoužívejte odsávačku, pokud silikonová membrána vykazuje známky poškození nebo je rozbitá.
Informace o tom, jak získat náhradní díly, naleznete v kapitole „Objednávání příslušenství“.
- Na čištění odsávačky nepoužívejte antibakteriální ani brusné čisticí prostředky.
- Pokud přístroj nehodláte delší dobu používat, vyjměte baterie, aby nevytekly.

Čeština
Varování pro zabránění problémům a bolesti prsů a bradavek:
- Nepokoušejte se sejmout tělo odsávačky z prsu, když je v něm vytvořeno vakuum. Přístroj vypněte
a prstem odtáhněte prs od trubice odsávačky. Poté odsávačku sejměte z prsu.
- Odsávačku nepoužívejte, pokud jste ospalá nebo velmi unavená, abyste jejímu používání mohla
věnovat dostatek pozornosti.
- Před sejmutím těla odsávačky z prsu odsávačku vždy nejprve vypněte, abyste došlo k uvolnění
vakua.
- Nikdy nepoužívejte příslušenství nebo díly od jiných výrobců nebo takové, které nebyly
doporučeny společností Philips Avent. Mohlo by dojít k nesprávné funkci přístroje a ovlivnění
elektromagnetické kompatibility. Pokud takové díly či příslušenství použijete, pozbývá záruka
platnosti.
- Pokud se vám nedaří žádné mléko odsát, nepokračujte v odsávání déle než pět minut najednou.
Zkuste odsávat v jinou část dne.
- Pokud odsávání začne být velmi nepříjemné nebo bolestivé, přestaňte odsávačku používat a
poraďte se s odborníkem na kojení.
- Pokud je vytvářený tlak nepříjemný nebo bolestivý, přístroj vypněte, prstem uvolněte prs od
odsávačky a odsávačku z prsu sejměte.
- Do žádného otvoru nestrkejte žádné cizí předměty.
Upozornění
Varování pro zabránění poškození a selhání produktu:
- Dbejte na to, aby adaptér a motorová jednotka nepřišly do styku s vodou.
- Adaptér a silikonové hadičky udržujte daleko od horkých povrchů, aby nedošlo k jejich přehřátí a
deformaci.
- Motorovou jednotku ani adaptér nikdy neponořujte do vody ani nevkládejte do myčky na nádobí
nebo sterilizátoru.
- Přestože tato odsávačka mateřského mléka splňuje požadavky platných směrnic EMC (směrnic
týkajících se elektromagnetické kompatibility), může být přesto citlivá na přílišné vyzařování nebo
může dojít k vzájemnému rušení s jinými zařízeními. Důsledkem může být vypnutí odsávačky nebo
její přechod do chybového režimu. Abyste zabránili rušení, udržujte při odsávání (viz 'Technické
informace') ostatní elektrické vybavení dále od odsávačky.
- Uvnitř motorové jednotky odsávačky nejsou žádné uživatelsky opravitelné součásti. Úpravy zařízení
nejsou dovoleny. Pokud úpravy provedete, záruka pozbyde platnosti.
- Dávejte pozor, aby nedošlo ke zkratu kontaktů baterií.
31
Příprava k použití
Čištění a sterilizace
Motorovou jednotku, silikonovou hadičku, víčko a adaptér není třeba čistit a sterilizovat, protože
nepřicházejí do styku s mateřským mlékem. Všechny ostatní součásti odsávačky před prvním použitím
očistěte a sterilizujte. Tyto součásti také čistěte po každém použití a před každým použitím je sterilizujte.
Upozornění: Motorovou jednotku ani adaptér nikdy neponořujte do vody ani nevkládejte do
myčky na nádobí nebo sterilizátoru, protože takto by se tyto součásti nenávratně poškodily.

Čeština
32
Omyvatelné části
Následující části očistěte před (prvním) použitím a po každém použití. Na seznamu v části Všeobecný
popis zjistíte, jaké položky jsou s vaší odsávačkou dodávány.
Součásti odsávačky:
- Silikonová membrána
- Tělo odsávačky
- Masážní polštářek
- Bílý ventil
- Kryt
Součásti lahve:
- Lahev Philips Avent Natural
- Kopulový uzávěr
- Zajišťovací kroužek
- Dudlík
- Těsnicí víčko
Věci potřebné k čištění:
Mytí ve dřezu Mytí v myčce na nádobí
- Jemný prostředek na mytí nádobí - Jemný prostředek/tableta na mytí nádobí
- Pitná voda vysoké kvality - Pitná voda vysoké kvality
- Měkký kartáč nebo čistá utěrka na nádobí
- Čistý dřez nebo mísa
Varování: Na čištění nepoužívejte antibakteriální ani brusné čisticí prostředky.
1 Odsávačku a lahev kompletně rozeberte. Také z odsávačky vyjměte bílý ventil.
Upozornění: Při vyjímání bílého ventilu a jeho čištění buďte opatrní. Pokud dojde k jeho
poškození, odsávačka nebude správně fungovat. Pro vyjmutí bílého ventilu jemně zatáhněte za
vroubkovaný jazýček na straně ventilu.
2 Omyjte součásti ve dřezu nebo v myčce na nádobí.
Mytí ve dřezu: Odpojte všechny součásti a namočte je na 5 minut do horké vody s trochou
jemného prostředku na mytí nádobí. Očistěte všechny součásti měkkým kartáčem nebo čistou
utěrkou a důkladně (obr. 2) je opláchněte.
Mytí v myčce na nádobí: Umyjte součásti odsávačky s výjimkou motorové jednotky, silikonové
hadičky a víčka a adaptéru v myčce na nádobí (pouze v horním koši).
Poznámka: Ventil čistěte jemným třením mezi prsty v teplé vodě s přídavkem mycího prostředku.
Nevkládejte do ventilu předměty, mohlo by dojít k jeho poškození.
Dezinfekce (volitelná)
Pokud chcete po čištění provést i dezinfekci, můžete součásti vyvařit ve vodě v běžném hrnci.

Čeština
Věci potřebné k vyvaření:
- Běžný hrnec
- Pitná voda vysoké kvality
Součásti dezinkujte následujícím způsobem:
Naplňte hrnec dostatečným množstvím vody, aby byly všechny součásti zcela ponořené. Přiveďte
vodu k varu. Umístěte součásti do hrnce a 5 minut je vařte (obr. 3) Během dezinfekce vařící vodou
nedovolte, aby se lahev a jiné součásti dotýkaly strany hrnce. Mohlo by dojít k nevratné deformaci
produktu nebo poškození, za které společnost Philips nemůže být odpovědná.
Nechte vodu vychladnout a opatrně součásti z vody vyjměte. Umístěte součásti na čistou papírovou
utěrku nebo na čistý odkapávač a nechte je uschnout na vzduchu. Nepoužívejte k osušení součástí
látkové utěrky, protože na nich mohou být bakterie škodlivé pro vaše dítě.
33
Nalezení nejvhodnějšího polštářku pro vás
Odsávání mateřského mléka by mělo být pohodlné. Proto nabízíme tři měkké pružné polštářky:
19,5mm masážní polštářek (dodávaný s vaší odsávačkou) a 25mm masážní polštářek.
Pro optimální komfort a výkon je nutné si vybrat optimální polštářek odpovídající vašim bradavkám (obr. 4).
19,5 mm: masážní polštářek,
25 mm: masážní polštářek (není součástí):
1 Začněte se standardním 19,5mm masážním polštářkem dodávaným s odsávačkou. Velikost
polštářku je na něm uvedena (obr. 5).
2 Pokud je polštářek příliš malý, kupte si větší 25mm polštářek (viz „Objednávání příslušenství“).
Příliš malý polštářek může působit bolest nebo snížit účinnost odsávání (obr. 6).
Sestavení odsávačky
Poznámka: Nezapomeňte všechny příslušné součásti odsávačky vyčistit a dezinkovat.
1 Před manipulací s vyčištěnými součástmi si důkladně umyjte ruce.
Varování: Dávejte pozor, protože vyčištěné části mohou být stále horké. Odsávačku
začněte sestavovat, až když vyčištěné součásti vychladnou.
Poznámka: Odsávačka se může snadněji sestavovat, když je vlhká.
2 Vložte bílý ventil zespodu do těla odsávačky. Ventil zasuňte co nejdále (obr. 7).
3 Tělo odsávačky našroubujte ve směru hodinových ručiček na lahev, dokud nebude pevně utažené
(obr. 8).
4 Do těla odsávačky vložte shora silikonovou membránu. Zatlačte ji prsty dolů tak, aby kolem okraje
odsávačky dokonale těsnila (obr. 9).
5 Vložte polštářek do trychtýřovité části těla (obr. 10) odsávačky.
6 Zatlačte vnitřní část polštářku co nejdále a ujistěte se, že je dokonale utěsněn kolem celého okraje
těla (obr. 11) odsávačky.
7 Zmáčknutím mezi výstupky uvolněte případný zachycený vzduch (obr. 12).
Poznámka: Na polštářek nasaďte kryt, aby odsávačka zůstala čistá, než se připravíte na odsávání.
Varování: Odsávačku vždy používejte s polštářkem.

Čeština
34
8 Připojte adaptér do elektrické zásuvky a zástrčku na druhém konci připojte k motorové jednotce
(obr. 13).
Referenční kód adaptéru je uveden na spodní straně přístroje. S přístrojem používejte pouze
uvedený adaptér.
- Při provozu přístroje na baterie (pouze samostatná elektrická odsávačka) otočte spodní stranu
motorové jednotky ve směru značek uvedených na spodní straně (krok 1 (obr. 14)) a sejměte ji
(krok 2 (obr. 14)). Vložte do přihrádky na baterie čtyři nové 1,5V (nebo 1,2V v případě dobíjecích
baterií) baterie AA. Zkontrolujte značky na přihrádce pro baterie udávající správnou polaritu.
Připojte spodní část k motorové jednotce.
Poznámka: Nová sada baterií umožňuje dobu provozu 1–3 hodiny. Dobíjecí baterie po čase ztrácejí
kapacitu a doba provozu se může snížit.
Poznámka: Pokud jste vložili baterie do přihrádky na baterie motorové jednotky a připojíte adaptér,
odsávačka bude napájena elektřinou z adaptéru. Baterie nelze nabíjet v jednotce.
Varování: Nekombinujte různé typy baterií.
Varování: Nekombinujte použité a nové baterie.
9 Připojte silikonovou hadičku a víčko k membráně. Zatlačte na víčko, dokud pevně nezapadne na
místo (obr. 15).
Používání odsávačky
Kdy odsávat mléko
Jestliže se vám daří kojit, doporučuje se (pokud vám lékař nebo odborník na kojení nedoporučí jinak)
před zahájením odsávání počkat, až se ustálí tvorba mléka a časový plán kojení (obvykle minimálně
2 až 4 týdny po porodu).
Výjimky:
- Pokud se vám kojení ze začátku nedaří, může pravidelné odsávání přispět k zahájení a udržení
tvorby mléka.
- Pokud odsáváte mléko pro dítě, kterým se bude krmit v nemocnici.
- Pokud máte nalité prsy (bolestivé nebo oteklé), můžete před nebo mezi kojením odsát malé
množství mléka, aby došlo k úlevě od bolesti a aby se dítě snadněji přisálo.
- Pokud máte bolavé nebo popraskané bradavky, můžete mléko odsávat, dokud se nezahojí.
- Pokud jste od dítěte oddělena a po jeho návratu chcete v kojení pokračovat, měla byste mléko
pravidelně odsávat, abyste stimulovala jeho tvorbu.
Je nutné si pro odsávání mléka najít optimální časy během dne, například těsně před nebo po prvním
ranním kojení, kdy máte plné prsy, nebo po kojení, pokud dítě oba prsy nevyprázdnilo. Pokud jste
se vrátila do zaměstnání, můžete odsávat během přestávky. Používání odsávačky vyžaduje trochu
cviku a možná bude třeba ho několikrát vyzkoušet, než ho úplně zvládnete. Elektrická odsávačka
mateřského mléka Philips Avent se naštěstí snadno sestavuje a používá, takže si na odsávání s ní
brzy zvyknete.

Čeština
Tipy
- Před prvním použitím se s odsávačkou a jejím ovládáním dobře seznamte.
- Zvolte si dobu, kdy nespěcháte a nikdo vás nebude rušit.
- Fotograe vašeho dítěte může podpořit spouštěcí reex.
- Pomoci může také teplo: zkuste odsávat po koupeli nebo sprše nebo si na prs na pár minut před
zahájením odsávání přiložte teplou utěrku či Philips Avent Thermopad.
- Odsávání může být snadnější, zatímco dítě saje z druhého prsu nebo ihned po kojení.
- Pokud začne být odsávání bolestivé, přestaňte a poraďte se s odborníkem na kojení nebo
s lékařem.
Ovládání odsávačky
1 Důkladně si umyjte ruce a dbejte na to, abyste měla čisté prsy.
2 Usaďte se do pohodlného křesla (můžete použít polštáře k podložení zad). Po ruce si nachystejte
sklenici vody.
3 Přiložte si sestavené tělo odsávačky k prsu. Bradavka musí být uprostřed, aby masážní polštářek
mohl vzduchotěsně přilnout (obr. 16).
Pro uživatele dvojité elektrické odsávačky: Dvojitá elektrická odsávačka vám umožňuje odsávat
mléko z obou prsů najednou. Přístroj můžete nicméně stejným způsobem používat k odsávání
z jednoho prsu. Připojte k oběma složeným tělům odsávačky silikonovou hadičku a víčko. Na druhé
doporučujeme umístit kryt.
4 Ujistěte se, že polštářek na vaší bradavce správně sedí. Informace o správné velikosti polštářku
naleznete v části „Nalezení nejvhodnějšího polštářku pro vás“.
5 Stiskněte tlačítko (obr. 17) pro zapnutí/vypnutí.
- Odsávačka mateřského mléka se automaticky spustí v režimu stimulace. Rozsvítí se tlačítko pro
zapnutí/vypnutí a tlačítko režimu stimulace.
- Ucítíte odsávání z prsu.
6 Jakmile mléko začne proudit, můžete zvolit pomalejší rytmus stisknutím tlačítka (obr. 18) odsávání
s nejnižší intenzitou.
- Toto tlačítko se rozsvítí namísto tlačítka režimu stimulace..
Poznámka: Pokud mléko nezačne ihned téct, nedělejte si starosti. Uvolněte se a pokračujte
v odsávání. Během několika prvních použití odsávačky může být nutné použít režim odsávání
s vyšší intenzitou, aby mléko začalo proudit.
7 Podle vlastních pocitů se možná rozhodnete používat režim odsávání s vyšší intenzitou, kdy je
mléko odsáváno důkladněji. Kdykoli se můžete vrátit do režimu (obr. 19) odsávání s nižší intenzitou.
Odsávačku můžete kdykoli vypnout stisknutím tlačítka (obr. 20) pro zapnutí/vypnutí.
Poznámka: Nemusíte využívat všechny režimy odsávání: zvolte si ty, které vám nejvíce vyhovují.
Varování: Před sejmutím těla odsávačky z prsu odsávačku vždy nejprve vypněte,
abyste uvolnili vakuum.
Varování: Pokud se vám nedaří žádné mléko odsát, nepokračujte v odsávání déle než
pět minut najednou. Zkuste odsávat v jinou část dne.
8 Průměrně je na získání 60–125 ml mateřského mléka z jednoho prsu potřeba odsávat 10 minut.
Jde však jen o orientační hodnotu, která se u různých žen liší.
Poznámka: Pokud pravidelně během jednoho použití přístroje odsáváte více než 125 ml, můžete
zakoupit a používat lahve Philips Avent s objemem 260 ml a zabránit tak přeplnění a rozlití mléka.
35

Čeština
36
9 Jakmile ukončíte odsávání, vypněte odsávačku (obr. 20) a tělo odsávačky opatrně sejměte z prsu.
10 Odšroubujte lahev od těla odsávačky. Máte několik možností:
- Vložte sterilizované těsnicí víčko do sterilizovaného zajišťovacího kroužku a našroubujte tuto
sestavu na lahev (obr. 21). Odsáté mléko v lahvi je připraveno na uskladnění.
- Případně na lahev nasaďte sterilizovaný dudlík a zajišťovací kroužek podle pokynů (viz 'Krmení').
Uzavřete dudlík pomocí kopulového uzávěru (obr. 22).
11 Vypojte adaptér ze zásuvky ve zdi, abyste přístroj odpojili od elektřiny. Odpojte motorovou
jednotku od adaptéru. Odpojte silikonovou hadičku a víčko od silikonové membrány. Pro
usnadnění skladování omotejte silikonovou hadičku okolo motorové jednotky a zaklapněte na
hadičku (obr. 23) víčko.
12 Vyčistěte ostatní použité části odsávačky podle pokynů v části „Čištění a sterilizace“.
Skladování mateřského mléka
Varování: Pro zajištění nezbytné hygieny uchovávejte pouze mateřské mléko získané
pomocí čisté a sterilizované odsávačky.
Mateřské mléko lze skladovat v chladničce (nikoli v jejích dveřích) po dobu až 48 hodin. Odsáté mléko
je třeba dát ihned chladit. Pokud v chladničce skladujete mléko, ke kterému chcete během dne přidat
další, přidávejte pouze mléko odsáté do sterilizované lahve nebo skladovacího pohárku. Mateřské
mléko lze skladovat v mrazáku po dobu až tří měsíců, pokud je ve sterilizovaných lahvích uzavřených
sterilizovaným zajišťovacím kroužkem a těsnicím víčkem nebo ve sterilizovaných skladovacích
pohárcích. Lahev jasně označte datem a časem odsátí a nejprve vždy spotřebujte starší mléko. Pokud
chcete dítě krmit odsátým mlékem do 48 hodin, můžete mléko skladovat v chladničce v sestavené
lahvi nebo skladovacím pohárku Philips Avent.
ANO
- Odsáté mléko vždy dejte ihned chladit nebo zmrazit.
- Uchovávejte pouze mléko získané pomocí sterilizované odsávačky ve sterilizovaných lahvích.
NE
- Rozmrazené mléko znovu nezmrazujte.
- Ke zmrazenému mléku nepřidávejte mléko čerstvé.
Kompatibilita
Elektrická odsávačka Philips Avent je kompatibilní s lahvemi Philips Avent v naší řadě a skladovacími
pohárky Philips Avent. Při používání jiných lahví Philips Avent použijte stejný typ dudlíku, jaký byl
dodán s danou lahví. Podrobnosti ohledně skládání dudlíku a obecné pokyny pro čištění naleznete
v částech „Krmení“ a „Čištění“. Tyto podrobnosti naleznete také na našich webových stránkách
www.philips.com/support.
- Náhradní dudlíky jsou k dispozici samostatně. Ujistěte se, že při krmení svého dítěte používáte
dudlík se správným průtokem. Chcete-li koupit příslušenství nebo náhradní díly, navštivte adresu
www.shop.philips.com/service, nebo se obraťte na prodejce výrobků Philips. Také se můžete
obrátit na středisko péče o zákazníky společnosti Philips ve své zemi.
- Nekombinujte součásti a dudlíky antikolikových lahví Philips Avent se součástmi lahví Philips Avent
Natural. Nemusí do sebe zapadat a mohlo by dojít k vytékání nebo jiným problémům.
- Vysoce kvalitní plastová lahev Philips Avent Natural je kompatibilní s většinou odsávaček, hubiček,
těsnicích víček a víček na pohárky Philips Avent.

Čeština
Krmení
Dítě můžete mateřským mlékem krmit pomocí lahví nebo skladovacích pohárků Philips Avent.
Pro bezpečnost a zdraví vašeho dítěte
Varování
Varování pro zabránění poranění dětí:
- Lahve a dudlíky vždy používejte pod dozorem dospělé osoby.
Nedovolte dítěti, aby si hrálo s malými částmi nebo aby při
používání láhví a pohárků chodilo či běhalo.
- Nikdy krmicí dudlíky nepoužívejte k uklidňování dítěte, aby se jimi
nemohlo zadusit.
- Trvalé a dlouhodobé sání kapalin způsobuje zubní kaz.
- Před krmením dítěte vždy zkontrolujte teplotu jídla, aby nedošlo
k popálení.
- Jakoukoli součást v případě jakýchkoli známek poškození nebo
opotřebení vyhoďte.
- Všechny části, které nepoužíváte, udržujte mimo dosah dětí.
- Žádným způsobem produkt ani jeho součásti neupravujte. Funkce
produktu by nemusela být nadále bezpečná.
Varování pro zabránění poškození produktu:
- Nevkládejte produkt do rozehřáté trouby, plast by se mohl
roztavit.
- Přípravky z plastu mohou podléhat vlivu sterilizace a vysokých
teplot. Může tak dojít ke změně přiléhání kopulového uzávěru.
- Nenechávejte krmicí dudlík na přímém slunci, nevystavujte jej
horku ani jej nenechávejte v dezinfekčním prostředku po delší než
doporučenou dobu, jelikož by mohlo dojít k jeho poškození.
37
Před prvním použitím
Před prvním použitím rozeberte všechny součásti a vyčistěte a popřípadě vydezinkujte lahev.
Před každým použitím zkontrolujte lahev a krmicí dudlík a natáhněte dudlík ve všech směrech, aby
nemohlo dojít k udušení. V případě jakýchkoli známek poškození nebo opotřebení jej vyhoďte.

Čeština
38
Čištění lahví
Pro zajištění nezbytné hygieny před každým použitím očistěte součásti lahve zmíněné v části „Čištění“.
Všechny součásti také vyčistěte po každém použití. Volitelně můžete provést dezinfekci podle pokynů
v části „Dezinfekce (volitelná)“.
Než se dotknete očištěných dílů, důkladně si umyjte ruce a zkontrolujte, zda je povrch, na který je
pokládáte, čistý. Nadměrná koncentrace čisticích přípravků může způsobit popraskání plastových
částí. V takovém případě je ihned vyměňte. Před každým použitím zkontrolujte lahev a krmicí dudlík
a natáhněte dudlík ve všech směrech, aby nemohlo dojít k udušení. Jakoukoli součást v případě
jakýchkoli známek poškození nebo opotřebení vyhoďte.
Sestavování lahví
Při sestavování lahve musíte kopulový uzávěr upevnit svisle na láhev, aby byl dudlík ve vzpřímené
poloze (obr. 23). Pokud chcete kopulový uzávěr sejmout, položte na něj ruku a palec vložte do
prohlubně v uzávěru (obr. 24). Dudlík se snáze nasazuje, pokud jím kroutíte ve svislé poloze, místo
abyste jej rovně (obr. 25) natahovali. Dudlík je nutné natáhnout tak, aby byl jeho povrch zarovnán
s povrchem zajišťovacího kroužku (obr. 26).
Ohřívání mateřského mléka
Zmrazené mléko nechte před ohřátím zcela rozmrazit.
Poznámka: V naléhavém případě můžete mléko rozmrazit v míse teplé vody.
Lahev nebo skladovací pohárek s rozmrazeným nebo chlazeným mateřským mlékem ohřejte v míse
teplé vody nebo v ohřívačce lahví. Odstraňte zajišťovací kroužek a těsnění z lahve nebo víčko ze
skladovacího pohárku.
Ohřáté jídlo vždy promíchejte nebo protřeste, abyste zajistili rovnoměrné rozložení tepla. Před
krmením také zkontrolujte jeho teplotu. Buďte zvláště opatrní při ohřívání v mikrovlnné troubě, protože
ohřev v mikrovlnné troubě může v určitých místech vytvářet vysoké teploty.
Poznámka: Mateřské mléko nedoporučujeme ohřívat v mikrovlnné troubě, protože při jeho přílišném
zahřátí dochází k poškození živin a vitamínů.
Poznámka: Pro ohřívání mléka můžete zakoupit a používat ohřívač lahví Philips Avent.
Údržba a skladování lahví
Před každým použitím zkontrolujte lahev a krmicí dudlík a natáhněte dudlík ve všech směrech,
aby nemohlo dojít k udušení. V případě jakýchkoli známek poškození nebo opotřebení jej vyhoďte.
Z hygienických důvodů doporučujeme měnit dudlíky každé 3 měsíce. Uchovávejte dudlíky v suché
a uzavřené nádobě. Pokud dudlíky nepoužíváte, nenechávejte je na přímém slunci, nevystavujte je
horku ani je nenechávejte v dezinfekčním přípravku („sterilizační roztok“) po delší než doporučenou
dobu. Mohlo by to vést k opotřebení dudlíku. Nepokládejte výrobek do rozehřáté trouby. Uchovávejte
lahve na suchém místě.

Čeština
39
Dodatečné informace
Dudlíky Philips Avent jsou k dispozici s různými průtoky pro co nejsnazší pití. Časem je možné dudlík
vyměnit za jiný, který lépe vyhovuje individuálním potřebám vašeho dítěte.
Výběr vhodného dudlíku pro vaše dítě
Dudlíky Philips Avent jsou k dispozici s různými hodnotami průtoku – usnadní tak pití každému dítěti.
Časem můžete vyměnit typ dudlíku za takový, který lépe vyhovuje individuálním potřebám dítěte.
Hodnota průtoku je na dudlících Philips Avent zřetelně vyznačena na straně (viz obrázek). Ujistěte se,
že při krmení svého dítěte používáte dudlík se správným průtokem. Pokud se dítě zakašlává, zalyká,
nebo nestíhá vypít všechno mléko, které z lahve vytéká, použijte dudlík s nižším průtokem. Pokud dítě
při krmení usíná, zlobí se , případně pokud krmení trvá příliš dlouho, použijte dudlík s vyšším průtokem.
Dudlíky jsou k dispozici pro děti ve věku 0 měsíců, více než 0 měsíců, více než 1 měsíc, více než
3 měsíce a více než 6 měsíců, s nastavitelným průtokem (I/II/III) a pro kašovitou stravu (Y).
(0) Dudlík pro děti staré 0 měsíců lze používat od prvního dne. Jedná se o extra měkký silikonový
dudlík s nejmenším průtokem. Je ideální pro novorozence a také pro kojence libovolného věku. Dudlík
má pouze jeden otvor pro průtok tekutiny a je označen číslicí 0.
(1) Dudlík pro děti starší než 0 měsíců je z extra měkkého silikonu. Je ideální pro novorozence a také
pro kojence libovolného věku. Dudlík je označen číslicí 1.
(2) Dudlík pro děti starší než 1 měsíc je z extra měkkého silikonu. Je ideální pro kojence libovolného
věku. Dudlík je označen číslicí 2.
(3) Dudlík pro děti starší než 3 měsíce je z extra měkkého silikonu. Pro děti starší než 3 měsíce, které
jsou krmené z lahve. Dudlík je označen číslicí 3.
(4) Dudlík pro děti starší než 6 měsíců je ze silikonu odolného vůči prokousnutí. Odolnější dudlík je
ideální pro děti starší než 6 měsíce, které jsou krmené z lahve. Dudlík je označen číslicí 4.
(I/II/III) Nastavitelný průtok: se silikonovým dudlíkem odolným vůči prokousnutí. Odolnější dudlík
s průtokem nastavitelným dle potřeby dítěte je ideální pro děti starší než 3 měsíce, které jsou krmené
z lahve. Dudlík má v horní části drážkový průřez pro průtok tekutiny a na stranách symboly I, II a III.
(Y) Kašovitá strava: se silikonovým dudlíkem odolným vůči prokousnutí. Odolnější dudlík navržený
pro kašovitou stravu je ideální pro děti starší než 6 měsíců, které jsou krmené z lahve. Dudlík má pro
průtok tekutiny otvor ve tvaru písmene „Y” a je označen symbolem „Y”.
Poznámka: Každé dítě je jedinečné a potřeby zrovna toho vašeho se od popsaných hodnot průtoku
mohou lišit.
Poznámka: Dudlík (0) nemusí být k dispozici ve vaší zemi, zkontrolujte webové stránky
www.philips.com/avent.
Výměna
Akumulátory
Při používání odsávačky (samostatné elektrické odsávačky) s napájením z baterií vždy používejte
čtyři 1,5V (nebo 1,2V v případě dobíjecích baterií) baterie AA. Nabíjecí baterie před nabíjením vyjměte
z motorové jednotky.
Vybité baterie vyjměte a bezpečně je zlikvidujte. Pokyny naleznete v kapitole „Recyklace“.
Pokyny k výměně baterií naleznete v kapitole „Příprava k použití“.

Čeština
40
Recyklace
- Tento symbol znamená, že výrobek nelze likvidovat s běžným komunálním odpadem (2012/19/EU)
(obr. 28).
- Tento symbol znamená, že výrobek obsahuje jednorázové baterie, které nesmí být likvidovány
společně s běžným domácím odpadem (2006/66/ES) (obr. 29).
- Dodržujte místní předpisy týkající se tříděného sběru elektrických a elektronických výrobků a
baterií. Správnou likvidací pomůžete zabránit negativním dopadům na životní prostředí a lidské
zdraví.
Vyjmutí baterií
Pro vyjmutí baterií z přístroje (pouze samostatná elektrická odsávačka) postupujte podle níže
uvedených kroků.
1 Před vyjmutím baterií se ujistěte, že motorová jednotka je vypnutá a adaptér je odpojen.
2 Pro vyjmutí baterií otočte spodní stranu motorové jednotky ve směru značek uvedených na spodní
straně (krok 1) a sejměte ji (krok 2 (obr. 30)).
3 Vyjměte z přihrádky na baterie čtyři 1,5V (nebo 1,2V v případě dobíjecích baterií) baterie AA.
4 Připojte spodní část k motorové jednotce.
Objednávání příslušenství
Chcete-li koupit příslušenství nebo náhradní díly, navštivte adresu www.shop.philips.com/service,
nebo se obraťte na prodejce výrobků Philips. Můžete se také obrátit na středisko péče o zákazníky
společnosti Philips ve své zemi (kontaktní údaje naleznete na mezinárodním záručním listu).
Příslušenství
Další položky
Součástí balení mohou být následující položky. Na seznamu v části Všeobecný popis zjistíte, jaké
položky jsou s vaší odsávačkou dodávány.
- Jednorázové prsní vložky
- Kryt
- Těsnicí víčka
- Cestovní pouzdro

Čeština
Záruka a podpora
Potřebujete-li další informace či podporu, navštivte web www.philips.com/support nebo si
prostudujte záruční list s mezinárodní platností.
Řešení problémů
Tato kapitola uvádí přehled nejběžnějších problémů, se kterými se můžete u tohoto přístroje setkat.
Pokud se vám nepodaří problém vyřešit za pomoci následujících informací, navštivte web
www.philips.com/support, kde najdete odpovědi na nejčastější dotazy. Případně kontaktujte
středisko péče o zákazníky ve své zemi.
Problém Řešení
Používání odsávačky je
bolestivé.
Odsávačka je
poškrábaná.
Odsávačka mateřského
mléka nefunguje a
tlačítko pro zapnutí/
vypnutí bliká.
Přestaňte odsávačku používat a poraďte se s odborníkem na kojení.
Pokud nejde tělo odsávačky od prsu snadno oddělit, může být nutné
přerušit vakuum zasunutím prstu mezi prs a masážní polštářek.
V případě pravidelného používání je mírné poškrábání normální a
nepředstavuje žádný problém. Pokud je však část odsávačky poškrábaná
hodně nebo pokud praskne, přestaňte odsávačku používat a obraťte se
na středisko péče o zákazníky Philips nebo navštivte obchod na adrese
www.shop.philips.com/service a kupte si náhradní díl. Kombinace čisticích
prostředků, sterilizačního roztoku, změkčené vody a teplotních výkyvů
může za určitých okolností způsobit prasknutí plastu. Nepoužívejte brusné
a antibakteriální prostředky, protože by mohly plast poškodit.
Nejprve zkontrolujte, zda jste odsávačku mateřského mléka správně
sestavili a zda není zkroucená hadička.Abyste zabránili rušení, udržujte
při odsávání ostatní elektrické vybavení, jako jsou mobilní telefony a
přenosné počítače, dále od odsávačky.Pokud používáte samostatnou
elektrickou odsávačku s bateriemi, vyměňte baterie podle pokynů
v uživatelské příručce.Pokud odsávačku používáte s napájením ze
zásuvky, ověřte, že používáte adaptér dodaný s přístrojem.Pokud
problém přetrvává, obraťte se na středisko péče o zákazníky na stránce
www.philips.com/support.
41
Necítím žádné sání. Zkontrolujte, zda jste odsávačku mateřského mléka správně sestavili
Sání je příliš silné. Pokud vám při používání odsávačky připadá sání příliš silné, postupujte
podle kroků uvedených v kapitole „Příprava k použití“. Ujistěte se, že
je silikonová hadička pevně připojena k motorové jednotce a k víčku a
membráně.Také se ujistěte, že je odsávačka na prsu správně umístěna
a umožňuje vytvoření vakua. Pokud stále necítíte sání, obraťte se na
středisko péče o zákazníky na stránce www.philips.com/support.
podle níže uvedených pokynů:
Ujistěte se, že používáte pouze součásti odsávačky Philips Avent Comfort.
–
– Ujistěte se, že jste odsávačku typu Comfort složili s masážním polštářkem:
při nepoužití masážního polštářku může být vakuum příliš silné.
– Při prvním použití odsávačky se vám sání může zdát příliš silné. Tento
pocit může s cvikem odeznít.Pokud problém přetrvá, poraďte se
s odborníkem na kojení.

Čeština
42
Doplňující informace
Níže je popsáno několik běžných stavů souvisejících s kojením. Pokud se s kterýmkoli z těchto
symptomů setkáte, kontaktujte lékaře nebo odborníka na kojení.
Symptom
Bolest Bolest prsu nebo bradavky.
Bolavé bradavky Trvalá bolest v bradavkách, která se objevuje na začátku odsávání nebo
Nalití Otok prsu. Prs může být na dotek tvrdý a citlivý a mohou v něm být cítit
Modřina, sraženina Červenoalové zabarvení, které nezesvětlá při stisknutí. Když modřina
Puchýře Malé bublinky na povrchu pokožky.
Poraněná tkáň na
bradavce (poranění
bradavky)
Krvácení Popraskání nebo natržení bradavky může vést ke krvácení zasažené oblasti.
Ucpané mléčné
kanálky
v celém jeho průběhu, popřípadě mezi použitími, podobná bolesti
pociťované při kojení.
bulky. Může se objevit i zarudnutí oblasti prsu a horečka.
bledne, změní barvu na zelenou a hnědou.
– Praskliny nebo popraskané bradavky.
– Odlupování pokožky z bradavky. Běžně se objevuje spolu s popraskáním
bradavek nebo puchýři.
– Natržení bradavky.
Červená citlivá bulka na prsu. Může se objevit i zarudnutí oblasti prsu a
horečka. Bez léčby může vést k mastitidě (zánětu prsu).
Technické informace
Informace o elektromagnetické kompatibilitě
Z hlediska elektromagnetické kompatibility vyžaduje odsávačka Philips Avent zvláštní opatrnost;
přístroj musí být instalován a používán v souladu s informacemi o elektromagnetické kompatibilitě,
které jsou uvedeny v této části.
Odsávačku Philips Avent může ovlivnit přenosné a mobilní vybavení pro radiofrekvenční komunikaci.
Elektronická odsávačka nemá žádnou nezbytnou funkčnost. Odsávačka se může z důvodu
elektromagnetických vlivů například z bezdrátových domácích síťových zařízení a mobilních nebo
bezdrátových telefonů vypnout nebo přejít do chybového režimu. Tím ovšem nevzniká žádné
nepřiměřené riziko. Abyste zabránili rušení, udržujte při odsávání ostatní elektrické vybavení aspoň 1 m
od odsávačky a nepokládejte ji na sebe s jinými elektrickými zařízeními. Délka kabelu adaptéru: 2,5 m.
Elektromagnetická kompatibilita (EMC, IEC 60601-1-2)
Prohlášení – elektromagnetické vyzařování
Odsávačka Philips Avent je určena k použití za elektromagnetických podmínek,
které jsou popsány níže. Uživatel odsávačky Philips Avent by měl takové prostředí k jejímu používání
zajistit.

Čeština
43
Test vyzařování Soulad s
Elektromagnetické prostředí – pokyny
normami
Test
radiofrekvenčního
vyzařování CISPR 11
Test
radiofrekvenčního
vyzařování CISPR 11
Test emisí
harmonického
proudu IEC 610003-2
Test kolísání
napětí/blikání
IEC 61000-3-3
Prohlášení – elektromagnetická odolnost
Odsávačka Philips Avent je určena k použití za elektromagnetických podmínek,
které jsou popsány níže. Uživatel odsávačky Philips Avent by měl takové prostředí k jejímu používání
zajistit.
Test ODOLNOSTI Testovací úroveň
Test odolnosti vůči
elektrostatickým
výbojům IEC 610004-2
Skupina 1 Odsávačka Philips Avent využívá radiofrekvenční energii
Třída B
Třída A
V souladu
IEC 60601
±6 kV při kontaktu±8 kV při přenosu vzdu chem
pouze pro své interní funkce. Úroveň jejího radiofrekvenčního
vyzařování je tudíž velice nízká a není proto pravděpodobné,
že by způsobila rušení elektronických zařízení ve svém okolí.
Odsávačka Philips Avent je vhodná k použití všude
včetně domácností a budov přímo připojených k veřejné
nízkonapěťové napájecí síti, která se nachází v obytných
budovách.
Úroveň souladu s
normami
±6 kV při kontaktu±8 kV při přenosu vzdu chem
Elektromagnetické
prostředí – pokyny
Podlahy by měly
být zhotoveny ze
dřeva, betonu či
keramických dlaždic.
Jsou-li podlahy kryty
syntetickým materiálem , měla by relativní vlhkost dosahovat
nejméně 30 %.
Rychlý elektrické
přechodné jevy /
skupiny impulzů IEC
61000-4-4
Rázový impulzIEC
61000-4-5
±2 kV pro napájecí
vedení
±1 kV od vedení
k vedení
±2 kV pro napájecí
vedení
±1 kV od vedení
k vedení
Kvalita napájecí sítě
by měla odpovídat
typickému obytnému
nebo nemocničnímu
prostředí.
Kvalita napájecí sítě
by měla odpovídat
typickému obytnému
nebo nemocničnímu
prostředí.

44
Čeština
Test ODOLNOSTI Testovací úroveň
IEC 60601
Poklesy napětí, krátká
přerušení a kolísání
napětí na přívodním
napájecím vedení IEC
61000-4-11
Test odolnosti
vůčimagnetickému
poli síťového
kmitočtu(50/60 Hz)IEC
61000-4-8
<5 % UT (>95% pokles
napětí UT) po dobu
0,5 cyklu40 % UT (60%
pokles napětí UT) po
dobu 5 cyklů70 % UT
(30% pokles napětí UT)
po dobu 25 cyklů<5 %
UT (>95% pokles napětí
UT) po dobu 5 s
3 A/m 3 A/m Intenzita magnetických
Úroveň souladu s
normami
<5 % UT (>95% pokles
napětí UT) po dobu
0,5 cyklu70 % UT (30%
pokles napětí UT) po
dobu 25 cyklů<5 % UT
(>95% pokles napětí
UT) po dobu 5 s
Elektromagnetické
prostředí – pokyny
Kvalita napájecí sítě
by měla odpovídat
typickému obytnému
nebo nemocničnímu
prostředí. Pokud
uživatel odsávačky
Philips Avent vyžaduje
nepřerušovaný
provoz i při výpadku
síťového napájení,
doporučujeme, aby
byla odsávačka
napájena
z nepřerušitelného
zdroje napájení nebo
baterie.Přerušitelný
zdroj napájení může
způsobit vypnutí
odsávačky. Toto je
přijatelné, jelikož
tím nevzniká žádné
nepřiměřené riziko.
polí síťového kmitočtu
by neměla přesahovat
úrovně, které jsou
charakteristické
pro typické obytné
či nemocniční prostředí.
Poznámka: UT je střídavé síťové napětí před aplikací zkušební úrovně.
Prohlášení – elektromagnetická odolnost
Odsávačka Philips Avent je určena k použití za elektromagnetických podmínek,
které jsou popsány níže. Uživatel odsávačky Philips Avent by měl takové prostředí k jejímu používání
zajistit.
Test
odolnosti
Testo va cí
úroveň
Úroveň
souladu s
nor ma mi
Elektromagnetické prostředí – pokyny
IEC
60601
Test ra di ofrekvenč ní ho
vedení IEC
61000-4-6
3 Vrms
150 kHz
až 80
MHz
3 Vrms Přenosné a mobilní vybavení pro radiofrekvenční komunikaci
by nemělo být používáno v menší vzdálenosti od kterékoli
ze součástí odsávačky Philips Avent (včetně kabelů), než je
vzdálenost vypočítaná podle rovnice pro dané vysílací pásmo.
Doporučená bezpečná vzdálenost d=1,17 √P Může dojít
k vypnutí odsávačky.

Čeština
45
Test
odolnosti
Testo va cí
úroveň
Úroveň
souladu s
nor ma mi
Elektromagnetické prostředí – pokyny
IEC
60601
Test ra di ofrekvenč ní ho
vyzařování
IEC 610004-3
Poznámka 1: Frekvence 80 MHz a 800 MHz spadají pod vyšší frekvenční pásma.
Poznámka 2: Tyto pokyny nemusí platit v každé situaci. Šíření elektromagnetických vln je ovlivňováno
jejich pohlcováním a odrazem od budov, předmětů a lidí.
Hodnotu intenzity polí stacionárních vysílačů, jakými jsou vysílací radiostanice pro mobilní/bezdrátové
telefony, vysílačky, amatérské radiostanice, radiové vysílání na vlnách AM a FM a televizní vysílání,
nelze přesně teoreticky předpovědět. Má-li být vyhodnocen vliv stacionárních radiofrekvenčních
vysílačů na elektromagnetické prostředí, je třeba uvažovat o provedení místního elektromagnetického
průzkumu. Pokud naměřená intenzita radiofrekvenčního pole v místě, kde je odsávačka Philips
Avent používána, překračuje příslušnou shora uvedenou schválenou úroveň, měla by být provedena
kontrola funkce odsávačky Philips Avent. Pokud se provoz odsávačky Philips Avent odchyluje
od normálu, může být zapotřebí dalších opatření, jako je změna jeho orientace či polohy.
Pro frekvenční pásmo 150 kHz až 80 MHz by intenzita polí měla být nižší než [3] V/m.
Doporučené bezpečné vzdálenosti mezi přenosným a mobilním vybavením pro radiofrekvenční
komunikaci a odsávačkou Philips Avent
Odsávačka Philips Avent je určena k použití v domácím zdravotním prostředí s neomezovaným
radiofrekvenčním rušením.
Zákazník či uživatel odsávačky Philips Avent může elektromagnetické rušení částečně omezit, pokud
při jejím používání zachová určitou minimální bezpečnou vzdálenost od přenosných a mobilních
zařízení pro radiofrekvenční komunikaci (např. vysílačů), která je doporučena níže, přičemž zohlední
maximální výstupní výkon příslušného komunikačního zařízení.
3 V/m
80 MHz
až 2,5
Ghz
3 V/m 80 MHz až 800 MHz d=1,17 √P 800 MHz až 2,5 GHz d=2,33
√P kde P je maximální jmenovitý výstupní výkon vysílače ve
wattech (W) stanovený výrobcem vysílače a d je doporučená
bezpečná vzdálenost v metrech (m).Hodnota intenzity polí
stacionárních radiofrekvenčních vysílačů, která byla stanovena
místním elektromagnetickým průzkumem, by měla být ve
všech frekvenčních pásmech nižší než příslušná povolená
úroveň. V okolí zařízení označeného tímto symbolem může
docházet k rušení: Upozornění: Přestože tato odsávačka
mateřského mléka splňuje požadavky platných směrnic EMC
(směrnic týkajících se elektromagnetické kompatibility), může
být přesto citlivá na přílišné vyzařování nebo může dojít
k vzájemnému rušení s jinými zařízeními. V důsledku toho se
odsávačka může vypnout nebo tlačítko pro zapnutí/vypnutí
může začít blikat (pro více informací viz řešení problémů). Toto
je přijatelné, jelikož tyto stavy nevedou k nepřijatelnému riziku.
Abyste zabránili rušení, udržujte při odsávání ostatní elektrické
vybavení dále od odsávačky.

Čeština
46
Bezpečná vzdálenost podle frekvence vysílače (m)
Maximální jmenný
výstupní výkon vysílače
(W)
0,01 0,12 0,12 0,23
0,1 0,38 0,38 0,73
1 1,2 1,2 2,3
10 3,8 3,8 7,3
100 12 12 23
Pro vysílače, jejichž jmenný maximální výstupní výkon není uveden výše, je možné doporučenou
bezpečnou vzdálenost d v metrech (m) stanovit pomocí rovnice pro příslušnou frekvenci daného
vysílače, kde P je maximální jmenný výstupní výkon vysílače ve wattech (W), jak jej stanovil výrobce
vysílače.
POZNÁMKA 1: Na frekvence 80 MHz a 800 MHz se vztahuje bezpečná vzdálenost stanovená pro vyšší
frekvenční pásma.
POZNÁMKA č. 2: Tyto pokyny nemusí platit v každé situaci. Šíření elektromagnetických vln je
ovlivňováno jejich pohlcováním a odrazem od budov, předmětů a lidí.
150 kHz až 80 MHz
mimo pásma ISMd=1,17
√P
80 MHz až
800 MHzd=1,17 √P
800 MHz až 2,5 GHz
d=2,33 √P
Podmínky skladování a používání
Odsávačku nevystavujte přímému slunečnímu svitu, protože po delší době může dojít ke změně
zabarvení. Odsávačku a příslušenství skladujte na bezpečném, čistém a suchém místě.
Pokud byl přístroj skladován v horkém nebo studeném prostředí, umístěte ho do prostředí, kde ho
budete používat, a nechte ho před použitím dosáhnout teplotních podmínek pro používání (5 až 40 °C).
Podmínky používání
Teplota +5 až +40 °C
Relativní vlhkost 15 až 93 % (nekondenzující)
Atmosférický tlak Tlak vzduchu 700 a 1060 Pa
Podmínky uskladnění
Teplota –25 až 70 °C
Relativní vlhkost 15 až 93 % (nekondenzující)

Čeština
47
Technické specikace
Adaptér není součástí zdravotnického elektrického vybavení, ale jedná se o samostatný napájecí zdroj
v rámci zdravotnického elektrického systému.
Síťové vstupní napětí: 100–240 V
Síťový vstupní proud: 1000 mA
Síťová vstupní frekvence: 50–60 Hz
Baterie (pouze pro
samostatnou elektrickou
odsávačku):
Samostatná elektrická
odsávačka
Dvojitá elektrická odsávačka Typové číslo adaptéru: VT0334
Nenabíjecí baterie: 4 × 1,5 V AA
Nabíjecí baterie: 4 × 1,2 V, min. kapacita 2000 mAh, max. kapacita
2100 mAh.
Typové číslo adaptéru: VS0332
Výstupní napětí: 5 V
Výstupní proud: 1000 mA
Typ proudu: DC
Třída ochrany: Třída 2
Výstupní napětí: 9 V
Výstupní proud: 1100 mA
Typ proudu: DC
Třída ochrany: Třída 2
Popis významu symbolů
Varovná upozornění a symboly mají zaručit vaše správné a bezpečné používání tohoto výrobku;
pomohou ochránit před poraněním vás i vaše blízké. Níže je uveden význam varovných upozornění a
ikon vyobrazených na štítku a v příručce uživatele.

48
Čeština
Symbol s významem „postupujte podle uživatelských pokynů“.
Značí, že si uživatel musí pročíst pokyny k použití, kde získá důležité bezpečnostní
informace, jakými jsou například varování a upozornění, která nemohou být z řady důvodů
umístěna přímo na zdravotnickém přístroji.
Značí tipy pro používání, další informace nebo poznámku.
Označuje výrobce podle denice normy IEC 60601-1, která obsahuje odkaz na normu ISO
15223-1:2012.
Udává datum výroby.
Tento symbol znamená, že část přístroje, která se dostává do fyzického kontaktu
s uživatelem (a bývá také označována jako aplikovaná součást), je v souladu
s normou IEC 60601-1 klasikována jako součást typu „BF“ (tělesný kontakt
mimo oblast srdce). Aplikované části jsou část 3 a 4 v přehledu všeobecného popisu
(obr. A).
Symbol pro „zařízení třídy II“. Adaptér má dvojitou izolaci (třída II).
Udává katalogové číslo přístroje výrobce.
Symbol pro stejnosměrný proud.
Symbol pro střídavý proud.
Soulad se Směrnicí pro užívání v určených mezích napětí.
Samostatný sběr elektrických a elektronických zařízení v souladu se směrnicí EU.
Elektrické odpadní produkty by neměly být likvidovány spolu s běžným domácím
odpadem. Další informace naleznete v části „Recyklace“.
Stisknutím tohoto tlačítka přístroj zapnete a vypnete.
Stupeň krytí IP22: První číslo 2: znamená, že zařízení je chráněno před vniknutím
cizích předmětů o průměru přes 12,5 mm. Druhé číslo: znamená, že zařízení je chráněno
před průnikem svisle kapající vody až do náklonu 15°. Svisle padající kapky by neměly
zařízení nijak poškodit, pokud je jeho schránka nakloněna v libovolném směru a úhlu do 15°
od svislé osy.
Označuje sériové číslo výrobce, které umožňuje identikaci konkrétního zdravotnického
přístroje.

Čeština
49
Značka souladu EurAsian Conformity
Symbol dvouleté záruky společnosti Philips.
Napájení z baterií (pouze pro samostatnou elektrickou odsávačku).
Testování UL (Underwriters Laboratories) podle normy pro domácnosti.
Značka RCM Tick Mark – Austrálie
Číslo série
Manipulujte s přístrojem opatrně.
Udržujte v suchu.
Označuje limity relativní vlhkosti, jíž může být přístroj bezpečně vystaven: 15 až 93 %.
104°F
40°C
41°F
5°C
Označuje limity skladovací a přepravní teploty, jíž může být zdravotnický přístroj
bezpečně vystaven: 5 až 40 °C.
Forest Stewardship Council – Ochranné známky společnosti FSC spotřebitelům umožňují
vybírat si produkty, které podporují ochranu lesů, nabízejí sociální benety a umožňují trhu
poskytovat podnět pro lepší správu lesů.

Lietuviškai
50
Turinys
Įvadas ______________________________________________________________________________ 51
Bendrasis aprašymas (A pav.) ___________________________________________________________ 51
Paskirtis _____________________________________________________________________________52
Svarbi saugos informacija ______________________________________________________________52
Kontraindikacijos _____________________________________________________________________52
Paruošimas naudoti ___________________________________________________________________53
Valymas ir dezinfekavimas _____________________________________________________________53
Raskite geriausiai jums tinkančią pagalvėlę ________________________________________________55
Pientraukio surinkimas _________________________________________________________________55
Kaip naudoti pientraukį _______________________________________________________________ 56
Kada nutraukinėti pieną ______________________________________________________________ 56
Patarimai ____________________________________________________________________________57
Kaip naudotis pientraukiu ______________________________________________________________57
Motinos pieno laikymas _______________________________________________________________ 58
Suderinamumas _____________________________________________________________________ 58
Maitinimas _________________________________________________________________________ 59
Jūsų vaiko saugumui ir sveikatai _______________________________________________________ 59
Prieš naudojant pirmą kartą ___________________________________________________________ 59
Buteliukų valymas ___________________________________________________________________ 60
Buteliukų surinkimas _________________________________________________________________ 60
Motinos pieno šildymas ______________________________________________________________ 60
Buteliukų priežiūra ir laikymas __________________________________________________________ 60
Papildoma informacija _________________________________________________________________ 61
Tinkamo čiulptuko parinkimas jūsų vaikui _________________________________________________ 61
Pakeitimas __________________________________________________________________________ 61
Maitinimo elementai __________________________________________________________________ 61
Perdirbimas ________________________________________________________________________ 62
Baterijų išėmimas ____________________________________________________________________ 62
Priedų užsakymas ___________________________________________________________________ 62
Priedai _____________________________________________________________________________ 62
Papildomi elementai _________________________________________________________________ 62
Garantija ir pagalba __________________________________________________________________ 63
Trikčių diagnostika ir šalinimas _________________________________________________________ 63
Papildoma informacija ________________________________________________________________ 64
Techninė informacija _________________________________________________________________ 64
EMS informacija _____________________________________________________________________ 64
Naudojimo ir laikymo sąlygos __________________________________________________________ 68
Techninės specikacijos ______________________________________________________________ 69
Simbolių paaiškinimas ________________________________________________________________ 70

Lietuviškai
51
Įvadas
Sveikiname įsigijus „Philips Avent“ ir sveiki prisijungę! Norėdami pasinaudoti visa „Philips Avent“
siūloma parama, užregistruokite savo gaminį www.philips.com/welcome.
Unikali „Philips Avent“ pientraukio konstrukcija suteikia jums galimybę nutraukiant sėdėti patogiau.
Minkšta masažinė pagalvėlė* suprojektuota, kad būtų minkšta ir šilta, kad imituotų jūsų kūdikio
čiulpimą, kad būtų užtikrintas pieno srautas – patogiai ir švelniai. Pientraukis pradeda veikti švelniu
režimu, kuris padeda stimuliuoti jūsų pieno tekėjimą. Paskui galite pasirinkti iš trijų siurbimo režimų,
kaip jums patogu. Siurblį lengva surinkti ir naudoti, visos su motinos pienu besiliečiančios dalys gali
būti plaunamos indaplovėje.
Sveikatos priežiūros specialistų nuomone, motinos pienas yra geriausias maistas kūdikiams pirmaisiais
metais, derinant jį su kietu maistu po pirmųjų 6 mėnesių. Jūsų pienas yra specialiai pritaikytas
jūsų kūdikio poreikiams ir padeda apsaugoti jūsų kūdikį nuo infekcijos ir alergijų. Pientraukis gali
jums padėti žindyti ilgiau. Galite nutraukti ir laikyti savo pieną, kad jūsų kūdikis galėtų mėgautis
pranašumais, net kai jūs negalite būti šalia, kad pamaitintumėte Kadangi siurblys yra kompaktiškas,
tylus ir gali būti naudojamas diskretiškai, galite jį pasiimti bet kur, tai jums suteikia galimybę nutraukti
pieną taip, kaip jums patogu, ir palaikyti pieno gamybą.
Šis pientraukis skirtas tik buitiniam naudojimui.
*Su šiuo siurbliu tiekiamos pagalvėlės suprojektuotos, kad patogiai tiktų daugumai moterų.
Tačiau prireikus galite nusipirkti didesnę pagalvėlę atskirai.
Bendrasis aprašymas (A pav.)
A pav. Toliau nurodyti skaičiai atitinka skaičius paveiksle, pateikiamame šio naudotojo vadovo
priekiniame atlenkiamame lape.
1 Variklio blokas su silikoniniu vamzdeliu ir gaubtu *
2 Silikoninė diafragma *
3 Pientraukio korpusas *
4 Masažinė pagalvėlė *
5 Dangtis *
6 Baterijų korpusas (tik atskiro elektrinio pientraukio)
7 Įjungimo ir išjungimo mygtukas
8 Stimuliavimo mygtukas
9 Silpno traukimo mygtukas
10 Vidutinio traukimo mygtukas
11 Gilaus traukimo mygtukas
12 Adapteris
13 Baltasis vožtuvas *
14 „Philips Avent Natural“ buteliukas *
15 Kupolo formos gaubtas *
16 Užsukamas žiedas *
17 Spenelis *
18 Sandarinimo diskas *
*Pastaba. Dvigubas pientraukis tiekiamas su dviem pažymėtomis dalis, išskyrus variklio bloką.
Į SCF332 įeina: atskiras elektrinis pientraukis (įskaitant 1 buteliuką), krūtų pagalvėlės
Į SCF334 įeina: dvigubas elektrinis pientraukis (įskaitant 2 buteliukus), krūtų pagalvėlės, kelioninis krepšys

Lietuviškai
52
Paskirtis
„Philips Avent Comfort“ atskiras / dvigubas pientraukis skirtas pienui nutraukti ir surinkti iš žindančios
moters krūties.
Šis prietaisas skirtas vienam naudotojui.
Svarbi saugos informacija
Prieš pradėdami naudoti pientraukį, atidžiai perskaitykite šį vartotojo vadovą, kurį pasilikite, nes jo gali
prireikti ateityje.
Šį naudotojo vadovą taip pat galima rasti internete „Philips Avent“ žiniatinklio svetainėje:
www.philips.com/avent
Kontraindikacijos
Niekada nenaudokite pientraukio nėštumo metu, nes pieno nutraukimas gali sukelti gimdymą.
Įspėjimas
Įspėjimai, kad būtų išvengta užspringimo, pasmaugimo ir sužalojimo:
- Neleiskite vaikams ar naminiams gyvūnams žaisti su variklio bloku, adapteriu ar priedais.
- Prižiūrėkite vaikus, kad jie nežaistų su prietaisu.
- Panaudoję visada nedelsdami atjunkite pientraukį nuo maitinimo lizdo.
- Nepalikite pientraukio be priežiūros, kol jis prijungtas prie tinklo.
- Pientraukis neskirtas naudoti asmenims (įskaitant vaikus), kurių ziniai, jutimo arba protiniai
gebėjimai yra silpnesni arba kuriems trūksta patirties ir žinių. Tokie asmenys gali naudoti šį
pientraukį tik jei juos prižiūri arba apie tai, kaip naudotis prietaisu, juos tinkamai instruktuoja už jų
saugą atsakingas asmuo.
Įspėjimai, skirti elektros šokui išvengti:
- Kaskart prieš naudojimą patikrinkite, ar nėra pientraukio, įskaitant adapterį, apgadinimo ženklų.
Nenaudokite pientraukio, jei adapteris ar kištukas apgadintas, jei jis tinkamai neveikia, jei jis nukrito
ar buvo įmerktas į vandenį.
Įspėjimai, siekiant išvengti nudegimų:
- Naudokite tik ant prietaiso nurodytą adapterį, kad užkirstumėte kelią adapterio perkaitimui.
- Jei baterijos nėra pakartotinai įkraunamos, jų negalima pakartotinai įkrauti, kad būtų užkirstas kelias
perkaitimui ir baterijų ištekėjimui.
Įspėjimai, kad būtų išvengta apsinuodijimo ir užteršimo, kad būtų užtikrinta higiena:
- Higienos tikslais pientraukis yra skirtas daugkartiniam vieno asmens naudojimui.
- Kaskart prieš naudodami išskalaukite ir dezinfekuokite visas siurblio dalis, išskyrus variklio bloką,
vamzdelį, dangtelį ir adapterį.
- Laikykite motinos pieną tik surinktą nuvalytu ir dezinfekuotu siurbliu.
- Nenaudokite pientraukio, jei silikoninė diafragma atrodo apgadinta ar suplyšusi. Informaciją apie
tai, kaip gauti atsarginių dalių, žr. skyriuje „Priedų užsakymas“.
- Pientraukio dalių valymui nenaudokite antibakterinių ar abrazyvinių valiklių.
- Jei neketinate prietaiso naudoti ilgą laiką, išimkite baterijas, kad užkirstumėte kelią jų ištekėjimui.

Lietuviškai
Įspėjimai, skirti išvengti krūtų ir spenelių problemų ir skausmo:
- Nebandykite pašalinti siurblio korpuso nuo krūties, kol sudarytas vakuumas. Išjunkite prietaisą ir
pirštu pašalinkite sandarinimą tarp krūties ir siurblio piltuvo. Nuimkite siurblį nuo krūties.
- Niekada nenaudokite pientraukio, jei ima miegas ar snūduriuojate, kad nesumažėtų dėmesys
naudojant.
- Visada išjunkite pientraukį prieš siurblio korpuso nuėmimą nuo krūties, kad būtų pašalintas
vakuumas.
- Nenaudokite kitų gamintojų ar konkrečiai „Philips Avent“ nerekomenduojamų priedų ar dalių.
Tai gali lemti netinkamą prietaiso veikimą ir gali turėti įtakos elektromagnetiniam suderinamumui
(EMS). Jei naudosite tokius priedus ar dalis, jūsų garantija nebegalios.
- Jei pienas nebėga, jokiu būdu netraukite pieno ilgiau kaip penkias minutes. Bandykite kitą kartą tą
pačią dieną.
- Jei procesas tampa labai nekomfortiškas arba skausmingas, nustokite naudoti siurblį ir pasitarkite
su maitinimo krūtimi konsultantu.
- Jei sukurtas slėgis jums kelia nemalonius jausmus ar skausmą, išjunkite prietaisą, tarp pientraukio
korpuso ir krūties įkiškite pirštą ir jį nuimkite.
- Saugokite, kad į jį nepatektų jokių pašalinių daiktų.
Dėmesio!
Atsargumo priemonės, kad būtų išvengta netinkamo produkto veikimo:
- Saugokite adapterį ir variklio bloką nuo kontakto su vandeniu.
- Laikykite adapterį ir silikoninius vamzdelius atokiau nuo įkaitusių paviršių, kad išvengtumėte šių
dalių perkaitimo ir deformacijos.
- Niekada nedėkite variklio bloko ar adapterio į vandenį, indaplovę ar dezinfekavimo įrenginį.
- Nors pientraukis atitinka taikomas EMS direktyvas, jis vis tiek gali būti jautrus per didelei
spinduliuotei ir (arba) jis gali sudaryti trikdžius kitai įrangai. Pasekmė gali būti ta, kad pientraukis
išsijungs arba persijungs į klaidos režimą. Kad užkirstumėte kelią trukdžiams, laikykite kitą elektros
įrangą atokiau nuo pientraukio per nutraukimą (žr. 'Techninė informacija').
- Pientraukio variklio viduje nėra dalių, kurių priežiūrą galėtų atlikti naudotojas. Neleidžiamas joks
įrangos modikavimas. Jei tai atliksite, jūsų garantija nebegalios.
- Nesudarykite baterijų maitinimo gnybtų trumpojo jungimo.
53
Paruošimas naudoti
Valymas ir dezinfekavimas
Variklio bloko, silikoninio vamzdelio, gaubto ir adapterio nereikia valyti ir dezinfekuoti, nes jie
nekontaktuoja su motinos pienu. Prieš pirmą kartą naudodami išvalykite ir dezinfekuokite visas
kitas pientraukio dalis. Taip pat valykite šias dalis kaskart po panaudojimo ir dezinfekuokite jas prieš
kiekvieną naudojimą.
Atsargiai! Niekada nemerkite variklio bloko ar adapterio į vandenį, nedėkite į indaplovę ar
dezinfekavimo įrenginį, nes tai lemia nepataisomą šių dalių sugadinimą.

Lietuviškai
54
Valomos dalys
Prieš (pirmą) naudojimą ir po kiekvieno kito naudojimo valykite tolesnes dalis. Su jūsų pientraukiu
tiekiamų elementų sąrašą žr. skyriuje „Bendrasis aprašymas“.
Pientraukio dalys:
- Silikoninė diafragma
- Pientraukio korpusas
- Masažinė pagalvėlė
- Baltasis vožtuvas
- Dangtis
Buteliuko dalys:
- „Philips Avent Natural“ buteliukas
- Kupolo formos gaubtas
- Užsukamas žiedas
- Čiulptukas
- Sandarinimo diskas
Valymui reikalingos priemonės:
Plovimas plautuvėje Plovimas indaplovėje
- Švelnus indų plovimo skystis - Švelnus indų plovimo skystis / tabletė
- Aukštos kokybės geriamasis vanduo - Aukštos kokybės geriamasis vanduo
- Minkštas šepetys arba švari indų šluostė
- Išvalykite plautuvą arba dubenį
Įspėjimas. Valymui nenaudokite antibakterinių ar abrazyvinių valymo medžiagų.
1 Visiškai išrinkite pientraukį ir buteliuką. Taip pat išimkite baltą vožtuvą iš pientraukio.
Atsargiai! Nuimant baltą vožtuvą ir jį valant būtinas atsargumas. Jį apgadinus jūsų pientraukis
tinkamai neveiks. Kad nuimtumėte baltą vožtuvą, švelniai patraukite už rumbuotos ąsos vožtuvo
šone.
2 Plaukite dalis plautuvėje arba indaplovėje.
Plovimas plautuvėje: Atjunkite visas dalis ir 5 minutes mirkykite karštame vandenyje su šiek tiek
švelnaus indų plovimo skysčio. Valykite visas dalis minkštu šepečiu arba švaria indų šluoste, tada
kruopščiai (pav. 2) jas išskalaukite.
Plovimas indaplovėje: Išplaukite dalis, išskyrus variklio bloką, silikoninį vamzdelį su gaubtu ir
adapterį, indaplovėje (tik viršutiniame laikiklyje).
Pastaba. Kad išvalytumėte vožtuvą, švelniai patrinkite jį tarp pirštų šiltame vandenyje su šiek tiek
skysto ploviklio. Nekiškite daiktų į vožtuvą, tai gali lemti apgadinimą.

Lietuviškai
Dezinfekcija (pasirinktinai)
Po valymo, jei norite dar ir dezinfekuoti, galite virinti dalis vandenyje buitiniame prikaistuvyje.
Dezinfekcijai reikalingos priemonės:
- Buitinis prikaistuvis
- Aukštos kokybės geriamasis vanduo
Dezinfekuokite dalis taip:
Į buitinį prikaistuvį įpilkite pakankamai vandens, kad uždengtų visas dalis. Užvirkite vandenį. Sudėkite
dalis į buitinį prikaistuvį ir virkite jas 5 minutes (pav. 3). Dezinfekuojant verdančiu vandeniu būtina
užtikrinti, kad buteliukas ar kitos dalys nesiliestų su prikaistuvio kraštais. Tai gali lemti nepataisomą
produkto deformaciją ar apgadinimą; už tai „Philips“ atsakomybės neprisiima.
Leiskite vandeniui atvėsti ir švelniai ištraukite dalis iš vandens. Tvarkingai sudėkite dalis ant švaraus
popierinio rankšluosčio arba ant švaraus džiovinimo laikiklio ir leiskite joms išdžiūti ore. Venkite
naudoti audeklo rankšluosčius dalims džiovinti, nes juose gali būti virusų ir bakterijų, žalingų jūsų
kūdikiui.
Raskite geriausiai jums tinkančią pagalvėlę
Pieno nutraukimas turi būti komfortiškas. Todėl mes siūlome 3 minkštas lanksčias pagalvėles: 19,5 mm
masažinę pagalvėlę (tiekiamą su jūsų pientraukiu) ir 25 mm masažinę pagalvėlę.
Kad būtų užtikrintas optimalus komfortas ir veikimas, turite pasirinkti optimalią pagalvėlę savo
speneliams (pav. 4).
19,5 mm: masažinę pagalvėlę,
25 mm: masažinę pagalvėlę (neįtrauktą):
1 Pradėkite nuo standartinės 19,5 mm masažinės pagalvėlės, tiekiamos su jūsų pientraukiu.
Pagalvėlės dydis nurodytas ant pačios pagalvėlės (pav. 5).
2 Jei pagalvėlė per maža, nusipirkite didesnę 25 mm pagalvėlę (žr. „Priedų užsakymas“). Per maža
pagalvėlė gali lemti skausmą arba mažiau veiksmingą nutraukimą (pav. 6).
55
Pientraukio surinkimas
Pastaba. Būtinai nuvalykite ir dezinfekuokite atitinkamas pientraukio dalis.
1 Prieš nuvalytų dalių tvarkymą kruopščiai nusiplaukite rankas.
Įspėjimas. Atsargiai – nuvalytos dalys gali būti dar karštos. Pradėkite surinkti
pientraukį tik tada, kai nuvalytos dalys atvės.
Pastaba. Gali būti, kad surinkti pientraukį bus lengviau, kol jis drėgnas.
2 Įstatykite baltąjį vožtuvą į pientraukio korpusą iš apačios. Stumkite vožtuvą gilyn tiek, kiek įmanoma
(pav. 7).
3 Sukite pientraukio korpusą pagal laikrodžio rodyklę ant buteliuko, kol jis tvirtai užsiksuos (pav. 8).
4 Įstatykite silikoninę diafragmą į pientraukio korpusą iš viršaus. Įsitikinkite, kad ji tvirtai laikosi apie
žiedą, spauskite žemyn pirštais, kad užtikrintumėte tobulą sandarinimą (pav. 9).
5 Įdėkite pagalvėlę į piltuvo formos siurblio korpuso (pav. 10) dalį.
6 Įstumkite vidinę pagalvėlės dalį kuo toliau ir įsitikinkite, kad ji puikiai užsandarinta apie siurblio
korpuso (pav. 11) lanką.

Lietuviškai
56
7 Įspauskite tarp segmentų, kad pašalintumėte visą patekusį orą (pav. 12).
Pastaba. Uždėkite gaubtą ant pagalvėlės, kad pientraukis išliktų švarus, kol ruošiatės nutraukimui.
Įspėjimas. Visada naudokite pientraukį su pagalvėle.
8 Įstatykite adapterį į sieninio lizdo ir įstatykite kištuką kitame gale į variklio bloką (pav. 13).
Adapterio nuorodos kodas nurodytas prietaiso apačioje. Su prietaisu naudokite tik nurodytą
adapterį.
- Naudojant su baterijomis (tik atskiras elektrinis pientraukis), reikia pasukti variklio bloko apačią
kryptimi, nurodyta žymėmis ant dugno (1 (pav. 14) veiksmas), ir nuimti (2 (pav. 14) veiksmas). Įdėkite
keturias naujas 1,5 V AA baterijas (arba 1,2 V, jei tai pakartotinai įkraunamos baterijos) į baterijų
korpusą. Tinkamą poliškumą nurodo ženklinimas ant baterijos korpuso. Vėl prijunkite dugną prie
variklio bloko.
Pastaba. Naujų baterijų rinkinys užtikrina 1–3 valandų veikimą. Pakartotinai įkraunamų baterijų galia
laikui bėgant mažėja ir tai gali lemti veikimo laiko sutrumpėjimą.
Pastaba. Jei įdėjote baterijas į variklio baterijų korpusą ir prijungėte adapterį, pientraukis veiks,
naudodamas elektros energiją. Baterijų prietaise įkrauti negalima.
Įspėjimas. Nenaudokite skirtingų tipų baterijų kartu.
Įspėjimas. Nenaudokite naudotų ir naujų baterijų kartu.
9 Prijunkite silikoninį vamzdelį ir gaubtą prie diafragmos. Spauskite žemyn gaubtą, kol jis tvirtai
įsistatys į vietą (pav. 15).
Kaip naudoti pientraukį
Kada nutraukinėti pieną
Jei maitinimas krūtimi jums nekelia rūpesčių, prieš pradedant nutraukimą patartina (jei jūsų sveikatos
priežiūros specialistas / maitinimo krūtimi konsultantas nepataria kitaip) palaukti, kol nusistovės jūsų
pieno susikaupimo krūtyse ir maitinimo grakas (normaliai mažiausiai 2–4 savaites po gimdymo).
Išimtys:
- Jei iškart maitinti krūtimi nepavyksta, reguliariai nutraukiant pieną galima paskatinti ir išlaikyti pieno
gamybą.
- Jei nutraukiate savo kūdikiui maitinti skirtą pieną ligoninėje.
- Jei krūtys smarkiai pritvinkusios (skausmingos ar ištinusios), galite nutraukti nedidelį kiekį pieno
prieš maitinimą arba tarp maitinimų, kad skausmas susilpnėtų, o kūdikiui būtų lengviau sugriebti
krūtį.
- Jei jūsų speneliai žaizdoti ar įtrūkę, gali būti, kad norėsite pieną nutraukinėti, kol jie sugis.
- Jei kūdikis yra atskirtas, o jūs norėsite toliau maitinti jį krūtimi, kai jis bus grąžintas, turite reguliariai
nutraukti pieną ir taip skatinti jo gamybą.
Turite rasti tinkamiausią laiką dienos metu pienui nutraukti, pvz., prieš ar po pirmojo maitinimo ryte,
kai krūtys pilnos pieno, arba kai kūdikis neištraukia viso pieno iš abiejų krūtų. Jei grįžote į darbą, gali
tekti nutraukti pieną per pertrauką. Naudoti pientraukį reikia praktikos, gali prireikti kelių bandymų, kol
pavyks. Laimei, „Philips Avent“ elektrinį pientraukį lengva surinkti ir naudoti, todėl greitai priprasite juo
nutraukti pieną.

Lietuviškai
Patarimai
- Susipažinkite su pientraukiu ir jo naudojimo būdu prieš pirmą panaudojimą.
- Pasirinkite laiką, kai neskubate ir jums niekas netrukdys.
- Jūsų kūdikio nuotrauka gali būti naudinga ir paskatinti „pieno atleidimo“ reeksą.
- Šiluma taip pat gali padėti: pabandykite nutraukti pieną po vonios ar dušo, arba ant krūties kelioms
minutėms uždėkite šiltą audeklą ar „Philips Avent“ šiluminę pagalvėlę prieš nutraukimą.
- Gali būti, kad jums bus paprasčiau nutraukti pieną tuo metu, kai kūdikis čiulpia kitą krūtį, arba iškart
po maitinimo.
- Jei nutraukimas tampa skausmingas, nustokite ir pasitarkite su maitinimo krūtimi konsultantu ar
sveikatos priežiūros specialistu.
Kaip naudotis pientraukiu
1 Kruopščiai nusiplaukite rankas ir užtikrinkite, kad krūtys būtų švarios.
2 Atsipalaiduokite patogioje kėdėje (gal bus patogiau sėdėti ant sofos, kad galėtumėte atsiremti).
Netoliese pasidėkite vandens stiklinę.
3 Prispauskite surinktą siurblio korpusą prie krūties. Spenelis turi būti sucentruotas, kad masažinė
pagalvėlė sudarytų orui nelaidų sandariklį (pav. 16).
Jei naudojamas dvigubas elektrinis pientraukis: Dvigubas elektrinis pientraukis suteikia jums
galimybę nutraukti pieną iš abiejų krūtų tuo pačiu metu. Tačiau taip pat galite naudoti prietaisą
nutraukimui iš vienos krūties tokiu pat būdu. Prijunkite abu surinktus siurblio korpusus prie
silikoninio vamzdelio ir gaubto. Mes rekomenduojame ant kito uždėti dangtelį.
4 Įsitikinkite, kad jūsų spenelis gerai atitinka pagalvėlę. Kad sužinotumėte, koks tinkamas pagalvėlės
dydis, žr. skyrių „Raskite geriausiai jums tinkančią pagalvėlę“.
5 Paspauskite įjungimo ir išjungimo mygtuką (pav. 17).
- Pientraukis automatiškai pradeda veikti stimuliavimo režimu, įjungimo ir išjungimo mygtukas bei
stimuliavimo mygtukas nušvinta.
- Krūtimi pradėsite jausti siurbimą.
6 Kai pienas pradės tekėti, galima sulėtinti ritmą, paspaudžiant mažiausio siurbimo mygtuką (pav. 18).
- Šis mygtukas nušvinta vietoj stimuliavimo mygtuko..
Pastaba. Nesijaudinkite, jei pienas nepradės tekėti iš karto. Atsipalaiduokite ir tęskite siurbimą.
Pirmus kelis kartus naudojant pientraukį jums gali tekti panaudoti didesnio siurbimo režimą, kad
pienas pradėtų tekėti.
7 priklausomai nuo to, kaip jums patogu, galite naudoti didesnio siurbimo režimą, kuris užtikrina
gilesnį siurbimą. Visada galite grįžti į mažesnio siurbimo režimą (pav. 19). Galima išjungti pientraukį
kada norite, paspaudus įjungimo ir išjungimo mygtuką (pav. 20).
Pastaba. Neprivalote naudotis visais traukimo režimais, naudokite tik tuos, kurie jums patogūs.
Įspėjimas. Visada išjunkite pientraukį prieš nuimant siurblio korpusą nuo krūties,
kad būtų pašalintas vakuumas.
Įspėjimas. Nebesiurbkite ilgiau kaip 5 minutes iš eilės, jei pienas neima tekėti.
Bandykite kitą kartą tą pačią dieną.
8 Kad ištrauktumėte 60–125 ml (2–4 oz) pieno iš vienos krūties, vidutiniškai reikia siurbti apie
10 min. Tačiau tai tėra orientacinis rodiklis, kiekvienai moteriai jis skirtingas.
Pastaba. Jeigu dažnai nutraukiate daugiau nei 125 ml pieno iš karto, galite pirkti ir naudoti 260 ml /
9 oz „Philips Avent“ buteliuką, kad išvengtumėte perpildymo ir išliejimo.
57

Lietuviškai
58
9 Kai traukimas baigtas, išjunkite pientraukį (pav. 20) ir atsargiai nuimkite siurblio korpusą nuo krūties.
10 Atsukite buteliuką nuo siurblio korpuso. Turite kelias parinktis:
- Įstatykite dezinfekuotą sandarinimo diską į dezinfekuotą užsukamą žiedą ir užsukite jį ant buteliuko
(pav. 21). Nutrauktas pienas buteliuke yra paruoštas laikymui.
- Arba surinkite dezinfekuotą čiulptuką ir užsukamą žiedą ant buteliuko pagal instrukcijas
(žr. 'Maitinimas'). Užsandarinkite čiulptuką kupolo formos gaubtu (pav. 22).
11 Atjunkite adapterį nuo sieninio lizdo, kad atjungtumėte prietaisą nuo elektros energijos. Atjunkite
variklio bloką nuo adapterio. Atjunkite silikoninį vamzdelį ir gaubtą nuo silikoninės diafragmos. Kad
laikyti būtų patogu, apsukite silikoninį vamzdelį aplink variklio bloką ir sąvarža pritvirtinkite gaubtą
prie vamzdelio (pav. 23).
12 Išvalykite kitas naudotas pientraukio dalis pagal instrukcijas, pateikiamas skyriuje „Valymas ir
dezinfekavimas“.
Motinos pieno laikymas
Įspėjimas. Laikykite motinos pieną tik nutrauktą nuvalytu ir dezinfekuotu siurbliu,
kad užtikrintumėte higieną.
Motinos pieną galima laikyti šaldytuve (ne durelėse) iki 48 valandų. Nutrauktą pieną būtina padėti į
šaldytuvą nedelsiant. Jei laikote pieną šaldytuve ir planuojate pridėti per dieną, pridėkite tik pieno,
nutraukto į sterilizuotą buteliuką ar laikymo puodelį. Motinos pieną šaldiklyje galima laikyti iki trijų
mėnesių, jei jis supilstytas į dezinfekuotus buteliukus, uždarytus dezinfekuotu užsukamu žiedu ir
sandarinimo disku, arba į dezinfekuotus laikymo puodelius Aiškiai pažymėkite ant buteliuko arba
laikymo puodelio nutraukimo datą ir laiką ir seniausią motinos pieną naudokite pirmiausia. Jei ketinate
kūdikį maitinti tik per 48 valandas nutrauktu pienu, galite jį laikyti šaldytuve surinktame „Philips Avent“
buteliuke ar laikymo puodelyje.
Ką daryti
- Nutrauktą pieną visuomet būtina nedelsiant atšaldyti arba užšaldyti.
- Laikykite tik dezinfekuotu pientraukiu į dezinfekuotus buteliukus surinktą pieną.
Ko nedaryti
- Niekada pakartotinai neužšaldykite atšildyto pieno.
- Niekada nepilkite ant užšaldyto motinos pieno šviežiai nutraukto pieno.
Suderinamumas
„Philips Avent“ elektrinis pientraukis suderinamas su mūsų diapazono „Philips Avent“ buteliukais ir
„Philips Avent“ laikymo puodeliais. Kai naudojate kitus „Philips Avent“ buteliukus, naudokite tokio pat
tipo čiulptuką, kuris buvo tiekiamas su tuo buteliuku. Išsamią informaciją, kaip surinkti čiulptuką, taip
pat bendrąsias valymo instrukcijas žr. skyriuose „Maitinimas“ ir „Valymas“. Šią informaciją taip galima
rasti mūsų žiniatinklio svetainėje, www.philips.com/support.
- Atsarginiai čiulptukai parduodami atskirai. Prieš maitindami kūdikį įsitikinkite,
kad naudojate tinkamo srauto čiulptuką. Norėdami įsigyti priedų ar atsarginių dalių,
apsilankykite www.shop.philips.com/service arba kreipkitės į „Philips“ platintoją.
Taip pat galite susisiekti su savo šalies „Philips“ vartotojų aptarnavimo centru.
- Nesumaišykite „Philips Avent Anti-colic“ buteliuko dalių ir čiulptukų su „Philips Avent Natural“
buteliuko dalimis. Gali netikti ir taip gali atsirasti pratekėjimų ar kitų problemų.
- Aukštos kokybės plastikinis „Philips Avent Natural“ buteliukas suderinamas su dauguma
„Philips Avent“ pientraukių, snapelių, sandarinimo diskų ir puodelių dangtelių.

Lietuviškai
Maitinimas
Galite maitinti savo kūdikį motinos pienu iš „Philips Avent“ buteliukų ir laikymo puodelių.
Jūsų vaiko saugumui ir sveikatai
Įspėjimas
Įspėjimai, siekiant išvengti žalos vaikams:
- Buteliukus ir čiulptukus visada naudokite suaugusiajam prižiūrint.
Neleiskite vaikui žaisti su smulkiomis dalimis ar vaikščioti / bėgioti
naudojant buteliukus ar puodelius.
- Niekada nenaudokite maitinimo čiulptukų kaip žindukų, kad
išvengtumėte užspringimo pavojaus.
- Nuolatinis ir per ilgas skysčio čiulpimas gali sukelti dantų ėduonį.
- Prieš maitinant kūdikį visada būtina patikrinti maisto temperatūrą,
kad būtų išvengta nudegimų.
- Išmeskite bet kokią dalį, kai pastebėsite pirmuosius apgadinimo ar
silpnumo ženklus.
- Laikykite visus nenaudojamus komponentus vaikams
nepasiekiamoje vietoje.
- Jokiu būdu nekeiskite produkto ar jo dalių. Tai gali lemti nesaugų
produkto veikimą.
Perspėjimai, kad būtų išvengta produkto apgadinimo:
- Nedėkite į įkaitintą orkaitę, plastikas gali išsilydyti.
- Plastiko medžiagos savybes gali paveikti dezinfekavimas ir aukšta
temperatūra. Dėl to gali nebetikti kupolo formos gaubtas.
- Nepalikite maitinimo žinduko tiesioginiuose saulės spinduliuose
ar karštyje, taip pat nepalikite dezinfekante ilgiau, nei
rekomenduojama, nes tai gali apgadinti produktą.
59
Prieš naudojant pirmą kartą
Prieš pirmą kartą naudodami išrinkite visas dalis, išvalykite ir pasirinktinai dezinfekuokite buteliuką.
Patikrinkite buteliuką ir maitinimo čiulptuką prieš kiekvieną naudojimą ir patampykite maitinimo
čiulptuką visomis kryptimis, kad būtų išvengta užspringimo pavojaus. Išmeskite, kai tik pastebėsite,
kad jis pažeistas ar silpnas.

Lietuviškai
60
Buteliukų valymas
Kad užtikrintumėte higieną, kaskart prieš naudojimą valykite buteliuko dalis, paminėtas skyriuje
„Valymas“. Taip pat valykite dalis prieš kiekvieną kitą naudojimą. Galite pasirinktinai dezinfekuoti,
laikydamiesi skyriuje „Dezinfekcija (pasirinktinai)“ pateikiamų instrukcijų.
Būtinai kruopščiai nusiplaukite rankas ir įsitikinkite, kad paviršiai yra švarūs prieš kontaktą su išvalytais
komponentais. Nuo per didelės valymo priemonių koncentracijos plastiko komponentai ilgainiui gali
suskilti. Taip atsitikus, iš karto juos pakeiskite. Patikrinkite buteliuką ir maitinimo čiulptuką prieš kiekvieną
naudojimą ir patampykite maitinimo čiulptuką visomis kryptimis, kad būtų išvengta užspringimo
pavojaus. Išmeskite bet kokią dalį, kai pastebėsite pirmuosius apgadinimo ar silpnumo ženklus.
Buteliukų surinkimas
Kai surenkate buteliuką, kupolo formos gaubtą būtinai dėkite ant buteliuko vertikaliai, kad čiulptukas
būtų stačias (pav. 24). Jei norite nuimti kupolo formos gaubtą, uždėkite ant jo ranką taip, kad nykštys
būtų ant gaubto (pav. 25) įdubimo. Čiulptuką bus lengviau surinkti, jei jį mausite aukštyn judindami, o
ne trauksite aukštyn tiesia linija (pav. 26). Būtinai ištraukite čiulptuką tiek, kad jo paviršius susilygiuotų
su užsukamo žiedo (pav. 27) paviršiumi.
Motinos pieno šildymas
Jei motinos pieną užšaldėte, prieš pakaitinimą jį visiškai atšildykite.
Pastaba. Skubiu atveju pieną galima atšildyti karšto vandens inde.
Pakaitinkite buteliuką ar saugojimui skirtą indelį su atšildytu ar iš šaldytuvo išimtu motinos pienu karšto
vandens inde ar buteliukų šildytuve. Nuo buteliuko nuimkite užsukamą žiedą ir sandarinimo diską,
arba nuo saugojimui skirto indelio nuimkite dangtelį.
Visada išmaišykite arba pakratykite pašildytą maistą, kad karštis pasiskirstytų tolygiai, ir prieš
maitindami patikrinkite temperatūrą. Šildydami mikrobangų krosnelėje būkite labai atsargūs, nes
šildant maistą mikrobangų krosnelėje gali susidaryti lokalizuota aukšta temperatūra.
Pastaba. Mes nerekomenduojame šildyti motinos pieno mikrobangų krosnelėje, nes kai motinos
pienas per daug sušyla, tai kenkia vitaminams ir maisto medžiagoms.
Pastaba. Pienui šildyti galite nusipirkti ir naudoti „Philips Avent“ buteliukų šildytuvą.
Buteliukų priežiūra ir laikymas
Patikrinkite buteliuką ir maitinimo čiulptuką prieš kiekvieną naudojimą ir patampykite maitinimo
čiulptuką visomis kryptimis, kad būtų išvengta užspringimo pavojaus. Išmeskite, kai tik pastebėsite,
kad jis pažeistas ar silpnas. Higienos sumetimais rekomenduojame keisti čiulptukus po 3 mėnesių
naudojimo. Laikykite čiulptukus sausoje uždengtoje talpykloje. Jei nenaudojate, nepalikite čiulptukų
saulėje ar karštyje, nepalikite dezinfekante („sterilizavimo tirpale“) ilgiau, nei rekomenduojama,
nes tai gali susilpninti čiulptuką. Nedėkite į įkaitintą orkaitę. Laikykite buteliukus sausoje vietoje.

Lietuviškai
61
Papildoma informacija
Tiekiami skirtingo srauto „Philips Avent“ čiulptukai, kad būtų galima pritaikyti prie vaiko gėrimo būdo.
Laikui bėgant galite keisti čiulptuką, pritaikydami prie individualių jūsų vaiko poreikių.
Tinkamo čiulptuko parinkimas jūsų vaikui
Tiekiami skirtingo srauto „Philips Avent“ čiulptukai, kad būtų galima pritaikyti prie vaiko gėrimo būdo.
Laikui bėgant galite keisti čiulptuką, pritaikydami prie individualių jūsų vaiko poreikių. „Philips Avent“
čiulptukai aiškiai sunumeruoti šone, kad būtų nurodytas srautas (žr. paveikslą). Būtinai naudokite
tinkamo srauto čiulptuką savo kūdikiui maitinti. Naudokite mažesnį srautą, jei jūsų vaikas springsta, jei
prateka pienas ar sunku prisitaikyti prie gėrimo spartos. Naudokite didesnį srautą, jei maitinant jūsų
vaikas užmiega, susierzina ar maitinimas užtrunka labai ilgai.
Tiekiami 0m, 0m+, 1m+, 3m+, 6m+ čiulptukai, kintamo srauto (I / II / III) ir kietam maistui (Y).
(0) Šį 0m čiulptuką galima naudoti nuo pirmosios dienos. Tai čiulptukas iš ypatingai minkšto silikono,
o srautas pats mažiausias. Idealiai tinka naujagimiams ir bet kokio amžiaus krūtimi žindomiems
vaikams. Čiulptukas turi vieną angą skysčiams, ant jo nurodytas 0 numeris.
(1) Čiulptukas 0m+ pagamintas iš ypatingai minkšto silikono. Idealiai tinka naujagimiams ir bet kokio
amžiaus krūtimi žindomiems vaikams. Ant čiulptuko nurodytas numeris 1.
(2) Čiulptukas 1m+ pagamintas iš ypatingai minkšto silikono. Idealiai tinka bet kokio amžiaus krūtimi
žindomiems vaikams. Ant čiulptuko nurodytas numeris 2.
(3) Čiulptukas 3m+ pagamintas iš ypatingai minkšto silikono. Tinka maitinti iš buteliuko vaikus nuo
3 mėnesių amžiaus. Ant čiulptuko nurodytas numeris 3.
(4) Čiulptukas nuo 6 mėnesių yra įkandimui atsparus silikoninis čiulptukas. Tvirtesnis čiulptukas idealiai
tinka maitinti iš buteliuko vaikus nuo 6 mėnesių amžiaus. Ant čiulptuko nurodytas numeris 4.
(I / II / III) kintamo srauto: aprūpintas įkandimui atspariu silikoniniu čiulptuku. Tvirtesnis čiulptukas, su
reguliuojamu srautu vaiko patogumui idealiai tinka maitinti iš buteliuko vaikus nuo 3 mėnesių amžiaus.
Ant čiulptuko yra viena įpjova viršuje skysčiui ir ženklinimas I, II, III čiulptuko kraštuose.
(Y) tirštas maistas. aprūpintas įkandimui atspariu silikoniniu čiulptuku. Tvirtesnis čiulptukas, skirtas
tirštesniam maistui ir idealiai tinka maitinti iš buteliuko vaikus nuo 6 mėnesių amžiaus. Ant čiulptuko
yra viena Y formos įpjova skysčiui ir simbolis Y ant čiulptuko.
Pastaba. Kiekvienas vaikas yra unikalus, ir jūsų vaiko individualūs poreikiai gali skirtis nuo srauto
spartos aprašymų.
Pastaba. (0) čiulptukas gali nebūti tiekiamas jūsų šalyje, žr. www.philips.com/avent.
Pakeitimas
Maitinimo elementai
Jei pientraukis (atskiras elektrinis pientraukis) naudojamas su baterijomis, visada naudokite keturias
1,5 AA baterijas (arba 1,2 V, jei tai pakartotinai įkraunamos baterijos). Išimkite pakartotinai įkraunamas
baterijas variklio bloko prieš jas įkraudami.
Išimkite išeikvotas baterijas ir šalinkite jas saugiai, žr. skyrių „Perdirbimas“. Instrukcijas, kaip pakeisti
baterijas, žr. skyriuje „Paruošimas naudoti“.

Lietuviškai
62
Perdirbimas
- Šis simbolis reiškia, kad gaminio negalima išmesti kartu su įprastomis buitinėmis atliekomis
(2012/19/ES) (pav. 28).
- Šis simbolis reiškia, kad šiame gaminyje yra vienkartinių baterijų, kurių negalima išmesti su
įprastomis buitinėmis atliekomis (2006/66/EB) (pav. 29).
- Laikykitės jūsų šalyje galiojančių taisyklių, kuriomis reglamentuojamas atskiras elektros ir
elektronikos gaminių bei baterijų surinkimas. Tinkamas šalinimas padės išvengti neigiamo poveikio
aplinkai ir žmonių sveikatai.
Baterijų išėmimas
Norėdami išimti baterijas iš prietaiso (tik atskiro elektrinio pientraukio), atlikite toliau nurodytus
veiksmus.
1 Prieš išimdami baterijas įsitikinkite, kad variklio blokas išjungtas ir adapteris atjungtas.
2 Norėdami išimti baterijas, pasukite variklio bloko apačią kryptimi, nurodyta žymėmis ant dugno
(1 veiksmas), ir nuimkite (2 veiksmas (pav. 30)).
3 Išimkite keturias 1,5 V AA baterijas (arba 1,2 V, jei tai pakartotinai įkraunamos baterijos), iš baterijų
korpuso.
4 Vėl prijunkite dugną prie variklio bloko.
Priedų užsakymas
Norėdami įsigyti priedų ar atsarginių dalių, apsilankykite www.shop.philips.com/service arba
kreipkitės į „Philips“ platintoją. Taip pat galite susisiekti su „Philips“ klientų aptarnavimo centru savo
šalyje (kontaktinius duomenis žr. tarptautinės garantijos lankstinuke).
Priedai
Papildomi elementai
Gali būti įtraukti tolesni elementai Su jūsų pientraukiu tiekiamų elementų sąrašą žr. skyriuje „Bendrasis
aprašymas“.
- Vienkartinės krūtų pagalvėlės
- Dangtis
- Sandarinimo diskai
- Kelioninis krepšys

Lietuviškai
Garantija ir pagalba
Jei reikia informacijos ar pagalbos, apsilankykite www.philips.com/support arba perskaitykite
tarptautinės garantijos lankstinuką.
Trikčių diagnostika ir šalinimas
Šiame skirsnyje apibendrintos dažniausios problemos, su kuriomis galite susidurti naudodami
prietaisą. Jei toliau pateikta informacija nepadės išspręsti problemos, apsilankykite
www.philips.com/support, ten rasite dažnai užduodamų klausimų sąrašą, arba kreipkitės į savo
šalies klientų aptarnavimo centrą.
Problema Sprendimas
Kai naudoju pientraukį,
jaučiu skausmą.
Pientraukis susibraižė. Reguliariai naudojant šioks toks nedidelis subraižymas yra normalus ir
Nustokite naudoti pientraukį ir pasitarkite su maitinimo krūtimi
konsultantu. Jei pientraukį sunku nuo krūties nuimti, kad panaikintumėte
vakuumą, turite tarp krūties ir masažinės pagalvėlės įkišti pirštą.
nesukelia problemų. Tačiau, jei pientraukio dalis labai susibraižo arba
suskyla, nustokite naudoti pientraukį ir susisiekite su „Philips“ klientų
aptarnavimo centru arba apsilankykite www.shop.philips.com/service,
kad gautumėte atsarginę dalį. Žinokite, kad ploviklių, valymo produktų,
dezinfekavimo tirpalo, paminkštinto vandens deriniai ir temperatūros
iuktuacijos tam tikromis sąlygomis lemia plastiko skilimą. Venkite
kontakto su abrazyviniais arba antibakteriniais plovikliais, nes jie gali
apgadinti plastiką.
63
Pientraukis neveikia
ir mirksi įjungimo /
išjungimo mygtukas.
Nejaučiu siurbimo. Patikrinkite, ar tinkamai surinkote pientraukį, tam atlikite skyriuje
Siurblys per stipriai
siurbia.
Pirmiausia patikrinkite, ar tinkamai surinkote pientraukį, ir įsitikinkite, kad
vamzdelis neperlinkęs.Kad užkirstumėte kelią trukdžiams, laikykite kitą
elektros įrangą, kaip mobilųjį telefoną ar nešiojamąjį kompiuterį, atokiau
nuo pientraukio per nutraukimą.Jei naudojate atskirą elektrinį pientraukį
su baterijomis, keiskite baterijas, kaip nurodyta naudotojo vadovo
instrukcijose.Jei naudojate pientraukį, veikiantį prijungus elektros energiją,
būtinai naudokite adapterį, tiekiamą su produktu.Jei problema išlieka,
susiekite su klientų aptarnavimo centru adresu www.philips.com/support.
„Pasiruošimas naudoti“ nurodytus veiksmus. Įsitikinkite, kad silikoninis
vamzdelis tvirtai prijungtas prie variklio bloko ir gaubto su diafragma.
Įsitikinkite, kad siurblio padėtis prie krūties tinkama, kad galėtų susidaryti
vakuumas. Jei vis dar nejaučiate siurbimo, susiekite su klientų aptarnavimo
centru adresu www.philips.com/support.
Laikykitės tolesnių nurodymų, jei jaučiate per stiprų jūsų pientraukio
siurbimą:
– Įsitikinkite, kad naudojate tik „Philips Avent Comfort“ pientraukio dalis.
– Įsitikinkite, kad tinkamai surinkote „Comfort“ pientraukį ir masažinę
pagalvėlę: nenaudojant masažinės pagalvėlės gali susidaryti per didelis
vakuumas.
– Kai naudojate pientraukį pirmą kartą, iš pradžių siurbimas jums gali
pasirodyti per stiprus. Praktika gali suteikti naudos.Jei problema išlieka,
pasitarkite su maitinimo krūtimi konsultantu.

Lietuviškai
64
Papildoma informacija
Toliau aprašytos su maitinimu krūtimi susijusios bendrosios būklės. Jei patiriate bet kurį iš šių
simptomų, susisiekite su sveikatos priežiūros specialistu arba maitinimo krūtimi konsultantu.
Simptomas
Skausmo pojūtis Jaučiamas krūties arba spenelio skausmas.
Žaizdoti speneliai Jaučiamas spenelių skausmas siurbimo laikotarpio pradžioje arba tai trunka
Pritvinkimas Krūties ištinimas. Krūtis gali būti jaučiama kieta, gumbuota ir skausminga.
Mėlynė, trombas Spalvos pasikeitimas į raudonai mėlyną, nepabąla paspaudus. Kai mėlynė
Pūslėtumas Atrodo kaip mažos pūslelės odos paviršiuje.
Sužalotas spenelio
audinys (spenelio
trauma).
Kraujavimas. Suskilinėję arba įplyšę speneliai gali lemti paveiktos srities kraujavimą.
Užkimšti pieno latakai. Raudonas, skausmingas krūties gumbas. Galima krūties srities eritema
visą siurbimo laikotarpį, arba skauda tarp seansų, labai panašiai į skausmą,
jaučiamą maitinant krūtimi.
Galima krūties srities eritema (paraudimas) ir pakilusi temperatūra.
nyksta, ji tampa žalia ir ruda.
– Įplyšę arba sutrūkinėję speneliai.
– Odos audinys lupasi nuo spenelio. Paprastai būna kartu su
sutrūkinėjusiais speneliais ir (arba) pūslelėmis.
– Spenelio įplėšimas.
(paraudimas) ir pakilusi temperatūra. Negydant gali sukelti mastitą (krūties
uždegimą).
Techninė informacija
EMS informacija
Naudojant „Philips Avent“ pientraukį reikia imtis specialių atsargumo priemonių, susijusių su EMS, jį
reikia sumontuoti ir perduoti eksploatacijai pagal EMS informaciją, pateikiamą šiame skyriuje.
Nešiojamoji ir mobilioji RD ryšių įranga gali paveikti „Philips Avent“ pientraukį.
Elektroninis pientraukis nepasižymi esminiu veiksmingumu. Dėl EMS įtakos, pvz., belaidės namų
tinklo įrangos, mobiliųjų telefonų ar belaidžių telefonų, pientraukis gali išsijungti arba persijungti į
klaidos režimą. Tai nelems nepriimtinos rizikos. Kad užkirstumėte kelią trukdžiams, laikykite kitą įrangą
mažiausiai 1,0 m / 3,3 pėdos atstumu nuo pientraukio per nutraukimą ir nekraukite į rietuvę su kita
elektros įranga. Adapterio kabelio ilgis: 2,50 metro / 8,2 pėdos.
Elektromagnetinis suderinamumas (EMS, IEC 60601-1-2)
Deklaracija – elektromagnetinė spinduliuotė
„Philips Avent“ pientraukis skirtas naudoti toliau nurodytoje elektromagnetinėje aplinkoje.
Naudojantys „Philips Avent“ pientraukį turi užtikrinti, kad jis būtų naudojamas tokioje aplinkoje.

Lietuviškai
65
Spinduliuotės
Atitiktis Elektromagnetinė aplinka – nurodymai
testas
RD spinduliuotė
CISPR 11
RD spinduliuotė
CISPR 11
Harmoninė
spinduliuotė IEC
61000-3-2
Įtampos
iuktuacijos
/ mirgėjimo
spinduliuotė IEC
61000-3-3
Deklaracija – elektromagnetinis atsparumas
„Philips Avent“ pientraukis skirtas naudoti toliau nurodytoje elektromagnetinėje aplinkoje.
Naudojantys „Philips Avent“ pientraukį turi užtikrinti, kad jis būtų naudojamas tokioje aplinkoje.
ATSPARUMO testas IEC 60601 testo
Elektrostatinė iškrova
(ESI) IEC 61000-4-2
Elektros spartusis
perėjimas / šuolis IEC
61000-4-4
ViršįtampisIEC 610004-5
1 grupė „Philips Avent“ pientraukis RD energiją naudoja tik savo
B klasė
A klasė
Atitinka
vidinėms funkcijoms. Todėl RD spinduliuotė yra labai maža
ir neturėtų lemti jokių trukdžių šalia esančiai elektroninei
įrangai.
„Philips Avent“ pientraukis tinka naudoti visokioje aplinkoje,
įskaitant buitinę aplinką ir tokią, kuri tiesiogiai prijungta prie
viešojo žemosios įtampos maitinimo tinklo, maitinančio
pastatus, naudojamus buitiniais tikslais.
Atitikties lygis Elektromagnetinė
lygis
± 6 kV kontaktas± 8 kV
oras
± 2 kV maitinimo
tiekimo linijoms
± 1 kV tarp linijų ± 1 kV tarp linijų Tinklo maitinimo
± 6 kV kontaktas± 8 kV
oras
± 2 kV maitinimo
tiekimo linijoms
aplinka – nurodymai
Grindys turi būti
medinės, betoninės
arba keramikos plytelių.
Jei grindys padengtos
sintetine medžiaga,
santykinė drėgmė turi
būti mažiausiai 30 %.
Tinklo maitinimo
kokybė turi būti
tipiška gyvenamajai ar
ligoninės aplinkai.
kokybė turi būti
tipiška gyvenamajai ar
ligoninės aplinkai.

Lietuviškai
66
ATSPARUMO testas IEC 60601 testo
lygis
Įtampos kryčiai, trumpi
pertrūkiai ir įtampos
variacijos maitinimo
tiekimo linijose IEC
61000-4-11
Maitinimo dažnis(50
/ 60 Hz)magnetinis
laukasIEC 61000-4-8
Pastaba. UT yra KS tinklo įtampa prieš prijungiant testo lygį.
Deklaracija – elektromagnetinis atsparumas
„Philips Avent“ pientraukis skirtas naudoti toliau nurodytoje elektromagnetinėje aplinkoje.
Naudojantys „Philips Avent“ pientraukį turi užtikrinti, kad jis būtų naudojamas tokioje aplinkoje.
Atsparumo
testas
IEC
60601
<5 % UT (>95 % UT
krytis) 0,5 ciklo40 %
UT (60 % UT krytis) 5
ciklams70 % UT (30 %
UT krytis) 25 ciklams
<5 % UT (>95 % UT
krytis) 5 s
3 A/m 3 A/m Maitinimo dažnio
Atitikties
Elektromagnetinė aplinka – nurodymai
lygis
Atitikties lygis Elektromagnetinė
aplinka – nurodymai
<5 % UT (>95 % UT
krytis) 0,5 ciklo70 %
UT (30 % UT krytis) 25
ciklams<5 % UT (>95 %
UT krytis) 5 s
Tinklo maitinimo
kokybė turi būti
tipiška gyvenamajai
ar ligoninės aplinkai.
Jei būtina užtikrinti
nuolatinį „Philips
Avent“ pientraukio
veikimą, kai nutrūksta
maitinimas iš tinklo,
rekomenduojamas
„Philips Avent“
maitinimas naudojant
nepertraukiamo
maitinimo šaltinį arba
bateriją.Pertraukiamas
elektros tiekimas gali
lemti pientraukio
išsijungimą. Tai
priimtina, nes tai
nelems nepriimtinos
rizikos.
magnetiniai laukai turi
būti tokio lygio, kuris
būdingas tipiškai vietai
tipiškoje gyvenamojoje
ar ligoninės aplinkoje.
testo
lygis
Indukuotasis
RD IEC
61000-4-6
3 Vrms
nuo 150
kHz iki
80 MHz
3 Vrms Nešiojamoji ir mobilioji RD ryšio įranga turi būti naudojama
ne arčiau bet kokios „Philips Avent“ dalies, įskaitant kabelius,
negu rekomenduojamas atskyrimo atstumas, apskaičiuotas
naudojant lygtį, taikomą siųstuvo dažniui.Rekomenduojamas
atskyrimo atstumas d=1,17 √P Pientraukį galima išjungti.

Lietuviškai
67
Atsparumo
testas
IEC
60601
Atitikties
lygis
Elektromagnetinė aplinka – nurodymai
testo
lygis
Spinduliuojamas RD IEC
61000-4-3
1 pastaba: esant 80 MHz ir 800 MHz taikomas aukštesnis dažnių diapazonas.
2 pastaba: šie nurodymai gali nebūti taikomi kiekvienai situacijai. Elektromagnetinę sklaidą veikia
sugertis ir atspindys nuo konstrukcijų, daiktų ir žmonių.
Kitų siųstuvų, kaip radijo (korinio ryšio / belaidžių) telefonų ir mobiliųjų antžeminių radijo ryšio
priemonių bazinių stočių, mėgėjiškų radijo stočių, AM ir FM radijo transliacijos ir TV transliacijos lauko
stiprumo teoriškai tiksliai prognozuoti negalima. Norint įvertinti elektromagnetinę aplinką, kuriai turi
įtakos ksuoti RD siųstuvai, reikia atlikti elektromagnetinį vietos tyrimą. Jei išmatuotas lauko stiprumas
vietoje, kurioje naudojamas „Philips Avent“ pientraukis viršija anksčiau nurodytą taikomą RD atitikties
lygį, būtina stebėti, ar „Philips Avent“ pientraukis veikia normaliai. Jei stebimas nenormalus veikimas,
gali prireikti papildomų priemonių, pvz., pakeisti „Philips Avent“ pientraukio orientaciją arba vietą.
Dažnių diapazone nuo 150 kHz iki 80 MHz lauko stiprumas turi būti mažesnis kaip 3 V/m.
Rekomenduojami atskyrimo atstumai tarp nešiojamosios ir mobiliosios RD ryšių įrangos ir „Philips
Avent“ pientraukio.
„Philips Avent“ pientraukis skirtas naudoti namų sveikatos priežiūros aplinkoje, kurioje spinduliuojami
RD trukdžiai nekontroliuojami.
„Philips Avent“ pientraukio naudotojai gali padėti išvengti elektromagnetinių trukdžių, išlaikydami
minimalų atstumą tarp nešiojamosios ir mobiliosios RD ryšio įrangos (siųstuvų) ir „Philips Avent“
pientraukio, kaip rekomenduojama toliau, pagal maksimalią ryšio įrangos išėjimo galią.
3 V/m
nuo 80
MHz iki
2,5 GHz
3 V/m Nuo 80 MHz iki 800 MHz d=1,17 √P Nuo 800 MHz iki 2,5 GHz
d=2,33 √P čia P yra maksimali siųstuvo išėjimo galia vatais (W)
gamintojo duomenimis, o d yra rekomenduojamas atskyrimo
atstumas metrais (m).Fiksuotų RD siųstuvų lauko stiprumas,
kaip nustatyta atliekant elektromagnetinį vietos tyrimą, turi būti
mažesnis, negu atitikties lygis kiekviename dažnio diapazone.
Trukdžiai galimi arti įrangos, paženklintos tolesniu simboliu:
Atsargiai! Nors pientraukis atitinka taikomas EMS direktyvas,
jis vis tiek gali būti jautrus per didelei spinduliuotei ir (arba) jis
gali sudaryti trikdžius kitai įrangai. Pasekmės gali būti tokios,
kad pientraukis išsijungs arba pradės mirksėti įjungimo ir
išjungimo mygtukas (išsamesnę informaciją žr. trikčių šalinimo
skyriuje), tai yra priimtina ir nelems nepriimtinos rizikos. Kad
užkirstumėte kelią trukdžiams, laikykite kitą elektros įrangą
atokiau nuo pientraukio per nutraukimą.

Lietuviškai
68
Atskyrimo atstumas pagal siųstuvo dažnį, m
Nurodytoji siųstuvo
išėjimo galia, W
0,01 0,12 0,12 0,23
0,1 0,38 0,38 0,73
1 1,2 1,2 2,3
10 3,8 3,8 7,3
100 12 12 23
Siųstuvams, kurių nurodytoji maksimali išėjimo galia aukščiau nenurodyta, rekomenduojamas
atskyrimo atstumas metrais (m) d gali būti įvertintas naudojant lygtį, taikomą siųstuvo dažniui, o P yra
maksimali nurodytoji siųstuvo išėjimo galia vatais (W) siųstuvo gamintojo duomenimis.
1 PASTABA: esant 80 MHz ir 800 MHz taikomas atskyrimo atstumas didesniam dažnių diapazonui.
2 PASTABA: šie nurodymai gali nebūti taikomi kiekvienai situacijai. Elektromagnetinę sklaidą veikia
sugertis ir atspindys nuo konstrukcijų, daiktų ir žmonių.
nuo 150 kHz iki
80 MHz už ISM juostų
ribųd=1,17 √P
nuo 80 MHz iki
800 MHzd=1,17 √P
nuo 800 MHz iki
2,5 GHz d=2,33 √P
Naudojimo ir laikymo sąlygos
Saugokite pientraukį nuo tiesioginių saulės spindulių, nes ilgesnis poveikis gali lemti spalvos
pasikeitimą. Pientraukį ir jo priedus laikykite saugioje, švarioje ir sausoje vietoje.
Jei prietaisas buvo laikomas karštoje ar šaltoje aplinkoje, padėkite jį naudojimo aplinkoje, kad jis
pasiektų naudojimo sąlygų temperatūrą (nuo 5 °C / 41 °F iki 40 °C / 104 °F) prieš jį naudojant.
Naudojimo sąlygos
Temperatūra Nuo +5 °C (41 °F) iki +40 °C (104 °F)
Santykinė drėgmė 15–93 % (be kondensato)
Atmosferos slėgis 700 ir 1060 Pa oro slėgis
Laikymo sąlygos
Temperatūra Nuo -25 °C (-13 °F) iki 70 °C (158 °F)
Santykinė drėgmė 15–93 % (be kondensato)

Lietuviškai
Techninės specikacijos
Adapteris nėra medicininės elektros įrangos dalis, o atskiras medicininės elektros įrangos maitinimo
šaltinis.
Tinklo įėjimo įtampa: 100–240 V
Tinklo įėjimo srovė: 1000 mA
Tinklo įėjimo dažnis: 50–60 Hz
69
Baterijos (tik atskiro elektrinio
pientraukio):
Atskiras elektrinis pientraukis Adapterio tipo numeris: VS0332
Dvigubas elektrinis pientraukis Adapterio tipo numeris: VT0334
Pakartotinai neįkraunamos baterijos: 4 x 1,5 V AA
Pakartotinai įkraunamos baterijos: 4 x 1,2 V, min. talpa 2000 mAh,
maks. talpa 2100 mAh.
Išėjimo įtampa: 5 V
Išėjimo srovė: 1000 mA
Srovės tipas: NS
Apsaugos klasė: 2 klasė
Išėjimo įtampa: 9 V
Išėjimo srovė: 1100 mA
Srovės tipas: NS
Apsaugos klasė: 2 klasė

Lietuviškai
70
Simbolių paaiškinimas
Įspėjimo ženklai ir simboliai būtini, norint užtikrinti, kad jūs naudosite šitą produktą saugiai ir tinkamai
bei apsaugoti jus ir kitus nuo sužalojimo. Toliau rasite etiketėje ir naudotojo vadove esančių įspėjimo
ženklų ir simbolių paaiškinimą.
Simbolis „Vykdykite naudojimo instrukcijas“.
Nurodo, kad naudotojui būtina peržiūrėti naudojimo instrukcijose pateikiamą svarbią su
atsargumu susijusią informaciją, kaip įspėjimai ir atsargumo priemonės, kurių dėl įvairių
priežasčių negalima pateikti ant paties medicinos prietaiso.
Nurodo naudojimo patarimus, papildomą informaciją ar pastabą.
Nurodo gamintoją, kaip apibrėžta IEC 60601-1, tai apima nuorodą į ISO 15223-1:2012.
Nurodo pagaminimo datą
Šis simbolis reiškia, kad prietaiso dalis, kuri ziškai liečia naudotoją (taip pat vadinama s
pacientu besiliečiančia dalimi) yra BF („Body Floating“, izoliuota nuo žemės su pacientu
besiliečianti) dalis pagal IEC 60601-1. Besiliečiančios yra 3 ir 4 dalys, nurodytos bendrojoje
aprašymo apžvalgoje (A pav.)
Simbolis reiškia II klasės įrangą. Adapteris yra dvigubai izoliuotas (II klasė).
Nurodo prietaiso gamintojo katalogo numerį.
Nuolatinės srovės simbolis.
Kintamosios srovės simbolis.
Atitiktis žemosios įtampos direktyvai.
Atskiras elektros ir elektroninės įrangos surinkimas pagal ES direktyvą. Elektros produktų
atliekos negali būti šalinamos su buitinėmis atliekomis. Daugiau informacijos žr. skyriuje
„Perdirbimas“.
Paspauskite mygtuką, kad įjungtumėte ir išjungtumėte.
IP22: pirmasis skaičius 2: apsaugota nuo kietų pašalinių 12,5 mm ir didesnio skersmens
daiktų. Antrasis skaičius: apsaugota nuo vertikaliai krintančių vandens lašų, kai gaubtas
pakreiptas iki 15°. Vertikaliai krintantys lašai neturės neigiamo poveikio, kai gaubtas
pakreiptas iki 15° kampu nuo vertikalės į bet kurią pusę.

Lietuviškai
Nurodo gamintojo serijos numerį, kad būtų galima identikuoti konkretų medicinos įtaisą.
Eurazijos bendrijos ženklas
2 metų „Philips“ garantijos simbolis.
Maitinimas baterijomis (tik atskiras elektrinis pientraukis)
UL („Underwriters Laboratories“) testavimas pagal buitinį standartą
RCM žymelė – Australija
Partijos numeris
Elgtis atsargiai
Laikyti sausai
Nurodo santykinės drėgmės, kurios poveikis prietaisui saugus, ribas: 15–93 %.
71
104°F
40°C
41°F
5°C
Nurodo laikymo ir gabenimo temperatūros, kurios poveikis medicinos įtaisui saugus, ribas:
nuo 5 °C iki 40 °C / nuo 41 °F iki 104 °F
„Forest Stewardship Council“ (Miškų priežiūros taryba) – FSC prekių ženklai suteikia
galimybę vartotojams pasirinkti produktus, kuriais palaikomas miškų išsaugojimas, siūloma
socialinė nauda ir rinkai suteikiama galimybė teikti geresnio miškų tvarkymo iniciatyvą.

Magyar
72
Tartalom
Bevezetés ___________________________________________________________________________73
Általános leírás („A” ábra) ______________________________________________________________73
Használat célja _______________________________________________________________________74
Fontos biztonsági tudnivalók ___________________________________________________________74
Ellenjavallatok _______________________________________________________________________74
Előkészítés a használatra ______________________________________________________________75
Tisztítás és fertőtlenítés ________________________________________________________________75
A legmegfelelőbb párna kiválasztása _____________________________________________________ 77
A mellszívó összeszerelése _____________________________________________________________ 77
A mellszívó használata ________________________________________________________________78
Mikor kell lefejni az anyatejet ___________________________________________________________78
Tippek ______________________________________________________________________________79
A mellszívó működtetése ______________________________________________________________79
Az anyatej tárolása __________________________________________________________________ 80
Kompatibilitás _______________________________________________________________________ 81
Etetés ______________________________________________________________________________ 81
Gyermeke egészségéért és biztonságáért ________________________________________________ 81
Teendők az első használat előtt _______________________________________________________ 82
A cumisüvegek tisztítása ______________________________________________________________ 82
A cumisüvegek összeszerelése _________________________________________________________ 82
Az anyatej melegítése ________________________________________________________________ 83
A cumisüvegek karbantartása és tárolása ________________________________________________ 83
További információk _________________________________________________________________ 83
A megfelelő etetőcumi kiválasztása gyermeke számára ____________________________________ 83
Csere ______________________________________________________________________________ 84
Elemek ____________________________________________________________________________ 84
Ujrahasznositas _____________________________________________________________________ 84
Az elemek eltávolítása ________________________________________________________________ 85
Tartozékok rendelése ________________________________________________________________ 85
Tartozékok _________________________________________________________________________ 85
Kiegészítő darabok __________________________________________________________________ 85
Garancia és terméktámogatás _________________________________________________________ 85
Hibaelhárítás _______________________________________________________________________ 85
Kiegészítő tudnivalók __________________________________________________________________87
Műszaki információ ___________________________________________________________________87
Az elektromágneses összeférhetőségre (EMC) vonatkozó tudnivalók __________________________87
Használati és tárolási feltételek _________________________________________________________ 91
Műszaki jellemzők ___________________________________________________________________ 92
Szimbólumok magyarázata ____________________________________________________________ 92

Magyar
73
Bevezetés
Köszönjük, hogy Philips terméket vásárolt, és üdvözöljük a Philips Avent világában! A Philips Avent
által biztosított teljes körű támogatáshoz regisztrálja termékét a www.philips.hu/myphilips/login
oldalon.
A Philips Avent mellszívó egyedi kialakítású, mely lehetővé teszi, hogy fejés közben minél
kényelmesebben üljön. A puha masszázspárnát* úgy alakították ki, hogy lágy és meleg érzést
biztosítson és utánozza a csecsemő szopási tevékenységét, hogy ezáltal biztosítsa a tej gyors leadását
– kényelmesen és kíméletesen. A mellszívó kímélő módban indul, ezzel serkentve a tejáramlást. Ezt
követően három szívás mód közül választhat, a saját kényelmét tartva szem előtt.
A mellszívó könnyen összeszerelhető és használható, és az anyatejjel érintkezésbe lépő valamennyi
tartozék mosogatógépben mosható.
Az egészségügyi szakemberek ajánlása szerint az anyatej a csecsemők legjobb tápláléka életük
első évében, amit az első 6 hónap után szilárd táplálékkal lehet kiegészíteni. Az anyatej speciálisan
igazodik kisbabája igényeihez, valamint antitesteket is tartalmaz, amelyek segítenek megvédeni
a csecsemőt a fertőzésekkel és az allergiával szemben. A mellszívó segíthet abban, hogy tovább
szoptathasson. Lefejheti és tárolhatja az anyatejet, hogy a kisbabája továbbra is élvezhesse az anyatej
nyújtotta előnyöket akkor is, ha éppen nem tud mellette lenni, hogy megszoptassa. Mivel a mellszívó
kompakt, működése csendes és a használata diszkrét, bárhová magával viheti, igény szerint bármikor
lefejheti az anyatejet, ezáltal fenntartva a tejtermelést.
A mellszívót csak háztartási használatra terveztük.
*A mellszívóhoz mellékelt párnát úgy tervezték, hogy a szoptatós anyák többségére kényelmesen
illeszkedjen. Ha azonban más méretre lenne szüksége, külön vásárolható nagyobb párna.
Általános leírás („A” ábra)
„A” ábra Az alábbi számok ennek a használati útmutatónak az elején található kihajtható oldalon
lévő ábrákon látható számoknak felelnek meg.
1 Motoregység szilikon csővel és hozzá tartozó szilikon dugóval *
2 Szilikon membrán *
3 Mellszívótest *
4 Masszázspárna *
5 Fedél *
6 Elemtartó ház (kizárólag szimpla típusú elektronikus mellszívó)
7 Be- és kikapcsológomb
8 Stimulálás gomb
9 Gyenge szívás gomb
10 Közepes szívás gomb
11 Erős szívás gomb
12 Adapter
13 Fehér szelep *
14 Philips Avent Natural cumisüveg *
15 Kupak *
16 Leszorító gyűrű *
17 Mellbimbó *
18 Tejzáró *
*Megjegyzés: A dupla típusú elektromos mellszívó a megjelölt részekből két darabbal van ellátva,
a motoregység kivételével.
Az SCF332 tartalma: szimpla típusú elektronikus mellszívó (1 cumisüveggel), melltartóbetétek
Az SCF334 tartalma: dupla típusú elektronikus mellszívó (2 cumisüveggel), melltartóbetétek, utazótáska

Magyar
74
Használat célja
A Philips Avent Comfort Single/Twin (szimpla vagy dupla típusú) elektromos mellszívó alkalmas a
szoptató édesanyák anyatejének lefejésére és gyűjtésére.
A készüléket egyszerre egy felhasználó tudja igénybe venni.
Fontos biztonsági tudnivalók
A mellszívó első használata előtt gyelmesen olvassa el a használati útmutatót, és őrizze meg a
későbbi használatra.
Ezt a használati útmutatót megtalálhatja a Philips Avent weboldalán is: https://www.philips.hu/c-m-mo/
Ellenjavallatok
A várandósság során soha ne használja a mellszívót, mivel a fejés megindíthatja a szülést.
Vigyázat!
Figyelmeztetések a fulladás vagy sérülések elkerülésének érdekében:
- Ne engedje, hogy a gyermekek vagy háziállatok játsszanak a motoregységgel, az adapterrel vagy a
tartozékokkal.
- Ügyeljen rá, hogy gyermekek ne játsszanak a készülékkel.
- Használat után mindig azonnal húzza ki a mellszívó csatlakozódugóját a konnektorból.
- Ne hagyja felügyelet nélkül a konnektorhoz csatlakoztatott mellszívót.
- A mellszívót nem arra tervezték, hogy gyermekek vagy csökkent zikai, érzékelési vagy szellemi
képességekkel rendelkező személyek, vagy a működtetésben járatlan vagy kellő ismerettel nem
rendelkező személyek használják. Az ilyen személyek csak felügyelet mellett használhatják a
mellszívót, illetve ha a készülék működéséről megfelelő tájékoztatást kaptak a biztonságukért
felelős személytől.
Figyelmeztetések az áramütés elkerülése érdekében:
- Használat előtt minden alkalommal vizsgálja át a mellszívót, beleértve az adaptert is, hogy nem
történt-e károsodás. Ne használja a mellszívót, ha az adapter vagy a csatlakozódugó megsérült,
ha nem működik megfelelően vagy ha korábban leejtették vagy vízbe merítették.
Figyelmeztetések az égési sérülések elkerülése érdekében:
- Kizárólag a készüléken feltüntetett adaptert használja az adapter túlmelegedésének megelőzése
érdekében.
- A nem újratölthető elemeket ne próbálja meg feltölteni, a túlhevülés és a szivárgás megelőzése
érdekében.
Figyelmeztetések a mérgezés vagy szennyeződés elkerülésének, valamint a higiénia fenntartása
érdekében:
- Higiéniai okokból, a mellszívót egy édesanya számára tervezték, többszöri használatra.
- Minden egyes használat előtt tisztítsa meg, öblítse le és fertőtlenítse a mellszívó minden tartozékát,
kivéve a motoregységet, a szilikon csövet, a hozzá tartozó szilikon dugót és az adaptert.
- Csak megtisztított és fertőtlenített mellszívóval lefejt anyatejet szabad tárolni.
- Ne használja a mellszívót, ha a szilikon membrán sérültnek vagy szakadtnak tűnik. A „Tartozékok
rendelése” című fejezet tartalmazza a cserélendő részek beszerzésével kapcsolatos információkat.
- A mellszívó tartozékainak tisztításához ne használjon antibakteriális vagy dörzshatású tisztítószert.
- Amennyiben hosszabb ideig nem kívánja használni a készüléket, távolítsa el az elemeket az
elemek szivárgásának megelőzése érdekében.

Magyar
Figyelmeztetések a mellel és a mellbimbóval kapcsolatos problémák és fájdalmak elkerülése
érdekében:
- Ne kísérelje meg levenni a melléről a mellszívótestet, amíg az vákuum alatt van. Kapcsolja ki a
készüléket, majd az ujja segítségével lazítsa meg a melle és a mellszívó harangja közötti vákuumot.
Távolítsa el a pumpát a melléről.
- Ha nagyon fáradt és álmos, ne használja a mellszívót, mert így nem képes odagyelni a használat
közben.
- Mindig kapcsolja ki a mellszívót, ezáltal megszüntetve a vákuumot, mielőtt levenné a melléről a
mellszívótestet.
- Ne használjon más gyártótól származó, vagy a Philips Avent által jóvá nem hagyott tartozékot
vagy alkatrészt. Ez a készülék nem megfelelő működéséhez vezethet és hatással lehet az
elektromágneses összeférhetőségre (EMC) is. Ha ilyen tartozékokat vagy alkatrészeket használ,
a jótállás érvényét veszti.
- Ha eredménytelen a fejés, akkor egyszerre 5 percnél tovább ne folytassa a műveletet. Próbálja
meg a fejést a nap másik időszakában.
- Ha a fejés nagyon kényelmetlenné vagy fájdalmassá válik, hagyja abba a mellszívó használatát,
és forduljon védőnőhöz vagy egészségügyi szakemberhez.
- Ha a készülék által létrehozott szívás kellemetlen vagy fájdalmas, kapcsolja ki a készüléket, az ujja
segítségével lazítsa meg a melle és a mellszívótest harangja közötti vákuumot, majd vegye le a
mellszívót.
- Soha ne dobjon vagy helyezzen be idegen tárgyat a készülék valamely nyílásába.
Figyelem!
Óvintézkedések a termék károsodásának és meghibásodásának elkerülése érdekében:
- Ügyeljen rá, hogy az adapter és a motoregység ne érintkezzen vízzel.
- Az adaptert és a szilikon csöveket tartsa távol felmelegedett felületektől a túlhevülés és ezen
részek deformálódásának elkerülése érdekében.
- Soha ne tegye a motoregységet vagy az adaptert vízbe, mosogatógépbe vagy sterilizálóba.
- Bár a mellszívó megfelel a vonatkozó EMC-irányelveknek, ettől függetlenül előfordulhat, hogy a
készülék érzékeny a túlzott kibocsátásra, és/vagy zavarhatja a többi készüléket. Ezek hatására a
mellszívó kikapcsolhat vagy hibát jelezhet. Az interferencia megelőzése érdekében, tartsa az egyéb
elektromos berendezéseket távol a mellszívótól a fejés (lásd: 'Műszaki információ') ideje alatt.
- A mellszívó motoregységének belsejében nem találhatók házilag javítható alkatrészek.
A berendezés mindennemű átalakítása tilos. Ellenkező esetben a jótállás érvényét veszti.
- Ne zárja rövidre az elemcsatlakozókat!
75
Előkészítés a használatra
Tisztítás és fertőtlenítés
A motoregységet, a szilikon csövet, a hozzá tartozó szilikon dugót és az adaptert nem szükséges
tisztítani és fertőtleníteni, mivel azok nem kerülnek kapcsolatba az anyatejjel. A mellszívó valamennyi
egyéb tartozékát tisztítsa meg és fertőtlenítse az első használat előtt. Ezeket a tartozékokat minden
használat után meg kell tisztítani és fertőtleníteni kell őket minden ezt követő használat előtt.
Figyelem! Soha ne tegye a motoregységet vagy az adaptert vízbe, mosogatógépbe vagy
fertőtlenítőbe, mivel ez az alkatrészek végleges károsodását okozhatja.

Magyar
76
Tisztítható részek
Tisztítsa meg a következő részeket (az első) használat előtt, illetve a későbbiekben minden használat
után. Ellenőrizze az „Általános leírás” részben található listán, hogy a kiválasztott mellszívóhoz milyen
tartozékok tartoznak.
A mellszívó részei:
- Szilikon membrán
- Mellszívótest
- Masszázspárna
- Fehér szelep
- Fedél
Cumisüveg részei:
- Philips Avent Natural cumisüveg
- Kupak
- Leszorító gyűrű
- Cumi
- Tejzáró
A tisztításhoz szükséges eszközök:
Mosogatás mosogatóban Mosogatás mosogatógépben
- Enyhe mosogatószer - Enyhe mosogatószer folyékony/tabletta
- Jó minőségű ivóvíz - Jó minőségű ivóvíz
- Puha kefe vagy tiszta konyharuha
- Tiszta mosogatótálca vagy tál
Figyelmeztetés: A tisztításához ne használjon antibakteriális vagy dörzshatású
tisztítószert.
1 Teljesen szerelje szét a mellszívót és a cumisüveget. Távolítsa el a fehér szelepet is a mellszívóból.
Figyelem! Legyen óvatos a fehér szelep eltávolításakor és tisztításakor. Ha a szelep megsérül,
akkor a mellszívó nem fog megfelelően működni. A fehér szelep eltávolításához óvatosan húzza
meg a szelep oldalán lévő bordázott fület.
2 Öblítse el az összes részt mosogatótálcában vagy mosogatógép segítségével.
Mosogatás mosogatóban: Szedje szét a részeket és 5 percig áztassa őket enyhén mosogatószeres
forró vízben. Valamennyi részt tisztítsa meg puha kefével vagy tiszta konyharuhával, majd teljesen
(ábra 2) szárítsa meg őket.
Mosogatás mosogatógépben: A motoregység, a szilikon cső és a hozzá tartozó szilikon dugó,
valamint az adapter kivételével, tisztítsa meg a részeket mosogatógépben (csak a felső kosárban).
Megjegyzés: A szelepet úgy tudja megtisztítani, hogy enyhén mosogatószeres meleg vízben az ujjai
között noman megdörzsölgeti. Ne nyomjon bele semmit a szelepbe, mert a szelep megsérülhet.

Magyar
77
Fertőtlenítés (opcionális)
A tisztítást követően, ha fertőtleníteni kívánja a tartozékokat, akkor kifőzheti őket egy edényben.
A fertőtlenítéshez szükséges eszközök:
- Edény
- Jó minőségű ivóvíz
Fertőtlenítse (főzze ki) a tartozékokat a következőképpen:
Töltsön egy edénybe annyi vizet, amennyi elfedi majd a tartozékokat. Forralja fel a vizet. Helyezze a
tartozékokat az edénybe és forralja őket 5 percig (ábra 3). A forró vizes fertőtlenítés (kifőzés) során
ellenőrizze, hogy a cumisüveg és a tartozékok ne érintkezzenek az edény oldalával. Ellenkező esetben
a termék maradandóan deformálódhat vagy sérülhet, ezekért pedig a Philips nem vállal felelősséget.
Várja meg, amíg a víz lehűl, majd óvatosan vegye ki a tartozékokat a vízből. Helyezze a tartozékokat
egy tiszta papírtörlőre vagy tiszta edényszárító állványra és hagyja őket teljesen megszáradni.
Lehetőség szerint ne használjon a tartozékok szárítására konyharuhát, mert lehetnek rajta olyan
kórokozók és baktériumok, amelyek ártalmasak a babára.
A legmegfelelőbb párna kiválasztása
Az anyatej fejése optimális esetben kényelmes művelet. Éppen ezért 3 fajta puha, rugalmas párnát
bocsátunk rendelkezésre: egy 19,5 mm-es masszázspárnát (a mellszívóhoz mellékelve) és egy
25 mm-es masszázspárnát.
Az optimális kényelem és teljesítmény érdekében válassza ki a mellbimbójának (ábra 4) leginkább
megfelelő párnát.
19,5 mm: masszázspárna,
25 mm: masszázspárna (nem része a csomagnak):
1 Kezdje a mellszívóhoz járó 19,5 mm-es szabványméretű masszázspárnával. A párna méretét
megtalálja magán a parnan (ábra 5).
2 Ha a párna túl kicsinek bizonyul, vásárolja meg a nagyobb, 25 mm-es párnát (lásd „Tartozékok
rendelése”). Ha túl kicsi a párna, az fájdalmat okozhat, illetve kevésbé hatékony a fejés (ábra 6).
A mellszívó összeszerelése
Megjegyzés: Tisztítsa meg és fertőtlenítse a mellszívó megfelelő tartozékait.
1 Alaposan mosson kezet, mielőtt hozzányúl a megtisztított tartozékokhoz.
Figyelmeztetés: Legyen óvatos, mert a megtisztított tartozékok még forróak
lehetnek. Csak akkor kezdje meg a mellszívó összeszerelését, ha a megtisztított
tartozékok lehűltek.
Megjegyzés: Előfordulhat, hogy úgy találja, a mellszívó nedves állapotban könnyebben
összeszerelhető.
2 Helyezze be a fehér szelepet alulról a mellszívótestbe. Nyomja bele a szelepet amennyire csak
lehetséges (ábra 7).
3 Az óramutató járásával megegyező irányban csavarja rá a mellszívótestet a cumisüvegre, amíg az
biztonságosan (ábra 8) nem rögzül.

Magyar
78
4 Helyezze a szilikon membránt felülről a mellszívótestbe. Ügyeljen arra, hogy szorosan illeszkedjen
a peremre; ennek biztosításához az ujjaival nyomja lefelé (ábra 9).
5 Helyezze a masszázspárnát a mellszívótest (ábra 10) harang alakú részébe.
6 Nyomja be a párna belső részét amennyire csak lehetséges, és győződjön meg arról, hogy
tökéletesen illeszkedik a mellszívótest (ábra 11) pereméhez.
7 Nyomkodja meg a szirmok közét az esetlegesen beszorult levegő (ábra 12) eltávolításához.
Megjegyzés: Helyezze a fedelet a párnára, hogy tiszta maradjon a mellszívó, míg előkészül a
fejéshez.
Figyelmeztetés: Mindig párnával használja a mellszívót.
8 Csatlakoztassa az adaptert a fali aljzathoz, a másik végén lévő csatlakozódugót pedig a
motoregységhez (ábra 13).
Az adapter hivatkozási kódja a készülék alján van feltüntetve. Csak a feltüntetett adaptert használja
a készülékkel.
- Ha elemről kívánja működtetni a készüléket (csak szimpla típusú elektronikus mellszívó), forgassa
el a motoregység alját az aljon látható jelzések irányába (1. lépés (ábra 14)) és vegye le (2. lépés
(ábra 14)). Helyezzen be négy új 1,5 V-os AA típusú elemet (vagy 1,2 V-osat, ha újratölthető
elemekről van szó) az elemházba. Ellenőrizze az elemházon található jelzéseket, hogy az elemeket
polaritásuknak megfelelően helyezze be. Illessze vissza motoregység alját.
Megjegyzés: Új elemekkel a működési idő 1–3 óra. A feltölthető elemek teljesítménye csökken az
idő múlásával, így a működési idő rövidülhet.
Megjegyzés: Ha a motoregység elemházában benne vannak az elemek, de csatlakoztatja az
adaptert a hálózathoz, a mellszívó a hálózati áramforrásról fog működni. Az elemek nem tölthetők
újra a motoregységben.
Figyelmeztetés: Ne használjon egyszerre különböző típusú elemeket.
Figyelmeztetés: Ne használjon egyszerre régi és új elemeket.
9 Illessze a szilikon csövet és a hozzá tartozó szilikon dugót a membránra. Nyomja rá a szilikon
dugót, amíg megfelelően nem rögzül (ábra 15).
A mellszívó használata
Mikor kell lefejni az anyatejet
Ha a szoptatással nincs problémája, azt javasoljuk, hogy (amennyiben ezt az egészségügyi
szakember/védőnő másképp nem javasolja) várjon, amíg be nem áll a tejtermelési és szoptatási
rendje (rendszerint a szülés után legalább 2–4 hét) mielőtt elkezdené fejni az anyatejet.
Kivételek:
- Ha a szoptatás nem megy azonnal problémamentesen, a rendszeres fejés segít beindítani és
fenntartani a tejtermelődést.
- Ha kisbabája Öntől távol, például kórházban van.
- Ha a melle túltelítődött (fájdalmas vagy duzzadt), lefejhet egy kevés anyatejet a szoptatások előtt
vagy között a fájdalom csökkentésére, illetve annak elősegítésére, hogy a kisbaba könnyebben
kezdjen szopni.
- Ha a mellbimbója nagyon sebes vagy berepedezett, lefejheti az anyatejet, amíg a mellbimbói meg
nem gyógyulnak.

Magyar
- Ha távol van a kisbabájától, és szeretné folytatni a szoptatást miután újra együtt vannak, érdemes
rendszeresen lefejnie az anyatejet, hogy serkentse a tejtermelést.
Meg kell találnia a nap során Önnek legoptimálisabb időszakokat az anyatej lefejéséhez. Ilyen
lehet például közvetlenül a kisbaba reggeli első szoptatása előtt vagy után, amikor a mellek a
legtelítettebbek, vagy valamelyik szoptatás után, amikor a kisbaba nem ürítette ki mindkét mellet. Ha
újra munkába áll, előfordulhat, hogy a munka egyik szünetében kell lefejnie az anyatejet. A mellszívó
használata gyakorlást igényel, így előfordulhat, hogy többször kell próbálkoznia a sikeres fejéshez.
Szerencsére a Philips Avent elektromos mellszívó könnyen összeszerelhető és használható, így
nagyon hamar megszokható a mellszívó használata.
79
Tippek
- Mielőtt először használná, ismerkedjen meg a mellszívóval és annak működtetésével.
- Olyan időszakot érdemes ehhez kiválasztania, amikor éppen nem siet és nem fogják félbeszakítani.
- A kisbabájáról készített fénykép segíthet Önnek a „tejleadás” reex beindításában.
- Segíthet, ha melegen tartja magát: próbálja meg a fejést közvetlenül fürdés vagy zuhanyozás után,
illetve fejés előtt néhány percig helyezzen egy meleg törölközőt vagy a Philips Avent hőpárnát a
mellére.
- Megkönnyítheti a fejés végrehajtását, ha a kisbabát éppen a másik melléből szoptatja, illetve ha
közvetlenül szoptatás után próbálja meg a fejést.
- Ha a fejés fájdalmassá válik, hagyja abba, és forduljon védőnőhöz vagy egészségügyi
szakemberhez.
A mellszívó működtetése
1 Alaposan mosson kezet, és ellenőrizze melle tisztaságát.
2 Helyezkedjen el egy kényelmes széken (a hátát támassza meg párnákkal). Készítsen maga mellé
egy pohár folyadékot.
3 Nyomja az összeszerelt mellszívótestet a melléhez. Ügyeljen arra, hogy a mellbimbója középen
helyezkedjen el, hogy a masszázspárna légmentesen (ábra 16) zárhasson.
A dupla típusú elektromos mellszívó felhasználói számára: A dupla típusú elektromos mellszívó
lehetővé teszi, hogy mindkét mellből egyszerre fejje az anyatejet. Ugyanakkor, a készüléket
ugyanúgy használhatja egy mellből történő fejésre is. Illessze mindkét összeszerelt mellszívótestet
a szilikon csőhöz és a hozzá tartozó szilikon dugóhoz. Tanácsos addig a fedelet a másikra rakni.
4 Ügyeljen arra, hogy a mellbimbója megfelelően illeszkedjen a párnába. Lásd „A legmegfelelőbb
párna kiválasztása” című fejezetet a helyes méretű párna megtalálásához.
5 Nyomja meg a be-/kikapcsoló gombot (ábra 17).
- A mellszívó automatikusan stimulációs üzemmódban indul el, és a be-/kikapcsoló gomb, illetve a
stimulálás gomb világítani kezd.
- Érezni kezdi a mellén a szívóerőt.
6 Ha az anyatej folyása megindul, a leggyengébb szívás gomb (ábra 18) megnyomásával lassíthatja a
ritmust.
- Ez a gomb kezd világítani a stimulálás gomb helyett.
Megjegyzés: Ne aggódjon, ha nem indul meg azonnal a tejáramlás. Próbáljon ellazulni, és folytassa
a fejést. A mellszívó első néhány használatakor előfordulhat, hogy az erősebb szívás módot kell
használnia a tej beindításához.

Magyar
80
7 A saját kényelmétől függően használhat erősebb szívás módot is, mely erősebb szívóerőt biztosít.
A megfelelő gomb megnyomásával bármikor visszatérhet egy gyengébb szívás módra (ábra 19).
A mellszívót bármikor kikapcsolhatja, ha megnyomja a be-/kikapcsoló (ábra 20) gombot.
Megjegyzés: Nem szükséges minden szívás módot használnia, csak azokat használja, melyek
kényelmesek.
Figyelmeztetés: Mindig kapcsolja ki a mellszívót, ezáltal megszüntetve a vákuumot,
mielőtt levenné a melléről a mellszívótestet.
Figyelmeztetés: Ha eredménytelen a fejés, akkor egyszerre 5 percnél tovább ne
folytassa a műveletet. Próbálja meg a fejést a nap másik időszakában.
8 Átlagosan 10 perc mellszívóhasználat szükséges 60–125 ml anyatej lefejéséhez az egyik mellből.
Ez azonban csupán irányadó mennyiség, hiszen ez minden nőnél eltérő lehet.
Megjegyzés: Ha alkalmanként rendszeresen több mint 125 ml anyatejet fej le, érdemes 260 ml-es
Philips Avent cumisüveget vásárolni és használni a túltöltés és a kilöttyenés elkerülése érdekében.
9 Amikor befejezte a fejést, kapcsolja ki a mellszívót (ábra 20), és óvatosan vegye le a melléről a
mellszívótestet.
10 Csavarja le a cumisüveget a mellszívótestről. Több választási lehetősége van:
- Helyezzen be egy fertőtlenített tejzárót egy fertőtlenített leszorító gyűrűbe, majd csavarja rá a
cumisüvegre (ábra 21). A lefejt tej a cumisüvegben így készen áll a tárolásra.
- Másik lehetőségként, helyezzen egy fertőtlenített etetőcumit és leszorító gyűrűt a cumisüvegre az
útmutató (lásd: 'Etetés') szerint. Zárja le az etetőcumit a kupakkal (ábra 22).
11 Húzza ki a hálózati adaptert a fali aljzatból, hogy a készülék ne csatlakozzon a hálózati
áramforráshoz. Húzza ki az adaptert a motoregységből. Húzza ki a szilikon csövet és a hozzá
tartozó szilikon dugót a szilikon membránból. Az egyszerű tárolás érdekében tekerje a szilikon
csövet a motoregység köré, majd pattintsa rá a hozzá tartozó szilikon dugót a csőre (ábra 23).
12 A mellszívó többi használt részét a „Tisztítás és fertőtlenítés” című fejezetben leírt utasítások szerint
tisztítsa meg.
Az anyatej tárolása
Figyelmeztetés: Higiéniai okokból, csak megtisztított és fertőtlenített mellszívóval
lefejt anyatejet szabad tárolni.
Az anyatej a hűtőszekrényben (nem a hűtőszekrény ajtajában) legfeljebb 48 óráig tárolható.
A lefejt anyatejet azonnal hűtőszekrénybe kell helyezni. Ha a hűtőszekrényben tárolja az anyatejet
a napközbeni felhasználáshoz, csak fertőtlenített cumisüvegbe vagy tárolópohárba lefejt anyatejet
használjon fel. Az anyatej a mélyhűtőben legfeljebb három hónapig tárolható, amennyiben
fertőtlenített leszorító gyűrűvel és fertőtlenített tejzáróval ellátott fertőtlenített cumisüvegekben
vagy fertőtlenített tárolópoharakban tárolják. Jól láthatóan tüntesse fel a cumisüvegen, illetve
a tárolópoháron a fejés dátumát és időpontját, és először a régebbi anyatejet használja fel.
Ha 48 órán belül szándékozik a kisbabát megetetni a lefejt anyatejjel, egy összeszerelt Philips
Avent cumisüvegben vagy tárolópohárban a hűtőszekrényben is tárolhatja az anyatejet.
Mit tegyen
- Mindig azonnal helyezze hűtőszekrénybe vagy mélyhűtőbe a lefejt anyatejet.
- Csak fertőtlenített mellszívóval lefejt anyatejet szabad tárolni, csak fertőtlenített cumisüvegekben.
Mit ne tegyen
- Soha ne fagyassza le újra a kiolvasztott anyatejet.
- Soha ne adjon friss anyatejet a fagyasztott anyatejhez.

Magyar
81
Kompatibilitás
A Philips Avent elektromos mellszívó kompatibilis a termékválasztékunkban megtalálható Philips
Avent cumisüvegekkel és Philips Avent tárolópoharakkal. Amikor más fajta Philips Avent cumisüveget
használ, olyan típusú etetőcumit használjon, amelyet eredetileg ahhoz a cumisüveghez adtak.
Az etetőcumi felszerelésére és az általános tisztításra vonatkozó részletes utasításokat lásd az
„Etetés” és „Tisztítás” című fejezetekben. Ezeket a részleteket elolvashatja a weboldalunkon is:
www.philips.com/support.
- Pótetetőcumik külön vásárolhatók. A kisbaba etetéséhez használjon megfelelő átfolyású etetőcumit.
A tartozékok és pótolandó kellékek vásárlásához látogasson el a www.shop.philips.hu/service
weboldalra vagy forduljon Philips márkakereskedőjéhez. Felveheti a kapcsolatot a Philips
magyarországi ügyfélszolgálatával is.
- A Philips Avent Anti-colic családba tartozó cumisüvegek tartozékait és etetőcumijait ne keverje
össze a Philips Avent Natural családba tartozókkal. Azok nem feltétlenül illeszkednek egymáshoz,
így szivároghatnak vagy más problémákat okozhatnak.
- A kiváló minőségű Philips Avent Natural műanyag cumisüveg kompatibilis a legtöbb Philips Avent
mellszívóval, itatófejjel, tejzáróval és zárókupakkal.
Etetés
A Philips Avent cumisüvegekből és a tárolópoharakból is megetetheti a kisbabát anyatejjel.
Gyermeke egészségéért és biztonságáért
Vigyázat!
Figyelmeztetések a gyermek sérülésének elkerülése érdekében:
- A cumisüvegek és etetőcumik használata kizárólag felnőtt
felügyeletében engedélyezett. Ne engedje, hogy gyermeke a
termék kisebb tartozékaival játsszon, illetve hogy az üveget vagy a
poharat járás vagy futás közben használja.
- A fulladás elkerülése érdekében az etetőcumikat soha ne
használja játszócumi helyett.
- Folyadékok hosszantartó és folyamatos cumizása tönkreteheti a
fogakat.
- Etetés előtt mindig ellenőrizze az étel/anyatej hőmérsékletét,
nehogy égési sérülést okozzon gyermekének.
- Amennyiben az anyag gyengülését vagy sérülését észleli
bármelyik tartozékon, azonnal dobja el.
- A termék használaton kívüli részeit tartsa olyan helyen, ahol
gyermek nem érheti el.

Magyar
82
- Semmilyen módon ne alakítsa át a terméket vagy annak
tartozékait. Az ilyen módosítás a termék nem biztonságos
működését okozhatja.
Óvintézkedések a termék károsodásának elkerülése érdekében:
- Ne tegye a sütőbe, a műanyag megolvadhat.
- A műanyag részek tulajdonságai fertőtlenítés során, és magas
hőmérséklet hatására megváltozhatnak. Ez a kupak illeszkedését
is befolyásolhatja.
- Ne hagyja az etetőcumit közvetlenül a napon vagy hőforrás
közelében, valamint ne hagyja a javasoltnál hosszabb ideig
fertőtlenítőszerben, mert ez károsíthatja a terméket.
Teendők az első használat előtt
Az első használat előtt szedje szét tartozékaira, és tisztítsa ki, illetve lehetőség szerint fertőtlenítse
a cumisüveget. Minden egyes használat előtt vizsgálja meg a cumisüveget és az etetőcumit, és
húzogassa meg az etetőcumit minden irányba, a fulladásveszély elkerülése érdekében. Amennyiben
az anyag gyengülését vagy sérülését észleli, azonnal dobja el.
A cumisüvegek tisztítása
A higiénia biztosítása érdekében a cumisüveg a „Tisztítás” című fejezetben szereplő tartozékait
minden használat előtt tisztítsa meg. A tartozékokat minden ezt követő használat után is tisztítsa meg.
Választható megoldás lehet még a tartozékok fertőtlenítése, a „Fertőtlenítés (opcionális)” fejezetben
található utasítások alapján.
Alaposan mosson kezet, és ügyeljen arra, hogy a megtisztított tartozékokkal érintkező felületek is
tiszták legyenek. A tisztítószerek túlzott koncentrációja a műanyag részek megrepedését okozhatja.
Ha ilyet tapasztal, cserélje ki a sérült tartozékot. Minden egyes használat előtt vizsgálja meg a
cumisüveget és az etetőcumit, és húzogassa meg az etetőcumit minden irányba, a fulladásveszély
elkerülése érdekében. Amennyiben az anyag gyengülését vagy sérülését észleli bármelyik tartozékon,
azonnal dobja el.
A cumisüvegek összeszerelése
Amikor összeállítja a cumisüveget, a kupakot függőlegesen helyezze a cumisüvegre, úgy hogy az
etetőcumi felfelé (ábra 24) álljon. A kupak eltávolításához tegye a kezét a kupakra, a hüvelykujját
pedig a kupak (ábra 25) bemélyedésébe. Az etetőcumit könnyebb összeszerelni, ha nem egyenesen
(ábra 26) kihúzza, hanem enyhén ide-oda mozgatva, húzza felfelé. Addig húzza az etetőcumit, amíg a
felszíni része szintbe nem kerül a lezáró gyűrű (ábra 27) felszínével.

Magyar
83
Az anyatej melegítése
Ha lefagyasztott anyatejet használ, melegítés előtt hagyja az anyatejet teljesen kiolvadni.
Megjegyzés: Ha nagyon sürgős az etetés, egy tál meleg vízben is kiolvaszthatja az anyatejet.
Melegítse fel a kiolvasztott vagy hűtőszekrényben tárolt anyatejjel töltött cumisüveget vagy
tárolópoharat meleg vízzel töltött tálban vagy üvegmelegítőben. Távolítsa el a leszorító gyűrűt és
tejzárót a cumisüvegről, illetve vegye le a tárolópohár fedelét.
Az egyenletes hőeloszlás érdekében mindig keverje meg vagy rázza fel a megmelegített anyatejet,
és ellenőrizze a hőmérsékletét. Különösen ügyeljen, ha mikrohullámú sütőben melegíti fel az ételt/
italt, mert a mikrohullámú sütőben melegített ételek/italok bizonyos pontjai magas hőmérsékletűvé
válhatnak.
Megjegyzés: Nem tanácsoljuk, hogy az anyatejet mikrohullámú sütőben melegítse fel, mert ha az
anyatej túlságosan felmelegszik, a tápanyagok és a vitaminok károsodnak.
Megjegyzés: Kapható Philips Avent cumisüveg-melegítő, amelyben szintén fel tudja melegíteni a tejet.
A cumisüvegek karbantartása és tárolása
Minden egyes használat előtt vizsgálja meg a cumisüveget és az etetőcumit, és húzogassa meg
az etetőcumit minden irányba, a fulladásveszély elkerülése érdekében. Amennyiben az anyag
gyengülését vagy sérülését észleli, azonnal dobja el. Higiéniai okokból az etetőcumikat 3 havonta
tanácsos kicserélni. Az etetőcumik tárolására száraz, fedeles tartót használjon. Az éppen nem használt
etetőcumikat ne tegye ki közvetlen napfénynek vagy hőnek, illetve ne hagyja fertőtlenítőszerben a
javasoltnál hosszabb ideig, mert ez gyengítheti az etetőcumi anyagát. Ne tegye sütőbe.
A cumisüvegeket tartsa száraz helyen.
További információk
A Philips Avent etetőcumik különböző átfolyásúak annak érdekében, hogy ki lehessen választani a
gyermek igényének legmegfelelőbbet. Az etetőcumi a későbbiek során kicserélhető, hogy gyermeke
egyéni igényeihez igazodjon.
A megfelelő etetőcumi kiválasztása gyermeke számára
A Philips Avent etetőcumik különböző átfolyásúak annak érdekében, hogy ki lehessen választani
a gyermek igényének legmegfelelőbbet. Az etetőcumi a későbbiek során kicserélhető, amely így
gyermeke egyéni igényeihez igazodik. A Philips Avent etetőcumik oldalán egy szám mutatja az
átfolyás mértékét (lásd a képen). A gyermek etetéséhez használjon megfelelő átfolyású etetőcumit.
Használjon kisebb átfolyású cumit, ha gyermeke fulladozik, szivárog a tej vagy ha a folyás sebessége
túl gyors. Használjon nagyobb átfolyású cumit, ha gyermeke etetés közben elalszik, nyűgös vagy ha
az etetés túl sokáig tart.
Az etetőcumik a következő választékban kaphatók: 0m (újszülött), 0m+(1 hónapos kor alatt), 1m+
(1 hónapos kor felett), 3m+ (3 hónapos kor felett), 6m+ (6 hónapos kor felett), változtatható folyású
(I/II/III), valamint pépes táplálásra (Y).
(0) A 0m etetőcumi az első naptól kezdve használható. Rendkívül puha szilikon etetőcumi, a lehető
legkisebb átfolyású. Ideális újszülöttek, illetve bármely korú, anyatejjel táplált gyermekek számára.
Az etetőcumi tetején egyetlen lyuk található folyadékokhoz, illetve egy 0 jel a cumi szélén.

Magyar
84
(1) A 0m+ (1 hónapos kor alatt) etetőcumi rendkívül puha szilikonból készült. Ideális újszülöttek, illetve
bármely korú, anyatejjel táplált gyermekek számára. A cumin egy 1-es szám látható.
(2) Az 1m+ (1 hónapos kor felett) etetőcumi rendkívül puha szilikonból készült. Ideális bármely korú,
anyatejjel táplált gyermekek számára. A cumin egy 2-es szám látható.
(3) A 3m+ (3 hónapos kor felett) etetőcumi rendkívül puha szilikonból készült. A harmadik hónaptól
használható cumi, cumisüvegből táplált gyermekek számára. A cumin egy 3-es szám látható.
(4) A 6m+ etetőcumi harapásálló szilikonból készült. Ez az ellenállóbb etetőcumi ideális 6 hónapos
vagy idősebb, cumisüvegből táplált gyermekek számára. A cumin egy 4-es szám látható.
(I/II/III) Változtatható folyású: harapásálló szilikon etetőcumival. Az átfolyás állíthatóságának
köszönhetően kényelmesen használható, tartósabb etetőcumi ideális 3 hónapos vagy idősebb,
cumisüvegből táplált gyermekek számára. Az etetőcumi tetején egy nyílás található folyadékokhoz,
illetve I, II, III jelölések a cumi szélén.
(Y) Pépes ételek: harapásálló szilikon etetőcumival. A pépes ételekhez készült ellenálló etetőcumi
ideális 6 hónapos vagy idősebb, cumisüvegből táplált gyermekek számára. Az etetőcumi tetején egy
Y-alakú lyuk található folyadékokhoz, illetve egy Y jel a cumi szélén.
Megjegyzés: Minden gyermek különböző, ennek megfelelően gyermeke egyéni igényei eltérhetnek a
fentebb leírtaktól.
Megjegyzés: A (0) jelzésű etetőcumi nem biztos, hogy kereskedelmi forgalomban van
Magyarországon; kérjük, ellenőrizze weboldalunkon: https://www.philips.hu/c-m-mo/.
Csere
Elemek
Amikor a mellszívót (szimpla típusú elektromos mellszívó) elemekről kívánja működtetni, használjon
négy 1,5 V-os AA típusú elemet (vagy 1,2 V-osat, ha újratölthető elemekről van szó). Vegye ki az
újratölthető elemeket a motoregységből, mielőtt tölteni kezdené azokat.
A kimerült elemeket távolítsa el, de ne dobja őket a háztartási szemétbe! Lásd a „Ujrahasznositas”
című fejezetet. Az elemek cseréjére vonatkozó tudnivalókat az „Előkészítés a használatra" című fejezet
tartalmazza.
Újrahasznosítás
- Ez a szimbólum azt jelenti, hogy a termék nem kezelhető normál háztartási hulladékként
(2012/19/EU) (ábra 28).
- Ez a szimbólum azt jelenti, hogy ez a termék olyan egyszer használatos elemeket tartalmaz,
amelyeket nem szabad háztartási hulladékként kezelni (2006/66/EK) (ábra 29).
- Tartsa be az elektromos és elektronikus termékek, akkumulátorok és elemek külön történő
hulladékgyűjtésére vonatkozó országos előírásokat. A megfelelő hulladékkezelés segítséget nyújt a
környezettel és az emberi egészséggel kapcsolatos negatív következmények megelőzéséhez.

Magyar
Az elemek eltávolítása
Az elemek készülékből (kizárólag szimpla típusú elektronikus mellszívó) történő eltávolításához
kövesse az alábbi utasításokat.
1 Az elemek eltávolítása előtt kapcsolja ki a motoregységet és húzza ki az adaptert a konnektorból.
2 Az elemek eltávolításához forgassa el a motoregység alját az aljon látható jelzések irányába
(1. lépés) és vegye le (2. lépés (ábra 30)).
3 Távolítsa el a négy 1,5 V-os AA típusú elemet (vagy 1,2 V-osat, ha újratölthető elemekről van szó)
az elemházból.
4 Illessze vissza motoregység alját.
Tartozékok rendelése
A tartozékok és pótolandó kellékek vásárlásához látogasson el a www.shop.philips.hu/service
weboldalra vagy forduljon Philips márkakereskedőjéhez. Fordulhat az országában működő Philips
vevőszolgálathoz is (az elérhetőségi információkat megtalálja a világszerte érvényes garancialevélen).
Tartozékok
Kiegészítő darabok
A következők tartozhatnak ide. Ellenőrizze az „Általános leírás” részben található listán, hogy a
kiválasztott mellszívóhoz milyen tartozékok tartoznak.
- Eldobható melltartóbetétek
- Fedél
- Tejzáró
- Hordtáska
85
Garancia és terméktámogatás
Ha információra vagy támogatásra van szüksége, látogasson el a www.philips.hu/support
weboldalra, vagy olvassa el a világszerte érvényes garancialevelet.
Hibaelhárítás
Ez a fejezet összefoglalja a készülékkel kapcsolatban leggyakrabban felmerülő problémákat. Ha
a hibát az alábbi útmutató segítségével nem tudja elhárítani, látogasson el a www.philips.hu/
support weboldalra a gyakran felmerülő kérdések listájáért, vagy forduljon az országában illetékes
ügyfélszolgálathoz.

Magyar
86
Probléma Megoldás
Fájdalmat érzek a
mellszívó használatakor
A mellszívó
megkarcolódott
A mellszívó nem
működik, és a be-/
kikapcsoló gomb villog.
Ne használja tovább a mellszívót és forduljon szakemberhez, illetve
védőnőhöz. Ha a mellszívótest nehezen távolítható el a mellétől,
előfordulhat, hogy a vákuum megszüntetéséhez az ujját a melle és a
masszázspárna közé kell helyeznie.
Rendszeres használat esetén az enyhébb karcolódás normálisnak
tekinthető, és nem okoz problémát. Ha azonban a mellszívó valamelyik
tartozéka erősen megkarcolódik vagy elreped, ne használja a mellszívót,
és cseretartozék beszerzéséhez forduljon a Philips ügyfélszolgálathoz
vagy látogasson el a www.shop.philips.com/service weboldalra. Ne
feledje, hogy a különböző tisztítószerek, fertőtlenítő oldatok, a lágyított víz
és a hőmérsékleti ingadozások együttes hatása miatt a műanyag bizonyos
körülmények között megrepedhet. Ne használjon súrolószert, vagy
antibakteriális tisztítószert, mivel ezek károsíthatják a műanyagot.
Először ellenőrizze, hogy megfelelően szerelte-e össze a mellszívót,
és győződjön meg róla, hogy a cső nincs megtörve.Az interferencia
megelőzése érdekében, tartsa az egyéb elektromos berendezéseket (pl.
mobiltelefon, laptop) távol a mellszívótól a fejés ideje alatt.Amennyiben
a szimpla típusú elektromos mellszívót elemekkel működteti, az elemeket
a használati útmutatóban lévő utasításoknak megfelelően cserélje.Ha az
elektromos mellszívót hálózatról működteti, kizárólag a termékhez tartozó
adapter használja!Ha a probléma továbbra is fennáll, forduljon
a magyarországi Philips ügyfélszolgálathoz: www.philips.com/support.
Nem érzek szívóerőt. Ellenőrizze, hogy megfelelően szerelte-e össze a mellszívót, az
A mellszívó túl erősen
szív.
„Előkészítés a használatra” című részben leírt lépéseket követve.
Ellenőrizze, hogy a szilikon cső megfelelően csatlakozik-e a
motoregységhez, a szilikon dugóhoz és a membránhoz.Ellenőrizze, hogy
a mellszívó úgy illeszkedik-e a melléhez, amely lehetővé teszi, hogy
vákuum jöjjön létre. Ha továbbra sem érez szívóerőt, kérjük, forduljon a
magyarországi Philips ügyfélszolgálathoz: www.philips.com/support.
Kövesse az alábbi utasításokat abban az esetben, ha úgy érzi, a mellszívó
túlságosan erősen szív:
- Kizárólag a Philips Avent comfort mellszívó tartozékait használja.
- Ellenőrizze, hogy a comfort mellszívóra illesztette-e a masszázspárnát:
ha nem használja a masszázspárnát, akkor lehetséges, hogy túlságosan
nagy a vákuum.
- Amikor először használja a mellszívót, elképzelhető, hogy nagyon
nagynak érzi a szívóerőt. Gyakorlással segíthet ezen a problémán.
Ha a probléma ezt követően is fennáll, forduljon szakemberhez,
illetve védőnőhöz.

Magyar
Kiegészítő tudnivalók
Az alábbiakban a szoptatáshoz kapcsolódó leggyakrabban előforduló egészségügyi problémák láthatók.
Ha ezen tünetek bármelyikét tapasztalja, forduljon védőnőhöz vagy egészségügyi szakemberhez
Tünet
Fájdalom Fájdalmas mell vagy mellbimbó.
Gyulladt mellbimbók Nem múló fájdalom a mellbimbóban a fejés kezdetekor vagy a fejés egész
A mellek túltelítődése A mellek megduzzadnak, feszülnek. A mell tapintásra kemény, csomós
Véraláfutás, vérrög Vöröses-lilás elszíneződés, amely nyomás hatására nem fehéredik ki.
Felhólyagzás Apró hólyagok (olyanok, mint a buborékok) jelennek meg a bőr felszínén.
Szöveti sérülés
a mellbimbón
(mellbimbósérülés)
Vérzés A kisebesedett vagy berepedezett mellbimbók miatt gyakran tapasztalható
Elzáródott tejcsatornák Piros, érzékeny csomó a mellen. Járhat a mellen megjelenő bőrpírrel és
időtartama alatt, vagy a fejések közötti időben is, és nagyon hasonló a fejés
során érzett fájdalomhoz.
tapintású és érzékeny. Járhat a mellen megjelenő bőrpírrel és lázzal.
A véraláfutás zöldessé és barnássá válik, amikor múlik.
- Kisebesedett vagy berepedezett mellbimbók.
- A hámsérülés miatt a mellbimbóról szöveti részek válnak le. Általában
együtt jár a berepedezett és/vagy felhólyagosodott mellbimbóval.
- Mellbimbó berepedése.
vérzés az érintett területen.
lázzal. Ha nem kezelik, mellgyulladáshoz (mastitis) vezethet.
.
87
Műszaki információ
Az elektromágneses összeférhetőségre (EMC) vonatkozó
tudnivalók
A Philips Avent mellszívó esetében külön elővigyázatosságra van szükség az elektromágneses
összeférhetőség tekintetében; és a mellszívót az ebben a fejezetben található, EMC-re vonatkozó
tudnivalók gyelembevételével kell üzembe helyezni és működtetni.
Hordozható és mobil rádiófrekvenciás kommunikációs készülékek befolyásolhatják a Philips Avent
mellszívó működését.
Az elektromos mellszívó esetében nincs alapvető teljesítőképesség. Az elektromágneses hatások
(mint pl. vezeték nélküli otthoni hálózati berendezések, mobiltelefonok, vezeték nélküli telefonok)
miatt, a mellszívó kikapcsolhat vagy hibát jelezhet. Ennek következtében elfogadhatatlan kockázatok
nem lépnek fel. Az interferencia megelőzése érdekében, tartsa az egyéb elektromos berendezéseket
legalább 1,0 m távolságra a mellszívótól a fejés ideje alatt, és ne helyezze másik elektromos
berendezés alá vagy fölé. Az adapter kábelének hosszúsága: 2,50 méter.
Elektromágneses összeférhetőség (EMC, IEC 60601-1-2)
Nyilatkozat – elektromágneses kibocsátási értékek
A Philips Avent mellszívót az alábbiakban meghatározott elektromágneses környezetben történő
használatra tervezték. A Philips Avent mellszívó felhasználójának kell arról gondoskodni, hogy a
mellszívót ilyen környezetben használják.

88
Magyar
Kibocsátási
Megfelelőség Elektromágneses környezet – útmutató
vizsgálat
Rádiófrekvenciás
kibocsátás CISPR 11
Rádiófrekvenciás
kibocsátás CISPR 11
Harmonikus
kibocsátások IEC
61000-3-2
Fe szült sé gin gado zá sok/fe szültség rez gé sek IEC
61000-3-3
Nyilatkozat – elektromágneses zavartűrés
A Philips Avent mellszívót az alábbiakban meghatározott elektromágneses környezetben történő
használatra tervezték. A Philips Avent mellszívó felhasználójának kell arról gondoskodni, hogy a
mellszívót ilyen környezetben használják.
Zavartűrés vizsgálat IEC 60601
1. csoport A Philips Avent mellszívó rádiófrekvenciás energiát kizárólag
B osztály
A osztály
Megfelel
saját, belső működéséhez használ. Ezért a rádiófrekvenciás
kibocsátása igen alacsony, így nem valószínű, hogy
bármilyen interferenciát okozna a közelében lévő elektromos
berendezésekkel.
A Philips Avent mellszívó minden létesítményben
használható, beleértve a lakókörnyezetet, valamint a
lakossági célokat szolgáló épületeket ellátó, alacsony
feszültségű, nyilvános hálózatra közvetlenül csatlakozó
környezeteket is.
Megfelelőségi szint Elektromágneses
mérőszint
környezet –
útmutató
Elektrosztatikus kisülés
(ESD) IEC 61000-4-2
Gyors elektromos
tranziens/lökés IEC
61000-4-4
TúlfeszültségIEC
61000-4-5
± 6 kV érintkező± 8 kV
levegő
± 2 kV hálózati
áramellátó vezeték
esetében
± 1 kV dierenciál
módusú
± 6 kV érintkező± 8 kV
levegő
± 2 kV hálózati
áramellátó vezeték
esetében
± 1 kV dierenciál
módusú
A padlóburkolatnak
fának, betonnak
vagy kerámialapnak
kell lennie. Ha a
padlóburkolat
műanyag, akkor a
relatív páratartalomnak
legalább 30%-nak kell
lennie.
A hálózati tápfeszültség
a lakó vagy kórházi
környezetre jellemző
minőségű legyen.
A hálózati tápfeszültség
a lakó vagy kórházi
környezetre jellemző
minőségű legyen.

Magyar
89
Zavartűrés vizsgálat IEC 60601
mérőszint
Feszültségesés,
rövid kimaradás és
feszültségváltozás
a bemeneti hálózati
feszültségben IEC
61000-4-11
Ipari frekvenciájú(50/60
Hz)mágneses mezőIEC
61000-4-8
<5 % UT (>95% esés
az UT értékben) 0,5
ciklus időtartamára40%
UT (60% esés az UT
értékében) 5 ciklus
időtartamára70%
UT (30% esés az UT
értékében) 25 ciklus
időtartamára<5 %
UT (>95% esés az UT
értékben) 5 s-ig
3 A/m 3 A/m Az ipari frekvenciájú
Megfelelőségi szint Elektromágneses
környezet –
útmutató
<5 % UT (>95% esés
az UT értékben) 0,5
ciklus időtartamára70%
UT (30% esés az UT
értékében) 25 ciklus
időtartamára<5 %
UT (>95% esés az UT
értékben) 5 s-ig
A hálózati tápfeszültség
a lakó vagy kórházi
környezetre jellemző
minőségű legyen. Ha a
Philips Avent mellszívó
használójának
folyamatos üzemelésre
van szüksége
áramszünetek idején
is, javasolt a Philips
Avent mellszívót
szünetmentes
tápegységről vagy
elemről működtetni.
A hálózati áram
megszakadása miatt a
mellszívó kikapcsolhat.
Ez elfogadhatónak
minősül mert ennek
következtében
nem eredményez
elfogadhatatlan
kockázatokat.
mágneses mező
erőssége a lakó vagy
kórházi környezetre
jellemző minőségű
legyen.
Megjegyzés: Az UT a hálózati váltóáramú feszültség értéke a mérőszint alkalmazása előtt.
Nyilatkozat – elektromágneses zavartűrés
A Philips Avent mellszívót az alábbiakban meghatározott elektromágneses környezetben történő
használatra tervezték. A Philips Avent mellszívó felhasználójának kell arról gondoskodni, hogy a
mellszívót ilyen környezetben használják.

90
Magyar
Zavartűrés
vizsgálat
IEC
60601
mé rő-
Meg fele lő sé gi
szint
Elektromágneses környezet – útmutató
szint
Vezetett rádi óf rek ven cia
IEC 610004-6
Sugárzott rádi óf rek ven cia
IEC 610004-3
1. megjegyzés: 80 MHz-en és 800 MHz-en a magasabb frekvenciatartomány érvényes.
3 Vrms
150 kHz
- 80
MHz
3 V/m
80 MHz
- 2,5
Ghz
3 Vrms Hordozható és mobil rádiófrekvenciás készülékeket nem
3 V/m
szabad a Philips Avent mellszívó bármelyik részéhez
(beleértve a kábeleket is) az adó frekvenciájára alkalmazható
egyenlettel számított, javasolt izolációs távolságnál közelebb
használni.Javasolt izolációs távolság d=1,17 √P A mellszívót ki
lehet kapcsolni.
80 MHz - 800 Mhz d=1,17 √P 800 MHz - 2,5 GHz d=2,33 √P
ahol P az adó gyártó által megadott legnagyobb kimeneti
teljesítménye Wattban (W), és d a javasolt izolációs
távolság méterben (m).A helyhez kötött rádiófrekvenciás
adók elektromágneses helyszínfelmérése során
megállapított elektromágneses térerősségének minden
frekvenciatartományban kisebbnek kell lennie a határértéknél.
A következő szimbólummal ellátott berendezések közelében
interferencia léphet fel:
vonatkozó EMC-irányelveknek, ettől függetlenül előfordulhat,
hogy a készülék érzékeny a túlzott kibocsátásra, és/vagy
zavarhatja a többi készüléket. Ennek következménye lehet az,
hogy a mellszívó kikapcsol vagy a be-/kikapcsoló gomb elkezd
villogni (további információk találhatók a hibaelhárításról szóló
fejezetben), ami még elfogadhatónak minősül, mert nem
eredményez elfogadhatatlan kockázatokat. Az interferencia
megelőzése érdekében, tartsa az egyéb elektromos
berendezéseket távol a mellszívótól a fejés ideje alatt.
Figyelem! Bár a mellszívó megfelel a
2. megjegyzés: Ezek az irányelvek nem minden esetben használhatók. Az elektromágneses hullámok
terjedését befolyásolja az építmények, tárgyak és emberek elnyelő és visszaverő hatása.
A helyhez kötött adók, például a rádiótelefon-bázisállomások (mobil/zsinór nélküli), valamint a
műholdas, amatőr, AM és FM rádió-műsorszórás és a televízió-műsorszórás elektromágneses
térerősségét nem lehet elméleti úton pontosan meghatározni. A helyhez kötött rádiófrekvenciás
adók miatt az elektromágneses környezet becsléséhez célszerű elektromágneses helyszínfelmérést
végezni. Ha a Philips Avent mellszívó használati helyén mért térerősség túllépi a vonatkozó fenti
megfelelőségi határértéket, akkor ellenőrizni kell, hogy a Philips Avent mellszívó képes-e a normál
működésre. Ha rendellenes működést észlel, akkor további intézkedésekre lehet szükség, például a
Philips Avent mellszívót más irányba kell állítani vagy át kell helyezni.
A 150 kHz–80 MHz-es frekvenciatartományban az elektromágneses térerősségnek 3 V/m-nél
kisebbnek kell lennie.
A Philips Avent mellszívó, valamint a hordozható és mobil rádiófrekvenciás kommunikációs
berendezések közötti ajánlott izolációs távolság
A Philips Avent mellszívót otthoni egészségügyi használatra tervezték, ahol a rádiófrekvenciás
zavarsugárzás nem szabályozott
A Philips Avent mellszívó használója úgy előzheti meg az elektromágneses interferenciát, hogy
betartja a Philips Avent mellszívó, valamint a hordozható és mobil rádiófrekvenciás kommunikációs
berendezések (adók) közötti alábbi (a kommunikációs berendezések maximális kimeneti
teljesítményének megfelelő) minimális távolságot.

Magyar
91
Izolációs távolság az adó frekvenciájának függvényében (m)
Az adó névleges
maximális kimeneti
teljesítménye (W)
0,01 0,12 0,12 0,23
0,1 0,38 0,38 0,73
1 1,2 1,2 2,3
10 3,8 3,8 7,3
100 12 12 23
A fent fel nem sorolt maximális kimeneti teljesítményű adók esetében a d javasolt izolációs távolságot
(m) az adó frekvenciájára vonatkozó egyenlettel lehet kiszámítani, ahol P az adó gyártója által
megadott legnagyobb kimeneti teljesítménye wattban (W).
1. MEGJEGYZÉS: 80 MHz-en és 800 MHz-en a magasabb frekvenciatartományhoz tartozó izolációs
távolság érvényes.
MEGJEGYZÉS 2: Ezek az irányelvek nem minden esetben használhatók. Az elektromágneses
hullámok terjedését befolyásolja az építmények, tárgyak és emberek elnyelő és visszaverő hatása.
150 kHz – 80 MHz ISM
sávokon kívüld=1,17 √P
80 MHz – 800
MHzd=1,17 √P
800 MHz – 2,5 GHz
d=2,33 √P
Használati és tárolási feltételek
Ne tegye ki a mellszívót hosszabb ideig közvetlen napfénynek, mert elszíneződhet. Biztonságos, tiszta
és száraz helyen tárolja a mellszívót és annak tartozékait.
Ha a tartozékokat forró vagy hideg környezetben tartotta, a használat előtt helyezze abba a környezetbe,
ahol használni kívánja, hogy elérje a használati feltételek szerinti hőmérsékletet (5 °C - 40 °C).
Tárolási feltételek
Hőmérséklet +5 °C és +40 °C között
Relatív páratartalom 15% és 93% között (nem lecsapódó)
Légköri nyomás 700 és 1060 Pa légnyomás
Tárolási feltételek
Hőmérséklet -25 °C és +70 °C között
Relatív páratartalom 15% és 93% között (nem lecsapódó)

Magyar
92
Műszaki jellemzők
Az adapter nem része az egészségügyi elektromos berendezésnek, hanem különálló tápegység az
egészségügyi elektromos rendszerben.
Bemeneti hálózati feszültség: 100–240 V
Hálózati bemeneti
áramerősség:
Hálózati bemeneti frekvencia: 50–60 Hz
Elemek (kizárólag szimpla
típusú elektronikus mellszívó):
Szimpla típusú elektronikus
mellszívó
Dupla típusú elektronikus
mellszívó
1000 mA
Nem újratölthető elemek: 4 x 1,5V AA
Újratölthető elemek: 4 x 1,2 V, min. kapacitás 2000 mAh, max.
kapacitás 2100 mAh.
Adapter típusszám: VS0332
Kimeneti feszültség: 5 V
Kimeneti áramerősség: 1000 mA
Áram típusa: egyenáram
Védelmi osztály: II. osztály
Adapter típusszám: VT0334
Kimeneti feszültség: 9 V
Kimeneti áramerősség: 1100 mA
Áram típusa: egyenáram
Védelmi osztály: II. osztály
Szimbólumok magyarázata
A gyelmeztető jelek és szimbólumok a készülék biztonságos és helyes használatát segítik elő, annak
érdekében, hogy se Ön, se mások ne sérülhessenek meg. Az alábbiakban láthatók a címkén és a
használati útmutatóban található gyelmeztető jelek és szimbólumok jelentései.

Magyar
Kövesse az utasításokat!
A felhasználónak el kell olvasnia a használatra vonatkozó utasításokat, mert
fontos gyelmeztető jellegű információkat tartalmaznak (pl. gyelmeztetéseket,
óvintézkedéseket), amelyeket, különböző okok miatt, nem lehetett az orvostechnikai
berendezésen magán feltüntetni.
A használatra vonatkozó tippekre, további információra vagy megjegyzésre hívja fel a
gyelmet.
A gyártó megnevezése, az IEC 60601-1 szabvány szerint, amely hivatkozik az ISO 152231:2012-re.
Gyártás dátuma
A készülék azon része, amely zikailag érintkezik a felhasználóval (az érintőrész) BF (Body
Floating) típusú az IEC 60601-1 szerint. Az érintőrészek a 3-mal és 4-gyel jelölt részek az
általános leírásban („A” ábra)
II. érintésvédelmi osztály. Az adapter kettős szigeteléssel van ellátva a (II. érintésvédelmi
osztály követelményeinek megfelelően).
A gyártó katalógusszámát jelöli, amely alapján a készülék azonosítható.
Egyenáram jelölése.
Váltakozó áram jelölése.
93
Megfelel az EU alacsony feszültségről szóló irányelvének
Az EU irányelvének megfelelően az elektromos és elektronikai termékek külön gyűjtéséről.
Az elektromos hulladékokat nem lehet a háztartási hulladékkal együtt kidobni. További
információk találhatók a „Újrahasznosítás” című fejezetben.
Nyomja meg ezt a gombot a be- és kikapcsolásához.
IP22: Az első 2-es jelentése: Védett az 12,5mm-nél nagyobb átmérőjű szilárd testek
behatolása ellen. A második szám jelentése: Függőlegesen csöpögő víz ellen védett, és
15º-ban dönthető a működési pozíciójához képest a készülék. A függőlegesen csöpögő víz
nem tesz kárt benne, ha a készüléket a max. 15 fokkal megdöntjük a függőlegeshez képet
bármelyik irányba.
A gyártó sorozatszáma annak érdekében, hogy az orvostechnikai eszközt azonosítani
lehessen.
eurázsiai megfelelőségi jel (EurAsian Conformity Mark)

94
41°F
5°C
Magyar
Philips jótállása 2 évre.
Elemmel működtetett (kizárólag szimpla típusú elektronikus mellszívó)
UL (Underwriters Laboratories) minősített
RCM Tick Mark– Ausztrália
Tételszám
Törékeny! Óvatosan kezelendő!
Száraz helyen tartandó
Relatív páratartalom határértékei, amelyeknek még biztonsággal kitehető a készülék: 15%
és 93% között.
104°F
40°C
Tárolási és szállítási hőmérséklethatárok, amelyeknek még biztonsággal kitehető az
orvostechnikai berendezés: 5 °C és 40 °C között.
Forest Stewardship Council - FSC tanúsítványa szavatolja, hogy az ilyennel rendelkező
gyártók elfogadják és betartják a felelős erdőgazdálkodás szigorú előírásait, és a vásárló
ilyen termék vásárlásával maga is hozzájárul az erdők megmentéséhez, az ezzel járó
pozitív társadalmi hatásokhoz és a felelős erdőgazdálkodást ösztönző piac kialakulásához

Slovensky
95
Obsah
Úvod ______________________________________________________________________________ 96
Všeobecný popis (obr. A) _____________________________________________________________ 96
Určené použitie ______________________________________________________________________97
Dôležité bezpečnostné informácie _______________________________________________________97
Kontraindikácie ______________________________________________________________________97
Príprava na použitie __________________________________________________________________ 98
Čistenie a dezinfekcia ________________________________________________________________ 98
Nájdite si vankúšik, ktorý vám najviac vyhovuje __________________________________________ 100
Zostavenie odsávačky mlieka _________________________________________________________ 100
Používanie odsávačky mlieka __________________________________________________________ 101
Kedy odsávať mlieko _________________________________________________________________ 101
Tipy _______________________________________________________________________________102
Používanie odsávačky mlieka __________________________________________________________ 102
Skladovanie materského mlieka ________________________________________________________ 103
Kompatibilita _______________________________________________________________________104
Kŕmenie ___________________________________________________________________________104
Pre bezpečnosť a zdravie vášho dieťaťa _________________________________________________104
Pred prvým použitím _________________________________________________________________105
Čistenie iaš ________________________________________________________________________105
Zostavenie iaš _____________________________________________________________________105
Ohrievanie materského mlieka _________________________________________________________106
Údržba a skladovanie iaš _____________________________________________________________106
Ďalšie informácie ____________________________________________________________________106
Výber správneho cumlíka pre vaše bábätko ______________________________________________106
Výmena ____________________________________________________________________________ 107
Batérie _____________________________________________________________________________ 107
Recyklacia _________________________________________________________________________ 107
Odstránenie batérií __________________________________________________________________108
Objednávanie príslušenstva ___________________________________________________________108
Príslušenstvo _______________________________________________________________________108
Príslušenstvo _______________________________________________________________________108
Záruka a podpora____________________________________________________________________108
Riešenie problémov __________________________________________________________________108
Doplňujúce informácie _______________________________________________________________ 110
Technické informácie _________________________________________________________________ 110
Informácie o elektromagnetickej kompatibilite ____________________________________________ 110
Podmienky na skladovanie a používanie _________________________________________________ 114
Technické parametre _________________________________________________________________ 115
Vysvetlenie symbolov ________________________________________________________________ 115

Slovensky
96
Úvod
Gratulujeme vám k nákupu a vítame vás medzi zákazníkmi používajúcimi výrobky Philips Avent! Ak
chcete využívať všetky výhody zákazníckej podpory výrobkov Philips Avent, zaregistrujte svoj výrobok
na stránke www.philips.com/welcome.
Odsávačka Philips Avent sa vyznačuje jedinečným dizajnom, ktorý vám umožňuje pri odsávaní sedieť
v pohodlnejšej polohe. Mäkký masážny vankúšik* je navrhnutý tak, aby bol mäkký a hrejivý a imitoval
satie bábätka, aby ste pohodlne a príjemne dosiahli prúdenie mlieka. Odsávačka sa spúšťa v jemnom
režime, ktorý pomáha stimulovať prúdenie mlieka. Potom si môžete vybrať niektorý z troch režimov
odsávania podľa toho, ktorý je vám najpríjemnejší. Odsávačka sa ľahko skladá a ovláda a všetky
súčasti, ktoré prichádzajú do kontaktu s materským mliekom, možno umyť v umývačke riadu.
Odborníci v oblasti zdravotnej starostlivosti tvrdia, že materské mlieko je počas prvého roka tou
najlepšou výživou bábätka, pričom po 6 mesiacoch ho možno kombinovať s pevnou stravou. Vaše
materské mlieko je špeciálne prispôsobené potrebám vášho bábätka a pomáha ho chrániť pred
infekciami a alergiami. Odsávačka vám môže pomôcť dojčiť dlhšie. Svoje mlieko môžete odsať a
uschovať, aby ho malo bábätko k dispozícii, hoci s ním práve nie ste. Odsávačka je kompaktná, tichá
a diskrétne sa používa, preto si ju môžete vziať kamkoľvek, odsávať mlieko, keď vám to vyhovuje, a
zachovať si tvorbu mlieka.
Táto odsávačka je určená výhradne na použitie v domácnosti.
*Vankúšiky dodávané spolu s odsávačkou sú navrhnuté tak, aby boli pohodlné pre väčšinu matiek.
V prípade potreby si však môžete samostatne kúpiť väčší vankúšik.
Všeobecný popis (obr. A)
Obrázok A. Ďalej uvedené čísla zodpovedajú číslam na obrázku na prednej rozkladacej strane tejto
používateľskej príručky.
1 Pohonná jednotka so silikónovou hadičkou a viečkom *
2 Silikónová membrána *
3 Telo odsávačky *
4 Masážny vankúšik *
5 Kryt *
6 Priestor na batérie (len samostatná elektrická odsávačka)
7 Vypínač
8 Tlačidlo stimulácie
9 Tlačidlo nízkeho sacieho výkonu
10 Tlačidlo stredného sacieho výkonu
11 Tlačidlo vysokého sacieho výkonu
12 Adaptér
13 Biely ventil *
14 Fľaša na prirodzené kŕmenie Philips Avent *
15 Kopulovité viečko *
16 Krúžok so závitom *
17 Cumlík *
18 Uzatvárací disk *
*Poznámka: S dvojitou elektrickou odsávačkou sa dodávajú dva kusy každej označenej súčasti
s výnimkou pohonnej jednotky.
Model SCF332 obsahuje: samostatnú elektrickú odsávačku (vrátane jednej fľaše), prsné podložky
Model SCF334 obsahuje: dvojitú elektrickú odsávačku (vrátane dvoch iaš), prsné podložky,
cestovnú tašku

Slovensky
Určené použitie
Samostatná alebo dvojitá elektrická odsávačka Philips Avent Comfort je určená na odsávanie a
zachytávanie mlieka z prsníkov dojčiacich žien.
Zariadenie je určené pre jedného používateľa.
Dôležité bezpečnostné informácie
Pred použitím odsávačky mlieka si pozorne prečítajte tento návod na použitie a uschovajte si ho na
použitie v budúcnosti.
Tuto používateľskú príručku nájdete aj online na webových stránkach venovaných výrobkom Philips
Avent: www.philips.com/avent
Kontraindikácie
Odsávačku mlieka nikdy nepoužívajte počas tehotenstva, pretože odsávanie môže vyvolať pôrod.
Varovanie
Varovania, ktoré majú zabrániť uduseniu, uškrteniu a zraneniu:
- Nedovoľte, aby sa s pohonnou jednotkou, adaptérom či ostatným príslušenstvom hrali deti alebo
zvieratá.
- Deti musia byť pod dozorom, aby sa nehrali so zariadením.
- Po použití odsávačku vždy okamžite odpojte z elektrickej siete.
- Kým je odsávačka pripojená do siete, nenechávajte ju bez dozoru.
- Táto odsávačka nie je určená na používanie osobami (vrátane detí) s obmedzenými fyzickými,
zmyslovými alebo mentálnymi schopnosťami, či s nedostatočnými skúsenosťami a znalosťami.
Tieto osoby môžu odsávačku používať len pod dohľadom alebo ak ich osoba zodpovedná za ich
bezpečnosť riadne poučila o tom, ako zariadenie používať.
Varovania, ktoré majú zabrániť úrazu elektrickým prúdom:
- Pred každým použitím odsávačku aj adaptér skontrolujte, či sa na nej neprejavujú známky
poškodenia. Odsávačku nepoužívajte, ak zistíte poškodenie adaptéra alebo zástrčky, ak odsávačka
nefunguje správne alebo ak spadla na zem, prípadne bola ponorená do vody.
Varovania na predchádzanie popáleninám:
- Aby ste predišli prehrievaniu adaptéra, používajte len adaptér uvedený na zariadení.
- Nenabíjateľné batérie sa nesmú nabíjať, hrozí ich prehriatie a vytečenie elektrolytu.
Varovania na zabránenie otrave a kontaminácii a na zaistenie riadnej hygieny:
- Z hygienických dôvodov je odsávačka určená len na opakované používanie jednou osobou.
- Pred každým použitím vyčistite, vysušte a vysterilizujte všetky časti odsávačky okrem pohonnej
jednotky, hadičky s krytom a adaptéra.
- Skladujte len materské mlieko získané pomocou čistej a vysterilizovanej odsávačky.
- Nepoužívajte odsávačku, ak sa na silikónovej membráne prejavujú známky poškodenia alebo
narušenia. Informácie o objednávaní náhradných dielov nájdete v kapitole „Objednávanie
príslušenstva“.
- Na čistenie častí odsávačky mlieka nepoužívajte antibakteriálne čistiace prostriedky ani tekutý
piesok.
- Ak zariadenie nebudete dlhšiu dobu používať, vyberte batérie, aby nevytiekli.
97

Slovensky
98
Varovania na zabránenie problémom a bolestivosti prsníkov a bradaviek:
- Nepokúšajte sa zložiť telo odsávačky z prsníka, keď je vákuovo prisaté. Zariadenie vypnite a prstom
prerušte tesnenie medzi prsníkom a lievikovitou časťou odsávačky. Potom si odsávačku zložte z
prsníka.
- Odsávačku nikdy nepoužívajte, ak ste ospalá alebo veľmi unavená, aby ste jej používaniu mohli
venovať dostatočnú pozornosť.
- Pred zložením tela odsávačky z prsníka odsávačku vždy najprv vypnite, aby ste uvoľnili vákuum.
- Nikdy nepoužívajte žiadne príslušenstvo ani súčiastky od iných výrobcov, ani príslušenstvo, ktoré
výslovne neodporúča spoločnosť Philips Avent. Mohlo by dôjsť k nesprávnej funkcii zariadenia
a ovplyvneniu elektromagnetickej kompatibility. Ak budete takéto príslušenstvo alebo súčiastky
používať, Vaša záruka bude neplatná.
- Ak sa vám nepodarí odsať žiadne mlieko do piatich minút, nepokračujte v odsávaní. Skúste odsávať
v priebehu inej časti dňa.
- Ak odsávanie začne byt veľmi nepríjemné alebo bolestivé, prestaňte používať odsávačku a poraďte
sa so svojím odborníkom z oblasti dojčenia alebo starostlivosti o zdravie.
- Ak je vytváraný podtlak nepríjemný alebo vám spôsobuje bolesť, vypnite zariadenie, prerušte
podtlak vložením prsta medzi prsník a telo odsávačky a oddeľte odsávačku od prsníka.
- Do žiadneho otvoru nikdy nevkladajte žiadne predmety a dbajte, aby sa tam nedostali
neúmyselne.
Výstraha
Upozornenie na zabránenie poškodeniu a poruche produktu:
- Dbajte na to, aby adaptér a pohonná jednotka neprišli do kontaktu s vodou.
- Adaptér a silikónové hadičky uchovávajte mimo vyhriatych povrchov, aby sa neprehriali a
nezdeformovali.
- Pohonnú jednotku ani adaptér nikdy neponárajte do vody ani nevkladajte do umývačky riadu
alebo sterilizátora
- Odsávačka síce vyhovuje všetkým príslušným nariadeniam normy EMC o elektromagnetickej
kompatibilite, môže byť však náchylná na nadmernú koncentráciu emisií alebo môže spôsobiť
rušenie iných zariadení. V dôsledku toho sa môže odsávačka vypnúť alebo prejsť do chybového
režimu. Aby ste zabránili rušeniu, udržujte pri odsávaní (pozrite 'Technické informácie') ostatné
elektrické vybavenie ďalej od odsávačky.
- Vnútri pohonnej jednotky odsávačky sa nenachádzajú žiadne súčasti, ktoré môže používateľ
opraviť. Úpravy zariadenia nie sú dovolené. Ak ich budete vykonávať, záruka bude neplatná.
- Neskratujte koncovky napájania batérií.
Príprava na použitie
Čistenie a dezinfekcia
Keďže pohonná jednotka, silikónová hadička s viečkom ani adaptér neprichádzajú do kontaktu s
materským mliekom, nie je potrebné ich čistiť a dezinkovať. Všetky ostatné súčasti odsávačky pred
prvým použitím očistite a sterilizujte. Tieto súčasti vyčistite po každom použití a pred každým použitím
ich vysterilizujte.
Výstraha: Pohonnú jednotku ani adaptér nikdy neponárajte do vody a neumiestňujte do umývačky
riadu ani do sterilizátora, pretože by mohlo dôjsť k trvalému poškodeniu týchto častí.

Slovensky
Umývateľné súčasti
Nasledujúce súčasti očistite pred (prvým) použitím a po každom ďalšom použití. V zozname v časti
Všeobecný popis zistite, ktoré súčasti sa dodávajú spolu s odsávačkou.
Súčasti odsávačky:
- Silikónová membrána
- Telo odsávačky
- Masážny vankúšik
- Biely ventil
- Kryt
Súčasti fľaše:
- Fľaša na prirodzené kŕmenie Philips Avent
- Kopulovité viečko
- Krúžok so závitom
- Cumlík
- Uzatvárací disk
Veci potrebné na čistenie:
Umývanie v umývadle Umývanie v umývačke riadu
- Jemný prostriedok na umývanie riadu - Jemný prostriedok/tableta na umývanie riadu
- Pitná voda vysokej kvality - Pitná voda vysokej kvality
- Mäkká kefka alebo čistá utierka na riad
- Čisté umývadlo alebo miska
99
Varovanie: Pri čistení nepoužívajte antibakteriálne čistiace prostriedky ani tekutý
piesok.
1 Odsávačku mlieka a fľašu úplne rozoberte. Z odsávačky vyberte aj biely ventil.
Výstraha: Pri vyberaní bieleho ventila a jeho čistení buďte opatrní. Ak dôjde k jeho poškodeniu,
odsávačka nebude správne fungovať. Pri vyberaní bieleho ventila jemne potiahnite za
vrúbkovaný jazýček na strane ventila.
2 Súčasti umyte v umývadle alebo v umývačke riadu.
Umývanie v umývadle: Odpojte všetky súčasti a na 5 minút ich ponorte do horúcej vody s jemným
prostriedkom na umývanie riadu. Všetky súčasti očistite mäkkou kefkou alebo čistou utierkou a
dôkladne (Obr. 2) ich opláchnite.
Umývanie v umývačke riadu: Vyčistite všetky časti okrem pohonnej jednotky, silikónovej hadičky s
viečkom a adaptéra v umývačke riadu (len v hornej časti).
Poznámka: Ventil čistite jemným trením medzi prstami v teplej vode s prostriedkom na umývanie
riadu. Nevkladajte do ventila žiadne predmety, mohlo by dôjsť k jeho poškodeniu.
Dezinfekcia (voliteľná)
Ak chcete po čistení vykonať aj dezinfekciu, môžete jednotlivé súčasti povariť v bežnom hrnci.

Slovensky
100
Veci potrebné na dezinfekciu:
- Bežný hrniec
- Pitná voda vysokej kvality
Súčasti dezinkujte nasledujúcim spôsobom:
Naplňte hrniec dostatočným množstvom vody, aby boli všetky súčasti ponorené. Nechajte vodu
zovrieť. Súčasti uložené v hrnci nechajte 5 minút povariť (Obr. 3). Počas dezinfekcie vo vriacej
vode zaistite, aby sa fľaša ani iné súčasti nedotýkali strán nádoby. Mohlo by to spôsobiť nevratnú
deformáciu výrobku alebo poškodenie, za ktoré spoločnosť Philips nenesie zodpovednosť.
Vodu nechajte vychladnúť a opatrne z nej vyberte jednotlivé súčasti. Súčasti uložte na čistú papierovú
utierku alebo na čistý odkvapkávač a nechajte ich uschnúť na vzduchu. Na ich osušenie nepoužívajte
textilné utierky, pretože sa nimi môžu prenášať mikroorganizmy a baktérie škodlivé pre vaše bábätko.
Nájdite si vankúšik, ktorý vám najviac vyhovuje
Odsávanie materského mlieka má byť pohodlné. Preto ponúkame 3 mäkké pružné vankúšiky: 19,5 mm
masážny vankúšik (dodávaný s odsávačkou) a 25 mm masážny vankúšik.
Na zaistenie optimálneho pohodlia a výkonu si treba vybrať optimálny vankúšik pre Vaše bradavky
(Obr. 4).
19,5 mm: Masážny vankúšik,
25 mm: Masážny vankúšik (nie je súčasťou balenia):
1 Začnite štandardným 19,5 mm masážnym vankúšikom dodávaným spolu s odsávačkou. Rozmer sa
uvádza priamo na vankušiku (Obr. 5).
2 Ak je vankúšik príliš malý, kúpte si väčší 25 mm vankúšik (pozrite si kapitolu „Objednávanie
príslušenstva“). Príliš malý vankúšik môže spôsobiť bolesť alebo znížiť účinnosť odsávania (Obr. 6).
Zostavenie odsávačky mlieka
Poznámka: Skontrolujte, či sú všetky príslušné časti odsávačky mlieka vyčistené a vysterilizované.
1 Pred manipuláciou s vyčistenými súčasťami si dôkladne umyte ruky.
Varovanie: Dávajte si pozor, vyčistené časti môžu byť stále horúce. Odsávačku
začnite skladať, až keď vyčistené súčasti schladli.
Poznámka: Zostavenie odsávačky mlieka môže byť jednoduchšie, ak je mokrá.
2 Zospodu vložte biely ventil do tela odsávačky. Ventil zatlačte čo najhlbšie (Obr. 7).
3 Nakrúťte telo odsávačky na fľašu v smere pohybu hodinových ručičiek, kým nie je bezpečne
pripevnená (Obr. 8).
4 Zhora vložte do tela odsávačky silikónovú membránu. Zatlačte ju prstami nadol, aby dokonale
tesnila. Skontrolujte pritom, či správne dosadá po celom obvode okraja tela odsávačky (Obr. 9).
5 Vložte vankúšik do lievikovitej časti tela (Obr. 10) odsávačky.
6 Zatlačte vnútornú časť vankúšika čo najhlbšie a presvedčte sa, či dokonale tesní po celom okraji
tela (Obr. 11) odsávačky.
 Loading...