

Page 1
b
a
c
e
h
l
i
m
n
f
k
l
h
j
d
g
h
h
j
or
ou
oder
of
GB
call free on
call free on
call on
Pour obtenir notre catalogue de produits,
FR
0805 025 510
(Appel gratuit sauf surcoût éventuel selon opérateur))
0800 331 6015 (GB Only)
1800 744 5477 (IRL Only)
1 300 364 474 (AUS)
numéro gratuit
De Suisse, composez le : 056 266 56 56
De Belgique / Luxembourg,
composez le : 0800 26 550
DE
sortiment erreichen Sie uns unter diesen Rufnummern:
Österreich
Schweiz
NL
de Philips AVENT consumentenlijn:
Für weitere Informationen über unser gesamtes Produkt-
Deutschland
0800 000 7520
0800 180 016
056 266 56 56
Bel voor meer informatie of een product catalogus
Nederland: 0800-023 0076
(kostenfrei)
(kostenfrei)
België/Luxemburg: 0800 26 550
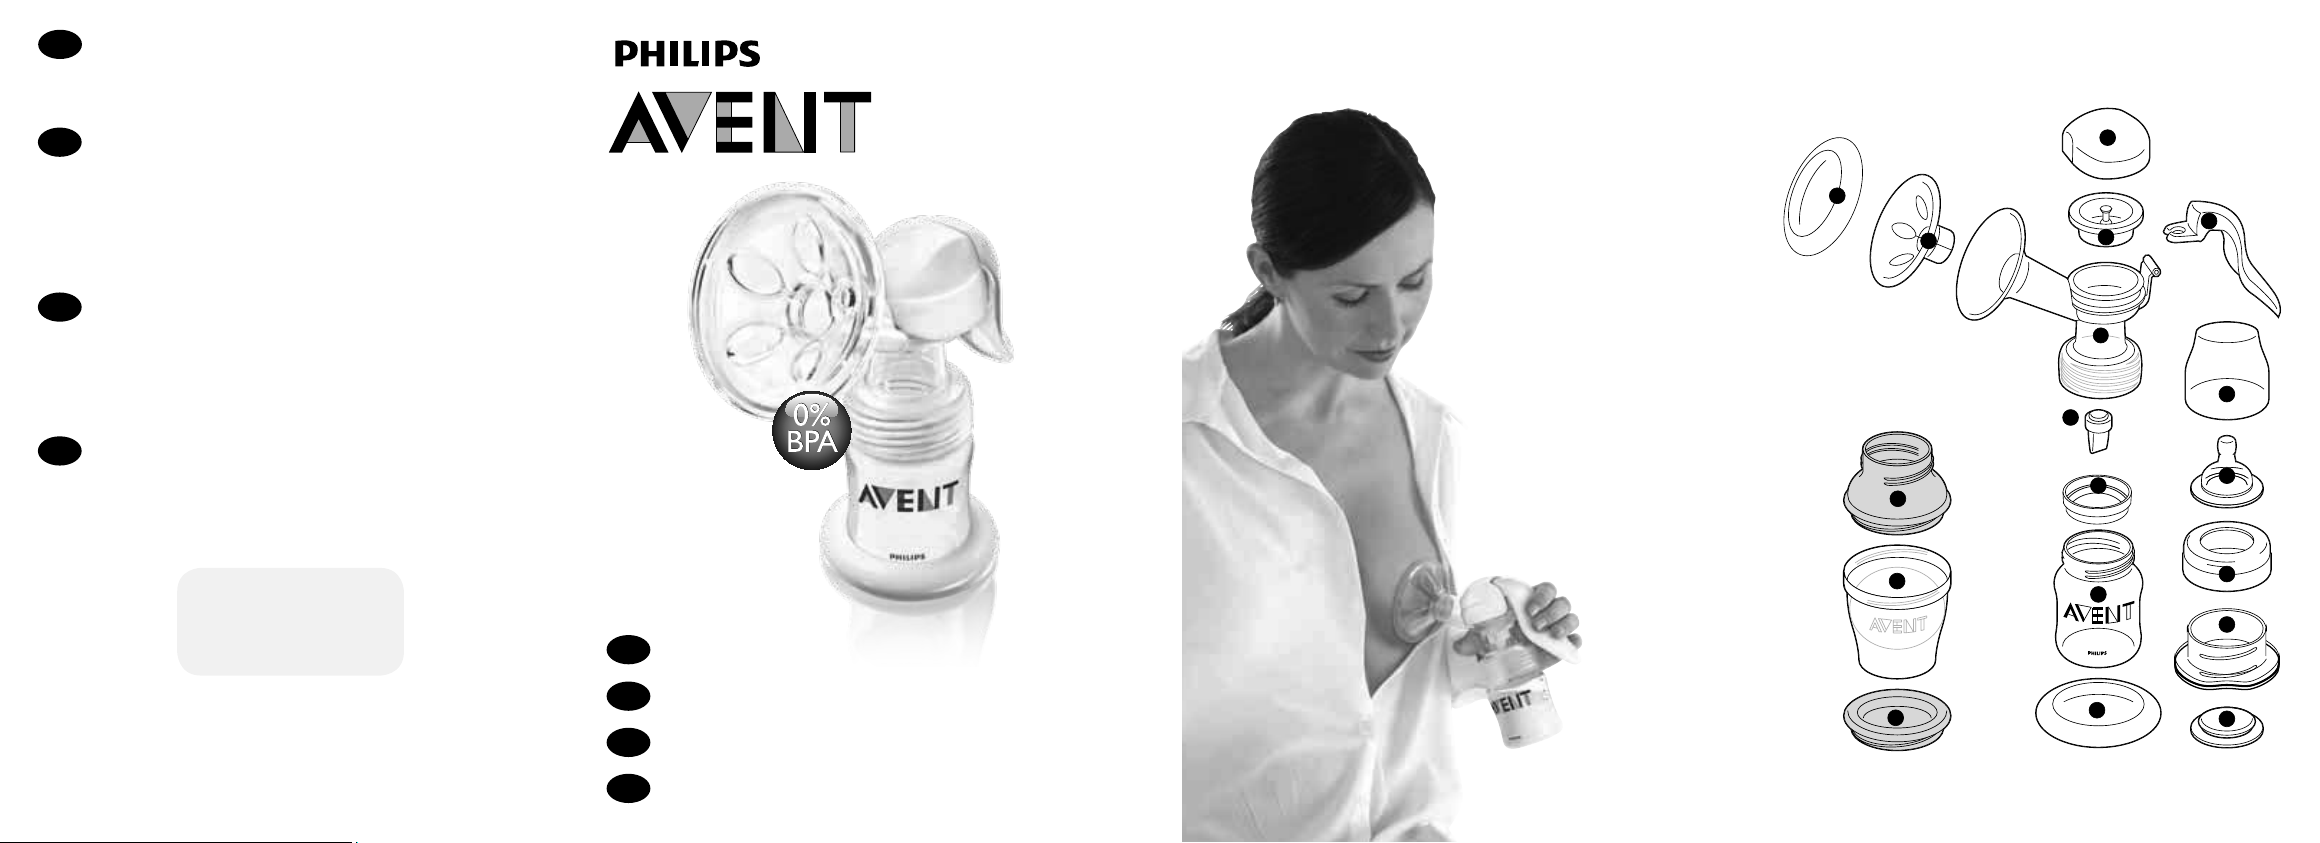
Breast pump – BPA-free
Tire-lait sans bisphenol A (0% BPA)
Milchpumpe – BPA-frei
Handkolf – bevat geen BPA
www.philips.com/AVENT
Philips AVENT, a business of Philips Electronics UK Ltd.
Philips Centre, Guildford Business Park, Guildford, Surrey, GU2 8XH
Trademarks owned by the Philips Group.
© Koninklijke Philips Electronics N.V. All Rights Reserved.
42133 5415 451
2.
GB
Manual breast pump
FR
Tire-lait manuel
DE
Handmilchpumpe
NL
Handkolf
Page 2
6. (1)–(7)
IMPORTANT: DO NOT LOSE THE WHITE VALVE. YOUR PUMP
WILL NOT WORK WITHOUT IT OR IF IT IS FITTED INCORRECTLY.
If lost, spare valves are available direct from Philips AVENT.
ATTENTION : VOTRE TIRE-LAIT NE FONCTIONNERA PAS SANS
CETTE PIÈCE. SI ELLE EST MISE À L’ENVERS OU MAL PLACÉE,
IL N’Y AURA PAS D’ASPIRATION. (Des valves de rechange
sont disponibles.)
WICHTIG: VERLIEREN SIE DAS WEISSE VENTIL NICHT! OHNE DAS
VENTIL ODER MIT VERKEHRT HERUM EINGESETZTEM VENTIL
FUNKTIONIERT DIE MILCHPUMPE NICHT. Ersatzventile sind bei
Bedarf direkt bei Philips AVENT erhältlich.
LET OP ! RAAK HET WITTE VENTIEL NIET KWIJT, ZONDER DIT VENTIEL
WERKT UW KOLF NIET. UW KOLF WERKT OOK NIET WANNEER
ONDERDELEN NIET CORRECT ZIJN GEPLAATST. Een reserve ventiel
kunt u aanvragen via de Philips AVENT consumentenlijn.
GB
Please take five minutes to read through the WHOLE
of this leaflet BEFORE you use your Philips AVENT
manual breast pump for the first time.
Contents
1. Introducing the manual breast pump
2. Detailed parts guide
3. Cleaning and sterilisation
4. Keeping your breast pump sterile for travel
5. Using the manual breast pumpwith the
AVENT VIA storage system
6. How to assemble the manual breast pump
7. When to express milk
8. Hints to help you succeed
9. How to use the manual breast pump
10. Storing your breast milk
11. Feeding your baby your expressed breast milk
12. Choosing the right teat for your baby
13. Troubleshooting guide
Should you ever lose these instructions, they are
available on our website: www.philips.com/AVENT
13. Problemen & oplossingen
Geen zuigkracht
Uw melk vloeit niet
Pijn in de borst
tijdens het kolven
Melk vloeit terug
achter het siliconen
massagekussentje
Barstjes en verkleuren
van onderdelen
Verloren of kapotte
onderdelen
Indien u alsnog problemen met uw kolf ondervindt, neem dan contact op met de
Philips AVENT consumentenservice via de genoemde telefoonnummers of raadpleeg
uw kraamverzorgster, consultatiebureau of lactatiekundige.
Controleer dat alle kolfonderdelen op de juiste manier in elkaar
zijn gezet en dat het witte ventiel met de ster naar boven wijst.
Zorg ervoor dat het siliconen massagekussentje en het membraan
goed op de kolf zijn aangebracht en dat deze goed aansluiten.
Controleer of er zuigkracht ontstaat en dat de kolf correct in
elkaar is gezet. Ontspan en probeer nogmaals, oefening baart
kunst! Lees de “Tips voor het succesvol afkolven”
nog eens door.
Het kan zijn dat u te hard kolft. U hoeft de hendel niet
in zijn geheel in te drukken om af te kolven.
Probeer de hendel maar tot halverwege in te drukken en
denk aan het kolfritme van 2 à 3 seconden.
Raadpleeg uw consultatiebureau of lactatiedeskundige.
Neem het massagekussentje van de trechter en plaats
opnieuw, zorg ervoor dat het massagekussentje goed aansluit
en dat het ver genoeg in de trechter is geplaatst. Neem de
“Gebruiksaanwijzing van de AVENT borstkolf” nog eens door.
Vermijd contact met antibacteriële reinigingsproducten,
deze kunnen het plastic beschadigen. De combinatie van
schoonmaakmiddelen, sterilisatie oplossingen, ontkalkt water
en temperatuurschommelingen kunnen in sommige gevallen
barsten in het plastic veroorzaken. In dit geval, niet gebruiken.
Neem voor het verkrijgen van losse onderdelen contact op
met de Philips AVENT consumentenlijn. De kolf is geschikt
voor de vaatwasser – kleurstoffen in voedingsresten kunnen
verkleuring van het plastic veroorzaken. Houd het product uit
rechtstreeks zonlicht. Langdurige blootstelling aan zonlicht kan
verkleuring veroorzaken.
Losse onderdelen zijn verkrijgbaar via de Philips AVENT
Consumentenlijn (zie achterkant voor contactinformatie)
NL
41
Page 3

1. Introducing the manual breast pump
The manual breast pump is a breakthrough in breast pump design.
Its silicone diaphragm provides 100% reliable vacuum, whilst the
Let-down Massage Cushion naturally imitates your baby’s suckling
action to provide fast milk flow – silently, comfortably and gently.
The pump is easy to assemble, discreet to use and all parts are
dishwasher safe.
Doctors recommend that breast milk is the best nutrition for babies
during the first year, combined with solid food after the first 6
months. Your milk is specially adapted to your baby’s needs and
contains antibodies which help protect your baby against infection
and allergies.
Your manual breast pump will help you breastfeed longer. You can
express and store your milk so that – whether you are out for a few
hours, taking a well deserved rest, or back at work – your baby can
still enjoy the benefits of your breast milk, even if you can’t be there
to give it yourself. As the pump is so silent and discreet you can take
it with you anywhere, allowing you to express milk at your own
convenience and maintain your milk supply.
Since the Philips AVENT bottle and AVENT teat are specially designed
to mimic breastfeeding, your baby will switch easily between breast
and bottle. This allows mothers to continue providing breast milk to
baby even when they return to work.
GB
1
Page 4
GB
2. Detailed parts guide
MANUAL BREAST PUMP
a) Funnel cover (same as i)
b) Let-down Massage Cushion
c) Pump cover
d) Silicone diaphragm
and stem*
e) Handle
f) Pump body
g) White valve*
BOTTLE
h) Philips AVENT feeding bottle (125ml/4oz)
/ VIA adaptor/ VIA cup/ adaptor ring
i) Stand (same as a)/ VIA lid/ stand
j) Dome cap
k) Extra Soft teat, Newborn Flow (0m+)
l) Screw ring
m) Sealing base
n) Sealing disc
*spares included
3. Cleaning and sterilisation
Before you use your breast pump for the first time and every time
before use:
Separate all parts, then wash in the dishwasher or in warm soapy
water and rinse. Do not use antibacterial or abrasive cleaners/detergents.
Sterilise all parts in a Philips AVENT steam steriliser, or by boiling
for 5 minutes. If using a Philips AVENT steam steriliser, the pump
will remain sterile in the steriliser for a minimum of 6 hours,
provided the lid is not removed.
Caution: Take care when cleaning the white valve. If
it gets damaged, your breast pump will not function
✓
properly. To clean the white valve, rub it gently
between your fingers in warm soapy water. Do not
insert objects as this may cause damage.
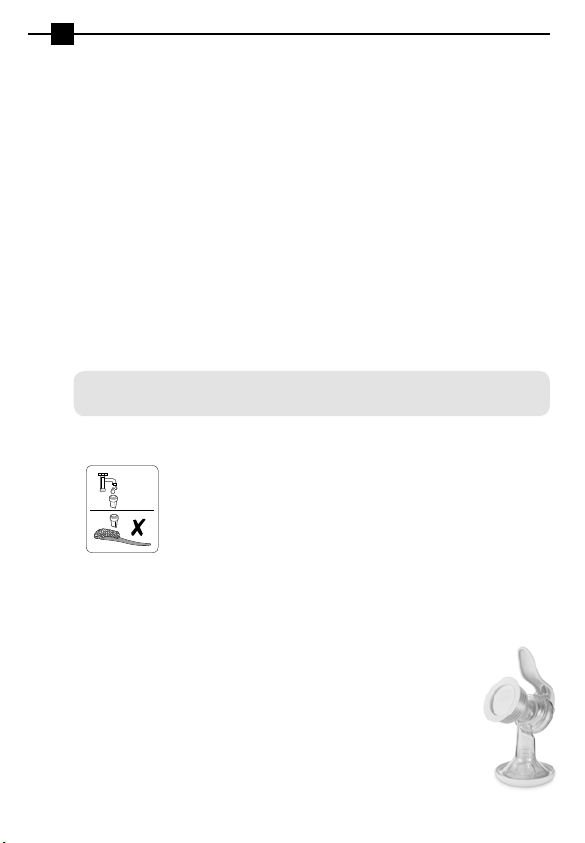
4. Keeping your breast pump sterile for travel
After sterilising all parts, insert the white valve (g) and
fit the diaphragm with stem (d) onto the pump body (f).
Clip the cover (a) over the funnel and Let-down Massage
Cushion (b) and screw on the sealing base (m) in place
of the Philips AVENT feeding bottle (h).
2
Page 5
5
.
Using the manual breast pump
with the AVENT VIA storage system
Simply replace the Philips AVENT feeding bottle with
a VIA cup and adaptor. To make the pump completely
stable insert the VIA cup into the VIA lid/stand.
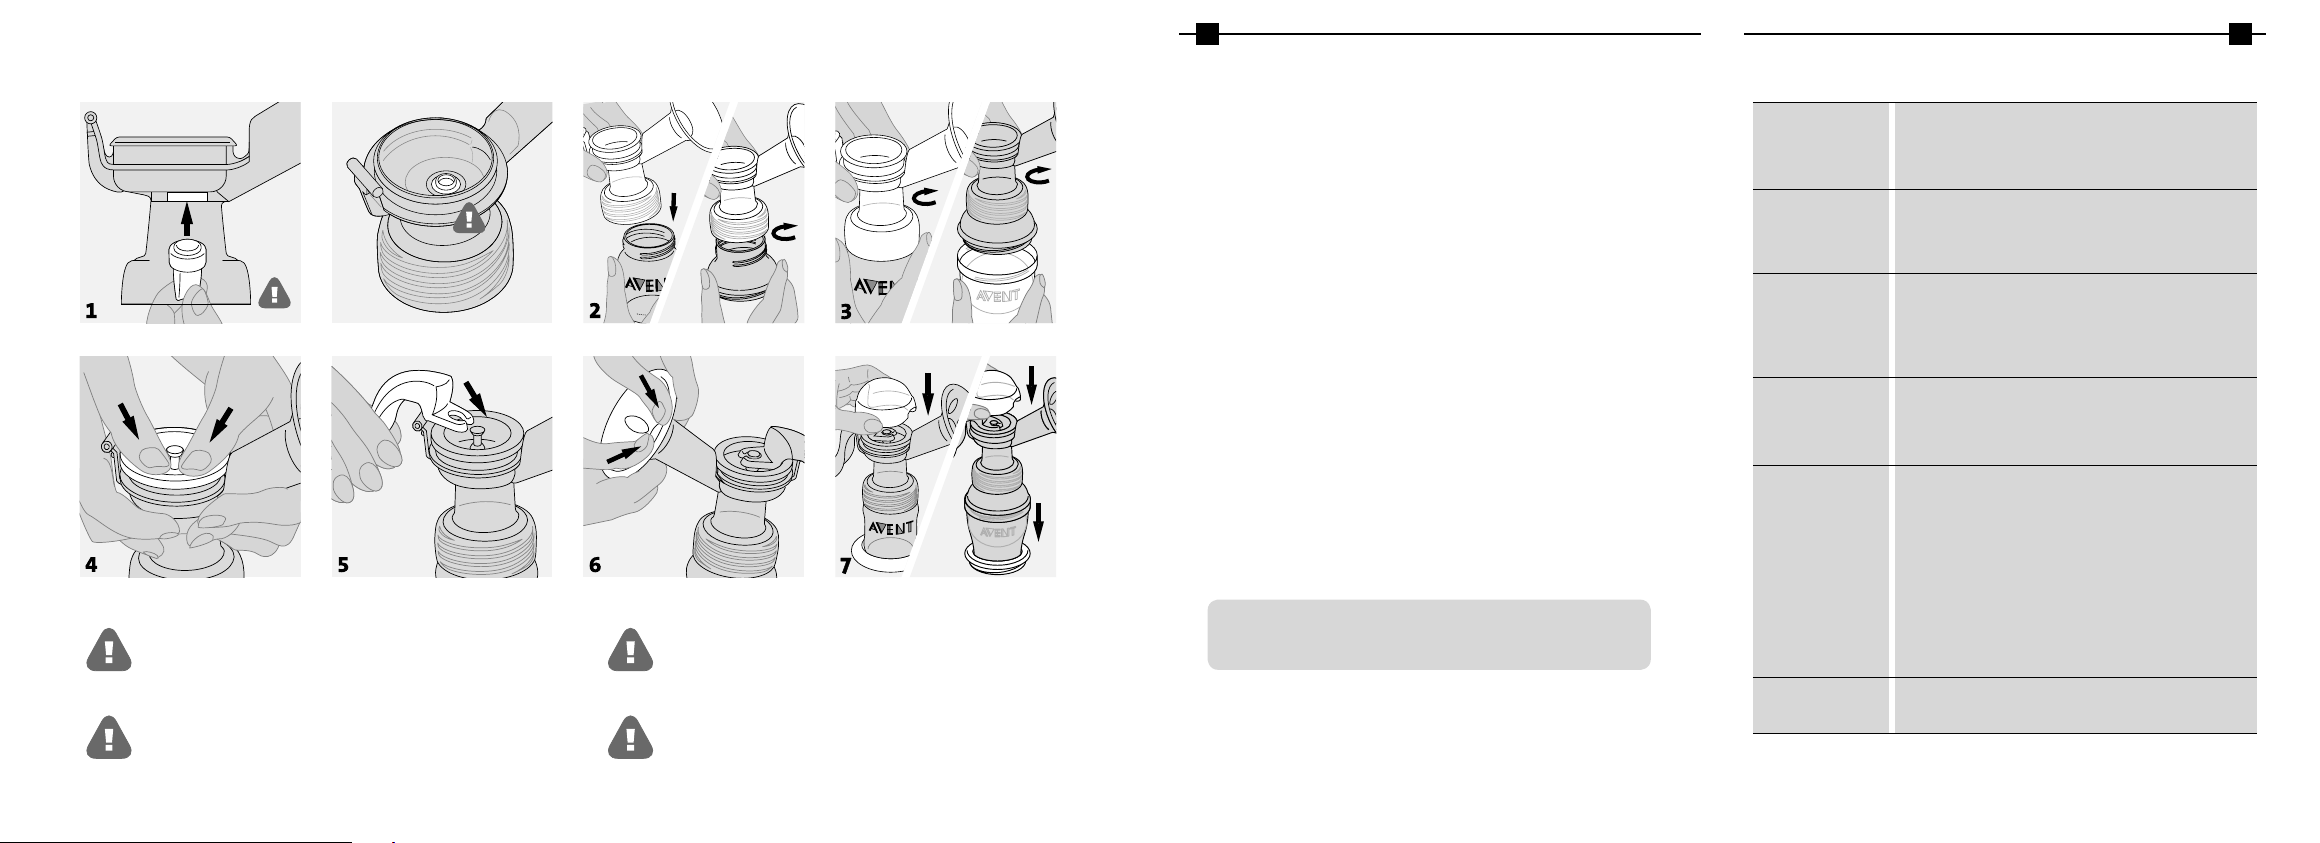
6. How to assemble the manual
breast pump
Separate all parts and ensure pump has been cleaned
and sterilised as in section 3:
1) Wash your hands thoroughly. Insert the white valve (g) into the
pump body (f) from underneath
2)
Place the pump body (f) onto the Philips AVENT feeding bottle (h).*
3)
Twist gently clockwise until secure. DO NOT OVERTIGHTEN!
4)
Place the silicone diaphragm and stem (d) into the pump body (f). Make
sure it fits securely around the rim by pressing down with your fingers
to ensure a perfect seal. (This is easier if assembled whilst wet).
5)
Place the forked end of the handle (e) under the silicone diaphragm
and stem (d) and push down gently on the handle until it clicks
into place.
6)
Carefully insert the Let-down Massage Cushion (b) into the pump
funnel (f) making sure it is perfectly sealed all round the rim of the
funnel. (This is easier if assembled whilst wet).
7)
Click the pump cover (c) onto the pump body (f). To make the pump
completely stable insert the bottle into the stand (i).
*ALWAYS insert the adapter ring when using a polypropylene bottle
.
GB
7. When to express milk
1) If possible, wait until your milk supply and breastfeeding schedule are
well established, normally at least 2-4 weeks after birth, unless told
otherwise by your health professional or breastfeeding advisor.
3
Page 6

GB
2) The exceptions to the above are:
a) If you are expressing milk for your baby to be given in hospital.
b) If your breasts are engorged (painful or swollen), you can express
a small amount of milk before or between feeds to ease the pain
and to help your baby latch on more easily.
c) If you have sore or cracked nipples, you may wish to express your
milk until they are healed.
d) If you are separated from your baby and wish to continue to
breastfeed when you are reunited, you should express your milk
regularly to stimulate your milk supply.
3) You will need to find the right times of the day for you to express
your milk, e.g.
a) Early in the morning when your breasts are full, just before or
after your baby’s first feed.
b) After a feed, if your baby has not emptied both breasts.
c) Between feeds, or in a break if you have returned to work.
8. Hints to help you succeed
Using a breast pump takes practice – you may need to make several
attempts before you succeed, but because the pump is so simple and
natural to use, you will soon get used to expressing your milk.
1) Choose a time when you’re not rushed and won’t be interrupted.
2) Having your baby or a photograph of your baby nearby can help
encourage ‘let-down’.
3) Placing a warm cloth on the breasts for a few minutes before you
start pumping can encourage milk flow and soothe painful breasts.
4) Warmth and relaxation can encourage milk flow. Try expressing after
a bath or shower.
5) Try expressing from one breast while your baby is feeding from the
other, or continue expressing just after a feed.
4
Page 7

GB
6) Repositioning the pump on the breast from time to time can help
stimulate your milk ducts.
Practice with your pump to find the best technique for you.
However, if the process becomes very painful, stop and consult
your breastfeeding advisor.
9. How to use the manual breast pump
1) Wash your hands thoroughly and make sure your breasts are clean.
Gently squeeze a little milk from each nipple to ensure milk ducts are
not blocked.
2) Make sure you have sterilised and carefully assembled your pump
exactly as shown in sections 3 and 6.
3) Consult the ‘Hints to help you succeed’ section.
4) Relax in a comfortable chair, leaning slightly forward (use cushions
to support your back). Make sure you have a glass of water nearby.
5) Press the funnel and Let-down Massage Cushion of the pump firmly
against your breast, making sure that no air can escape – otherwise
there will be no suction.
6) As you gently push down on the pump handle, you will feel the
suction on your breast. You don’t need to depress the handle fully
to create a vacuum – only as much as is comfortable. Your milk will
soon start flowing, even though you may not use all the suction the
pump can generate.
7) Begin by pumping 5-6 times rapidly to initiate let-down. Then, hold the
handle down for 2-3 seconds, and allow it to return to its resting place.
These 2-3 second cycles imitate your baby’s natural suckling pattern
and allow the milk to flow between strokes.
8) Milk should begin to flow after the first few strokes. Don’t worry if
your milk does not flow immediately. Relax and continue pumping.
Do not continue pumping for more than 5 minutes at a time if NO
result is achieved. Try expressing at another time during the day.
5
Page 8
GB
Please remember that, should the process become very painful or
uncomfortable, you should stop using the pump and consult your
health professional or breastfeeding advisor.
9) On average you will need to pump for 10 minutes to express 60-125ml
or 2-4oz. However, this is just a guide and varies from woman to
woman. If you find that you regularly express more than 125ml per
session, please use a 260ml/9oz AVENT bottle or 240ml/8oz VIA cup.
Do not overfill Philips AVENT feeding bottles or VIA cups and keep
upright, otherwise milk may leak from below the pump body.
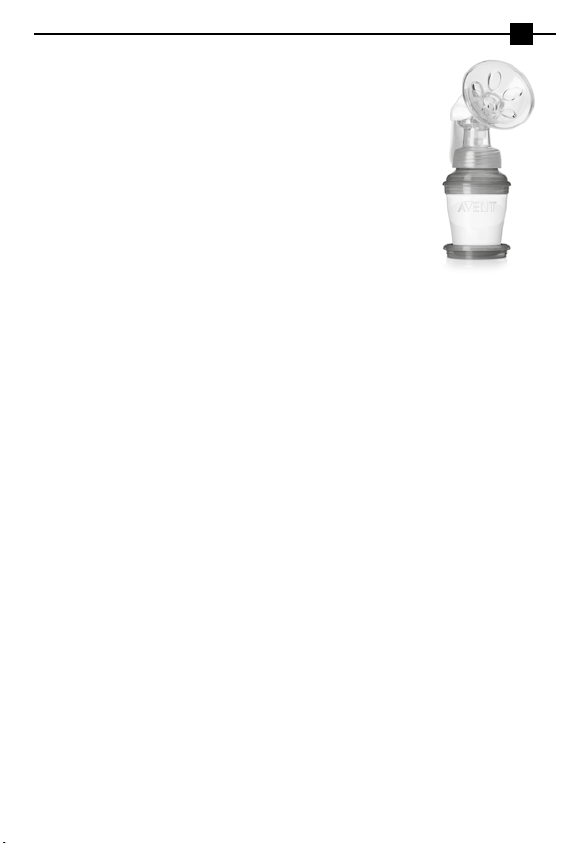
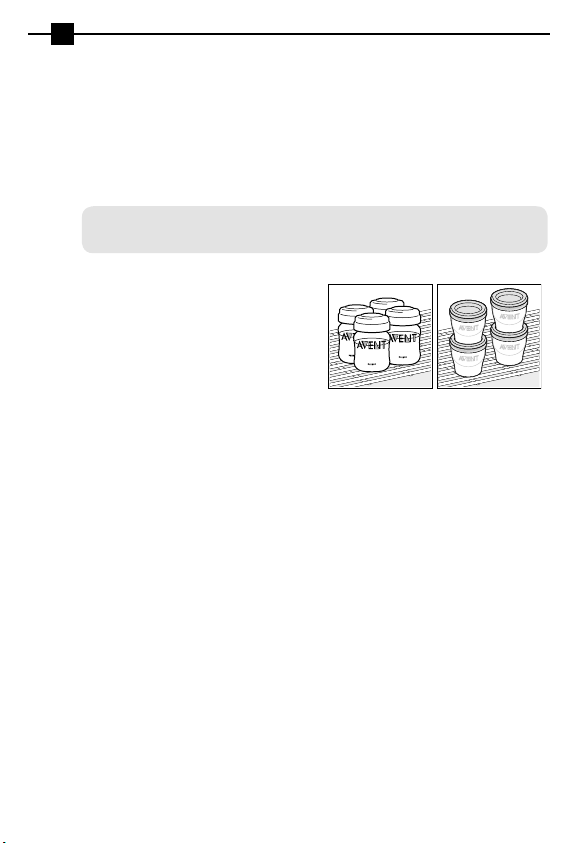
10. Storing your breast milk
• Breast milk can be stored in
the fridge or freezer in either
sterile breast milk containers
(125ml/4oz or 260ml/9oz bottles
fitted with sealing discs) or in VIA
cups with lids.
• Only milk collected with a sterile pump should be stored to be fed to
your baby.
• Expressed milk should be refrigerated immediately.
• Expressed breast milk can be stored in the refrigerator for up to
48 hours (not in the door) or in the freezer for up to 3 months.
• If you are storing milk in the fridge to add to during the day, only add
milk which has been expressed into a sterile container. Milk can only
be kept like this for a maximum of 48 hours (from first expression)
after which it must be used immediately or frozen for future use.
• For products other than breast milk make feeds up fresh when
needed, following the manufacturer’s instructions.
Storing your milk in the fridge
If your expressed breast milk will be fed to your baby within 48 hours,
it can be stored in the fridge (not in the door) in an assembled Philips
AVENT feeding bottle or VIA feeding system. Assemble a sterilised
teat, screw ring and dome cap and attach onto the body of the Philips
AVENT bottle or the VIA adaptor and cup (see below).
6
Page 9
GB
Storing your milk in the freezer
To store in the freezer, use a sealing disc in place of the teat and
dome cap or use a sterilised VIA lid to seal the VIA cup. The storage
containers should be clearly labelled with the date and time of
expression and older milk used up first.
NEVER refreeze breast milk. DO NOT add fresh breast milk to already
frozen milk. ALWAYS discard any milk that is left over at the end of a feed.
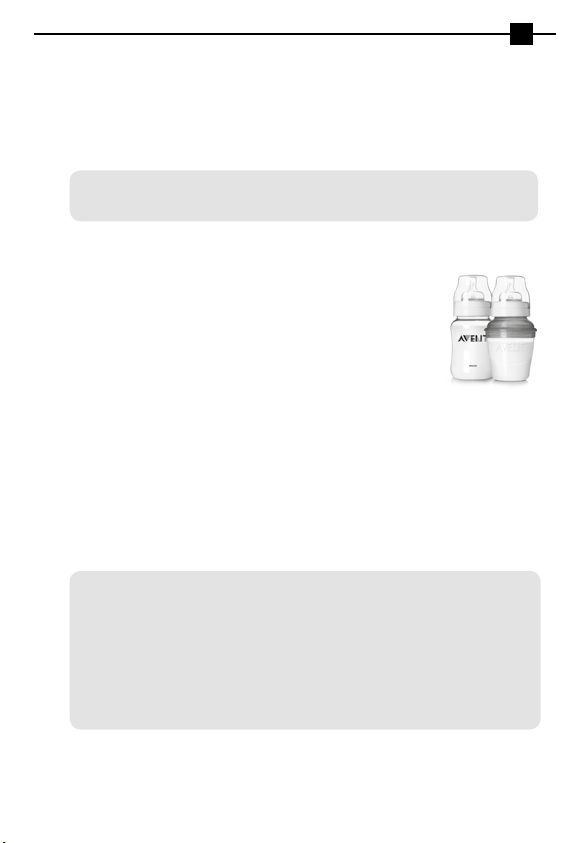
11. Feeding your baby your expressed breast milk
If breast milk has been stored in an AVENT Breast Milk
Container, replace the sealing disc with a sterilised
AVENT teat.
Alternatively replace the VIA lid with a sterilised VIA
adaptor, screw ring, dome cap and AVENT teat.
Frozen breast milk should be defrosted overnight in the
refrigerator. However, in an emergency, it can be defrosted
in a jug of hot water. Once thawed use within 24 hours.
Breast milk can be heated in the same way as any other bottle feed.
stand the Philips AVENT bottle or VIA feeding system in a bowl of hot
water, or alternatively, for a safe and fast way to warm feeds, use
the Philips AVENT bottle and baby food warmer. IMPORTANT! Milk
or food will heat faster in VIA cups than in standard feeding bottles/
containers. Always check milk or food temperature before feeding.
Never heat milk in a microwave as this may destroy valuable nutrients
and antibodies. In addition, the uneven heating may cause hot spots
in the liquid which could cause burns to the throat.
Never immerse a frozen milk container or VIA cup in boiling water as
this may cause it to crack/split.
Never put boiling water directly into a VIA cup, allow to cool for
around 20 minutes before filling.
7
Page 10
GB
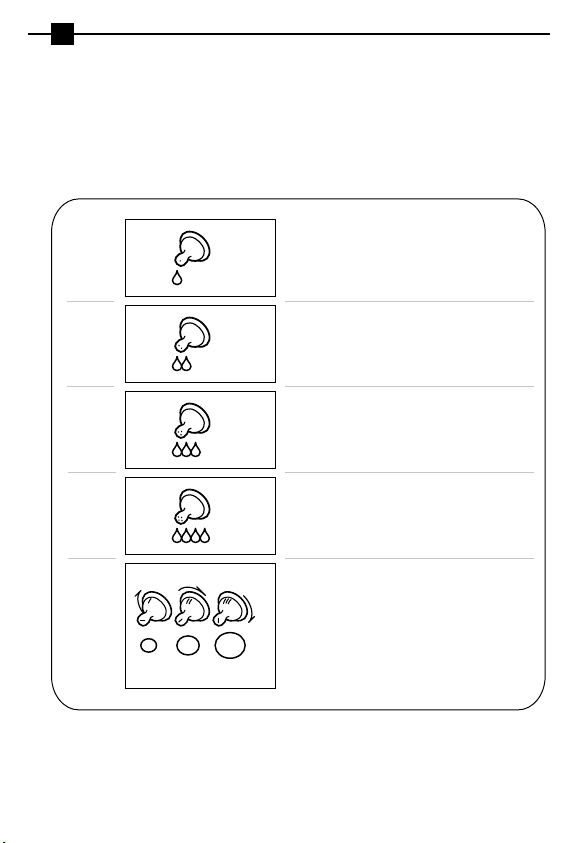
12. Choosing the right teat for your baby
AVENT teats can be used on both the Philips AVENT feeding bottle
and VIA feeding system. AVENT teats are clearly numbered on the
side to indicate flow rate.
+
0
m
+
1
m
+
3
m
+
m
6
+
3
m
8
1
2
2 holes
3
3 holes
4
4 holes
NEWBORN FLOW
EXTRA SOFT SILICONE TEAT
Ideal for newborns and breastfed
1 hole
babies of all ages.
SLOW FLOW
EXTRA SOFT SILICONE TEAT
Ideal for newborns and breastfed
babies of all ages.
MEDIUM FLOW
SOFT SILICONE TEAT
For bottle fed babies at 3 months
of age and up.
FAST FLOW
SOFT SILICONE TEAT
Offers a faster flow for older babies.
VARIABLE FLOW
SOFT SILICONE TEAT – SLOT CUT
Provides an extra fast flow and
accommodates thicker liquids.
Flow rate can be varied by turning
the bottle to align the I, II or III markings
1 slot
on the teat with baby’s nose.
Page 11

13. Troubleshooting guide
GB
Lack of suction
No milk being expressed
Pain in the breast area
when expressing
Milk is drawn up the
Let-down Massage
Cushion
Cracking/discolouration
of pump parts
Lost or broken parts
Check that all the pump components have been
assembled correctly and that the white valve is the right
way up. Ensure that the diaphragm and Let-down Massage
Cushion are fitted securely to the pump body and a
perfect seal is created.
Ensure suction is created and the pump is
correctly assembled. Relax and try again, expression may
improve after practice. Please refer to the ‘Hints to help
you succeed’ section.
You may be pumping too hard. You do not need to use
all the suction the pump can generate. Try depressing
the handle halfway and remember the 2-3 second
pumping rhythm. Consult your health professional/
breastfeeding advisor.
Remove and refit the Let-down Massage Cushion
ensuring it is firmly attached and pushed far enough
down the funnel. Try leaning slightly forward.
Avoid contact with antibacterial or abrasive detergents/
cleaners as these can damage the plastic. Combinations
of detergents, cleaning products, sterilising solution,
softened water and temperature fluctuations may, under
certain circumstances, cause the plastic to crack. If this
occurs, do not use. Contact Philips AVENT Customer
Services for spare parts. The pump is dishwasher safe
but food colourings may discolour components. Keep the
product out of direct sunlight, as prolonged exposure
may cause discolouration.
Spare parts are available through Philips AVENT
Customer Services (see back cover for contact details)
If you are still experiencing problems, please contact Philips AVENT Customer
Services (see back cover for contact details). Alternatively contact your health
professional/breastfeeding advisor.
9
Page 12

FR
Veuillez lire attentivement TOUT ce mode d’emploi
AVANT d’utiliser votre tire-lait manuel Philips AVENT
pour la première fois.
Sommaire
1. Présentation du tire-lait manuel
2. Identification des pièces
3. Nettoyage et stérilisation
4. Comment transporter votre tire-lait stérilisé
5. Utilisation du tire-lait manuel avec le système
de conservation AVENT VIA
6. Comment assembler le tire-lait manuel
7. Quand tirer votre lait
8. Conseils d’utilisation
9. Comment utiliser le tire-lait manuel
10. Conservation de votre lait maternel
11. Pour donner du lait tiré à votre bébé
12. Quelle tétine choisir pour votre bébé
13. En cas de problème
Ce manuel est également disponible sur notre
site Internet : www.philips.com/AVENT
10
Page 13

FR
1. Présentation du tire-lait manuel
Le tire-lait manuel est unique et révolutionnaire dans sa conception.
Le diaphragme en silicone garantit l’aspiration à 100%, en même
temps que le coussin masseur reproduit naturellement les
mouvements de succion de votre bébé. Il stimule le réflexe d’éjection
du lait, entretenant la rapidité de son débit, sans bruit, sans douleur et
tout en douceur. Le tire-lait est facile à assembler, discret à utiliser et
toutes les pièces vont au lave-vaisselle.
Le corps médical recommande de nourrir bébé au lait maternel pendant
ses deux premières années, avec l’introduction d’aliments solides à partir
de 6 mois. Votre lait est parfaitement adapté aux besoins de votre bébé et
contient des anticorps qui protègent contre les infections et les allergies.
Votre tire-lait manuel va vous permettre d’allaiter plus longtemps. Grâce
à votre tire-lait, vous pouvez entretenir votre lactation, tirer votre lait
et en faire des réserves pour que votre bébé puisse en profiter même si
vous n’êtes pas là pour le lui donner : si vous sortez, si vous vous reposez,
quand vous reprenez vos activités professionnelles ou autres. L’appareil
est si discret et si léger que vous pouvez l’emporter partout pour vous en
servir quand vous voulez.
Comme le biberon et la tétine AVENT sont spécialement conçus pour
reproduire la technique de la tétée au sein, votre bébé alternera
facilement entre sein et biberon. Ainsi, il continuera à stimuler votre
production de lait même si vous reprenez le travail.
2. Identification des pièces
TIRE-LAIT MANUEL
(a) Protège-entonnoir (comme i)
(b) Coussin masseur
(c) Couvercle
(d) Diaphragme en silicone et tige*
(e) Poignée
(f) Bol et entonnoir
(g) Valve blanche*
BIBERON
(h) Biberon AVENT (125ml)
/Adaptateur VIA/Pots VIA/
bague d’adaptation
(i) Socle (comme a)
/Couvercle/Socle VIA
(j) Capuchon
(k) Tétine extra-souple,
débit nouveau-né (0m+)
(l) Bague
(m) Base d’étanchéité
(n) Disque d’étanchéité
*Pièces détachées de
rechange
11
Page 14

FR
3. Nettoyage et stérilisation
Avant la première utilisation de votre tire-lait (instructions valables
avant chaque utilisation) :
Séparez toutes les pièces, puis passez-les au lave-vaisselle ou lavez-
les à l’eau savonneuse et rincez-les. N’utilisez pas de détergents ou
d’agents de nettoyage abrasifs ou antibactériens.
Attention : Nettoyez soigneusement la valve blanche.
Si vous l’endommagez, votre tire-lait ne fonctionnera pas
✓
correctement. Pour nettoyer la valve blanche, frottez-la
doucement entre vos doigts à l’eau chaude savonneuse.
N’insérez jamais d’objets pour éviter tout dommage.
Stérilisez toutes les pièces à l’aide d’un stérilisateur Philips AVENT à
vapeur ou plongezles dans l’eau bouillante pendant 5 minutes. Si vous
utilisez un stérilisateur Philips AVENT à vapeur, la pompe reste stérile
dans le stérilisateur au moins 6 heures à condition que le couvercle
reste en place.
4. Comment transporter votre tire-lait stérilisé
Après avoir stérilisé toutes les pièces, insérez la valve
blanche (g) et insérez le diaphragme à tige (d) dans le bol
del’entonnoir (f). Positionnez le protège-entonnoir (a) sur
l’entonnoir muni du coussin masseur (b) puis vissez la
base d’étanchéité (m) à la place du biberon AVENT (h).
12
Page 15

FR
5. Utilisation du tire-lait manuel avec
le système de conservation AVENT VIA
Il suffit de remplacer le biberon AVENT par un pot VIA et
son adaptateur. Pour plus de stabilité, insérez la base du
pot VIA dans un couvercle/socle VIA.
6. Comment assembler votre
tire-lait manuel
Séparez toutes les pièces et assurez-vous que le tire-lait a bien été
lavé et stérilisé suivant les indications du paragraphe 3. Puis :
1) Lavez-vous soigneusement les mains. Insérez la valve blanche (g)
dans le tire-lait (f) par en-dessous.
2) Placez le bol de l’entonnoir (f) sur le biberon AVENT (h).*
3) Faites tourner doucement dans le sens des aiguilles d’une montre,
jusqu’au déclic. NE SERREZ PAS TROP FORT !
4) Enfoncez le diaphragme et la tige (d) dans le bol (f), les bords bien
repliés autour. Pressez les doigts sur toute la circonférence pour
assurer que l’étanchéité est parfaite. (La tâche est facilitée quand
les pièces sont mouillées.)
5) Glissez la fourchette de la poignée (e) sous la tige du diaphragme (d)
et pressez doucement jusqu’au déclic pour enclencher la poignée.
6) Installez le coussin masseur (b) dans l’entonnoir en vous assurant que
les bords sont bien repliés par-dessus tout autour et que le coussin adhère
bien au fond. (La tâche est facilitée quand les pièces sont mouillées.)
7) Cliquez le couvercle (c) sur le bol (f). Pour plus de stabilité, posez le
biberon sur le socle (i).
*Insérez TOUJOURS la bague d’adaptation lorsque vous utilisez un biberon en polypropylène.
7. Quand tirer votre lait
1) Si possible, attendez que votre lactation soit bien en route et que les
tétées soient plus ou moins régulières, de 2 à 4 semaines après la
naissance généralement, à moins de contre-indications.
13
Page 16

FR
2) Utilisez votre tire-lait plus tôt si :
a) Vous devez tirer du lait pour votre bébé hospitalisé.
b) Vos seins sont engorgés (gonflés et douloureux). Extraire un
peu de lait avant ou entre les tétées peut soulager l’inconfort et
faciliter la mise au sein.
c) Vous avez les mamelons gercés ou crevassés. Vous préférerez
peut-être tirer votre lait jusqu’à leur cicatrisation.
d) Vous êtes momentanément séparée de votre bébé mais vous
voulez entretenir votre lactation pour continuer à l’allaiter
quand vous serez réunis.
e) Vous devez prendre un médicament empêchant d’allaiter : tirez et
jetez votre lait pour ne pas interrompre votre lactation le temps du
traitement.
3) C’est à vous de déterminer les moments qui vous conviennent
le mieux pour tirer votre lait, cependant, en règle générale, il est
recommandé d’essayer :
a) Au réveil, quand les seins sont pleins, juste avant ou après la
première tétée de la journée.
b) Après une tétée, si bébé n’a pas vidé les deux seins.
c) Entre les tétées, ou pendant vos pauses si vous travaillez.
8. Conseils d’utilisation
L’utilisation d’un tire-lait est une habitude qui s’acquiert. Il vous faudra
peut-être vous y prendre à plusieurs reprises, mais le tire-lait est si simple
et si naturel à employer que vous arriverez très vite à tirer votre lait.
1) Choisissez un moment où vous n’êtes pas pressée et où vous ne
risquez pas d’être interrompue.
2) Tenir bébé ou regarder une photo de lui peut déclencher le réflexe
d’éjection du lait.
3) Un gant de toilette chaud et humide, appliqué quelques minutes sur
les seins avant de commencer à tirer, favorise le réflexe d’éjection du
14
lait et soulage les seins gonflés.
Page 17

FR
4) Votre lait coule mieux quand vous êtes détendue et que vous avez
bien chaud. Essayez d’en tirer après un bain ou une douche.
5) Essayez de tirer d’un sein quand votre bébé tète de l’autre, ou bien
tirez juste après une tétée.
6) Changez la position du tire-lait de temps en temps pour stimuler
les galactophores.
Entraînez-vous pour trouver la technique et la position qui vous
conviennent le mieux. Si le procédé s’avérait douloureux, arrêtez
et demandez conseil à une consultante en lactation.
9. Comment utiliser le tire-lait manuel
1) Lavez-vous soigneusement les mains et assurez-vous que vos seins
sont propres. Pincez doucement vos mamelons pour exprimer quelques
gouttes de lait et pour vérifier ainsi que les canaux ne sont pas bouchés.
2) Assurez-vous que votre tire-lait est bien stérilisé et correctement
assemblé comme indiqué aux paragraphes 3 et 6.
3) Relisez notre paragraphe : “Conseils d’utilisation”.
4) Asseyez-vous confortablement, penchez-vous légèrement en avant
(avec des coussins dans le dos si vous préférez). Ayez une boisson
quelconque à portée de la main.
5) Placez fermement l’entonnoir muni de son coussin masseur sur le sein,
l’épousant de façon à ce qu’il n’y ait aucun appel d’air – sinon vous
n’aurez pas d’aspiration.
6) Pressez doucement la poignée et vous ressentirez la succion. Vous
n’avez pas besoin de presser jusqu’au bout : adaptez l’aspiration à
votre confort, c’est vous qui la contrôlez. Votre lait commencera vite
à couler, même si vous ne serrez pas la poignée à fond.
7) Commencez par presser la poignée rapidement 5 à 6 fois pour
déclencher la montée de lait. Puis maintenez la pression 2 ou 3
secondes et relâchez. Ces cycles de 2 ou 3 secondes reproduisent
l’action de votre bébé lorsqu’il tète et permettent au lait de s’écouler
dans le biberon entre les pressions.
8) Le lait devrait se mettre à couler après quelques pressions. Ne
vous inquiétez pas s’il ne coule pas tout de suite. Détendez-vous et
continuez à presser.
15
Page 18

FR
Ne continuez pas plus de 5 minutes si vous n’obtenez AUCUN
résultat. Essayez plutôt à un autre moment.
Souvenez-vous bien que si le procédé s’avérait inconfortable ou
douloureux, vous devez arrêter et consulter votre médecin ou votre
consultante en lactation.
9) En moyenne, il faut 10 minutes pour tirer de 60 à 125ml de lait. Ceci
n’est donné qu’à titre d’indication et varie d’une maman à l’autre. Si
vous vous rendez compte que vous exprimez régulièrement plus de
125ml par séance, adaptez un biberon AVENT 260ml ou un pot VIA
de 240ml à votre tire-lait.
Ne laissez pas vos biberons AVENT ou vos pots VIA déborder et
maintenez-les droits pour éviter que du lait ne s’écoule par le
dessous du bol de l’entonnoir.
10. Conservation de votre lait maternel
• Le lait maternel se conserve au
réfrigérateur ou bien au congélateur,
soit dans des biberons de conservation
stérilisés (125ml ou 260ml muni de
disques d’étanchéité) soit dans des
pots VIA munis de couvercles.
• Ne conservez pour votre bébé que du lait tiré avec un tire-lait stérilisé.
• Le lait tiré doit être réfrigéré immédiatement.
• Le lait tiré se conserve 48 heures au réfrigérateur (pas dans la porte)
ou bien 3 mois au congélateur.
• Si vous mettez du lait tiré au réfrigérateur et que vous souhaitez en
rajouter le même jour dans le même récipient, ne remettez que du lait
recueilli dans un récipient préalablement stérilisé. Un biberon ainsi
constitué ne se conserve pas plus de 48 heures (à partir de la première
extraction) après quoi il doit être consommé immédiatement ou congelé.
• Pour des produits autres que du lait maternel, préparez au dernier
moment selon les instructions du fabricant.
16
Page 19

FR
Conservation au réfrigérateur
Si votre lait tiré sera donné dans les 48 heures, il peut se conserver au
réfrigérateur (pas dans la porte) dans un biberon AVENT ou dans un
pot VIA. Assemblez bague, tétine et capuchon stérilisés et vissez au
biberon AVENT ou au pot VIA muni de son adaptateur (voir ci-dessous).
Conservation au congélateur
Pour la conservation au congélateur, remplacez la tétine et son capuchon
avec un disque d’étanchéité ou vissez un couvercle VIA stérilisé sur le pot.
Indiquez clairement sur le récipient la date et l’heure d’extraction pour
utiliser le lait le plus ancien d’abord.
NE recongelez JAMAIS du lait maternel. NE rajoutez PAS de lait fraîchement
tiré à du lait déjà congelé. Jetez TOUJOURS le lait qui reste à la fin de la tétée.
11. Pour donner du lait tiré à votre bébé
Si le lait maternel est conservé dans un biberon de
conservation AVENT, mettez une tétine AVENT stérilisée
à la place du disque d’étanchéité. Alternativement, vissez
bague et tétine AVENT à l’adaptateur VIA, les 3 pièces
étant stérilisées, et attachez au pot VIA.
Le lait maternel congelé se décongèle généralement
la nuit au réfrigérateur. Cependant, en cas d’urgence, il peut aussi se
décongeler dans de l’eau chaude. Une fois décongelé, le lait doit être
consommé dans les 24 heures qui suivent.
Le lait maternel se réchauffe de la même façon que le lait artificiel. Placez
le biberon ou le pot VIA dans un bol d’eau chaude ou bien, pour être
tranquille et gagner du temps, utilisez un chauffe-biberon Philips AVENT
Express. Attention, le lait se réchauffe plus vite dans un pot VIA. Vérifiez
toujours la température du lait avant de le donner à bébé.
Ne réchauffez pas de lait ou autres repas de bébé au micro-ondes, vous
risqueriez de détruire certains éléments nutritifs et certains anticorps.
De plus, la chaleur inégalement répartie peut causer des brûlures.
Ne plongez jamais un biberon ou un pot VIA de lait congelé dans
de l’eau bouillante car le plastique se fendrait.
Ne versez jamais d’eau bouillante directement dans un pot VIA.
Laissez-la refroidir au moins 20 minutes avant de le remplir.
17
Page 20

FR
12. Quelle tétine choisir pour votre bébé
Les tétines AVENT peuvent s’utiliser avec le biberon AVENT aussi
bien qu’avec le système VIA. Les tétines ont leur débit gravé dessus.
+
m
0
+
1
m
+
3
m
+
6
m
+
3
m
1
2
3
4
1 fente
DÉBIT NOUVEAU-NÉ
TÉTINE EXTRA-SOUPLE EN SILICONE
Idéale pour nouveau-nés et pour
1 trou
bébés allaités au sein (de tout âge).
DÉBIT LENT
TÉTINE EXTRA-SOUPLE EN SILICONE
Idéale pour nouveau-nés et pour
2 trous
bébés allaités au sein (de tout âge).
DÉBIT MOYEN
TÉTINE SOUPLE EN SILICONE
Pour bébés nourris au biberon,
3 trous
à partir de 3 mois.
DÉBIT RAPIDE
TÉTINE SOUPLE EN SILICONE
Un débit plus rapide pour bébés
4 trous
plus âgés.
DÉBIT VARIABLE
TÉTINE SOUPLE EN SILICONE –
MUNIE D'UNE FENTE
Permet un débit extra-rapide et convient
aux liquides épaissis. Faites varier le débit
en alignant les marques I, II ou III, gravées
sur le côté de la tétine, avec le nez de bébé.
18
Page 21

13. En cas de problème
Manque d’aspiration
Vérifiez que toutes les pièces du tire-lait sont assemblées
correctement et que la valve est positionnée dans le
bon sens. Assurez-vous que le diaphragme et le coussin
masseur adhèrent bien et qu’il n’y a pas d’appel d’air.
FR
Le lait ne vient pas
Douleur au sein quand
vous tirez du lait
Le lait rentre dans le
coussin masseur
Fissures/décoloration
sur les pièces
Pièces de rechange
Assurez-vous que le tire-lait aspire bien et que les
pièces sont à leur place. Détendez-vous et réessayez,
vous avez peut-être besoin d’un peu d’entraînement.
Suivez les conseils du paragraphe 8.
Vous tirez probablement trop fort. Vous n’avez pas
besoin de serrer la poignée à fond. Essayez de ne
presser qu’à moitié et souvenez-vous du rythme à
intervalles de 2 ou 3 secondes. Demandez conseil à
une consultante en lactation.
Enlevez et repositionnez le coussin masseur en vous
assurant qu’il est bien replié tout autour et bien
repoussé dans le fond de l’entonnoir. Penchez-vous
bien en avant quand vous activez la poignée.
Évitez de mettre les pièces en contact avec des produits
désinfectants qui abîment le plastique. Certains mélanges
de détergents, de produits de nettoyage, de solution de
stérilisation chimique, d’eau adoucie et de fluctuations de
température peuvent causer des fissures dans le plastique.
En cas d’apparition de fissures, ne vous servez pas du tirelait avant d’avoir remplacé les pièces affectées. Le tire-lait
va au lave-vaisselle mais certains colorants alimentaires
peuvent déteindre sur les pièces. N’exposez pas le produit
directement aux rayons du soleil car une exposition
prolongée pourrait provoquer une décoloration.
Vous pouvez en obtenir chez certains fournisseurs ou
directement chez Philips AVENT en appelant notre
Numéro Vert : 0800 90 81 54 .
Si le problème persiste, contactez-nous à notre Numéro Vert
(détails au dos) ou bien questionnez une consultante en lactation.
19
Page 22

DE
Bitte nehmen Sie sich 5 Minuten Zeit um diese
Gebrauchsanweisung vollständig durchzulesen, bevor
Sie Ihre Philips AVENT Handmilchpumpe zum ersten
Mal verwenden.
Inhalt
1. Die Handmilchpumpe
2. Liste aller Einzelteile
3. Reinigung und Sterilisation
4. So bleibt Ihre Pumpe unterwegs kompakt und steril
5. Gebrauch des AVENT VIA Aufbewahrungssystems
mit Handmilchpumpe
6. So setzen Sie Ihre Handmilchpumpe zusammen
7. Wann Sie Milch abpumpen sollten
8. Tipps für erfolgreiches Abpumpen
9. Gebrauchsanweisung für die Handmilchpumpe
10. Aufbewahrung abgepumpter Muttermilch
11. Füttern Ihres Babys mit abgepumpter Muttermilch
12. Die Wahl des richtigen Saugers für Ihr Baby
13. Mögliche Probleme und Lösungsvorschläge
Sollten Sie diese Gebrauchsanweisung verlieren,
finden Sie sie auch zum Download auf unserer
Webseite www.philips.com/AVENT
20
Page 23

1. Die Handmilchpumpe
Mit der Handmilchpumpe wurde das Design von Milchpumpen neu
definiert. Die Silikonmembran gewährt eine 100% zuverlässige
Saugleistung, während das spezielle Massagekissen das Saugen Ihres
Babys auf natürliche Weise imitiert und so den Milchspendereflex
auslöst – auf angenehme, leise und sanfte Weise. Die Pumpe ist
leicht zusammenzusetzen, diskret im Gebrauch und alle Teile
sind spülmaschinenfest.
Ärzte bestätigen, dass Muttermilch im ersten Lebensjahr die beste
Ernährung für Babys ist, kombiniert mit fester Nahrung nach 6 Monaten.
Ihre Milch ist speziell auf die Bedürfnisse Ihres Babys ausgerichtet und
enthält wichtige Antikörper, die es vor Infektionen und Allergien schützen.
Mit der Handmilchpumpe können Sie länger stillen. Ob Sie für kurze
Zeit von Ihrem Baby getrennt sind, eine wohlverdiente Pause einlegen
oder zum Arbeitsplatz zurückkehren: Sie können Ihre Milch abpumpen
und aufbewahren, so dass Ihr Baby auch dann die kostbare Muttermilch
bekommt, wenn Sie selbst nicht anwesend sind. Da die Pumpe äußerst
leise und diskret arbeitet, können Sie immer und überall – ganz nach
Ihrem Zeitplan und Ihren Bedürfnissen – abpumpen und damit Ihre
Milchproduktion aufrecht erhalten.
Da die AVENT Flasche und der AVENT Silikonsauger speziell
entwickelt wurden, um das natürliche Stillen zu imitieren, kann Ihr Baby
problemlos zwischen Brust und Flasche wechseln. Dies ermöglicht es
Müttern ihr Baby weiterhin mit Muttermilch zu füttern, selbst wenn
sie wieder arbeiten gehen.
DE
21
Page 24

DE
2. Liste aller Einzelteile
HANDMILCHPUMPE
a) Trichterdeckel
b) Massagekissen
c) Pumpenkappe
d) Silikonmembran
mit Schaft*
e) Griff
f) Pumpe mit Trichter
g) Weißes Ventil*
FLASCHE
h) AVENT Flasche (125ml)
/ VIA Adapter/ VIA Mehrwegbecher
/ adapterring
i) Standfuß
/ VIA Schraubdeckel/ Untersetzer
j) Verschlusskappe
k) Extra-weicher Sauger
für Neugeborene (0m+)
l) Schraubring
m) Transportring
n) Verschlussdeckel
*auch als Ersatzteil mit enthalten
3. Reinigung und Sterilisation
Beachten Sie Folgendes vor der ersten und auch vor allen
anderen Verwendungen:
Zerlegen Sie die Milchpumpe in ihre Einzelteile, und reinigen Sie diese
in der Spülmaschine oder in warmem Spülwasser. Spülen Sie die Teile
anschließend mit Wasser ab. Verwenden Sie keine antibakteriellen
Reinigungsmittel oder Scheuermittel.
Achtung: Reinigen Sie das weiße Ventil sorgfältig.
Wenn es beschädigt wird, funktioniert Ihre Milchpumpe
✓
nicht mehr richtig. Reiben Sie es in warmem Spülwasser
vorsichtig mit den Fingern ab. Führen Sie keine
Gegenstände ein, da dies zu Beschädigungen führen kann.
Sterilisieren Sie alle Teile in einem Philips AVENT Dampfsterilisator,
oder kochen Sie sie 5 Minuten lang ab. Wenn Sie einen Philips AVENT
Dampfsterilisator verwenden, bleibt die Pumpe im Sterilisator bei
ungeöffnetem Deckel mindestens 6 Stunden steril.
22
Page 25

4. So bleibt Ihre Pumpe unterwegs
kompakt und steril
Nach dem Sterilisieren der Pumpenteile platzieren Sie das
weiße Ventil (g) und die Silikonmembran mit Schaft (d) im
Pumpenkörper und stecken den Trichterdeckel (a) auf den
das Massagekissen enthaltenden Trichter auf. Nun können
Sie den Transportring (m) anstelle der AVENT Flasche unten
an die Pumpe (f) schrauben.
5.
Gebrauchdes AVENT VIA Aufbewahrungssystems
mit Handmilchpumpe
Verwenden Sie anstelle der AVENT Flasche einfach einen
VIA Becher mit Adapter. Um die Pumpe besonders standfest
zu machen, stecken Sie den VIA Becher in einen
VIA Schraubdeckel/Untersetzer.
6. So setzen Sie Ihre
Handmilchpumpe zusammen
Nehmen Sie alle Teile auseinander und vergewissern Sie sich, dass
die Pumpe gemäß den Angaben in Punkt 3 gereinigt und sterilisiert
wurde. Gehen Sie dann wie folgt vor:
1) Waschen Sie Ihre Hände gründlich. Drücken Sie das weiße Ventil
(g) von unten in die Pumpe (f).
2) Setzen Sie die Pumpe (f) auf die AVENT Flasche (h).*
3) Drehen Sie die Pumpe behutsam im Uhrzeigersinn bis sie fest sitzt.
NICHT ÜBERDREHEN!
4) Setzen Sie die Silikonmembran mit Schaft (d) in die Pumpe (f) ein.
Drücken Sie die Membran mit den Fingern sorgfältig nach unten,
damit sie gut und dicht mit dem Pumpenrand abschließt. (Die
Membran lässt sich nass leichter einsetzen.)
5) Setzen Sie das gegabelte Ende des Griffes (e) unter den Schaft der
Silikonmembran (d) und drücken Sie den Griff behutsam nach
unten bis er mit einem Klick einrastet.
6) Legen Sie das Massagekissen (b) in den Trichter der Pumpe (f) und
DE
23
Page 26

DE
achten Sie darauf, dass es um den Rand des Pumpentrichters herum
völlig dicht anliegt. (Dies ist einfacher, wenn die Teile nass sind.)
7) Setzen Sie die Pumpenkappe (c) auf die Pumpe (f).
Stecken Sie die Flasche in den Standfuß (i) damit die Milchpumpe
absolut standfest ist.
*
Verwenden Sie IMMER einen Adapterring, wenn Sie mit einer Polypropylenflasche füttern.
7. Wann Sie Milch abpumpen sollten
1) Ihr Milchfluss und Ihr Stillrhythmus sollten bereits gut eingespielt sein
– normalerweise 2 bis 4 Wochen nach der Geburt – es sei denn, Ihr
Arzt, Ihre Hebamme oder Ihre Stillberaterin rät Ihnen etwas anderes.
2) Ausnahmen:
a) Wenn Sie Milch für Ihr Baby im Krankenhaus abpumpen möchten.
b) Bei Milchstau, wenn Ihre Brüste geschwollen sind und schmerzen,
können Sie vor und zwischen den Stillzeiten etwas Milch abpumpen.
Ihre Schmerzen werden dadurch gelindert und Sie können Ihr Baby
leichter an die Brust anlegen.
c) Wenn Sie wunde oder aufgesprungene Brustwarzen haben,
möchten Sie Ihre Milch eventuell abpumpen bis Ihre Brustwarzen
wieder verheilt sind.
d) Wenn Sie von Ihrem Baby getrennt sind und nach der Trennung
weiterstillen möchten, sollten Sie Ihre Milch regelmäßig
abpumpen, um Ihre Milchproduktion aufrecht zu erhalten.
3) Sie werden bald die für Sie günstigsten Zeiten zum Abpumpen
herausfinden:
a) Frühmorgens, wenn am meisten Milch vorhanden ist – kurz vor
oder nach Babys erster Mahlzeit.
b) Nach dem Stillen, wenn Ihr Baby nicht beide Brüste leer getrunken hat.
c) Zwischen zwei Stillzeiten oder während einer Arbeitspause.
8. Tipps für erfolgreiches Abpumpen
Der Gebrauch einer Milchpumpe erfordert etwas Übung.
Möglicherweise benötigen Sie mehrere Versuche, bis es funktioniert,
aber da die Milchpumpe so problemlos und natürlich ist, werden Sie
24
sich sicher schnell an das Abpumpen Ihrer Muttermilch gewöhnen.
Page 27

DE
1) Wählen Sie zum Abpumpen einen Zeitpunkt, an dem Sie ungestört
und nicht in Eile sind.
2) Ihr Milchspendereflex wird besonders stimuliert, wenn Sie Ihr Baby bei
sich haben oder während des Abpumpens ein Foto Ihres Baby anschauen.
3) Legen Sie ein paar Minuten lang warme Kompressen auf die Brust,
bevor Sie abpumpen. Dies lindert Schmerzen in den Brüsten und
stimuliert den Milchspendereflex.
4) Wärme und Entspannung fördern den Milchspendereflex; pumpen Sie
z.B. nach einer Dusche oder einem Bad ab.
5) Sie können auch unmittelbar nach dem Stillen abpumpen oder von
einer Brust, während Ihr Baby an der anderen trinkt.
6) Ein gelegentliches Umpositionieren der Pumpe an der Brust kann zum
Stimulieren der Milchkanäle beitragen.
Üben Sie mit Ihrer Pumpe bis Sie die beste Methode gefunden haben.
Sollte das Abpumpen sehr schmerzhaft sein, pumpen Sie nicht mehr
ab bis Sie mit Ihrer Hebamme/Stillberaterin gesprochen haben.
9. Gebrauchsanweisung für die
Handmilchpumpe
1) Waschen Sie Ihre Hände, Brüste und Brustwarzen gründlich.
Drücken Sie aus jeder Brustwarze behutsam ein wenig Milch aus
um sicherzustellen, dass die Milchkanäle nicht verstopft sind.
2) Vergewissern Sie sich, dass alle Teile Ihrer Milchpumpe genau
nach den Angaben in Absatz 3 und 6 sterilisiert und
zusammengesetzt wurden.
3) Lesen Sie erneut die ”Tipps für erfolgreiches Abpumpen”.
4) Setzen Sie sich bequem hin und beugen Sie sich etwas nach vorne.
Stellen Sie sich ein Glas Wasser griffbereit hin.
5) Drücken Sie den Pumpentrichter mit dem Massagekissen fest gegen
Ihre Brust. Achten Sie dabei darauf, dass keine Luft an der Seite
entweichen kann, da sonst kein Vakuum entsteht.
25
Page 28

DE
6) Wenn Sie den Pumpengriff langsam herunterdrücken, fühlen Sie ein
Saugen an Ihrer Brust. Sie müssen den Griff nicht ganz nach unten
drücken, um ein Vakuum zu erzeugen. Drücken Sie den Griff nur so
weit hinunter wie es Ihnen angenehm ist. Ihre Milch beginnt schon
bald zu fließen, auch wenn Sie nicht die volle Saugleistung der
Pumpe nutzen.
7) Pumpen Sie zu Beginn 5 bis 6 mal hintereinander zügig damit sich
der Milchfluss einstellt. Halten Sie dann den Griff für 2-3 Sekunden
gedrückt und lassen ihn wieder zurück in die Ausgangsstellung gleiten.
Diese 2-3 Sekunden imitieren den natürlichen Saugrhythmus Ihres
Babys und lassen die Muttermilch zwischen den Pumpbewegungen
in die AVENT Flasche oder den VIA Becher fließen.
8) Die Milch sollte schon nach einigen wenigen Pumpbewegungen zu
fließen beginnen. Sorgen Sie sich jedoch nicht, wenn dies nicht sofort
klappt. Entspannen Sie sich und pumpen Sie weiter.
Pumpen Sie nicht länger als jeweils 5 Minuten lang ab, wenn die
Milch NICHT zu fließen beginnt. Versuchen Sie es zu einer anderen
Tageszeit wieder.
Bitte beachten Sie folgendes: Wenn das Abpumpen sehr schmerzhaft
oder unangenehm wird, sollten Sie die Pumpe nicht mehr benutzen bis
Sie mit Ihrem Arzt oder Ihrer Hebamme/Stillberaterin gesprochen haben.
9) Durchschnittlich können Sie in 10 Minuten ca. 60 bis 125ml Muttermilch
abpumpen – dies variiert jedoch von Frau zu Frau. Bei mehr als 125ml
pro Abpumpzyklus empfehlen wir, eine 260ml Flasche oder einen 240ml
VIA Becher mit der Pumpe zu verwenden.
Bitte darauf achten, nicht zuviel Milch in die AVENT Flaschen oder VIA
Becher zu füllen und die Pumpe aufrecht zu halten, da es sonst zum
Auslaufen unter dem Pumpenkörper kommen kann.
26
Page 29

DE
10. Aufbewahrung abgepumpter Muttermilch
• Muttermilch kann entweder in
sterilen Nahrungsbehältern (125ml
oder 260ml AVENT Flaschen mit
Verschlussdeckeln versehen) oder
in VIA Mehrwegbechern mit
Schraubdeckeln im Kühl- oder
Gefrierschrank aufbewahrt werden.
• Nur mit einer sterilen Milchpumpe abgepumpte
Milch darf zum Füttern Ihres Babys aufbewahrt werden.
• Abgepumpte Milch muss sofort gekühlt werden.
• Sie kann im Kühlschrank (jedoch nicht in der Kühlschranktür) bis zu 48
Stunden oder im Gefrierschrank bis zu 3 Monate aufbewahrt werden.
• Sollten Sie abgepumpte Muttermilch im Kühlschrank aufbewahren
und im Laufe des Tages weitere Milch hinzufügen wollen, benutzen Sie
bitte hierfür nur Milch, die in einen sterilen Behälter abgepumpt und
ausreichend gekühlt wurde. Auf diese Weise gesammelte Muttermilch
muss innerhalb von 48 Stunden (vom ersten Abpumpen an gerechnet)
verfüttert oder für späteren Gebrauch eingefroren werden.
• Alle anderen Mahlzeiten wie z.B. Zusatz- und Folgemilch sollten immer
frisch zubereitet werden. Bitte beachten Sie hierfür die Angaben des
jeweiligen Herstellers.
Aufbewahrung von Muttermilch im Kühlschrank
Wenn Ihre abgepumpte Milch innerhalb von 48 Stunden verfüttert wird,
kann sie im Kühlschrank in einer AVENT Flasche oder einem VIA Becher
aufbewahrt werden. Hierzu schrauben Sie die aus sterilisiertem AVENT
Sauger, Schraubring und Verschlusskappe bestehende Saugereinheit
entweder auf eine AVENT Flasche oder einen VIA Becher mit Adapter
(siehe rechts).
Aufbewahrung von Muttermilch im Gefrierschrank
Für die Aufbewahrung im Gefrierschrank benutzen Sie bei AVENT
Flaschen anstelle des AVENT Saugers und der Verschlusskappe
einen AVENT Verschlussdeckel oder bei VIA Bechern einen VIA
Schraubdeckel. Die Behälter sollten deutlich sichtbar mit dem
Abpumpdatum versehen und ältere Milch immer zuerst
aufgebraucht werden.
27
Page 30

DE
Muttermilch AUF KEINEN FALL ein zweites Mal einfrieren. NIEMALS
frische Muttermilch auf bereits gefrorene Milch schütten. Von einer
Mahlzeit übrig gebliebene Milch IMMER entsorgen.
11. Füttern Ihres Babys mit abgepumpter
Muttermilch
Wenn Sie abgepumpte Milch in einem AVENT
Nahrungsbehälter aufbewahrt haben, brauchen Sie
zum Füttern nur den Verschlussdeckel durch einen
sterilisierten AVENT Silikonsauger zu ersetzen.
Bei Aufbewahrung in einem VIA Becher, ersetzen Sie
den VIA Schraubdeckel einfach durch einen sterilisierten
VIA Adapter, Schraubring und AVENT Silikonsauger.
Lassen Sie eingefrorene Muttermilch über Nacht im Kühlschrank
auftauen. Im Notfall tauen Sie sie den Behälter mit Muttermilch im
heißen Wasserbad auf. Einmal aufgetaut, muss sie innerhalb von 24
Stunden aufgebraucht werden.
Muttermilch kann wie jede andere Flaschennahrung erwärmt werden.
Stellen Sie die AVENT Flasche oder den VIA Becher in eine Schüssel
heißes Wasser. Eine andere Möglichkeit zur sicheren und schnellen
Erwärmung von Milch und Babynahrung sind die Philips AVENT
Flaschen- und Babykostwärmer. WICHTIG! Der Inhalt eines
VIA Mehrwegbechers wird schneller heiß als der einer Standard
Flasche oder eines Gläschens. Prüfen Sie die Temperatur der Milch
bzw. Babynahrung immer direkt bevor Sie diese Ihrem Baby geben.
Muttermilch sollte nicht in der Mikrowelle aufgewärmt werden,
da dies wertvolle Nährstoffe und Antikörper zerstören kann.
Außerdem kann die ungleichmäßige Erhitzung in der Mikrowelle
zu überhitzten Stellen in der Flüssigkeit führen, die dem Baby den
Mund verbrennen könnten.
Niemals einen gefrorenen Nahrungsbehälter oder VIA Becher
in kochendes Wasser stellen, da dies den Behälter zum Platzen
bringen kann.
Niemals kochendes Wasser in einen VIA Becher füllen. Nach dem
28
Abkochen sollte Wasser erst für circa 20 Minuten abkühlen.
Page 31

DE
12. Die Wahl des richtigen Saugers für Ihr Baby
Die AVENT Silikonsauger können sowohl mit AVENT Flaschen als auch
mit VIA Bechern verwendet werden. Eine deutlich zu erkennende
Zahl an der Seite der Sauger gibt die Anzahl der Löcher und somit die
Stärke des Nahrungsflusses an.
0 M
1
M
3 M
6 M
3 M
+
+
1
2
2 Löcher
+
3
3 Löcher
+
4
4 Löcher
+
1 Schlitz
NAHRUNGSFLUSS FÜR NEUGEBORENE
EXTRA-WEICHER SILIKONSAUGER
Ideal für Neugeborene und gestillte
1 Loch
Babys jeden Alters.
LANGSAMER NAHRUNGSFLUSS
EXTRA-WEICHER SILIKONSAUGER
Etwas schnellerer Nahrungsfluss für
Neugeborene und gestillte Babys jeden Alters.
MITTLERER NAHRUNGSFLUSS
WEICHER SILIKONSAUGER
Für Babys ab 3 Monaten, die mit der
Flasche gefüttert werden.
SCHNELLER NAHRUNGSFLUSS
WEICHER SILIKONSAUGER
Schneller Nahrungsfluss für ältere
Babys.
VARIABLER NAHRUNGSFLUSS
WEICHER SILIKONSAUGER MIT SCHLITZ
Extra-schneller Nahrungsfluss – auch
geeignet für dickflüssigere Nahrung.
Der Nahrungsfluss kann variiert werden,
indem die Flasche so gedreht wird, dass
die Markierungen I, II oder III auf dem
Sauger eine Linie mit Babys Nase bilden.
29
Page 32

DE
13. Mögliche Probleme und Lösungsvorschläge
Keine oder stark
verminderte
Saugwirkung
Es fließt keine Milch
Schmerzen in der
Brustgegend beim
Abpumpen
Hinter dem
Massagekissen wird
Milch hochgesaugt
Risse in/Verfärbung
von Pumpenteilen
Verlorene oder
beschädigte Teile
Prüfen Sie, ob alle Teile der Pumpe richtig eingesetzt bzw.
angebracht wurden und dass das weiße Ventil richtig herum (mit
den Zacken nach oben) eingesetzt wurde. Stellen Sie sicher, dass
die Silikonmembran und das Massagekissen sicher an der Pumpe
angebracht sind und die Abdichtung zwischen den Teilen perfekt ist.
Stellen Sie sicher, dass die Pumpe saugt und dass sie richtig
zusammengesetzt wurde. Entspannen Sie sich und versuchen Sie
es noch einmal; vielleicht fehlt es Ihnen nur ein wenig an Übung.
Lesen Sie hierzu die
Es kann sein, dass Sie zu stark abpumpen. Sie brauchen
nicht unbedingt die volle Saugleistung anzuwenden, die die
Pumpe erzeugen kann. Versuchen Sie, den Griff nur zur Hälfte
herunterzudrücken und denken Sie daran, den 2 – 3 SekundenRhythmus einzuhalten. Sprechen Sie mit Ihrer Hebamme/Stillberaterin.
Entfernen Sie das Massagekissen und setzen es erneut ein.
Es muss fest angebracht und weit genug in die Saugglocke
hineingedrückt werden. Lehnen Sie sich beim Abpumpen etwas
weiter vor. Versuchen Sie, den Griff etwas häufiger loszulassen,
um gewonnene Muttermilch in die AVENT Flasche oder den
VIA Becherablaufen zu lassen. Lesen Sie hierzu das Kapitel
Gebrauchsanweisung für die Handmilchpumpe”.
”
Vermeiden Sie den Kontakt der Pumpenteile mit
antibakteriellen Reinigungs-/Spülmitteln, da diese den
Kunststoff beschädigen können. Die Kombination von
Spülmitteln, Reinigungsprodukten, Sterilisierlösung, entkalktem
Wasser und Temperaturschwankungen kann unter gewissen
Umständen zu Rissen im Kunststoff führen. Verwenden Sie die
Pumpe nicht, wenn sie Beschädigungen aufweist. Bestellen Sie
Ersatzteile beim Philips AVENT-Kundendienst. Die Pumpe ist
spülmaschinengeeignet, jedoch können Lebensmittelfarben
zur Verfärbung von Kunststoffteilen führen. Setzen Sie das
Gerät keinem direkten Sonnenlicht aus, da dies über längere Zeit
Verfärbungen verursachen kann.
Ersatzteile erhalten Sie über den Philips AVENT-Kundendienst.
Bitte rufen Sie uns an oder besuchen Sie unsere Webseite:
www.philips.com/AVENT
Tipps für erfolgreiches Abpumpen”.
”
Sollten Sie immer noch Probleme haben, wenden Sie sich bitte telefonisch an den
Philips AVENT-Kundendienst oder sprechen Sie mit Ihrer Hebamme/Stillberaterin.
Philips AVENT Kundendienst: Deutschland 0800 180 81 74 (gebührenfrei),
Österreich 0800 292 553 (gebührenfrei), Schweiz 056 266 56 56.
30
Page 33

Neem de tijd om deze instructies aandachtig door te lezen
VOORDAT u de Philips AVENT Handkolf voor de eerste keer
gaat gebruiken.
Inhoud
1. De Handkolf
2. Onderdelen voor uw kolf
3. Schoonmaken en steriliseren van de kolf
4. Steriel houden van de kolf
5. Gebruik van de Handkolf met de AVENT Zuigfles
6. In elkaar zetten van uw AVENT Handkolf
7. Het afkolven van moedermelk
8. Tips voor succesvol afkolven
9. Toepassen van de AVENT Handkolf
10. Bewaren van afgekolfde melk
11. Voeden met afgekolfde melk
12. Kiezen van de juiste speen voor uw baby
13. Problemen & oplossingen
NL
Als u deze gebruikshandleiding ooit kwijt raakt,
dan vindt u die ook als download op onze
website: www.philips.com/AVENT
31
Page 34

NL
1. De Handkolf
De Handkolf is een doorbraak in het design van borstkolven.
Het unieke siliconen membraan zorgt voor een 100% effectieve
zuigkracht. Het siliconen massagekussentje bootst het zuigen van
uw baby na waardoor het toeschieten en de afgifte van de melk wordt
gestimuleerd – geruisloos, gemakkelijk en comfortabel. De kolf is
eenvoudig in elkaar te zetten, discreet in gebruik en geschikt voor
gebruik in vaatwasser.
Volgens artsen is moedermelk in het eerste levensjaar de beste babyvoeding,
na zes maanden aangevuld met vast voedsel. Uw melk is speciaal
afgestemd op de behoeften van uw kind en bevat afweerstoffen die
helpen bij de bescherming tegen infecties en allergieën.
Uw Handkolf helpt u om langer borstvoeding te geven. Als u op uw
werk bent, een paar uurtjes weg, of eenvoudig een dutje doet,
kan uw kindje toch gevoed worden met uw waardevolle moedermelk.
Omdat de kolf zo geruisloos en discreet is, kunt u hem overal mee
naar toe nemen en uw melk afkolven waar en wanneer het u uitkomt.
Op deze manier houdt u uw melkvoorraad altijd op peil.
Omdat de AVENT Zuigfles en AVENT Speen zijn ontwikkeld om het
borstvoeden na te bootsen, zal uw kindje probleemloos kunnen
wisselen tussen borst- en flesvoeding. Hierdoor kunnen moeders
doorgaan met het geven van moedermelk, zelfs als zij naar het
werk terugkeren.
2. Onderdelen voor uw borstkolf
HANDKOLF
a) Trechterafdekking (zelfde als i)
b) Siliconen massagekussentje
c) Kolfkapje
d) Siliconen membraan
met stift*
e) Hendel
f) Kolfgedeelte
g) Wit siliconen ventiel*
32
FLES
h) AVENT Zuigfles (125ml)
/ VIA Adapter/ VIA Bewaarbeker
/ adapterring
i) Houder (zelfde als a)
/ VIA Deksel/ Houder
j) Afsluitdop
k) Extra Zachte Speen voor
pasgeborenen (0m+)
l) Afsluitring
m) Afsluitbasis
n) Afsluitplaatje
*reserve ingesloten
Page 35

NL
3. Reinigen en steriliseren
Voordat u de borstkolf voor de eerste keer gebruikt en vervolgens
voor elk gebruik:
Haal het apparaat volledig uit elkaar en maak alle onderdelen schoon
in de vaatwasmachine of in warm water met wat afwasmiddel.
Gebruik geen antibacteriële of schurende schoonmaakmiddelen.
Let op: Wees voorzichtig wanneer u het witte ventiel
schoonmaakt. Als het beschadigd raakt, functioneert
✓
uw borstkolf niet meer naar behoren. Wrijf het ventiel
voorzichtig tussen uw vingers in warm water met wat
afwasmiddel. Steek er geen voorwerpen in; dit beschadigt
het onderdeel mogelijk.
Steriliseer alle onderdelen met een Philips AVENTstoomsterilisator of
door ze 5 minuten te koken. Als u een Philips AVENT-stoomsterilisator
gebruikt, blijft de kolf minstens 6 uur steriel in de sterilisator, mits het
deksel niet wordt verwijderd.
4. Steriel houden van de kolf
Plaats, nadat u alle onderdelen heeft gesteriliseerd, het
witte ventiel (g) en het siliconen membraan met stift (d)
in het kolfgedeelte (f). Plaats de trechterafdekking (a)
over de trechter met het siliconen massagekussentje (b).
Draai de reisdop (m) op het kolfgedeelte (f) in plaats van
de AVENT Zuigfles (h).
33
Page 36

NL
5. Gebruik van de Handkolf met het AVENT
VIA Bewaarsysteem
Vervang de AVENT Zuigfles met een Via Beker en
Adapter. Door de VIA beker in een VIA Deksel/houder
te plaatsen, maakt u de kolf stabiel.
6. In elkaar zetten van uw Handkolf
Haal alle onderdelen uit elkaar en reinig en
steriliseer zoals beschreven in hoofdstuk 3.
1) Was grondig uw handen. Druk het witte stervormige ventiel (g) van
onder naar boven in het kolfgedeelte (f) waarbij de platte kant van
het ventiel naar beneden wijst en de kant met de ster naar boven.
2) Plaats het kolfgedeelte (f) op de AVENT Zuigfles (h).*
3) Draai zachtjes met de klok mee totdat het op zijn plaats klikt.
NIET TE STRAK AANDRAAIEN!
4) Plaats het siliconen membraan met stift (d) in het kolfgedeelte (f).
Druk het met uw vingers langs de randen aan, zodat alles goed
aansluit. Dit is makkelijker wanneer het membraan nat is.
5) Plaats het gevorkte uiteinde van de hendel (e) onder de stift van het
membraan (d) en oefen een lichte druk uit op de hendel, totdat deze
op zijn plaats klikt.
6) Plaats het siliconen massagekussentje (b) voorzichtig over de rand
van de trechter (f) van de kolf. Zorg dat hij rondom de rand van de
trechter overal goed aansluit. (Dit is makkelijker wanneer het
massagekussentje nat is.)
7) Klik het kolfkapje (c) op het kolfgedeelte (f). Plaats de kolf in de
houder (i) om hem volledig stabiel te maken.
*Breng ALTIJD de tussenring aan als u een fles van polypropyleen gebruikt.
34
Page 37

7. Het afkolven van moedermelk
1) Het beste moment om te beginnen met het gebruik van uw
borstkolf is wanneer uw melktoevoer goed op gang is gekomen en
u de voedingen volgens een vast patroon geeft. Normaal gesproken
is dit het geval vanaf 2 – 4 weken na de geboorte.
2) Uitzonderingen op de bovenstaande regel:
a) wanneer u melk afkolft voor uw baby in het ziekenhuis;
b) wanneer uw borsten pijnlijk en opgezwollen zijn, kunt u voor
of tussen voedingen wat melk afkolven om de pijn te verlichten,
uw baby kan hierdoor makkelijker drinken;
c) wanneer u pijnlijke, droge of gebarsten tepels heeft kunt u melk
afkolven totdat uw tepels hersteld zijn;
d) wanneer u voor langere tijd niet bij u baby kunt zijn en u wilt toch
de borstvoeding voortzetten, dient u regelmatig melk af te kolven
om uw melkproductie op gang te houden.
3) Stel voor uzelf vast welke tijdstippen van de dag voor u het beste zijn
om melk af te kolven:
a) ’s ochtends vroeg, wanneer uw borsten erg vol zijn, net voor of na
de eerste voeding van uw baby;
b) na een voeding, als uw baby niet beide borsten heeft leeggedronken;
c) tussen voedingen of, als u weer aan het werk bent, in een pauze.
NL
8. Tips voor succesvol afkolven
Het gebruik van een borstkolf vereist enige oefening. Het kan zijn
dat u pas na meerdere pogingen erin slaagt melk af te kolven, maar
omdat de borstkolf zo eenvoudig en natuurlijk in gebruik is, zult u
zich de techniek van het afkolven snel eigen kunnen maken.
35
Page 38

NL
1) Neem ruim de tijd om af te kolven en kies een tijdstip waarvan u
weet dat u dan niet gestoord zal worden.
2) Het toeschieten van de melk kan worden gestimuleerd als u uw
baby (of een foto van uw baby) in de buurt hebt.
3) Het plaatsen van een warme doek over de borsten, enkele minuten
voordat u begint met afkolven, is weldadig voor pijnlijke borsten
en kan helpen bij de toestroom van melk.
4) De toestroom van melk kan gestimuleerd worden wanneer u warm
en ontspannen bent, bijvoorbeeld na een bad of douche.
5) Terwijl uw baby drinkt van één borst, kunt u proberen de andere
borst af te kolven, of u kunt dezelfde borst afkolven direct na het
voeden.
6) Verander zo nu en dan de positie van de kolf op de borst, dit kan
helpen de melktoevoer te stimuleren.
Oefen met de kolf en bepaal zelf welke techniek voor u het beste
werkt. Wanneer het afkolven echter erg pijnlijk wordt, stop dan met
kolven en raadpleeg uw consultatiebureau of lactatiedeskundige.
9. Toepassen van de AVENT Handkolf
1) Was uw handen grondig en zorg dat uw borsten en de
tepelopeningen volledig schoon zijn. Druk zachtjes een klein beetje
melk uit elke tepel om er zeker van te zijn dat de melkklieren niet
verstopt zijn.
2) Zorg dat u de kolf hebt gesteriliseerd en in elkaar hebt gezet
overeenkomstig de aanwijzingen in hoofdstukken 3 en 6.
3) Neem de “Tips voor succesvol afkolven” nog eens door.
4) Ga lekker zitten in een gemakkelijke stoel en leun iets voorover
(gebruik kussens om uw rug te ondersteunen). Houd een glas water
of een ander drankje binnen handbereik.
5) Druk de trechter met het siliconen massagekussentje stevig tegen
uw borst. Zorg ervoor dat er geen lucht kan ontsnappen – anders
ontstaat er onvoldoende zuigkracht.
36
Page 39

NL
6) Druk nu de hendel van de kolf zachtjes in, u zult de zuigkracht voelen
toenemen. De hendel hoeft niet volledig te worden ingedrukt – u
kunt zelf de zuigkracht bepalen die voor u prettig aanvoelt. Uw melk
zal al snel beginnen te stromen, zelfs zonder de maximale zuigkracht.
7) Druk de hendel eerst 5-6 maal snel in om de melk te laten toeschieten.
Houd dan de hendel zo’n 2 à 3 seconden ingedrukt. Laat daarna de
hendel voorzichtig weer in de uitgangspositie terugkeren. Deze 2 à
3 seconden durende cyclus bootst het natuurlijke zuigritme van uw
baby na waardoor de melk in de fles zal stromen.
8) Nadat u de hendel een paar keer heeft ingedrukt, zal de melk
beginnen te stromen. Maakt u zich geen zorgen als uw melk niet
direct toestroomt, ontspan en probeer het nogmaals.
Ga NIET door met kolven als uw melk na 5 minuten nog niet
toeschiet. Probeer het later nog eens.
Wanneer het afkolven erg pijnlijk of oncomfortabel wordt, stop dan
met het gebruik van de kolf en raadpleeg uw consultatiebureau of
lactatiedeskundige.
9) Gemiddeld bent u ongeveer 10 minuten bezig om 60-125ml melk
af te kolven. Dit is echter slechts een algemene richtlijn en de
afkolftijden verschillen van vrouw tot vrouw. Wanneer u regelmatig
meer dan 125ml afkolft, gebruik dan een 260ml AVENT zuigfles of
een 240ml VIA Beker.
Zorg ervoor dat u tijdens het kolven de AVENT Zuigflessen of VIA
Bekers niet volledig vult en houd de kolf rechtop, anders kan de
melk van onder het kolfgedeelte lekken.
37
Page 40

NL
10. Bewaren van afgekolfde melk
• Moedermelk kan in de koelkast
of vriezer worden bewaard in
steriele bewaarflessen (125ml
of 260ml zuigflessen afgesloten
met een afsluitplaatje) of in VIA
Bekers met deksels.
• Gebruik alleen melk voor uw baby die afgekolfd is met een steriele kolf.
• Plaats uw afgekolfde melk direct in de koelkast.
• Afgekolfde melk blijft maximaal 48 uur goed in de koelkast (niet inde
deur) en kan maximaal 3 maanden in de diepvries worden bewaard.
• Als u melk in de koelkast bewaardt om er in de loop van de dag melk
aan toe te voegen, let er dan op dat u enkel melk toevoegt die is
afgekolfd in een steriele bewaarcontainer. Melk kan op deze wijze
maximaal 48 uur bewaard worden, geldend vanaf de eerste keer
afkolven. Daarna moet de melk onmiddellijk worden gebruikt of
worden ingevroren voor toekomstig gebruik.
• Alle voeding anders dan moedermelk, dient bereidt te worden direct
voor gebruik volgens de aanwijzing van de fabrikant.
Het bewaren van moedermelk in de koelkast
Wanneer u binnen 48 uur uw baby voedt met uw afgekolfde melk
kunt u de melk in de koelkast bewaren in een AVENT Zuigfles of het
VIA Bewaarsysteem. Zet de speen, afsluitring en afsluitdop in elkaar
en plaats deze op de AVENT Zuigfles of op de VIA Adapter en Beker
(zie afbeelding).
Het bewaren van moederkolf in de vriezer
Om melk te bewaren in de vriezer, gebruikt u een AVENT
afsluitplaatje in plaats van de speen met afsluitdop of gebruik een
AVENT VIA deksel om de VIA bewaarbeker af te sluiten. Voorzie de
bewaarcontainers altijd van datum en tijd en gebruik als eerste de
melk die u het langst geleden heeft afgekolfd.
Vries ontdooide melk NOOIT opnieuw in. Voeg NOOIT verse melk toe
aan bevroren melk. Gooi overgebleven melk na het voeden ALTIJD weg.
38
Page 41

NL
11. Voeden met afgekolfde melk
Wanneer moedermelk bewaard wordt in een AVENT
Bewaarfles, vervang dan het afsluitplaatje met een
steriele AVENT Speen.
Bij gebruik van een VIA Beker, vervangt u het VIA
Deksel met een steriele VIA Adapter, schroefdop,
afsluitdop en AVENT speen.
Haal de bevroren moedermelk de avond voor gebruik uit de vriezer en laat
ontdooien in de koelkast. In geval van nood kan de melk ontdooid worden
in een kom met warm water. Gebruik ontdooide melk binnen 24 uur.
Borstvoeding kan worden opgewarmd gelijk aan elke andere
flesvoeding. Plaats de zuigfles of VIA bewaarbeker in een kom met
heet water, of anders, voor een veilige en snelle mannier om voeding
op te warmen, gebruik de Philips AVENT flessenwarmer. BELANGRIJK!
Melk of voeding warmt sneller op in VIA bekers dan in standaard
zuigflessen of bewaarcontainertjes. Controleer de melk of de voeding
op de juiste temperatuur voor het voeden.
Verwarm afgekolfde- en poedermelk nooit in de magnetron, hierdoor
kunnen namelijk waardevolle voedingsstoffen en afweerstoffen
verloren gaan. Ook kan de ongelijkmatige verwarming verbranding
in mond en keel veroorzaken.
Plaats nooit een bevroren melkcontainer of VIA beker in kokend
water omdat dit dan kan leiden tot het ontstaan van barsten.
Doe nooit kokend water direct in een VIA beker. Laat het water
ongeveer 20 minuten afkoelen voordat u de beker vult.
39
Page 42

NL
12. Kiezen van de juiste speen voor uw baby
AVENT Spenen kunnen worden gebruikt in combinatie met de AVENT
Zuigflessen en het VIA Voedingsysteem. AVENT spenen zijn duidelijk
genummerd op de zijkant om de doorstroomsnelheid aan te geven.
+
m
0
+
1
m
+
3
m
+
6
m
+
3
m
1
1 gaatje
2
2 gaatjes
3
3 gaatjes
4
4 gaatjes
1 sleue
STROOMSNELHEID VOOR PASGEBORENEN
EXTRA ZACHTE SILICONEN SPEEN
Ideaal voor pasgeborenen en
borstgevoede baby’s.
LANGZAME STROOMSNELHEID
EXTRA ZACHTE SILICONEN SPEEN
Ideaal voor pasgeborenen en
borstgevoede baby’s.
NORMALE STROOMSNELHEID
ZACHTE SILICONEN SPEEN
Voor baby’s van 3 maanden en ouder
die flesvoeding krijgen.
SNELLE STROOMSNELHEID
ZACHTE SILICONEN SPEEN
Snellere stroomsnelheid voor
oudere baby’s.
VARIABELE STROOMSNELHEID
ZACHTE SILICONEN SPEEN – SLEUFJE
Voor een extra snelle stroomsnelheid en voor
dikkere dranken (zoals pap). Door de fles te
draaien past u de doorstroomsnelheid aan.
Plaats de gewenste streepjesmarkering (I, II
of III) in het verlengde van uw baby’s neus.
40
 Loading...