

Page 1
Twin Electronic Breast Pump
Extractor de Leche Electrónico Doble
Tire lait Electronique Double
42133 5410 980
Call TOLL-FREE: 1.800.54.AVENT
Llame gratuítamente: 1.800.54.AVENT
Appelez SANS FRAIS : 1.800.54.AVENT
www.philips.com/AVENT
USA: Philips Consumer Lifestyle, a division of Philips Electronics North America
Corporation. 1600 Summer Street, PO Box 120015, Stamford, CT 06905-5125
Canada: Philips Electronics Ltd, 281 Hillmount Road, Markham, ON L6C2S3
Trademarks owned by the Philips Group.
© 2008 Koninklijke Philips Electronics N.V.All Rights Reserved.
Las marcas son propiedad del Philips Group.
© 2008 Koninklijke Philips Electronics N.V.Todos los Derechos Reservados.
Les marques de commerce sont la propriété du Groupe Philips.
© 2008 Koninklijke Philips Electronics N.V.Tous droits réservés.
Page 2

2
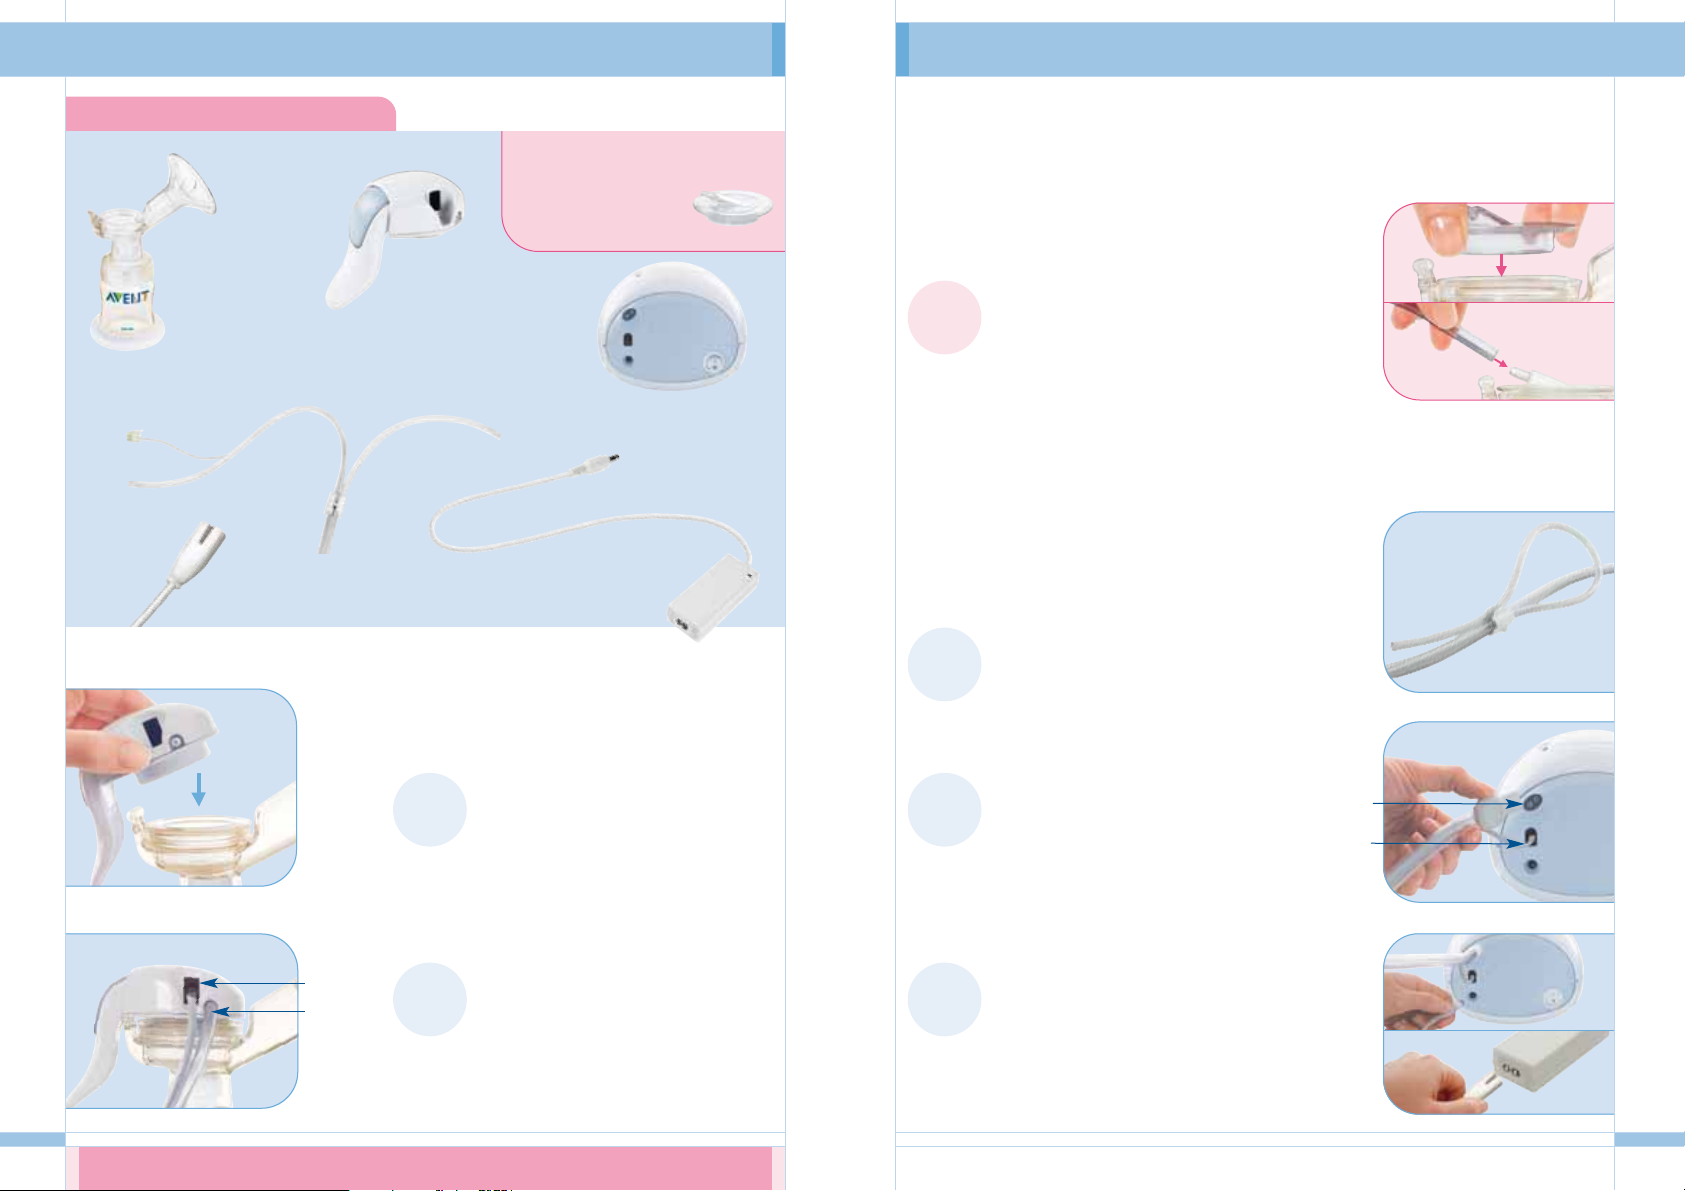
One-Touch
Memory Control
Control handle
Pump Motor
Light
Control cable socket
Power socket
Twin tubing port
Control cable socket
Tubing port
NEVER SANITIZE OR IMMERSE IN WATER
NEVER SANITIZE OR IMMERSE IN WATER
On/off switch
Control Handle
Need Help? Call us at 1.800.54.AVENT or visit www.philips.com/AVENT
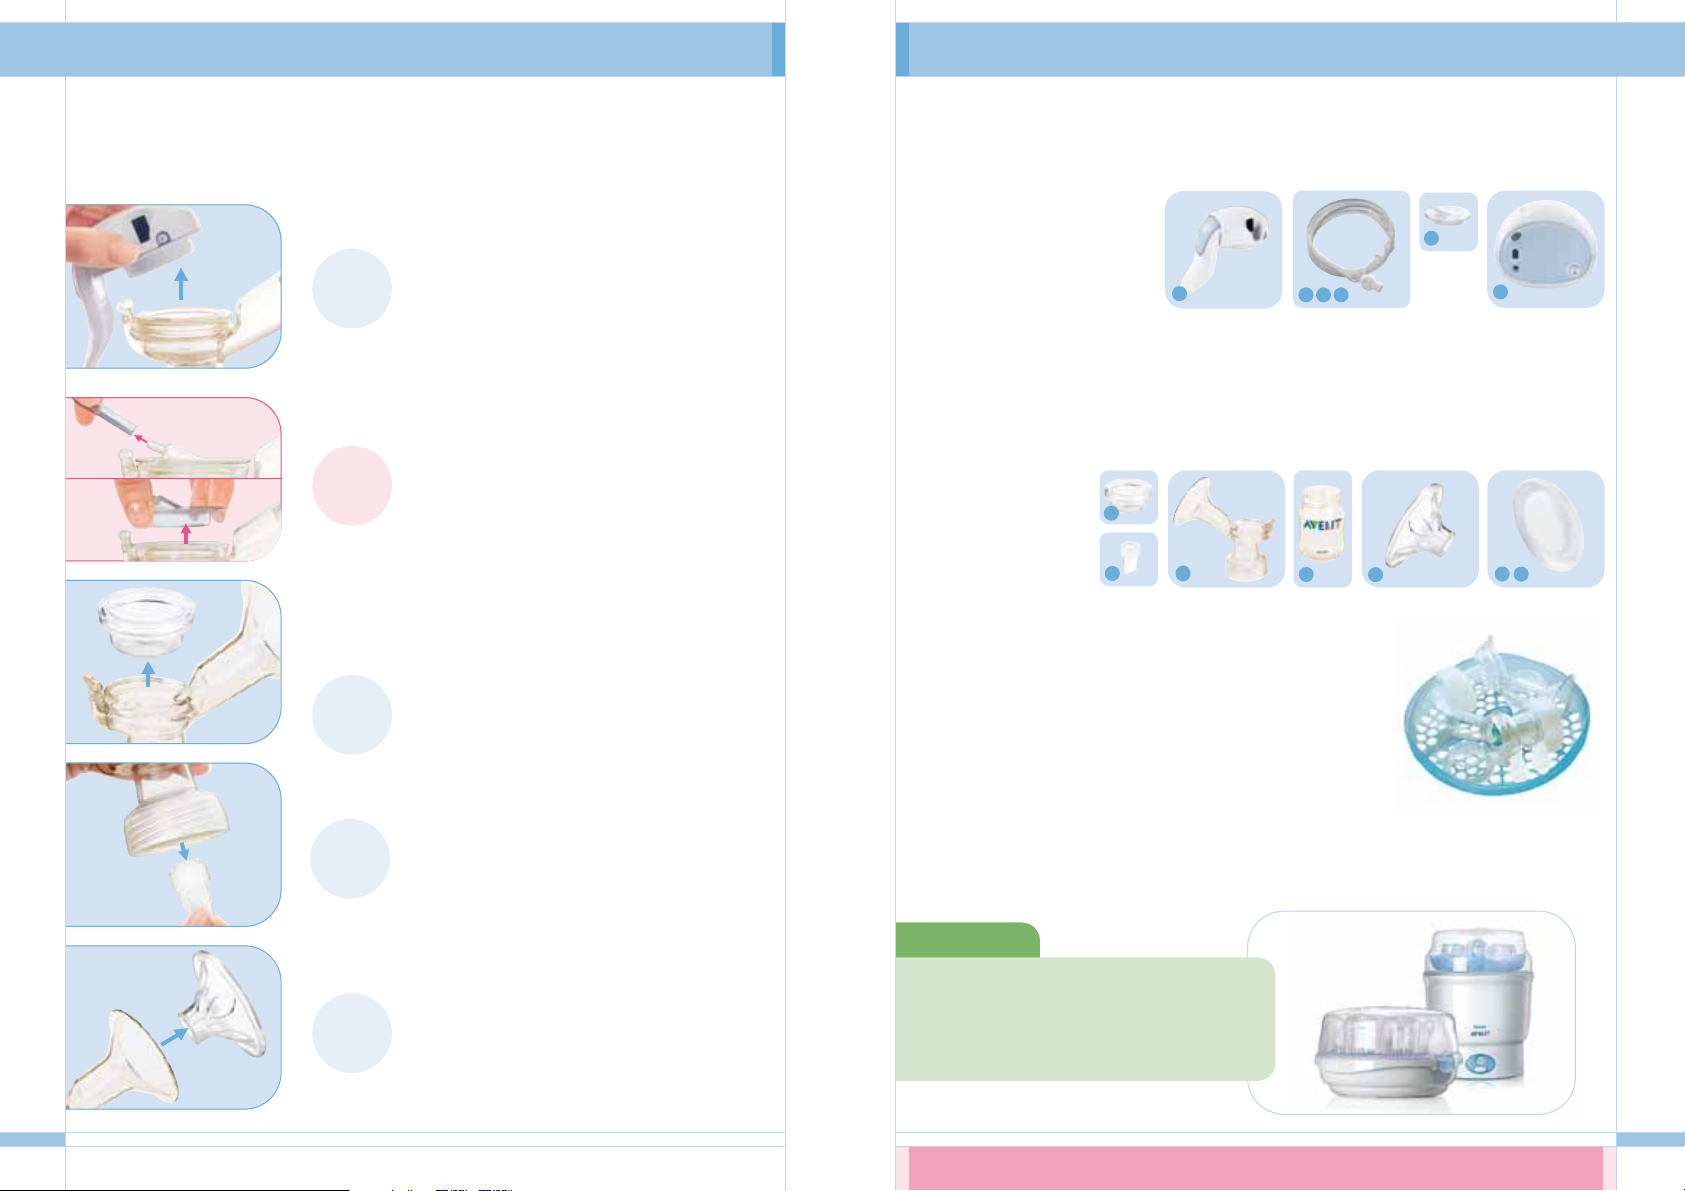
Twin Electronic Breast Pump Parts Guide – Detailed
1
First (Control) Pump Second Pump
Pump Motor
1x Control handle
2x Silicone diaphragm
2x White valve
2x Pump body
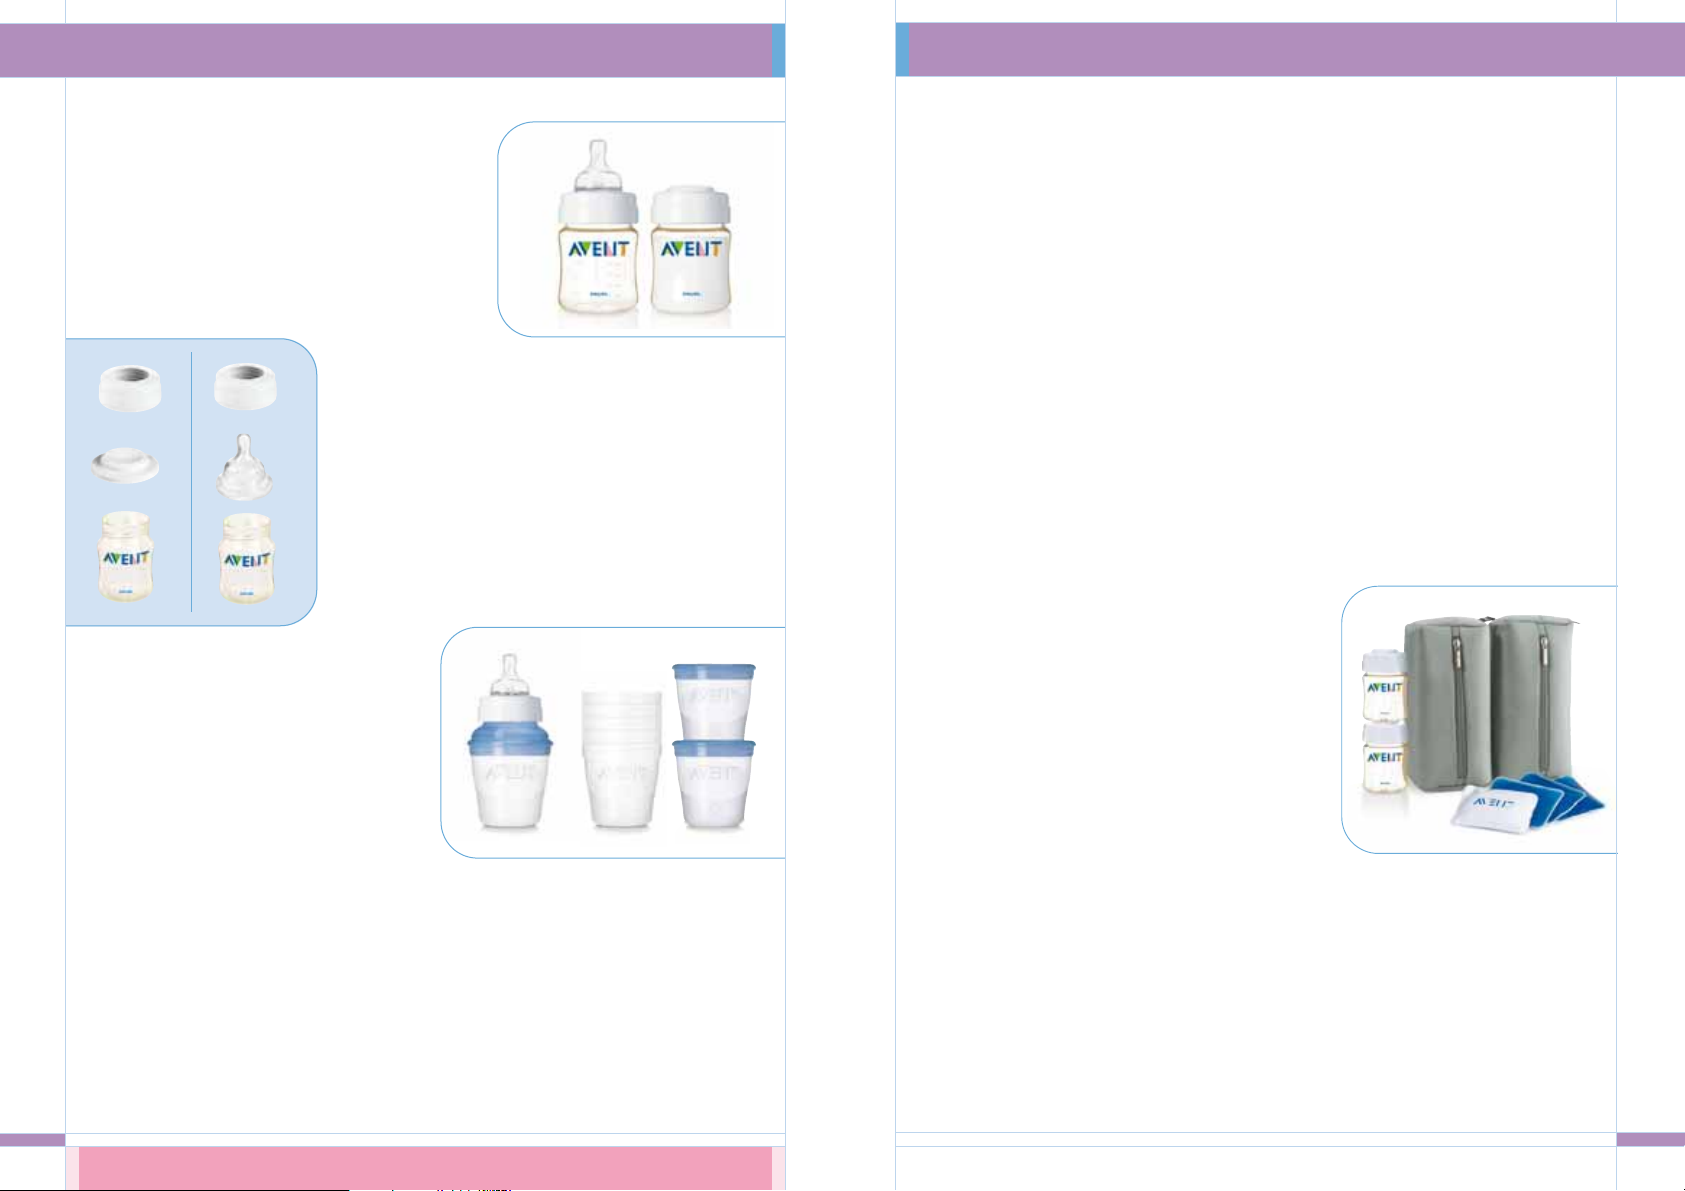
4x Milk container
(2x 4 oz/125 ml and 2x 9 oz/260 ml)
2x Stand (same as )
2x Let-down Massage Cushion
2x Funnel cover (same as )
1x Control cable
2x Tr ansparent tube
1x Twin tubing
1x Double pumping connector
1x Pump motor
1x Electric adaptor
1x Wall plug cord
2x Dome cap
2x Extra Soft, Newborn Flow
Nipple (0m+)
2x Screw ring
2x Sealing base
2x Sealing disc
a
b
c
d
e
f
f
g
h
i
j
k
l
m
n
o
p
q
r
s
t
a
b
c
d
e
f
b
c
d
e
f
g
h
g
h
i
j
j
k
l
m
n
o
p
q
r
s
t
h
When assembled parts b – g make up an assembled pump body.When the Control handle (a) is added
to this assembled pump body, it becomes the First (Control) Pump.When the Double pumping connector (l)
is added to this assembled pump body, it becomes the Second Pump.
All you need to assemble and use the breast pump is shown here. If any of the parts are missing, or if you
have any questions, please call customer support at 1.800.54.AVENT or visit www.philips.com/AVENT
Twin Electronic Breast Pump Parts Guide
Page 3

Manual Pumping
Manual Breast Pump Parts Guide 15
Cleaning the Manual Breast Pump 15
Assembling the Manual Breast Pump 16
Using the Manual Breast Pump 17
What’s Inside:
Electric Pumping
(Single and Double)
Twin Elecronic Breast Pump
Parts Guide 1-2
Important Safeguards 3
Disassembling Your Electronic Pump 5
Cleaning and Sanitizing Your Pump 6
Preparing to Pump 7-8
Assembling the Pump Body 9-10
Connecting the Electronics 11-12
Pumping with Your Electronic
Breast Pump 13-14
Keeping Parts Clean and
Compact for Travel 18
Storing Your Expressed Breast Milk 19-20
Troubleshooting Guide 21
Technical Specifications 22
Limited Warranty 22
4
Please take a few minutes to read through
this entire instruction leaflet before using
your breast pump for the first time.
PLEASE SAVE THESE INSTRUCTIONS.
Unless advised otherwise by your health
professional it is best to wait until your
breastfeeding routine is established before
expressing – usually around 4 weeks.
Congratulations!
Soon you will discover what makes this Philips AVENT Twin Electronic Breast Pump so uniquely yours.The
breast pump is designed with an electronic memory that learns and continues your gentle pumping rhythm.
It gives you complete control over your comfort, which means that pumping with your Twin Electronic
Breast Pump always feels natural and exactly right for you.
Let-down Massage Cushion has petals
that flex in and out to gently massage the areola.
This is intended to help stimulate a fast, natural
milk flow.
One-Touch Memory Control is right at your
fingertips.You can stop, start or adjust the speed
and suction level without removing your hand
from the pump.
Electronic Memory learns from you. Just
begin a comfortable pumping rhythm, press
a button and the Twin Electronic Breast Pump
automates it.
Pump, Store, Feed Convenience from
the Philips AVENT Natural Feeding System.
Products work together,so you never have
to transfer milk between containers.
Ultra Comfortable, Quiet and Effective
making it easier for you to continue giving your
baby the benefits of breast milk.
Need Help? Call us at 1.800.54.AVENT or visit www.philips.com/AVENT
When using electrical products, especially
when children are present, basic safety
precautions should always be followed.
READ ALL INSTRUCTIONS BEFORE USING
THIS PRODUCT.
WARNING – To reduce the risk of fire,
electrocution, or other personal injury:
• The breast pump is intended for repeated use by
a single user only.
• Always unplug the breast pump motor from
the electrical outlet immediately after use.
• Do not use while bathing.
• Do not place or store the product where it
can be pulled or fall into water.
• Do not place or drop the pump motor, control
handle, electric adaptor or wall plug cord into
water or other liquid.
• Do not reach for a product that has fallen into
water. Unplug from electrical outlet immediately.
• Close supervision is necessary when this
product is used near children or persons
with disabilities.
• Do not allow children or pets to play with
the pump motor, tubing, power supply or
accessories as these parts may pose a
choking or strangulation danger.
• There are no serviceable parts inside the
breast pump. Do not attempt to open,
service or repair the breast pump yourself.
• Before each use inspect the product, including
mains cord, for signs of damage. Never operate
this product if it has a damaged cord or plug, if
it is not working properly, if it has been dropped
or damaged, or has been submerged in water.
• Only use attachments recommended by
Philips AVENT.
• Do not use outdoors with the AC adaptor,
where aerosol spray products are being used,
or where oxygen is being administered.
• Equipment not suitable for use in the
presence of flammable anesthetic mixture
with air, or with oxygen or nitrous oxide.
• Only use the electric adaptor supplied with
the product.
• Ensure the unit is not exposed to extreme
heat or placed in direct sunlight.
• This product is a personal care item and
should not be shared between mothers.
• Do not attempt to remove the pump body
from your breast while under vacuum.Turn
the unit off and break the seal between your
breast and the pump funnel with your finger,
then remove the pump from your breast.
• Never use while pregnant, as pumping
can induce labor.
• Never use when sleepy or drowsy.
CAUTION – To reduce the risks of injury,
device malfunction or failure:
• Do not leave product unattended when
plugged into an electrical outlet.
• Never drop or insert any object into any
opening or tubing.
• Do not shorten the tubing.
• Make sure the voltage of the electrical
adaptor is compatible with the power source.
• First plug the adaptor into the breast pump motor.
Then, attach the wall plug cord into the adaptor.
Lastly, insert plug into the wall socket.
• Although compliant with applicable EMC
directives, this equipment may still be
susceptible to excessive emissions and/or may
interfere with other more sensitive material.
• Wash and sanitize the appropriate pump
components before each use.
• Do not continue pumping for more than five
minutes at a time if no result is achieved.
• Do not use antibacterial or abrasive cleaners/
detergents when cleaning breast pump parts.
• Never put the control handle or breast pump
motor in water or a sterilizer, as you can
cause permanent damage to the pump.
• If the pressure generated is uncomfortable
or causing pain, turn the unit off, break the
seal between the breast and the pump body
with your finger and remove the pump
from your breast.
SAVE THESE
INSTRUCTIONS
3
IMPORTANT SAFEGUARDS
Page 4
Clean with a Damp Cloth when Necessary:
Control handle (a)
Tubing (i/j/k)
Note:The tubes are used for
suction and do not carry milk.
Double pumping connector (l)
Pump motor (m)
Caution: NEVER put the control handle or pump motor in water or a sterilizer, as you can cause permanent
damage to the pump.
Clean Before Every Use (including first use):
Silicone diaphragm (b)
White valve (c)
Pump body (d)
Milk container (e)
Let-down Massage Cushion(g)
Funnel cover/White stand (h/f)
Cleaning Instructions:
These pump parts should be sanitized before every use.
Disassemble the pump before cleaning.Wash in warm soapy
water and rinse, or wash on the top rack dishwasher. Sanitize
in a steam sterilizer (electronic or microwave) or by boiling
in water for 5 minutes.
Caution: Do not use antibacterial or abrasive cleaners/detergents.To clean the valve, rub gently
between your fingers in warm soapy water – do not insert objects as this may cause damage.
HELPFUL TIP!
The Philips AVENT Electronic and Microwave
Steam Sterilizers are designed to hold the
washable components of the Electronic Breat
Pump and the entire Manual Breast Pump.
6
Need Help? Call us at 1.800.54.AVENT or visit www.philips.com/AVENT
a
c
d
e
g
h
i
l
m
b
f
j
k
Make sure that your breast pump is turned off and unplugged before cleaning.
Cleaning and Sanitizing Your Pump
2
5
4
3
5
Make sure that your breast pump motor is turned off and unplugged before disassembling parts.
See section titled, ‘Twin Electronic Breast Pump Parts Guide’ on page 1 for a description of the First
(Control) Pump and Second Pump.
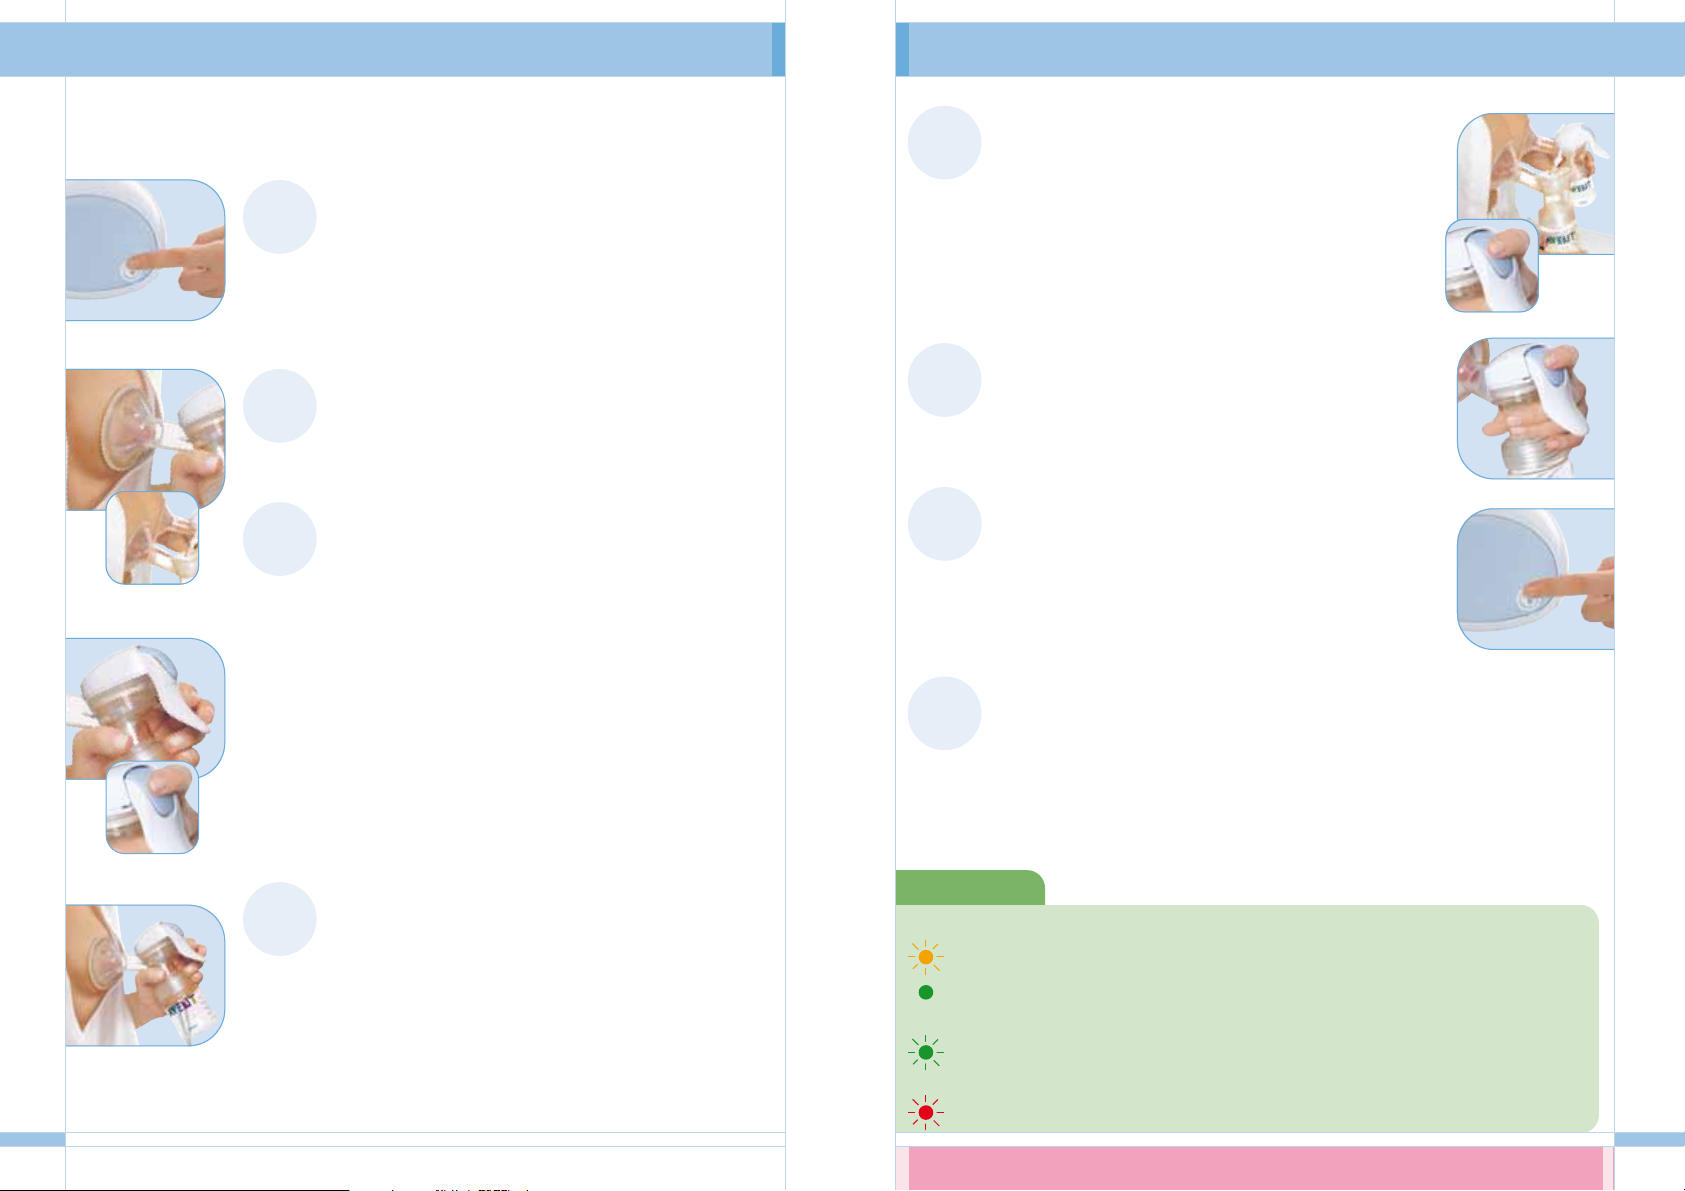
Second Pump
On the second pump, detach the transparent tube
from the double pumping connector. Remove the
double pumping connector by pulling it away from
the silicone diaphragm.
Remove the Let-down Massage Cushion
by gently pulling it away from the funnel
on the pump body.
Remove the white valve from the pump body.
Remove the silicone diaphragm by pulling it
away from the pump body.
Perform steps 3-5 on both the First
(Control Pump) and Second Pump.
1
First (Control) Pump
On the first (control) pump, remove the control
handle by pulling it away from the silicone diaphragm.
First (Control) Pump
Second Pump
Disassembling Your Electronic Pump
Page 5
8
You can use Twin Electronic Breast Pump as a:
Twin Electronic Pump
Manual Pump
(to use the Manual Pump, see page 15)
Single Electronic Pump
Need Help? Call us at 1.800.54.AVENT or visit www.philips.com/AVENT
7
When using your Twin Electronic Breast Pump for the first time, it will have retained factory
settings stored in the memory as a result of quality control testing. If the blue One-Touch
Memory Control is pressed prior to squeezing the control handle upon first use the pump will
operate at these settings, which may or may not be comfortable for you.We recommend that
prior to engaging the automatic mode, you establish a comfortable
rhythm manually, then press the blue One-Touch Memory Control
to continue your preferred rhythm.
If you find that you are not expressing a lot of milk the
first few times you pump, don’t be discouraged. Learning
to express milk, like breastfeeding, takes practice.
Here are some tips that might make pumping easier:
1. Choose a time when you’re not rushed and won’t
be interrupted.
2. Choose a comfortable chair with a table nearby,
so you can set the pump motor within reach.
3. Look at a photograph of your baby to help
encourage let-down.
4. Place a warm cloth on your breasts for a few minutes before you
start pumping.This encourages milk flow and can soothe painful breasts.
5. Warmth and relaxation can encourage milk flow.Try expressing after
a bath or shower.
6. Try expressing from one breast while your baby is feeding from the
other, or continue expressing just after a feed.
7. Reposition the pump on your breasts from time to time.This can
stimulate your milk ducts.
How quickly will the milk flow begin?
When pumping with the Twin Electronic Breast Pump your milk should begin to flow
after a few compressions. If your milk does not begin to flow immediately, relax and
continue pumping. CAUTION: DO NOT CONTINUE PUMPING FOR MORE THAN
5 MINUTES AT A TIME IF NO RESULT IS ACHIEVED. Stop, and try expressing milk
at another time of day. If the process becomes painful, stop and consult your
health professional or breastfeeding advisor.
How much milk can you expect?
It has been shown that double pumping boosts prolactin levels and stimulates
milk production so, if you can, use your breast pump regularly as a double pump.
On average you will need to pump for 10 minutes to express 60-120 mls or
2-4 oz of milk. However, this is just a guide and varies from woman to woman.
If you find that you regularly express more than 4 oz/125 ml of milk per session,
attach a 9 oz/260 ml AVENT Breast Milk Container to the pump body.
Preparing to Pump
Preparing to Pump
Page 6
Need Help? Call us at 1.800.54.AVENT or visit www.philips.com/AVENT
10
To ensure that the pump
is completely stable, you
can use the stand with the
4 oz/125 ml milk container.
Let-down Massage Cushion White standMilk container
3
4
Screw the pump body onto the milk
container until securely in place.
The Let-down Massage Cushion has petals
that flex in and out to gently massage the area
around the breast.This is intended to help
stimulate a fast, natural milk flow.When using the
breast pump without the Let-down Massage
Cushion, the maximum vacuum level achievable
will be higher.
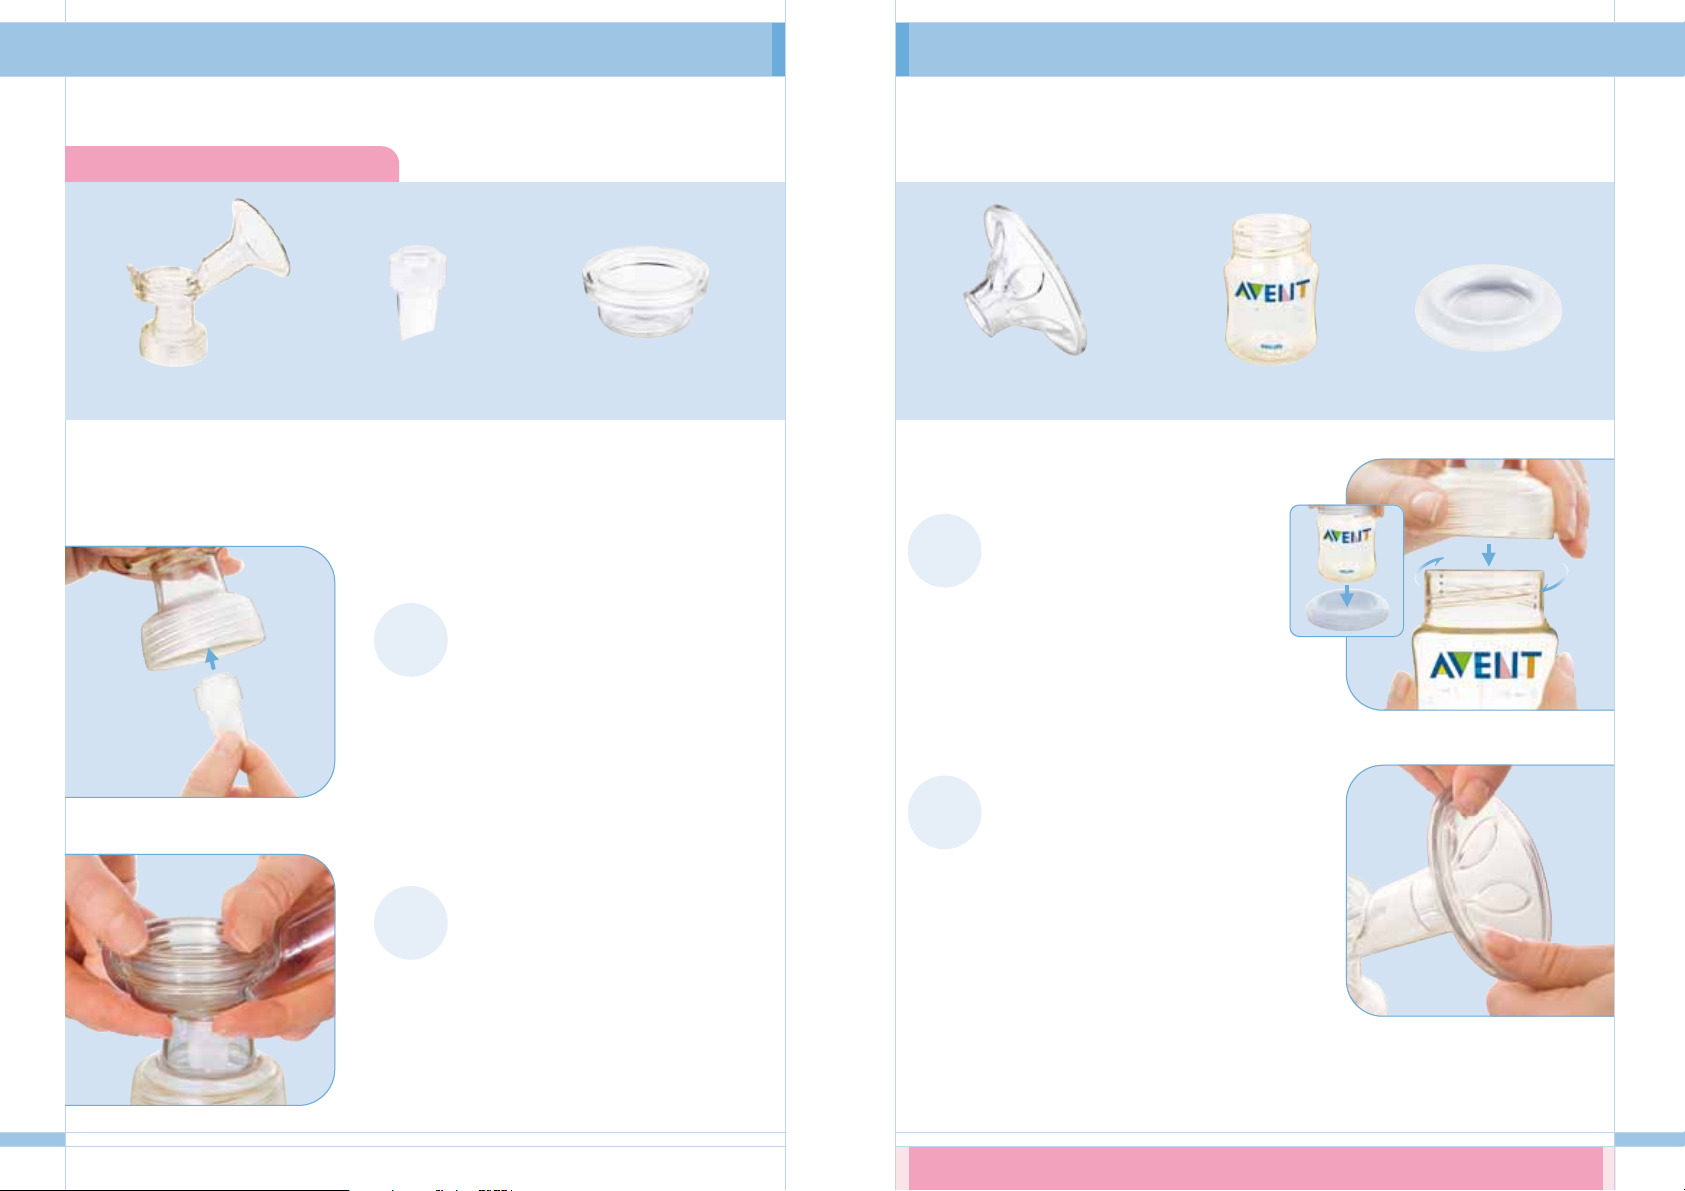
Parts you will need for this step:
White valve Clear silicone diaphragm
Double pumping? Assemble two pumps as shown below.
Single pumping? Assemble one pump as shown below.
Pump body
9
Before assembling, make sure that you have correctly washed and sanitized the pump.
See section titled ‘Cleaning and Sanitizing Your Pump’ on page 6.
1
2
Insert the white valve into the pump body,
so that it fits securely into the small round
hole. Make sure the pointed side of the
valve is facing down.
Fit the clear silicone diaphragm into the
pump body. Ensure a perfect seal around
the rim by pressing down with your
fingers. (This is easier if assembled while
the diaphragm is wet.)
Assembling the Pump Body Assembling the Pump Body
Page 7
12
Second Pump
Control cable
socket
Twin tubing
port
Double pumping? Complete the next step
with your second assembled pump body.
Single pumping? Complete the next step
with the remaining tube.
3a
4
5
3b
Push the double pumping connector onto the pump
body so that it sits firmly on top of the silicone
diaphragm. Securely attach the other transparent tube
to the double pumping connector. When the breast
pump is fully assembled, the Second Pump will mimic
simultaneously the speed and suction of the First
(Control) Pump.
If you are single pumping, you can keep
the transparent tube out of the way by
attaching it to the white clip.
Securely attach the twin tubing
to the ports on the pump motor.
Connect the control cable
into the adjacent socket.
Connect the electric adaptor to power socket
on the pump motor.
Then connect the wall plug cord to the electric
adaptor and insert the plug into the wall outlet.
See section titled,‘Twin Electronic Breast Pump Parts
Guide’ on page 1 for a description of First (Control)
Pump and Second Pump
Need Help? Call us at 1.800.54.AVENT or visit www.philips.com/AVENT
11
First (Control) Pump
First (Control) Pump
Parts you will need for this step:
Assembled
pump body
(see pages 9-10)
Double Pumping?
Double pumping
connector
Control handle
Pump motor
Electric
adaptor
Control
cable
Transparent tubing
Wall plug cord
1
2
Push the control handle onto the
assembled pump body so that it sits
firmly on top of the silicone diaphragm.
This assembly becomes the First (Control)
Pump which contains the electronics
of the pump.
Click the control cable into the socket
on the control handle.
Then securely attach one of the
transparent tubes to the port on
the control handle.
Transparent
tubing port
Control cable
socket
See section titled,‘Twin Electronic Breast Pump
Parts Guide’ on page 1 for a description of First
(Control) Pump and Second Pump.
Connecting the ElectronicsConnecting the Electronics
Page 8
HELPFUL TIP!
The light on top of the Twin Electronic Breast Pump Motor indicates the pump mode:
Flashing
ORANGE Light: Pump is in warm-up mode.Wait for the continuous GREEN light.
Continuous GREEN Light: Manual pumping mode.You control the speed and pressure
of the pump.
Flashing GREEN Light:Automatic pumping mode.Your breast pump will mimic your last
established pumping rhythm and level of suction.
Flashing
RED Light: Consult the ‘Troubleshooting Guide’ on page 21.
14
Need Help? Call us at 1.800.54.AVENT or visit www.philips.com/AVENT
7
8
6
5
Your Electronic Breast Pump Mimics Your Pumping:To create a natural
breastfeeding rhythm, we suggest you hold down on the handle for
3 seconds, then release and repeat the pattern for the next compression.
Next, press the blue One-Touch Memory Control on the
handle. The mode light on the pump motor will change from solid
GREEN to flashing GREEN and your breast pump will mimic the
rhythmof the last two compressions.
Note:You do not need to compress the handle fully,only until it feels comfortable.The
further you compress the handle, the more suction the pump will provide.If the pressure
is uncomfortable, stop the automated pumping by pressing the One-Touch Memory
Control and breaking the seal between your breast and pump funnel with your finger.
Changing the Speed and Level of Suction: Press the blue
One-Touch Memory Control on the handle again, and the pump
will revert to manual control.The light will turn from flashing
GREEN to solid GREEN. Establish a comfortable speed and level
of suction. Press the blue One-Touch Memory Control again, and
your Electronic Breast Pump will continue the same pumping rhythm.
Ending Pumping Session: Press the blue One-Touch Memory Control,
break the seal between your breast and pump funnel with your finger
and remove the pump from your breast.Turn the pump off and
unplug at the power source.Your Electronic Breast Pump will
remember and save the speed and suction level of your last two
compressions. Unscrew the base after milk is collected. If any milk
remains in the pump body, pour it into the base. Do not overfill the
base. Wash and re-sanitize all necessary parts before the next use.
Next time you turn your pump on: Resuming Saved Session? Turn on the pump as in
Step 1. Complete Step 2. Press the blue One-Touch Memory Control.This engages the
automatic pumping mode.The pump will continue with the rhythm of the last two saved
compressions of the milk expression phase. Continue pumping as described in Step 4.
Need to re-establish let-down? If you need to establish let-down, turn on the pump as in
Step 1. Complete Step 2. Squeeze the handle with shallow quick strokes and proceed as
described in Step 3.
CONSULT THE GUIDELINES FOR STORING EXPRESSED BREAST MILK ON PAGE 19 & 20.
13
Before you begin pumping, make sure that you have correctly washed, sanitized and
assembled the pump. Consult the ‘Preparing to Pump’ Section on page 7 for tips on
stimulating let-down and milk flow.
4
3
1
2
Wash your hands thoroughly and make sure your breasts
are clean.
Turn on Pump: When the flashing ORANGE light changes
to a continuous GREEN light, the pump is ready to use.
If the light is flashing RED,refer to the ‘Troubleshooting Guide’
on page 21.
Form a Seal: Press the pump against your breast, so that
your nipple fits into the funnel.A seal should form between
the pump and your breast. (If double pumping, press a pump
to each breast.)
Let-down: Let-down is your body’s physiological response to
the suckling action of your baby on the breast.This stimulates
the breast to produce milk and send it towards the nipple
where it is available for baby.
To initiate let-down, begin by squeezing the handle with shallow
quick strokes.This is intended to imitate your baby’s natural
suckling pattern. At the same time you are doing this, you are
enabling the petals on the Let-down Massage Cushion to flex in
and out around the areola, creating a massaging effect.This is
intended to help stimulate the natural let-down reflex. Let-down
can occur immediately after a few strokes and should not take
longer than 5 minutes (refer to page 7 on ‘Preparing to Pump’).
You can choose to automate this let-down phase by pressing
the blue One-Touch Memory Control or you can continue
to pump manually.
Milk Expression: Milk Expression occurs after let-down
is achieved and milk begins to flow. It is the phase that
is induced by the baby’s deeper more comfor table
suckling rhythm.
If you did not automate the let-down rhythm, please skip to
Step 5. If you have automated the let-down phase in Step 3,
press the blue One-Touch Memory Control to end the let-down
rhythm.You can now begin to establish a comfortable pumping
rhythm and level of suction that can be maintained throughout
your pumping session.
Pumping with Your Electronic Breast Pump Pumping with Your Electronic Breast Pump
Page 9
Wash and sanitize all parts before use. See section titled
‘Cleaning the Manual Breast Pump’ on page 15.
16
1
Wash your hands thoroughly. Insert the white
valve into the pump body so that it fits securely into
the small round hole. Make sure the pointed side of
the valve is facing down.
2
3
Twist the milk container onto the pump body
until securely in place.
To ensure that the
pump is completely stable, you can use the
stand with the 4 oz/125 ml milk container.
4
Fit the Let-down Massage Cushiononto the pump
funnel. Secure the rim of the Let-down Massage
Cushion around the funnel, so that there are no
gaps. (This is easier if assembled while the Let-down
Massage Cushion is wet.)
5
Place the forked end of the handle under the
rounded tip of the diaphragm stem. Push down
gently on the handle until it clicks into place.
6
Click the pump cover onto the pump body.
Fit the silicone diaphragm with stem into the pump
body. Ensure a perfect seal around the rim by
pressing down with your fingers.
(This is easier if
assembled while the diaphragm is wet.)
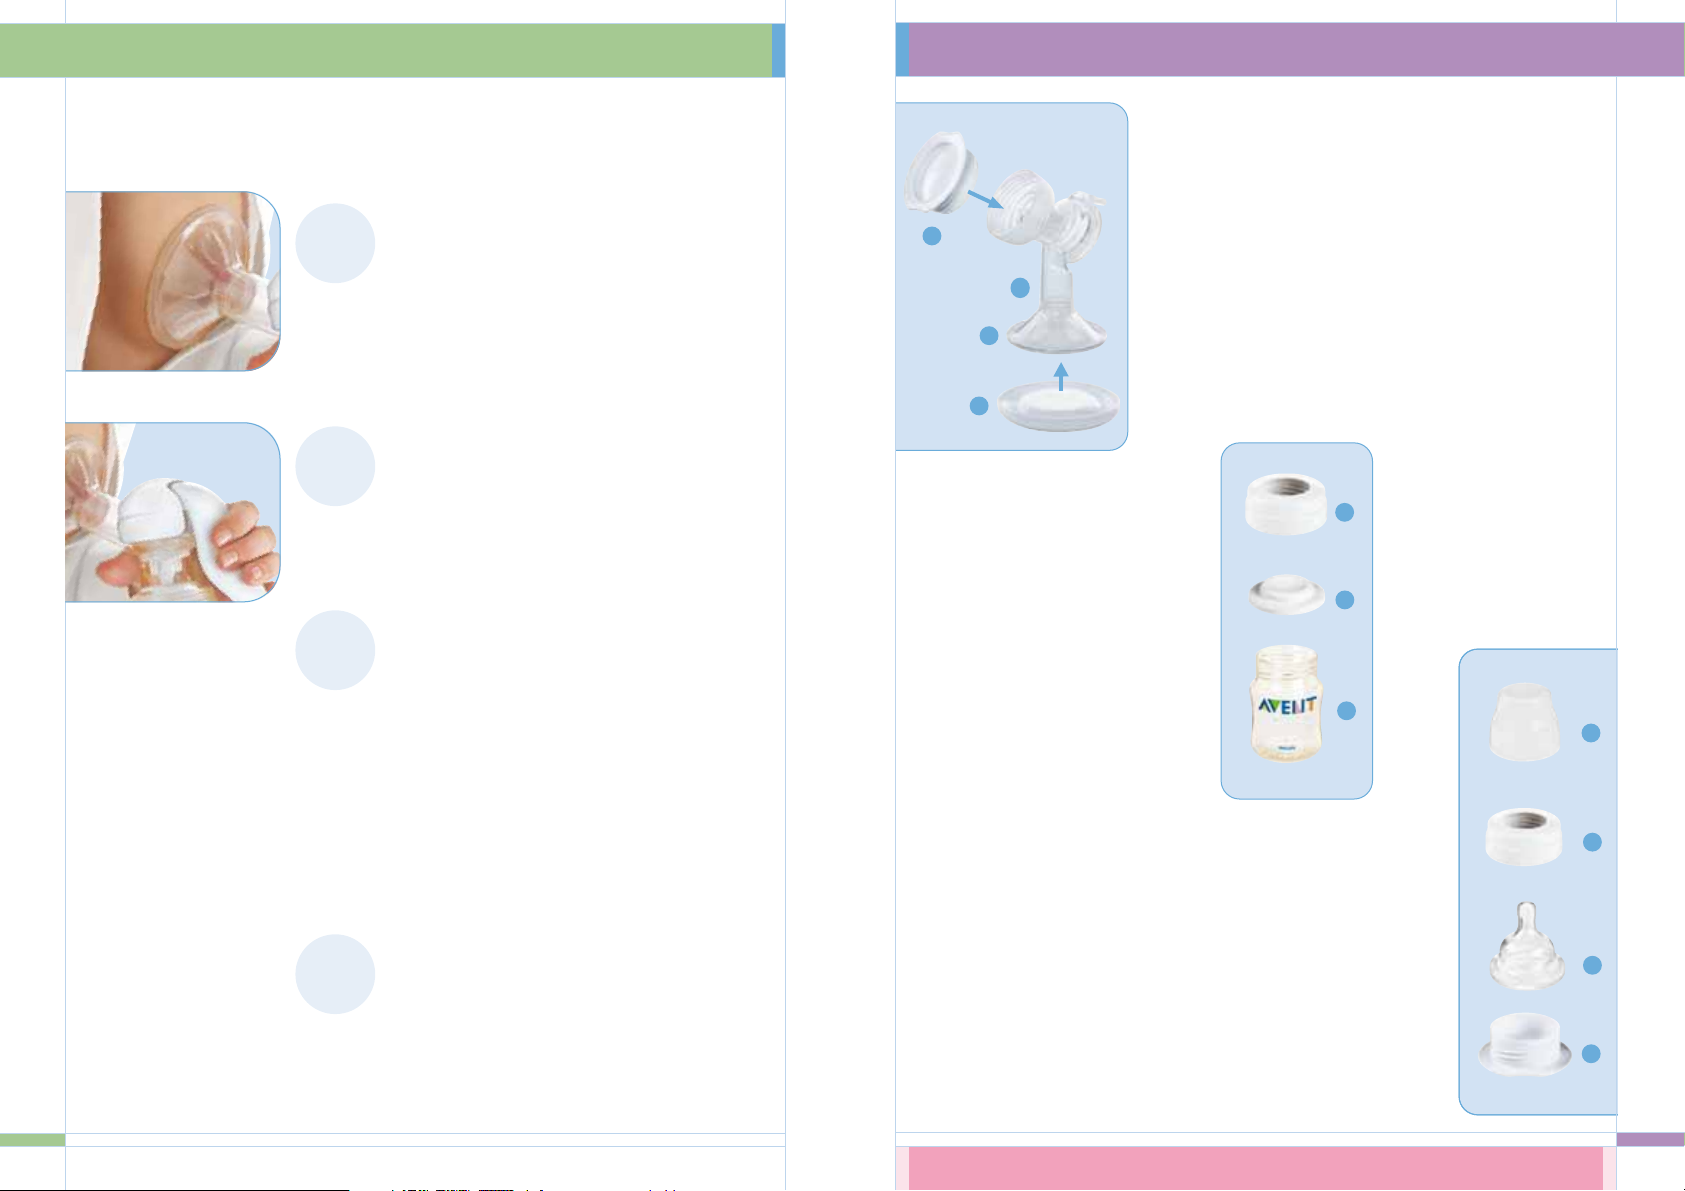
White stand
Assembling the Manual Breast Pump
White valve
Pump body
Milk container (4 oz/125 ml)
Stand (same as )
Let-down Massage Cushion
Funnel cover (same as )
Need Help? Call us at 1.800.54.AVENT or visit www.philips.com/AVENT
15
Clear pump cover
Silicone diaphragm with a stem
Forked handle
You may want to use the Manual Breast Pump when you need a cord-free alternative to the
Electronic Breast Pump.
While the Manual Breast Pump uses many of the same parts as the
Electronic
Breast Pump
, please note the parts shaded in green are specific to the Manual Breast Pump.
Parts specific to the Manual
Breast Pump are included
in a separate bag:
Cleaning the Manual Breast Pump
Caution: Do not use antibacterial or abrasive cleaners/detergents.To clean the valve, rub gently
between your fingers in warm soapy water – do not insert objects as this may cause damage.
Every time before use (including first use):
Disassemble and clean all parts of the Manual Breast Pump on the top rack of the
dishwasher, or in warm soapy water and rinse. All parts of the Manual Breast Pump
are sterilizer safe. Sanitize Manual in a Philips AVENT Steam Sterilizer (electronic
or microwave), or by boiling in water for 5 minutes.
Manual Pump
c
d
e
f
f
g
h
h
u
v
w
u
v
w
c
d
e
f
g
h
Manual Breast Pump – Parts Guide
Page 10
Need Help? Call us at 1.800.54.AVENT or visit www.philips.com/AVENT
18
AVENT Naturally Shaped Nipple
After sanitizing all parts, insert the
nipple into the screw ring and attach
the dome cap over the top of the
nipple. Screw on the sealing base.
Dome cap (p)
Screw ring (r)
Nipple (q)
Sealing base (s)
d
e
g
h
p
q
r
r
s
s
t
Keeping Parts Clean and Compact for Travel
Pump
After sanitizing all parts insert the white valve and fit the
diaphragm onto the pump body.Clip the funnel cover over
the Let-down Massage Cushion and screw the sealing base
onto the bottom of the pump body.Then put the assembled
items in the gray drawstring bag.
Sealing base (s)
Pump body (d)
Let-down Massage Cushion (g)
Funnel cover (h) (also used as a stand when pumping)
Breast Milk Container
After sanitizing all parts, click the
sealing disc into the screw ring
and twist onto the container.
Screw ring (r)
Sealing disc (t)
Milk container (e)
Before you begin pumping, make sure you have washed, sanitized and carefully assembled
the Manual Breast Pump. Consult the ‘Preparing to Pump’ on page 7 for tips about
stimulating let-down and milk flow.
17
2
Initiate let-down: Squeeze the handle with shallow,
quick strokes, until milk starts to flow. Do not use
full compression on the handle.
3
Begin Pumping:When you see milk beginning to
flow,you can establish a comfortable pumping rhythm
and level of suction. Create a natural breastfeeding
rhythm by holding down on the handle for 3 seconds,
then releasing, and repeating that pattern for
each compression.
Note:You do not need to compress the handle fully, only until it
feels comfortable.The further you compress the handle, the more
suction the pump will provide.
4
After milk is collected, unscrew the pump body
from the base.
Caution: Do not continue pumping for more than 5 minutes
at a time if no result is achieved.Try expressing at another
time during the day.
1
Wash your hands thoroughly and make sure your
breasts are clean.
Form a Seal: Press the pump against your breast,
so that your nipple fits into the funnel.A seal should
form between the pump and your breast.
Using the Manual Breast Pump
Page 11
20
Guidelines for Storing Expressed Breast Milk
°
Refrigerate breast milk immediately. Refrigerate for up to 24 hours in the back of the
refrigerator, not in the door.
°
Freeze for up to 3 months, or 6 months in a zero-degree freezer.
°
Frozen breast milk can be defrosted overnight in the refrigerator, thawed in warm
water or heated on the lowest setting of a bottle warmer or baby food warmer.
°
NEVER refreeze breast milk.
°
If you express small amounts of milk throughout the day, you can top up the milk container
by keeping it in the refrigerator and adding to it. Make sure the milk is used within 24 hours
of the first expression, or store it in the freezer.
°
DO NOT add fresh breast milk to already frozen milk.
°
ALWAYS discard any milk that is left over at the end of a feed.
Note: Only milk collected with a clean,sanitized pump should be stored to be fed to your baby. Sanitize Breast
Milk Containers before use or express milk directly into pre-sterilized VIA Cups.
Never immerse a frozen bottle or liner in boiling water as this may cause it
to crack/split.
Transporting Expressed Breast Milk
°
Please refer to Tote Bag Instructions for complete
directions on how to store and transport breast
milk using the Thinsulate
™
carriers.
°
When removed from the freezer, four cool packs
will keep one 4 oz /125 ml or one 9 oz /260 ml
container of freshly expressed breast milk sufficiently
chilled inside a Thinsulate carrier and insulated bag
for up to 6 hours. Ensure that both the storage
containers and carriers are placed upright in the bag
to prevent leaking.Also make sure that the Thinsulate
carriers are completely zipped.
°
Be sure to keep the cool packs frozen until they
are ready to use and refrigerate milk immediately
after removing it from the insulated bags.
°
In hot climates, avoid storing Thinsulate carriers or
the travel bag containing expressed milk in a car,
office, cabinet etc. Milk must be sufficiently chilled
to avoid spoilage.
Please note: Milk storage times vary
based on collection and storage
conditions.This storage information is
only a suggestion. Please contact your
health professional or breastfeeding
advisor about milk storage guidelines.
Storing Your Expressed Breast Milk
Need Help? Call us at 1.800.54.AVENT or visit www.philips.com/AVENT
19
Using Philips AVENT products interchangeably,
you can pump, store and feed with the same
container, preserving valuable nutrients that can
get lost if breast milk is transferred.
With your Twin Electronic Breast Pump or Manual Breast Pump, you can express milk
directly into pre-sterilized VIA Cups.VIA Cups are safe, sturdy and offer protection for
pumping, storing and feeding breast milk.
Get VIA and Get Going!
• Twist-on VIA Lid seals tightly to VIA Cup for leak-proof storing or freezing
• Writable and stackable cups make it easy to organize
• Compatible system lets you pump,store and feed using the same cup
• Sturdy VIA Cups heat easily and quickly in a bottle warmer
AVENT VIA:
After expressing milk into an AVENT container,
click a sealing disc into the screw ring and twist
onto the container.To feed, just replace the sealing
disc with an AVENT Naturally Shaped Nipple.
Storing Your Expressed Breast Milk
Page 12

22
Need Help? Call us at 1.800.54.AVENT or visit www.philips.com/AVENT
Technical Specifications
FULL ONE-YEAR WARRANTY
Philips Electronics North America Corporation (USA) and Philips Electronics Ltd (CANADA)
warrant each new Philips AVENT product, model SCF304, against defects in materials or
workmanship for a period of one year from the date of purchase, and agrees to repair or
replace any defective product without charge. IMPORTANT:This warranty does not cover
damage resulting from accident, misuse or abuse, lack of reasonable care, or the affixing of any
attachment not provided with the product. NO RESPONSIBILITY IS ASSUMED FOR ANY
SPECIAL, INCIDENTAL OR CONSEQUENTIAL DAMAGES.
In order to obtain warranty service, simply call toll-free 1.800.54.AVENT.
Key to product base label
Technical Specifications
°
Mains Input Voltage 100 – 240 VAC
°
Mains Input Current 1.5A
°
Mains Input Frequency 50 – 60 Hz
°
Supply voltage fluctuations not exceeding
+/- 10% of the nominal voltage
°
Ambient temperature range: +10° C to
+40° C (+50° F to +104° F)
°
Relative Humidity range: 30% to 75%
°
Atmospheric Pressure: 700 to 1060hPa
°
Equipment rated for continuous operation
TYPE B APPLIED PART GENERAL WARNING
FOLLOW OPERATING
INSTRUCTIONS
ETL LISTED MARK –
CANADA/UNITED STATES
LISTED
3045297
CLASS II EQUIPMENT
FOR INDOOR USE ONLY
21
Lack of suction
No milk being
expressed
°
Ensure the pump is correctly assembled and that suction is being created.
°
Relax and try again, as expression may improve after practice.
°
Refer to the ‘Preparing to Pump’ section on page 7.
Pain in the
breast area
when expressing
°
You may be pumping too hard.You do not need to use all the suction the pump
can generate.Try compressing the handle halfway.
°
Try holding down the pump handle for 2-3 seconds per compression.
°
Consult your health professional or breastfeeding advisor.
Milk is drawn up
the Let-down
Massage Cushion
°
Try leaning slightly forward.
°
Remove and re-fit the Let-down Massage Cushion to ensure it is firmly
attached and pushed far enough down the center of the funnel.
Some women may prefer to use the pump without the Let-down Massage Cushion.The Let-down
Massage Cushion has petals that flex in and out to gently massage the area around the breast.
This is intended to help stimulate a fast, natural milk flow.When using the breast pump without
the Let-down Massage Cushion, the maximum vacuum level achievable will be higher.
Cracking or
discoloration
of pump parts
°
Avoid contact with antibacterial or abrasive detergents or cleaners as they
can damage the plastic. Combinations of detergents, cleaning products, sanitizing
solution, softened water and temperature fluctuations may, under certain
circumstances, cause the plastic to crack. If this occurs, do not use.The pump
bodies and breast milk containers are dishwasher safe but food colorings may
discolor them. Follow guidelines in ‘Cleaning and sanitizing your
Your Pump’ on page 6.
Lost or broken parts
°
Contact Philips AVENT for replacements.
Call 1.800.54.AVENT or visit www.philips.com/AVENT
Pump not responding
to pressing of the
control handle
°
Ensure the pump is correctly assembled and switched on with the power indicator
illuminated GREEN.
°
Make sure the cables between the electric wall socket and the pump are correctly
connected.
Pump light
flashing RED
°
If the pump stops working and the power light is flashing RED then a fault has been
detected.
°
3 flashes, delay, 3 flashes, etc – the breast pump has detected a vacuum fault. Switch
off the motor and check tubing and connections for obstructions or damage.
°
2 flashes, delay, 2 flashes, etc – the breast pump has detected that it is over the
acceptable temperature. Switch off the motor. Ensure unit is not exposed to heat
sources or sitting in direct sunlight. Allow unit to stabilize before trying again.
°
Continuous flashing – the pump has detected that the control cable has been
incorrectly fitted/not fitted or the cable is damaged.
°
Check that all the pump components have been assembled correctly and that the
white valve is positioned correctly.
°
Ensure that the silicone diaphragm and Let-down Massage Cushion are fitted
securely to the pump body and a perfect seal is created, making sure to push the
Let-down Massage Cushion far enough down the center of the funnel.
°
Make certain that the tubing connections and control handle are firmly in place.
Troubleshooting Guide
Page 13

24
Motor del Extractor
Luz
Enchufe del cable
de control
Tomacorriente
de electricidad
Puerto de tubo gemelo
Puerto de tubos
Enchufe del cable
de control
NUNCA DESINFECTE NI SUMERJA AL AGUA
NUNCA DESINFECTE NI SUMERJA AL AGUA
Interruptor
encender/apagar
Palanca de Control
¿Necesita ayuda? Llámenos al 1.800.54.AVENT o visite www.philips.com/AVENT
Guía de Piezas del Extractor de Leche Electrónico Doble – Detallada
Palanca de Control
Control de Memoria
de un Solo Toque
23
Primer Extractor
(Extractor de Control)
Segundo Extractor
Motor del Extractor
1x Palanca de control
2x Diafragmas de silicona
2x Válvulas blancas
2x Cuerpos de extractor
4x Contenedores para leche
(2x 4 oz/125 ml y 2x 9 oz/260 ml)
2x Bases (igual que )
2x Cojines de Pétalos
Masajeadores
2x Tapas de embudo (igual que )
1x Cable de control
2x Tubos transparentes
1x Tubo gemelo
1x Conector de doble extracción
1x Motor de extractor
1x Adaptador eléctrico
1x Cable que conecta a la pared
2x Tapas de cúpula
2x Mamila extra suave de flujo
de recién nacido (desde 0 meses)
2x Roscas
2x Bases para sellado
2x Discos de sellado
a
b
c
d
e
f
f
g
h
i
j
k
l
m
n
o
p
q
r
s
t
a
b
c
d
e
f
b
c
d
e
f
g
h
g
h
i
j
j
k
l
m
n
o
p
q
r
s
t
h
Cuando está montado, las piezas b–g forman un cuerpo de extractor montado. Cuando la Palanca de
Control (a) está sujetada a este cuerpo de extractor montado, se convierte en el Primer Extractor (Extractor
de Control). Cuando el Conector de Doble Extracción (l) está sujetado a este cuerpo de extractor montado,
se convierte en el Segundo Extractor
Todo lo que necesita para montar y utilizar el Extractor de Leche se muestra
aquí. Si le falta cualquier pieza, o si tiene cualquier duda, favor de contactar
atención al cliente al 1.800.54.AVENT o visite www.philips.com/AVENT
Guía de Piezas del Extractor de Leche Electrónico Doble
Page 14

Extracción Manual
Guía de piezas del Extractor de
Leche Manual 37
Limpiando el Extractor de Leche
Manual 37
Montando el Extractor de Leche
Manual 38
Utilizando el Extractor de Leche
Manual 39
Contenido:
Extracción Eléctrica
(Sencilla y Doble)
Guía de Piezas del Extractor
de Leche Electrónico Doble 23-24
Medidas preventivas importantes 25
Desmontando el Extractor
de Leche Electrónico 27
Limpiando y Desinfectando
el Extractor de Leche 28
Preparándose para una Extracción
29-30
Montando los Cuerpos del
Extractor de Leche 31-32
Conectando los componentes
Electrónicos 33-34
Extrayendo Leche con el
Extractor de Leche 35-36
Manteniendo las Piezas Limpias
y Compactas para Viajes 40
Conservando la Leche Materna
Extraída 41-42
Guía de Solución de Problemas 43
Especificaciones Técnicas 44
Garantía Limitada 44
26
Tómese unos cuantos minutos para leer el
folleto de instrucciones entero antes de utilizar
su Extractor de Leche por primera vez.
POR FAVOR GUARDE ESTAS INSTRUCCIONES.
A menos que un profesional de salud la aconseje de otra
manera, debe esperar hasta que su rutina de amamantar
haya sido establecida antes de extraer leche – usualmente
después de cuatro semanas.
Cojín de Pétalos Masajeadores cuenta
con pétalos que se flexionan para suavemente
masajear la areola. Esto tiene la intención
de ayudar a estimular un flujo de leche
rápido y natural.
Control de Memoria de un Solo Toque está
al alcance de los dedos. Puede parar,empezar o
ajustar los niveles de velocidad y succión sin quitar
la mano del extractor.
Memoria Electrónica aprende de usted.
Simplemente empiece un ritmo de bombeo
cómodo, oprima un botón, y Extractor de Leche
Electrónico Doble lo automatiza.
Conveniencia para extraer, conservar y
alimentar del Sistema de Alimentación Natural
Philips AVENT. Los productos se combinan para
que nunca tenga que transferir leche entre
contenedores.
Ultra Cómodo, Silencioso y Eficiente,
haciéndolo fácil el continuar regalándole
a su bebé las ventajas de la leche materna.
¡Felicidades!
Muy pronto descubrirá lo que hace este Extractor de Leche Electrónico Doble tan único para usted. Extractor
de Leche ha sido diseñado con una memoria electrónica que aprende y luego continúa su ritmo de bombeo
suave. Le da el control completo sobre su comodidad, lo cual significa que extraer leche con Extractor de
Leche Electrónico Doble siempre se sentirá natural y completamente normal.
¿Necesita ayuda? Llámenos al 1.800.54.AVENT o visite
www.philips.com/AVENT
Al utilizar productos eléctricos, especialmente
en presencia de niños, hay que siempre seguir
las precauciones de seguridad básicas.
LEA TODAS LAS INSTRUCCIONES ANTES
DE UTILIZAR ESTE PRODUCTO.
ADVERTENCIA – Para reducir el riesgo
de incendio, electrocución, u otra
lesión personal:
•Extractor de Leche se ha creado para ser usado
repetidas veces por una sola usuaria.
•Siempre desenchufe el motor del extractor de
leche del tomacorriente inmediatamente después
del uso.
•No utilice al bañarse.
•No coloque o guarde el producto donde puede
ser jalado o caerse al agua.
•No coloque o deje caer el motor del extractor,
palanca de control, adaptador eléctrico o cable
que conecta a la pared en agua u otro líquido.
•No intente alcanzar un producto que se ha caído
al agua. Desenchufe del tomacorriente
inmediatamente.
•Se requiere vigilancia de cerca cuando se utiliza
este producto cerca de niños o personas con
discapacidades.
•No permita que niños o mascotas jueguen con el
motor del extractor,los tubos, la fuente de
electricidad o las accesorias ya que estas piezas
representan un peligro de atragantar o
estrangularse.
•No hay piezas que se puedan revisar dentro del
Extractor de Leche. No intente abrir, arreglar o
revisar el Extractor de Leche usted misma.
•Antes de cada uso inspeccione el producto,
incluyendo el cable principal, para señales de
daño. Nunca opere este producto si tiene un
cable o enchufe dañado, si no funciona
correctamente, o si ha sido tirado al suelo o
dañado, o si ha sido sumergido al agua.
•Sólo utilice acoplamientos recomendados
por Philips AVENT.
•No utilice al aire libre con el adaptador AC, en
donde se utilizan productos de aerosol, o donde
se administra oxígeno.
•No se puede utilizar este equipo en presencia de
una mezcla anestésica inflamable con aire, o con
oxígeno u óxido nitroso.
•Utilice sólo el adaptador eléctrico proveído con
este producto.
•Asegure que la unidad no esté expuesta a calor
extremo o colocada en luz solar directa.
•Este es un producto de cuidado personal y
no se lo debe compartir entre madres.
•No intente quitar el cuerpo del extractor del seno
mientras haya un vacío.Apague la unidad y rompa
el cierre entre el seno y el embudo del extractor
con el dedo, luego quite el extractor del seno.
•Nunca utilice si está embarazada, como la
extracción puede provocar el parto.
•Nunca utilice al estar cansada o soñolienta
PRECAUCIÓN – Para reducir el riesgo
de lesión o fallo del aparato:
•No deje el producto desatendido cuando está
enchufado a un tomacorriente.
•Nunca deje caer ni introduzca ningún objeto en
ningún tubo o abertura.
•No acorte los tubos.
•Asegure que el voltaje del adaptador eléctrico
sea compatible con la fuente de electricidad.
•Primero, enchufe el adaptador al motor del
extractor de leche. Luego, sujete el cable que
conecta a la pared al adaptador. Finalmente,
introduzca el enchufe al tomacorriente de la pared.
•Aunque cumple las directivas aplicables de EMC,
este equipo todavía podría ser propenso a
emisiones excesivas y/o podría interferir con otro
material más sensible.
•Lave y desinfecte los componentes apropiados
del extractor antes de cada uso.
•No continúe extrayendo durante más de cinco
minutos a la vez si no logre ningún resultado.
•No utilice productos de limpieza/detergentes
antibacterianos o abrasivos al limpiar las piezas
del extractor de leche.
•Nunca meta la palanca de control o el motor del
extractor de leche en agua ni en un esterilizador,
ya que esto pudiera ocasionar daño permanente
al extractor.
•Si la presión que se genera es incómoda o le
causa dolor, apague la unidad, rompa el cierre
entre el seno y el cuerpo del extractor con el
dedo y quite el extractor del seno.
CONSERVE
ESTAS
INSTRUCCIONES
25
MEDIDAS PREVENTIVAS IMPORTANTES
Page 15

Limpie Con un Trapo Húmedo al Ser Necesario:
Palanca de control (a)
Tubos (i/j/k)
Note: Los tubos se utilizan para
succión y no transportan leche.
Conector de doble extracción (l)
Motor del extractor (m)
Precaución: NUNCA meta la palanca de control o el motor del extractor en agua
o en un esterilizador, ya que esto podría ocasionar daño permanente al extractor.
Limpie Antes de Cada Uso (incluyendo el primer uso):
Diafragma de silicona (b)
Válvula blanca (c)
Cuerpo del extractor (d)
Contenedores para leche (e)
Cojín de Pétalos Masajeadores (g)
Tapa de embudo/base blanca (h/f)
Instrucciones de Limpieza:
Se debe desinfectar estas piezas del extractor antes
de cada uso. Desmonte el extractor antes de limpiarlo.
Lave en agua tibia jabonosa y enjuague, o lave en el estante
superior del lavavajillas. Desinfecte en un esterilizador de vapor
(electrónico o de microondas) o hierva en agua por 5 minutos.
Precaución: No utilice productos de limpieza/detergentes antibacterianos o abrasivos. Para limpiar la
válvula, frótela suavemente entre los dedos en agua tibia jabonosa – no le introduzca objetos ya que
esto puede ocasionar daño.
¡CONSEJO DE
AYUDA!
Los Esterilizadores de Vapor Electrónicos y para
Microondas Philips AVENT han sido diseñados
para contener los componentes lavables del
Extractor de Leche Electrónico y el Extractor
de Leche Manual entero.
28
¿Necesita ayuda? Llámenos al 1.800.54.AVENT o visite
www.philips.com/AVENT
a
c
d
e
g
h
i
l
m
b
f
j
k
Asegure que el Extractor de Leche esté apagado y desenchufado antes de limpiarlo.
Limpiando y Desinfectando el Extractor de Leche
2
5
4
3
27
Asegure que el motor del Extractor de Leche esté apagado y desenchufado antes de desmontar las
piezas. Vea la sección ‘Guía de Piezas del Extractor de Leche Electrónico Doble’ en la página 23 par
a una descripción del Primer Extractor (Extractor de Control) y el Segundo Extractor.
Segundo Extractor
Del segundo extractor,separe el tubo transparente del
conector de doble extracción. Quite el conector de doble
extracción jalándolo del diafragma de silicona.
Quite el Cojín de Pétalos Masajeadores
jalándolo cuidadosamente del embudo
en el cuerpo del extractor.
Quite la válvula blanca del cuerpo del extractor.
Quite el diafragma de silicona jalándolo del
cuerpo del extractor.
Realice los pasos 3-5 tanto en el Primer
Extractor (Extractor de Control) como
en el Segundo Extractor.
1
Primer Extractor (Extractor de Control)
Del primer extractor (extractor de control),
quite la palanca de control jalándola del diafragma
de silicona.
Primer Extractor
(Extractor de Control)
Segundo Extractor
Desmontando el Extractor de Leche Electrónico
Page 16

30
Se puede utilizar el Extractor de Leche Electrónico Doble como:
Extractor Eléctrico Doble
Extractor Manual
(para utilizar el Extractor Manual,
vea la página 37)
Extractor Eléctrico Sencillo
¿Necesita ayuda? Llámenos al 1.800.54.AVENT o visite
www.philips.com/AVENT
29
Al utilizar el extractor por primera vez, su Extractor de Leche Electrónico Doble contendrá las
posiciones del fabricante guardadas en su memoria como resultado de pruebas de control de
calidad. Si se oprime el Control de Memoria de un Solo Toque azul antes de apretar la palanca
de control al utilizarlo por primera vez, el extractor funcionará con estas posiciones, las cuales
le podrían resultar ser incómodas. Recomendamos que establezca
manualmente un ritmo cómodo antes de meter el modo automático.
Luego, oprima el Control de Memoria de un Solo Toque azul para
continuar su propio ritmo preferido.
Si encuentra que no consiga mucha leche las primeras
cuantas veces que intenta extraer, no se desanime. Aprender
a extraer leche, así como aprender a amamantar, requiere
práctica.Aquí hay unos consejos para facilitar la extracción:
1. Elija un tiempo cuando no tenga prisa y no
será interrumpida.
2. Elija un sillón cómodo cerca de una mesa, para que pueda
colocar el motor del Extractor de Leche Electrónico Doble
a su alcance.
3. Mire una foto de su bebé para estimular la bajada de leche.
4. Coloque un paño templado sobre los senos por unos pocos minutos antes que
empiece la extracción. Esto estimula el flujo de leche y puede aliviar los senos dolorosos.
5. El calor y la relajación pueden estimular el flujo de leche. Intente extraer leche
después de bañarse o ducharse.
6. Intente extraer leche de un seno mientras alimenta al bebé del otro, o continúe
extrayendo leche justo después de una alimentación.
7. Cambie la posición del extractor en los senos de vez en cuando. Esto puede
estimular los conductos de leche.
¿Con qué rapidez empezará el flujo de leche?
Al extraer leche con el Extractor de Leche Electrónico Doble, su leche debe empezar
a fluir después de unas pocas compresiones. Si la leche no empieza a fluir inmediatamente,
relájese y continúe extrayendo. PRECAUCIÓN: NO CONTINÚE EXTRAYENDO POR
MÁS DE 5 MINUTOS A LA VEZ SI NO LOGRE NINGÚN RESULTADO. Deje la extracción
e intente extraer en otro momento del día. Si el proceso se pone doloroso, pare y
consulte con su profesional de salud o asesora de lactancia.
¿Qué cantidad de leche puede esperar?
Se ha demostrado que la doble extracción incrementa los niveles de prolactina y
estimula la producción de leche. Por eso, cuando pueda,utilice su Extractor de Leche
regularmente como un doble extractor. Como promedio tendrá que extraer leche
por 10 minutos para acumular 60-120 ml o 2-4 onzas de leche. Sin embargo, esto es
sólo una guía y la cantidad varía de mujer a mujer. Si descubre que regularmente
extrae más de 4 oz. /125 ml de leche por sesión, sujete una contenedores para leche
AVENT de 9 oz. /260 ml al cuerpo del extractor.
Preparándose Para una Extracción
Preparándose Para una Extracción
Page 17

¿Necesita ayuda? Llámenos al 1.800.54.AVENT o visite
www.philips.com/AVENT
32
Para asegurar que el extractor
esté completamente estable,
puede utilizar la base con el
contenedor para leche de
4 oz/125 ml.
Cojín de Pétalos
Masajeadores
Base blanca
Contenedores para leche
3
4
Enrosque el cuerpo del extractor al
contenedor para leche hasta que
quede seguramente en su lugar.
El Cojín de Pétalos Masajeadores cuenta
con pétalos que flexionan para suavemente
masajear el área alrededor del seno. Esto tiene la
intención de ayudar a estimular un flujo de leche
rápido y natural. Cuando se utiliza el extractor de
leche sin el Cojín de Pétalos Masajeadores, el nivel
de vacío máximo que se puede lograr será mayor.
Las piezas que necesitará para este paso:
Válvula blanca
Diafragma de silicona
transparente
¿Extracción doble? Monte dos extractores como se demuestra abajo.
¿Extracción sencilla? Monte un extractor como se demuestra abajo.
Cuerpo del extractor
31
Antes de montar, asegure que haya correctamente lavado y desinfectado el extractor. Vea la
sección ‘Limpiando y Desinfectando el Extractor de Leche’ en la página 28.
1
2
Introduzca la válvula blanca en el cuerpo del
extractor para que quede seguramente en el
pequeño agujero redondo.Asegure que el
lado puntiagudo de la válvula dé hacia abajo.
Coloque el diafragma de silicona transparente
en el cuerpo del extractor.Asegure que
forme un cierre perfecto alrededor del
borde apretándolo con los dedos. (Esto será
más fácil si lo monta cuando el diafragma
está mojado.)
Montando los Cuerpos del Extractor de Leche Montando los Cuerpos del Extractor de Leche
Page 18

34
Segundo Extractor
Enchufe del
cable de control
Puerto de
tubos gemelos
¿Extracción doble? Complete el siguiente paso
con el segundo cuerpo de extractor montado.
¿Extracción sencilla? Complete el
siguiente paso con el tubo que queda.
Vea la sección ‘Guía de Piezas del Extractor de Leche
Electrónico Doble’ en la página 23 para una
descripción del Primer Extractor (Extractor
de Control) y el Segundo Extractor.
3a
4
5
3b
Empuje el conector de doble extracción al cuerpo del
extractor para que se siente firmemente encima del
diafragma de silicona. Sujete seguramente el otro tubo
transparente al conector de doble extracción. Cuando
el Extractor de Leche esté completamente montado, el
Segundo Extractor imitará simultáneamente la velocidad
y succión del Primer Extractor (Extractor de Control).
Si realiza una extracción sencilla, puede
apartar el tubo transparente sujetándolo
con el gancho blanco.
Sujete seguramente los tubos
gemelos a los puertos en el motor
del extractor.Conecte el cable de
control al enchufe adyacente.
Conecte el adaptador eléctrico al tomacorriente
en el motor del extractor.
Luego conecte el cable que conecta a la pared
al adaptador eléctrico e introduzca el enchufe
en el tomacorriente de la pared.
¿Necesita ayuda? Llámenos al 1.800.54.AVENT o visite
www.philips.com/AVENT
33
Primer Extractor (Extractor de Control)
Primer Extractor (Extractor de Control)
Las piezas que necesitará para este paso:
Cuerpo del
extractor montado
(vea las páginas
31-32)
¿Extracción doble?
Conector de
extracción doble
Palanca de control
Motor del extractor
Adaptador
eléctrico
Cable de control
Tubos transparentes
Cable que conecta a la pared
Vea la sección ‘Guía de Piezas del Extractor de
Leche Electrónico Doble’ en la página 23 para
una descripción del Primer Extractor (Extractor
de Control) y el Segundo Extractor.
1
2
Empuje la palanca de control al cuerpo
del extractor montado para que se siente
firmemente encima del diafragma de silicona.
Este montaje se convierte en el Primer
Extractor (Extractor de Control) que
contiene los electrónicos del extractor.
Encaje el cable de control al enchufe
de la palanca de control.
Luego, sujete seguramente uno de los
tubos transparentes al puerto en la
palanca de control.
Puerto
de tubo
transparente
Enchufe del
cable de
control
Conectando los componentes ElectrónicosConectando los componentes Electrónicos
Page 19

¡CONSEJO DE
AYUDA!
Luz ANARANJADA Intermitente:
El extractor se encuentra en el modo
de calentamiento. Espere una luz
VERDE continua.
Luz VERDE Continua: Modo de
extracción manual. Usted controla la
velocidad y la presión del extractor.
Luz VERDE Intermitente: Modo de
extracción manual. Extractor de Leche
imitará el último ritmo de bombeo y
nivel de succión establecidos.
Luz
ROJA Intermitente: Consulte la
‘Guía de Solución de Problemas’ en la
página 43.
La luz encima del motor del Extractor de Leche Electrónico Doble indica el modo del extractor:
36
¿Necesita ayuda? Llámenos al 1.800.54.AVENT o visite
www.philips.com/AVENT
7
8
6
Luego,oprima el Control de Memoria de un Solo Toque azul
en la palanca. La luz del modo en el motor del extractor cambiará
de un VERDE continuo a un VERDE intermitente e Extractor de Leche
imitará el ritmo de las últimas dos compresiones.
Note: No es necesario comprimir completamente la palanca, sólo hasta que le sienta
cómodo. Cuánto más comprime la palanca, tanta más succión será proveída por el
extractor.Si la presión resulta incómoda, deje la extracción automatizada oprimiendo
el Control de Memoria de un Solo Toque y rompiendo, con el dedo, el cierre entre el seno
y el embudo del extractor.
Cambiando la Velocidad y el Nivel de Succión: Oprima
nuevamente el Control de Memoria de un Solo Toque azul,
y el extractor se volverá al control manual. La luz cambiará de
un VERDE intermitente a un VERDE continuo. Establezca una
velocidad y un nivel de succión cómodos. Oprima nuevamente
el Control de Memoria de un Solo Toque azul, e Extractor de
Leche Electrónico continuará el mismo ritmo de bombeo.
Terminando la Sesión de Extracción: Oprima el Control de Memoria
de un Solo Toque azul, rompa el cierre entre el seno y el embudo del
extractor con el dedo y quite el extractor del seno. Apague el extractor
y desenchúfelo de la fuente de electricidad. Extractor de Leche
Electrónico recordará y guardará la velocidad y el nivel de succión de
las últimas dos compresiones.. Desenrosque la base después que se
haya acumulado la leche. Si alguna leche queda en el cuerpo del
extractor, viértala en la base. No llene la base más de lo debido. Lave
y desinfecte nuevamente todas las piezas necesarias antes del próximo uso.
La próxima vez que prende el extractor: ¿Volviendo a una Sesión Guardada? Prenda
el extractor igual que en Paso 1. Complete el Paso 2. Oprima el Control de Memoria de
un Solo Toque azul. Esto meterá el modo de extracción automática. El extractor seguirá
con el ritmo de las últimas dos compresiones guardadas de la etapa de extracción de
leche. Continúe extrayendo como se describe en el Paso 4. ¿Necesita restablecer la
bajada de leche? Si necesita establecer la bajada de leche, prenda el extractor igual que en
el Paso 1. Complete el Paso 2. Apriete la palanca con compresiones rápidas y superficiales
y continúe como se describe en el Paso 3.
CONSULTE LOS CONSEJOS PARA CONSERVAR LECHE MATERNA EXTRAÍDA EN LAS PÁGINAS 41 & 42.
35
Antes de empezar una extracción, asegure que haya correctamente lavado, desinfectado y
montado el extractor. Consulte la sección ‘Preparándose para una Extracción’ en la página
29 para consejos sobre estimular la bajada y el flujo de leche.
4
5
3
1
2
Lávese las manos con cuidado y asegure que los senos estén
limpios. Prenda el extractor: Cuando la luz ANARANJADA
intermitente cambie a una luz VERDE continua, el extractor está
listo para utilizar. Si la luz parpadea ROJA, vea la ‘Guía de Solución
de Problemas’ en la página 43.
Forme un cierre: Apriete el extractor contra el seno, para que
el pezón quepa en el embudo. Un cierre debe formarse entre
el extractor y el seno. (Si está realizando una doble extracción,
apriete un extractor contra cada seno.)
Bajada de leche: La bajada de leche es la respuesta fisiológica del
cuerpo cuando un bebé succiona del seno. Esto estimula el seno
a producir leche y la manda hacia el pezón donde se encuentr
a disponible para el bebé.
Para iniciar la bajada de leche, empiece por apretar la palanca
con compresiones rápidas y superficiales. Esto tiene la intención
de imitar la pauta de succión natural de su bebé. Mientras hace
esto, está permitiendo que los pétalos del Cojín de Pétalos
Masajeadores flexionen alrededor del areola, así creando un
efecto de masaje. Esto tiene la intención de ayudar a estimular
el reflejo natural de la bajada de leche. La bajada de leche puede
ocurrir inmediatamente después de unas cuantas compresiones
y no debe tardar más de
5 minutos (vea la página 29
‘Preparándose para una Extracción’).
Puede optar por automatizar
este paso de la bajada de leche oprimiendo el Control de
Memoria de un Solo Toque azul o puede continuar con una
extracción manual.
Extracción de Leche: La extracción de leche ocurre después que
haya logrado la bajada de leche y la leche haya empezado a fluir.
Es la etapa inducida por el ritmo de succionar más profundo y
cómodo del bebé.
Si no automatizó el ritmo de la bajada de leche, por favor salte al
Paso 5. Si ha automatizado el paso de la bajada de leche del Paso
3, oprima el Control de Memoria de un Solo Toque azul para
terminar el ritmo de la bajada de leche. Entonces puede empezar
a establecer un ritmo de bombeo y un nivel de succión cómodos
que pueden mantenerse durante toda la sesión de extracción.
Extractor de Leche Electrónico Doble imita su Ritmo de Bombeo:
Para crear un ritmo natural de amamantar, sugerimos que apriete
la palanca por 3 segundos, luego suelte y repita la pauta para la
próxima compresión.
Extrayendo Leche con el Extractor de Leche Extrayendo Leche con el Extractor de Leche
Page 20

Lave y desinfecte todas las piezas antes del uso.
Vea la sección ‘Limpiando el Extractor de Leche Manual’ en la página 37.
38
1
Lávese completamente las manos. Introduzca la válvula
blanca en el cuerpo del extractor para que quede
seguramente en el pequeño agujero redondo.Asegure
que el lado puntiagudo de la válvula dé hacia abajo.
2
3
Enrosque el contenedor para leche al cuerpo
del extractor hasta que quede seguramente
en su lugar. Para asegurar que el extractor esté
completamente estable, puede utilizar la base
con el contenedor para leche de 4 oz/125 ml.
4
Meta el Cojín de Pétalos Masajeadores en el embudo
del extractor.Asegure el borde del Cojín de Pétalos
Masajeadores alrededor del embudo, para que no
haya espacios. (Esto será más fácil si lo monta mientras
el Cojín de Pétalos Masajeadores está mojado.)
5
Coloque el extremo horquillado de la palanca debajo
de la punta redonda del pie del diafragma. Apriete
suavemente la palanca hasta que se encaje en su lugar.
6
Encaje la tapa del extractor al cuerpo del extractor.
Meta el diafragma de silicona con pie en el cuerpo del
extractor.Asegure un cierre perfecto alrededor del
borde apretando con los dedos.
(Esto será más fácil si
lo monta mientras el diafragma está mojado.)
Base blanca
Montando el Extractor de Leche Manual
Válvula blanca
Cuerpo del extractor
Contenedores para leche
(4 oz/125 ml)
Base (igual que )
Cojines de Pétalos
Masajeadores
Tapa del embudo (igual que )
¿Necesita ayuda? Llámenos al 1.800.54.AVENT o visite www.philips.com/AVENT
37
Tapa del extractor transparente
Diafragma de silicona con pie
Palanca ahorquillada
Puede que desee utilizar el Extractor de Leche Manual cuando no le convengan los cables
del Extractor de Leche Electrónico.Aunque el Extractor de Leche Manual utiliza muchas
de las mismas piezas que el Extractor de Leche Electrónico, tenga en cuenta que las
piezas de tono verde son específicas al Extractor de Leche Manual.
Las piezas específicas al
Extractor de Leche Manual
se encuentran en una
bolsa aparte:
Limpiando el Extractor de Leche Manual
Precaución: No utilice productos de limpieza/detergentes antibacterianos o abrasivos. Para limpiar la válvula,
frótela suavemente entre los dedos en agua tibia jabonosa – no le introduzca objetos ya que esto puede
ocasionar daño.
Cada vez antes de cada uso (incluyendo el primer uso):
Desmonte y limpie todas las piezas del Extractor de Leche Manual en el estante superior
del lavavajillas, o en agua tibia jabonosa y enjuague.Todas las piezas del Extractor Manual son
a prueba del esterilizador. Desinfecte en un Philips AVENT Esterilizador de Vapor
(electrónico, eléctrico o para microondas), o hiérvalas en agua por 5 minutos antes de
cada uso.
Extractor Manual
c
d
e
f
f
g
h
h
u
v
w
u
v
w
c
d
e
f
g
h
Guía de piezas del Extractor de Leche Manual
Page 21

¿Necesita ayuda? Llámenos al 1.800.54.AVENT o visite www.philips.com/AVENT
40
Contenedor para Leche Materna
Después de desinfectar todas las piezas,
encaje el disco de sellado dentro de la
rosca y enrósquela en el contenedor.
Rosca (r)
Disco de sellado (t)
Contenedores para leche (e)
Mamila de Contorno Natural de AVENT
Después de desinfectar todas las piezas, introduzca
la mamila en la rosca y sujete la tapa de cúpula
encima de la mamila. Enrósquele la base para sellado.
Tapa de cúpula (p)
Rosca (r)
Mamila (q)
Bases para sellado (s)
d
e
g
h
p
q
r
r
s
s
t
Extractor
Después de desinfectar todas las partes, introduzca la válvula
blanca y encaje el diafragma en el cuerpo de extractor. Encaje
la tapa del embudo sobre el Cojín de Pétalos Masajeadores
y enrosque la base para sellado al inferior del cuerpo del
extractor.Luego guarde los artículos montados en la bolsa
gris con cordón.
Bases para sellado (s)
Cuerpo del extractor (d)
Cojín de Pétalos Masajeadores (g)
Tapa de embudo (h) (se utiliza también como base
al extraer leche)
Antes de empezar una extracción, asegure que haya lavado, desinfectado y montado
cuidadosamente el Extractor Manual. Consulte la sección ‘Preparándose para una Extracción’
en la página 29 para consejos sobre como estimular la bajada de leche y el flujo de leche.
39
2
3
4
1
Lávese completamente las manos y asegure que los
senos estén limpios.
Forme un cierre: Apriete el extractor contra el seno,
para que el pezón quepa en el embudo. Un cierre debe
formarse entre el extractor y el seno.
Inicie la bajada de leche: Apriete la palanca con
compresiones rápidas y superficiales, hasta que la leche
empiece a fluir. No apriete completamente la palanca.
Empiece la extracción: Cuando ve que la leche empieza
a fluir, puede establecer un ritmo de bombo y un nivel
de succión cómodos. Cree un ritmo natural parecido al
del amamantar sujetando la palanca por 3 segundos,
soltándola y repitiendo la pauta para cada compresión.
Note: No es necesario comprimir completamente la palanca, sólo
hasta que le sienta cómodo. Cuánto más comprime la palanca,
tanta más succión será proveída por el extractor.
Después de acumular la leche, desenrosque el cuerpo del
extractor de la base.
Precaución: No continúe extrayendo por más de 5 minutos a la vez
si no logre ningún resultado. Intente extraer leche en otro momento
del día.
Utilizando el Extractor de Leche Manual
Manteniendo las Piezas Limpias y Compactas para Viajes
Page 22

42
Consejos para Conservar Leche Materna Extraída
°
Refrigere inmediatamente la leche materna. Refrigere por hasta 24 horas en la parte
de atrás de la nevera, no en la puerta.
°
Congele por hasta 3 meses, o hasta 6 meses en un congelador de cero grados.
°
Leche materna congelada puede ser descongelada durante la noche en la nevera, calentada
gradualmente en agua tibia o calentada en la posición mínima de un calentador de
biberones o calentador de comida para bebé.
°
NUNCA vuelva a congelar leche materna.
°
Si extrae cantidades pequeñas de leche a lo largo del día, puede guardar el contenedor
de leche en la nevera y agregarle leche. Asegure que la leche sea alimentada dentro de
24 horas de su extracción, o consérvela en el congelador.
°
NO le agregue leche materna fresca a leche ya congelada.
°
SIEMPRE tire cualquier leche que quede después de una alimentación.
Note: Sólo debe alimentarle a su bebé leche que haya sido extraída con un extractor limpio y desinfectado.
Desinfecte los Contenedores para Leche Materna antes del uso o extraiga leche directamente en los Vasitos
VIA preesterilizados.
Nunca sumerja un biberón congelado o una bolsa congelada en agua hirviendo
como esto podría ocasionar que parta o agriete.
Transportando Leche Materna Extraída
°
Favor de ver las Instrucciones para Bolsa para indicaciones
detalladas sobre cómo conservar y transportar leche
materna utilizando las bolsas Thinsulate
™
.
°
Cuando los saca del congelador, cuatro paquetes para
enfriar mantendrá un contendor de 4 oz/125 ml o uno de
9 oz/260 ml de leche materna recientemente extraída lo
suficientemente enfriado dentro del maletín de Thinsulate y
su bolsa aislada por hasta 6 horas. Asegure que tanto los
contenedores de conservación como las bolsas sean puestos
de pie para prevenir derrames. Además, asegure que los
cierres de las bolsas Thinsulate estén completamente subidos.
°
Asegure de mantener congelados los paquetes para enfriar
hasta que los use y de refrigerar leche inmediatamente
después de sacarla de las bolsas aisladas.
°
En climas calurosos, no guarde bolsas Thinsulate o la bolsa
para viajes que contiene leche materna en un coche, oficina,
gabinete, etc. Es preciso que la leche esté lo suficientemente
enfriada para evitar que se eche a perder.
Favor de notar: Los períodos de
conservación de leche varían con
respecto a las condiciones de su
extracción y conservación. Esta
información sobre la conservación
es sólo una sugerencia. Por favor
contacte a su profesional de salud o
asesora de lactancia para consejos
sobre la conservación de leche.
¿Necesita ayuda? Llámenos al 1.800.54.AVENT o visite www.philips.com/AVENT
41
Intercambiando los productos Philips AVENT,
puede extraer,conservar y alimentar en un solo
contendor, así preservando los nutrientes valiosos
que se pueden perder al transferir leche.
Con su Extractor de Leche Electrónico Doble o Manual, puede extraer leche directamente
en los Vasitos VIA preesterilizados. Los Vasitos VIA son seguros y resistentes y le brindan
protección al extraer,conservar y alimentar leche materna.
¡Ándale con VIA!
• Tapa de media rosca VIA se cierra herméticamente al Vasito VIA para que se pueda
conservar y alimentar sin goteos.
• Vasitos amontonables en los que se puede escribir facilitan la organización
• Sistema compatible le permite extraer,conservar y alimentar con un sólo vasito
• Vasitos VIA duraderos se calientan fácil y rápidamente en un calentador de biberones
AVENT VIA:
Después de extraer leche en un contenedor
AVENT, encaje un disco de sellado en la rosca
y enrósquela en el contenedor. Para alimentar,
simplemente reemplace el disco de sellado con
una Mamila de Contorno Natural de AVENT.
Conservando Leche Materna Extraída Conservando Leche Materna Extraída
Page 23

Especificaciones Técnicas
°
Voltaje de entrada principal 100 – 240 VAC
°
Corriente de entrada principal 1.5A
°
Frecuencia de entrada principal 50 – 60 Hz
°
Fluctuaciones del suministro de voltaje no
excediendo +/– 10% del voltaje nominal
°
Variedad de temperatura ambiente:
+10° C a +40° C (+50° F a +104° F)
°
Variedad de humedad relativa: 30% a 75%
°
Presión atmosférica: 700 a 1060hPa
°
Equipo clasificado para operación continua
44
Clave para calcomanía al inferior del producto.
PIEZA APLICADA
TIPO B
ADVERTENCIA
GENERAL
SIGA LAS INSTRUCCIONES
DE OPERACIÓN
MARCA DE ‘ETL
LISTED’ – CANADÁ/
ESTADOS UNIDOS
LISTED
3045297
EQUIPO DE
CATEGORÍA II
SOLO PARA USARSE
ADENTRO
GARANTÍA COMPLETA DURANTE DEL AÑO
Philips Electronics North America Corporation (EE.UU.) y Philips Electronics Ltd (CANADÁ)
garantizan cada nuevo producto Philips AVENT, modelo SCF304, contra defectos de los
materiales o de fabricación durante un período de un año desde la fecha de compra, y está
de acuerdo en reparar o sustituir sin cargo cualquier producto defectuoso. IMPORTANTE: Esta
garantía no cubre deterioros producidos por accidente, mal uso o abuso, falta de un cuidado
razonable, o la fijación de cualquier accesorio no suministrado con el producto. NO SE
ASUME LA RESPONSABILIDAD POR CUALESQUIERA DETERIOROS ESPECIALES,
INCIDENTALES O CONSECUENCIALES.
A fin de obtener el servicio de garantía, simplemente llame gratuítamente 1.800.54.AVENT.
¿Necesita ayuda? Llámenos al 1.800.54.AVENT o visite
www.philips.com/AVENT
43
Falta de succión
No se saca
ninguna leche
Dolor en el área del
seno al extraer leche
Leche entra en
el Cojín de Pétalos
Masajeadores
Piezas del extractor
están partidas o
decoloradas
Piezas perdidas
o rotas
Extractor no responde
a la compresión de la
palanca de control
Luz del extractor
parpadea ROJA
°
Revise que todos los componentes del extractor hayan sido montados correctamente
y que la válvula blanca se encuentre en la posición correcta.
°
Asegure que el diafragma de silicona y el Cojín de Pétalos Masajeadores estén
colocados seguramente al cuerpo del extractor y que un cierre perfecto haya sido
creado, asegurando que el Cojín de Pétalos Masajeadores esté lo suficientemente
metido en el centro del embudo.
°
Asegure que las conexiones de los tubos y la palanca de control estén firmemente
metidas en su lugar.
°
Asegure que el extractor esté montado correctamente y que haya succión.
°
Relájese e intente nuevamente, como la extracción se mejora con la práctica.
°
Vea la sección ‘Preparándose para una Extracción’ en la página 29.
°
Puede que esté extrayendo con demasiada fuerza. No es necesario utilizar
toda la succión que el extractor puede generar. Intente comprimir la palanca
a mitad de camino.
°
Intente sujetar la palanca por 2-3 segundos por compresión.
°
Consulte con su proveedor de atención médica o su asesora de lactancia.
°
Intente inclinarse un poco hacia adelante.
°
Quite y coloque nuevamente el Cojín de Pétalos Masajeadores para asegurar
que esté sujetado firmemente y que esté lo suficientemente metido en el centro
del embudo.
Algunas mujeres preferirán utilizar el extractor sin el Cojín de Pétalos Masajeadores. El Cojín
de Pétalos Masajeadores cuenta con pétalos que flexionan para suavemente masajear el área
alrededor del seno. Esto tiene la intención de ayudar a estimular un flujo de leche rápido y natural.
Si se utiliza el extractor de leche sin el Cojín de Pétalos Masajeadores, el nivel máximo de vació que
se logre será mayor.
°
Evite contacto con detergentes o productos de limpieza antibacterianos o abrasivos
ya que pueden dañar el plástico. Combinaciones de detergentes, productos de
limpieza, solución desinfectante, agua descalcificada y fluctuaciones de temperatura
pueden, bajo ciertas circunstancias, hacer que el plástico se agriete. Si esto ocurre,
no utilice el producto. Los cuerpos del extractor y los contenedores para leche
materna son a prueba del lavavajillas pero los colorantes alimenticios los pueden
decolorar. Siga los consejos en la sección ‘Limpiando y Desinfectando el Extractor
de Leche’ en la página 28.
°
Contacte AVENT para piezas de repuesto.
Llame al 1.800.54.AVENT o visite www.philips.com/AVENT
°
Asegure que el extractor esté montado correctamente y prendido con el indicador
de poder iluminado VERDE.
°
Asegure que los cables entre el tomacorriente de la pared y el extractor estén
enchufados correctamente.
°
Si el extractor deja de funcionar y la luz de poder parpadea ROJA significa que un
defecto ha sido detectado.
°
3 parpadeos, una demora, 3 parpadeos, etc. – el Extractor de Leche ha detectado un
defecto del vacío.Apague el motor y revise los tubos y conexiones en busca de
obstrucciones o daños.
°
2 parpadeos, una demora, 2 parpadeos, etc. – el Extractor de Leche ha detectado que
se ha excedido la temperatura aceptable. Asegure que la unidad no esté expuesta a
fuentes de calor ni luz del sol directa. Deje que la unidad se estabilice antes de
intentar de utilizarla nuevamente.
°
Parpadea continuamente – el extractor ha detectado que el cable de control ha sido
colocado incorrectamente o no ha sido colocado o que el cable está dañado.
Guía de Solución de Problemas Especificaciones Técnicas
Page 24

46
La touche
de commande
Poignée de
commande
Moteur du tire-lait
Témoin
lumineux
Prise pour câble
pilote
Prise
Port pour double
tube
Prise pour câble pilote
Port pour
double tube
NE JAMAIS DÉSINFECTER OU IMMERGER DANS L’EAU
NE JAMAIS DÉSINFECTER OU IMMERGER DANS L’EAU
Interrupteur
marche/arrêt
Poignée de commande
Besoin d’aide? Appelez-nous au 1.800.54.AVENT ou visitez www.philips.com/AVENT
45
Tire-lait régulateur Second tire-lait
Moteur du tire-lait
1 Poignée de commande
2 Diaphragmes en silicone
2 Valves blanches
2 Bols
4 Contenants de lait
(2 x 4 oz/125 ml et 2 x 9 oz/260 ml)
2 Socles (identiques à )
2 Coussins Masseurs
2 Protège-entonnoirs (identiques à )
1 Câble pilote
2 Tubes transparents
1 Double tube
1 Double connecteur à pompage
1 Moteur de tire-lait
1 Adaptateur électrique
1 Cordon d’alimentation
2 Capuchons
2 Tétines ultra douces, débit
nouveau-né (0m+)
2 Bagues d’étanchéité
2 Bases étanches
2 Disques d’étanchéité
a
b
c
d
e
f
f
g
h
i
j
k
l
m
n
o
p
q
r
s
t
a
b
c
d
e
f
b
c
d
e
f
g
h
g
h
i
j
j
k
l
m
n
o
p
q
r
s
t
h
Les pièces b à g assemblées forment un des bols du tire-lait. Lorsque la poignée de commande (a) est fixée
sur ce bol, il devient le tire-lait régulateur. Lorsque le double connecteur à pompage (l) est fixé à ce bol, il
devient le second tire-lait.
Toutes les pièces nécessaires au fonctionnement du tire-lait sont illustrées ci-contre. Si
toutefois une pièce était manquante ou si vous avez des questions, veuillez communiquer
avec notre service de soutien au 1.800.54.AVENT ou visitez www.philips.com/AVENT.
Guide des pièces du tire lait Electronique Double
Guide des pièces du tire lait Electronique Double – en détail
Page 25

Exprimer manuellement
Guide des pièces du tire-lait manuel
59
Nettoyer le tire-lait manuel 59
Assembler le tire-lait manuel 60
Utiliser le tire-lait manuel 61
Contenu
Tire-lait (Simple et double)
Guide des pièces du tire lait
Electronique Double 45-46
Mises en garde importantes 47
Démonter le tire-lait 49
Nettoyer et désinfecter 50
Préparation pour tirer du lait 51-52
Assembler les bols 53-54
Brancher les composants
électroniques 55-56
Tirer du lait avec votre Philips
AVENT Electronique Double 57-58
Garder les pièces propres et le
tire-lait compact en déplacement 62
Conservation du lait maternel 63-64
Guide de dépannage 65
Données techniques 66
Garantie limitée 66
48
Veuillez prendre le temps de lire attentivement ce
feuillet en entier avant d’utiliser votre tire-lait Philips
AVENT Electronique Double pour la première fois.
CONSERVEZ PRÉCIEUSEMENT CE FEUILLET.
À moins d'avis contraire d'un professionnel de la santé, il est
préférable d'attendre que votre routine d'allaitement soit bien
établie avant d'extraire votre lait – généralement au bout de
quatre semaines.
Félicitations!
Bientôt vous découvrirez ce qui rend votre tire-lait Philips AVENT Electronique Double si unique. Le tire-lait
a une mémoire électronique intégrée qui reproduit votre rythme d’extraction en douceur.Vous contrôlez
complètement le niveau de votre confort. Ainsi, extraire votre lait avec Philips AVENT Electronique Double
vous semblera tout à fait naturel.
Le Coussin Masseur est doté de pétales
qui massent doucement la région sous le
mamelon, entretenant ainsi un débit de lait
rapide et régulier.
La touche de commande est au bout de vos
doigts.Vous pouvez arrêter, mettre en marche ou
modifier la vitesse et la puissance d’aspiration sans
retirer votre main du tire-lait.
La mémoire électronique mémorise vos
gestes. Commencez par tirer manuellement,
appuyez sur la touche et le tire-lait prend le relais
automatiquement.
Exprimer, conserver et nourrir grâce à la
commodité du système naturel Philips AVENT.
Comme les produits s’adaptent les uns aux
autres, vous n’avez pas à transvider votre
lait d’un contenant à l’autre.
Ultra confortable, silencieux et efficace,
ce tire-lait vous permet aisément de faire profiter
à votre bébé des bienfaits du lait maternel.
Besoin d’aide? Appelez-nous au 1.800.54.AVENT ou visitez www.philips.com/AVENT
Lorsque vous utilisez des appareils
électriques, particulièrement en présence
d’enfants, vous devez respecter certaines
règles de sécurité.
LISEZ ATTENTIVEMENT LE MODE
D’EMPLOI AVANT L’UTILISATION
DE CE PRODUIT.
AVERTISSEMENTS – Pour réduire le
risque d’incendie, d’électrocution
ou de blessures :
•Le tire-lait Philips AVENT Electronique Double est
destiné à un usage répété par une seule utilisatrice.
•Débranchez toujours le moteur du tire-lait
immédiatement après usage.
•N’utilisez pas lorsque vous prenez un bain.
•Ne rangez pas l’appareil là où il pourrait tomber ou
être tiré à l’eau.
• N’immergez et ne plongez pas le moteur du tire-
lait, la poignée, l’adaptateur ou le cordon
d’alimentation dans l’eau ou autre liquide.
•Ne saisissez pas un appareil qui est tombé à l’eau.
Débranchez-le immédiatement de la prise murale.
•Une étroite surveillance s’impose lorsqu’on utilise
cet appareil en présence d’enfants ou de
personnes handicapées.
•Ne laissez pas les enfants ou les animaux
domestiques jouer avec le moteur, les tubes, le
bloc d’alimentation ou les accessoires puisque
ces éléments pourraient provoquer un risque
d’étouffement ou d’étranglement.
•Aucune pièce interne du tire-lait ne peut être
réparée par l’utilisateur. N’essayez pas d’ouvrir
l’appareil pour en faire l’entretien ou pour tenter
de le réparer vous-même.
•Avant chaque utilisation, examinez l’appareil,y
compris les cordons d’alimentation. N’utilisez pas
l’appareil si la fiche ou le cordon sont abîmés ou
encore si l’appareil fonctionne mal, s’il a été échappé
ou endommagé ou s’il a été immergé dans l’eau.
•N’utilisez que les accessoires recommandés par
Philips AVENT.
•Ne vous servez pas de l'appareil à l'extérieur avec
l’adaptateur secteur, là où on utilise des aérosols ni
là où on administre de l’oxygène.
•Cet appareil ne doit pas être utilisé en présence
d’un mélange d’anesthésique inflammable et d’air,
d’oxygène ou d’acide nitrique.
•N’utilisez que l’adaptateur électrique fourni avec
ce produit.
•N’exposez pas l’appareil à des températures
extrêmes ou aux rayons directs du soleil.
•Pour des raisons d’hygiène, il est préférable de ne
pas partager cet appareil entre mères.
•
N’essayez pas de retirer le bol de votre sein pendant
l’aspiration. Arrêtez le moteur et brisez l’étanchéité
en glissant un doigt entre votre sein et l’entonnoir.
•Ne l’utilisez pas si vous êtes enceinte : l’expression
du lait peut provoquer l’accouchement.
•Ne l’utilisez pas en cas de somnolence ou d’envie
de dormir.
MISES EN GARDE – Pour réduire les
risques de blessures, de mauvais
fonctionnement ou de défaillance :
• Ne vous éloignez pas de l’appareil lorsqu’il est
branché.
• N’introduisez aucun objet dans les ouvertures ou
dans les tubes.
• Ne raccourcissez pas les tubes.
• Assurez-vous que la tension du courant sortant de
l’adaptateur est compatible avec la source de courant.
• Branchez d’abord l’adaptateur dans le moteur du
tire-lait. Ensuite, insérez le cordon d’alimentation
dans l’adaptateur. Enfin,branchez le cordon dans la
prise murale.
• Bien que conforme aux normes de CEM, ce
produit pourrait créer des perturbations
électromagnétiques ou gêner d’autres appareils
particulièrement sensibles.
• Lavez et stérilisez les pièces du tire-lait avant
chaque utilisation.
• Même sans résultat, ne continuez pas à pomper
plus de cinq minutes à la fois.
•N’utilisez pas de nettoyants/détergents
antibactériens ou abrasifs pour laver les pièces du
tire-lait.
• Ne mettez jamais la poignée de commande ni le
moteur du tire-lait dans l’eau ou dans un
stérilisateur,car vous pourriez causer des
dommages irréversibles au tire-lait.
• Si l’expression du lait devient inconfortable, voire
douloureuse, arrêtez le moteur, brisez l’étanchéité
en glissant un doigt entre votre sein et le bol de
l’entonnoir et retirez le tire-lait de votre sein.
CONSERVEZ CES
DIRECTIVES
47
MISES EN GARDE IMPORTANTES
Page 26

Nettoyez avec un chiffon humide lorsque nécessaire :
Poignée de commande (a)
Tubes (i/j/k)
Note : Les tubes servent à la
succion et non à acheminer le lait.
Double connecteur à pompage (l)
Moteur du tire-lait (m)
Mise en garde : NE JAMAIS immerger dans l’eau ou stériliser la poignée de
commande ou le moteur du tire-lait, vous pourriez causer des dommages irréparables.
Nettoyez avant chaque usage (y compris lors de la première utilisation) :
Diaphragme en silicone (b)
Valve blanche (c)
Bol (d)
Contenant de lait (e)
Coussin Masseur(g)
Protège-entonnoir/socle blanc (h/f)
Instructions de nettoyage :
Ces pièces du tire-lait doivent être désinfectées avant chaque
utilisation. Démontez le tire-lait avant de le nettoyer. Lavez à l’eau
chaude savonneuse et rincez ou passez au lave-vaisselle dans le panier
supérieur.Désinfectez dans un stérilisateur vapeur (électronique ou
pour micro-ondes) ou en faisant bouillir dans l’eau durant 5 minutes.
Mise en garde : N’utilisez pas de nettoyants/détergents antibactériens ou abrasifs. Pour nettoyer la valve, frottez
doucement avec vos doigts dans de l’eau savonneuse — n’insérez aucun objet, cela pourrait l’endommager.
CONSEIL PRATIQUE!
Les stérilisateurs vapeur électronique ou pour
micro-ondes Philips AVENT peuvent contenir toutes
les pièces lavables du tire-lait Electronique Double
ainsi que le tire-lait Manuel au complet.
50
Besoin d’aide? Appelez-nous au 1.800.54.AVENT ou visitez www.philips.com/AVENT
a
c
d
e
g
h
i
l
m
b
f
j
k
Mettez le tire-lait hors tension et débranchez-le avant de le nettoyer.
Nettoyer et désinfecter
2
5
4
3
49
Mettez le tire-lait Electronique Double hors tension et débranchez-le avant de le démonter.
Consultez la section intitulée «Guide des pièces du tire lait Electronique Double» à la page 45
pour la description du tire-lait régulateur et du second tire-lait.
Second tire-lait
Enlevez le tube simple transparent du double connecteur
à pompage du second tire-lait. Dégagez délicatement
le double connecteur à pompage du diaphragme en
silicone.
Retirez le Coussin Masseur en le dégageant
délicatement de l’entonnoir.
Retirez la valve blanche du bol.
Retirez le diaphragme en silicone en
le dégageant du bol.
Suivez les instructions de 3 à 5 pour
démonter le tire-lait régulateur et le
second tire-lait.
1
Tire-lait régulateur
Retirez la poignée de commande du bol du
tire-lait régulateur en la dégageant délicatement
du diaphragme en silicone.
Tire-lait régulateur
Second tire-lait
Démonter le tire-lait
Page 27

52
Vous pouvez utiliser votre tire-lait Electronique Double comme un :
Tire-lait à double pompage
Tire-lait en mode manuel
(pour l’utiliser en mode manuel,
voir page 59)
Tire-lait à simple pompage
Besoin d’aide? Appelez-nous au 1.800.54.AVENT ou visitez www.philips.com/AVENT
51
Le tire-lait Electronique a gardé en mémoire le réglage par défaut de l’usine réalisé pour les tests
de contrôle de la qualité. Si vous appuyez sur la touche de commande bleue avant de presser la
poignée de commande lors de la première utilisation, elle fonctionnera selon les paramètres
enregistrés, ce qui peut s’avérer inconfortable pour vous. Nous vous conseillons d’établir votre rythme
d’extraction manuellement et ensuite d’appuyer sur la touche de commande
bleue, la mémoire de l’appareil prendra ensuite le relais et reproduira
le rythme qui vous convient.
Ne vous découragez pas si vous n’arrivez pas à exprimer
une grande quantité de lait au début. L’utilisation d’un tire-lait
est une habitude qui s’acquiert.Voici quelques conseils qui
pourraient vous aider :
1. Choisissez un moment où vous n’êtes pas pressée et
où vous ne serez pas interrompue.
2. Choisissez une chaise confortable près d’une table où sera
posé votre tire-lait, ainsi vous pourrez le régler facilement.
3. Regarder une photo de votre bébé pourrait déclencher
le réflexe d’éjection du lait.
4. Une débarbouillette chaude et humide appliquée quelques minutes sur les seins
avant de commencer à tirer favorise le réflexe d’éjection du lait et soulage les
seins gonflés.
5. Votre lait coule mieux quand vous êtes détendue et que vous êtes au chaud.
Essayez d’en tirer après un bain ou une douche.
6. Essayez de tirer d’un sein quand votre bébé tète de l’autre, ou bien tirez juste après
une tétée.
7.
Changez la position du tire-lait de temps en temps pour stimuler le canal galactophore.
Le lait commencera-t-il à s’écouler rapidement?
Lorsque vous utilisez le tire-lait, votre lait devrait commencer à couler après quelques
pressions. Ne vous inquiétez pas s’il ne coule pas tout de suite. Détendez-vous et
continuez à pomper. MISE EN GARDE : MÊME SANS RÉSULTAT,NE CONTINUEZ
PAS À POMPER PLUS DE 5 MINUTES À LA FOIS. Essayez plutôt à un autre moment.
Si le procédé s’avère douloureux, vous devez arrêter et consulter un professionnel de la
santé ou une conseillère en lactation.
Quelle est la quantité de lait à prévoir?
Il a été démontré que le double pompage stimule le niveau de prolactine et, par
conséquent, la production de lait. Donc, utilisez votre tire-lait Electronique Double en
mode double le plus souvent possible. En moyenne, il faut 10 minutes pour tirer de
60 à 120 ml de lait. Ceci n’est donné qu’à titre d’indication et varie d’une maman
à l’autre. Si vous vous rendez compte que vous tirez généralement plus de 4 oz/125 ml
par séance, veuillez utiliser les contenants de lait 9 oz/260 ml AVENT.
Préparation pour tirer du lait
Préparation pour tirer du lait
Page 28

Besoin d’aide? Appelez-nous au 1.800.54.AVENT ou visitez www.philips.com/AVENT
54
Pièces nécessaires à cette étape :
Valve blanche
Diaphragme en
silicone transparent
Pour plus de stabilité, posez
le contenant de 4 oz/125 ml
sur le socle.
Coussin Masseur Socle blanc
Double pompage? Assemblez les deux tire-laits tels qu’illustrés ci-dessous.
Simple pompage? Assemblez le tire-lait tel qu’illustré ci-dessous.
Bol de l’entonnoir Contenant de lait
53
Avant d’assembler ces pièces, assurez-vous d’avoir lavé et désinfecté le tire-lait.
Voir section intitulée « Nettoyer et désinfecter » à la page 50.
1
3
4
2
Poussez fermement la petite valve
blanche dans le fond du bol de l’entonnoir.
Assurez-vous que le côté pointu de la
valve est en dessous.
Enfoncez le diaphragme en silicone
transparent dans le bol, les bords bien
repliés sur le pourtour. Pressez les doigts
sur toute la circonférence pour assurer
que l’étanchéité est parfaite. (La tâche est
facilitée quand le diaphragme est mouillé.)
Vissez fermement le bol de l’entonnoir
sur le contenant de lait.
Le Coussin Masseur est doté de pétales
qui massent la région sous le mamelon
et stimulent le réflexe d’éjection du lait,
entretenant la rapidité de son débit en
douceur. Lorsque vous utilisez le tire-lait
sans son Coussin Masseur, la puissance
d'aspiration pourrait être plus forte.
Assembler les bols Assembler les bols
Page 29

56
Second tire-lait
Prise pour
câble pilote
Port pour
double tube
Double pompage? Suivez les étapes suivantes
pour assembler le second bol du tire-lait.
Simple pompage? Suivez l’étape
suivante avec le tube qui reste.
Voir la section intitulée « Guide des pièces du tire lait
Electronique Doubl » à la page 45 pour la description
du tire-lait régulateur et du second tire-lait.
3a
4
5
3b
Insérez le double connecteur à pompage dans
le second bol de manière à ce qu’il soit fixé
fermement au diaphragme en silicone. Branchez
solidement l’autre tube transparent au double
connecteur à pompage. Lorsque le tire-lait est
complètement assemblé, le second tire-lait reproduit
les paramètres du tire-lait régulateur.
Si vous utilisez le simple pompage, vous pouvez
attacher le tube transparent, devenu inutile,
à l’agrafe blanche.
Insérez le double tube aux ports
situés à l’arrière du moteur du tire-lait.
Branchez le câble pilote sur la
prise adjacente.
Branchez l’adaptateur électrique sur la
prise du moteur du tire-lait.
Ensuite, branchez le cordon d’alimentation
dans l’adaptateur électrique, puis le cordon
dans la prise murale.
Besoin d’aide? Appelez-nous au 1.800.54.AVENT ou visitez www.philips.com/AVENT
55
Tire-lait régulateur
Tire-lait régulateur
Pièces nécessaires à cette étape :
Bol de l’entonnoir
assemblé (voir
pages 53-54)
Double pompage?
Double connecteur à
pompage
Poignée de commande
Moteur du tire-lait
Adaptateur
électrique
Câble
pilote
Tube transparent
Cordon d’alimentation
Voir la section intitulée « Guide des pièces du
tire lait Electronique Double » à la page 45
pour la description du tire-lait régulateur et
du second tire-lait.
1
2
Insérez la poignée de commande dans
le bol assemblé de manière à ce qu’elle
soit fixée solidement au diaphragme en
silicone. Ce bol assemblé devient le
tire-lait régulateur doté des composants
électroniques.
Branchez le câble pilote sur la prise de
la poignée.
Insérez solidement un des tubes transparents
au port de la poignée de contrôle.
Port
pour tube
transparent
Prise pour
câble pilote
Brancher les composants électroniques Brancher les composants électroniques
Page 30

Besoin d’aide? Appelez-nous au 1.800.54.AVENT ou visitez www.philips.com/AVENT
CONSEILS UTILES!
Le témoin lumineux sur le moteur indique le mode du tire-lait :
Témoin lumineux
ORANGE clignotant : Le tire-lait est en mode réchauffage.
Attendez le témoin lumineux VERT en continu.
Témoin lumineux VERT en continu : mode manuel.Vous contrôlez la vitesse
et la pression du tire-lait.
Témoin lumineux VERT clignotant : mode automatique. Votre tire-lait Electronique
reproduit les paramètres gardés en mémoire des dernières compressions.
Témoin lumineux
ROUGE clignotant : Consultez le « Guide du dépannage » de la page 65.
58
7
8
6
5
Votre tire-lait Electronique reproduit votre rythme : Pour établir un rythme
de succion naturel, pressez la poignée durant 3 secondes puis relâchez-la.
Répétez. Ensuite, appuyez sur la touche de commande bleue sur
la poignée. Le témoin lumineux VERT se mettra à clignoter et le tire-lait
reproduira les paramètres des deux dernières compressions.
Note : Ne pressez la poignée qu’à moitié,ou jusqu’à ce que vous vous sentiez à l’aise.
Souvenez-vous que plus vous pressez la poignée, plus le tire-lait aspire.Si la pression
est inconfortable, interrompez le mode automatique en appuyant sur la touche de
commande et brisez l’étanchéité en glissant un doigt entre votre sein et l’entonnoir.
Modifier la vitesse et le niveau de succion :Appuyez à nouveau
sur la touche de commande bleue de la poignée, le tire-lait passe
au mode manuel. Le témoin lumineux VERT cesse de clignoter et
devient VERT en continu. Établissez un rythme et un niveau de
succion confortables. Appuyez à nouveau sur la touche de
commande bleue de la poignée, et le tire-lait prendra le relais
en gardant en mémoire les nouveaux paramètres..
Interrompre la séance de pompage : Appuyez sur la touche de
commande, brisez l’étanchéité en glissant un doigt entre votre
sein et l’entonnoir et retirez le tire-lait de votre sein. Mettez le
tire-lait hors tension et débranchez-le.Votre tire-lait Electronique
gardera en mémoire le rythme et le niveau de succion de vos deux
dernières compressions. Dévissez le contenant rempli de lait. Si du
lait reste dans le bol de l’entonnoir, videz-le dans le contenant.
Ne remplissez pas le contenant à ras bord. Lavez et désinfectez
toutes les pièces avant la prochaine utilisation.
La prochaine utilisation du tire-lait : Poursuivre la séance mémorisée? Mettez le tire-lait
en marche comme à l’étape 1.Terminez l’étape 2. Appuyez sur la touche de commande
bleue qui active le mode automatique. Le tire-lait reproduit les paramètres gardés en
mémoire des deux dernières compressions. Continuez de pomper tel que décrit à l’étape
4. Vous devez restimuler le réflexe d’éjection? Si vous devez stimuler le réflexe d’éjection,
mettez le tire-lait en marche comme à l’étape 1.Terminez l’étape 2. Pressez la poignée
par petits coups secs et passez à l’étape 3.
POUR LA CONSERVATION DU LAIT MATERNEL, SUIVEZ LES CONSEILS DES PAGES 63 ET 64.
57
Avant de commencer à exprimer votre lait, assurez-vous que vous avez soigneusement lavé,
désinfecté et correctement assemblé le tire-lait. Consultez la section « Préparation pour tirer
du lait » à la page 51 pour des conseils sur la façon de stimuler le réflexe d’éjection.
4
3
1
2
Lavez soigneusement vos mains et assurez-vous que vos seins
sont propres.
Allumez le tire-lait : Lorsque le témoin lumineux ORANGE
passe au VERT, le tire-lait est prêt à être utilisé.
Si le témoin lumineux clignote en ROUGE, consultez le « Guide
de dépannage » à la page 65.
Obtenez une bonne étanchéité : Placez fermement le
tire-lait sur le sein, de manière à ce que le mamelon adhère
parfaitement à l’entonnoir. Il ne doit y avoir aucune fuite d’air
entre votre sein et le tire-lait. (Si double pompage, appuyez
un tire-lait sur chaque sein).
Réflexe d’éjection.Votre corps réagit physiologiquement
au mouvement de succion qu’effectue votre bébé, ce qui
provoque le sein à produire du lait et à l’acheminer vers
le mamelon.
Pour déclencher le réflexe d’éjection,pompez la poignée
avec des petits coups secs. Ce rythme reproduit l’action de
votre bébé lorsqu’il tète. En même temps, vous permettez
aux pétales du Coussin Masseur de masser la région sous le
mamelon, stimulant ainsi le réflexe d’éjection. Le lait se met
à couler après quelques pressions; ça ne devrait pas prendre
plus de 5 minutes (consultez la page 51 « Préparation pour
tirer du lait »).Vous pouvez automatiser votre rythme
d’éjection en appuyant sur la touche de commande bleue
ou vous pouvez continuer à pomper manuellement.
Expression du lait : Le lait s’écoule une fois le réflexe d’éjection
enclenché. C’est la phase durant laquelle le bébé est confortable
et prend correctement le sein pour recevoir le flot dont il a besoin.
Si vous n’avez pas enclenché le pompage automatique, passez à
l’étape 5. Si vous avez automatisé le pompage à l’étape 3, appuyez
sur la touche de commande bleue pour interrompre le réflexe
d’éjection.Vous pouvez maintenant maintenir un rythme de
pompage et une puissance d’extraction adaptés à votre confort
durant toute votre séance.
Tirer du lait avec votre Philips AVENT Electronique Double Tirer du lait avec votre Philips AVENT Electronique Double
Page 31

Lavez et désinfectez toutes les pièces avant chaque utilisation.
Consultez la section intitulée « Nettoyer le tire-lait Manuel » à la page 59.
60
1
2
3
4
5
6
Socle blanc
Assembler le tire-lait manuel
Lavez vos mains soigneusement. Poussez fermement
la petite valve blanche dans le fond du bol de
l’entonnoir. Assurez-vous que le côté pointu de la
valve est en dessous.
Enfoncez le diaphragme en silicone avec sa tige
dans le bol, les bords bien repliés sur le pourtour.
Pressez les doigts sur toute la circonférence pour
assurer que l’étanchéité est parfaite. (La tâche est
facilitée quand le diaphragme est mouillé.)
Vissez fermement le contenant de lait au bol
de l’entonnoir. Pour plus de stabilité,posez
le contenant de 4 oz/125 ml sur le socle.
Insérez le Coussin Masseur dans l’entonnoir.
Assurez-vous que le Coussin Masseur adhère
bien au pourtour de l’entonnoir pour préserver
l’étanchéité. (La tâche est facilitée quand le Coussin
Masseur est mouillé.)
Glissez la partie fourchue de la poignée sous
la tige du diaphragme et pressez doucement
jusqu’au déclic pour enclencher la poignée.
Cliquez le couvercle sur le bol.
Valve blanche
Bol de l’entonnoir
Contenant de lait
Socle (identique à )
Coussin Masseur
Protège-entonnoir
(identique à )
Besoin d’aide? Appelez-nous au 1.800.54.AVENT ou visitez www.philips.com/AVENT
59
Couvercle pour tire-lait
Diaphragme en silicone
avec tige
Poignée fourchue
Vous pouvez utiliser le tire-lait Manuel lorsque vous préférez une option sans fil. Bien que
le tire-lait Manuel partage la plupart des pièces avec la version électronique, veuillez noter
que les pièces en vert sont propres au tire-lait Manuel.
Les pièces du tire-lait Manuel
sont dans un sac séparé.
Nettoyer le tire-lait manuel
Mise en garde : N’utilisez pas de nettoyants/détergents antibactériens ou abrasifs. Pour nettoyer la
valve, frottez doucement avec vos doigts dans de l’eau savonneuse – n’insérez aucun objet, cela pourrait
l’endommager.
Avant chaque usage (y compris à la première utilisation)
Séparez tous les éléments du tire-lait Manuel et passez-les au lave-vaisselle dans le panier
supérieur ou lavez-les à l’eau chaude savonneuse et rincez.Vous pouvez désinfecter toutes
les pièces du tire-lait Manuel dans un Stérilisateur Vapeur Philips AVENT (électronique ou à
micro-ondes) ou en les faisant bouillir dans l’eau durant 5 minutes.
Tire-lait manuel
c
d
e
f
f
g
h
h
u
v
w
u
v
w
c
d
e
f
g
h
Guide des pièces du tire-lait manuel
Page 32

Besoin d’aide? Appelez-nous au 1.800.54.AVENT ou visitez www.philips.com/AVENT
62
Contenant de lait maternel
Après avoir désinfecté toutes les
pièces, insérez un disque d’étanchéité
dans la bague d’étanchéité et vissez
sur le contenant.
Bague d’étanchéité (r)
Disque d’étanchéité (t)
Contenant de lait (e)
Tétine de forme naturelle AVENT
Après avoir désinfecté toutes les pièces, insérez la
tétine dans la bague d’étanchéité. Couvrir la tétine
avec le capuchon.Vissez sur la base étanche.
Capuchon (p)
Bague d’étanchéité (r)
Tétine (q)
Base étanche (s)
d
e
g
h
p
q
r
r
s
s
t
Garder les pièces propres et le tire-lait compact en déplacement
Tire-lait
Après avoir désinfecté toutes les pièces,insérez la petite valve
blanche et le diaphragme dans le bol de l’entonnoir. Fixez le
protège-entonnoir sur le Coussin Masseur et vissez la base
étanche sur la partie inférieure du bol. Ensuite, placez les pièces
assemblées dans le sac gris à cordon coulissant.
Base étanche (s)
Bol de l’entonnoir (d)
Coussin Masseur (g)
Protège-entonnoir (h) (utilisé comme socle lors
de l’extraction de lait)
Avant de commencer à tirer, assurez-vous que vous avez soigneusement lavé, désinfecté et
correctement assemblé le tire-lait Manuel. Consultez la section « Préparation pour tirer du
lait » à la page 51 pour des conseils sur la façon de stimuler le réflexe d’éjection.
61
2
3
4
1
Lavez vos mains soigneusement et assurez-vous que vos
seins sont propres.
Obtenez une bonne étanchéité : Placez fermement le
tire-lait sur votre sein, de manière à ce que le mamelon
adhère parfaitement à l’entonnoir. Il ne doit y avoir aucune
fuite d’air entre votre sein et le tire-lait.
Pour déclencher le réflexe d’éjection :Pompez la
poignée avec des petits coups secs jusqu’à ce que
le lait commence à couler.Vous n’avez pas besoin
de presser jusqu’au bout.
Commencez à pomper : Lorsque le lait commence à
couler, adaptez l’aspiration et le rythme à votre confort
en pressant la poignée durant 3 secondes, puis en la
relâchant. Répétez cette cadence pour créer un rythme
naturel de succion.
Note :Vous n’avez pas besoin de presser jusqu’au bout, adaptez
la pression à votre confort. Plus vous pressez la poignée, plus
l’aspiration augmente.
Après avoir recueilli votre lait, dévissez le bol
du contenant.
Mise en garde : Ne continuez pas à pomper plus de 5 minutes
à la fois, même si vous n’obtenez aucun résultat.Essayez plutôt
à un autre moment.
Utiliser le tire-lait manuel
Page 33

64
Conseils pour la conservation du lait maternel
°
Le lait tiré doit être réfrigéré immédiatement. Il se conserve 24 heures au fond d’une
tablette du réfrigérateur, pas dans la porte.
°
Le lait tiré congelé se garde 3 mois ou 6 mois dans un congélateur à zéro degré F° ou à –18° C.
°
Le lait congelé se décongèle durant la nuit au réfrigérateur, dans de l’eau chaude ou dans un
chauffe-biberon/chauffe-repas au réglage minimum.
°
NE recongelez JAMAIS du lait maternel.
°
Si vous tirez de petites quantités de lait durant la journée, vous pouvez finir de remplir le
contenant de lait en le laissant dans le réfrigérateur. Le lait doit être utilisé en l’espace de
24 heures à partir de la première extraction, ou il doit être congelé.
°
NE RAJOUTEZ PAS de lait fraîchement tiré à du lait congelé.
°
Jetez TOUJOURS le lait maternel non utilisé après que bébé a fini de boire.
Note : Seul du lait recueilli à l’aide d’un tire-lait nettoyé et stérilisé devrait être conser vé pour nourrir bébé.
Désinfectez les contenants de lait maternel avant utilisation ou exprimez votre lait directement dans des
gobelets préstérilisés VIA.
N’immergez jamais un biberon ou un sac congelé dans l’eau bouillante.
Ils pourraient fendre.
Transporter du lait maternel
°
Consultez le feuillet du Fourre-tout thermique sur la
façon de conserver et de transporter le lait maternel
dans des porte-biberons en Thinsulate
™
.
°
Lorsque retirés du congélateur, 4 sachets réfrigérants
garderont suffisamment au frais un contenant de lait
maternel fraîchement tiré de 4 oz/125 ml ou de
9 oz/260 ml dans un sac en Thinsulate jusqu’à 6 heures.
Assurez-vous que les contenants de conservation et
les porte-biberons sont placés bien droits dans le sac
pour prévenir les fuites. Les porte-biberons en
Thinsulate doivent être bien zippés.
°
Gardez les sachets réfrigérants au congélateur jusqu’à
la dernière minute et réfrigérez le lait aussitôt que
vous le sortez des sacs thermiques.
°
Par temps chaud, ne laissez pas les porte-biberons en
Thinsulate ou les sacs de voyage contenant du lait
maternel dans l’auto, le bureau, les armoires, etc. Le
lait doit rester frais pour éviter de cailler.
Veuillez prendre note : Le temps
de conservation du lait varie selon
les méthodes d’extraction et de
conservation. Cette information n’est
proposée qu’à titre de suggestion.
Veuillez contacter un professionnel
de la santé ou une conseillère en
lactation pour des conseils sur la
conservation du lait.
Conservation du lait maternel
Besoin d’aide? Appelez-nous au 1.800.54.AVENT ou visitez www.philips.com/AVENT
63
Les produits intercompatibles Philips AVENT
permettent d’exprimer, de conserver et de
nourrir avec le même contenant, préservant
ainsi les précieux nutriments qui peuvent se
perdre lorsque le lait maternel est transvidé.
Grâce au tire-lait Electronique Double et au tire-lait Manuel, vous pouvez tirer directement votre
lait dans des gobelets pré stérilisés VIA. Les gobelets VIA sont fiables et robustes, et permettent
d’exprimer,de conserver et de nourrir en toute sécurité.
Choisissez VIA et hop,la vie!
• Le couvercle vissable VIA rend le gobelet VIA étanche pour le rangement ou la congélation
• Gobelets inscriptibles et empilables
• Système compatible permet de tirer, conserver et nourrir avec le même gobelet
• Gobelets VIA robustes faciles et rapides à chauffer dans le chauffe-biberon
AVENT VIA:
Après avoir recueilli votre lait dans un contenant
AVENT, insérez un disque d’étanchéité dans la bague
d’étanchéité et vissez au contenant. Pour nourrir
bébé, remplacez le disque d’étanchéité par la tétine
de forme naturelle AVENT.
Conservation du lait maternel
Page 34

Données techniques
°
Tension d’entrée secteur 100 – 240 VAC
°
Courant d’entrée secteur 1.5A
°
Fréquence d’entrée secteur 50 – 60 Hz
°
Fluctuations de la tension d’alimentation
n’excédant pas +/- 10% de la tension nominale
°
Plage de température ambiante +10° C
à +40° C (+50° F to +104° F)
°
Plage de l’humidité relative : 30% à 75%
°
Pression atmosphérique : 700 à 1060hPa
°
Appareil homologué pour service continu
66
Besoin d’aide? Appelez-nous au 1.800.54.AVENT ou visitez www.philips.com/AVENT
Données techniques
Légendes de l’étiquette de la base
PIÈCE APPLIQUÉE
DE TYPE B
AVERTISSEMENT
GÉNÉRAL
SUIVEZ LE MODE
D’EMPLOI
APPROUVÉ PAR LES
LABORATOIRES ETL –
CANADA/ÉTATS-UNIS
LISTÉ
3045297
ÉQUIPEMENT
DE CATÉGORIE II
UTILISATION À
L'INTÉRIEUR SEULEMENT
GARANTIE COMPLÈTE D’UNE ANNÉE
Philips Electronics North America Corporation (É.U.) et Philips Electronics Ltée (CANADA)
garantissent chaque nouveau produit AVENT de Philips, modèle (SCF304) contre les défauts
de matériaux et de fabrication durant une période d’une année à partir de la date d’achat et
acceptent de réparer ou de remplacer tout produit défectueux sans frais. IMPORTANT: Cette
garantie ne s’applique pas aux dommages résultant d’un accident, d’un mauvais emploi ou d’un
emploi abusif, d’un manque raisonnable de soins ou de l’utilisation de tout accessoire non
fourni avec le produit.AUCUNE RESPONSABILITÉ N’EST ASSUMÉE EN CAS DE QUELQUE
DOMMAGE QUE CE SOIT: ACCESSOIRE, SPÉCIAL OU INDIRECT.
Pour obtenir un service de garantie, composer tout simplement sans frais 1.800.54.AVENT.
°
Vérifiez que toutes les pièces sont correctement assemblées et que la valve
blanche est dans le fond du bol de l’entonnoir, le côté pointu en dessous.
°
Assurez-vous que le diaphragme en silicone et le Coussin Masseur adhèrent bien
au bol et qu’il n’y a pas d’appel d’air – le Coussin Masseur étant rentré au fond
de l’entonnoir.
°
Assurez-vous que les tubes et la poignée de commande sont bien assemblés.
°
Assurez-vous que le tire-lait est bien assemblé pour permettre une bonne succion.
°
Détendez-vous et réessayez, vous avez peut-être besoin d’un peu d’entraînement.
°
Consultez la section « Préparation pour tirer du lait » à la page 51.
°
Vous tirez probablement trop for t. Vous n’avez pas besoin de presser la poignée à
fond. Ne pressez la poignée qu’à moitié.
°
Souvenez-vous du rythme à intervalles de 2 ou 3 secondes.
°
Demandez conseil à une consultante en allaitement ou à un professionnel
de la santé
°
Penchez-vous légèrement vers l’avant.
°
Retirez le Coussin Masseur et repositionnez-le pour qu’il adhère parfaitement et qu’il
soit bien rentré au fond de l’entonnoir.
Certaines femmes préfèrent utiliser le tire-lait sans son Coussin Masseur. Le Coussin Masseur est
doté de pétales qui massent la région sous le mamelon et stimulent le réflexe d’éjection du lait,
entretenant la rapidité de son débit en douceur. Lorsque vous utilisez le tire-lait sans son Coussin
Masseur, la puissance d'aspiration pourrait être plus forte.
°
Évitez de mettre les pièces en contact avec des nettoyants ou des détergents
antibactériens ou abrasifs afin de ne pas abîmer le plastique. Certaines combinaisons
de détergents, de produits de nettoyage et de solutions désinfectantes, l’eau
adoucie et les fluctuations de température peuvent, dans certaines circonstances,
causer des fissures dans le plastique. Si cela survenait, ne pas utiliser. Les bols des
entonnoirs et les contenants de lait vont au lave-vaisselle, mais certains colorants
alimentaires peuvent déteindre sur les pièces. Suivez les conseils de la section
« Nettoyer et désinfecter » à la page 50.
°
Contactez Philips AVENT pour des pièces de rechange
Appelez 1.800.54.AVENT ou visitez notre site à www.philips.com/AVENT
°
Assurez-vous que le tire-lait est correctement assemblé et qu’il est sous tension;
le témoin VERT indique que l’appareil est en marche.
°
Assurez-vous que le cordon d’alimentation est bien branché au tire-lait et dans
la prise murale.
°
Si le tire-lait cesse de fonctionner et que le témoin lumineux ROUGE clignote,
une anomalie a été détectée.
°
3 clignotements, 1 délai, 3 clignotements, etc. – le tire-lait a décelé un appel d’air.
Éteignez le moteur et vérifiez le branchement des tubes pour voir s’ils sont
endommagés ou obstrués.
°
2 clignotements, 1 délai, 2 clignotements, etc. – la température du tire-lait a dépassé
le degré acceptable. Éteignez le moteur. Assurez-vous que l’appareil n’est pas près
d’une source de chaleur ni exposé directement au soleil. Après une période de
refroidissement, l’appareil pourra être remis en marche.
°
Clignotement continu – le tire-lait signale que le câble pilote n’est pas bien branché,
pas branché ou qu’il est endommagé.
65
Manque d’aspiration
Le lait ne vient pas
Douleur dans le sein
lorsque vous exprimez
votre lait
Le lait pénètre dans le
Coussin Masseur
Fissures et décoloration
des pièces
Pièces de rechange
Le tire-lait ne réagit
pas aux pressions
de la poignée de
commande
La lumière ROUGE du
tire-lait clignote :
Guide de dépannage
 Loading...