

Page 1
b
k
a
c
d
e
h
i
l
j
m
n
f
l
g
or
ou
ya da
0%
0%
BPA
BPA
GB
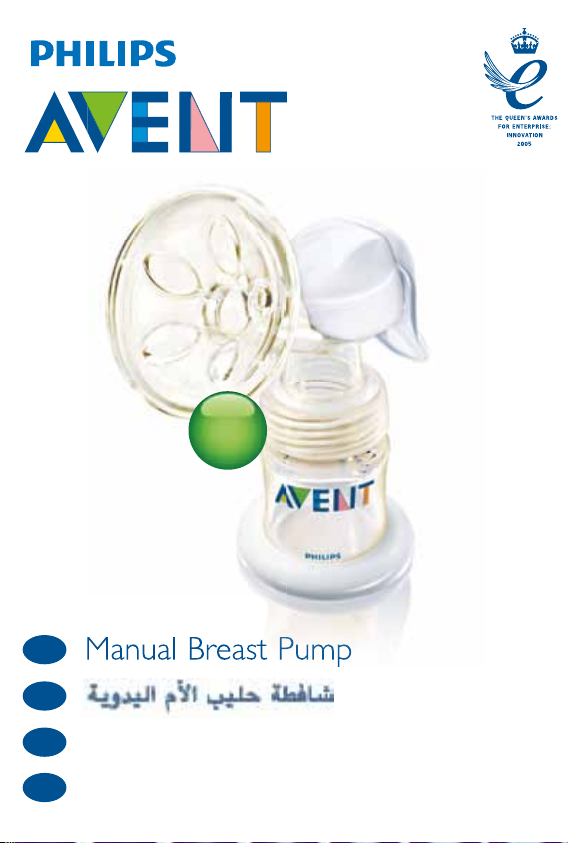
Manual Breast Pump
AR
FR
Tire-lait manuel
TR
Manuel Gö¤üs Pompas›
Page 2

b
k
a
c
d
e
h
i
l
j
m
n
f
l
g
or
ou
ya da
Page 3
2.
b
k
a
c
d
e
h
i
l
j
m
n
f
l
g
or
ou
ya da
Page 4

6. (1)–(7)
or/ /ou/ya da or/ /ou/ya da
or/ou/ya da/ or/ou/ya da/
IMPORTANT: DO NOT LOSE THE WHITE VALVE. YOUR PUMP
WILL NOT WORK WITHOUT IT OR IF IT IS FITTED INCORRECTLY.
If lost, spare valves are available direct from Philips AVENT.
Page 5
ATTENTION : VOTRE TIRE-LAIT NE FONCTIONNERA PAS SANS
CETTE PIÉCE. SI ELLE EST MISE À L’ENVERS OU MAL PLACÉE, IL
N’Y AURA PAS D’ASPIRATION. (Des valves de rechange sont
disponibles.)
ÖNEML∞: BEYAZ VALF∞ KAYBETMEY∞N. POMPANIZ BU OLMADAN
VEYA DO≥RU TAKILI OLMA≥INDA ÇALI∑MAYACAKTIR. E≤er
kaybolursa, yedek parçaları Grup LTD.’den temin edebilirsiniz.
Page 6

GB TR
Please take five minutes to read through the WHOLE
of this leaflet BEFORE you use your Philips AVENT
Manual Breast Pump for the first time.
Contents
1. Introducing the Manual Breast Pump
2. Detailed parts guide
3. Cleaning and sterilisation
4. Keeping your breast pump sterile for travel
5. Using the Manual Breast Pump with the
AVENT VIA Storage System
6. How to assemble the Manual Breast Pump
7. When to express milk
8. Hints to help you succeed
9. How to use the Manual Breast Pump
10. Storing your breast milk
11. Feeding your baby your expressed breast milk
12. Choosing the right teat for your baby
13. Troubleshooting guide
14. Other helpful products from Philips AVENT
Should you ever lose these instructions, they are
available on our website: www.philips.com/AVENT
Page 7

1. Introducing the Manual Breast Pump
The Manual Breast Pump is a breakthrough in breast pump design.
Its silicone diaphragm provides 100% reliable vacuum, whilst the
Let-down Massage Cushion naturally imitates your baby’s suckling
action to provide fast milk flow – silently, comfortably and gently.
The pump is easy to assemble, discreet to use and all parts
are dishwasher safe.
Doctors recommend that breast milk is the best nutrition for babies
during the first year, combined with solid food after the first 6
months. Your milk is specially adapted to your baby’s needs and
contains antibodies which help protect your baby against infection
and allergies.
Your Manual Breast Pump will help you breastfeed longer. You can
express and store your milk so that – whether you are out for a few
hours, taking a well deserved rest, or back at work – your baby can
still enjoy the benefits of your breast milk, even if you can’t be there
to give it yourself. As the pump is so silent and discreet you can take
it with you anywhere, allowing you to express milk at your own
convenience and maintain your milk supply.
Since the AVENT Bottle and AVENT Teat are specially designed to
mimic breastfeeding, your baby will switch easily between breast
and bottle. This allows mothers to continue providing breast milk to
baby even when they return to work.
GB
1
Page 8

GB
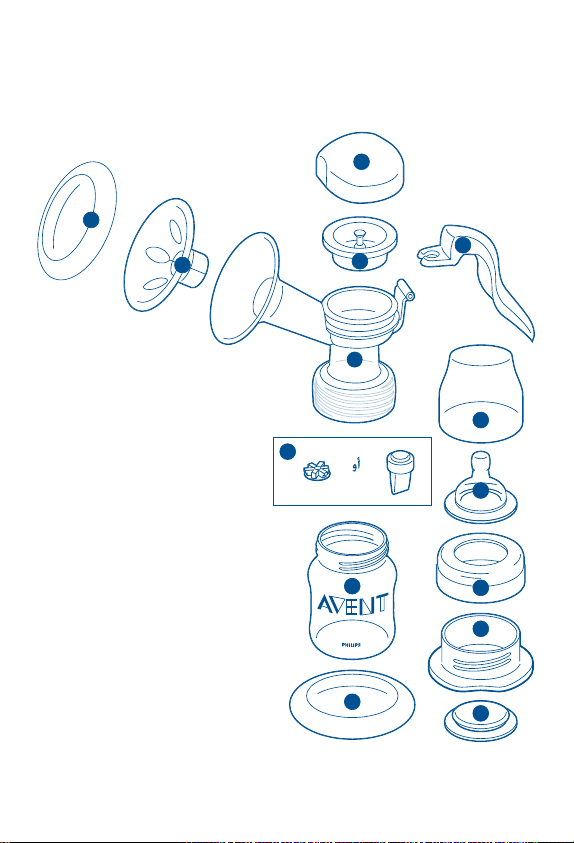
2. Detailed parts guide
MANUAL BREAST PUMP
a) Funnel cover (same as i)
b) Let-down Massage Cushion
c) Pump cover
d) Silicone diaphragm
and stem*
e) Handle
f) Pump body
g) White valve*
BOTTLE
h) AVENT Feeding Bottle (125ml/4oz)
i) Stand (same as a)
j) Dome cap
k) Extra Soft Teat, Newborn Flow (0m+)
l) Screw ring
m) Sealing base
n) Sealing disc
*spares included
3. Cleaning and sterilisation
Before you use your breast pump for the first time and every time before use:
Separate all parts, then wash in the dishwasher or in warm soapy
water and rinse. Do not use antibacterial or abrasive cleaners/
detergents. Sterilise in a Philips AVENT Steam Steriliser (Digital,
Electric or Microwave), or by boiling for 5 minutes. If using a Philips
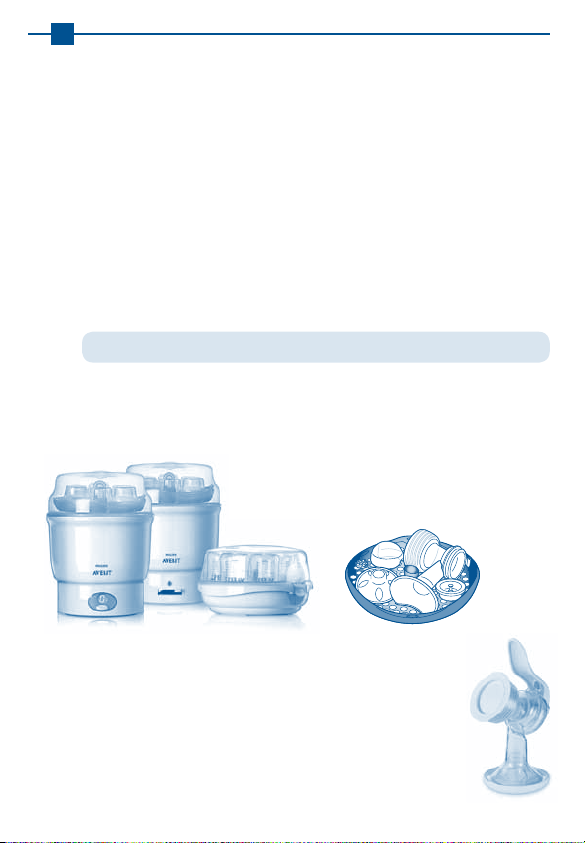
AVENT Steam Steriliser, the pump will remain
sterile in the steriliser for a minimum of 6 hours,
provided the lid is not removed.
4. Keeping your breast pump sterile for travel
After sterilising all parts, insert the white valve (g) and
fit the diaphragm with stem (d) onto the pump body (f).
Clip the cover (a) over the funnel and Let-down Massage
Cushion (b) and screw on the sealing base (m) in place of
the AVENT Feeding Bottle (h).
2
Page 9

GB
5
.
Using the Manual Breast Pump
with the AVENT VIA Storage System
Simply replace the AVENT Feeding Bottle with a VIA
Cup and Adaptor. To make the pump completely
stable insert the VIA Cup into the VIA Lid/Stand.
6. How to assemble the Manual
Breast Pump
Separate all parts and ensure pump has been cleaned
and sterilised as in section 3:
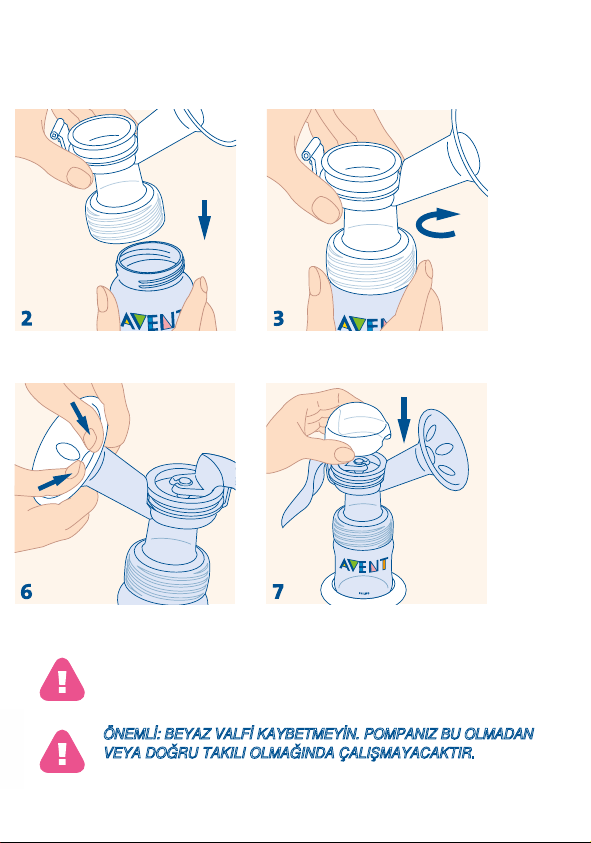
1) Wash your hands thoroughly. Insert the white valve (g) into the pump
body (f) from underneath
2)
Place the pump body (f) onto the AVENT Feeding Bottle (h).
3)
Twist gently clockwise until secure. DO NOT OVERTIGHTEN!
4)
Place the silicone diaphragm and stem (d) into the pump body (f). Make
sure it fits securely around the rim by pressing down with your fingers
to ensure a perfect seal. (This is easier if assembled whilst wet.)
5)
Place the forked end of the handle (e) under the silicone diaphragm and
stem (d) and push down gently on the handle until it clicks into place.
6)
Carefully insert the Let-down Massage Cushion (b) into the pump
funnel (f) making sure it is perfectly sealed all round the rim of the
funnel. (This is easier if assembled whilst wet.)
7)
Click the pump cover (c) onto the pump body (f). To make the pump
completely stable insert the bottle into the stand (i).
.
7. When to express milk
1) If possible, wait until your milk supply and breastfeeding schedule are
well established, normally at least 2-4 weeks after birth, unless told
otherwise by your health professional or breastfeeding advisor.
3
Page 10

GB
2) The exceptions to the above are:
a) If you are expressing milk for your baby to be given in hospital.
b) If your breasts are engorged (painful or swollen), you can express
a small amount of milk before or between feeds to ease the pain
and to help your baby latch on more easily.
c) If you have sore or cracked nipples, you may wish to express your
milk until they are healed.
d) If you are separated from your baby and wish to continue to
breastfeed when you are reunited, you should express your milk
regularly to stimulate your milk supply.
3) You will need to find the right times of the day for you to express
your milk, e.g.
a) Early in the morning when your breasts are full, just before or
after your baby’s first feed.
b) After a feed, if your baby has not emptied both breasts.
c) Between feeds, or in a break if you have returned to work.
8. Hints to help you succeed
Using a breast pump takes practice – you may need to make several
attempts before you succeed, but because the pump is so simple and
natural to use, you will soon get used to expressing your milk.
1) Choose a time when you’re not rushed and won’t be interrupted.
2) Having your baby or a photograph of your baby nearby can help
encourage ‘let-down’.
3) Placing a warm cloth on the breasts for a few minutes before you
start pumping can encourage milk flow and soothe painful breasts.
4) Warmth and relaxation can encourage milk flow. Try expressing after
a bath or shower.
5) Try expressing from one breast while your baby is feeding from the
4
other, or continue expressing just after a feed.
Page 11

GB
6) Repositioning the pump on the breast from time to time can help
stimulate your milk ducts.
Practice with your pump to find the best technique for you.
However, if the process becomes very painful, stop and consult
your breastfeeding advisor.
9. How to use the Manual Breast Pump
1) Wash your hands thoroughly and make sure your breasts are clean.
Gently squeeze a little milk from each nipple to ensure milk ducts are
not blocked.
2) Make sure you have sterilised and carefully assembled your pump
exactly as shown in sections 3 and 6.
3) Consult the ‘Hints to help you succeed’ section.
4) Relax in a comfortable chair, leaning slightly forward (use cushions
to support your back). Make sure you have a glass of water nearby.
5) Press the funnel and Let-down Massage Cushion of the pump firmly
against your breast, making sure that no air can escape – otherwise
there will be no suction.
6) As you gently push down on the pump handle, you will feel the
suction on your breast. You don’t need to depress the handle fully
to create a vacuum – only as much as is comfortable. Your milk will
soon start flowing, even though you may not use all the suction the
pump can generate.
7) Begin by pumping 5-6 times rapidly to initiate let-down. Then, hold the
handle down for 2-3 seconds, and allow it to return to its resting place.
These 2-3 second cycles imitate your baby’s natural suckling pattern
and allow the milk to flow between strokes.
8) Milk should begin to flow after the first few strokes. Don’t worry if
your milk does not flow immediately. Relax and continue pumping.
Do not continue pumping for more than 5 minutes at a time if NO
result is achieved. Try expressing at another time during the day.
5
Page 12

GB
Please remember that, should the process become very painful or
uncomfortable, you should stop using the pump and consult your
health professional or breastfeeding advisor.
9) Whilst some women may prefer to use the pump without the Let-down
Massage Cushion, extensive trials show that, in most cases, the
massaging effect of the petals flexing in and out around the areola
stimulates the let-down reflex and allows you to express more milk, faster.
10) On average you will need to pump for 10 minutes to express 60-125ml
or 2-4oz. However, this is just a guide and varies from woman to
woman. If you find that you regularly express more than 125ml per
session, please use a 260ml/9oz AVENT Bottle or 240ml/8oz VIA Cup.
Do not overfill AVENT Feeding Bottles or VIA Cups and keep upright,
otherwise milk may leak from below the pump body.
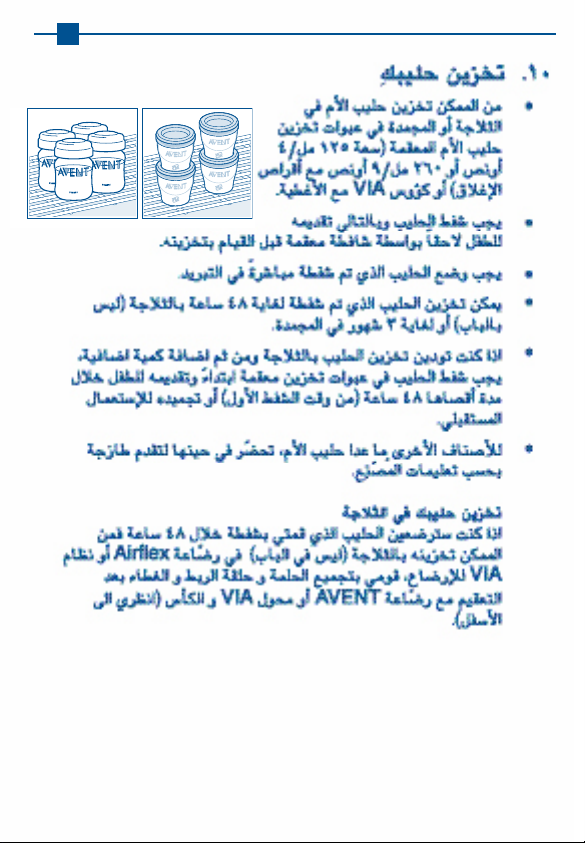
10. Storing your breast milk
• Breastmilkcanbestoredin
the fridge or freezer in either
sterile breast milk containers
(125ml/4oz or 260ml/9oz
bottles fitted with sealing discs)
or in VIA Cups with lids.
• Onlymilkcollectedwithasterile
pump should be stored to be fed to your baby.
• Expressedmilkshouldberefrigeratedimmediately.
• Expressedbreastmilkcanbestoredintherefrigeratorforupto
48 hours (not in the door) or in the freezer for up to 3 months.
• Ifyouarestoringmilkinthefridgetoaddtoduringtheday,onlyadd
milk which has been expressed into a sterile container. Milk can only
be kept like this for a maximum of 48 hours (from first expression)
after which it must be used immediately or frozen for future use.
• Forproductsotherthanbreastmilkmakefeedsupfreshwhen
needed, following the manufacturer’s instructions.
Storing your milk in the fridge
If your expressed breast milk will be fed to your baby within 48 hours,
6
it can be stored in the fridge (not in the door) in an assembled AVENT
Page 13
GB
Feeding Bottle or VIA Feeding System. Assemble a sterilised teat, screw
ring and dome cap and attach onto the body of the AVENT Bottle or
the VIA Adaptor and Cup (see below).
Storing your milk in the freezer
To store in the freezer, use a sealing disc in place of the teat and
dome cap or use a sterilised VIA Lid to seal the VIA Cup. The storage
containers should be clearly labelled with the date and time of
expression and older milk used up first.
NEVER refreeze breast milk. DO NOT add fresh breast milk to already
frozen milk. ALWAYS discard any milk that is left over at the end of a feed.
11. Feeding your baby your expressed breast milk
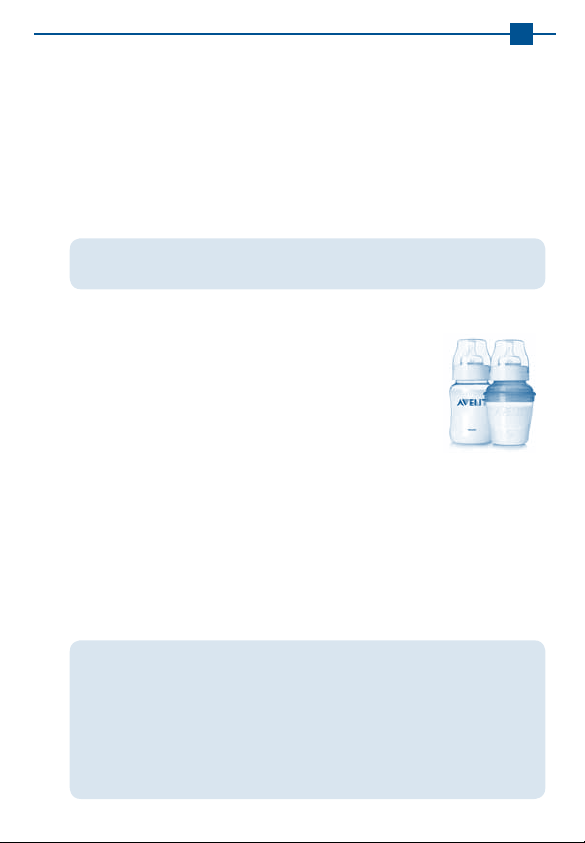
If breast milk has been stored in an AVENT Breast Milk
Container, replace the sealing disc with a sterilised
AVENT Teat.
Alternatively replace the VIA Lid with a sterilised VIA
Adaptor, screw ring, dome cap and AVENT Teat.
Frozen breast milk should be defrosted overnight in the
refrigerator. However, in an emergency, it can be defrosted
in a jug of hot water. Once thawed use within 24 hours.
Breast milk can be heated in the same way as any other bottle feed.
Stand the AVENT Bottle or VIA Feeding System in a bowl of hot water,
or alternatively, for a safe and fast way to warm feeds, use the Philips
AVENT Bottle and Baby Food Warmer. IMPORTANT! Milk or food will
heat faster in VIA Cups than in standard feeding bottles/containers.
Always check milk or food temperature before feeding.
Never heat milk in a microwave as this may destroy valuable nutrients
and antibodies. In addition, the uneven heating may cause hot spots
in the liquid which could cause burns to the throat.
Never immerse a frozen milk container or VIA Cup in boiling water as
this may cause it to crack/split.
Never put boiling water directly into a VIA Cup, allow to cool for
around 20 minutes before filling.
7
Page 14
GB
1
3
2
4
0
m
+
6
m
+
1
m
+
3
m
+
3
m
+
1 hole
2 holes
3 holes
4 holes
1 slot
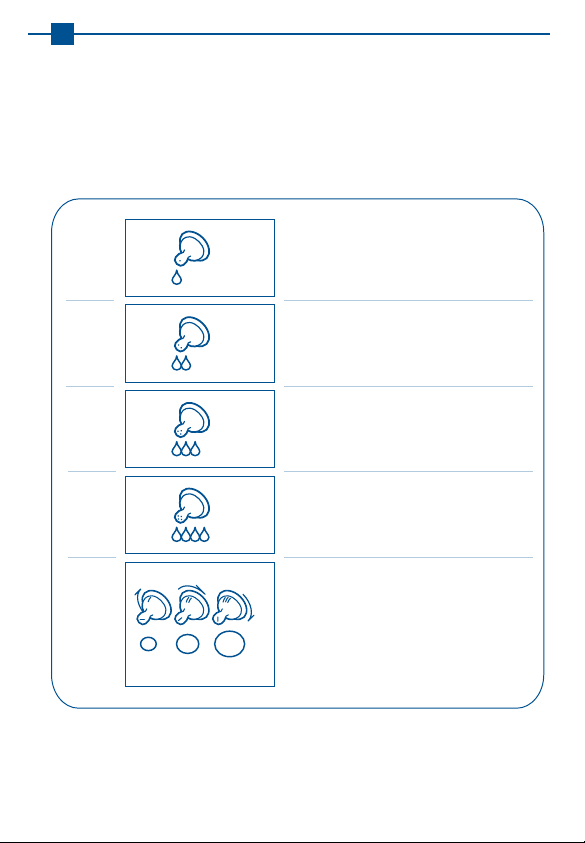
NEWBORN FLOW
EXTRA SOFT SILICONE TEAT
Ideal for newborns and breastfed
babies of all ages.
SLOW FLOW
EXTRA SOFT SILICONE TEAT
Ideal for newborns and breastfed
babies of all ages.
MEDIUM FLOW
SOFT SILICONE TEAT
For bottle fed babies at 3 months
of age and up.
FAST FLOW
SOFT SILICONE TEAT
Offers a faster flow for older babies.
VARIABLE FLOW
SOFT SILICONE TEAT – SLOT CUT
Provides an extra fast flow and
accommodates thicker liquids.
Flow rate can be varied by turning
the bottle to align the I, II or III markings
on the teat with baby’s nose.
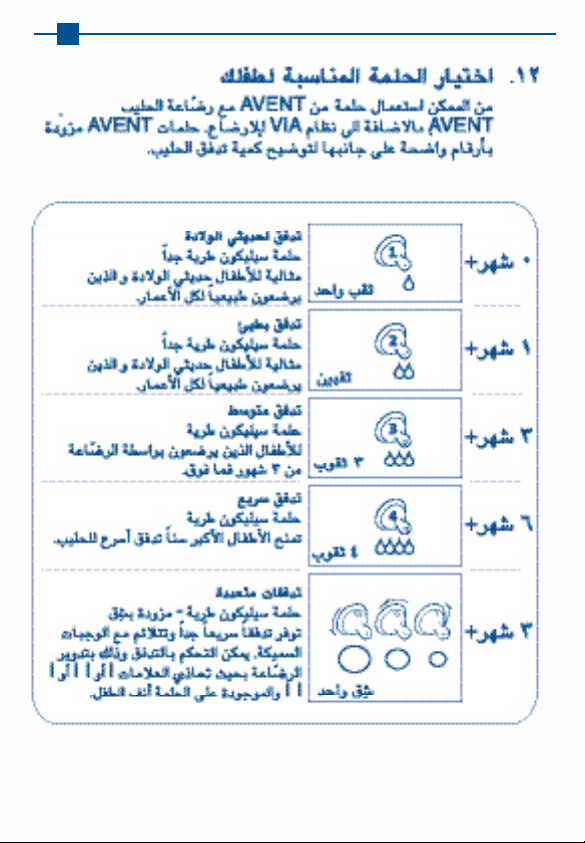
12. Choosing the right teat for your baby
AVENT Teats can be used on both the AVENT Feeding Bottle and VIA
Feeding System. AVENT Teats are clearly numbered on the side to
indicate flow rate.
8
Page 15

13. Troubleshooting guide
GB
Lack of suction
No milk being expressed
Pain in the breast area
when expressing
Milk is drawn up the
Let-down Massage Cushion
Cracking/discolouration of
pump parts
Lost or broken parts
Check that all the pump components have been
assembled correctly and that the white valve is the right
way up. Ensure that the diaphragm and Let-down Massage
Cushion are fitted securely to the pump body and a perfect
seal is created.
Ensure suction is created and the pump is correctly
assembled. Relax and try again, expression may improve
after practice. Please refer to the ‘Hints to help you
succeed’ section.
You may be pumping too hard. You do not need to use
all the suction the pump can generate. Try depressing
the handle halfway and remember the 2-3 second
pumping rhythm. Consult your health professional/
breastfeeding advisor.
Remove and refit the Let-down Massage Cushion
ensuring it is firmly attached and pushed far enough
down the funnel. Try leaning slightly forward.
Avoid contact with antibacterial or abrasive detergents/
cleaners as these can damage the plastic. Combinations
of detergents, cleaning products, sterilising solution,
softened water and temperature fluctuations may, under
certain circumstances, cause the plastic to crack. If this
occurs, do not use. Contact Philips AVENT Customer
Services for spare parts. The pump is dishwasher safe
but food colourings may discolour components.
Spare parts are available through Philips AVENT Customer
Services (see back cover for contact details).
If you are still experiencing problems, please contact Philips AVENT Customer
Services (see back cover for contact details). Alternatively contact your health
professional/breastfeeding advisor.
9
Page 16
GB
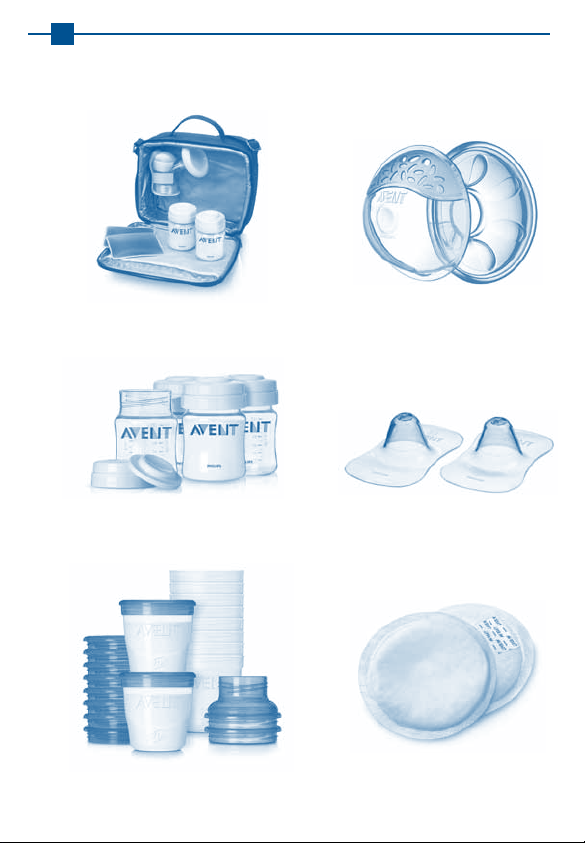
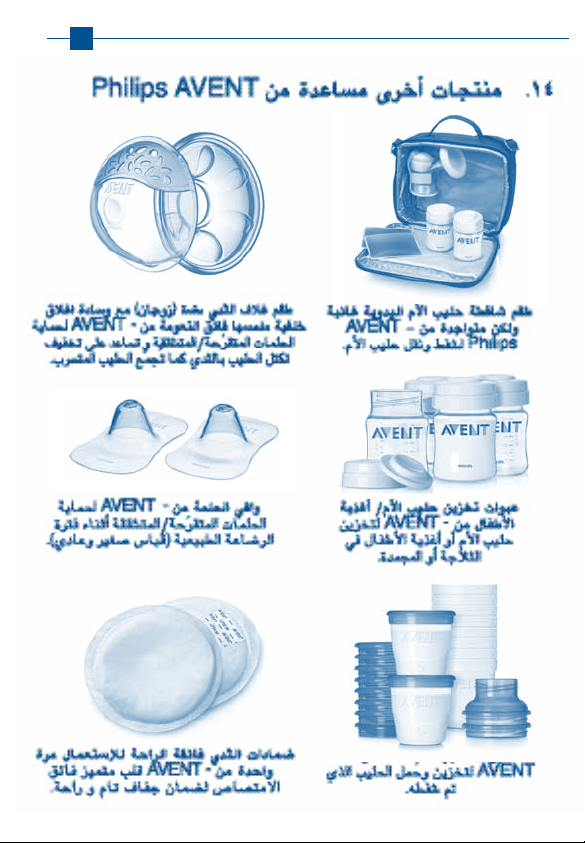
14. Other helpful products from Philips AVENT
Philips AVENT Out & About Manual
Breast Pump Set – for expressing and
transporting breast milk.
AVENT Breast Milk/Baby Food Containers –
for storage of breast milk or baby food
in the fridge or freezer.
AVENT VIA Breast Milk Containers –
for expressed milk storage and transport.
10
AVENT Breast Shell Set (2 pairs)
with Ultrasoft Backing Cushion –
to protect sore/cracked nipples,
help ease engorgement and
collect leaking breast milk.
AVENT Nipple Protectors –
to protect sore/cracked nipples
during breastfeeding (small and
standard sizes).
AVENT Ultra Comfort Disposable
Breast Pads – unique ULTRA
absorbent core guarantees total
dryness and comfort.
Page 17

AR
11
Page 18
AR
12
Page 19

AR
13
Page 20

AR
14
Page 21
AR
15
Page 22
AR
16
Page 23
AR
17
Page 24

AR
18
Page 25
AR
19
Page 26
AR
20
Page 27
AR
21
Page 28

AR
22
Page 29

Veuillez lire attentivement TOUT ce mode d’emploi
AVANT d’utiliser votre tire-lait manuel Philips AVENT
pour la première fois.
Sommaire
1. Présentation du tire-lait manuel
2. Identification des pièces
3. Nettoyage et stérilisation
4. Comment transporter votre tire-lait stérilisé
5. Utilisation du tire-lait manuel avec le système
de conservation AVENT VIA
6. Comment assembler le tire-lait manuel
7. Quand tirer votre lait
8. Conseils d’utilisation
9. Comment utiliser le tire-lait manuel
10. Conservation de votre lait maternel
11. Pour donner du lait tiré à votre bébé
12. Quelle tétine choisir pour votre bébé
13. En cas de problème
14. Autres accessoires d’allaitement Philips AVENT
FR
Ce manuel est également disponible sur notre
site Internet : www.philips.com/AVENT
23
Page 30

FR
1. Présentation du tire-lait manuel
Le tire-lait manuel est unique et révolutionnaire dans sa conception.
Le diaphragme en silicone garantit l’aspiration à 100%, en même temps
que le coussin masseur reproduit naturellement les mouvements de
succion de votre bébé. Il stimule le réflexe d’éjection du lait, entretenant
la rapidité de son débit, sans bruit, sans douleur et tout en douceur.
Le tire-lait est facile à assembler, discret à utiliser et toutes les pièces
vont au lave-vaisselle.
Le corps médical recommande de nourrir bébé au lait maternel pendant
ses deux premières années, avec l’introduction d’aliments solides à partir
de 6 mois. Votre lait est parfaitement adapté aux besoins de votre bébé et
contient des anticorps qui protègent contre les infections et les allergies.
Votre tire-lait manuel va vous permettre d’allaiter plus longtemps.
Grâce à votre tire-lait, vous pouvez entretenir votre lactation, tirer votre
lait et en faire des réserves pour que votre bébé puisse en profiter même
si vous n’êtes pas là pour le lui donner : si vous sortez, si vous vous
reposez, quand vous reprenez vos activités professionnelles ou autres.
L’appareil est si discret et si léger que vous pouvez l’emporter partout
pour vous en servir quand vous voulez.
Comme le biberon et la tétine AVENT sont spécialement conçus pour
reproduire la technique de la tétée au sein, votre bébé alternera
facilement entre sein et biberon. Ainsi, il continuera à stimuler votre
production de lait même si vous reprenez le travail.
24
Page 31
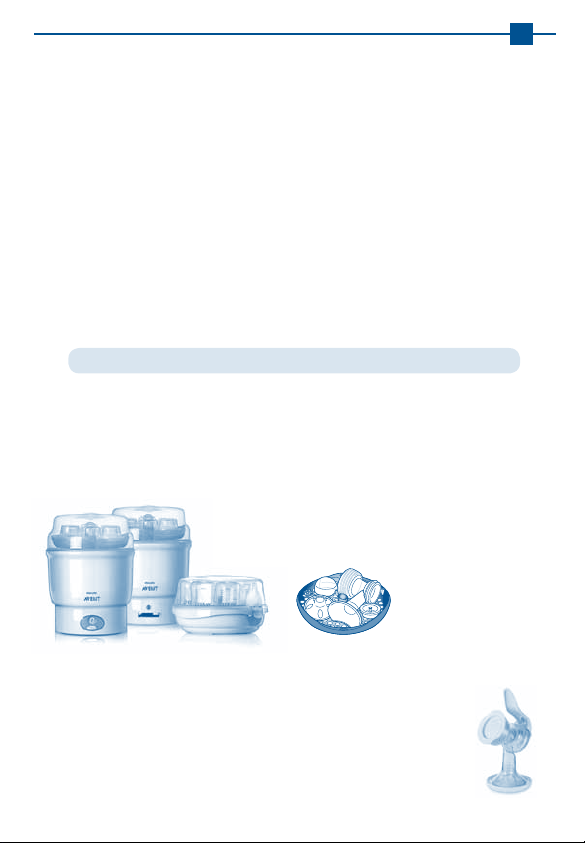
2. Identification des pièces
TIRE-LAIT MANUEL
(a) Protège-entonnoir (comme i)
(b) Coussin masseur
(c) Couvercle
(d) Diaphragme en silicone et tige*
(e) Poignée
(f) Bol et entonnoir
(g) Valve blanche*
BIBERON
(h) Biberon AVENT (125ml)
(i) Socle (comme a)
(j) Capuchon
(k) Tétine extra-souple,
débit nouveau-né (0m+)
(l) Bague
(m) Base d’étanchéité
(n) Disque d’étanchéité
*Pièces détachées de rechange
3. Nettoyage et stérilisation
Avant la première utilisation de votre tire-lait et à chaque fois :
Séparez toutes les pièces et passez-les au lave-vaisselle ou bien lavez-
les à l’eau chaude savonneuse et rincez. N’utilisez pas de produits
nettoyants anti-bactériens ou abrasifs. Stérilisez-les avec un
stérilisateur à vapeur Philips AVENT (électronique, électrique ou microondes), ou en les faisant bouillir 5 minutes ou encore en les plongeant
dans une solution chimique, suivant les instructions du fabricant. Dans
un stérilisateur à vapeur Philips AVENT, le tire-lait
restera stérilisé pendant un minimum de 6 heures
du moment que le couvercle n’est pas soulevé.
FR
4. Comment transporter votre tire-lait stérilisé
Après avoir stérilisé toutes les pièces, insérez la valve blanche
(g) et insérez le diaphragme à tige (d) dans le bol de l’entonnoir
(f). Positionnez le protège-entonnoir (a) sur l’entonnoir muni
du coussin masseur (b) puis vissez la base d’étanchéité (m) à la
place du biberon AVENT (h).
25
Page 32

FR
5. Utilisation du tire-lait manuel avec
le système de conservation AVENT VIA
Il suffit de remplacer le biberon AVENT par un pot VIA et
son adaptateur. Pour plus de stabilité, insérez la base du
pot VIA dans un couvercle/socle VIA.
6. Comment assembler votre
tire-lait manuel
Séparez toutes les pièces et assurez-vous que le tire-lait a bien été lavé
et stérilisé suivant les indications du paragraphe 3. Puis :
1) Lavez-vous soigneusement les mains. Insérez la valve blanche (g)
dans le tire-lait (f) par en-dessous.
2) Placez le bol de l’entonnoir (f) sur le biberon AVENT (h).
3) Faites tourner doucement dans le sens des aiguilles d’une montre,
jusqu’au déclic. NE SERREZ PAS TROP FORT !
4) Enfoncez le diaphragme et la tige (d) dans le bol (f), les bords bien
repliés autour. Pressez les doigts sur toute la circonférence pour
assurer que l’étanchéité est parfaite. (La tâche est facilitée quand
les pièces sont mouillées.)
5) Glissez la fourchette de la poignée (e) sous la tige du diaphragme (d)
et pressez doucement jusqu’au déclic pour enclencher la poignée.
6) Installez le coussin masseur (b) dans l’entonnoir en vous assurant que
les bords sont bien repliés par-dessus tout autour et que le coussin adhère
bien au fond. (La tâche est facilitée quand les pièces sont mouillées.)
7) Cliquez le couvercle (c) sur le bol (f). Pour plus de stabilité, posez le
biberon sur le socle (i).
7. Quand tirer votre lait
1) Si possible, attendez que votre lactation soit bien en route et que les
tétées soient plus ou moins régulières, de 2 à 4 semaines après la
naissance généralement, à moins de contre-indications.
26
Page 33

2) Utilisez votre tire-lait plus tôt si :
a) Vous devez tirer du lait pour votre bébé hospitalisé.
b) Vos seins sont engorgés (gonflés et douloureux). Extraire un peu de
lait avant ou entre les tétées peut soulager l’inconfort et faciliter la
mise au sein.
c) Vous avez les mamelons gercés ou crevassés. Vous préférerez peut-
être tirer votre lait jusqu’à leur cicatrisation.
d) Vous êtes momentanément séparée de votre bébé mais vous
voulez entretenir votre lactation pour continuer à l’allaiter quand
vous serez réunis.
e) Vous devez prendre un médicament empêchant d’allaiter : tirez et jetez
votre lait pour ne pas interrompre votre lactation le temps du traitement.
3) C’est à vous de déterminer les moments qui vous conviennent
le mieux pour tirer votre lait, cependant, en règle générale, il est
recommandé d’essayer :
a) Au réveil, quand les seins sont pleins, juste avant ou après la
première tétée de la journée.
b) Après une tétée, si bébé n’a pas vidé les deux seins.
c) Entre les tétées, ou pendant vos pauses si vous travaillez.
8. Conseils d’utilisation
L’utilisation d’un tire-lait est une habitude qui s’acquiert. Il vous faudra
peut-être vous y prendre à plusieurs reprises, mais le tire-lait est si simple
et si naturel à employer que vous arriverez très vite à tirer votre lait.
1) Choisissez un moment où vous n’êtes pas pressée et où vous ne
risquez pas d’être interrompue.
2) Tenir bébé ou regarder une photo de lui peut déclencher le réflexe
d’éjection du lait.
3) Un gant de toilette chaud et humide, appliqué quelques minutes sur
les seins avant de commencer à tirer, favorise le réflexe d’éjection du
lait et soulage les seins gonflés.
FR
27
Page 34

FR
4) Votre lait coule mieux quand vous êtes détendue et que vous avez
bien chaud. Essayez d’en tirer après un bain ou une douche.
5) Essayez de tirer d’un sein quand votre bébé tète de l’autre, ou bien
tirez juste après une tétée.
6) Changez la position du tire-lait de temps en temps pour stimuler les
galactophores.
Entraînez-vous pour trouver la technique et la position qui vous
conviennent le mieux. Si le procédé s’avérait douloureux, arrêtez
et demandez conseil à une consultante en lactation.
9. Comment utiliser le tire-lait manuel
1) Lavez-vous soigneusement les mains et assurez-vous que vos seins
sont propres. Pincez doucement vos mamelons pour exprimer quelques
gouttes de lait et pour vérifier ainsi que les canaux ne sont pas bouchés.
2) Assurez-vous que votre tire-lait est bien stérilisé et correctement
assemblé comme indiqué aux paragraphes 3 et 6.
3) Relisez notre paragraphe : “Conseils d’utilisation”.
4) Asseyez-vous confortablement, penchez-vous légèrement en avant
(avec des coussins dans le dos si vous préférez). Ayez une boisson
quelconque à portée de la main.
5) Placez fermement l’entonnoir muni de son coussin masseur sur le sein,
l’épousant de façon à ce qu’il n’y ait aucun appel d’air – sinon vous
n’aurez pas d’aspiration.
6) Pressez doucement la poignée et vous ressentirez la succion. Vous
n’avez pas besoin de presser jusqu’au bout : adaptez l’aspiration à
votre confort, c’est vous qui la contrôlez. Votre lait commencera vite
à couler, même si vous ne serrez pas la poignée à fond.
7) Commencez par presser la poignée rapidement 5 à 6 fois pour
déclencher la montée de lait. Puis maintenez la pression 2 ou 3
secondes et relâchez. Ces cycles de 2 ou 3 secondes reproduisent
l’action de votre bébé lorsqu’il tète et permettent au lait de s’écouler
dans le biberon entre les pressions.
8) Le lait devrait se mettre à couler après quelques pressions. Ne vous
inquiétez pas s’il ne coule pas tout de suite. Détendez-vous et
28
continuez à presser.
Page 35

FR
Ne continuez pas plus de 5 minutes si vous n’obtenez AUCUN
résultat. Essayez plutôt à un autre moment.
Souvenez-vous bien que si le procédé s’avérait inconfortable ou
douloureux, vous devez arrêter et consulter votre médecin ou votre
consultante en lactation.
9) Certaines mamans préfèrent parfois utiliser le tire-lait sans son coussin
masseur. Cependant, des tests approfondis montrent que, la plupart du
temps, l’effet de massage exercé par la flexion des alvéoles du coussin
sur l’aréole stimule le réflexe d’éjection et permet de tirer davantage de
lait, plus rapidement.
10) En moyenne, il faut 10 minutes pour tirer de 60 à 125ml de lait. Ceci
n’est donné qu’à titre d’indication et varie d’une maman à l’autre. Si
vous vous rendez compte que vous exprimez régulièrement plus de
125ml par séance, adaptez un biberon AVENT 260ml ou un pot VIA
de 240ml à votre tire-lait.
Ne laissez pas vos biberons AVENT ou vos pots VIA déborder et
maintenez-les droits pour éviter que du lait ne s’écoule par le
dessous du bol de l’entonnoir.
10. Conservation de votre lait maternel
• Le lait maternel se conserve au
réfrigérateur ou bien au congélateur,
soit dans des biberons de conservation
stérilisés (125ml ou 260ml muni de
disques d’étanchéité) soit dans des
pots VIA munis de couvercles.
• Neconservezpourvotrebébéquedulaittiréavecuntire-laitstérilisé.
• Lelaittirédoitêtreréfrigéréimmédiatement.
• Lelaittiréseconserve48heuresauréfrigérateur(pasdanslaporte)
ou bien 3 mois au congélateur.
• Si vous mettez du lait tiré au réfrigérateur et que vous souhaitez en
rajouter le même jour dans le même récipient, ne remettez que du lait
recueilli dans un récipient préalablement stérilisé. Un biberon ainsi
constitué ne se conserve pas plus de 48 heures (à partir de la première
extraction) après quoi il doit être consommé immédiatement ou congelé.
• Pourdesproduitsautresquedulaitmaternel,préparezaudernier
moment selon les instructions du fabricant.
29
Page 36
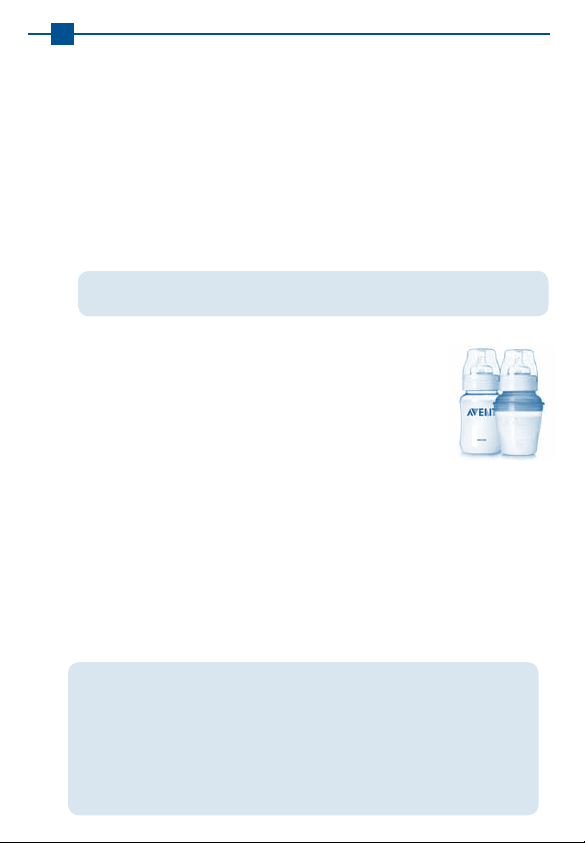
FR
Conservation au réfrigérateur
Si votre lait tiré sera donné dans les 48 heures, il peut se conserver au
réfrigérateur (pas dans la porte) dans un biberon AVENT ou dans un
pot VIA. Assemblez bague, tétine et capuchon stérilisés et vissez au
biberon AVENT ou au pot VIA muni de son adaptateur (voir ci-dessous).
Conservation au congélateur
Pour la conservation au congélateur, remplacez la tétine et son capuchon
avec un disque d’étanchéité ou vissez un couvercle VIA stérilisé sur le pot.
Indiquez clairement sur le récipient la date et l’heure d’extraction pour
utiliser le lait le plus ancien d’abord.
NE recongelez JAMAIS du lait maternel. NE rajoutez PAS de lait fraîchement
tiré à du lait déjà congelé. Jetez TOUJOURS le lait qui reste à la fin de la tétée.
11. Pour donner du lait tiré à votre bébé
Si le lait maternel est conservé dans un biberon
de conservation AVENT, mettez une tétine AVENT
stérilisée à la place du disque d’étanchéité.
Alternativement, vissez bague et tétine AVENT à
l’adaptateur VIA, les 3 pièces étant stérilisées, et
attachez au pot VIA.
Le lait maternel congelé se décongèle généralement la nuit au
réfrigérateur. Cependant, en cas d’urgence, il peut aussi se décongeler
dans de l’eau chaude. Une fois décongelé, le lait doit être consommé
dans les 24 heures qui suivent.
Le lait maternel se réchauffe de la même façon que le lait artificiel. Placez
le biberon ou le pot VIA dans un bol d’eau chaude ou bien, pour être
tranquille et gagner du temps, utilisez un chauffe-biberon Philips AVENT
Express. Attention, le lait se réchauffe plus vite dans un pot VIA. Vérifiez
toujours la température du lait avant de le donner à bébé.
Ne réchauffez pas de lait ou autres repas de bébé au micro-ondes, vous
risqueriez de détruire certains éléments nutritifs et certains anticorps.
De plus, la chaleur inégalement répartie peut causer des brûlures.
Ne plongez jamais un biberon ou un pot VIA de lait congelé dans
de l’eau bouillante car le plastique se fendrait.
Ne versez jamais d’eau bouillante directement dans un pot VIA.
30
Laissez-la refroidir au moins 20 minutes avant de le remplir.
Page 37
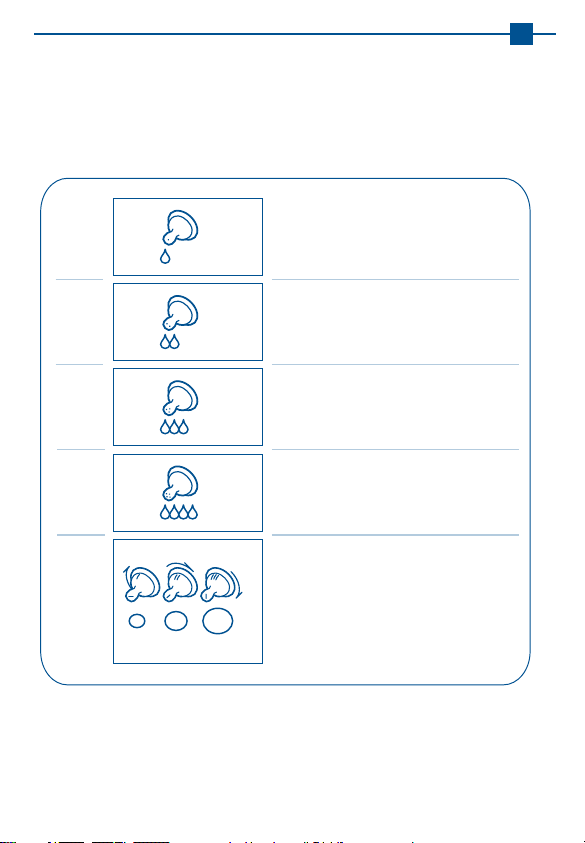
12. Quelle tétine choisir pour votre bébé
Les tétines AVENT peuvent s’utiliser avec le biberon AVENT aussi
bien qu’avec le système VIA. Les tétines ont leur débit gravé dessus.
FR
+
0
m
+
1
m
+
m
3
+
6
m
+
3
m
1
2
3
4
DÉBIT NOUVEAU-NÉ
TÉTINE EXTRA-SOUPLE EN SILICONE
Idéale pour nouveau-nés et pour
1 trou
bébés allaités au sein (de tout âge).
DÉBIT LENT
TÉTINE EXTRA-SOUPLE EN SILICONE
Idéale pour nouveau-nés et pour
2 trous
bébés allaités au sein (de tout âge).
DÉBIT MOYEN
TÉTINE SOUPLE EN SILICONE
Pour bébés nourris au biberon,
3 trous
à partir de 3 mois.
DÉBIT RAPIDE
TÉTINE SOUPLE EN SILICONE
Un débit plus rapide pour bébés
4 trous
plus âgés.
DÉBIT VARIABLE
TÉTINE SOUPLE EN SILICONE –
MUNIE D'UNE FENTE
Permet un débit extra-rapide et convient
aux liquides épaissis. Faites varier le débit
en alignant les marques I, II ou III, gravées
1 fente
sur le côté de la tétine, avec le nez de bébé.
31
Page 38

FR
13. En cas de problème
Manque d’aspiration
Le lait ne vient pas
Douleur au sein quand
vous tirez du lait
Le lait rentre dans le
coussin masseur
Fissures/décoloration
sur les pièces
Pièces de rechange
Vérifiez que toutes les pièces du tire-lait sont assemblées
correctement et que la valve est positionnée dans le
bon sens. Assurez-vous que le diaphragme et le coussin
masseur adhèrent bien et qu’il n’y a pas d’appel d’air.
Assurez-vous que le tire-lait aspire bien et que les
pièces sont à leur place.
Détendez-vous et réessayez, vous avez peut-être
besoin d’un peu d’entraînement. Suivez les conseils
du paragraphe 8.
Vous tirez probablement trop fort. Vous n’avez pas
besoin de serrer la poignée à fond. Essayez de ne
presser qu’à moitié et souvenez-vous du rythme à
intervalles de 2 ou 3 secondes. Demandez conseil à
une consultante en lactation.
Enlevez et repositionnez le coussin masseur en vous
assurant qu’il est bien replié tout autour et bien
repoussé dans le fond de l’entonnoir. Penchez-vous
bien en avant quand vous activez la poignée.
Évitez de mettre les pièces en contact avec des produits
désinfectants qui abîment le plastique. Certains
mélanges de détergents, de produits de nettoyage, de
solution de stérilisation chimique, d’eau adoucie et de
fluctuations de température peuvent causer des fissures
dans le plastique. En cas d’apparition de fissures, ne vous
servez pas du tire-lait avant d’avoir remplacé les pièces
affectées. Le tire-lait va au lave-vaisselle mais certains
colorants alimentaires peuvent déteindre sur les pièces.
Vous pouvez en obtenir chez certains fournisseurs ou
directement chez Philips AVENT en appelant notre
Numéro Vert : 0800 90 81 54 .
Si le problème persiste, contactez-nous à notre Numéro Vert (détails au
dos) ou bien questionnez une consultante en lactation.
32
Page 39

FR
14. Autres accessoires d’allaitement Philips AVENT
Coffret Vie Active manuel
Philips AVENT : pour tirer et
transporter du lait maternel.
Biberons de conservation AVENT : pour
les réserves de lait ou de solides au
réfrigérateur ou au congélateur.
Système de conservation pour lait maternel
VIA : pour conserver, transporter et donner
du lait maternel.
Coquilles Confort (2 paires) avec coussins-
doublure ultrasouples : pour protéger
les mamelons gercés ou crevassés, pour
aider à soulager les engorgements et pour
recueillir les fuites de lait.
Protège-mamelons Tendresse :
pour protéger les mamelons
douloureux pendant la tétée
(taille standard et petit).
Coussinets jetables Ultra Confort : avec
microcapteurs d’humidité uniques
ULTRA absorbants, garantissant peau
au sec et confort total.
33
Page 40

TR
Philips AVENT Manuel Gö¤üs Pompas›n› ilk
kullan›m›n›zdan ÖNCE lütfen TÜM kullan›m
k›lavuzunu okumak için befl dakikan›z› ay›r›n.
∞çindekiler
1. Manuel Gö¤üs Pompas› tan›t›m›
2. Detayl› parça listesi
3. Temizlik ve sterilizasyon
4. Tafl›mak üzere pompan›z›n steril saklanmas›
5. Manuel Gö¤üs Pompas›n›n AVENT VIA Besleme
sistemi ile kullan›lmas›
6. Manuel Gö¤üs Pompas›n›n monte edilmesi
7. Sütünüzü ne zaman sa¤mal›s›n›z
8. Sütünüzü sa¤mada baflar›l› olman›za
yard›mc› ipuçlar›
9. Manuel Gö¤üs Pompan›z›
nas›l kullanmal›s›n›z
10. Sütünüzü nas›l saklayabilirsiniz
11. Sa¤d›¤›n›z sütünüzle bebe¤inizin beslenmesi
12. Bebe¤iniz için do¤ru biberon emzi¤i seçimi
13. Problem çözme k›lavuzu
14. Philips AVENT’in di¤er yard›mc› ürünleri
K›lavuzu kaybederseniz, ayr›ca www.philips.com/AVENT
web sitesinde bulabilirsiniz.
34
Page 41

TR
1. Manuel Gö≤üs Pompasının Tanıtımı
Manuel Gö¤üs Pompas›, gö¤üs pompas› dizayn›nda bir devrimdir.
Taç yaprakl› masaj bafll›¤› bebe¤in anne gö¤sünü emerken gö¤se
yapt›¤› masaj›n do¤al taklidini – sessiz rahat ve nazik bir flekildeyaparak daha fazla süt gelmesini sa¤larken silikon diyafram %100
güvenli çekim sa¤lar. Pompan›n montaj› kolay, kullan›m› rahatt›r ve
tüm parçalar› bulafl›k makinesinde y›kanabilir.
Doktorlar ilk y›l boyunca, 6. aydan sonra kat› g›dalarla desteklenmesi
koflulu ile bebekler için en iyi g›da olan anne sütünü önerirler.
Sütünüz bebe¤inizin ihtiyaçlar›na uygundur ve bebe¤inizi enfeksiyon
ve alerjilere karfl› koruyacak maddeler içerir.
Manuel Gö¤üs Pompan›z bebe¤inizi daha uzun süre emzirmenize
yard›mc› olacakt›r. Sütünüzü sa¤abilir ve saklayabilirsiniz- böylece
bebe¤inizden bir kaç saat ayr›ld›¤›n›zda, kendinize zaman
ay›rmak istedi¤inizde ya da ifle tekrar bafllad›¤›n›zda siz yan›nda
olamad›¤›n›zda bile bebe¤iniz anne sütünün faydalar›ndan
yararlanmaya devam edebilir. Pompa öylesine sessiz ve kolayd›r
ki yan›n›zda her yere götürebilir ve kendinize en uygun flekilde
sütünüzü sa¤›p, süt gelmesinin devaml›l›¤›n› sa¤layabilirsiniz.
AVENT Biberonlar› ve AVENT Biberon Emzikleri özellikle emzirmeye
benzer flekilde dizayn edildi¤inden bebe¤iniz kolayl›kla gö¤sünüzden
ve biberondan beslenmeyi bir arada gerçeklefltirecektir. Böylelikle
anneler, tekrar çal›flmaya bafllad›klar›nda bile bebeklerini sütleriyle
beslemeye devam edebilirler.
35
Page 42
TR
2. Detaylı Parça Listesi
MANUEL GÖ⁄ÜS POMPASI
a) Huni kapak (i deki ile ayn›)
b) Süt-art›r›c› Silikon Masaj Bafll›¤›
c) Pompa kapa¤›
d) Silikon diyafram*
e) Pompa kolu
f) Pompa gövdesi
g) Beyaz y›ld›z conta*
*parçalar dahildir
B‹BERON
h) AVENT Biberon (125 ml/4oz)
i) Taban (a daki ile ayn›)
j) Biberon Kapa¤›
k) Ekstra Yumuflak Biberon
Emzi¤i, Yenido¤an ak›fll› (0m+)
l) Biberon Halkas›
m) Kapatma taban›
n) Kapatma diski
3. Temizlik ve Sterilizasyon
Gö¤üs pompan›z› ilk kez ve her kullan›mdan önce:
Bütün parçalar› sökün ve sabunlu su ile veya bulafl›k makinenizde
y›kay›p durulay›n. Anti-bakteriyel temizleyici ve deterjanlar›
kullanmay›n›z. Philips AVENT Buharl› Sterilizörde (Elektronik,
Elektrikli veya Mikrodalga) ya da 10 dakika kaynatarak steril edin.
E¤er Philips AVENT Buharl› Sterilizörleri
kullan›yorsan›z, pompan›z kapak aç›lmad›¤›
sürece en az 6 saat steril olarak kalacakt›r.
4. Yanınızda ta∂ımak üzere pompanızın
steril saklanması
Tüm parçalar› steril ettikten sonra, beyaz contay› (g) ve
diyafram› (d) pompa gövdesine tak›n (f). Huni parçan›n
üzerine kapa¤› (a) ve Süt- art›r›c› Masaj Bafll›¤›n› yerlefltirin
36
ve kapatma taban›na (m) AVENT Biberonu (h) tak›n.
Page 43

TR
5
.
Manuel Gö≤üs Pompasının AVENT
VIA Besleme Sistemi ile kullanılması
Sadece AVENT Biberonu bir VIA Kap ve Adaptörü
ile de¤ifltirin. Pompay› tamamen dengeli hale getirmek
için VIA Kap’› VIA Kapa¤a/Tabana tak›n.
6. Manuel Gö≤üs Pompanızın
monte edilmesi
Tüm parçalar› ay›r›p pompan›z› 3. bölümde
anlat›ld›¤› gibi temizleyip steril edin:
1) Ellerinizi iyice y›kay›n. Beyaz valfi (g) pompa gövdesinin (f)
alt›ndan tak›n.
2) Pompa gövdesini (f) AVENT Biberona (h) tak›n.
3) S›k›ca kapanana dek saat yönünde nazikçe çevirin,
gere¤inden fazla s›kmay›n.
4) Silikon diyafram› (d) pompa gövdesine (f) tak›n. ‹yice oturana
dek parmaklar›n›zla iyice yerlefltirin. (Islakken tak›ld›¤›nda bu
daha kolay olur)
5) Pompa kolunun çatall› ucunu (e) silikon diyafram›n beyaz parças›n›n
(d) alt›na tak›n ve nazikçe afla¤› iterek yerine iyice oturtun.
6) Silikon Masaj Bafll›¤›n› (b) tüm kenarlar›n› kaplayacak flekilde
dikkatlice huni parçaya (f) yerlefltirin. (Islakken tak›ld›¤›nda bu
daha kolay olur)
7) Pompa kapa¤›n› (c) pompa gövdesine tak›n (f). Pompay› tamamen
dengeli hale getirmek için biberon tabanl›¤›na oturtun(i).
37
Page 44

TR
7. Sütünüzü ne zaman sa≤malısınız
1) Mümkünse, doktorunuz veya emzirme hemflireniz aksini
söylemedi¤i takdirde, sütünüzün iyice gelmesini ve emzirme
düzeninizin oturmas›n› bekleyin. Bu normal olarak do¤umdan
sonra en az 2-4 hafta sürer.
2) Afla¤›daki durumlar bunun d›fl›ndad›r:
a) Bebe¤inize sa¤›lm›fl sütünüz hastanede verilecekse
kullanabilirsiniz.
b) Gö¤üsleriniz dolmufl, ac›yor veya fliflmiflse emzirme öncesi
ya da aralar›nda sütünüzü bir miktar çekip ac›y› azaltabilir ve
bebe¤inizin gö¤üs ucunuzu yakalamas›n› kolaylaflt›rabilirsiniz.
c) Gö¤üs uçlar›n›z hassaslaflm›fl ya da çatlak oluflmuflsa iyileflene
dek sütünüzü sa¤arak vermeyi tercih edebilirsiniz.
d) Bebe¤inizden bir süre ayr›ysan›z ve tekrar bir araya geldi¤inizde
3) Sütünüzü çekmek için günün size en uygun zaman›n› bulman›z
emzirmeye devam etmek istiyorsan›z, sütünüzü düzenli olarak
çekerek sütünüzün kesilmemesini sa¤layabilirsiniz.
gerekecektir. Örne¤in;
a) Sabahlar› bebe¤inizi ilk kez emzirmeden hemen önce ya da
sonra gö¤üsleriniz dolu oldu¤unda.
b) Bir emzirmeden sonra bebe¤iniz her iki gö¤sünüzü tam olarak
boflaltmam›flsa.
c) Tekrar çal›flmaya bafllam›flsan›z, bofl an›n›z ya da beslemeler
aras›nda.
8. Baflarılı olmanız için yardımcı ipuçları
Gö¤üs pompas› kullanmak deneyim gerektirir- bu nedenle baflar›l›
olmak için bir kaç kez denemeniz gerekebilir. Ancak pompa
kullan›m› öylesine kolay ve do¤ald›r ki çok k›sa sürede sütünüzü
sa¤maya al›flacaks›n›z.
38
Page 45

TR
1) Kofluflturma içinde olmad›¤›n›z ve rahats›z edilmeyece¤iniz
bir zaman› seçin.
2) Bebe¤inizi ya da bir foto¤raf›n› yak›n›n›zda bulundurman›z süt
salg›lama güdünüzün harekete geçmesine yard›mc› olacakt›r.
3) Pompan›z› çal›flt›rmaya bafllamadan bir kaç dakika önce gö¤sünüze
›l›k bir havlu koymak süt ak›fl›na yard›mc› olacak ve sanc›l› gö¤üsleri
rahatlatacakt›r.
4) S›cakl›k ve rahat olmak süt ak›fl›na yard›mc› olur. Bir dufl veya banyo
sonras› sütünüzü sa¤may› deneyin.
5) Bebe¤iniz bir gö¤sünüzü emerken di¤erini pompalamay› deneyin ya
da bir emzirme sonras› pompa ile sütünüzü sa¤maya devam edin.
6) Pompan›n gö¤üsteki pozisyonunu zaman zaman de¤ifltirmek süt
kanallar›n›za destek olur.
Kendinize en uygun tekni¤i bulmak için pompan›zla denemeler yap›n.
Ancak, ifllem sizin için çok sanc›l› hale gelirse lütfen son verin ve
doktorunuz veya hemflirenizle görüflün.
9. Manuel Gö≤üs Pompasının Kullanımı
1) Ellerinizi iyice y›kay›n ve gö¤üslerinizin temiz oldu¤undan emin olun.
Süt kanallar›n›z›n t›kal› olmad›¤›ndan emin olmak için her iki gö¤üs
ucunuzu hafifçe s›karak biraz süt ç›kar›n.
2) Pompan›z› 3. ve 6. bölümlerde belirtildi¤i gibi steril ve monte
etti¤inizden emin olun.
3) Baflar›l› olman›za yard›mc› ipuçlar› bölümüne bak›n.
4) Rahat bir sandalyeye oturun ve hafifçe öne do¤ru e¤ilin (s›rt›n›z›
desteklemek için bir yast›k kullan›n). Yan›n›zda bir bardak su
bulundurun.
39
Page 46

TR
5) Pompan›z›n huni a¤z›n› ve Silikon Masaj Bafll›¤›n› s›k›ca gö¤sünüze
bast›r›p herhangi bir hava bofllu¤u olmad›¤›ndan emin olun; aksi
taktirde çekim gerçekleflemez.
6) Pompa sap›n› hafifçe afla¤›ya itti¤inizde gö¤sünüzdeki çekilmeyi
hissedeceksiniz. Bir vakum oluflturmak için pompa sap›n› tamamen
afla¤›ya itmenize gerek yoktur; kendinizi rahat hissetti¤iniz oranda
çekme yap›n. Pompan›n
kullanmasan›z da süt ak›fl›n›z bafllayacakt›r.
7) Süt salg›s›n› bafllatmak için 5-6 kere h›zl› pompalay›n. Daha sonra pompa
sap›n› 2-3 saniye afla¤›da tutun ve sonra normal bafllang›ç pozisyonuna
geri gidecek flekilde serbest b›rak›n. Bu 2-3- saniye bebe¤inizin
gö¤sünüzü emerken yapt›¤› do¤al emme/b›rakma ritmini taklit edecek ve
bu aral›klarda sütünüz gelmeye baflla
meydana getirece¤i vakum gücünün tümünü
yacakt›r.
8) ‹lk birkaç hareketten sonra sütünüz akmaya bafllayacakt›r. Sütünüz
hemen gelmezse merak etmeyin, rahat olun ve pompalamaya devam
edin.
E¤er H‹Ç süt gelmezse bir defada 5 dakikadan fazla pompalamaya
devam etmeyin.
Gün içinde baflka bir zaman sütünüzü sa¤maya devam edin. E¤er
ifllem can›n›z› ac›t›yorsa veya rahats›z oluyorsan›z, pompalamaya
son vermeniz ve doktorunuz veya hemflirenizle görüflmeniz
gerekti¤ini lütfen hat›rlay›n.
9) Baz› annelerin pompay› Süt-art›r›c› Masaj Bafll›¤› olmadan kullanmay›
tercih etmelerine ra¤men yayg›n deneyler, yaprakç›klar›n meme ucu
(areola) çevresinde içe ve d›fla hafifçe esnemesi ile oluflan masaj
etkisinin süt üretimini art›rd›¤›n› ve daha fazla sütün daha h›zl› olarak
sa¤›lmas›n› sa¤lad›¤›n› göstermektedir.
10) Ortalama olarak 60-125ml süt sa¤mak için 10 dakikaya ihtiyac›n›z
olacakt›r. Ancak bu sadece bir genellemedir ve kad›ndan kad›na de¤iflir.
Düzenli olarak her seferinde 125ml’den daha fazla süt sa¤›yorsan›z,
lütfen 260ml AVENT Biberon veya 240ml/8oz VIA Kap kullan›n.
AVENT Biberonlar› ve VIA Kaplar› gere¤inden fazla doldurmay›n
ve dik tutun, aksi taktirde pompa gövdesinden süt s›zabilir.
40
Page 47
TR
10. Sa≤ılmı∂ sütünüzün saklanması
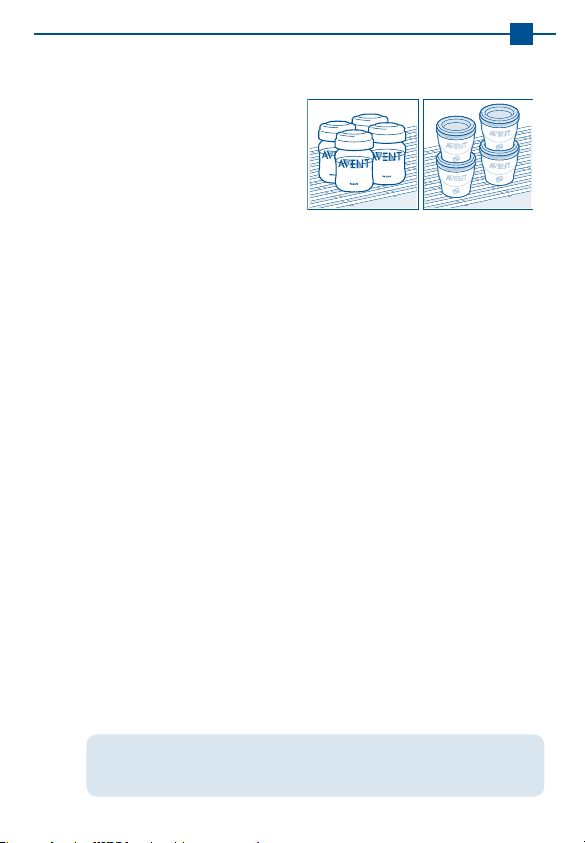
• Sa¤›lm›fl sütünüzü steril
edilmifl anne sütü saklama
kaplar›nda (kapatma diskleri
tak›l› 125 ml veya 260ml/9oz
biberonlarda) veya kapak
tak›lm›fl VIA Kaplarda
saklayabilirsiniz.
• Bebe¤inize vermek üzere sadece steril bir pompa ile sa¤›lm›fl
süt saklanmal›d›r.
• Sa¤›lm›fl süt hemen buzdolab›na konulmal›d›r.
• Sa¤›lm›fl süt buzdolab›nda (buzdolab›n›n kapa¤›nda de¤il) 48 saate
kadar, derin dondurucuda ise 3 aya kadar saklanabilir.
• Annesütünügünboyuüstüneeklemekiçinbuzdolab›nda
sakl›yorsan›z, sadece steril kaplara sa¤›lm›fl sütü ekleyin. Anne
sütü bu flekilde ilk sa¤›mdan itibaren en fazla 48 saat saklanabilir.
• Sonras›ndaiseyahemenkullan›lmal›yadaileridekullanmaküz
ere dondurulmal›d›r.
Sa≤ılmı∂ sütünüzün buzdolab›nda saklanması
E¤er sa¤›lm›fl sütünüz bebe¤inize 48 saat içinde verilecekse
buzdolab›nda (kapa¤›nda olmamak flart›yla) AVENT Biberon veya
VIA Besleme Sistemi ile saklanabilir. Steril edilmifl biberon emzi¤i,
biberon halkas› ve kapa¤›n› AVENT Biberona veya VIA Kap ve
adaptöre tak›n (afla¤›ya bak›n›z).
Sa≤ılmı∂ sütünüzün dondurucuda saklanması
Sütünüzü dondurucuda (3 aya kadar) saklamak için biberon emzi¤i
ve kapa¤› yerine kapatma diski ile kapat›lm›fl AVENT Biberon veya
steril VIA kapakla kapat›lm›fl VIA Kap kullan›n. Saklama kaplar›na
aç›k bir flekilde sa¤›m günü ve saati etiketlenmeli ve ilk sa¤›lan süt
ilk önce kullan›lmal›d›r.
Donmufl anne sütünü çözüldükten sonra ASLA tekrar
dondurmay›n. Donmufl süte taze anne sütü EKLEMEY‹N.
Bir beslenmeden artan sütü HER ZAMAN at›n.
41
Page 48

TR
11. Bebe≤inizin sa≤ılmı∂ sütünüzle beslenmesi
E¤er anne sütü AVENT Anne Sütü Saklama
Kaplar›nda saklanm›flsa, kapatma diskini steril
edilmifl bir AVENT Biberon Emzi¤i ile de¤ifltirin.
Veya anne sütü VIA Kap içinde saklanm›flsa, kapa¤›
VIA Adaptör, biberon halkas› ve AVENT Biberon
Emzi¤i ve kapa¤› ile de¤ifltirin.
Donmufl anne sütü buzdolab›nda bir gece b›rak›larak çözülmelidir.
Ancak, acil bir durumda, s›cak su dolu bir kap içinde de çözdürülebilir.
Bir kez çözüldü¤ünde 24 saat içinde kullan›lmal›d›r.
Anne sütü di¤er tüm biberon g›dalar› gibi ›s›t›labilir. Süt biberonunu
içi s›cak su dolu bir kaba koyun veya alternatif olarak g›dalar›
güvenli ve h›zl› bir flekilde ›s›tmak için Philips AVENT H›zl› Biberon
ve Mama Is›t›c›y› kullan›n. ÖNEML‹! Süt veya mama VIA kab›n
içinde di¤er standart biberonlardan/saklama kaplar›ndan daha h›zl›
›s›nacakt›r. Bebe¤inizi beslemeden önce her zaman sütün veya
maman›n ›s›s›n› kontrol ediniz.
De¤erli besleyici ve koruyucu maddeleri yok edebilece¤inden anne
sütünü asla mikrodalga f›r›nda ›s›tmay›n. Ayr›ca, eflit olmayan ›s›tma
s›v›da s›cak bölgeler oluflturabilece¤inden bebe¤inizin bo¤az›nda
yanmalara neden olabilir.
Çatlay›p k›r›labilece¤inden donmufl süt saklama kab›n› veya VIA
Kab› kaynar suyun içine dald›rmay›n.
Kaynar suyu VIA Kab›n içine do¤rudan boflaltmay›n, doldurmadan
önce 20 dakika kadar so¤umas›n› bekleyin.
42
Page 49

TR
1
3
2
4
0
m
+
6
m
+
1
m
+
3
m
+
3
m
+
Tek delikli
İki delikli
Üç delikli
Dört delikli
Bir yarıklı
YEN‹DO⁄AN AKIfiLI
EKSTRA YUMUfiAK S‹L‹KON B‹BERON EMZ‹⁄‹
Yenido¤an ve emzirilen bebekler
için uygundur.
YAVAfi AKIfiLI
EKSTRA YUMUfiAK S‹L‹KON B‹BERON EMZ‹⁄‹
Yenido¤an ve emzirilen bebekler
için uygundur.
ORTA AKIfiLI
YUMUfiAK S‹L‹KON B‹BERON EMZ‹⁄‹
3 aylık ve daha büyük bebekler
için uygundur.
HIZLI AKIfiLI
YUMUfiAK S‹L‹KON B‹BERON EMZ‹⁄‹
Daha büyük bebekler için hızlı akıfl.
AKIfi AYARLI
YUMUfiAK S‹L‹KON B‹BERON EMZ‹⁄‹ –YARIKLI
Daha hızlı akıfl sa¤lar ve daha yo¤un
sıvılar için uygundur. Biberon emzi¤inin
yanlarındaki I, II veya III göstergeleri
bebe¤in burnuna bakacak flekilde biberonu
çevirerek akıfl hızı de¤ifltirilebilir.
12. Bebe≤iniz için do≤ru biberon emzi≤i seçimi
AVENT Biberon Emzikleri hem AVENT Biberonlarla hem de VIA
Besleme Sistemi ile kullan›labilir. AVENT Biberon Emzikleri ak›fl
oranlar›na göre yan taraflar›nda numaraland›r›lm›fllard›r.
43
Page 50

13. Sorun çözme rehberi
TR
Çekim yok
Süt sa¤›lm›yor
Sa¤arken gö¤üste
ac› duyuluyor
Silikon Masaj Bafll›¤›na
süt s›z›yor
Pompa parçalar› çatlarsa /
renk de¤ifltirirse
Kay›p veya k›r›lan parçalar
Tüm pompa parçalar›n›n do¤ru olarak tak›ld›¤›n› ve
beyaz y›ld›z contan›n t›rt›kl› k›sm›n›n yukar› dönük
oldu¤unu kontrol edin. Diyafram ile Süt-art›r›c› silikon
masaj bafll›¤›n›n huni k›s›m ve pompa gövdesine arada
hiç boflluk kalmayacak flekilde tak›lm›fl oldu¤undan da
emin olun.
Pompan›n do¤ru olarak tak›ld›¤›ndan ve çekim
sa¤land›¤›ndan emin olun. Rahat olun ve tekrar deneyin,
sa¤›m birkaç denemeden sonra oluflacakt›r. Lütfen
‘Baflar›l› olman›z için yard›mc› ipuçlar›’ bölümüne bak›n›z.
Çok sert pompal›yor olabilirsiniz. Pompan›n meydana
getirece¤i bütün çekim gücünü kullanman›za gerek
yoktur. Pompa kolunu yar›ya kadar bast›rmay› ve 2-3
saniye pompalama ritmini hat›rlay›n. Doktorunuza veya
hemflirenize baflvurun.
Masaj bafll›¤›n› ç›kart›p tekrar tak›n ve huni k›sma iyice
oturdu¤undan emin olun. Öne do¤ru hafifçe e¤ilin.
Çatlama ya da k›r›lmalara neden olaca¤›ndan antibakteriyal
deterjanlar / temizleyicilerle temastan uzak tutun.
Deterjanlar, temizlik ürünleri, sterilizasyon solüsyonlar›,
yumuflat›lm›fl su kombinasyonlar› ve ›s› de¤ifliklikleri, baz›
flartlarda, plasti¤in çatlamas›na neden olabilir. Bu oldu¤unda
pompay› kullanmay›n. Yedek parça temini için Philips
AVENT Türkiye distribütörünü aray›n. Pompan›z› bulafl›k
makinesinde y›kayabilirsiniz ancak yiyeceklerin renkleri
pompa parçalar›n›n renk de¤ifltirmesine neden olabilir.
Philips AVENT Türkiye Distribütörü GRUP LTD.
müflteri hizmetlerine arka kapaktaki iletiflim bilgilerinden
ulaflabilirsiniz.
E¤er hala problem yafl›yorsan›z, lütfen Philips AVENT Türkiye Distribütörü
GRUP LTD. müflteri hizmetlerini (iletiflim bilgileri arka kapakta) aray›n.
Alternatif olarak doktorunuza veya hemflirenize dan›flabilirsiniz.
44
Page 51

14. Philips AVENT’in di≤er yardımcı ürünleri
AVENT Manual Gö≤üs Pompası Çantalı
Seti – anne sütünü
sa¤mak ve saklamak için.
AVENT Anne Sütü/ Mama Saklama Kapları
– anne sütünü veya mamay› buzdolab› veya
dondurucuda saklamak içindir.
AVENT VIA Anne Sütü Kapları –
sa¤›lm›fl sütü saklamak ve tafl›mak içindir.
AVENT Gö≤üs Kalkan Seti (2 çift)
Ultra –Yumuflak Destek Yastıkları ile
– ac›yan ve çatlam›fl gö¤üs uçlar›n›
korumak, gö¤üslerin fliflmesini azaltmak
ve s›zan sütü biriktirmek içindir.
AVENT Gö≤üs Ucu Koruyucuları
– ac›yan/çatlam›fl gö¤üs uçlar›n›z›
emzirme s›ras›nda korumak içindir.
(küçük ve standart boylardad›r)
AVENT Ultra Konfor Disposable
(atılır) Gö≤üs Pedleri – benzersiz
ULTRA emici özü tam kuruluk ve
konforu garantiler.
45
Page 52
Call FREE on
b
k
a
c
d
e
h
i
l
j
m
n
f
l
g
or
ou
ya da
GB
Call FREE on
Call on
(+971)
AR
Renseignements et documentation,
FR
Service consommateurs :
Numéro Vert
Daha fazla bilgi için lütfen aray›n›z:
TR
0216- 573 62 00 (pbx)
BPA is Bisphenol-A. This product uses Polyethersulfone (PES), which is
BPA signifie bisphénol A. Ce produit est fabriqué en polyéthersulfone (PES),
matériau sans BPA, ayant une couleur naturelle miel.
BPA Bisfenol A'dır. Bu ürün BPA içermeyen Polietersülfon (PES)
0800 289 064 (GB Only)
1800 509 021 (IRL Only)
1 300 364 474 (AUS)
800AVENT
0800 90 81 54
BPA-Free and has a natural honey-coloured tint.
kullanmaktadır ve do al bal rengindedir.
www.philips.com/AVENT
Philips AVENT, a business of Philips Electronics UK Ltd.
Philips Centre, Guildford Business Park, Guildford, Surrey, GU2 8XH
Trademarks owned by the Philips Group.
© Koninklijke Philips Electronics N.V. All Rights Reserved.
42133 5411 890
 Loading...