

PHILIPS SCF271-20 User Manual
I
1
A
1
GB FR DE NL NO SE IT
ES PT PL RU HU TR SC
a
2
b
c
d
3
f
a
2
e
3
4
II
5
AVENT Ltd, Suffolk, CO10 7QS,England (AVENT Ltd is a member of the Philips Group)
www.philips.com/AVENT
Philips of Holland. All logos brands and product names are trademarks or registered
trademarks of their respective holders and are hereby recognised as such.
42133 5435 100
200ml
2
3 41
΅ᆛ
జୋ
Ѥ۹
MOC
CZAS
STERYLIZACJI
CZAS
STYGNIĘCIA
B
٭৭ྔτᙢVIA༩ၢࠪවᇁ180ml/
6oz ࠎ240ml/8oz٭৭ྔτᙢ >1)НთНۉè
1. ࢃଶቐ٩ᇉᄤଶቐҩບಈè
2. ࢃઋໜಈ٩ᇉଶቐഏè
3. ࢃ٭৭ྔτᙢVIAНನሩᇖရᆭᇿ֡ᇉᄤ
ະࡖഏè
4. ࢃ٭৭ྔτᙢVIAሎߗఝྃᄤະࡖяჿ
Ɠ൜Ɣè
5. ࢃ٭৭ྔτᙢVIAНۉՃᆷ֬٩್ະࡖяჿƗ
Нۉяჿӛບè
6. ࢃଶۉ٩ᇉᇖရᆭᇿؑè
ఊ҆ჩႯ
֙ఊ٫ఝӈ൏ƗࢃቍࡸٺೢϬ٩ະࡖഏƗ
ၢѓᆜడႼཹ׀è
౯ሆၰƥގᇖ౯༆٩ᇉݝئ༅è
౯ሆၰƥ౯༆ࢃଶۉ֡ᇉᄤގୄè
౯ሆၰƥЮӈເᆓؚ٭৭ྔτᙢঁଶ֬ሌനࡀè
Ўচ٭৭ྔτᙢVIAНçНۉçሎߗఝç٤ᅵఞଶቐçଶቐۉၢࠪઋໜಈè
ોൗႯݝޱ
ᇞ
း൜ƥຸѶຢпƗ౯ᇇങಥގಖ
ٺᇙᄣ՝ຸѶᇖಃԢè
1. ތ՝ຸѶᇖಃԢގƥಖٺᇙޱƗ
ࢃގ՝ຸѶᇖྡྷಃԢƗ
٩ᇉณౖۡଷಪ֬ขഏè
౯ሆၰƥݛ໊ռۉƗ٭৭ྔτᙢঀຸѶᆜడ
ݘ11ୄᆴ҆ჩႯГԂ24ཱི൏ቒࡋመฆè
2. ՝ຸѶಃԢޱƥռႾҮτϣƗ
ଭ༶ۉƗყ༺ۉ൏Ɨ౯ࢃӛບѰሆ
ၰᆜడೢၵ١སè
౩ࢸთГဨ
Ķ
֡ԢގୄئඪٺƗѰ൨֙֬౩༨ၢ٤
ᆿඪܘ֬ӈഺè
Ķ
ְຢۋᄹޱᄣቛ൳ଳè
Ķ
٭৭ྔτᙢঀຸѶᆜడݘ11٩್
༨ຣࠖᇖ౩༨è
ࣥۨ౯༇шቕ൶ൗႯනଃƗၢ૮ᄶӵຸѶç
ގၢࠪ۸ಭ֬෬ഋࠎູཉ
Ķ
౯ᄤಃႯႯఴ༨ࣱට൴è
Ķ
౯ᄤఴಙಱࡍ್200ml౩ඪèƓોൗႯޱƗ
౯ࢃുඪٺ֡לƔè
Ķ
౯٩ᇉ൨ႯƗ౯༆ݝè
Ķ
౯༆ᄤގୄൗႯϩ࠻ࠎߋ࿗့့࠻è
Ķ
౯
༆ᄤގୄሷࣈඒӈè
Ķ
౯۳ቕ൶ທඛ൏࡞ؚᅽѝƓҜࡵѝ Ɣè
Ķ
ئє܆ຸѶƗ౯ܸхམ܆è
Ķ
ގ٩್ຸѶఴƗ౯ಙಱ෴ഏτϣè
Ķ
ຸѶຢпޱƗ౯ഔְٺᇙޱᄣ՝ຸѶᇖಃ
Ԣގè
Ķ
ຢޱႵᆜడݝಪƗ౯༆છഏచಃႯè
Ķ
ຸѶຢпޱ౯ྡྷಃԢގƗచۉ൏
౯ࢃӛບƗཱིྖᆜడೢၵ١སè
Ķ
ຸѶຢпޱƗ౯ཱིྖӈಶಝۡ໘֬è
Ķ
చۉ൏Ɨ౯ࢃӛບᄀঢ়ᆜడԢè
Ķ
ಃԢݝ֬Ⴏ൏Ɨ౯ሆၰ໘؎ၢ૮ฦ൴è
Ķ
֙ಃԢޱ֬ଶƗ҉ྺᄣԑ༨è
Ķ
౯ࢃގᇉݠٌଭಃᆴè
Ķ
౯༆ࢃଶඞ٩್ຸѶୄè
҉ᄤႼ֬ݚࡌᅺ֥ဩ֬٭৭ྔτᙢӈè
ྺڢ༇౯৺༩٭৭ྔτᙢࣣഌè
٭৭ྔτᙢ৺༩١൛༶
ᝰخઅሉ: (02) 8245 7399
Ϛخઅሉ: 2422 4476
ˁʩఀخѡઅሉ: 4008 800 008
AVENT, Suffolk, CO10 7QS, England
www.philips.com/AVENT
IV
E
III
D
III
SC
C
2
1
3
2
1
4
3
4
5
6
1
GB
FR
DE
2
NL
NO
SE
IT
ES
PT
WATTAGE
WATTAGE
WATTLEISTUNG
IHRER MIKROWELLE
WATTVERBRUIK
WATTFORBRUK
WATTFÖRBRUKNING
WATTAGGIO
VOLTA J E
VOLTAGEM
FULL POWER
PUISSANCE
MAXIMUM
STERILISATIONSZEIT
AUF HÖCHSTER STUFE
VOL VERMOGEN
FULL STYRKE
FULL EFFEKT
POTENZA
MASSIMA
POTENCIA
MÁXIMA
POTÊNCIA
MÁXIMA
COOLING TIME
TEMPS DE
REFROIDISSEMENT
ABKÜHLZEIT
AFKOELTIJD
AVKJØLINGSTID
AVKYLNINGSTID
TEMPO DI
RAFFREDDAMENTO
TIEMPO DE
ENFRIAMIENTO
TEMPO DE
ARREFECIMENTO
PL
E
RU
4
3
HU
TR
SC
5
2
1
6
Мощность
печи
TELJESÍTMÉNY
TÁBLÁZAT
GÜÇ
1100 – 1850W
850 – 1000W
500 – 800W
Время
стерилизации
MAXIMÁLIS
TELJESÍTMÉNY
TAM GÜÇ
Время
охлаждения
LEHŰLÉSI
IDŐ
SO⁄UMA SÜRES‹
2 mins 2 mins
4 mins 2 mins
6 mins 2 mins
35
IV
1
2

GB GB
Philips AVENT Express II Microwave Steam Steriliser
Thank you for
choosing Philips AVENT
Now you can enjoy the convenience
and ease of using the Philips AVENT
Express II Microwave Steam Steriliser,
which effe ctively eliminates harmful
bacteria in just minutes! Its large
capacity holds more than any other
microwave steriliser – up to six
bottles – yet it is compact and
lightweight enough for travel.
Advanced features such as cool
safety grips aid in safe handling,
and make it easier than ever to
sterilise Philips AVENT Breast
Pumps, Bottles, Cups and more.
Please take a few minutes to read through
the ENTIRE INSTRUCTION LEAFLET including
the warnings before
Microwave Steam Steriliser
PLEASE RETAIN THESE INSTRUCTIONS. Also
available at www.philips.com/AVENT
using your Express II
for t he first time.
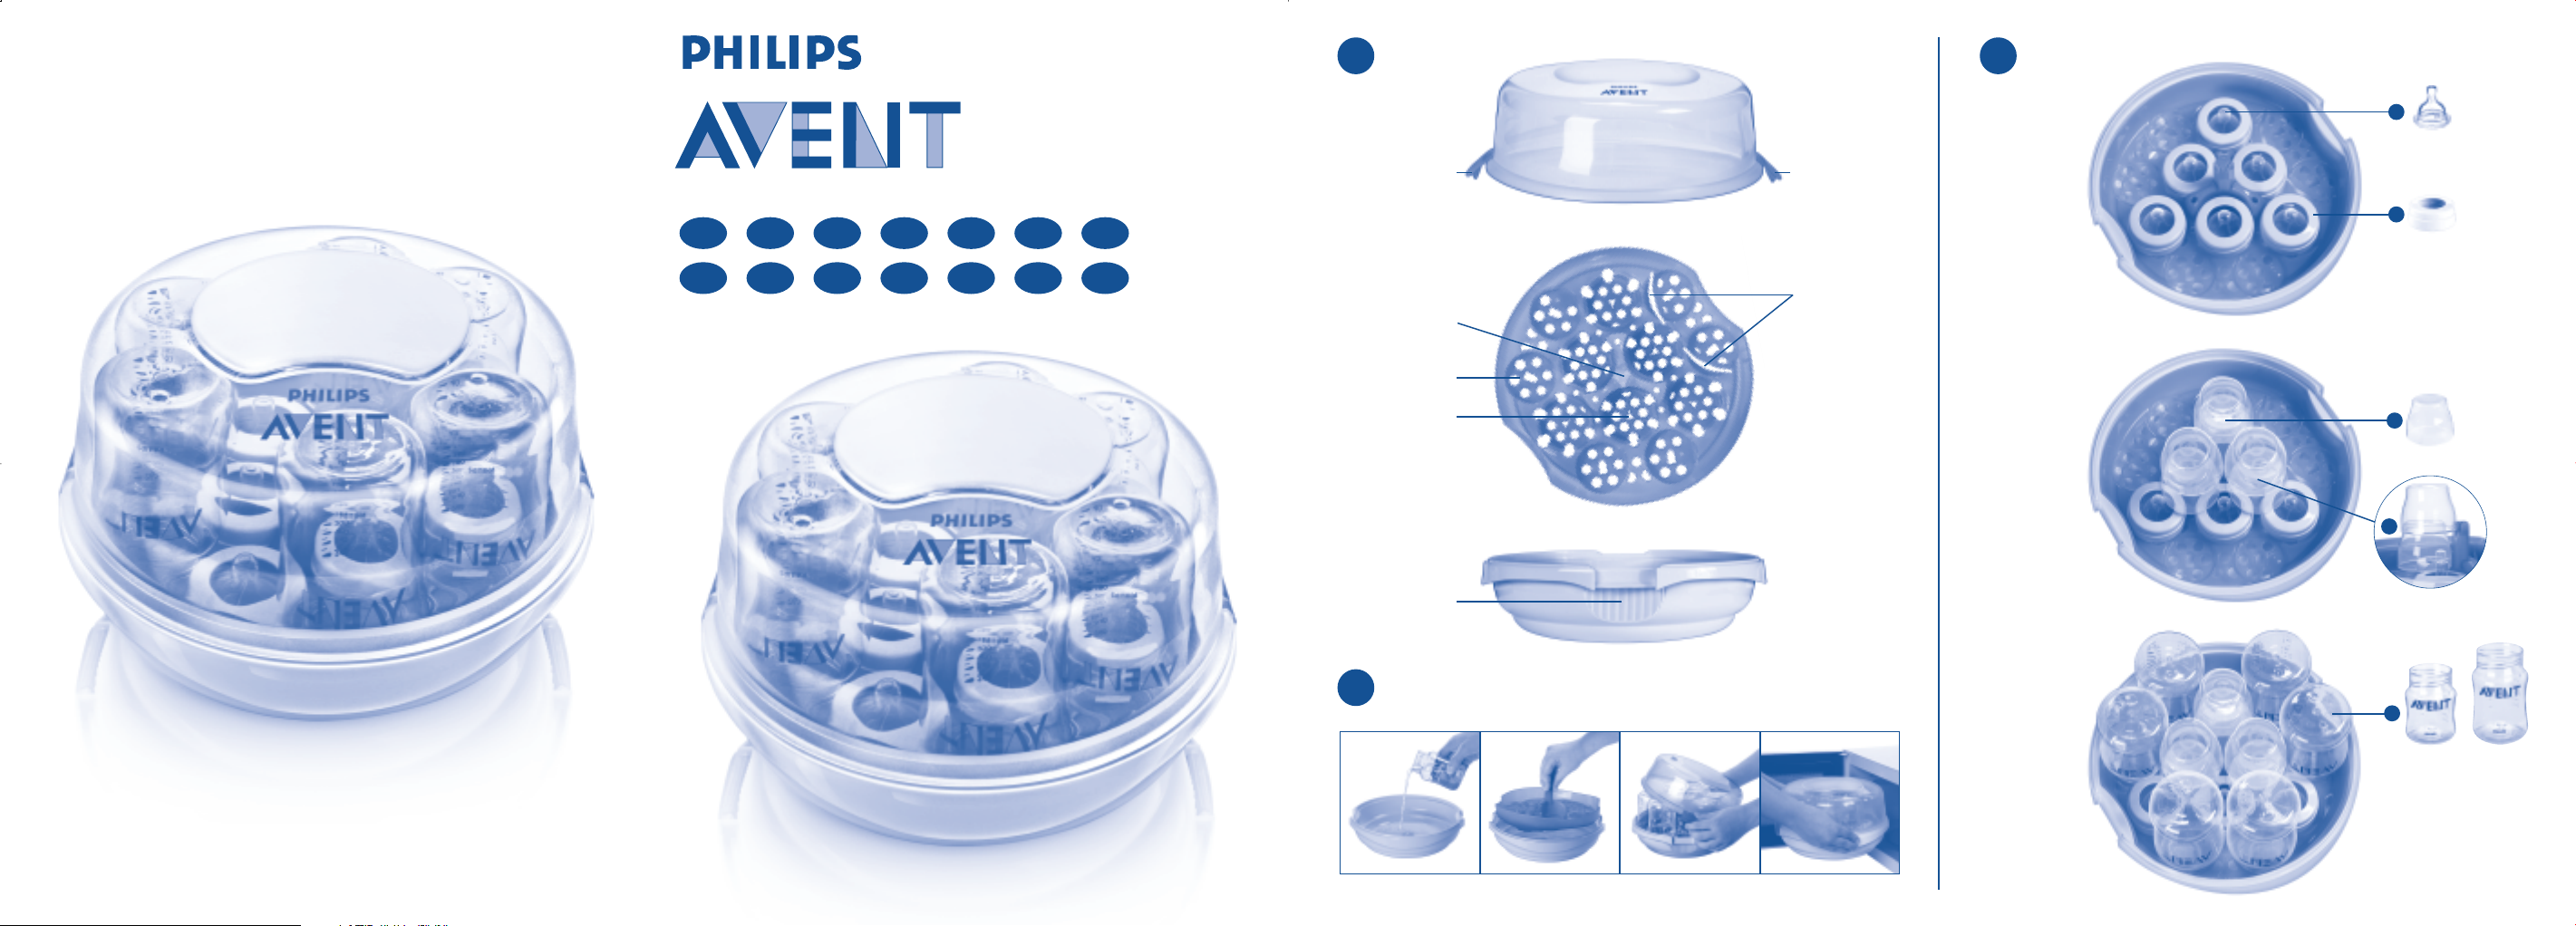
Assembly and Use
I IV
Contents
1. Lid
a. Clips
2. Bottle/Accessories Rack
b. Dome cap stem
c. Bottle cavity
d. Teat cavity
e. ISIS Breast Pump slots
3. Base
f. Safety grips
II
Before each use
Wash all items in warm
soapy water and then
rinse in water.
1. Remove rack from the
steriliser and pour
200ml of water
into the base.
Loading the steriliser
Before using the Express II Microwave Steam Steriliser,
always ensure that the items are positioned according
to the below loading instructions.
A
Loading six 125ml/4oz or 260ml/9oz
AVENT Airflex Feeding Bottles
1. Position the teats in the teat cavities around
the dome cap stem.
2. Place the screw rings over the teats.
3. Place the first three dome caps in the lower slots
of the dome cap stem.
4. Place the remaining three dome caps in the upper
slots of the dome cap stem.
5. Position the bottles upside down around the
previously loaded teats and screw rings.
B
Loading three 330ml Airflex Feeding Bottles
1. Position the teats in the three teat cavities
surrounding the dome cap stem.
2. Place the screw rings over the teats.
3. Position the bottles upside down in the three
outer teat cavities.
4. Arrange the three dome caps around the edge
of the rack in between the inverted bottles.
IMPORTANT: Failure to add
enough water may cause
damage to the Express II
Microwave Steam Steriliser
and/or your microwave. Adding
too much water may mean your
items are not properly sterilised.
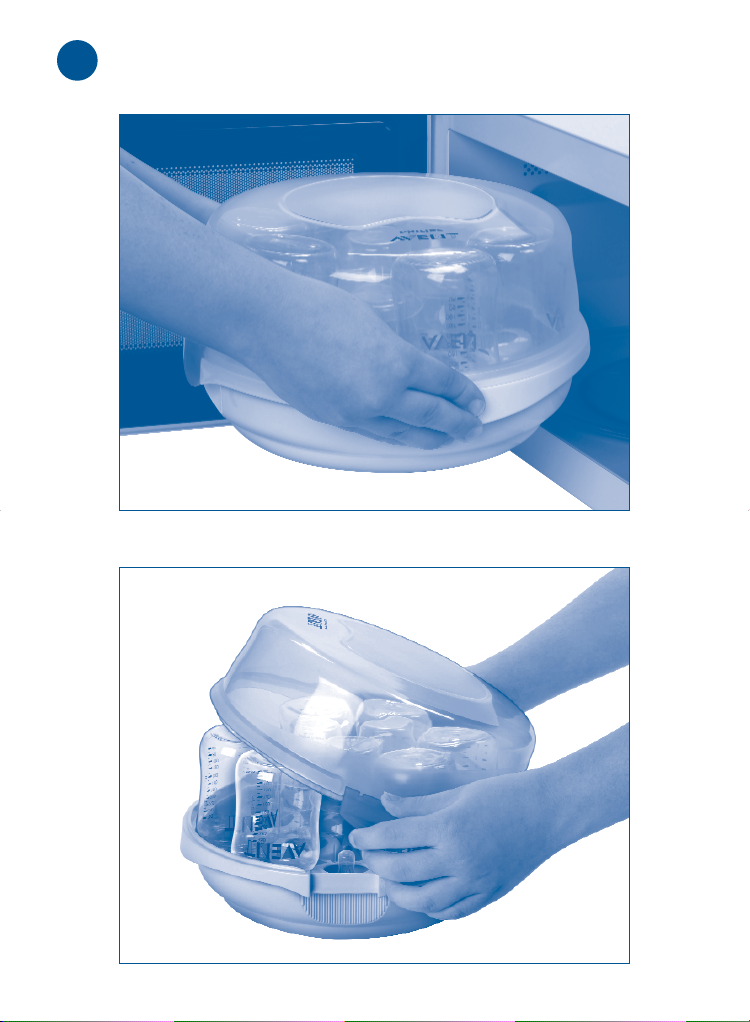
2. Put the rack back into
the base.
3. Position the lid over the
steriliser base and lock the
clips into place until you
hear them
4. Ensure that the microwave
“
click”.
is clean and dry before use –
Place the steriliser into the
centre of the microwave.
III
Select microwave wattage
and timings – See Table III –
do not exceed these times.
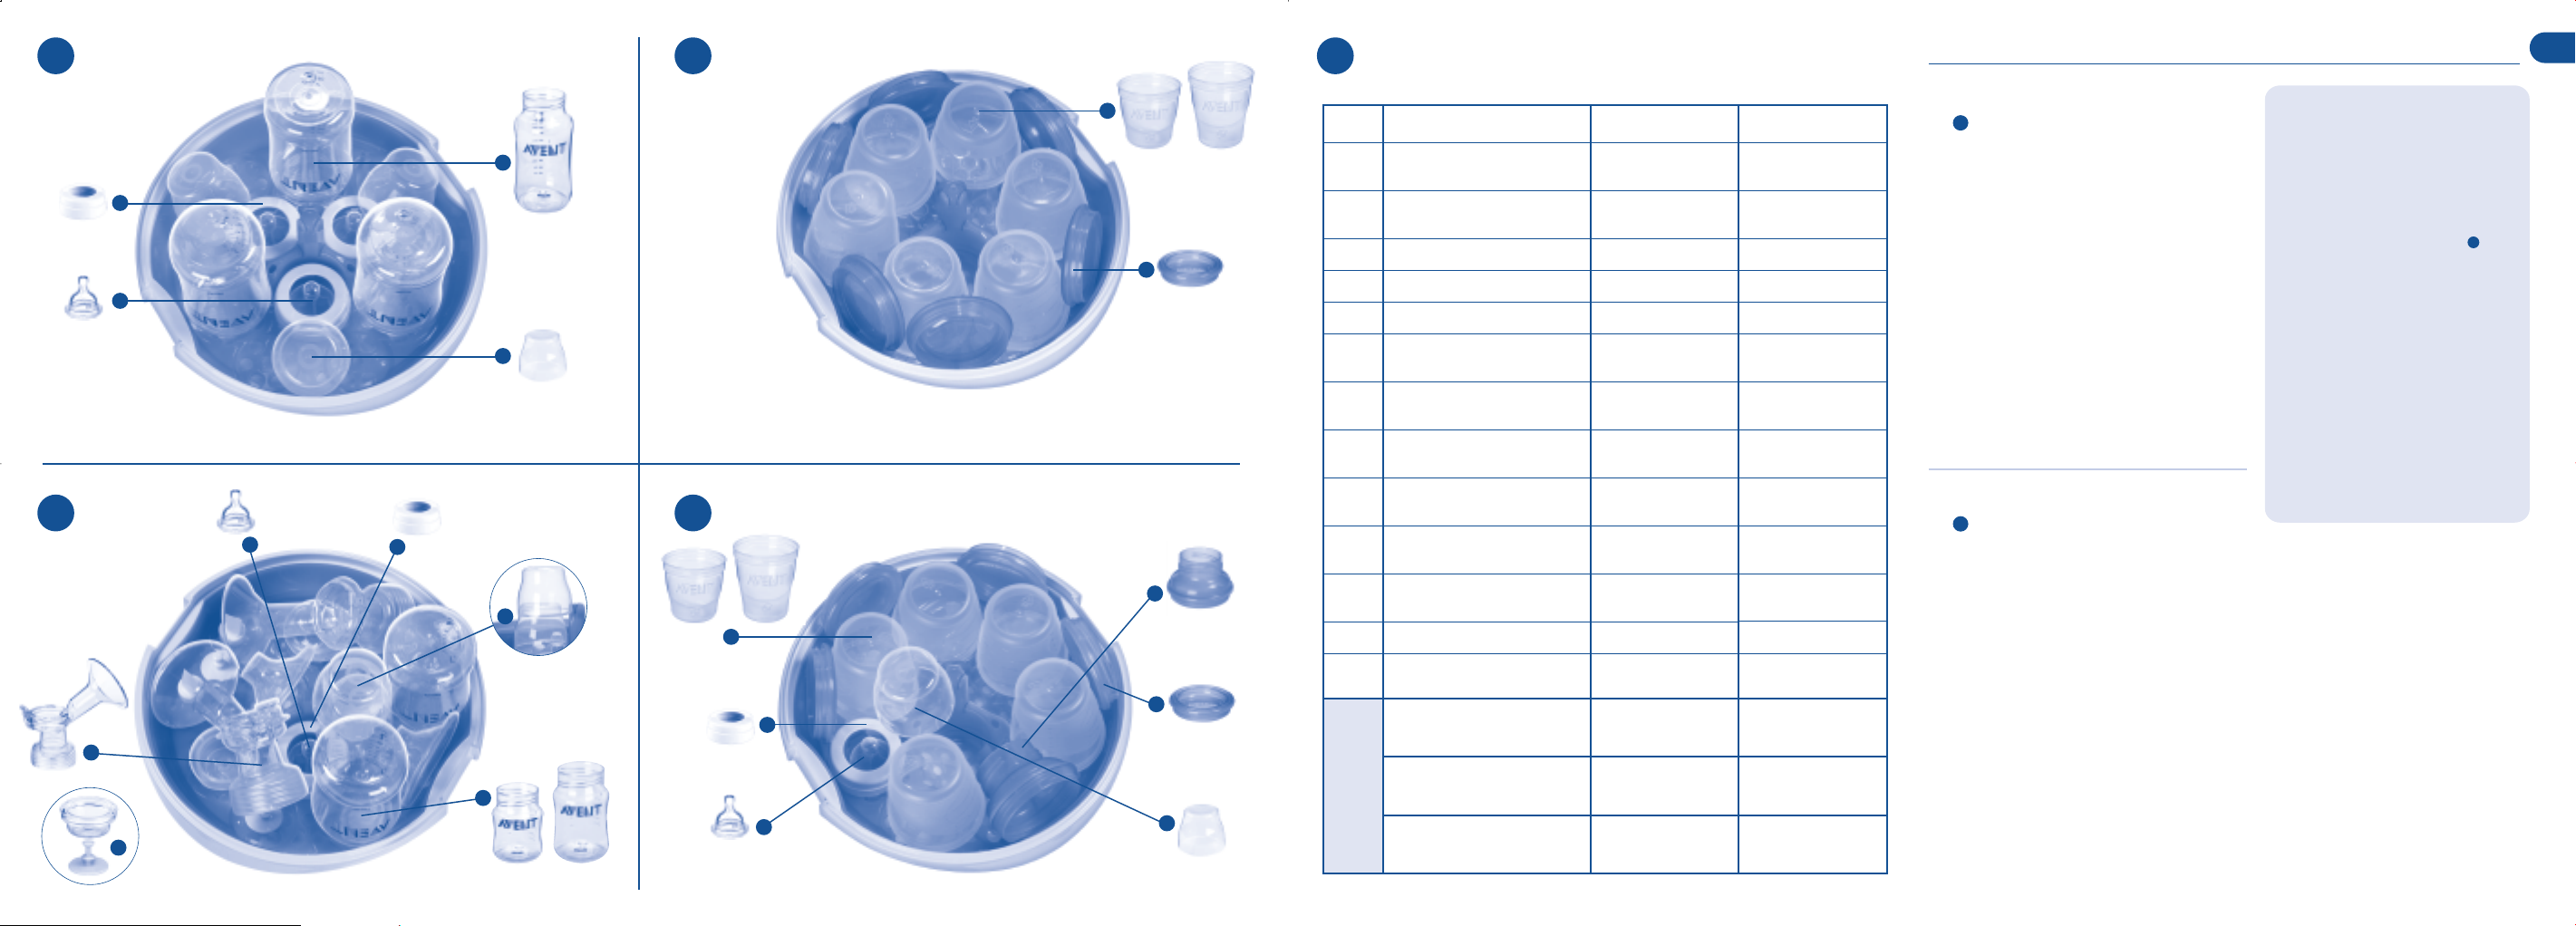
Loading one or two Philips AVENT ISIS Breast
C
Pumps (non-electrical components only) and
two 125ml/4oz OR two 260ml/9oz Airflex
Feeding Bottles
1. Disassemble the ISIS Breast Pump ensuring
the stem is removed from the diaphragm.
2. Position the ISIS Breast Pump bodies into the
two slots provided.
3. Position the teats in the teat cavities around
the dome cap stem.
4. Place the screw rings over the teats.
5. Place one dome cap in the unobstructed lower
slot of the dome cap stem, then the second in
the upper slot on top of the inserted dome cap.
6. Position the bottles upside down in the
unobstructed bottle cavities.
Place the remaining NON-ELECTRICAL pump
7.
components in any unobstructed space on the rack.
Loading six 180ml/6oz OR 240ml/8oz
D
AVENT VIA Cups and Lids
1. Position the VIA Cups upside down around
the dome cap stem.
2. Position the VIA Lids vertically around the racks
edge. Rims should face out for easier loading.
After each cycle
IMPORTANT: Allow the unit to cool for at least
two minutes before removing the steriliser from
the microwave.
1. Removing the steriliser from the microwave: After
the unit has cooled, remove it from the microwave
by holding the skirt and/or safety grips and then
place on an even, heat resistant surface.
NB: Items will remain sterile in the Express II Microwave Steam
Steriliser for up to 24 hours providing the lid is not removed.
2. After removing the steriliser from the microwave:
Remove the lid by unlocking the clips – When
removing the lid, point it away from you to allow
steam to escape.
Care and cleaning
• Always drain the excess water from the unit
and rinse to prevent the build up of limescale.
• Always store when completely dry.
• The Express II Microwave Steam Steriliser
is dishwasher safe.
Loading one VIA Feeding System* and up to
E
four 180ml/6oz OR 240ml/8oz VIA Cups and Lids
1. Position the teat in an outer teat cavity.
2. Place the screw ring over the teat.
3. Position the VIA Cups upside down around
the dome cap stem.
4. Place the VIA Adaptor on its side around the
racks edge (as shown).
5. Position the VIA Lids vertically around the racks
edge. Rims should face out for easier loading.
6. Place the dome cap in the unobstructed upper
slot of the dome cap stem.
Loading other feeding and baby product items
When sterilising other NON-ELECTRICAL PRODUCTS simply
place the components in the rack allowing enough
space so that steam can effectively circulate.
* Consists of VIA Cup, Lid and Adaptor, an Extra Soft Slow
Flow teat, dome cap & screw ring.
WARNINGS – FAILURE TO FOLLOW INSTRUCTIONS MAY
CAUSE SCALDING OR DAMAGE TO THIS PRODUCT
AND/OR YOUR MICROWAVE
• Wash your hands before handling your
sterilised products.
• Always ensure you use 200ml of water before
sterilising. (The unit should be emptied of residual
water before each subsequent use.)
• Always follow loading instructions and do
not overload.
• Do not use bleach or chemical sterilising solutions
/tablets in steriliser or on products to be sterilised.
• Do not sterilise metallic or electronic items
in the steriliser.
• Always use the appropriate heating time for the
power of your microwave unit. (see Table )
• In combination ovens, ensure grill is switched off
and has cooled before use.
• Be sure that the lid is properly fastened to
the base before placing in microwave.
• Always allow at least 2 minutes cooling time
before removing from the microwave.
• Do not remove the lid from the steriliser
immediately after cycle. Allow to cool as the steam
will be hot.
• When removing from microwave, be sure to hold
the steriliser level to avoid leaking or spilling of
hot water.
• When taking the steriliser out of the microwave,
TAKE CARE – it will still be hot.
• When removing the lid, point it away from you to
allow steam to escape.
• Take care when handling the sterilised products as
they may be hot.
• Do not rinse the bottles when you remove them
from the steriliser.
• Always keep out of reach of children.
• Do not microwave bottle brush.
NB: Do not overload the steriliser.
NB: Do not place dome caps in the steriliser upside down.
NB: The Express II Microwave Steam Steriliser is
designed to specifically hold the wide shape of
Airflex Feeding Bottles.
Some products featured may not be available
in all countries. Please contact Philips AVENT
to check availability.
III
Philips AVENT is here to help
GB: Call FREE on 0800 289 064
IRL: Call FREE on 1800 509 021
AU: 1 300 364 474
AVENT, Suffolk, CO10 7QS, England
www.philips.com/AVENT
98

FR FR
Stérilisateur micro-ondes Philips AVENT Express II à vapeur
Merci d’avoir choisi un
produit Philips AVENT
Vous pouvez maintenant apprécier le
côté pratique et la facilité d’utilisation
du stérilisateur micro-ondes Express II
AVENT à vapeur. Il élimine les bactéries
nocives en seulement quelques
minutes ! De grande capacité, il peut
traiter plus d’accessoires – jusqu’à 6
biberons – cependant il reste compact
et léger. De nouveaux détails tels que
les poignées de sécurité contribuent à
sécuriser sa manipulation et facilitent
plus que jamais la stérilisation des
tire-laits, biberons, pots, tasses et
accessoires Philips AVENT.
Veuillez bien prendre le temps de lire
attentivement TOUT LE MODE D’EMPLOI, y
compris les avertissements, avant d’utiliser
votre stérilisateur micro-ondes Express II à
vapeur pour la première fois. CONSERVEZ
SOIGNEUSEMENT CE MODE D’EMPLOI.
Il est également disponible sur
www.philips.com/AVENT
Assemblage et utilisation
I IV
Contenu
1. Couvercle
a. Attaches de sécurité
2. Plateau biberons/
accessoires
b. Tige centrale
c. Emplacement pour
biberon
d. Emplacement pour
tétine
e. Fentes pour tire-lait
3. Base
f. Poignées de sécurité
II
Avant chaque utilisation
Lavez toutes les pièces à
l’eau tiède savonneuse et
rincez-les à l’eau claire.
1. Retirez le panier du
stérilisateur et versez
200ml d’eau dans le fond.
Disposer les accessoires dans le stérilisateur
Avant de vous servir de votre stérilisateur micro-ondes
Express II à vapeur, assurez-vous toujours que les
articles sont disposés selon les instructions suivantes :
A
Pour mettre six biberons AVENT Airflex
125ml ou 260ml
1. Placez les tétines dans leurs emplacements
autour de la tige centrale.
2. Posez les bagues par-dessus les tétines.
3. Placez les trois premiers capuchons dans les
fentes inférieures de la tige.
4. Placez le restant des capuchons dans les
fentes supérieures.
5. Disposez les biberons, goulots en bas, autour
des tétines et bagues présentes.
B
Pour mettre trois biberons Airflex 330ml
1. Placez les tétines dans leurs trois emplacements
autour de la tige centrale.
2. Posez les bagues par-dessus les tétines.
3. Placez les biberons, goulots en bas, dans les
trois autres emplacements à tétines.
4. Arrangez les trois capuchons sur les bords
du plateau, entre les biberons.
C
1. Démontez le tire-lait ISIS en vous assurant
2. Placez les entonnoirs du tire-lait dans les
3. Placez les tétines dans leurs emplacements
4. Posez les bagues par-dessus les tétines.
5. Placez un capuchon dans la fente inférieure
6. Placez les biberons, goulots en bas, dans les
7.
D
1. Placez les pots VIA, goulots en bas, autour
2. Placez les couvercles VIA à la verticale sur
IMPORTANT : Un volume d’eau
insuffisant risque d’endommager
le stérilisateur micro-ondes
Express II à vapeur et/ou votre
micro-ondes. Un volume trop
important risque de faire échouer
le procédé de stérilisation.
2. Replacez le panier dans
le fond.
3. Placez le couvercle sur la
base et pressez les attaches
de sécurité jusqu’au déclic.
4. Assurez-vous que votre
micro-ondes est propre et
sec avant de vous en servir
– Placez le stérilisateur au
centre du micro-ondes.
III
Sélectionnez la longueur
de temps nécessaire en
fonction du wattage de
votre micro-ondes – Voir
tableau III – Ne dépassez
pas les minutes requises.
Pour mettre un ou deux tire-laits ISIS Philips
AVENT (pièces non-électriques uniquement)
et deux biberons Airflex 125ml ou 260ml
que la tige est séparée du diaphragme.
deux fentes prévues.
autour de la tige centrale.
libre de la tige, puis l’autre dans la fente
supérieure au-dessus du capuchon inséré.
emplacements à biberons libres.
Disposez le reste des pièces NON-ÉLECTRIQUES
du tire-lait là où il y a de la place sur le plateau.
Pour mettre six pots AVENT VIA 180ml ou
240ml et leurs couvercles
de la tige centrale.
les bords du panier. La partie extérieure des
couvercles doit être tournée vers le centre
du stérilisateur.
Après chaque cycle
IMPORTANT : Laissez le stérilisateur refroidir au moins
deux minutes avant de le sortir du micro-ondes.
1. Pour sortir le stérilisateur du micro-ondes : Après
qu’il ait refroidi, sortez-le en le tenant par le
rebord et/ou les poignées de sécurité et posez-le
sur une surface plane et résistante à la chaleur.
NB : Les articles à l’intérieur resteront stérilisés pendant près
de 24 heures si le couvercle n’est pas soulevé.
2. Après avoir sorti le stérilisateur du micro-ondes :
Défaites les attaches du couvercle et soulevez-le
en dirigeant l’ouverture de façon à ce que la
vapeur s’échappe loin de vous.
Entretien de votre stérilisateur
• Égouttez toujours l’eau qui reste dans votre
stérilisateur et rincez-le pour éviter qu’il
ne s’entartre.
• Assurez-vous qu’il a bien séché avant de le ranger.
• Le stérilisateur micro-ondes Express II à vapeur
convient au lave-vaisselle.
Pour mettre les pièces du système AVENT
E
VIA et jusqu’à quatre pots VIA 180 ou 240ml
1. Placez la tétine dans un emplacement à tétine.
2. Posez la bague sur la tétine.
3. Placez les pots VIA goulots en bas autour de
la tige centrale.
4. Posez l’adaptateur VIA verticalement sur le
bord du plateau (comme illustré).
5. Placez les couvercles à la verticale tout autour
des bords du plateau. La partie extérieure des
couvercles doit être tournée vers le centre
du stérilisateur.
6. Placez le capuchon de la tétine dans la fente
supérieure libre de la tige.
Pour mettre d’autres articles de petite puériculture
Pour stériliser D’AUTRES PRODUITS NON-ÉLECTRIQUES
il suffit de disposer les pièces sur le plateau de façon
à ce que la vapeur puisse circuler entre elles.
AVERTISSEMENT – TOUTE DÉFAILLANCE AUX
INSTRUCTIONS DONNÉES DANS CE MODE D’EMPLOI
RISQUE D’ENDOMMAGER CE PRODUIT OU/ET VOTRE
MICRO-ONDES.
• Lavez-vous soigneusement les mains avant
de toucher des articles stérilisés.
• Assurez-vous que vous utilisez exactement 200ml
d’eau (le stérilisateur doit être égoutté et séché
après chaque utilisation.)
• Suivez toujours les instructions relatives à la
disposition des pièces et ne surchargez pas.
• N’utilisez pas d’eau de Javel ni de liquides ou
comprimés de stérilisation chimiques dans votre
stérilisateur, ni sur les pièces à stériliser.
• Ne mettez ni pièces métalliques, électriques, ou
électroniques dans votre stérilisateur.
• Respectez la longueur de temps nécessaire en
fonction du wattage de votre micro-ondes.
(Voir tableau )
• Si vous avez un micro-ondes muni d’un grill,
assurez-vous que le grill n’est pas allumé ou qu’il
a bien refroidi avant d’utiliser votre stérilisateur.
• Assurez-vous que le couvercle est bien attaché à
la base avant de mettre le stérilisateur au four.
• Laissez bien refroidir le stérilisateur au moins deux
minutes avant de le sortir du micro-ondes.
• N’enlevez pas le couvercle tout de suite
à la sortie du micro-ondes. Laissez-le refroidir
un peu car la vapeur est chaude.
• Quand vous sortez le stérilisateur du micro-ondes,
tenez-le droit pour éviter de renverser de
l’eau chaude.
• Faites attention en sortant votre stérilisateur
du micro-ondes. Il sera encore chaud.
• Enlevez le couvercle en dirigeant l’ouverture
loin de vous pour laisser la vapeur s’échapper.
• Attention en sortant les articles stérilisés,
ils seront peut-être encore chauds.
• Ne rincez pas les biberons qui viennent
d’être stérilisés.
• Gardez toujours hors de portée des enfants.
• Ne mettez pas de goupillon au micro-ondes.
NB : Ne surchargez pas votre stérilisateur.
NB : Ne mettez pas les capuchons à l’envers dans
le stérilisateur.
Le stérilisateur micro-ondes Express II à vapeur
NB :
est spécifiquement conçu pour prendre les biberons
à goulot large Airflex.
Certains des produits illustrés ne sont pas disponibles
dans tous les pays. Veuillez contacter Philips AVENT pour
vérifier les disponibilités.
III
Philips AVENT est à votre disposition
Appelez le Numéro Vert
(France uniquement) : 0800 90 81 54
De Suisse, composez le : 056 266 56 56
De Belgique/Luxembourg, composez le : +32 (0)9 259 1050
AVENT, Suffolk, CO10 7QS, England
www.philips.com/AVENT
1110

DE DE
Philips AVENT Express II Mikrowellen-Dampfsterilisator
Vielen Dank, dass Sie sich für
ein Philips AVENT-Produkt
entschieden haben.
Der praktische und leicht zu bedienende
Philips AVENT Express II MikrowellenDampfsterilisator nutzt die Leistung Ihrer
Mikrowelle, um schädliche Bakterien in nur
wenigen Minuten vollständig abzutöten.
Sein Fassungsvermögen von bis zu
sechs Flaschen übertrifft alle anderen
Mikrowellen-Sterilisatoren, trotzdem ist
das Gerät kompakt, leicht und damit sogar
ideal für den Urlaub. Die revolutionären
Anti-Hitze-Rillen machen den Gebrauch des
Sterilisators noch sicherer und die
Sterilisation von Philips AVENT Milchpumpen,
Airflex Flaschen, Bechern und anderem
Zubehör noch einfacher als zuvor.
Bitte nehmen Sie sich einige Minuten Zeit
um die Gebrauchsanweisung vollständig
durchzulesen, bevor Sie Ihren Express II
Mikrowellen-Dampfsterilisator zum ersten
Mal benutzen und heben Sie sie für späteren
Gebrauch auf. Auch erhältlich unter
www.philips.com/AVENT
Einzelteile und Gebrauch des Gerätes
I IV
Inhalt
1. Deckel
a. Clips
2. Flaschen- und Zubehörgitter
Ständer für Verschlusskappen
b.
c. Flaschenhalterung
d. Saugerhalterung
e. Schlitze für ISIS-
Milchpumpe
3. Untersatz
f. Seitliche Griffe
mit Anti-Hitze-Rillen
II
Vor jedem Gebrauch
Waschen Sie vor dem
Sterilisieren alle Teile in
mildem Spülwasser und
spülen Sie sie danach
gründlich mit klarem
Wasser ab.
1. Nehmen Sie das
Flaschengitter aus dem
Sterilisator und füllen Sie
200ml Wasser in den Boden.
Beladen des Sterilisators
Bevor Sie den Express II Mikrowellen-Dampfsterilisator
benutzen, stellen Sie sicher, dass er gemäß den
folgenden Anweisungen befüllt wurde.
Beladen mit sechs 125ml oder 260ml AVENT
A
Airflex Flaschen
1. Setzen Sie die Sauger in die Saugerhalterungen
um den Ständer.
2. Legen Sie die Verschlussringe auf die Sauger.
3. Platzieren Sie drei Verschlusskappen in den
unteren Schlitzen am Ständer.
4. Platzieren Sie nun die übrigen drei Verschlusskappen
in den oberen Schlitzen am Ständer.
5. Stellen Sie die umgedrehten Flaschen zwischen
die vorher platzierten Sauger und Verschlussringe.
Beladen mit drei 330ml Airflex Flaschen
B
1. Setzen Sie die Sauger in die drei
Saugerhalterungen um den Ständer.
2. Legen Sie die Verschlussringe auf die Sauger.
3. Stellen Sie die umgedrehten Flaschen in die drei
äußeren Saugerhalterungen.
4. Platzieren Sie nun die drei Verschlusskappen
zwischen den umgedrehten Flaschen am Rand
des Flaschengitters.
WICHTIG: Das Einfüllen von
zuwenig Wasser kann zu
Beschädigungen an Ihrem
Express II MikrowellenDampfsterilisator und/oder
Ihrem Mikrowellengerät führen.
Benutzung von zuviel Wasser
Die
kann
zur Folge haben, dass der
Inhalt des Gerätes nicht
ausreichend sterilisiert wird.
2. Stellen Sie das Flaschengitter
zurück in den Sterilisator.
3. Setzen Sie den Deckel auf das
Unterteil des Sterilisators und
schließen Sie die Clips bis diese
mit einem Klick einrasten.
4. Stellen Sie vor der Benutzung
sicher, dass Ihr Mikrowellengerät
sauber und trocken ist und
platzieren Sie den Sterilisator in
der Mitte des Gerätes.
III
Wählen Sie die Wattleistung
und Sterilisationszeit
entsprechend Tabelle III –
diese Zeiten auf keinen Fall
überschreiten.
Beladen mit ein oder zwei Philips AVENT ISIS
C
Milchpumpen (ohne elektrische Teile) und zwei
125ml ODER zwei 260ml Airflex Flaschen
1. Nehmen Sie die ISIS Milchpumpe auseinander
und stellen Sie sicher, dass der Stiel von der
Silikonmembran entfernt wurde.
2. Stecken Sie die Pumpenkörper in die hierfür
vorgesehenen Schlitze.
3. Setzen Sie die Sauger in die Saugerhalterungen
um den Ständer.
4. Legen Sie die Verschlussringe auf die Sauger.
5. Stecken Sie eine Verschlusskappe in den freien
unteren Schlitz und die zweite in den freien
oberen Schlitz am Ständer.
6. Platzieren Sie die umgedrehten Flaschen in
den verbleibenden Flaschenhalterungen.
7. Ordnen Sie die übrigen Teile der Milchpumpen
(jedoch KEINE elektrischen Teile) in den
verbleibenden Lücken im Flaschengitter an.
Beladen mit sechs 180ml ODER 240ml
D
AVENT VIA Bechern inklusive Schraubdeckeln
1. Platzieren Sie die umgedrehten VIA Becher um
den Ständer.
2.
Stellen Sie die VIA Schraubdeckel hochkant an den
äußeren Rand des Flaschengitters. Die Gewinde
der Deckel sollten hierbei nach außen zeigen.
Nach jedem Gebrauch
WICHTIG: Lassen Sie den Sterilisator mindestens zwei
Minuten lang abkühlen, bevor Sie ihn aus der
Mikrowelle nehmen.
1. Entnahme des Sterilisators aus der Mikrowelle:
Nachdem das Gerät ausreichend ausgekühlt ist, nehmen
Sie es aus der Mikrowelle, indem Sie es an den seitlichen
Griffen festhalten. Stellen Sie den Sterilisator nun auf
eine ebene, hitzebeständige Oberfläche.
HINWEIS: Der Inhalt des Express II Mikrowellen-Dampfsterilisators
bleibt nach der Sterilisation bei ungeöffnetem Deckel bis zu
24 Stunden steril.
2. Nach der Entnahme aus der Mikrowelle:
Entfernen Sie den Deckel, indem Sie die Clips öffnen.
Halten Sie den Deckel beim Hochheben von sich fern,
um den Wasserdampf entweichen zu lassen.
Pflege und Reinigung
• Entfernen Sie nach jedem Gebrauch überschüssiges
Wasser aus dem Gerät und spülen Sie es aus, um die
Ablagerung von Kalk zu vermeiden.
• Das Gerät nur in trockenem Zustand aufbewahren.
• Der Express II Mikrowellen-Dampfsterilisator
ist spülmaschinenfest.
Beladen mit einer VIA-Flasche* und bis zu vier 180ml
E
ODER 240ml VIA Bechern inklusive Schraubdeckeln
1. Setzen Sie den Sauger in eine der äußeren
Saugerhalterungen.
2. Legen Sie den Verschlussring auf den Sauger.
3. Platzieren Sie die umgedrehten VIA Becher um
den Ständer.
4. Legen Sie den VIA Adapter hochkant an den äußeren
Rand des Flaschengitters (siehe Abbildung).
5. Stellen Sie die VIA Schraubdeckel hochkant an den
äußeren Rand des Flaschengitters. Die Gewinde
der Deckel sollten hierbei nach außen zeigen.
6. Stecken Sie die Verschlusskappe in den freien
oberen Schlitz am Ständer.
Beladen mit anderen Fütterutensilien und Zubehör
Wenn Sie andere NICHT-ELEKTRISCHE PRODUKTE
sterilisieren, platzieren Sie die einzelnen Teile so auf dem
Flaschengitter, dass der Wasserdampf alle Oberflächen
leicht erreichen kann.
* Bestehend aus VIA Becher, Schraubdeckel und Adapter, Sauger,
Verschlussring und Verschlusskappe.
SICHERHEITSHINWEISE – NICHTBEACHTUNG KANN ZU
VERBRENNUNGEN ODER BESCHÄDIGU NG DES STERI LISATORS
UND/ODER IHRES MIKROWELLENGERÄTES FÜHREN.
• Vor dem Berühren von sterilisierten Artikeln sollten
Sie sich die Hände waschen.
• Geben Sie immer exakt 200ml Wasser in das Gerät.
(Restwasser vor jedem Sterilisationsvorgang wegschütten.)
• Beachten Sie die Hinweise zum Beladen des Gerätes und
überladen Sie es nicht.
• Verwenden Sie keine Bleichmittel oder
Sterilisationslösungen/-tabletten im Sterilisator oder
für die zu sterilisierenden Artikel.
• Sterilisieren Sie niemals metallische oder elektronische
Artikel im Sterilisator.
• Halten Sie sich an die vorgegebene Sterilisationszeit,
die sich nach der Wattleistung Ihres Mikrowellengerätes
richtet (siehe Tabelle ).
• Bei Kombinationsgeräten mit integriertem
Grill sollte dieser ausgeschaltet und ausreichend abgekühlt
sein, bevor Sie in dem Gerät sterilisieren.
• Prüfen Sie, dass der Deckel fest geschlossen ist, bevor Sie
den Sterilisator in die Mikrowelle stellen.
• Lassen Sie den Sterilisator immer mindestens 2 Minuten
abkühlen, bevor Sie ihn aus der Mikrowelle nehmen.
• Nehmen Sie den Deckel des Sterilisators nicht unmittelbar
nach der Sterilisation ab. Lassen Sie das Gerät erst
abkühlen, da der Wasserdampf heiß ist.
• Halten Sie den Sterilisator gerade, wenn Sie ihn aus der
Mikrowelle nehmen, um das Auslaufen von heißem
Wasser zu verhindern.
• Seien Sie VORSICHTIG, wenn Sie den Sterilisator aus der
Mikrowelle nehmen – er ist immer noch heiß.
• Halten Sie den Deckel beim Entfernen von sich fern, um
den Wasserdampf entweichen zu lassen.
• Bei der Entnahme der sterilisierten Teile vorsichtig sein,
da diese noch heiß sein können.
• Sterilisierte Artikel nach der Entnahme aus
dem Sterilisator nicht ausspülen.
• Das Gerät immer außerhalb der Reichweite von
Kindern aufbewahren.
• Die AVENT Flaschen- und Saugerbürste ist nicht
zur Sterilisation geeignet.
HINWEIS:
Den Sterilisator nicht überladen.
Verschlusskappen nie umgekehrt im Sterilisator
platzieren.
Der Express II Mikrowellen-Dampfsterilisator wurde speziell
für die weite Form von Airflex Flaschen entwickelt.
Unter Umständen sind einige der abgebildeten Produkte
nicht in allen Ländern erhältlich. Bitte kontaktieren Sie
Philips AVENT, um die Verfügbarkeit zu prüfen.
III
Philips AVENT ist für Sie da:
DE: 0800 180 81 74
AT: 0800 292 553 (gebührenfrei) CH: 056 266 56 56
(gebührenfrei)
AVENT, Suffolk,CO10 7QS, England
www.philips.com/AVENT
1312
 Loading...