

Page 1
SCD831
SCD833
SCD835
SCD620
Page 2

Page 3
1
16
2
3
4
5
13
14
12
11
6
9 1087
17
18
19
25
21
20
22
24
23
15
Page 4

Page 5

English 6
Dansk 29
Deutsch 53
Español 78
Français 102
Italiano 126
Nederlands 150
Norsk 174
Português 197
Suomi 221
Svenska 244
Türkçe 268
ﺔﻴﺑﺮﻌﻟﺍ
291
Page 6

6
English
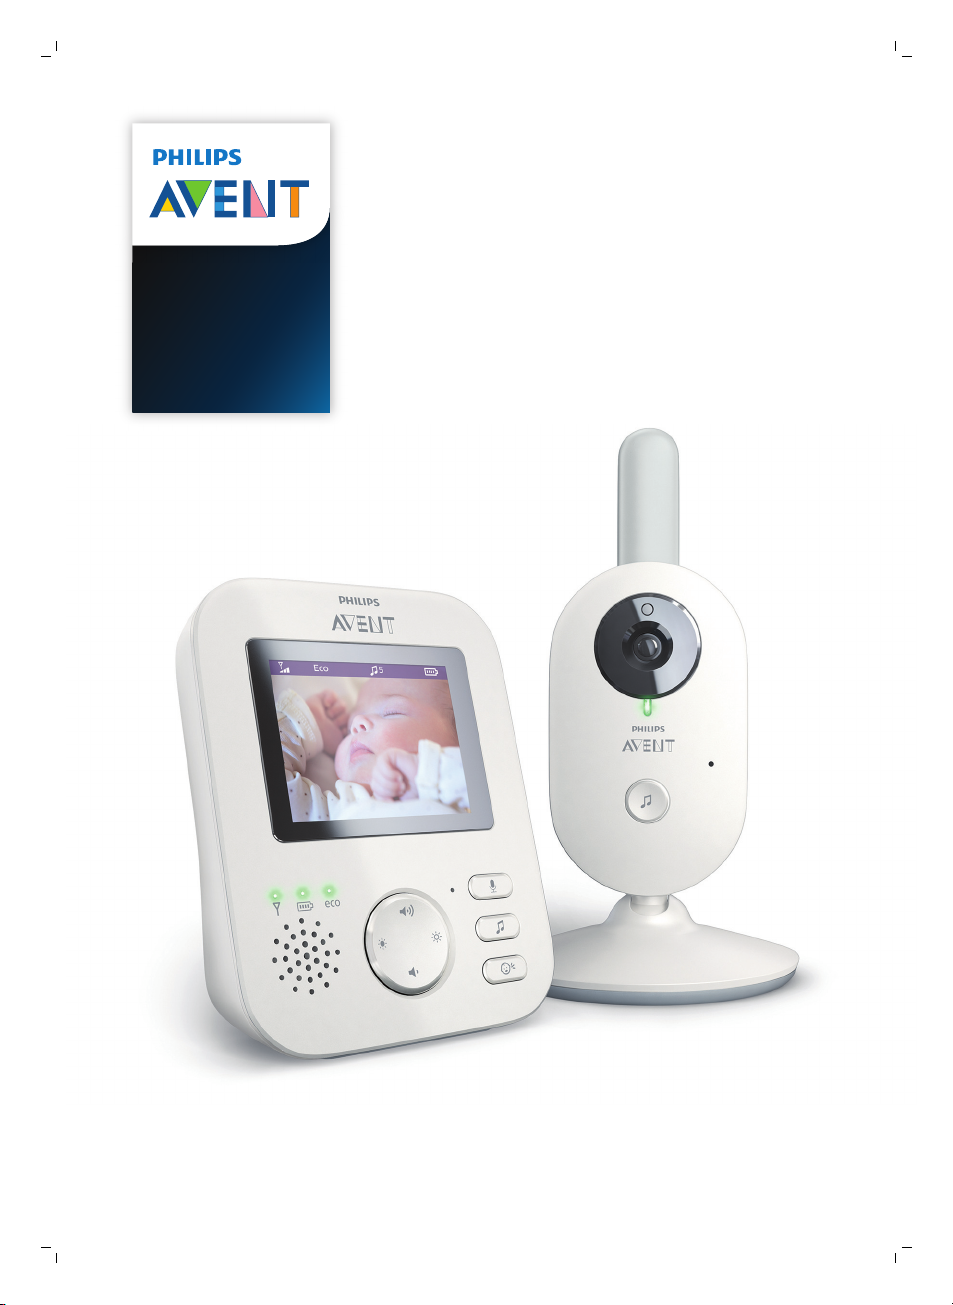
Introduction
Congratulations on your purchase and welcome to Philips Avent! To fully
benefit from the support that Philips Avent offers, register your product at
www.philips.com/welcome.
The Philips Avent video babymonitor provides you with round-the-clock
support and it allows you to see your baby day and night from anywhere in
the house. The latest digital technology guarantees clear sound and the
clearest image of your baby. This gives you an additional sense of security
without entering your baby’s room and disturbing its sleep.
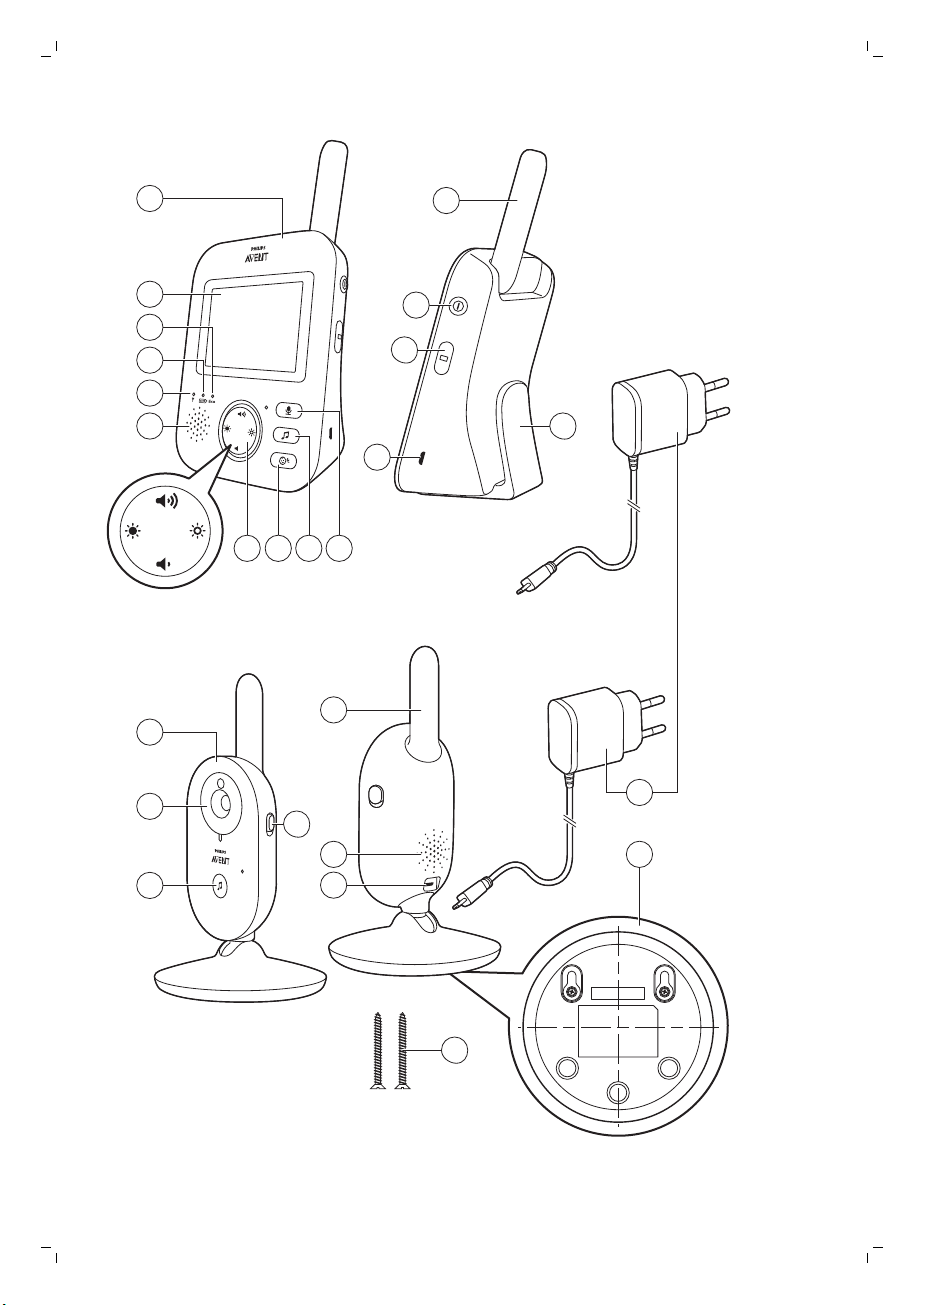
General description
1 Parent unit
2 Display
3 ECO light
4 Battery status light
5 Link light
6 Speaker
7 Control button (menu navigation/volume/brightness)
8 Sensitivity button
9 Lullaby button
10 Talk-back button
11 Socket for small plug
12 Mode button
13 On/off button
14 Antenna
15 Belt clip
16 Baby unit
17 Camera
18 Lullaby on/off button
19 On/off slide
20 Antenna
21 Speaker
22 Socket for small plug
23 Wall mounting holes
24 Adapter(2x)
25 Screws
Important safety information
Read this important information carefully before you use the appliance and
save it for future reference.
IMPORTANT
This baby monitor is intended as an aid. It is not a substitute for
responsible and proper adult supervision and should not be used as such.
Never leave your baby alone in your home. Always make sure there is
someone present to look after the baby and take care of its needs.
English
Page 7
English
Disclaimer
Please note that you use this baby monitor at your own risk. Koninklijke
Philips N.V. and its subsidiary companies are not responsible for the
operation of this baby monitor or your use of it and therefore do not accept
any liability in connection with your use of this baby monitor.
Danger
-
Never immerse any part of the baby monitor in water or any other liquid.
Do not place the appliance where water or any other liquid can drip or
splash onto it. Never use the baby monitor in moist places or close to
water.
-
Never put any object on top of the baby monitor and do not cover it. Do
not block any ventilation openings. Install according to the
manufacturer’s instructions.
-
Cords present a potential strangulation hazard. Keep cords out of the
reach of children (more than 1 meter/3.5 feet away). Never place the baby
monitor inside the baby’s bed or playpen.
Warning
-
Check if the voltage indicated on the adapter corresponds to the local
mains voltage before you connect the appliance.
-
Do not modify or cut off any part of the adapter and its cord, as this
causes a hazardous situation.
-
Only use the adapter supplied.
-
If the adapter is damaged, always have it replaced with one of the
original type in order to avoid a hazard.
-
This appliance can be used by children aged from 8 years and above and
persons with reduced physical, sensory or mental capabilities or lack of
experience and knowledge if they have been given supervision or
instruction concerning use of the appliance in a safe way and understand
the hazards involved. Children shall not play with the appliance. Cleaning
and user maintenance shall not be made by children without supervision.
-
Protect the mains cord from being walked on or pinched particularly at
plugs, convenience receptacles, and the point where they exit from the
appliance.
-
Make sure that you place the baby monitor in such a way that its cord
does not obstruct a doorway or passage. If you place the baby monitor
on a table or low cabinet, do not let the mains cord hang over the edge
of the table or cabinet. Make sure the cord does not lie on the floor
where it presents a tripping hazard.
-
Keep the packaging materials (plastic bags, cardboard buffers, etc.) out of
the reach of children, as they are not a toy.
-
To prevent electric shock, do not open the housing of the baby unit or
parent unit.
7
Caution
-
Use the appliance at a temperature between 0°C (32°F) and 40°C (104°F).
-
Do not install the appliance near any heat sources such as radiators, heat
registers, stoves or other apparatus (including amplifiers) that produce
heat.
Page 8
8
English
-
Make sure that your hands are dry when you handle adapters, plugs and
the mains cord.
-
All required markings on the baby unit, parent unitand power adapter
are located on the bottom of the baby unit, parent unit and power
adapter.
Compliance with standards
-
This product complies with the radio interference requirements of the
European Community.
-
Philips Consumer Lifestyle hereby declares that this baby monitor is in
compliance with the essential requirements and other relevant provisions
of Directive 2014/53/EU (FHSS: frequency band 2.4GHz, maximum radiofrequency power: 100 mW EIRP). A copy of the EC Declaration of
Conformity (DoC) is available online at www.philips.com/support.
Electromagnetic fields (EMF)
This Philips appliance complies with all applicable standards and
regulations regarding exposure to electromagnetic fields.
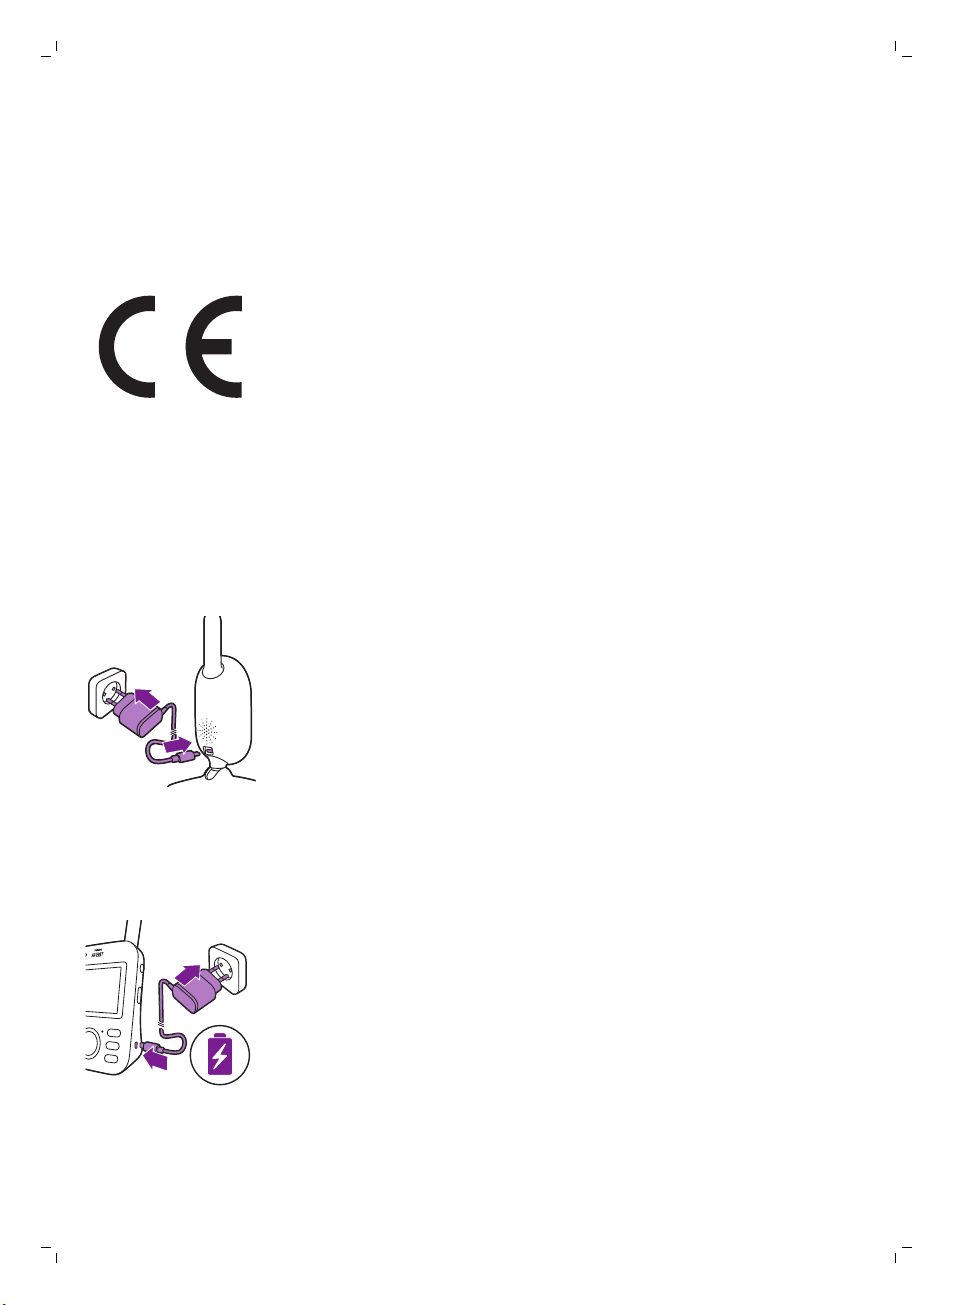
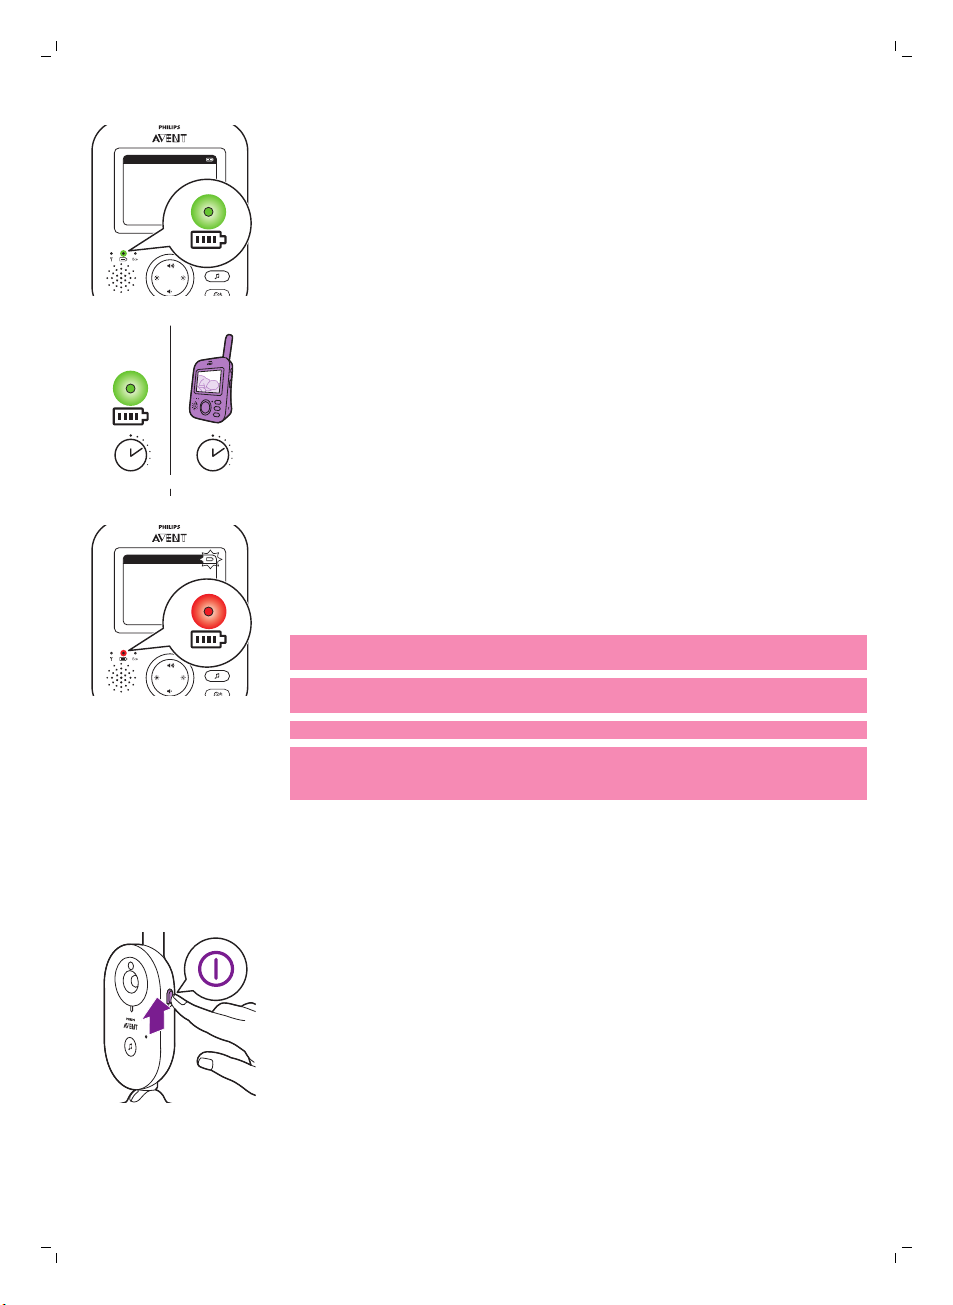
Preparing for use
Baby unit
Put the power adapter in the baby unit and the adapter in the wall socket.
Parent unit
The parent unit runs ona built-in rechargeable Li-ion battery.
Follow the below steps to charge the parent unit:
1 Put the power adapter in the parent unit and put the adapter in the wall
socket.
-
The battery status light turns orange to indicate that the appliance is
charging.
Page 9
20°CEco
1
10 hrs=3 hrs
20°CEco
1
English
-
When the battery is fully charged, thebattery statusindicator lights up
green continuously.
-
When you charge the parent unit for 3 hours, it can be used cordlessly for
approx. 10 hours.
-
If the parent unit is switched on during charging, charging takes
approximately twice as long.
-
When the rechargeable battery of the parent unit is almost empty, the
battery status light turnsred and the parent unit beeps.
-
If the battery is completely empty and the parent unit it not connected to
the mains, the parent unit automatically switches off and loses contact
with the baby unit.
Note: The built in rechargeable battery cannot be removed from the
product.
Note: The battery gradually and very slowly discharges, even when the
parent unit is switched off.
Tip: To save battery, switch off the parent unit when you do not use it.
Note: We advise you to keep the parent unit connected to the mains during
the whole night. If the battery of the parent unit runs low during the night,
the parent unit beeps and this may wake you up.
9
Using the baby monitor
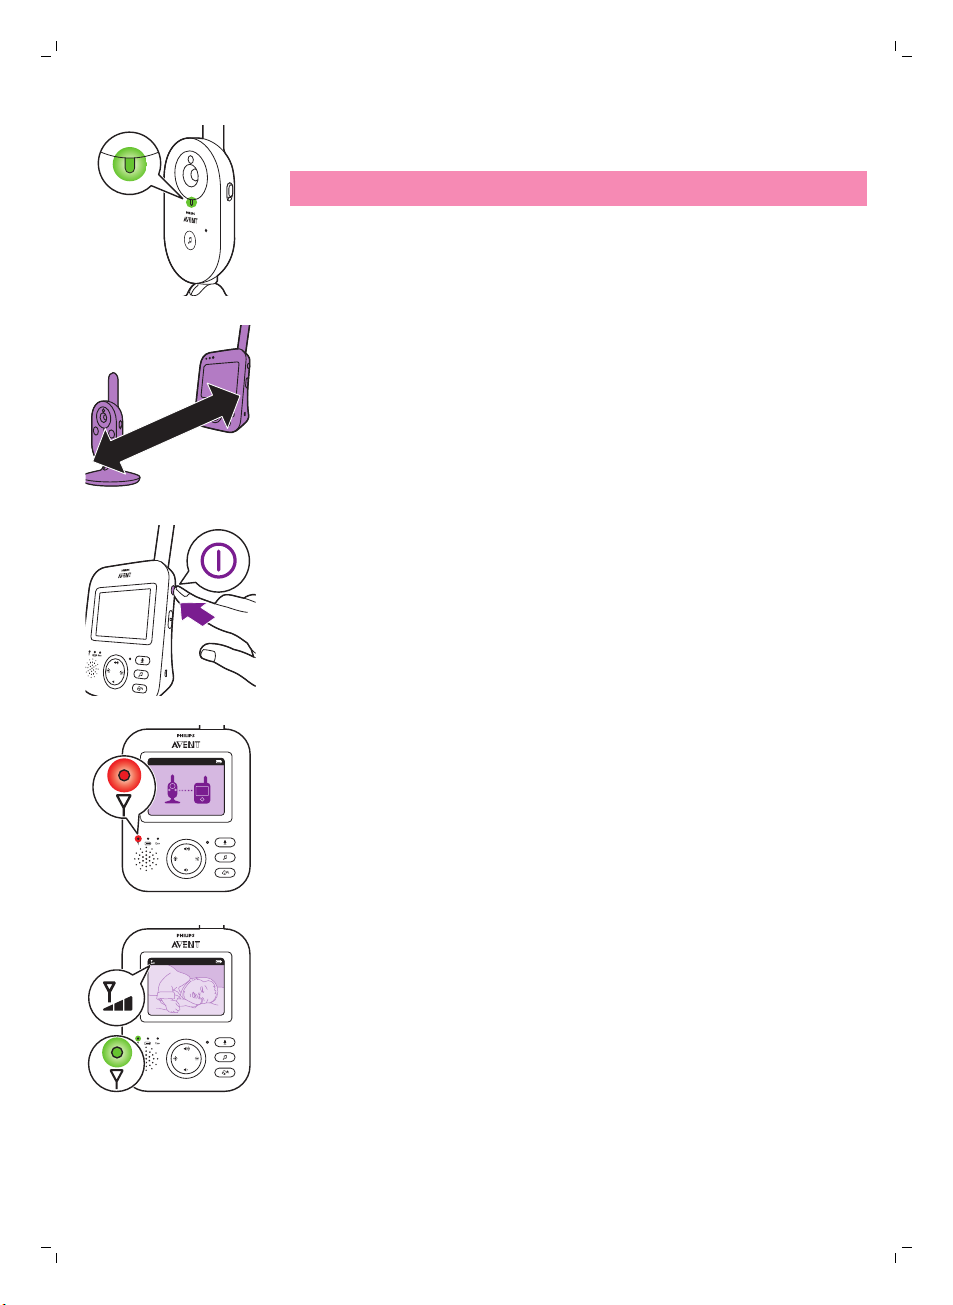
Linking parent unit and baby unit
1 Push the on/off slide on the baby unit upwards to the ON position.
Page 10
>2 .5m/8.2ft
20°CEco
1
20°CEco
1
10
English
2 When the baby unit is on, the power-on light on the baby unit lights up
green.
Note: The power-on light on the baby unit always lights up green, even
when there is no connection with the parent unit.
3 Make sure that the parent unit and the baby unit are at least 2.5 meters/
8.2 feet away from each otherto avoid acoustic feedback.
4 Press the on/off button on the parent unit to switch on the parent unit.
-
The display goes on, the linking image appears on the display and the
link light lights up red. The parent unit starts to search for the baby
unit.
-
When the parent unit and baby unit are linked, the link light lights up
green on the parent unit and one or more bars appear on the display.
Page 11
20°CEco
1
Note: It takes less than 10 seconds to establish the link between the
>1-1.5m/3.5-5ft
>2 .5m/8.2ft
parent unit and the baby unit.
When thebaby unit is turned off, the parent unit will show the out of
range image. Make sure that the baby unit is switched on.
-
If no connection has been established, the link light turns red, the
parent unit beeps three short beeps every 20 seconds and the out-ofrange image appears on the display.
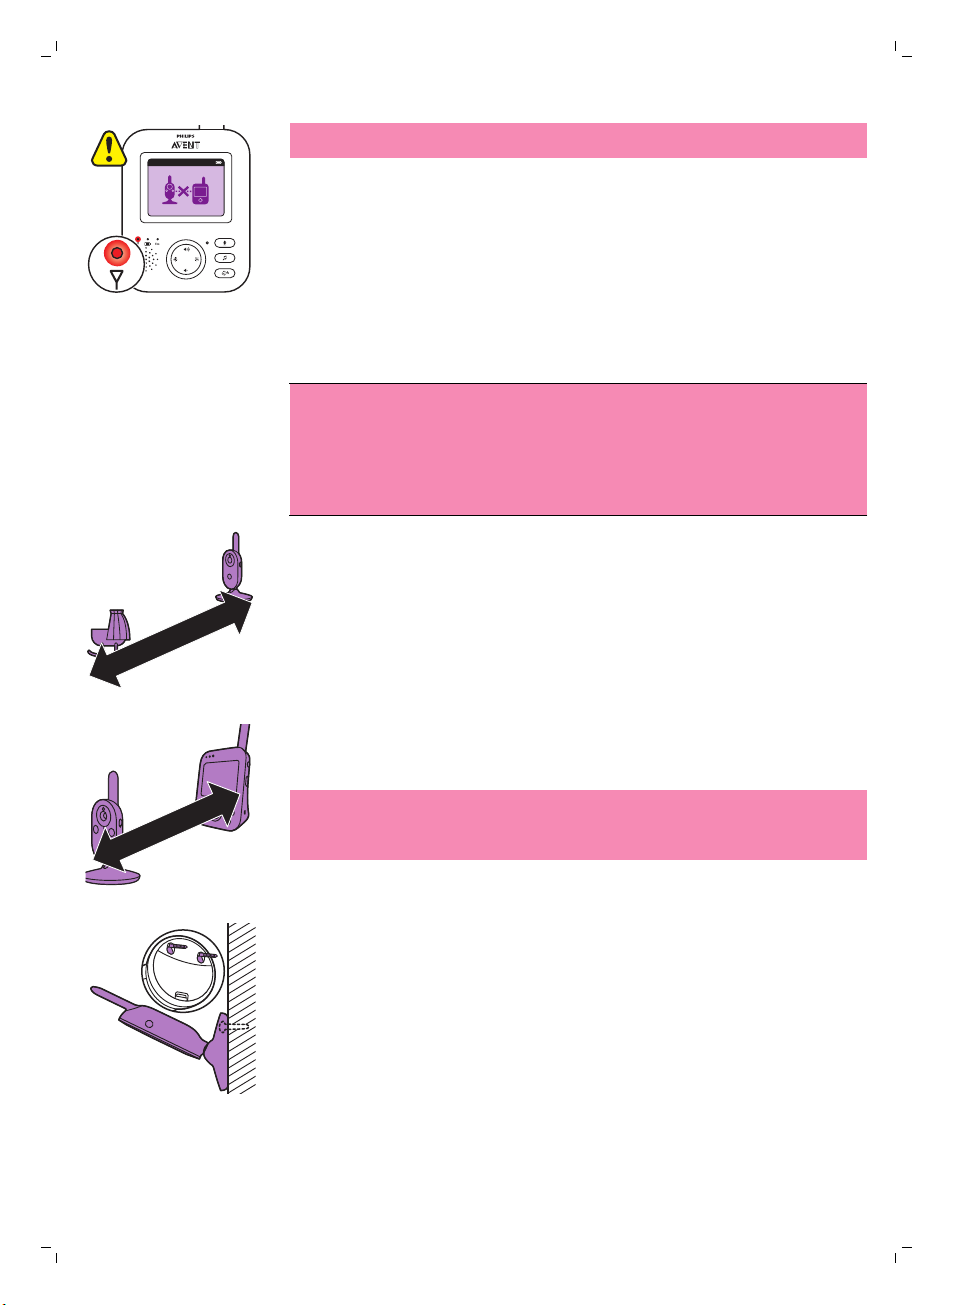
Positioning the baby monitor
Warning: The cord of the baby unit presents a
potential strangulation hazard. Make sure that
the baby unit and its cord are at least 1 meter /
3.5 feet away from your baby. Never place the
baby monitor inside the baby’s bed or playpen.
1 For optimal sound detection, make sure that the baby unit is no further
than 1.5 meter/ 5 feet away from the baby. Make sure that the baby unit
is at least 1 meter/ 3.5 feet away from the baby because of potential
strangulation hazard.
English
11
2 Place the parent unit within the operating range of the baby unit. Make
sure it is at least 2.5 meters / 8.2 feet away from the baby unit to avoid
acoustic feedback.
Note: If you use a cordless phone, wireless video, Wi-Fi network,
microwave oven or Bluetooth on 2.4GHz and you experience interference
on either the parent unit or baby unit, move the parent unit until there is
no more interference.I
3 There are two ways to position the baby unit
a Place the baby unit on a stable, level and horizontal surface.
b Mount the baby unit to the wall with the screws supplied.
Page 12
<300m/985ft
<50m/165ft
12
English
Tip: The wall mount template (see 'Wall mount') to mount the baby unit
to the wall can be found at the end of this user manual.
Tip: Use the provided template to mark the exact location of the screw
holes on the wall.
Tip: Position the baby unit at a higher level to get a good overview of the
baby’s bed or playpen.
4 Adjust the baby unit in a way that ensures the best visibility of your baby.
The baby unit can be rotated to position it in the desired way.
Operating range
The operating range is up to 50 meters/ 165 feet indoors and 300
meters/985 feet outdoors. The operating range of the baby monitor varies
depending on the surroundings and factors that cause interference. Wet
and moist materials cause so much interference that the range loss is up to
100%.
Dry materials Material
Loss of range
thickness
Wood, plaster, cardboard, glass (without metal,
wires or lead)
Brick, plywood < 30cm (12in) 5-35%
Reinforced concrete < 30cm (12in) 30-100%
Metal grilles or bars < 1cm (0.4in) 90-100%
Metal or aluminium sheets < 1cm (0.4in) 100%
< 30cm (12in) 0-10%
Features and settings
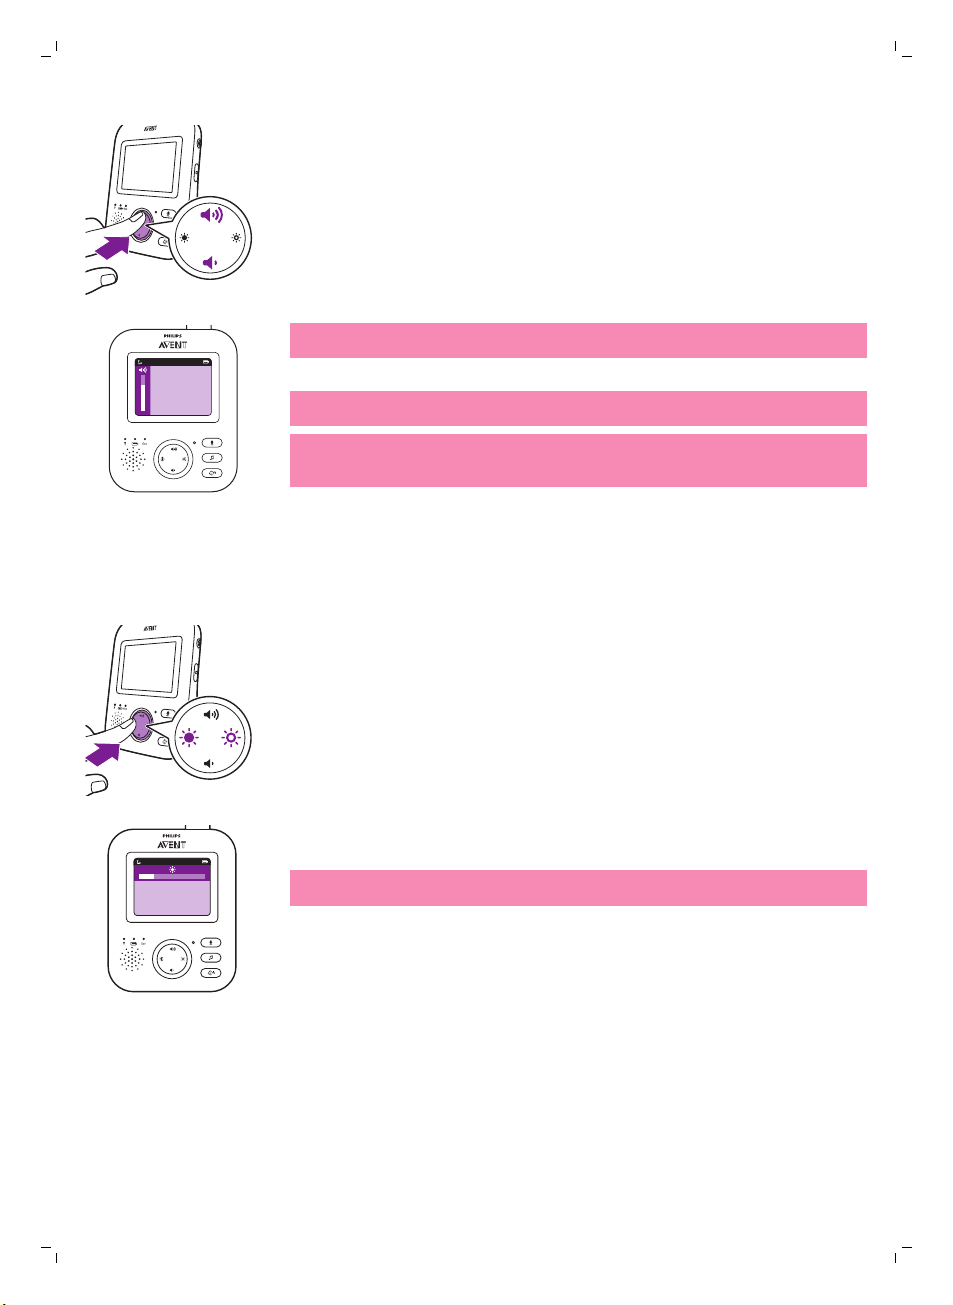
Volume
You can adjust the speaker volume of the parent unit to the level you prefer.
Page 13
20°C
1
Brightness
20°C
1
English
1 Press the top or bottom part of the control button to adjust the volume.
Tip: Make sure that the volume is adapted to the current conditions.
Under noisy conditions, the vibration alert can be turned on as well.
The volume bar appears on the display to show the selected volume.
Note: If the volume is set to a high level, the parent unit consumes more
power.
Note: When the volume bar is at its minimum, the volume is muted. The
parent unit shows a mute icon in the status bar and you will only receive
alerts and video from the parent unit.
You can adjust the display brightness of the parent unit to the level you
prefer.
1 Press the left or right part of the control button to adjust the brightness
of the display of the parent unit.
13
Modes
The brightness bar appears on the display to show the selected display
brightness.
Note: If the brightness is set to a high level, the parent unit consumes more
power.
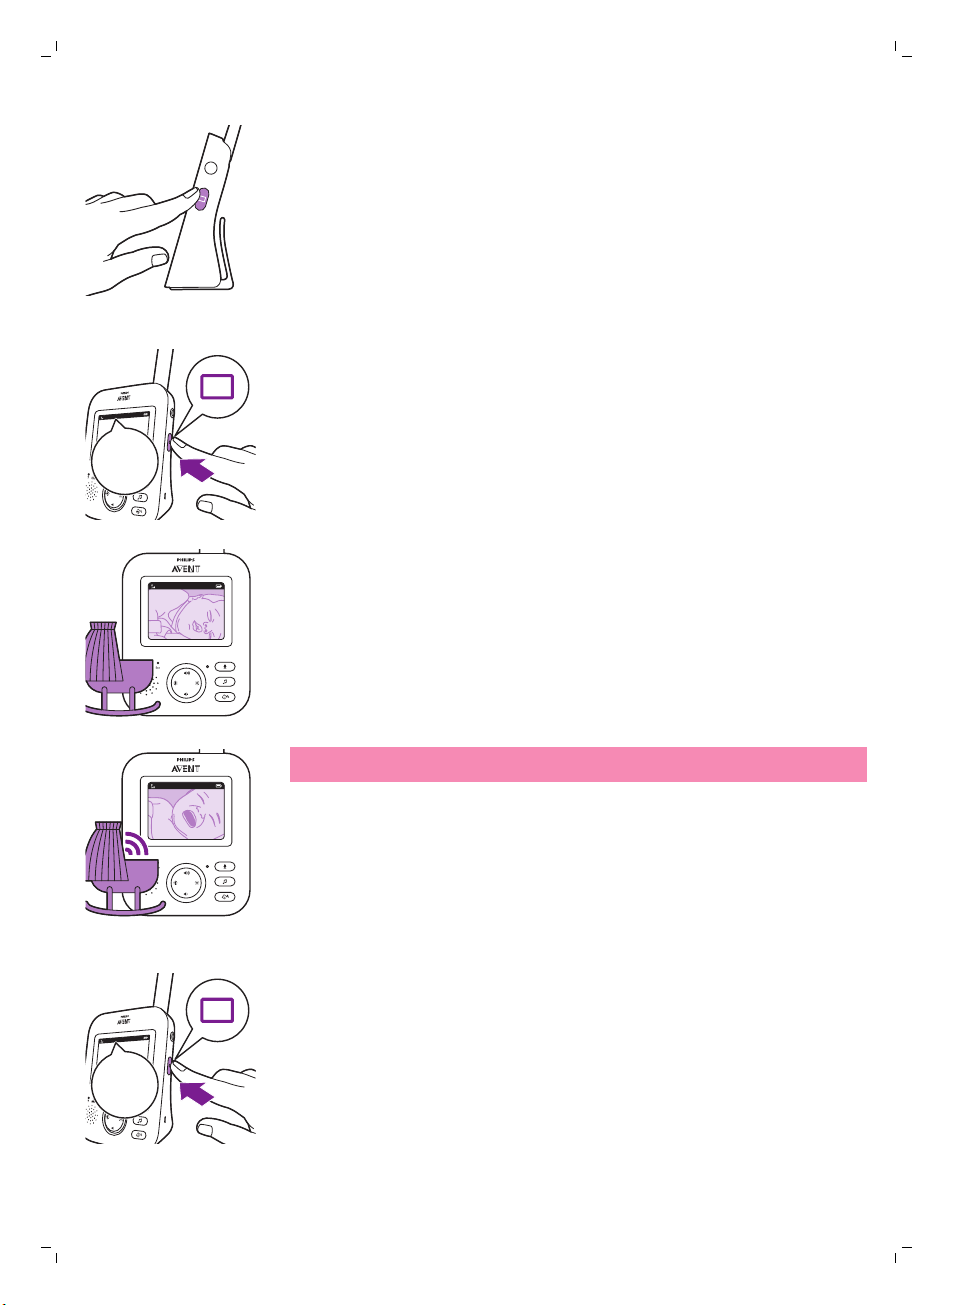
This baby monitor has four different modes that allows you to choose how
you want to look after your baby: VIDEO, AUDIO, VOX and ECO.
Page 14
VIDEO
VIDEO
20°C
1
VIDEO
20°C
1
VIDEO
AUDIO
AUDIO
14
English
With the baby monitor on, you can switch between these 4 different modes
by pressing the mode button on the side of the parent unit.
The display shows the selected mode. The selected mode is also indicated
in the status bar. When turning on the device, the mode that was last used
will be active.
VIDEO mode
Press the mode button on the side of the parent unit to select theVIDEO
mode.
When the VIDEO mode is activated, the screen is always on, so you can see
your baby. All sounds are directly transmitted to the parent unit.
Note: Set the sensitivity level to 'very high' to have continuous sound on the
parent unit. Please see the Sensitivity level chapter for more information.
AUDIO mode
1 Press the mode button on the side of the parent unit to switch to AUDIO
mode.
Page 15
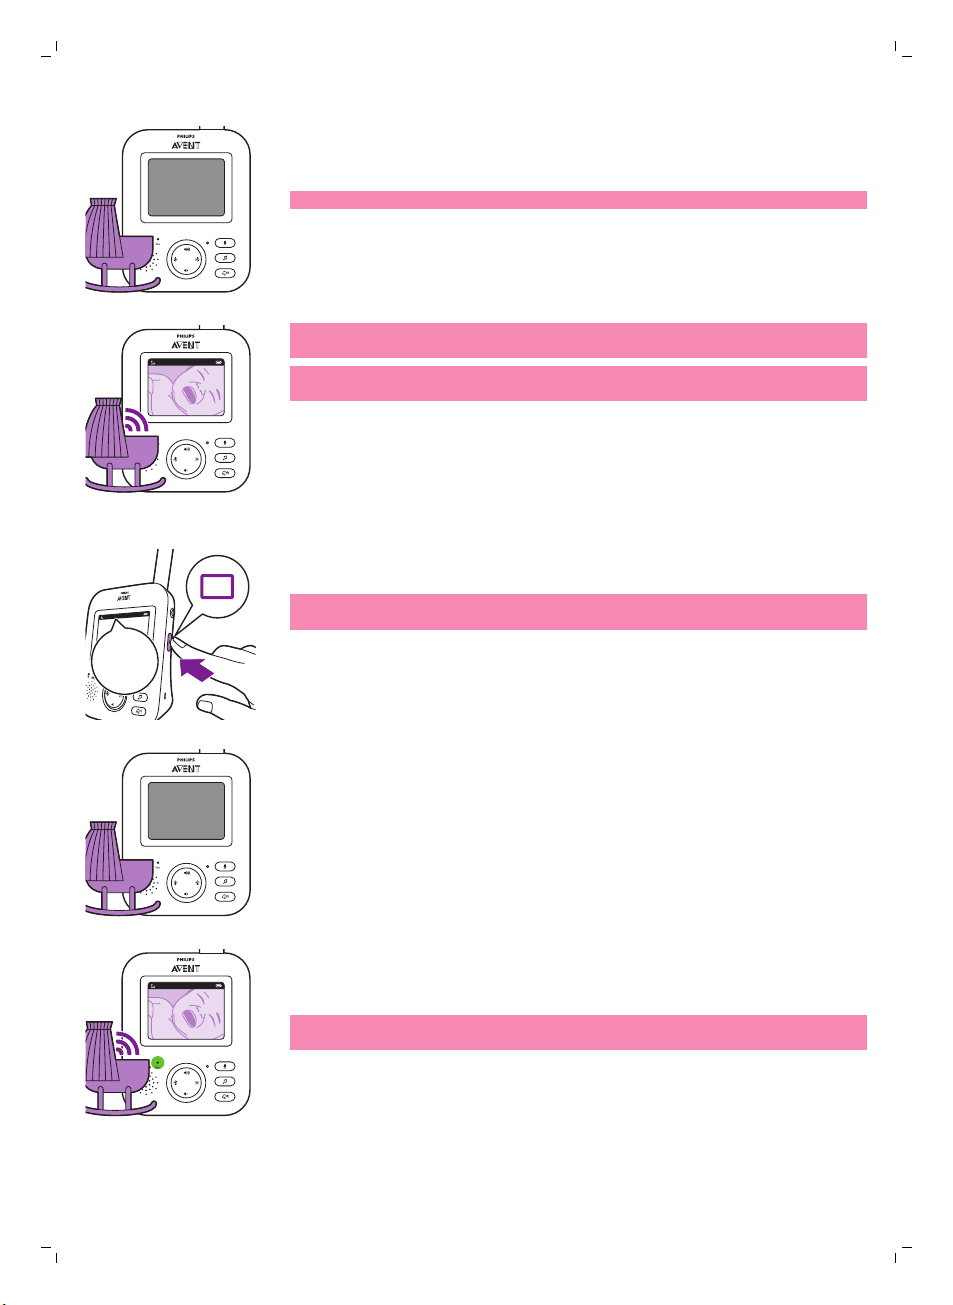
20°C
1
AUDIO
20°C
1
VOX
VOX
VOX
20°C
1
AUDIO
20°C
1
ECO
English
When the AUDIO mode is activated, the display of the parent unit switches
off. After 3 seconds the display will completely turn off and the status bar
will disappear.
Note: The status bar is not visible when the display is off.
Note: The link light shows that the parent unit is still on and connected to
the baby unit.
Note: Set the sensitivity level to 'very high' to have continuous sound on the
parent unit. Please see the Sensitivity level chapter for more information.
All sounds are constantly transmitted to the parent unit. If your baby cries,
the display of the parent unit is still off, but the sounds detected by
thebaby unitare transmitted to the parent unit.
VOX mode
1 Press the mode button on the side of the parent unit to switch to VOX
mode.
Note: When the display is on, the selected mode is shown in the status bar.
The status baris not visible when the display is off.
15
When the VOX mode is activated, the display and sound of the parent unit
switch off, if there is no sound detected for 20 seconds.
Whensound is picked up by the baby unit, the displayand sound of the
parent unit switch on immediately.The sounds are transmitted to the parent
unit.
Note: The minimum sound level to activate sound and display is defined by
the sensitivity setting.
Page 16
ECO
ECO
20°C
1
ECO
ECO
20°C
1
ECO
16
English
ECO mode
1 Press the mode button on the side of the parent unit to switch to ECO
mode.
Note: When the display is on, the selected mode will be visible in the status
bar. The status bar is not visible when the display is off.
When the ECO mode is activated the display and sound of the parent unit
switch off when no sound is detected for 20 seconds. TheECO light lights up
green to indicate that the ECO mode is activated. During ECO mode the
display and sound transmissions are turned off.
Whensound is picked up by the baby unit, the displayand sound of the
parent unit switch on immediately.The sounds are transmitted to the parent
unit.
Note: The minimum sound level to activate sound and display is defined by
the sensitivity setting.
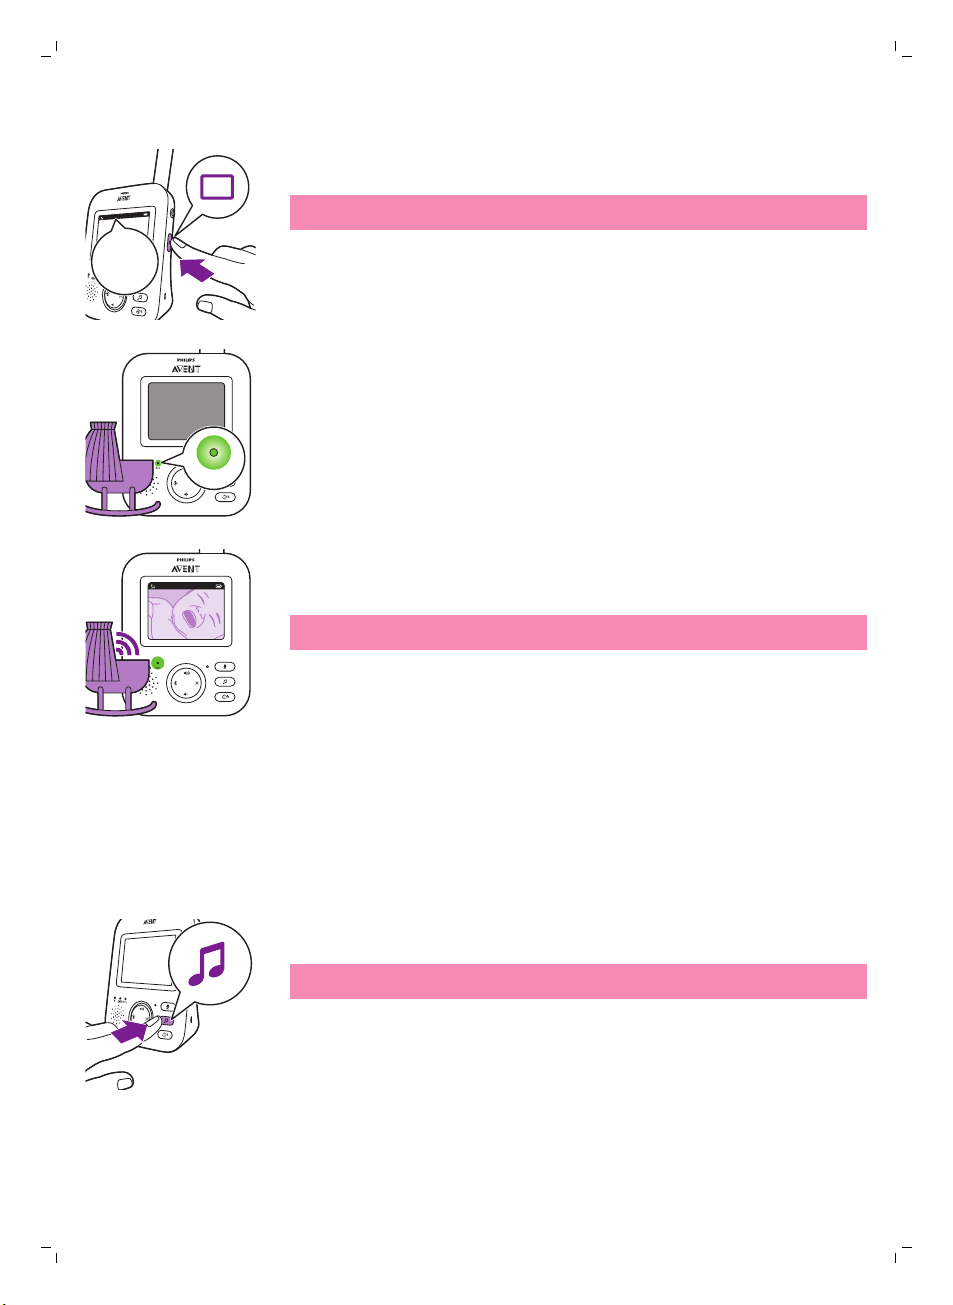
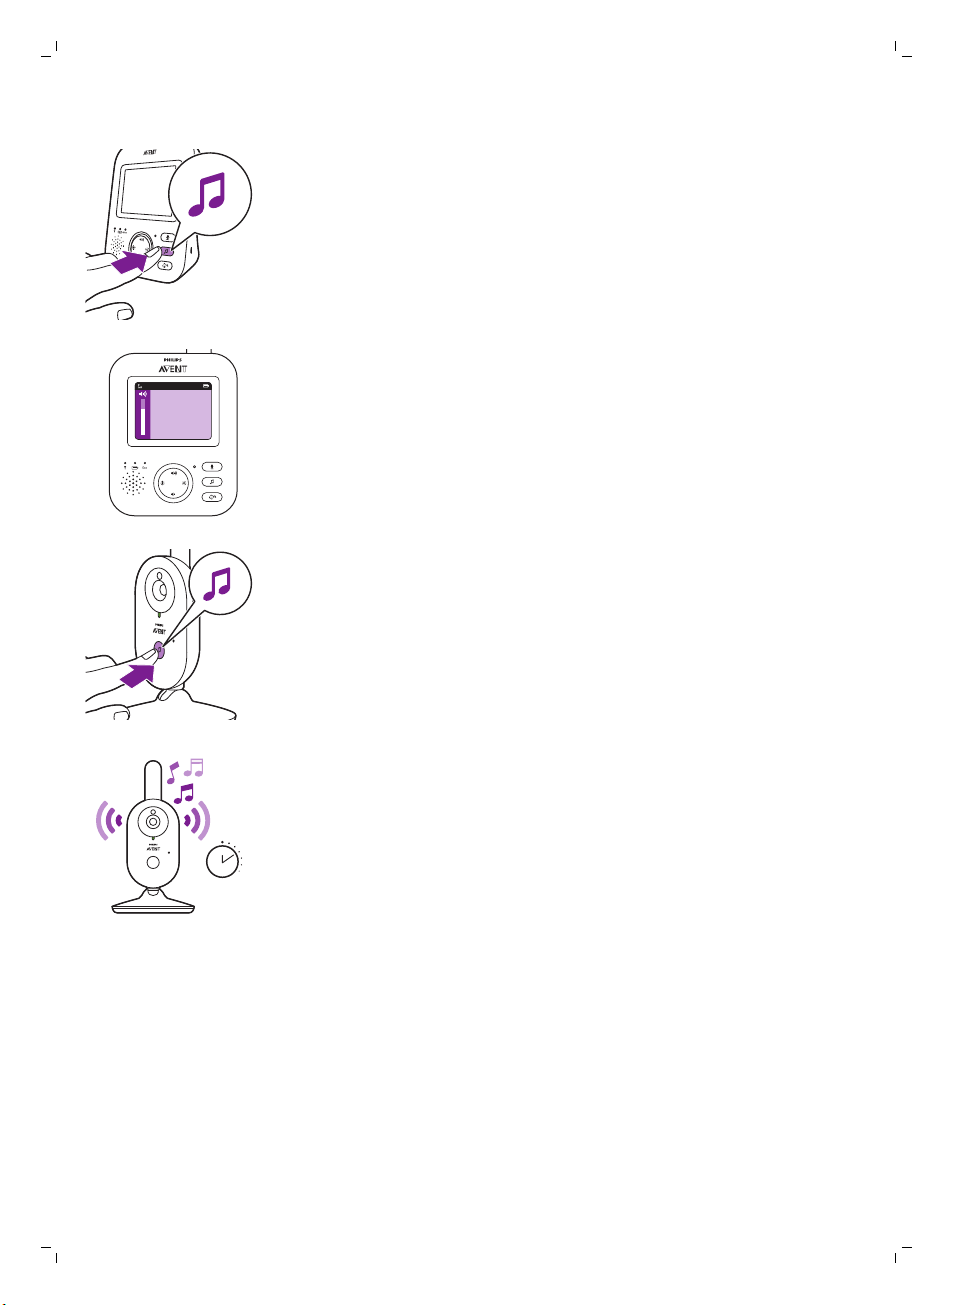
Lullabies
You can activate the lullaby feature either from the parent unit or from the
baby unit.
To activate the lullaby feature from the parent unit, follow the instructions
below:
Lullaby selection
1 Press the lullaby button on the parent unit to open the menu for
lullabies.
Note: Pressing the lullaby button while the lullaby menu is already open,
will close the menu.
Page 17

Lullaby Songs
1 Rock-a-Bye Baby
2 Twinkle, Twinkle
3 Hush, Little Baby
4 Brahm’s Lullaby
5 Golden Slumbers
Lullaby Songs
1 Rock-a-Bye Baby
2 Twinkle, Twinkle
3 Hush, Little Baby
4 Brahm’s Lullaby
5 Golden Slumbers
15 min
Lullaby Songs
1 Rock-a-Bye Baby
2 Twinkle, Twinkle
3 Hush, Little Baby
4 Brahm’s Lullaby
5 Golden Slumbers
English
2 Press the right part of the control button to enter the list of lullabies.
3 Press the top or bottom part of the control button to scroll through the
list of lullabies.
4 Press the right part of the control button to play a specific lullaby.
If you want to pause the lullaby, press the right side of the control button
again.
5 The status barof the parent unit shows the number of lullabies thatare
being played and repeated.
17
The lullaby starts to play on the baby unit and it is repeated continuously
for approximately 15 minutes.
Tip: To repeat all songs that are available, select the last option in the list.
6 To select another lullaby, scroll up or down with thecontrol button to
select another song from the list.Press the right part of the control
button to start the selected song.
7 To stop the lullaby, press the lullaby button on the parent unit and pause
the song that is currently playing by pressing the right part of the control
button one more time.
Page 18
20°C
1
15 min
18
English
Lullaby volume
1 Press the lullaby button on the parent unit to open the menu for
lullabies. Press the left part of the control button and then press the
bottom of the control button to select the volume options of thelullaby
menu. Press the right part of the control button to access the lullaby
volume levels.
2 Press the top or bottom part of the control button to adjust the volume.
3 To stop the lullaby, press the lullaby button on the parent unit and pause
the song that is currently playing by pressing the right part of the control
button one more time.
To activate the lullaby feature from the baby unit, press the lullaby on/off
button on the baby unit.
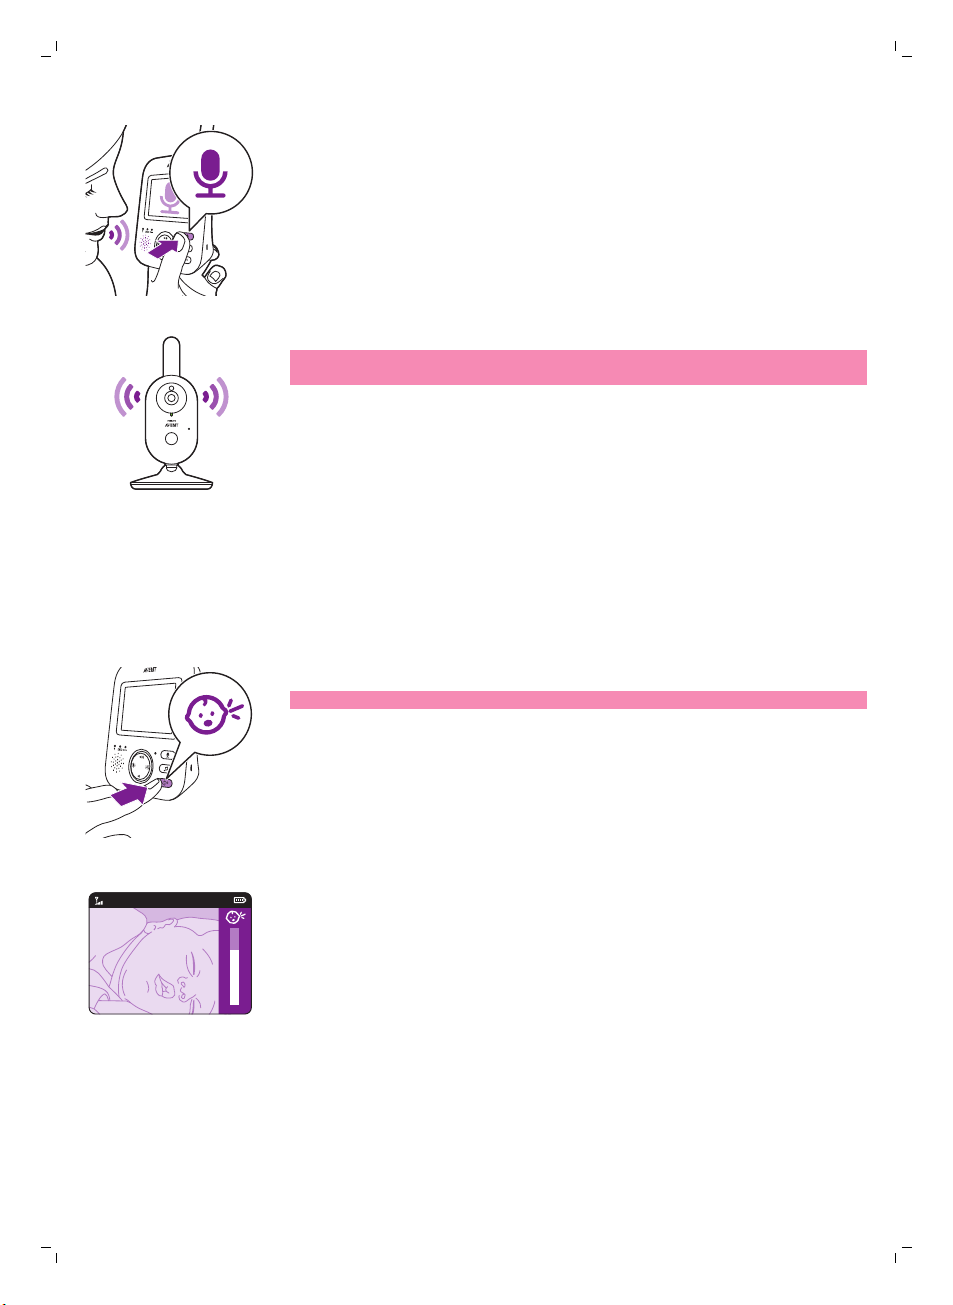
Talk-back
The latest lullaby selected on the parent unit starts to play on the baby unit
and is repeated continuously for approximately 15 minutes.
To stop the lullaby on the baby unit, press the lullaby on/off button on the
baby unit.
You can use the talk-back button on the parent unit to talk to your baby.
Page 19
Sensitivity
20°C
1
English
1 Press and hold the talk-back button on the parent unit.
2 Talk clearly into the microphoneat the front of the parent unit from a
distance between 15-30cm /0.5-1ft.
As long as the talk-back button is pressed, there is an open sound
connection to the baby unit. The display of the parent unit shows the
talk-back icon, indicating the active connection.
3 Release the talk-back button when you have finished talking.
Note: As long as the talk-back button is pressed, theparent unitcannot
process sounds coming from the baby unit.
The sensitivity level of the baby unit defines what you hear through the
parent unit. When the level is set high, you will hear many sounds, including
soft background sounds. When the sensitivity level is set low, you will hear
only the louder sounds.
1 Press the sensitivity button to access the sensitivity levels.
Note: When pressing the sensitivity button again, you will leave the menu.
19
2 Press the top or bottom part of the control button to select the desired
sensitivity level.
Page 20

20°C
1
20°C
1
20
English
Belt clip
If your baby only makes soft sounds, the sensitivity of the baby unit needs
to be set to a high sensitivitylevel on the parent unit.
The louder your baby sounds, the lower the sensitivity can be set on the
parent unit.
Note: In AUDIO and VIDEO mode, you will have continuous sound when the
sensitivity level is on 'very high'. Otherwise, low sounds will be muted.
Tip: The sensitivity level can be adjusted so you will always hear your baby
without the disruption of other sounds. When there is a lot of background
noise, turn the sensitivity lower so you will not hear these sounds through
the parent unit.
You can take the parent unit with you inside and outside the house by
attaching the parent unit to your belt or waistband with the belt clip. This
allows you to monitor your baby while you are moving around.
Note: The display is now turned upside down, which allows you to see your
baby on the screen by simply lifting up the parent unit.
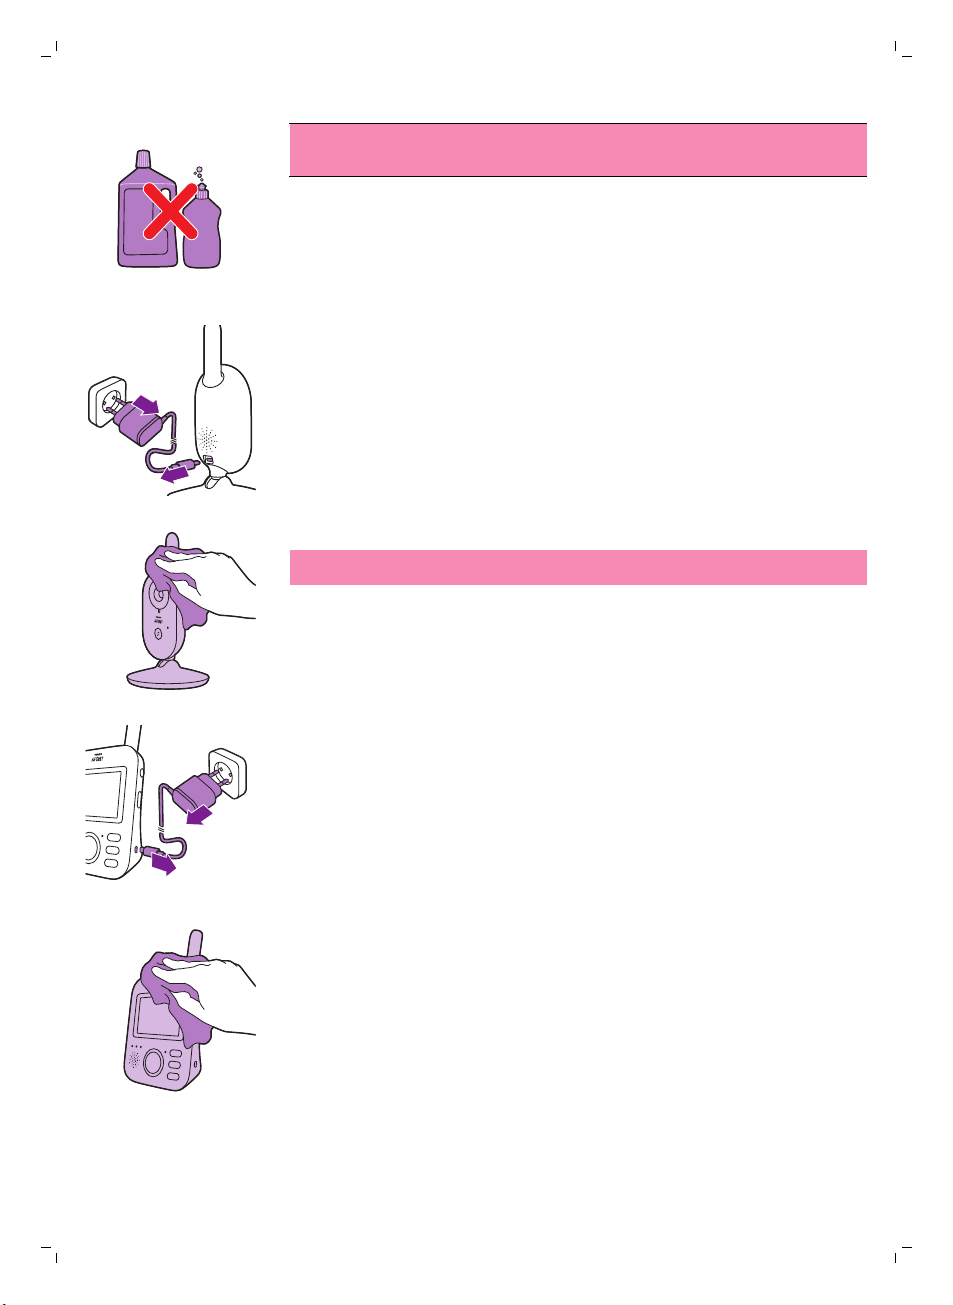
Cleaning and maintenance
Warning: Do not immerse the parent unit, baby
unit and power adapters in water and do not
clean them under the tap.
Page 21

English
Warning: Do not use cleaning sprays or liquid
cleaners.
1 Switch off the baby unit, remove the power adapter from the baby unit
and remove the power adapter from the wall socket.
2 Clean the baby unit with a dry cloth.
Note: Fingerprints or dirt on the lens of the baby unit may affect the
camera’s performance. Avoid touching the lens with your fingers.
21
3 Switch off the parent unit, remove the power adapter from the parent
unit and remove the power adapter from the wall socket.
4 Clean the parent unit with a dry cloth.
Page 22
22
English
5 Clean the adapters with a dry cloth.
Storage
When you are not going to use the baby monitor fora long time, store the
parent unit, the baby unit and the adapters in a cool and dry place.
Ordering accessories
To buy accessories or spare parts, visit www.philips.com/parts-andaccessories or go to your Philips dealer. You can also contact the Philips
Consumer Care Center in your country (see the international warranty leaflet
for contact details).
Recycling
-
This symbol means that this product shall not be disposed of with normal
household waste (2012/19/EU).
-
This symbol means that this product contains a built-in rechargeable
battery which shall not be disposed of with normal household waste
(2006/66/EC). Please take your product to an official collection point or
a Philips service center to have a professional remove the rechargeable
battery.
-
Follow your country’s rules for the separate collection of electrical and
electronic products and rechargeable batteries. Correct disposal helps
prevent negative consequences for the environment and human health.
Removing the rechargeable battery
Note: We strongly advise you to have a professional remove the
rechargeable battery.
Only remove the rechargeable battery when you discard the appliance.
Make sure the battery is completely empty when you remove it. Only the
parent unit includes a battery.
Procedure:
1 Remove the 2 rubber feet at the bottom of the parent unit.
Page 23

2 Remove the 2 screws that are now visible at the bottom of the parent
unit.
3 Put the antenna in upward position and remove the screw in the back
housing that is now visible.
4 Remove the back housing from the front housing by forcing a screwdriver
in between them.
5 Disconnect the battery connector cable (black-white-red cable).
6 Remove the 4 screws from the battery holder.
7 Remove the battery.
Warranty and support
If you need information or support, please visit www.philips.com/support or
read the international warranty leaflet.
Frequently asked questions
This chapter summarizes the most common problems you could encounter
with the appliance. If you are unable to solve the problem with the
information below, visit www.philips.com/support for a list of frequently
asked questions or contact the Consumer Care Center in your country.
HOW TO USE / CONNECTING THE UNITS
Question Answer
English
23
Why does the power-on
light of the baby unit
not go on when I switch
on the unit?
Why doesn't the parent
unit charge when I plug
it in?
Why doesn’t the baby
unit charge when I plug
it in?
Why can’t I establish a
connection?
Why is the connection
lost every now and
then?
Why are there sound
interruptions?
Perhaps the baby unit is not connected to the mains. Connect the baby unit
to the mains. Then set the on/off switch of the baby unit upwards to the ON
position to establish connection with the parent unit.
Perhaps the adapter is not plugged in properly. Make sure the adapter is
plugged into the wall socket properly.
The parent unit may already be fully charged. The battery status light will be
green when the battery is fully charged and the device is connected to the
mains power.
The baby unit does not have a charging function. The baby unit only works
when it isconnected to themains.
The baby unit and the parent unit are probably close to the outer limits of
the operating range or there is interference from other 2.4 GHz wireless
devices. Try a different location, decrease the distance between the units or
switch off other 2.4 GHz wireless devices (laptops, mobile phones,
microwaves, etc) . It can take up to 10 seconds before the connection
between the units is reestablished.
If the signal is lost, then the parent unit will make a beeping sound (3 quick
beeps every 20 seconds).
Page 24

24
English
HOW TO USE / CONNECTING THE UNITS
The baby and parent unit might be too close to each other, keep them at
least 1.5 meters/ 5 feet away from each other to prevent interference.
What happens during a
power failure?
Why can the charging
time of the parent unit
exceed 3 hours?
Why do I need to keep
the baby unit and its
cord at least 1 meter/
3.5 feet away from my
baby?
What is the difference
between the various
user modes on the
parent unit: Video,
Audio, VOX and ECO?
As the parent unit works on a rechargeable battery, the parent unit
continues to work if the battery is sufficiently charged. However, the baby
unit stops working because it has no rechargeable battery and only works
on a mains power. The parent unit will give a beeping sound to indicate that
the link with the baby unit is lost.
When mains power is restored, the connection between the parent unit and
the baby unit will automatically be established.
The parent unit may be switched on during charging. Switch off the parent
unit during charging to reduce the charging time. When the display of the
parent unit is constantly on, charging of the parent unit will take more time.
To avoid strangulation with the cord and for optimal sound detection,
always place the baby unit and its cord at least 1 meter / 3.5 feet away from
the baby.
See below list for an explanation on the available modes on your baby
monitor.
* Video mode: the screen and sound of the parent unit are always on.
* Audio mode: only audio will be activated. The display of the parent unit
switches off when AUDIO mode is activated. The link light shows that the
parent unit is still on and connected to the baby unit. SCD630 only: the
sound level lights above the screen will light up green when sound from the
baby unit is heard. All normal correspondence with the baby unit is possible
via the talk back, lullaby, menu and sensitivity buttons.
* VOX mode: The display and sound of the parent unit switch off if there is
no sound detected for 20 seconds (or not enough sound above the
sensitivity setting). Both display and sound will be activated immediately
when your baby cries and the sensitivity threshold is passed. When the
sound drops below the sound threshold, the video will remain active for 20
seconds. When one of the control buttons is pressed (brightness or
volume), the device shall display video for roughly 5 seconds. Also the
lullaby menu is accessible.
* ECO mode: The display and sound of the parent unit switch off when no
sound is detected for 20 seconds. Eco Mode reduces power consumption
during quiet times while keeping you connected to your baby. In ECO mode
the ECO LED light is green and the device will operate on a different
connection modus. In ECO mode the parent unit uses the 2 seconds ping
mechanism to check the connection with the baby unit instead of a
continuous radio frequency connection. Therefore the Baby Unit will also
consume less energy in ECO mode.
Page 25

HOW TO USE / CONNECTING THE UNITS
English
25
Where can I turn on the
nightlight?
How can I reset the
parent unit?
Press the nightlight on/off button on the baby unit to switch on the
nightlight feature. It is not possible to control the nightlight from the parent
unit. The nightlight does not turn off automatically, press the nightlight
on/off button again on the baby unit to switch it off.
You can reset the parent unit by simultaneously press the "power on/off
button" and the round "navigation down button" at the front of the parent
unit for about 1 second. The parent unit will switch off. In order to turn the
parent unit back on, press the "power on/off button". Specific user
information stored in the memory of the parent unit such as user mode,
brightness settings, volume, lullaby selection, zoom selection and vibration
settings will not be lost.
INDICATIONS ON THE PARENT UNIT
Question Answer
The battery LED on the
parent unit turns red.
What should I do?
Why does the parent
unit beep?
The battery power is low. If you do not connect the parent unit to the mains
power when the battery LED has turned red and starts to make a beeping
sound, the unit will stop working after approximately 60 minutes.
Switch to lower brightness and/or volume to save battery consumption and
connect the parent unit to the mains with the power adapter. (see chapter
‘Preparing for use’).
Your baby monitor beeps in a certain way to tell you what the problem is.
1 beep: parent unit is switched off.
1 beep, every 20 seconds for the first 3 minutes, after that, every minute:
parent unit is low in battery.
What does the battery
LED colour (green,
orange, red) or no
burning LED mean for
the status of my
battery?
2 quick beeps every 20 seconds: temperature of the baby room is outside
the range that is defined by the user, temperature icon is shown on parent
unit's screen (for model SCD630 only).
3 quick beeps every 20 seconds: connection between parent and baby unit
is lost, link icon is shown on the parent unit's screen and the link connection
button is red.
When the parent unit is connected to the mains power the color of the
battery light will show:
* Green: battery is full.
* Orange: battery is charging.
When the parent unit is not connected to the mains power the color of the
battery light will show:
* Red: battery is almost empty (<10%)
* No burning LED: parent unit is not connected to the mains.
Page 26

26
English
NOISE/SOUND
Question Answer
Why does the parent
unitand/or baby unit
produce a high-pitched
noise?
How can I mute the
sound?
Why don’t I hear a
sound?Why can’t I hear
my baby cry?
Why does the parent
unit react too quickly to
other sounds than my
baby makes?
The parent unit and baby unit may be too close to each other. Make sure
the parent unit and the baby unit are at least 2.5 meters / 8.2 feet away
from each other.
The volume of the parent unit may be set too high. Decrease the volume of
the parent unit.
For causes of a beeping sound from the parent unit, see the FAQ "Why does
the parent unit beep?"
Mute the device by pressing the bottom part of the control button. When
the volume bar on the screen is completely empty, the volume is muted.
The volume of the parent unit may be set too low or may be switched off.
Press the top part on the control button to increase the volume level.
Perhaps the parent unit is muted, unmute the device by pressing the top
part of the control button and adjust the volume.
The sensitivity is set too low, adjust the sensitivity in the parent unit's menu
to a higher level.
The baby unit may be too far away from your baby. Make sure the baby unit
is not further than 1.5 meters/ 5 feet away from your baby for optimal sound
detection. Closer than 1 meter /3.5 feet increases strangulation hazard.
The baby unit also picks up other sounds than those of your baby. Move
the baby unit closer to the baby (but observe the minimum distance of 1
meter/ 3.5 feet).
Why does the parent
unit make a buzzing
sound?
How long will the lullaby
song be played by the
baby unit?
The sensitivity level may be set too high. When your baby makes soft
sounds, the sensitivity has to be higher. However, the louder your baby
sounds, the lower the sensitivity level can be set. You can change the
sensitivity of your baby monitor on the parent unit's menu.
Interference may occur when the parent unit is out of range of the baby
unit. Interference may also occur if there are too many walls or ceilings
between the parent unit and the baby unit or when other 2.4 GHz wireless
devices are switched on (e.g. microwave, Wi-Fi router).
Put the parent unit in a different place, closer to the baby unit, or switch off
other wireless devices.
If this answer does not help you, check the other FAQ on " Why does the
parent unit and/or baby unit produce a high-pitched noise?"
Once you select a lullaby, it will be continuously repeated for approximately
15 minutes. In case you want to play all songs that are available, select the
last option in the lullaby list.
Page 27

NOISE/SOUND
English
27
How can I increase the
volume of the lullaby?
You can adjust the volume of the lullaby on the parent unit, not on the baby
unit. Press the lullaby button on the parent unit to open the lullaby menu
and adjust the volume.
OPERATING TIME / RANGE
Question Answer
Why does my baby
monitor manage a much
smaller distance than
specified in this user
manual?
The operating time of
the parent unit is
supposed to be up
to10hours. Why is the
operating time of my
parent unit shorter?
The specified operating range of 300 meters /985 feet is only valid
outdoors in open air and in the line of sight. Depending on the surroundings
and other disturbing factors, the operating range may be smaller (see also
table in chapter on positioning of parent and baby unit).
Inside your house, the operating range is up to 50 meters/165 feet, which is
also limited by the number and type of walls and/or ceilings between the
parent unit and the baby unit.
The video brightness of the parent unit may be set too high, which causes
the parent unit to consume a lot of energy. Decrease the brightness of the
parent unit.
The parent unit consumes a lot of energy when the video display is
switched on continuously. Activate the AUDIO, VOX or ECO mode in the
parent unit's menu to increase the operating time (see chapter ‘Features’,
sections 'AUDIO mode', ‘VOX mode' or ' ECO mode' ).
The volume of the parent unit may be set too high, which causes the parent
unit to consume a lot of energy. Decrease the volume of the parent unit.
As any other rechargeable electronic device, the battery capacity decreases
after a long period of usage.
VIDEO DISPLAY
Question Answer
Why do I get
interference on the
parent unit? Why does
the video display on the
parent unit flicker?
Why isn’t there any
image on the video
display while the
linklight is green?
Interference may occur when the parent unit is out of range of the baby
unit. Interference may also occur if there are too many walls or ceilings
between the parent unit and the baby unit or when other 2.4 GHz wireless
devices are switched on (e.g. microwave, Wi-Fi router).
Put the parent unit in a different place, closer to the baby unit, or switch off
other wireless devices.
The rechargeable battery of the parent unit may need to be charged.
The parent unit may be in the AUDIO, VOX or ECO mode. Press the mode
button on the right side of the parent unit to switch modes (see 'Modes').
Page 28
28
English
VIDEO DISPLAY
Why isn't the image on
the video display clear?
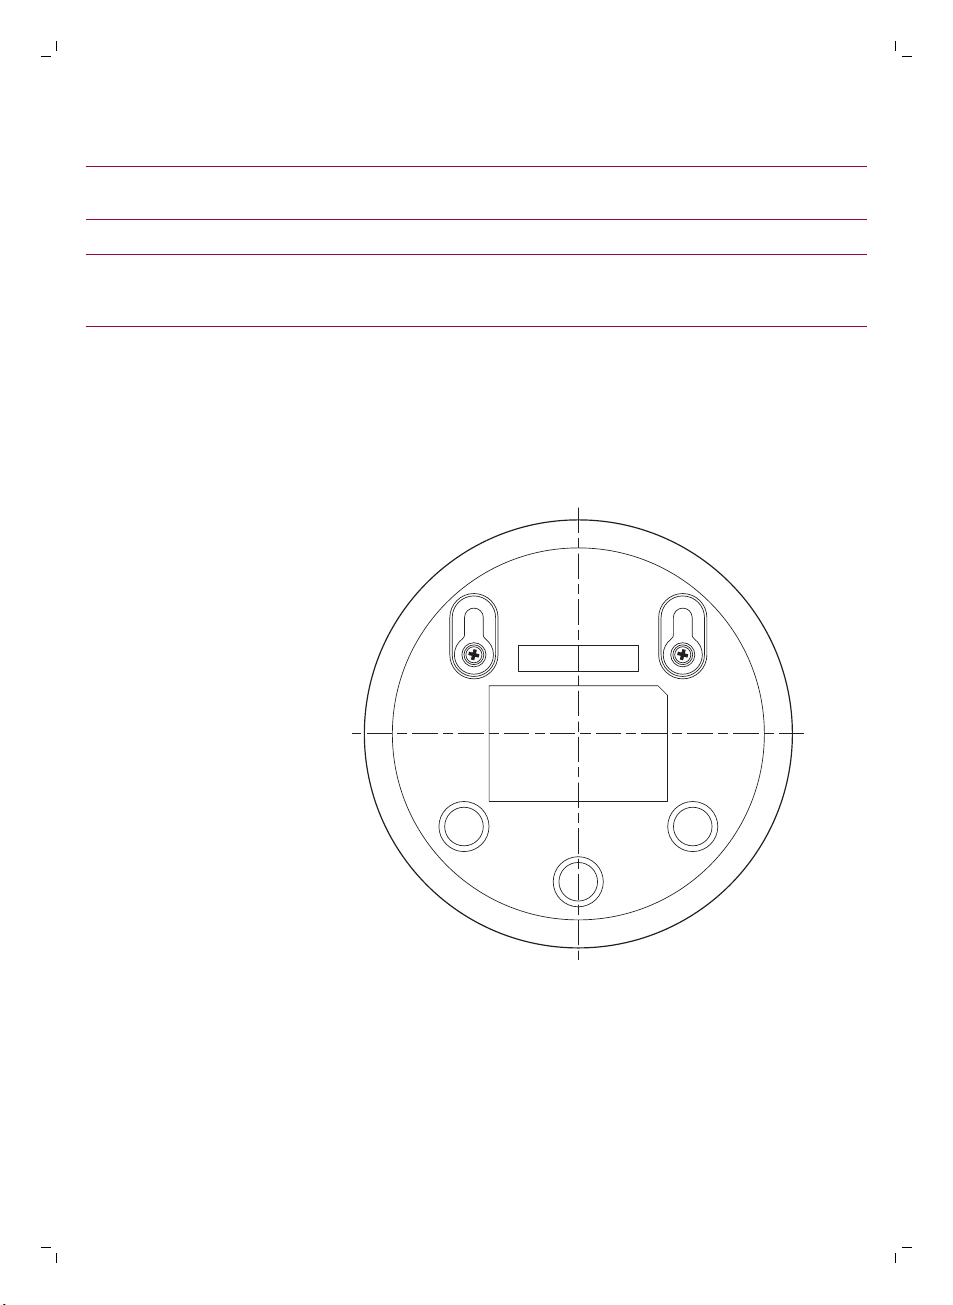
Wall mount
The display brightness may be set too low. Increase the display brightness
on the parent unit using the control button in the centre.
Perhaps the lens of the baby unit is dirty. Clean the lens with a dry cloth.
The baby unit may be too far away from your baby. Make sure the baby unit
is not further than 1.5 meters / 5 feet away from your baby for optimal video
quality. Closer than 1 meter / 3.5 feet increases strangulation hazard.
Printing instructions:
Print this page in scale 100% and use the template to accurately mark the
position of the holes for the screws on the wall.
Page 29

Introduktion
Tillykke med dit køb og velkommen til Philips Avent! For at få fuldt udbytte
af den støtte, Philips Avent tilbyder, skal du registrere dit produkt på
www.philips.com/welcome.
Philips Avent-babyalarmen hjælper dig døgnet rundt og giver dig mulighed
for at se din baby dag og nat fra alle steder i dit hjem. Den nyeste digitale
teknologi garanterer klar lyd og et tydeligt billede af din baby. Det giver dig
en følelse af ekstra sikkerhed, uden at du behøver at gå ind på barnets
værelse og forstyrre dets søvn.
Generel beskrivelse
1 Forældreenhed
2 Display
3 ECO-indikator (Forbindelse)
4 Batteristatusindikator
5 Link-indikator
6 Højttaler
7 Kontrolknap (menunavigation/lydstyrke/lysstyrke)
8 Sensitivity-knap (Følsomhed)
9 Vuggevise-tast
10 Talk-back-knap
11 Lille strømstik
12 Indstillingsknap
13 On/off-knap
14 Antenne
15 Bælteclips
16 Babyenhed
17 Kamera
18 On/off-knap til vuggevise
19 On/off-skydekontakt
20 Antenne
21 Højttaler
22 Lille strømstik
23 Vægmonteringshuller
24 Adapter(2x)
25 Skruer
Dansk
29
Vigtige sikkerhedsoplysninger
Læs disse vigtige oplysninger omhyggeligt igennem, inden apparatet tages i
brug, og gem dem til eventuel senere brug.
VIGTIGT
Denne babyalarm er beregnet til at fungere som et hjælpemiddel. Den kan
aldrig erstatte ansvarlig og korrekt forældreopsyn og -overvågning og må
ikke bruges sådan.
Lad aldrig det overvågede barn være alene i hjemmet. Sørg altid for, at der
er nogen, der kan holde øje med barnet og tage sig af dets behov.
Dansk
Page 30

30
Dansk
Ansvarsfraskrivelse
Bemærk, at du bruger denne babyalarm på eget ansvar. Koninklijke Philips
N.V. og dets datterselskaber er ikke ansvarlig for betjeningen af denne
babyalarm eller din brug af den og påtager sig således intet ansvar i
forbindelse med din brug af denne babyalarm.
Fare
-
Babyalarmen (eller dele af den) må aldrig kommes ned i vand eller andre
væsker. Anbring ikke apparatet, hvor vand eller anden væske kan dryppe
eller sprøjte på det. Babyalarmen må ikke bruges i fugtige omgivelser
eller tæt ved vand.
-
Placer aldrig en genstand oven på babyalarmen, og dæk den ikke til.
Ventilationsåbningerne må ikke blokeres. Installer i overensstemmelse
med producentens instruktioner.
-
Ledninger udgør en potentiel risiko for kvælning. Hold ledninger uden for
børns rækkevidde (mere end 1 m væk). Anbring ikke babyalarmen i
barnets seng eller kravlegård.
Advarsel
-
Kontrollér, om den angivne netspænding på adapteren svarer til den
lokale netspænding, før du slutter strøm til opladeren.
-
Ingen dele af adapteren eller ledningen må ændres eller klippes af, da
dette vil føre til farlige situationer.
-
Brug kun den medfølgende adapter.
-
Hvis adapteren beskadiges, skal den altid udskiftes med en original
adapter af samme type for at undgå en farlig situation.
-
Dette apparat må bruges af børn fra 8 år og opefter og personer med
reducerede fysiske, sensoriske eller mentale evner eller manglende
erfaring og viden, hvis de er blevet instrueret i sikker brug af apparatet og
forstår de medfølgende risici. Lad ikke børn lege med apparatet.
Rengøring og vedligeholdelse må ikke foretages af børn uden opsyn.
-
Sørg for, at lysnetledningen ikke trædes på eller klemmes, navnlig ved
stikkene og stikforbindelserne samt det sted, hvor ledningen føres ud af
apparatet.
-
Sørg for at placere babyalarmen, så den tilsluttede ledning ikke spærrer
en døråbning eller på anden måde er i vejen. Hvis du placerer
babyalarmen på et bord eller et lavt kabinet, må du aldrig lade ledningen
hænge ud over kanten af bordet eller skabet. Sørg for, at den tilsluttede
ledning ikke ligger på gulvet, hvor den udgør en fare for fald.
-
Hold emballagen (plastikposer, pap, karton osv.) uden for børns
rækkevidde. Det er ikke legetøj.
-
Babyalarmens kabinet må ikke åbnes, da det kan forårsage elektrisk stød.
Forsigtig
-
Anvend apparatet ved en temperatur mellem 0 °C og 40 °C.
-
Installer ikke apparatet i nærheden af varmekilder, som f.eks. radiatorer,
varmeapparater, ovne eller andre apparater (inkl. forstærkere), der
producerer varme.
-
Husk, at hænder og apparat skal være helt tørre, når du håndterer
adaptere, stik og netledning.
Page 31

Klargøring
Babyenhed
Dansk
-
Alle de nødvendige afmærkninger på babyenheden, forældreenhedenog
strømadapteren er nederst på babyenheden, forældreenheden og
strømadapteren.
Overholdelse af standarder
-
Dette apparat overholder EU's krav om radiointerferens.
-
Philips Consumer Lifestyle erklærer hermed, at denne babyalarm
overholder de væsentlige krav og andre relevante bestemmelser i direktiv
2014/53/EU (FHSS: frekvensbånd 2,4 GHz, maksimal radiofrekvenseffekt:
100 mW EIRP). En kopi af EU-overensstemmelseserklæringen (DoC) er
tilgængelig online på www.philips.com/support.
Elektromagnetiske felter (EMF)
Dette Philips-apparat overholder alle branchens gældende standarder og
regler angående eksponering for elektromagnetiske felter.
Sæt strømadapteren ibabyenheden, og sæt adapteren i stikkontakten.
31
Forældreenhed
Forældreenheden kører pået indbygget, genopladeligt li-ion-batteri.
Følg nedenstående trin for at oplade forældreenheden:
1 Sæt strømadapteren i forældreenheden, og sæt adapteren i en
stikkontakt.
-
Batteristatusindikatoren bliver orange for at indikere, at apparatet
oplades.
Page 32

20°CEco
1
10 hrs=3 hrs
20°CEco
1
32
Dansk
-
Når batteriet er fuldt opladet, lyser batteristatusindikatoren konstant
grønt konstant.
-
Når du oplader forældreenheden i 3 tomer, kan den bruges trådløst i ca.
10 timer.
-
Hvis forældreenheden er tændt under opladningen, tager opladningen
ca. dobbelt så lang tid.
-
Når det genopladelige batteri i forældreenheden er løbet næsten tør for
strøm, lyser batteristatusindikatorenrødt, og forældreenheden bipper.
-
Hvis den batteriet er fuldstændigt afladt, og forældreenheden ikke er sat
i stikkontakten, slukkes forældreenheden automatisk, og kontakten til
babyenheden afbrydes.
Bemærk: Det indbyggede genopladelige kan ikke tages ud af produktet.
Bemærk: Batteriet aflades gradvist og meget langsomt, selv når
forældreenheden er slukket.
Tip: Spar på batteristrømmen ved at slukke for forældreenheden, når du ikke
bruger den.
Bemærk: Vi anbefaler, at du holder forældreenheden tilsluttet stikkontakten
hele natten. Hvis batteriet i forældreenheden er ved at løbe tør for strøm i
løb et af natten, bipper forældreenheden, og du kan blive vækket.
Brug af babyalarmen
Oprettelse af forbindelse mellem forældre- og babyenhed
1 Skyd on/off-skydekontakten på babyenheden opad til ON.
Page 33

>
2
m/6.7 ft
20°CEco
1
20°CEco
1
Dansk
2 Når babyenheden er tændt, lyser lysindikatoren for tændt på
babyenheden grønt.
Bemærk: Lysindikatoren for tændt på babyenheden lyser altid grønt,
også selv om der ikke er forbindelse til forældreenheden.
3 Sørg for, at forældreenheden og babyenheden er placeret mindst 2,5 m
fra hinandenfor at undgå akustisk tilbagekobling.
4 Tryk på tænd/sluk-knappen på forældreenheden for at tænde
forældreenheden.
33
-
Displayet tændes, tilslutningsbilledet vises på displayet, og
forbindelsesindikatoren lyser rødt. Forældreenheden begynder at
søge efter babyenheden.
-
Når forældreenheden og babyenheden har forbindelse med
hinanden, lyser forbindelsesindikatoren grønt på forældreenheden, og
der vises en eller flere bjælker på displayet.
Page 34

20°CEco
1
>1-1.5m/3.5-5ft
>
2
m/6.7 ft
34
Dansk
Bemærk: Det tager mindre end 10 sekunder at etablere forbindelsen
mellem forældreenhed og babyenhed.
Nårbabyenheden er slukket, viser forældreenheden billedet uden for
rækkevidde. Kontrollér, at babyenheden er tændt.
-
Hvis forbindelsen ikke er etableret, lyser forbindelsesindikatoren rødt,
forældreenheden bipper tre koret bip hvert 20. sekund, og billedet for
uden for rækkevidde vises på displayet.
Placering af babyalarmen
Advarsel: Ledningen i babyenheden udgør en
potentiel risiko for kvælning. Sørg for, at
babyenheden og dens ledning er mindst 1 meter
væk fra barnet. Anbring ikke babyalarmen i
barnets seng eller kravlegård.
1 For at få optimal lydregistrering skal du sørge for, at babyenheden ikke er
mere end 1,5 meter væk fra babyenheden. Sørg for, at babyenheden er
mindst 1 meter væk fra barnet på grund af den potentielle risiko for
kvælning.
2 Placer forældreenheden inden for senderækkevidde af babyenheden.
Sørg for, at den er mindst 2,5 m væk fra babyenheden for at undgå
akustisk tilbagekobling.
Bemærk: Hvis du bruger en trådløs telefon, trådløs video, Wi-Fi-netværk,
mikroovn eller Bluetooth på 2,4 GHz og du oplever interferens på
forældreenheden eller babyenheden, skal du flytte forældreenheden
længere væk, indtil interferensen forsvinder.I
3 Der er to måder at placere babyenheden på
a Placer babyenheden på et stabilt, plant og vandret underlag.
b Monter babyenheden på væggen ved hjælp af de medfølgende
skruer.
Page 35

<300m/985ft
<50m/165ft
Dansk
Tip: Vægmonteringsskabelonen (se 'Vægmontering') til montering af
babyenheden på væggen findes i slutningen af denne brugervejledning.
Tip: Brug den medfølgende skabelon for at markere den nøjagtige
placering af skruehullerne på væggen.
Tip: Anbring babyenheden højt for at få et godt overblik over barnets
seng eller kravlegård.
4 Juster babyenheden på den måde, der giver bedst udsyn til barnet.
Babyenheden kan drejes, så den vender i den ønskede retning.
35
Senderækkevidde
Senderækkevidden er 50 meterindendørs og 300 meterudendørs.
Babyalarmens rækkevidde afhænger af omgivelserne og andre faktorer, der
kan forårsage interferens. Våde og fugtige materialer kan give op til 100 %
tab i rækkevidden på grund af interferens.
Tørre materialer Materialets
tykkelse
Træ, gips, pap, glas (uden metal, ledninger eller
bly)
Mursten, krydsfiner < 30 cm 5-35%
Armeret beton < 30 cm 30-100%
Metalgitter eller -stænger < 1 cm 90-100%
Metal- eller aluminiumsplader < 1 cm 100%
< 30 cm 0-10%
Tab af
rækkevidde
Egenskaber og indstillinger
Lydstyrke
Du kan justere lydstyrken for forældreenhedens højttaler til det ønskede
niveau.
Page 36

20°C
1
20°C
1
36
Dansk
Lysstyrke
1 Tryk på den øverste eller nederste del af kontrolknappen for at justere
lydstyrken.
Tip: Sørg for, at lydstyrken er tilpasset de aktuelle betingelser. Hvis der er
meget støj, kan vibrationsalarmen også slås til.
Lydstyrkebjælken vises på displayet for at angive den valgte lydstyrke.
Bemærk: Hvis lydstyrken er indstillet til at være høj, bruger forældreenheden
mere strøm.
Bemærk: Når lydstyrkebjælken er på minimum, er lyden slået fra.
Forældreenheden viser et lydstyrke fra-ikon i statuslinjen, og du modtager
kun alarmer og video fra forældreenheden.
Du kan justere lysstyrken på forældreenhedens display til det ønskede
niveau.
1 Tryk på venstre eller højre del af kontrolknappen for at justere lysstyrken i
displayet på forældreenheden.
Modusser
Bjælken for lysstyrke vises på displayet for at angive den valgte
displaylysstyrke.
Bemærk: Hvis lysstyrken er indstillet til at være høj, bruger forældreenheden
mere strøm.
Denne babyalarm har fire forskellige modusser, der giver dig mulighed for at
vælge, hvordan du vil holde øje med din baby: VIDEO, AUDIO, VOX og ECO.
Page 37

VIDEO
VIDEO
20°C
1
VIDEO
20°C
1
VIDEO
AUDIO
AUDIO
Dansk
37
Når babyalarmen er tændt, kan skifte mellem disse 4 forskellige indstillinger
ved at trykke på indstillingsknappen på siden af forældreenheden.
Displayet viser den valgte indstilling. Det valgte modus vises også i
statuslinjen. Når du tænder enheden, vil det modus, der sidst blev brugt,
være aktivt.
VIDEO-modus
Tryk på indstillingsknappen på siden af forældreenheden for at
vælgeVIDEO-modus.
Når VIDEO-modus er aktiveret, er skærmen altid tændt, så du kan se dit
barn. Alle lyde sendes direkte til forældreenheden.
Bemærk: Sæt følsomhedsniveauet til "meget højt" for at få konstant lyd på
forældreenheden. Se kapitlet Følsomhedsniveau for få flere oplysninger.
AUDIO-modus
1 Tryk på indstillingsknappen på siden af forældreenheden for at skifte til
AUDIO-modus.
Page 38

20°C
1
AUDIO
20°C
1
VOX
VOX
VOX
20°C
1
AUDIO
20°C
1
ECO
38
Dansk
Når AUDIO-modus er aktiveret, er displayet på forældreenheden slukket.
Efter 3 sekunder slukkes displayet helt, og statuslinjen forsvinder.
Bemærk: Statuslinjen er ikke synlig, når displayet er slukket.
Bemærk: Forbindelsesindikatoren viser, at forældreenheden stadig er tændt
og har forbindelse med babyenheden.
Bemærk: Sæt følsomhedsniveauet til "meget højt" for at få konstant lyd på
forældreenheden. Se kapitlet Følsomhedsniveau for få flere oplysninger.
Alle lyde sendes konstant til forældreenheden. Hvis barnet græder, er
displayet på forældreenheden stadig slukket, men de lyde, der registreres
afbabyenheden, sendes til forældreenheden.
VOX-modus
1 Tryk på indstillingsknappen på siden af forældreenheden for at skifte til
VOX-modus.
Bemærk: Når displayet tændt, vises det valgte modus i statuslinjen.
Statuslinjener ikke synlig, når displayet er slukket.
Når VOX-modus er aktiveret, slukkes displayet og lydene på
forældreenheden, hvis der ikke registreres nogen lyde i 20 sekunder.
Nårbabyenheden registrerer lyd, tændes displayetog lydene på
forældreenheden straks.Lydene sendes til forældreenheden.
Bemærk: Det mindste lydniveau, der kræves for at aktivere lyd og display, er
angivet af følsomhedsindstillingen.
Page 39

ECO
ECO
20°C
1
ECO
ECO
20°C
1
ECO
Dansk
39
ECO-modus
1 Tryk på indstillingsknappen på siden af forældreenheden for at skifte til
ECO-modus.
Bemærk: Når displayet tændt, vil det valgte modus være synligt i
statuslinjen. Statuslinjen er ikke synlig, når displayet er slukket.
Når ECO-modus er aktiveret, slukkes displayet og lydene på
forældreenheden, hvis der ikke registreres nogen lyde i 20 sekunder. ECOindikatoren lyser grønt for at angive, at ECO-modus er aktiveret. Når ECOmodus er aktiveret, er display- og lydtransmissionerne slukket.
Nårbabyenheden registrerer lyd, tændes displayetog lydene på
forældreenheden straks.Lydene sendes til forældreenheden.
Bemærk: Det mindste lydniveau, der kræves for at aktivere lyd og display, er
angivet af følsomhedsindstillingen.
Vuggeviser
Du kan aktivere vuggevisefunktionen fra forældreenheden eller
babyenheden.
Følg nedenstående vejledning for at aktivere vuggevisefunktionen fra
forældreenheden:
Valg af vuggevise
1 Tryk på vuggeviseknappen på forældreenheden for at åbne menuen med
vuggeviser.
Bemærk: Hvis du trykker på vuggeviseknappen, når vuggevisemenuen
allerede er åben, lukkes menuen.
Page 40

Lullaby Songs
1 Rock-a-Bye Baby
2 Twinkle, Twinkle
3 Hush, Little Baby
4 Brahm’s Lullaby
5 Golden Slumbers
Lullaby Songs
1 Rock-a-Bye Baby
2 Twinkle, Twinkle
3 Hush, Little Baby
4 Brahm’s Lullaby
5 Golden Slumbers
15 min
Lullaby Songs
1 Rock-a-Bye Baby
2 Twinkle, Twinkle
3 Hush, Little Baby
4 Brahm’s Lullaby
5 Golden Slumbers
40
Dansk
2 Tryk på den højre del af kontrolknappen for at åbne listen over
vuggeviser.
3 Tryk på den øverste eller nederste del af kontrolknappen for at rulle
gennem listen med vuggeviser.
4 Tryk på den højre del af kontrolknappen for at afspille en bestemt
vuggevise.
Hvis du vil sætte vuggevisen på pause, skal du trykke på højre side af
kontrolknappen igen.
5 Statuslinjenpå forældreenheden viser det antal vuggeviser, derafspilles
og gentages.
Vuggevisen går i gang med at spille på babyenheden, og den gentages
konstant i ca. 15 minutter.
Tip: Hvis du vil gentage alle de tilgængelige sange, skal du vælge den
sidste mulighed på listen.
6 Hvis du vil vælge en anden vuggevise, skal du rulle op eller ned
medkontrolknappen for at vælge en anden sang på listen.Tryk på højre
del af kontrolknappen for at starte den valgte sang.
7 Du kan stoppe vuggevisen ved at trykke på vuggeviseknappen på
forældreenheden og sætte den sang, der i øjeblikket afspilles, på pause
ved at trykke en gang til på højre del af kontrolknappen.
Page 41

20°C
1
15 min
Dansk
41
Vuggeviselydstyrke
1 Tryk på vuggeviseknappen på forældreenheden for at åbne menuen med
vuggeviser. Tryk på den venstre del af kontrolknappen, og tryk nederst på
kontrolknappen for at vælge lydstyrkeindstilling ivuggevisemenuen. Tryk
på den højre del af kontrolknappen for at åbne lydstyrkeniveauerne for
vuggeviser.
2 Tryk på den øverste eller nederste del af kontrolknappen for at justere
lydstyrken.
3 Du kan stoppe vuggevisen ved at trykke på vuggeviseknappen på
forældreenheden og sætte den sang, der i øjeblikket afspilles, på pause
ved at trykke en gang til på højre del af kontrolknappen.
Du kan aktivere vuggevisefunktionen fra babyenheden ved at trykke på
on/off-knappen til vuggeviser på babyenheden.
Talk-back
Den sidst valgte vuggevise på forældreenheden går i gang med at spille på
babyenheden, og den gentages konstant i ca. 15 minutter.
Du kan stoppe vuggevisen på babyenheden ved at trykke på on/offknappen til vuggeviser på babyenheden.
Du kan bruge talk-back-knappen på forældreenheden, hvis du vil tale med
barnet.
Page 42

20°C
1
42
Dansk
Følsomhed
1 Tryk på talk-back-knappen på forældreenheden.
2 Tal tydeligt ind i mikrofonenpå forsiden af forældreenheden på en
afstand af 15-30 cm.
Så længe talk-back-knappen er trykket ned, er der er åben
lydforbindelse til babyenheden. Displayet på forældreenheden viser talkback-ikonet og angiver den aktive forbindelse.
3 Slip talk-back-knappen, når du er færdig med at tale.
Bemærk: Så længe talk-back-knappen er trykket ned,
kanforældreenhedenikke behandle lyde, der kommer fra babyenheden.
Følsomhedsniveauet på babyenheden definerer, hvad du hører via
forældreenheden. Når niveauet er indstillet højt, hører du mange lyde,
herunder bløde baggrundslyde. Når følsomhedsniveauet er indstillet lavt,
hører du kun højere lyde.
1 Tryk på følsomhedsknappen for at få adgang til følsomhedsniveauerne.
Bemærk: Når du trykker påfølsomhedsknappen igen, forlader du
menuen.
2 Tryk på den øverste eller nederste del af kontrolknappen for at vælge det
ønskede følsomhedsniveau.
Page 43

20°C
1
20°C
1
Bælteclips
Dansk
Hvis barnet laver bløde lyde, skal følsomheden for babyenheden indstilles til
et højt følsomhedsniveau på forældreenheden.
Jo højere dit barns lyde er, jo lavere følsomhed kan du indstille på
forældreenheden.
Bemærk: I AUDIO- og VIDEO-modus vil du have konstant lyd, når
følsomhedsniveauet er sat til "meget højt". Ellers vil lave lyde blive slået fra.
Tip: Følsomhedsniveauet kan justeres, så du altid hører dit barn uden
forstyrrelser fra andre lyde. Hvis der er en masse baggrundsstøj, skal du
indstille følsomheden til et lavere niveau, så du ikke hører disse lyde
gennem forældreenheden.
Du kan tage forældreenheden med dig i og uden for huset, hvis du spænder
den fast til dit bælte eller din bukselinning med bælteclipsen. På denne
måde kan du overvåge din baby, mens du bevæger dig rundt.
Bemærk: Displayet er nu vendt om, så du kan se dit barn på skærmen blot
ved at løfte forældreenheden op.
43
Rengøring og vedligeholdelse
Advarsel: Forældre- og babyenheden samt
strømadapterne må aldrig kommes ned i vand
eller skylles under vandhanen.
Page 44
44
Dansk
Advarsel: Anvend aldrig rengøringsmidler i
spraydåse eller flydende rengøringsmidler.
1 Sluk for babyenheden, fjern strømadapteren fra babyenheden, og tag
strømadapteren ud af stikkontakten.
2 Rengør babyenheden med en tør klud.
Bemærk: Fingeraftryk eller snavs på babyenhedens linse kan påvirke
kameraets funktion. Undgå at berøre linsen med fingrene.
3 Sluk for forældreenheden, fjern strømadapteren fra forældreenheden, og
tag strømadapteren ud af stikkontakten.
4 Rengør forældreenheden med en tør klud.
Page 45

5 Tør adapterne med en tør klud.
Lager
Hvis du ikke skal bruge babyenheden ilængere tid, skal du opbevare
forældreenheden, babyenheden og adapterne på et køligt og tørt sted.
Bestilling af tilbehør
Du kan købe tilbehør og reservedele på www.philips.com/parts-andaccessories eller hos din Philips-forhandler. Du kan også kontakte det lokale
Philips-kundecenter (du kan finde kontaktoplysninger i den internationale
garantifolder).
Genanvendelse
-
Dette symbol betyder, at dette produkt ikke må bortskaffes sammen med
almindeligt husholdningsaffald (2012/19/EU).
Dansk
45
-
Dette symbol betyder, at produktet indeholder et indbygget
genopladeligt batteri, som ikke må bortskaffes sammen med almindeligt
husholdningsaffald (2006/66/EF). Aflever produktet på et officielt
indsamlingssted eller hos en Philips-forhandler, hvor du kan få en
fagmand til at tage det genopladelige batteri ud.
-
Følg den nationale lovgivning om særskilt indsamling af elektriske og
elektroniske produkter og genopladelige batterier. Korrekt bortskaffelse
er med til at forhindre negativ påvirkning af miljøet og menneskers
helbred.
Udtagning af det genopladelige batteri
Bemærk: Vi anbefaler på det kraftigste, at du får en fagmand til at tage det
genopladelige batteri ud.
Det genopladelige batteri må kun tages ud af apparatet, når det skal
bortskaffes. Sørg for, at batteriet er fuldstændig tomt, når du tager det ud.
Det er kun forældreenheden, der indeholder et batteri.
Fremgangsmåde:
Page 46

46
Dansk
1 Fjern de 2 gummifødder nederst på forældreenheden.
2 Fjern de 2 skruer, som nu er synlige nederst på forældreenheden.
3 Sæt antennen i opret position, og fjern skruen, som nu er synlig på
kabinettets bagside.
4 Tag kabinettets bagside af kabinettets forside ved at tvinge en
skruetrækker ind mellem.
5 Frakobl batteritilslutningskablet (sort-hvidt-rødt kabel).
6 Fjern de 4 skruer fra batteriholderen.
7 Tag batteriet ud.
Reklamationsret og support
Hvis du har brug for hjælp eller support, bedes du besøge
www.philips.com/support eller læse i folderen om international garanti.
Ofte stillede spørgsmål
Dette afsnit opsummerer de mest almindelige problemer, der kan
forekomme ved brug af apparatet. Har du brug for yderligere hjælp og
vejledning, så besøg www.philips.com/support for en liste af ofte stillede
spørgsmål, eller kontakt dit lokale Philips Kundecenter.
SÅDAN BRUGER DU/TILSLUTTER DU ENHEDERNE
Spørgsmål Svar
Hvorfor lyser
strømindikatoren på
babyenheden ikke, når
jeg tænder for
enheden?
Hvorfor oplader
forældreenheden ikke,
når jeg har sat den i
stikkontakten?
Hvorfor oplader
babyenheden ikke, når
jeg har sat den i
stikkontakten?
Hvorfor kan jeg ikke
oprette forbindelse?
Hvorfor falder
forbindelsen ud, fra tid
til anden?
Hvorfor er der
afbrydelser i lyden?
Babyenheden er muligvis ikke sat i stikkontakten. Tilslut babyenheden til
stikkontakten. Sæt tænd-/slukknappen på babyenheden på positionen ON
(TIL) for at etablere forbindelse med forældreenheden.
Adapteren er muligvis ikke sat korrekt i stikkontakten. Sørg for, at adapteren
er sat rigtigt i stikkontakten.
Forældreenheden er muligvis allerede fuldt opladet.
Batteristatusindikatoren lyser grønt, når batteriet er fuldt opladet, og
apparatet er sluttet til lysnettet.
Babyenheden har ikke nogen ladefunktion. Babyenheden fungerer kun, når
den ertilsluttetlysnettet.
Babyenheden og forældreenheden er muligvis tæt på de ydre grænser for
senderækkevidden, eller der er interferens fra andre trådløse 2,4 GHzenheder. Prøv en anden placering, mindsk afstanden mellem enhederne,
eller sluk andre trådløse 2,4 GHz-enheder (computere, mobiltelefoner,
mikrobølgeovne osv.) Det kan tage op til 10 sekunder, før forbindelsen
mellem enhederne er genoprettet.
Page 47

SÅDAN BRUGER DU/TILSLUTTER DU ENHEDERNE
Hvis signalet er forsvundet, vil forældreenheden udsende en biplyd (3
hurtige bip hvert 20. sekund).
Babyenheden og forældreenheden er muligvis for tæt på hinanden. Der
skal være mindst 1,5 meter mellem dem for at undgå interferens.
Dansk
47
Hvad sker der
vedstrømsvigt?
Hvorfor overstiger
opladningstiden på
forældreenheden3
timer?
Hvorfor skal jeg sørge
for, at babyenheden og
ledningen er mindst 1
meter fra mit barn?
Hvad er forskellen på de
forskellige brugermodi
på forældreenheden:
Video, Audio, VOX og
ECO?
Forældreenheden drives af et genopladeligt batteri, og den fortsætter
derfor med at køre, hvis batteriet er tilstrækkeligt opladet. Babyenheden
stopper imidlertid med at fungere, fordi den ikke har et genopladeligt
batteri og kun fungerer med strøm fra lysnettet. Forældreenheden bipper
for at angive, at forbindelsen til babyenheden er afbrudt.
Når strømmen kommer igen, genetableres forbindelsen mellem
forældreenheden og babyenheden automatisk.
Forældreenheden er muligvis tændt under opladningen. Sluk for
forældreenheden under opladningen for at mindske opladningstiden. Når
displayet på forældreenheden er tændt konstant, tager det længere tid at
oplade forældreenheden.
For at undgå kvælning i ledningen og for at sikre optimal lydregistrering skal
du altid placere babyenheden og ledningen mindst 1 meter fra barnet.
Nedenstående liste indeholder en forklaring af de forskellige modi på
babyalarmen.
* Video-modus: Skærmen og lyden på forældreenheden er altid tændt.
* Audio-modus: Kun lyd vil være aktiveret. Displayet på forældreenheden
slukkes, når AUDIO-modus er aktiveret. Forbindelsesindikatoren viser, at
forældreenheden stadig er tændt og har forbindelse med babyenheden.
Kun SCD630: Lydstyrkeindikatorerne over skærmen lyser grønt, når der
høres lyd fra babyenheden. Al normal korrespondance med babyenheden
er mulig via talk-back-, vuggevise-, menu- og følsomhedsknapperne.
* VOX-modus: Displayet og lydene på forældreenheden slukkes, hvis der
ikke registreres nogen lyde i 20 sekunder (eller der ikke er nok lyd, der ligger
over følsomhedsindstillingen). Både displayet og lyden aktiveres straks, hvis
barnet græder, og følsomhedsgrænsen overstiges. Når lyden ryger ned
under lydgrænsen, forbliver videoen aktiv i 20 sekunder. Når der trykkes på
en af kontrolknapperne (lysstyrke eller lydstyrke), viser apparatet video i
omkring 5 sekunder. Vuggevisemenuen er også tilgængelig.
* ECO-modus: Displayet og lyden på forældreenheden slukkes, når der ikke
registreres nogen lyd i 20 sekunder. Eco-modus reducerer strømforbruget i
stille perioder, men du har stadig forbindelse med dit barn. I ECO-modus
lyser ECO-indikatoren grønt, og apparatet fungerer i et andet
forbindelsesmodus. I ECO-modus bruger forældreenheden 2-sekunders
pingmekanismen til at kontrollere forbindelsen med babyenheden i stedet
for en konstant radiofrekvensforbindelse. Det betyder, at babyenheden
også forbruger mindre strøm i ECO-modus.
Page 48

48
Dansk
SÅDAN BRUGER DU/TILSLUTTER DU ENHEDERNE
Hvor tænder jeg for
natlampen?
Hvordan nulstiller jeg
forældreenheden?
Tryk på tænd/sluk-knappen for natlampen på babyenheden for at tænde
natlampefunktionen. Det er ikke muligt at styre natlampen fra
forældreenheden. Natlampen slukkes ikke automatisk. Tryk på tænd/slukknappen for natlampen igen på babyenheden for at slukke for den.
Du kan nulstille forældreenheden ved at trykke på "tænd/sluk-knappen" og
den runde "navigation-ned-knap" samtidig på forsiden af forældreenheden
i ca. 1 sekund. Forældreenheden slukker. Tryk på "tænd/sluk-knappen" for
at tænde forældreenheden igen. Specifikke brugeroplysninger, som er
lagret i forældreenhedens hukommelse, såsom brugermodus,
lysstyrkeindstillinger, lydstyrke, vuggevisevalg, zoomvalg og
vibrationsindstillinger, går ikke tabt.
ANGIVELSER PÅ FORÆLDREENHEDEN
Spørgsmål Svar
Batteriindikatoren på
forældreenheden lyser
rødt. Hvad skal jeg gøre?
Hvorfor bipper
forældreenheden?
Batteriet er næsten afladet. Hvis du ikke slutter forældreenheden til
stikkontakten, når batteriindikatoren lyser rødt og begynder at bippe,
stopper enheden med at fungere efter ca. 60 minutter.
Skift til lavere lysstyrke og/eller lydstyrke for at spare batteristrøm, og slut
forældreenheden til stikkontakten med strømadapteren. (se kapitlet
"Klargøring").
Babyalarmen bipper på en bestemt måde for at fortælle dig, hvad
problemet er.
1 bip: Forældreenheden er slukket.
1 bip hvert 20. sekund i de første 3 minutter, og derefter hvert minut:
Batteriet i forældreenheden er næsten afladet.
Hvad betyder
batteriindikatorens farve
(grøn, orange, rød) eller
ingen lysende indikator
for batteriets status?
2 hurtige bip hvert 20. sekund: Temperaturen i børneværelset ligger uden
for det område, som er defineret af brugeren, og temperaturikonet vises på
forældreenhedens skærm (kun på model SCD630).
3 hurtige bip hvert 20. sekund: Forbindelsen mellem forældreenheden
ogbabyenheden er afbrudt, forbindelsesikonet vises på forældreenhedens
skærm, og forbindelsesknappen lyser rødt.
Når forældreenheden er sluttet til stikkontakten, viser batteriindikatorens
farve følgende:
* Grøn: Batteriet er fuldt opladet.
* Orange: Batteriet oplades.
Når forældreenheden ikke er sluttet til stikkontakten, viser
batteriindikatorens farve følgende:
* Rød: Batteriet er næsten afladet (<10 %)
* Ingen lysende indikator: Forældreenheden er ikke tilsluttet lysnettet.
Page 49

STØJ/LYD
Spørgsmål Svar
Dansk
49
Hvorfor afgiver
forældreenhedenog
babyenheden en
skinger, hvinende tone?
Hvordan kan jeg slå
lyden fra?
Hvorfor hører jeg ingen
lyde?Hvorfor kan jeg
ikke høre mitbarn
græde?
Hvorfor reagerer
forældreenheden alt for
hurtigt på lyde fra mit
barn?
Forældreenheden og babyenheden er muligvis for tæt på hinanden. Sørg
for, at forældreenheden og babyenheden er placeret mindst 2,5 m fra
hinanden.
Lydstyrken på forældreenheden kan være indstillet for højt. Skru ned for
lydstyrken på forældreenheden.
Se Ofte stillede spørgsmål "Hvorfor bipper forældreenheden?" for at finde
årsager til en bippende lyd fra forældreenheden.
Slå lyden fra på enheden ved at trykke på den nederste del af
kontrolknappen. Når lydstyrkebjælken på skærmen er helt tom, er lyden
slået fra.
Lydstyrken på forældreenheden kan være indstillet for lavt, eller den kan
være deaktiveret. Tryk på den øverste del af kontrolknappen for at øge
lydstyrkeniveauet.
Lyden er muligvis slået fra på forældreenheden. Slå lyden til på enheden
ved at trykke på den øverste del af kontrolknappen og justere lydstyrken.
Følsomheden er indstillet for lavt. Indstil følsomheden i forældreenhedens
menu til et højere niveau.
Babyenheden kan være for langt væk fra barnet. Sørg for, at babyenheden
ikke er mere end 1,5 meter væk fra barnet for at få den optimale
lydregistrering. Hvis enheden er tættere på end 1 meter, øges faren for
kvælning.
Babyenheden opfanger også andre lyde end lyde fra barnet. Sæt
babyenheden tættere på barnet (men sørg for, at den ikke er tættere på
end 1 meter).
Hvorfor kommer der en
brummelyd fra
forældreenheden?
Følsomhedsniveauet er muligvis indstillet for højt. Når barnet kommer med
bløde lyde, skal følsomheden være højere. Men jo højere dit barns lyde er,
jo lavere kan du indstille følsomhedsniveauet. Du kan ændre følsomheden
på babyalarmen i menuen på forældreenheden.
Der kan forekomme interferens, når forældreenheden er uden for
babyenhedens rækkevidde. Der kan også forekomme interferens, hvis der
er for mange vægge eller lofter mellem forældreenheden og babyenheden,
eller hvis andre trådløse 2,4 GHz-enheder er tændt (f.eks. mikrobølgeovn
eller Wi-Fi-router).
Sæt forældreenheden et andet sted, tættere på babyenheden, eller sluk for
andre trådløse enheder.
Hvis dette svar ikke hjælper dig, kan du læse andre ofte stillede spørgsmål
under "Hvorfor afgiver forældreenheden og/eller babyenheden en skinger,
hvinende tone?"
Page 50

50
Dansk
STØJ/LYD
Hvor længe spiller
babyenheden
vuggevisen?
Hvordan kan jeg øge
lydstyrken på
vuggevisen?
Når du har valgt en vuggevise, gentages den konstant i ca. 15 minutter. Hvis
du vil spille alle de tilgængelige sange, skal du vælge den sidste mulighed
på listen over vuggeviser.
Du kan justere lydstyrken for vuggevisen på forældreenheden, men ikke på
babyenheden. Tryk på vuggeviseknappen på forældreenheden for at åbne
vuggevisemenuen og justere lydstyrken.
SENDETID/-RÆKKEVIDDE
Spørgsmål Svar
Hvorfor er min
babyalarms rækkevidde
meget mindre end det,
der er angivet i denne
brugervejledning?
Brugstiden for
forældreenheden er
beregnet til at være op
til10timer. Hvorfor er
brugstiden for min
forældreenhed kortere?
Den angivne senderækkevidde på 300 meter gælder kun udendørs i fri luft
og i synslinjen. Senderækkevidden kan være mindre afhængigt af
omgivelserne og andre forstyrrende faktorer (se også tabellen i kapitlet om
placering af forældre- og babyenheden).
Inde i huset er rækkevidden op til 50 meter, hvilket desuden begrænses af
antallet af vægge og/eller lofter mellem forældreenheden og
babyenheden.
Videolysstyrken på forældreenheden er muligvis indstillet for højt, hvilket får
forældreenheden til at bruge meget strøm. Skru ned for lysstyrken på
forældreenheden.
Forældreenheden bruger en masse energi, når videodisplayet er tændt
konstant. Aktivér AUDIO-, VOX- eller ECO-modus i forældreenhedens menu
for at øge brugstiden (se afsnittene "AUDIO-modus", "VOX-modus" og
"ECO-modus" i kapitlet "Funktioner").
Lydstyrken på forældreenheden er muligvis indstillet for højt, hvilket får
forældreenheden til at bruge meget strøm. Skru ned for lydstyrken på
forældreenheden.
Som på enhver anden genopladelig enhed mindskes batterikapaciteten
efter længere tids brug.
VIDEODISPLAY
Spørgsmål Svar
Hvorfor opstår der
interferens i
forældreenheden?
Hvorfor blinker
videodisplayet på
forældreenheden?
Der kan forekomme interferens, når forældreenheden er uden for
babyenhedens rækkevidde. Der kan også forekomme interferens, hvis der
er for mange vægge eller lofter mellem forældreenheden og babyenheden,
eller hvis andre trådløse 2,4 GHz-enheder er tændt (f.eks. mikrobølgeovn
eller Wi-Fi-router).
Sæt forældreenheden et andet sted, tættere på babyenheden, eller sluk for
andre trådløse enheder.
Page 51

VIDEODISPLAY
Dansk
Det genopladelige batteri på forældreenheden skal muligvis oplades.
51
Hvorfor er der ikke
billede på
videodisplayet, når
forbindelsesindikatoren
lyser grønt?
Hvorfor er billedet på
videodisplayet ikke
tydeligt?
Vægmontering
Forældreenheden er muligvis i AUDIO-, VOX- eller ECO-modus. Tryk på
indstillingsknappen på højre side af forældreenheden for at skifte modus
(se 'Modusser').
Displaylysstyrken er muligvis indstillet for lavt. Øg displaylysstyrken på
forældreenheden ved hjælp af kontrolknappen i midten.
Babyenhedens linse er muligvis snavset. Tør linsen med en tør klud.
Babyenheden kan være for langt væk fra barnet. Sørg for, at babyenheden
ikke er mere end 1,5 meter væk fra barnet for at få den optimale
videokvalitet. Hvis enheden er tættere på end 1 meter, øges faren for
kvælning.
Udskrivningsvejledning:
Udskriv denne side i 100 %-skala, og brug skabelonen til nøjagtigt at markere
placeringen af hullerne til skruerne på væggen.
Page 52

52
Dansk
Page 53

Einführung
Herzlichen Glückwunsch zu Ihrem Kauf und willkommen bei Philips Avent!
Um die Kundenunterstützung von Philips Avent optimal zu nutzen,
registrieren Sie Ihr Produkt bitte unter www.philips.com/welcome.
Das Philips Avent-Babyphonemit Videofunktion bietet Support rund um die
Uhr und ermöglicht Ihnen, Ihr Baby Tag und Nacht von jedem Ort im Haus
aus zu sehen. Die moderne Digitaltechnologie garantiert einen sauberen
Ton und ein absolut klares Bild Ihres Babys. Dadurch erhalten Sie eine
beruhigende erhöhte Sicherheit, ohne das Zimmer Ihres Babys betreten zu
müssen und seinen Schlaf zu stören.
Allgemeine Beschreibung
1 Elterneinheit
2 Display
3 ECO-Anzeige
4 Batteriestandanzeige
5 Verbindungsanzeige
6 Lautsprecher
7 Bedienungstaste (Menünavigation/Lautstärke/Helligkeit)
8 Empfindlichkeitstaste
9 Schlaflied-Taste
10 Gegensprechtaste
11 Buchse für Gerätestecker
12 Modus-Taste
13 Ein-/Ausschalter
14 Antenne
15 Gürtel-Clip
16 Babyeinheit
17 Kamera
18 Schlaflied-Ein-/Ausschalter
19 Ein-/Ausschalter
20 Antenne
21 Lautsprecher
22 Buchse für Gerätestecker
23 Aussparungen zur Wandbefestigung
24 Ladegerät(2x)
25 Schrauben
Deutsch
53
Wichtige Sicherheitsinformationen
Lesen Sie diese wichtigen Informationen vor dem Gebrauch des Geräts
aufmerksam durch, und bewahren Sie sie für eine spätere Verwendung auf.
WICHTIG
Dieses Babyphone ist zu Ihrer Unterstützung gedacht. Es ist kein Ersatz für
eine angemessene und verantwortungsvolle Überwachung durch
Erwachsene und sollte keineswegs als solcher eingesetzt werden.
Lassen Sie Ihr Baby nie alleine zuhause. Sorgen Sie stets dafür, dass jemand
anwesend ist, der auf das Baby aufpasst und es versorgt.
Deutsch
Page 54
54
Deutsch
Haftungsausschluss
Bitte beachten Sie, dass Sie dieses Babyphone auf eigene Verantwortung
gebrauchen. Koninklijke Philips N.V. und ihre Tochtergesellschaften sind
nicht verantwortlich für den Betrieb des Babyphones oder dessen Gebrauch
durch Sie und tragen daher keine Haftung in Zusammenhang mit dem
Einsatz des Babyphones.
Gefahr
-
Tauchen Sie keine Teile des Babyphones in Wasser oder andere
Flüssigkeiten. Stellen Sie das Gerät nicht an Orten auf, an denen
Wasser oder andere Flüssigkeiten auf das Gerät tropfen oder
spritzen können. Benutzen Sie das Babyphone keinesfalls in
feuchter Umgebung oder in der Nähe von Wasser.
-
Legen Sie keine Gegenstände auf das Babyphone, und bedecken
Sie es nicht. Achten Sie darauf, dass die Belüftungsöffnungen frei
sind. Führen Sie die Installation gemäß den Anweisungen des
Herstellers durch.
-
Kabel stellen eine potenzielle
Strangulationsgefahr dar. Bewahren Sie die
Kabel außer Reichweite von Kindern (mehr als
1Meter Entfernung) auf. Legen Sie das
Babyphone niemals in das Bett oder in den
Laufstall des Babys.
Warnung
-
Überprüfen Sie vor dem ersten Gebrauch, ob die
Spannungsangabe auf dem Adapter mit der örtlichen
Netzspannung übereinstimmt.
-
Modifizieren, trennen oder öffnen Sie den Adapter und das Kabel
nicht, da dies eine Gefährdung darstellt.
-
Verwenden Sie ausschließlich den mitgelieferten Adapter.
-
Wenn der Adapter defekt oder beschädigt ist, darf er nur durch ein
Original-Ersatzteil ausgetauscht werden, um Gefährdungen zu
vermeiden.
Page 55

Deutsch
-
Dieses Gerät kann von Kindern ab 8Jahren und Personen mit
verringerten physischen, sensorischen oder psychischen
Fähigkeiten oder Mangel an Erfahrung und Kenntnis verwendet
werden, wenn sie bei der Verwendung beaufsichtigt werden oder
Anleitung zum sicheren Gebrauch des Geräts erhalten und die
Gefahren verstanden haben. Kinder dürfen nicht mit dem Gerät
spielen. Die Reinigung und Pflege des Geräts darf von Kindern
nicht ohne Aufsicht durchgeführt werden.
-
Achten Sie darauf, dass das Netzkabel nicht betreten und,
insbesondere an Steckern und Steckdosen und an den
Austrittspunkten am Gerät, nicht geknickt wird.
-
Stellen Sie das Babyphone so auf, dass das Kabel an Türen und
Durchgängen nicht im Weg ist. Wenn Sie das Babyphone auf
einem Tisch oder niedrigen Schrank aufstellen, lassen Sie das
Netzkabel nicht über die Tisch- oder Schrankkante hängen. Führen
Sie das Kabel so, dass es am Boden keine Stolpergefahr darstellt.
-
Halten Sie das Verpackungsmaterial (Plastikbeutel,
Kartonfüllmaterial usw.) von Kindern fern. Diese Gegenstände sind
kein Spielzeug.
-
Um Stromschläge zu verhindern, öffnen Sie niemals das Gehäuse
des Babyphones oder der Elterneinheit.
55
Achtung
-
Verwenden Sie das Gerät bei Temperaturen zwischen 0°C und
40°C.
-
Platzieren Sie das Gerät nicht in der Nähe von Wärmequellen wie
z.B. Heizkörpern, Öfen oder anderen Geräten (einschließlich
Verstärkern), die Wärme erzeugen.
-
Achten Sie darauf, dass Ihre Hände beim Anfassen von Netzteilen,
Steckern und Stromkabeln trocken sind.
-
Alle erforderlichen Markierungen für die Babyeinheit, die
Elterneinheitund das Netzteil befinden sich auf dem unteren Teil
der Babyeinheit, der Elterneinheit und des Netzteils.
Page 56

56
Deutsch
Einhaltung von Normen
-
Dieses Produkt erfüllt die Anforderungen der Europäischen
Gemeinschaft zur elektromagnetischen Verträglichkeit.
-
Philips Consumer Lifestyle erklärt hiermit, dass dieses Babyphone die
grundlegenden Anforderungen und andere relevante Bestimmungen der
Richtlinie 2014/53/EU erfüllt (FHSS: Frequenzband 2,4 GHz, abgestrahlte
maximale Sendeleistung: 100mW EIRP). Eine Kopie der EGKonformitätserklärung finden Sie unter www.philips.com/support.
Elektromagnetische Felder
Dieses Philips-Gerät erfüllt alle einschlägigen Normen und Vorschriften zur
Exposition gegenüber elektromagnetischen Feldern.
Für den Gebrauch vorbereiten
Babyeinheit
Stecken Sie den Netzstecker in die Babyeinheit und den Adapter in die
Steckdose.
Elterneinheit
Die Elterneinheit wird miteinem integrierten Lithium-Ionen-Akku betrieben.
Gehen Sie folgendermaßen vor, um die Elterneinheit aufzuladen.:
1 Stecken Sie den Netzstecker in die Elterneinheit und den Adapter in die
Steckdose.
-
Die Akkustandanzeige wechselt zu Orange, um anzuzeigen, dass das
Gerät aufgeladen wird.
Page 57
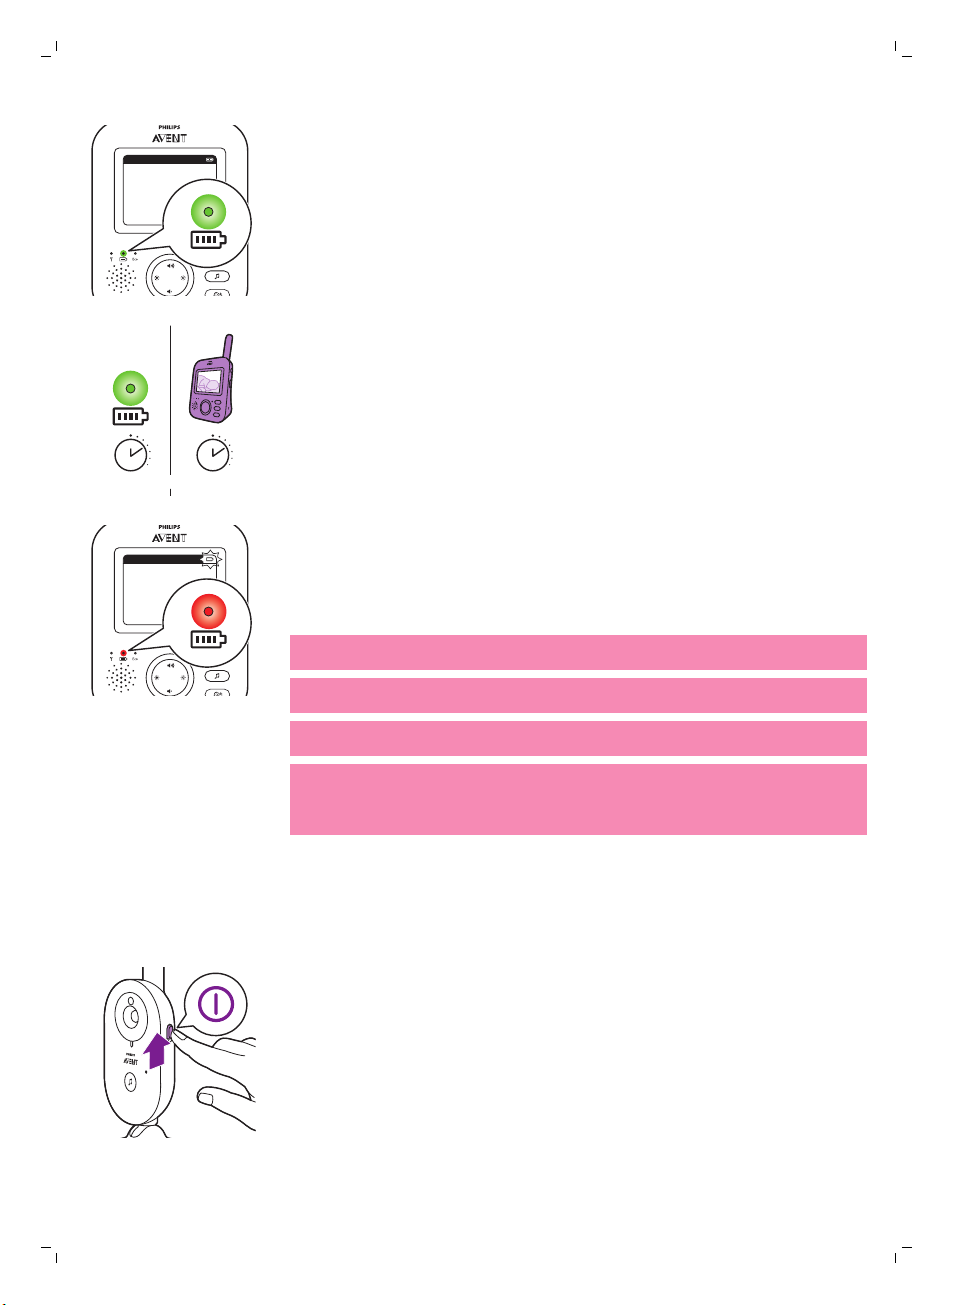
20°CEco
1
10 hrs=3 hrs
20°CEco
1
Deutsch
-
Ist der Akku vollständig geladen,leuchtet
dieAkkustandanzeigedauerhaft grün.
-
Wenn Sie die Elterneinheit für 3Stunden aufladen, kann sie ca.
10Stunden lang ohne Kabel verwendet werden.
-
Wenn die Elterneinheit während des Ladevorgangs eingeschaltet ist,
dauert das Aufladen doppelt so lange.
-
Wenn die Ladung der Akkus in der Elterneinheit zur Neige geht, wechselt
die Akkustandanzeige zuRot, und die Elterneinheit piept.
-
Wenn die Akkus vollständig entleert sind und die Elterneinheit nicht mit
Netzstrom versorgt wird, schaltet sich die Elterneinheit automatisch aus,
und die Verbindung mit der Babyeinheit wird unterbrochen.
Hinweis: Der integrierte Akku kann nicht aus dem Produkt entnommen
werden.
Hinweis: Die Akkus entladen sich sehr langsam nach und nach, auch wenn
die Elterneinheit ausgeschaltet ist.
Tipp: Um Akkuladung einzusparen, schalten Sie die Elterneinheit aus, wenn
Sie sie nicht verwenden.
Hinweis: Wir empfehlen Ihnen, die Elterneinheit bei Gebrauch während der
ganzen Nacht an die Stromversorgung angeschlossen zu lassen. Wenn der
Akku der Elterneinheit während der Nacht zur Neige geht, ertönt ein Signal
an der Elterneinheit, sodass Sie möglicherweise aufwachen.
57
Verwenden des Babyphones
Verbinden der Elterneinheit mit der Babyeinheit
1 Schieben Sie den Ein-/Ausschalter der Babyeinheit in die EIN-Position.
Page 58

>
2
m/6.7 ft
20°CEco
1
20°CEco
1
58
Deutsch
2 Wenn die Babyeinheit eingeschaltet ist, leuchtet ihre Betriebsanzeige
grün.
Hinweis: Die Betriebsanzeige der Babyeinheit leuchtet immer grün, auch
wenn keine Verbindung mit der Elterneinheit besteht.
3 Elterneinheit und Babyeinheit sollten mindestens 2Meter voneinander
entfernt sein, um ein akustisches Feedbackzu vermeiden.
4 Drücken Sie an der Elterneinheit den Ein-/Ausschalter, um die
Elterneinheit einzuschalten.
-
Das Display wird eingeschaltet, das Verbindungssystem wird
angezeigt, und die Verbindungsanzeige wechselt zu Rot. Die
Elterneinheit beginnt, nach der Babyeinheit zu suchen.
-
Wenn die Elterneinheit und die Babyeinheit verbunden sind, leuchtet
die Verbindungsanzeige auf der Elterneinheit grün, und ein oder
mehrere Balken werden auf dem Display angezeigt.
Page 59

20°CEco
1
Hinweis: Der Verbindungsaufbau zwischen Elterneinheit und Babyeinheit
>1-1.5m/3.5-5ft
>
2
m/6.7 ft
dauert weniger als 10Sekunden.
Wenn dieBabyeinheit ausgeschaltet ist, wird auf der Elterneinheit das
Symbol für überschrittenen Maximalabstand angezeigt. Prüfen Sie, ob die
Babyeinheit eingeschaltet ist.
-
Wenn keine Verbindung aufgebaut wurde, leuchtet die
Verbindungsanzeige rot, die Elterneinheit piept, und das Symbol für
die Reichweitenüberschreitung wird auf dem Display angezeigt.
Aufstellen des Babyphones
Warnhinweis: Da durch das Kabel der
Babyeinheit eine potenzielle Gefahr des
Strangulierens besteht, sollten Sie sicherstellen,
dass die Babyeinheit und das Kabel mindestens
1 Meter von Ihrem Baby entfernt sind.
1 Für eine optimale Geräuscherkennung sollte sich die Babyeinheit
höchstens 1,5Meter entfernt befinden. Stellen Sie sicher, dass die
Babyeinheit mindestens 1Meter vom Baby entfernt ist, sonst eine
potenzielle Gefahr des Strangulierens besteht.
Deutsch
59
2 Stellen Sie die Elterneinheit im Betriebsbereich der Babyeinheit auf. Sie
sollte mindestens 2Meter von der Babyeinheit entfernt sein, um ein
akustisches Feedback zu vermeiden.
Hinweis: Wenn Sie ein schnurloses Telefon, drahtlose Videoübertragung,
ein Wi-Fi-Netzwerk, eine Mikrowelle oder Bluetooth im Frequenzbereich
von 2,4GHz verwenden und Störungen an der Elterneinheit oder der
Babyeinheit auftreten, stellen Sie die Elterneinheit an einen anderen Ort,
bis keine Störungen mehr auftreten.I
3 Es gibt zwei Möglichkeiten, die Babyeinheit zu positionieren.
a Stellen Sie die Babyeinheit auf eine stabile, ebene und waagerechte
Oberfläche.
b Befestigen Sie die Babyeinheit mit den im Lieferumfang enthaltenen
Schrauben an der Wand.
Page 60

<300m/985ft
<50m/165ft
60
Deutsch
Tipp: Hinweise zur Wandmontage finden Sie am Ende dieser
Bedienungsanleitung.
Tipp: Verwenden Sie die im Lieferumfang enthaltene Schablone, um den
genauen Ort der Bohrlöcher an der Wand zu markieren.
Tipp: Positionieren Sie die Babyeinheit höher, um einen guten Überblick
über das Bett oder den Laufstall des Babys zu erhalten.
4 Richten Sie die Babyeinheit so aus, dass Sie Ihr Baby optimal sehen
können. Die Babyeinheit kann gedreht werden, bis sie wie gewünscht
ausgerichtet ist.
Empfangsbereich
Der Betriebsbereich beträgt bis zu 50Meter im Innenbereich und
300Meterim Außenbereich. Die Reichweite des Babyphones ist von der
Umgebung und von eventuellen Störfaktoren abhängig. Nasse und feuchte
Materialien können die Reichweite um bis zu 100% verringern.
Trockene Materialien Materialstärke Empfangsver
lust
Holz, Gips, Pappe, Glas (ohne Metall, Drähte oder
Blei)
Ziegel, Sperrholz <30cm 5-35%
Stahlbeton <30cm 30-100%
Metallgitter oder -stangen <1cm 90-100%
Metall- oder Aluplatten <1cm 100%
<30cm 0-10%
Merkmale und Einstellungen
Lautstärke
Sie können die Lautsprecherlautstärke der Elterneinheit auf den
gewünschten Pegel einstellen.
Page 61

20°C
1
Helligkeit
20°C
1
Deutsch
61
1 Drücken Sie den oberen oder unteren Teil der Bedienungstaste, um die
Lautstärke zu ändern.
Tipp: Stellen Sie sicher, dass die Lautstärke mit den
Umgebungsbedingungen abgestimmt ist. Bei Umgebungsgeräuschen
kann auch der Vibrationsalarm eingeschaltet werden.
Der auf dem Display angezeigte Lautstärkebalken zeigt die ausgewählte
Lautstärke an.
Hinweis: Bei hoch eingestellter Lautstärke verbraucht die Elterneinheit mehr
Energie.
Hinweis: Wenn keine Lautstärkebalken angezeigt werden, ist die Lautstärke
stummgeschaltet. Auf der Elterneinheit wird in der Statusleiste ein
Stummschaltungssymbol angezeigt, und Sie erhalten nur Alarme und Video
von der Elterneinheit.
Sie können die Anzeigehelligkeit der Elterneinheit auf die gewünschte
Stärke einstellen.
1 Drücken Sie den linken oder rechten Teil der Bedienungstaste, um die
Helligkeit des Displays der Elterneinheit anzupassen.
Betriebsarten
Der angezeigte Helligkeitsbalken gibt die ausgewählte Display-Helligkeit
wieder.
Hinweis: Bei hoch eingestellter Helligkeit verbraucht die Elterneinheit mehr
Energie.
Dieses Babyphone weist vier unterschiedliche Modi auf, über die Sie
festlegen können, wie Sie sich um Ihr Baby kümmern möchten: VIDEO,
AUDIO, VOX und ECO.
Page 62

VIDEO
VIDEO
20°C
1
VIDEO
20°C
1
VIDEO
AUDIO
AUDIO
62
Deutsch
Bei eingeschaltetem Babyphone können Sie zwischen diesen vier
verschiedenen Modi wählen, indem Sie die Modus-Taste auf der Seite der
Elterneinheit drücken.
Im Display wird der gewählte Modus angezeigt. Der ausgewählte Modus
wird auch in der Statusleiste angezeigt. Wenn Sie das Gerät einschalten, ist
der zuletzt verwendete Modus aktiv.
VIDEO-Modus
Drücken Sie die Modus-Taste an der Seite der Elterneinheit, um denVIDEOModus auszuwählen.
Bei aktiviertem VIDEO-Modus ist der Bildschirm immer eingeschaltet,
sodass Sie Ihr Baby beim Schlafen sehen können. Alle Geräusche werden
direkt an die Elterneinheit übertragen.
Hinweis: Stellen Sie die Empfindlichkeitsstufe auf "Sehr hoch" ein, um
kontinuierlich Geräusche an der Elterneinheit zu haben. Bitte lesen Sie das
Kapitel zu den Empfindlichkeitsstufen, um weitere Informationen zu
erhalten.
AUDIO-Modus
1 Drücken Sie die Modus-Taste an der Elterneinheit, um in den AUDIO-
Modus zu wechseln.
Page 63

20°C
1
AUDIO
20°C
1
VOX
VOX
VOX
20°C
1
AUDIO
20°C
1
ECO
Deutsch
63
Das Display der Elterneinheit wird ausgeschaltet, der AUDIO-Modus ist
jedoch aktiviert. 3Sekunden nach dem Auswählen des AUDIO-Modus wird
das Display ausgeschaltet.
Hinweis: Die Statusleiste ist nicht sichtbar, wenn das Display ausgeschaltet
ist.
Hinweis: Die Verbindungsanzeige zeigt, dass die Elterneinheit eingeschaltet
und mit der Babyeinheit verbunden ist.
Hinweis: Stellen Sie die Empfindlichkeitsstufe auf "Sehr hoch" ein, um
kontinuierlich Geräusche an der Elterneinheit zu haben. Bitte lesen Sie das
Kapitel zu den Empfindlichkeitsstufen, um weitere Informationen zu
erhalten.
Alle Geräusche werden ständig an die Elterneinheit übertragen. Wenn das
Baby weint, bleibt das Display der Elterneinheit ausgeschaltet, die von
derBabyeinheiterkannten Geräusche werden jedoch an die Elterneinheit
übertragen.
VOX-Modus
1 Drücken Sie die Modus-Taste an der Elterneinheit, um in den VOX-
Modus zu wechseln.
Hinweis: Wenn das Display eingeschaltet ist, wird der ausgewählte Modus in
der Statusleiste angezeigt. Die Statusleiste istnicht sichtbar, wenn das
Display ausgeschaltet ist.
Das Display unddie Tonausgabe der Elterneinheit werden ausgeschaltet,
wenn im VOX-Modus für 20Sekunden kein Geräusch erkannt wird.
Wennein Geräusch von der Babyeinheit entdeckt wird, werden das
Displayund die Tonausgabe der Elterneinheit sofort eingeschaltet.Die
Geräusche werden an die Elterneinheit übertragen.
Hinweis: Der minimale Geräuschpegel zum Aktivieren der Tonausgabe und
des Displays wird durch die Empfindlichkeitseinstellung festgelegt..
Page 64

ECO
ECO
20°C
1
ECO
ECO
20°C
1
ECO
64
Deutsch
ECO-Modus
1 Drücken Sie die Modus-Taste an der Elterneinheit, um in den ECO-
Modus zu wechseln.
Hinweis: Wenn das Display eingeschaltet ist, kann der ausgewählte Modus
der Statusleiste entnommen werden. Die Statusleiste ist nicht sichtbar,
wenn das Display ausgeschaltet ist.
Das Displayund die Tonausgabe der Elterneinheit werden ausgeschaltet,
wenn für 20Sekunden kein Geräusch erkannt wird. DieECO-Anzeige
leuchtet durchgehend grün und zeigt an, dass der ECO-Modus aktiviert ist.
Im ECO-Modus sind das Display und die Tonübertragung ausgeschaltet.
Wennein Geräusch von der Babyeinheit entdeckt wird, werden das
Displayund die Tonausgabe der Elterneinheit sofort eingeschaltet.Die
Geräusche werden an die Elterneinheit übertragen.
Hinweis: Der minimale Geräuschpegel zum Aktivieren der Tonausgabe und
des Displays wird durch die Empfindlichkeitseinstellung festgelegt..
Schlaflieder
Sie können die Schlafliedfunktion von der Elterneinheit oder der
Babyeinheit aus aktivieren.
Um die Schlafliedfunktion über die Elterneinheit zu aktivieren, gehen Sie wie
nachstehend beschrieben vor.:
Auswahl des Schlafliedes
1 Drücken Sie die Schlaflied-Taste an der Elterneinheit, um das Schlaflied-
Menü zu öffnen.
Hinweis: Wenn Sie die Schlaflied-Taste drücken, während das Schlaflied-
Menü bereits geöffnet ist, wird das Menü geschlossen.
Page 65

Lullaby Songs
1 Rock-a-Bye Baby
2 Twinkle, Twinkle
3 Hush, Little Baby
4 Brahm’s Lullaby
5 Golden Slumbers
Lullaby Songs
1 Rock-a-Bye Baby
2 Twinkle, Twinkle
3 Hush, Little Baby
4 Brahm’s Lullaby
5 Golden Slumbers
15 min
Lullaby Songs
1 Rock-a-Bye Baby
2 Twinkle, Twinkle
3 Hush, Little Baby
4 Brahm’s Lullaby
5 Golden Slumbers
Deutsch
2 Drücken Sie den rechten Teil der Bedienungstaste, um die Liste der
Schlaflieder zu öffnen..
3 Drücken Sie den oberen oder unteren Teil der Bedienungstaste, um
durch die Liste der Schlaflieder zu blättern.
4 Drücken Sie den rechten Teil der Bedienungstaste, um ein bestimmtes
Schlaflied abzuspielen.
Wenn Sie das Schlaflied pausieren möchten, drücken Sie erneut die
rechte Seite der Bedienungstaste.
5 In der Statusleisteder Elterneinheit wird der Anzahl der Schlaflieder
angezeigt, dieabgespielt und wiederholt werden.
65
Die Babyeinheit gibt das Schlaflied wieder, und es wird für ca. 15Minuten
fortlaufend wiederholt.
Tipp: Um alle verfügbaren Lieder zu wiederholen, wählen Sie die letzte
Option in der Liste aus.
6 Um ein anderes Schlaflied auszuwählen, blättern Sie mit der
Bedienungstastenach oben oder unten, und wählen Sie ein anderes Lied
in der Liste aus.Drücken Sie den rechten Teil der Bedienungstaste, um
das ausgewählte Lied zu starten.
7 Um das Schlaflied anzuhalten, drücken Sie die Schlaflied-Taste an der
Elterneinheit, und pausieren Sie das zurzeit abgespielte Lied, indem Sie
den rechten Teil der Bedienungstaste erneut drücken.
Page 66

20°C
1
15 min
66
Deutsch
Schlaflied-Lautstärke
1 Drücken Sie die Schlaflied-Taste an der Elterneinheit, um das Schlaflied-
Menü zu öffnen.Drücken Sie den linken Teil der Bedienungstaste, und
drücken Sie dann die Unterseite der Bedienungstaste, um die
Lautstärkeoptionen imSchlaflied-Menü auszuwählen. Drücken Sie den
rechten Teil der Bedienungstaste, um auf die Lautstärkeeinstellungen für
Schlaflieder zuzugreifen.
2 Drücken Sie den oberen oder unteren Teil der Bedienungstaste, um die
Lautstärke zu ändern.
3 Um das Schlaflied anzuhalten, drücken Sie die Schlaflied-Taste an der
Elterneinheit, und pausieren Sie das zurzeit abgespielte Lied, indem Sie
den rechten Teil der Bedienungstaste erneut drücken.
Um die Schlafliedfunktion an der Babyeinheit zu aktivieren, drücken Sie den
Schlaflied-Ein-/Ausschalter an der Babyeinheit.
Die Babyeinheit spielt das zuletzt an der Elterneinheit ausgewählte
Schlaflied wieder, und wiederholt es für ca. 15Minuten fortlaufend.
Um das Schlaflied an der Babyeinheit anzuhalten, drücken Sie den
Schlaflied-Ein-/Ausschalter an der Babyeinheit.
Gegensprechfunktion
Über die Gegensprechtaste an der Elterneinheit können Sie mit Ihrem Kind
sprechen.
Page 67

Empfindlichkeit
20°C
1
Deutsch
67
1 Drücken Sie die Gegensprechtaste an der Elterneinheit, und halten Sie
sie gedrückt.
2 Sprechen Sie aus einer Entfernung von 15 bis 30cm deutlich ins Mikrofon
auf der Vorderseite der Elterneinheit.
Solange die Gegensprechtaste gedrückt wird, besteht eine offene
Tonverbindung zur Babyeinheit. Auf dem Display der Elterneinheit wird
das Gegensprechsymbol angezeigt, das auf die aktive Verbindung
hinweist.
3 Lassen Sie die Gegensprechtaste nach dem Sprechen wieder los.
Hinweis: Solange die Gegensprechtaste gedrückt wird, kann
dieElterneinheit keineGeräusche von der Babyeinheit verarbeiten.
Die Empfindlichkeitsstufe an der Babyeinheit bestimmt, was Sie an der
Elterneinheit hören. Wird die Stufe auf hoch gestellt, werden Sie viele
Geräusche hören, einschließlich leiser Hintergrundgeräusche. Wird die
Empfindlichkeitsstufe auf niedrig gestellt, werden Sie nur die lauteren
Geräusche hören.
1 Drücken Sie die Empfindlichkeitstaste, um die Empfindlichkeitsstufe
einzustellen.
Hinweis: Wenn Sie die Empfindlichkeitstaste noch einmal drücken,
beenden Sie das Menü.
2 Drücken Sie den oberen oder unteren Teil der Bedienungstaste, um die
gewünschte Empfindlichkeitsstufe auszuwählen.
Page 68

20°C
1
20°C
1
68
Deutsch
Gürtel-Clip
Wenn Ihr Baby nur leise Geräusche von sich gibt, muss die Empfindlichkeit
der Babyeinheit an der Elterneinheit auf eine hoheStufe eingestellt werden.
Je lauter die Geräusche des Babys jedoch sind, desto geringer kann die
Empfindlichkeit an der Elterneinheit eingestellt werden.
Hinweis: Im AUDIO- und VIDEO-Modus erhalten Sie kontinuierlich
Geräusche, wenn die Empfindlichkeitsstufe auf "Sehr hoch" gestellt wird.
Andernfalls werden leise Geräusche stummgeschaltet.
Tipp: Die Empfindlichkeit kann so angepasst werden, dass Sie Ihr Baby
immer ohne Störungen durch andere Geräusche hören. Wenn viele
Hintergrundgeräusche vorhanden sind, stellen Sie die Empfindlichkeit
geringer an, damit Sie diese Geräusche nicht über die Elterneinheit hören.
Sie können die Elterneinheit überall im und um das Haus mitnehmen.
Befestigen Sie die Elterneinheit dazu entweder mithilfe des Gürtel-Clips an
Ihrem Gürtel oder am Hosen- bzw. Rockbund. So können Sie Ihr Kind
überwachen und haben dennoch beide Hände frei.
Hinweis: Das Display ist nun auf den Kopf gestellt, sodass Sie das Baby auf
dem Bildschirm sehen können, indem Sie die Elterneinheit einfach anheben.
Reinigung und Wartung
Warnhinweis: Tauchen Sie die Eltern- und die
Babyeinheit nicht in Wasser ein, und reinigen Sie
sie auch nicht unter fließendem Wasser.
Page 69

Deutsch
69
Warnhinweis: Verwenden Sie weder
Reinigungssprays noch flüssige Reinigungsmittel.
1 Schalten Sie die Babyeinheit aus, entfernen Sie den Netzstecker von der
Babyeinheit und ziehen Sie den Adapter aus der Steckdose.
2 Reinigen Sie die Babyeinheit mit einem trockenen Tuch.
Hinweis: Fingerabdrücke oder Schmutz auf der Linse der Babyeinheit
können die Leistung der Kamera beeinträchtigen. Berühren Sie die Linse
nicht mit den Fingern.
3 Schalten Sie die Elterneinheit aus, und ziehen Sie den Adapter aus der
Steckdose.
4 Reinigen Sie die Elterneinheit mit einem trockenen Tuch.
Page 70

70
Deutsch
5 Reinigen Sie die Adapter mit einem trockenen Tuch.
Lagerräume
Wenn Sie vorhaben, das Babyphonelange Zeit nicht zu benutzen, bewahren
Sie die Eltern- und die Babyeinheit sowie die Adapter an einem kühlen und
trockenen Ort auf.
Bestellen von Zubehör
Um Zubehör oder Ersatzteile zu kaufen, besuchen Sie
www.philips.com/parts-and-accessories, oder suchen Sie Ihren Philips
Händler auf. Sie können sich auch an das Philips Consumer Care Center in
Ihrem Land wenden. Die Kontaktdaten finden Sie in der internationalen
Garantieschrift.
Recycling
-
Dieses Symbol bedeutet, dass das Produkt nicht mit dem normalen
Hausmüll entsorgt werden kann (2012/19/EU).
-
Dieses Symbol bedeutet, dass das Produkt einen Akku enthält, der nicht
mit dem normalen Hausmüll entsorgt werden darf (2006/66/EG). Bitte
geben Sie das Produkt bei einer offiziellen Sammelstelle oder einem
Philips Service-Center ab, um den Akku fachgerecht ausbauen zu lassen.
-
Beachten Sie die örtlichen Vorschriften zur getrennten Entsorgung von
elektrischen und elektronischen Produkten, Akkus und Batterien. Die
ordnungsgemäße Entsorgung dient dem Schutz von Umwelt und
Gesundheit.
Den Akku entfernen
Hinweis: Wir empfehlen Ihnen, den Akku von einem Fachmann entfernen zu
lassen.
Bauen Sie den wiederaufladbaren Akku nur zur Entsorgung des Geräts aus.
Vergewissern Sie sich, dass der Akku ganz leer ist, bevor Sie ihn ausbauen.
Nur die Elterneinheit hat einen Akku.
Page 71

Vorgehensweise:
1 Nehmen Sie die 2 Gummifüße an der Unterseite der Elterneinheit ab.
2 Entfernen Sie die 2 Schrauben, die jetzt an der Unterseite der
Elterneinheit sichtbar sind.
3 Schieben Sie die Antenne in eine aufrechte Position und entfernen Sie
das hintere Gehäuse, das jetzt sichtbar ist.
4 Entfernen Sie das hintere Gehäuse von dem vorderen Gehäuse, in dem
Sie einen Schraubendreher zwischen dem vorderen und hinteren
Gehäuse des Geräts klemmen.
5 Ziehen Sie das Akku-Anschlusskabel (schwarz-weiß-rotes Kabel) ab.
6 Nehmen Sie die 4 Schrauben aus dem Akkufach.
7 Entnehmen Sie den Akku.
Garantie und Support
Für Unterstützung und weitere Informationen besuchen Sie die Philips
Website unter www.philips.com/support, oder lesen Sie die internationale
Garantieschrift.
Häufig gestellte Fragen
In diesem Kapitel sind die häufigsten Probleme aufgeführt, die beim
Gebrauch des Geräts auftreten können. Sollten Sie ein Problem mithilfe der
nachstehenden Informationen nicht beheben können, besuchen Sie unsere
Website unter: www.philips.com/support und ziehen Sie die Liste „Häufig
gestellte Fragen“ hinzu, oder wenden Sie sich an das Philips Consumer
Care-Center in Ihrem Land.
NUTZUNG / DIE EINHEITEN VERBINDEN
Deutsch
71
Frage Antwort
Warum leuchtet die
Betriebsanzeige der
Babyeinheit nicht, wenn
ich die Einheit
einschalte?
Warum wird die
Elterneinheit nicht
aufgeladen, wenn sie an
der Stromversorgung
angeschlossen ist?
Möglicherweise ist die Babyeinheit nicht an die Stromversorgung
angeschlossen. Schließen Sie die Babyeinheit an die Stromversorgung an.
Stellen Sie dann den Ein-/Ausschalter der Babyeinheit nach oben auf die
EIN-Position, um eine Verbindung mit der Elterneinheit herzustellen.
Möglicherweise haben Sie den Adapter nicht ordnungsgemäß in die
Steckdose gesteckt. Achten Sie darauf, den Adapter ordnungsgemäß in die
Steckdose zu stecken.
Die Elterneinheit ist möglicherweise bereits vollständig aufgeladen. Die
Akkuanzeige leuchtet grün, wenn der Akku vollständig aufgeladen und das
Gerät an das Stromnetz angeschlossen ist.
Page 72

72
Deutsch
NUTZUNG / DIE EINHEITEN VERBINDEN
Warum wird die
Babyeinheit nicht
aufgeladen, wenn sie an
der Stromversorgung
angeschlossen ist?
Warum kann ich keine
Verbindung herstellen?
Weshalb geht
zwischendurch die
Verbindung immer
wieder einmal verloren?
Warum treten
Unterbrechungen in der
Tonübertragung auf?
Was passiert bei einem
Stromausfall?
Die Babyeinheit hat keine Ladefunktion. Die Babyeinheit funktioniert nur,
wenn sie an eineSteckdose angeschlossenist.
Die Babyeinheit und die Elterneinheit befinden sich wahrscheinlich an der
äußeren Grenze des Empfangsbereichs oder es gibt eine Störung von
anderen drahtlosen Geräten im Sendebereich 2,4GHz. Versuchen Sie es mit
einem anderen Aufstellungsort, verringern Sie den Abstand zwischen den
Einheiten, oder schalten Sie andere drahtlose 2,4-GHz-Geräte (Laptops,
Mobiltelefone, Mikrowellen usw.) aus. Es kann bis zu 10Sekunden dauern,
bevor die Verbindung zwischen den Geräten wiederherstellt wird.
Geht das Signal verloren, piept die Elterneinheit (3 kurze Signaltöne alle 20
Sekunden).
Möglicherweise stehen die Eltern- und die Babyeinheit zu nah beieinander.
Behalten Sie mindestens einen Abstand von 1,5Meter zwischen den beiden
Einheiten, um Störungen zu vermeiden.
Da die Elterneinheit mit einem Akku ausgestattet ist, funktioniert sie
weiterhin, wenn dieser ausreichend aufgeladen ist. Die Babyeinheit
funktioniert jedoch nicht mehr, da sie nicht über einen Akku verfügt und nur
an einer Steckdose betrieben werden kann. Die Elterneinheit gibt einen
Piepton aus, um anzuzeigen, dass die Verbindung zur Babyeinheit
unterbrochen ist.
Wenn der Netzstrom wieder vorhanden ist, wird die Verbindung zwischen
der Elterneinheit und der Babyeinheit automatisch wiederhergestellt.
Warum kann das
Aufladen der
Elterneinheit länger als
drei Stunden dauern?
Warum muss ich die
Babyeinheit und das
Kabel mindestens
1Meter von meinem
Baby entfernt
aufstellen?
Worin besteht der
Unterschied zwischen
den verschiedenen
Benutzermodi an der
Elterneinheit? Video,
Audio, VOX und ECO?
Möglicherweise ist die Elterneinheit während des Ladevorgangs
eingeschaltet. Schalten Sie die Elterneinheit während des Ladevorgangs
aus, um die Ladezeit zu verringern. Wenn das Display der Elterneinheit
ständig eingeschaltet ist, wird das Aufladen der Elterneinheit länger dauern.
Um zu vermeiden, dass sich das Baby mit dem Kabel stranguliert, und um
eine optimale Geräuscherkennung zu sichern, positionieren Sie die
Babyeinheit und das Kabel immer mindestens 1Meter von Ihrem Baby
entfernt.
In der unten angeführten Liste finden Sie ein Erklärung zu den verfügbaren
Modi am Elternteil.
* Video-Modus: Der Bildschirm und die Lautstärke an der Elterneinheit sind
immer eingeschaltet.
Page 73

NUTZUNG / DIE EINHEITEN VERBINDEN
* Audio-Modus: Nur der Audio-Modus ist aktiviert. Das Display der
Elterneinheit wird ausgeschaltet, wenn der AUDIO-Modus aktiviert ist. Die
Verbindungsanzeige zeigt, dass die Elterneinheit eingeschaltet und mit der
Babyeinheit verbunden ist. Nur SCD630: Die Lautstärkenanzeigen über dem
Bildschirm leuchten grün auf, wenn die Babyeinheit ein Geräusch
wahrnimmt. Eine normale Unterhaltung mit der Babyeinheit ist über die
Tasten der Sprechfunktion, Schlaflied, Menü und Empfindlichkeit möglich.
* VOX-Modus: Das Display und die Tonausgabe der Elterneinheit werden
ausgeschaltet, wenn für 20Sekunden kein Geräusch erkannt wird (oder das
Geräusch nicht über der Empfindlichkeitseinstellung liegt). Display und
Sound werden beide sofort aktiviert, wenn Ihr Baby weint und die
Empfindlichkeitsstufe überschritten wird. Wenn das Geräusch unter die
Empfindlichkeitsstufe fällt, bleibt das Video für 20 Sekunden aktiv. Wenn
eine der Bedienungstasten (Helligkeit oder Lautstärke) gedrückt wird, wird
das Gerät das Video etwa 5 Sekunden lang anzeigen. Das Schlaflied-Menü
ist ebenfalls aufrufbar.
* ECO-Modus: Das Display und die Tonausgabe der Elterneinheit werden
ausgeschaltet, wenn für 20Sekunden kein Geräusch erkannt wird. Der ECOModus reduziert den Stromverbrauch während Ruhezeiten, während Sie
weiter mit Ihrem Baby verbunden bleiben. Im ECO-Modus leuchtet die
ECO-LED-Anzeige grün und das Gerät wird in einem anderen
Verbindungsmodus betrieben. Im ECO- Modus verwendet die Elterneinheit
einen 2-Sekunden Ping-Mechanismus, anstelle einer kontinuierlichen
Radiofrequenzverbindung, um die Verbindung mit der Babyeinheit zu
prüfen. Daher verbraucht die Babyeinheit im ECO-Modus weniger Energie.
Deutsch
73
Wo schalte ich das
Nachtlicht ein?
Wie kann ich die
Elterneinheit
zurücksetzen?
Drücken Sie den Ein-/Ausschalter für das Nachtlicht an der Babyeinheit, um
das Nachtlicht einzuschalten. Das Nachtlicht kann nicht von der
Elterneinheit aus geregelt werden. Das Nachtlicht schaltet sich nicht
automatisch aus. Drücken Sie erneut den Ein-/Ausschalter für das
Nachtlicht an der Babyeinheit, um das Nachtlicht auszuschalten.
Sie können die Elterneinheit zurücksetzen, indem Sie gleichzeitig den Ein/Ausschalter und den runden Schalter "Navigation unten" an der
Vorderseite der Elterneinheit für etwa 1 Sekunde gedrückt halten. Die
Elterneinheit schaltet sich aus. Um die Elterneinheit wieder einzuschalten,
drücken Sie den Ein-/Ausschalter. Spezifische Benutzerinformationen, die
im Speicher der Elterneinheit gespeichert wurden, wie beispielsweise
Benutzermodus, Helligkeitseinstellungen, Lautstärke, Schlafliedauswahl,
Zoom-Einstellungen und Vibrationsstufen gehen nicht verloren.
ANZEIGEN AN DER ELTERNEINHEIT
Frage Antwort
Die Akku-LED an der
Elterneinheit wird rot.
Was ist zu tun?
Der Batterieladezustand ist niedrig. Wenn Sie die Elterneinheit nicht an die
Steckdose anschließen, wenn die Akku-LED rot leuchtet und anfängt einen
Piepton auszugeben, wird das Gerät sich in etwa 60 Minuten ausschalten.
Page 74

74
Deutsch
ANZEIGEN AN DER ELTERNEINHEIT
Schalten Sie auf eine geringere Helligkeit und/oder Lautstärke, um den
Batterieverbrauch zu senken und schließen Sie die Elterneinheit mit dem
Netzteil an das Stromnetz an. (siehe Kapitel "Für den Gebrauch
vorbereiten“).
Warum ertönt an der
Elterneinheit ein
akustisches Signal?
Was sagt die Farbe der
Batterie-LED (grün,
orange, rot) oder eine
nicht leuchtende LED
über den Zustand
meines Akkus aus?
Ihr Babyphone piept auf bestimmte Weise, um Sie über die Art des
Problems zu informieren.
1 Piepton: Die Elterneinheit ist ausgeschaltet.
1 Piepton, alle 20 Sekunden innerhalb der ersten 3 Minuten, danach jede
Minute: Der Akku der Elterneinheit ist fast leer.
2 schnelle Pieptöne alle 20 Sekunden: Die Temperatur im Kinderzimmer
liegt außerhalb des vom Benutzer eingestellten Bereichs, das
Temperatursymbol wird auf der Elterneinheit angezeigt (nur bei Modell
SCD630).
3 schnelle Pieptöne alle 20 Sekunden: Die Verbindung zwischen der Babyund Elterneinheit ist unterbrochen, das Verbindungssymbol wird auf dem
Display der Elterneinheit angezeigt und die LINK-Verbindungstaste ist rot.
Wenn die Elterneinheit mit der Stromversorgung verbunden ist, zeigt die
Farbe der Akku-Anzeige folgendes an:
* Grün: Der Akku ist voll.
* Orange: Der Akku wird geladen.
Wenn die Elterneinheit nicht mit der Stromversorgung verbunden ist, zeigt
die Farbe der Akku-Anzeige folgendes an:
* Rot: Der Akku ist fast vollständig leer (<10 %)
* LED leuchtet nicht: Die Elterneinheit ist nicht an das Stromnetz
angeschlossen.
GERÄUSCHE/TÖNE
Frage Antwort
Warum geben die
Elterneinheitund/oder
die Babyeinheit einen
hohen Pfeifton aus?
Wie kann ich den Ton
ausschalten?
Eventuell sind Elterneinheit und Babyeinheit zu nah beieinander aufgestellt.
Stellen Sie sicher, dass Elterneinheit und Babyeinheit mindestens 2,5Meter
voneinander entfernt sind.
Eventuell ist die Lautstärke an der Elterneinheit zu hoch eingestellt.
Verringern Sie die Lautstärke an der Elterneinheit.
Gründe für akustische Signale an der Elterneinheit finden Sie in den Häufig
gestellten Fragen "Warum ertönt an der Elterneinheit ein akustisches
Signal?"
Um den Ton am Gerät stummzuschalten, drücken Sie den unteren Teil der
Bedienungstaste. Wenn keine Lautstärkebalken am Bildschirm angezeigt
werden, ist die Lautstärke stummgeschaltet.
Page 75

GERÄUSCHE/TÖNE
Deutsch
75
Warum höre ich kein
Geräusch?Warum höre
ich mein Baby nicht
weinen?
Warum reagiert die
Elterneinheit schneller
auf
Umgebungsgeräusche
als auf die von meinem
Baby?
Warum ertönt ein
Summgeräusch aus der
Elterneinheit?
Eventuell ist die Lautstärke an der Elterneinheit zu niedrig eingestellt oder
stummgeschaltet. Drücken Sie den oberen Teil der Bedienungstaste, um die
Lautstärke zu erhöhen.
Möglicherweise ist das Elternteil stummgeschaltet. Um die Lautstärke
wieder einzuschalten, drücken Sie den oberen Teil der Bedienungstaste
und stellen Sie die Lautstärke ein.
Die Empfindlichkeit ist zu niedrig eingestellt. Stellen Sie die Empfindlichkeit
im Menü an der Elterneinheit auf eine höhere Stufe ein.
Möglicherweise befindet sich die Babyeinheit zu weit vom Baby entfernt.
Stellen Sie sicher, dass die Babyeinheit maximal 1,5Meter weit vom Baby
entfernt ist, damit die Geräuscherkennung optimal funktioniert. Bei einer
geringeren Entfernung als 1m besteht die Gefahr des Strangulierens.
Die Babyeinheit nimmt außer den Geräuschen des Babys auch andere
Geräusche wahr. Bewegen Sie die Babyeinheit näher an das Baby heran
(beachten Sie dabei jedoch den Minimalabstand von 1Meter).
Eventuell ist die Empfindlichkeit zu hoch gewählt. Wenn Ihr Baby leise
Geräusche von sich gibt, muss die Empfindlichkeit höher eingestellt werden.
Je lauter die Geräusche des Babys jedoch sind, desto geringer kann die
Empfindlichkeit eingestellt werden. Sie können die Empfindlichkeit des
Babyphones an der Elterneinheit einstellen.
Wenn sich die Elterneinheit und die Babyeinheit zu weit voneinander
entfernt befinden, können Störungen auftreten. Dies kann auch geschehen,
wenn zwischen der Elterneinheit und der Babyeinheit zu viele Wände oder
Decken liegen oder wenn andere drahtlose Geräte, die im Bereich 2,4GHz
senden, eingeschaltet sind (z.B. Mikrowelle, Wi-Fi-Router).
Stellen Sie die Elterneinheit an einem anderen Ort näher an der Babyeinheit
auf, oder schalten Sie andere drahtlose Geräte aus.
Falls diese Antwort nicht hilfreich ist, schauen Sie in den Häufig gestellten
Fragen nach "Warum ertönt aus der Elterneinheit und/oder Babyeinheit ein
Pfeifton?"
Wie lange wird das
Schlaflieds von der
Babyeinheit gespielt?
Wie kann ich die
Lautstärke des
Schlaflieds erhöhen?
Nachdem Sie ein Schlaflied ausgewählt haben, und es wird für ca.
15Minuten fortlaufend wiederholt. Falls Sie alle Lieder spielen möchten,
wählen Sie die letzte Option in der Schlaflied-Liste aus.
Sie können die Lautsprecherlautstärke des Schlaflieds an der Elterneinheit
einstellen, jedoch nicht an der Babyeinheit. Drücken Sie die SchlafliedTaste an der Elterneinheit, um das Schlaflied-Menü zu öffnen und die
Lautstärke einzustellen.
BETRIEBSZEIT/EMPFANGSBEREICH
Frage Antwort
Page 76

76
Deutsch
BETRIEBSZEIT/EMPFANGSBEREICH
Warum ist die
Reichweite meines
Babyphones viel
geringer als im
Benutzerhandbuch
angegeben?
Die Betriebszeit der
Elterneinheit sollte bis
zu10Stunden betragen.
Warum ist die
Betriebszeit meiner
Elterneinheit kürzer?
VIDEO-ANZEIGE
Der angegebene Betriebsbereich von 300Metern gilt nur im offenen
Außenbereich und bei unbehinderter Sichtlinie. Je nach Umgebung und
anderen Störfaktoren kann die Reichweite geringer sein (siehe auch die
Tabelle im Kapitel über das Aufstellen der Eltern- und Babyeinheiten).
Innerhalb des Hauses beträgt der Betriebsbereich maximal 50Meter und ist
außerdem durch die Anzahl und Beschaffenheit der Wände bzw. Decken
zwischen der Elterneinheit und der Babyeinheit begrenzt.
Möglicherweise ist die Videohelligkeit der Elterneinheit zu hoch eingestellt,
und die Elterneinheit verbraucht viel Energie. Verringern Sie die Helligkeit
der Elterneinheit.
Die Elterneinheit verbraucht viel Energie, wenn das Video-Display dauerhaft
eingeschaltet sind. Aktivieren Sie einen der Modi AUDIO, VOX oder ECO im
Menü der Elterneinheit, um die Betriebszeit zu erhöhen (siehe Abschnitte
"AUDIO-Modus“,"VOX-Modus“ und "ECO-Modus“ im Kapitel
"Produktmerkmale“).
Möglicherweise ist die Lautstärke der Elterneinheit zu hoch eingestellt, und
die Elterneinheit verbraucht viel Energie. Verringern Sie die Lautstärke an
der Elterneinheit.
Wie bei jedem anderen wiederaufladbaren Elektronikgerät verringert sich
die Akkukapazität nach langer Nutzung.
Frage Antwort
Weshalb ist die
Elterneinheit gestört?
Warum flackert das
Video-Display an der
Elterneinheit?
Warum wird kein Bild
auf dem Video-Display
angezeigt, wenn
dieVerbindungsanzeige
grün leuchtet?
Warum ist das Bild auf
dem Video-Display
nicht gut zu erkennen?
Wenn sich die Elterneinheit und die Babyeinheit zu weit voneinander
entfernt befinden, können Störungen auftreten. Dies kann auch geschehen,
wenn zwischen der Elterneinheit und der Babyeinheit zu viele Wände oder
Decken liegen oder wenn andere drahtlose Geräte, die im Bereich 2,4GHz
senden, eingeschaltet sind (z.B. Mikrowelle, Wi-Fi-Router).
Stellen Sie die Elterneinheit an einem anderen Ort näher an der Babyeinheit
auf, oder schalten Sie andere drahtlose Geräte aus.
Der Akku der Elterneinheit muss möglicherweise aufgeladen werden.
Die Elterneinheit befindet sich möglicherweise in einem der Modi AUDIO,
VOX oder ECO. Drücken Sie die Modus-Taste an der rechten Seite der
Elterneinheit, um des Modus (siehe 'Betriebsarten') zu wechseln.
Möglicherweise ist die Anzeigehelligkeit zu gering eingestellt. Erhöhen Sie
die Anzeigehelligkeit an der Elterneinheit mithilfe der Bedienungstaste in
der Mitte.
Page 77
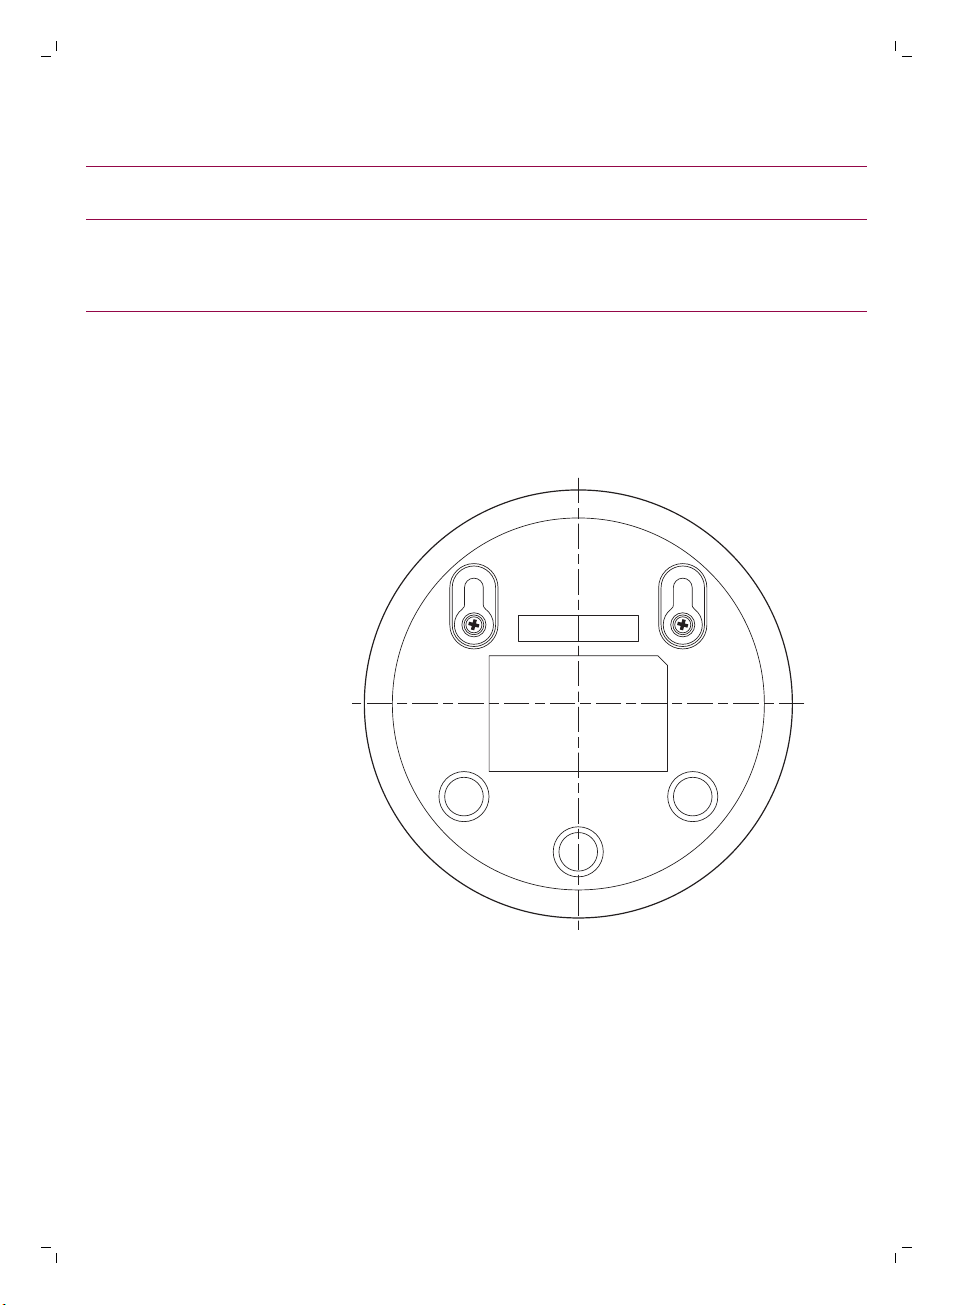
VIDEO-ANZEIGE
Wandanbringung
Deutsch
Möglicherweise ist die Linse der Babyeinheit verschmutzt. Reinigen Sie die
Linse mit einem trockenen Tuch.
Möglicherweise befindet sich die Babyeinheit zu weit vom Baby entfernt.
Stellen Sie sicher, dass die Babyeinheit maximal 1,5Meter weit vom Baby
entfernt ist, um eine optimale Videoquality zu erreichen. Bei einer
geringeren Entfernung als 1m besteht die Gefahr des Strangulierens.
Druckanleitungen:
Drucken Sie diese Seite im Maßstab von 100 % und verwenden Sie die
Schablone, um den genauen Ort der Bohrlöcher an der Wand zu markieren.
77
Page 78

78
Español
Introducción
Enhorabuena por la adquisición de este producto y bienvenido a Philips
Avent. Para sacar el mayor partido a la asistencia que Philips Avent le
ofrece, registre el producto en www.philips.com/welcome.
El vigilabebés con vídeo Philips Aventle ofrece supervisión ininterrumpida y
le permite ver a su bebé día y noche desde cualquier parte de su hogar. La
última tecnología digital le garantiza un sonido claro y la imagen más nítida
de su bebé. Disfrutará de mayor sensación de seguridad sin entrar en la
habitación ni despertarlo.
Descripción general
1 Unidad de padres
2 Pantalla
3 Piloto ECO (Conexión)
4 Piloto de estado de las pilas
5 Piloto LINK
6 Altavoz
7 Botón de control (menú navegación/volumen/brillo)
8 Botón de sensibilidad
9 Botón de nana
10 Botón del intercomunicador
11 Toma para clavija pequeña
12 Botón de modo
13 Botón de encendido/apagado
14 Antena
15 Pinza para cinturón
16 Unidad del bebé
17 Cámara
18 Botón de encendido/apagado de nana
19 Botón de encendido/apagado
20 Antena
21 Altavoz
22 Toma para clavija pequeña
23 Orificios de montaje en pared
24 Adaptador de corriente(2x)
25 Tornillos
Información de seguridad importante
Antes de usar el aparato, lea atentamente esta información importante y
consérvela por si necesitara consultarla en el futuro.
IMPORTANTE
Este vigilabebés está pensado como una ayuda. En ningún caso sustituye
la supervisión responsable y adecuada por parte de un adulto y no debe
utilizarse como tal.
Nunca deje al bebé solo en la casa. Asegúrese siempre de que haya alguien
presente para cuidar de él y hacerse cargo de sus necesidades.
Español
Page 79

Español
79
Descargo de responsabilidad
Tenga en cuenta que utiliza este vigilabebés bajo su responsabilidad.
Koninklijke Philips N.V. y sus empresas filiales no se hacen responsables del
funcionamiento ni el uso de este vigilabebés y, por lo tanto, no asumen
responsabilidad alguna en relación con el uso del mismo.
Peligro
-
No sumerja nunca ninguna parte del vigilabebés en agua u otros líquidos.
No coloque el aparato en un lugar en el que le pueda caer o salpicar
agua o cualquier otro líquido. No utilice nunca el vigilabebés en lugares
húmedos o cerca del agua.
-
No coloque nunca ningún recipiente encima de la unidad del bebé ni lo
cubra. No bloquee las aberturas de ventilación. Realice la instalación
según las instrucciones del fabricante.
-
Los cables presentan posibles riesgos de estrangulamiento. Mantenga
los cables fuera del alcance de los niños (más de 1metro/3,5pies). No
coloque nunca el vigilabebés en el interior de la cuna o del parque del
bebé.
Advertencia
-
Antes de enchufar el aparato, compruebe si el voltaje indicado en el
adaptador se corresponde con el voltaje de red local.
-
No modifique ni corte ninguna pieza del adaptador ni del cable, ya que
puede provocar una situación peligrosa.
-
Utilice únicamente el adaptador que se suministra.
-
Si el adaptador está dañado, sustitúyalo siempre por otro del modelo
original para evitar situaciones de peligro.
-
Este aparato puede ser usado por niños a partir de 8 años y por
personas con su capacidad física, psíquica o sensorial reducida y por
quienes no tengan los conocimientos y la experiencia necesarios, si han
sido supervisados o instruidos acerca del uso del aparato de forma
segura y siempre que sepan los riesgos que conlleva su uso. No permita
que los niños jueguen con el aparato. Los niños no deben limpiar el
aparato ni realizar tareas de mantenimiento sin supervisión.
-
Evite que el cable de alimentación se pise o se doble, especialmente en
las clavijas, las tomas de corriente y el punto de salida del aparato.
-
Coloque el vigilabebés de modo que el cable no obstruya el paso. Si
coloca el vigilabebés sobre una mesa o un mueble bajo, no deje que el
cable de alimentación cuelgue del borde de la mesa o mueble. No tienda
el cable sobre el suelo donde pueda provocar tropiezos.
-
Mantenga los materiales del embalaje (bolsas de plástico, cartones de
protección, etc.) fuera del alcance de los niños, ya que no son un juguete.
-
Para evitar el riesgo de descarga eléctrica, no abra la carcasa de la
unidad del bebé ni de la unidad de padres.
Precaución
-
Utilice el aparato a una temperatura de entre 0°C y 40°C.
-
No instale el aparato cerca de ninguna fuente de calor, como radiadores,
rejillas de aire caliente, estufas u otros aparatos (incluidos
amplificadores) que generen calor.
Page 80

80
Español
-
Asegúrese de tener las manos secas cuando manipule adaptadores,
enchufes y cables eléctricos.
-
Todas las marcas obligatorias de la unidad del bebé, de la unidad de
padresy del adaptador de alimentación se encuentran en la parte
inferior de la unidad del bebé, de la unidad de padres y del adaptador de
alimentación.
Cumplimiento de las normas
-
Este producto cumple los requisitos de la Comunidad Europea relativos
a las interferencias de radio.
-
Por la presente, Philips Consumer Lifestyle declara que este vigilabebés
cumple los requisitos fundamentales y otras disposiciones pertinentes
de la Directiva 2014/53/UE (FHSS: banda de frecuencia 2,4 GHz, potencia
máxima de radiofrecuencia: 100 mW EIRP). Hay una copia de la
declaración de conformidad de la CE disponible en línea en
www.philips.com/support.
Campos electromagnéticos (CEM)
Este Philips cumple los estándares y las normativas aplicables sobre
exposición a campos electromagnéticos.
Preparación para su uso
Unidad del bebé
Enchufe el adaptador de alimentación a la unidad del bebé y a la toma de
corriente.
Unidad de padres
La unidad de padres usa una bateríade iones de litio recargable integrada.
Siga estos pasos para cargar la unidad de padres:
1 Enchufe el adaptador de alimentación a la unidad de padres y conecte el
adaptador a una toma eléctrica.
-
El indicador de estado de la batería cambia a naranja para indicar que
el aparato se está cargando.
Page 81

20°CEco
1
10 hrs=3 hrs
20°CEco
1
81
-
Cuando la batería está completamente cargada, elindicador de
Español
estado de la bateríase ilumina en verde de forma continua.
-
Después de cargarla durante 3 horas, la unidad de padres tiene
autonomía para 10 horas aproximadamente.
-
Si la unidad de padres está encendida durante la carga, esta tardará el
doble en completarse.
-
Cuando la carga de la batería recargable de la unidad de padres es baja,
el piloto de estado de la batería parpadea en rojo y launidad de padres
emite un pitido.
-
Si la batería está completamente descargada y la unidad de padres no se
conecta a la red eléctrica, se apaga automáticamente y pierde el
contacto con la unidad del bebé.
Nota: La batería recargable no se puede extraer.
Nota: La batería se descarga de forma gradual y muy lentamente incluso
cuando la unidad de padres está apagada.
Consejo: Apague la unidad de padres cuando no la esté usando para
ahorrar batería.
Nota: Le aconsejamos que deje la unidad de padres conectada a la red toda
la noche. Si la batería de la unidad de padres está a punto de agotarse,
emite un pitido que podría despertarle durante la noche.
Uso del vigilabebés
Conexión de la unidad de padres y la unidad del bebé
1 Mueva el botón deslizante de encendido/apagado de la unidad del bebé
hacia arriba, hacia la posición ON (encendido).
Page 82

>
2
m/6.7 ft
20°CEco
1
20°CEco
1
82
Español
2 Cuando la unidad del bebé está encendida, el piloto de encendido de la
unidad del bebé está iluminado de color verde.
Nota: El piloto de encendido siempre se ilumina en verde en la unidad
del bebé, aunque no haya conexión con la unidad de padres.
3 Asegúrese de colocar la unidad de padres a una distancia mínima de 2
metros de la unidad del bebépara evitar retroalimentación acústica.
4 Pulse el botón de encendido/apagado de la unidad de padres para
encenderla.
-
La pantalla se enciende, se muestra la imagen de enlace en la
pantalla y el piloto de enlace se ilumina de color rojo. La unidad de
padres comenzará a buscar la unidad del bebé.
-
Cuando la unidad de padres y la unidad del bebé están enlazadas, el
piloto LINK se enciende de color verde en la unidad de padres y se
muestran una o más barras en la pantalla.
Page 83

20°CEco
1
Nota: La conexión entre la unidad de padres y la unidad del bebé se
>1-1.5m/3.5-5ft
>
2
m/6.7 ft
establece en menos de 10 segundos.
Cuando la unidad delbebé se apaga, la unidad de padres muestra la
imagen de fuera de alcance. Compruebe que la unidad del bebé está
encendida.
-
Si no se establece la conexión, el piloto LINK se ilumina de color rojo,
la unidad de padres emite un pitido y aparece la imagen de fuera de
alcance en la pantalla.
Colocación del vigilabebés
Advertencia: El cable de la unidad del bebé
supone un posible riesgo de estrangulación para
su bebé, por lo que debe asegurarse de que la
unidad del bebé y su cable están al menos a
1 metro del bebé.
1 Para una detección de sonido óptima, asegúrese de que la unidad del
bebé no esté a más de 1,5 metros de distancia. Asegúrese de que la
unidad del bebé esté como mínimo a 1 metro de distancia del bebé para
evitar posibles riesgos de estrangulamiento.
Español
83
2 Coloque la unidad de padres dentro del alcance de funcionamiento de la
unidad del bebé. Asegúrese de que esté a una distancia mínima de 2
metros de la unidad del bebé para evitar la retroalimentación acústica.
Nota: Si utiliza un teléfono inalámbrico, un reproductor de vídeo
inalámbrico, una red Wi-Fi, un horno microondas o un dispositivo
Bluetooth en la banda de 2,4GHz y experimenta interferencias en la
unidad de padres o la unidad del bebé, aleje la unidad de padres hasta
que no se produzcan interferencias.I
3 Puede colocar la unidad del bebé de dos formas
a Coloque la unidad del bebé sobre una superficie estable, plana y
horizontal.
b Fije la unidad del bebé a la pared con los tornillos suministrados.
Page 84

<300m/985ft
<50m/165ft
84
Español
Consejo: La instalación en pared se explica al final de este manual de
usuario.
Consejo: Utilice la plantilla proporcionada para marcar la ubicación
exacta de los orificios de los tornillos en la pared.
Consejo: Coloque la unidad del bebé a una altura suficiente para obtener
una buena perspectiva de la cuna o el parque de juegos.
4 Ajuste la posición de la unidad del bebé de manera que garantice la
mejor visibilidad del bebé. La unidad del bebé se puede girar hasta
colocarla en la posición deseada.
Alcance de funcionamiento
El alcance de funcionamiento es de hasta 50metrosen interiores y de hasta
300metrosen exteriores. El alcance de funcionamiento del vigilabebés
varía en función del entorno y de los factores que provocan interferencias.
Los materiales mojados y húmedos provocan tantas interferencias que la
pérdida de alcance puede ser de hasta el 100 %.
Materiales secos Grosor del
material
Madera, yeso, cartón, cristal (sin metal, cables o
plomo)
Ladrillo, madera contrachapada < 30cm 5-35%
Hormigón armado < 30cm 30-100%
Rejillas o barras metálicas < 1cm 90-100%
Láminas de metal o aluminio < 1cm 100%
< 30cm 0-10%
Pérdida de
alcance
Características y configuración
Volumen
Puede ajustar el volumen del altavoz de la unidad de padres al nivel que
prefiera.
Page 85

20°C
1
Luminosidad
20°C
1
Español
85
1 Pulse la parte superior o inferior del botón de control para ajustar el
volumen.
Consejo: Asegúrese de ajustar el volumen a las condiciones del entorno
actuales. En entornos con mucho ruido se puede activar también la
alerta por vibración.
La barra de volumen aparece en la pantalla para mostrar el volumen
seleccionado.
Nota: Si el ajuste de volumen es muy alto, la unidad de padres consume
más energía.
Nota: Si la barra de volumen está totalmente vacía, el volumen está
silenciado. La unidad de padres mostrará un icono de silencio en la barra de
estado y solo recibirá alertas y vídeo de la unidad de padres.
Puede ajustar el brillo de la pantalla de la unidad de padres al nivel que
prefiera.
1 Pulse la parte izquierda o derecha del botón de control para ajustar el
brillo de la pantalla de la unidad de padres.
Modos
La barra de brillo aparece para mostrar el brillo de la pantalla
seleccionado.
Nota: Si el ajuste de brillo es muy alto, la unidad de padres consume más
energía.
Este vigilabebés tiene cuatro modos distintos que le permiten elegir cómo
quiere vigilar a su bebé. VIDEO, AUDIO, VOX y ECO.
Page 86
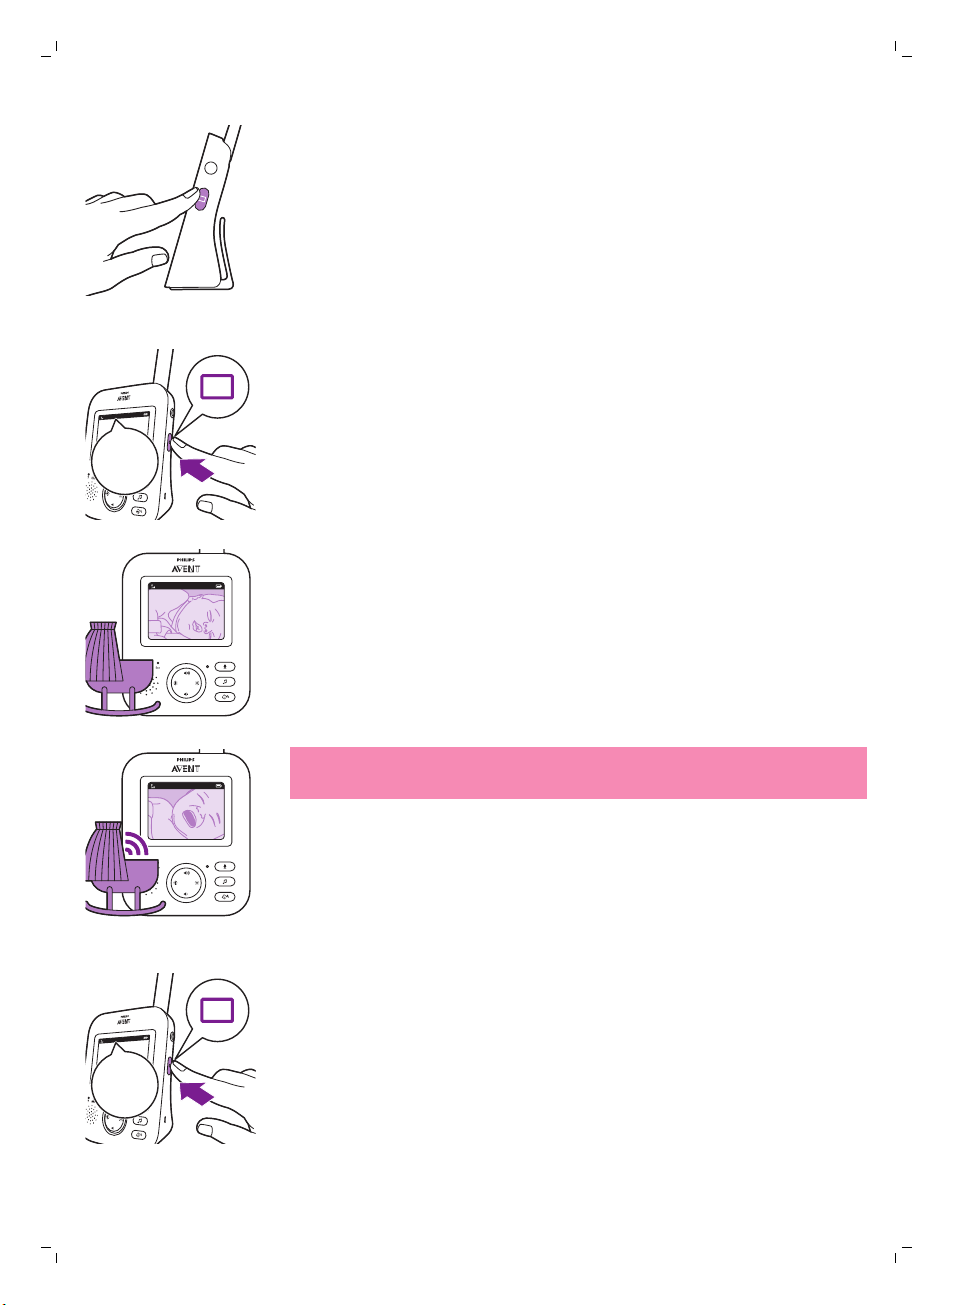
VIDEO
VIDEO
20°C
1
VIDEO
20°C
1
VIDEO
AUDIO
AUDIO
86
Español
Con el monitor del bebé encendido, puede elegir entre 4 modos diferentes
pulsando el botón de modo en el lateral de la unidad de padres.
La pantalla mostrará el modo seleccionado. El modo seleccionado también
se indica en la barra de estado. Al encender el dispositivo, el modo activo
será el que se usó por última vez.
Modo VIDEO
Pulse el botón de modo en el lateral de la unidad de padres para
seleccionar el modoVIDEO.
Cuando el modo VIDEO está activado, la pantalla está siempre encendida
para que pueda ver dormir a su bebé. Todos los sonidos se transmiten
directamente a la unidad de padres.
Nota: Ajuste el nivel de sensibilidad a "Very high" (Muy alto) para recibir
sonido continuo en la unidad de padres. Consulte el capítulo sobre el nivel
de sensibilidad para obtener más información.
Modo AUDIO
1 Pulse el botón de modo en el lateral de la unidad de padres para
cambiar al modo AUDIO.
Page 87

20°C
1
AUDIO
20°C
1
VOX
VOX
VOX
20°C
1
AUDIO
20°C
1
ECO
Español
87
La pantalla de la unidad de padres se apaga, pero el modo AUDIO está
activado. La pantalla se apagará 3 segundos después de seleccionar el
modo AUDIO.
Nota: La barra de estado no se muestra cuando la pantalla está apagada.
Nota: El piloto LINK muestra que la unidad de padres sigue encendida y
conectada a la unidad del bebé.
Nota: Ajuste el nivel de sensibilidad a "Very high" (Muy alto) para recibir
sonido continuo en la unidad de padres. Consulte el capítulo sobre el nivel
de sensibilidad para obtener más información.
Todos los sonidos se transmiten continuamente a la unidad de padres. Si su
bebé llora, la pantalla de la unidad de padres permanece apagada, pero los
sonidos detectados por launidad del bebése transmiten a la unidad de
padres.
Modo VOX (Ecológico)
1 Pulse el botón de modo en el lateral de la unidad de padres para
cambiar al modo VOX.
Nota: Cuando la pantalla está encendida, el modo seleccionado se muestra
en la barra de estado. La barra de estadono se muestra cuando la pantalla
está apagada.
La pantallay el sonido de la unidad de padres se apagan si no se detecta
ningún sonido durante 20 segundos, pero el modo VOX está activado.
Si la unidad del bebédetecta un sonido, la pantallay el sonido de la unidad
de padres se encienden inmediatamente.Los sonidos se transmiten a la
unidad de padres.
Nota: El nivel de sonido mínimo para activar el sonido y la pantalla se define
en el ajuste de sensibilidad.
Page 88

ECO
ECO
20°C
1
ECO
ECO
20°C
1
ECO
88
Español
Modo ECO (Ecológico)
1 Pulse el botón de modo en el lateral de la unidad de padres para
cambiar al modo ECO.
Nota: Cuando la pantalla está encendida, el modo seleccionado se puede
ver en la barra de estado. La barra de estado no se muestra cuando la
pantalla está apagada.
La pantalla yel sonido de la unidad de padres se apagan cuando no se
detecta sonidodurante 20 segundos. El pilotoECO se ilumina en verde para
indicar que el modo ECO está activado. Durante el modo ECO se apagan la
pantalla y las transmisiones de sonido.
Si la unidad del bebédetecta un sonido, la pantallay el sonido de la unidad
de padres se encienden inmediatamente.Los sonidos se transmiten a la
unidad de padres.
Nota: El nivel de sonido mínimo para activar el sonido y la pantalla se define
en el ajuste de sensibilidad.
Nanas
Puede activar la función de nana desde la unidad de padres o desde la del
bebé.
Para activar la función de nana desde la unidad de padres, siga estas
instrucciones.:
Selección de nana
1 Pulse el botón de nanas en la unidad de padres para abrir el menú de
nanas.
Nota: Al pulsar el botón de nanas con el menú de nanas abierto, se cierra
dicho menú.
Page 89

Lullaby Songs
1 Rock-a-Bye Baby
2 Twinkle, Twinkle
3 Hush, Little Baby
4 Brahm’s Lullaby
5 Golden Slumbers
Lullaby Songs
1 Rock-a-Bye Baby
2 Twinkle, Twinkle
3 Hush, Little Baby
4 Brahm’s Lullaby
5 Golden Slumbers
15 min
Lullaby Songs
1 Rock-a-Bye Baby
2 Twinkle, Twinkle
3 Hush, Little Baby
4 Brahm’s Lullaby
5 Golden Slumbers
Español
2 Pulse la parte derecha del botón de control para acceder a la lista de
nanas..
3 Pulse la parte superior o inferior del botón de control para desplazarse
por la lista de nanas.
4 Pulse la parte derecha del botón de control para reproducir una nana
concreta.
Si quiere pausar la nana, pulse de nuevo la parte derecha del botón de
control.
5 La barra de estadode la unidad de padres muestra el número de nanas
quese reproducen y repiten.
89
La nana empieza a reproducirse en la unidad del bebé y se repite
continuamente durante 15 minutos aproximadamente.
Consejo: Para repetir todas las canciones disponibles, seleccione la
última opción de la lista.
6 Para seleccionar otra nana, desplácese hacia arriba o abajo con el botón
de controlpara seleccionar otra canción de la lista.Pulse la parte
derecha del botón de control para iniciar la canción seleccionada.
7 Para detener la nana, pulse el botón de nanas en la unidad de padres y
detenga la canción que suena actualmente pulsando la parte derecha
del botón de control otra vez.
Page 90

20°C
1
15 min
90
Español
Volumen de nana
1 Pulse el botón de nanas en la unidad de padres para abrir el menú de
nanas. Pulse la parte izquierda del botón de control y, después, la parte
inferior para seleccionar las opciones de volumen delmenú de nanas.
Pulse la parte derecha del botón de control para acceder a los niveles de
volumen de las nanas.
2 Pulse la parte superior o inferior del botón de control para ajustar el
volumen.
3 Para detener la nana, pulse el botón de nanas en la unidad de padres y
detenga la canción que suena actualmente pulsando la parte derecha
del botón de control otra vez.
Para activar la función de nanas desde la unidad del bebé, pulse el botón
de encendido/apagado de nanas en la unidad del bebé.
La última nana seleccionada en la unidad de padres empieza a reproducirse
en la unidad del bebé y se repite continuamente aproximadamente unos
15minutos.
Para detener la nana desde la unidad del bebé, pulse el botón de
encendido/apagado de nanas en la unidad del bebé.
Intercomunicador
Puede utilizar el botón del intercomunicador de la unidad de padres para
hablarle al bebé.
Page 91

Sensibilidad
20°C
1
Español
91
1 Mantenga pulsado el botón del intercomunicador de la unidad de
padres.
2 Hable con claridad hacia el micrófonode la parte delantera de la unidad
de padres desde una distancia de 15-30cm.
Mientras mantenga pulsado el botón del intercomunicador, la
comunicación de sonido a la unidad del bebé permanecerá abierta. La
pantalla de la unidad de padres muestra el icono del intercomunicador,
que indica que la conexión está activa.
3 Suelte el botón del intercomunicador cuando haya terminado de hablar.
Nota: Mientras mantenga pulsado el botón del intercomunicador, launidad
de padresno procesará los sonidos procedentes de la unidad del bebé.
El nivel de sensibilidad de la unidad del bebé define lo que se oye en la
unidad de padres. Si el nivel se ajusta alto, se oirán muchos sonidos,
incluidos los sonidos tenues de fondo. Si el nivel se ajusta bajo, se oirán solo
los sonidos más fuertes.
1 Pulse el botón de sensibilidad para acceder a los niveles de sensibilidad.
Nota: Al pulsar de nuevo el botón de sensibilidad, se abandona el menú.
2 Pulse la parte superior o inferior del botón de control para seleccionar el
nivel de sensibilidad deseado.
Page 92

20°C
1
20°C
1
92
Español
Si su bebé solo emite sonidos leves, debe ajustar la sensibilidad de la
unidad del bebé en un nivel alto en launidad de padres.
Cuanto más ruido haga su bebé, más bajo debe ajustar el nivel de
sensibilidad en la unidad de padres.
Nota: En los modos AUDIO y VIDEO, se recibe sonido continuamente si el
nivel de sensibilidad está ajustado en el valor "Very high" (Muy alto). En caso
contrario, los sonidos bajos se silencian.
Consejo: El nivel de sensibilidad se puede ajustar para que oiga siempre a
su bebé sin las molestias causadas por otros ruidos. Si hay mucho ruido de
fondo, baje el nivel de sensibilidad para no oírlos por la unidad de padres.
Pinza para cinturón
Puede desplazarse por el interior y el exterior de su casa llevando consigo la
unidad de padres sujeta al cinturón gracias a la pinza incorporada. De este
modo podrá controlar a su bebé sin dejar de moverse por su casa.
Nota: La imagen se gira, lo que le permite ver a su bebé en la pantalla con
tan solo levantar la unidad de padres.
Limpieza y mantenimiento
Advertencia: No sumerja la unidad de padres ni la
del bebé en agua ni las lave bajo el grifo.
Page 93

Español
93
Advertencia: No utilice aerosoles ni líquidos de
limpieza.
1 Apague la unidad del bebé y retire el adaptador de la toma de corriente.
2 Limpie la unidad del bebé con un paño seco.
Nota: Si la lente de la unidad del bebé está sucia o tiene marcas de
huellas, el rendimiento de la cámara puede verse afectado. Intente no
tocar la lente con los dedos.
3 Apague la unidad de padres y retire el adaptador de la toma de
corriente.
4 Limpie la unidad de padres con un paño seco.
Page 94
94
Español
5 Limpie los adaptadores con un paño seco.
Almacenamiento
Si no va a utilizar el vigilabebés durante un periodo detiempo prolongado,
guarde la unidad de padres, la unidad del bebé y los adaptadores en un
lugar fresco y seco.
Solicitud de accesorios
Para comprar accesorios o piezas de repuesto, visite
www.philips.com/parts-and-accessories o acuda a su distribuidor de
Philips. También puede ponerse en contacto con el Servicio de Atención al
Cliente de Philips en su país (consulte los datos de contacto en el folleto de
la garantía internacional).
Reciclaje
-
Este símbolo significa que este producto no debe desecharse con la
basura normal del hogar (2012/19/UE).
-
Este símbolo significa que este producto contiene una batería recargable
integrada, que no debe desecharse con los residuos domésticos
normales (2006/66/EC). Lleve el producto a un punto de recogida oficial
o a un centro de asistencia de Philips para que un profesional extraiga la
batería recargable.
-
Siga la normativa de su país para la recogida selectiva de productos
eléctricos y electrónicos y de baterías recargables. El desechado correcto
ayuda a evitar consecuencias negativas para el medio ambiente y la
salud humana.
Cómo extraer la batería recargable
Nota: Le recomendamos encarecidamente que acuda a un profesional para
que extraiga la batería recargable.
No quite la batería recargable hasta que deseche el aparato. Asegúrese de
que la batería está completamente descargada cuando la quite. Solo la
unidad de padres incluye una batería.
Page 95

Procedimiento:
1 Quite las 2 patas de goma de la parte inferior de la unidad de padres.
2 Quite los 2 tornillos que se ven ahora en la parte inferior de la unidad de
padres.
3 Coloque la antena en la posición hacia arriba y quite los tornillos que se
ven ahora en la carcasa posterior.
4 Separe la carcasa posterior de la delantera con ayuda de un
destornillador.
5 Desconecte el cable conector de la batería (el cable negro, blanco y rojo).
6 Quite los 4 tornillos del soporte de la batería.
7 Quite la pila.
Garantía y asistencia
Si necesita asistencia o información, visite www.philips.com/support o lea
el folleto de garantía internacional.
Preguntas más frecuentes
En este capítulo se resumen los problemas más comunes que pueden surgir
al usar el aparato. Si no puede resolver el problema con la siguiente
información, visite www.philips.com/support para consultar una lista de
preguntas frecuentes o comuníquese con el servicio de atención al cliente
en su país.
¿CÓMO USAR O CONECTAR LAS UNIDADES?
Español
95
Pregunta Respuesta
¿Por qué no se ilumina
el piloto de encendido
de la unidad del bebé
cuando la enciendo?
¿Por qué la unidad de
padres no se carga
cuando la enchufo?
¿Por qué la unidad del
bebé no se carga
cuando la enchufo?
¿Por qué no puedo
establecer conexión?
¿Por qué se pierde la
conexión de vez en
cuando?
¿Por qué hay cortes en
el sonido?
Puede que la unidad del bebé no esté conectada a la alimentación
eléctrica. Conecte la unidad del bebé a la red eléctrica. Después, ponga el
interruptor de encendido hacia arriba en la posición ON (Encendido) para
establecer la conexión con la unidad de padres.
Puede que el adaptador no esté conectado correctamente. Compruebe
que el adaptador está conectado correctamente a la toma de corriente.
Puede que la unidad de padres ya esté completamente cargada. El piloto
de estado de la batería se iluminará en verde cuando la batería está
completamente cargada y el dispositivo está conectado a la alimentación.
La unidad del bebé no dispone de función de carga. La unidad del bebé
solo funciona cuando estáconectada a lared eléctrica.
Tal vez la unidad del bebé y la de padres están muy separadas, o bien
puede que haya alguna interferencia con otros dispositivos inalámbricos en
la banda de 2,4GHz. Pruebe a cambiar la ubicación, reduzca la distancia
entre las unidades o apague otros dispositivos inalámbricos que usen la
banda de 2,4 GHz (portátiles, teléfonos móviles, microondas, etc.). Pueden
transcurrir hasta 10 segundos hasta que se restablezca la conexión entre las
unidades.
Page 96

96
Español
¿CÓMO USAR O CONECTAR LAS UNIDADES?
Si se pierde la señal, la unidad de padres emitirá una señal sonora (3 pitidos
rápidos cada 20 segundos).
Tal vez las unidades estén demasiado cerca. Deje una distancia mínima
entre ambas de 1,5metros para evitar interferencias.
¿Qué sucede si hay un
corte en el suministro
eléctrico?
¿Por qué la unidad de
padres tarda más de
3horas en cargarse?
¿Por qué debo
mantener la unidad del
bebé y su cable al
menos a 1metro del
bebé?
¿Cuál es la diferencia
entre los distintos
modos de usuario de la
unidad de padres:
VIDEO, AUDIO, VOX y
ECO?
Dado que la unidad de padres funciona con una batería recargable, seguirá
funcionando mientras la batería tenga suficiente carga. Sin embargo, la
unidad del bebé deja de funcionar porque no tiene batería recargable y
solo funciona cuando está conectada a la corriente eléctrica. La unidad de
padres emitirá una señal sonora para indicar que se ha perdido la conexión
con la unidad del bebé.
Cuando se reanude el suministro, la conexión entre la unidad de padres y la
del bebé se restablecerá automáticamente.
Es posible que la unidad de padres esté encendida durante el proceso de
carga. Apague la unidad de padres durante la carga para reducir el tiempo
de carga. Si la pantalla de la unidad de padres está encendida siempre, la
carga de la unidad de padres tardará más.
Para evitar la estrangulación con el cable y optimizar la detección del
sonido, coloque siempre la unidad del bebé y su cable al menos a 1metro
del bebé.
Consulte la lista siguiente para obtener una explicación de los modos
disponibles en el vigilabebés.
* Modo VIDEO: la pantalla y el sonido de la unidad de padres está siempre
encendida.
* Modo AUDIO: solo se activará el audio. La pantalla de la unidad de padres
se apaga cuando se activa el modo AUDIO. El piloto LINK muestra que la
unidad de padres sigue encendida y conectada a la unidad del bebé. Sólo
modelo SCD630: los pilotos de nivel de sonido de la parte superior de la
pantalla se iluminarán en verde cuando se oigan sonidos de la unidad del
bebé. Es posible realizar toda la comunicación normal con la unidad del
bebé mediante los botones de intercomunicador, nana, menú y
sensibilidad.
* Modo VOX: la pantalla y el sonido de la unidad de padres se apagan si no
se detecta ningún sonido durante 20 segundos (o si el sonido no supera el
ajuste de sensibilidad). Tanto la pantalla como el sonido se activarán de
inmediato si el bebé llora y se supera el umbral de sensibilidad. Si el sonido
queda por debajo del umbral de sonido, el vídeo seguirá activo durante 20
segundos. Si se pulsa uno de los botones de control (brillo o volumen), el
dispositivo mostrará vídeo durante unos 5segundos. También estará
disponible el menú de nanas.
Page 97

¿CÓMO USAR O CONECTAR LAS UNIDADES?
* Modo ECO: la pantalla y el sonido de la unidad de padres se apagan
cuando no se detecta sonido durante 20 segundos. El modo ECO permite
reducir el consumo energético durante los momentos de calma
manteniendo la conexión con el bebé. En el modo ECO, el piloto LED ECO
se ilumina en verde y el dispositivo funciona en un modo de conexión
distinto. En el modo ECO, la unidad de padres utiliza el mecanismo de
fijación de 2 segundos para comprobar la conexión con la unidad del bebé,
en lugar de usar una conexión de radiofrecuencia continua. Por lo tanto, la
unidad del bebé también consumirán menos energía en el modo ECO.
Español
97
¿Dónde se enciende la
luz de nocturna?
¿Cómo puedo
restablecer la unidad de
padres?
Pulse el botón de encendido/apagado de la luz nocturna en la unidad del
bebé para activar la función de luz nocturna. No se puede controlar la luz
de compañía desde la unidad de padres. La luz nocturna no se apaga
automáticamente. Pulse el botón de encendido/apagado de la luz
nocturna de nuevo en la unidad del bebé para encenderla o apagarla.
Para restablecer la unidad de padres, pulse de forma simultánea el "botón
de encendido/apagado" y el "botón de navegación hacia abajo" de la parte
delantera de la unidad de padres durante 1segundo, aproximadamente. La
unidad de padres se apagará. Para encender la unidad de padres otra vez,
mantenga pulsado el "botón de encendido/apagado". La información
específica del usuario almacenada en la memoria de la unidad de padres,
como el modo de usuario, los ajustes de brillo o volumen, la selección de
nana o de zoom y la configuración de vibración no se perderán.
INDICACIONES EN LA UNIDAD DE PADRES
Pregunta Respuesta
El LED de la batería de
la unidad de padres se
vuelve rojo. ¿Qué debo
hacer?
¿Por qué la unidad de
padres emite un pitido?
Queda poca batería. Si no conecta la unidad de padres a la alimentación de
red cuando el LED de la batería se vuelve rojo y empieza a emitir un pitido,
la unidad dejará de funcionar en unos 60 minutos.
Reduzca el brillo o el volumen para ahorrar batería y enchufe la unidad de
padres a la red mediante el adaptador de alimentación. (Consulte el
capítulo "Preparación para su uso").
El vigilabebés emite sonidos característicos para indicar cuál es el
problema.
1 pitido: la unidad de padres está apagada.
1 pitido cada 20 segundos durante los 3 primeros minutos y, después, cada
minuto: la batería de la unidad de padres se está agotando.
2 pitidos rápidos cada 20 segundos: la temperatura de la habitación del
bebé está fuera del intervalo definido por el usuario. El icono de
temperatura se muestra en la pantalla de la unidad de padres (solo en el
modelo SCD630).
3 pitidos rápidos cada 20 segundos: se ha perdido la conexión entre las
unidades de padres y del bebé. En la pantalla de la unidad de padres se
muestra el icono de enlace y el botón de conexión de enlace se vuelve rojo.
Page 98

98
Español
INDICACIONES EN LA UNIDAD DE PADRES
¿Qué significa el color
del LED de la batería
(verde, naranja o rojo) o
que el LED esté
apagado en relación al
estado de mi batería?
Si la unidad de padres está conectada a la alimentación, el piloto de la
batería mostrará estos colores:
* Verde: la batería está llena.
* Naranja: la batería se está cargando.
Si la unidad de padres no está conectada a la alimentación, el piloto de la
batería mostrará estos colores:
* Rojo: la batería está casi descargada (menos del 10%)
* LED apagado: la unidad de padres no está conectada a la red.
RUIDO/SONIDO
Pregunta Respuesta
¿Por qué la unidad de
padres ola del bebé
produce un ruido
agudo?
¿Cómo puedo silenciar
el sonido?
Puede que la unidad de padres esté muy cerca de la del bebé. Compruebe
que la separación entre la unidad de padres y la unidad del bebé sea
superior a 2,5metros (8,2pies).
Es posible que el volumen de la unidad de padres esté demasiado alto.
Reduzca el volumen de la unidad de padres.
Para averiguar el motivo de los pitidos de la unidad de padres, consulte la
pregunta "¿Por qué la unidad de padres emite un pitido?".
Para silenciar el dispositivo, pulse la parte inferior del botón de control. Si la
barra de volumen de la pantalla está totalmente vacía, el volumen está
silenciado.
¿Por qué no se oye
ningún sonido?¿Por
qué no se oye llorar al
bebé?
¿Por qué la unidad de
padres reacciona tan
rápidamente a otros
sonidos distintos a los
que produce mi bebé?
Es posible que el volumen de la unidad de padres esté demasiado bajo o
apagado. Pulse la parte superior del botón de control para aumentar el
nivel de volumen.
Quizás la unidad de padres está silenciada. Para activar el sonido en el
dispositivo, pulse la parte superior del botón de control y ajuste el volumen.
El nivel de sensibilidad está ajustado demasiado bajo. Ajuste la sensibilidad
en el menú de la unidad de padres a un nivel más alto.
Puede que la unidad del bebé esté demasiado lejos de su hijo. Para una
detección de sonido óptima, asegúrese de que la unidad del bebé no esté
a más de 1,5metros (5 pies) de distancia. A menos de un 1metro se
aumenta el riesgo de estrangulación.
La unidad del bebé capta también otros sonidos, además de los del bebé.
Acerque la unidad del bebé a su hijo (pero respetando siempre la distancia
mínima de 1metro).
Page 99

RUIDO/SONIDO
Español
Puede que el ajuste de sensibilidad sea demasiado alto. Si su bebé hace
ruidos suaves, el nivel de sensibilidad tiene que ser mayor. Sin embargo,
cuanto más ruido haga su bebé, más bajo debe ajustar el nivel de
sensibilidad. Puede cambiar la sensibilidad del vigilabebés en el menú de la
unidad de padres.
99
¿Por qué la unidad de
padres emite un
zumbido?
¿Cuánto tiempo sonará
la nana en la unidad del
bebé?
¿Cómo puedo aumentar
el volumen de la nana?
Se pueden producir interferencias si la unidad de padres está fuera del
alcance de la unidad del bebé. También se pueden producir interferencias
si hay demasiadas paredes o techos entre la unidad de padres y la del
bebé o si tiene encendido algún otro dispositivo inalámbrico en la banda
de 2,4GHz (p. ej.: microondas, router Wi-Fi).
Cambie de ubicación la unidad de padres, acérquela a la del bebé o
apague los otros dispositivos inalámbricos.
Si esta respuesta no se sirve de ayuda, consulte la respuestas a la pregunta
"¿Por qué la unidad de padres o la del bebé produce un ruido agudo?".
Cuando seleccione una nana, seguirá reproduciéndose continuamente
durante 15 minutos, aproximadamente. Si desea reproducir todas las
canciones disponibles, seleccione la última opción de la lista de nanas.
Puede ajustar el volumen de la nana en la unidad de padres, no en la del
bebé. Pulse el botón de nanas en la unidad de padres para abrir el menú
de nanas y ajustar el volumen.
TIEMPO Y ALCANCE DE FUNCIONAMIENTO
Pregunta Respuesta
¿Por qué el alcance de
mi vigilabebés es
mucho menor de lo
especificado en el
manual del usuario?
El alcance de funcionamiento especificado (300metros) solo es válido en
exteriores y sin obstáculos de por medio. En función del entorno y de otros
factores de interferencia, el alcance de funcionamiento puede ser menor
(consulte también la tabla del capítulo sobre la colocación de las unidades
de padres y del bebé).
El alcance de funcionamiento dentro de casa (50metros) también se ve
limitado por el tipo de tabiques o techos que se interponen entre la unidad
de padres y la del bebé.
La duración de
funcionamiento de la
unidad de padres es de
hasta10horas
aproximadamente. ¿Por
qué el tiempo de
funcionamiento de la
unidad de padres es
inferior?
Es posible que el brillo del vídeo de la unidad de padres sea demasiado
alto, lo que provoca que la unidad de padres consuma mucha energía.
Reduzca el brillo de la unidad de padres.
La unidad de padres consume mucha energía si la pantalla está encendida
continuamente. Active el modo AUDIO, VOX o ECO en el menú de la unidad
de padres para aumentar el tiempo de funcionamiento (consulte las
secciones "Modo AUDIO", "Modo VOX" o "Modo ECO" del capítulo
"Funciones").
Page 100

100
Español
TIEMPO Y ALCANCE DE FUNCIONAMIENTO
Es posible que el volumen de la unidad de padres sea demasiado alto, lo
que provoca que la unidad de padres consuma mucha energía. Reduzca el
volumen de la unidad de padres.
Como sucede con cualquier otro dispositivo electrónico, la capacidad de la
batería va disminuyendo con los ciclos de uso.
PANTALLA DE VÍDEO
Pregunta Respuesta
¿Por qué recibo
interferencias en la
unidad de padres? ¿Por
qué parpadea la
pantalla de la unidad de
padres?
¿Por qué no hay
ninguna imagen en la
pantalla de vídeo
cuando el pilotode
enlace está iluminado
en verde?
¿Por qué la imagen de
la pantalla de vídeo no
es nítida?
Se pueden producir interferencias si la unidad de padres está fuera del
alcance de la unidad del bebé. También se pueden producir interferencias
si hay demasiadas paredes o techos entre la unidad de padres y la del
bebé o si tiene encendido algún otro dispositivo inalámbrico en la banda
de 2,4GHz (p. ej.: microondas, router Wi-Fi).
Cambie de ubicación la unidad de padres, acérquela a la del bebé o
apague los otros dispositivos inalámbricos.
Tal vez tenga que recargar la batería de la unidad de padres.
La unidad de padres puede estar en los modos AUDIO, VOX O ECO. Pulse
el botón de modo en el lateral derecho de la unidad de padres para
cambiar de modo (consulte 'Modos').
Puede que el ajuste de brillo de la pantalla sea demasiado bajo. Aumente
el brillo de la pantalla de la unidad de padres mediante el botón de control
del centro.
Puede que la lente de la unidad del bebé esté sucia. Limpie la lente con un
paño seco.
Puede que la unidad del bebé esté demasiado lejos de su hijo. Para una
calidad de vídeo óptima, asegúrese de que la unidad del bebé no esté a
más de 1,5metros (5 pies) de distancia. A menos de un 1metro se aumenta
el riesgo de estrangulación.
Montaje en pared
Instrucciones de impresión:
Imprima esta página con una escala del 100% y use la plantilla para marcar
exactamente la posición de los orificios para los tornillos en la pared.
 Loading...