

Page 1

SCD730/SCD731
SCD733/SCD734
SCD735
FR-NL
Page 2

Page 3

Page 4

Page 5

English 6
Deutsch 22
Français 39
Italiano 56
Page 6

1
9 10 11 12 13
7
8
14
2 3 4 5 6
1
6
English
Page 7

Introduction
Go to www.philips.com/welcome to register your product and to read the
detailed user manual.
Display of the parent unit (Fig. 1)
1 Signal strength indicator
2 Eco Max indicator
3 Night dim mode symbol
4 Cry alert indicator
5 Mute symbol
6 Battery status indicator
7 Navigation arrow
8 Temperature symbol
9 Microphone sensitivity indicator
10 Nightlight symbol
11 Lullaby symbol
12 Projector symbol
13 Timer or timer repeat symbol
14 Soothing menu screen
Preparing for use
IMPORTANT: Read the safety instructions carefully before you use the
baby monitor and keep them for future reference.
English
7
Baby unit
Parent unit
We advise you to use the baby unit connected to the mains. To guarantee
automatic power backup in case of mains failure, you can insert four 1.5V AA
alkaline batteries (not included).
Do not use rechargeable batteries. The baby unit does not have a charging
function and rechargeable batteries discharge slowly when they are not in
use.
The parent unit runs on two rechargeable batteries that are supplied with
the baby monitor. Charge the parent unit before you use it for the first time
and when the batteries are low.
Please note that for the SCD730/SCD731/SCD733, you have to charge the
parent unit for the full 10 hours to have a cordless operating time of 18
hours. (For the SCD734 and SCD735: the charging time is 14 hours and the
operating time is 25 hours.
Note: When you start using the baby monitor, it takes 4 charge and
discharge cycles before the rechargeable batteries reach their full capacity.
Page 8

8
English
Using the baby monitor
Positioning the baby monitor
Keep the baby unit out of the reach of the baby. Never place the
baby unit inside the baby’s bed or playpen.
-
Because the cord of the baby unit presents a potential strangulation
hazard, make sure that the baby unit and its cord are at least 1 metre/3.5
feet away from your baby.
-
To prevent a high-pitched sound from one or both units, make sure that
the parent unit is at least 1 metre/3.5 feet away from the baby unit.
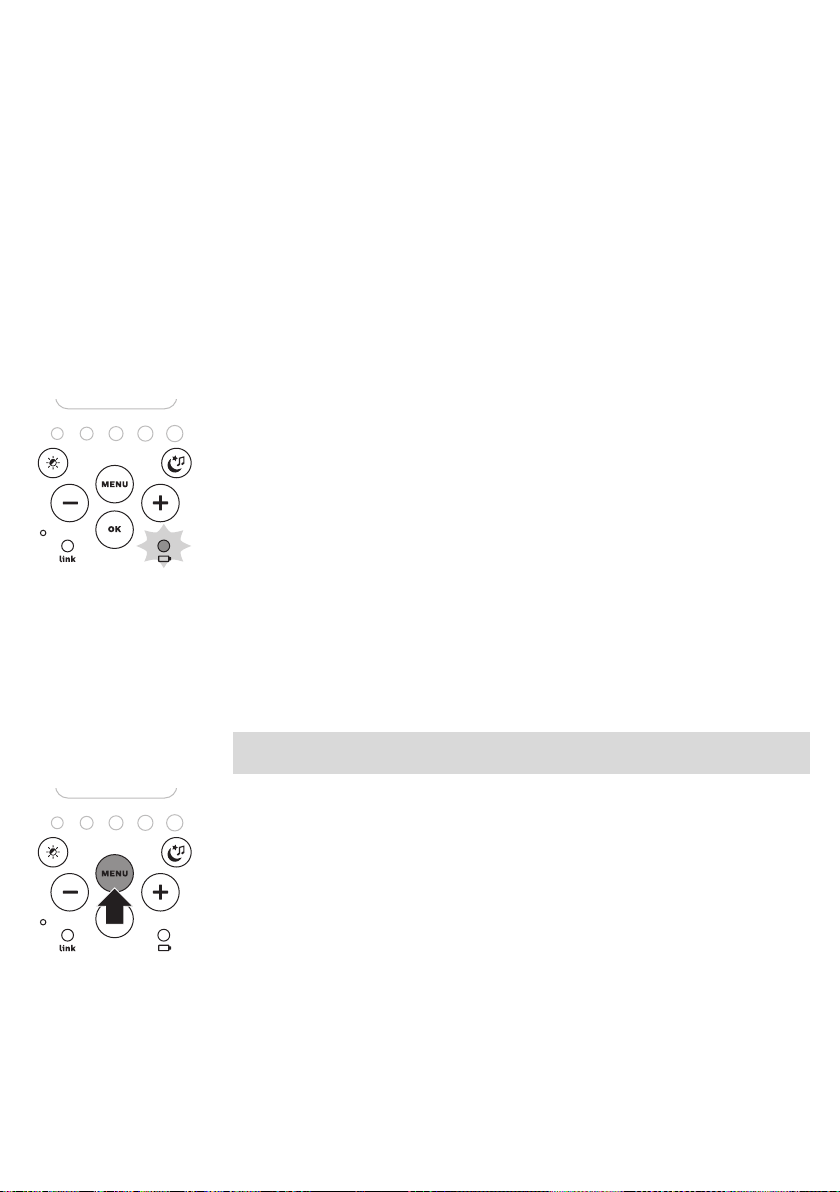
Linking parent unit and baby unit
1 Press and hold the button on the baby unit for 2 seconds until the
power-on light goes on.
2 Press and hold the button on the parent unit for 2 seconds until the
display lights up. The 'link' light on the parent unit starts flashing red and
the message 'I AM LINKING' appears on the display.
When the parent unit and baby unit are linked, the 'link' light turns solid
green. The signal strength indicator and the message 'LINKED' appear on
the display.
If no connection is established, the message 'NOT LINKED' is displayed
and the parent unit starts and the parent unit starts to beep.
What to do if no link is established
-
If the parent unit is out of range, place it closer to the baby unit, but not
closer than 1 metre/3.5 feet.
-
If the baby or parent unit is too close, >2m/6.5 ft away from another
DECT appliance (e.g. a cordless phone), switch off this appliance or move
the unit away from this appliance.
-
If the baby unit is switched off, switch it on.
Operating range
-
The operating range is 330 metres/1000 feet outdoors and up to 50
metres/150 feet indoors.
-
The operating range of the baby monitor varies depending on the
surroundings and factors that cause interference. Wet and moist
materials cause so much interference that the range loss is up to 100%.
For interference from dry materials, see the table below.
Dry materials Material thickness Loss of range
Wood, plaster, cardboard,
glass (without metal, wires
or lead)
Brick, plywood < 30cm (12in) 5-35%
Reinforced concrete < 30cm (12in) 30-100%
< 30cm (12in) 0-10%
Page 9

Dry materials Material thickness Loss of range
Metal grilles or bars < 1cm (0.4in) 90-100%
Metal or aluminium sheets < 1cm (0.4in) 100%
Functions and feedback on the baby unit
Nightlight
The nightlight produces a soft glow that comforts your baby.
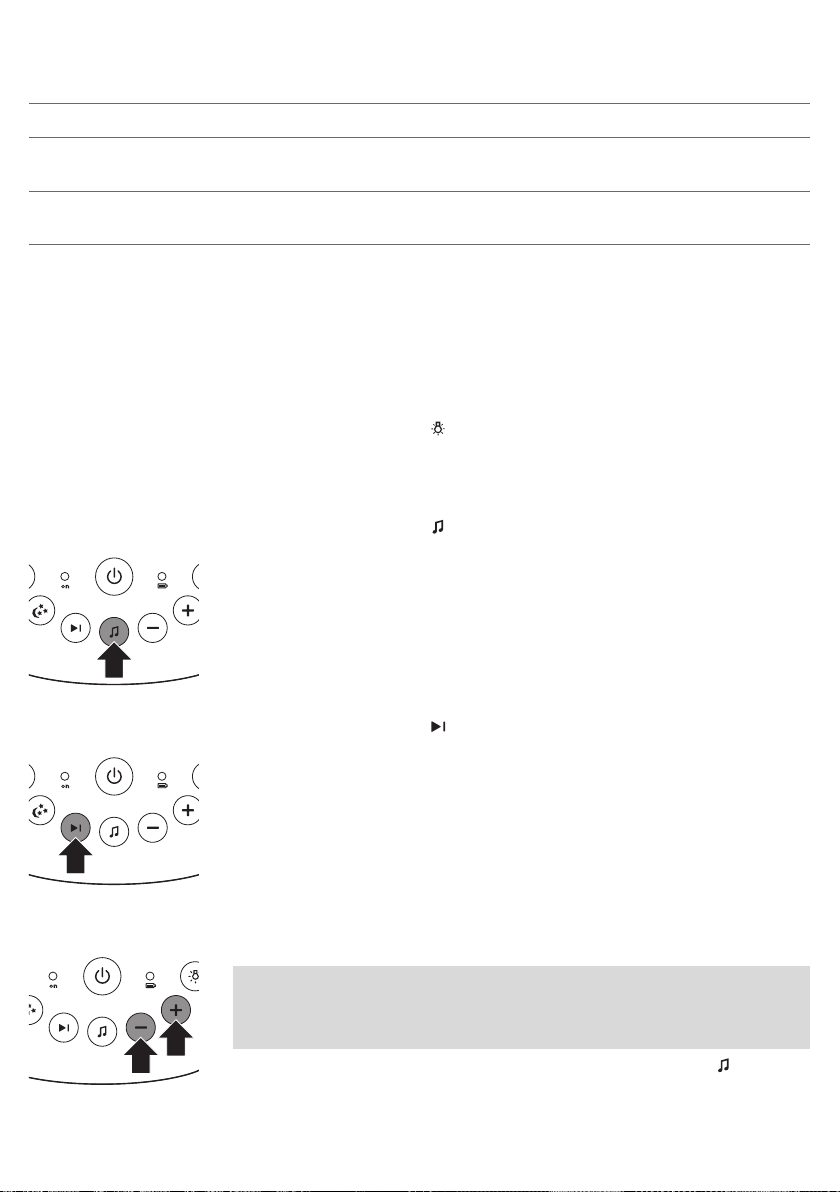
1 Press the button on the baby unit to switch the nightlight on or off.
Lullaby function
1 Press the button on the baby unit to play the last selected lullaby. The
selected lullaby repeats for the set time.
English
9
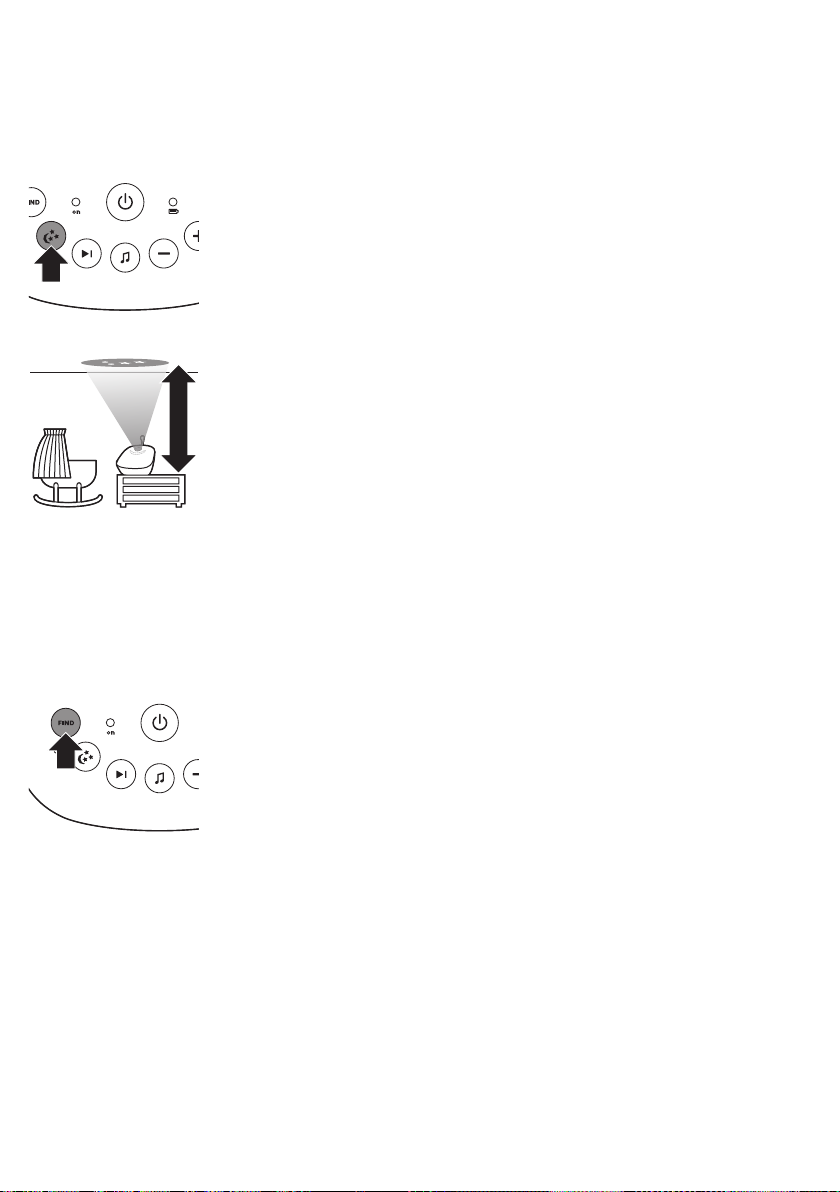
Projector
2 Press the button to select another lullaby from the list.
3 To adjust the sound level of the lullaby, press the volume + or the volume
– button the baby unit.
Note: You can only set the loudspeaker volume on the baby unit when a
lullaby is playing. If you set the volume for the lullaby higher, the sound
will also be louder when you use the talk function on the parent unit.
4 To stop lullaby playing, press the button on the baby unit.
You can soothe your baby with coloured light patterns projected on the
ceiling by switching on the projector.
Page 10

>2.5m/8.2ft
10
English
1 Press the projector on/off button to switch on the projector. The
projector symbol appears on the display of the parent unit.
2 There are six different patterns. The first pattern fades in to full intensity
in 2 seconds. It is projected for 8 seconds and then fades out for 2
seconds while the next pattern fades in. Each pattern is projected for 10
seconds. The patterns are repeated for the set time.
3 To switch off the projector, press the projector on/off button again.
Paging the parent unit
If you have lost the parent unit, you can use the FIND button on the baby
unit to locate the parent unit. This function only works when the parent unit
is switched on.
1 Press FIND on the baby unit. The parent unit produces a paging alert
tone.
2 To stop the paging alert tone, press FIND on the baby unit again or press
any button on the parent unit. The paging alert tone stops automatically
after 2 minutes.
Battery status light
1 The battery status light is solid green when the baby unit is operating on
battery power and the batteries contain enough energy.
2 The battery status light flashes red quickly when the batteries run low
while the baby unit is operating on battery power. Replace the batteries
when they run low.
Functions and feedback on the parent unit
Soothing menu
The parent unit has a separate soothing menu for all soothing features:
nightlight, lullaby and projector. To open the soothing menu, press the
Page 11

English
soothing button. This screen allows you to operate the nightlight, the
lullabies and the projector on the baby unit remotely.
1 To open the soothing menu, press the soothing button.
2 Use the + and - buttons to point the arrow to a soothing feature.
3 To switch on a soothing feature when it is off or to switch it off when it is
on, press OK. When the feature is on, there is a tick above the symbol of
the feature. When the feature is off, there is a cross above the symbol of
the feature.
11
4 To open the menu with options for the feature, move the arrow over the
options field and press OK. Use the - and + buttons to select items in the
options field.
5 To leave the soothing menu, press the soothing button.
Nightlight
This soothing feature allows you to switch the nightlight on or off and to set
the nightlight timer.
1 Select the nightlight feature and open the menu with nightlight options.
Page 12

12
English
2 You can set the nightlight timer for 5 to 20 minutes or you can switch on
the nightlight continuously. Press OK to confirm. The nightlight symbol
appears on the display.
If you set the nightlight timer, the nightlight switches off automatically. If
you switch on the nightlight continuously, switch it off in the soothing
menu or by pressing the button on the baby unit.
Lullaby
This soothing feature allows you to select the lullaby playing options and set
the lullaby timer.
1 Select the lullaby feature and open the menu with lullaby options.
2 In the lullaby options menu, you can select a lullaby from the list of pre-
stored lullabies. You can also select 'Play all' to play all pre-stored
lullabies.
3 You can set the lullaby timer for 5 to 20 minutes or you can choose to
play lullabies continuously. Press OK to confirm the timer setting. The
lullaby symbol and the lullaby played are shown on the display.
If you set the timer, the lullaby function switches off after the time set. If
you choose play continuously, switch off the lullaby function in the
soothing menu or by pressing the button on the baby unit.
Projector
This soothing feature allows you to switch on the projector on the baby unit
and to program the duration of projection.
1 Select the projector feature and open the menu with projector options.
2 To access the projector options, point the arrow at the options field and
press OK.
Volume
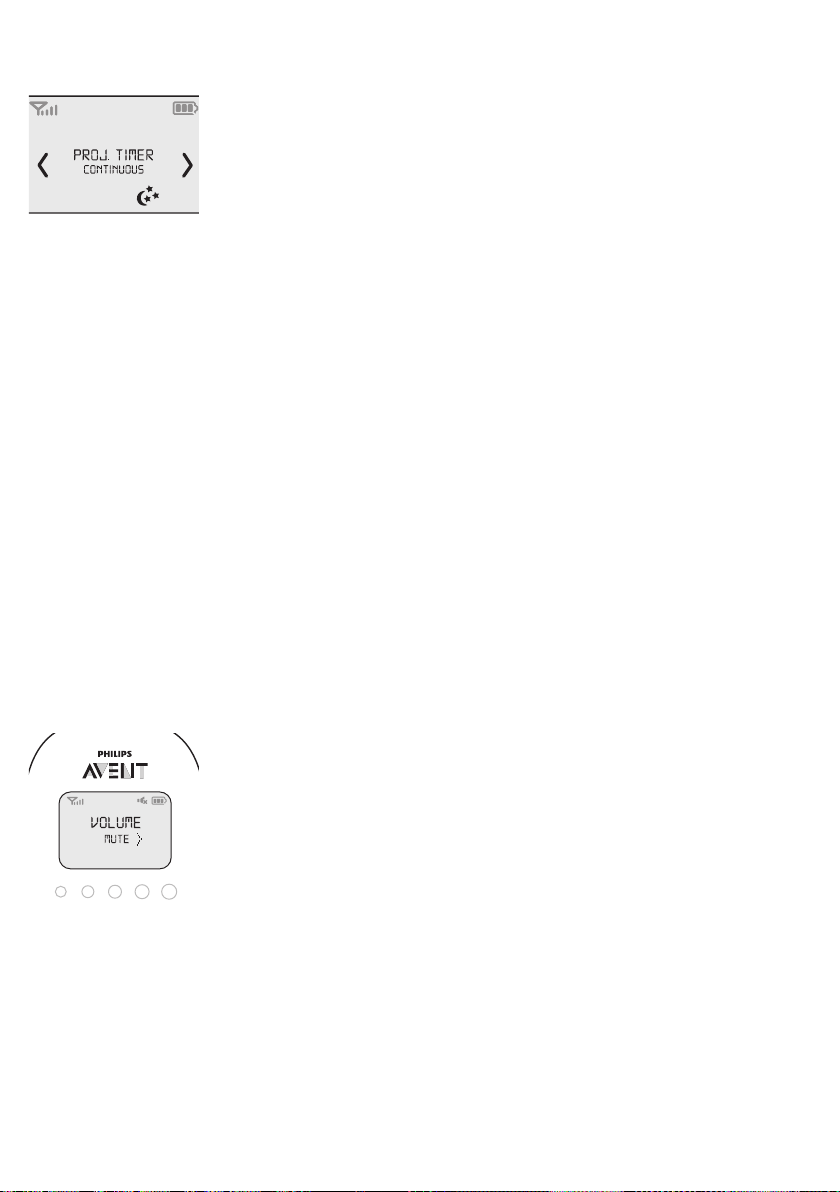
3 You can set the projector timer for 5 to 20 minutes or you can switch on
the projector continuously. Press OK to confirm. The projector symbol
appears on the display.
If you set the projector timer, the projector switches off automatically. If
you switch on the projector continuously, switch off the projector in the
soothing menu or by pressing the projector button on the baby unit.
The volume can be set if the menu is not active. There are seven volume
levels and a 'volume off' setting.
Setting the volume level
1 Press the + button or the - button once.
Page 13

Talk function
English
The current volume level appears on the display.
2 Press the + button to increase the volume or press the - button to
decrease the volume.
If no button is pressed for more than 2 seconds, the volume level
indication disappears from the display and the volume setting is saved.
13
Volume off
Below the lowest volume setting, there is a 'volume off' setting.
1 Press the + button or the - button once.
The current volume level appears on the display.
2 Press and hold the - button for more than 2 seconds to set the volume to
off.
The message 'MUTE' and the mute symbol appear on the display. Only
the sound level lights show that the baby produces sounds.
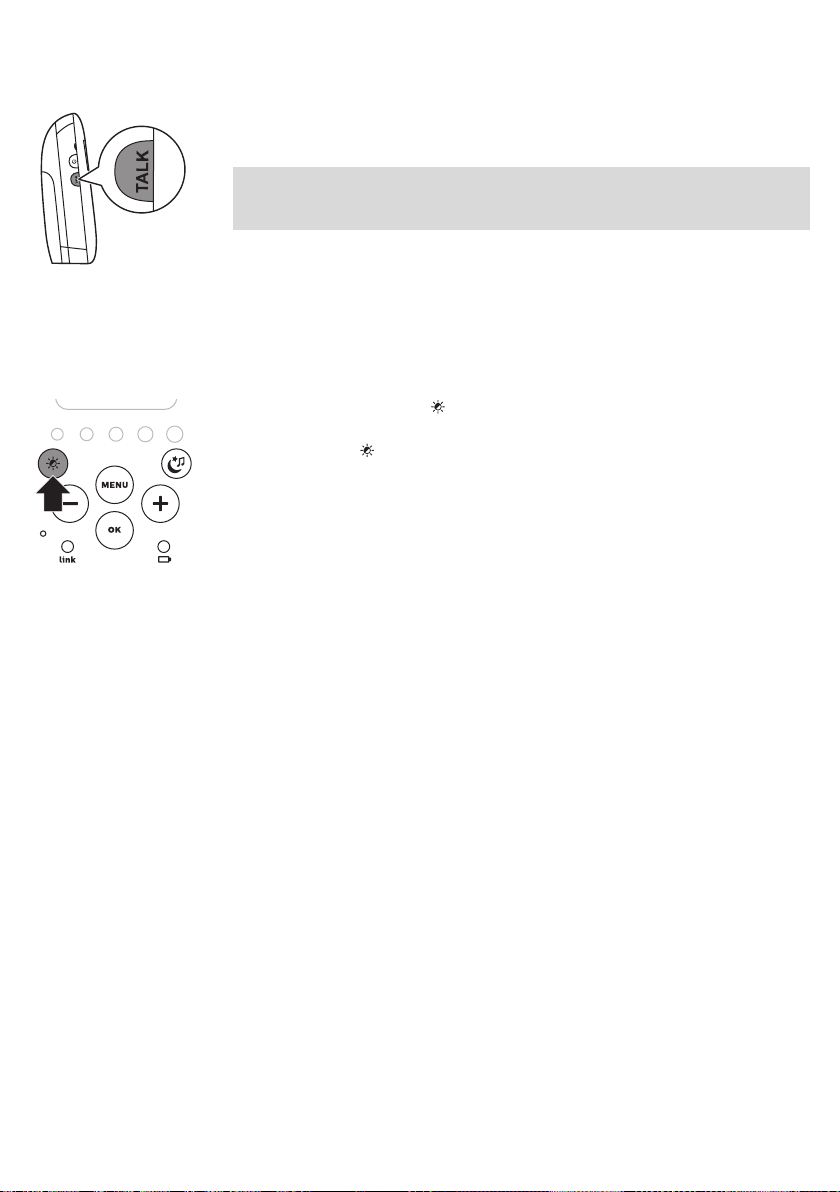
1 If you want to comfort your baby, press TALK on the parent unit and talk
clearly into the microphone on the front from a distance of 15-30cm
(0.5-1ft).
Note: If you have set the volume of the lullaby higher on the baby unit,
the sound will also be louder when you use the talk function on the
parent unit.
2 Release TALK when you have finished talking.
Night dim mode
In night dim mode, the light intensity of the lights and the display is reduced
and the volume of alert sounds is decreased.
1 Press the button to switch on the night dim mode.
2 Press the button again to switch back to normal operating mode.
Page 14
14
English
Baby unit battery low alert
1 When the baby unit runs on battery power and its batteries are low, the
parent unit beeps and the text ‘Baby unit Change batteries’ appears on
the display.
2 If you do not replace the batteries in time, the link with the baby unit will
be lost.
Battery status indications
Battery low
When the rechargeable batteries are low, 'BATTERY LOW' appears on the
display, the status indicator is empty and flashes, and the parent unit beeps.
The remaining operating time is at least 30 minutes.
Battery empty
1 If the rechargeable batteries are almost empty, the battery status light
flashes red quickly.
2 If you do not connect the parent unit to the mains, it switches off.
Menu of the parent unit
Navigating the menu
Note: Some menu functions only work when the baby unit and the parent
unit are linked.
1 Press the MENU button to open the menu and to make the first menu
option appear.
Page 15

Sensitivity
English
2 Use the + button to go to the next option or the - button to go to the
previous option. The arrow on the display indicates in which direction
you can navigate.
3 Press OK to confirm your selection.
Note: Press the MENU button if you want to leave the menu without making
any changes. If there is no input in the menu for more than 20 seconds, the
menu closes automatically.
This option in the parent unit menu allows you to set the microphone
sensitivity of the baby unit.
The microphone sensitivity determines what noise level the baby unit picks
up, e.g. you will want to hear when your baby cries, but you may be less
interested in its babbling.
1 Select ‘Sensitivity’ in the menu with the + and - buttons and press OK to
confirm.
2 Use the + and - buttons to increase or decrease the microphone
sensitivity. The number of filled segments shows the sensitivity level
selected. Press OK to confirm the setting.
15
Sensitivity levels and indications
Icon Sensitivity Description
highest Hear everything from your baby.
The speaker of the parent unit is
continuously on.
high Hear all sounds from soft
babbling and louder. If your
baby does not make any sound,
the speaker of the parent unit is
off.
medium Hear sounds from soft cries and
louder. If your baby makes softer
sounds, the speaker of the
parent unit does not go on.
Page 16

16
English
Eco Max mode
low The speaker of the parent unit
only goes on if the baby makes
loud sounds, for instance
because it is crying.
Smart Eco is a standard feature on this baby monitor. It automatically
reduces the DECT signal from the baby unit to save energy. To save even
more energy, activate the Eco Max mode. In this mode, the DECT signal of
the baby unit is switched off as long as the baby does not make a sound.
Caution: In Eco Max mode, the parent unit receives feedback from the
baby unit with a delay. When your baby makes a sound, the baby unit first
has to reactivate radio transmission before it can send feedback to the
parent unit.
Please note the following:
-
In Eco Max mode you do not receive feedback when the parent unit is
out of range of the baby unit. You can check the link by pressing any
button on the parent unit.
-
The Eco Max mode cannot be activated if the microphone sensitivity is
set to the highest level.
Activating Eco Max mode
1 Select 'Eco Max' in the menu with the + and - buttons and press OK to
confirm.
2 When the display shows 'Turn On', press OK to switch on the Eco Max
mode.
3 The warning message '!No alert if out of range, OK?' appears on the
display. Press OK to confirm.
Note: The warning message scrolls across the display twice. If you do not
press OK, the parent unit leaves the menu and the Eco Max mode
remains off.
4 The Eco Max indication flashes on the display. The 'link' light flashes
green slowly when the baby unit does not transmit any signals to the
parent unit.
5 When the parent unit receives a signal from the baby unit because radio
transmission has been reactivated, the 'link' light turns solid green.
Feed timer
Deactivating Eco Max mode
1 Press the MENU button.
2 Use the + and - buttons to select ‘Eco Max’ and press OK to confirm.
3 When the display shows ‘Turn Off’, press OK to confirm.
You can set the feed timer to alert you that it is time to feed your baby. The
timer can be set from 1 minute to 23 hours and 59 minutes.
1 To open the feed timer submenu, select 'Feed Timer' in the menu. Press
OK to confirm.
Page 17

English
2 Select 'Set Timer' in the feed timer submenu. Press OK to start setting the
timer.
3 Set the hour and the minutes and press OK to confirm.
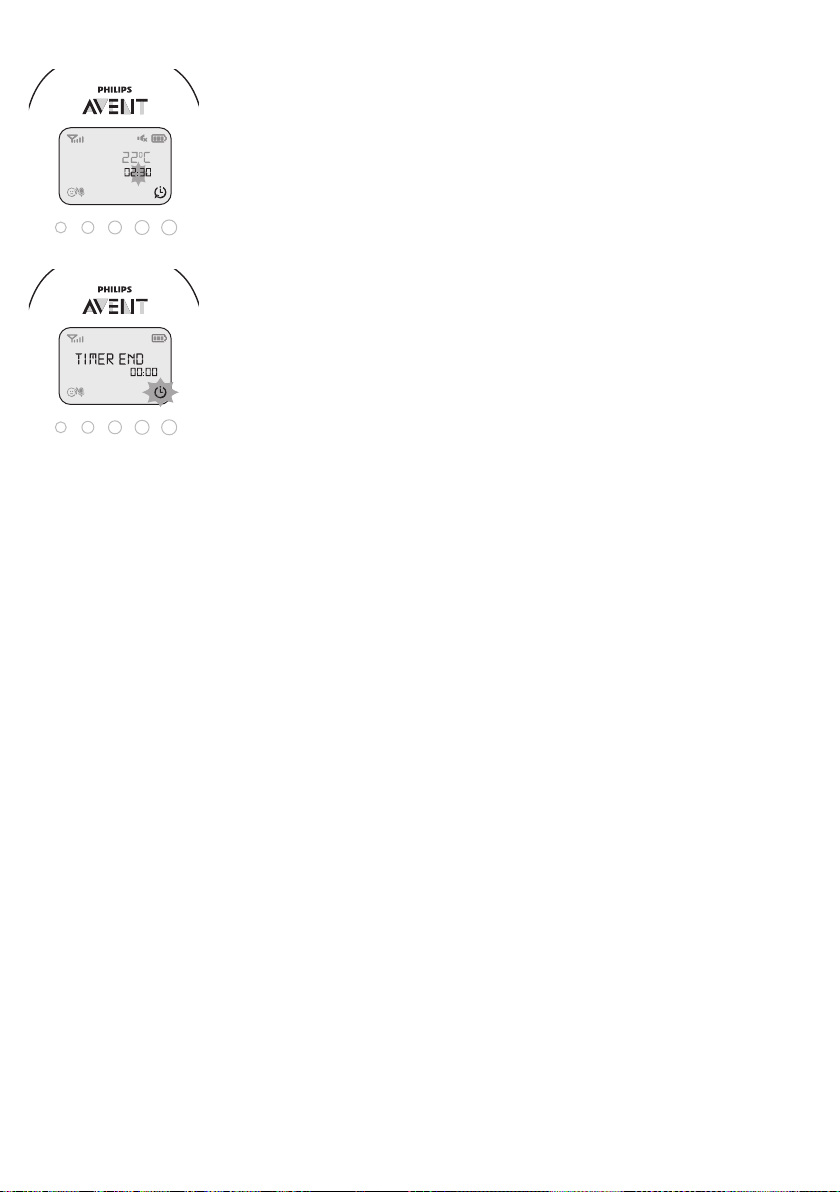
4 To start the feed timer, select 'xx:xx Start' in the feed timer submenu.
Press OK to confirm. The timer symbol appears on the display and the
timer starts counting down.
5 When the timer has reached 00:00, the feed timer alert goes off, the
timer symbol starts flashing on the display and the message 'TIMER END'
scrolls across the display.
6 To stop the timer, select 'Stop & Reset' in the feed timer submenu and
press OK to confirm.
17
Setting the feed timer repeat
1 To make the feed timer go off after the same set time, select ‘Timer
repeat’ in the feed timer submenu after you have set the timer. Press OK
to confirm.
2 Choose ‘Repeat ON’ or ‘Repeat OFF’ and press OK to confirm. The timer
repeat symbol appears on the display.
3 If ‘Repeat ON’ is set, the feed timer starts counting down again after you
stop the alert.
Setting a feed timer alert
1 To set an alert, select 'Timer Alert' in the feed timer submenu. Press OK to
2 Choose one of the alert options. The options available are sound only,
3 Press any key to stop the alert or the alert stops automatically after 2
4 To stop the timer, select 'Stop & Reset' in the feed timer submenu and
Room temperature
A baby sleeps comfortably at a temperature between 16°C/61°F and
20°C/68°F. You can set a minimum and a maximum temperature range and
an alert.
1 To open the temperature submenu, select 'Temperature' in the menu.
2 Select 'Temp Range' in the temperature submenu and press OK to
3 Use the + and - buttons to set the minimum temperature range between
4 Select 'Alert' in the temperature submenu. Press OK to confirm.
confirm.
sound and vibration and vibration only.
minutes.
press OK to confirm.
Press OK to confirm.
confirm.
10°C/50°F and 19°C/66°F and the maximum temperature range between
22°C/72°F and 37°C/99°F. Press OK to confirm.
Page 18

18
English
Cry alert
5 Choose one of the alert options. The options available are sound only,
sound and vibration,vibration only and display only. Press OK to confirm.
The temperature alert symbol appears on the display.
6 Select 'Temp Scale' in the temperature submenu. Press OK to confirm.
7 Select 'Celsius' or 'Fahrenheit' and press OK to confirm. The temperature
in the set scale appears on the display.
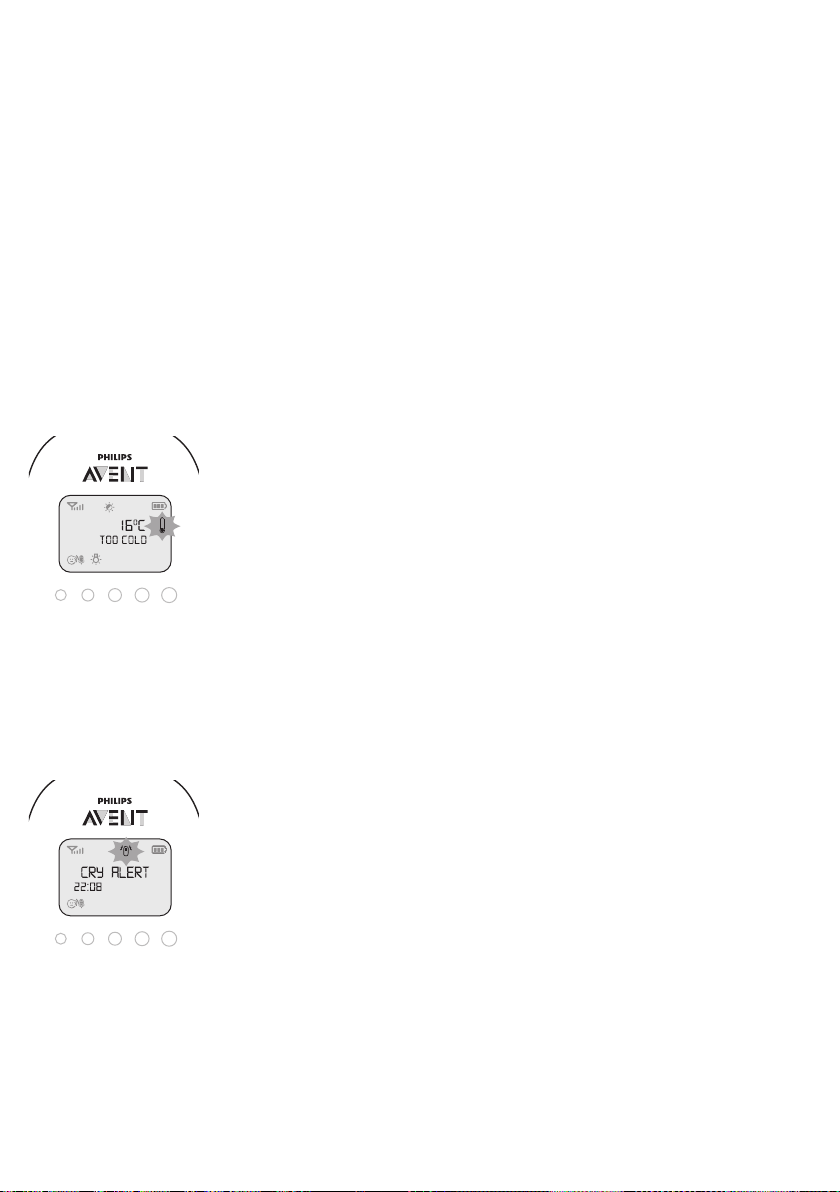
If the temperature is within the set range, the temperature alert symbol
has two segments.
If the temperature is below or above the set range, the temperature alert
symbol on the display has only one segment and flashes. The message
'TOO COLD' or 'TOO HOT' appears on the display.
You can set a cry alert to warn you that the baby is crying.
1 Select 'Cry alert' in the menu with the + and - buttons. Press OK to
confirm.
2 When the display shows 'Vibration ON', press OK to confirm. The cry alert
indicator appears on the display.
The cry alert goes off when the sound in the baby room is loud enough to
make the fourth sound level light go on. The parent unit vibrates and the
message 'Cry alert' appears on the display for 4 seconds. The cry alert
repeats every 8 seconds until the sound becomes less loud or you
deactivate the cry alert.
3 To deactivate the cry alert, select 'Cry alert' in the menu. When the
display shows 'Vibration OFF', press OK to confirm.
Clock
Language
The default setting for the clock is hidden. You can choose to show the clock
and set the clock time in the menu of the parent unit.
1 Select 'Set clock' in the menu with the + and - buttons. Press OK to
confirm.
2 Select 'Show Time' and press OK to confirm.
3 Select 'Set the time' and press OK to confirm.
4 Set the hour and the minutes and press OK to confirm.
The clock time alternates with other indications in the message field of
the display.
You can use this menu option to change the language setting.
1 Select ‘Set language’ in the menu with the + and - buttons. Press OK to
confirm.
Page 19

2 Use the + and - buttons to select your language and press OK to confirm.
Key lock
You can activate the key lock to prevent the buttons from being pressed
accidentally while you carry the parent unit around.
1 To activate the key lock, press OK.
2 Press the + button within 2 seconds.
Note: If you do not press the + button within 2 seconds, the instruction
remains on the display.
3 After you have pressed the + button, the message 'Keys locked' appears
on the display.
4 To deactivate the key lock, press OK. When the display shows the
instruction message, press the + button within 2 seconds.
Notes:
-
When you press a button other than OK while the key lock is active, the
display goes on and the second line on the display tells you how to
deactivate the key lock.
-
When you press OK while the key lock is active, the second line on the
display tells you what second step is necessary to unlock the buttons.
Warranty and support
If you need information or support, please visit www.philips.com/support or
read the international warranty leaflet.
English
19
Page 20

< >
< >
< >
< >
>
<
>
< >
<
< >
>
< >
< >
< >
<
>
<
< > >
<
<
Sensitivity
Eco Max
Cry Alert
Feed Timer
Temperature
Set Clock
Set Language >
Press OK = < =
Timer Alert
Turn On?
Turn O?
Vibrate On?
Vibrate O?
xx:yy Start?
Set Timer
Timer Repeat
Temp Range
Temp Alert
Temp Scale
Show/Hide
Set The Time
English
...
Русский
<
<
<
<
<
<
<
<
<
>
>
>
>
>
>
>
>
>
>
>
>
Minimum XXºC
!No alert if…
Hr 00:00
Hr 00:00
Repeat ON
Repeat OFF
Sound only
Sound & Vibe
Vibrate only
Sound only
Sound & Vibe
Vibrate only
Screen only
O
Celsius
Fahrenheit
Hide Clock
Show Clock
Maximum YYºC
00:30 Min
00:00 Min
SCD730/SCD731/SCD733/SCD734/SCD735 (EN
)
> =
20
English
Page 21

Light Timer
Lullaby
Proj. timer
5 minutes
10 minutes
15 minutes
20 minutes
Continuous
Play no.1
Play no.12
.................
Play all
5 minutes
10 minutes
15 minutes
20 minutes
Continuous
Song Timer 5 minutes
10 minutes
15 minutes
20 minutes
Continuous
<
<
<
<
<
<
<
<
<
<
<
>
>
>
>
>
>
>
>
>
>
>
>
<
<
<
<
>
>
>
>
Press OK = < =
> =
English
21
Page 22

1
9 10 11 12 13
7
8
14
2 3 4 5 6
1
22
Deutsch
Page 23

Einführung
Besuchen Sie www.philips.com/welcome, um Ihr Produkt zu registrieren und
die ausführliche Bedienungsanleitung zu lesen.
Display der Elterneinheit (Abb. 1)
1 Signalstärkeanzeige
2 Eco Max-Anzeige
3 Symbol für Nachtmodus
4 Weinalarmanzeige
5 Symbol für Stummschaltung
6 Akkustandanzeige
7 Navigationspfeil
8 Temperatursymbol
9 Mikrofonempfindlichkeitsanzeige
10 Nachtlichtsymbol
11 Schlafliedsymbol
12 Projektorsymbol
13 Timer- oder Timer-Wiederholungs-Symbol
14 Bildschirm des Beruhigungsmenüs
Vorbereiten für den Gebrauch
WICHTIG: Lesen Sie die Sicherheitshinweise genau durch, bevor Sie das
Babyphone verwenden, und bewahren Sie sie zur späteren Verwendung
auf.
Deutsch
23
Babyeinheit
Elterneinheit
Wir raten, die Babyeinheit im Stromnetzbetrieb zu verwenden. Zur
automatischen Pufferung bei einem Stromausfall können Sie vier AAAlkalibatterien (1,5 V, nicht im Lieferumfang enthalten) einlegen.
Verwenden Sie keine wiederaufladbaren Akkus. Die Babyeinheit hat keine
Ladefunktion, und Akkus entladen sich mit der Zeit, wenn sie nicht in
Gebrauch sind.
Die Elterneinheit wird mit zwei Akkus betrieben, die im Lieferumfang des
Babyphones enthalten sind. Laden Sie die Elterneinheit vor dem ersten
Gebrauch und wenn die Akkus fast leer sind.
Bitte beachten Sie für SCD730/SCD731/SCD733, dass Sie die Elterneinheit
mindestens 10 Stunden lang aufladen müssen, um eine Betriebszeit von
18 Stunden zu gewährleisten. (Für SCD734 und SCD735: Die Ladezeit
beträgt 14 Stunden und die Betriebszeit 25 Stunden.
Hinweis: Wenn Sie das Babyphone verwenden, erreicht der Akku seine volle
Kapazität erst nach 4-maligem Laden und Entladen.
Page 24

24
Deutsch
Verwenden des Babyphones
Aufstellen des Babyphones
Stellen Sie die Babyeinheit außer Reichweite Ihres Babys auf.
Legen Sie die Babyeinheit keinesfalls in das Kinderbett oder in
den Laufstall.
-
Da durch das Kabel der Babyeinheit potenziell Strangulationsgefahr
besteht, stellen Sie sicher, dass die Babyeinheit und das Kabel
mindestens 1Meter vom Baby entfernt sind.
-
Umeinen schrillen Ton von einer oder beiden Einheiten zu vermeiden,
stellen Sie sicher, dass sich die Elterneinheit mindestens 1Meter von der
Babyeinheit entfernt befindet.
Verbinden der Elterneinheit mit der Babyeinheit
1 Halten Sie die Taste auf der Babyeinheit 2Sekunden lang gedrückt, bis
die Betriebsanzeige aufleuchtet.
2 Halten Sie die Taste an der Elterneinheit 2Sekunden lang gedrückt, bis
das Display aufleuchtet. Die LINK-Anzeige (Verbindungsanzeige) an der
Elterneinheit beginnt, rot zu blinken, und die Meldung "I AM LINKING"
(Verbindung wird hergestellt) wird auf dem Display angezeigt.
Wenn die Eltern- und die Babyeinheit verbunden sind, leuchtet die LinkAnzeige kontinuierlich grün. Die Signalstärkeanzeige und die Meldung
"‘LINKED" (Verbunden) werden auf dem Display angezeigt.
Wenn keine Verbindung hergestellt ist, wird die Meldung "NOT LINKED"
(Nicht verbunden) Display angezeigt, und die Elterneinheit beginnt einen
Signalton auszugeben.
So gehen Sie vor, wenn keine Verbindung hergestellt wurde
-
Wenn sich die Elterneinheit außerhalb der Reichweite befindet, bewegen
Sie sie in die Nähe der Babyeinheit, jedoch nicht näher als 1Meter.
-
Wenn sich die Baby- oder die Elterneinheit zu nahe, > 2 m, an einem
anderen DECT-Gerät (z.B. einem schnurlosen Telefon) befindet, schalten
Sie dieses Gerät aus, oder stellen Sie die Einheit weiter entfernt davon
auf.
-
Wenn die Babyeinheit ausgeschaltet ist, schalten Sie sie ein.
Empfangsbereich
-
Der Empfangsbereich beträgt 330Meter im Außenbereich und bis zu
50Metern im Innenbereich.
-
Die Reichweite des Babyphones ist von der Umgebung und von
eventuellen Störfaktoren abhängig. Nasse und feuchte Materialien
können die Reichweite um bis zu 100% verringern. Trockene Materialien
haben den in der Tabelle unten angegebenen Einfluss auf die
Reichweite.
Page 25

Trockene Materialien Materialstärke Empfangsverlust
Holz, Gips, Pappe, Glas
(ohne Metall, Drähte oder
Blei)
Ziegel, Sperrholz <30cm 5-35%
Stahlbeton <30cm 30-100%
Metallgitter oder -stangen <1cm 90-100%
Metall- oder Aluplatten <1cm 100%
<30cm 0-10%
Funktionen und Signale der Babyeinheit
Nachtlicht
Das Nachtlicht erzeugt ein sanftes Licht, das Ihr Baby beruhigt.
1 Drücken Sie an der Babyeinheit die Taste , um das Nachtlicht ein- oder
auszuschalten.
Schlaflied-Funktion
1 Drücken Sie die Taste an der Babyeinheit, um das zuletzt ausgewählte
Schlaflied wiederzugeben. Das ausgewählte Schlaflied wird über die
eingestellte Zeit wiederholt.
Deutsch
25
2 Drücken Sie die Taste zur Auswahl eines anderen Schlaflieds aus der
Liste.
Page 26

>2.5m/8.2ft
26
Deutsch
Projektor
3 Um den Geräuschpegel des Schlaflieds einzustellen, drücken Sie die
Taste Lautstärke "+" oder Lautstärke "-" an der Babyeinheit.
Hinweis: Sie können die Lautstärke an der Babyeinheit nur einstellen,
wenn ein Schlaflied abgespielt wird. Wenn Sie die Lautstärke für das
Schlaflied höher eingestellt haben, wird der Ton auch dann lauter, wenn
Sie die Sprechfunktion auf der Elterneinheit verwenden.
4 Um die Wiedergabe des Schlaflieds abzubrechen, drücken Sie die Taste
auf der Babyeinheit.
Sie können Ihr Baby mit farbigen Lichtmustern beruhigen, die auf die
Zimmerdecke projiziert werden, wenn Sie den Projektor einschalten.
1 Drücken Sie zum Einschalten des Projektors den Ein-/Ausschalter. Auf
dem Display der Elterneinheit wird das Projektorsymbol angezeigt.
2 Es stehen sechs verschiedene Muster zur Verfügung. Das erste Muster
erreicht innerhalb von 2Sekunden die vollständige Helligkeit. Es wird
8Sekunden projiziert und anschließend 2Sekunden lang allmählich
ausgeblendet, während das nächste Muster eingeblendet wird. Jedes
Muster wird 10Sekunden lang an die Decke projiziert. Die Muster werden
über die eingestellte Zeit wiederholt.
3 Betätigen Sie zum Ausschalten des Projektors erneut den Ein-
/Ausschalter des Projektors.
Die Elterneinheit rufen
Wenn Sie die Elterneinheit verloren haben, können Sie die Taste FIND
(Finden) an der Babyeinheit verwenden, um die Elterneinheit zu suchen.
Dazu muss die Elterneinheit eingeschaltet sein.
1 Drücken Sie FIND an der Babyeinheit. Die Elterneinheit gibt ein
akustisches Rufsignal ab.
2 Um dieses zu beenden, drücken Sie erneut FIND an der Babyeinheit oder
eine beliebige Taste an der Elterneinheit. Das akustische Rufsignal hört
automatisch nach 2Minuten auf.
Page 27

Batteriestandanzeige
1 Die Batteriestandanzeige leuchtet grün, wenn sich die Babyeinheit im
Batteriebetrieb befindet und die Batterien ausreichend Ladung haben.
2 Die Batteriestandanzeige blinkt schnell rot, wenn die Batterien der
Babyeinheit im Batteriebetrieb fast leer sind. Ersetzen Sie die Batterien,
wenn sie zur Neige gehen.
Funktionen und Signale der Elterneinheit
Beruhigungsmenü
Die Elterneinheit hat ein separates Beruhigungsmenü für alle
Beruhigungsfunktionen: Nachtlicht, Schlaflied und Projektor. Um das
Beruhigungsmenü zu öffnen, drücken Sie die Beruhigungstaste. Dieser
Bildschirm ermöglicht Ihnen, das Nachtlicht, die Schlaflieder und den
Projektor auf der Babyeinheit aus der Ferne zu steuern.
1 Um das Beruhigungsmenü zu öffnen, drücken Sie die Beruhigungstaste.
Deutsch
27
2 Verwenden Sie die Tasten "–" und "+", um den Pfeil auf eine
Beruhigungsfunktion zu richten.
3 Um eine Beruhigungsfunktion ein- oder auszuschalten, drücken Sie OK.
Wenn die Funktion eingeschaltet ist, wird ein Häkchen über dem Symbol
der Funktion angezeigt. Wenn die Funktion ausgeschaltet ist, wird ein
Kreuz über dem Symbol der Funktion angezeigt.
Page 28

28
Deutsch
4 Um das Menü mit den Optionen für die Funktion zu öffnen, bewegen Sie
den Pfeil über das Optionsfeld, und drücken Sie OK. Verwenden Sie die
Tasten "–" und "+", um Elemente im Optionsfeld auszuwählen.
5 Um das Beruhigungsmenü zu beenden, drücken Sie die
Beruhigungstaste.
Nachtlicht
Diese Beruhigungsfunktion ermöglicht Ihnen, das Nachtlicht ein- oder
auszuschalten und den Nachtlicht-Timer einzustellen.
1 Wählen Sie die Nachtlichtfunktion aus, und öffnen Sie das Menü für die
Nachtlichtoptionen.
2 Sie können den Nachtlicht-Timer auf eine Zeitspanne zwischen 5 und
20Minuten einstellen oder das Nachtlicht dauerhaft einschalten.
Drücken Sie zur Bestätigung auf OK. Das Nachtlichtsymbol wird im
Display angezeigt.
Wenn Sie den Nachtlicht-Timer einstellen, wird das Nachtlicht
automatisch ausgeschaltet. Wenn Sie das Nachtlicht ununterbrochen
einschalten, können Sie es über das Beruhigungsmenü oder durch
Drücken der Taste auf der Babyeinheit ausschalten.
Schlaflied
Diese Beruhigungsfunktion ermöglicht Ihnen, die Optionen für die
Wiedergabe von Schlafliedern auszuwählen und den Schlaflied-Timer
einzustellen.
1 Wählen Sie die Schlafliedfunktion aus, und öffnen Sie das Menü für die
Schlafliedoptionen.
2 Im Menü für die Schlafliedoptionen können Sie ein Schlaflied aus der
Liste der gespeicherten Schlaflieder auswählen. Sie können auch "Play
all" (Alle wiedergeben) auswählen, um alle werksseitig gespeicherten
Schlaflieder wiederzugeben.
3 Sie können den Schlaflied-Timer auf 5 bis 20Minuten stellen oder die
kontinuierliche Wiedergabe von Schlafliedern auswählen. Drücken Sie
OK, um die Timer-Einstellung zu bestätigen. Das Schlafliedsymbol und
das abgespielte Schlaflied werden auf dem Display angezeigt.
Wenn Sie den Timer einstellen, schaltet sich die Schlafliedfunktion nach
der festgelegten Zeit aus. Wenn Sie die ununterbrochene Wiedergabe
von Schlafliedern ausgewählt haben, können Sie die Schlafliedfunktion
über das Beruhigungsmenü oder durch Drücken der Taste an der
Babyeinheit ausschalten.
Projektor
Diese Beruhigungsfunktion ermöglicht Ihnen, den Projektor auf der
Babyeinheit einzuschalten und die Dauer der Projektion zu programmieren.
Page 29

Lautstärke
Deutsch
1 Wählen Sie die Projektorfunktion aus, und öffnen Sie das Menü für die
Projektoroptionen.
2 Um auf die Projektoroptionen zuzugreifen, richten Sie den Pfeil auf das
Optionsfeld, und drücken Sie OK.
3 Sie können den Projektor-Timer auf 5bis 20Minuten stellen oder den
Projektor ununterbrochen einschalten. Drücken Sie zur Bestätigung auf
OK. Das Projektorsymbol wird auf dem Display angezeigt.
Wenn Sie den Projektor-Timer einstellen, wird der Projektor automatisch
ausgeschaltet. Wenn Sie den Projektor dauerhaft einschalten, können Sie
den Projektor über das Beruhigungsmenü oder durch Drücken der
Projektortaste auf der Babyeinheit ausschalten.
Die Lautstärke kann eingestellt werden, wenn das Menü nicht aktiv ist. Es
gibt sieben Lautstärken und die Einstellung "Stummschaltung".
Einstellen der Lautstärke
1 Drücken Sie die Taste "+" oder "–" einmal.
Die aktuelle Lautstärke wird auf dem Display angezeigt.
2 Drücken Sie zur Erhöhung der Lautstärke die Taste "+" bzw. zur
Reduzierung der Lautstärke die Taste "–".
Wenn für mehr als 2Sekunden keine Taste gedrückt wird, verschwindet
die Lautstärkenanzeige vom Display, und die Lautstärkeneinstellung ist
gespeichert.
29
Stummschaltung
Nach der niedrigsten Lautstärkeneinstellung gibt es die Einstellung
"Stummschaltung".
1 Drücken Sie die Taste "+" oder "–" einmal.
Die aktuelle Lautstärke wird auf dem Display angezeigt.
2 Halten Sie die Taste "–" länger als 2 Sekunden gedrückt, um die
Lautstärke auf Stummschaltung zu setzen.
Die Meldung "MUTE" (Stumm) und das Symbol für Stummschaltung
werden auf dem Display angezeigt. Nur die Geräuschpegelanzeigen
geben an, dass das Baby Töne von sich gibt.
Page 30

30
Deutsch
"Talk"-Funktion (Sprechfunktion)
1 Wenn Sie Ihr Kind beruhigen möchten, drücken Sie "TALK" (Sprechen) an
der Elterneinheit, und sprechen Sie aus einer Entfernung von 15–30cm
deutlich in das Mikrofon auf der Vorderseite.
Hinweis: Wenn Sie die Lautstärke für das Schlaflied auf der Babyeinheit
höher einstellen, wird der Ton auch dann lauter, wenn Sie die
Sprechfunktion auf der Elterneinheit verwenden.
2 Lassen Sie die TALK-Taste (Sprechtaste) nach dem Sprechen wieder los.
Nachtmodus
Im Nachtmodus werden die Helligkeit der Anzeigen und des Displays sowie
die Lautstärke der akustischen Signale verringert.
1 Drücken Sie die Taste , um den Nachtmodus einzuschalten.
2 Drücken Sie die Taste erneut, um zum normalen Betriebsmodus
zurückzukehren.
Alarm bei niedrigem Akkustand der Babyeinheit
1 Wenn die Babyeinheit mit Batterien betrieben wird und die Batterien fast
leer sind, gibt die Elterneinheit ein akustisches Signal aus, und der Text
"Baby unit Change batteries" (Babyeinheit – Batterien austauschen) wird
auf dem Display angezeigt.
2 Wenn Sie die Akkus nicht rechtzeitig ersetzen, wird die Verbindung zur
Babyeinheit unterbrochen.
Akkustandsanzeigen
Akku fast leer
Wenn die Akkus fast leer sind, wird "BATTERYLOW" (Akku fast leer) auf dem
Display angezeigt, die Akkustandanzeige ist leer und blinkt, und an der
Elterneinheit werden Signaltöne ausgegeben. Die Akkuladung reicht noch
für mindestens 30 Minuten aus.
Akku leer
Page 31

1 Wenn die Akkus fast leer sind, leuchtet die Akkustandanzeige schnell rot
auf.
2 Wenn Sie die Elterneinheit nicht an das Stromnetz anschließen, wird sie
ausgeschaltet.
Menü der Elterneinheit
Navigation durch das Menü
Hinweis: Einige Menüfunktionen funktionieren nur, wenn die Babyeinheit
und die Elterneinheit miteinander verbunden sind.
1 Drücken Sie die Taste MENU, um das Menü zu öffnen. Die erste
Menüoption wird angezeigt.
Deutsch
31
2 Verwenden Sie die Taste "+", um zur nächsten Option zu wechseln, oder
die Taste "–", um zur vorherigen Option zu wechseln. Der Pfeil auf dem
Display zeigt an, in welche Richtung Sie navigieren können.
3 Drücken Sie OK, um Ihre Auswahl zu bestätigen.
Hinweis: Drücken Sie die Taste MENU, wenn Sie das Menü verlassen
möchten, ohne Änderungen vorzunehmen. Wenn 20Sekunden keine
Eingabe im Menü vorgenommen wurde, wird das Menü automatisch
geschlossen.
Page 32

32
Deutsch
Empfindlichkeit
Diese Option im Menü der Elterneinheit ermöglicht es Ihnen, die
Mikrofonempfindlichkeit der Babyeinheit einzustellen.
Die Mikrofonempfindlichkeit bestimmt, welchen Geräuschpegel die
Babyeinheit wahrnimmt – wenn Sie beispielsweise zwar hören möchten,
wenn Ihr Baby weint, nicht aber, wenn es murmelt.
1 Wählen Sie im Menü mithilfe der Tasten "+" und "–" die Option
"Sensitivity" (Empfindlichkeit) aus, und drücken Sie zur Bestätigung auf
"OK".
2 Verwenden Sie die Tasten "+" und "–" zur Erhöhung/Reduzierung der
Mikrofonempfindlichkeit. Die Anzahl ausgefüllter Segmente zeigt die
ausgewählte Empfindlichkeitsstufe an. Drücken Sie auf "OK", um die
Einstellung zu bestätigen.
Empfindlichkeitsstufen und Anzeigen
Symbol Empfindlichkeit Beschreibung
sehr hoch Sie hören alles von Ihrem Baby.
Der Lautsprecher der
Elterneinheit ist ständig
eingeschaltet.
hoch Sie hören alle Geräusche: leises
Brabbeln sowie lautere
Geräusche. Wenn Ihr Baby kein
Geräusch von sich gibt, ist der
Lautsprecher der Elterneinheit
ausgeschaltet.
Eco Max-Modus
mittel Sie hören leises Weinen sowie
lautere Geräusche. Wenn Ihr
Baby leisere Geräusche von sich
gibt, wird der Lautsprecher der
Elterneinheit nicht aktiviert.
niedrig Der Lautsprecher der
Elterneinheit wird nur aktiviert,
wenn das Baby laute Geräusche
von sich gibt, zum Beispiel, weil
es weint.
Smart Eco ist eine Standard-Funktion auf diesem Babyphone. Die Funktion
reduziert automatisch das DECT-Signal von der Babyeinheit, um Energie zu
sparen. Um noch mehr Energie zu sparen, aktivieren Sie den Eco MaxModus. In diesem Modus ist das DECT-Signal der Babyeinheit
ausgeschaltet, solange das Baby kein Geräusch macht.
Achtung: Im Eco Max-Modus empfängt die Elterneinheit das Signal der
Babyeinheit mit einiger Verzögerung. Wenn Ihr Baby ein Geräusch von sich
Page 33

Deutsch
gibt, muss die Babyeinheit zunächst die Funkübertragung wieder
aktivieren, bevor sie ein Signal an die Elterneinheit senden kann.
Bitte beachten Sie Folgendes:
-
Im Eco Max-Modus erhalten Sie keine Rückmeldung, wenn sich die
Elterneinheit außerhalb der Reichweite der Babyeinheit befindet. Sie
können die Verbindung durch das Drücken einer beliebigen Taste auf der
Elterneinheit prüfen.
-
Der Eco Max-Modus kann nicht aktiviert werden, wenn die
Mikrofonempfindlichkeit auf die höchste Stufe eingestellt ist.
33
Aktivieren des Eco Max-Modus
1 Wählen Sie "EcoMax" mit den Tasten "+" und "–" im Menü aus, und
drücken Sie "OK" zur Bestätigung.
2 Wenn das Display "Turn On" (Einschalten) anzeigt, drücken Sie auf "OK",
um den Eco Max-Modus einzuschalten.
3 Die Warnung "No alert if out of range, OK?" (Kein Alarm außer Reichweite,
OK?) erscheint auf dem Display. Drücken Sie "OK" zur Bestätigung.
Drücken Sie zur Bestätigung auf OK.
Hinweis: Die Warnung läuft zwei Mal über das Display. Wenn Sie nicht
"OK" drücken, verlässt die Elterneinheit das Menü, und der Eco MaxModus bleibt ausgeschaltet.
4 Die Eco Max-Anzeige blinkt auf dem Display. Die LINK-Anzeige
(Verbindungsanzeige) blinkt langsam grün, wenn die Babyeinheit keine
Signale zur Elterneinheit sendet.
5 Wenn die Elterneinheit ein Signal von der Babyeinheit empfängt, da die
Funkübertragung reaktiviert wurde, leuchtet die Verbindungsanzeige
durchgehend grün.
Feed-Timer
Deaktivieren des Eco Max-Modus
1 Drücken Sie die MENU-Taste (Menü).
2 Verwenden Sie die Tasten "+" und "–", um "Eco Max" auszuwählen, und
drücken Sie "OK" zur Bestätigung.
3 Wenn das Display die Meldung "Ausschalten" anzeigt, drücken Sie zur
Bestätigung OK.
Sie können den Feed-Timer einstellen, der Sie benachrichtigt, dass es Zeit
ist, Ihr Baby zu füttern. Der Timer kann von 1Minute bis 23Stunden und
59Minuten eingestellt werden.
1 Umdas Untermenü des Feed-Timers zu öffnen, wählen Sie im Menü
"Feed-Timer" aus. Drücken Sie zur Bestätigung auf OK.
2 WählenSie im Untermenü des Feed-Timers "Set Timer" (Timer einstellen)
aus. Drücken Sie OK, um die Einstellung des Timers zu starten.
3 Stellen Sie die Stunden und die Minuten ein, und drücken Sie zur
Bestätigung auf OK.
Page 34
34
Deutsch
4 Umden Feed-Timer zu starten, wählen Sie im Untermenü des Feed-
Timers "'xx:xx Start" aus. Drücken Sie zur Bestätigung auf OK. TimerSymbol wird auf dem Display angezeigt, und der Timer beginnt mit dem
Rückwärtszählen.
5 Wenn der Timer 00:00 erreicht hat, wird der Feed-Timer-Alarm
ausgelöst, das Timersymbol leuchtet auf dem Display auf, und die
Meldung "TIMER END" (Timer-Ende) läuft über das Display.
6 Um den Timer zu stoppen, wählen Sie im Untermenü des Feed-Timers
"Stop & Reset" (Anhalten und Zurücksetzen) aus, und drücken Sie zur
Bestätigung auf OK.
Die Feed-Timer-Wiederholung einstellen
1 Damit sich der Feed-Timer nach derselben Zeit einschaltet, wählen Sie
im Untermenü des Feed-Timers "Timer repeat" (Timer-Wiederholen) aus,
nachdem Sie den Timer eingestellt haben. Drücken Sie zur Bestätigung
auf OK.
2 Wählen Sie "Repeat ON" (Wiederholen EIN) oder "Repeat OFF
(Wiederholen AUS) aus, und drücken Sie zur Bestätigung die Taste OK.
Das Symbol für die Timer-Wiederholung wird auf dem Display angezeigt.
3 Wenn "Repeat ON" (Wiederholen EIN) eingestellt ist, beginnt der Feed-
Timer mit dem Rückwärtszählen, nachdem Sie den Alarm beendet haben.
Raumtemperatur
Den Feed-Timer-Alarm einstellen
1 Umeinen Alarm einzustellen, wählen Sie "Timer Alert" (Timer-Alarm) im
Untermenü des Feed-Timers aus. Drücken Sie zur Bestätigung auf OK.
2 Wählen Sie eine der Alarmeinstellungen. Die verfügbaren Optionen sind:
Nur Ton, Ton und Vibration sowie nur Vibration.
3 Drücken Sie eine beliebige Taste, um den Alarm anzuhalten. Andernfalls
hört der Alarm automatisch nach 2Minuten auf.
4 Um den Timer zu stoppen, wählen Sie im Untermenü des Feed-Timers
"Stop & Reset" (Anhalten und Zurücksetzen) aus, und drücken Sie zur
Bestätigung auf OK.
Ein Baby schläft am besten, wenn die Temperatur zwischen 16°C und 20°C
beträgt. Siekönnen einen minimalen und einen maximalen
Temperaturbereich sowie ein Temperatursignal einstellen.
1 Umdas Untermenü zur Einstellung der Temperatur zu öffnen, wählen Sie
im Menü "Temperature" (Temperatur) aus. Drücken Sie zur Bestätigung
auf OK.
2 Wählen Sie im Untermenü zur Einstellung der Temperatur "Temp Range"
(Temperaturbereich) aus, und drücken Sie zur Bestätigung auf OK.
Page 35
Deutsch
3 Verwenden Sie die Tasten+ und-, um den Mindesttemperaturbereich
zwischen 10°C und 19°C und den maximalen Temperaturbereich
zwischen 22°C und 37°C festzulegen. Drücken Sie zur Bestätigung auf
OK.
4 WählenSie im Untermenü zur Einstellung der Temperatur "Alert" (Alarm)
aus. Drücken Sie zur Bestätigung auf OK.
5 Wählen Sie eine der Alarmeinstellungen. Die verfügbaren Optionen sind:
Nur Ton, Ton und Vibration, nur Vibration sowie nur Anzeige. Drücken Sie
zur Bestätigung auf OK. DasSymbol für den Temperaturalarm auf dem
Display angezeigt.
6 Wählen Sie im Untermenü zur Einstellung der Temperatur "TempScale"
(Temp.Skala) aus. Drücken Sie zur Bestätigung auf OK.
7 Wählen Sie "Celsius" oder "Fahrenheit" aus, und drücken Sie zur
Bestätigung die Taste OK. Die Temperatur in der festgelegten Skala wird
auf dem Display angezeigt.
Wenn die Temperatur innerhalb des eingestellten Bereichs liegt, besteht
das Symbol für den Temperaturalarm aus zwei Teilen.
Wenn die Temperatur unter oder über dem festgelegten Bereich liegt,
besteht das Symbol für das Tempersignal auf dem Display nur aus einem
Teil und blinkt. Die Meldung "TOO COLD" (Zu kalt) oder "TOO HOT" (Zu
warm) wird auf dem Display angezeigt.
35
Weinalarm
Uhr
Sie können einen Weinalarm einstellen, um Sie beim Weinen des Babys zu
warnen.
1 Wählen Sie mit den Tasten "+" und "–" die Option "CryAlert" (Weinalarm)
im Menü aus. Drücken Sie zur Bestätigung auf OK.
2 Wenn das Display die Meldung "Vibration ON" (Vibrationsalarm EIN)
anzeigt, drücken Sie zur Bestätigung OK. Die Anzeige für den Weinalarm
wird auf dem Display angezeigt.
Der Weinalarm wird ausgelöst, wenn der Geräuschpegel im Kinderzimmer
so hoch ist, dass die vierte Geräuschpegelanzeige aktiviert wird. Die
Elterneinheit vibriert, und die Meldung "Cryalert" (Weinalarm) wird
4Sekunden lang auf dem Display angezeigt. Der Weinalarm wird alle
8Sekunden wiederholt, bis der Geräuschpegel leiser wird oder Sie den
Weinalarm deaktivieren.
3 Um den Weinalarm zu deaktivieren, wählen Sie "Cryalert" (Weinalarm)
aus dem Menü aus. Wenn das Display "VibrationOFF" (Vibrationsalarm
AUS) anzeigt, drücken Sie zur Bestätigung OK.
Standardmäßig ist die Uhr ausgeblendet. Sie können auswählen, dass die
Uhr angezeigt wird, und die Uhrzeit im Menü der Elterneinheit einstellen.
Page 36

36
Deutsch
Sprache
Feststelltaste
1 Wählen Sie mit den Tasten "+" und "–" die Option "Setclock" (Uhrzeit
einstellen) im Menü aus. Drücken Sie zur Bestätigung auf OK.
2 Wählen Sie "Show Time" (Anzeigen der Zeit) aus, und drücken Sie zur
Bestätigung auf OK.
3 Wählen Sie "Set Time" (Einstellen der Zeit) aus, und drücken Sie zur
Bestätigung auf OK.
4 Stellen Sie die Stunden und die Minuten ein, und drücken Sie zur
Bestätigung auf OK.
Die Uhrzeit wechselt mit anderen Anzeigen im Meldungsfeld des Displays
ab.
Sie können diese Menüoption verwenden, um die Spracheinstellung zu
ändern.
1 Wählen Sie mit den Tasten "+" und "–" die Option "Set language"
(Sprache einstellen) im Menü aus. Drücken Sie zur Bestätigung auf OK.
2 Verwenden Sie die Tasten "+" und "-", um Ihre Sprache auszuwählen, und
drücken Sie zur Bestätigung die Taste OK.
Sie können die Tastensperre aktivieren, um das versehentliche Betätigen der
Tasten beim Mitführen der Elterneinheit zu verhindern.
1 Um die Tastensperre zu aktivieren, drücken Sie auf OK.
2 Drücken Sie die Taste"+" innerhalb von 2Sekunden.
Hinweis: Wenn Sie die Taste"+" nicht innerhalb von 2Sekunden drücken,
bleibt die Anweisung auf dem Display.
3 Nachdem Sie die Taste"+" gedrückt haben, wird die Meldung "Keys
locked" (Tasten gesperrt) auf dem Display angezeigt.
4 Um die Tastensperre zu deaktivieren, drücken Sie auf OK. Wenn auf dem
Display die Anweisung angezeigt wird, drücken Sie innerhalb von
2Sekunden die Taste"+".
Hinweise:
-
Wenn Sie bei aktivierter Feststelltaste eine andere Taste als die OK-Taste
drücken, wird das Display eingeschaltet und in der zweiten Zeile wird
angezeigt, wie Sie die Feststelltaste deaktivieren.
-
Wenn Sie bei aktivierter Feststelltaste die OK-Taste drücken, wird in der
zweiten Zeile des Displays der zweite Schritt angezeigt, der zum
Entsperren der Tasten notwendig ist.
Garantie und Support
Für Unterstützung und weitere Informationen besuchen Sie die Philips
Website unter www.philips.com/support, oder lesen Sie die internationale
Garantieschrift.
Page 37

< >
< >
< >
< >
>
<
>
< >
<
< >
>
< >
< >
< >
<
>
<
< > >
<
<
Emndl.
Eco Max
Weinalarm
Feed Timer
Temperatur
Uhr stel.
Spr. stel. >
OK drücken = < =
Timer-Alarm
Einschalt.?
Ausschalt.?
Vibrat. ein?
Vibrat. aus?
xx:yy Start?
Timer stl.
Timer-wdh.
Temp.-Ber.
Temp.-Alarm
Temp.-Skl.
Anz./Ausbl.
Zeit stellen
English
...
Русский
<
<
<
<
<
<
<
<
<
>
>
>
>
>
>
>
>
>
>
>
>
Minimum XXºC
!Kein Alarm außer…OK?
Std 00:00
Std 00:00
Wdh. ein
Wdh. Aus
Nur Ton
Ton & Vibr.
Nur Vibrat.
Nur Ton
Ton & Vibr.
Nur Vibrat.
Nur Bildsch.
Aus
Celsius
Fahrenheit
Zeit ausbl.
Zeit anz.
Maximum YYºC
00:30 Min
00:00 Min
SCD730/SCD731/SCD733/SCD734/SCD735 (DE
)
> =
Deutsch
37
Page 38

Licht-Timer
Schlaied
Proj. timer
5 Minuten
10 Minuten
15 Minuten
20 Minuten
Fortlaufend
Schla. n1
Schla. n2
.................
Alle wdg.
5 Minuten
10 Minuten
15 Minuten
20 Minuten
Fortlaufend
Lied-Timer 5 Minuten
10 Minuten
15 Minuten
20 Minuten
Fortlaufend
<
<
<
<
<
<
<
<
<
<
<
>
>
>
>
>
>
>
>
>
>
>
>
<
<
<
<
>
>
>
>
< =
> =
OK drücken =
38
Deutsch
Page 39

1
9 10 11 12 13
7
8
14
2 3 4 5 6
1
Français
39
Page 40

40
Français
Introduction
Accédez à www.philips.com/welcome pour enregistrer votre produit et lire le
mode d'emploi détaillé.
Afficheur de l'unité-parents (fig. 1)
1 Indicateur de puissance du signal
2 Indicateur ECO Max
3 Symbole du mode nocturne
4 Indicateur d'alerte de pleurs
5 Indicateur du mode silencieux
6 Témoin d'état de la batterie
7 Flèche de navigation
8 Indicateur de température
9 Indicateur de sensibilité du microphone
10 Symbole de veilleuse
11 Indicateur de berceuse
12 Symbole de projecteur
13 Symbole du minuteur ou de répétition du minuteur
14 Écran du menu d'apaisement
Avant utilisation
IMPORTANT : Lisez attentivement les consignes de sécurité avant
d'utiliser l'écoute-bébé et conservez-les pour un usage ultérieur.
Unité-bébé
Unité-parents
Nous vous conseillons de faire fonctionner l'unité-bébé branchée sur
secteur. Pour garantir un fonctionnement continu de l'appareil, même en
cas de coupure de courant, insérez quatrepiles alcalinesAA1,5V (non
fournies).
N'utilisez pas de piles rechargeables. L'unité-bébé ne possède pas de
fonction de recharge et les piles rechargeables se déchargent lentement
lorsqu'elle ne sont pas utilisées.
L'unité-parents fonctionne sur deuxpiles rechargeables fournies avec
l'écoute-bébé. Chargez l'unité-parents avant la première utilisation et
lorsque les piles sont déchargées.
Notez que pour le modèle SCD730/SCD731/SCD733, vous devez charger
l'unité-parents pendant 10 heures complètes pour bénéficier d'une
autonomie sans fil de 18 heures. (Pour les modèles SCD734 et SCD735 : La
durée de charge est de 14 heures et l'autonomie de 25 heures.
Remarque: Lorsque vous commencez à utiliser l'écoute-bébé, les piles
rechargeables ont besoin de quatrecycles de charge et décharge avant
d'atteindre leur pleine capacité.
Page 41

Utilisation de l'écoute-bébé
Emplacement de l'écoute-bébé
Ne placez pas l'unité-bébé à portée de bébé. Ne placez jamais
l'unité-bébé dans le lit ou le parc de l'enfant.
-
Le cordon de l'unité-bébé présentant un risque potentiel d'étranglement,
assurez-vous que l'unité-bébé et son cordon se trouvent à une distance
d'au moins 1mètre de votre bébé.
-
Afin d'éviter l'émission de tout son aigu par l'une des deux(ou les deux)
unités, assurez-vous que l'unité-parents se trouve à une distance
minimale d'1mètre de l'unité-bébé.
Liaison de l'unité-parents à l'unité-bébé
1 Maintenez enfoncé le bouton de l'unité-bébé pendant 2secondes
jusqu'à ce que le voyant d'alimentation s'allume.
2 Maintenez enfoncé le bouton de l'unité-parents pendant 2secondes
jusqu'à ce que l'écran s'allume. Le voyant de liaison de l'unité-parents
commence à clignoter en rouge et le message «I AM LINKING» (Liaison
en cours) apparaît sur l'afficheur.
Lorsque l'unité-parents et l'unité-bébé sont liées, le voyant de liaison
reste allumé en vert. L'indicateur de puissance du signal et le message
«LINKED» (Liées) apparaissent sur l'afficheur.
Si aucune connexion n'est établie, le message «NOT LINKED» (Non liées)
apparaît et l'unité-parents commence à émettre un signal sonore.
Français
41
Que faire si aucune liaison n'est établie?
-
Si l'unité-parents est hors de portée, rapprochez-la de l'unité-bébé, mais
pas à moins d'1mètre.
-
Si l'unité-bébé ou l'unité-parents est trop proche (>2m) d'un autre
appareil DECT (par exemple, un téléphone sans fil), éteignez cet appareil
ou éloignez l'unité de cet appareil.
-
Si l'unité-bébé est éteinte, allumez-la.
Portée
-
La portée est de 330mètres environ à l'extérieur et jusqu'à 50mètres
environ à l'intérieur.
-
La portée de l'écoute-bébé varie en fonction de l'environnement et
d'autres facteurs à l'origine d'interférences. Pour les interférences
provoquées par des objets humides, la perte de portée peut être totale.
Pour les interférences provoquées par des objets secs, consultez le
tableau suivant.
Matériaux secs Épaisseur du matériau Perte de portée
Bois, plastique, carton,
verre (sans métal, fil de fer
ou plomb)
Brique, contreplaqué < 30cm 5-35%
< 30cm 0-10%
Page 42
42
Français
Matériaux secs Épaisseur du matériau Perte de portée
Béton armé < 30cm 30-100%
Grilles ou barres
métalliques
Feuilles de métal ou
d'aluminium
< 1cm 90-100%
< 1cm 100%
Fonctions et indications de l'unité-bébé
Veilleuse
La veilleuse diffuse une lumière douce qui réconforte votre bébé.
1 Appuyez sur le bouton de l'unité-bébé pour allumer ou éteindre la
veilleuse.
Fonction Berceuse
1 Appuyez sur le bouton de l'unité-bébé pour diffuser la berceuse
sélectionnée. La berceuse sélectionnée est répétée pendant la durée
définie.
2 Appuyez sur le bouton pour sélectionner une autre berceuse dans la
liste.
3 Pour régler le niveau sonore de la berceuse, appuyez sur le bouton
volume + ou volume – de l'unité-bébé.
Remarque: Vous pouvez uniquement régler le volume du haut-parleur
sur l'unité-bébé lorsqu'une berceuse est en cours de lecture. Si vous avez
augmenté le volume de la berceuse, le son sera également plus fort
lorsque vous utilisez la fonction Parler de l'unité-parents.
4 Pour arrêter la lecture de la berceuse, appuyez sur le bouton de
l'unité-bébé.
Page 43
Projecteur
>2.5m/8.2ft
Vous pouvez apaiser votre bébé avec des motifs colorés projetés sur le
plafond en allumant le projecteur.
1 Appuyez sur le bouton marche/arrêt du projecteur pour allumer le
projecteur. Le symbole de projecteur apparaît sur l'afficheur de l'unitéparents.
2 Il y a six motifs différents. Le premier motif apparaît et atteint sa pleine
intensité en 2secondes. Il est projeté pendant 8secondes, puis
s'estompe pendant 2secondes tandis que le motif suivant apparaît.
Chaque motif est projeté pendant 10secondes. Les motifs sont répétés
pendant la durée définie.
3 Pour éteindre le projecteur, appuyez de nouveau sur le bouton
marche/arrêt du projecteur.
Appel de l'unité-parents
Si vous avez égaré l'unité-parents, vous pouvez utiliser le bouton FIND
(Trouver) de l'unité-bébé pour la localiser. Cette fonction n'est utilisable que
lorsque l'unité-parents est allumée.
1 Appuyez sur le bouton FIND (Trouver) de l'unité-bébé. L'unité-parents
émet un signal sonore d'appel.
2 Pour arrêter le signal sonore d'appel, appuyez de nouveau sur le bouton
FIND (Trouver) de l'unité-bébé ou sur n'importe quel bouton de l'unitéparents. Le signal sonore d'appel s'arrête automatiquement au bout de
2minutes.
Français
43
Voyant de charge de la batterie
1 Le voyant d'état des piles est allumé en vert lorsque l'unité-bébé
fonctionne sur piles et que celles-ci contiennent suffisamment d'énergie.
2 Le voyant d'état des piles clignote rapidement en rouge lorsque les piles
sont presque déchargées et que l'unité-bébé fonctionne sur piles.
Remplacez les piles lorsqu'elles sont faibles.
Page 44

44
Français
Fonctions et indications de l'unité-parents
Menu d'apaisement
L'unité-parents est dotée d'un menu d'apaisement séparé pour toutes les
fonctions d'apaisement: veilleuse, berceuse et projecteur. Pour ouvrir le
menu d'apaisement, appuyez sur le bouton d'apaisement. Cet écran vous
permet de commander à distance la veilleuse, les berceuses et le projecteur
de l'unité-bébé.
1 Pour ouvrir le menu d'apaisement, appuyez sur le bouton d'apaisement.
2 Utilisez les boutons + et - pour diriger la flèche vers une fonction
d'apaisement.
3 Pour activer une fonction d'apaisement ou désactiver une fonction
activée, appuyez sur OK. Lorsque la fonction est activée, une case à
cocher est présente au-dessus du symbole de la fonction. Lorsque la
fonction est désactivée, une croix est présente au-dessus du symbole de
la fonction.
4 Pour accéder aux options d'une fonction, déplacez la flèche sur le champ
des options et appuyez sur OK. Utilisez les boutons + et - pour
sélectionner des éléments dans le champ d'options.
5 Pour quitter le menu d'apaisement, appuyez sur le bouton d'apaisement.
Veilleuse
Cette fonction d'apaisement vous permet d'allumer ou d'éteindre la
veilleuse et de régler le minuteur de la veilleuse.
Page 45

Français
1 Sélectionnez la fonction de veilleuse et ouvrez le menu des options de
veilleuse.
2 Vous pouvez régler le minuteur de la veilleuse sur une durée de 5 à
20minutes ou vous pouvez allumer la veilleuse de manière continue.
Appuyez sur OK pour confirmer. Le symbole de veilleuse apparaît sur
l'afficheur.
Si vous réglez le minuteur de la veilleuse, la veilleuse s'éteint
automatiquement. Si vous allumez la veilleuse de manière continue, vous
pouvez l'éteindre dans le menu d'apaisement ou en appuyant sur le
bouton de l'unité-bébé.
Berceuse
Cette fonction d'apaisement vous permet de sélectionner les options de
lecture de berceuse et de régler le minuteur de la berceuse.
1 Sélectionnez la fonction de berceuse et ouvrez le menu des options de
berceuse.
2 Dans le menu d'options de berceuse, vous pouvez sélectionner une
berceuse dans la liste des berceuses préprogrammées. Vous pouvez
également sélectionner «Play all» (Lire tout) pour diffuser toutes les
berceuses préenregistrées.
3 Vous pouvez régler le minuteur de la berceuse sur une durée de 5
à20minutes ou vous pouvez choisir de lire les berceuses de manière
continue. Appuyez sur OK pour confirmer le réglage du temporisateur.
L'indicateur de berceuse et la berceuse lue apparaissent sur l'afficheur.
Si vous réglez le minuteur, la fonction de berceuse se désactive après la
durée définie. Si vous lisez des berceuses en continu, désactivez la
fonction de berceuse dans le menu d'apaisement ou en appuyant sur le
bouton de l'unité-bébé.
45
Projecteur
Cette fonction d'apaisement vous permet d'allumer le projecteur sur l'unitébébé et de programmer la durée de projection.
1 Sélectionnez la fonction de projecteur et ouvrez le menu des options du
projecteur.
2 Pour accéder aux options du projecteur, pointez la flèche vers le champ
d'options et appuyez sur OK.
Page 46
46
Français
Volume
3 Vous pouvez régler le minuteur du projecteur sur une durée de 5 à
20minutes ou vous pouvez allumer le projecteur de manière continue.
Appuyez sur OK pour confirmer. Le symbole de projecteur apparaît sur
l'afficheur.
Si vous réglez le minuteur du projecteur, le projecteur s'éteint
automatiquement. Si vous allumez le projecteur de manière continue,
éteignez le projecteur dans le menu d'apaisement ou en appuyant sur le
bouton du projecteur de l'unité-bébé.
Le volume peut être réglé si le menu n'est pas actif. L'unité-parents propose
sept niveaux de volume et un réglage de désactivation du volume.
Réglage du volume
1 Appuyez une fois sur le bouton + ou le bouton -.
Le niveau de volume actuel apparaît sur l'écran.
2 Appuyez sur le bouton + pour augmenter le volume ou sur le bouton -
pour le diminuer.
Si vous n'appuyez sur aucun bouton pendant plus de 2secondes,
l'indication du niveau de volume disparaît de l'afficheur et le réglage du
volume est enregistré.
Désactivation du volume
Un réglage de désactivation du volume figure en dessous du réglage de
volume le plus bas.
1 Appuyez une fois sur le bouton + ou le bouton -.
Le niveau de volume actuel apparaît sur l'écran.
2 Maintenez enfoncé le bouton - pendant plus de 2secondes pour
désactiver le volume.
Le message «MUTE» (silencieux) et l'indicateur de coupure du son
apparaissent sur l'écran. Seuls les voyants de niveau sonore indiquent
que le bébé émet des sons.
Page 47
Fonction Parler
Mode nocturne
Français
1 Si vous voulez réconforter votre bébé, appuyez sur le bouton TALK
(Parler) de l'unité-parents et parlez clairement dans le microphone à
l'avant de l'unité à une distance de 15 à 30cm.
Remarque: Si vous avez augmenté le volume de la berceuse sur l'unitébébé, le son sera également plus fort lorsque vous utilisez la fonction
Parler de l'unité-parents.
2 Relâchez le bouton TALK (Parler) lorsque vous avez fini de parler.
En mode nocturne, l'intensité lumineuse des voyants et de l'afficheur est
réduite et le volume des alertes sonores est diminué.
1 Appuyez sur le bouton pour activer le mode nocturne.
2 Pour revenir au mode de fonctionnement normal, appuyez de nouveau
sur le bouton .
47
Alerte de piles faibles sur l'unité-bébé
1 Lorsque l'unité-bébé fonctionne sur piles et que ses piles sont faibles,
l'unité-parents émet un signal sonore et le texte «Baby unit Change
batteries» (Unité-bébé - Remplacer les piles) apparaît sur l'afficheur.
2 Si vous ne remplacez pas les piles à temps, la liaison avec l'unité-bébé
sera perdue.
Indications de l'état des piles
Piles faibles
Lorsque les piles rechargeables sont faibles, le message «BATTERY LOW»
(Piles faibles) apparaît sur l'afficheur, l'indicateur d'état des piles est vide et
clignote, et l'unité-parents émet un signal sonore. L'autonomie restante est
d'au moins 30minutes.
Piles épuisées
Page 48

48
Français
1 Si les piles rechargeables sont presque vides, le voyant d'état des piles
clignote rapidement en rouge.
2 Si vous ne branchez pas l'unité-parents sur le secteur, elle s'éteint.
Menu de l'unité-parents
Navigation dans le menu
Remarque: Certaines fonctions du menu fonctionnent uniquement lorsque
l'unité-bébé et l'unité-parents sont liées.
1 Appuyez sur le bouton MENU pour ouvrir le menu et faire apparaître la
première option du menu.
2 Utilisez le bouton+ pour passer à l'option suivante ou le bouton- pour
revenir à l'option précédente. La flèche sur l'afficheur indique la direction
dans laquelle vous pouvez naviguer.
3 Appuyez sur OK pour confirmer votre sélection.
Remarque: Appuyez sur le boutonMENU si vous souhaitez quitter le menu
sans faire de modification. Si aucune entrée n'est faite dans le menu
pendant plus de 20secondes, le menu se ferme automatiquement.
Page 49

Sensibilité
Cette option du menu de l'unité-parents vous permet de définir la
sensibilité du microphone de l'unité-bébé.
La sensibilité du microphone détermine le niveau sonore que l'unité-bébé
peut capter, par exemple lorsque vous voulez entendre lorsque votre bébé
pleure mais pas quand il gazouille.
1 Sélectionnez «Sensitivity» (sensibilité) dans le menu à l'aide des boutons
+ et -, puis appuyez sur OK pour confirmer.
2 Utilisez les boutons + et - pour augmenter ou diminuer la sensibilité du
microphone. Le nombre de parties remplies indique le niveau de
sensibilité sélectionné. Appuyez sur OK pour confirmer le réglage.
Niveaux de sensibilité et indications
Icône Sensibilité Description
le plus élevé Entendez tous les sons émis par
votre bébé. Le haut-parleur de
l'unité-parents reste allumé.
élevée Entendez tous les sons émis par
le bébé, même les plus petit
gazouillis. Si votre bébé ne fait
aucun bruit, le haut-parleur de
l'unité-parents est désactivé.
moyen Entendez tous les pleurs légers
et plus bruyants. Si votre bébé
émet des sons plus légers, le
haut-parleur de l'unité-parents
ne s'allume pas.
Français
49
Mode ECOMax
faible Le haut-parleur de l'unité-
parents ne s'allume que si le
bébé émet des sons bruyants,
par exemple parce qu'il pleure.
SmartEco est une fonctionnalité standard de cet écoute-bébé. Il réduit
automatiquement le signal DECT de l'unité-bébé pour économiser de
l'énergie. Pour économiser encore plus d'énergie, activez le mode EcoMax.
Dans ce mode, le signal DECT de l'unité-bébé est désactivé tant que le bébé
n'émet aucun son.
Attention : En mode Eco Max, l'unité-parents reçoit le signal de l'unitébébé avec un certain retard. Lorsque votre bébé émet un son, l'unité-bébé
doit tout d'abord réactiver la transmission radio avant de pouvoir envoyer
un signal à l'unité-parents.
Veuillez noter ce qui suit :
Page 50

50
Français
-
En mode EcoMax, aucun signal n'est émis lorsque l'unité-parents est
hors de portée de l'unité-bébé. Vous pouvez vérifier la liaison en
appuyant sur n'importe quel bouton de l'unité-parents.
-
Le mode EcoMax ne peut pas être activé si la sensibilité du microphone
est réglée sur le niveau le plus élevé.
Activation du mode EcoMax
1 Sélectionnez «EcoMax» dans le menu à l'aide des boutons + et -, puis
appuyez sur OK pour confirmer.
2 Lorsque l'écran indique «Turn on» (allumer), appuyez sur OK pour
activer le mode ECOMax.
3 Le message d'avertissement «No alert if out of range, OK?» (Aucune
alerte si hors de portée, OK?) apparaît sur l'afficheur. Appuyez sur OK
pour confirmer.
Remarque: Le message d'avertissement défile sur l'afficheur à
deuxreprises. Si vous n'appuyez pas sur OK, l'unité-parents quitte le
menu et le mode Eco Max reste désactivé.
4 L'indication Eco Max clignote sur l'afficheur. Le voyant de liaison clignote
lentement en vert lorsque l'unité-bébé ne transmet pas de signaux à
l'unité-parents.
5 Lorsque l'unité-parents reçoit un signal de l'unité-bébé parce que la
transmission radio a été réactivée, le voyant de liaison LINK s'allume à
nouveau en vert.
Désactivation du mode EcoMax
1 Appuyez sur le boutonMENU.
2 Utilisez les boutons + et - pour sélectionner «EcoMax» et appuyez sur
OK pour confirmer.
3 Lorsque l'afficheur indique «Turn Off» (Désactiver), appuyez sur OK pour
confirmer.
Minuteur repas
Vous pouvez régler le minuteur repas afin d'être averti(e) qu'il est l'heure de
nourrir votre bébé. Le minuteur repas peut être réglé sur une durée allant
d'1minute à 23heures et 59minutes.
1 Pour ouvrir le sous-menu du minuteur repas, sélectionnez «Feed Timer»
(Minuteur repas) dans le menu. Appuyez sur OK pour confirmer.
2 Sélectionnez «Set Timer» (Régler minuteur) dans le sous-menu du
minuteur repas. Appuyez sur OK pour commencer le réglage du
minuteur.
3 Réglez l'heure et les minutes, et appuyez sur OK pour confirmer.
Page 51

Français
4 Pour démarrer le minuteur repas, sélectionnez «xx:xx Start» (xx:xx
Début) dans le sous-menu du minuteur repas. Appuyez sur OK pour
confirmer. Le symbole de minuteur apparaît sur l'afficheur et le minuteur
se met en marche.
5 Lorsque le minuteur a atteint 00:00, l'alerte du minuteur repas se
déclenche, le symbole de minuteur commence à clignoter sur l'afficheur
et le message «TIMER END» (Fin du minuteur) défile sur l'afficheur.
6 Pour arrêter le minuteur, sélectionnez «Stop & Reset» (Arrêter et
réinitialiser) dans le sous-menu du minuteur repas, puis appuyez sur OK
pour confirmer.
Réglage de la répétition du minuteur repas
1 Pour que le minuteur repas se déclenche après la même durée définie,
sélectionnez «Timer repeat» dans le sous-menu du minuteur repas
après avoir réglé le minuteur. Appuyez sur OK pour confirmer.
2 Choisissez «Repeat ON» (Répétition activée) ou «Repeat OFF»
(Répétition désactivée), puis appuyez sur OK pour confirmer. Le symbole
de répétition du minuteur s'affiche à l'écran.
3 Si «Repeat ON» (Répétition activée) est sélectionné, le minuteur repas
se remet en marche après que vous avez arrêté l'alerte.
51
Réglage d'une alerte de minuteur repas
1 Pour régler une alerte, sélectionnez «Timer Alert» (Alerte minuteur) dans
le sous-menu du minuteur repas. Appuyez sur OK pour confirmer.
2 Choisissez une des options d'alerte. Les options disponibles sont les
suivantes: son uniquement, son et vibration, et vibration uniquement.
3 Appuyez sur n'importe quelle touche pour arrêter l'alerte ou l'alerte
stoppe automatiquement après 2minutes.
4 Pour arrêter le minuteur, sélectionnez «Stop & Reset» (Arrêter et
réinitialiser) dans le sous-menu du minuteur repas, puis appuyez sur OK
pour confirmer.
Température ambiante
Un bébé dort confortablement à une température comprise entre 16°C et
20°C. Vous pouvez définir des températures minimale et maximale, ainsi
qu'une alerte.
1 Pour ouvrir le sous-menu de température, sélectionnez «Temperature»
(Température) dans le menu. Appuyez sur OK pour confirmer.
2 Sélectionnez «Temp Range» (Plage de température) dans le sous-menu
de température et appuyez sur OK pour confirmer.
3 Utilisez les boutons + et - pour définir la température minimale entre
10°C et 19°C, et la température maximale entre 22°C et 37°C. Appuyez
sur OK pour confirmer.
4 Sélectionnez «Alert» (Alerte) dans le sous-menu de température.
Appuyez sur OK pour confirmer.
Page 52

52
Français
Alerte de pleurs
5 Choisissez une des options d'alerte. Les options disponibles sont les
suivantes: son uniquement, son et vibration, vibration uniquement et
afficheur uniquement. Appuyez sur OK pour confirmer. Le symbole
d'alerte de température apparaît sur l'afficheur.
6 Sélectionnez «Temp Scale» (Échelle de température) dans le sous-menu
de température. Appuyez sur OK pour confirmer.
7 Sélectionnez «Celsius» ou «Fahrenheit» et appuyez sur OK pour
confirmer. La température dans l'échelle définie apparaît sur l'afficheur.
Si la température est dans la plage définie, le symbole d'alerte de
température comporte deuxparties.
Si la température est en-dessous ou au-dessus de la plage définie, le
symbole d'alerte de température sur l'afficheur comporte uniquement
une partie et clignote. Le message «TOO COLD» (Trop froid) ou «TOO
HOT» (Trop chaud) apparaît sur l'afficheur.
Vous pouvez définir une alerte de pleurs pour vous avertir lorsque le bébé
pleure.
1 Sélectionnez «Cry alert» (Alerte de pleurs) dans le menu à l'aide des
boutons + et -. Appuyez sur OK pour confirmer.
2 Lorsque l'afficheur indique «Vibration ON» (Vibration activée), appuyez
sur OK pour confirmer. L'indicateur d'alerte de pleurs apparaît sur
l'afficheur.
L'alerte de pleurs se déclenche lorsque le son dans la chambre de bébé
est assez fort pour que le quatrième voyant de niveau sonore s'allume.
L'unité-parents vibre et le message «Cry alert» (Alerte de pleurs)
apparaît sur l'afficheur pendant 4secondes. L'alerte de pleurs se répète
toutes les 8secondes jusqu'à ce que le son devienne moins bruyant ou
que vous désactiviez l'alerte de pleurs.
3 Pour désactiver l'alerte de pleurs, sélectionnez «Cry alert» (Alerte de
pleurs) dans le menu. Lorsque l'afficheur indique «Vibration OFF»
(Vibration désactivée), appuyez sur OK pour confirmer.
Montre
L'horloge est masquée par défaut. Vous pouvez choisir d'afficher l'horloge et
régler l'heure dans le menu de l'unité-parents.
1 Sélectionnez «Set clock» (Régler l'horloge) dans le menu à l'aide des
boutons + et -. Appuyez sur OK pour confirmer.
2 Sélectionnez «Show Time» (Afficher l'heure), puis appuyez sur OK pour
confirmer.
3 Sélectionnez «Set the time» (Régler l'heure) et appuyez sur OK pour
confirmer.
4 Réglez l'heure et les minutes, et appuyez sur OK pour confirmer.
Page 53

Langue
Verrou
Français
L'heure s'affiche alternativement avec d'autres indications dans le champ
de message de l'afficheur.
Vous pouvez utiliser cette option de menu pour modifier le réglage de la
langue.
1 Sélectionnez «Set language» (Définir la langue) dans le menu à l'aide
des boutons + et -. Appuyez sur OK pour confirmer.
2 Utilisez les boutons + et - pour sélectionner votre langue et appuyez sur
OK pour confirmer.
Vous pouvez activer le verrou afin d'éviter toute pression intempestive sur
les boutons lorsque vous tenez l'unité-parents.
1 Pour activer le verrou, appuyez sur OK.
2 Appuyez sur le bouton + dans un délai de 2secondes.
Remarque: Si vous n'appuyez pas sur le bouton + dans un délai de
2secondes, l'instruction reste sur l'afficheur.
3 Après que vous avez appuyé sur le bouton +, le message «Keys locked»
(Touches verrouillées) apparaît sur l'afficheur.
4 Pour désactiver le verrou, appuyez sur OK. Lorsque l'afficheur indique le
message d'instruction, appuyez sur le bouton + pendant 2secondes.
Remarques :
-
Si vous appuyez sur un autre bouton que le bouton OK alors que le
verrou est actif, l'afficheur s'allume et la deuxième ligne de l'afficheur
vous indique comment désactiver le verrou.
-
Si vous appuyez sur OK alors que le verrou est actif, la deuxième ligne de
l'afficheur vous indique la deuxième étape nécessaire pour déverrouiller
les boutons.
53
Garantie et assistance
Si vous avez besoin d'une assistance ou d'informations supplémentaires,
consultez le site Web www.philips.com/support ou lisez le dépliant sur la
garantie internationale.
Page 54

< >
< >
< >
< >
>
<
>
< >
<
< >
>
< >
< >
< >
<
>
<
< > >
<
<
Sensibilité
Eco Max
Alerte cri
Minut. ux
Température
Régl. horl.
Régl. Langue >
Appuyer OK = < =
Alerte min.
Allumer ?
Éteindre ?
Vibr. act. ?
Vibr. dés. ?
xx:yy Dém. ?
Déf. minut.
Rép. minut.
Plage temp.
Alerte tmp.
Echelle tp.
A./Masqu.
Régler heure
English
...
Русский
<
<
<
<
<
<
<
<
<
>
>
>
>
>
>
>
>
>
>
>
>
Minimum XXºC
!Aucune alerte si … OK?
Hr 00:00
Hr 00:00
Répét. act
Répét. dés.
Son seul
Son et vibr.
Vibr. seul.
Son seul
Son et vibr.
Vibr. seul.
Écran seul.
Désactivé
Celsius
Fahrenheit
Masq. heure
A. Heure
Maximum YYºC
00:30 Min
00:00 Min
SCD730/SCD731/SCD733/SCD734/SCD735 (FR
)
> =
54
Français
Page 55

Minut. Lum.
Berceuse
Minut. Proj.
5 minutes
10 minutes
15 minutes
20 minutes
Continu
Berceuse 1
Berceuse 2
.................
Lire tout
5 minutes
10 minutes
15 minutes
20 minutes
Continu
Min. chanson 5 minutes
10 minutes
15 minutes
20 minutes
Continu
<
<
<
<
<
<
<
<
<
<
<
>
>
>
>
>
>
>
>
>
>
>
>
<
<
<
<
>
>
>
>
< =
> =
Appuyer OK =
Français
55
Page 56
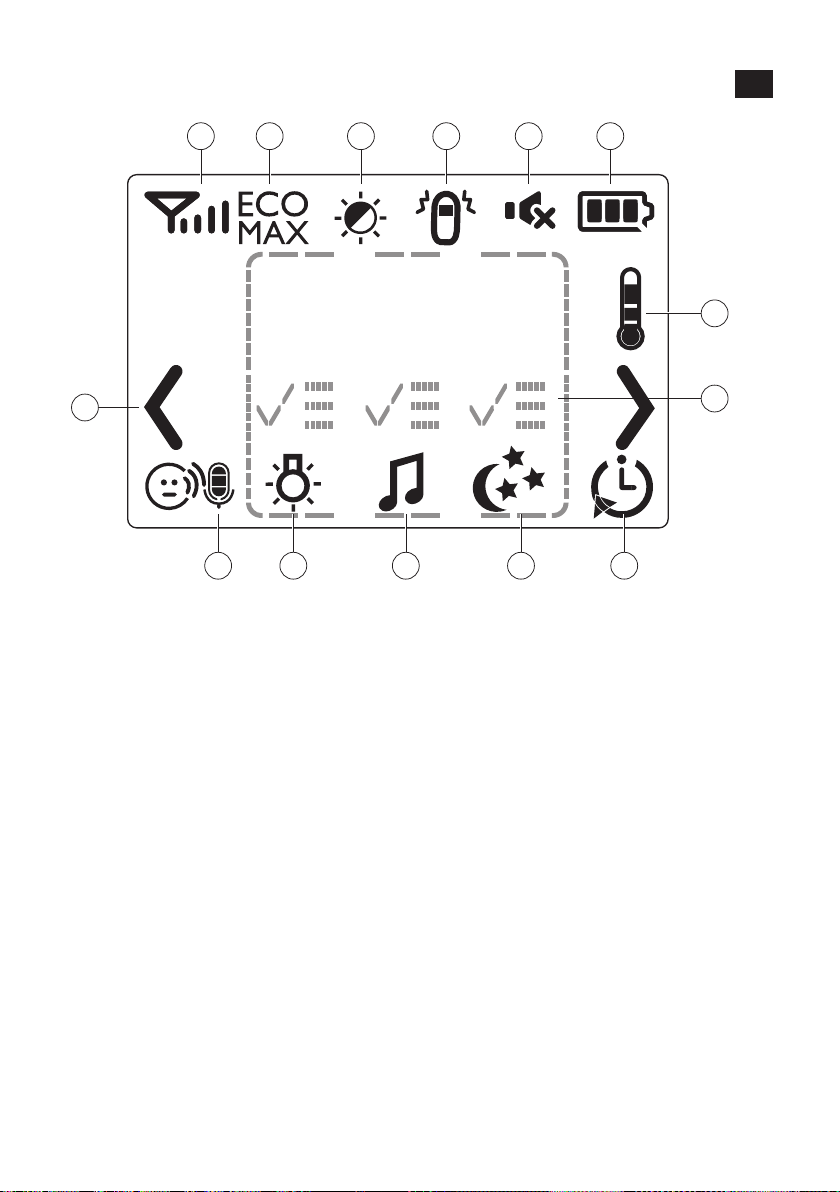
1
9 10 11 12 13
7
8
14
2 3 4 5 6
1
56
Italiano
Page 57

Introduzione
Andate sul sito www.philips.com/welcome per iscrivere il vostro prodotto e
leggere il manuale dell'utente dettagliato.
Display dell'unità genitore (Fig. 1)
1 Indicatore intensità segnale
2 Indicatore Eco Max
3 Simbolo modalità attenuazione notturna
4 Indicatore di avviso di pianto
5 Simbolo disattivazione del volume
6 Indicatore dello stato della batteria
7 Freccia di navigazione
8 Simbolo temperatura
9 Indicatore della sensibilità microfono
10 Simbolo luce notturna
11 Simbolo ninnananna
12 Simbolo proiettore
13 Simbolo timer o ripetizione del timer
14 Schermata del menu calmante
Predisposizione del dispositivo
IMPORTANTE: leggete attentamente le istruzioni di sicurezza prima di
utilizzare il baby monitor e conservatele per eventuali riferimenti futuri.
Italiano
57
Unità bambino
Unità genitore
Si consiglia di utilizzare l'unità bambino mentre è connessa
all'alimentazione. Per garantire il funzionamento continuo anche in caso di
black out, si consiglia di inserire quattro batterie alcaline AA da 1,5 V (non
incluse).
Non utilizzate batterie ricaricabili. L'unità bambino non è dotata di funzione
di ricarica e le batterie ricaricabili si scaricano lentamente quando non sono
in uso.
L'unità genitore è alimentata da due batterie ricaricabili fornite con il baby
monitor. Ricaricate l'unità genitore prima del primo utilizzo e quando le
batterie sono scariche.
Per i modelli SCD730/SCD731/SCD733, caricate l'unità genitore per 10 ore
per poter usufruire di un'autonomia di funzionamento senza filo di 18 ore.
(Per i modelli SCD734 e SCD735: il tempo di ricarica è di 14 ore e la durata è
di 25 ore.
Nota: al primo utilizzo del baby monitor, le batterie ricaricabili raggiungono
la massima capacità soltanto dopo essere state caricate e scaricate
completamente per quattro volte.
Page 58

58
Italiano
Utilizzo del baby monitor
Posizionamento del baby monitor
Tenete l'unità bambino lontano dalla portata dei bambini. Non
posizionate l'unità bambino nel lettino o nel box.
-
Poiché il cavo dell'unità bambino presenta un pericolo potenziale di
strangolamento, assicuratevi che l'unità bambino e il rispettivo cavo
siano distanti almeno 1 metro dal bambino.
-
Per evitare suoni acuti da una o da entrambe le unità, assicurarsi che
l'unità genitore sia ad almeno 1 metro di distanza dall'unità bambino.
Collegamento dell'unità genitore e unità bambino
1 Tenete premuto il pulsante sull'unità bambino per 2 secondi finché la
spia di accensione non si accende.
2 Tenete premuto il pulsante sull'unità genitore per 2 secondi finché il
display non si accende. La spia di collegamento sull'unità genitore
comincia a lampeggiare in rosso e sul display compare il messaggio "I AM
LINKING" (Collegamento in corso).
Quando l'unità genitore e l'unità bambino sono collegate, la spia di
collegamento emette una luce verde fissa. L'indicatore di potenza del
segnale e il messaggio "LINKED" (COLLEGATO) appaiono sullo schermo.
Se non è stata stabilita una connessione, viene visualizzato il messaggio
"NOT LINKED" (NON COLLEGATO) e l'unità genitore si avvia e inizia a
emettere un segnale acustico.
Cosa fare se non viene stabilita una connessione
-
Se l'unità genitore è fuori portata, posizionarla più vicino all'unità
bambino, rispettando comunque una distanza di 1 metro.
-
Se l'unità bambino o l'unità genitore è troppo vicina (meno di 2 m) a un
altro apparecchio DECT, ad esempio un telefono cordless, spegnete
quest'apparecchio o allontanate l'unità.
-
Se l'unità bambino è spenta, accenderla.
Portata di funzionamento
-
La portata di funzionamento è di 330 m in esterno e fino a un massimo di
50 m all'interno.
-
La portata di funzionamento del baby monitor varia a seconda
dell'ambiente circostante e dei fattori che causano interferenze. I
materiali bagnati e umidi causano un'interferenza tale da ridurre la
portata fino al 100%. Per l'interferenza causata dai materiali asciutti,
vedere la tabella riportata di seguito.
Materiali asciutti Spessore dei materiali Perdita di portata
Legno, gesso, cartone,
vetro (privo di metalli, fili o
piombo)
Mattoni, legno compensato < 30 cm 5-35%
< 30 cm 0-10%
Page 59

Materiali asciutti Spessore dei materiali Perdita di portata
Cemento armato < 30 cm 30-100%
Grate o barre metalliche < 1 cm 90-100%
Italiano
59
Lastre di metallo o
alluminio
< 1 cm 100%
Funzioni e segnalazioni sull'unità bambino
Luce notturna
La luce notturna produce un bagliore soffuso che tranquillizza il bambino.
1 Premete il pulsante sull'unità bambino per accendere o spegnere la
luce notturna.
Funzione ninnananna
1 Premete il pulsante sull'unità bambino per riprodurre l'ultima
ninnananna selezionata. La ninnananna selezionata viene ripetuta per il
tempo impostato.
2 Premete il pulsante per scegliere un'altra ninnananna dall'elenco.
3 Per regolare il livello audio della ninnananna, premete il pulsante volume
+ o – sull'unità bambino.
Nota: è possibile impostare il volume dell'altoparlante sull'unità bambino
solo durante la riproduzione di una ninnananna. Se avete impostato il
volume per la ninnananna più alto, il suono sarà ancora più forte quando
utilizzate la funzione Talk sull'unità genitore.
4 Per interrompere la riproduzione della ninnananna, premete il pulsante
sull'unità bambino.
Page 60

>2.5m/8.2ft
60
Italiano
Proiettore
Potete tranquillizzare il vostro bambino con motivi di luce colorata proiettati
sul soffitto accendendo il proiettore.
1 Premete il pulsante on/off per accendere il proiettore. Sul display
dell'unità genitore compare il simbolo del proiettore.
2 Ci sono sei motivi diversi. Il primo motivo si dissolve in entrata per
raggiungere l'intensità massima in 2 secondi. Ha una durata di 8 secondi,
quindi si dissolve in uscita per 2 secondi mentre il motivo successivo
subentra lentamente. Ogni motivo ha una durata di 10 secondi. I motivi
sono ripetuti per il tempo impostato.
3 Per spegnere il proiettore, premete nuovamente il pulsante on/off.
Come localizzare l'unità genitore
Se non ricordate dove avete lasciato l'unità genitore, potete utilizzare il
pulsante FIND dell'unità bambino per ritrovarla. Questa funzione funziona
solo quando l'unità genitore è accesa.
1 Premete FIND (AVVISO) sull'unità bambino. L'unità genitore produce un
segnale acustico di localizzazione.
2 Per interrompere il segnale acustico, premete nuovamente FIND
(AVVISO) sull'unità bambino o qualsiasi altro pulsante dell'unità genitore.
Il segnale acustico di avviso si interrompe automaticamente dopo 2
minuti.
Spia dello stato della batteria
1 La spia di stato della batteria è verde fissa quando l'unità bambino è
alimentata a batterie e queste sono sufficientemente cariche.
2 La spia di stato delle batterie lampeggia rapidamente in rosso quando le
batterie in uso sull'unità bambino stanno per esaurirsi. Sostituite le
batterie quando sono scariche.
Page 61
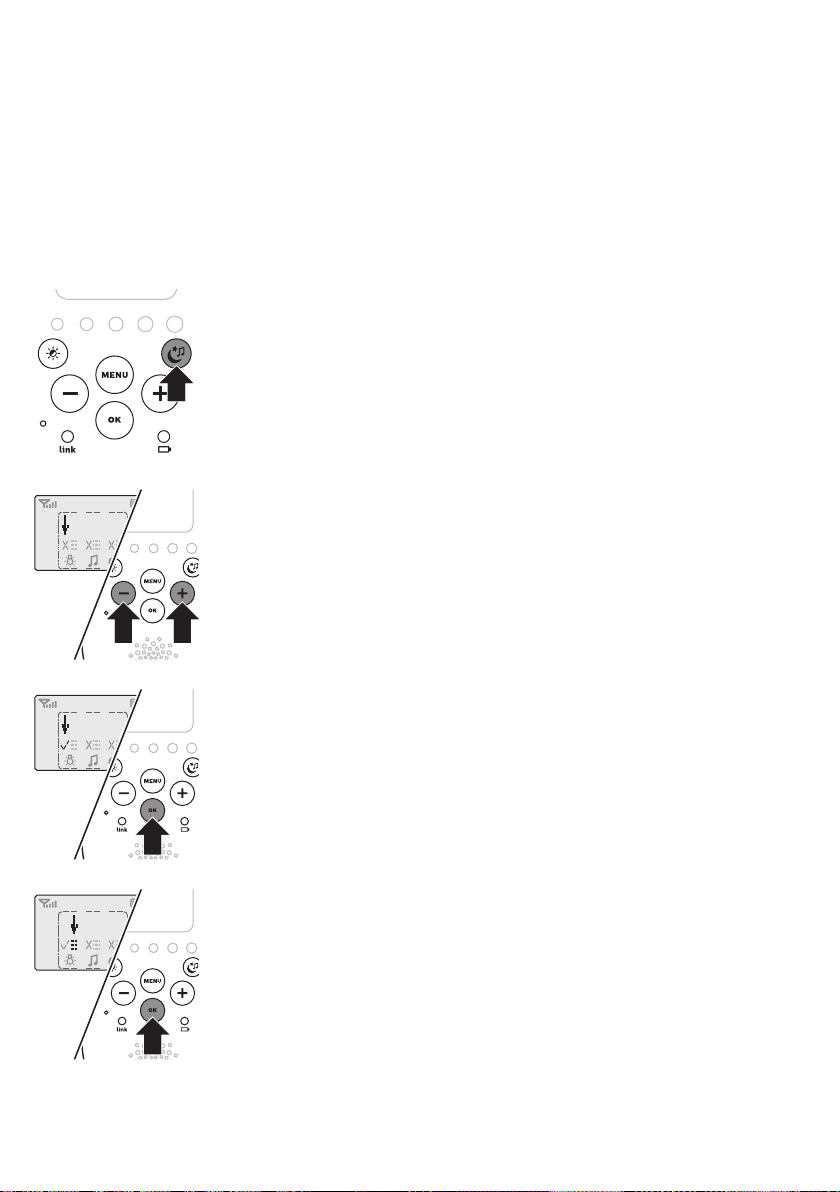
Funzioni e segnalazioni sull'unità genitore
Menu delle opzioni calmanti
L'unità genitore è dotata di un menu delle opzioni calmanti separato per
tutte le funzionalità che consentono al vostro bambino di rilassarsi: luce
notturna, ninnananna e proiettore. Per aprire il menu delle opzioni calmanti,
premete il relativo pulsante. Questa schermata consente di attivare la luce
notturna, le ninnananne e il proiettore sull'unità bambino in modalità
remota.
1 Per aprire il menu delle opzioni calmanti, premete il relativo pulsante.
2 Usate i pulsanti + e - per dirigere la freccia verso una funzione calmante.
Italiano
61
3 Per attivare una funzione calmante quando è disattivata e viceversa,
premete OK. Quando la funzione è attiva, sul simbolo della funzione
viene visualizzato un segno di spunta. Quando la funzione è disattivata,
sul simbolo della funzione viene visualizzata una croce.
4 Per aprire il menu con le opzioni per la funzione, spostate la freccia sopra
il campo delle opzioni e premete OK. Usate i pulsanti - e + per
selezionare le voci nel campo delle opzioni.
5 Per uscire dal menu delle opzioni calmanti, premete il relativo pulsante.
Luce notturna
Questa funzione vi consente di accendere o spegnere la luce notturna e di
impostare il relativo timer.
Page 62

62
Italiano
1 Selezionate la funzione luce notturna e aprite il menu con le opzioni per
la luce notturna.
2 Potete impostare il timer della luce notturna per un tempo che va da 5 a
20 minuti oppure potete tenere la luce notturna accesa continuamente.
Premete OK per confermare. Il simbolo della luce notturna compare sul
display.
Se impostate il timer della luce notturna, questa si spegne
automaticamente. Se lasciate accesa la luce notturna, disattivatela dal
menu delle opzioni calmanti o premendo il pulsante sull'unità
bambino.
Ninnananna
Questa funzione vi consente di selezionare le opzioni di riproduzione della
ninnananna e di impostare il timer per la ninnananna.
1 Selezionate la funzione ninnananna e aprite il menu con le opzioni
relative.
2 Nel menu delle opzioni per la ninnananna, potete selezionare una
ninnananna dall'elenco delle ninnananne pre-memorizzate. Potete
anche selezionare "Play all" (Riproduci tutte) per riprodurre tutte le
ninnenanne preimpostate.
3 Potete impostare il timer della ninnananna per un periodo che va da 5 a
20 minuti oppure potete riprodurre le ninnenanne in continuazione.
Premete OK per confermare l'impostazione del timer. Il simbolo della
ninnananna e la ninnananna riprodotta appaiono sul display.
Se impostate il timer, la funzione ninnananna si disattiva al termine del
tempo impostato. Se scegliete la riproduzione continua, disattivate la
funzione ninnananna nel menu delle opzioni calmanti o premete il
pulsante sull'unità bambino.
Proiettore
Questa funzione vi consente di accendere il proiettore sull'unità bambino e
di programmare la durata della proiezione.
1 Selezionate la funzione proiettore e aprite il menu con le opzioni per il
proiettore.
2 Per accedere alle opzioni del proiettore, puntate la freccia al campo delle
opzioni e premete OK.
Page 63

Volume
Italiano
3 Potete impostare il timer del proiettore per un tempo che va da 5 a 20
minuti oppure potete tenere il proiettore acceso continuamente.
Premete OK per confermare. Il simbolo del proiettore compare sul
display.
Se impostare il timer del proiettore, il proiettore si spegne
automaticamente. Se tenete acceso il proiettore di continuo, disattivatelo
dal menu delle opzioni calmanti o premendo il pulsante del proiettore
sull'unità bambino.
Il volume può essere impostato se il menu non è attivo. Ci sono sette livelli
di volume e un'impostazione per disattivare il volume.
Impostazione del livello del volume
1 Premete il pulsante + o - una volta.
Il livello del volume attuale appare sul display.
2 Premete il pulsante + per aumentare il volume o il pulsante - per
diminuirlo.
Se non viene premuto alcun pulsante per oltre 2 secondi, l'indicazione
del livello del volume scompare dal display e l'impostazione del volume
viene salvata.
Volume disattivato
Al di sotto dell'impostazione minima del volume, c'è un'impostazione che
consente di disattivare il volume.
1 Premete il pulsante + o - una volta.
Il livello del volume attuale appare sul display.
2 Tenete premuto il pulsante per oltre 2 secondi per disattivare il volume.
Il messaggio "MUTE" (DISATTIVA AUDIO) e il simbolo di disattivazione
audio appaiono sul display. Solo le spie del livello audio indicano che il
bambino produce dei suoni.
63
Page 64

64
Italiano
Funzione Talk (Parla)
1 Se volete confortare il vostro bambino, premete TALK sull'unità genitore
e parlate in modo chiaro nella parte frontale del microfono da una
distanza di 15-30 cm.
Nota: se sull'unità bambino avete impostato il volume per la ninnananna
più alto, il suono sarà ancora più forte quando utilizzate la funzione Talk
sull'unità genitore.
2 Rilasciate TALK quando avete finito di parlare.
Modalità attenuazione notturna
In modalità attenuazione notturna, l'intensità luminosa delle spie e del
display viene ridotta e il volume degli avvisi acustici viene diminuito.
1 Premete il pulsante , per attivare la modalità oscurazione notte.
2 Premete di nuovo il pulsante per tornare alla modalità di
funzionamento normale.
Avviso di batteria scarica sull'unità bambino
1 Quando l'unità bambino utilizza le batterie e queste si stanno esaurendo,
l'unità genitore emette un segnale acustico e il testo "Baby unit Change
batteries'' (Cambiare batterie unità bambino) appare sul display.
2 Se non sostituite le batterie in tempo, il collegamento con l'unità
bambino andrà perso.
Indicazioni dello stato della batteria
Batteria scarica
Quando le batterie ricaricabili sono scariche, il messaggio "BATTERY LOW"
(BATTERIA SCARICA) appare sul display, l'indicatore di stato è vuoto e
lampeggia e l'unità genitore emette segnali acustici. La durata residua è di
almeno 30 minuti.
Batteria scarica
Page 65
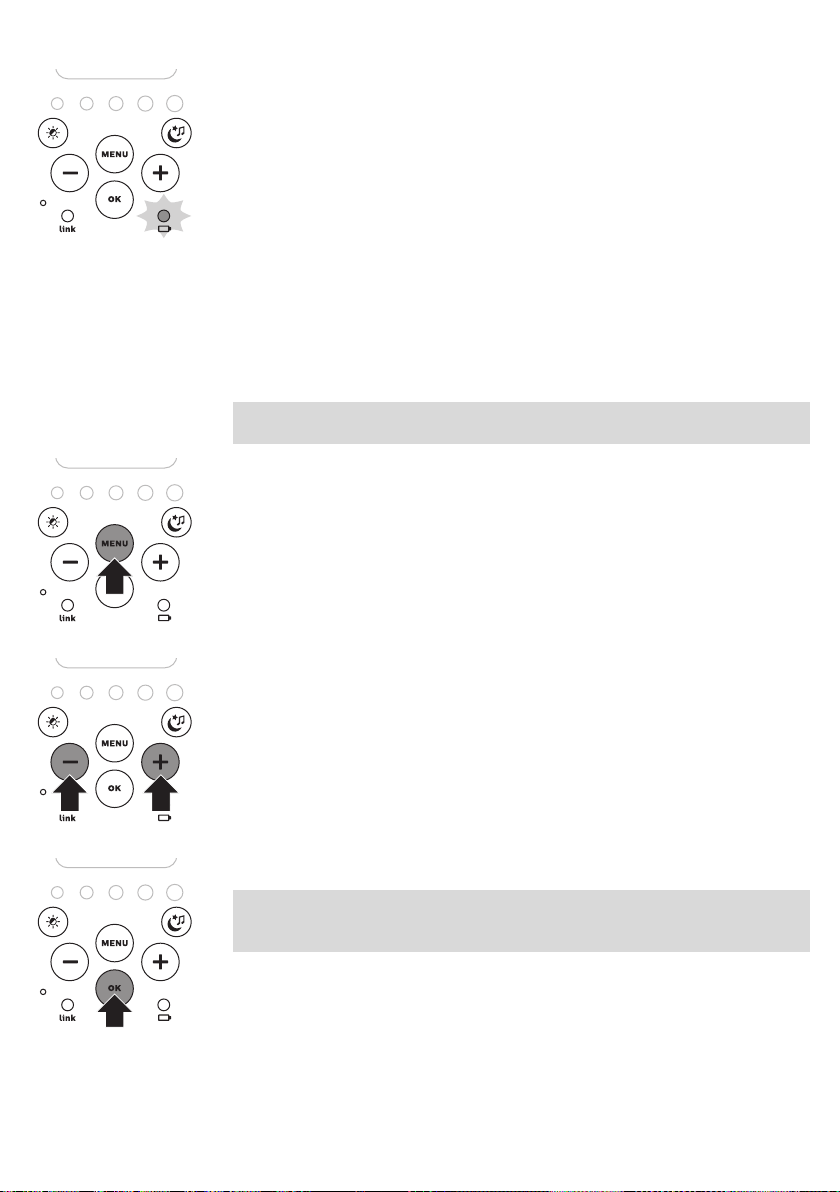
1 Se le batterie ricaricabili sono quasi scariche, la spia dello stato della
batteria lampeggia rapidamente in rosso.
2 Se non collegate l'unità genitore all'alimentazione, si spegnerà.
Menu dell'unità genitore
Navigazione del menu
Nota: è possibile utilizzare alcune funzioni del menu solo quando l'unità
bambino e l'unità genitore sono collegate.
1 Premete il pulsante MENU per aprire il menu e far apparire la prima
opzione del menu.
Italiano
65
2 Usate il pulsante + per passare alla successiva opzione o il pulsante - per
tornare all'opzione precedente. La freccia sul display indica la direzione
in cui è possibile spostarsi.
3 Premete OK per confermare la scelta.
Nota: premete il pulsante MENU se volete uscire dal menu senza fare
modifiche. Se non vengono effettuate azioni nel menu per oltre 20 secondi,
il menu si chiude automaticamente.
Page 66

66
Italiano
Sensibilità
Questa opzione nel menu dell'unità genitore consente di impostare la
sensibilità del microfono dell'unità bambino.
La sensibilità del microfono determina il livello acustico dell'unità bambino,
ad esempio il livello acustico quando il bambino piange, o quando emette
dei vagiti.
1 Selezionate "Sensitivity" (Sensibilità) nel menu con i pulsanti + e - e
premete OK per confermare.
2 Usate i pulsanti + e - per aumentare o diminuire la sensibilità del
microfono. L'indicazione di sensibilità sul display presenta quattro
tacchette. Premete OK per confermare l'impostazione.
Livelli di sensibilità e indicazioni
Icona Sensibilità Descrizione
massima Potete sentire tutto del vostro
bambino. L'altoparlante
dell'unità genitore è sempre
acceso.
alta Potete sentire tutti i suoni dai
versi più lievi a quelli più forti. Se
il bambino non emette alcun
suono, l'altoparlante dell'unità
genitore viene disattivato.
Modalità Eco Max
Smart Eco è una funzionalità standard del baby monitor, che riduce
automaticamente il segnale DECT dell'unità bambino per risparmiare
energia. Per risparmiare ancora più energia, attivate la modalità Eco Max. In
questa modalità, il segnale DECT dell'unità bambino viene spento fino a
quando il bambino non emette un suono.
Attenzione: in modalità Eco Max, l'unità genitore riceve il segnale
dall'unità bambino con un certo ritardo. Quando il bambino emette un
suono, l'unità bambino deve riattivare la trasmissione radio prima di poter
inviare il segnale all'unità genitore.
Ricordate quanto segue:
medio Potete sentire il pianto da quello
lieve a quello più forte. Se il
bambino emette suoni più lievi,
l'altoparlante dell'unità genitore
non si attiva.
bassa L'altoparlante dell'unità genitore
si attiva solo se il bambino
emette suoni forti, ad esempio
perché piange.
Page 67
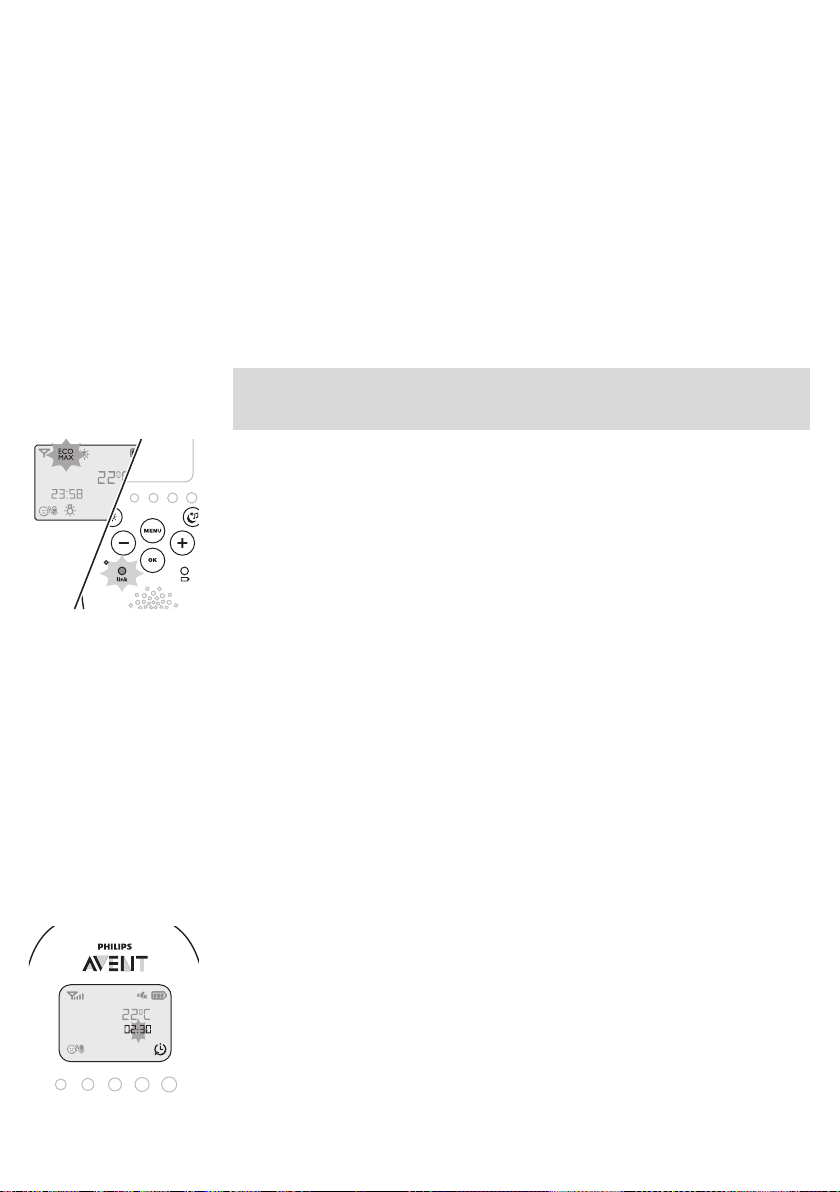
Italiano
-
In modalità ECO Max non ricevete avvisi quando l'unità bambino è
spenta o l'unità genitore è fuori dalla portata dell'unità bambino. Potete
controllare il collegamento premendo qualsiasi pulsante sull'unità
genitore.
-
La modalità Eco Max non può essere attivata se la sensibilità del
microfono è impostata sul livello più alto.
67
Attivazione della modalità Eco Max
1 Selezionate "Eco Max" nel menu con i pulsanti + e - e premete OK per
confermare.
2 Quando il display mostra "Turn On" (Attivazione) premete OK per attivare
la modalità Eco Max.
3 Il messaggio di avviso "No alert if out of range, OK?" (Nessun allarme se
fuori portata, OK?) appare sul display. Premete OK per confermare.
Nota: il messaggio di avviso scorre sul display due volte. Se non premete
OK, l'unità genitore esce dal menu e la modalità Eco Max rimane
disattivata.
4 L'indicazione Eco Max lampeggia sul display. La spia di collegamento
lampeggia in verde lentamente quando l'unità bambino non trasmette
alcun segnale all'unità genitore.
5 Quando l'unità genitore riceve un segnale dall'unità bambino perché la
trasmissione radio è stata riattivata, la spia di collegamento diventa
verde fisso.
Disattivazione della modalità Eco Max
1 Premete il pulsante MENU.
2 Usate i pulsanti + e - per selezionare "Eco Max" e premete OK per
confermare.
3 Quando il display mostra "Turn Off" (Disattivazione), premete OK per
confermare.
Timer pappe
Potete impostare il timer pappe per essere avvisati quando arriva l'ora della
pappa. Il timer può essere impostato da 1 minuto a 23 ore e 59 minuti.
1 Per aprire il sottomenu del timer pappe, selezionate "Feed Timer" (Timer
pappe)" nel menu. Premete OK per confermare.
2 Selezionate "Set Timer" (Imposta timer) nel sottomenu del timer pappe.
Premete OK per iniziare a impostare il timer.
3 Impostate l'ora e i minuti e premete OK per confermare.
4 Per avviare il timer pappe, selezionate "'xx:xx Start" (xx:xx Avvio) nel
sottomenu del timer pappe. Premete OK per confermare. Il simbolo del
timer appare sul display e il timer avvia il conto alla rovescia.
Page 68

68
Italiano
5 Quando il timer ha raggiunto 00:00, l'avviso timer pappe si attiva, il
simbolo del timer inizia a lampeggiare sul display e il messaggio "TIMER
END" (FINE TIMER) scorre sul display.
6 Per interrompere il timer, selezionate "Stop & Reset" (Termina e ripristina)
nel sottomenu del timer pappe e premete OK per confermare.
Impostazione della ripetizione del timer pappe
1 Per far attivare il timer pappe dopo lo stesso tempo impostato,
selezionate "Timer repeat" (Ripetizione timer) nel sottomenu del timer
pappe dopo aver impostato il timer. Premete OK per confermare.
2 Scegliete "Repeat ON" (Ripetizione attiva) o "Repeat OFF" (Ripetizione
non attiva) e premete OK per confermare. Il simbolo di ripetizione timer
viene visualizzato sul display.
3 Se è impostato "Repeat ON" (Ripetizione attiva), il timer pappe comincia
il conto alla rovescia di nuovo dopo che avete interrotto l'allarme.
Impostazione di un allarme timer pappe
1 Per impostare un allarme, selezionate "Timer Alert" (Allarme timer) nel
sottomenu del timer pappe. Premete OK per confermare.
2 Scegliete una delle opzioni dell'allarme. Le opzioni disponibili sono: solo
vibrazione, solo audio, audio e vibrazione.
3 Premete qualunque tasto per interrompere l'allarme che altrimenti si
interrompe automaticamente dopo 2 minuti.
4 Per interrompere il timer, selezionate "Stop & Reset" (Termina e ripristina)
nel sottomenu del timer pappe e premete OK per confermare.
Temperatura ambiente
Un bambino dorme in maniera confortevole a una temperatura tra 16 °C e
20 °C. Potete impostare un intervallo di temperatura minimo e massimo e
un allarme.
1 Per aprire il sottomenu della temperatura, selezionate "Temperature"
(Temperatura) nel menu. Premete OK per confermare.
2 Selezionate "Temp Range" (Intervallo temperatura) nel sottomenu della
temperatura e premete OK per confermare.
3 Usate i pulsanti + e - per impostare l'intervallo della temperatura minima
tra 10 °C e 19 °C e l'intervallo di temperatura massima tra 22 °C e 37 °C.
Premete OK per confermare.
4 Selezionate "Alert" (Allarme) nel sottomenu della temperatura. Premete
OK per confermare.
5 Scegliete una delle opzioni dell'allarme. Le opzioni disponibili sono solo
audio, audio e vibrazione, solo vibrazione e solo display. Premete OK per
confermare. Il simbolo di allarme temperatura appare sul display.
6 Selezionate "Temp Scale" (Scala temperatura) nel sottomenu della
temperatura. Premete OK per confermare.
7 Selezionate "Celsius" o "Fahrenheit" e premete OK per confermare. La
temperatura nella scala impostata appare sul display.
Se la temperatura rientra nell'intervallo impostato, il simbolo di allarme
temperatura presenta due tacchette.
Page 69
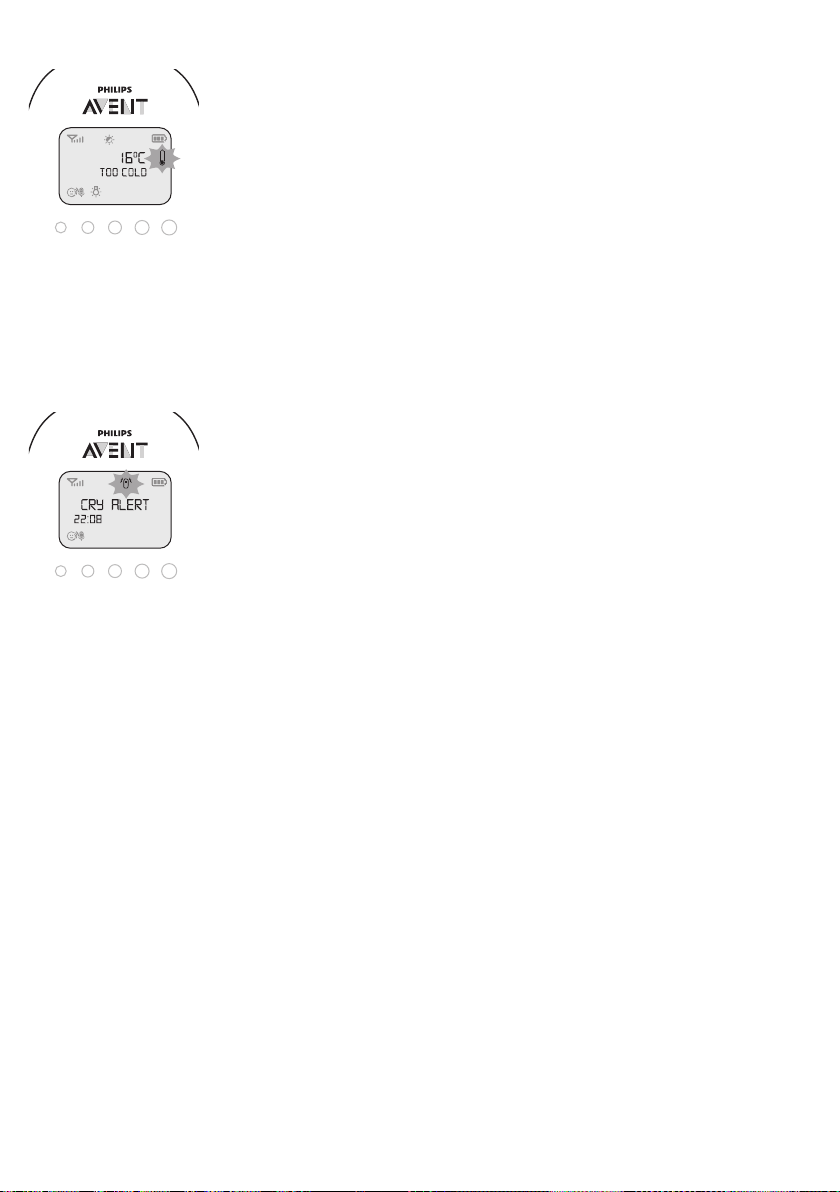
Avviso di pianto
Italiano
Se la temperatura è al di sotto o al di sopra dell'intervallo impostato, il
simbolo di allarme della temperatura sul display ha solo una tacchetta e
lampeggia. Il messaggio "TOO COLD" (TROPPO FREDDO) o "TOO HOT"
(TROPPO CALDO) appare sul display.
Potete impostare un avviso di pianto per avvertirvi che il bambino sta
piangendo.
1 Selezionate "Cry alert" (Avviso di pianto) nel menu utilizzando i pulsanti +
e -. Premete OK per confermare.
2 Quando il display mostra "Vibration ON" (Vibrazione attiva), premete OK
per confermare. L'indicatore dell'avviso di pianto compare sul display.
L'avviso di pianto si attiva quando il suono nella stanza del bambino è
abbastanza forte da far accendere la quarta spia del livello audio. L'unità
genitore vibra e il messaggio " Cry alert" (Avviso di pianto) compare sul
display per 4 secondi. L'avviso di pianto viene ripetuto ogni 8 secondi
finché il suono diventa meno forte o non viene disattivato l'avviso di
pianto.
3 Per disattivare l'avviso di pianto, selezionate "Cry alert" (Avviso di pianto)
nel menu. Quando il display mostra "Vibration OFF" (Vibrazione non
attiva), premete OK per confermare.
69
Orologio
Lingua
L'impostazione predefinita per l'orologio è nascosta. Potete scegliere di
visualizzare l'orologio e impostare l'ora nel menu dell'unità genitore.
1 Selezionate "Set clock" (Impostazione orologio) nel menu utilizzando i
pulsanti + e -. Premete OK per confermare.
2 Selezionate "Show Time" (Mostra ora) e premete OK per confermare.
3 Selezionate "Set the time" (Imposta orario) e premete OK per confermare.
4 Impostate l'ora e i minuti e premete OK per confermare.
L'ora dell'orologio si alterna con le altre indicazioni nel campo dei
messaggi del display.
Potete usare questa opzione del menu per modificare l'impostazione della
lingua.
1 Selezionate "Set language" (Impostazione lingua) nel menu utilizzando i
pulsanti + e -. Premete OK per confermare.
2 Usate i pulsanti + e - per selezionare la vostra lingua e premete OK per
confermare.
Page 70

70
Italiano
Blocco pulsanti
Potete attivare il blocco pulsanti per evitare di premere involontariamente i
pulsanti quando portate con voi l'unità genitore.
1 Per attivare il blocco pulsanti, premete OK.
2 Premete il pulsante + entro 2 secondi.
Nota: se non premete il pulsante + entro 2 secondi, l'istruzione rimane sul
display.
3 Dopo aver premuto il pulsante +, sul display compare il messaggio "Keys
locked" (Pulsanti bloccati).
4 Per disattivare il blocco pulsanti, premete OK. Quando sul display viene
visualizzato il messaggio di istruzioni, premete il pulsante + entro 2
secondi.
Note:
-
Se premete un pulsante diverso da OK mentre il blocco pulsanti è attivo,
il display si accende e la seconda riga sul display vi dice come disattivare
il blocco pulsanti.
-
Se premete OK mentre il blocco pulsanti è attivo, la seconda riga sul
display vi dice cosa è necessario fare per sbloccare i pulsanti.
Garanzia e assistenza
Per assistenza o informazioni, visitate il sito Web all'indirizzo
www.philips.com/support oppure leggete l'opuscolo della garanzia
internazionale.
Page 71
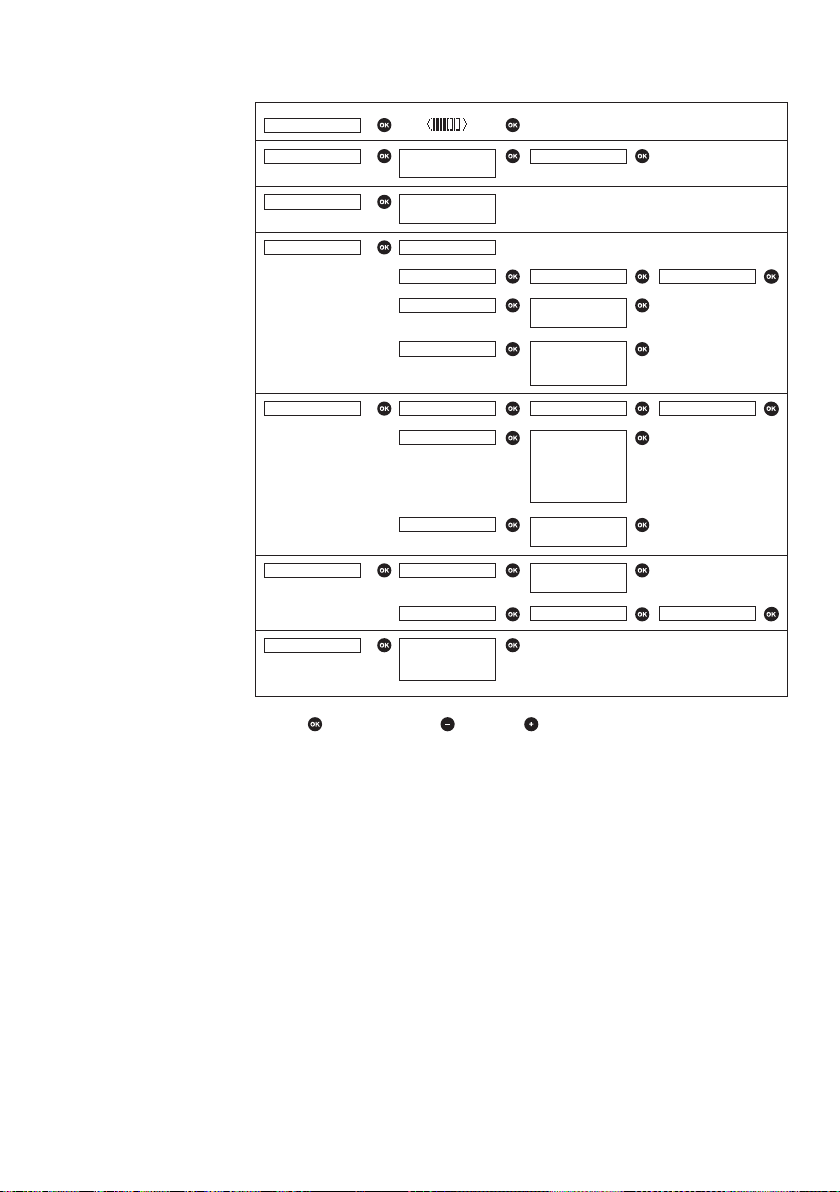
< >
< >
< >
< >
>
<
>
< >
<
< >
>
< >
< >
< >
<
>
<
< > >
<
<
Sensibilità
Eco Max
Avv. pianto
Timer feed
Temperatura
Imp. orol
Imp. Lingua >
Premi OK = < =
Avv. Timer
Attivare?
Disattiv?
Vibraz. On ?
Vibraz. O ?
xx:yy avv.?
Imp. timer
Rip. timer
Inter. temp.
Avviso temp
Scala temp
Mos/Nasc
Imposta ora
English
...
Русский
<
<
<
<
<
<
<
<
<
>
>
>
>
>
>
>
>
>
>
>
>
Minimo XXºC
No avvisi fuori portata, OK?
H 00:00
H 00:00
Ripeti
Ripeti o
Solo audio
Audio e vib.
Solo vibr.
Solo audio
Audio e vib.
Solo vibr.
Solo schermo
Spento
Celsius
Fahrenheit
Nasc ora
Mostra ora
Massimo YYºC
00:30 Min
00:00 Min
SCD730/SCD731/SCD733/SCD734/SCD735 (IT
)
> =
Italiano
71
Page 72

Luce timer
Ninna nanna
Minut. Prog.
5 minuti
10 minuti
15 minuti
20 minuti
Continua
Nin. nanna 1
Nin. nanna 2
.................
Ript. tutti
5 minuti
10 minuti
15 minuti
20 minuti
Continua
Timer canz. 5 minuti
10 minuti
15 minuti
20 minuti
Continua
<
<
<
<
<
<
<
<
<
<
<
>
>
>
>
>
>
>
>
>
>
>
>
<
<
<
<
>
>
>
>
< =
> =
Premi OK =
72
Italiano
Page 73

Page 74

www.philips.com/avent
Philips Consumer Lifestyle BV
Tussendiepen 4, 9206 AD Drachten, the Netherlands
Trademarks owned by the Philips Group.
© 2018 Koninklijke Philips N.V.
All rights reserved
4213.354.4259.1 (28/6/2018)
>75% recycled paper
>75% papier recyclé
 Loading...