

Page 1
SCD710/SCD711
SCD713/SCD715
FR-NL
Page 2

English 6
Español 17
Nederlands 29
Português 41
Page 3

1 2 3 4
98765
10
1
6
English
Page 4

Introduction
Go to www.philips.com/welcome to register your product and to read the
detailed user manual.
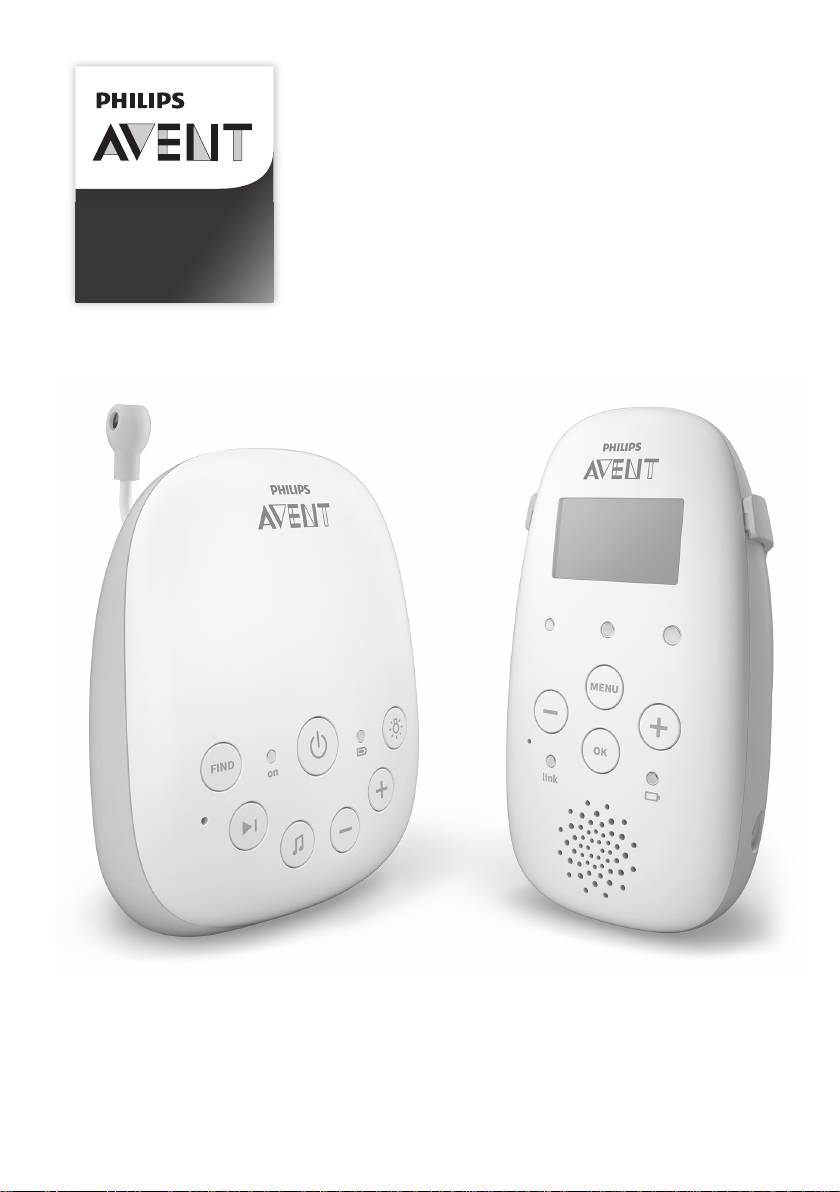
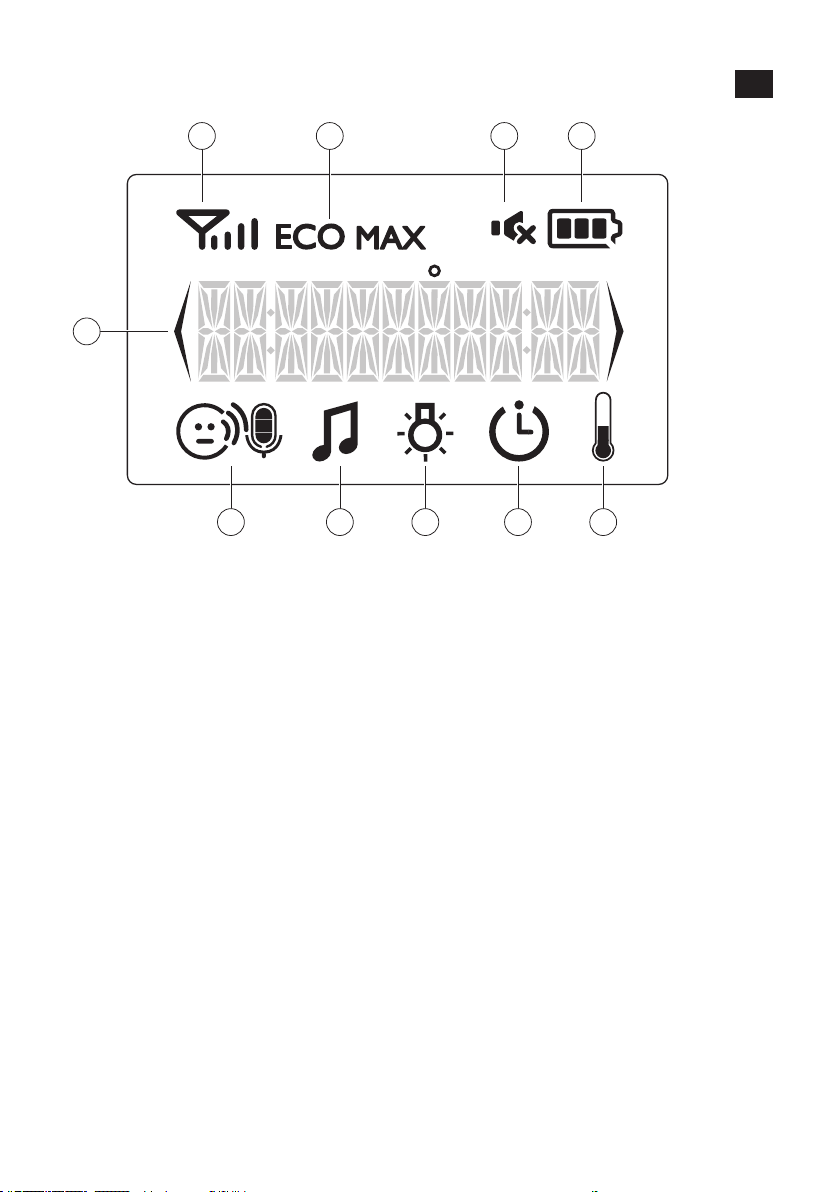
Display of the parent unit (Fig. 1)
1 Signal strength indicator
2 Eco Max indicator
3 Mute symbol
4 Battery status indicator
5 Microphone sensitivity indicator
6 Lullaby symbol
7 Nightlight symbol
8 Timer symbol
9 Temperature symbol
10 Navigation arrow
Preparing for use
IMPORTANT: Read the safety instructions carefully before you use the
baby monitor and keep them for future reference.
Baby unit
We advise you to use the baby unit connected to the mains. To guarantee
automatic power backup in case of mains failure, you can insert four 1.5V AA
alkaline batteries (not included).
Do not use rechargeable batteries. The baby unit does not have a charging
function and rechargeable batteries discharge slowly when they are not in
use.
English
7
Parent unit
The parent unit runs on two rechargeable batteries that are supplied with
the baby monitor. Charge the parent unit before you use it for the first time
and when the batteries are low.
Please note that for the SCD710/SCD711/SCD713, you have to charge the
parent unit for the full 10 hours to have a cordless operating time of 18
hours. (For the SCD715: the charging time is 14 hours and the operating
time is 25 hours.
Note: When you start using the baby monitor, it takes 4 charge and
discharge cycles before the rechargeable batteries reach their full capacity.
Page 5

8
English
Using the baby monitor
Positioning the baby monitor
Keep the baby unit out of the reach of the baby. Never place the
baby unit inside the baby’s bed or playpen.
-
Because the cord of the baby unit presents a potential strangulation
hazard, make sure that the baby unit and its cord are at least 1 metre/3.5
feet away from your baby.
-
To prevent a high-pitched sound from one or both units, make sure that
the parent unit is at least 1 metre/3.5 feet away from the baby unit.
Linking parent unit and baby unit
1 Press and hold the button on the baby unit for 2 seconds until the
power-on light goes on.
2 Press and hold the button on the parent unit for 2 seconds until the
display lights up. The 'link' light on the parent unit starts flashing red and
the message 'LINKING' appears on the display.
When the parent unit and baby unit are linked, the 'link' light turns solid
green. The signal strength indicator and the message 'LINKED' appear on
the display.
If no connection is established, the message 'NOT LINKED' is displayed
and the parent unit starts and the parent unit starts to beep.
What to do if no link is established
-
If the parent unit is out of range, place it closer to the baby unit, but not
closer than 1 metre/3.5 feet.
-
If the baby or parent unit is too close, <2m/6.5 ft away from another
DECT appliance (e.g. a cordless phone), switch off this appliance or move
the unit away from this appliance.
-
If the baby unit is switched off, switch it on.
Operating range
-
The operating range is 330 metres/1000 feet outdoors and up to 50
metres/150 feet indoors.
-
The operating range of the baby monitor varies depending on the
surroundings and factors that cause interference. Wet and moist
materials cause so much interference that the range loss is up to 100%.
For interference from dry materials, see the table below.
Dry materials Material thickness Loss of range
Wood, plaster, cardboard,
glass (without metal, wires
or lead)
Brick, plywood < 30cm (12in) 5-35%
Reinforced concrete < 30cm (12in) 30-100%
< 30cm (12in) 0-10%
Page 6
Dry materials Material thickness Loss of range
Metal grilles or bars < 1cm (0.4in) 90-100%
Metal or aluminium sheets < 1cm (0.4in) 100%
Functions and feedback on the baby unit
Nightlight
The nightlight produces a soft glow that comforts your baby.
1 Press the button on the baby unit to switch the nightlight on or off.
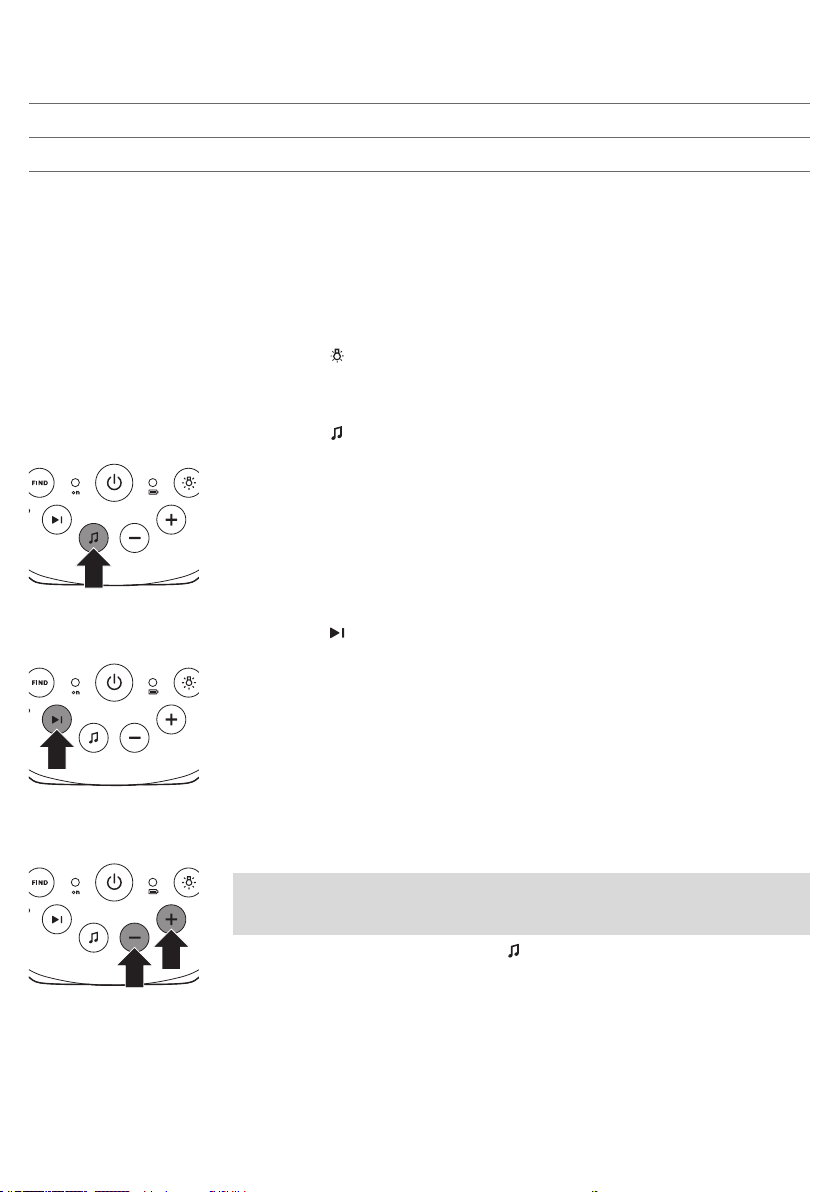
Lullaby function
1 Press the button on the baby unit to play the last selected lullaby. The
selected lullaby repeats for 15 minutes.
English
9
2 Press the button to select another lullaby from the list.
3 To adjust the sound level of the lullaby, press the volume + or the volume
– button the baby unit.
Note: You can only set the loudspeaker volume on the baby unit when a
lullaby is playing. If you set the volume for the lullaby higher, the sound
will also be louder when you use the talk function on the parent unit.
4 To stop lullaby playing, press the button on the baby unit.
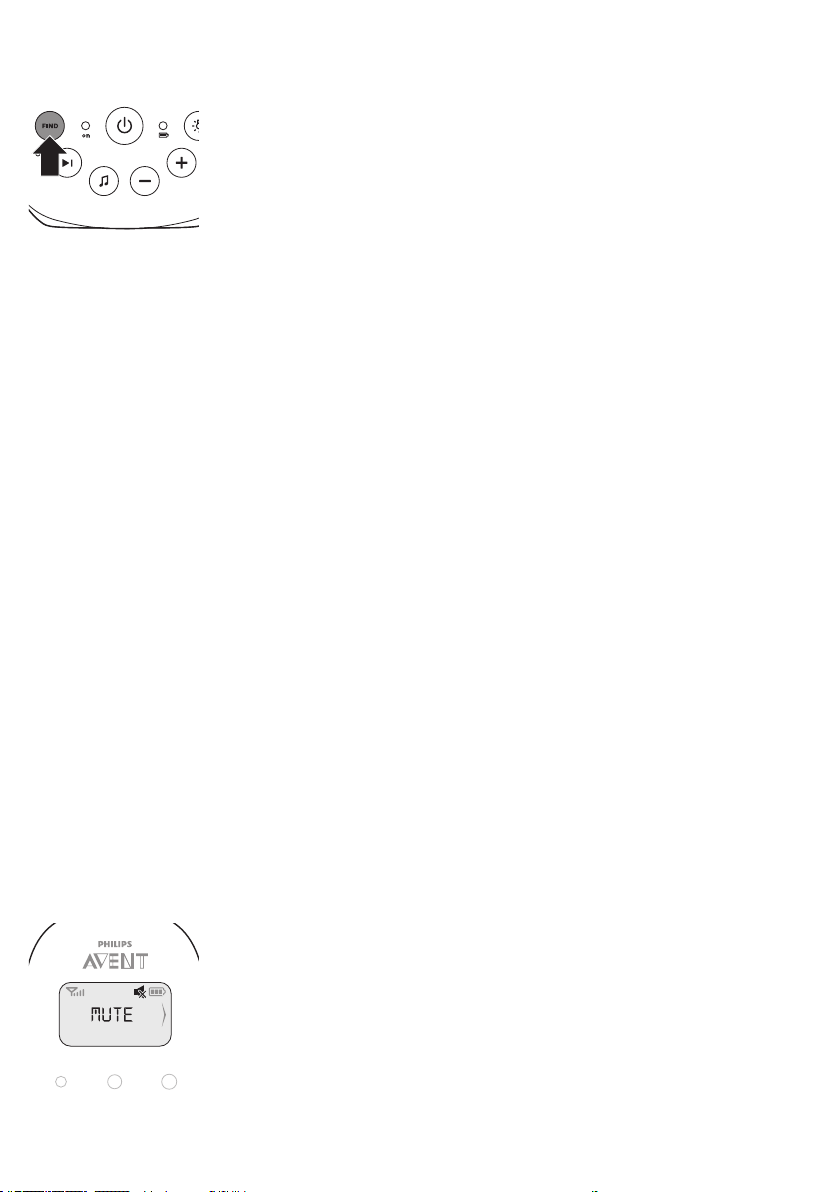
Paging the parent unit
If you have lost the parent unit, you can use the FIND button on the baby
unit to locate the parent unit. This function only works when the parent unit
is switched on and within range.
Page 7
10
English
1 Press FIND on the baby unit. The parent unit produces a paging alert
tone.
2 To stop the paging alert tone, press FIND on the baby unit again or press
any button on the parent unit. The paging alert tone stops automatically
after 2 minutes.
Battery status light
1 The battery status light is solid green when the baby unit is operating on
battery power and the batteries contain enough energy.
2 The battery status light flashes red quickly when the batteries run low
while the baby unit is operating on battery power. Replace the batteries
when they run low.
Functions and feedback on the parent unit
Volume
The volume can be set if the menu is not active. There are seven volume
levels and a 'volume off' setting.
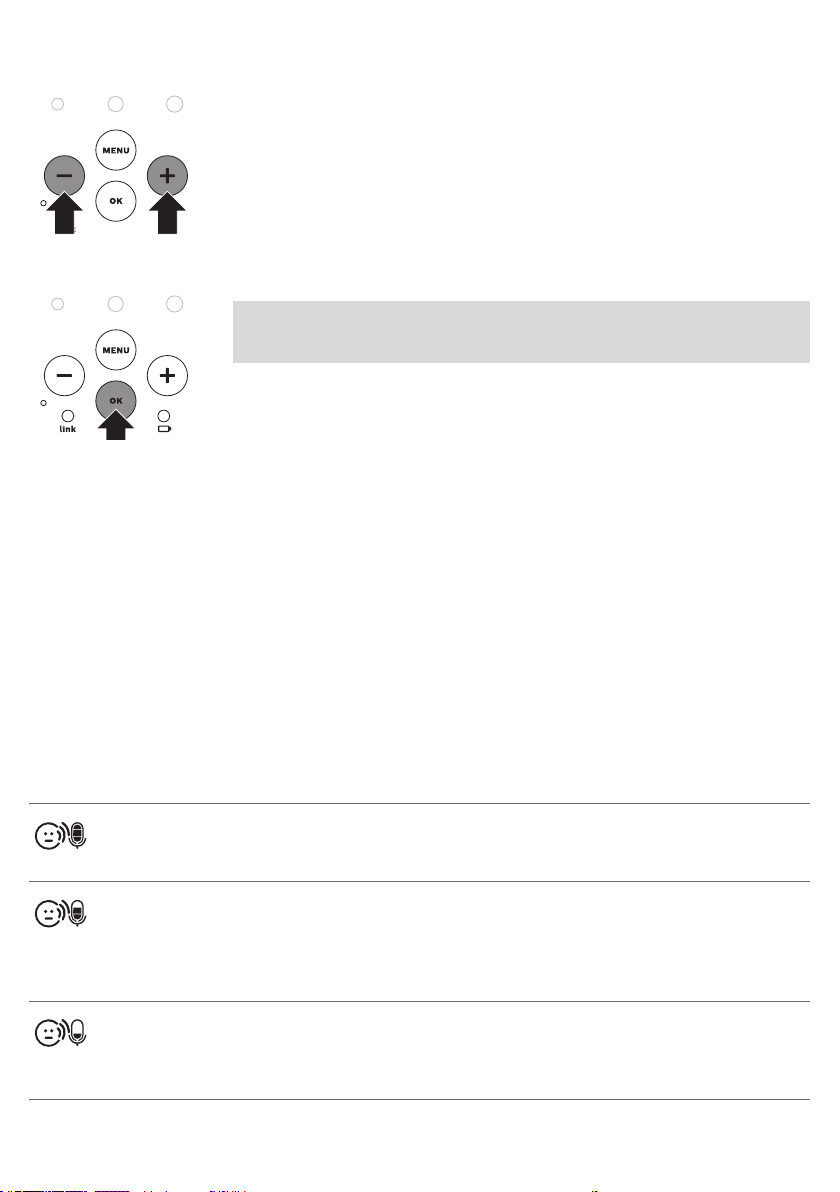
Setting the volume level
1 Press the + button or the - button once.
The current volume level appears on the display.
2 Press the + button to increase the volume or press the - button to
decrease the volume.
If no button is pressed for more than 2 seconds, the volume level
indication disappears from the display and the volume setting is saved.
Volume off
Below the lowest volume setting, there is a 'volume off' setting.
1 Press the + button or the - button once.
The current volume level appears on the display.
2 Press and hold the - button for more than 2 seconds to set the volume to
off.
The message 'MUTE' and the mute symbol appear on the display. Only
the sound level lights show that the baby produces sounds.
Page 8
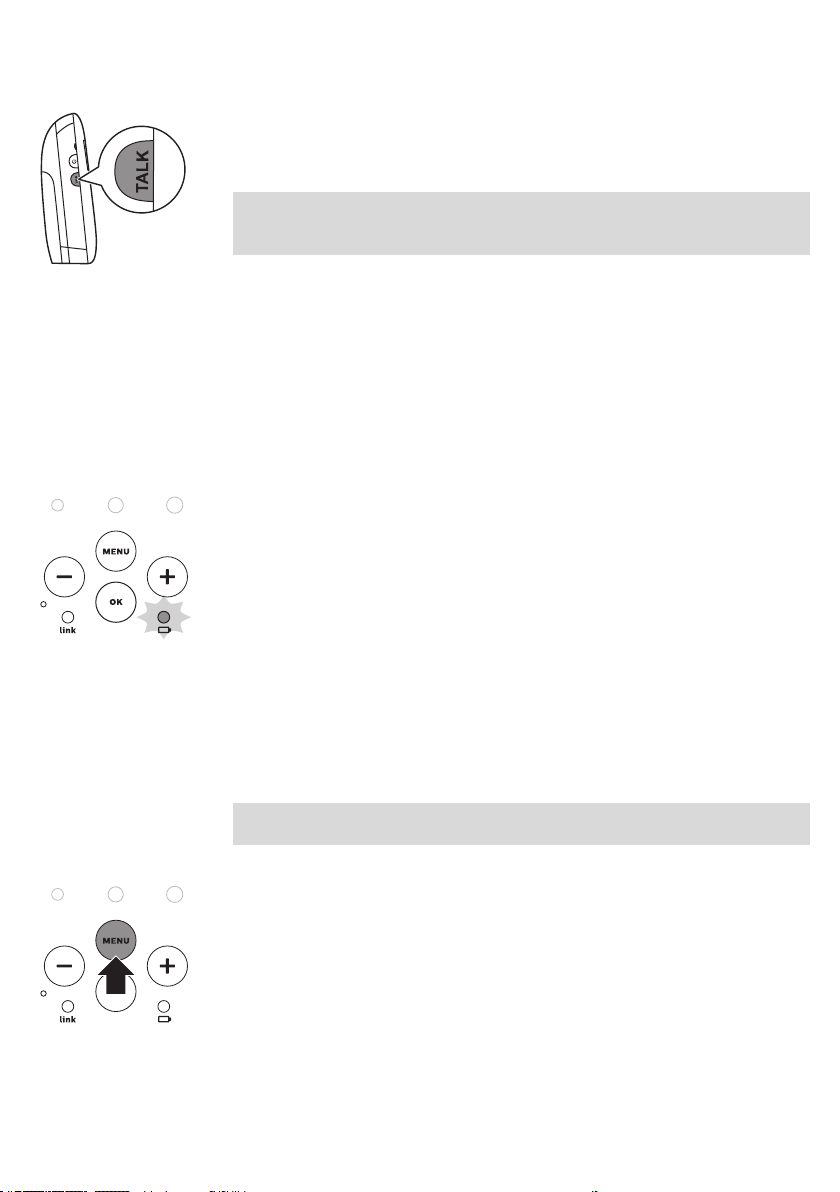
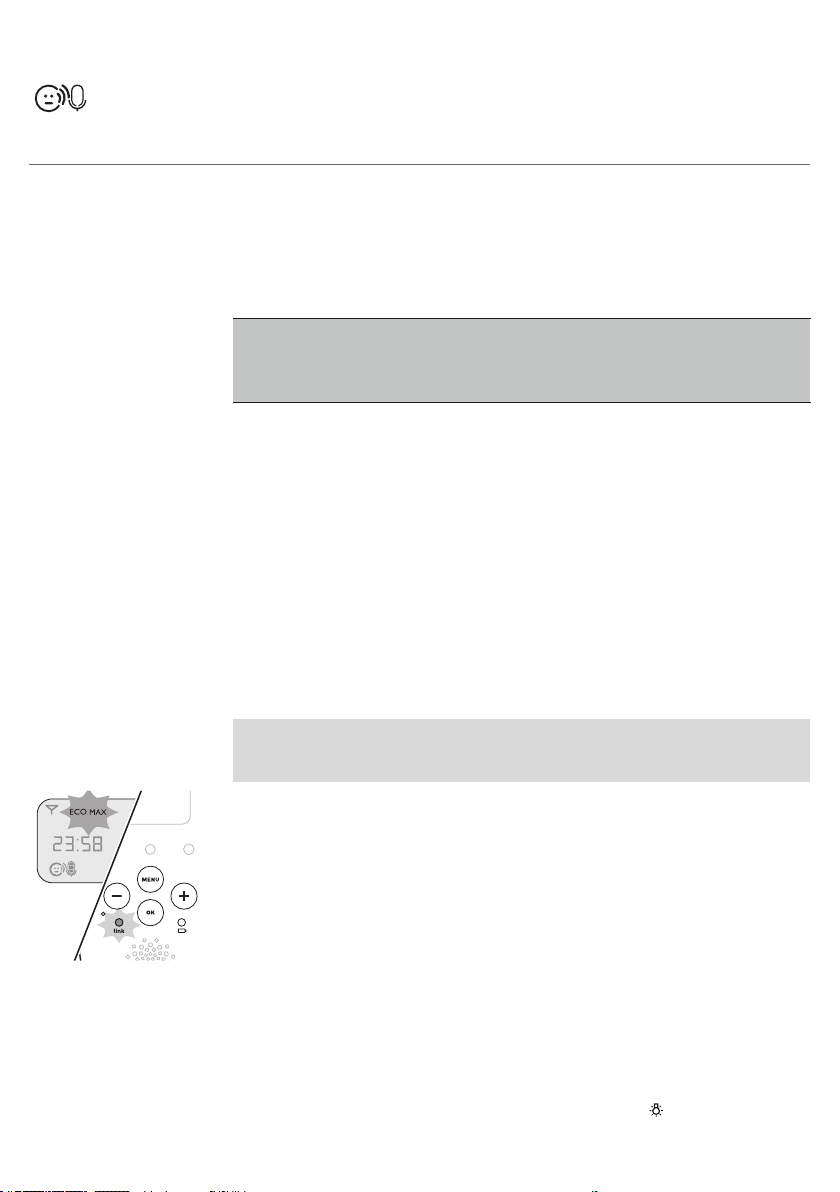
Talk function
1 If you want to comfort your baby, press TALK on the parent unit and talk
clearly into the microphone on the front from a distance of 15-30cm
(0.5-1ft).
The 'link' light starts flashing green and 'TALK' appears on the display.
Note: If you have set the volume of the lullaby higher on the baby unit,
the sound will also be louder when you use the talk function on the
parent unit.
2 Release TALK when you have finished talking.
Battery status indications
Battery low
When the rechargeable batteries are low, 'BATTERY LOW' appears on the
display, the status indicator is empty and flashes, and the parent unit beeps.
The remaining operating time is at least 30 minutes.
Battery empty
1 If the rechargeable batteries are almost empty, the battery status light
flashes red quickly.
2 If you do not connect the parent unit to the mains, it switches off.
English
11
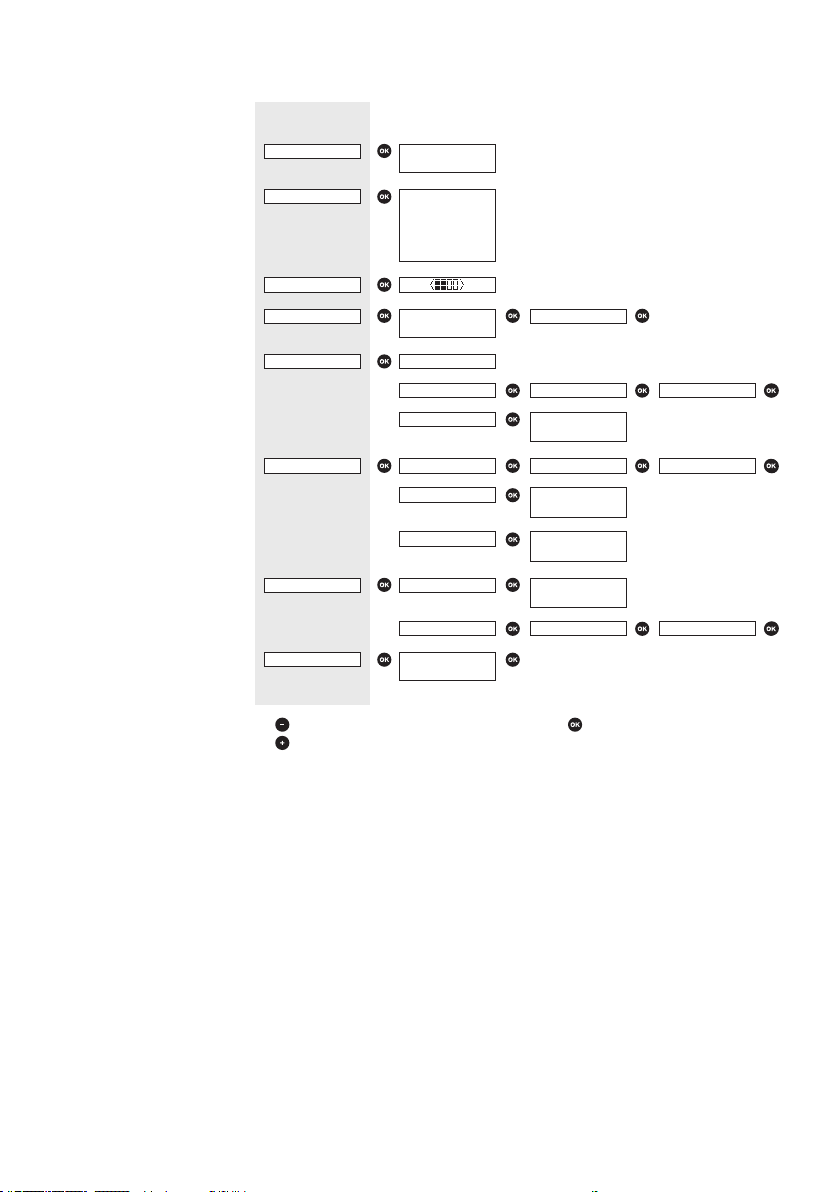
Menu of the parent unit
Navigating the menu
Note: Some menu functions only work when the baby unit and the parent
unit are linked.
1 Press the MENU button to open the menu and to make the first menu
option appear.
Page 9
12
English
Sensitivity
2 Use the + button to go to the next option or the - button to go to the
previous option. The arrow on the display indicates in which direction
you can navigate.
3 Press OK to confirm your selection.
Note: Press the MENU button if you want to leave the menu without making
any changes. If there is no input in the menu for more than 20 seconds, the
menu closes automatically.
This option in the parent unit menu allows you to set the microphone
sensitivity of the baby unit.
The microphone sensitivity determines what noise level the baby unit picks
up, e.g. you will want to hear when your baby cries, but you may be less
interested in its babbling.
1 Select ‘Sensitivity’ in the menu with the + and - buttons and press OK to
confirm.
2 Use the + and - buttons to increase or decrease the microphone
sensitivity. The number of filled segments shows the sensitivity level
selected. Press OK to confirm the setting.
Sensitivity levels and indications
Icon Sensitivity Description
highest Hear everything from your baby.
The speaker of the parent unit is
continuously on.
high Hear all sounds from soft
babbling and louder. If your
baby does not make any sound,
the speaker of the parent unit is
off.
medium Hear sounds from soft cries and
louder. If your baby makes softer
sounds, the speaker of the
parent unit does not go on.
Page 10
Eco Max mode
English
low The speaker of the parent unit
only goes on if the baby makes
loud sounds, for instance
because it is crying.
Smart Eco is a standard feature on this baby monitor. It automatically
reduces the DECT signal from the baby unit to save energy. To save even
more energy, activate the Eco Max mode. In this mode, the DECT signal of
the baby unit is switched off as long as the baby does not make a sound.
Caution: In Eco Max mode, the parent unit receives feedback from the
baby unit with a delay. When your baby makes a sound, the baby unit first
has to reactivate radio transmission before it can send feedback to the
parent unit.
Please note the following:
-
In Eco Max mode you do not receive feedback when the parent unit is
out of range of the baby unit. You can check the link by pressing any
button on the parent unit.
-
The Eco Max mode cannot be activated if the microphone sensitivity is
set to the highest level.
Activating Eco Max mode
1 Select 'Eco Max' in the menu with the + and - buttons and press OK to
confirm.
2 When the display shows 'Turn On', press OK to switch on the Eco Max
mode.
3 The warning message 'No alert if out of range, OK' appears on the
display. Press OK to confirm.
Note: The warning message scrolls across the display twice. If you do not
press OK, the parent unit leaves the menu and the Eco Max mode
remains off.
4 The Eco Max indication flashes on the display. The 'link' light flashes
green slowly when the baby unit does not transmit any signals to the
parent unit.
5 When the parent unit receives a signal from the baby unit because radio
transmission has been reactivated, the 'link' light turns solid green.
13
Nightlight
Deactivating Eco Max mode
1 Press the MENU button.
2 Use the + and - buttons to select ‘Eco Max’ and press OK to confirm.
3 When the display shows ‘Turn Off’, press OK to confirm.
1 To switch the nightlight on the baby unit on, select 'Nightlight' in the
menu with the + and - buttons and press OK to confirm.
2 Press OK to choose 'Turn On'. The nightlight symbol appears on the
display.
Page 11
14
English
Lullaby
Feed timer
3 When the nightlight is on and you want to switch it off, select 'Nightlight'
in the menu and press OK to choose 'Turn Off'. The nightlight symbol
disappears from the display.
1 To play one or more lullabies on the baby unit, select 'Lullaby' in the
menu with the + and - buttons. Press OK to confirm.
2 Press OK again to play the first lullaby. Use the + and - buttons to select
one of the lullabies or 'Play all'.
The display shows the lullaby symbol and the number of the lullaby that
is playing. The selected lullaby repeats continuously for 15 minutes,
unless you select 'stop' in the menu.
If you select 'Play all', all pre-stored lullabies are played for 15 minutes.
The display shows the number of the lullaby that is playing.
3 To stop playing, select 'Stop' in the menu and press OK to confirm.
You can set the feed timer to alert you that it is time to feed your baby. The
timer can be set from 1 minute to 23 hours and 59 minutes.
1 To open the feed timer submenu, select 'Feed Timer' in the menu. Press
OK to confirm.
2 Select 'Set Timer' in the feed timer submenu. Press OK to start setting the
timer.
3 Set the hour and the minutes and press OK to confirm.
4 To start the feed timer, select 'xx:xx Start' in the feed timer submenu.
Press OK to confirm. The timer symbol appears on the display and the
timer starts counting down.
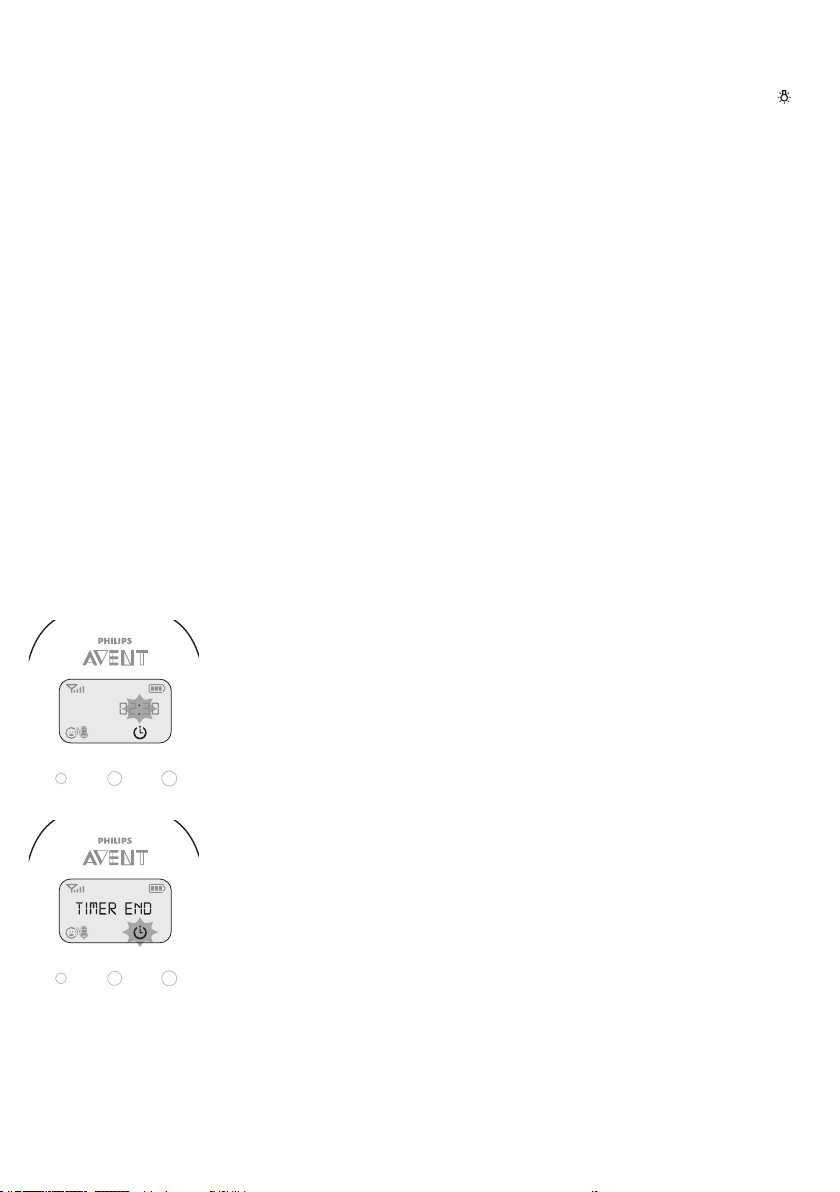
5 When the timer has reached 00:00, the feed timer alert goes off, the
timer symbol starts flashing on the display and the message 'TIMER END'
scrolls across the display.
6 To stop the timer, select 'Stop & Reset' in the feed timer submenu and
press OK to confirm.
Setting the feed timer repeat
1 To make the feed timer go off after the same set time, select ‘Timer
repeat’ in the feed timer submenu after you have set the timer. Press OK
to confirm.
2 Choose ‘Repeat ON’ or ‘Repeat OFF’ and press OK to confirm. The timer
repeat symbol appears on the display.
3 If ‘Repeat ON’ is set, the feed timer starts counting down again after you
stop the alert.
Page 12
Room temperature
A baby sleeps comfortably at a temperature between 16°C / 61°F and 20°C
/ 68°F. You can set a minimum and a maximum temperature range. You can
also set a temperature alert.
1 To open the temperature submenu, select 'Temperature' in the menu.
2 Select 'Temp Range' in the temperature submenu and press OK to
3 Use the + and - buttons to set the minimum temperature range between
4 Select 'Alert' in the temperature submenu. Press OK to confirm.
5 Select 'Alert ON' or or 'Alert OFF'. Press OK to confirm.
6 Select 'Temp Scale' in the temperature submenu. Press OK to confirm.
7 Select 'Celsius' or 'Fahrenheit' and press OK to confirm. The temperature
English
Press OK to confirm.
confirm.
10°C / 50°F and 19°C / 66°F and the maximum temperature range
between 22°C / 72°F and 37°C / 99°F. Press OK to confirm.
in the set scale appears on the display.
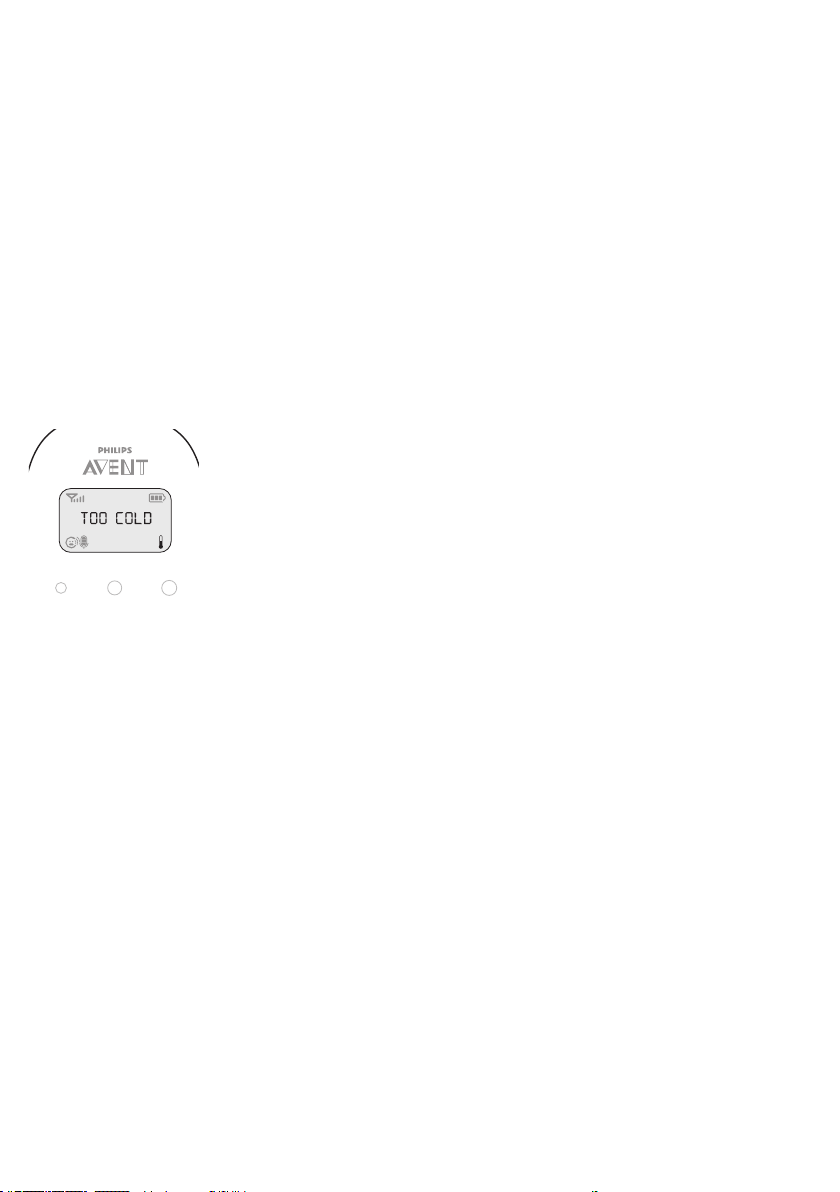
If the temperature is outside the set range, the temperature alert symbol
on the display flashes and the message 'TOO COLD' or 'TOO HOT'
appears on the display. If you set the alert to 'ON', the parent unit also
beeps.
15
Clock
The default setting for the clock is hidden. You can choose to show the clock
and set the clock time in the menu of the parent unit.
1 Select 'Clock' in the menu with the + and - buttons. Press OK to confirm.
2 Select 'Show Time' and press OK to confirm.
3 Select 'Set Time' and press OK to confirm.
4 Set the hour and the minutes and press OK to confirm.
The clock time alternates with other indications in the message field of
the display.
Language
You can use this menu option to change the language setting.
1 Select 'Language' in the menu with the + and - buttons. Press OK to
confirm.
2 Use the + and - buttons to select your language and press OK to confirm.
Warranty and support
If you need information or support, please visit www.philips.com/support or
read the international warranty leaflet.
Page 13
< >
< >
< >
>
<
< >
>
<
>
<
< > >
<
<
Sensitivity
Eco Max
Feed Timer
Temperature
Set Clock
Language
Press OK = < =
Turn ON
Turn OFF
xx:xx Start
Set Timer
Repeat
Temp Range
Temp Alert
Temp Scale
Show/Hide
Set Time
English
Русский
<
<
<
<
<
<
<
>
>
>
>
>
>
>
>
Minimum x
!No alert if…
Hr 00:00
Hr 00:00
Repeat ON
Repeat OFF
Alert ON
Alert OFF
>
< >
< >
< >
<
Play 1
Play 2
...
Play 5
Play All
Celsius
Fahrenheit
Show Clock
Hide Clock
Maximum y
00:30 Min
00:00 Min
>
< >
Nightlight
Menu
Lullaby
Turn ON
Turn OFF<
>
SCD710/SCD711/SCD713/SCD715 (EN
)
> =
16
English
Page 14
1 2 3 4
98765
10
1
Español
17
Page 15

18
Español
Introducción
Visite www.philips.com/welcome para registrar su producto y leer el manual
de usuario detallado.
Pantalla de la unidad de padres (Fig. 1)
1 Indicador de intensidad de señal
2 Indicador de Eco Max
3 Símbolo de silenciamiento
4 Indicador de estado de la batería
5 Indicador de sensibilidad del micrófono
6 Símbolo de nana
7 Símbolo de luz de compañía
8 Símbolo de temporizador
9 Símbolo de temperatura
10 Flecha de navegación
Preparación para su uso
IMPORTANTE: Lea las instrucciones de seguridad con atención antes de
utilizar el vigilabebés y consérvelas por si necesita consultarlas en el
futuro.
Unidad del bebé
Es aconsejable utilizar la unidad del bebé conectada a la red eléctrica. Para
garantizar una alimentación de reserva automática en caso de fallo de la
red eléctrica, puede introducir cuatro pilas alcalinas AA de 1,5V (no
incluidas).
No utilice pilas recargables. La unidad del bebé no tiene función de carga y
las pilas recargables se descargan lentamente mientras no se utilizan.
Unidad de padres
La unidad de padres funciona con dos pilas recargables que se suministran
con el vigilabebés. Cargue la unidad de padres antes de utilizarla por
primera vez y cuando quede poca carga en las pilas.
Tenga en cuenta que con los modelos SCD710/SCD711/SCD713 debe cargar
la unidad de padres durante 10 horas completas para que ofrezca un
tiempo de funcionamiento sin cable de 18 horas. (Para el modelo SCD715:
el tiempo de carga es de 14 horas y el tiempo de funcionamiento de
25 horas.
Nota: Cuando empiece a utilizar el vigilabebés, las pilas recargables tardan 4
ciclos de carga y descarga en alcanzar su capacidad total.
Page 16

Uso del vigilabebés
Colocación del vigilabebés
Mantenga el vigilabebés fuera del alcance del bebé. No coloque
nunca la unidad del bebé en el interior de la cuna o del parque.
-
El cable de la unidad del bebé presenta posibles riesgos de
estrangulación, por lo que debe asegurarse de que la unidad del bebé y
su cable están al menos a 1metro (3,5pies) del bebé.
-
Para evitar que el sonido de una o ambas unidades sea muy agudo,
asegúrese de que la unidad de padres está al menos a 1metro (3,5 pies)
de la unidad del bebé.
Conexión de la unidad de padres y la unidad del bebé
1 Mantenga pulsado el botón de la unidad del bebé durante 2segundos
hasta que el piloto de encendido se ilumine.
2 Mantenga pulsado el botón de la unidad de padres durante
2segundos hasta que se ilumine la pantalla. El piloto "LINK" de la unidad
de padres empieza a parpadear en rojo y aparece el mensaje "LINKING"
(Conectando) en la pantalla.
Cuando la unidad de padres y la unidad del bebé están conectadas, el
piloto "LINK" se ilumina en verde de forma permanente. El indicador de
intensidad de la señal y el mensaje 'LINKED' (Conectado) aparecen en la
pantalla.
Si no se establece la conexión, se muestra el mensaje 'NOT LINKED' (No
conectado) en la pantalla y la unidad de padres empieza a pitar.
Español
19
Qué hacer si no se establece la conexión
-
Si la unidad de padres está fuera de alcance, acérquela a la unidad del
bebé, aunque no a menos de 1metro (3,5pies).
-
Si la unidad del bebé o la unidad de padres está a menos de 2 m/6,5
pies de otro aparato DECT (por ejemplo, un teléfono inalámbrico),
apague el aparato o aleje la unidad del mismo.
-
Si la unidad del bebé está apagada, enciéndala.
Alcance de funcionamiento
-
El alcance de funcionamiento es de 330metros (1000pies) en exteriores
y de hasta 50metros (150pies) en interiores.
-
El alcance de funcionamiento del vigilabebés varía en función del
entorno y de los factores que provocan interferencias. Los materiales
mojados y húmedos provocan tantas interferencias que la pérdida de
alcance puede ser de hasta el 100 %. Para las interferencias de
materiales secos, consulte la tabla siguiente.
Materiales secos Grosor del material Pérdida de alcance
Madera, yeso, cartón,
cristal (sin metal, cables o
plomo)
< 30cm 0-10%
Page 17

20
Español
Materiales secos Grosor del material Pérdida de alcance
Ladrillo, madera
contrachapada
Hormigón armado < 30cm 30-100%
Rejillas o barras metálicas < 1cm 90-100%
< 30cm 5-35%
Láminas de metal o
aluminio
< 1cm 100%
Funciones y reacciones de la unidad del bebé
Luz nocturna
La luz de compañía produce un resplandor suave que tranquiliza al bebé.
1 Pulse el botón de la unidad del bebé para encender o apagar la luz de
compañía.
Función de nanas
1 Pulse el botón en la unidad del bebé para reproducir la última nana
seleccionada. La nana seleccionada se repite durante 15minutos.
2 Pulse el botón para seleccionar otra nana de la lista.
3 Para ajustar el nivel de sonido de la nana, pulse el botón para subir o
bajar el volumen en la unidad del bebé.
Nota: Sólo se puede ajustar el volumen del altavoz en la unidad del bebé
cuando esté sonando una nana. Si ha aumentado el volumen de la nana,
el sonido también será más alto cuando utilice la función de
intercomunicador de la unidad de padres.
4 Para detener la reproducción de la nana, pulse el botón de la unidad
del bebé.
Page 18

Localización de la unidad de padres
Si ha perdido la unidad de padres, puede utilizar el botón FIND de la unidad
del bebé para encontrarla. Esta función solo está disponible si la unidad de
padres está encendida y dentro del alcance.
1 Pulse FIND en la unidad del bebé. La unidad de padres emite un tono de
aviso de localización.
2 Para detener el tono de alerta de localización, pulse FIND de nuevo en la
unidad del bebé o pulse cualquier botón de la unidad de padres. El tono
de alerta de localización se detiene automáticamente después de
2minutos.
Piloto de estado de las pilas
1 El piloto de estado de las pilas se ilumina en verde de forma permanente
cuando la unidad del bebé funciona con las pilas y estas contienen
suficiente energía.
2 El piloto de estado de las pilas parpadea en rojo rápidamente cuando las
pilas se están agotando si la unidad del bebé funciona con la
alimentación de las pilas. Sustituya las pilas cuando se estén agotando.
Español
21
Funciones y reacciones de la unidad de padres
Volumen
Puede ajustar el volumen si el menú no está activo. Hay siete niveles de
volumen y un ajuste de volumen desactivado.
Ajuste del nivel de volumen
1 Pulse el botón + o - una vez.
El nivel de volumen actual aparece en la pantalla.
2 Pulse el botón + para aumentar el volumen o - para bajarlo.
Si no pulsa ningún botón durante más de 2segundos, la indicación de
nivel de volumen desaparece de la pantalla y el ajuste de volumen se
guarda.
Volumen desactivado
Por debajo del ajuste de volumen más bajo, hay un ajuste de volumen
desactivado.
1 Pulse el botón + o - una vez.
El nivel de volumen actual aparece en la pantalla.
2 Mantenga pulsado el botón - durante más de 2segundos para
desactivar el volumen.
Page 19

22
Español
El mensaje "MUTE" (Silencio) y el símbolo de silenciamiento aparecen en
la pantalla. Solo los pilotos de nivel de sonido muestran que el bebé está
produciendo sonidos.
Función TALK (Intercomunicador)
1 Si desea tranquilizar al bebé, pulse TALK en la unidad de padres y hable
con claridad hacia el micrófono de la parte delantera desde una
distancia de 15-30cm (0,5-1pie).
El piloto 'LINK' comienza a parpadear en verde y 'TALK'
(Intercomunicador) aparece en la pantalla.
Nota: Si ha aumentado el volumen de la nana en la unidad del bebé, el
sonido también será más alto cuando utilice la función de
intercomunicador de la unidad de padres.
2 Suelte TALK cuando termine de hablar.
Indicaciones de estado de la batería
Batería baja
Cuando las pilas recargables se están agotando, aparece 'BATTERY LOW'
(Batería baja) en la pantalla, el indicador de estado aparece vacío y
parpadea, y la unidad de padres emite un pitido. El tiempo de
funcionamiento restante es de al menos 30 minutos.
Batería descargada
1 Si las pilas recargables están casi agotadas, el piloto de estado de las
pilas parpadea en rojo rápidamente.
2 Si no conecta la unidad de padres a la red eléctrica, se apagará.
Menú de la unidad de padres
Navegación por el menú
Nota: Algunas funciones del menú solo funcionan cuando la unidad del
bebé y la unidad de padres están conectadas.
Page 20

Español
1 Pulse el botón MENU para abrir el menú y que aparezca la primera
opción del mismo.
2 Utilice el botón+ para acceder a la opción siguiente o el botón - para
acceder a la opción anterior. La flecha de la pantalla indica en qué
dirección puede navegar.
3 Pulse OK para confirmar la selección.
Nota: Pulse el botón MENU si desea salir del menú sin realizar cambios. Si
no hay ninguna entrada durante más de 20 segundos, el menú se cerrará
automáticamente.
23
Sensibilidad
Esta opción del menú de la unidad de padres le permite ajustar la
sensibilidad del micrófono de la unidad del bebé.
La sensibilidad del micrófono determina el nivel de ruido que detecta la
unidad del bebé. Por ejemplo, puede que quiera oír al bebé cuando llore,
pero esté menos interesado en oír los balbuceos.
1 Seleccione "Sensitivity" (Sensibilidad) en el menú con los botones + y -.
Pulse OK para confirmar.
2 Utilice los botones + y - para aumentar o reducir la sensibilidad del
micrófono. El número de segmentos rellenos muestra el nivel de
sensibilidad seleccionado. Pulse OK para confirmar el ajuste.
Niveles e indicaciones de sensibilidad
Icono Sensibilidad Descripción
más alto Oír todos los sonidos del bebé.
El altavoz de la unidad de
padres está encendido de forma
continua.
Page 21

24
Español
Modo Eco Max
alta oír todos los sonidos de
balbuceo suave y más altos. Si el
bebé no emite ningún sonido, el
altavoz de la unidad de padres
se apaga.
medio: oír sonidos de llanto suave y
más alto. Si el bebé emite
sonidos más suaves, el altavoz
de la unidad de padres no se
enciende.
baja El altavoz de la unidad de
padres se activa si el bebé emite
sonidos altos, por ejemplo
cuando llora.
El modo ECO inteligente es una función estándar de este vigilabebés que
reduce automáticamente la señal DECT de la unidad del bebé para ahorrar
energía. Para ahorrar incluso más energía, active el modo ECO Max. En este
modo, la señal DECT de la unidad del bebé se desactiva siempre que el
bebé no haga ruido.
Precaución: En el modo Eco Max, la unidad de padres recibe las
respuestas de la unidad del bebé con retraso. Cuando el bebé emite un
sonido, la unidad del bebé tiene que reactivar primero la transmisión de
radio para poder enviar la respuesta a la unidad de padres.
Tenga en cuenta lo siguiente:
-
En el modo Eco Max, no recibirá ninguna respuesta si la unidad de
padres está fuera del alcance de la unidad del bebé. Puede comprobar la
conexión pulsando cualquier botón de la unidad de padres.
-
El modo Eco Max no se puede activar si la sensibilidad del micrófono se
establece en el nivel más alto.
Activación del modo Eco Max
1 Seleccione 'Eco Max' en el menú con los botones + y -. Pulse OK para
confirmar.
2 Cuando la pantalla muestre "Turn On" (Activar), pulse OK para activar el
modo Eco Max.
3 El mensaje de advertencia 'No alert if out of range, OK' (Sin alerta si está
fuera de alcance, ¿aceptar?) aparece en la pantalla. Pulse OK para
confirmar. Pulse OK (Aceptar) para confirmar.
Nota: El mensaje de advertencia se desplaza por la pantalla dos veces. Si
no pulsa OK, la unidad de padres sale del menú y el modo Eco Max
permanece desactivado.
Page 22

Luz nocturna
Español
4 La indicación de Eco Max parpadea en la pantalla. El piloto 'link'
parpadea en verde lentamente cuando la unidad del bebé no transmite
señal alguna a la unidad de padres.
5 Si la unidad de padres recibe una señal de la unidad del bebé porque la
transmisión de radio se ha reactivado, el piloto "LINK" se ilumina en verde
de forma permanente.
Desactivación del modo Eco Max
1 Pulse el botón MENU (Menú).
2 Utilice los botones + y - para seleccionar "Eco Max" y pulse OK para
confirmar.
3 Cuando la pantalla muestre "Turn Off" (Desactivar), pulse OK para
confirmar.
1 Para encender la luz de compañía de la unidad del bebé, seleccione
"Nightlight" (Luz de compañía) en el menú con los botones + y -. Pulse
OK para confirmar.
2 Pulse OK para seleccionar "Turn On" (Encender). El símbolo de la luz de
compañía aparece en la pantalla.
3 Si la luz de compañía está encendida y desea apagarla, seleccione
'Nightlight' (Luz nocturna) en el menú y pulse OK para elegir "Turn OFF"
(Desactivar). El símbolo de luz de compañía desaparece de la pantalla.
25
Nana
1 Para reproducir una o más nanas en la unidad del bebé, seleccione
'Lullaby' (Nana) en el menú con los botones+ y -. Pulse OK (Aceptar)
para confirmar.
2 Pulse OK de nuevo para reproducir la primera nana. Utilice los botones +
y - para seleccionar una de las nanas o "Play all" (Reproducir todas).
La pantalla muestra el símbolo de nana y el número de la nana que se
está reproduciendo. La nana seleccionada se repite de forma continua
durante 15minutos, a menos que seleccione 'Stop' (Detener) en el menú.
Si selecciona 'Play all', todas las nanas almacenadas previamente se
reproducen durante 15 minutos. La pantalla muestra el número de la
nana que se está reproduciendo.
3 Para detener la reproducción, seleccione "Stop" (Detener) en el menú y
pulse OK para confirmar.
Temporizador de alimentación
Puede establecer el temporizador de alimentación para que avise cuando
sea la hora de alimentar a su bebé. Puede establecer el temporizador desde
1 minuto hasta 23 horas y 59 minutos.
1 Para abrir el submenú del temporizador de alimentación, seleccione
'Feed Timer' (Temporizador de alimentación) en el menú. Pulse OK
(Aceptar) para confirmar.
Page 23

26
Español
2 Seleccione 'Set Timer' (Establecer temporizador) en el submenú del
temporizador de alimentación. Pulse OK para comenzar a ajustar el
temporizador.
3 Ajuste la hora y los minutos, y pulse OK para confirmar.
4 Para iniciar el temporizador de alimentación, seleccione 'xx:xx Start' en el
submenú del temporizador de alimentación. Pulse OK (Aceptar) para
confirmar. El símbolo del temporizador aparece en la pantalla y el
temporizador empezará la cuenta atrás.
5 Cuando el temporizador llega a 00:00, se activa la alerta del
temporizador de alimentación, el símbolo del temporizador empieza a
parpadear en la pantalla y el mensaje 'TIMER END' (Fin del temporizador)
se desplaza por la pantalla.
6 Para detener el temporizador, seleccione "Stop & Reset" (Detener y
restablecer) en el submenú del temporizador de alimentación y pulse OK
para confirmar.
Ajuste de la repetición del temporizador de alimentación
1 Para hacer que el temporizador de alimentación se active después del
mismo tiempo establecido, seleccione "Timer repeat" (Repetición del
temporizador) en el submenú del temporizador después de ajustarlo.
Pulse OK (Aceptar) para confirmar.
2 Seleccione "Repeat ON" (Repetición activada) o "Repeat OFF"
(Repetición desactivada) y pulse OK para confirmar. El símbolo de
repetición del temporizador aparece en la pantalla.
3 Si establece "Repeat ON" (Repetición activada), el temporizador de
alimentación inicia la cuenta atrás de nuevo después de detener la
alerta.
Temperatura ambiente
Los bebés duermen cómodamente a una temperatura entre 16°C / 61°F
and 20°C / 68°F. Puede establecer un intervalo de temperatura mínima y
máxima. También puede ajustar una alerta de temperatura.
1 Para abrir el submenú de la temperatura, seleccione 'Temperature' en el
menú. Pulse OK (Aceptar) para confirmar.
2 Seleccione "Temp Range" (Intervalo de temperatura) en el submenú de
temperatura y pulse OK para confirmar.
3 Utilice los botones + y - para establecer el intervalo de temperatura
mínimo entre 10°C / 50°F and 19°C / 66°F y el intervalo de temperatura
máximo entre 22°C / 72°F and 37°C / 99°F. Pulse OK (Aceptar) para
confirmar.
4 Seleccione 'Alert' en el submenú de temperatura. Pulse OK (Aceptar)
para confirmar.
5 Seleccione 'Alert ON' o 'Alert OFF'. Pulse OK (Aceptar) para confirmar.
Page 24

Reloj
Español
6 Seleccione 'Temp Scale' (Escala de temperatura) en el submenú de
temperatura. Pulse OK (Aceptar) para confirmar.
7 Seleccione "Celsius" o "Fahrenheit" y pulse OK para confirmar. La
temperatura aparece en la pantalla en la escala establecida.
Si la temperatura está fuera del intervalo establecido, el símbolo de
alerta de temperatura de la pantalla parpadea y el mensaje 'TOO HOT'
(Demasiado calor) aparece en la pantalla. Si establece la alerta en 'ON', la
unidad de padres también emite un pitido.
El ajuste predeterminado del reloj está oculto. Puede elegir mostrar el reloj y
ajustar la hora en el menú de la unidad de padres.
1 Seleccione 'Clock' (Reloj) en el menú con los botones + y -. Pulse OK
(Aceptar) para confirmar.
2 Seleccione "Show Time" (Mostrar hora) y pulse OK para confirmar.
3 Seleccione "Set time" (Ajustar hora) y pulse OK para confirmar.
4 Ajuste la hora y los minutos, y pulse OK para confirmar.
La hora del reloj se alterna con el resto de indicaciones en el campo de
mensajes de la pantalla.
27
Idioma
Puede utilizar esta opción del menú para cambiar el ajuste de idioma.
1 Seleccione 'Language' (Idioma) en el menú con los botones + y -. Pulse
OK (Aceptar) para confirmar.
2 Utilice los botones + y - para seleccionar su idioma, y pulse OK para
confirmar.
Garantía y asistencia
Si necesita asistencia o información, visite www.philips.com/support o lea
el folleto de garantía internacional.
Page 25

< >
< >
< >
>
<
< >
>
<
>
<
<
>
>
<
<
Sensibilidad
Eco Max
Feed Timer
Temperatura
Ajuste del
reloj
Idioma
Pulse OK =< =
Encender
Apagar
xx:xx inicio
Ajuste
temporizado
Repetir
Rango de temp.
Alerta de temp.
Escala de temp
Mostrar/
Ocultar
Ajustar hora
English
Русский
<
<
<
<
<
<
<
>
>
>
>
>
>
Minimum x
!Sin alerta si …
Hr 00:00
Std 00:00
Repeat ON
Repeat OFF
Alert ON
Alert OFF
>
< >
< >
< >
<
Rep. 1
Rep. 2
...
Rep. 5
Reproducir
todas
Celsius
Fahrenheit
Mostrar hora
Ocultar hora
yy máximo
00:30 Min
00:00 Min
>
< >
Luz nocturna
Menu
Nana
Encender
Apagar<
>
SCD710/SCD711/SCD713/SCD715 (ES
)
> =
28
Español
Page 26

1 2 3 4
98765
10
1
Nederlands
29
Page 27

30
Nederlands
Introductie
Ga naar www.philips.com/welcome om uw product te registreren en de
gedetailleerde gebruiksaanwijzing te lezen.
Display van de ouderunit (afb. 1)
1 Signaalsterkte-indicator
2 Eco Max-indicator
3 Dempsymbool
4 Accustatusindicator
5 Microfoongevoeligheidsindicator
6 Slaapliedjessymbool
7 Nachtlampsymbool
8 Timersymbool
9 Temperatuursymbool
10 Navigatiepijl
Klaarmaken voor gebruik
BELANGRIJK: Lees de veiligheidsinstructies zorgvuldig door voordat u de
babyfoon gebruikt en bewaar dit document, zodat u de instructies indien
nodig kunt raadplegen.
Babyunit
We raden u aan de babyunit op het stopcontact aan te sluiten. Als u er zeker
van wilt zijn dat de babyunit blijft werken bij een stroomstoring, kunt u vier
AA-alkalinebatterijen van 1,5 V (niet meegeleverd) in de babyunit plaatsen.
Gebruik geen oplaadbare batterijen. De babyunit heeft geen oplaadfunctie
en oplaadbare batterijen lopen langzaam leeg wanneer ze niet worden
gebruikt.
Ouderunit
De ouderunit werkt op twee oplaadbare batterijen die bij de babyfoon zijn
geleverd. Laad de ouderunit op voordat u deze voor het eerst gebruikt en
wanneer de batterijen bijna leeg zijn.
Voor een snoerloze gebruiksduur van 18 uur moet u de ouderunit
gedurende de volledige 10 uur opladen (SCD710/SCD711/SCD713). (Voor de
SCD715: de oplaadtijd bedraagt 14 uur en de gebruiksduur 25 uur.)
Opmerking: Wanneer u de babyfoon voor het eerst gebruikt, moet u de
oplaadbare batterijen eerst vier keer opladen en ontladen voordat ze hun
volledige capaciteit hebben bereikt.
Page 28

Nederlands
De babyfoon gebruiken
De babyfoon plaatsen
Houd de babyunit buiten het bereik van uw baby. Plaats de
babyunit nooit in het bedje of de box van de baby.
-
Het snoer van de babyunit kan wurgingsgevaar opleveren. Zorg er
daarom voor dat de babyunit en het bijbehorende snoer zich op ten
minste 1 meter afstand van uw baby bevinden.
-
Houd een afstand van minstens 1 meter aan tussen de ouderunit en de
babyunit om een hoge pieptoon uit één of beide units te voorkomen.
Een verbinding maken tussen ouderunit en babyunit
1 Houd de knop op de babyunit 2 seconden ingedrukt tot het aan-
lampje gaat branden.
2 Houd de knop op de ouderunit 2 seconden ingedrukt tot het display
oplicht. Het 'link'-lampje (Verbinding) op de ouderunit begint rood te
knipperen en het bericht 'LINKING' (Verbinden) verschijnt op het display.
Wanneer de ouderunit en babyunit verbonden zijn, brandt het linklampje (Verbinding) groen. De signaalsterkte-indicator en het bericht
'LINKED' (Verbonden) verschijnen op het display.
Als er geen verbinding tot stand is gebracht, wordt het bericht 'NOT
LINKED' (Niet verbonden) weergegeven en begint de ouderunit te
piepen.
31
Wat moet ik doen als er geen verbinding tot stand is gebracht?
-
Als de ouderunit zich buiten het bereik bevindt, plaats deze dan dichter
bij de babyunit, maar niet dichter bij dan 1 meter.
-
Als de babyunit of ouderunit zich te dicht (<2 m) bij een ander DECTapparaat (bijv. een draadloze telefoon) bevindt, schakel dit apparaat dan
uit of plaats de unit verder van het apparaat vandaan.
-
Als de babyunit is uitgeschakeld, schakel deze dan in.
Bereik
-
Het bereik is buiten 330 meter en binnenshuis maximaal 50 meter.
-
Het bereik van de babyfoon varieert en is afhankelijk van
omgevingsfactoren die storing veroorzaken. Natte en vochtige materialen
kunnen zoveel storing veroorzaken dat de babyfoon helemaal geen
bereik meer heeft. Raadpleeg de onderstaande tabel voor informatie
over storing door droge materialen.
Droge materialen Dikte van het materiaal Vermindering van bereik
Hout, pleisterwerk, karton,
glas (zonder metaal,
bedrading of lood)
Baksteen, triplex < 30 cm 5-35%
< 30 cm 0-10%
Page 29

32
Nederlands
Droge materialen Dikte van het materiaal Vermindering van bereik
Gewapend beton < 30 cm 30-100%
Metalen roosters of
stangen
Metaal- of
aluminiumplaten
< 1 cm 90-100%
< 1 cm 100%
Functies en feedback van de babyunit
Nachtlampje
Het nachtlampje produceert een zachte gloed die uw baby geruststelt.
1 Druk op de knop op de babyunit om het nachtlampje in of uit te
schakelen.
Slaapliedjesfunctie
1 Druk op de knop op de babyunit om het laatst gekozen slaapliedje af
te spelen. Het gekozen slaapliedje wordt gedurende 15 minuten herhaald.
2 Druk op de knop om een ander slaapliedje uit de lijst te kiezen.
3 Druk op de volumeknop + of - op de babyunit om het geluidsniveau van
het slaapliedje aan te passen.
Opmerking: U kunt het luidsprekervolume van de babyunit alleen
instellen als er een slaapliedje wordt afgespeeld. Als u voor het
slaapliedje een hoger volume instelt, is het geluid van de babyunit ook
harder wanneer u de terugspreekfunctie van de ouderunit gebruikt.
4 Druk op de knop op de babyunit om het afspelen van slaapliedjes te
stoppen.
Page 30

De ouderunit oproepen
Als u de ouderunit kwijt bent, kunt u met de FIND-knop (Zoeken) op de
babyunit de ouderunit terugvinden. Deze functie werkt alleen wanneer de
ouderunit is ingeschakeld en zich binnen het juiste bereik bevindt.
1 Druk op FIND (Zoeken) op de babyunit. De ouderunit geeft een
oproepsignaal af.
2 Als u het oproepsignaal wilt uitschakelen, drukt u nogmaals op FIND
(Zoeken) op de babyunit of drukt u op een willekeurige knop op de
ouderunit. Het oproepsignaal stopt automatisch na 2 minuten.
Batterijstatuslampje
1 Het batterijstatuslampje blijft groen branden wanneer de babyunit op
batterijstroom werkt en de batterijen genoeg energie bevatten.
2 Het batterijstatuslampje knippert snel rood wanneer de batterijen bijna
leeg zijn terwijl de babyunit op batterijstroom werkt. Vervang de
batterijen wanneer deze bijna leeg zijn.
Functies en feedback van de ouderunit
Nederlands
33
Volume
Het volume kan worden ingesteld als het menu niet actief is. Er zijn zeven
volumeniveaus en een 'volume uit'-stand.
Het volumeniveau instellen
1 Druk eenmaal op de knop + of -.
Het huidige volumeniveau verschijnt op het display.
2 Druk op de knop + om het volume te verhogen of op de knop - om het
volume te verlagen.
Als u langer dan 2 seconden niet op een knop drukt, verdwijnt de
volumeniveau-aanduiding van het display en wordt de volumestand
opgeslagen.
Volume uit
Onder de laagste volumestand bevindt zich de 'volume uit'-stand.
1 Druk eenmaal op de knop + of -.
Het huidige volumeniveau verschijnt op het display.
2 Houd de knop - langer dan 2 seconden ingedrukt om het volume uit te
schakelen.
Page 31

34
Nederlands
Het bericht 'MUTE' (Dempen) en het dempsymbool verschijnen op het
display. U kunt nu alleen aan de geluidsniveaulampjes zien dat de baby
geluid maakt.
Terugspreekfunctie
1 Als u uw baby wilt troosten, drukt u op de knop TALK (Spreken) op de
ouderunit en spreekt u duidelijk in de microfoon aan de voorzijde opeen
afstand van 15-30cm.
Het verbindingslampje begint groen te knipperen en 'TALK' (Spreken)
verschijnt op het display.
Opmerking: Als u het volume voor het slaapliedje op de babyunit harder
hebt ingesteld, zal het geluid van de terugspreekfunctie op de ouderunit
ook harder zijn.
2 Laat de knop TALK los wanneer u bent uitgesproken.
Batterijstatusindicator
Batterij bijna leeg
Wanneer de oplaadbare batterijen bijna leeg zijn, verschijnt het bericht
'BATTERY LOW' (Batterij bijna leeg) op het display, gaat de lege
statusindicator knipperen en begint de ouderunit te piepen. De resterende
gebruikstijd is ten minste 30 minuten.
Batterij leeg
1 Als de oplaadbare batterijen bijna leeg zijn, knippert het
batterijstatuslampje snel rood.
2 Als u de ouderunit niet op netspanning aansluit, schakelt deze uit.
Menu van de ouderunit
Navigeren in het menu
Opmerking: Bepaalde menufuncties werken alleen wanneer de babyunit en
de ouderunit met elkaar zijn verbonden.
Page 32

Nederlands
1 Druk op de knop MENU om het menu te openen en de eerste menuoptie
te bekijken.
2 Gebruik de knop + om naar de volgende optie te gaan of de knop - om
naar de vorige optie te gaan. De pijl op het display geeft aan in welke
richting u kunt navigeren.
3 Druk op OK om uw keuze te bevestigen.
Opmerking: Druk op de knop MENU als u het menu wilt verlaten zonder
wijzigingen aan te brengen. Als er langer dan 20 seconden op geen enkele
knop wordt gedrukt, wordt het menu automatisch gesloten.
35
Gevoeligheid
Met deze optie in het menu van de ouderunit kunt u de
microfoongevoeligheid van de babyunit instellen.
De gevoeligheid van de microfoon bepaalt bij welk geluidsniveau de
babyunit actief wordt. Als uw baby huilt, wilt u dat natuurlijk horen, maar
misschien wilt u het gebrabbel van uw kind niet horen.
1 Kies 'Sensitivity' (Gevoeligheid) in het menu met de knoppen + en -, en
druk op OK om uw keuze te bevestigen.
2 Gebruik de knoppen + en - om de gevoeligheid van de microfoon te
verhogen of te verlagen. Het aantal gevulde segmenten geeft het
geselecteerde gevoeligheidsniveau weer. Druk op OK om de instelling te
bevestigen.
Gevoeligheidsniveaus en -aanduidingen
Icoon Gevoeligheid Beschrijving
hoogst Hoor alle geluiden die uw baby
maakt. De luidspreker van de
ouderunit is ononderbroken
ingeschakeld.
Page 33

36
Nederlands
Eco Max-modus
hoog Hoor alle geluiden vanaf zacht
gebrabbel en luider. Als uw baby
geen geluid maakt, wordt de
luidspreker van de ouderunit
uitgeschakeld.
gemiddeld Hoor geluiden vanaf zachte
kreetjes en luider. Als uw baby
zachtere geluiden maakt, wordt
de luidspreker van de ouderunit
niet ingeschakeld.
laag De luidspreker van de ouderunit
schakelt alleen in als de baby
luide geluiden maakt,
bijvoorbeeld wanneer de baby
huilt.
Smart Eco is een standaardfunctie op deze babyfoon. Met deze functie
wordt het DECT-signaal van de babyunit automatisch beperkt om energie te
besparen. Activeer de Eco Max-modus om nog meer energie te besparen. In
deze modus wordt het DECT-signaal van de babyunit naar de ouderunit
uitgeschakeld zolang de baby geen geluid maakt.
Let op: In de Eco Max-modus ontvangt de ouderunit met vertraging
feedback van de babyunit. Wanneer uw baby geluid maakt, moet de
babyunit eerst de radio-overdracht opnieuw activeren voordat deze
feedback naar de ouderunit kan sturen.
Let op het volgende:
-
In de Eco Max-modus ontvangt u geen feedback wanneer de ouderunit
zich buiten bereik van de babyunit bevindt. U kunt de verbinding
controleren door op een willekeurige knop op de ouderunit te drukken.
-
De Eco Max-modus kan niet worden geactiveerd als de
microfoongevoeligheid op het hoogste niveau is ingesteld.
De Eco Max-modus activeren
1 Kies met de knoppen + en - de optie 'Eco Max' in het menu, en druk op
OK om uw keuze te bevestigen.
2 Druk op OK als op het display 'Turn On' (Inschakelen) verschijnt om de
Eco Max-modus in te schakelen.
3 Het waarschuwingsbericht 'No alert if out of range, OK?' (Geen alarm
wanneer buiten bereik) verschijnt op het display. Druk op OK om uw
keuze te bevestigen.
Opmerking: Het waarschuwingsbericht rolt twee keer over het display. Als
u niet op OK drukt, wordt het menu op de ouderunit gesloten en wordt
de Eco Max-modus niet ingeschakeld.
Page 34

Nachtlampje
Nederlands
4 De Eco Max-aanduiding knippert op het display. Het verbindingslampje
knippert langzaam groen wanneer de babyunit geen signalen naar de
ouderunit verzendt.
5 Wanneer de ouderunit een signaal ontvangt van de babyunit omdat de
radio-overdracht opnieuw is geactiveerd, gaat het 'link'-lampje
(Verbinding) groen branden.
De Eco Max-modus deactiveren
1 Druk op de MENU-knop.
2 Gebruik de knoppen + en - om 'Eco Max' te kiezen en druk op OK om uw
keuze te bevestigen.
3 Als het display 'Turn off' (Uitschakelen) weergeeft, drukt u op OK om te
bevestigen.
1 Om het nachtlampje op de babyunit in te schakelen, kiest u 'Nightlight'
(Nachtlampje) in het menu met de knoppen + en -. Druk op OK om uw
keuze te bevestigen.
2 Druk op OK om 'Turn On' (Inschakelen) te kiezen. Het symbool van het
nachtlampje verschijnt op het display.
3 Als het nachtlampje aan is en u wilt het uitschakelen, drukt u op
'Nightlight' (Nachtlampje) in het menu en drukt u op OK om 'Turn off'
(Uitschakelen) te kiezen. Het nachtlampsymbool verdwijnt van het
display.
37
Slaapliedje
Voedingstimer
1 Als u een of meer slaapliedjes op de babyunit wilt afspelen, kiest u met
de knoppen + en - de optie 'Lullaby' (Slaapliedje) in het menu. Druk op
OK om uw keuze te bevestigen.
2 Druk nogmaals op OK om het eerste slaapliedje af te spelen. Gebruik de
knoppen + en - om een van de slaapliedjes of 'Play all' (Alles afspelen) te
selecteren.
Op het display verschijnt het slaapliedjessymbool en het nummer van het
slaapliedje dat wordt afgespeeld. Het gekozen slaapliedje wordt
gedurende vijftien minuten ononderbroken herhaald, tenzij u 'Stop'
(Beëindigen) selecteert in het menu.
Als u 'Play all' (Alles afspelen) selecteert, worden alle
voorgeprogrammeerde slaapliedjes gedurende vijftien minuten
afgespeeld. Op het display ziet u het nummer van het slaapliedje dat
wordt afgespeeld.
3 Om het afspelen te stoppen, kiest u 'Stop' (Stoppen) in het menu en
drukt u op OK om uw keuze te bevestigen.
U kunt de voedingstimer instellen om u te waarschuwen dat het tijd is om
uw baby te voeden. De timer kan worden ingesteld op een tijdsduur van 1
minuut tot 23 uur en 59 minuten.
Page 35

38
Nederlands
1 Kies in het menu de optie 'Feed Timer' (Voedingstimer) om het submenu
van de voedingstimer te openen. Druk op OK om uw keuze te bevestigen.
2 Kies in het submenu van de voedingstimer de optie'Set Timer' (Timer
instellen). Druk op OK om de timer in te stellen.
3 Stel het uur en de minuten in en druk op OK om uw keuze te bevestigen.
4 Kies in het submenu van de voedingstimer de optie 'xx:xx Start' (xx:xx
starten) om de voedingstimer te starten. Druk op OK om uw keuze te
bevestigen. Het timersymbool verschijnt op het display en de timer
begint af te tellen.
5 Wanneer de timer 00:00 heeft bereikt, gaat de
voedingstimerwaarschuwing af, begint het timersymbool op het display
te knipperen en rolt het bericht 'TIMER END' (Einde timer) over het
display.
6 Als u de timer wilt stoppen, kiest u in het submenu van de voedingstimer
de optie 'Stop & Reset' (Stoppen en opnieuw instellen) en drukt u op OK
om te bevestigen.
De herhaaloptie voor de voedingstimer instellen
1 Als u de voedingstimer steeds na dezelfde ingestelde periode wilt laten
afgaan, kiest u, nadat u de timer hebt ingesteld, de optie 'Timer repeat'
(Timer herhalen) in het submenu voor de voedingstimer. Druk op OK om
uw keuze te bevestigen.
2 Kies 'Repeat ON' (Herhalen aan) of 'Repeat OFF' (Herhalen uit) en druk
op OK om uw keuze te bevestigen. Het timerherhaalsymbool verschijnt
op het display.
3 Als 'Repeat ON' (Herhalen aan) is ingesteld, begint de voedingstimer
opnieuw af te tellen nadat u het alarm hebt gestopt.
Kamertemperatuur
Een baby slaapt comfortabel bij een temperatuur tussen 16°Cen20°C. U
kunt een bereik instellen voor de minimum- en de maximumtemperatuur.
Daarnaast kunt u een temperatuurwaarschuwing instellen.
1 Kies in het menu de optie 'Temperature' (Temperatuur) om het
2 Kies in het temperatuursubmenu de optie 'Temp Range'
3 Gebruik de knoppen + en - om het minimumtemperatuurbereik in te
4 Kies in het temperatuursubmenu de optie 'Alert' (Alarm). Druk op OK om
5 Kies 'Alert ON' (Waarschuwing aan) of 'Alert OFF' (Waarschuwing uit).
temperatuursubmenu te openen. Druk op OK om uw keuze te
bevestigen.
(Temperatuurbereik) en druk op OK om uw keuze te bevestigen.
stellen van 10°Ctot19°C en het maximumtemperatuurbereik van
22°Ctot37°C. Druk op OK om uw keuze te bevestigen.
uw keuze te bevestigen.
Druk op OK om uw keuze te bevestigen.
Page 36

Klok
Nederlands
6 Kies in het temperatuursubmenu de optie 'Temp Scale'
(Temperatuurschaal). Druk op OK om uw keuze te bevestigen.
7 Kies 'Celsius' of 'Fahrenheit' en druk op OK om uw keuze te bevestigen.
De temperatuur verschijnt op het display in de ingestelde schaal.
Als de temperatuur zich buiten het ingestelde bereik bevindt, knippert
het temperatuuralarmsymbool op het display en verschijnt het bericht
'TOO HOT' (Te warm) op het display. Als u het alarm instelt op 'ON' (Aan),
gaat de ouderunit ook piepen.
De klok is standaard verborgen. U kunt ervoor kiezen de klok weer te geven.
In het menu van de ouderunit kunt u de kloktijd instellen.
1 Kies met de knoppen + en - de optie 'Clock' (Klok) in het menu. Druk op
OK om uw keuze te bevestigen.
2 Kies 'Show time' (Tijd weergeven) en druk op OK om uw keuze te
bevestigen.
3 Kies 'Set time' (Tijd instellen) en druk op OK om uw keuze te bevestigen.
4 Stel het uur en de minuten in en druk op OK om uw keuze te bevestigen.
In het berichtveld van het display worden afwisselend de kloktijd en
andere aanduidingen weergegeven.
39
Taal
U kunt deze menuoptie gebruiken om de taalinstelling te wijzigen.
1 Kies met de knoppen + en - de optie 'Language' (Taal) in het menu. Druk
op OK om uw keuze te bevestigen.
2 Gebruik de knoppen + en - om uw taal te kiezen en druk op OK om uw
keuze te bevestigen.
Garantie en ondersteuning
Hebt u informatie of ondersteuning nodig, ga dan naar
www.philips.com/support of lees de internationale garantieverklaring.
Page 37

< >
< >
< >
>
<
< >
>
<
>
<
< > >
<
<
Gevoeligh.
Eco Max
Timer-feed
Temperatuur
Klok inst.
Taal
Druk op OK = < =
insch.
uitsch.
xx:xx Start
Timer inst.
Herhalen
Temp. bereik
Temp. wrsch.
Temp. schaal
Weerg./verb.
Tijd inst.
English
Русский
<
<
<
<
<
<
<
>
>
>
>
>
>
Minimum x
!Geen mldg
buiten…
uur 00:00
uur 00:00
Herh. aan
Herh. uit
Wrsch. AAN
Wrsch UIT
>
< >
< >
< >
<
1 afspelen
2 afspelen
...
5 afspelen
alle afspelen
Celsius
Fahrenheit
Tijd weerg.
Tijd verb.
Maximum y
00:30 min
00:00 min
>
< >
Nachtlampje
Menu
Slaapliedje
Insch.
Uitsch.<
>
SCD710/SCD711/SCD713/SCD715 (NL
)
> =
40
Nederlands
Page 38

1 2 3 4
98765
10
1
Português
41
Page 39

42
Português
Introdução
Vá a www.philips.com/welcome para registar o seu produto e ler o manual
do utilizador detalhado.
Visor da unidade dos pais (fig. 1)
1 Indicador da intensidade do sinal
2 Indicador Eco Max
3 Símbolo do corte de som
4 Indicador do estado da bateria
5 Indicador da sensibilidade do microfone
6 Símbolo de canção de embalar
7 Símbolo de luz de presença
8 Símbolo do temporizador
9 Símbolo da temperatura
10 Seta de navegação
Preparar para a utilização
IMPORTANTE: leia cuidadosamente as instruções de segurança antes de
utilizar o intercomunicador para bebé e guarde-as para consultas futuras.
Unidade do bebé
Aconselhamos a utilização da unidade do bebé ligada à corrente elétrica.
Para garantir alimentação de reserva automática em caso de falhas de
energia, pode inserir quatro pilhas alcalinas AA de 1,5V (não incluídas).
Não utilize pilhas recarregáveis. A unidade do bebé não tem uma função de
carregamento e as pilhas recarregáveis descarregam lentamente quando
não são utilizadas.
Unidade dos pais
A unidade dos pais é alimentada por duas pilhas recarregáveis fornecidas
com o intercomunicador para bebé. Carregue a unidade dos pais antes de a
utilizar pela primeira vez e quando as pilhas tiverem pouca carga.
Tenha em atenção que, para os modelos SCD710/SCD711/SCD713, tem de
carregar a unidade dos pais durante 10 horas para ter uma autonomia sem
fios de 18 horas. (Para o modelo SCD715: o tempo de carregamento é 14
horas e o tempo de funcionamento é 25 horas.)
Nota: Quando começar a utilizar o intercomunicador para bebé, são
necessários quatro ciclos de carga e descarga até as pilhas recarregáveis
alcançarem a capacidade total.
Page 40

Utilizar o intercomunicador para bebé
Colocação do intercomunicador para bebé
Mantenha o intercomunicador para bebé fora do alcance do bebé.
Nunca coloque a unidade do bebé dentro do berço ou do parque
do bebé.
-
Visto que o cabo da unidade do bebé representa um perigo potencial de
estrangulamento, assegure-se de que a unidade do bebé e o cabo estão,
no mínimo, a 1 metro de distância do seu bebé.
-
Para evitar um som agudo de uma ou ambas as unidades, assegure-se
de que a unidade dos pais está, no mínimo, a 1 metro de distância da
unidade do bebé.
Ligar a unidade dos pais e a unidade do bebé
1 Mantenha o botão premido na unidade do bebé durante 2 segundos,
até a luz de alimentação acender.
2 Mantenha o botão premido na unidade dos pais durante 2 segundos,
até o visor se iluminar. A luz "link" (ligação) na unidade dos pais fica
intermitente a vermelho e a mensagem "LINKING" (A ligar) é apresentada
no visor.
Quando a unidade dos pais e a unidade do bebé estão ligadas, a luz
"link" (ligação) mantém-se continuamente acesa a verde. O indicador da
intensidade do sinal e a mensagem "LINKED" (Ligado) são apresentados
no visor.
Se não for estabelecida uma ligação, é apresentada a mensagem "NOT
LINKED" (Sem ligação) e a unidade dos pais começa a emitir sinais
sonoros.
Português
43
O que fazer se não for estabelecida nenhuma ligação
-
Se a unidade dos pais estiver fora do alcance, aproxime-a da unidade do
bebé, mas mantenha uma distância mínima de 1 metro.
-
Se a unidade do bebé ou dos pais estiver demasiado próxima, a menos
de 2m de outro aparelho DECT (por exemplo, um telefone sem fios),
desligue esse aparelho ou afaste a unidade do mesmo.
-
Se a unidade do bebé estiver desligada, ligue-a.
Alcance de funcionamento
-
O alcance de funcionamento é 330 metros no exterior e até 50 metros
no interior.
-
O alcance de funcionamento do intercomunicador para bebé varia
consoante a área circundante e fatores que provoquem interferência.
Materiais molhados e húmidos causam tanta interferência que a perda
de alcance pode atingir os 100%. Consulte na tabela abaixo a
interferência provocada por materiais secos.
Page 41

44
Português
Materiais secos Espessura do material Perda de alcance
Madeira, estuque, cartão,
vidro (sem metal, fios ou
chumbo)
Tijolo, contraplacado < 30 cm 5-35%
Betão reforçado < 30 cm 30-100%
Grelhas ou barras de metal < 1 cm 90-100%
< 30 cm 0-10%
Folhas de metal ou de
alumínio
< 1 cm 100%
Funções e informações da unidade do bebé
Luz de presença
A luz de presença emite um brilho suave que reconforta o seu bebé.
1 Prima o botão na unidade do bebé para ligar ou desligar a luz de
presença.
Função de canções de embalar
1 Prima o botão na unidade do bebé para reproduzir a última canção de
embalar selecionada. A canção de embalar seleccionada é repetida
durante 15 minutos.
2 Prima o botão para selecionar outra canção de embalar na lista.
Page 42

3 Para ajustar o nível de som da canção de embalar, prima os botões de
volume + ou – na unidade do bebé.
Nota: O volume do altifalante da unidade do bebé apenas pode ser
definido durante a reprodução de uma canção de embalar. Se aumentar
o volume para a canção de embalar, o som também será mais alto
quando utilizar a função de conversação na unidade dos pais.
4 Para parar a reprodução de canções de embalar, prima o botão na
unidade do bebé.
Enviar aviso sonoro para a unidade dos pais
Se não souber onde deixou a unidade dos pais, pode utilizar o botão FIND
(Encontrar) na unidade do bebé para localizar a unidade dos pais. Esta
função só funciona quando a unidade dos pais está ligada e dentro do
alcance.
1 Prima o botão FIND (Encontrar) na unidade do bebé. A unidade dos pais
emite um sinal de alerta.
2 Para interromper o sinal de alerta, prima novamente o botão FIND
(Encontrar) na unidade do bebé ou prima qualquer botão na unidade
dos pais. O sinal sonoro de alerta para automaticamente depois de 2
minutos.
Português
45
Luz de estado das pilhas
1 A luz de estado das pilhas mantém-se acesa a verde quando a unidade
do bebé está a ser alimentada pelas pilhas e estas têm energia
suficiente.
2 A luz de estado das pilhas pisca rapidamente a vermelho quando as
pilhas têm pouca carga e a unidade do bebé está a funcionar com
energia das pilhas. Substitua as pilhas quando estas tiverem pouca
carga.
Funções e informações da unidade dos pais
Volume
O volume pode ser definido se o menu não estiver ativo. Existem sete níveis
de volume e uma regulação de volume desligado.
Definir o nível de volume
1 Prima o botão + ou o botão - uma vez.
O nível de volume atual é apresentado no visor.
2 Prima o botão + para aumentar o volume ou prima o botão - para
diminuir o volume.
Page 43

46
Português
Se não premir nenhum botão durante mais de 2 segundos, a indicação
do nível de volume desaparece do visor e a regulação de volume é
guardada.
Volume desligado
Sob a definição do nível de volume mais baixo, há uma regulação de
"'volume off" (volume desligado).
1 Prima o botão + ou o botão - uma vez.
O nível de volume atual é apresentado no visor.
2 Mantenha o botão - premido durante mais de 2 segundos para desligar
o volume.
A mensagem "MUTE" (Som cortado) e o símbolo de corte do som são
apresentados no visor. As luzes do nível de som são a única indicação de
que o bebé produz sons.
Função "Talk" (Conversar)
1 Se quiser reconfortar o seu bebé, prima TALK (Conversar) na unidade dos
pais e fale claramente para o microfone na parte frontal, a uma distância
de 15-30cm.
A luz "link" (ligação) fica intermitente a verde e "TALK" (Conversar) é
apresentado no visor.
Nota: Se aumentar o volume da canção de embalar na unidade do bebé,
o som também será mais alto quando utilizar a função de conversação
na unidade dos pais.
2 Solte o botão TALK (Conversar) quando terminar de falar.
Indicações de estado da bateria
Bateria fraca
Quando as pilhas recarregáveis estão fracas, é apresentado o texto
"BATTERY LOW" (Pilhas fracas) no visor, o indicador de estado está vazio e
pisca, e a unidade dos pais emite sinais sonoros. O tempo de
funcionamento restante é de 30 minutos, no mínimo.
Pilha vazia
Page 44

1 Se as pilhas recarregáveis estiverem quase vazias, a luz do estado das
pilhas pisca rapidamente a vermelho.
2 Se não ligar a unidade dos pais à alimentação, esta desliga-se.
Menu da unidade dos pais
Navegar no menu
Nota: Algumas funções do menu funcionam apenas quando há uma ligação
estabelecida entre a unidade do bebé e a unidade dos pais.
1 Prima o botão MENU para abrir o menu e visualizar a primeira opção do
menu.
Português
47
2 Utilize o botão + para ir para a opção seguinte ou o botão - para ir para a
opção anterior. A seta no visor indica em que direção se pode deslocar.
3 Prima OK para confirmar a sua seleção.
Nota: Prima o botão MENU se pretender sair do menu sem efetuar
alterações. Se não ocorrer qualquer seleção no menu durante mais de 20
segundos, o menu fecha-se automaticamente.
Page 45

48
Português
Sensibilidade
Esta opção no menu da unidade dos pais permite-lhe definir a
sensibilidade do microfone na unidade do bebé.
A sensibilidade do microfone determina o nível de ruído que é captado pela
unidade do bebé, por exemplo, quer ouvir o seu bebé quando ele chorar,
mas ouvi-lo a palrar poderá não ser tão importante.
1 Seleccione "Sensitivity" (Sensibilidade) no menu com os botões + e -.
Prima OK para confirmar.
2 Utilize os botões + e - para aumentar ou diminuir a sensibilidade do
microfone. O número de segmentos preenchidos indica o nível de
sensibilidade selecionado. Prima OK para confirmar a definição.
Níveis e indicações da sensibilidade
Ícone Sensibilidade Descrição
mais elevada Ouvir todos os ruídos do seu
bebé. O altifalante da unidade
dos pais está continuamente
ligado.
alta Ouvir todos os sons, desde um
palrar baixinho a sons mais
altos. Se o seu bebé não fizer
qualquer som, o altifalante da
unidade dos pais permanece
desligado.
Modo Eco Max
média Ouvir sons desde choros
baixinhos a sons mais altos. Se o
seu bebé fizer barulhos mais
baixos, o altifalante da unidade
dos pais não se liga.
baixa O altifalante da unidade dos
pais só se liga se o bebé
produzir um som elevado, por
exemplo porque está a chorar.
O modo Eco inteligente é uma funcionalidade padrão neste
intercomunicador para bebé. Reduz automaticamente o sinal DECT da
unidade do bebé para poupar energia. Para poupar ainda mais energia,
ative o modo Eco Max. Neste modo, o sinal DECT da unidade do bebé
permanece desligado, desde que o bebé não faça barulho.
Atenção: No modo Eco Max, a unidade dos pais recebe as informações da
unidade do bebé com um atraso. Quando o seu bebé faz um barulho, a
unidade do bebé primeiro tem de reativar a transmissão de rádio, antes de
poder enviar a informação à unidade dos pais.
Tenha em atenção o seguinte:
Page 46

Português
-
No modo Eco Max, não recebe informações quando a unidade dos pais
estiver fora do alcance da unidade do bebé. Pode verificar a ligação
premindo qualquer botão na unidade dos pais.
-
Não pode ativar o modo Eco Max se a sensibilidade do microfone estiver
definida para o nível mais elevado.
Ativar o modo Eco Max
1 Selecione "Eco Max" no menu com os botões + e -. Prima OK para
confirmar.
2 Quando o visor apresenta "Turn on" (Ligar), prima OK para ativar o modo
Eco Max.
3 A mensagem de aviso "No alert if out of range, OK?'' (Sem alerta de fora
de alcance, ok?) é apresentada no visor. Prima OK para confirmar.
Nota: A mensagem de aviso é apresentada no visor duas vezes. Se não
premir OK, a unidade dos pais sai do menu e o modo Eco Max
permanece desligado.
4 A indicação Eco Max pisca no visor. A luz "link" (ligação) pisca lentamente
a verde quando a unidade do bebé não transmite quaisquer sinais para
a unidade dos pais.
5 Quando a unidade dos pais recebe um sinal da unidade do bebé porque
a transmissão de rádio foi reativada, a luz "link" (ligação) mantém-se
continuamente acesa a verde.
Desactivar o modo Eco Max
1 Prima o botão MENU.
2 Utilize os botões + e - para selecionar "Eco Max" e prima OK para
confirmar.
3 Quando o visor apresenta "Turn Off" (Desligar), prima OK para confirmar.
49
Luz de presença
1 Para ligar a luz de presença na unidade do bebé, seleccione "Nightlight"
2 Prima OK para seleccionar "Turn On" (Ligar). O símbolo da luz de
3 Se a luz de presença estiver ligada e pretender desligá-la, selecione
Canção de embalar
1 Para reproduzir uma ou várias canções de embalar na unidade do bebé,
2 Prima OK novamente para reproduzir a primeira canção de embalar.
(Luz de presença) no menu com os botões + e -. Prima OK para
confirmar.
presença é apresentado no visor.
"Nightlight" (Luz de presença) no menu e prima OK para selecionar "Turn
Off" (Desligar). O símbolo de luz de presença desaparece do visor.
selecione "Lullaby" (Canção de embalar) no menu, utilizando os botões +
e -. Prima OK para confirmar.
Utilize os botões + e - para seleccionar uma das canções de embalar ou
"Play all" (Reproduzir tudo).
O visor apresenta o símbolo da canção de embalar e o número da
canção de embalar que está a ser reproduzida. A canção de embalar
Page 47

50
Português
selecionada é repetida continuamente durante 15 minutos, a menos que
selecione "Stop" (Parar) no menu.
Se selecionar "Play all" (Reproduzir tudo), todas as canções de embalar
pré-memorizadas são reproduzidas durante 15 minutos. O visor
apresenta o número da canção de embalar que está a ser reproduzida.
3 Para parar a reprodução, seleccione "Stop" (Parar) no menu e prima OK
para confirmar.
Temporizador da alimentação
Pode definir o temporizador da alimentação para o alertar quanto estiver na
hora de alimentar o seu bebé. O temporizador pode ser definido desde 1
minuto a 23 horas e 59 minutos.
1 Para abrir o submenu do temporizador da alimentação, selecione "Feed
Timer" (Temporizador da alimentação) no menu. Prima OK para
confirmar.
2 Selecione "Set Timer" (Definir temporizador) no submenu do
temporizador da alimentação. Prima OK para começar a definição do
temporizador.
3 Defina a hora e os minutos e prima OK para confirmar.
4 Para iniciar o temporizador da alimentação, selecione "xx:xx Start" (Iniciar
xx:xx) no submenu do temporizador da alimentação. Prima OK para
confirmar. O símbolo do temporizador é apresentado no visor e o
temporizador inicia a contagem decrescente.
5 Quando o temporizador alcançar 00:00, o alerta do temporizador da
alimentação é ativado, o símbolo do temporizador pisca no visor e a
mensagem "TIMER END" (Final da temporização) é apresentada no visor.
6 Para parar o temporizador, selecione "Stop & Reset" (Parar e repor) no
submenu do temporizador da alimentação e prima OK para confirmar.
Definir a repetição do temporizador da alimentação
1 Para o temporizador da alimentação voltar a ser ativado depois do
mesmo período de tempo já definido, selecione "Timer repeat" (Repetir
temporizador) no submenu do temporizador da alimentação, depois de
definir o temporizador. Prima OK para confirmar.
2 Selecione "Repeat ON" (Repetição ligada) ou "Repeat OFF" (Repetição
desligada) e prima OK para confirmar. O símbolo de repetição do
temporizador é apresentado no visor.
3 Se "Repeat ON" (Repetição ligada) estiver definido, o temporizador da
alimentação reinicia a contagem decrescente depois de parar o alerta.
Temperatura ambiente
Um bebé dorme confortavelmente a uma temperatura entre o 16°C e os
20°C. Pode definir um valor mínimo e máximo para os limites de
temperatura. Também pode definir um alerta de temperatura.
Page 48

Português
1 Para abrir o submenu da temperatura, selecione "Temperature"
(Temperatura) no menu. Prima OK para confirmar.
2 Selecione "Temp Range" (Limites da temperatura) no submenu da
temperatura e prima OK para confirmar.
3 Utilize os botões + e - para definir o limite mínimo da temperatura entre
10°C e 19°C e o limite máximo da temperatura entre 22°C e 37°C. Prima
OK para confirmar.
4 Selecione "Alert" (Alerta) no submenu da temperatura. Prima OK para
confirmar.
5 Selecione "Alert ON" (Alerta ligado) ou "Alert OFF" (Alerta desligado).
Prima OK para confirmar.
6 Selecione "Temp Scale" (Escala de temperatura) no submenu da
temperatura. Prima OK para confirmar.
7 Selecione "Celsius" ou "Fahrenheit" e prima OK para confirmar. A
temperatura na escala definida é apresentada no visor.
Se a temperatura estiver fora do limite definido, o símbolo de alerta da
temperatura no visor fica intermitente e a mensagem "TOO COLD"
(Demasiado fio) ou "TOO HOT" (Demasiado quente) é apresentada no
visor. Se definir o alerta para "ON" (Ligado), a unidade dos pais também
emite sinais sonoros.
51
Relógio
O relógio está oculto por predefinição. Pode selecionar a apresentação do
relógio e definir a hora no menu da unidade dos pais.
1 Selecione "Clock" (Relógio) no menu com os botões + e -. Prima OK para
confirmar.
2 Selecione "Show Time" (Mostrar as horas) e prima OK para confirmar.
3 Seleccione "Set Time" (Acertar a hora) e prima OK para confirmar.
4 Defina a hora e os minutos e prima OK para confirmar.
As horas são apresentadas alternadamente com outras indicações no
campo de mensagem do visor.
Idioma
Pode utilizar esta opção do menu para mudar a definição do idioma.
1 Selecione "Language" (Idioma) no menu com os botões + e -. Prima OK
para confirmar.
2 Utilize os botões + e - para seleccionar o seu idioma e prima OK para
confirmar.
Garantia e assistência
Se precisar de informações ou assistência, visite www.philips.com/support
ou leia o folheto da garantia internacional.
Page 49

< >
< >
< >
>
<
< >
>
<
>
<
< > >
<
<
Sensitivity
Eco Max
Feed Timer
Temperature
Set Clock
Language
Press OK = < =
Turn ON
Turn OFF
xx:xx Start
Set Timer
Repeat
Temp Range
Temp Alert
Temp Scale
Show/Hide
Set Time
English
Русский
<
<
<
<
<
<
<
>
>
>
>
>
>
>
>
Minimum x
!No alert if…
Hr 00:00
Hr 00:00
Repeat ON
Repeat OFF
Alert ON
Alert OFF
>
< >
< >
< >
<
Play 1
Play 2
...
Play 5
Play All
Celsius
Fahrenheit
Show Clock
Hide Clock
Maximum y
00:30 Min
00:00 Min
>
< >
Nightlight
Menu
Lullaby
Turn ON
Turn OFF<
>
SCD710/SCD711/SCD713/SCD715 (EN
)
> =
52
Português
Page 50

www.philips.com/avent
Philips Consumer Lifestyle BV
Tussendiepen 4, 9206 AD Drachten, the Netherlands
Trademarks owned by the Philips Group.
© 2018 Koninklijke Philips N.V.
All rights reserved
4213.354.4257.1 (5/7/2018)
>75% recycled paper
>75% papier recyclé
 Loading...