

Page 1

SCD525
Page 2

2
Page 3
3
1
2
5
3
12
4
6
13
14
1
8
7
2
3
4
5
6
11
10
9
8
7
17
15
16
21
20
19
18
12
13
17
14
1
9
10
1
2
3
4
5
6
º
7
C
º
F
11
15
16
Page 4

4
Page 5

ENGLISH 6
ESPAÑOL 22
PORTUGUÊS DO BRASIL 38
SCD525
Page 6

6
ENGLISH
Introduction
Congratulations on your purchase and welcome to Philips AVENT! To fully benet from the support
that Philips AVENT offers, register your product at www.philips.com/welcome.
Philips AVENT is dedicated to producing caring, reliable products that give parents the reassurance
they need. This Philips AVENT baby monitor provides round-the-clock support by ensuring you can
always hear your baby clearly without any distracting noise. The DECT technology guarantees zero
interference and a crystal clear signal between the baby unit and the parent unit.
The temperature sensor enables you to monitor the temperature in your baby’s room, and offers
you personalised settings to help keep your baby’s room comfortable.
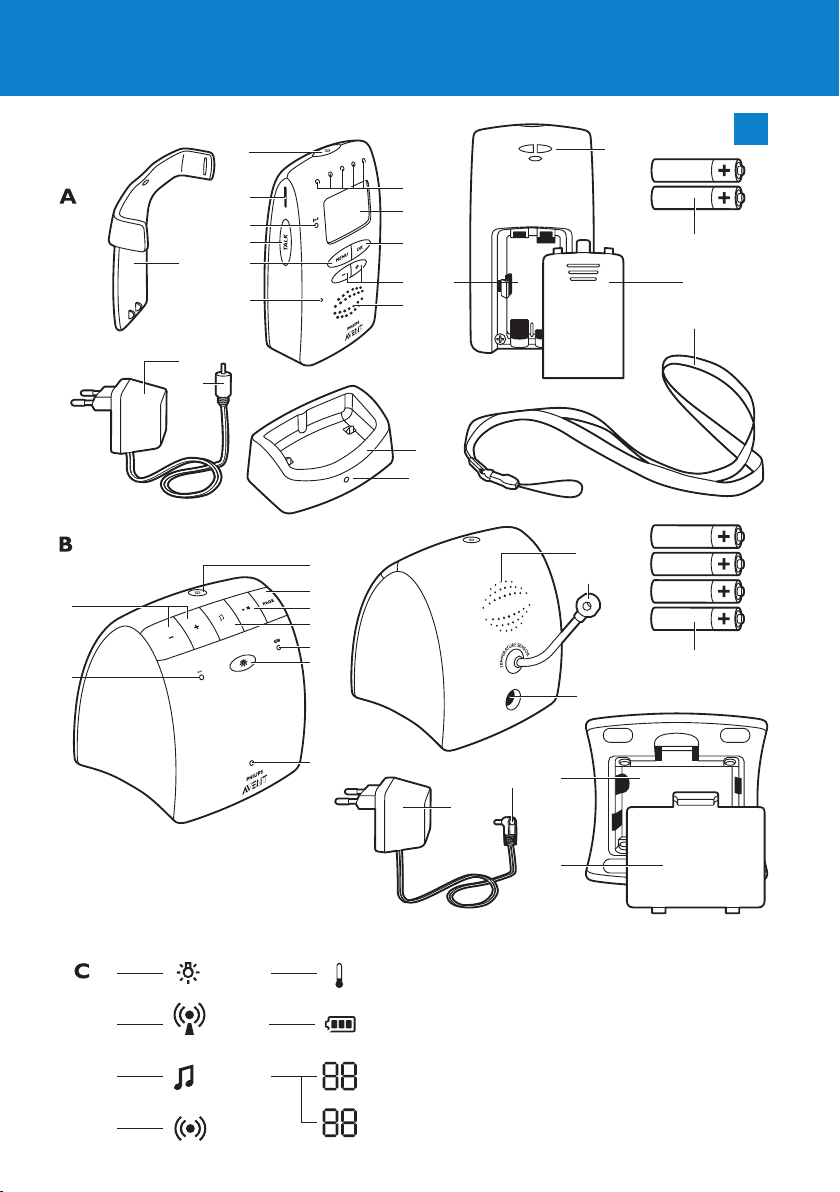
General description (Fig. 1)
A Parent unit
1 On/off button 3
2 Slot for belt clip
3 TALK button
4 MENU button
5 LINK light
6 Microphone
7 Loudspeaker
8 Menu and volume +/– buttons
9 OK button
10 Display
11 Sound level lights
12 Belt clip
13 Adapter
14 Small appliance plug
15 Charger
16 Charging light
17 Compartment for rechargeable batteries
18 Neck strap
19 Lid of compartment for rechargeable batteries
20 Rechargeable batteries (included)
21 Opening for neck strap
B Baby unit
1 On/off button 3
2 PAGE button
3 Play/stop button E
4 Lullaby button K
5 Battery light T
6 Nightlight button Q
7 Power-on light
8 Volume +/– buttons
9 Microphone
10 Adapter
11 Large appliance plug
12 Loudspeaker
13 Temperature sensor
14 Socket for large appliance plug
15 Compartment for non-rechargeable batteries
16 Lid of compartment for non-rechargeable batteries
17 Non-rechargeable batteries (not included)
Page 7

ENGLISH 7
C Display
1 Nightlight symbol
2 ECO symbol
3 Lullaby symbol
4 Sound alert
5 Temperature alert
6 Battery symbol
7 Room temperature indication (Celcius or Fahrenheit)
For other display indications and volume/sensitivity levels, see chapters ‘Features’ and ‘Menu options’.
Important
Read this user manual carefully before you use the appliance and save it for future reference.
Danger
- Never immerse any part of the baby monitor in water or any other liquid.
- Do not place the appliance where water or any other liquid can drip or splash onto it.
- Never put any object containing liquid on top of the baby unit.
Warning
- Check if the voltage indicated on the adapters of the baby unit and the charger corresponds to
the local mains voltage before you connect the appliance.
- Only use the adapter supplied to connect the baby unit to the mains.
- Only use the charger and adapter supplied to charge the parent unit.
- The adapters contain a transformer. Do not cut off the adapters to replace them with other
plugs, as this causes a hazardous situation.
- If the adapters are damaged, always have them replaced with one of the original type in order
to avoid a hazard. For the correct type, see chapter ‘Replacement’.
- If the charger of the parent unit is damaged, always have it replaced with one of the original
type.
- Never use the baby monitor in moist places or close to water.
- Except for the battery compar tments, do not open the housing of the baby unit and parent unit
in order to prevent electric shock.
- This appliance is not intended for use by persons (including children) with reduced physical,
sensory or mental capabilities, or lack of experience and knowledge, unless they have been given
supervision or instruction concerning use of the appliance by a person responsible for their
safety.
- Children should be supervised to ensure that they do not play with the appliance.
Caution
- Use and store the appliance at a temperature between 7°C and 40°C.
- Do not expose the baby unit and parent unit to extreme cold or heat or to direct sunlight. Do
not put the baby unit and the parent unit close to a heating source.
- Make sure the baby unit and the cord are always out of reach of the baby (at least 1 metre/3
feet away).
- Never place the baby unit inside the baby’s bed or playpen.
- Never cover the parent unit and the baby unit with anything (e.g. a towel or blanket).
- Always place non-recheargeable batteries of the correct type in the baby unit.
- Always place rechargeable batteries of the correct type in the parent unit.
- If you place the parent unit next to a transmitter or other DECT appliance (e.g. a DECT
telephone or wireless router for the internet), the connection with the baby unit may be lost.
Move the baby monitor further away from the other wireless appliances until the connection is
restored.
Page 8

ENGLISH8
- Switched-on mobile phones in the vicinity of the baby monitor may cause interference with the
baby monitor.
- Radio interference is inevitable and may have an effect on the sound quality of the baby monitor.
General
- This baby monitor is intended as an aid. It is not a substitute for responsible and proper adult
supervision and should not be used as such.
- Take every precaution to make sure that your baby can sleep safely.
- The temperature sensor only measures the temperature in the baby room. It cannot be used
to control or adjust the temperature in the baby room.
Important information about non-rechargeable and rechargeable batteries
- Non-rechargeable batteries and rechargeable batteries may explode if exposed to sunshine, re
or high temperatures due to other causes.
- Always place rechargeable batteries of the correct type in the parent unit to avoid the risk of
explosion. Do not use non-rechargeable batteries to avoid the risk of explosion.
- Always place non-recheargeable batteries of the correct type in the baby unit to avoid the risk
of explosion. The baby unit does not have a charging function.
- Make sure that your hands are dry when you insert or replace non-rechargeable batteries
or rechargeable batteries.
- To avoid damage due to leakage of non-rechargeable or rechargeable batteries:
1 Do not expose the appliance to temperatures higher than 35°C.
2 Remove the rechargeable batteries of the parent unit and the non-rechargeable batteries of the
baby unit if you are not going to use the appliance for one month or more.
3 Do not leave empty non-rechargeable batteries in the baby unit.
- Dispose of non-rechargeable batteries and rechargeable batteries properly (see chapter
‘Environment’).
Electromagnetic elds (EMF)
This Philips AVENT appliance complies with all standards regarding electromagnetic elds (EMF). If
handled properly and according to the instructions in this user manual, the appliance is safe to use
based on scientic evidence available today.
Preparing for use
Baby unit
You can use the baby unit from the mains or on non-rechargeable batteries. Even if you are going to
use the unit from the mains, we advise you to insert the non-rechargeable batteries. This guarantees
automatic back-up in case of mains failure.
Mains operation
1 Put the large appliance plug in the baby unit and put the adapter in a wall socket (Fig. 2).
Operation on non-rechargeable batteries
The baby unit runs on four 1.5V R6 AA batteries (not included). We strongly advise you to use
Philips LR6 PowerLife batteries.
Do not use rechargeable batteries, as the baby unit does not have a charging function.
Place batteries in the baby unit if you do not want to use it from the mains or if you want to be
sure of backup power in case of mains failure. Replace the batteries when the baby unit indicates
that the batteries are low (the empty battery symbol ashes on the display and the text ‘Battery
low’ appears).
Unplug the baby unit and make sure your hands and the unit are dry when you insert the
non-rechargeable batteries.
Page 9

ENGLISH 9
1 Remove the lid of the compartment for non-rechargeable batteries. (Fig. 3)
2 Insert four non-rechargeable batteries (Fig. 4).
Note: Make sure the + and - poles point in the right direction.
3 Reattach the lid. (Fig. 5)
Note: When the batteries are low, the battery light on the baby unit ashes red.
Parent unit
Operation on rechargeable batteries
The parent unit comes with two rechargeable NiMH AAA 850mAh batteries.
Charge the parent unit before you use it for the rst time or when the parent unit indicates that the
batteries are low (the empty battery symbol ashes on the display and the parent unit beeps). The
parent unit starts indicating that the batteries are low 30 minutes before the batteries are
completely empty.
Note: If the batteries are completely empty, the parent unit automatically switches off and loses contact
with the baby unit.
1 Remove the lid of the compartment for the rechargeable batteries (Fig. 6).
2 Insert the rechargeable batteries (Fig. 7).
Note: Make sure the + and - poles of the batteries point in the right direction.
3 Reattach the lid (Fig. 8).
4 Insert the small appliance plug into the charger, put the adapter in a wall socket and place the
parent unit in the charger (Fig. 9).
, The charging light on the charger goes on.
, The display shows a charging battery symbol to indicate that the parent unit is charging.
5 Leave the parent unit in the charger until the batteries are fully charged.
, During charging, the charging light on the charger stays on.
, When the batteries are fully charged, the display of the parent unit shows a full battery
symbol T.
- When you charge the parent unit for the rst time or after a long period of disuse, switch it
off and let it charge continuously for at least 10 hours.
- Charging normally takes 8 hours, but it takes longer when the parent unit is switched on while
charging. To keep the charging time as shor t as possible, switch off the parent unit during
charging.
- When the batteries are fully charged, the parent unit can be used cordlessly for up to 24 hours.
Note: When the parent unit is charged for the rst time, the operating time is less than 24 hours. The
batteries only reach their full capacity after you have charged and discharged them four times.
Note: When the parent unit is not in the charger, the batteries gradually discharge, even when the parent
unit is switched off.
Using the appliance
1 Place the parent unit and the baby unit in the same room to test the connection (Fig. 10).
Make sure the baby unit is at least 1 metre/3 feet away from the parent unit.
2 Press and hold the on/off button 3 on the baby unit until the green power-on light goes
on. (Fig. 11)
Note: The power-on light always lights up green, even when there is no connection with the parent unit.
, The nightlight lights up briey and then goes out again.
Page 10

ENGLISH10
, The battery light T lights up briey and then goes out again. (Fig. 12)
3 Press and hold the on/off button 3 on the parent unit until the sound level lights light up
briey. (Fig. 13)
, The display goes on and the battery symbol appears on the display (Fig. 14).
, The LINK light ashes red and the message ‘Searching’ appears on the display. (Fig. 15)
, The LINK light on the parent unit turns green and lights up continuously when a connection
has been established between the baby unit and parent unit. The message ‘Linked’ appears on
the display. (Fig. 16)
, After 2 seconds the message ‘Linked’ disappears and the temperature value is shown on the
display. (Fig. 17)
, If no connection is established, the LINK light on the parent unit ashes red. The parent unit
beeps from time to time and the message ‘Searching’ appears on the display, followed by the
message ‘Not Linked’ (Fig. 18).
Positioning the baby monitor
1 Place the baby unit at least 1 metre/3 feet away from your baby (Fig. 19).
2 Place the parent unit within the operating range of the baby unit. Make sure it is at least 1
metre/3 feet away from the baby unit to avoid acoustic feedback (Fig. 20).
For more information on the operating range, see section ‘Operating range’ below.
Operating range
The operating range of the baby monitor is 330 metres/1000 feet in open air. Depending on the
surroundings and other disturbing factors, this range may be smaller. Indoors the operating range is
up to 50 metres/150 feet.
Note: If the ECO mode is switched on, the operating range of the baby monitor is also smaller. See
section ‘ECO mode’ in chapter ‘Menu options’.
Dry materials Material thickness Loss of range
Wood, plaster, cardboard, glass
(without metal, wires or lead)
Brick, plywood < 30cm/12in 5-35%
Reinforced concrete < 30cm/12in 30-100%
Metal grilles or bars < 1cm /0.4in 90-100%
Metal or aluminium sheets < 1cm/0.4in 100%
For wet and moist materials, the range loss may be up to 100%.
Features
The following features are described in chapter ‘Menu options’, as they can only be operated in the
menu of the parent unit:
- Adjusting microphone sensitivity
- Sound alert on/off
- Setting room temperature range (minimum and maximum temperature)
- Temperature alert on/off
- ECO mode on/off
- Setting temperature scale (Fahrenheit or Celcius)
< 30cm/12in 0-10%
Page 11
ENGLISH 11
Adjusting loudspeaker volume
1 Press the volume + or – button on the baby unit until the desired loudspeaker volume for
the baby unit has been reached (Fig. 21).
Note: You can only set the loudspeaker volume on the baby unit when a lullaby is playing.
2 Press the volume + or – button on the parent unit until the desired loudspeaker volume for
the parent unit has been reached (Fig. 22).
, The display gives visual feedback on the volume settings of the parent unit: (Fig. 23)
- Volume switched off/silent baby monitoring
- Minimum volume
- Maximum volume
Note: If the volume is set to a high level, the units consume more power.
Talk function
You can use the TALK button on the parent unit to talk to your baby (e.g. to comfort your baby).
1 Press and hold the TALK button and talk clearly into the microphone from a distance of
15-30cm (Fig. 24).
, The green LINK light starts ashing and the message ‘Talk’ appears on the display.
2 Release the TALK button when you have nished talking.
Sound level lights
The parent unit continuously monitors the sound level in your baby´s room and the sound level
lights let you know if there is any activity. If your baby cries, you see the sound level lights light up on
the parent unit.
- As long as the baby unit does not detect a sound, all sound level lights on the parent unit are
out.
- When the baby unit picks up a sound, one or more sound level lights on the parent unit go on.
The number of lights that go on is related to the loudness of the sound picked up by the baby
unit.
Nightlight
Note: You can also switch the nightlight on and off in the menu of the parent unit (see chapter ‘Menu
options’, section ‘Nightlight’).
1 Press the nightlight button Q on the baby unit to switch on the nightlight. (Fig. 25)
, Q appears on the display of the parent unit.
2 Press the nightlight button Q again to switch off the nightlight.
, The nightlight dims gradually before it goes out completely.
, Q disappears from the display of the parent unit.
Tip: Switch off the nightlight when you operate the baby unit on the non-rechargeable batteries. This
saves power.
Paging the parent unit
If you have misplaced the parent unit and its volume is switched off, you can use the PAGE button
on the baby unit to locate the parent unit.
Note: The paging function only works when the parent unit is switched on.
1 Press the PAGE button on the baby unit (Fig. 26).
, The message ‘Paging’ appears on the display of the parent unit.
, The parent unit produces a paging alert tone.
Page 12

ENGLISH12
2 To stop the paging alert tone, press the PAGE button again or press any button on the parent
unit.
Lullaby function
Note: You can also operate the lullaby function in the menu of the parent unit (see chapter ‘Menu
options’, section ‘Lullaby function’).
1 Press the play/stop button E on the baby unit to play the currently selected
lullaby. (Fig. 27)
, The lullaby starts to play and repeats continuously.
2 To select another lullaby when a lullaby is playing: (Fig. 28)
- Press the lullaby button K on the baby unit.
- Wait 2 seconds for the next lullaby to start.
- If you want another lullaby, press the lullaby button K on the baby unit again.
3 To stop the lullaby, press the play/stop button E on the baby unit again. (Fig. 27)
Out of range alert
When the parent unit is out of range of the baby unit, the parent unit beeps from time to time and
the messages ‘Searching’ and ‘Not linked’ appear on the display. The LINK light on the parent unit
ashes red.
Note: The message ‘Not Linked’ also appears on the display of the parent unit when the baby unit is
switched off.
Menu options
All functions can be operated on the parent unit, but some functions can also be operated on the
baby unit.
Menu operation - general explanation
Note: Menu functions can only be operated when a connection has been established between the baby
unit and the parent unit.
1 Press the MENU button to open the menu (Fig. 29).
, The rst menu option appears on the display.
2 Use the – and + buttons to select the desired menu option (Fig. 30).
Note: The arrow indicates in which direction you can navigate.
3 Press the OK button to conrm (Fig. 31).
4 Use the + and - buttons to select the desired setting.
5 Press the OK button to conrm.
, The new setting ashes once. The message ‘saved’ also ashes once and then disappears from
the display.
6 Press the MENU button again to exit the menu.
ECO mode
Note: You can only switch the ECO mode on and off in the menu of the parent unit.
You can use the ECO mode to reduce the energy consumption of the appliance. Monitoring your
baby from a small distance requires less transmission power and less electrical power
than monitoring your baby from a large distance. When you monitor your baby from a small
distance, you can activate the ECO mode. In the ECO mode, the appliance consumes
Page 13
ENGLISH 13
less energy, but still ensures that you can always hear your baby clearly without any distracting noise.
Using the baby monitor in the ECO mode helps you to preserve the environment.
Note: The operating range of the baby monitor when it is operated in the ECO mode is 260 meters in
open air. Depending on the surroundings and other factor that may cause interference, this range may be
smaller.
1 Select ‘ECO mode’ with the + and - buttons (Fig. 30).
2 Press the OK button to conrm (Fig. 31).
3 If the ECO mode is off, the display shows ‘On?’. Press the OK button to switch on the ECO
mode. If the ECO mode is on, the display shows ‘Off?’. Press the OK button to switch off the
ECO mode.
, If you have set the ECO mode to ‘on’, the parent unit switches off and on again. The ECO
mode symbol appears on the display of the baby unit and the parent unit to indicate that
both units now operate in ECO mode.
Note: The connection between parent and baby unit may be lost when the ECO mode is switched on. If
this happens, the operating range may be too large for the ECO mode. In this case, either reduce the
operating range or switch off the ECO mode.
Nightlight on/off
1 Select ‘Light’ with the + and - buttons.
2 Press the OK button to conrm.
3 If the nightlight is off, the display shows ‘On?’. Press the OK button to switch on the
nightlight. If the nightlight is on, the display shows ‘Off?’. Press the OK button to switch off
the nightlight.
Lullaby function
Selecting a lullaby
1 Select ‘Lullaby’ with the + and - buttons.
2 Press the OK button to conrm.
3 Press the + button once or several times to select one of the ve lullabies from the list or to
select ‘Play All’.
4 Press the OK button to conrm.
When you have selected one of the ve lullabies, it is played 5 times in a row.
When you select ‘play all’, all 5 lullabies are played once.
Switching to another lullaby
1 Press the + button to choose another lullaby from the list.
2 Press the OK button to conrm.
Pausing a lullaby
1 Press the OK button.
, The message ‘Paused’ appears on the display.
2 Press the OK button again to resume the lullaby.
If you do not continue the lullaby within 30 seconds, the lullaby function switches off automatically.
The message ‘Paused’ and the lullaby symbol disappear from the display.
Page 14

ENGLISH14
Stopping a lullaby
1 Press the + button to select ‘Stop’ from the list.
2 Press the OK button to conrm.
Adjusting microphone sensitivity
Note: You can only adjust the microphone sensitivity in the menu of the parent unit.
You can set the microphone sensitivity of the baby unit to the desired level. You can only change the
microphone sensitivity when a connection between the baby unit and the parent unit has been
established, i.e. when the LINK light on the parent unit lights up green continuously.
1 Select ‘Sensitivity’ with the + and - buttons.
2 Press the OK button to conrm.
3 Select the desired microphone sensitivity level for the baby unit with the + and -
buttons. (Fig. 32)
1 Minimum sensitivity level
2 Maximum sensitivity level
4 Press the OK button to conrm.
, The message ‘Saved’ appears on the display.
Note: When the microphone sensitivity of the baby unit is set to a high level, it picks up more sounds and
therefore transmits more often. As a result, the units consume more power and the operating time of the
battery is shorter.
Sound alert on/off
Note: You can only switch the sound alert on and off in the menu of the parent unit.
This feature allows you to monitor your baby silently. It enables you to switch off the volume on
your parent unit and still be alerted if your baby cries.
If the sound alert is switched on, the parent unit beeps as soon as the four th sound level light lights
up blue while the volume is switched off. In addition, the backlight of the parent unit display goes on
and the sound alert symbol ( q) ashes on the display.
1 Select ‘Alert settings’ with the + and - buttons.
2 Press the OK button to conrm.
3 Select ‘Sound alert’ with the + and - buttons.
4 Press the OK button to conrm.
5 If the alert is off, the display shows ‘On?’. Press the OK button to switch on the alert. If the
alert is on, the display shows ‘Off?’. Press the OK button to switch off the alert.
, If you have set the sound alert to ‘on’, the sound alert symbol ( q) appears on the display of
the parent unit.
Setting room temperature range
Note: You can only adjust the temperature range in the menu of the parent unit.
A baby will sleep comfortably in a room heated to a temperature between 16°C and 20°C. This is
important, since a baby cannot regulate its body temperature as well as an adult. A baby needs
more time to adjust to temperature changes.
If you do not set a temperature range, the baby monitor alerts you when the temperature in your
baby’s room drops below 14°C or rises above 35°C. In this case, the backlight of the parent unit
display goes on and ‘High’ or ‘Low’ appears on the display. To change the default minimum and
maximum temperature, follow the instructions below.
Page 15
ENGLISH 15
Note: The temperature of the baby’s room is shown on the display of the parent unit when they are
linked.
1 Select ‘Temperature’ with the + and - buttons.
2 Press the OK button to conrm.
3 Select ‘Range’ with the + and - buttons.
4 Press the OK button to conrm.
5 Set the desired minimum temperature with the + and - buttons.
6 Press the OK button to conrm.
7 Set the desired maximum temperature with the + and - buttons.
8 Press the OK button to conrm.
, The message ‘Saved’ appears on the display.
Temperature alert on/off
Note: You can only switch the temperature alert on and off in the menu of the parent unit.
Note: If the temperature alert is activated too often, reduce the set minimum temperature and/or
increase the set maximum temperature (see ‘Setting room temperature range’).
If the temperature alert is switched on, the parent unit beeps if the actual room temperature
exceeds the set maximum temperature or drops below the set minimum temperature. In addition,
the backlight of the parent unit display goes on and ‘High’ or ‘Low’ appears on the display. If no
minimum and maximum temperatures have been set, the temperature alert is given when the room
temperature drops below 14°C or rises above 35°C.
1 Select ‘Temperature’ with the + and - buttons.
2 Press the OK button to conrm.
3 Select ‘Alert’ with the + and - buttons.
4 Press the OK button to conrm.
5 If the alert is off, the display shows ‘On?’. Press the OK button to switch on the alert. If the
alert is on, the display shows ‘Off?’. Press the OK button to switch off the alert.
Setting temperature scale
Note: You can only set the temperature scale in the menu of the parent unit.
You can set the temperature scale either to Celsius (C) or Fahrenheit (F).
1 Select ‘Settings’ with the + and - buttons.
2 Press the OK button to conrm.
3 Select ‘Temp scale’ with the + and - buttons.
4 Press the OK button to conrm.
5 Select ‘Celsius’ or ‘Fahrenheit’ with the + and - buttons.
Reset function
This function in the menu of the parent unit allows you to reset both the parent unit and the baby
unit to the default settings at the same time. You can use this function if problems occur that you
cannot solve by following the suggestions in chapter ‘Frequently asked questions’.
1 Select ‘Settings’ with the + and - buttons.
Page 16

ENGLISH16
2 Press the OK button to conrm.
3 Select ‘Reset’ with the + and - buttons.
4 Press the OK button to conrm.
, The message ‘Conrm?’ appears on the display of the parent unit.
5 Press the OK button to conrm.
, The parent unit switches off and then switches on again.
, The units have now both been reset to the default factory settings.
Default settings
Parent unit
- Language: English
- Loudspeaker volume: 1
- Microphone sensitivity: 5
- Sound alert: off
- Temperature alert: off
- ‘Temperature low’ aler t: 14°C
- ‘Temperature high’ aler t: 35°C
- Temperature scale: Celsius
- ECO mode: off
Baby unit
- Loudspeaker volume: 3
- Nightlight: off
- Lullaby: off
Accessories
Belt clip and neck strap
If the batteries of the parent unit are sufciently charged, you can take the unit with you inside and
outside the house if you attach the unit to your belt or waistband with the belt clip or if you hang it
around your neck with the neck strap. This allows you to monitor your baby while you are moving
around.
Connecting the belt clip
1 Snap the belt clip onto the parent unit (Fig. 33).
Disconnecting the belt clip
1 Pull the belt clip off the parent unit.
Connecting the neck strap
1 Insert the end loop of the neck strap through the hole behind the strap post. Thread the
neck strap through the end loop and pull the neck strap tight (Fig. 34).
Disconnecting the neck strap
1 Pass the neck strap though the end loop and pull the end loop out of the hole behind the
strap post.
Cleaning and maintenance
Do not immerse the parent unit and the baby unit in water and do not clean them under the tap.
Do not use cleaning spray or liquid cleaners.
Page 17

ENGLISH 17
1 Unplug the baby unit if it is connected to the mains and take the parent unit out of the
charger.
2 Clean the parent unit and the baby unit with a damp cloth.
Make sure the parent unit is dry before you put it back into the plugged-in charger.
3 Clean the charger with a dry cloth.
4 Clean the adapters with a dry cloth.
Storage
- When you are not going to use the baby monitor for some time, remove the non-rechargeable
batteries from the baby unit and the rechargeable batteries from the parent unit. Store the
parent unit, the baby unit, the charger of the parent unit and the adapters in a cool and dry
place.
Replacement
Baby unit
Batteries
Only replace the non-rechargeable batteries of the baby unit with four non-rechargeable 1.5V R6
AA batteries.
Note: We strongly advise you to use Philips non-rechargeable batteries.
Adapter
Only replace the adapter of the baby unit with an adapter of the original type.You can order a new
adapter from your dealer or a Philips service centre.
Adaptor: S004LN0750040
Input: 100-240V ~ 50/60Hz 150mA
Output: 7.5Vdc 400mA
Parent unit
Batteries
Only replace the rechargeable batteries of the parent unit with two rechargeable NiMh AAA
850mAh batteries.
Note: We strongly advise you to use Philips rechargeable batteries.
Adapter
Only replace the adapter of the parent unit with an adapter of the original type.You can order a
new adapter from your dealer or a Philips service centre.
Adaptor: S004LN0750050
Input: 100-240V ~ 50/60Hz 150mA
Output: 7.5Vdc 500mA
Environment
- Do not throw away the appliance with the normal household waste at the end of its life, but
hand it in at an ofcial collection point for recycling. By doing this, you help to preserve the
environment (Fig. 35).
- Rechargeable and non-rechargeable batteries contain substances that may pollute the
environment. Do not throw away rechargeable and non-rechargeable batteries with the normal
household waste, but hand them in at an ofcial collection point. Always remove rechargeable
Page 18

ENGLISH18
and non-rechargeable batteries before you discard and hand in the appliance at an ofcial
collection point. (Fig. 36)
Guarantee and service
If you need service or information or if you have a problem, please visit the Philips AVENT website
at www.philips.com/AVENT or contact the Philips Consumer Care Centre in your country (you
nd its phone number in the worldwide guarantee leaet). If there is no Consumer Care Centre in
your country, go to your local Philips dealer.
Frequently asked questions
This chapter lists the questions most frequently asked about the appliance. If you cannot nd the
answer to your question, contact the Customer Care Centre in your country.
Question Answer
What is ECO mode?
How does this mode
help the environment?
Why don’t the
power-on light of the
baby unit and the LINK
light of the parent unit
come on when I press
the on/off buttons of
the units?
Why does the LINK
light on the parent unit
light up red
continuously and why is
the message ‘Searching’
shown on the display?
Why does the battery
light on the baby unit
ash red?
The ECO mode has been developed to enable you to reduce your
energy consumption. Monitoring your baby from a small distance
requires less power than monitoring your baby from a large distance.
When you monitor your baby from a small distance, you can activate
the ECO mode. By switching on the ECO mode, your baby monitor
uses less energy and is therefore more enviornment-friendly.
Perhaps the batteries of the parent unit are empty and the parent unit
is not in the plugged-in charger. Insert the small appliance plug into the
charger, put the adapter of the charger in a wall socket and place the
parent unit in the charger. Then press the on/off button to establish
connection with the baby unit.
Perhaps the non-rechargeable batteries of the baby unit are empty and
the baby unit is not connected to the mains. Replace the nonrechargeable batteries or connect the baby unit to the mains. Then
press the on/off button to establish connection with the parent unit.
If the LINK light on the parent unit still does not start to ash, use the
reset function to reset the units to their default settings.
The baby unit and the parent unit are out of range of each other. Move
the parent unit closer to the baby unit.
The baby unit may be switched off. Switch on the baby unit.
The ECO mode is switched on, but the operating range is too large.
Move the parent unit closer to the baby unit or switch off the ECO
mode.
The non-rechargeable batteries of the baby unit are running low.
Replace the non-rechargeable batteries or connect the baby unit to
the mains (see chapter ‘Preparing for use’).
Page 19

Question Answer
Why does the parent
unit beep?
Why does the appliance
produce a high-pitched
noise?
Why don’t I hear a
sound/Why can’t I hear
my baby cry?
Why does the parent
unit react too quickly to
other sounds?
Why does the parent
unit react slowly to the
baby’s crying?
Why do the nonrechargeable batteries
of the baby unit run low
quickly?
If the parent unit beeps while the LINK light lights up red continuously
and the message ‘Searching’ is shown on the display, the connection
with the baby unit is lost. Move the parent unit closer to the baby unit.
If the parent unit beeps and the battery symbol on the display is
empty, the rechargeable batteries of the parent unit are running low.
Recharge the batteries.
If you have switched off the volume while the sound alert is on, the
parent unit beeps whenever the fourth sound level light lights up
because the baby unit has picked up a sound.
If you have set the room temperature range on the parent unit and the
temperature alert is on, the parent unit beeps when the temperature
drops below the set level or below 14°C or when the temperature
rises above the set level or above 35°C.
The baby unit may be switched off. Switch on the baby unit.
The units may be too close to each other. Make sure the parent unit
and the baby unit are at least 1 metre/3 feet away from each other.
The volume of the parent unit may be set too high. Decrease the
volume of the parent unit.
The volume of the parent unit may be set too low or may be switched
off. Increase the volume of the parent unit.
The microphone sensitivity level of the baby unit may be set too low.
Set the microphone sensitivity level to a higher level in the menu of the
parent unit.
The baby unit and the parent unit may be out of range of each other.
Reduce the distance between the units.
The baby unit also picks up other sounds than those of your
baby. Move the baby unit closer to the baby (but observe the minimum
distance of 1 metre/3 feet).
The microphone sensitivity level of the baby unit may be set too high.
Decrease the microphone sensitivity level in the menu of the parent
unit.
The microphone sensitivity level of the baby unit may be set too low.
Increase the microphone sensitivity level of in the menu of the parent
unit.
The microphone sensitivity level of the baby unit may be set too high,
which causes the baby unit to transmit more often. Decrease the
microphone sensitivity level in the menu of the parent unit.
The volume on the baby unit may be set too high, which causes the
baby unit to consume a lot of energy. Decrease the volume of the baby
unit.
ENGLISH 19
Page 20

ENGLISH20
Question Answer
You may have set a maximum room temperature that is lower than the
actual room temperature or a minimum room temperature that is
higher than the actual room temperature. The baby unit continues to
send data to the parent unit and therefore uses more power.This
causes the non-rechargeable batteries of the baby unit to run low
quickly.
Perhaps you have switched on the nightlight. If you want to use the
nightlight, we advise you to run the baby unit on mains power.
Why does the charging
time of the parent unit
exceed 8 hours?
The specied operating
range of the baby
monitor is 330
metres/1000 feet. Why
does my baby monitor
manage a much smaller
distance than that?
Why is the
connection lost every
now and then? Why are
there sound
interruptions?
What happens during a
power failure?
Is my baby monitor
secure from
eavesdropping and
interference?
The operating time of
the parent unit is
supposed to be up
to 24 hours. Why is
the operating time of
my parent unit shorter?
The parent unit may be switched on during charging. Switch off the
parent unit during charging.
The specied range is only valid outdoors in open air. Inside your
house, the operating range is limited by the number and type of walls
and/or ceilings in between. Inside the house, the operating range is up
to 50 metres/150 feet.
The ECO mode is switched on. When you operate the baby unit
inECO mode, the operating range is 260 meters/800 feet in open air.
Inside your house, the operating range is limited by the number and
type of walls and/or ceilings in between. Move the parent unit closer to
the baby unit or switch off the ECO mode.
The baby unit and the parent unit are probably close to the outer
limits of the operating range. Try a different location or decrease the
distance between the units. Please note that it takes about 30 seconds
each time before a connection between the units is established.
You may have placed the parent unit next to a transmitter or
otherDECT appliance, such as a DECT telephone or other
1.8GHz/1.9GHz baby monitor. Move the parent unit away from the
other appliances until the connection is re-established.
If the parent unit is sufciently charged, it continues to operate during a
power failure, both inside and outside the charger. If there are batteries
in the baby unit, it also continues to operate during a power failure.
The DECT technology of this baby monitor guarantees no interference
from other equipment and no eavesdropping.
When the parent unit has been charged for the rst time, the
operating time is less than 24 hours. The rechargeable batteries only
reach their full capacity after you have charged and discharged them at
least four times.
Page 21

Question Answer
The volume of the parent unit may be set too high, which causes the
parent unit to consume a lot of energy. Decrease the volume of the
parent unit
The microphone sensitivity level of the baby unit may be set too high,
which causes the parent unit to consume a lot of energy. Decrease the
microphone sensitivity level in the menu of the parent unit.
Why doesn’t battery
symbol appear on the
display of the parent
unit when I start to
recharge the parent
unit?
It may take a few minutes before the battery symbol appears on the
display of the parent unit when you charge the parent for the rst time
or after a long period of disuse.
ENGLISH 21
Page 22

22
ESPAÑOL
Introducción
Felicitaciones por su compra y bienvenido a Philips AVENT. Para disfrutar de todos los benecios
que le ofrece Philips AVENT, registre su producto en www.philips.com/welcome.
Philips AVENT se dedica a fabricar productos conables para el cuidado del bebé que brindan a los
padres toda la tranquilidad que necesitan. Este baby monitor Philips AVENT le permite vigilar a su
bebé constantemente y oírlo con claridad y sin ruidos molestos. La tecnología DECT garantiza la
eliminación de interferencias y una señal nítida entre la unidad del bebé y la unidad para padres.
El sensor de temperatura mide la temperatura de la habitación del bebé y ofrece ajustes
personalizados para mantener la habitación confor table.
Descripción general (Fig. 1)
A Unidad para padres
1 Botón de encendido y apagado 3
2 Ranura del clip para el cinturón
3 Botón TALK
4 Botón MENU
5 Luz LINK
6 Micrófono
7 Parlante
8 Botones de menú y volumen +/–
9 Botón OK
10 Pantalla
11 Luces de nivel de sonido
12 Clip para el cinturón
13 Adaptador
14 Enchufe pequeño de la unidad
15 Cargador
16 Luz de carga
17 Compartimiento para las pilas recargables
18 Correa para el cuello
19 Tapa del compartimiento para las pilas recargables
20 Pilas recargables (incluidas)
21 Abertura de la correa para el cuello
B Unidad del bebé
1 Botón de encendido y apagado 3
2 Botón PAGE
3 Botón para reproducir y detener E
4 Botón de canción de cuna K
5 Luz de la pila T
6 Botón de luz nocturna Q
7 Luz de encendido
8 Botones de volumen +/–
9 Micrófono
10 Adaptador
11 Enchufe grande de la unidad
12 Parlante
13 Sensor de temperatura
14 Toma para el enchufe grande de la unidad
15 Compartimiento para las pilas no recargables
16 Tapa del compartimiento para las pilas no recargables
17 Pilas no recargables (no incluidas)
Page 23

ESPAÑOL 23
C Pantalla
1 Símbolo de luz nocturna
2 Símbolo de modo ECO
3 Símbolo de canción de cuna
4 Alerta sonora
5 Alerta de temperatura
6 Símbolo de la pila
7 Indicador de temperatura de la habitación (Celcius o Fahrenheit)
Para conocer otras indicaciones de la pantalla y los niveles de volumen y sensibilidad, consulte los
capítulos «Funciones» y «Opciones del menú».
Importante
Antes de usar la unidad, lea atentamente este manual del usuario y consérvelo para futuras
consultas.
Peligro
- No sumerja la unidad en ningún tipo de líquido.
- No coloque el artefacto en lugares donde existan riesgos de que se derramen líquidos o de
salpicaduras.
- Nunca coloque recipientes con líquido sobre la unidad del bebé.
Advertencia
- Antes de conectar el aparato, compruebe si el voltaje indicado en los adaptadores de la unidad
del bebé y el cargador coinciden con la red eléctrica local.
- Utilice sólo el adaptador suministrado para conectar la unidad del bebé a la red eléctrica.
- Utilice sólo el cargador y el adaptador suministrados para cargar la unidad para padres.
- Los adaptadores contienen un transformador. Para evitar accidentes, no sustituya los
adaptadores por otros conectores.
- Si los adaptadores están dañados, sustitúyalos siempre por adaptadores originales para evitar
riesgos. Consulte el capítulo «Reemplazo» para conocer los tipos de adaptadores correctos.
- Si el cargador de la unidad para padres está dañado, sustitúyalo por otro original.
- Nunca use la unidad en lugares húmedos o cerca del agua.
- Nunca abra la carcasa de la unidad del bebé o de la unidad para padres (con excepción de los
compartimientos de las pilas) para evitar descargas eléctricas.
- Este artefacto no debe ser utilizado por personas con capacidad física, mental o sensorial
reducida (adultos o niños) o sin los conocimientos y la experiencia necesarios, a menos que
sean supervisados o instruidos acerca del uso del artefacto por una persona responsable de su
seguridad.
- Asegúrese de que los niños no jueguen con este artefacto.
Precaución
- Utilice y guarde el artefacto en lugares con una temperatura de entre 7 °C y 40 °C.
- No exponga la unidad del bebé ni la unidad para padres a temperaturas extremadamente bajas
o altas, ni a la luz solar directa. Tampoco coloque las unidades cerca de fuentes de calor.
- Siempre mantenga la unidad del bebé y el cable fuera del alcance del bebé (a 1 metro de
distancia como mínimo).
- No coloque la unidad del bebé en el interior de la cuna o corralito.
- No cubra las unidades con ningún objeto (por ejemplo, toallas o mantas).
- Coloque siempre pilas no recargables del tipo correcto en la unidad del bebé.
- Coloque siempre pilas recargables del tipo correcto en la unidad para padres.
- Si acerca la unidad para padres a un transmisor u otro dispositivo DECT (por ejemplo, un
teléfono DECT o un router inalámbrico para Internet) es posible que pierda la conexión con la
Page 24

ESPAÑOL24
unidad del bebé. Aleje el aparato de los demás dispositivos inalámbricos hasta que se
restablezca la conexión.
- Los teléfonos celulares encendidos cerca de la unidad pueden ocasionar interferencias.
- Las interferencias de radio son inevitables y pueden afectar la calidad de sonido del aparato.
General
- Esta unidad tiene por objeto asistir en la vigilancia de su hijo, pero no reemplaza la supervisión
responsable y adecuada de un adulto y no debe utilizarse con ese n.
- Tome todas las precauciones posibles para garantizar el sueño seguro de su bebé.
- El sensor de temperatura sólo mide la temperatura de la habitación del bebé y no puede
utilizarse para controlarla ni ajustarla.
Información importante acerca de las pilas recargables y no recargables.
- Las pilas recargables y no recargables pueden explotar si se exponen al sol, el fuego o las altas
temperaturas, entre otras causas.
- Siempre coloque pilas recargables del tipo correcto en la unidad para padres. Para prevenir
explosiones, evite usar pilas no recargables.
- Siempre coloque pilas no recargables del tipo correcto en la unidad del bebé para evitar riesgos
de explosión. La unidad del bebé no tiene función de carga.
- Séquese correctamente las manos antes de colocar o reemplazar las pilas recargables o no
recargables.
- Para evitar que las pilas se sulfaten y produzcan daños:
1 No exponga el dispositivo a temperaturas superiores a 35 °C.
2 Retire las pilas recargables de la unidad para padres y las pilas no recargables de la unidad del
bebé si el dispositivo quedará en desuso durante un mes o un período más prolongado.
3 No deje pilas no recargables vacías en la unidad del bebé.
- Deseche las pilas recargables y no recargables de forma adecuada (consulte el capítulo «Medio
ambiente»).
Campos electromagnéticos
Este producto Philips AVENT cumple con todas las normativas sobre campos electromagnéticos. Si
se emplea correctamente y de acuerdo con las instrucciones de este manual, el uso del dispositivo
es seguro de acuerdo con las evidencias cientícas disponibles en la actualidad.
Preparación inicial
Unidad del bebé
Puede conectar la unidad del bebé a la red eléctrica o utilizarla con pilas no recargables. Incluso si
conecta la unidad a la red eléctrica, se recomienda usar pilas no recargables como fuente de
alimentación de reserva para mantener la energía en caso de producirse un corte en el suministro
eléctrico.
Funcionamiento con electricidad
1 Conecte el enchufe grande en la unidad del bebé y enchufe el adaptador a un tomacorriente
de pared (Fig. 2).
Funcionamiento con pilas no recargables
La unidad del bebé funciona con 4 pilas R6 AA de 1,5 V (no incluidas). Se recomienda utilizar pilas
Philips LR6 PowerLife.
No use pilas recargables porque la unidad del bebé no tiene función de carga.
Coloque pilas en la unidad del bebé si no desea conectarla a la red eléctrica o como fuente de
energía de reserva si se produce un corte de electricidad. Cambie las pilas cuando la unidad indique
que el nivel de carga es bajo: el símbolo de la pila vacía parpadea en la pantalla y aparece el mensaje
«Battery low» (Pila baja).
Page 25

ESPAÑOL 25
Antes de colocar las pilas no recargables, desenchufe la unidad del bebé y verique que sus
manos y la unidad estén secas.
1 Quite la tapa del compartimiento para las pilas no recargables. (Fig. 3)
2 Coloque cuatro pilas no recargables (Fig. 4).
Nota: Verique que los polos + y - de las pilas estén en la posición correcta.
3 Vuelva a colocar la tapa. (Fig. 5)
Nota: Cuando las pilas estén por agotarse, la luz correspondiente en la unidad del bebé titilará en color
rojo.
Unidad para padres
Funcionamiento con pilas recargables
La unidad para padres incluye dos pilas recargables NiMH AAA 850 mAh.
Cargue la unidad para padres antes de usarla por primera vez o cuando la unidad indique que las
pilas están por agotarse (cuando el símbolo de pila descargada parpadee en la pantalla y la unidad
para padres emita un sonido). La unidad para padres comienza a indicar que el nivel de carga de las
pilas es bajo media hora antes de que se agoten por completo.
Nota: Si las pilas están vacías, la unidad para padres se apaga automáticamente y pierde contacto con la
unidad del bebé.
1 Quite la tapa del compartimiento para las pilas recargables (Fig. 6).
2 Coloque las pilas recargables (Fig. 7).
Nota: Verique que los polos + y - de las pilas estén en la posición correcta.
3 Vuelva a colocar la tapa (Fig. 8).
4 Inserte el enchufe pequeño en el cargador, enchufe el adaptador a un tomacorriente de
pared y coloque la unidad para padres en el cargador (Fig. 9).
, La luz de carga del cargador se encenderá.
, La pantalla mostrará el símbolo de una pila cargándose para indicar que la unidad para padres
se está cargando.
5 Deje la unidad para padres en el cargador hasta que las pilas estén completamente cargadas.
, Durante la carga, la luz de carga del cargador permanece encendida.
, Cuando las pilas estén completamente cargadas, aparecerá el símbolo de una pila completa
T en la pantalla de la unidad para padres.
- Cuando cargue la unidad para padres por primera vez o después de un largo período sin usarla,
apáguela y cárguela durante al menos 10 horas seguidas.
- Normalmente la carga del dispositivo demora 8 horas, pero ese período podría prolongarse si
la unidad para padres está encendida durante la carga. Para reducir el tiempo de carga, apague
la unidad durante el proceso.
- Cuando las pilas estén completamente cargadas, podrá utilizar la unidad para padres de forma
inalámbrica durante 24 horas.
Nota: Cuando cargue por primera vez la unidad para padres, el tiempo de funcionamiento será inferior a
24 horas. Las pilas alcanzan su capacidad total tras cargarse y descargarse al menos cuatro veces.
Nota: Cuando la unidad para padres no está en el cargador, las pilas se descargan gradualmente aunque
la unidad esté apagada.
Page 26

ESPAÑOL26
Uso del dispositivo
1 Coloque la unidad del bebé y la unidad para padres en la misma habitación para vericar la
conexión (Fig. 10).
Coloque la unidad del bebé a una distancia mínima de 1 metro de la unidad para padres.
2 Mantenga pulsado el botón de encendido y apagado 3 de la unidad del bebé hasta que la luz
verde de encendido se ilumine. (Fig. 11)
Nota: La luz de encendido se ilumina siempre en color verde, aunque no haya conexión con la unidad
para padres.
, La luz nocturna se enciende brevemente y se vuelve a apagar.
, La luz de la pila T se enciende brevemente y, a continuación, vuelve a apagarse. (Fig. 12)
3 Mantenga presionado el botón de encendido y apagado 3 de la unidad para padres hasta que
las luces de nivel de sonido se enciendan brevemente. (Fig. 13)
, La pantalla se encenderá y aparecerá el símbolo de la pila (Fig. 14).
, La luz LINK parpadeará en rojo y el mensaje «Searching» (Buscando) aparecerá en la
pantalla. (Fig. 15)
, La luz de conexión LINK de la unidad para padres cambiará al color verde y quedará
encendida cuando la unidad establezca conexión con la unidad del bebé. El mensaje «Linked»
(Conectado) aparecerá en la pantalla. (Fig. 16)
, Tras 2 segundos, el mensaje «Linked» (Conectado) desaparecerá y aparecerá el valor de la
temperatura en la pantalla. (Fig. 17)
, Si no se estableció conexión, la luz LINK de la unidad para padres parpadeará en rojo. La
unidad para padres emitirá un sonido intermitente y en la pantalla aparecerán los mensajes
«Searching» (Buscando) y «Not Linked» (Sin conexión) (Fig. 18).
Ubicación del aparato
1 Coloque la unidad del bebé a una distancia mínima de 1 metro del bebé (Fig. 19).
2 Coloque la unidad para padres dentro del radio de alcance de la unidad del bebé. Debe
existir una distancia mínima de 1 metro entre ambas unidades para evitar
acoplamientos (Fig. 20).
Para obtener más información sobre el radio de alcance, consulte la sección «Alcance de
funcionamiento» a continuación.
Alcance de funcionamiento
El radio de alcance del aparato es de 330 metros al aire libre. En función del entorno y de otros
factores de interferencia, este alcance puede ser menor. En interiores, el alcance de funcionamiento
es de 50 metros.
Nota: Si el modo ECO está encendido, el alcance de funcionamiento del aparato también es menor.
Consulte la sección “Modo ECO” del capítulo “Opciones del menú”.
Materiales secos Grosor del material Pérdida de alcance
Madera, yeso, cartón, cristal (sin
metal, cables o plomo)
Ladrillos, madera enchapada < 30 cm / 12 pulg. 5-35%
Hormigón reforzado < 30 cm / 12 pulg. 30-100%
Rejillas o rejas metálicas < 1cm / 0,4 pulg. 90-100%
Placas de metal o aluminio < 1cm / 0,4 pulg. 100%
En materiales mojados o húmedos, la pérdida de alcance puede ser total.
< 30 cm / 12 pulg. 0-10%
Page 27

ESPAÑOL 27
Funciones
Las siguientes funciones se describen en el capítulo «Opciones del menú» dado que sólo pueden
controlarse desde el menú de la unidad para padres:
- Ajuste de la sensibilidad del micrófono
- Activación y desactivación de la señal de alerta sonora
- Ajuste del margen de temperatura de la habitación (temperatura máxima y mínima)
- Activación y desactivación del alerta de temperatura
- Activación y desactivación del modo ECO
- Ajuste de la escala de temperatura (Celcius o Fahrenheit)
Ajuste del volumen de los parlantes
1 Pulse los botones de volumen + / – de la unidad del bebé para seleccionar el nivel de
volumen del parlante (Fig. 21).
Nota: El volumen del parlante en la unidad del bebé sólo puede ajustarse mientras se reproduce una
canción de cuna.
2 Pulse los botones de volumen + / – de la unidad para padres para seleccionar el nivel de
volumen del parlante (Fig. 22).
, La pantalla proporciona información visual sobre los ajustes de volumen de la unidad para
padres: (Fig. 23)
- Volumen desactivado / vigilancia silenciosa del bebé
- Volumen mínimo
- Volumen máximo
Nota: Si el ajuste de volumen es muy alto, las unidades consumen más energía.
Función de intercomunicador
Puede utilizar el botón TALK de la unidad para padres para hablarle al bebé (por ejemplo, para
tranquilizarlo).
1 Mantenga pulsado el botón TALK y hable por el micrófono a una distancia de 15 a 30 cm y
de forma clara (Fig. 24).
, La luz verde LINK comenzará a parpadear y el mensaje «Talk» (Intercomunicador) aparecerá
en la pantalla.
2 Cuando haya terminado de hablar, suelte el botón TALK.
Luces de nivel de sonido
La unidad para padres controla permanentemente el nivel de sonido de la habitación del bebé y las
luces de nivel de sonido indican si existe alguna actividad. Si el bebé llora, las luces se iluminan en la
unidad para padres.
- Si la unidad del bebé no detecta ningún sonido, todas las luces de nivel de sonido permanecen
apagadas.
- Cuando la unidad del bebé capta un sonido, se enciende una o varias luces de nivel de sonido
en la unidad para padres. La cantidad de luces encendidas dependerá del volumen del sonido
captado por la unidad del bebé.
Luz nocturna
Nota: También puede encender y apagar la luz nocturna desde el menú de la unidad para padres
(consulte la sección «Luz nocturna» en el capítulo «Opciones del menú»).
1 Pulse el botón de luz nocturna Q en la unidad del bebé para encenderla. (Fig. 25)
, Q aparecerá en la pantalla de la unidad para padres.
2 Vuelva a pulsar el botón de luz nocturna Q para apagarla.
Page 28

ESPAÑOL28
, La luz nocturna se atenuará gradualmente hasta apagarse por completo.
, Q desaparecerá de la pantalla de la unidad para padres.
Sugerencia: Cuando utilice la unidad del bebé con pilas no recargables, apague la luz nocturna para
ahorrar energía.
Localización de la unidad para padres
Si la unidad para padres tiene el volumen apagado y no sabe dónde la dejó, puede utilizar el botón
PAGE de la unidad del bebé para encontrarla.
Nota: La función de localización sólo está disponible si la unidad para padres está encendida.
1 Pulse el botón PAGE de la unidad del bebé (Fig. 26).
, El mensaje «Paging» (Localización) aparecerá en la pantalla de la unidad para padres.
, La unidad para padres emitirá un tono de aviso de localización.
2 Para detener el tono de aviso de localización, pulse el botón PAGE nuevamente o cualquier
botón de la unidad para padres.
Función de canción de cuna
Nota: También puede controlar esta función desde el menú de la unidad para padres (consulte la sección
«Función de canción de cuna» del capítulo «Opciones del menú»).
1 Pulse el botón para reproducir / detener E en la unidad del bebé para reproducir la
canción de cuna seleccionada. (Fig. 27)
, La canción de cuna comenzará a reproducirse y se repetirá de forma continua.
2 Para seleccionar otra canción mientras se reproduce otra: (Fig. 28)
- Pulse el botón de canción de cuna K en la unidad del bebé.
- Espere dos segundos hasta que comience la reproducción de la próxima canción.
- Si desea seleccionar otra canción de cuna, vuelva a pulsar el botón K en la unidad del bebé.
3 Para detener la canción, pulse nuevamente el botón reproducir / detener E de la unidad
del bebé. (Fig. 27)
Alerta de fuera de alcance
Cuando la unidad para padres está fuera del alcance de la unidad del bebé, emite un sonido de
forma intermitente y los mensajes «Searching» (Buscando) y «Not linked» (Sin conexión) aparecen
en la pantalla. La luz de conexión LINK parpadea en color rojo.
Nota: El mensaje «Not Linked» (Sin conexión) también aparece en la pantalla de la unidad para padres
cuando la unidad del bebé está apagada.
Opciones del menú
Todas las funciones pueden controlarse desde la unidad para padres, pero sólo algunas pueden
operarse desde la unidad del bebé.
Funcionamiento del menú: descripción general
Nota: Las funciones del menú sólo pueden utilizarse si se ha establecido conexión entre la unidad del
bebé y la unidad para padres.
1 Pulse el botón MENU para abrir el menú (Fig. 29).
, La primera opción de menú aparecerá en la pantalla.
2 Utilice los botones - / + para seleccionar la opción deseada (Fig. 30).
Nota: La echa indica la dirección en la que puede desplazarse.
Page 29

ESPAÑOL 29
3 Pulse el botón OK para conrmar (Fig. 31).
4 Utilice los botones + / - para seleccionar la opción deseada.
5 Pulse el botón OK para conrmar.
, El nuevo ajuste parpadeará una vez. El mensaje «saved» (guardado) también parpadeará una
vez y desaparecerá de la pantalla.
6 Pulse el botón MENU nuevamente para salir del menú.
Modo ECO
Nota: Sólo puede activar y desactivar el modo ECO desde el menú de la unidad para padres.
Puede utilizar el modo ECO para reducir el consumo de energía del aparato. Si vigila a su bebé
desde una distancia corta, el dispositivo necesita menos potencia para transmitir y consume menos
electricidad, a diferencia de lo que ocurre si está más lejos. Si desea vigilar al bebé desde cerca,
puede activar el modo ECO para reducir el consumo de energía y poder escuchar a su bebé de
forma clara y sin interferencias. Si utiliza el aparato en el modo ECO puede ayudar a preservar el
medio ambiente.
Nota: El alcance de funcionamiento del aparato en el modo ECO es de 260 metros al aire libre. En
función del entorno y de otros factores que pueden causar interferencias, el alcance puede ser menor.
1 Seleccione el modo ECO con los botones + / - (Fig. 30).
2 Pulse el botón OK para conrmar (Fig. 31).
3 Si el modo ECO está desactivado, la pantalla mostrará el mensaje «On?» (¿Activar?). Pulse el
botón OK para activar el modo ECO. Si ya está activado, aparecerá el mensaje «Off?»
(¿Desactivar?). Pulse el botón OK para desactivarlo.
, Si activa el modo ECO, la unidad para padres se apagará y volverá a encenderse. El símbolo
del modo ECO aparecerá en la pantalla de la unidad del bebé y de la unidad para padres para
indicar que ambas unidades funcionan en modo ECO.
Nota: La conexión entre las unidades puede perderse cuando el modo ECO está activado. Si eso ocurre,
es posible que el alcance de funcionamiento sea demasiado amplio para el modo ECO. En este caso,
reduzca el alcance de funcionamiento o desactive el modo ECO.
Encendido y apagado de la luz nocturna
1 Seleccione «Light» (Luz) con los botones + / -.
2 Pulse el botón OK para conrmar.
3 Si la luz nocturna está apagada, la pantalla mostrará el mensaje «On?» (¿Activar?). Pulse el
botón OK para encender la luz nocturna. Si está encendida, aparecerá el mensaje «Off?»
(¿Desactivar?) en la pantalla. Pulse el botón OK para apagarla.
Función de canción de cuna
Selección de una canción de cuna
1 Seleccione «Lullaby» (Canción de cuna) con los botones + / -.
2 Pulse el botón OK para conrmar.
3 Pulse el botón + una o varias veces para seleccionar una de las cinco canciones de la lista o
para elegir la opción «Play All» (Reproducir todo).
4 Pulse el botón OK para conrmar.
Si selecciona una de las cinco canciones, la canción se reproducirá cinco veces seguidas.
Si elige la opción «Play all» (Reproducir todo) se reproducirán las cinco canciones una vez.
Page 30

ESPAÑOL30
Selección de otra canción de cuna
1 Pulse el botón + para elegir otra canción de la lista.
2 Pulse el botón OK para conrmar.
Pausa de una canción de cuna
1 Pulse el botón OK.
, El mensaje «Paused» (En pausa) aparecerá en la pantalla.
2 Pulse el botón OK nuevamente para reanudar la reproducción.
Si no reanuda la reproducción dentro de los 30 segundos, la función de canción de cuna se
desactivará automáticamente. El mensaje «Paused» (En pausa) y el símbolo de canción de cuna
desaparecerán de la pantalla.
Cómo detener una canción de cuna
1 Pulse el botón + para seleccionar la opción «Stop» (Detener) de la lista.
2 Pulse el botón OK para conrmar.
Ajuste de la sensibilidad del micrófono
Nota: Sólo puede ajustar la sensibilidad del micrófono desde el menú de la unidad para padres.
Puede congurar el nivel de sensibilidad del micrófono de la unidad del bebé. Sólo puede ajustar la
sensibilidad si hay conexión entre ambas unidades; es decir, cuando la luz de conexión LINK de la
unidad para padres está encendida en color verde.
1 Seleccione «Sensitivity» (Sensibilidad) con los botones + / -.
2 Pulse el botón OK para conrmar.
3 Seleccione el nivel de sensibilidad del micrófono de la unidad del bebé con los botones + /
-. (Fig. 32)
1 Nivel de sensibilidad mínimo
2 Nivel de sensibilidad máximo
4 Pulse el botón OK para conrmar.
, El mensaje «Saved» (Guardado) aparecerá en la pantalla.
Nota: Cuando el nivel de sensibilidad del micrófono de la unidad del bebé es alto, recibe más sonidos. Por
lo tanto, transmite con más frecuencia. Como resultado las unidades consumen más energía y la pila se
agota más rápidamente.
Activación y desactivación de la señal de alerta sonora
Nota: Sólo puede activar y desactivar la alerta sonora en el menú de la unidad para padres.
Esta función le permite vigilar al bebé de forma silenciosa. Puede desactivar el volumen de la unidad
para padres y recibir un aviso si el bebé llora.
Si la alerta sonora está activada, la unidad para padres emite un sonido apenas se enciende en color
azul la cuarta luz de nivel de sonido mientras el volumen está apagado. Además, la retroiluminación
de la pantalla de la unidad para padres se enciende y el símbolo de alerta sonora (q) parpadea en la
pantalla.
1 Seleccione «Alert settings» (Ajuste de alerta) con los botones + / -.
2 Pulse el botón OK para conrmar.
3 Seleccione «Sound alert» (Alerta sonora) con los botones + / -.
4 Pulse el botón OK para conrmar.
Page 31

ESPAÑOL 31
5 Si la alerta está desactivada, la pantalla mostrará el mensaje «On?» (¿Activar?). Pulse el botón
OK para activar la alerta. Si ya está activada, aparecerá el mensaje «Off?» (¿Desactivar?). Pulse
el botón OK para desactivarla.
, Si activa la alerta sonora, el símbolo de alerta sonora (q) aparecerá en la pantalla de la unidad
para padres.
Ajuste del margen de temperatura de la habitación
Nota: Sólo puede ajustar el margen de temperatura desde el menú de la unidad para padres.
Un bebé duerme confortablemente en una habitación con una temperatura de entre 16 °C y 20
°C. Este dato es muy importante porque los bebés no pueden regular su temperatura corporal
como un adulto, y necesitan más tiempo para adaptarse a los cambios de temperatura.
Si no dene un margen de temperatura, el aparato le avisará cuando la temperatura de la habitación
del bebé esté por debajo de 14 °C o supere los 35 °C. En ese caso, la retroiluminación de la
pantalla de la unidad para padres se activará y el mensaje «High» (Alta) o «Low» (Baja) aparecerá
en la pantalla. Para cambiar la temperatura máxima y mínima predeterminadas, siga las instrucciones
que se indican a continuación.
Nota: La temperatura de la habitación del bebé aparece en la pantalla de la unidad para padres cuando
ambas unidades están conectadas.
1 Seleccione «Temperature» (Temperatura) con los botones + / -.
2 Pulse el botón OK para conrmar.
3 Seleccione «Range» (Margen) con los botones + / -.
4 Pulse el botón OK para conrmar.
5 Fije la temperatura mínima con los botones + / -.
6 Pulse el botón OK para conrmar.
7 Fije la temperatura máxima con los botones + / -.
8 Pulse el botón OK para conrmar.
, El mensaje «Saved» (Guardado) aparecerá en la pantalla.
Activación y desactivación del alerta de temperatura
Nota: Sólo puede activar y desactivar la alerta de temperatura en el menú de la unidad para padres.
Nota: Si la alerta de temperatura se activa con demasiada frecuencia, reduzca la temperatura mínima
jada y / o aumente la temperatura máxima establecida (consulte «Ajuste del margen de temperatura
de la habitación»).
Si la alerta de temperatura está activada, la unidad para padres emitirá un sonido cuando la
temperatura real de la habitación supere la máxima jada o caiga por debajo de la mínima
establecida. Además, la retroiluminación de la pantalla de la unidad para padres se activará y en la
pantalla aparecerá el mensaje «High» (Alta) o «Low» (Baja). Si no se ha establecido ninguna
temperatura máxima y mínima, la alerta se activará cuando la temperatura de la habitación
descienda por debajo de los 14 °C o supere los 35 °C.
1 Seleccione «Temperature» (Temperatura) con los botones + / -.
2 Pulse el botón OK para conrmar.
3 Seleccione «Alert» (Alerta) con los botones + / -.
4 Pulse el botón OK para conrmar.
Page 32

ESPAÑOL32
5 Si la alerta está desactivada, la pantalla mostrará el mensaje «On?» (¿Activar?). Pulse el botón
OK para activar la alerta. Si ya está activada, aparecerá el mensaje «Off?» (¿Desactivar?). Pulse
el botón OK para desactivarla.
Ajuste de la escala de temperatura
Nota: Sólo puede ajustar la escala de temperatura desde el menú de la unidad para padres.
Puede ajustar la escala de temperatura en grados Celcius (C) o Fahrenheit (F).
1 Seleccione «Settings» (Ajustes) con los botones + / -.
2 Pulse el botón OK para conrmar.
3 Seleccione «Temp scale» (Escala de temperatura) con los botones + / -.
4 Pulse el botón OK para conrmar.
5 Seleccione «Celsius» o «Fahrenheit» con los botones + / -.
Función de reinicio
Esta función del menú de la unidad para padres le permite reestablecer los ajustes predeterminados
de ambas unidades al mismo tiempo. Puede utilizarla si se produce algún problema que no puede
solucionar mediante las sugerencias del capítulo «Preguntas frecuentes».
1 Seleccione «Settings» (Ajustes) con los botones + / -.
2 Pulse el botón OK para conrmar.
3 Seleccione «Reset» (Reiniciar) con los botones + / -.
4 Pulse el botón OK para conrmar.
, En la pantalla de la unidad para padres aparecerá el mensaje «Conrm?» (¿Conrmar?).
5 Pulse el botón OK para conrmar.
, La unidad para padres se apagará y volverá a encenderse.
, Se habrán restablecido los ajustes predeterminados de fábrica de ambas unidades.
Ajustes predeterminados
Unidad para padres
- Idioma: inglés
- Volumen del parlante: 1
- Sensibilidad del micrófono: 5
- Alerta sonora: desactivada
- Alerta de temperatura: desactivada
- Alerta de temperatura baja: 14 °C
- Alerta de temperatura alta: 35 °C
- Escala de temperaturas: Celcius
- Modo ECO: desactivado
Unidad del bebé
- Volumen del parlante: 3
- Luz nocturna: apagada
- Canción de cuna: desactivada
Accesorios
Clip para el cinturón y correa para el cuello
Si las pilas de la unidad para padres tienen carga suciente, puede colgarse la unidad del cuello con
la correa o ajustarla al cinturón con el clip. Así, podrá usar la unidad dentro o fuera de la casa para
vigilar al bebé mientras se desplaza de un lado a otro.
Page 33

ESPAÑOL 33
Cómo colocar el clip para el cinturón
1 Coloque el clip para el cinturón en la unidad para padres (Fig. 33).
Cómo quitar el clip para el cinturón
1 Tire del clip hasta separarlo de la unidad para padres.
Cómo colocar la correa para el cuello
1 Introduzca el lazo del extremo de la correa en el oricio situado en la parte trasera de la
unidad para padres. Pase la correa por el lazo y tire para ajustarla (Fig. 34).
Cómo quitar la correa para el cuello
1 Pase la correa por el lazo y sáquela por el oricio de la parte trasera.
Limpieza y mantenimiento
No sumerja ninguna de las unidades en agua ni las limpie bajo la canilla.
No utilice aerosoles de limpieza ni limpiadores líquidos.
1 Desenchufe la unidad del bebé si está conectada a la electricidad y saque la unidad para
padres del cargador.
2 Limpie ambas unidades con un paño húmedo.
Verique que la unidad para padres esté seca antes de volver a colocarla en el cargador
enchufado.
3 Limpie el cargador con un paño seco.
4 Limpie los adaptadores con un paño seco.
Almacenamiento
- Si el aparato quedará en desuso durante un período prolongado, retire las pilas no recargables
de la unidad del bebé y las pilas recargables de la unidad para padres. Guarde ambas unidades,
el cargador de la unidad para padres y los adaptadores en un lugar fresco y seco.
Reemplazo
Unidad del bebé
Pilas
Reemplace las pilas no recargables de la unidad del bebé únicamente por cuatro pilas R6 AA de 1,5 V.
Nota: Se recomienda el uso de pilas no recargables Philips.
Adaptador
Sólo reemplace el adaptador de la unidad del bebé por un adaptador original. Para adquirir un
nuevo adaptador, comuníquese con su distribuidor local o con el servicio técnico y solicite el
repuesto con:
Adaptador: S004LN0750040
Entrada: 100-240V ~ 50/60Hz 150mA
Salida: 7.5Vdc 400mA
Unidad para padres
Pilas
Sustituya las pilas recargables de la unidad para padres únicamente por dos pilas NiMh AAA 850
mAh.
Page 34

ESPAÑOL34
Nota: Se recomienda usar pilas recargables Philips.
Adaptador
Sólo reemplace el adaptador de la unidad para padres por un adaptador original. Para adquirir un
nuevo adaptador, comuníquese con su distribuidor local o con el servicio técnico y solicite el
repuesto con:
Adaptador: S004LN0750050
Entrada: 100-240V ~ 50/60Hz 150mA
Salida: 7.5Vdc 500mA
Medio ambiente
- Cuando nalice la vida útil del artefacto, no lo deseche junto con los residuos domésticos
habituales. Llévelo a un centro de recolección ocial para su reciclaje. De esta forma, ayudará a
proteger el medio ambiente (Fig. 35).
- Las pilas recargables y no recargables contienen sustancias que pueden contaminar el medio
ambiente. En lugar de desecharlas con los residuos domésticos habituales, deposítelas en un
punto de recolección ocial. Siempre saque las pilas antes de desechar y llevar el artefacto a un
centro de recolección ocial. (Fig. 36)
Garantía y servicio técnico
Si desea obtener información, solicitar la asistencia del servicio técnico o tiene alguna dicultad,
ingrese en el sitio web de Philips AVENT (www.philips.com/AVENT) o comuníquese con el centro
de atención al cliente de Philips correspondiente a su país (el número de teléfono gura en la
garantía internacional). Si no existe un centro de atención al cliente en su país, comuníquese con su
distribuidor local de Philips.
Preguntas frecuentes
En este capítulo se enumeran las preguntas más habituales sobre el dispositivo. Si no encuentra la
respuesta que busca, comuníquese con el centro de atención al cliente correspondiente a su país.
Pregunta Respuesta
¿Qué es el modo
ECO? ¿Cómo
contribuye a proteger
el medio ambiente?
¿Por qué no se ilumina
la luz de encendido de
la unidad del bebé y la
luz LINK de la unidad
para padres cuando
pulso los botones de
encendido y apagado?
El modo ECO fue diseñado con el objetivo de reducir el consumo de
energía. Para vigilar al bebé desde una distancia corta, el aparato necesita
menos potencia que si se encuentra a mayor distancia. Cuando desee
vigilar al bebé desde cerca, puede activar el modo ECO para consumir
menos energía y proteger el medio ambiente.
Es posible que se hayan agotado las pilas recargables de la unidad para
padres y que la unidad no esté conectada al cargador. Inserte el enchufe
pequeño en el cargador, enchufe el adaptador del cargador a un
tomacorriente de pared y coloque la unidad para padres en el cargador.
A continuación, pulse el botón de encendido y apagado para establecer
la conexión con la unidad del bebé.
Es posible que las pilas no recargables de la unidad del bebé estén
descargadas y la unidad no esté conectada a la red eléctrica. Sustituya las
pilas o conecte la unidad a la red eléctrica. A continuación, pulse el botón
de encendido y apagado para establecer la conexión con la unidad para
padres.
Page 35

Pregunta Respuesta
Si después de realizar este procedimiento la luz LINK de la unidad para
padres no se enciende, use la función de reinicio para restablecer los
valores de conguración predeterminados de las unidades.
¿Por qué la luz LINK
de la unidad para
padres permanece
encendida en color
rojo y en la pantalla
aparece el mensaje
«Searching»
(Buscando)?
¿Por qué la luz de la
pila de la unidad del
bebé parpadea en
color rojo?
¿Por qué la unidad
para padres emite un
sonido?
¿Por qué el aparato
emite un sonido
agudo?
¿Por qué no se oyen
los sonidos? ¿Por qué
no oigo el llanto de mi
bebé?
La unidad del bebé y la unidad para padres están fuera de alcance y no
pueden establecer conexión. Acerque las unidades.
Es posible que la unidad del bebé esté apagada. Enciéndala.
El modo ECO está activado, pero es posible que el alcance de
funcionamiento sea demasiado amplio. Acerque la unidad para padres a
la unidad del bebé o desactive el modo ECO.
Las pilas no recargables de la unidad del bebé están por agotarse.
Reemplace las pilas no recargables o enchufe la unidad del bebé a la red
eléctrica (consulte el capítulo «Preparación inicial»).
Si la unidad para padres emite un sonido mientras la luz LINK
permanece encendida en color rojo y aparece el mensaje «Searching»
(Buscando) en la pantalla, signica que se perdió la conexión con la
unidad del bebé. Acerque la unidad para padres a la unidad del bebé.
Si la unidad para padres emite un sonido y aparece el símbolo de una
pila vacía en la pantalla, signica que las pilas recargables de la unidad
están por agotarse. Recárguelas.
Si desactivó el volumen y la alerta sonora está activada, la unidad para
padres emitirá un sonido cuando la cuarta luz de nivel de sonido se
ilumine porque la unidad del bebé captó un sonido.
Si conguró el margen de temperatura de la habitación en la unidad
para padres y la alerta de temperatura está activada, la unidad para
padres emitirá un sonido si la temperatura es inferior a la establecida o
cae por debajo de los 14 °C, o si la temperatura supera el nivel
establecido o es superior a 35 °C.
Es posible que la unidad del bebé esté apagada. Enciéndala.
Es posible que las unidades estén demasiado cerca. La separación entre
la unidad para padres y la unidad del bebé debe ser superior a un metro.
También es posible que el volumen de la unidad para padres esté muy
alto. Disminuya el volumen de la unidad.
Es posible que el volumen de la unidad para padres esté demasiado bajo
o apagado. Suba el volumen de la unidad.
ESPAÑOL 35
Page 36

ESPAÑOL36
Pregunta Respuesta
Es posible que el nivel de sensibilidad del micrófono de la unidad del
bebé esté demasiado bajo. Ajuste la sensibilidad del micrófono a un nivel
más alto en el menú de la unidad para padres.
Es posible que el radio de alcance de las unidades no coincida. Reduzca
la distancia entre ambas unidades.
¿Por qué la unidad
para padres responde
rápidamente ante
otros sonidos?
¿Por qué la unidad
para padres reacciona
tan lentamente al
llanto de mi bebé?
¿Por qué las pilas no
recargables de la
unidad del bebé se
agotan tan rápido?
¿Por qué la unidad
para padres tarda más
de 8 horas en
cargarse?
El alcance de
funcionamiento
especicado para el
aparato es de 330
metros. ¿Por qué el
radio de alcance de mi
aparato es mucho
menor?
La unidad del bebé también capta otros sonidos además de los que
emite el bebé. Acerque la unidad al bebé pero siempre mantenga una
distancia mínima de 1 metro.
Es posible que el nivel de sensibilidad del micrófono de la unidad del
bebé esté demasiado alto. Reduzca el nivel de sensibilidad del micrófono
en el menú de la unidad para padres.
Es posible que el nivel de sensibilidad del micrófono de la unidad del
bebé esté demasiado bajo. Aumente el nivel de sensibilidad del
micrófono en el menú de la unidad para padres.
Es posible que el nivel de sensibilidad del micrófono de la unidad del
bebé sea demasiado alto, lo que provoca que la unidad transmita con
más frecuencia. Reduzca el nivel de sensibilidad del micrófono en el
menú de la unidad para padres.
Es posible que el nivel de volumen de la unidad del bebé sea muy alto,
por lo que la unidad consume mucha energía. Baje el volumen de la
unidad del bebé.
Es posible que haya establecido una temperatura máxima que sea
inferior a la temperatura real de la habitación, o una temperatura mínima
superior a la real. Por lo tanto, la unidad del bebé sigue enviando
información a la unidad para padres y consume más energía. Por esta
razón, las pilas no recargables se agotan más rápidamente.
Es posible que haya encendido la luz nocturna. Si desea utilizar la función
de luz nocturna, se recomienda conectar la unidad del bebé a la
electricidad.
Es posible que la unidad para padres esté encendida durante el proceso
de carga. Apague la unidad cuando la cargue.
El alcance especicado es válido sólo en exteriores y al aire libre. En
interiores, el radio de alcance es de 50 metros y está limitado por la
cantidad y el tipo de paredes o techos que separan a las dos unidades.
Page 37

Pregunta Respuesta
El modo ECO está activado. Si utiliza la unidad del bebé en este modo,
el alcance de funcionamiento es de 260 metros al aire libre. En interiores,
el alcance de funcionamiento está limitado por la cantidad y el tipo de
paredes y techos que se encuentren dentro del radio. Acerque la unidad
para padres a la unidad del bebé o desactive el modo ECO.
¿Por qué a veces se
pierde la conexión?
¿Por qué hay
interrupciones de
sonido?
¿Qué ocurre si se
corta el suministro
eléctrico?
¿El aparato está
protegido contra
escuchas e
interferencias?
El tiempo de
funcionamiento de la
unidad para padres es
de 24 horas. ¿Por qué
mi unidad para padres
funciona durante
menos tiempo?
¿Por qué no aparece
el símbolo de la pila
en la pantalla de la
unidad para padres
cuando comienzo a
recargarla?
Las unidades están próximas al límite de su radio de alcance. Intente
ubicarlas en otro lugar o acérquelas. La conexión entre ambas unidades
demora aproximadamente 30 segundos en establecerse.
Es posible que haya colocado la unidad para padres junto a un
transmisor u otro aparato DECT, por ejemplo un teléfono DECT u otro
baby monitor de 1,8 GHz / 1,9 GHz. Aleje la unidad para padres de los
otros aparatos hasta que se restablezca la conexión.
Si la unidad para padres tiene carga suciente, continuará funcionando
durante un corte de energía eléctrica, tanto dentro o fuera del cargador.
Si la unidad del bebé tiene pilas y se produce un corte de energía
eléctrica, también seguirá funcionando.
La tecnología DECT de este aparato elimina las interferencias de otros
equipos y las escuchas.
Cuando cargue por primera vez la unidad para padres el tiempo de
funcionamiento será inferior a 24 horas. Las pilas recargables alcanzan su
capacidad máxima tras haberlas cargado y descargado al menos cuatro
veces.
Es posible que el volumen de la unidad para padres esté demasiado alto
y por eso la unidad consuma más energía. Baje el volumen de la unidad.
Es posible que el ajuste del nivel de sensibilidad del micrófono de la
unidad del bebé sea demasiado alto, y esto hace que la unidad para
padres consuma mucha energía. Reduzca el nivel de sensibilidad del
micrófono en el menú de la unidad para padres.
Es posible que el símbolo de la pila demore varios minutos en aparecer
en la pantalla de la unidad para padres cuando la cargue por primera vez
o tras un largo período sin usarla.
ESPAÑOL 37
Page 38

38
PORTUGUÊS DO BRASIL
Introdução
Parabéns pela sua compra e bem-vindo à Philips AVENT! Para aproveitar ao máximo o suporte
oferecido pela Philips AVENT, registre o produto em www.philips.com/welcome.
A Philips AVENT se dedica à criação de produtos conáveis que proporcionem aos pais a
tranqüilidade de que precisam. Esta Babá eletrônica Philips AVENT fornece monitoramento 24
horas, garantindo que você sempre ouvirá claramente seu bebê, sem que nenhum ruído
desnecessário seja captado. A tecnologia DECT garante a ausência total de interferência e um sinal
extremamente nítido entre a unidade do bebê e a dos pais.
Com o sensor de temperatura, você pode monitorar a temperatura do quarto do bebê e fazer
congurações personalizadas para manter o quarto agradável.
Descrição geral (g. 1)
A Unidade dos pais
1 Botão liga/desliga 3
2 Abertura da presilha para cinto
3 Botão TALK
4 Botão MENU
5 Luz LINK
6 Microfone
7 Alto-falante
8 Botões de menu e volume +/–
9 Botão OK
10 Tela
11 Luzes de nível de som
12 Presilha para cinto
13 Adaptador
14 Plugue pequeno do aparelho
15 Carregador
16 Luz de carregamento
17 Compartimento de pilhas recarregáveis
18 Alça para o pescoço
19 Tampa do compartimento de pilhas recarregáveis
20 Pilhas recarregáveis (inclusas)
21 Abertura da alça para pescoço
B Unidade do bebê
1 Botão liga/desliga 3
2 Botão PAGE
3 Botão reproduzir/parar E
4 Botão de canções de ninar K
5 Luz das pilhas T
6 Botão de luz noturna Q
7 Luz indicadora de energia
8 Botões de volume +/–
9 Microfone
10 Adaptador
11 Plugue grande do aparelho
12 Alto-falante
13 Sensor de temperatura
14 Entrada para o plugue grande do aparelho
15 Compartimento de pilhas não recarregáveis
16 Tampa do compartimento de pilhas não recarregáveis
17 Pilhas não recarregáveis (não inclusas)
Page 39

PORTUGUÊS DO BRASIL 39
C Tela
1 Símbolo de luz noturna
2 Símbolo do modo ECO
3 Símbolo de canção de ninar
4 Alerta sonoro
5 Alerta de temperatura
6 Símbolo de pilha
7 Indicação da temperatura ambiente (Celcius ou Fahrenheit)
Para outras indicações na tela e níveis de volume/sensibilidade, consulte os capítulos “Recursos” e
“Opções do menu”.
Importante
Leia este manual do usuário atentamente antes de usar o aparelho e guarde-o para consultas
futuras.
Perigo
- Nunca mergulhe qualquer parte da babá eletrônica em água nem em outro líquido.
- Não coloque o aparelho em um local sujeito a respingos de água ou outros líquidos.
- Nunca coloque objetos contendo líquido sobre a unidade do bebê.
Aviso
- Verique se a voltagem indicada nos adaptadores da unidade do bebê e do carregador
corresponde à voltagem do local antes de conectar o aparelho.
- Use somente o adaptador fornecido para conectar a unidade do bebê à rede elétrica.
- Só use o carregador e o adaptador fornecidos para carregar a unidade dos pais.
- Os adaptadores contêm um transformador. Não corte os adaptadores para substituí-los por
outros plugues, pois isso provocará uma situação de risco.
- Se os adaptadores estiverem danicados, sempre os substitua por outros originais para evitar
situações de risco. Para vericar o tipo correto, consulte o capítulo “Substituição”.
- Se o carregador da unidade dos pais estiver danicado, substitua-o apenas por um carregador
original.
- Nunca use a babá eletrônica em lugares úmidos nem próximo a água.
- Com exceção dos compartimentos de pilhas, não abra a unidade do bebê nem a unidade dos
pais para prevenir choque elétrico.
- Este aparelho não deve ser usado por pessoas (inclusive crianças) com capacidades físicas,
mentais ou sensoriais reduzidas ou pouca experiência e conhecimento, a menos que sejam
supervisionadas ou instruídas sobre o uso do aparelho por uma pessoa responsável por sua
segurança.
- Crianças pequenas devem ser supervisionadas para que não brinquem com o aparelho.
Cuidado
- Use e guarde o aparelho a uma temperatura entre 7°C e 40°C.
- Não exponha a unidade do bebê e unidade dos pais a frio ou calor extremo nem a luz solar
direta. Não coloque a unidade do bebê e a unidade dos pais perto de uma fonte de calor.
- Certique-se de que a unidade do bebê e o cordão estejam sempre fora do alcance do bebê
(pelo menos a 1 metro de distância).
- Nunca coloque a unidade do bebê dentro do berço ou do cercado.
- Nunca cubra a unidade dos pais e a unidade do bebê com algo (por exemplo, uma toalha ou
cobertor).
- Sempre coloque pilhas não recarregáveis do tipo correto na unidade do bebê.
- Sempre coloque pilhas recarregáveis do tipo correto na unidade dos pais.
Page 40

PORTUGUÊS DO BRASIL40
- Se você colocar a unidade dos pais perto de um transmissor ou aparelho DECT (por exemplo,
telefone ou roteador sem o), a conexão com a unidade do bebê poderá ser perdida. Afaste a
babá eletrônica de outros aparelhos sem o até que a conexão seja restabelecida.
- Telefones celulares ligados próximo à babá eletrônica podem causar interferência.
- A interferência de rádio é inevitável e pode afetar a qualidade do som da babá eletrônica.
Geral
- Esta babá eletrônica é apenas uma ajuda. Ela não substitui a supervisão responsável e adequada
de um adulto.
- Tome todos os cuidados necessários para ter certeza de que o bebê poderá dormir com
segurança.
- O sensor de temperatura apenas mede a temperatura do quarto do bebê. Ele não pode ser
usado para controlar nem ajustar a temperatura no quar to.
Informação importante sobre pilhas não recarregáveis e recarregáveis
- Pilhas não recarregáveis e recarregáveis poderão explodir se forem expostas a luz do sol, fogo
ou altas temperaturas de outras fontes de calor.
- Para evitar risco de explosão, sempre coloque pilhas recarregáveis do tipo correto na unidade
dos pais e não use pilhas não recarregáveis.
- Sempre coloque pilhas não recarregáveis do tipo correto na unidade do bebê para evitar risco
de explosão. A unidade do bebê não tem função de carregamento.
- Certique-se de que suas mãos estejam secas quando inserir ou substituir pilhas não
recarregáveis ou carregáveis.
- Para evitar danos decorrentes do vazamento de pilhas não recarregáveis e carregáveis:
1 Não exponha o aparelho a temperaturas superiores a 35°C.
2 Retire as pilhas recarregáveis da unidade dos pais e as não recarregáveis da unidade do bebê se
não for utilizar o aparelho por um mês ou mais.
3 Não deixe pilhas não recarregáveis descarregadas na unidade do bebê.
- Descarte adequadamente pilhas não recarregáveis e recarregáveis (consulte o capítulo “Meio
ambiente”).
Campos eletromagnéticos
Este aparelho Philips AVENT atende a todos os padrões relacionados a campos eletromagnéticos.
Se manuseado adequadamente e de acordo com as instruções deste manual do usuário, a utilização
do aparelho é segura, baseando-se em evidências cientícas atualmente disponíveis.
Preparação para o uso
Unidade do bebê
Você pode usar a unidade do bebê alimentada pela rede elétrica ou por pilhas não recarregáveis.
Ainda que você use a unidade pela rede elétrica, recomendamos inserir pilhas não recarregáveis.
Isso garante o uso contínuo em caso de falta de energia.
Operação pela rede elétrica
1 Insira o plugue maior do aparelho na unidade do bebê e insira o adaptador na tomada da
parede (g. 2).
Operação com pilhas não recarregáveis
A unidade do bebê funciona com quatro pilhas AA R6 de 1,5 V (não inclusas). É altamente
recomendável usar pilhas Philips LR6 PowerLife.
Não use pilhas recarregáveis, pois a unidade do bebê não tem função de carregamento.
Coloque pilhas na unidade do bebê se não quiser usá-la conectada à rede elétrica ou se quiser ter
certeza de que haverá energia de reserva em caso de falha na rede elétrica. Substitua as pilhas
quando a unidade do bebê indicar que elas estão fracas (o símbolo de pilha descarregada pisca na
tela e a mensagem “Battery low” (Pilha fraca) é exibida).
Page 41

PORTUGUÊS DO BRASIL 41
Desconecte a unidade do bebê e certique-se de que suas mãos e a unidade estejam secas
quando inserir pilhas não recarregáveis.
1 Retire a tampa do compartimento de pilhas não recarregáveis. (g. 3)
2 Insira quatro pilhas não recarregáveis (g. 4).
Nota: verique se os pólos + e - apontam na direção certa.
3 Feche a tampa novamente. (g. 5)
Nota: quando as pilhas estão fracas, a luz da pilha na unidade do bebê pisca na cor vermelha.
Unidade dos pais
Operação com pilhas recarregáveis
A unidade dos pais vem com duas pilhas recarregáveis AAA NiMH de 850 mAh.
Carregue a unidade dos pais antes de usá-la pela primeira vez ou quando ela indicar que as pilhas
estão fracas (o símbolo de pilha descarregada pisca na tela e a unidade emite um bipe). A unidade
dos pais começa a indicar que as pilhas estão fracas 30 minutos antes que as pilhas descarreguem
completamente.
Nota: se as pilhas estiverem completamente descarregadas, a unidade dos pais se desligará
automaticamente e perderá contato com a unidade do bebê.
1 Retire a tampa do compartimento de pilhas recarregáveis (g. 6).
2 Insira as pilhas recarregáveis (g. 7).
Nota: verique se os pólos + e - das pilhas apontam na direção correta.
3 Feche a tampa novamente (g. 8).
4 Insira o plugue pequeno do aparelho no carregador, conecte o adaptador a uma tomada na
parede e coloque a unidade dos pais no carregador (g. 9).
, A luz piloto de recarga no carregador acende.
, A tela exibe um símbolo de carregamento da pilha para indicar que a unidade dos pais está
sendo carregada.
5 Deixe a unidade dos pais conectada ao carregador até as pilhas carregarem totalmente.
, Durante o carregamento, a luz piloto de recarga no carregador permanece acesa.
, Quando as pilhas estão totalmente carregadas, a tela da unidade dos pais exibe um símbolo
de pilha totalmente carregada T.
- Quando você carregar a unidade dos pais pela primeira vez ou após um longo período sem
usá-la, desligue-a e deixe-a carregando continuamente por pelo menos 10 horas.
- O carregamento normalmente leva 8 horas, mas é mais longo quando a unidade dos pais está
ligada durante o carregamento. Para manter o tempo de recarga tão curto quanto possível,
desligue a unidade dos pais durante o carregamento.
- Quando as pilhas estão totalmente carregadas, a unidade dos pais pode ser usada sem o por
até 24 horas.
Nota: quando a unidade dos pais é carregada pela primeira vez, o tempo operacional é inferior a 24
horas. As pilhas só alcançam sua capacidade máxima depois de serem carregadas e descarregadas
por quatro vezes.
Nota: quando a unidade dos pais não está no carregador, as pilhas descarregam gradativamente, mesmo
quando a unidade está desligada.
Page 42

PORTUGUÊS DO BRASIL42
Utilização do aparelho
1 Coloque a unidade dos pais e a unidade do bebê no mesmo ambiente para testar a
conexão (g. 10).
Certique-se de que a unidade do bebê esteja a pelo menos 1 metro da unidade dos pais.
2 Pressione e segure o botão liga/desliga 3 na unidade do bebê até a luz verde indicadora da
posição ligado acender. (g. 11)
Nota: a luz indicadora de energia sempre acende na cor verde, mesmo quando não há nenhuma
conexão com a unidade dos pais.
, A luz noturna acende rapidamente e apaga.
, A luz da pilha T acende rapidamente e, em seguida, apaga. (g. 12)
3 Pressione e segure o botão liga/desliga 3 na unidade dos pais até as luzes do nível de som
acenderem rapidamente. (g. 13)
, A tela acende e o símbolo de pilha aparece na tela (g. 14).
, A luz LINK pisca na cor vermelha e a mensagem “Searching” (Procurando) aparece na
tela. (g. 15)
, A luz LINK na unidade dos pais cará verde sem piscar quando uma conexão for
estabelecida entre a unidade do bebê e a unidade dos pais. A mensagem “Linked”
(Conectada) aparece na tela. (g. 16)
, Depois de 2 segundos a mensagem “Linked” (Conectada) desaparece e a temperatura é
exibida na tela. (g. 17)
, Se nenhuma conexão for estabelecida, a luz LINK na unidade dos pais pisca na cor vermelha.
A unidade dos pais emite um bipe periodicamente, e a mensagem “Searching” (Procurando)
aparece na tela, seguida pela mensagem “Not Linked” (Sem conexão) (g. 18).
Posicionamento da babá eletrônica
1 Coloque a unidade do bebê a pelo menos 1 metro de distância do seu bebê (g. 19).
2 Coloque a unidade dos pais dentro da faixa operacional da unidade do bebê. Certique-se de
que esteja a pelo menos 1 metro de distância da unidade do bebê para evitar
microfonia (g. 20).
Para obter mais informações sobre a faixa operacional, consulte a seção “Faixa operacional” abaixo.
Faixa operacional
A faixa operacional da babá eletrônica é de 330 metros ao ar livre. Dependendo dos arredores e
de outros fatores, esse alcance pode ser menor. Em ambientes internos, a faixa operacional é de até
50 metros.
Nota: se o modo ECO estiver ligado, a faixa operacional da babá eletrônica cará ainda mais reduzida.
Consulte a seção “Modo ECO” no capítulo “Opções do menu”.
Materiais secos Espessura do material Perda de alcance
Madeira, gesso, papelão, vidro
(sem metal, os ou chumbo)
Tijolo, madeira compensada < 30 cm 5 a 35%
Concreto reforçado < 30 cm 30 a 100%
Grades ou barras de metal < 1 cm 90 a 100%
Folhas de metal ou alumínio < 1 cm 100%
Para materiais molhados e úmidos, a perda de alcance pode ser de até 100%.
< 30 cm 0 a 10%
Page 43

PORTUGUÊS DO BRASIL 43
Funções
As funções abaixo estão descritas no capítulo “Opções do menu”, pois só podem ser conguradas
no menu da unidade dos pais:
- Ajuste da sensibilidade do microfone
- Ligar/desligar alerta sonoro
- Ajuste da faixa de temperatura ambiente (mínima e máxima)
- Ligar/desligar alerta de temperatura
- Ligar/desligar modo ECO
- Ajuste da escala de temperatura (Fahrenheit ou Celcius)
Ajuste do volume do alto-falante
1 Pressione o botão de volume + ou - na unidade do bebê até que o volume desejado do alto-
falante da unidade seja alcançado (g. 21).
Nota: você só pode ajustar o volume do alto-falante da unidade do bebê durante a reprodução de uma
canção de ninar.
2 Pressione o botão de volume + ou – na unidade dos pais até que o volume desejado do alto-
falante da unidade seja alcançado (g. 22).
, A tela exibe os ajustes de volume da unidade dos pais: (g. 23)
- Som desativado/silenciar babá eletrônica
- Volume mínimo
- Volume máximo
Nota: se o volume estiver ajustado para um nível alto, as unidades consumirão mais energia.
Função de conversa
Você pode usar o botão TALK na unidade dos pais para falar com o bebê (para confortá-lo, por
exemplo).
1 Pressione e segure o botão TALK e fale claramente no microfone a uma distância de 15 a 30
cm (g. 24).
, A luz LINK verde começa a piscar e a mensagem “Talk” (Falar) aparece na tela.
2 Solte o botão TALK quando terminar de falar.
Luzes de nível de som
A unidade dos pais controla continuamente o nível de som no quarto do bebê, e as luzes do nível
de som informam quando há alguma atividade. Se o bebê chorar, as luzes do nível de som
acenderão na unidade dos pais.
- Se a unidade do bebê não detectar nenhum som, todas as luzes do nível de som na unidade
dos pais carão apagadas.
- Quando a unidade do bebê capta um som, uma ou mais luzes do nível de som na unidade dos
pais acendem. O número de luzes que acendem está relacionado à altura do som captado pela
unidade do bebê.
Luz noturna
Nota: Você também pode acender ou apagar a luz noturna no menu da unidade dos pais (consulte o
capítulo “Opções do menu” seção “Luz noturna”).
1 Pressione o botão de luz noturna Q na unidade do bebê para ativar essa função. (g. 25)
, Q aparece na tela da unidade dos pais.
2 Pressione o botão de luz noturna Q novamente para desativar essa função.
, A luz noturna diminui gradativamente antes de apagar completamente.
, Q desaparece da tela da unidade dos pais.
Page 44

PORTUGUÊS DO BRASIL44
Dica: desative a luz noturna quando a unidade do bebê estiver funcionando com pilhas não
recarregáveis. Isso poupa energia.
Localização da unidade dos pais
Se você não souber onde está a unidade dos pais e o volume estiver desligado, poderá usar o botão
PAGE na unidade do bebê para localizar a unidade dos pais.
Nota: a função de localização só funciona quando a unidade dos pais está ligada.
1 Pressione o botão PAGE na unidade do bebê (g. 26).
, A mensagem “Paging” (Localizar) aparece na tela.
, A unidade dos pais produz um tom de alerta de localização.
2 Para interromper o tom de alerta de localização, pressione novamente o botão PAGE ou
qualquer botão na unidade dos pais.
Função de canção de ninar
Nota: você também pode controlar a função de canção de ninar no menu da unidade dos pais (consulte
o capítulo “Opções do menu”, seção “Canção de ninar”).
1 Pressione o botão reproduzir/parar E na unidade do bebê para reproduzir a canção de
ninar selecionada. (g. 27)
, A reprodução da canção de ninar é iniciada e repetida continuamente.
2 Para mudar de canção de ninar durante a reprodução: (g. 28)
- Pressione o botão da função de canção de ninar K na unidade do bebê.
- Aguarde 2 segundos para que a próxima canção de ninar seja reproduzida.
- Para selecionar outra canção de ninar, pressione novamente o botão de canção de ninar K na
unidade do bebê.
3 Para interromper a reprodução, pressione novamente o botão reproduzir/parar E na
unidade do bebê. (g. 27)
Alerta de fora de alcance
Quando a unidade dos pais estiver fora do alcance da unidade do bebê, ela emitirá um bipe de vez
em quando e as mensagens “Searching” (Procurando) e “Not linked” (Sem conexão) aparecerão na
tela. A luz LINK na unidade dos pais piscará na cor vermelha.
Nota: a mensagem “Not Linked” (Sem conexão) também é exibida na tela da unidade dos pais quando
a unidade do bebê está desligada.
Opções do menu
Todas as funções podem ser controladas na unidade dos pais, mas algumas também podem ser
operadas na unidade do bebê.
Operação do menu — explicação geral
Nota: as funções do menu só podem ser controladas quando a unidade do bebê e a dos pais estão
conectadas.
1 Pressione o botão MENU para abrir o menu (g. 29).
, A primeira opção do menu aparece na tela.
2 Use os botões – e + para selecionar a opção do menu desejada (g. 30).
Nota: a seta indica em que direção você pode navegar.
3 Pressione o botão OK para conrmar (g. 31).
Page 45

PORTUGUÊS DO BRASIL 45
4 Use os botões + e - para selecionar o ajuste desejado.
5 Pressione o botão OK para conrmar.
, O novo ajuste pisca uma vez. A mensagem “saved” (salvo) pisca uma vez e desaparece da
tela.
6 Pressione novamente o botão MENU para sair do menu.
Modo ECO
Nota: você só pode ligar e desligar o modo ECO no menu da unidade dos pais.
Você pode usar o modo ECO para reduzir o consumo de energia do aparelho. O
monitoramento do bebê a curta distância requer uma capacidade menor de transmissão e
consome menos energia do que o monitoramento feito a longa distância. Quando você estiver
monitorando o bebê de perto, poderá ligar o modo ECO. Nesse modo, o aparelho consome
menos energia, permitindo que você continue ouvindo claramente o bebê sem que nenhum ruído
desnecessário seja captado. O uso da babá eletrônica no modo ECO ajuda a preservar o meio
ambiente.
Nota: a faixa operacional da babá eletrônica no modo ECO é de 260 metros ao ar livre. Dependendo
dos arredores e de outros fatores que possam causar interferência, esse alcance pode ser menor.
1 Selecione “ECO mode” (Modo ECO) usando os botões + e - (g. 30).
2 Pressione o botão OK para conrmar (g. 31).
3 Se o modo ECO estiver ligado, a tela mostrará “On?” (Ativar?). Pressione o botão OK para
ligar o modo ECO. Se esse modo estiver ligado, a tela mostrará “Off?” (Desligar). Pressione o
botão OK para desligar o modo ECO.
, Quando você liga o modo ECO, a unidade dos pais desliga e religa. O símbolo do modo ECO
aparece na tela da unidade do bebê e da unidade dos pais para indicar que as duas unidades
estão funcionando nesse modo.
Nota: a conexão entre a unidade dos pais e a do bebê pode se perder quando o modo ECO estiver
ligado. Se isso acontecer, talvez a faixa operacional esteja muito ampla para o modo ECO. Nesse caso,
reduza a faixa operacional ou desligue o modo ECO.
Luz noturna ligada/desligada
1 Selecione “Light” (Luz) com os botões + e -.
2 Pressione o botão OK para conrmar.
3 Se a luz noturna estiver desligada, a tela exibirá “On?” (Ligar?). Pressione o botão OK para
ligar a luz noturna. Se a luz noturna estiver ligada, a tela exibirá “Off?” (Desligar?). Pressione o
botão OK para desligar a luz noturna.
Função de canção de ninar
Seleção de uma canção de ninar
1 Selecione “Lullaby” (Canção de ninar) com os botões + e -.
2 Pressione o botão OK para conrmar.
3 Pressione o botão + uma ou várias vezes para selecionar um das cinco canções de ninar da
lista ou selecionar “Play All” (Reproduzir todas).
4 Pressione o botão OK para conrmar.
Quando você tiver selecionado uma das cinco canções de ninar, ela será reproduzida cinco vezes
consecutivas.
Page 46

PORTUGUÊS DO BRASIL46
Quando você selecionar ‘play all’ (reproduzir todas), todas as cinco canções de ninar serão
reproduzidas uma vez.
Mudar para outra canção de ninar
1 Pressione o botão + para escolher outra canção de ninar na lista.
2 Pressione o botão OK para conrmar.
Pausar uma canção de ninar
1 Pressione o botão OK.
, A mensagem “Paused” (Em pausa) aparece na tela.
2 Pressione novamente o botão OK para reiniciar a reprodução da canção de ninar.
Se você não continuar a reprodução da canção de ninar dentro de 30 segundos, a função de canção
de ninar será automaticamente desligada. A mensagem “Paused” (Em pausa) e o símbolo de canção
de ninar desaparecem da tela.
Parar uma canção de ninar
1 Pressione o botão + para selecionar “Stop” (Parar) na lista.
2 Pressione o botão OK para conrmar.
Ajuste da sensibilidade do microfone
Nota: você pode ajustar a sensibilidade do microfone somente no menu da unidade dos pais.
Você pode aumentar a sensibilidade do microfone da unidade do bebê para o nível desejado. Só é
possível alterar a sensibilidade do microfone quando houver conexão entre a unidade do bebê e a
unidade dos pais, ou seja, quando a luz LINK na unidade dos pais estiver acesa na cor verde.
1 Selecione “Sensitivity” (Sensibilidade) com os botões + e -.
2 Pressione o botão OK para conrmar.
3 Selecione o nível desejado de sensibilidade do microfone da unidade do bebê com os botões
+ e -. (g. 32)
1 Nível de sensibilidade mínimo
2 Nível de sensibilidade máximo
4 Pressione o botão OK para conrmar.
, A mensagem “Saved” (Salvo) aparece na tela.
Nota: quando a sensibilidade do microfone da unidade do bebê estiver ajustada no nível alto, ela captará
mais sons e, portanto, transmitirá com mais freqüência. Como resultado, as unidades consomem mais
energia e o tempo operacional das pilhas é reduzido.
Ligar/desligar alerta sonoro
Nota: você pode ligar e desligar o alerta sonoro somente no menu da unidade dos pais.
Esta função permite monitorar silenciosamente o bebê. Você pode desligar o volume na unidade
dos pais e, mesmo assim, receber um aler ta se o bebê chorar.
Embora o volume esteja desligado, se o alerta sonoro estiver ligado, a unidade dos pais emitirá um
bipe assim que a luz do quarto nível de som acender na cor azul. Além disso, a luz de fundo da tela
da unidade dos pais acenderá e o símbolo de alerta sonoro ( q) piscará na tela.
1 Selecione ‘Alert settings’ (Congurações de alerta) com os botões + e -.
2 Pressione o botão OK para conrmar.
3 Selecione ‘Sound alert’ (Alerta sonoro) com os botões + e -.
4 Pressione o botão OK para conrmar.
Page 47

PORTUGUÊS DO BRASIL 47
5 Se o alerta estiver desligado, a tela exibirá “On?” (Ligar?). Pressione o botão OK para ligar o
alerta. Se ele estiver ligado, a tela exibirá “Off?” (Desligar?). Pressione o botão OK para
desligar o alerta.
, Se você tiver ajustado o alerta sonoro para o modo “on” (ligado), o símbolo de alerta sonoro
( q) aparecerá na tela da unidade dos pais.
Ajuste da faixa de temperatura ambiente
Nota: você pode ajustar a faixa de temperatura somente no menu da unidade dos pais.
O bebê dormirá confortavelmente em um ambiente aquecido a uma temperatura entre 16°C e
20° C. Isso é importante, pois o bebê não consegue regular a temperatura corporal como um
adulto. Ele precisa de mais tempo para se adaptar a mudanças de temperatura.
Se você não ajustar a faixa de temperatura, a babá eletrônica o alertará quando a temperatura no
quarto do bebê estiver abaixo de 14°C ou acima de 35° C. Nesse caso, a luz de fundo da tela da
unidade dos pais acenderá e “High” (Alta) ou “Low” (Baixa) aparecerá na tela. Para alterar a
temperatura padrão mínima e máxima, siga as instruções abaixo.
Nota: a temperatura do quarto do bebê é exibida na tela da unidade dos pais quando as unidades estão
conectadas.
1 Selecione “Temperature” (Temperatura) com os botões + e -.
2 Pressione o botão OK para conrmar.
3 Selecione “Range” (Faixa) com os botões + e -.
4 Pressione o botão OK para conrmar.
5 Ajuste a temperatura mínima desejada com os botões + e -.
6 Pressione o botão OK para conrmar.
7 Ajuste a temperatura máxima desejada com os botões + e -.
8 Pressione o botão OK para conrmar.
, A mensagem “Saved” (Salvo) aparece na tela.
Ligar/desligar alerta de temperatura
Nota: você só pode ligar e desligar o alerta de temperatura no menu da unidade dos pais.
Nota: se o alerta de temperatura for ativado com muita freqüência, reduza a temperatura mínima
denida e/ou aumente a temperatura máxima denida (consulte “Ajuste da faixa de temperatura
ambiente”).
Se o alerta de temperatura estiver ligado, a unidade dos pais emitirá um bipe se a temperatura
ambiente real ultrapassar a temperatura máxima denida ou estiver abaixo da temperatura mínima
denida. Além disso, a luz de fundo da tela da unidade dos pais acenderá e “High” (Alta) ou “Low”
(Baixa) aparecerá na tela. Se as temperaturas mínimas e máximas não tiverem sido ajustadas, o
alerta de temperatura será emitido quando a temperatura ambiente for inferior a 14°C ou acima
de 35°C.
1 Selecione “Temperature” (Temperatura) com os botões + e -.
2 Pressione o botão OK para conrmar.
3 Selecione “Alert” (Alerta) com os botões + e -.
4 Pressione o botão OK para conrmar.
5 Se o alerta estiver desligado, a tela exibirá “On?” (Ligar?). Pressione o botão OK para ligar o
alerta. Se ele estiver ligado, a tela exibirá “Off?” (Desligar?). Pressione o botão OK para
desligar o alerta.
Page 48

PORTUGUÊS DO BRASIL48
Ajuste da escala de temperatura
Nota: você pode ajustar a escala de temperatura somente no menu da unidade dos pais.
É possível ajustar a escala de temperatura em Celsius (C) ou Fahrenheit (F).
1 Selecione “Settings” (Congurações) com os botões + e -.
2 Pressione o botão OK para conrmar.
3 Selecione “Temp scale” (Escala de temperatura) com os botões + e -.
4 Pressione o botão OK para conrmar.
5 Selecione ‘Celsius’ ou ‘Fahrenheit’ com os botões + e -.
Função de reinicialização
Esta função no menu da unidade dos pais permite restaurar simultaneamente os ajustes de fábrica
na unidade dos pais e na unidade do bebê. Você pode usar esta função se não conseguir resolver os
problemas seguindo as sugestões do capítulo “Perguntas freqüentes”.
1 Selecione ‘Settings’ (Congurações) com os botões + e -.
2 Pressione o botão OK para conrmar.
3 Selecione “Reset” (Reinicializar) com os botões + e -.
4 Pressione o botão OK para conrmar.
, A mensagem “Conrm?” (Conrmar?) aparece na tela da unidade dos pais.
5 Pressione o botão OK para conrmar.
, A unidade dos pais desliga e liga novamente.
, As duas unidades foram reinicializadas com as congurações padrão de fábrica.
Congurações padrão
Unidade dos pais
- Idioma: inglês
- Volume do alto-falante: 1
- Sensibilidade do microfone: 5
- Alerta sonoro: desligado
- Alerta de temperatura: desligado
- Alerta de “Baixa temperatura”: 14°C
- Alerta de “Alta temperatura”: 35°C
- Escala de temperatura: Celsius
- Modo ECO: desligado
Unidade do bebê
- Volume do alto-falante: 3
- Luz noturna: desligada
- Canção de ninar: desligada
Acessórios
Presilha para cinto e alça para o pescoço
Se as pilhas da unidade dos pais estiverem com carga suciente, você poderá transportá-la dentro e
fora de casa, prendendo-a no cinto com a presilha ou pendurando-a no pescoço com a alça para o
pescoço. Assim, você pode monitorar o bebê enquanto se locomove.
Conectar a presilha
1 Encaixe a presilha na unidade dos pais (g. 33).
Page 49

PORTUGUÊS DO BRASIL 49
Desconectar a presilha
1 Retire a presilha da unidade dos pais.
Conectar a alça para o pescoço
1 Passe o laço na ponta da alça para o pescoço pelas aberturas encontradas na parte de trás da
unidade. Ene a outra ponta da alça para o pescoço no laço e puxe-a rmemente (g. 34).
Desconectar a alça para o pescoço
1 Passe a alça para o pescoço pelo laço e retire-a das aberturas na parte de trás da unidade.
Limpeza e manutenção
Não mergulhe a unidade dos pais ou a do bebê na água nem lave-as em água corrente.
Não use spray para limpeza nem produtos para limpeza líquidos.
1 Se a unidade do bebê estiver conectada à rede elétrica, desconecte-a e retire a unidade dos
pais do carregador.
2 Limpe a unidade dos pais e a do bebê usando um pano úmido.
Verique se a unidade dos pais está seca antes de colocá-la novamente no carregador conectado
à rede elétrica.
3 Limpe o carregador com um pano seco.
4 Limpe os adaptadores com um pano seco.
Armazenamento
- Caso não pretenda usar a babá eletrônica por algum tempo, remova as pilhas não recarregáveis
da unidade do bebê e as pilhas recarregáveis da unidade dos pais. Guarde a unidade dos pais, a
do bebê, o carregador da unidade dos pais e os adaptadores em um local fresco e seco.
Substituição
Unidade do bebê
Pilhas
Substitua as pilhas não recarregáveis da unidade do bebê somente por quatro pilhas não
recarregáveis AA R6 de 1,5 V.
Nota: é altamente recomendável usar pilhas não recarregáveis Philips.
Adaptador
Substitua o adaptador da unidade do bebê somente por um original. Você pode encomendar um
novo adaptador a um representante ou em uma Assistência Técnica Philips com:
Adaptador: S004LN0750040
Entrada: 100-240V ~ 50/60Hz 150mA
Saída: 7.5Vdc 400mA
Unidade dos pais
Pilhas
Substitua as pilhas recarregáveis da unidade dos pais somente por duas pilhas recarregáveis AAA
NiMh de 850 mAh.
Nota: é altamente recomendável usar pilhas recarregáveis Philips.
Page 50

PORTUGUÊS DO BRASIL50
Adaptador
Substitua o adaptador da unidade dos pais somente por um original. Você pode encomendar um
novo adaptador a um representante ou em uma Assistência Técnica Philips com:
Adaptador: S004LN0750050
Entrada: 100-240V ~ 50/60Hz 150mA
Saída: 7.5Vdc 500mA.
Meio ambiente
- Não descarte o aparelho com o lixo doméstico no nal de sua vida útil. Leve-o a um posto de
coleta ocial para que possa ser reciclado. Com esse ato, você ajuda a preservar o meio
ambiente (g. 35).
- Não descarte o aparelho com o lixo doméstico no nal de sua vida útil. Leve-o a um posto de
- coleta ocial para que possa ser reciclado. Com esse ato, você ajuda a preservar o meio
- ambiente (g. 36).
- ADVERTÊNCIA: Cuidados com a utilização e descarte de pilhas e baterias (g. 29).
- Não descarte as pilhas e baterias juntamente ao lixo doméstico.
- O descarte inadequado de pilhas e baterias pode representar riscos ao meio ambiente e à
saúde humana.
- Para contribuir com a qualidade ambiental e com sua saúde, a Philips receberá pilhas e baterias
fornecidas com seus produtos após seu m de vida. A Philips dispõe de pontos de coleta em
Assistências Técnicas que auxiliarão neste processo.
- Para evitar o vazamento de pilhas ou baterias, o que pode resultar em danos à saúde,
ambientais ou ao produto, recomendamos que: (i) Em caso de aparelhos com pilhas removíveis,
retire-as quando não estiver em uso por um longo período, (ii) Não misture pilhas (antigas com
novas ou de zinco-carbono com alcalinas, etc.), (iii) Não exponha o produto com pilhas/baterias
em seu interior a altas temperaturas.
- Em caso de aparelhos com pilhas não removiveis, promover o encaminhamento à assistência
técnica Philips.
- Pilhas e baterias usadas ou inservíveis recebidas pela Philips serão encaminhadas à destinação
ambientalmente correta.
- Em caso de dúvida ou consulta, favor ligar para 0800 701 0203 Brasil ou 2121 0203 Grande
São Paulo ou acessar o site http://www.philips.com.br
Garantia e assistência técnica
Se você precisar de informações ou assistência técnica, visite o site da Philips AVENT em
www.philips.com/AVENT ou entre em contato com a Central de Atendimento ao Cliente Philips
no seu país (o telefone está disponível no folheto de garantia mundial). Se não houver uma Central
de Atendimento ao Cliente no seu país, dirija-se a um revendedor local Philips.
Perguntas freqüentes
Este capítulo lista as perguntas mais freqüentes sobre o aparelho. Se você não conseguir encontrar a
resposta para sua pergunta, entre em contato com o Atendimento ao Cliente de seu país.
Pergunta Resposta
O que é o modo ECO?
Como esse modo
contribui para o meio
ambiente?
O modo ECO foi desenvolvido para reduzir o consumo de energia. O
monitoramento do bebê a curta distância requer menos energia do
que o monitoramento feito a longa distância. Ao monitorar o bebê a
curta distância, você pode ativar o modo ECO. Nesse modo, a babá
eletrônica consome menos energia, contribuindo para o meio
ambiente.
Page 51

Pergunta Resposta
Por que a luz indicadora
de energia da unidade
do bebê e a luz LINK
da unidade dos pais não
acendem quando
pressiono os botões
liga/desliga das
unidades?
Por que a luz LINK na
unidade dos pais
acende na cor vermelha
e por que a mensagem
“Searching”
(Procurando) é exibida
na tela?
Por que a luz das pilhas
na unidade do bebê
pisca na cor vermelha?
Por que a unidade dos
pais emite um bipe?
Talvez as pilhas da unidade dos pais estejam descarregadas e a unidade
não esteja conectada ao carregador. Insira o plugue pequeno do
aparelho no carregador, conecte o adaptador do carregador a uma
tomada na parede e coloque a unidade dos pais no carregador. Em
seguida, pressione o botão liga/desliga para estabelecer conexão com a
unidade do bebê.
Talvez as pilhas não recarregáveis da unidade do bebê estejam
descarregadas e a unidade não esteja conectada à rede
elétrica. Troque-as ou conecte a unidade do bebê à rede elétrica. Em
seguida, pressione o botão liga/desliga para estabelecer a conexão com
a unidade dos pais.
Se a luz LINK na unidade dos pais não começar a piscar, use a função
de reinicialização para restaurar as congurações de fábrica da unidade.
A unidade do bebê e a dos pais estão fora do alcance uma da outra.
Aproxime a unidade dos pais da unidade do bebê.
A unidade do bebê pode estar desligada. Ligue-a.
O modo ECO está ligado, mas a faixa operacional é ampla demais.
Aproxime a unidade dos pais da unidade do bebê ou desligue o modo
ECO.
As pilhas não recarregáveis da unidade do bebê estão fracas. Troqueas ou conecte a unidade do bebê à rede elétrica (consulte o capítulo
“Preparação para o uso”).
Se a unidade dos pais emitir um bipe enquanto a luz LINK estiver acesa
na cor vermelha (sem piscar) e a mensagem “Searching” (Procurando)
for exibida na tela, a conexão com a unidade do bebê foi perdida.
Aproxime a unidade dos pais da unidade do bebê.
Caso a unidade dos pais emita um bipe e o símbolo de pilha na tela
esteja vazio, as pilhas recarregáveis da unidade dos pais estão com
pouca carga. Recarregue-as.
Se você tiver desativado o volume com o alerta sonoro ligado, a
unidade dos pais emitirá um bipe sempre que a luz do quarto nível de
som acender, pois a unidade do bebê captou um som.
Se você tiver ajustado a faixa de temperatura do ambiente na unidade
dos pais e o alerta de temperatura estiver ligado, a unidade dos pais
emitirá um bipe quando a temperatura car abaixo do nível denido
ou abaixo de 14°C ou quando a temperatura atingir um nível acima do
denido ou acima de 35°C.
A unidade do bebê pode estar desligada. Ligue-a.
PORTUGUÊS DO BRASIL 51
Page 52

PORTUGUÊS DO BRASIL52
Pergunta Resposta
Por que o aparelho
emite um ruído agudo?
Por que não ouço
nenhum som ou não
ouço o bebê chorando?
Por que a unidade dos
pais reproduz
rapidamente outros
sons?
Por que a unidade dos
pais demora a
reproduzir o choro do
bebê?
Por que as pilhas não
recarregáveis da
unidade do bebê
descarregam
rapidamente?
Por que o tempo de
carregamento da
unidade dos pais é
superior a 8 horas?
As unidades podem estar muito próximas uma da outra. Certique-se
de manter pelo menos 1 metro de distância entre elas.
O volume da unidade dos pais pode estar muito alto. Diminua-o.
A unidade dos pais pode estar com um volume muito baixo ou
desligada. Aumente o volume.
O nível de sensibilidade do microfone da unidade do bebê talvez esteja
muito baixo. Aumente o nível de sensibilidade do microfone no menu
da unidade dos pais.
A unidade do bebê e a dos pais talvez estejam foram do alcance uma
da outra. Reduza a distância entre elas.
A unidade do bebê também capta outros sons além dos emitidos pelo
bebê. Aproxime-a do bebê, mantendo a distância mínima de 1 metro.
O nível de sensibilidade do microfone da unidade do bebê talvez esteja
muito alto. Diminua-o no menu da unidade dos pais.
O nível de sensibilidade do microfone da unidade do bebê talvez esteja
muito baixo. Aumente-o no menu da unidade dos pais.
O nível de sensibilidade do microfone da unidade do bebê talvez esteja
muito alto, fazendo com que ela faça transmissões com maior
freqüência. Diminua-o no menu da unidade dos pais.
O volume da unidade do bebê talvez esteja muito alto, fazendo com
que ela consuma muita energia. Diminua o volume.
Você pode ter ajustado uma temperatura ambiente máxima inferior à
temperatura ambiente real ou uma temperatura ambiente mínima
superior à temperatura ambiente real. A unidade do bebê continua
enviando dados à unidade dos pais e, portanto, usa mais energia. Isso
faz com que as pilhas não recarregáveis da unidade do bebê
descarreguem rapidamente.
Talvez você tenha ligado a luz noturna. Se desejar usá-la,
recomendamos conectar a unidade do bebê à rede elétrica.
A unidade dos pais talvez esteja ligada durante o carregamento.
Desligue-a durante o carregamento.
Page 53

Pergunta Resposta
A faixa operacional
especicada para a babá
eletrônica é de 330
metros. Por que a babá
eletrônica só funciona
em uma distância bem
menor do que essa?
Por que a conexão cai
de vez em quando? Por
que há falhas no som?
O que acontece em
caso de falta de energia?
A babá eletrônica é
segura em termos de
privacidade e
interferência?
Espera-se que o tempo
operacional da unidade
dos pais seja de pelo
menos 24 horas. Por
que a unidade dos pais
está apresentando um
tempo operacional
menor?
A faixa especicada é válida apenas em ambientes externos, em locais
abertos. Dentro de casa, a faixa operacional é limitada pela quantidade
e pelo tipo de parede e/ou teto entre as unidades. Dentro de casa, a
faixa operacional é de até 50 metros.
O modo ECO está ligado. Quando a unidade do bebê está
funcionando nesse modo, a faixa operacional é de 260 metros em
locais abertos. Dentro de casa, a faixa operacional é limitada pela
quantidade e pelo tipo de parede e/ou teto entre as unidades.
Aproxime a unidade dos pais da unidade do bebê ou desligue o modo
ECO.
A unidade do bebê e a dos pais provavelmente estão atingindo os
limites máximos da faixa operacional. Experimente usá-las em outro
local ou diminua a distância entre elas. Observe que são necessários
cerca de 30 segundos para que a conexão entre as unidades seja
estabelecida.
Você pode ter colocado a unidade dos pais ao lado de um transmissor
ou aparelho DECT, como um telefone DECT ou outra babá eletrônica
na faixa de 1,8 GHz/1,9 GHz. Afaste a unidade dos pais dos outros
aparelhos até que a conexão seja restabelecida.
Se a unidade dos pais tiver carga suciente, ela continuará funcionando
durante a falta de energia, com ou sem o carregador. Se houver pilhas
na unidade do bebê, ela também continuará funcionando.
A tecnologia DECT desta babá eletrônica garante que não ocorrerá
interferência de outros equipamentos nem invasão de privacidade.
Quando a unidade dos pais é carregada pela primeira vez, o tempo
operacional é inferior a 24 horas. As pilhas recarregáveis só atingem sua
capacidade máxima após serem carregadas e descarregadas pelo
menos quatro vezes.
O volume da unidade dos pais talvez esteja muito alto, fazendo com
que ela consuma muita energia. Diminua o volume.
O nível de sensibilidade do microfone da unidade do bebê talvez esteja
muito alto, fazendo com que a unidade dos pais consuma muita
energia. Diminua o nível de sensibilidade do microfone no menu da
unidade dos pais.
PORTUGUÊS DO BRASIL 53
Page 54

54
PORTUGUÊS DO BRASIL
Pergunta Resposta
Por que o símbolo de
pilha não aparece na
tela da unidade dos pais
quando começo a
recarregá-la?
Talvez sejam necessários alguns minutos para que o símbolo de pilha
apareça na tela da unidade dos pais quando você carregá-la pela
primeira vez ou após um longo período sem uso.
Page 55

CERTIFICADO DE GARANTIA
ATENÇÃO
Este certificado é uma vantagem adicional oferecida ao consumidor,
porém, para que o mesmo tenha validade é imprescindível que seja
apresentada a competente NOTA FISCAL de compra do produto.
Com este produto, a Philips tem como objetivo atender plenamente o
consumidor, proporcionando a garantia na forma aqui estabelecida.
1. Esta garantia é complementar à legal e estipula que todas as partes
e componentes, ficam garantidos integralmente contra eventuais
defeitos de peças ou de fabricação que venham a ocorrer no
prazo de 2 (dois) anos a partir da data de entrega do produto ao
consumidor, conforme expresso na nota fiscal de compra.
2. Se o consumidor vier a transferir a propriedade deste produto, a
garantia ficará automaticamente transferida, respeitando o prazo de
validade, contado a partir da 1ª aquisição.
3. Constatado o eventual defeito de fabricação, o consumidor deverá
entrar em contato com a Assistência Técnica Autorizada mais próxima.
4. Nas demais localidades onde não exista Assistência Técnica
Autorizada as despesas de transportes do produto correm por conta
do consumidor.
5. No prazo de garantia as partes, peças e componentes eventualmente
defeituosos, serão trocados gratuitamente, assim como a mão de
obra aplicada.
6. Esta garantia fica extinta se ocorrer uma das hipóteses a seguir:
a) Se o defeito for ocasionado pelo uso não domiciliar ou mau uso e
em desacordo com as recomendações do manual de instruções do
produto,
b) Se o produto foi examinado, alterado, adulterado, fraudado,
ajustado ou consertado por oficina ou pessoa não autorizada pelo
fabricante,
c) Se qualquer peça, parte ou componente agregado ao produto, se
caracterizar como não original,
d) Se ocorrer a ligação deste produto em voltagem diversa da
indicada no produto,
e) Se o número de série que identifica o produto, estiver de alguma
forma adulterado ou rasurado,
f) Por casos fortuitos ou de força maior, bem como aqueles causados
por agentes da natureza.
7. Não está coberta por esta garantia a mudança ou alteração de
voltagem do produto.
55PORTUGUÊS DO BRASIL5657
IMPORTADO POR PHILIPS DO BRASIL LTDA.
AV. OTTO SALGADO, 250 - DISTR. INDUSTRAL CLÁUDIO GALVÃO NOGUEIRA
VARGINHA - MINAS GERAIS - CEP 37066-440 - CX. POSTAL 311 - CNPJ(MF) 61 086 336/0144-06
FABRICADO NA CHINA
Page 56

Page 57

Page 58

2 3 4 5
6 7 8 9
10 11 12 13
58
14
18
15 16 17
19
20
21
Page 59

59
22
1
2
3
23 24 25
26 27 28 29
30 31
34
35 36
1
2
32 33
Page 60

4222.005.0130.2
 Loading...