

Page 1
Operating Instructions
EB
EP
Blu-ray Disc Home Theater Sound System
Model No. SC-BT735
SC-BT330
SC-BT230
The illustration shows the image of the unit SC-BT735.
Dear customer
Thank you for purchasing this product.
For optimum performance and safety, please read these instructions carefully.
Before connecting, operating or adjusting this product, please read the instructions completely.
Please keep this manual for future reference.
Model number suffix “EB” denotes UK model.
VQT2Q52
Page 2
Getting started
(Side of product)
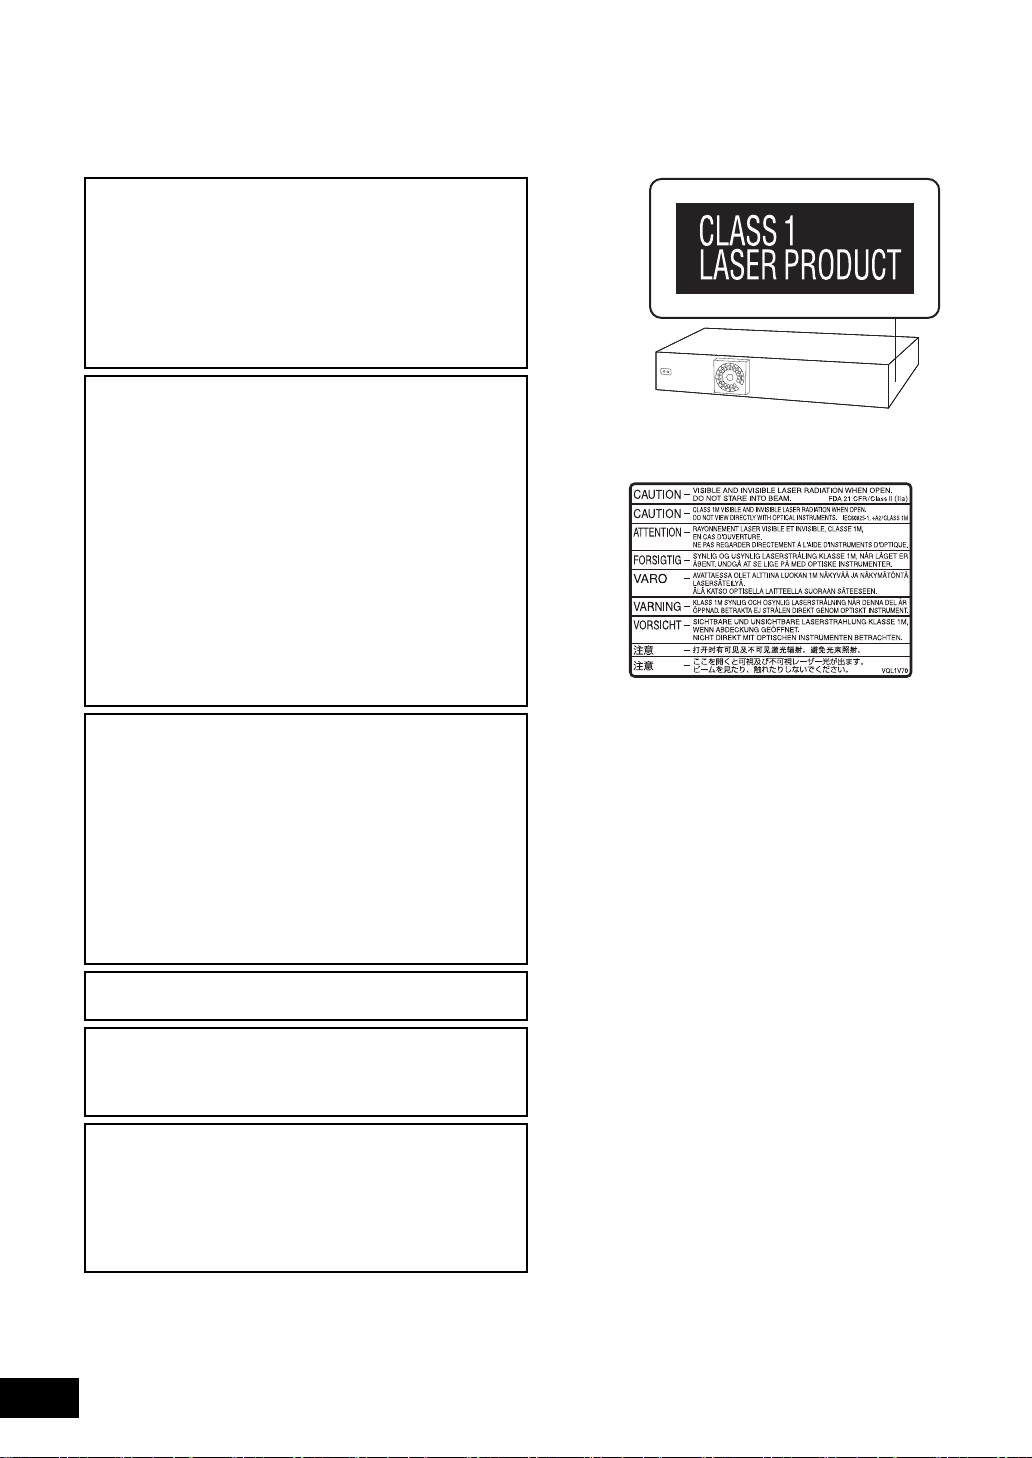
CAUTION!
THIS PRODUCT UTILIZES A LASER.
USE OF CONTROLS OR ADJUSTMENTS OR
PERFORMANCE OF PROCEDURES OTHER THAN
THOSE SPECIFIED HEREIN MAY RESULT IN
HAZARDOUS RADIATION EXPOSURE.
DO NOT OPEN COVERS AND DO NOT REPAIR
YOURSELF. REFER SERVICING TO QUALIFIED
PERSONNEL.
CAUTION!
≥ DO NOT INSTALL OR PLACE THIS UNIT IN A
BOOKCASE, BUILT-IN CABINET OR IN ANOTHER
CONFINED SPACE. ENSURE THE UNIT IS WELL
VENTILATED. TO PREVENT RISK OF ELECTRIC
SHOCK OR FIRE HAZARD DUE TO OVERHEATING,
ENSURE THAT CURTAINS AND ANY OTHER
MATERIALS DO NOT OBSTRUCT THE VENTILATION
VENTS.
≥ DO NOT OBSTRUCT THE UNIT’S VENTILATION
OPENINGS WITH NEWSPAPERS, TABLECLOTHS,
CURTAINS, AND SIMILAR ITEMS.
≥ DO NOT PLACE SOURCES OF NAKED FLAMES,
SUCH AS LIGHTED CANDLES, ON THE UNIT.
≥ DISPOSE OF BATTERIES IN AN ENVIRONMENTALLY
FRIENDLY MANNER.
WARNING:
TO REDUCE THE RISK OF FIRE, ELECTRIC SHOCK OR
PRODUCT DAMAGE,
≥ DO NOT EXPOSE THIS APPARATUS TO RAIN,
MOISTURE, DRIPPING OR SPLASHING AND THAT
NO OBJECTS FILLED WITH LIQUIDS, SUCH AS
VASES, SHALL BE PLACED ON THE APPARATUS.
≥ USE ONLY THE RECOMMENDED ACCESSORIES.
≥ DO NOT REMOVE THE COVER (OR BACK); THERE
ARE NO USER SERVICEABLE PARTS INSIDE.
REFER SERVICING TO QUALIFIED SERVICE
PERSONNEL.
(Inside of product)
VQT2Q52
2
THIS UNIT IS INTENDED FOR USE IN MODERATE
CLIMATES.
This product may receive radio interference caused by
mobile telephones during use. If such interference is
apparent, please increase separation between the product
and the mobile telephone.
The socket outlet shall be installed near the equipment and
easily accessible.
The mains plug of the power supply cord shall remain
readily operable.
To completely disconnect this apparatus from the AC
Mains, disconnect the power supply cord plug from AC
receptacle.
Page 3
Caution for AC Mains
Lead
(For the United Kingdom and Republic of Ireland)
For your safety, please read the following text carefully.
This appliance is supplied with a moulded three pin mains plug
for your safety and convenience.
A 5-ampere fuse is fitted in this plug.
Should the fuse need to be replaced please ensure that the
replacement fuse has a rating of 5-ampere and that it is
approved by ASTA or BSI to BS1362.
Check for the ASTA mark Ï or the BSI mark Ì on the body of
the fuse.
If the plug contains a removable fuse cover you must ensure
that it is refitted when the fuse is replaced.
If you lose the fuse cover the plug must not be used until a
replacement cover is obtained.
A replacement fuse cover can be purchased from your local
dealer.
CAUTION!
IF THE FITTED MOULDED PLUG IS UNSUITABLE FOR
THE SOCKET OUTLET IN YOUR HOME THEN THE
FUSE SHOULD BE REMOVED AND THE PLUG CUT OFF
AND DISPOSED OF SAFELY.
THERE IS A DANGER OF SEVERE ELECTRICAL
SHOCK IF THE CUT OFF PLUG IS INSERTED INTO ANY
13-AMPERE SOCKET.
Before use
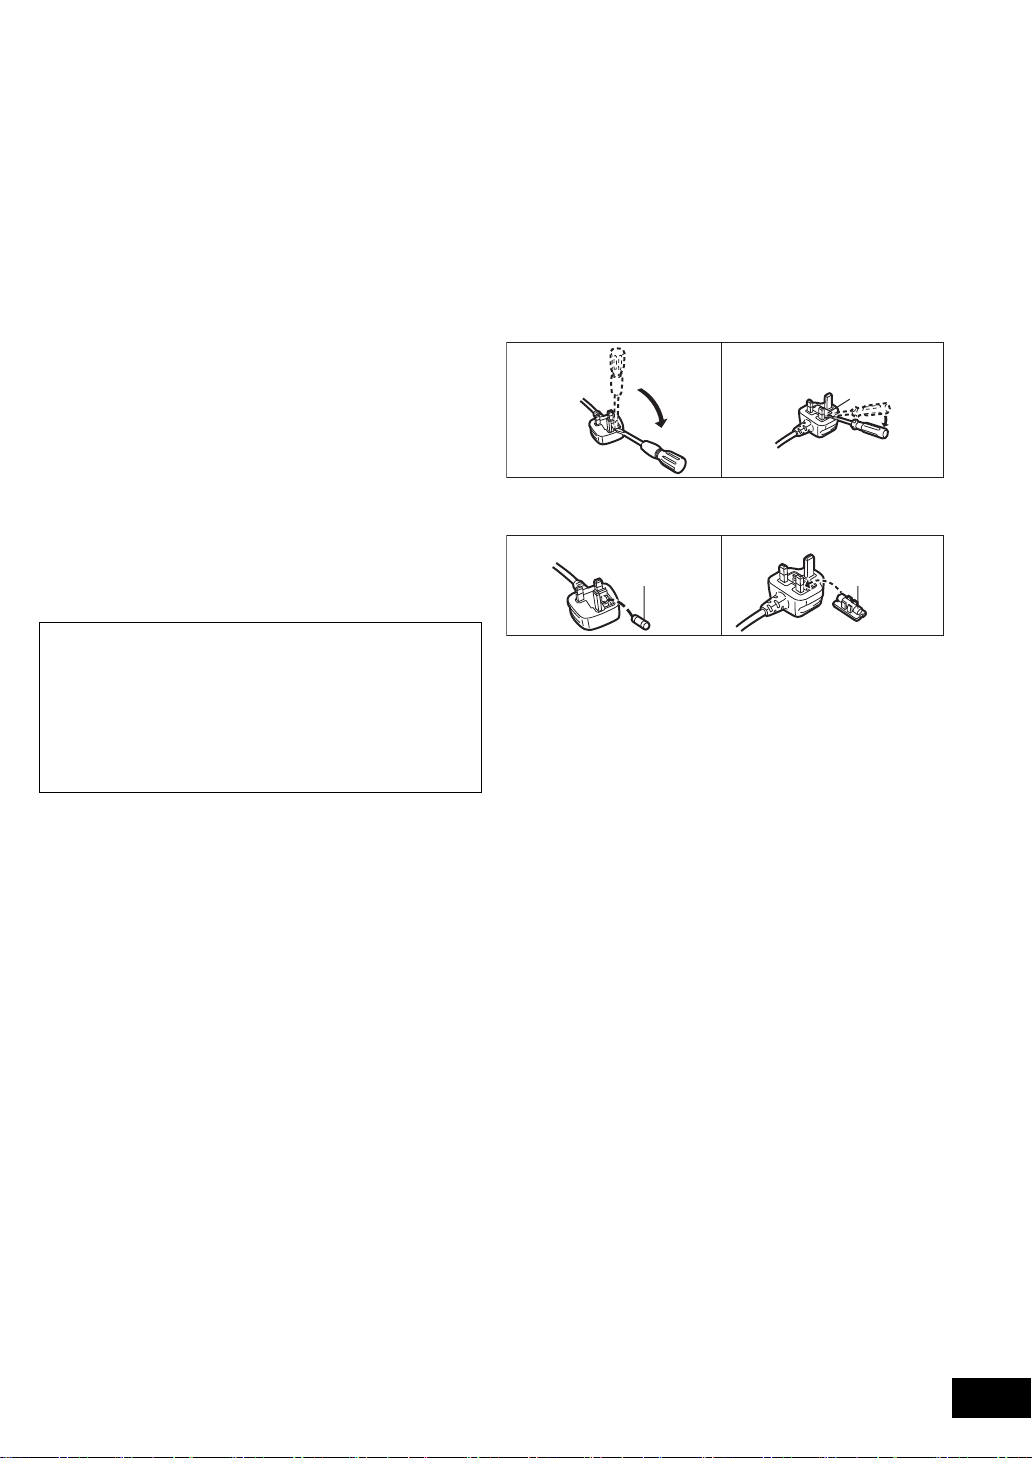
Remove the connector cover.
How to replace the fuse
The location of the fuse differ according to the type of AC
mains plug (figures A and B). Confirm the AC mains plug fitted
and follow the instructions below.
Illustrations may differ from actual AC mains plug.
1 Open the fuse cover with a screwdriver.
Figure A Figure B
Fuse cover
2 Replace the fuse and close or attach the fuse cover.
Figure A Figure B
Fuse
(5 ampere)
Fuse
(5 ampere)
If a new plug is to be fitted please observe the wiring code as
stated below.
If in any doubt please consult a qualified electrician.
IMPORTANT
The wires in this mains lead are coloured in accordance with
the following code:
Blue: Neutral, Brown: Live.
As these colours may not correspond with the coloured
markings identifying the terminals in your plug, proceed as
follows:
The wire which is coloured Blue must be connected to the
terminal which is marked with the letter N or coloured Black or
Blue.
The wire which is coloured Brown must be connected to the
terminal which is marked with the letter L or coloured Brown or
Red.
WARNING: DO NOT CONNECT EITHER WIRE TO THE
EARTH TERMINAL WHICH IS MARKED WITH THE LETTER
E, BY THE EARTH SYMBOL Ó OR COLOURED GREEN
OR GREEN/YELLOW.
THIS PLUG IS NOT WATERPROOF—KEEP DRY.
VQT2Q52
3
Page 4
Safety precautions
Cd
Placement
Set the unit up on an even surface away from direct sunlight,
high temperatures, high humidity, and excessive vibration.
These conditions can damage the cabinet and other
components, thereby shortening the unit’s service life. Do not
place heavy items on the unit.
Voltage
Do not use high voltage power sources. This can overload the
unit and cause a fire. Do not use a DC power source. Check
the source carefully when setting the unit up on a ship or other
place where DC is used.
AC mains lead protection
Ensure the AC mains lead is connected correctly and not
damaged. Poor connection and lead damage can cause fire or
electric shock. Do not pull, bend, or place heavy items on the
lead.
Grasp the plug firmly when unplugging the lead. Pulling the AC
mains lead can cause electric shock. Do not handle the plug
with wet hands. This can cause electric shock.
Information for Users on Collection and Disposal of
Old Equipment and used Batteries
These symbols on the products, packaging,
and/or accompanying documents mean that
used electrical and electronic products and
batteries should not be mixed with general
household waste.
For proper treatment, recovery and recycling
of old products and used batteries, please
take them to applicable collection points, in
accordance with your national legislation and the Directives
2002/96/EC and 2006/66/EC.
By disposing of these products and batteries correctly, you
will help to save valuable resources and prevent any
potential negative effects on human health and the
environment which could otherwise arise from
inappropriate waste handling.
For more information about collection and recycling of old
products and batteries, please contact your local
municipality, your waste disposal service or the point of
sale where you purchased the items.
Penalties may be applicable for incorrect disposal of this
waste, in accordance with national legislation.
For business users in the European
Union
If you wish to discard electrical and
electronic equipment, please contact your
dealer or supplier for further information.
Foreign matter
Do not let metal objects fall inside the unit. This can cause
electric shock or malfunction.
Do not let liquids get into the unit. This can cause electric
shock or malfunction. If this occurs, immediately disconnect
the unit from the power supply and contact your dealer.
Do not spray insecticides onto or into the unit. They contain
flammable gases which can ignite if sprayed into the unit.
Service
Do not attempt to repair this unit by yourself. If sound is
interrupted, indicators fail to light, smoke appears, or any other
problem that is not covered in these instructions occurs,
disconnect the AC mains lead and contact your dealer or an
authorized service centre. Electric shock or damage to the unit
can occur if the unit is repaired, disassembled or reconstructed
by unqualified persons.
Extend operating life by disconnecting the unit from the power
source if it is not to be used for a long time.
[Information on Disposal in other Countries outside the
European Union]
These symbols are only valid in the European Union. If you
wish to discard these items, please contact your local
authorities or dealer and ask for the correct method of
disposal.
Note for the battery symbol (bottom two
symbol examples):
This symbol might be used in combination
with a chemical symbol. In this case it
complies with the requirement set by the
Directive for the chemical involved.
VQT2Q52
4
Page 5

Table of contents
Caution for AC Mains Lead ............................... 3
Safety precautions ............................................. 4
Getting started
Getting started TV Radio PlaybackOther devices
TV
Accessory .......................................................... 6
Unit and media care .......................................... 7
Using the remote control ................................... 7
Control reference guide ..................................... 8
•Remote control .................................................................8
•Main unit (Front) ...............................................................9
•Main unit (Rear) ................................................................9
Playable discs/Cards/USB devices ................. 10
STEP 1: Preparing the speakers ..................... 12
•Assembling the speakers ...............................................12
•Speaker assembly option ...............................................13
STEP 2: Positioning ........................................ 14
STEP 3: Connections ...................................... 15
•Speaker cable connection ..............................................15
•Radio antenna connection ..............................................15
•Connection to a TV .........................................................16
•Connection to a broadband network ...............................18
STEP 4 : AC mains lead connection ............... 18
STEP 5: Smart setup / Easy setup .................. 19
•Network Easy Setting ....................................................20
•Firmware updating ..........................................................21
STEP 6:
Reprogramming the remote control ................. 22
Inserting or removing a media ......................... 22
START menu ................................................... 23
Enjoying sound effects from all speakers ........ 24
•Enjoying surround sound effects ....................................24
Enjoying TV with unit’s speakers .....................30
•Surround sound effects .................................................. 30
•Sound modes ................................................................. 30
•Making settings for digital audio input ............................ 30
Linked operations with the TV
(VIERA Link “HDAVI Control
•Setting the audio link ...................................................... 31
•Easy control only with VIERA remote control ................ 32
TM
”) ...................... 31
Other devices
Using the iPod/iPhone ..................................... 32
•iPod/iPhone Connection ................................................ 32
•iPod/iPhone Playback .................................................... 33
Advanced operations
Enjoying VIERA CAST ..................................... 34
Playback menu ................................................ 34
DLNA feature ................................................... 36
Setup menu .....................................................37
•Speaker settings ............................................................ 41
Optional speaker settings
Speaker installation option ...............................42
Playback
Playing video contents .................................... 25
•Other operations during play ..........................................25
•Useful functions ..............................................................26
•Enjoying BD-Live or BONUSVIEW in BD-Video .............26
•Regarding DivX ..............................................................27
Playing music .................................................. 27
Playing still pictures ......................................... 28
•Useful functions ..............................................................28
Radio
Listening to the Radio ...................................... 29
•Presetting stations automatically ....................................29
•Presetting stations manually ...........................................29
•Listening/confirming the preset channels .......................29
•RDS broadcasting ..........................................................29
Reference
Troubleshooting guide ..................................... 43
Messages ........................................................ 45
About MP3/JPEG/DivX/
AVCHD/MPEG2 files ....................................... 46
Supplemental information ................................ 47
Glossary ........................................................... 49
Specifications ...................................................50
Index ................................................. Back Cover
Advanced operations
settings
Optional speaker
Reference
VQT2Q52
5
Page 6
Getting started
≥ These operating instructions are applicable to models
SC-BT735, SC-BT330 and SC-BT230. Unless otherwise
indicated, illustrations in these operating instructions
Indicates features applicable to:
SC-BT735 only
[BT735]:
: SC-BT330 only
[BT330]
SC-BT230 only
[BT230]:
are of SC-BT735.
≥ Operations in these instructions are described mainly
with the remote control, but you can perform the
operations on the main unit if the controls are the
same.
System SC-BT735 SC-BT330 SC-BT230
Main unit SA-BT735 SA-BT330 SA-BT230
Speaker system Front speakers SB-HF730 SB-HF330 SB-HF230
Centre speaker SB-HC730 SB-HC230 SB-HC230
Surround speakers SB-HS735 SB-HS230 SB-HS230
Subwoofer SB-HW330 SB-HW330 SB-HW480
≥Some models may not be on sale in certain regions.
≥Some accessories and external devices mentioned in these operating instructions that are not included with this
product may not be on sale in certain regions.
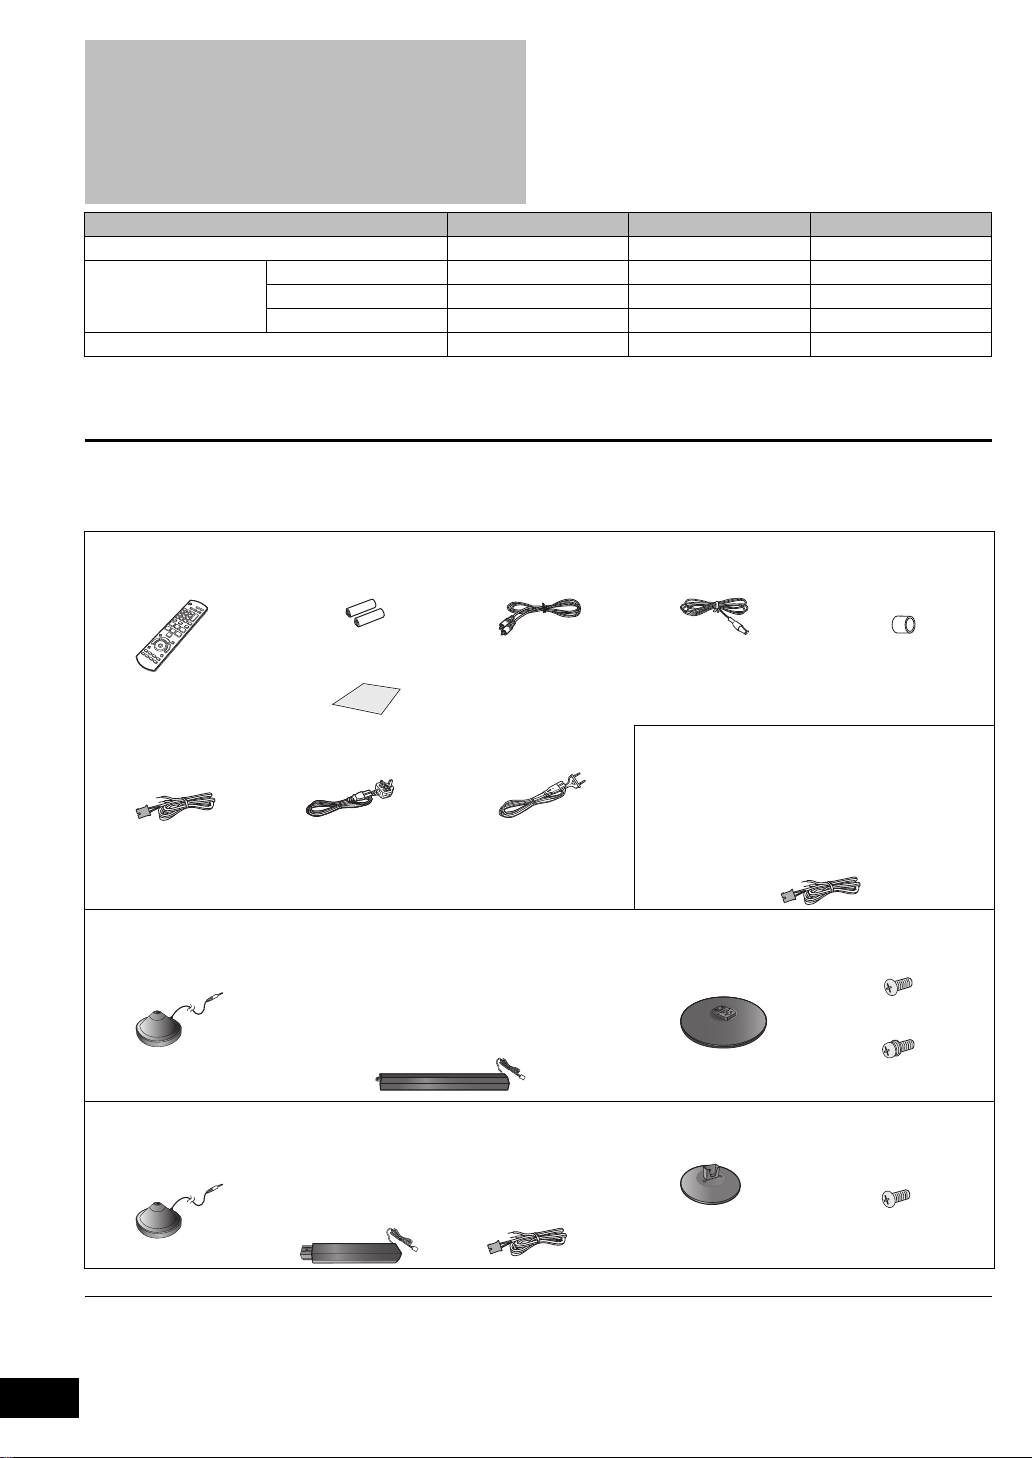
Accessory
Check the supplied accessories before using this unit.
[BT735] [BT330] [BT230]
∏ 1 Remote control
(N2QAKB000090)
∏ 2Batteries for
remote control
∏ 1 Video cable
(K2KA2BA00001)
∏ 1 FM indoor antenna
(RSAX0002)
∏ 1 Antenna plug
adaptor
(K1YZ02000013)
∏ Speaker cable (centre)
[REEX1154]
with green connector
[BT735]
∏ 1 Auto speaker setup
microphone
(L0CBAY000051)
[BT330]
∏ 1 Auto speaker setup
microphone
(L0CBAY000051)
∏ 1 Sheet of speaker
cable stickers
∏ 1 AC mains lead
(RFAX1022)
For the United Kingdom
and Republic of Ireland
∏ 4 Speaker stands
(with cable)
[RYK1609-K]
with white connector
[RYK1609A-K]
with red connector
∏ 2 Speaker stands
(with cable)
[RYPX1041-KL]
with white connector
[RYPX1041-KR]
with red connector
(RFAX0024)
For Continental Europe
[RYK1609C-K]
with grey connector
[RYK1609B-K]
with blue connector
∏ Speaker cables
(surround)
[REEX1155]
with grey connector
[REEX1156]
with blue connector
[BT230]
∏ Speaker cables
(front)
[REEX1152A]
with red connector
[REEX1153A]
with white connector
∏ 4 Bases
(RYK1610-K)
∏ 2 Bases
(RYPX0389-K)
For the United Kingdom
and Republic of Ireland
(surround)
[REEX1155]
with grey connector
[REEX1156]
with blue connector
∏ 8 Screws
(XTN5+10FFJK)
4 Screws
(XYN5+J16FJK)
∏ 8 Screws
(XTN5+10FFJK)
≥ Product numbers correct as of December 2009. These may be subject to change.
≥ Do not use AC mains lead with other equipment.
VQT2Q52
6
Page 7
\For\the\United\Kingdom\and\Republic\of\Ireland\customers\
R6/LR6, AA
(Alkaline or manganese
batteries)
∫ Sales and Support Information
Customer Care Centre
≥ For customers within the UK: 0844 844 3852
≥ For customers within the Republic of Ireland: 01 289 8333
≥ Visit our website for product information
www.panasonic.co.uk
≥ E-mail: [email protected]
Direct Sales at Panasonic UK
≥ For customers: 0844 844 3856
≥ Order accessory and consumable items for your product with ease
and confidence by phoning our Customer Care Centre
Monday–Thursday 9:00 a.m.–5:30 p.m., Friday 9:30 a.m.–5:30 p.m.
(Excluding public holidays)
≥ Or go on line through our Internet Accessory ordering application at
www.pas-europe.com
≥ Most major credit and debit cards accepted.
≥ All enquiries transactions and distribution facilities are provided
directly by Panasonic UK Ltd.
≥ It couldn’t be simpler!
≥ Also available through our Internet is direct shopping for a wide range
of finished products, take a browse on our website for further details.
Getting started
Unit and media care
∫ Clean this unit with a soft, dry cloth
≥ Never use alcohol, paint thinner or benzine to clean this unit.
≥ Before using chemically treated cloth, carefully read the
instructions that came with the cloth.
∫ Clean the lens with the lens cleaner
Lens cleaner: RP-CL720E
≥ This lens cleaner may not be available for sale in all
countries, e.g. not available in Germany, please consult
your Panasonic dealer for advice.
≥ This lens cleaner is primarily for use on Panasonic DVD
recorders (DIGA), but it is also suitable for use on this unit.
∫ Clean discs
DO DO NOT
Wipe with a damp cloth and then wipe dry.
∫ Disc and card handling precautions
≥ Handle discs by the edges to avoid inadvertent scratches or
fingerprints on the disc.
≥ Do not attach labels or stickers to discs.
≥ Do not use record cleaning sprays, benzine, thinner, static
electricity prevention liquids or any other solvent.
≥ Clean any dust, water, or foreign matter from the terminals
on the rear side of the card.
≥ Do not use the following discs:
jDiscs with exposed adhesive from removed stickers or
labels (rented discs etc).
jDiscs that are badly warped or cracked.
jIrregularly shaped discs, such as heart shapes.
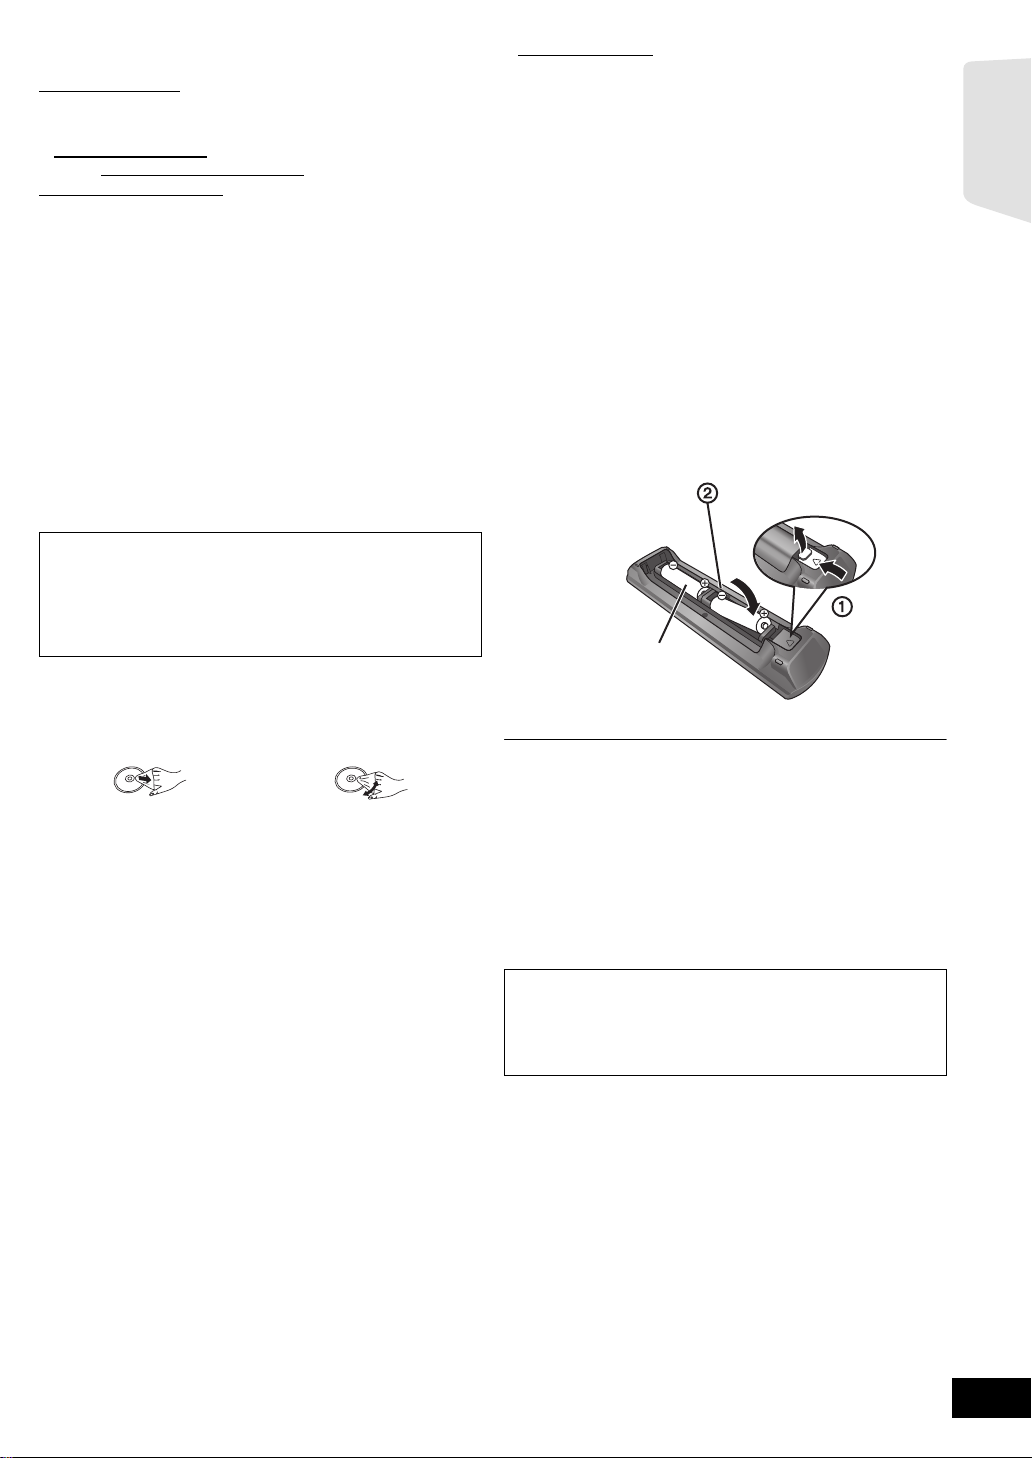
Using the remote
control
Insert so the poles (i and j) match those in the remote
control.
Point it at remote control signal sensor on this unit. (> 9)
Mishandling of batteries can cause electrolyte leakage which can damage
items the fluid contacts and may cause a fire.
≥ Do not mix old and new batteries or different types at the same time.
≥ Do not heat or expose to flame.
≥ Do not leave the battery(ies) in an automobile exposed to direct sunlight for
a long period of time with doors and windows closed.
≥ Do not take apart or short circuit.
≥ Do not attempt to recharge alkaline or manganese batteries.
≥ Do not use batteries if the covering has been peeled off.
Remove batteries if the remote control is not going to be used for a long
period of time. Store in a cool, dark place.
CAUTION
Danger of explosion if battery is incorrectly replaced.
Replace only with the same or equivalent type
recommended by the manufacturer. Dispose of used
batteries according to the manufacturer’s instructions.
∫ To dispose or transfer this unit
The unit may keep the user settings information in the unit. If
you discard this unit either by disposal or transfer, then follow
the procedure to return all the settings to the factory presets to
delete the user settings. (> 43, “To return to the factory
preset.”)
≥ The operation history may be recorded in the memory of this
unit.
VQT2Q52
7
Page 8
Control reference guide
CANCEL
PIP
RETURN
VOL
STOP
1 2 3
4 5 6
7 809
VOL
TV
AV
SEARCH
SKIP
SLOW
SKIP
PLAY
PAUSE
SEARCH
OK
BD/SD
iPod
EXT-IN
MUTE
RADIO
P
O
P
-
U
P
M
E
N
U
T
O
P
M
E
N
U
EXIT
STATUS
OPTION
-
SLEEP
-
CH SELECT
SOUND
SURROUND
DISPLAY
AUDIO
abc
def
jkl
mno
tuv
ghi
qrs
p
xyz
w
D
I
R
E
C
T
N
A
V
I
G
A
T
O
R
19
8
21
22
24
13
15
20
1
4
18
2
23
14
16
17
3
5
6
7
9
10
11
12
S
T
A
R
T
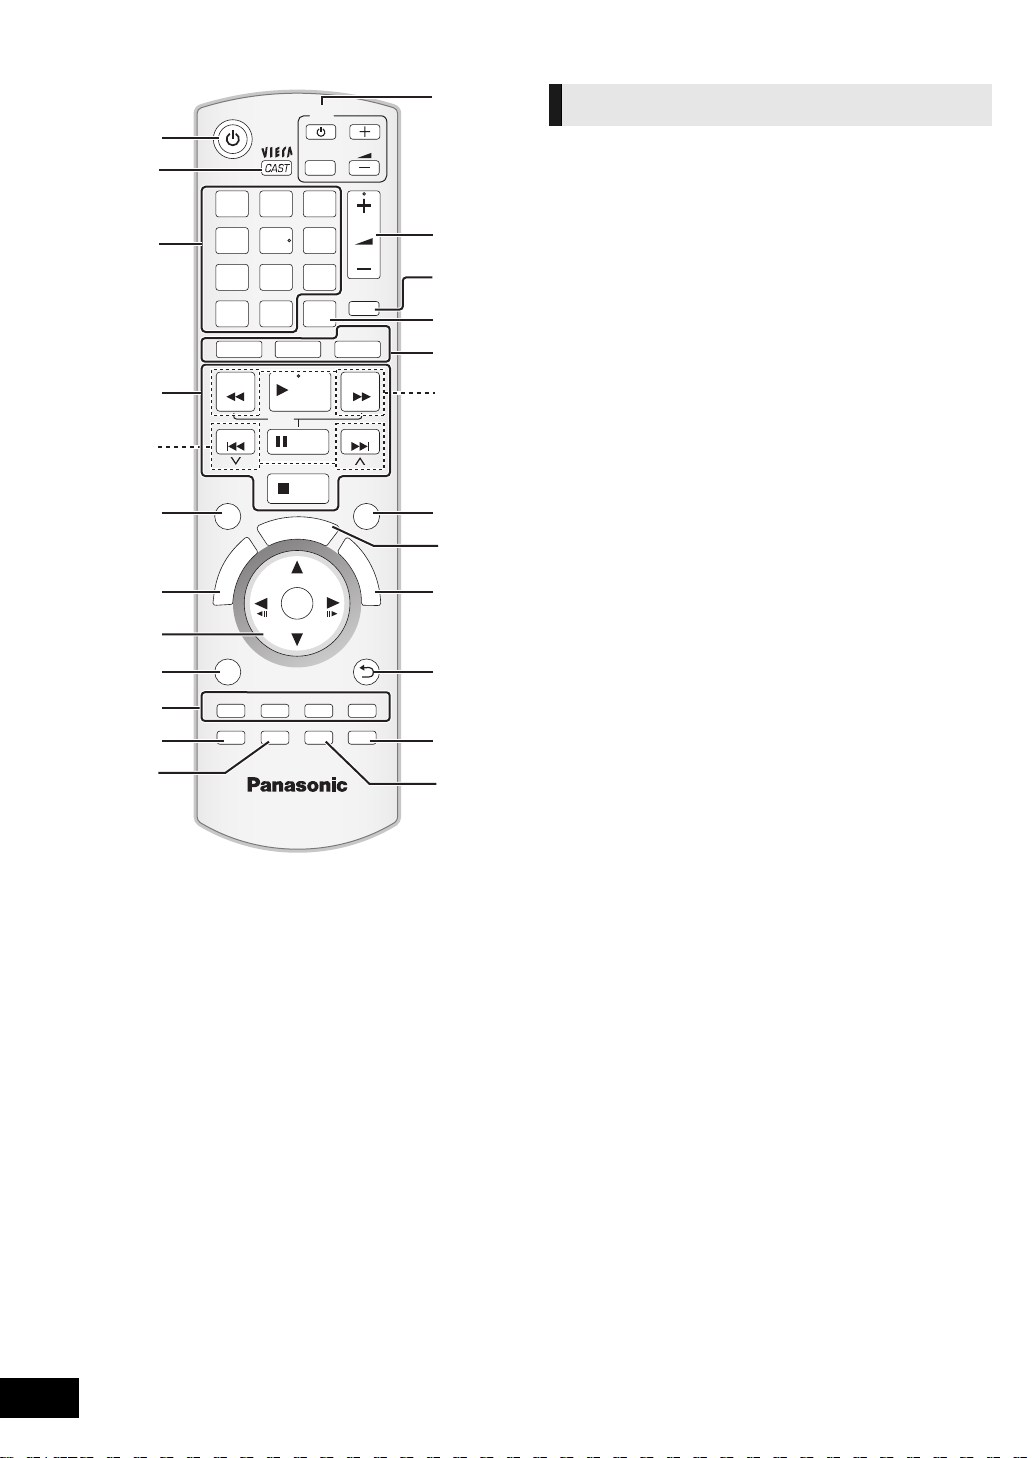
Remote control
1 Turn the unit on and off (> 19)
2 Display the Home screen of VIERA CAST (> 34)
3 Select title numbers, etc./Enter numbers or characters
(> 34)
[CANCEL] : Cancel
4 Basic playback control buttons (> 25)
5 Select preset radio stations (> 29)
6 Show status messages (> 25)
7 Show Top Menu/DIRECT NAVIGATOR (> 25)
8[3, 4, 2, 1]: Menu selection
[OK]: Selection
[2, 1]: Select preset radio station (> 29)
[2] (2;), [1] (;1): Frame-by-frame (> 25)
9 Show OPTION menu (> 26)
10 Coloured buttons (red, green yellow, blue)
These buttons are used when;
≥ Operating a BD-Video disc that includes Java
applications (BD-J).
≥ Displaying “Title View” and “Album View” screens.
(> 28)
≥ Operating contents of VIERA CAST (> 34)
11 Set the sound mode (> 24)/Select speaker channel
(> 24)
12 Select surround sound effects (> 24)
13 TV operation buttons
You can operate the TV through the unit’s remote control.
[Í]: Turn the television on and off
[AV]: Switch the input select
[ijVOL] : Adjust the volume
14 Adjust the volume of the main unit
15 Mute the sound
≥ “MUTE” flashes on the unit’s display, while the function is
on.
≥ To cancel, press the button again or adjust the volume.
≥ Muting is cancelled if the unit is turned off.
16 Switch on/off Secondary Video (Picture-in-picture) (> 26)
17 Select the source
[BD/SD]: Select disc drive or SD card drive (> 23)
[iPod]: Select iPod/iPhone as the source (> 23, 33)
[RADIO/EXT-IN]: Select FM tuner, USB or external audio
as the source (> 23, 29, 30)
18 Select radio stations manually (> 29)
19 Exit the menu screen
20 Show START menu (> 23)
21 Show Pop-up menu (> 25)
22 Return to previous screen
23 Select audio (> 25)
24 Show Playback menu (> 34)/Set the sleep timer
1 Press and hold [jSLEEP].
2 While “SLEEP ££” is displayed, press [jSLEEP]
several times to select the time (in minutes).
≥ Timer selection is up to 120 minutes.
≥ Select “OFF” when cancelling the setting.
≥ To confirm the remaining time
Press and hold the button again.
TM
VQT2Q52
8
Page 9
Main unit (Front)
OPEN/CLOSEVOLUME
iPod
SELECTOR
SD CARD
SETUP MIC
1 2
3
45
6 7 8 9 10 11 12 13
14
Pull open.
e.g., [BT735]
2
DIGITAL AUDIO IN
DIGITAL TRANSMITTER
VIDEO
OUT
AUX
LAN
WIRELESS
FM ANT
L
R
5
2
1
3Ω6Ω6
Ω
FRONT
CENTER
SUBWOOFER
R L
6
4
3
3
Ω
SURROUND
R L
(75Ω)
OPTICAL
2
DIGITAL AUDIO IN
DIGITAL TRANSMITTER
1
LAN
(
10BASE-T/
100BASE-TX
)
AC IN
(ARC)
AV
OUT
1 2 3 4 5 6 7 8
109 11
Getting started
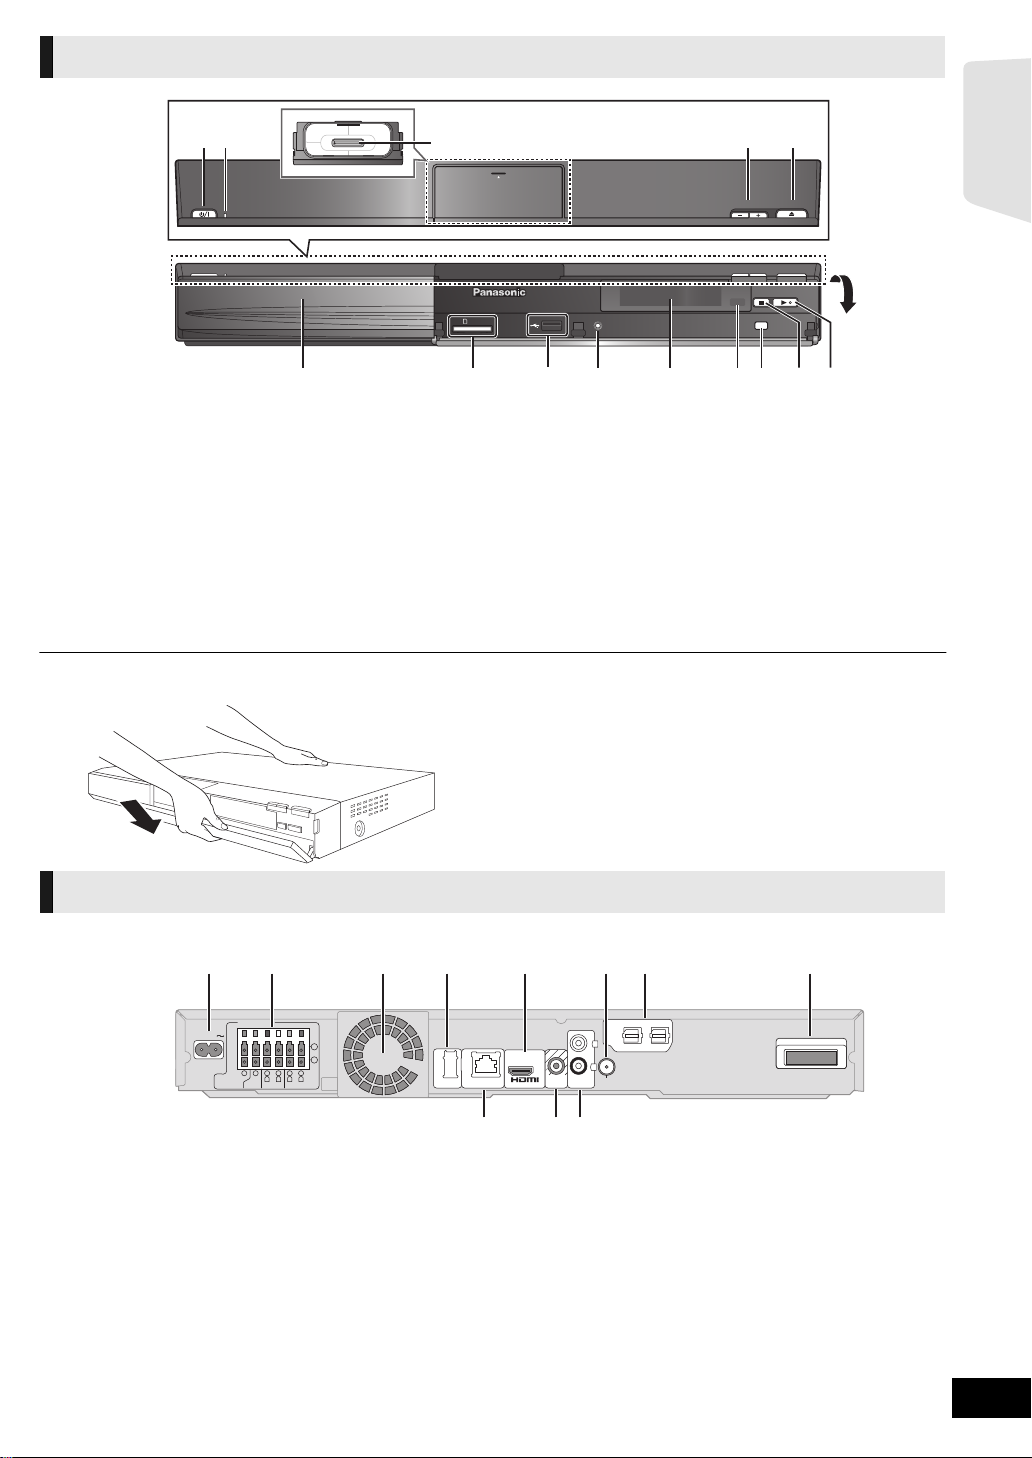
1 Standby/on switch (Í/I) (> 19)
Press to switch the unit from on to standby mode or vice
versa. In standby mode, the unit is still consuming a small
amount of power.
2 Power indicator
The indicator lights when this unit is turned on.
3 Connect iPod/iPhone (> 32)
4 Adjust the volume of the main unit
5 Open or close the disc tray (> 22)
6 Disc tray
7 SD card slot (> 22)
∫ If the front cover comes off
Main unit (Rear)
8 USB port (> 22)
9 [BT735] [BT330] Connect Auto speaker setup microphone
10 Display (FL display)
≥ “SRD” (SURROUND) lights when sound is output to the
surround speakers.
11 Remote control signal sensor
Distance: within approx. 7 m.
Angle: Approx. 20e up and down, 30e left and right
12 Select the source (> 23)
13 Stop (> 25)
14 Start play (> 25)
1 Hold rear side of main unit by one hand and match up left
or right side protruding hook on the cover first with the
corresponding slot on the unit.
2 Push the hook firmly towards the unit until it clicks into
place. Then push the succeeding hooks one by one until
all have clicked into place.
3 Check that the cover now moves correctly.
≥ If it does not, remove it and repeat the above procedure.
1 AC IN terminal (> 18)
2 Speaker terminals (> 15)
3 Cooling fan
4 USB port for optional wireless adaptor (> 18)
5 HDMI AV OUT terminal (> 17)
6 FM radio antenna terminal (> 15)
8 Digital transmitter dock (> 14)
Connect a digital transmitter when using an optional
wireless system.
9LAN port (> 18)
10 VIDEO OUT terminal (> 16)
11 AUX terminal (> 16)
7 DIGITAL AUDIO IN terminals (> 16 , 17)
Terminal 1 is designated for connection with the TV.
Terminal 2 can be used with equipment other than the
STB.
VQT2Q52
9
Page 10
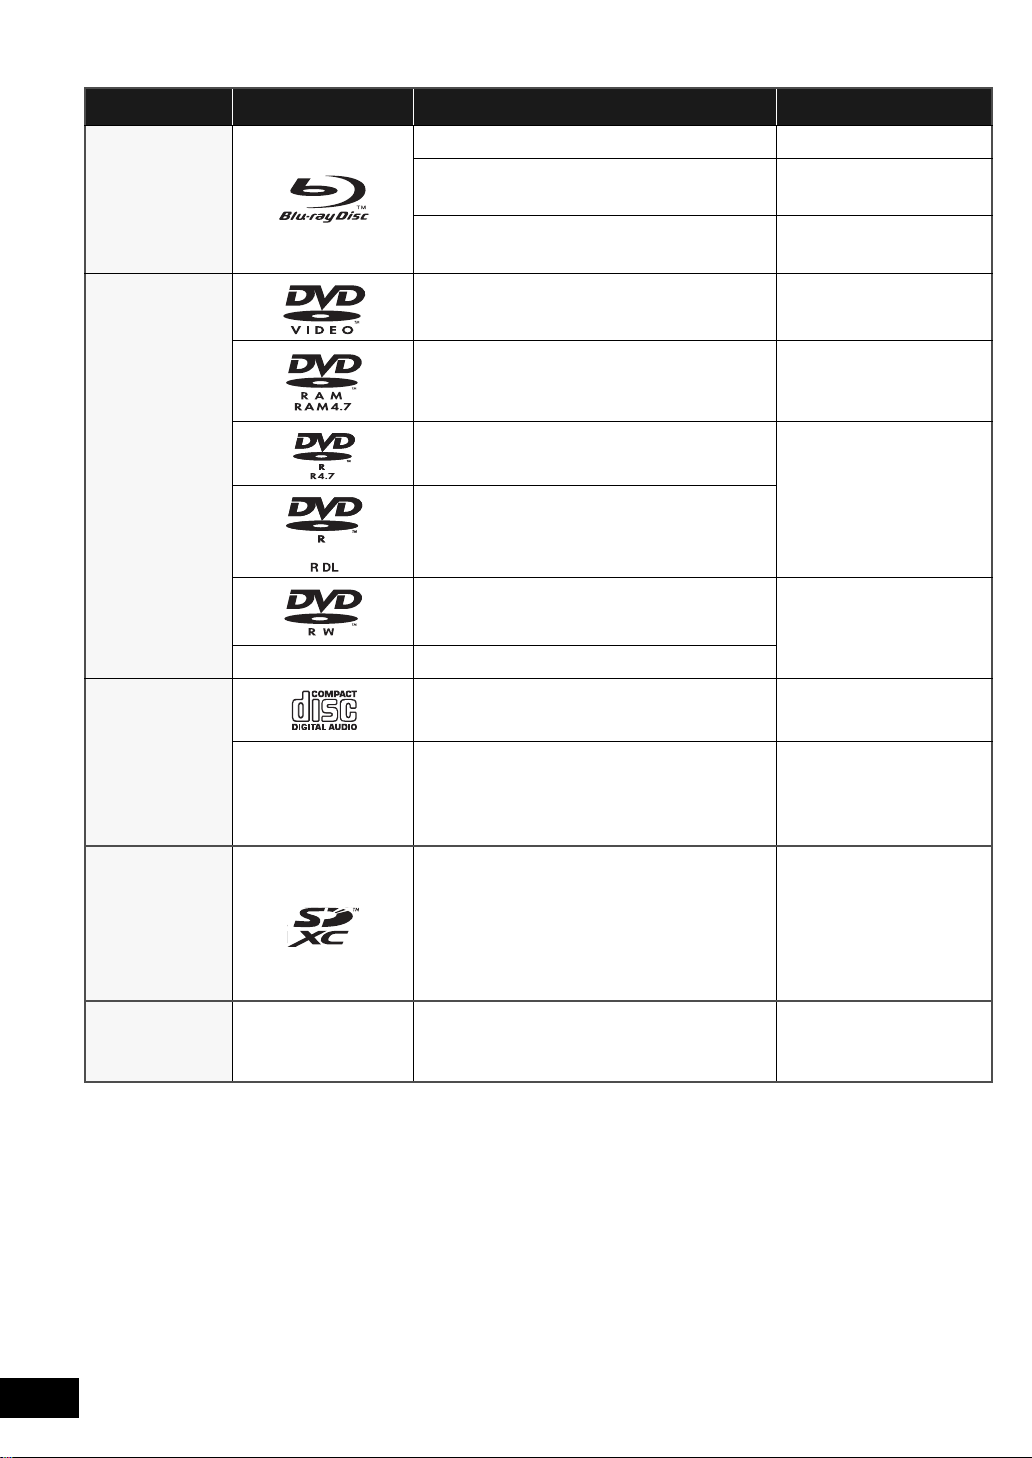
Playable discs/Cards/USB devices
Type Logo examples Type detail Playable contents*
BD-Video Video
[BD]
BD-RE
BD-R
DVD-Video Video
DVD-RAM
Video
JPEG
Video
®
DivX
Video
AVCHD
JPEG
DVD-R
[DVD]
DVD-R DL
DVD-RW
—
+R/+RW/+R DL
Music CD Music [CD-DA]
[CD]
—
CD-R
CD-RW
SD Memory Card (8 MB to 2 GB)
(Includes miniSD Card and microSD Card)
SDHC Memory Card (4 GB to 32 GB)
[SD]
(Includes microSDHC Card)
SDXC Memory Card (48 GB, 64 GB)
(Includes microSDXC Card)
[USB] —
* See page 11, 46–47 for more information on the types of content that can be played.
USB device
(up to 128 GB)
(as of December 2009)
Video
AVCHD
DivX
MP3
JPEG
Video
AVCHD
DivX
Music [CD-DA]
MP3
JPEG
MPEG2
AVCHD
JPEG
DivX
MP3
JPEG
VQT2Q52
10
Page 11
∫ Discs that cannot be played in this unit
Any other disc that is not specifically supported or
previously described.
≥ 2.6 GB and 5.2 GB DVD-RAM
≥ DVD-RAM that cannot be removed from cartridge
≥ Super Audio CD
≥ Photo CD
≥ DVD-Audio
≥ Video CD and Super Video CD
≥ WMA discs
≥ HD DVD
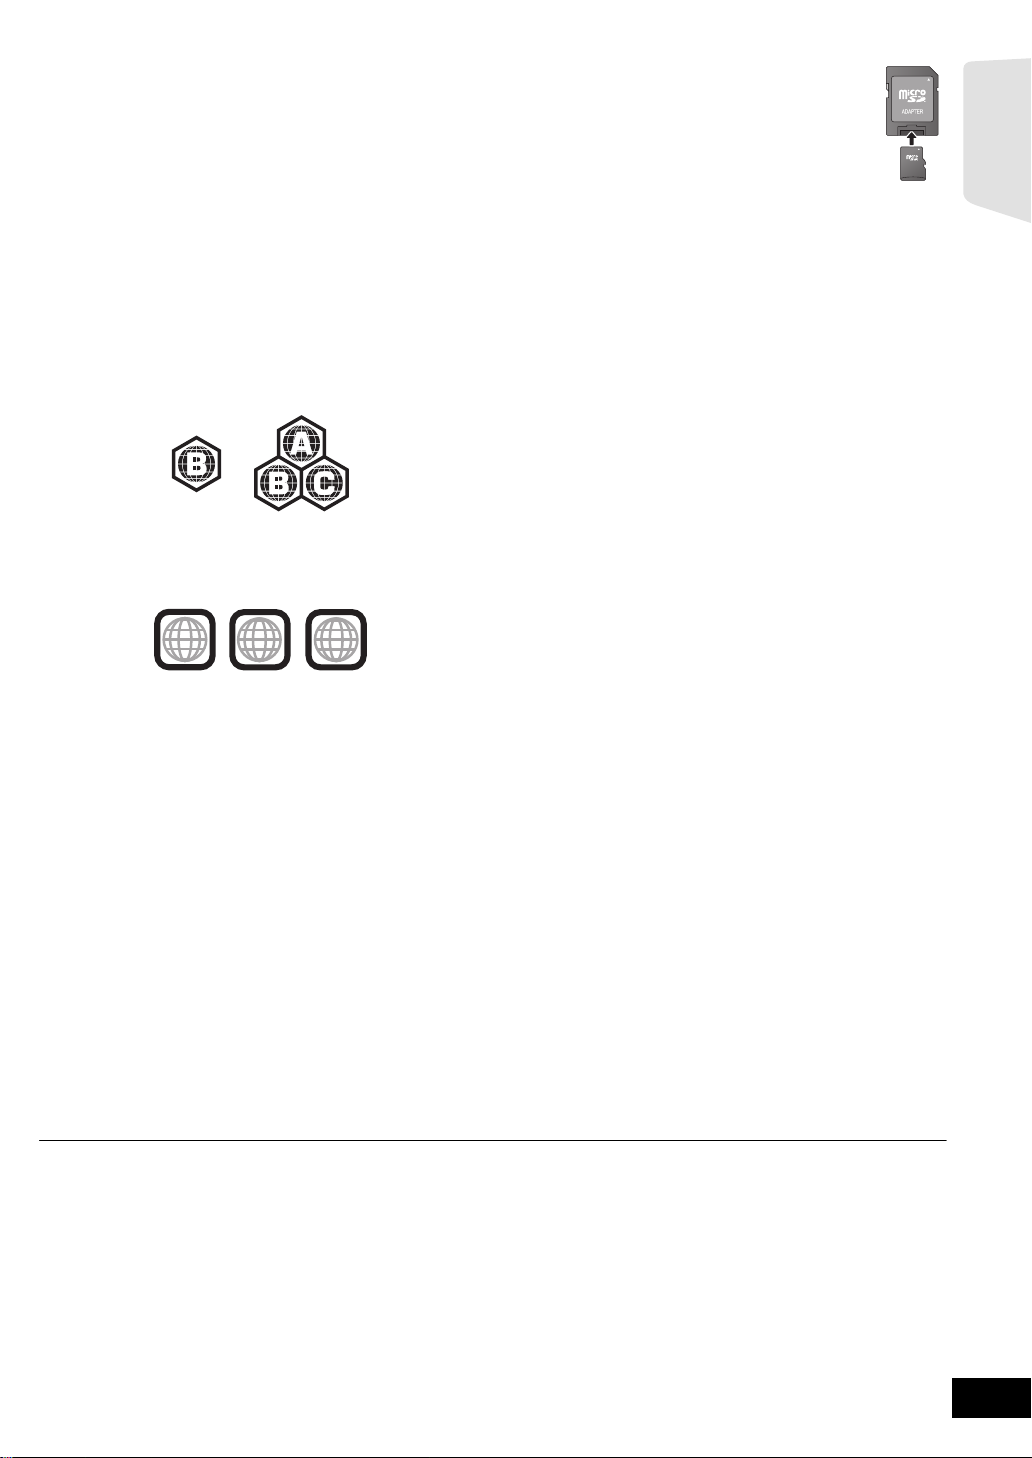
∫ Region management information
BD-Video
This unit plays BD-Video marked with labels containing the
region code “B”.
Example:
DVD-Video
This unit plays DVD-Video marked with labels containing the
region number “2” or “ALL”.
Example:
∫ SD card
≥ MiniSD Cards, microSD Cards, microSDHC
Cards and microSDXC Cards can be used, but
must be used with an adaptor card. These are
usually supplied with such cards, or otherwise
customer provided.
≥ Keep the Memory Card out of reach of children to
prevent swallowing.
≥ To protect the card’s contents, move the record prevention
tab (on the SD card) to “LOCK”.
≥ This unit is compatible with SD Memory Cards that meet SD
Card Specifications FAT12 and FAT16 formats, as well as
SDHC Memory Cards in FAT32 format (Does not support
long file name.) and SDXC Memory Cards in exFAT.
≥ If the SD card is used with incompatible computers or
devices, recorded contents may be erased due to the card
being formatted etc.
≥ Useable memory may be slightly less than the card capacity.
∫ USB device
≥ This unit supports connecting a USB memory, digital camera
and video camera produced by Panasonic, etc. It is not
warranted that all USB devices will work with this unit.
≥ This unit does not support USB device charging.
≥ FAT12, FAT16 and FAT32 file systems are supported.
≥ This unit supports USB 2.0 High Speed.
Getting started
1
2
ALL
2
4
∫ Finalize
DVD-R/RW/R DL, +R/+RW/+R DL and CD-R/RW recorded by
a recorder, etc. needs to be finalized by the recorder to play on
this unit. Please refer to the recorder’s instructions.
∫ BD-Video
This unit supports high bit rate audio (Dolby Digital Plus, Dolby
TrueHD, DTS-HD High Resolution Audio and DTS-HD Master
Audio) adopted in BD-Video. In order to enjoy these audio
formats, refer to page 38.
∫ Music CD
Operation and sound quality of CDs that do not conform to
CD-DA specifications (copy control CDs, etc.) cannot be
guaranteed.
≥ It may not be possible to play the above media in some cases due to the type of media, the condition of the recording, the recording method and how the files
were created.
≥ The producers of the disc can control how discs are played. So you may not always be able to control play as described in these operating instructions. Read
the disc’s instructions carefully.
VQT2Q52
11
Page 12
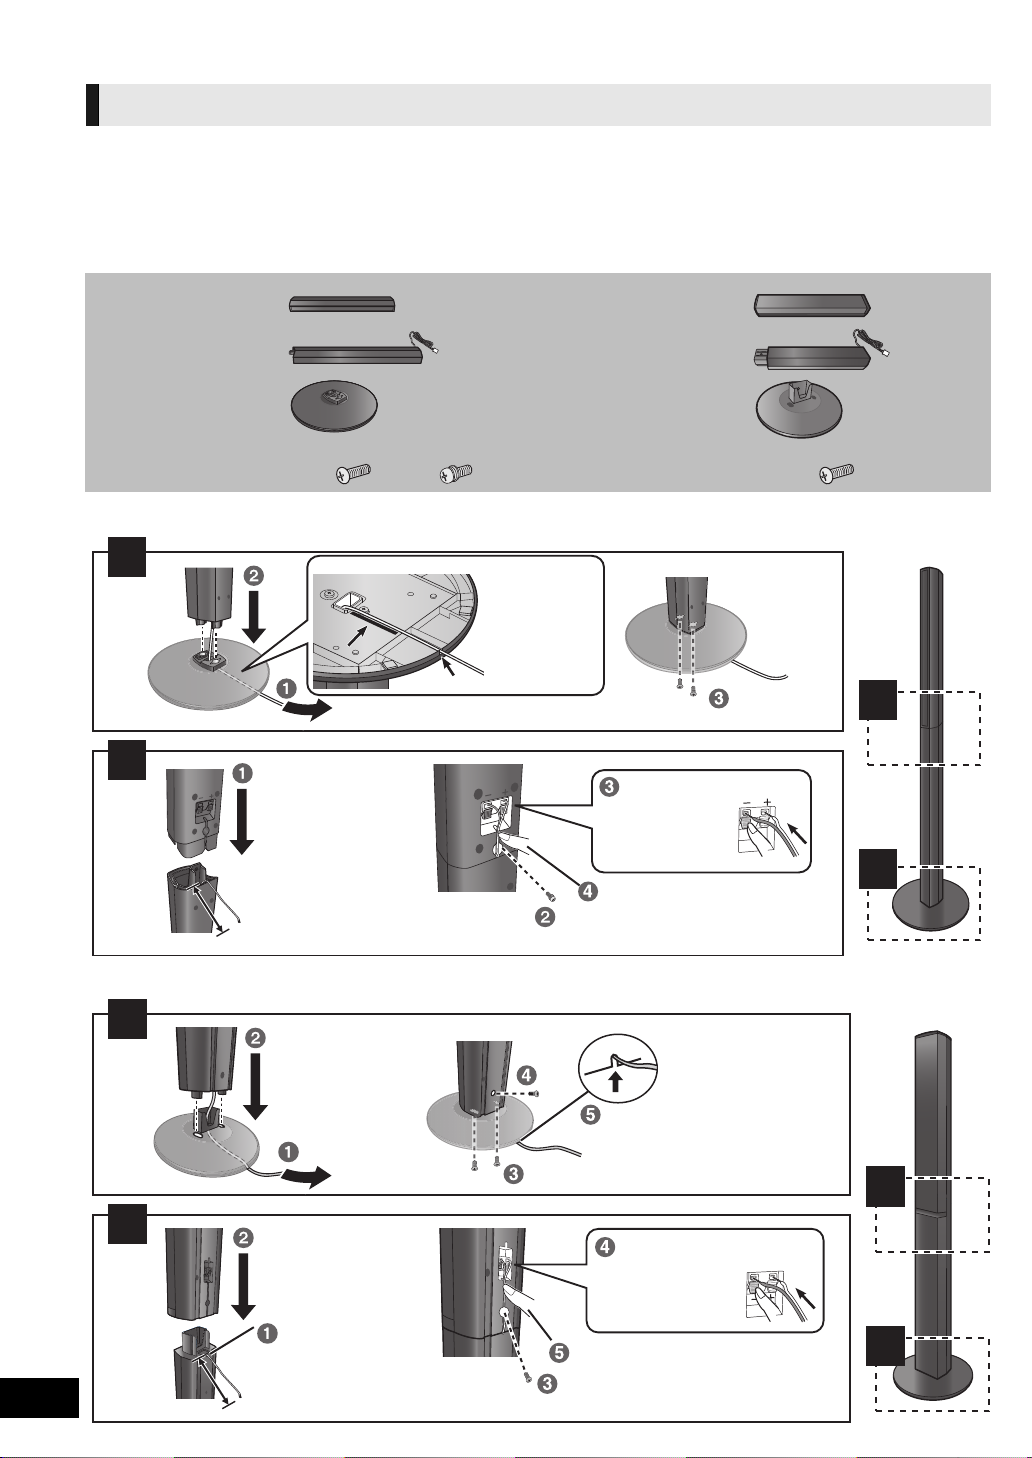
STEP 1: Preparing the speakers
1
2
2
1
Back of the base
Tighten
securely.
Insert the wire fully.
r: White
s: Blue line
Push!
Leave about 80 mm
Tighten securely.
Screw A
Screw B
Press into the groove.
Pull the cable
straight along
the line and
slide into the
groove.
1
2
2
1
Slide into the groove.
Tighten securely.
Insert the wire fully.
r: White
s: Blue line
Push!
Position the cable
between the ridges.
Leave about 120 mm
Press into the groove.
Tighten securely.
Screw
Assembling the speakers
[BT735] [BT330]
Caution
≥ Do not stand on the base. Be cautious when children are
near.
≥ When carrying speakers, hold the stand and base parts.
[BT735]
2 Front speakers
2 Surround speakers
4 Stands (with cables)
4 Bases
8 Screws A
4 Screws B
A B
[BT735]
Preparation
≥ To prevent damage or scratches, lay down a soft cloth and
perform assembly on it.
≥ For wall mount, refer to page 42.
≥ Keep the screws out of reach of children to prevent
swallowing.
[BT330]
2 Front speakers
2 Stands (with cables)
2 Bases
8 Screws
VQT2Q52
12
[BT330]
Page 13
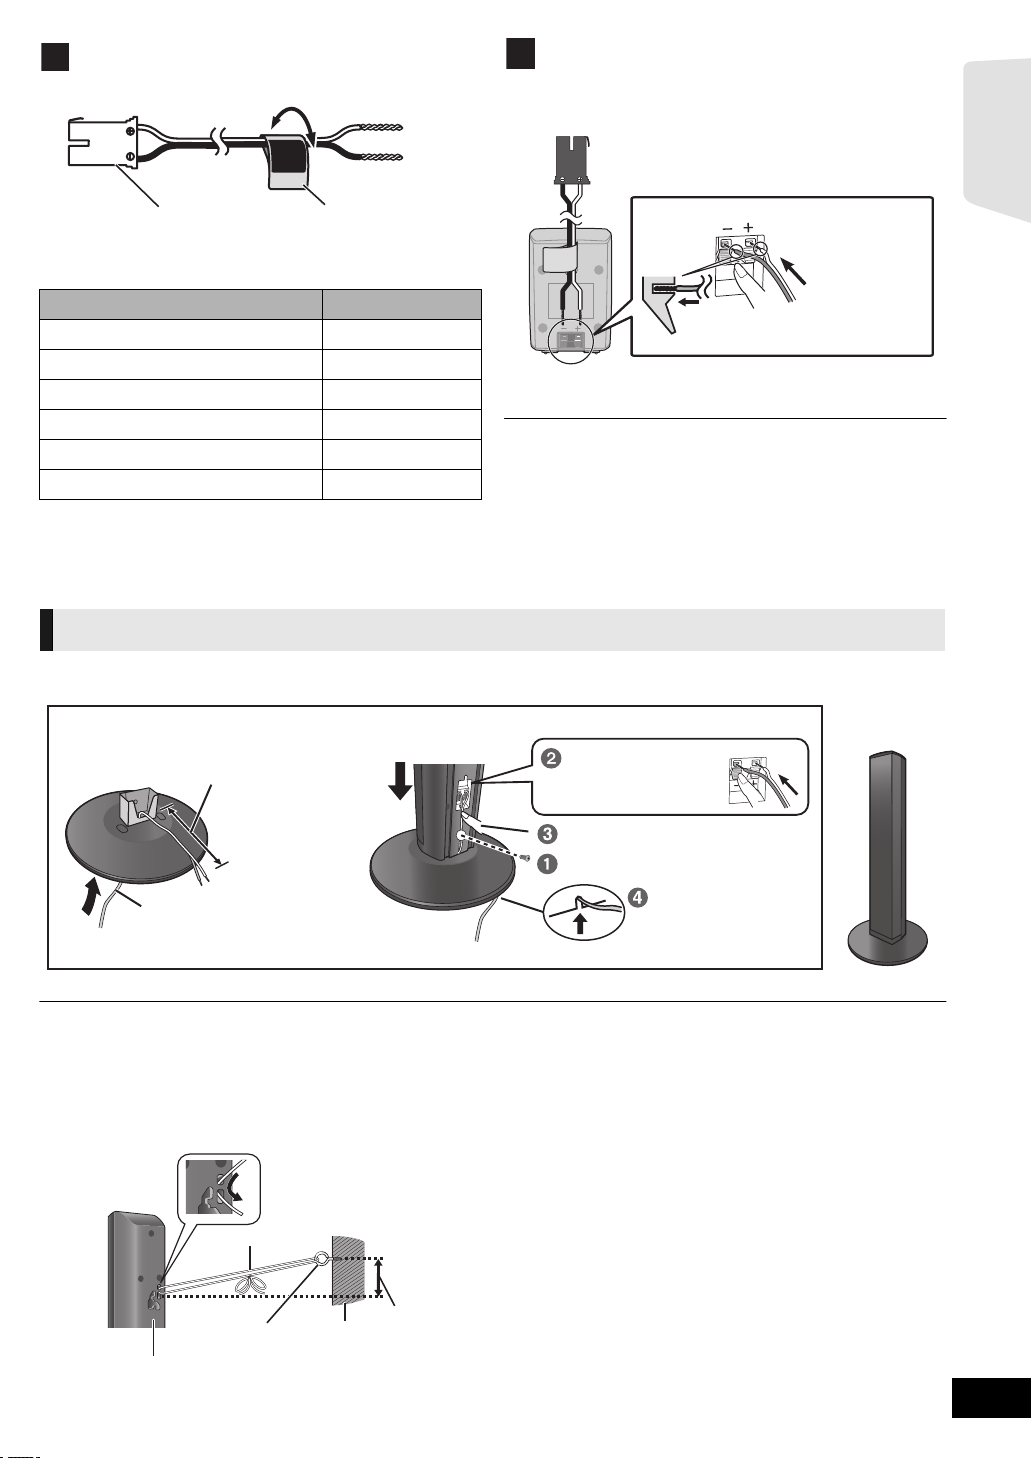
3
Use of the speaker cable stickers is convenient
when making cable connections.
e.g. Front speaker (L)
Push!
r: White
s: Blue line
Connecting the speaker cables. Insert the wire fully,
taking care not to insert beyond the wire insulation.
e.g. Surround speaker [BT230]
Thread the speaker cable
through the base.
Attach the speaker.
Leave about 120 mm
You can remove and use the cable from
the stand. To reattach the cable, refer to
page 42.
Insert the wire fully.
r: White
s: Blue line
Push!
Press into the groove.
Tighten securely.
Slide into the
groove.
FRONT
Lch
A Speaker cable sticker (included)
B Connector
Speaker cable sticker Colour
1 FRONT (L) WHITE
2 FRONT (R) RED
3 SURROUND (L) BLUE
4 SURROUND (R) GREY
5 CENTRE GREEN
6 SUBWOOFER PURPLE
Be sure to match the number on each sticker with the
connector colour.
Speaker assembly option
4
≥ Be careful not to cross (short-circuit) or reverse the polarity of the
speaker wires as doing so may damage the speakers.
≥ Don’t use a front speaker as a surround speaker or vice versa. Verify
the type of speaker with the label on the rear of the speaker before
connecting the appropriate cable.
≥ To avoid injury by falling or dropping the speaker, place the speaker cables
with care not to stumble or hook.
≥ Do not hold the speaker in one hand to avoid injury by dropping the
speaker when carrying.
Getting started
[BT330]
[BT735] [BT330]
∫ Preventing the speakers from falling
≥Consult a qualified housing contractor concerning the appropriate procedure when attaching to a concrete wall or a surface that
may not have strong enough support. Improper attachment may result in damage to the wall or speakers.
≥Use a string of less than ‰ 2.0 mm, which is capable of supporting over 10 kg.
e.g., [BT735]
A String (not included)
Thread from the wall to the speaker and tie tightly.
B Rear of the speaker
C Screw eye (not included)
D Wall
E Approx.150 mm
VQT2Q52
13
Page 14
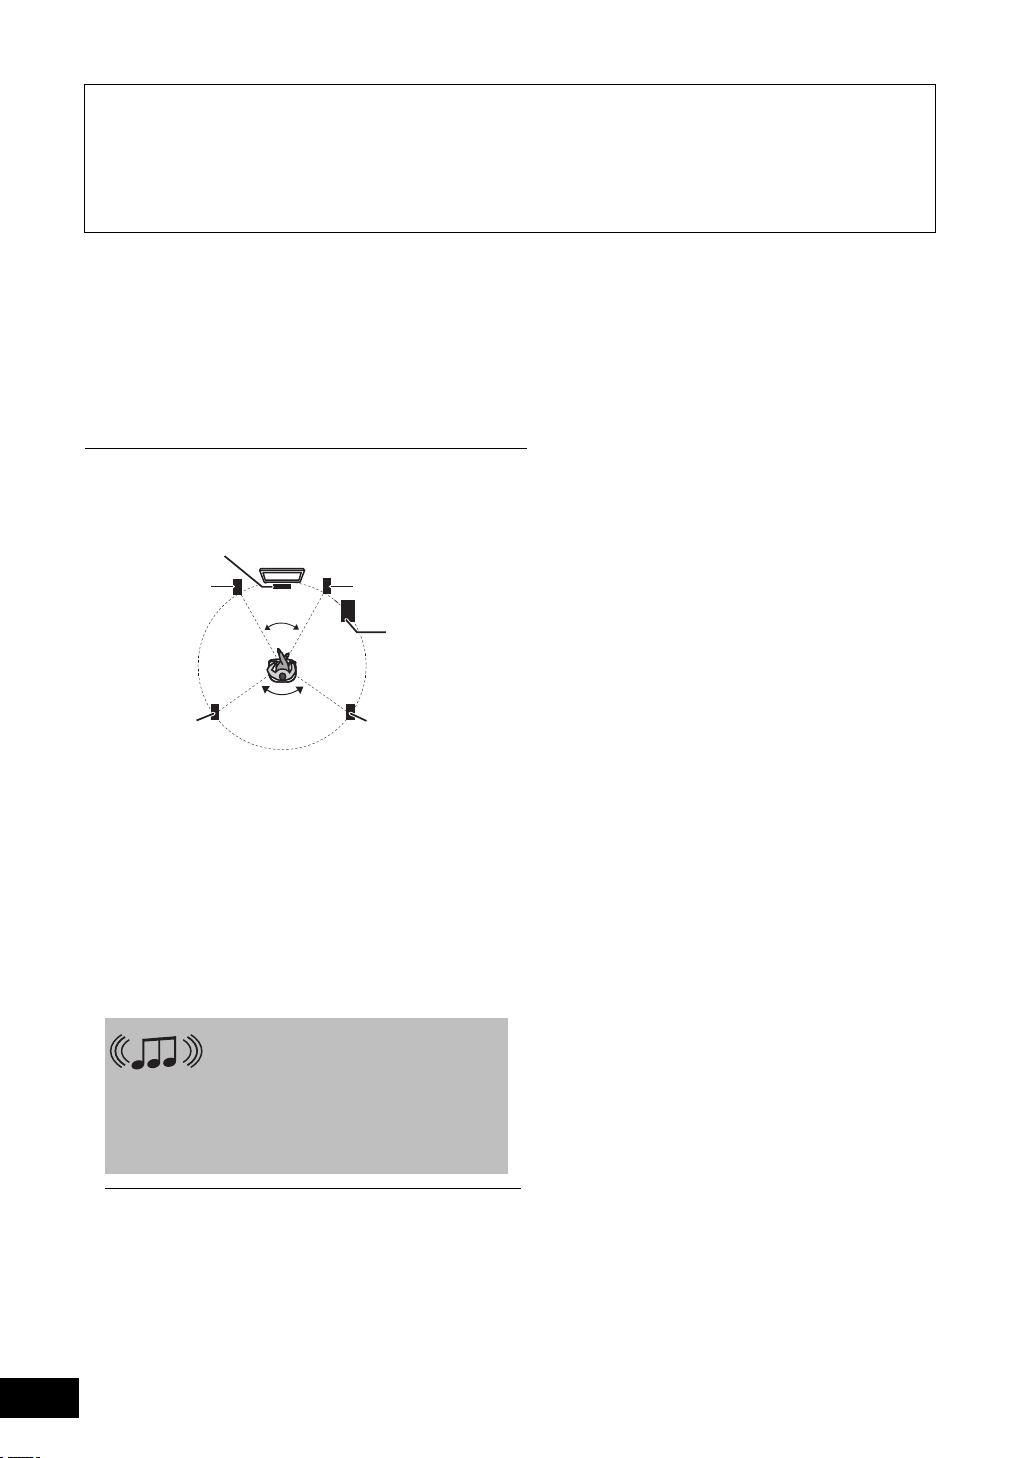
STEP 2: Positioning
120°
60°
≥ Use only supplied speakers
Using other speakers can damage the unit, and sound quality will be
negatively affected.
≥ You can damage your speakers and shorten their useful life if you play
sound at high levels over extended periods.
≥ Positioning speakers in front
It is possible to locate all the speakers in front of the listening position.
However, the optimal surround sound effect may not be obtainable.
≥ Place speakers on flat secure bases.
≥ Placing speakers too close to floors, walls, and corners can result in
excessive bass. Cover walls and windows with thick curtains.
≥ For optional wall mount, refer to page 42.
You can enjoy surround speaker
sound wirelessly when you use the
optional Panasonic wireless
accessory (SH-FX71).
For more details, refer to the operating
instructions for the optional wireless
system.
Caution
≥ The main unit and supplied speakers are to be used only as indicated in this setup. Failure to do so may
lead to damage to the amplifier and/or the speakers, and may result in the risk of fire. Consult a qualified
service person if damage has occurred or if you experience a sudden change in performance.
≥ Do not attempt to attach these speakers to walls using methods other than those described in this
manual.
≥ Do not touch the front netted area of the speakers. Hold by the sides.
How you set up your speakers can affect the bass and the sound field.
Setup example
Place the front, centre, surround speakers at approximately
the same distance from the seating position.
The angles in the diagram are approximate.
[BT330]
[BT735]
Using “Auto Speaker Setup” (> 19) is a convenient way to get
the ideal surround sound from your speakers when you are
unable to place them.
≥ Keep your speakers at least 10 mm away from the system for proper
ventilation.
A Centre speaker
Put on a rack or shelf. Vibration caused by the speaker can
disrupt the picture if it is placed directly on the TV.
B Front speakers
C Subwoofer
D Surround speakers
≥ Place the speakers at the same height or higher than ear
level.
∫ If irregular colouring occurs on your TV,
turn the TV off for about 30 minutes.
If it persists, move the speakers further away from the TV.
∫ Upgrade your system to 7.1-channel
system
The main unit is designed to enjoy the 7.1ch surround sound.
By connecting 2 units of the Panasonic wireless system
SH-FX71 with 4 speakers, more theatre-like effect can be
available.
Necessary equipment:
≥ 2 optional wireless systems (SH-FX71)
≥ 2 additional speakers
[Impedance: 3 ≠ to 6 ≠, Speaker input power: 100 W (Min)]
For more details, refer to the operating instructions for the
optional wireless system.
VQT2Q52
14
Page 15
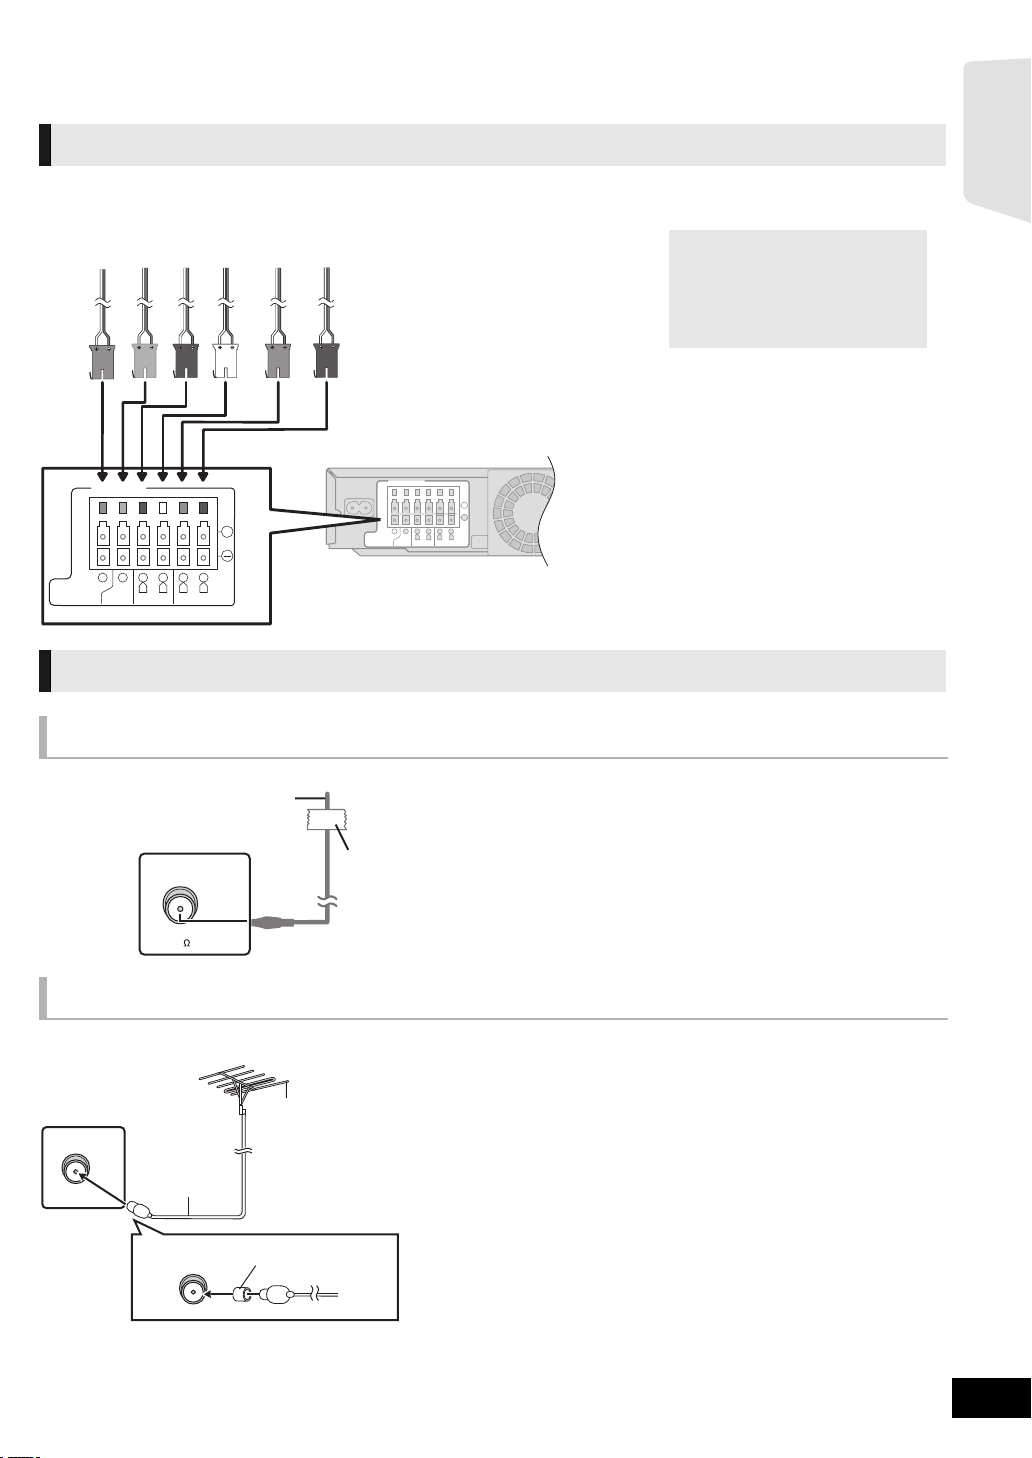
STEP 3: Connections
AC I N
Main unit
6 PURPLE Subwoofer
5 GREEN Centre speaker
2 RED Front speaker (Rch)
1 WHITE Front speaker (Lch)
4 GREY Surround speaker (Rch)
3 BLUE Surround speaker (Lch)
When using the optional wireless
system, do not attempt to connect
any extra surround or surround
back speakers to the main unit.
Main unit
A FM indoor antenna (included)
B Adhesive tape
Affix this end of the antenna where reception is best.
Main unit
A FM outdoor antenna [Using a TV antenna
(not included)]
The antenna should be installed by a competent technician.
B 75 ≠ coaxial cable (not included)
C Antenna plug adaptor (United Kingdom and Republic of Ireland
only)
≥ Keep the adaptor out of reach of children to prevent swallowing.
e.g.,
Turn off all equipment before connection and read the appropriate operating instructions.
Do not connect the AC mains lead until all other connections are complete.
Speaker cable connection
Connect to the terminals of the same colour.
Ω
SUBWOOFER
6
CENTER
2
5
R L R L
3Ω6Ω6
FRONT
4
1
SURROUND
+
3
3
Ω
Getting started
Radio antenna connection
Using an indoor antenna
FM ANT
(75 )
Using an outdoor antenna
Use outdoor antenna if FM radio reception is poor.
FM ANT
(
75
Ω
)
VQT2Q52
15
Page 16
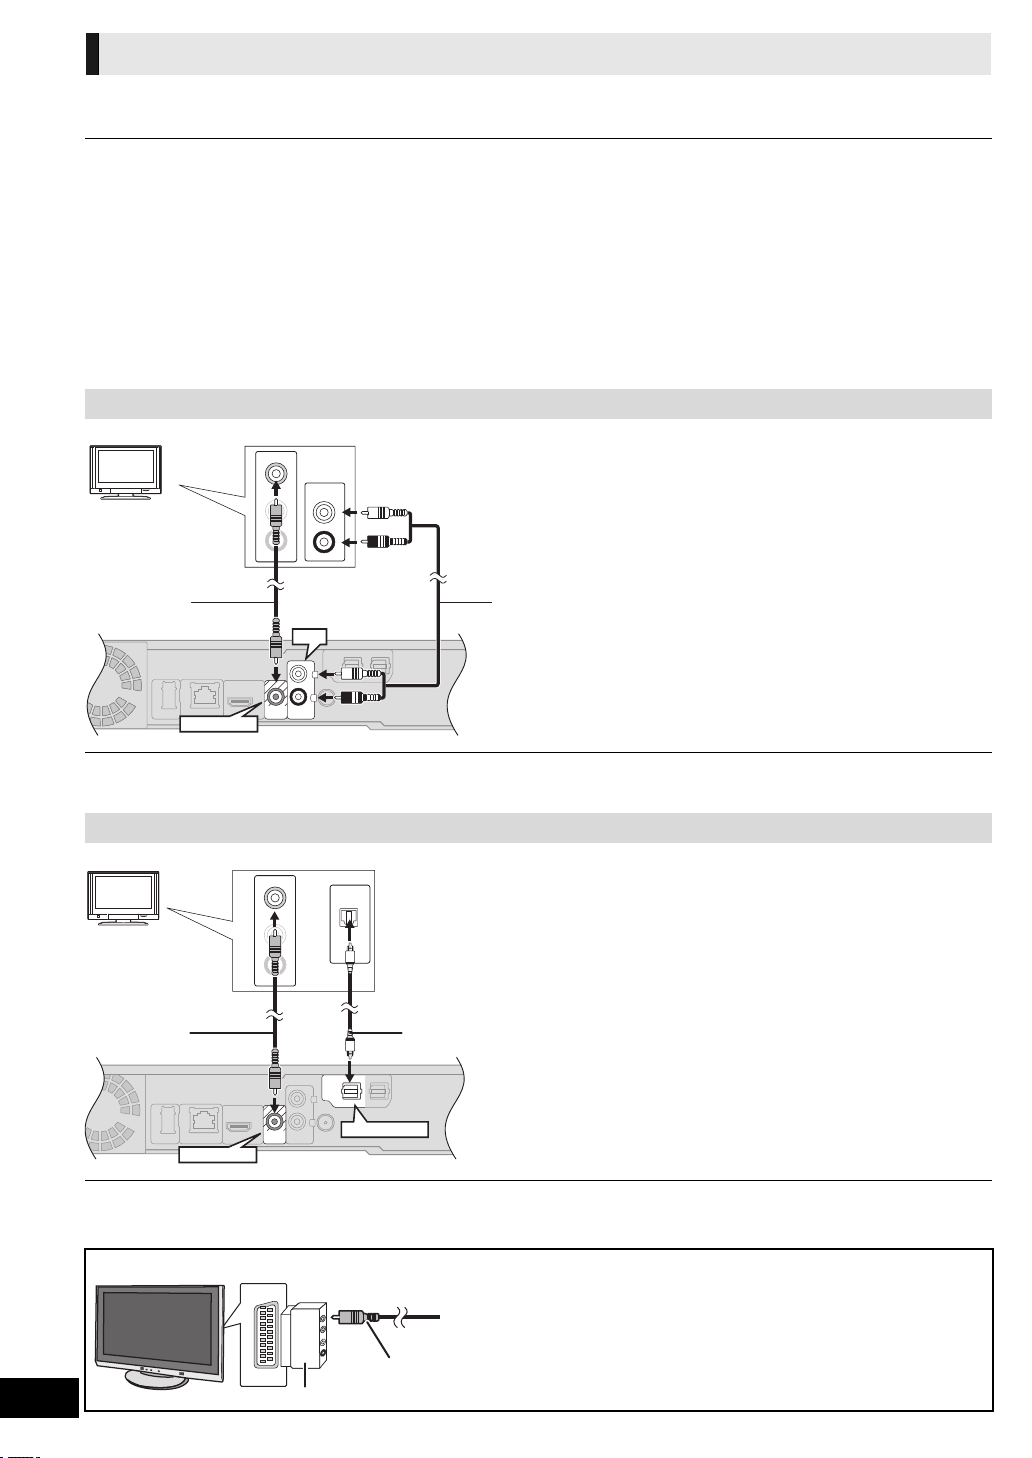
Connection to a TV
AV
OUT
VIDEO
OUT
AUX
L
R
VIDEO
OUT
L
R
AUX
L
VIDEO IN
R
AUDIO IN
L
R
AUD IO O UT
VIDEO OUT
AUX
TV
A Video cable (included)
B Audio cable (not included)
AUX
1
LRL
R
2
OPTICAL
1
DIGITAL AUDIO IN
VIDEO
OUT
VIDEO
OUT
OPTICAL
OUT
L
VIDEO IN
R
AUDIO IN
OPTICAL 1
VIDEO OUT
TV
A Video cable (included)
B Optical digital audio cable
(not included)
If the TV does not have a VIDEO IN terminal, connect using
a Scart adaptor (Scart—VIDEO IN).
A Scart adaptor (not included)
B Video cable (included)
e.g.,
The basic connection is shown in the included Easy Setting Guide, however, there are more connection examples to optimize
your system setting.
≥ Do not make the video connections through the VCR.
Due to copy guard protection, the picture may not be displayed properly.
≥Turn off all equipment before connection.
∫ OPTICAL IN
≥ After making the digital audio connection, make settings to
suit the type of audio from your digital equipment (> 30).
∫ HDMI
The HDMI connection supports VIERA Link “HDAVI Control”
(> 31) when used with a compatible Panasonic TV.
Basic connection
≥ Please use High Speed HDMI Cables that have the HDMI
logo (as shown on the cover). It is recommended that you
use Panasonic’s HDMI cable. When outputting 1080p signal,
please use HDMI cables 5.0 meters or less.
Recommended part number:
RP-CDHS15 (1.5 m), RP-CDHS30 (3.0 m),
RP-CDHS50 (5.0 m), etc.
VQT2Q52
≥To enjoy TV audio from this home theatre system’s speakers, select “AUX (TV)” as a source (> 23).
Connection for the better audio
≥To enjoy TV audio from this home theatre system’s speakers, select “DIGITAL IN 1 (TV)” or “D-IN 1” as a source.
16
AV1
VIDEO IN
Page 17
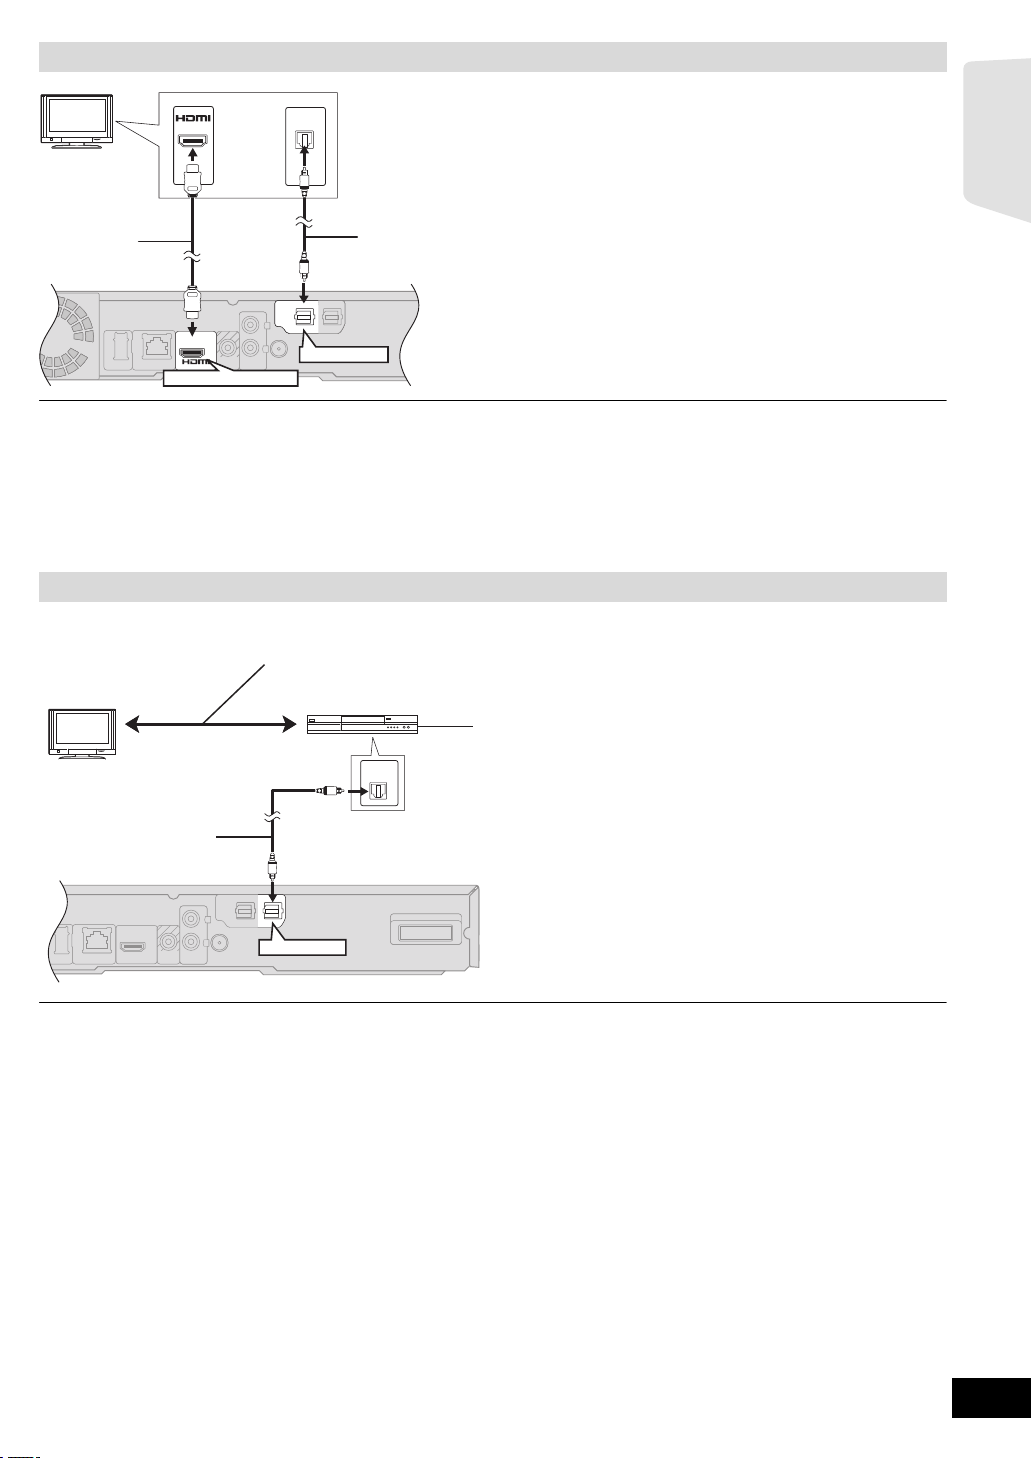
Connection for the best picture and audio
VIDEO
OUT
AUX
OPTICAL
21
DIGITAL AUDIO IN
L
R
OPTICAL
21
DIGITAL AUDIO IN
L
R
2
OPTICAL
1
DIGITAL AUDIO IN
AV
OUT
AV
OUT
(ARC)
OPTICAL
OUT
AV IN
OPTICAL 1
HDMI AV OUT (ARC)
TV
A HDMI cable (not included)
B Optical digital audio cable (not included)
≥ For the TV audio, an audio cable (not included) can be also
used by connecting the AUX terminal with the AUDIO OUT
terminal on the TV.
LAN
AUX
LAN
DIGITAL TRANSMITTER
LRL
R
OPTICAL
21
DIGITAL AUDIO IN
OPTICAL
1
DIGITAL AUDIO IN
OPTICAL
OUT
OPTICAL 2
TV
A Optical digital audio cable (not included)
B Set Top Box, cable TV, VCR, DVD recorder, etc.
Refer to the operating instructions of the respective
devices for the optimal connections.
≥To enjoy TV audio from this home theatre system’s speakers, select “DIGITAL IN 1 (TV)” or “D-IN 1” as a source (> 23).
ARC (Audio Return Channel)
(Available when using an ARC compatible TV)
With this function it is possible to receive the digital audio signal from the TV without connecting any other audio cables.
≥Select “ARC (TV)” as the audio input source (> 23)
≥Refer to the operating instructions of the TV for the settings to output digital audio.
Connection with Set Top Box, etc.
Getting started
≥To enjoy TV audio from this home theatre system’s speakers, select “DIGITAL IN 2 (CABLE/SAT)” or “D-IN 2” as a source
(> 23).
NECESSARY SETTINGS
≥ “HDMI Audio Output” : “Off” (> 39)
VQT2Q52
17
Page 18
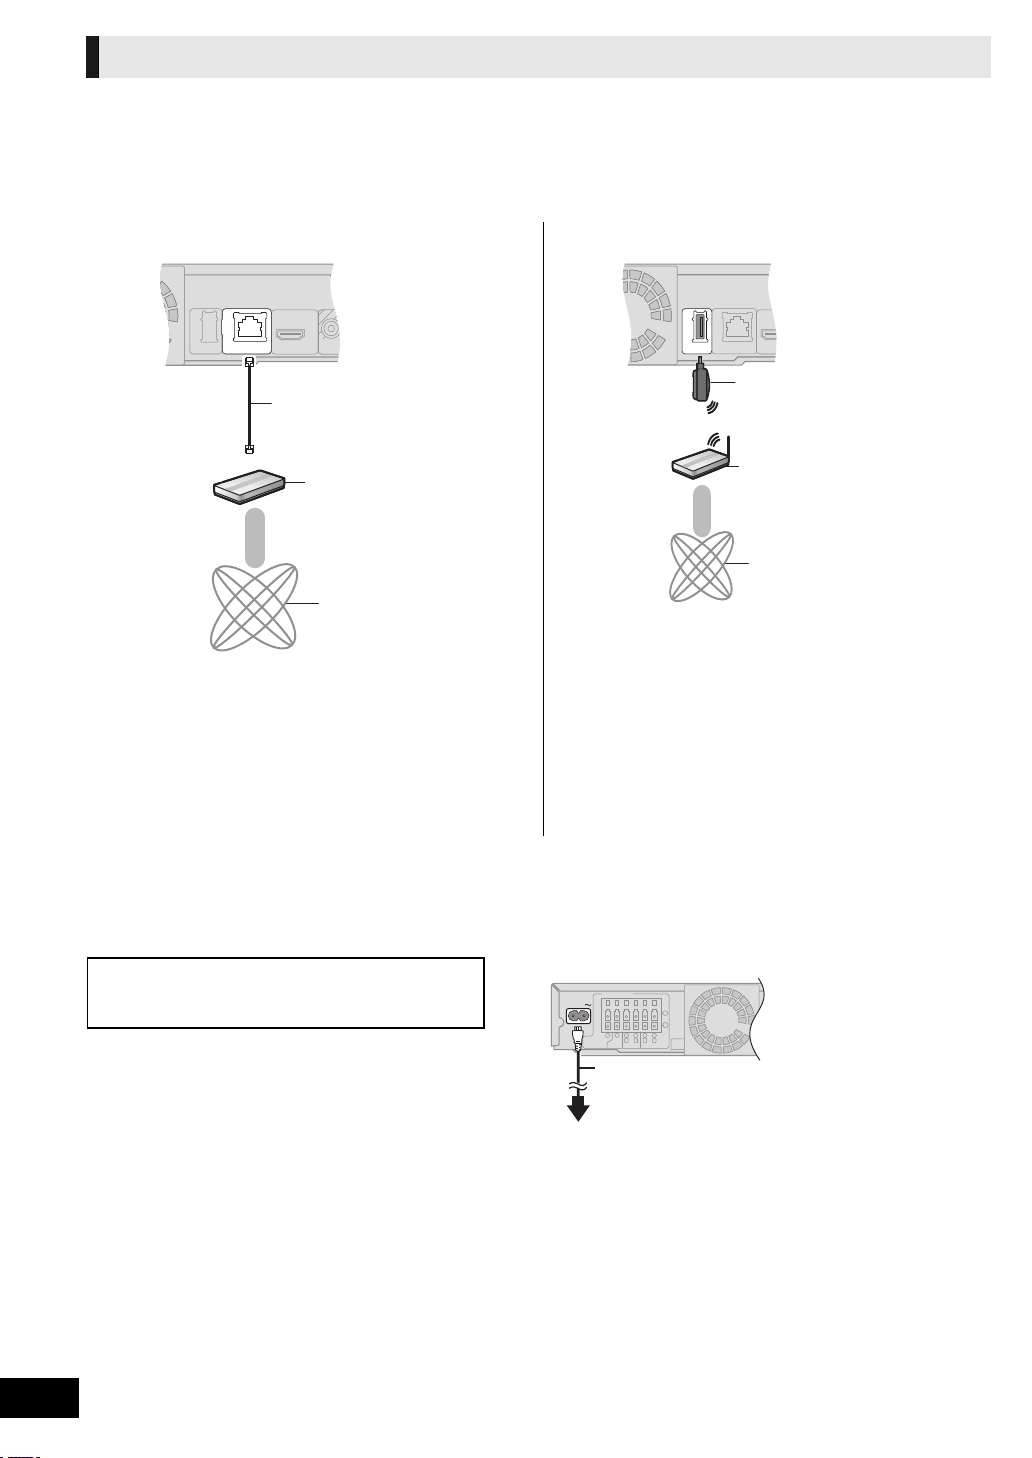
Connection to a broadband network
VIDEO
OUT
LAN
(
10BASE-T/
100BASE-TX
)
LAN
WIRELESS
≥ Only the Wireless
LAN Adaptor
DY-WL10 (optional)
can be used.
AC IN
Main unit
A AC mains lead (included)
B To a household mains
socket
≥ Connect only after all other connections are complete.
≥ The main unit consumes a small amount of AC power, even
when it is turned off (When the “Quick Start” setting is “Off”,
[BT735] [BT330]: approx. 0.1 W, [BT230]: approx. 0.2 W). In the
interest of power conservation, if you will not be using this
unit for a long time, unplug it from the household mains
socket.
≥ Do not use any other AC mains lead except the supplied one.
\For\the\United\Kingdom\and\Republic\of\Ireland\only\
BE SURE TO READ THE CAUTION FOR THE AC
MAINS LEAD ON PAGE 4 BEFORE CONNECTION.
The following services can be used when this unit is connected
to broadband.
≥ Firmware can be updated (> 21)
≥ You can enjoy the BD-Live (> 26)
For details about connection method, refer to the instructions
supplied with the connected equipment.
≥ The unit is not compatible with public wireless LAN services
(Hotspot etc.) provided in airports, stations, cafes etc.
≥ You can enjoy VIERA CAST (> 34)
≥ DLNA feature (> 36)
∫ Using LAN (ethernet) cable ∫ Using Wireless LAN Adaptor (optional)
A LAN Cable [Straight]
(not included)
B Broadband router, etc.
C Internet
≥ Use shielded LAN cables when connecting to peripheral
devices.
≥ Inserting any cable other than a LAN cable in the LAN
terminal can damage the unit.
A Wireless LAN Adaptor
B Wireless router (Access point), etc.
C Internet
≥ Read the operating instructions for the Wireless LAN
Adaptor DY-WL10 (optional) thoroughly when using it.
≥ For up to date compatibility information on your Wireless
router (Access Point) refer to
http://panasonic.jp/support/global/cs/
STEP 4: AC mains lead connection
VQT2Q52
18
Page 19
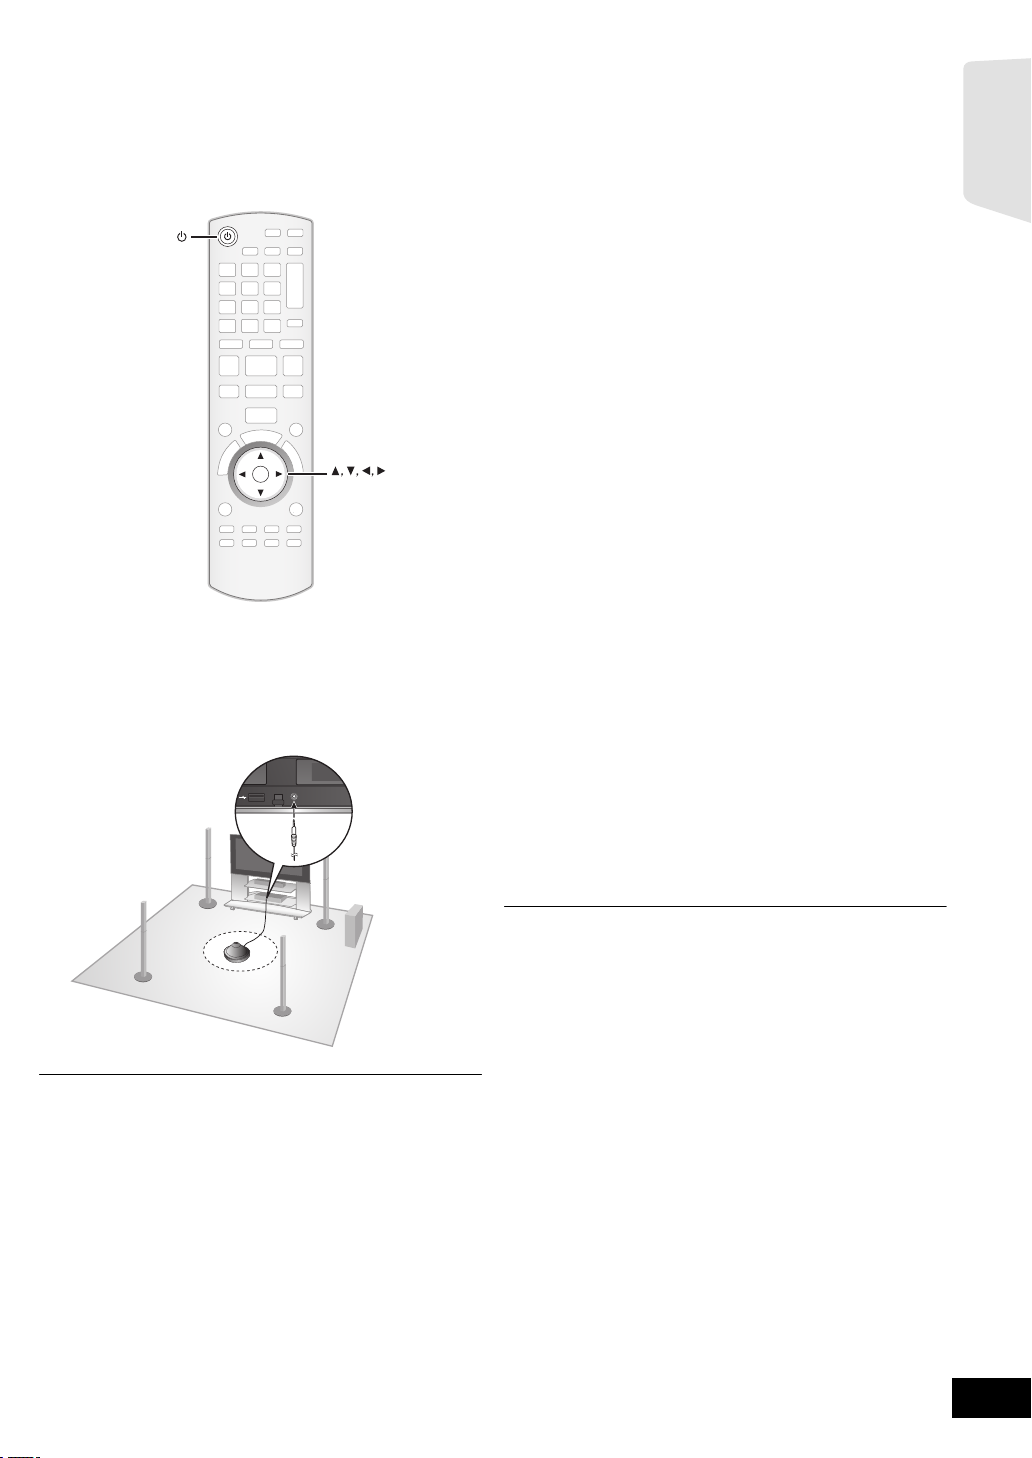
STEP 5: Smart setup / Easy setup
SETUP MIC
e.g., [BT735]
The Smart setup/Easy setup assists you to make
necessary settings.
Follow the on-screen prompts to make basic settings for the
system.
[BT735] [BT330]: Smart setup
[BT230]: Easy setup
OK
OK
Preparation
≥ Turn on your TV and select the appropriate video input mode
(e.g., VIDEO 1, AV 1, HDMI, etc.) to suit the connections to
this unit.
≥ [BT735] [BT330]: Place the Auto speaker setup microphone at
the actual seating position. (At ear level when seated.)
1 Press [Í].
2 Follow the on-screen instructions and
make the settings with [3, 4, 2, 1] and
press [OK].
Language
Select the language used on menu screen.
TV Aspect
Select the aspect to suit your TV and preference.
Wireless System
If a digital transmitter is inserted,
it is required to specify the current settings.
Speakers position
Specify the positioning of the surround speakers.
[BT230]: Speaker check
Check if the connection to each speaker is valid.
[BT735] [BT330]: Auto Speaker Setup
Adjust the speaker output level automatically.
Speaker Output
Make surround sound setting for speaker output.
Cinema Surround
The function creates the sound of virtual speakers to
enhance the realistic surround feeling as if the sound
comes from all directions.
(Speakers position: Surround Layout only)
(Effective when playing video with 5.1/7.1ch audio)
TV Audio
Select the audio input connection from your TV,
[item with “(TV)”].
Quick Start
Speed of startup from standby mode is increased.
Getting started
≥ Keep as quiet as possible during the Auto speaker setup. Excessive
background noise may lead to incorrect settings.
≥ The speakers output loud test signals during setup.
≥ After the Smart setup is completed, unplug the Auto speaker setup
microphone and keep it for future use.
3 Press [OK] several times to finish the
“Smart setup” or “Easy setup”.
After completing “Smart setup” or “Easy setup”, you can
perform “Network Easy Setting”.
≥ You can perform this setup anytime by selecting “Smart setup” or “Easy
setup” in the Setup menu. (> 40)
≥ Language and TV Aspect settings are automatically retrieved if this unit is
connected to a Panasonic TV (VIERA) supporting HDAVI Control 2 or later
via an HDMI cable.
VQT2Q52
19
Page 20
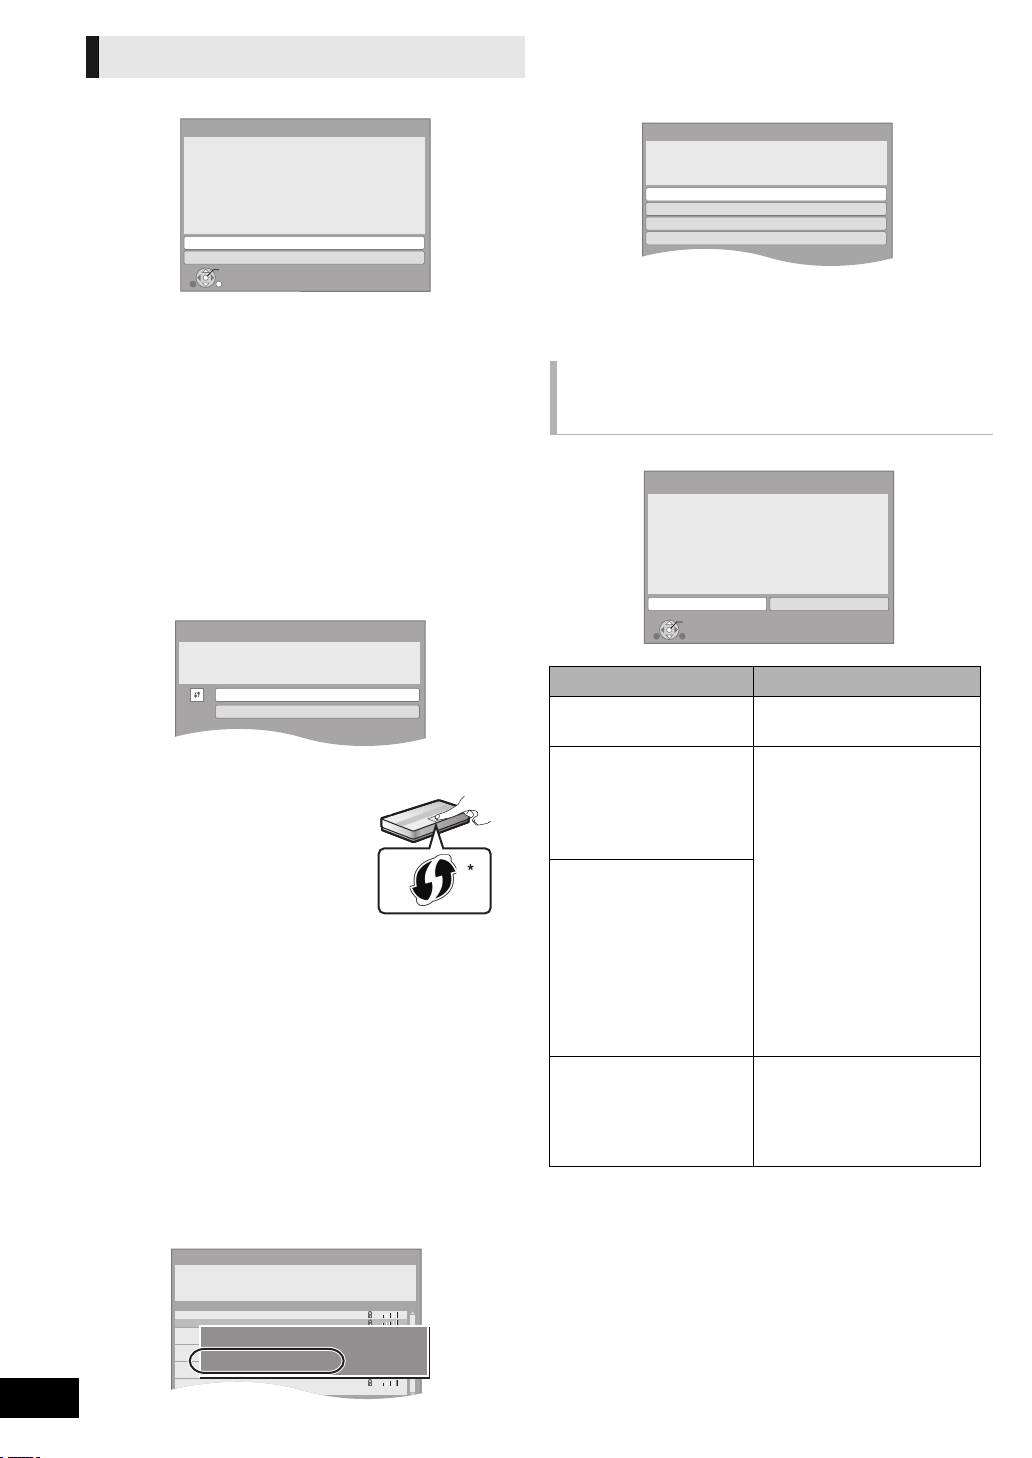
Network Easy Setting
OK
RETURN
Network Easy Setting (Connection Test)
Wired
Wireless
Select a connection mode.
Current setting : Wired
LAN cable connection:
Connect a LAN cable to the unit and select “Wired”.
Wireless LAN connection:
Connect the Wireless LAN Adaptor (DY-WL10) to the USB
port and select “Wireless”.
Access Point Connection Setting
Select a connection method for access to
Wireless LAN.
Please refer to the operating instructions of
the access point about connection methods.
WPS (PUSH button)
Search for access point
1
e.g.,
Access Point Connection Setting
Reception
Select an access point to connect with.
To search for access point again, please
select "Search again" below.
SSID
XXXXXXXXXX
XXXXXXXXXX
XXXXXXXXXX
XXXXXXXXXX
XXXXXXXXXX
XXXXXXXXXX
XXXXXXXXXX
XXXXXXXXXX
Search again
SSID
Wireless type
Authentication type
Encryption type
:XXXXXXXXXXXXXXX
:802.11n/g/b (2.4GHz)
:WPA-PSK
:AES
Access Point Connection Setting
WPA2-PSK (AES/TKIP)
WPA-PSK (AES/TKIP)
Open/Shared Key (WEP)
Open system
Select authentication type.
Select “Wired” or “Wireless” and press [OK].
∫ “Wired” connection
Follow the on-screen instructions to make your connection
settings.
≥ When you experience problems (> right)
∫ “Wireless” connection
If you select “Wireless” and “Wireless LAN Adaptor is not
connected.” is displayed, check that the Wireless LAN Adaptor
is fully inserted. Alternatively, disconnect and reconnect it. If
there is still no change in the display, consult your dealer for
advice.
Select “WPS (PUSH button)” or “Search for
access point” and then follow the on-screen
instructions and make the settings.
2 Press [RETURN] and then press [OK].
Then select an item on the following screen which
corresponds to the authentication type noted down in step
1 (> left).
Follow the on-screen instructions to make the settings.
≥ Input your encryption key code in “Encryption Key”
supplied with your Wireless router (Access point).
When you experience
problems with settings
Access Point Connection Setting
Access Point Connection Setting
Failed to connect to the access point.
A conflict with other devices occurred.
Do you wish to setup Access Point
Connection Setting again ?
Yes
OK
No
WPS (PUSH button):
If your Wireless router (Access point)
supports WPS (PUSH button), you can
easily perform the settings by pressing
WPS button on it.
WPS (Wi-Fi Protected Setup) is a
standard that facilitates settings relating
to the connection and security of
wireless LAN devices.
1 Press WPS button or corresponding button of Wireless
router (Access point) until the lamp starts flashing.
≥ For details, refer to the operating instruction of Wireless
router (Access point).
2 Press [OK].
*1 Wi-Fi Protected Setup-compatible Wireless router (Access point) may
have the mark.
Search for access point:
Available Wireless routers (Access points) are searched and
listed. You can select the one to use from the list.
2
1 Press [3, 4] to select SSID*
of Wireless router (Access
point) you want to connect with. Then press [OPTION] to
show information of the selected router, make a note of the
authentication and encryption type.
Display Check the following
A conflict with another
device occurred.
≥ Please wait a few moments,
and then try again.
A time out error occurred. ≥ Setting of the Wireless
router (Access point) for
MAC Address etc.
≥ The signal may be weak.
Using the USB extension
An authentication error or a
time out error occurred.
cable supplied with the
Wireless LAN Adaptor,
adjust the position of the
Wireless LAN Adaptor.
≥ The SSID*
2
and the
encryption key of the
Wireless router (Access
point).
≥ Please wait a few moments,
and then try again.
A device error occurred. ≥ Connection of Wireless LAN
Adaptor
If there is no improvement in
symptom, consult your
dealer.
VQT2Q52
20
≥ If you can not find the SSID*
2
, select “Search again”.
Page 21
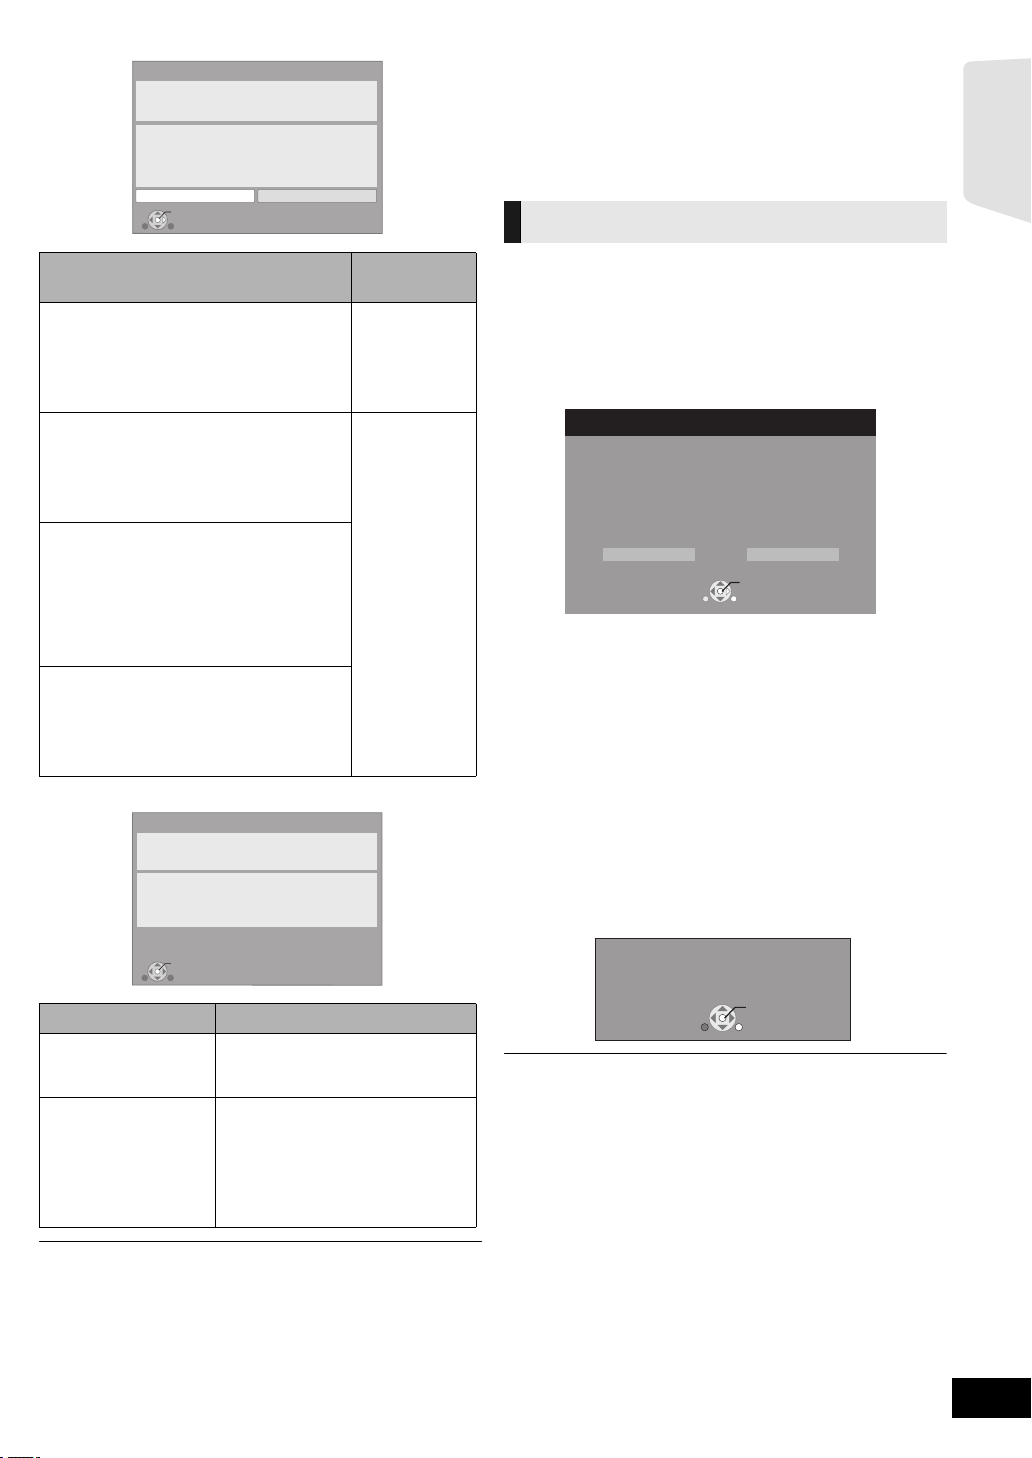
Network Easy Setting (Connection Test)
OK
Network Easy Setting (Internet Connection Test)
Complete.
- Connection to the Internet : Fail(B019)
Failed the connection test.
Cannot find the server.(B019)
Please refer to the operating instructions for the cause
of the error and the solution for it.
Press [OK].
Firmware Update
Latest Online Version: x.xx
Current Installed Version: x.xx
Do you want to start firmware update?
For the update information, please visit the
following website:
http://panasonic.net/support/
RETURN
OK
Yes No
The firmware has been updated.
Current Installed Version:
x.xx
RETURN
OK
Network Easy Setting (Connection Test)
Complete.
1. LAN cable connection
2. IP address setting
3. Connection to gateway
LAN cable is not connected.
Please check the connection.
Select “Yes” and press [OK] to check network
connection again.
Select “No” and press [OK] to finish Network
Easy Setting.
Yes No
OK
: Fail
: Fail
: Fail
≥ After performing network settings on this unit, the settings (encryption level,
etc.) of the Wireless router (Access point) might change. When you have
trouble getting online on your PC, perform the network settings of your PC
in accordance with the settings of Wireless router (Access point).
*2 This is a name given to identify specific networks among wireless LANs.
When the SSID is the same in two devices, data can be transmitted
between them.
Firmware updating
Getting started
Display
1. LAN cable connection or
:Fail ≥ Connection of
Connection to access point
2. IP address setting :Fail
Check the
following
the LAN
cables
(> 18)
3. Connection to gateway :Fail
1. LAN cable connection or
Connection to access point
:Pass
2. IP address setting :Fail
3. Connection to gateway :Fail
1. LAN cable connection or
Connection to access point
:Pass
:Home
2. IP address setting
network
≥ Connection
and settings
of the hub
and router
≥ Settings of
“IP Address /
DNS
Settings”
(> 40)
available
3. Connection to gateway :Fail
1. LAN cable connection or
Connection to access point
:Pass
2. IP address setting :Pass
3. Connection to gateway :Fail
Network Easy Setting (Internet Connection Test)
Occasionally, Panasonic may release updated firmware for this
unit that may add or improve the way a feature operates.
These updates are available free of charge.
This unit is capable of checking the firmware automatically
when connected to the Internet via a broadband connection.
When a new firmware version is available, the following screen
is displayed.
If downloading on this unit fails or this unit is not connected to
the Internet, then you can download the latest firmware from
the following website and burn it to a CD-R to update the
firmware.
http://panasonic.jp/support/global/cs/
(This site is in English only.)
To show the firmware version on this unit. (> 40, “System
Information”)
DO NOT DISCONNECT the unit from the AC power or perform
any operation while the update takes place.
After the firmware is installed, “FINISH” will be displayed on the
unit’s display. Unit will restart and the following screen will be
displayed.
Display Check the following
Cannot find the server.
(B019)
Failed to connect to
the server.
(B020)
≥ “Primary DNS” and “Secondary
DNS” settings of “IP Address /
DNS Settings” (> 40)
≥ The server may be busy or the
service may have been
suspended. Please wait a few
moments, and then try again.
≥ Settings of “Proxy Server
Settings” (> 40) and the router
≥ Refer to the operating instructions of the hub or router.
≥ You can perform this setup anytime by selecting “Network Easy Setting” in
≥ You can redo these settings individually using “Network Settings”. (> 40)
≥ Do not connect to a wireless network for which you do not have usage
the Setup menu. (> 40)
rights. Wireless networks for which you do not have usage rights (SSID
may appear during the automatic search for a wireless network
environment. However, if you connect, there is a risk that it will be regarded
as illegal access.
≥ You can perform update anytime by selecting “Firmware Update” in the
Setup menu. (> 40)
≥ Downloading will require several minutes. It may take longer or may not
work properly depending on the connection environment.
≥ If you do not want to check for the latest firmware version, set “Automatic
Update Check” to “Off”. (> 40)
2
*
)
VQT2Q52
21
Page 22
STEP 6:
SD CARD
SETUP MIC
Inserting or removing a
Reprogramming the
remote control
When other Panasonic products respond to this
remote control
Change “Remote Control” (> 40) on the main unit and the
remote control (the two must match) if you place other
Panasonic products close together and it responds to this
remote control.
To change the code on the main unit.
1 While stopped, press [START].
2 Press [3, 4] to select “To Others” and
press [OK].
3 Press [3, 4] to select “Setup” and press
[OK].
4 Press [3, 4] to select “General” and press
[OK].
5 Press [3, 4] to select “Remote Control”
and press [OK].
6 Press [3, 4] to select the code (1 or 2) and
press [OK].
To change the code on the remote control.
1 While pressing [OK]
Press and hold the numbered button (1 or
2), which has the same number you
selected in the step 6 for more than 5
seconds.
2 Press [OK].
media
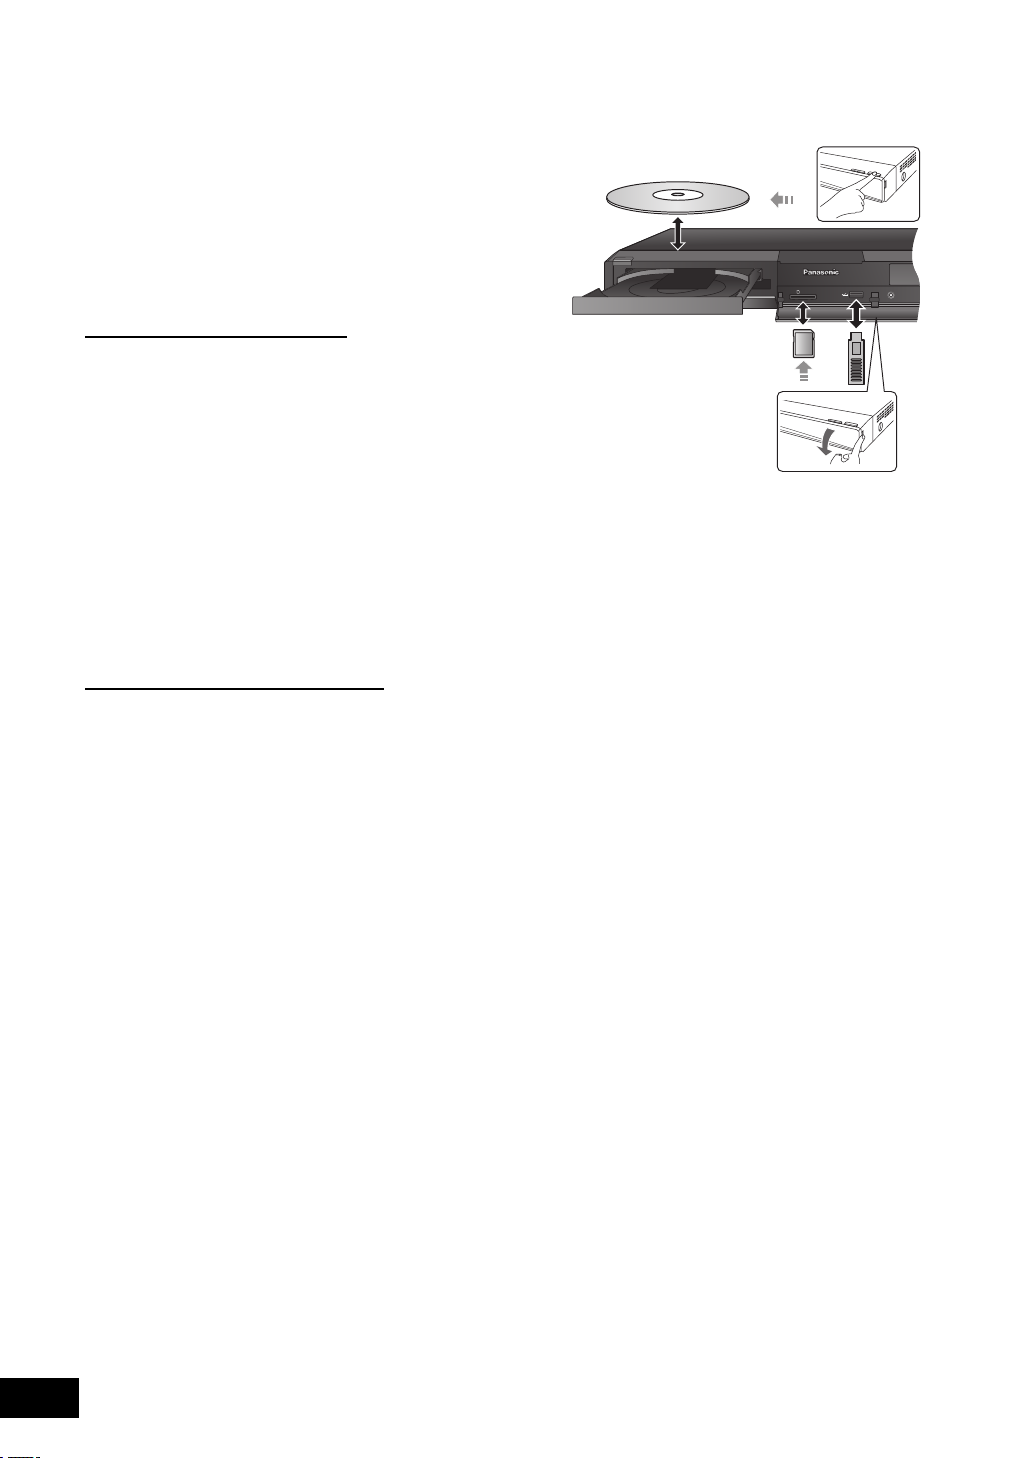
≥ When inserting a media, ensure that it is facing the right way
up.
≥ While the reading indicator is displayed, do not turn off the
unit or remove the media. Such action may result in loss of
the media’s contents.
≥ When removing the SD card, press on the centre of the card
and pull it straight out.
≥ If you connect a Panasonic product with a USB connection
cable, setup screen may be displayed on connected
equipment. For details, refer to the instructions for the
connected equipment.
∫ To switch sources
Press [BD/SD] or [EXT-IN] to select “BD/DVD”, “SD” or
“USB”.
≥ If a media is inserted while the unit is stopped, the source
switches automatically depending on the inserted media.
VQT2Q52
22
Page 23
START menu
OK
RETURN
Home Cinema
START
BD-Video
To Others
Playback
Top Menu
Input Selection
Sound(Equalizer)
Network
BD/SD
iPod
EXT-IN
RADIO
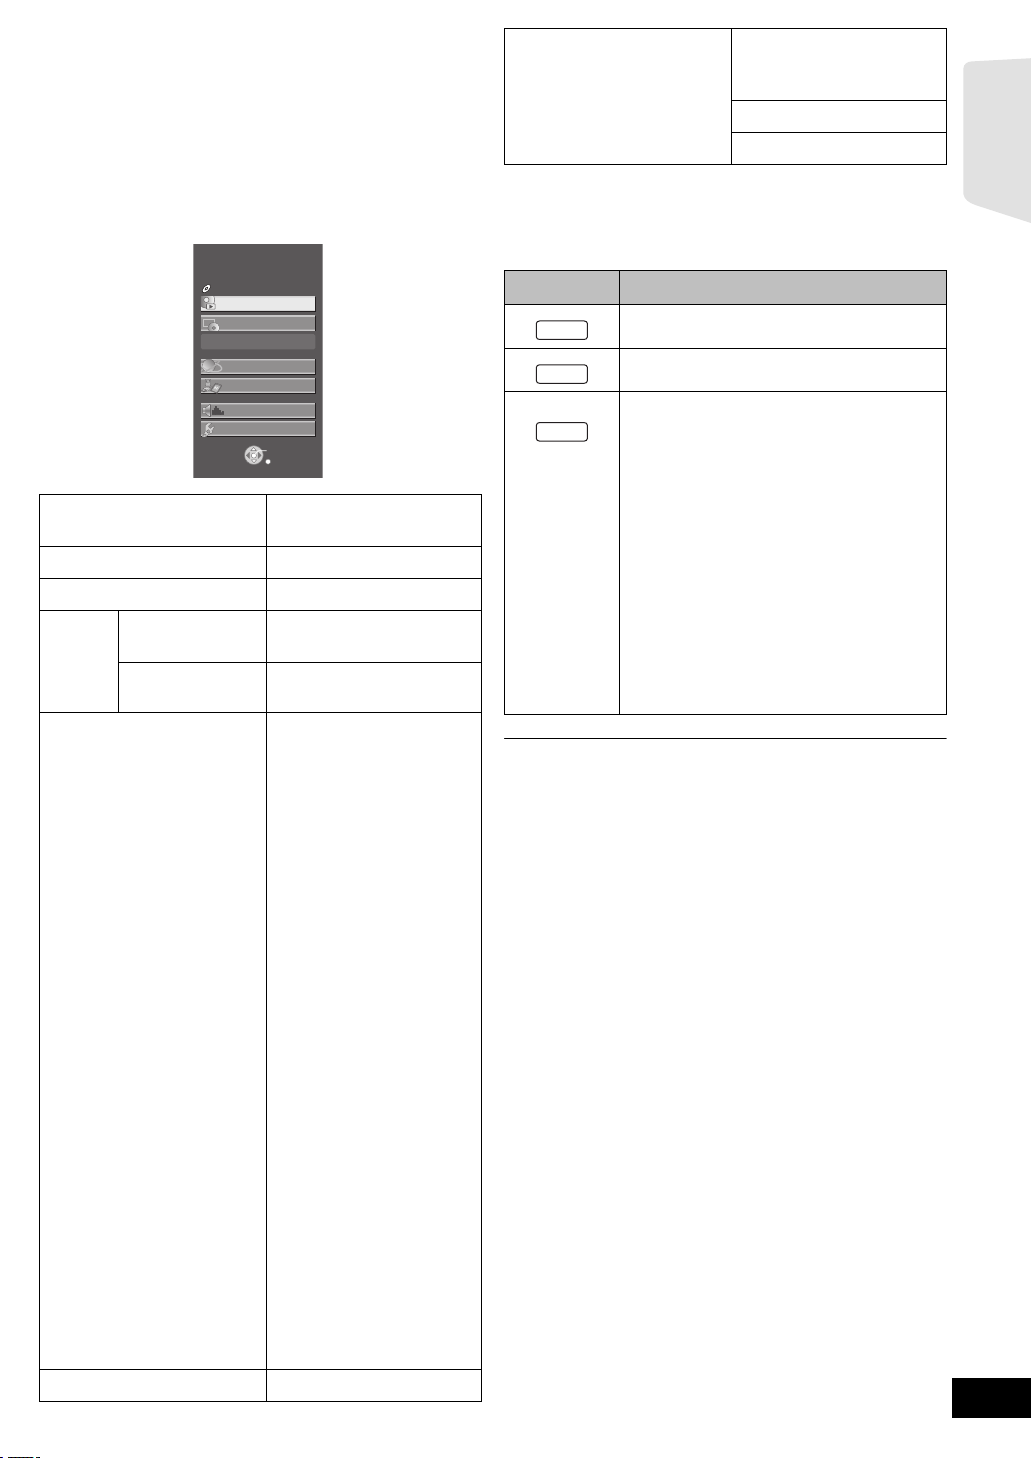
Major functions of this unit can be operated from the START
menu.
1 Press [START].
2 Press [3, 4] to select the item and press
[OK].
e.g., BD-Video
Playback
Viewing Picture
Top Menu (> 25)
Menu (> 25)
Home Network
Network
(DLNA)
Internet Content
Input Selection
Sound(Equalizer)
Play back the contents.
(> 36)
Displays the Home screen of
the VIERA CAST (> 34)
Switches to each source
BD/DVD/CD
SD card
iPod
FM Radio:
To enjoy the FM radio
(> 29)
USB device
*1
:
AUX
To enjoy TV broadcasts with
this unit’s speakers (> 30)
*1
: To enjoy TV
ARC
broadcasts with this unit’s
speakers (> 30)
DIGITAL IN 1
*1
:
To enjoy TV broadcasts with
this unit’s speakers (> 30)
*1 “(TV)” is displayed next to
items set for TV AUDIO input.
DIGITAL IN 2*2:
To enjoy audio from other
devices with this unit’s
speakers (> 30)
*2 “(CABLE/SAT)” is displayed
next to DIGITAL IN when set
for CABLE/SAT AUDIO input.
To enjoy sound from the
TV
Select one source from
either “AUX (TV)”, “ARC
(TV)” or “DIGITAL IN 1 (TV)”.
(> 24)
Playlists:
You can play playlists
To O t h ers
created on DVD-VR.
Setup: (> 37)
Card Management: (> 26)
To exit the screen
Press [START].
∫ Selecting the source by the remote control
Button Source
BD/DVD or SD card (SD) (> 25)
iPod (IPOD) (> 32)
FM Radio (FM) (> 29)
*1
AUX
(> 30)
USB (> 25)
*1
ARC
(> 30)
DIGITAL IN 1
DIGITAL IN 2
*1 “(TV)” is displayed next to items set for
TV AUDIO input.
*2 “(CABLE/SAT)” is displayed next to
DIGITAL IN when set for CABLE/SAT
AUDIO input.
To enjoy sound from the TV
Select one source from either “AUX (TV)”,
“ARC (TV)” or “DIGITAL IN 1 (TV)”.
1
*
(D-IN 1) (> 30)
2
*
(D-IN 2) (> 30)
≥ Items to be displayed may vary with the media.
Getting started
VQT2Q52
23
Page 24

Enjoying sound effects
from all speakers
Enjoying surround sound
effects
1 Press [SURROUND] several times to select
the effect.
STANDARD
Sound is output as it was recorded/encoded.
Speaker output varies depending on the source.
MULTI-CH
You can enjoy sound from the front speakers, as well as
the surround even when playing a 2-channel sound or
non-surround sound.
MANUAL
≥ The selected effect will only be displayed on the main
unit.
2 While “MANUAL” is displayed, press
[2, 1] and select the desired effect.
DOLBY PL II MOVIE (Dolby Pro Logic II Movie)
Suitable for movie software, or the one recorded in
Dolby Surround.
(except DivX)
DOLBY PL II MUSIC (Dolby Pro Logic II Music)
Adds 5.1-channel effects to stereo sources.
(except DivX)
7.1CH VS (7.1CH Virtual Surround)
You can enjoy 6.1/7.1-channel surround-like effect
using 5.1-channel speakers.
S.SURROUND (Super Surround)
You can enjoy sound from all speakers with stereo
sources.
2CH STEREO
You can play any source in stereo. Sound will be
output to the front speakers and the subwoofer only.
3 Press [3] (increase) or [4] (decrease) to adjust the
speaker level for each speaker.
s6 dB to r6 dB
∫ Changing the sound modes
1 Press [SOUND] several times to select the mode.
≥ The selected mode will only be displayed on the main
unit.
2 While the selected mode is displayed
Press [2, 1] and select the desired setting.
EQ: (Equalizer)
You can select sound quality settings.
FLAT
Cancel (no effect is added).
HEAVY
Adds punch to rock.
CLEAR
Clarifies higher sounds.
SOFT
For background music.
SUB W: (Subwoofer level)
You can adjust the amount of base.
1 (Weakest effect) to 4 (Strongest effect)
≥ The setting you make is retained, and recalled every
time you play the same type of source.
H.BASS
You can enhance low-frequency sound so that heavy
bass sound can be heard clearly, even if the acoustics
of your room are not optimal.
≥ The setting you make is retained, and recalled every
time you play from the same type of source.
C.FOCUS: (Centre focus)
(Effective when playing audio containing centre
channel sound.)
You can make the sound of the centre speaker seem
like it is coming from within the TV.
W.SRND: (Whisper-mode Surround)
You can enhance the surround effect for low volume
sound. (Convenient for late night viewing.)
≥ The sound effects/modes may not be available or have no effect with some
sources.
≥ You may experience a reduction in sound quality when these sound
effects/modes are used with some sources. If this occurs, turn the sound
effects/modes off.
∫ Adjusting speaker level during play
1 Press and hold [jCH SELECT] to activate the speaker
setting mode.
2 Press [jCH SELECT] several times to select the speaker.
Each time you press the button:
L R—) C_) RS_)RB
^"""""""""""""""""""""""""""""b
* When the optional surround back speakers are connected.
L R: Front speaker (left and right:only the balance
is adjustable.)
≥ Press [2, 1] to adjust the balance of the front
speakers.
C: Centre speaker
RS: Surround speaker (right)
*: Surround back speaker (right)
RB
*: Surround back speaker (left)
LB
LS: Surround speaker (left)
SW: Subwoofer
≥ The channels not included in the playing audio will not be
VQT2Q52
displayed (subwoofer is displayed even if it is not
included).
*_) LB*_)LS_) SW
24
Page 25
Playback
Current position
e.g. BD-Video
Tot a l ti m e
Elapsed time in the title
T: Title, C: Chapter, PL: Playlist
Playing video contents
Other operations during play
[BD] [DVD] [CD] [SD] [USB]
Preparation
Turn on the television and select the appropriate video input on
the television.
1 Press [Í] to turn on the unit.
2 Insert the media.
Play starts.
≥ If the menu is displayed, press [3, 4, 2, 1] to select
the item and press [OK].
≥ If play does not start, press [1 PLAY].
∫ To show menus
You can display Top Menu, DIRECT NAVIGATOR or Pop-up
Menu.
Press [TOP MENU/DIRECT NAVIGATOR] or [POP-UP
MENU].
≥ Press [3, 4, 2, 1] to select the item and press [OK].
≥ Pop-up menu also appears by pressing [OPTION] and
selecting “Pop-up Menu”.
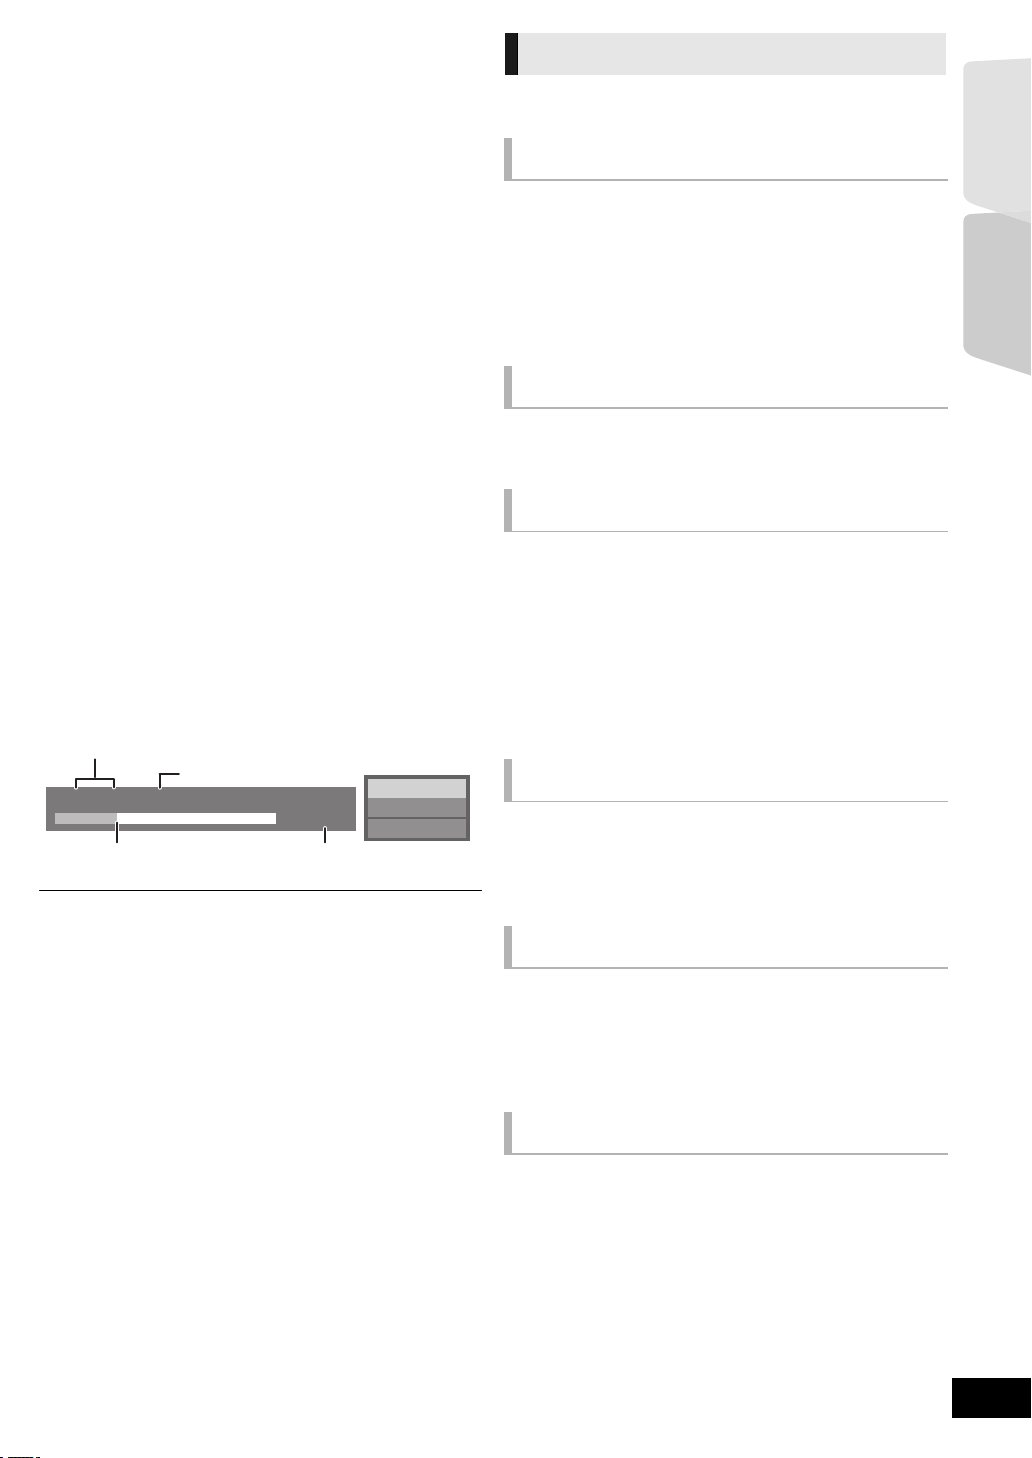
∫ To show the status messages
While playing, press [STATUS].
The status messages give you information about what is
currently being played. Each time you press [STATUS], the
information displayed will change.
These functions may not work depending on the media and
contents.
Stop
Getting started Playback
Press [∫ STOP].
The stopped position is memorised.
Resume play function
Press [1 PLAY] to restart from this position.
≥ The position is cleared if the tray is opened or you press
[∫ STOP] several times to display “STOP” on unit’s display.
≥ On BD-Video discs including BD-J (> 49), the resume
play function does not work.
Pause
Press [;PAUSE].
≥ Press [;PAUSE] again or [1 PLAY] to restart play.
Search/Slow-motion
Search
While playing, press [SEARCH6] or [SEARCH5].
≥ Music and MP3: The speed is fixed to a single step.
Slow-motion
While paused, press [SEARCH6] or [SEARCH5].
≥ BD-Video and AVCHD: Forward direction [SEARCH5]
only.
The speed increases up to 5 steps.
≥ Press [1 PLAY] to revert to normal playback speed.
T1 C1 0:05.14
0:20.52
BD-Video
≥ Signal from PAL discs is output as PAL. Signal from NTSC discs is output
as “NTSC” or “PAL60”. You can select “NTSC” or “PAL60” in “NTSC
Contents Output” for NTSC discs. (> 38)
≥ Depending on media and contents, the display may change or may not
appear.
≥ DivX: Successive play is not possible.
≥ It is not possible to playback AVCHD and MPEG2 video which have been
dragged and dropped, copied and pasted to the media.
Skip
PLAY
While playing or paused, press [SKIP:] or [SKIP9].
Skip to the title, chapter or track you want to play.
≥ Each press increases the number of skips.
≥ DivX: Backward direction [SKIP:] only.
Frame-by-frame
While paused, press [2] (2;) or [1] (;1).
≥ Press and hold to change in succession forward or
backward.
≥ Press [1 PLAY] to revert to normal playback speed.
≥ BD-Video and AVCHD: Forward direction [1] (;1) only.
Changing audio
Press [AUDIO].
You can change the audio channel number or soundtrack
language (> 47), etc.
VQT2Q52
25
Page 26
Useful functions
1 Press [OPTION].
2 Select an item and press [OK].
While DIRECT NAVIGATOR screen is displayed
Properties
Chapter
View
To P i ctur e Playing still pictures (> 28)
Folder To switch to another folder
To display the titles properties (recording
date, etc.)
To select the chapter
To turn on/off secondary audio
1 Press [DISPLAY].
2 Press [3, 4] to select the “Disc” menu and press [1].
3 Press [3, 4] to select the “Signal Type” menu and press
[OK].
4 Press [3, 4] to select the “Soundtrack” under “Secondary
Video” menu and press [1].
5
Press [3,4] to select the “On” or “Off”.
When “On” is selected, press [1] and then press [3,4] to
select the language.
6 Press [RETURN] to exit.
≥ During search/slow-motion or frame-by-frame, only the primary video is
displayed.
≥ When “BD-Video Secondary Audio” in “Digital Audio Output” is set to “Off”,
secondary audio will not be played (> 38).
While playing
Screen
Aspect
Top Menu To display Top Menu.
Pop-up
Menu
Menu To display Menu.
≥ Depending on the played contents if you perform “Screen
Aspect”, there may be no effect.
≥ When “TV Aspect” (> 39) is set to “4:3” or “4:3 Letterbox”,
the “Zoom” effect is disabled.
When black bars are shown at the top,
bottom, left, and right sides of the screen, you
can enlarge the image to fill the screen.
To display Pop-up Menu.
≥ Depending on the media and contents, displayed items are different.
Enjoying BD-Live or
BONUSVIEW in BD-Video
What is BONUSVIEW?
BONUSVIEW allows you to enjoy functions such as
picture-in-picture or secondary audio etc.
What is BD-Live?
In addition to the BONUSVIEW function, BD-Live allows you to
enjoy more functions such as subtitles, exclusive images and
online games by connecting this unit to the Internet.
≥ The usable functions and the operating method may vary
with each disc, please refer to the instructions on the disc
and/or visit their website.
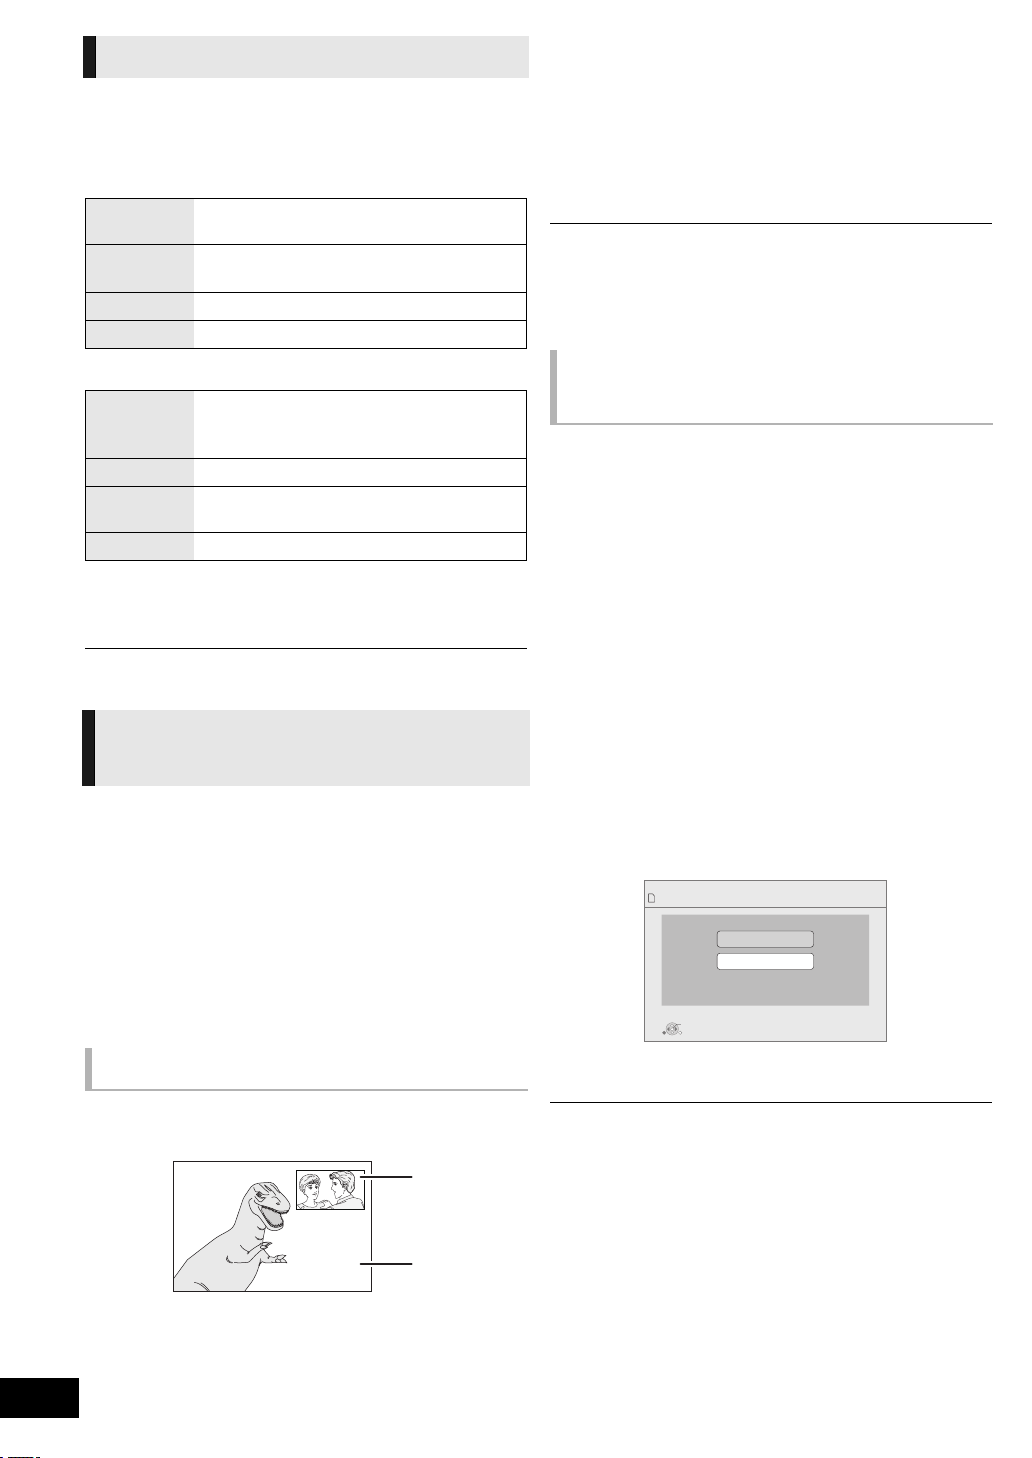
Playing picture-in-picture
To turn on/off secondary video
Press [PIP].
Enjoying BD-Live discs with
Internet
Some BD-Live content available on the Blu-ray discs may
require an Internet account to be created in order to access the
BD-Live content. Follow the screen display or instruction
manual of the disc for information on acquiring an account.
1 Connect to the network. (> 18)
2 Insert an SD card (with 1 GB or more free space).
SD card is used as the local storage (> 49).
3 Insert the disc.
∫ Deleting data/Formatting SD cards
1 Insert an SD card.
2 Press [START].
3 Press [3, 4] to select “To Others” and press [OK].
4 Press [3, 4] to select “Card Management” and press
[OK].
5 Press [3, 4] to select “BD-Video Data Erase” or “Format
SD Card” and press [OK].
Card Management No. of Files 6
SD CARD
OK
RETURN
6 Press [2, 1] to select “Yes” and press [OK].
7 Press [2, 1] to select “Start” and press [OK].
≥ To use the above functions, it is recommended that you format the card on
this unit. If the SD card you use is formatted, all data on the card will be
erased. It cannot be recovered.
≥ “BD-Live Internet Access” may need to be changed for certain discs
(> 38).
≥ When discs supporting BD-Live are played back, the player or disc IDs
may be sent to the content provider via the Internet.
Free space 300 MB
BD-Video Data Erase
Format SD Card
Format this SD Card.
A Secondary video
B Primary video
VQT2Q52
26
Page 27
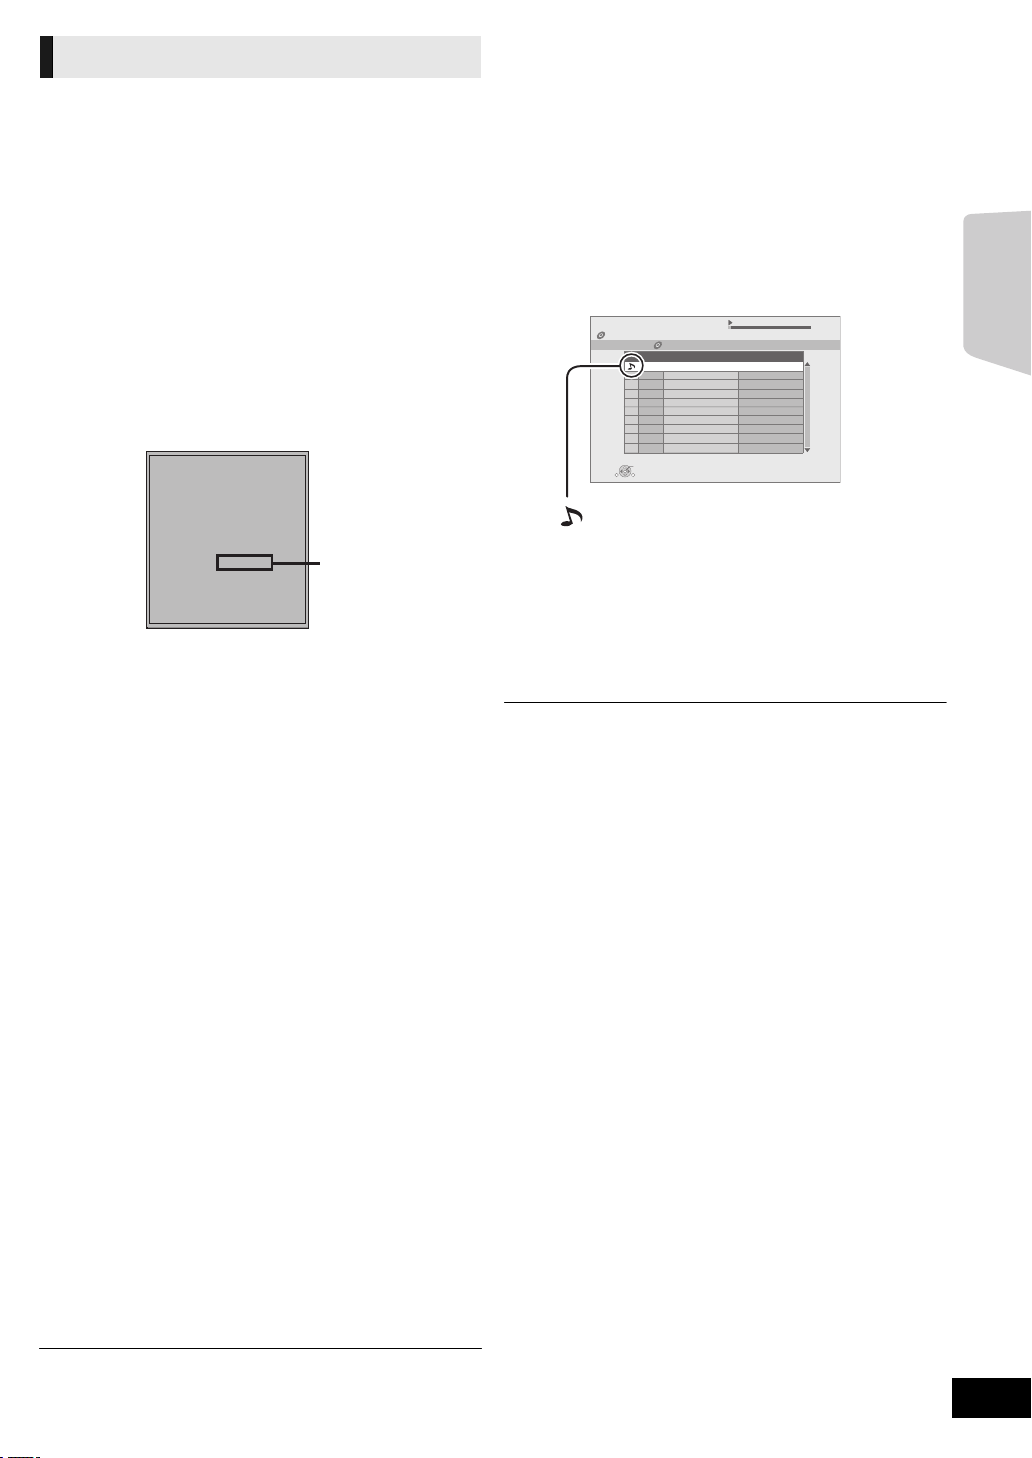
Regarding DivX
DivX Registration
You must register this unit to play
protected DivX videos.
The registration code is necessary to
register this unit.
Registration Code: XXXXXXXXXX
Please register at www.divx.com/vod/
0.09 4.30
01
02
03
04
05
DIRECT NAVIGATOR
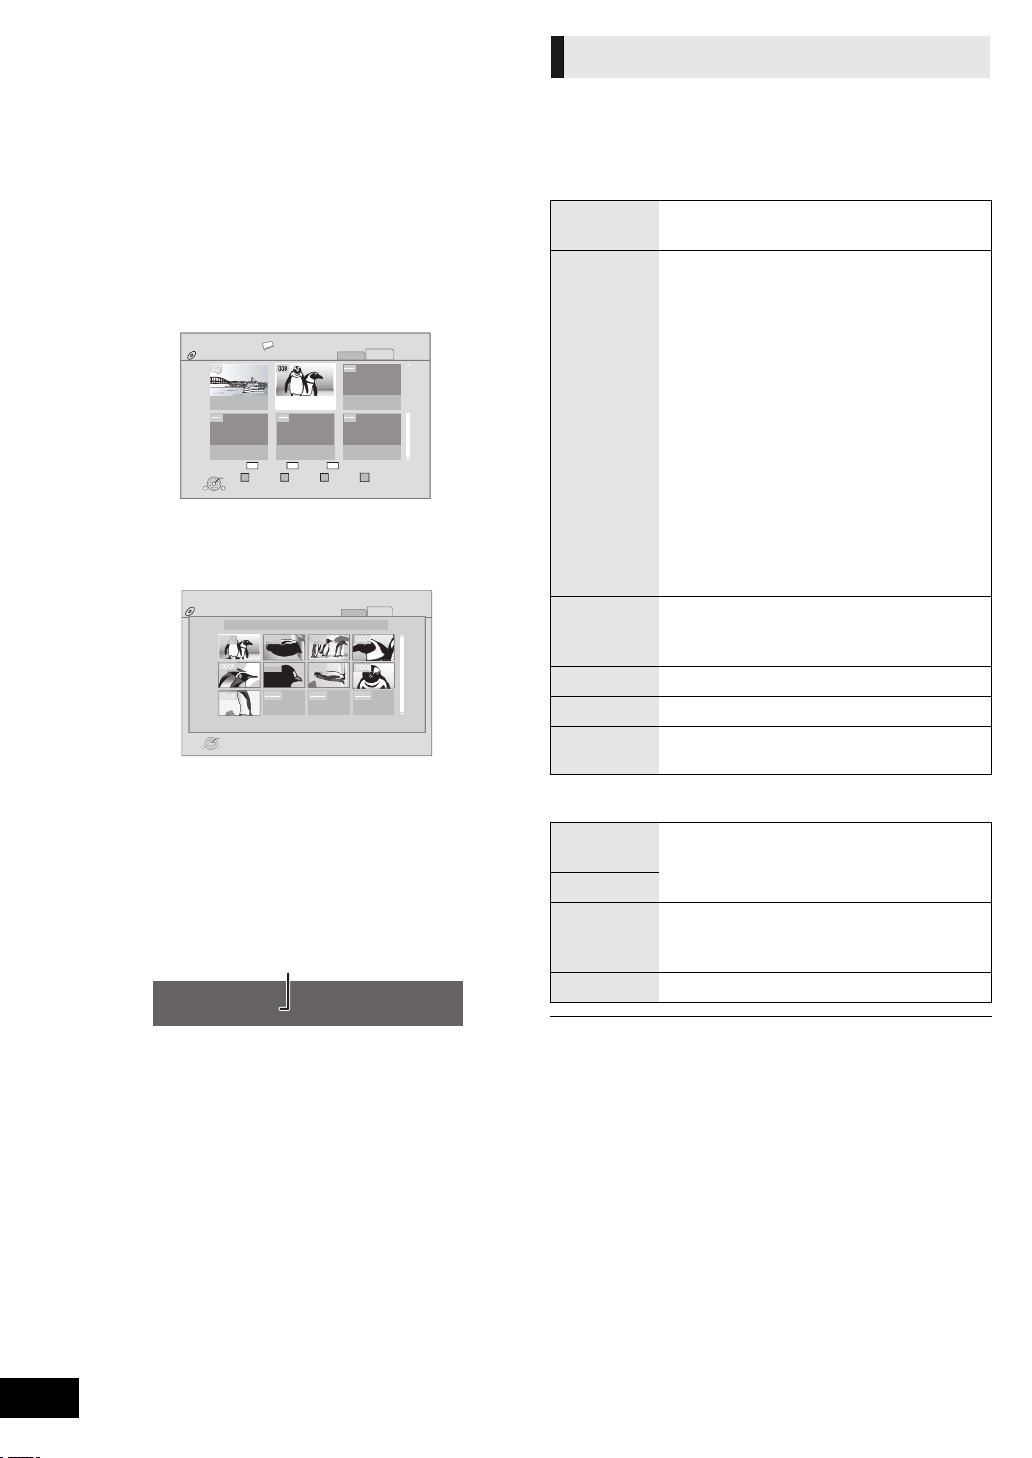
Music list
CD
No.
Track Name Play Time
Track1
Track1
4min30sec
3min41sec
4min30sec
3min11sec
5min 2sec
Track2
5 Tracks / Total Play Time 20min54sec
Track3
Track4
Track5
Play
RETURN
OPTION
“ ” indicates the track currently playing.
Playing music
ABOUT DIVX VIDEO:
®
is a digital video format created by DivX, Inc. This is an
DivX
official DivX Certified device that plays DivX video. Visit
www.divx.com for more information and software tools to
convert your files into DivX video.
ABOUT DIVX VIDEO-ON-DEMAND:
This DivX Certified
®
device must be registered in order to play
DivX Video-on-Demand (VOD) content.
To generate the registration code, locate the DivX VOD section
in the device setup menu.
Go to vod.divx.com with this code to complete the registration
process and learn more about DivX VOD.
≥ It is not possible to playback DivX VOD content recorded on
the USB device.
Display the unit’s registration code.
(> 40, “DivX Registration” in “General”)
A 10 alphanumeric characters
≥ After playing DivX VOD content for first time, the registration
code is not displayed.
≥ If you purchase DivX VOD content using a registration code
different from this unit’s code, you will not be able to play this
content. (“Authorisation Error.” is displayed.)
[DVD] [CD] [USB]
(DVD-R/-R DL, music CD, CD-R/RW, USB device)
1 Insert a disc or USB device.
If the menu is displayed, press [3, 4] to select the item
and press [OK].
2 Press [3, 4] to select the track and press
[OK].
Playback
∫ Playing a track in another folder
1 While the “Music list” is displayed
Press [OPTION].
2 Press [3, 4] to select “Select Folder” and press [OK].
≥ You cannot select folders that contain no compatible tracks.
Cancel the unit’s registration.
(> 40, “DivX Registration” in “General”)
Press [2, 1] to select “Yes” in “DivX Registration”.
Use the deregistration code to cancel the registration in
www.divx.com.
Regarding DivX VOD content that can only be played a set
number of times
Some DivX VOD content can only be played a set number of
times. When you play this content, the remaining number of
plays is displayed. You cannot play this content when the
number of remaining plays is zero. (“Rental Expired.” is
displayed.)
≥ The remaining number of plays decreases each time a
program is played. However, when playing from the point
where play was previously stopped, the remaining number of
plays does not decrease due to the resume play function.
∫ Displaying subtitles text
You can display subtitles text on the DivX video disc on this
unit.
This function has no relation to the subtitles specified in DivX
standard specifications and has no clear standard. The
operation might be different or it may not operate properly
depending on the way the file was made or the state of this unit
(playing, stopped, etc.).
Set “Subtitle” in “Disc” (> 34)
≥ DivX video files that do not display “Text” do not contain subtitles text.
≥ If the subtitles text are not displayed correctly, try changing the language
settings. (> 38)
VQT2Q52
27
Page 28
Playing still pictures
Tot al 8
106_DVD
Total 13
2006 9 12
Video
Picture
Press OK to go to Picture View.
Previous Next
Slideshow
Video Picture
Page 02/02
DIRECT NAVIGATOR
Album View
DVD-RAM(VR)
OPTION
OK
RETURN
OPTION
DIRECT NAVIGATOR
Picture View
DVD-RAM(VR)
Video
Picture
Play
RETURN
2006 9 12
Page 001/001
0001
0005
0009
0006 0007 0008
0002 0003 0004
e.g. JPEG on DVD-RAM
Shooting date
[BD] [DVD] [CD] [SD] [USB]
(BD-RE, DVD-RAM/-R/-R DL, CD-R/RW, SD Card,
USB device)
1 Insert a disc, SD card or USB device.
If the menu is displayed, press [3, 4] to select the item
and press [OK].
2 BD-RE, DVD-RAM
Press [3, 4, 2, 1] to select the album and
press [OK].
3 Press [3, 4, 2, 1] to select the still
picture and press [OK].
Press [2, 1] to display the previous or next still picture.
To exit the screen
Press [TOP MENU/DIRECT NAVIGATOR].
∫ To show the picture properties
While playing, press [STATUS] twice.
Date 11.12.2009 Total 3/9
To exit the screen
Press [STATUS].
Useful functions
1 Press [OPTION].
2 Select an item and press [OK].
While “Album View” or “Picture View” screen is displayed
Start
Slideshow
Slideshow
Setting
Select
Folder
Folder To select the still pictures in another folder
To Vi d e o Playing video contents (> 25)
To album
view
While playing (except for slideshow)
Rotate
RIGHT
Rotate LEFT
Zoom out
Zoom in Cancel “Zoom out”
≥ Depending on the media and contents, displayed items are different.
≥ When a still picture with large number of pixels is played, the display
interval may become longer. Even if the setting is changed, the display
interval may not become shorter.
≥ When a music CD, a USB device with MP3 recorded and an iPod/iPhone
are inserted/connected to this unit, iPod/iPhone has a priority to be played
back as background music.
You can display still pictures one by one at a
constant interval.
Display Interval
Change the display interval.
Transition Effect
Set display method.
Repeat Play
Repeat slideshow.
Soundtrack
Music files on an iPod/iPhone or a music CD
or USB device can be played back as
background music during the slideshow.
Soundtrack Folder
A folder to playback can be selected when a
USB device with MP3 recorded is connected
to this unit.
Press [3, 4, 2, 1] to select “Set” and
press [OK].
To switch to another higher folder
≥ Only if there is a multiple number of higher
folders recognizable
To display album view.
Rotate the still picture.
Reduce the still picture
≥ This function is only available for
small-sized still pictures.
28
VQT2Q52
Page 29
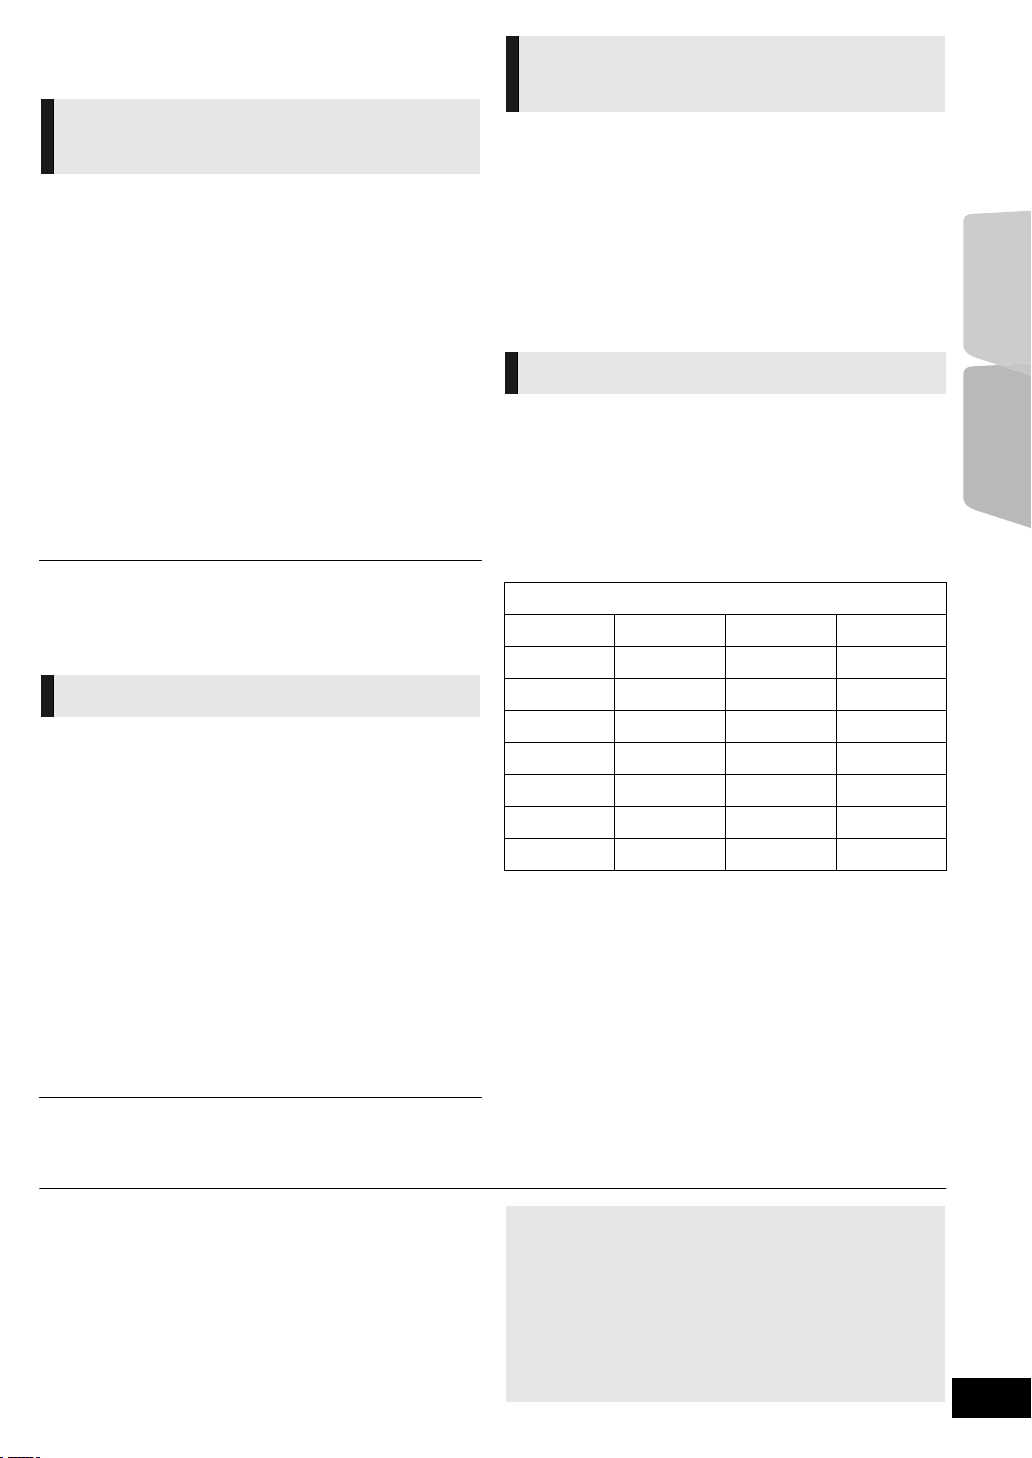
Radio
Listening to the Radio
Presetting stations
automatically
Up to 30 stations can be set.
1 Press [RADIO] to select “FM”.
2 Press [STATUS] to select the position to
start the auto preset search.
LOWEST:
To begin auto preset with the lowest frequency (FM87.50).
CURRENT:
To begin auto preset with the current frequency.*
* To change the frequency, refer to “Presetting stations
manually”.
3 Press and hold [OK].
Release the button when “AUTO” is displayed.
The tuner starts to preset all the stations it can receive into
the channels in ascending order.
≥ “SET OK” is displayed when the stations are set, and the radio tunes to the
last preset station.
≥ “ERROR” is displayed when automatic presetting is unsuccessful. Preset
the stations manually.
Presetting stations manually
Preparation
Select a radio broadcast.
1 Press [RADIO] to select “FM”.
2 Press [SEARCH6] or [SEARCH5] to select the
frequency.
≥ To start automatic tuning, press and hold [SEARCH6], [SEARCH5]
until the frequency starts scrolling. Tuning stops when a station is found.
1 While listening to the radio broadcast
Press [OK].
2 While “P” is flashing on the display
Press the numbered buttons to select a
channel.
To select a 1-digit number
e.g., 1: [1] B [OK].
To select a 2-digit number
e.g., 12: [1] B [2]
Listening/confirming the preset
channels
1 Press [RADIO] to select “FM”.
2 Press the numbered buttons to select the
channel.
To select a 1-digit number
e.g., 1: [1] B [OK].
To select a 2-digit number
e.g., 12: [1] B [2].
Alternatively, press [W, X] or [2, 1].
RDS broadcasting
If the station you are listening to is transmitting RDS signals,
“RDS” will light up on the display.
While listening to the radio broadcast
Press [DISPLAY] to display the text data.
PS: Programme service
PTY: Programme type
OFF: Frequency display
PTY displays
NEWS VARIED FINANCE COUNTRY
AFFAIRS POP M CHILDREN NATIONAL
INFO ROCK M SOCIAL A OLDIES
SPORT M.O.R. M* RELIGION FOLK M
EDUCATE LIGHT M PHONE IN DOCUMENT
DRAMA CLASSICS TRAVEL TEST
CULTURE OTHER M LEISURE ALARM
SCIENCE WEATHER JAZZ
* M.O.R. M=Middle of the road music
Radio Playback
≥ A station previously stored is overwritten when another station is stored in
the same channel preset.
∫ Display on the main unit
TUNED/STEREO: Displayed when receiving stereo
TUNED: Displayed when receiving monaural
broadcasting
broadcasting or monaural sound is
selected.
∫ If noise is excessive
Press [AUDIO] to display “MONO”.
The sound becomes monaural.
Press the button again to cancel the mode. “AUTO ST” will
be displayed on the main unit. Depending on the broadcast
system, stereo or monaural will be selected.
“MONO” is also cancelled when you change the frequency.
≥ This setting can be preset for each broadcasting station.
VQT2Q52
29
Page 30
TV
Enjoying TV with unit’s
Making settings for digital
speakers
Preparation
Turn on your TV and select the appropriate audio input mode
[AUX, ARC, D-IN 1 or D-IN 2] to suit the connections to this
unit. (> 23)
Surround sound effects
You can enhance stereo sources with surround sound effect.
1 Press [SURROUND] several times to select
the effect.
2 While “MANUAL” is displayed on the unit’s display
Press [2, 1] and select the desired effect.
Surround modes to enjoy TV audio or stereo
sources from all speakers:
≥ DOLBY PL II MOVIE
≥ DOLBY PL II MUSIC
≥ S.SURROUND
≥ Cinema Surround (> 19)
For more detailed information on this operation, please refer to
the “Enjoying surround sound effects” section on page 24.
audio input
Select to suit the type of audio from the DIGITAL AUDIO IN
terminals on the main unit.
Press [EXT-IN] several times to select “D-IN 1”
(DIGITAL IN 1) or “D-IN 2” (DIGITAL IN 2).
∫ DIGITAL IN 1/DIGITAL IN 2
Press [AUDIO].
M1
M2
M1rM2 (stereo audio)
(Only works with Dolby Dual Mono)
≥ “M1” or “M2” is not available if “On” is selected in “Digital
Audio Input”. (> 38)
∫ DIGITAL IN 2
Press [STATUS].
CABLE/SAT AUDIO
Select when an HDMI connected STB is selected on the
TV, “D-IN 2” input is automatically selected. (> 31, “Setting
the audio link with the STB”).
≥ Audio that is input through the DIGITAL AUDIO IN or AUX terminals are not
output from the HDMI AV OUT terminal.
Sound modes
You can adjust the mode depending on the source or situation.
1 Press [SOUND] several times to select the
mode.
2 While the selected mode is displayed on the unit’s
display
Press [2, 1] and select the desired setting.
For more detailed information on this operation, please refer to
the “Changing the sound modes” section on page 24.
VQT2Q52
30
Page 31
Linked operations with
One touch play
the TV
(VIERA Link “HDAVI ControlTM”)
What is VIERA Link “HDAVI Control”?
VIERA Link “HDAVI Control” is a convenient function
that offers linked operations of this unit, and a
Panasonic TV (VIERA) under “HDAVI Control”.
You can use this function by connecting the equipment
with an HDMI cable. See the operating instructions for
connected equipment for operational details.
Preparation
1 Set “VIERA Link” to “On” (> 39).
(The default setting is “On”.)
2 Set the “HDAVI Control” operations on the connected
equipment (e.g., TV).
3 Turn on all “HDAVI Control” compatible equipment and
select this unit’s input channel on the connected TV so that
the “HDAVI Control” function works properly.
Also when the connection or settings are changed,
repeat this procedure.
Setting the audio link
∫ Setting the audio link with the TV
With the remote control;
≥ Select the actual TV audio connection on the main unit.
1 Press [START] and press [3, 4] to select “To Others” and
press [OK].
2 Press [3, 4] to select “Setup” and press [OK].
3 Press [3, 4] to select “TV / Device Connection” and press
[OK].
4 Press [3, 4] to select “TV Audio Input”.
5 Press [2, 1] to switch “AUX”, “ARC” or “DIGITAL IN 1”.
Whenever the connection or settings are changed, reconfirm
the points above.
∫ Setting the audio link with the STB
With the remote control;
≥ Select the STB input channel on the TV.
1 Press [EXT-IN] to select “D-IN 2”.
2 Press [STATUS] to select “CABLE/SAT AUDIO ON”.
≥ If the input channel of the STB on the TV is changed or if you
want to change the device allocated for the linked
operations, select “CABLE/SAT AUDIO OFF” in step 2
above and then repeat steps 1 to 2.
You can turn on this unit and the TV, and start play with a
single press of a button.
While the unit and the TV are in standby mode;
Press [1 PLAY].
Speaker Selection
You can select whether audio is output from the unit’s
speakers or the TV speakers by using the TV menu settings.
Home Cinema
This unit’s speakers are active.
≥ When this unit is in standby mode, changing the TV
speakers to this unit’s speakers in the TV menu will
automatically turn the unit on and select, “AUX”
“D-IN 1” (DIGITAL IN 1)
≥ You can control the volume setting using the volume or mute
button on the TV’s remote control.
≥ If you turn off this unit, TV speakers will be automatically
activated.
*1
as the source.
*1
, “ARC”*1 or
TV
TV speakers are active.
≥ The volume of this unit is set to “0”.
≥ Audio output is 2-channel audio.
≥ When switching between this unit’s speakers and TV speakers, the TV
screen may be blank for several seconds.
Automatic input switching
(Power on link)
When the following operations are performed, the television
will automatically switch the input channel and display the
corresponding action. When the television is off, the television
will automatically turn on.
jWhen play starts on the unit
jWhen an action that uses the display screen is performed
(e.g., DIRECT NAVIGATOR screen)
jBD-Video, DVD-Video:
When playback stops, the TV will automatically return to TV
tuner mode.
≥ When you switch the TV input to TV tuner mode, this unit will
automatically switch to “AUX”
*1
or “D-IN 2” (DIGITAL IN 2)*2.
IN 1)
≥ This function does not work when the iPod/iPhone selector is
chosen. (> 33)
*1
, “ARC”*1 or “D-IN 1” (DIGITAL
TV
≥ VIERA Link “HDAVI Control”, based on the control functions provided by
HDMI which is an industry standard known as HDMI CEC (Consumer
Electronics Control), is a unique function that we have developed and
added. As such, its operation with other manufacturers’ equipment that
supports HDMI CEC cannot be guaranteed.
≥ This unit supports “HDAVI Control 5” function.
“HDAVI Control 5” is the newest standard (current as of December, 2009)
for Panasonic’s HDAVI Control compatible equipment. This standard is
compatible with Panasonic’s conventional HDAVI equipment.
≥ Please refer to individual manuals for other manufacturers’ equipment
supporting VIERA Link function.
VQT2Q52
31
Page 32
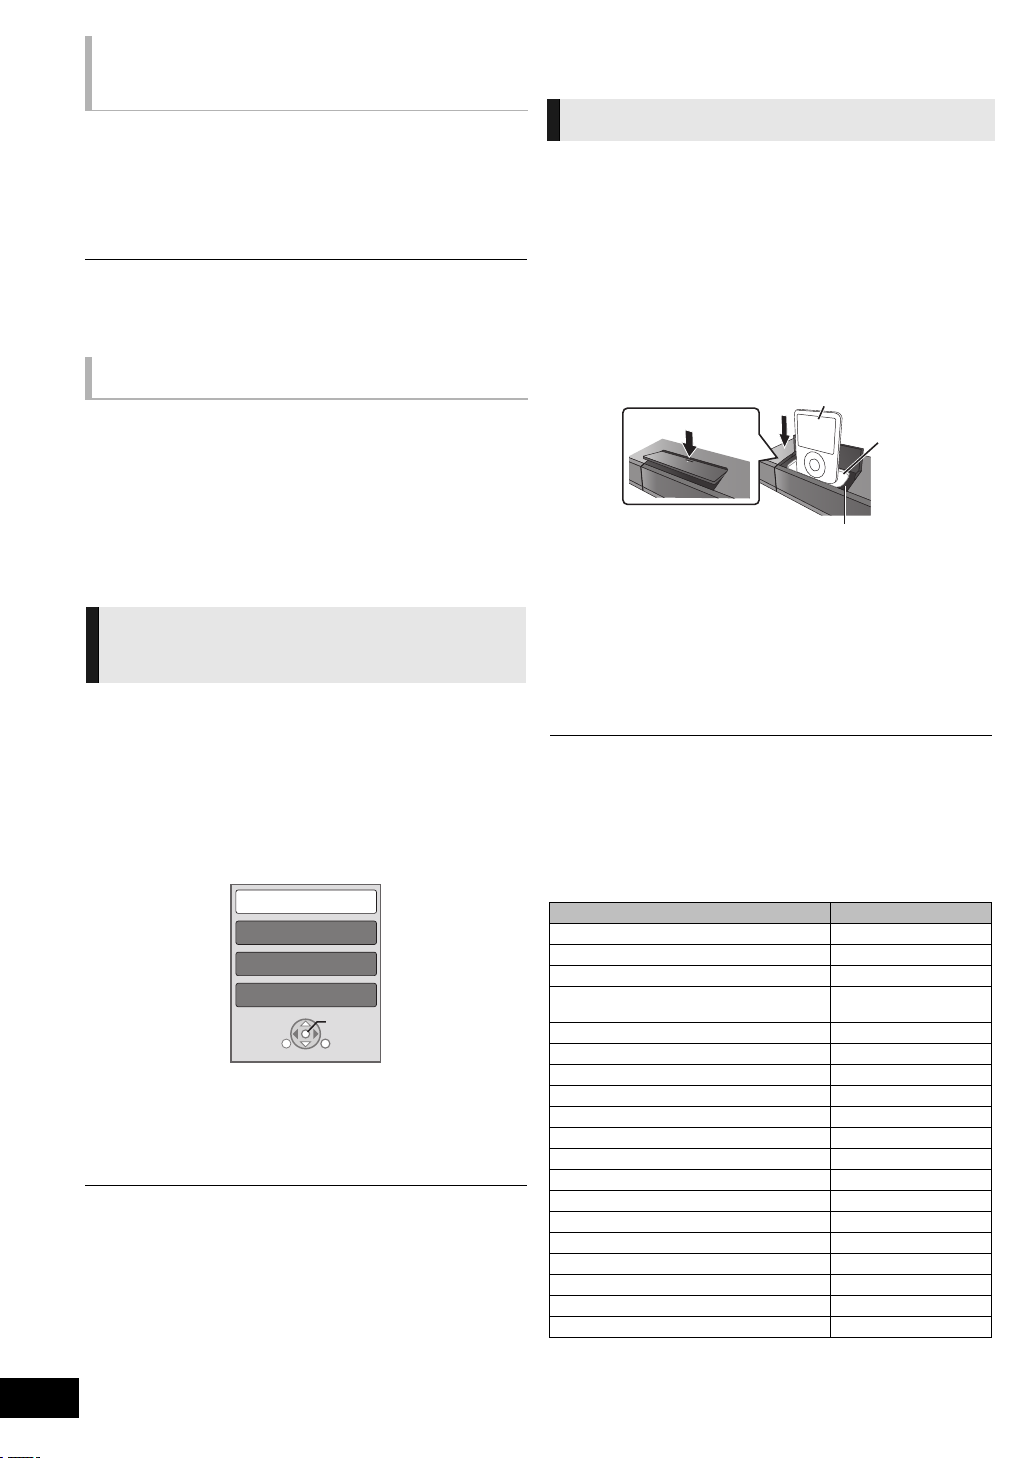
Delay between audio and video is automatically adjusted,
Control Panel
Screen Aspect
Top Menu
Pop-up Menu
OK
RETURN
OPTION
e.g. BD-Video
Main unit
iPod/iPhone
1
2
enabling you to enjoy smooth audio for the picture.(> 38,
“Audio Delay”)
≥ This function works only when “BD/DVD”, “SD”, “USB”,
*1 “AUX”, “ARC” or “D-IN 1” works depending on the setting in “Setting the
*2 “D-IN 2” works depending on the setting in “Setting the audio link with
All connected equipment compatible with “HDAVI Control”,
including this unit, automatically turns off when you switch the
television off.
Playing music continuously even after turning off the TV
(When the unit is connected to a Panasonic TV (VIERA) that
supports HDAVI Control 2 or later.)
Select “Video” in “Power Off Link” (> 39)
Only TV supports “HDAVI Control 2” or later
By using the TV remote control, you can play discs using the
“Control Panel” and display the Top Menu or Pop-up Menu,
etc.
≥ This works only during “BD/DVD”, “SD” or “USB” playback
1 Press [OPTION].
2 Select an item and press [OK].
≥ The OPTION menu may not appear while the Top Menu for
≥ The buttons that you can use for this unit vary depending on the TV. For
≥ The operation of this unit may be interrupted when you press incompatible
≥ Depending on the menu, some button operations cannot be performed
VQT2Q52
32
Automatic lip-sync function
(for HDAVI Control 3 or later)
*1
, “ARC”*1, “D-IN 1” (DIGITAL IN 1)*1 or “D-IN 2”
“AUX”
(DIGITAL IN 2)
audio link with the TV”. (> 31)
the STB”. (> 31)
*2
is selected as the source on this unit.
Power Off Link
Easy control only with VIERA
remote control
and resume modes.
BD-Video or DVD-Video is displayed.
details, refer to the operating instructions of the TV.
buttons on the TV remote control.
from the TV’s remote control.
Other devices
Using the iPod/iPhone
iPod/iPhone Connection
Preparation
≥ Before connecting/disconnecting the iPod/iPhone, turn the
main unit off or reduce the volume of the main unit to its
minimum.
≥ Make sure that the video cable connection is made to view
photos/videos from the iPod/iPhone.
1 Push # to open the iPod/iPhone lid.
2 Connect the iPod/iPhone (not included)
firmly.
A Dock adapter (not included)
≥ Attach the dock adapter until firmly fitting into the
dock. The adapter should be supplied with your
iPod/iPhone for the stable use.
If you need an adapter, consult your iPod/iPhone
dealer.
B Dock for iPod/iPhone
About recharging the battery
≥ iPod/iPhone will start recharging regardless of whether this unit is on or off.
≥ “IPOD ¢” will be shown on the main unit’s display during iPod/iPhone
charging in main unit standby mode.
≥ Once fully recharged, additional recharging will not occur.
Compatible iPod/iPhone (as of December 2009)
≥ Compatibility depends on the software version of your iPod/iPhone.
Name Memory size
iPhone 3GS 16 GB, 32 GB
iPhone 3G 8 GB, 16 GB
iPod nano 5th generation (video camera) 8 GB, 16 GB
iPod touch 2nd generation
iPod classic 120 GB, 160 GB (2009)
iPod nano 4th generation (video) 8 GB, 16 GB
iPod classic 160 GB (2007)
iPod touch 1st generation 8 GB, 16 GB, 32 GB
iPod nano 3rd generation (video) 4 GB, 8 GB
iPod classic 80 GB
iPod nano 2nd generation (aluminum) 2 GB, 4 GB, 8 GB
iPod 5th generation (video) 60 GB, 80 GB
iPod 5th generation (video) 30 GB
iPod nano 1st generation 1 GB, 2 GB, 4 GB
iPod 4th generation (colour display) 40 GB, 60 GB
iPod 4th generation (colour display) 20 GB, 30 GB
iPod 4th generation 40 GB
iPod 4th generation 20 GB
iPod mini 4 GB, 6 GB
8 GB, 16 GB, 32 GB,
64 GB
Page 33
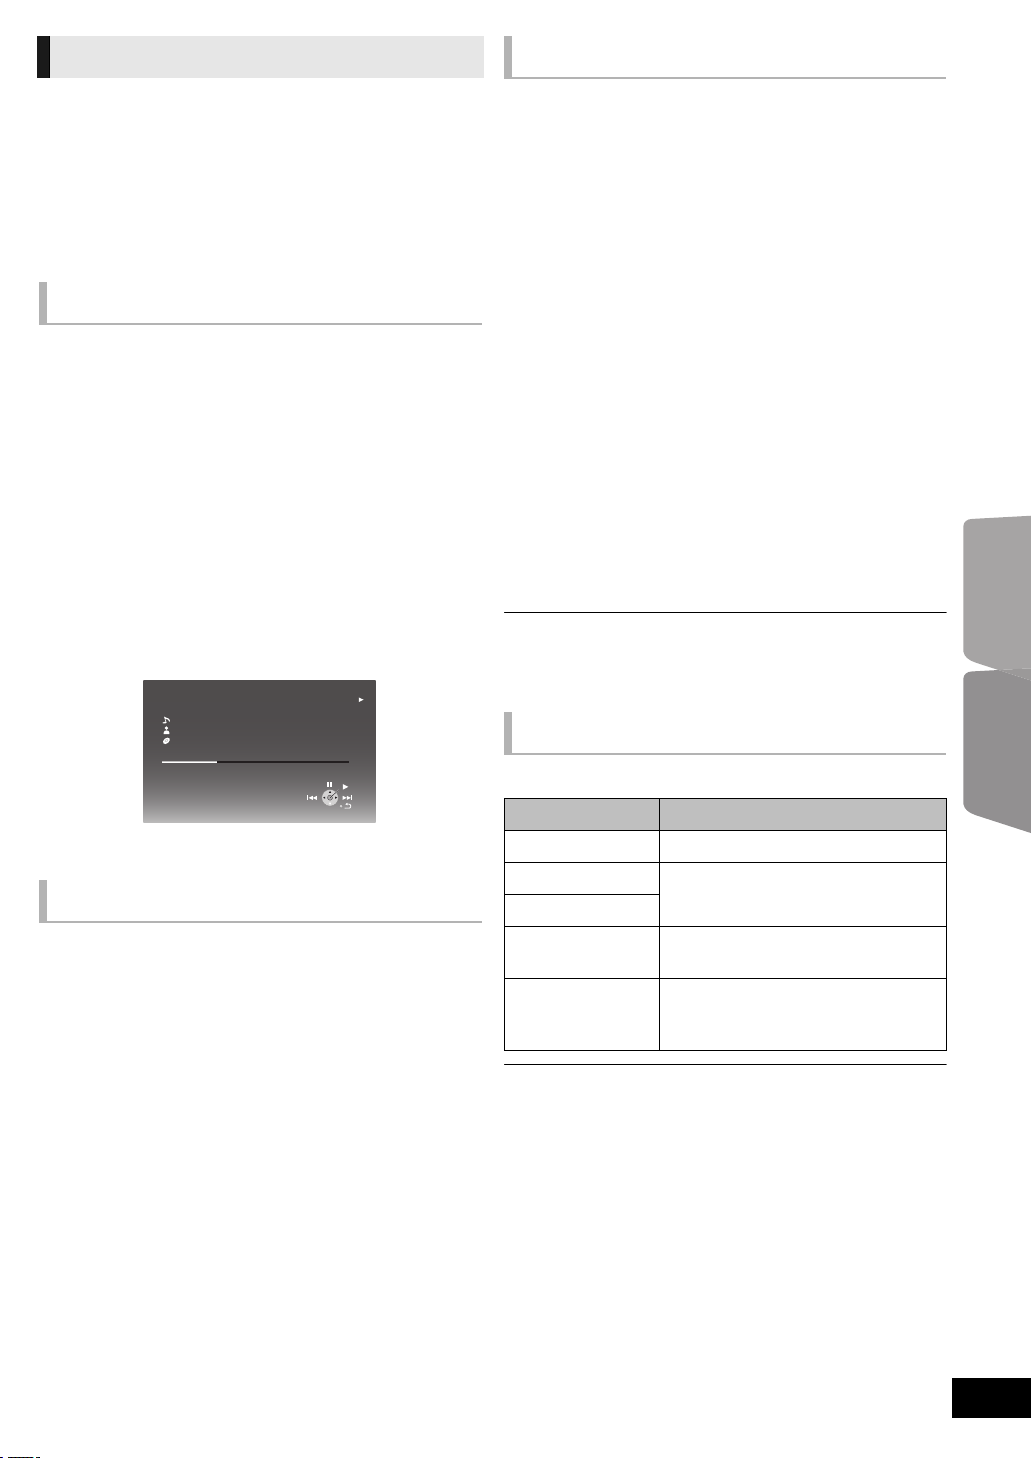
iPod/iPhone Playback
Other methods of playback
Preparation
≥ Make sure that the “IPOD” source is selected. Press [iPod] to
select the source.
≥ To view photos/videos from the iPod/iPhone
Operate the iPod/iPhone menu to make the appropriate
photo/video output settings for your TV.
≥ To display the picture, turn on the TV and select the
appropriate video input mode.
Enjoy music/video
To use the iPod touch/iPhone features
1 Press the Home button on the iPod touch/iPhone.
2 Select the iPod touch/iPhone features on the touch screen
to operate.
1 Press [iPod] to select “IPOD”.
2 Press [STATUS] several times to select the
music menu or videos menu.
3 Press [3, 4] to select an item and press
[OK].
≥ Repeat this step until the selected title starts playback.
≥ Press [2, 1] to display the previous or next page.
e.g., music playback screen
iPod
Good morning
Ronaldo
Happy days
1:00
Shuffle (Albums)
Repeat (All)
To exit, press [TOP MENU/DIRECT NAVIGATOR].
-2:30
45 of 1230
Enjoy photos
1 Press [iPod] to select “IPOD”.
2 Press [STATUS] several times to select
“ALL” on the unit’s display.
3 Switch the TV input to video in.
4 Play a slideshow on your iPod/iPhone.
The picture will be displayed on your TV.
1 Press [START].
2 Press [3, 4] to select “Menu” and then
press [OK].
3 Press [3, 4] to select “Play Mode” and
then press [OK].
4 Press [3, 4] to select an item and press
[OK].
Shuffle (For music playback only.)
Songs:
Play all songs on iPod/iPhone in random order.
Albums:
Play all songs on an album in random order.
Repeat
One:
Play a single song/video repeatedly.
All:
Play all songs/videos from selected items (e.g., Playlists,
Albums, etc.) repeatedly.
5 Press [3, 4] to select the setting and press
[OK].
≥ The setting of the playback mode will be kept until changes are made on
the same iPod/iPhone.
≥ This function does not work when “Use iPod display (All)” is selected.
Basic controls
(For music and video playback only)
Buttons Functions
[1 PLAY] Play
[∫ STOP] Pause
[;PAU SE]
[SKIP:,
SKIP9]
(Press and hold)
[SEARCH6,
SEARCH5]
≥ Surround sound effect and sound mode are available (> 24).
Skip
Search
TVOther devices
You can use the remote control to operate the iPod/iPhone
menu.
The operation may vary among iPod/iPhone models.
≥ [3, 4]: To navigate menu items
≥ [OK]: To go to the next menu.
≥ [RETURN]: To return to the previous menu.
VQT2Q52
33
Page 34
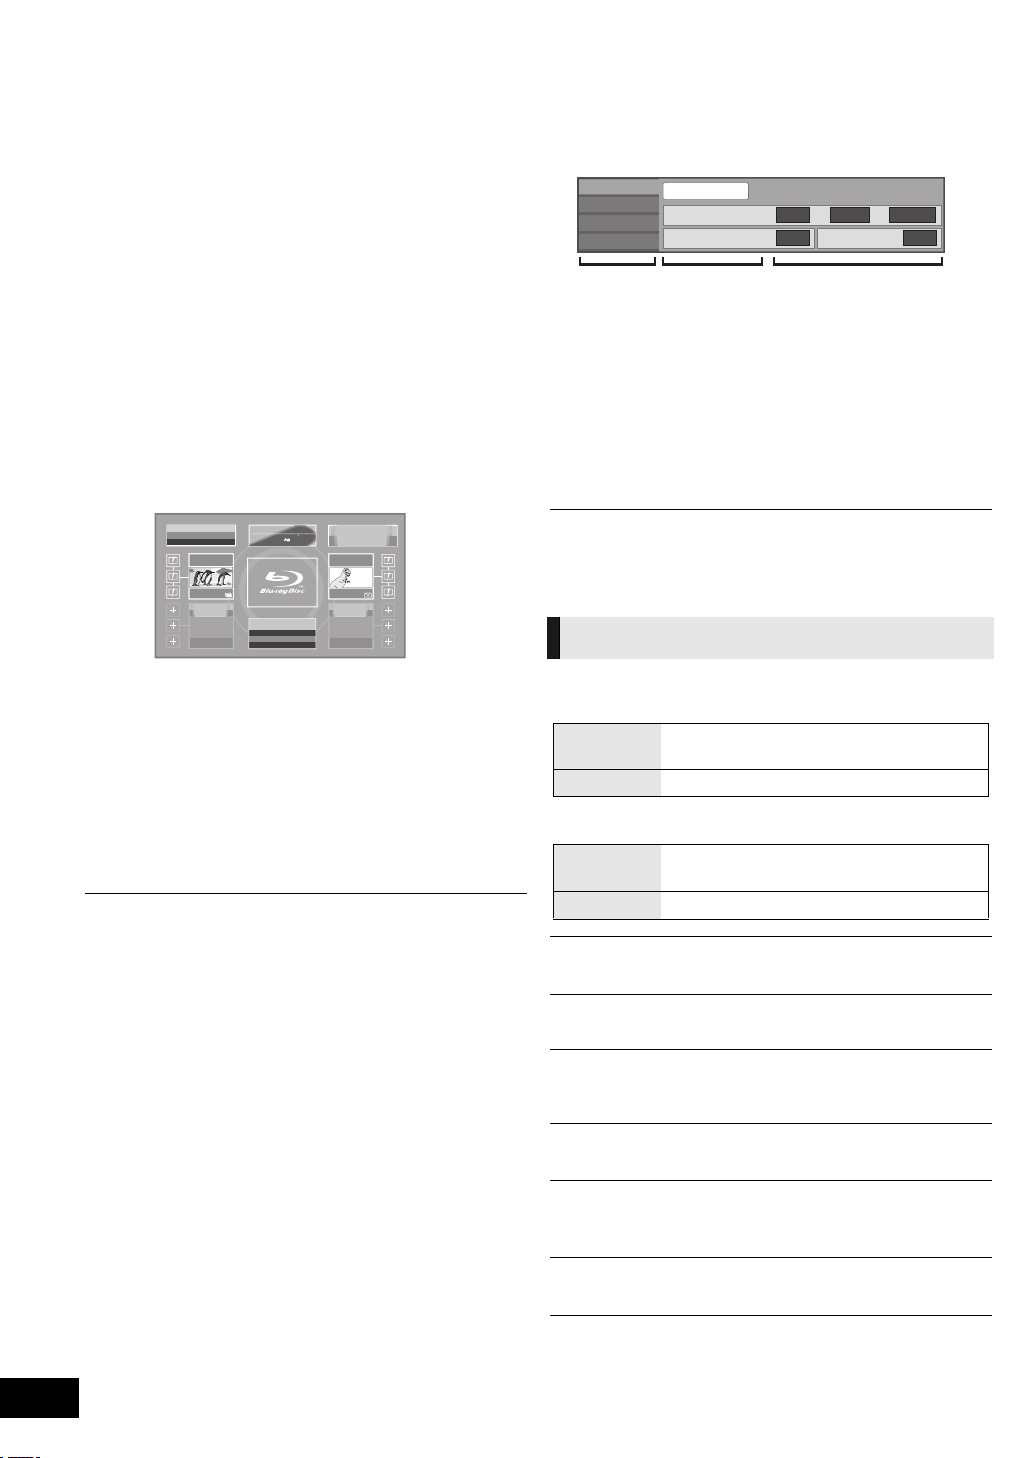
Advanced operations
Featured Videos
Featured Photos
Weather
3°
London, United Kingdom
WSW 21
km/h
Setup
Bloomberg
XXX
XXX
XXX
7465.95
778.94
1442.82
-89.68
-9.47998
-25.15
TELEVISION
15min. delay
COMING SOON
COMING
SOON
COMING
SOON
Images are for illustration purposes,
contents may change without notice.
Picture
Sound
Play
Disc
Subtitle Style Angle
Subtitle
Off Main 1ENG
--
Signal Type
Menus SettingsItems
Enjoying VIERA CAST
Playback menu
You can access a selection of Internet services from the Home
screen with VIERA CAST, for example YouTube, Picasa Web
Albums. (Current as of December 2009)
Preparation
≥ Network connection (> 18)
≥ Network setting (> 20)
1 Press [VIERA CAST].
Message is displayed. Please read these instructions
carefully and then press [OK].
2 Press [3, 4, 2, 1] to select the item and
press [OK].
Operable buttons:
[3, 4, 2, 1], [OK], [RETURN], coloured buttons,
numbered buttons
VIERA CAST Home screen;
1 Press [BD/SD] to select “BD/DVD”.
2 Press [DISPLAY].
e.g., BD-Video
3 Press [3, 4] to select the menu and press
[1].
4 Press [3, 4, 2, 1] to select the item and
press [1].
5 Press [3, 4] to select the setting.
Some items can be changed by pressing [OK].
To exit the screen
Press [DISPLAY].
Depending on the condition of the unit (playing, stopped,
etc.) and media contents, there may be some items that
you cannot select or change.
Regarding Language, Audio attribute and Video attribute:
(> 47)
Disc
To return to VIERA CAST Home screen
Press [VIERA CAST].
To exit from VIERA CAST
Press [EXIT], [START] or [TOP MENU/DIRECT NAVIGATOR].
≥ When the Blu-ray disc logo is selected on the Home screen,
the playback source will be changed and go back to the
source previously selected.
≥ In the following cases, settings are possible using “Internet Content
Settings” (> 40)
– When restricting the use of VIERA CAST.
– When the audio is distorted.
– When wrong time is displayed
≥ If using slow Internet connection, the video may not be displayed correctly.
A high-speed Internet service with a speed of at least 6 Mbps is
recommended.
≥ Be sure to update the firmware when a firmware update notice is displayed
on the screen. If the firmware is not updated, you will not be able to use the
VIERA CAST function. (> 21)
≥ VIERA CAST home screen is subject to change without notice.
≥ The services through VIERA CAST are operated by their respective
service providers, and service may be discontinued either temporarily or
permanently without notice. Therefore, Panasonic will make no warranty
for the content or the continuity of the services.
≥ All features of websites or content of the service may not be available.
≥ Some content may be inappropriate for some viewers.
≥ Some content may only be available for specific countries and may be
presented in specific languages.
Signal Type
Primary Video
Video The recording method of original video
appears.
Soundtrack Select the type of audio or language.
Secondary Video
Video Select on/off of images. The recording
method of original video appears.
Soundtrack Select on/off of audio and the language.
Video
The recording method of original video appears.
Soundtrack
Show or change the soundtrack.
Subtitle
Turn the subtitle on/off, and change the language depending
on the media.
Subtitle Style
Select the subtitle style.
Audio channel
Select the audio channel number.
(> 25, “Changing audio”)
VQT2Q52
34
Angle
Select the number of the angle.
Some items may be changed only on the disc specific menu.
(> 25)
Page 35
Play
*&/+
Sound
Repeat Play
(Only when the elapsed time is being displayed on the unit’s
display.)
Select the item which you want to repeat. The items displayed
differ depending on the type of media.
Select “Off” to cancel.
Random
Select whether or not to play random.
Playback Information Window
Displays the following.
Audio/video attribute information of disc.
Settings status of “Digital Audio Output” (> 38).
HDMI output information.
Press [RETURN] to exit.
Picture
Mode
Select the picture quality mode during play.
Detail Clarity
The picture is sharp and detailed.
Sound Effects
(Discs recorded at 48 kHz or less)
This feature gives you brighter sound by increasing the high
frequency portion of the audio.
Re-master 1 Pop and rock
Re-master 2 Jazz
Re-master 3 Classical
Dialog Enhancer
The volume of the centre channel is raised to make dialog
easier to hear.
*1, *2
*1
High Clarity Sound
When connected to TV via HDMI AV OUT terminal for
outputting image, it produces clearer sound.
Only when you have selected “Enable” in “High Clarity Sound”
(> 38)
*1 When audio is output from the HDMI AV OUT terminal this function is
effective only when “Dolby D/Dolby D +/Dolby TrueHD” or “DTS/
DTS-HD” is set to “PCM”. (> 38)
*2 This function has no effect when the type of audio is Dolby Pro Logic II.
Progressive
Select the method of conversion for progressive output to suit
the type of material being played.
≥ If the video is disrupted when “Auto” is selected, select either
“Video” or “Film” depending on the material to be played
back.
24p
Movies and other material recorded on DVD-Video at 24p are
output at 24p.
≥ Only when you have selected “On” in “24p Output” (> 39)
and play discs recorded at a rate of 60 fields per second.
Advanced operations
VQT2Q52
35
Page 36
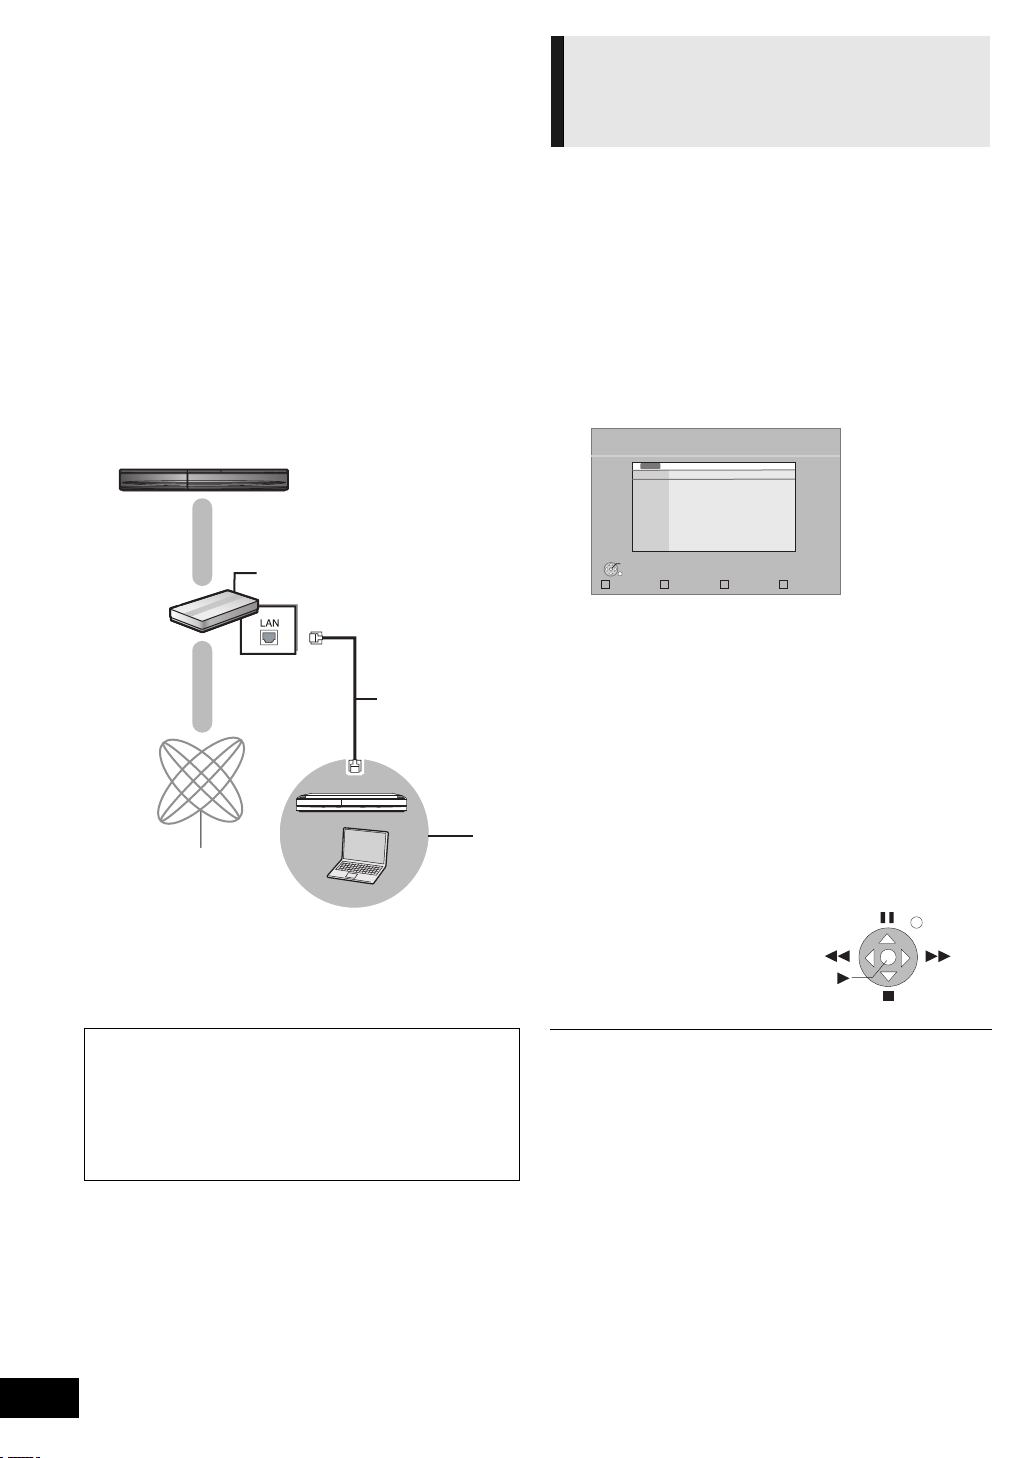
DLNA feature
Update
Media Server
OK
RETURN
Servers found on the network are displayed.
Please select one.
DIGA DIGA
PC name
e.g.
Control Panel
e.g.
Enjoy contents on the
You can enjoy music, video and picture contents saved on a
DLNA Certified media server (such as a PC with Windows 7
installed etc.) connected to the home network with this unit.
You also can enjoy viewing them with Panasonic DLNA
compatible recorders (DIGA).
≥ The countries where DIGA is available are limited. Refer to
following site for availability.
http://panasonic.jp/support/global/cs/
≥ For the operation of equipment connected to the network,
refer their respective operating instructions.
Preparation
1 Perform network connection (> 18) and network setting
(> 20).
2 Connect a DLNA Certified media server to the network.
equipment connected to this
unit via the network
1 Press [START].
2 Press [3, 4] to select “Network” and press
[OK].
3 Press [3, 4] to select “Home Network
(DLNA)” and press [OK].
≥ A list of equipment connected via the network is
displayed.
≥ This list can be updated by pressing the red button on
the remote control.
4 Press [3, 4] to select the equipment to
playback the contents, and press [OK].
5 Press [3, 4, 2, 1] to select the item to
playback (folder), and press [OK].
≥ Menu structure will be different depending on the
equipment connected to this unit. Select the contents by
repeating the operation.
≥ Control Panel is displayed once the playback starts.
Operation can be performed with [3, 4, 2, 1], [OK],
[RETURN] and [EXIT].
VQT2Q52
36
A Broadband router, Wireless router (Access point), etc.
B LAN Cable (Straight)
C Internet
D DLNA Certified media server
When connected to a Panasonic DLNA compatible
recorder (DIGA)
Perform the Home Network (DLNA) setup.
When a message requesting operation of the equipment to
be registered is displayed, perform the operations in steps
1-4 of “Enjoy contents on the equipment connected to this
unit via the network” (> right).
Exit
≥ Press [OK] if the Control Panel is not displayed.
≥ Discs cannot be played back. Also, depending on the equipment, playback
of pictures may not be possible.
≥ Items displayed in grey on the display cannot be played back by this unit.
≥ This unit cannot be played back via connected equipment.
≥ Depending on the performance of the connected PC, video frames may be
dropped during playback, or it may not playback at all.
Page 37
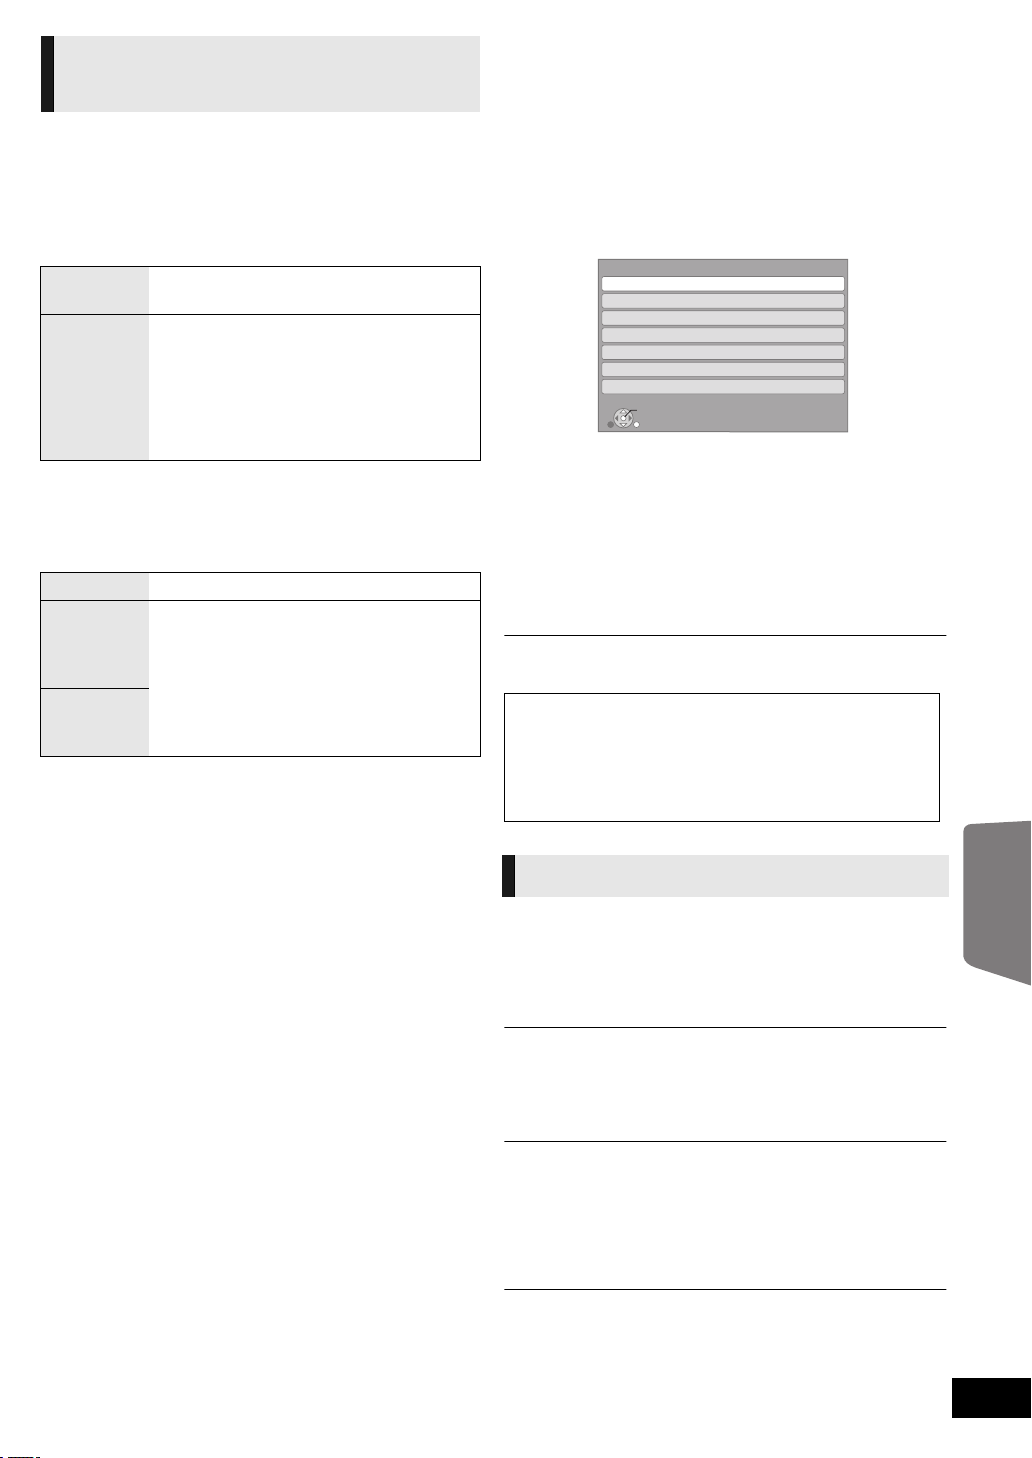
Useful functions for when
OK
RETURN
Setup
Disc
Picture
Sound
Display
TV / Device Connection
Network
General
Setup menu
playing back pictures
The following operations are possible when playing back
pictures from connected equipment.
While picture list screen or folder with picture list screen
is displayed
1 Press [OPTION].
2 Select an item, then press [OK].
Start
Slideshow
Slideshow
Settings
While playing
1 Press [OPTION].
2 Select an item, then press [OK].
Status Show the picture properties (> 28).
Rotate
RIGHT
(except for
slideshow)
Rotate LEFT
(except for
slideshow)
You can display still pictures one by one at a
constant interval.
Display Interval
Change the display interval.
Repeat Play
Repeat slideshow.
Press [3, 4, 2, 1] to select “Set” and
press [OK].
Rotate the still picture.
Change the unit’s settings if necessary. The settings remain
intact even if you switch the unit to standby.
1 Press [START] and press [3, 4] to select
“To Others” and press [OK].
2 Press [3, 4] to select “Setup” and press
[OK].
3 Press [3, 4] to select the menu and press
[OK].
4 Press [3, 4] to select the item and press
[OK].
If there are any other items, repeat these steps.
5 Press [3, 4, 2, 1] to select the option and
press [OK].
≥ There may be differences in operation methods. If this
happens, follow the on-screen instructions for the operation.
About the password
The password of the following items are common.
Don’t forget your password.
≥ “DVD-Video Ratings”
≥ “BD-Video Ratings”
≥ “Lock” (> 40)
Disc
DVD-Video Ratings
Set a ratings level to limit DVD-Video play.
≥ Follow the on-screen instructions. Enter a 4-digit password
with the numbered buttons when the password screen is
shown.
BD-Video Ratings
Set an age limit of BD-Video play.
≥ Follow the on-screen instructions. Enter a 4-digit password
with the numbered buttons when the password screen is
shown.
Soundtrack Preference
Choose the language for audio.
≥ If “Original” is selected, the original language of each disc
will be selected.
≥ Enter a code (> 47) with the numbered buttons when you
select “Other ¢¢¢¢”.
Advanced operations
VQT2Q52
37
Page 38
Subtitle Preference
Choose the language for subtitle.
≥ If “Automatic” is selected and the language selected for
“Soundtrack Preference” is not available, subtitles of that
language will automatically appear if available on that disc.
≥ Enter a code (> 47) with the numbered buttons when you
select “Other ¢¢¢¢”.
Menu Preference
Choose the language for disc menus.
≥ Enter a code (> 47) with the numbered buttons when you
select “Other ¢¢¢¢”.
BD-Live Internet Access (> 26)
You can restrict Internet access when BD-Live functions are
used.
≥ If “Limit” is selected, Internet access is permitted only for
BD-Live contents which have content owner certificates.
DivX Subtitle Text
Select a suitable item according to the language used for DivX
subtitles text (> 27).
≥ This item is displayed only after playing back a file.
Picture
Still Mode
Select the type of picture shown when you pause playback.
Automatic Automatically selects the type of picture shown.
Field
Frame
Seamless Play
The chapters segment in playlists are played seamlessly.
≥ Select “On” when the picture freezes for a moment at the
chapters segment in playlists.
Select if jittering occurs when “Automatic” is
selected.
Select if small text or fine patterns cannot be
seen clearly when “Automatic” is selected.
BD-Video Secondary Audio
Select whether to mix or not mix the primary audio and
secondary audio (including the button click sound). (> 26)
≥ If “Off” is selected, the unit outputs the primary audio only.
Digital Audio Input
Select whether to receive the digital sound as PCM or the
original sound format.
Select “On” if the sound is cut off intermittently.
Downmix
Select the downmix system to enjoy multi-channel or
2-channel sound.
≥ Select “Surround encoded” to enjoy the surround sound.
≥ There is no downmix effect on the bitstream audio signal.
≥ The audio will be output in “Stereo” in the following cases.
– AVCHD playback
jPlayback of secondary audio (including the button click
sound).
7.1ch Audio Reformatting
Surround sound with 6.1ch or less is automatically expanded
and played back at 7.1ch.
≥ If “Off” is selected, sound is played over the original number
of channels.
(Note that in the case of 6.1ch audio, playback will be at
5.1ch.)
Audio reformatting is enabled in the following cases:
≥ When you have selected “PCM” in “Digital Audio Output”.
≥ When the audio is Dolby Digital, Dolby Digital Plus, Dolby
TrueHD or LPCM.
High Clarity Sound
When connected to TV via HDMI AV OUT terminal for
outputting image, it produces clearer sound.
≥ Set to “Enable” and then set “High Clarity Sound” on the
playback menu to “On”. (> 35)
Audio Delay
Mis-sync between the video and audio is corrected by delaying
the audio output.
NTSC Contents Output
Select PAL60 or NTSC output when playing NTSC discs.
Sound
Dynamic Range Compression
You can listen at low volumes but still hear dialogue clearly.
(Dolby Digital, Dolby Digital Plus and Dolby TrueHD only)
≥ “Auto” is effective only when playing Dolby TrueHD.
Digital Audio Output
Press [OK] to show the following settings.
Dolby D/Dolby D +/Dolby TrueHD
DTS/DTS-HD
MPEG Audio
.
VQT2Q52
38
Select the audio signal to output
≥ Select “PCM” when the connected equipment cannot
decode the respective audio format.
≥ Not making the proper settings may result in noise.
Speaker
Refer to page 41
Display
On-Screen Messages
Choose whether to show status messages automatically.
On-Screen Language
Choose the language for these menus and on-screen
messages.
Screen Saver Function
This is to prevent burn-in on the screen.
≥ When this is set to “On”:
If there is no operation for 5 minutes or more, DIRECT
NAVIGATOR screen switches to START menu automatically.
≥ While playing and pausing, etc., this function is not available.
≥ As for Music [CD-DA] or MP3, regardless of the setting, if
there is no operation for a while, DIRECT NAVIGATOR
screen switches to the other states automatically.
Page 39
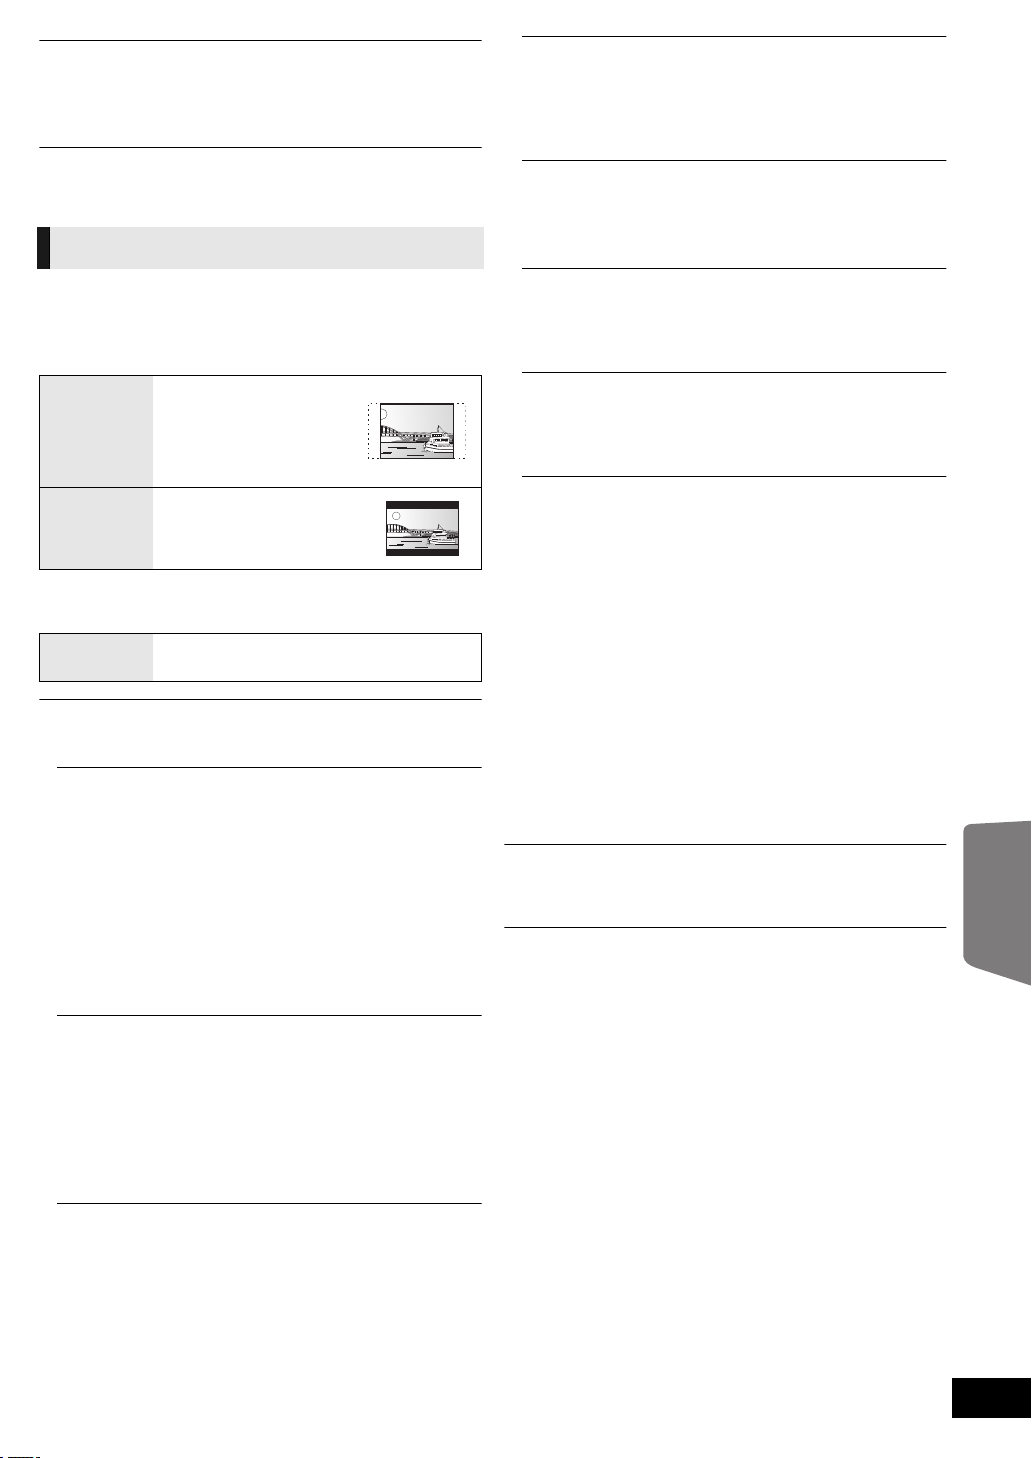
FL Display
Changes the brightness of the unit’s display.
≥ If “Automatic” is selected, the display is dimmed but
brightens when you perform some operations.
Software Licence
Information about the software used by this unit is displayed.
TV / Device Connection
HDMI Audio Output
This setting selects whether or not to output audio from
HDMI.
≥ Audio will be output through the system's speakers when
“Off” is selected.
VIERA Link
Set to use “HDAVI Control” function when connected with
an HDMI cable to a device that supports “HDAVI Control”.
≥ Select “Off” when you do not want to use “HDAVI Control”.
TV Aspect
Set to match the type of television connected.
When connected to a 4:3 aspect television and playing 16:9
ratio image:
4:3
4:3 Letterbox
When connected to a 16:9 widescreen television and playing
4:3 ratio image:
16:9 Video is displayed as a 4:3 ratio image in the
The sides are cut off so
the picture fills the screen.
When playing BD-Video,
video is output as “4:3
Letterbox”.
Black bands appear at the
top and bottom of the
picture.
centre of the screen.
HDMI Connection
Press [OK] to show the following settings.
HDMI Video Format
The items supported by the connected devices are
indicated on the screen as “¢”. When any item without “¢”
is selected, the images may be distorted.
≥ If “Automatic” is selected, automatically selects the output
resolution best suited to the connected television.
≥ To enjoy high definition video up-converted to 1080p, you
need to connect the unit directly to 1080p compatible
HDTV (High Definition Television). If this unit is connected
to an HDTV through other equipment, it must also be
1080p compatible.
24p Output
When this unit is connected to a TV supporting 1080/24p
output using an HDMI cable, movies and other material
recorded at 24p are output at 24p.
≥ When playing DVD-Video, set to “On” and then set “24p”
in “Picture” (> 35) to “On”
≥ When BD-Video images other than 24p are played,
images are output at 60p.
Deep Colour Output
This setting is for selecting whether to use Deep Colour
Output when a television that supports Deep Colour is
connected.
Contents Type Flag
Depending on the playback content, the TV will output
adjusting to the optimal method when a TV that supports
Contents Type Flag is connected.
Power Off Link
Select the desired power off link setting of this unit for
VIERA Link operation (> 32). (This works depending on the
settings of the connected VIERA Link “HDAVI Control”
compatible equipment.)
Video/Audio:
When the TV is turned off, this unit will turn off automatically.
Video:
When the TV is turned off, this unit will turn off except during
the following conditions:
jCD or MP3 audio playback
jiPod/iPhone mode
jRadio mode
j“AUX”, “ARC” or “D-IN 1” (DIGITAL IN 1) mode
(non-selected TV AUDIO setting for VIERA Link)
j“D-IN 2” (DIGITAL IN 2) mode (non-selected CABLE/SAT
AUDIO setting for VIERA Link)
TV Audio Input
Select the TV audio input to work with the VIERA Link
operations
TV System
Change the setting to match the equipment you are connecting
with.
≥ When NTSC contents are played, they are outputted in the
signal format specified in the “NTSC Contents Output”,
irrespective of the settings here.
Advanced operations
HDMI Colour Mode
This setting is for selecting colour-space conversion of the
image signal when the unit is connected using an HDMI
cable.
VQT2Q52
39
Page 40
Network
General
Network Easy Setting (> 20)
Network Settings
Perform network-related settings individually.
Press [OK] to show the following settings.
LAN Connection Mode
Select connection method.
Access Point Connection Setting
This allows the Wireless router (Access point) and
connection settings to be set and the current connection
settings and connection state to be checked when a
wireless connection is used.
Connection Setting
The Wireless router (Access point) connection wizard will
be displayed.
IP Address / DNS Settings
This is for checking the state of the network connection and
setting the IP address and DNS-related.
Press [OK] to show the respective setting.
≥ “Connection Speed Setting” is enabled only when
“Connection Speed Auto-Config” is turned “Off”.
Proxy Server Settings
This is for checking the state of connection with the Proxy
server and performing settings.
Press [OK] to show the respective setting.
Remote Control
Change the remote control code if other Panasonic products
react to this remote control.
Quick Start*
Speed of startup from standby mode is increased.
≥ Internal control unit will be powered when it is set to “On” so
compared to when the setting is “Off” the following will occur.
jIdle power consumption will increase. (about the power
consumption > 50)
*The cooling fan may turn slowly to prevent overheating of
internal parts.
* Depending on the power conserving setting activated on
the TV, this function may have less effect when the unit is
started by the power on link function. (> 31)
[BT735] [BT330] Smart setup / [BT230] Easy setup (> 19)
You can execute basic settings to optimize your home theatre
system.
Default Settings
This returns all values in the Setup menu and the playback
menu, except for “Remote Control”, “On-Screen Language”,
“IP Address / DNS Settings”, “Proxy Server Settings”, “Lock”,
“DVD-Video Ratings” and “BD-Video Ratings” to the default
settings.
DivX Registration (> 27)
You need this registration code to purchase and play DivX
Video-on-Demand (VOD) content.
Internet Content Settings (> 34) (VIERA CAST)
Press [OK] to show the following settings.
Lock
You can restrict using VIERA CAST.
≥ Follow the on-screen instructions. Enter a 4-digit
password with the numbered buttons when the
password screen is shown.
Audio Auto Gain Control
Volume that is different depending on the contents is
adjusted automatically to the standard volume while using
the VIERA CAST.
≥ Depending on contents, this function effect will not
work.
≥ Select “Off” when the audio is warped.
Time Zone
By selecting the time zone, it is possible to set the unit’s
time to match your location.
≥ Some VIERA CAST contents require the time zone to
be set. Set the time zone if necessary.
Summer Time
≥ Select “On” when using Daylight Saving time.
MAC Address
Displays the MAC address of this unit.
System Information
Display firmware version of this unit and wireless LAN module
of optional Wireless LAN Adaptor.
Firmware Update (> 21)
Press [OK] to show the following settings.
Automatic Update Check
When this equipment remains connected to the Internet, it
will check for the latest firmware version when it is turned on
and you can update it if necessary.
Update Now
You can update the firmware manually.
VQT2Q52
40
Page 41
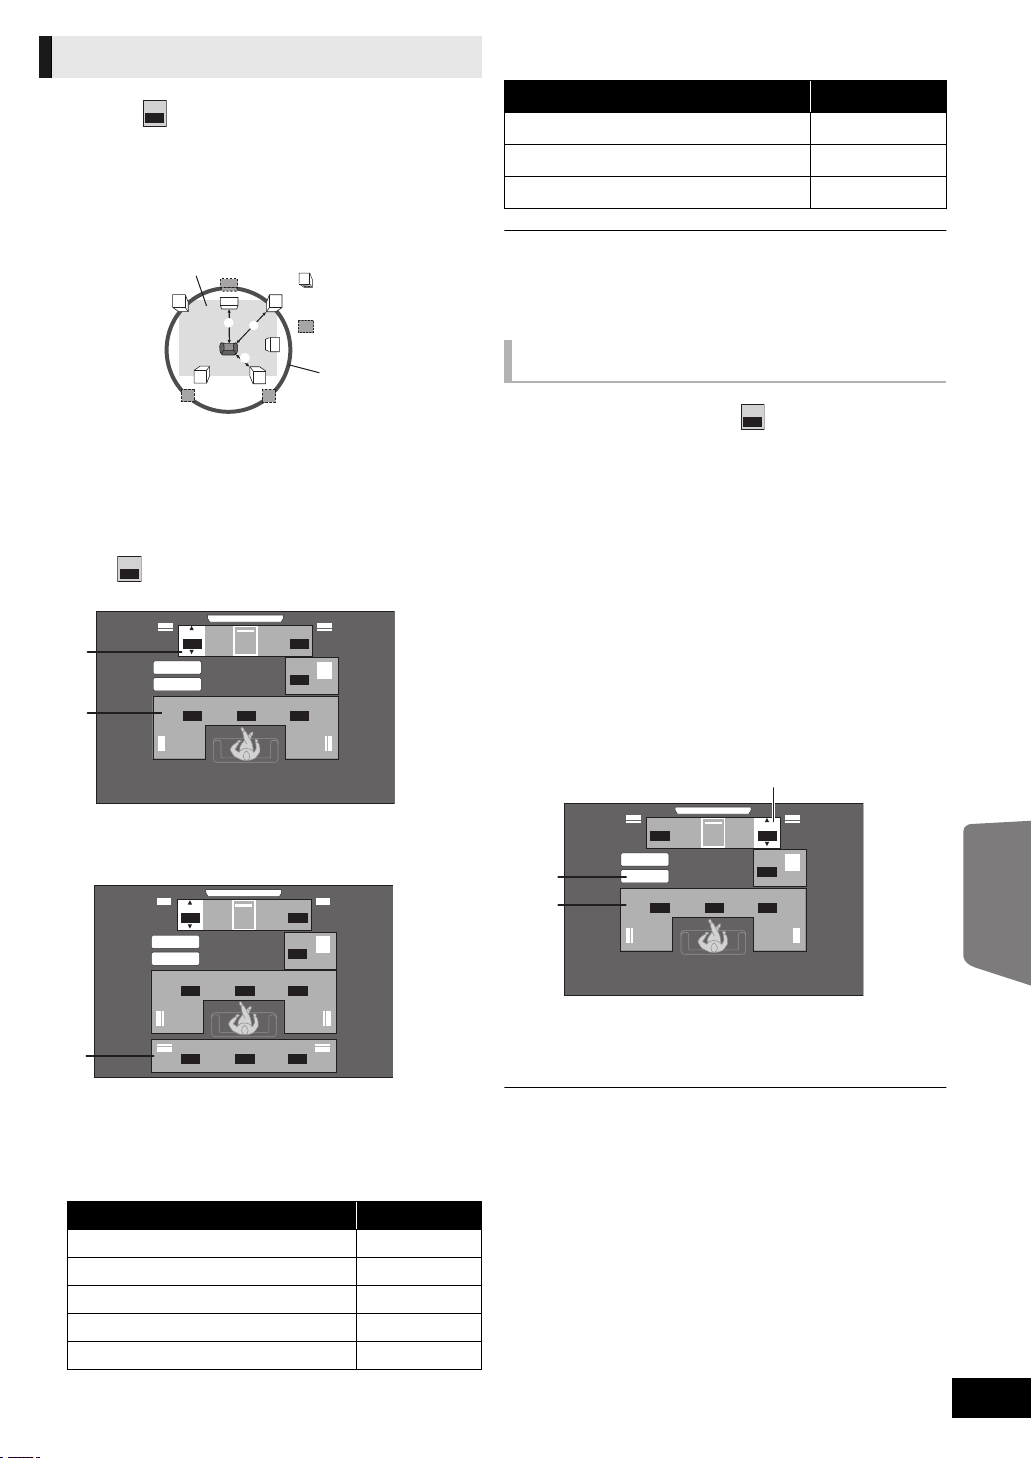
Speaker settings
0
00
0.0
0.0
ms
Complete
Tes t
LS
RL
RS
dB
dBdB
ms
C
0
dB
SW
0
00
0.0
0.0
0.0 00
dBdB
ms
RBLB
ms
Complete
Tes t
LS
RL
RS
dB
dBdB
ms
C
0
dB
SW
dB
0
0
00
0.0
0.0
ms
Complete
Tes t
LS
RL
RS
dB
dBdB
ms
C
0
dB
SW
e.g., 5.1ch setting
Delay time ()
For optimum listening with 5.1-channel sound, all the
speakers, except for the subwoofer, should be the same
distance from the seating position.
If either distance A or B is less than C (> below), find the
difference in the relevant table and adjust the delay time to
make up for the difference.
A B C: Primary listening distance
A Approximate room dimensions
B Actual speaker position
C Ideal speaker position
D Circle of constant primary listening distance
ms
0.0
A
C
C
L
A
C
B
LS
LS
RS
RS
B
:
R
:
SW
C
D
1 Press [3, 4, 2, 1] to select the distance
ms
box ( ) and press [OK].
0.0
e.g., 5.1ch setting
B Surround / Surround back speakers
Difference Setting
Approx. 170 cm 5.0 ms
Approx. 340 cm 10.0 ms
Approx. 510 cm 15.0 ms
∫ When using the 7.1ch speaker system
1 Check the distance difference of both the front speakers
and the surround back speakers from the seating position.
2 Set the delay time of the surround back speakers.
Adjusting speaker level
Volume (Channel balance) ( )
(Effective when playing multi-channel audio)
1 Select “Test” and press [OK].
A test signal is output.
2 While listening to the test signal
Press [3, 4] to adjust the volume of each
speaker.
The volume can be adjusted between r6 dB to s6 dB.
≥ Set each speaker level according to the volume of the
Front (L) and Front (R) speaker volume respectively.
≥ No signal is output for the subwoofer. To adjust its
volume, see page 24, “Adjusting speaker level during
play”.
3 Press [OK].
The test signal stops.
A Centre (C)
B Left Surround (LS), Right Surround (RS)
e.g., 7.1ch setting
C Left Surround back (LB), Right Surround back (RB)
2 Press [3, 4] to select the setting and press
[OK].
A Centre speaker
Difference Setting
Approx. 34 cm 1.0 ms
Approx. 68 cm 2.0 ms
Approx. 102 cm 3.0 ms
Approx. 136 cm 4.0 ms
Approx. 170 cm 5.0 ms
Advanced operations
A Centre (C)
B Te st
C Left Surround (LS), Right Surround (RS)
To finish the speaker setting
Press [3, 4, 2, 1] to select “Complete” and press [OK].
VQT2Q52
41
Page 42
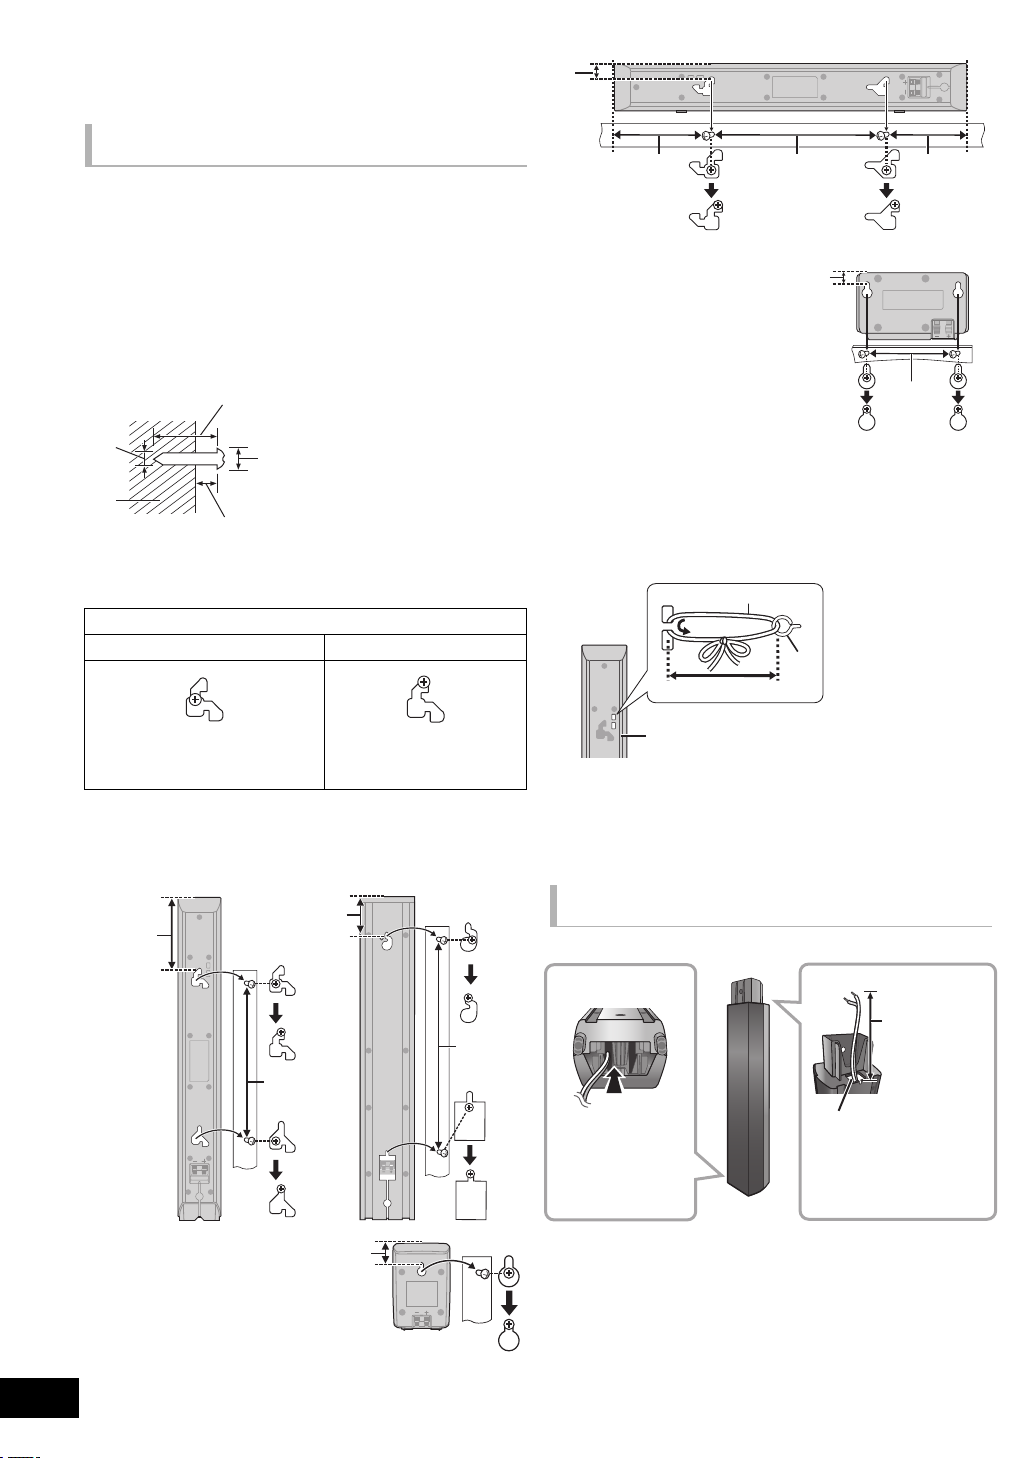
Optional speaker settings
A At least 30 mm
B ‰ 4.0 mm
C ‰
7.0 mm to 9.4 mm
D Wall or pillar
E
5.5 mm to 7.5 mm
[BT735]
[BT330]
A String (not included)
B Screw eye (not included)
C Less than 10 cm
D Rear of the speaker
Insert the cable
from the bottom.
Leave about
120 mm
Pull out the cable
through the hole.
Speaker installation
option
Attaching to a wall
You can attach all of the speakers (except subwoofer) to a wall.
≥ The wall or pillar on which the speakers are to be attached
should be capable of supporting 10 kg per screw. Consult a
qualified building contractor when attaching the speakers to
a wall. Improper attachment may result in damage to the wall
and speakers.
≥ Do not attempt to attach these speakers to walls using
methods other than those described in this manual.
1 Drive a screw (not included) into the wall.
[BT735]: Centre speaker
[BT330] [BT230]: Centre speaker
K 11 7 m m
L 209 mm to 211 mm
M 97 mm
N 18.8 mm
O 17 mm
P 99 mm to 101 mm
∫ To avoid speaker dropping
[BT735]: Front speaker, Centre speaker, Surround speaker
[BT330]: Front speaker
2 Fit the speaker securely onto the screw(s)
with the hole(s).
e.g., [BT735] Front speaker
DO NOT DO
≥ In this position, the speaker
will likely fall if moved to the
left or right.
[BT735]: Front speaker, Surround speaker
[BT330]: Front speaker
Attach to a wall without the base and the stand.
≥ Move the speaker so
that the screw is in this
position.
e.g., [BT735]: Front speaker
≥ Consult a qualified building contractor to avoid damage to
the wall or speakers.
≥ Use a string of less than ‰ 2.0 mm, which is capable of
supporting over 10 kg.
Reattaching the speaker cable
[BT330]
[BT330]:
Surround speaker
[BT230]:
Front speaker, Surround speaker
F 97 mm
G 210 mm to 212 mm
VQT2Q52
H 72 mm
I 349 mm to 351 mm
42
J 26 mm
Page 43
Reference
Troubleshooting guide
Before requesting service, please perform the
following steps.
Do you have the latest firmware installed?
Firmware updates may be released to correct operating irregularities that
are discovered with certain movies. (
Make the following checks.
If the problem remains unresolved, consult your
dealer for instructions.
The following do not indicate a problem with this unit:
≥
Regular disc rotating sounds.
≥
Image disturbance during search.
∫ Unit doesn’t respond to remote control or
front panel buttons.
Press and hold [Í/I] on the main unit for 5 seconds.
j
If still unable to turn the unit off, disconnect the AC mains lead, wait 1
minute, then reconnect the AC mains lead.
∫ Cannot eject disc.
The unit may have a problem.
While the unit is off, press and hold [SKIP9] on the remote control and
[
<
OPEN/CLOSE] on the unit at the same time for more than 5 seconds.
General operation
To return to the factory preset.
≥
Select “Yes” in “Default Settings” in the Setup menu. (>40)
To return all settings to the factory preset.
≥
Reset the unit as follows:
While the unit is off, press and hold [+ VOLUME], [
and [
Í
/I] on the main unit at the same time for more than 5 seconds.
The remote control doesn’t work properly.
The remote control and main unit are using different codes. Change the
≥
code on the remote control. (
≥
It may be necessary to set the code of the remote control again after
changing the batteries for remote control. (
Disc cannot be played.
≥
The disc is dirty. (>7)
≥
Check the region code.
Still pictures (JPEG) do not playback normally.
≥
The images that were edited on the PC, such as Progressive JPEG, etc.,
may not playback.
The TV tuner mode is not displayed when the TV is switched
on.
≥
This phenomenon may occur, depending on the TV setting, when “Quick
Start” is set to “On”.
≥
Depending on the TV, this phenomenon may be prevented by
reconnecting the HDMI cable to a different HDMI input terminal or by
changing the HDMI auto connection setting.
The contents of the USB device cannot be read.
≥ If inserted during playback, the USB device may not be
recognised by this unit.
>
21)
4
<
OPEN/CLOSE]
>
22)
>
22)
You have forgotten your ratings password.
You want to cancel the ratings level.
While the disc tray is empty and “BD/DVD” is selected as a source, press
and hold [SKIP
the same time for more than 5 seconds. The ratings level returns to the
factory preset.
:
] on the remote control and [1] (Play) on the unit at
Power
No power.
≥
Insert the AC mains lead securely into a household mains socket. (>18)
The unit switches to standby mode.
≥
When the time set for the sleep timer has passed, the power will be
turned off. (
≥
One of the unit’s safety devices is activated. Press [Í/I] on the main unit
to turn the unit on.
The main unit is turned off when the input for the TV is
changed.
≥
This is a normal phenomenon when using VIERA Link (HDAVI Control 4
or later). For details please read the operating instructions for the TV.
>
8)
Displays
The display is dim.
≥
Change “FL Display” in the Setup menu. (>39)
TV screen and video
The images from this unit do not appear on the TV.
Picture is distorted.
Jittering occurs.
≥
An incorrect resolution is selected in “HDMI Video Format”. Reset the
setting as follows:
While the disc tray is empty and “BD/DVD” is selected as a source, press
and hold [
1
more than 5 seconds to cancel the setting.
≥
When Dolby Digital Plus, Dolby TrueHD, and DTS-HD audio are not
output in bitstream, select “Yes” in “Default Settings” and make proper
settings. (
≥
The unit and television are using different video systems. While stopped,
keep pressing [
or more seconds. The system switches from PAL to NTSC or vice versa.
≥
The system used on the disc doesn’t match your television.
Video is not output.
≥
Set the “High Clarity Sound” in the
VIDEO OUT terminal. (
Video is not output in high definition.
≥
Confirm that “HDMI Video Format” in the Setup menu is set properly.
(
>
A black band is displayed around the edge of the screen.
The aspect ratio of the screen is abnormal.
≥
Confirm the “TV Aspect” is set properly. (>39)
≥
Adjust the aspect setting on the television.
(Adjustment using “Screen Aspect” (
] (Play) and [∫] (Stop) on the main unit at the same time for
>
40)
∫
] (Stop) and [<OPEN/CLOSE] on the main unit for 5
– PAL discs cannot be correctly viewed on an NTSC television.
– This unit can convert NTSC signals to PAL60 for viewing on a PAL
television (“NTSC Contents Output” in the “Picture”).
playback
menu to “Off” to use the
>
26) on the unit is also possible.)
39)
>
35)
settings
Optional speaker
Reference
After choosing “Home Cinema” in “Speaker Selection” with the
TV’s remote control, the TV’s input selection also changes.
≥
Disconnect the HDMI cable from the TV and reconnect it to a different
HDMI IN terminal.
VQT2Q52
43
Page 44
Sound
Radio
No sound.
Low volume.
Distorted sound.
Cannot hear the desired audio type.
≥ Check connections to speakers and other equipment. (> 12,
13,15s18)
Ensure the speaker settings for your speakers are correct. (>41)
≥
≥
To output audio from a device connected with an HDMI cable,
set “HDMI Audio Output” to “On” in the Setup menu. (
≥ When “BD-Video Secondary Audio” is set to “On”, Dolby
TrueHD, Dolby Digital Plus, DTS-HD Master Audio and
DTS-HD High Resolution Audio are output as Dolby Digital
or DTS Digital Surround.
≥ Re-master will not work when the bitstream signal is output
from the HDMI AV OUT terminal. (> 35)
≥ Depending on the connected equipment, the sound may be
distorted if this unit is connected with an HDMI cable.
≥ The multi-channel audio from a device connected to the TV
is not output in it’s original multi-channel form.
jIf the device has an optical audio output terminal, connect
the device to this unit’s “OPTICAL 2” terminal. (> 17, 30)
No surround sound.
≥ Press [SURROUND] to select a surround effect. (> 24)
≥ (When using the 7.1ch speaker system)
Audio is not available from the surround back speakers even
though Dolby Pro Logic II turns on.
Cannot switch audio.
≥ When audio is output from the HDMI AV OUT terminal, set
“Dolby D/Dolby D +/Dolby TrueHD”, “DTS/DTS-HD” or
“MPEG Audio” to “PCM”. (> 38)
No sound from the TV.
≥ Press [EXT-IN] to select the corresponding source. (> 23)
≥ The ARC (Audio Return Channel) function is not available.
Instead, use an optical digital audio cable or an audio cable
to have the TV sound. (> 16, 17)
If the TV is not ARC compatible and only the HDMI connection
≥
is used, an extra audio connection is necessary (
>
>
39)
16, 17).
Distorted sound or noise is heard.
≥ Adjust the position of the antenna.
≥ Use an outdoor antenna. (> 15)
A beat sound is heard.
≥ Try to keep a certain amount of distance between the
antenna and the TV.
Network
I can’t connect to the network.
≥ Confirm the network connection and settings. (> 18, 40)
≥ Check the operating instructions for each device and
connect accordingly.
When using Wireless LAN connection, video or audio from the
DLNA Certified media server is played back intermittently, not
played back or video frames are dropped during playback.
≥
Higher transfer rate router such as 802.11n (2.4 GHz or 5
GHz) Wireless router (Access Point) may solve the problem. If
you use 802.11n (2.4 GHz or 5 GHz) Wireless router (Access
Point), it is necessary to set the encryption type to “AES”.
Simultaneous use with a microwave, cordless telephone etc.
at 2.4 GHz may result in connection interruptions or other
problems.
≥
On the “Access Point Connection Setting” screen (>40), the
continuous lighting of at least 4 “Reception” indicators is the
target for a stable connection. If 3 or fewer indicators are lit or
the connection is being interrupted, change the position or angle
of your Wireless router (Access point) and see if the connection
state improves. If there is no improvement, connect to a wired
>
network and perform the “Network Easy Setting” (
The contents of the USB device cannot be read.
≥ USB devices connected using USB extension cable other
than the included with the Wireless LAN Adaptor DY-WL10
(optional) or a USB hub may not be recognised by this unit.
20) again.
Other difficulties with playback
iPod/iPhone operation
Cannot charge or operate.
≥ Check that the iPod/iPhone is connected firmly. (> 32)
≥ The battery of the iPod/iPhone is depleted. Charge the iPod/
iPhone, and then operate again.
Cannot display iPod/iPhone videos/photos on the TV.
≥ Make sure that TV is connected to the VIDEO OUT terminal
on this unit. (> 16)
≥ Operate the iPod/iPhone menu to make the appropriate
video/photo output settings for your TV. (Refer to operating
instructions for your iPod/iPhone.)
The TV input channel unintentionally changes to HDMI input.
≥
When the main unit is connected with an “HDAVI Control”
compatible TV and VIDEO IN is selected for iPod/iPhone video
or photo playback, the TV input channel will automatically
change to the HDMI input channel when [START] is pressed.
jRe-select the TV’s VIDEO IN input channel.
VQT2Q52
44
BD-Video or DVD-Video is not played.
≥ Ensure the disc is for the correct BD-Video region code or
DVD-Video region number, and is not defective. (> 11)
≥ You have set a ratings level to limit BD-Video or DVD-Video
play. Change this setting. (> 37)
≥ Some BD-Video can only be output with HDMI.
I can’t play back BD-Live.
≥ The SD card is write-protected. (> 11)
≥ Confirm that this unit is connected to the broadband Internet.
(> 18)
≥ Confirm the “BD-Live Internet Access” settings. (> 38)
≥ Confirm an SD Card is inserted into the SD Card slot. (> 22)
Alternative soundtrack and subtitles cannot be selected.
≥ The languages are not recorded on the disc.
≥ You may not be able to use the playback menu to change the
soundtrack and subtitles on some discs. Use the disc’s
menus to make changes. (> 25)
Angle cannot be changed.
≥ Angles can only be changed during scenes where different
angles are recorded.
Page 45
Messages
The following messages or service numbers appear on the
television or unit’s display when something unusual is detected
during startup and use.
HDMI ONLY
≥ Some BD-Video discs can only be output with HDMI.
NET
≥ Displays while VIERA CAST is starting up.
On the television
Cannot play.
≥ You inserted an incompatible disc.
Cannot play on this unit.
≥ You tried to play a non-compatible image.
No disc is inserted.
≥ The disc may be upside down.
$ This operation is not available.
≥ Some operations are unsupported by the unit. For example;
– BD-Video: During playback, reverse slow-motion or
reverse frame-by-frame is not possible.
IP address is not set.
≥ The “IP Address” in “IP Address / DNS Settings” is “---. ---.
---. ---”. Set the “IP Address”, “Subnet Mask”, and “Gateway
Address”. (Select the automatic address acquisition if
necessary.)
(When using the optional wireless LAN adaptor: DY-WL10)
The current security setting of Wireless LAN is low. It is
recommended to change the setting.
≥ Authentication type for the Wireless LAN is set to “Open
system”, or the encryption type is set to “No encryption”. It is
recommended to encrypt for safety reasons. For details,
refer to the instructions of the Wireless router being used.
Encryption is required when playing back video, etc., from
DLNA compatible devices.
No Video
≥ Depending on the connected iPod/iPhone, video menu may
not be available on the TV. Select “ALL” on the unit’s display
and operate video playback from your iPod/iPhone menu.
(> 33)
On the unit’s display
F99
≥ The unit fails to operate properly. Press [Í] on the main unit
to switch the unit to standby for 3 seconds. Now press [Í]
on the main unit again to turn the unit on.
U59
≥ The unit is hot.
The unit switches to standby for safety reasons. Wait for
about 30 minutes until the message disappears.
Select a position with good ventilation when installing the
unit. Do not block the ventilation hole on the rear and side of
the unit.
U72
U73
≥ The HDMI connection acts unusually.
– Turn the unit and TV off.
– Disconnect the HDMI cable between the player and the
TV.
No PLAY
≥ There is a viewing restriction on a BD-Video or DVD-Video.
(> 37)
No READ
≥ The media is dirty or badly scratched. The unit cannot play.
PLEASE WAIT
≥ The unit is carrying out internal process. This is not a
malfunction. You cannot operate the unit while “PLEASE
WAIT” is displayed.
REMOVE
≥ The USB device is drawing too much power. Remove the
USB device.
SET
(“ ” stands for a number.)
≥ The remote control and main unit are using different codes.
Change the code on the remote control. (> 22)
H or F
(“ ” stands for a number.)
≥ Check and correct the speaker cable connections.
≥ There is something unusual.
≥ Check the unit using the troubleshooting guide. If the service
number does not disappear, do the following.
1 Disconnect the plug from the household mains socket, wait
a few seconds, then reconnect it.
2 Press [Í/I] to turn the unit on.
If the service number does not disappear despite doing the
above, request service from the dealer. Inform the dealer of
the service number when requesting service.
UPD/
(“ ” stands for a number.)
≥ The firmware is being updated.
Please do not turn off the unit.
IPOD OVER CURRENT ERROR
≥ The iPod/iPhone is drawing too much power. Remove the
iPod/iPhone, and turn the unit off and on again.
START
≥ The system is being restarted during the firmware update.
Please do not turn the unit off.
FINISH
≥ The firmware update is completed.
NOT CONDITIONAL
≥ The requested operation cannot be conducted.
Reference
VQT2Q52
45
Page 46
About MP3/JPEG/DivX/
Subtitles text file of DivX
AVCHD/MPEG2 files
MP3
File format MP3
Extension Files must have the extension “.mp3” or
Compression
rate
Sampling rate 44.1 kHz/48 kHz
Reference ID3 tags: version 1, 2.2, 2.3, 2.4
JPEG
File format JPEG
Extension Files must have the extension “.jpg” or
Picture
resolution
Reference JPEG conforming DCF* is supported.
* Design rule for Camera File system: unified standard
established by Japan Electronics and Information
Technology Industries Association (JEITA).
≥ DVD-RAM must conform to UDF 2.0.
≥ BD-RE must conform to UDF 2.5.
DivX
File format DivX
Extension Files must have the extension “.DIVX”,
Picture
resolution
Reference ≥ DivX certified to play DivX video up to HD
≥ DVD-R and DVD-R DL must conform to UDF 1.02 without
ISO9660 and UDF 1.5 with ISO9660.
≥ BD-R must conform to UDF 2.5.
“.MP3”.
32 kbps to 320 kbps
(Only titles and the names of artists)
“.JPG”.
between 34k34 and 8192k8192 pixels
(sub sampling is 4:2:2 or 4:2:0)
≥ MOTION JPEG and Progressive JPEG is
not supported.
“.divx”, “.AVI” or “.avi”.
Up to 1920k1080 pixels
1080p, including premium content.
Video
jNumber of stream: Up to 1
– Codec: DIV3, DIV4, DIVX, DX50, DIV6
– FPS (Frame Per Second): Up to 60 fps
Audio
jNumber of stream: Up to 8
jFormat: MP3, MPEG, Dolby Digital
jMulti channel: Dolby Digital is possible.
MPEG multi is 2 ch conversion.
≥ GMC (Global Motion Compensation) is
not supported.
File format Subtitles text file of DivX
File format MicroDVD, SubRip, or TMPlayer
Extension Files must have the extension “.SRT”,
“.srt”, “.SUB”, “.sub”, “.TXT”, or “.txt”
Reference ≥ The DivX video file and subtitles text file
are inside the same folder, and the file
names are the same except for the file
extensions.
≥ Depending on the methods used to
create the file or the state of the
recording, only parts of the subtitles may
be displayed, or the subtitles may not be
displayed at all.
AVCHD
File format AVCHD format (V1.0) used on High
Definition Video Camera
(Panasonic and some other’s)
Codec MPEG-4 AVC/H.264
≥ Discs must conform to UDF 2.5.
MPEG2
File format SD-Video format* used on Standard
Codec MPEG2
* SD-Video Entertainment Video Profile
≥ With certain recording states and folder structures, the play order may
differ or playback may not be possible.
≥ CD-R, CD-RW: ISO9660 level 1 or 2 (except for extended formats), Joliet
This unit is compatible with multi-session.
This unit is not compatible with packet writing.
≥ DVD-R, DVD-R DL (except for AVCHD): ISO9660 level 1 or 2 (except for
extended formats), Joliet, UDF bridge (UDF 1.02/ISO9660)
This unit is not compatible with multi-session.
This unit is not compatible with packet writing.
Definition Video Camera
(Panasonic and some other’s)
Structure of folders that can be
played in this unit
You can play files on this unit by structure of folders as
shown below. However depending on the method of
writing data (writing software), play may not be in the
order you numbered the folders.
: Folder which can be displayed with this unit
¢¢¢: Numbers
XXX: Letters
*1 ¢¢¢: from 001 to 999
*2 ¢¢¢: from 100 to 999
XXXXX: 5 figures
*3 ¢¢¢¢: from 0001 to 9999
XXXX: 4 figures
VQT2Q52
46
Page 47
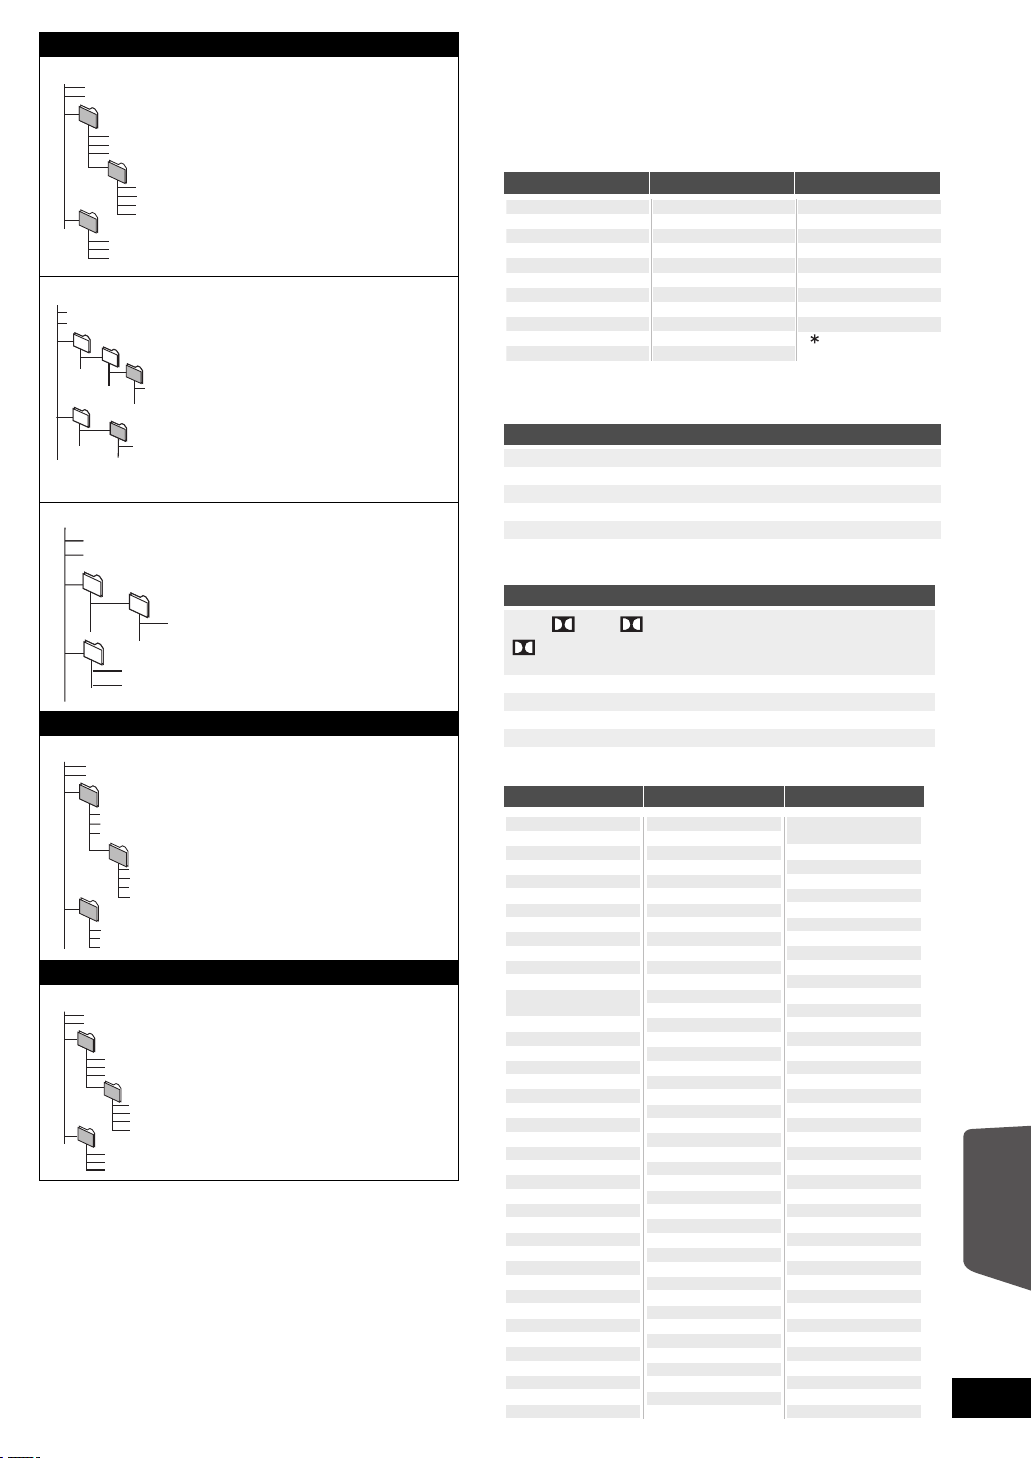
Structures of still picture (JPEG) folders
P0000010.jpg
P0000011.jpg
P0000012.jpg
P0000003.jpg
P0000004.jpg
P0000005.jpg
P0000001.jpg
P0000002.jpg
P0000006.jpg
P0000007.jpg
P0000008.jpg
P0000009.jpg
Root
Folder A
Folder B
Folder C
e.g.,
in DVD-R*4/DVD-R DL*4/
CD-R*
5
/CD-RW*
5
Files inside a folder are
displayed in the order they
were updated or taken.
DCIM
JPEG
XXXX
.jpg
P0000001
.jpg
P0000002
.jpg
XXXXX
XXXXX
DCIM
XXXX
.jpg
*1
*2
*3
*3
*2
Root
e.g.,
in BD-RE*6/DVD-RAM*
4
Folder structure is not
displayed.
XXXX
.jpg
P0000001
.jpg
DCIM
P0000003
.jpg
P0000004
.jpg
XXXXX
P0000002
.jpg
*3
*2
Root
Folder A
e.g.,
in SD card*
4
/USB device*
4
Displays JPEG files in all
folders.
Folder structure is not
displayed.
001
010
XXXX
.mp3
011
XXXX
.mp3
012
XXXX
.mp3
003
XXXX
.mp3
004
XXXX
.mp3
005
XXXX
.mp3
006
XXXX
.mp3
007
XXXX
.mp3
008
XXXX
.mp3
009
XXXX
.mp3
001
XXXX
.mp3
002
XXXX
.mp3
Root
Folder A
Folder B
e.g.,
Folder C
in DVD-R/DVD-R DL/CD-R/
CD-RW/USB device
Prefix the file names with
3-digit numbers in the order
you want to play them.
P0000010.divx
P0000011.divx
P0000012.divx
P0000003.divx
P0000004.divx
P0000005.divx
P0000001.divx
P0000002.divx
P0000006.divx
P0000007.divx
P0000008.divx
P0000009.divx
Root
Folder A
Folder B
Folder C
e.g.,
in BD-R*7/DVD-R*7/DVD-R
DL*
7
/CD-R*7/CD-RW*7/USB
device*
7
Files inside a folder are
displayed in the order they
were updated or taken.
ENG
FRA
DEU
ITA
ESP
NLD
SVE
NOR
DAN
POR
RUS
English
French
German
Italian
Spanish
Dutch
Swedish
Norwegian
Danish
Portuguese
Russian
ARA
HIN
PER
IND
MRI
BUL
RUM
GRE
TUR
JPN
CHI
KOR
MAL
VIE
THA
POL
CES
SLK
HUN
FIN
Japanese
Chinese
Korean
Malay
Vietnamese
Thai
Polish
Czech
Slovak
Hungarian
Finnish
Arabic
Hindi
Persian
Indonesian
Maori
Bulgarian
Romanian
Greek
Turkish
Others
Structure of MP3 folders
Structure of DivX folders
*4 The total combined maximum number of recognizable picture contents
and folders: 3000 picture contents and 300 folders.
*5 The total combined maximum number of recognizable picture contents
and folders: 999 picture contents and 99 folders.
*6 The total combined maximum number of recognizable picture contents
and folders: 9999 picture contents and 300 folders.
*7 The total combined maximum number of recognizable file contents and
folders: 200 file contents and 300 folders.
Supplemental
information
∫ Display languages list
Display
∫ Video attribute
MPEG-2/MPEG-4 AVC/VC-1 Video recording method
480/576/720/1080 Video Format
24p/50i/60i/50p/60p Video Frame rate
YCbCr4:2:2/YCbCr4:4:4/RGB Colour Space
bps (bit per second) Transfer rate of bit
∫ Audio attribute
LPCM/ Digital/ Digital+/
DTS-HD MSTR/MPEG
ch (channel) Number of channels
k (kHz) Sampling frequency
b (bit) Number of bits
bps (bit per second) Transfer rate of bit
∫ Language code list
Language Code Language Code Language Code
Language
Display
Display Meaning
Display Meaning
TrueHD/DTS/DTS 96/DTS-HD HI RES/
Abkhazian 6566
Afar: 6565
Afrikaans: 6570
Albanian: 8381
Amharic
:
Arabic: 6582
Armenian: 7289
Assamese: 6583
Aymara: 6589
Azerbaijani: 6590
Bashkir: 6665
Basque: 6985
Bengali; Bangla:
Bhutani: 6890
Bihari: 6672
Breton: 6682
Bulgarian: 6671
Burmese: 7789
Byelorussian: 6669
Cambodian: 7577
Catalan: 6765
Chinese: 9072
Corsican: 6779
Croatian: 7282
Czech: 6783
Danish: 6865
Dutch: 7876
English: 6978
Esperanto: 6979
Estonian: 6984
Faroese: 7079
Fiji: 7074
Finnish: 7073
French: 7082
Frisian: 7089
Galician: 7176
Georgian: 7565
German: 6869
Greek: 6976
Greenlandic: 7576
Guarani: 7178
Gujarati: 7185
Hausa: 7265
Hebrew: 7387
Hindi: 7273
6577
Hungarian: 7285
Icelandic: 7383
Indonesian: 7378
Interlingua: 7365
Irish: 7165
Italian: 7384
Japanese: 7465
Javanese: 7487
Kannada: 7578
6678
Kashmiri: 7583
Kazakh: 7575
Kirghiz: 7589
Korean: 7579
Kurdish: 7585
Laotian: 7679
Latin: 7665
Latvian, Lettish: 7686
Lingala: 7678
Lithuanian: 7684
Macedonian: 7775
Malagasy: 7771
Malay: 7783
Malayalam: 7776
Maltese: 7784
Maori: 7773
Marathi: 7782
Moldavian: 7779
Mongolian: 777 8
Nauru: 7865
Nepali: 7869
Norwegian: 7879
Oriya: 7982
Pashto, Pushto: 8083
Persian: 7065
Poli sh: 8 07 6
Portuguese: 8084
Punjabi: 8065
Quechua: 8185
Language
Signal type
Display
Rhaeto-Romance:
Romanian: 8279
Russian: 8285
Samoan: 8377
Sanskrit: 8365
Scots Gaelic: 7168
Serbian: 8382
Serbo-Croatian: 8372
Shona: 8378
Sindhi: 8368
Singhalese: 8373
Slovak: 8375
Slovenian: 8376
Somali: 8379
Spanish: 6983
Sundanese: 8385
Swahili: 8387
Swedish: 8386
Tagalog: 8476
Tajik: 8471
Tamil: 8465
Tatar: 8484
Telugu: 8469
Thai: 8472
Tibetan: 6679
Tigrinya: 8473
Tonga: 8479
Turkish: 8482
Turkmen: 8475
Twi: 8487
Ukrainian: 8575
Urdu: 8582
Uzbek: 8590
Vietnamese: 8673
Volapük: 8679
Welsh: 6789
Wolof: 8779
Xhosa: 8872
Yiddish: 7473
Yo r u b a : 8 9 7 9
Zulu: 9085
Language
8277
Reference
VQT2Q52
47
Page 48
Java and all Java-based trademarks and logos are trademarks or
registered trademarks of Sun Microsystems, Inc. in the United States and
other countries.
Manufactured under license from Dolby Laboratories.
Dolby, Pro Logic, and the double-D symbol are trademarks of Dolby
Laboratories.
Manufactured under license under U.S. Patent #’s: 5,451,942; 5,956,674;
5,974,380; 5,978,762; 6,226,616; 6,487,535; 7,392,195; 7,272,567;
7,333,929; 7,212,872 & other U.S. and worldwide patents issued &
pending.
DTS and the Symbol are registered trademarks, & DTS-HD, DTS-HD
Master Audio | Essential and the DTS logos are trademarks of DTS, Inc.
Product includes software.
© DTS, Inc. All Rights Reserved.
This product incorporates copyright protection technology that is protected
by U.S. patents and other intellectual property rights. Use of this copyright
protection technology must be authorized by Macrovision, and is intended
for home and other limited viewing uses only unless otherwise authorized
by Macrovision. Reverse engineering or disassembly is prohibited.
HDMI, the HDMI Logo, and High-Definition Multimedia Interface are
trademarks or registered trademarks of HDMI Licensing LLC in the United
States and other countries.
This product is licensed under the AVC patent portfolio license and VC-1
patent portfolio license for the personal and non-commercial use of a
consumer to (i) encode video in compliance with the AVC Standard and
VC-1 Standard (“AVC/VC-1 Video”) and/or (ii) decode AVC/VC-1 Video
that was encoded by a consumer engaged in a personal and
non-commercial activity and/or was obtained from a video provider
licensed to provide AVC/VC-1 Video. No license is granted or shall be
implied for any other use. Additional information may be obtained from
MPEG LA, LLC. See http://www.mpegla.com
HDAVI Control
x.v.Colour
TM
is a trademark of Panasonic Corporation.
TM
is a trademark.
.
VIERA CAST is a trademark of Panasonic Corporation.
“AVCHD” and the “AVCHD” logo are trademarks of Panasonic Corporation
and Sony Corporation.
SDXC Logo is a trademark of SD-3C, LLC.
“Blu-ray Disc” is a trademark.
®
DivX
is a registered trademark of DivX, Inc., and is used under license.
“BD-Live” logo is a trademark of Blu-ray Disc Association.
“BONUSVIEW” is a trademark of Blu-ray Disc Association.
YouTube and Picasa are trademarks of Google, Inc.
This product incorporates the following software:
(1) the software developed independently by or for Panasonic
Corporation,
(2) the software owned by third party and licensed to Panasonic
Corporation,
(3) the software licensed under the GNU General Public License, Version
2 (GPL v2),
(4) the software licensed under the GNU LESSER General Public
License, Version 2.1 (LGPL v2.1) and/or,
(5) open sourced software other than the software licensed under the
GPL v2 and/or LGPL v2.1
For the software categorized as (3) and (4), please refer to the terms and
conditions of GPL v2 and LGPL v2.1, as the case may be at
http://www.gnu.org/licenses/old-licenses/gpl-2.0.html and
http://www.gnu.org/licenses/old-licenses/lgpl-2.1.html.
In addition, the software categorized as (3) and (4) are copyrighted by
several individuals.
Please refer to the copyright notice of those individuals at
http://www.am-linux.jp/dl/JPRCBW98
The GPL/LGPL software is distributed in the hope that it will be useful, but
WITHOUT ANY WARRANTY, without even the implied warranty of
MERCHANTABILITY or FITNESS FOR A PARTICULAR PURPOSE.
At least three (3) years from delivery of products, Panasonic will give to
any third party who contacts us at the contact information provided below,
for a charge no more than our cost of physically performing source code
distribution, a complete machine-readable copy of the corresponding
source code covered under GPL v2/LGPL v2.1.
Contact Information
[email protected]
Source code is also freely available to you and any other member of the
public via our website below.
http://www.am-linux.jp/dl/JPRCBW98
“
Made for iPod” means that an electronic
accessory has been designed to connect
specifically to iPod and has been certified by the
developer to meet Apple performance standards.
“Works with iPhone” means that an
electronic accessory has been designed
to connect specifically to iPhone and has
been certified by the developer to meet
Apple performance standards.
Apple is not responsible for the operation
of this device or its compliance with
safety and regulatory standards.
iPod is a trademark of Apple Inc., registered in the U.S. and other
countries.
iPhone is a trademark of Apple Inc.
®
DLNA
, the DLNA Logo and DLNA CERTIFIEDTM are trademarks, service
marks, or certification marks of the Digital Living Network Alliance.
Windows is a registered trademark of Microsoft Corporation in the United
States and other countries.
VQT2Q52
48
Page 49

Glossary
AVCHD
AVCHD is a new format (standard) for high definition video
cameras that can be used to record and play high-resolution
HD images.
BD-J
Some BD-Video discs contain Java applications, and these
applications are called BD-J. You can enjoy various interactive
features in addition to playing normal video.
Bitstream
This is the digital form of multi-channel audio data (e.g., 5.1
channel) before it is decoded into its various channels.
Deep Colour
This unit incorporates HDMI (V.1.4, Content Type) technology
that can reproduce greater colour gradation (4096 steps) when
connected to a compatible TV.
You can enjoy exceptionally rich, natural-looking colours, with
smooth, detailed gradation and minimal colour banding.
[A lower colour gradation (256 steps), without Deep Colour, will
be reproduced if connected to a TV which does not support
Deep Colour.
The unit will automatically set appropriate output to suit the
connected TV.]
DLNA (Digital Living Network Alliance)
DLNA is a standard that makes DLNA Certified digital
electronics easier and more convenient to use on a home
network.
Dolby Digital
This is a method of coding digital signals developed by Dolby
Laboratories. Apart from stereo (2-channel) audio, these
signals can also be multi-channel audio.
Dolby Digital Plus
Multi-channel audio and higher audio quality is made possible
using Dolby Digital Plus. BD-Video supports up to 7.1 channel
output.
DTS-HD High Resolution Audio
This is a signal format achieved by improving the previous
DTS, DTS-ES and DTS 96/24 formats. It is compatible with
sampling frequency 96 kHz/48 kHz. BD-Video supports up to
7.1 channel output.
DTS-HD Master Audio | Essential
This is a lossless audio format and compatible with 96 kHz/
7.1 ch and 192 kHz/2 ch or less. In addition, faithful
reproduction of the master audio is enabled using lossless
audio encoding technology. BD-Video supports up to
7.1 channel output.
Dynamic range
Dynamic range is the difference between the lowest level of
sound that can be heard above the noise of the equipment and
the highest level of sound before distortion occurs.
Dynamic range compression means reducing the gap between
the loudest and softest sounds. This means you can listen at
low volumes but still hear dialogue clearly.
HDMI (High-Definition Multimedia Interface)
HDMI is a digital interface for consumer electronic products.
Unlike conventional connections, it transmits uncompressed
digital video and audio signals on a single cable.
Local storage
This storage area is used as a destination for sub contents for
playing BD-Live on BD-Video.
LPCM (Linear PCM)
These are a kind of PCM format.
These are uncompressed digital signals, similar to those found
on CDs.
PCM (Pulse Code Modulation)
This is one format for converting analogue audio into digital
audio, enabling you to enjoy digital audio with no hassle.
Dolby Pro Logic II
Dolby Pro Logic II enables you to play stereo sources on 5.1
channel.
Dolby TrueHD
Dolby TrueHD is a very high quality audio format that
reproduces the studio master audio. BD-Video supports up to
7.1 channel output.
Down-mixing
This is the process of remixing the multi-channel audio found
on some discs into fewer channels.
DTS (Digital Theater Systems)
This surround system is used in many movie theatres. There is
good separation between the channels, so realistic sound
effects are possible.
DTS-HD
DTS-HD is a high-quality, sophisticated audio format used in
movie theatres. Previous DTS Digital Surround-compatible
equipment can play DTS-HD as DTS Digital Surround audio.
BD-Video supports up to 7.1 channel output.
P4HD (Pixel Precision Progressive Processing for HD)
This is a processor which makes use of an exclusive
Panasonic algorithm. Various processing is supported,
including a high-level conversion of the TV scanning format
from interlace to progressive and a high-level conversion of
standard resolution (480i or 576i) video signal to a 1080 High
Definition video signal.
Consequently, this unit is able to provide video of optimal
resolution to the connected TV.
x.v.Colour
x.v.ColourTM is a name for devices that are compatible with the
xvYCC format, an international standard for expanded colour
in motion pictures, and that follow the rules for signal
transmission.
You can enjoy vivid colours of wider colour ranges for a more
realistic picture when connected to a TV that supports the
x.v.Colour
24p
This is a progressive image recorded at a rate of 24 frames per
second (motion-picture film). Many BD-Video movie contents
are recorded in 24 frames/second in accordance with the film
materials.
TM
TM
with HDMI cable.
Reference
VQT2Q52
49
Page 50

Specifications
GENERAL
Power consumption: 100 W
Power consumption in
standby mode
[BT735] [BT330] Approx. 0.1 W
[BT230] Approx. 0.2 W
Power supply: AC 220 V to 240 V, 50 Hz
iPod/iPhone Connector: DC OUT 5 V 500 mA MAX
WIRELESS LAN Connector:
(USB 2.0 standard)
Dimensions (WkHkD): 430 mmk54 mmk287 mm
Mass: Approx. 3.1 kg
Operating temperature
range: 0 oC to 40 oC
Operating humidity range: 35 % to 80 % RH
DC OUT 5 V 500 mA
(Dimensions and Weight do not
include speakers)
(no condensation)
AMPLIFIER SECTION
RMS TTL POWER OUTPUT: 1000 W
1 kHz, 10 % total harmonic distortion
FRONT: 125 W per ch (3 ≠)
CENTRE: 250 W per ch (6 ≠)
SURROUND: 125 W per ch (3 ≠)
100 Hz, 10 % total harmonic distortion
SUBWOOFER: 250 W per ch (6 ≠)
DIN TTL POWER OUTPUT: 590 W
1 kHz, 1.0 % total harmonic distortion
FRONT: 90 W per ch (3 ≠)
CENTRE: 115 W per ch (6 ≠)
SURROUND: 90 W per ch (3 ≠)
100 Hz, 1.0 % total harmonic distortion
SUBWOOFER: 115 W per ch (6 ≠)
FM TUNER SECTION
Preset memory: 30 stations
Frequency range: 87.50 MHz to 108.00 MHz (50 kHz step)
Antenna terminals: 75 ≠ (unbalanced)
SPEAKER SECTION
FRONT SPEAKERS
[BT735] SB-HF730
Typ e: 2 WAY 3 SPEAKER Bass-ref.
Woofer: 3.5 cm k 10 cm
CONE TYPEk 2
Tweeter: 2.5 cm SEMI-DOME TYPE
Impedance: 3 ≠
Output sound pressure: 78 dB/W (1 m)
Frequency range: 100 Hz to 30 kHz (j16 dB),
130 Hz to 25 kHz (j10 dB)
Dimensions (WkHkD): 255 mmk1023 mmk255 mm
Mass: Approx. 2.3 kg
[BT330] SB-HF330
Typ e: 1 WAY 1 SPEAKER Bass-ref.
Full range: 6.5 cm CONE TYPE
Impedance: 3 ≠
Output sound pressure: 78 dB/W (1 m)
Frequency range: 85 Hz to 25 kHz (j16 dB),
95 Hz to 22 kHz (j10 dB)
Dimensions (WkHkD): 100 mmk530 mmk78 mm
Mass: Approx. 0.92 kg
Full assembly with stand base
Dimensions (WkHkD)
Max: 255 mmk1020 mmk255 mm
Min: 255 mmk550 mmk255 mm
Mass: Approx. 2.3 kg
[BT230] SB-HF230
Typ e: 1 WAY 1 SPEAKER Bass-ref.
Full range: 6.5 cm CONE TYPE
Impedance: 3 ≠
Output sound pressure: 78 dB/W (1 m)
Frequency range: 105 Hz to 25 kHz (j16 dB),
130 Hz to 22 kHz (j10 dB)
Dimensions (WkHkD): 80 mmk118.5 mmk68 mm
Mass: Approx. 0.4 kg
VQT2Q52
50
Page 51

CENTRE SPEAKER
[BT735] SB-HC730
Typ e: 2 WAY 3 SPEAKER Bass-ref.
Woofer: 3.5 cm k 10 cm
CONE TYPEk 2
Tweeter: 2.5 cm SEMI-DOME TYPE
Impedance: 6 ≠
Output sound pressure: 78 dB/W (1 m)
Frequency range: 100 Hz to 30 kHz (j16 dB),
130 Hz to 25 kHz (j10 dB)
Dimensions (WkHkD): 424 mmk59 mmk76 mm
Mass: Approx. 1.06 kg
[BT330] [BT230] SB-HC230
Typ e: 1 WAY 1 SPEAKER Bass-ref.
Full range: 6.5 cm CONE TYPE
Impedance: 6 ≠
Output sound pressure: 79 dB/W (1 m)
Frequency range: 90 Hz to 25 kHz (j16 dB),
115 Hz to 22 kHz (j10 dB)
Dimensions (WkHkD): 145 mmk85 mmk71.5 mm
Mass: Approx. 0.6 kg
VIDEO SECTION
Signal system: PAL625/50, PAL525/60, NTSC
Video output
Output level: 1.0 Vp-p (75 ≠)
Output connector: Pin jack (1 system)
HDMI AV output
Output format: 480p (525p)/1080i (1125i)/
720p (750p)/1080p (1125p)
Output connector: Type A (19 pin)
HDMI (V.1.4, Content Type)
This unit supports “HDAVI
Control 5” function.
LASER Specification
Class 1 LASER Product
Wave length: 790 nm (CDs)/655 nm (DVDs)/
405 nm (BDs)
Laser power: No hazardous radiation is
emitted with the safety
protection
SURROUND SPEAKERS
[BT735] SB-HS735
Typ e: 2 WAY 3 SPEAKER Bass-ref.
Woofer: 3.5 cm k 10 cm
Tweeter: 2.5 cm SEMI-DOME TYPE
Impedance: 3 ≠
Output sound pressure: 78 dB/W (1 m)
Frequency range: 100 Hz to 30 kHz (j16 dB),
Dimensions (WkHk
Mass: Approx. 2.3 kg
[BT330] [BT230] SB-HS230
Typ e: 1 WAY 1 SPEAKER Bass-ref.
Full range: 6.5 cm CONE TYPE
Impedance: 3 ≠
Output sound pressure: 78 dB/W (1 m)
Frequency range: 105 Hz to 25 kHz (j16 dB),
Dimensions (WkHkD): 80 mmk11 8.5 m mk68 mm
Mass: Approx. 0.4 kg
SUBWOOFER
[BT735] [BT330] SB-HW330
Typ e: 1 WAY 1 SPEAKER (Kelton
Woofer: 16 cm CONE TYPE
Passive radiator: 25 cm
Impedance: 6 ≠
Output sound pressure: 78 dB/W (1 m)
Frequency range: 35 Hz to 180 Hz (j16 dB),
Dimensions (WkHkD): 180.5 mmk322 mmk351 mm
Mass: Approx. 4.6 kg
CONE TYPEk 2
130 Hz to 25 kHz (j10 dB)
D): 255 mmk1023 mmk255 mm
130 Hz to 22 kHz (j10 dB)
type)
40 Hz to 160 Hz (j10 dB)
TERMINAL SECTION
USB:
(Front) USB 2.0 High Speed
USB port power: Max 500 mA
Bit rate: Up to 4 Mbps (DivX)
(Rear) USB 2.0 (Use for Wireless LAN
Adaptor only)
Ethernet: 10BASE-T/100BASE-TX 1 system
SD card slot: Connector: 1 system
[BT735] [BT330] Calibration Mic
Sensitivity: 100 mV, 4.7 k≠
Terminal: Mono, 3.5 mm
Audio Input
AUX: k 1
Digital Audio Input
Optical: k 2
Sampling frequency: 32 kHz, 44.1 kHz, 48 kHz
Audio Format: PCM, Dolby Digital
Specifications are subject to change without notice.
[BT230] SB-HW480
Typ e: 1 WAY 1 SPEAKER Bass- ref.
Woofer: 16 cm CONE TYPE
Impedance: 6 ≠
Output sound pressure: 78 dB/W (1 m)
Frequency range: 40 Hz to 220 Hz (j16 dB),
Dimensions (Wk
Mass: Approx. 2.8 kg
HkD): 145 mmk289.5 mmk258 mm
45 Hz to 180 Hz (j10 dB)
Reference
VQT2Q52
51
Page 52

Index
A
AC mains lead connection . . . . . . . . . .18
Angle . . . . . . . . . . . . . . . . . . . . . . . . . . .34
Audio
Attribute . . . . . . . . . . . . . . . . . . . . . .47
Changing audio during play . . . . . . .25
Channel . . . . . . . . . . . . . . . . . . . . . .34
Language . . . . . . . . . . . . . . . . . . . . .37
AVCHD . . . . . . . . . . . . . . . . . . . . . . .46, 49
B
BD-J . . . . . . . . . . . . . . . . . . . . . . . . . . . . 49
BD-Live. . . . . . . . . . . . . . . . . . . . . . . . . .26
BD-Video Ratings . . . . . . . . . . . . . . . . .37
BONUSVIEW . . . . . . . . . . . . . . . . . . . . . 26
C
Chapter. . . . . . . . . . . . . . . . . . . . . . . . . .26
Cleaning
Disc. . . . . . . . . . . . . . . . . . . . . . . . . . . 7
Lens . . . . . . . . . . . . . . . . . . . . . . . . . .7
Main unit . . . . . . . . . . . . . . . . . . . . . . .7
Connection
Antenna . . . . . . . . . . . . . . . . . . . . . .15
AUX . . . . . . . . . . . . . . . . . . . . . . . . .16
DVD recorder . . . . . . . . . . . . . . . . . .17
HDMI. . . . . . . . . . . . . . . . . . . . . . . . .17
iPod/iPhone . . . . . . . . . . . . . . . . . . .32
OPTICAL IN . . . . . . . . . . . . . . . .16, 17
Set Top Box . . . . . . . . . . . . . . . . . . .17
Speaker . . . . . . . . . . . . . . . . . . . . . .15
TV . . . . . . . . . . . . . . . . . . . . . . . . . . .16
USB . . . . . . . . . . . . . . . . . . . . . . . . .22
Video cassette recorder . . . . . . . . . .17
Wireless LAN . . . . . . . . . . . . . . . . . .18
Wireless system . . . . . . . . . . . . . . . .14
D
Deep Colour. . . . . . . . . . . . . . . . . . . . . .49
Default Settings. . . . . . . . . . . . . . . . . . .40
Dialog Enhancer . . . . . . . . . . . . . . . . . .35
Direct Navigator . . . . . . . . . . . . . . . . . .25
Disc and card handling. . . . . . . . . . . . . .7
DivX . . . . . . . . . . . . . . . . . . . . . . . . . . . .46
DLNA . . . . . . . . . . . . . . . . . . . . . . . . . . .36
Dolby Digital . . . . . . . . . . . . . . . . . .38, 49
Dolby Digital Plus . . . . . . . . . . . . . .38, 49
Dolby Pro Logic II . . . . . . . . . . . . . . 24, 49
Dolby TrueHD . . . . . . . . . . . . . . . . .38, 49
DTS . . . . . . . . . . . . . . . . . . . . . . . . . .38, 49
DTS-HD. . . . . . . . . . . . . . . . . . . . . . .38, 49
F
Finalize. . . . . . . . . . . . . . . . . . . . . . . . . .11
Firmware update . . . . . . . . . . . . . . . . . .21
Formatting SD cards. . . . . . . . . . . . . . .26
Frame-by-frame. . . . . . . . . . . . . . . . . . .25
H
HDMI . . . . . . . . . . . . . . . . . . . . . . . . 16, 49
High Clarity Sound . . . . . . . . . . . . . 35, 38
I
iPod/iPhone. . . . . . . . . . . . . . . . . . . . . . 32
IP address . . . . . . . . . . . . . . . . . . . . . . . 40
J
JPEG . . . . . . . . . . . . . . . . . . . . . . . . . . . 46
L
LAN . . . . . . . . . . . . . . . . . . . . . . . . . . . . 18
Language
Audio . . . . . . . . . . . . . . . . . . . . . . . . 37
Code list . . . . . . . . . . . . . . . . . . . . . . 47
Menu . . . . . . . . . . . . . . . . . . . . . . . . 38
On-Screen . . . . . . . . . . . . . . . . . . . . 38
Soundtrack. . . . . . . . . . . . . . . . . . . . 34
Subtitle . . . . . . . . . . . . . . . . . . . . 34, 38
Local storage . . . . . . . . . . . . . . . . . . . . 49
LPCM . . . . . . . . . . . . . . . . . . . . . . . . . . . 49
M
Menu
Playback . . . . . . . . . . . . . . . . . . . . . 34
Pop-up . . . . . . . . . . . . . . . . . . . . . . . 25
Setup . . . . . . . . . . . . . . . . . . . . . . . . 37
MPEG2. . . . . . . . . . . . . . . . . . . . . . . . . . 46
MP3 . . . . . . . . . . . . . . . . . . . . . . . . . . . . 46
Mute the sound. . . . . . . . . . . . . . . . . . . . 8
O
On-Screen
Language . . . . . . . . . . . . . . . . . . . . . 38
Status Message . . . . . . . . . . . . . . . . 25
P
Picture-in-picture . . . . . . . . . . . . . . . . . 26
Playback
AVCHD . . . . . . . . . . . . . . . . . . . . . . 25
DivX . . . . . . . . . . . . . . . . . . . . . . . . . 27
JPEG . . . . . . . . . . . . . . . . . . . . . . . . 28
MPEG2 . . . . . . . . . . . . . . . . . . . . . . 25
MP3 . . . . . . . . . . . . . . . . . . . . . . . . . 27
Playback Information Window . . . . . . 35
Playlists. . . . . . . . . . . . . . . . . . . . . . . . . 23
Pop-up menu . . . . . . . . . . . . . . . . . . . . 25
Product Disposal . . . . . . . . . . . . . . . . . . 7
Progressive. . . . . . . . . . . . . . . . . . . . . . 35
Properties
Title . . . . . . . . . . . . . . . . . . . . . . . . . 26
Still picture . . . . . . . . . . . . . . . . . . . . 28
Proxy Server. . . . . . . . . . . . . . . . . . . . . 40
P4HD . . . . . . . . . . . . . . . . . . . . . . . . . . . 49
Q
Quick Start . . . . . . . . . . . . . . . . . . . . . . 40
R
Radio . . . . . . . . . . . . . . . . . . . . . . . . . . 29
Random play . . . . . . . . . . . . . . . . . . . . 35
Re-master. . . . . . . . . . . . . . . . . . . . . . . 35
Remote control
Remote control code . . . . . . . . . . . . 22
Using the remote control . . . . . . . . . . 7
Repeat play . . . . . . . . . . . . . . . . . . . . . 35
Resume play function . . . . . . . . . . . . . 25
S
SD card. . . . . . . . . . . . . . . . . . . . . . 11, 26
Search . . . . . . . . . . . . . . . . . . . . . . . . . 25
Setup menu . . . . . . . . . . . . . . . . . . . . . 37
Skip . . . . . . . . . . . . . . . . . . . . . . . . . . . . 25
Sleep timer . . . . . . . . . . . . . . . . . . . . . . . 8
Slideshow . . . . . . . . . . . . . . . . . . . . . . . 28
Slow-motion . . . . . . . . . . . . . . . . . . . . . 25
Soundtrack . . . . . . . . . . . . . . . . . . . . . . 34
Status Message . . . . . . . . . . . . . . . . . . 25
Still picture. . . . . . . . . . . . . . . . . . . . . . 28
Subtitle . . . . . . . . . . . . . . . . . . . . . . . . . 34
Surround sound. . . . . . . . . . . . . . . . . . 24
V
VIERA CAST . . . . . . . . . . . . . . . . . . . . . 34
VIERA Link “HDAVI Control
W
Whisper-mode Surround . . . . . . . . . . 24
X
x.v.Colour
24p . . . . . . . . . . . . . . . . . . . . . . 35, 39, 49
TM
. . . . . . . . . . . . . . . . . . . . . 49
TM
” . . . . . 31
Panasonic Corporation
Web Site: http://panasonic.net
Pursuant to at the directive 2004/108/EC, article 9(2)
Panasonic Testing Centre
Panasonic Marketing Europe GmbH
Winsbergring 15, 22525 Hamburg, Germany
Panasonic Corporation 2010
EU
VQT2Q52
F0210SB0
 Loading...